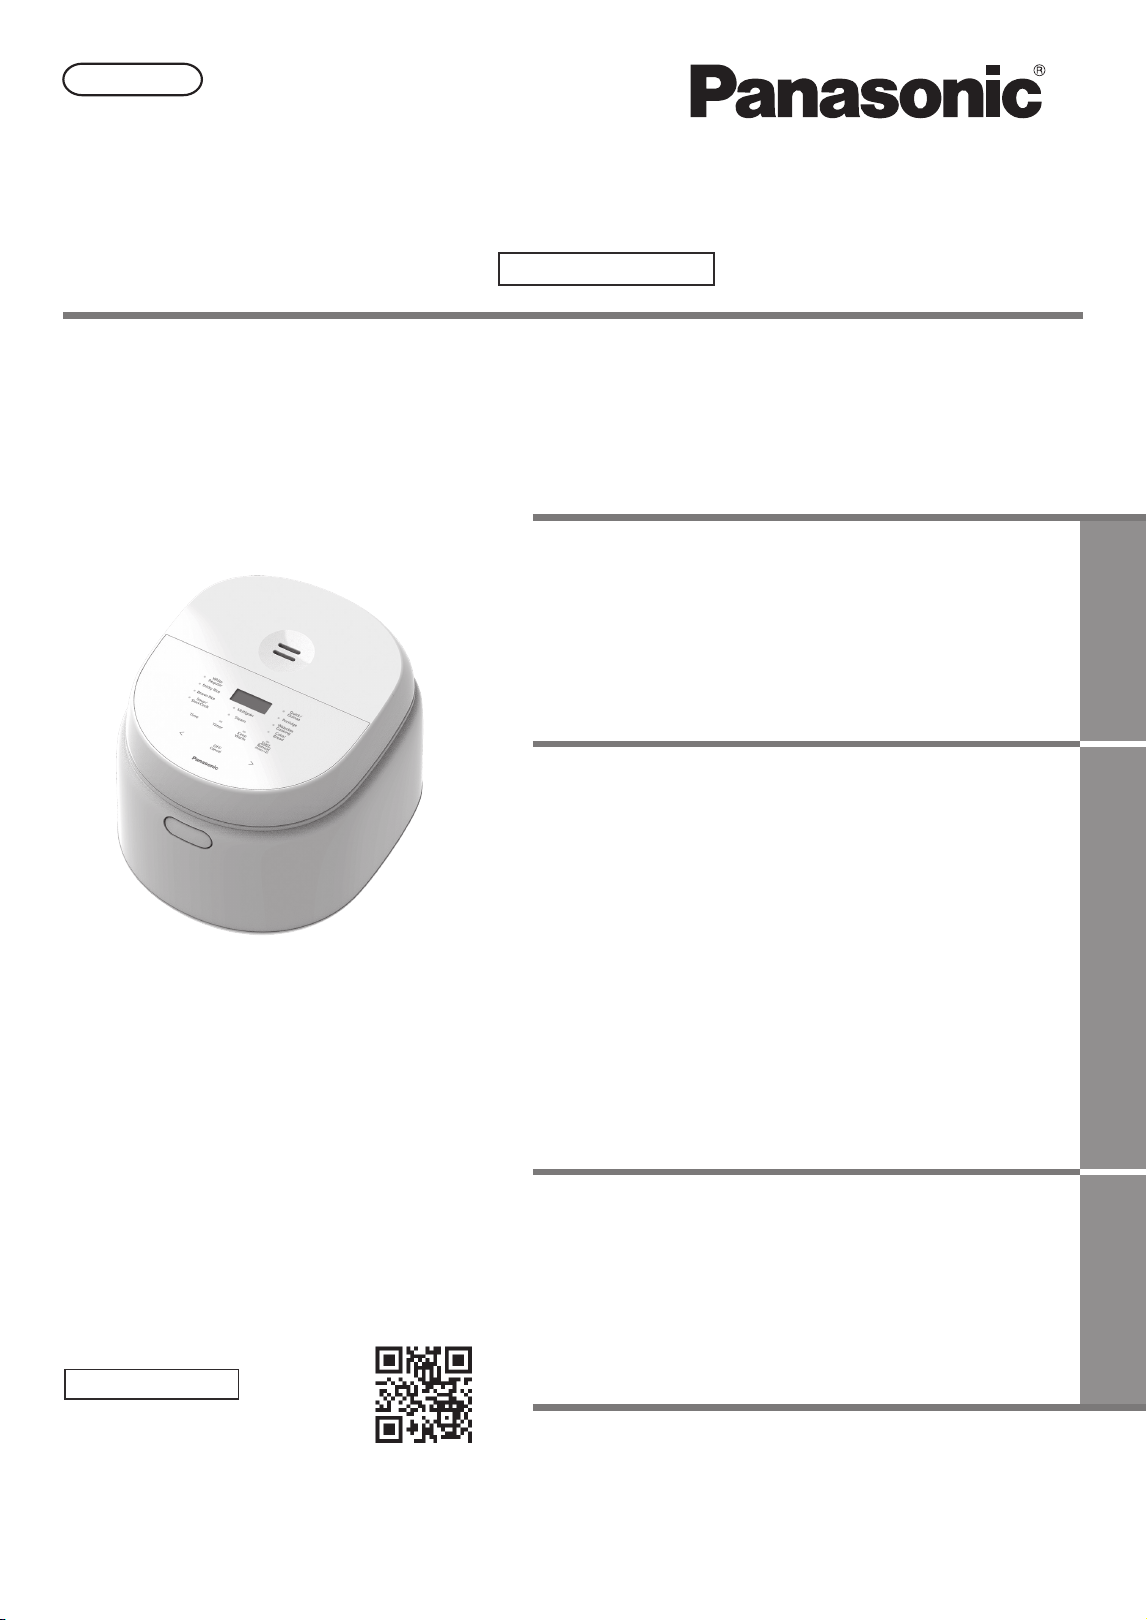
Operation manual
Contents
IMPORTANT SAFEGUARDS................... 2-3
Safety Precautions............................. 4-5
Instructions for Use ................................. 6
Parts Identification
Preparation
Menu Functions
●
●
●
Wash rice and add water .............................................8
Function selecting/Setting cooking time/
Tips to cook delicious rice ...........................................9
●
●
Cooking rice or grains/Keep warm/Reheat..............10
Porridge and other cuisines/Timer...........................11
●
Troubleshooting ............................... 14-15
Error Codes Indication .......................... 16
Specifications ........................................ 17
Warranty...................................Back cover
●
●
●
Keep for future use
Household Use
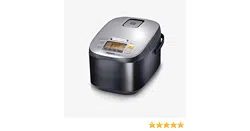
Electronic Rice Cooker
Recipes ................................................... 13
Cleaning and Maintenance ................... 12
Thank you for purchasing this Panasonic product.
This appliance is intended to be used in household
and similar applications.
Please read these Operating Instructions carefully for
safe and proper use of this product.
Be sure to read the "IMPORTANT SAFEGUARDS"
(page2~3) and "Safety Precautions" (page 4 ~ 5)
before use.
Model No.1.0LSR-DL105
1.8LSR-DL185
Before Use Usage
Troubleshooting
Main body .....................................................................7
Control panel................................................................7
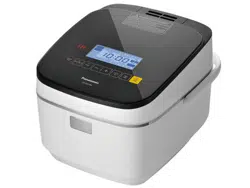
The pictures in these instructions use SR-DL105 as an example.
Voir pages 19-34 en français
中文请参考第35页~第49页
USA/CAN

2
IMPORTANT SAFEGUARDS
15. SAVE THESE INSTRUCTIONS.
When using electrical appliances, basic safety precautions should always be followed including the following:
1. Read all instructions.
2. Do not touch hot surfaces. Use handles or knobs.
3. To protect against electrical shock do not immerse cord, plugs, or Rice Cooker except the pan in water
or other liquid.
4. Close supervision is necessary when any appliance is used by or near children.
5. Remove plug from outlet when the appliance is not in use, before putting on or taking off parts, and
before cleaning. Allow to cool before handling.
6. Do not operate any appliance with a damaged cord or plug or after the appliance malfunctions or has
been damaged in any manner. Return appliance to the nearest authorized service facility for
examination, repair, or adjustment.
7. The use of accessory attachments not recommended by the appliance manufacturer may cause
injuries.
8. Do not use outdoors.
9. Do not let cord hang over edge of table or counter, or touch hot surfaces.
10. Do not place on or near a hot gas or electric burner, or in a heated oven.
11. Extreme caution must be used when moving an appliance containing hot oil or other hot liquids.
12. To disconnect, turn the control to“off” , then remove plug from wall outlet.
13. Do not use appliance for other than intended use.
14. This product is intended for household use only.
This appliance has a polarized plug (one blade is wider than the other). To reduce the risk of electric shock,
this plug is intended to fit into a polarized outlet only one way. If the plug does not fit fully into the outlet,
reverse the plug. If it still does not fit, contact a qualified electrician. Do not attempt to modify the plug
in any way.
a) A short power-supply cord is to be provided to reduce the risk resulting from becoming entangled in
or tripping over a longer cord.
b) The cord should be arranged so that it will not drape over the countertop or tabletop where it can be
pulled on by children or tripped over unintentionally.
c) The use of extension cords is not recommended.
CAUTION :

IMPORTANTES MESURES DE SÉCURITÉ
15. CONSERVER CE MANUEL
Lors de l’utilisation de tout appareil électrique, il est toujours recommandé de prendre certaines précautions,
dont les suivantes :
1. Lire toutes les instructions.
2. Éviter de toucher aux surfaces chaudes. Toujours utiliser les poignées ou les anses.
3. Afin de prévenir tout risque de choc électrique, ne pas immerger les cordons, les fiches ou l’appareil
dans l’eau ou tout autre liquide, à l’exception du panier cuisson.
4. Ne jamais laisser des enfants utiliser l’appareil sans surveillance.
5. Après usage et avant le nettoyage, toujours débrancher l’appareil. Laisser refroidir avant de retirer
des pièces ou de les remettre en place.
6. Ne jamais utiliser l’appareil si sa fiche ou son cordon sont endommagés ou après avoir constaté une
défectuosité ou des dommages. Le cas échéant, l’appareil doit être retourné au centre de service
le plus près pour vérification, réparation ou ajustement.
7. L’utilisation d’accessoires non recommandés par le fabricant peut représenter un risque de blessures.
8. Ne pas utiliser l’appareil à l’extérieur.
9. Ne pas laisser le cordon pendre d’une table ou d’un comptoir, ni le mettre en contact avec une
surface chaude.
10. Ne pas placer l’appareil sur le dessus ou à proximité d’un appareil de chauffage, ni dans un four
chaud.
11. S’assurer d’être extrêmement prudent lors du déplacement d’un appareil contenant de l’huile
chaude ou tout autre liquide chaud.
12. Avant de débrancher, couper le contact, puis retirer la fiche de la prise secteur.
13. N’utiliser l’appareil qu’aux fins recommandées.
14. Cet appareil a été conçu pour un usage domestique.
a) Un cordon d'alimentation court est fourni pour réduire le risque d'emmêlement et de trébuchement.
b) Le cordon ne doit pas pendre du comptoir ou de la table, afin d'éviter que des enfants tirent dessus ou
trébuchent accidentellement.
c) L'utilisation de rallonges est déconseillée.
ATTENTION :
Cet appareil est équipé d’une fiche polarisée (fiche avec une lame plus large que l'autre). Afin de réduire
le risque de choc électrique, cette fiche doit être enfichée dans une prise polarisée dans un seul sens. Si
elle ne s’enfiche pas complètement dans la prise, l’inverser. Si elle ne s’enfiche toujours pas, communiquer
avec un maître-électricien. Ne pas tenter de modifier la fiche de quelque façon que ce soit.
3
Before Use
Safety Precautions
To prevent personal injury, injury to others and property damage, the following instructions must be followed.
■The following symbols show the damage or harm level caused by incorrect operation.
WARNING:
Indicates a potential hazard which could result in death or serious injury.
CAUTION:
Indicates a potential hazard which could result in injury or damage to property.
■Classification and description of symbols are as follows.
This symbol indicates an action that is prohibited.
This symbol indicates an action that must be followed.
Be sure to observe the following precautions
4
Be sure to use a separate AC power outlet with the rated
values as listed in the specification table ( P17).
(Using the unit together with other equipment on the same
outlet can cause overheating and fire.)
·Only use a power strip rated at least 10 amperes.
Single-phase bipolar grounded power outlets should be
used for this appliance to ensure reliable grounding. If a
grounding device is not installed,electrostatic induction
of other metal parts such as housing may occur.
(To avoid causing the risk of electric shock due to failure or
electric leakage.)
Make sure that the power plug and the instrument plug
are fully inserted in place.
(To avoid causing smoke, fire or electric shock.)
●
●
●
●
●
●
●
●
●
●
●
●
●
Do not use the appliance if the power cord or
power plug is damaged or the power plug is
loosely connected to the power outlet.
(To avoid causing an electric shock, or a fire due to
a short circuit.)
→If the power cord is damaged, it must be replaced
by a special cord or assembly available from the
manufacturer or its service agent.
Do not damage the power cord or power plug.
·The following actions are strictly prohibited:
Damaging, processing, making contact with or near
high temperature surfaces or heating elements,
forcibly bending, twisting, pulling, hanging/pulling over
sharp corners, placing heavy objects on it, tying into
bundles, sandwiching, pulling the power cord to move.
(So as to avoid electric shock due to damaged power
cord and power plug or avoid fire due to short circuit.)
Do not connect or disconnect the power plug with
wet hands.
·Make sure your hands are dry before touching the power
plug or the product.
(To avoid causing an electric shock or injury.)
Do not spill water or other liquids on the instrument plug.
(To avoid causing an electric shock, or fire due to a short circuit.)
Clean the power plug regularly.
(To avoid causing a fire due to poor insulation of the power
plug due to accumulation of moisture and foreign matter.)
→Disconnect the power plug and wipe it with a dry cloth.
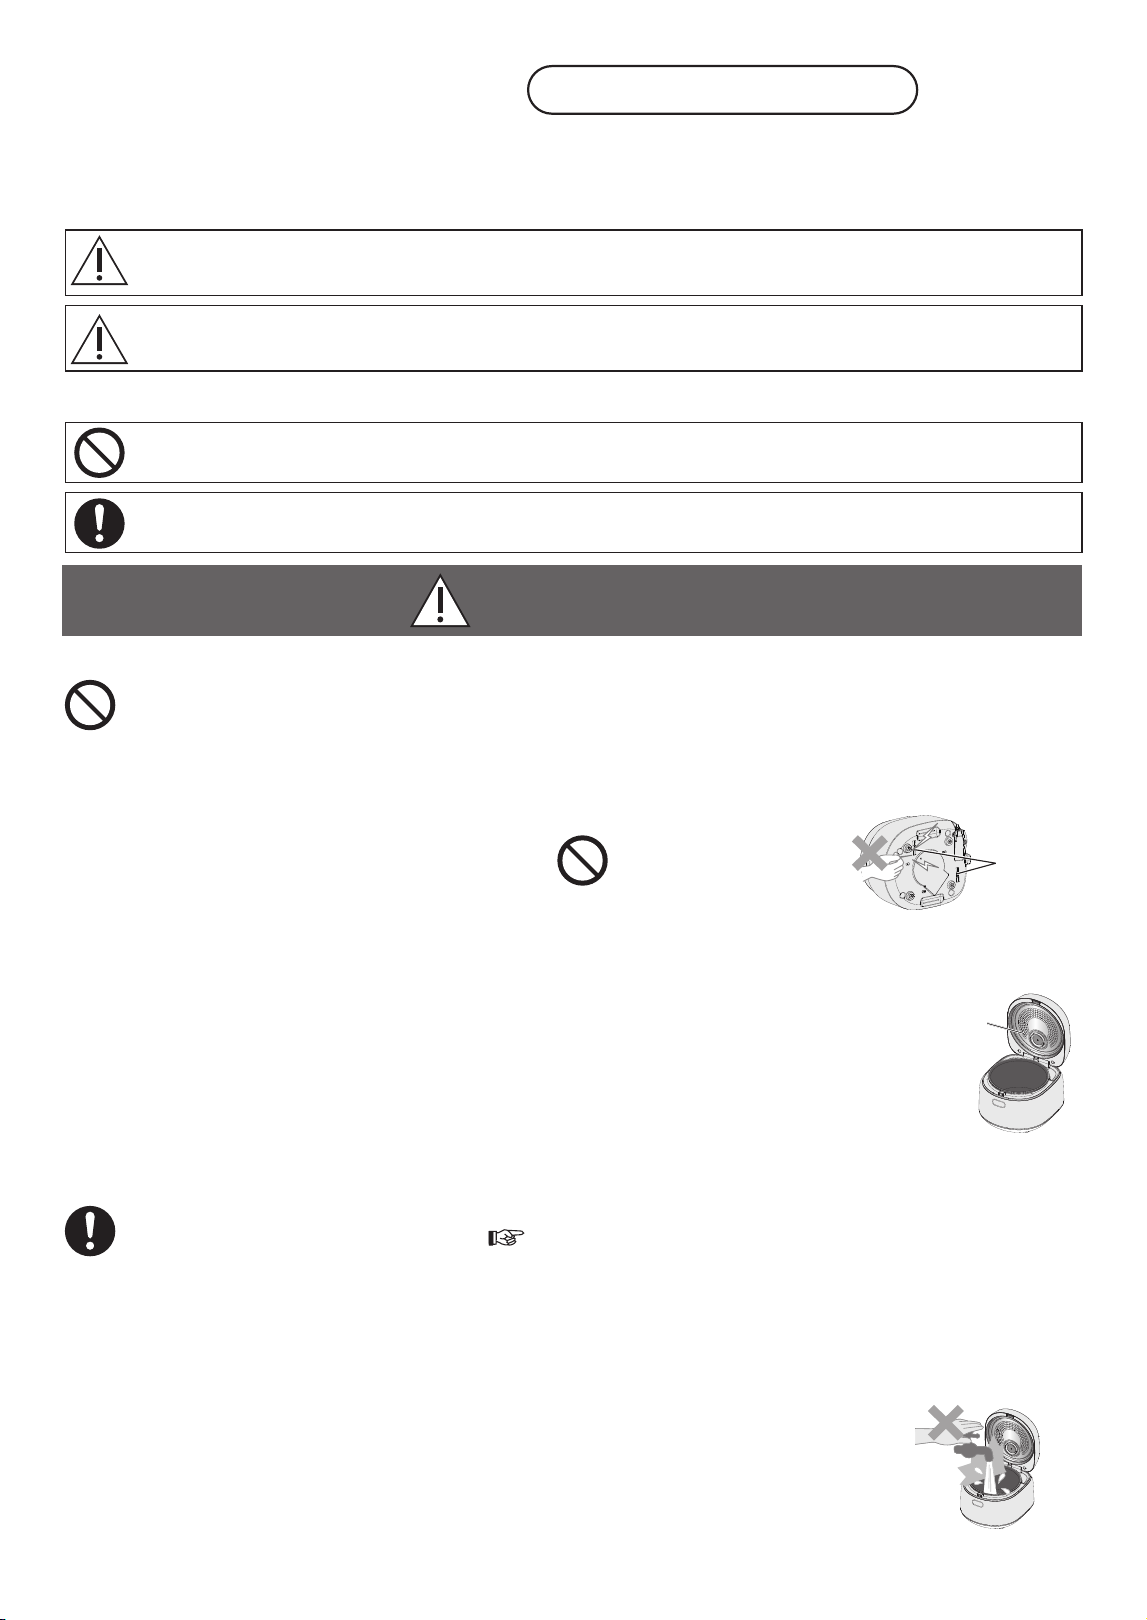
WARNING
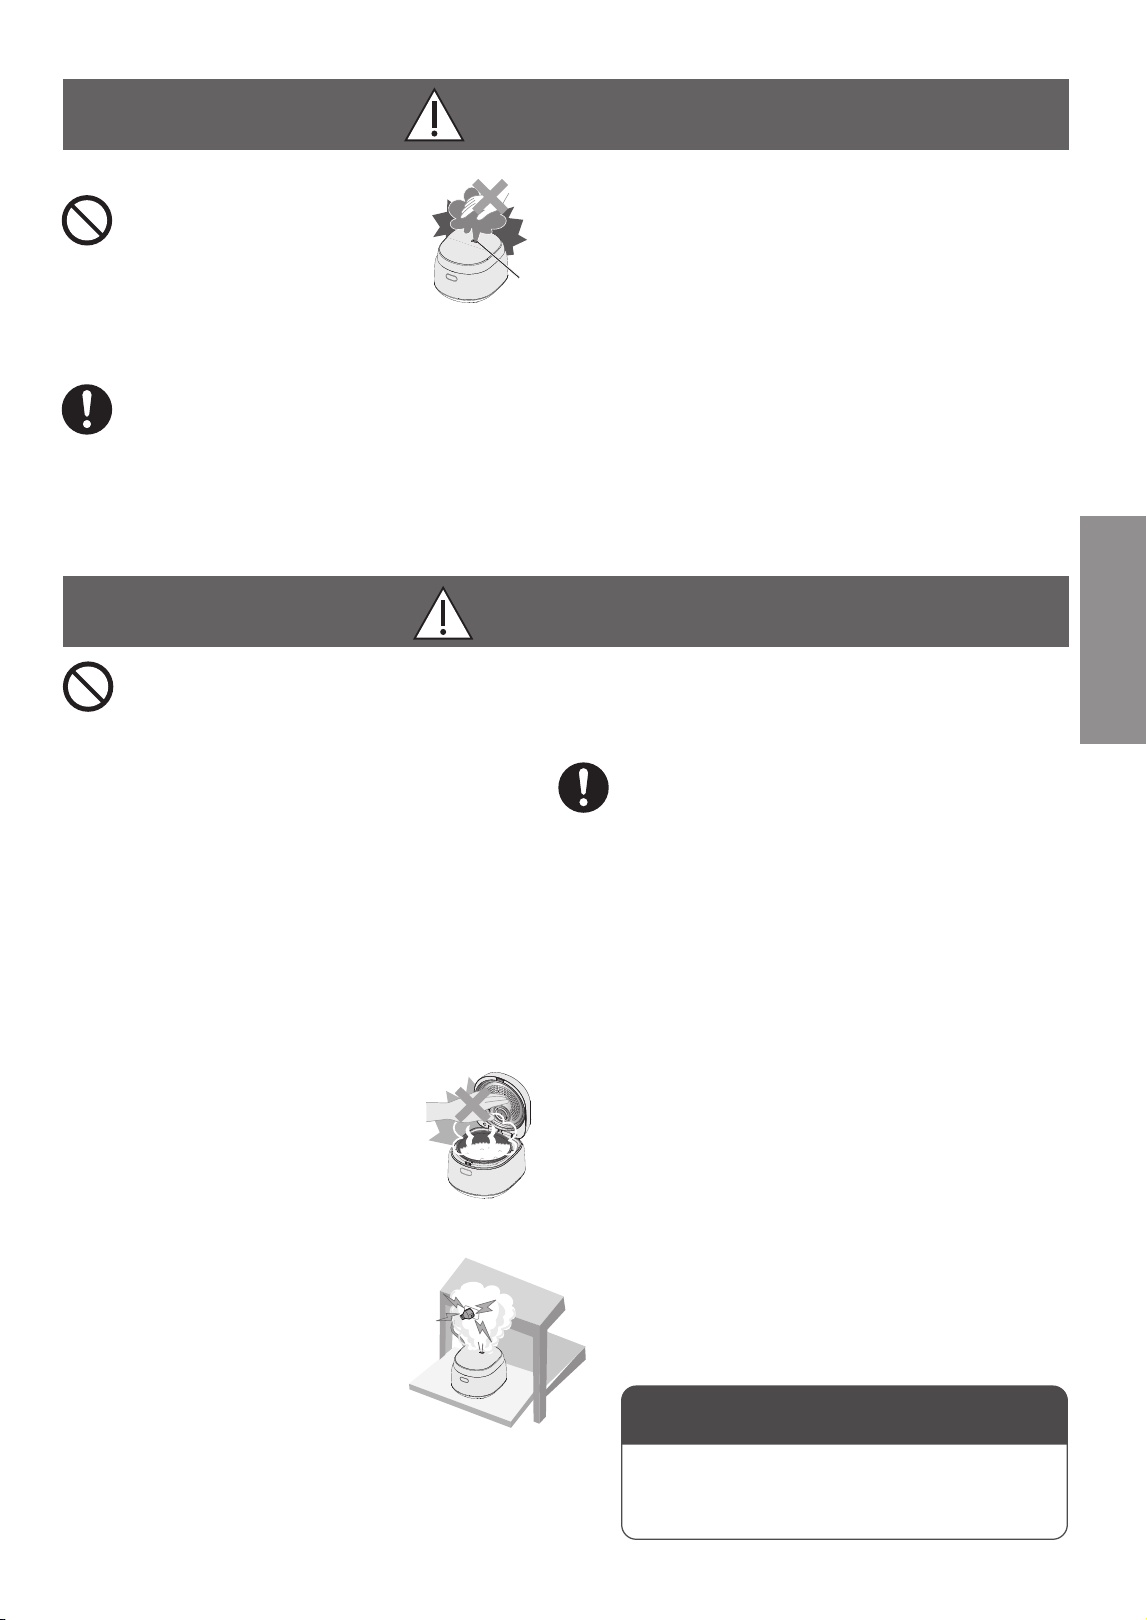
■ Power supply·Power cord·Power plug
Do not place items which may clog the hole on the
heating plate into the pan.
(So as to avoid burns or injuries
resulting from steam or cooked food blowing out.)
Cooking methods which involve ingredients
and seasonings that are placed into a plastic
bag to heat cannot be done with this appliance.
Hole on the
heating plate
■ Main body
Do not insert anything
into the vent or gaps,
especially pins or other
metal objects.
(To avoid causing an electric shock or abnormal operation.)
Vents
Do not modify, disassemble, or repair this appliance.
(To avoid causing a fire, electric shock or injury.)
→For repair, please contact a Panasonic authorized service
center.
Do not immerse the appliance in water or splash it
with water.
(To avoid causing an electric shock,
or a fire due to a short circuit.)
→Please contact a Panasonic authorized
service center if water gets inside the
appliance.
Do not use this appliance for any purpose other than
those described in the Operating Instructions.
(To avoid causing a fire, burn, injury or electric shock.)
·
Panasonic shall not assume any responsibility for improper
use or failure to follow the operating instructions.
WARNING
If an abnormality or malfunction occurs, stop using
the appliance immediately and unplug the power plug.
(To avoid causing smoke, fire or electric shock.)
Abnormalities·Malfunction Cases:
·The power plug and cord become abnormally hot.
·The power cord is damaged or there are intermittent power
outages when being touched.
·The main body is deformed or abnormally hot.
·The main body emits smoke or a burning smell.
·The main body is broken, loose or makes abnormal noise.
·The heating plate is warped or the pan is deformed.
→Please contact a Panasonic authorized service center for
inspection and repair immediately.
This appliance is not intended for use by persons
(including children) with reduced physical, sensory or mental
capabilities, or lack of experience and knowledge, unless they
have been given supervision or instruction concerning use of
the appliance by a person responsible for their safety. Children
should be supervised to ensure that they do not play with the
appliance.
(To avoid causing burns, injury or electric shock.)
Spilled food can cause serious burns. Keep appliance
and cord away from children. Never drape cord over
edge of counter, never use outlet below counter, and
never use with an extension cord.
(To avoid causing burns, injury or electric shock.)
CAUTION
■Use
●
●
Do not use a non-dedicated pan or a deformed pan.
(To avoid causing burns or injury due to overheating or
malfunction.)
Do not use the appliance in the following places:
·Near heat or in high humidity environments.
(To avoid causing electric shock, electric leakage or fire.)
·
On uneven surfaces or a mat which is not heat-resistant.
(To avoid causing injury, burns or fire.)
·In places close to walls or furniture, etc.
(To avoid bumping into them when opening the outer lid,
or causing discoloration, deformation and breakage of
the furniture.)
This includes unplugging of the power plug, trip, etc.
● Return to standby mode.
If a power outage occurs during use
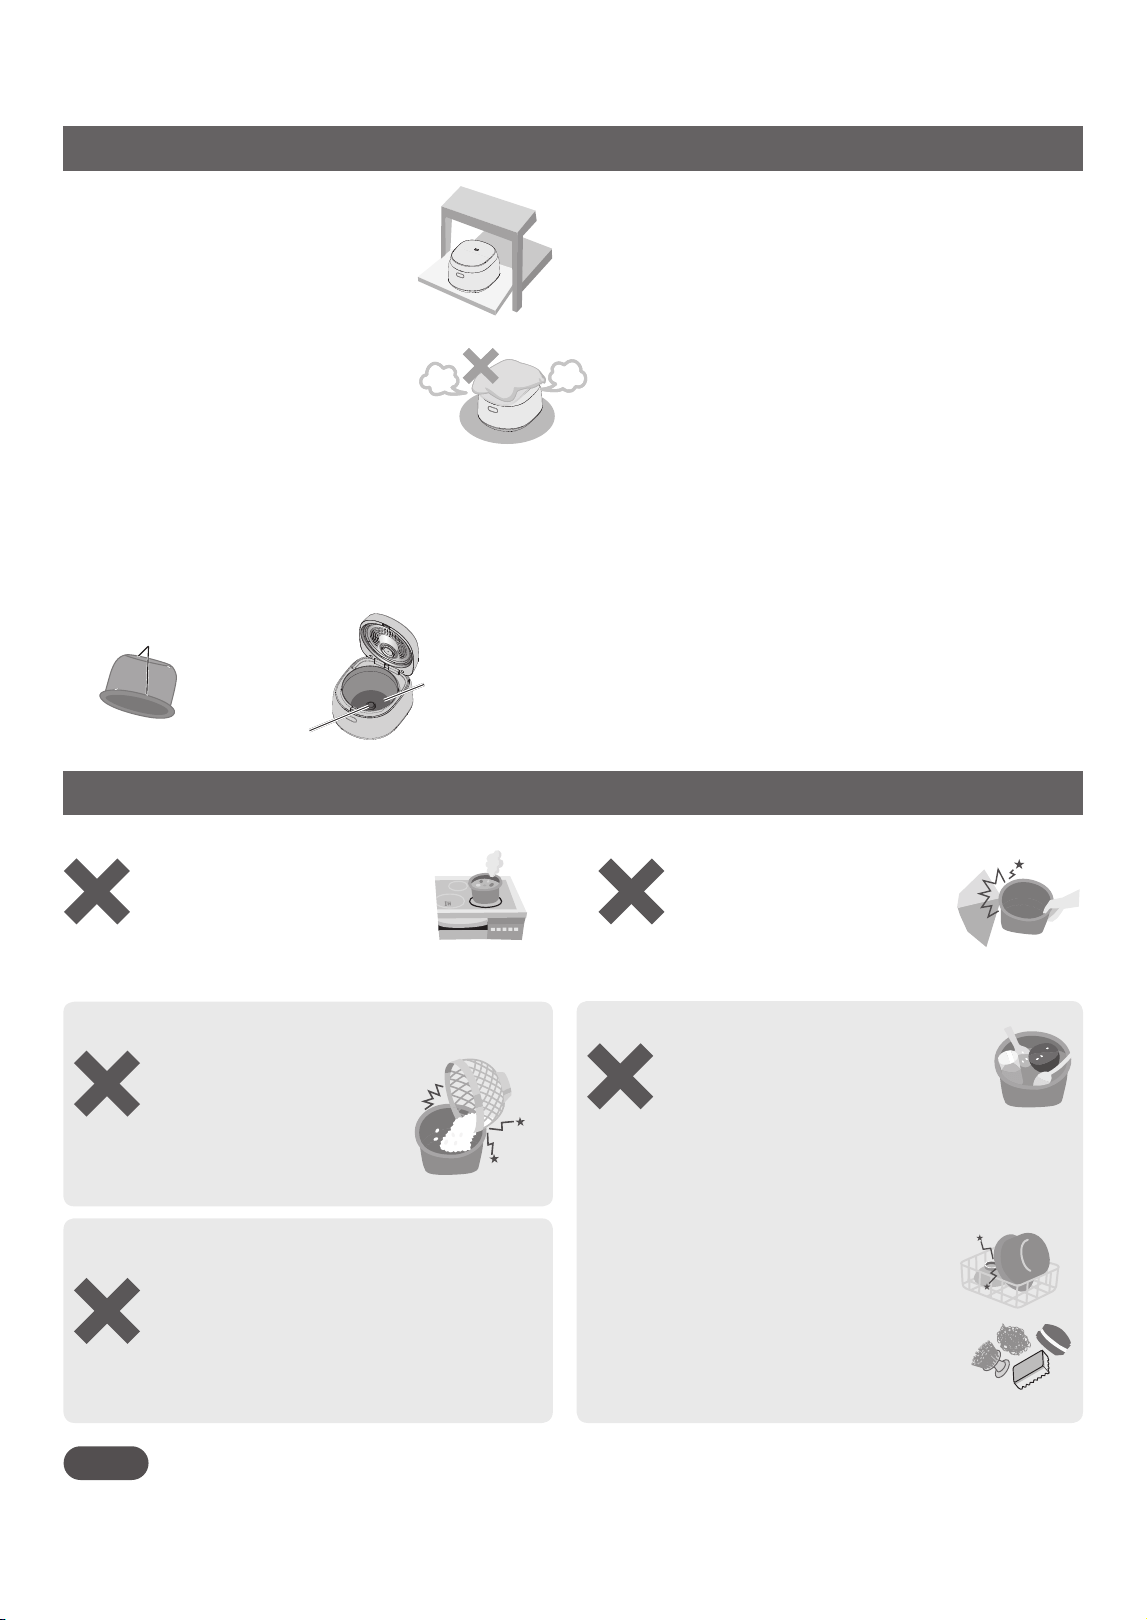
Do not open the lid or move the main body during cooking.
(
So as to avoid burns or injuries resulting from steam or cooked
food blowing out.
)
●
●
●
●
●
When in use or after cooking, do
not put your face or hands near the
steam vent. Special attention must
be paid to children and infants.
(To avoid causing a burn.)
Steam
vent
5
Before Use
●
Do not move the main body while in use.
(So as to avoid burns caused by the opening of the
outer lid due to touching the hook button.)
●
Do not touch the hot surfaces while
the appliance is in use or after
cooking.
·The main body has a high temperature.
In particular, the metal parts such as
the heating plate, the pan and cast
heater.
(To avoid causing a burn.)
●
●
Do not expose the power plug to
the steam.
(To avoid causing an electric shock,
or fire due to a short circuit.)
→When using a cabinet with sliding
table, use the appliance where
the power plug cannot be
exposed to steam.
Do not let the appliance operate in an empty state.
(To avoid causing burns.)
●
Do not connect the appliance to an external timing
device or operate the appliance using a separeate
remote control system.
(To avoid fire.)
●
When you unplug the power plug, be sure to hold
the plug itself, and never pull the power cord.
(To avoid causing an electric shock, or a fire due to a
short circuit.)
●
When taking out the pan or when the pan is not in
use, remember to turn off the power and unplug
the power plug.
(To avoid causing burns, injury, or an electric shock,
leakage, fire due to insulation aging.)
●
Wait for the main body to cool down sufficiently
before cleaning.
(To avoid causing burns.)
●
When used within a cupboard or other enclosed
spaces, make sure that the steam can emit outward.
(To avoid causing discoloration or deformation of the
cupboard.)
●
This appliance is intended to be used in household
and similar applications such as:
·staff kitchen areas in shops, offices and other working
environments;
·farm houses;
·by clients in hotels, motels and other residential type
environments;
·bed and breakfast type environments.
●
Intended for countertop use only.
( To avoid causing burns, injury or electric shock.)
About the Main Body
About the Pan
(
)
Before cooking
The following will not affect product performance or personal health.
[Outer surface] superficial scratches, small dents or collisions.
[Inner surface] flaking of the coating of the pan.
→If the pan is deformed or if you are worried about its condition, please purchase a new pan.
Instructions for Use
■
Do not use the pan in places other than the rice cooker.
●
Do not use it on a gas stove or
induction cooker or in a microwave.
●
Do not let objects like metal
sieves make contact with the
coating of the pan.
■
Avoid hitting the pan against hard objects.
Doing so may cause
scratches or dents on
the outer surface.
■
Pay attention to the following in order to avoid damaging the coating of the pan.
After cooking
●
●
●
Do not put vinegar into the rice in the pan.
(While cooking Sushi and other food)
Do not use a metal spoon.
(While cooking congee and other food)
Do not touch or strike the pan.
(While filling a bowl with rice)
During cleaning and maintenance(P12)
Notes
Edge or bottom
(Pan)
■
If the product is on a cabinet with sliding
table, make sure that the load capacity
of the table is greater than
1.0 L:10 kg
1.8 L:12 kg
(To avoid dropping the product.)
Cast heater
Bottom sensor
6
●
●
●
●
●
●
Do not use the pan as a washing container.
Do not place spoons or other utensils into
the pan.
After cooking with seasoning, do not leave food
inside the pan.
→Please clean out the food in the pan as soon as
possible and then clean the pan.
Do not use a bowl dryer or dish washer/dryer for
cleaning.
Do not put the pan onto other utensils
to dry after washing.
Do not use abrasive materials such as
powders,metal brushes, nylon brushes
or scouring pads to clean or scrub the
pan.
→To clean the pan, wash it with a soft
sponge.
■
Do not cover the outer lid with a cloth
or other objects when the product is
in use.
(To avoid causing the steam from being
blocked, resulting in deformation, discoloration
of the outer lid and malfunction of the product.)
■
Do not tilt or rotate the product.
■
Please clean rice and other foreign objects
that become stuck on the main body (bottom
sensor,cast heater, and the bottom of the pan).
In order to avoid error displays, scorched rice,
half-cooked rice, etc.
■
Be sure to remove the pan protection bag before use.
(So as to avoid poor cooking or fire.)
■
Do not pour food that needs to be cooked directly into
the protective frame where no pan has been placed.
(So as to avoid failure caused by impurities.)
■
When there is any overflow of rice water from the steam
vent, pull out the power plug immediately to disconnect
the power supply. Do not resume use until the rice water
on the power plug and the instrument plug is cleaned with
a dry cloth.
■
Do not use the product outdoors.
(Unstable power supply may result in product failure.)
■
Avoid using the product under direct sunlight.
(So as to avoid color change/discoloration.)
■
Do not use this product on items that are not resistant to
high temperatures, such as carpets, electric heating
carpets, and tablecloths (made of ethylene plastic).
(So as to avoid poor cooking or fire.)

Before using this product for the first time, clean the pan, moisturizing cap, and accessories.( P12)
The control panel is covered with protective film. Please remove it before use.
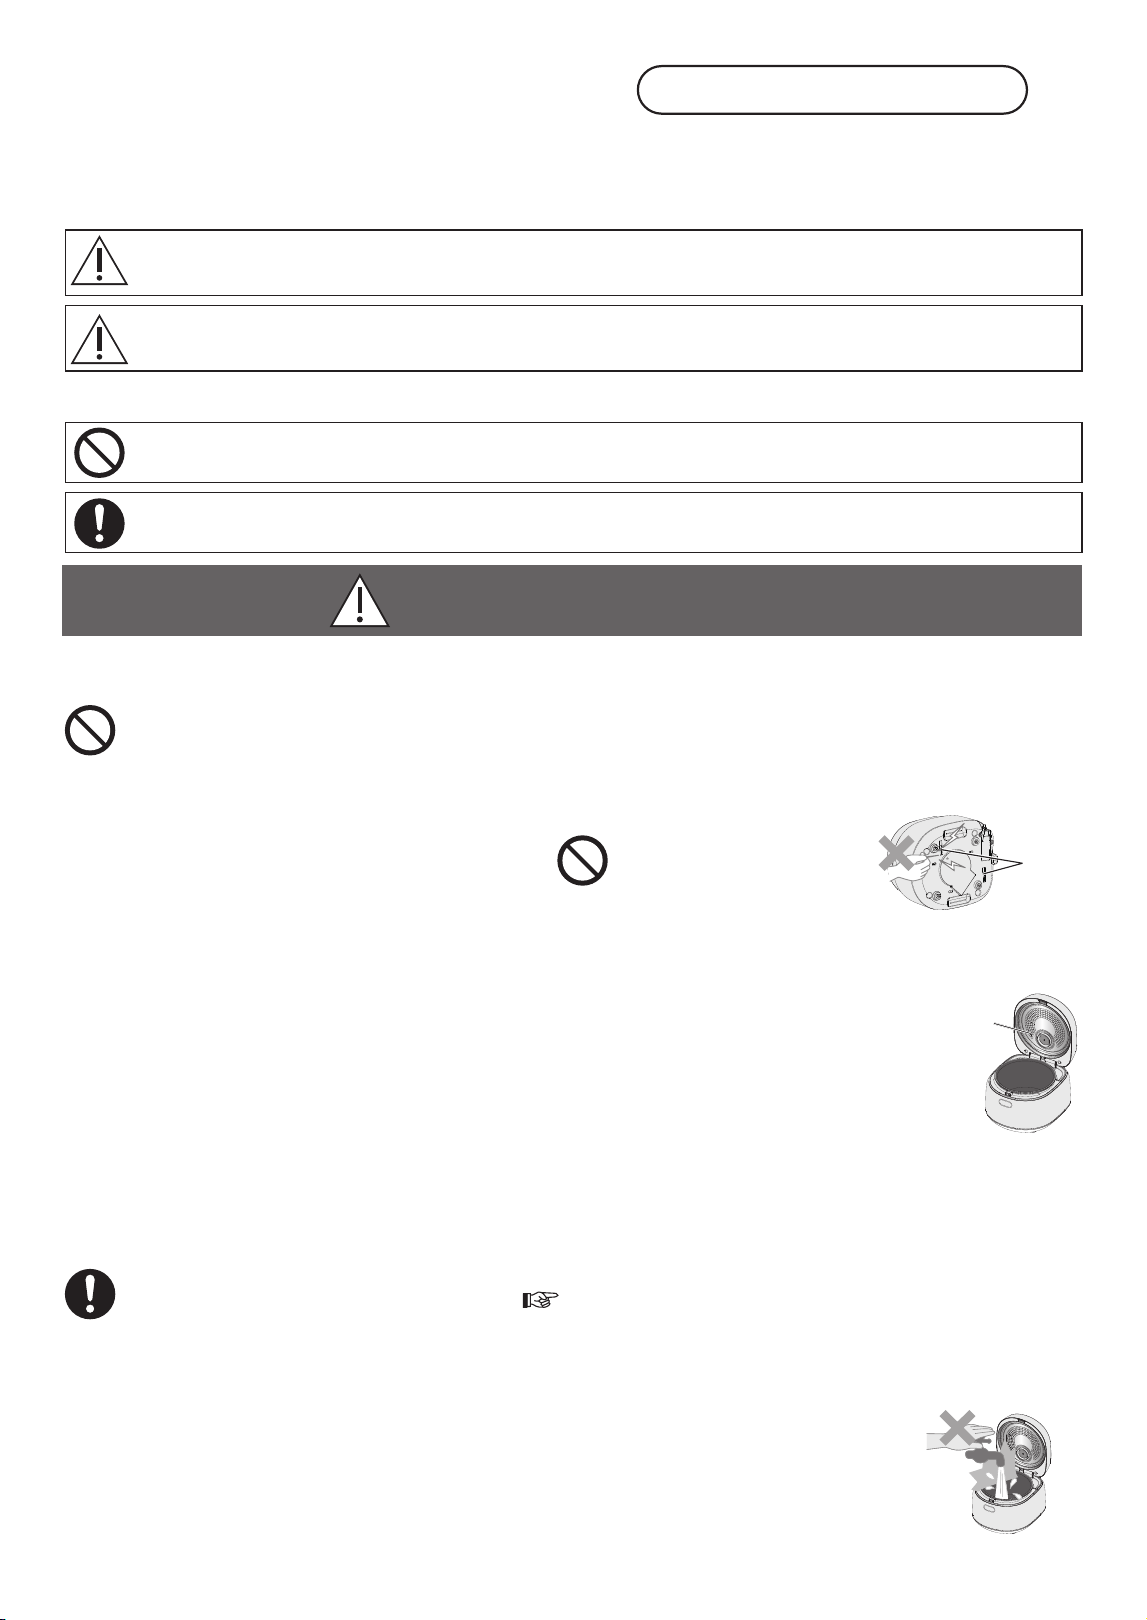
Main body
Parts Identification
Control panel
Pan
Hook button
Power cord
Bottom sensor
Body
Outer lid
Moisturizing cap
Cast heater
Accessories
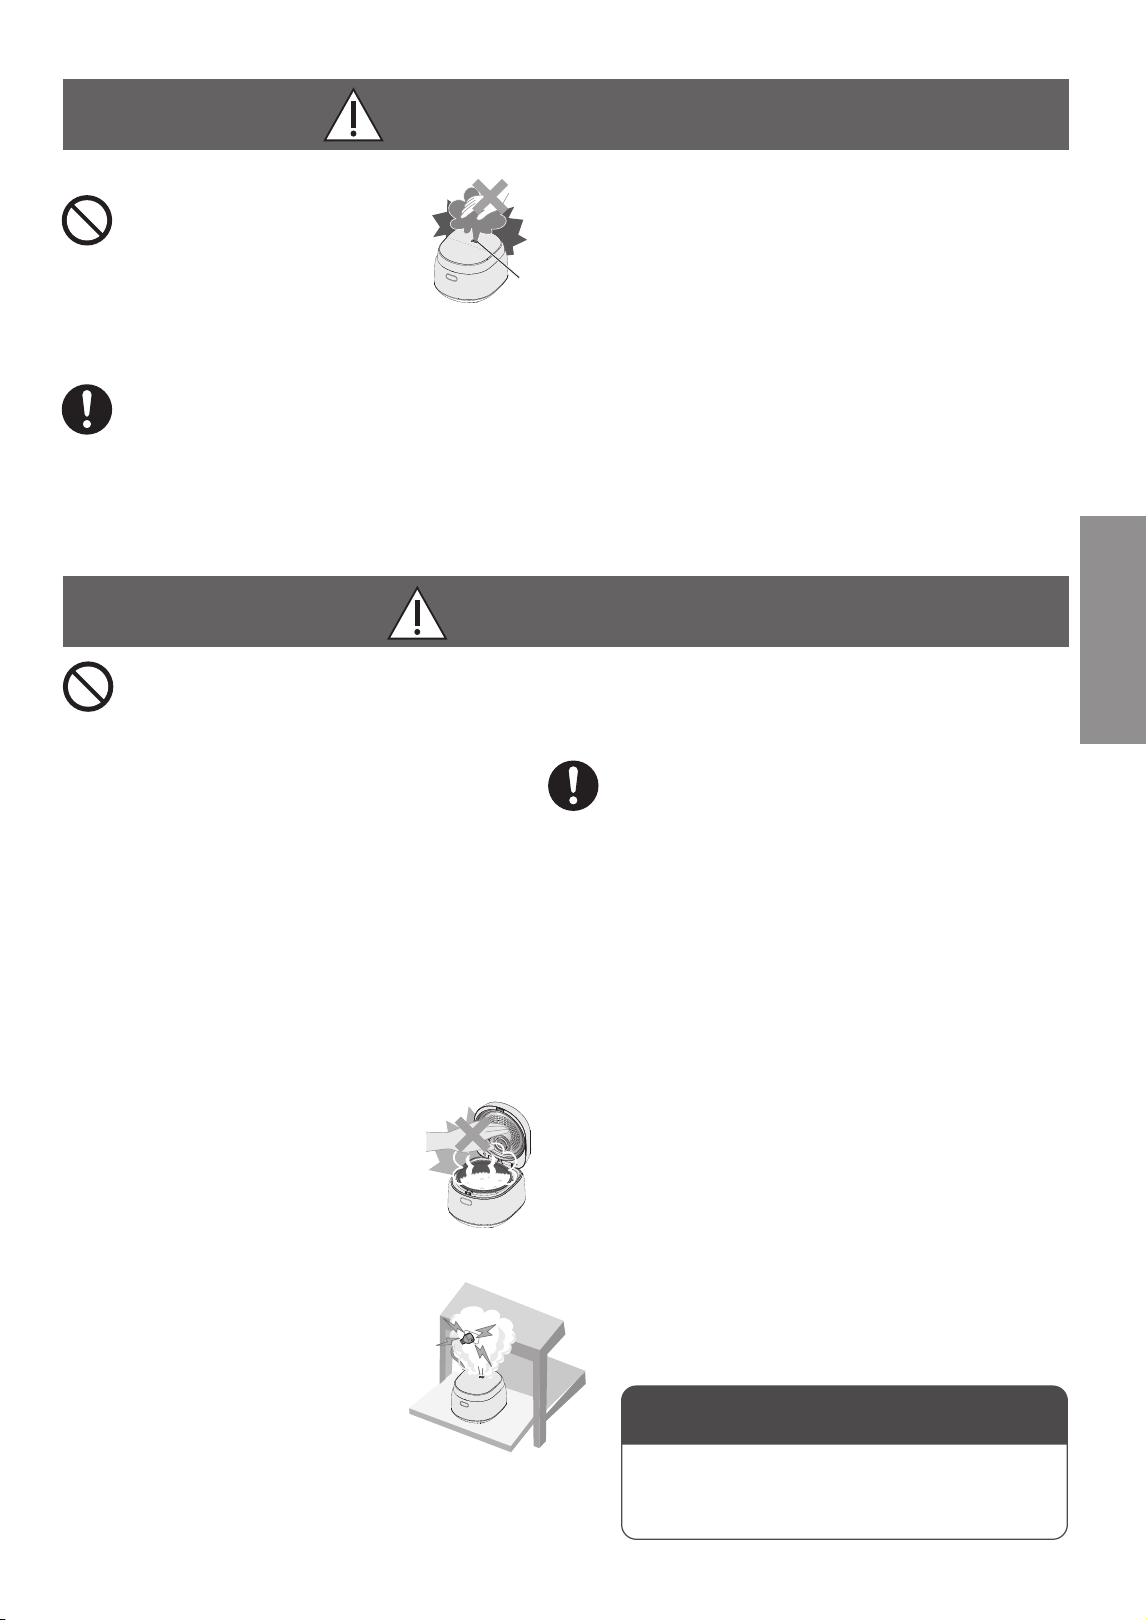
Control panel
When the product is in use, it is normal for the [Off/Cancel] key to take longer to respond.
If there is no operation for 30 seconds, the product will enter sleep mode. To exit sleep mode, press any key.
Keys may take longer to respond when exiting sleep mode.
Notes
①「Off/Cancel」:
● Press this key to start cooking or end the
setting of the preset time.
● Cancel incorrect operation, or turn off
keep warm.
● Press this key to keep food warm.
● To set the cooking time, you must first
press this key.
②「Time」:
③「Timer」:
● Press this key to use the timer..
④「Keep Warm」:
⑤「 Start」:
● It is used to select the function.
● It is used to set preset time and cooking
time.
●
When setting time, press and hold the key
to quickly add or subtract time.
⑥「 」or「 」:
①
② ③
④
⑤
⑥
⑥
7
Before Use
Heating plate
Pan seal ring
Rice scoop(1)
Porridge [Soup]
scoop(1)
Measuring cup(1)
(Approx.180 mL)
Steaming basket(1)
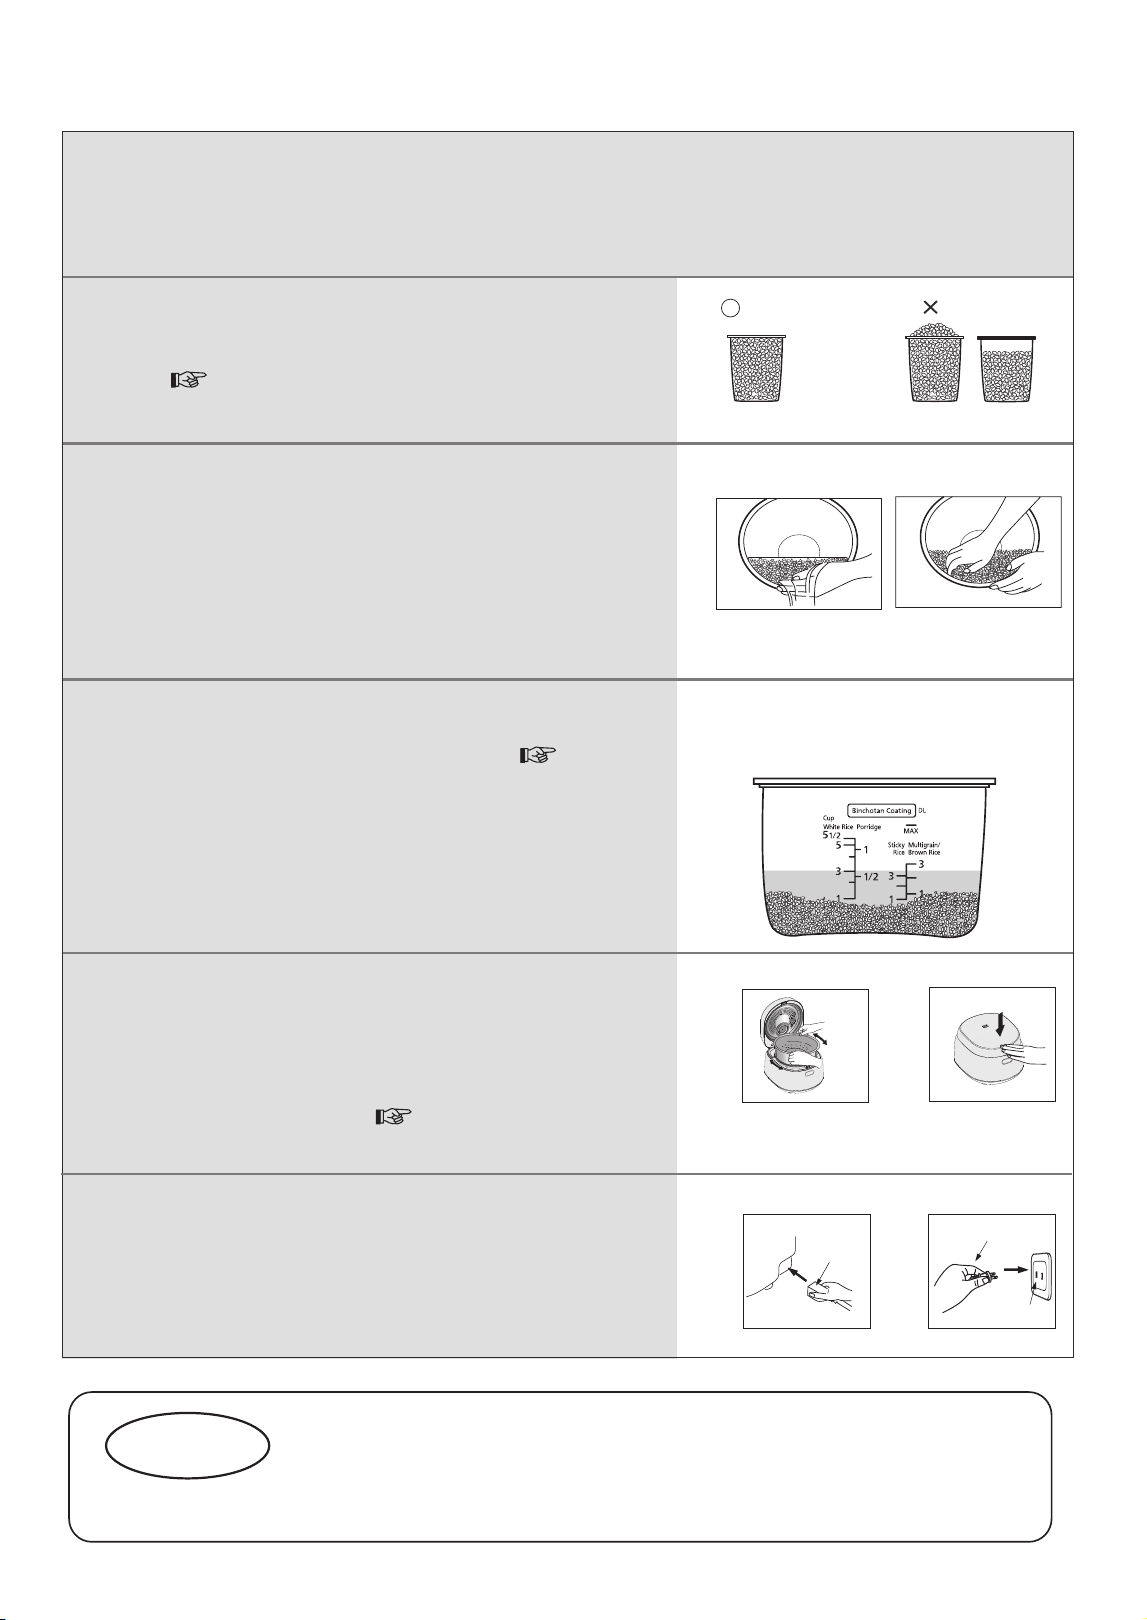
Measure rice with the measuring cup provided
Wash the rice until the water turns relatively clear
Place the washed rice into the pan
Connect the plugs
Correct Incorrect
About 180 mL
(about 150 g)
●
Check the maximum quantity of rice that can be cooked at once
"Specifications" on P17.
●
●
●
●
●
When adding water, place the pan on a flat surface and flatten the
surface of the rice. (Confirm that the right amount of water is added
based on the correct scale.)
●
When too much water is added, it may overflow when cooking.
●
Quinoa can only be cooked one cup at a time, and requires 1.5 cups
of water (Approx 270 mL).
Add water up to the corresponding waterline( P9) and dry
the outside of the pan.
Plug in the instrument plug, then the power plug, and make sure
both are connected securely.
Put the pan into the body and close the outer lid
So that the pan bottom can be closely attached to the cast heater,
please rotate the pan along the direction indicated by the arrow for
2 or 3 times.
Check if the moisturizing cap is correctly positioned.
(Cleaning and maintenance P12)
When closing the outer lid, confirm that there is a "click" sound.
①
②
①
②
①
Wash the rice quickly with plenty of water, changing the water as
you go.
②
Stir the rice gently, and repeat washing several times → rinse with
water until the water turns relatively clear.
●
In order to avoid scratching the non-stick coating on the pan surface,
do not wash rice in the pan.
●
Wash the rice thoroughly. Otherwise, rice crust may appear and the
residual rice bran may affect the taste of the rice.
Before using for the first time
Preparation Wash rice and add water
① ②
5
4
3
2
1
Boil a pan of water, then drain it.
① Add water to the waterline 4 of "White Rice", and close the outer lid.
② Select the "Steam" function, and set the cooking time to 15 minutes.
③ When you hear the buzzer, remove the pan, and pour away the water inside it.
Example: when cooking 3 cups of rice,
add water to the "3" waterline
of "White Rice".
Please Note
When cooking with the steaming basket, the maximum cooking capacity is: 1.0 L Model: 3 cups; 1.8 L Model: 6 cups.
main body
instrument
plug
power plug
power outlet
8
★Tips to cook delicious rice
● Wash rice gently and quickly.
● Do not place rice in a sieve.
(To avoid rice fragmentation or rice
sticking to the pan.)
● Measure water and rice
correctly.
①
②
●
Add water to the pan on a flat countertop.
●
Do not use hot water or alkaline water with
a pH higher than 9.
(So as to avoid rice from sticking to the pan
or becoming burned.)
③
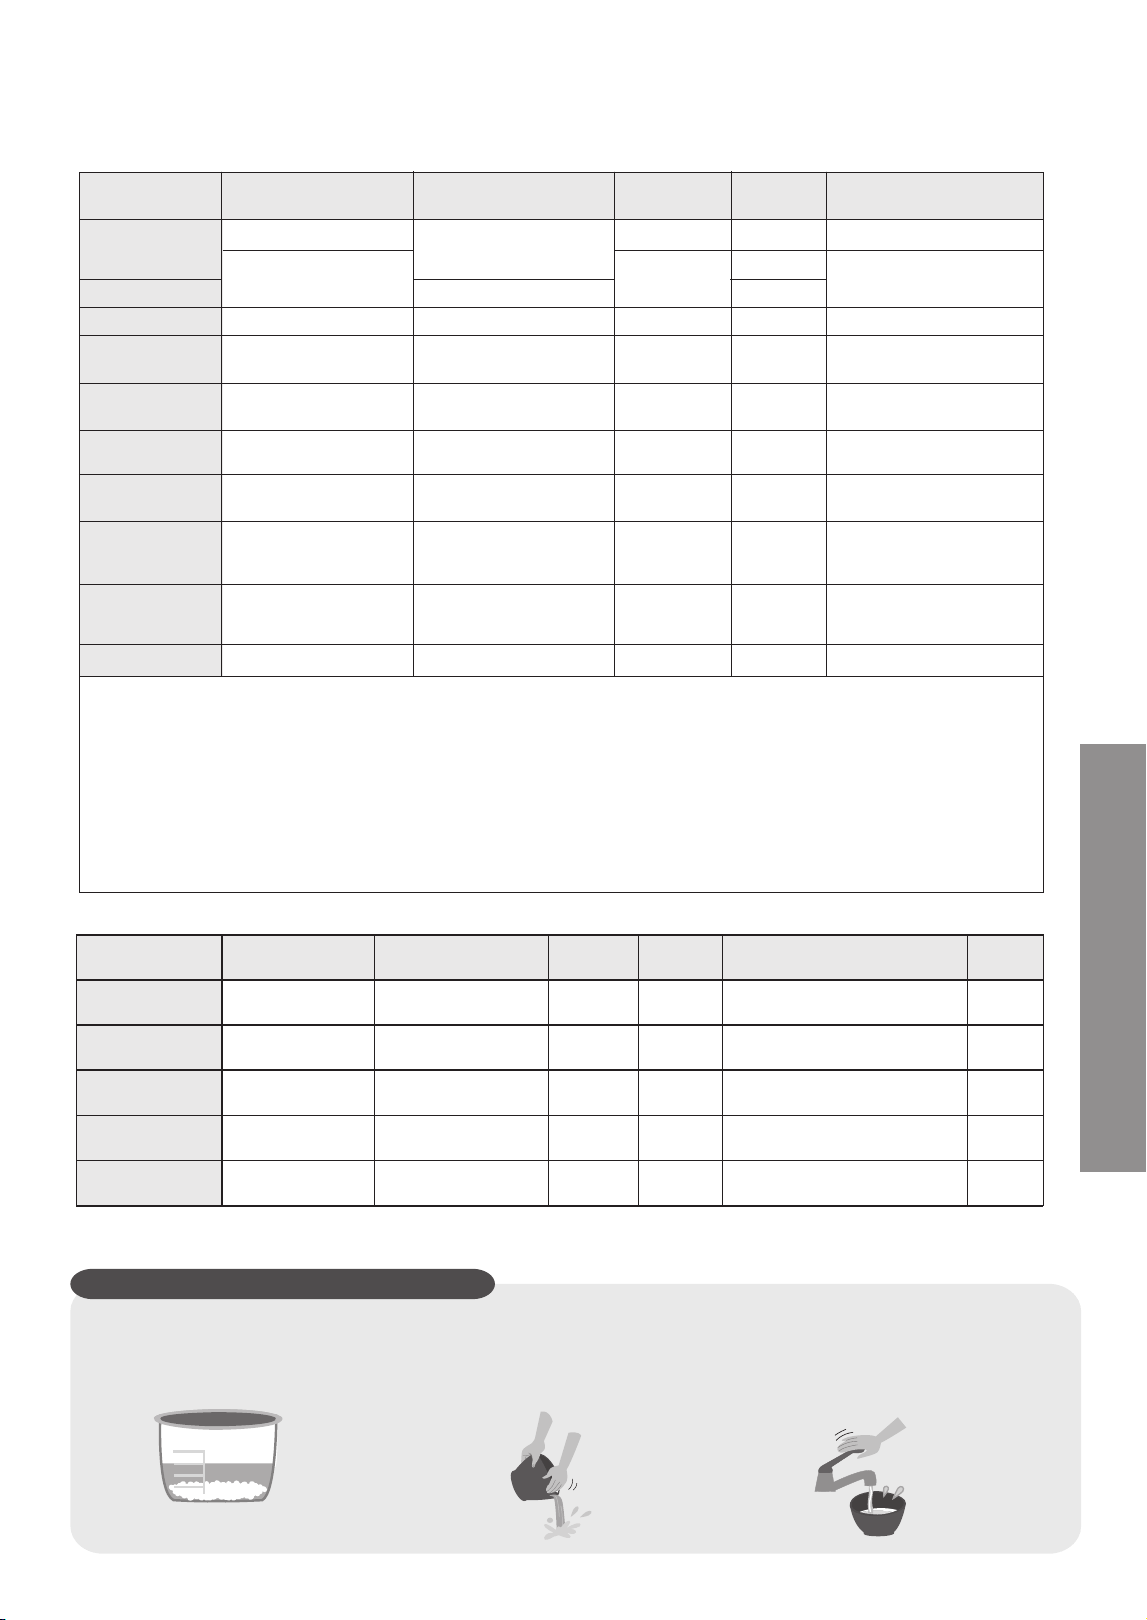
■ Function selecting
Table 1
Preparation
Function selecting/Setting cooking time/Tips to cook delicious rice
*1 ·
These cooking times are based off a room temperature of 20℃ and a water temperature of 20℃, and with a medium
amount of rice (3 cups for the 1.0 L model, or 5 cups for the 1.8 L model) and at the rated voltage as listed in the
specification table.
·
The actual cooking time will vary according to the amount of rice, water, voltage, temperature, water temperature and rice quality.
*2 ·
At the end of cooking, the unit will automatically change to 'Keep Warm'. It is not recommended that foods marked with "x" are
kept warm with this function. Please press the [Off/Cancel] key as soon as possible after cooking has ended.
*3 ·The Soup/Slow cook, Waterless Cooking, Cake/Bread and Reheat functions do not have a timer option.
·
In summer when temperatures are higher, the preset timer for rice menus should not be greater than 8 hours to avoid rice deterioration.
*4 ·Quinoa can only be cooked one cup at a time, and requires 1.5 cups of water (Approx 270 mL).
■ Setting cooking time
Table 2
Categories
of food to cook
Menu select
Setting
cooking time range
Setting
increments
Time display
Initial
value
Time
memory*
*:After the power is off, the cooking time is reset and the previously set cooking time is no longer memorized.
9
Usage
Categories
of food to cook
White Rice
Sticky Rice
Brown Rice
Multigrain
Porridge
Soup/Slow Cook
Steam
Waterless Cooking
Cake/Bread
Menu select
White Regular
Quick/Quinoa
Sticky Rice
Brown Rice
Multigrain
Porridge
Soup/Slow Cook
Steam
Waterless Cooking
Cake/Bread
White Rice
*4
Sticky Rice
Multigrain/Brown Rice
Multigrain/Brown Rice
Porridge
To the maximum
waterline of "Porridge"
Add water to 4 cups
when steaming
—
Waterline
43
30
37
110
70
Table 2
Table 2
Table 2
Table 2
Table 2
*1
Cooking time
(Approx .minutes)
*2
Keep warm
(auto)
×
×
×
×
×
×
×
×
○
*3
Preset timer options
60 minutes or more
60 minutes or more
60 minutes or more
2 hours 10 minutes or more
1 hour 20 minutes or more
Cooking time +
10 minutes or more
—
Cooking time +
20 minutes or more
—
—
Porridge
Soup/Slow cook
Steam
Waterless Cooking
Cake/Bread
Porridge
Soup/Slow cook
Steam
Waterless Cooking
Cake/Bread
1 hour-4 hours
1 hour-12 hours
1 minute-60 minutes
10 minutes-2 hours
40 minutes-60 minutes
10 minutes
30 minutes
1 minute
10 minutes
1 minute
1 hour
1 hour
5 minutes
30 minutes
60 minutes
Back to 1 hour after 4 hours
Back to 1 hour after 12 hours
Back to 1 minute after 60 minutes
Back to 10 minutes after 2 hours
Back to 40 minutes after 60 minutes
○
○
○
○
○
Quinoa
○
×
1.0 L:MAX
1.8 L:To the maximum
waterline of "Porridge"
■ Please note
●
When cooking with "Quick/Quinoa", as the cooking time is
shortened, the rice may be harder or there may be rice crust.
→Soak the rice in water in advance, and you can make the
cooked rice become soft.
●
Do not mix brown rice with white rice, as this may affect the
cooking result.
※
When cooking rice or quinoa
Menu Functions
Cooking rice or grains/Keep warm/Reheat
■ Please note
● When adding cooled rice, do not exceed the maximum
amount (as shown in Table 3).
● It is recommended to reheat cooled rice only once
to avoid affecting the taste of the rice.
●
Do not reheat sticky rice, brown rice, quinoa or multigrain
rice to avoid affecting the taste.
1
● The "Start" indicator lights up.
● The remaining time decreases in units of 1 minute.
When using the "Quick/Quinoa" and "Brown Rice"
function, the remaining time will be displayed
approximately 7 minutes and 12 minutes before
cooking ends.
● After entering the cooking stage, the remaining
cooking time displayed will be automatically adjusted
depending on the rice volume. For example, it may
sometimes drop from "15" to "13
", rather than
decreasing in units of 1 minute.
2
3
When cooking is over, loosen the rice or quinoa.
●
After the buzzer rings, cooking has finished. The function
will automatically change to keep warm status. To prevent
the rice or quinoa from sticking together, please loosen after
cooking.
●
For Quinoa, Sticky Rice, Brown Rice or Multigrain, when
cooking is over, press the Off/Cancel key as soon as
possible to cancel "keep Warm" and avoid affecting the
taste.
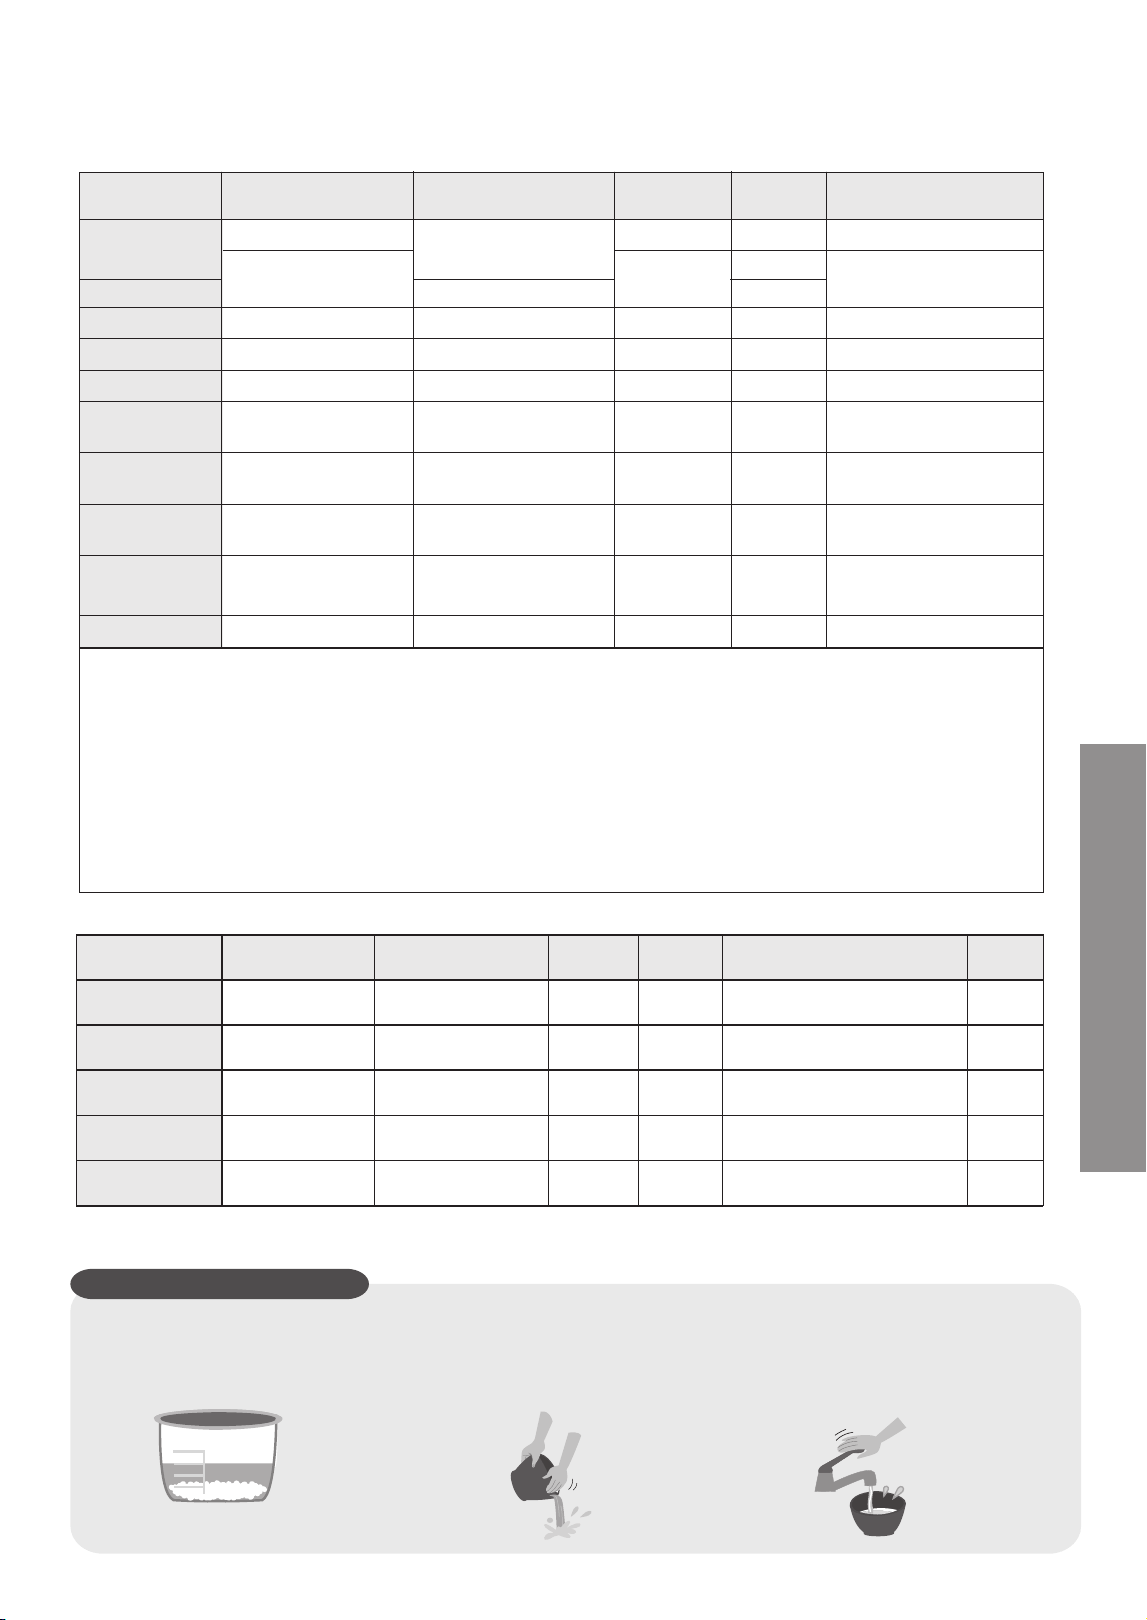
※When reheating cooled rice
● Stir the cooled rice in the pan to make it even.
●
Please refer to the following table for the amount
of water to be added.
Preparation
Table 3
■
The maximum amount of cooled rice that can be
reheated is:
1.0 L:White Rice 3 cups 1.8 L:White Rice 5 cups
3
After the buzzer rings, reheating has finished.
The function will automatically change to keep
warm status.
● Please loosen the rice as soon as possible, as it
will be more delicious.
●
Keep warm time displays from to . After 24hours,
it displays " ", but it is still keeps warm.
●
If the "Keep Warm" function is used for longer than 96 hours,
it will automatically stop, and the display will show "U14." To
continue use, press the [Off/Cancel] button first.
●
Cooked rice should be consumed within 12 hours of keeping
warm to avoid discoloration or becoming stale.
●
When using the keep warm function, there may be some
droplets at the edge of the pan.
●
The rice taste may be affected if the rice scoop is left in the
pan when using the keep warm function..
Keep Warm
● No matter how much cooled rice to reheat, the
heating time is about 20 minutes.
● The selected function menu flashes.
● The "Start" indicator lights up.
Press ,to start cooking.
2
Press ,twice to start reheating.
Cooled rice
quantity
(Waterline)
Water volume (measuring cup)
1/4
1/2
1/2
—
—
1/4
1/2
1/2
1/2
1
1.0 L 1.8 L
1
2
3
4
5
Press or key to select desired function.
10
1
Press or to select a rice cooking function,
like "White Regular".
Menu Functions Porridge and other cuisines/Timer
■ Please note
●
In summer when temperature is high, the preset time for rice
menus should not be greater than 8 hours to avoid rice
deterioration.
●
In summer when temperature is high, it is not recommended
to use the "Timer" function with the "Steam" function.
3
2
Press .
1
● The selected function menu flashes.
● The [Start] indicator lights up.
● When porridge or steam timer is set, you need to
set the cooking time accordingly, and then press
the Timer key.
Press or key to select "
White Regular
".
4
Press ,Timer cooking starts.
●
The "Start" indicator turns off, the "Timer" indicator
lights up, then the preset is finished.
※
Using the "Timer" function
For the following example, the "White Regular"
function will be completed after 4 hours.
※
When cooking porridge for 1.5 hours
1
● The selected function menu flashes.
● The [Start] indicator lights up.
2
● The "Start" indicator lights up.
● The remaining time decreases in unit of 1 minute.
Press ,to start cooking.
3
4
After the buzzer rings, cooking has finished.
The function will automatically change to
keep warm status.
● Keep warm function will affect taste, press
「Off/Cancel」key as soon as possible.
■ Please note
●
Opening the lid during cooking will increase the amount of
condensation.
●
Incorrect water quantity or rice quantity may lead to overflow
of rice water from the steam vent.
●
When the porridge is kept in keep warm function for an
excessively long time, it will get thicker.
●
Soup may overflow if exceeding the "Porridge" max water
level. ( "Specifications" on P17)
●
For longer steaming time, add 4 cups of water to avoid
dry heating.
●
When using the steam function, the time shown on the display
is the remaining time after the water in the pan boils.
●
The maximum weight of cake batter/bread batter must not
exceed:1.0 L: 500 g,1.8 L: 700 g (total weight of cake mix/
bread flour, milk, eggs, etc.). Otherwise the cake/bread may
be under-baked.
●
When baking the cake batter with maximum weight, set the
cooking time to 60 minutes to avoid the cake/bread being
half-cooked.
●
For "Waterless cooking" function, it is recommended to use
ingredients with high moisture content (e.g. mushrooms,
cabbage,etc.) or put ingredients that are prone to becoming
juicy at the bottom for cooking.
※
For details about what cooking time can be set,
P9 Table 2.
●
Press and hold the [ ] or [ ] key to quickly add
or subtract time.
Press or key to select "
Porridge
".
Press ,and then press or key
to set the cooking time.
● Press and hold the [ ] or [ ] key to quickly add
or subtract time.
●
For the functions and time range which apply to the
timer P9 Table 1.
Press or key to set the preset time.
11
Usage
Cleaning and Maintenance
Clean with diluted detergent, soft sponge and water.
Accessories
● Before cleaning, pull out the power plug first. Do not clean the main body until it cools down.
● When cleaning the main body, do not immerse it in water, or clean it with lacquer thinner, gasoline,
alcohol, cleaning powder or abrasive materials, etc.
● Do not use a dishwasher or dish dryer.
Attention
●
●
Bottom sensor/Cast heater
Wipe with a damp cloth.
● When adhesion is present, wipe with fine sandpaper
(around No.600) or a dry cloth.
● If you do not clean the bottom sensor, the rice may
get burnt or boiled badly.
Notes
●
●
●
●
垫 圈
Upper Frame
Wipe with a damp towel.
● Do not pour water in to wash.
Notes
Wipe with a damp cloth.
●
Clean it promptly after cooking with seasonings.
(Failure to do so may result in odor, deterioration or rusting.)
●
Do not pull the pan seal ring.
●
If oil stains are not removed, any oil stains on the heating
plate may stick to it and become difficult to remove. Clean
the heating plate after each use.
●
As the metal parts are heated, there may be color
changes or stripes on their surfaces, which will not
affect their normal functions.
Heating plate/Pan seal ring
Pan
●
Clean with diluted detergent, a soft sponge and water.
Wipe off any water on the outside of the pan.
●
Do not use the pan as a container for cleaning.
●
Color change or stripes may appear on the fluoridized
coating surface, which will not affect human health or
normal functions of the main body.
Moisturizing cap
●
After each use, remove the moisturizing cap, then rinse
it so that no odor is produced.
■How to remove
Pull it out from the heating
plate.
■How to Install
Insert it into the hole of the
heating plate in the opposite
direction of removal.
Be sure to insert it fully to
prevent it from falling off.
Notes
●
Before installation, make sure that the seal ring is attached
to the moisturizing cap.
12
●
Seal ring
Rice scoop(1) Measuring cup(1) Steaming basket(1)
Porridge [Soup] scoop(1)

Recipes
Notes:·The rice may get burnt at the bottom depending on the ingredients added.
·To use white fungus soup or other ingredients that will get thicker, use the "Porridge" function and do not exceed the "Porridge"
max water level. Otherwise, the soup may overflow.
※
These recipes use the cooking volume of the 1.0 L model as example. Please refer to P17 for details about the cooking amount of
the 1.8 L model.
※1 cup (Measuring cup): approx. 150 g
Tomato chicken wings
Ingredients:Chicken wings 8
Shiitake mushrooms 100 g
Tomato 2
1) Score both sides of the wings twice with a knife, peel and dice the tomatoes, wash the shitake mushrooms
2) Put all ingredients and seasoning in the pan then close the outer lid.
3) Press the [ ] or [ ] key to select "Steam", set the cooking time to 25 minutes, and then press the [Start] key.
Seasonings: Tomato ketchup 10 mL Water 50 mL
Soy sauce 15 mL Sugar 5 g
Oyster sauce 10 mL Salt 2.5 g
Chili oil 40 mL Light soy sauce 10 mL
Vinegar 15 mL Sugar 2.5 g
Steamed chicken slices
Steps:
Ingredients:
Skinless chicken thigh
2 (Approx. 150 g)
Chopped scallion 2 g
Chopped ginger 10 g
Chopped garlic 10 g
1) Put the chicken thighs and chopped ginger in the pan, then put the pan into the main body, and close the outer lid.
2) Press the [ ] or [ ] key to select "Waterless", set the cooking time to 20 minutes, and then press the [Start] key.
3) Mix the chili oil, vinegar, white sugar and light soy sauce in a bowl, then add the chopped scallion and chopped garlic,
and mix them well.
4) After the cooking is complete, press the [Off/Cancel] key, open the outer lid, take out the chicken thighs. Discard the
original soup; otherwise, it will dilute the original flavor. Then let them cool slightly, cut them into pieces, and drizzle
with the juice.
Seasonings:
Mushroom soup
Ingredients:
White beech mushroom 70 g
Crab mushroom 70 g
King oyster mushroom 60 g
Chopped scallion Small amount
Seasonings:
Salt Suitable amount
Ground white pepper Small amount
1) Soak the three species of mushrooms in lightly salted water for 10 minutes. Wash them clean, cut off the roots,
and cut the king oyster mushrooms into small pieces.
2) Put all the mushrooms in the pan, add water to the "Porridge" max water level, and close the outer lid.
3) Press the [ ] or [ ] key to select "Soup/Slow cook", set the cooking time to 1 hour and 30 minutes,
and then press the [Start] key.
4) After the cooking is complete, open the outer lid, add a suitable amount of salt, ground white pepper and chopped
scallion to taste.
Note: You can choose your favorite species of mushrooms.
Cake (Low-gluten flour)
Low-gluten flour 100 g
Egg 3
White sugar 100 g
Butter 30 g
Milk 25 g
1) Separate the egg whites and yolks into two bowls (without water or oil), add 20 g of white sugar to the yolks and
stir until smooth and particle-free.
2) Add 80 g of white sugar to the egg whites, beat them with a whisk until the chopsticks can stand upright in the
egg whites, add the egg yolks to the egg whites, and stir well left and right.
3) Add the sifted low-gluten flour to the cake batter in batches and stir well until smooth and particle-free.
4) Add melted butter and milk to the cake batter and stir well. Pour the cake batter into the pan and close the outer lid.
5) Press the [ ] or [ ] key to select "Cake/Bread", and set the cooking time to 50 minutes. Then, press the [Start]
key.
6) When the buzzer sounds, it means that the cake is baked. Press the [Off/Cancel] key, take out the pan and let it
cool for 2 minutes. Then reverse the pan to pour the cake onto a plate or disk and let it cool.
※ Do not exceed the specified weight of cake batter. Otherwise, the cake may be undercooked.
13
Steps:
Steps:
Ingredients:
Steps:
Usage

Please check before requesting a repair.
Troubleshooting
Scenario Possible Cause
Does not cook during
preset time
14
Cooking time is long
or short
The appliance
makes a noise
Steam vapor leaks from a
place other than the steam
vent
Key operation can
not be performed
There is a plastic smell
Rice is glutinous (soft)
Rice is dry (hard)
Rice is half-cooked
(undercooked)
Liquid overflows
·Check if the [Start] key has been pressed. ( P11)
·If cooking is done continuously, the cooking time will be longer (by up to 30 minutes).
·Due to the different amounts of rice and water, the remaining time displayed may be
stopped for adjustment in the middle of cooking.
·Is "U12" displayed? ( P16)
·
The sound of "click,click" in cooking is the sound of adjusting firepower,which is not a fault.
·
The “pa”sound in cooking is the cracking sound generated by the thermal expansion of
water droplets at the bottom (outside) of the pan, which is not a fault.
·A foreign object may be attached to the pan seal ring or along the pan.
·The pan may be deformed.
·Check if the lights above the keys are on.
→
Key operation can not be performed during cooking, while using the timer, or when using
the "Keep Warm" function. Press the [Off/Cancel] key before operation.
·There may be a plastic smell at the beginning of use. This will be eliminated after several
more uses. It is not abnormal.
·Rice quantity and water volume may be incorrect.
·There may be broken rice mixed in.
·Hot water was used to wash the rice.
·The rice was not loosened immediately after cooking.
·Too much water was added into new rice for cooking.
·
The rice may have been immersed in water for a long time (e.g. preset time is too long, etc.).
→When using the timer function to cook, you need to put less water.
·Rice quantity and water volume may be incorrect.
·The outer lid was not closed properly.
·The "Quick/Qunioa" function was used for cooking.
·The rice was not loosened immediately after cooking.
·The bottom of the pan is uneven.
·
There is a foreign object attached to the outside of the pan, on the bottom sensor, or on the
cast heater.
·The wrong function was selected.
·
Rice quantity and water volume may be incorrect.
·
Rice was not washed prior to cooking.
·
The moisturizing cap was not installed correctly.
·
The outer lid is not was not closed properly.
·
The wrong function was selected.

Troubleshooting
Rice is scorched
There is condensation
There is odor
Rice is yellow
Rice is dry
Rice porridge
Rice sticks onto the pan
A thin film is formed
·Rice was not washed adequately.
·Broken rice has been mixed in.
·The bottom of the pan is uneven.
·A foreign object is attached to the bottom of the pan, on the bottom sensor, or on the
cast heater.
·The cooking timer hasn't been set.
·Spices have been added for cooking.
·The outer lid was not closed properly.
·The "Keep Warm" function is used for longer than 12 hours.
·Rice is reheated several times.
·The outer lid was not closed properly.
·The rice was soaked in water for a long time while using the cooking timer function.
·The "Keep Warm" function has been used.
·There is too much broken rice.
·Due to the different varieties of rice, soft rice might easily stick to the pan.
·A paper-like film is the result of dry starch dissolution, and it is harmless.
If rice is not washed sufficiently prior to cooking, such a film may form.
Timer is not working when
using steam function
·There is not enough water in the pan. Add more water, to the pan about half way is best.
15
Please check before requesting a repair.
Scenario Possible Cause
·Rice was not washed adequately
·Rice has not been loosened immediately after cooking.
·The "keep Warm" function has been used for longer than 12 hours.
·The rice scoop has been left in the pan while using the "Keep Warm" function.
·Cooled rice has been added into the pan and the "Keep Warm" function has been used.
·Different types of rice or water quality may cause cooked rice to be yellowish in colour.
·If seasonings are used during cooking, you may notice a smell.
→ Carefully clean the pan, heating plate and moisturizing cap after use.
Troubleshooting

Error display Please check
Ref.
page
If the appliance is still not back to normal after the above is confirmed, contact a Panasonic authorized
service center for repair.
●
Is any foreign object attached to the bottom of the pan, the bottom sensor or cast
heater?
→Press the [Off/Cancel] key, unplug the power cord, and remove foreign objects and
stains after the pan has cooled down completely.
Has too much water been added?
→Press the [Off/Cancel] key.
(For continuous cooking, you can slightly reduce the amount of water)
●
6
8
●
Was the "Keep Warm" duration set to more than 96 hours?
→Please press [Off/Cancel] key.
10
●
Unplug the power plug and plug it in again.
If "H※※" still appears, then there is a fault.
→Please consult a Panasonic authorized service center, and advise what
the error code says (two digits after "H").
—
Error Codes Indication
16
Please check before requesting a repair.

17
Troubleshooting
Specifications
● Please make sure to use this product in areas under 2000 meters above sea level to avoid affecting cooking performance.
Model No. SR-DL105 SR-DL185
Rated voltage
120 V
Rated frequency
60 Hz
Rated power input
810 W
Cooking volume(Approx)
1.0 L 1.8 L
Nominal volume of the pan(Approx)
3.2 L 4.8 L
Cooking quantity
(Rice)(Approx)
L (cup)
White Regular
0.18-0.99[1-51/2] 0.18-1.8[1-10]
Sticky Rice
0.18-0.54[1-3] 0.18-1.08[1-6]
Brown Rice
Multigrain
Porridge cooking
volume (Rice)
(Approx) L(cup)
Porridge
0.09-0.18[1/2-1] 0.09-0.36[1/2-2]
Maximum weight of cake batter/
bread batter (Approx)g
500 700
Power cord length (Approx)m
0.9
Weight (Approx)kg
2.8 3.2
Size
(Approx)mm
Depth
302
Width
271
Height
194 239
Quick
Quinoa
0.18[1], add 1.5 cups of water 0.18[1], add 1.5 cups of water
0.18-0.99[1-5
1/2] 0.18-1.44[1-8]
The maximum
waterline of "Porridge"
MAX
Maximum
cooking volume
(ingredients
+water) L
1.5 2.5
2.1 -

18
Manuel d'utilisation
Table des matières
IMPORTANTES MESURES DE SÉCURITÉ
...... 3
Précautions à prendre ................. 20-21
Instructions d'utilisation.................... 22
Identification des pièces
Préparatifs
Fonctions de menu
●
●
●
Lavage du riz et ajout d'eau ............................... 24
Sélection de fonction/Réglage de la durée de cuisson/
Conseils pour préparer un riz délicieux............... 25
●
●
Cuisson de riz ou de grains/Maintien au chaud/
Réchauffage ....................................................... 26
Gruau et autres/Minuterie .................................. 27
●
Dépannage .................................. 30-31
Indication des codes d'erreur............ 32
Spécifications.................................... 33
Garantie ................... Couverture arrière
●
●
●
À conserver pour un usage ultérieur
Usage domestique
Cuiseur de riz électronique
Recettes ............................................ 29
Nettoyage et entretien ...................... 28
Merci d'avoir acheté ce produit Panasonic.
Cet appareil est destiné à être utilisé dans des
applications domestiques et similaires.
Veuillez lire attentivement ce manuel pour une
utilisation sûre et correcte de ce produit.
N° de modèle 1,0LSR-DL105
1,8LSR-DL185
Utilisation
Dépannage
Boîtier................................................................. 23
Panneau de commande ..................................... 23
Les images dans ce manuel d'utilisation illustrent le
modèle SR-DL105.
Veuillez lire attentivement les « IMPORTANTES
MESURES DE SÉCURITÉ » (page 3) et les
« Précautions à prendre » (pages 20 et 21)
avant d'utiliser l'appareil.
Avant utilisation
Précautions à prendre
Afin d'éviter les blessures corporelles et les dommages matériels, les instructions ci-dessous doivent être
respectées.
■Les symboles suivants indiquent les dommages ou le niveau de danger causés par une
utilisation incorrecte.
AVERTISSEMENT:
Indique un danger potentiel pouvant entraîner la mort ou
des blessures graves.
ATTENTION:
Indique un danger potentiel pouvant entraîner des blessures ou
des dommages matériels.
■La classification et la description des symboles sont les suivantes.
Ce symbole indique une action interdite.
Ce symbole indique une action requise.
Veillez à observer les précautions suivantes
20
Veillez à utiliser une prise de courant alternatif séparée avec les valeurs
nominales indiquées dans le tableau des spécifications ( page 33).
(L'utilisation de l'appareil avec d'autres équipements sur la
même prise peut provoquer une surchauffe et un incendie.)
·N'utilisez qu'une multiprise d'au moins 10ampères.
Utilisez une prise de courant bipolaire monophasée avec
mise à la terre pour cet appareil afin d'assurer une mise à
la terre fiable. Si un dispositif de mise à la terre n'est pas
installé, il peut se produire une induction électrostatique
sur d'autres pièces métalliques telles que le boîtier.
(Pour éviter tout risque de choc électrique dû à une défaillance ou à une
fuite électrique.)
Insérez fermement la fiche côté appareil et la fiche
d'alimentation dans la prise de courant.
(Pour éviter de provoquer de la fumée, un incendie ou un choc électrique.)
●
●
●
●
●
●
●
●
●
●
●
●
●
N'endommagez pas le cordon d'alimentation
ou la fiche d'alimentation.
· Les actions suivantes sont strictement interdites :
Ne branchez et ne débranchez pas la fiche d'alimentation
avec les mains mouillées.
·
Assurez-vous que vos mains sont sèches avant de toucher la fiche
d'alimentation ou le produit.
(Pour éviter de provoquer un choc électrique ou des blessures.)
Ne renversez pas d'eau ou d'autres liquides sur la fiche de l'appareil.
(
Pour éviter de provoquer un choc électrique ou un incendie dû à un court-circuit.
)
Nettoyez régulièrement la fiche d'alimentation.
(Pour éviter de provoquer un incendie dû à une mauvaise
isolation de la fiche d'alimentation en raison de
l'accumulation d'humidité et de corps étrangers.)
→Débranchez la fiche d'alimentation et essuyez-la avec
un chiffon sec.
AVERTISSEMENT
■ Alimentation électrique·Cordon
d'alimentation · Fiche d'alimentation
Ne placez pas d'objets susceptibles d'obstruer les trous de la plaque
exothermique dans le panier de cuisson.
(Pour éviter les brûlures ou les blessures
résultant de l'expulsion de vapeur ou d'aliments cuits.)
N'utilisez pas cet appareil pour la cuisson d'aliments
ou d'assaissonements placés dans un sac en
plastique pour être chauffés.
Trous de la
plaque
exothermique
■ Boîtier
N'insérez rien dans
les évents ou les interstices,
en particulier des épingles
ou d'autres objets métalliques.
(Pour éviter de provoquer un choc électrique ou un fonctionnement anormal.)
Évents
Ne modifiez, ne démontez et ne réparez pas cet appareil.
(
Pour éviter tout risque d'incendie, de choc électrique ou de blessure.
)
→
Pour la réparation, communiquez avec un centre de service agréé
Panasonic.
N'immergez pas l'appareil dans l'eau et ne
l'éclaboussez pas.
(Pour éviter de provoquer un choc
électrique, ou un incendie dû à un
court-circuit.)
→Communiquez avec un centre de
service agréé Panasonic si de l'eau
pénètre à l'intérieur de l'appareil.
N'utilisez pas cet appareil à d'autres fins que celles
décrites dans le manuel d'utilisation.
(
Pour éviter tout risque d'incendie, de brûlure, de blessure ou de
choc électrique.)
·Panasonic n'assume aucune responsabilité en cas d'utilisation
incorrecte ou de non-respect du manuel d'utilisation.
N'utilisez pas l'appareil si le cordon d'alimentation
ou la fiche d'alimentation sont endommagés
ou si la fiche d'alimentation n'est pas branchée
correctement sur la prise de courant.
(Pour éviter de provoquer un choc électrique, ou un
incendie dû à un court-circuit.)
Si le cordon d'alimentation est abîmé, il doit être
remplacé par un cordon ou un ensemble disponible
auprès du fabricant ou de son agent de service.
→
Endommager, traiter, entrer en contact avec ou à
proximité de surfaces à haute température ou
d'éléments chauffants, plier, tordre, tirer de force,
suspendre/tirer par-dessus des angles vifs, placer sous
des objets lourds, enrouler, coincer, tirer sur le cordon
d'alimentation pour le déplacer.
(Pour éviter tout choc électrique dû à un cordon
d'alimentation et à une fiche d'alimentation endom-
magés ou tout incendie dû à un court-circuit.)
En cas d'anomalie ou de dysfonctionnement, cessez
immédiatement d'utiliser l'appareil et débranchez la fiche
d'alimentation.
(
Pour éviter de provoquer de la fumée, un incendie ou un choc électrique.
)
Anomalies · Cas de dysfonctionnement:
·
La fiche et le cordon d'alimentation deviennent anormalement chauds
.
· Le cordon d'alimentation est endommagé ou il y a des coupures de
courant intermittentes sur manipulation.
· Le boîtier est déformé ou anormalement chaud.
· Le boîtier émet de la fumée ou une odeur de brûlé.
· Le boîtier est brisé, desserré ou fait un bruit anormal.
·
La plaque exothermique est voilée ou le panier de cuisson est déformé.
→
Communiquez avec un centre de service agréé Panasonic pour une
inspection et une réparation immédiates.
Cet appareil n'est pas destiné à être utilisé par des personnes
(y compris les enfants) aux capacités physiques, mentales et
sensorielles réduites, ou avec un manque d'expérience et de
connaissance, sauf si elles ont été supervisées ou instruites sur
l'utilisation de l'appareil par une personne responsable de leur
sécurité. Les enfants doivent être surveillés pour s’assurer
qu’ils ne jouent pas avec l’appareil.
(Pour éviter les brûlures, les blessures ou les chocs électriques.)
Les aliments qui débordent peuvent causer des brûlures sévères.
Gardez l'appareil et le cordon éloignés des enfants. Ne laissez
jamais pendre le cordon hors du comptoir, ni n'utilisez une prise
de courant située en dessous du comptoir, ni une rallonge.
(
Pour éviter les brûlures, les blessures ou les chocs électriques.
)
ATTENTION
■Utilisation
●
N'utilisez pas un panier de cuisson non dédié ou
déformé.
(Pour éviter les brûlures ou les blessures dues à une
surchauffe ou à un dysfonctionnement.)
●
N'utilisez pas l'appareil dans les endroits suivants:
·À proximité d'une source de chaleur ou dans un
environnement très humide.
(Pour éviter tout risque de choc électrique, de fuite
électrique ou d'incendie.)
·Sur des surfaces irrégulières ou sur un tapis qui ne
résiste pas à la chaleur.
(Pour éviter de provoquer des blessures, des brûlures
ou un incendie.)
·Dans les endroits proches des murs ou des meubles, etc.
(
Pour éviter de les heurter lors de l'ouverture du couvercle
extérieur, ou de décolorer, déformer ou briser le meuble.
)
Notamment le débranchement de la prise de
courant, le déclenchement, etc.
● Retour au mode veille.
Si une interruption de courant se
produit pendant l'utilisation
N'ouvrez pas le couvercle et ne déplacez pas le boîtier
pendant la cuisson.
(Pour éviter les brûlures ou les blessures résultant de
l'expulsion de vapeur ou d'aliments cuits.)
●
●
●
●
●
Pendant l'utilisation ou après la cuisson,
ne mettez pas votre visage ou vos mains
à proximité de l'évent de vapeur. Il faut
accorder une attention particulière aux
enfants et aux nourrissons.
(Pour éviter les brûlures.)
Évent de
vapeur
21
Avant utilisation
●
Ne déplacez pas le boîtier pendant l'utilisation.
(Pour éviter les brûlures causées par l'ouverture du couvercle
extérieur en cas de contact avec le bouton du loquet.)
●
Ne touchez pas les surfaces
chaudes pendant l'utilisation de
l'appareil ou après la cuisson.
·Le boîtier a une température élevée.
En particulier, les pièces métalliques
telles que la plaque exothermique, le
panier de cuisson et le chauffage en
fonte.
(Pour éviter les brûlures.)
●
N'exposez pas la fiche
d'alimentation à la vapeur.
(Pour éviter de provoquer un choc
électrique ou un incendie dû à un
court-circuit.)
→ Lors de l'utilisation d'un meuble
avec table coulissante, utilisez
l'appareil à un endroit où la prise
d'alimentation ne peut pas être
exposée à la vapeur.
●
Ne laissez pas l'appareil fonctionner à vide.
(Pour éviter les brûlures.)
●
Veillez à débrancher en tirant la fiche
d'alimentation et le cordon d'alimentation.
(Pour éviter de provoquer un choc électrique, ou un
incendie dû à un court-circuit.)
●
Pour utilisation sur comptoir seulement.
(
Pour éviter les brûlures, les blessures ou les chocs électriques.
)
●
N'oubliez pas de mettre l'appareil hors marche et
de débrancher la fiche d'alimentation lors du
retrait ou de la non-utilisation du panier de
cuisson.
(Pour éviter les brûlures, les blessures, les chocs électriques,
les fuites et les incendies dus au vieillissement de l'isolation.)
●
Attendez que le boîtier refroidisse suffisamment
avant de le nettoyer.
(Pour éviter les brûlures.)
●
Assurez-vous que la vapeur puisse s'échapper lors
de l'utilisation de l'appareil dans un placard ou un
autre espace clos.
(Pour éviter toute décoloration ou déformation de l'armoire.)
●
Cet appareil est destiné à être utilisé dans des
applications domestiques et similaires telles que:
· les coins-cuisine du personnel dans les magasins,
les bureaux et autres environnements de travail;
· les maisons de ferme;
· par les clients dans les hôtels, les motels et autres
environnements de type résidentiel;
· les environnements de type gite touristique.
AVERTISSEMENT
●
Ne connectez pas l'appareil à une minuterie externe
et ne faites pas fonctionner l'appareil à l'aide d'un
système de commande à distance séparé.
(Pour éviter les incendies.)

À propos du boîtier
À propos du panier de cuisson
(
)
Avant la cuisson
Les éléments suivants n'affectent pas les performances du produit ou la santé des personnes.
[Surface extérieure] rayures superficielles, petites bosses ou chocs.
[Surface intérieure] écaillage du revêtement du panier de cuisson.
→Si le panier de cuisson est déformé ou si vous vous inquiétez de son état, achetez un nouveau panier
de cuisson.
Instructions d'utilisation
■
N'utilisez pas le panier de cuisson dans d'autres
endroits que dans le cuiseur de riz.
●
Ne l'utilisez pas sur une cuisinière
à gaz ou à induction, ni dans un
four à micro-ondes.
●
Ne laissez pas d'objets tels que
des tamis métalliques entrer en
contact avec le revêtement du
panier de cuisson.
■
Évitez de heurter le panier de cuisson contre des
objets durs.
Cela pourrait provoquer
des rayures ou des bosses
sur la surface extérieure.
■
Faites attention aux points suivants afin d'éviter d'endommager le revêtement du panier de cuisson.
Après la cuisson
●
●
●
Ne mettez pas de vinaigre dans le riz dans le
panier de cuisson.
(En cuisinant des sushis et d'autres aliments)
N'utilisez pas de cuillère en métal.
(En cuisinant des congee et d'autres aliments)
Ne touchez pas et ne frappez pas le panier de
cuisson.
(En remplissant un bol de riz)
Pendant le nettoyage et l'entretien (page 28)
Nota
Bord ou fond
(Panier de cuisson)
■
Si le produit est placé sur un meuble
avec table coulissante, assurez-vous
que la capacité de charge de la table
est supérieure à
1,0 L :10 kg
1,8 L :12 kg
(Pour éviter de faire tomber le produit.)
Chauffage en
fonte
Capteur de fond
22
●
●
●
●
●
●
N'utilisez pas le panier de cuisson
comme récipient de lavage.
Ne placez pas de cuillères ou d'autres
ustensiles dans le panier de cuisson.
N'utilisez pas de matériaux abrasifs tels que des poudres,
des brosses métalliques, des brosses en nylon ou des
tampons à récurer pour nettoyer ou frotter le
panier de cuisson.
→Pour nettoyer le panier de cuisson,
lavez-le avec une éponge douce.
Ne séchez pas le panier de cuisson sur
d'autres ustensiles après le lavage.
N'utilisez pas de sécheuse à cuvette ou de
lave-vaisselle/
sèche-vaisselle pour le nettoyage.
Après la cuisson avec l'assaisonnement, ne laissez pas
d'aliments à l'intérieur du panier de cuisson.
→
Retirez les aliments dans le panier de cuisson dès
que possible, puis nettoyez le panier de cuisson.
■
Ne couvrez pas le couvercle extérieur avec
un chiffon ou d'autres objets lorsque le
produit est en cours d'utilisation.
(
Pour éviter que la vapeur ne soit bloquée, ce qui
entraînerait une déformation, une décoloration du
couvercle extérieur et un mauvais fonctionnement
de l'appareil.)
■
N'inclinez pas et ne faites pas pivoter le produit.
■
Retirez le riz et les autres corps étrangers qui restent
collés sur le boîtier (capteur inférieur, chauffage en fonte
et fond du panier de cuisson). Pour éviter l'affichage
d'erreurs, le riz brûlé, le riz mi-cuit, etc.
■
Veillez à retirer le sac de protection du panier de cuisson
avant de l'utiliser.
(Pour éviter une mauvaise cuisson ou un incendie.)
■
Ne versez pas d'aliments à cuire directement dans le
boîtier où aucun panier de cuisson n'a été placé.
(Pour éviter les défaillances dues aux impuretés.)
■
En cas de débordement d'eau de riz par l'évent de vapeur,
débranchez immédiatement la fiche d'alimentation pour
couper l'alimentation. Ne reprenez pas l'utilisation avant
d'avoir nettoyé l'eau de riz sur la fiche d'alimentation et la
fiche de l'appareil à l'aide d'un chiffon sec.
■
N'utilisez pas le produit à l'extérieur.
(Une alimentation instable peut entraîner une
défaillance du produit.)
■
Évitez d'utiliser le produit sous la lumière directe du soleil.
(Pour éviter tout changement de couleur/décoloration.)
■
N'utilisez pas ce produit sur des objets qui ne résistent
pas à des températures élevées, tels que les tapis, les
tapis chauffants électriques et les nappes (en plastique
éthylène.)
(Pour éviter une mauvaise cuisson ou un incendie.)
Avant d'utiliser ce produit pour la première fois, nettoyez le panier de cuisson, le capuchon d'échappement
de vapeurt et les accessoires. ( page 28)
Le panneau de commande est recouvert d'un film protecteur. Retirez-le avant usage.
Boîtier
Identification des pièces
Panneau de commande
Panier de
cuisson
Bouton du loquet
Cordon d'alimentation
Capteur de fond
Boîtier
Couvercle extérieur
Capuchon d'échappement
de vapeur
Chauffage en fonte
Accessoires
Panneau de commande
Lorsque le produit est en cours d'utilisation, il est normal que la touche [Off/Cancel] (Arrêt/Annulation)
mette plus de temps à répondre.
Si aucune opération n'est effectuée pendant 30secondes, le produit passe en mode veille. Pour quitter le
mode veille, appuyez sur n'importe quelle touche.
Les touches peuvent prendre plus de temps à répondre lorsque vous quittez le mode veille.
Nota
①「Off/Cancel」(Arrêt/Annulation) :
●
Appuyez sur cette touche pour démarrer la
cuisson ou annuler le préréglage.
●
Annulez l'opération incorrecte ou
désactivez Keep Warm (Maintien au chaud).
●
Appuyez sur cette touche pour maintenir les
aliments au chaud.
●
Appuyez sur cette touche pour régler la
durée de cuisson.
②「Time」(Durée) :
③「Timer」(Minuterie) :
●
Appuyez sur cette touche pour utiliser la minuterie.
④「Keep Warm」(Maintien au chaud):
⑤「Start」(Démarrer) :
●
Pour sélectionner la fonction.
●
Pour régler la durée préréglée
et la durée de cuisson.
●
Lors du réglage de la durée, appuyez
longuement sur la touche pour ajouter ou
soustraire rapidement du temps.
⑥「 」ou「 」:
①
② ③
④
⑤
⑥
⑥
23
Plaque
exothermique
Joint d'étanchéité du panier
de cuisson
Cuillère à riz (1)
Cuillère à gruau
[soupe] (1)
Verre mesureur (1)
(Environ 180ml)
Panier d'étuvage (1)
Avant utilisation
Mesurez le riz à l'aide du verre mesureur prévu à cet effet
Lavez le riz jusqu'à ce que l'eau devienne relativement claire
Mettez le riz lavé dans le panier de cuisson
Branchez les fiches
Correct Incorrect
Environ 180ml
(environ 150g)
●
Vérifiez la quantité maximale de riz pouvant être cuit en une seule fois
« Spécifications » à la page 33.
●
●
●
●
●
Lors de l'ajout d'eau, placez le panier de cuisson sur une surface
plane et aplanissez la surface du riz. (Assurez-vous que la bonne
quantité d'eau est ajoutée selon l'échelle appropriée.)
●
Si trop d'eau est ajoutée, elle risque de déborder lors de la cuisson.
●
Le quinoa ne peut être cuit qu'un verre mesureur à la fois et
nécessite 1,5 verre mesureur d'eau (environ 270 ml).
Ajoutez de l'eau jusqu'au niveau d'eau correspondant
( page 25) et séchez l'extérieur du panier de cuisson.
Branchez la fiche de l'appareil, puis la fiche d'alimentation,
et assurez-vous qu'elles sont toutes deux bien branchées.
Placez le panier de cuisson dans le boîtier et fermez le
couvercle extérieur
Pour que le fond du panier de cuisson soit bien fixé au chauffage
en fonte, faites tourner le panier de cuisson dans le sens indiqué
par la flèche pendant 2 ou 3fois.
Vérifiez que le capuchon d'échappement de vapeur est correcte-
ment positionné. (Nettoyage et entretien page 28)
Lors de la fermeture du couvercle extérieur, assurez-vous qu'un
« clic » se fait entendre.
①
②
①
②
①
Laver rapidement le riz à grande eau, en changeant l'eau au fur
et à mesure.
②
Remuez doucement le riz et répétez le lavage plusieurs fois →
rincez à l'eau jusqu'à ce que l'eau devienne relativement claire.
●
Afin d'éviter de rayer le revêtement antiadhésif de la surface du
panier de cuisson, ne lavez pas le riz dans le panier de cuisson.
●
Lavez soigneusement le riz. Sinon, une croûte de riz peut
se former et le son de riz résiduel peut affecter le goût du riz.
Avant la première utilisation
Préparatifs Lavage du riz et ajout d'eau
① ②
5
4
3
2
1
Faites bouillir de l'eau dans le panier de cuisson, puis videz l'eau.
① Ajoutez de l'eau jusqu'au niveau d'eau « 4 » de « White Rice » (Riz blanc) et fermez le couvercle extérieur.
② Sélectionnez la fonction « Steam » (Vapeur) et réglez la durée de cuisson sur 15minutes.
③ Lorsqu'un signal sonore est émis, retirez le panier de cuisson et videz l'eau.
Exemple: lors de la cuisson de 3verres mesureur
de riz, ajoutez de l'eau jusqu'au niveau
d'eau « 3 » de « White Rice » (Riz blanc).
Nota
Lors de la cuisson avec le panier d'étuvage, la capacité maximale de cuisson est de :
Modèle 1,0L : 3verres mesureur; Modèle 1,8L : 6 verres mesureur.
boîtier
fiche de
l'appareil
fiche d'alimentation
prise de courant
24
★Conseils pour préparer un riz délicieux
●Lavez le riz délicatement et
rapidement.
●
Ne mettez pas le riz dans un tamis.
(Pour éviter que le riz ne se brise
ou ne colle au panier de cuisson.)
●Mesurez correctement
l'eau et le riz.
①
②
●
Ajoutez de l'eau dans le panier de cuisson
sur une surface plate.
●
N'utilisez pas d'eau chaude ou d'eau
alcaline dont le pH est supérieur à9.
(Pour éviter que le riz ne colle au panier
de cuisson ou ne soit brûlé.)
③
■ Sélection de fonction
Tableau 1
Préparatifs
*1 · Ces durées de cuisson sont basées sur une température ambiante de 20℃ et une température de l'eau de 20℃, et avec une quantité moyenne de riz
(3verres mesureur pour le modèle 1,0L, ou 5verres mesureur pour le modèle 1,8L) et à la tension nominale indiquée dans le tableau des spécifications.
·
La durée de cuisson varie en fonction de la quantité de riz, de l'eau, de la tension, de la température, de la température de l'eau et de la qualité du riz.
*2 · À la fin de la cuisson, l'appareil passe automatiquement en mode « Keep Warm » (Maintien au chaud). Il n'est pas recommandé de maintenur au chaud
à l'aide de cette fonction les aliments marqués d'un « X ». Appuyez sur la touche [Off/Cancel] (Arrêt/Annulation) dès que possible après la fin de la cuisson.
*3 · Les fonctions Soup/Slow Cook (Soupe/Cuisson lente), Waterless Cooking (Cuisson sans eau), Cake/Bread (Gâteau/Pain) et Reheat (Réchauffage)
n'ont pas d'option de minuterie.
· En été, lorsque la température est plus élevée, la durée préréglée pour le menu riz ne doit pas être supérieure à 8heures afin d'éviter la
détérioration du riz.
*4 · Le quinoa ne peut être cuit qu'un verre mesureur à la fois, il nécessite 1,5verre mesureur d'eau (environ 270ml).
■ Réglage de la durée de cuisson
Tableau 2
Catégories
d'aliments à cuisiner
Sélection du menu
Réglage de la plage
de durée de cuisson
Réglage des
incréments
Affichage de la durée
Valeur
initiale
Mémoire de
la durée*
*:Après la mise hors marche, la durée de cuisson est réinitialisée et la durée de cuisson précédemment
réglée n'est plus mémorisée.
25
Waterless Cooking
(Cuisson sans eau)
Waterless Cooking
(Cuisson sans eau)
Utilisation
Sélection de fonction/Réglage de la durée de cuisson/Conseils
pour préparer un riz délicieux
Catégories
d'aliments à cuisiner
White Rice
(Riz blanc)
Sticky Rice (Riz gluant)
Brown Rice
(Riz brun)
Multigrain
(Céréales)
Porridge (Gruau)
Soup/Slow Cook
(Soupe/Cuisson lente)
Steam
(Cuisson à la vapeur)
Waterless Cooking
(Cuisson sans eau)
Cake/Bread (Gâteau/Pain)
Sélection du menu
White Regular (Blanc standard)
Quick/Quinoa
(Rapide/Quinoa)
Sticky Rice (Riz gluant)
Brown Rice (Riz brun)
Multigrain (Céréales)
Porridge (Gruau)
Soup/Slow Cook
(Soupe/Cuisson lente)
Steam
(Cuisson à la vapeur)
Waterless Cooking
(Cuisson sans eau)
Cake/Bread (Gâteau/Pain)
White Rice (Riz blanc)
*4
Sticky Rice (Riz gluant)
Multigrain/Brown Rice
(Céréales/Riz brun)
Multigrain/Brown Rice
(Céréales/Riz brun)
Porridge (Gruau)
Jusqu'au niveau maximal d'eau
« Porridge » (Gruau)
Jusqu'à 4 verres mesureur
d'eau lors de la cuisson à la
vapeur
—
Niveau d'eau
43
30
37
110
70
Tableau 2
Tableau 2
Tableau 2
Tableau 2
Tableau 2
*1
Durée cuisson
(Minutes environ)
*2
Maintien au
chaud (auto)
×
×
×
×
×
×
×
×
○
*3
Options de minuterie
préréglée
60minutes ou plus
60minutes ou plus
60minutes ou plus
2heures 10minutes ou plus
1heure 20minutes ou plus
Durée de cuisson +
10minutes ou plus
—
Durée de cuisson +
20 minutes ou plus
—
—
1heure à 4heures
1heure à 12heures
1minute à 60minutes
10minutes à 2heures
40minutes à 60minutes
10minutes
30minutes
1minute
10minutes
1minute
1heure
1heure
5minutes
30minutes
60minutes
Retour à 1heure après 4heures
Retour à 1heure après 12heures
Retour à 1minute après 60minutes
Retour à 10minutes après 2heures
Retour à 40minutes après 60minutes
○
○
○
○
○
Quinoa
○
×
1,0L: MAX
1,8L: Jusqu'au niveau maximal d'eau
« Porridge » (Gruau)
Porridge (Gruau)
Soup/Slow Cook
(Soupe/Cuisson lente)
Steam
(Cuisson à la vapeur)
Cake/Bread
(Gâteau/Pain)
Porridge (Gruau)
Soup/Slow Cook
(Soupe/Cuisson lente)
Steam
(Cuisson à la vapeur)
Cake/Bread
(Gâteau/Pain)
■ Nota
●
Lors de la cuisson avec « Quick/Quinoa
»
(Rapide/Quinoa),
la durée de cuisson étant raccourcie, le riz peut être plus dur
ou il peut y avoir une croûte de riz.
→Pour un riz plus mou, faites le tremper à l'avance dans
de l'eau.
●
Ne mélangez pas du riz brun avec du riz blanc, car cela
pourrait affecter le résultat de la cuisson.
※
Lors de la cuisson du riz ou du quinoa
Fonctions de menu
Cuisson de riz ou de grains/Maintien au chaud/Réchauffage
■ Nota
●
Lors de l'ajout de riz refroidi, ne dépassez pas la
quantité maximale (comme indiqué dans le tableau3).
●
Il est recommandé de ne réchauffer le riz refroidi qu'une
seule fois pour éviter d'en altérer le goût.
●
Ne réchauffez pas le riz gluant, le riz brun, le quinoa ou le
riz multigrain pour ne pas en altérer le goût.
1
●
Le voyant « Start » (Démarrer) s'allume.
●Le temps restant diminue par unité de 1minute.
Lors de l'utilisation de la fonction « Quick/Quinoa »
(Rapide/Quinoa) ou « Brown Rice » (Riz brun),
le temps restant s'affiche environ 7minutes et
12minutes avant la fin de la cuisson.
●Au début, le temps de cuisson restant affiché est
automatiquement ajusté en fonction du volume
de riz. Par exemple, il peut parfois passer de
« 15 » à « 13», au lieu de diminuer par unités
d'une minute.
2
3
En fin de cuisson, remuez le riz ou le quinoa.
●
Lorsqu'un un bip est émis, la cuisson est terminée.
La fonction passe automatiquement à l'état de maintien
au chaud. Pour éviter que le riz ou le quinoa ne colle,
remuez le riz après la cuisson.
●
Pour Quinoa, Sticky Rice (Riz gluant),
Brown Rice (Riz brun) ou Multigrain (Multigrain),
lorsque la cuisson est terminée, appuyez sur la touche
Off/Cancel (Arrêt/Annulation) dès que possible pour annuler
« Keep Warm » (Maintien au chaud) et éviter d'altérer le goût.
※Pour réchauffer du riz refroidi
●
Remuez le riz refroidi dans le panier de cuisson pour qu'il soit
homogène.
●
La quantité d'eau à ajouter est indiquée dans le tableau suivant.
Prépartifs
Tableau 3
■
La quantité maximale de riz refroidi qui peut être
réchauffée est la suivante :
1,0L: Riz blanc 3verres mesureur
1,8L: Riz blanc 5verres mesureur
3
Lorsqu'un un bip est émis, le réchauffage est terminé.
La fonction passe automatiquement à l'état de
maintien au chaud.
●Remuez le riz le plus rapidement possible,
il sera plus savoureux.
●
Le temps de maintien au chaud s'affiche de à .
Après 24heures, l'écran affiche « », mais l'aliment reste chaud.
●
Si la fonction « Keep Warm » (Maintien au chaud) est utilisée pendant
plus de 96heures, elle s'arrête automatiquement et l'écran affiche
« U14 ». Pour poursuivre l'utilisation, appuyez d'abord sur la
touche [Off/Cancel] (Arrêt/Annulation).
●
Le riz cuit doit être consommé dans les 12heures suivant son maintien
au chaud afin d'éviter qu'il ne se décolore ou ne devienne rassis.
●
Lors de l'utilisation de la fonction de maintien au chaud, il peut y avoir
des gouttes sur le bord du panier de cuisson.
●
Le goût du riz peut être altéré si la cuillère à riz est laissée dans le
panier de cuisson lors de l'utilisation de la fonction de maintien au
chaud.
Keep Warm (Maintien au chaud)
●
Quelle que soit la quantité de riz refroidi à réchauffer,
le temps de chauffage est d'environ 20minutes.
●Le menu de la fonction sélectionnée clignote.
●Le voyant « Start » (Démarrer) s'allume.
Appuyez sur ,pour démarrer la cuisson.
2
Appuyez deux fois sur ,pour lancer
le réchauffage.
Quantité de
riz refroidi
(Niveau
d'eau)
Volume d'eau (verre mesureur)
¼
½
½
—
—
¼
½
½
½
1
1,0 L 1,8 L
1
2
3
4
5
Appuyez sur la touche ou pour
sélectionner la fonction souhaitée.
26
1
Appuyez sur ou pour sélectionner
une fonction de cuisson du riz, comme
« White Regular » (Blanc standard).
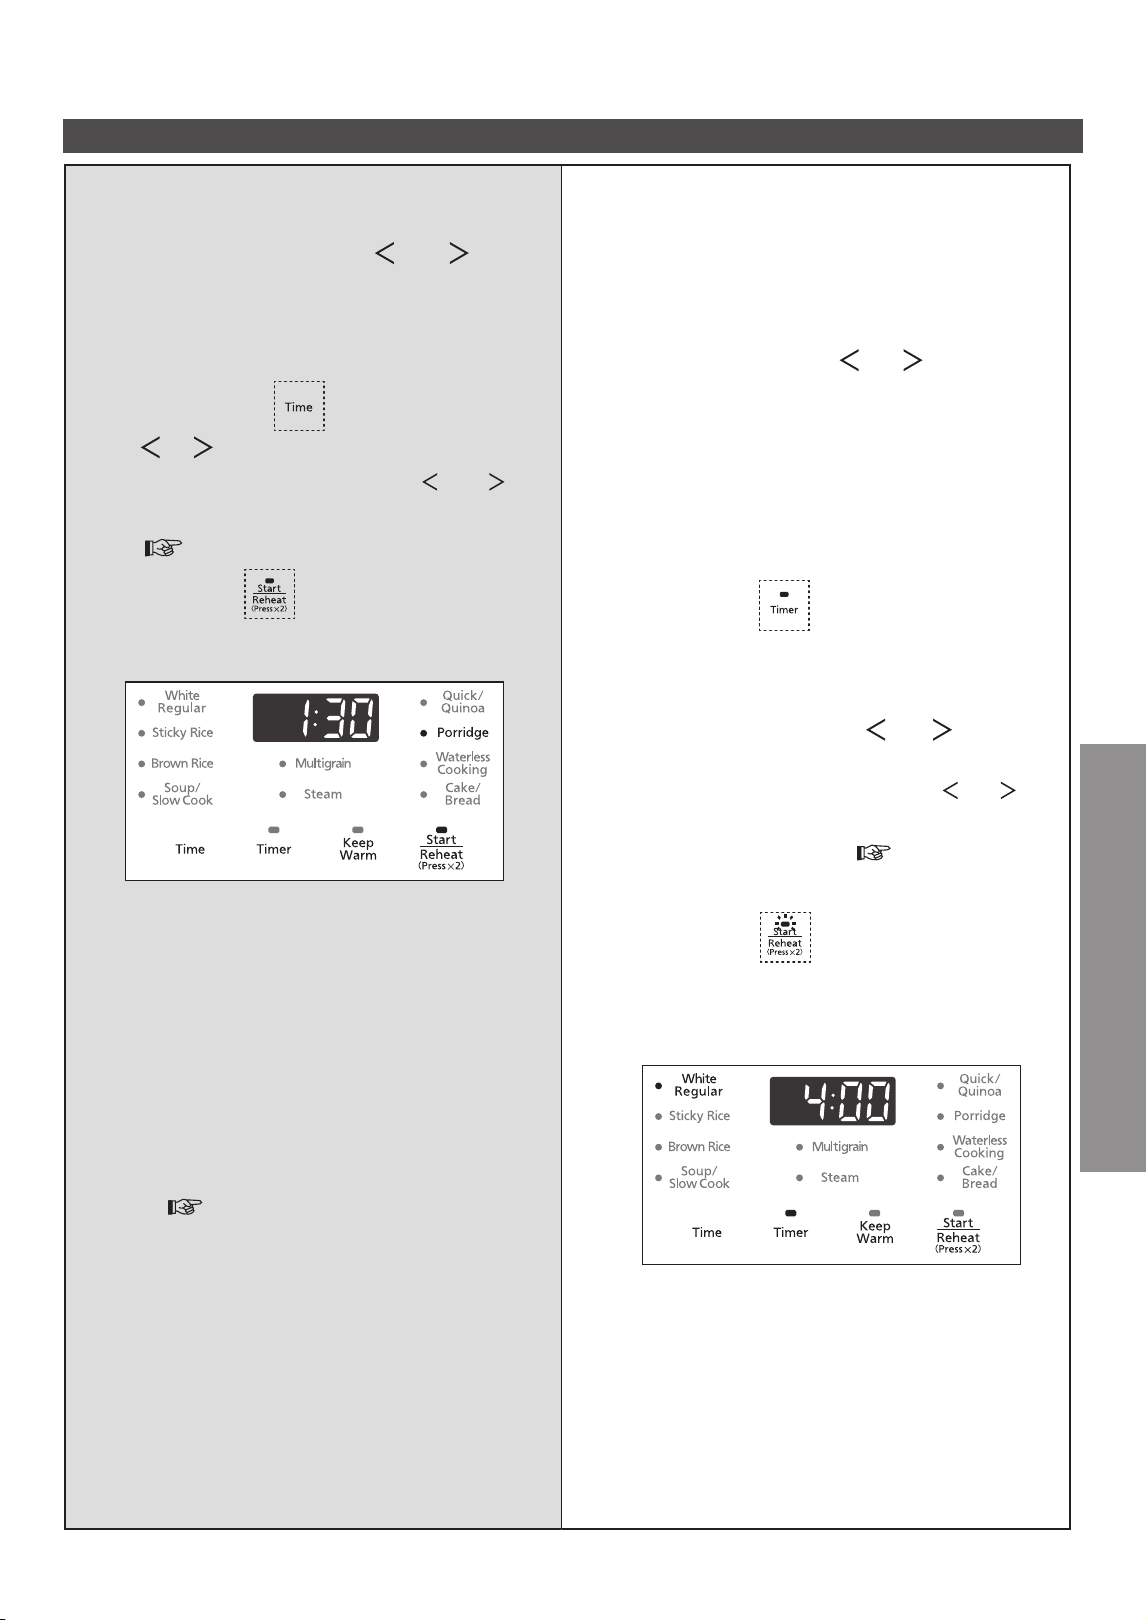
Fonctions de menu
Gruau et autres/Minuterie
■ Nota
●
●
3
2
Appuyez sur .
1
Appuyez sur la touche ou pour
sélectionner « White Regular » (Blanc standard)
.
4
Appuyez sur , la cuisson par
minuterie démarre.
●
Le voyant « Start » (Démarrer) s'éteint, le voyant « Timer »
(Minuterie) s'allume, puis le préréglage est terminé.
※
Utilisation de la fonction « Timer » (Minuterie)
Dans l'exemple suivant, la fonction
« White Regular » (Blanc standard) prend fin
après 4heures.
※
Lors de la cuisson de gruau pendant
1,5 heure
1
●Le menu de la fonction sélectionnée clignote.
●Le voyant « Start » (Démarrer) s'allume.
2
● Le voyant « Start » (Démarrer) s'allume.
● Le temps restant diminue par unité de 1minute.
Appuyez sur ,pour démarrer la cuisson.
3
4
Lorsqu'un un bip est émis, la cuisson est
terminée. La fonction passe automatique-
ment à l'état de maintien au chaud.
●
Si la fonction de maintien au chaud affecte le goût,
appuyez sur la touche [Off/Cancel] (Arrêt/Annulation)
dès que possible.
■ Nota
●
L'ouverture du couvercle pendant la cuisson augmente la quantité de
condensation.
●
Une quantité d'eau ou de riz incorrecte peut entraîner un débordement
de l'eau de riz par le capuchon d'échappement de vapeur.
●
Si le gruau est conservé trop longtemps dans la fonction de maintien
au chaud, il devient plus épais.
●
La soupe peut déborder si elle dépasse le niveau maximal d'eau de « Porridge »
(Gruau). ( « Spécifications » à la page 33)
●
Pour une cuisson à la vapeur plus longue, ajoutez 4 verres mesureur
d'eau pour éviter de chauffer à sec.
●
Lors de l'utilisation de la fonction vapeur, le temps indiqué sur l'écran
est le temps restant après l'ébullition de l'eau dans le panier de
cuisson.
●
Le poids maximal de la pâte à gâteau/pâte à pain ne doit pas
dépasser:1,0L: 500g, 1,8L: 700g (poids total du mélange à
gâteau/de la farine de pain, du lait, des œufs, etc.). Sinon, le gâteau/
pain risque de ne pas être assez cuit.
●
Lors de la cuisson de la pâte à gâteau avec le poids maximum,
réglez la durée de cuisson sur 60minutes pour éviter que le
gâteau/pain ne soit à moitié cuit.
●
Pour la fonction « Waterless cooking » (Cuisson sans eau), il est
recommandé d'utiliser des ingrédients à forte teneur en eau
(champignons, choux, etc.) ou de placer les ingrédients qui ont
tendance à devenir juteux au fond de l'appareil pour la cuisson.
※
Pour plus de détails sur la durée de cuisson pouvant être réglée,
Tableau 2 à la page 25.
●
Appuyez longuement sur la touche [ ] ou [ ]
pour ajouter ou retrancher rapidement du temps.
Appuyez sur la touche ou pour
sélectionner « Porridge » (Gruau).
Appuyez sur ,puis sur la touche
ou pour régler la durée de cuisson.
● Appuyez longuement sur la touche ou
pour ajouter ou retrancher rapidement du temps.
●
Pour les fonctions et la plage de durée qui
s'appliquent à la minuterie Tableau 1 à la
page 25.
Appuyez sur la touche ou pour
régler la durée préréglée.
27
● Le menu de la fonction sélectionnée clignote.
● Le voyant « Start » (Démarrer) s'allume.
● Lorsque la minuterie pour le gruau ou la
cuisson à vapeur est établie, réglez la durée de
cuisson en conséquence, puis appuyez sur la
touche Timer (Minuterie).
En été, lorsque la température est élevée, la durée
préréglée pour le menu riz ne doit pas être supérieure à
8 heures afin d'éviter la détérioration du riz.
En été, lorsque la température est élevée, il n'est pas
recommandé d'utiliser la fonction
«
Timer
»
(Minuterie) avec
la fonction
«
Steam
»
(Vapeur).
Utilisation

Nettoyage et entretien
Nettoyez avec un détergent dilué, une éponge douce et de l'eau.
Accessoires
●
●
●
Attention
●
●
Capteur de fond/Chauffage en fonte
Essuyez avec un chiffon humide.
●
En cas d'adhérence, essuyez avec du papier de verre fin
(environ n°600) ou un chiffon sec.
●
Si le capteur de fond n'est pas nettoyé,
le riz risque d'être brûlé ou mal cuit.
Nota
●
●
●
●
垫 圈
Cadre supérieur
Essuyez avec une serviette humide.
●
N'y versez pas d'eau pour le laver.
Nota
Essuyez avec un chiffon humide.
Plaque exothermique/
Joint d'étanchéité du panier de cuisson
Panier de cuisson
●
Nettoyez avec un détergent dilué, une éponge douce et de l'eau.
Essuyez toute trace d'eau sur l'extérieur du panier de cuisson.
●
N'utilisez pas le panier de cuisson comme récipient de lavage.
●
Un changement de couleur ou des stries peuvent apparaître
sur la surface du revêtement fluoré, ce qui n'affecte pas la santé
humaine ou les fonctions normales du boîtier.
Capuchon d'échappement de vapeur
●
Après chaque utilisation, retirez le capuchon d'échappement de
vapeur, puis rincez-le afin d'éviter toute odeur.
■Comment retirer
Retirez-le de la plaque
exothermique.
■
Comment installer
Nota
●
Avant l'installation, assurez-vous que le joint d'étanchéité
est fixé au capuchon d'échappement de vapeur.
28
●
Joint
d'étanchéité
Cuillère à riz (1) Verre mesureur (1) Panier d'étuvage (1)Cuillère à gruau [soupe] (1)
Avant de procéder au nettoyage, débranchez d'abord la fiche d'alimentation.
Ne nettoyez pas le boîtier avant qu'il ne refroidisse.
Lors du nettoyage du boîtier, ne l'immergez pas dans l'eau, ni ne le nettoyez avec du diluant à laque,
de l'essence, de l'alcool, de la poudre de nettoyage ou des matériaux abrasifs, etc.
N'utilisez pas de lave-vaisselle ou de sèche-vaisselle.
●
Nettoyez l'appareil rapidement après avoir cuisiné avec des
assaisonnements.
(Au cas contraire, il peut y avoir des odeurs, une
détérioration ou de la rouille.)
●
Ne tirez pas sur le joint d'étanchéité du panier de cuisson.
●
Si les taches d'huile ne sont pas éliminées, les taches d'huile présentes
sur la plaque exothermique risquent d'y adhérer et de devenir difficiles
à éliminer. Nettoyez la plaque exothermique après chaque utilisation.
●
Lorsque les pièces métalliques sont chauffées, leur surface peut
présenter des changements de couleur ou des stries qui n'affectent
pas leur fonctionnement normal.
Insérez-le dans le trou de la
plaque exothermique dans
le sens inverse du retrait.
Ensuite, poussez-le à fond
pour éviter qu’il ne tombe.

1)
Pratiquez deux entailles au couteau sur les deux côtés des ailes, pelez et coupez les tomates en dés, lavez les
champignons shiitake.
2)
Mettez tous les ingrédients et l'assaisonnement dans le panier de cuisson, puis fermez le couvercle extérieur.
3)
Appuyez sur la touche [ ] ou [ ] pour sélectionner
«
Steam
»
(Vapeur), réglez la durée de cuisson sur
25minutes, puis appuyez sur la touche « Start » (Démarrer).
1)
Mettez les cuisses de poulet et le gingembre haché dans le panier de cuisson, puis placez le panier de cuisson
dans le boîtier et fermez le couvercle extérieur.
2)
Appuyez sur la touche [ ] ou [ ] pour sélectionner « Waterless » (Sans eau), réglez la durée de cuisson
sur 20 minutes, puis appuyez sur la touche [Start] (Démarrer).
3)
Mélangez l'huile pimentée, le vinaigre, le sucre blanc et la sauce de soya légère dans un bol, puis ajoutez
l'échalote et l'ail hachés, et mélangez bien.
4)
Une fois la cuisson terminée, appuyez sur la touche [Off/Cancel] (Arrêt/Annulation), ouvrez le couvercle
extérieur et retirez les cuisses de poulet. Jetez le liquide, sinon il diluera la saveur originale.
Laissez-les ensuite refroidir légèrement, coupez-les en morceaux et arrosez-les avec le jus.
Recettes
Nota :
※
Ces recettes prennent pour exemple le volume de cuisson du modèle de 1,0L. Consultez page 33 pour plus de détails sur
la quantité de cuisson du modèle 1,8L.
※ 1verre mesureur : environ 150
g
Ailes de poulet à la tomate
Ingrédients:
Ailes de poulet 8
Champignons shiitake 100 g
Tomates 2
Assaisonnements:
Ketchup
10 ml
Sauce soya 15 ml
Sauce d'huître 10 ml
Eau 50 ml
Sucre 5 g
Sel 2,5 g
Huile pimentée 40 ml
Vinaigre 15 ml
Sauce soya légère
10 ml
Sucre 2,5 g
Tranches de poulet cuites à la vapeur
Étapes :
Ingrédients:
Cuisses de poulet sans peau 2 (environ 150g)
Échalote hachée 2 g
Gingembre haché 10 g
Ail haché 10 g
Assaisonnements:
Soupe aux champignons
Ingrédients:
Champignon de hêtre blanc 70 g
Champignon crabe 70 g
Pleurote royal 60 g
Échalote hachée Petite quantité
Assaisonnements:
Sel Quantité appropriée
Poivre blanc moulu
Petite quantité
Gâteau (farine pauvre en gluten)
Farine pauvre en gluten 100 g
Œufs 3
Sucre blanc 100 g
Beurre 30 g
Lait 25 g
29
Ingrédients:
· Le riz peut être brûlé au fond en fonction des ingrédients ajoutés.
· Pour utiliser de la soupe de champignons blancs ou d'autres ingrédients qui deviennent plus épais, utilisez la fonction « Porridge »
(Gruau) et ne dépassez pas le niveau maximal d'eau de la fonction « Porridge » (Gruau). Sinon, la soupe risque de déborder.
Étapes :
Étapes :
Étapes :
1) Faites tremper les trois espèces de champignons dans de l'eau légèrement salée pendant 10minutes.
Lavez-les, coupez les racines et coupez les pleurotes royaux en petits morceaux.
2) Mettez tous les champignons dans le panier de cuisson, ajoutez de l'eau jusqu'au niveau maximal de
«
Porridge
»
(Gruau) et fermez le couvercle extérieur.
3)
Appuyez sur la touche [ ] ou [ ] pour sélectionner « Soup/Slow cook » (Soupe/Cuisson lente), réglez la durée
de cuisson sur 1heure et 30minutes, puis appuyez sur la touche
«
Start
»
(Démarrer).
4) Une fois la cuisson terminée, ouvrez le couvercle extérieur, ajoutez une quantité appropriée de sel, de poivre
blanc moulu et d'échalotes hachées à votre convenance.
Nota: Vous pouvez choisir vos espèces de champignons préférées.
1)
Séparez les blancs et les jaunes d'œufs dans deux bols (sans eau ni huile), ajouter 20g de sucre blanc aux jaunes et
mélangez jusqu'à ce que le mélange soit lisse et sans grumeau.
2) Ajoutez 80g de sucre blanc aux blancs d'œufs, battez-les au fouet jusqu'à ce que le fouet tienne debout
dans les blancs d'œufs, ajoutez les jaunes d'œufs aux blancs d'œufs et mélangez bien à gauche et à droite.
3)
Ajoutez la farine pauvre en gluten tamisée à la pâte à gâteau par lots et mélangez bien jusqu'à ce qu'elle soit lisse
et sans grumeau.
4) Ajoutez le beurre fondu et le lait à la préparation et mélangez bien.
Versez la préparation dans le panier de cuisson et fermez le couvercle extérieur.
5)
Appuyez sur la touche [ ] ou [ ] pour sélectionner
«
Cake/Bread
»
(Gâteau/Pain), réglez la durée de cuisson
sur
50minutes. Ensuite, appuyez sur la touche « Start » (Démarrer). Lorsqu'un bip est émis, cela signifie que le
gâteau est cuit.
6)
Appuyez sur la touche [Off/Cancel] (Arrêt/Annulation), sortez le panier de cuisson et laissez-le refroidir pendant 2minutes.
Renversez ensuite le panier de cuisson pour déposer le gâteau sur une assiette ou un disque et laissez-le refroidir.
※ Ne dépassez pas le poids de pâte à gâteau indiqué. Sinon, le gâteau risque de ne pas être assez cuit.
Utilisation
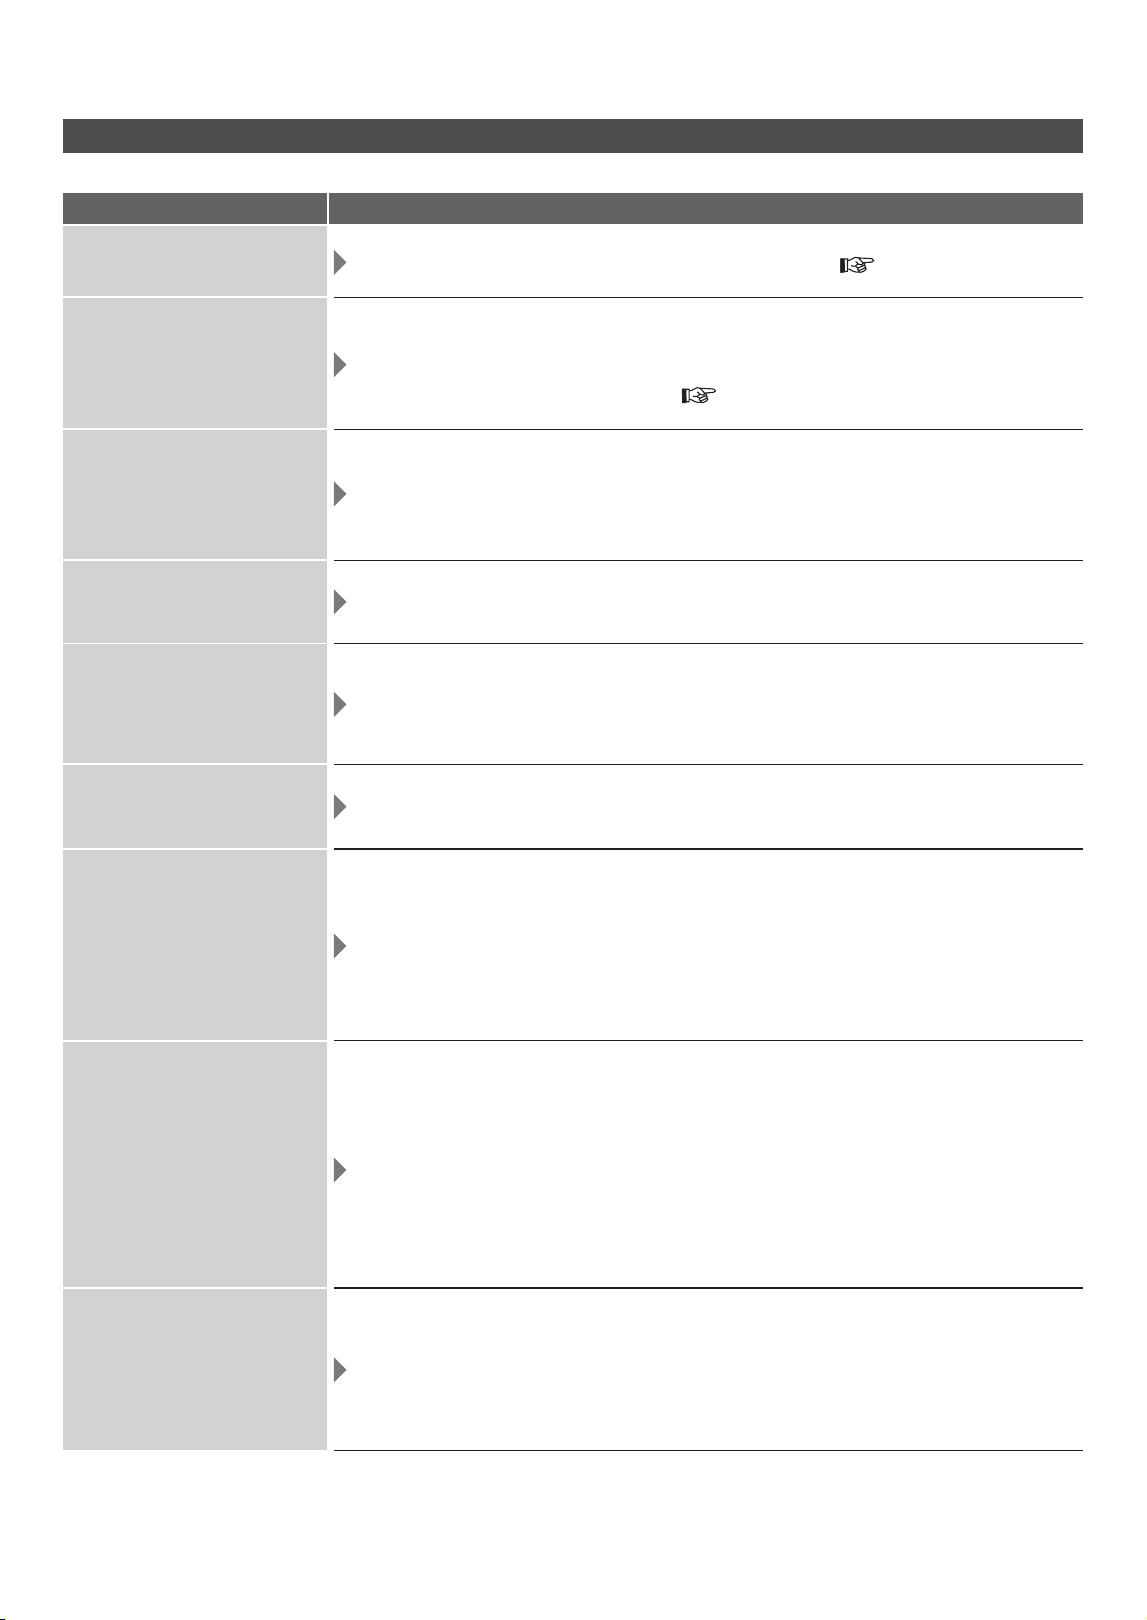
Vérifiez avant de demander une réparation.
Dépannage
Scénario Causes possibles
Pas de cuisson pendant
la durée préréglée
30
La durée de cuisson
est longue ou courte
L'appareil fait du bruit
Fuites de vapeur à partir d'un
endroit autre que le capuchon
d'échappement de vapeur
L'actionnement de touche
ne peut pas être effectuée
Il y a une odeur
de plastique
Le riz est gluant (mou)
Le riz est sec (dur)
Le riz est à moitié cuit
(pas assez cuit)
Le liquide déborde
· Vérifiez si la touche « Start » (Démarrer) a été appuyée. ( page 27)
·
Si la cuisson se fait en continu, la durée de cuisson sera plus longue (jusqu'à 30minutes).
· En raison des différentes quantités de riz et d'eau, le temps restant affiché peut être
arrêté pour être ajusté au milieu de la cuisson.
· La mention « U12 » est-elle affichée? ( page 32)
· Le son du « clic, clic » de la cuisson est le son du réglage de la puissance de chauffage,
ce qui n'est pas une défaillance.
· Le son « pa » de la cuisson est le bruit de craquement généré par la dilatation
thermique des gouttelettes d'eau au fond (à l'extérieur) du panier de cuisson, ce qui
n'est pas une défaillance.
· Un corps étranger peut être fixé au joint d'étanchéité du panier de cuisson ou le long
du panier de cuisson.
· Le panier de cuisson peut être déformé.
· Vérifiez si les voyants au-dessus des touches sont allumés.
→
Il n'est pas possible d'utiliser les touches pendant la cuisson, l'utilisation de la minuterie
ou de la fonction « Keep Warm » (Maintien au chaud). Appuyez sur la touche [Off/Cancel]
(Arrêt/Annulation) avant d'effectuer l'opération.
· Une odeur de plastique peut se dégager au début de l'utilisation.
Ce problème disparaîtra après plusieurs autres utilisations. Ce n'est pas anormal.
· La quantité de riz et le volume d'eau peuvent être incorrects.
· Il est possible que des brisures de riz y soient mélangées.
· L'eau chaude a été utilisée pour laver le riz.
· Le riz n'a pas été remué immédiatement après la cuisson.
· Trop d'eau a été ajoutée au nouveau riz pour la cuisson.
·
Le riz peut avoir été immergé dans l'eau pendant une longue période
(p. ex. : la durée préréglée est trop longue, etc.).
→
Lors de l'utilisation de la fonction de minuterie pour la cuisson, utilisez moins d'eau.
· La quantité de riz et le volume d'eau peuvent être incorrects.
· Le couvercle extérieur n'était pas correctement fermé.
· La fonction
«
Quick/Qunioa
»
(Rapide/Qunioa) a été utilisée pour la cuisson.
· Le riz n'a pas été remué immédiatement après la cuisson.
· Le fond du panier de cuisson est irrégulier.
·
Un corps étranger est fixé à l'extérieur du panier de cuisson, sur le capteur de fond
ou sur
le chauffage en fonte.
· La fonction sélectionnée n'est pas la bonne.
·
La quantité de riz et le volume d'eau peuvent être incorrects.
·
Le riz n'a pas été lavé avant la cuisson.
·
Le capuchon d'échappement de vapeur n'a pas été installé correctement.
·
Le couvercle extérieur n'a pas été correctement fermé.
·
La fonction sélectionnée n'est pas la bonne.

Dépannage
Le riz est brûlé
Il y a de la condensation
Il y a une odeur
Le riz est jaune
Le riz est sec
Bouillie de riz
Le riz colle au panier
de cuisson
Formation d'un film mince
·La fonction « Keep Warm
»
(Maintien au chaud) est utilisée pendant plus de 12heures.
·Le riz est réchauffé plusieurs fois.
·Le couvercle extérieur n'était pas correctement fermé.
· Le riz a été trempé dans l'eau pendant une longue période en utilisant la fonction
de minuterie de cuisson.
· La fonction« Keep Warm » (Maintien au chaud) a été utilisée.
· Il y a trop de brisures de riz.
·
En raison des différentes variétés de riz, le riz mou peut facilement coller au panier
de cuisson.
· Un film semblable à du papier est le résultat de la dissolution de l'amidon sec,
et il est inoffensif.
Si le riz n'est pas suffisamment lavé avant la cuisson, un tel film peut se former.
La minuterie ne fonctionne
pas lors de l'utilisation de
la fonction vapeur
· Il n'y a pas assez d'eau dans le panier de cuisson. Ajoutez de l'eau, de préférence
jusqu'à la moitié du panier de cuisson.
31
Vérifiez avant de demander une réparation.
Scénario Causes possibles
Dépannage
· Le riz n'a pas été lavé correctement.
· Des brisures de riz ont été mélangées.
· Le fond du panier de cuisson est irrégulier.
· Un corps étranger est fixé au bas du panier de cuisson, sur le capteur de fond
ou sur le chauffage en fonte.
· La minuterie de cuisson n'a pas été réglée.
· Des épices ont été ajoutées pour la cuisson.
· Le couvercle extérieur n'était pas correctement fermé.
· Le riz n'a pas été lavé correctement
· Le riz n'a pas été remué immédiatement après la cuisson.
·
La fonction « Keep Warm » (Maintien au chaud) a été utilisée pendant plus de 12heures.
· La cuillère à riz a été laissée dans le panier de cuisson lors de l'utilisation de la
fonction « Keep Warm » (Maintien au chaud).
· Du riz refroidi a été ajouté dans le panier de cuisson et la fonction
«
Keep Warm »
(Maintien au chaud) a été utilisée.
·
Des types de riz différents ou la qualité de l'eau peuvent donner au riz cuit une couleur
jaunâtre.
· Si des assaisonnements sont utilisés pendant la cuisson, une odeur peut se dégager.
→
Nettoyez soigneusement le panier de cuisson, la plaque exothermique et le capuchon
d'échappement de vapeur
après utilisation.
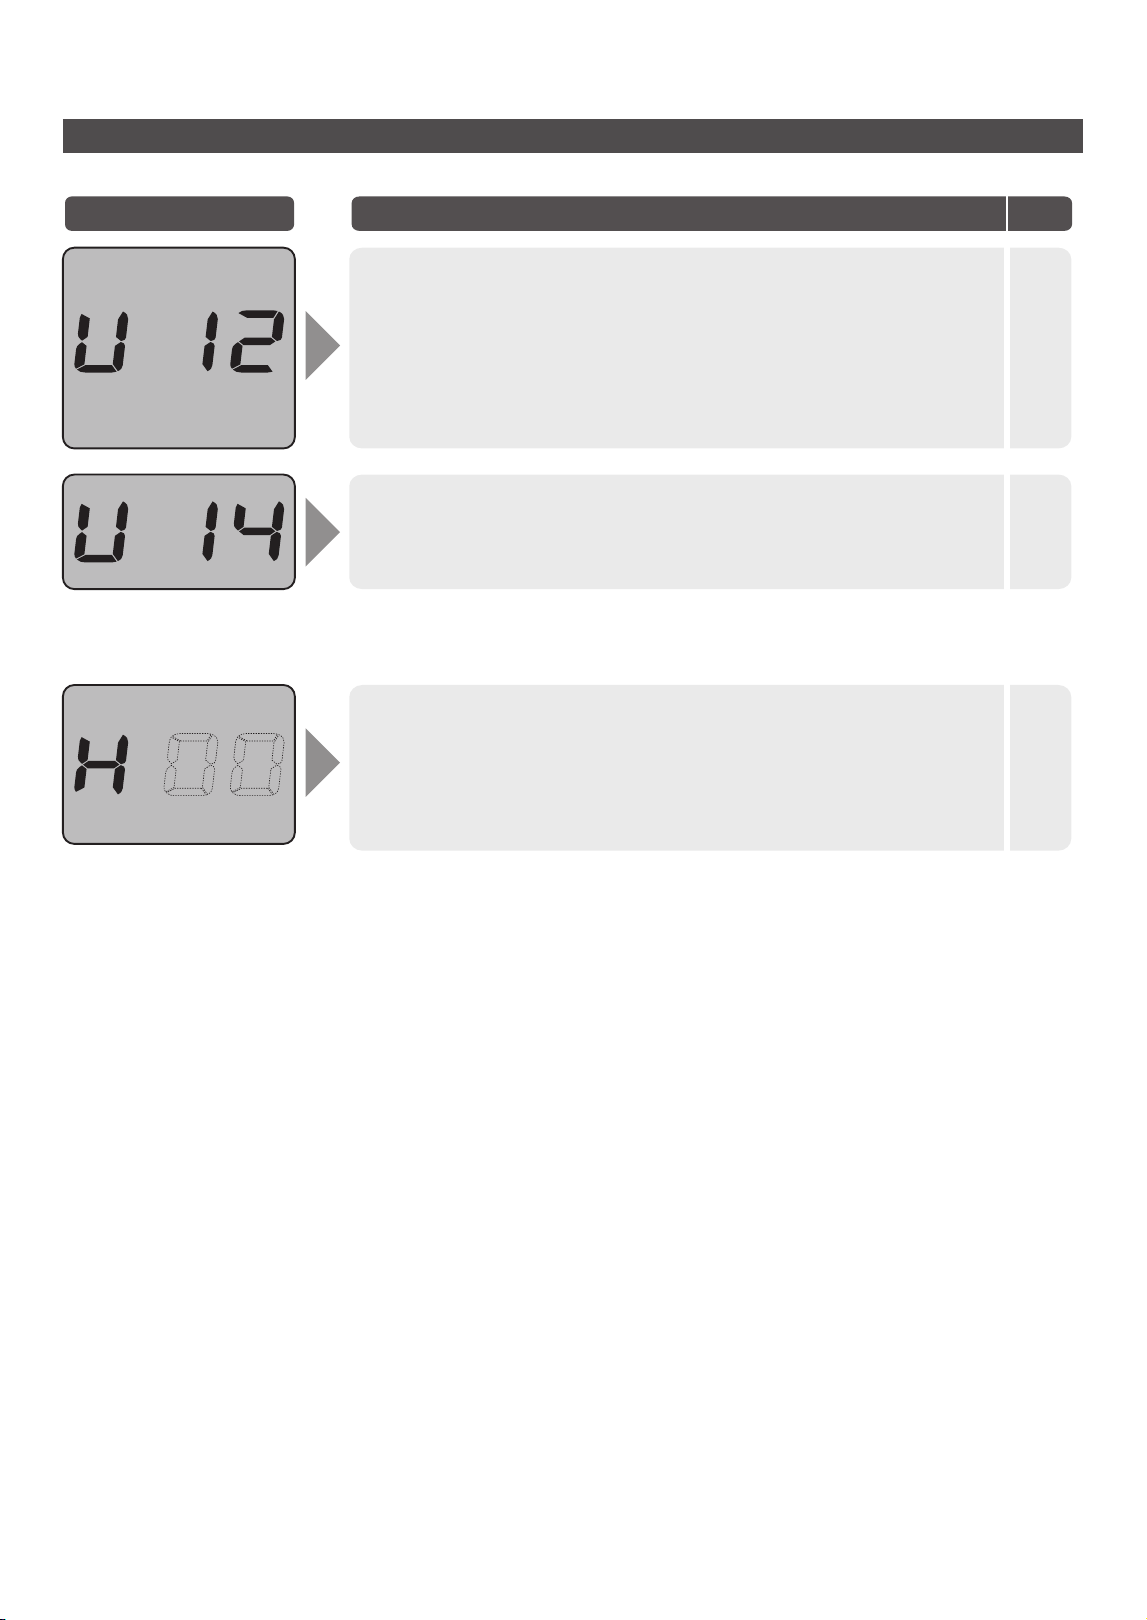
Affichage des erreurs Vérifications
Page
de réf.
●
Un corps étranger est-il fixé au fond du panier de cuisson, au capteur de fond ou au
chauffage en fonte?
→Appuyez sur la touche [Off/Cancel] (Arrêt/Annulation), débranchez le cordon
d'alimentation et retirez les corps étrangers et les taches une fois que le panier de
cuisson a complètement refroidi.
Trop d'eau a-t-elle été ajoutée?
→Appuyez sur la touche [Off/Cancel] (Arrêt/Annulation).
(Pour une cuisson continue, réduisez légèrement la quantité d'eau)
●
22
24
●
La durée du « Keep Warm » (Maintien au chaud) a-t-elle été réglée sur plus
de 96heures?
→Appuyez sur la touche [Off/Cancel] (Arrêt/Annulation).
26
●
Débranchez la fiche d'alimentation et rebranchez-la.
Si « H※※ » apparaît toujours, c'est qu'il y a une défaillance.
→Consultez un centre de service agréé Panasonic et indiquez le code
d'erreur (deux chiffres après « H »).
—
Indication des codes d'erreur
32
Vérifiez avant de demander une réparation.
Si l'appareil n'est toujours pas revenu à la normale après avoir vérifié ce qui précède, communiquez
avec un centre de service agréé Panasonic pour réparation.
33
Dépannage
Spécifications
● Veillez à utiliser ce produit dans des zones situées à moins de 2 000mètres au-dessus du niveau de la mer afin
d'éviter d'influencer l'efficacité de la cuisson.
N° de modèle SR-DL105 SR-DL185
Tension nominale
120 V
Fréquence nominale
60 Hz
Consommation nominale
810 W
Volume de cuisson (env.)
1,0 L 1,8 L
Volume nominal du panier de cuisson (env.)
3,2 L 4,8 L
Quantité de
cuisson (riz)
(env.) L (verre
mesureur)
White Regular
(Blanc standard)
0,18 à 0,99 [ 1 à 5½ ] 0,18 à 1,8 [ 1 à 10 ]
Sticky Rice (Riz gluant)
0,18 à 1,08 [ 1 à 6 ]0,18 à 0,54 [ 1 à 3 ]
Brown Rice (Riz brun)
Multigrain
Quantité de cuisson
de gruau (riz)
(env.) L (verre
mesureur)
Porridge (Gruau)
0,09 à 0,18 [ ½ à 1 ] 0,09 à 0,36 [ ½ à 2 ]
Poids maximal de la pâte à gâteau /
pâte à pain (env.) g
500 700
Longueur du cordon d'alimentation (env.) m
0,9
Poids (env.) kg
2,8 3,2
Taille
(environ) mm
Profondeur
302
Largeur
271
Hauteur
194 239
Quick (Rapide)
Quinoa
0,18 [ 1 ], avec 1,5 verre mesureur d'eau 0,18 [ 1 ], avec 1,5 verre mesureur d'eau
0,18 à 0,99 [ 1 à 5½ ] 0,18 à 1,44 [ 1 à 8 ]
Niveau maximal d'eau de
« Porridge » (Gruau)
MAX
Volume maximal
de cuisson
(
ingrédients + eau
) L
1,5 2,5
2,1 -

34
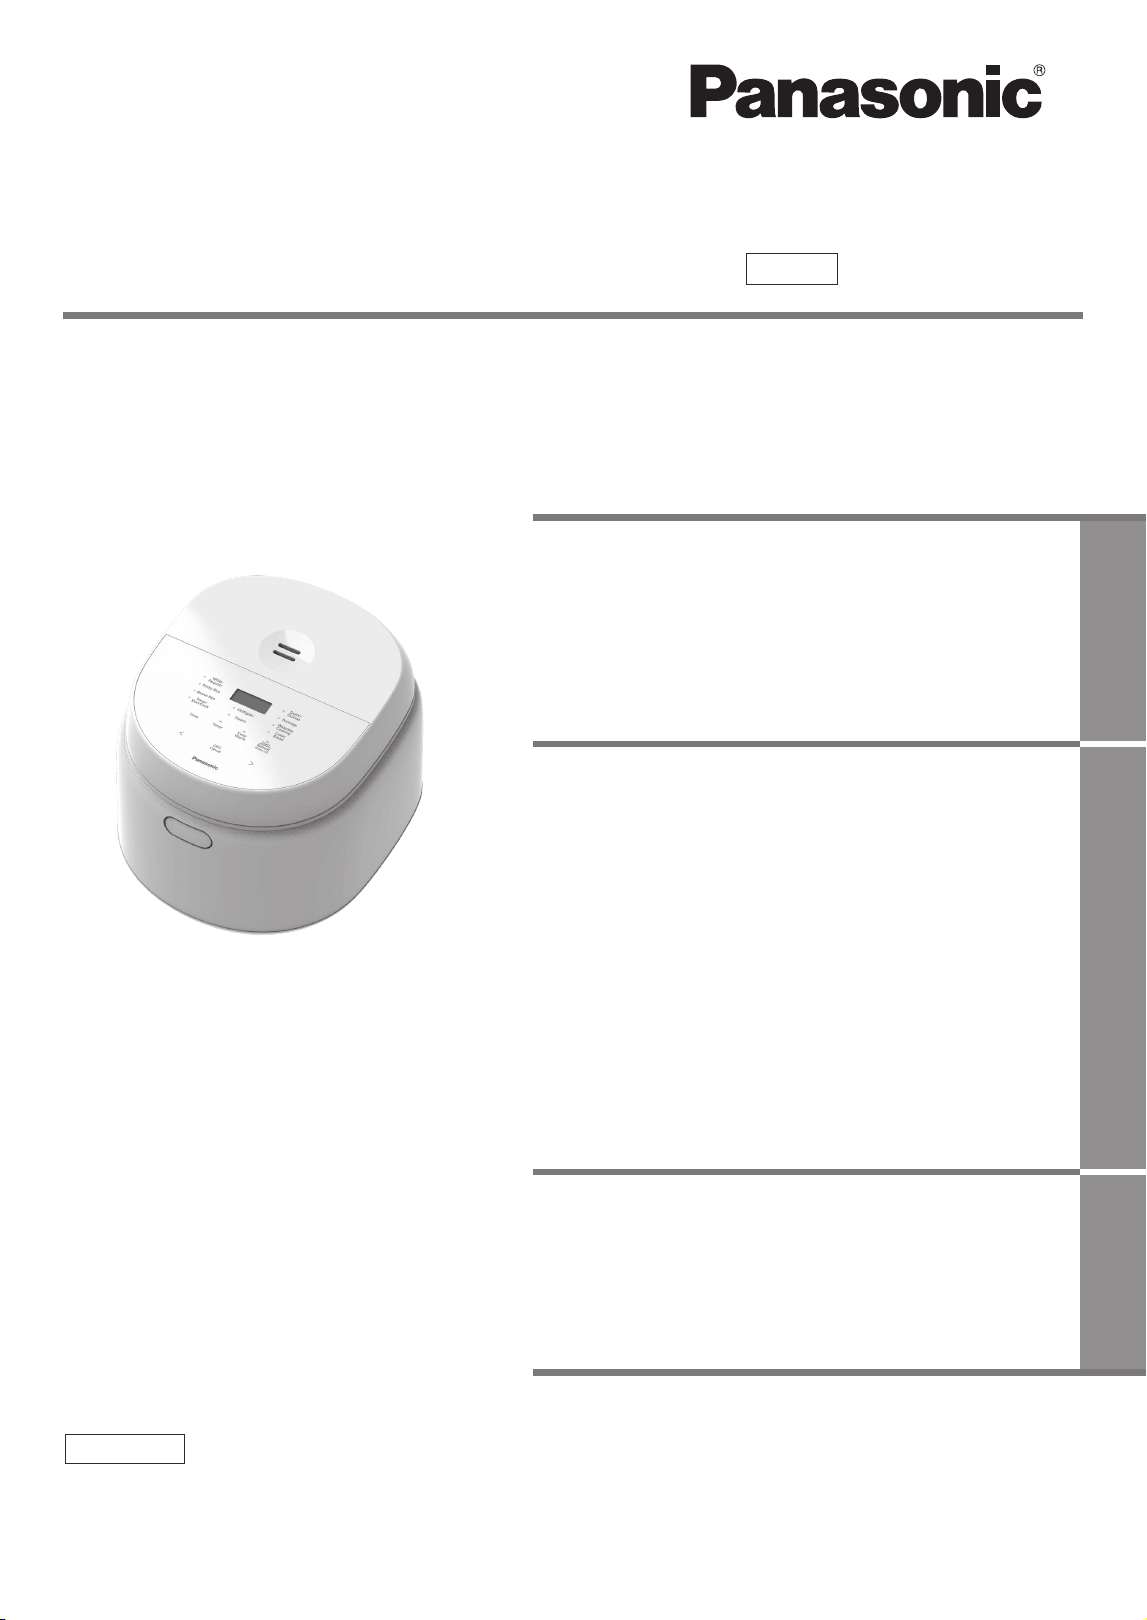
使用说明书
目 次
安全注意事项..........................36-37
使用注意事项................................38
零件名称
准 备
关于各功能
●
●
●
洗米、加水 ....................................................... 40
功能的选择/烹调时间的设定/
煮出美味米饭的诀窍 ......................................... 40
●
●
米饭烹调/保温/冷饭加热 ................................... 42
粥·其他料理类烹调/预约功能.......................... 43
●
故障排除 .................................46-47
当出现这样的显示时 .....................48
●
●
●
保留备用
家庭用
微电脑电饭煲
食谱 ..............................................45
规格 ..............................................49
清洁保养 ....................................... 44
非常感谢您购买Panasonic的产品
本产品只限于家庭使用。
使用产品前,请仔细阅读本使用说明书,
以确保正确安全使用本产品。
特别要留意【安全注意事项】(第36-37页)。
型号 1.0LSR-DL105
1.8LSR-DL185
使
用
前
使
用
方
法
困
惑
时
本体 ................................................................. 39
操作面板 .......................................................... 39
本使用说明书中的图片均以SR-DL105为例。
安全注意事项
为防止造成人身伤害、财产损失,请务必遵守以下安全注意事项。
■以下图标表示错误操作可能导致的伤害程度。
警告:
表示如不避免,则可能导致死亡或严重伤害的某种潜在危害情况。
注意:
表示如不避免,则可能导致轻微或中度伤害的某种潜在危害情况。
■符号的分类及解释如下。
此符号表示不能进行,即“禁止”的内容。
此符号表示务必执行,即“强制”的内容。
请务必遵守!
36
● 务必要单独使用规格表中( P49)记载
的额定值的交流电的电源插座。
(以免与其他电器并用,因发热而引起火灾。)
·务必使用规格至少为10 A的接线板。
● 本产品应使用单相两极带接地的电源插座,
并保证其可靠接地。未安装接地装置,可能
会引起箱体等其他金属部件带有感应静电。
(以免发生故障或漏电时有触电的危险。)
● 务必要将本体插头、电源插头切实插到底。
(以免导致冒烟、火灾或触电。)
● 如电源线或电源线插头已损坏或电源插座与
电源插头的接口松脱,请勿使用产品。
(以免导致触电或因短路导致火灾。)
→
如有损坏,为了避免危险,必须用专用电源线
或从制造厂或维修部买到的专用组件来更换。
● 请勿损坏电源线或电源插头。
·绝对禁止进行以下操作:
损伤、加工、使其接触或靠近高温部、强行
弯曲、扭转、拉拔、挂在角上、在其上放置
重物、扎成束、夹入、拉动电源线移动。
(以免因电源线和电源插头破损而触电,或因短
路导致火灾。)
● 请勿以湿手插入或拔掉电源插头。
·接触电源插头或产品前请务必确保手是干燥的。
(以免导致触电或受伤。)
● 请勿将水或其它液体溅到本体插头上。
(以免导致触电或因短路导致火灾)
● 定期清洁电源插头。
(以免电源插头因湿气及外物积聚而导致绝缘
不良,从而引起火灾。)
→拔掉电源插头然后使用干布擦拭。
警告
■电源·电源线·电源插头
● 请勿将可能堵塞放热板上的
孔的物品放入内锅。
(以免因蒸汽泄漏或烹调物喷
出而导致烫伤或受伤。)
<禁止的烹调例>
·将配料和调味料放入塑料袋中等进行
加热的烹调方法。
放热板上的孔
■本体
● 请勿在散热孔或
间隙中插入任何
物件。
·特别是针及其他金属物件。
(以免导致触电或异常动作。)
散热孔
● 请勿自行更改、拆解或修理产品。
(以免导致火灾、触电或受伤。)
→如需修理,请Panasonic授权的服务中心联系
咨询。
● 请勿淋水、直接用水清洗或把产品浸在水中。
(以免导致触电或因短路导致
火灾。)
→如水进入产品内,请联络
Panasonic授权的服务中心。
●
请勿将产品用于使用说明书记载以外的任何用途。
(否则可能会导致火灾、烧伤、受伤或触电。)
·对于使用不当或未能遵守使用说明书而导致的
情况,Panasonic将不承担任何责任。

警告
●
发生异常或故障时,请立即停止使用并拔掉
电源插头。
(以免导致冒烟、火灾或触电。)
异常· 故障例
·电源插头及电源线异常发热。
·电源线已损坏或碰到电源线后发生间歇性断电。
·本体变形或异常发热。
·本体冒烟或发出焦味。
·本体破裂、松动或发出异响。
·放热板翘曲或内锅变形。
→
请立即与Panasonic授权的服务中心联系,咨
询检查
及修理事宜。
●
本产品不适合供下列人士(包括孩童)使用:
身体官能或心智能力退化者,或是经验
与使用
知识缺乏者,除非有负责他们安全的人员在旁
监督或指导,方可使用。请注意避免让孩童
戏玩本产品。
(以免导致烧伤、受伤或触电。)
● 溢出的食物可能会导致严重烫伤。请将本产
品和电源线放置在儿童无法接触的地方。切
勿将电源线悬挂在台面边缘,切勿使用台面
下方的插座,切勿使用延长线。
(以免导致烫伤、受伤或触电。)
注意
■使用
● 请勿使用非专用内锅或变形后的内锅。
(以免因过热或故障导致烫伤或受伤。)
● 请勿在下记地方使用本产品。
·靠近热源或高湿环境中。
(以免导致触电、漏电或火灾。)
·不平稳的台面或不耐热的垫子上。
(以免导致受伤、烫伤或火灾。)
·靠近墙壁或家具等处。
(以免开盖时碰到,或导致家具等变色、
变形及破损。)
● 搬运本体时,请勿触碰开盖按钮。
(以免使外盖打开,从而导致受伤。)
● 使用中或烹调刚结束时,
请勿触摸高温部。
·本体温度很高。特别是放热板、
内锅、铸造加热器等金属部。
(以免导致烫伤。)
● 请勿将电源插头暴露在蒸汽中。
(以免导致触电或因短路导致
火灾。)
→
使用有拉桌的橱柜时,
请在电源插头不会接触
到蒸汽的地方使用产品。
● 本产品仅限在台面上使用。
(以免导致烫伤、受伤或触电。)
包括在中途拔掉电源插头,跳闸等情况;
●
返回待机状态。
在使用过程中发生停电时
● 请勿在烹调时打开外盖或移动本体。
(以免因蒸汽泄漏或烹调物喷出而导致烫伤或受伤。
)
● 使用中或刚使用后,请勿将
脸或手靠近蒸汽口处,对小
孩要格外注意。
(以免导致烫伤。)
蒸汽口
●
拔掉电源插头时,请确保握住电源插头本身。
(以免导致触电,或因短路引起火灾。)
● 取出内锅或不使用时,切记关闭电源并拔下
电源插头。
(以免导致烫伤、受伤或因绝缘老化而引起触电、
漏电、火灾。)
● 请等到本体充分冷却后再进行清洗。
(以免导致烫伤。)
● 在橱柜等封闭空间使用时,请确保蒸汽能
向外散发。
(以免导致橱柜等变色或变形。)
● 本产品用于家庭和类似用途,例如:
·商店、办公室或其他工作环境下的员工厨房区域;
·农场住所;
·在酒店,旅馆和其他住宅类型的环境中,供顾客
使用;
·仅提供床位和早餐的类似环境。
37
使
用
前
● 请勿空烧。
(以免导致烫伤。)
● 请勿将本产品外接定时器或在独立的遥控
控制系统的方式下运行。
(以免引起火灾。)

关于本体
关于内锅
(
)
准备烹调时
以下情况不会影响产品性能或人身健康。
[外层表面]浅的刮痕、细小凹痕或碰撞。
[内层表面]内锅涂层剥落。
→如内锅变形或您担心其状况,请购买新的内锅。
使用注意事项
■
使用中请勿将布或其他物品盖在外盖上。
(以免蒸汽无法释放,导致外盖变形、
变色或发生故障。)
■ 请及时清理粘在本体上(铸造加热器、底传感器、
内锅底部)的饭粒等异物。
(以免出现错误显示,或有饭焦、饭烧不熟等情况。)
■ 请勿将电饭煲倾斜,翻转。
■ 请勿把需要烹调的食物直接倒入没有放入内锅
的保护框内。
(以免因杂质而引起故障。)
■ 若米汤等从蒸汽口溢出,请先拔掉电源插头,
切断电源,用干布擦去电源插头等部位的米汤
后,方可继续使用。
■ 请勿在户外使用产品。
(不稳定的电源可能会导致产品发生故障。)
■ 请勿在阳光直射下使用。
(以免导致变色。)
■ 请勿在地毯、电热地毯,台布(乙烯塑料制)
等不耐高温的物品上使用本产品。
(以免烹调不良或发生火灾。)
■ 请勿在电饭煲以外的地方使用内锅。
● 请勿在煤气灶或电磁炉及
微波炉内使用。
■ 请勿将内锅与硬物撞击。
以免导致外层表面刮伤
或产生凹痕。
■ 留意以下情况以避免削去或刮伤内锅涂层。
● 请勿让金属洗米箩等物件
接触内锅涂层。
烹调结束后
● 请勿将醋放入内锅中的米饭里。
(制作寿司等食物)
● 请勿使用金属勺子。(烹调粥等食物)
● 请勿轻触或击打内锅。(盛饭时)
清洁保养时(P44)
● 请勿将内锅作为洗碗容器。
● 请勿将汤匙或其他餐具放入内锅中。
● 使用调味料烹调后,请勿将食物留在内锅中。
→
烹调后,请尽快清除内锅中
的食物然后进行
清洗。
● 请勿使用干碗机或洗碗机/烘干机进行清洗。
● 请勿在清洗后将内锅放在其他
餐具上晾干。
● 请勿使用研磨粉或金属刷、尼龙刷
(含有研磨料)、百洁布等清洗或
擦洗内锅。
→
使用软海棉进行清洗。
提 示
边缘或底部
(内锅)
■ 使用之前务必去掉内锅保护袋。
(以免烹调不良或发生火灾。)
■ 放在滑动式拉桌上时,请务必确认
桌子的负荷强度在:
1.0 L:10 kg
1.8 L:12 kg
(以免产品掉落。)
铸造加热器
底传感器
38
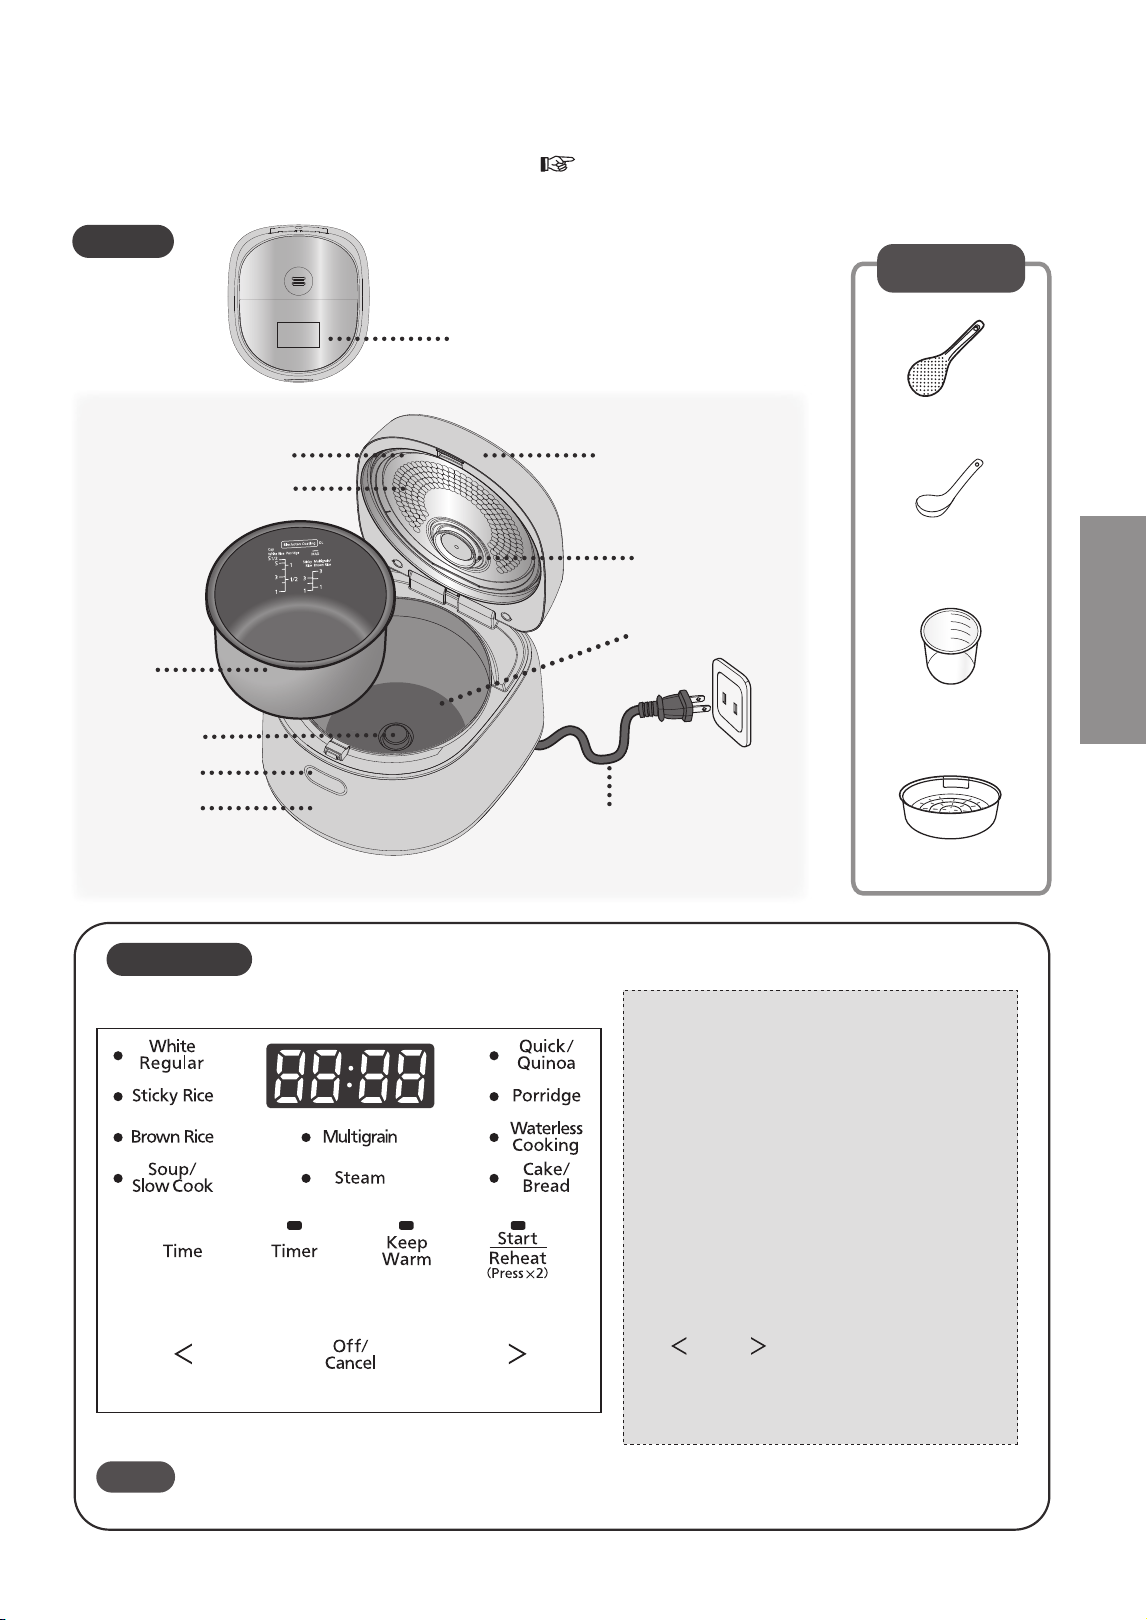
首次使用时,请清洗内锅、保湿帽
、
附属品。( P44)
操作面板表面贴有保护薄膜时,请揭下后再使用。
本体
零件名称
操作面板
放热板
内锅
开盖按钮
电源线
底传感器
锅垫圈
壳体
外盖
保湿帽
铸造加热器
附属品
饭勺(1个)
粥[汤]勺(1个)
计量杯(1个)
(约180 mL)
蒸笼(1个)
操作面板
产品在工作状态下,对「Off/Cancel」(关/取消)按键的操作需要更长的时间,这属于正常现象。
30秒无操作,产品进入休眠模式,可按任意键唤醒,此时按键操作需要更长的时间。
)
提 示
①「Off/Cancel」(关/取消):
●开始烹调或预约时间设置结束、
冷饭加热时按此按键。
●可取消不正确的操作,或关闭保温。
●要保温时,按此按键。
●设置烹调时间时,先按此按键。
②「Time」(时间):
③「Timer」(预约):
●要预约时,按此按键。
④「Keep Warm」(保温):
⑤「Start」(开始):
●要选择功能时使用。
●调整设置预约时间和烹调时间。
●长按按键则可快速前进或后退。
⑥「 」和「 」:
①
② ③
④
⑤
⑥
⑥
39
使
用
前

用附属的计量杯量米
将米洗至水清
将洗好的米放入内锅
插上插头
正确 不正确
约180 mL
(约150 g)
●一次可煮的米量, P49“规格”。
根据需要加水至相应的水位线( P41),并擦干内锅
外表面。
●放在平坦的台面上加水,并整平米的表面。
(确认水位线,加水至相同的高度)
●水量过多时,可能会在烹调中因沸腾而溢出。
●纯藜麦饭时,只能烹煮1杯,需加1.5 杯水(约270 mL)。
●请先插入本体插头,再插电源插头,并确保两者均
已连接稳妥。
将内锅放入本体内,闭合外盖
●为使锅底和铸造加热器能紧密贴附,请将内锅按箭头
所示方向转动2-3次。
●确认「保湿帽」装置是否安装(清洁保养 P44)。
●闭合外盖时,请确认发出“咔嗒”的闭合音。
①
②
①
②
①加入充分的水,快速淘洗后立即倒掉水。
②
轻轻揉搓淘洗后的米,重复数次揉搓→淘洗,直至水清为止。
●为避免擦伤内锅表面的不粘涂层,请勿直接用内锅洗米。
●请把米洗干净。否则会有产生锅巴的可能,而且残留的
米糠会影响米饭的味道。
初次使用前
准备 洗米、加水
① ②
5
4
3
2
1
请先烧开一锅水,再倒掉。
①加水至“White Rice(白米)”的4水位线,闭合外盖。
②选择“Steam(蒸煮)”功能,烹调时间设定为15分钟。
③蜂鸣器响后,取出内锅,倒掉里面的水。
例)烹调3杯白米时,加水至“White Rice
(白米)”的水位线“3”处。
注意
在煮饭的同时使用蒸笼蒸煮食物时,白米最大烹调容量:1.0 L型-3杯,1.8 L型-6杯。
本体
本体插头
电源插头
插座
40
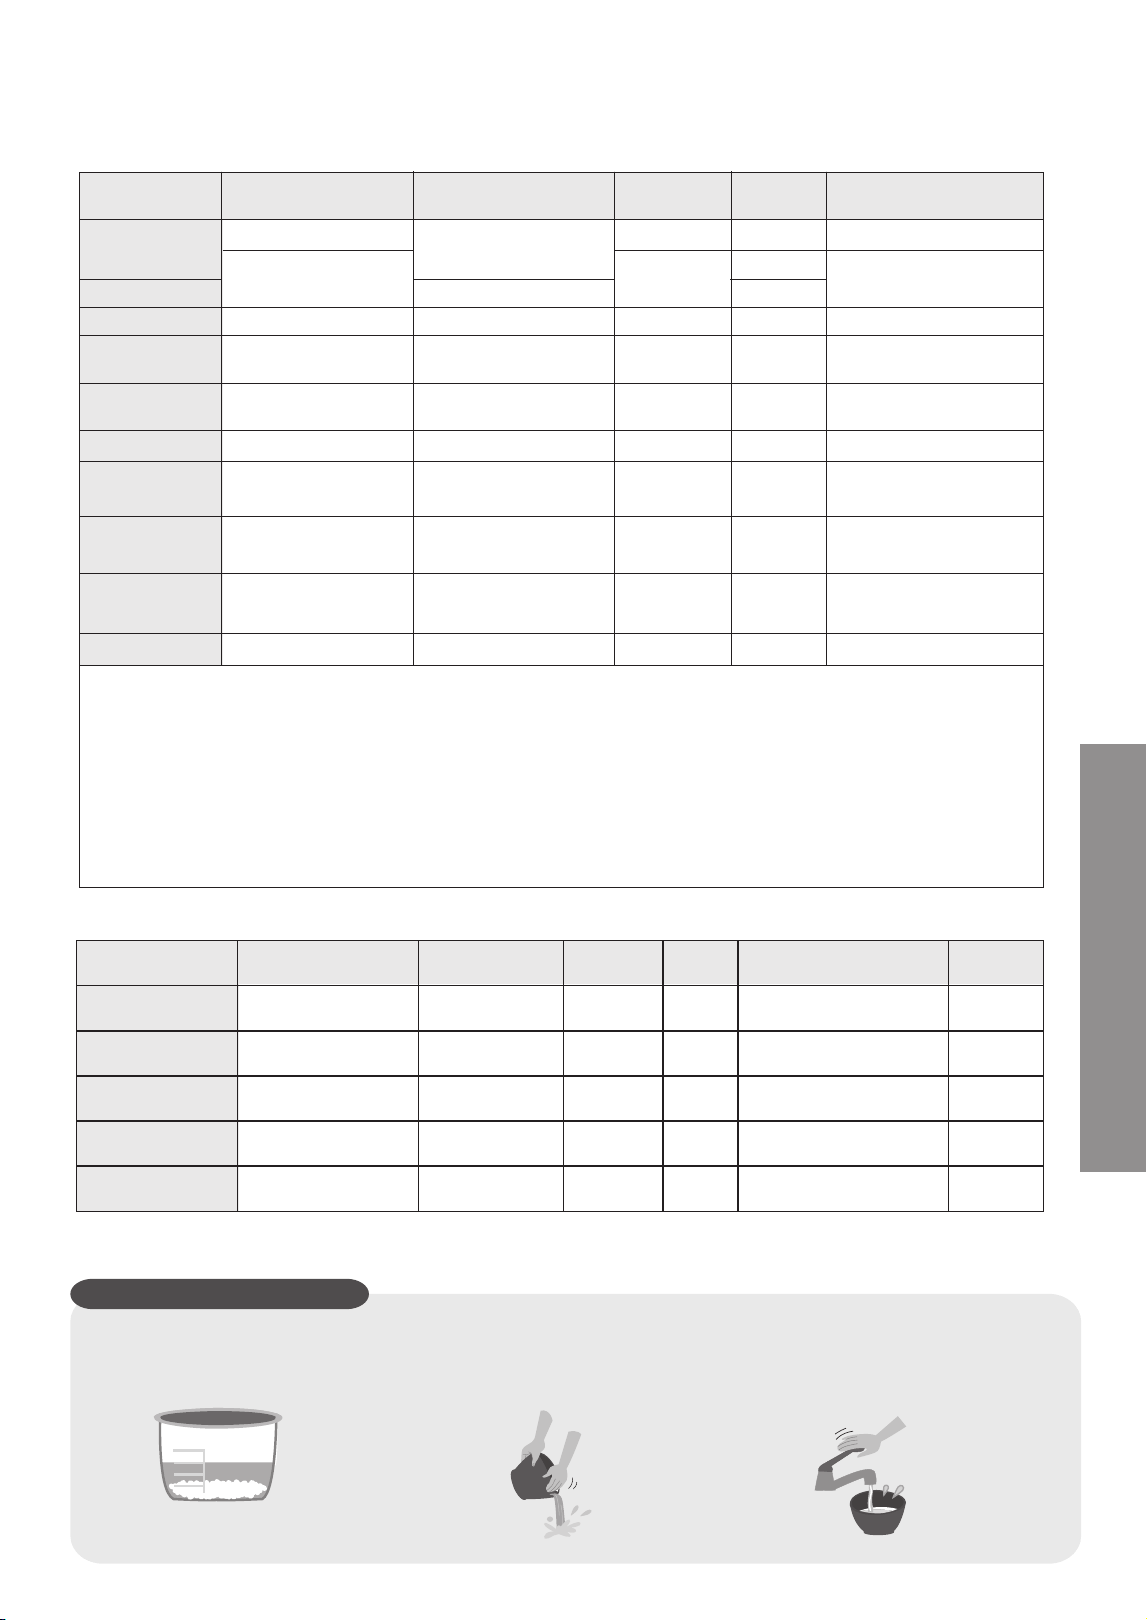
★煮出美味米饭的诀窍
●
轻柔并快速地洗米。
●
勿将米放置在洗米箩内。
(以免米粒碎裂或米饭粘锅。)
●
正确量水及量米。
①
②
●
在平坦的台面加水。
●
勿用热水及pH9以上的碱性水。
(以免米饭粘锅或变黄。)
③
■功能的选择
表1
准备 功能的选择/烹调时间的设定/煮出美味米饭的诀窍
*1 ·
在电压为规格表额定电压时,室温20 ℃,水温20 ℃,米量为中间量(1.0 L:3杯,1.8 L:5杯)时,烹调所需的
参考时间。
·烹调的实际时间会根据米量、水量、电压、室温、水温、米质的不同而变化。
*2 ·所有功能在烹调结束后都自动转为保温。打“×”的功能不建议保温,烹调结束后请尽快按「Off/Cancel」
(关/取消)。
*3 ·Soup/Slow cook(汤/慢炖)、Waterless Cooking(无水料理)、Cake/Bread(蛋糕/面包)功能不能预约。
·夏季等高温天气下,米饭类菜单预约时间请勿超过8小时,以免米粒等变质。
*4 ·纯藜麦饭时,只能烹煮1杯,需加1.5杯水(约270 mL)。
■烹调时间的设定
表2
烹调类别 功能选择
烹调时间
设定范围
设定单位 调理时间的显示
初期值
调理时间
的记忆*
*:断电后,调理时间重置,不再记忆上次设定的烹调时间。
41
使
用
方
法
烹调类别
烹调白米
烹调藜麦饭
烹调糯米饭
烹调糙米
烹调杂粮饭
烹调粥
汤/慢炖
蒸煮
无水料理
烘烤蛋糕,面包
功能选择
White Regular(白米标准)
Sticky Rice(糯米)
Brown Rice(糙米)
Multigrain(杂粮饭)
Porridge(粥)
Soup/Slow cook
(汤/慢炖)
Steam(蒸煮)
Waterless Cooking
(无水料理)
Cake/Bread(蛋糕/面包)
White Rice(白米)
*4
Sticky Rice(糯米)
Multigrain/Brown Rice
(杂粮饭/糙米)
Multigrain/Brown Rice
(杂粮饭/糙米)
Porridge(粥)
至“Porridge(粥)”
最大水位线
蒸煮40分钟以上时请加
4计量杯水
1.0 L:MAX(最大)
1.8 L:至“Porridge”
(粥)最大水位线
—
水位线
43
30
37
110
70
表2
表2
表2
表2
表2
*1
烹调时间
(约 分钟)
*2
保温
(自动)
×
×
×
×
×
×
×
×
○
○
×
*3
预约时的可设定范围
60分钟~24小时
60分钟~24小时
60分钟~24小时
2小时10分~24小时
1小时20分钟~24小时
烹调时间+10分钟~24小时
—
烹调时间+20分钟~24小时
—
—
烹调粥
汤/慢炖
蒸煮
无水料理
烘烤蛋糕,面包
Porridge
(粥)
Soup/Slow cook
(汤/慢炖)
Steam
(蒸煮)
Waterless Cooking
(无水料理)
Cake/Bread
(蛋糕/面包)
1小时-4小时
1小时-12小时
1分钟-60分钟
10分钟-2小时
40分钟-60分钟
10分钟
30分钟
1分钟
10分钟
1分钟
1小时
1小时
5分钟
30分钟
60分钟
到4小时后又回到1小时
到12小时后又回到1小时
到60分钟后又回到1分钟
到2小时后又回到10分钟
到60分钟后又回到40分钟
○
○
○
○
○
Quick/Quinoa
(超快速/藜麦饭)
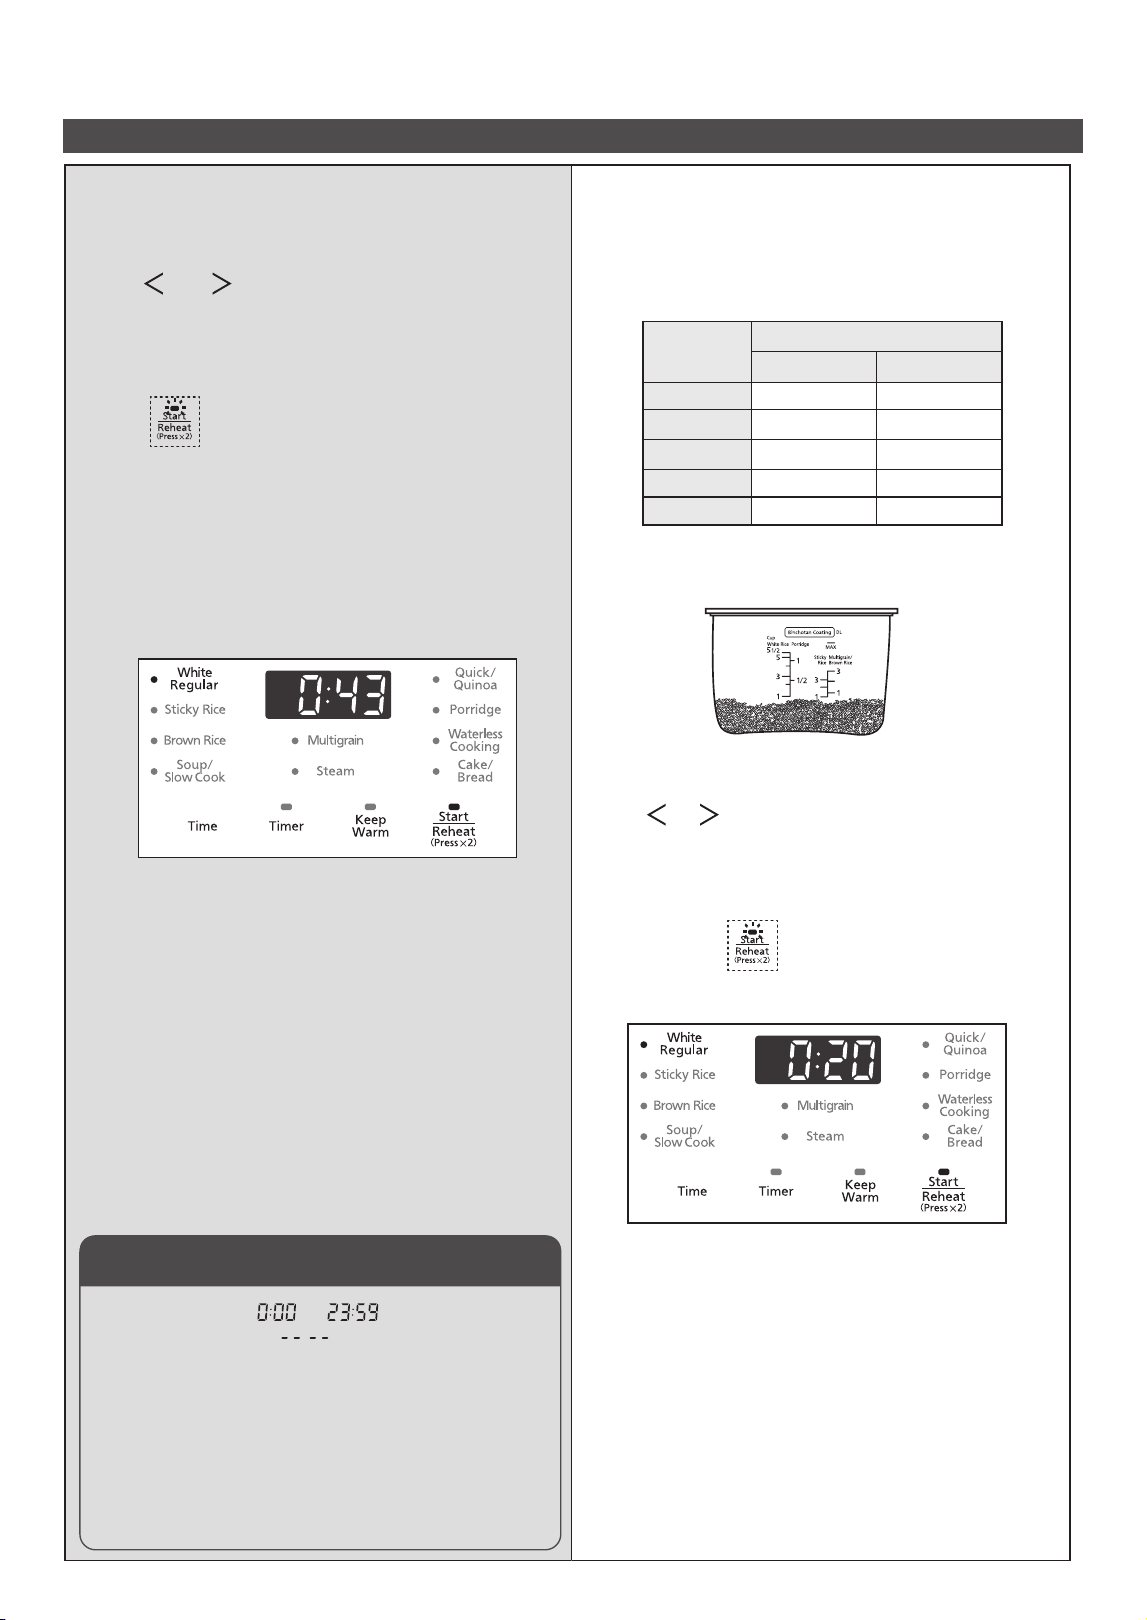
■温馨提示
●
用“Quick/Quinoa(超快速/藜麦饭)”煮饭时,因时
间缩短,米饭会稍硬或有锅巴产生。
→预先将米浸泡在水中,则可以使煮好的米饭变软。
●请不要将糙米与白米(短粒米、长粒米)混合煮饭,
以免影响煮饭效果。
※用“White Regular(白米标准)”
功能煮饭时
关于各功能
米饭烹调/保温/冷饭加热
■温馨提示
●加入冷饭时,请不要超出最大冷饭量(如表3所示)。
●建议冷饭加热的次数为一次,以免影响米饭的口感。
●
请不要加热糯米饭、糙米、藜麦饭、杂粮饭,以免影
响口感。
1
●“Start(开始)”指示灯点亮。
●剩余时间以1分钟为单位递减,“Quick/Quinoa
(超快速/藜麦饭)”和“Brown Rice(糙米)”
功能在烹调结束前约7分钟和12分钟开始显
示剩余时间。
●进入焖煮阶段后,会根据饭量的多少自动调
整显示的剩余炊饭时间。如:有时可能会从
“15”一下跳到“13”,而不是逐分递减。
2
3
烹调结束,翻松米饭。
●蜂鸣器响后,烹调结束,自动转入保温状态。
为防止米饭粘在一起,请尽快翻松米饭。
●
Quinoa(藜麦饭)、Sticky Rice(糯米饭)、Brown
Rice(糙米)、Multigrain
(杂粮饭)烹调结束后,请
尽快按「Off/Cancel」
(关/取消)按键取消保温,
以免影响口感。
※冷饭加热时
●请将锅内的冷饭搅拌均匀,使之平整。
●冷饭加热时,请参照下记水量表的标准加水。
准备
表3
■冷饭加热的最大量:
1.0 L:白米3水位线;1.8 L:白米5水位线。
3
蜂鸣器响后,烹调结束,自动转入保温
状态。
●请尽快翻松米饭,米饭将更美味。
●保温时间显示从 到 共24小时,超过
24小时后,显示“ ”但仍然继续保温。
●保温超过96小时,保温将自动停止,显示屏显示
“U14”,要继续使用时,请先按「Off/Cancel」
(关/取消)按键。
●米饭以在保温12小时以内食用为佳,以免米饭变
色或变味。
●保温时,内锅的边缘部有时会出现少量水珠。
●保温时内锅中如放有饭勺等盛饭用具则会影响米
饭的味道。
保 温
●不管冷饭量多少,加热时间都约20分钟。
●所选择的功能指示灯点亮。
●“Start(开始)”指示灯闪烁。
按 ,烹调开始。
2
连按两次 ,烹调开始。
1
按 或 ,选择烹调米饭的功能。如:
“White Regular(白米标准)”。
冷饭量
(刻度线)
水量(计量杯)
1/4
1/2
1/2
—
—
1/4
1/2
1/2
1/2
1
1.0 L 1.8 L
1
2
3
4
5
按 或 ,选择“White Regular
(白米标准)”。
42
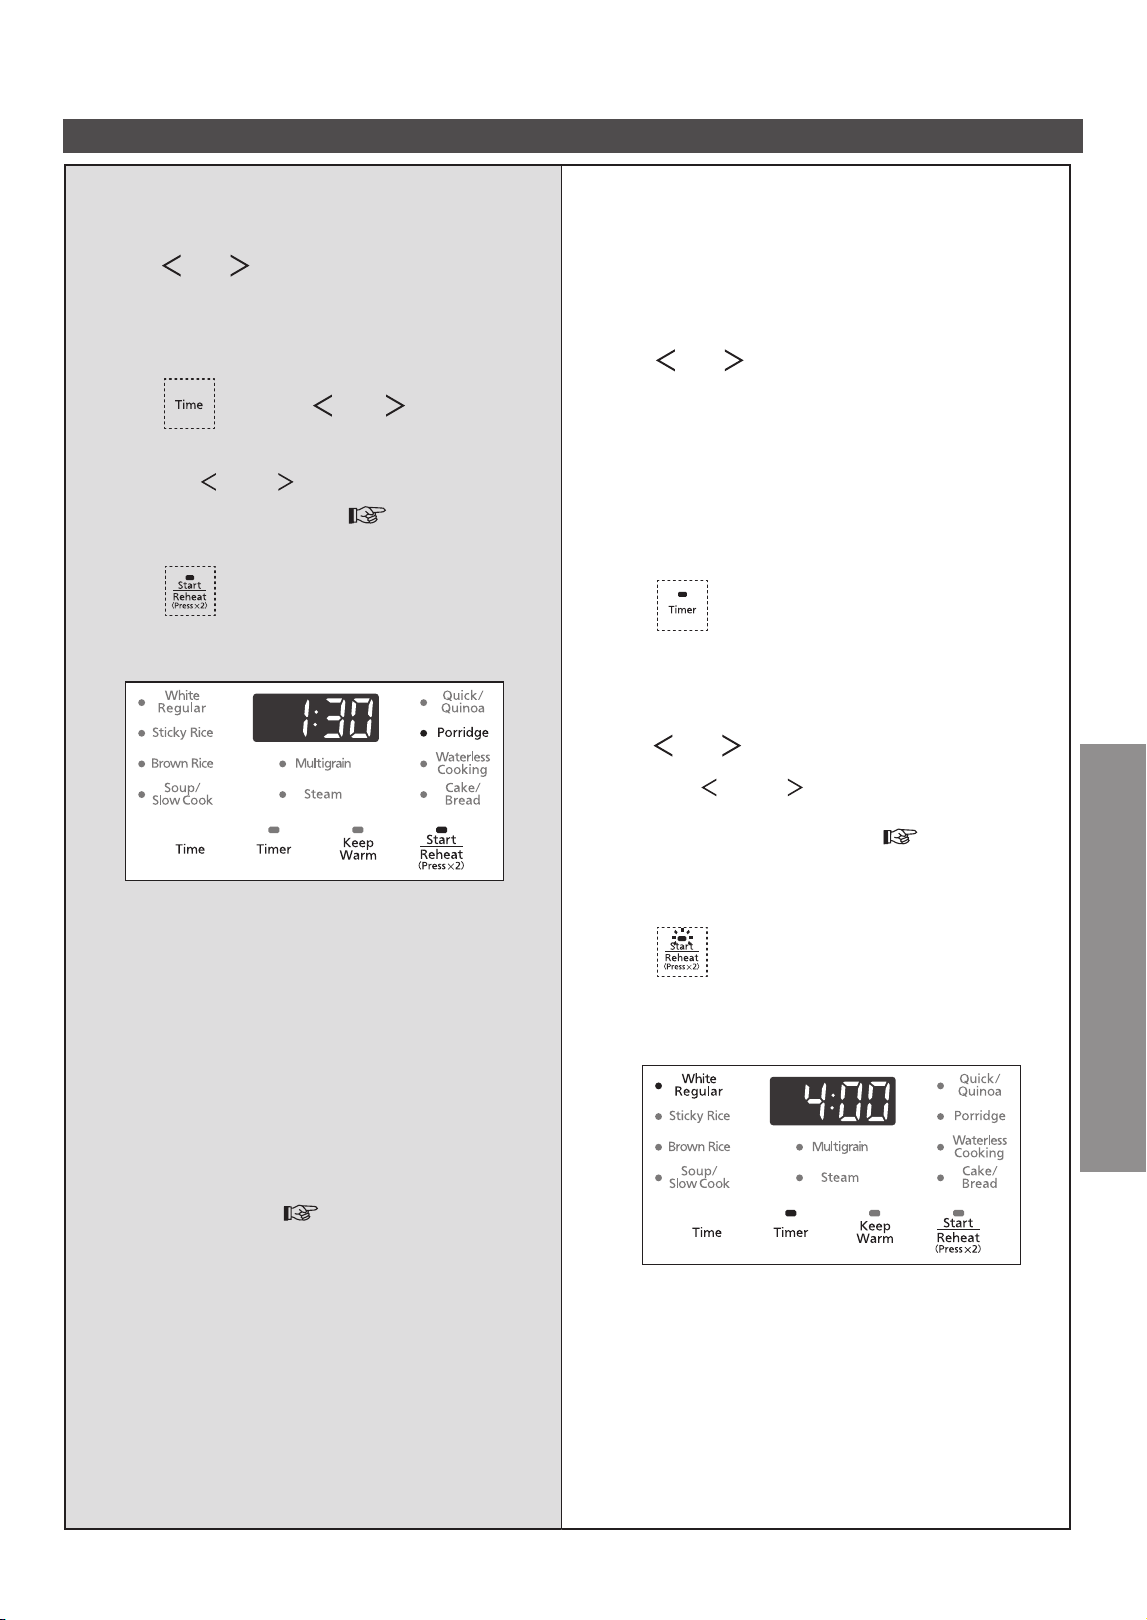
关于各功能 粥、其他料理类烹调/预约功能
●如选择了较长的蒸煮时间(如蒸40分钟以上),
加水4计量杯,以免水被蒸干。
●Steam(蒸煮)功能时,显示屏内显示的时间为内锅
中的水沸腾后的剩余时间。
●蛋糕糊/面团的最大量:1.0 L不超过500 g,1.8 L不
超过700 g(蛋糕粉/面包粉、牛奶、鸡蛋等的总重
量),超过此量可能会导致蛋糕烘烤不熟。
●
烘烤最大量的蛋糕糊
/面团
时,烹调时间请设定为60
分钟,
以免蛋糕/面包不熟。
●“Waterless(无水料理)”功能建议使用出水率高的
食材(如蘑菇、白菜等),或将易出水的食材置于底
部进行烹调。
■温馨提示
●夏季等高温天气下,米饭类菜单预约时间请勿超过
8小时,以免米粒变质。
●夏季等高温天气下,不建议Steam(蒸煮)功能预约
烹调。
3
2
按 。
1
●所选择的功能
指示灯
点亮。
●“Start(开始)”指示灯闪烁。
●预约煮粥或蒸煮时,先设定烹调时间,再按
「Timer」(预约)按键。
按 或 ,
选择“White Regular
(白米标准)”功能。
4
按 ,预约烹调开始。
●“Start(开始)”指示灯熄灭,“Timer(预约)”
指示灯及所选功能指示灯点亮,预约设定完成。
※用“Timer(预约)”功能在4小时
后完成“White Regular(白米标
准)”时
※用1.5 小时烹调粥时
1
●所选择的功能指示灯点亮。
●“Start(开始)”指示灯闪烁。
2
●“Start(开始) ”指示灯点亮。
●剩余时间以1分钟为单位递减。
按 ,烹调开始。
3
4
蜂鸣器响后,烹调结束,自动转入
保温状态。
●为避免因保温而影响口感,请尽快按
「Off/Cancel」(关/取消)按键。
■温馨提示
●烹调中打开外盖,会增加结露量。
●水量、米量不正确,可能会导致米汤从蒸汽口中
溢出。
●如保温时间过长,粥将会变稠。
●炖汤时,如超过“Porridge(粥)”的最大水位线,
可能会造成溢出。( P49规格)
※烹调时间的可设定范围 P41表2。
●
长按「 」或「 」按键,时间可快速前进或后退。
按 或 ,
选择“Porridge(粥)”。
按 ,再
按 或 ,
设定烹调
时间。
●长按「 」或「 」按键,时间可快速前进或
后退。
●可以预约的功能和时间范围 P41表1。
按 或
,设定预约时间。
43
使
用
方
法
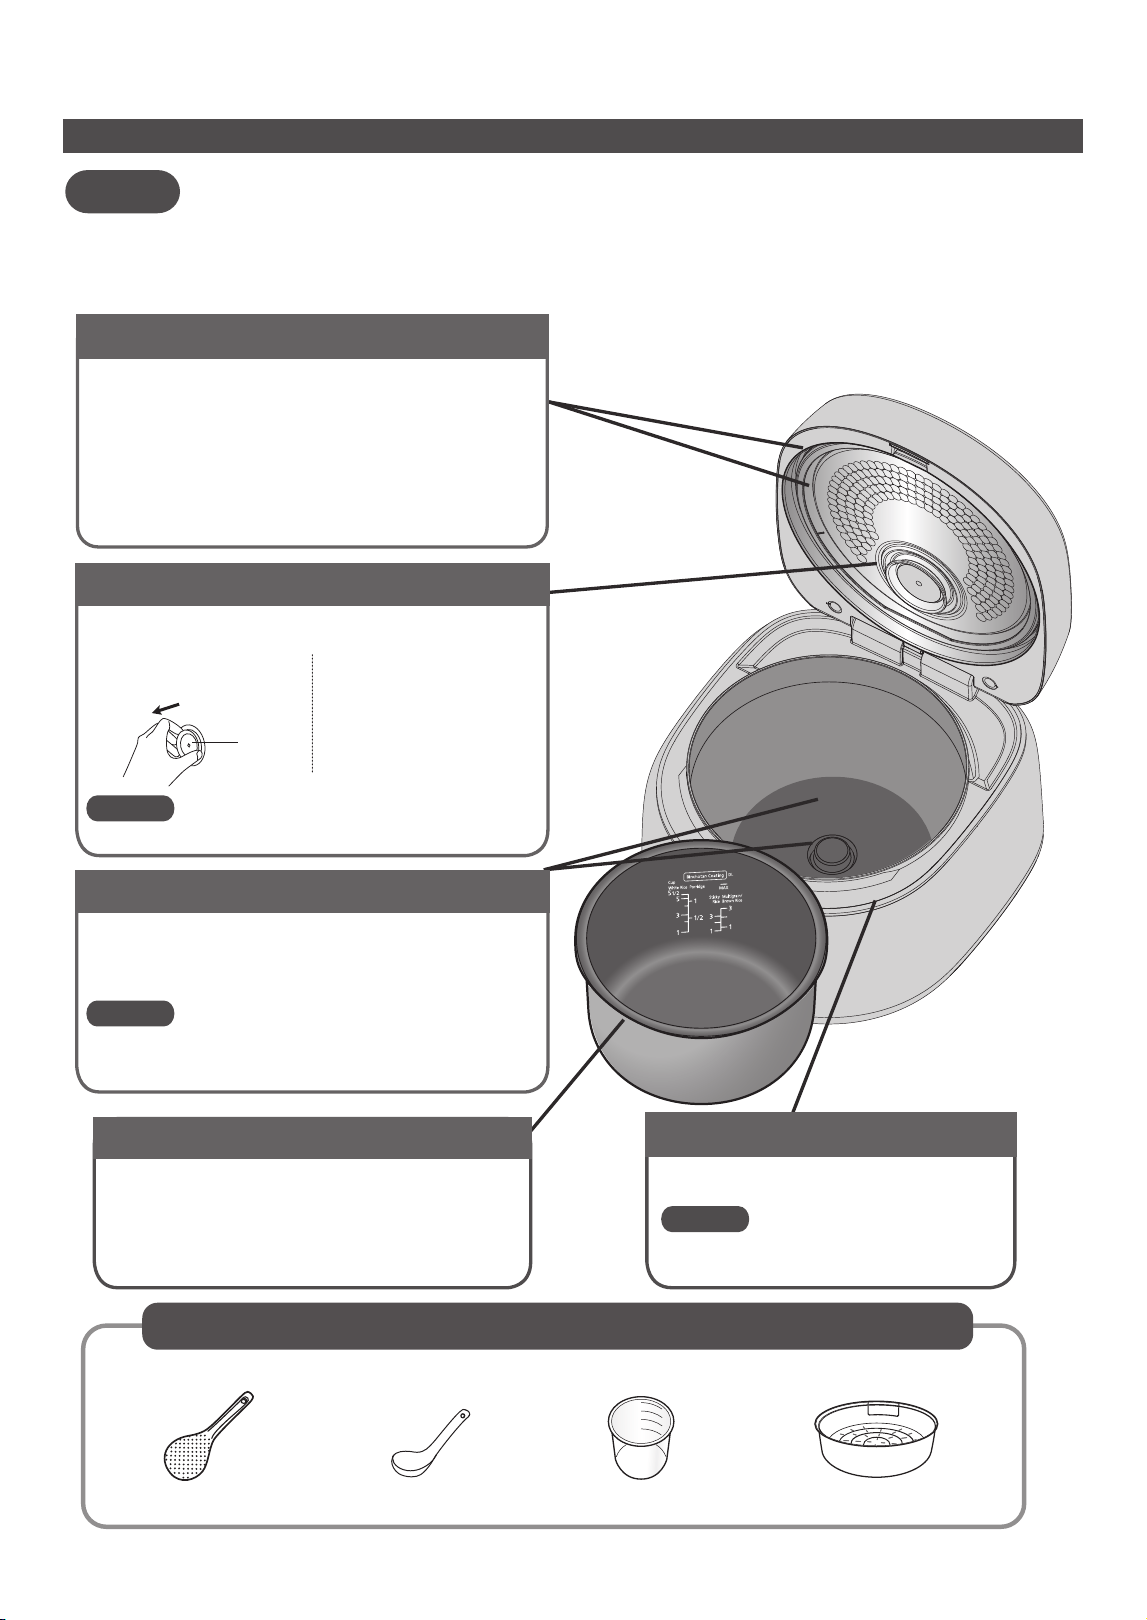
清洁保养
用稀释后的餐具清洗剂和海绵清洗
附属品
饭勺(1个) 计量杯(1个)粥[汤]勺(1个) 蒸笼(1个)
●清洁前,务必拔掉电源插头,等本体冷却后再进行清洗。
●清洁时,切勿将本体浸入水中,不要使用香蕉水,汽油、酒精,去污粉,硬质刷等擦拭。
●请勿使用洗碗机或烘干机。
注 意
●
●
底传感器/铸造加热器
用拧干的湿毛巾擦拭。
●有顽固粘附物时,请用纤细砂纸(600号左右)或
干布擦拭。
●如果不擦干净底传感器和铸造加热器,则米饭
可能会被烧焦,煮不好。
提示
●
●
●
●
●
垫 圈
上框
用拧干的湿毛巾擦拭。
●请勿将水倒入进行清洗。
提示
用拧干的湿毛巾擦拭。
●
使用调味料后,请及时清洗。
(否则可能产生异味、变质或锈蚀。)
●请勿拉扯锅垫圈。
●
放热板上的油污如不及时洗净,则会黏附在放热
板上,很难洗掉。每次使用后都要及时擦洗干净。
●金属部品受热,其表面可能会出现变色或斑纹现
象,但不影响使用。
放热板/锅垫圈
内 锅
●用稀释后的餐具清洗剂和海绵及水清洗。
擦干内锅外侧表面的水份。
●请勿将内锅作为清洗容器。
●涂氟面可能会出现变色或斑纹现象,但不影响
健康及使用。
保湿帽
●每次使用完后,应取下保湿帽进行冲洗,以免产
生异味。
■拆卸方法
从放热板上拔出。
■安装方法
以与拆卸时相反的方向,
塞入放热板上的孔内。
并务必要安装到底,以
防脱落。
垫圈
提示
●安装时,请确保垫圈已安装在保湿帽上。
44

食谱
注意:·根据加入米饭内的不同食材,饭的底部可能有烧焦的现象。
·
煮银耳汤等会变浓稠的食材时,请使用“Porridge(粥)”功能,最大烹调量至“Porridge(粥)”最高水位线,以免溢出。
※本食谱中的烹调量以1.0 L型为例,1.8 L型的烹调量 P49规格。
※1杯(计量杯):约150 g
番茄鸡翅
做法:
食材:鸡翅 8个
香菇 100 g
番茄 2个
1) 将鸡翅两面划两刀,番茄去皮切丁,香菇洗净。
2) 将所有食材和调味料放入内锅,闭合外盖。
3) 按「 」或「 」按键,选择“Steam(蒸煮)”,设置烹调时间25分钟,再按下「Start」(开始)按键。
调味料: 番茄酱 10 mL 水 50 mL
酱油 15 mL 糖 5 g
蚝油 10 mL 盐 2.5 g
辣椒油 40 mL 生抽 10 mL
醋 15 mL 白糖 2.5 g
口水鸡
做法:
食材:去皮鸡腿肉 2个,约 150 g
葱末 2 g
姜末 10 g
蒜末 10 g
1) 锅内放入鸡腿,撒上姜末,然后将内锅放入本体,合上外盖。
2) 按「 」或「 」按键,选择“Waterless(无水料理)”,烹调时间设定为20分钟,再按下「Start」(开始)
按键。
3) 把辣椒油、醋、白糖、生抽调成一碗,再将葱末、蒜末放入拌匀。
4) 烹调结束后,按「Off/Cancel」(关/取消)按键,打开外盖,取出鸡腿肉(把原汤倒掉,否则会稀释调味料
的味道),待稍凉切块,淋上汁即可。
调味料:
菌菇汤
做法:
食材:
白玉菇 70 g
蟹味菇 70 g
调味料:
盐 适量
白胡椒粉 少许
1) 三种菌菇在加了适量盐的淡盐水中浸泡10分钟。洗净,切去根部,杏鲍菇切小段。
2) 将所有菌菇放入内锅,加水至“Porridge(粥)”的最大水位线,并闭合外盖。
3) 按「 」或「 」按键,选择“Soup/Slow Cook(汤/慢炖)”,烹调时间设定为1小时30分钟,再按下
「Start」(开始)按键。
4) 烹饪结束后,打开外盖,加入适量盐、白胡椒粉及葱花调味即可。
注:菌菇可选用自己喜欢的种类。
杏鲍菇 60 g
葱花 少许
蛋糕(低筋粉版)
做法:
食材:
低筋面粉 100 g
鸡蛋 3个
白糖 100 g
黄油 30 g
牛奶 25 g
1) 将鸡蛋的蛋白和蛋黄分开到两个盆中(无水无油),在蛋黄中加入20 g白糖,搅拌至顺滑无颗粒。
2) 在蛋白中加入白糖80 g,用打蛋器打发至筷子可以直立在蛋白中不倒,将蛋黄加入到蛋白中,左右
搅拌均匀。
3) 分次在蛋糕糊中加入过筛的低筋面粉,搅拌均匀至顺滑无颗粒。
4) 在蛋糕糊中加入融化的黄油和牛奶,搅拌均匀。将蛋糕糊倒入内锅,闭合外盖。
5) 按「 」或「 」按键,选择“Cake/Bread(蛋糕/面包)”,设置烹调时间50分钟。再按下「Start」
(开始)按键。
6) 蜂鸣器响后,表示蛋糕已经烤熟,按「Off/Cancel」(关/取消)按键,取出内锅并冷却2分钟,再倒转内
锅把蛋糕倒入盘中或碟上,冷却即可。
※请注意不要倒入超过指定重量的蛋糕糊,否则蛋糕会烘烤不熟。
45
使
用
方
法
在委托维修之前请先进行检查。
故障排除
现象 请检查
不在预约时间烹调
46
烹调时间过长或过短
发出声音
蒸汽从蒸汽口以外的部位漏出
不能进行按键操作
有塑料异味
发粘(较软)
发干(较硬)
夹生(未煮熟)
米汤溢出
·是否已按了「Start」(开始)按键?( P43)
·如果连续烹调,则烹调时间将会变长。(最多可能会延长30分钟左右)
·因米饭量和水量不同,在烹调中途,可能会停止剩余时间显示并进行调整。
·是否显示“U12”?( P48)
·烹调中发出「咯嗒、咯嗒」的声音,是调整火力的声音,并非故障。
·烹调中发出「叭」的声音,是内锅底部(外侧)的水滴受热膨胀后产生的破裂
声音,并非故障。
·放热板的垫圈部和内锅的锅沿上是否有异物?
·内锅是否变形?
·按键的指示灯是否亮着?
→
烹调、预约、保温中途,无法进行按键操作,请按「Off/Cancel」(关/取消)按键
后再进行操作。
·刚开始使用时可能会有塑料的味道,多使用几次后便会消除,不是异常。
·米量和水量是否正确?
·是否混入较多碎米?
·是否使用热水洗米?
·煮好后,是否立即将米饭翻松?
·新米是否放入较多水进行烹调?
·是否长时间浸泡水中?(预约时间太长等)→使用预约功能烹调时,需少放些水。
·米量和水量是否正确?
·外盖是否盖好?
·是否用“Quick/Quinoa(超快速/藜麦饭)”功能进行烹调?
·煮好后,是否立即将米饭翻松?
·内锅底部是否凹凸不平?
·内锅外侧或底传感器、铸造加热器上是否粘有异物?
· 是否选错了功能?
·
米量和水量是否正确?是否淘洗干净?
· 是否安装了保湿帽?
·外盖是否盖好?
· 是否选错了功能?

在委托维修之前请先进行检查。
故障排除
现象 请检查
饭烧焦
结露
有气味
带黄色
米饭干燥
粥变糊状
米饭粘在内锅上
形成一层薄膜
·洗米是否充分?
·是否混入了较多碎米?
·内锅底部是否凹凸不平?
·
内锅外侧或底传感器、铸造加热器上是否粘有异物?
·是否进行了预约定时烹调?
·是否放入调料进行烹调?
·外盖是否盖好?
·洗米是否充分?
·煮好后,是否立即将米饭翻松?
·是否保温超过12小时?
·是否在放入饭勺的状态下进行了保温?
·是否把冷饭添加到内锅里并进行了保温?
·因米的种类或所用水质的不同,煮熟的饭可能会带黄色。
·在放入调料烹调后,可能有气味。
→请仔细清洗内锅、放热板及保湿帽。
·是否保温超过12小时?
·是否反复加热冷饭?
·外盖是否盖好?
·预约定时烹调时,是否让米长时间浸泡于水中?
·是否对粥进行了保温?
·是否碎米太多?
·因大米品种不同,柔软的米饭和粘性好的米饭可能会容易粘锅。
·是否残留着糠皮?
糯米纸装的薄膜是由于淀粉溶解后干燥所生成的,对人体无害,米没有洗干净
则容易生成这种薄膜。
47
困
惑
时

错误显示
请检查
参考
页码
在委托维修之前请先进行检查。
当进行了上述处理后仍不能恢复正常时,请联系Panasonic授权的服务中心报修。
●
锅底或底传感器、铸造加热器上是否附有异物?
→
请清除异物及污渍,然后按「Off/Cancel」(关/取消)按键。
●
水量是否太多?
→
请按「Off/Cancel」(关/取消)按键。
(连续烹调时,可稍微减少一些水)
38
40
●
保温时间是否在96小时以上?
→
请按「Off/Cancel」(关/取消)按键。
42
●
尝试拔下电源插头,再重新插入。
如仍出现“H※※”,则表示存在故障。
→
请咨询Panasonic授权的服务中心,并告知错误代码(“H”后的
两位数字)。
—
当出现这样的显示时
48
●请勿在海拔2000米以上的地区使用本产品,以免影响烹调效果。
规格
49
困
惑
时
至"Porridge"(粥)
最大水位线
MAX(最大)
炖汤的最大烹
调容量(食材+水)
约 L
1.5 2.5
2.1 —
SR-DL105 SR-DL185
120 V
60 Hz
810 W
1.0 L 1.8 L
3.2 L 4.8 L
0.18-0.99[1-5
1/2] 0.18-1.8[1-10]
0.18-0.54[1-3] 0.18-1.08[1-6]
0.09-0.18[1/2-1] 0.09-0.36[1/2-2]
500 700
0.9
2.8 3.2
302
271
194 239
0.18[1], 加水1.5杯 0.18[1], 加水1.5杯
0.18-0.99[1-5
1/2] 0.18-1.44[1-8]
型号
额定电压
额定频率
额定输入功率
烹调额定容积(约)
内锅的额定容积(约)
煮饭容量
(米量)(约)
L(杯)
White Regular
(白米标准)
Quick(超快速)
Quinoa(藜麦饭)
Sticky Rice(糯米)
Brown Rice(糙米)
Multigrain(杂粮饭)
煮粥容量
(米量)(约)
L(杯)
粥
蛋糕糊/面团的最大量(约)g
电源线长度(约)m
产品重量(约)kg
外形尺寸
(约)mm
宽
深
高

Notes
50

Notes
51

RZ19AP65
S0325-0
PrintedinChina/ImpriméenChine
PanasonicAppliancesRiceCooker(Hangzhou)Co.,Ltd.
Website/SiteWeb:https://panasonic.net
©
PanasonicAppliances(China)Co.,Ltd.2025