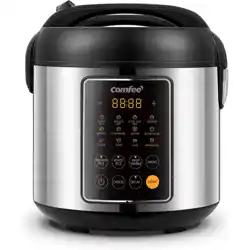
RICE COOKER
CRD30LB3APK

• Read carefully and save all the instructions.
• For additional protection, we recommend the use
of a power outlet with a rated current of 10A. To
avoid circuit overload, do not operate another
high wattage appliance on the same circuit.
• Do not fill kettle when positioned on base. Dry the
water on the bottom of the body before place it
onto power base.
• Never leave the appliance unattended when in
• Close supervision is necessary when your appli-
ance is being used near children or infirm per-
sons.
• Electric kettle must be operated on a flat
surface.Do not place this appliance on or near a
hot gas or electric burner or on the top of other
electric appliances.
The external surface can be hot. Do not touch
hot surfaces. Use handles or knobs.
• Be aware of steam being emitted from spout or lid
especially during refilling.
• Read carefully and save all the instructions.
• For additional protection, we recommend the use
of a power outlet with a rated current of 10A. To
avoid circuit overload, do not operate another
high wattage appliance on the same circuit.
• Do not fill kettle when positioned on base. Dry the
water on the bottom of the body before place it
onto power base.
• Never leave the appliance unattended when in
• Close supervision is necessary when your appli-
ance is being used near children or infirm per-
• Electric kettle must be operated on a flat
surface.Do not place this appliance on or near a
hot gas or electric burner or on the top of other
electric appliances.
The external surface can be hot. Do not touch
hot surfaces. Use handles or knobs.
• Be aware of steam being emitted from spout or lid
especially during refilling.
CONTENT
• Read carefully and save all the instructions.
• For additional protection, we recommend the use
of a power outlet with a rated current of 10A. To
avoid circuit overload, do not operate another
high wattage appliance on the same circuit.
• Do not fill kettle when positioned on base. Dry the
water on the bottom of the body before place it
onto power base.
• Never leave the appliance unattended when in
use.
• Close supervision is necessary when your appli-
ance is being used near children or infirm per-
sons.
• Electric kettle must be operated on a flat
surface.Do not place this appliance on or near a
hot gas or electric burner or on the top of other
electric appliances.
• The external surface can be hot. Do not touch
hot surfaces. Use handles or knobs.
• Be aware of steam being emitted from spout or lid
especially during refilling.
• Do not open lid during boiling cycle.
• Do not use the kettle to heat anything other than
water. Do not fill above the "MAX" indication. Do not
operate kettle if water is below "MIN" indication.
• Do not let the power cord hang over the edge of
the table or touch hot surfaces. Always store
• Read carefully and save all the instructions.
• For additional protection, we recommend the use
of a power outlet with a rated current of 10A. To
avoid circuit overload, do not operate another
high wattage appliance on the same circuit.
• Do not fill kettle when positioned on base. Dry the
water on the bottom of the body before place it
onto power base.
• Never leave the appliance unattended when in
• Close supervision is necessary when your appli-
ance is being used near children or infirm per-
sons.
• Electric kettle must be operated on a flat
surface.Do not place this appliance on or near a
hot gas or electric burner or on the top of other
electric appliances.
The external surface can be hot. Do not touch
hot surfaces. Use handles or knobs.
• Be aware of steam being emitted from spout or lid
especially during refilling.
• Do not open lid during boiling cycle.
• Do not use the kettle to heat anything other than
water. Do not fill above the "MAX" indication. Do not
operate kettle if water is below "MIN" indication.
• Do not let the power cord hang over the edge of
the table or touch hot surfaces. Always store
• Read carefully and save all the instructions.
• For additional protection, we recommend the use
of a power outlet with a rated current of 10A. To
avoid circuit overload, do not operate another
high wattage appliance on the same circuit.
• Do not fill kettle when positioned on base. Dry the
water on the bottom of the body before place it
onto power base.
• Never leave the appliance unattended when in
• Close supervision is necessary when your appli-
ance is being used near children or infirm per-
• Electric kettle must be operated on a flat
surface.Do not place this appliance on or near a
hot gas or electric burner or on the top of other
electric appliances.
The external surface can be hot. Do not touch
hot surfaces. Use handles or knobs.
• Be aware of steam being emitted from spout or lid
especially during refilling.
• Do not open lid during boiling cycle.
• Do not use the kettle to heat anything other than
water. Do not fill above the "MAX" indication. Do not
operate kettle if water is below "MIN" indication.
• Do not let the power cord hang over the edge of
the table or touch hot surfaces. Always store
IMPORTANT SAFEGUARDS
SPECIFICATIONS
1
3
PRODUCT OVERVIEW
4
OPERATION INSTRUCTIONS
6
CLEANING AND MAINTENANCE
21
TROUBLESHOOTING
QUICK START GUIDE
5
24
LIMITED ONE YEAR WARRANTY
25

• Read carefully and save all the instructions.
• For additional protection, we recommend the use
of a power outlet with a rated current of 10A. To
avoid circuit overload, do not operate another
high wattage appliance on the same circuit.
• Do not fill kettle when positioned on base. Dry the
water on the bottom of the body before place it
onto power base.
• Never leave the appliance unattended when in
• Close supervision is necessary when your appli-
ance is being used near children or infirm per-
sons.
• Electric kettle must be operated on a flat
surface.Do not place this appliance on or near a
hot gas or electric burner or on the top of other
electric appliances.
The external surface can be hot. Do not touch
hot surfaces. Use handles or knobs.
• Be aware of steam being emitted from spout or lid
especially during refilling.
• Read carefully and save all the instructions.
• For additional protection, we recommend the use
of a power outlet with a rated current of 10A. To
avoid circuit overload, do not operate another
high wattage appliance on the same circuit.
• Do not fill kettle when positioned on base. Dry the
water on the bottom of the body before place it
onto power base.
• Never leave the appliance unattended when in
• Close supervision is necessary when your appli-
ance is being used near children or infirm per-
sons.
• Electric kettle must be operated on a flat
surface.Do not place this appliance on or near a
hot gas or electric burner or on the top of other
electric appliances.
The external surface can be hot. Do not touch
hot surfaces. Use handles or knobs.
• Be aware of steam being emitted from spout or lid
especially during refilling.
• Do not open lid during boiling cycle.
• Do not use the kettle to heat anything other than
water. Do not fill above the "MAX" indication. Do not
operate kettle if water is below "MIN" indication.
• Do not let the power cord hang over the edge of
the table or touch hot surfaces. Always store
• Read carefully and save all the instructions.
• For additional protection, we recommend the use
of a power outlet with a rated current of 10A. To
avoid circuit overload, do not operate another
high wattage appliance on the same circuit.
• Do not fill kettle when positioned on base. Dry the
water on the bottom of the body before place it
onto power base.
• Never leave the appliance unattended when in
• Close supervision is necessary when your appli-
ance is being used near children or infirm per-
sons.
• Electric kettle must be operated on a flat
surface.Do not place this appliance on or near a
hot gas or electric burner or on the top of other
electric appliances.
The external surface can be hot. Do not touch
hot surfaces. Use handles or knobs.
• Be aware of steam being emitted from spout or lid
especially during refilling.
• Do not open lid during boiling cycle.
• Do not use the kettle to heat anything other than
water. Do not fill above the "MAX" indication. Do not
operate kettle if water is below "MIN" indication.
• Do not let the power cord hang over the edge of
the table or touch hot surfaces. Always store
• Read carefully and save all the instructions.
• For additional protection, we recommend the use
of a power outlet with a rated current of 10A. To
avoid circuit overload, do not operate another
high wattage appliance on the same circuit.
• Do not fill kettle when positioned on base. Dry the
water on the bottom of the body before place it
onto power base.
• Never leave the appliance unattended when in
• Close supervision is necessary when your appli-
ance is being used near children or infirm per-
• Electric kettle must be operated on a flat
surface.Do not place this appliance on or near a
hot gas or electric burner or on the top of other
electric appliances.
The external surface can be hot. Do not touch
hot surfaces. Use handles or knobs.
• Be aware of steam being emitted from spout or lid
especially during refilling.
• Do not open lid during boiling cycle.
• Do not use the kettle to heat anything other than
water. Do not fill above the "MAX" indication. Do not
operate kettle if water is below "MIN" indication.
• Do not let the power cord hang over the edge of
the table or touch hot surfaces. Always store
1
When using electrical appliances, basic safety precautions should
always be followed including the following:
• Read all instructions.
• Do not touch hot surfaces. Use handles or knobs.
• To protect against electrical shock do not immerse cord, plugs, or
(state specific part or parts in question) in water or other liquid.
• Close supervision is necessary when any appliance is used by or
near children.
• Unplug from outlet when not in use and before cleaning. Allow to
cool before putting on or taking off parts.
• Do not operate any appliance with a damaged cord or plug or
after the appliance malfunctions or has been damaged in any
manner. Return appliance to the nearest authorized service facility
for examination, repair, or adjustment.
• The use of accessory attachments not recommended by the
appliance manufacturer may cause injuries.
• Do not use outdoors
• Do not let cord hang over edge of table or counter, or touch hot
surfaces.
• Do not place on or near a hot gas or electric burner, or in a heated
oven.
• Extreme caution must be used when moving an
appliance containing hot oil or other hot liquids.
• Always attach plug to appliance first, then plug cord into the wall
outlet. To disconnect, turn any control to "off", then remove plug
from wall outlet.
• Do not use appliance for other than intended use.
• Household Use Only.
• Do Not Immerse In Water.
• CAUTION : To Reduce The Risk Of Electric Shock, Cook Only In
Removable Container.
• Intended for countertop use only.
• WARNING: Spilled food can cause serious burns. Keep appliance
and cord away from children. Never drape cord over edge of
counter, never use outlet below counter, and never use with an
extension cord.

SAVE THESE INSTRUCTIONS
2
• This appliance has a polarized plug (one blade is wider than the
other). To reduce the risk of electric shock, this plug is intended to
fit into a polarized outlet only one way. If the plug does not fit fully
into the outlet, reverse the plug. If it still does not fit, contact a
qualified electrician. Do not attempt to modify the plug in any way.
CRD30LB3APK
SPECIFICATIONS
Model
Rated Voltage
Rated Frequency
120V~
Rated Power
60Hz
619W
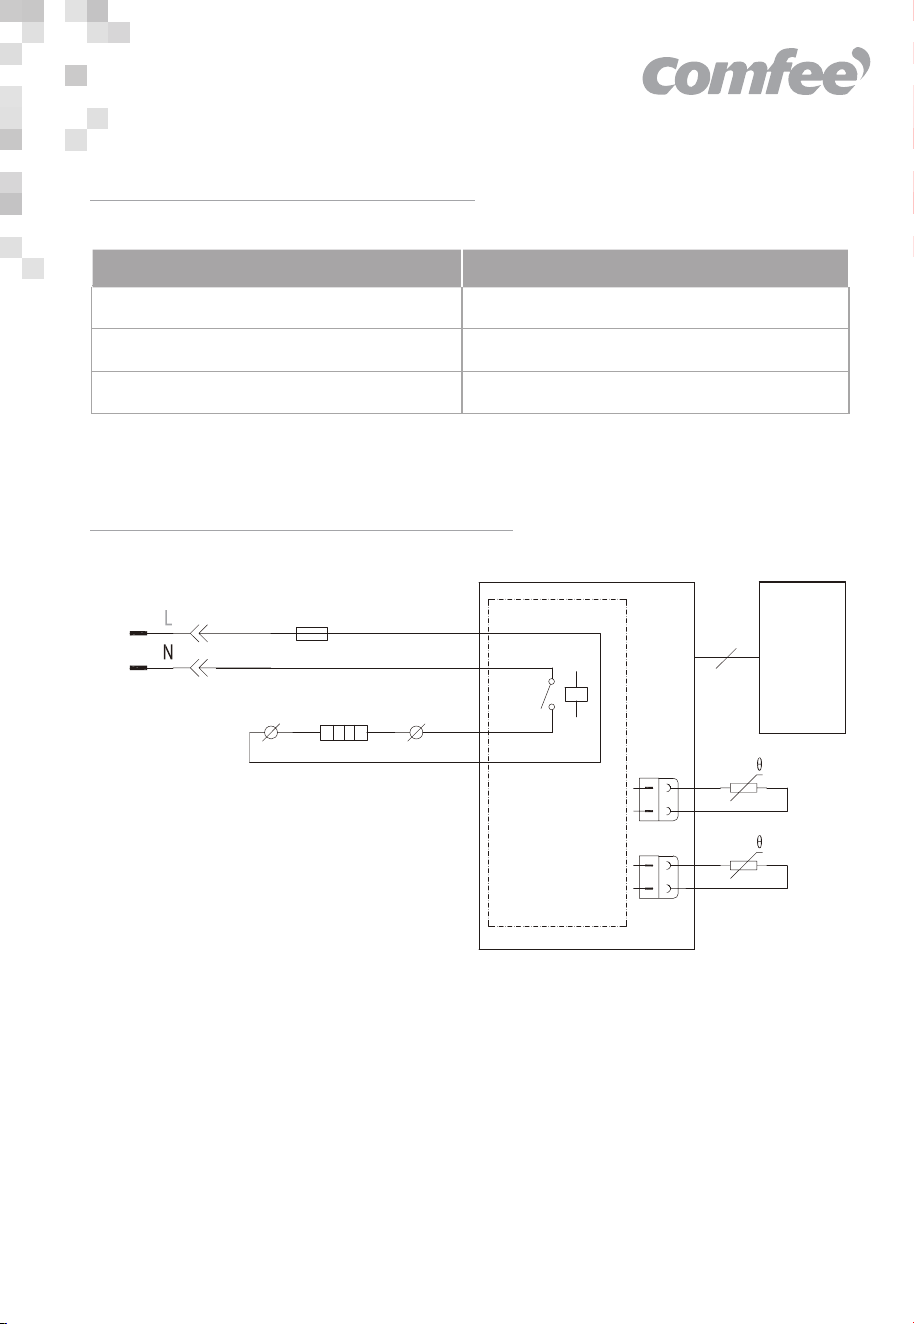
Circuit Principle Diagram
3
Red
Black
Red
Bottom sensor
Heatingplate
Top cover sensor
Black
White
Display
panel
Conne
cting
line
board
power
Blue
120V~60Hz
Temperaturefuse
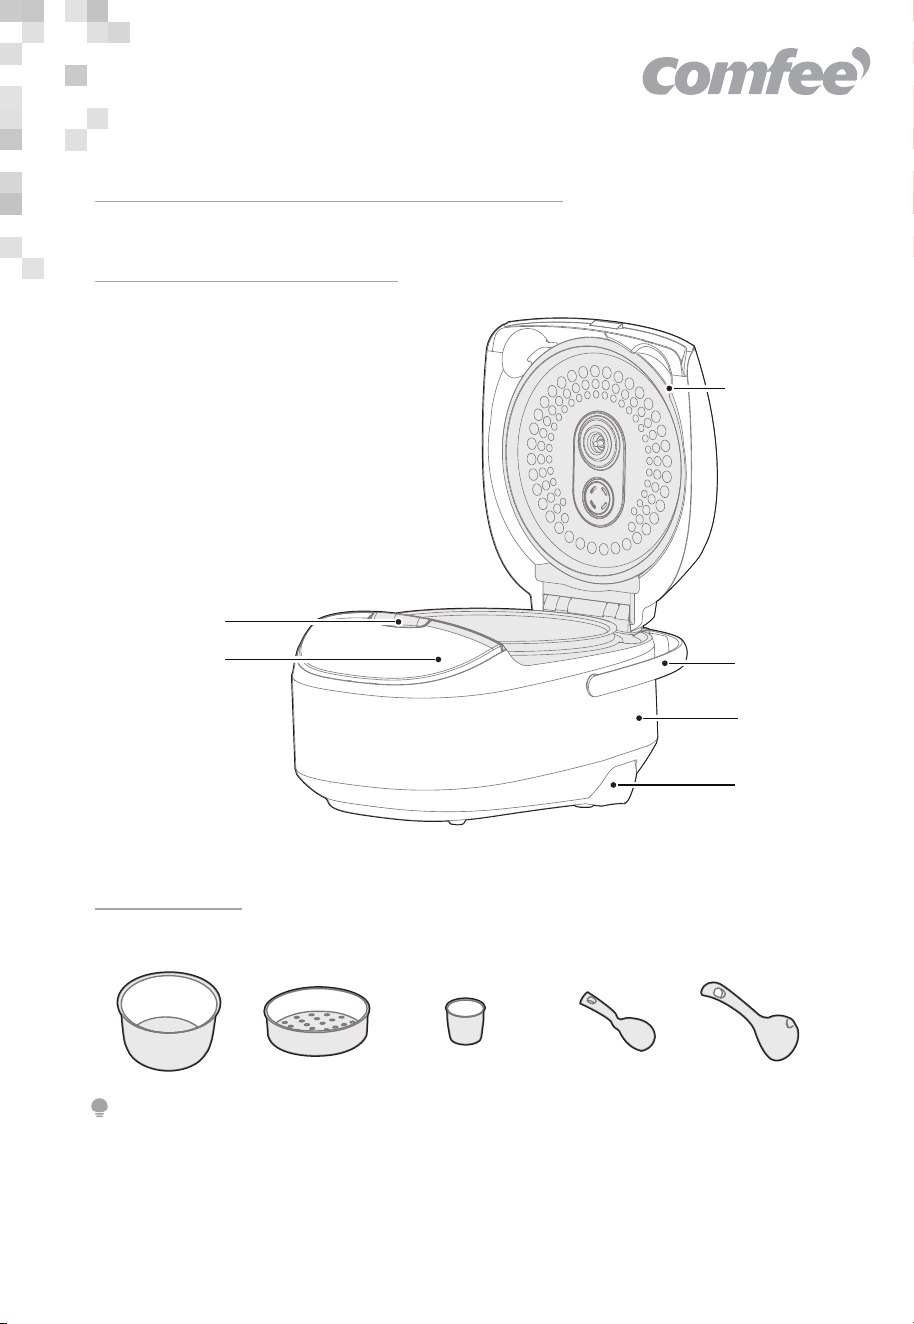
PRODUCT OVERVIEW
NOTE
Component Name
Parts List
All the pictures in this manual are for explanation purpose only. Any
discrepancy between the real object and the illustration in the drawing shall
be subject to the real subject.
4
Cover
Uncovering
button
Control Panel
Handle
Main unit
Power Cord
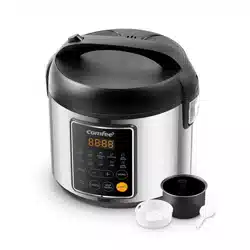
Inner Pot Steam Tray Rice Measuring
Cup
Rice Spatula Soup Ladle
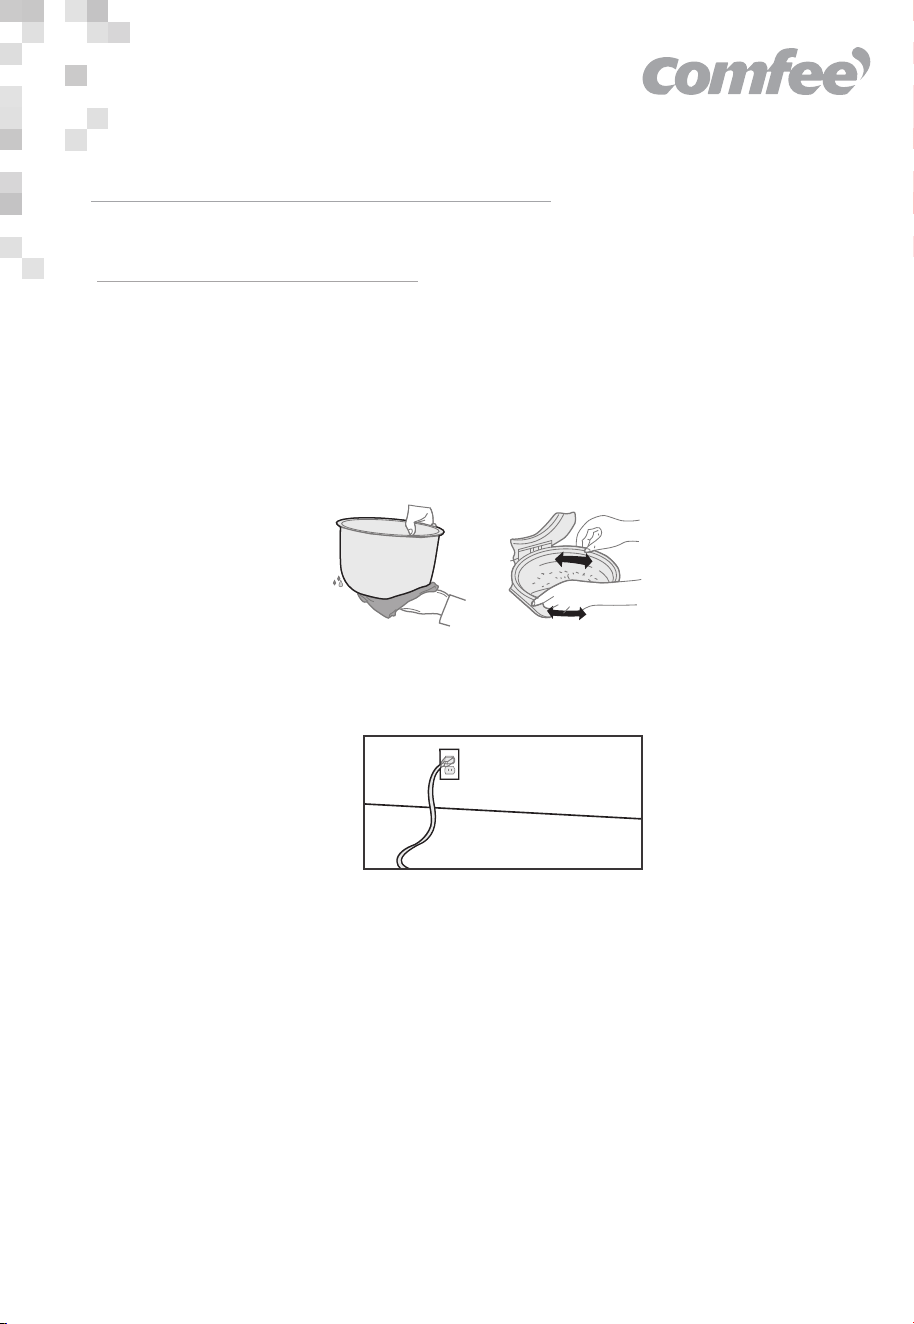
QUICK START GUIDE
Instructions for Use
Figure
socket
Power
Wipe dry the exterior of cooking pot with cloth and place in the body; rotate
the pot around for 2-3 times to ensure close attachment between the pot
bottom and heating plate; press the lid until you hear a click.
Do not place the cooking pot on other stoves for heating to avoid
deformation due to high temperature; do not replace the cooking pot with
other containers and operate on the heating plate.
Press function button to select functions as you need and then press the
“Start” button to start operation. Or press button of the selected function to
directly enter operation mode.
Plug in the power supply
Ensure plugs of the body and power source are properly connected.
5
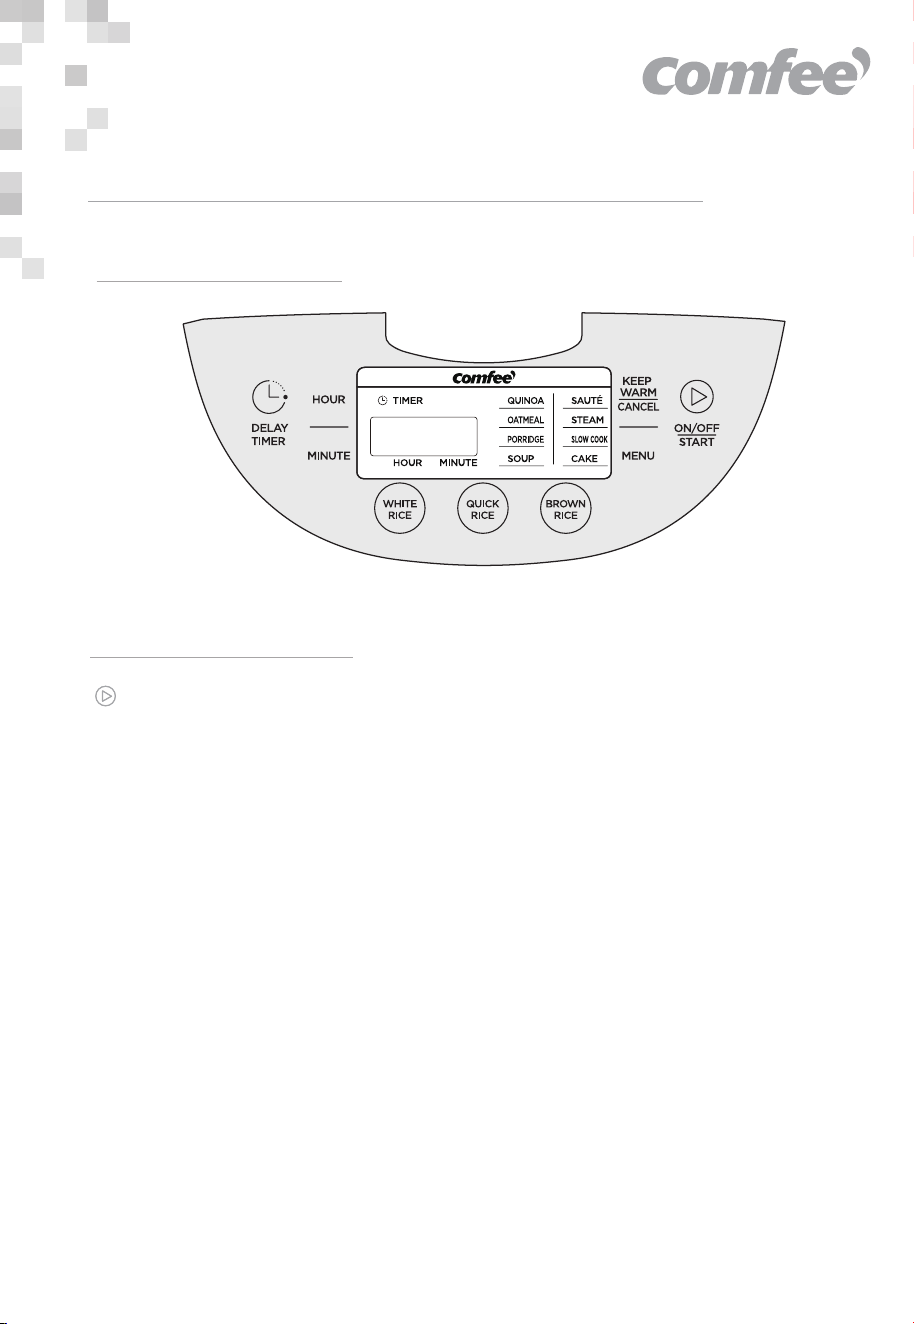
OPERATION INSTRUCTIONS
Operation Part
6
Digital Controls
/ON/OFF/START
Turns the cooker on/off and to begin a function.
KEEP WARM/CANCEL
Keep Warm is perfect for keeping food warm and ready to serve. Press
once to cancel and to manual set to Keep Warm.
DELAY TIMER
Allows for rice to be ready right when it's needed. Add rice and water in the
morning and come home to delicious rice ready to eat!
MENU
Allows the cooker to be set to one of its 8 specialized cooking functions:
QUINOA, OATMEAL, PORRIDGE,SOUP,SAUTÉ, STEAM, SLOW COOK, CAKE
QUICK RICE
A great time-saving option for rice in a pinch.
WHITE RICE
Cooks fluffy, delicious rice automatically.
BROWN RICE
Ideal for cooking brown rice and other tough-to-cook whole grains to
perfection.
HOUR/MINUTE
Allows you to adjust time for specific functions.

Before First Use
7
/ON/OFF/START
Turns the cooker on/off and to begin a function.
KEEP WARM/CANCEL
Keep Warm is perfect for keeping food warm and ready to serve. Press
once to cancel and to manual set to Keep Warm.
DELAY TIMER
Allows for rice to be ready right when it's needed. Add rice and water in the
morning and come home to delicious rice ready to eat!
MENU
Allows the cooker to be set to one of its 8 specialized cooking functions:
QUINOA, OATMEAL, PORRIDGE,SOUP,SAUTÉ, STEAM, SLOW COOK, CAKE
QUICK RICE
A great time-saving option for rice in a pinch.
WHITE RICE
Cooks fluffy, delicious rice automatically.
BROWN RICE
Ideal for cooking brown rice and other tough-to-cook whole grains to
perfection.
HOUR/MINUTE
Allows you to adjust time for specific functions.
1. Read all instructions and important safeguards.
2. Remove all packaging materials and check that all items have been
received in good condition.
3. Tear up all plastic bags and dispose of properly as they can pose a risk to
children.
4. Wash steam vent and all other accessories in warm, soapy water. Rinse
and dry thoroughly.
5. Remove the inner pot from cooker and clean with warm, soapy water.
Rinse and dry thoroughly before returning to cooker.
6. Wipe cooker body clean with a damp cloth.
• Do not use harsh abrasive cleaners, scouring pads or products that are
not considered safe to use on nonstick coatings.
• If washing in the dishwasher, a slight discoloration to the inner pot and
accessories may occur. This is cosmetic only and will not affect
performance.
• Any other servicing should be performed by Comfee's official service.
NOTE
1. Remove the steam vent from the lid when cooker is completely cooled by
lifting up.
2. Handwash the inner pot and all accessories or wash them in the top rack
of the dishwasher.
3. Wipe cooker body clean with a damp cloth.
4. Thoroughly dry cooker body and all accessories.
5. Reassemble for next use.
Helpful Hints
The provided rice cooker cup is the equivalent to a 3/4 standard US cup.
To Clean

8
Rice is too dry/hard after cooking.
If your rice is dry or hard/chewy when the cooker switches to KEEP WARM,
additional water and cooking time will soften the rice. Depending on how
dry your rice is, add 1/2 to 1 cup of water and stir through. Close the lid and
press the WHITE RICE button. When cooker switches to KEEP WARM mode,
open the lid and stir the rice to check the
consistency. Repeat as necessary until rice is soft and moist.
Rice is too moist/soggy after cooking.
If your rice is still too moist or soggy when the cooker switches to KEEP
WARM, use the serving spatula to stir the rice. This will redistribute the
bottom (moistest) part of the rice as well as release excess moisture. Close
the lid and allow to remain on KEEP WARM mode for 10-30 minutes as
needed, opening the lid and stirring periodically to release excess
moisture.
• Because rice varieties may vary in their make-up, results may differ. Here
are some troubleshooting tips to help you achieve the desired
consistency.
NOTE
Troubleshooting
1. Using the provided measuring cup, add rice to the inner pot.
2. Rinse rice to remove excess starch. Drain.
3. Fill with water to the line which corresponds to the number of cups of rice
being cooked.
4. Place the inner pot into the cooker.
5. Close the lid securely.
6. Plug the power cord into an available( 120V ~) wall outlet.
7. Press the /ON/OFF/START button to turn on the cooker.
8. Press WHITE RICE, QUICK RICE, or BROWN RICE to start cooking, the cooking
start indicator light and corresponding function indicator light will turn
on. The digital display will start showing the cooking time after one
rotation.
9. The rice cooker enters the full countdown display, and in the final stage of
cooking, it counts down accurately in 1-minute increments.
Cooking Rice
10. After the the cooking is finished, it will automatically switch to the
keep-warm mode.
11. When finished serving rice, turn the cooker off by pressing KEEP WARM
/CANCEL so digital display reads “----”. Press /ON/OFF/START to turn
offcooker.
12. Unplug the power cord from the power outlet.
• Before placing the inner pot into the cooker, check that it is dry and free of
debris. Adding the inner pot when wet may damage the cooker.
• BROWN RICE requires a much longer cooking cycle than other rice
varieties due to the extra bran layers on the grains. The BROWN RICE
function on this cooker allows extra time and adjusted heat settings in
order to cook the rice properly. If it appears the cooker is not heating up
immediately on the BROWN RICE setting, this is due to a low-heat soak
cycle that proceeds the cooking cycle to produce better BROWN RICE
results.
• Rice should not be left in the cooker on KEEP WARM for more than 12 hours.
• Recommended timer pre-setting is no more than 12 hours to avoid food
deterioration.
• If you misplace the measuring cup, a 3/4 standard US cup is an exact
replacement.
• To add more flavor to rice, try substituting a favorite meat or vegetable
broth or stock. The ratio of broth/stock to rice will be the same as water to
rice.
• For approximate rice cooking times and suggested rice/water ratios, see
the “Rice/ Water Measurement Table” on page 11.

7. Press the /ON/OFF/START button to turn on the cooker.
8. Press MENU to select STEAM. The digital display will show a flashing “5” to
represent five minutes of steam time.
9. Press HOUR and MINUTE functions to adjust the cooking time for the
steaming function. The range can be adjusted from 1 minute to 1 hour
(long press for quick increase).
10. Press the /ON/OFF/START button to begin cooking.
1 1. When the water reaches a boil, the digital display will countdown in 1
minute increments from the selected time.
12. Once the selected time has passed, the cooker will beep and switch to
KEEP WARM.
13. Check steamed food for doneness. If finished steaming, carefully remove
food when finished steaming to prevent overcooking. Wear a protective,
heat-resistant glove when removing to prevent possible injury.
14. When finished steaming, turn the cooker off by pressing KEEP WARM/
CANCEL so digital display reads “----”. Press /ON/OFF/START to turn off
cooker.
15. Unplug the power cord from the power outlet.
• Smaller foods may be placed on a heat-proof dish and then placed onto
the steam rack. Parchment paper or aluminum foil may be used as well.
Place the paper/foil in the center of the steam rack and ensure it does
not create a seal along the bottom of the steam rack. For best results, it is
recommended to puncture small holes in the paper/foil.
• For suggested steaming times and water amounts, see the meat and
vegetable steaming tables on.
9
1. Using the provided measuring cup, add rice to the inner pot.
2. Rinse rice to remove excess starch. Drain.
3. Fill with water to the line which corresponds to the number of cups of rice
being cooked.
4. Place the inner pot into the cooker.
5. Close the lid securely.
6. Plug the power cord into an available( 120V ~) wall outlet.
7. Press the /ON/OFF/START button to turn on the cooker.
8. Press WHITE RICE, QUICK RICE, or BROWN RICE to start cooking, the cooking
start indicator light and corresponding function indicator light will turn
on. The digital display will start showing the cooking time after one
rotation.
9. The rice cooker enters the full countdown display, and in the final stage of
cooking, it counts down accurately in 1-minute increments.
10. After the the cooking is finished, it will automatically switch to the
keep-warm mode.
11. When finished serving rice, turn the cooker off by pressing KEEP WARM
/CANCEL so digital display reads “----”. Press /ON/OFF/START to turn
offcooker.
12. Unplug the power cord from the power outlet.
• Before placing the inner pot into the cooker, check that it is dry and free of
debris. Adding the inner pot when wet may damage the cooker.
• BROWN RICE requires a much longer cooking cycle than other rice
varieties due to the extra bran layers on the grains. The BROWN RICE
function on this cooker allows extra time and adjusted heat settings in
order to cook the rice properly. If it appears the cooker is not heating up
immediately on the BROWN RICE setting, this is due to a low-heat soak
cycle that proceeds the cooking cycle to produce better BROWN RICE
results.
• Rice should not be left in the cooker on KEEP WARM for more than 12 hours.
• Recommended timer pre-setting is no more than 12 hours to avoid food
deterioration.
• If you misplace the measuring cup, a 3/4 standard US cup is an exact
replacement.
• To add more flavor to rice, try substituting a favorite meat or vegetable
broth or stock. The ratio of broth/stock to rice will be the same as water to
rice.
• For approximate rice cooking times and suggested rice/water ratios, see
the “Rice/ Water Measurement Table” on page 11.
NOTE
HELPFUL HINTS
1. Using the provided measuring cup, add 2 cups of water to the inner pot.
2. Place the inner pot into the cooker.
3. Place the steam tray into the cooker.
4. Place food to be steamed onto the steam tray.
5. Close the lid securely.
6. Plug the power cord into an available (120V ~) wall outlet.
STEAM

7. Press the /ON/OFF/START button to turn on the cooker.
8. Press MENU to select STEAM. The digital display will show a flashing “5” to
represent five minutes of steam time.
9. Press HOUR and MINUTE functions to adjust the cooking time for the
steaming function. The range can be adjusted from 1 minute to 1 hour
(long press for quick increase).
10. Press the /ON/OFF/START button to begin cooking.
1 1. When the water reaches a boil, the digital display will countdown in 1
minute increments from the selected time.
12. Once the selected time has passed, the cooker will beep and switch to
KEEP WARM.
13. Check steamed food for doneness. If finished steaming, carefully remove
food when finished steaming to prevent overcooking. Wear a protective,
heat-resistant glove when removing to prevent possible injury.
14. When finished steaming, turn the cooker off by pressing KEEP WARM/
CANCEL so digital display reads “----”. Press /ON/OFF/START to turn off
cooker.
15. Unplug the power cord from the power outlet.
• Smaller foods may be placed on a heat-proof dish and then placed onto
the steam rack. Parchment paper or aluminum foil may be used as well.
Place the paper/foil in the center of the steam rack and ensure it does
not create a seal along the bottom of the steam rack. For best results, it is
recommended to puncture small holes in the paper/foil.
• For suggested steaming times and water amounts, see the meat and
vegetable steaming tables on.
10
1. Using the provided measuring cup, add 2 cups of water to the inner pot.
2. Place the inner pot into the cooker.
3. Place the steam tray into the cooker.
4. Place food to be steamed onto the steam tray.
5. Close the lid securely.
6. Plug the power cord into an available (120V ~) wall outlet.
HELPFUL HINTS

11
COOKING RICE
*1 Rice Cooker Cup = 3/4 US Cup
UNCOOKED
RICE
2 Cups*
3 Cups*
4 Cups*
5 Cups*
6 Cups*
RICE WATER
LINE
(inside pot)
Line 2
Line 3
Line 4
Line 5
Line 6
APPROX.
COOKED
RICE YIELD
4 Cups*
6 Cups*
8 Cups*
10 Cups*
12 Cups*
COOKING
TIMES
White Rice: 39-44 Min.
Brown Rice: 72-77 Min.
White Rice: 39-48 Min.
Brown Rice: 75-80 Min.
White Rice: 46-52 Min.
Brown Rice: 78-83 Min.
White Rice: 47-52 Min.
Brown Rice: 80-85 Min.
White Rice: 48-53 Min.
Brown Rice: 81-86 Min.
• Rinse rice before placing it into the inner pot to remove excess bran and
starch. This will help reduce browning and sticking to the bottom of the
pot.
• Want perfect brown rice without the wait? Use the Delay Timer. Simply
add rice and water in the morning and set the Delay Timer for when rice
will be needed that night. See “USING DELAY TIMER” on for more details.
• This chart is only a general measuring guide, rice/water measurements
may vary.
NOTE

12
USING DELAY TIMER
1. Using the provided measuring cup, add rice to the inner pot.
2. Rinse rice to remove excess starch. Drain.
3. Fill with water to the line which corresponds to the number of cups of rice
being cooked.
4. Place the inner pot into the cooker.
5. Close the lid securely.
6. Plug the power cord into an available 120V AC wall outlet.
7. Press the /ON/OFF/START button to turn on the cooker.
8. Press the function WHITE RICE,QUICK RICE,BROWN RICE or MENU button to
select QUINOA/PORRIDGE/SOUP/STEAM(CAN BE RESERVED), OATMEAL/SAU-
TÉ/SLOW COOK/CAKE (cannot bereserved)
9. Press the DELAY TIMER button to enter the reservation setting state. You
can adjust the reservation time through the HOUR and MINUTE buttons.
The maximum reservation time is 24 hours, and the set time is the total
time required for cooking.
10. After the reservation time is set, press the START button to enter the
reservation waiting state. At this time, the digital display shows the
remaining time.
11. Once rice is finished, the cooker will beep and automatically switch to
KEEP WARM.
12. For better results, stir the rice with the serving spatula to distribute any
remaining moisture.
13. When finished serving cooking, turn the cooker off by pressing the KEEP
WARM/CANCEL so digital display reads “----”. Press /ON/OFF/START to
turn off cooker.
14. Unplug the power cord from the power outlet.
• Due to the longer cooking time needed, BROWN RICE may only be
delayed for 2 hours or more.
• Rice should not be left in the cooker on KEEP WARM for more than 12
hours.
• Recommended timer pre-setting is no more than 12 hours to avoid food
deterioration.
• If you misplace the measuring cup, a 3A standard US cup is an exact
replacement.
NOTE
HELPFUL HINTS
• To add more flavor to rice, try substituting a favorite meat or vegetable
broth or stock. The ratio of broth/stock to rice will be the same as water to
rice.
• For approximate rice cooking times and suggested rice/water ratios, see
the “Rice & Water Measurement Table” on.

13
1. Using the provided measuring cup, add rice to the inner pot.
2. Rinse rice to remove excess starch. Drain.
3. Fill with water to the line which corresponds to the number of cups of rice
being cooked.
4. Place the inner pot into the cooker.
5. Close the lid securely.
6. Plug the power cord into an available 120V AC wall outlet.
7. Press the /ON/OFF/START button to turn on the cooker.
8. Press the function WHITE RICE,QUICK RICE,BROWN RICE or MENU button to
select QUINOA/PORRIDGE/SOUP/STEAM(CAN BE RESERVED), OATMEAL/SAU-
TÉ/SLOW COOK/CAKE (cannot bereserved)
9. Press the DELAY TIMER button to enter the reservation setting state. You
can adjust the reservation time through the HOUR and MINUTE buttons.
The maximum reservation time is 24 hours, and the set time is the total
time required for cooking.
10. After the reservation time is set, press the START button to enter the
reservation waiting state. At this time, the digital display shows the
remaining time.
11. Once rice is finished, the cooker will beep and automatically switch to
KEEP WARM.
12. For better results, stir the rice with the serving spatula to distribute any
remaining moisture.
13. When finished serving cooking, turn the cooker off by pressing the KEEP
WARM/CANCEL so digital display reads “----”. Press /ON/OFF/START to
turn off cooker.
14. Unplug the power cord from the power outlet.
• Due to the longer cooking time needed, BROWN RICE may only be
delayed for 2 hours or more.
• Rice should not be left in the cooker on KEEP WARM for more than 12
hours.
• Recommended timer pre-setting is no more than 12 hours to avoid food
deterioration.
• If you misplace the measuring cup, a 3A standard US cup is an exact
replacement.
NOTE
QUICK RICE
1. Using the provided measuring cup, add rice to the inner pot
2. Rinse rice to remove excess starch. Drain.
3. Fill with water to the line which corresponds to the number of cups of rice
being cooked.
4. Place the inner pot into the cooker.
5. Close the lid securely.
6. Plug the power cord into an available 120V AC wall outlet.
7. Press /ON/OFF/START to turn on the cooker.
8. Press the Quick Rice button to start cooking immediately. The digital
display will enter the countdown display after one rotation, and in the
final stage, it will count down in 1-minute increments until the the cooking
is finished.
9. Once rice is finished, the cooker will beep and automatically switch to
KEEP WARM.
10.For better results, stir the rice with the serving spatula to distribute any
remaining moisture.
11. When finished serving rice, turn the cooker off by pressing KEEP WARM
/CANCEL so digital display reads “----”. Press /ON/OFF/START to turn off
cooker.
12.Unplug the power cord from the power outlet.
• Cooking times are approximate. Altitude, humidity and outside
temperature will affect cooking time.
• Opening the lid during the cooking cycle causes a loss of heat and
steam. Cooking time may be prolonged if the lid is opened before the
rice is finished.
• To add more flavor to rice, try substituting a favorite meat or vegetable
broth or stock. The ratio of broth/stock to rice will be the same as water to
rice.
• For approximate rice cooking times and suggested rice/water ratios, see
the “Rice & Water Measurement Table” on.

1. Using the provided measuring cup, add quinoa to the inner pot.
2. Rinse quinoa to remove excess starch. Drain.
3. Fill with water to the line which corresponds to the number of cups of rice
being cooked.
4. Place the inner pot into the cooker.
5. Close the lid securely.
6. Plug the power cord into an available 120V AC wall outlet.
7. Press /ON/OFF/START to turn the cooker on.
8. Press MENU to cycle to QUINOA. The indicator light will confirm which
function is selected.
9. Press the START button to start cooking. The digital display will enter the
countdown display after one rotation, and in the final stage, it will count
down in 1-minute increments until the cooking is finished.
10.Once rice is finished, the cooker will beep and automatically switch to
KEEP WARM.
11. When finished serving rice, turn the cooker off by pressing KEEP WARM
/CANCEL so digital display reads "----". Press /ON/OFF/START to turn off
cooker.
12.Unplug the power cord from the power outlet.
14
* Cups referenced are with the included measuring cup.
Comparison Tobies
White Rice
Uncooked
Cups*
2 Cups*
4 Cups*
6 Cups*
Cooking Time
With Quick
Rice Function
22-27 Min.
24-29 Min.
31-36 Min.
Approx Time Savings
Compared To White
Rice Function
17 Min.
22 Min.
17 Min.
QUINOA

15
OATMEAL
PORRIDGE
1. Using the provided measuring cup, add rice to the inner pot.
2. Rinse rice to remove excess starch. Drain.
3. Fill with water to the line which corresponds to the number of cups of rice
being cooked.
4. Place the inner pot into the cooker.
5. Close the lid securely.
6. Plug the power cord into an available 120V AC wall outlet.
7. Press /ON/OFF/START to turn the cooker on.
8. Press MENU to cycle to PORRIDGE. The indicator light will confirm which
function is selected.
9. Press the START button to start cooking. The digital display will enter the
countdown display after one rotation, and in the final stage, it will count
down in 1-minute increments until the cooking is finished.
10. Once rice is finished, the cooker will beep and automatically switch to
KEEP WARM.
11. When finished serving rice, turn the cooker off by pressing KEEP WARM
/CANCEL so digital display reads "----". Press ON/OFF/START to turn off
cooker.
12. Unplug the power cord from the power outlet.
1. Follow packaging instructions for suggested oatmeal/water ratio, add
oatmeal and water to the inner pot.
2. Place the inner pot into the cooker.
3. Close the lid securely.
4. Plug into an available 120V AC outlet.
5. Press /ON/OFF/START to turn the cooker on.
6. Press MENU to cycle to OATMEAL. The indicator light will confirm which
function is selected.
7. Press /ON/OFF/START to begin cooking on the selected function. The
digital display will show a “chasing” pattern and the indicator light will
become solid to indicate that it is cooking.
8. The cooker will countdown the final minutes of cook time starting at 10
minutes.
9. Once OATMEAL is finished, the cooker will beep and automatically switch
to KEEP WARM. The digital display will show the number of hours the
cooker has been on the KEEP WARM setting, beginning with “0”.
10. When finished serving, turn the cooker off by pressing KEEP WARM/
CANCEL so digital display reads “----”. Press /ON/OFF/START Io turn off
cooker.
1 1. Unplug the power cord from the power outlet.
• The rice cooker will not switch to KEEP WARM until all liquid is boiled away.
Follow the recipe carefully and do not leave the rice cooker unattended.
• Do not use the provided serving spatula to slow cook. It is not intended to
be used in contact with high temperatures. Use a long-handled wooden
or heat-safe spoon to stir food while slow cooking.
• Inner pot can become hot. Use oven mitts to handle.

16
1. Follow packaging instructions for suggested oatmeal/water ratio, add
oatmeal and water to the inner pot.
2. Place the inner pot into the cooker.
3. Close the lid securely.
4. Plug into an available 120V AC outlet.
5. Press /ON/OFF/START to turn the cooker on.
6. Press MENU to cycle to OATMEAL. The indicator light will confirm which
function is selected.
7. Press /ON/OFF/START to begin cooking on the selected function. The
digital display will show a “chasing” pattern and the indicator light will
become solid to indicate that it is cooking.
8. The cooker will countdown the final minutes of cook time starting at 10
minutes.
9. Once OATMEAL is finished, the cooker will beep and automatically switch
to KEEP WARM. The digital display will show the number of hours the
cooker has been on the KEEP WARM setting, beginning with “0”.
10. When finished serving, turn the cooker off by pressing KEEP WARM/
CANCEL so digital display reads “----”. Press /ON/OFF/START Io turn off
cooker.
1 1. Unplug the power cord from the power outlet.
CAUTION
• The rice cooker will not switch to KEEP WARM until all liquid is boiled away.
Follow the recipe carefully and do not leave the rice cooker unattended.
• Do not use the provided serving spatula to slow cook. It is not intended to
be used in contact with high temperatures. Use a long-handled wooden
or heat-safe spoon to stir food while slow cooking.
• Inner pot can become hot. Use oven mitts to handle.
SLOW COOK
1. Add food to be slow cooked to the inner pot.
2. Place the inner pot into the cooker.
3. Close the lid securely.
4. Plug the power cord into an available 120V AC wall outlet.
5. Press the /ON/OFF/START button to turn on the cooker.
6. Press MENU to select SLOW COOK. The digital display will show a flashing
“2” to represent 2 hours of slow cook time.
7. Press HOUR or MINUTE to set cook time by one hour, upto 10 hours.
8. Press the /ON/OFF/START button to begin cooking.
9. The digital display will countdown in one minute increments from the
selected time.
10. Once cooking is finished, the cooker will beep and automatically switch
to KEEP WARM.
1 1. Open the lid to check food for doneness. If fully cooked, remove food for
serving.
12. Turn the rice cooker off by pressing KEEP WARM/ CANCEL so digital
display reads “----”. Press /ON/OFF/START to turn off cooker.
13. Unplug the power cord from the power outlet.
• When removing inner pot wear a protective, heat-resistant glove to avoid
possible injury.
CAUTION

17
Meat
Fish
Chicken
Pork
Beef
Steaming Time
25 Min.
30 Min.
30 Min.
Medium = 25 Min.
Medium-Well = 30 Min.
Well = 33 Min.
Safe Internal
Temperature
140°
165°
160°
160°
STEAMING TABLES
Meat Steaming Table
• Since most vegetables only absorb a small amount of water, there is no
need to increase the amount of water with a larger serving of vegetables.
• Steaming times may vary depending upon the cut of meat being used.
• To ensure meat tastes its best, and to prevent possible illness, check that
meat is completely cooked prior to serving. If it is not, simply place more
water in the inner pot and repeat the cooking process until the meat is
adequately cooked.
HELPFUL HINTS
Vegetable Steaming Table
Corn on the Cob 25 Minutes
Vegetable
Cabbage
Carrots
Cauliflower
Steaming Time
25 Minutes
25 Minutes
25 Minutes
Asparagus
Broccoli
20 Minutes
15 Minutes

1. Add ingredients to be sauteed or browned to the inner pot.
2. Place the inner pot into the cooker.
3. Plug into an available 120V AC outlet.
4. Press the /ON/OFF/START to turn on the cooker.
5. Cycle through MENU to select SAUTÉ. Press START to start sauteing.
6. The digital display will show a "chasing" pattern and the indicator light
will become solid to indicate that it is cooking. Using a longhandled
wooden spoon, stir ingredients until sauteed/browned to the desired
level.
7. Add other called for ingredients and liquid to the inner pot.
8. Close the lid securely and allow the cooker to cook.
9. After a few minutes, the cooker will automatically switch to its "Simmer"
mode. The cooker will countdown the final 10 minutes of cook time.
10. Once the meal has cooked, the cooker will beep and automatically
switch over to KEEP WARM.
11. When finished serving, turn the cooker off by pressing the KEEP WARM
/CANCEL so digital display reads "----". Press /ON/OFF/START to turn off
cooker.
12. Unplug the power cord from the power outlet.
18
Vegetable
Green Beans
Peas
Spinach
Squash
Zucchini
Steaming Time
15 Minutes
20 Minutes
20 Minutes
20 Minutes
20 Minutes
SAUTÉ
• Altitude, humidity and outside temperature will affect cooking times.
• These steaming charts are for reference only. Actual cooking times may
vary.
NOTE
* When steaming, recommends using 2 cups of water with the provided
measuring cup.

1. Add ingredients to the inner pot.
2. Place the inner pot into the cooker.
3. Close the lid securely.
4. Plug into an available 120V AC outlet.
5. Press /ON/OFF/START to turn the cooker on.
6. Press MENU to cycle to Soup . The indicator light will confirm which
function is selected. Digital display should read “2:00”.
7. Use HOUR/MINUTE to set the time. Adjust cooking time in one hour/ten
minute increments 1 and 4 hours for Soup. Press
/ON/OFF/START.
8. Once the selected time has passed, cooker will beep and switch to Keep
WARM. Digital display will show the number of hours the cooker has been
on KEEP WARM beginning with “0”.
9. Once food is finished, the cooker will beep and automatically switch to its
KEEP WARM setting. The digital display will show the number of hours the
cooker has been on the KEEP WARM setting, beginning with “0”.
10. When finished serving, turn the cooker off by pressing the KEEP WARM
/CANCEL so digital display reads11 “----”, Press /ON/OFF/START to turn
off cooker.
1 1. Unplug the power cord from the power outlet.
• When cooking time has expired, the cooker will go into KEEP WARM. Follow
the recipe carefully and do not leave the cooker unattended.
• Do not use the provided serving spatula to cook soups, stews or chilis. It is
not intended to be used in contact with high temperatures. Use a
long-handled wooden or heat-safe spoon to stir food while slow cooking.
• Inner pot can become hot. Use oven mitts to handle.
Proportion Table
Water
volume
(Scale)
One scale
Two scales
Three scales
Olive oil
(mL)
40mL
60mL
80mL
Onion
(piece)
1/3 piece
2/3 piece
1 piece
Bell pepper
(piece)
1/3 piece
2/3 piece
1 piece
Salt
(gram)
10g
20g
30g
Ketchup
(gram)
60g
90g
120g
SOUP
CAUTION
19

CAKE
1. Follow instructions on cake mix packaging or recipe to mix liquid
ingredients and cake mix. Add cake mix into the inner pot.
2. Place the inner pot into the cooker.
3. Close the lid securely.
4. Plug into an available 120V AC outlet.
5. Press /ON/OFF/START to turn the cooker on.
6. Press the MENU button to cycle to CAKE. The indicator light will confirm
which function is selected.
7. Press the Start button to begin cooking on the selected function. The
digital display will show a “chasing” pattern and the indicator light will
become solid to indicate that it is cooking.
8. The cooker will countdown the final minutes of cook time starting at 10
minutes.
9. Once cake is finished, the cooker will beep and automatically switch to its
KEEP WARM setting. The digital display will show the number of hours the
cooker has been on the KEEP WARM, beginning with “0”.
10. Remove the cake carefully by inverting the inner pot onto a flat dish or
surface. Turn the cooker off by pressing the KEEP WARM/CANCEL so digital
display reads “----”.
Press /ON/OFF/START to turn off cooker.
1 1. Unplug the power cord from the power outlet.
• When removing inner pot wear a protective, heat-resistant glove to avoid
possible injury.
CAUTION
20

21
CLEANING AND MAINTENANCE
• Wipe the heat preservation
cover with wet cloth and do not
wash with water.
• Wipe dry the water in
condensation collector with dry
cloth.
• Clean the multi-cooker with a
damp cloth.
• Wipe the water and rice around
and below the cooking pot
before placing in.
• Clean the water on heating
plate (if any) with cloth; polish
the burnt rice on the plate (if
any) with steel scrubber or
sand paper.
22
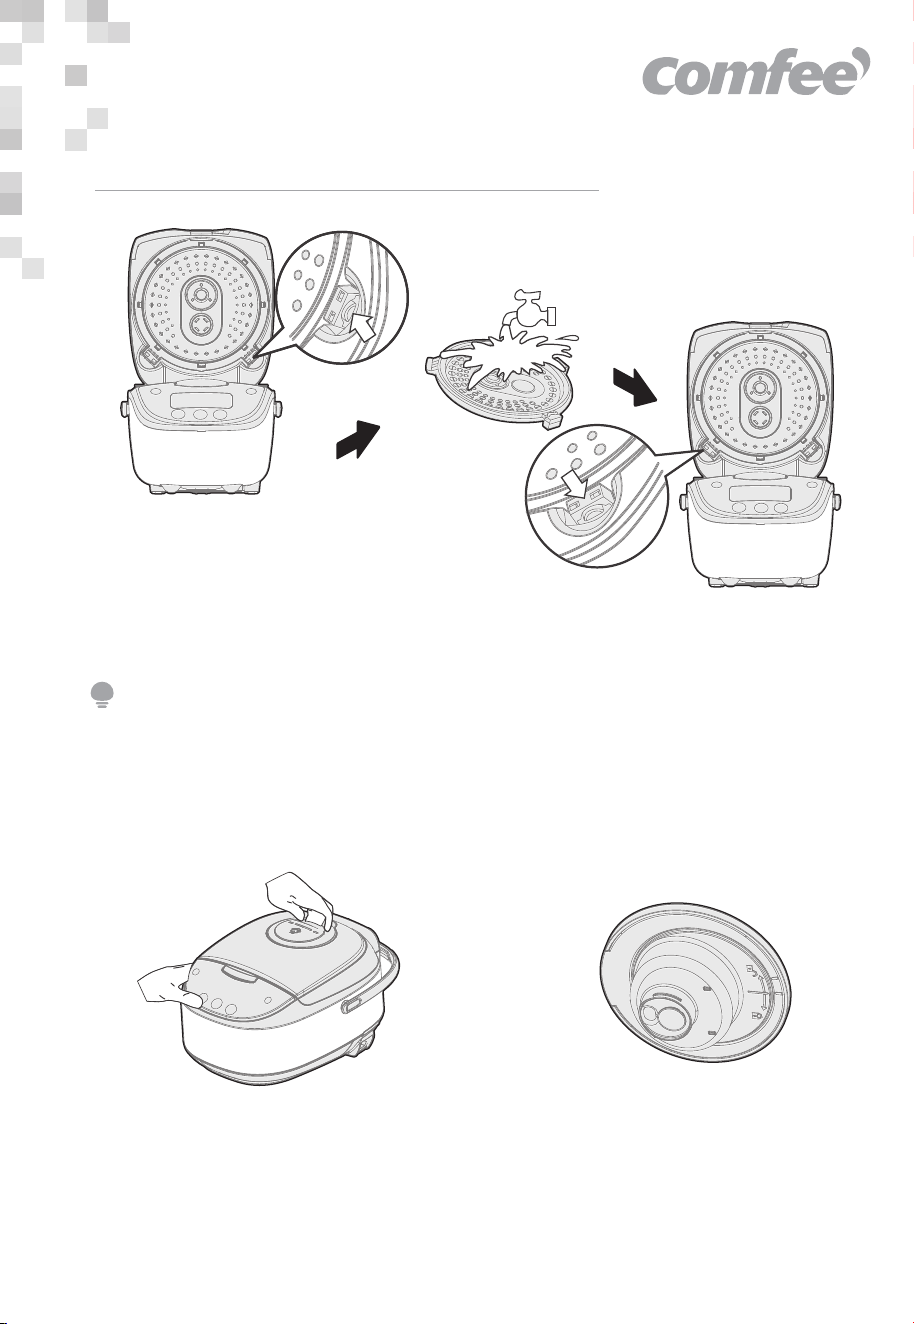
Cover Plate Cleaning Methods
Disassembly, Cleaning and Assembly of Steam Valve.
The valve should be cleaned frequently to ensure smooth venting. Please
clean when the appliance cools down to avoid burns.
NOTE:
• Grasp the handle of steam
valve and lift upward.
• Open the valve seat and valve
cover in according to the
direction indicated on the valve
seat.
Press here
Clean the
cover plate
Open the cover,
remove the cover plate
Install the plate

23
• Drawing of opening it. • Clean it with water after open-
ing.
• Align the valve cover with the
slot of valve seat, close the
steam valve in accordance
with the instructions,
installation completed when
heard "Click" sound
• Press down to install the steam
valve

24
TROUBLESHOOTING
Possible reasons Coping methods
Abnormal code
is always on
E1:
Bottom sensor open
circuit
E2:
Bottom sensor short circuit
E5:
Upper cover sensor open
circuit
E6:
Upper cover sensor short
circuit
EU:
Communication failure
(receiving)
EU(Flashing):
Communication failure
(transmission)
If it still reports a fault
after unplugging the
power and plugging
again, please send it to
the local after-sales
service center
Abnormal code
flicking
EU: Communication sending
failure
EU: Pull out and
re-connect the power
cord, if the display still
shows the same
message, please send
the cooker to your local
after-sales service
center for maintenance.
Fault
Operation of your appliance can lead to errors and malfunctions. The
following tables contain possible causes and notes for resolving an error
message or malfunction. It is recommended to read the tables carefully
below in order to save your time and money that may cost for calling to the
service center.

LIMITED ONE YEAR WARRANTY
This is the only express warranty for this product and is in lieu of anyother
warranty or condition
This product is warranted to be free from defects in material and
workman-ship for a period of one (1) year from the date of original
purchase. During this period, your exclusive remedy is repair or
replacement of this product or any component found to be defective, at
your option; however, you are reponsi-ble for all costs associated with with
returning the product to us and our returning the product or component
under this warranty to you. If the product or component is no l onger
available, we will replace with a similar one of equal or greater value.
This warranty does not cover glass, filters, wear from normal use, use not in
conformity with the printed directions, or damage to the product resultinig
from accident, alteration, abuse or misuse. This warranty extends only to
the original consumer purchaser or gist recipient. Keep tile original sales
receipt, as proof of purchase is required to make a warranty claim. This
warranty is volid if product is used for other than single-family household
use or subject-ed to any voltage and wave form other than as specified on
the label(e.g., 120V ~)
We exclude all claims for special, incidental, and consequential damages
by breach of express or implied warranty. All liability is limited to amout of
the purchase price. Every implied warranty, including any statutory
warranty or condition of merchantability or fitness for particular purpose, is
disclaimed except to the extent prohibited by law, in which case such
warranty or conditon is limited to the duration of this written warranty. This
warranty gives you specific legal rights. you may have other legal rights
that vary depending on where you live. Some states or provinces do not
allow limitations on implied warranties or special, incidental consequential
damages, so tile foregoing limitations may not apply to you.
NOTE:
Customer Service Management office:
5 Sylvan Way, Suite 100 parsippany, NJ, 07054
Amazon Store: https://www.amazon.com/comfee
Tel: 866-646-4332
E-mail: [email protected]
25