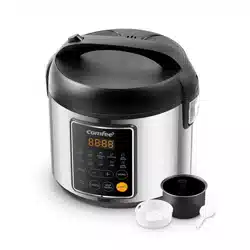
RICE
COOKER
CRD20LB1BSS
Instruction Manual
IMPORTANT NOTE: For your safety and continued enjoyment of this
product, always read the instruction Manual carefully before using.

CONTENT
IMPORTANT SAFEGUARDS
SPECIFICATIONS
PRODUCT OVERVIEW
OPERATION INSTRUCTIONS
CLEANING AND MAINTENANCE
TROUBLESHOOTING
LIMITED ONE YEAR WARRANTY
1
3
4
5
22
23
24

1
IMPORTANT SAFEGUARDS
• DO NOT operate any appliance with a damaged cord or plug or after the
appliance malfunctions or has been damaged in any manner. Return
appliance to the nearest authorized service facility for examination, repair, or
adjustment.
• Protect against electrical shock do not immerse cord, plugs, or (state specific
part or parts in question) in water or other liquid.
• CAUTION: To reduce the risk of electric shock, cook only in removable
container.
• DO NOT touch hot surfaces. Use handles or knobs.
• Extreme caution must be used when moving an appliance containing hot oil
or other hot liquids.
• DO NOT use outdoors, HOUSEHOLD USE ONLY.
• Close supervision is necessary when any appliance is used by or near children.
• DO NOT use appliance for other than intended use.
• Unplug from outlet when not in use and before cleaning. Allow to cool before
putting on or taking off parts.
• The use of accessory attachments not recommended by the appliance
manufacturer may cause injuries.
• DO NOT let cord hang over edge of table or counter, or touch hot surfaces.
• DO NOT place on or near a hot gas or electric burner, or in a heated oven.
• Always attach plug to appliance first, then plug cord into the wall outlet.To
disconnect, turn any control to "off", then remove plug from wall outlet.
• Intended for countertop use only.
WARNING
When using electrical appliances, basic safety precautions should always be
followed including the following:
Read all instructions.

2
• WARNING: Spilled food can cause serious burns. Keep appliance and cord away
from children. Never drape cord over edge of counter, never use outlet below
counter, and never use with an extension cord.
• A short power-supply cord is used to reduce the risk resulting from it being
grabbed by children, becoming entangled in, or tripping over a longer cord.
• DO NOT use the handle to move the cooker when any food is in it.
• This appliance has a polarized plug (one blade is wider than the other). To reduce
the risk of electric shock, this plug is intended to fit into a polarized outlet only
one way. If the plug does not fit fully into the outlet, reverse the plug. If it still
does not fit, contact a qualified electrician. Do not attempt to modify the plug in
any way.
• A short power supply cord is provided to reduce the risk resulting from becoming
entangled in or tripping over a longer cord.
• Extension cords are available and may be used if care is exercised in their use.
• If an extension cord is used
- The marked electrical rating of the extension cord should be at least as great as
electrical rating of the appliance
- The longer cord should be arranged so that it will not drape over the counter
or table top where it could be pulled on by children or tripped over
unintentionally.
- If the appliance is of the grounded type, the cord set or extension cord should
be a grounding-type 3-wire cord.
• Trouble shooting: any other servicing should be performed by an authorized
service representative.
SAVE THESE INSTRUCTIONS

3
SPECIFICATIONS
CRD20LB1BSSProduct Model
Capacity
Power Supply
Rated Power
2.0L
/2.0QT
120V~ 60Hz
450W
4
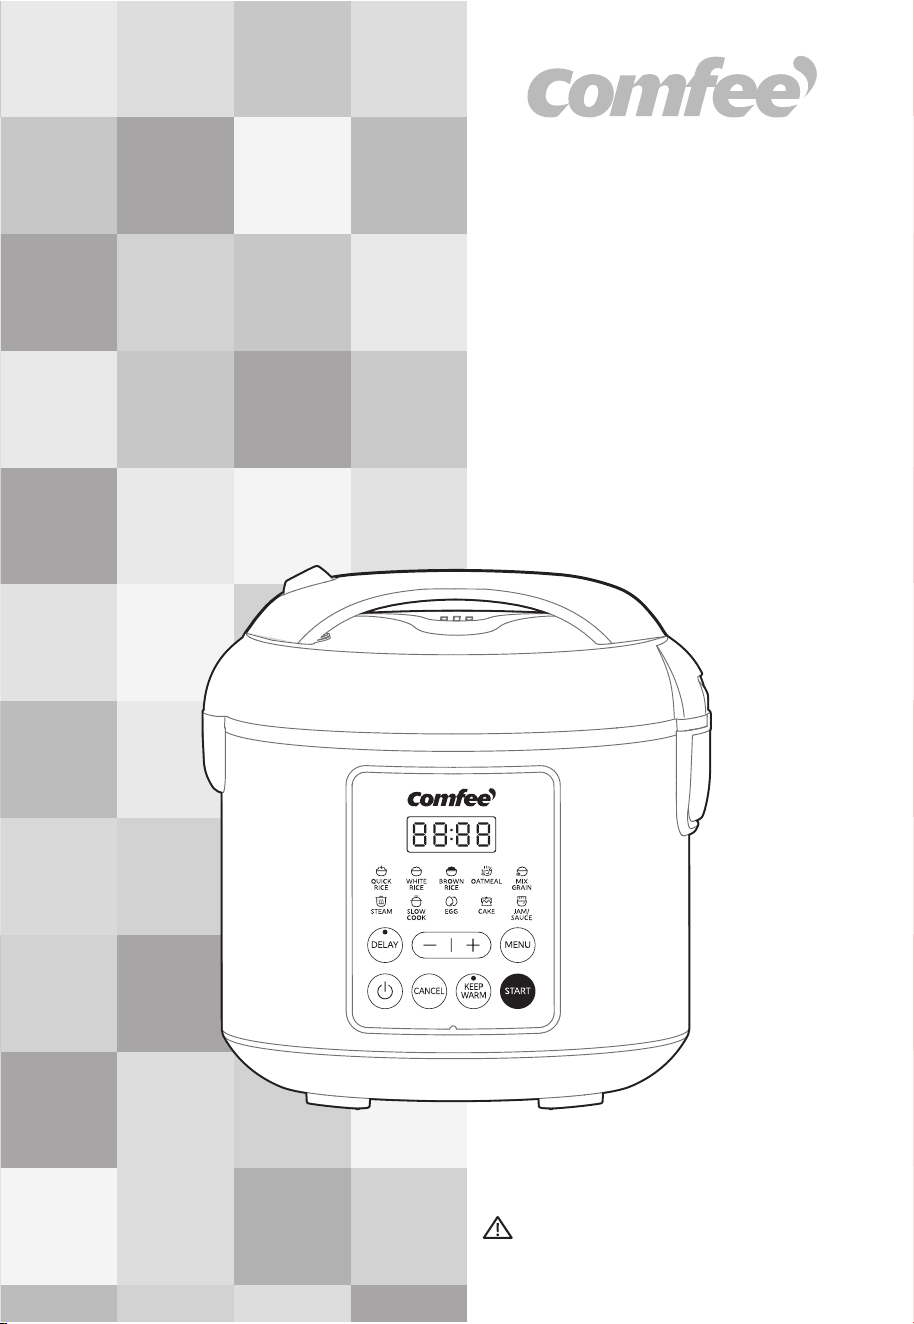
PRODUCT OVERVIEW
NOTE
All the pictures in this manual are for explanation purpose only. Any discrepancy between the
real object and the illustration in the drawing shall be subject to the real object.
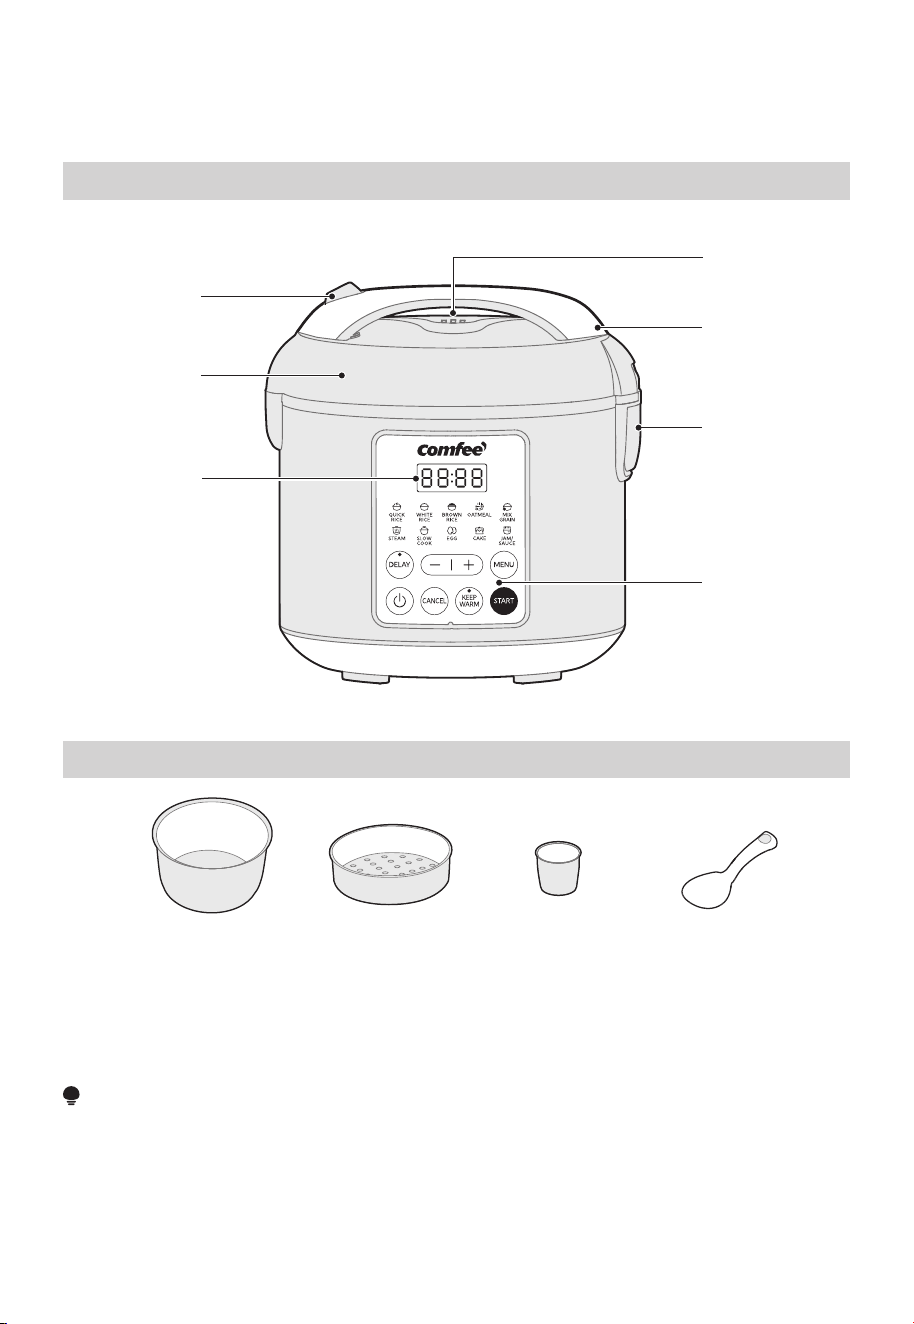
Steamer
Measurng CupInner Cooking Pot Rice Spatula
Lid
Lid Release
Button
Steam Vent
Handle
Condensation
Collector
Digital Display
Digital Control
Panel
Component Name
Parts List

5
WHITE RICE
• Transform your plain rice grains into a fluffy, flavorful delight. With
just one touch, you can enjoy restaurant-quality rice right at home.
BROWN RICE
• This function is ideal for cooking brown rice and other tough-to-cook
whole grains to perfection.
QUICK RICE
• It is perfect for those busy days when you need a fast and delicious
meal. It cooks your rice in a fraction of the time compared to the
regular setting.
Functions ReviewFunction
OPERATION INSTRUCTIONS
Control Panel
Cooking/Timer/Fault Code Display
Menu Options
Function Settings
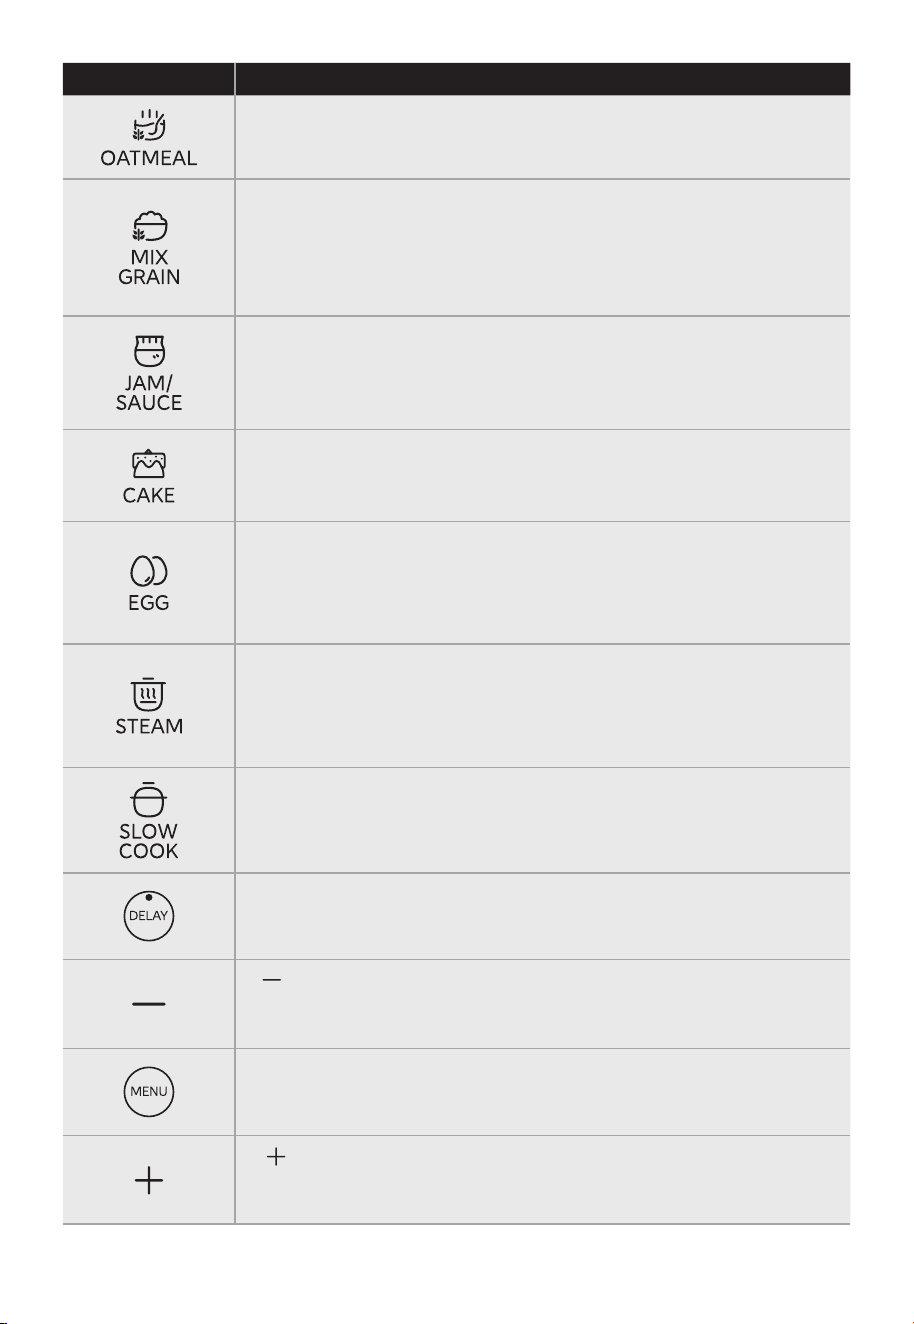
SLOW COOK
• The Slow Cook function sets for 1-12 hours for perfectly cooked soups
and stews.
6
Functions ReviewFunction
QATMEAL
• Makes a quick and healthy breakfast with no need to stir.
MIX GRAIN
• This function allows you to reasonably combine and cook black rice,
red rice, white rice, corn and other grains together, so as to get
delicious multigrain rice. It is easy to cook and rich in nutrition,
especially suitable for healthy eating enthusiasts.
STEAM
• The “Steam” function is perfect for healthy sides and main courses.
Press the Steam button. The Steam light illuminates and the digital
display shows the suggested cooking time.
EGG
• Put the eggs in the pot, add appropriate amount of water, turn on the
EGG function, and you can make a unique and delicious
onsen-tamago.
CAKE
• By using this function with a suitable cake recipe, you can cook a
sweet, tender and golden cake.
JAM/SAUCE
• Just put the prepared ingredients into the pot, turn on the JAM/SAUCE
function, and cook slowly. After a while, you will get sweet and
delicious jam.
DELAY
• The delayed start function can get the rice ready when needed, and
we can have delicious rice when we come home.
“ ”
• This button is used to decrease the adjustment time of the Delayed
Start function and decrease the cooking time.
“ ”
• This button is used to increase the adjustment time of the Delayed
Start function and increase the cooking time.
MENU
• Used to select the cooking program you need.

7
1. Read all instructions and important safeguards.
2. Remove all packaging materials and check that all items have been received in good
condition.
3. Keep plastic bags away from children as they can pose a risk to children and please
dispose of them properly.
4. Wash steam vent and all other accessories in warm, soapy water. Rinse and dry
thoroughly.
5. Wipe body clean with a damp cloth.
Functions ReviewFunction
ON/OFF
• Start the cooker and enter standby mode at the same time.
CANCEL
• Cancel the working function at any time.
KEEP WARM
• In standby mode, press the KEEP WARM key to start the keep warm
program; automatically keep warm after any cooking program such
as QUICK RICE, WHITE RICE, BROWN RICE and JAM/SAUCE ends.
START
• Used to start any cooking program such as QUICK RICE, WHITE RICE,
BROWN RICE, JAM/SAUCE.
Before First Use
In standby mode, there is no button action, the rice cooker will automatically enter sleep
mode after 5 minutes. And the rice cooker can be woken up by pressing any other buttons
except the “ ” button to re-enter the standby state.
Plug the power cord into an available power outlet (120V~60Hz). All lights and display are off.
The rice cooker is in off mode at this time. Then press “ ”, and the “QUICK RICE” light
flashes to enter standby mode.
Standby Mode
Sleep Mode

Brown Rice
Level 1 on the
inner pot
1 68min
Level 2 on the
inner pot
2 72min
Level 3 on the
inner pot
3 75min
Steam --
5-30 min,
adjustable
Accurate timing
after boiling
--
Default
time:
5 min
Mix Grain
Level 1 on the
inner pot
1 55min
Slow Cook
--
Large amount
Small amount
1 hour-12 hours,
adjustable
Default
time:
2 hours
Level 2 on the
inner pot
2 60min
8
Function
Cups (Ingredients)
Cups
(Water)
White Rice
Cooking
Times
Remarks
Quick Rice
Level 1 on the
inner pot
1 28min
Level 2 on the
inner pot
2 35min
Level 3 on the
inner pot
3 40min
Level 4 on the
inner pot
4 42min
Level 1 on the
inner pot
1 30min
Level 2 on the
inner pot
2 40min
Level 3 on the
inner pot
3 42min
Oatmeal
Steel Cut
Oatmeal:2.5
cups of water
1 30min
Rolled Oatmeal:
3 cups of milk or
3 cups of water
Level 4 on the
inner pot
4 45min
Working Time
9
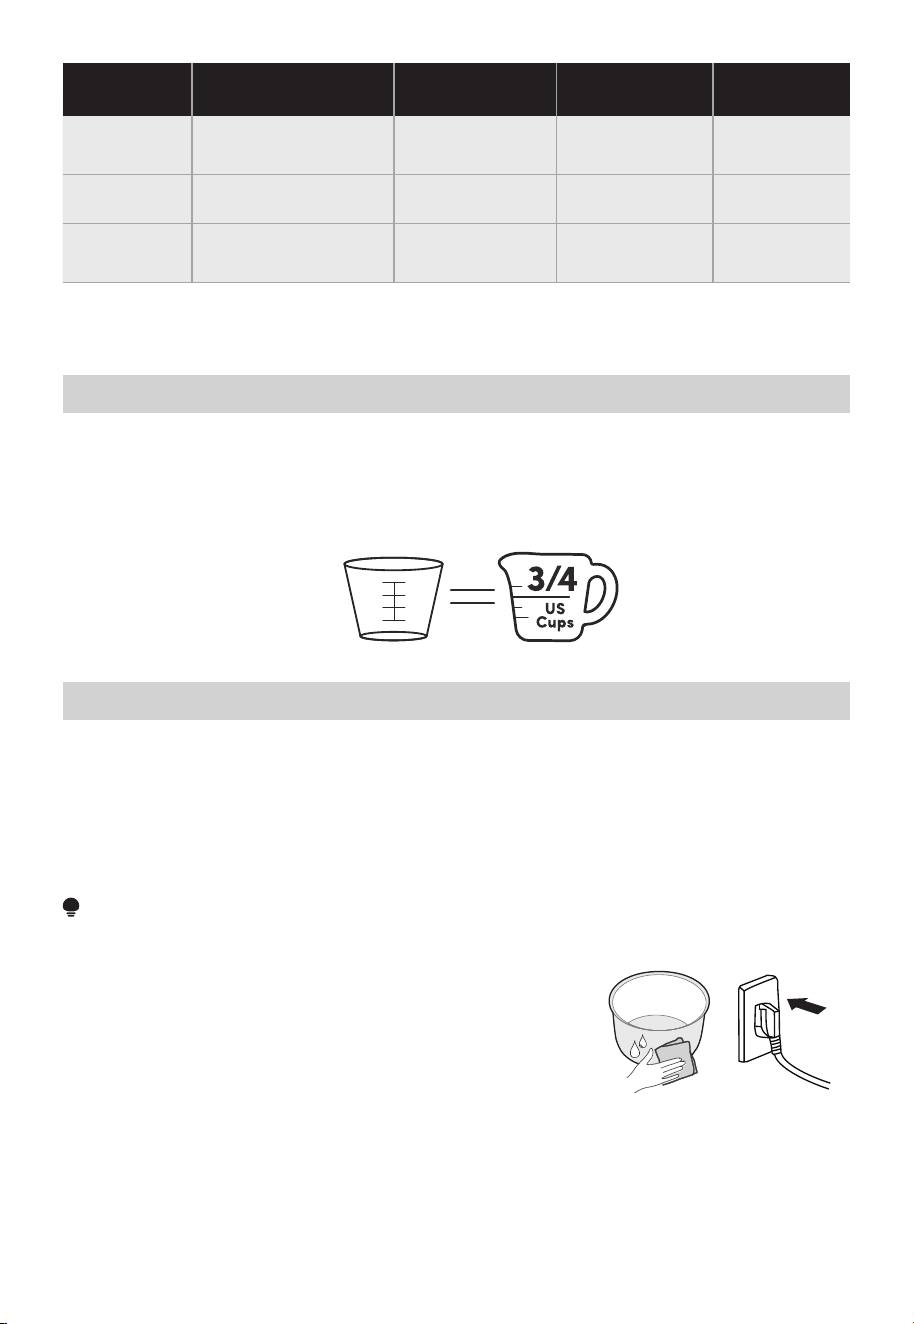
*Cups referenced are with the included measuring cup
(1 Rice Measuring Cup = V U.S. Cup)
Function
Cups (Ingredients)
Cups
(Water)
Cooking
Times
Remarks
Depending on the actual cooking situation, the cooking time is about 5-10 minutes different
from the time described in the above table.
Egg
--
-- 30min
Cake
--
-- 50min
Jam/Sauce
--
-- 2hour
1. Using the included measuring cup, add the uncooked rice to be cooked into the inner pot.
2. Wash the rice, remove impurities, and pour away the water; repeat this at least 2 times
until the rice washing water becomes clear. Add appropriate amount of water according to
the amount of uncooked rice to be cooked (refer to the water line in the inner pot: 1 cup of
uncooked rice corresponds to 1 scale mark).
If you do not wash the rice, please add appropriate amount of water
(refer to the rice-to-water ratio table).
3. Wipe the moisture on the outer surface of the inner pot
and place the inner pot into the cooker. Make sure that
there are no foreign objects on the bottom where the
cooker is in contact with the inner pot, and then close
the lid.
4. Plug the power cord into an available power outlet (120V~ 60Hz).
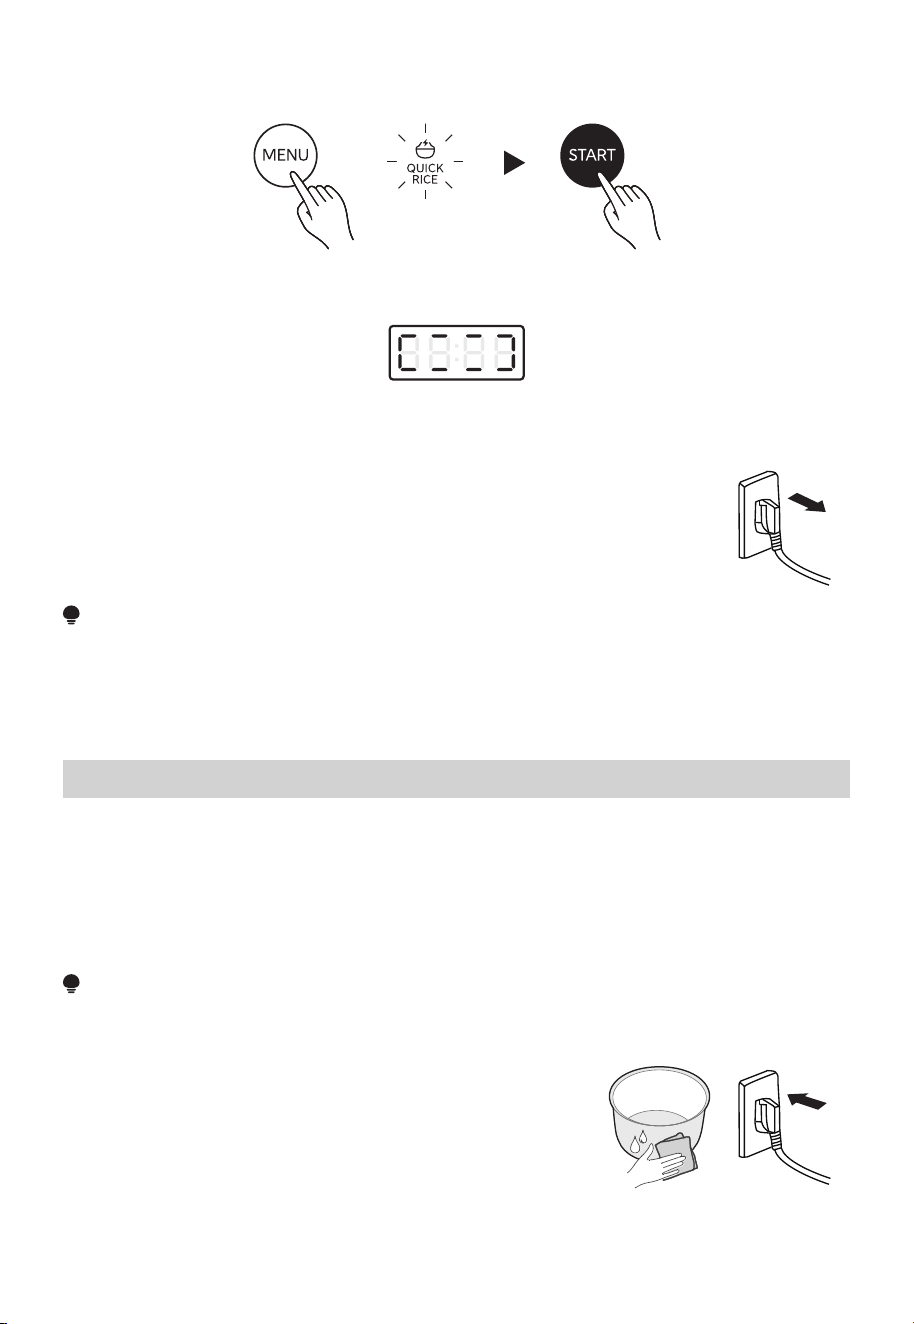
Quick Rice
When adding water, the amount of water can be increased or decreased according to
personal taste.
Rice to Water Scale
NOTE
10
1. Using the included measuring cup, add the uncooked rice to be cooked into the inner pot
2. Wash the rice, remove impurities, and pour away the water; repeat this at least 2 times
until the rice washing water becomes clear. Add appropriate amount of water according to
the amount of uncooked rice to be cooked (refer to the water line in the inner pot: 1 cup of
uncooked rice corresponds to 1 scale mark).
If you do not wash the rice, please add appropriate amount of water
(refer to the rice-to-water ratio table).
3. Wipe the moisture on the outer surface of the inner pot
and place the inner pot into the cooker. Make sure that
there are no foreign objects on the bottom where the
cooker is in contact with the inner pot, and then close
the lid.
4. Plug the power cord into an available power outlet (120V~ 60Hz).
White Rice
5. Press the MENU button to select QUICK RICE to turn on the QUICK RICE icon, and then
press the START button to start cooking.
6. The cooker beeps, a rotating light symbol appears on the display tube, and the cooker
starts cooking.
7. After cooking is completed, the cooker will beep and automatically enter the keep-warm
mode.
8. Open the lid and stir the rice using the included rice spatula to expel
any remaining moisture and make the rice more perfect.
9. After taking out all the rice, unplug the power cord of the cooker.
NOTE
NOTE
1. The amount of rice and water used for cooking must not exceed the maxi-mum water line
of the inner pot.
2. Users can also adjust the ratio of rice to water for cooking according to their own needs.
3. Do not leave rice in the appliance to keep it warm for more than 24 hours.
11
1. Using the included measuring cup, add the brown rice to be cooked into the inner pot.
2. Wash the brown rice, remove impurities, and pour away the water; repeat this at least 2
times until the rice washing water becomes clear. Add appropriate amount of water
according to the amount of brown rice to be cooked (refer to the water line in the inner
pot: 1 cup of brown rice corresponds to 1 scale mark).
If you do not wash the rice, please add appropriate amount of water
(refer to the rice-to-water ratio table).
3. Wipe the moisture on the outer surface of the inner pot
and place the inner pot into the cooker. Make sure that
there are no foreign objects on the bottom where the
cooker is in contact with the inner pot, and then close
the lid.
4. Plug the power cord into an available power outlet (120V~ 60Hz).
Brown Rice
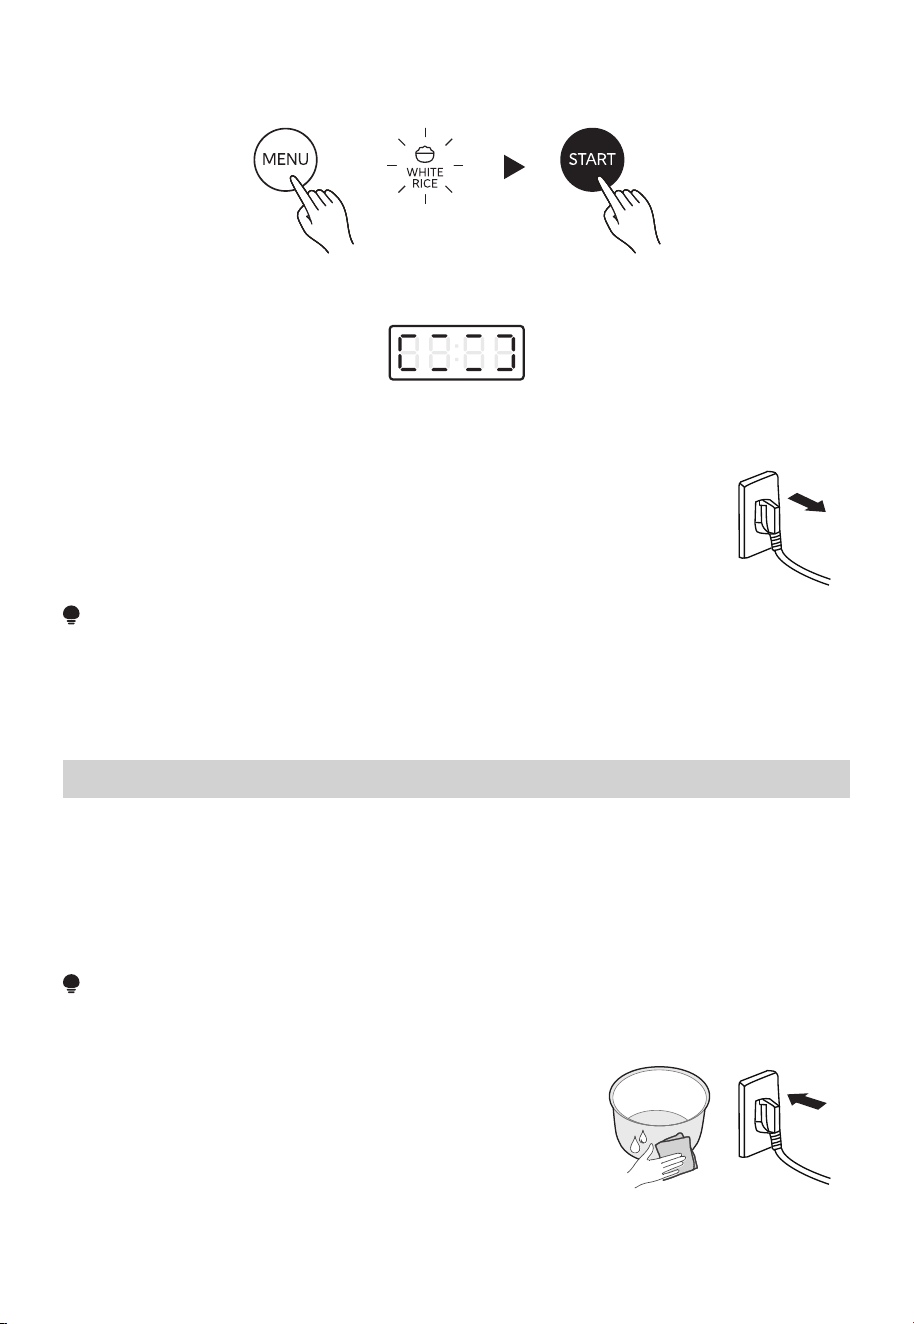
5. Press the MENU button to select WHITE RICE to turn on the WHITE RICE icon, and then
press the START button to start cooking.
6. The cooker beeps, a rotating light symbol appears on the display tube, and the cooker
starts cooking.
7. After cooking is completed, the cooker will beep and automatically enter the keep-warm
mode.
8. Open the lid and stir the rice using the included rice spatula to expel
any remaining moisture and make the rice more perfect.
9. After taking out all the rice, unplug the power cord of the cooker.
NOTE
1. The amount of rice and water used for cooking must not exceed the maxi-mum water line
of the inner pot.
2. Users can also adjust the ratio of rice to water for cooking according to their own needs.
3. Do not leave rice in the appliance to keep it warm for more than 24 hours.
NOTE
12
1. Using the included measuring cup, add the oatmeal to be cooked into the inner pot.
2. Add appropriate amount of water according to the amount of oatmeal to be cooked
(rice to water ratio 1:2.5) (or refer to the rice-to-water ratio table).
3. Wipe the moisture on the outer surface of the inner pot
and place the inner pot into the cooker. Make sure that
there are no foreign objects on the bottom where the
cooker is in contact with the inner pot, and then close
the lid.
4. Plug the power cord into an available power outlet (120V~ 60Hz).
Oatmeal
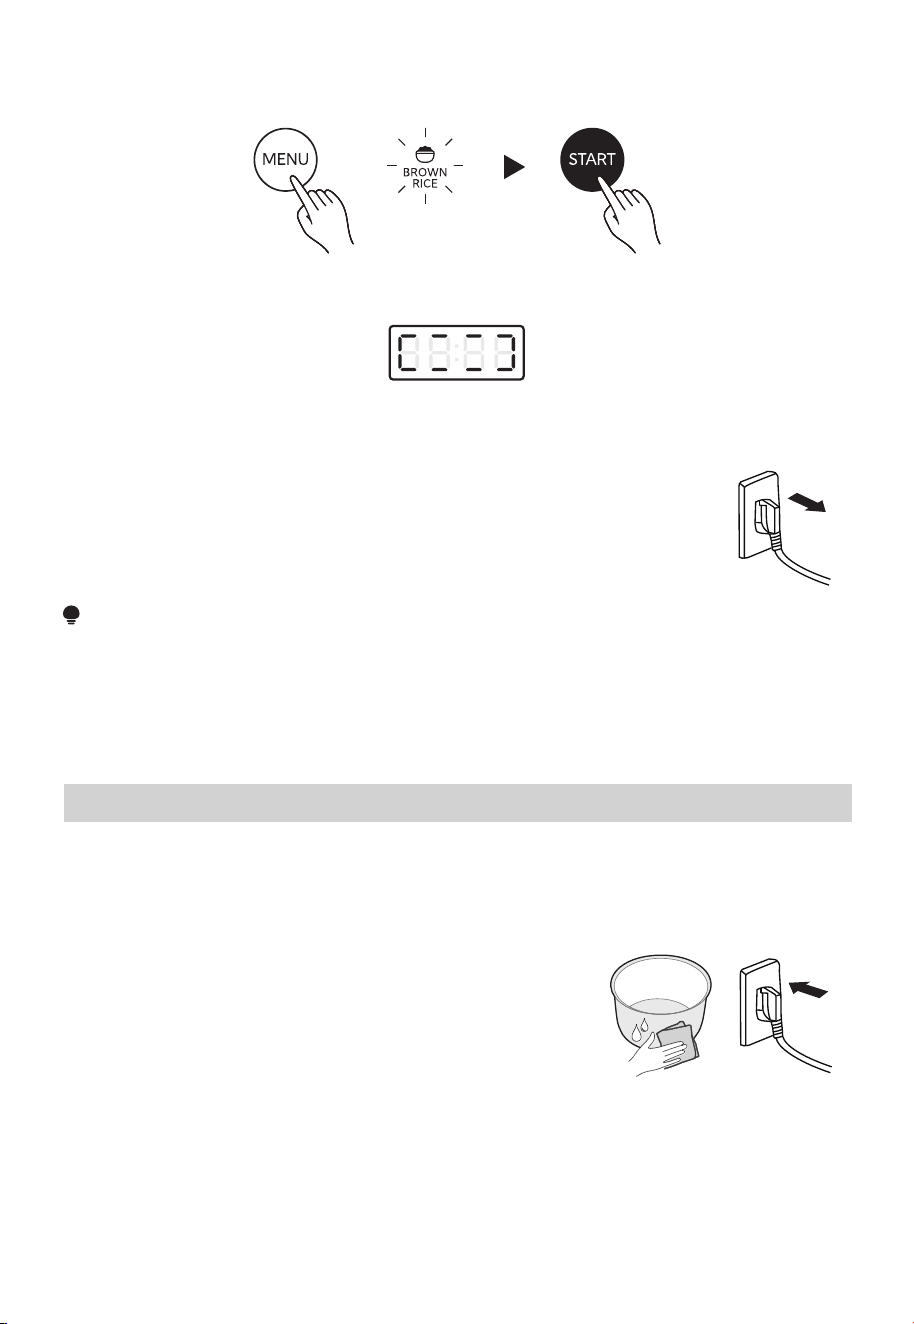
5. Press the MENU button to select BROWN RICE to turn on the BROWN RICE icon, and then
press the START button to start cooking.
6. The cooker beeps, a rotating light symbol appears on the display tube, and the cooker
starts cooking.
7. After cooking is completed, the cooker will beep and automatically enter the keep-warm
mode.
8. Open the lid and stir the brown rice using the included rice spatula
to expel any remaining moisture and make the rice more perfect.
9. After taking out all the brown rice, unplug the power cord of the cooker.
NOTE
1. The amount of brown rice and water used for cooking must not exceed the maxi-mum
water line of the inner pot.
2. Users can also adjust the ratio of brown rice to water for cooking according to their own
needs.
3. Do not leave brown rice in the appliance to keep it warm for more than 24 hours.
13
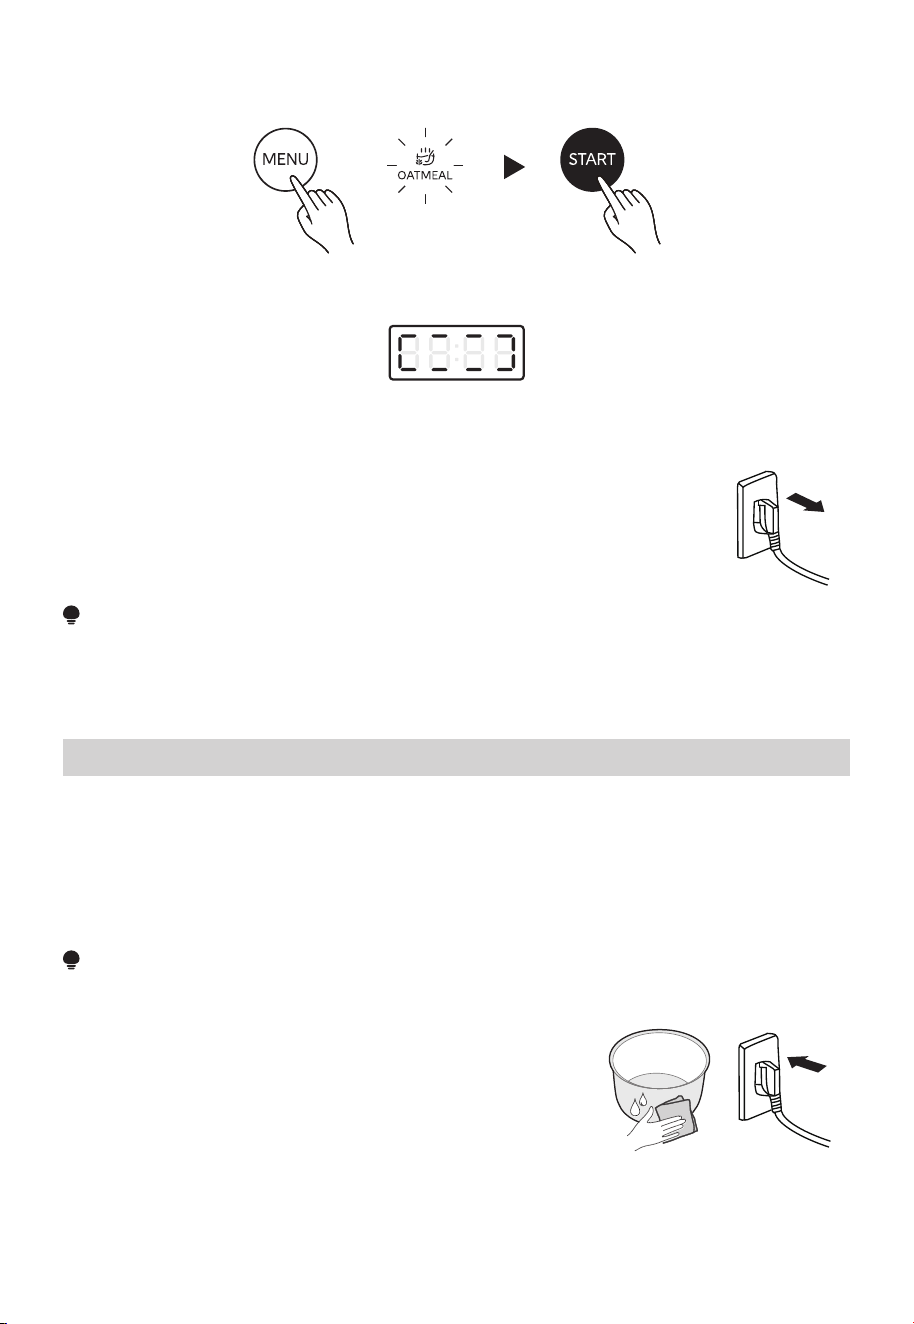
NOTE
5. Press the MENU button to select OATMEAL to turn on the OPATMEAL icon, and then press
the START button to start cooking.
6. The cooker beeps, a rotating light symbol appears on the display tube, and the cooker
starts cooking.
7. After cooking is completed, the cooker will beep and automatically enter the keep-warm
mode.
8. Open the lid and stir the oatmeal using the included rice spatula to
expel any remaining moisture.
9. After taking out all the oatmeal, unplug the power cord of the cooker.
NOTE
1. The amount of oatmeal and water used for cooking must not exceed the maxi-mum water
line of the inner pot.
2. Don't leave oatmeal in the appliance to keep it warm for more than 24 hours.
1. Using the included measuring cup, add the mix grain to be cooked into the inner pot.
2. Wash the mix grain, remove impurities, and pour away the water; repeat this at least 2
times until the rice washing water becomes clear. Add appropriate amount of water
according to the amount of mix grain to be cooked (refer to the water line in the inner
pot: 1 cup of mix grain corresponds to 1 scale mark).
If you do not wash the mix grain, please add appropriate amount of water
(refer to the rice-to-water ratio table).
3. Wipe the moisture on the outer surface of the inner pot
and place the inner pot into the cooker. Make sure that
there are no foreign objects on the bottom where the
cooker is in contact with the inner pot, and then close
the lid.
4. Plug the power cord into an available power outlet (120V~ 60Hz).
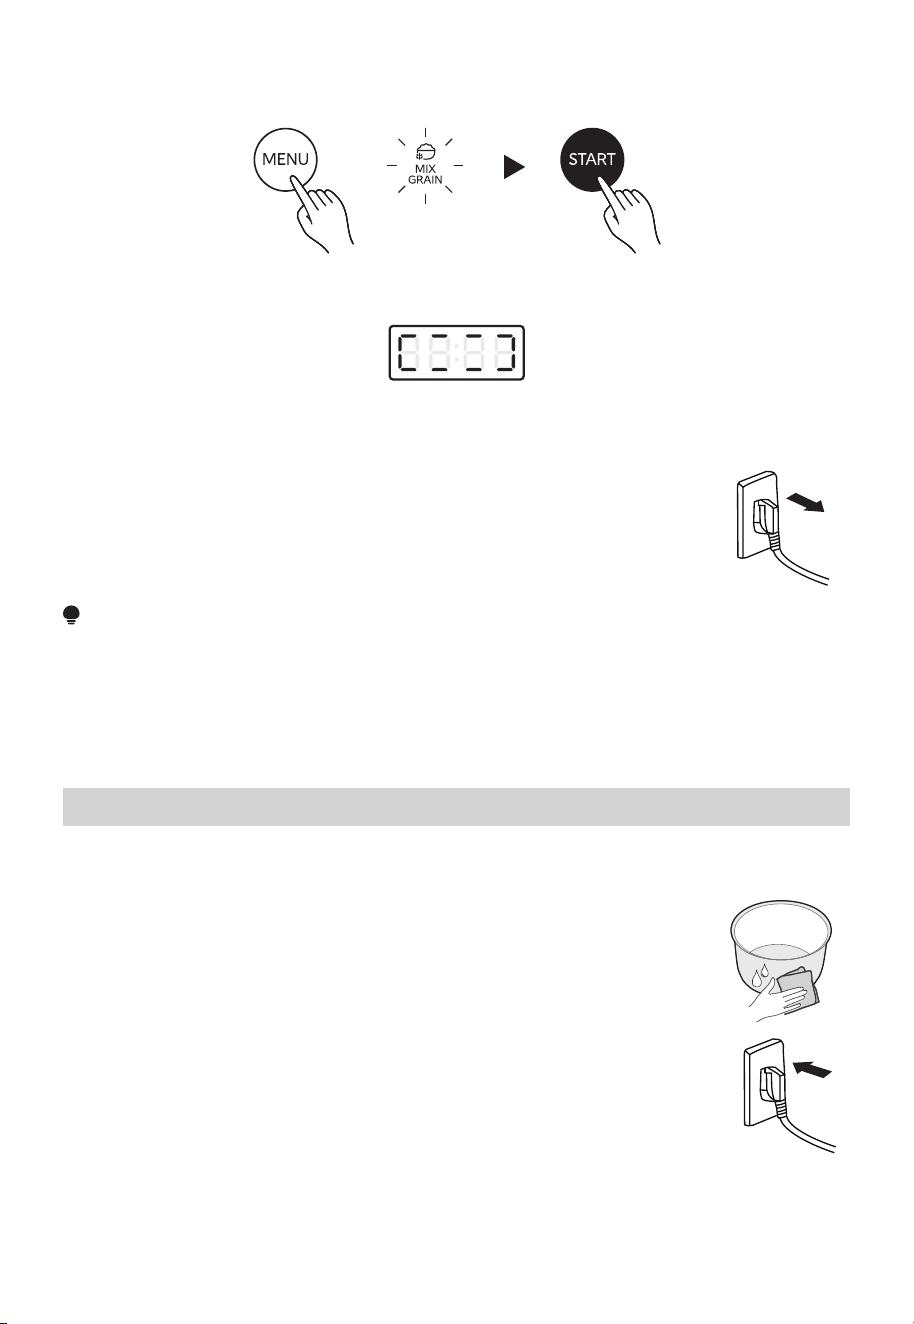
Mix Grain
14
5. Press the MENU button to select MIX GRAIN to turn on the MIX GRAIN icon, and then press
the START button to start cooking.
6. The cooker beeps, a rotating light symbol appears on the display tube, and the cooker
starts cooking.
7. After cooking is completed, the cooker will beep and automatically enter the keep-warm
mode.
8. Open the lid and stir the mix grain using the included rice spatula to
expel any remaining moisture and make the mix grain more perfect.
9. After taking out all the mix grain, unplug the power cord of the cooker.
NOTE
1. The amount of mix grain and water used for cooking must not exceed the maxi-mum
water line of the inner pot.
2. Users can also adjust the ratio of mix grain to water for cooking according to their own
needs.
3. Don't leave mix grain in the appliance to keep it warm for more than 24 hours.
1. Add water to mark 1 according to the water line of the inner pot (or refer to the
rice-to-water ratio table)
2. Wipe the moisture on the outer surface of the inner pot and place the
inner pot into the cooker. Make sure that there are no foreign objects
on the bottom where the cooker is in contact with the inner pot.
3. Put the food to be steamed into the included steamer.
4. Put the steamer into the inner pot and close the lid.
5. Plug the power cord into an available power outlet (120V~ 60Hz).
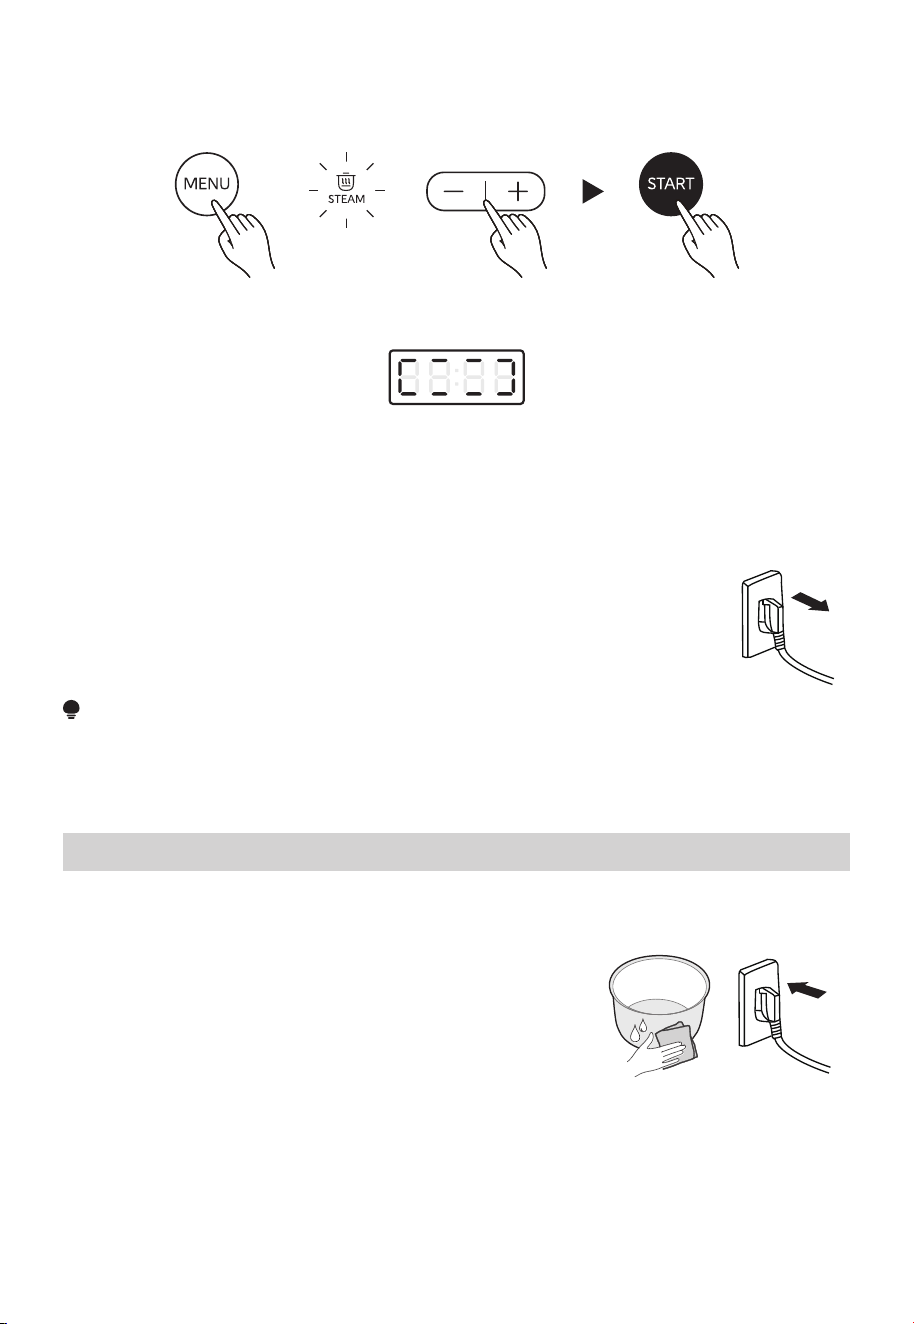
Steam
15
6. Press the MENU button to select STEAM to turn on the STEAM icon((default is 5 minutes,
press “+” “-” to adjust in the range of 5 minutes to 30 minutes),and then press the START
button to start cooking.
7. The cooker beeps, a rotating light symbol appears on the display tube, and the cooker
starts cooking.
8. After cooking is completed, the cooker will beep and automatically enter the keep-warm
mode.
9. When opening the lid, be careful to avoid escaping steam and then check the cooked food
for doneness.
10. After cooking, please take out the food carefully to avoid over-cooking,
and be careful when taking out the food to avoid burns.
11. After taking out all the cooked food, unplug the power cord of the cooker.
NOTE
1. The "+" "-" keys support short pressing (the step is 1) and continuous pressing
(the step is 1 quickly changing).
2. Do not leave food in the appliance to keep it warm for more than 24 hours.
1. Add ingredients to the inner pot and add appropriate water as needed (refer to the
rice-to-water ratio table)
2. Wipe the moisture on the outer surface of the inner pot
and place the inner pot into the cooker. Make sure that
there are no foreign objects on the bottom where the
cooker is in contact with the inner pot, and then close
the lid.
3. Plug the power cord into an available power outlet (120V~ 60Hz).
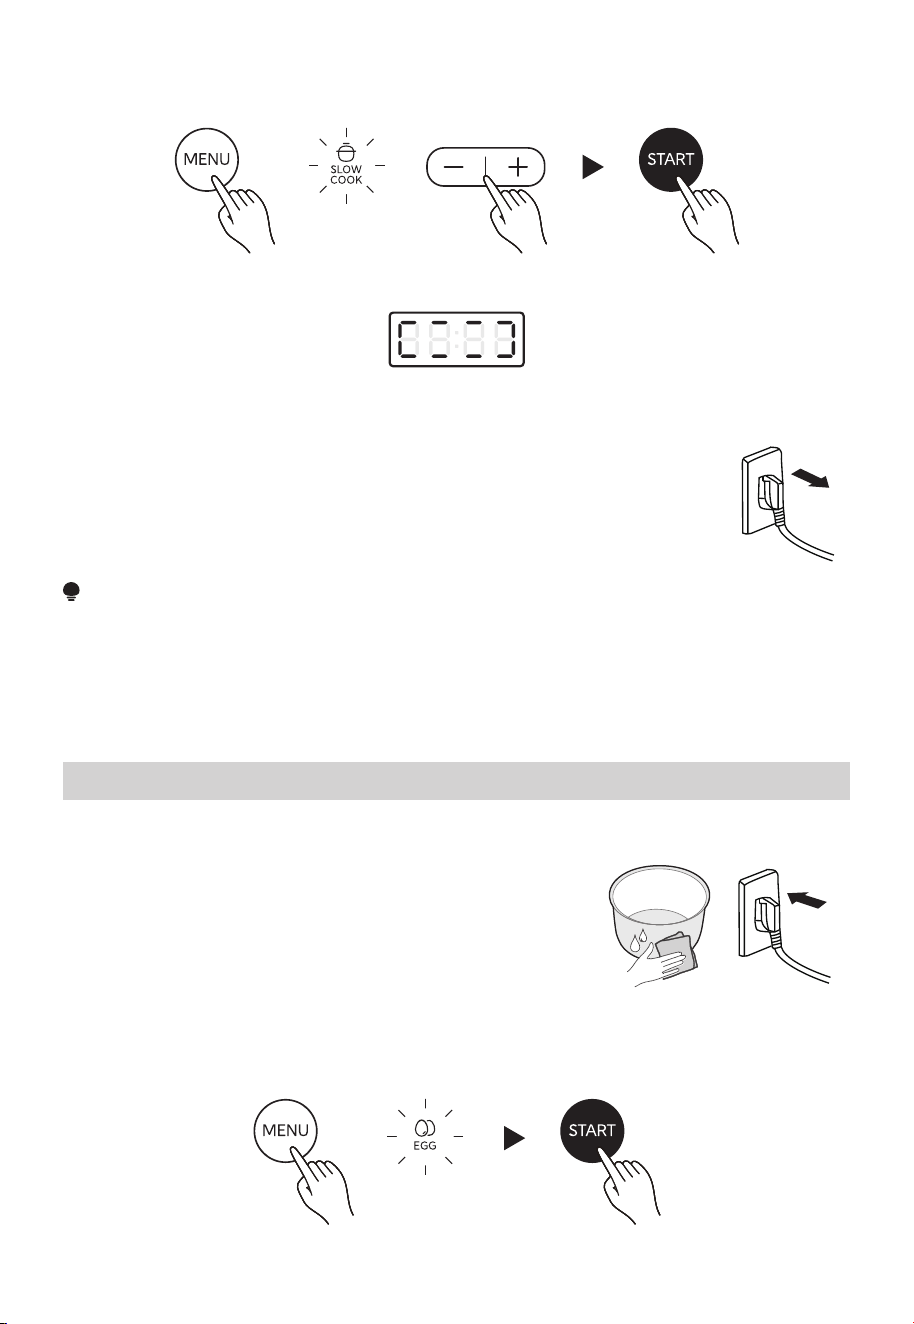
Slow Cook
16
4. Select the “Slow Cook” function (default is 2 hours, press “+” “-” to adjust in the range of 1
hour to 12 hours),and then press the START button to start cooking.
5. The cooker beeps, the display tube displays the time, and the cooker starts cooking.
6. After cooking is completed, the cooker will beep and automatically enter the keep-warm
mode.
7. When opening the lid, be careful to avoid escaping steam.
8. After all the soup or food has been removed, unplug the power cord
of the cooker.
NOTE
1. The "+" "-" keys support short pressing (the step is 1) and continuous pressing
(the step is 1 quickly changing).
2. The amount of rice and water used for cooking must not exceed the maximum water line
of the inner pot.
3. Do not leave the soup or food in the appliance to keep it warm for more than 24 hours.
1. Add the required eggs to the inner pot, and then add water over the surface of the eggs.
2. Wipe the moisture on the outer surface of the inner pot
and place the inner pot into the cooker. Make sure that
there are no foreign objects on the bottom where the
cooker is in contact with the inner pot, and then close
the lid.
3. Plug the power cord into an available power outlet (120V~ 60Hz).
4. Press the “MENU” key, select “EGG” function, and then press the “START” key to start
cooking.
Egg
17
5. The cooker emits a prompt sound, the display tube displays a rotating light symbol, and
the cooking starts.
6. After the 30-minute cooking is completed, the rice cooker will beep and
automatically enter the keep warm mode.
7. After taking out all the eggs, please unplug the power cord of the rice
cooker.
NOTE
1. The amount of ingredients and water used for cooking must not exceed the maximum
water level of the inner pot.
2. Do not leave eggs in the appliance to keep warm for more than 24 hours.
3. Be careful to avoid burns when taking freshly cooked eggs.
1. Add eggs and corresponding white sugar to the container, and stir with a whisk until
frothing, and the ingredients flow down in filaments when you pick up the whisk. The
container and whisk must be kept clean. If there is grease, frothing cannot be made.
2. Add cake flour and stir evenly with a wooden spoon.
3. Slowly add appropriate melted butter, stir quickly to mix, and slowly pour it into the rice
cooker before the bubbles disappear.
4. Apply a layer of cooking oil to the bottom of the inner pot in advance to prevent the
cooked cake from sticking to the bottom of the pot.
5. Wipe the outer surface of the inner pot dry, then place the
inner pot in the rice cooker. Make sure there is no foreign
matter on the bottom of the rice cooker where it contacts
the inner pot, then close the lid.
6. Plug the power cord into an available power outlet (120V~ 60Hz).
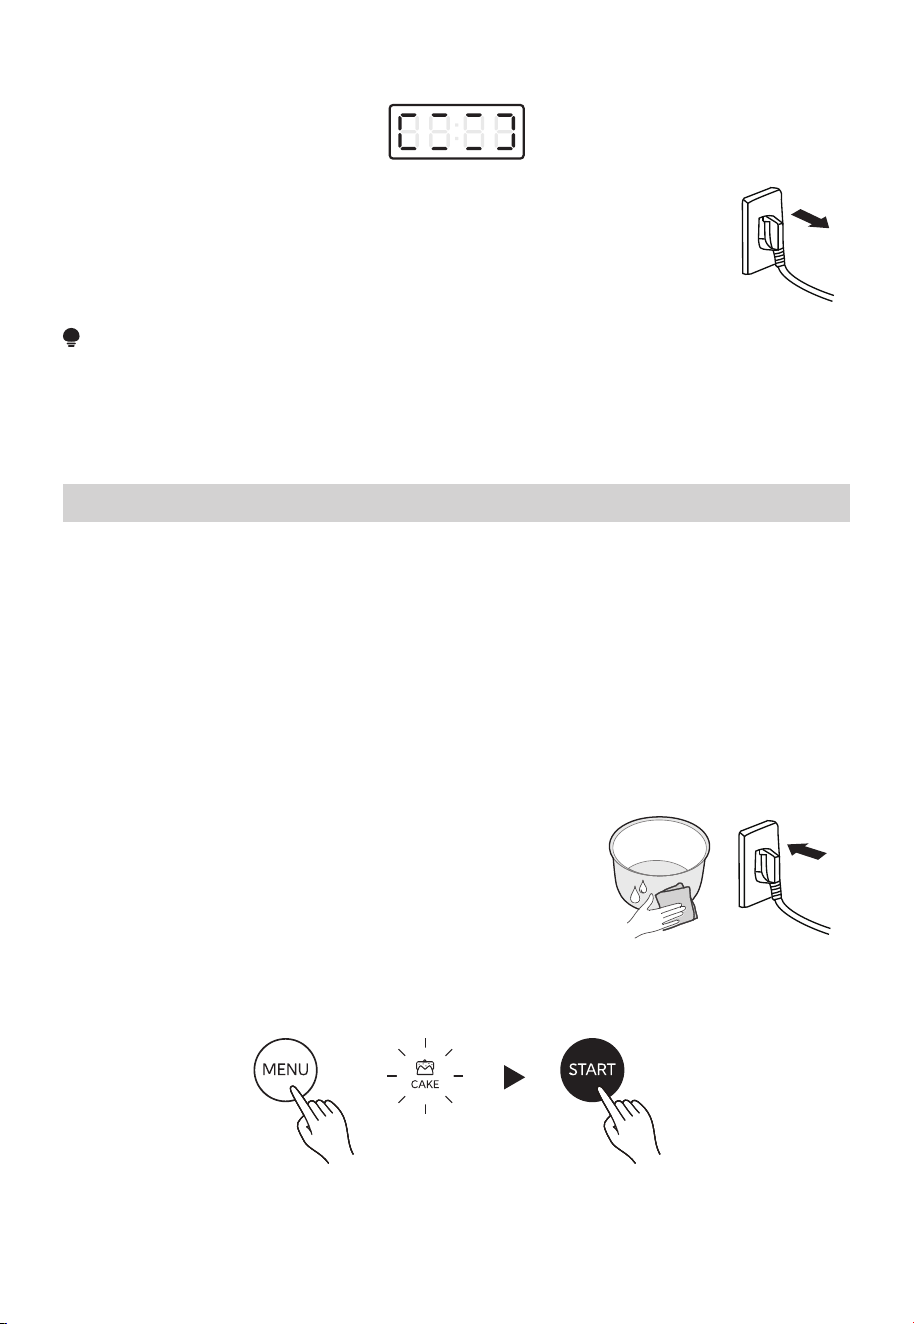
7. Press the “MENU” button, select the “CAKE” function, and then press the “START” button to
start cooking.
Cake
18
8. The rice cooker beeps, a rotating light symbol appears on the display tube, and the rice
cooker starts cooking.
9. After 50 minutes of cooking, the rice cooker will beep and automatically
enter the keep warm mode.
10. After taking out the cake in the pot, please unplug the power cord of
the rice cooker.
Suggestions for cake making:
Tools: rice cooker, electronic scale, measuring cup, whisk.
Ingredients: cake flour (self-raising flour), fresh eggs, white sugar, vegetable butter or
vegetable oil.
Dosage: 3 eggs, 100g fine white sugar, 120g cake flour (self-raising flour), 30g butter.
NOTE
1. The amount of sugar added can be adjusted according to personal taste
2. You can also cook according to your needs.
3. The amount of ingredients and water used for cooking must not exceed the maximum
water level of the inner pot.
4. Do not leave the cake in the rice cooker for more than 24 hours.
1. Cut the fruit to be made into about 1*1cm in size, or use a meat grinder to crush the pulp.
2. Put the diced or chopped pulp and the prepared rock sugar into the inner pot and mix
well.
3. Wipe the moisture on the outer surface of the inner pot
and place the inner pot into the cooker. Make sure that
there are no foreign objects on the bottom where the
cooker is in contact with the inner pot, and then close
the lid.
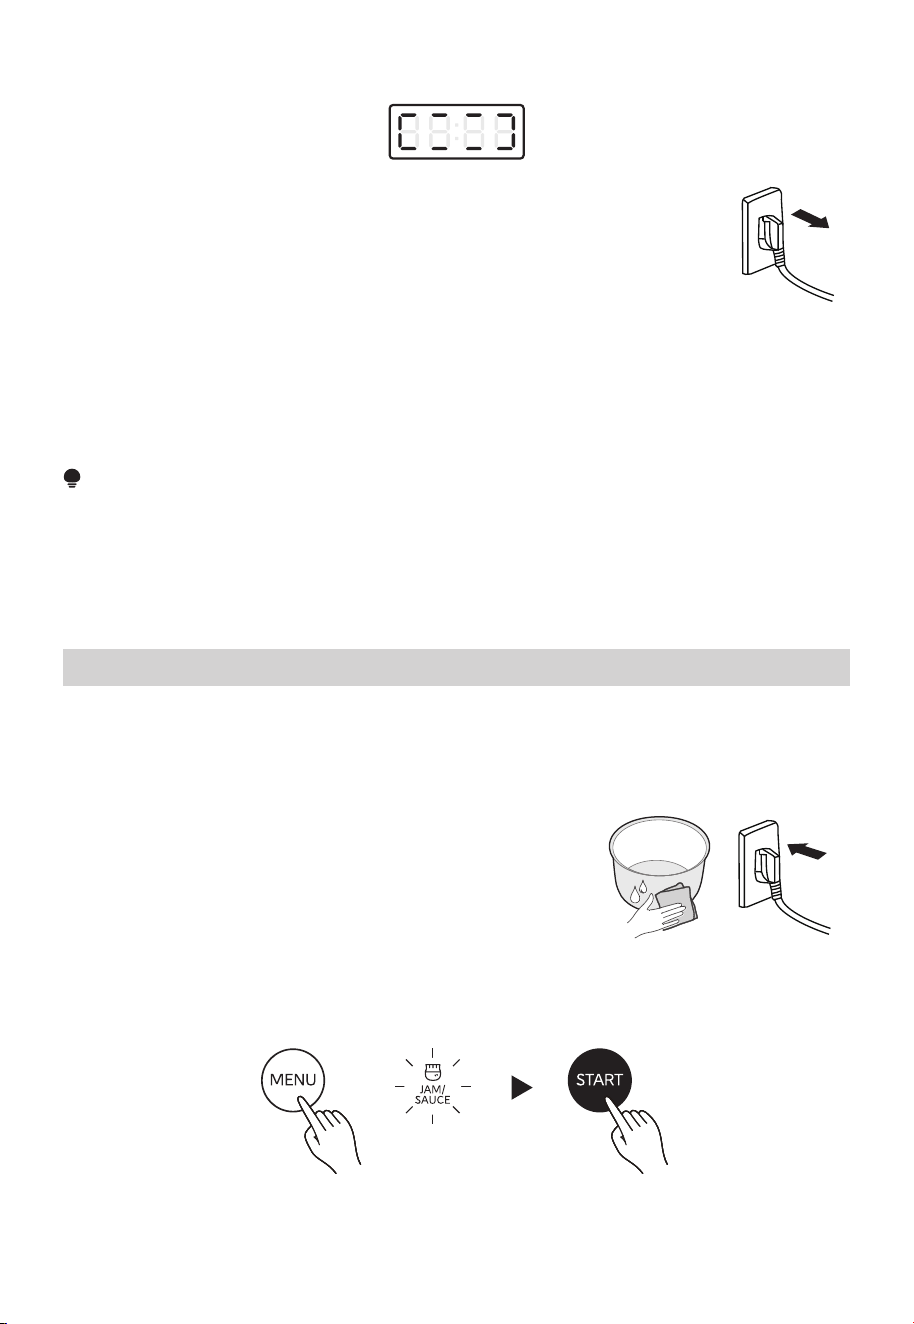
4. Plug the power cord into an available power outlet (120V~ 60Hz).
5. Select the “JAM/SAUCE” function , and then press the START button to start cooking.
Jam/Sauce

19
6. The cooker beeps, the display tube displays the time, and the cooker starts cooking.
7. During the cooking process of jam, you can open the rice cooker lid intermittently and stir
evenly to make the jam softer and more delicious.
8. After cooking is completed, the cooker will beep and automatically enter the keep-warm
mode.
9. Open the lid, stir the jam evenly to achieve the best taste, and then let the jam stand to
cool to room temperature, you can get a sweet and delicious jam.
10. When opening the lid, be careful to avoid escaping steam.
11. After all the food has been removed, unplug the power cord of the cooker.
Example of making jam:
Tools:rice cooker,rice spoon,container
Ingredients:3 apples (approximately 600g), rock sugar(approximately 180g)
NOTE
1. The amount of sugar added can be adjusted according to personal taste
2. You can also cook according to your needs.
3. You can use a rice spoon to stir or crush the pulp during or after cooking to get jam that
suits your taste.
4. The amount of ingredients and water used for cooking must not exceed the maximum
water level of the inner pot.
5. Do not leave the jam in the rice cooker for more than 24 hours.
WHITE RICE、OATMEAL、BROWN RICE、MIX GRAIN
1. Using the included measuring cup, add the amount of uncooked rice to be cooked into the
inner pot (choose step 2 or 3 to add an appropriate amount of water according to your
preference).
2. Do not wash the rice, add appropriate amount of water (refer to the rice-to-water ratio).
3. Wash the rice, remove impurities, and pour away the water; repeat this at least 2 times
until the rice washing water becomes clear. Add appropriate amount of water according to
the amount of uncooked rice to be cooked (refer to the water line in the inner pot: 1 cup of
uncooked rice corresponds to 1 scale mark).
Delay
20
4. Wipe the moisture on the outer surface of the inner pot
and place the inner pot into the cooker. Make sure that
there are no foreign objects on the bottom where the
cooker is in contact with the inner pot, and then close
the lid.
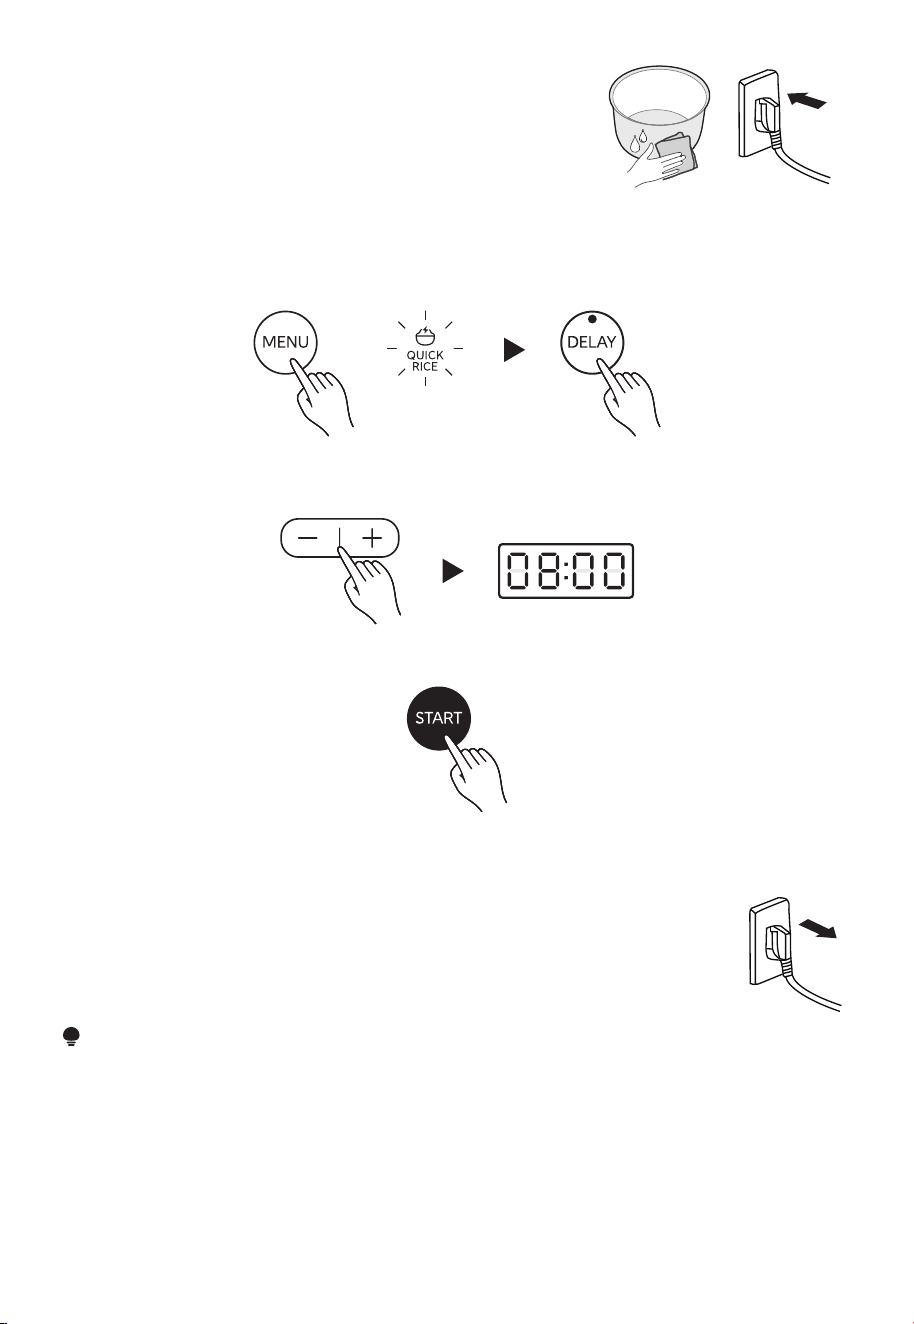
5. Plug the power cord into an available power outlet (120V~ 60Hz).
6. Select the cooking function that needs to be delayed, such as the "White Rice" function;
then press the "Delay Start" button, and the display tube will display the default delay time.
7. Press the "+" "-" keys to adjust the required delay time. Taking the delay for 8 hours as an
example, the cooker will complete cooking after 8 hours.
8. Press the START button to start cooking, the cooker will beep, and the delay time will start
counting down.
9. After cooking is completed, the cooker will beep and automatically enter the keep-warm
mode.
10. Open the lid and stir the rice using the included rice spatula to expel
any remaining moisture and make the rice more perfect.
11. After taking out all the rice, unplug the power cord of the cooker.
NOTE
1. The default delay time for each function: White Rice defaults to 1 hour, Oatmeal defaults
to 1 hour, Brown Rice defaults to 2 hours,and Mix Grain defaults to 2 hours.
2. The delay time can be set up to 15 hours.
3. QUICK RICE, STEAM, SLOW COOK, EGG, CAKE, JAM/SAUCE do not support Delay Start.
4. The delay time refers to the cooking end time. Taking the delay for 8 hours as an example,
cooking will be completed after 8 hours.

21
Function
WHITE RICE
OATMEAL
BROWN RICE
Delay Heating Time
55 minutes
35 minutes
80 minutes
MIX GRAIN 80 minutes
5. It is recommended that the delay time should not exceed 12 hours, or the rice may have a
peculiar smell.
6. The "+" "-" keys support short pressing (the step is 1) and continuous pressing (the step is
1 quickly changing).
7. When the delay time is less than the preset heating time of this function, cooking will start
heating; if the delay heating time of White Rice is 00:55, heating will start when the delay
countdown reaches 00:55.
8. Please refer to the table below for the delay heating time of different functions:
NOTE
1. [0h] means the keep-warm time is less than 1 hour, [1h] will be displayed after 1 hour,
[2h] will be displayed after 2 hours, and so on.
2. The cooker can keep warm for up to 24 hours.
3. In order to maintain the taste of food, the maximum keep-warm time is recommended to
be no more than 5 hours.
4. During the keep-warm process, the cooker will heat intermittently to keep the food in the
pot above 65°C.
KEEP WARM
1. After cooking, the cooker will automatically enter the keep warm state.
2. In the non-cooking state, press the " Keep Warm " key to automatically enter the
keep-warm state.
Cancel
1. To switch or cancel the current function during cooking, you can press the "Cancel" key
and then select again.
Keep Warm / Cancel
65
4
1 2
22
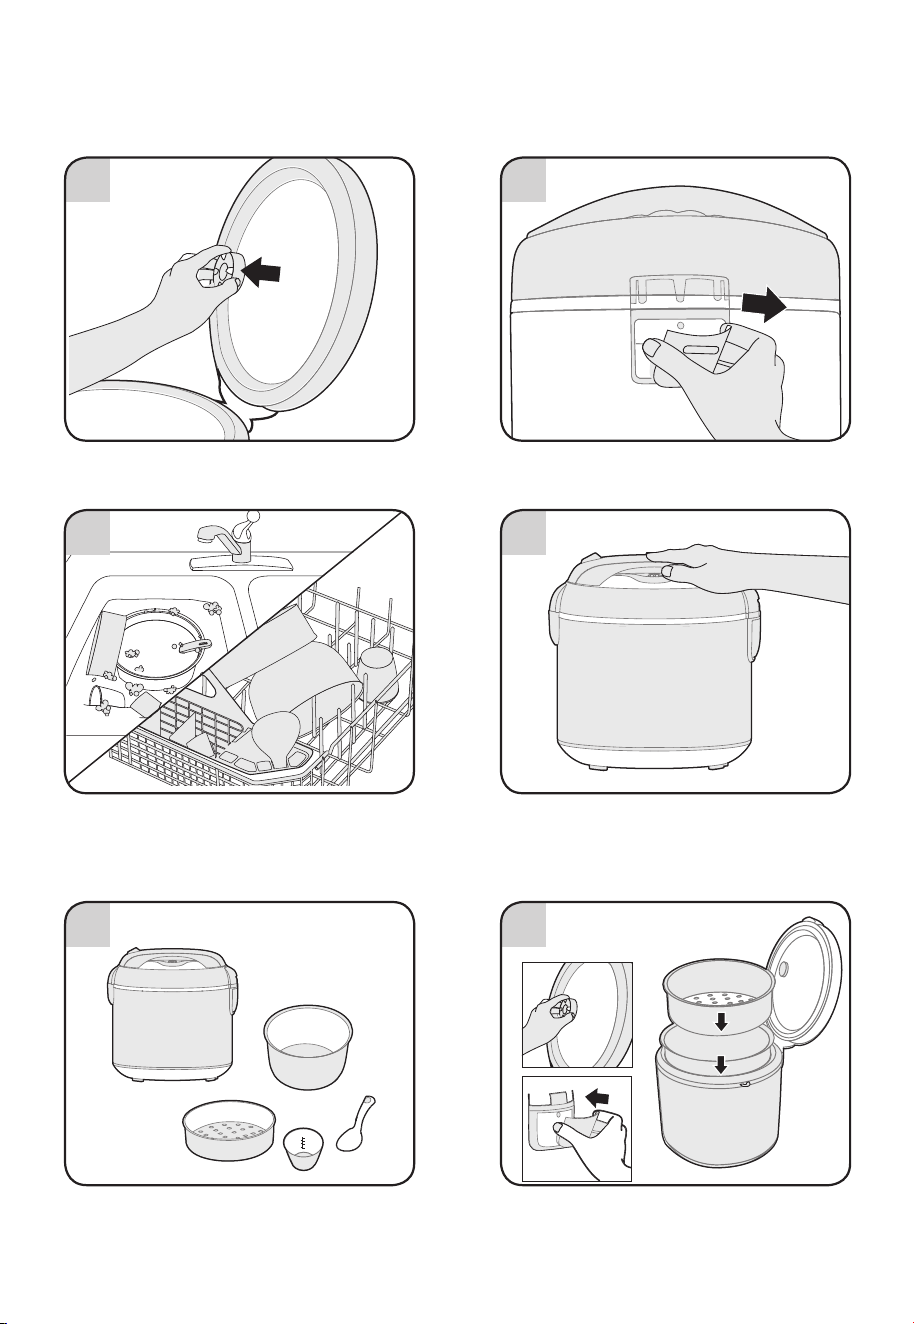
CLEANING AND MAINTENANCE
• Wipe rice cooker body clean with a damp
cloth.
• Reassemble for next use.
• Remove the condensation collector.• Remove the steam vent.
• Thoroughly dry rice cooker body and all
accessories.
• Handwash the inner cooking pot and all
accessories or wash them in the
dishwasher.
3

23
Operation of your appliance can lead to errors and malfunctions. The following tables contain
possible causes and notes for resolving an error message or malfunction. It is recommended
to read the tables carefully below in order to save your time and money that may cost for
calling to the service center.
TIPSProblem
• If your rice is dry or hard/chewy when the rice cooker
switches to Keep-Warm, additional water and cooking time
will soften the rice. Depending on hhow dry the rice is add
1/2 to 1 cup of water and stir through. Close the lid and
press the White Rice button. When rice cooker switches to
Keep-Warm, open the lid and stir the rice to check the
consistency. Repeat as necessary until rice is soft and
moist.
• If the rice is still too moist or soggy when the rice cooker
switches to Keep-Warm, use the serving spatula to stir the
rice. This will redistribute the bottom (moistest) part of the
rice as well as release excess mois-ture. Close the lid and
allow to remain on Keep-Warm for 10-30 minutes as
needed, opening the lid and stirring periodically to release
excess moisture.
• The bottom layer of cooked rice may become slightly
browned and/or caramelized during cooking. To reduce
browning, rice should be rinsed before cooking to remove
any excess starch. Stirring rice once it switches to
Keep-Warm will also help to reduce
browning/caramelizing.
Rice is too dry/hard after
cooking
The bottom layer of rice is
browned / caramelized
Rice is too moist/soggy
after cooking
Possible Reasons Coping Methods
E1
Bottom sensor open circuit
E2
Bottom sensor short circuit
If it still reports a fault after unplugging the
power and plugging again, please send it
to the local after-sales service center.
Fault
TROUBLESHOOTING

24
This is the only express warranty for this product and is in lieu of anyother warranty or
condition.
This product is warranted to be free from defects in material and workman-ship for a period
of one (1) year from the date of original purchase. During this period, your exclusive remedy is
repair or replacement of this product or any component found to be defective, at your option;
however, you are reponsi-ble for all costs associated with with returning the product to us and
our returning the product or component under this warranty to you. If the product or
component is no l onger available, we will replace with a similar one of equal or greater value.
This warranty does not cover glass, filters, wear from normal use, use not in conformity with
the printed directions, or damage to the product resultinig from accident, alteration, abuse or
misuse. This warranty extends only to the original consumer purchaser or gist recipient. Keep
tile original sales receipt, as proof of purchase is required to make a warranty claim. This
warranty is volid if product is used for other than single-family household use or subject-ed to
any voltage and wave form other than as specified on the label(e.g., 120V ~)
We exclude all claims for special, incidental, and consequential damages by breach of express
or implied warranty. All liability is limited to amout of the purchase price. Every implied
warranty, including any statutory warranty or condition of merchantability or fitness for
particular purpose, is disclaimed except to the extent prohibited by law, in which case such
warranty or conditon is limited to the duration of this written warranty. This warranty gives
you specific legal rights. you may have other legal rights that vary depending on where you
live. Some states or provinces do not allow limitations on implied warranties or special,
incidental consequential damages, so tile foregoing limitations may not apply to you.
NOTE
Customer Service Management office:
5 Sylvan Way, Suite 100 parsippany, NJ, 07054
Amazon Store: https://www.amazon.com/comfee
Tel: 866-646-4332
E-mail: offi[email protected]
LIMITED ONE YEAR WARRANTY