US_CA
820-422V83_820-422V82_820-422V81
IN240500276V01_US
820-422V80
ELECTRIC HEATER INSTRUCTION MANUAL
Models: W914-36F, W914-40F, W914-50F and W914-60F
ATTENTION:
1. Keep this electric heater away from direct sunlight.
2. Before plugging in the electric heater, read all instructions.

1
IMPORTANT SAFETY INSTRUCTIONS
Keep this manual for future reference.
WHEN USING ELECTRICAL APPLIANCES, BASIC PRECAUTIONS SHOULD
ALWAYS BE FOLLOWED TO REDUCE THE RISK OF FIRE, ELECTRIC SHOCK
AND INJURY TO PERSONS, INCLUDING THE FOLLOWING:
Read all instructions before using this heater. Failure to follow these important
safety instructions may cause fire, electric shock or damage. Following proper
safety and operating instructions is the responsibility of the owner.
1) If needed, ensure proper grounding – this heater is designed for use with 120
volts. Do not modify the plug or use adapters that would disable the grounding
feature.
2) Caution: This heater becomes hot during use. To prevent burns, avoid direct
skin contact with hot surfaces. The grill in front of the heater outlet also becomes
hot while in use.
3) Do not block the front of the fireplace while in use.
4) CAUTION: Take extreme caution when using this heater near small children or
persons with disabilities. Never leave this heater operating unattended.
5) Never use a heater with a damaged cord or plug, or if the heater malfunctions or
has been dropped or damaged in any way. Instead, take the heater to an
authorised service facility for examination, adjustment or repair.
6) Never modify this heater in any way. If parts need removing or servicing, they
must be replaced at a qualified repair center before operating the heater again.
7) Do not use this heater outdoors or in wet areas. Keep this heater away from
bathrooms, laundry areas or similar indoor locations. Ensure the appliance is
not positioned where it could fall into a bathtub or any other water container.
8) Avoid running the cord under carpets or covering it with throw rugs, runners or
anything similar. Keep the cord away from congested areas to prevent it from
being tripped over.
9) Only connect this heater to properly grounded outlets.
10) Never insert foreign objects into ventilation or exhaust openings, as this
could cause an electric shock, fire or damage to the heater.
11) To minimize the risk of fire, do not block air intakes or exhausts. Do not use this
appliance on beds or other soft surfaces where openings may get blocked.
12) CAUTION: This heater contains hot and arcing or sparking parts. Do not use
it in areas where gasoline, propane, paint or flammable liquids are present or
stored. Avoid exposing the heater to flammable vapours. Never use this heater
for drying clothes and do not hang decorations on it.
13) Do not modify this heater. Only use this heater in accordance with the
instructions provided in this manual. Any other usage not recommended by the
manufacturer may result in fire, electric shock or personal injury.
14) Avoid using extension cords with this heater, as it could overheat. However,
if you must use an extension cord, make sure it is a minimum size of No.16AWG
and rated at least 1875 watts. The extension cord must be a three-wire cord with
a grounding-type plug and cord connector.
15) Do not connect this product to a receptacle that is controlled by a wall switch
or dimmer.
16) If new circuits or outlets are needed, always contact a qualified electrician
for installation.
17) Before cleaning, maintenance or moving the heater, turn off and unplug the
appliance.
18) When not in use for long periods, store the appliance in a dry location.
19) If you experience headaches, nausea, vomiting, tiredness, dizziness,
fainting or a rapid pulse, turn off the heater and seek medical attention.
2
20) To avoid extreme room temperatures, do not leave the product running
unattended, especially around small children or individuals with reduced
physical, sensory or mental capabilities.
CAUTION: Procedures and techniques, if not carefully followed, can result in
damage to the equipment, property or personal injury.
WARNING: Procedures and techniques, if not carefully followed, can expose the
user to the risk of serious injury, illness or death.
WARNING:
The heater and its components become hot during operation. Ensure the area
directly around and underneath the heater is clear of any obstructions.
DO NOT ALLOW CHILDREN TO OPERATE THIS HEATER: Keep children and
pets away from the heater and its controls.
ELECTRICAL PARAMETER
● Power supply: 120V AC
● Frequency: 60Hz
● Power: 1500W
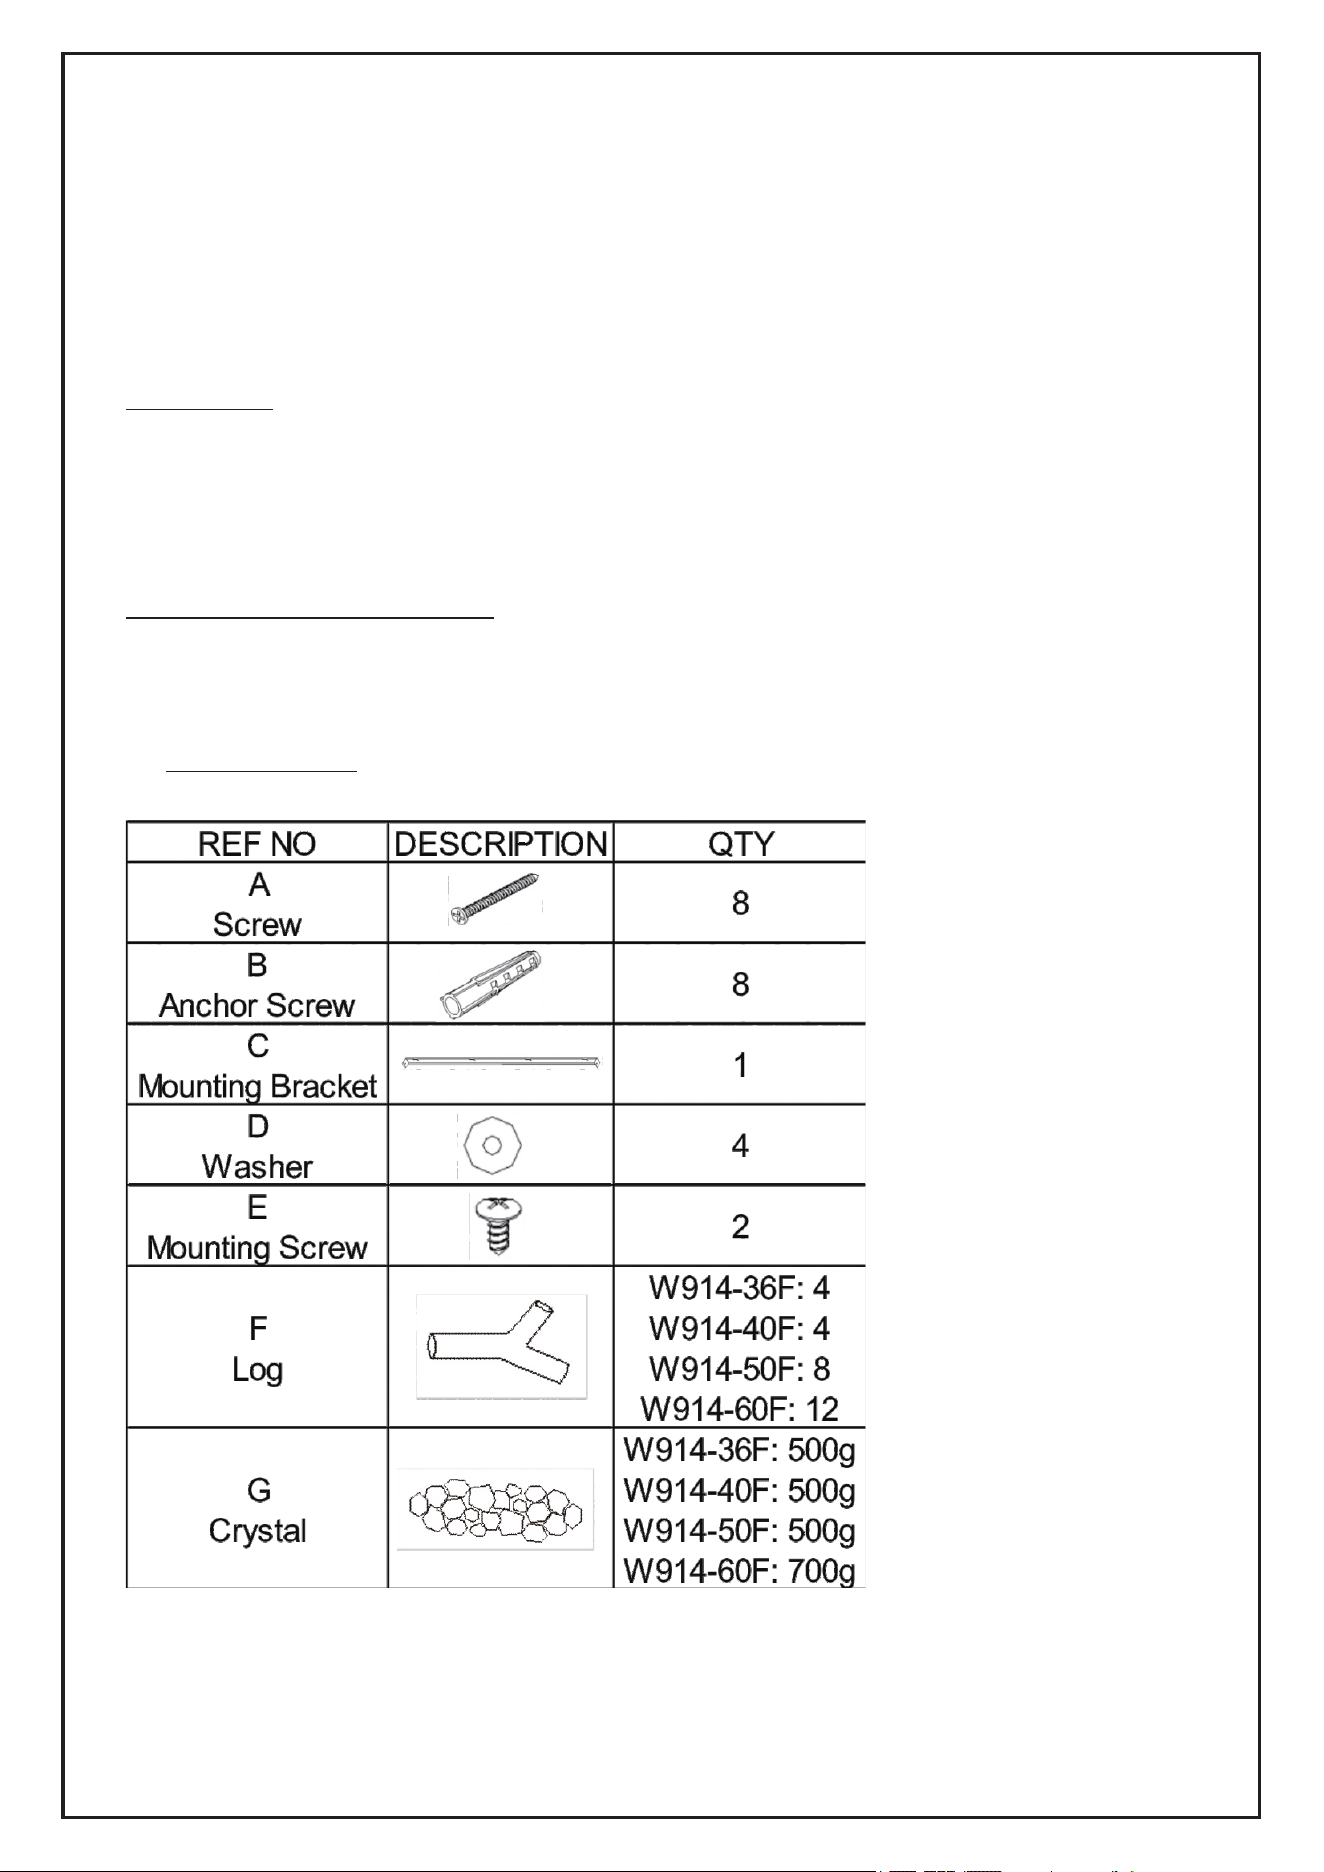
PARTS LIST
3
NOTE: This heater offers two installation options, which can be selected based on
your preference.
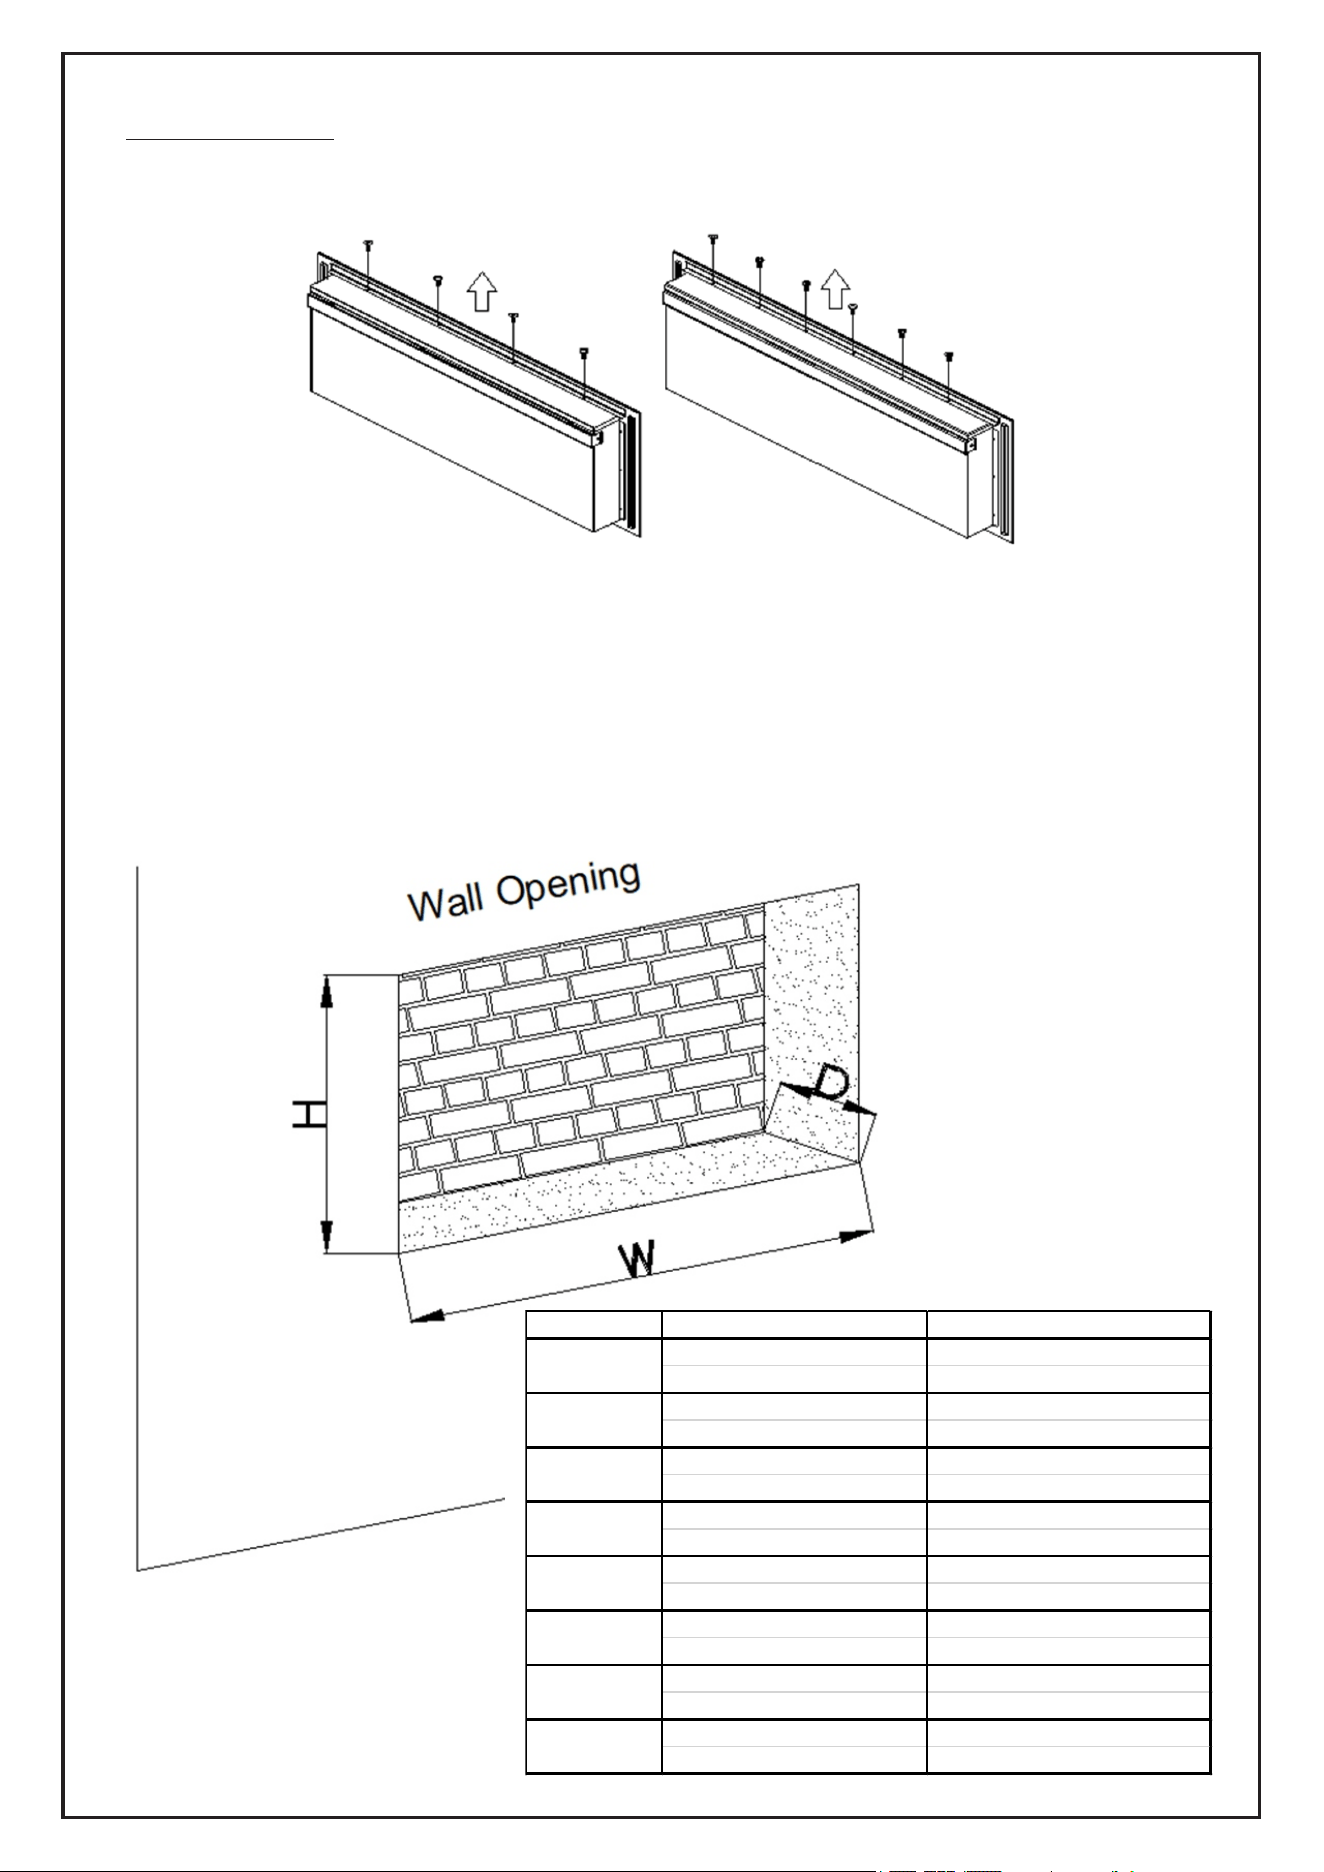
Installation 1: Built-in wall
Clearance: Maintain a minimum spacing of 0.5 inches between the rear of the unit
and the wall.
Wall opening dimensions: Before installation, confirm the wall opening
dimensions.
INSTALLATION
Caution: Before installation, remove the fixing screws on the top plate.
(W914-36F/ W914-40F/W914-50F) (W914-60F)
Model Unit Overall Dimensions Cutout Dimensions(W*D*H)
18” x 6.2” x 24” 15.75”x 6.313”x 23.625”
45.7 x 15.75 x 61 cm 40 x 16 x 60 cm
26” x 6.2” x17.7” 22.75”x 6.313”x 17.125”
66 x 15.75 x 45 cm 58 x 40 x 43.5 cm
30” x 6.2” x17.7” 26.75”x 6.313”x 17.125”
76 x 15.75 x 45 cm 68 x 40 x 43.5 cm
36” x 6.2” x17.7” 32.75”x 6.313”x 17.125”
91.5 x 15.75 x 45 cm 83.5 x 40 x 43.5 cm
40” x 6.2” x17.7” 36.75”x 6.313”x 17.125”
101.6 x 15.75 x 45 cm 93.5 x 40 x 43.5 cm
48” x 6.2” x17.7” 44.75”x 6.313”x 17.125”
122 x 15.75 x 45 cm 113.6 x 40 x 43.5 cm
50” x 6.2” x17.7” 46.75”x 6.313”x 17.125”
127 x 15.75 x 45 cm 119 x 40 x 43.5 cm
60” x 6.2” x17.7” 56.75”x 6.313”x 17.125”
152.4 x 15.75 x 45 cm 144 x 40 x 43.5 cm
W914-50F
W914-60F
W914-18F
W914-26F
W914-30F
W914-36F
W914-40F
W914-48F
4
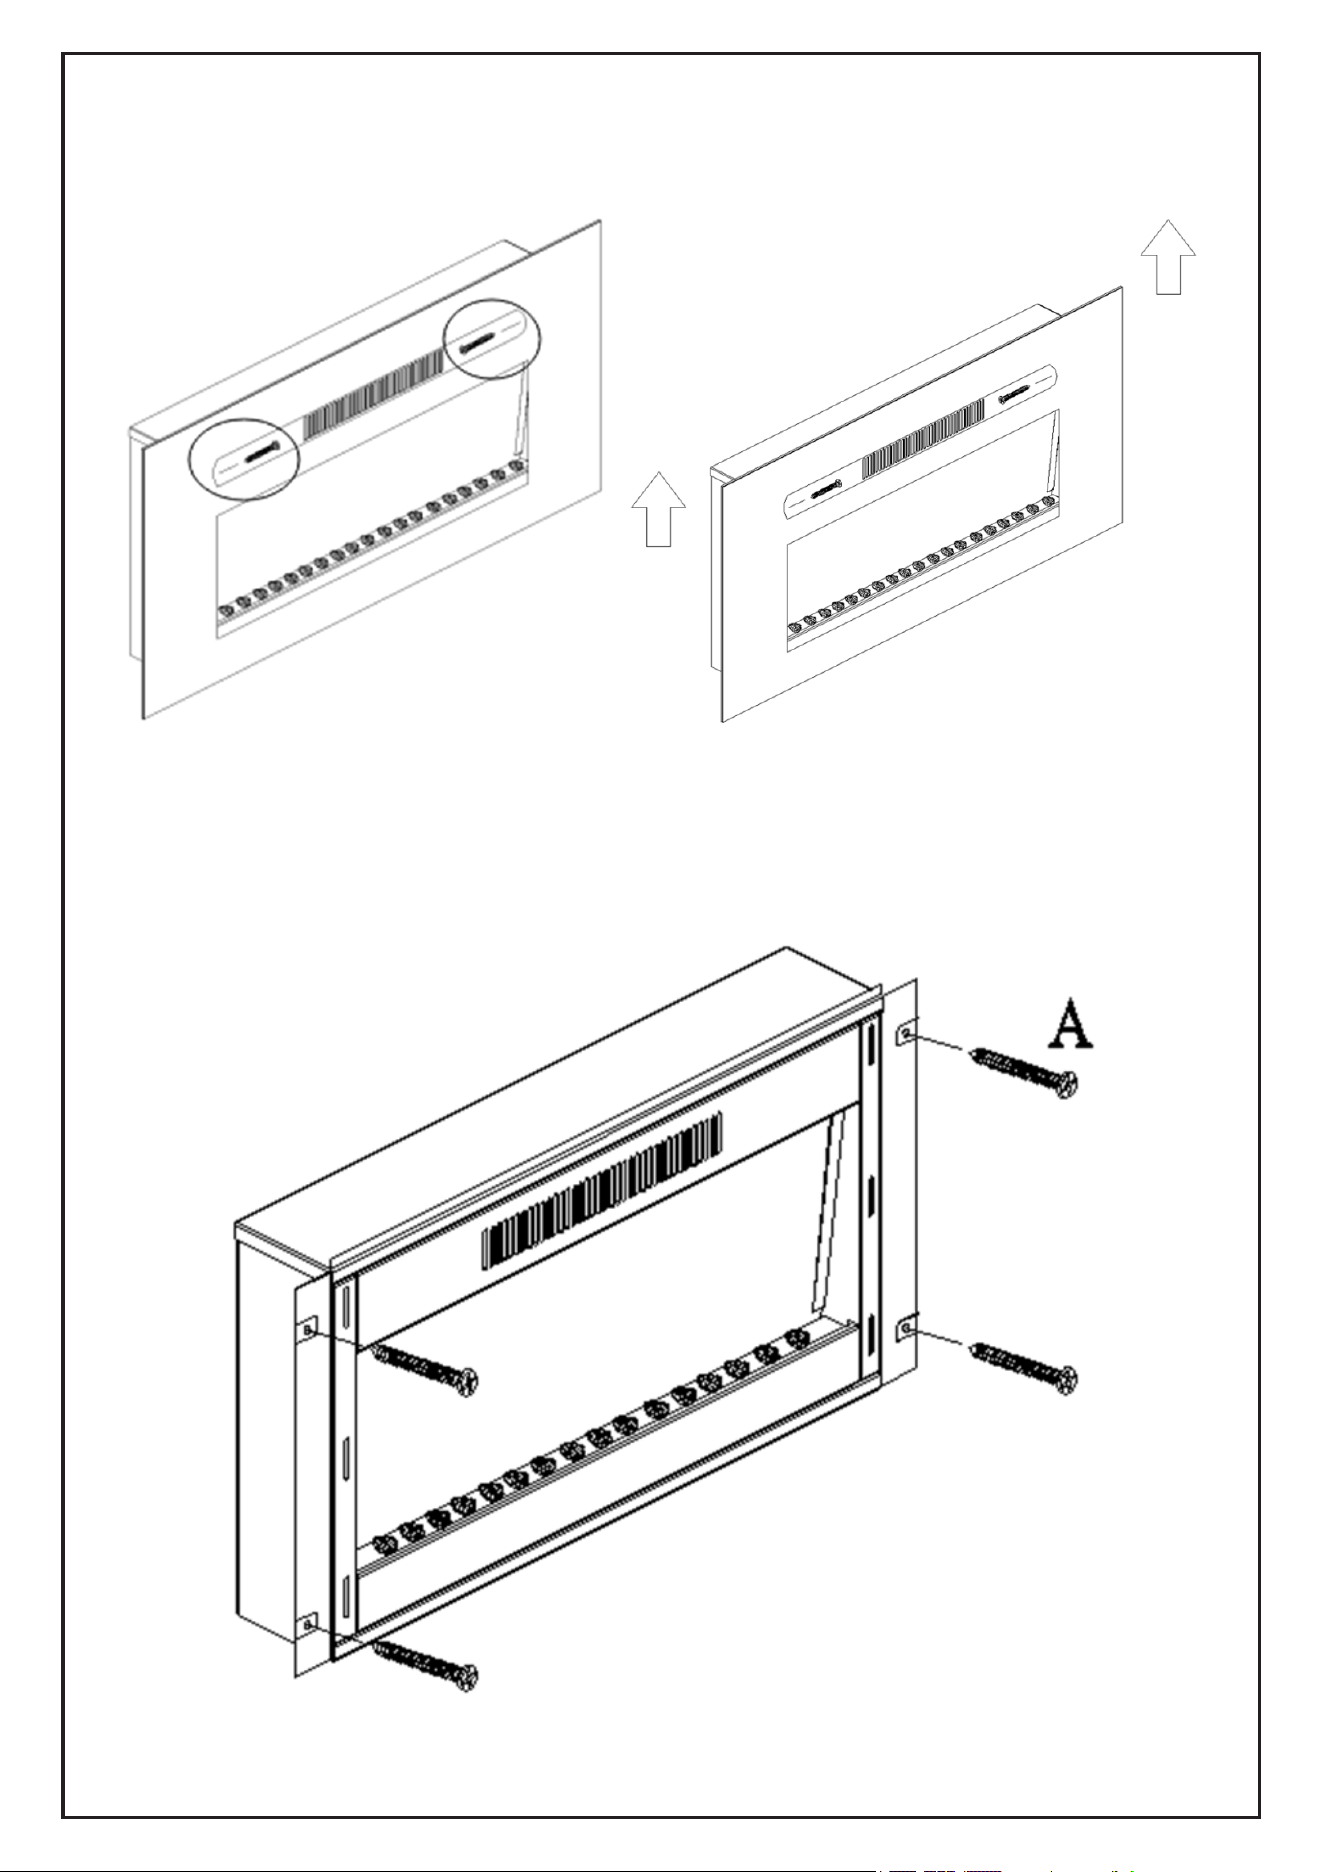
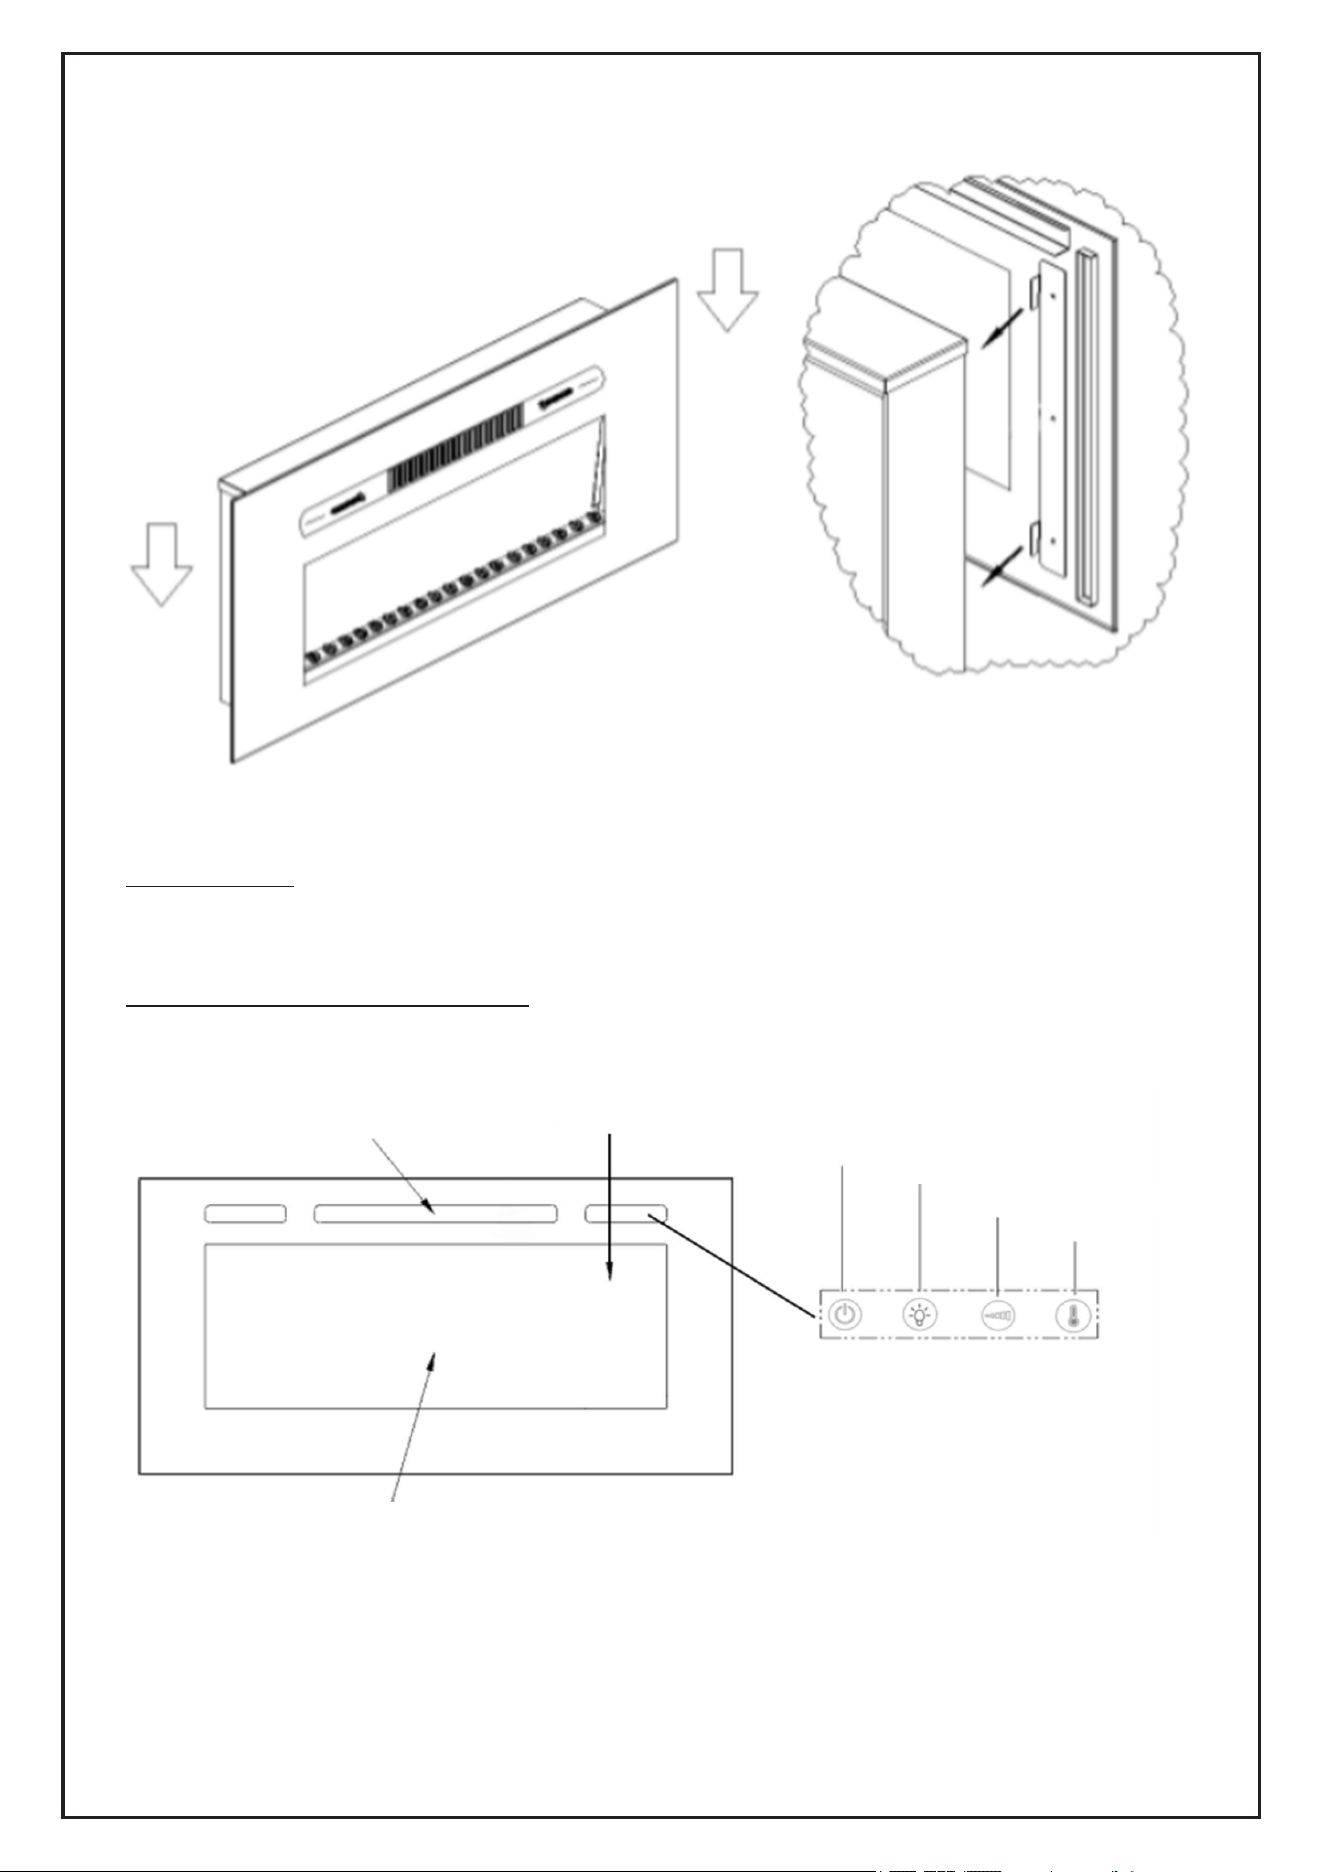
Step 1: (1) Locate and remove the two mounting screws. (2) Pull the front cover
upwards to remove it (see figures below).
Fig. A (1) Fig. A (2)
Step 2: Using four screws, secure the unit to the wall (see figure below).
Fig. B

5
Installation 2: Wall hanging
Step 1: Choose the wall location for hanging your electric heater. Use a level to
draw a horizontal line and mark four drill holes for the anchor screws.
Note: The drill holes are for mounting the heater – the heater needs to be level
during installation, ensuring proper mounting and alignment.
Step 3:Replace the front cover and secure it with two mounting screws (see figure
below).
Fig.A
Step 2: Drill four 8mm (5/16 inch) diameter holes, each 43mm (1.7 inches) deep at
the marked locations. If any hole does not hit a stud, use the included wall anchor.
Insert and firmly tap the wall anchors into place until flush with the wall surface (see
figure below).
Fig.B
Fig. C
6
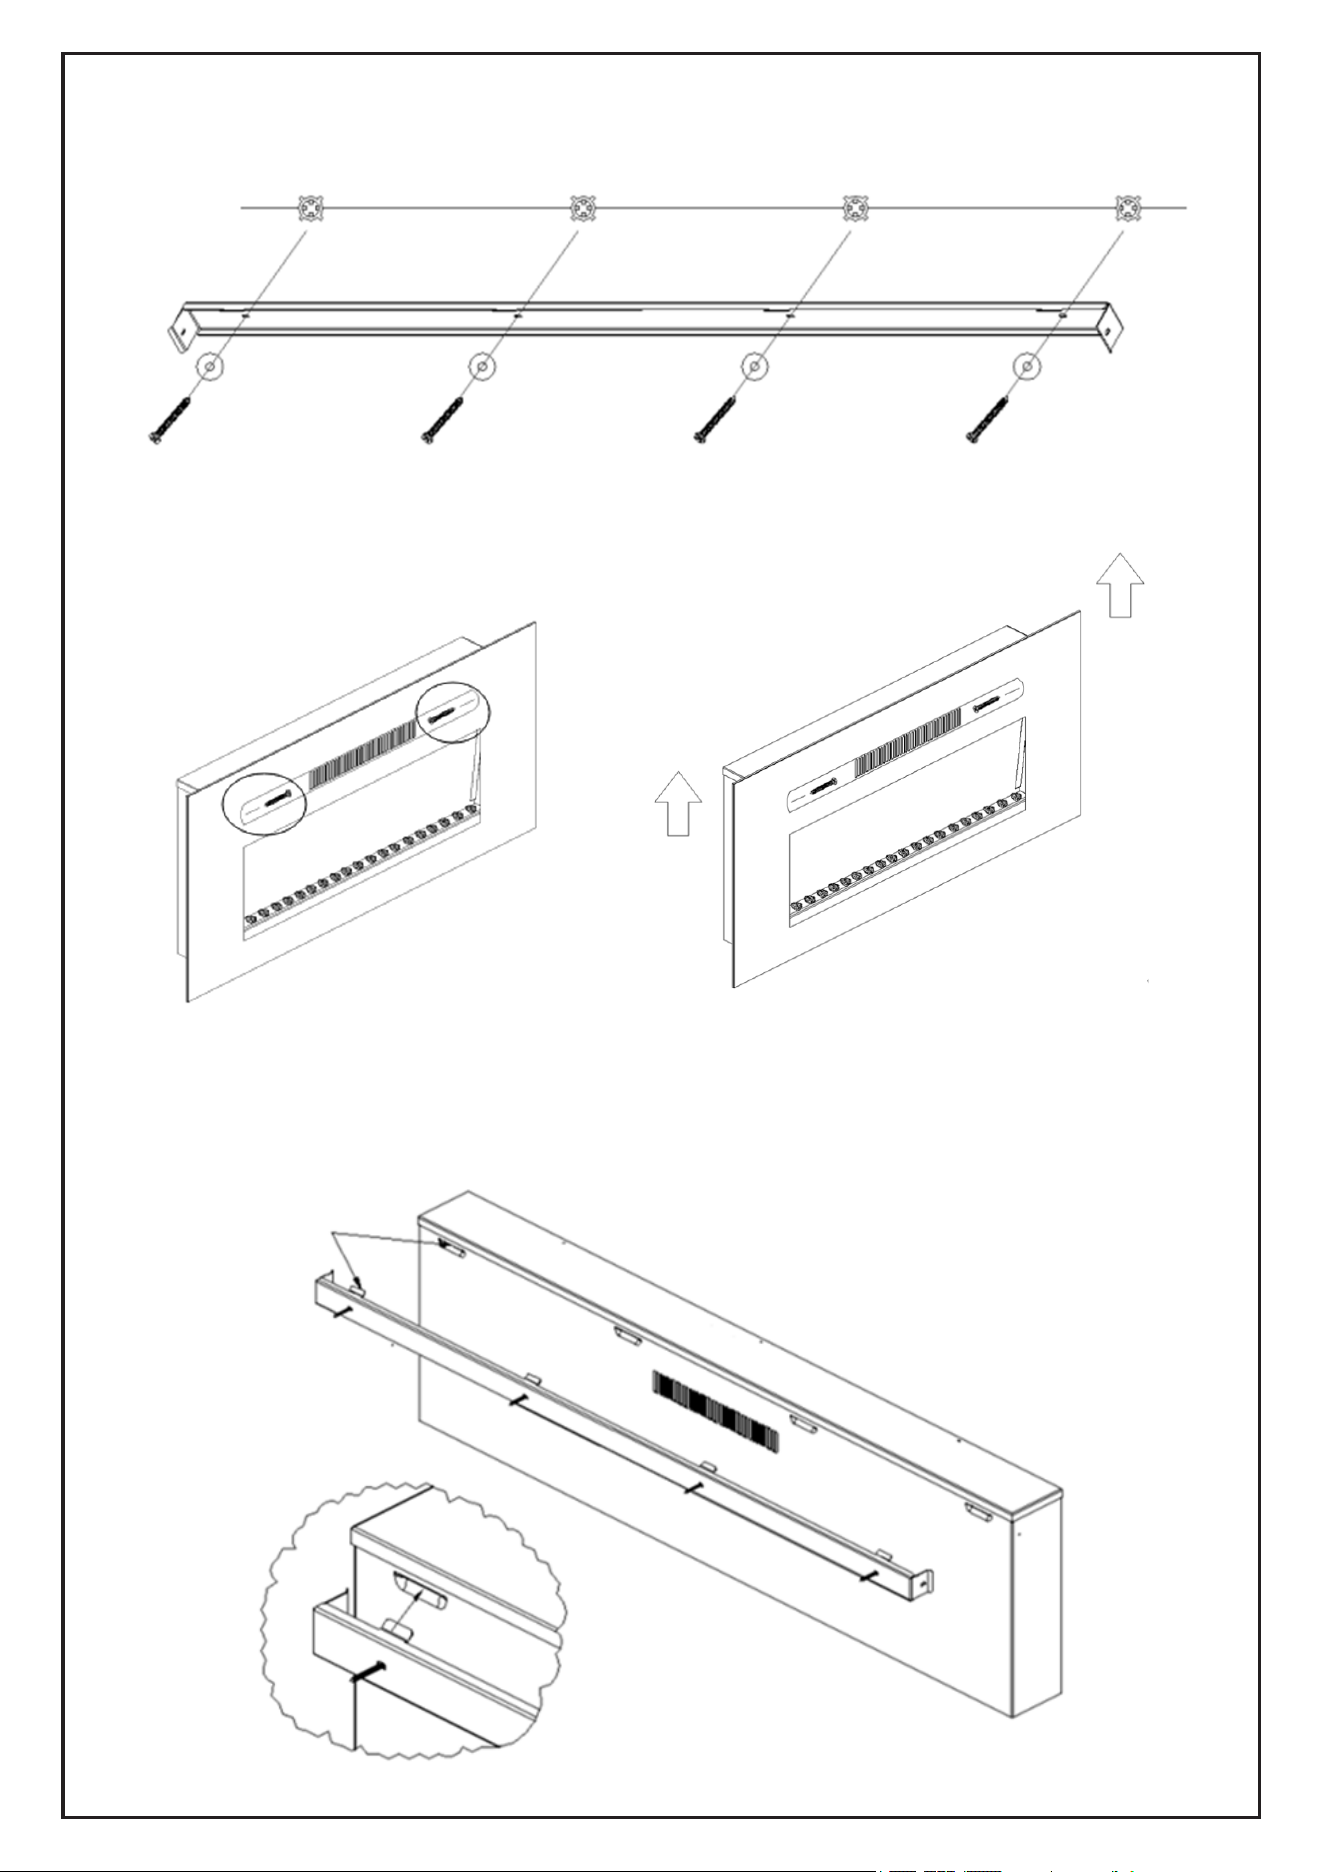
Step 3: Using four anchor screws and four washers, attach the mounting bracket to
the wall (see figure below).
Step 4: (1) Locate and remove the two mounting screws. (2) Pull the front cover
upwards to remove it (see figures below).
Fig. D (1) Fig. D (2)
Fig. C
Step 5: Mount the heater on the wall using the keyhole slots on the metal bracket,
which is on the back of the heater (see figure below).
Ensure the mounting bracket is securely engaged with the metal bracket at the
back of the heater.
Fig. E
7
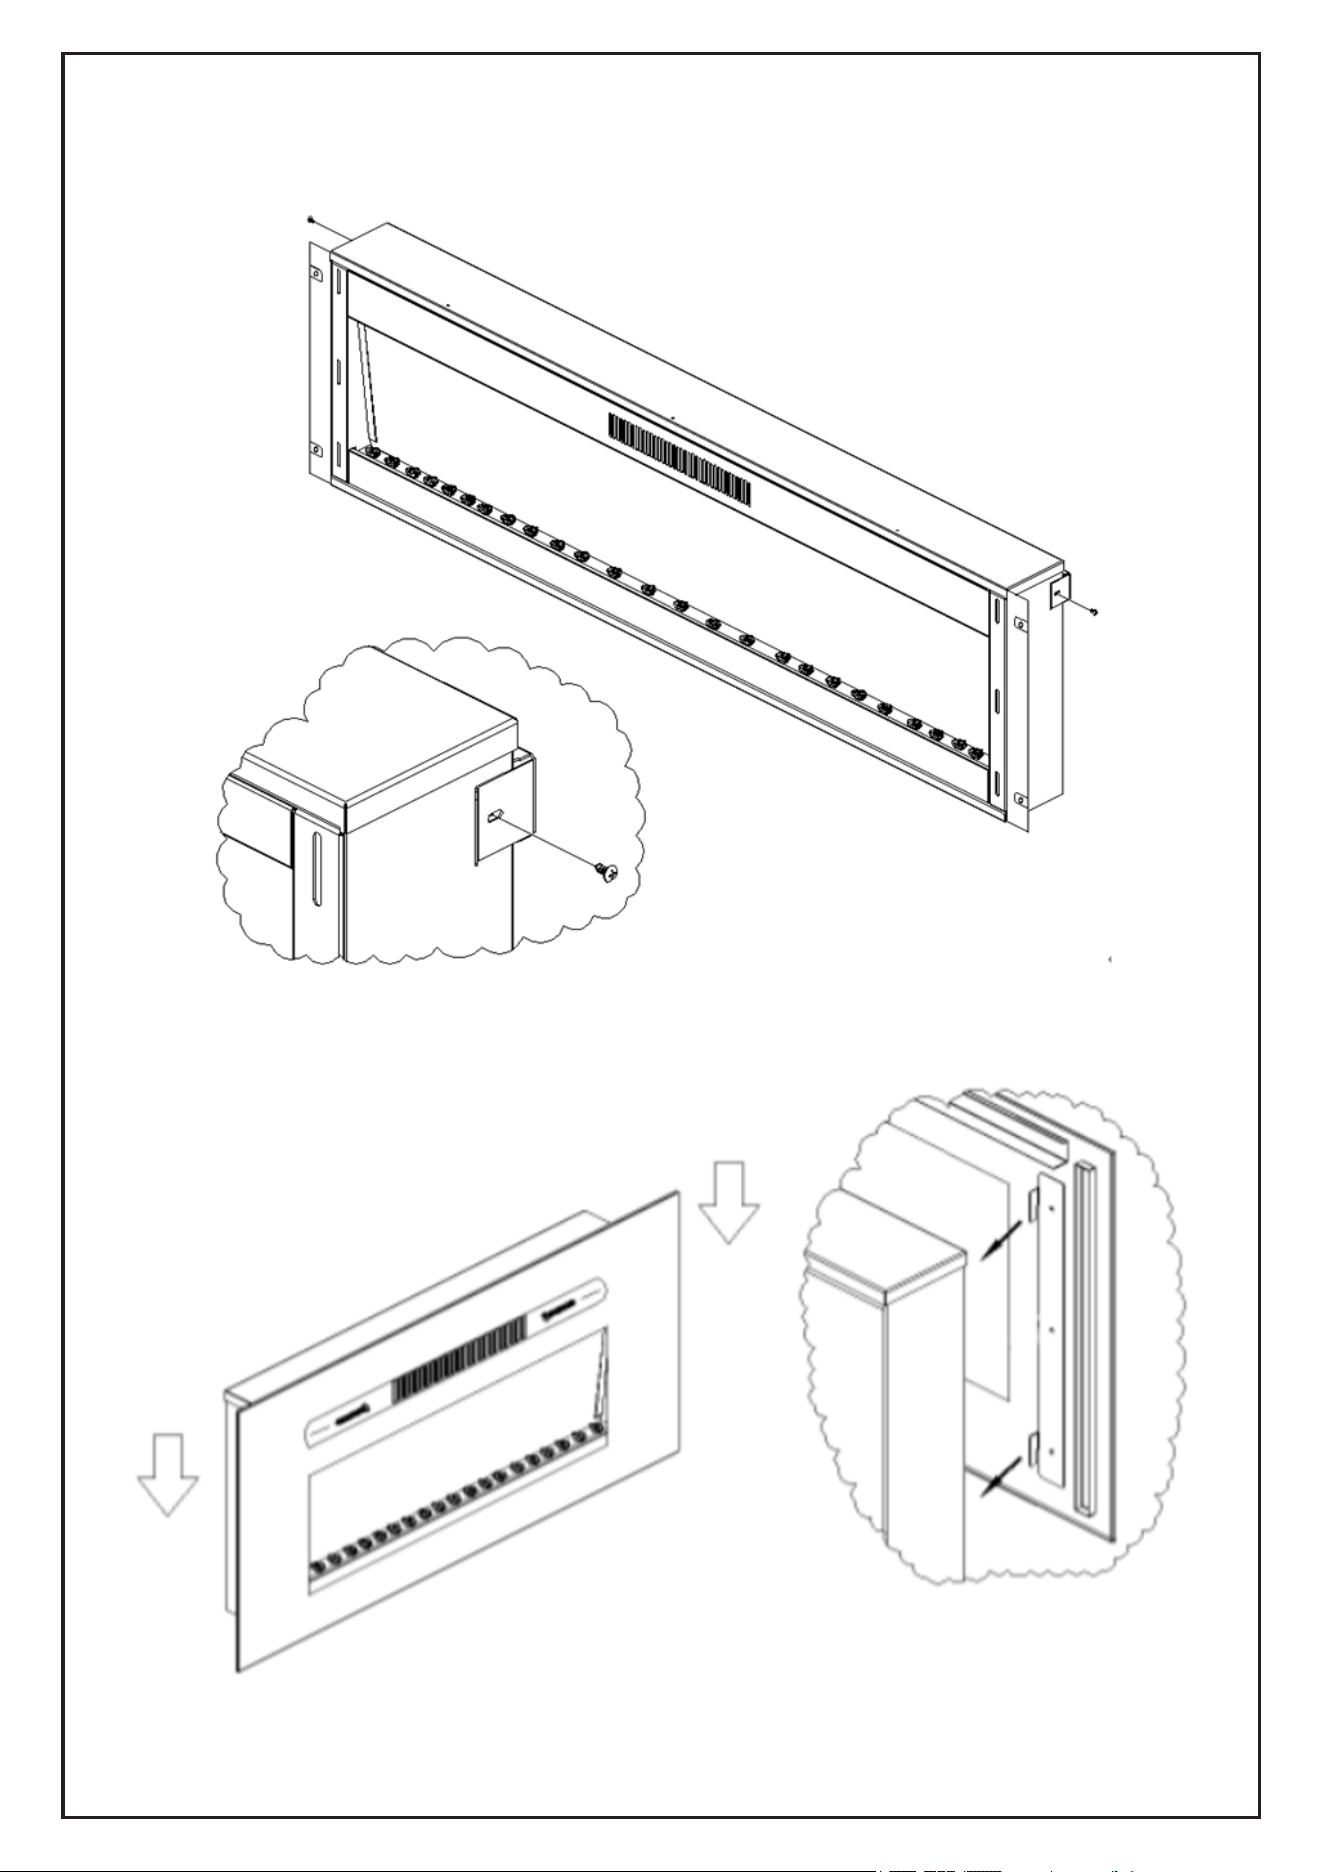
Step 6: Using two mounting screws, secure the mounting bracket to the heater (see
figure below).
Fig. F
Step 7:Attach the front cover and secure it with two mounting screws (see figure
below).
Fig. G
8
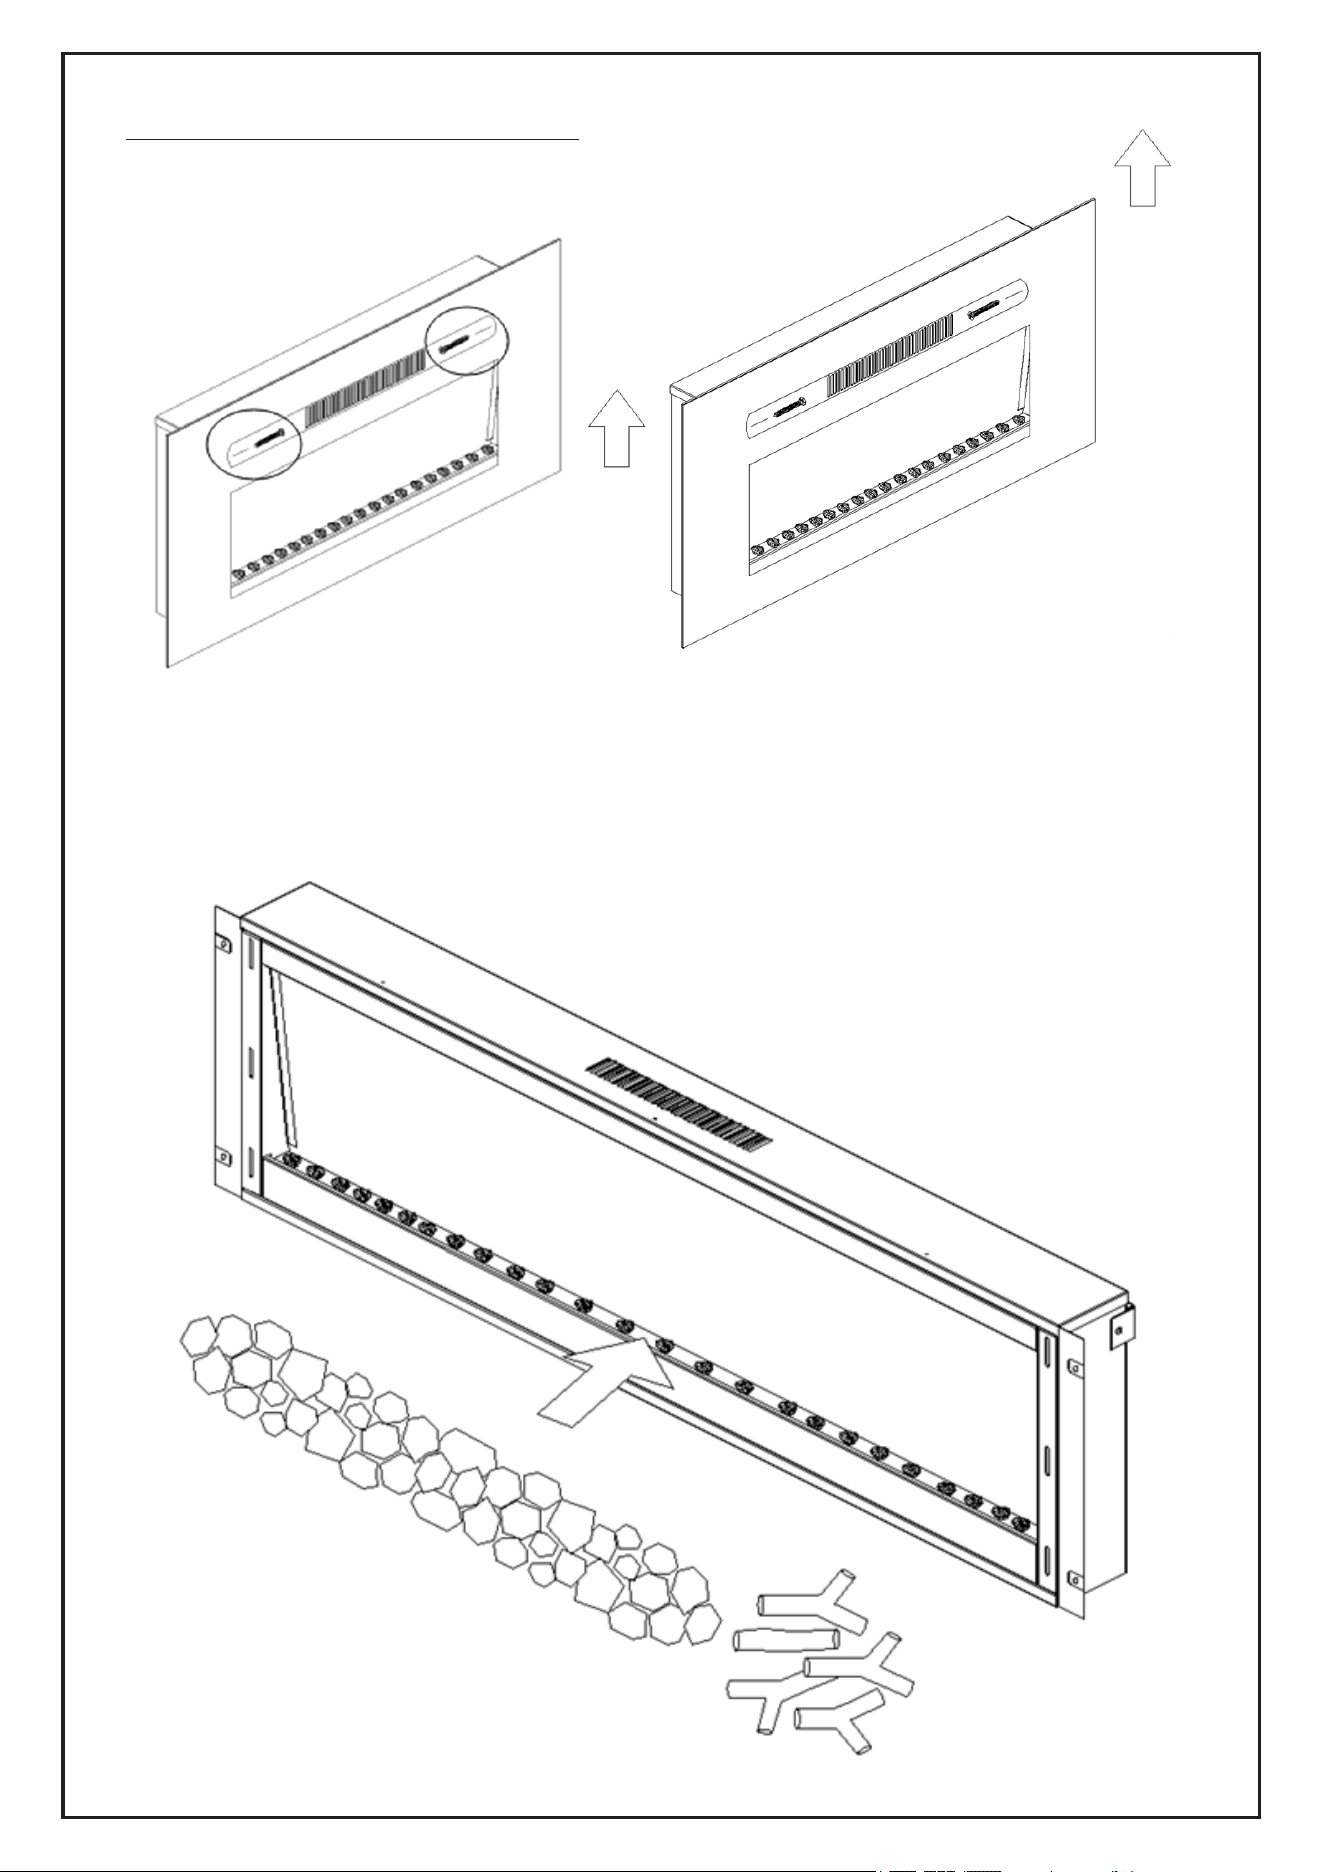
REPLACING DECORATIVE ROCK
Step 1: (1) Locate and remove the two mounting screws. (2) Pull the front cover
upwards and remove it (see figure below).
Fig. A (1) Fig. A (2)
Step 2: Place the rock or branch into the heater (see figure below).
Fig. B
9
Step 3: Attach the front cover and secure it with two mounting screws (see figure
below).
Fig. C
CAUTION: Before operating the unit, ensure all screws are tightened.
OPERATION
After reading all the instructions, ensure the fireplace controls are in the OFF
position. Then, plug the fireplace into a 15A/120V outlet.
USING THE CONTROL PANEL
Vent Indicator
Flame colour
Flame effect
Temperature
setting
Control panel
Flame
Power
10
The controls are on the right side of the unit.
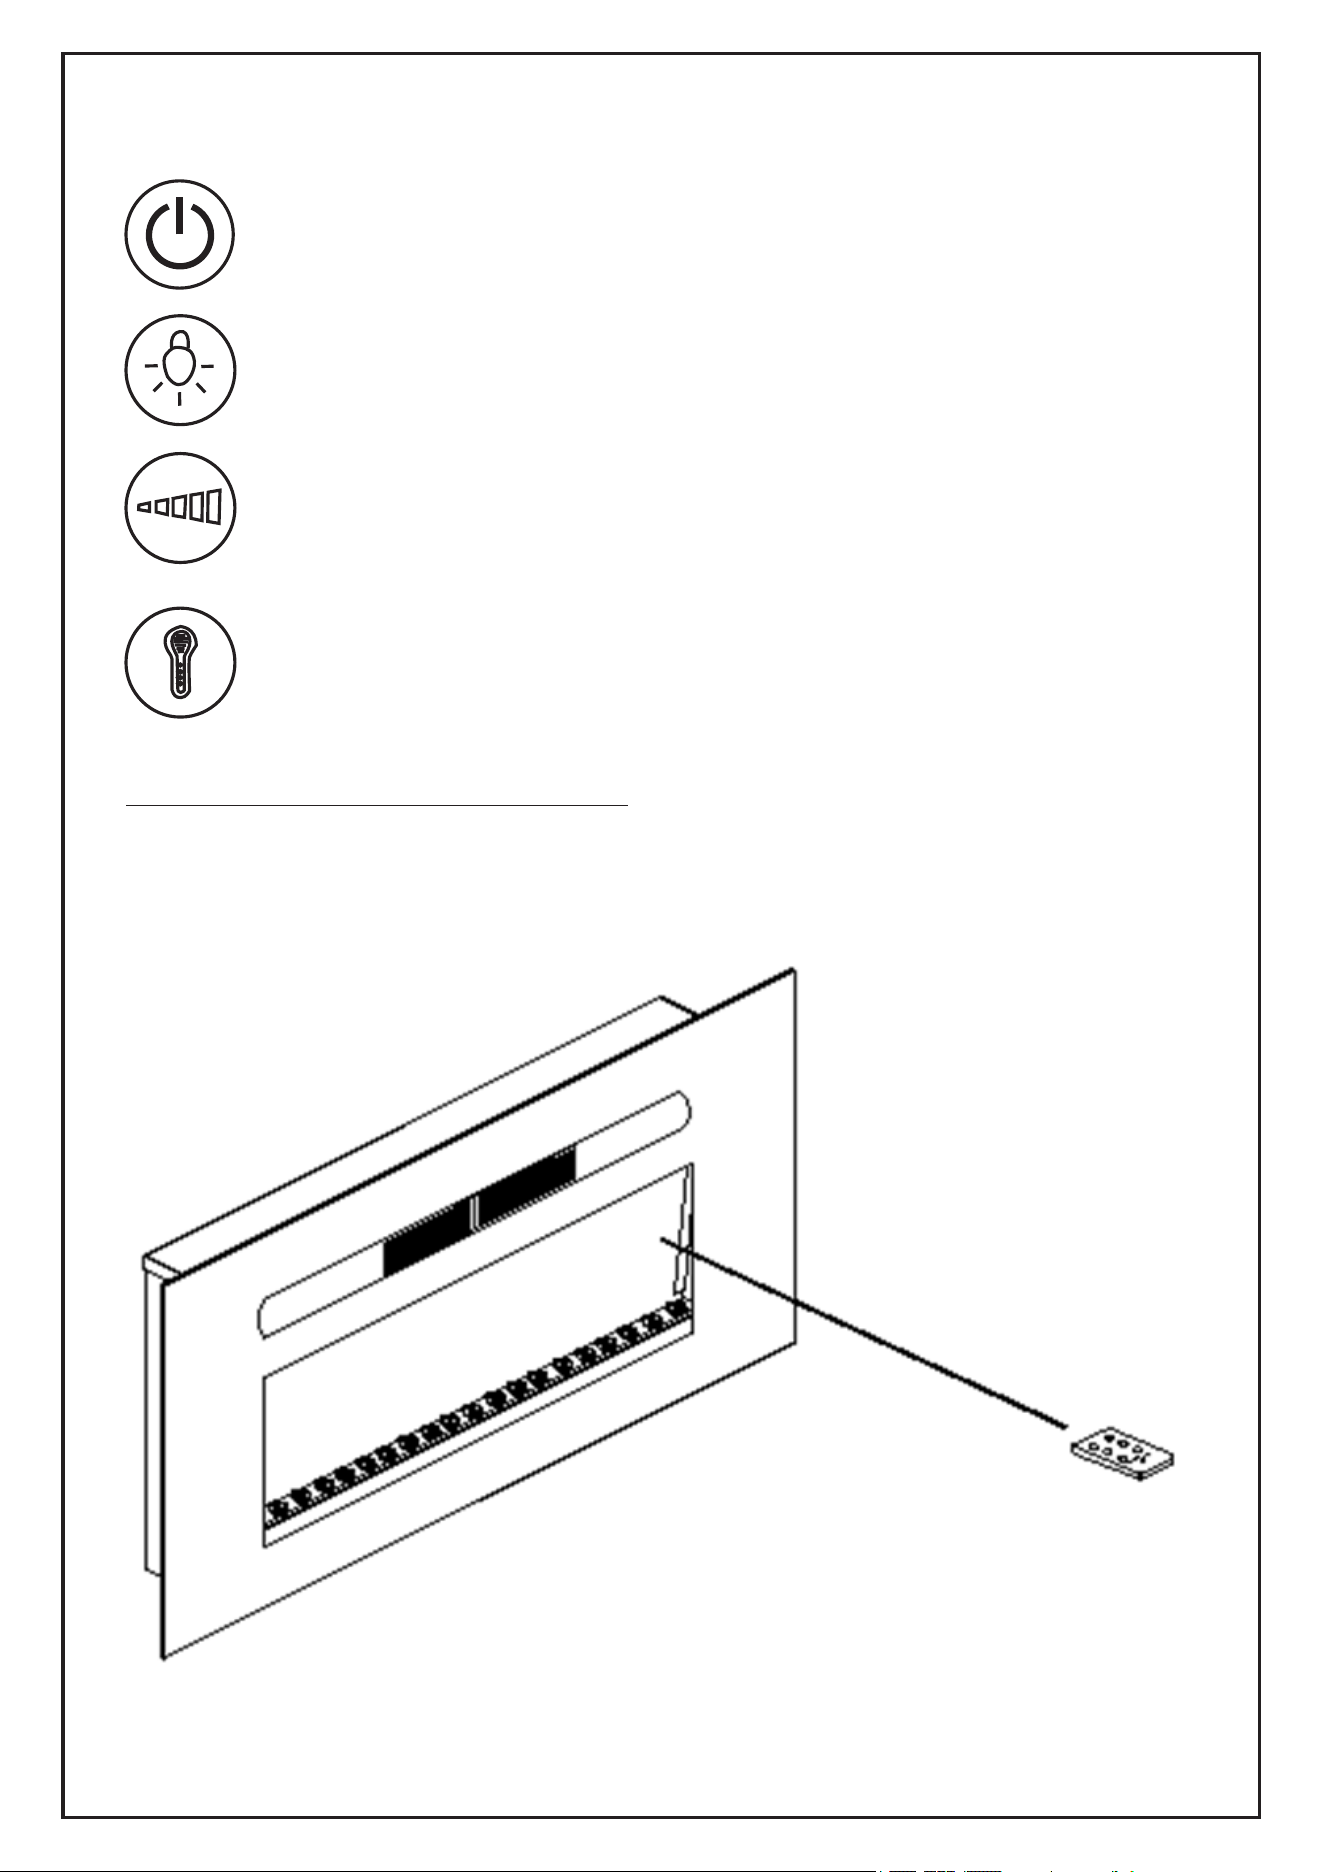
: Press this button to turn the fireplace on. Press it again to turn it off.
Once the fireplace is turned off, the fan will continue to operate for 60
seconds without heat.
: Press this button to change the flame color. There are ten different
flame effects available. Keep pressing the button until you reach the
desired color effect.
: Press the button to change the flame effect. Press it again to
decrease the flame intensity. There are six light intensities available,
numbered from 6-1. Press the button once more to stop the flame
effect.
: Press this button to set the temperature – press it repeatedly until
you reach the desired temperature. Once the desired ambient
temperature is reached, the heater will automatically stop heating.
Please note, if the ambient temperature drops 2°C below the desired
temperature, the heater will resume heating.
USING THE REMOTE CONTROL
NOTE: For optimal performance, use the remote control in front of the heater, ensuring you
do not exceed five meters from the heater.
11
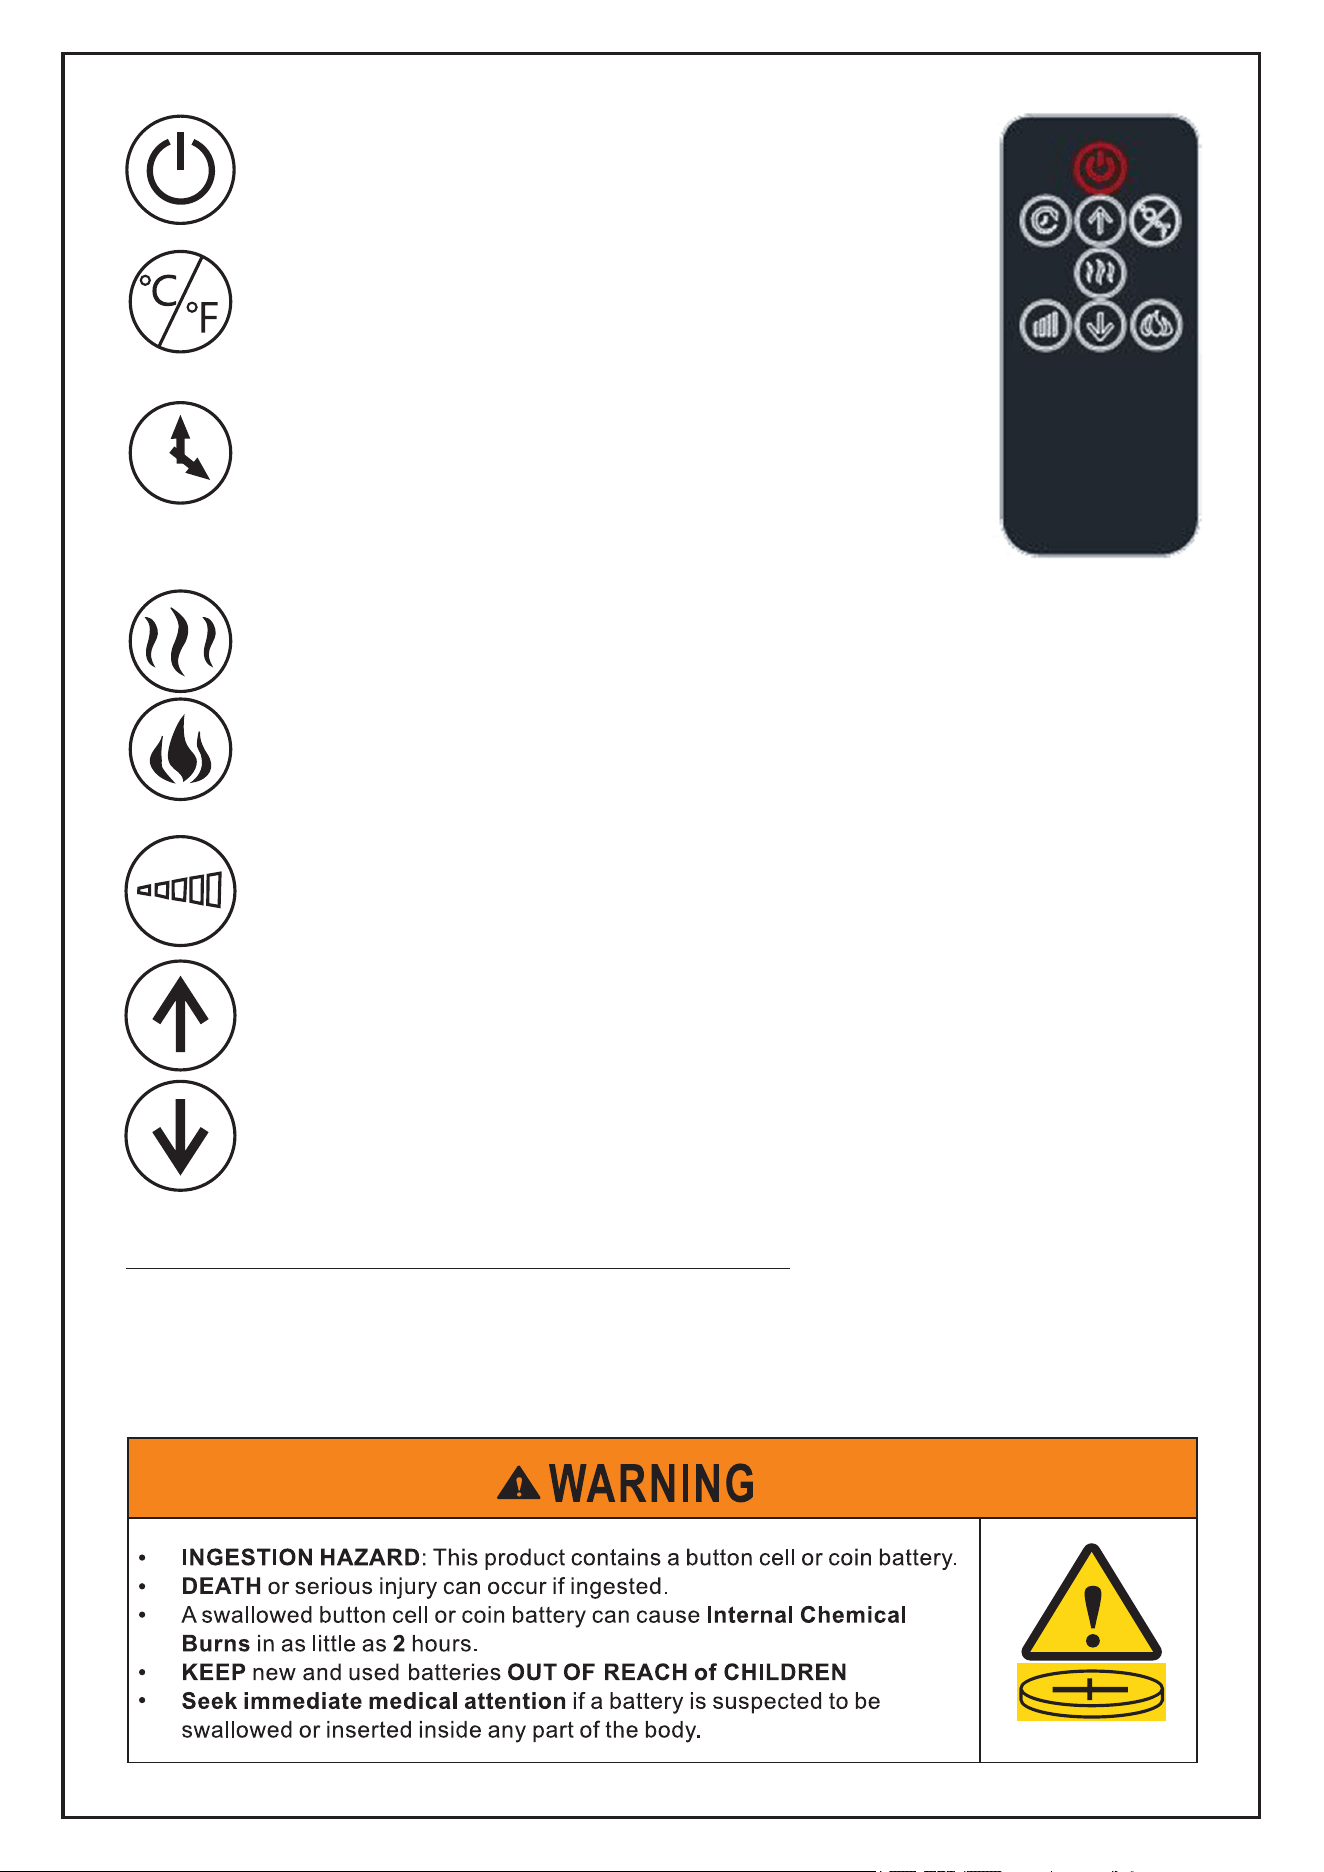
: Press this button to turn the fireplace on. Press it
again to turn it off. Once the fireplace is turned off, the
fan will continue to operate for 60 seconds without
heat.
: Press this but ton to toggl e bet wee n the tw o
temperature scales. The corresponding Celsius (C) or
F a h r e n h e i t ( F ) L E D w i l l i n d i c a t e t h e c u r r e n t
temperature scale setting.
: Press this button for the timer function. The LED
screen will display the options from 0H-8H, OH
indicates that there is no set running time – the heater
will run continuously. The numbers 1H-8H represent
the number of hours that the heater will run before
automatically shutting off.
: Press this button to activate the heat function. Press it again to turn it off.
: Press this button to change the flame color. There are ten different flame
effects available. Keep pressing the button until you reach the desired
color effect.
: Press the button to change the flame effect. Press it again to decrease
the flame intensity. There are six light intensities available, numbered
from 6-1. Press the button once more to stop the flame effect.
: Press these buttons to adjust the temperature. Once the desired
ambient temperature is reached, the heater will automatically stop
heating. If the ambient temperature drops below the desired
temperature by 2°C, the heater will resume heating to maintain the
set temperature.
11REMOTE CONTROL BATTERY REPLACEMENT
Replace with a CR2025 battery. To install the new battery, follow the diagram on the
back of the remote control.
1 CR2025 batteries required (NOT INCLUDED)
12
1.) Battery type:CR2025
2.)Nominal Vlotage 3V
Battery
a) Remove and immediately recycle or dispose of used batteries according to local
regulations and keep away from children. Do NOT dispose of batteries in
household trash or incinerate.
b) Even used batteries may cause severe injury or death.
c) Call a local poison control center for treatment information.
d) A statement indicating the compatible battery type Cr2025.
e) A statement indicating the nominal battery voltage.
f ) Non-rechargeable batteries are not to be recharged.
g) Do not force discharge, recharge, disassemble, heat above (manufacturer's
specified temperature rating) or incinerate. Doing so may result in injury due to
venting, leakage or explosion resulting in chemical burns.
h) Ensure the batteries are installed correctly according to polarity (+ and -).
I ) The statement “Do not mix old and new batteries, different brands or types of
batteries, such as alkaline, carbon-zinc, or rechargeable batteries.”
j) The statement “Remove and immediately recycle or dispose of batteries from
equipment not used for an extended period of time according to local regulations.”
k) The statement “Always completely secure the battery compartment. If the battery
compartment does not close securely, stop using the product, remove the batteries,
and keep them away from children.
MAINTENANCE
WARNING: Before performing any maintenance or cleaning, turn off and unplug
the appliance to reduce the risk of fire or electric shock. It is recommended to have
maintenance tasks carried out by a qualified technician.
CLEANING
CAUTION: Before cleaning, wait for the appliance to completely cool down.
CLEANING GLASS PANEL
- Use a dry cloth to remove dust.
- Use a damp cloth to remove fingerprints and other marks from the glass door.
- Do not use abrasive cleaners or liquid sprays on glass door surfaces.
- Clean metal and metal-painted parts with a damp cloth only. Do not use abrasive
cleaners or liquid sprays on these surfaces.
13
