Owner’s Manual
Model: 47010
Questions or Concerns?
Amazon Purchases: support@nuwavenow.com All Other Purchases: help@nuwavenow.com
1-888-502-7805 1-877-689-2838
Mon-Fri 7:30am-4:30pm CST
Scan the code to find
how-to videos and more!
Master Your Oxypure
2 | OxyPure Smart
Register Today!
Use your smartphone or device to scan the QR code located on the back
of your unit to register your product, or visit nuwavenow.com/register.
Connect with Us!
#nuwavenow
Visit nuwavenow.com to see other great products and accessories.
THANK YOU!
Congratulations on your Nuwave® purchase. We know there are many options available
and sincerely appreciate the trust you have placed in us.
For the last 30 years, we have committed to introducing products that promote healthy
living at affordable prices. By combining the highest quality designs with cutting edge
technology, we have always strived to blend feature, function, and innovation into every
product we make. We hope you will agree.
We would love to hear from you. Please feel free to reach out with any feedback or
comments that could improve your experience. We would also enjoy hearing about your
successes. Scan the QR code below to email us.
For Amazon Purchases
support@nuwavenow.com
For All Other Purchases
help@nuwavenow.com
nuwavenow.com | 3
TABLE OF CONTENTS
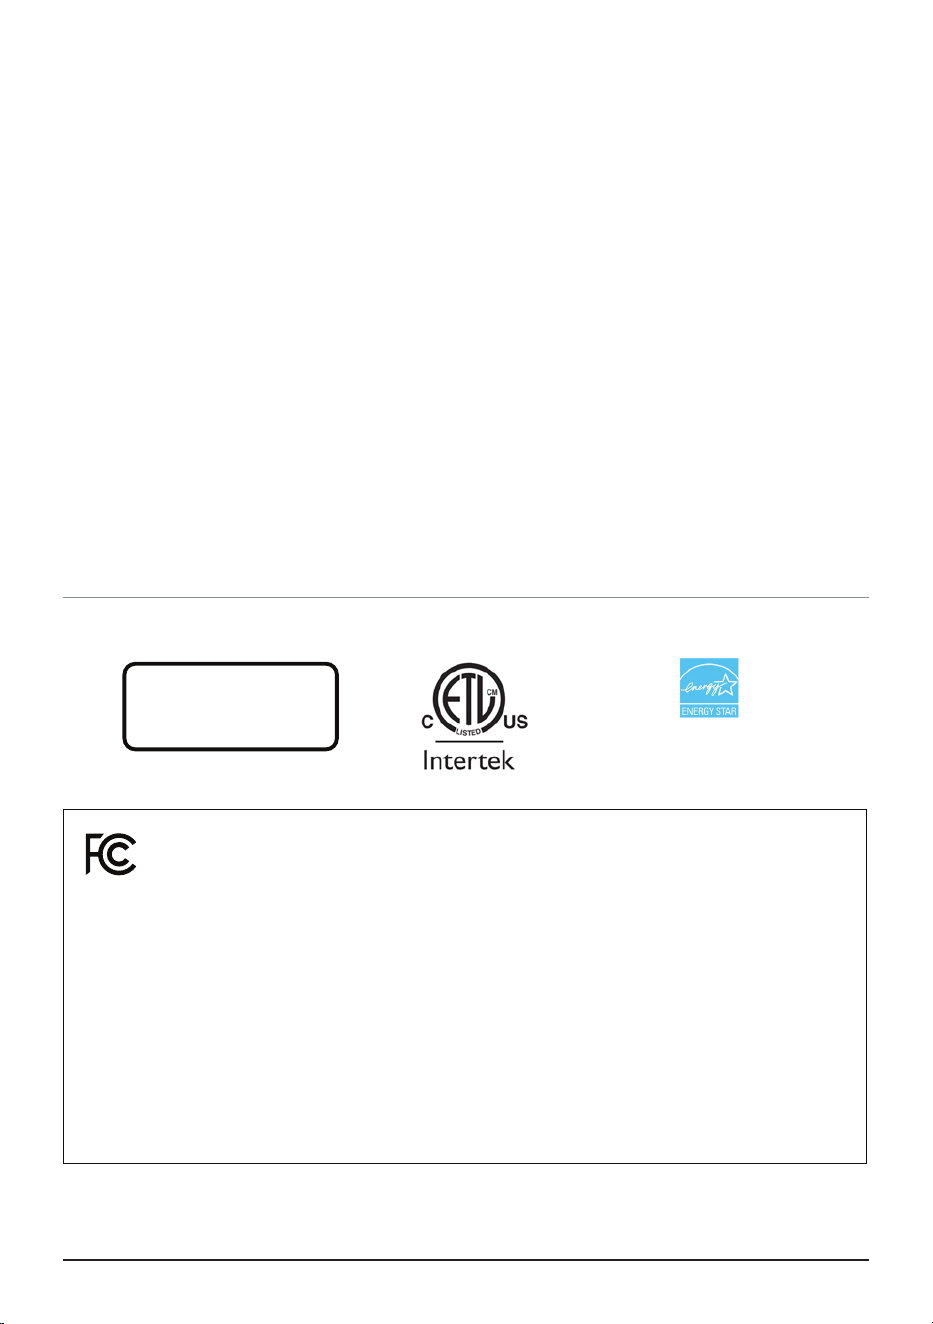
U.S Environmental
Protection Agency
Meets California ozone
emissions limit.
CARB certified
This equipment has been tested and found to comply with the limits for a Class B digital
device, pursuant to part 15 of the FCC Rules. These limits are designed to provide
reasonable protection against harmful interference in a residential installation. This
equipment generates, uses and can radiate radio frequency energy and, if not installed and used
in accordance with the instructions, may cause harmful interference to radio communications.
However, there is no guarantee that interference will not occur in a particular installation. If
this equipment does cause harmful interference to radio or television reception, which can be
determined by turning the equipment off and on, the user is encouraged to try to correct the
interference by one or more of the following measures:
• Reorient or relocate the receiving antenna.
• Increase the separation between the equipment and receiver.
• Connect the equipment into an outlet on a circuit different from that to which the receiver is
connected.
• Consult the dealer or an experienced radio/TV technician for help.
Safeguards & Information ...................................................................................... 4–5
Parts & Accessories ................................................................................................................6
Assembly..................................................................................................................................7
WiFi Connection ......................................................................................................................8-9
Operation ..................................................................................................................................9-11
Cleaning and Maintenance .....................................................................................................12-15
Troubleshooting Guide ...........................................................................................................16
Limited Warranty .....................................................................................................................17-19

4 | OxyPure Smart
1. ONLY use the OxyPure for its intended
purpose.
2. To protect against the risk of electrical shock,
DO NOT immerse the cord, plug, or any part
of the OxyPure in water or any other liquid.
3. Close supervision is necessary when the
OxyPure is used by or near children. The
OxyPure is not intended for use by children,
persons with reduced physical, sensory,
or mental capabilities, or those who lack
expertise or knowledge of this device.
4. DO NOT operate the OxyPure with a
damaged cord, plug, after any malfunction, or
if the unit has been dropped or damaged in
any way. Contact Customer Service.
5. Discard the protective plastic covering the
power plug before use.
6. DO NOT run the cord under carpeting, throw
rugs, runners or other coverings.
7. DO NOT route the cord under furniture or
appliances. Arrange the cord away from high-
traffic areas where it will not pose a tripping
hazard.
8. DO NOT plug the OxyPure into an outlet
or power strip that is being used by other
appliances.
9. Remove any dust or water from the plug, if
needed.
10. ALWAYS set up the OxyPure on a flat, stable
surface.
11. DO NOT set up the OxyPure where it could
be pushed, kicked, or tripped over.
IMPORTANT SAFEGUARDS
HOUSEHOLD USE ONLY • READ ALL INSTRUCTIONS BEFORE USE
12. Leave at least 2-3 feet of space between the
OxyPure’s vents and any walls.
13. DO NOT install the OxyPure near a heating
device, flammable or combustible gases or
vapors, or in areas exposed to moisture or
water.
14. DO NOT operate the OxyPure on its side.
15. DO NOT place objects on top of the
OxyPure.
16. DO NOT sit or stand on, or lean against, the
OxyPure.
17. Alteration or modification of any part of the
OxyPure, or the use of attachments not
recommended by the manufacturer, may
cause fire, injury, or damage to property.
18. As with most electrical units, electrical parts
are live even when the OxyPure is off.
Be sure the OxyPure is unplugged when
assembling.
19. DO NOT use the OxyPure in a factory or
industrial setting where machine oil may be
present in the air.
20. Turn the power OFF on the OxyPure before
unplugging it.
21. DO NOT operate the OxyPure if an abnormal
sound or motion is detected.
22. Unplug the OxyPure from outlet when the
unit is not in use or will be left unattended for
an extended period of time; before putting
on or taking off parts; when removing or
replacing the filters; and before cleaning.
ALWAYS KEEP THIS MANUAL HANDY FOR FUTURE REFERENCE.
READ ALL INSTRUCTIONS and WARNINGS: The failure to follow any of the important safe-
guards, warnings, or instructions for safe use is a misuse of the OxyPure that can void your warranty
and create the risk of serious injury. When using the OxyPure, basic safety precautions should always
be followed.
nuwavenow.com | 5
FILTER CHANGING PRECAUTIONS
1. Once all filters have been removed, the body
of the OxyPure can be washed with warm,
soapy water. Dry thoroughly before replacing
the filters.
2. ALWAYS use rubber gloves when handling
the filters.
3. When removing dirty filters, ALWAYS do so
outside or in a well ventilated area.
4. ALWAYS replace your filters with
Nuwave filters made for your model of air
purifier.
23. If a hard or foreign object comes into contact
with the fan, DO NOT operate. Turn off and
unplug the OxyPure.
24. Inspect the OxyPure for any loose or missing
parts before and after each use. If parts
are loose, damaged, or missing, contact
Customer Service.
25. DO NOT pull, lift, drag, pick up, or carry the
OxyPure by its cord.
26. DO NOT block the air inlet or outlet vents.
27. DO NOT operate the OxyPure without filters
or the Filter Access Panel in place.
28. DO NOT place anything with a strong odor or
chemical on or close to the odor sensor.
29. Only use Nuwave brand filters and
accessories for the OxyPure model
purchased.
WARNING
RISK OF ELECTRIC SHOCK: To reduce the
risk of electric shock, this equipment has a
polarized plug (one blade is wider than the
other). This plug will fit in a polarized outlet
only one way. If the plug does not fit fully in the
outlet, reverse the plug. If it still does not fit,
contact qualified personnel to install the proper
outlet. DO NOT alter the plug in any way.
These servicing instructions are for use by
qualified personnel only. To reduce the risk of
electric shock, DO NOT perform any servicing
other than that contained in the operating
instructions unless you are qualified to do so.
IMPORTANT SAFEGUARDS
HOUSEHOLD USE ONLY • READ ALL INSTRUCTIONS BEFORE USE
ELECTRICAL INFORMATION
These servicing instructions are for use by
qualified personnel only. To reduce the risk of
electric shock, do not perform any servicing other
than that contained in the operating instructions
unless you are qualified to do so.
Power-Supply Cords
A short, detachable power-supply cord is
provided to reduce the risk of becoming
entangled in, or tripping over, a longer cord.
Longer detachable power-supply cords or
extension cords are available and may be used
if care is exercised in their use. If a longer,
detachable power-supply cord or extension cord
is used:
1. The marked electrical rating of the extension
cord should be at least as great as the
electrical rating of the appliance.
2. The longer cord should be arranged so that it
will not drape over any countertop or tabletop
where it could be pulled on or tripped over
unintentionally.
3. The OxyPure should be operated on a
separate electrical outlet from other operating
appliances due to wattage limitations.
6 | OxyPure Smart
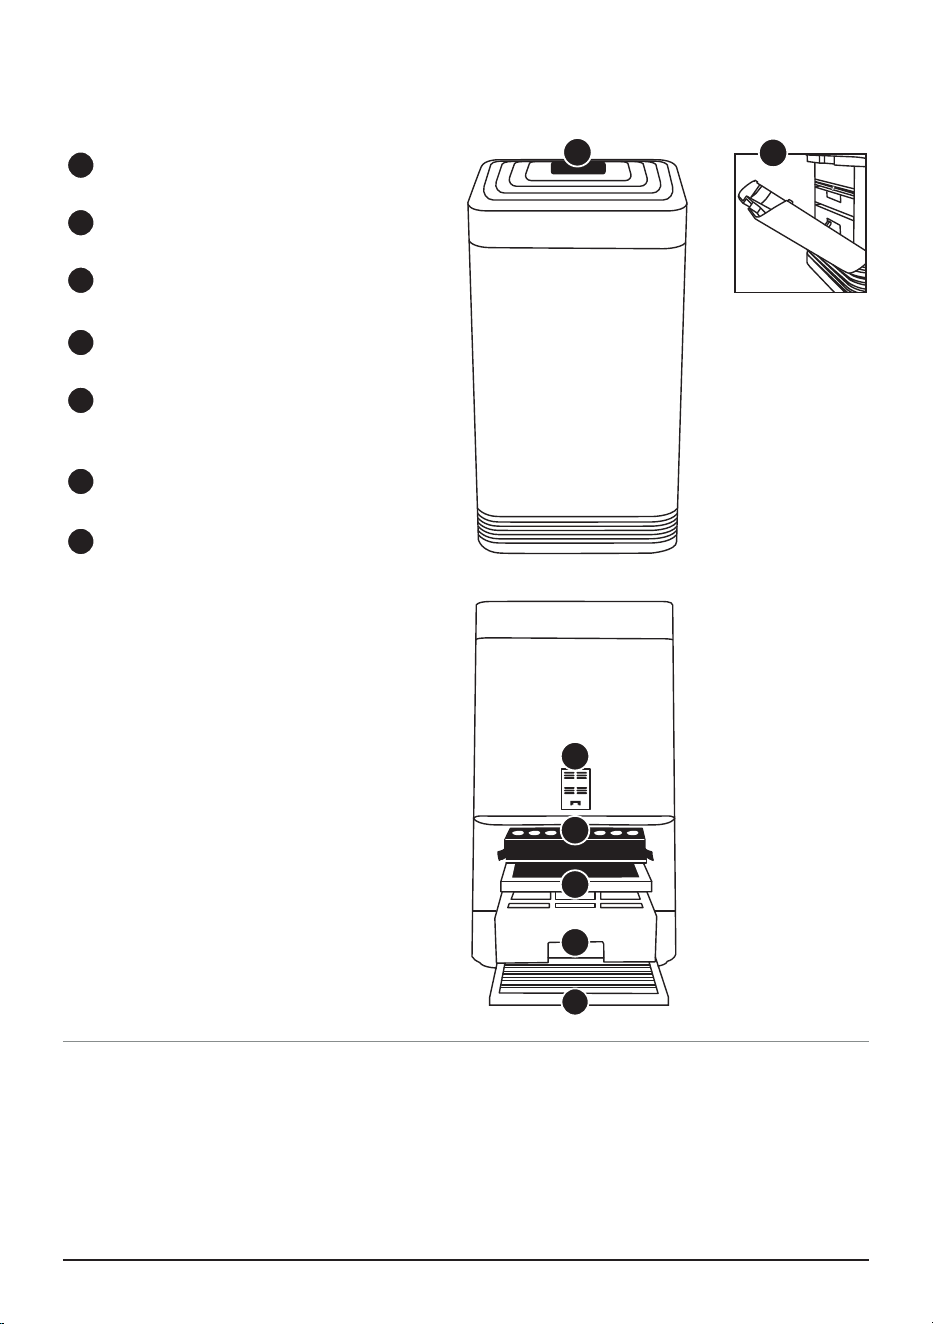
PARTS
Keeping your OxyPure up and running with new lters is a breeze. Locate the part number on the above
images and contact Customer Service.
For Amazon Purchases: [email protected]
For All Other Purchases: help@nuwavenow.com
or order online at www.nuwavenow.com
ORDERING PARTS
Air Vent
Part #: OXA1
Filter Slot Cover
Part #: OXP6
Sensor Cover
Part #: OXP3
HEPA/Carbon Filter
Part #: OXA5
Ozone Emission
Removal Filter
Part #: OXA6
Bio-Guard® Filter
Part #: OXA7
Stainless Steel
Pre-Filter
Part #: OXA8
1
Front
3
2
4
5
6
7
1
2
3
4
5
6
7
Back
nuwavenow.com | 7
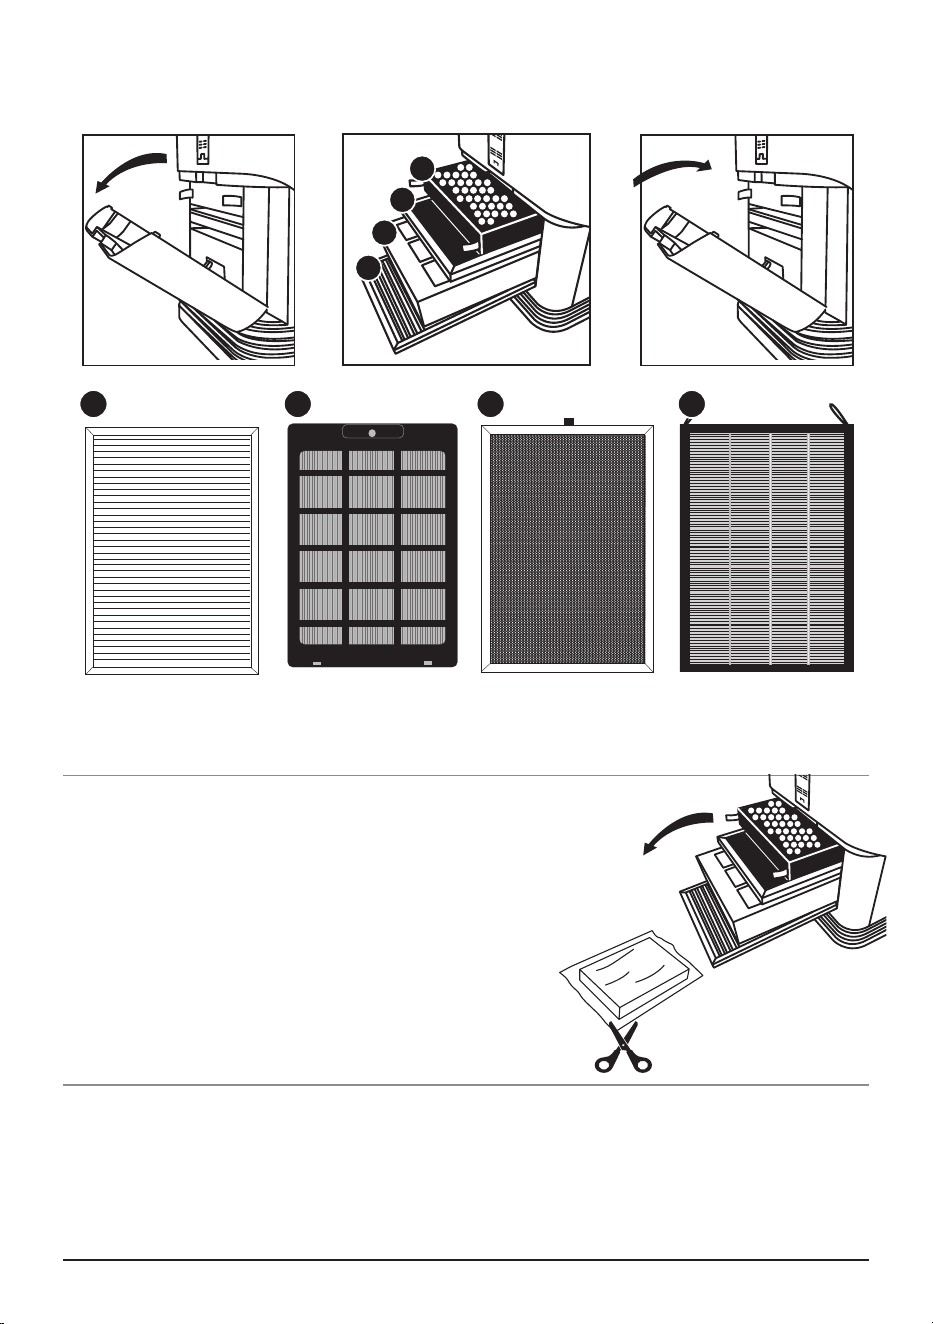
Air Filter Assembly
The OxyPure
®
comes with four different preassembled filters inside the unit (see diagram). Each
filter is labeled with a number. Match these with the slot numbers when installing the filters. When
the filters require cleaning, please refer to Cleaning & Maintenance.
ASSEMBLY
Open Close
Access to Filters
Stainless Steel
Pre-Filter
Bio-Guard™ Filter Ozone Emission
Removal Filter
HEPA/Carbon Filter
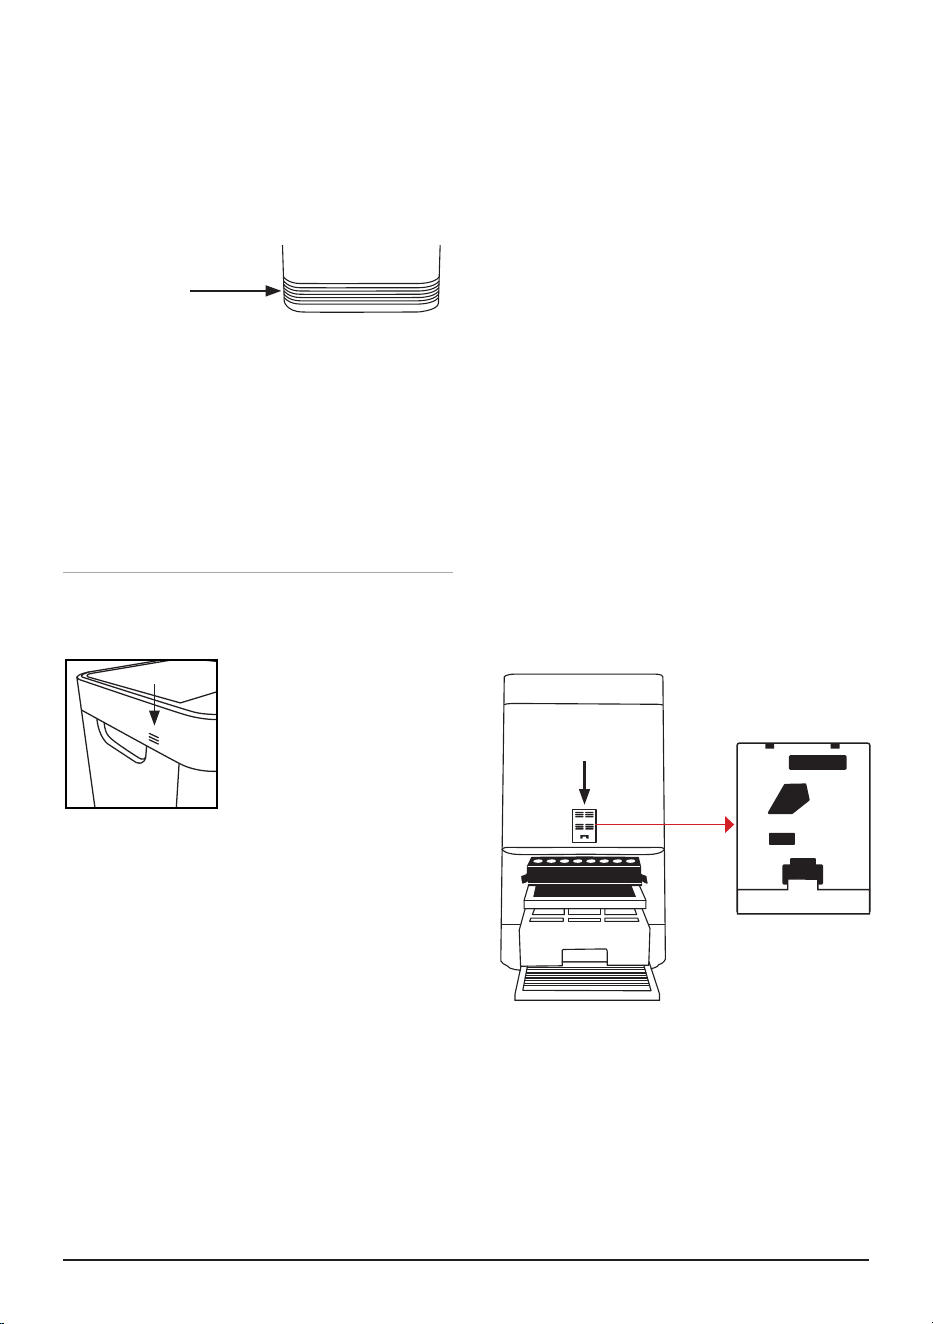
Before Use:
1. Make sure the OxyPure
®
is unplugged. Open the panel
on the back to expose the filters.
2. Pull the filters from their slots.
3. Remove the plastic wrapping from the filters. The Bio-
Guard Filter is not wrapped.
4. Fully reinsert the filters into the Oxypure and close the
panel.
5. Remove the sticker from the control panel.
4
3
2
1
4321

8 | OxyPure Smart
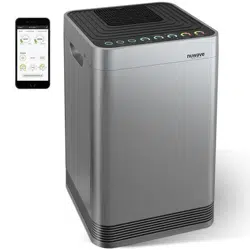
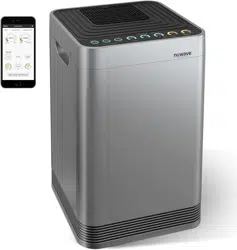
THE NUWAVE CONNECT APP
MONITOR AND CONTROL THE OXYPURE REMOTELY
Download the Nuwave Connect App
This is an optional feature that is not required to
operate your OxyPure.
Using the QR reader in your Camera App:
Scan the QR code below.
1. It will take you to the App’s download page
on either the Google Play Store or the Apple
AppStore, then just follow the download and
installation instructions.
Downloading a QR reader App:
If your phone doesn’t have that capability
built-in, simply download a 3rd-Party QR
Scanning App before scanning the Nuwave QR
Codes and you are ready to go.
2. Open your device’ mobile app store (Apple
App Store or the Google Play Store).
3. Search for “QR code readers.”
4. Simply download the QR code reader to your
phone, open it, scan the code and you are
ready to go.
The OxyPure is equipped to operate using WI-FI. This allows you to conveniently operate your new air
purifier from nearly any location, whether at home or while you are out and about, as long as you have
a reliable Internet connection.
WiFi LED Status Light
Pairing Mode & Standby Mode
Solid Light.
The OxyPure is paired with the Wi-Fi
network and ready to be used.
Rapid Blinking Light.
The OxyPure is in Pairing Mode.
The OxyPure will stay in Pairing Mode for up to
10 minutes or until your device is paired.
Slowly Blinking Light.
The OxyPure is in AP Pairing Mode.
No Light. The OxyPure’s WiFi is off.
Wi-Fi
Auto Scan Mode
1. Once you download the Nuwave® Connect
app, ensure your phone is connected to
your home Wi-Fi network on the 2.4G or 5G
frequency and that your phone’s Bluetooth
is on.
2. Turn on the OxyPure and activate Wi-Fi
Pairing Mode by pressing and holding
POWER until the light next to the Wi-Fi
symbol begins to blink rapidly.
3. In the Nuwave® Connect app, tap the +
symbol, then tap Auto Scan and select your
device.
4. Enter your Wi-Fi network’s password and tap
Confirm. If the connection is successful, the
app will display “Added Successfully” on the
screen.
Trouble Shooting Your Wi-Fi Connection
If the OxyPure did not connect to your network, the Wi-Fi light will turn off. Repeat the steps for
pairing. Make sure to select the proper Wi-Fi network and type the correct password.

nuwavenow.com | 9
Air/Odor Quality - Detects particles as small as 2.5/1000mm
Low PM Level High PM Level
AP Mode
1. If you can’t connect your OxyPure using
Auto Scan, tap the + symbol, then select the
OxyPure unit you want to add to the network.
AP Mode will be in the top right-hand corner.
2. On the unit press and hold POWER 2-3
seconds, then wait until the Wi-Fi light blinks.
If blinking rapidly, press and hold again then
wait for slow blinking to appear. Confirm on
the App.
3. Connect your phone to the available hotspot.
4. Once connected, return to the Nuwave
Connect App and the unit will begin
connecting automatically.
5. When the Oxypure is successfully connected,
tap Done.
THE NUWAVE CONNECT APP
MONITOR AND CONTROL THE OXYPURE REMOTELY
OPERATING THE OXYPURE
Particulate Matter (PM) with a diameter of 2.5 microns or less
0~5 5~10 10~20 20~30 30~50 Over 50
Fan Speeds
1 2 3 4 5 6
Air and Odor LEDs
The OxyPure will display the Air/Odor quality based on the particulate matter in the air from low to
high as represented below. If the PM level in the air exceeds the upper limit of the range, a warning is
triggered with a beeping sound and a ashing LED. To turn off this warning, press AUTO and
FAN SPEED at the same time. Press the same buttons to turn the warning feature back on.
Low PM Level High PM Level
EZ Mode
1. Tap the + symbol, then select the OxyPure
unit you want to add to the network.
2. Enter and confirm your Wi-Fi network
password.
3. Tap AP Mode in the top right of your screen,
then select EZ Mode to switch pairing modes.
4. Confirm that the Wi-Fi light on your OxyPure
is blinking rapidly.
5. Once the OxyPure is connected, tap Done.

10 | OxyPure Smart
SLEEP
When in Sleep Mode the LED lights will be off but
the fan will still be active. Adjust the fan speed to
your preference prior to going into Sleep Mode.
1. Manually adjust FAN SPEED.
2. Press and hold FAN SPEED for 2 seconds to
activate SLEEP Mode.
• The OxyPure will run at the fan speed that
was previously selected.
3. To turn off SLEEP Mode, press any button.
Note: ULTIMATE CLEAN and TURBO will work
while the OxyPure is in SLEEP Mode.
TIMER
Use the Timer function to choose the duration of
operation.
1. Press TIMER. The bar next to ½ hour will be
lit. There are 6 preset times to choose from
the bar will be lit green for the selected time:
½ hour, 1, 2, 4, 8, or 12 hours.
2. Press TIMER to increase the time.
3. To turn off the TIMER, press TIMER one time
when the 12 is lit, no bars will are now lit.
POWER ON/OFF
Press POWER to turn the OxyPure on or off.
• POWER will be lit green when on
• POWER will be lit red when off.
Note: When powered on, the OxyPure will
execute any previously selected functions or
modes.
AUTO
When the AUTO function is used, the OxyPure
will adjust the fan speed automatically dependent
on the air quality.
• AUTO will be lit in green when selected.
• No time limit unless TIME is selected.
• Will not operate together with FAN and
ULTIMATE CLEAN Modes.
ULTIMATE CLEAN
When in ULTIMATE CLEAN mode, the
OxyPure will automatically adjust to the
highest fan speed dependent when poor air
quality is detected.
• ULTIMATE CLEAN will be lit in green when
selected.
• The OxyPure can operate with TURBO and
AUTO modes.
MUTE
Press and hold AUTO for 2 seconds, a beep
will be heard. Repeat to unmute.
ODOR
NO
ODOR
STRONG
ODOR
REPLACE
FILTER 4
CLEAN
FILTER 2
WIFI
SLEEP MODE
AUTO
ULTIMATE
CLEAN
FAN
SPEED
TIMER TURBO
HR CLEAN DIRTY
POWER
HRHIGHLOW
ECO-FRIENDLY MODE
RESET FILTER 2
HOLD FOR 2 SECONDS
RESET FILTER 4
HOLD FOR 2 SECONDS
AIR
OPERATING THE OXYPURE
CONTROL PANEL • POWER • MODES & FUNCTIONS
The OxyPure’s control panel allows you to turn the unit on and off, choose an operating mode or
function and monitor your filter health.
MUTE

nuwavenow.com | 11
2 BUTTONS FUNCTIONS
ECO-FRIENDLY MODE
Allows you to save energy by turning off the
OxyPure fan and lights until poor air quality
is detected. While in Eco Mode, the fan will
automatically run when the PM level is high and
will remain off when the PM level is low.
1. Press POWER and ULTIMATE CLEAN at
the same time, the POWER will be backlit
yellow.
2. To tun off Eco-Friendly Mode, tap POWER
and ULTIMATE CLEAN at the same time.
The Power button will be lit red.
TURBO
The Turbo function cleans your air using the
highest fan speed at the time selected.
1. Press TURBO to the amount of working time
desired.
2. To exit TURBO, press TURBO until no bars
are lit.
AIR QUALITY INDICATORS
The OxyPure will automatically measure and
display the current air quality in the room.
CLEAN AND REPLACE FILTER INDICATORS
The lights next to CLEAN FILTER 2 and
REPLACE FILTER 4 will illuminate, indicating
that your filters will need to be cleaned or
replaced.
TURBO with TIMER
To operate longer than 2 hours.
1. Press TURBO to 2 hours.
2. Press TIMER and set the additional
time desired.
FAN SPEED
You can adjust from 6 different speeds.
1. Press FAN SPEED to adjust.
• The fan cannot be turned off.
• The lowest fan speed will be 1 bar lit.
OPERATING THE OXYPURE
CONTROL PANEL • POWER • MODES & FUNCTIONS
Clean Filter 2 Schedule
3 Months Yellow Routine cleaning.
6 Months Orange Should be cleaned for continued efficiency.
12 Months Red Clean for optimal performance especially if the first 2 were missed.
Replace Filter 4 Schedule
Green Should be cleaned for optimal efficiency.
Red Need to replace for efficiency.

12 | OxyPure Smart
Before First Use
Wipe the Top Vent and In Flow Vent with a slightly damp cloth or paper towel. Dry thoroughly before
use.
After Use
Your OxyPure should be cleaned periodically and after excessive use to ensure proper performance
and function. Be sure the OxyPure is off and unplugged.
Cleaning the Base of the OxyPure
Use a cloth, paper towel, duster, or vacuum brush attachment to remove dust and other particles from
the vents. Clean tougher buildup with a dampened cloth with soap and warm water. Dry thoroughly.
Ozone Emission
Removal Filter
1. Remove the Filter Slot Cover in the rear of the
OxyPure using its built-in handle.
2. Slide out the filters that need cleaning or
replacement.
3. Allow the washable filters to dry completely
before you reinstall them.
• Ensure the Filter Slot Cover is properly aligned
and secure when reattaching.
CLEANING & MAINTENANCE
Your OxyPure can easily be moved from one location to another.
Just hold the OxyPure by the handles on each side and roll the
OxyPure to the chosen location. The wheels underneath provide
extra maneuverability and mobility whenever it’s needed.
Handles
Wheels
4
3
2
1
Pre Filter
IMPORTANT: ALWAYS allow at least 12-24 hours for filters to dry before re-inserting into
the Oxypure. Do not dry filters in direct sunlight or heat source. Air dry only.
Stainless Steel Pre-Filter:
Washable and reusable.
Captures and collects large particles
and allergens including pet hair,
dander, and pollen.
Bio-Guard
™
Filter:
Washable and reusable.
8,000V, positive and negative charges
capture particles as small as 0.1
microns, as well as smoke, pollen,
and allergens.
Ozone Emission Removal Filter:
Reusable. DO NOT wash.
Eliminates ozone emissions and
other harmful airborne chemicals.
HEPA/Carbon Filter:
Disposable. DO NOT wash
Captures and traps pollen, allergens,
industrial emissions, VOCs including
formaldehydes, household fumes,
odors and nitrogen dioxides from gas
stoves and car exhausts.
FILTERS
Air purifiers operate more efficiently when all windows and doors are closed. The OxyPure can
purify the air in extra-large rooms (up to 2,671sq.ft.per hour).
Bio-Guard™
Filter
nuwavenow.com | 13
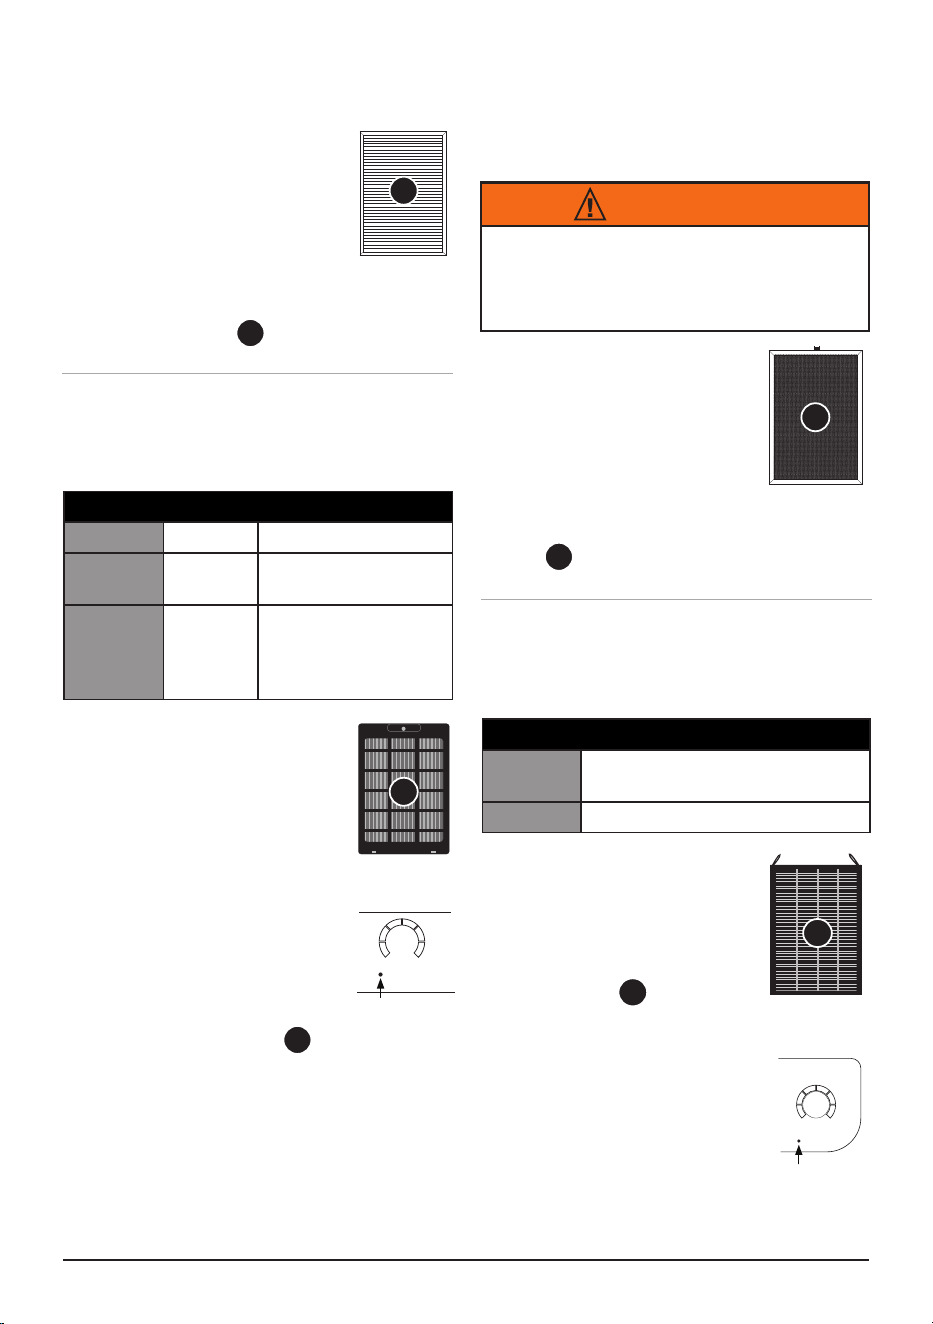
CLEAN THE OZONE EMISSION REMOVAL
FILTER:
1. Remove the Filter using
the tabs.
2. Thoroughly clean the Filter
using a nonabrasive brush
or soft, clean, dry cloth.
3. Repeat this process on the
other side.
4. Using the tabs, replace into
slot .
Clean the Bio-Guard™ Filter:
1. Remove the Filter.
2. Spray the Filter with a mild
degreaser or dish soap and
let it sit for 2-3 minutes.
3. Submerge the Filter in warm
water, shake, and remove.
4. Repeat this process until
the Filter water is clean.
5. Rinse the Filter with warm
water. Repeat as needed.
6. Dry the Filter completely
before inserting into slot .
• Note: The Bio-Guard™ Filter may discolor
and retain odor after prolonged exposure
to thick smoke and strong odors. This
prolonged exposure will require more
frequent cleanings to ensure maximum
filtration efficiency.
Ozone Emission
Removal Filter
1. Turn off and unplug the unit.
Using the tabs remove the
Hepa/Carbon Filter and
place in a disposable bag.
2. Unwrap the new filter and
slide into slot . Be sure
the tabs are visible.
CLEANING & MAINTENANCE
2
2
DIRTY
AIR
ON THE CONTROL PANEL:
CLEAN
FILTER 2
Clean Filter
Indicator
4
3
3
1
1
Bio-Guard
™
Filter
Pre Filter
WARNING
DO NOT Immerse, wash or wipe with water,
this will result in permanent damage to the
Ozone Filter. It must be replaced!
HEPA/Carbon
Filter
4
IMPORTANT: NEVER Insert a wet
or damp filter into the OxyPure.
CLEAN THE PRE FILTER:
1. Use a vacuum with a
brush attachment.
2. Clean the Filter with warm
soapy water.
3. Rinse the Filter thoroughly
and remove any soap particles.
4. Allow the Filter to dry completely BEFORE
placing it into slot using the tabs.
Clean Filter 2 Schedule
3 Months Yellow Routine cleaning.
6 Months Orange Should be cleaned for
continued efficiency.
12
Months
Red Clean for optimal
performance
especially if the first 2
were missed.
Replace Filter 4 Schedule
Green Should be cleaned for optimal
efficiency.
Red Need to replace for efficiency.
CLEAN FILTER 2
This indicates the Bio-Guard™ Filter should or
must be cleaned (see Cleaning Chart).
REPLACE FILTER 4
Indicates the Hepa/Carbon Filter should or must be
replaced.
ON THE CONTROL PANEL:
Filter Replacement
Indicator
ODOR
NO
ODOR
STRONG
ODOR
REPLACE
FILTER 4
14 | OxyPure Smart
For Filter 4: Press and hold TURBO
for 2 seconds until a beep is heard.
• The Filter is reset when the first
bar around ODOR is lit green.
Resetting the Filter and Air Quality Indicators
Filter 2: Press and hold TIMER for
2 seconds or until a beep is heard.
• The Filter is reset when the first
bar around AIR is lit green.
CLEANING & MAINTENANCE
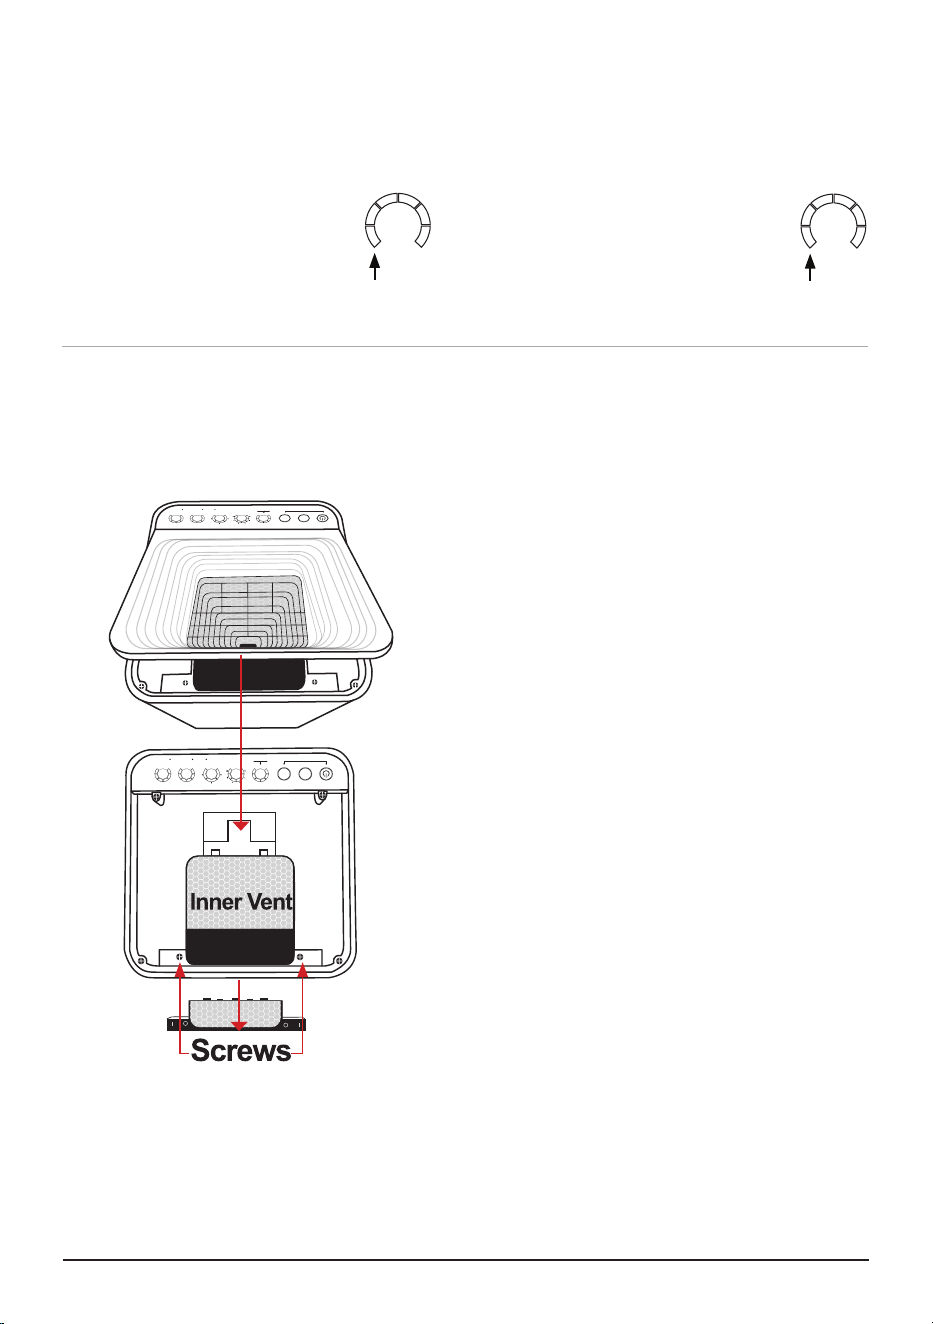
To clean the surface underneath and Inner
Vent Screen.
1. Turn the OxyPure off and unplug it from the
wall outlet.
2. Lift the Top Vent using the built-in tab.
3. Using a Using a vacuum with brush
attachment or duster, clean any dust or
accumulated particles from the surface an
Inner Vent Screen.
To clean the inner wall opposite of the fan or
to remove an object that has fallen through the
Inner Vent Screen.
1. After removing the Top Vent, locate the two
screws.
2. Use a Phillips screwdriver to loosen the two
screws (only).
3. Lift up the Inner Vent Screen.
4. After cleaning the inner wall with a soft cloth
or paper towel, or duster. Reassemble the
Inner Vent, retightening the two screws, and
replace the Top Vent.
• Make sure all parts are secure before plugging
in the OxyPure and turning it on again.
Cleaning the Top Vent
The Top Vent of your OxyPure can be removed to clean with mild soapy water and dried thoroughly.
ODOR
NO
ODOR
STRONG
ODOR
REPLACE
FILTER 4
CLEAN
FILTER 2
WIFI
SLEEP MODE
AUTO
ULTIMATE
CLEAN
FAN
SPEED
TIMER TURBO
HR CLEAN DIRTY
POWER
HRHIGHLOW
ECO-FRIENDLY MODE
RESET FILTER 2
HOLD FOR 2 SECONDS
RESET FILTER 4
HOLD FOR 2 SECONDS
AIR
ODOR
NO
ODOR
STRONG
ODOR
REPLACE
FILTER 4
CLEAN
FILTER 2
WIFI
SLEEP MODE
AUTO
ULTIMATE
CLEAN
FAN
SPEED
TIMER TURBO
HR CLEAN DIRTY
POWER
HRHIGHLOW
ECO-FRIENDLY MODE
RESET FILTER 2
HOLD FOR 2 SECONDS
RESET FILTER 4
HOLD FOR 2 SECONDS
AIR
DIRTY
AIR
GREEN
DIRTY
ODOR
GREEN
Note: DO NOT unscrew the four outer screws located toward the corners. Doing so will void your
warranty.
nuwavenow.com | 15
The Odor Sensor is located on the upper right
side corner of the OxyPure underneath the small
grill opening. Dust and debris may accumulate.
1. Use a vacuum brush attachment and gently
brush the grill.
• Be careful when using sprays. DO NOT
spray on or close to the odor sensor. Spray
at least 3 feet away and not in the direction of
the Odor Sensor.
CLEANING & MAINTENANCE
Note: DO NOT immerse the OxyPure in water. Clean with a damp sponge or cloth and wipe dry. Make
sure all parts and covers are securely attached.
ODOR SENSOR
Cleaning the Inflow Vent
The Inflow Vent is located at the bottom of the
unit as shown.
1. Turn off and unplug the OxyPure.
2. Use a vacuum with a brush attachmenT to
remove any dust and debris.
3. If needed, use a paper towel or cloth slightly
dampened to remove heavier buildup.
• DO NOT use any harsh abrasives or cleaning
pads on the Top Vent or any other part of the
OxyPure.
BOTTOM
IN FLOW VENT
Cleaning the Filter Sensor
The Filter Sensor is located on the back, above
the Filter Slot Cover.
1. Open the Sensor Cover.
2. Using a dry cotton swab or small, soft
brush, gently remove any dirt or dust from
the Sensor.
3. For heavier buildup on the Sensor, wipe it
with a slightly wet cotton swab.
4. Remove any moisture with a dry cotton
swab.
• The Filter Sensor requires regular cleaning
(approx. every 3 months) for the OxyPure to
operate efficiently.
• If your OxyPure is set up in an area with high
dust accumulation, more frequent cleaning of
the Filter Sensor is needed.
• DO NOT use the cotton swab on any part or
area other than the Filter Sensor.
Sensor Cover
Cleaning the Odor Sensor Opening
Filter Sensor

16 | OxyPure Smart
TROUBLESHOOTING GUIDE
CLEAN and REPLACE FILTER Indicators have not reset after the filter(s) have been cleaned
or changed.
1. The Filter Sensor is not reading the new filter. Turn the OxyPure off then on again. Press and
hold down TIMER and/or TURBO for 2 seconds until a beep is heard.
2. Turn the OxyPure off, unplug and adjust the filter(s). Plug in and turn the OxyPure ON again.
3. The Filter Slot Cover in back rear is not securely in place. Make sure Filter Slot Cover is on
securely.
4. The Filter Sensor is dirty. Clean the Filter Sensor.
ULTIMATE CLEAN does not come on when pressed.
The OxyPure is not reading the function selected. Turn the OxyPure on and off by pressing POWER
twice.
Power is blinking red.
1. The Bio-Guard™ filter is not properly installed or is loose. Turn off and unplug the OxyPure.
Check that the filters are properly installed and are not loose. Plug in the OxyPure and press
POWER to turn it on.
2. When the Filter Slot Cover is removed, POWER will be backlit solid red. Pressing POWER will
make it blink. However, as a safety measure, the OxyPure will not operate when the Filter Slot
Cover is removed. Ensure that Filter Slot Cover is installed securely.
The Odor Sensor is not resetting itself and not clearing all bars on the AIR and ODOR indi-
cators. All bars on the control panel are flashing.
Run the OxyPure without selecting any functions for 8 hours or overnight. Clean the Dust Sensor
using a vacuum with a brush attachment on a low setting. If the problem persists, contact Customer
Service.
The OxyPure does not turn on.
1. The plug is not in the wall outlet. Plug into wall outlet.
2. POWER on the touchpad panel is not on. Press POWER.
3. The Filter Slot Cover in the back rear is off or loose. Make sure Filter Slot Cover is on securely.
TIMER does not work when pressed.
The OxyPure is not reading the function selected.
Press FAN SPEED or AUTO, then press TIMER.
The fans are not blowing.
1. An appropriate outlet is not being used. Make sure the outlet has appropriate voltage for use.
2. The Filter Slot Cover in back rear is not properly in place. Make sure the Filter Slot Cover is on
securely.
3. Check the Air Vent for obstructions.
Speed of the airflow is not changing when FAN SPEED is pressed.
The OxyPure may be in AUTO mode. Set the OxyPure to another operating mode on the touchpad
then press FAN SPEED
Airflow from the Top Vent is weak.
The air filter(s) are dirty. Change or clean the air filters.
The OxyPure is producing smoke or odor.
The air filter(s) are dirty. Change or clean the air filters. If the problem continues, contact Customer
Service.

nuwavenow.com | 17
LIMITED WARRANTY
THE MANUFACTURER WARRANTS
Nuwave, LLC warrants that OxyPure® Smart Air Purier will be free from manufacturer defects for
1 years from the date of purchase, under normal household use, and when operated in accordance
with the Manufacturer’s written instructions. The Limited Warranty covers the Original Purchaser only.
The Manufacturer will provide the necessary parts and labor to repair the product at the Nuwave LLC
Service Department. After the expiration of the warranty, the cost of the parts and labor will be the
responsibility of the owner.
THE WARRANTY DOES NOT COVER
The Limited Warranty is voided if repairs are made by an unauthorized dealer, or the serial number
data plate is removed or defaced. Normal deterioration of nish due to use or exposure is not covered
by this Warranty. This Limited Warranty does not cover failure, damages, or inadequate performance
due to accident, acts of God (such as lightning), uctuations in electric power; alterations, abuse,
misuse, misapplications, corrosive-type atmospheres, improper installation; failure to operate and
maintain the unit in accordance with the Manufacturer’s written instructions; failure to regularly clean
and maintain the unit and reusable lters, and to replace the disposable lters in accordance with the
Manufacturer’s written instructions; abnormal, commercial, or rental uses; or resold units. Nuwave LLC
reserves the right to void the Limited Warranty, where allowable by law, for products purchased from
an unauthorized dealer.
TO OBTAIN SERVICE
The owner shall have the obligation and responsibility to pay for all services and parts not covered by
the warranty; prepay the freight to and from Service Department for any part or system returned under
this warranty; and carefully package the product using adequate padding material to prevent damage
in transit. The original container is ideal for this purpose. Include in the package the owner’s name,
address, daytime telephone number, a detailed description of the problem, and RGA (Return Goods
authorization number). To obtain the RGA number, email us at:
For Amazon Purchases: support@nuwavenow.com
For All Other Purchases: help@nuwavenow.com
Provide the product model & serial number and proof of date of purchase (a copy of the receipt) when
making claims under this warranty.
MANUFACTURER’S OBLIGATION
The Manufacturer’s obligation under this Limited Warranty is limited, to the extent allowable by law, to
repairing or replacing any part covered by this Limited Warranty which upon examination is found to
be defective under normal use. The Limited Warranty is applicable only within the continental United
States and only to the original purchaser of the manufacturer’s authorized channels of distribution.
THE LIMITED WARRANTY MAY NOT BE ALTERED, VARIED OR EXTENDED EXCEPT BY A
WRITTEN INSTRUMENT EXECUTED BY THE MANUFACTURER. THE REMEDY OF REPAIR
OR REPLACEMENT AS PROVIDED UNDER THIS LIMITED WARRANTY IS EXCLUSIVE. IN NO
EVENT SHALL THE MANUFACTURER BE LIABLE FOR ANY CONSEQUENTIAL OR INCIDENTAL
DAMAGES TO ANY PERSON, WHETHER OR NOT OCCASIONED BY NEGLIGENCE OF THE
MANUFACTURER, INCLUDING WITHOUT LIMITATION, DAMAGES FOR LOSS OF USE, COSTS
OF SUBSTITUTION, PROPERTY DAMAGE, OR OTHER MONEY LOSS. Some states do not allow
the exclusion or limitation of incidental or consequential damages, so the above limitation exclusions
may not apply. This Limited Warranty gives specic legal rights, and there may also be other rights
which vary from state to state.

18 | OxyPure Smart
LIMITED WARRANTY
EXCEPT AS OTHERWISE EXPRESSLY PROVIDED ABOVE, THE MANUFACTURER MAKES
NO WARRANTIES EXPRESSED OR IMPLIED ARISING BY LAW OR OTHERWISE, INCLUDING
WITHOUT LIMITATION, THE IMPLIED WARRANTIES OF MERCHANTABILITY AND FITNESS
FOR A PARTICULAR PURPOSE TO ANY OTHER PERSON. READ YOUR OWNER’S MANUAL. IF
YOU STILL HAVE ANY QUESTIONS ABOUT OPERATION OR WARRANTY OF THE PRODUCT,
PLEASE CONTACT NUWAVE LLC.
DISPUTE RESOLUTION PROCEDURE
For disputes relating to use of the website or use or purchase of a Nuwave product or service
(collectively “Disputes”), you agree to rst contact Nuwave LLC at legal@nuwavenow.com. If we
cannot resolve your dispute informally, any and all disputes shall be submitted to nal and binding
arbitration. You may start the arbitration process by submitting in writing a demand to the American
Arbitration Association (“AAA”) and sending a copy to Nuwave. Nuwave will pay all ling costs. A
single arbitrator of the AAA will conduct the arbitration in a location convenient to you or by phone.
The arbitrator’s award will be binding and may be entered as a judgment in a court of competent
jurisdiction. The arbitration will be conducted in accordance with the provisions of AAA’s Commercial
Arbitration Rules and Mediation Procedures in effect at the time of submission of your demand for
arbitration. See https://www.adr.org/sites/default/les/CommercialRules_Web.pdf. Except as may
be required by law as determined by an arbitrator, no party or arbitrator may disclose the existence,
content, or results of any arbitration hereunder without prior written consent of both parties.
A. WAIVER OF RIGHT TO SUE. By agreeing to arbitration, you understand that, to the maximum
extent permitted by law, you are agreeing to waive your right to le suit in any court, to a court hearing,
a judge trial, or a jury trial.
B. CLASS ACTION WAIVER. To the maximum extent permitted by law, you expressly agree to
refrain from bringing or joining any claims in any representative or class-wide capacity, including but
not limited to, bringing or joining any claims in any class action or class-wide arbitration.
C. OPT OUT PROCEDURE. To request to opt out of arbitration you must contact Nuwave LLC at
legal@nuwavenow.com, Nuwave LLC, 560 Bunker Ct., Vernon Hills, IL 60061, U.S.A. You will have
thirty (30) days from the date of product delivery to opt out of arbitration with respect to any dispute
arising out of or relating to use or purchase of any Nuwave product. If more than 30 days have passed,
you are not eligible to opt out of arbitration and will have waived your right to sue or participate in a
class action with respect to the dispute arising out of your purchase or use of a Nuwave product. For
any dispute arising out of your use of Nuwave’s website, you have thirty (30) days from the date you
provided information to the website to opt out of arbitration. If more than 30 days have passed, you are
not eligible to opt out of arbitration and you will have waived your right to sue and participate in a class
action with respect to the dispute arising out of your use of Nuwave’s website.
D. SOME MATTERS ARE NOT SUBJECT TO ARBITRATION. Notwithstanding the foregoing,
the following shall not be subject to arbitration and may be adjudicated only in the state and federal
courts of Illinois: (i) any dispute, controversy, or claim relating to or contesting the validity of our
intellectual property rights and proprietary rights, including without limitation, patents, trademarks,
service marks, copyrights, or trade secrets; (ii) an action by a party for temporary, preliminary, or
permanent injunctive relief, whether prohibitive or mandatory, or other provisional relief; or (iii)
interactions with governmental and regulatory authorities. You expressly agree to refrain from bringing
or joining any claims in any representative or class-wide capacity, including but not limited to, bringing
or joining any claims in any class action or any class-wide arbitration.

nuwavenow.com | 19
LIMITED WARRANTY
NOTES
Para la versión en español de este manual,
visita www.nuwavenow.com.
FOR HOUSEHOLD USE ONLY
120VAC / 60 Hz / 120W
Model:
47010
For patent information please go to:
www.nuwavenow.com/legal/patent
Designed & Developed in USA
Nuwave LLC
560 Bunker Ct.
Vernon Hills, IL 60061, U.S.A.
Made in China
©2024 • All Rights Reserved.
EPA Establishment Number: 101594-CHN-1
Item: BM47010
V2-YK
07-30-24
Questions or Concerns?
Amazon Purchases: support@nuwavenow.com All Other Purchases: help@nuwavenow.com
1-888-502-7805 1-877-689-2838
Mon-Fri 7:30am-4:30pm CST
Master Your Oxypure
Scan the code to find quick start
guide, how-to videos and more!
www.nuwavenow.com