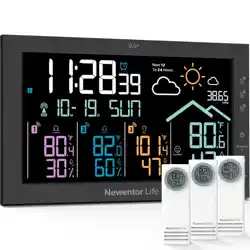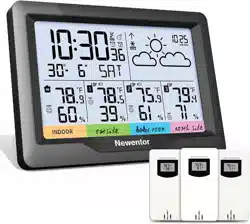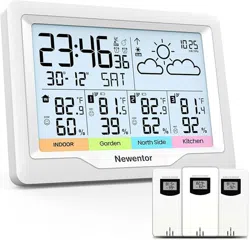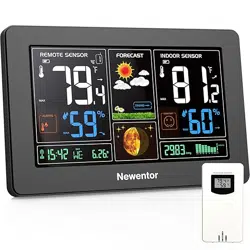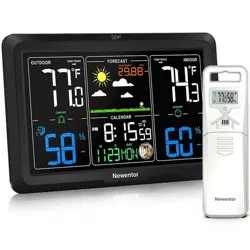
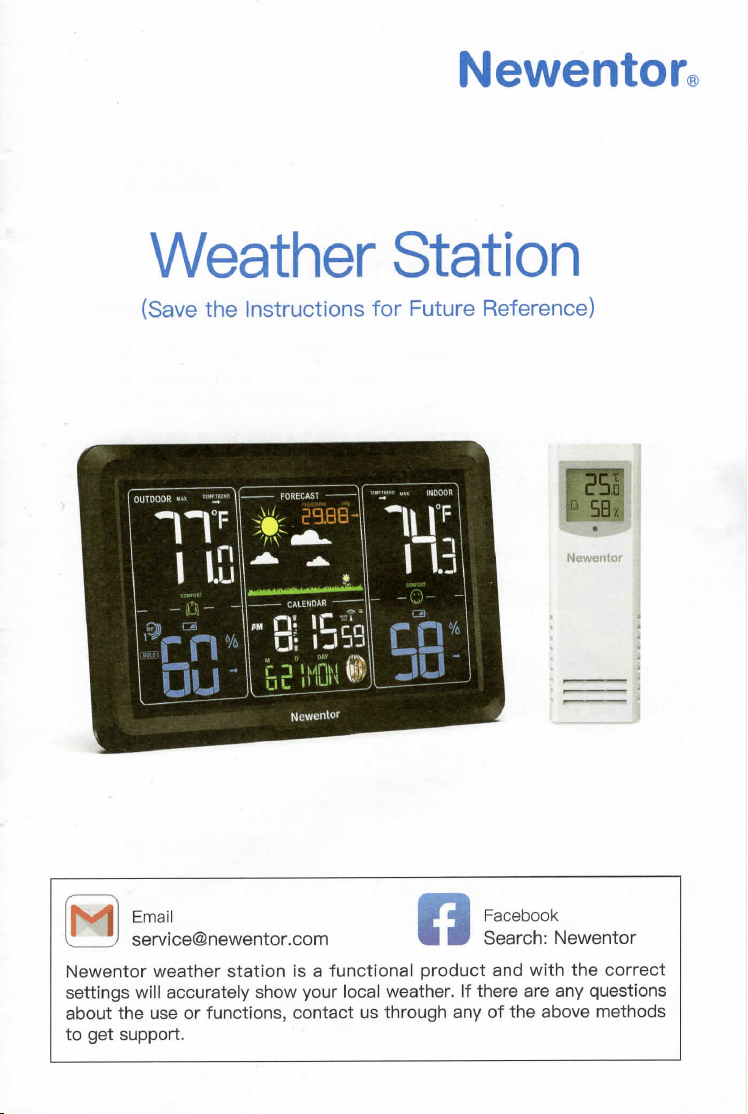
Newentor®
Weather Station
(Save the Instructions for Future Peference)
I.'`..Ill
a :::'i'ce@newentorcom ill 5:Caer%°h?kNewentor
Newentor weather station is a functional product and with the correct
settings will accurately show your local weather. If there are any questions
about the use or functions, contact us through any of the above methods
to get support.
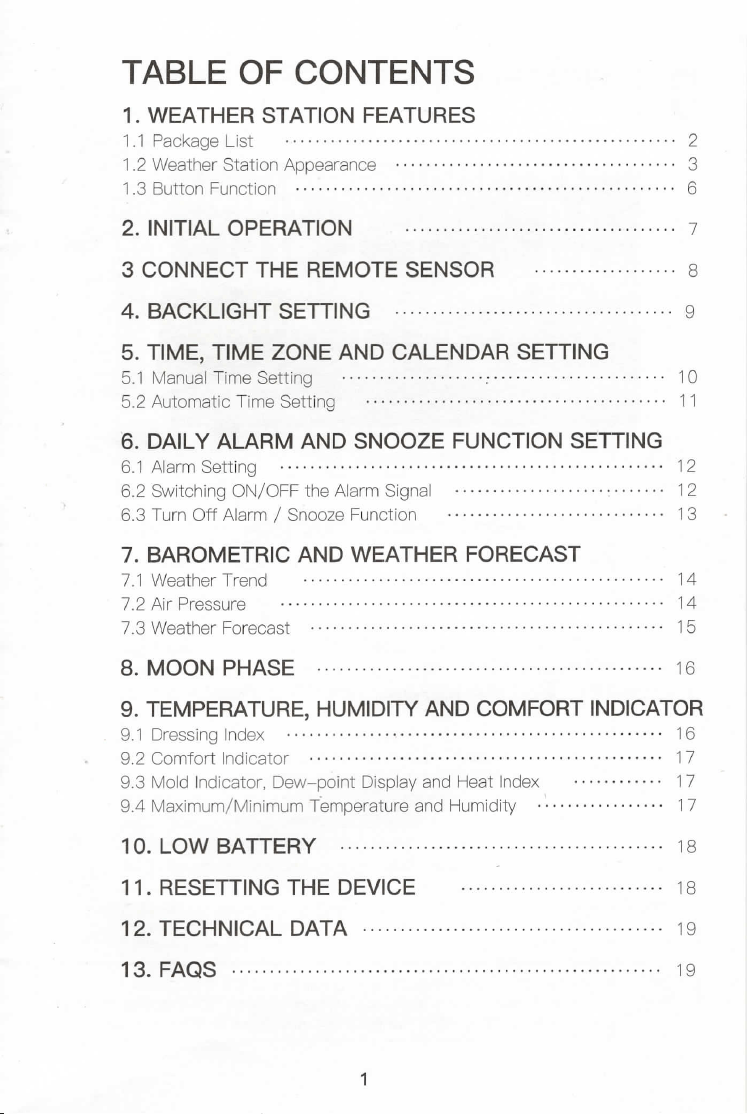
TABLE OF CONTENTS
1. WEATHER STATION FEATURES
1.1 Package List
1.2 Weather Station Appearance
1.3 Button Function
2. INITIAL OPERATION
3 CONNECT THE REMOTE SENSOR ..... 8
4. BACKLIGHT SETTING
5. TIME, TIME ZONE AND CALENDAR SETTING
5.1 Manual Time Setting
5.2 Automatic Time Setting
`6. DAILY ALARM AND SNOOZE FUNCTION SETTING
6.1 Alarm Setting
6.2 Switching ON/OFF the Alarm Signal
6.3 Turn Off Alarm / Snooze Function
7. BAROMETRIC AND WEATHER FOPECAST
7.1 Weather Trend
7.2 Air Pressure
7.3 Weather Forecast
8. MOON PHASE
14
14
15
16
9. TEMPERATURE, HUMIDITY AND COMFORT INDICATOR
9.1 Dressing Index
9.2 Comfort Indicator
9.3 Mold Indicator, Dew-point Display and Heat Index
9.4 Maximum/Minimum Temperature and Humidity I
10. LOW BAITEPIY
11. RESETTING THE DEVICE
12. TECHNICAL DATA
13. FAQS
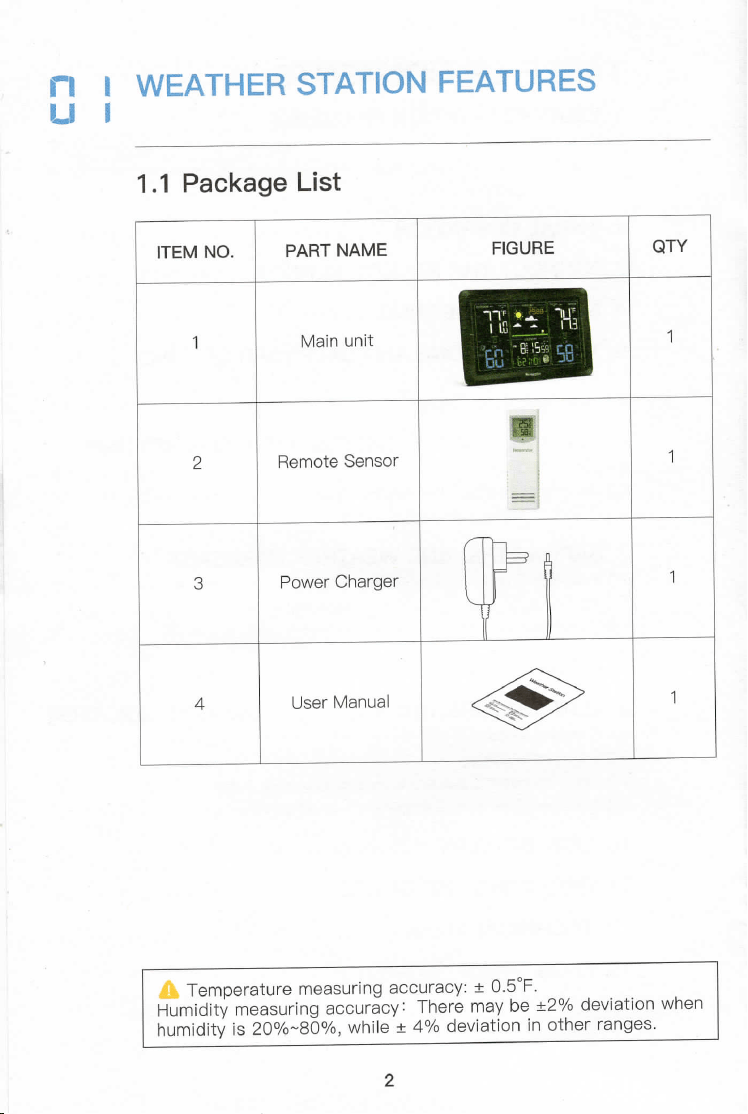
ri I WEATHER STATioN FEATUF`ES
L'l
1.1 Package List
ITEM NO.
PAF3T NAME
FIGURE
QTY
1
Main unit
I
1
2
Bemote Sensor
+,himnlu1)
1
I
i
-I
=J
34
Power Charger
1
User Manual
~se+esisinsno
1
A Temperature measuring accuracy: ± o.5°F.Humiditymeasuringaccuracy:Theremaybe ±2°/o deviation whenhumidityis20%~80%,while±4%deviationinotherranges.
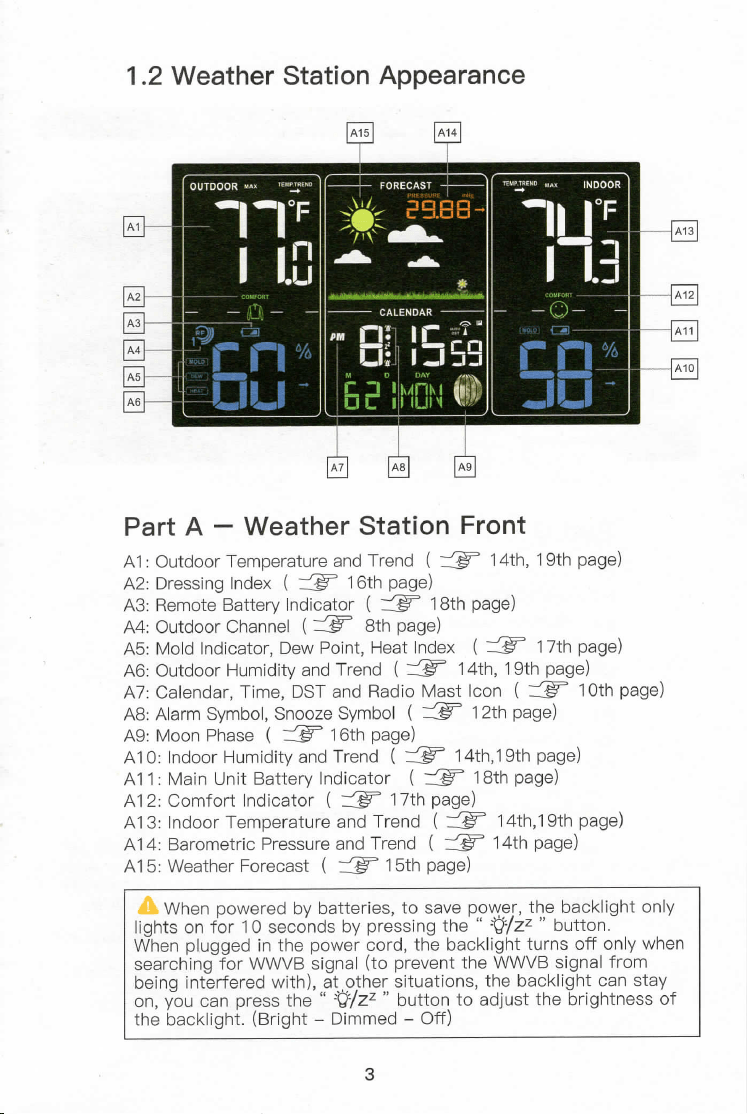
1.2 Weather Station Appearance
Part A - Weather Station Front
A1 : Outdoor Temperature and Trend ( # 14th,19th page)
A2: Dressing Index ( $ 16th page)
A3: Bemote Battery Indicator ( $ 18th page)
A4: Outdoor Channel ( $ 8th page)
A5: Mold Indicator, Dew Point, Heat lndex ( # 17th page)
A6: Outdoor Humidity and Trend ( $ 14th,19th page)
A7: Calendar, Time, DST and Badio Mast loon ( $ loth page)
A8: Alarm Symbol, Snooze Symbol ( $ 12th page)
A9: Moon Phase ( $ 16th page)
A10: Indoor Humidity and Trend ( $ 14th,19th page)
All : Main Unit Battery Indicator ( $ 18th page)
A12: Comfort Indicator ( # 17th page)
A13: Indoor Temperature and Trend ( $ 14th,19th page)
A14: Barometric Pressure and Trend ( $ 14th page)
A15: Weather Forecast ( $ 15th page)
|fht¥hoennf%:Y%rs8cboyn8:t£;r;er%'sts?nsatvheep<9#jrzztp,eb%?tcok|'.ght°n'y
When plugged in the power cord, the backlight turns off only when
searching for W\/\/\/B signal (to prevent the WWVB signal from
-` ``_==-`--`-`-:7;`----`-` -` ``:-
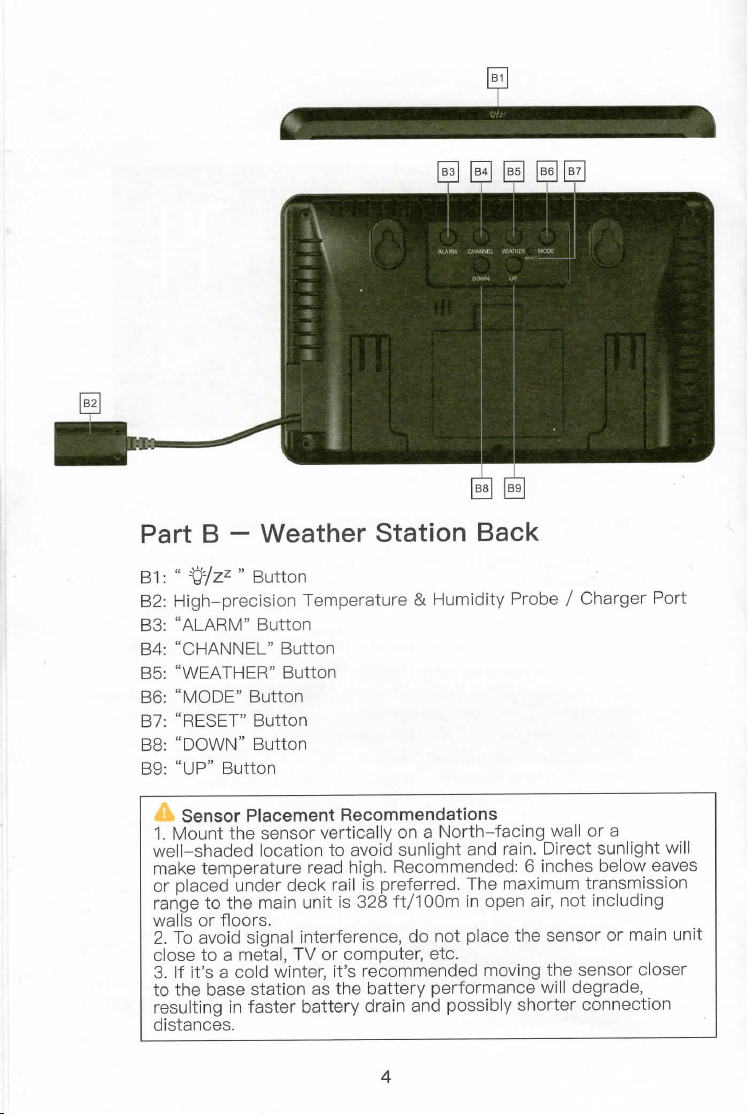
Part 8 - Weather Station Back
81 : " -ti/zZ " Button
82: High-precision Temperature & Humidity Probe / Charger Port
83: "ALABM" Button
84: "CHANNEL" Button
85: "WEATHEB" Button
86: "MODE" Button
87: "RESET" Button
88: "DOWN" Button
89: "UP" Button
A Sensor Placement Recommendations
1. Mount the sensor vertically on a North-facing wall or a
#[F:s:::;#rd#ig:::::K:tr8iJi;!:h::r::tin;i#inn:i:r:a;?#igt:[%!ug#;::v:'s
walls or floors.
8|.ot°e?:°:dmsi8:,?I+Vt%rrf%:e#edr:ent%iplacethesensorormainunit
:g:t:h,:,,:bgaa:::s:?gt!#tbe:rit:is,r!r:at:tngraTne8ne:r:::Tbiyx:n:go;!eFrds:egn:s:o:r::;::er
distances.
4
+I,i,,I,,;',.''i,,:'i::',I"''!
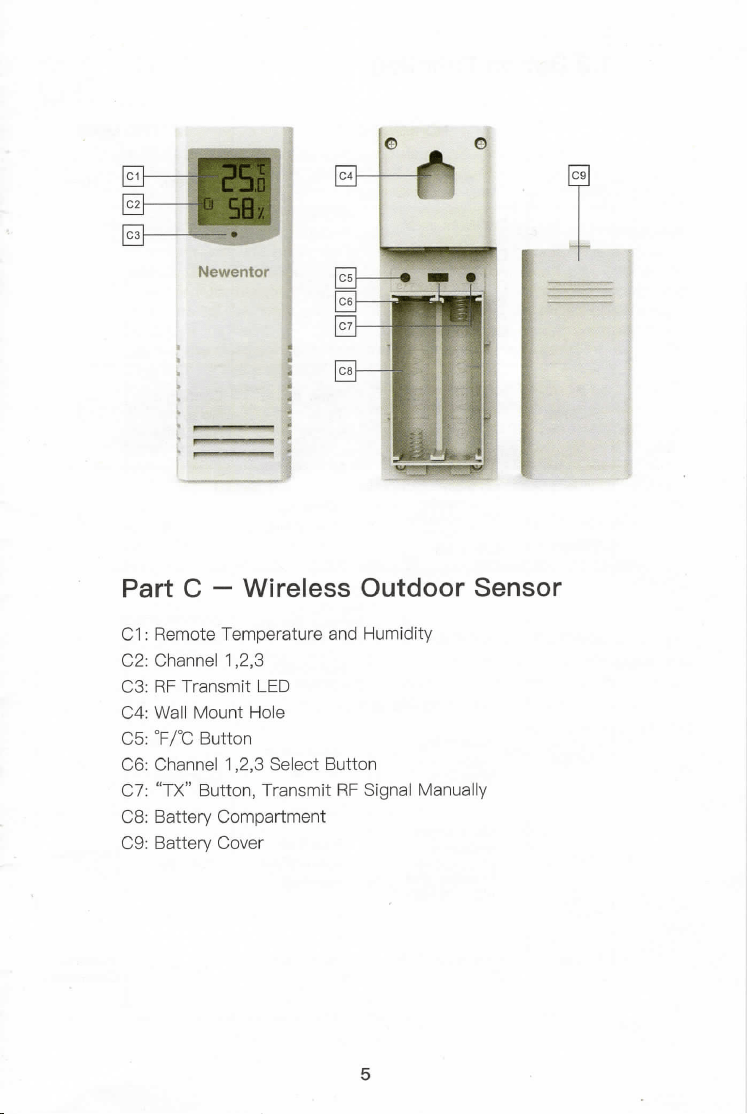
Part C - Wireless Outdoor Sensor
C1 : Bemote Temperature and Humidity
C2: Channel 1,2,3
C3: BF Transmit LED
C4: Wall Mount Hole
c5: °F/°C Button
C6: Channel 1,2,3 Select Button
C7: "TX" Button, Transmit BF Signal Manually
C8: Battery Compartment
C9: Battery Cover

1.3 Button Function
FunctionButton
NORMAL MODE
SETTING MODE
Press
Hold
Press
Hold
-#/z:z
fBoarcTk88|:isonBatteryMode;!h!guit;ncie:;:Fg3f,nE8#t_Dimmed
/
/
/
ALARM
Switch
Enter Alarm
Confirm and
/
Display OfT'
Time
Go to the
line OrAlarml/2
Setting
Next Step
CHANNEL
To ViewTemperature
Enter RF
/
/
3Fd3%uuTi8'o¥Channels
Searching
WEATHER
oc/a F switch
Enter theBarometerSetting,Set the
Conflrm and
/
Barometer
Go to the
#li:!jw::?i:rrePatterninTurn
Next Step
MODE
Switch the
Enter Time
Confirm andGtth
/
Time Zone:p/M/C/E
Setting
00eNextStep
DOWN
View MoldIndicator,
Enter/Exit
Decrease
Decrease
Dew-point
RCC(WWVB)
Continually
B:Sapt'i¥daenxd
Searching
uP
View MAX/MIN
Clear MAX/MIN
Increase
Increase
Data
Data
Continually
I; B INITIAL OPERATION
• Plug in the original power cord or insert 3 x AA batteries observing
polarity [ "+" and ``-" marks]. All icons on the screen will light up for
3 seconds, you will hear a beep, and the main unit will begin to
detect the indoor temperature and humidity.
• After the indoor temperature and humidity detection is completed,
:tens::,'nthuen.EFW:'}£%%',n«ts?S::%'j'::taocfl°ansnhecA[°tnh#mt:,ecrheomo::ea
channel (C6, channel 1,2,3 select button) for the remote sensor that
matches to the main unit's (A4), insert 2 x AA batteries observing
polarity [ "+" and "-" marks], then the remote sensor will begin to
detect the outdoor temperature and humidity and send BF signal to
connect to the main unit.
• After 3 minutes, the device will automatically begin to search for
WVV\/B signal to set the time and date (the default time zone is
Pacific Time, if you need to select the time zone that matches your
location, hold the"DOWN" button for 2S to exit from \/\/VWB signal
search mode, then refer to "5 TIME, TIME ZONE AND CALENDAF3
SETTING" to set the clock and date). At this time, the radio mast
;j7,n;,orb,,,a::gt,tnosptroe#eansthttht:eviELnBa5,%vnea,t[reo:jE:i:Sj,:fedrftehree3creen
with), this process takes about 7 minutes. If the reception is
successful, the radio mast icon "?" will appear on the screen.
F.Y.I.
• lf possible, use alkaline batteries instead of zinc-carbon batteries.
Alkaline batteries last longer, particularly outside in low temperatures.
:tn„tt:,,par:3:::::ds:::c::nr:efnorww#sa,#f,a:,ttthh:sr:.[ELoe,moan:;[ch:n
" -ti/zZ " button and the"DOWN" button can work. You can press the
" -WZZ " button to light up the screen for 10 seconds or hold
the"DOWN" button for 2S button to stop searching for WWVB signal.
7
EE
CONNECT THE FiEMOTE SENSOR
(1 ) Press the "CHANNEL" button of the main unit to switch the
channel(A4).
(2) Open the sensor battery cover, switch the sensor channel(C6) to
match the main unit. Such as both in CH1.
(3) Hold the "CHANNEL" button for 3S to enter the RF signal search
state.
(4) Insert the batteries for the sensor, press the "TX" button to
transmit the BF signal.
(5) Sensor temperature and humidity are displayed on the screen,
done.
F.Y.I.
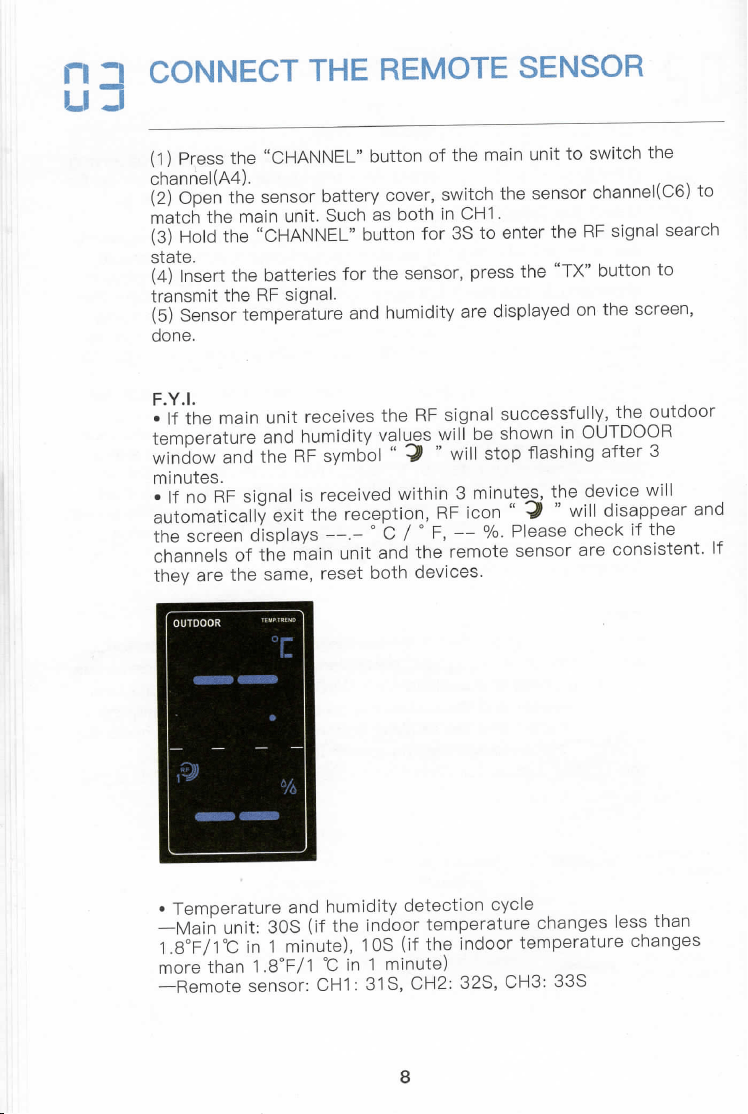
• lf the main unit receives the RF signal successfully, the outdoor
twejTdpoeta:unrdetahnedRhFu:;#:yore,u5S,vyw,„P:t%;°flwansHTn3UaTtDe98R
minutes.
:j{on:apj:ai',;nea*,{St[:Ore:::8t%j::'BF3jcmo':U«test»h:iqie5:::p::'arand
the screen displays --.- a C / a F, -- %. please check if the
channels of the main unit and the remote sensor are consistent. If
they are the same, reset both devices.
• Temperature and humidity detection cycle
-Main unit: 30S (if the indoor temperature changes less than
1 .8°F/loo in 1 minute),10S (if the indoor temperature changes
more than 1.8°F/1 °C in 1 minute)
-Remote sensor: CH1 : 31 S, CH2: 32S, CH3: 33S
8
I;I
BACKLIGHT SETTING
(,Tg)h%hoennf%°rvyeoresdecboyn3:t;eyrjpers6sts:nsga¥:ep.9Y#%zth„ebbuat:5|:ht°n'y
!2u)tt¥#::tp|:gt%:d«jrsI/hzezp,°#%:{ghethbeutbt%Cnk83htth:i%Bt)repsr%ss,t
to adjust brightness (bright-dimmed-off). When the backlight is
i:t:ti:Lgj`hb}r::hTst;::tr%;lq;¥e}?sey:oil::.hpe%}!§5#ut:tc;a:#:s::;:'Ot%u:Yeo:n:tT?tohe
the brightest to keep the backlight stay on.
F.Y.I.
:a¥:e#:ts':,Sceoanr?<h|n,gj%¥Pjns:g:::i:ncga|[Psrasteea::°h?nkgafnodrdwatviettB):
to prevent the interference of the radio wave, the screen will go
blank, this process lasts about 7 minutes then it will light up again
automatically.
(1 )The main unit will automatically search for the WWVB signal at
1 :00, 2:00, and 3:00 am every day.
(2)ln addition, if the WWVB signal is interfered or weak, the device
will also automatically search WWVB once an hour. such as
10:00-10:07,11 :00-11 :07,12:00-12:07am...
• lf the WWVB signal is weak, but you want to keep the backlight
always on, you can turn off the WWVB function, which does not
affect the normal use of the device. (refer to "5.1 Manual Time
Setting")
9
[i Ei 5]EMTEi[tMSE ZONE AND CALENDAR
5.1 Manual Time Setting
• Press the "MODE" button LIGHTLY to choose the time zone (the
time zone icon is displayed above the seconds on the screen).
P=PST M=MST C=CST E=EST
• Hold the "MODE" button for 2 seconds to enter the time setting,
press the "UP" and "DOWN" button to select, press the "MODE"
button to confirm and go to the next step. The sequence steps are as
follows.
DST ON/OFF (turn ON when daylight saving time starts and turn OFF
when it ends)
Year
Month
Date
12/24 Hour Format
Hour
Minute
W\/V\/B Function ON/OFF
For example, hold the "MODE" button for 2 seconds, the DST display
begins to flash. Press the "UP"button and the"DOWN" button to set
the DST ON/OFF. Press the"MODE" button to confirm and the Year
begins to flash.
F.Y.I.
• During operation, if no operation is performed within 20 seconds,
the device will return to normal mode automatically.
• The time zone must be selected correctly according to your
location, or the time/date will be synced incorrectly after connecting
with WVWB signal.
• DST Function (default is OFF)
The weather station will adapt to winter /summer time automatically
if DST is ON.
Summer time: on the second Sunday of March, 1 :59 59' changes to
3:00 00'
Winter time: on the first Sunday of November, 1 :59 59' changes to
1 :00 00'
When DST is OFF: no symbol is shown on the display.
When DST is ON: the AUTO DST symbol is shown on the display next
to the time.
DST symbol is shown during the DST period.
10
5.2 Automatic Time Setting
±oBn:f:rcec:%jrncghjtnogy:::i,°ocsigjnoan'.((#¥rBt:i%TTa)I)tchoosearighttime
• After 3 minutes reception of the signal from the outdoor sensor, the
Sj:V:C:n:''aaatuet.°Amtatth?sa'{ymbe:gt'hnet:a3:oar£:sft°|c¥nvyiB„SLoeng:|Sstt°osfle:sthhe
and the screen will go blank, this process takes about 7 minutes. If
:hpep:::eopnt':hneast::emepnt.i,:fsau,Fs:etshsefuJ;t|ceer#°art:Si::i%:||`;£a';c:'|or
WWVB signals every 1 hour until the signal is received.
• At 1 :00AM, 2:00AM, 3:00AM, 4:00AM and 5:00 AM every day, the
device will search for the VVWVB signal to calibrate for any deviations
of time automatically.
• To start searching WWVB signal manually, choose a time zone and
DST, return to normal mode first, then hold the "DOWN" button for
more than 3 seconds.
F.Y.I.
• During WWVB signal searching, only the " :a/ZZ " button and the
"DOWN" button work, other buttons do not work and backlight will
go blank. If you want to carry out other operations, hold the "DOWN"
button to exit this process.
• Information: Badio station WWVB is local:ed near Fort Collins,
Colorado.
• More information related to the WVWB signal, please refer to:
www.nist.gov/pml/div688/grp40/wwvb.cfm.
• Signal reception is normally bet:ter at night and when the weather is
clear. The atomic signal generally takes 2 ~ 5 days to synchronize,
so it is important to manually set the time and date after powering
on the display.If there are some obstacles and sources of interfer-
ence, it may substantially hinder reception. If your weather station
does not correctly receive the WW\/B radio signal, please hang or
place the weather station in a different location at your site. Please
note that devices such as Computers, telephones, radios and
televisions may cause electromagnetic radiation which can interfere
with the W\/VVB signal reception. Other possible detriments to
reception are: strong building insulation (metal building materials),
nearby mountains or atmospheric interference.
iI
I; Ei PfihLJTtoLfiRs¥TATYNDGSNOOZE
6.1 Alarm Setting
• The device allows you to set two different Alarm times. For
example, you can set an Alarm for the morning and for an afternoon
:apprebsysatcht:V9A'[8#ihbuAt'taornm:hcetoviewALABMTIME"resstwlce
to view ALABM TIME 2, press three times to go back to normal mode.
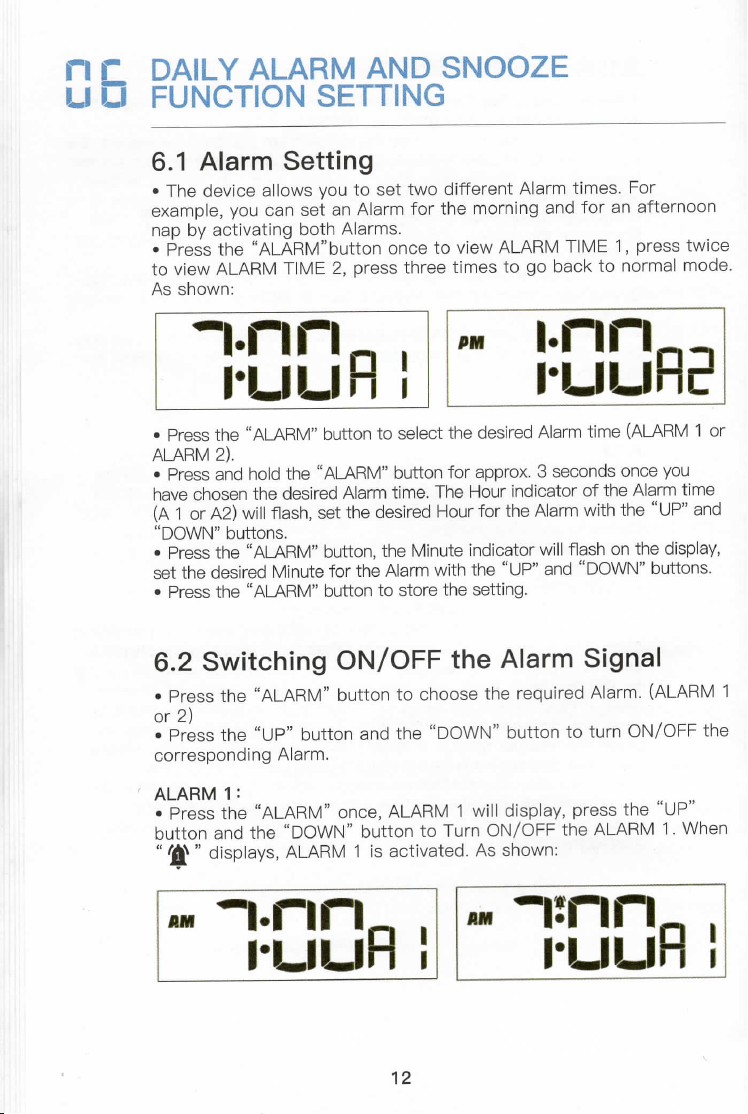
As shown:
-I.rln
I.IJIJ
I
II
'M I.nn
I.uLIF]
i
• Press the "ALARM" button to select the desired Alarm time (ALARM 1 or
ALARM 2).
• Press and hold the "ALARM" button for approx. 3 seconds once you
have chosen the desired Alarm time. The Hour indicator of the Alarm time
(A 1 or A2) will flash, set the desired Hour for the Alarm with the "UP" and
" DOWN" buttons.
• Press the "ALABM" button, the Minute indicator will flash on the display,
set the desired Minute for the Alarm with the "UP" and "DOWN" buttons.
• Press the "ALARM" button to store the setting.
6.2 Switching ON/OFF the Alarm Signal
• Press the "ALARM" button to choose the required Alarm. (ALARM 1
or2)
• Press the "UP" button and the "DOWN" button to turn ON/OFF the
corresponding Alarm.
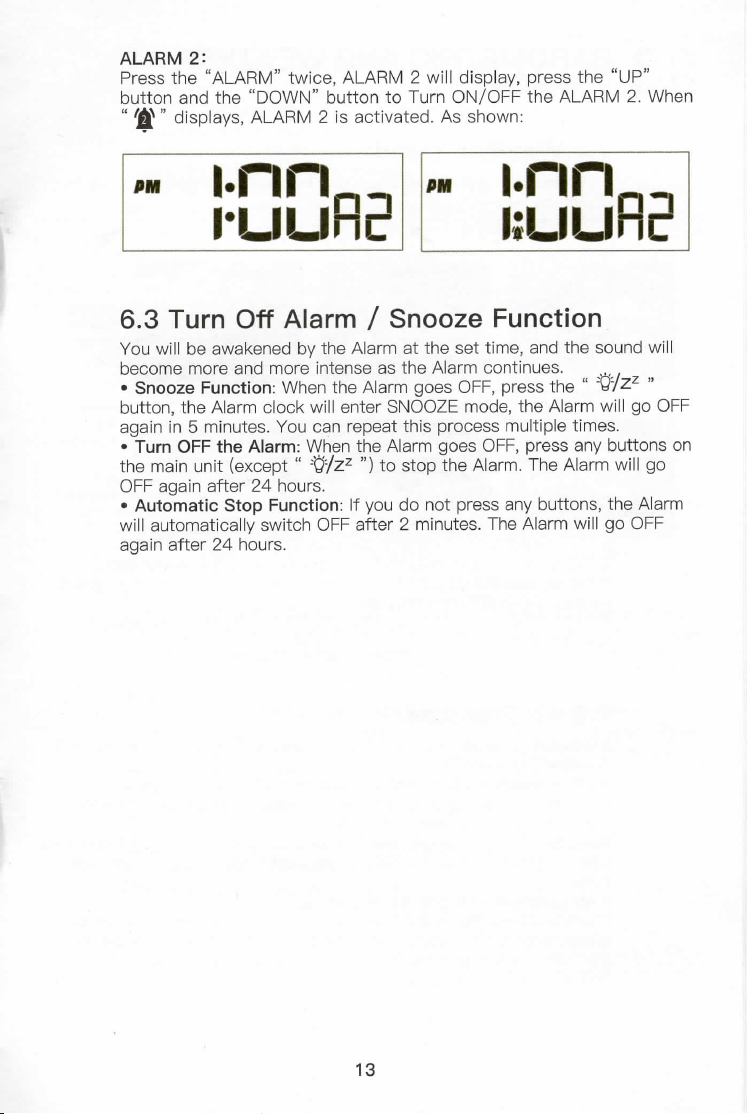
ALAPIM 1 :
• Press the "ALARM" once, ALARM 1 will display, press the "UP"
button and the "DOWN" button to Turn ON/OFF the ALARM 1. When
" 'A^ " displays, ALABM 1 is activated. As shown:
AV I.rlrl
l'LILI
I
II
12
AH i:rlrl
I.LluPl
II
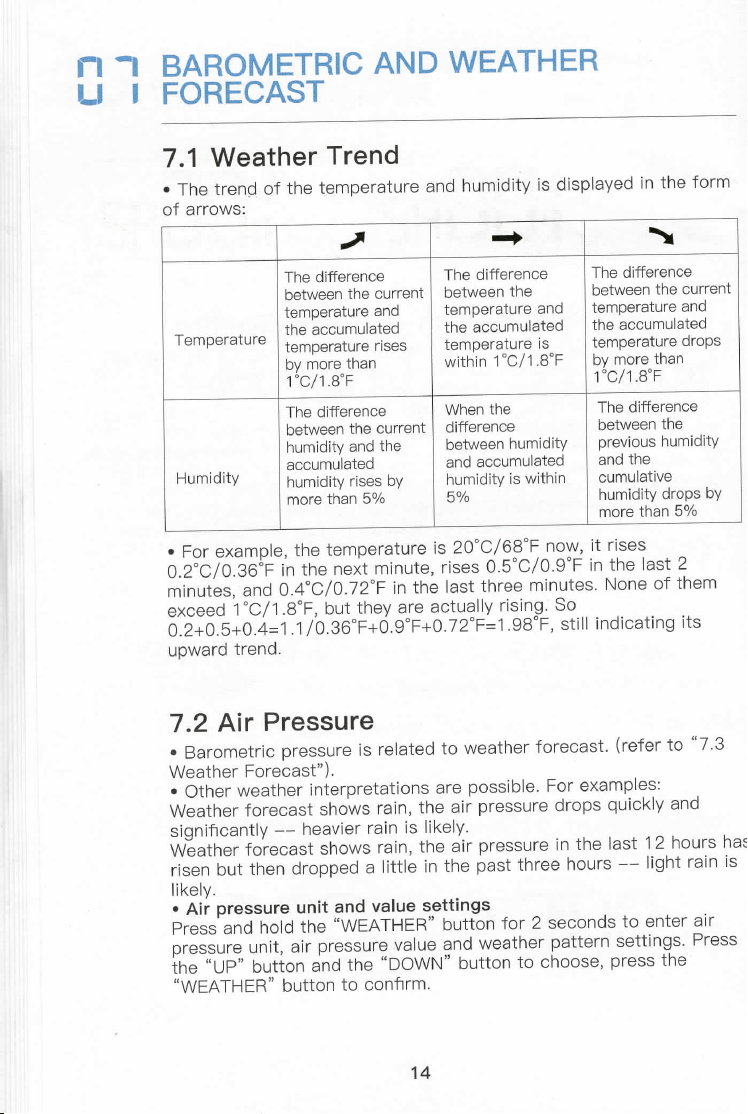
ALARM 2:
Press the "ALABM" twice, ALABM 2 will display, press the "UP"
button and the "DOWN" button to Turn ON/OFF the ALARM 2. When
" AAh " displays, ALABM 2 is activated. As shown:
'N I.nn
I.IJLIF!
i
•M ;;E[;plE
6.3 Turn Off Alarm / Snooze Function
You will be awakened by the Alarm at the set time, and the sound will
8esc:omoezem:[%t?gnTfrr:einnttehnesA,::ihgeo!:aromF:,o5::nsusetshe"-#,zz„
button, the Alarm clock will enter SNOOZE mode, the Alarm will go OFF
again in 5 minutes. You can repeat this process multiple times.
• Turn OFF the Alarm: When the Alarm goes OFF, press any buttons on
the main unit (except " :tt/ZZ ") to stop the Alarm. The Alarm will go
OFF again after 24 hours.
• Automatic Stop Function: lf you do not press any buttons, the Alarm
will automatically switch OFF after 2 minutes. The Alarm will go OFF
again after 24 hours.
13
ri -I BAROMETRic AND WEATHER
I.I I FORECAST
7.1 Weather Trend
• The trend of the temperature and humidity is displayed in the form
of arrows:
1111+
+
Temperature
The difference
The difference
The difference
between the current
between 1:he
between the current
temperature and
temperature and
temperature and
the accumulated
the accumulated
the accumulated
temperature rises
temperature is
temperature drops
Pyc7?I:a:han
within 1 °C/1 .8°F
Pyc7:I:oEhan
Humidity
The difference
When the
The difference
between the current
difference
between the
humidity and the
between humidity
previous humidity
accumulated
and accumulated
and the
humidity rises by
humidity is within
cumulative
more than 5o/o
5%
humidity drops bymorethan5o/o
• For example, the temperature is 20°C/68°F now, it rises
o.2°C/o.36°F in the next minute, rises 0.5°C/0.9°F in the last 2
minutes, and 0.4°C/0.72°F in the last three minutes. None of them
8f£:8d5|;#;7'oP3U6otFh+eoygaorFe+%C;u2eE±irj.S9'3ogF,Ss:H|ind,cat,ng,ts
upward trend.
7.2 Air Pressure
iv::I:emreE::e8:%:,9)Tre'SrelatedtoWeatherforecast(referto"73
• Other weather interpretations are possible. For examples:
Weather forecast shows rain, the air pressure drops quickly and
significantly -- heavier rain is likely.
Weather forecast shows rain, the air pressure in the last 12 hours ha
risen but then dropped a lil:tle in the past three hours -- light rain is
likely.
• Air pressure unit and value settings
Press and hold the "WEATHER" button for 2 seconds to enter air
tphr:St:Jig,ubnuj:{oairapnrdeii:re;8`WeN9nbdut#thoercR::tseer,npsr%tst:nt8hs;Press
"WEATHER" button to confirm.
14
7.3 Weather Forecast
• After setting up initially, the weather forecast can not be used for
about 12 hours, as the weather station needs some time to collect
and evaluate the weather data.
• The weather forecast is a result of the collected data and the
measured changes in air pressure.
• The forecast refers to the area around the weather station with a
radius of about 30 to 50 kin for the next 12 to 24 hours.
• The accuracy of the weather forecast is about 75 %.
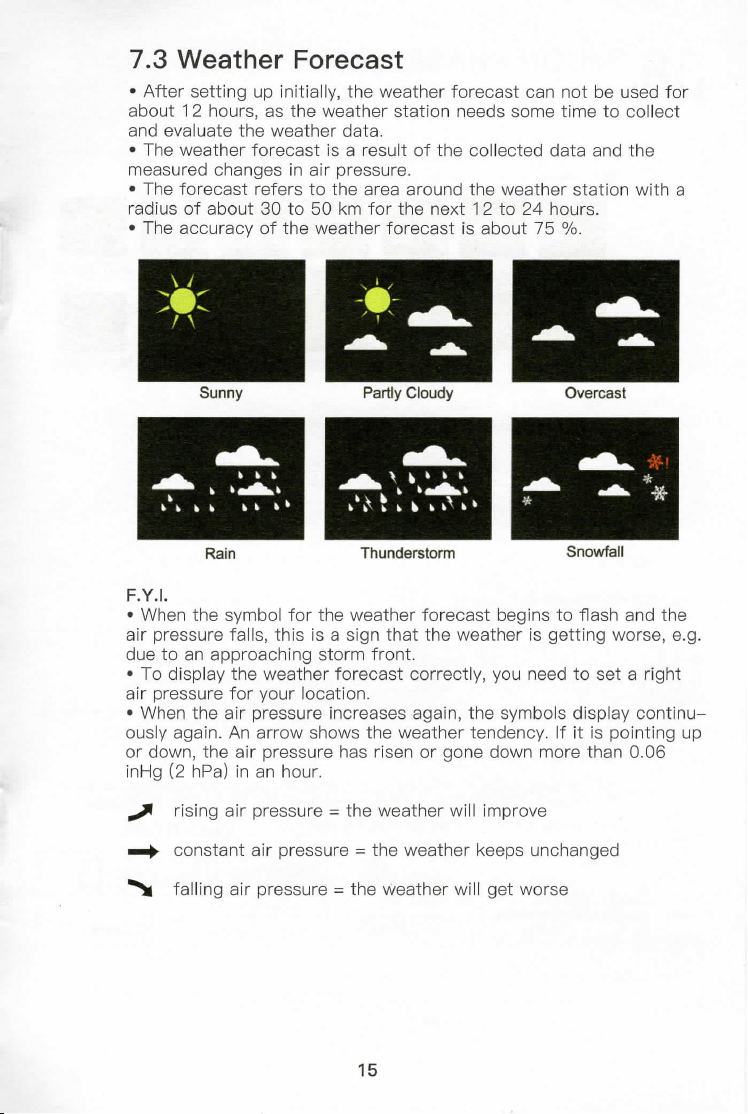
Ratn Thunderstorm Snowfall
F.Y.I.
• When the symbol for the weather forecast begins to flash and the
air pressure falls, this is a sign that the weather is getting worse, e.g.
due to an approaching storm front.
• To display the weather forecast correctly, you need to set a right
air pressure for your location.
• When the air pressure increases again, the symbols display continu-
ously again. An arrow shows the weather tendency. If it is pointing up
or down, the air pressure has risen or gone down more than 0.06
inHg (2 hpa) in an hour.
+ rising air pressure = the weather will improve
+ constant air pressure = the weather keeps unchanged
` falling air pressure = the weather will get worse
15
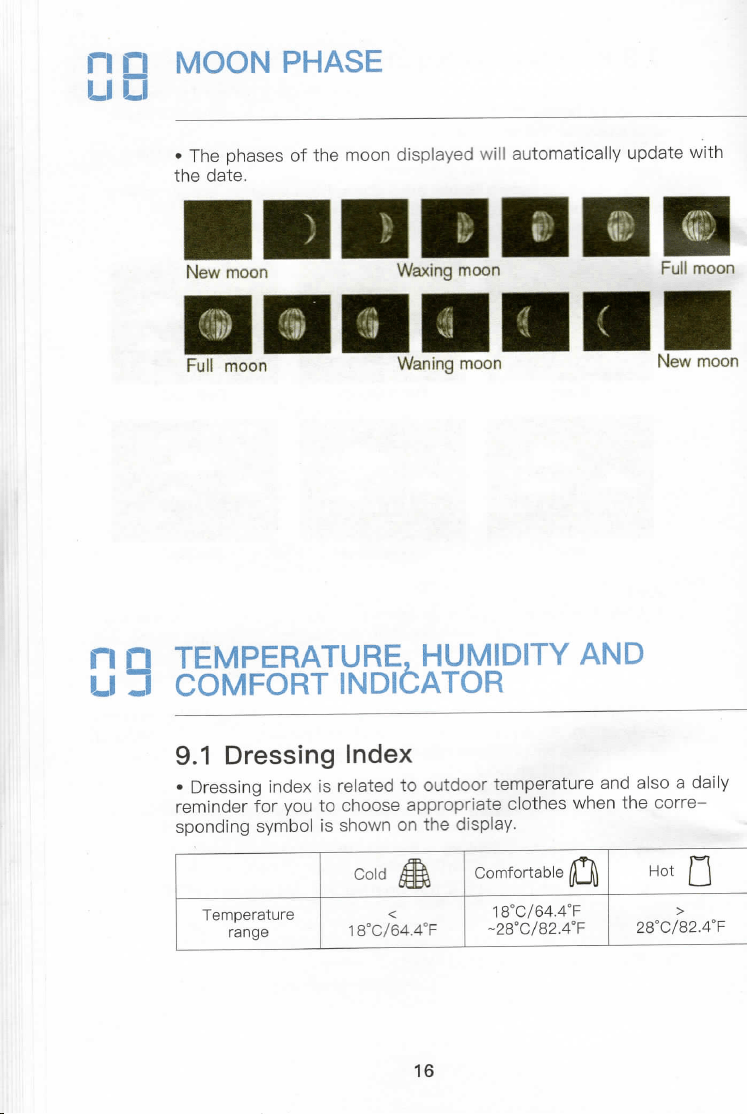
[i Ei MOON PHASE
• The phases of the moon displayed will automatically update with
the date.
IIIIIID
New moon Waxing moon
DDDDIIFEn
Full moon Waning moon New moon
I;E!5E;MMPFEORRATT[UNRDFbH¥oMEDITYAND
9.1 Dressing Index
• Dressing index is related to outdoor temperature and also a daily
reminder for you to choose appropriate clothes when the corre-
sponding symbol is shown on the display.
16
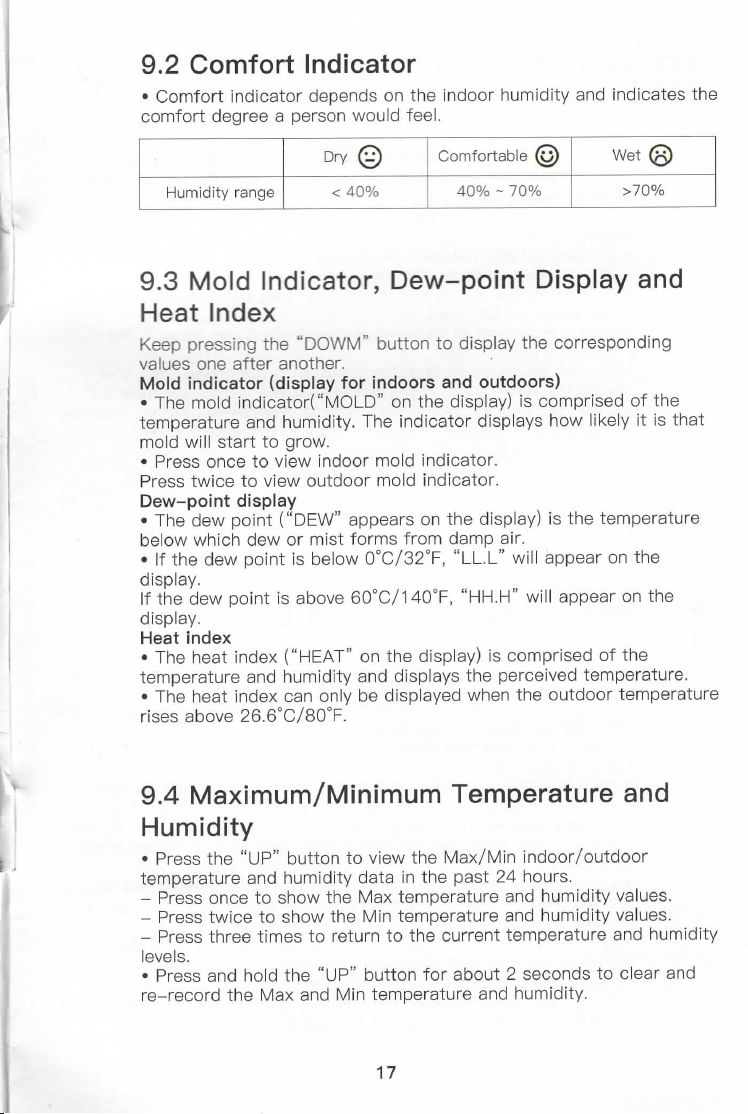
9.2 Comfort Indicator
• Comfort indicator depends on the indoor humidity and indicates the
comfort degree a person would feel.
Dry©
Comfortable ©
wet®
Humidity range
<40%
400/o - 70%
>70%
9.3 Mold Indicator, Dew-point Display and
Heat Index
Keep pressing the "DOWM" button to display the corresponding
values one after another.
Mold indicator (display for indoors and outdoors)
• The mold indicator("MOLD" on the display) is comprised of the
temperature and humidity. The indicator displays how likely it is that
mold will start to grow.
• Press once to view indoor mold indicator.
Press twice to view outdoor mold indicator.
PeT#d°e]#pdojFnE'?`yDEw"appearsonthedisplay)isthetemperature
below which dew or mist forms from damp air.
• lf the dew point is below 0°C/32°F, "LL.L" will appear on the
display.
If the dew point is above 60°C/140°F, "HH.H" will appear on the
display.
Heat index
• The heat index ("HEAT" on the display) is comprised of the
temperature and humidity and displays the perceived temperature.
• The heat index can only be displayed when the outdoor temperature
rises above 26.6°c/8o°F.
9.4 Maximum/Minimum Temperature and
Humidity
• Press the "UP" button to view the Max/Min indoor/outdoor
temperature and humidity data in the past 24 hours.
- Press once to show the Max temperature and humidity values.
- Press twice to show the Min temperature and humidity values.
- Press three times to return to the current temperature and humidity
levels.
• Press and hold the "UP" button for about 2 seconds to clear and
re-record the Max and Min temperature and humidity.
17
I rl Low BATTEFEv
Ill
When the low battery indicator " tE " is shown on the screen, you
have to replace the batteries for the main unit or the remote sensor
as soon as possible.
Note
• The low battery indicator for the remote sensor shows that the
batteries need changing for the channel number shown.
• All the settings will be lost if you don't plug in the power cord when
you change the batteries.
• Always exchange all batteries and only use those listed in the
"Technical Data".
• Even if the main unit is being powered by the power cord, you
should still remove any empty batteries present from the main unit.
• Clean the battery and device contacts if necessary before inserting.
• Dispose of the old batteries in an environmentally manner.
I I FRESETT!NGTHE DEVICE
1B
• lf the main unit appears to display incorrect values, you should reset
the weather station to the factory settings.
• Use a sharp and thin obj.ect to press the "BESET" button at the
back of main unit.
• Take the batteries out of the device and put them back in again. If
you are operating the device using the power cord, remove the
switching adapter from the socket, then plug it back in. If additional
batteries have been inserted, these also need to be removed briefly-
and then reinserted.
• When the main unit has power again, all the symbols on the display
are shown for a brief moment. The display also briefly lights up and
the unit emits a beep.
• After approx. 20 seconds, the display starts to flash and the current
data from the wireless sensors is retrieved.
• Observe the values shown on the display.
• Only if you continue to see the wrong values: take the batteries out
of all the remote sensors in use and put them back in.
18
; a TECHNICAEL DATA
Main Unit
Power consumption: 5.OV 600 rnA
Power supply: 3 x L86 (AA) / 1.5 V (not included)
Temperature measuring range: -1 o°C ~ 5o°C / 1 4.2°F ~ 1 22°F
Resolution: 0.1 °C / o.1 8°F
Humidity measuring range: 1 % to 99 % relative humidity
Besolution: 1 %
Remote Sensor
Batteries: 2 x L86 (AA) 1.5 V (not included)
Temperature measuring range: -5o°C ~ 7o°C / _58°F ~ 1 58°F
Protection type: lpx4: Protection against splash water from all
directions
Transmission frequency: 433 MHz
Bange: max. 328 ft (100 meters) (in an open area)
Power Charger
Power supply: 100-240V~50 / 60Hz 0.2A Max
Output: 5.OV 600 rnA
;i FAGS
1. How long does the device take to learn and calibrate?
(1 ) When using the device for the first time, it usually takes 3-7
days to calibrate.
(2) lf the device is moved from one environment to another (such as
bringing the sensor from outside to inside in winter), a calibration
time of several hours may be required.
19
2. Why can't the backlight stay on/backlight goes blank occasional-
ly after plugging in the power cord?
(1 ) Check whether the constant light mode has been set.
(2) Check if the device is searching for VVWVB when the backlight
goes blank. There will be a radio mast icon " A " flashing showing it's
searching for W\/VVB, the process lasts about 7 minutes.
--The device will automatically search for the W\/VVB signal at 1 :00,
2:00, and 3:00 am every day.
--ln addition, when the \/VVWB signal is interfered or weak, the device
will also automatically search once an hour.
If the W\/VVB signal is weak, but you want to keep the backlight always
on, you can turn off the WWVB function, which does not affect the
normal use of the device.
Here are the steps:
Hold the "MODE" button for 2S, turn ON/OFF DST--Set the right
Year--Month--Day--12/24 hrs display--Hour--Minutes--turn OFF
W\/VVB function--End
(3) Befer to ``4 BACKLIGHT SETTING".
3. Why the clock does not keep correct time?
The default time zone of the device is the PST, you need to manually
set the time zone and DST when using the device for the first time,
%tnhueaF+°jcmkews:ti,°ngvyi°ngafterreceivlngwwvB.(referto"51
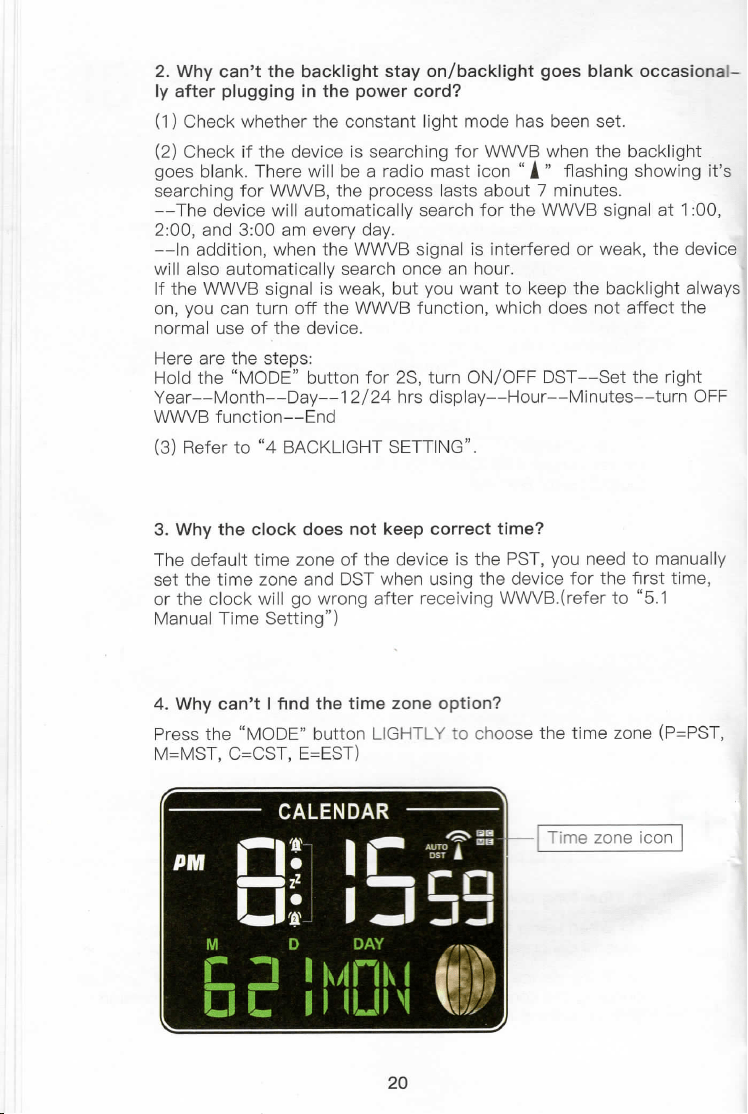
4. Why can't I find the time zone option?
Press the "MODE" button LIGHTLY to choose the time zone (P=PST,
M=MST, C=CST, E=EST)
20
Time zone icon

5. What if the WWVB signal(atomic clock signal) is weak or no
signal? / What if it does not contain my time zone?
Turn OFF W\/VVB function and set the clock manually.
Hold the "MODE" button for 2S, turn OFF DST--Set the right
Year--Month--Day--12/24 hrs display--Hour--Minutes--turn OFF
\/\/WVB function--End
6. Is the sensor waterproof?
No.
7. Why are the data recorded by my weather station inconsistent
with the data on the weather channel/APP?
(1 ) The Newentor weather station is a home version device, its
detection range is around the house and its data will be more
accurate.
(2) The data detection range on the weather channel/APP is the
area. Besides, airport weather stations are only updated once per
hour.
(3) lf the environment near the house is comfortable(plants, crops,
air conditioner, etc.), it is normal for the temperature of the sensor
to be different from that on the APP.
8. Why can't the data be exactly the same after I put the main unit
and remote sensor/other brands of thermometers together?
(1 ) The size and structure of the devices are different. In order to
get more accurate readings, the main unit has more small holes for
ventilation, while the remote sensor is usually placed in a relatively
harsh environment, its holes will be smaller. At this time, the chip
environment will be slightly different. This is possible one of the
reasons for the difference. Therefore, the devices need learning and
calibration time. Generally, the longer it is placed, the more accurate
the temperature will be.
(2) lf the distance between the cold source or the heat source is
different, this is also one of the reasons for the difference.
(3)To compare temperature, we recommend a mercury or red
spirit(fluid) thermometer. Bi-metal(dial) and digital thermometers(-
from other weather stations) are not a good source and have their
own margin of error.
21

9. Why is the wrong day of the week displayed?
Make sure that the year, month, and day are all set correctly.
10. Why can't the screen stay on when only using the batteries?
Different from the traditional black and white screen weather station,
this colorful weather station uses an LCD screen. If the backlight is
always on when the battery is used, it will be very battery+ntensive,
which is easy to cause waste of energy.
11. How to adjust to relative air pressure?
The device displays absolute air pressure by default, and generally
does not need to be adjusted.
If you are accustomed to using relative air pressure (after adjusting
for altitude), you could check the relative air pressure published by
local weather bureau and adjust the air pressure of your device to
match it.
Hold the "WEATHER" button for 2Sto enter weather settings, we ca
press "UP" and "DOWN" buttons to adjust value and press the
"WEATHER" to confirm and go to the next steps.
The setting sequence is as follows: pressure unit--adjust pressure
value--current weather icon.
Contact us:
Email: [email protected]
lf you have any unresolved problems, please feel free to contact us
by email, our friendly customer service professionals are always
standing by to help.
22
GUARANTEE
• The device has been manufactured in accordance with strict quality
guidelines and has been inspected carefully before delivery.
• Newentor guarantees that the warranty period of the device is 1 year
from the date of purchase.
SAFETY
Bead the following advice carefully and store these operating instructions
in case you want to reread something later. If you give the item to
someone else, give them these operating instructions as well.
• This device can be used by people over 8 years old. People with weak
physical, sensory or mental abilities, and lack of experience or knowledge
need to be supervised or guided to use it.
• Cleaning and user maintenance may not be carried out by children unless
they are supervised.
• Children must be supervised to make sure that they do not play with the
device.
• The device must not be immersed in water or other liquids. Electric
shock hazard!
• Do not use the device in areas where it may be wet, such as a sink.
Danger
• When installing the device on a wall, there must be no electrical cables,
gas or water pipes in the wall at the installation site. Otherwise there is a
risk of electric shock.
• You can stand the main unit up or hang it up. For this the main unit has
a fold-out stand as well as a loop for hanging.
• Unfold the stand until it clicks into place to set up the main unit.
• Place or hang the main unit as close to a window as possible. The
reception is generally best there.
Cleaning
• When operating using the power cord: Bemove the switching adapter plug from the
base unit.
• Wipe the main unit with a slightly damp cloth when required.
• Dry off the device completely before connecting it with the switching adapter again.
FCC STATEMENT
This device complies with Part 15 of the FCC Rules. Operation is subject
to the following two conditions: (1 ) This device may not cause harmful
interference, and (2) This device must accept any interference received,
including interference that may cause undesired operation.
WARNING: Changes or modifications to this unit not expressly approved
by the party responsible for compliance could void the user's authority to
operate the equipment.
23
NOTE: This equipment has been tested and found to comply with the
limits for a class 8 digital device, pursuant to Part 15 of the FCC Rules.
These limits are designed to provide reasonable protection against
harmful interference in a residential installation.
This equipment generates uses and can radiate radio frequency energy
and, if not installed and used in accordance with the instructions, may
cause harmful interference to radio communications. However, there is
no guarantee that interference will not occur in a particular installation. If
this equipment does cause harmful interference to radio or television
reception, which can be determined by turning the equipment off and on,
the user is encouraged to try to correct the interference by one or more
of the following measures:
• Beorient or relocate the receiving antenna.
• Increase the separation between the equipment and receiver.
• Connect the equipment into an outlet on a circuit different from that to
which the receiver is connected.
• Consult the dealer or an experienced radio / TV technician for help.
DISCLAIMERS
Manufacturer reserves the right to change specifications of the product.
Manufacturer and supplier are not responsible for malfunction where
interference occurs.
This device complies with Part 15 of the FCC Rules. Operation is
i:pLefcut,i:t:hrfeei:I::,,nagn5Y3)ctohTsd,:ieovl::`1'utsiisacdceev::eaTyayntneoiecraeunscee
received, including interference that may cause undesired operation.
This device has been tested and found to comply with the limits for a
Class 8 digital device, pursuant to Part 15 of the FCC Rules. These
limits are designed to provide reasonable protection against harmful
interference in a residential installation. This device generates, uses
and can radiate radio frequency energy and, if not installed and used
in accordance with the instructions, may cause harmful interference
to radio communications.
However, there is no guarantee that interference will not occur in a
particular installation. If this device does cause harmful interference
to radio or television reception, which can be determined by turning
the device off and on, the user is encouraged to try to correct the
interference by one or more of the following measures:
--Beorient or relocate the receiving antenna.
--Increase the separation between the device and receiver.
--Connect the device into an outlet on a circuit different from that to
which the receiver is connected.
--Consult the dealer or an experienced radio/TV technician for help.
Changes or modifications not expressly approved by the party
responsible for compliance could void the user's authority to operate
the equipment.
24
DECLARATION OF CONFORMITY
•This product was manufactured in accordance with the harmonized
European standards, you will find the declaration of conformity below:
02014/30/EU EMC Directive
02014/53/EU RED Directive
02011 /65/EU ROHS Directive
DISPOSAL
F©(€
ROHS
COMPLIANT
The packaging is made of environmentally friendly
materials, which may be disposed through your local
recycling facilities.
When your device has come to the end of its life, in the
interest of environmental protection please do not throw it
out with your household refuse, but take it to a suitable
I- center where is can be disposed of properly.
All batteries must be handed in at a collection point in
your community, suburb, or at the retailer. Such batteries
can thus be disposed of in an environmentally friendly way.
25