Newentor Q5 Weather Station User Manual
1. WEATHER STATION FEATURES
1.1 Package List
| ITEM NO |
PART NAME |
FIGURE |
QTY |
| 1 |
Weather Station |
 |
1 |
| 2 |
Outside Sensor |
 |
3 |
| 3 |
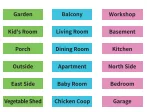
Stickers (Garden, Kit's Room, Pooh, Evade, Eat Side, Vegetable Side, Living Room, Eating Room, North Side, Gargi) |
 |
18 |
| 4 |
User Manual |
 |
1 |
Warning: The device will consume a lot of battery power when the backlight is on. Like most other black-and-white screen devices, to extend battery life, its backlight will turn off after 15 seconds.
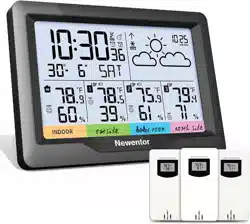
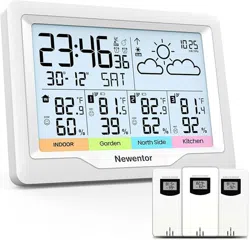
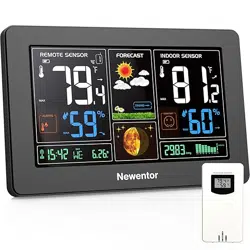
1.2 Appearance Description
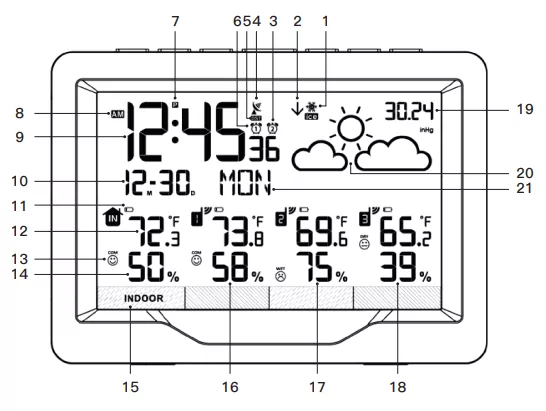
1. Ice alert (11th)
2. Air pressure Trend (12th)
3. Alarm clock 2 (9th)
4. WWVB searching signal (8th)
5. DST (7th)
6. Alarm clock 1 (9th)
7. Time zone (7th)
8. AM/PM (7th)
9. Time (7th)
10. Date/Month (7th)
11. Battery signal (13th)
12. Temperature (13th)
13. Comfort level (12th)
14. Humidity (13th)
15. Remote sensor location label
16. Remote sensor 1 data (6th)
17. Remote sensor 2 data (6th)
18. Remote sensor 3 data (6th)
19. Current Air pressure (7th)
20. Weather forecast (11th)
21. Week (7th)
Warning:
7. Choose correct time zone (P, M, C, E) to set time correctly.
12. There is 1°C deviation when temperature is 0°C~40°C, while 2°C in -9.9°C~0°C or 40°C~50°C.
14. There is 5% deviation when humidity is 40%~80%, while 8% deviation in 20%~40% or 80%~95%.
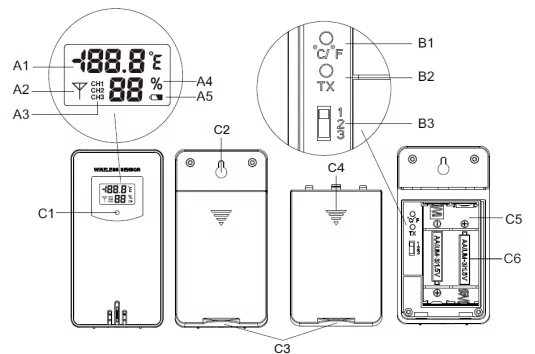
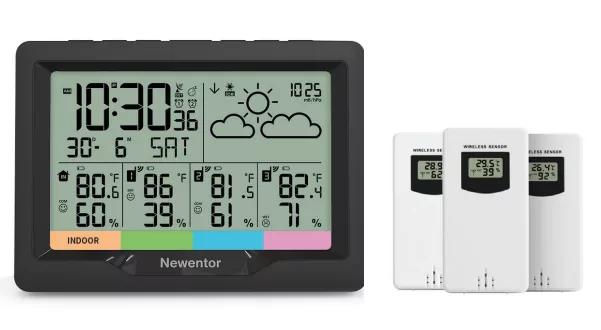
A1: Remote sensor temperature
A2: Emission symbols
A3: Channel number
A4: Remote sensor humidity
A5: Remote sensor low battery indicate (12th)
B1: °C/°F unit transfer button
B2: Manual transmitter button
B3: Channel switch,
C1: Transmit indicating lamp
C2: Wall mounting hole
C3: Stand cover
C4: Battery compartment cover
C5: Battery compartment
C6: Remote sensor battery.
Warning: To make sure your remote sensor more accurate, put it away from direct rain, sunny or close to the place where will affect the sense result.
1.3 Button Function
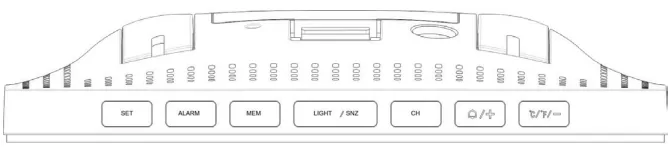
| Button Function |
SET |
ALARM |
MEM |
LIGHT/SNZ |
CH |
 /+ /+ |
°C/°F/– |
| Normal Mode |
Press |
/ |
Alarm time display |
MAX/MIN temperature & humidity |
Wake up backlight for 15s |
Select channel |
Turn on/off alarm 1/2 |
°C/°F Switch |
| Hold |
Time Setting |
Set Alarm time |
Re-record MAX/MIN temperature & humidity |
Wake up backlight for 15s |
Channel searching |
/ |
Start/cancel WWVB searching |
| Time Setting |
Press |
Confirm and go next steps |
/ |
/ |
/ |
/ |
Increase |
Decrease |
| Hold |
/ |
/ |
/ |
/ |
/ |
Increase Continuously |
Increase Continuously |
| Alarm Setting |
Press |
/ |
Confirm and go next steps |
/ |
/ |
/ |
Increase |
Decrease |
| Hold |
/ |
/ |
/ |
/ |
/ |
Increase Continuously |
Increase Continuously |
| Alarm Clock Goes Off |
Press |
Turn off the alarm |
Turn off the alarm |
Turn off the alarm |
Snooze mode |
Turn off the alarm |
Turn off the alarm |
Turn off the alarm |
| Hold |
/ |
/ |
/ |
/ |
/ |
/ |
/ |
2. INITIAL OPERATION
- Open the Weather Station battery compartment cover.
- Insert 2×AA batteries observing polarity [/+] and[°C/°F/–] marks.
- When you insert the batteries, all icons on the LCD will light up for 3 seconds, and you will hear a beep tone, then detect indoor temperature & humidity.
- The Weather Station will start to make a connection to the outdoor remote sensor. This process lasts for a maximum of 3 minutes and will displayed by a flashing reception antenna symbol
 in the "OUTDOOR" display area on the receiver.
- Open the remote sensor battery compartment cover, push the channel switch to the "1" position, insert 2×AA batteries observing polarity [/+] and [°C/°F/–] marks, press "TX" button of remote sensor at the same time to connect main unit, close the battery cover.
- According to the same method, push the channel of remote sensor switch to the "2" or "3" position to connect main unit.
- After receiver has created 3 remote sensor connections, it will enter the Radio control receive mode.
F.Y.I.
- If the Weather Station failed to receive transmission from outdoor remote sensor ("––.–" display on the LCD), press the [CH] button to select the channel, the number of selected channel will flash, then press and hold the [CH] button for 3 seconds, RF icon will be flashing, the weather station will reconnect the launch signal of the channel.
Warning: There is 1°C deviation when temperature is 0°C-40°C while 2°C in -40°C-0°C or 40°C-70°C. Warning: There is 5% deviation when humidity is 40%-80% while 8% deviation in 20%-40% or 80%-95%.
3. TIME SETTING
3.1 Set Time Manually
- Press and hold the [SET] button for 2 seconds, the "
 ON/OFF" starts to flash. Now use [/+] and [°C/°F/–] buttons to set the radio control function ON or OFF.
- Press [SET] button to confirm your setting, the 12/24HR start to flash. Now use [/+] and [°C/°F/–]buttons to set the 12/24 hour mode you need.
- Press [SET] to confirm your setting, the Time Zone start to flash. Now use [/+] and [°C/°F/–] buttons set a correct time zone (P/M/C/E).
- Press [SET] to confirm your setting, the "DST ON/OFF" start to flash, Now use [/+] and [°C/°F/–] buttons set the DST ON or OFF.
- Press [SET] to confirm your setting, the Hour starts to flash. Now use [/+] and [°C/°F/–] buttons to set the correct hour.
- Press [SET] to confirm your setting, the Minute starts to flash. Now use [/+] and [°C/°F/–] buttons to set the correct minute.
- Press [SET] to confirm your setting, the Month and Date icon starts to flash. Now use [/+] and [°C/°F/–] buttons to select date display on Month/Date or Date/Month.
- Press [SET] to confirm your setting, the Year is display and starts to flash. Now use [/+] and [°C/°F/–] buttons to set the correct year.
- Press [SET] button to confirm your setting, the Month starts to flash. Now use [/+] and [°C/°F/–] buttons to set the correct month.
- Press [SET] button to confirm your setting, the Date starts to flash. Now use [/+] and [°C/°F/–] buttons to set the correct date.
- Press [SET] button to confirm your setting, the Weather forecast Pattern starts to flash. Now use [/+] and [°C/°F/–] buttons to select the current weather pattern.
- Press [SET] button to confirm your setting, the Air Pressure Unit will display and starts to flash. Now use [/+] and [°C/°F/–] buttons to choose the air pressure unit you need.
- Press [SET] button to confirm your setting, the Air Pressure Value starts to flash. Now use [/+] and [°C/°F/–] buttons set to local standard pressure value.
- Press [SET] button to confirm your setting and to end the setting procedures, then it will return to the normal mode.
F.Y.I.
- If there is no valid operation within 20 seconds, it will automatically return to normal time mode from the set mode.
- When adjusting the value, press and hold the [/+] or [°C/°F/–] key to adjust continuously and quickly.
3.2 Set Time Automatically
- The clock will automatically search the WWVB signal after 3 minutes of any restart or changing of new fresh batteries. Before searching WWVB, please set a correct Time Zone according to your location. When searching for WWVB, the radio mast icon will flash.
- At 1:00/2:00/3:00 AM, the clock automatically carries out the synchronization procedure with the WWVB signal to correct any deviations to the exact time. If fail, the radio mast icon will disappear, the system will automatically attempt another synchronization at the next full one hour. This procedure will be repeated automatically up to total 5 times.
- To start manual WWVB signal reception, choose a correct Time Zone first, then leave it alone until it return to the normal mode. Press [°C/°F/–] button for 3 seconds to start searching WWVB, the time and date will be set correctly after searching. If no signals received within 7 minutes, the WWVB signal search will stop (the radio mast icon disappears) and start again at the next full one hour.
- During RC reception, Press [°C/°F/–] button can stop searching WWVB signal.
F.Y.I.
- A flashing radio mast icon indicates that the WWVB signal reception has started.
- A continuously displayed radio mast icon indicates that the WWVB signal was received successfully.
- We recommend Placing weather station at a minimum distance of 2.5 meters (8.2 Feet) to all sources of interference, such as televisions or computer monitors or switching power adapter.
- Radio reception is weaker in rooms with concrete walls (e.g.: in cellars) and in offices. In such extreme circumstances, place the weather station close to the window.
- During the RC receive mode, only the [Light/SNZ] and [°C/°F/–] buttons have a function, other buttons are not functional. If you want to carry out other functions of operation, please press [°C/°F/–] button to exit the RC receiving mode.
4. ALARM CLOCKS
4.1 Setting the Daily Alarms
- Press once [/+] button, LCD will display
 , press again to display
  , press again to display , each to represent Alarm1 ON (Alarm2 OFF), Alarm2 ON (Alarm1 OFF), Alarm1&Alarm2 ON. Press [/+] button again to Alarm1 and Alarm2 all OFF (no "" and "" display).
- Press once [ALARM] button, LCD display alarm1 time, press [ALARM] button again, LCD display alarm2 time, press [ALARM] button again, return to time display.
- Press and hold ALARM button for 3 seconds, until the Hour of the Alarm1 time starts to flash. Use the [/+] and [°C/°F/–] buttons to set the required hour.
- Press [ALARM] button to confirm your setting, the Minute of the Alarm1 time starts to flash. Use the [/+] and [°C/°F/–] buttons to set the required minute.
- Press [ALARM] button to confirm your setting, the Hour of the Alarm2 time starts to flash. Use the [/+] and [°C/°F/–] buttons to set the required hour.
- Press [ALARM] button to confirm your setting, the Minute of the Alarm2 time starts to flash. Use the [/+] and [°C/°F/–] buttons to set the required Minute.
- Press [ALARM] button to confirm your setting and end the setting procedure.
F.Y.I.
- If there is no valid operation within 20 seconds, it will automatically return to normal time mode from the alarm time setting mode.
- When adjusting the value, press and hold the [/+] or [°C/°F/–] key to adjust continuously and quickly.
- The alarm will sound for 2 minutes if you do not deactivate it by pressing any button. In this case the alarm will be repeated automatically after 24 hours.
- Rising alarm sound (crescendo) changes the volume 4 times whilst the alarm signal is heard.
4.2 Switching OFF the Alarm Signal
- When the alarm is ringing, press any button except the [Light/SNZ] button to stop the alarm signal. It is not necessary to reactivate the alarm. It will ring again this time next day.
4.3 Snooze Function
- When the alarm is ringing, press the [Light/SNZ] button the alarm mode will get to snooze mode. The alarm signal sounds again after 8 minutes.
5. QUERY MAXIMUM/MINIMUM NUMERICAL VALUE
- When the temperature/humidity are shown in the LCD, the weather station begins to record temperature/humidity maximum and minimum numerical value.
- Press [MEM] button, the LCD will display the maximum value of temperature/humidity. Press [MEM] button again, the LCD will display the minimum value of temperature/humidity.
- At the same time, there are "MAX" or "MIN" displayed on the LCD.
- The temperature/humidity maximum/minimum value will re-record when press and hold [MEM] button 3 seconds.
- The memory value of the day will be automatically cleared at every 0:00 am.
F.Y.I.
- If the temperature reading is below the measuring range, the LL.L will be displayed. If the temperature reading is above the measuring range, the HH.H will be displayed.
6. °C/°F UNIT TRANSFER
- Press the [°C/°F/–] button to select °C or °F units.
7. ICE ALERT
- The ice alert symbol will appear and flash when the outdoor temperature at -1°C to +3°C or +30.2°F to +37.4°F.
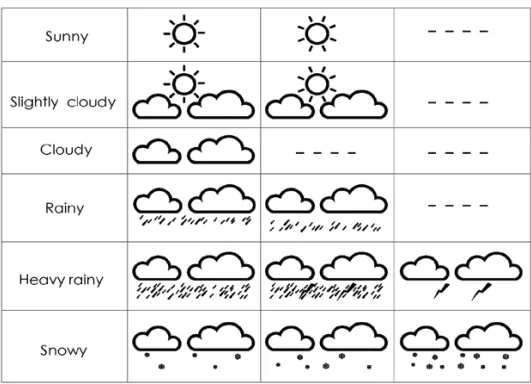
8. WEATHER FORECAST FUNCTION
- The weather symbols indicate the weather fluctuation over the next 6-12 hours, not the current weather.
- Please take the weather forecast from your local weather forecasting service into account as well as the forecast from your weather station. If there are discrepancies between the information from your device and from the local weather forecasting service, please take the advice of the latter as authoritative.
- The weather forecast is calculated from evaluation of fluctuations in the barometric pressure and may deviate from the actual weather conditions.
- The weather station displays the following weather symbols: Sunny, Slightly cloudy, Cloudy, Rainy, Heavy rainy, Snowy.
9. COMFORT LEVEL
- The temperature and humidity is dry (When the humidity is below 40%).
- The temperature and humidity is comfort (When the temperature in 20-28°C and the humidity is 40-70%).
- The temperature and humidity is wet (When the humidity is above 70%).
F.Y.I.
When the temperature is not 20-28°C and the humidity is 40-70%, the comfort level icon will not be displayed.
10. BAROMETRIC PRESSURE TREND DISPLAY
↑ The barometric pressure is rising more than 2 hPa.
↓ The barometric pressure is dropping more than 2 hPa.
If there is no arrow trend, it means the barometric pressure does not change more than 2 hPa in 1 hour.
11. BACKGROUND LIGHTING
- Press the [Light/SNZ] button, the backlight will light up for 15 seconds.
12. LOW BATTERY INDICATE
- If the battery icon "
 ' appears, the batteries in the outdoor sensor should be replaced as soon as possible.
13. PRODUCT SPECIFICATION
- LCD screen size: 5.2 inches x 3.5 inches
- Perpetual Calendar up to year 2099
- Humidity: Indoor & Outdoor measurement range: 20% RH - 95% RH (5% deviation)
- Temperature measurement range (1°C deviation):
- - Indoor: -9.9°C(14.2°F) - 50°C(122°F)
- - Outdoor: -25°C(-13°F) - 50°C(122°F)
- Wireless Outdoor Sensor:
- - 433.92MHz RF transmitting frequency
- - 60m/200ft transmission range in an open area
- Power Supply:
- - Weather Station: Battery: 2×LR06 AA (Not including)
- - Wireless Outdoor Sensor: 2×LR06 AA (Not including)
14. FAQ AND TROUBLESHOOTING GUIDE
Why are the data recorded by my weather station inconsistent with the data on the weather channel/APP?
The Newentor weather station is a home version weather station, its detection range is around the house and its data will be more accurate. The data detection range on the weather channel/APP is the area. Besides, airport weather stations are only updated once per hour. Therefore, it is normal that their temperature and humidity
Why can't the data be exactly the same after I put the main unit and remote sensor/other brands of thermometers together?
- The size and structure of the devices are different. In order to get more accurate readings, the main unit has more small holes for ventilation, while the remote sensor is usually placed in a relatively harsh environment, its holes will be smaller. At this time, the chip environment will be slightly different. This is possible One of the reasons for the difference. Therefore, the devices need learning and calibration time. Generally, the longer it is placed, the more accurate the temperature will be.
- If the distance between the cold source or the heat source is different, this is also one of the reasons for the difference.
- Due to the reason of 1), between different devices, there may be ±1°C/1.8°F deviation when the temperature is 0°C~40°C/ 32°F~104°F, while ±2°C/3.6° F deviation in other ranges. There may be±2% deviation when humidity is 20%~80%, while ± 4% deviation in other ranges.
How long does the device take to learn and calibrate?
- When using the device for the first time, it usually takes 3-7 days to calibrate.
- If the device is moved from one environment to another (such as bringing the sensor from outside to inside in winter), a calibration time of several hours may be required.
Why is the wrong day of the week displayed?
Please make sure that the year, month, and day are all set correctly.
One of the remote sensors cannot connect with the main unit.
- Make sure 3 remote sensors are in different channels
- Press the "CH" button to select channel, hold the "CH" button for 3S to search for remote sensor manually.
- Press the "TX" button of the remote sensor to transmit RF signal to connect base unit. Here is a video: https://www.facebook.com/111953800541815/videos/353653802423811/
Tip: Please ensure that the distance between the sensor and the main unit is within 200ft. If there is a wall between them, the distance between the main unit and the remote sensor cannot exceed 150ft. Which means 1 wall is equivalent to 50 ft, because objects with metallic properties will affect signal reception.
If the above way no help, please try to change the channels of the remote sensors, such as #1changes to #2, #2 changes to #3, #3 changes to #1. If the issue still can’t be addressed, contact us to resolve the issue.
What if the device does not contain my time zone? /What to do if the WWVB signal is weak?
Radio station WWVB is located near Fort Collins, Colorado. Since the United States has a wide area and the WWVB signal is interfered by many factors, the device is only set in the area where it is most likely to receive the WWVB signal. If the device does not contain our time zone or the WWVB signal is weak, we can turn off the WWVB function and set the time manually.
- Press and hold the【SET】button for 2 seconds to enter time setting, use [/+] or [°C/°F/–] to choose, use 【SET】button to confirm. The order of setting is: turn ON/OFF WWVB function -- 12/24HR mode -- Standard time zone(according to your location)--turn ON/OFF DST(turn ON when daylight saving time starts and turn OFF when it ends)--Hour--Minute--Month--Day--Year
- Do not press any button until it turn back to normal mode.
How to connect 3 remote sensors?
- Insert the batteries for the weather station, all icons on the LCD will light up for 3 seconds, and you will hear a beep tone, then it will detect indoor temperature & humidity.
- At this time, set channels of the 3 remote sensors to 1, 2, 3 and insert the batteries respectively.
- The Indoor Station will now start to make a connection to the outdoor sensors. This process takes about 3 minutes and will be displayed by a flashing reception antenna symbol in the “OUTDOOR” display areas.
- When the temperature and humidity of all 3 areas are displayed, done.
What is the difference between turning ON or OFF the radio control function?
- Radio control function ON: At 1:00 /2:00 / 3:00 AM, the clock automatically carries out the synchronization procedure to correct any deviations to the exact time.
- Radio control function OFF: Can't sync time automatically, it will be convenient for you to use in places with poor signal.
How to set radio control function ON or OFF?
Press and hold the 【SET】 button for 3 seconds, the “ ON/OFF” starts to flash. Then use button and button to set the radio control function ON or OFF.
About the Reception of the Radio signal
- The clock will automatically search the WWVB signal after 3 minutes of any restart or changing of new brand batteries, the radio mast icon starts to flash. When the radio control function is ON:
- At 1:00 /2:00 / 3:00 AM, the clock automatically carries out the synchronization procedure to correct any deviations to the exact time. If fail ( disappears from the display), the system will repeat this request at the next full one hour. This procedure will be repeated automatically up to a total of 5 times.
- To start manual WWVB signal reception, press and hold the【-】button for 3 seconds. If it fail within 7 minutes, this operation will start again at the next full hour.
- During WWVB reception, only【Light / SNZ】button and [°C/°F/–] button work, you can press [°C/°F/–] button to stop searching radio signal.
How to choose Time Zone and set the time manually?
- Press and hold the 【SET】 button for 3 seconds, set the radio control function ON.
- Press【SET】button to confirm your setting, the 12h/24h start to flash, use [/+] and [°C/°F/–] buttons to set the 12/24 hour mode you need.
- Press 【SET】 to confirm your setting, the Time zones start to flash, use [/+] and [°C/°F/–] button set correct Time Zone (-12 to +12).
- Press【SET】 to confirm your setting, the Hour starts to flash. Now use [/+] and [°C/°F/–] button to set the correct hour.
- In the same way, you can set the Minute, date display on Month/Date or Date/Month, the year, the “month” and the “date”.
A. ---- You can continue to set the language, current weather pattern, the air pressure unit you need and the local standard pressure value. After all the above operations are completed, it will returntothe normal mode.
B. ---- Or you can leave it alone for about 20 seconds, it will automatically return to the normal mode.
How to set the Daily Alarms?
- Repeat press the button, to turn ON alarm 1,turn ON alarm 2 ,turn ON both Alarm1andAlarm 2, turn OFF both Alarm 1 and Alarm 2.
- Press【ALARM】button, LCD display alarm 1, press 【ALARM】 button again, LCD display alarm2, press【ALARM】button again, return to time display.
- Press and hold【ALARM】button until the hour of the Alarm 1 starts to flash. Use the [/+] and [°C/°F/–] button to set the required hour.
- Press【ALARM】button to confirm your setting, the Minute of the Alarm 1 starts to flash. Use the [/+] and [°C/°F/–] button to set the required minute.
- Press【ALARM】button to confirm your setting, the hour of the Alarm 2 starts to flash. According to the same method, set the hour and minute of the Alarm 2.
(Snooze function: When the alarm is ringing, press any buttons except【LIGHT/SNZ】button canstopthe alarm. The alarm will sound again after 8 minutes by pressing the【LIGHT/SNZ】button.)