User Manual
WAVE
Legendary 8-Voice Multi-Timbral Hybrid Synthesizer with
Wavetable Generators and Analog VCF and VCA, LFO, 3 Envelopes,
Arpeggiator and Sequencer
V 0.0

2 WAVE User Manual
Table of Contents
About this manual .........................................12
Introduction ...................................................12
How Wavetable synthesis works ..................12
Working with transients................................12
Preset Wavetables and Transients ...............13
Modulation Matrix .........................................15
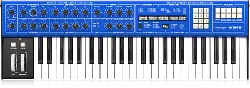
Top Panel ........................................................16
Master Controls ......................................................................... 16
Low Frequency Oscillator ...................................................... 16
Envelope Generator 1 ..............................................................16
Modiers ...................................................................................... 17
Filter Modulation ...................................................................... 17
Waves Modulation ................................................................... 17
Envelope Generator 3 ............................................................. 18
Envelope Generator 2 ............................................................. 18
Group ............................................................................................ 18
Modiers Control ...................................................................... 18
Display .......................................................................................... 19
Numeric Keypad ....................................................................... 19
Display/Menu Select and Sequencer Controls .............. 19
Performance Controls ............................................................. 19
Menus .............................................................20
Program Menu ........................................................................... 20
User Menu ................................................................................... 21
Digital Menu ...............................................................................22
Tuning Menu .............................................................................. 24
Analog Menu ..............................................................................25
Sequencer Menu .......................................................................25
Using The Sequencer .....................................26
Sequencer use examples ....................................................... 26
User Waves and Transients ...........................27
Programs ........................................................28
Bank 0 ...........................................................................................28
Bank 1 ...........................................................................................29
Rear Panel ......................................................31
Calibration .....................................................31
VCA/VCF Calibration................................................................ 31
CV Input Calibration ................................................................ 31
Mod Wheel Calibration .......................................................... 31
Pitch Wheel Calibration .......................................................... 31
MIDI CCs .........................................................32
MIDI NRPNs ....................................................33
SysEx ...............................................................34
SysEx Data Format ....................................................................34
SysEx Preset Data ......................................................................34
Global SysEx ............................................................................... 37
Sequencer SysEx Data .............................................................38
Wave Specic SysEx ................................................................. 38
Troubleshooting ........................................... 40
Glossary .......................................................... 41
SynthTribe ......................................................42
3 WAVE User Manual
Terminals marked with this symbol carry
electrical current of sucient magnitude
to constitute risk of electric shock.
Use only high-quality professional speaker cables with
¼" TS or twist-locking plugs pre-installed. All other
installation or modication should be performed only
by qualied personnel.
This symbol, wherever it appears,
alertsyou to the presence of uninsulated
dangerous voltage inside the
enclosure-voltage that may be sucient to constitute a
risk ofshock.
This symbol, wherever it appears,
alertsyou to important operating and
maintenance instructions in the
accompanying literature. Please read the manual.
Caution
To reduce the risk of electric shock, donot
remove the top cover (or the rear section).
No user serviceable parts inside. Refer servicing to
qualied personnel.
Caution
To reduce the risk of re or electric shock,
do not expose this appliance to rain and
moisture. The apparatus shall not be exposed to dripping
or splashing liquids and no objects lled with liquids, such
as vases, shall be placed on the apparatus.
Caution
These service instructions are for use
by qualied service personnel only.
To reduce the risk of electric shock do not perform any
servicing other than that contained in the operation
instructions. Repairs have to be performed by qualied
service personnel.
Warning
Please refer to the information on the
exterior of bottom enclosure for electrical
and safety information before installing or operating
the device.
1. Please read and follow all instructions and warnings.
2. Keep the apparatus away from water (except for
outdoor products).
3. Clean only with dry cloth.
4. Do not block ventilation openings. Do not install in a
conned space. Install only according to manufacturer's
instructions.
5. Protect the power cord from damage, particularly at
plugs and appliance socket.
6. Do not install near any heat sources such as radiators,
heat registers, stoves or other apparatus (including
ampliers) that produce heat.
7. Do not defeat the safety purpose of the polarized or
grounding-type plug. A polarized plug has two blades
with one wider than the other (only for USA and Canada).
A grounding-type plug has two blades and a third
grounding prong. The wide blade or the third prong are
provided for your safety. If the provided plug does not t
into your outlet, consult an electrician for replacement of
the obsolete outlet.
8. Use only attachments and accessories recommended
by the manufacturer.
9. Use only specied
carts, stands, tripods,
brackets, or tables. Use
caution to prevent tip-over
when moving the cart/
apparatus combination.
10. Unplug during
storms, or if not in use for
a long period.
11. Only use qualied personnel for servicing, especially
after damage.
12. The apparatus with protective earthing terminal
shall be connected to a MAINS socket outlet with a
protective earthing connection.
13. Where the MAINS plug or an appliance coupler is
used as the disconnect device, the disconnect device shall
remain readily operable.
14. Avoid installing in conned spaces like bookcases.
15. Do not place naked ame sources, such as lighted
candles, on the apparatus.
16. Operating temperature range 5° to 45°C
(41° to 113°F).
Music Tribe accepts no liability for any loss which may
be suered by any person who relies either wholly or in
part upon any description, photograph, or statement
contained herein. Technical specications, appearances
and other information are subject to change without
notice. All trademarks are the property of their
respective owners. Midas, Klark Teknik, Lab Gruppen,
Lake, Tannoy, Turbosound, TC Electronic, TC Helicon,
Behringer, Bugera, Aston Microphones and Coolaudio
are trademarks or registered trademarks of Music
Tribe Global Brands Ltd. © Music Tribe Global Brands
Ltd. 2024 All rights reserved.
For the applicable warranty terms and conditions
and additional information regarding Music Tribe’s
Limited Warranty, please see complete details online at
community.musictribe.com/support.
Las terminales marcadas con este símbolo
transportan corriente eléctrica de
magnitud suciente como para constituir
un riesgo de descarga eléctrica. Utilice
solo cables de altavoz profesionales y de alta calidad con
conectores TS de 6,3 mm o de bayoneta prejados.
Cualquier otra instalación o modicación debe ser
realizada únicamente por un técnico cualicado.
Este símbolo, siempre que aparece,
leadvierte de la presencia de voltaje
peligroso sin aislar dentro de la caja;
estevoltaje puede ser suciente para constituir un riesgo
dedescarga.
Este símbolo, siempre que aparece,
leadvierte sobre instrucciones operativas
y de mantenimiento que aparecen en la
documentación adjunta. Por favor, lea el manual.
Atención
Para reducir el riesgo de descarga
eléctrica, no quite la tapa (o la parte
posterior). No hay piezas en el interior del equipo que
puedan ser reparadas por el usuario. Si es necesario,
póngase en contacto con personal cualicado.
Atención
Para reducir el riesgo de incendio o
descarga eléctrica, no exponga este
aparato a la lluvia, humedad o alguna otra fuente que
pueda salpicar o derramar algún líquido sobre el aparato.
Nocoloque ningún tipo de recipiente para líquidos sobre
el aparato.
Atención
Las instrucciones de servicio deben
llevarlas a cabo exclusivamente personal
cualicado. Para evitar el riesgo de una descarga eléctrica,
no realice reparaciones que no se encuentren descritas
en el manual de operaciones. Lasreparaciones deben ser
realizadas exclusivamente por personalcualicado.
Advertencia
Consulte la información en el exterior del
recinto inferior para obtener información
eléctrica y de seguridad antes de instalar u operar
el dispositivo.
1. Por favor, lea y siga todas las instrucciones y
advertencias.
2. Mantenga el aparato alejado del agua (excepto para
productos diseñados para uso en exteriores).
3. Limpie solo con un paño seco.
4. No obstruya las aberturas de ventilación. No instale
en un espacio connado. Instale solo de acuerdo con las
instrucciones del fabricante.
Instrucciones de
seguridad
Important Safety
Instructions
LEGAL DISCLAIMER
LIMITED WARRANTY
4 WAVE User Manual
5. Proteja el cable de alimentación contra daños,
especialmente en los enchufes y en el tomacorriente
del aparato.
6. No lo instale cerca de fuentes de calor como
radiadores, rejillas de calefacción, estufas u otros aparatos
(incluyendo amplicadores) que generen calor.
7. No anule el propósito de seguridad del enchufe
polarizado o del tipo con toma de tierra. Un enchufe
polarizado tiene dos clavijas, una más ancha que la otra
(solo para EE. UU. y Canadá). Un enchufe con toma de
tierra tiene dos clavijas y una tercera clavija de toma de
tierra. La clavija ancha o la tercera clavija se proporcionan
para su seguridad. Si el enchufe suministrado no encaja
en su toma de corriente, consulte a un electricista para
reemplazar la toma obsoleta.
8. Utilice solo accesorios y accesorios recomendados por
el fabricante.
9. Utilice solo carritos,
soportes, trípodes,
soportes o mesas
especicados. Tenga
cuidado para evitar que el
carro/ combinación de
aparatos se vuelque al
moverlo.
10. Desenchufe durante tormentas o si no se utiliza
durante un largo período.
11. Solo utilice personal cualicado para el servicio,
especialmente después de daños.
12. El aparato con terminal de puesta a tierra protectora
debe conectarse a un tomacorriente de red con una
conexión de puesta a tierra protectora.
13. Cuando se utilice el enchufe de red o un acoplador de
aparatos como dispositivo de desconexión, el dispositivo
de desconexión debe seguir siendo fácilmente operable.
14. Evite la instalación en espacios connados
como estanterías.
15. No coloque fuentes de llama desnuda, como velas
encendidas, en el aparato.
16. Rango de temperatura de funcionamiento de
5°a 45°C (41°a 113°F).
Music Tribe no admite ningún tipo de responsabilidad
por cualquier daño o pérdida que pudiera sufrir
cualquier persona por conar total o parcialmente en la
descripciones, fotografías o armaciones contenidas en
este documento. Las especicaciones técnicas, imágenes
y otras informaciones contenidas en este documento
están sujetas a modicaciones sin previo aviso. Todas las
marcas comerciales que aparecen aquí son propiedad
de sus respectivos dueños. Midas, Klark Teknik,
Lab Gruppen, Lake, Tannoy, Turbosound, TC Electronic,
TC Helicon, Behringer, Bugera, Aston Microphones y
Coolaudio son marcas comerciales o marcas registradas
de Music Tribe Global Brands Ltd. © Music Tribe Global
Brands Ltd. 2024 Reservados todos los derechos.
Si quiere conocer los detalles y condiciones aplicables
de la garantía así como información adicional sobre
la Garantía limitada de Music Tribe, consulte online
toda la información en la web community.musictribe.
com/support.
Les points repérés par ce symbole portent
une tension électrique susante pour
constituer un risque d’électrocution.
Utilisez uniquement des câbles d’enceintes professionnels
de haute qualité avec ches Jack mono 6,35 mm ou ches
à verrouillages déjà installées. Touteautre installation ou
modication doit être eectuée uniquement par un
personnel qualié.
Ce symbole avertit de la présence d’une
tension dangereuse et non isolée à
l’intérieur de l’appareil - elle peut
provoquer des chocs électriques.
Ce symbol signale les consignes
d’utilisation et d'entretien importantes
dans la documentation fournie. Lisez les
consignes de sécurité du manuel d’utilisation de
l’appareil.
Attention
Pour éviter tout risque de choc électrique,
ne pas ouvrir le capot de l’appareil ni
démonter le panneau arrière. L’intérieur de l’appareil
ne possède aucun élément réparable par l’utilisateur.
Laissertoute réparation à un professionnel qualié.
Attention
Pour réduire les risques de feu et de choc
électrique, n’exposez pas cet appareil à la
pluie, à la moisissure, aux gouttes ou aux éclaboussures.
Ne posez pas de récipient contenant un liquide sur
l’appareil (un vase par exemple).
Attention
Ces consignes de sécurité et d’entretien
sont destinées à un personnel qualié.
Pouréviter tout risque de choc électrique, n’eectuez
aucune réparation sur l’appareil qui ne soit décrite par le
manuel d’utilisation. Les éventuelles réparations doivent
être eectuées uniquement par un technicien spécialisé.
Avertissement
Veuillez vous référer aux informations
situées à l'extérieur du boîtier inférieur
pour obtenir les renseignements électriques et de sécurité
avant d'installer ou d'utiliser l'appareil.
1. Veuillez lire et suivre toutes les instructions et
avertissements.
2. Éloignez l'appareil de l'eau (sauf pour les produits
conçus pour une utilisation en extérieur).
3. Nettoyez uniquement avec un chion sec.
4. Ne bloquez pas les ouvertures de ventilation.
N'installez pas dans un espace conné. Installez
uniquement selon les instructions du fabricant.
5. Protégez le cordon d'alimentation contre les
dommages, en particulier au niveau des ches et de la
prise de l'appareil.
6. N'installez pas près de sources de chaleur telles
que radiateurs, registres de chaleur, cuisinières ou autres
appareils (y compris les amplicateurs) qui produisent de
la chaleur.
7. Ne contrecarrez pas le but de sécurité de la che
polarisée ou de type mise à la terre. Une che polarisée
a deux lames, l'une plus large que l'autre (uniquement
pour les États-Unis et le Canada). Une che de type mise
à la terre a deux lames et une troisième broche de mise à
la terre. La lame large ou la troisième broche sont fournies
pour votre sécurité. Si la che fournie ne s'adapte pas à
votre prise, consultez un électricien pour remplacer la
prise obsolète.
8. Utilisez uniquement des accessoires et des pièces
recommandés par le fabricant.
9. Utilisez
uniquement des chariots,
des supports, des trépieds,
des supports ou des tables
spéciés. Faites attention
pour éviter le
renversement lors du
déplacement de la
combinaison chariot/appareil.
10. Débranchez pendant les tempêtes ou si l'appareil
n'est pas utilisé pendant une longue période.
11. Utilisez uniquement du personnel qualié pour
l'entretien, surtout après des dommages.
12. L'appareil avec une borne de mise à la terre
protectrice doit être connecté à une prise secteur avec une
connexion de mise à la terre protectrice.
13. Lorsque la che secteur ou un coupleur d'appareil
est utilisé comme dispositif de déconnexion, le dispositif
de déconnexion doit rester facilement utilisable.
14. Évitez l'installation dans des espaces connés
comme des bibliothèques.
15. Ne placez pas de sources de amme nue, telles que
des bougies allumées, sur l'appareil.
16. Plage de température de fonctionnement de
5°à 45°C (41°à 113°F).
Music Tribe ne peut être tenu pour responsable pour
toute perte pouvant être subie par toute personne
se ant en partie ou en totalité à toute description,
photographie ou armation contenue dans ce
document. Les caractéristiques, l’apparence et d’autres
informations peuvent faire l’objet de modications
sans notication. Toutes les marques appartiennent
NEGACIÓN LEGAL
GARANTÍA LIMITADA
Consignes de sécurité
DÉNI LÉGAL
5 WAVE User Manual
à leurs propriétaires respectifs. Midas, Klark Teknik,
Lab Gruppen, Lake, Tannoy, Turbosound, TC Electronic,
TC Helicon, Behringer, Bugera, Aston Microphones et
Coolaudio sont des marques ou marques déposées de
Music Tribe Global Brands Ltd. © Music Tribe Global
Brands Ltd. 2024 Tous droits réservés.
Pour connaître les termes et conditions de
garantie applicables, ainsi que les informations
supplémentaires et détaillées sur la Garantie
Limitée de Music Tribe, consultez le site Internet
community.musictribe.com/support.
Die mit dem Symbol markierten
Anschlüsse führen so viel Spannung,
dassdie Gefahr eines Stromschlags
besteht. Verwenden Sie nur hochwertige, professionelle
Lautsprecherkabel mit vorinstallierten 6,35 mm
MONO-Klinkensteckern oder Lautsprecherstecker mit
Drehverriegelung. Alle anderen Installationen oder
Modikationen sollten nur von qualiziertem
Fachpersonal ausgeführt werden.
Dieses Symbol weist Sie immer dann
darauf hin, wenn es erscheint, dass im
Inneren des Gehäuses gefährliche
unisolierte Spannung vorhanden ist – eine Spannung,
die ausreichend sein kann, um ein Stromschlagrisiko
darzustellen.
Dieses Symbol weist Sie an jeder Stelle, an
der es erscheint, auf wichtige Betriebs-
und Wartungsanweisungen in der
beiliegenden Literatur hin. Bitte lesen Sie die
Bedienungsanleitung.
Vorsicht
Um eine Gefährdung durch Stromschlag
auszuschließen, darf die Geräteabdeckung
bzw. Geräterückwand nicht abgenommen werden.
ImInnern des Geräts benden sich keine vom Benutzer
reparierbaren Teile. Reparaturarbeiten dürfen nur von
qualiziertem Personal ausgeführt werden.
Vorsicht
Um eine Gefährdung durch Feuer bzw.
Stromschlag auszuschließen, darf dieses
Gerät weder Regen oder Feuchtigkeit ausgesetzt werden
noch sollten Spritzwasser oder tropfende Flüssigkeiten
in das Gerät gelangen können. Stellen Sie keine mit
Flüssigkeit gefüllten Gegenstände, wie z.B. Vasen,
aufdasGerät.
Vorsicht
Die Service-Hinweise sind nur durch
qualiziertes Personal zu befolgen.
Umeine Gefährdung durch Stromschlag zu vermeiden,
führen Sie bitte keinerlei Reparaturen an dem Gerät
durch, die nicht in der Bedienungsanleitung beschrieben
sind. Reparaturen sind nur von qualiziertem
Fachpersonaldurchzuführen.
Warnung
Bitte beachten Sie die Informationen auf
der Außenseite der unteren Abdeckung
bezüglich elektrischer und sicherheitstechnischer
Hinweise, bevor Sie das Gerät installieren oder in
Betrieb nehmen.
1. Bitte lesen Sie alle Anweisungen und Warnhinweise
sorgfältig durch und befolgen Sie diese.
2. Halten Sie das Gerät von Wasser fern (außer bei
Produkten für den Außenbereich).
3. Reinigen Sie nur mit einem trockenen Tuch.
4. Blockieren Sie nicht die Belüftungsönungen.
Installieren Sie das Gerät nicht in einem engen Raum und
nur gemäß den Anweisungen des Herstellers.
5. Schützen Sie das Netzkabel vor Beschädigungen,
insbesondere an Steckern und Gerätebuchsen.
6. Installieren Sie das Gerät nicht in der Nähe von
Wärmequellen wie Heizkörpern, Heizregistern, Öfen oder
anderen Geräten (einschließlich Verstärkern), die Wärme
erzeugen.
7. Heben Sie nicht den Sicherheitszweck des
polarisierten oder geerdeten Steckers auf. Ein polarisierter
Stecker hat zwei Klingen, von denen eine breiter ist als die
andere (nur für USA und Kanada). Ein geerdeter Stecker
hat zwei Klingen und einen dritten Erdungszapfen.
Die breite Klinge oder der dritte Zapfen dienen Ihrer
Sicherheit. Wenn der mitgelieferte Stecker nicht in Ihre
Steckdose passt, konsultieren Sie einen Elektriker, um die
veraltete Steckdose zu ersetzen.
8. Verwenden Sie nur vom Hersteller empfohlene
Anbaugeräte und Zubehörteile.
9. Verwenden Sie nur
spezizierte Wagen,
Ständer, Stative,
Halterungen oder Tische.
Achten Sie darauf, dass der
Wagen/Geräte-
Kombination beim
Bewegen nicht umkippt.
10. Ziehen Sie bei Gewittern oder bei längerer
Nichtbenutzung den Stecker.
11. Lassen Sie nur qualiziertes Personal für
Wartungsarbeiten arbeiten, besonders nach
Beschädigungen.
12. Das Gerät mit schützendem Erdungsterminal muss
an eine Steckdose mit schützender Erdungsverbindung
angeschlossen werden.
13. Wenn der Netzstecker oder ein Gerätekuppler
als Trennvorrichtung verwendet wird, muss die
Trennvorrichtung leicht bedienbar bleiben.
14.
Vermeiden Sie die Installation in engen Räumen wie
Bücherregalen.
15. Platzieren Sie keine oenen Flammenquellen, wie
brennende Kerzen, auf dem Gerät.
16. Betriebstemperaturbereich von 5°bis 45°C
(41°bis 113°F).
Music Tribe übernimmt keine Haftung für Verluste,
die Personen entstanden sind, die sich ganz oder
teilweise auf hier enthaltene Beschreibungen,
Fotos oder Aussagen verlassen haben. Technische Daten,
Erscheinungsbild und andere Informationen können
ohne vorherige Ankündigung geändert werden. Alle
Warenzeichen sind Eigentum der jeweiligen Inhaber.
Midas, Klark Teknik, Lab Gruppen, Lake, Tannoy,
Turbosound, TC Electronic, TC Helicon, Behringer, Bugera,
Aston Microphones und Coolaudio sind Warenzeichen
oder eingetragene Warenzeichen der Music Tribe Global
Brands Ltd. © Music Tribe Global Brands Ltd. 2024 Alle
Rechte vorbehalten.
Die geltenden Garantiebedingungen und zusätzliche
Informationen bezüglich der von Music Tribe gewährten
beschränkten Garantie nden Sie online unter
community.musictribe.com/support.
Terminais marcados com o símbolo
carregam corrente elétrica de magnitude
suciente para constituir um risco de
choque elétrico. Use apenas cabos de alto-falantes de alta
qualidade com plugues TS de ¼" ou plugues com trava de
torção pré-instalados. Todas as outras instalações e
modicações devem ser efetuadas por
pessoasqualicadas.
Este símbolo, onde quer que apareça, alerta
para a presença de tensão perigosa não
isolada dentro do invólucro - uma tensão
que pode ser suciente para constituir um risco de choque.
Este símbolo, onde quer que o encontre,
alerta-o para a leitura das instruções de
manuseamento que acompanham o
equipamento. Por favor leia o manual de instruções.
Wichtige
Sicherheitshinweise
HAFTUNGSAUSSCHLUSS
BESCHRÄNKTE GARANTIE
GARANTIE LIMITÉE
Instruções de Segurança
Importantes
6 WAVE User Manual
Atenção
De forma a diminuir o risco de choque
eléctrico, não remover a cobertura
(ouasecção de trás). Não existem peças substituíveis por
parte do utilizador no seu interior. Para esse efeito recorrer
a um técnico qualicado.
Atenção
Para reduzir o risco de incêndios ou
choques eléctricos o aparelho não deve ser
exposto à chuva nem à humidade. Além disso, não deve
ser sujeito a salpicos, nem devem ser colocados em cima
do aparelho objectos contendo líquidos, tais como jarras.
Atenção
Estas instruções de operação devem ser
utilizadas, em exclusivo, por técnicos de
assistência qualicados. Para evitar choques eléctricos
não proceda a reparações ou intervenções, que não as
indicadas nas instruções de operação, salvo se possuir as
quali-cações necessárias. Para evitar choques eléctricos
não proceda a reparações ou intervenções, que não as
indicadas nas instruções de operação. Só o deverá fazer se
possuir as qualicações necessárias.
Aviso
Consulte as informações na parte
externa do invólucro inferior para obter
informações elétricas e de segurança antes de instalar ou
operar o dispositivo.
1. Por favor, leia e siga todas as instruções e
advertências.
2. Mantenha o aparelho longe da água (exceto para
produtos destinados a uso externo).
3. Limpe apenas com um pano seco.
4. Não obstrua as aberturas de ventilação. Não instale
em espaços connados. Instale apenas de acordo com as
instruções do fabricante.
5. Proteja o cabo de alimentação contra danos,
especialmente nos plugs e na tomada do aparelho.
6. Não instale próximo a fontes de calor, como
radiadores, registros de calor, fogões ou outros aparelhos
(incluindo amplicadores) que produzam calor.
7. Não desfaça a nalidade de segurança da tomada
polarizada ou do tipo com aterramento. Uma tomada
polarizada possui duas lâminas, sendo uma mais larga
que a outra (apenas para EUA e Canadá). Uma tomada
com aterramento possui duas lâminas e uma terceira
ponta de aterramento. A lâmina larga ou a terceira ponta
são fornecidas para sua segurança. Se o plug fornecido
não se encaixar na sua tomada, consulte um eletricista
para substituir a tomada obsoleta.
8. Use apenas acessórios e equipamentos
recomendados pelo fabricante.
9. Use apenas
carrinhos, suportes, tripés,
suportes ou mesas
especicados. Tenha
cuidado para evitar
tombamentos ao mover a
combinação carrinho/
aparelho.
10. Desconecte durante tempestades ou se não estiver
em uso por um longo período.
11. Use apenas pessoal qualicado para serviços,
especialmente após danos.
12. O aparelho com terminal de aterramento protetor
deve ser conectado a uma tomada de corrente com
conexão de aterramento protetor.
13. Quando o plugue de corrente ou um acoplador
de aparelho é usado como dispositivo de desconexão,
o dispositivo de desconexão deve permanecer
prontamente operável.
14. Evite instalar em espaços connados, como estantes.
15. Não coloque fontes de chama nua, como velas
acesas, no aparelho.
16. Faixa de temperatura de operação de 5°a 45°C
(41°a 113°F).
O Music Tribe não se responsabiliza por perda
alguma que possa ser sofrida por qualquer pessoa
que dependa, seja de maneira completa ou parcial,
de qualquer descrição, fotograa, ou declaração
aqui contidas. Dados técnicos, aparências e outras
informações estão sujeitas a modicações sem aviso
prévio. Todas as marcas são propriedade de seus
respectivos donos. Midas, Klark Teknik, Lab Gruppen,
Lake, Tannoy, Turbosound, TC Electronic, TC Helicon,
Behringer, Bugera, Aston Microphones e Coolaudio
são marcas ou marcas registradas do Music Tribe
Global Brands Ltd. © Music Tribe Global Brands Ltd.
2024 Todos direitos reservados.
Para obter os termos de garantia aplicáveis e condições e
informações adicionais a respeito da garantia limitada do
Music Tribe, favor vericar detalhes na íntegra através do
website community.musictribe.com/support.
I terminali contrassegnati da questo
simbolo conducono una corrente elettrica
di magnitudine suciente a costituire un
rischio di scossa elettrica. Utilizzare solo cavi per
altoparlanti professionali di alta qualità con jack
sbilanciati da 6,35mm. o connettori con blocco a
rotazione. Tutte le altre installazioni o modiche devono
essere eseguite esclusivamente da personale qualicato.
Questo simbolo, ovunque appaia, avverte
della presenza di una tensione pericolosa
non isolata all'interno dello chassis,
tensione che può essere suciente per
costituire un rischio di scossa elettrica.
Questo simbolo, ovunque appaia, segnala
importanti istruzioni operative e di
manutenzione nella documentazione
allegata. Si invita a leggere il manuale.
Attenzione
Per ridurre il rischio di scosse elettriche,
non rimuovere il coperchio superiore
(o la sezione posteriore). All'interno non ci sono parti
riparabili dall'utente. Per la manutenzione rivolgersi a
personale qualicato.
Attenzione
Per ridurre il rischio di incendi o scosse
elettriche, non esporre questo apparecchio
a pioggia e umidità. L'apparecchio non deve essere
esposto a gocciolio o schizzi di liquidi e nessun oggetto
contenente liquidi, come vasi, deve essere collocato
sull'apparecchio.
Attenzione
Queste istruzioni di servizio sono destinate
esclusivamente a personale qualicato.
Per ridurre il rischio di scosse elettriche non eseguire
interventi di manutenzione diversi da quelli contenuti
nel manuale di istruzioni. Le riparazioni devono essere
eseguite da personale di assistenza qualicato.
Avvertimento
Consultare le informazioni sulla parte
esterna dell'involucro inferiore per
ottenere informazioni elettriche e di sicurezza prima di
installare o utilizzare il dispositivo.
1. Si prega di leggere e seguire tutte le istruzioni e
gli avvertimenti.
2. Mantenere l'apparecchio lontano dall'acqua (tranne
che per i prodotti destinati all'uso all'aperto).
3. Pulire solo con un panno asciutto.
4. Non ostruire le aperture di ventilazione. Non
installare in spazi ristretti. Installare solo secondo le
istruzioni del produttore.
5. Proteggere il cavo di alimentazione dai danni,
soprattutto alle spine e alla presa dell'elettrodomestico.
6. Non installare vicino a fonti di calore come
termosifoni, bocchette di calore, fornelli o altri apparecchi
(compresi gli amplicatori) che producono calore.
7. Non eludere lo scopo di sicurezza della spina
polarizzata o della spina con messa a terra. Una spina
polarizzata ha due lame di cui una più larga dell'altra (solo
per USA e Canada). Una spina con messa a terra ha due
lame e una terza spina di messa a terra. La lama larga o
la terza spina sono fornite per la vostra sicurezza. Se la
spina fornita non si adatta alla vostra presa, consultare un
elettricista per la sostituzione della presa obsoleta.
8. Utilizzare solo accessori e attrezzature raccomandati
dal produttore.
LEGAL RENUNCIANTE
GARANTIA LIMITADA
Informazioni importanti
7 WAVE User Manual
9. Utilizzare solo
carrelli, supporti, treppiedi,
stae o tavoli specicati.
Prestare attenzione per
evitare il ribaltamento
durante lo spostamento
della combinazione
carrello/apparecchio.
10. Scollegare durante le tempeste o se non viene
utilizzato per un lungo periodo.
11. Utilizzare solo personale qualicato per la
manutenzione, specialmente dopo danni.
12. L'apparecchio con terminale di messa a terra
protettiva deve essere collegato a una presa di corrente
con connessione di messa a terra protettiva.
13. Se la spina di rete o un accoppiatore
dell'elettrodomestico viene utilizzato come dispositivo
di disconnessione, il dispositivo di disconnessione deve
rimanere facilmente utilizzabile.
14. Evitare l'installazione in spazi ristretti come librerie.
15. Non posizionare fonti di amma nuda, come candele
accese, sull'apparecchio.
16. Intervallo di temperatura di funzionamento da
5°a 45°C (da 41°a 113°F).
Music Tribe non si assume alcuna responsabilità per
eventuali danni che possono essere subiti da chiunque
si adi in tutto o in parte a qualsiasi descrizione,
fotograa o dichiarazione contenuta qui. Speciche
tecniche, aspetti e altre informazioni sono soggette
a modiche senza preavviso. Tutti i marchi sono di
proprietà dei rispettivi titolari. Midas, Klark Teknik,
Lab Gruppen, Lake, Tannoy, Turbosound, TC Electronic,
TC Helicon, Behringer, Bugera, Aston Microphones e
Coolaudio sono marchi o marchi registrati di Music Tribe
Global Brands Ltd. © Music Tribe Global Brands Ltd.
2024 Tutti i diritti riservati.
Per i termini e le condizioni di garanzia applicabili e le
informazioni aggiuntive relative alla garanzia limitata
di Music Tribe, consultare online i dettagli completi su
community.musictribe.com/support.
Aansluitingen die gemerkt zijn met het
symbool voeren een zodanig hoge
spanning dat ze een risico vormen voor
elektrische schokken. Gebruik uitsluitend kwalitatief
hoogwaardige, in de handel verkrijgbare luidsprekerkabels
die voorzien zijn van ¼"TS stekkers. Laat uitsluitend
gekwaliceerd personeel alle overige installatie- of
modicatiehandelingen uitvoeren.
Dit symbool waarschuwt u, waar het ook
verschijnt, voor de aanwezigheid van
ongeïsoleerde gevaarlijke spanning
binnenin de behuizing - spanning die voldoende kan zijn
om een risico op elektrische schokken te vormen.
Dit symbool wijst u altijd op belangrijke
bedienings - en onderhoudsvoorschriften
in de bijbehorende documenten.
Wijvragen u dringend de handleiding te lezen.
Attentie
Verwijder in geen geval de bovenste
afdekking (van het achterste gedeelte)
anders bestaat er gevaar voor een elektrische schok.
Het apparaat bevat geen te onderhouden onderdelen.
Reparatiewerkzaamheden mogen uitsluitend door
gekwaliceerd personeel uitgevoerd worden.
Attentie
Om het risico op brand of elektrische
schokken te beperken, dient u te
voorkomen dat dit apparaat wordt blootgesteld aan regen
en vocht. Het apparaat mag niet worden blootgesteld aan
neerdruppelend of opspattend water en er mogen geen
met water gevulde voorwerpen – zoals een vaas – op het
apparaat worden gezet.
Attentie
Deze onderhoudsinstructies zijn
uitsluitend bedoeld voor gekwaliceerd
onderhoudspersoneel. Omelektrische schokken te
voorkomen, mag u geen andere onderhoudshandelingen
verrichten dan in de bedieningsinstructies vermeld staan.
Reparatiewerkzaamheden mogen alleen uitgevoerd
worden door gekwaliceerd onderhoudspersoneel.
Waarschuwing
Raadpleeg de informatie op de buitenkant
van de onderste behuizing voor elektrische
en veiligheidsinformatie voordat u het apparaat installeert
of bedient.
1. Gelieve alle instructies en waarschuwingen zorgvuldig
te lezen en op te volgen.
2. Houd het apparaat uit de buurt van water (behalve
voor producten bedoeld voor gebruik buitenshuis).
3. Reinig alleen met een droge doek.
4. Blokkeer de ventilatieopeningen niet. Installeer niet
in een afgesloten ruimte. Installeer alleen volgens de
instructies van de fabrikant.
5. Bescherm de voedingskabel tegen schade, vooral bij
stekkers en het stopcontact van het apparaat.
6. Installeer niet in de buurt van warmtebronnen
zoals radiatoren, warmte registers, fornuizen of andere
apparaten (inclusief versterkers) die warmte produceren.
7. Hef het veiligheidsdoel van de gepolariseerde of
geaarde stekker niet op. Een gepolariseerde stekker heeft
twee pennen waarvan één breder is dan de andere (alleen
voor de VS en Canada). Een geaarde stekker heeft twee
pennen en een derde aardingspen. De brede pen of de
derde pen zijn voor uw veiligheid. Als de meegeleverde
stekker niet in uw stopcontact past, raadpleeg dan een
elektricien om het verouderde stopcontact te vervangen.
8. Gebruik alleen accessoires en apparatuur die door de
fabrikant worden aanbevolen.
9. Gebruik alleen
gespeciceerde karren,
stands, statieven, beugels
of tafels. Wees voorzichtig
om kantelen te voorkomen
bij het verplaatsen van de
kar/apparaatcombinatie.
10.
Trek de stekker uit tijdens stormen of als het apparaat
gedurende lange tijd niet wordt gebruikt.
11. Gebruik alleen gekwaliceerd personeel voor
onderhoud, vooral na schade.
12. Het apparaat met een beschermende
aardingsaansluiting moet worden aangesloten op een
stopcontact met een beschermende aardingsverbinding.
13. Als de stekker van het stopcontact of een
apparaatkoppeling als het ontkoppelingsapparaat wordt
gebruikt, moet het ontkoppelingsapparaat gemakkelijk
bedienbaar blijven.
14. Vermijd installatie in afgesloten ruimtes zoals
boekenkasten.
15. Plaats geen open vlambronnen, zoals brandende
kaarsen, op het apparaat.
16. Bedrijfstemperatuurbereik van 5°tot 45°C
(41°tot 113°F).
Music Tribe aanvaardt geen aansprakelijkheid voor enig
verlies dat kan worden geleden door een persoon die
geheel of gedeeltelijk vertrouwt op enige beschrijving,
foto of verklaring hierin. Technische specicaties,
verschijningen en andere informatie kunnen zonder
voorafgaande kennisgeving worden gewijzigd. Alle
handelsmerken zijn eigendom van hun respectievelijke
eigenaren. Midas, Klark Teknik, Lab Gruppen, Lake,
Tannoy, Turbosound, TC Electronic, TC Helicon,
Behringer, Bugera, Aston Microphones en Coolaudio
zijn handelsmerken of gedeponeerde handelsmerken
van Music Tribe Global Brands Ltd. © Music Tribe Global
Brands Ltd. 2024 Alle rechten voorbehouden.
DISCLAIMER LEGALE
GARANZIA LIMITATA
Belangrijke
veiligheidsvoorschriften
WETTELIJKE ONTKENNING
8 WAVE User Manual
Voor de toepasselijke garantievoorwaarden en
aanvullende informatie met betrekking tot de beperkte
garantie van Music Tribe, zie de volledige details online
op community.musictribe.com/support.
Uttag markerade med symbolen leder
elektrisk strömstyrka som är tillräckligt
stark för att utgöra en risk för elchock.
Använd endast högkvalitativa, kommersiellt tillgängliga
högtalarkablar med förhandsinstallerade ¼"TS-
kontakter. All annan installering eller modikation bör
endast utföras av kompetent personal.
Denna symbol, var den än förekommer,
varnar för närvaron av farlig, oisolerad
spänning inuti höljet - spänning som kan
vara tillräcklig för att utgöra en risk för stöt.
Den här symbolen hänvisar till viktiga
punkter om användning och underhåll i
den medfölljande dokumentationen.
Varvänlig och läs bruksanvisningen.
Försiktighet
Minska risken för elektriska stötar genom
att aldrig ta av höljet upptill på apparaten
(eller ta av baksidan). Inuti apparaten nns det inga delar
som kan repareras av användaren. Endastkvalicerad
personal får genomföra reparationer.
Försiktighet
För att minska risken för brand och
elektriska stötar ska apparaten skyddas
mot regn och fukt. Apparaten går inte utsättas för
dropp eller spill och inga vattenbehållare som vaser etc.
fårplaceras på den.
Försiktighet
Serviceinstruktionen är enbart avsedd
för kvalicerad servicepersonal. Föratt
undvika risker genom elektriska stötar, genomför inga
reparationer på apparaten, vilka inte är beskrivna i
bruksanvisningen. Endast kvalicerad fackpersonal får
genomföra reparationerna.
Varning
Vänligen se informationen på
utsidan av bottenhöljet för elektrisk
och säkerhetsinformation innan du installerar eller
använder enheten.
1. Vänligen läs och följ alla instruktioner och
varningar noggrant.
2. Håll apparaten borta från vatten (utom för
utomhusprodukter).
3. Rengör endast med en torr trasa.
4. Blockera inte ventilationsöppningarna. Installera inte
i trånga utrymmen. Installera endast enligt tillverkarens
anvisningar.
5. Skydda nätkabeln från skador, särskilt vid kontakter
och apparatkontakten.
6. Installera inte nära värme källor som element,
värmeregistrar, spisar eller andra apparater (inklusive
förstärkare) som producerar värme.
7. Förstör inte säkerhetsfunktionen hos den polariserade
eller jordade kontakten. En polariserad kontakt har två
blad varav ett är bredare än det andra (endast för USA
och Kanada). En jordad kontakt har två blad och en tredje
jordningsstift. Det breda bladet eller det tredje stiftet är
till för din säkerhet. Om den medföljande kontakten inte
passar i ditt uttag, kontakta en elektriker för att byta ut
det föråldrade uttaget.
8. Använd endast tillbehör och tillbehör som
rekommenderas av tillverkaren.
9. Använd endast
specicerade vagnar, ställ,
stativ, fästen eller bord. Var
försiktig för att förhindra
vältningsrisk när du yttar
vagnen/
apparatkombinationen.
10. Koppla ur under åskväder eller om enheten inte
används under en längre tid.
11. Använd endast kvalicerad personal för service,
särskilt efter skador.
12. Apparaten med skyddsjordanslutning ska anslutas
till ett vägguttag med skyddsjordanslutning.
13. Om nätkontakten eller en apparatkoppling
används som frånkopplingsanordning måste
frånkopplingsanordningen vara lätt åtkomlig.
14. Undvik installation i trånga utrymmen som
bokhyllor.
15. Placera inte öppna lågor, som tända ljus, på
apparaten.
16. Driftstemperaturområde 5°till 45°C (41°till 113°F).
Music Tribe tar inget ansvar för någon förlust som kan
drabbas av någon person som helt eller delvis förlitar
sig på någon beskrivning, fotogra eller uttalande som
nns här. Tekniska specikationer, utseenden och annan
information kan ändras utan föregående meddelande.
Alla varumärken tillhör respektive ägare. Midas,
Klark Teknik, Lab Gruppen, Lake, Tannoy, Turbosound,
TC Electronic, TC Helicon, Behringer, Bugera, Aston
Microphones och Coolaudio är varumärken eller
registrerade varumärken som tillhör Music Tribe Global
Brands Ltd. © Music Tribe Global Brands Ltd. 2024 Alla
Rättigheter reserverade.
För tillämpliga garantivillkor och ytterligare
information om Music Tribes begränsade garanti,
se fullständig information online på community.
musictribe.com/support.
Terminale oznaczone symbolem
przenoszą wystarczająco wysokie napięcie
elektryczne, aby stworzyć ryzyko
porażenia prądem. Używaj wyłącznie wysokiej jakości
fabrycznie przygotowanych kabli z zainstalowanymi
wtyczkami ¼"TS. Wszystkie inne instalacje lub
modykacje powinny być wykonywane wyłącznie przez
wykwalikowany personel techniczny.
Ten symbol, gdziekolwiek się pojawi,
informuje Cię o obecności nieizolowanego
niebezpiecznego napięcia wewnątrz
obudowy - napięcia, które może stanowić ryzyko
porażenia.
Ten symbol informuje o ważnych
wskazówkach dotyczących obsługi i
konserwacji urządzenia w dołączonej
dokumentacji. Proszę przeczytać stosowne informacje w
instrukcji obsługi.
Uwaga
W celu wyeliminowania zagrożenia
porażenia prądem zabrania się
zdejmowania obudowy lub tylnej ścianki urządzenia.
Elementy znajdujące się we wnętrzu urządzenia nie mogą
być naprawiane przez użytkownika. Naprawy mogą być
wykonywane jedynie przez wykwalikowanypersonel.
Uwaga
W celu wyeliminowania zagrożenia
porażenia prądem lub zapalenia się
urządzenia nie wolno wystawiać go na działanie deszczu
i wilgotności oraz dopuszczać do tego, aby do wnętrza
dostała się woda lub inna ciecz. Nie należy stawiać na
urządzeniu napełnionych cieczą przedmiotów takich jak
np. wazony lub szklanki.
Uwaga
Prace serwisowe mogą być wykonywane
jedynie przez wykwalikowany personel.
W celu uniknięcia zagrożenia porażenia prądem nie należy
wykonywać żadnych manipulacji, które nie są opisane
w instrukcji obsługi. Naprawywykonywane mogą być
jedynie przez wykwalikowany personeltechniczny.
Viktiga
säkerhetsanvisningar
BEPERKTE GARANTIE
Ważne informacje o
bezpieczeństwie
BEGRÄNSAD GARANTI
FRISKRIVNINGSKLAUSUL
9 WAVE User Manual
Ostrzeżenie
Przed zainstalowaniem lub
uruchomieniem urządzenia prosimy
zajrzeć do informacji umieszczonej na
zewnętrznej części dolnej obudowy dotyczącej informacji
elektrycznych i bezpieczeństwa.
1. Proszę przeczytać i ścisłe przestrzegać wszystkich
instrukcji i ostrzeżeń.
2. Trzymaj urządzenie z dala od wody (z wyjątkiem
produktów przeznaczonych do użytku na zewnątrz).
3. Czyść tylko suchą szmatką.
4. Nie blokuj otworów wentylacyjnych. Nie instaluj w
zamkniętym miejscu. Instaluj tylko zgodnie z instrukcjami
producenta.
5. Zabezpiecz przewód zasilający przed uszkodzeniem,
zwłaszcza przy wtyczkach i gnieździe urządzenia.
6. Nie instaluj w pobliżu źródeł ciepła, takich jak
grzejniki, rejestratory ciepła, kuchenki lub inne urządzenia
(w tym wzmacniacze), które generują ciepło.
7. Nie unieważniaj celu bezpieczeństwa wtyczki
spolaryzowanej lub wtyczki z uziemieniem. Wtyczka
spolaryzowana ma dwie wtyczki, z których jedna jest
szersza niż druga (tylko dla USA i Kanady). Wtyczka z
uziemieniem ma dwie wtyczki i trzeci bolc uziemiający.
Szeroka wtyczka lub trzeci bolc są dostarczone dla
Twojego bezpieczeństwa. Jeśli dostarczona wtyczka nie
pasuje do Twojej gniazdka, skonsultuj się z elektrykiem w
celu wymiany przestarzałego gniazdka.
8. Używaj tylko akcesoriów i dodatków zalecanych
przez producenta.
9. Używaj tylko
określonych wózków,
stojaków, statywów,
uchwytów lub stolików.
Uważaj, aby uniknąć
przewrócenia wózka/
kombinacji urządzenia
podczas przemieszczania.
10. Odłączaj w czasie burz lub jeśli urządzenie nie jest
używane przez długi okres.
11. Korzystaj tylko z kwalikowanego personelu do
serwisowania, zwłaszcza po uszkodzeniach.
12. Urządzenie z zabezpieczonym terminalem
uziemiającym powinno być podłączone do gniazdka
sieciowego z połączeniem ochronnym.
13. Jeśli wtyczka sieciowa lub złącze urządzenia jest
używane jako urządzenie odłączające, urządzenie
odłączające powinno pozostać łatwo dostępne.
14. Unikaj instalacji w zamkniętych miejscach, takich jak
biblioteczki.
15. Nie umieszczaj źródeł otwartego ognia, takich jak
palące się świeczki, na urządzeniu.
16. Zakres temperatury pracy od 5°do 45°C
(od 41°do 113°F).
Music Tribe nie ponosi odpowiedzialności za
jakiekolwiek straty, które mogą ponieść osoby, które
polegają w całości lub w części na jakimkolwiek opisie,
fotograi lub oświadczeniu zawartym w niniejszym
dokumencie. Specykacje techniczne, wygląd i inne
informacje mogą ulec zmianie bez powiadomienia.
Wszystkie znaki towarowe są własnością ich
odpowiednich właścicieli. Midas, Klark Teknik,
Lab Gruppen, Lake, Tannoy, Turbosound, TC Electronic,
TC Helicon, Behringer, Bugera, Aston Microphones i
Coolaudio są znakami towarowymi lub zastrzeżonymi
znakami towarowymi rmy Music Tribe Global Brands
Ltd. © Music Tribe Global Brands Ltd. 2024 Wszystkie
prawa zastrzeżone.
Aby zapoznać się z obowiązującymi warunkami
gwarancji i dodatkowymi informacjami dotyczącymi
ograniczonej gwarancji Music Tribe, zapoznaj się ze
wszystkimi szczegółami w trybie online pod adresem
community.musictribe.com/support.
感電の.恐 れがありますので、
カバーやその他の部品を取り
外したり、開けたりしないでく
ださい。高品質なプロ用スピーカーケーブ
ル(
¼" TS 標準ケーブルおよびツイスト ロ
ッキング プラグケーブル)を使 用してくだ
さい。
このシンボルは、どこに現れて
も 、筐 体 内 部 に 絶 縁 の な い 危
険 な 電 圧 が 存 在 し て お り 、こ れ
は感電の危険性を構成する可能性がある
ことを示しています。
火事および感電の危険を防ぐ
ため、本装置を水分や湿気の
あるところには設 置しないで 下
さい。装置には決して水分がかからないよ
うに注意し、花瓶など水分を含んだもの
は、装置の上には置かないようにしてくだ
さい。
注意
このマークが表示されている
箇所には、内部に高圧電流が
生じています。手を触れると感電の恐れが
あります。
注意
取り扱いとお手入れの方法に
ついての重要な説 明が付属の
取扱説明書に記載されてい
ま す 。ご 使 用 の 前 に 良 く お 読 み く だ さ い 。
注意
こ れ ら の サ ー ビ ス 指 示 は 、有 資
格のサービス担当者のみが使
用 す る た め の も の で す。操 作 説 明 書 に 含 ま
れているもの以外のサービスを行わないで
ください。修理は有資格のサービス担当者
によって 行 わ れ なけ れ ば なりませ ん 。
警告
デバイスの取り付けまたは操作
を 行 う 前 に 、電 気 お よ び 安 全
に関する情報については、底部の外装に記
載されている情報を参照してください。
1. すべての指示と警告を注意 深く読み、
従ってください 。
2. 装 置 を 水 か ら 離 し て く だ さ い( 屋 外 用
の製品を除く)。
3. 乾いた布でしか清掃しないでくださ
い。
4. 換 気 口 を 塞 が な い で く だ さ い 。密 閉 さ
れたスペースには 取り付けないでくださ
い。必ず製造元の指示に従って取り付けて
ください。
5. 電源コードを特にプラグやアプライア
ンスの 差 込 口 で 損 傷 から守ってください 。
6. 暖 房 器 、ヒ ー タ ー 、ス ト ー ブ 、ア ン プ な
ど発熱する機 器の近くには取り付けないで
ください。
7. 偏光または接地型プラグの安全目的を
妨 げ な い で く だ さ い 。偏 光 プ ラ グ は 片 方 が
も う 一 方 よ り 幅 が 広 い も の で す( ア メ リ カ と
カナダ専用)。接地型プラグは二本の刃と
三 本 目 の ア ー ス プ ラ グ が つ い て い ま す 。幅
の広い刃または三本目のプラグは安全のた
めに設けられています。提供されたプラグ
がコンセントに合わない場合は、電気技師
に相 談して陳 腐 化したコン セントを交 換し
てください 。
8. 製 造 元 が推奨するアタッチメントやア
クセサリーだけを使用してください。
9. 指定されたカ
ート、スタンド、三
脚 、ブ ラ ケ ッ ト 、ま
たはテ ーブルだけを
使 用してください 。
カート/ 装置の組み
合わせを移動する
際には倒れないよ
うに注意してください。
10. 嵐時や長期間使用しない場合はプラ
グ を 抜 いてください 。
11. 特に損傷後は、修理には資格のある専
門 家 を 利 用してください 。
ZASTRZEŻENIA PRAWNE
OGRANICZONA GWARANCJA
安全にお使いいただくために
10 WAVE User Manual
12. 保護アース端子のある装置は、保護ア
ース接 続 のあるメインの電 源コンセントに
接 続してください 。
13. メインプラグまたはアプライアンスコ
プ ラ が 切 断 装 置 と し て 使 用 さ れ る 場 合 、切
断 装置は操作 可能でなけれ ばなりません
。
14. 書棚などの密閉された空
間には設置し
ないでください 。
15. ろうそくなどの明火を装置に置かない
でください。
16. 動作温度範囲は 5° から 45°C までです
(
41° から 113°F)。
こ こ に 含 ま れ る 記 述 、写 真 、意 見 の 全
体 ま た は 一 部 に 依 拠 し て 、い か な る 人 が
損害を生じさせた場合にも、
Music Tribe
は 一 切 の 賠 償 責 任 を 負 い ま せ ん 。技 術
仕様、外観およびその他の情報は予告
な く 変 更 に な る 場 合 が あ り ま す 。商 標
はすべて、それぞれの所有者に帰属し
ます。
Midas、Klark Teknik、Lab Gruppen、
Lake、Tannoy、Turbosound、TC Electronic、
TC Helicon、Behringer、Bugera、Aston Microphones
および Coolaudio は Music Tribe Global Brands
Ltd. の商標または登録商標です。© Music
Tribe Global Brands Ltd. 2024 無断転用禁止。
適用される保証条件と
Music Tribe の限定
保 証 に 関 す る 概 要 に つ い て は 、オ ン ラ イ
ン上
community.musictribe.com/support にて詳
細をご確 認ください 。
产品输出端子带有此标志表示
此端子具有大电流, 存在触电
危险。 仅限使用带有
¼" TS 或扭
锁式插头的高品质专业扬声器线。 与这些
端子连接的外部导线需要由经过指导的人
员来安装和使用厂家提供的导线或指定的
导线。
此标志提醒您
,
产品内存在未
绝缘的危险电压
,
有触电危险。
此标志提醒您查阅所附的重要
的使用及维修说明。 请阅读有
关手册。
小心
为避免着火或触电危险
,
请勿
将此产品置于雨淋或潮湿中。
此产品也不可受液体滴溅
,
盛有液体的容
器也不可置于其上
,
如花瓶等。
小心
维修说明仅是给合格的专业
维修人员使用的。 为避免触电
危险
,
除了使用说明书提到的以外
,
请勿进
行任何其他维修。 所有维修均须由合格的
专业人员进行操作。
1. 请阅读, 保存, 遵守所有的说明, 注意所
有的警示。
2. 请勿在靠近水的地方使用本产品。
3. 请用干布清洁本产品。
4. 请勿堵塞通风孔, 安装本产品时请遵照
厂家的说明, 通风孔不要覆盖诸如报纸, 桌
布和窗帘等物品而妨碍通风。
5. 请勿将本产品安装在热源附近, 如暖
气片, 炉子或其它产生热量的设备 (包括
功放器)。 产品上不要放置裸露的火焰源,
如点燃的蜡烛。
6. 如果产品附带接地插头, 请勿移除接地
插头的安全装置, 接地插头是由火线和零
线两个插片及一个接地插片构成。 如随货
提供的插头不适合您的插座, 请找电工更
换一个合适的插座。
7. 妥善保护电源线, 使其不被践踏或刺
破, 尤其注意电源插头, 多用途插座接设备
连接处。
8. 请只使用厂家指定的附属设备和配件。
9. 请只使用厂家指
定的或随货销售的
手推车, 架子, 三角
架, 支架和桌子等。
若使用手推车来搬
运设备, 请注意安全
放置设备, 以避免手
推车和设备倾倒而
受伤。
10. 遇闪电雷鸣或长期不使用本设备时,
请拔出电源插头。
11. 如果电源线或电源插头受损, 液体流
入或异物落入设备内, 设备遭雨淋或受潮,
设备不能正常运作或被摔坏等, 设备受损
需进行维修时, 所有维修均须由合格的维
修人员进行维修。
12. 如果产品附带接地插头, 本产品应当
连接到带保护接地连接的电网电源输出插
座上, 确保连接电源时一定有可靠的接地
保护。
13. 若电源插头或器具耦合器用作为断路
装置, 应当保证它们处于随时可方便操作
状态。
14. 本产品仅适合用于海
拔
2000 米以下和非热带气
候条件下的地区。
对于任何因在此说明书提到的全部或部份
描述、 图片或声明而造成的损失,
Music Tribe
不负任何责任。 技术参数和外观若有更改,
恕不另行通知。 所有的商标均为其各自所
有者的财产。
Midas, Klark Teknik, Lab Gruppen,
Lake, Tannoy, Turbosound, TC Electronic, TC Helicon,
Behringer, Bugera, Aston Microphones 和 Coolaudio
是 Music Tribe Global Brands Ltd. 公司的商标
或注册商标。
© Music Tribe Global Brands Ltd.
2024 版权所有。
有关音乐集团保修的适用条款及其它相关
信息, 请登陆
community.musictribe.com/support
网站查看完整的详细信息。
限定保証
法的放棄
重要的安全须知
保修条款
法律声明

11 WAVE User Manual

12 WAVE User Manual
About this manual
This manual oers a comprehensive guide to the Wave synthesizer, detailing
its functionality and features. Additionally, it includes a brief introduction to
wavetable synthesis, providing insight into the theory behind this synthesis
method. We highly recommend reading through this manual to fully acquaint
yourself with the controls and enhance your experience with the instrument.
Introduction
The Wave is an 8-voice hybrid wavetable synthesizer that combines digital and
analog sound generation techniques to deliver rich and complex sounds. Unlike
conventional analog synthesizers that rely on voltage-controlled oscillators,
The Wave employs digitally crafted waveforms housed in wavetables for sound
generation. Each voice in this system is composed of a pair of oscillators, the
main and the sub. These oscillators are combined and then transformed into
analog signals via a Digital-to-Analog Converter (DAC). Following this conversion,
the signal is directed through a Voltage-Controlled Filter (VCF) and a Voltage-
Controlled Amplier (VCA), completing the sound production process.
voice diagram (x8)
main osc wavetable
sub osc wavetable
DAC VCF VCA
OUTPUT
MIX
To further enhance sound design capabilities, the Wave includes a comprehensive
modulation matrix, three envelope generators, and a low-frequency oscillator
with four waveforms and adjustable delay. Creative possibilities are expanded
with an extensive set of keyboard modes and split points, allowing the synth to
be used in standard 8-voice polyphony, unison, or bi-timbral congurations with
a layered keyboard.
The Wave oers 30 factory wavetables and 64 user-dened wavetables,
each containing 64 waveforms. Additionally, there are 32 slots available for
user-dened transients. Both user-dened wavetables and transients can be
downloaded using the SynthTribe app.
How Wavetable synthesis works
Wavetable synthesis is a digital sound generation technique based on the
periodic reproduction of single-cycle waveforms. Introduced for the rst time in
the eighties and pioneered by artists such as Depeche Mode, Tangerine Dream
and Tears for Fears, wavetable synthesis is widely used today by musicians and
sound designers for the versatility it oers. In a wavetable synthesizer, single-
cycle waveforms are stored in tables called wavetables. What sets wavetable
synthesis apart from other generation techniques is the ability to sweep through
the wavetable, generating complex, evolving sounds. Like any other modulation
destination, wavetable sweeping can be controlled by various modulation
sources such as envelopes and LFOs, expanding the sonic possibilities. The
image graphically depicts how the output sound changes when sweeping
the wavetable using a four-stage ADSR envelope. For the sake of simplicity, a
wavetable with four waveforms is considered.
When transitioning from one waveform to the next, artifacts can be generated
due to phase discontinuities between waveforms resulting in abrupt transitions.
This characteristic is typical of the rst wavetable synthesizers and contributes
to their distinctive sound. The Wave oers the option to reduce these artifacts
through the Osc setting in the User menu. With this setting engaged, the
adjacent waveforms are morphed together resulting in smoother transitions.
Each of the Wave synthesizer wavetables contains 64 single cycle waveforms.
In each wavetable the last four waveforms emulate the typical analog
waveforms: Sawtooth, pulse, square and triangle. In addition to the envelope,
the waveform position can be further modulated by many sources including the
LFO, Aftertouch, Modulation wheel, Pitch wheel, expression pedal and keyboard,
further extending the expressiveness of the instrument. The Wave also oers
the possibility to store and reproduce up to 32 transient sounds, adding to its
sonic capabilities.
Each voice consists of two independent oscillators, one main oscillator and a
secondary sub oscillator. The position of each oscillator inside the wavetable can
be controlled using the Waves-Osc and Waves-Sub controls. When sweeping
through the wavetable the sub oscillator waveform can be set to run in parallel
with the main oscillator or to be manually controlled.
In addition to the wavetable selected from the Program menu, each program has
an additional wavetable called the Upper wavetable, which can be enabled via
the UW option in the Digital menu. These two wavetables are linked in a looping
sequence, meaning that when any modulation source exceeds the wavetable
lower or upper limits, the upper wavetable will become audible.
Working with transients
The Wave also supports transient sounds, which are short audio samples you
can import using the SynthTribe app. When a transient slot is selected from the
Program menu, the WAVE text is replaced with TRAN. In this mode, Waves-
Osc and Waves-Sub set the start points for the main and sub oscillators, while
ENV1>WAVES sets the loop point for both oscillators. The loop size is xed to 128
samples. For information on how to import custom transients, please refer to the
section "User Waves and Transients".
WAVES-OSC
WAVES-SUB
ENV1>WAVES
CW CW
start point loop point
loop duration
128 samples
loop duration
128 samples
time

13 WAVE User Manual
Preset Wavetables and Transients
As mentioned in the introduction the Wave comes with 30 preset wavetables and one preset transient. In addition to this a number of the user dened slots have
wavetables in them from the factory, which can be overwritten if required. The preset wavetables are:
No Name Description
0 Harmonic Bliss This wavetable features pronounced harmonics ranging from 1 to 8, mimicking the behavior of a resonant lter. The waveform corresponding
to wave number 00 is a pure sine wave.
1 Harmonic Bliss2 This wavetable boasts enhanced higher harmonics alongside a dual virtual analog lter (VCF) simulation.
2 Bells Extending the features of the previous wavetables, this one is particularly suited for producing vibes, bells, and tubular bell sounds.
3 WindSweep ResoFlute Oering a sine-to-rectangular sweep and a low-resonance virtual analog lter (VCF) simulation, this wavetable is optimized for creating
clarinet and ute-like tones
4 Churchy Waves 00-47 exhibit progressively escalating high harmonics, each with increasing amplitudes. Waves 47-59 continue this trend at an
accelerated pace. Additionally, this wavetable lends itself well to creating delay eects and evoking the resonance of church bells.
5 Harmonic MixBlend This wavetable accentuates very high harmonics, delivering eects akin to wavetable 016 but with a more blended, mixture-like character.
6 WoodwindSweep ResoVibe Featuring a sine-to-ramp sweep and subtle low-resonance virtual analog lter (VCF) eects, this wavetable is well-suited for generating
woodwind sounds.
7 SylvanSweep ResoWind With a sine-to-ramp sweep and gentle low-resonance virtual analog lter (VCF) eects, this wavetable excels in producing woodwind-
like timbres.
8 PercuStrings This wavetable oers a highpass VCF simulation without resonance. Wave 00 exhibits minimal or absent fundamental frequencies, while
Wave 25 features a maximum amplitude fundamental. Ideal for crafting dark percussive strings and bass tones with click-like attacks.
9 VoxEnsemble Characterized by robust middle-range harmonics, these formants are well-suited for ring modulation and vocal-like textures.
10 Reso Similar to wavetable 9.
11 Chiaroscuro Featuring low formants, this wavetable ranges from dark (Wave 00) to bright (Wave 32) and back to dark (Wave 59).
12 SweepingHigh This wavetable showcases sweeping high formants
13 HarmonicStrike This wavetable features powerful high-order harmonics with a subdued fundamental, perfect for crafting bright percussive keyboard
instrument sounds such as clavichord and harpsichord. Sweeping through the waves creates an amplitude modulation eect, with Wave
00 at maximum amplitude, Wave 24 at minimum amplitude, and Wave 59 back to maximum. For intriguing noise eects, experiment with
signicant detuning and dissonant low chords.
14 OrganicRegisters Oering a variety of organ registers, including Sine, Hammond, Lowery, and Church organ tones.
15 HarmonicSaw Accordionizer Harmonics 2 and 3 transition to a sawtooth sweep, ideal for generating harmonium, accordion, and harmonica-like sounds
16 SweepFrenzy Sweeping this wavetable results in wild amplitude modulation eects, featuring multiple peaks and dips in amplitude.
17 Spectrum Shift Wave 00 presents the fundamental and second harmonic, while Wave 14 features only the fundamental. Wave 40 showcases high harmonics,
and Wave 59 returns to the fundamental alone.
18 Harmonic Sweep Oscillation Sweeping this wavetable yields a high-low-high harmonic sweep eect.
19 ElectricP Waves 00-32 consist of static waveforms with prominent upper harmonics resembling strings, accompanied by a few lower harmonics. Wave
59 lacks a fundamental frequency.
20 Robotic This wavetable facilitates rapid, discrete alterations between low and high harmonics, ideal for achieving sample and hold eects. Wave 00
begins with a sine wave.
21 StrongHrm Transitioning from a sine wave to high-frequency formants.
22 EchoScape Spectrum Tailored for echoing eects, this wavetable oers waveforms ranging from the original attack plus one delay to two colored delays. Wave 00
starts with a sine wave.
23 HighHarmonic Emphasis Prominent high harmonics
24 Organic Ascend Sweep Static organ-like tones. When swept, creates ascending high harmonic sweeps.
25 EchoColor Spectrum Shift Waves 59 to 49 transition from bright to sine wave. Waves 48 to 33 feature a colored delay, while Waves 33 to 18 are sine waves. Waves 17 to
00 incorporate a colored delay echo.
26 BrassForm SawVariants Various iterations of sawtooth waves characterized by robust, bright formants, perfect for brass-like timbres.
27 VoxForm Formant sweeps enable the creation of vocal and choir sounds when controlled by a keyboard.
28 PhaseString Ensemble Sawtooth waves with phasing, ideal for ensemble string sounds.
29 PulseShift Modulation Transitioning from square to rectangular to narrow pulse waves, with sweeps producing pulse-width modulation eects.
30 Upper Wavetable
14 WAVE User Manual
The Wave is shipped with additional wavetables in slots 64 – 83, which can be over-written using SynthTribe:
No Name Description
64 Pipes Xfade Crossfade of two Church Organ Pipe Waveforms
65 PD_Saw PWM SAW Waveshaper
66 DX_Tubular Famous DX Tubular sound
67 DX_E.Guitar Jazz Guitar
68 DX_FullTine Famous Full Tines Sound
69 Vibe-rant Vibraphone Waveforms
70 DX_Bass Digital Bass
71 StratoSweep Corssfade of four digital synth waveforms
72 FormantPad Rotating Phase Shifter
73 FairVox Famous Fairlight Voices
74 SpaceSweep Famous D50 Synth Sound
75 SoundTrack LA Filter Sweep
76 PWMstringer SAW+PWM_Square+Sub Juno Sound
77 Hoover Juno 106 PWM
78 PD_Saw CZ Phase Distortion SAW
79 PD_SQU CZ Phase Distortion SQU
80 PD_TPL CZ Phase Distortion TRI Pulse
81 PD_DBL CZ Phase Distortion Double Sine
82 PD_SPL CZ Phase Distortion Sine Pulse
83 PD_RES CZ Phase Distortion Resonant
84 Wurli Wave Electric Reed Piano
85 Rhodos Electric Piano
86 Vorcode Vocal Jam
The preset transients are:
No Name Description
31 PianoSaxo Piano and Saxophone Sample
32 PanFlute Wood Flute
33 Pizzi String Section Pizzicato
34 Steel Guitar Plugged Steel String
35 Elec. Cello PM Solo String Sound
36 Xylophon Xylophone with hard Mallet
37 Harp Plugged Harp String
38 Pizzagogo Famous D50 Sound
39 Soft Bell EP PM Electric Piano
40 Medium EP Medium Velocity EP Tone
41 Trumpet Solo Trumpet Tone
42 Mute Trumpet Muted Trumprt Tone
43 Duuhh Scat Voices
Note that transients 32 – 38 can be over-written using SynthTribe.

15 WAVE User Manual
Modulation Matrix
The Wave synthesizer oers a wide range of modulation options, providing the user with virtually innite capabilities in terms of sound design. MAIN-OSC and
SUB-OSC pitch, Waves, VCF, and VCA can be modulated through various settings accessible in the menus. The table below shows the modulation matrix. The types of
modulation, and their options are discussed in Top Panel below; and in the Digital Menu section.
Destination / Source Pitch Bend Mod Wheel(1) LFO(2) KEY Velocity AF(3) Exp Ped(4) ENV1 ENV2 ENV3
MAIN-OSC PITCH x x x
SUB-OSC PITCH x x x
WAVES (MAIN and SUB) x x x x x x x x
Filter Cuto x x x x x x x x
Loudness x x x x x x
Filter emphasis x x
(1) & (2) Modulation wheel can be either used as a direct source of modulation or to control the amount of modulation by the LFO.
(3) After touch must be enabled in the User menu (setting TOUCH).
(4) The Expression Pedal can be assigned to directly modulate these parameters. If it is set to EXP:5, it will have the same effect as turning the MOD wheel.
16 WAVE User Manual
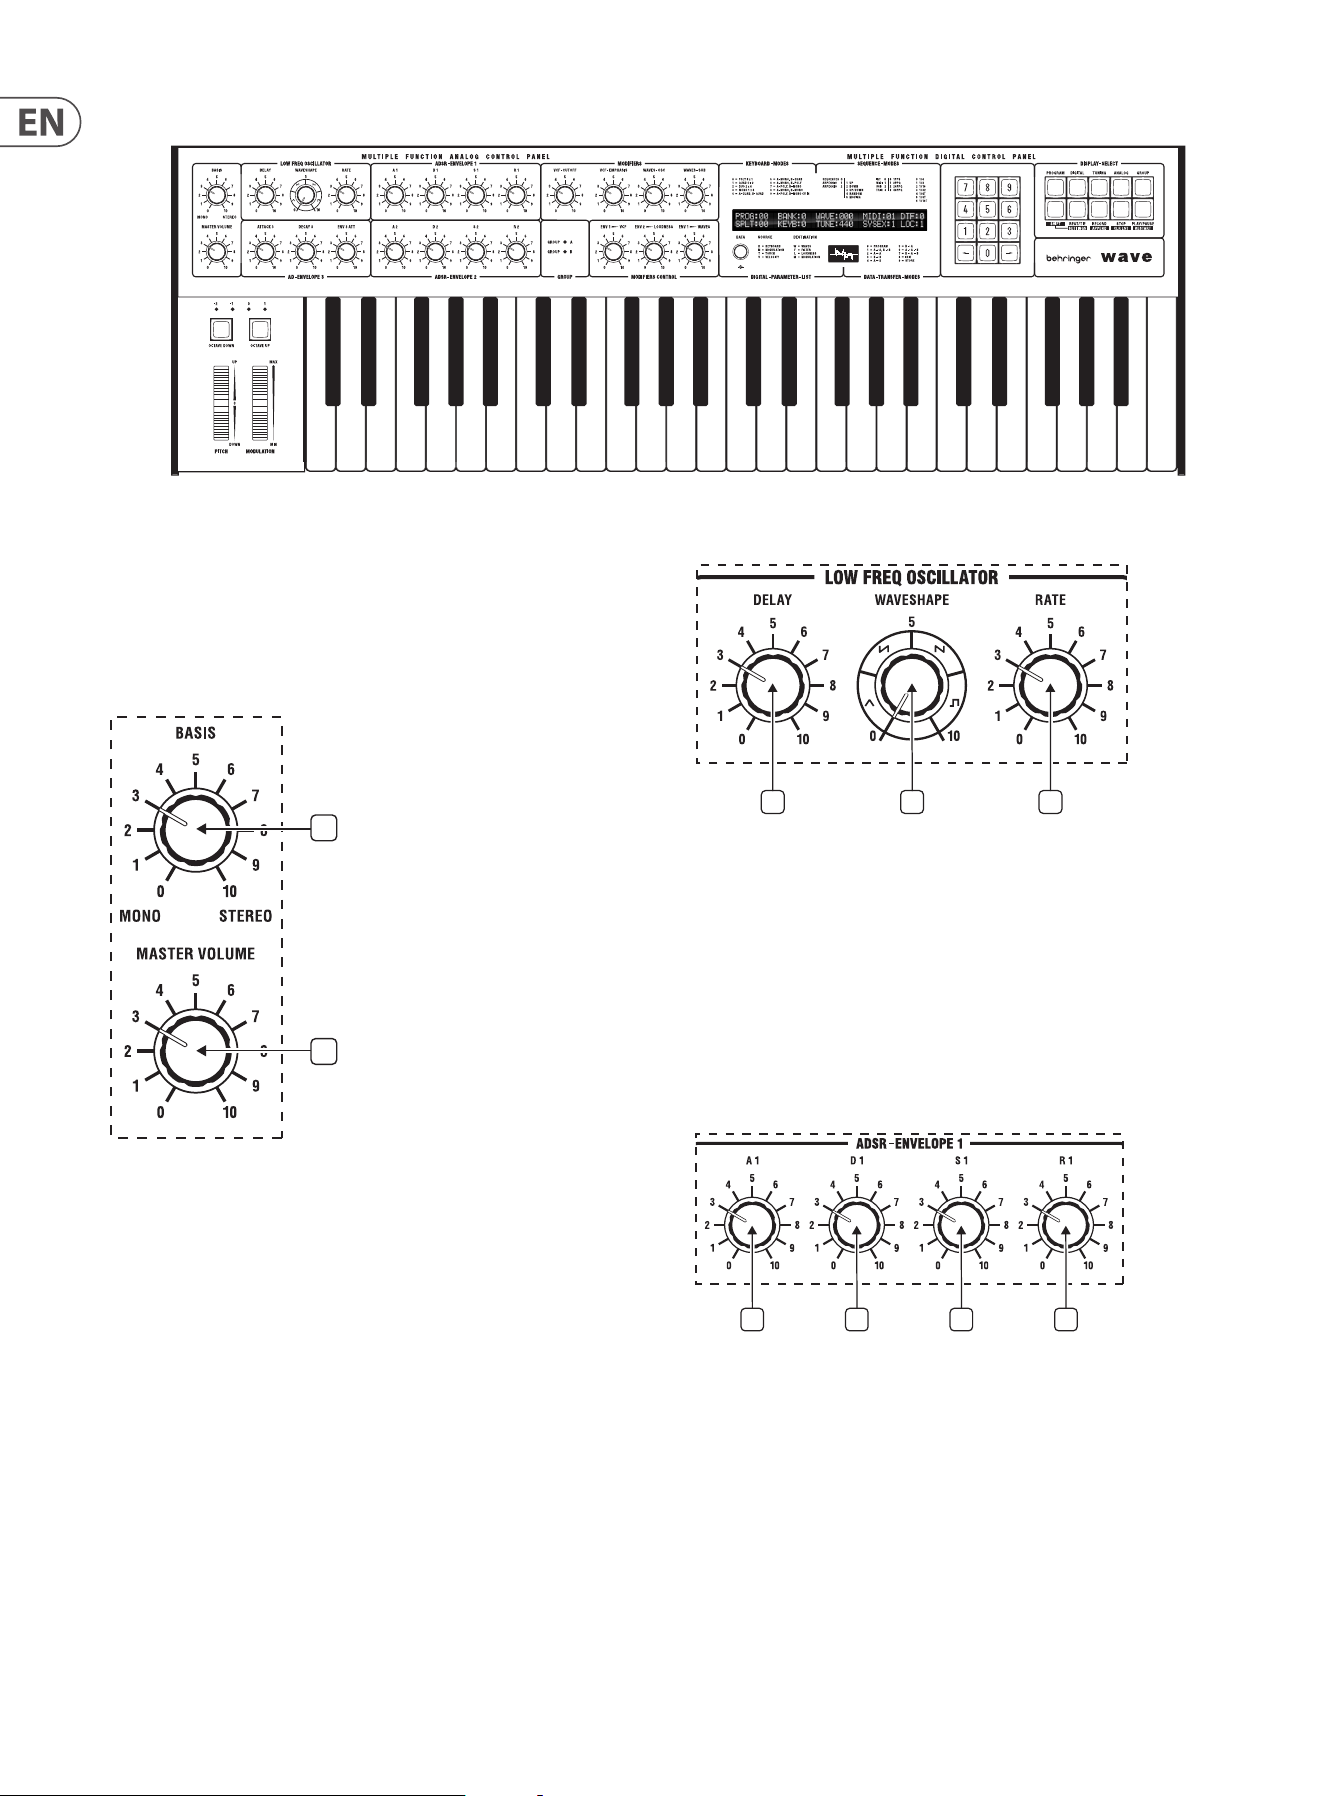
Top Panel
The following sections describe the top panel controls of the Wave; and how they
are used in program creation. All Top Panel control settings are stored in the
program memories, with the exception of Basis
(1 )
and Master Volume
(2)
.
The control settings can be monitored and ne adjusted if needs be in the
Analog Menu, described below.
Master Controls
1
2
(1) Basis – adjusts the stereo spread of the notes played on the keyboard.
When the control is at minimum then all notes will be output at equal level
from both the channel 1 and channel 2 outputs. When the control is at
maximum notes will alternate between the outputs.
(2) Master Volume – sets the Wave's output level.
Low Frequency Oscillator
3 4 5
(3) LFO Delay – delays the action of the LFO. When the control is at minimum
there will be a slight delay before modulation can be heard (depending on
the rmware setting (see User Menu below)). When at maximum there will
be a delay of 10 seconds before modulation is applied.
(4) Waveshape – the LFO has four waveshapes available: triangle, ramp,
sawtooth and square.
(5) Rate – controls the rate at which the LFO runs, from 0.2 Hz to 12.0 Hz.
Envelope Generator 1
6 7 8 9
(6) EG 1 Attack – controls the attack time for the lter envelope. If the
Envelope attack rate is set above 47 then the attack will fully complete even
if the key is released; and will then move to the release phase. This can be
used for lter and wavetable sweeps.
(7) EG 1 Decay – controls the decay time for the lter envelope.
(8) EG 1 Sustain – controls the sustain level for the lter envelope following Decay.
(9) EG 1 Release – controls the release time for the lter envelope.
17 WAVE User Manual
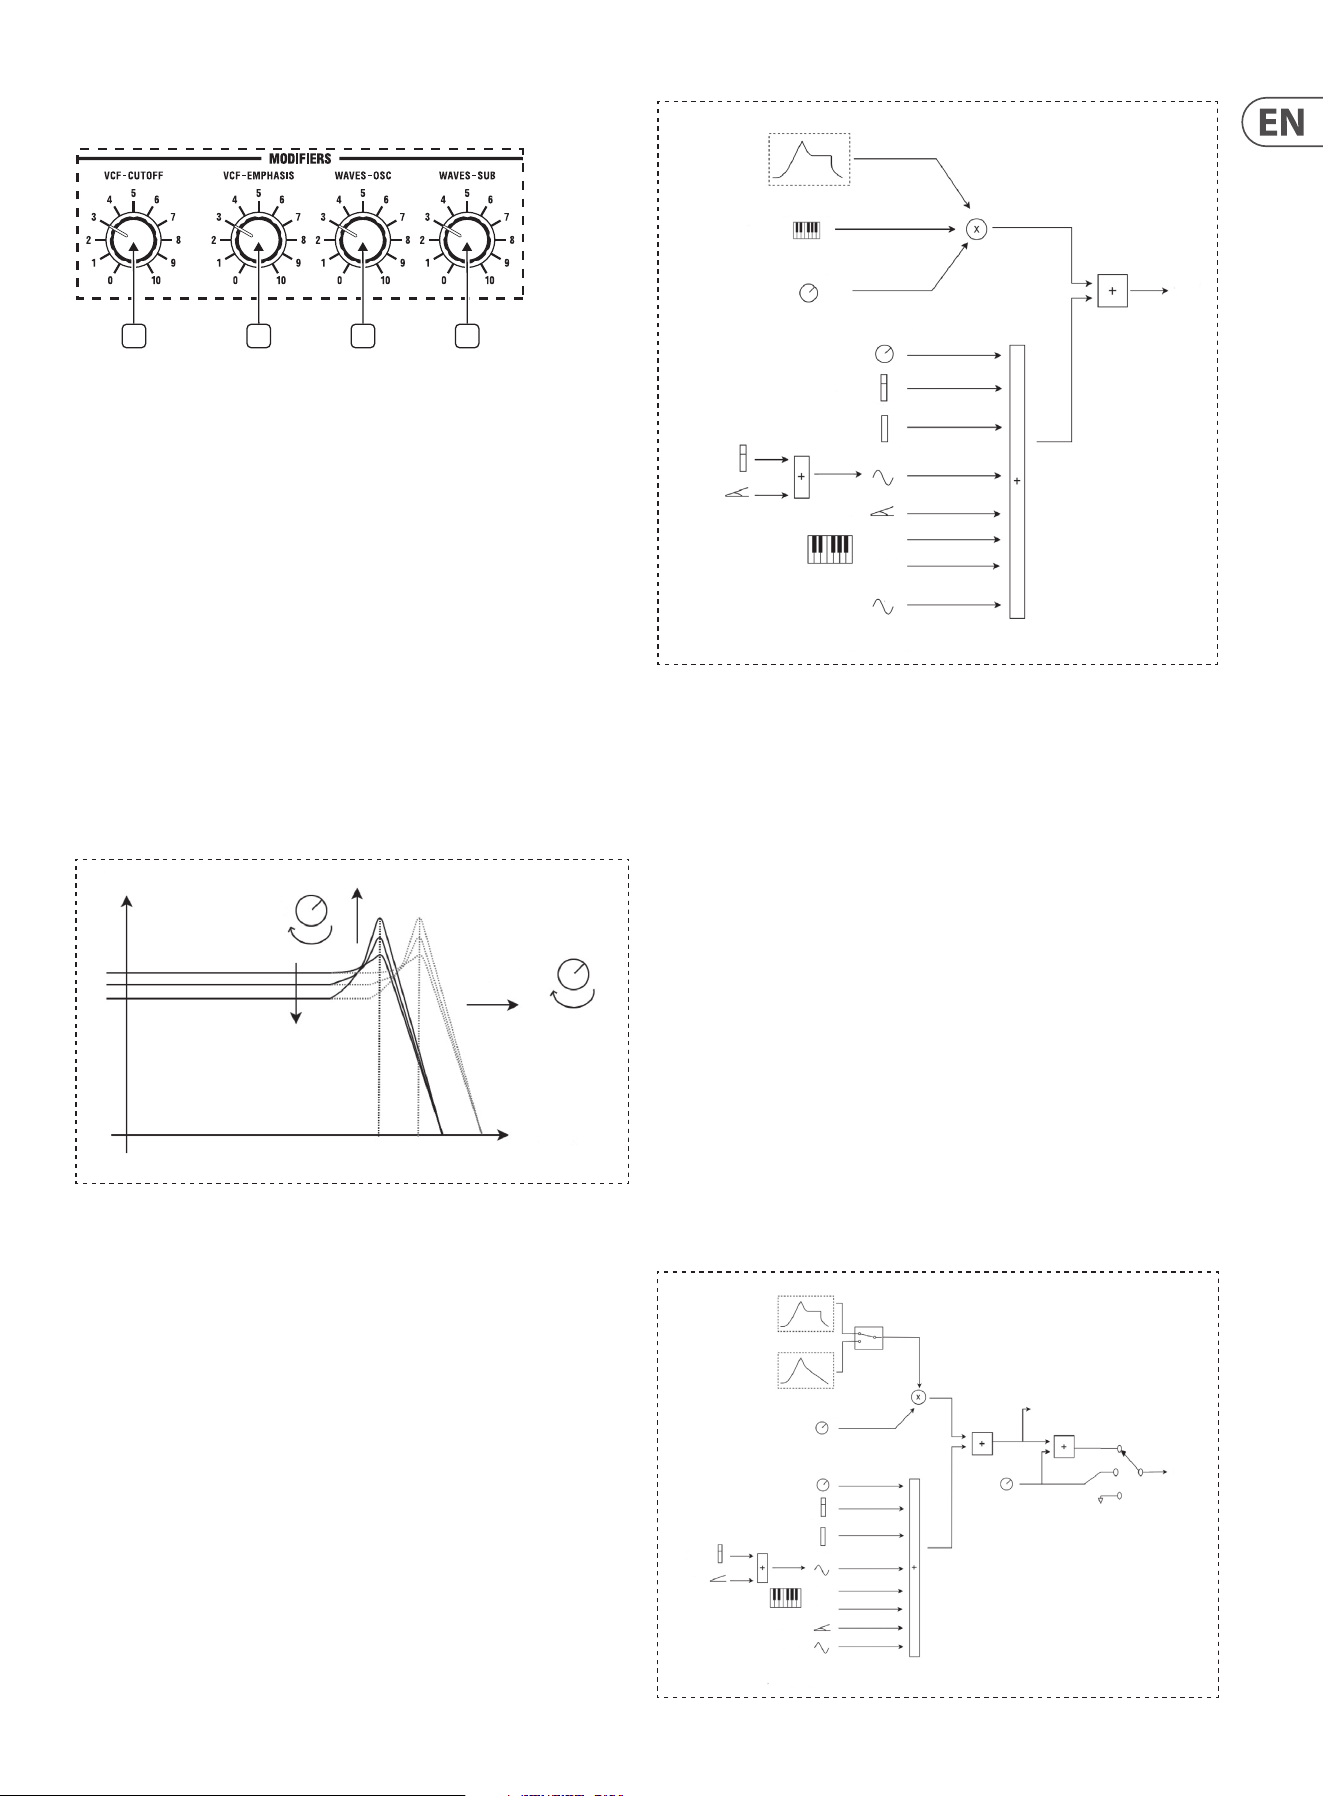
Modifiers
10
11 12 13
(10) VCF Cuto – controls the cuto frequency of the low pass lter.
(11) VCF Emphasis – controls the resonance of the lter.
Each of the voices of the Wave synthesizer is equipped with a 24dB per octave
voltage-controlled low-pass lter, based on the reproduction of the SSM2044 chip.
The VCF-Cuto knob sets the lter cuto frequency: frequencies below
this threshold pass unchanged, while frequencies above it are attenuated.
Turning the VCF-Cuto knob clockwise increases the cuto frequency, so when
the knob is turned fully clockwise, the sound passes unchanged.
The Emphasis control adjusts the lter resonance, emphasizing the frequencies
around the cuto frequency set by the VCF-Cuto knob. If the resonance is
increased signicantly, the lter will start to self-oscillate, generating a sine
wave whose frequency depends on the VCF Cuto. You can experiment the
eect of the resonance by increasing the Emphasis knob. Setting the emphasis
to values below 50%, produces the typical bright sound. Please note that one of
the characteristics of the SSM2044 is the dependency between resonance and
output signal level: as the resonance increases, the lter output level decreases.
The operation of the lter is depicted in the image below.
level
Emphasis
CW
VCF-Cuto
CW
frequency
cuto
frequency
Filter Modulation
Filter Cuto frequency can be modulated by the following sources:
• • Pitch bend (Option BD in Digital menu)
• • Modulation Wheel (Option MF in Digital menu)
• • Low Frequency Oscillator (Option MF in Digital menu)
• • Keyboard (Option KF in Digital menu)
• • Velocity (Option VF in Digital menu)
• • Envelope 1 (Default)
• • Expression Pedal (Option EXP-PED in USER menu)
• • Channel Aftertouch (Option TL in Digital menu)
ENV1
VF:1-3
velocity sensor
ENV1>VCF
VCF - Cuto
to VCF
Cuto
MF:2
BD:2,5,7
MOD Wheel
PitchWheel
LFO
MF:1
EXP-PED:5
MOD Wheel
EXP-PED:2
TF:1*
KF:1-7
LFO
MF:3-9
*TOUCH has bo ne enabled in the USER menu.
(12) Waves Osc – steps through the waveforms of the selected wavetable for the
main oscillator, from 00 to 63.
(13) Waves Sub – steps through the waveforms of the selected wavetable for
the sub oscillator, from 00 to 63.
If the selected waveform is a transient one (31-63) then controls
(12)
and
(13)
will
set the sample playback start points for the main and sub oscillators.
Waves Modulation
Main and Sub oscillator waves can also be modulated by:
• • Pitch bend (Option BD in Digital menu)
• • Modulation wheel (Option MW in Digital menu)
• • LFO (Option MW in Digital menu)
• • Keyboard (Option KW in Digital menu)
• • Aftertouch (Option TW in Digital menu)
• • Expression pedal (Option EXP-PED in USER menu)
• • Envelope 1 or Envelope 3 (Option SW in Digital menu)
*TOUCH has bo ne enabled in the USER menu.
ENV1
ENV3
SW:2
ENV1>WAVES
WAVES-OSC
MW:2
BD:3,7
MW:1
EXP-PED:5
SUB-OSC
WAVE
SW:0
SW:1
SW:3-6
SUB-OSC
MAIN-OSC
WAVE
EXP-PED:4
MW:3-9
LFO
TW:1*
KW:1-7
LFO
PitchWheel
MOD Wheel
18 WAVE User Manual
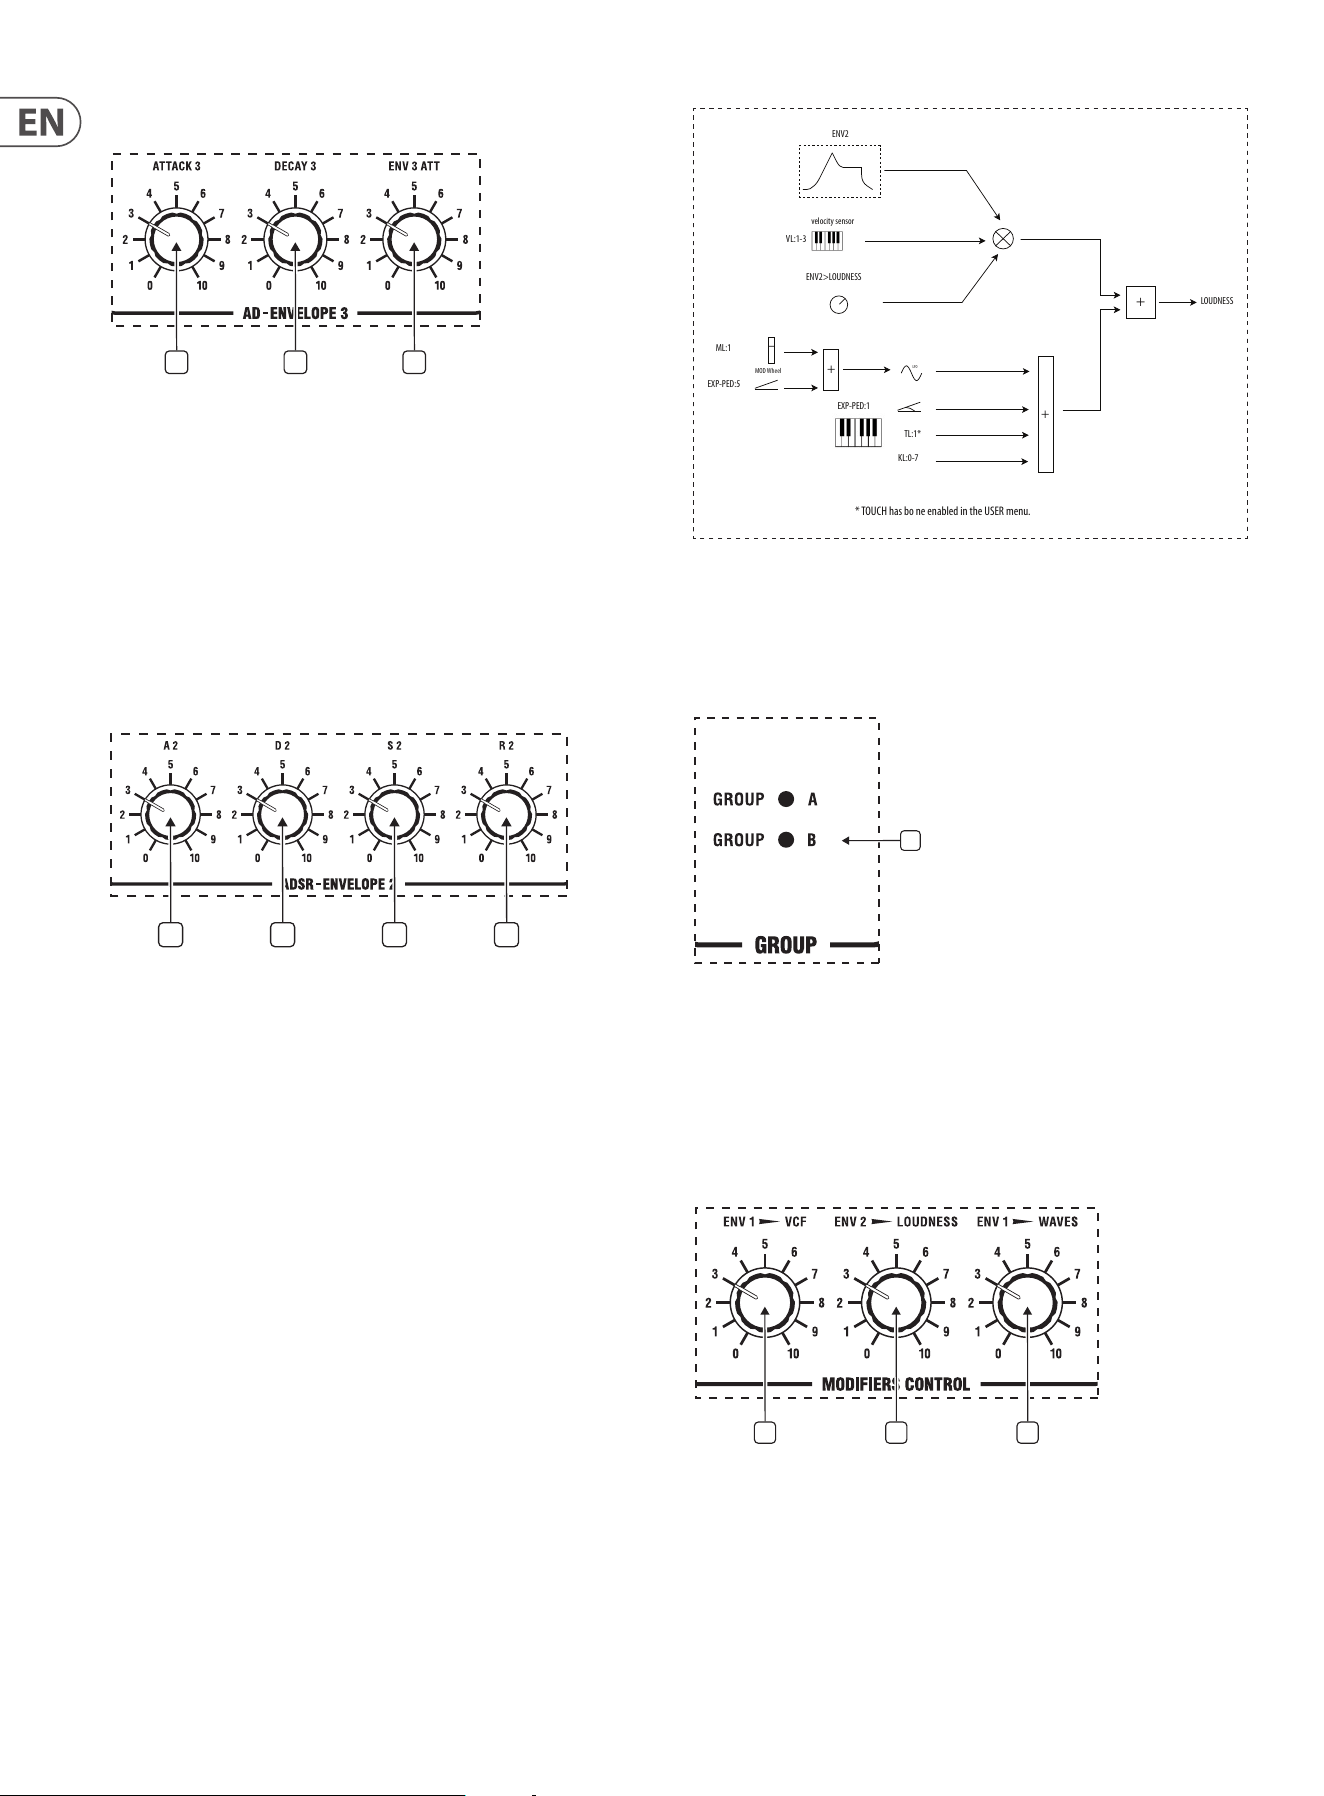
Envelope Generator 3
14 15 16
(14) EG3 Attack – controls the attack time for the third envelope.
(15) EG3 Decay – controls the decay time for the third envelope.
(16) EG3 Attenuation – attenuates (reduces) the maximum output of the third
envelope generator. This has a dierent eect according to what the third
envelope is being used for: if it is being used on the pitch of the oscillator
then in position ve there is no modulation, with lower settings resulting
in negative action and higher in positive. When used for modulating the
wavetables then the settings run from no modulation at 0 to full
(63 wavetable steps) at 10. This modulation is added to the WAVES SUB value.
Envelope Generator 2
17 18 19 20
(17) EG 2 Attack – controls the attack time for the loudness envelope. If the
Envelope attack rate is set above 47 then the attack will fully complete even
if the key is released; and will then move to the release phase. This can be
used for lter and wavetable sweeps.
(18) EG 2 Decay – controls the decay time for the loudness envelope.
(19) EG 2 Sustain – controls the sustain level for the loudness envelope
following Decay.
(20) EG 2 Release – controls the release time for the loudness envelope.
Loudness modulation
Loudness can be modulated by the following sources:
• • LFO (Option ML in Digital menu)
• • Keyboard (Option KL in Digital menu)
• • Velocity (Option VL in Digital menu)
• • Aftertouch (Option TL in Digital menu)
• • Expression pedal (Option EXP-PED in USER menu)
• • Envelope 2 (Default)
ENV2
ENV2>LOUDNESS
ML:1
LFO
TL:1*
+
+
KL:0-7
VL:1-3
EXP-PED:1
LOUDNESS
MOD Wheel
+
EXP-PED:5
velocity sensor
* TOUCH has bo ne enabled in the USER menu.
Note that the ML option set to 1 switches on direct modulation through the LFO if
FIRM is 0. When FIRM is set to 1, then the amount of LFO loudness modulation is
determined by the Mod wheel. See User Menu and Digital Menu sections below.
Group
21
(21) Group – each program has two sounds associated with it, in groups A and B.
The group LEDs indicate which sound can be edited when using the DIGITAL/
TUNING/ANALOG menus. If both LEDs are lit, parameter changes eect both
group sounds. In KEYB POLY 8x1 mode, the lit LED indicates which sound is
used. (if both LEDs are lit, group B sound is used).
Modifiers Control
22 23 24
(22) Env 1 VCF – controls the amount of lter modulation from Envelope Generator 1.
(23) Env 2 Loudness – this control adjusts the output level of the active group;
and can be used to balance group A and B sounds when used together or in a
split mode.
(24) Env 1 Waves – controls the use of Envelope Generator 1 to step through
the waveforms in the wavetable in use. If a transient is selected then
this control will set the loop point for sample playback for both the main
oscillator and the sub-oscillator.
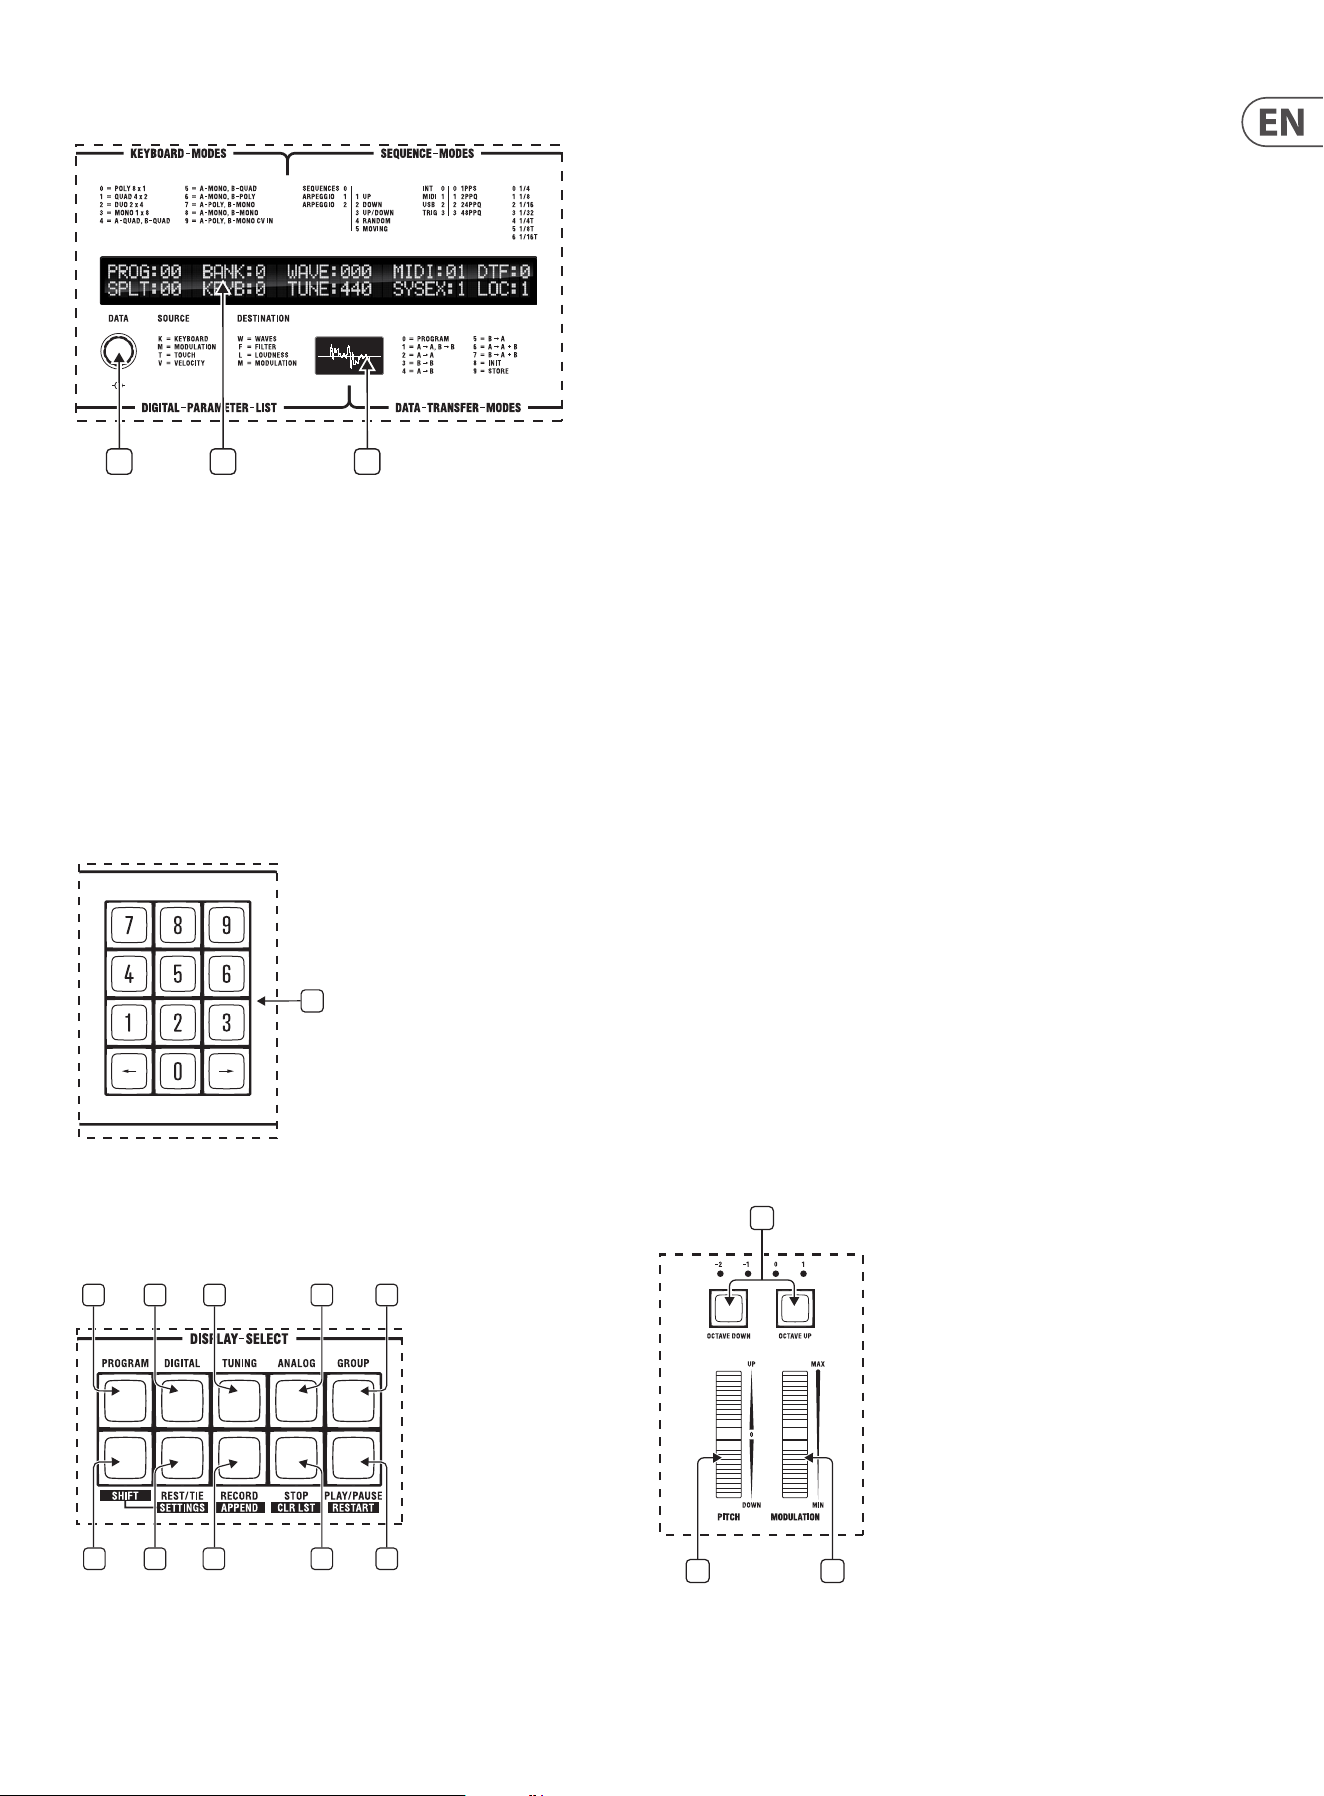
19 WAVE User Manual
Display
2625 27
(25) Data Control – used as an alternative to the keypad for entering values.
Turn the control to the desired value then press to change the value.
(26) LCD Display – 2 x 40 character display, showing dierent parameter
information according to which button on the keypad is in use. The display is
vitally important when using the various menus.
(27) OLED Display – The OLED display serves as an oscilloscope, displaying the
real-time output waveform of the synth. During calibration, it provides
calibration information. It also shows the names of selected wavetables
and transients when in editing mode and conrms successful receipt of
wavetables or transients transferred via SynthTribe.
Numeric Keypad
28
(28) Numeric Keypad – used for direct number entry and cursor control.
Display/Menu Select and Sequencer Controls
29 30 31 32 33
34 35 36 37 38
(29) Program – calls up the program menu to the display. This is the default
menu on power-up. Pressing the button twice calls up the User menu.
See Program and User Menus below for full detail.
(30) Digital – calls up the digital parameters to the display for editing.
See Digital menu below for full detail.
(31) Tuning – calls up the tuning parameters to the display for editing.
See Tuning menu below for full detail.
(32) Analog – calls up the analog parameters to the display for editing.
See Analog menu below for full detail.
(33) Group – each program has two sounds associated with it, in groups A and B.
The group LEDs indicate which sound can be edited when using the DIGITAL/
TUNING/ANALOG menus. If both LEDs are lit, parameter changes eect both
group sounds. In KEYB POLY 8x1 mode, the lit LED indicates which sound is
used. (if both LEDs are lit, group B sound is used).
SEQUENCER BUTTONS
(34) Shift – used to access the shifted functions on buttons 35 - 38.
(35) Rest/Tie – pressing this button while holding a note or chord will extend
(tie) the note(s) across more than one step of the sequence. Pressing it
without holding any notes will insert a rest at that point in the sequence.
(36) Record – puts the sequencer into Record mode.
(37) Stop – when a sequence is running pressing the stop button stops the
sequence and resets it to the rst position.
(38) Play/Pause – if a sequence is not running then pressing this button starts
it. A further press will pause the sequence, but unlike the use of the Stop
button will not reset to rst position. Pressing the button a third time will
restart the sequence from the point that it was paused.
Using the Shift button with the four sequencer buttons adds additional functions:
Shift & 35 – Settings – accesses sequencer settings menu. See Sequencer
Menu below for full detail.
Shift & 36 – Append – after using the </> buttons to go to a specic step in
the sequence pressing Shift and 36 allows you to add additional notes to those
already recorded on the selected step, to the maximum allowed by the keyboard
settings; or to replace the already programmed note(s), depending on the OVP
settings in the Sequencer menu.
Shift & 37 – Clr Lst – Clear Last allows steps to be erased from the sequence,
starting with the last step recorded. Pressing and holding Clear Last will erase
the whole sequence.
Shift & 38 – Restart – when a sequence is running pressing Shift and 38
restarts it from the rst step.
Performance Controls
41
39 40
(39) Pitch Wheel – the function of the Pitch Wheel is congured through
the BD option in the Digital menu. It can operate as a traditional pitch
bend controller for one or both oscillators or be assigned to control
other parameters, such as lter cuto or wavetable position. The wheel
automatically returns to its center position when released.
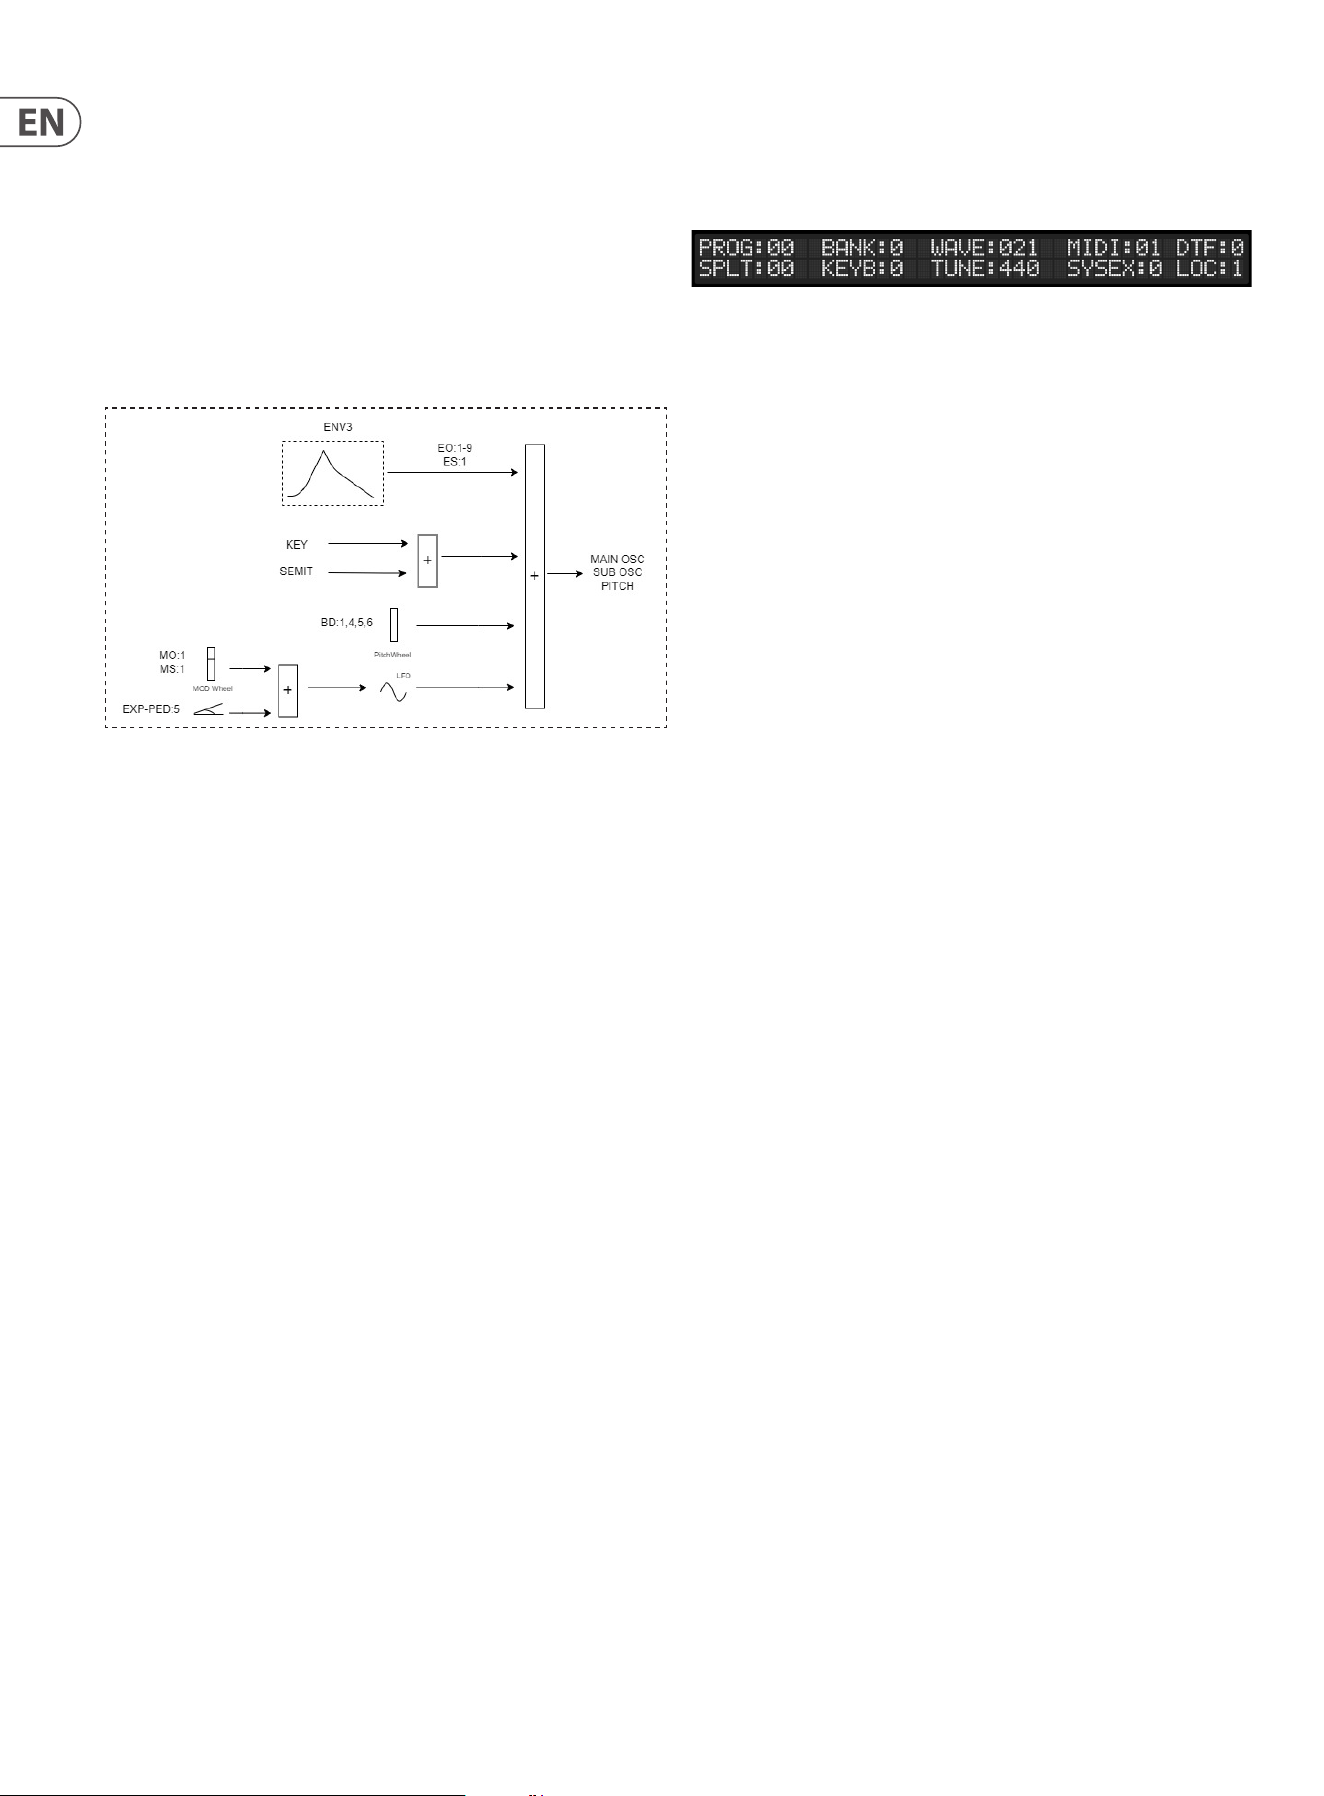
20 WAVE User Manual
Main and Sub Oscillator Modulation
Both the Main and Sub oscillators' pitch can be modulated by the following sources:
• • Pitch bend (Option BD in Digital menu)
• • LFO (Option MO and SO in Tuning menu, through the MOD wheel)
• • Expression pedal (Option EXP-PED:5 in USER menu, through the LFO if
MO/SO is activated)
• • Envelope 3 (Option EO and ES in Tuning menu)
Note: Bend Interval (BI) in Digital menu determines amount of Pitch Wheel
modulation. EO2 - 9 in TUNING menu activates polyphonic portamento.
(40) Modulation Wheel – can be used for various types of modulation
depending on the user settings. Please note that the wheel position is stored
in each preset, separate for Group A and B sound parameters.
(41) Octave Up/Down – transposes the keyboard up by one octave or down by
one or two octaves, as indicated by the associated LEDs.
Menus
Program Menu
This is the default menu, which you will see on the display when you power up. It
indicates the status of the Wave.
Please note that where two characters are required on a data entry then a
leading zero should be added for single gure numbers (eg 01 for 1.) Parameters
are navigated using the left and right cursor controls on the numeric keypad
(28)
;
or by using the data encoder
(25)
.
From left to right / top row:
PROG – indicates the current program number from 0 to 99.
BANK – indicates the program bank in use, 0 or 1.
WAVE/TRAN – indicates the wavetable or transient associated with the current
program, from 0 to 127. Positions 0 to 30 are the preset wavetables, position
31 is a preset transient wave, positions 32 to 63 are user dened transients and
positions 64 to 127 are user dened wavetables.
MIDI – indicates the MIDI transmit and receive channel that your Wave is set to.
0 – indicates that MIDI is switched o; no messages will be transmitted
or received.
1-16 – indicates that the Wave will transmit and receive on the specied
channel (MIDI mode 3).
DTF – indicates Data Transfer status as follows:
0. Program (default)
1. A – A, B – B: the program data for the group A sound is loaded into
the group A edit buer, and that of group B to the group B edit buer.
Wavetable, split and keyboard mode are unaected.
2. A – A: the program data for the group A sound is loaded into the
group A edit buer. Group B, wavetable, split and keyboard mode are
unaected.
3. B – B: the program data for the group B sound is loaded into the
group B edit buer. Group A, wavetable, split and keyboard mode
are unaected.
4. A – B: the program data for the group A sound is loaded into the group B
edit buer. Group A, wavetable, split and keyboard mode are unaected.
5. B – A: the program data for the group B sound is loaded into the group A
edit buer. Group B, wavetable, split and keyboard mode are unaected.
6. A – A & B: the program data for the group A sound is loaded into both
edit buers. Wavetable, split and keyboard mode are unaected.
7. B – A & B: the program data for the group B sound is loaded into both
edit buers. Wavetable, split and keyboard mode are unaected.
8. INIT: this option resets the Wave to its factory settings. You will be
asked to type 1 to conrm reset or 0 to cancel.
9. Store
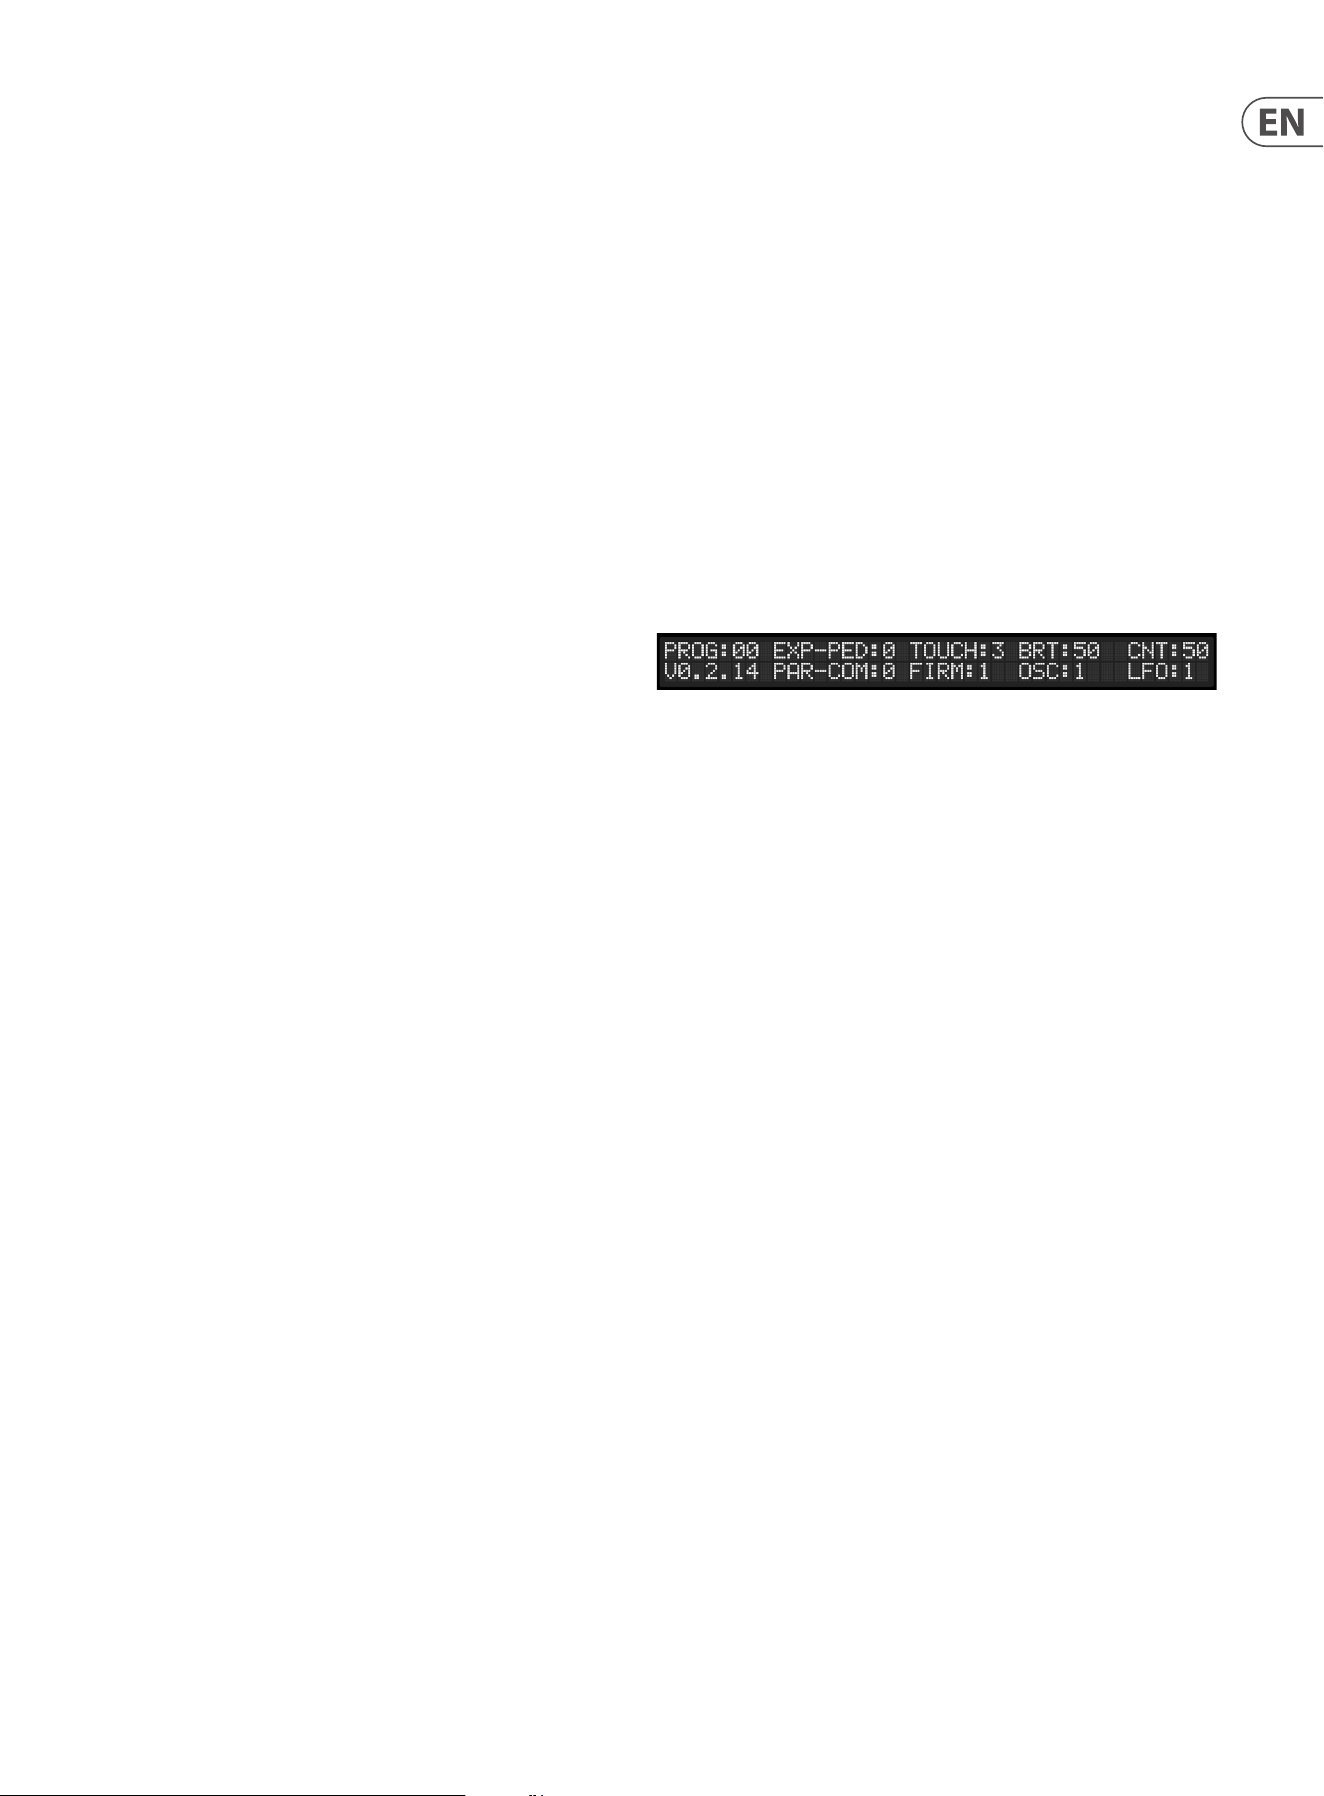
21 WAVE User Manual
To use the Data Transfer menu to store your edited programs take the
following steps:
1. Make your edits as required.
2. Move the cursor in the program menu to DTF. The number next to the
DTF indicator should be 0, which is the default setting.
3. Press 9.
4. Select the required program bank (0 or 1).
5. Move the cursor to the PG (program) position and select the program
number that you wish to write to, even if you are writing to the same
program memory. You will be asked to conrm the write operation
by typing 1 for yes or 0 for no. This completes the operation, and DTF
will return to 0.
From left to right / bottom row:
SPLT – allows the programming of keyboard split point for use with keyboard
modes 4 – 8 as discussed below. The lowest octave of the keyboard, in -2 octave
mode, is represented by 0 – 12; -1 octave mode 13-24; 0 octave mode 25-36 etc.
The note selected as the split point will be the lowest note of the upper keyboard.
KEYB – indicates which keyboard mode is in use:
0. Poly (default) – eight note polyphony with one oscillator voice
and one sub-oscillator voice for each note, sound can be switched
between Group A and Group B using button 34.
1. Quad – four note polyphony with two oscillator voices and two sub-
oscillator voices for each note, four voices each from Group A (odd
numbers) and B (even numbers).
2. Duo – duophonic operation with four oscillator voices and four sub-
oscillator voices for each note, four voices each from Group A (odd
numbers) and B (even numbers).
3. Mono (Unison) – monophonic operation with all eight oscillator
voices and eight sub-oscillator voices for each note, four voices each
from Group A (odd numbers) and B (even numbers).
4. A - Quad, B - Quad – split mode with four note polyphony for each
sound in Group A and Group B, with Group A sounds on the upper
keyboard and Group B on the lower.
5. A – Mono, B – Quad – split mode where the Group A sound is
monophonic with four oscillator voices and four sub-oscillator voices
and the Group B sound is four note polyphonic with one oscillator
voice and one sub-oscillator voice per note played, with Group A
sounds on the upper keyboard and Group B on the lower.
6. A – Mono, B – Poly – split mode where the Group A sound is
monophonic with two oscillator and two sub-oscillator voices and the
Group B sound is six note polyphonic with one oscillator voice and one
sub-oscillator voice per note played, with Group A sounds on the upper
keyboard and Group B on the lower.
7. A – Poly, B – Mono – split mode where the Group A sound is six note
polyphonic with one oscillator voice and one sub-oscillator voice per
note played and group B is monophonic with two oscillator and two
sub-oscillator voices, with Group A sounds on the upper keyboard and
Group B on the lower.
8. A – Mono, B – Mono – split mode where Group A and Group B are
monophonic, with four oscillator voices and four sub-oscillator voices
each, with group A sounds on the upper keyboard and group B on
the lower.
9. A – Poly, B – Mono CV IN – Group A sound is 7 notes polyphonic,
monophonic Group B sound is controlled by CV/GATE Inputs on the
rear panel
TUNE – indicates the master tuning of the Wave. Normally this would be set to
A = 440 (Hz), but it can be adjusted in the range 400 Hz to 499 Hz
SYSEX – Used for manual dump of program data.
0 – default (no action).
1 – sends current edit buer data.
2 – sends current program data.
3 – sends current bank.
4 – sends sequencer edit buer.
5 – sends current program's sequencer data.
6 – sends current bank's sequencer data.
LOC – selects whether local control from the internal keyboard is active,
or whether the Wave will only respond to incoming MIDI messages:
0 = O (keyboard and controls transmit MIDI, Sound Engine is controlled
only through MIDI IN)
1 = Enabled (keyboard and MIDI IN controls Sound Engine)
User Menu
The User Menu is selected by pressing the Program button
(29)
twice. It shows
global parameters and allows them to be edited Parameters are navigated using
the left and right cursor controls on the numeric keypad
(28)
From left to right / top row:
PROG – shows the current program number, which can be changed in this menu.
EXP-PEDAL – if a footpedal is connected to socket 56 (Expression Pedal) on the
rear panel this option allows you to select what action the pedal will have:
0 = O (the pedal will have no eect).
1 = Loudness (works with the ENV 2 Loudness control).
2 = Filter Frequency (works with the VCF Cuto control).
3 = Filter Emphasis (works with the VCF Emphasis control).
4 = Wave (works with the Waves Osc control).
5 = Modulation Wheel (duplicates the modulation wheel).
Note that the use of an expression pedal does not disable the control that it is
duplicating, the two work together until the maximum value is reached. So, for
example, if the ENV 2 Loudness control is at its maximum value and option 1 is
selected the pedal will have no eect.
TOUCH – selects how Channel Aftertouch is transmitted and received by the Wave:
0 = O (no aftertouch is transmitted or received over MIDI)
1 = Aftertouch is enabled and transmitted over MIDI
2 = Aftertouch is enabled and received over MIDI only, not from the
internal keyboard.
3 = Aftertouch is enabled and both transmitted and received over MIDI
BRT – allows the brightness of the LCD display to be adjusted between minimum
(00) and maximum (99).
CNT – allows the contrast of the LCD display to be adjusted between minimum
(00) and maximum (99).
From left to right /bottom row
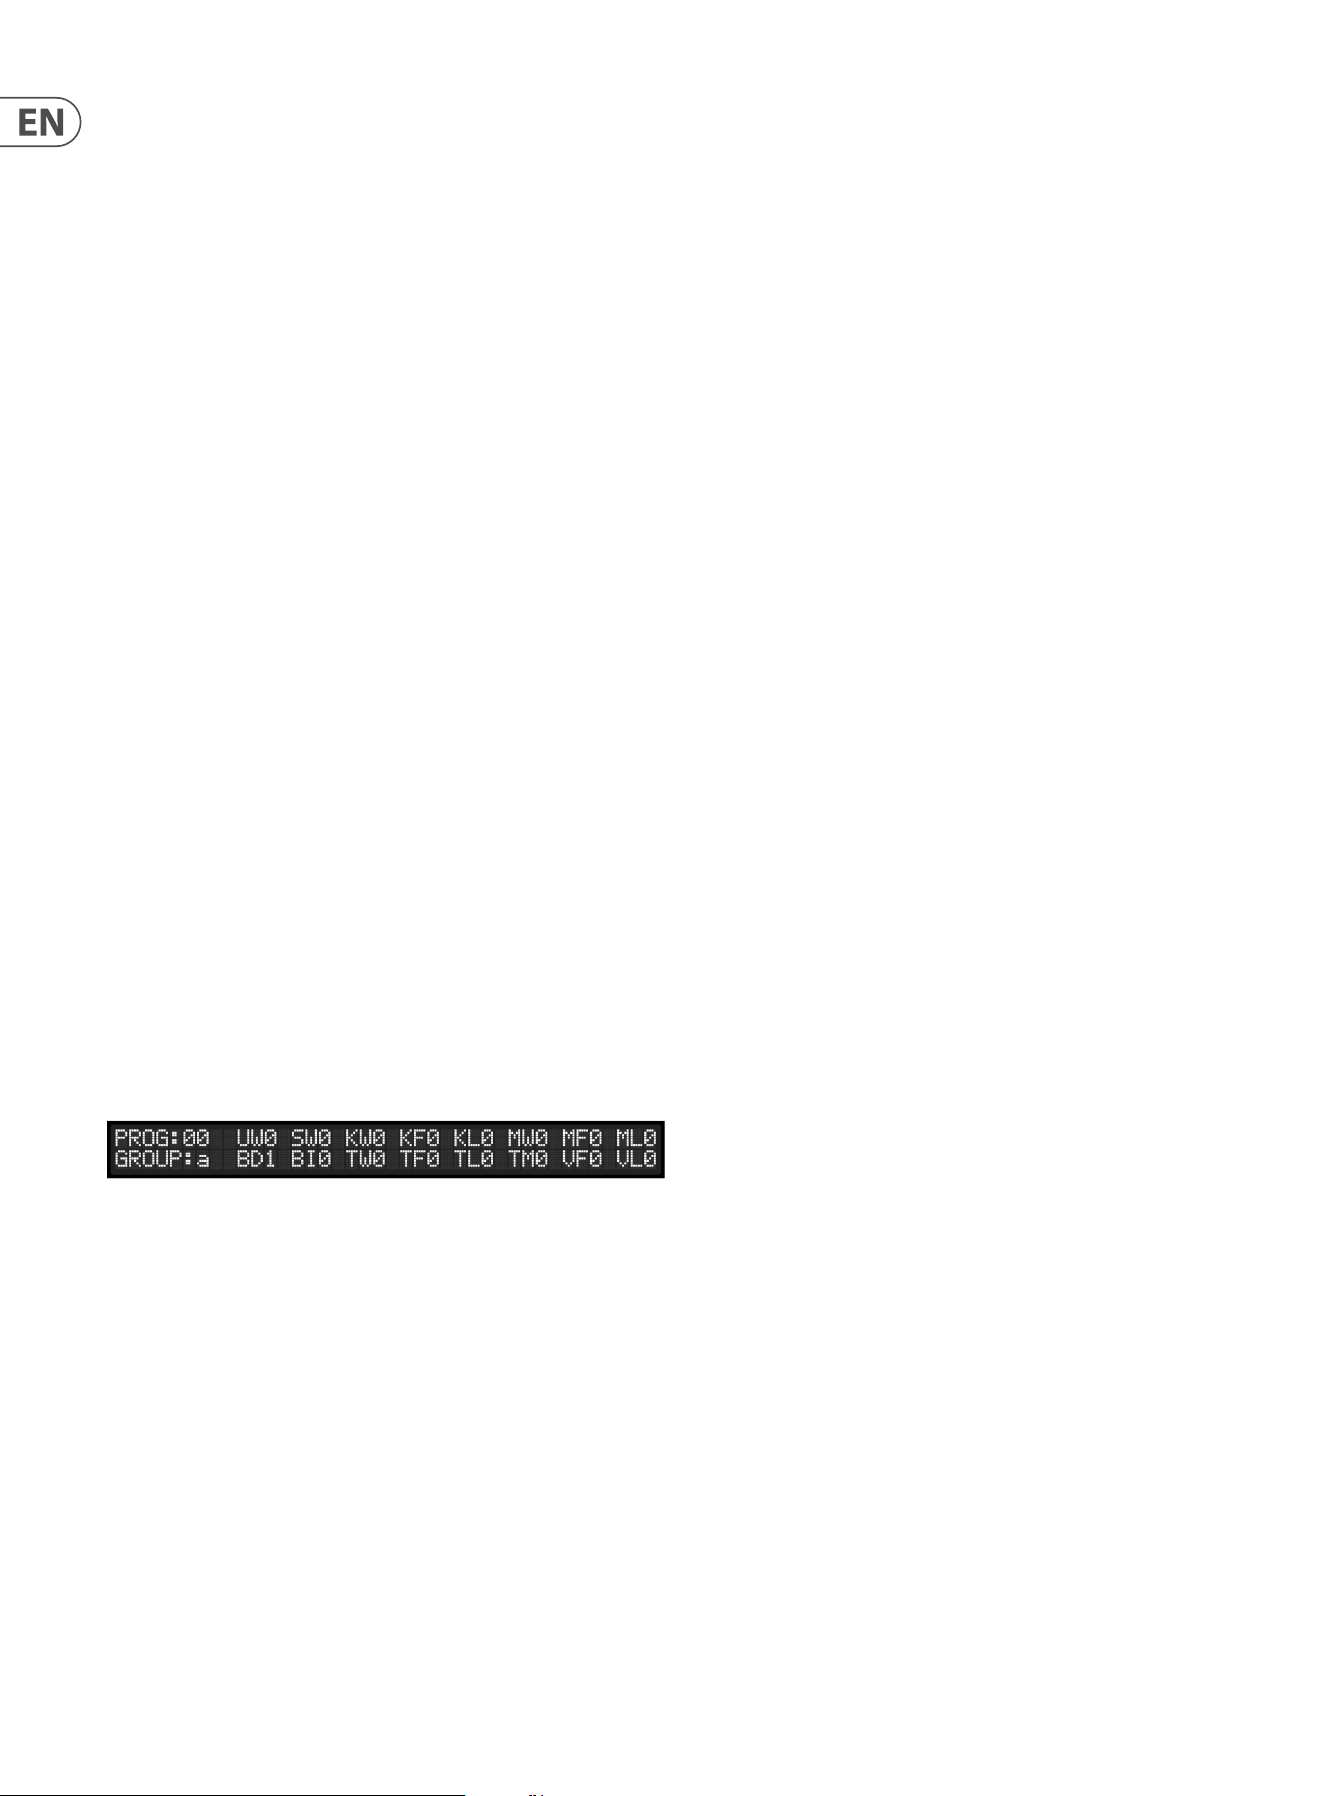
22 WAVE User Manual
V – indicates the current Firmware version Firmware updates are available
through the SynthTribe app; and it is advisable to run the app regularly to check if
there are updates available.
PAR-COM – the PAR-COM setting determines if the Wave receives and transmits
MIDI CC messages that adjust the sound parameters.
0 = No Sound Parameter Changes are transmitted or received
1 = Sound Parameter Changes are transmittedonly.
2 = Sound Parameter Changes are receivedonly.
3 = Sound Parameter Changes are both transmitted and received
A good example of how to use PAR-COM would be the recording of MIDI CC data in a
DAW: switch the Wave to Local O and connect to the DAW using USB. Use the Wave's
keyboard to play the selected sound and the controls to modify it. All MIDI data will be
recorded into the DAW, and the DAW will control the Wave in real time. The recording
can then be edited if necessary until you are happy with it; and played back as required.
FIRM – indicated the rmware emulation setting:
0 = Original rmware: this setting reproduces the original accurately.
1 = Enhanced: this setting introduces some enhancements:
• • Disables LFO delay completely when DELAY=0
• • Increases LFO->Loudness modulation range
• • Leaves ADSR envelope 2 shape intact when ML=1and adds Mod
Wheel control (see Digital Menu below).
• • Reduces Wave sweep range for MW=½(see Digital Menu below)
OSC – indicated the oscillator quality setting:
0 = Original rmware
1 = Enhanced (less aliasing and improved wave sweeping)
LFO – indicated the LFO precision setting:
0 = Original rmware (LFO is quite wobbly, especially at high speeds)
1 = Modern (Improved timing and precision)
Digital Menu
The Digital Menu, selected by Digital button
(30)
, shows the digital parameters of
your selected program, and allows them to be edited. Parameters are navigated
using the left and right cursor controls on the numeric keypad
(28)
.
The two character control abbreviations refer to the source (rst character) and
destination (second character) of each setting, with the exception of the rst two
options, which reference the Upper wavetable and the Sub-oscillator. The sources are:
K – keyboard, or incoming MIDI notes.
M – modulation from the LFO.
B – pitchbend from the internal bend wheel, or from an external MIDI source.
T – aftertouch from the keyboard or from an external MIDI source.
V – velocity from the keyboard or from an external MIDI source.
These are variously applied to the following destinations:
W – Wavetable position.
F – the voltage controlled lter.
L - the VCA (loudness).
M – modulation intensity from the LFO.
With the exception of the pitchbend options, where D represents pitchbend
destination and I represents its interval or range.
From left to right / top row:
PROG – shows the current program number, which can be changed in this menu
UW – changes from normal wavetable to Upper Wavetable. The settings are:
0 – The selected Wavetable is used. WT Positions 60 - 63 and table
wrapping is enabled
1 – The upper Wavetable is used, which contains the most interesting
waves from all 30 wavetables
2 – The selected Wavetable is used. Wavetable locations 60 - 63
and wavetable wrapping are disabled. (Very useful for
Wavetable sweeping)
SW – indicates the sub-oscillator waveform status. There are seven settings:
0 – waveform is the same as the main oscillator, plus any modication
made using the Waves Sub control
(13)
.
1 – the sub-oscillator waveform is set only by the Waves Sub control
(13)
.
2 – replaces envelope generator 1 with envelope generator 3 to sweep
through the waves in the wavetable, as set by Env 1 – waves control
(24)
.
3 – switches the sub-oscillator o.
4 – The sub-oscillator output is muted and used to hard-sync the main
oscillator. The frequency of the main oscillator can be adjusted with the
Waves Sub control
(13)
5 – The sub-oscillator waveform is set only by the Waves Sub control
(13)
.
Its output is used for ring-modulation with the main-oscillator
6 – The Sub-oscillator turns into a noise generator. The Noise level can be
adjusted with the Waves Sub control
(13)
KW – the keyboard controls the waveform for each note played. There are eight settings:
0 – the keyboard eect is switched o. All notes will have the
waveform selected.
1-3 – as higher notes are played the waveform will shift to a higher
waveform in the wavetable.
4 – each note will have its own waveform. The lowest C on the keyboard will
have the waveform selected by the Waves Osc control
(12)
; each subsequent
key will take the waveform below that in the table. If the rst waveform is
reached then the next note will take the highest waveform (63).
5-7 – stronger versions of 4, whereby waveforms are skipped.

23 WAVE User Manual
KF – the frequency of the lter is tracked by the keyboard. There are eight settings:
0 – No keyboard tracking
1-2 – keyboard tracking is less than 100%
3 – keyboard tracking is approximately at 100% (double VCF frequency
for every octave)
4-6 – keyboard tracking is between 100% and 200%
7 – keyboard tracking is approximately at 200%
KL – the loudness of the voltage controlled amplier is tracked by the keyboard.
There are eight settings:
0-3 – higher keys will sound louder than lower keys (subject to the
settings on envelope generator 2).
4 – all keys have the same loudness.
5-7 – lower keys will sound louder than higher keys (subject to the
settings on envelope generator 2).
MW – controls the wavetable position modulation by the modulation wheel and LFO.
0 – o.
1 – waveform LFO sweeping is controlled by Mod Wheel.
2 – waveform is swept directly by Mod Wheel.
3-9 – waveform is swept by the LFO by between 10% and 100%.
MF – controls lter frequency and resonance modulation by the modulation
wheel and LFO.
0 – o.
1 – lter frequency LFO sweeping is controlled by the modulation wheel
2 – lter frequency can be controlled directly by the modulation wheel
3 – lter emphasis can be controlled directly by the modulation wheel
4-9 – lter frequency is modulated by the waveform LFO constantly by
between 10% and 100%.
ML – controls whether the loudness of the VCA can be controlled by the
modulation LFO. 0 is o, 1 is on. For emulation of the original this sets a constant
low amplitude modulation by the LFO. However, when enhanced FIRMWARE in
the USER menu is enabled this controls LFO loudness modulation of the VCA by
the Mod Wheel
Left to right / bottom row:
GROUP – indicates whether the display is showing settings for Group A or Group
B. Switched with Group button
(33)
BD – controls what the pitchbend wheel will aect. There are eight settings:
0 – pitchbend wheel is o.
1 – pitchbend (oscillator and sub-oscillator).
2 – lter frequency cuto.
3 – waveform sweep.
4 – pitchbend (sub-oscillator only).
5 – pitchbend (oscillator and sub-oscillator) plus lter frequency cuto.
6 – pitchbend (oscillator and sub-oscillator) plus waveform sweep.
7 – lter frequency cuto and waveform sweep.
BI – controls the pitchbend wheel range. There are six settings:
0 – two semitones.
1 – major third (four semitones).
2 – fth (seven semitones).
3 – one octave (twelve semitones).
4 – two octaves (24 semitones).
5 – one octave (12 semitones) in semitones steps.
TW- controls aftertouch for waveform sweeping and LFO modulation:
0 – o
1 – aftertouch controls waveform sweeping
2 – aftertouch controls LFO waveform modulation
TF- controls aftertouch for lter frequency sweeping and LFO modulation:
0 – o
1 – aftertouch controls lter frequency sweeping
2 – aftertouch controls LFO lter frequency modulation
TL- controls aftertouch for loudness and loudness modulation:
0 – o
1 – aftertouch controls loudness
2 – aftertouch controls LFO loudness modulation
TM – allows aftertouch control of the modulation wheel:
0 – o
1 – on.
VF- sets the sensitivity for velocity control of lter frequency cuto:
0 – o
1 – low sensitivity.
2 – medium sensitivity.
3 – high sensitivity.
VL– sets the sensitivity of velocity control of loudness (VCA level):
0 – o
1 – low sensitivity.
2 – medium sensitivity.
3 – high sensitivity
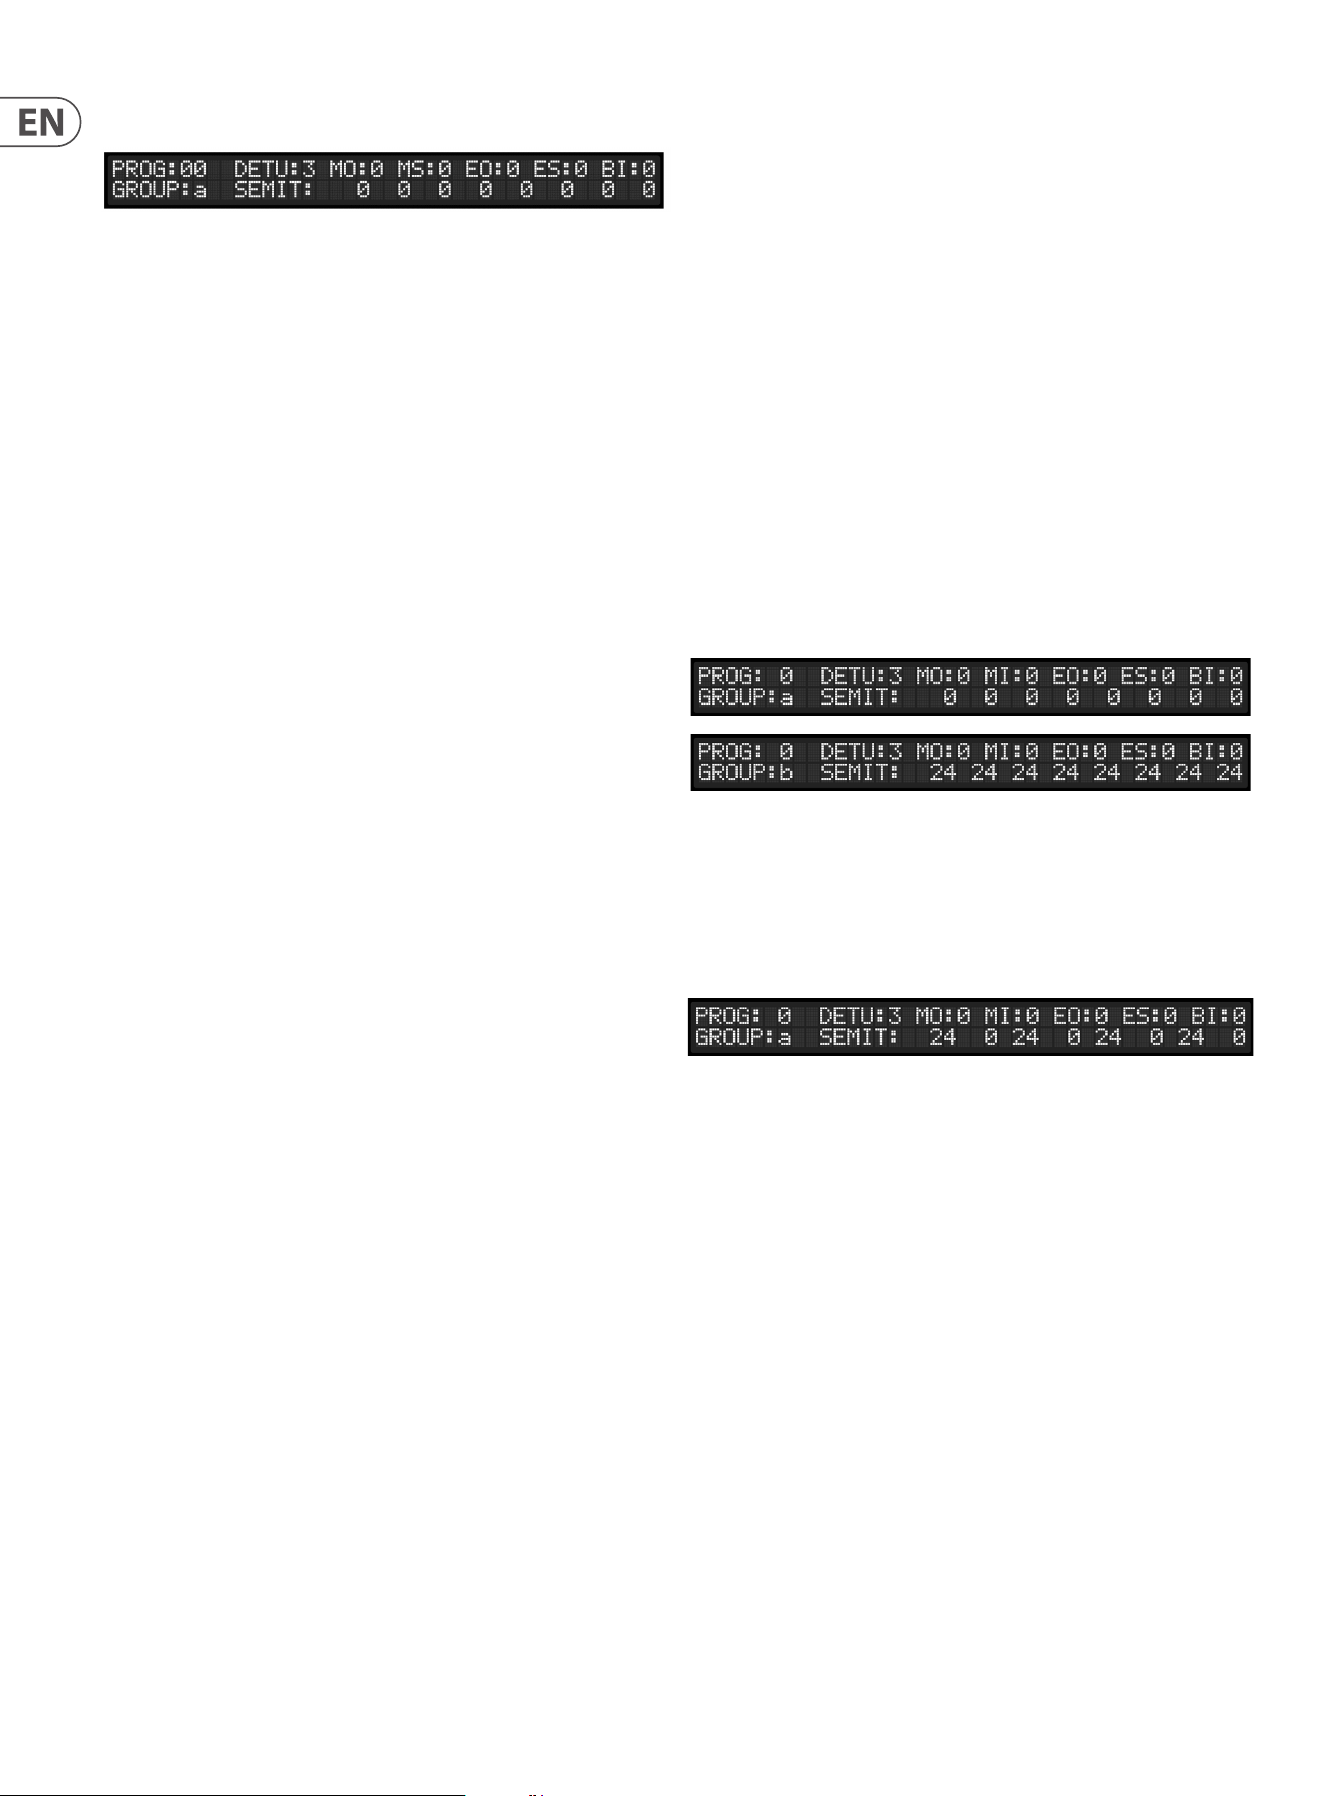
24 WAVE User Manual
Tuning Menu
The Tuning Menu allows individual voices to be detuned, which can be used to provide
interesting eects, especially in monophonic or duophonic modes. Parameters are
navigated using the left and right cursor controls on the numeric keypad
(28)
.
Left to right / top row:
PROG – shows current program number, which can be changed in this menu
DETU – indicates detuning between the sub-oscillator and the main oscillator.
There are ten settings:
0 – no detuning.
1 – slight detuning.
2 – increased detuning.
3 – obvious detuning.
4 – strong detuning.
5 – detuned by ve semitones up.
6 – detuned by one octave up.
7 – detuned by two octaves up.
8 – detuned by one octave down.
9 – detuned by two octaves down.
MO – switches pitch modulation of the main oscillator. 0 is o, 1 is on.
MS – switches pitch modulation of the sub-oscillator. 0 is o, 1 is on.
EO – switches pitch modulation of the main oscillator by envelope generator 3:
0 – o.
1 – on
2-9 – enable a portamento eect with increasing glide time
ES – switches pitch modulation of the sub-oscillator by envelope generator 3. 0
is o, 1 is on.
BI – sets the range of the bend wheel. There are six settings:
0 – two semitones.
1 – major third (four semitones).
2 – fth (seven semitones).
3 – octave (12 semitones).
4 – two octaves (24 semitones).
5 – one octave (12 semitones) in semitone steps.
Left to right / bottom row:
GROUP – indicates whether the display is showing settings for Group A or Group B.
Switched with Group button
(33)
SEMIT – each of the eight voices can be detuned upwards, with the detuning
indicated on the display. Values can either be entered for each voice using
the numeric keypad
(28)
or by using the keyboard. 0 indicates that there is no
detuning and is represented on the keyboard by the bottom C key. The largest
possible detuning is 63 semitones when entered manually, or 48 when entered
from the keyboard using the top C key. The octave buttons
(41)
have no eect in
this instance.
The cursor will automatically move to the next voice when a key is pressed, but it
is possible to navigate forward or back using the cursor controls on the numeric
keypad
(28)
, which is necessary when entering values manually.
It should also be noted that excessive SEMIT detuning can take higher notes out
of the Wave's note range; and that therefore some notes will not sound when
played, so care should be taken when using this function.
A good use of SEMIT detuning, which is found in many of the Wave presets, is to
place the group B sound in a dierent octave to those of group A when layering,
for example using keyboard mode 1. Group A is left as normal, group B tuned two
octaves higher.
Another example would be to allow the detuning of group A voices against group
B voices when using split keyboard modes, as in the following example:
In the program menu set the keyboard mode to 4 (Quad A/B) and a keyboard
split point of your choice. This means that the odd numbered voices are assigned
to the group A sound and the even to group B. In the Tuning menu set the SEMIT
value of each odd numbered voice to 24, as shown below:
The upper keyboard (group A) notes will sound two octaves higher than those of
the lower keyboard (group B); and the sub-oscillator will be noticeably detuned
from the main in both groups.
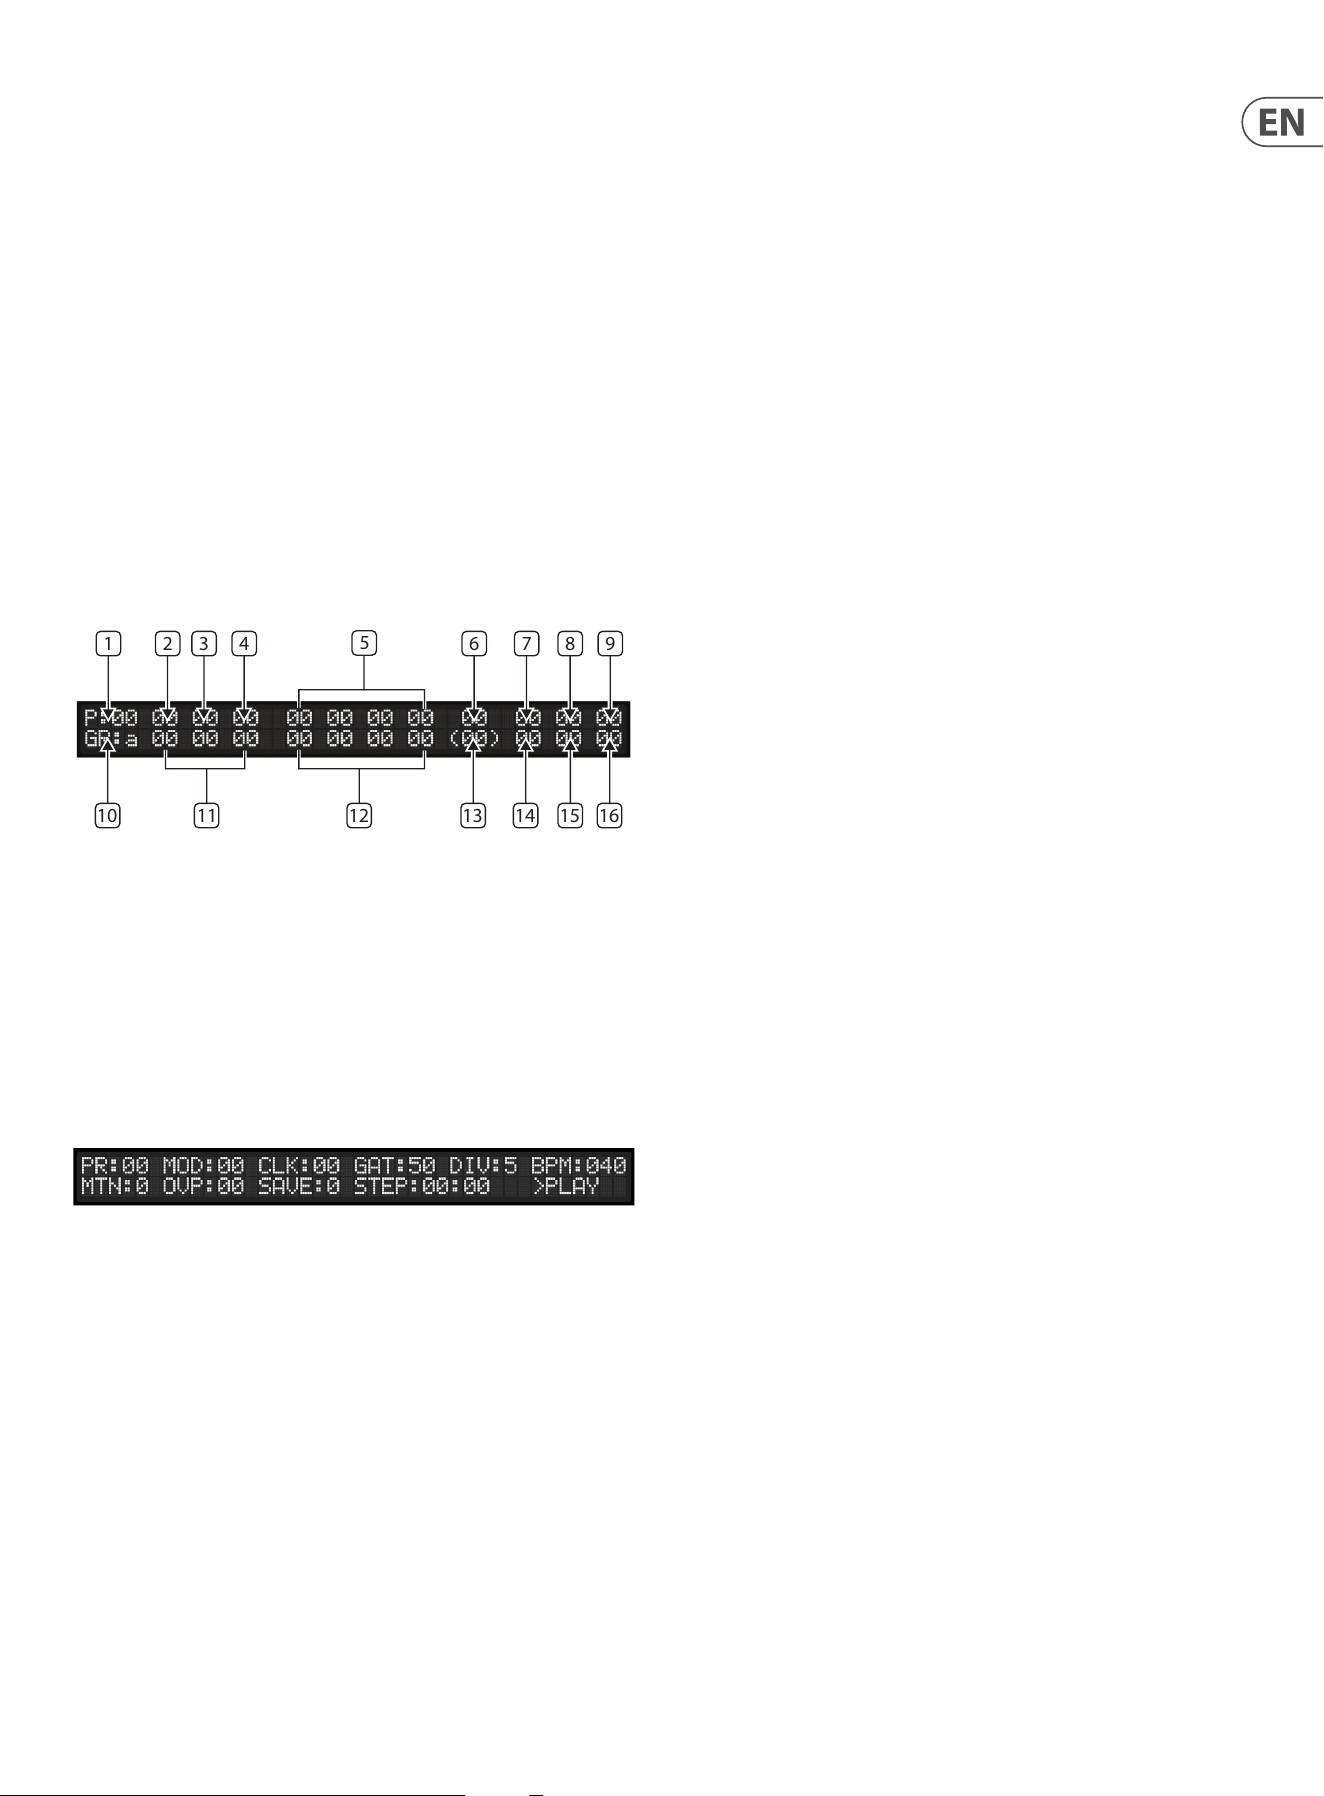
25 WAVE User Manual
Analog Menu
The analogue menu displays the stored positions of the analog controls on the
top panel. Altering the position of any of the controls will replace the stored value
with the actual position of the control, but this will not be written to memory
unless the Data Transfer writing procedure is followed. Values can also be
changed using the numeric keypad to move to the desired control and entering a
number between 00 and 63 using the keypad or the data control.
The numbers represent the following settings and controls:
(1) Program Number
(2) LFO Delay
(3) LFO Waveshape
(4) LFO Rate
(5) Envelope Generator 1 Attack/Decay/Sustain/Release
(6) Filter Cuto
(7) Filter Emphasis
(8) Waves Osc
(9) Waves Sub
1 2 3 4 6
10 12 13 14 15
7 8 9
1611
5
(10) Group A or B
(11) Envelope Generator 3 Attack/Decay/Attenuation
(12) Envelope Generator 2 Attack/Decay/Sustain/Release
(13) Modulation Wheel
(14) Modier Envelope 1 to VCF
(15) Modier Envelope 2 to Loudness
(16) Modier Envelope 1 to Waves
Sequencer Menu
The Sequencer Menu is accessed by pressing and holding the Shift button
(34)
and pressing the Settings button
(35)
, or by pressing any of the sequencer
controls
(35)
–
(38)
.
Left to Right / top row:
PR – indicates the current program, which can be changed within the menu
MOD – indicates which mode the sequencer/arpeggiator is in. The rst digit
shows whether the sequencer or arpeggiator is active:
0 – the sequencer is active (second digit cannot be altered). See Using The
Sequencer section below.
1 – arpeggiator 1 is active.
2 – arpeggiator 2 is active.
The second digit show which arpeggiator mode is selected when the arpeggiator
is active:
1 – up.
2 – down.
3 – up and down.
4 – random.
5 – moving (the root of the arpeggiation moves through the notes held).
Using the simple example of a C major chord (C / E / G) the various arpeggiator
modes would result in:
11: C, E, G, C, E, G etc.
12: G, E, C, G, E, C etc.
13: C, E, G, G, E, C etc.
14: E, G, E, C, G, C or similar.
15: C, E, G, E, C, G, G, C, E etc.
21 – 25: as 11 – 15 but with the octave above added.
When the arpeggiator is in use a footswitch connected to the Sustain Pedal
socket on the rear panel
(57)
will hold the arpeggio without the need to key
hands on the keyboard. A latching switch allows the foot to be removed as well.
Note that when the arpeggio is held in this way the constituent notes cannot be
changed or added to. When used with the arpeggiator the pedal will not aect
the sustain function of ENV 2 as it usually would.
CLK – indicates the clock source and rate where appropriate. The rst digit shows
the source:
0 – internal.
1 – DIN MIDI.
2 – USB MIDI.
3 – Analog trigger (via the rear panel Sync In socket).
The second digit shows the clock rate for the internal clock and external
analog trigger. The rate is xed at 24 pulse per quarter note for the MIDI clocks,
and when one of them is selected the second digit cannot be altered:
0 – 1 pulse per step
1 – 2 ppqn
2 – 24 ppqn
3 – 48 ppqn
So, for example, a setting of 02 would utilize the internal clock at a rate of
24 ppqn; whereas 30 would use an external analog clock from the Sync In socket
(52)
on the rear panel expecting 1 pps.
GAT – indicates the gate duration, which can be adjusted between 1 and 99.
Default is 50.
DIV – indicates the clock division for sequenced or arpeggiated notes:
0 – ¼ note
1 – 1/8 note
2 – 1/16 note
3 – 1/32 note
4 – ¼ note triplet
5 – 1/8 note triplet
6 – 1/16 note triplet

26 WAVE User Manual
BPM – when the internal clock is selected then the bpm can be set in the range
40 ppm to 240 bpm, with a default setting of 100 bpm. When any of the external
clock sources are selected then their bpm will be calculated and indicated.
MTN – indicates whether the metronome is active (1) or inactive (0).
OVP – the rst digit indicates whether overdub is disabled (0); where new notes
will replace what is currently programmed onto the current step, or enabled
(1) where new notes will be added to the step until the maximum number
(eight per step) is reached. The second digit indicates whether the keyboard will
transpose the sequencer (0), which is the default, or play voices independently
of it (1).
SAVE – typing 1 against SAVE saves the programmed sequence and the values of
GATE and DIV as part of the current program.
STEP – shows the current step of the sequence to the left of the colon, and the
total number of steps programmed to the right.
STATUS – indicates the current sequencer status: STOP, PLAY, RECORD or APPEND
To copy a sequence from one program memory to another load the program that
you want to copy to, then move the cursor to the PR number, press Shift and type
the number of the program that you want to copy from. The sequence will copy
into your current program when you release the shift button.
Using The Sequencer
The Wave stores a polyphonic sequence of up to 64 steps, with up to eight
notes on each step, in each program. There are four controls associated with the
sequencer, which also have additional functions when using the Shift button.
To start recording a sequence press the Record button
(36)
.
Any notes or chords that you play will be recorded into the sequence, and the
step counters will advance by one. The </> buttons with shift can be used to
navigate through steps that have been recorded. While in Record mode new
notes can be added to a recorded step by navigating to the step and playing
them, up to the maximum of eight notes per step if overdub mode is switched
on. After a sequence has been recorded then append can be used to either add
or replace notes on a selected step, depending on the overdub setting; or to add
new steps to the sequence up to the maximum of 64.
When you have nished recording press the Record button again, or press Stop
(37)
.
To play back the sequence press Play
(38)
. Pressing Play again will pause the
sequence. A further press resumes playback from the pause point.
To store your sequence move the cursor to Save, then type 1 to complete the
write procedure.
If an error is made while programming a sequence then the Clr Last (Shift and
Stop) button can be used to erase the last note. Holding the buttons for more
than two seconds will erase all steps.
Pressing any key on the keyboard while a sequence is playing will instantly
transpose the sequence if the second digit of OVP is set to 0. If it is set to 1 then
the keyboard will have no eect on the sequence, but will be used to play voices
that the sequencer is not using. If VL (Velocity Loudness) is selected in the digital
menu then the velocity of the key used to transpose the sequence will be applied
to all steps while the sequence is transposed.
Sequencer use examples
Append: after you have programmed some notes and chords you may wish to
add in additional steps. Start the Append process by pressing Shift and Record
(the display will show APPEND) at bottom right). Press and hold the Shift button
then use the <> keys on the numeric keypad to move through the recorded
steps, which will sound as you navigate. Move to step 00 and whatever you play
will be added before the original rst step; move to the last step and new steps
will be added at the end of the sequence, until step 64 is reached. Move to a step
at any point between the beginning and the end and new steps will be added
after the step you navigate to.
Overdub: the overdub facility can be used to add additional notes to steps that
have already been recorded. First ensure that the leading digit of the OVP option
is set to 1 (the second digit is not necessary for this function). Put the Wave into
record mode, then record some notes. When you have recorded enough steps
press Stop. Re-activating record mode allows you to add additional notes to each
step; and to continue recording additional steps after the nal step of the rst
pass if required. Note that the maximum number of notes allowed on each step is
eight, so trying to add a ninth note is not possible.
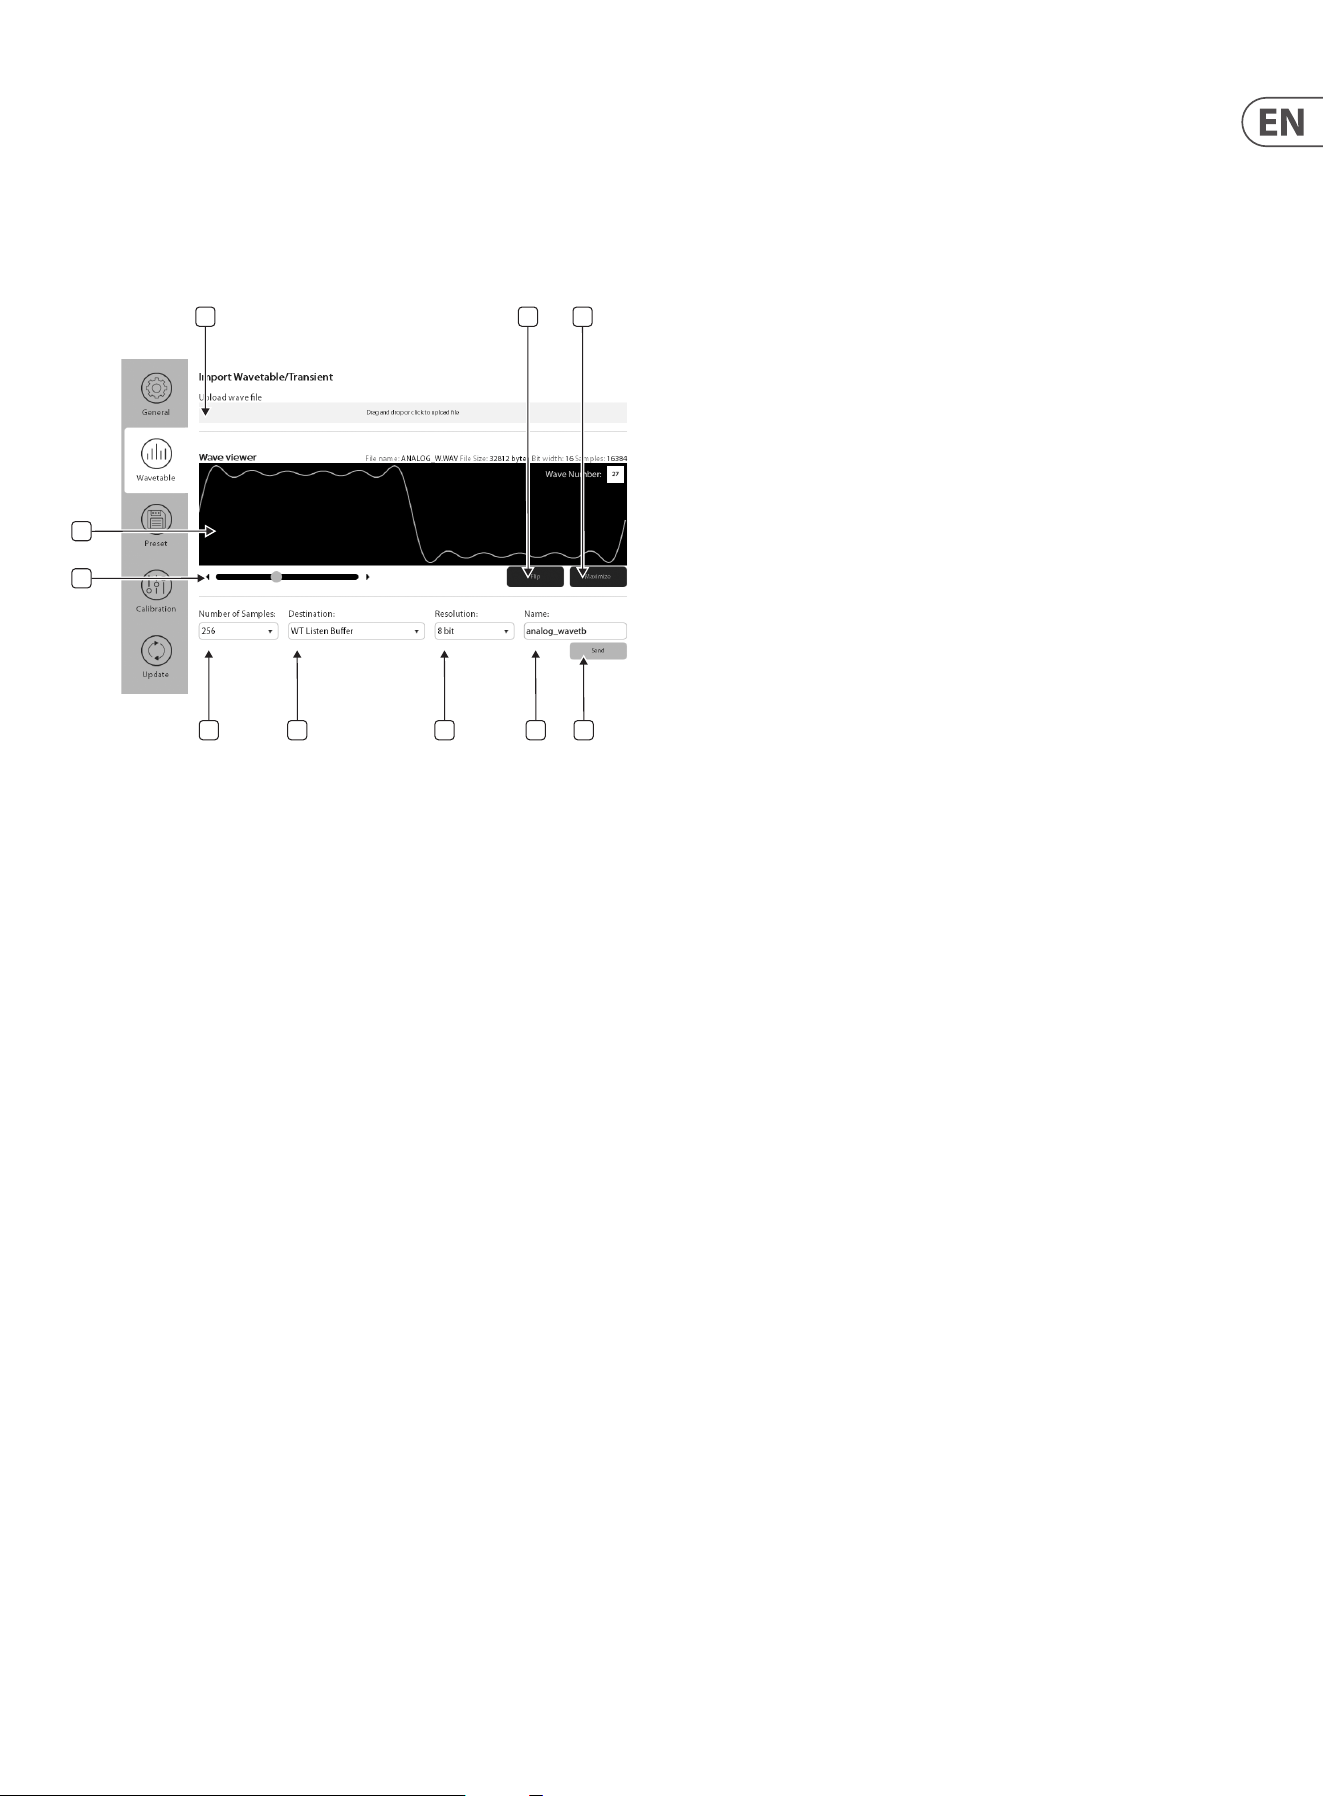
27 WAVE User Manual
User Waves and Transients
One of the key features of the Wave synthesizer is the ability to import custom
wavetables and transients, created using third-party tools. This can be done
through the SynthTribe App, which you can connect to your WAVE synthesizer via
USB on your PC or Mac. Once connected, launch the SynthTribe App and navigate
to the Wavetable tab to access the import window.
54 6 7 8
1
9
10
2
3
Loading Files
To import a le, simply click or drag and drop the le at the top of the import
window
(1)
. The app accepts standard uncompressed Mono WAV les. Once loaded,
the le’s information and waveform will be displayed in the wave viewer
(2)
.
You can navigate through the waveform using the navigation slider
(3)
.
Configuring Waveform Samples
Wavetables can have dierent sample lengths per waveform depending on the
export settings of the third-party application. Common lengths include 128, 256,
512, 1024, 2048 and 4096 samples. To ensure full compatibility, the SynthTribe
app automatically down-samples the wavetable to match the Wave synthesizer’s
requirement of 128 samples per waveform, with 64 waves per wavetable.
Use the Number of Samples window
(4)
to adjust the sample count per
waveform based on your wavetable le. This adjustment will immediately
update the waveform display to reect the chosen sample set. If the le contains
more than 64 waves, only the rst 64 will be used, while any remaining slots will
be left empty if fewer waves are present.
For transients, no down-sampling occurs, and the full wavetable memory is
utilized. As a result, the Number of Samples option is disabled, and the entire
transient is displayed in the viewer.
Selecting Destination
You can choose one of three destinations for your wave from the Destination
drop-down menu
(5)
:
• • User Wavetables (locations 64–127)
• • User Transients (locations 32–63)
• • WT / TR Listen Buers
Waves sent to the user wavetable or transient locations will be saved into the
Wave’s no-volatile memory. If either of the Listen Buers is selected then the
wave or transient of the current program will be replaced by three dashes (---)
and the wave will not be saved. This is a useful way of previewing how a user
wave or transient will sound without committing it to memory.
Setting Resolution and Naming
The Resolution window
(6)
gives the option of sending the waveform in 8 or 16
bit form. The Name window
(7)
shows the name of the le that was imported,
with the option to edit in the window.
Sending the Wavetable or Transient
When all the parameters have been set satisfactorily use the Send button
(8)
to
send the le to your chosen destination. This takes around 8 seconds, with the
progress displayed in the app. Once the le has been successfully received the
Wave's OLED display will momentarily show the le name and destination.
Additional Functions
The Flip and Maximize buttons
(9) (10)
provide two extra tools for rening
your waveforms:
• • Flip reverses the wavetable, swapping the order of waves (e.g., wave
0 becomes wave 63). This can be useful when programming sounds,
particularly when sweeping through the table with the ADSR 1 envelope.
• • Maximize normalizes the waveform, scaling all values proportionally to
ensure the highest peak reaches the maximum output level. This is helpful
when the imported wavetable or transient has low audio levels, ensuring
optimal volume without aecting the waveform's shape and dynamics.
.
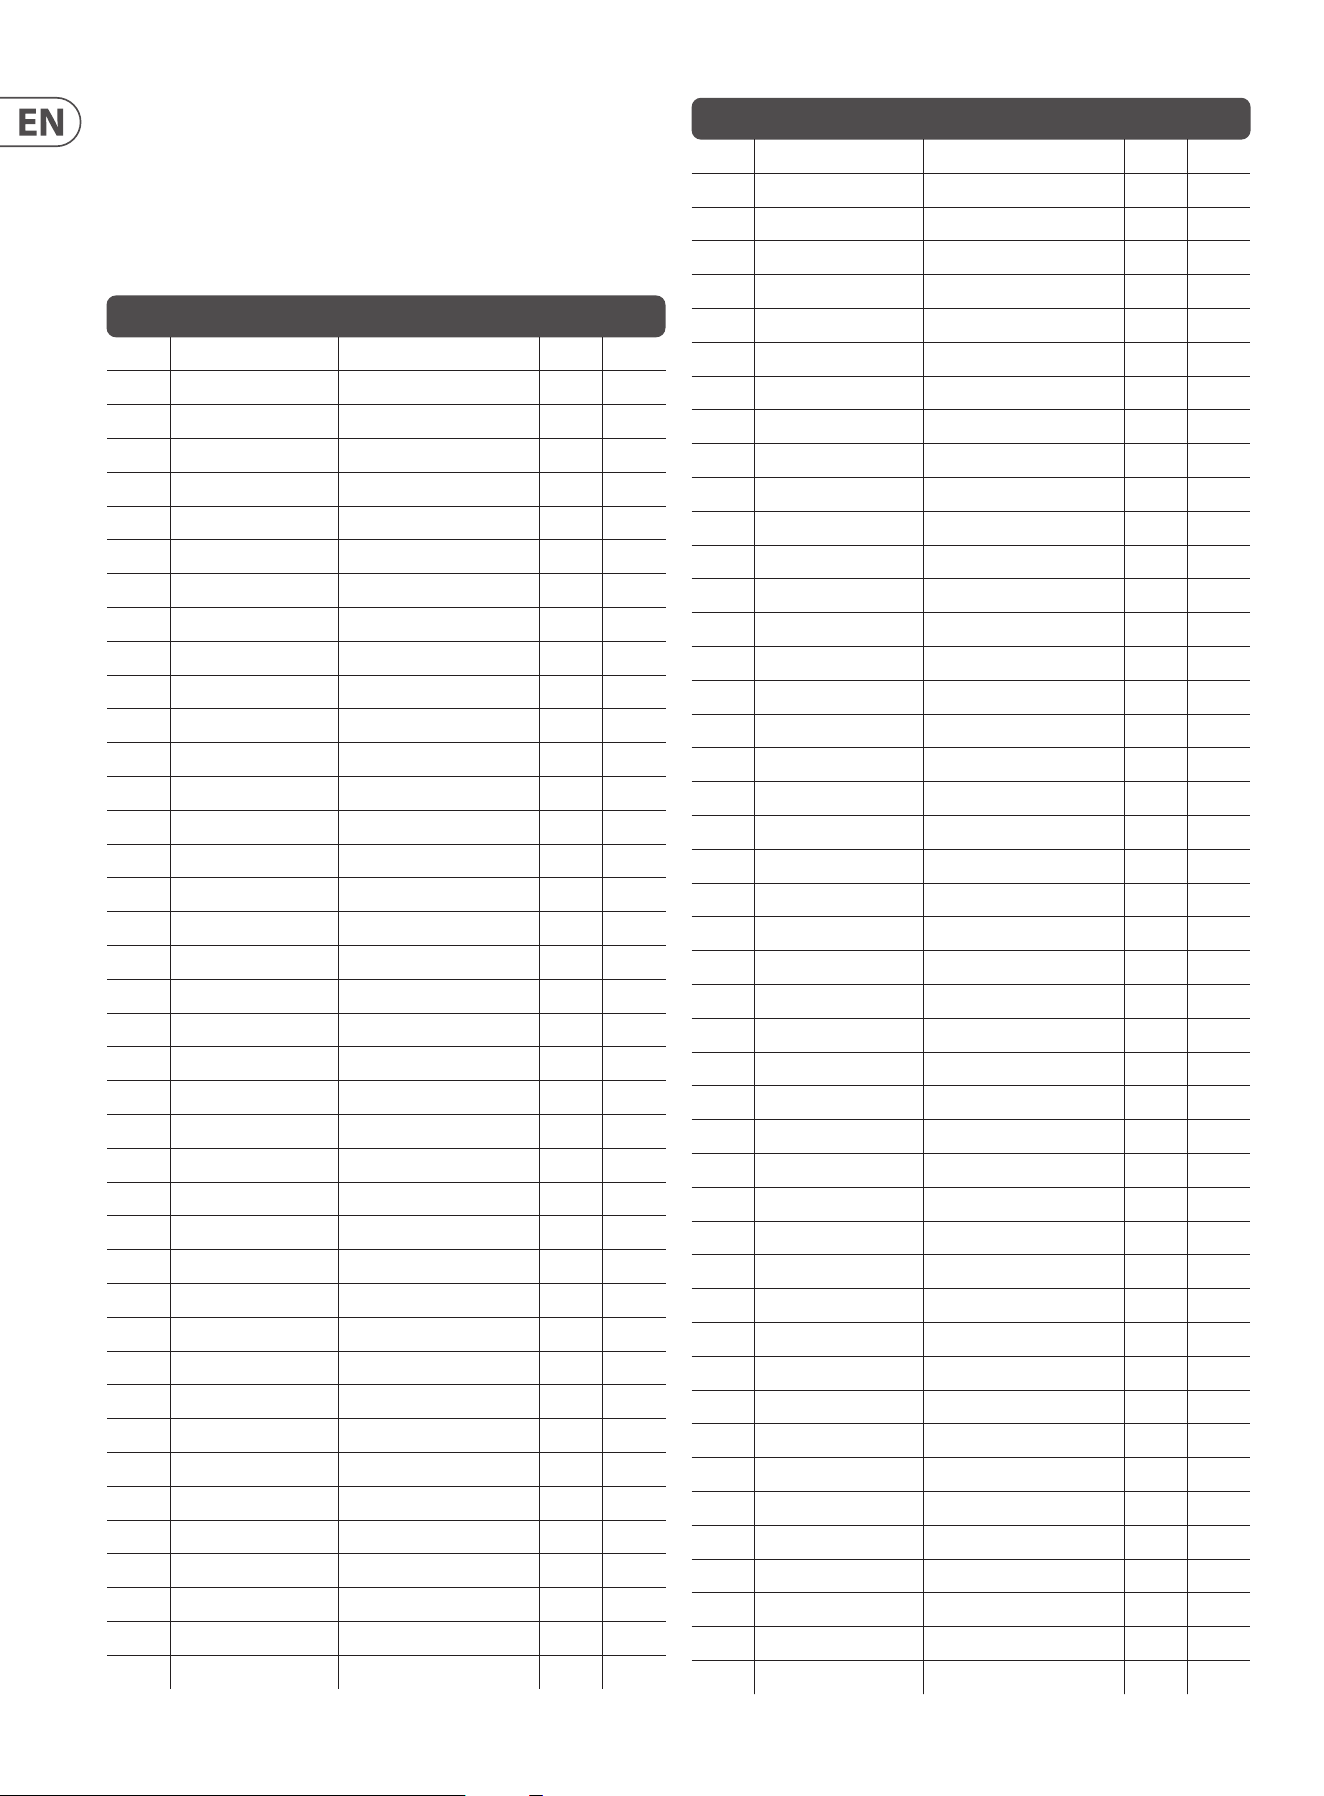
28 WAVE User Manual
Programs
The Wave comes with two banks of 100 programs from the factory. Bank 0
contains our Behringer sounds, Bank 1 contains some classic Wave programs.
Bank 0
PROG NAME KEYB WT/TR
AT
0 Thingie Poly 21
1 Space Sweep Poly 74
2 Dynamic Tines Poly 68
3 Bass & Juno Sweep A poly, B mono 29 X
4 Dynamic Prophet Brass Poly 24 X
5 Stratos Poly 71
6 Bass & Voco Trem A poly, B mono 86
7 Wurli One Poly 84
8 Jazz Guitar Poly 67
9 Rotary B3 Poly 27
10 Bass & PWM Strings A poly, B mono 29
11 Tomita's Bass Poly 0 X
12 Church Pipes Poly 64
13 Dream Vibes Poly 69
14 Fretless & Tines A poly, B mono 68
15 BellTasia Poly 2
16 Tubular Poly 66
17 CZ Sawer Poly 78
18 FM Brass Poly 6 X
19 WAVE Waves Poly 16 X
20 FairVox Poly 73
21 PanFlute Poly 32 X
22 Pizzicato Poly 33
23 Steel Guitar Poly 34
24 Xylophone Poly 36
25 Sail Away Poly 38
26 PWMstringer A poly, B mono 76
27 Soft Bell EP Poly 39
28 Dusty Rhodos Poly 40
29 Solo Trumpet Poly 41 X
30 Mute Trumpet Poly 42 X
31 Duuuh Poly 43 X
32 Bass & Wurli A poly, B mono 84
33 Sync Solo Quad 30 X
34 Synth Flute Poly 30 X
35 Alto Sax Poly 31 X
36 Retro Split A poly, B mono 19 X
37 Strings'n Solo Quad A/B 29 X
38 Matrix Strings Poly 24
39 Alpha Pad Poly 65
PROG NAME KEYB WT/TR
AT
40 Cosmic Soup Poly 18
41 HarpOon Poly 37
42 Square Solo Poly 24 X
43 Fantasia Poly 22
44 Synth Pizzi Poly 30
45 Super Saw Poly 0
46 Organ Chariot Poly 14
47 Noise Siren Poly 24
48 Piano X Poly 31
49 Percussion Poly 0
50 Drone Harmonica Poly 11
51 FanWAVEia Poly 17
52 Lyle's Solo Poly 30 X
53 FM Bass1 Poly 70
54 PWM Pad Poly 72
55 Solina 1 Poly 71
56 808 Bass Poly 20
57 SYNC Poly 0 X
58 WAVE SeqSplit A poly, B mono 6 X
59 Synth Cello Poly 35 X
60 SoundTrack Poly 24 X
61 Solead Poly 77
62 LA Strings Poly 82 X
63 Crystal Waves Poly 17
64 80s Rig A poly, B mono 71
65 JunPad & CV-Bass A poly, B mono CV in 24
66 Fendi Rhodos Poly 85
67 Funky Wurli Poly 84
69 Arpeggio PAD Poly 18
69 Ding Ding Poly 86
70 Short Bell Poly 2
71 Square Arp Poly 8 X
72 Reso Harp Poly 9 X
73 Harpsi Bell Poly 12 X
74 Steel Organ Poly 18
75 Spring Pad Poly 19
76 Octave Bell Poly 23
77 Yoga Temple Poly 25
78 Steel Drum Poly 2
79 Chime Bell Poly 1
80 Matrix Strings 2 Poly 6
81 Wheel Pad Poly 14
82 Organic Synth Poly 14
83 Squared Dreams Poly 29
84 Robotic Poly 20
85 Reso Phase Poly 26
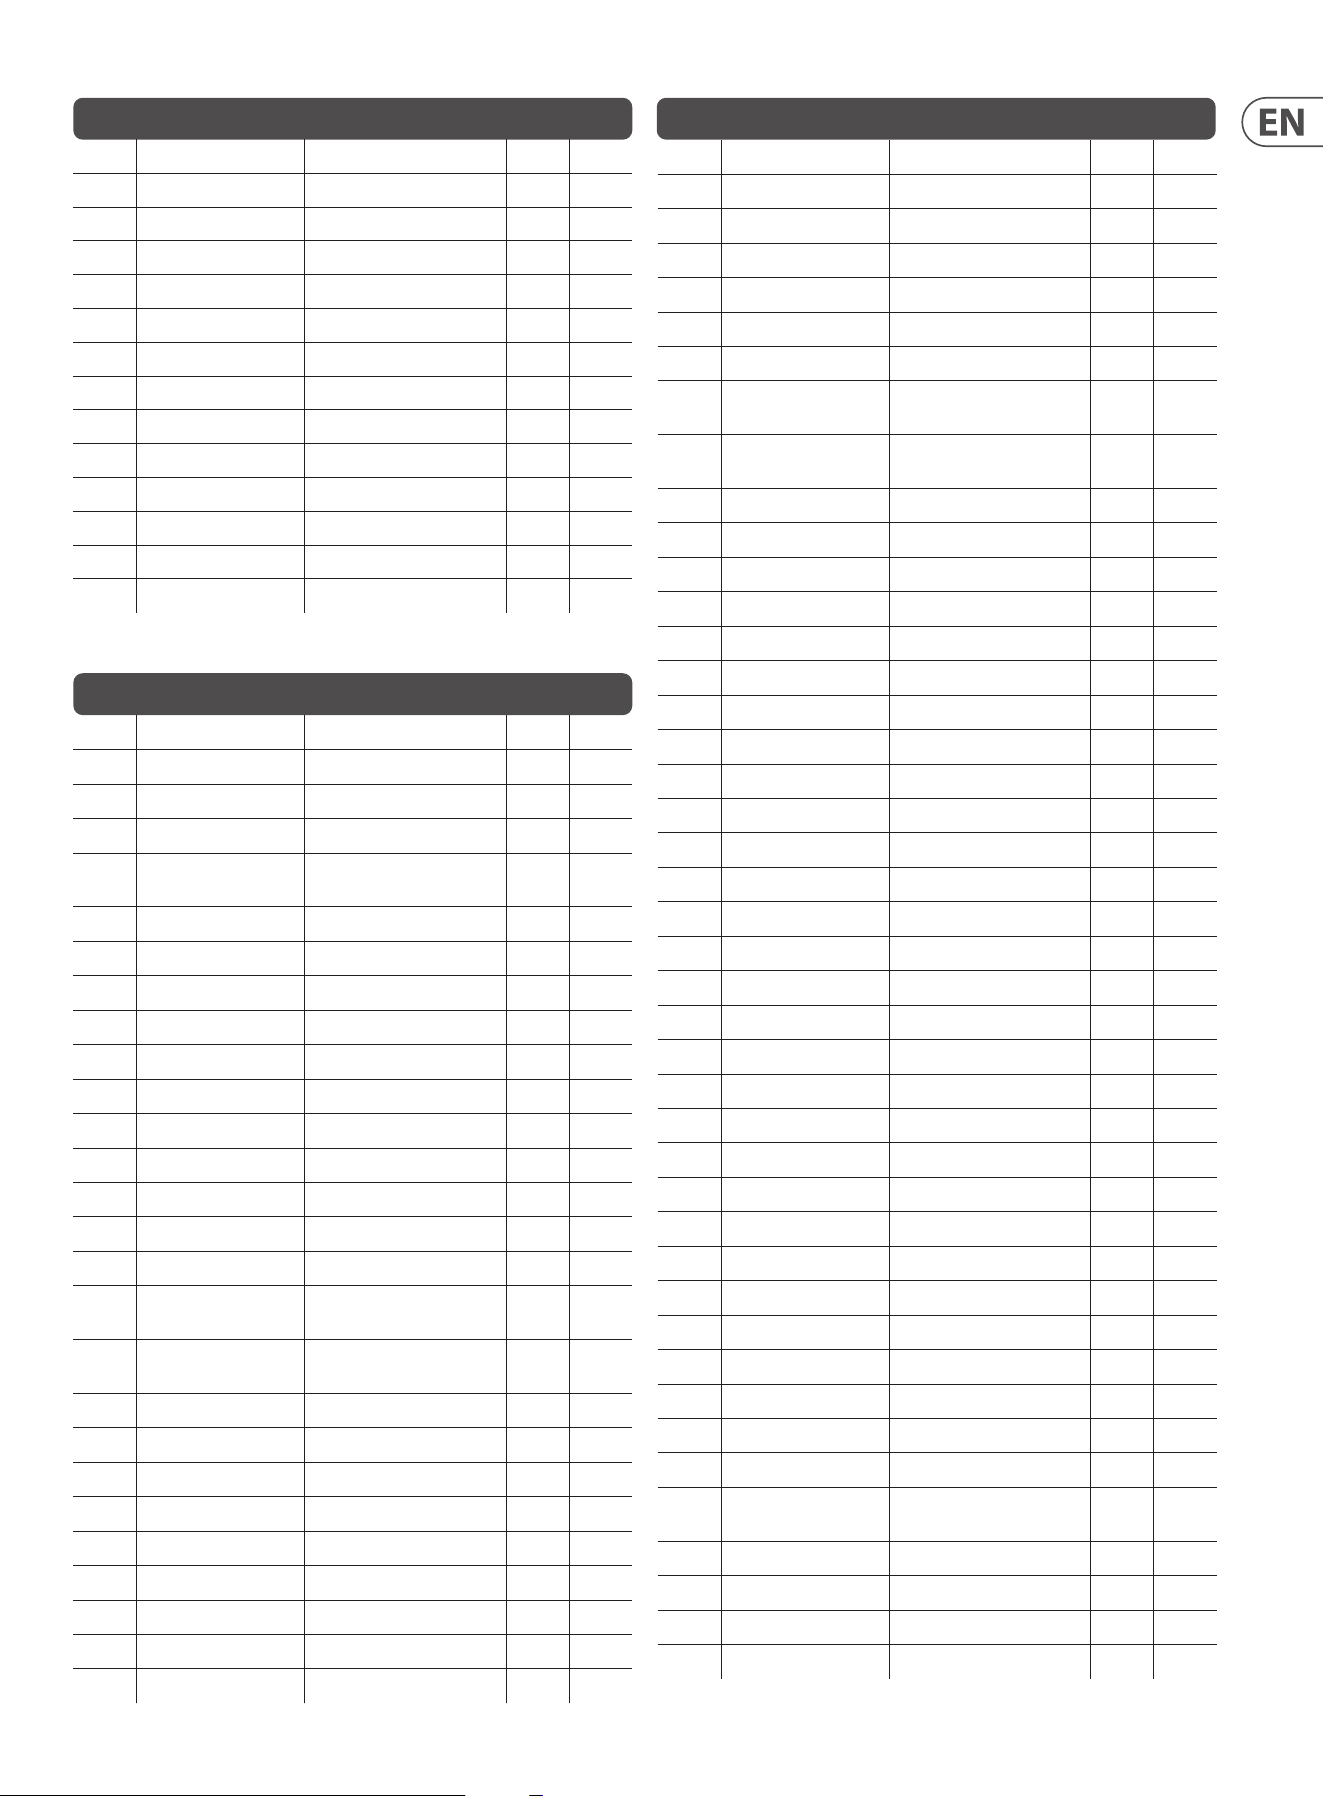
29 WAVE User Manual
PROG NAME KEYB WT/TR
AT
86 Arcade Pad Poly 19
87 PWM Solo Poly 29
88 VCF SSM2044 Poly 0
89 ARP Lead Quad 3
90 Spring Pad Poly 19
91 Reso Dive Organ Poly 27
92 ArpEratus Poly 0
93 EquiSAW Poly 26
94 Woody SQU Poly 14
95 Wave Chase Poly 14
96 Poly Bass Poly 14
97 Wave Slide Poly 14
98 Landscape Poly 14
99 Formant Drop Poly 14
Bank 1
PROG NAME KEYB WT/TR AT
0 WAVE Swirl Poly 17
1 Modulated Vibraphone Poly 8
2 Harmonic Glide Poly 0
3 WAVE Tone 16 Poly 18
4
Resonant
Extended Synth
Poly 27
5 Belli Pad Poly 0
6 KW Organ Poly 14
7 Waow! Quad 18
8 Organ 1 Poly 20
9 Organ 2 Poly 20
10 Bellgan Quad 20
11 Wave Organ Poly 18
12 Filter Mod Poly 14
13 WAVE Sitar Poly 9
14 Sawyer Poly 0
15 StringPan Poly 28
16
Inspired by
Fender Keys
Poly 8
17
Inspired by
Electric Keys
Poly 8
18 Env Sync Poly 28
19 Punchy with Quinte Poly 24
20 Wave Shaping Quad 6
21 Concert Piano Poly 31
22 Brass Bel Quad 0
23 Punchy Poly 24
24 Dynamic Spinet Quad 13
25 Bubble Square Poly 0
26 Cosmic Spinet Poly 5
PROG NAME KEYB WT/TR AT
27 Upright Piano Poly 23
28 Citrus Quad 20
29 Wave Bypass Poly 15
30 Synth Poly 0
31 Pulse Width Synth Poly 28
32 Resonant Synth Attack Poly 14
33 Tinkle Poly 24
34
Sawtooth
Extended Synth
Poly 28
35
Punchy with
Resonance
Poly 9
36 Punchy Metal Quad 13
37 Punchy Chime Poly 2
38 Electric 12-String Quad 28
39 Chime Poly 4
40 Long Space Chime Poly 24
41 Chime-like Quad 4
42 Delicate Punch Poly 0
43 Mallet Keys Quad 2
44 Vibrating Keys Poly 2
45 Punchy 3 Poly 15
46 Saxophone Poly 31
47 Brass Section 1 Poly 26
48 Trumpet Section Quad 26
49 Perc. / Extended Poly 6
50 Deep Brass Poly 7
51 Trombone Section Poly 26
52 Brass Ensemble Quad 26
53 Blended Brass Quad 26
54 High Register Flute Poly 3
55 Woodwind Flute Poly 3
56 String Ensemble 1 Quad 16
57 String Ensemble 2 Quad 29
58 Vox Ocean Poly 27
59 ChoirTasia Quad 27
60 Ethereal Strings Poly 29
61 Ethereal Strings Quad 29
62 Poly with Sync FX Quad 28
63 Echo Bell Pad Poly 25
64 Reed Instrument Poly 10
65
Concert Piano +
Saxophone
A-Quad, B-Quad 31
66 Studio Organ Poly 14
67 Cathedral Organ Poly 14
68 Orgish Bell Poly 14
69 High Perc Poly 24
30 WAVE User Manual
PROG NAME KEYB WT/TR AT
70 Perc Poly 24
71 Organ 3 Poly 14
72 Organ 1 Redux Poly 20
73 Raw Choir Poly 27
74 Blended Choir Quad 27
75 Ethereal Choir Quad 21
76 Ethereal Choir 2 Quad 27
77 FX Poly 25
78 Space Poly Quad 16
79 FX Poly Quad 20
80 Sync-stortion Poly 28
81 Elec Piano Poly 30
82 Poly Pad Poly 30
83 Funk Saw Poly 14
84 Simple Organ Poly 30
85 Glockenspiel Quad 4
86 Harp-une Poly 29
87 Chain Saw Bass Poly 13
88 Soundcard FM Poly 26
89 Full Keys Quad 30
90 Concert Piano Strings Poly 31
91
Concert Piano with
Wave Tone
Poly 31
92 Concert Piano with Sax A-Quad, B-Quad 31
93 Perc for Sequencer Poly 0
94 Delay Poly 25
95 Pitch Shift Poly 0
96 FX Poly 13
97 Quirky Mono 13
98 Delay Eect Poly 25
99 Sample & Hold Poly 20
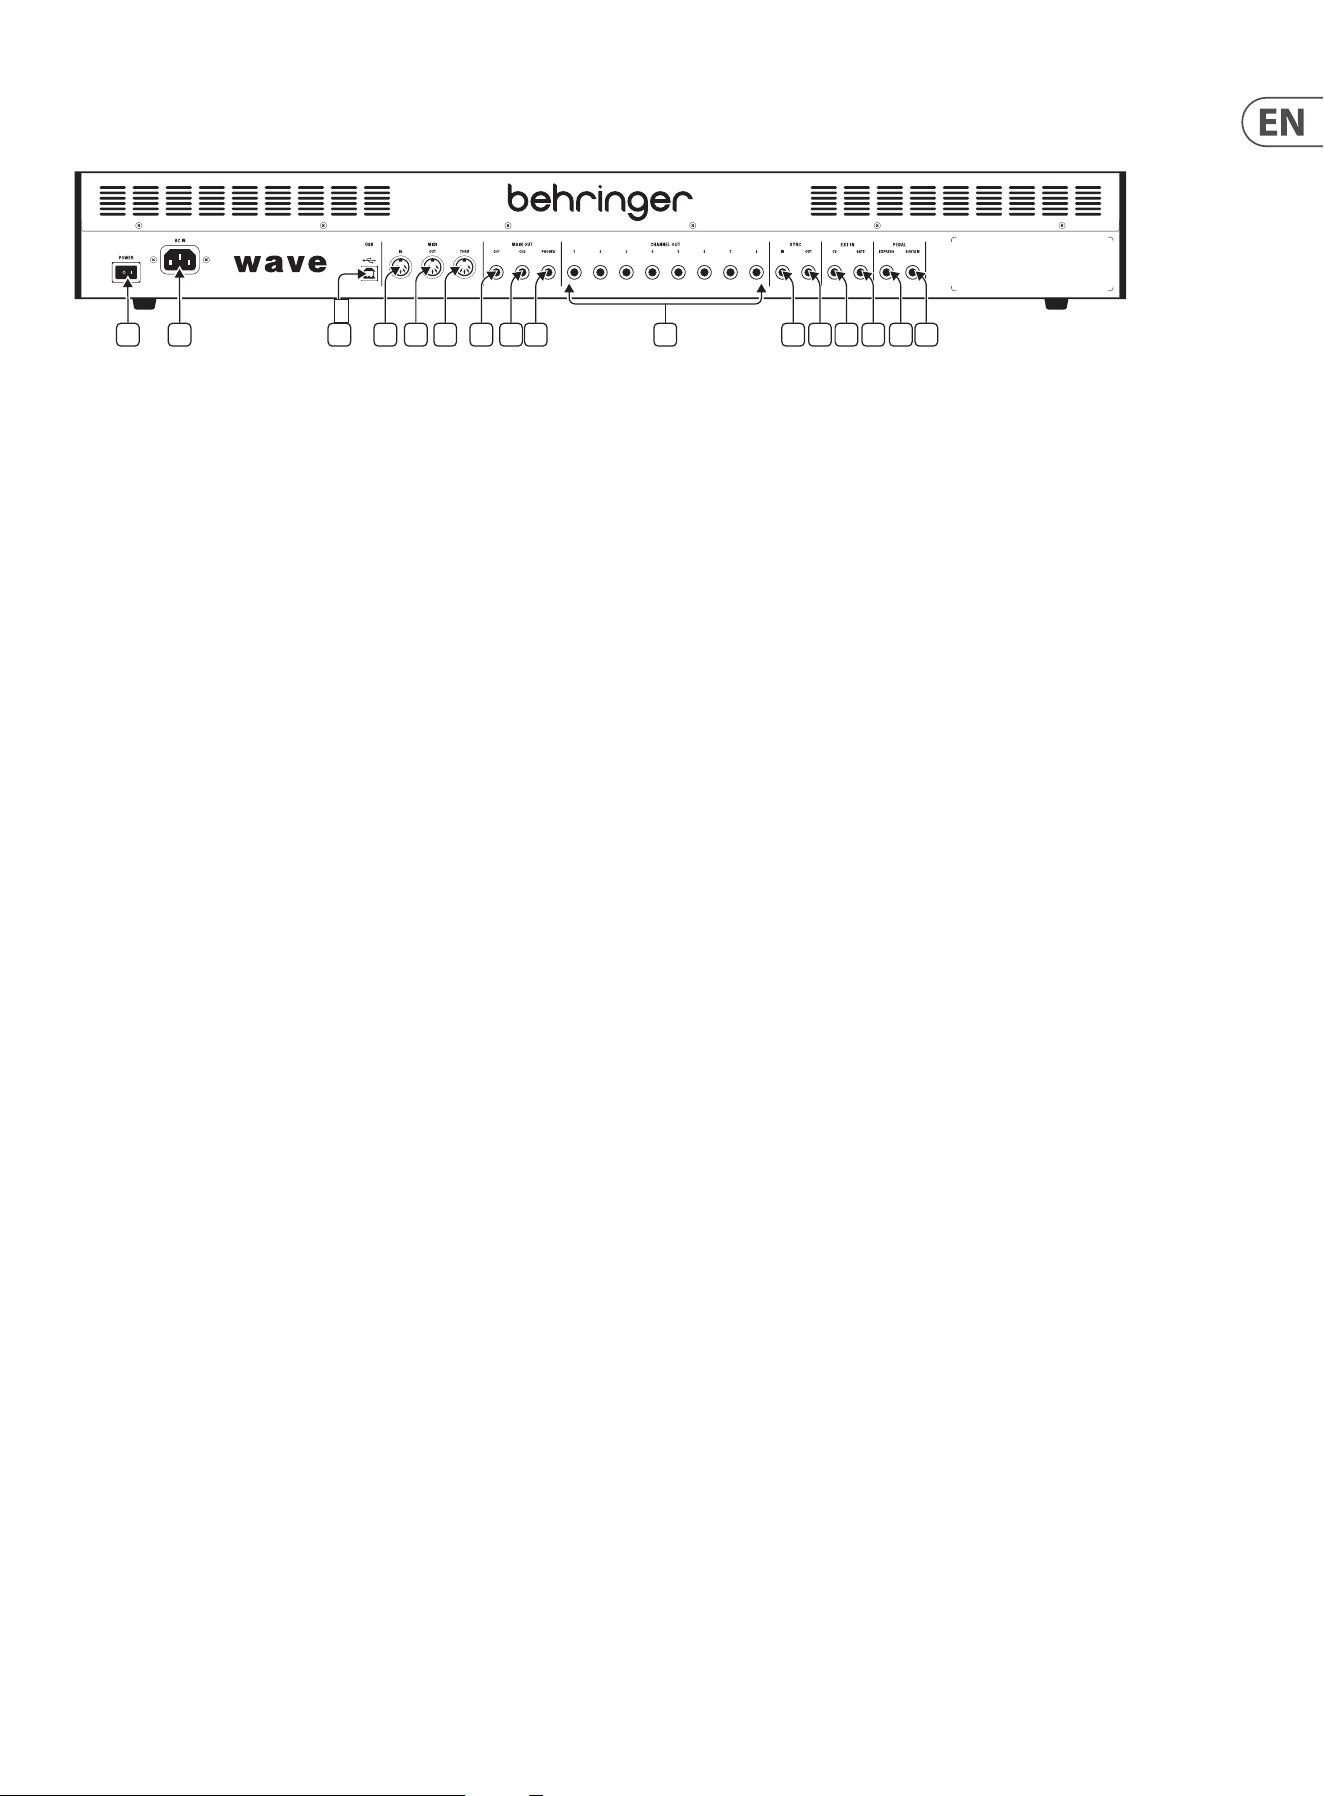
31 WAVE User Manual
Rear Panel
42 44 45 46 47 48 49 51 53 55 5750 52 54 5643
(42) Power Switch
(43) IEC Power Inlet – connects to AC power source in the range 100 – 240 volt,
using the supplied IEC cable.
(44) USB Socket – connects to your computer for MIDI control and rmware updates.
(45) MIDI IN DIN – allows control of the Wave from an external MIDI source
using 5-pin DIN lead.
(46) MIDI OUT DIN – outputs MIDI messages from the Wave to other connected
equipment using 5-pin DIN lead.
(47) MIDI THRU DIN – passes messages received at the MIDI IN socket to
external MIDI equipment using 5-pin DIN lead.
(48) Channel 1 Output – unbalanced audio output using 6.35mm (¼") TS jack.
If the Basis control
(1)
is set to minimum then the Wave will be in mono. When
Basis is above minimum then this carries the left hand part of the signal.
(49) Channel 2 Output – carries the right hand part of the signal when Basis is
above minimum. Doubles up the mono output of Channel 1 when the Basis
control is set to minimum.
(50) Phones – stereo headphone output on 6.35mm TRS jack.
(51) Channel Outs – unbalanced outputs for individual voices on 6.35mm (¼")
TS jacks. Voices will still feed the main left and right outputs when channel
outs are in use.
(52) Sync In – external synchronization input for the sequencer and arpeggiator,
selected in the sequencer menu. The socket is TRS with the start/stop
function on the ring and the clock on the tip.
(53) Sync Out – outputs a trigger pulse in time with the internal sequencer and
arpeggiator. The socket is TRS with the start/stop function on the ring and
the clock on the tip.
(54) CV In – allows control of group B voices, monophonically, from an external
1 volt/octave CV source, when in Keyboard Mode 9. CV range is -5 V to +5 V.
(55) Gate In – allows the envelope generators to be controlled by an external
gate, when in Keyboard Mode 9.
(56) Expression Pedal – allows connection of a footpedal, such as the
Behringer FC600, to control a variety of parameters based on the
selected settings.
(57) Sustain Pedal – allows notes to be held indenitely at the sustain level of
envelope generator 2 using a footswitch.
Calibration
The Wave is fully calibrated at the factory, but recalibration can be performed if
needed. Four types of calibrations are available: VCA/VCF, CV Input, Mod Wheel,
and Pitch Wheel. All calibrations can be initiated through the Synthtribe app,
while VCA/VCF calibration can also be accessed directly from the synth via a
specic key combination at startup. Instructions and results are shown on the
OLED screen during the process.
VCA/VCF Calibration
For best results, allow the Wave to warm up for 45 minutes before starting the
calibration. To begin, power cycle the Wave while holding the ANALOG
(32)
and
GROUP
(33)
buttons. The OLED will display the calibration progress, which may
take up to 200 seconds.
CV Input Calibration
This calibration requires playing a note on the Wave’s keyboard or an external
MIDI keyboard while supplying the corresponding voltage to the CV Input on the
rear panel. Then, play a second note with a new CV input.
Mod Wheel Calibration
To calibrate the Mod Wheel, move it to its maximum position, then back to the
minimum position as instructed on the OLED.
Pitch Wheel Calibration
For the Pitch Wheel calibration, move the wheel to its maximum position and
hold it until prompted to release, then move it to the minimum position and hold
until instructed to release.
32 WAVE User Manual
MIDI CCs
Apart from note on/o messages on the selected channel (see MIDI under Program Menu above) the Wave also responds to, and transmits, the following MIDI messages:
Control # Range Function Transmit Receive Remarks
0 0-1 Bank Select MSB X X
1 0-127 Modulation Wheel X X
6 0-127 NRPN Data MSB 1.) 2.) Data Value
7 0-127 Volume 1.) 2.) MASTER VOLUME
8 0-127 Balance 1.) 2.) BASIS
11 0-127 Expression Pedal X X
12 0-127 DELAY 1.) 2.) LFO Delay
13 0-127 WAVESHAPE 1.) 2.) LFO Shape
14 0-127 RATE 1.) 2.) LFO Rate
15 0-127 ATTACK 3 1.) 2.) Env 3 - Attack
16 0-127 DECAY 3 1.) 2.) Env 3 - Decay
17 0-127 ENV 3 ATT 1.) 2.) Env 3 - Amount
18 0-127 A1 1.) 2.) Env 1 - Attack
19 0-127 D1 1.) 2.) Env 1 - Decay
20 0-127 S1 1.) 2.) Env 1 - Sustain
21 0-127 R1 1.) 2.) Env 1 - Release
22 0-127 A2 1.) 2.) Env 2 - Attack
23 0-127 D2 1.) 2.) Env 2 - Decay
24 0-127 S2 1.) 2.) Env 2 - Sustain
25 0-127 R2 1.) 2.) Env 2 - Release
26 0-127 WAVES-OSC 1.) 2.) Main Osc Wave Tab Position
27 0-127 WAVES-SUB 1.) 2.) Sub Osc Wave Tab Position
28 0-127 ENV 1 -> VCF 1.) 2.) Env1 -> VCF Frequency Mod
29 0-127 ENV 2 -> LOUDNESS 1.) 2.) Preset Volume
30 0-127 ENV 1 -> WAVES 1.) 2.) Env1 -> Wave Pos Mod
31 0-2 Group Select 1.) 2.) 0=A, 1=B, 2=A+B
32 0-1 Bank Select LSB X X
64 0/127 Sustain Pedal X X
71 0-127 VCF-EMPHASIS 1.) 2.) Filter Resonance
74 0-127 VCF-CUTOFF 1.) 2.) Filter Frequency
98 0-127 NRPN Para# LSB 1.) 2.) Lower 7 bits
99 0-127 NRPN Para# MSB 1.) 2.) Higher 7 bits
120 All Sound O X
121 Reset all Controllers X
122 0/127 Local Control X X 0=O/127=On
123 All Notes O X
X = Yes
1.) When PAR-COM=1,3
2.) When PAR-COM=2,3

33 WAVE User Manual
MIDI NRPNs
The Wave also responds to, and transmits, MIDI NRPNS
MSB LSB 14-bit Parameter Name Range Notes
0 0 00 WAVETB 0-127 Wavetable (32-127 = User WT/Trans)
0 1 01 SPLIT 0-99 Split Point
0 2 02 KEYB 0-9 Keyboard Mode
0 3 03 DTF 0-7 Preset Data recall Mode
0 4 04 TUNE 0-99 Tuning (400-499)
0 5 05 EXP-PEDAL 0-5 Expression Pedal Function
0 6 06 TOUCH 0-3 Channel Aftertouch
0 7 07 BRT 0-99 LCD Brightness
0 8 08 CNT 0-99 LCD Contrast
0 9 09 FIRM 0-1 Firmware Mode
0 10 10 OSC 0-1 Oscillator Mode
0 11 11 LFO 0-1 LFO Mode
0 12 12 UW 0-2 Upper WT Select
0 13 13 SW 0-6 Sub Osc Mode
0 14 14 KW 0-7 Key -> Wave Mod
0 15 15 KF 0-7 Key -> Filter Mod
0 16 16 KL 0-7 Key -> Loudness Mod
0 17 17 MW 0-9 Mod Wheel -> Wave Mod
0 18 18 MF 0-9 Mod Wheel -> Filter Mod
0 19 19 ML 0-1 Mod Wheel -> Loudness Mod
0 20 20 BD 0-7 Bender Destination
0 21 21 BI 0-5 Bender Interval
0 22 22 TW 0-2 Touch -> Wave Mod
0 23 23 TF 0-2 Touch -> Filter Mod
0 24 24 TL 0-2 Touch -> Loudness Mode
0 25 25 TM 0-1 Touch -> Mod Wheel
0 26 26 VF 0-3 Velocity -> Filter Mod
0 27 27 VL 0-3 Velocity -> Loudness Mod
0 28 28 DETU 0-9 Sub Osc Detuning
0 29 29 MO 0-1 Mod -> Main Osc Pitch
0 30 30 MS 0-1 Mod -> Sub Osc Pitch
0 31 31 EO 0-9 Env3 -> Main Osc Pitch
0 32 32 ES 0-1 Env3 -> Main Sub Pitch
0 33 33 SEMIT V1 0-63 Voice 1 - Semi Oset
0 34 34 SEMIT V2 0-63 Voice 2 - Semi Oset
0 35 35 SEMIT V3 0-63 Voice 3 - Semi Oset
0 36 36 SEMIT V4 0-63 Voice 4 - Semi Oset
0 37 37 SEMIT V5 0-63 Voice 5 - Semi Oset
0 38 38 SEMIT V6 0-63 Voice 6 - Semi Oset
0 39 39 SEMIT V7 0-63 Voice 7 - Semi Oset
0 40 40 SEMIT V8 0-63 Voice 8 – Semi Oset
0 41 41 STATE 0-3 Arp/Seq - State (Stop,Play,Rec,Overdub)
0 42 42 MOD 0-25 Arp/Seq - Mode
34 WAVE User Manual
MSB LSB 14-bit Parameter Name Range Notes
0 43 43 CLK 0-34 Arp/Seq - Clock Selection
0 44 44 GAT 1-99 Arp/Seq - Gate Time
0 45 45 DIV 0-6 Arp/Seq - Sequencer Time
0 46 46 BPM 40-240 Arp/Seq - Speed (MSB/LSB)
Notes:
Data change commands (RX & TX)
1. Bn 63 00
2. Bn 62
ParNum
3. Bn 06
Value
(n = MIDI Chan. (0 - 15)
ParNum
= 0 - 37
Value
= 0 - 127)
Bank Select (RX & TX)
1. Bn 00 00
2. Bn 20
BankNum
(n = MIDI Chan, (0 - 15)
BankNum
= 0 or 1)
All numbers are in HEX format.
SysEx
This section describes how the Wave responds to SysEx commands. Note that all
numbers are Hex.
SysEx Data Format
MIDI SysEx transmissions always begin with data 0xF0, end with 0xF7.
WAVE Data Structure of MIDI SysEx Messages
F0 Manu ID Model ID Device ID PKT SPKT Data F7
Description of SysEx structure
Field (Hex) Description
F0 System exclusive start.
00 20 32 Manufacturer ID (Behringer GmbH)
00 01 39 Model ID (WAVE)
Device ID Always '0' for the WAVE
PKT Packet Type
SPKT Sub Packet Type (SPKT is absent for some packets)
Version Data Package Version Byte (currently 0x0)
Data Payload of packet
F7 End of system exclusive
SysEx Preset Data
Byte Group Menu Parameter Name Range Notes
0-15 NAME PRESET NAME 32-126 16x ASCII Character Bytes
16 PROGRAM WAVETB 0-127 Wavetable (32-127 = User TR/WT)
17 PROGRAM SPLIT 0-99 Split Point
18 PROGRAM KEYB 0-9 Keyboard Mode
19 A TUNING DETU 0-9 Sub Osc Detuning
20 A TUNING MO 0-1 Mod -> Main Osc Pitch
21 A TUNING MS 0-1 Mod -> Sub Osc Pitch
22 A TUNING EO 0-1 Env3 -> Main Osc Pitch
23 A TUNING ES 0-1 Env3 -> Main Sub Pitch
24 A TUNING SEMIT V1 0-63 Voice 1 - Semi Oset
25 A TUNING SEMIT V2 0-63 Voice 2 - Semi Oset
26 A TUNING SEMIT V3 0-63 Voice 3 - Semi Oset
27 A TUNING SEMIT V4 0-63 Voice 4 - Semi Oset
28 A TUNING SEMIT V5 0-63 Voice 5 - Semi Oset
29 A TUNING SEMIT V6 0-63 Voice 6 - Semi Oset
30 A TUNING SEMIT V7 0-63 Voice 7 - Semi Oset
31 A TUNING SEMIT V7 0-63 Voice 8 - Semi Oset
32 A ANALOG DELAY 0-127 LFO Delay
33 A ANALOG WAVESHAPE 0-127 LFO Shape

35 WAVE User Manual
Byte Group Menu Parameter Name Range Notes
34 A ANALOG RATE 0-127 LFO Rate
35 A ANALOG A1 0-127 Env 1 - Attack
36 A ANALOG D1 0-127 Env 1 - Decay
37 A ANALOG S1 0-127 Env 1 - Sustain
38 A ANALOG R1 0-127 Env 1 - Release
39 A ANALOG VCF-CUTOFF 0-127 Filter Frequency
40 A ANALOG VCF-EMPHASIS 0-127 Filter Resonance
41 A ANALOG WAVES-OSC 0-127 Main Osc Wave Tab Position
42 A ANALOG WAVES-SUB 0-127 Sub Osc Wave Tab Position
43 A ANALOG ATTACK 3 0-127 Env 3 - Attack
44 A ANALOG DECAY 3 0-127 Env 3 - Decay
45 A ANALOG ENV 3 ATT 0-127 Env 3 - Amount
46 A ANALOG A2 0-127 Env 2 - Attack
47 A ANALOG D2 0-127 Env 2 - Decay
48 A ANALOG S2 0-127 Env 2 - Sustain
49 A ANALOG R2 0-127 Env 2 - Release
50 A ANALOG MOD WHL 0-127 Mod Wheel Position
51 A ANALOG ENV 1 -> VCF 0-127 Env1 -> VCF Frequency Mod
52 A ANALOG ENV 2 -> LOUDNESS 0-127 Preset Volume
53 A ANALOG ENV 1 -> WAVES 0-127 Env1 -> Wave Pos Mod
54 A DIGITAL UW 0-2 Upper WT Select
55 A DIGITAL SW 0-6 Sub Osc Mode
56 A DIGITAL KW 0-7 Key -> Wave Mod
57 A DIGITAL KF 0-7 Key -> Filter Mod
58 A DIGITAL KL 0-7 Key -> Loudness Mod
59 A DIGITAL MW 0-9 Mod Wheel -> Wave Mod
60 A DIGITAL MF 0-9 Mod Wheel -> Filter Mod
61 A DIGITAL ML 0-1 Mod Wheel -> Loudness Mod
62 A DIGITAL BD 0-7 Bender Destination
63 A DIGITAL BI 0-5 Bender Interval
64 A DIGITAL TW 0-2 Touch -> Wave Mod
65 A DIGITAL TF 0-2 Touch -> Filter Mod
66 A DIGITAL TL 0-2 Touch -> Loudness Mode
67 A DIGITAL TM 0-1 Touch -> Mod Wheel
68 A DIGITAL VF 0-3 Velocity -> Filter Mod
69 A DIGITAL VL 0-3 Velocity -> Loudness Mod
70 B TUNING DETU 0-9 Sub Osc Detuning
71 B TUNING MO 0-1 Mod -> Main Osc Pitch
72 B TUNING MS 0-1 Mod -> Sub Osc Pitch
73 B TUNING EO 0-9 Env3 -> Main Osc Pitch
74 B TUNING ES 0-1 Env3 -> Main Sub Pitch
75 B TUNING SEMIT V1 0-63 Voice 1 - Semi Oset
76 B TUNING SEMIT V2 0-63 Voice 2 - Semi Oset
77 B TUNING SEMIT V3 0-63 Voice 3 - Semi Oset
78 B TUNING SEMIT V4 0-63 Voice 4 - Semi Oset
79 B TUNING SEMIT V5 0-63 Voice 5 - Semi Oset
36 WAVE User Manual
Byte Group Menu Parameter Name Range Notes
80 B TUNING SEMIT V6 0-63 Voice 6 - Semi Oset
81 B TUNING SEMIT V7 0-63 Voice 7 - Semi Oset
82 B TUNING SEMIT V7 0-63 Voice 8 - Semi Oset
83 B ANALOG DELAY 0-127 LFO Delay
84 B ANALOG WAVESHAPE 0-127 LFO Shape
85 B ANALOG RATE 0-127 LFO Rate
86 B ANALOG A1 0-127 Env 1 - Attack
87 B ANALOG D1 0-127 Env 1 - Decay
88 B ANALOG S1 0-127 Env 1 - Sustain
89 B ANALOG R1 0-127 Env 1 - Release
90 B ANALOG VCF-CUTOFF 0-127 Filter Frequency
91 B ANALOG VCF-EMPHASIS 0-127 Filter Resonance
92 B ANALOG WAVES-OSC 0-127 Main Osc Wave Tab Position
93 B ANALOG WAVES-SUB 0-127 Sub Osc Wave Tab Position
94 B ANALOG ATTACK 3 0-127 Env 3 - Attack
95 B ANALOG DECAY 3 0-127 Env 3 - Decay
96 B ANALOG ENV 3 ATT 0-127 Env 3 - Amount
97 B ANALOG A2 0-127 Env 2 - Attack
98 B ANALOG D2 0-127 Env 2 - Decay
99 B ANALOG S2 0-127 Env 2 - Sustain
100 B ANALOG R2 0-127 Env 2 - Release
101 B ANALOG MOD WHL 0-127 Mod Wheel Position
102 B ANALOG ENV 1 -> VCF 0-127 Env1 -> VCF Frequency Mod
103 B ANALOG ENV 2 -> LOUDNESS 0-127 Preset Volume
104 B ANALOG ENV 1 -> WAVES 0-127 Env1 -> Wave Pos Mod
105 B DIGITAL UW 0-2 Upper WT Select
106 B DIGITAL SW 0-3 Sub Osc Mode
107 B DIGITAL KW 0-7 Key -> Wave Mod
108 B DIGITAL KF 0-7 Key -> Filter Mod
109 B DIGITAL KL 0-7 Key -> Loudness Mod
110 B DIGITAL MW 0-9 Mod Wheel -> Wave Mod
111 B DIGITAL MF 0-9 Mod Wheel -> Filter Mod
112 B DIGITAL ML 0-1 Mod Wheel -> Loudness Mod
113 B DIGITAL BD 0-7 Bender Destination
114 B DIGITAL BI 0-5 Bender Interval
115 B DIGITAL TW 0-2 Touch -> Wave Mod
116 B DIGITAL TF 0-2 Touch -> Filter Mod
117 B DIGITAL TL 0-2 Touch -> Loudness Mode
118 B DIGITAL TM 0-1 Touch -> Mod Wheel
119 B DIGITAL VF 0-3 Velocity -> Filter Mod
120 B DIGITAL VL 0-3 Velocity -> Loudness Mod
37 WAVE User Manual
Global SysEx
Byte Parameter Range Synth Tribe Notes Parameters
0 MIDI 0-16 YES MIDI Channel 0 = o
1 TTUNE 0-99 YES Tuning: 400-499 Hz
2 SYSEX 0/1 NO SysEx RX/TX on/o
3 LOCAL 0/1 YES Local on/o
4 EXP_PED 0-5 YES Expression Pedal Mode (see Table)
5 TOUCH 0-3 YES Channel Aftertouch Mode (see Table)
6 BRT 0-99 YES LCD Brightness
7 CNT 0-99 YES LCD Contrast
8 PAR-COM 0-3 YES Edit Parameters MIDI RX/TX (see Table)
9 FIRM 0/1 YES Firmware Enhancements on/o
10 OSC 0/1 YES Oscillator Enhancements on/o
11 LFO 0/1 YES LFO Enhancements on/o
12 MOD 0-2 / 11-15 / 21-25 YES Arp/Seq Mode (see Table)
13 CLK 00-03 / 12/22/30-33 YES Clock Source and Rate (see Table)
14 GAT 1-99 YES Gate Time (see Table)
15 DIV 0-6 YES Clock Division (see Table)
16 BPM (MSB) 40-240 YES Tempo (Bits 8-13)
17 BPM (LSB) 40-240 YES Tempo (Bits 0-7)
18 MTN 0/1 YES Metronome mode on/o
19 OVP 00/01/10/11 YES Overdub & Transpose modes (see Table)
EXP_PED Parameters
0 O
1 Loudness
2 VCF-Cuto
3 VCF-Emphasis
4 Wavetable Position
5 Modulation Wheel
Par-Com
0 O
1 Sound Paramater TX
2 Sound Parameter RX
3 Sound Parameter TX & RX
CLK
Value = Mode + 10*Clock_Rate
Mode Clock Rate
0 = Internal 0 = 1 ppqn
1 = DIN MIDI 1 = 2 ppqn
2 = USB MIDI 2 = 24 ppqn
3 = Analog Trigger 3 = 48 ppqn
OVP
Value = Overdub + 10*Key_Transpose
Overdub Key_Transpose
0 = Disabled 0 = Enabled
1 = Enabled 1 = Disabled
Touch
0 O
1 MIDI TX
2 MIDI RX
3 MIDI TX & RX
MOD
Value = Mode_A + 10*Mode_B
Mode_A Mode_B
0 = Sequencer (0 when Mode_A=0)
1 = Arpeggiator 1 1 = Up
2 = Arpeggiator 2 2 = Down
3 = Up & Down
4 = Random
5 = Moving
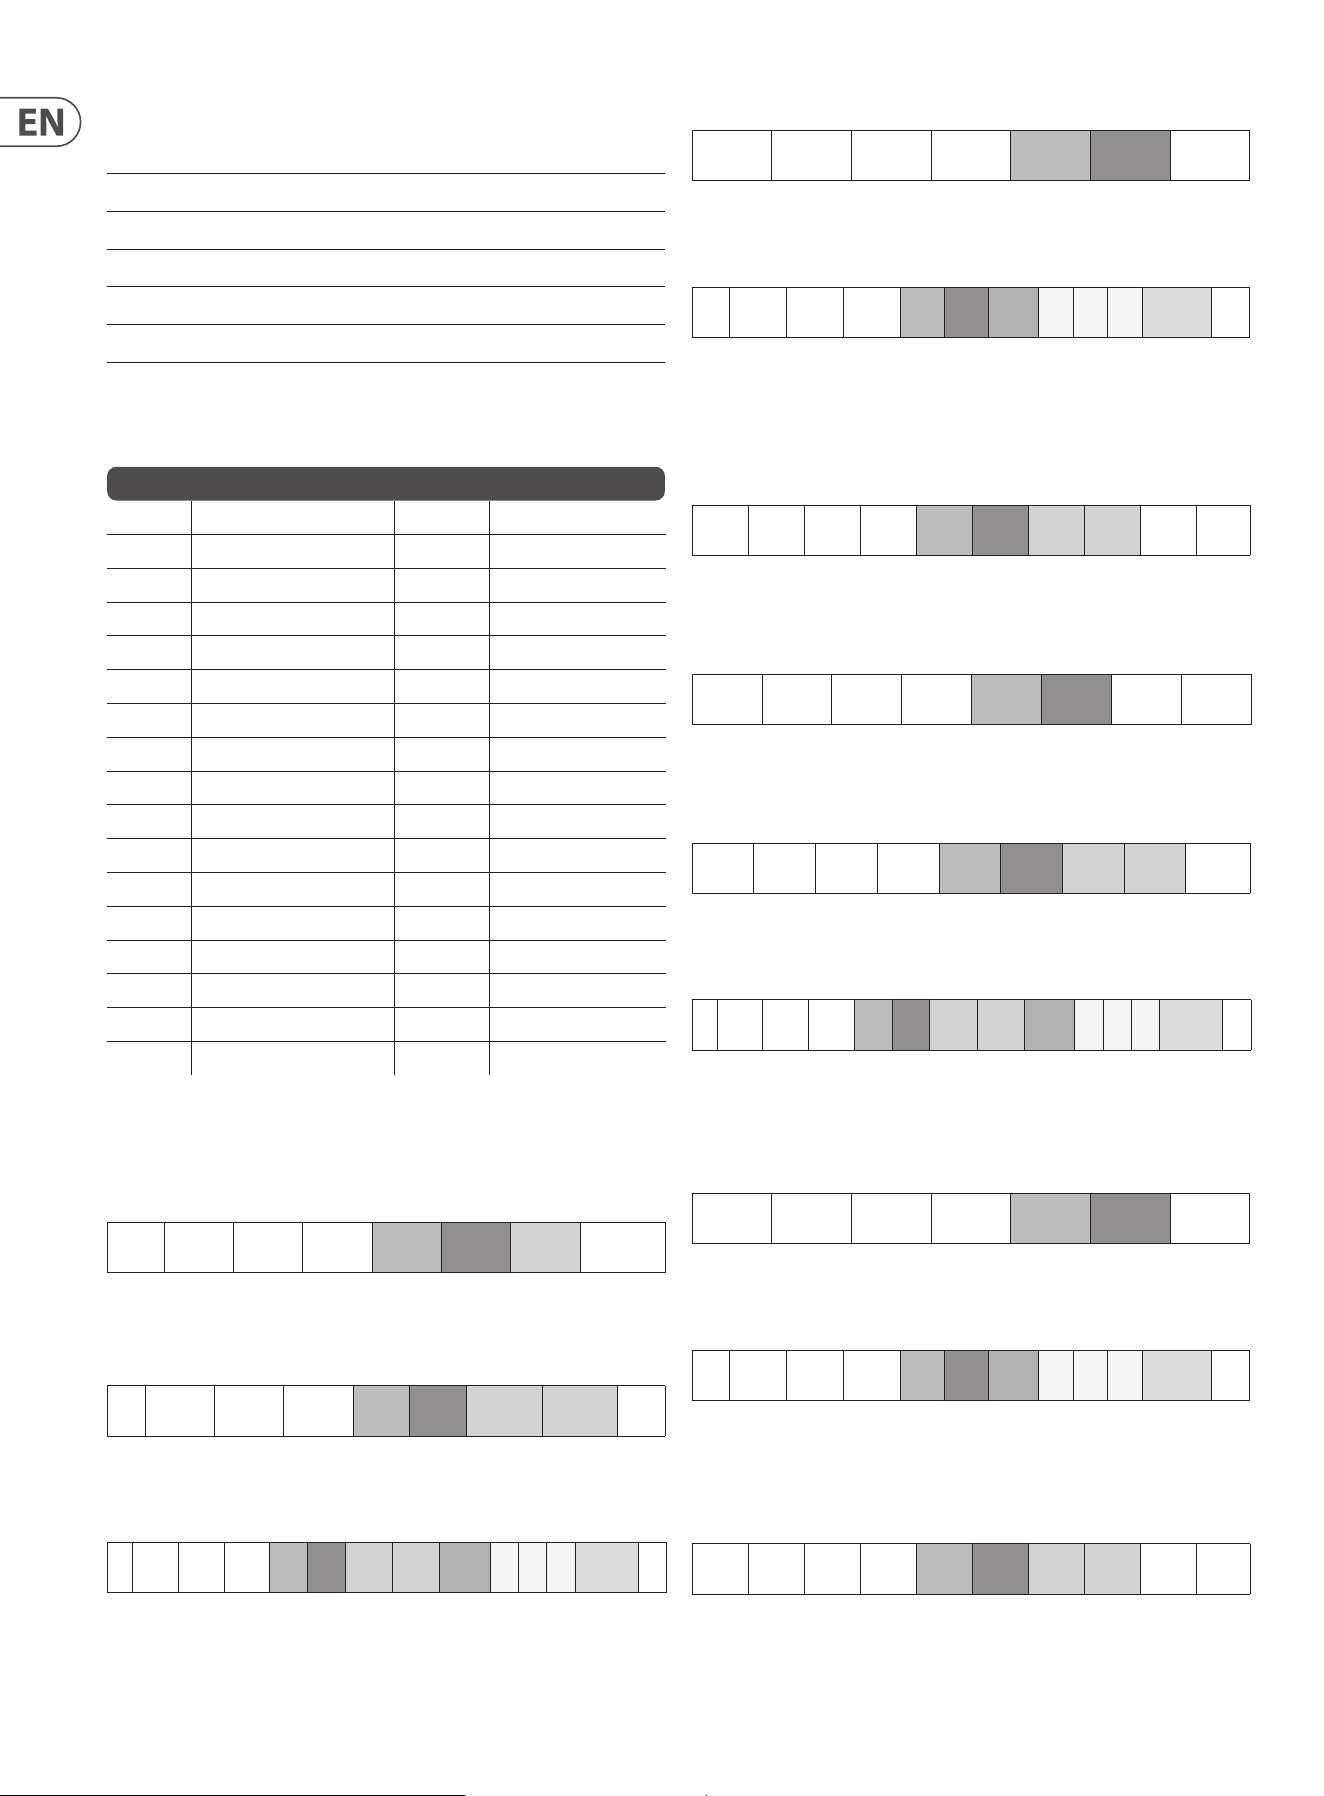
38 WAVE User Manual
DIV
0 ¼ Note
1 1/8 Note
2 1/16 Note
3 1/32 Note
4 ¼ Note Triplet
5 1/8 Note Triplet
6 1/16 Note Triplet
Sequencer SysEx Data
Byte Parameter Name Range Notes
0 GAT 0-99
1 DIV 0-6
2 Step-1 / Voice-1 0-127 Seq Data
3 Step-1 / Voice-2 0-127
4 Step-1 / Voice-3 0-127
5 Step-1 / Voice-4 0-127
6 Step-1 / Voice-5 0-127
7 Step-1 / Voice-6 0-127
8 Step-1 / Voice-7 0-127
9 Step-1 / Voice-8 0-127
10 Step-2 / Voice-1 0-127
11 Step-2 / Voice-2 0-127
… … …
513 Step-64 / Voice-8 0-127
514 Step-1 / Attr. Byte 0-127 Attribute Byte for Step-1
…
577 Step-64 / Attr. Byte 0-127 Attribute Byte for Step-64
Wave Specific SysEx
PKT = 0x74 (Wave specic):
SPKT: 0x04 Initiate Calibration
F0 Manu ID Model ID Device ID 0x74 SPKT Calib Type F7
Type: 0=VCA/VCF 1=CV-IN 2=MOD Wheel 3=PITCH Wheel
SPKT: 0x05 Program Preset Sound Parameters Dump Request
F0 Manu ID Model ID Device ID 0x74 SPKT Bank Num Preset Num F7
SPKT: 0x06 Response for Program Preset Sound Parameters Dump Request /
Dump to WAVE Preset Sound Parameters (and store to Preset#):
F0
Manu
ID
Model
ID
Device
ID
0x74 SPKT
Bank
Num
Preset
Num
Version D0 … Dn Checksum F7
D0 …Dn: Preset Value (n = 120)
CheckSum = (u8)(D0+…+Dn)&0x7F
SPKT: 0x07 Edit Buer Sound Parameters Dump Request
F0 Manu ID Model ID Device ID 0x74 SPKT F7
SPKT: 0x08 Response for Edit Buer Sound Parameters Dump Request /
Dump Sound Parameters to WAVE Edit Buer:
F0 Manu ID Model ID Device ID 0x74 SPKT Version D0 … Dn Checksum F7
D0 …Dn: Preset Value (n = 120)
CheckSum = (u8)(D0+…+Dn)&0x7F
SPKT: 0x0A Response for Dump to WAVE Preset Sound Parameters
(and store to Preset#):
F0 Manu ID Model ID Device ID 0x74 SPKT
Bank
Num
Preset
Num
Status F7
Status: 0 = Data Length/Checksum were wrong / 1 = Success
SPKT: 0x0C Response to Dump Sound Parameters to WAVE Edit Buer:
F0 Manu ID Model ID Device ID 0x74 SPKT Status F7
Status: 0 = Data Length/Checksum were wrong / 1 = Success
SPKT: 0x0D Program Sequencer Data Dump Request
F0 Manu ID Model ID Device ID 0x74 SPKT
Bank
Num
Preset
Num
F7
SPKT: 0x0E Response for Program Sequencer Data Dump Request /
Dump to WAVE Sequencer Data (and store to Preset#):
F0
Manu
ID
Model
ID
Device
ID
0x74 SPKT
Bank
Num
Preset
Num
Version D0 … Dn Checksum F7
D0 …Dn: Preset Value (n = 577)
CheckSum = (u8)(D0+…+Dn)&0x7F
SPKT: 0x0F Edit Buer Sequencer Data Dump Request
F0 Manu ID Model ID Device ID 0x74 SPKT F7
SPKT: 0x10 Response for Edit Buer Sequencer Data Dump Request /
Dump Sequencer Data to WAVE Edit Buer:
F0 Manu ID Model ID Device ID 0x74 SPKT Version D0 … Dn Checksum F7
D0 …Dn: Preset Value (n = 577)
CheckSum = (u8)(D0+…+Dn)&0x7F
SPKT: 0x12 Response for Dump to WAVE Sequencer Data (and store to Preset#):
F0 Manu ID Model ID Device ID 0x74 SPKT
Bank
Num
Preset
Num
Status F7
Status: 0 = Data Length/Checksum were wrong / 1 = Success
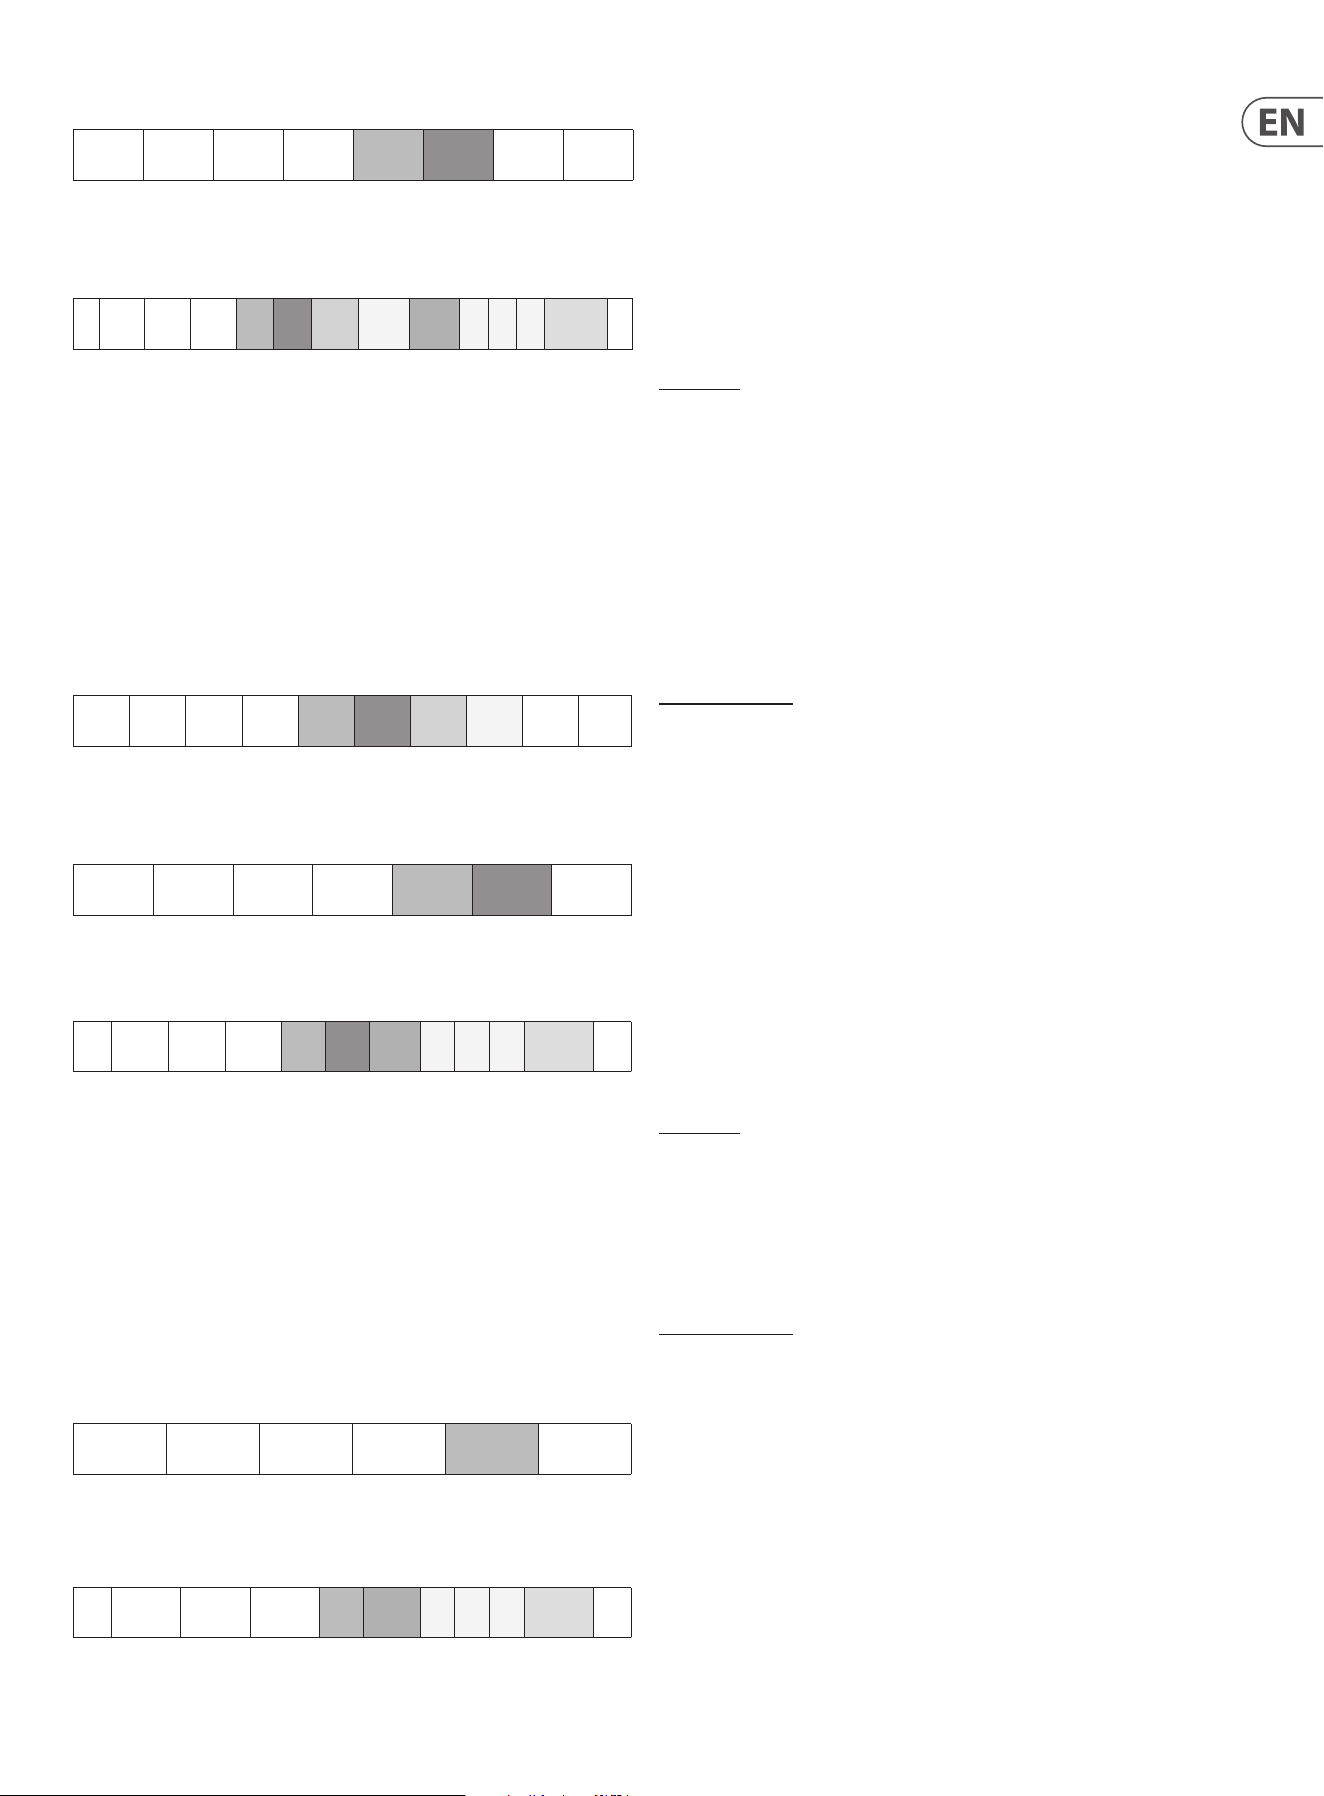
39 WAVE User Manual
SPKT: 0x14 Response to Dump Sequencer Data to WAVE Edit Buer:
F0 Manu ID Model ID Device ID 0x74 SPKT Status F7
Status: 0 = Data Length/Checksum were wrong / 1 = Success
SPKT: 0x5D WAVE User Wavetable Receive
F0
Manu
ID
Model
ID
Device
ID
0x74 SPKT
WAVE
Num
Position Version D0 … Dn Checksum F7
WAVE Num:
0 Store in Edit Listen Buer and treat data as a wavetable.
1 Store in Edit Listen Buer and treat data as a transient (sample).
32-.127 Store in User WT location (32-.63 is used as TR, 64-.127 is used as WT)
Position determines the Wave slot in Wavetable (0-63)
(After the Wavetable data for Position 63 has been received it will be stored.
If the Edit Buer was the selected destination, it will be used as the active Wavetable).
D0 …Dn: Encoded Sample data (n = 308)
SPKT: 0x5E Response for WAVE User Wavetable Receive
F0 Manu ID Model ID Device ID 0x74 SPKT
WAVE
Num
Position Status F7
Status: 0 = Data Length/Checksum were wrong / 1 = Success
SPKT: 0x5F TR/WT Slot Usage/Name List Data Dump Request
F0 Manu ID Model ID Device ID 0x74 SPKT F7
SPKT: 0x60
Response for TR/WT Slot Usage/Name List Data Dump Request
F0 Manu ID Model ID Device ID 0x74 SPKT Version D0 … Dn Checksum F7
D0 …Dn: Preset Value (n = 1535). The data contains:
0000-0015: TR-32 “Slot Name” (16 ASCII character bytes 0x20-0x7e)
(…)
0496-0511: TR-63 “Slot Name“ (16 ASCII character bytes 0x20-0x7e)
0512-0527: WT-64 “Slot Name“ (16 ASCII character bytes 0x20-0x7e)
(…)
1520-1535: TR-127 “Slot Name“ (16 ASCII character bytes 0x20-0x7e)
CheckSum = (u8)(D0+…+Dn)&0x7F
PKT = 0x75 / 0x76 / 0x77 (Wave specic):
PKT: 0x75 Request Global Parameters Values
F0 Manu ID Model ID Device ID 0x75 F7
PKT: 0x76 Response for Global Parameters Dump Request /
Dump Global Parameters to WAVE:
F0 Manu ID Model ID Device ID 0x76 Version D0 … Dn Checksum F7
D0 …Dn: Global Data (n = 19)
CheckSum = (u8)(D0+…+Dn)&0x7F
BEHRINGER WAVE MIDI
SysEx Wave Table data package format
The data block starts with 16 bytes which are ASCII characters for the TR/WT name:
Bytes 0-15: 0x20-0x7e (ASCII Character 32-126)
After that follows 128 x 16 bit of PCM sample data (signed INT - Hi-Byte, Lo-Byte)
However, since in Midi SysEx messages bytes can only use the lower 7 bit, the
data is encoded in 7 byte blocks. An additional byte is added at the beginning of
each block which contains the highest bits of the 7 bytes:
Source Data:
byte 0: [a7] [a6] [a5] [a4] [a3] [a2] [a1] [a0]
byte 1: [b7] [b6] [b5] [b4] [b3] [b2] [b1] [b0]
byte 2: [c7] [c6] [c5] [c4] [c3] [c2] [c1] [c0]
byte 3: [d7] [d6] [d5] [d4] [d3] [d2] [d1] [d0]
byte 4: [e7] [e6] [e5] [e4] [e3] [e2] [e1] [e0]
byte 5: [f7] [f6] [f5] [f4] [f3] [f2] [f1] [f0]
byte 6: [g7] [g6] [g5] [g4] [g3] [g2] [g1] [g0]
Gets transmitted as:
byte 0: [0] [g7] [f7] [e7] [d7][c7] [b7] [a7]
byte 1: [0] [a6] [a5] [a4] [a3][a2] [a1] [a0]
byte 2: [0] [b6] [b5] [b4] [b3][b2] [b1] [b0]
byte 3: [0] [c6] [c5] [c4] [c3] [c2] [c1] [c0]
byte 4: [0] [d6] [d5] [d4] [d3] [d2] [d1] [d0]
byte 5: [0] [e6] [e5] [e4] [e3] [e2] [e1] [e0]
byte 6: [0] [f6] [f5] [f4] [f3] [f2] [f1] [f0]
byte 7: [0] [g6] [g5] [g4] [g3] [g2] [g1] [g0]
The encoding of the 256 bytes results in 36 blocks of 7+1 bytes. The remaining
4 bytes are encoded in the same way:
Source Data:
byte 0: [a7] [a6] [a5] [a4] [a3] [a2] [a1] [a0]
byte 1: [b7] [b6] [b5] [b4] [b3] [b2] [b1] [b0]
byte 2: [c7] [c6] [c5] [c4] [c3] [c2] [c1] [c0]
byte 3: [d7] [d6] [d5] [d4] [d3] [d2] [d1] [d0]
Gets transmitted as:
byte 0: [0] [--] [--] [--] [d7][c7] [b7] [a7]
byte 1: [0] [a6] [a5] [a4] [a3][a2] [a1] [a0]
byte 2: [0] [b6] [b5] [b4] [b3] [b2] [b1] [b0]
byte 3: [0] [c6] [c5] [c4] [c3] [c2] [c1] [c0]
byte 4: [0] [d6] [d5] [d4] [d3] [d2] [d1] [d0]
The total number of bytes in the data block is:
16 ASCII bytes + 36 x blocks of (7+1) bytes + one block of (4+1) bytes = 309 bytes

40 WAVE User Manual
Troubleshooting
Q1. Voices are out of tune.
• • Check if any of the SEMIT and/or DETU settings in the Tuning menu are
enabled. Make sure global TUNE is set to 440 in the Program menu.
• • Perform VCA and VCF calibration. For more information about how to
perform calibration please refer to the calibration section above.
• • Check MO, SO, EO, ES settings in the Digital menu.
Q2. The synth does not generate any sound.
• • Check that output audio is connected to your sound system.
• • Check that the master volume control
(1)
is above minimum level.
• • Check that LOC is enabled in the Program menu.
• • Make sure ENV1->Loudness is not set to Zero.
Q3. After touch does not work
• • Check that TOUCH parameter in User menu is correctly congured.
• • Check whether the other modulation sources are maximising the modulation.
• • If you are using an external keyboard, check that it is transmitting on the
right MIDI channel.
Q4. Wave does not respond to external MIDI.
• • Verify that your midi source is correctly connected to Wave (MIDI DIN or USB)
and that you are transmitting on the right MIDI channel. You can change the
Wave MIDI channel from the Program menu (MIDI: --).
• • If CC messages are involved, please verify that the PARAM settings in User
menu are correctly congured.
Q5. Wave does not send MIDI data
• • Check that Wave is connected to destination MIDI device.
• • Check that the Wave MIDI channel corresponds to the destination
MIDI channel.
• • If CC messages are involved, please verify that the PARAM settings in the
User menu are correctly congured.
Q5. Some of the modulation sources in the Digital menu do not aect the sound.
• • In the WAVE some modulation sources can be summed up. This means that
if the modulation limit is reached, any additional modulation will not have
any eect.
Q6. Sequencer / Arpeggiator do not start when connected to external sequencer
• • Make sure sequence is stored
• • Check that Wave is connected to external device and MIDI channel is correct
• • Check that input source is correctly congured in the Sequencer
menu (CLK: --)
Q7. CV IN does not work properly.
• • If notes are out of tune, perform CV Input calibration.
• • Make sure Gate signal is connected to WAVE and your source device is
transmitting the signals.
• • Make sure your external device is working correctly.
Q8. SynthTribe (or other apps) do not detect the Wave over USB
• • Try a dierent USB lead, especially if you are using a long one.
• • If you are using a USB hub try bypassing it by making a direct connection
between your computer and the Wave.
Q9. SynthTribe is unable to communicate with the Wave
• • Check that the SYSEX parameter in the Program menu is set to 1.
Q10. Some notes in the upper octaves produce no sound
• • Check if there is a large SEMIT detuning in place in the Tuning menu.
Large SEMIT detunes can take the Wave above its MIDI note limit.

41 WAVE User Manual
Glossary
ADSR – Envelope generator with four stages: Attack, Decay, Sustain and Release.
Amplitude – The volume of a sound.
Aftertouch – MIDI data sent when pressure is applied to the keyboard after keys
have been played, but while they are still being held.
Arpeggiator – a part of the synthesizer which causes the notes of a chord to be
played individually as an arpeggio according to settings.
Attack Time – The rst stage of the envelope. Specied as the time taken for
the envelope to reach maximum level when keys are played.
Attenuate – To reduce the level of a signal or modulation source.
Bank – A collection of a number of programs.
Basis – controls the positioning of notes across the stereo eld.
Cent – Unit of measurement for tuning. One semitone is divided into 100 cents.
Cuto Frequency – The point at which the lter starts to cut frequencies.
Decay Time – The second stage of the envelope. Specied as the time taken for
the sound level to drop from maximum to the sustain level while the played keys
are being held.
Digital Audio Workstation (DAW) – A computer based software package that
allows the recording, editing and playing back of audio and/or MIDI data.
Division – the fraction of a whole note (¼, 1/8 etc) that is set for use by the
sequencer and arpeggiator.
Emphasis – The emphasis of frequencies centered on the cuto frequency. Also
known as Resonance.
Envelope Generator – Envelope generators can be used to contour the sound.
Most commonly used to aect the amplitude (volume) of the sound they can also
be used on lters and to aect pitch.
Filter – Filters attenuate the frequencies above or below their cuto point,
thus aecting the timbre of the sound.
Frequency Modulation (FM) – The use of one frequency to modulate
another. Typically the use of a low frequency from a low frequency oscillator to
add vibrato or tremolo to a sound, but could also be the use of one audio level
frequency to modulate another, which would cause a change in timbre.
Global – parameters that aect all programs.
Group – each of the Wave's programs has two sounds, from group A and group B,
which can be combined in dierent ways according to the keyboard mode selected.
Hertz (Hz) – Unit of measurement for frequencies. 1 Hz is one cycle per second.
Invert – change to the opposite, so a positive becomes negative for example.
Keyboard Tracking – Use of the notes played on the keyboard to adjust another
parameter, for example.
KiloHertz (kHz) – Common abbreviation for one thousand Hz.
Low Frequency Oscillator (LFO) – An oscillator that runs at a low speed and is
used to modulate other parts of the synthesizer.
Musical Instrument Digital Interface (MIDI) – a protocol that allows
musical instruments, other peripherals and DAWs to pass data according to a
dened standard.
MIDI Clock – a timing signal that is sent as part of the MIDI data.
MIDI Message – data transmitted from one MIDI device to another that
constitutes an instruction.
Mix – The balance between two or more signals.
Modulation – The use of sources to control a parameter of a destination.
Monophonic – Only allowing one note to be played at a time.
Noise – A random sound comprising of all frequencies.
Note Priority – Determines which note is played when the maximum number is
exceeded. Typically lowest, highest or last.
Octave – A measure of pitch.
Oscillator – The basic sound source of the synthesizer.
Oscillator Sync – The process by which the cycle of one oscillator is
synchronized to the cycle of another.
Output – Can refer both to the signal sent out from one part of the synthesizer
to another, or to the physical sockets used to connect to external equipment.
Overdub – sets whether notes played on a sequencer step are added to the
existing notes on that step; or whether they replace them.
Parameter – A setting whose value can be changed.
Pitch Bend – Changing the pitch of a note up or down while it is being played.
Polyphonic – Capable of playing more than one note at a time, expressed as a
number of voices.
Portamento – The eect of 'gliding' the pitch between notes rather than
changing instantly.
Program – A stored combination of parameters that make up a sound.
Pulse Wave – A wave similar to a square wave, but whose symmetry can be changed.
Pulse Width Modulation – The modulation of the symmetry of a pulse wave.
Rate – The speed at which an action takes place.
Release Time – The nal stage of the envelope. Specied as the time taken for
the envelope to reach zero once keys have been released.
Sample & Hold (S&H) – the sampling of a waveform, typically that of an LFO or
noise source, to provide a series of voltages at a set rate.
Sawtooth – A waveform resembling the teeth of a saw, with an instantaneous
leading edge followed by a gradual decline to zero point.
Self Oscillation – The point at which a lter starts to produce a sine wave
output owing to excessive use of emphasis (resonance).
Semitone – A measure of pitch. Each octave contains 12 semitones.
Sequencer – A part of the synthesizer which can be programmed with a series
of notes and/or chords which are then repeated back at a selected tempo.
Signal Flow – The path of a signal from one part of the synthesizer to another.
Sine Wave – A smooth waveform that contains only the fundamental frequency
with no harmonics.
Square Wave – a symmetrical waveform which changes instantaneously from
zero state to full.
Sub-Oscillator – In the case of the WAVE it is simply a 'second Oscillator'.
Sustain Level – The third stage of the envelope. This is the level that the
envelope holds at after decay until keys are released.
Synchronization (Sync) – Co-ordinating the timing of devices where one is the
master and the other(s) are synchronized to it.
System Exclusive (SysEx) – a system of device-specic messages that allows
control over the instrument's functions.

42 WAVE User Manual
Transient – a sample that is used in place of a wavetable (see below) whose
start, end and looping can be manually adjusted or modulated.
Trigger – The activation of a function, for example pressing a key to start the
Envelope cycle.
Tune – The adjustment of the pitch of an instrument to be the same as that of
another instrument; or the adjustment of one oscillator to be in tune with the other.
Unison – Two or more voices played together on the same key(s).
Universal Serial Bus (USB) – An interface that can be used to connect your
synthesizer to a DAW, or to receive rmware updates.
Velocity – The strength at which the keyboard is played, which can be used as a
modulation source.
Voltage Controlled Amplier (VCA) – An amplier whose level can be
adjusted by control voltages, for example from an envelope generator.
Wavetable – the basic audio source for the Wave. Each wavetable contains 64
128 bit waveshapes, which can be 'swept' manually or by a modulation source.
SynthTribe
The SynthTribe app is a convenient way to quickly change some commonly
used parameters on the Wave without using menus; and to check for rmware
updates. When you rst connect your Wave to SynthTribe it will automatically
pick up the Wave's settings for the parameters concerned. Please note that this
is the only communication from Wave to Synthtribe: if you change any settings
on the Wave subsequently SynthTribe will not update unless it is closed and then
started again.

43 WAVE User Manual
44 WAVE User Manual
Other important information
1. Register online. Please register your new
Music Tribe equipment right after you purchase it by
visiting musictribe.com. Registering your purchase using
our simple online form helps us to process your repair
claims more quickly and eciently. Also, read the terms
and conditions of our warranty, if applicable.
2. Malfunction. Should your Music Tribe
Authorized Reseller not be located in your vicinity,
you may contact the Music Tribe Authorized Fulller for
your country listed under “Support” at musictribe.com.
Should your country not be listed, please check if your
problem can be dealt with by our “Online Support” which
may also be found under “Support” at musictribe.com.
Alternatively, please submit an online warranty claim at
musictribe.com BEFORE returning the product.
3. Power Connections. Before plugging the
unit into a power socket, please make sure you are using
the correct mains voltage for your particular model.
Faulty fuses must be replaced with fuses of the same type
and rating without exception.
1. Registro online. Le recomendamos que
registre su nuevo aparato Music Tribe justo después de
su compra accediendo a la página web musictribe.com.
El registro de su compra a través de nuestro sencillo
sistema online nos ayudará a resolver cualquier
incidencia que se presente a la mayor brevedad posible.
Además, aproveche para leer los términos y condiciones de
nuestra garantía, si es aplicable en su caso.
2. Averías. En el caso de que no exista un distribuidor
Music
Tribe en las inmediaciones, puede ponerse en
contacto con el distribuidor
Music
Tribe de su país,
que encontrará dentro del apartado “Support” de nuestra
página web musictribe.com. En caso de que su país no
aparezca en ese listado, acceda a la sección “Online Support”
(que también encontrará dentro del apartado “Support”
de nuestra página web) y compruebe si su problema aparece
descrito y solucionado allí. De forma alternativa, envíenos a
través de la página web una solicitud online de soporte en
periodo de garantía ANTES de devolvernos el aparato.
3. Conexiones de corriente. Antes de enchufar
este aparato a una salida de corriente, asegúrese de que dicha
salida sea del voltaje adecuado para su modelo concreto.
En caso de que deba sustituir un fusible quemado, deberá
hacerlo por otro de idénticas especicaciones, sin excepción.
1. Enregistrez-vous en ligne. Prenez le
temps d’enregistrer votre produit Music Tribe aussi vite
que possible sur le site Internet musictribe.com. Le fait
d’enregistrer le produit en ligne nous permet de gérer
les réparations plus rapidement et plus ecacement.
Prenez également le temps de lire les termes et conditions
de notre garantie.
2. Dysfonctionnement. Si vous n’avez pas
de revendeur Music Tribe près de chez vous, contactez le
distributeur Music Tribe de votre pays : consultez la liste
des distributeurs de votre pays dans la page “Support”
de notre site Internet musictribe.com. Si votre pays n’est
pas dans la liste, essayez de résoudre votre problème avec
notre “aide en ligne” que vous trouverez également dans
la section “Support” du site musictribe.com. Vous pouvez
également nous faire parvenir directement votre demande
de réparation sous garantie par Internet sur le site
musictribe.com AVANT de nous renvoyer le produit.
3. Raccordement au secteur. Avant de relier
cet équipement au secteur, assurez-vous que la tension
secteur de votre région soit compatible avec l’appareil.
Veillez à remplacer les fusibles uniquement par des
modèles exactement de même taille et de même valeur
électrique — sans aucune exception.
1. Online registrieren. Bitte registrieren Sie
Ihr neues Music Tribe-Gerät direkt nach dem Kauf auf der
website musictribe.com. Wenn Sie Ihren Kauf mit unserem
einfachen online Formular registrieren, können wir Ihre
Reparaturansprüche schneller und ezienter bearbeiten.
Lesen Sie bitte auch unsere Garantiebedingungen,
falls zutreend.
2. Funktionsfehler. Sollte sich kein Music Tribe
Händler in Ihrer Nähe benden, können Sie den
Music Tribe Vertrieb Ihres Landes kontaktieren, der auf
musictribe.com unter „Support“ aufgeführt ist. Sollte Ihr
Land nicht aufgelistet sein, prüfen Sie bitte, ob Ihr Problem
von unserem „Online Support“ gelöst werden kann, den
Sie ebenfalls auf musictribe.com unter „Support“ nden.
Alternativ reichen Sie bitte Ihren Garantieanspruch
online auf musictribe.com ein, BEVOR Sie das
Produkt zurücksenden.
3. Stromanschluss. Bevor Sie das Gerät an
eine Netzsteckdose anschließen, prüfen Sie bitte, ob Sie
die korrekte Netzspannung für Ihr spezielles Modell
verwenden. Fehlerhafte Sicherungen müssen ausnahmslos
durch Sicherungen des gleichen Typs und Nennwerts
ersetzt werden.
1. Registre-se online. Por favor, registre seu
novo equipamento Music Tribe logo após a compra
visitando o site musictribe.com Registrar sua compra
usando nosso simples formulário online nos ajuda a
processar seus pedidos de reparos com maior rapidez e
eciência. Além disso, leia nossos termos e condições de
garantia, caso seja necessário.
2. Funcionamento Defeituoso.
Caso seu fornecedor Music Tribe não esteja localizado
nas proximidades, você pode contatar um distribuidor
Music Tribe para o seu país listado abaixo de “Suporte”
em musictribe.com. Se seu país não estiver na lista,
favor checar se seu problema pode ser resolvido com o
nosso “Suporte Online” que também pode ser achado
abaixo de “Suporte”em musictribe.com. Alternativamente,
favor enviar uma solicitação de garantia online em
musictribe.com ANTES da devolução do produto.
3. Ligações. Antes de ligar a unidade à tomada,
assegure-se de que está a utilizar a voltagem correcta para
o modelo em questão. Os fusíveis com defeito terão de
ser substituídos, sem qualquer excepção, por fusíveis do
mesmo tipo e corrente nominal.
1. Registratevi online. Vi invitiamo a registrare
il nuovo apparecchio Music Tribe subito dopo averlo
acquistato visitando musictribe.com. La registrazione
dell'acquisto tramite il nostro semplice modulo online ci
consente di elaborare le richieste di riparazione in modo
più rapido ed eciente. Leggete anche i termini e le
condizioni della nostra garanzia, qualora applicabile.
2. Malfunzionamento. Nel caso in cui il
rivenditore autorizzato Music Tribe non si trovi nelle vostre
vicinanze, potete contattare il Music Tribe Authorized
Fulller per il vostro paese, elencato in “Support”
@ musictribe.com. Se la vostra nazione non è elencata,
controllate se il problema può essere risolto tramite il
nostro “Online Support”che può anche essere trovato sotto
“Support” @ musictribe.com. In alternativa, inviate una
richiesta di garanzia online su musictribe.com PRIMA di
restituire il prodotto.
3. Collegamento all’alimentazione.
Prima di collegare l'unità a una presa di corrente,
assicuratevi di utilizzare la tensione di rete corretta
per il modello specico. I fusibili guasti devono essere
sostituiti, senza eccezioni, con fusibili dello stesso tipo e
valore nominale.
Important information
Aspectos importantes
Informations importantes
Weitere wichtige
Informationen
Outras Informações
Importantes
Informazioni importanti
45 WAVE User Manual
1. Registreer online. Registreer uw nieuwe
Music Tribe-apparatuur direct nadat u deze hebt gekocht
door naar musictribe.com te gaan. Door uw aankoop
te registreren via ons eenvoudige online formulier,
kunnen wij uw reparatieclaims sneller en eciënter
verwerken. Lees ook de voorwaarden van onze garantie,
indien van toepassing.
2. Storing. Mocht uw door Music Tribe
geautoriseerde wederverkoper niet bij u in de buurt zijn
gevestigd, dan kunt u contact opnemen met de door Music
Tribe Authorized Fulller voor uw land vermeld onder
“Support” op musictribe.com. Als uw land niet in de lijst
staat, controleer dan of uw probleem kan worden opgelost
door onze "Online Support", die u ook kunt vinden onder
"Support" op musictribe.com. U kunt ook een online
garantieclaim indienen op musictribe.com VOORDAT u het
product retourneert.
3. Stroomaansluitingen. Voordat u het
apparaat op een stopcontact aansluit, moet u ervoor
zorgen dat u de juiste netspanning voor uw specieke
model gebruikt. Defecte zekeringen moeten zonder
uitzondering worden vervangen door zekeringen van
hetzelfde type en dezelfde waarde.
1. Registrera online. Registrera din nya Music
Tribe-utrustning direkt efter att du köpt den genom
att besöka musictribe.com. Att registrera ditt köp med
vårt enkla onlineformulär hjälper oss att behandla dina
reparationsanspråk snabbare och mer eektivt. Läs också
villkoren i vår garanti, om tillämpligt.
2. Fel. Om din Music Tribe-auktoriserade återförsäljare
inte nns i din närhet kan du kontakta Music Tribe
Authorized Fulller för ditt land listat under “Support” på
musictribe.com. Om ditt land inte är listat, kontrollera om
ditt problem kan hanteras av vår “Onlinesupport” som
också nns under “Support” på musictribe.com. Alternativt
kan du skicka in ett online-garantianspråk på musictribe.
com INNAN du returnerar produkten.
3. Strömanslutningar. Innan du ansluter
enheten till ett eluttag, se till att du använder rätt
nätspänning för just din modell. Felaktiga säkringar
måste bytas ut mot säkringar av samma typ och
märkning utan undantag.
1. Zarejestrować online. Zarejestruj swój
nowy sprzęt Music Tribe zaraz po zakupie na stronie
musictribe.com. Zarejestrowanie zakupu za pomocą
naszego prostego formularza online pomaga nam szybciej
i efektywniej rozpatrywać roszczenia dotyczące naprawy.
Przeczytaj również warunki naszej gwarancji, jeśli dotyczy.
2. Awaria. Jeśli Twój autoryzowany sprzedawca
Music Tribe nie znajduje się w pobliżu, możesz
skontaktować się z autoryzowanym dostawcą Music Tribe
dla swojego kraju, wymienionym w sekcji „Wsparcie” na
stronie musictribe.com. Jeśli Twojego kraju nie ma na
liście, sprawdź, czy Twój problem może zostać rozwiązany
przez nasze „Wsparcie online”, które można również
znaleźć w sekcji „Wsparcie” na stronie musictribe.com.
Alternatywnie, prześlij zgłoszenie gwarancyjne online na
musictribe.com PRZED zwrotem produktu.
3. Połączenia zasilania. Przed podłączeniem
urządzenia do gniazdka sieciowego upewnij się, że
używasz odpowiedniego napięcia sieciowego dla danego
modelu. Wadliwe bezpieczniki należy bez wyjątku
wymienić na bezpieczniki tego samego typu i wartości.
1. 登録. 新しい Music Tribe 機器をご購
入後、すぐに musictribe.com にアクセスし
てオンライン登録を行ってください。
シンプルなオンラインフォームでの登
録は、修理請求の処理をより迅速かつ効
率的に行うために役立ちます。また、
適用される場合は、保証の利用規約をお
読みください。
2. 故障. お近くに Music Tribe 認定販売店
がない場合は、musictribe.com の "サポー
ト" セクションに記載されている国別の
Music Tribe 認定代理店にお問い合わせくだ
さい。お住まいの国がリストにない場合
は、"オンラインサポート" から問題が解
決できるか確認してください。こちらも
"サポート" セクションにございます。あ
るいは、製品を返品する前に、musictribe.
com でオンライン保証請求を提出してく
ださい。
3. 電源接続. ユニットを電源コンセント
に差し込む前に、モデルに適した正しい
電圧を使用していることを確認してくだ
さい。ヒューズが故障した場合は、必ず
同じ種類と定格のヒューズに交換してく
ださい。
1. 在线注册。 购买后, 请访问我们的网站
立即注册新的 Music Tribe 设备。 使用我们简
单的在线表格注册您的购买信息有助于我
们更快, 更有效地处理您的维修索赔。 另外,
请阅读我们保修的条款和条件 (如适用)。
2. 无法正常工作。 如果您所在地区没有
Music Tribe 授权的经销商, 您可以联系您
所在国家/地区的 Music Tribe 授权履行者,
其联系方式在 behringer.com 的 “支持” 部
分列出。 如果您的国家/地区未列出, 请检
查您的问题是否可以通过我们的 “在线支
持” 解决, 该选项也可以在 behringer.com 的
“支持” 部分找到。 或者, 您也可以在退回产
品之前在 behringer.com 提交在线保修索赔。
3. 电源连接。 将本设备连接电源前,
请确保使用的电压正确。 保险丝需要更换时,
必须使用相同型号及定额的保险丝。
Belangrijke informatie
Viktig information
Ważna informacja
その他の重要な情報
其他的重要信息

46 WAVE User Manual
FEDERAL COMMUNICATIONS
COMMISSION COMPLIANCE
INFORMATION
Responsible Party Name: Music Tribe Commercial NV Inc.
Address: 122 E. 42nd St.1,
8th Floor NY, NY 10168,
United States
Email Address: le[email protected]
This equipment has been tested and found to comply with the limits for a Class B
digital device, pursuant to part 15 of the FCC Rules. These limits are designed
to provide reasonable protection against harmful interference in a residential
installation. This equipment generates, uses and can radiate radio frequency
energy and, if not installed and used in accordance with the instructions, may cause
harmful interference to radio communications. However, there is no guarantee that
interference will not occur in a particular installation. If this equipment does cause
harmful interference to radio or television reception, which can be determined
by turning the equipment o and on, the user is encouraged to try to correct the
interference by one or more of the following measures:
• • Reorient or relocate the receiving antenna.
• • Increase the separation between the equipment and receiver.
• • Connect the equipment into an outlet on a circuit dierent from that to which the
receiver is connected.
• • Consult the dealer or an experienced radio/TV technician for help.
This equipment complies with Part 15 of the FCC rules. Operation is subject to the
following two conditions:
(1) this device may not cause harmful interference, and
(2) this device must accept any interference received, including interference that may
cause undesired operation.
Important information:
Changes or modications to the equipment not expressly approved by Music Tribe
can void the user’s authority to use the equipment.
Hereby, Music Tribe declares that this product is in compliance with Directive
2014/35/EU,Directive 2014/30/EU, Directive 2011/65/EU and Amendment 2015/863/
EU, Directive 2012/19/EU, Regulation 519/2012 REACH SVHC and Directive
1907/2006/EC.
Full text of EU DoC is available at https://community.musictribe.com/
EU Representative: Music Tribe Brands DK A/S
Address: Gammel Strand 44, DK-1202 København K, Denmark
UK Representative: Music Tribe Brands UK Ltd.
Address: 8
th
Floor, 20 Farringdon Street London EC4A 4AB, United Kingdom
Correct disposal of this product: This symbol indicates that this
product must not be disposed of with household waste,
according to the WEEE Directive (2012/19/EU) and your
national law. This product should be taken to a collection
center licensed for the recycling of waste electrical and
electronic equipment (EEE). The mishandling of this type of
waste could have a possible negative impact on the
environment and human health due to potentially hazardous
substances that are generally associated with EEE. At the same
time, your cooperation in the correct disposal of this product will contribute to the
ecient use of natural resources. For more information about where you can take
your waste equipment for recycling, please contact your local city oce, or your
household waste collection service.
Behringer
WAVE
WAVE

47 WAVE User Manual

We Hear You