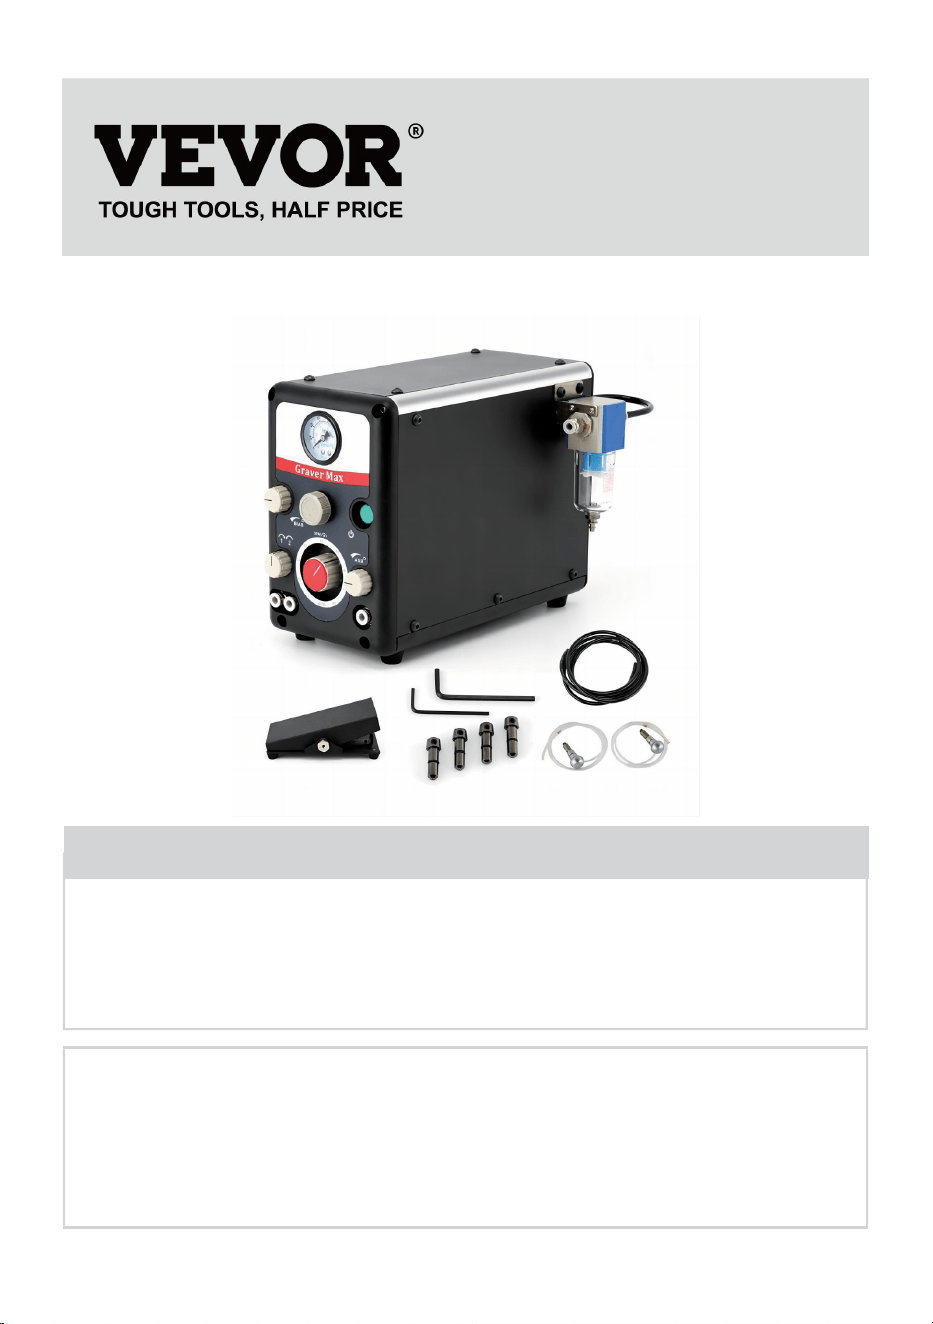
Technical Support and E-Warranty Certificate
www.vevor.com/support
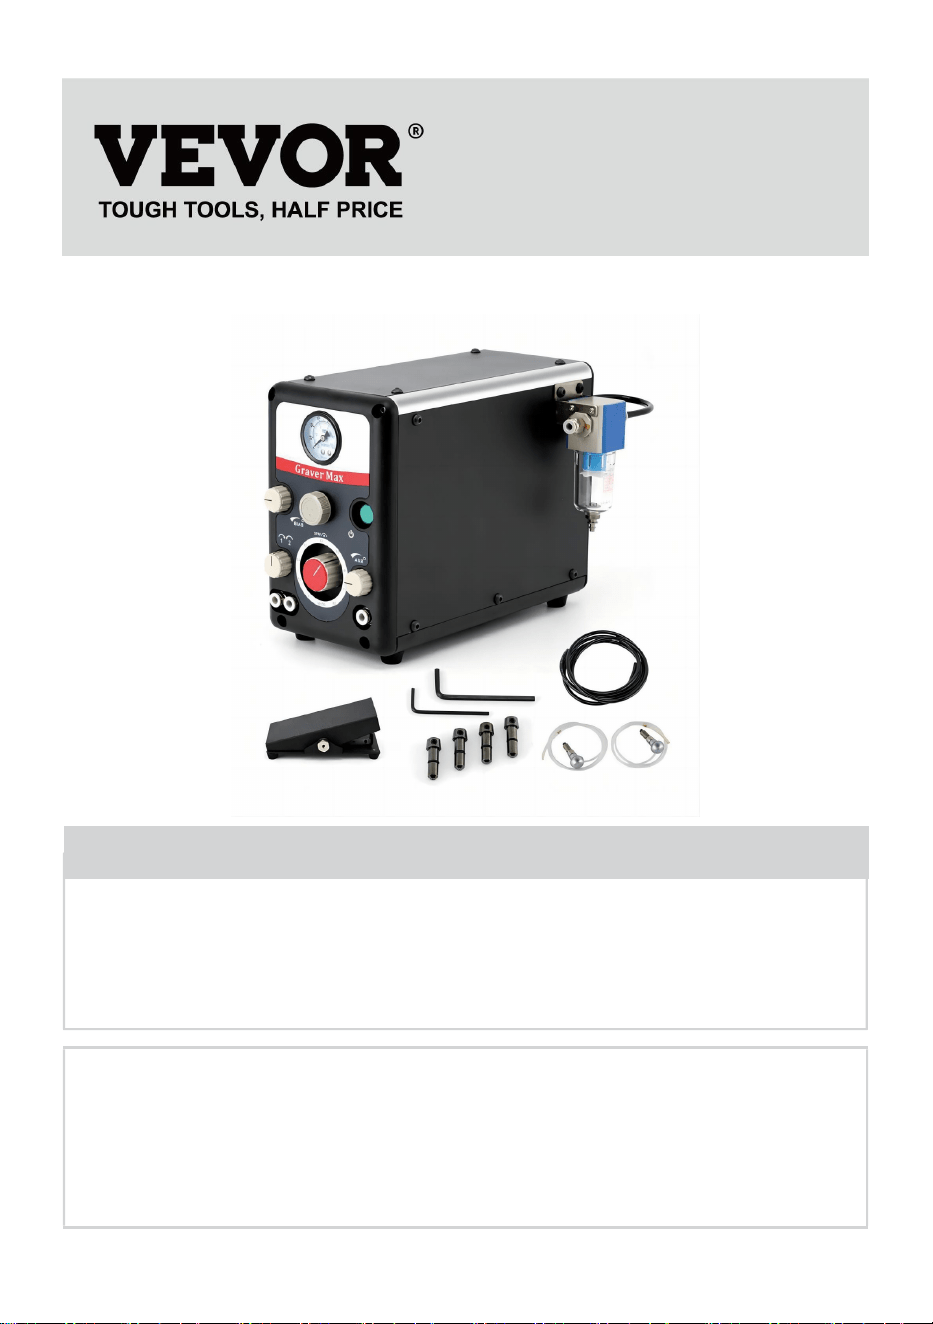
USER MANUAL OF ENGRAVING
MACHINE
MODEL: HR-G002
We continue to be committed to provide you tools with competitive price.
"Save Half", "Half Price" or any other similar expressions used by us only represents an
estimate of savings you might benefit from buying certain tools with us compared to the major
top brands and does not necessarily mean to cover all categories of tools offered by us. You
are kindly reminded to verify carefully when you are placing an order with us if you are
actually saving half in comparison with the top major brands.
- 1 -
MODEL: HR-G002
Have product questions? Need technical support? Please feel free to
contact us:
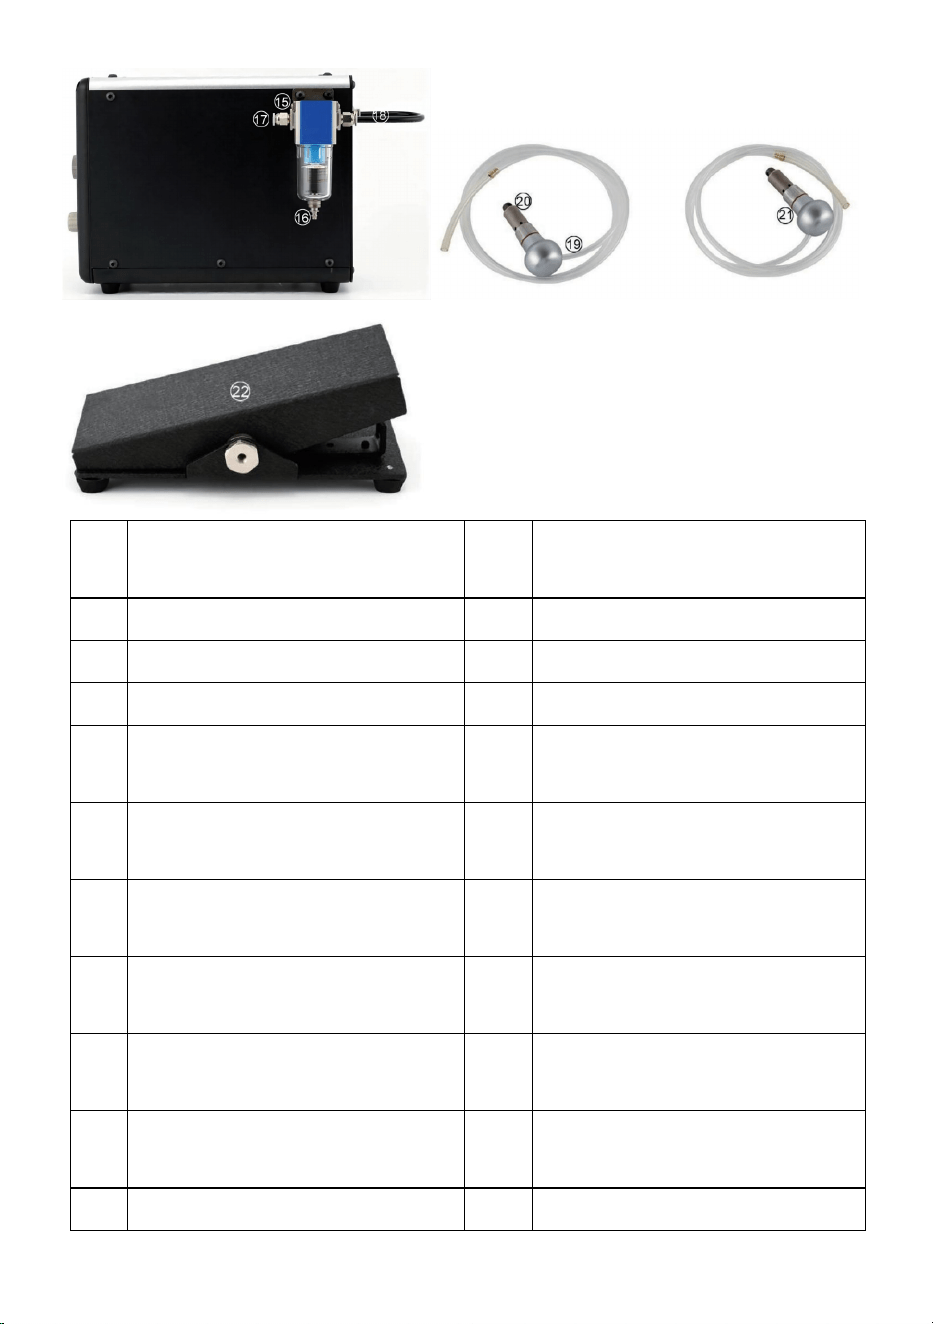
Technical Support and E-Warranty Certificate
www.vevor.com/support
NEED HELP? CONTACT US!
This is the original instruction, please read all manual instructions
carefully before operating. VEVOR reserves a clear interpretation of our
user manual. The appearance of the product shall be subject to the
product you received. Please forgive us that we won't inform you again if
there are any technology or software updates on our product.
ENGRAVING MACHINE
- 2 -
Warning-To reduce the risk of injury, user must read
instructions manual carefully.
IMPORTANT NOTICE
This machine requires clean, dry,oil-free air, We suggest using an oil free
compressor.If your compressor is an oil type, you MUST have an oil
removal filter(coalescing type)in the air supply line to this machine.If you
are unsure of this requirement, please contact your salesman.
TECHNICAL PARAMETERS
Model
HR-G002
Input
AC230V 50HZ / AC120V 60HZ
Hand Piece Working Speed
100-8000 RPM
Range of pressure display
0-1MPa / 0-10kg/cm²
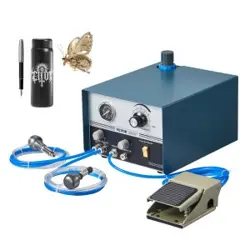
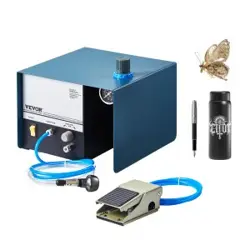
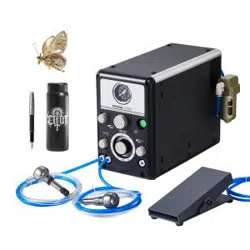
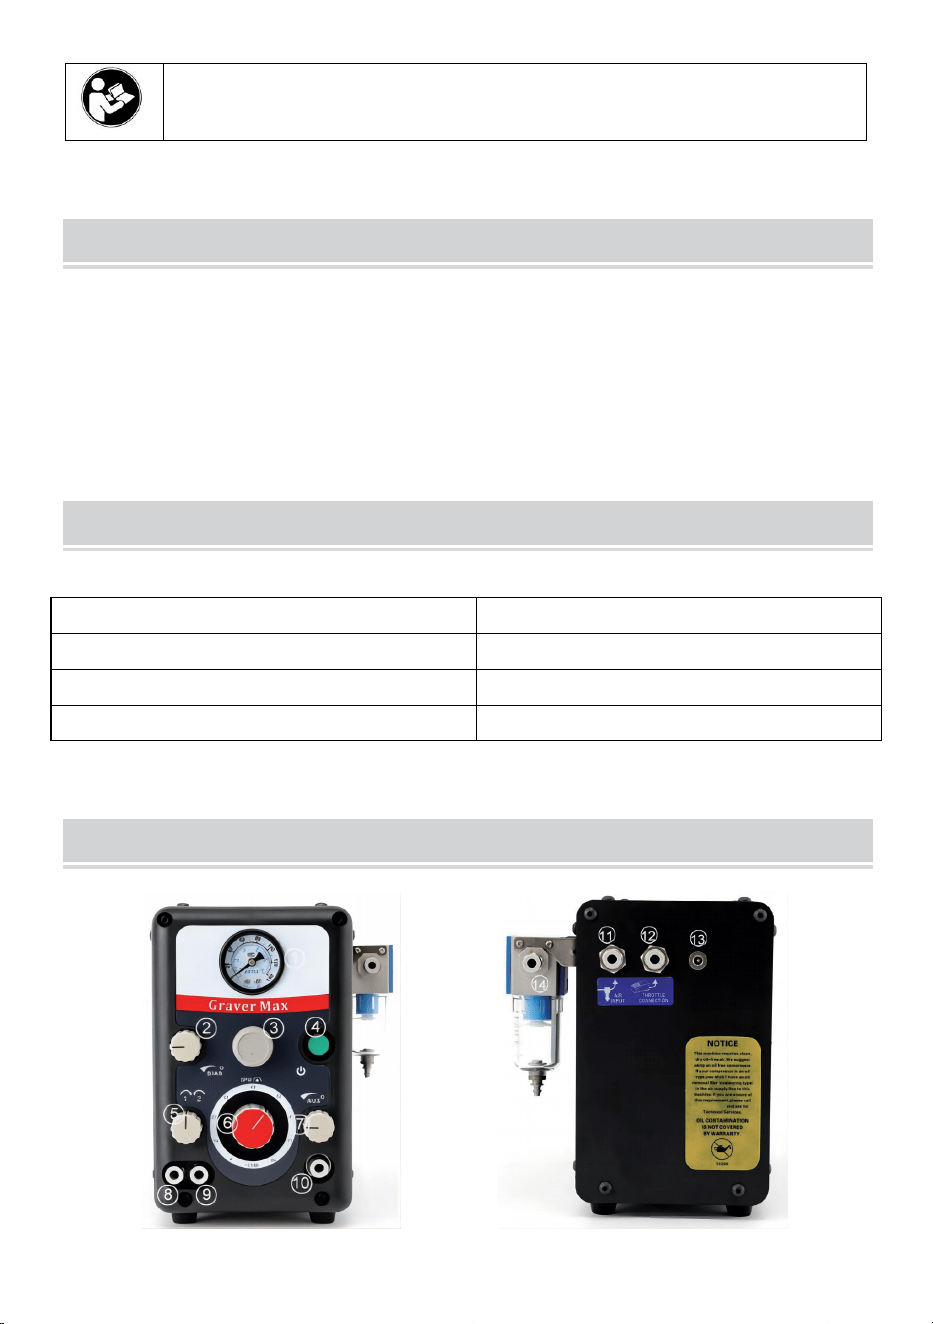
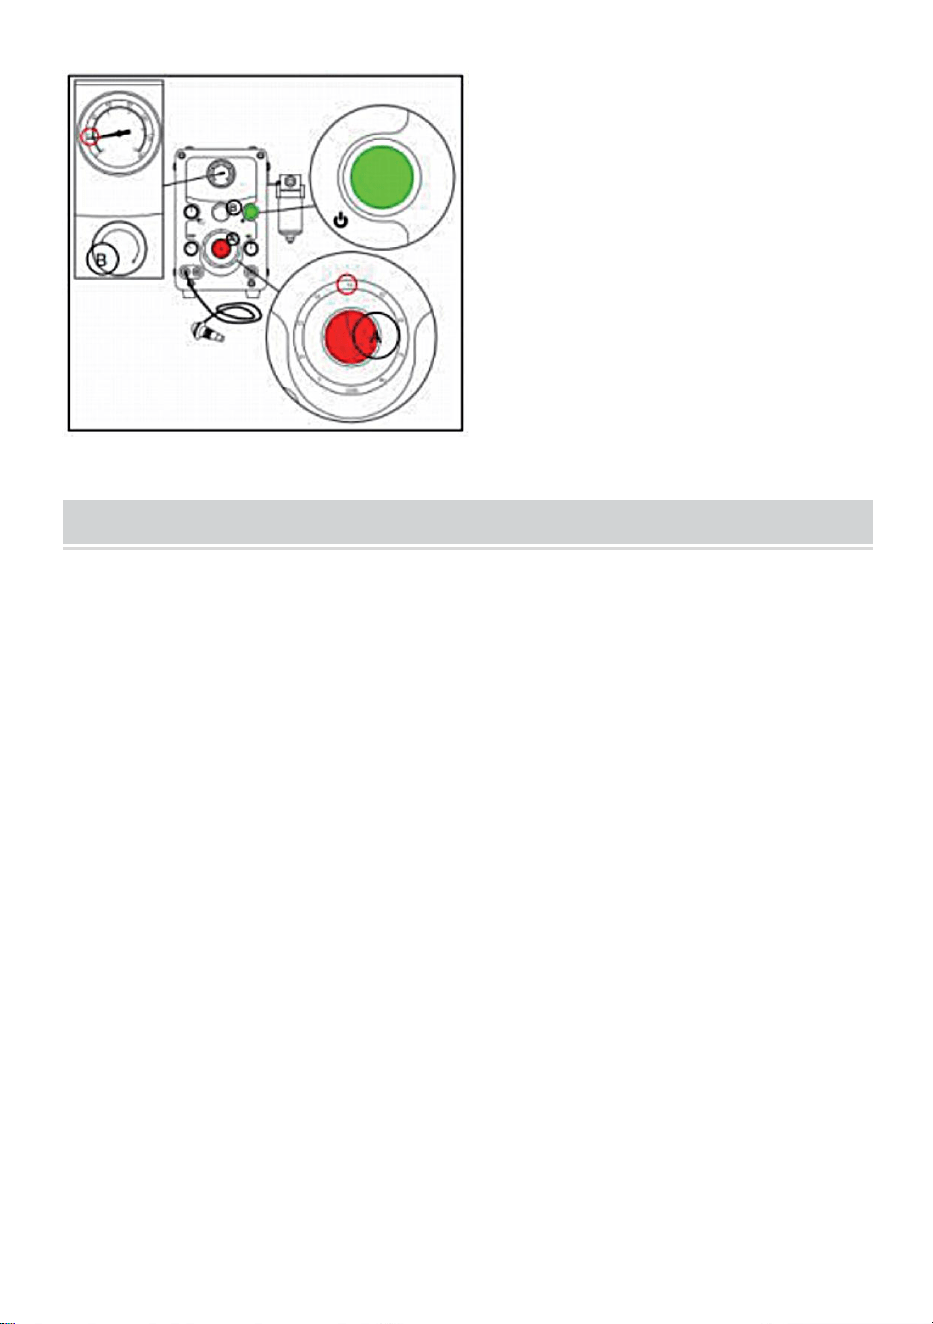
FUNCTION INTRODUCTION
- 3 -
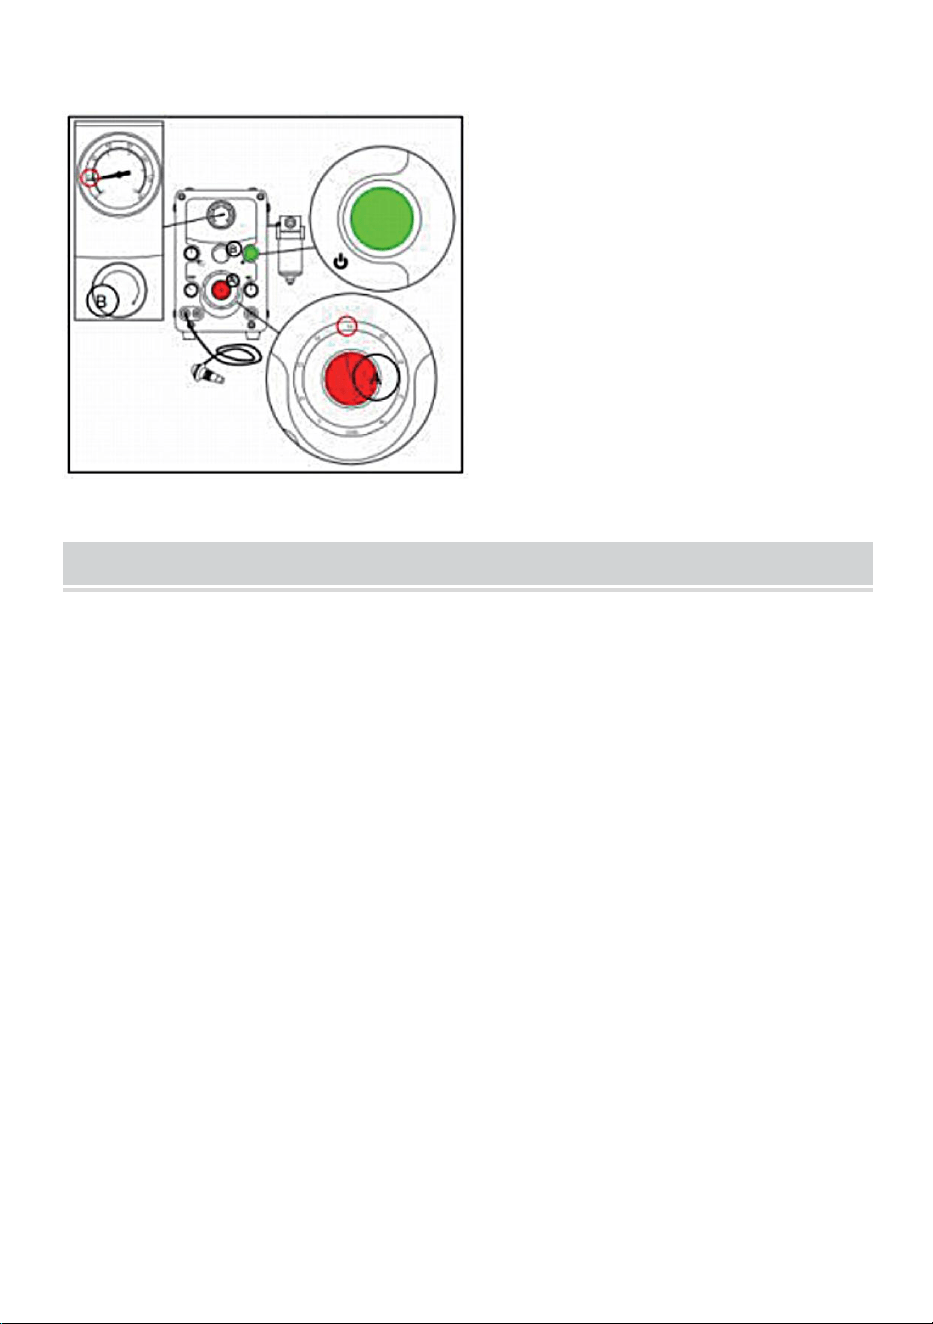
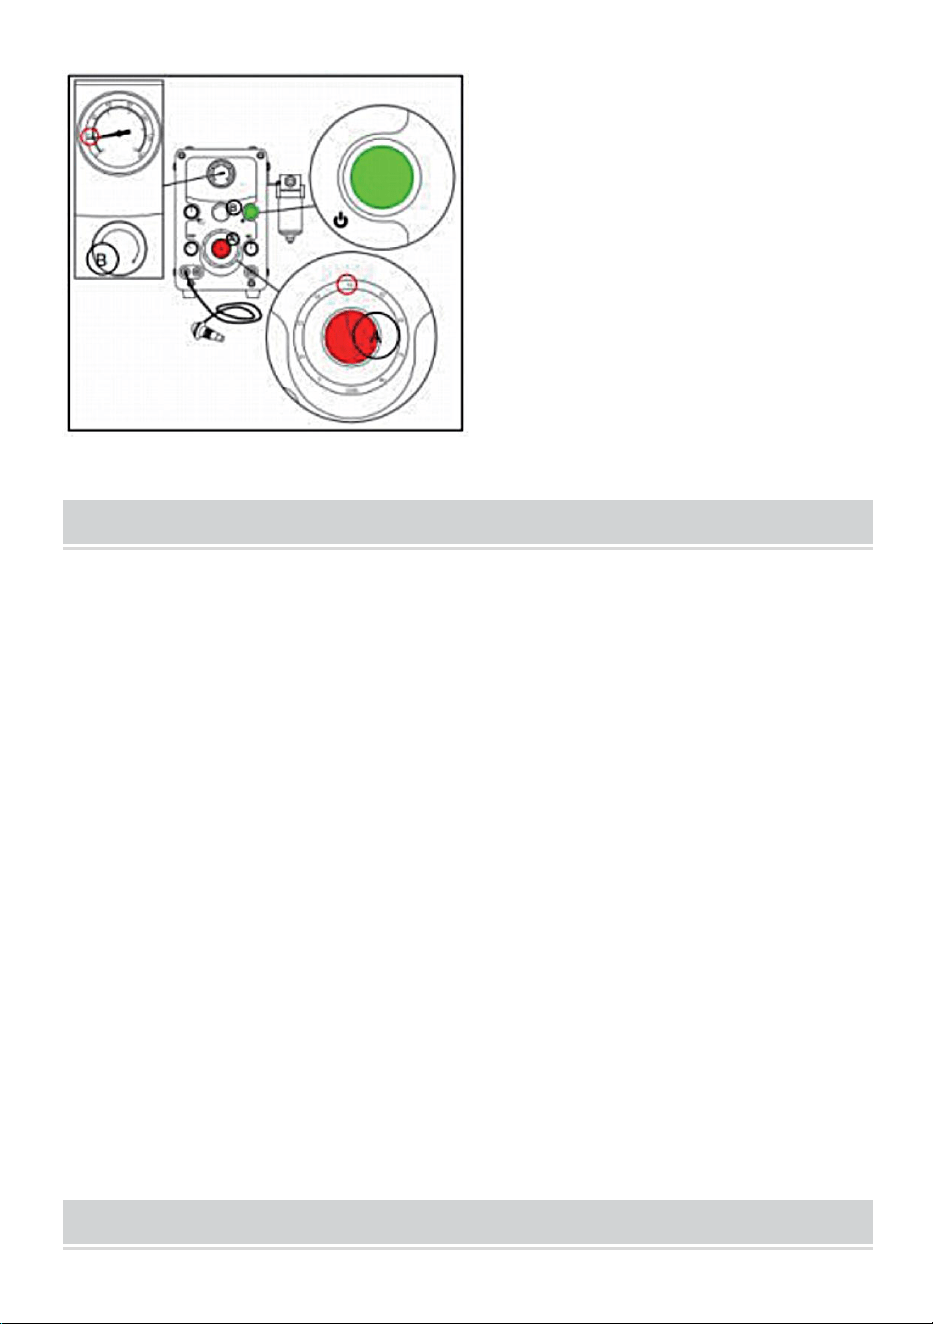
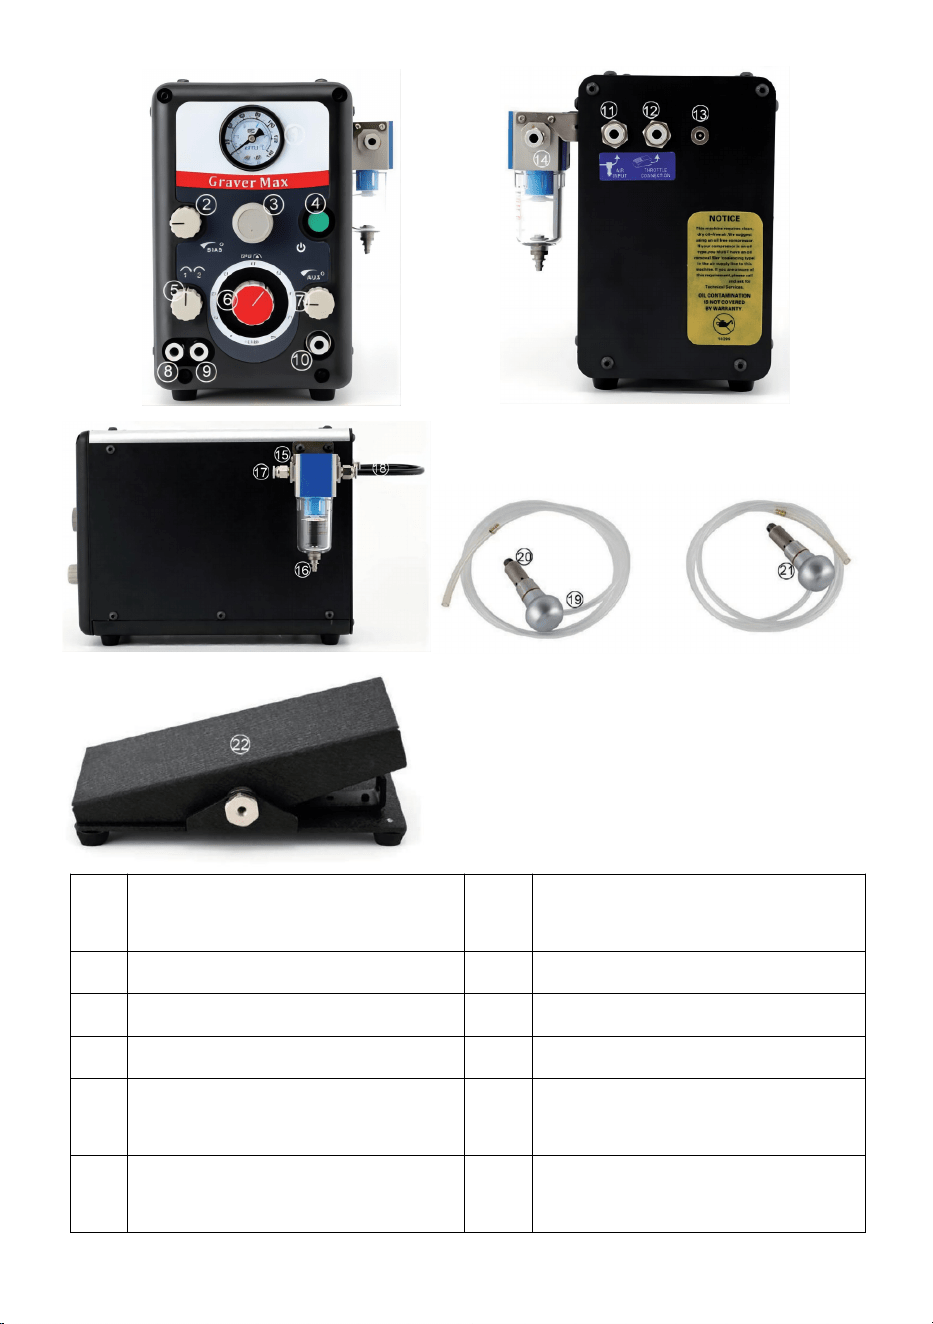
1
Air pressure gauge
12
Foot throttle quick connect
fitting
2
BIAS-control knob
13
Power connect
3
Air pressure control knob
14
Filter
4
Power On/Off button
15
Screw
5
Hand piece selector knob for
8 and 9
16
Air filter
6
Strokes per minute selector
knob
17
Air filter input quick connect
fitting
7
Auxiliary air open/close knob
for 10
18
Air filter output quick
connect fitting
8
I Hand piece quick connect
fittings I
19
Engraving hand piece I
9
II Hand piece quick connect
fittings II
20
Chuck
10
Auxiliary air quick connect
fitting
21
Engraving hand piece II
11
Air input quick connect fitting
22
Foot throttle

- 4 -
OUICK SET UP INTRODUCTION
AIR SUPPLY REOUIREMENTS
Engraving machine requires 1.4 CFM (40 liters/min. ) at minimum 45 psi
(3.1 bar). at minimum input is 125psi (8.6bar) . We encourage reducing the
air pressure from a regulator to 45~60psi (3.1~4.1bar)as this ensures a
stable air pressure supply. The compressed air must be clean, dry,and oil
free. The filter supplied with each unit is a final filter and is not capable of
removing large amounts of water, oil, or contaminants.
If the air supply has excessive water, oil, or contaminants, and additional
filter/water trap and coalescing oil removal filter must be installed ahead of
the unit, Oil or water contamination will damage engraving machine.
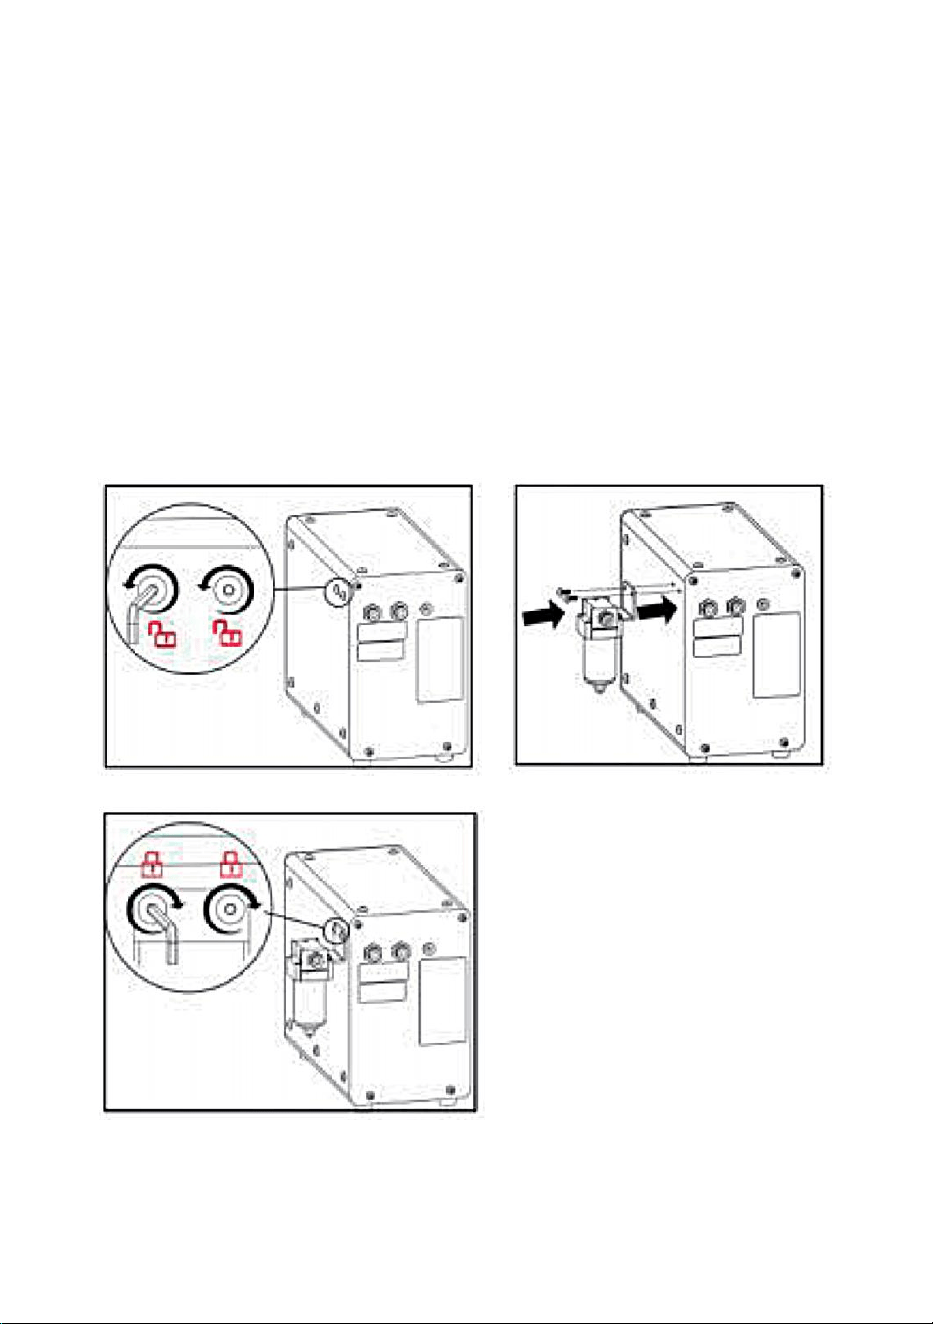
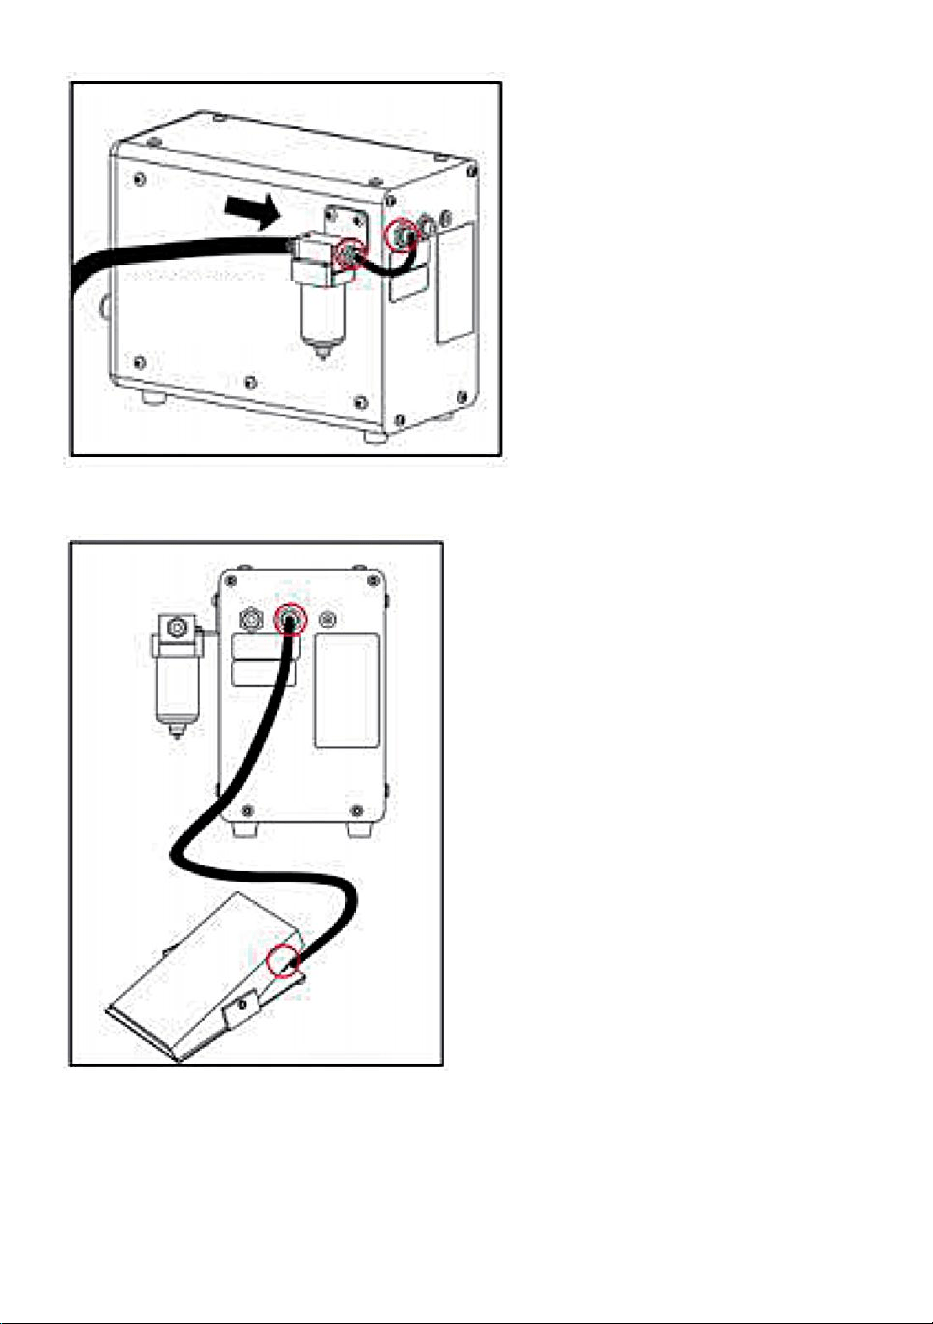
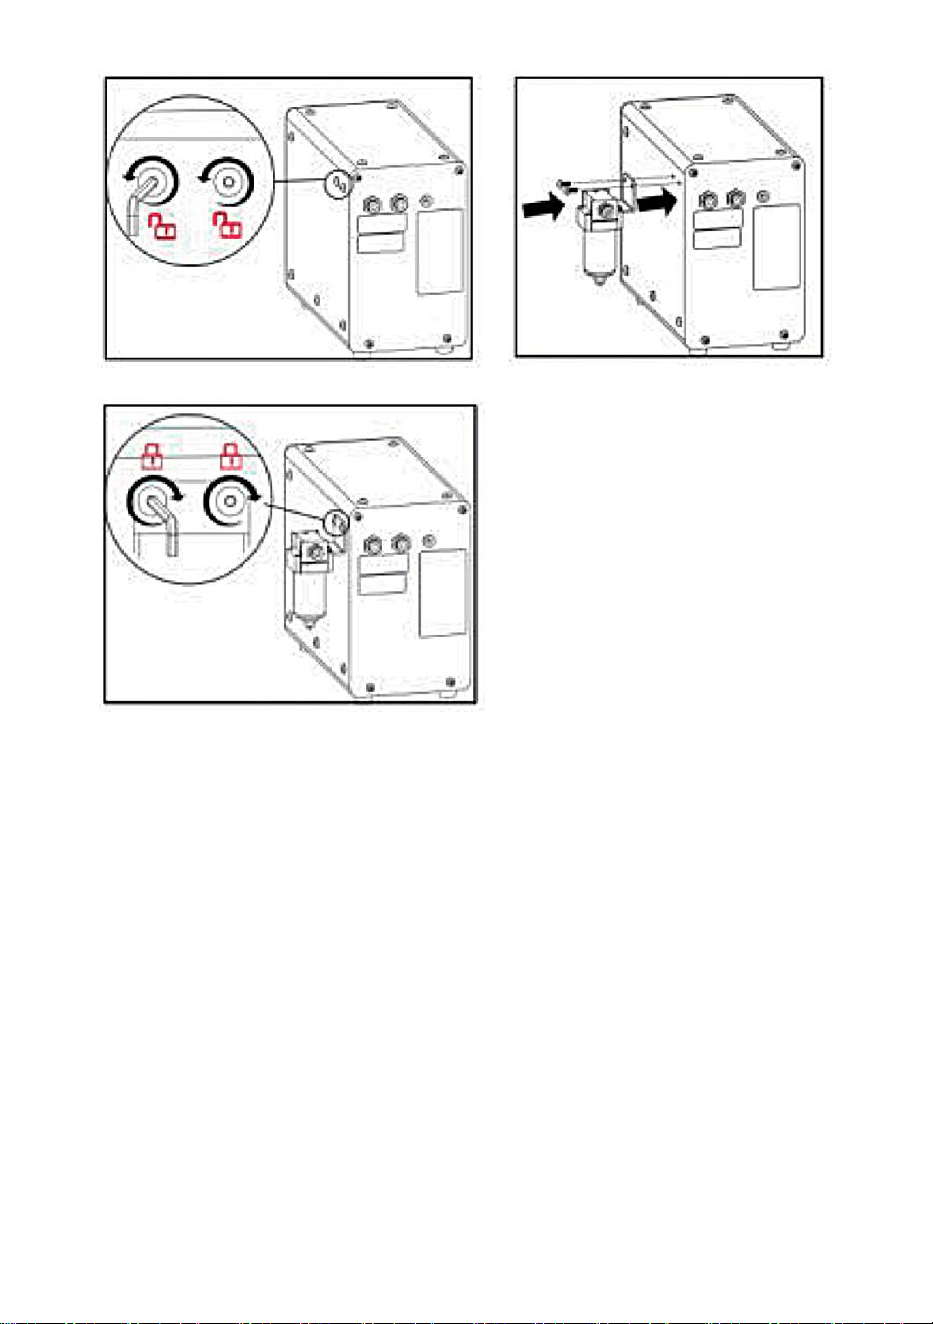
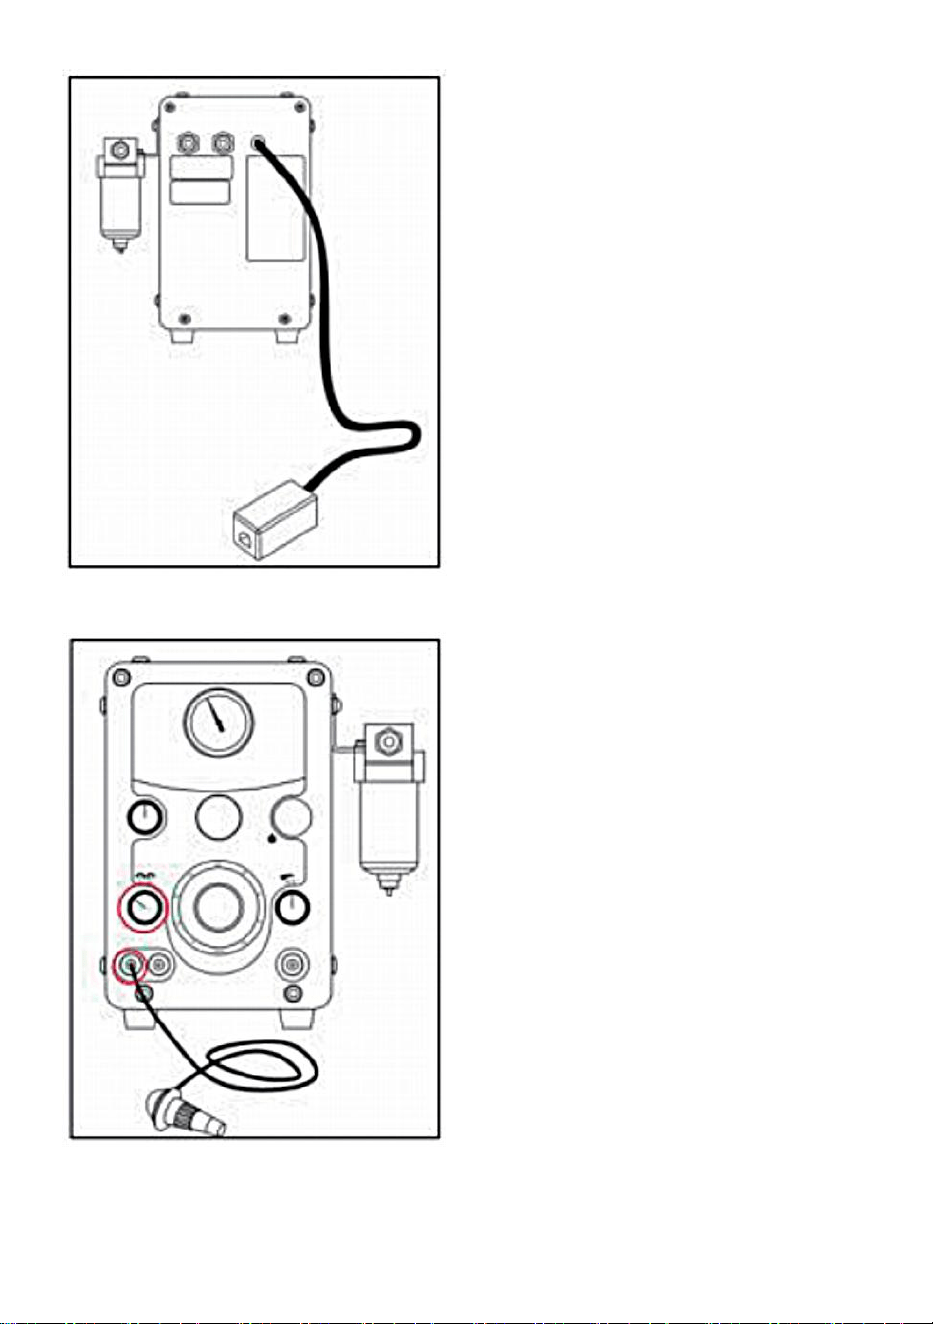
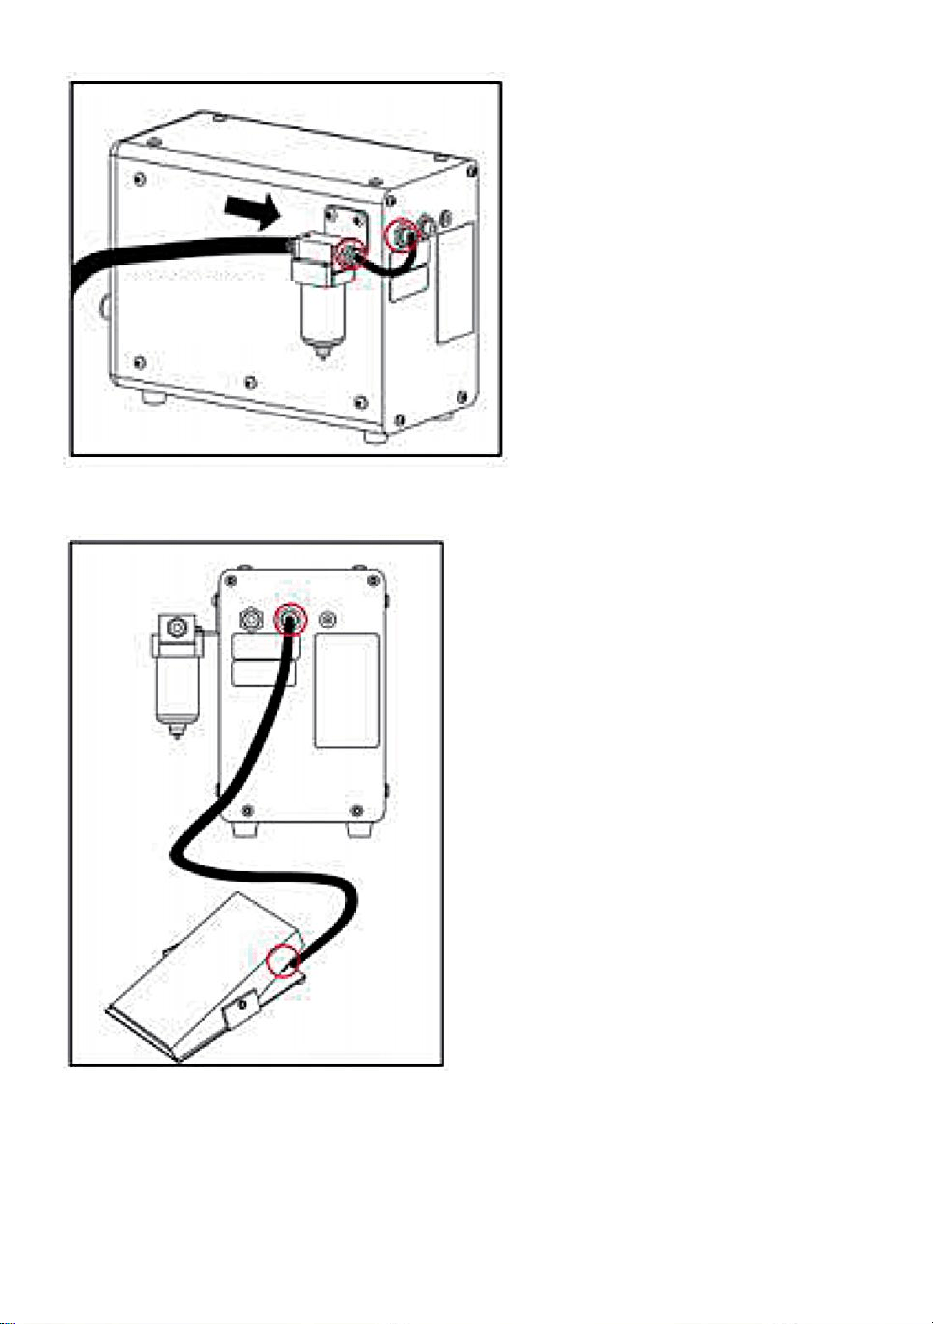
INITINAL SETUP
Decide where you want to place the machine on your bench and where
you would like the air filter located.Make its location readily accessible so it
is easy to drain water from the bowl daily. You may attach the air filter to
your machine, workbench, or wherever you desire. Here we show it
attached to the back right side of the machine. Remove the screw at this
location and place the screw through the key hole opening in the filter
bracket. Tighten the screw to secure bracket, The bottom screw in the
bracket will position into the slot to keep the filter from twisting. (pic. 3) If
push-to-connect fittings are new to you, they are amazing with the air
pressure TURNED OFF, simply insert the hose all the way into the fitting
opening-it stay sattached. To disconnect, press in on the white ring while
gently pulling the hose out.
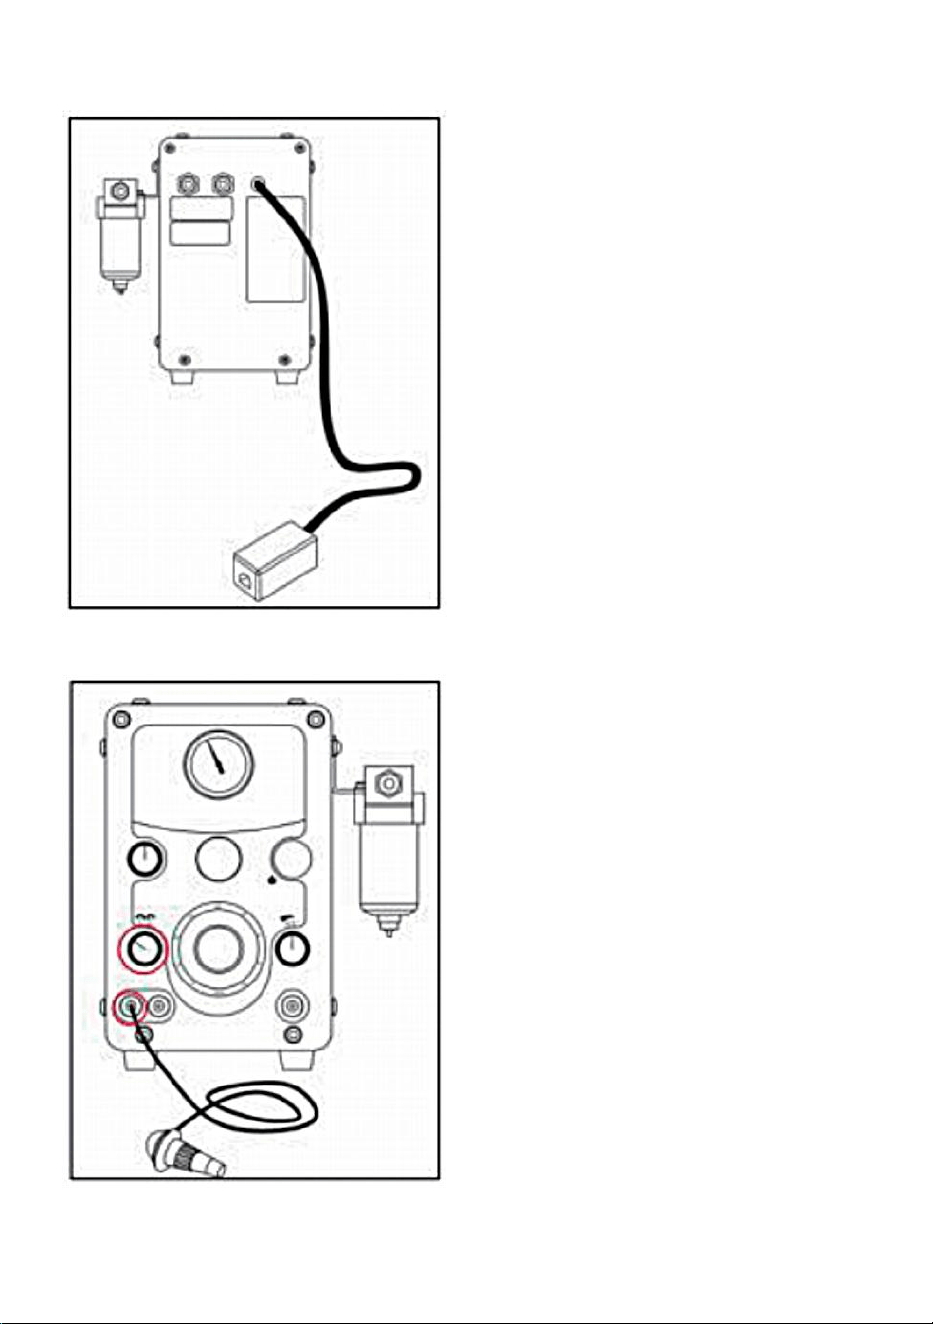
CONNECT FOOT THROTTLE
Place the foot throttle on the floor in a convenient position. Run the hose to
the back of the machine. If you need to snake the hose through an opening
on your bench, make sure the hose is not pinched or kinked. Connect the
hose from the foot throttle to the push-to-connect fitting above the label
marked THROTTLE CONNECTION.
NOTE: It is normal to hear air leaking when you depress the foot
throttle, this is what activates the hand piece.
- 5 -
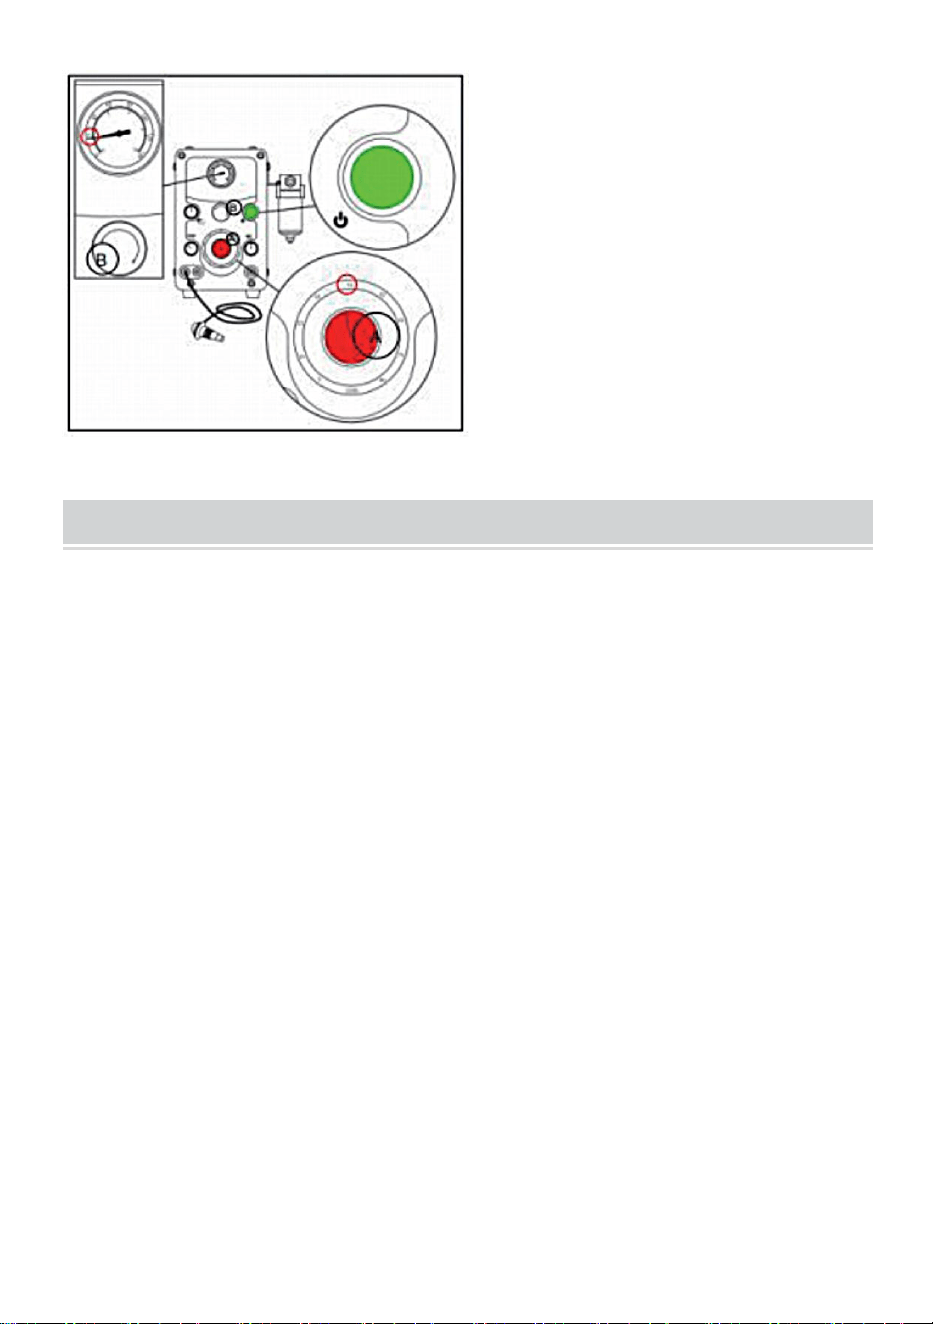
CONNECT HANDPIECE
There are two fitting to attach impact hand pieces. Decide which hand
pieces you want in postions 1 and 2. Connect the hand piece hose to the
push-to-connect fitting simply by pushing the hose inside the white ring
receiver. A selector knob above the connections lets you select which
impact hand piece you want to use,1 or 2.
NOTE: Make sure selector knob is turend until it stops, either
direction.Auxiliary outlet is a straight flow air supply that is limited to
40psi (2.7 bar) . The knob is a twist-open/twist-close valve. (pic.1)This
is where you connect a Rotary Hand piece or other pneumatic tool.
FILTER INSTALLATION

- 6 -
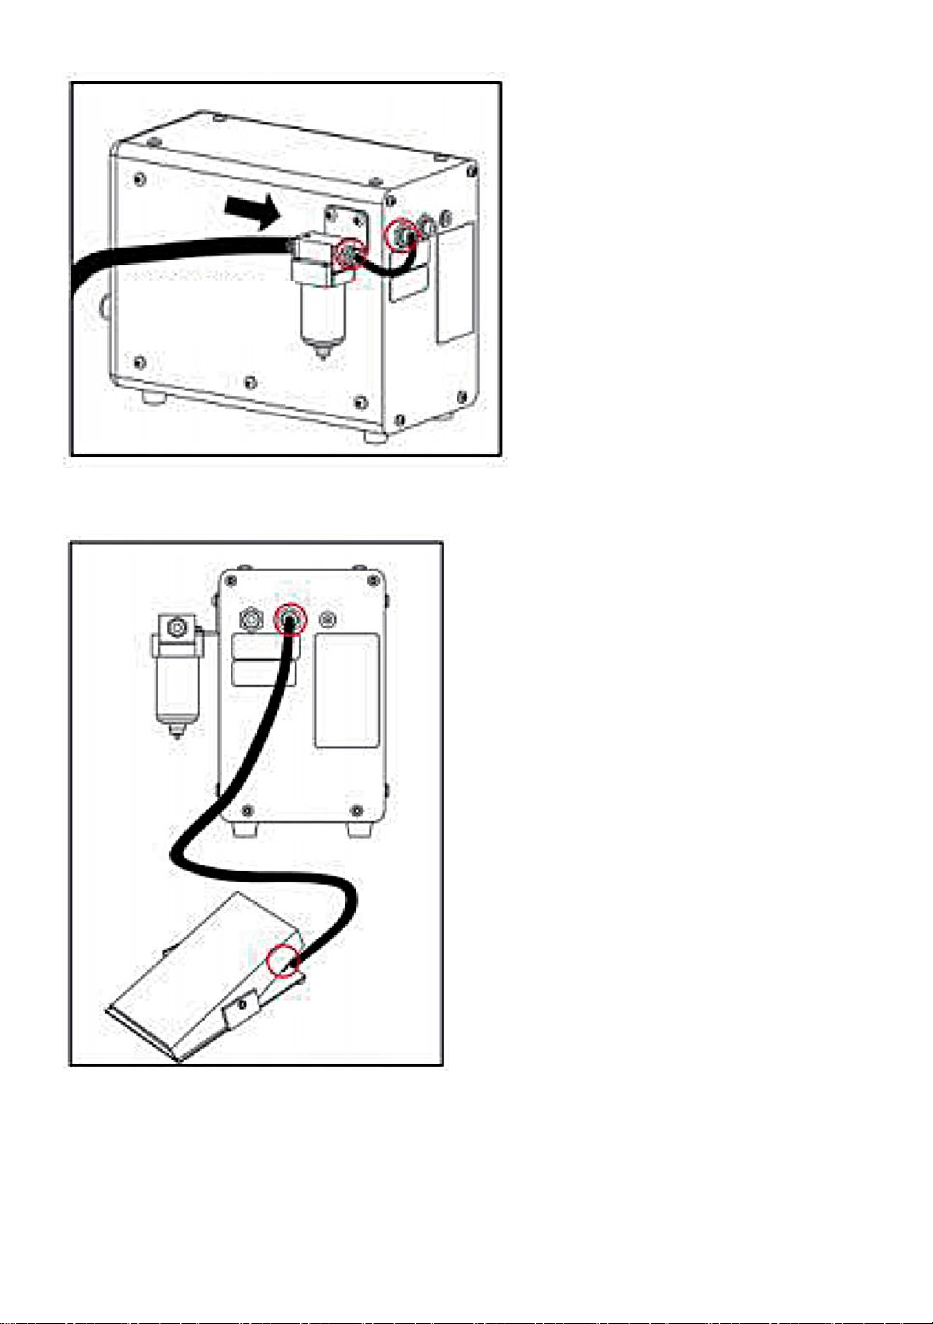
CONNECT THE AIR FILTER
CONNECT FOOT THROTTLE
Find the transparent hose
139mm connect one end to
the air input quick connect
fitting on the back of the
machine and the other end
to the straightly quick
connect fitting.
Connect the air
compressor hose
Connect the foot throttle hose to
he throttle connection on the
back of the machine.
- 7 -
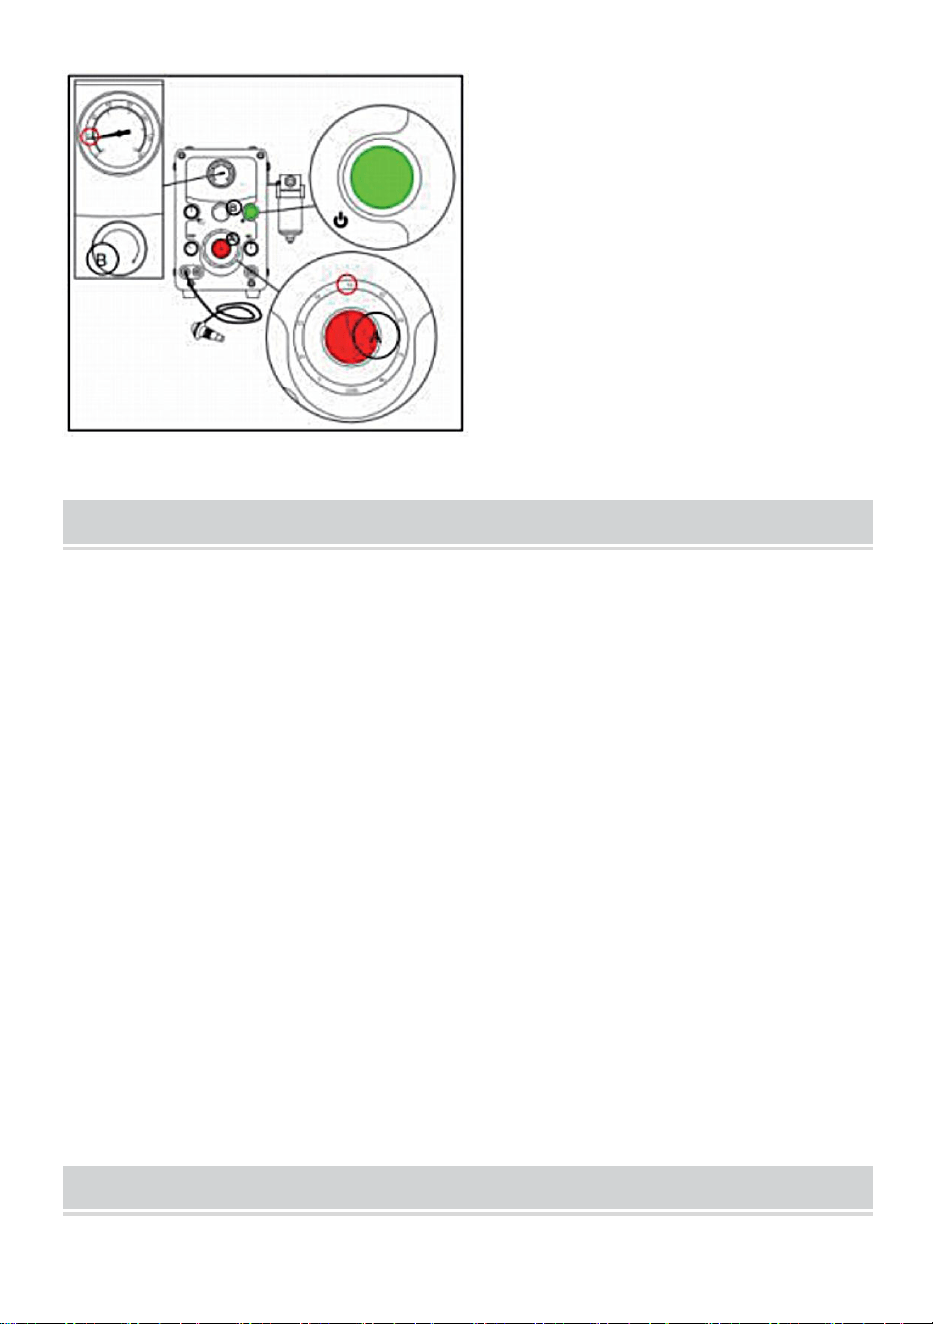
POWER SUPPLY
MPACT HANDPIECE
Connect the electrical power
cord into he 24V converter
box.plug the converter cord
not the jack on the back of the
machine.
IMPORTANT
The rotary valve is lubricated
by at passing through it do no
run electrical system unless
air system is on.
Connect the hand piece hose
to one of the hand piece quick
connect fitting. Move the hand
piece selector knob to the
corresponding hand piece
quick connect fitting you are
using.
- 8 -
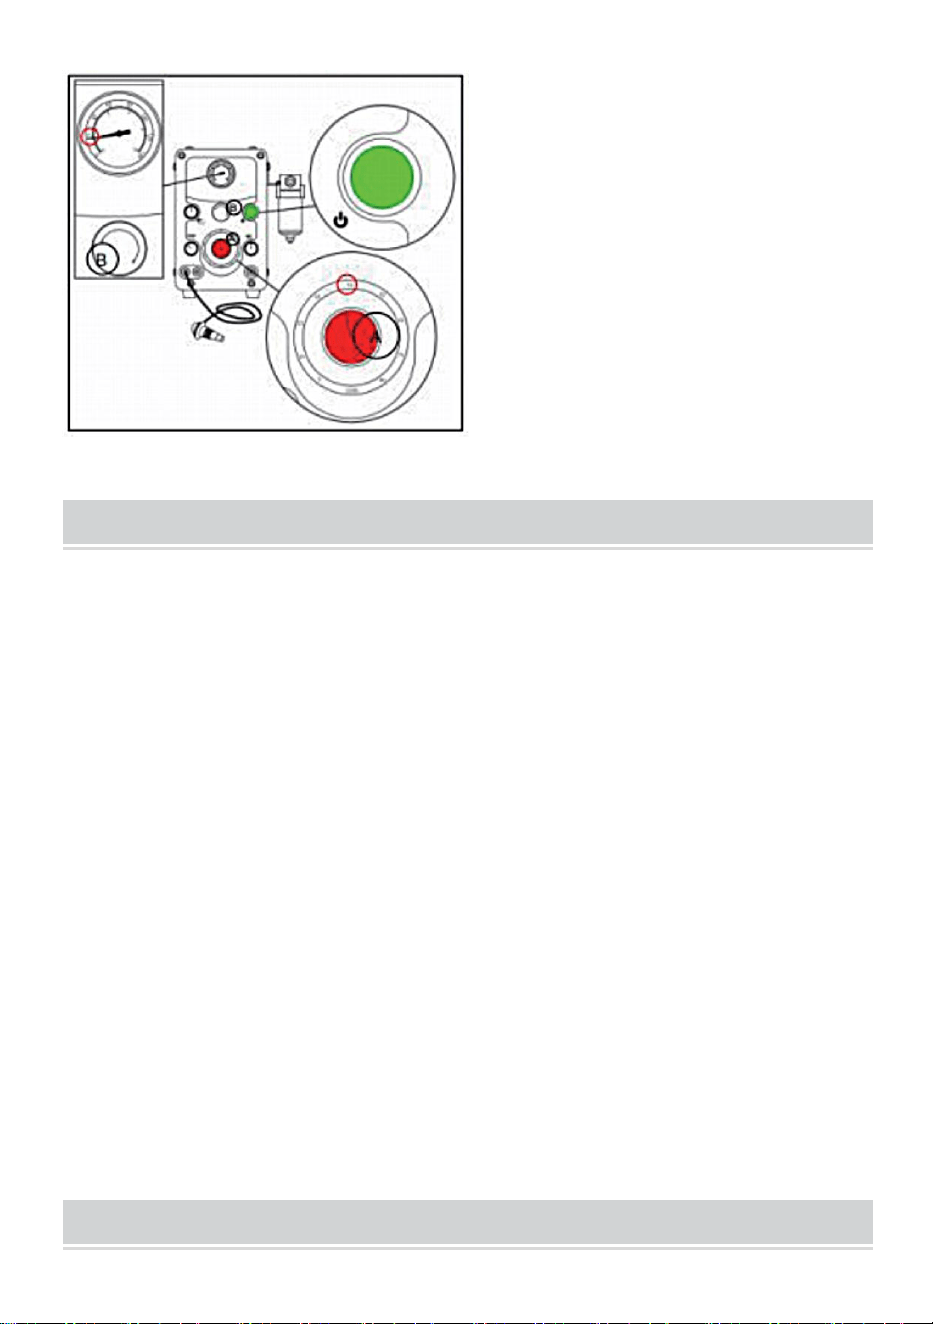
HANDPIECE TUNNING
OPERATING INSTRUCTION
HOW TO TUNE ENGRAVING MACHINE
By tuning your machine, we mean adjusting the strokes per minute and air
pressure for minute and air pressure for optimum performance.
TUNING YOUR MACHINE PROPERLY IS THE SINGLE
MOSTIMPORTANTOPERATION YOU SHOULD LEARN.
1. Turn on your air compressor and allow the tank to fill. Wait for the
compressor to cycle off and stop running.
2. Turn on the Engraving machine HR-G002 and set the stroke per minute dial
at 2300. Using the pressure control knob on the front of the machine, back the
air pressure down to 2 to 5 MPa (0.1 to 0.4bar)
3. Hold the hand piece you have selected to use with the tool holder end up
(vertically) next to your ear.
4. Without depressing the foot throttle, SLOWLY increase the air pressure until
the hand piece will vibrate, and more air pressure will make it knock. Siowly
add air pressure and when the knocking barely stops, this is considered the
perfect air pressure operating range for that particular hand piece.
Move the hand piece selector
knob to te corresponding hand
piece quck connect fitting you
are using.Set the stroke per
minute(A to around 4000-4200,
Set the main air regulator
kob(B)o aroud
0.18-0.20BAR(18-20PSI)

- 9 -
HOW TO USE THE FOOT THROTTLE
The engraving machine foot throttle is operated like an automobile
accelerator and NOT like a flexible-shaft foot control. Begin by placing your
foot on the top plate with your heel even with the bottom of the top plate.
You should put the tool in position BEFORE depressing the foot throttle.
Never depress the foot throttle and then try to bring a stroking hand piece
to work! If you need more you need more power when cutting deeper, push
more on the foot throttle to increase the hand piece power. You will soon
learn to coordinate at your foot action with the need for more power as you
work. A beginner will push the foot throttle down a set amount and try to do
the rest by pushing the hand piece harder While never changing foot
position. This is incorrect and not a safe way to use a hand piece. At the
start of the aut, increase power in a smooth fashion. If you need more
power, press more with your foot. As the cut tapers to the end, rduce the
foot pressure gradually as your hand tilts the graver up and out. With a little
practice, this hand/foot coordination will become as natural as driving a car.
HOW TO UESE THE BIAS CONTROL
After you tune the hand piece,notice that the hand piece starts working as
you press down on the foot throtle. Add one or two pounds of air pressure
control knob. Now, open the bias control by turning it counter-clockwise
and notice that it does not take as much pressure on the foot throttle to
activate to the hand piece. 'The bias control allows you to adjust the foot
throttle action so you can predict the moment the hand piece will start,
giving you optimum hand piece control. This is a feature that one would
use for finede tail work such as bulino or shading. By opening the bias
control fully, you will find that the hand piecewill start to work without
pressing on the foot throttle. You may find this function useful for some
operations such as stippling.

- 10 -
EOUIPMENT MAINTENANCE
KEEPING THE HANDPIECE CLEAN
The impact hand piece must be kept clean for proper operation. If operation
becomes sluggish, erratic, or fails, cleaning is needed. Remove the piston and
spring from the hand piece. Take each, one at a time, and place in a sheet of
writing or copier paper. Do not use a paper towel, tissue, or newsprint, Holding
it between your fingers buff and polish of any dirt or residue. Folding the paper,
use the edge to clean between the piston grooves and the space between the
spring. 'To clean the hand piece inside, take the writing or copier paper and
twist it to a point. Insert the paper point into the hand piece and rotate paper
and hand piece against each other. This will buff and polish the inside and
clean. IMPORTANTNOTE: DO NOT LUBRICATEPISTON, SPRING, OR
BORE.
FOOT THROTTLE
The throttle should require little maintenance, It should be cleaned periodically.
OILING: Periodically, place a drop oil on the throttle hinges. Keep the floor
clean.
When you sweep or vacuum, place foot throttle on your bench or chair.
If large amounts of water and contaminants are in the air supply to the unit,
more frequentattention must be given to the unit filter. The bowl must be
drained frequently to prevent water from entering the rotary valve. hoses hand
piece, etc. In addition, the filter elementmust be cleaned and/or replaced
frequently. If mositure is noted in the hand piece or throttle hoses, shut the unit
down immediately and drain the filter bowl.
Then proceed as follows:
1. Disassemble and clean impact hand piece(s)and reassemble.
2. Reduce pressure setting to l0 psi and turn unit ON to purge mositure for
mvalves. hoses etc.
3. Located on the lower back of the machine is the drain plug to the internal
air reservoir, Using a hex wrench, remove the plug and drain any mositure
from reservoir. Replace drain plug. Before using machine again, figure out
where the mositure came from and fix the problem. It may require an additional
filter(s) or water trap in the line.


- 12 -
Technique Certificat d'assistance et de garantie électronique
www.vevor.com/support
MANUEL D'UTILISATION DE LA MACHINE
À GRAVURE
MODÈLE: HR-G002
We continue to be committed to provide you tools with competitive price.
"Save Half", "Half Price" or any other similar expressions used by us only represents an
estimate of savings you might benefit from buying certain tools with us compared to the major
top brands and does not necessarily mean to cover all categories of tools offered by us. You
are kindly reminded to verify carefully when you are placing an order with us if you are
actually saving half in comparison with the top major brands.

- 1 -
MODÈLE: HR-G002
Have product questions? Need technical support? Please feel free to
contact us:
Technical Support and E-Warranty Certificate
www.vevor.com/support
NEED HELP? CONTACT US!
This is the original instruction, please read all manual instructions
carefully before operating. VEVOR reserves a clear interpretation of our
user manual. The appearance of the product shall be subject to the
product you received. Please forgive us that we won't inform you again if
there are any technology or software updates on our product.
ENGRAVING MACHINE

- 2 -
Avertissement - Pour réduire le risque de blessure, l'utilisateur
doit lire attentivement le manuel d'instructions.
IMPORTANT NOTICE
Cette machine nécessite de l'air propre, sec et sans huile. Nous vous
suggérons d'utiliser un compresseur sans huile. Si votre compresseur est
de type à huile, vous DEVEZ avoir un filtre d'élimination d'huile (de type
coalescent) dans la conduite d'alimentation en air de cette machine. Si
vous n'êtes pas sûr de cette exigence, veuillez contacter votre vendeur.
TECHNICAL PARAMETERS
Modèle
HR-G002
Saisir
CA 2 3 0 V 50 Hz / CA 1 2 0 V 60
Hz
Vitesse de travail à la main et à la
pièce
100-8000 RPM
Plage d'affichage de la pression
0-1 MPa / 0-10kg/cm²
FUNCTION INTRODUCTION

- 3 -
1
Manomètre de pression d'air
12
Raccord rapide pour pédale
d'accélérateur
2
Bouton de commande BIAS
13
Connexion électrique
3
Bouton de contrôle de la
pression d'air
14
Filtre
4
Bouton marche/arrêt
15
Vis
5
Main bouton sélecteur de
pièces pour 8 et 9
16
Filtre à air
6
Bouton de sélection des
17
Raccord rapide d'entrée de

- 4 -
coups par minute
filtre à air
7
Bouton
d'ouverture/fermeture d'air
auxiliaire pour 10
18
Raccord rapide de sortie de
filtre à air
8
Je donne la main pièce
raccords à connexion rapide
I
19
Gravure à la main pièce I
9
II Main raccords à connexion
rapide en pièce II
20
C'est un cuck
10
Raccord rapide d'air
auxiliaire
21
Gravure à la main morceau
II
11
Raccord rapide d'entrée d'air
22
Pédale d'accélérateur
OUICK SET UP INTRODUCTION
BESOINS EN ALIMENTATION EN AIR
La machine à graver nécessite 1,4 CFM (40 litres/min) à un minimum de
45 psi (3,1 bar). L'entrée minimale est de 125 psi (8,6 bar). Nous vous
conseillons de réduire la pression d'air d'un régulateur à 45~60 psi
(3,1~4,1 bar) car cela garantit une alimentation en pression d'air stable.
L'air comprimé doit être propre, sec et sans huile. Le filtre fourni avec
chaque unité est un filtre final et n'est pas capable d'éliminer de grandes
quantités d'eau, d'huile ou de contaminants.
Si l'alimentation en air contient trop d'eau, d'huile ou de contaminants, un
filtre/piège à eau supplémentaire et un filtre d'élimination d'huile
coalescente doivent être installés en amont de l'appareil. La contamination
par l'huile ou l'eau endommagera la machine à graver.
CONFIGURATION INITIALE
Décidez où vous voulez placer la machine sur votre établi et où vous
souhaitez que le filtre à air soit situé. Faites en sorte que son emplacement
soit facilement accessible afin qu'il soit facile de vider l'eau du bol
quotidiennement. Vous pouvez fixer le filtre à air à votre machine, à votre
établi ou à l'endroit de votre choix. Ici, nous le montrons fixé sur le côté

- 5 -
arrière droit de la machine. Retirez la vis à cet endroit et placez-la dans
l'ouverture du trou de serrure du support du filtre. Serrez la vis pour fixer le
support. La vis inférieure du support se positionnera dans la fente pour
empêcher le filtre de se tordre. (photo 3) Si les raccords à emboîter sont
nouveaux pour vous, ils sont étonnants avec la pression d'air
DÉSACTIVÉE, insérez simplement le tuyau à fond dans l'ouverture du
raccord - il reste fixé. Pour déconnecter, appuyez sur l'anneau blanc tout
en tirant doucement sur le tuyau.
CONNECTER LA PÉDALE DES GAZ
Placez la pédale d'accélérateur sur le sol dans une position pratique.
Faites passer le tuyau à l'arrière de la machine. Si vous devez faire passer
le tuyau à travers une ouverture de votre établi, assurez-vous qu'il n'est
pas pincé ou plié. Raccordez le tuyau de la pédale d'accélérateur au
raccord à emboîter situé au-dessus de l'étiquette marquée THROTTLE
CONNECTION.
REMARQUE : Il est normal d'entendre une fuite d'air lorsque vous
appuyez sur la pédale d'accélérateur, c'est ce qui active la pièce à
main.
CONNECTER LA PIÈCE À MAIN
Il existe deux raccords pour fixer les pièces à main à percussion. Décidez
quelles pièces à main vous souhaitez utiliser dans les positions 1 et 2.
Connectez le tuyau de la pièce à main au raccord à pression en poussant
simplement le tuyau à l'intérieur du récepteur à anneau blanc. Un bouton
de sélection au-dessus des connexions vous permet de sélectionner la
pièce à main à percussion que vous souhaitez utiliser, 1 ou 2.
REMARQUE : Assurez-vous que le bouton de sélection est tourné
jusqu'à ce qu'il s'arrête, dans un sens ou dans l'autre. La sortie
auxiliaire est une alimentation en air à flux direct limitée à 40 psi (2,7
bar). Le bouton est une vanne à ouverture/fermeture par rotation.
(photo 1) C'est ici que vous connectez une pièce à main rotative ou
un autre outil pneumatique.
INSTALLATION DU FILTRE

- 6 -
CONNECTER LE FILTRE À AIR
- 7 -
CONNECTER LA PÉDALE DES GAZ
ALIMENTATION ÉLECTRIQUE
Find the transparent hose
139mm connect one end to
the air input quick connect
fitting on the back of the
machine and the other end
to the straightly quick
connect fitting.
Connect the air
compressor hose
Connect the foot throttle hose to
he throttle connection on the
back of the machine.

- 8 -
PIÈCE À MAIN MPACT
RÉGLAGE DE LA PIÈCE À MAIN
Connect the electrical power
cord into he 24V converter
box.plug the converter cord
not the jack on the back of the
machine.
IMPORTANT
The rotary valve is lubricated
by at passing through it do no
run electrical system unless
air system is on.
Connect the hand piece hose
to one of the hand piece quick
connect fitting. Move the hand
piece selector knob to the
corresponding hand piece
quick connect fitting you are
using.
- 9 -
OPERATING INSTRUCTION
COMMENT RÉGLER UNE MACHINE À GRAVURE
En réglant votre machine, nous entendons ajuster les coups par minute et la
pression d'air par minute et la pression d'air pour des performances optimales.
RÉGLER CORRECTEMENT VOTRE MACHINE EST L’OPÉRATION LA
PLUS IMPORTANTE QUE VOUS DEVEZ APPRENDRE.
1. Allumez votre compresseur d'air et laissez le réservoir se remplir. Attendez
que le compresseur s'éteigne et cesse de fonctionner.
2. Allumez la machine à graver HR-G002 et réglez le cadran de course par
minute sur 2300. À l'aide du bouton de contrôle de pression situé à l'avant de
la machine, réduisez la pression d'air à 2 à 5 MPa (0,1 à 0,4 bar )
3. Tenez la pièce à main que vous avez choisie d'utiliser avec l'extrémité du
porte-outil vers le haut (verticalement) à côté de votre oreille.
4. Sans appuyer sur la pédale d'accélérateur, augmentez LENTEMENT la
pression d'air jusqu'à ce que la pièce à main vibre et qu'une pression d'air plus
importante la fasse cogner. Ajoutez lentement de la pression d'air et lorsque le
cognement s'arrête à peine, cela est considéré comme la plage de pression
d'air idéale pour cette pièce à main particulière.
HOW TO USE THE FOOT THROTTLE
Move the hand piece selector
knob to te corresponding hand
piece quck connect fitting you
are using.Set the stroke per
minute(A to around 4000-4200,
Set the main air regulator
kob(B)o aroud
0.18-0.20BAR(18-20PSI)

- 10 -
La pédale d'accélérateur de la machine à graver fonctionne comme un
accélérateur d'automobile et NON comme une pédale de commande à tige
flexible. Commencez par placer votre pied sur la plaque supérieure avec
votre talon au même niveau que bas de la plaque supérieure. Vous devez
mettre l'outil en position AVANT d'appuyer sur la pédale d'accélérateur. Ne
jamais appuyez sur la pédale d'accélérateur, puis essayez d'amener une
main caressante pièce à travailler ! Si vous avez besoin de plus, vous avez
besoin plus de puissance lors d'une coupe plus profonde, appuyez
davantage sur la pédale d'accélérateur pour augmenter la puissance de la
main pièce de puissance. Vous apprendra bientôt à coordonner l'action de
votre pied avec le besoin de plus de puissance pendant que vous travaillez.
Un débutant poussera la pédale d'accélérateur vers le bas d'une quantité
définie et essaiera de faire le reste en poussant la main morceau plus dur
Sans jamais changer la position du pied. Ceci est incorrect et n'est pas une
façon sûre d'utiliser une main pièce. Au début de l'aut, augmentez la
puissance de manière progressive. Si vous avez besoin de plus de
puissance, appuyez davantage avec votre pied. la coupe se rétrécit
jusqu'à l'extrémité, réduisez progressivement la pression du pied pendant
que votre main incline le burin vers le haut et vers l'extérieur. avec un peu
de pratique, cette coordination main/pied deviendra aussi naturelle que la
conduite d'une voiture.
HOW TO UESE THE BIAS CONTROL
Après avoir accordé la main pièce, remarquez que la main la pièce
commence à fonctionner lorsque vous appuyez sur le pied manette des
gaz. Ajoutez un ou deux livres de pression d'air au bouton de commande.
Maintenant, ouvrez le contrôle de polarisation en le tournant dans le sens
inverse des aiguilles d'une montre et remarquez qu'il ne faut pas autant de
pression sur la pédale d'accélérateur pour activer le main pièce. « Le
contrôle de biais vous permet d'ajuster l'action de la pédale d'accélérateur
afin que vous puissiez prédire le moment où main la pièce va démarrer,
vous donnant une main optimale contrôle des pièces. C'est une
fonctionnalité que l'on utiliserait pour affiner travail de queue tel que bulino

- 11 -
ou ombrage. En ouvrant complètement le contrôle de biais, vous
constaterez que la main la pièce commencera à fonctionner sans appuyer
sur la pédale d'accélérateur. Cette fonction peut vous être utile pour
certaines opérations comme le pointillé.
EOUIPMENT MAINTENANCE
GARDER LA PIÈCE À MAIN PROPRE
La main d'impact la pièce doit être maintenue propre pour un bon
fonctionnement. Si le fonctionnement devient lent, erratique ou échoue, un
nettoyage est nécessaire. Retirez le piston et le ressort de la main morceau.
Prenez chacun, un à la fois, et placez-le sur une feuille de papier à écrire ou à
photocopier. N'utilisez pas d'essuie-tout, de mouchoir ou de papier journal.
Tenez-le entre vos doigts frottent et polissent toute saleté ou résidu. Pliez le
papier, utilisez le bord pour nettoyer entre les rainures du piston et l'espace
entre le ressort. 'Pour nettoyer la main morceau à l'intérieur, prenez l'écriture
ou le copieur papier et tournez-le jusqu'à ce qu'il forme une pointe. Insérez la
pointe du papier dans la main pièce et faire tourner le papier et la main
morceau les uns contre les autres. Cela polira et polira l'intérieur et le nettoiera.
REMARQUE IMPORTANTE : NE PAS LUBRIFIER LE PISTON, LE RESSORT
OU L'ALÉSAGE.
PÉDALE D'ACCÉLÉRATEUR
L'accélérateur devrait nécessiter peu d'entretien. Il doit être nettoyé
périodiquement.
HUILAGE : Versez régulièrement une goutte d'huile sur les charnières de la
manette des gaz. Gardez le sol propre.
Lorsque vous balayez ou passez l’aspirateur, placez la pédale d’accélérateur
sur votre banc ou votre chaise.
Si de grandes quantités d'eau et de contaminants se trouvent dans
l'alimentation en air de l'appareil, il faut prêter une attention plus fréquente au
filtre de l'appareil. La cuve doit être vidangée fréquemment pour éviter l'eau de
pénétrer dans la vanne rotative. tuyaux à main pièce, etc. De plus, l'élément
filtrant doit être nettoyé et/ou remplacé fréquemment. Si de l'humidité est

- 12 -
constatée dans la main pièce ou tuyaux d'accélérateur, arrêtez
immédiatement l'appareil et vidangez le bol du filtre .
Procédez ensuite comme suit :
4. Démonter et nettoyer la main d'impact pièce(s) et réassembler.
5. Réduisez le réglage de pression à 10 psi et allumez l'appareil pour purger
l'humidité pendant vannes, tuyaux, etc.
6. Situé à l'arrière inférieur de la machine se trouve le bouchon de vidange de
l'air interne Réservoir, À l'aide d'une clé hexagonale, retirez le bouchon et
vidangez toute humidité du réservoir. Remplacez bouchon de vidange. Avant
d'utiliser à nouveau la machine, déterminez d'où vient l'humidité et réparez-la.
Problème. Il faudra peut-être ajouter un ou plusieurs filtres ou un séparateur
d'eau dans la conduite.


- 14 -
Technisch Support und E-Garantie-Zertifikat
www.vevor.com/support
BENUTZERHANDBUCH DER
GRAVURMASCHINE
MODELL: HR-G002
We continue to be committed to provide you tools with competitive price.
"Save Half", "Half Price" or any other similar expressions used by us only represents an
estimate of savings you might benefit from buying certain tools with us compared to the major
top brands and does not necessarily mean to cover all categories of tools offered by us. You
are kindly reminded to verify carefully when you are placing an order with us if you are
actually saving half in comparison with the top major brands.

- 1 -
MODELL: HR-G002
Have product questions? Need technical support? Please feel free to
contact us:
Technical Support and E-Warranty Certificate
www.vevor.com/support
NEED HELP? CONTACT US!
This is the original instruction, please read all manual instructions
carefully before operating. VEVOR reserves a clear interpretation of our
user manual. The appearance of the product shall be subject to the
product you received. Please forgive us that we won't inform you again if
there are any technology or software updates on our product.
ENGRAVING MACHINE

- 2 -
Warnung: Um das Verletzungsrisiko zu verringern, muss der
Benutzer die Bedienungsanleitung sorgfältig lesen.
IMPORTANT NOTICE
Diese Maschine benötigt saubere, trockene und ölfreie Luft. Wir empfehlen
die Verwendung eines ölfreien Kompressors. Wenn Ihr Kompressor ein
Ölkompressor ist, MÜSSEN Sie in der Luftzufuhrleitung dieser Maschine
einen Ölentfernungsfilter (Koaleszenztyp) haben. Wenn Sie sich
hinsichtlich dieser Anforderung nicht sicher sind, wenden Sie sich bitte an
Ihren Verkäufer.
TECHNICAL PARAMETERS
Modell
HR-G002
Eingang
Wechselstrom 2 3 0 V 50 Hz /
Wechselstrom 1 2 0 V 60 Hz
H und Stück
Arbeitsgeschwindigkeit
100-8000 Drehzahl
Bereich der Druckanzeige
0-1 MPa / 0-10kg/cm²
FUNCTION INTRODUCTION
- 3 -
1
Luftdruckmessgerät
12
Schnellkupplung für das
Fußgas
2
BIAS-Reglerknopf b
13
Stromanschluss
3
Luftdruck-Reglerknopf
14
Filter
4
Ein-/Ausschalter
15
Schrauben
5
Hand Stückwahlknopf für 8
und 9
16
Luftfilter
6
Wählknopf für Schläge pro
Minute
17
Schnellanschluss für den
Luftfiltereingang

- 4 -
7
Hilfsluft öffnen/schließen
Knopf für 10
18
Schnellanschluss für den
Luftfilterausgang
8
Ich gebe Stück
Schnellkupplungen I
19
Gravur Hand Stück I
9
II Hand Stück
Schnellkupplungen II
20
C huck
10
Hilfsluft-Schnellkupplung
21
Gravur Hand Stück II
11
Schnellanschluss für den
Lufteingang
22
Fußgas
OUICK SET UP INTRODUCTION
Anforderungen an die Luftversorgung
Die Graviermaschine benötigt 1,4 CFM (40 Liter/min.) bei mindestens 45
psi (3,1 bar). Der Mindesteingang beträgt 125 psi (8,6 bar). Wir empfehlen,
den Luftdruck mit einem Regler auf 45–60 psi (3,1–4,1 bar) zu
reduzieren, da dies eine stabile Luftdruckversorgung gewährleistet. Die
Druckluft muss sauber, trocken und ölfrei sein. Der mit jeder Einheit
gelieferte Filter ist ein Endfilter und kann keine großen Mengen Wasser, Öl
oder Verunreinigungen entfernen.
Wenn die Luftzufuhr übermäßig viel Wasser, Öl oder Verunreinigungen
enthält, müssen vor der Einheit ein zusätzlicher Filter/Wasserabscheider
und ein Koaleszenzöl-Entfernungsfilter installiert werden. Eine Öl- oder
Wasserverunreinigung beschädigt die Graviermaschine.
ERSTEINRICHTUNG
Entscheiden Sie, wo auf Ihrer Werkbank Sie die Maschine platzieren
möchten und wo der Luftfilter angebracht sein soll. Sorgen Sie für einen
gut zugänglichen Standort, damit Sie täglich problemlos das Wasser aus
der Schüssel ablassen können. Sie können den Luftfilter an Ihrer Maschine,
Werkbank oder wo immer Sie möchten anbringen. Hier zeigen wir ihn an
der rechten Rückseite der Maschine angebracht. Entfernen Sie die
Schraube an dieser Stelle und stecken Sie sie durch die

- 5 -
Schlüssellochöffnung in der Filterhalterung. Ziehen Sie die Schraube fest,
um die Halterung zu sichern. Die untere Schraube in der Halterung wird in
den Schlitz positioniert, um ein Verdrehen des Filters zu verhindern. (Abb.
3) Wenn Sie mit Steckverbindern noch nicht vertraut sind: Sie funktionieren
hervorragend bei ABGESCHALTETEM Luftdruck. Stecken Sie den
Schlauch einfach ganz in die Öffnung des Anschlusses – er bleibt
befestigt. Zum Abnehmen drücken Sie auf den weißen Ring, während Sie
den Schlauch vorsichtig herausziehen.
FUSSGAS ANSCHLIESSEN
Stellen Sie das Fußgaspedal in einer bequemen Position auf den Boden.
Führen Sie den Schlauch zur Rückseite der Maschine. Wenn Sie den
Schlauch durch eine Öffnung in Ihrer Werkbank führen müssen, achten Sie
darauf, dass der Schlauch nicht eingeklemmt oder geknickt ist. Schließen
Sie den Schlauch vom Fußgaspedal an die Steckverbindung über dem
Etikett mit der Aufschrift „DROSSELKLAPPENANSCHLUSS“ an.
HINWEIS: Es ist normal, dass Sie beim Betätigen des Fußgashebels
Luft austreten hören. Dadurch wird das Handstück aktiviert.
HANDSTÜCK VERBINDEN
Es gibt zwei Anschlüsse zum Anbringen von Schlaghandstücken.
Entscheiden Sie, welche Handstücke Sie in Position 1 und 2 haben
möchten. Verbinden Sie den Handstückschlauch mit dem Steckanschluss,
indem Sie den Schlauch einfach in die weiße Ringaufnahme drücken. Mit
einem Auswahlknopf über den Anschlüssen können Sie auswählen,
welches Schlaghandstück Sie verwenden möchten, 1 oder 2.
HINWEIS: Stellen Sie sicher, dass der Wahlknopf in beide Richtungen
bis zum Anschlag gedreht ist. Der Zusatzauslass ist eine Luftzufuhr
mit geradem Durchfluss, die auf 40 psi (2,7 bar) begrenzt ist. Der
Knopf ist ein Drehventil zum Öffnen/Schließen. (Abb. 1) Hier
schließen Sie ein rotierendes Handstück oder ein anderes
pneumatisches Werkzeug an.
FILTERINSTALLATION
- 6 -
ANSCHLIESSEN DES LUFTFILTERS
- 7 -
FUSSGAS ANSCHLIESSEN
STROMVERSORGUNG
Find the transparent hose
139mm connect one end to
the air input quick connect
fitting on the back of the
machine and the other end
to the straightly quick
connect fitting.
Connect the air
compressor hose
Connect the foot throttle hose to
he throttle connection on the
back of the machine.

- 8 -
MPACT-HANDSTÜCK
HANDSTÜCK-TUNING
Connect the electrical power
cord into he 24V converter
box.plug the converter cord
not the jack on the back of the
machine.
IMPORTANT
The rotary valve is lubricated
by at passing through it do no
run electrical system unless
air system is on.
Connect the hand piece hose
to one of the hand piece quick
connect fitting. Move the hand
piece selector knob to the
corresponding hand piece
quick connect fitting you are
using.
- 9 -
OPERATING INSTRUCTION
So stimmen Sie eine Graviermaschine ab
Unter Feinabstimmung Ihrer Maschine verstehen wir die Anpassung der Hübe
pro Minute und des Luftdrucks für optimale Leistung.
DIE RICHTIGE EINSTELLUNG IHRER MASCHINE IST DER WICHTIGSTE
EINZELNE VORGANG, DEN SIE LERNEN SOLLTEN.
1. Schalten Sie Ihren Luftkompressor ein und lassen Sie den Tank füllen.
Warten Sie, bis der Kompressor abschaltet und aufhört zu laufen.
2. Schalten Sie die Graviermaschine HR-G002 ein und stellen Sie die Hubzahl
pro Minute auf 2300. Mit dem Druckregler an der Vorderseite der Maschine
reduzieren Sie den Luftdruck auf 2 bis 5 MPa (0,1 bis 0,4 bar )
3. Halten Sie das ausgewählte Handstück mit dem Werkzeughalterende nach
oben (senkrecht) neben Ihr Ohr.
4. Ohne das Fußgaspedal zu betätigen, erhöhen Sie LANGSAM den Luftdruck,
bis das Handstück vibriert und durch mehr Luftdruck klopft. Erhöhen Sie
langsam den Luftdruck, und wenn das Klopfen kaum aufhört, gilt dies als der
perfekte Luftdruck-Betriebsbereich für das jeweilige Handstück.
HOW TO USE THE FOOT THROTTLE
Move the hand piece selector
knob to te corresponding hand
piece quck connect fitting you
are using.Set the stroke per
minute(A to around 4000-4200,
Set the main air regulator
kob(B)o aroud
0.18-0.20BAR(18-20PSI)

- 10 -
Das Fußgaspedal der Graviermaschine wird wie ein Autobeschleuniger
bedient und NICHT wie eine Fußsteuerung mit flexiblem Schaft. Stellen
Sie zunächst Ihren Fuß auf die obere Platte, wobei Ihre Ferse auf gleicher
Höhe mit dem Unterseite der oberen Platte. Sie sollten das Werkzeug in
Position bringen, BEVOR Sie das Fußgas betätigen. Niemals Drücken Sie
das Gaspedal und versuchen Sie dann, eine streichelnde Hand zu bringen
Stück zu arbeiten! Wenn Sie mehr brauchen, brauchen Sie Um mehr
Leistung beim tieferen Schneiden zu erzielen, drücken Sie stärker auf das
Fußgas, um die Hand Stück Kraft. Sie Sie werden bald lernen, Ihre
Fußbewegungen mit dem Bedarf an mehr Kraft bei der Arbeit zu
koordinieren. Ein Anfänger wird das Fußgaspedal um einen bestimmten
Betrag nach unten drücken und versuchen, den Rest durch Drücken der
Hand zu erledigen Stück härter Während Sie nie die Fußposition ändern.
Dies ist falsch und keine sichere Art, eine Hand zu benutzen Stück. Am
Anfang des Auts, erhöhen Sie die Leistung auf sanfte Weise. Wenn Sie
mehr Leistung benötigen, drücken Sie stärker mit dem Fuß. Der Schnitt
verjüngt sich zum Ende hin, verringern Sie den Fußdruck allmählich,
während Ihre Hand den Stichel nach oben und außen neigt. Mit Mit ein
wenig Übung wird diese Hand-Fuß-Koordination so selbstverständlich wie
Autofahren.
HOW TO UESE THE BIAS CONTROL
Nach dem Stimmen der Hand Stück, beachten Sie, dass die Hand Das Teil
beginnt zu arbeiten, wenn Sie auf den Fuß drücken. Gas. Fügen Sie ein
oder zwei Pfund Luftdruckregler hinzu. Öffnen Sie nun die
Vorspannungssteuerung, indem Sie sie drehen gegen den Uhrzeigersinn
drehen und merken, dass man nicht so viel Druck auf das Gaspedal
braucht, um den Hand Stück. „Mit der Bias-Steuerung können Sie die
Gaspedalwirkung so einstellen, dass Sie den Moment vorhersagen können,
in dem die Hand Stück beginnt, so dass Sie optimale Hand Stückkontrolle.
Dies ist eine Funktion, die man für feinere Schwanzarbeit wie Bulino oder
Schattierung. Wenn Sie die Bias-Steuerung vollständig öffnen, werden Sie
feststellen, dass die Hand das Teil beginnt zu arbeiten, ohne dass Sie das

- 11 -
Gaspedal betätigen müssen. Diese Funktion kann für Sie nützlich sein für
einige Operationen wie beispielsweise Punktierung.
EOUIPMENT MAINTENANCE
DAS HANDSTÜCK SAUBER HALTEN
Die Schlaghand Das Teil muss sauber gehalten werden, damit es richtig
funktioniert. Wenn der Betrieb träge, unregelmäßig oder fehlschlägt, muss
gereinigt werden. Entfernen Sie den Kolben und die Feder aus der Hand Stück.
Nimm jedes Stück einzeln und Legen Sie es in ein Blatt Schreib- oder
Kopierpapier. Verwenden Sie kein Papiertuch, Taschentuch oder
Zeitungspapier. Halten Sie es zwischen Ihre Finger polieren und entfernen Sie
Schmutz und Rückstände. Falten Sie das Papier und reinigen Sie mit der
Kante zwischen den Kolbennuten und der Raum zwischen der Feder. 'Um die
Hand zu reinigen Stück innen, nehmen Sie den Schreib- oder Kopierer Papier
und drehen Sie es zu einer Spitze. Führen Sie die Papierspitze in die Hand
Stück und drehen Papier und Hand Stück gegeneinander. Dadurch wird die
Innenseite poliert und gereinigt. WICHTIGER HINWEIS: KOLBEN, FEDER
ODER BOHRUNG NICHT SCHMIEREN.
FUSSGAS
Der Gashebel sollte nur wenig Wartung erfordern und regelmäßig gereinigt
werden.
ÖLEN: Geben Sie regelmäßig einen Tropfen Öl auf die Gasscharniere. Halten
Sie den Boden sauber.
Wenn Sie fegen oder staubsaugen, betätigen Sie den Fußhebel auf Ihrer Bank
oder Ihrem Stuhl.
Wenn sich große Mengen Wasser und Verunreinigungen in der Luftzufuhr zum
Gerät befinden, muss der Gerätefilter häufiger überprüft werden. Die Schüssel
muss häufig entleert werden, um zu verhindern Wasser in das Drehventil
eindringt. Schläuche Hand Stück usw. Darüber hinaus muss das Filterelement
häufig gereinigt und/oder ausgetauscht werden. Wenn Feuchtigkeit in der
Hand Stück oder Schläuche drosseln, Anlage sofort abschalten und Filtertopf
entleeren .

- 12 -
Gehen Sie dann wie folgt vor:
7. Schlaghand zerlegen und reinigen Teil(e) und wieder zusammenbauen.
8. Reduzieren Sie den Druck auf 10 psi und schalten Sie das Gerät ein, um
die Feuchtigkeit zu entfernen. Ventile, Schläuche usw.
9. An der unteren Rückseite der Maschine befindet sich der Ablassstopfen für
die interne Luft Reservoir, Entfernen Sie mit einem Inbusschlüssel den
Stopfen und lassen Sie die Feuchtigkeit aus dem Reservoir ab. Ersetzen Sie
Ablassschraube. Bevor Sie die Maschine wieder benutzen, finden Sie heraus,
woher die Feuchtigkeit kam und beheben Sie das Problem. Möglicherweise
sind zusätzliche Filter oder ein Wasserabscheider in der Leitung erforderlich.


- 14 -
Tecnico Supporto e certificato di garanzia elettronica
www.vevor.com/support
MANUALE D'USO DELLA MACCHINA PER
INCISIONE
MODELLO: HR-G002
We continue to be committed to provide you tools with competitive price.
"Save Half", "Half Price" or any other similar expressions used by us only represents an
estimate of savings you might benefit from buying certain tools with us compared to the major
top brands and does not necessarily mean to cover all categories of tools offered by us. You
are kindly reminded to verify carefully when you are placing an order with us if you are
actually saving half in comparison with the top major brands.
- 1 -
MODELLO: HR-G002
Have product questions? Need technical support? Please feel free to
contact us:
Technical Support and E-Warranty Certificate
www.vevor.com/support
NEED HELP? CONTACT US!
This is the original instruction, please read all manual instructions
carefully before operating. VEVOR reserves a clear interpretation of our
user manual. The appearance of the product shall be subject to the
product you received. Please forgive us that we won't inform you again if
there are any technology or software updates on our product.
ENGRAVING MACHINE

- 2 -
Attenzione: per ridurre il rischio di lesioni, l'utente deve leggere
attentamente il manuale di istruzioni.
IMPORTANT NOTICE
Questa macchina richiede aria pulita, asciutta e priva di olio. Consigliamo
di utilizzare un compressore senza olio. Se il compressore è del tipo a olio,
è NECESSARIO disporre di un filtro di rimozione dell'olio (di tipo
coalescente) nella linea di alimentazione dell'aria di questa macchina. Se
non si è sicuri di questo requisito, contattare il proprio venditore.
TECHNICAL PARAMETERS
Modello
HR-G002
Ingresso
CA 2 3 0V 50 Hz / CA 1 2 0 V 60
Hz
Velocità di lavoro H e pezzo
100-8000 giri al minuto
Campo di visualizzazione della
pressione
0-1 MPa / 0-10 kg/cm²
FUNCTION INTRODUCTION

- 3 -
1
Manometro dell'aria
12
Raccordo rapido
acceleratore a pedale
2
Manopola di controllo BIAS b
13
Collegamento elettrico
3
Manopola di controllo della
pressione dell'aria
14
Filtro
4
Pulsante di
accensione/spegnimento
15
Vite
5
Mano manopola selettore
pezzi per 8 e 9
16
Filtro dell'aria

- 4 -
6
Manopola di selezione dei
colpi al minuto
17
Raccordo di collegamento
rapido per ingresso filtro aria
7
Manopola di
apertura/chiusura aria
ausiliaria per 10
18
Raccordo rapido di uscita
del filtro dell'aria
8
Io mano raccordi rapidi
pezzo I
19
Incisione a mano pezzo I
9
II Mano raccordi a innesto
rapido pezzo Io sono
20
C- huck
10
Raccordo rapido aria
ausiliaria
21
Incisione a mano pezzo Io
sono
11
Raccordo rapido di ingresso
aria
22
Acceleratore a pedale
OUICK SET UP INTRODUCTION
RICHIESTE DI ALIMENTAZIONE DELL'ARIA
La macchina per incisione richiede 1,4 CFM (40 litri/min.) a un minimo di
45 psi (3,1 bar). L'ingresso minimo è di 125 psi (8,6 bar). Incoraggiamo a
ridurre la pressione dell'aria da un regolatore a 45~60 psi (3,1~4,1 bar)
poiché ciò garantisce un'alimentazione di pressione dell'aria stabile. L'aria
compressa deve essere pulita, asciutta e priva di olio. Il filtro fornito con
ciascuna unità è un filtro finale e non è in grado di rimuovere grandi
quantità di acqua, olio o contaminanti.
Se l'alimentazione dell'aria contiene acqua, olio o contaminanti in quantità
eccessiva, è necessario installare un filtro/trappola per l'acqua aggiuntivo e
un filtro per la rimozione dell'olio coalescente prima dell'unità. La
contaminazione da olio o acqua danneggerà la macchina per incisione.
CONFIGURAZIONE INIZIALE
Decidi dove vuoi posizionare la macchina sul tuo banco e dove vorresti che
fosse posizionato il filtro dell'aria. Rendi la sua posizione facilmente
accessibile in modo che sia facile drenare l'acqua dalla ciotola ogni giorno.
Puoi attaccare il filtro dell'aria alla tua macchina, al banco da lavoro o

- 5 -
ovunque tu voglia. Qui lo mostriamo attaccato al lato posteriore destro
della macchina. Rimuovi la vite in questa posizione e inserisci la vite
attraverso l'apertura del foro della chiave nella staffa del filtro. Stringi la vite
per fissare la staffa, la vite inferiore nella staffa si posizionerà nella fessura
per evitare che il filtro si attorcigli. (foto 3) Se i raccordi push-to-connect
sono una novità per te, sono fantastici con la pressione dell'aria
DISATTIVATA, inserisci semplicemente il tubo fino in fondo nell'apertura
del raccordo: rimane attaccato. Per scollegarlo, premi sull'anello bianco
mentre tiri delicatamente fuori il tubo.
COLLEGARE L'ACCELERATORE A PIEDE
Posizionare l'acceleratore a pedale sul pavimento in una posizione
comoda. Far passare il tubo flessibile sul retro della macchina. Se è
necessario far passare il tubo flessibile attraverso un'apertura sul banco,
assicurarsi che il tubo flessibile non sia schiacciato o piegato. Collegare il
tubo flessibile dall'acceleratore a pedale al raccordo push-to-connect sopra
l'etichetta contrassegnata THROTTLE CONNECTION.
NOTA: è normale sentire una perdita d'aria quando si preme
l'acceleratore a pedale; è questo che attiva l'impugnatura.
COLLEGAMENTO MANIPOLO
Ci sono due raccordi per collegare i manipoli a impatto. Decidi quali
manipoli desideri nelle posizioni 1 e 2. Collega il tubo del manipolo al
raccordo push-to-connect semplicemente spingendo il tubo all'interno del
ricevitore ad anello bianco. Una manopola di selezione sopra i
collegamenti ti consente di selezionare quale manipolo a impatto desideri
utilizzare, 1 o 2.
NOTA: assicurarsi che la manopola del selettore sia girata fino
all'arresto, in entrambe le direzioni. L'uscita ausiliaria è
un'alimentazione d'aria a flusso dritto limitata a 40 psi (2,7 bar). La
manopola è una valvola a rotazione per aprire/girare e chiudere. (fig.
1) Qui è dove si collega un pezzo rotante o un altro utensile
pneumatico.
INSTALLAZIONE DEL FILTRO

- 6 -
COLLEGARE IL FILTRO DELL'ARIA

- 7 -
COLLEGARE L'ACCELERATORE A PIEDE
ALIMENTAZIONE ELETTRICA
Find the transparent hose
139mm connect one end to
the air input quick connect
fitting on the back of the
machine and the other end
to the straightly quick
connect fitting.
Connect the air
compressor hose
Connect the foot throttle hose to
he throttle connection on the
back of the machine.
- 8 -
MANIPOLO MPACT
REGOLAZIONE DEL MANIPOLO
Connect the electrical power
cord into he 24V converter
box.plug the converter cord
not the jack on the back of the
machine.
IMPORTANT
The rotary valve is lubricated
by at passing through it do no
run electrical system unless
air system is on.
Connect the hand piece hose
to one of the hand piece quick
connect fitting. Move the hand
piece selector knob to the
corresponding hand piece
quick connect fitting you are
using.
- 9 -
OPERATING INSTRUCTION
COME REGOLARE LA MACCHINA PER INCISIONE
Con "regolare la macchina" intendiamo regolare i colpi al minuto e la
pressione dell'aria al minuto per ottenere prestazioni ottimali.
LA CORRETTA MESSA A PUNTO DELLA TUA MACCHINA È
L'OPERAZIONE PIÙ IMPORTANTE CHE DOVRESTI IMPARARE.
1. Accendere il compressore d'aria e lasciare che il serbatoio si riempia.
Attendere che il compressore si spenga e smetta di funzionare.
2. Accendere la macchina per incisione HR-G002 e impostare il quadrante dei
colpi al minuto su 2300. Utilizzando la manopola di controllo della pressione
sulla parte anteriore della macchina, ridurre la pressione dell'aria a 2 per 5
MPa (da 0,1 a 0,4 bar )
3. Tieni l'impugnatura che hai scelto di utilizzare con l'estremità del
portautensile rivolta verso l'alto (verticalmente) accanto all'orecchio.
4. Senza premere l'acceleratore a pedale, aumentare LENTAMENTE la
pressione dell'aria finché il manipolo non vibra, e una maggiore pressione
dell'aria lo farà battere. Aggiungere lentamente la pressione dell'aria e quando
il battito si ferma appena, questo è considerato il perfetto intervallo operativo di
pressione dell'aria per quel particolare manipolo.
Move the hand piece selector
knob to te corresponding hand
piece quck connect fitting you
are using.Set the stroke per
minute(A to around 4000-4200,
Set the main air regulator
kob(B)o aroud
0.18-0.20BAR(18-20PSI)

- 10 -
HOW TO USE THE FOOT THROTTLE
L'acceleratore a pedale della macchina per incidere funziona come un
acceleratore per automobile e NON come un controllo a pedale con albero
flessibile. Inizia posizionando il piede sulla piastra superiore con il tallone
allineato con il fondo della piastra superiore. Dovresti mettere l'utensile in
posizione PRIMA di premere l'acceleratore a pedale. Non premere
l'acceleratore a pedale e poi provare a portare una mano che carezza
pezzo al lavoro! Se ne hai bisogno di più hai bisogno più potenza quando
si taglia più in profondità, premere di più sull'acceleratore a pedale per
aumentare la mano pezzo di potenza. Tu imparerai presto a coordinare
l'azione del tuo piede con la necessità di più potenza mentre lavori. Un
principiante spingerà l'acceleratore a pedale verso il basso di una certa
quantità e cercherà di fare il resto spingendo la mano pezzo più duro
Senza mai cambiare la posizione del piede. Questo è scorretto e non è un
modo sicuro di usare una mano pezzo. All'inizio dell'aut, aumenta la
potenza in modo fluido. Se hai bisogno di più potenza, premi di più con il
piede. Come il taglio si assottiglia verso l'estremità, riduci gradualmente la
pressione del piede mentre la mano inclina il bulino verso l'alto e verso
l'esterno. Con Con un po' di pratica, la coordinazione mano/piede
diventerà naturale come guidare un'auto.
HOW TO UESE THE BIAS CONTROL
Dopo aver accordato la mano pezzo, nota che la mano il pezzo inizia a
funzionare quando si preme sul piede valvola a farfalla. Aggiungere una o
due libbre di manopola di controllo della pressione dell'aria. Ora, aprire il
controllo di polarizzazione ruotandolo in senso antiorario e notare che non
è necessaria molta pressione sul pedale dell'acceleratore per attivare l'
mano pezzo. Il controllo della polarizzazione consente di regolare l'azione
dell'acceleratore a pedale in modo da poter prevedere il momento in cui
mano il pezzo inizierà, dandoti la mano ottimale controllo del pezzo.
Questa è una caratteristica che si userebbe per la messa a punto lavori di
coda come bulino o ombreggiatura. Aprendo completamente il controllo di

- 11 -
polarizzazione, scoprirai che la mano il pezzo inizierà a funzionare senza
premere l'acceleratore a pedale. Potresti trovare utile questa funzione per
alcune operazioni come la punteggiatura.
EOUIPMENT MAINTENANCE
MANTENERE PULITO IL MANIPOLO
La mano d'impatto pezzo deve essere mantenuto pulito per un corretto
funzionamento. Se il funzionamento diventa lento, irregolare o fallisce, è
necessaria la pulizia. Rimuovere il pistone e la molla dalla mano pezzo.
Prendine uno alla volta e mettere in un foglio di carta da scrivere o da
fotocopiatrice. Non usare un tovagliolo di carta, un fazzoletto o carta da
giornale, tenendolo tra le dita lucidano e lucidano ogni traccia di sporco o
residuo. Piegando la carta, usa il bordo per pulire tra le scanalature del pistone
e lo spazio tra la molla. 'Per pulire la mano pezzo dentro, prendi la scrittura o la
fotocopiatrice carta e torcerla fino a formare una punta. Inserire la punta della
carta nella mano pezzo e ruota carta e mano pezzo uno contro l'altro. Questo
luciderà e pulirà l'interno. NOTA IMPORTANTE: NON LUBRIFICARE IL
PISTONE, LA MOLLA O L'ALESAGGIO.
ACCELERATORE A PEDALE
L'acceleratore dovrebbe richiedere poca manutenzione. Dovrebbe essere
pulito periodicamente.
OLIO: periodicamente, metti una goccia di olio sulle cerniere dell'acceleratore.
Mantieni pulito il pavimento.
Quando spazzi o passi l'aspirapolvere, posiziona l'acceleratore a pedale sul
tavolo o sulla sedia.
Se nell'aria di alimentazione dell'unità sono presenti grandi quantità di acqua e
contaminanti, è necessario prestare maggiore attenzione al filtro dell'unità. La
tazza deve essere svuotata frequentemente per evitare acqua dall'ingresso
nella valvola rotante. tubi flessibili mano pezzo, ecc. Inoltre, l'elemento filtrante
deve essere pulito e/o sostituito frequentemente. Se si nota umidità nella
mano pezzo o tubi flessibili dell'acceleratore, spegnere immediatamente l'unità
e svuotare la vaschetta del filtro .

- 12 -
Quindi procedere come segue:
10. Smontare e pulire la mano d'impatto pezzo/i e rimontare.
11. Ridurre l'impostazione della pressione a 10 psi e accendere l'unità per
eliminare l'umidità valvole, tubi flessibili ecc.
12. Nella parte inferiore posteriore della macchina si trova il tappo di scarico
dell'aria interna serbatoio, Utilizzando una chiave esagonale, rimuovere il
tappo e scaricare l'umidità dal serbatoio. Sostituire tappo di scarico. Prima di
utilizzare nuovamente la macchina, scoprire da dove proviene l'umidità e
riparare il problema. Potrebbe essere necessario un filtro aggiuntivo o una
trappola per l'acqua nella linea.


- 14 -
Técnico Certificado de soporte y garantía electrónica
www.vevor.com/support
MANUAL DE USUARIO DE LA MÁQUINA
DE GRABADO
MODELO: HR-G002
We continue to be committed to provide you tools with competitive price.
"Save Half", "Half Price" or any other similar expressions used by us only represents an
estimate of savings you might benefit from buying certain tools with us compared to the major
top brands and does not necessarily mean to cover all categories of tools offered by us. You
are kindly reminded to verify carefully when you are placing an order with us if you are
actually saving half in comparison with the top major brands.

- 1 -
MODELO: HR-G002
Have product questions? Need technical support? Please feel free to
contact us:
Technical Support and E-Warranty Certificate
www.vevor.com/support
NEED HELP? CONTACT US!
This is the original instruction, please read all manual instructions
carefully before operating. VEVOR reserves a clear interpretation of our
user manual. The appearance of the product shall be subject to the
product you received. Please forgive us that we won't inform you again if
there are any technology or software updates on our product.
ENGRAVING MACHINE

- 2 -
Advertencia: Para reducir el riesgo de lesiones, el usuario
debe leer atentamente el manual de instrucciones.
IMPORTANT NOTICE
Esta máquina requiere aire limpio, seco y sin aceite. Sugerimos utilizar un
compresor sin aceite. Si su compresor es de tipo aceite, DEBE tener un
filtro de eliminación de aceite (tipo coalescente) en la línea de suministro
de aire a esta máquina. Si no está seguro de este requisito, comuníquese
con su vendedor.
TECHNICAL PARAMETERS
Modelo
HR-G002
Aporte
CA 2 3 0 V 50 Hz / CA 1 2 0 V 60
Hz
Velocidad de trabajo de la pieza H
100-8000 RPM
Rango de visualización de presión
0-1 MPa / 0-10 kg/cm²
FUNCTION INTRODUCTION

- 3 -
1
Manómetro de presión de
aire
12
Accesorio de conexión
rápida del acelerador de pie
2
Perilla de control BIAS
13
Conexión de energía
3
Perilla de control de presión
de aire
14
Filtrar
4
Botón de
encendido/apagado
15
Tornillo
5
Mano Perilla selectora de
piezas para 8 y 9
16
Filtro de aire

- 4 -
6
Perilla selectora de golpes
por minuto
17
Accesorio de conexión
rápida para entrada de filtro
de aire
7
Perilla de apertura/cierre de
aire auxiliar para 10
18
Accesorio de conexión
rápida para salida de filtro
de aire
8
Yo mano pieza de conexión
rápida I
19
Grabado a mano pieza yo
9
II Mano pieza de conexión
rápida II
20
Chupete
10
Accesorio de conexión
rápida de aire auxiliar
21
Grabado a mano pedazo II
11
Accesorio de conexión
rápida para entrada de aire
22
Acelerador de pie
OUICK SET UP INTRODUCTION
REQUISITOS DE SUMINISTRO DE AIRE
La máquina de grabado requiere 1,4 CFM (40 litros/min) a un mínimo de
45 psi (3,1 bar). La entrada mínima es de 125 psi (8,6 bar).
Recomendamos reducir la presión de aire de un regulador a 45~60 psi
(3,1~4,1 bar) ya que esto garantiza un suministro de presión de aire
estable. El aire comprimido debe estar limpio, seco y sin aceite. El filtro
suministrado con cada unidad es un filtro final y no es capaz de eliminar
grandes cantidades de agua, aceite o contaminantes.
Si el suministro de aire tiene exceso de agua, aceite o contaminantes, se
debe instalar un filtro/trampa de agua adicional y un filtro de eliminación de
aceite coalescente antes de la unidad. La contaminación por aceite o agua
dañará la máquina de grabado.
CONFIGURACIÓN INICIAL
Decide dónde quieres colocar la máquina en tu banco de trabajo y dónde
te gustaría que se ubique el filtro de aire. Haz que su ubicación sea
fácilmente accesible para que sea fácil drenar el agua del recipiente todos

- 5 -
los días. Puedes colocar el filtro de aire en tu máquina, banco de trabajo o
donde desees. Aquí lo mostramos colocado en el lado derecho trasero de
la máquina. Quita el tornillo en esta ubicación y colócalo a través de la
abertura del orificio de la cerradura en el soporte del filtro. Aprieta el tornillo
para asegurar el soporte. El tornillo inferior del soporte se colocará en la
ranura para evitar que el filtro se tuerza. (imagen 3) Si los accesorios de
conexión a presión son nuevos para ti, son increíbles con la presión de
aire APAGADA, simplemente inserta la manguera completamente en la
abertura del accesorio y se mantendrá unida. Para desconectar, presiona
el anillo blanco mientras tiras suavemente de la manguera hacia afuera.
CONECTAR EL ACELERADOR DE PIE
Coloque el acelerador de pie en el piso en una posición conveniente. Lleve
la manguera hasta la parte posterior de la máquina. Si necesita pasar la
manguera por una abertura en su banco, asegúrese de que no esté
pellizcada ni doblada. Conecte la manguera desde el acelerador de pie al
accesorio de conexión a presión que se encuentra sobre la etiqueta
marcada CONEXIÓN DEL ACELERADOR.
NOTA: Es normal escuchar una fuga de aire cuando presiona el pedal
acelerador, esto es lo que activa la pieza manual.
CONECTAR PIEZA DE MANO
Hay dos accesorios para conectar las piezas de mano de impacto. Decida
qué piezas de mano desea en las posiciones 1 y 2. Conecte la manguera
de la pieza de mano al accesorio de conexión a presión simplemente
empujando la manguera dentro del receptor de anillo blanco. Una perilla
selectora sobre las conexiones le permite seleccionar qué pieza de mano
de impacto desea utilizar, 1 o 2.
NOTA: Asegúrese de que la perilla selectora esté girada hasta el tope,
en cualquier dirección. La salida auxiliar es un suministro de aire de
flujo directo que está limitado a 40 psi (2,7 bar). La perilla es una
válvula que se abre y se cierra con un giro. (Imagen 1) Aquí es donde
se conecta una pieza de mano giratoria u otra herramienta neumática.
INSTALACIÓN DEL FILTRO

- 6 -
CONECTE EL FILTRO DE AIRE

- 7 -
CONECTAR EL ACELERADOR DE PIE
FUENTE DE ALIMENTACIÓN
Find the transparent hose
139mm connect one end to
the air input quick connect
fitting on the back of the
machine and the other end
to the straightly quick
connect fitting.
Connect the air
compressor hose
Connect the foot throttle hose to
he throttle connection on the
back of the machine.

- 8 -
PIEZA DE MANO MPACT
AFINAMIENTO DE PIEZA DE MANO
Connect the electrical power
cord into he 24V converter
box.plug the converter cord
not the jack on the back of the
machine.
IMPORTANT
The rotary valve is lubricated
by at passing through it do no
run electrical system unless
air system is on.
Connect the hand piece hose
to one of the hand piece quick
connect fitting. Move the hand
piece selector knob to the
corresponding hand piece
quick connect fitting you are
using.
- 9 -
OPERATING INSTRUCTION
CÓMO AFINAR LA MÁQUINA DE GRABADO
Al ajustar su máquina, nos referimos a ajustar las carreras por minuto y la
presión del aire por minuto y por presión del aire para un rendimiento óptimo.
AJUSTAR CORRECTAMENTE SU MÁQUINA ES LA OPERACIÓN MÁS
IMPORTANTE QUE DEBE APRENDER.
1. Encienda el compresor de aire y deje que el tanque se llene. Espere a que
el compresor se apague y deje de funcionar.
2. Encienda la máquina de grabado HR-G002 y ajuste el dial de golpes por
minuto en 2300. Usando la perilla de control de presión en la parte frontal de
la máquina, reduzca la presión de aire a 2 a 300. 5 MPa (0,1 a 0,4 bar )
3. Sostenga la pieza de mano que ha seleccionado para utilizar con el
extremo del portaherramientas hacia arriba (verticalmente) junto a su oreja.
4. Sin presionar el pedal acelerador, aumente LENTAMENTE la presión de
aire hasta que la pieza de mano vibre y más presión de aire hará que vibre.
Agregue presión de aire lentamente y cuando el golpeteo apenas se detenga,
este se considera el rango de presión de aire operativo perfecto para esa
pieza de mano en particular.
HOW TO USE THE FOOT THROTTLE
Move the hand piece selector
knob to te corresponding hand
piece quck connect fitting you
are using.Set the stroke per
minute(A to around 4000-4200,
Set the main air regulator
kob(B)o aroud
0.18-0.20BAR(18-20PSI)

- 10 -
El acelerador de pie de la máquina de grabado funciona como un
acelerador de automóvil y NO como Un pedal de control con eje flexible.
Comience colocando el pie en la placa superior con el talón al mismo nivel
que el pie. parte inferior de la placa superior. Debe colocar la herramienta
en posición ANTES de presionar el acelerador de pie. Nunca Presione el
acelerador con el pie y luego intente llevar una mano acariciando ¡Pieza a
trabajar! Si necesitas más, necesitas Más potencia al cortar más
profundamente, presione más el acelerador con el pie para aumentar la
potencia de la mano. pieza de poder. Pronto aprenderá a coordinar la
acción de sus pies con la necesidad de más potencia a medida que trabaja.
Un principiante Presionará el acelerador con el pie una cantidad
determinada e intentará hacer el resto presionando la mano. pedazo más
duro Sin cambiar nunca la posición del pie. Esto es incorrecto y no es una
forma segura de utilizar una mano. pieza. al principio del aut, aumenta la
potencia de manera suave. Si necesitas más potencia, presiona más con
el pie. El corte se estrecha hasta el final, reduzca la presión del pie
gradualmente mientras su mano inclina el buril hacia arriba y hacia afuera.
Con un poco de práctica, esta coordinación mano/pie se volverá tan
natural como conducir un automóvil.
HOW TO UESE THE BIAS CONTROL
Después de afinar la mano pieza, note que la mano La pieza comienza a
funcionar a medida que presionas el pie. Acelerador. Agregue una o dos
libras de presión de aire a la perilla de control. Ahora, abra el control de
polarización girándolo en sentido antihorario y observe que no se necesita
tanta presión en el acelerador para activarlo. mano pieza. 'El control de
polarización le permite ajustar la acción del acelerador de pie para que
pueda predecir el momento en que mano La pieza comenzará, dándote
una mano óptima. Control de piezas. Esta es una característica que se
usaría para definir con precisión. Trabajos de cola como bulino o
sombreado. Al abrir completamente el control de sesgo, verá que la mano
La pieza comenzará a funcionar sin pisar el acelerador. Esta función
puede resultarle útil para algunas operaciones como el puntillismo.

- 11 -
EOUIPMENT MAINTENANCE
MANTENER LIMPIA LA PIEZA DE MANO
La mano de impacto La pieza debe mantenerse limpia para un funcionamiento
adecuado. Si el funcionamiento se vuelve lento, errático o falla, es necesario
limpiarlo. Retire el pistón y el resorte de la mano pieza. Tome cada una, una a
la vez, y Colóquelo en una hoja de papel para escribir o fotocopiar. No use una
toalla de papel, pañuelos de papel ni papel de periódico. Sosténgalo entre
Con los dedos, pule y elimina cualquier suciedad o residuo. Dobla el papel y
usa el borde para limpiar entre las ranuras del pistón y el espacio entre el
resorte. 'Para limpiar la mano pieza dentro, coger la escritura o fotocopiadora
papel y gírelo hasta formar una punta. Inserte la punta del papel en la mano
pieza y girar papel y mano pedazo entre sí. Esto pulimentará y abrillantará el
interior y lo limpiará. NOTA IMPORTANTE: NO LUBRIQUE EL PISTÓN, EL
RESORTE NI EL ORIFICIO.
ACELERADOR DE PIE
El acelerador debe requerir poco mantenimiento y debe limpiarse
periódicamente.
LUBRICACIÓN: Periódicamente, coloque una gota de aceite en las bisagras
del acelerador. Mantenga el piso limpio.
Al barrer o aspirar, coloque el pedal acelerador en su banco o silla.
Si hay grandes cantidades de agua y contaminantes en el suministro de aire
de la unidad, se debe prestar más atención al filtro de la unidad. El recipiente
debe vaciarse con frecuencia para evitar Evite que el agua entre en la válvula
rotatoria. Mangueras de mano pieza, etc. Además, el elemento filtrante debe
limpiarse y/o reemplazarse con frecuencia. Si se nota humedad en la mano
pieza o mangueras del acelerador, apague la unidad inmediatamente y vacíe
el recipiente del filtro .
Luego proceda de la siguiente manera:
13. Desmontar y limpiar la mano de impacto pieza(s) y volver a ensamblar.
14. Reduzca el ajuste de presión a 10 psi y encienda la unidad para purgar la
humedad. válvulas, mangueras, etc.

- 12 -
15. Ubicado en la parte inferior trasera de la máquina se encuentra el tapón
de drenaje del aire interno. Depósito. Con una llave hexagonal, retire el tapón
y drene la humedad del depósito. Vuelva a colocarlo. Tapón de drenaje. Antes
de volver a utilizar la máquina, averigüe de dónde proviene la humedad y
arregle el tapón. Problema. Es posible que se requieran filtros adicionales o
trampa de agua en la línea.


- 14 -
Techniczny Wsparcie i certyfikat e-gwarancji
www.vevor.com/support
INSTRUKCJA OBSŁUGI MASZYNY
GRAWERUJĄCEJ
MODEL: HR-G002
We continue to be committed to provide you tools with competitive price.
"Save Half", "Half Price" or any other similar expressions used by us only represents an
estimate of savings you might benefit from buying certain tools with us compared to the major
top brands and does not necessarily mean to cover all categories of tools offered by us. You
are kindly reminded to verify carefully when you are placing an order with us if you are
actually saving half in comparison with the top major brands.
- 1 -
MODEL: HR-G002
Have product questions? Need technical support? Please feel free to
contact us:
Technical Support and E-Warranty Certificate
www.vevor.com/support
NEED HELP? CONTACT US!
This is the original instruction, please read all manual instructions
carefully before operating. VEVOR reserves a clear interpretation of our
user manual. The appearance of the product shall be subject to the
product you received. Please forgive us that we won't inform you again if
there are any technology or software updates on our product.
ENGRAVING MACHINE

- 2 -
Ostrzeżenie: Aby zminimalizować ryzyko obrażeń, użytkownik
powinien uważnie przeczytać instrukcję obsługi.
IMPORTANT NOTICE
Do działania tej maszyny potrzebne jest czyste, suche i wolne od oleju
powietrze. Zalecamy stosowanie sprężarki bezolejowej. Jeśli Twoja
sprężarka jest sprężarką olejową, MUSISZ zamontować filtr usuwający olej
(typu koalescencyjnego) w przewodzie doprowadzającym powietrze do tej
maszyny. Jeśli nie masz pewności co do tych wymagań, skontaktuj się ze
swoim sprzedawcą.
TECHNICAL PARAMETERS
Model
HR-G002
Wejście
Prąd zmienny 2 3 0 V 50 Hz / Prąd
zmienny 1 2 0 V 60 Hz
Prędkość pracy H i P ięce
100-8000 Obroty na minutę
Zakres wyświetlania ciśnienia
0-1 MPa / 0-10 kg/cm²
FUNCTION INTRODUCTION

- 3 -
1
Manometr ciśnienia
powietrza
12
Szybkozłączka do
przepustnicy nożnej
2
Pokrętło sterujące BIAS
13
Podłączenie zasilania
3
Pokrętło regulacji ciśnienia
powietrza
14
Filtr
4
Przycisk
włączania/wyłączania
zasilania
15
Śruba
5
Ręka pokrętło wyboru
16
Filtr powietrza

- 4 -
elementów dla 8 i 9
6
Pokrętło wyboru liczby
uderzeń na minutę
17
Szybkozłącze wejściowe
filtra powietrza
7
Pokrętło
otwierania/zamykania
powietrza pomocniczego na
10
18
Szybkozłącze wyjściowe
filtra powietrza
8
Ja ręka szybkozłączki sztuk I
19
Grawerowanie ręczne część
I
9
II ręka szybkozłączki do
elementów II
20
Kurwa
10
Szybkozłącze powietrza
pomocniczego
21
Grawerowanie ręczne
sztuka II
11
Szybkozłączka do
podłączenia wlotu powietrza
22
Przepustnica nożna
OUICK SET UP INTRODUCTION
WYMAGANIA DOTYCZĄCE ZASILANIA POWIETRZNEGO
Maszyna grawerująca wymaga 1,4 CFM (40 litrów/min.) przy minimalnym
ciśnieniu 45 psi (3,1 bar). przy minimalnym ciśnieniu wejściowym 125 psi
(8,6 bar). Zalecamy zmniejszenie ciśnienia powietrza z regulatora do
45~60 psi (3,1~4,1 bar), ponieważ zapewnia to stabilne ciśnienie
powietrza. Sprężone powietrze musi być czyste, suche i wolne od oleju.
Filtr dostarczany z każdym urządzeniem jest filtrem końcowym i nie jest w
stanie usunąć dużych ilości wody, oleju lub zanieczyszczeń.
Jeśli w dopływie powietrza znajduje się nadmierna ilość wody, oleju lub
zanieczyszczeń, a przed urządzeniem konieczne jest zamontowanie
dodatkowego filtra/separatora wody i filtra koalescencyjnego usuwającego
olej, zanieczyszczenie olejem lub wodą spowoduje uszkodzenie maszyny

- 5 -
grawerującej.
KONFIGURACJA POCZĄTKOWA
Zdecyduj, gdzie chcesz umieścić maszynę na stole warsztatowym i gdzie
chcesz umieścić filtr powietrza. Uczyń jego lokalizację łatwo dostępną, aby
łatwo było codziennie spuszczać wodę z miski. Możesz przymocować filtr
powietrza do maszyny, stołu warsztatowego lub gdziekolwiek chcesz. Tutaj
pokazujemy go przymocowanego do tylnej prawej strony maszyny. Wyjmij
śrubę w tym miejscu i umieść śrubę przez otwór klucza w uchwycie filtra.
Dokręć śrubę, aby zabezpieczyć uchwyt. Dolna śruba w uchwycie zostanie
umieszczona w szczelinie, aby zapobiec skręcaniu się filtra. (rys. 3) Jeśli
złącza typu push-to-connect są dla Ciebie nowością, są niesamowite przy
WYŁĄCZONYM ciśnieniu powietrza, po prostu włóż wąż do końca do
otworu złącza — pozostanie on przymocowany. Aby odłączyć, naciśnij
biały pierścień, jednocześnie delikatnie wyciągając wąż.
PODŁĄCZ PRZEPUSTNICĘ NOŻNĄ
Umieść przepustnicę nożną na podłodze w dogodnej pozycji. Przeprowadź
wąż do tyłu maszyny. Jeśli musisz przeciągnąć wąż przez otwór w ławce,
upewnij się, że wąż nie jest ściśnięty ani zagięty. Podłącz wąż od
przepustnicy nożnej do złącza typu push-to-connect nad etykietą
oznaczoną THROTTLE CONNECTION.
UWAGA: Podczas naciskania przepustnicy nożnej normalnym
zjawiskiem jest słyszenie wycieku powietrza. Powoduje to aktywację
rękojeści.
PODŁĄCZ RĘKOJEŚĆ
Istnieją dwa przyłącza do mocowania końcówek udarowych. Zdecyduj,
które końcówki chcesz umieścić w pozycjach 1 i 2. Podłącz wąż końcówki
do złącza push-to-connect, po prostu wsuwając wąż do białego pierścienia

- 6 -
odbiorczego. Pokrętło selektora nad przyłączami pozwala wybrać koń
cówkę udarową, której chcesz użyć, 1 lub 2.
UWAGA: Upewnij się, że pokrętło wyboru jest przekręcone do oporu,
w obu kierunkach. Wyjście pomocnicze to bezpośrednie źródło
powietrza o ciśnieniu ograniczonym do 40 psi (2,7 bara). Pokrętło to
zawór otwierany/zamykany przez obrót. (rys. 1) Tutaj podłączasz
ręczny element obrotowy lub inne narzędzie pneumatyczne.
INSTALACJA FILTRA
PODŁĄCZ FILTR POWIETRZA
- 7 -
PODŁĄCZ PRZEPUSTNICĘ NOŻNĄ
ZASILANIE
Find the transparent hose
139mm connect one end to
the air input quick connect
fitting on the back of the
machine and the other end
to the straightly quick
connect fitting.
Connect the air
compressor hose
Connect the foot throttle hose to
he throttle connection on the
back of the machine.

- 8 -
RĘKOJEŚĆ UDERZENIA
STROJENIE RĘKOJEŚCI
Connect the electrical power
cord into he 24V converter
box.plug the converter cord
not the jack on the back of the
machine.
IMPORTANT
The rotary valve is lubricated
by at passing through it do no
run electrical system unless
air system is on.
Connect the hand piece hose
to one of the hand piece quick
connect fitting. Move the hand
piece selector knob to the
corresponding hand piece
quick connect fitting you are
using.
- 9 -
OPERATING INSTRUCTION
JAK STROJIĆ MASZYNĘ GRAWERSKĄ
Przez dostrojenie maszyny rozumiemy regulację liczby uderzeń na minutę,
ciśnienia powietrza na minutę i ciśnienia powietrza w celu uzyskania
optymalnej wydajności.
PRAWIDŁOWE STROJENIE MASZYNY JEST NAJWAŻNIEJSZĄ
OPERACJĄ, JAKĄ POWINIENEŚ SIĘ NAUCZYĆ.
1. Włącz sprężarkę powietrza i pozwól na napełnienie zbiornika. Poczekaj, aż
sprężarka się wyłączy i przestanie działać.
2. Włącz maszynę grawerującą HR-G002 i ustaw pokrętło liczby uderzeń na
minutę na 2300. Za pomocą pokrętła regulacji ciśnienia z przodu maszyny
zmniejsz ciśnienie powietrza do 2,5–3,5. 5 MPa (0,1 do 0,4 bara )
3. Przytrzymaj wybraną przez siebie końcówkę rękojeści, trzymając ją
uchwytem na narzędzia (pionowo) przy uchu.
4. Bez naciskania przepustnicy nożnej, POWOLI zwiększaj ciśnienie
powietrza, aż rękojeść zacznie wibrować, a większe ciśnienie powietrza
spowoduje stukanie. Delikatnie zwiększaj ciśnienie powietrza, a gdy stukanie
ledwo ustanie, jest to uważane za idealny zakres roboczy ciśnienia powietrza
dla tej konkretnej rękojeści.
Move the hand piece selector
knob to te corresponding hand
piece quck connect fitting you
are using.Set the stroke per
minute(A to around 4000-4200,
Set the main air regulator
kob(B)o aroud
0.18-0.20BAR(18-20PSI)

- 10 -
HOW TO USE THE FOOT THROTTLE
Przepustnica nożna maszyny grawerującej jest obsługiwana jak pedał
gazu w samochodzie, a NIE jak giętki wałek sterujący stopą. Zacznij od
umieszczenia stopy na górnej płycie, piętą na równi z dolnej części górnej
płyty. Narzędzie należy umieścić w pozycji PRZED naciśnięciem
przepustnicy nożnej. Nigdy naciśnij przepustnicę nożną, a następnie
spróbuj wykonać ruch ręką do głaskania kawałek do pracy! Jeśli
potrzebujesz więcej, potrzebujesz większa moc przy głębszym cięciu,
mocniej naciskaj na przepustnicę nożną, aby zwiększyć siłę nacisku dłoni
moc części. Ty wkrótce nauczysz się koordynować ruchy stóp z potrzebą
większej mocy podczas pracy. Początkujący naciśnie przepustnicę nożną
na ustaloną wartość i spróbuje zrobić resztę, naciskając ręką kawałek
twardszy Nigdy nie zmieniając pozycji stopy. To niepoprawne i nie jest
bezpieczny sposób używania ręki. kawałek. Na początku aut, zwiększaj
moc w płynny sposób. Jeśli potrzebujesz więcej mocy, naciskaj mocniej
stopą. Jako cięcie zwęża się ku końcowi, stopniowo zmniejszaj nacisk
stopy, gdy twoja ręka przechyla grawer w górę i na zewnątrz. Przy
odrobinie praktyki koordynacja rąk i stóp stanie się tak naturalna jak
prowadzenie samochodu.
HOW TO UESE THE BIAS CONTROL
Po dostrojeniu ręki kawałek, zauważ, że ręka część zaczyna pracować,
gdy naciśniesz stopę przepustnica. Dodaj jeden lub dwa funty pokrętła
sterującego ciśnieniem powietrza. Teraz otwórz sterowanie odchyleniem,
obracając je przeciwnie do ruchu wskazówek zegara i zauważ, że nie
potrzeba aż tak dużego nacisku na przepustnicę nożną, aby ją aktywować
ręka element. 'Kontrola odchylenia pozwala na dostosowanie działania
przepustnicy nożnej, dzięki czemu można przewidzieć moment ręka
rozpocznie się część, dająca Ci optymalną rękę kontrola elementów. Jest
to funkcja, której można użyć do precyzyjnego praca ogonowa, taka jak
bulino lub cieniowanie. Otwierając całkowicie kontrolę odchylenia,
odkryjesz, że ręka piecewill zacznie działać bez naciskania na

- 11 -
przepustnicę nożną. Ta funkcja może okazać się przydatna dla niektórych
operacji takie jak punktowanie.
EOUIPMENT MAINTENANCE
UTRZYMYWANIE RĘKOJEŚCI W CZYSTOŚCI
Ręka uderzeniowa część musi być utrzymywana w czystości, aby zapewnić
prawidłowe działanie. Jeśli działanie staje się powolne, nieregularne lub nie
działa, konieczne jest czyszczenie. Wyjmij tłok i sprężynę z ręki kawałek. Weź
każdy, jeden po drugim, i umieścić na kartce papieru do pisania lub
kserokopiarki. Nie używać ręcznika papierowego, chusteczki higienicznej ani
papieru gazetowego, trzymając go pomiędzy Twoje palce polerują i polerują
wszelkie zabrudzenia i pozostałości. Składając papier, użyj krawędzi do
czyszczenia między rowki tłoka i przestrzeń między sprężyną. „Aby oczyścić
dłoń część wewnątrz, weź pismo lub kserokopiarkę papier i przekręć go do
punktu. Włóż końcówkę papieru do ręki kawałek i obróć papier i rękę sztuka o
siebie. Spowoduje to wypolerowanie i wyczyszczenie wnętrza. WAŻNA
UWAGA: NIE SMARUJ TŁOKA, SPRĘŻYNY ANI OTWORU.
PRZEPUSTNICA NOŻNA
Przepustnica powinna wymagać niewielkiej konserwacji. Należy ją okresowo
czyścić.
OLEJOWANIE: Okresowo nałóż kroplę oleju na zawiasy przepustnicy.
Utrzymuj podłogę w czystości.
Kiedy zamiatasz lub odkurzasz, umieść nogę z przepustnicą na ławce lub
krześle.
Jeśli w powietrzu doprowadzanym do jednostki znajdują się duże ilości wody i
zanieczyszczeń, należy częściej zwracać uwagę na filtr jednostki. Aby
zapobiec, miskę należy często opróżniać. woda przedostająca się do zaworu
obrotowego. węże ręczne element itp. Ponadto element filtrujący należy
często czyścić i/lub wymieniać. Jeśli zauważysz wilgoć w dłoni, kawałek lub
węże przepustnicy, natychmiast wyłącz urządzenie i opróżnij miskę filtra .
Następnie postępuj następująco:
16. Rozmontuj i wyczyść dłoń uderzeniową część(i) i ponownie złożyć.

- 12 -
17. Zmniejsz ustawienie ciśnienia do 10 psi i włącz urządzenie, aby usunąć
wilgoć. zawory, węże itp.
18. W dolnej tylnej części maszyny znajduje się korek spustowy powietrza
wewnętrznego zbiornik, Używając klucza imbusowego, wyjmij korek i spuść
wilgoć ze zbiornika. Wymień korek spustowy. Przed ponownym użyciem
maszyny należy ustalić, skąd pochodzi wilgoć i naprawić problem. Może to
wymagać dodatkowego filtra(ów) lub syfonu w linii.


- 14 -
Technisch Ondersteuning en E-garantiecertificaat
www.vevor.com/support
GEBRUIKERSHANDLEIDING VAN DE
GRAVEERMACHINE
MODEL: HR-G002
We continue to be committed to provide you tools with competitive price.
"Save Half", "Half Price" or any other similar expressions used by us only represents an
estimate of savings you might benefit from buying certain tools with us compared to the major
top brands and does not necessarily mean to cover all categories of tools offered by us. You
are kindly reminded to verify carefully when you are placing an order with us if you are
actually saving half in comparison with the top major brands.

- 1 -
MODEL: HR-G002
Have product questions? Need technical support? Please feel free to
contact us:
Technical Support and E-Warranty Certificate
www.vevor.com/support
NEED HELP? CONTACT US!
This is the original instruction, please read all manual instructions
carefully before operating. VEVOR reserves a clear interpretation of our
user manual. The appearance of the product shall be subject to the
product you received. Please forgive us that we won't inform you again if
there are any technology or software updates on our product.
ENGRAVING MACHINE

- 2 -
Waarschuwing: om het risico op letsel te verkleinen, moet de
gebruiker de gebruiksaanwijzing zorgvuldig lezen.
IMPORTANT NOTICE
Voor deze machine is schone, droge, olievrije lucht nodig. Wij adviseren
een olievrije compressor te gebruiken. Als uw compressor een
oliecompressor is, MOET er een oliefilter (coalescerend type) in de
luchttoevoerleiding naar deze machine zitten. Als u niet zeker weet of dit
vereist is, neem dan contact op met uw verkoper.
TECHNICAL PARAMETERS
Model
HR-G002
Invoer
Wisselstroom 2 3 0V 50 Hz /
Wisselstroom 1 2 0 V 60 Hz
H en stuk werksnelheid
100-8000 Toerental
Bereik van drukweergave
0-1 MPa / 0-10 kg/cm²
FUNCTION INTRODUCTION

- 3 -
1
Luchtdrukmeter
12
Voetgas snelkoppeling
2
BIAS-regelknop b
13
Stroomaansluiting
3
Luchtdrukregelknop
14
Filter
4
Aan/uit-knop
15
Schroef
5
Hand stuk selectieknop voor
8 en 9
16
Luchtfilter
6
Keuzeknop voor slagen per
minuut
17
Snelkoppeling voor
luchtfilteringang
7
Hulplucht open/dicht knop
18
Snelkoppeling voor

- 4 -
voor 10
luchtfilteruitgang
8
Ik geef stuk snelkoppelingen
I
19
Gravure hand stuk ik
9
II Hand stuk snelkoppelingen
Ik
20
Kuch
10
Snelkoppeling voor hulplucht
21
Gravure hand deel Ik
11
Snelkoppeling voor
luchtinlaat
22
Voetgas
OUICK SET UP INTRODUCTION
LUCHTAANVOER
Graveermachine vereist 1,4 CFM (40 liter/min.) bij minimaal 45 psi (3,1
bar). bij minimale invoer is 125 psi (8,6 bar). Wij raden aan de luchtdruk
van een regelaar te verlagen tot 45~60 psi (3,1~4,1 bar), omdat dit zorgt
voor een stabiele luchttoevoer. De perslucht moet schoon, droog en olievrij
zijn. Het filter dat bij elke unit wordt geleverd, is een eindfilter en is niet in
staat om grote hoeveelheden water, olie of verontreinigingen te
verwijderen.
Als de luchttoevoer te veel water, olie of verontreinigingen bevat, moet er
een extra filter/waterafscheider en een coalescerend oliefilter voor het
apparaat worden geïnstalleerd. Verontreiniging met olie of water kan
schade aan de graveermachine veroorzaken.
EERSTE INSTELLING
Bepaal waar u de machine op uw werkbank wilt plaatsen en waar u het
luchtfilter wilt plaatsen. Zorg dat de locatie gemakkelijk toegankelijk is,
zodat u dagelijks gemakkelijk water uit de kom kunt laten lopen. U kunt het
luchtfilter bevestigen aan uw machine, werkbank of waar u maar wilt. Hier
laten we zien hoe het aan de achterkant van de machine is bevestigd.
Verwijder de schroef op deze locatie en plaats de schroef door de
sleutelgatopening in de filterbeugel. Draai de schroef vast om de beugel
vast te zetten. De onderste schroef in de beugel wordt in de sleuf geplaatst
om te voorkomen dat het filter gaat draaien. (afb. 3) Als
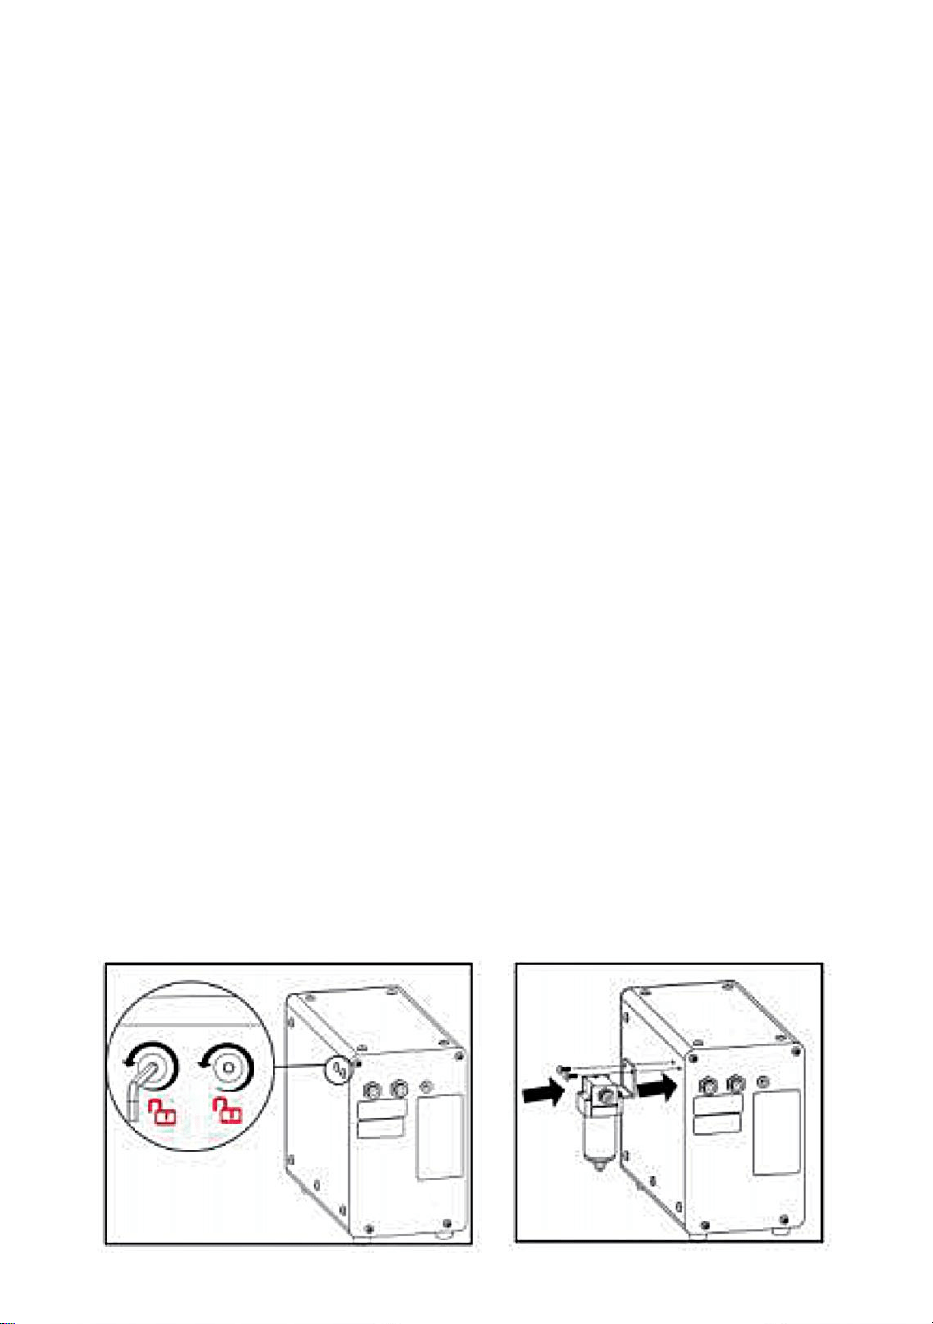
- 5 -
push-to-connect-fittingen nieuw voor u zijn, zijn ze geweldig met de
luchtdruk UITGESCHAKELD. Steek de slang gewoon helemaal in de
fittingopening - hij blijft vastzitten. Om los te koppelen, drukt u op de witte
ring terwijl u de slang voorzichtig eruit trekt.
VOETGAS AANSLUITEN
Plaats het voetgas op een handige plek op de vloer. Leid de slang naar de
achterkant van de machine. Als u de slang door een opening op uw
werkbank moet leiden, zorg er dan voor dat de slang niet wordt afgekneld
of geknikt. Sluit de slang van het voetgas aan op de push-to-connect-fitting
boven het label met de THROTTLE CONNECTION.
LET OP: Het is normaal dat u lucht hoort lekken wanneer u het
voetgaspedaal indrukt. Dit is wat het handstuk activeert.
HANDSTUK AANSLUITEN
Er zijn twee fittingen om impact handstukken te bevestigen. Bepaal welke
handstukken u in positie 1 en 2 wilt. Sluit de slang van het handstuk aan op
de push-to-connect fitting door de slang eenvoudig in de witte
ringontvanger te duwen. Met een selectieknop boven de aansluitingen kunt
u selecteren welk impact handstuk u wilt gebruiken, 1 of 2.
OPMERKING: Zorg ervoor dat de selectieknop in beide richtingen tot
aan de aanslag wordt gedraaid. De hulpuitgang is een rechtstreekse
luchtstroom die beperkt is tot 40 psi (2,7 bar). De knop is een
draai-open/draai-dicht-klep. (afb. 1) Hier sluit u een roterende
handstuk of ander pneumatisch gereedschap aan.
FILTERINSTALLATIE
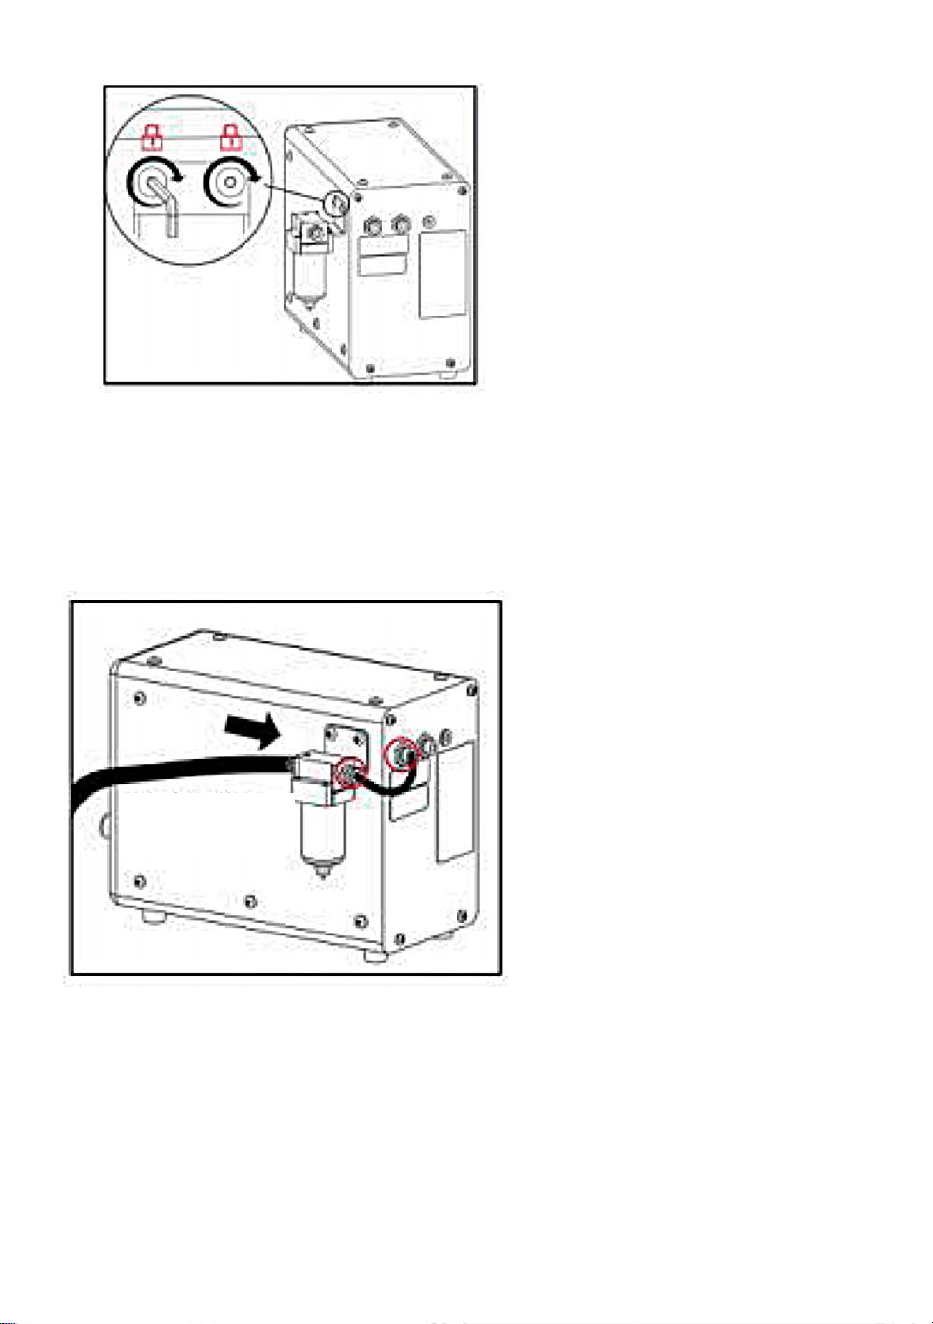
- 6 -
SLUIT HET LUCHTFILTER AAN
VOETGAS AANSLUITEN
Find the transparent hose
139mm connect one end to
the air input quick connect
fitting on the back of the
machine and the other end
to the straightly quick
connect fitting.
Connect the air
compressor hose
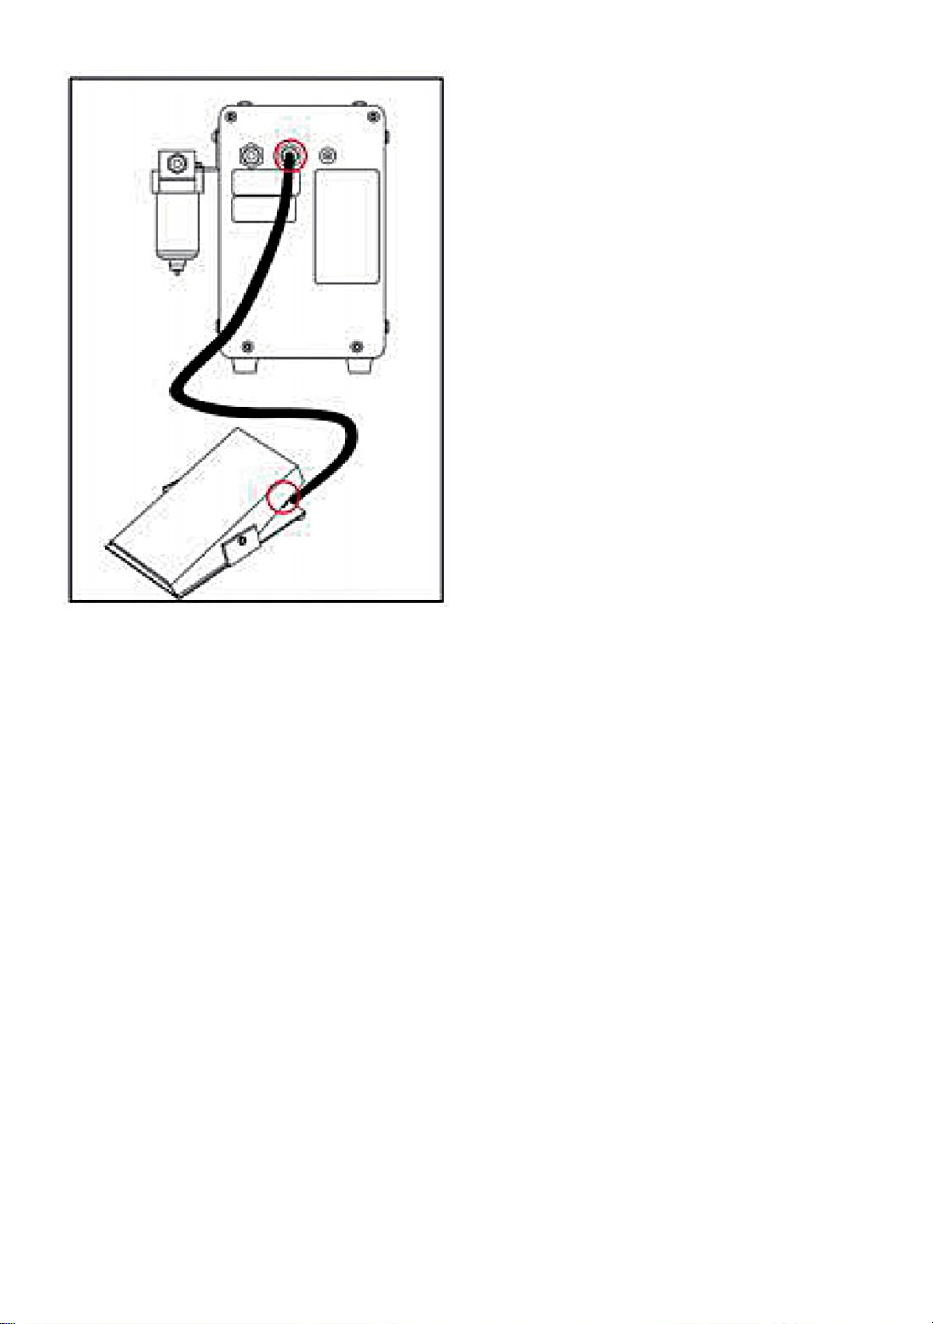
- 7 -
STROOMVOORZIENING
Connect the foot throttle hose to
he throttle connection on the
back of the machine.
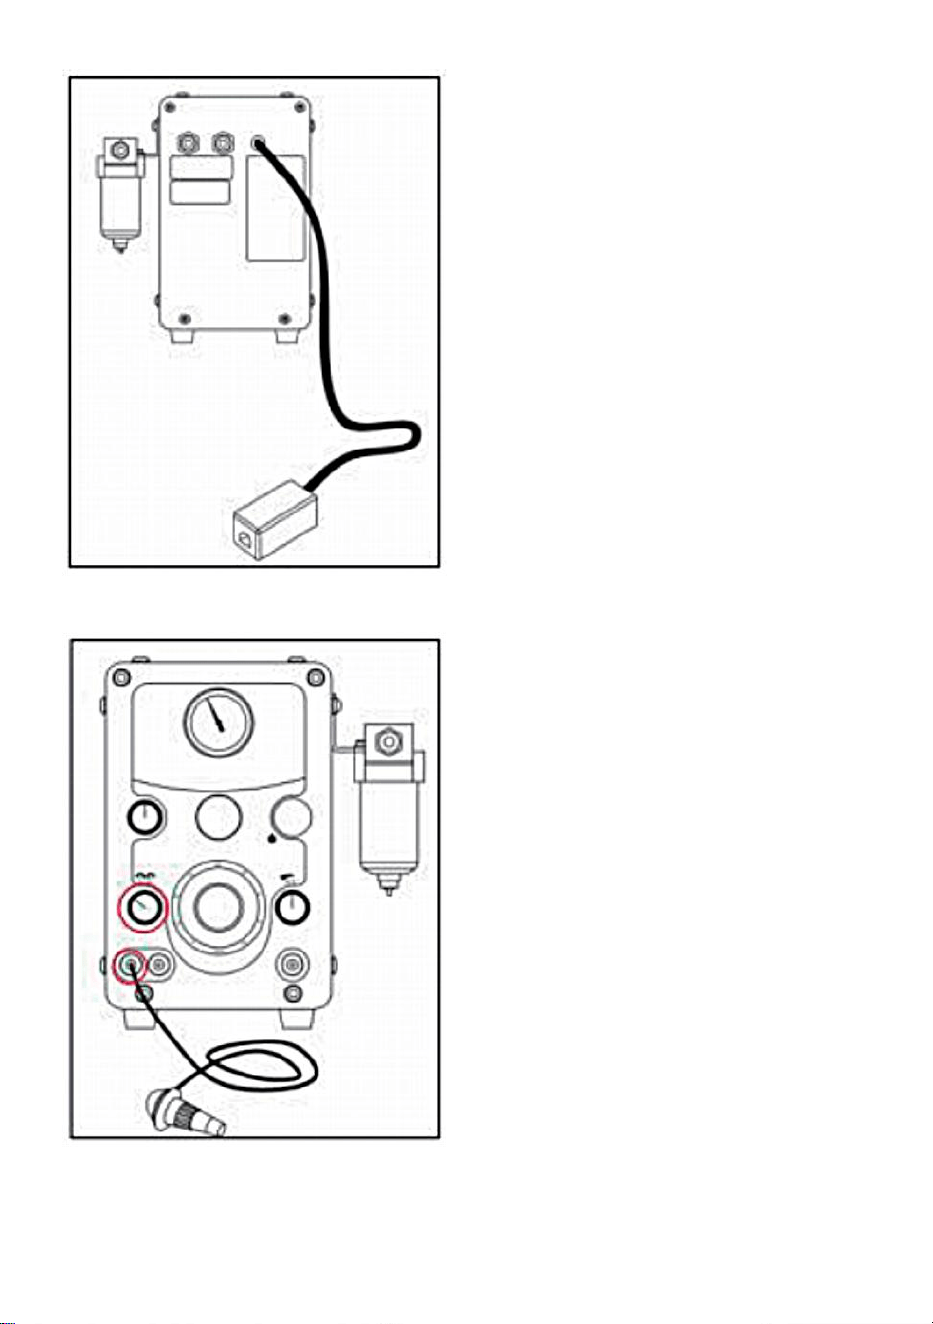
- 8 -
MPACT HANDSTUK
HANDSTUK STEMMEN
Connect the electrical power
cord into he 24V converter
box.plug the converter cord
not the jack on the back of the
machine.
IMPORTANT
The rotary valve is lubricated
by at passing through it do no
run electrical system unless
air system is on.
Connect the hand piece hose
to one of the hand piece quick
connect fitting. Move the hand
piece selector knob to the
corresponding hand piece
quick connect fitting you are
using.
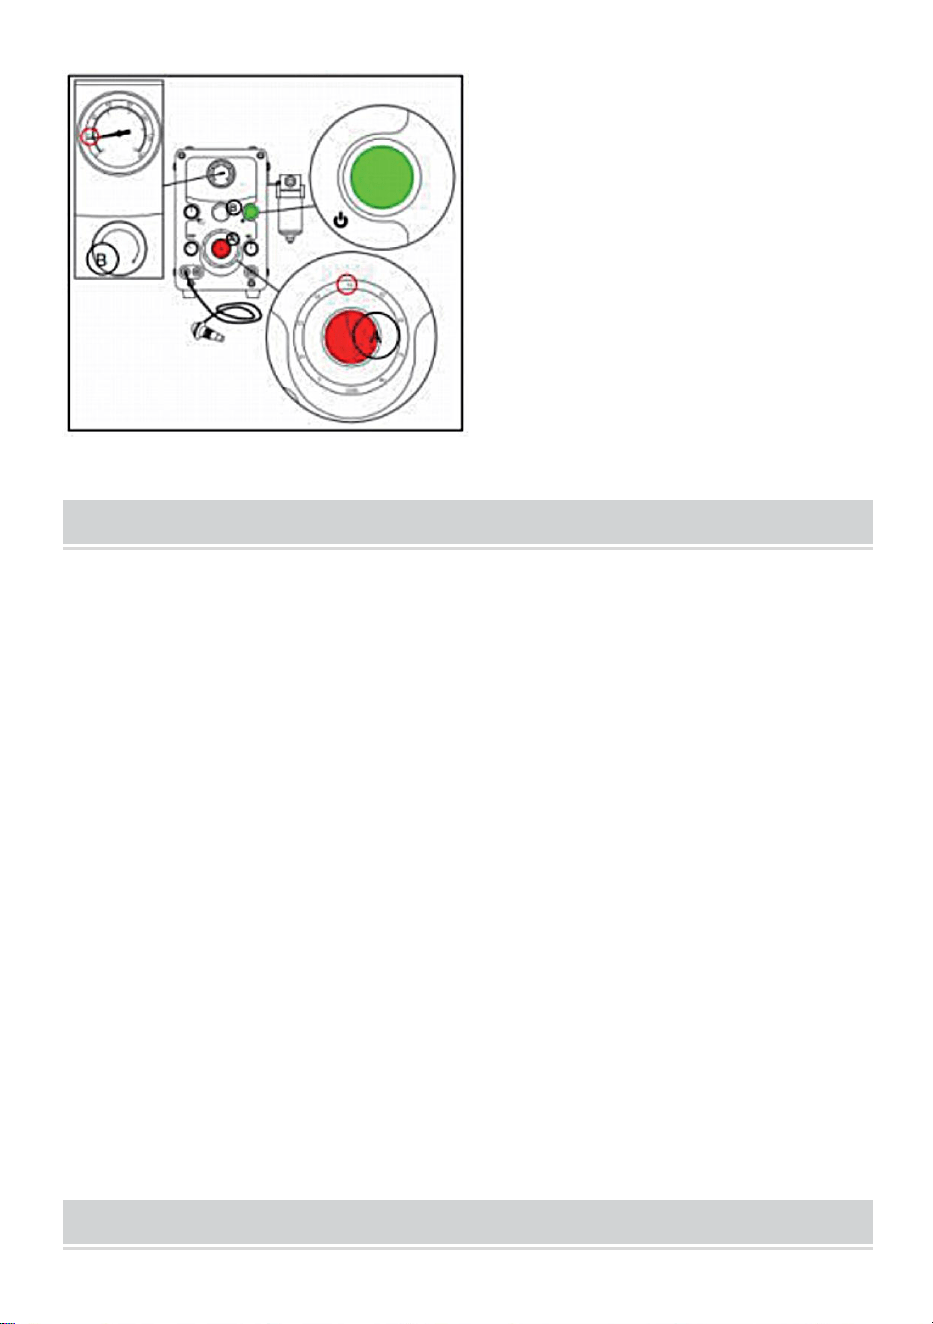
- 9 -
OPERATING INSTRUCTION
HOE JE EEN GRAVEERMACHINE AFSTELT
Met het afstellen van uw machine bedoelen we het aanpassen van het aantal
slagen per minuut en de luchtdruk per minuut en de luchtdruk voor optimale
prestaties.
HET GOED AFSTELLEN VAN UW MACHINE IS DE BELANGRIJKSTE
HANDELING DIE U MOET LEREN.
1. Zet uw luchtcompressor aan en laat de tank vollopen. Wacht tot de
compressor uitgaat en stopt met draaien.
2. Zet de graveermachine HR-G002 aan en stel de slag per minuut-wijzerplaat
in op 2300. Gebruik de drukregelknop aan de voorkant van de machine om de
luchtdruk terug te brengen naar 2 tot 5 MPa (0,1 tot 0,4 bar )
3. Houd het handstuk dat u wilt gebruiken met de gereedschapshouder naar
boven (verticaal) naast uw oor.
4. Zonder het voetgas in te drukken, verhoogt u LANGZAAM de luchtdruk
totdat het handstuk trilt en meer luchtdruk het laat kloppen. Voeg vervolgens
luchtdruk toe en wanneer het kloppen nauwelijks stopt, wordt dit beschouwd
als het perfecte bereik voor de luchtdrukwerking voor dat specifieke handstuk.
HOW TO USE THE FOOT THROTTLE
Move the hand piece selector
knob to te corresponding hand
piece quck connect fitting you
are using.Set the stroke per
minute(A to around 4000-4200,
Set the main air regulator
kob(B)o aroud
0.18-0.20BAR(18-20PSI)

- 10 -
Het voetgaspedaal van de graveermachine wordt bediend als een
autogaspedaal en NIET als een flexibele-schacht voetbediening. Begin
met het plaatsen van uw voet op de bovenplaat met uw hiel gelijk met de
onderkant van de bovenplaat. U moet het gereedschap in positie brengen
VOORDAT u het voetgaspedaal indrukt. Nooit druk het voetgas in en
probeer dan een strijkende hand te brengen stuk om te werken! Als je
meer nodig hebt, heb je meer kracht bij dieper snijden, druk meer op het
voetgas om de hand te vergroten stuk macht. Jij zal binnenkort leren om
uw voetactie te coördineren met de behoefte aan meer kracht terwijl u
werkt. Een beginner zal het gaspedaal een bepaalde hoeveelheid naar
beneden duwen en proberen de rest te doen door de hand te duwen stuk
harder Terwijl je nooit de voetpositie verandert. Dit is incorrect en geen
veilige manier om een hand te gebruiken stuk. Aan het begin van de aut,
verhoog de kracht op een soepele manier. Als u meer kracht nodig hebt,
druk dan meer met uw voet. Als de snede loopt taps toe naar het einde,
verminder de druk van de voet geleidelijk terwijl uw hand de graver
omhoog en naar buiten kantelt. Met Met een beetje oefening wordt deze
hand-voetcoördinatie net zo natuurlijk als autorijden.
HOW TO UESE THE BIAS CONTROL
Nadat je de hand hebt gestemd stuk,merk op dat de hand het stuk begint
te werken als je op de voet drukt gashendel. Voeg een of twee pond
luchtdrukregelknop toe. Open nu de biasregeling door deze te draaien
tegen de klok in en merk op dat het minder druk op het voetgas kost om te
activeren hand stuk. 'Met de biasregeling kunt u de werking van het
voetgas aanpassen, zodat u het moment kunt voorspellen waarop de hand
stuk zal beginnen, waardoor u een optimale hand krijgt stukcontrole. Dit is
een functie die men zou gebruiken voor finede tail work zoals bulino of
shading. Door de bias control volledig te openen, zult u merken dat de
hand stukzal beginnen te werken zonder op het voetgas te drukken. U
vindt deze functie misschien handig voor sommige operaties zoals
stippelen.

- 11 -
EOUIPMENT MAINTENANCE
HET HANDSTUK SCHOON HOUDEN
De impacthand stuk moet schoon worden gehouden voor een goede werking.
Als de werking traag, onregelmatig of mislukt, reiniging is nodig. Verwijder de
zuiger en veer uit de hand stuk. Neem ze elk, één voor één, en plaats in een
vel schrijf- of kopieerpapier. Gebruik geen papieren handdoek, tissue of
krantenpapier. Houd het tussen uw vingers polijsten en poetsen van vuil of
resten. Vouw het papier, gebruik de rand om tussen de zuigergroeven en de
ruimte tussen de veer. 'Om de hand schoon te maken stuk binnen, neem het
schrijven of kopieermachine papier en draai het tot een punt. Steek de
papierpunt in de hand stuk en draai papier en hand deel tegen elkaar. Dit zal
de binnenkant polijsten en schoonmaken. BELANGRIJKOPMERKING: NIET
DE ZUIGER, VEER OF BOOR SMEREN.
VOETGAS
Het gaspedaal heeft weinig onderhoud nodig. Het moet regelmatig worden
schoongemaakt.
OLIËN: Doe regelmatig een druppel olie op de gasklepscharnieren. Houd de
vloer schoon.
Wanneer u gaat vegen of stofzuigen, zet u het voetpedaal op uw bank of stoel.
Als er grote hoeveelheden water en verontreinigingen in de luchttoevoer naar
de unit zitten, moet er vaker aandacht worden besteed aan het filter van de
unit. De kom moet vaker worden leeggemaakt om te voorkomen water uit de
roterende klep. slangen hand stuk, etc. Bovendien moet het filterelement
regelmatig worden gereinigd en/of vervangen. Als er vocht in de hand wordt
opgemerkt stuk of gasslangen, schakel het apparaat onmiddellijk uit en laat de
filterkom leeglopen .
Ga dan als volgt te werk:
19. Demonteer en reinig de impacthand stuk(ken) en zet ze weer in elkaar.
20. Verlaag de drukinstelling tot 10 psi en zet het apparaat AAN om vocht te
verwijderen. kleppen, slangen etc.
21. Aan de onderkant van de achterkant van de machine bevindt zich de
aftapplug voor de interne luchttoevoer. reservoir, Verwijder de plug met een

- 12 -
inbussleutel en laat eventueel vocht uit het reservoir lopen. Vervang aftapplug.
Voordat u de machine weer gebruikt, moet u uitzoeken waar het vocht
vandaan kwam en de probleem. Mogelijk zijn er extra filters of een
waterafscheider in de leiding nodig.


- 14 -
Teknisk Support och e-garanticertifikat
www.vevor.com/support
ANVÄNDARHANDBOK FÖR
GRAVERMASKINEN
MODELL: HR-G002
We continue to be committed to provide you tools with competitive price.
"Save Half", "Half Price" or any other similar expressions used by us only represents an
estimate of savings you might benefit from buying certain tools with us compared to the major
top brands and does not necessarily mean to cover all categories of tools offered by us. You
are kindly reminded to verify carefully when you are placing an order with us if you are
actually saving half in comparison with the top major brands.

- 1 -
MODELL: HR-G002
Have product questions? Need technical support? Please feel free to
contact us:
Technical Support and E-Warranty Certificate
www.vevor.com/support
NEED HELP? CONTACT US!
This is the original instruction, please read all manual instructions
carefully before operating. VEVOR reserves a clear interpretation of our
user manual. The appearance of the product shall be subject to the
product you received. Please forgive us that we won't inform you again if
there are any technology or software updates on our product.
ENGRAVING MACHINE
- 2 -
Varning - För att minska risken för skada måste användaren
läsa instruktionerna noggrant.
IMPORTANT NOTICE
Denna maskin kräver ren, torr, oljefri luft. Vi föreslår att du använder en
oljefri kompressor. Om din kompressor är en oljetyp, MÅSTE du ha ett
oljeborttagningsfilter (koalescerande typ) i lufttillförselledningen till denna
maskin. är osäker på detta krav, kontakta din säljare.
TECHNICAL PARAMETERS
Modell
HR-G002
Input
AC 2 3 0V 50HZ / AC 1 2 0 V 60HZ
H and P ece A rbetshastighet
100-8000 RPM
Visning av tryckområde
0-1 MPa / 0-10 kg/cm²
FUNCTION INTRODUCTION
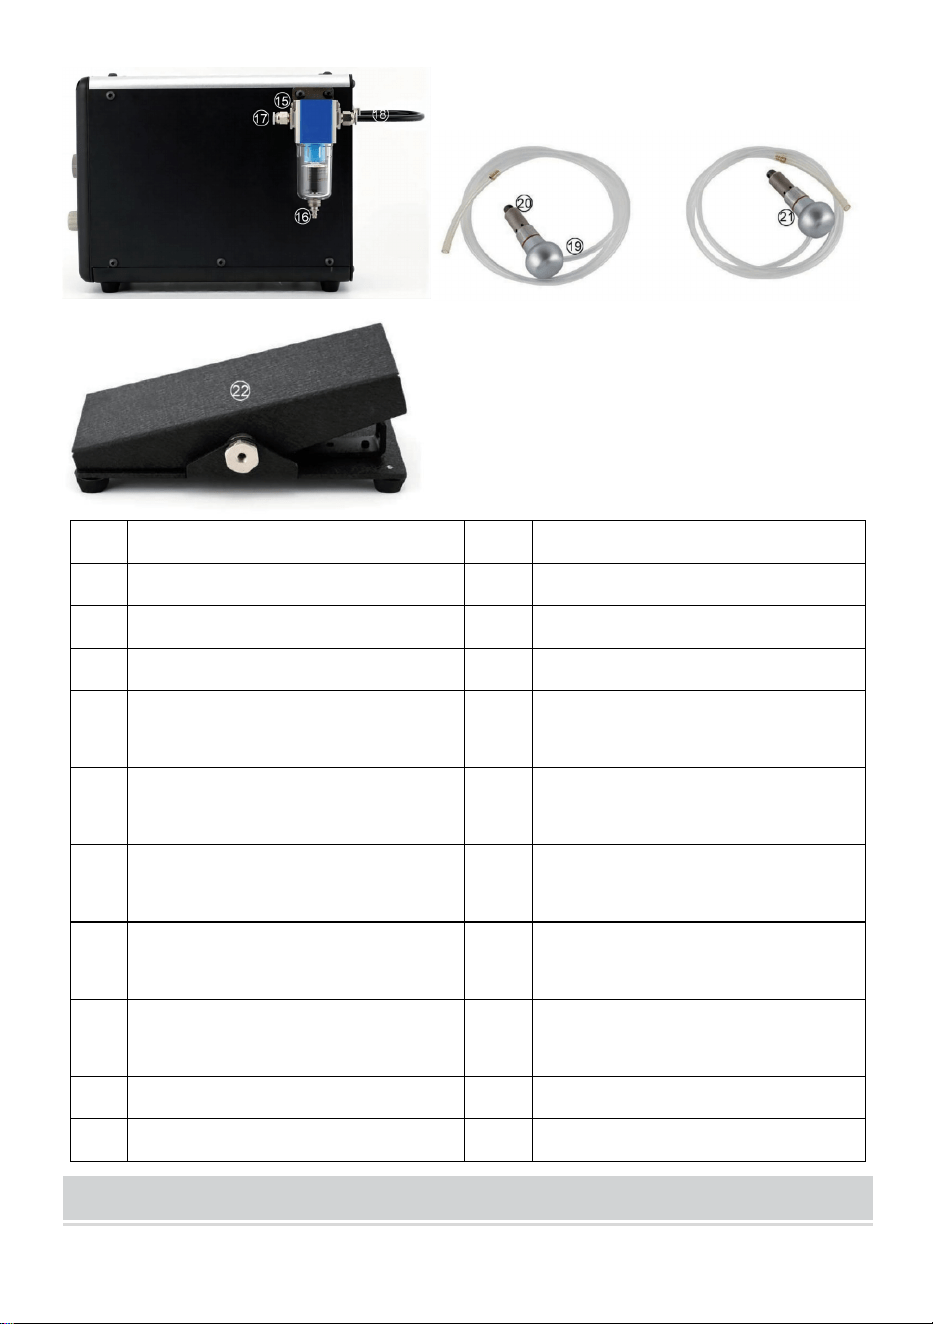
- 3 -
1
Lufttrycksmätare
12
Fotgas snabbkoppling
2
BIAS-kontrollratt b
13
Anslut ström
3
Reglage för lufttryck
14
Filtrera
4
Power On/Off-knapp
15
Skruva
5
Hand styckeväljarvred för 8
och 9
16
Luftfilter
6
Väljarratt för slag per minut
17
Luftfilteringång
snabbkoppling
7
Öppnings-/stängknapp för
hjälpluft för 10
18
Luftfilterutgång
snabbkoppling
8
I Hand bit
snabbkopplingsbeslag I
19
Gravyr hand bit I
9
II Hand bit
snabbkopplingsbeslag II
20
C huck
10
Extra luftsnabbkoppling
21
Gravyr hand bit II
11
Snabbkoppling för luftingång
22
Fotgas
OUICK SET UP INTRODUCTION

- 4 -
REOUIREMENTS LUFTFÖRSÖRJNING
Graveringsmaskinen kräver 1,4 CFM (40 liter/min. ) vid minst 45 psi (3,1
bar). vid minsta ingång är 125psi (8,6bar) . Vi uppmuntrar att sänka
lufttrycket från en regulator till 45~60psi (3,1~4,1bar) eftersom detta
säkerställer en stabil lufttryckstillförsel. Tryckluften måste vara ren, torr och
oljefri. Filtret som medföljer varje enhet är ett slutfilter och kan inte ta bort
stora mängder vatten, olja eller föroreningar.
Om lufttillförseln har för mycket vatten, olja eller föroreningar, och
ytterligare filter/vattenlås och filter för borttagning av koalescerande olja
måste installeras före enheten, kommer olja eller vattenförorening att
skada gravyrmaskinen.
INITINAL INSTÄLLNING
Bestäm var du vill placera maskinen på din bänk och var du vill att luftfiltret
ska placeras. Gör dess plats lättillgänglig så att det är lätt att tömma vattnet
från skålen dagligen. Du kan fästa luftfiltret på din maskin, arbetsbänk eller
var du vill. Här visar vi den fäst på baksidan av maskinens högra sida. Ta
bort skruven på denna plats och placera skruven genom
nyckelhålsöppningen i filterfästet. Dra åt skruven för att fästa fästet. Den
nedre skruven i fästet kommer att placeras i skåran för att förhindra att
filtret vrider sig. (bild 3) Om push-to-connect-kopplingar är nya för dig, är
de fantastiska med lufttrycket AVSTÄNGT, för bara in slangen hela vägen
in i anslutningsöppningen - den hålls fast. För att koppla bort, tryck in den
vita ringen samtidigt som du försiktigt drar ut slangen.
ANSLUT FOTGAS
Placera gasreglaget på golvet i ett bekvämt läge. Dra slangen till baksidan
av maskinen. Om du behöver slingra slangen genom en öppning på din
bänk, se till att slangen inte är klämd eller krökt. Anslut slangen från
fotgasreglaget till push-to-connect-kopplingen ovanför etiketten märkt
THROTTLE CONNECTION.
OBS: Det är normalt att höra luft läcka när du trycker ner gasreglaget,
det är detta som aktiverar handstycket.
ANSLUT HANDSTYCKE

- 5 -
Det finns två beslag för att fästa slaghandstycken. Bestäm vilka
handstycken du vill ha i position 1 och 2. Anslut handstyckesslangen till
push-to-connect-kopplingen genom att helt enkelt trycka in slangen inuti
den vita ringmottagaren. En väljarknapp ovanför anslutningarna låter dig
välja vilket slaghandstycke du vill använda, 1 eller 2.
OBS: Se till att väljarvredet är vridet tills det tar stopp, i båda
riktningarna. Extrautloppet är en lufttillförsel med rakt flöde som är
begränsad till 40psi (2,7 bar) . Vred är en vrid-öppna/vrid-stäng ventil.
(bild 1) Det är här du ansluter ett roterande handstycke eller annat
pneumatiskt verktyg.
INSTALLATION AV FILTER
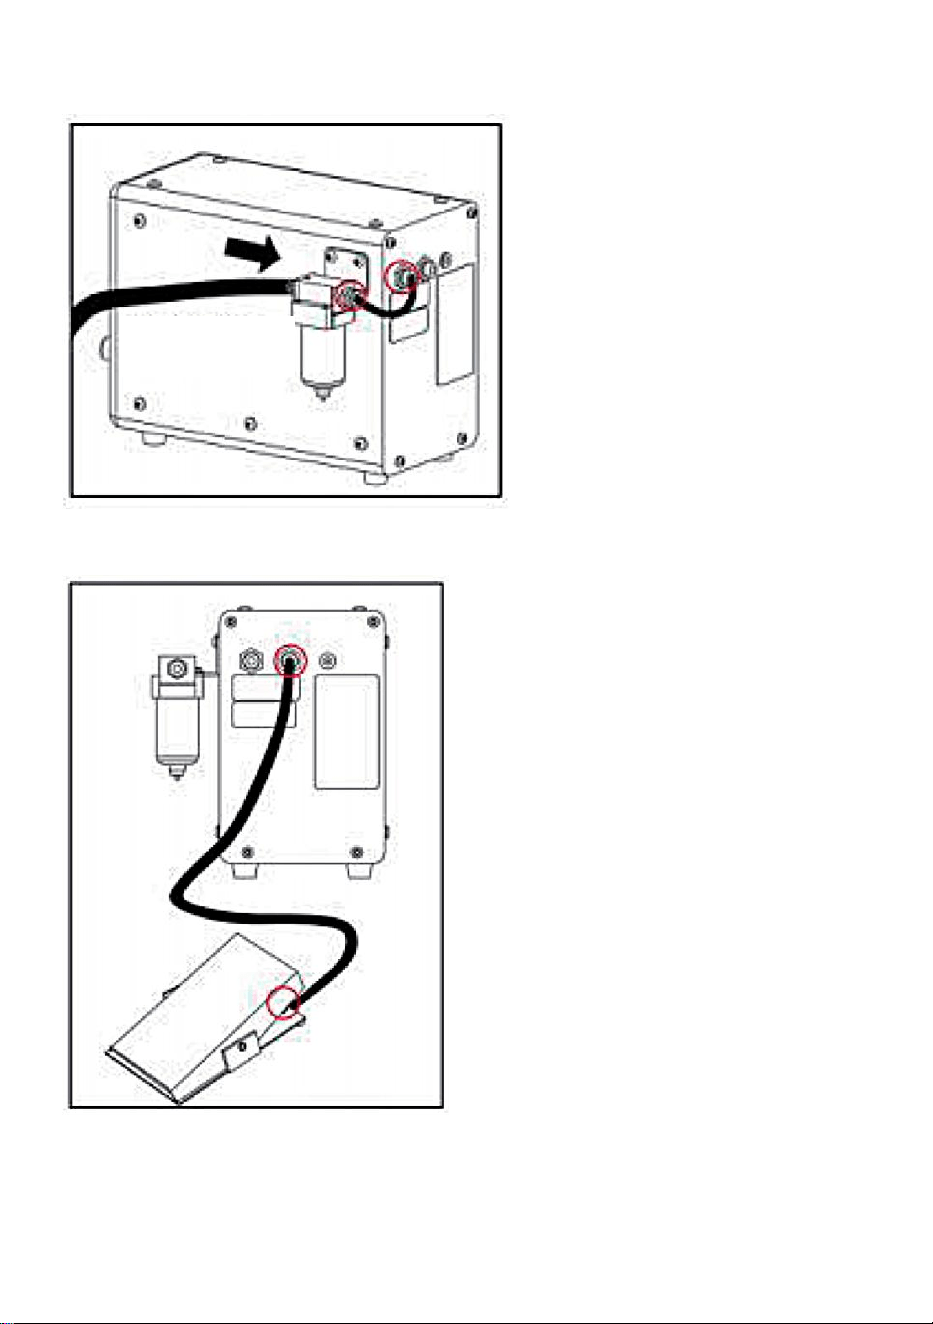
- 6 -
ANSLUT LUFTFILTRET
ANSLUT FOTGAS
Find the transparent hose
139mm connect one end to
the air input quick connect
fitting on the back of the
machine and the other end
to the straightly quick
connect fitting.
Connect the air
compressor hose
Connect the foot throttle hose to
he throttle connection on the
back of the machine.

- 7 -
STRÖMFÖRSÖRJNING
MPACT HANDSTYCKE
Connect the electrical power
cord into he 24V converter
box.plug the converter cord
not the jack on the back of the
machine.
IMPORTANT
The rotary valve is lubricated
by at passing through it do no
run electrical system unless
air system is on.
Connect the hand piece hose
to one of the hand piece quick
connect fitting. Move the hand
piece selector knob to the
corresponding hand piece
quick connect fitting you are
using.

- 8 -
TUNNING AV HANDSTEK
OPERATING INSTRUCTION
HUR MAN STÄMMA GRAVERMASKINEN
Genom att ställa in din maskin menar vi att justera slag per minut och lufttryck
för minut och lufttryck för optimal prestanda.
ATT STÄMLA DIN MASKIN RIKTIGT ÄR DEN VIKTIGASTE OPERATIONEN
DU BÖR LÄRA dig.
1. Slå på din luftkompressor och låt tanken fyllas. Vänta tills kompressorn
stängs av och slutar gå.
2. Sätt på graveringsmaskinen HR-G002 och ställ in ratten för slag/minut på
2300. Använd tryckkontrollratten på maskinens framsida och backa ner
lufttrycket till 2 till 5 MPa (0,1 till 0,4 bar )
3. Håll det handstycke du har valt att använda med verktygshållaren uppåt
(vertikalt) bredvid ditt öra.
4. Utan att trycka ner fotgasreglaget, öka LÅNGSAMT lufttrycket tills
handstycket vibrerar, och mer lufttryck får det att knacka. Lägg snabbt till
lufttrycket och när knackningen knappt upphör anses detta vara det perfekta
lufttrycksdriftintervallet för just det handstycket.
Move the hand piece selector
knob to te corresponding hand
piece quck connect fitting you
are using.Set the stroke per
minute(A to around 4000-4200,
Set the main air regulator
kob(B)o aroud
0.18-0.20BAR(18-20PSI)

- 9 -
HOW TO USE THE FOOT THROTTLE
Graveringsmaskinens fotgasreglage manövreras som en bilaccelerator
och INTE som en fotkontroll med flexibelt skaft. Börja med att placera foten
på toppplattan med hälen även med botten av toppplattan. Du bör sätta
verktyget i läge INNAN du trycker ned gaspedalen. Aldrig trampa ner
gasreglaget och försök sedan ta med en strykande hand bit till jobbet! Om
du behöver mer behöver du mer kraft när du skär djupare, tryck mer på
gasreglaget för att öka handen styckekraft. Du kommer snart att lära sig att
koordinera din fotåtgärd med behovet av mer kraft när du arbetar. En
nybörjare kommer att trycka ner gasreglaget ett visst antal och försöka
göra resten genom att trycka på handen bit hårdare Medan du aldrig
ändrar fotposition. Detta är felaktigt och inte ett säkert sätt att använda en
hand bit. I början av aut, öka kraften på ett smidigt sätt. Om du behöver
mer kraft, tryck mer med foten. Som snittet smalnar av till slutet, minska
fottrycket gradvis när din hand lutar gravaren upp och ut. Med lite övning
kommer denna hand/fot-koordination att bli lika naturlig som att köra bil.
HOW TO UESE THE BIAS CONTROL
Efter att du har ställt in handen stycke, märk att handen biten börjar
fungera när du trycker ner foten gas. Lägg till ett eller två pund
lufttryckskontrollratt. Öppna nu förspänningskontrollen genom att vrida den
moturs och märk att det inte krävs lika mycket tryck på gasreglaget för att
aktivera till hand bit. 'Basreglaget låter dig justera gaspådraget så att du
kan förutsäga ögonblicket hand pjäsen startar, vilket ger dig optimal hand
styckkontroll. Detta är en funktion som man skulle använda för finede
svansarbete som bulino eller shading. Genom att öppna biaskontrollen helt,
kommer du att upptäcka att handen piece kommer att börja arbeta utan att
trycka på gaspedalen. Du kan ha nytta av den här funktionen för vissa
operationer som t.ex. stipling.

- 10 -
EOUIPMENT MAINTENANCE
HÅLL HANDDELEN RENT
Slaghanden stycket måste hållas rent för korrekt funktion. Om driften blir trög,
oregelbunden eller misslyckas, städning behövs. Ta bort kolven och fjädern
från handen bit. Ta var och en, en i taget, och placera i ett skriv- eller
kopiatorpapper. Använd inte pappershanddukar, vävnader eller tidningspapper,
håll det emellan fingrarna polerar och polerar av eventuell smuts eller rester.
Vik papperet, använd kanten för att rengöra mellan kolvspår och utrymmet
mellan fjädern. 'För att rengöra handen bit inuti, ta skrivaren eller kopiatorn
papper och vrid det till en punkt. Sätt in pappersspetsen i handen bit och rotera
papper och hand bit mot varandra. Detta kommer att polera och polera insidan
och rengöra. VIKTIGT NOTERING: SMÖR INTE KOLV, FJÄDER ELLER
BORRA.
FOT GAS
Gasreglaget bör kräva lite underhåll, det bör rengöras regelbundet.
OLJNING: Lägg med jämna mellanrum en droppe olja på gasspjällens
gångjärn. Håll golvet rent.
När du sopar eller dammsuger, sätt gasreglaget på din bänk eller stol.
Om stora mängder vatten och föroreningar finns i lufttillförseln till enheten,
måste enhetens filter uppmärksammas oftare. Skålen måste tömmas ofta för
att förhindra vatten från att komma in i vridventilen. slangar hand stycke etc.
Dessutom måste filterelementet rengöras och/eller bytas ut ofta. Om fukt
noteras i handen stycke eller gasslangar, stäng av enheten omedelbart och
töm filterskålen .
Fortsätt sedan enligt följande:
22. Demontera och rengör slaghanden bit(ar) och sätt ihop dem igen.
23. Sänk tryckinställningen till 10 psi och slå PÅ enheten för att rensa ut fukt
mventiler. slangar etc.
24. På maskinens nedre baksida finns avtappningspluggen till den interna
luften behållare, Använd en insexnyckel, ta bort pluggen och töm eventuell fukt
från behållaren. Ersätta avtappningsplugg. Innan du använder maskinen igen,
ta reda på varifrån fukten kom och fixa problem. Det kan kräva ett eller flera
extra filter eller vattenlås i ledningen.