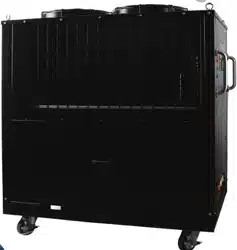
Water Chiller
Owner's manual
2 page
Owner’s Manual
Caution before using
Product features
Caution while maneuvering
Instruction for installation
Controller manual
Instruction & caution for running
Maintenance
Self-diagnostic code
Circuit diagram
Model specification
Index
1
03
06
07
08
10
12
14
15
17
18
page 3
Owner’s Manual
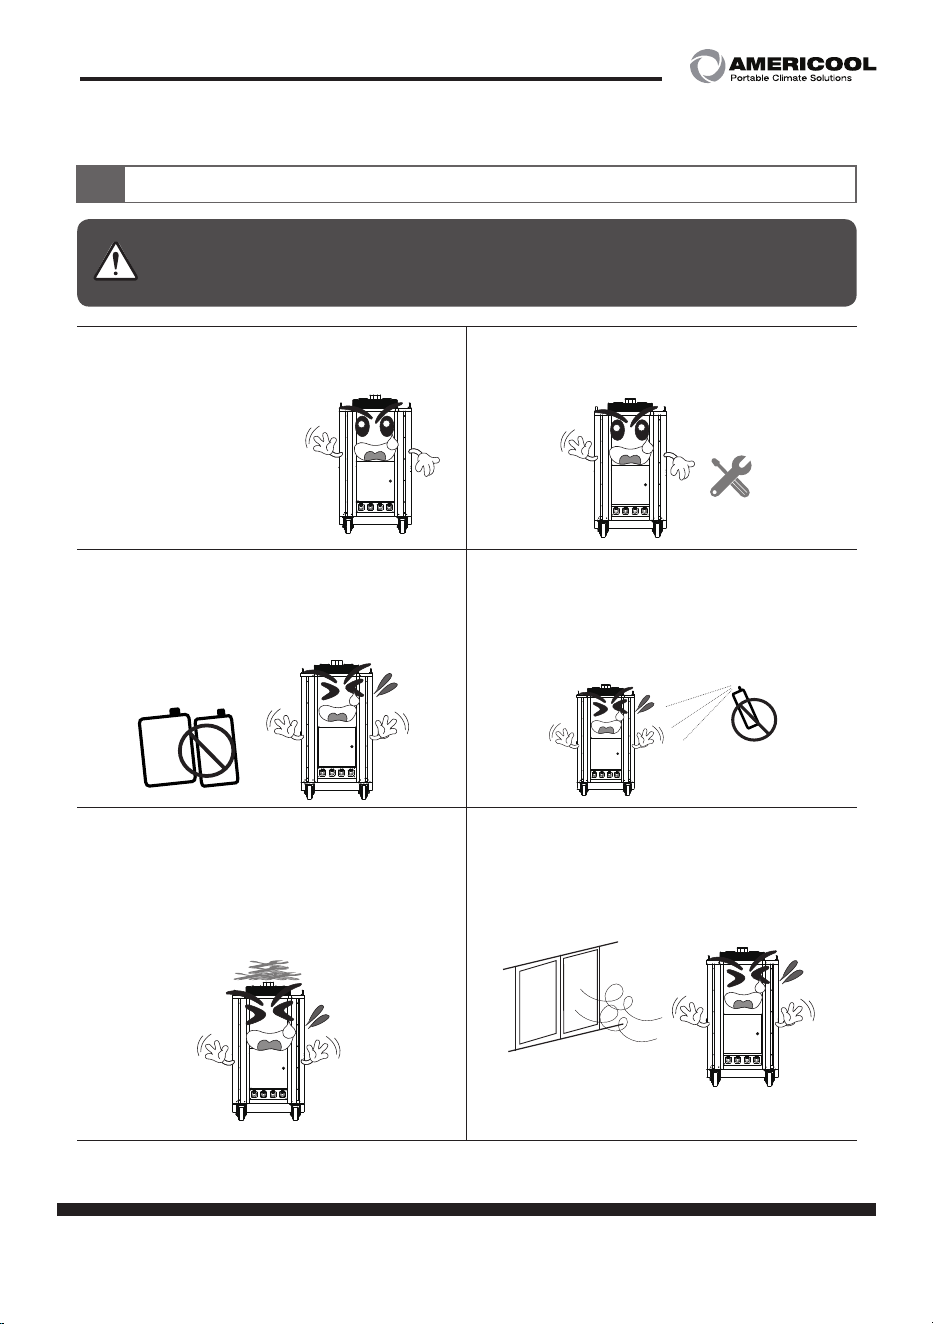
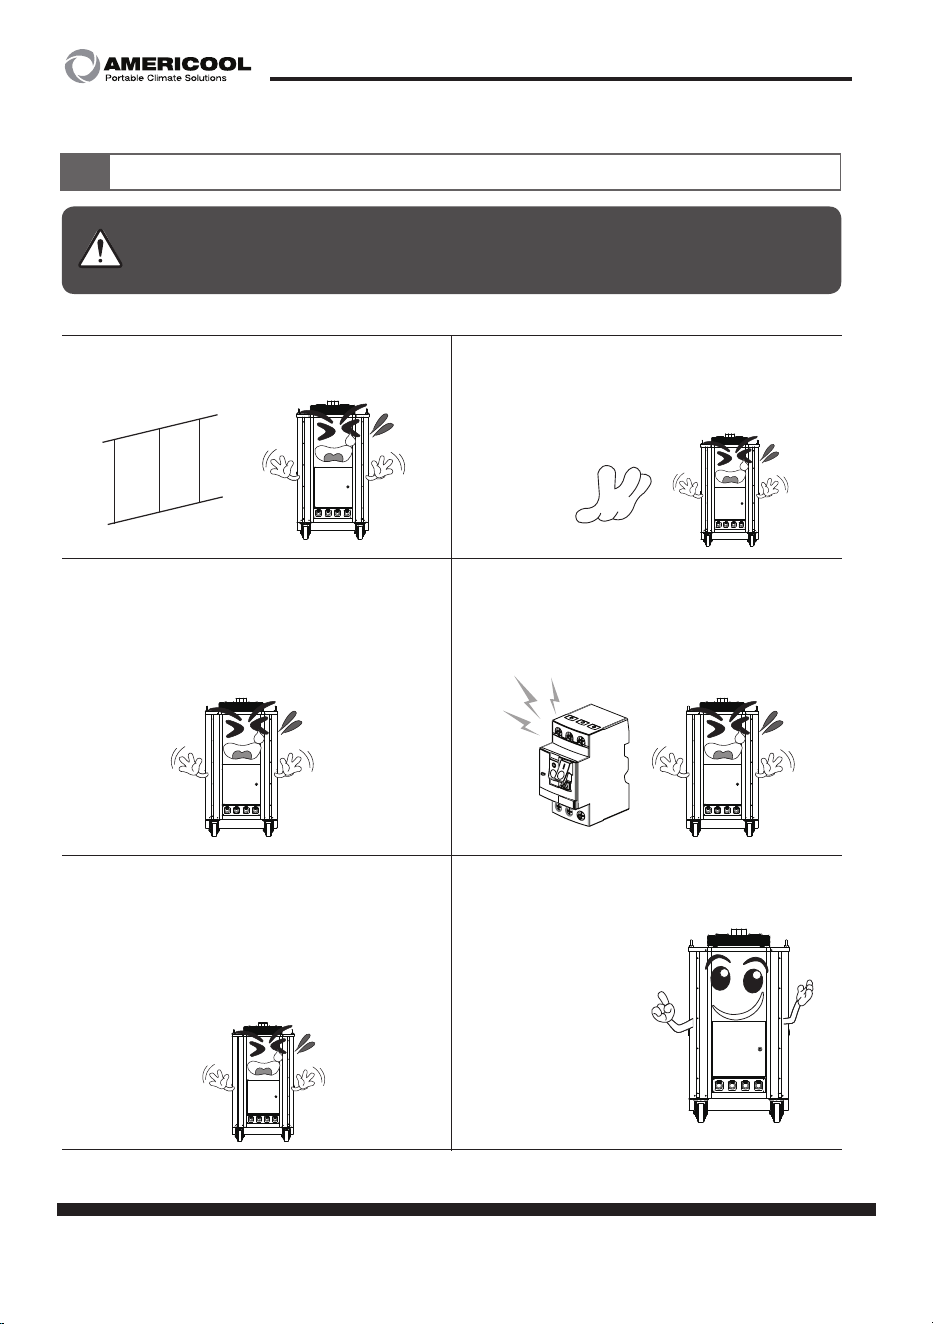
Caution before using
2
Caution
Make sure to follow these safety tips to use the machine properly and
prevent any accident.
·Check the power source's voltage.
(to prevent fire, electric shock)
·Do not place and use any flammable
material near the machine.
(to prevent fire, damage to the machine)
·Do not force the power cord to bent
or have it pressed by heavy stuffs.
(to prevent fire, electric shock)
·Do not install the machine near the stuffs
easy to burn like curtain, blanket, clothes.
(to prevent fire)
·Do not spray and wipe water, benzene,
thinner alcohol directly to the machine
(to prevent fire, electric shock, damage to
the machine)
·Use the proper power cord for the
machine.
gaso
-
line
gas
-
oline
4 page
Owner’s Manual
·Do not block the air inlet & outlet port.
·Do not let external substance go into the
air inlet & outlet port.
(to prevent malfunction)
· When not using for a long time, drain out
the remaining water inside the machine
using drainage valve and place the
machine avoiding hot and humid place.
(to prevent freeze of the inner component)
·Make sure to manage the water
always clean.
·Make sure to use a proper relay to the
machine.
(to prevent fire, electric shock)
·Do not get the eyes near the air outlet port
while running to prevent the burnt from
the heat.
Caution before using
2
Caution
Make sure to follow these safety tips to use the machine properly and
prevent any accident.

page 5
Owner’s Manual
·Do not use or touch the damaged
power cord.
(to prevent fire, electric shock)
·Do not use or touch the damaged
power cord.
(to prevent fire, electric shock)
· Do not open the covers while running.
(to prevent fire, electric shock)
·Never disassemble, repair, modify the
machine by your own.
(to prevent fire, electric shock. Contact the
service center for the maintenance)
·Make sure to do the grounding of the
machine.
(to prevent fire, electric shock)
·Make sure to have the power source
is connected only with this machine.
(to prevent fire, electric shock)
Caution before using
2
Caution
Make sure to follow these safety tips to use the machine properly and
prevent any accident.
6 page
Owner’s Manual
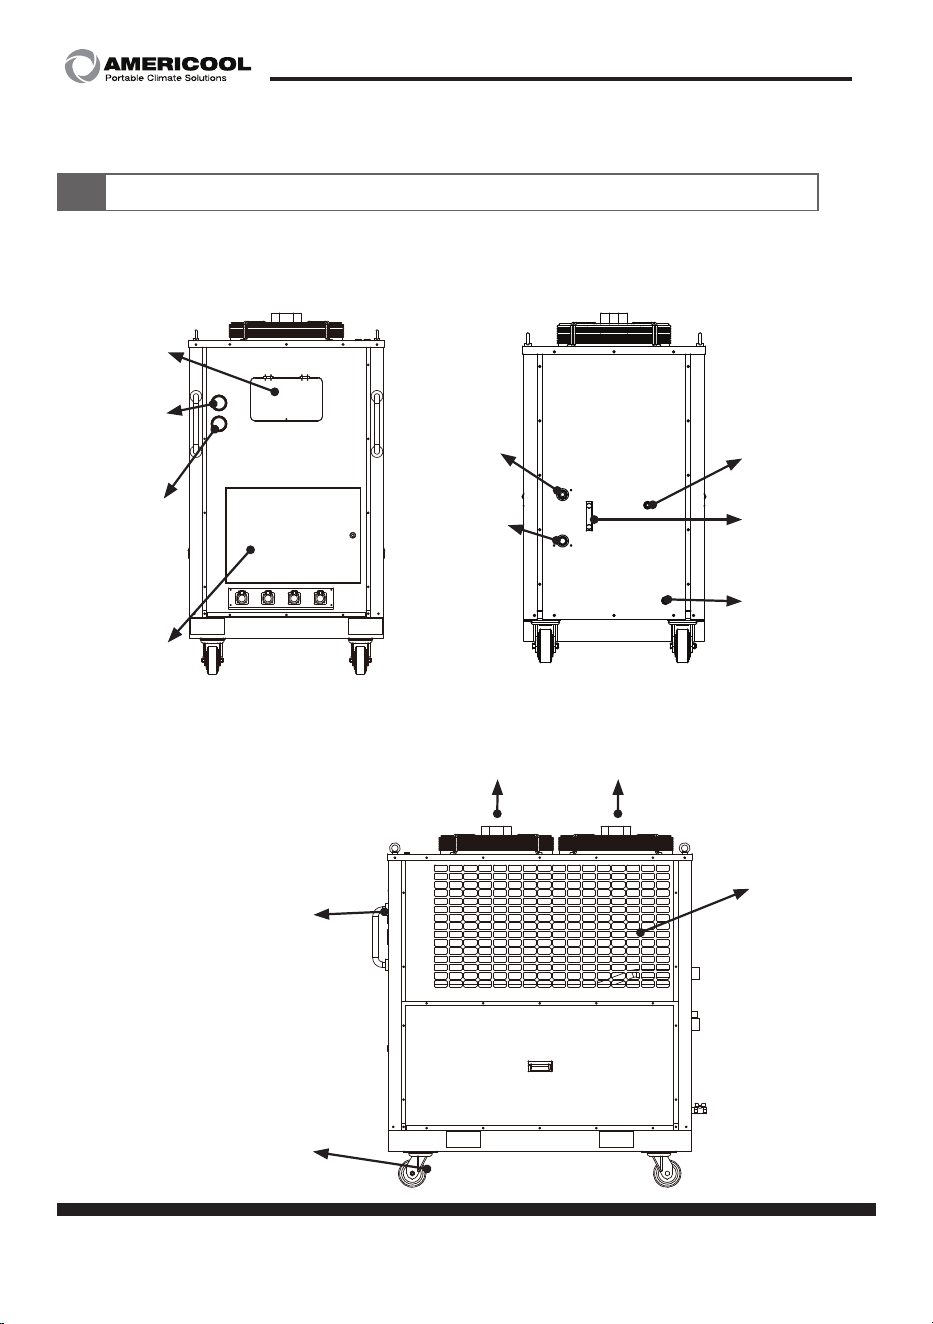
Product features (WWC-1200)
3
Water inlet
port
40A(1inch)
Control
panel
Electric
panel
Carrying handle
High pressure
gauge
Low pressure
gauge
Moving wheel
Water outlet
port
40A(1inch)
Drainage port
15A(1/2inch)
Water level
gauge
Air inlet
Air outlet
Water supply
port
15A(1/2inch)

page 7
Owner’s Manual
Caution while maneuvering
4
1. While maneuvering, do not tilt the unit more than 40°.
Too much tilting might cause malfunction of the machine.
Do not put too much vibration or shock to prevent the gas leakage.
To maneuver with forklift or hoist, please refer the below picture.
2. While using forklift
- Make sure the machine is balanced well.
- Make sure the fork is inserted deep enough to hold
the machine stably.
3. While using hoist
- Have the brackets on the top stay up to use hoist.
- Use the hoist can stand more than 500 KG.
- Make sure the machine is not tilted while using hoist.
8 page
Owner’s Manual
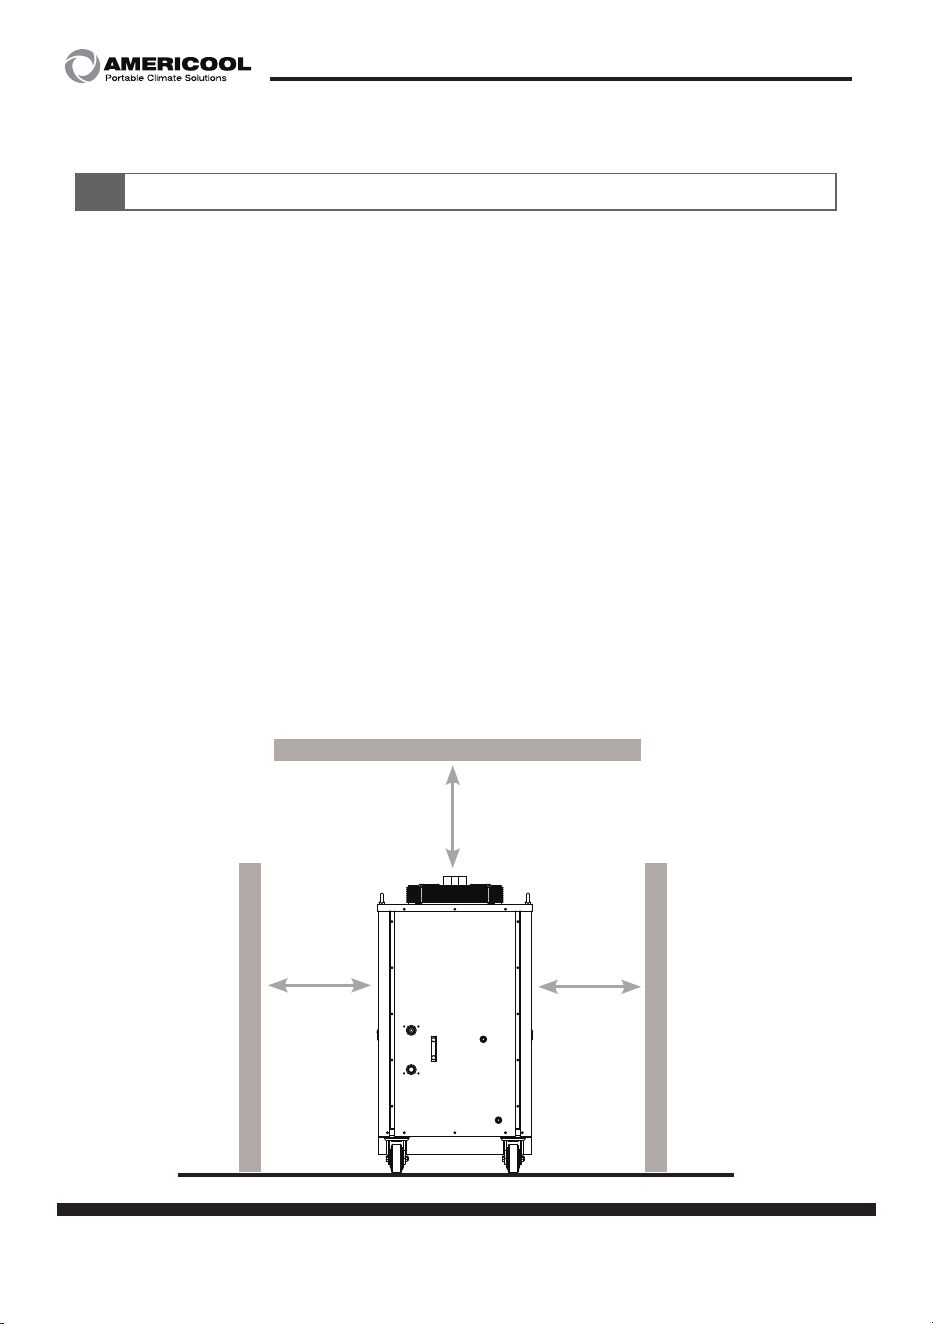
Instruction for installation
5
1. Do not use the machine at where explosive, flammable gas leakage
might happen.
2. Install the machine at where is well ventilated and has low humidity.
3. Do not place any external substance near the ventilation port.
4. Make sure the air inlet & outlet port have enough space to suck
in & pull out the air.
5. Do not install the machine at powdery, dusty, oily area.
(Do not place any external substance within 500mm from the
ventilation port)
more than
500mm
more than
500mm
more than
500mm
[Choosing the right spot to install]

page 9
Owner’s Manual
Instruction for installation
5
1. Make sure the pressure of the inlet valve lower than 0.1 Mpa,
outlet valve lower than 0.6 Mpa.
2. Check if there is no leakage on the pipe while running.
3. Check the loose of the valve connection, leakage, infiltration of air
while running.
4. While installing the pipe, avoid maneuver the valve to
prevent loosing the pressure.
5. Let the supply valve always open, as the machine is designed for
auto-water supply system.
6. Make sure to connect the right valve of inlet & outlet port.
7. When the inner contamination is found for long-time using,
drain out the water and refill it.
8. When not using for a long time, drain out the remaining water inside
the machine using drainage valve and place the machine avoiding
hot and humid place.
[Instruction for the valve connection]
10 page
Owner’s Manual
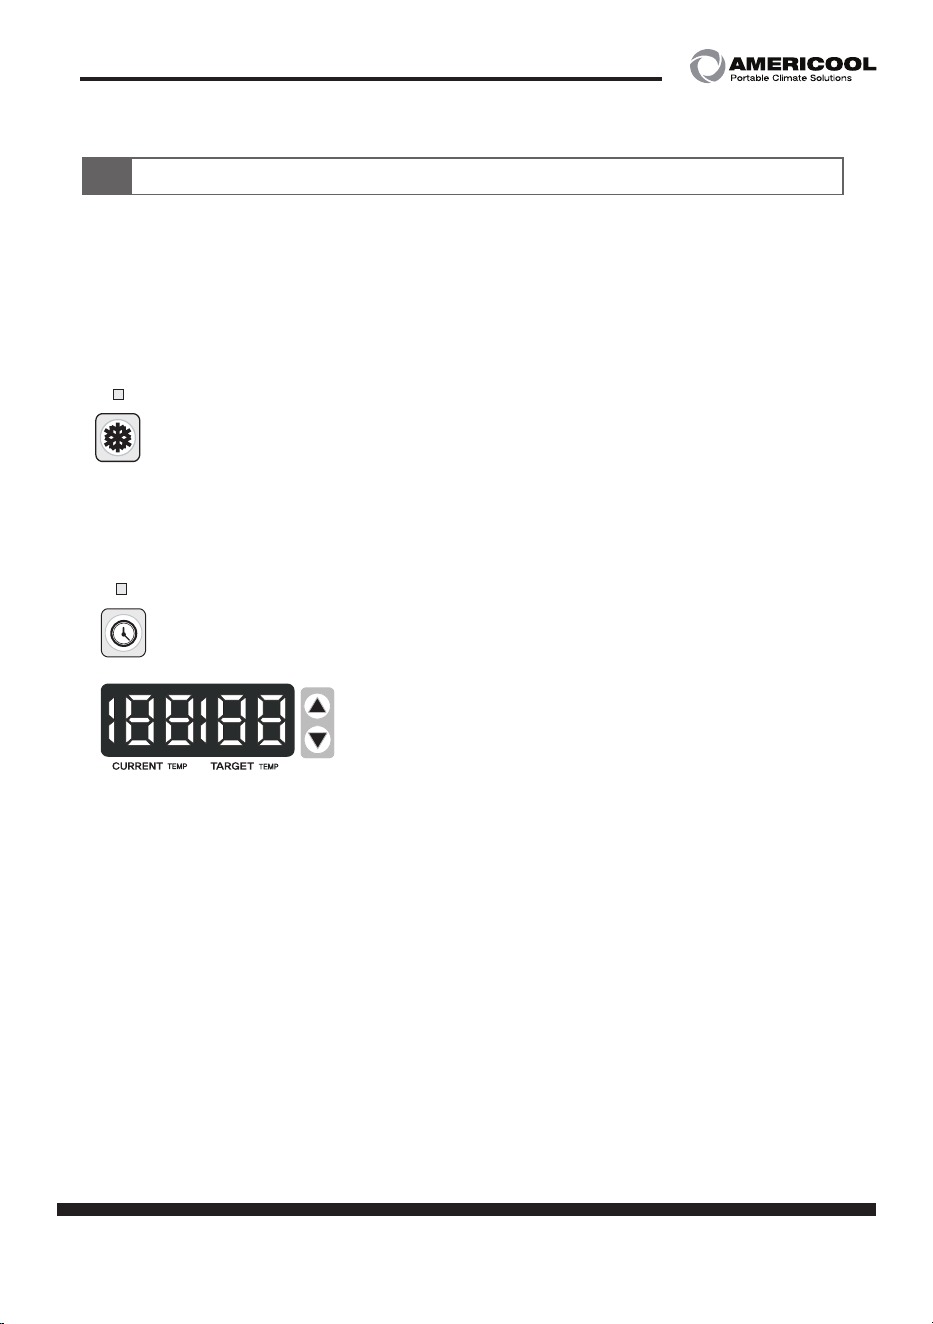
Controller manual
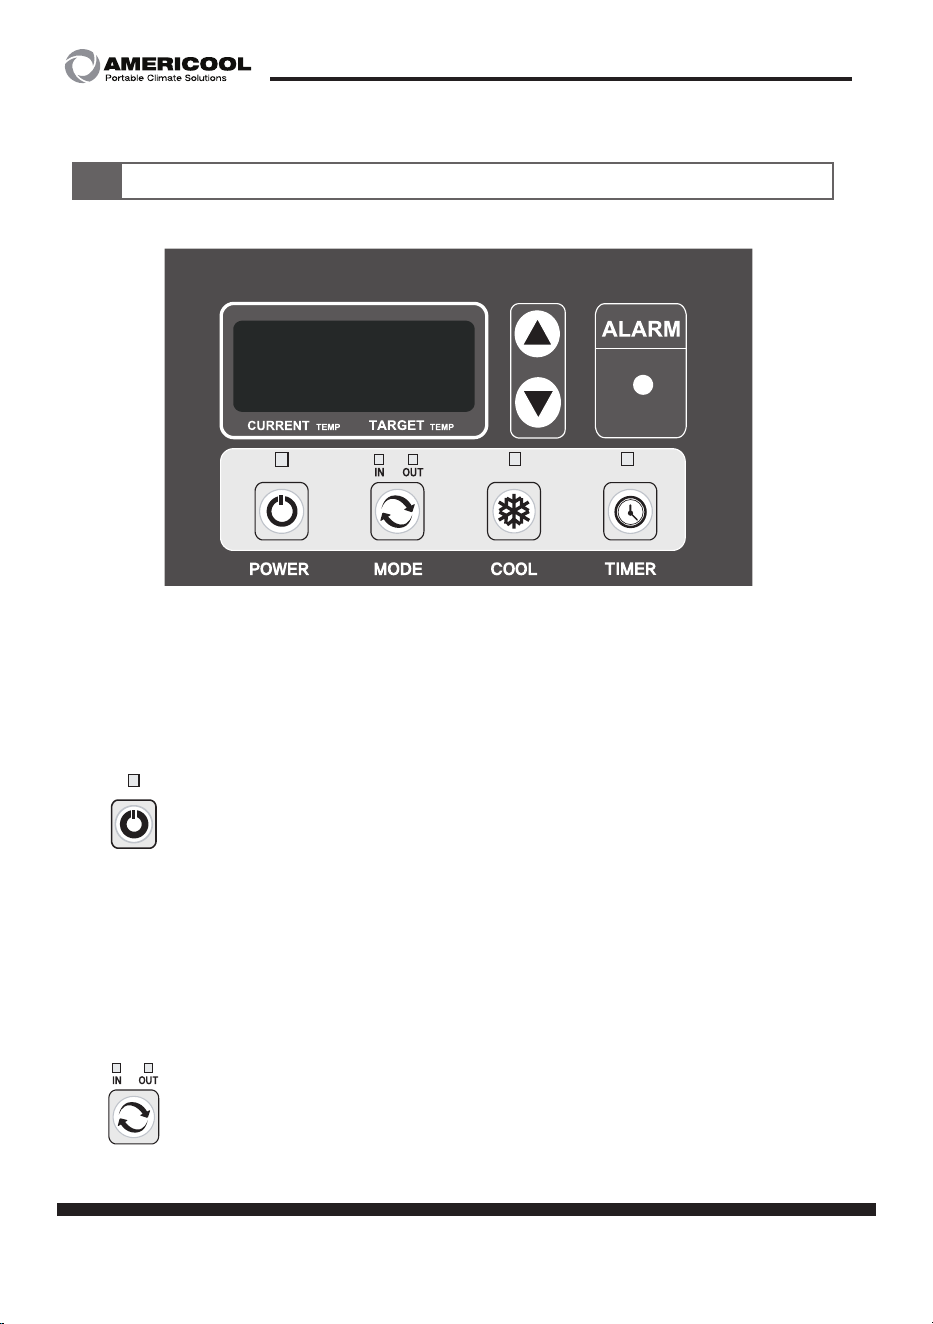
6
1) Power button
- Press and hold for 1 second to turn on the unit.
- Press and hold for 1 second to turn off the unit.
2) Mode button
- Press the button to change the temperature sensor on inlet and
outlet.
- When IN is on, the display shows inlet water temperature.
- When OUT is on, the display shows outlet water temperature.
Note : When main power is on, compressor starts after
3 minutes.(Compressor protective system)
Power button LED : Showing the power is on / off.
Press the button to change the temperature sensor on inlet
and outlet (IN ↔ OUT)
By pressing the button, you can set the target temperature.
(5~30℃)
page 11
Owner’s Manual
Controller manual
6
3) Cool button
- Press the button to select the cooling mode.
- When current temperature is higher than target temperature,
the cooling starts. When current temperature is lower than
target temperature, the cooling stops.
4) Timer button
- Press the button to set the off-timer.
- The setting value is from 30 minutes to 12 hours.
5) Cancel the off-timer
- By turning off the machine pressing POWER button,
the off-timer will be cancelled.
- Enter the off-timer mode, set the value as ‘_ _ _’, ‘_ _ _’ to
cancel the off-timer.
- When the unit is shut down by external accident, the
remaining time is memorized in the system when turning
on again.
LED ON : Cooling on
LED OFF : Cooling off
(compressor stops, condenser fan stops, drainage pump starts)
LED ON : Off-timer on
LED OFF : Off-timer off
After set the desired time, leave the unit not
manipulate for 5 seconds to exit the setting
mode OR press COOL button to
exit immediately.
Display shows [current temperature, target temperature] for
5 seconds and switch to [remain hour, minute] for 2 seconds.
When off-timer triggers to off the machine, the machine goes
into stand-by mode.
[hour]
[minute]
12 page
Owner’s Manual
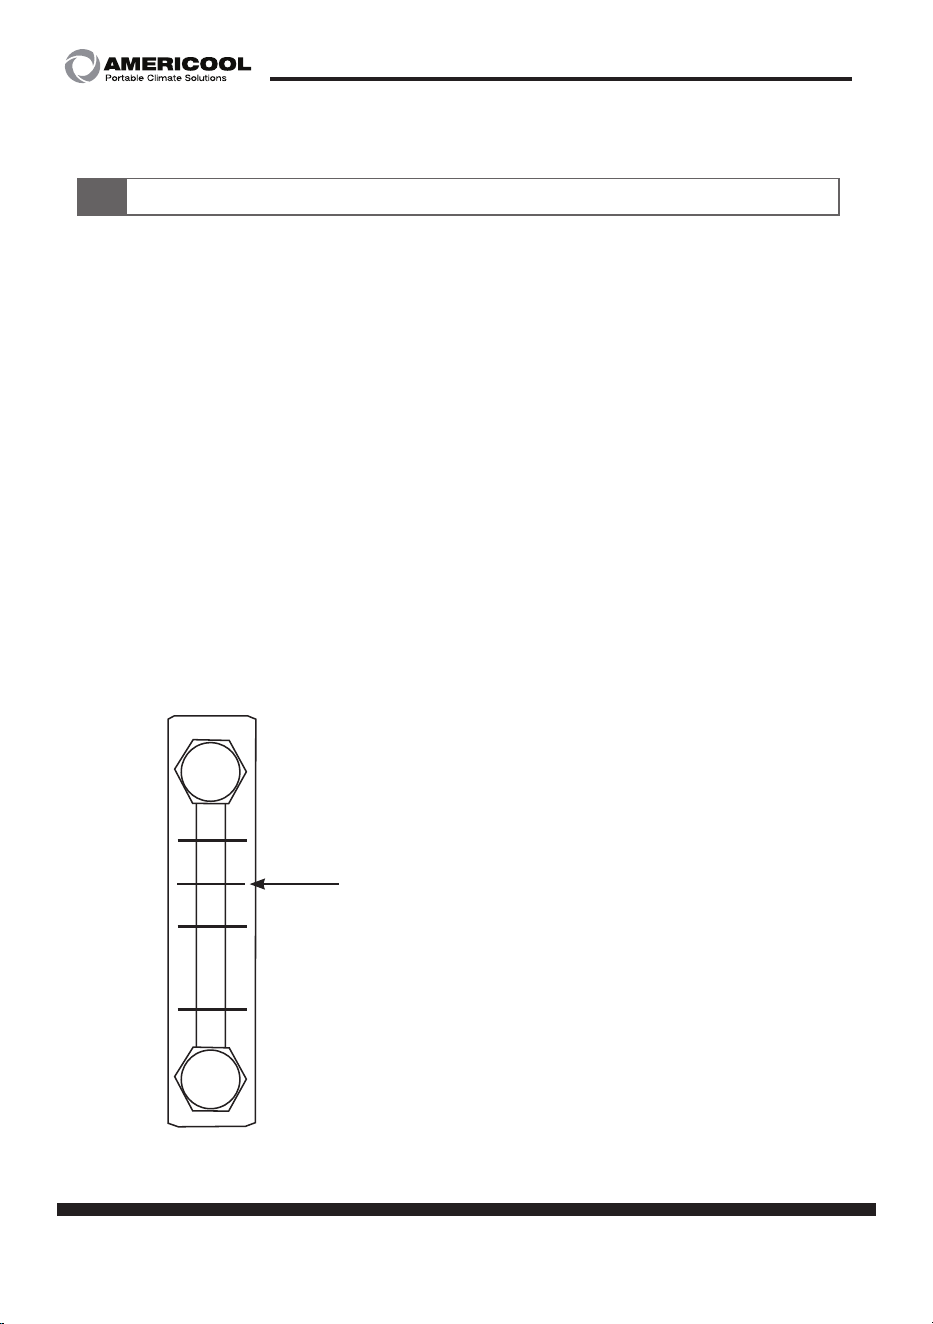
Instruction & caution for running
7
1. Before initial start, fill up the tank with clean water (distilled water).
(subterranean water might cause blocking of the pipe and multiple
malfunction)
2. Recommended water is distilled water and tap water.
- Mixing ratio (prevent freezing until -2℃)
distilled water : 90wt%, Antifreeze : 10~20wt%
(If the ratio is not correct, the circulation pump might have leakage.)
3. For the initial running, connect the valve and open it.
The water will be supplied automatically.
Check the water level gauge and run the machine.
4. Refer the picture below to check and supply the water.
Supply the water to reach this level
and start the machine.
H
L

page 13
Owner’s Manual
Instruction & caution for running
7
5. Never run the machine without the water.
This will damage the water pump.
6. Make sure the air not to go into the water pipe.
7. The compressor protective system will delay of the initial
start of the compressor.
8. Do not put in fingers or tools through the ventilation port.
9. Do not put any kind of substance that has a chance to drop into the unit.
10. Do not place any kind of external substance near the ventilation port.
11. Make sure to not have your face near the air outlet to avoid any
burnt from the heat.

14 page
Owner’s Manual
Maintenance
8
Use the air gun or brush to clean the fin of the condenser.
Make sure not to bend or damage the fin.
Furthermore, do not use iron brush, it might damage the fin.
1. Make sure to manage the water to be clean.
2. Clean the water inlet & outlet valve once every 6 moths, to prevent
any sludge block the pipe.
If the pipe or valve is blocked, it will make a loud noise and worsen
the performance.
4. During the cold season, it is recommended to use anti freeze like
ethylene glycol to prevent freezing to burst.
1. Make sure to cut off the power.
2. Put the cover on the machine to prevent any external substance to
infiltrate into the unit.
3. Make sure to manage the condensers not to have dust or
oil mist on the surface.
4. Make sure to drain out all the water remaining inside the machine.
1. For the maintenance, cut off the power to the machine in advance.
2. Never do the maintenance while the machine is running.
This cause various accident.
[Cleaning the condenser]
[Water Tank]
[For long time storage]
page 15
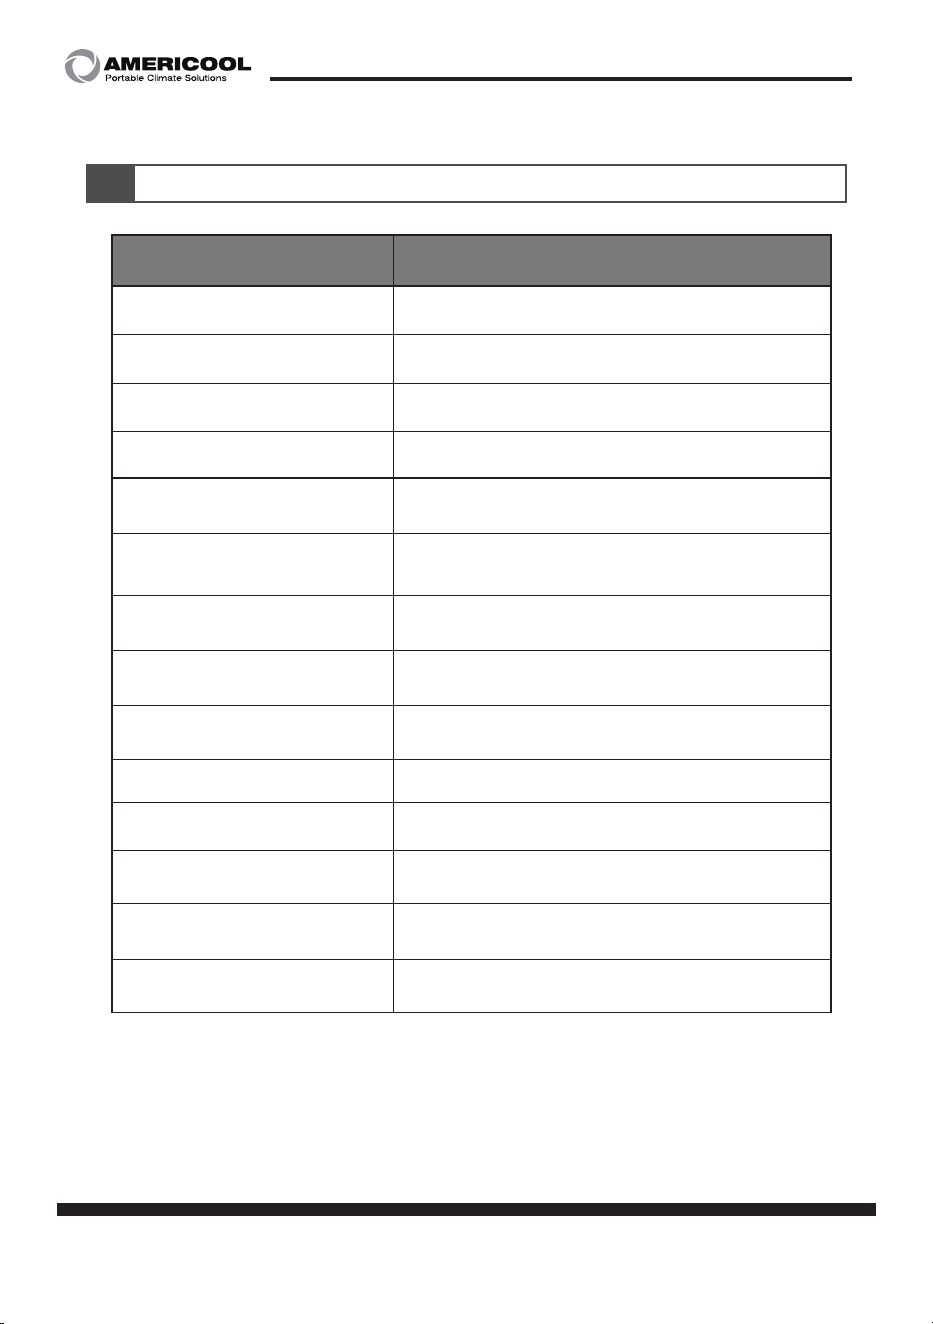
Owner’s Manual
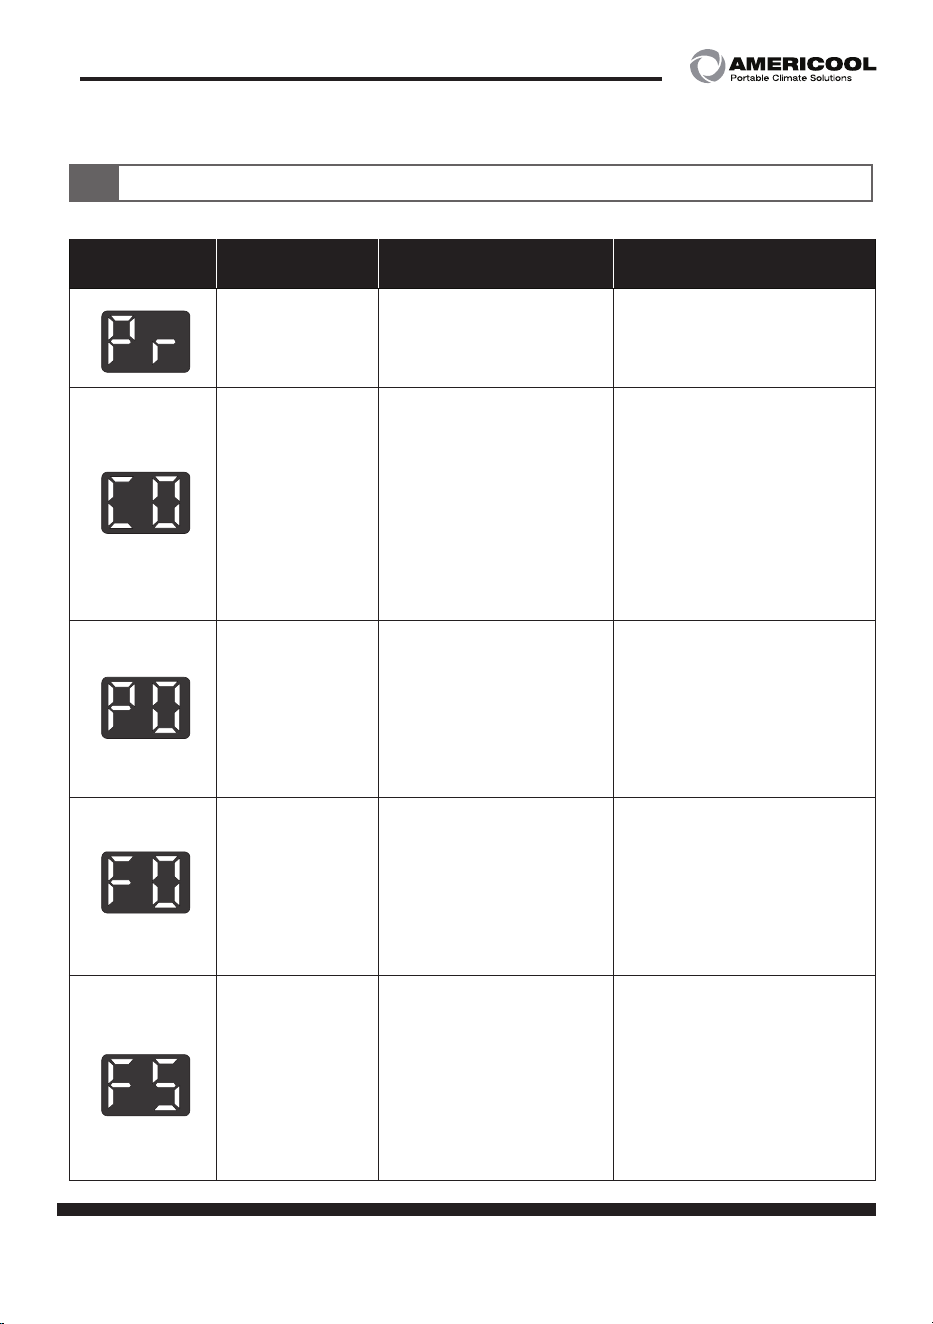
Self-diagnostic code
9
Alarm
display
Problem Cause Corrective action
Reversed
phased
·Power cable is
connected wrongly
·Reconnect the power
cable R,S,T correctly
Compressor
overload
·Ambient temperature
is too high
·Unstable power
supply
·Compressor failure
·Do not run the machine
when ambient
temperature is higher
than 45℃
·Reset the relay and
check
·Contact the qualified
service agency
Water pump
overcurrent
·Pipe blocked
·Loosing pressure of
the pipe
·Damage of the
bearing of the motor
or pump
·Inspect the blocking
and clean it out
·Contact the service
agency
Fan motor over
current
·Unstable power
supply
·Crack on the fan or
Stuck
·Damage on the
bearing
·Replace the fan motor
·Contact the service
agency
·Reset the relay and
check
Water tank
shortage
·Loosing of flow in the
circulation system
·Flow switch failure
Water shortage of
the evaporator
·Blocking of evapora-
tor or condenser
·Inspect and fix the
cause of the lost flow
·Supply the water to the
tank
·Clean the evaporator
and condenser
16 page
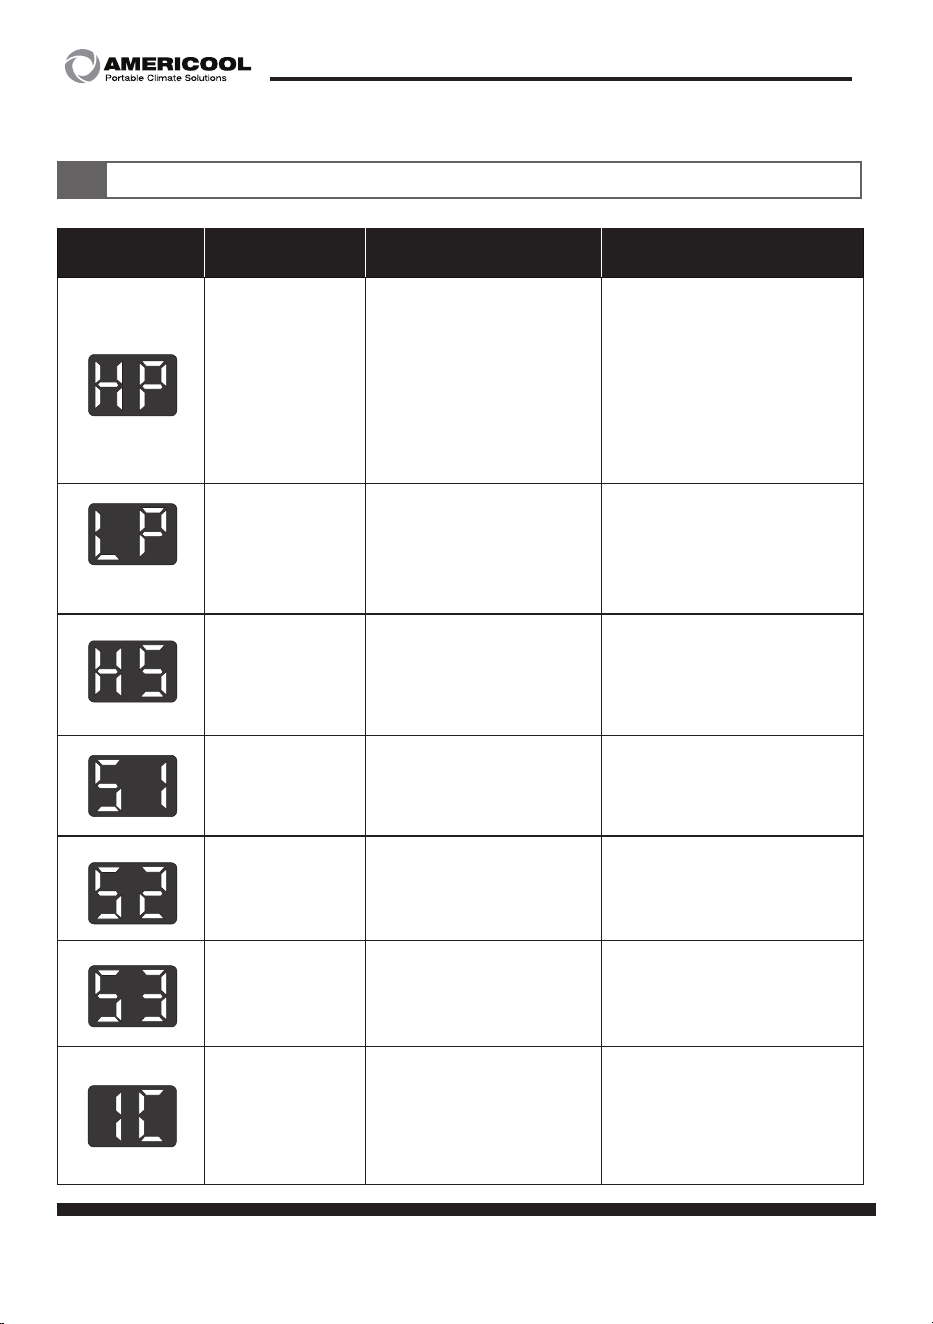
Owner’s Manual
Alarm
display
Problem Cause Corrective action
High pressure
·Too high ambient
temperature
·Too high water
temperature
·Do not run the machine
when ambient
temperature is higher
than 45℃
·Contact the service
agency
·Check the fan running
Refrigerant
low pressure
switch
Refrigerant leakage or
shortage
·Replace low pressure
switch
·Contact the service
agency
Too high inlet
Water temper
-
ature
·Not cooling properly
·Refrigerant shortage
·Water inlet tempera
-
ture is higher than 45℃
·Contact the service
agency
Abnormal
temperature
sensor
cut out or connection
failure of TH1(outlet)
sensor
·Contact the service
agency
Abnormal
temperature
sensor
cut out or connection
failure of TH2(inlet)
sensor
·Contact the service
agency
Abnormal
temperature
sensor
cut out or connec
-
tion failure of TH3(Anti
freeze) sensor
·Contact the service
agency
Anti freeze
sensor acti
-
vated
·Too low temperature
on evaporator or con
-
denser
·Refrigerant shortage
·Operate under
5℃~ 45℃
·Contact the service
agency
(Optional)
Self-diagnostic code
9
page 17
Owner’s Manual
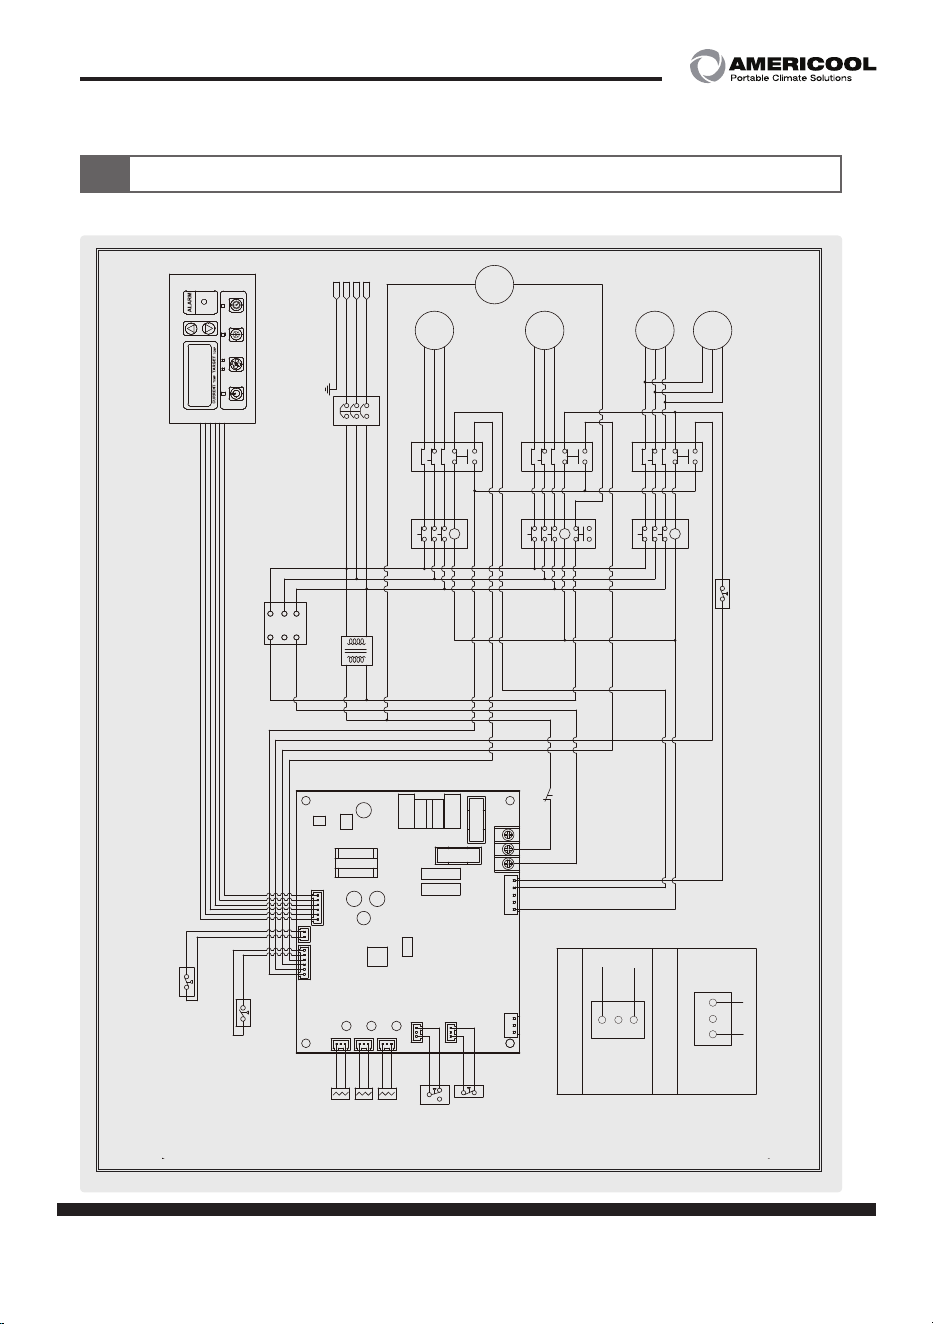
Circuit diagram
10
WWC-1200
WWC-1200
POWER MODE
COOL
TIMER
IN OUT
T (AC) S
CP
PU
HT
EXT
COM
TH1
TH1
OUT_TEMP
Sensor
SEN1
SEN2
SEN3
TH2
TH2
TH3
TH3
IN_TEMP
Sensor
ICE_TEMP
Sensor
FND
PS (HP)
COM
COM
EXT
FU
FT
CO
COM
T-1
S-1
COM
CO
(FUSE)
(FUSE)
FU
R
R-1
EXT
COM
Power Remote
Control (Option)
High Pressure Switch
COM
IR/FT
IR/FU
ALARM
NO COM NC
FT
FU
CO
FT
Water
Flow Switch
F/S
F/S
Low
Pressure
Switch (Option)
LP
LP
MCCB
Power
3P AC 460V-60Hz
E
R
S
T
MC 1 OCR 1
R
T
R
S
T
R
S
T
S
MC 2 OCR 2
R
T
S
MC 3 OCR 3
T
Fan On / Off Pressure Control
E
PBS
(Emergency Stop)
COM
NO
NC
1
2
4
Flow Switch Diagram
KP6W Diagram
Phase
Protector
C (CM)
B (NC)
A (NO)
R (L1)
S (L2)
T (L3)
TR
220V
R
T
460V
L
N
S
R
COM
R
T
S
R
T
S
PUMP
COMP'
COND'
MOTOR
A
COND'
MOTOR
B
Crank
Case
Heater
L
N
COM
NO
NC
1
2
4
18 page
Owner’s Manual
11
Model specification
Model
WWC-1200
Rated power
460V / 60Hz
Cooling capacity
146,000 BTU
Compressor
3phase scroll
Power consumption
16.6 Kw
Current consumption
20.8 Amps
Tank capacity(L)
120
Operation range
(Ambient temperature) ℉ (℃)
50~113 ( 10~45 )
Operation range
(water inlet temperature) ℉ (℃)
41~86 ( 5~30 )
Refrigerant type oz (kg)
R-410A 282.1 ( 8 )
Pump HP
3 HP
Design flow rate
72 gpm
Weight Lbs (kg)
864.2 ( 392 )
Dimensions
W x D x H - in. (mm)
35.4 x 57.8 x 65.2 (900 x 1468 x 1658)
Using fluid
distilled water, tap water(mix with 10% anti freeze)
※ Tested under condition
- Ambient temperature : 95℉(35℃) / 40%
- Inlet water temperature : 53.6℉(12℃)

page 19
Owner’s Manual
OBTAINING SERVICE
If the Weltem Water chiller by AmeriCool requires Service:
1. Use the TROUBLESHOOTING secon in this manual to eliminate obvious causes.
2. Verify there are no circuit breakers tripped.
3. Call your dealer for assistance. If you cannot reach your dealer, or if they cannot resolve the
problem, call
Weltem Water chiller by AmeriCool Technical Support at 888-726-6158 Please
have the following informaon available BEFORE calling the Technical Support Department:
a. Your name and address.
b. The serial number of the unit.
c. Where and when the unit was purchased.
d. All of the model informaon about your
Weltem Water chiller by AmeriCool.
e. Any informaon on the failure, including LED’s that may or may not be illuminated.
f. A descripon of the protected equipment, including model numbers if possible.
SHIPPING LIST
• (1) Water chiller
• (1) Owner’s Manual

Manufactured in Weltem Co., Ltd.,
154, Jayumuyeok 3-gil, Masanhoewon-gu, Changwon-City, Gyeongsangnam-do,
Republic of KOREA 51340 www.weltem.com
Distributed by Americool,Inc. In the USA (Tel.888-726-6158)
WWW.AMERICOOLLLC.COM
Printed in April, 2023
LIMITED WARRANTY
AmeriCool warrants all AmeriCool products to be free from defects in materials or work-
manship, under normal use and service, for a period of 12 months from the date of pur-
chase to the end user (original invoice must be provided). AmeriCool further warrants that
the compressor will be free from defects in materials and workmanship for 12 months from
the date of purchase to the end user.
AmeriCool’s obligaon under this warranty is limited to the repair or replacement at its op
-
on, of any part or parts, which, upon Ameriool’s examinaon are shown to be defecve,
or at AmeriCool’s opon, the return of the purchase price to the purchaser.
Correcon of such defects by repair or replacement, or at AmeriCool’s opon, the return
of the purchase price shall constute fulllment of warranty obligaons to the purchaser.
This warranty does not cover defects or malfuncons which result from causes beyond
AmeriCool’s control, including, without limitaon,(i) unusal physical or electrical stress:(ii)
accident, neglect, abuse, misuse or other abnormal use; (iii) failure to perform roune
maintenance in accordance with AmeriCool’s recommended procedures; (iv)normal wear
and tear; (v) repairs or aempted repairs by an unauthorized person; (vi) modicaons
or alteraons to the Products; (vii) use with parts or devices not supplied or approved by
AmeriCool (viii) improper installaon or service; (ix) shipping damage to any units or spare
parts during shipping. This includes and is not limited to compressors, evaporators and
condenser coils. This warranty shall extend only to the original end-user and shall be void
if any labels or other idenfying marks permanently axed to Products when shipped by
AmeriCool are removed, altered, defaced or obliterated.
TO THE EXTENT PERMITTED BY LAW, THIS WARRANTY, AS LIMITED HEREIN, SHALL BE IN
LIEU OF AND EXCLUSIVE OF ALL OTHER WARRANTIES, EITHER EXPRESSED OR IMPLIED,
ON THE PART OF AMERICOOL INC., OR WELTEM CO.,LTD. WHETHER ARISING FROM LAW,
COURSE OF DEALING, USAGE OF TRADE, OR OTHERWISE, INCLUDING WITHOUT LIMITA
-
TION ANY IMPLIED WARRANTY OF MERCHANT-ABILITY OR FITNESS OF A PARTICULAR PURP
OSE OR ANY LIABILITY FOR COMMERCIAL LOSSES BASED UPON NEGLIGENCE OR MANU
-
FACTURER’S STRICT LIABILITY. EXCEPT AS EXPRESSLY PROVIDED HEREIN,NEITHER AMERI-
COOL, INC., NOR WELTEM CO., LTD. WILL, IN ANY EVENT, BE LIABLE FOR LOST PROFITS,
COSTS OF PROCESSING,INJURY, GOODWILL, OR ANY OTHER CONSEQUENTIAL DAMAGES
OF ANY KIND ARISING FROM BREACH OF THIS WARRANTY.


