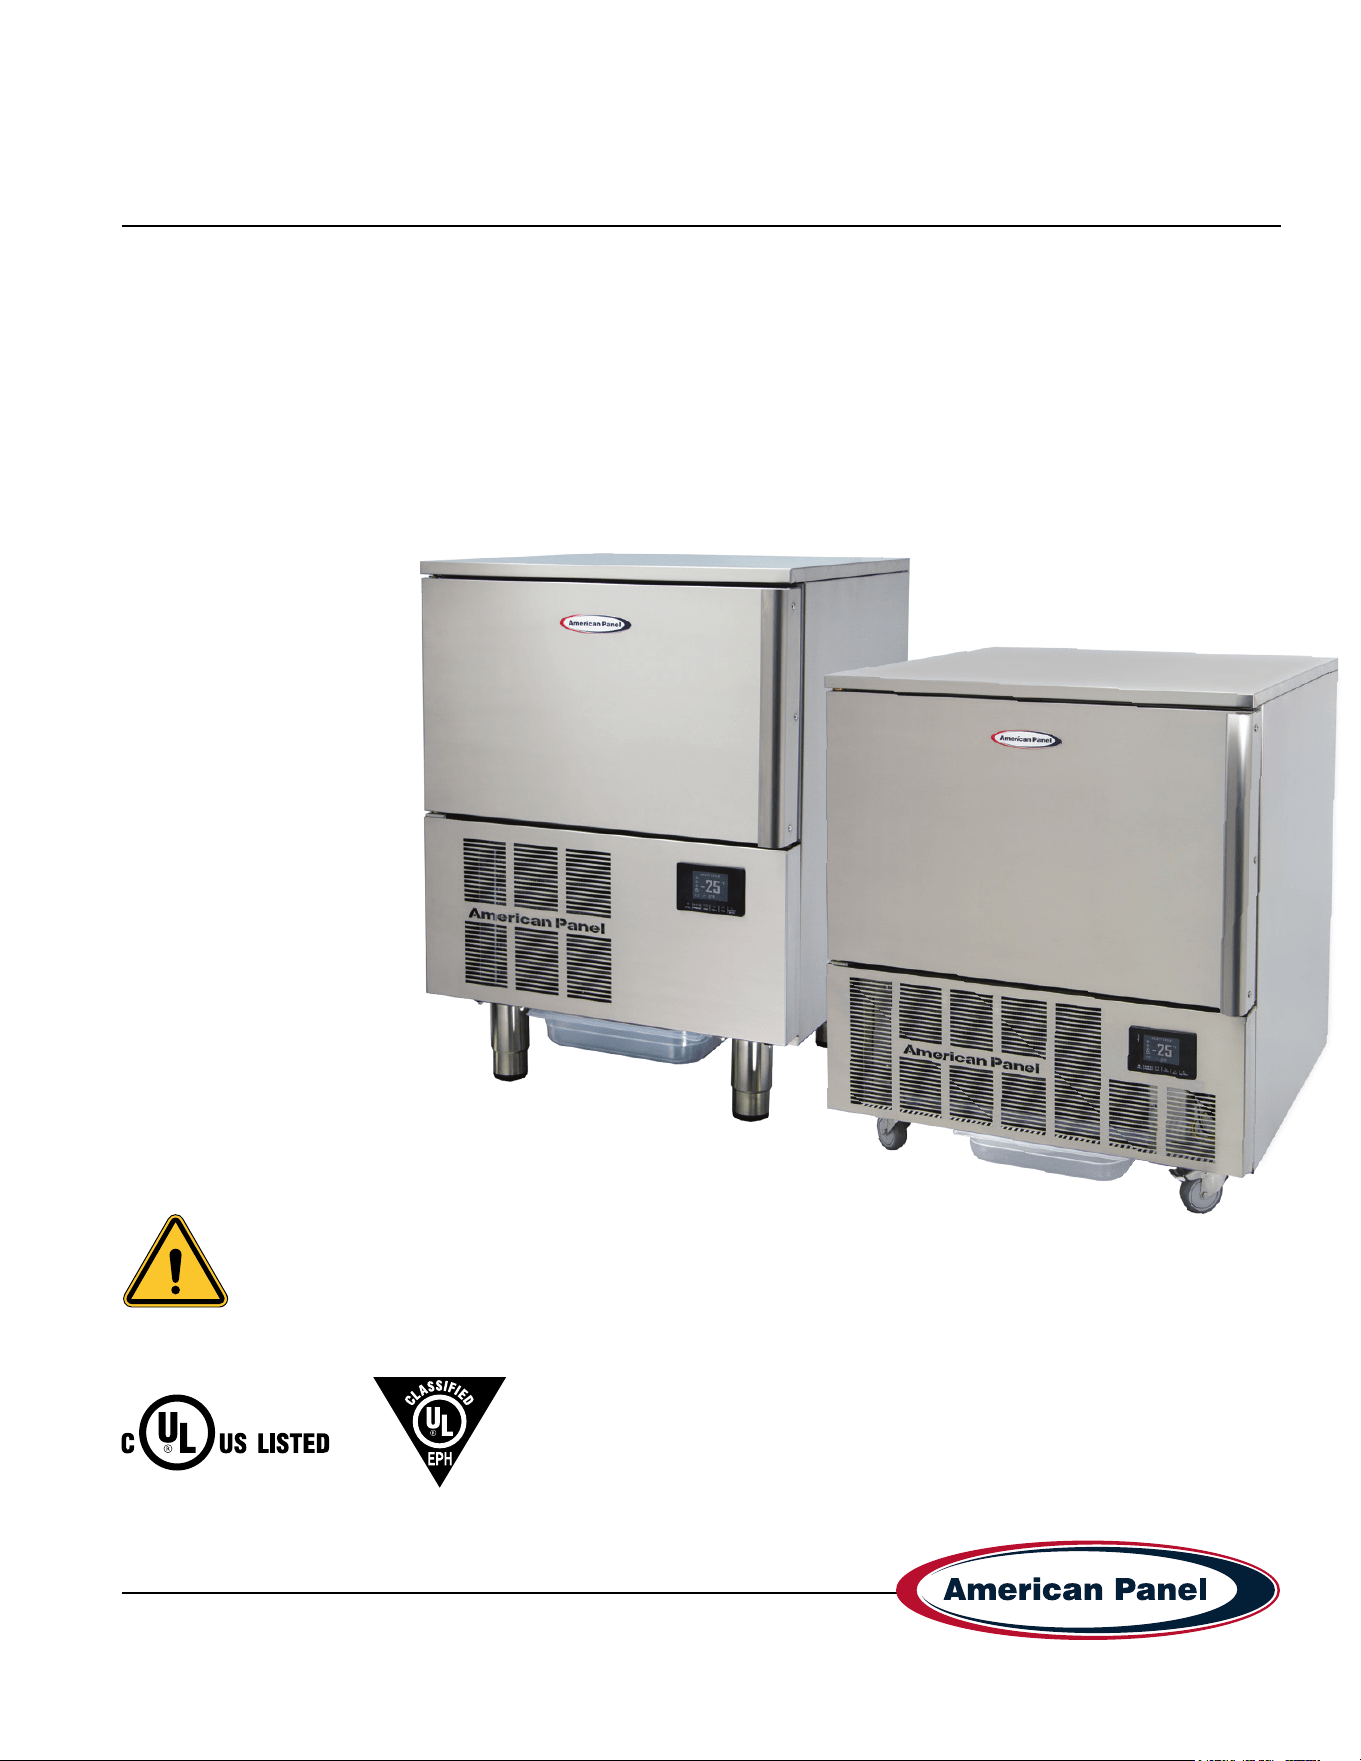
Installation & Operators Manual
HURRiCHiLL blast chillers & shock freezers
Please read this manual
before installing or
operation of this equipment.
This manual is updated as new information and models are released. Visit our website for the latest manual.
994430_APC_HC_SC-P_OEM
08/25
5800 SE 78th St. Ocala, FL 34472 • 352.245.7055 • [email protected]
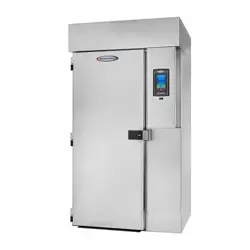
Versatile, Dependable Walk-Ins & Blast Chillers
MODELS COVERED:
AP3BCF30-1-P
AP5BCF45-2-P
Part #: 994430

5800 SE 78th St. Ocala, FL 34472
2
P: (800) 327-3015
Simple Controller HURRiCHiLL Installation & Operations Manual
Warranty .................................................................................................................................................................3-4
Basic Safety Information.........................................................................................................................................5-6
Equipment Tag ...........................................................................................................................................................6
Pre-installation Checks ..............................................................................................................................................6
Installation .................................................................................................................................................................7
Installation Checklist ............................................................................................................................................... 7-9
Specications & Performance ...................................................................................................................................9
General Operating Instructions................................................................................................................................10
Modes Explained ................................................................................................................................................ 10-11
Display .................................................................................................................................................................... 11
Starting a Cycle .......................................................................................................................................................12
Alarm Codes ............................................................................................................................................................12
Maintenance Instructions....................................................................................................................................13-14
Evaporator Coil Cleaning.........................................................................................................................................15
Contacts and Information
Customer service - +1(800) 327-3015 or +1(352) 245-7055
Service department. - [email protected]
Parts department. - [email protected]
Website - www.americanpanel.com
For all blast chiller information requests, please have the Model and Serial Number available as stated on the
equipment tag (pg 5) on the exterior of the cabinet.
3
5800 SE 78th St. Ocala, FL 34472
Simple Controller HURRiCHiLL Installation & Operations Manual
P: (800) 327-3015
American Panel HURRiCHiLL Blast Chiller/Shock Freezer Warranty
American Panel Corporation products are warranted to the original user installed within the United States, Canada and Puerto Rico
to be free from from defects in material or workmanship under normal and proper use, as outlined in the HURRiCHiLL owner’s
manual and maintenance service specications provided by American Panel.
The warranty period begins on the date of installation or 30 days from the date of product shipment from American Panel
Corporation, whichever comes rst. For this warranty to be in effect, the installation checklist/registration must be accurately
completed and emailed to [email protected] within 72 hours from the installation or start-up date.
NOTE: This Warranty does not apply to altered or misused parts.
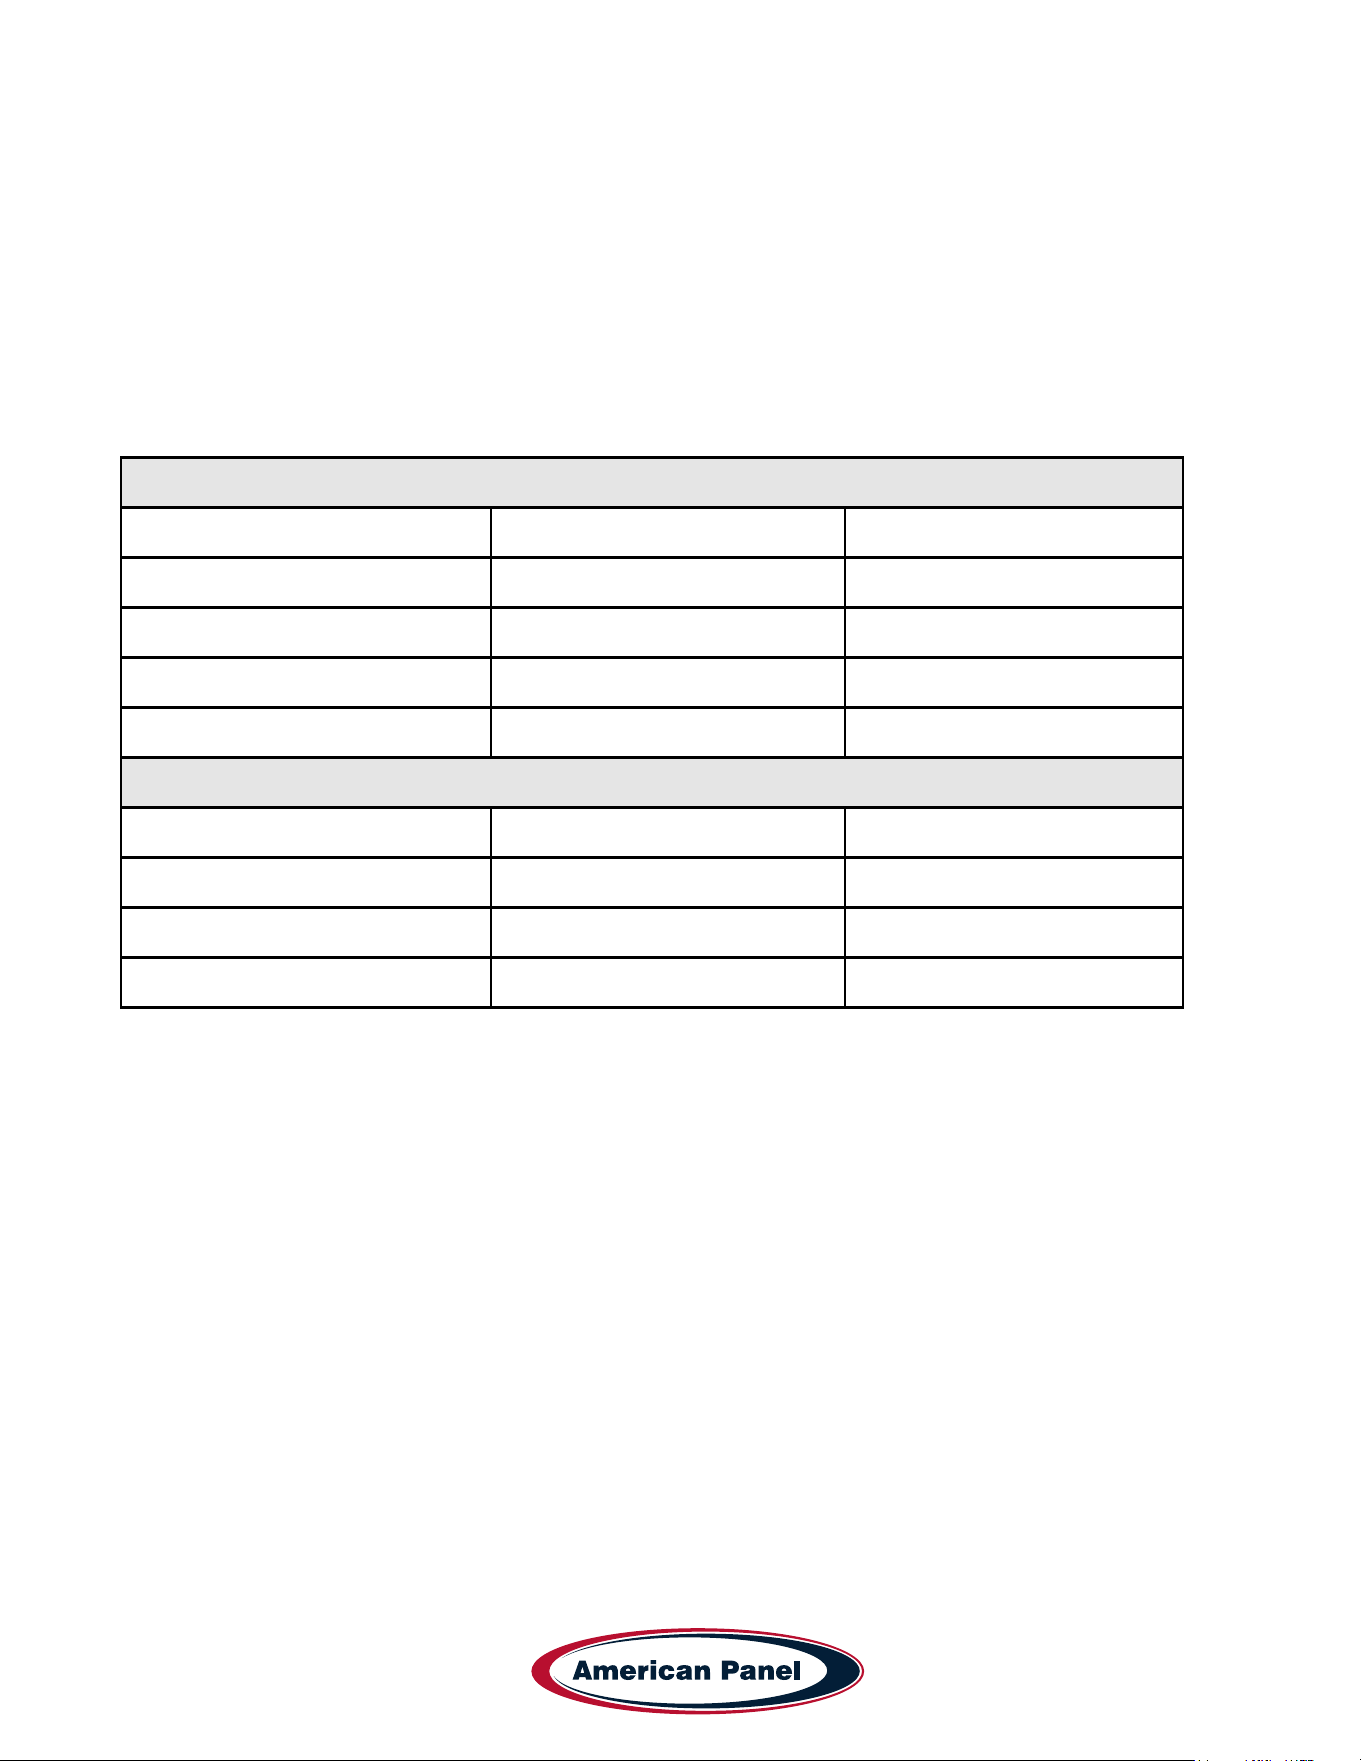
Self-Contained Units
WARRANTY COVERS PARTS LABOR
Cabinet Assembly 3 Year from date of shipment 3 Year from date of shipment
Refrigeration Components 3 Year from date of shipment 3 Year from date of shipment
Refrigeration Compressor 5 Years from date of shipment 3 Year from date of shipment
Food Temperature Probes & Lights None None
Remote Refrigeration Units
Cabinet Assembly 3 Year from date of shipment 3 Year from date of shipment
Refrigeration Components 3 Year from date of shipment None
Refrigeration Compressor 5 Years from date of shipment None
Food Temperature Probes & Lights None None
Note: Refrigeration compressor warranty is valid for one time replacement.
This warranty is not assignable and applies only valid to the original purchaser/user to whom delivered. Any such assignment
or transfer shall void the warranties herein made and shall void all warranties, express or implied, including any warranty of
merchantability or tness for a particular purpose. There aren’t any other warranties expressed, implied or statutory, except the
warranties as described above.
American Panel Corporation agrees to repair or replace at its option, FOB Factory, any part which proves to be defective due to
defects in material or workmanship during the warranty period, providing the equipment has been properly installed, maintained
and operated in accordance with the HurriChill™ User’s Manual. Refer to the above chart for details and exceptions for various
equipment items. Labor covered by this warranty must be authorized by American Panel Corporation and performed by a factory
authorized service agency or factory preferred service company. Contact American Panel Corporation for a list of agents in your
area.
This warranty does not apply to remote or pre-assembled remote refrigeration systems requiring electrical inter-wiring or refrigerant
piping provided by others. American Panel Corporation reserves the right to withdraw this warranty if it is determined that
equipment is not being operated or maintained properly per the HURRiCHiLL operations manual .

5800 SE 78th St. Ocala, FL 34472
4
P: (800) 327-3015
Simple Controller HURRiCHiLL Installation & Operations Manual
WHAT IS NOT COVERED BY THIS WARRANTY
This warranty does not apply to:
• Any aesthetic components
• Door Gaskets
• Bulbs, Condenser Filters, Food Probes, Damaged or Misused Probes
• Unit(s) moved from original installation site or location or during any shipping.
• Software update/parameter modication
American Panel will not assume:
• Responsibility for economic loss; prot loss or special indirect or consequential damages, including but not limited to, losses
or damages arising from food or product spoilage claims, delayed installations or shipping, parts shortages, labor shortages or
strikes.
• Liability for parts or labor coverage for component failure or other damages resulting from improper usage or installation or
failure to clean and/or maintain product per the HURRiCHiLL operations manual.
• Responsibility for the repair or replacement of any parts that American Panel determines have been subjected after the date of
manufacture to alteration, neglect, abuse, misuse, accident, damage during transit or installation.
• Responsibility for the repair or replacement of failed or damaged components resulting from improper voltage feeds, electrical
power failure, electrical storm or grid power surges, the use of extension cords, low voltage, or voltage drops or spikes to the
unit.
• Responsibility for any damages caused during or at any storage facility including but not limited to, dealer and on/off site
storage.
TRANSPORTATION DAMAGE AND CLAIMS
All American Panel equipment is sold FOB shipping point, and when accepted by the carrier, such shipments become the property
of the consignee. Should damage occur in shipment, it is a matter between the carrier and consignee. In such cases, the carrier is
assumed to be responsible for the safe delivery of merchandise, unless negligence can be established on the part of the shipper.
• Make an immediate inspection while equipment is still in the truck or immediately after it is moved to the receiving area.
• Do not sign a delivery receipt or freight bill until you have made a proper count and inspection of all merchandise received.
• Note all damage to packages directly on the carrier’s delivery receipt.
• Make certain the driver signs this receipt. If he refuses to sign, make a notation of this refusal on the receipt.
• If the driver refuses to allow inspection, write the following on the delivery receipt, “Driver refuses to allow inspection of
containers for visible damage”.
• Save any packages and packing material for further inspection by the carrier.
• Promptly le a written claim with the carrier and attach copies of all supporting paperwork.
American Panel requires that the consignee unpack and fully inspect their unit(s) for any concealed freight damage. Any claims for
concealed freight damaged must be reported to American Panel within 72 hours of receipt of shipment via email to
traf[email protected].
During the warranty period, all requests for service MUST be made before any work is begun. Such requests must be directed to
American Panel Corporation Service Department, which will issue written authorization when applicable. Without this authorization,
the Warranty may be voided. The service department can be contacted by mail at American Panel Corp., 5800 S.E. 78th Street,
Ocala, Florida 34472-3412; by telephone at 1-800-327-3015; by fax at (352) 245-0726; or via email at service@americanpanel.
com.
Service department hours - Monday - Friday 8am-5pm EST.
American Panel will continue its policy of assisting our customers in collecting claims which have been properly led and actively
pursued. American Panel will not assume the responsibility of any claims nor accept deductions in payment for such claims.
** Proper installation is the responsibility of the dealer, the owner-user, or the installing contractor. It is not covered by
this warranty.
5
5800 SE 78th St. Ocala, FL 34472
Simple Controller HURRiCHiLL Installation & Operations Manual
P: (800) 327-3015
Basic Safety Information
WARNING
• Flammable Refrigerant (R290): This equipment contains
R290, a ammable refrigerant. Extreme caution is required
during transportation, installation, and servicing to avoid any
risk of re, explosion, or personal injury.
• Do not damage the refrigerant circuit. Avoid piercing,
burning, or using tools that could compromise the sealed
system.
• Avoid excessive vibration and jarring during movement to
reduce the risk of refrigerant leaks.
• Install only in a well-ventilated area to allow for safe
dissipation of any leaked refrigerant gas.
• Refrigerants may not have an odor. Always assume caution
when working near the system.
• Use only procedures recommended by the manufacturer.
Inappropriate methods may damage the refrigerant circuit
and create re or explosion hazards.
• Servicing and Repairs: Only trained service personnel
should perform maintenance or repairs. Use only OEM parts
as specied by the manufacturer.
• Servicing must only be performed by trained personnel
familiar with R290 systems and ammable refrigerant
safety.
• Use only OEM replacement parts to maintain the
equipment’s safety and certication.
• Do not remove or bypass safety devices or protective
covers during routine maintenance or service operations.
• Installation Requirements:
• Read the entire installation procedure before beginning.
Failure to follow instructions may void the warranty.
• Ensure the appliance is installed in a well-ventilated area.
• Keep ventilation openings in the unit and surrounding
structure clear of obstruction.
• A xed disconnection device must be incorporated in
accordance with local electrical codes.
IMPORTANT
• Safe Handling & Installation: Due to the size and weight
of the equipment, at least two people are required for safe
installation.
• Follow all OSHA safety regulations while on site.
• User Safety:
• Do not touch or operate the unit with wet hands or feet.
• Do not insert tools or objects into any openings or near
moving parts.
• The core probe is designed only to measure the internal
temperature of food during chilling/freezing. Do not misuse.
• Protective Equipment:
• Use heat-resistant gloves when handling hot trays or
trolleys.
• Use appropriate gloves for handling cold items.
• During condenser cleaning, wear safety gloves, eye
protection, and a respiratory mask.
NOTE
• Always disconnect the unit from power before performing
cleaning or maintenance.
• If the power supply cable is damaged, it must be replaced by
a qualied service technician.
• This unit must be stored in a location free from continuous
ignition sources.
WARNING: Keep ventilation openings, in the appliance
enclosure or in the built-in structure, clear of obstruction.
WARNING: Do not use mechanical devices or other means
to accelerate the defrosting process, other than those
recommended by the manufacturer.
WARNING: Do not damage the refrigerant circuit.
Do not store explosive substances such as aerosol cans with a
ammable propellant in this appliance
WARNING: Do not use electrical appliances inside the storage
compartments of the appliance, unless they are of the type
recommended by the manufacturer
Notice that servicing shall be performed only as recommended
by the manufacturer
WARNING
Do not use means to accelerate the defrosting process or to
clean, other than those recommended by the manufacturer.
The appliance shall be stored in a room without continuously
operation ignition sources (for example: open ames, an
operating gas appliance or and open electric heater.)
Do no pierce or burn.
Be aware that refrigerants may not contain an odour.
5800 SE 78th St. Ocala, FL 34472
6
P: (800) 327-3015
Simple Controller HURRiCHiLL Installation & Operations Manual
• This manual is an integral part of the product, it
supplies all of the indications necessary for correct
installation, correct use and maintenance of the
machine.
• It is mandatory for the user to read this manual
carefully and always make reference to it. It must be
kept in a place that is known and accessible to the
authorized operators (installer, user, maintenance
technician)
• The blast chiller is intended for professional use and
therefore only qualied staff can use it
• The blast chiller is destined only for the use for which it
has been designed.
• The manufacturer declines all responsibility for any
damage caused by incorrect or unreasonable use, as
for example:
• improper use by untrained staff.
• modication or interventions that are not specic for
the model.
• use of non-original spare parts or that are not
specic for the model.
• failure to comply, even partial, with the instructions
in this manual.
• The manufacturer disclaims all responsibility for
problems related to an incorrect installation of the blast
chiller.
• The blast chiller must be installed by an authorized
service/install provider.
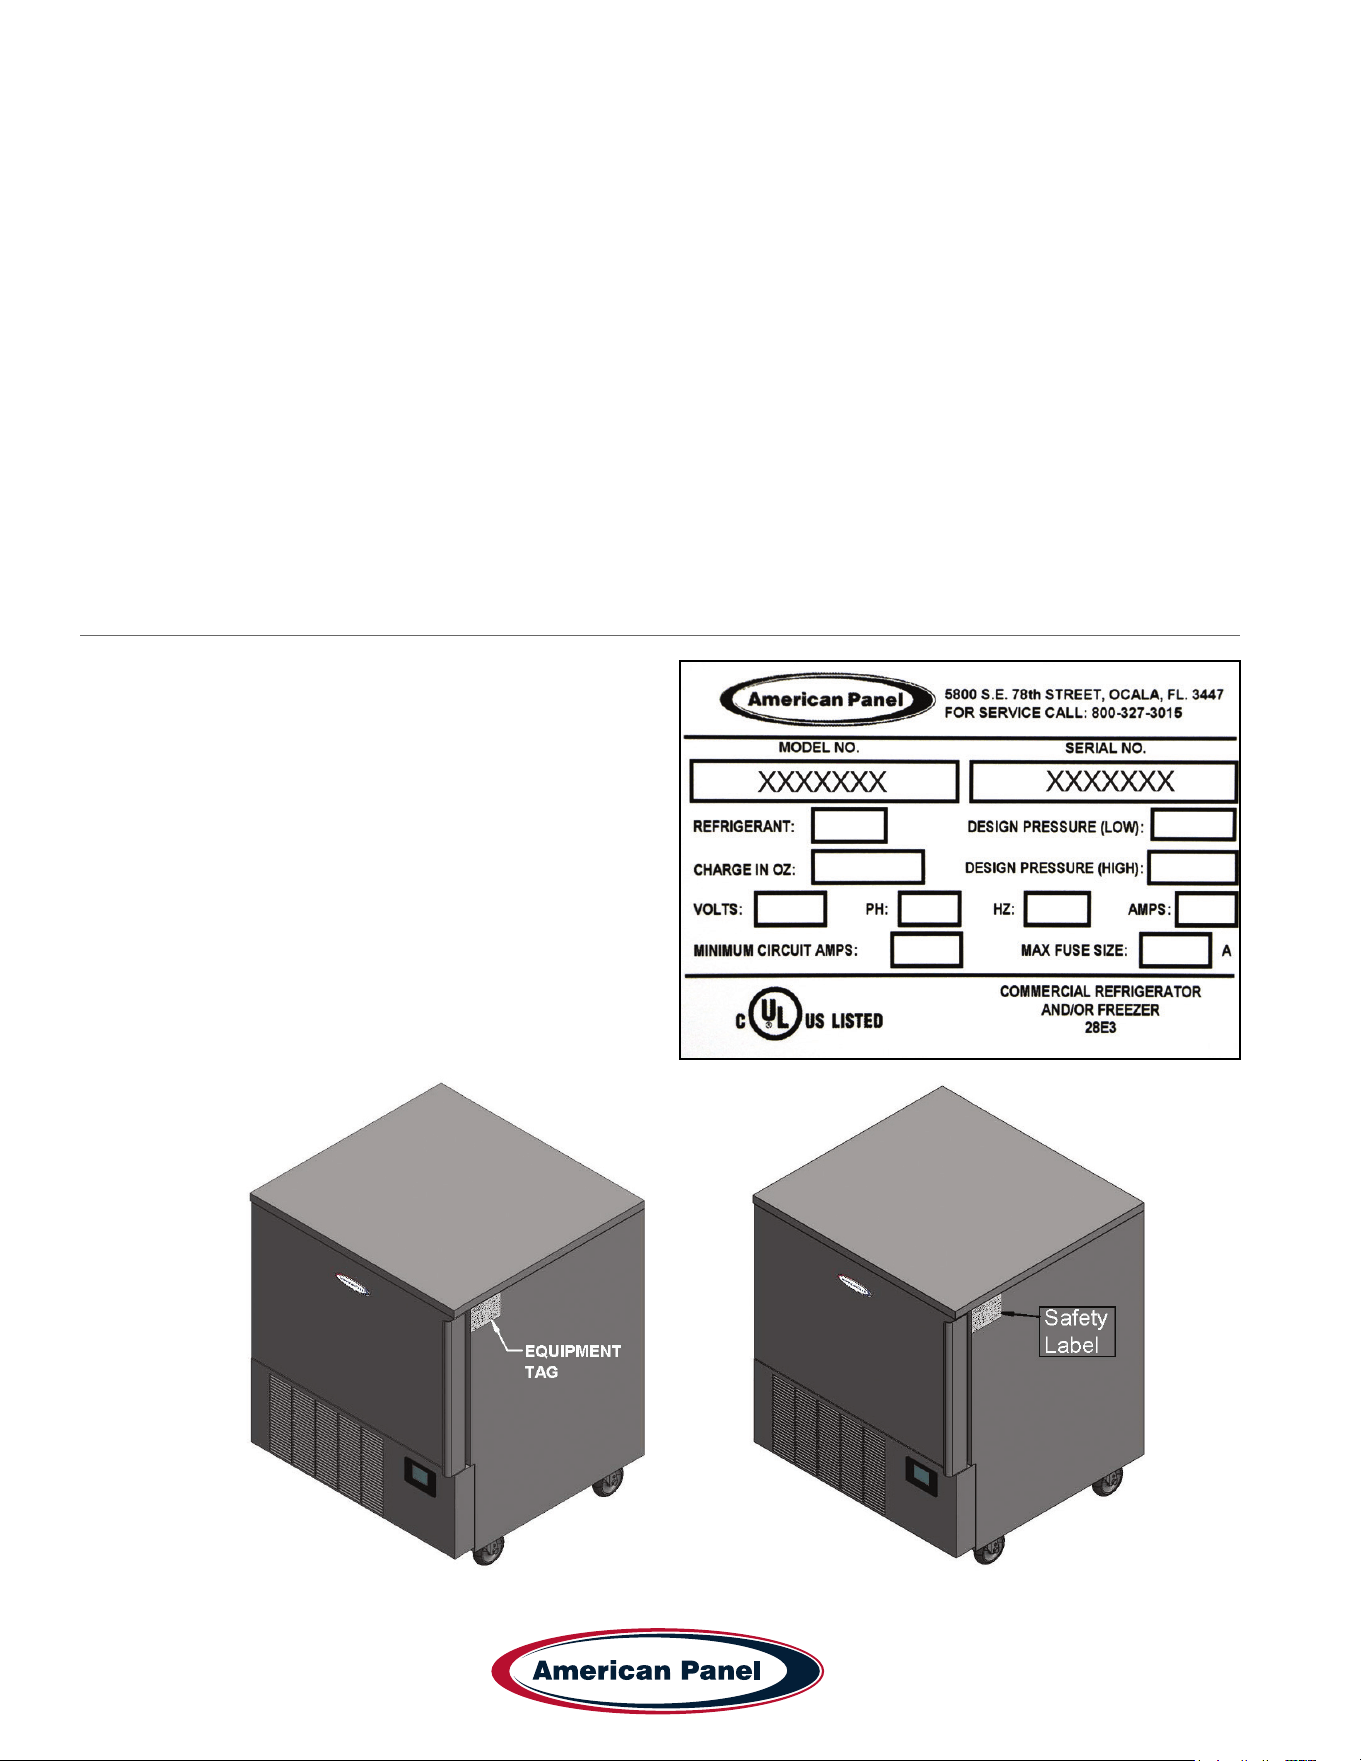
Equipment Tag
The equipment tag is located on the exterior of the unit
and displays the following information that is unique to
the unit:
• Model Number
• Serial Number
• Refrigerant Charge
• Refrigerant Pressure (Low & High)
• Electrical Volts, Phase, Hertz and Amps
• Minimum Circuit Amps
• Maximum Fuse Size (Amps)
Please have this information on hand when contacting
service or parts.
7
5800 SE 78th St. Ocala, FL 34472
Simple Controller HURRiCHiLL Installation & Operations Manual
P: (800) 327-3015
Pre-installation Checks
• Check components against the packing list. The packing list is located inside the accessory box.
• Check the integrity of the components once unpacked.
• Check for proper location
• Ambient temperature no greater than 90˚F
• Do not install near heat source
• Do not install near vapor source
• Do not install near grease source
• Do not install in direct sun light
• Do not install in closed areas with insufcient air change
• Check for proper clearances
• See page 7 for clearances.
• Check for unobstructed air ow at the condensing unit
Installation
American Panel Corporation equipment has been shipped in a package designed to sufciently protect from damage
under normal shipping circumstances. Upon receiving the shipment, carefully inspect the package for visible damage
and check the number of packages against the Bill of Lading. Notify the carrier immediately of any shortage or
damage to your shipment. Claims must be led promptly with the carrier.
After receipt of shipment, carefully and safely remove the unit from the package. Check the contents of the package
against the packing list. Under no circumstances may a damaged piece of equipment be returned to American Panel
Corporation without rst obtaining written permission.
To assure proper installation carefully read and comply with the following instructions.
WARNING - Please read the entire installation procedure before attempting to install the unit. Failure
to follow the procedures listed in this manual may result in voiding the warranty.
IMPORTANT - Due to the size and weight of this equipment, a minimum of two people are required to
install this equipment safely. All OSHA regulations must be followed while on the job site.
Installation Checklist
Check the integrity of the unit once it is unpacked.
Check for proper location.
• Install this equipment in a well-ventilated area.
• Do not install this equipment near any ignition source such as open ame
• Ambient temperature no greater than 90˚F (to ensure rated performance)
• Do not install near heat source
• Do not install near vapor source
• Do not install in direct sun light
• Do not install in closed areas with insufcient air change
5800 SE 78th St. Ocala, FL 34472
8
P: (800) 327-3015
Simple Controller HURRiCHiLL Installation & Operations Manual
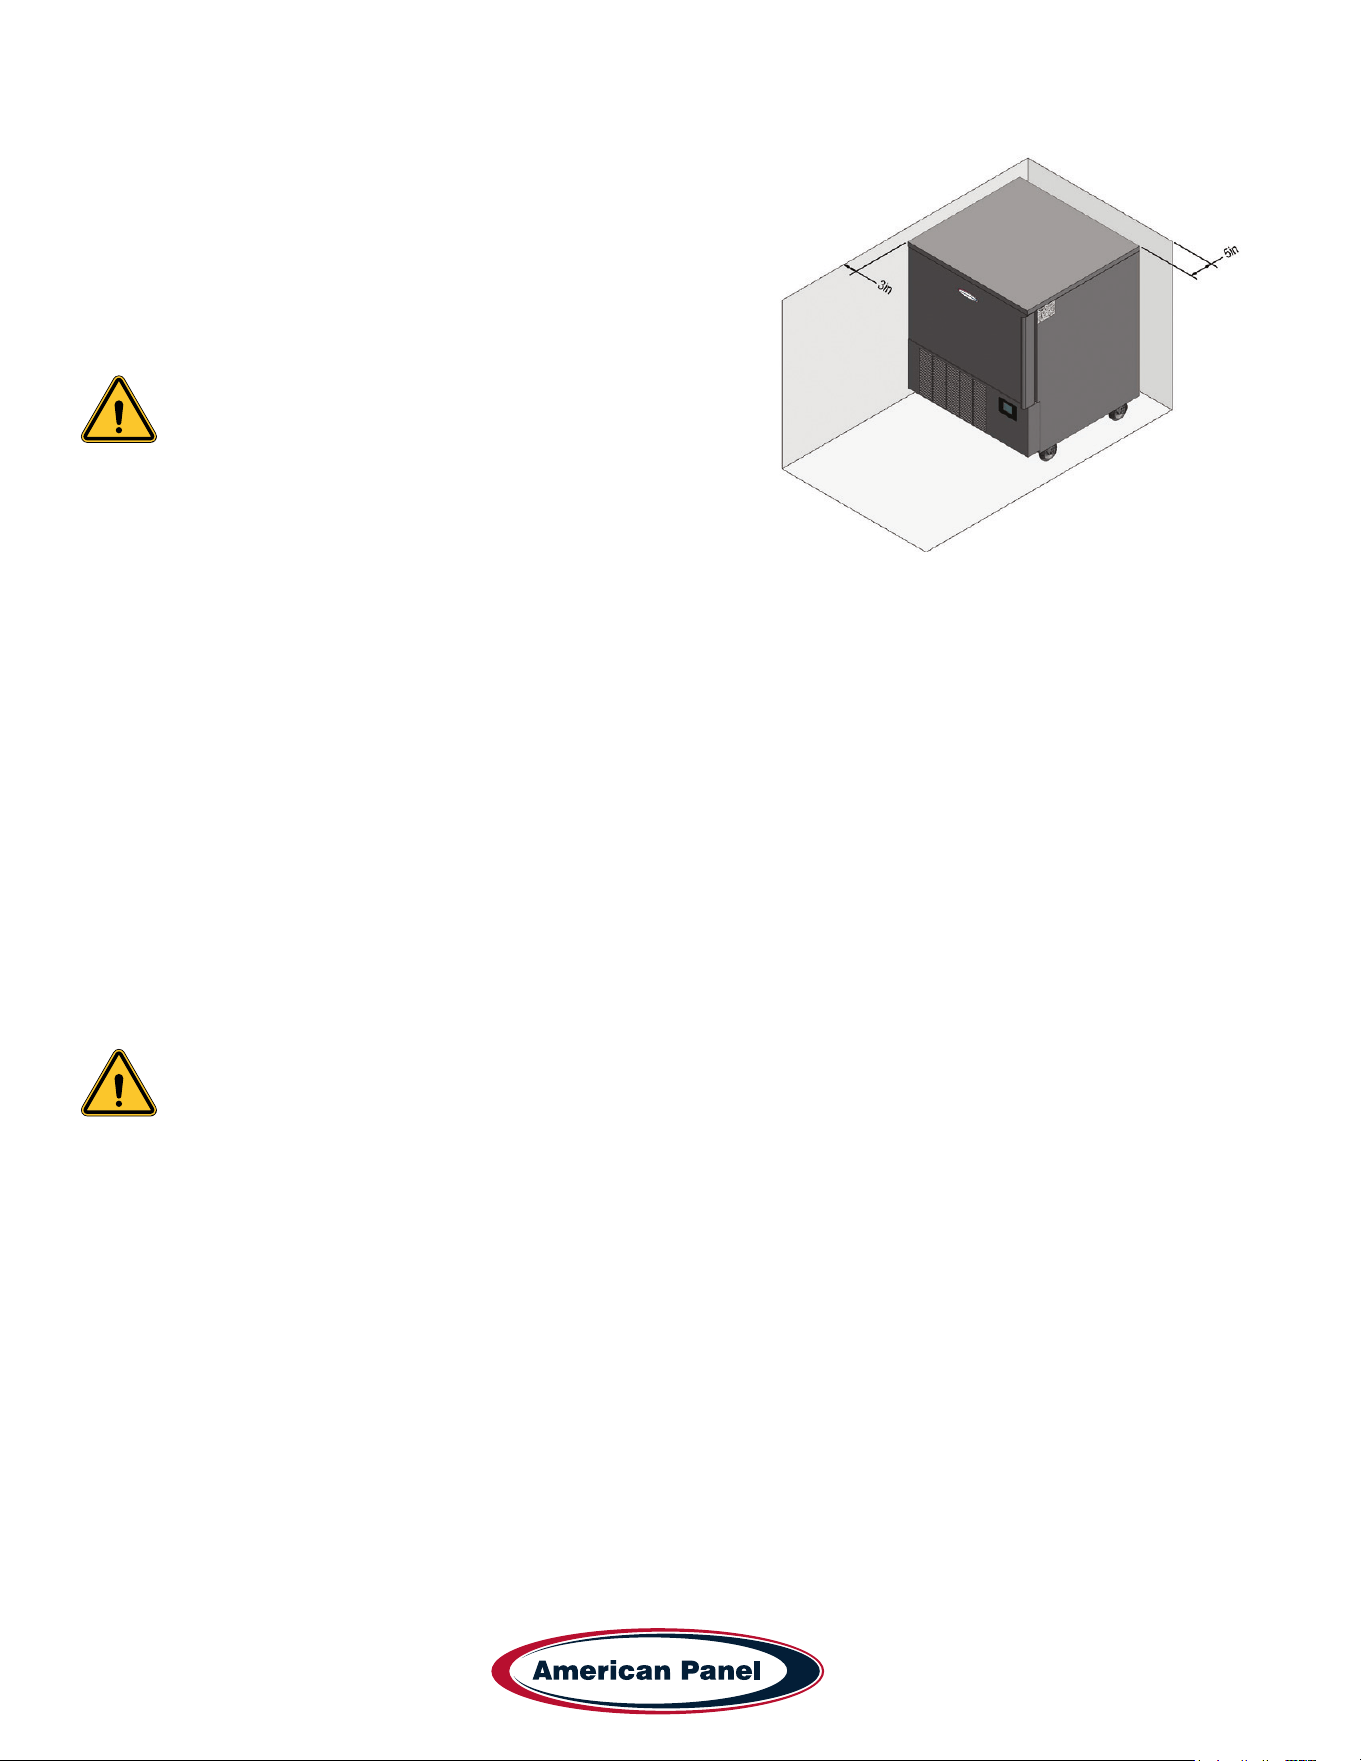
Check for proper clearances
• 3” clearance on both sides of the unit
• 5” clearance on the back of the unit
• Provide enough space in front to allow door opening
• Check for unobstructed air ow at the condensing unit
• Always keep the unit in the upright position
Failure to comply with the above note may cause severe
damage to the unit and will void the warranty.
Verify the electrical service to be in accordance with the
manufacturer label located on the right side of the unit.
Connect the unit to the mains.
• Plug the unit into the wall receptacle
Condensate Drainage
• Install drain pan or drain line. Install the drain pan by sliding the pan on the guides located on the bottom of
the unit. When installing the drain line the drainage connection must be carried out in conformity with the local
regulation. As a standard conguration, all reach-in Hurrichill units are provided with ¾” ID exible tubing drain
line.
Install wire shelves (if so equipped).
Operate the unit in Freeze time driven mode for approximately 20 minutes to verify temperature pull down,
see chapter Unit Operation.
Note: American Panel Corporation blast chillers are equipped with a short cycle protection. If the
unit is stopped or the door is opened and closed during a chilling cycle more than once, the
compressor will not start for a period of 3 to 5 minutes.
Engage, operate and verify effectiveness of manually engaged defrost cycle, see chapter Unit Operation –
Defrost Cycle.
Inform the factory if any functional and performance issues were found following the completion of the above
tests.
Verify that the operator has all necessary operation manuals, menus and instructions. Contact factory with any
questions, Monday-Friday 8:00 a.m. to 5:00 p.m. ET at 800-327-3015 or consult the website at
www.americanpanel.com
9
5800 SE 78th St. Ocala, FL 34472
Simple Controller HURRiCHiLL Installation & Operations Manual
P: (800) 327-3015
Specications and Performance
The performance listed below was achieved under the conditions listed below:
• Ambient temperature of 77˚F.
• Blast chiller prechilled to 0˚F.
• Product was loaded in steam table pans, 12” x 20” x 2 ½”.
• Product thickness of 2” maximum.
• Pans were left uncovered.
Blast chilling - Capable of lowering the core temperature of product from 160˚F to 38˚F within 105 minutes.
Shock freeze - Capable of lowering the core temperature of product from 160˚F to 0˚F within 240 minutes.
Model Type
Pan Capacity
Sheet/Steam
Chilling Capacity
(105 min)
Freezing Capacity
(240 min)
AP3BCF30-1-P Blast Chiller/Shock Freezer 0/3 30 18
AP5BCF45-2-P Blast Chiller/Shock Freezer 0/5 50 30
Note: Each unit was designed for a specic product capacity as shown above. Overloading the unit
could signicantly reduce its service life.
General Operating Instructions
Panning and Loading
Follow the methods below for faster cooling, freezing and thawing:
• Place the food in shallow pans.
• Do not use food pans deeper than 2 ½” and do not ll the pan with more than 2” of product.
• Separate the food in smaller or thinner portions.
• Do not cover the containers unless danger of overhead contamination.
• Loosely cover the containers if necessary. Allow the cover material (aluminum foil) to touch the surface of the food.
• Arrange the pans for optimum air circulation within the cabinet.
• Know the capacity of the unit. Do not overload the unit.
Probing (for chilling and freezing cycles)
Follow the methods below to ensure correct probing of the product:
• Insert the food probe into the thickest part of the product.
• The tip of the food probe will have to be located at the core of the food.
• Always place the available food probe in the hardest to cool product.
• It is a good practice to restart the cycle every time food is added.
• Clean and sanitize the food probe after each use.

5800 SE 78th St. Ocala, FL 34472
10
P: (800) 327-3015
Simple Controller HURRiCHiLL Installation & Operations Manual
Modes Explained
There are two cycles available, Chill and Freeze with the option of adding a Hard phase to the Chill cycle and a
Soft phase to the Freeze cycle. Each cycle can run in automatic (food temperature dependent) or manual (time
dependent) mode.
Soft Chill: Soft Chill cycle is design to safely chill all food products without any freezing.
During the active cycle, the air temperature will cycle between 28˚F and 33˚F. In the automatic mode the cycle will
continue until the food probe senses the food target temperature set at the start of the cycle, default food target
temperature is 38˚F. In the manual mode the cycle will continue until the timer set at the beginning of the cycle
expires, the default timer is set for 500 minutes.
At the end of the cycle the unit will maintain an air temperature between 35˚F and 40˚F until the user removes the
food from the cabinet and stops the cycle.
Hard Chill: Hard Chill works best for batch chilling - one type of product in the entire cabinet, with similar thickness
and initial temperature.
Add the Hard phase to Chill cycle to achieve a shorter the chilling time. Note that in order to avoid surface freezing of
the product the unit must be loaded with the same product at the same time.
During the Hard phase of the cycle, the air temperature will cycle between 0˚F and 5˚F. In automatic mode the Hard
phase will end when the food probe senses the food temperature of 50˚F. In the manual mode the Hard phase will end
after 60 minutes. At the end of the Hard phase of the cycle the controller will revert to Soft Chill cycle until the food
target temperature is achieved, see Soft Chill cycle above.
Hard Freeze: Used to quickly freeze all food products.
During the active cycle the air temperature will cycle between -25˚F and -20˚F. In the automatic mode the cycle will
continue until the food probe senses the food target temperature set at the start of the cycle, default food target
temperature is 0˚F. In the manual mode the cycle will continue until the timer set at the beginning of the cycle expires,
the default timer is set for 500 minutes.
At the end of the cycle the unit will maintain an air temperature between -4˚F and 1˚F until the user removes the food
from the cabinet and stops the cycle.
Soft Freeze: Add a Soft phase to your freeze cycle to cool the core of the food product before beginning the freezing
process. The Soft phase will lengthen the freezing time but it is useful in certain applications such as pastry and
confectionary. During the Soft phase of the Soft Freeze cycle the air temperature will cycle between 28˚F and 33˚F.
In the automatic mode the Soft phase part of the cycle will continue until the food probe senses a food temperature
below 38˚F. In the manual mode the Soft phase will end after 90 minutes.
At the end of the cycle the unit will revert to Hard Freeze, see Hard Freeze cycle above.
Fish Sanitation (AP5BCF45-2-P only): Used to control parasites in sh and it follows the CDC guidelines. The air
temperature will drop to a range of -36˚F to -31˚F. After the sh core temperature reaches -4˚F the air temperature
will cycle between -10˚F and -5˚F for a period of 24 hours. After the 24 hours period expire, the controller will hold the
same temperature range until the user removes the sh from the cabinet and stops the cycle.
Hardening: Use to harden the surface of gelato. This is a continuous Hard Freeze cycle. Once the air temperature
cycle reaches the range of -25˚F and -20˚F a timer preset for 10 minutes will start countdown every time the door is
opened.
NOTE: The blast chiller must be manually defrosted every 8 hours of continuous operation or more
often if needed.
11
5800 SE 78th St. Ocala, FL 34472
Simple Controller HURRiCHiLL Installation & Operations Manual
P: (800) 327-3015
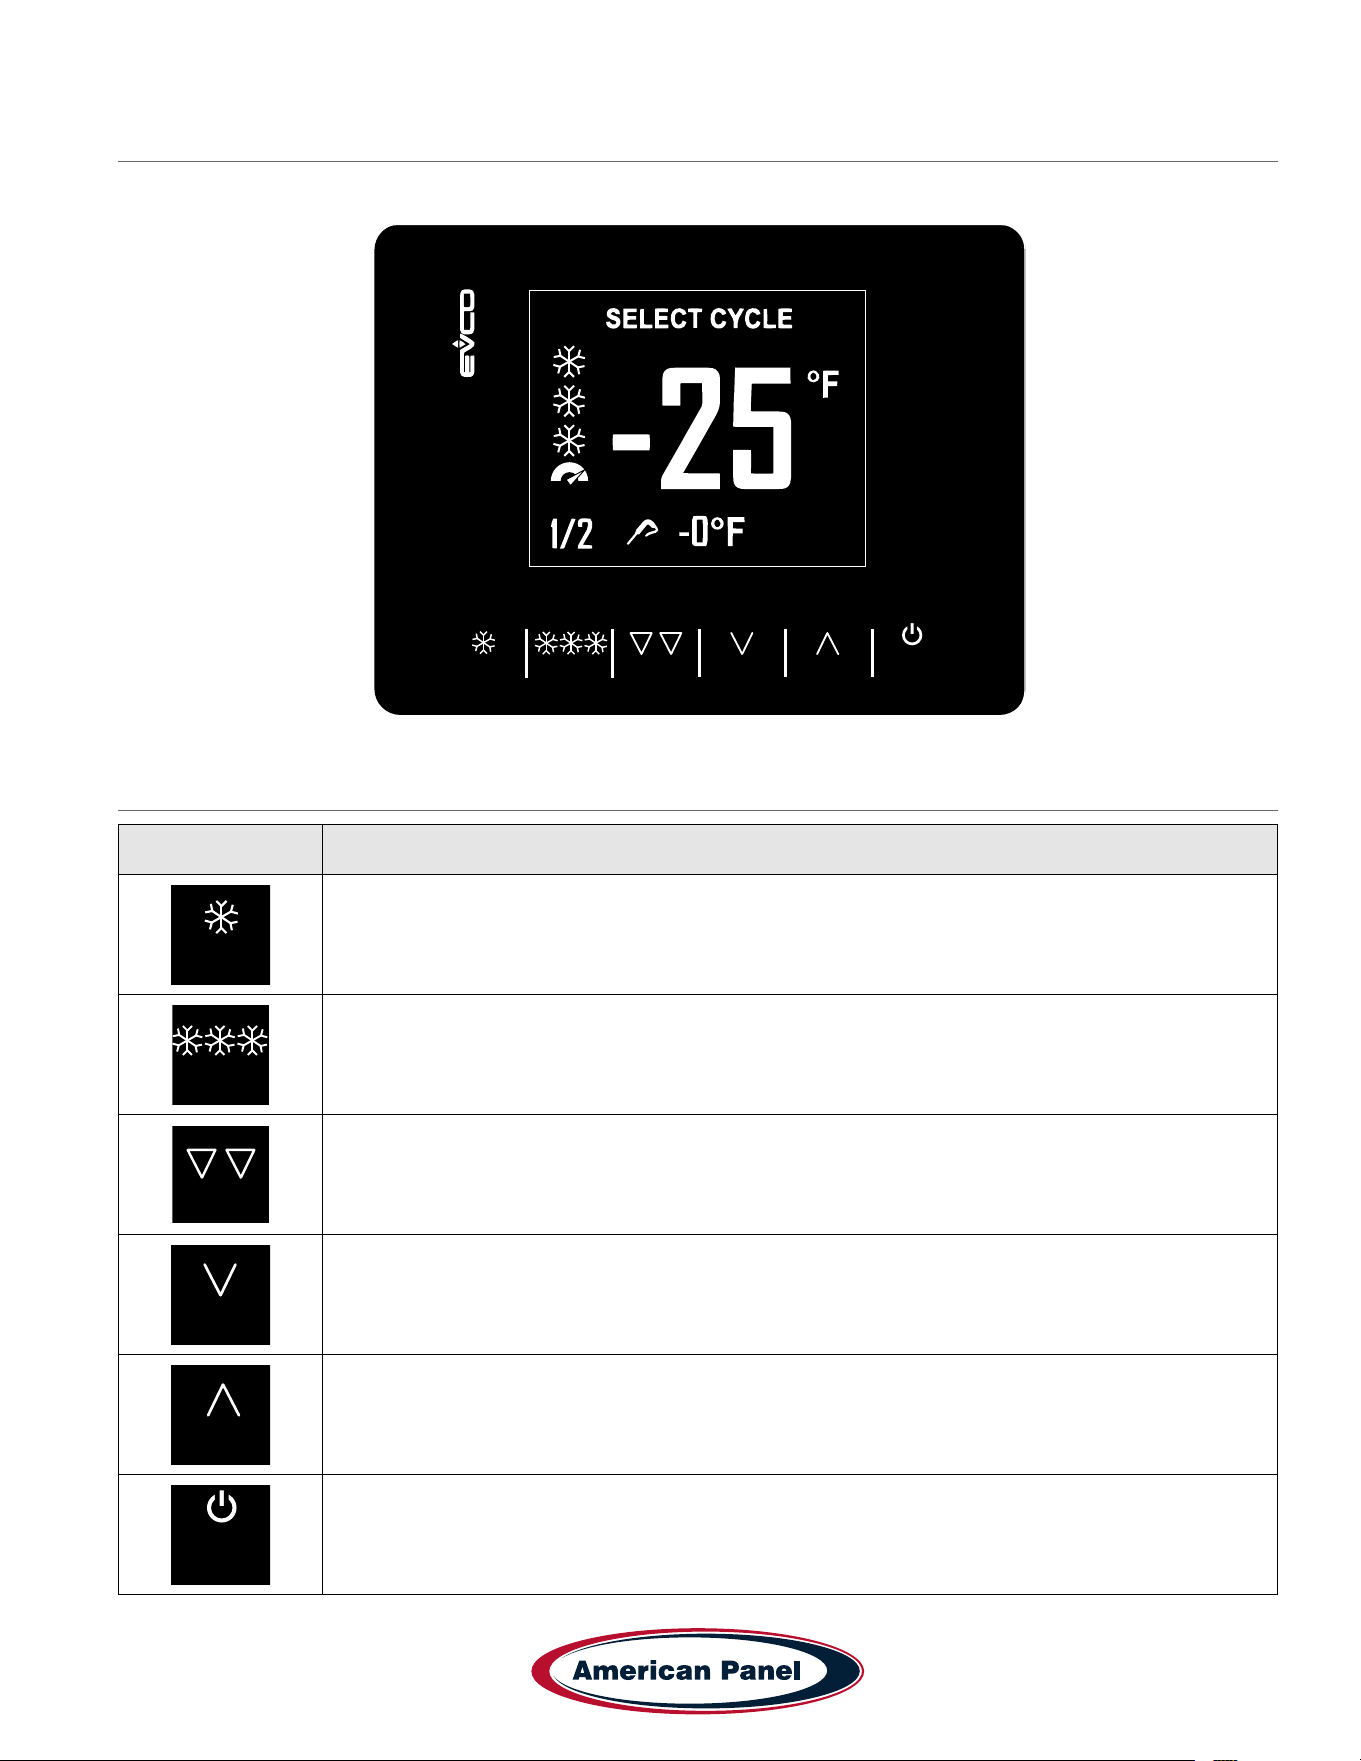
Display
Controller Keys
Key Function
CHILL
FREEZE
HARD
HARD
MENU
AUX
START
STOP
- Select blast chill cycle.
- Switch between automatic and manual modes.
- While in a menu, acts as the ESC key. Press this button to return to the previous screen or menu option.
CHILL
FREEZE
HARD
HARD
MENU
AUX
START
STOP
- Select the shock freeze cycle.
- Switch between automatic and manual modes.
CHILL
FREEZE
HARD
HARD
MENU
AUX
START
STOP
- After selecting the CHILL or FREEZE cycle, press HARD button to switch between Soft and Hard
modes.
CHILL
FREEZE
HARD
HARD
MENU
AUX
START
STOP
- From Home screen press MENU button to access the settings menu.
- Within a menu list, press ˅ to scroll down.
- While modifying a parameter, press ˅ to decrease the value of the parameter being modied.
CHILL
FREEZE
HARD
HARD
MENU
AUX
START
STOP
- While in Home screen, press AUX to gain access to special cycles menu.
- Within a menu list, press ˄ to move up the list.
- While modifying a parameter, press ˄ to increase the value of the parameter being modied.
CHILL
FREEZE
HARD
HARD
MENU
AUX
START
STOP
- Short press to start the selected cycle.
- Long press (for 2 seconds) to turn off the active cycle.
- Within a menu list it selects the highlighted menu option.
- While modifying a parameter, press START/STOP button to conrm the change to the parameter.
CHILL
FREEZE
HARD
HARD
MENU
AUX
START
STOP

5800 SE 78th St. Ocala, FL 34472
12
P: (800) 327-3015
Simple Controller HURRiCHiLL Installation & Operations Manual
Controller Icons
Icon Description
SOFT
Indicates cabinet temperature during the standby mode.
SOFT
Indicates food temperature.
SOFT
Soft Chill cycle
CHILL
FREEZE
HARD
HARD
MENU
AUX
START
STOP
Hard Chill cycle
CHILL
FREEZE
HARD
HARD
MENU
AUX
START
STOP
Hard Freeze cycle
SOFT
Soft Freeze cycle
SOFT
Manual mode, time dependent.
SOFT
Cycle in progress
SOFT
Compressor output on
SOFT
Cabinet door is open. Close the door or press any key to cancel door open alarm.
SOFT
Phase in progress. Relevant to hard chill and soft freeze cycles.
13
5800 SE 78th St. Ocala, FL 34472
Simple Controller HURRiCHiLL Installation & Operations Manual
P: (800) 327-3015
Operation
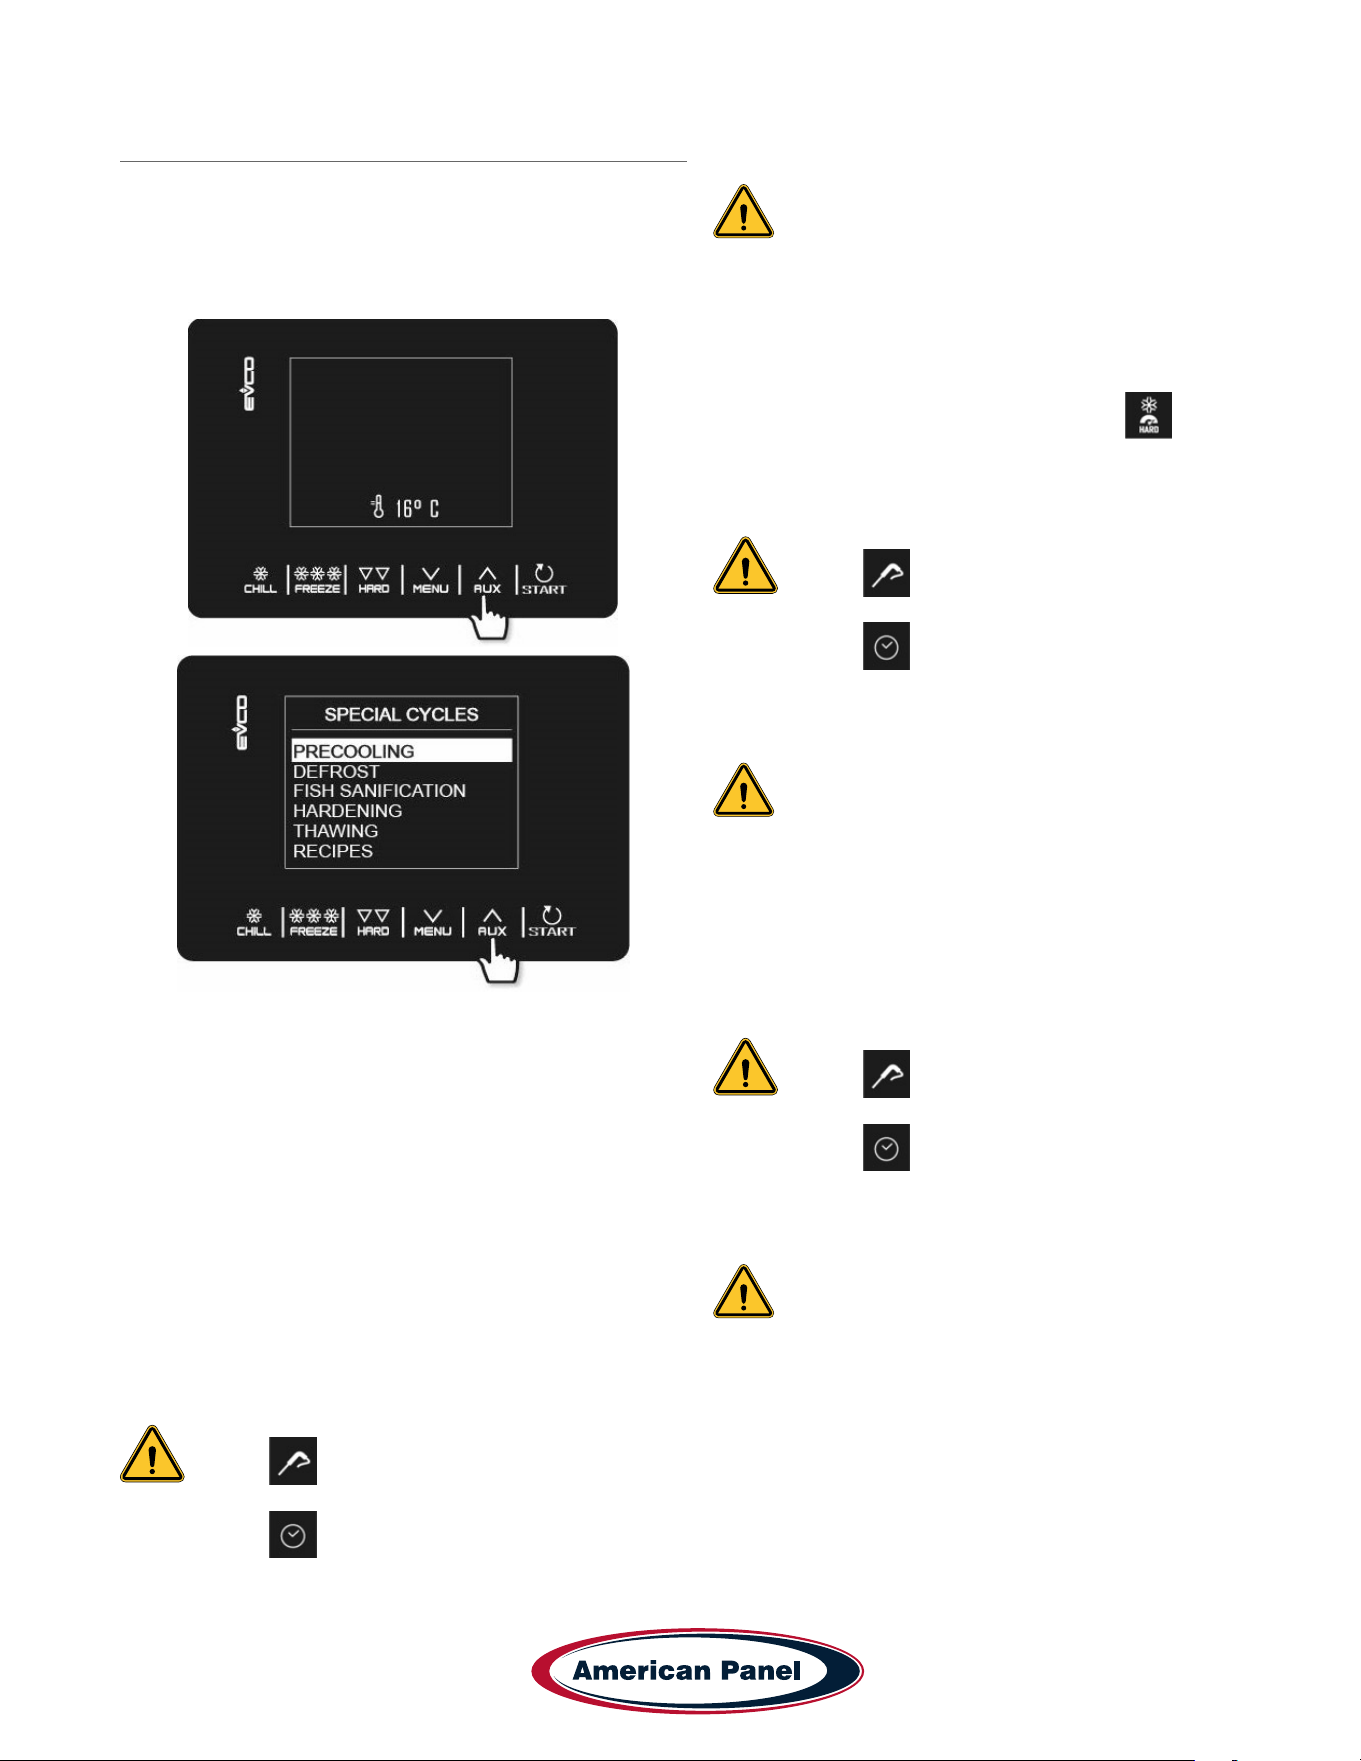
Precooling
• With the controller in standby mode press AUX
button.
• Use the ˄ and ˅ buttons to scroll and highlight
PRECOOLING
• Press START/STOP button to select it.
• Use the ˄ and ˅ buttons to adjust the precool target
temperature of the cabinet.
• Press START/STOP button to start the precool cycle.
• When the air temperature reaches the target
temperature, the controller will beep 5 times and it
will maintain the air temperature within 5 degrees.
Automatic Soft Chill
• With the controller in standby mode press CHILL
button.
• Use ˄ and ˅ buttons to adjust the target temperature
of the food – optional.
NOTE: If the controller is set to Automatic
mode but the user does not insert the
probe, the controller will revert to Manual
mode .
• Press START/STOP button to turn on the cycle.
NOTE: To turn off a cycle long press START/
STOP button.
Automatic Hard Chill
• With the controller in standby mode press CHILL
button.
• Press HARD button to select the Hard Chill cycle.
The controller will show the hard icon .
• Use ˄ and ˅ buttons to adjust the target temperature
of the food – optional.
NOTE: If the controller is set to Automatic
mode but the user does not insert the
probe, the controller will revert to Manual
mode .
• Press START/STOP button to turn on the cycle.
NOTE: To turn off a cycle long press START/
STOP button.
Automatic Hard Freeze
• With the controller in standby mode press FREEZE
button.
• Use ˄ and ˅ buttons to adjust the target temperature
of the food – optional.
NOTE: If the controller is set to Automatic
mode but the user does not insert the
probe, the controller will revert to Manual
mode .
• Press START/STOP button to turn on the cycle.
NOTE: To turn off a cycle long press START/
STOP button.
Automatic Soft Freeze
• With the controller in standby mode press FREEZE
button.
• Press HARD button switch to Soft Freeze cycle.
• Use ˄ and ˅ buttons to adjust the target temperature
of the food – optional.
5800 SE 78th St. Ocala, FL 34472
14
P: (800) 327-3015
Simple Controller HURRiCHiLL Installation & Operations Manual
Operation - continued
NOTE: If the controller is set to Automatic
mode but the user does not insert the
probe, the controller will revert to Manual
mode .
• Press START/STOP button to turn on the cycle.
NOTE: To turn off a cycle long press START/
STOP button.
Manual Soft Chill
• With the controller in standby mode press CHILL
button.
• Press CHILL button again to switch to Manual mode.
The controller will display the preset chilling time and
the timer icon .
• Use ˄ and ˅ buttons to adjust the chilling time –
optional.
• Press START/STOP button to turn on the cycle.
NOTE: To turn off a cycle long press START/
STOP button.
Manual Hard Chill
• With the controller in standby mode press CHILL
button.
• Press CHILL button again to switch to Manual mode.
The controller will display the preset chilling time and
the timer icon .
• Press HARD button to select the Hard Chill cycle.
The controller will show the hard icon .
• Use ˄ and ˅ buttons to adjust the chilling time –
optional.
• Press START/STOP button to turn on the cycle.
NOTE: To turn off a cycle long press START/
STOP button.
Manual Hard Freeze
• With the controller in standby mode press FREEZE
button.
• Press FREEZE button again to switch to Manual
mode. The controller will display the preset cycle time
and the timer icon .
• Use ˄ and ˅ buttons to adjust the cycle time –
optional.
• Press START/STOP button to turn on the cycle.
NOTE: To turn off a cycle long press START/
STOP button.
Manual Soft Freeze
• With the controller in standby mode press FREEZE
button.
• Press FREEZE button again to switch to Manual
mode. The controller will display the preset cycle time
and the timer icon .
• Press HARD button switch to Soft Freeze cycle.
• Use ˄ and ˅ buttons to adjust the cycle time –
optional.
• Press START/STOP button to turn on the cycle.
NOTE: To turn off a cycle long press START/
STOP button.
Defrost
• With the controller in standby mode press AUX
button.
• Use the ˄ and ˅ buttons to scroll and highlight
DEFROST.
• Press START/STOP button to select it.
• Open the cabinet door and press START/STOP
button to start the defrost cycle.
Fish Sanitation (AP5BCF45-2-P only)
• With the controller in standby mode press AUX
button.
• Use the ˄ and ˅ buttons to scroll and highlight FISH
SANITATION.
• Press START/STOP button to select it.
• Press START/STOP button to turn on the cycle.
Hardening
• With the controller in standby mode press AUX
button.
• Use the ˄ and ˅ buttons to scroll and highlight
HARDENING.
• Press START/STOP button to select it.
• Use ˄ and ˅ buttons to adjust the timer – optional.
• Press START/STOP button to turn on the cycle.
15
5800 SE 78th St. Ocala, FL 34472
Simple Controller HURRiCHiLL Installation & Operations Manual
P: (800) 327-3015
Maintenance Instructions
Daily Maintenance
• Defrost the unit daily or as needed.
• Wipe clean the interior and the exterior of the unit using a solution of mild soap and water.
• Wipe clean the door gasket
IMPORTANT!
Do not use any corrosive chemicals to clean the unit!
Do not use any abrasive materials to clean the unit!
Do not spray water on the unit!
Quarterly Maintenance
The quarterly maintenance should be done by a service technician or by trained maintenance personnel.
• Inspect door hinge for proper operation.
• Inspect door gasket for proper seal.
• Inspect the drain line for proper ow.
• Use vacuum and brush to clean the condenser coil.
• Clean the evaporator coil.
• Inspect the site glass to ensure it’s clean and dry
• Use an 80/20 ice/water bath to check the accuracy of the probes.
IMPORTANT!
Do not use water jet to clean the condenser coil!
Do not use any sharp or abrasive materials to clean the coils!
Annual Maintenance Checklist The quarterly maintenance should be done by a service technician or by trained
maintenance personnel.
• Verify unit is properly installed, see installation checklist at the beginning of this manual.
• Check door hinges and gasket for proper operation and seal. Use mild soapy warm water to clean the door
gasket.
• Inspect integrity of the unit, exterior and interior
• Verify evaporator fans are rmly mounted, balanced, free-turning and properly aligned.
• Disconnect unit from the main power and clean the evaporator coil, see the evaporator coil cleaning procedure at
the end of this checklist.
• Wipe down cabinet interior with soapy water and rinse. Do not use any abrasive or corrosive materials!
• Inspect and clean the condenser coil
• Disconnect the unit from power and remove the front and back air inlet/outlet panels. With great care given to
electrical connections and moving parts, inspect the integrity of the condensing unit.
• Lightly brush clean/vacuum any lint and/or dust in cavity with special attention given to the condenser. Do not
use any abrasive or corrosive materials.
• Re-install the front and back air inlet/outlet panels.
• Connect the unit to power supply.
5800 SE 78th St. Ocala, FL 34472
16
P: (800) 327-3015
Simple Controller HURRiCHiLL Installation & Operations Manual
• Use an 80/20 ice/water bath to check the accuracy of the probe. To do so, close the door of the unit with the probe
hanging on the outside of the cabinet and start a manual hard cycle. Use the probe to continually stir the ice-water
bath and observe the readings for approximately 3 minutes. The temperature of the ice-water mixture should be
32 to 33˚F.
• Verify the accuracy of the air probe against a calibrated thermocouple or against an accurate food probe.
Note: American Panel Corporation blast chillers are equipped with a short cycle protection. If the
unit is stopped during a chilling cycle more than once, the compressor will not start for the following
3 minutes.
• Operate the unit in the hard chill / manual mode, for approximately 20 minutes, to verify temperature pull down.
• Verify the functionality of the evaporator fans. The direction of the air ow for the evaporator should be from the
front of the unit towards the back of the unit.
• Verify the functionality of the condenser fans. Air direction should be from the front of the unit towards the back.
• Engage, operate, and verify effectiveness of manual defrost cycle.
• Turn unit off, wipe down the exterior with mild soap and water.
• Inform the customer and the factory of any functional and performance issues found following the completion of
the above checks.
• Complete inspection paperwork and verify consumer has all necessary operation manuals, menus, and
instructions. Contact factory with any questions. Monday-Friday 8am to 5pm EST. 1-800-327-3015 or through the
website at
www.americanpanel.com.
The above maintenance procedure should be done twice a year and is not a substitute for an
efcient local maintenance schedule such as daily and quarterly maintenance schedule.

17
5800 SE 78th St. Ocala, FL 34472
Simple Controller HURRiCHiLL Installation & Operations Manual
P: (800) 327-3015
Evaporator Coil Cleaning
The following cleaning procedure is recommended as part of routine maintenance activity for all American Panel
Corporation blast chillers.
IMPORTANT: Do not use any sharp or abrasive tools to clean the evaporator coil!
Before cleaning the evaporator coil run the defrost cycle to make sure the coil is completely free of ice.
When cleaning the evaporator coil particular attention must be paid to the kind of cleansing agent used. The following
products MUST NEVER BE USED:
• Ammonia or detergents which contain ammonia (ammoniac solutions)
• Bleach or products containing bleach (chlorinated liquids)
• Acid detergents such as anti-lime scale, various anti-incrustations, muriatic acid, sulfuric, hydrochloric and acetic
acid liquids, etc. (highly acidic liquids)
• Acetone, trichloro-ethylene (organic solvents)
• Caustic soda and other highly alkaline substances (high basicity liquids)
All the above substances can damage the protective coating and/or corrode the metal components and seriously
damage the coil.
WARNING: Disconnect and lock the main power switch prior to cleaning the unit.
Monthly
• Open the evaporator door by removing the screws that secure the door to the vertical frame and swing
the door open.
• Use a vacuum cleaner or a soft non-metallic bristle to remove the surface loaded bers and dirt. Apply the tool in
the direction of the ns.
• Rinse the coil nned area and the return bends with plenty of clean warm water. To avoid damaging the ns and
the coating, it is important that the water temperature is below 130oF and the water pressure is below 100 PSI.
• Close and secure the evaporator door.
Quarterly
• Open the evaporator door by removing the screws that secure the door to the vertical frame and swing
the door open.
• Use a vacuum cleaner or a soft non-metallic bristle brush to remove the surface loaded bers and dirt. Apply the
tool in the direction of the ns.
• Spray the coil nned area and the return bends with a generous amount of the recommended coil cleaner (see
below) using a pump-up sprayer or conventional spray bottle. Refer to the manufacturer’s directions on the
container for proper mixing ratio.
• After cleaning the coil use the approved chloride remover (see below) to remove soluble salts and revitalize the
unit. Use a pump-up sprayer or a conventional spray bottle to soak the nned area and the return bends. Refer
to the manufacturer’s directions on the container.
• Rinse the coil nned area and the return bends with plenty of clean warm water. To avoid damaging the ns and
the coating, it is important that the water temperature is below 130oF and the water pressure is below 100 PSI.
• Close and secure the evaporator door.
Recommended Coil Cleaner
Enviro-Coil Concentrate
Hydro-Balance Corporation
Tel. (972) 394-9422
Recommended Chloride Remover
CHLOR*RID DTS
CHLOR*RID International, Inc.
Tel. (800) 422-3217

5800 SE 78th St. Ocala, FL 34472
18
P: (800) 327-3015
Simple Controller HURRiCHiLL Installation & Operations Manual

19
5800 SE 78th St. Ocala, FL 34472
Simple Controller HURRiCHiLL Installation & Operations Manual
P: (800) 327-3015
This manual is updated as new information and models are released. Visit our website for the latest manual.
5800 SE 78th St. Ocala, FL 34472 • 352.245.7055 • [email protected] • www.americanpanel.com
Versatile, Dependable Walk-Ins & Blast Chillers
American panel is your trusted manufacturer for all your cold
storage, blast chilling and shock freezing needs. Building on a
60-year family owned and operated heritage, American panel
provides versatile, dependable custom crafted walk-in coolers,
freezers, combination cold rooms and blast chillers.
American Panel is proud to offer the largest line of blast chillers and shock freezers on the
market. 37 different freestanding models and an innite number of integral congurations.
HURRiCHiLL offers the easiest to use controls in the industry, blast chilling is complex
but controlling it doesn’t have to be. American Panel is the go-to source for all your blast
chilling/shock freezing needs.
Find out more at www.americanpanel.com
994430_APC_HC_SC-P_OEM
08/25