PRESSURE WASHERS
OPERATOR’s MANUAL
MANUEL D’UTILISATION

2
ARIENSPOWEREQUIPMENT.COM
TABLE OF CONTENTS
INTRODUCTION 3
SAFETY OVERVIEW 4
PRESSURE WASHER COOLING SYSTEM 9
FUEL AND OIL TYPES 10
COMPONENT DIAGRAMS GAS PRESSURE WASHERS 11
COMPONENT DIAGRAMS ELECTRIC PRESSURE WASHERS 13
ASSEMBLY 15
PRE-OPERATION 17
GAS ENGINE START PROCEDURE 19
GAS ENGINE STOP PROCEDURE 20
ELECTRIC MOTORS WITH AUTO STOP-START SYSTEM 21
ELECTRIC MOTOR STOP PROCEDURE 21
CLEANING WITH DETERGENTS 22
STORAGE 23
MAINTENANCE 24
TROUBLESHOOTING 26
WARRANTY 30

ARIENSPOWEREQUIPMENT.COM
3
INTRODUCTION
PRODUCT IDENTIFICATION
Model Number:
Serial Number:
Date of Purchase:
Dealer Name:
Congratulations on your purchase of a Ariens pressure washer. You can
be confident that this machine is constructed and tested with optimum
performance and quality in mind.
Reading this manual will help get you the best results for set-up,
operation, maintenance and avoid personal injury or damage to your
machine. By knowing how best to operate this machine, you will be
better positioned to show others who may also operate the unit.
All the information in this manual is based on the latest product
information available at the time of printing. Ariens reserves the right to
make changes at any time without notice or incurring any obligation.
Owner/Operator Responsibility
The owner/operator must have a thorough understanding of the
operation, maintenance and dangers associated with using this machine.
It must be understood that it is ultimately up to the owner/operator to
safely use this machine as outlined in this manual.
This manual is considered a part of the machine and needs to be kept
in a safe location. If the machine is resold or given to someone else, this
manual needs to be included.
Product Registration
Please register your product online to get the maximum benefit
from your warranty. Use the QR code below or register online at:
arienspowerequipment.com/pages/product-registration
It is recommended that you record the product identification numbers
in this manual. These numbers are important to have on hand if you
need to contact technical support (1-855-486-0498). The model and
serial number can be found on the box and on decal on the machine.

4
ARIENSPOWEREQUIPMENT.COM
SAFETY OVERVIEW
The safety alert symbol ( ) is used with a signal word (DANGER, CAUTION,
WARNING), a pictorial and a safety message to alert you to hazards.
DANGER indicates a hazard that, if not avoided, will result in death or serious
injury.
WARNING indicates a hazard that, if not avoided, could result in death or serious
injury.
CAUTION indicates a hazard that, if not avoided, might result in minor or
moderate injury.
NOTICE indicates a situation that could result in equipment or property damage.
SAVE THESE INSTRUCTIONS - SAFETY RULES
This is the safety alert symbol. It is used to alert you to
potential personal injury hazards. Obey all safety messages
that follow this symbol to avoid possible injury or death.
IMPORTANT WARNINGS
Failure to observe warnings will void the warranty or cause injury.
1. Do not let the pressure washer overheat. Excess heat will cause serious
damage (see page 10 for details).
2. Never run the unit without water. Running the pump dry will cause it to fail
quickly.
3. Do not let the unit freeze. Frozen water in the pump will cause severe
damage.
4. Always wear eye protection when operating the unit.
5. High-pressure spray can cause serious bodily injury or damage to soft
material. Use with caution.
6. Never adjust the unloader to exceed the preset pressure. Premature wear,
equipment failure, or injury may occur.
IMPORTANT SAFETY INSTRUCTIONS - SAVE THESE INSTRUCTIONS
WARNING – When using this product, the following precautions should always
be observed and adhered to.
1. Read all instructions before using the product.
2. To reduce the risk of injury, close supervision is necessary when a product is
used near children.
3. Know how to stop the product and bleed pressures quickly. Be thoroughly
familiar with the controls.
4. Stay alert. Watch what you are doing.
5. Do not operate the product when fatigued or under the inuence of alcohol or
drugs.
6. Keep operating area clear of other people.
7. Do not overreach or stand on unstable support. Instead, keep solid
footing and balance at all times.
8. Follow the maintenance instructions specied in the manual.

ARIENSPOWEREQUIPMENT.COM
5
SAFETY OVERVIEW
PERSONAL SAFETY
WARNING - Always wear correct personal protection equipment because the
high-pressure spray can launch debris at high velocity creating a risk of injury or
damage.
• ALWAYS wear safety goggles for eye protection. Other protective equipment
such as hearing protection, steel toe boots, safety apparel, work gloves and
face shield are all recommended.
• NEVER pressure wash without closed-toe foot protection in case of accidental
spray.
• ALWAYS be aware of where the spray gun is pointing and your environment
• NEVER point it at people or animals.
• DO NOT let children or unqualied people operate this machine.
• DO NOT use the machine when fatigued or under the inuence of alcohol or
drugs.
GENERAL PRESSURE WASHER SAFETY
DANGER – High-Pressure Spray
• NEVER point the gun at yourself, anyone else, or animals.
• The high-pressure water stream can cut through clothing, skin and underlying
tissues leading to serious injury.
• If this type of injury occurs, DO NOT TREAT AS A SIMPLE CUT. SEEK
EMERGENCY MEDICAL ATTENTION IMMEDIATELY. If you are using
cleaning detergents, be prepared to tell the physician exactly what kind.
• Spray guns can have signicant kickback. ALWAYS brace yourself and have
rm footing when operating.
• NEVER attempt to repair high-pressure hose, ttings or gun. Always replace
parts if they are leaking or damaged.
• NEVER bypass the trigger assembly. This is an important safety feature of the
system.
• NEVER leave a running machine unattended.
• Use CAUTION even when the machine has been turned o. Pressure can be
trapped in the pump and hose assembly and still inict injury or damage. After
turning the machine o, always squeeze the trigger to release any trapped
pressure.
• ALWAYS ensure all component connections and ttings are securely fastened.
High-pressure water can turn loose ttings or spray nozzles into projectiles
causing injury or damage.
• NEVER look directly into the gun or high-pressure hose.
• NEVER place your hand in front of the spray nozzle to test pressure.
DANGER – ELECTROCUTION
• NEVER spray near electric power source or cords.
• NEVER let run-o water pool and ow into power sources or cords.
WARNING – GENERAL SAFETY
• ONLY use cold water to feed into the machine. Unless specically instructed
that the machine can use hot water.
• Check the work area to make sure it is clear of hazards and debris which can
be thrown by pressure spray causing injuries or damage.
• ALWAYS be aware of surfaces that will become wet and may become
slippery.
• ALWAYS have a secure grip of the gun and stable footing.

6
ARIENSPOWEREQUIPMENT.COM
• ALWAYS ensure proper drainage to avoid water ooding into unwanted areas.
• NEVER operate machinery that is damaged or missing components.
• NEVER modify the machine in any way.
• DO NOT move the machine by pulling on the hoses or cords. Instead, use the
handle on the frame to move the machine when needed.
• Use CAUTION when spraying soft materials such as plants or wood because
the high-pressure spray can damage them quickly.
• Use CAUTION when spraying brittle materials such as glass, that may break
apart, creating dangerous projectiles.
• Use only recommended accessories. DO NOT force or modify parts to t.
• ALWAYS turn o the engine and disconnect the spark plug for any
maintenance procedures.
• NEVER attempt to maintain the machine while it is operating. Moving parts
and pressure can cause serious injuries.
• Keep machine out of the rain and elements.
• ALWAYS operate the machine on a level surface. It may seize if operated at
an angle.
WARNING – CHEMICAL DETERGENTS/SOAPS
• ALWAYS use detergents explicity designed for a pressure washer.
• NEVER use any ammable, corrosive or acidic solutions.
• NEVER modify the chemical injector system.
• ALWAYS ush the system after using a detergent. Run the machine for
at least two minutes with clean water to prevent detergent from drying and
building up residue. If residue builds up, it may cause the chemical injector
system to fail.
• ALWAYS BE PREPARED for an emergency involving detergents. Know
exactly what the detergent contains. If an emergency occurs and a physician
needs this information, Safety Data Sheets (SDS) are available and should be
easily accessible.
• ALWAYS keep detergents away from children and animals.
• Keep an eyewash kit available in case of emergency.
GAS ENGINE SAFETY
If your pressure washer has a gas engine, the engine will have it’s own manual.
Thoroughly review and understand the engine manual.
DANGER – TOXIC FUMES
• ALWAYS operate the machine outdoors in well-ventilated spaces.
• The emissions from the engine include the poisonous gas carbon monoxide.
It is a colorless, odorless gas that will displace oxygen and be lethal in high
enough concentrations.
• Symptoms of carbon monoxide poisoning include headache, fatigue,
dizziness, nausea, confusion, vomiting, and seizures. If poisoning continues,
unconsciousness and death will occur.
• At the rst sign of any symptoms, IMMEDIATELY shut o the machine and
move into a well-ventilated area and seek medical attention.
• Carbon monoxide is heavier than atmospheric air and will ll in low spaces
rst. Use EXTREME CAUTION when operating in low spaces such as
trenches, tunnels or ditches.
• NEVER position the machine where the exhaust can go through windows,
doors, ventilation or other access points that lead indoors or to conned areas.
• NEVER use a respirator as protection against carbon monoxide. The ONLY
protection that can be relied on is a positive pressure fresh air supply system,
such as a SCUBA system.
SAFETY OVERVIEW

ARIENSPOWEREQUIPMENT.COM
7
SAFETY OVERVIEW
DANGER – FUEL RELATED FIRE AND EXPLOSIONS
• Fuel and its vapors are highly ammable and explosive.
• Fire and explosion can cause severe burns and death.
• NEVER ll the fuel tank while the unit is running.
• ALWAYS turn the engine o and let it cool at least two minutes before
removing fuel cap. Loosen the fuel cap slowly to relieve tank pressure.
• ALWAYS ll or drain the fuel tank outdoors.
• DO NOT overll the tank. Leave an airspace in the neck of the fuel tank to
allow it to breathe and for fuel expansion.
• NEVER have any spark or ame near the fuel, including cigarettes, open
ame, pilot lights and other ignition sources.
• If fuel spills, wait until it evaporates completely. Move the unit to a new location,
then wait at least two minutes before starting the engine.
• NEVER crank the engine with the spark plug removed and still in its boot.
• When transporting or putting the unit into storage, drain the fuel tank and
carburetor and store the fuel in an airtight container. Then, move the fuel valve
into the closed position.
• Never store fuel near any ignition source or hot surface.
CAUTION – HOT SURFACES
• The muer on the engine will heat up rapidly and can cause severe burns if
touched.
• Muer exhaust will be hot and can cause burns to people and objects.
• Keep ammables away from the muer.
• Keep at least a ve-foot clearance from the exhaust to prevent damaging other
surfaces such as house siding and vehicles.
• The pump will also become hot during operation and should be avoided.
• After the pressure washer has been started, DO NOT touch any part of the
pressure washer other than the on/o switch, handle, hose and gun.
CAUTION – RECOIL KICKBACK
• Starter cord kickback (rapid retraction) can result in bodily injury.
• Kickback can pull your hand and arm back towards the engine faster than you
can let go causing sprains, cuts, bruising and bone fractures.
• NEVER pull the starter cord without rst relieving the spray gun pressure.
• When starting an engine, the best practice is to have the trigger squeezed to
prevent pressure from building up in the system.
• Pull the starter cord until you feel resistance. Allow the cord to retract back and
then pull the starter to avoid kickback and injury.
ELECTRIC PRESSURE WASHER SAFETY
DANGER – RISK OF ELECTROCUTION
• NEVER spray an electric pressure washer, its cord, or power source.
• NEVER leave the machine exposed to rain or the elements.
• NEVER modify the plug or cord.
• NEVER use an adapter so the plug will t into a dierent outlet.
• NEVER touch the cord or plug with wet hands or when standing in water.
• ALWAYS replace damaged components, including plug and cord. DO NOT
attempt to repair.
• ALWAYS ensure power source matches the pressure washers’ requirements.
• ALWAYS use a licensed electrician if any electrical work needs to be done.
• ALWAYS unplug the motor from the power source before attempting repairs or
maintenance.

8
ARIENSPOWEREQUIPMENT.COM
SAFETY OVERVIEW
DANGER – GROUNDING
• This product must be grounded. If this machine malfunctions, grounding
provides a path of least resistance for electric current, reducing the risk of
electrocution.
• Ensure the plug has all three prongs it came with and is plugged into an
appropriate outlet that is grounded in accordance with local regulations.
• If your machine is equipped with a Ground Fault Circuit Interrupter (GFCI), DO
NOT remove or alter it. Replace if damaged.
• If the GFCI is dropped or damaged, be certain to test it to make sure it is still
working correctly.
WARNING – EXTENSION CORDS
• The use of extension cords is not recommended.
• If the use of an extension cord is unavoidable, then it must be plugged into a
GFCI found in circuit boxes or protected receptacles
• ALWAYS use a 3-wire extension cord that has three prongs for proper
grounding.
• DO NOT yank or pull on extension cords.
• ALWAYS replace if damaged.
• The extension cord gauge MUST be adequate for the power demands of the
pressure washer to prevent stalling, overheating or short-circuiting.
BATTERY – WHERE APPLICABLE
• NEVER use a battery that is cracked or shows other signs of visible damage.
• ALWAYS connecct postive lead to positive terminal, and negative lead to
negative terminal. NEVER cross-wire.
• The engine is equipped with an alternator and will charge the battery during
operation. If recharging battery with an auxillary charger it is your responsiblity
to use the appropriate equipment and settings.
• NEVER operate when battery is wet. Avoid contact with water when not in use.
• Do not tamper with battery, alter it anyway, or try to open it up.
ARIENSPOWEREQUIPMENT.COM
9
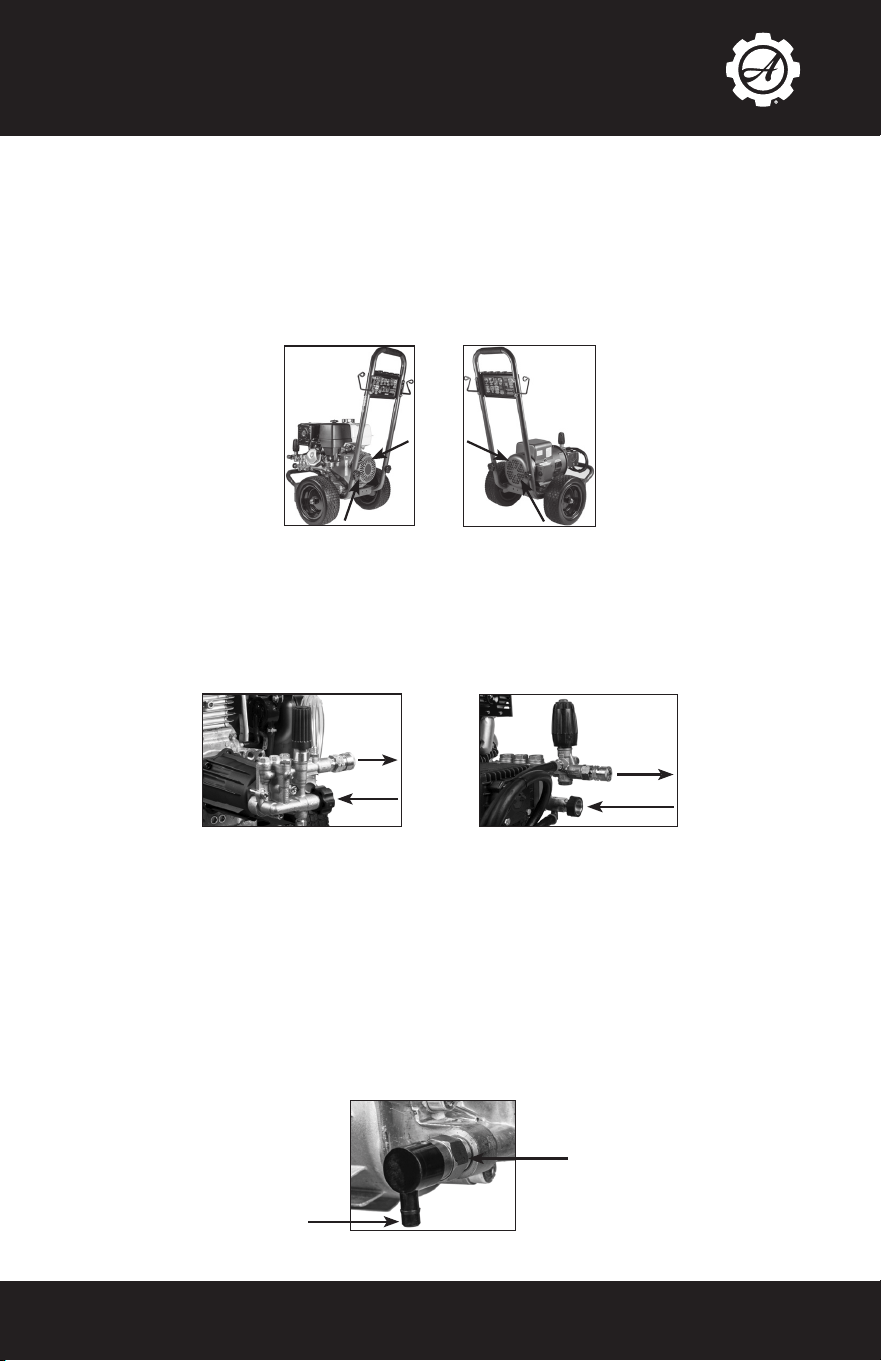
PRESSURE WASHER
COOLING SYSTEM
DO NOT OVERHEAT YOUR MACHINE
Do not let your machine overheat. Failure to do so will result in damage, void
warranty, or cause injury.
Gas engines and electric motors are air-cooled. Always ensure that the machine
is operated in a well-ventilated area where it can draw a steady supply of fresh
air. If the motor overheats, it may shut down, rapidly burn oil, and result in
component failure. The arrows below show an example of locations for air intake
on an engine.
Pumps are cooled on the front end by having fresh water run into the pump,
then spray out of the gun wand. To maintain the water flow, keep the trigger of
the gun depressed to keep spraying out water. Do not let the machine run for
more than 30 seconds without pressing down on the trigger. If the pump is left to
overheat (not spraying water), it may experience thermal shock when cold water
is introduced to the system once water is sprayed out again. This thermal shock
can result in multiple component failures.
Most pumps are protected by a thermal valve. The thermal valve releases
water if a pump starts to run too hot. It will prevent catastrophic heat failure.
However, the pump may have suffered damage and need maintenance, repair, or
replacement. The thermal valve will need to be replaced once it is triggered.
The back end of the pump is cooled by maintaining the proper level and quality of
pump oil. Always check the oil level on the back of the pump by using the dipstick
or sight gauge. Use 30w non-detergent oil if it needs to be added or replaced.
Axial Pump Triplex Pump
Threaded into pump
with teflon tape
Leaks water to
prevent overheating
10
ARIENSPOWEREQUIPMENT.COM
FUEL AND OIL TYPES
ENGINE FUEL TYPE
Use only regular unleaded gasoline rated at 86 octane or higher. The best fuel
to use will have a 0% ethanol blend. However, the engine can use a fuel with an
ethanol blend of up to 10%.
ENGINE OIL TYPE
Use only SAE 10W30 motor oil for the engine. To check the oil, unscrew the
engine dipstick. Then, wipe off the oil with a clean rag and dip it back into the
engine. The oil should be well within the oil level markings.
Note* the engine will have two oil caps. Only one will have a dipstick.
PUMP OIL TYPE
For pressure washer pumps, use only SAE 30W non-detergent oil. Never use
motor oil in your pressure washer pump because it will destroy the seals.
Never overfill the pump.
• If your pump has a sight glass, then ll halfway up to the middle of the red dot.
• If your pump has a dipstick, then ll to the mark on the dipstick.
• If your pump doesn’t have a sight glass or dipstick, then it is a sealed unit, and
the owner doesn’t have to be concerned with maintaining the pump oil.
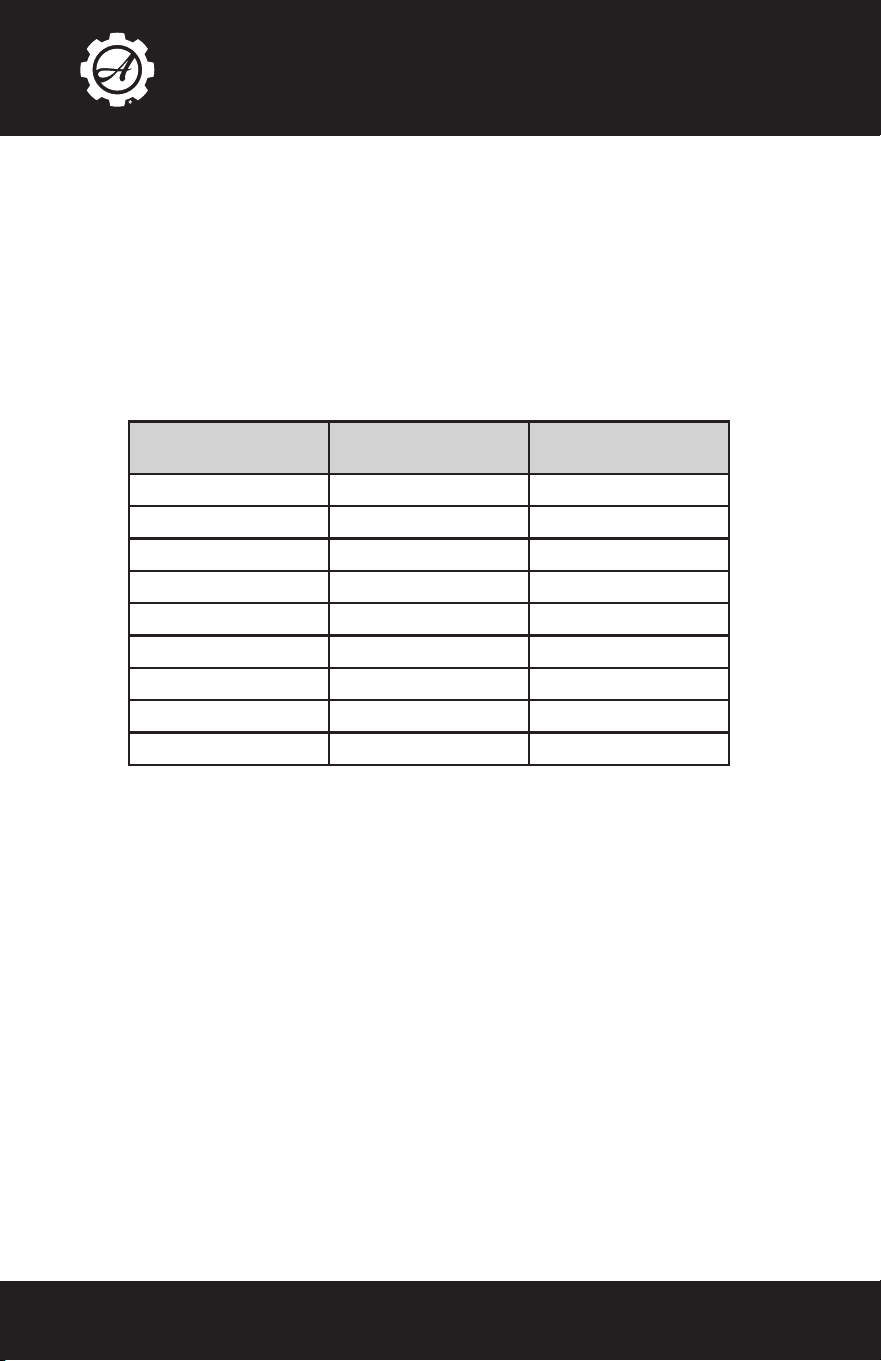
ENGINE TYPE
FUEL TANK
CAPACITY
OIL CAPACITY
Ariens 212 3.6 L / 0.95 US Gal 0.6 L / 0.63 US qt
Ariens 225 3.6 L / 0.95 US Gal 0.6 L / 0.63 US qt
Ariens 420 6.7 L / 1.7 US Gal 1.1 L / 1.16 US qt
Honda GC160 1.8 L / 0.48 US Gal 0.58 L / 0.61 US qt
Honda GC190 1.8 L / 0.48 US Gal 0.58 L / 0.61 US qt
Honda GX200 3.1 L / 0.82 US Gal 0.6 L / 0.63 US qt
Honda GX270 5.3 L / 1.4 US Gal 1.1 L / 1.16 US qt
Honda GX390 6.1 L / 1.6 US Gal 1.1 L / 1.16 US qt
Honda GX690 N/A 2.0 L / 2.1 US qt
ARIENSPOWEREQUIPMENT.COM
11
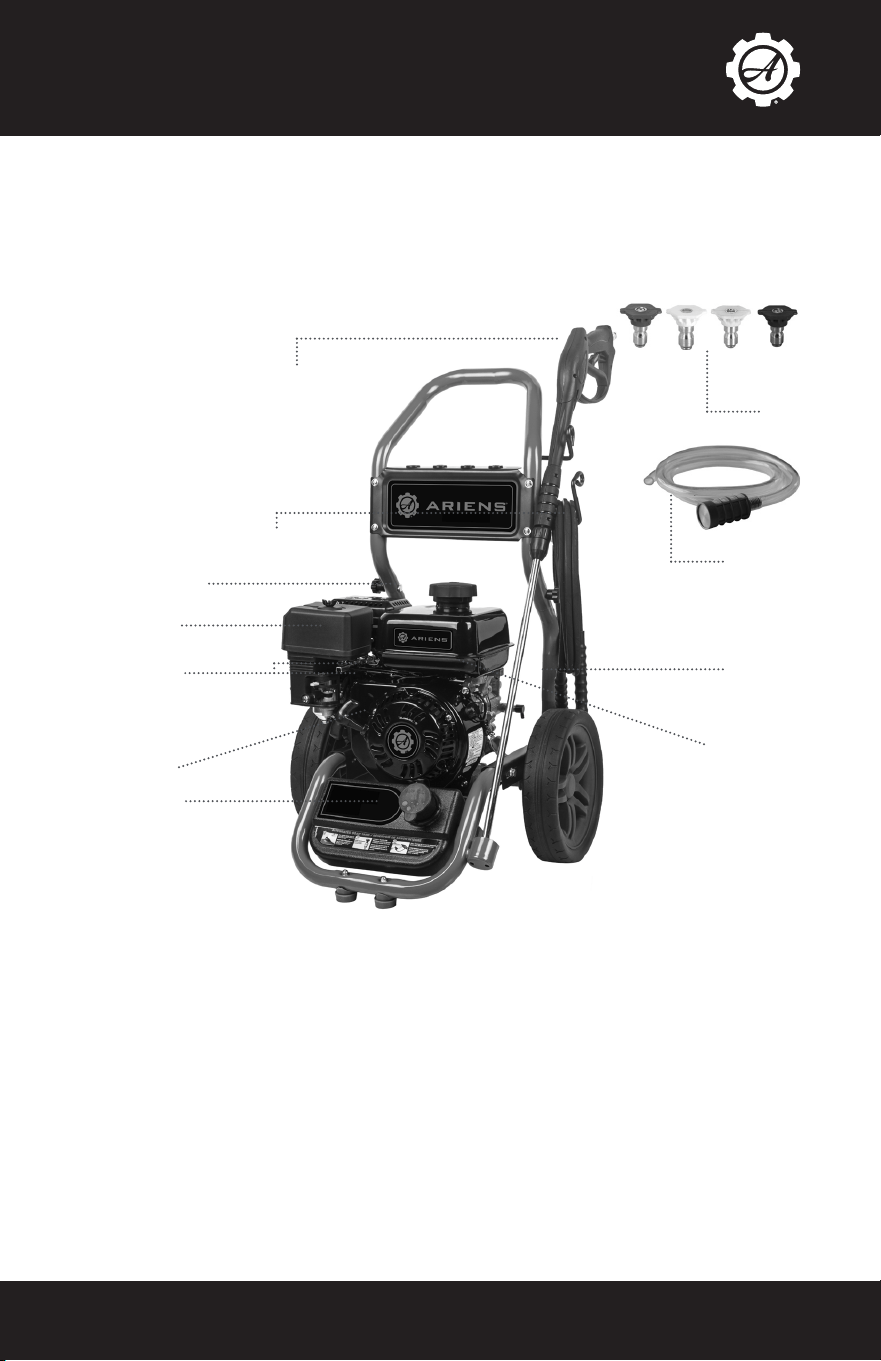
COMPONENT DIAGRAMS
The following diagrams are intended for general reference.
Your pressure washer may dier from the models shown in the following
pages. For specic model information, please visit bepowerequipment.com
1. Split Lance Spray Gun
2. High-pressure Hose to the outlet. Connections vary by model.
3. Muer/Exhaust - Reduces noise of the engine and expels heat.
4. Air Filter housing
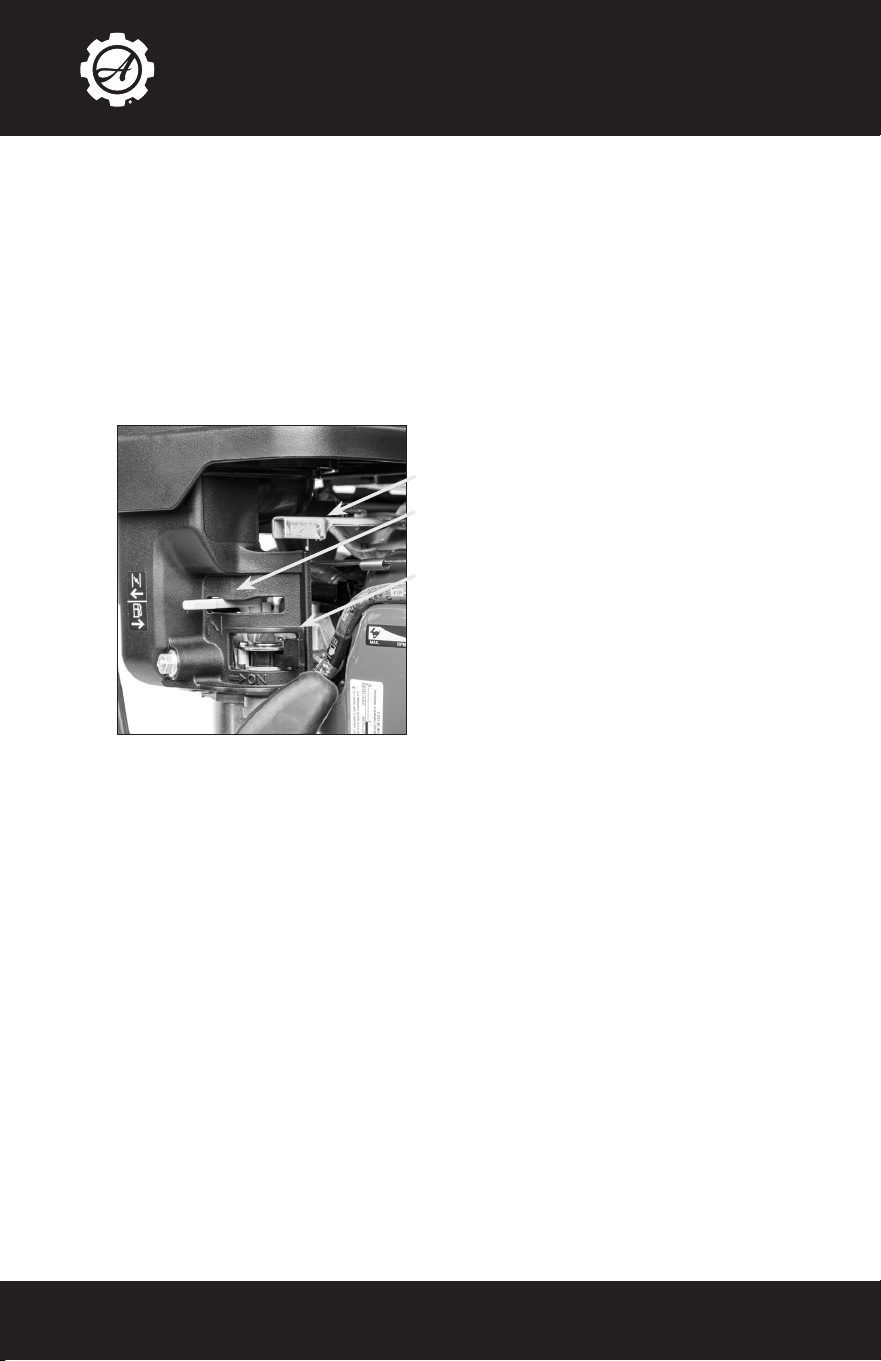
5. (Above) Choke rod - Prepares a cold engine for starting.
(Down) Throttle Lever - Controls engine RPM speed.
6. Recoil Starter - Used to manually start the engine.
7. Soap Tank: (not included on all models) Fill with pressure washer detergent
only.
8. Pump: develops high pressure. Connect the garden hose to the water pump
inlet and connect the high pressure hose to the outlet. Connections vary
by model.
9. Gas tank
10. Detergent suction hose: used to draw detergent into the low pressure stream.
11. Spray nozzles: 0°, 25°, 40° Detergent: For various cleaning applications.
2.
10.
11.
5.
6.
7.
8.
3.
9.
4.
1.
12
ARIENSPOWEREQUIPMENT.COM
COMPONENT DIAGRAMS
1. Spray Gun - Controls the application of water onto the cleaning surface with a trigger
device. Includes trigger lock. Allows you to switch between various spray nozzles.
2. High-Pressure Hose - Designed to withstand the pressure created by the pump.
3. Fuel Tank - Fill tank with regular, unleaded fuel. Always leave room for fuel expansion.
4. Unloader - Pressure is preset from the factory.
5. Pump - Develops high-pressure. Connect the garden hose to the inlet of the water
pump, and connect the high-pressure hose to the outlet. Connections vary by model.
6. Detergent Siphoning Hose - Used to draw detergent into the low-pressure stream.
7. Muer/Exhaust - Reduces noise of the engine and expels heat.
8. Air Filter - Protects engine by ltering dust and debris out of the intake air.
9. Spray Nozzles - 0°, 25°, 40° and Detergent: for various cleaning applications.
3.
4.
5.
7.
8.
2.
9.
1.
6.
ARIENSPOWEREQUIPMENT.COM
13
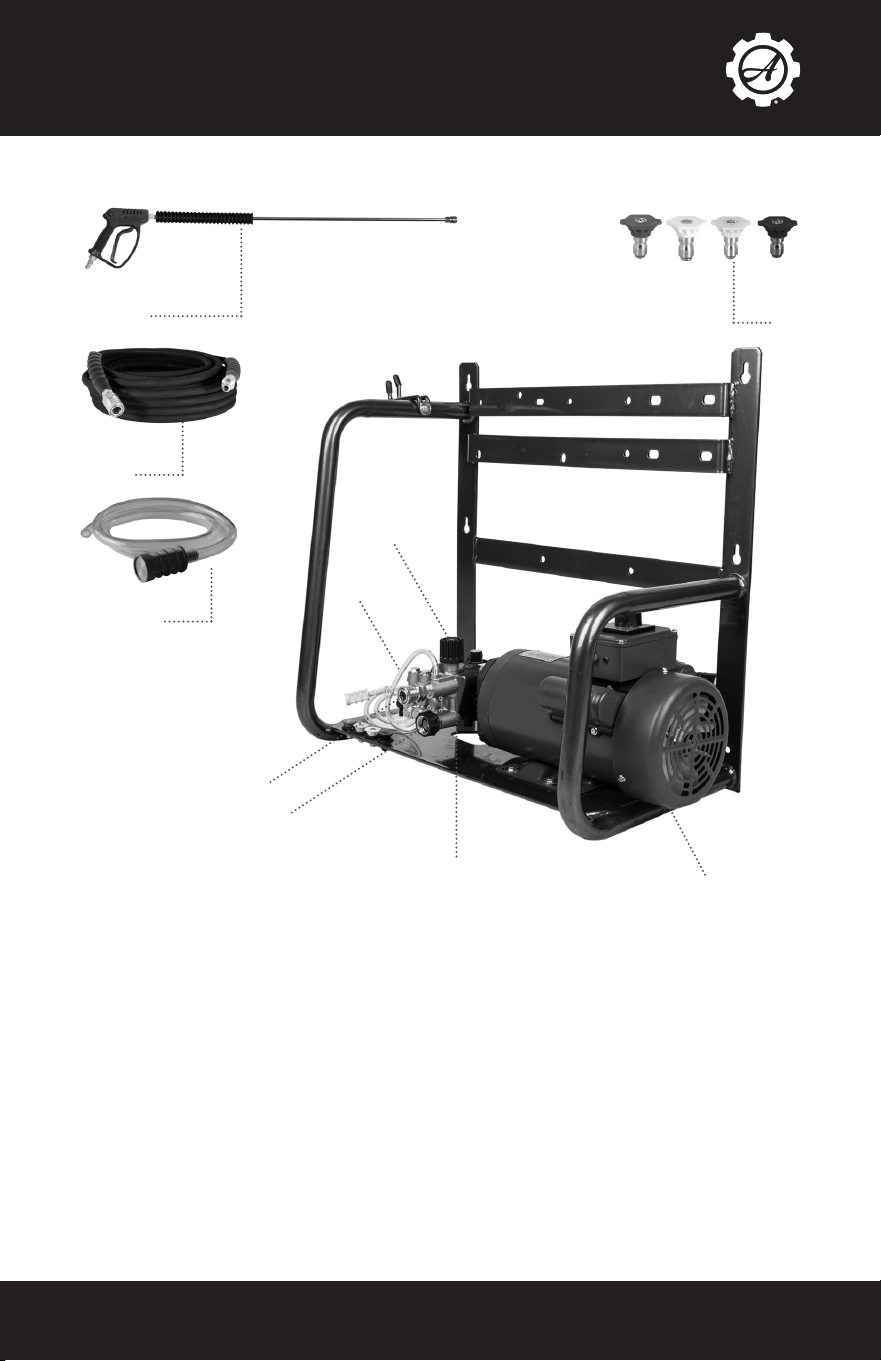
COMPONENT DIAGRAMS
2.
3.
1.
1. Spray Gun - Controls the application of water onto the cleaning surface with a trigger
device. Includes trigger lock. Allows you to switch between various spray nozzles.
2. High Pressure Hose - Designed to withstand the pressure created by the pump.
3. Spray Nozzles - 0°, 15°, 40° and Detergent: for various cleaning applications.
4. Detergent Siphoning Hose - Used to draw detergent into the low-pressure stream.
5. Unloader - Pressure is preset from the factory.
6. Pump - Develops high pressure. Connect the garden hose to the inlet of the water
pump, and connect the high-pressure hose to the outlet. Connections vary by model.
7. Inlet - Connection for the water source such as a garden hose.
8. Outlet - Connection for the high-pressure hose.
9. Motor - Power source that spins the pump
4.
5.
4.
8.
7.
6.
9.

14
ARIENSPOWEREQUIPMENT.COM
COMPONENT DIAGRAMS
2.
3.
1.
4.
1. Spray Gun - Controls the application of water onto the cleaning surface with a trigger
device. Includes trigger lock. Allows you to switch between various spray nozzles.
2. High Pressure Hose - Designed to withstand the pressure created by the pump.
3. Spray Nozzles - 0°, 15°, 40° and Detergent: for various cleaning applications.
4. Detergent Siphoning Hose - Used to draw detergent into the low-pressure stream.
5. Unloader - Pressure is preset from the factory.
6. Pump - Develops high pressure. Connect the garden hose to the inlet of the water
pump, and connect the high-pressure hose to the outlet. Connections vary by model.
7. Inlet - Connection for the water source such as a garden hose.
8. Outlet - Connection for the high-pressure hose.
9. Motor - Power source that spins the pump
5.
9.
8.
7.
6.
ARIENSPOWEREQUIPMENT.COM
15
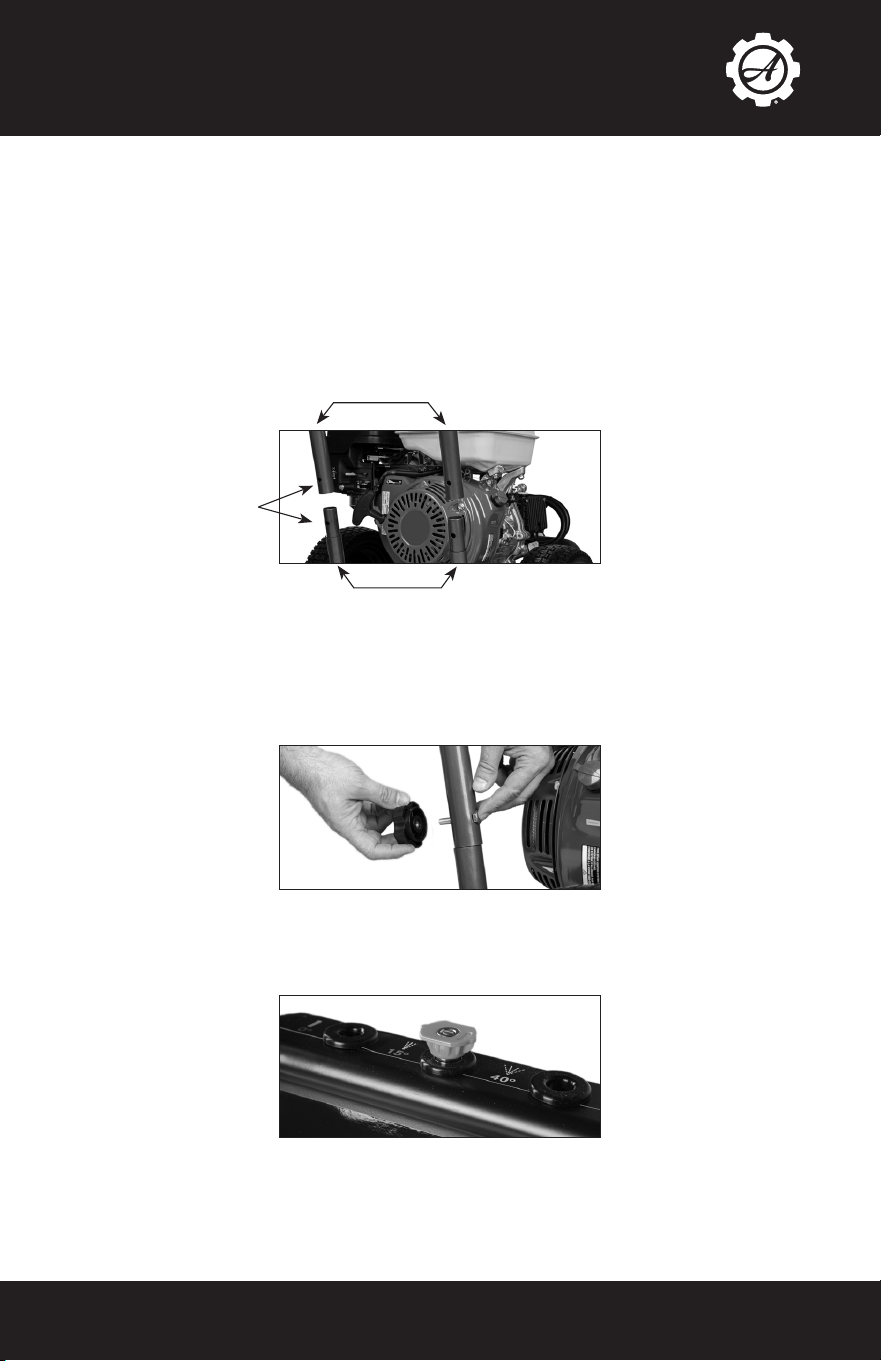
Your pressure washer will require some assembly. If you have any trouble with
this process, please call our tech support department (1-866-850-6662) with your
model number.
Unpack your pressure washer
• Remove all the components, including bags and manuals.
• Inspect components to make sure there is no visible damage.
ATTACH HANDLE
1. Remove any plastic coverings that may be on the handle. Place handle (A)
onto handle supports (B) connected to the frame. Make sure holes (C) in
handle align to the holes on the frame supports.
NOTE: These diagrams are intended for general reference. As a result, they may
not fully reect the appearance of your product.
2. Insert the bolts through holes. The carriage bolts will have hex heads that
need to be matched to the side of the handles with a hex shaped hole pattern
to help secure them.
3. Insert colored quick connect spray nozzles, high-pressure hose, gun wand
assembly into the spaces provided.
4. If needed, attach the provided detergent siphoning hose to brass barb coming
out of the pump near the high-pressure outlet. (Do not attach to the black
plastic thermal relief valve barb.)
ASSEMBLY
C
B
A
16
ARIENSPOWEREQUIPMENT.COM
ASSEMBLY
5. Assemble the gun wand. The trigger assembly will be threaded onto the wand.
Hand tighten only.
HOSE CONNECTIONS
• Quick connect ttings: pull back the collar of the coupler, insert plug, and
release the collar. Tug on ttings to conrm a secure lock.
• M22 Fittings: Line up the insert and thread together so it is hand tight. Do not
overtighten.
• Spray Nozzles: To attach a spray nozzle to the end of the wand, pull back on
the collar of the brass tting. Insert the spray nozzle and release the collar. Tug
on the nozzle to make sure it is secure. If it is loose, the high-pressure water
will launch it out and may cause injury or damage.
Your pressure washer will come with several colored spray nozzles that will have
dierent spray patterns and abilities.
0° Nozzle (Red)
Concentrated stream to break apart baked-on mud
or dirt. Use with caution.
15° Nozzle (Yellow)
Narrow spray pattern that is aggressive and best used
on hard surface to remove tough dirt.
25° Nozzle (Green)
General purpose spray pattern. Slightly wider, but still
fairly aggressive.
40° Nozzle (White) Wider spray pattern for large areas or softer surfaces.
Black Soaper Nozzle
Low pressure nozzle. This is the only nozzle that can
be used with the chemical injector system.

ARIENSPOWEREQUIPMENT.COM
17
PRE
-
OPERATION
1. Before operating the pressure washer, ensure you are familiar with all the
warnings and safety recommendations.
2. Wear proper clothing and eye protection.
3. Always setup the machine where:
3.1 It is on a level surface. If the machine is not level, it may not start or cause
failures.
3.2 There is sucient ventilation.
3.3 There are no signs of oil or gas leaks, including gas vapors.
3.4 The machine is not exposed to rain, snow or freezing temperatures. These
harsh conditions can lead to component failure causing damage or injury.
4. Ensure that oil levels for the engine and pump are correct.
4.1 Use 10W30 oil to ll the engine if needed.
4.2 Use 30W non-detergent oil to ll the pump if needed.
5. If the pump has an oil cap dipstick, make sure it is the breathing oil cap
instead of the sealed travel oil cap. If the sealed travel oil cap is left in, the
pump will over pressurize and blow it out.
6. Inspect the overall condition of the unit. Make sure there are no fuel or oil
leaks or damaged parts. If any leaks or damaged parts are detected DO NOT
start the pressure washer until it is xed.
7. Connect the high-pressure hose to the pump and the gun wand assembly to
the other end of the hose.
8. Connect the garden hose to the pump.
8.1 Ensure the inlet lter on the pump is present, intact, and clean before
connecting the garden hose.
WATER SUPPLY MUST BE SUFFICIENT TO SUPPLY THE PUMP
ADEQUATELY.
Every pressure washer has a Gallons Per Minute (GPM)/ Liters Per Minute (LPM)
rating that must be adhered to. If the pump does not get enough water, it will
cavitate (starve for water). This will cause internal damage and pending failure.
To measure your water source GPM/ LPM, you will need a container that you
know the exact size such as a 5-gallon/20-Liter bucket. When you’re ready, start
lling it from your water source while timing it for one minute. The amount of
water in the 5-gallon/20-liter bucket after one minute is the GPM/LPM rating.
The water source GPM/ LPM should exceed the GPM/ LPM rating of the machine
by one GPM/ LPM to account for any uctuations from the water source.
The water source should have 20 to 60 PSI/1.38 to 4.1 BAR pressure going into
the pump. Do not use a hose longer than 50ft/15m to the water source.
PRIME THE PUMP WITH WATER
Once all the hoses are connected, turn on your water supply and hold down the
spray gun’s trigger. Let water ow through it until all the air bubbles are worked
through, and there is a constant stream of water coming out the nozzle.
Insert the color spray nozzle that you plan to use. Make sure the nozzle is clean
with no damage or blockages.
18
ARIENSPOWEREQUIPMENT.COM
GAS ENGINE START PROCEDURE SET UP
1. Fill the fuel tank with gasoline. Use regular unleaded, 86 octane or higher that
has no more than 10% ethanol blend.
2. Do not overll the fuel tank. Always leave a space to allow the tank to breathe
and the fuel to expand.
3. If your engine has throttle, please set to full throttle. The lever will be all the
way LEFT on all models except the Honda GC which will have the lever all the
way UP.
4. Turn the fuel valve to the ON position which is all the way to the RIGHT on all
models except the Honda GC which do not have a separate fuel valve.
3
5
4
∙ ARIENS
∙ HONDA GX

ARIENSPOWEREQUIPMENT.COM
19
6. Put engine switch to the ON position. On the Honda GX, Ariens, and Kohler
SH270 engines it will be switch on the side of the engine like the picture
below. The Kohler CH440 has the ON/OFF built into the fuel valve.
7. With one hand, squeeze the trigger of the spray gun, so the water is owing.
Brace the pressure washer with your foot. With the other hand, grip the recoil
handle and slowly pull it out until you feel resistance. Pull briskly on the recoil.
You may have to pull it several times before it starts running.
8. Once the engine has warmed up, disengage the choke by moving the choke
lever all the way RIGHT on all models except the HONDA GC where the
choke tab is pushed all the way IN. If it stalls, then it needs to get warmer
before the choke is turned o. Restart the engine, let it warm up, and then try
turning the choke o again.
Important Note: The pressure washer has been designed to run at full throttle.
If you lower the throttle then the load-to-power ratio between the engine and
pump will be incorrect. This will cause undue strain on the system while pressure
washing, causing parts to wear quicker.
GAS ENGINE PULL START PROCEDURE
∙ ARIENS
∙ HONDA GX
20
ARIENSPOWEREQUIPMENT.COM
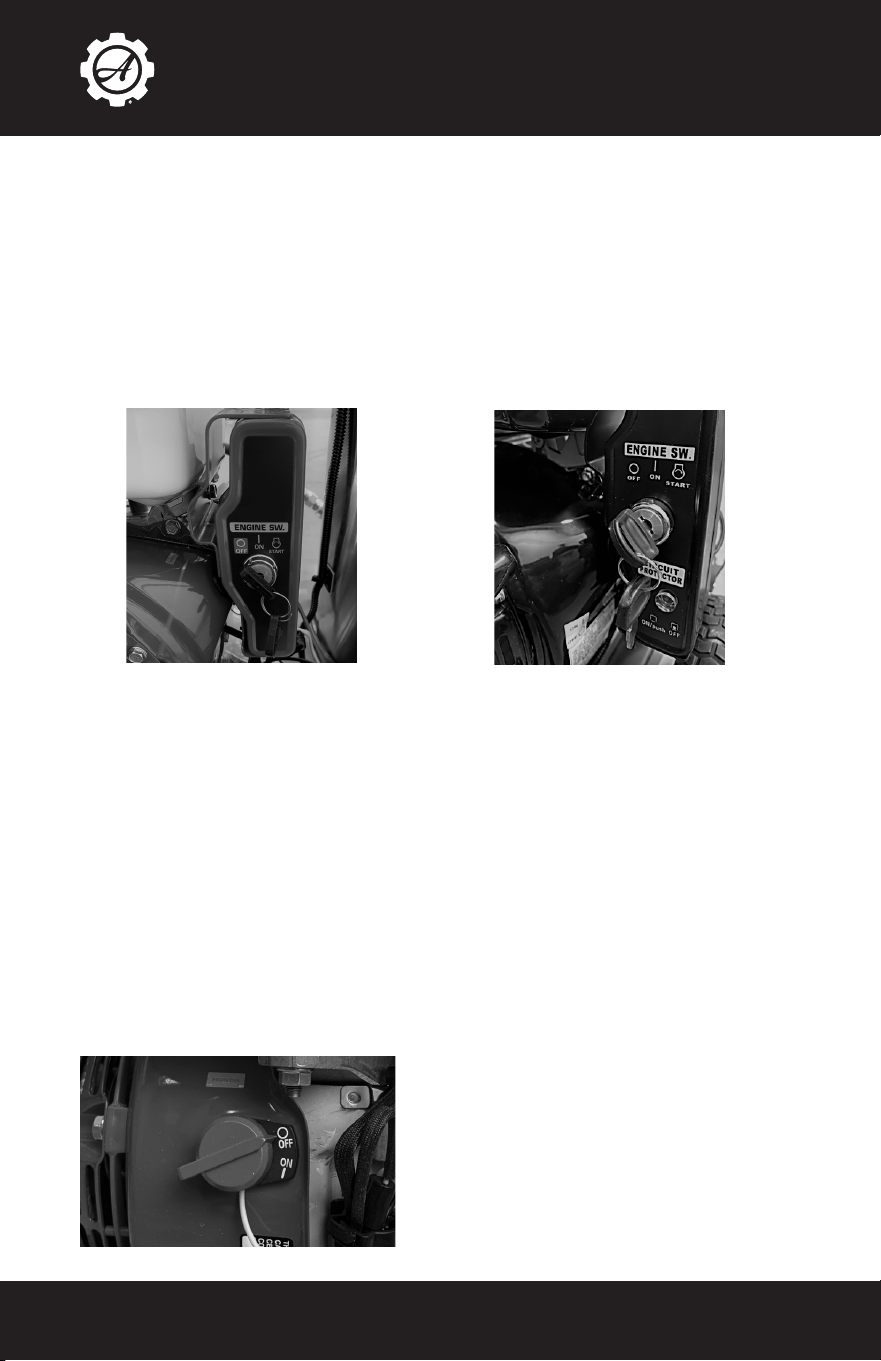
ELECTRIC START
For units that are equipped with an electric start engine.
1. Follow all the set ups already described up to the point of pulling the recoil.
2. Connect the battery cable (battery must be connected and charged to use
electric start).
3. With one hand, squeeze the trigger of the spray gun so the water is
owing. With the other hand, turn the key on the engine to the ‘ON’ position
to start the engine.
4. Once the engine starts, release the key.
∙ ARIENS
∙ HONDA GX390
GAS ENGINE ELECTRIC START PROCEDURE
GAS ENGINE STOP PROCEDURE
In normal operation, to stop the engine:
1. Throttle down the engine. (This step does not apply to engines without
throttle)
2. While holding the spray gun trigger, turn o the engine. Reference the below
for the method to turn o the various pull-start engines. If it is an electric
start model, turn the ignition key to the left.
3. Turn the fuel valve to the OFF position.
Emergency Stop: Switch the engine to the OFF position immediately. This will
stop the engine right away, but may trap pressure in the system, which may
prevent restarts or the ability to remove the hose or spray gun.
1. Turn o the water source, and squeeze the trigger again to release pressure
and water before disconnecting the hoses.
2. Drain the water out of the hoses before putting into storage.
∙ ARIENS
∙ HONDA GX

ARIENSPOWEREQUIPMENT.COM
21
ELECTRIC MOTORS WITH
AUTO STOP
-
START SYSTEM
If your electric pressure washer is equipped with an auto start/stop system, it will
completely turn off when the spray gun trigger is released. Both pump and motor
will be inactive even though it is plugged in and turned on. When the trigger is
squeezed, the system will detect this and turn on. There will be a time delay
between depressing/releasing the trigger and the machine turning on/off.
Always turn the machine off when it is not going to be used for a significant
period of time. Do not rely on the auto start/stop system because if it fails, it will
lead to pump and/or motor failures.
ELECTRIC MOTOR STOP PROCEDURE
1. Keep the spray gun trigger squeezed and pointing in a safe direction.
2. Turn the motor to the o position.
3. Keep trigger squeezed to make sure all the pressure is released and it is only
garden hose pressure.
4. Unplug machine (if applicable, some may be hard wired).
5. Disconnect and drain hoses.
ELECTRIC MOTOR START PROCEDURE
1. Review all the safety warnings at the beginning of the manual. Turn the motor
to the o position.
2. Follow all the pre-operation steps before starting.
3. Connect pressure washer to a power source that matches the unit’s
requirements. It is critically important to have the pressure washer connected
to the correct power source, including volt, amp, and circuit breaker capacity.
Using a wrong power source will prevent start up, or damage the motor
causing it to fail.
4. Hold the spray gun, point it in a safe direction and squeeze the trigger.
5. Locate the ON/OFF switch on the pressure washer. Brace yourself for
possible kickback from the spray wand, and turn machine on.
GENERAL PRESSURE WASHER OPERATION TECHNIQUES
1. Always follow safety practices as outlined.
2. Always begin spraying at a safe distance from the intended surface and move
closer until the desired cleaning eect can be observed.
3. Generally, do not use a 90° spray angle. Instead, it is usually more eective to
use a shallower angle so that the reecting spray can be directed in safe and
controlled direction.
4. Holding down the trigger, move the wand side-to-side to clean the surface.
Once you get a feel for how the cleaning performance behaves you will
naturally nd your rhythm.
5. Always be aware of what you are spraying and take greater care on fragile
surfaces such as wood or glass to prevent damage.
6. Always remember to squeeze the trigger once every 30 seconds to ush the
pump with cool water to prevent overheating.
7. If you have to stop washing for more than a few minutes, you should turn o
the machine.

22
ARIENSPOWEREQUIPMENT.COM
CLEANING WITH DETERGENTS
HOW TO CONTROL PRESSURE
• The pressure washer is preset at the factory to deliver the optimum
performance for its set up.
• Do not adjust the unloader.
• Adjusting the unloader can lead to failures, including poor performance, engine
stalling, and breaking internal parts of the pump and unloader.
• The primary method of controlling pressure is by the distance between the
nozzle and the surface. Always start far away and slowly move closer to the
surface.
• The angle of spray to the surface will also inuence pressure. For example,
coming at the surface at a 90° angle will have more impact force than a
shallow angle.
• Pressure can also be controlled by the type of nozzle that is put into the tip.
The wider the spray, the less pressure directly impacting the surface.
• Pressure can also be decreased by using nozzles with a larger orice size.
• Be careful when cleaning any soft surface like wood or anything that can crack
or break apart, like glass or paint.
CLEANING WITH DETERGENTS
1. The black soaper nozzle must be installed on the spray gun wand. It is the
only nozzle that will draw soap through the pressure washer system.
2. The detergent being used must have thin viscosity (similar to water).
3a.For models without an onboard soap tank; ll a container with detergent and
place it next to the pressure washer. Connect the clear detergent suction tube
to the brass barb on the pressure washer pump, and put the end with the lter
into the detergent container.
3b.For models with an onboard soap tank; ll the soap tank with the detergent.
4. Turn on the pressure washer and spray the water. You will be able to see the
detergent moving through the suction tube. Once the detergent is spraying
out the nozzle, it will cause foam to appear.
5. When using detergent, spray the desired area and give it some time for the
soap to chemically breakdown the dirt chemically. Then, wash it o with water
before it dries. Do not let the detergent dry on the surface as it may result in
damage.
6. When you are nished using the detergent you must ush the detergent
injector system to prevent detergent residue from building up. To rinse, use
clean water (either in a separate container or in the onboard soap tank).
Spray for at least two minutes while drawing the clean water through the soap
system.

ARIENSPOWEREQUIPMENT.COM
23
STORAGE
Improper storage of the pressure washer will lead to failures that are not covered
by warranty.In general, cover the pressure washer and store it in a clean and dry
location. Wipe off any dirt or water.
WATER – FREEZING WARNING
Leaving water in the pump and accessories can result in damage if the
water freezes. Water will expand when it turns to ice. The resulting force will
cause ruptures and crack brass fittings, valves, and seals requiring complete
replacements (not warrantable).
1. When the unit is not in use, drain all the hoses and spray gun assembly.
2. If the unit is going to be stored for a extended period, or if there is any chance
the pressure washer will be exposed to freezing temperatures, then plumbing/
RV anti-freeze must be cycled through the pumps water ways.
3. We recommend using Ariens Power Equipment Pump Saver Anti-Freeze. It
has a specially designed cap to thread right onto the garden hose tting of the
pump. (Part number 85.490.046, contact your local dealer).
4. To apply, rst ensure the engine and fuel valve are in the OFF position.
5. Thread the bottle onto the garden hose tting of the pump and open the valve
on the cap. Pull the recoil to cycle the anti-freeze solution through the pump.
It is recommended to squeeze the bottle to force the anti-freeze into the pump
if needed. Continue until it comes out of the high-pressure hose tting. At this
point, anti-freeze is protecting all the internal water chambers of the pump.
6. The best defense against freezing is to store the pressure washer in a warm
location that will not be exposed to freezing temperatures.
GASOLINE ENGINE FUEL SYSTEM WARNING
Gasoline degrades overtime and will leave solid residues if it dries out in your fuel
system. This will clog the fuel system and result in failure to start the machine
(not warrantable).
1. Fuel degrades quicker the more it is exposed to air, and the greater the
ethanol percentage blend.
2. Fuel stabilizer is strongly recommended to slow down the degradation
process of fuel. Best practice is to mix the fuel stabilizer in the fuel storage
container.
3. If the unit will not be used within 30 days, then drain all the fuel from the tank
and carburetor.
3.1 Use fuel stabilizer in the tank to mix with the fuel.
3.2 To drain the fuel, have a container ready to catch the fuel.
3.3 Use a wrench to loosen the bottom bolt of the carburetor and let all
the fuel pour into the container. Once it stops, tighten the bolt. The fuel
stabilizer that was put in the tank earlier will help prevent any residue fuel
from drying into a hard residue.
3.4 Open the fuel valve of the engine.
3.5 To prevent wasting fuel, you can use the drained fuel in any vehicle that
uses the same type of fuel.
3.6 When storing gasoline, always use an airtight jerry can and fuel stabilizer
for best results. Best practice is to store fuel for no more than a year
before using it.
BATTERY (IF EQUIPPED)
1. Disconnect battery if it will not be used for two weeks or more.
2. Keep battery in a cool, dry place at normal room temperatures.
3. Is not used for 6 months or more, then it may need to be recharged.
24
ARIENSPOWEREQUIPMENT.COM
MAINTENANCE
GASOLINE ENGINE
Refer to the engine manual that came with your pressure washer for details.
Routinely check:
1. Oil level and condition
2. Air lter
3. Sparkplug
4. Watch for leaks
ELECTRIC MOTOR
No special maintenance needed. Keep clean.
PUMP MAINTENANCE
1. Applicable for pumps that have sight glasses and dipsticks where the oil can
be inspected and changed.
2. Does not apply to sealed pumps which are maintenance free. These pumps
are identied by having no way to check or change the oil. (No sight glasses
or dipsticks).
ENGINE MAINTENANCE SCHEDULE
Engine Oil
Check
Every Use
Replace
After the rst 20 hours of operation.
After every 100 hours there after.
Inspection shows oil is dirty.
Air Filter
Check
Every Use
Replace
When dirty or damaged.
Fuel Lines
Check
Every Use
Replace
When damaged/leaking fuel.
Fuel Cap Filter
Check
Every Use.
Replace
When unable to clean or if damaged.
Spark Arrestor
(if applicable)
Check
Every 25 hours.
Replace
When unable to clean or if damaged.
Spark Plug
Check
Every 100 hours.
Replace
When unable to clean or adjust
Valve Clearance
Check
Every 300 hours.*
Idling RPM
Check
Every 300 hours.*
*Have serviced at an authorized service center.

ARIENSPOWEREQUIPMENT.COM
25
If oil is milky in color, then water has leaked into the crankcase. Further
inspections will be needed, including pump seals and ceramics plungers.
Fittings: Inspect for leaks and damage. Replace parts as needed.
WATER INLET FILTER
1. Inspect before every use
2. Rinse clean when dirty
3. Replace when damaged or leaking
PUMP MAINTENANCE SCHEDULE
Oil Condition Inspect before every use
First oil change 25 hours
Then Change after
Every 250 hours of use, 12 months.
Inspection shows oil is dirty
MAINTENANCE
BATTERY SCHEDULE (IF APPLICABLE)
Charge Capacity Check before every use
Recharge
Every 6 months or
When no longer has enough charge to start.
26
ARIENSPOWEREQUIPMENT.COM
TROUBLESHOOTING
GAS ENGINE TROUBLE SHOOTING
PROBLEM CAUSE SOLUTION
Engine will turn
over, but doesn’t
start
(recoil can be
pulled normally)
No Fuel. Fill with fresh regular unleaded fuel
Fuel is stale or contaminated.
Remove old fuel, replace with fresh
fuel. May need to clean fuel system.
Low Oil. Fill with 10W30 motor Oil.
Engine is switched off. Turn switch to the ON position.
Low RPM setting. Turn throttle to full RPM (Rabbit).
Choke not engaged. Turn choke on.
Fuel Valve is off. Turn fuel valve on.
Air filter too dirty. Clean or replace.
Fuel tank is overfilled and
cannot breathe.
Drain some fuel to allow it to breathe.
Oil in Carberator.
Remove the bolt from bottom of
carburetor and flush with fuel.
Unloader set too tight. Back off unloader.
Gasoline in engine crankcase
Carburetor is plugged. Need to clean
carburetor and engine.
Unable to pull
Recoil
(recoil feels seized)
Trapped pressure in the
pump.
Squeeze Trigger of the gun to release
pressure.
Oil In Air Filter.
Remove and replace air filter. Clean
excess oil.
Oil In spark plug cyclinder.
Remove and clean spark plug. Clear
out oil from cycliner.
Unloader set too tight. Back off unloader.
Recoil mechanism failed Replace recoil
Internal engine failure Replace engine
Engine runs then
stops
No Fuel. Fill with regulatar unleaded fuel.
Low Oil. Fill with 10W30 motor Oil.
Unloader set too tight. Back off unloader.
Fuel Cap, or breather
tube not breathing (where
applicable).
Loosen fuel cap and if the machine
runs, then clean or replace fuel cap/
valve.
Fuel is stale or contaminated.
Remove old fuel, replace it with fresh
fuel. May need to clean any fuel
valves, carburator or filters.
Leaking fuel. Inspect for leaks and repair.
ARIENSPOWEREQUIPMENT.COM
27
Rough running/odd
sound
Choke is still engaged. Turn choke off.
Engine not at full throttle. Turn engine to full throttle (rabbit).
Air Filter Dirty. Check air filter, replace if needed.
Clogged Exhaust or Spark
Arrestor.
Clean or replace as needed.
Spark plug failure/dirty Clean or replace spark plug
Stale/bad fuel Drain and replace with fresh fuel
Valves needs adjustment
Take to service center for valve
adjustment.
PUMP TROUBLE SHOOTING
No water going
through pump
(with no hose/gun
attached)
No water source attached. Connect garden hose to pump.
Water source is blocked.
Confirm water is flowing through
hose without obstruction.
Inlet filter plugged. Clean or replace inlet filter.
Low water
pressure
Low water inlet pressure.
Ensure inlet GPM/LPM flow is
enough for pressure washer.
Partially blocked water flow.
Ensure water flows through all
hoses and fittings.
Gun Nozzle issue.
Ensure nozzle is clean and right
size.
Gun Failure.
The gun is leaking or blocked, may
need to replace.
Water leaks in system.
Locate water leak, and fix or
replace.
Unloader not properly
adjusted.
Tighten unloader.
Water not getting
through the spray
gun
Pressure hose not
connected to pump.
Connect to pump.
Hose obstruction.
Check for water through hose. Clean
or replace.
Gun failure.
May need to replace gun, especially
if leaking.
Spray nozzle plugged. Clean or replace spray nozzle.
Pressure
Fluctuation
Partially blocked inlet filter.
Remove garden hose, ensure filter
is in place and clean.
Inconsistent water source.
Ensure gallons per minute flow is
enough for pressure washer.
TROUBLESHOOTING
28
ARIENSPOWEREQUIPMENT.COM
Pressure
Fluctuation
Clogged Check Valve.
Need to clean or replaces valves.
Recommend call service center.
Gun failure.
Trigger flaw, intermittedly siezed.
May need to clean or replace.
Worn valves and/or seals in
head of pump.
Need to replaces seals.
Recommend call service center.
Thermal Valve
Leaking.
Unit was over heated. Need to replace thermal valve.
Water in Oil.
(pump oil is a
milky color)
Unit overheated and thermal
shocked.
Call service center, may need to
replace pump.
ELECTRIC MOTOR TROUBLE SHOOTING
Motor doesn’t
start.
(makes no noise)
(doesn’t trip any
breakers)
Unit is not switched on. Turn switch to the ON postion.
No power going to unit.
Check the cord for faults, make sure
it is plugged into correct outlet.
Breaker needs to be reset
(wall and/or unit).
Reset Breakers.
Faulty on/off switch. Replace switch.
Motor overheats
Extension cord being used.
Plug directly into wall, or use much
heavier guage of cord.
Unloader adjusted too tight. Adjust or replace unloader.
Clogged spray nozzle. Clean or replace nozzle.
Motor doesn’t
start.
(Trips wall
breakers)
(Trips reset on
motor)
(Motor only hums)
Too much pressure in the
brass head.
Relieve pressure by pressing the
trigger on the gun. Keep trigger held
down while starting the machine.
Extension cord being used.
Plug directly into wall, or use much
heavier gauge of cord.
Unloader adjusted too tight. Back off unloader.
Breaker rating doesn’t
match the pressure washer.
For example, if pressure washer
is 17amp draw, it needs at least a
20amp breakers.
Weak circuit breaker.
Try machine on several different
outlets.
Wall plug in too far from
main electric panel.
Try machine on an outlet closer to
the panel.
Motor doesn’t
start.
(Trips wall
breakers)
(Trips reset on
motor)
(Motor only hums)
Nozzle size too small.
Try running machine without colored
nozzle, if it works then get a larger
nozzle.
Power source not
compatible.
Confirm voltage and amp
requirements of the machine, make
sure power source matches up.
Extreme cold air
temperature.
Operate in area where temperature
is above 10°C.
TROUBLESHOOTING
ARIENSPOWEREQUIPMENT.COM
29
GFCI TROUBLE SHOOTING
Tripped GFCI. Will
not reset.
GFCI tripped.
Unplug GFCI, reset, and then plug
back in.
GFCI has worn out and no
longer functions.
Replace.
Damaged cord, pinching or
exposing wires.
Replace cord.
Circuit breaker has tripped.
Multiple items lose power.
Unplug unnecassary items then
reset circuit breaker.
Short in the system between
outlet and breaker box.
Call an electrian to service the
problem.
DETERGENT SYSTEM TROUBLE SHOOTING
Not spraying
detergent
Black spray nozzle not
being use.
Only the black spray nozzle will work
with the detergent system.
Blak spray nozzle clogged
or damaged.
Clean or replace as needed. Orifice
must be unobstructed.
Detergent pick-up tube is
not in the solution.
Make sure the detergent container
is full and the pick up tube is deeply
submerged.
Detergent pick-up tube is
not attached to brass barb.
Make sure pick up tube is attached
to the brass injector barb (not the
black plastic barb).
Detergent pick-up tube has
been extrended.
If the pick-up tube is too long, it will
no longer work. Use original length
pick-up tube.
Detergent too thick.
Thin solution. The visosity needs to
be similar to water.
Ball-bearing in detergent
injector is stuck.
Carefully remove brass injector.
Clean ball bearing, spring, and brass
making sure parts are moving freely.
TROUBLESHOOTING

30
ARIENSPOWEREQUIPMENT.COM
WARRANTY
Ariens Power Equipment . warrants to the original retail purchaser that our new
products are free from defects in material and workmanship for the time-frames
set forth. If a defect is found in a Ariens Power Equipment product within the
limitations outlined in this warranty statement, Ariens Power Equipment , at its
sole discretion, will repair, replace, or credit the product.
The warranty coverage begins on the date of the retail purchase by the end-user.
Valid proof of purchase must be presented with the warranty claim.
This warranty is limited to defects that occurred during regular operational use. It
does not cover failures due to lack of maintenance, negligence, abuse, misuse,
including, but not limited to, freezing damage, alterations, chemical deterioration,
scale buildup, rust, thermal shock, thermal expansion, transportation damage,
oil changes, valve adjustments, fuel system maintenance, or the use of incorrect
parts. Furthermore, using the wrong fuel, water, or power supply is considered a
form of misuse.
This warranty does not cover normal wearing items such as O-rings, valves,
seals, lters, spark plugs, or packings. These are normal wearing items and
should be factored into your regular maintenance schedule.
The warranty herein is in lieu of all other warranties, express or implied, including
any implied warranty of tness for a particular purpose. Ariens Power Equipment
does not authorize any of its dealers, service centers, agents, employees, or any
other party to expand, extend, or modify the scope of this warranty in any manner
on behalf of Ariens Power Equipment .
Ariens Power Equipment expressly disclaims liability for injuries to persons or
property, or for incidental damages, rental loss, time loss, transportation costs,
or consequential damages. It is the buyer’s responsibility to ensure the correct
installation, application, and use of the product purchased.
HONDA ENGINE WARRANTY
Honda requires their warranty claims to be evaluated and processed at their
respective authorized service centers. Locations can be found on their respective
website.
REGISTERED PRODUCT EXTENDED WARRANTY
Ariens oers an extended warranty on its products upon registration on the
website. To qualify for the extended warranty, products must be registered within
90 days of purchase. This extended warranty does not apply to Honda engines;
it is your responsibility to follow and adhere to the Honda warranty processes
and procedures. Ariens retains sole discretion in determining whether the
failure results from a manufacturing defect or workmanship and is the cause of
premature failure.
PRODUCT REGISTRATION
Product registration form can be found at:
arienspowerequipment.com/pages/product-registration
ARIENSPOWEREQUIPMENT.COM
31
WARRANTY
WARRANTY PROCEDURE
Contact the Ariens Technical Service department at 1-855-486-0498
• Model/part number
• Serial number (if applicable)
• Copy of the original purchase receipt
• Detailed description of the failure
• Any additional relevant details or photos pertinent to the situation
AUTHORIZED "ARIENS" SERVICE CENTERS
Authorized Ariens service centers can be found at:
arienspowerequipment.com//pages/nd-a-service-center
WARRANTY TIMELINES
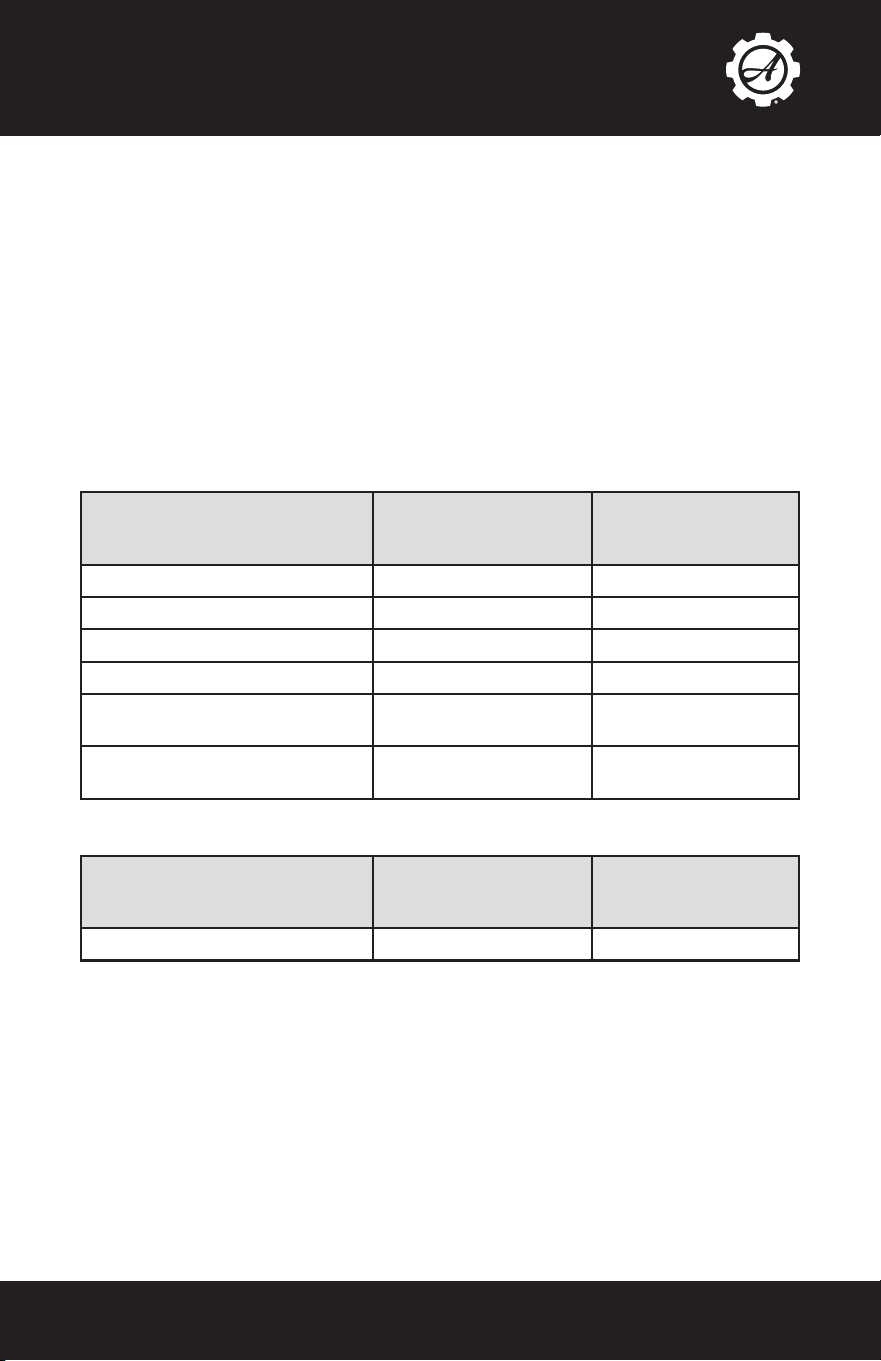
COMPREHENSIVE BUMPER TO BUMPER WARRANTY
ENGINES AND MOTORS
STANDARD
WARRANTY
REGISTERED
EXTENDED
WARRANTY
HONDA GX 3 YRS Through Honda N/A
KOHLER 3 YRS 5 YRS
ARIENS GAS ENGINES 3 YRS 5 YRS
ARIENS ELECTRIC MOTORS 1 YR 5 YRS
BALDOR ELECTRIC
MOTORS
3 YRS 5 YRS
TECHTOP ELECTRIC
MOTORS
3 YRS 5 YRS
ACCESSORIES
STANDARD
WARRANTY
REGISTERED
EXTENDED
WARRANTY
ALL ACCESSORIES 1 YR N/A

DO NOT RETURN THIS PRODUCT TO THE RETAILER
CONTACT OUR CUSTOMER SERVICE if you need assistance
with the assembly, operation, or if you experience a problem with your
pressure washer, please call 1-855-486-0498
Monday - Friday. 8AM to 430PM PST.
NE RENVOYEZ PAS CE PRODUIT AU DÉTAILLANT, CONTACTEZ
NOTRE SERVICE À LA CLIENTÈLE si vous avez besoin d’aide pour
l’assemblage, le fonctionnement ou si vous rencontrez un problème avec
votre nettoyeur haute pression, veuillez appeler le 1-855-486-0498
Lundi à Vendredi. De 8h à 430h PST.
OPERATOR’s MANUAL
MANUEL D’UTILISATION
