
Technical Support and E-Warranty Certificate
www.vevor.com/support
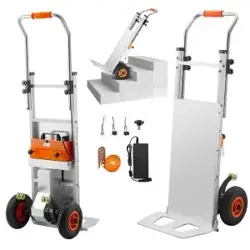
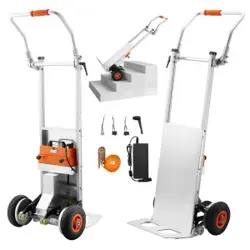
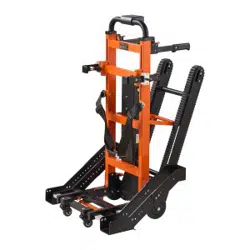
STAIR CLIMBING CHAIR
MODEL: YHR-LD02
We continue to be committed to provide you tools with competitive price.
"Save Half", "Half Price" or any other similar expressions used by us only represents an
estimate of savings you might benefit from buying certain tools with us compared to the major
top brands and does not necessarily mean to cover all categories of tools offered by us. You
are kindly reminded to verify carefully when you are placing an order with us if you are
actually saving half in comparison with the top major brands.
- 1 -
MODEL: YHR-LD02
Have product questions? Need technical support? Please feel free to
contact us:
Technical Support and E-Warranty Certificate
www.vevor.com/support
NEED HELP? CONTACT US!
This is the original instruction, please read all manual instructions
carefully before operating. VEVOR reserves a clear interpretation of our
user manual. The appearance of the product shall be subject to the
product you received. Please forgive us that we won't inform you again if
there are any technology or software updates on our product.
STAIR CLIMBING CHAIR

- 2 -
SAFETY INSTRUCTIONS
Before Initial Operation
● Read the user manual and note all warnings and safety instructions.
● Note technical data as lifting capacity cannot be exceeded.
● Check all electronic functions, safety brakes, and the position of the
climbing track.
While Operating the Unit
● Never change settings while climbing or descending stairs.
● Never put any part of a body, especially feet, under the climbing tracks.
● If the drive elements lock up, turn off the unit immediately.
1. We strongly advise that only certificated trained personnel operate the
Stair chair. Untrained personnel may cause injury or damage !
2. Pay attention to smooth handling.
3. When carrying patients with this machine, be sure to lock tightly, fasten
the safety belt for safety and tell him to hold on to the handrail.
4. Don't move too fast when passing pothole areas.
5. When there is a failure, non-professional personnel shall not be
disassembled at will.
6. You can add some lubricating oil to the transmission mechanism of the
drive wheel to increase the service life.
7. When working, do not carry out other work on both sides of the car to
avoid accidents.
8. After the completion of the operation, check whether the electric
climbing car is normal, and turn off the power.
9. Do not knock, needle, tread, modify, sun the battery, do not place the
battery in the microwave, high pressure and other environments.
10. Keep away from naked flames.
11. Wear non-slip footwear and always operate with both hands.
12. Do not use it in rain, wet conditions, or on snow or ice.
13. Do not use it on escalators or travelators.
14. The wheelchair stair lift should not be used for the transportation of
- 3 -
cargo.
MODEL AND PARAMETERS
Model
YHR-LD02
Max. Load
150kg
Rubber-track Belts' Angle
20°
Input
AC 100-240V 50/60Hz
Motor
DC 24V / 120W;3-different Speed Adjustable
Battery
Lithium Battery; DC 24V / 13Ah
Charger
DC29.4V / 2A
Telescopic Gripping Frame
Height
H108cm, H126cm, H145cm and H163cm
Cargo Platform
33.5x31.5cm
Folding Size
109x45x30cm
Materials
Aluminium alloy
Weight
35kg
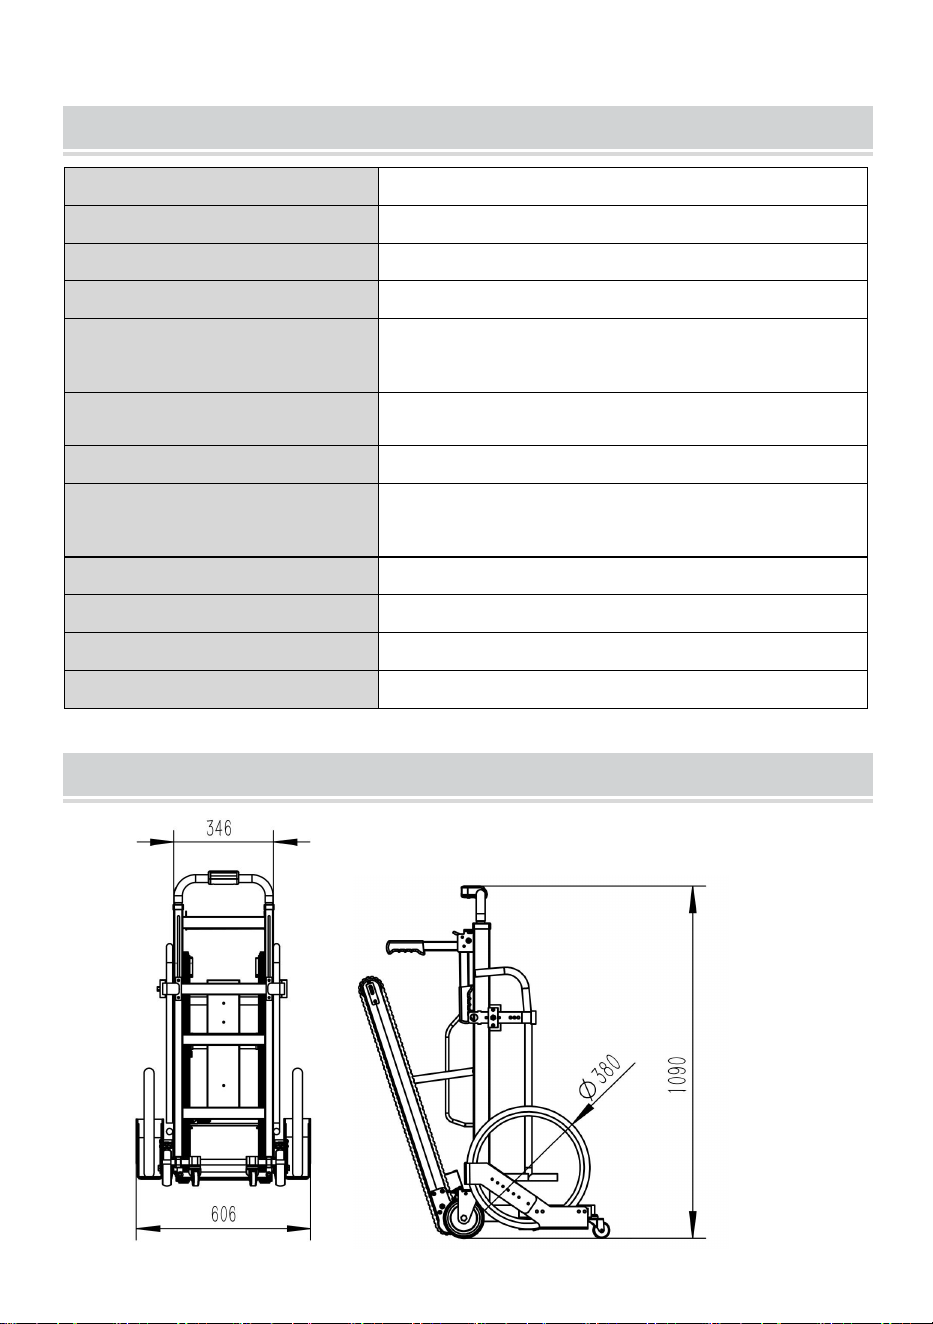
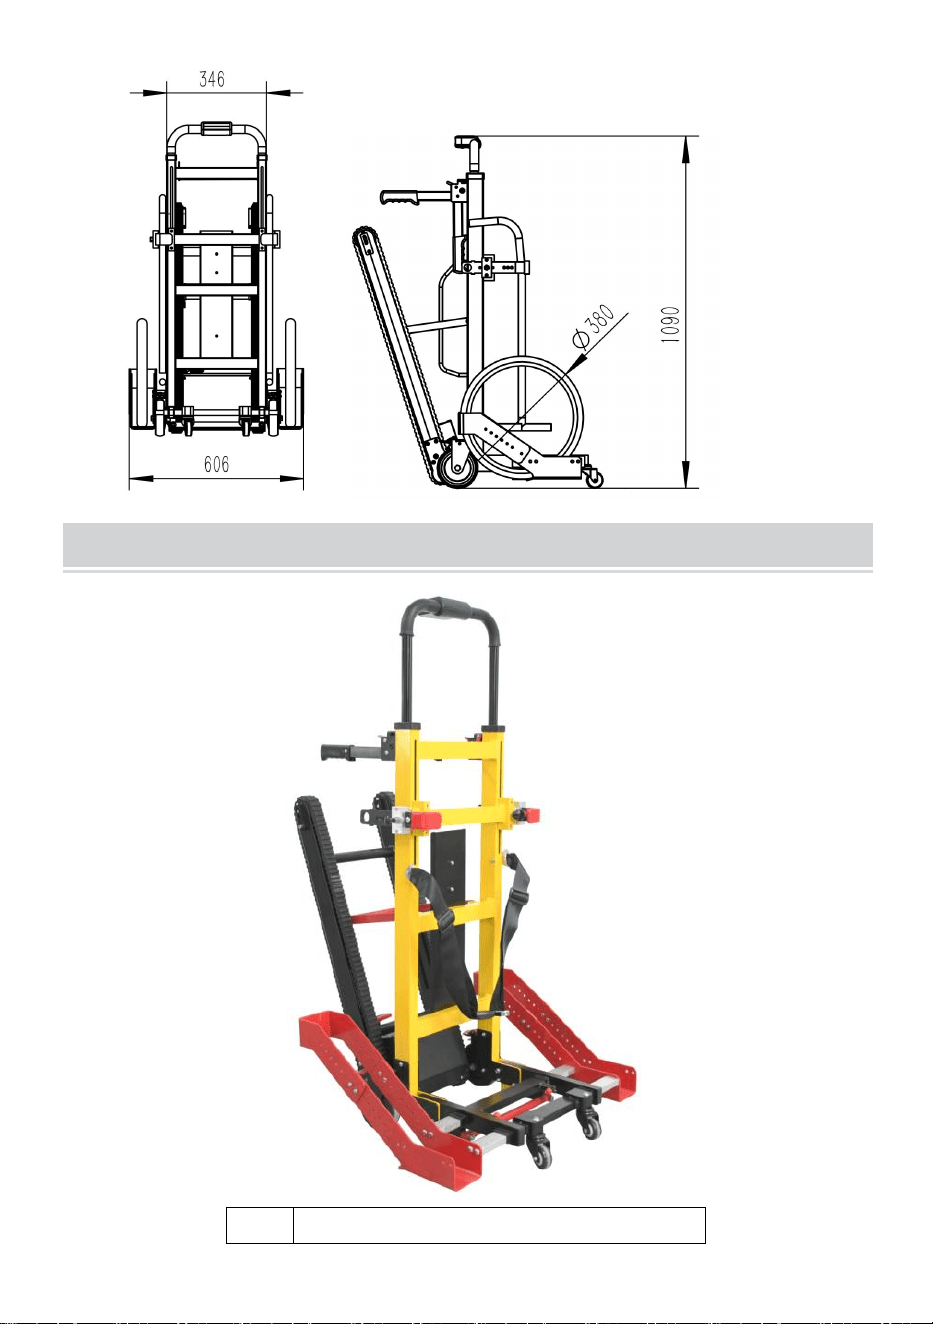
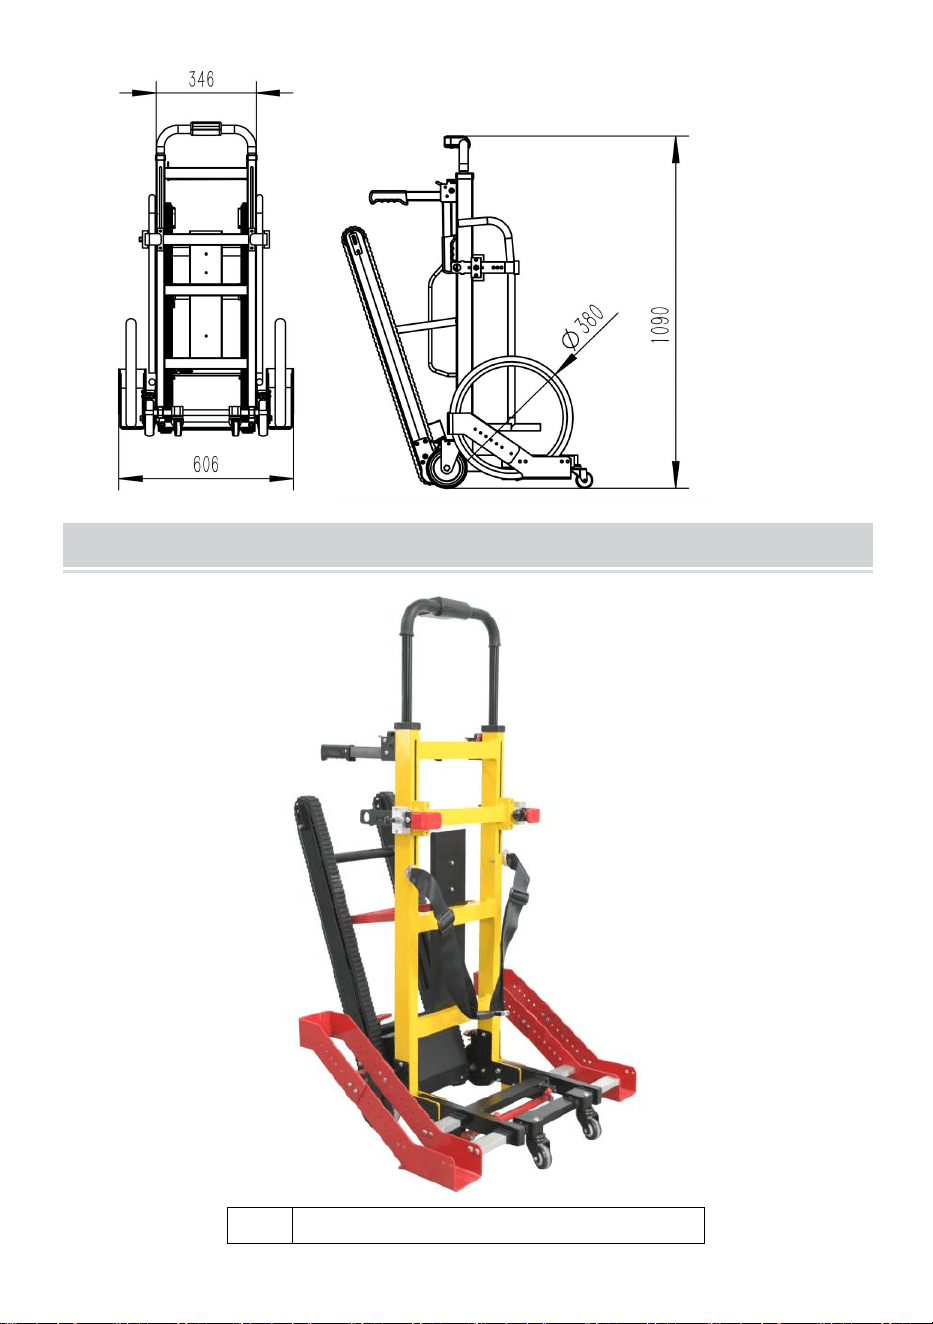
DIMENSION AND DIAGRAM
Unit: mm
- 4 -
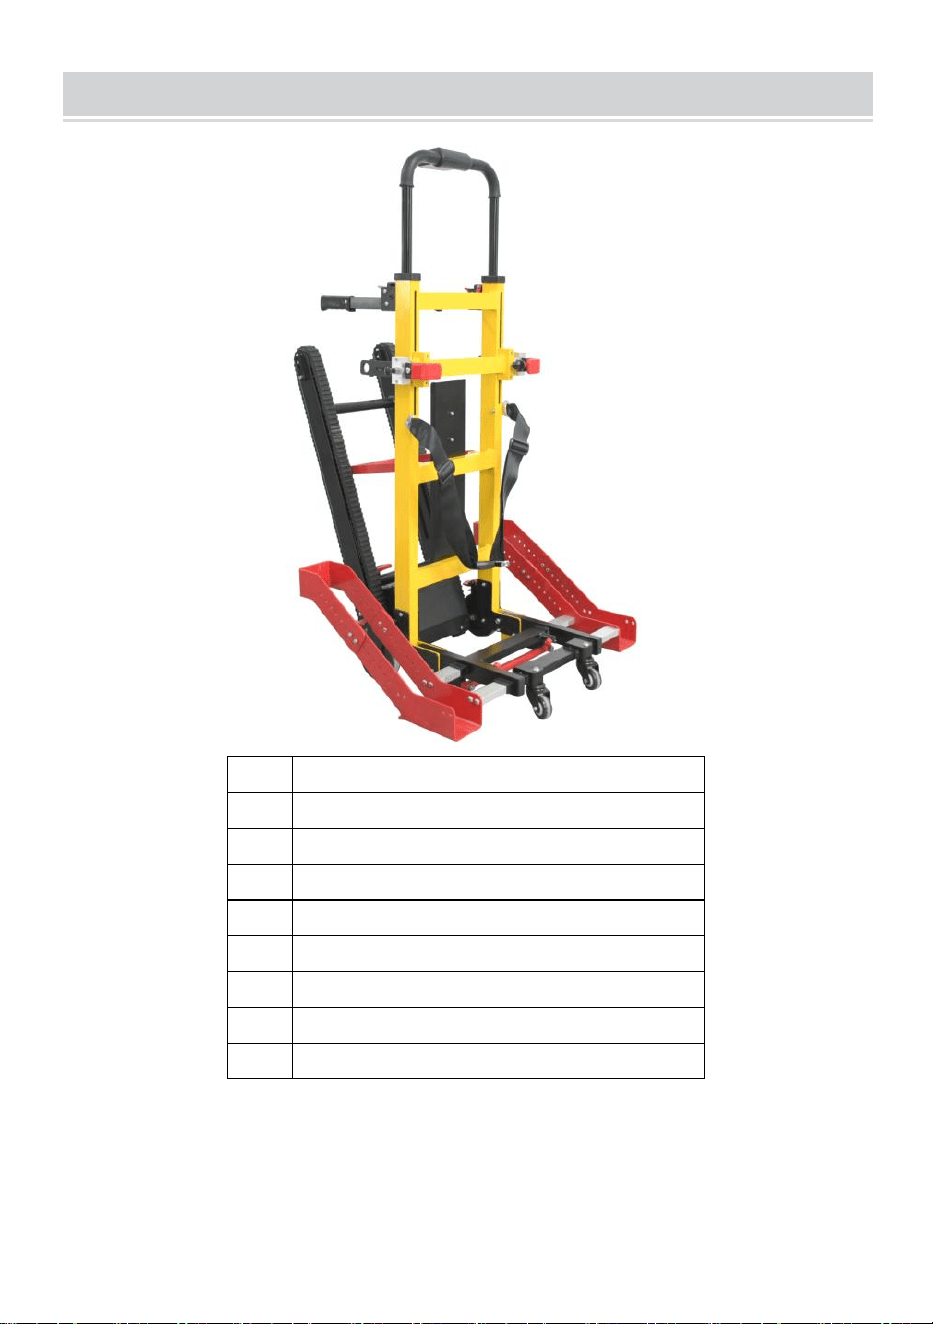
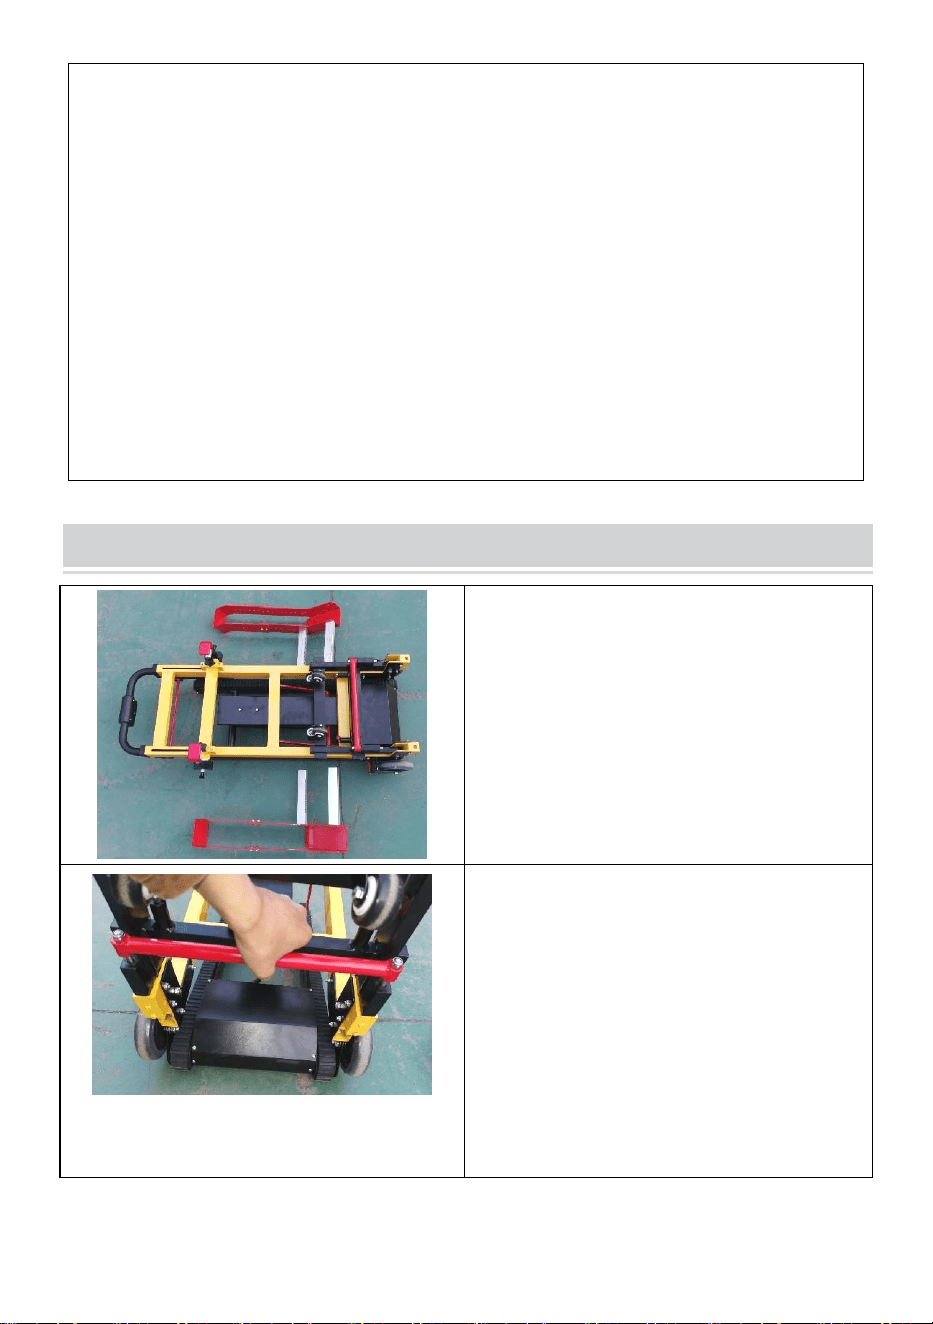
COMPONENTS
No.
Name
1
Handle and Control Panel
2
Rear Carry Handle
3
Track Belt
4
Rear Wheels(5in)
5
Wheel Carrier
6
Safety Belt
7
Locking Catch
8
Front Wheels(2in)
1
2
3
5
4
6
7
8

- 5 -
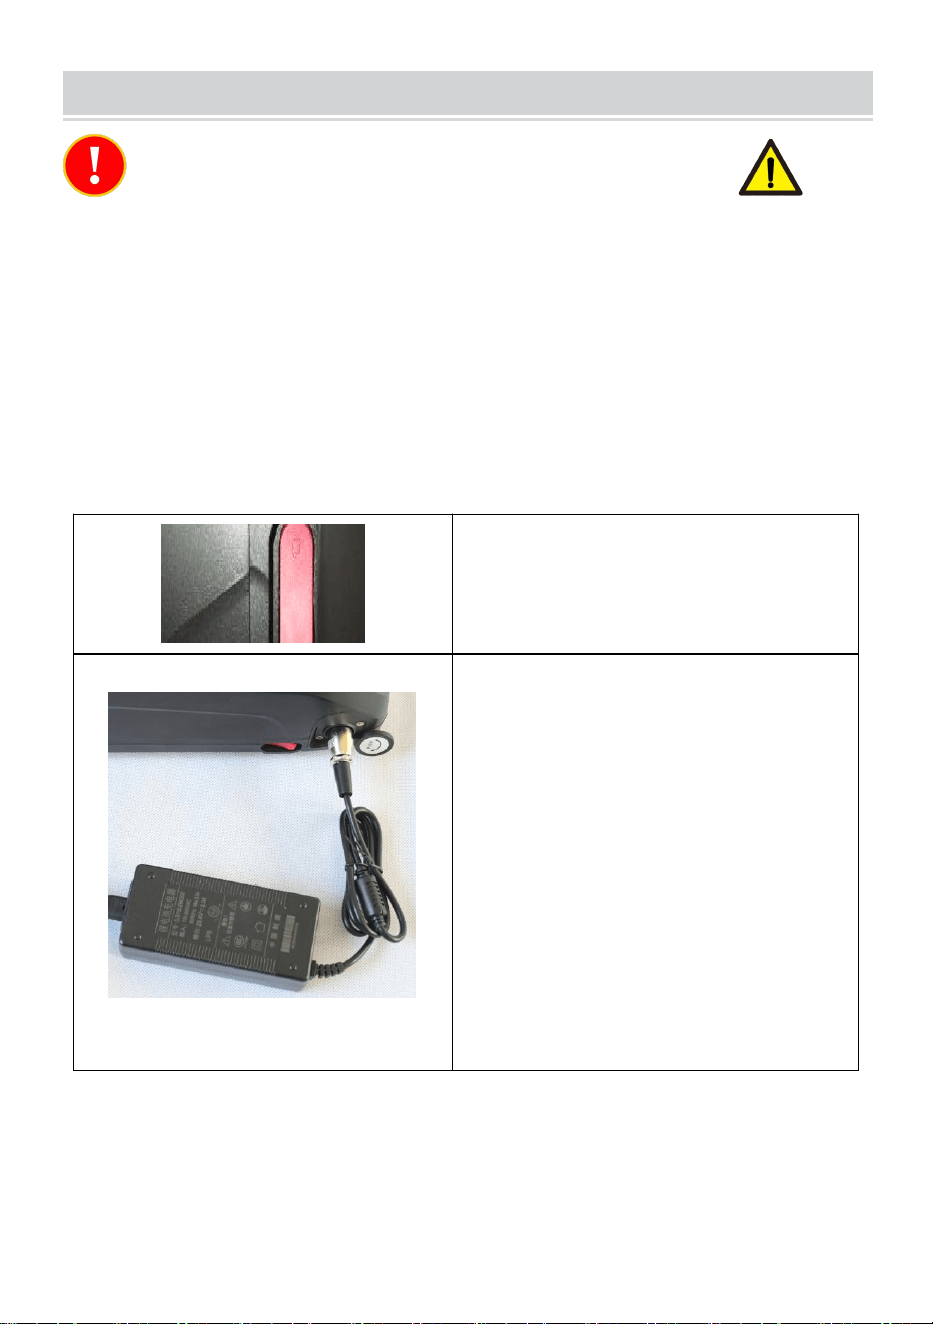
INITIAL OPERATION
NOTE: Before the initial operation, please ensure the STAIR LIFT
will be operated in an environment higher than 0°C.
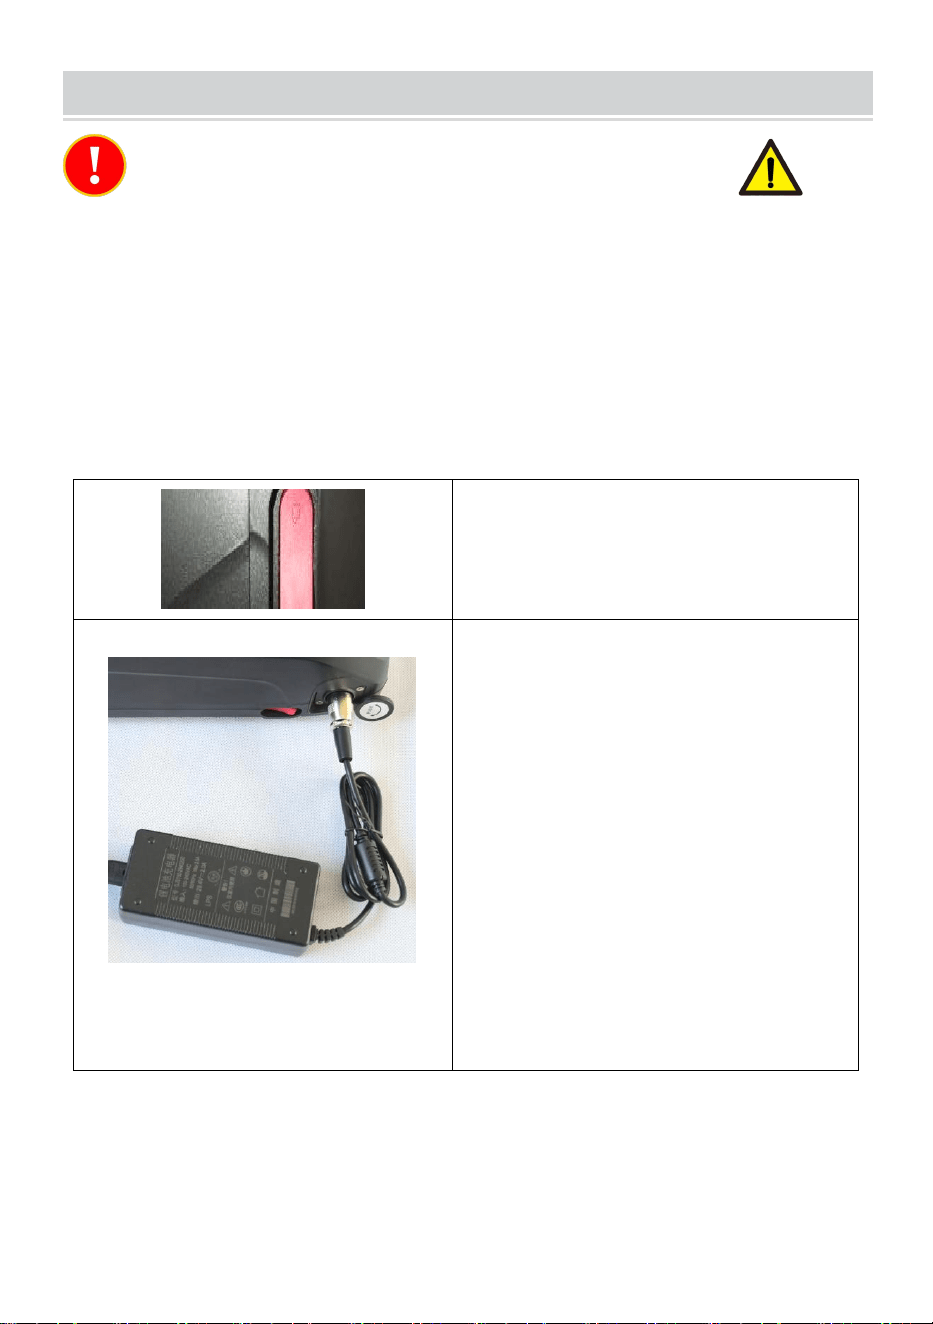
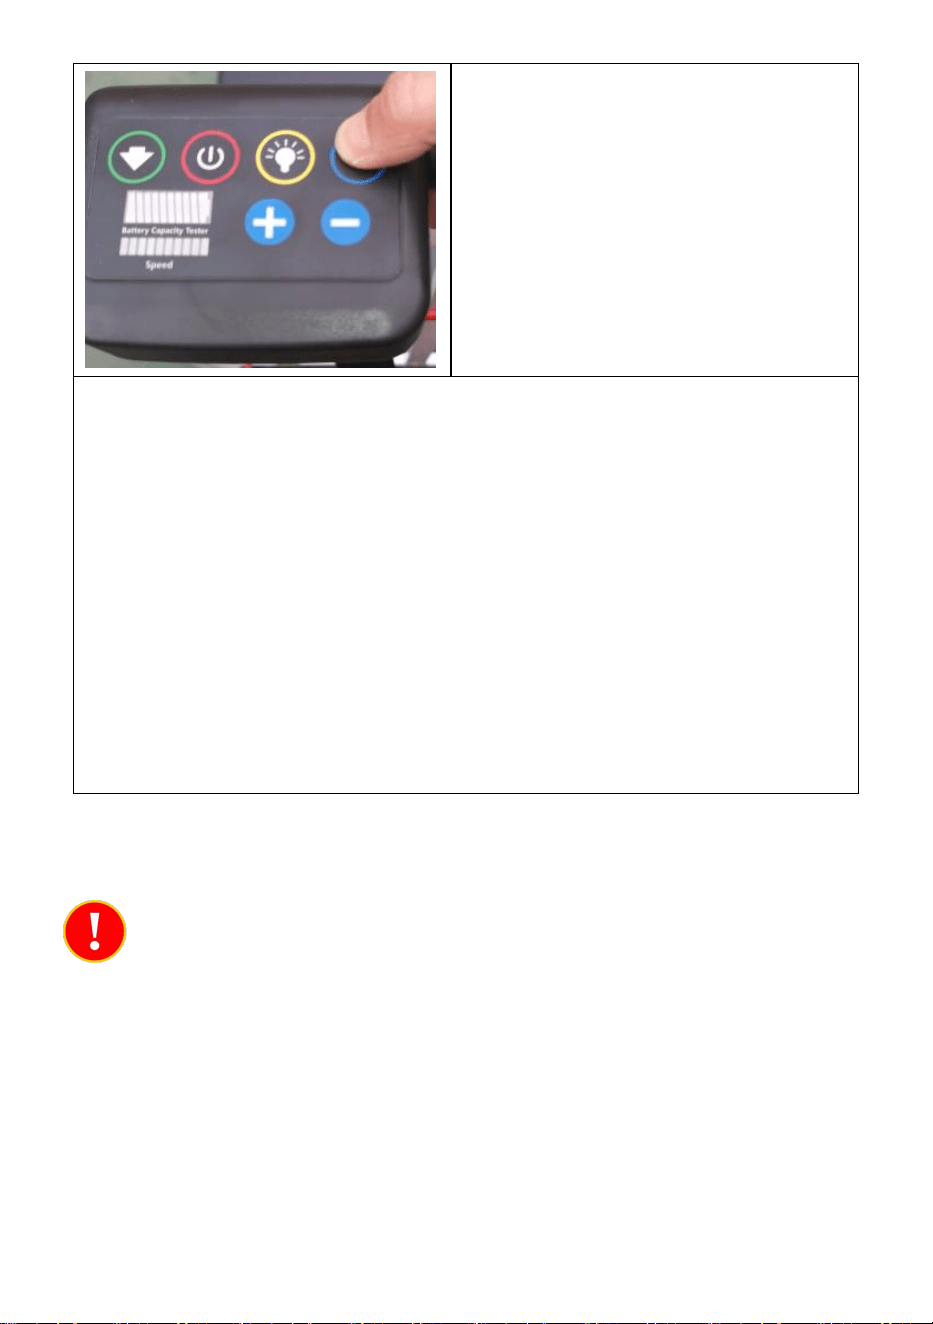
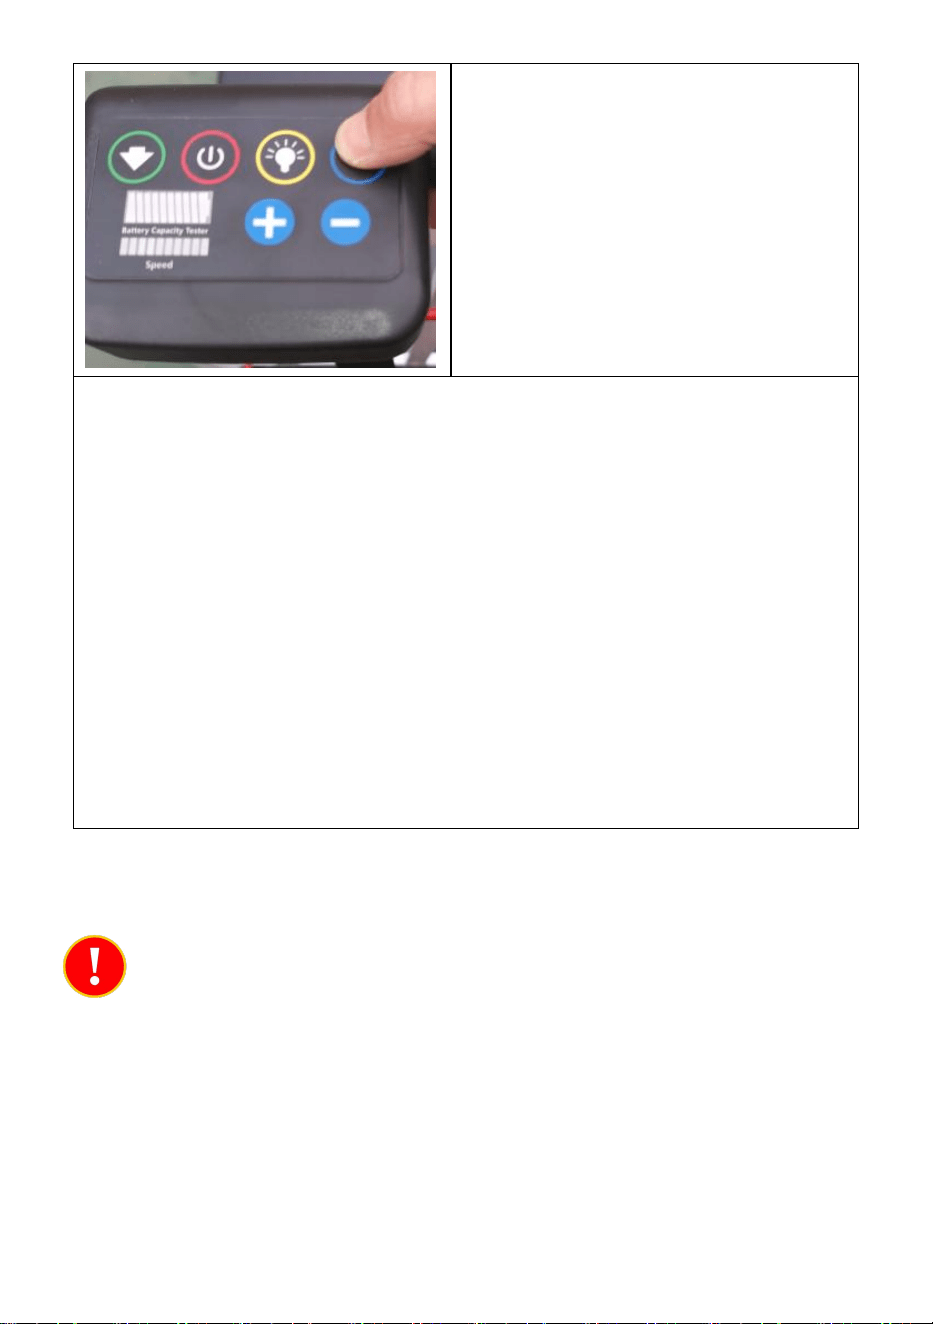
Turning the Unit On: The power switch
is located on the battery, press red
button to turn on the power supply.
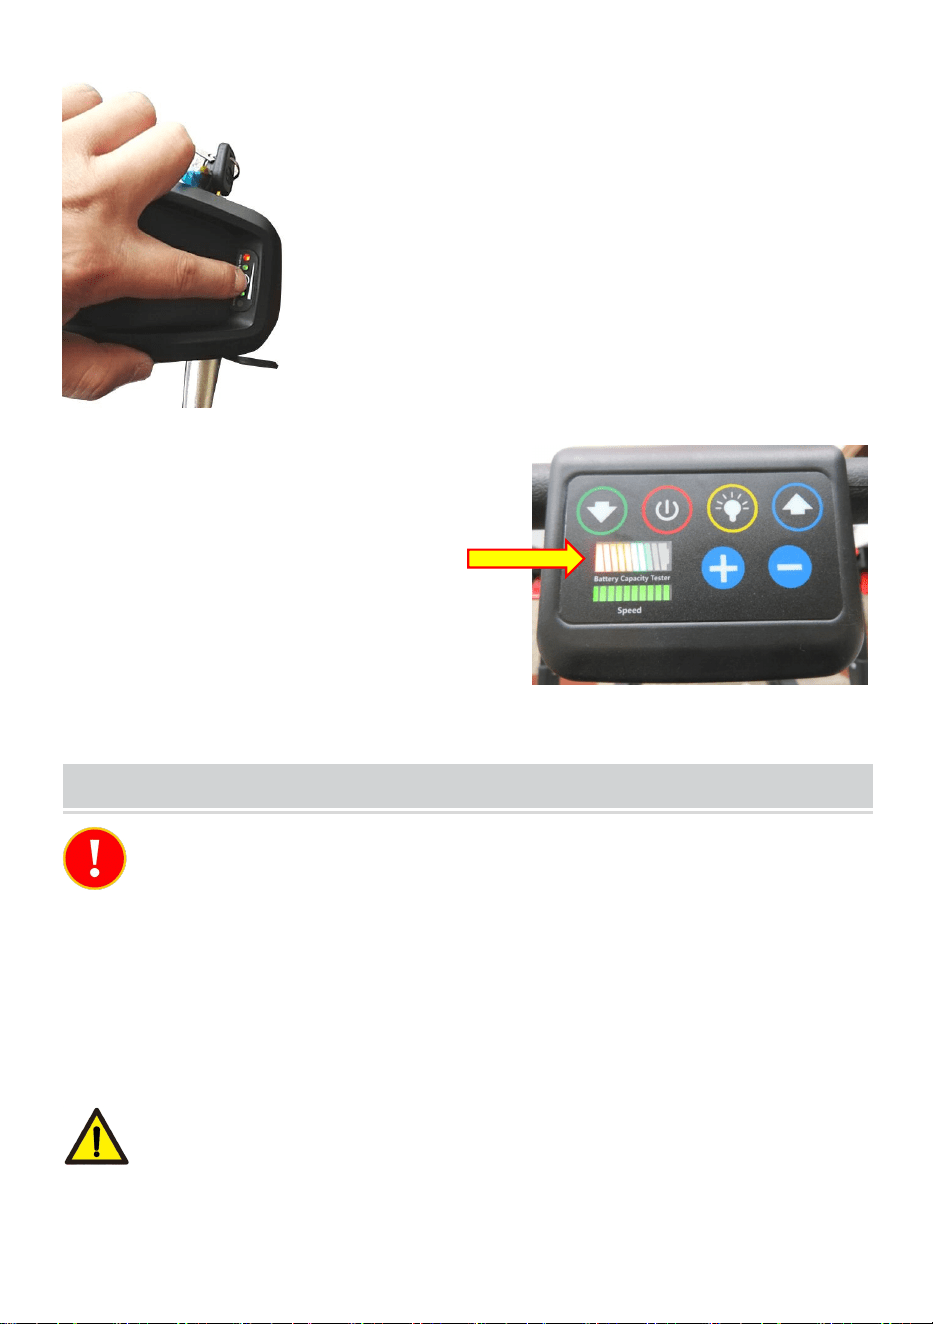
Checking the Battery Charge: Press
the round button on the battery charge
indicator panel. The green lights will
illuminate if there is a charge.
1 light= 25% charge
2 lights= 50% charge
3 lights= 75% charge
4 lights= 100% charge
Ensure the unit is charged prior to use.
The battery tester on top handle,
confirm the Percentage of
Charge more than 25%.
- 6 -
OPERATION
1. Never leave a wheelchair user unattended in the unit and always use
the supplied safety belts.
2. The wheelchair stair lift should only be operated by trained personnel.
3. The unit must be operated with two hands at all times.
NOTE: The battery should be fully charged prior to using the unit for the
first time.
A. Loading a Wheelchair User
Position the unit close to the stairs but
far enough away to allow the
wheelchair user to be loaded safely.
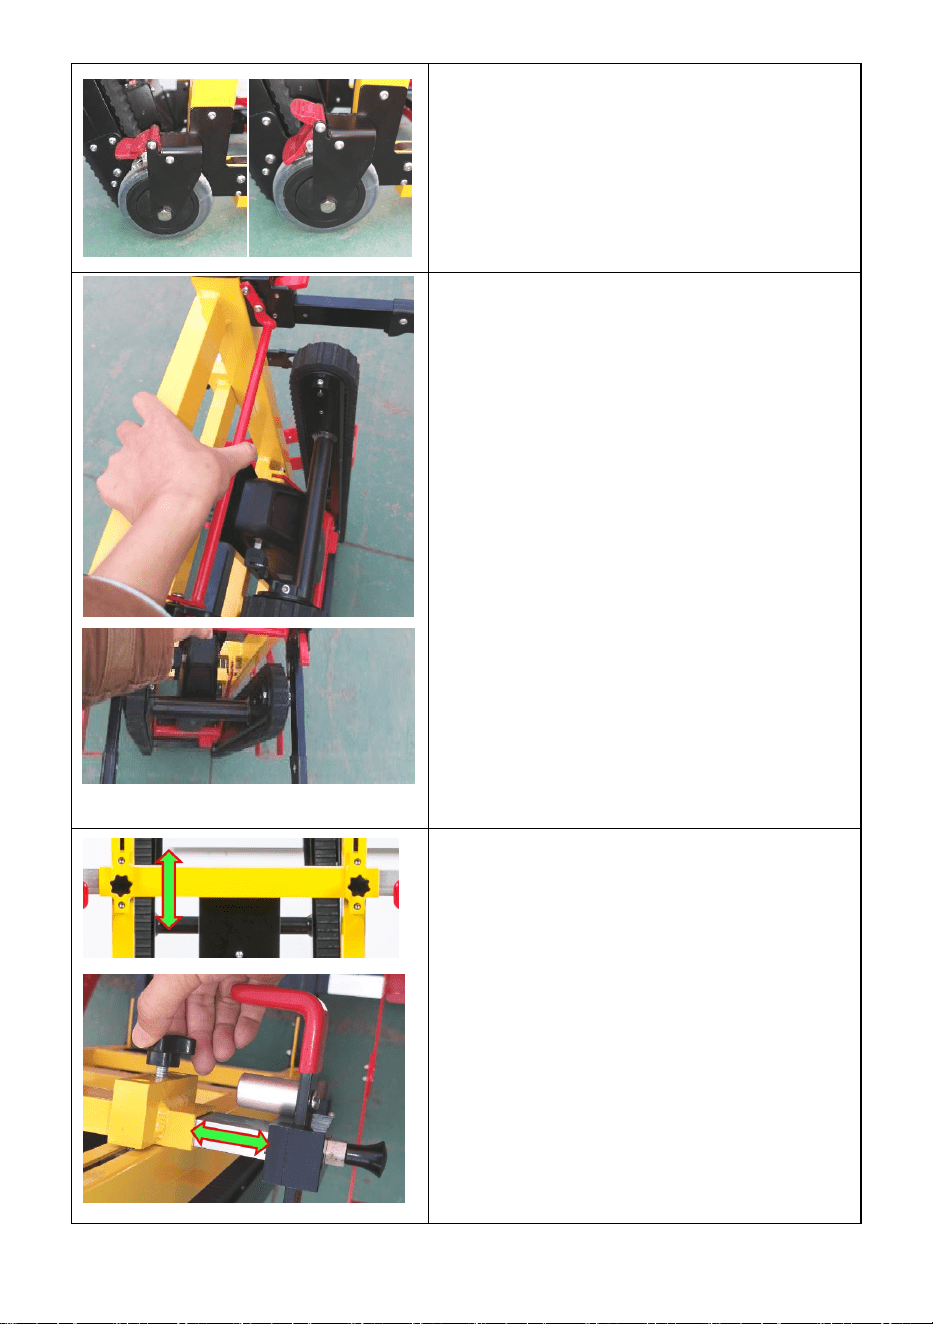
Lock the wheels on the unit.
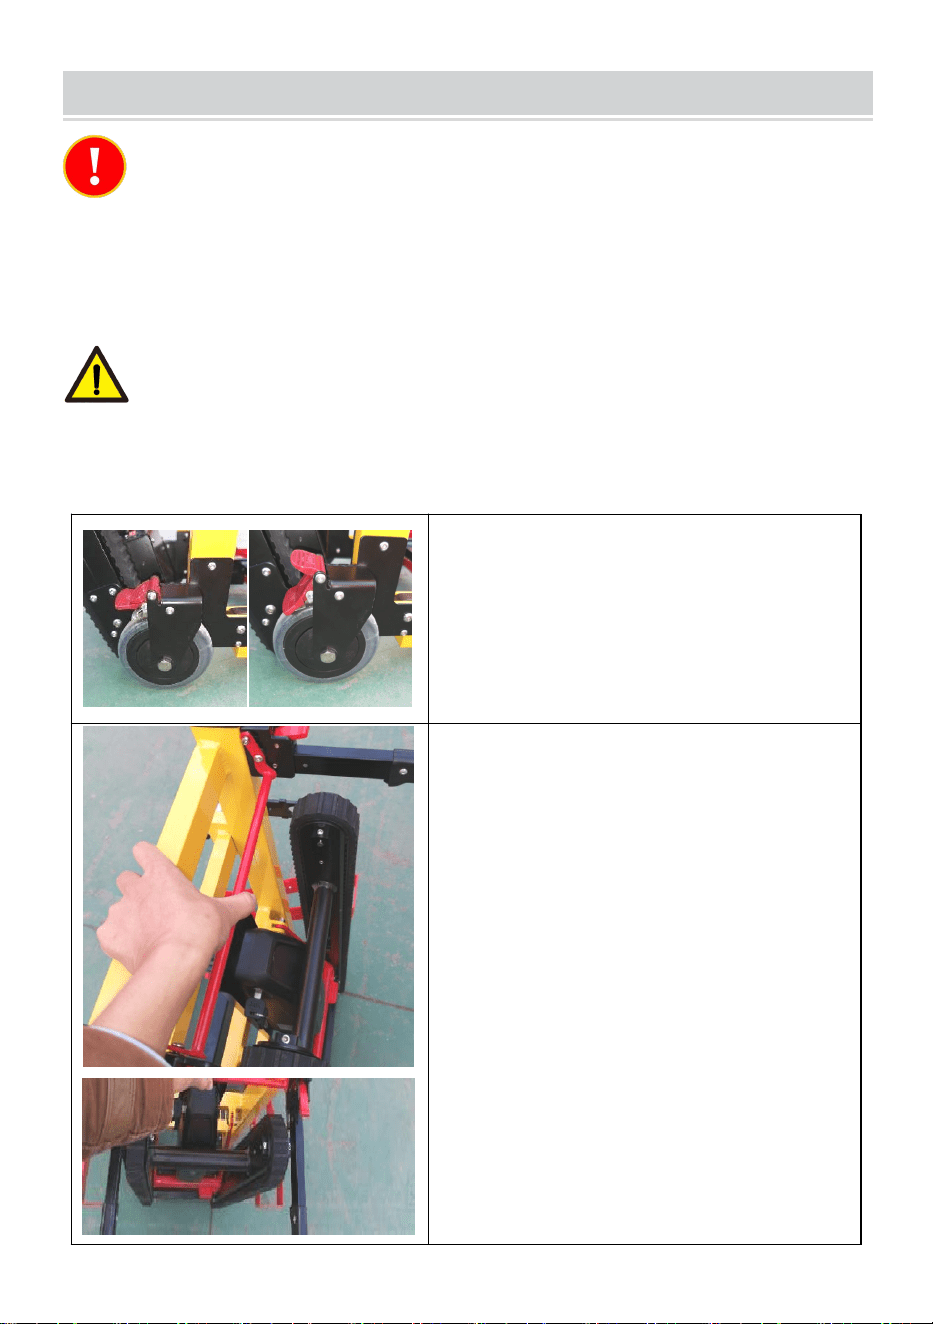
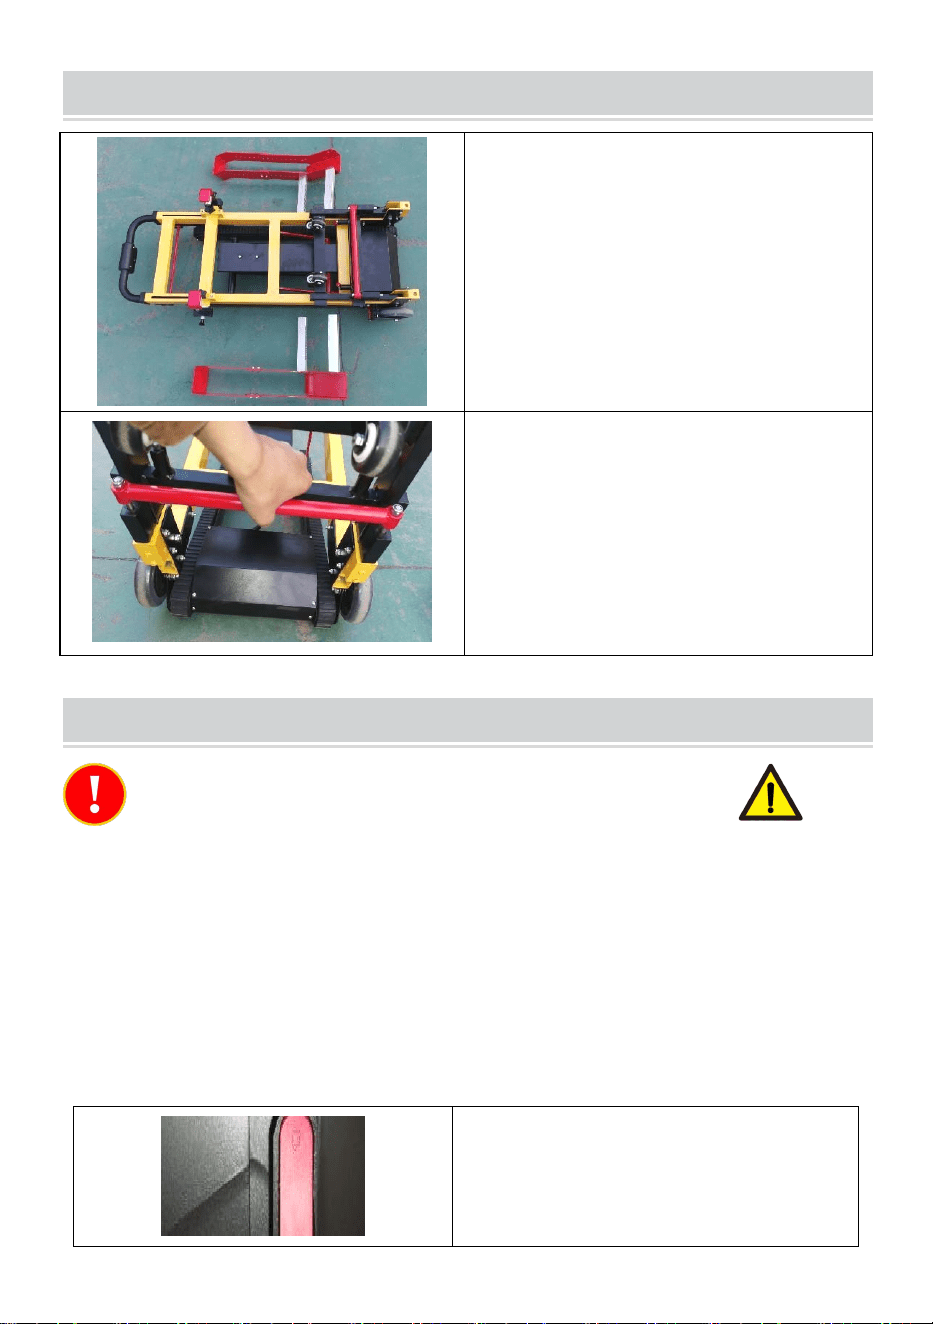
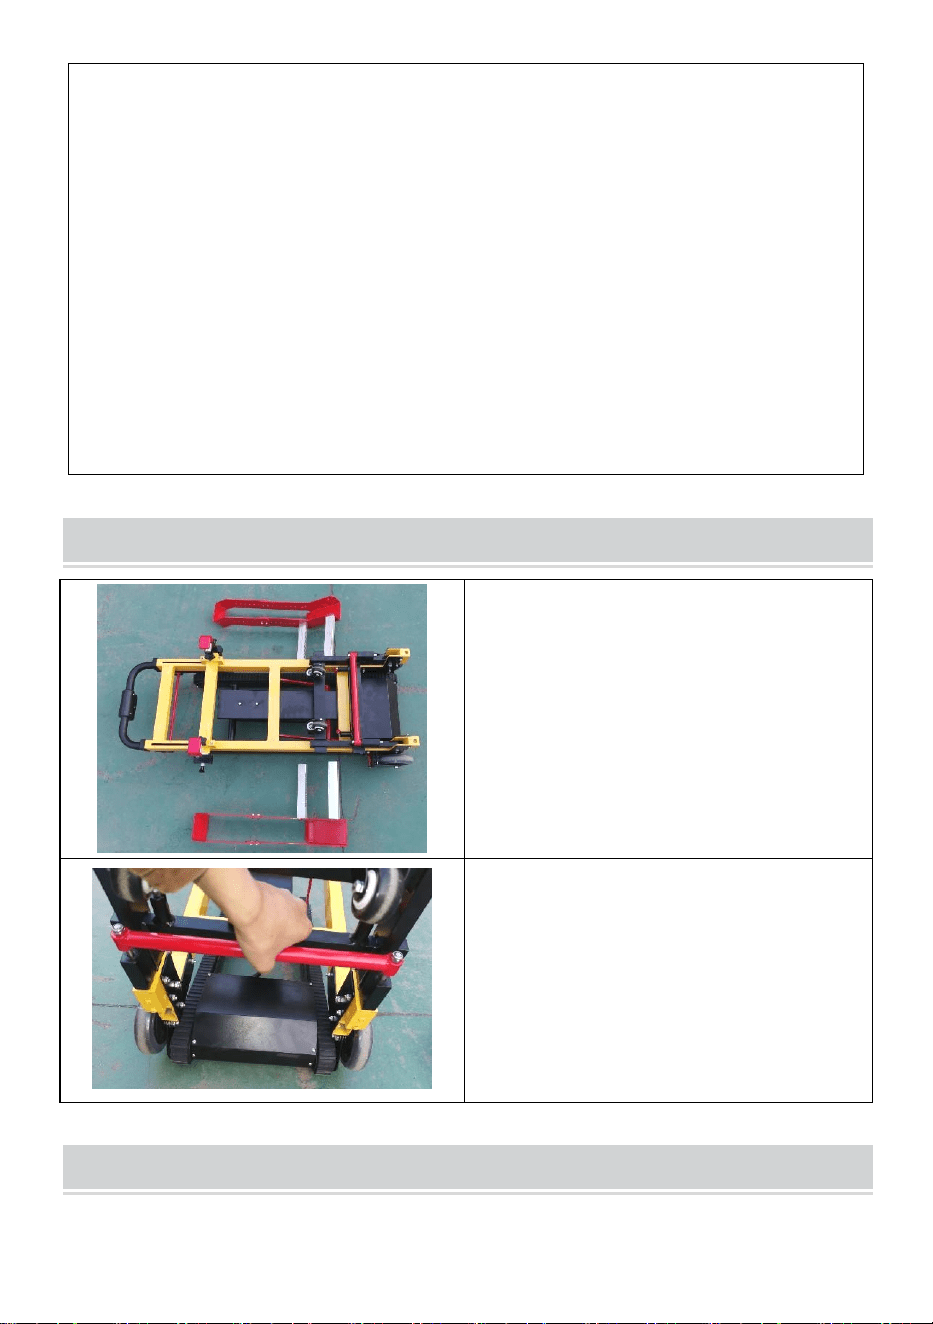
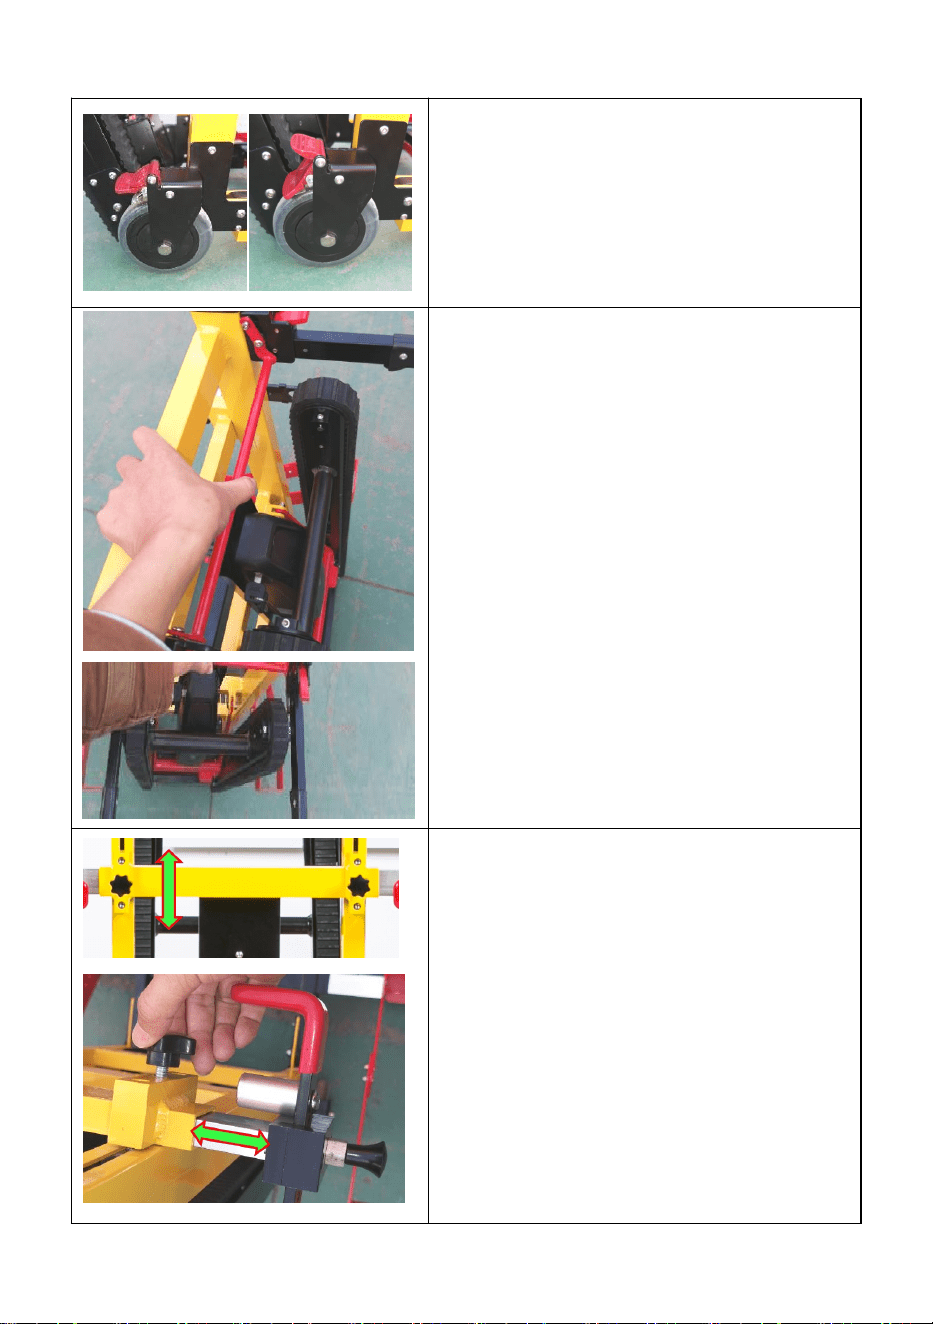
1. Extend the operating handle by
pressing the lower of the red rod on
the back of the frame (as shown) and
pulling up on the handle.
2. When the desired position is
reached, release the red rod.
3. There are 3 heights that can be
selected.
Ensure the operating handle is locked
in position by pulling on the handle
with the rod released.
- 7 -
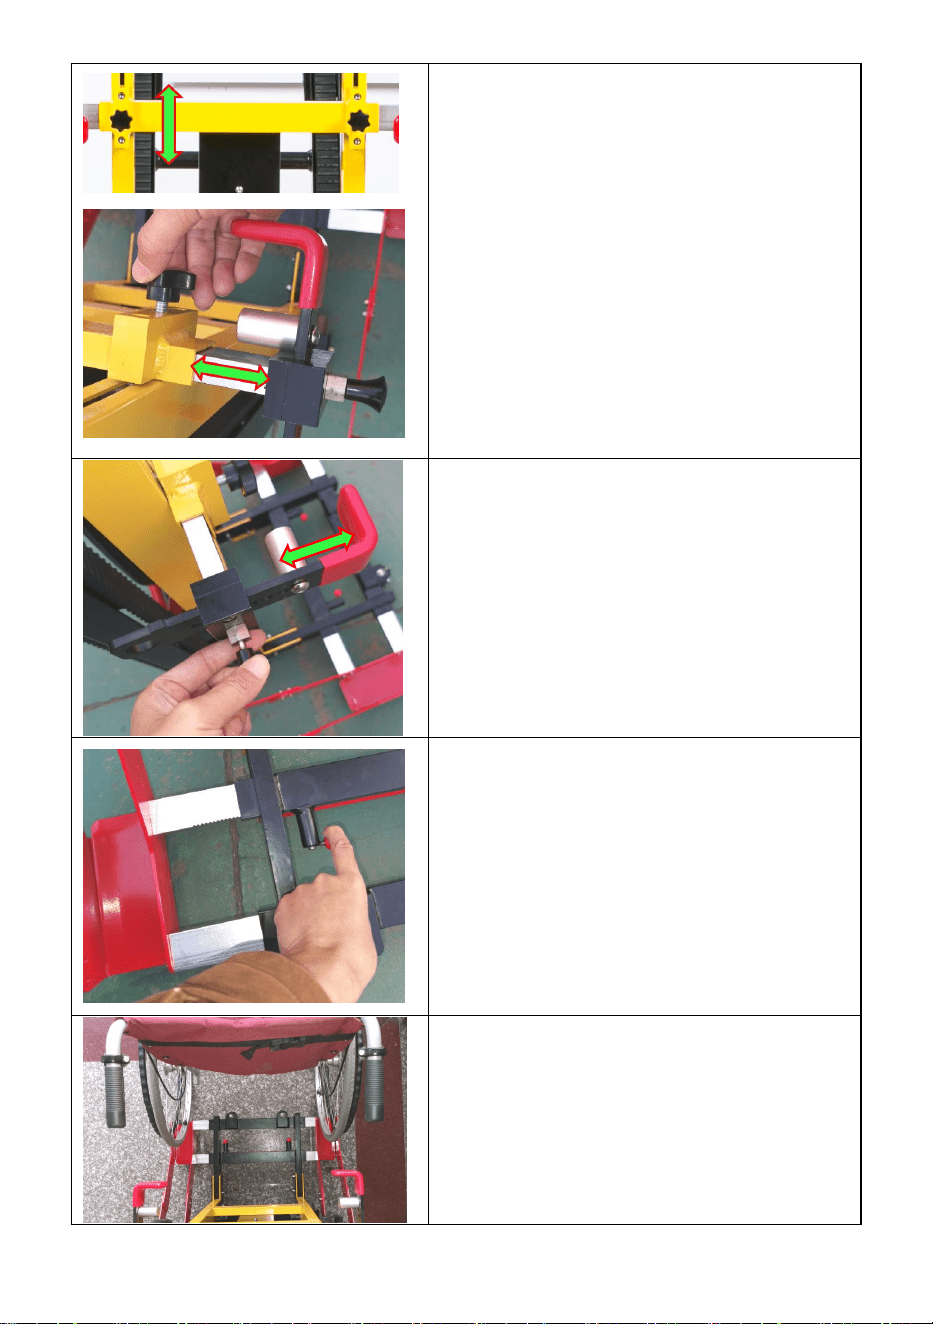
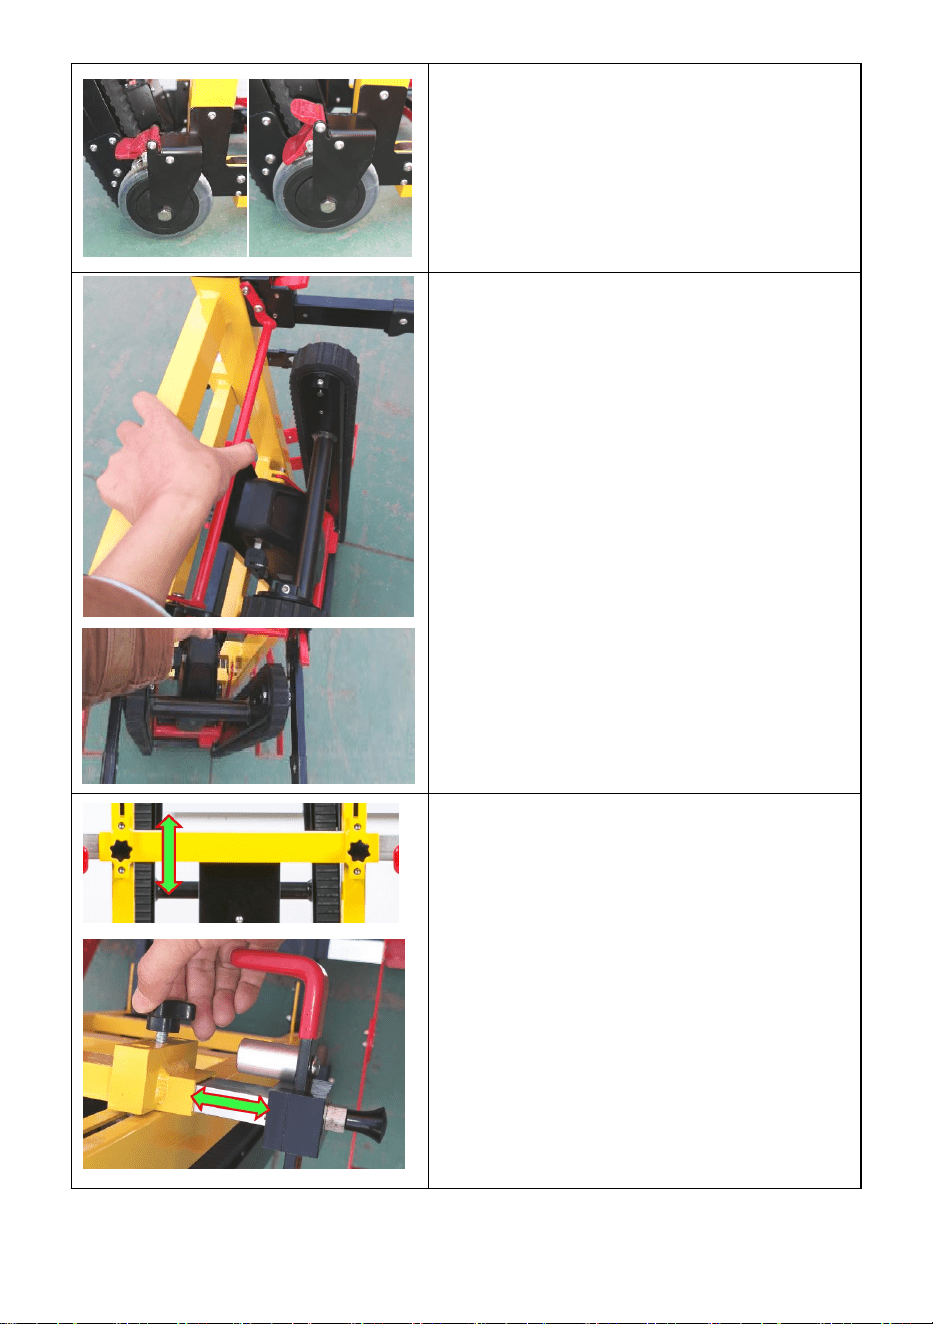
Adjust each locking catch to the
appropriate size for the wheelchair
with a hexagon screw to adjust the
catch support up or down, a cap
screw for sliding the locking catch out
or in as required.
Pull the locking ring upwards outside
the lock catch to adjust the lock
catch.
Adjust the position of each wheel
loading tray by pulling the locking ring
away from the unit and sliding
the loading tray to the desired width.
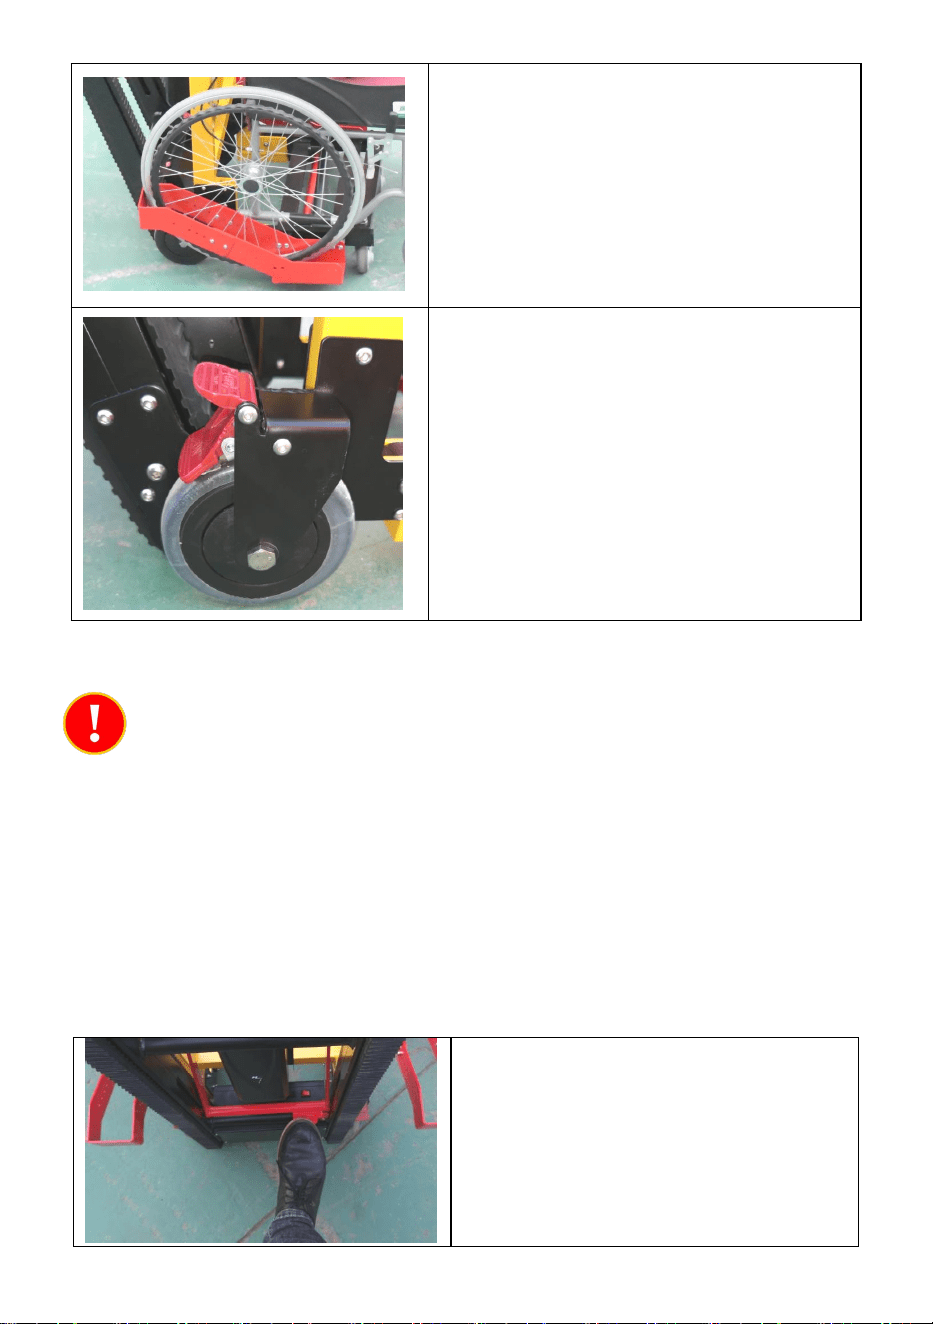
Manoeuvre the wheelchair onto the
unit as shown.
The main wheels of the wheelchair
should be firmly seated in the loading
trays.

- 8 -
The locking catches should secure
the back of the wheelchair.
The headrest should be in a
comfortable position for the
wheelchair user.
Make any adjustments required
before moving the chair.
Secure the wheelchair and user in
place using the safety belts.
Lock the main wheels of the stair lift.
B. Climbing Stairs
1. Never touch any part of the climbing tracks when the unit is powered.
2. Always ensure that all parts of the unit are securely locked into place,
especially the stair climbing tracks, before climbing stairs.
3. Practice operating without a load and at a LOW speed initially.
- 9 -
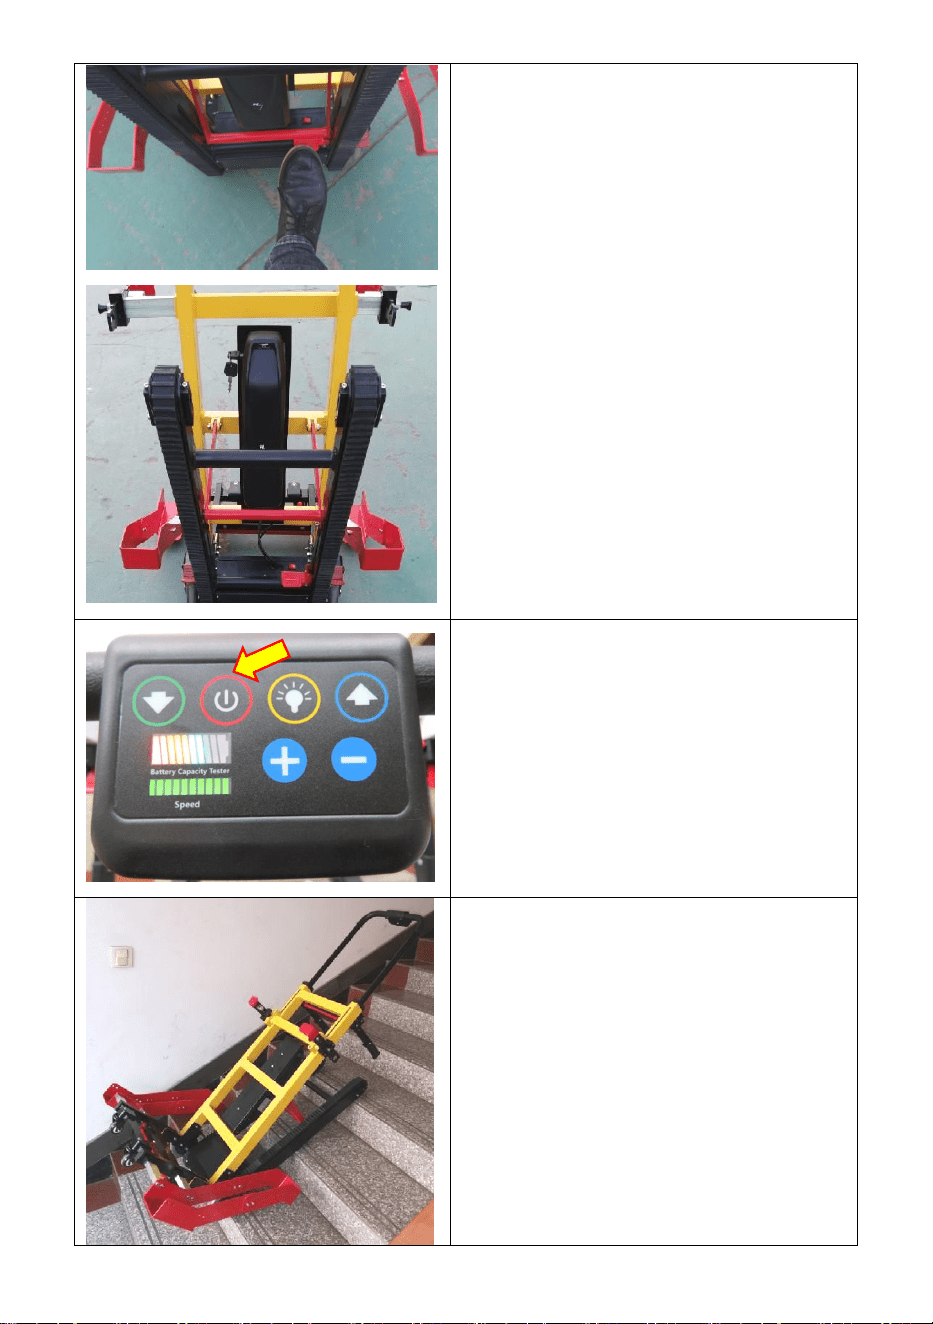
Position the unit at the base of the
stairs.
Lock the wheels on the unit.
Visually inspect the stairs to ensure
that there are no safety hazards,
including debris, ice, or water.
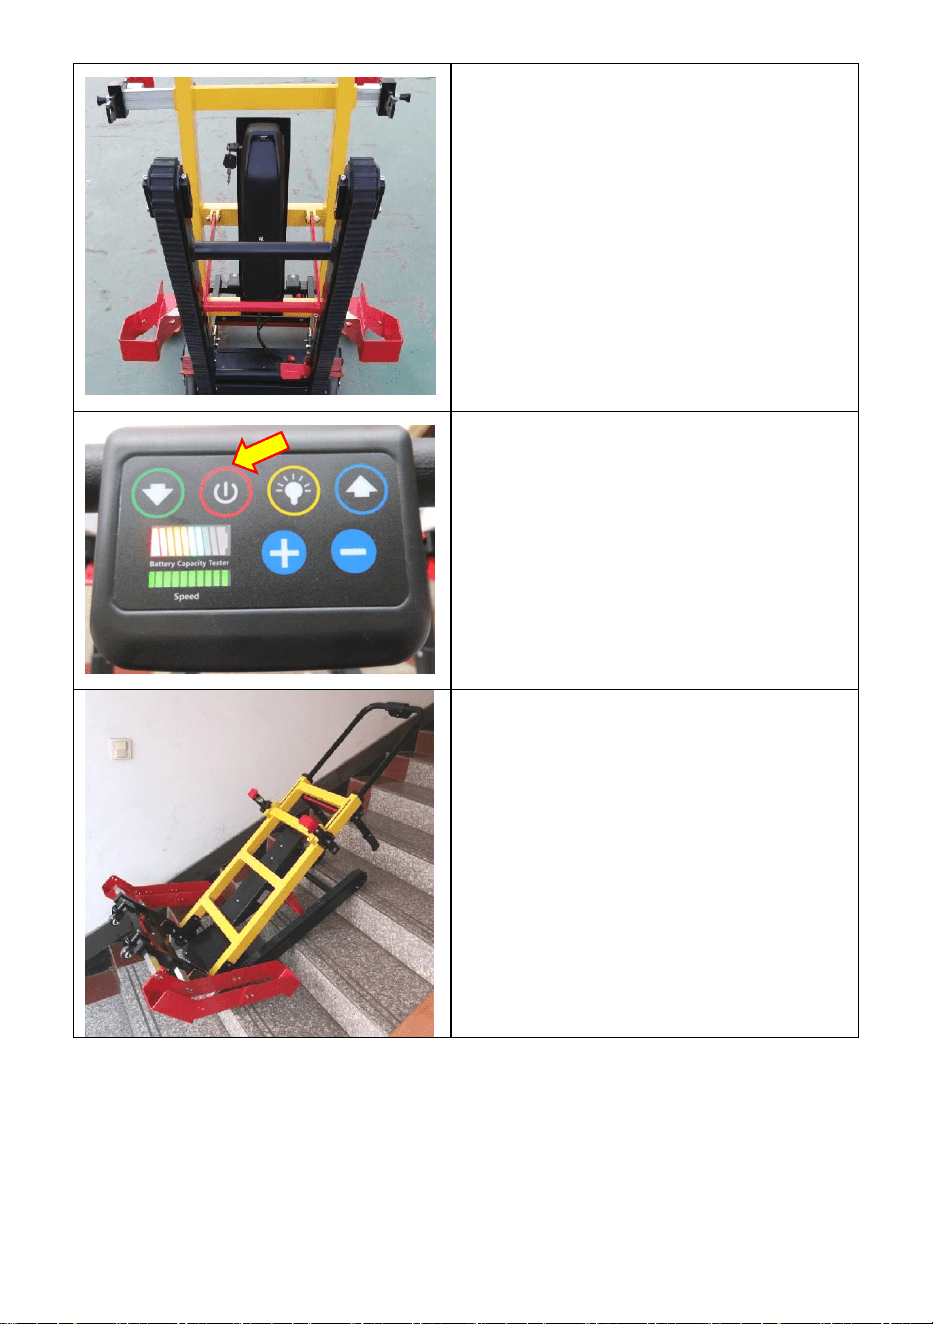
Release the climbing tracks by
stepping on the red plate.
Ensure the climbing tracks are as
close to the stairs as possible and
firmly locked in position.
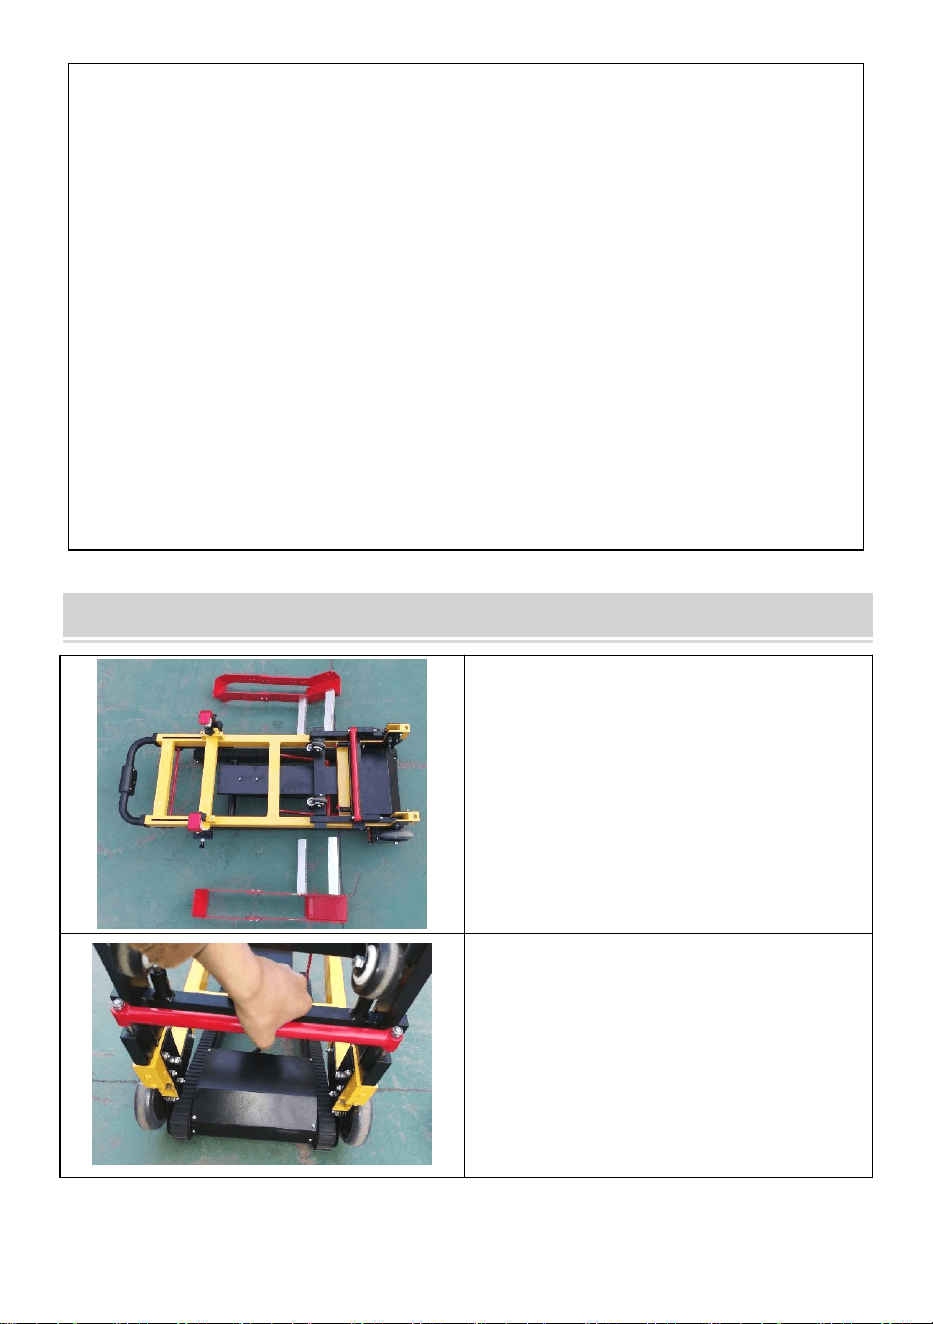
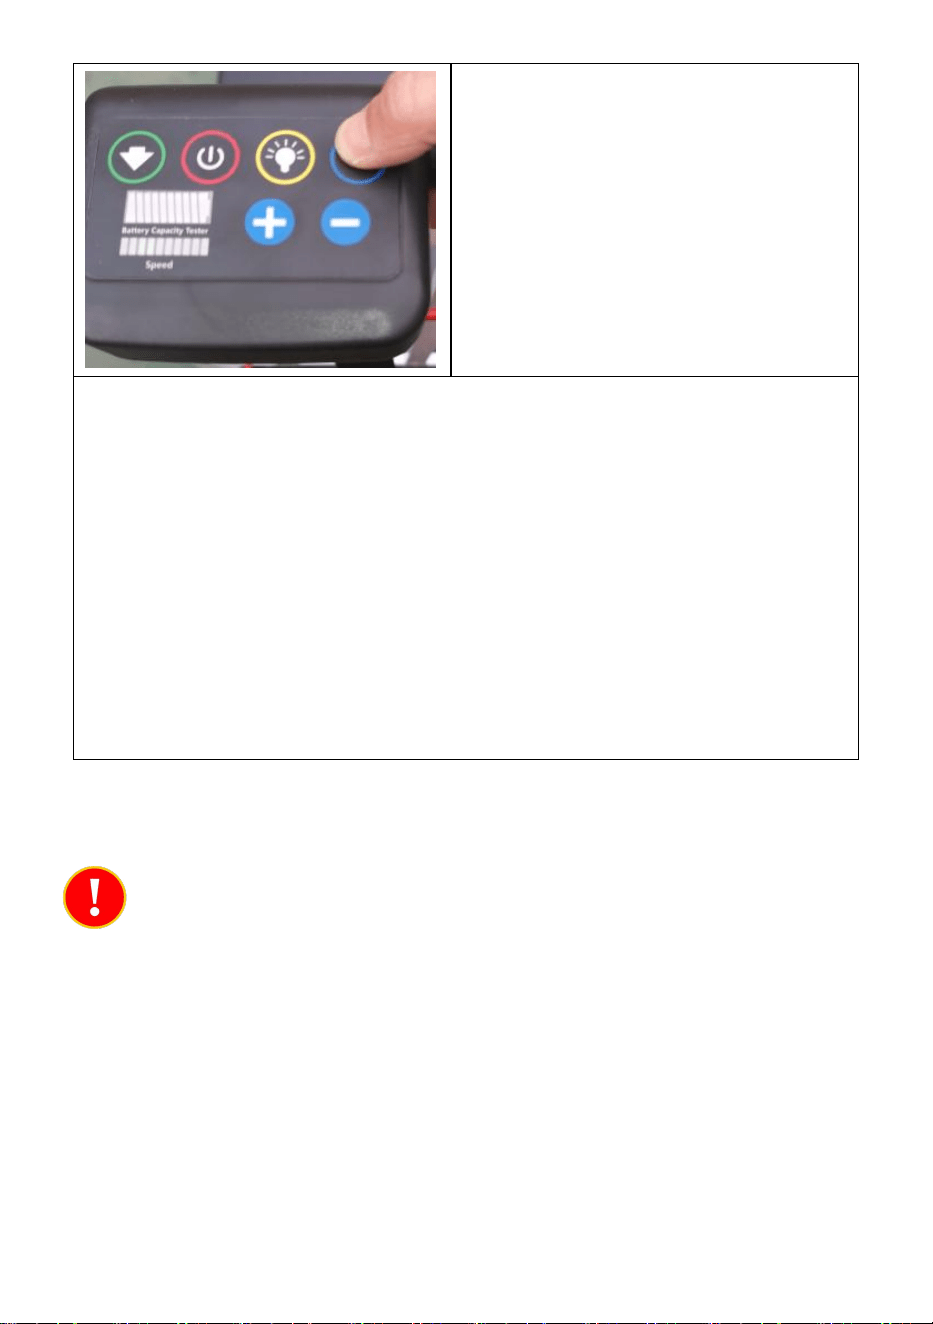
A red button on the top handle,Turn
on the control unit by pressing the
red POWER button.
Tilt the unit backward until the
climbing track is in contact with the
stairs.

- 10 -
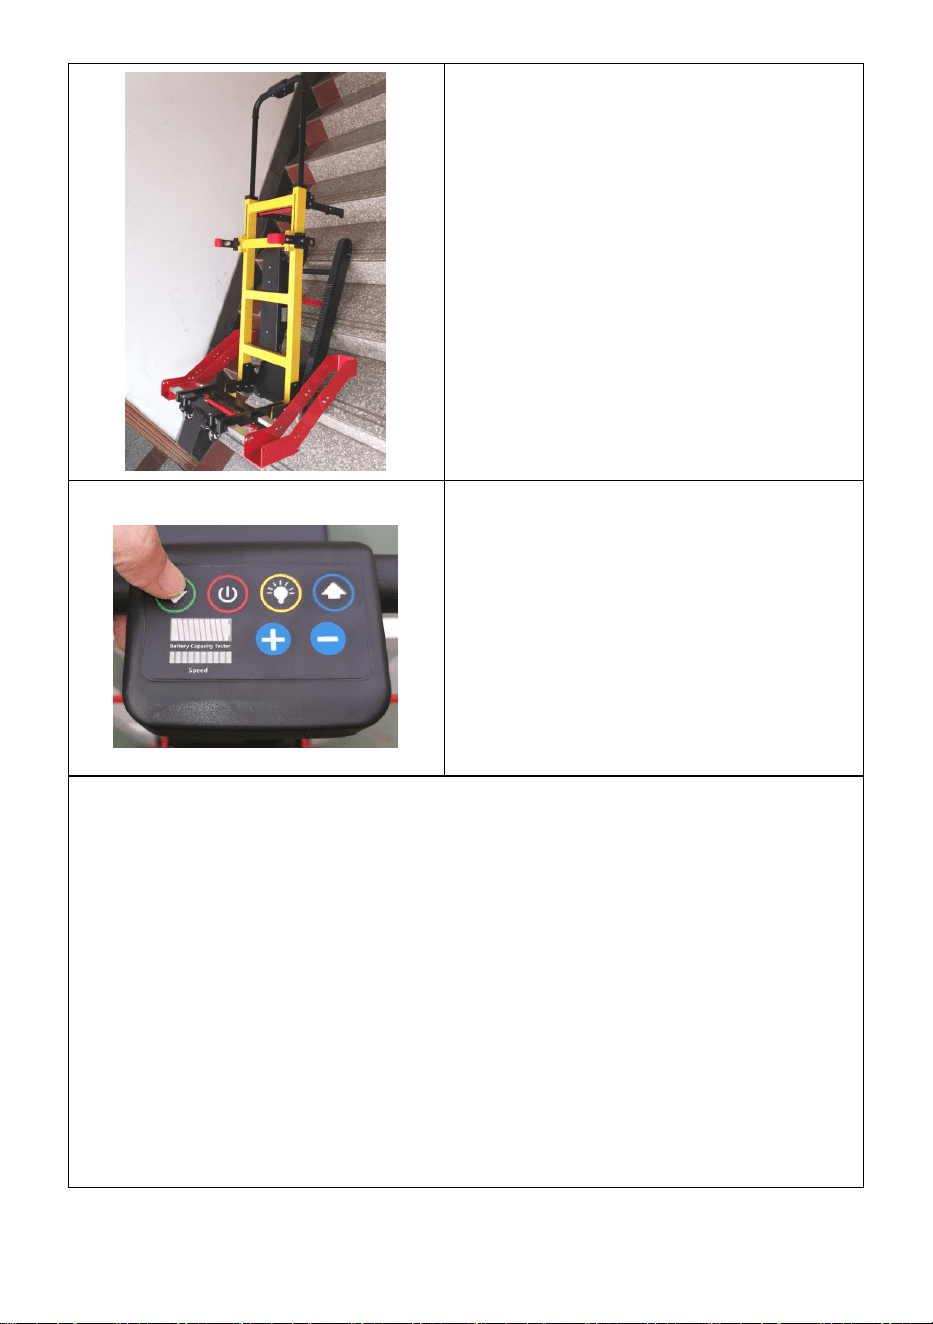
Press the UP button on the control
unit to begin moving.
1. When you have reached the top of the stairs, manoeuvre the unit
completely onto the landing and return the unit to an upright position.
2. Press the red POWER button to turn off the climbing tracks.
3. Move the unit far enough away from the stairs to allow the
wheelchair user to be safely unloaded.
4. Lock the wheels on the unit.
5. Unstrap the safety belts and disengage the wheelchair wheel locks
and the locking catches on the unit.
6. Push the wheelchair forward until it is clear of the unit.
C. Descending Stairs
1. Never touch any part of the climbing tracks when the unit is powered.
2. Always ensure that all parts of the unit are securely locked into place,
especially the stair climbing tracks, before climbing stairs.
- 11 -
Position the unit at the top of the
stairs.
Lock the wheels on the unit.
Visually inspect the stairs to ensure
that there are no safety hazards,
including debris, ice, or water.
Release the climbing tracks (as
described above) and firmly lock
them in position.
Turn on the control unit by pressing
the red POWER button.
Tilt the unit backwards and carefully
push the unit towards the stairs until
the climbing tracks engage on the
stairs.
Press the DOWN button on the
control unit to begin moving.
1. If possible, have a second person positioned on the stairs to steady
the unit as you manoeuvre it into position.
2. When you have reached the bottom of the stairs return the unit to an
upright position.
3. Press the red POWER button to turn off the climbing tracks.
4. Move the unit far enough away from the stairs to allow the
wheelchair user to be safely unloaded.
5. Lock the wheels on the unit.
6. Unstrap the safety belts and disengage the wheelchair wheel locks
and the locking catches on the unit.
7. Push the wheelchair forward until it is clear of the unit.
- 12 -
FOLDING THE UNIT
Remove each wheel loading tray by
pulling the locking ring away from
the unit and sliding the tray
completely free of the unit.
Lay the unit on the ground.
Under the loading pallet is a red
rod;pull the rod upward then press
lightly on the loading pallet.The unit
will fold.
BATTERY CHARGING
Do not use wet hands when operating the equipment.
1. Charge the unit after each use. The MINIMUM Percentage of Charge is
25%.
2. Protect the charger and the charging wires from oil, grease, detergent,
thinner or any potentially damaging liquids.
3. Always keep sockets dry.
4. Follow the operating instructions to charge the battery.
5. The new battery will reach its optimum state after several charging and
discharging cycles.
Turn off the main switch.

- 13 -
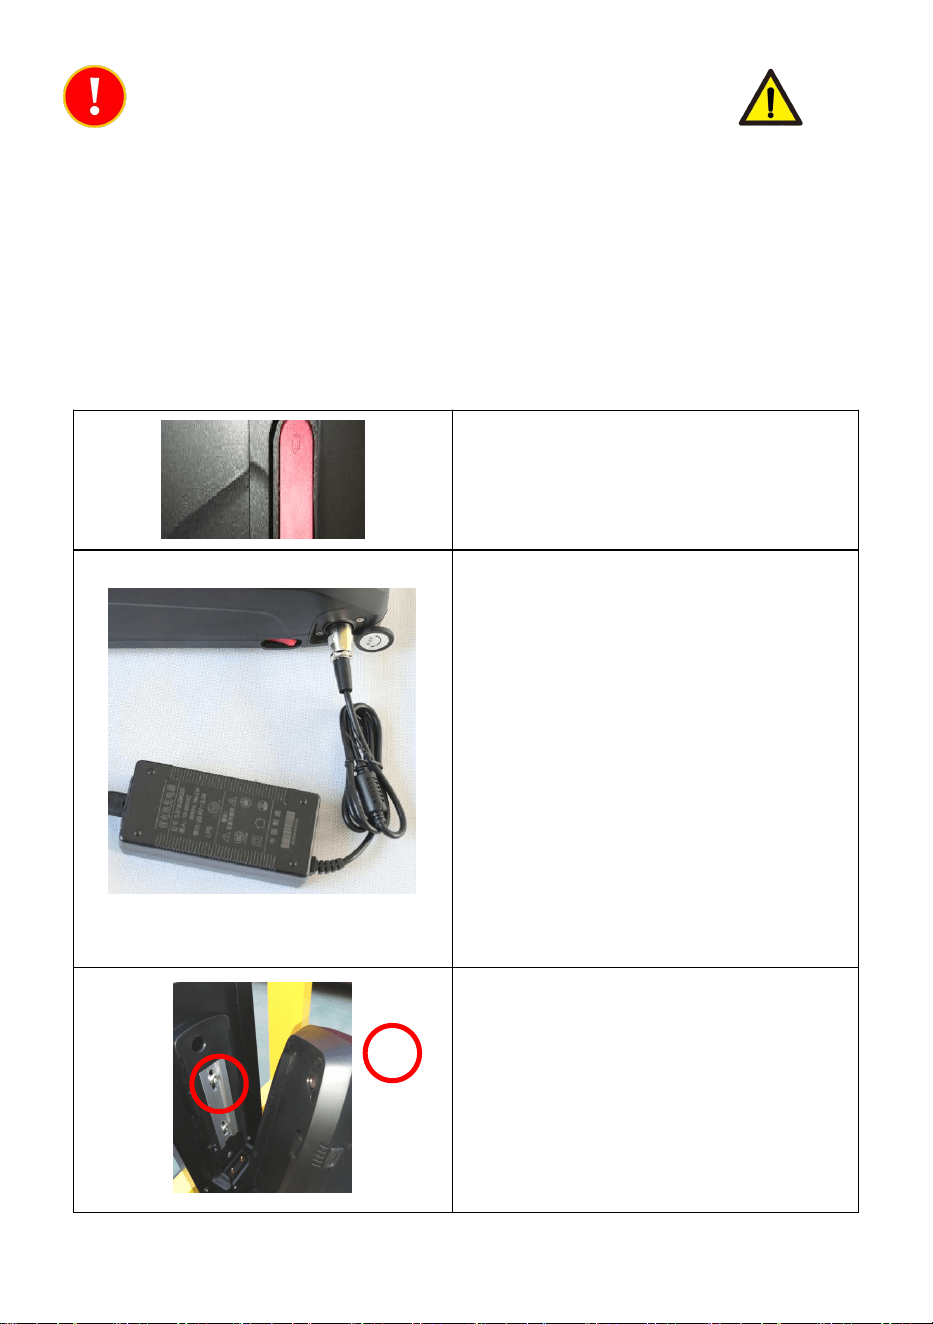
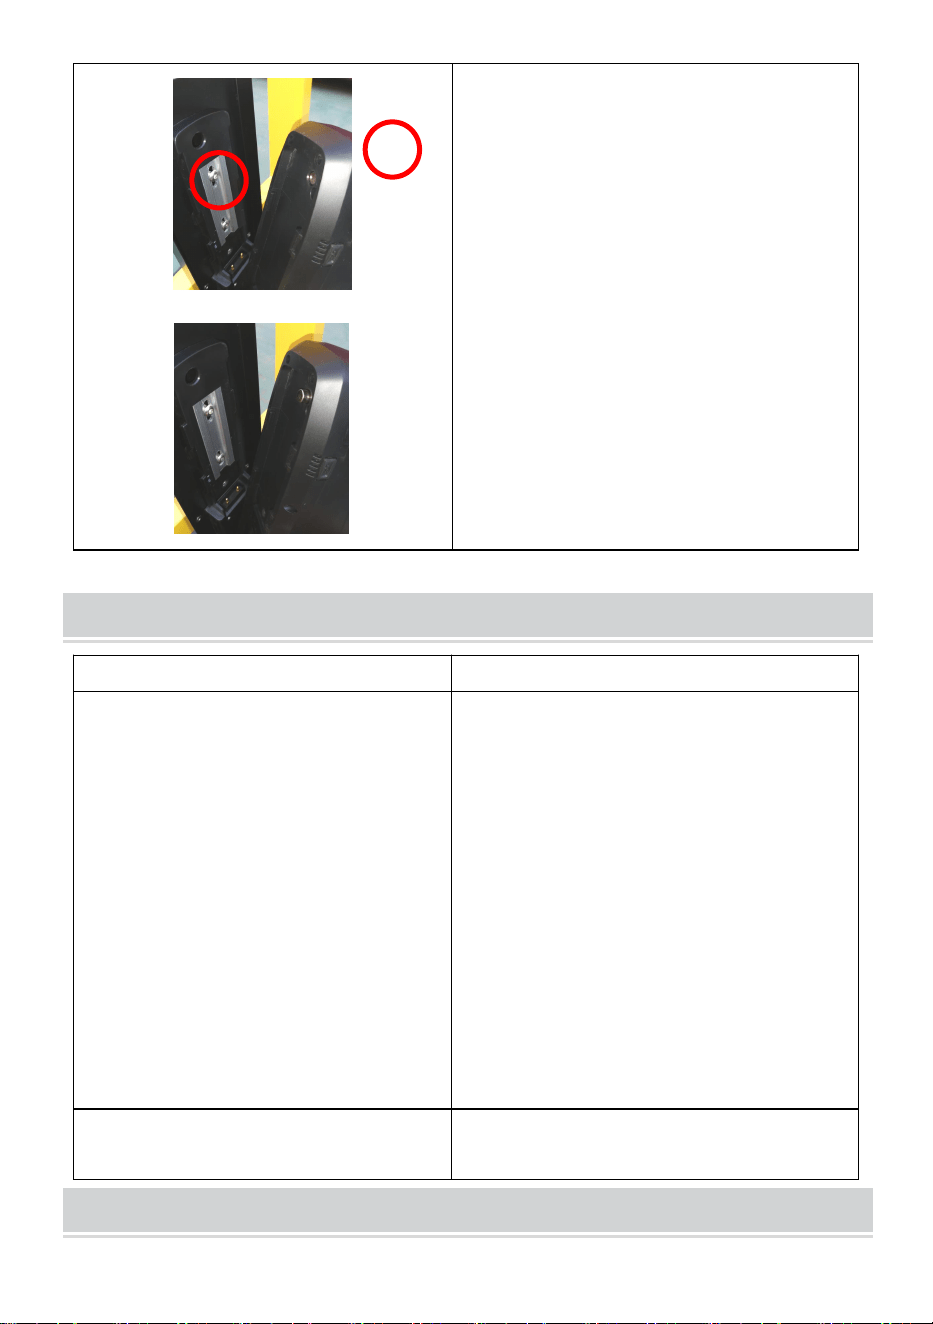
1. The charging port is located
next to the power switch.
2. Unscrew the charging port
cover.
3. Connect the charging cable to
the charging port Plug the charging
cable into a mains power outlet.
4. When the battery is charged,
remove the charging cable and
screw the charging port cover back
into place.
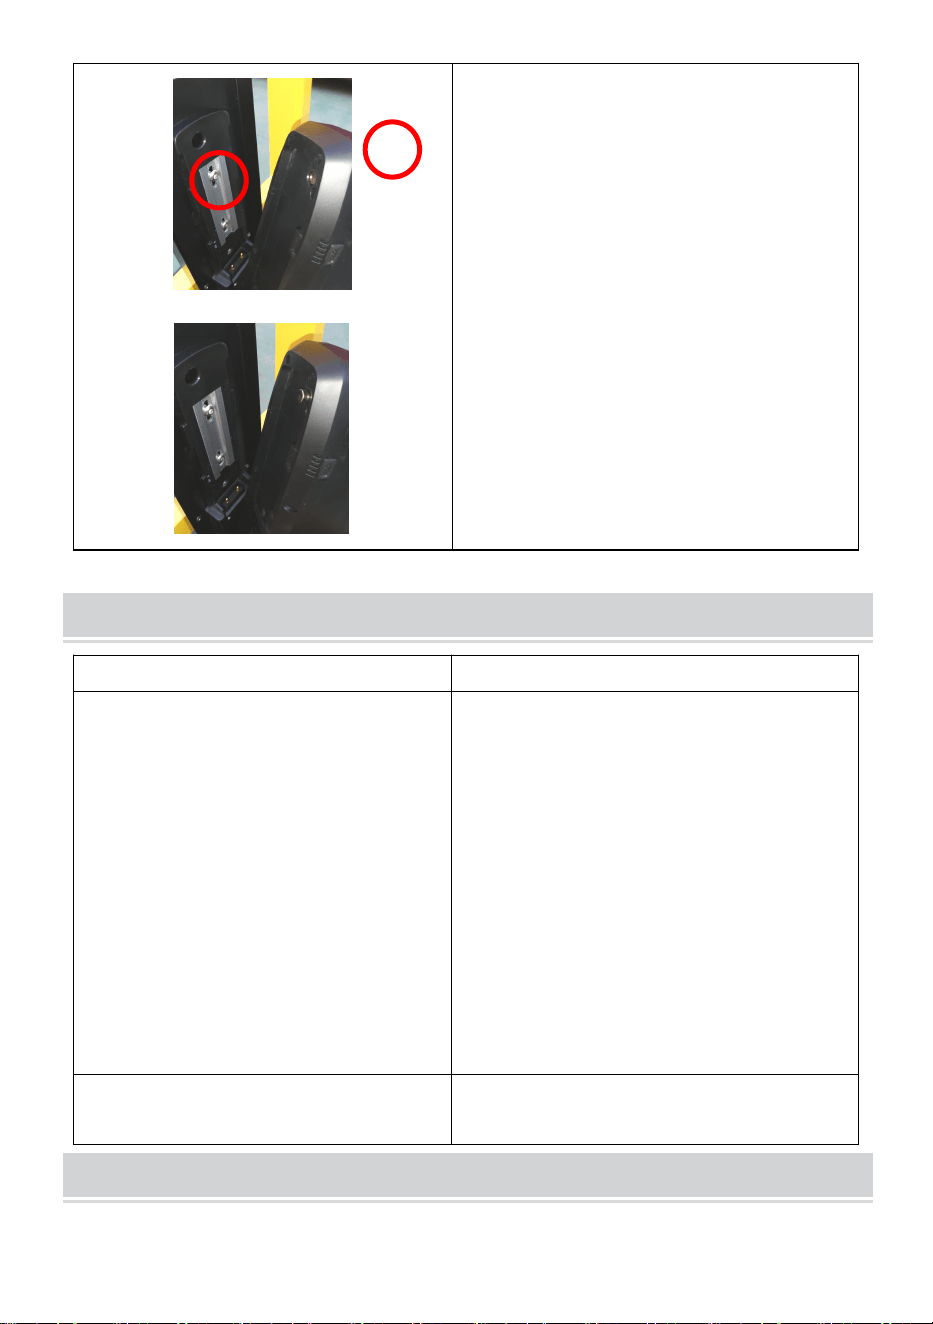
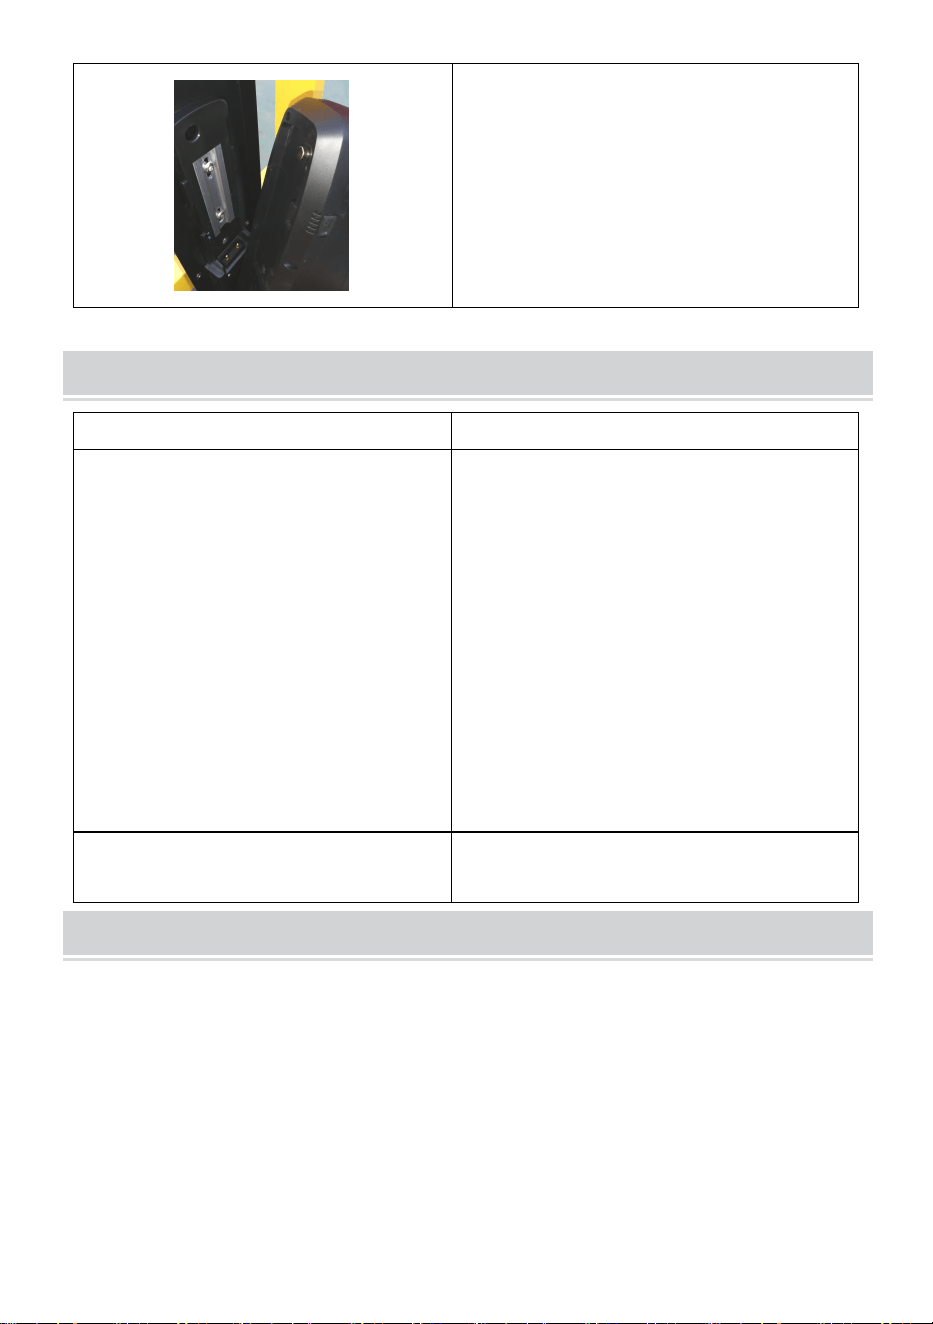
The battery has two keys and can
be used to lock battery on unit.
TROUBLESHOOTING
Faults
Detection and Solutions
The unit won’t start or can't go
up or down stairs.
Ensure the main power switch on
the loading pallet is in the ON
position. The indicator light should
glow red.
Check the battery charge.
If it shows low power (<25%),
charge the unit.
If the battery has > 25% charge
remaining, and the unit is unable to
start, please contact the
manufacturer.
The battery can't be recharged.
Please contact the manufacturer.

- 14 -
MAINTENANCE
1. Keep clean as routine.
2. Check frequently for loose parts.
3. If not used for a long time, please fully charge the battery and take out
the battery and store it in a cool and dry place. Beware of water entering
the lithium battery.
4. Clean the unit and its parts with a clean cloth or soft brush and warm
soapy water. Rinse with warm water and air dry.
5. Do not clean with products comprising of bleach or phenol. A stiff
bristled brush can be used if necessary.


- 2 -
Assistance technique et certificat de garantie électronique
www.vevor.com/support
CHAISE D'ESCALADE
MODÈLE : YHR-LD02
We continue to be committed to provide you tools with competitive price.
"Save Half", "Half Price" or any other similar expressions used by us only represents an
estimate of savings you might benefit from buying certain tools with us compared to the major
top brands and does not necessarily mean to cover all categories of tools offered by us. You
are kindly reminded to verify carefully when you are placing an order with us if you are
actually saving half in comparison with the top major brands.

- 1 -
MODÈLE : YHR-LD02
Have product questions? Need technical support? Please feel free to
contact us:
Technical Support and E-Warranty Certificate
www.vevor.com/support
NEED HELP? CONTACT US!
This is the original instruction, please read all manual instructions
carefully before operating. VEVOR reserves a clear interpretation of our
user manual. The appearance of the product shall be subject to the
product you received. Please forgive us that we won't inform you again if
there are any technology or software updates on our product.
STAIR CLIMBING CHAIR

- 2 -
SAFETY INSTRUCTIONS
Avant la première opération
● Lisez le manuel d'utilisation et notez tous les avertissements et
instructions de sécurité.
● Tenir compte des données techniques car la capacité de levage ne peut
pas être dépassée.
● Vérifiez toutes les fonctions électroniques, les freins de sécurité et la
position de la piste d'escalade.
Pendant le fonctionnement de l'appareil
● Ne modifiez jamais les paramètres lorsque vous montez ou descendez
des escaliers.
● Ne placez jamais aucune partie du corps, notamment les pieds, sous les
rails d'escalade.
● Si les éléments d'entraînement se bloquent, éteignez immédiatement
l'appareil.
15. Nous conseillons fortement que seul un personnel formé et certifié
utilise le fauteuil d'escalier . Un personnel non formé peut provoquer des
blessures ou des dommages !
16. Faites attention à une manipulation fluide.
17. Lorsque vous transportez des patients avec cette machine ,
assurez-vous de bien verrouiller , attachez la ceinture de sécurité pour plus
de sécurité et dites - lui de se tenir à la main courante.
18. Ne vous déplacez pas trop vite lorsque vous passez des zones de
nids-de-poule.
19. En cas de panne, le personnel non professionnel ne doit pas être
démonté à volonté .
20. Vous pouvez ajouter de l'huile lubrifiante au mécanisme de
transmission de la roue motrice pour augmenter la durée de vie .
21. Lorsque vous travaillez, n'effectuez pas d'autres travaux des deux
côtés de la voiture pour éviter les accidents .
22. Une fois l'opération terminée, vérifiez si la voiture d'escalade électrique

- 3 -
est normale et coupez l'alimentation .
23. Ne frappez pas, n'aiguilletez pas, ne marchez pas, ne modifiez pas,
n'exposez pas la batterie au soleil, ne placez pas la batterie au micro
-ondes, à haute pression et dans d'autres environnements.
24. Tenir à l'écart des flammes nues.
25. Portez des chaussures antidérapantes et travaillez toujours avec les
deux mains.
26. Ne l' utilisez pas sous la pluie, dans des conditions humides, sur la
neige ou sur la glace.
27. Ne l' utilisez pas sur les escaliers mécaniques ou les tapis roulants.
28. Le monte-escalier pour fauteuil roulant ne doit pas être utilisé pour le
transport de marchandises.
MODEL AND PARAMETERS
Modèle
YHR-LD02
Max. Charger
150 kg
Angle des courroies à
chenilles en caoutchouc
20°
Saisir
CA 100-240 V 50/60 Hz
Moteur
DC 24 V/120 W ; 3 vitesses différentes
réglables.
Batterie
Batterie au lithium; C.C 24 V/13 Ah.
Chargeur
DC29,4 V/2 A.
Hauteur du cadre de
préhension télescopique
H108cm, H126cm, H145cm et H163cm
Plate-forme de chargement
33,5x31,5cm
Taille de pliage
109x45x30cm
Matériaux
Alliage d'aluminium
Poids
35 kg
DIMENSION AND DIAGRAM

- 4 -
Unité : mm
COMPONENTS
Non.
Nom
1
2
3
5
4
6
7
8

- 5 -
1
Poignée et panneau de commande
2
Poignée de transport arrière
3
Ceinture de chenille
4
Roues arrière (5 pouces)
5
Porte-roue
6
Ceinture de sécurité
7
Loquet de verrouillage
8
Roues avant (2 pouces)
INITIAL OPERATION
NOTE: Before the initial operation, please ensure the STAIR LIFT
will be operated in an environment higher than 0°C.
Turning the Unit On: The power switch
is located on the battery, press red
button to turn on the power supply.

- 6 -
OPERATION
4. Ne laissez jamais un utilisateur de fauteuil roulant sans surveillance
dans l'unité et utilisez toujours les ceintures de sécurité fournies.
5. Le monte-escalier pour fauteuil roulant ne doit être utilisé que par du
personnel qualifié.
6. L'appareil doit toujours être utilisé à deux mains.
REMARQUE : La batterie doit être complètement chargée avant d'utiliser
l'appareil pour la première fois.
A. Chargement d'un utilisateur de fauteuil roulant
Checking the Battery Charge: Press
the round button on the battery charge
indicator panel. The green lights will
illuminate if there is a charge.
1 light= 25% charge
2 lights= 50% charge
3 lights= 75% charge
4 lights= 100% charge
Ensure the unit is charged prior to use.
The battery tester on top handle,
confirm the Percentage of
Charge more than 25%.

- 7 -
Placez l'unité près des escaliers mais
suffisamment loin pour permettre à
l'utilisateur de fauteuil roulant d'être
chargé en toute sécurité.
Verrouillez les roues de l'appareil.
4. Déployez la poignée de
commande en appuyant sur la partie
inférieure de la tige rouge à l'arrière
du cadre (comme illustré) et en tirant
sur la poignée.
5. Lorsque la position souhaitée est
atteinte, relâchez la tige rouge.
6. Il y a 3 hauteurs qui peuvent être
sélectionnées.
Assurez-vous que la poignée de
commande est verrouillée en position
en tirant sur la poignée avec la tige
libérée.
Ajustez chaque loquet de verrouillage
à la taille appropriée pour le fauteuil
roulant avec un Vis hexagonale pour
régler le support du loquet vers le
haut ou vers le bas, vis à capuchon
pour faire glisser le loquet de
verrouillage vers l'extérieur ou vers
l'intérieur selon les besoins.

- 8 -
Tirez l'anneau de verrouillage vers le
haut, à l'extérieur du loquet de
verrouillage, pour régler le loquet de
verrouillage.
Ajustez la position de chaque plateau
de chargement de roues en tirant
l'anneau de verrouillage loin de l'unité
et en le faisant glisser.
le plateau de chargement à la largeur
souhaitée.
Manipulez le fauteuil roulant sur
l'unité comme indiqué.
Les roues principales du fauteuil
roulant doivent être fermement
assises dans les plateaux de
chargement.
Les loquets de verrouillage doivent
sécuriser l'arrière du fauteuil roulant.
L'appui-tête doit être dans une
position confortable pour l'utilisateur
de fauteuil roulant.
Effectuez les ajustements
nécessaires avant de déplacer le
fauteuil.
- 9 -
Fixez le fauteuil roulant et l'utilisateur
en place à l'aide des ceintures de
sécurité.
Verrouillez les roues principales du
monte-escalier.
D. Monter des escaliers
4. Ne touchez jamais aucune partie des pistes d’escalade lorsque
l’appareil est sous tension.
5. Assurez-vous toujours que toutes les pièces de l'appareil sont
solidement verrouillées en place, en particulier les rails de montée
d'escalier, avant de monter les escaliers.
6. Entraînez-vous initialement à fonctionner sans charge et à FAIBLE
vitesse.
Placez l'unité au pied des escaliers.
Verrouillez les roues de l'appareil.
Inspectez visuellement les
escaliers pour vous assurer qu'il n'y
a aucun risque pour la sécurité,
- 10 -
notamment des débris, de la glace
ou de l'eau.
Libérez les pistes d'escalade en
marchant sur la plaque rouge.
Assurez-vous que les rails
d'escalade sont aussi proches que
possible des escaliers et
fermement verrouillés en position.
Un bouton rouge sur la poignée
supérieure, allumez l'unité de
commande en appuyant sur le
bouton rouge POWER.
Inclinez l'appareil vers l'arrière
jusqu'à ce que le rail de montée
soit en contact avec les escaliers.

- 11 -
Appuyez sur le bouton HAUT de
l'unité de commande pour
commencer à vous déplacer.
7. Lorsque vous avez atteint le haut des escaliers, déplacez
complètement l'appareil sur le palier et remettez l'appareil en position
verticale.
8. Appuyez sur le bouton rouge POWER pour éteindre les pistes
d'escalade.
9. Éloignez suffisamment l'unité des escaliers pour permettre à
l'utilisateur de fauteuil roulant d'être déchargé en toute sécurité.
10. Verrouillez les roues de l'appareil.
11. Détachez les ceintures de sécurité et désengagez les verrous des
roues du fauteuil roulant et les loquets de verrouillage de l'appareil.
12. Poussez le fauteuil roulant vers l'avant jusqu'à ce qu'il soit dégagé
de l'unité.
E. Descendre les escaliers
3. Ne touchez jamais aucune partie des pistes d’escalade lorsque
l’appareil est sous tension.
4. Assurez-vous toujours que toutes les pièces de l'appareil sont
solidement verrouillées en place, en particulier les rails de montée
d'escalier, avant de monter les escaliers.

- 12 -
Placez l'unité en haut des escaliers.
Verrouillez les roues de l'appareil.
Inspectez visuellement les escaliers
pour vous assurer qu'il n'y a aucun
risque pour la sécurité, notamment
des débris, de la glace ou de l'eau.
Libérez les rails d'escalade (comme
décrit ci-dessus) et verrouillez- les
fermement en position.
Allumez l'unité de commande en
appuyant sur le bouton rouge
POWER.
Inclinez l'appareil vers l'arrière et
poussez-le avec précaution vers les
escaliers jusqu'à ce que les rails
d'escalade s'enclenchent dans les
escaliers.
Appuyez sur le bouton BAS de
l'unité de commande pour
commencer à vous déplacer.
- 13 -
8. Si possible, demandez à une deuxième personne de se positionner
dans les escaliers pour stabiliser l'appareil pendant que vous le mettez
en position.
9. Lorsque vous avez atteint le bas des escaliers, remettez l'appareil
en position verticale.
10. Appuyez sur le bouton rouge POWER pour éteindre les pistes
d'escalade.
11. Éloignez suffisamment l'unité des escaliers pour permettre à
l'utilisateur de fauteuil roulant d'être déchargé en toute sécurité.
12. Verrouillez les roues de l'appareil.
13. Détachez les ceintures de sécurité et désengagez les verrous des
roues du fauteuil roulant et les loquets de verrouillage de l'appareil.
14. Poussez le fauteuil roulant vers l'avant jusqu'à ce qu'il soit dégagé
de l'unité.
FOLDING THE UNIT
Retirez chaque plateau de
chargement de roues en tirant
l'anneau de verrouillage loin de
l'unité et en faisant glisser le
plateau complètement pour le
libérer de l'unité.
Posez l'appareil sur le sol.
Sous la palette de chargement se
trouve une tige rouge ; tirez la tige
vers le haut puis appuyez
légèrement sur la palette de
chargement. L'unité se pliera.
- 14 -
BATTERY CHARGING
Do not use wet hands when operating the equipment.
6. Chargez l'appareil après chaque utilisation . Le pourcentage MINIMUM
de charge est de 25 %.
7. Protégez le chargeur et les fils de charge de l'huile, de la graisse, du
détergent, du diluant ou de tout liquide potentiellement nocif.
8. Gardez toujours les prises au sec .
9. Suivez les instructions d'utilisation pour charger la batterie.
10. La nouvelle batterie atteindra son état optimal après plusieurs cycles
de charge et de décharge.
Éteignez l'interrupteur principal.
5. Le port de chargement est situé
à côté de l'interrupteur
d'alimentation.
6. Dévissez le couvercle du port
de chargement.
7. Connectez le câble de
chargement au port de
chargement. Branchez le câble de
chargement sur une prise secteur.
8. Lorsque la batterie est chargée,
retirez le câble de charge et
revissez le couvercle du port de
charge en place.
- 15 -
La batterie possède deux clés et
peut être utilisée pour verrouiller la
batterie sur l'unité.
TROUBLESHOOTING
Défauts
Détection et solutions _
L'appareil ne démarre pas ou je
ne peux pas monter ou
descendre escaliers .
Assurez-vous que l’interrupteur
principal de la palette de
chargement est en position ON. Le
voyant lumineux doit être rouge.
Vérifiez la charge de la batterie.
S'il indique une faible puissance
(<25%), chargez l'appareil.
Si la batterie a > 25 % de charge
restante et que l'appareil ne
parvient pas à démarrer, veuillez
contacter le fabricant.
La batterie ne peut pas être
rechargée .
Veuillez contacter le fabricant.
MAINTENANCE
6. Gardez propre comme routine.

- 16 -
7. Vérifiez fréquemment les pièces détachées .
8. Si vous ne l'utilisez pas pendant une longue période, veuillez charger
complètement la batterie, retirer la batterie et la stocker dans un endroit
frais et sec. Faites attention à l'eau qui pénètre dans la batterie au lithium.
9. Nettoyez l'appareil et ses pièces avec un chiffon propre ou une brosse
douce et de l'eau tiède savonneuse. Rincer à l'eau tiède et sécher à l'air.
10. Ne pas nettoyer avec des produits contenant de l'eau de Javel ou du
phénol. Une brosse à poils durs peut être utilisée si nécessaire.


- 2 -
Zertifikat für technischen Support und E-Garantie
www.vevor.com/support
TREPPENSTEIGSTUHL
MODELL: YHR-LD02
We continue to be committed to provide you tools with competitive price.
"Save Half", "Half Price" or any other similar expressions used by us only represents an
estimate of savings you might benefit from buying certain tools with us compared to the major
top brands and does not necessarily mean to cover all categories of tools offered by us. You
are kindly reminded to verify carefully when you are placing an order with us if you are
actually saving half in comparison with the top major brands.

- 1 -
MODELL: YHR-LD02
Have product questions? Need technical support? Please feel free to
contact us:
Technical Support and E-Warranty Certificate
www.vevor.com/support
NEED HELP? CONTACT US!
This is the original instruction, please read all manual instructions
carefully before operating. VEVOR reserves a clear interpretation of our
user manual. The appearance of the product shall be subject to the
product you received. Please forgive us that we won't inform you again if
there are any technology or software updates on our product.
STAIR CLIMBING CHAIR

- 2 -
SAFETY INSTRUCTIONS
Vor der Erstinbetriebnahme
● Lesen Sie die Bedienungsanleitung und beachten Sie alle Warn- und
Sicherheitshinweise.
● Technische Daten beachten, da die Tragfähigkeit nicht überschritten
werden darf.
● Überprüfen Sie alle elektronischen Funktionen, Sicherheitsbremsen und
die Position der Kletterbahn.
Während des Betriebs des Geräts
● Ändern Sie niemals die Einstellungen beim Treppensteigen oder
-absteigen.
● Stellen Sie niemals Körperteile, insbesondere Füße, unter die
Kletterschienen.
● Sollten die Antriebselemente blockieren, schalten Sie das Gerät sofort
aus.
29. Wir empfehlen dringend, dass nur zertifiziertes, geschultes Personal
den Treppenstuhl bedient . Durch ungeschultes Personal kann es zu
Verletzungen oder Sachschäden kommen!
30. Achten Sie auf eine reibungslose Handhabung.
31. Wenn Sie Patienten mit dieser Maschine befördern , achten Sie
darauf , dass sie fest verschlossen ist , legen Sie zur Sicherheit den
Sicherheitsgurt an und fordern Sie den Patienten auf, sich am Handlauf
festzuhalten.
32. Fahren Sie nicht zu schnell, wenn Sie an Schlaglochstellen
vorbeifahren.
33. Bei einem Ausfall darf Laienpersonal nicht nach Belieben demontiert
werden .
34. Sie können dem Übertragungsmechanismus des Antriebsrads etwas
Schmieröl hinzufügen, um die Lebensdauer zu erhöhen .
35. Führen Sie während der Arbeit keine anderen Arbeiten auf beiden
Seiten des Fahrzeugs durch, um Unfälle zu vermeiden .

- 3 -
36. Überprüfen Sie nach Abschluss des Vorgangs, ob das elektrische
Kletterauto normal ist, und schalten Sie den Strom aus .
37. Klopfen, stechen, treten Sie nicht auf die Batterie, modifizieren Sie sie
nicht, legen Sie sie nicht in die Sonne, legen Sie die Batterie nicht in die
Mikrowelle, unter hohen Druck oder in andere Umgebungen.
38. Von offenem Feuer fernhalten.
39. Tragen Sie rutschfestes Schuhwerk und arbeiten Sie stets mit beiden
Händen.
40. es nicht bei Regen, Nässe oder auf Schnee oder Eis.
41. es nicht auf Rolltreppen oder Fahrsteigen.
42. Der Rollstuhl-Treppenlift darf nicht zum Transport von Lasten
verwendet werden.
MODEL AND PARAMETERS
Modell
YHR-LD02
Max. Belastung
150kg
Winkel der
Gummiraupenbänder
20°
Eingang
Wechselstrom 100–240 V, 50/60 Hz
Motor
DC 24 V / 120 W; 3 verschiedene
Geschwindigkeiten einstellbar
Batterie
Lithium Batterie; DC 24V / 13Ah
Ladegerät
DC29,4V / 2A
Höhe des
Teleskop-Greifrahmens
H108cm, H126cm, H145cm und H163cm
Frachtplattform
33,5x31,5cm
Faltgröße
109x45x30cm
Materialien
Aluminiumlegierung
Gewicht
35kg
DIMENSION AND DIAGRAM

- 4 -
Einheit: mm
COMPONENTS
NEIN.
Name
1
2
3
5
4
6
7
8

- 5 -
1
Griff und Bedienfeld
2
Tragegriff hinten
3
Raupengürtel
4
Hinterräder (5 Zoll)
5
Radträger
6
Sicherheitsgurt
7
Sperrverschluss
8
Vorderräder (2 Zoll)
INITIAL OPERATION
NOTE: Before the initial operation, please ensure the STAIR LIFT
will be operated in an environment higher than 0°C.
Turning the Unit On: The power switch
is located on the battery, press red
button to turn on the power supply.

- 6 -
OPERATION
7. Lassen Sie einen Rollstuhlfahrer niemals unbeaufsichtigt im Gerät und
verwenden Sie stets die mitgelieferten Sicherheitsgurte.
8. Der Rollstuhl-Treppenlift darf nur von geschultem Personal bedient
werden.
9. Das Gerät muss stets mit zwei Händen bedient werden.
HINWEIS: Der Akku sollte vor der ersten Verwendung des Geräts
vollständig aufgeladen sein.
A. Beladen eines Rollstuhlfahrers
Checking the Battery Charge: Press
the round button on the battery charge
indicator panel. The green lights will
illuminate if there is a charge.
1 light= 25% charge
2 lights= 50% charge
3 lights= 75% charge
4 lights= 100% charge
Ensure the unit is charged prior to use.
The battery tester on top handle,
confirm the Percentage of
Charge more than 25%.
- 7 -
Stellen Sie das Gerät in der Nähe der
Treppe auf, aber weit genug entfernt,
damit der Rollstuhlfahrer sicher
verladen werden kann.
Blockieren Sie die Räder am Gerät.
7. Ziehen Sie den Bediengriff aus,
indem Sie auf den unteren Teil der
roten Stange auf der Rückseite des
Rahmens drücken (wie abgebildet)
und den Griff nach oben ziehen.
8. Wenn die gewünschte Position
erreicht ist, lassen Sie den roten Stab
los.
9. Es stehen 3 Höhen zur Auswahl.
Stellen Sie sicher, dass der
Bediengriff eingerastet ist, indem Sie
bei freigegebener Stange am Griff
ziehen.
Stellen Sie jede Verriegelung mit
einem auf die entsprechende Größe
für den Rollstuhl ein
Sechskantschraube zum Verstellen
der Sperrklinke nach oben oder
unten, obere Schraube zum Heraus-
oder Hineinschieben der Sperrklinke
je nach Bedarf.

- 8 -
Ziehen Sie den Sicherungsring nach
oben aus der Sperrklinke heraus, um
die Sperrklinke einzustellen.
Passen Sie die Position jedes
Radladetabletts an, indem Sie den
Sicherungsring vom Gerät wegziehen
und verschieben
Stellen Sie das Ladefach auf die
gewünschte Breite ein.
Manövrieren Sie den Rollstuhl wie
gezeigt auf das Gerät.
Die Haupträder des Rollstuhls sollten
fest in den Ladeschalen sitzen.
Die Verriegelungen sollten die
Rückseite des Rollstuhls sichern.
Die Kopfstütze sollte für den
Rollstuhlfahrer in einer bequemen
Position sein.
Nehmen Sie alle erforderlichen
Einstellungen vor, bevor Sie den
Stuhl bewegen.

- 9 -
Sichern Sie Rollstuhl und Benutzer
mit den Sicherheitsgurten.
Blockieren Sie die Haupträder des
Treppenlifts.
F. Treppen steigen
7. Berühren Sie niemals Teile der Kletterschienen, wenn das Gerät mit
Strom versorgt wird.
8. Stellen Sie immer sicher, dass alle Teile des Geräts, insbesondere die
Treppensteigschienen, sicher eingerastet sind, bevor Sie Treppen steigen.
9. Üben Sie zunächst den Betrieb ohne Last und mit NIEDRIGER
Geschwindigkeit.
Positionieren Sie das Gerät am
Fuß der Treppe.
Blockieren Sie die Räder am Gerät.
Überprüfen Sie die Treppe visuell,
um sicherzustellen, dass keine
Sicherheitsrisiken wie Schmutz, Eis

- 10 -
oder Wasser bestehen.
Lösen Sie die Kletterspuren, indem
Sie auf die rote Platte treten.
Stellen Sie sicher, dass die
Kletterschienen so nah wie möglich
an der Treppe liegen und fest
eingerastet sind.
Ein roter Knopf am oberen Griff.
Schalten Sie die Steuereinheit ein,
indem Sie die rote POWER-Taste
drücken.
Kippen Sie das Gerät nach hinten,
bis die Kletterschiene Kontakt mit
der Treppe hat.
- 11 -
Drücken Sie die AUF-Taste an der
Steuereinheit, um mit der
Bewegung zu beginnen.
13. Wenn Sie das obere Ende der Treppe erreicht haben,
manövrieren Sie das Gerät vollständig auf den Treppenabsatz und
bringen Sie das Gerät wieder in eine aufrechte Position.
14. Drücken Sie die rote POWER-Taste, um die Kletterbahnen
auszuschalten.
15. Bewegen Sie das Gerät weit genug von der Treppe weg, damit der
Rollstuhlfahrer sicher entladen werden kann.
16. Blockieren Sie die Räder am Gerät.
17. Schnallen Sie die Sicherheitsgurte ab und lösen Sie die
Radsperren des Rollstuhls sowie die Sperrklinken am Gerät.
18. Schieben Sie den Rollstuhl nach vorne, bis er sich vom Gerät löst.
G. Absteigende Treppe
5. Berühren Sie niemals Teile der Kletterschienen, wenn das Gerät mit
Strom versorgt wird.
6. Stellen Sie immer sicher, dass alle Teile des Geräts, insbesondere die
Treppensteigschienen, sicher eingerastet sind, bevor Sie Treppen steigen.

- 12 -
Positionieren Sie das Gerät oben
auf der Treppe.
Blockieren Sie die Räder am Gerät.
Überprüfen Sie die Treppe visuell,
um sicherzustellen, dass keine
Sicherheitsrisiken wie Schmutz, Eis
oder Wasser bestehen.
Lösen Sie die Kletterschienen (wie
oben beschrieben) und verriegeln
Sie sie fest .
Schalten Sie die Steuereinheit ein,
indem Sie die rote POWER-Taste
drücken.
Kippen Sie das Gerät nach hinten
und schieben Sie das Gerät
vorsichtig in Richtung Treppe, bis
die Steigschienen in der Treppe
einrasten.
Drücken Sie die AB-Taste an der
Steuereinheit, um mit der Bewegung
zu beginnen.
- 13 -
15. Wenn möglich, stellen Sie eine zweite Person auf die Treppe, um
das Gerät zu stabilisieren, während Sie es in Position bringen.
16. Wenn Sie das Ende der Treppe erreicht haben, bringen Sie das
Gerät wieder in eine aufrechte Position.
17. Drücken Sie die rote POWER-Taste, um die Kletterbahnen
auszuschalten.
18. Bewegen Sie das Gerät weit genug von der Treppe weg, damit der
Rollstuhlfahrer sicher entladen werden kann.
19. Blockieren Sie die Räder am Gerät.
20. Schnallen Sie die Sicherheitsgurte ab und lösen Sie die
Radsperren des Rollstuhls sowie die Sperrklinken am Gerät.
21. Schieben Sie den Rollstuhl nach vorne, bis er sich vom Gerät löst.
FOLDING THE UNIT
Entfernen Sie jedes Radladefach,
indem Sie den Sicherungsring vom
Gerät wegziehen und das Fach
vollständig aus dem Gerät
herausziehen.
Legen Sie das Gerät auf den
Boden.
Unter der Ladepalette befindet sich
eine rote Stange . Ziehen Sie die
Stange nach oben und drücken Sie
dann leicht auf die Ladepalette.
Das Gerät wird
zusammengeklappt.
- 14 -
BATTERY CHARGING
Do not use wet hands when operating the equipment.
11. Laden Sie das Gerät nach jedem Gebrauch auf . Der
MINDESTprozentsatz der Ladung beträgt 25 %.
12. Schützen Sie das Ladegerät und die Ladekabel vor Öl, Fett,
Reinigungsmitteln, Verdünnern oder anderen potenziell schädlichen
Flüssigkeiten.
13. Steckdosen immer trocken halten .
14. Befolgen Sie zum Laden des Akkus die Bedienungsanleitung.
15. Nach mehreren Lade- und Entladezyklen erreicht der neue Akku
seinen optimalen Zustand.
Schalten Sie den Hauptschalter
aus.
9. Der Ladeanschluss befindet
sich neben dem Netzschalter.
10. Schrauben Sie die Abdeckung
des Ladeanschlusses ab.
11. Schließen Sie das Ladekabel
an den Ladeanschluss an. Stecken
Sie das Ladekabel in eine
Steckdose.
12. Wenn der Akku aufgeladen ist,
entfernen Sie das Ladekabel und
schrauben Sie die Abdeckung des
Ladeanschlusses wieder fest.

- 15 -
Der Akku verfügt über zwei
Schlüssel und kann zum Verriegeln
des Akkus am Gerät verwendet
werden.
TROUBLESHOOTING
Fehler
Erkennung und Lösung s
Das Gerät startet nicht bzw kann
nicht hoch oder runter gehen
Treppe .
Stellen Sie sicher, dass der
Hauptnetzschalter an der
Ladepalette auf ON steht. Die
Kontrollleuchte sollte rot leuchten.
Überprüfen Sie die Batterieladung.
Wenn eine geringe Leistung
(<25 %) angezeigt wird, laden Sie
das Gerät auf.
Wenn der Akku zu mehr als 25 %
geladen ist und das Gerät nicht
starten kann, wenden Sie sich bitte
an den Hersteller.
Der Akku kann nicht aufgeladen
werden .
Bitte wenden Sie sich an den
Hersteller.
MAINTENANCE

- 16 -
11. Halten Sie sich regelmäßig sauber.
12. Überprüfen Sie regelmäßig, ob lose Teile vorhanden sind .
13. Bei längerer Nichtbenutzung laden Sie den Akku bitte vollständig auf,
nehmen Sie den Akku heraus und lagern Sie ihn an einem kühlen und
trockenen Ort. Achten Sie darauf, dass Wasser in die Lithiumbatterie
eindringt.
14. Reinigen Sie das Gerät und seine Teile mit einem sauberen Tuch oder
einer weichen Bürste und warmem Seifenwasser. Mit warmem Wasser
abspülen und an der Luft trocknen.
15. Nicht mit Produkten reinigen, die Bleichmittel oder Phenol enthalten.
Bei Bedarf kann eine Bürste mit steifen Borsten verwendet werden.


- 2 -
Supporto tecnico e certificato di garanzia elettronica
www.vevor.com/support
SEDIA PER SALIRE LE SCALE
MODELLO: YHR-LD02
We continue to be committed to provide you tools with competitive price.
"Save Half", "Half Price" or any other similar expressions used by us only represents an
estimate of savings you might benefit from buying certain tools with us compared to the major
top brands and does not necessarily mean to cover all categories of tools offered by us. You
are kindly reminded to verify carefully when you are placing an order with us if you are
actually saving half in comparison with the top major brands.

- 1 -
MODELLO: YHR-LD02
Have product questions? Need technical support? Please feel free to
contact us:
Technical Support and E-Warranty Certificate
www.vevor.com/support
NEED HELP? CONTACT US!
This is the original instruction, please read all manual instructions
carefully before operating. VEVOR reserves a clear interpretation of our
user manual. The appearance of the product shall be subject to the
product you received. Please forgive us that we won't inform you again if
there are any technology or software updates on our product.
STAIR CLIMBING CHAIR

- 2 -
SAFETY INSTRUCTIONS
Prima del funzionamento iniziale
● Leggere il manuale dell'utente e prendere nota di tutte le avvertenze e
istruzioni di sicurezza.
● Osservare i dati tecnici poiché la capacità di sollevamento non può
essere superata.
● Controllare tutte le funzioni elettroniche, i freni di sicurezza e la posizione
della pista da arrampicata.
Durante il funzionamento dell'unità
● Non modificare mai le impostazioni mentre si salgono o si scendono le
scale.
● Non mettere mai nessuna parte del corpo, soprattutto i piedi, sotto le
piste da arrampicata.
● Se gli elementi di azionamento si bloccano, spegnere immediatamente
l'unità.
43. Consigliamo vivamente che solo personale qualificato e certificato
utilizzi la sedia per scale . Il personale non addestrato può causare lesioni
o danni!
44. Prestare attenzione alla maneggevolezza.
45. Quando si trasportano pazienti con questa macchina , assicurarsi di
bloccarla saldamente , allacciare la cintura di sicurezza per sicurezza e
dirgli di tenersi al corrimano.
46. Non muoverti troppo velocemente quando attraversi aree con buche.
47. In caso di guasto, il personale non professionale non dovrà essere
smontato a piacimento .
48. È possibile aggiungere un po' di olio lubrificante al meccanismo di
trasmissione della ruota motrice per aumentarne la durata .
49. Durante il lavoro, non eseguire altri lavori su entrambi i lati della vettura
per evitare incidenti .
50. Dopo il completamento dell'operazione, controllare se l'auto elettrica
da arrampicata è normale e spegnere l'alimentazione .

- 3 -
51. Non urtare, pungere, calpestare, modificare, esporre al sole la batteria,
non posizionare la batteria nel microonde , in ambienti ad alta pressione e
in altri ambienti.
52. Tenere lontano dalle fiamme libere.
53. Indossare calzature antiscivolo e operare sempre con entrambe le
mani.
54. Non utilizzarlo in caso di pioggia, condizioni di bagnato, neve o
ghiaccio.
55. Non utilizzarlo su scale mobili o tappeti mobili.
56. Il montascale per sedia a rotelle non deve essere utilizzato per il
trasporto di merci.
MODEL AND PARAMETERS
Modello
YHR-LD02
Massimo. Carico
150 kg
Angolo dei nastri con
cingoli in gomma
20°
Ingresso
CA 100-240 V 50/60 Hz
Il motore
DC 24V / 120W; 3 diverse velocità regolabili
Batteria
Batteria al litio; CC 24 V/13 Ah
Caricabatterie
CC 29,4 V/2 A
Altezza del telaio di presa
telescopica
H108cm, H126cm, H145cm e H163cm
Piattaforma di carico
33,5x31,5 cm
Dimensioni pieghevoli
109x45x30 cm
Materiali
Lega di alluminio
Peso
35 kg
DIMENSION AND DIAGRAM
- 4 -
Unità: mm
COMPONENTS
NO.
Nome
1
2
3
5
4
6
7
8

- 5 -
1
Maniglia e pannello di controllo
2
Maniglia per il trasporto posteriore
3
Cintura cingolata
4
Ruote posteriori (5 pollici)
5
Portaruota
6
Cintura di sicurezza
7
Chiusura a scatto
8
Ruote anteriori (2 pollici)
INITIAL OPERATION
NOTE: Before the initial operation, please ensure the STAIR LIFT
will be operated in an environment higher than 0°C.
Turning the Unit On: The power switch
is located on the battery, press red
button to turn on the power supply.

- 6 -
OPERATION
10. Non lasciare mai un utente su sedia a rotelle incustodito nell'unità e
utilizzare sempre le cinture di sicurezza in dotazione.
11. Il montascale per sedia a rotelle deve essere utilizzato solo da
personale addestrato.
12. L'unità deve essere sempre utilizzata con due mani.
NOTA: la batteria deve essere completamente carica prima di utilizzare
l'unità per la prima volta.
A. Caricamento di un utente su sedia a rotelle
Checking the Battery Charge: Press
the round button on the battery charge
indicator panel. The green lights will
illuminate if there is a charge.
1 light= 25% charge
2 lights= 50% charge
3 lights= 75% charge
4 lights= 100% charge
Ensure the unit is charged prior to use.
The battery tester on top handle,
confirm the Percentage of
Charge more than 25%.
- 7 -
Posizionare l'unità vicino alle scale
ma sufficientemente lontano da
consentire il carico sicuro dell'utente
su sedia a rotelle.
Bloccare le ruote dell'unità.
10. Estendere la maniglia operativa
premendo la parte inferiore dell'asta
rossa sul retro del telaio (come
mostrato) e tirando verso l'alto la
maniglia.
11. Una volta raggiunta la posizione
desiderata, rilasciare l'asta rossa.
12. È possibile selezionare 3 altezze.
Assicurarsi che la maniglia operativa
sia bloccata in posizione tirando la
maniglia con l'asta rilasciata.
Regolare ciascun fermo di bloccaggio
alla dimensione appropriata per la
sedia a rotelle con a Vite esagonale
per regolare il supporto del fermo
verso l'alto o verso il basso, vite ca
per far scorrere il fermo di bloccaggio
verso l'esterno o verso l'interno
secondo necessità.

- 8 -
Tirare l'anello di bloccaggio verso
l'alto fuori dal fermo per regolare il
fermo.
Regolare la posizione di ciascun
vassoio di caricamento delle ruote
estraendo l'anello di bloccaggio
dall'unità e facendolo scorrere
il vassoio di caricamento alla
larghezza desiderata.
Manovrare la sedia a rotelle sull'unità
come mostrato.
Le ruote principali della sedia a rotelle
devono essere saldamente
posizionate nei vassoi di carico.
I fermi di bloccaggio dovrebbero
fissare lo schienale della sedia a
rotelle.
Il poggiatesta deve trovarsi in una
posizione comoda per l'utilizzatore
della sedia a rotelle.
Apportare eventuali modifiche
necessarie prima di spostare la sedia.

- 9 -
Fissare la sedia a rotelle e l'utente in
posizione utilizzando le cinture di
sicurezza.
Bloccare le ruote principali del
montascale.
H. Salire le scale
10. Non toccare mai nessuna parte dei binari di arrampicata quando l'unità
è alimentata.
11. Assicurarsi sempre che tutte le parti dell'unità siano bloccate
saldamente in posizione, in particolare i binari per salire le scale, prima di
salire le scale.
12. inizialmente a operare senza carico e a BASSA velocità.
Posizionare l'unità alla base delle
scale.
Bloccare le ruote dell'unità.
Ispezionare visivamente le scale
per assicurarsi che non vi siano
rischi per la sicurezza, inclusi

- 10 -
detriti, ghiaccio o acqua.
Rilascia le tracce di arrampicata
calpestando la piastra rossa.
Assicurarsi che i binari di
arrampicata siano il più vicino
possibile alle scale e saldamente
bloccati in posizione.
Un pulsante rosso sulla maniglia
superiore, accendere l'unità di
controllo premendo il pulsante
rosso POWER.
Inclinare l'unità all'indietro fino a
quando la pista di arrampicata non
è in contatto con le scale.
- 11 -
Premere il pulsante SU sull'unità di
controllo per iniziare il movimento.
19. Una volta raggiunta la cima delle scale, manovrare
completamente l'unità sul pianerottolo e riportarla in posizione
verticale.
20. Premere il pulsante rosso POWER per disattivare le piste da
arrampicata.
21. Spostare l'unità abbastanza lontano dalle scale per consentire
all'utente su sedia a rotelle di essere scaricato in sicurezza.
22. Bloccare le ruote dell'unità.
23. Slacciare le cinture di sicurezza e disattivare i blocchi delle ruote
della sedia a rotelle e i fermi di bloccaggio sull'unità.
24. Spingere la sedia a rotelle in avanti finché non si allontana
dall'unità.
I. Scale discendenti
7. Non toccare mai nessuna parte dei binari di arrampicata quando l'unità
è alimentata.
8. Assicurarsi sempre che tutte le parti dell'unità siano bloccate
saldamente in posizione, in particolare i binari per salire le scale, prima di
salire le scale.

- 12 -
Posizionare l'unità in cima alle scale.
Bloccare le ruote dell'unità.
Ispezionare visivamente le scale per
assicurarsi che non vi siano rischi
per la sicurezza, inclusi detriti,
ghiaccio o acqua.
Rilasciare i binari di arrampicata
(come descritto sopra) e bloccarli
saldamente in posizione.
Accendere l'unità di controllo
premendo il pulsante rosso
POWER.
Inclinare l'unità all'indietro e
spingere con cautela l'unità verso le
scale fino a quando i binari di salita
si agganciano alle scale.
Premere il pulsante GIÙ sull'unità di
controllo per iniziare lo
spostamento.
22. Se possibile, chiedi a una seconda persona di posizionarsi sulle
scale per stabilizzare l'unità mentre la manovri in posizione.
23. Una volta raggiunta la fine delle scale, riportare l'unità in posizione
verticale.
24. Premere il pulsante rosso POWER per disattivare le piste da
arrampicata.
25. Spostare l'unità abbastanza lontano dalle scale per consentire
all'utente su sedia a rotelle di essere scaricato in sicurezza.
26. Bloccare le ruote dell'unità.
27. Slacciare le cinture di sicurezza e disattivare i blocchi delle ruote
della sedia a rotelle e i fermi di bloccaggio sull'unità.
28. Spingere la sedia a rotelle in avanti finché non si allontana
- 13 -
dall'unità.
FOLDING THE UNIT
Rimuovere ciascun vassoio di
caricamento delle ruote estraendo
l'anello di bloccaggio dall'unità e
facendo scorrere il vassoio
completamente per liberarlo
dall'unità.
Appoggiare l'unità a terra.
Sotto il pallet di carico c'è un'asta
rossa ; tirare l'asta verso l'alto
quindi premere leggermente sul
pallet di carico. L'unità si piegherà.
BATTERY CHARGING
- 14 -
Do not use wet hands when operating the equipment.
16. Caricare l'unità dopo ogni utilizzo . La percentuale MINIMA di addebito
è del 25%.
17. Proteggere il caricabatterie e i cavi di ricarica da olio, grasso,
detergenti, diluenti o liquidi potenzialmente dannosi.
18. Mantenere sempre le prese asciutte .
19. Seguire le istruzioni per l'uso per caricare la batteria.
20. La nuova batteria raggiungerà il suo stato ottimale dopo diversi cicli di
carica e scarica.
Spegnere l'interruttore principale.
13. La porta di ricarica si trova
accanto all'interruttore di
alimentazione.
14. Svitare il coperchio della porta
di ricarica.
15. Collegare il cavo di ricarica alla
porta di ricarica Collegare il cavo di
ricarica a una presa di corrente.
16. Quando la batteria è carica,
rimuovere il cavo di ricarica e
riavvitare il coperchio della porta di
ricarica in posizione.
La batteria ha due chiavi e può
essere utilizzata per bloccare la
batteria sull'unità.
- 15 -
TROUBLESHOOTING
Difetti
Rilevamento e soluzioni _
L'unità non si avvia o non può
andare su o giù scale .
Assicurarsi che l'interruttore di
alimentazione principale sul pallet
di carico sia in posizione ON. La
spia dovrebbe illuminarsi di rosso.
Controllare la carica della batteria.
Se mostra un livello di carica basso
(<25%), caricare l'unità.
Se la batteria ha una carica
rimanente > 25% e l'unità non è in
grado di avviarsi, contattare il
produttore.
La batteria non può essere
ricaricata .
Si prega di contattare il produttore.
MAINTENANCE
16. Mantieniti pulito come routine.
17. Controllare frequentemente la presenza di parti allentate .
18. Se non viene utilizzata per un lungo periodo, caricare completamente
la batteria, estrarla e conservarla in un luogo fresco e asciutto. Fare
attenzione all'ingresso di acqua nella batteria al litio.
19. Pulire l'unità e le sue parti con un panno pulito o una spazzola morbida
e acqua calda e sapone. Risciacquare con acqua tiepida e asciugare
all'aria.

- 16 -
20. Non pulire con prodotti contenenti candeggina o fenolo. Se necessario
è possibile utilizzare una spazzola a setole rigide.


- 2 -
Soporte técnico y certificado de garantía electrónica
www.vevor.com/support
SILLA PARA SUBIR ESCALERAS
MODELO: YHR-LD02
We continue to be committed to provide you tools with competitive price.
"Save Half", "Half Price" or any other similar expressions used by us only represents an
estimate of savings you might benefit from buying certain tools with us compared to the major
top brands and does not necessarily mean to cover all categories of tools offered by us. You
are kindly reminded to verify carefully when you are placing an order with us if you are
actually saving half in comparison with the top major brands.

- 1 -
MODELO: YHR-LD02
Have product questions? Need technical support? Please feel free to
contact us:
Technical Support and E-Warranty Certificate
www.vevor.com/support
NEED HELP? CONTACT US!
This is the original instruction, please read all manual instructions
carefully before operating. VEVOR reserves a clear interpretation of our
user manual. The appearance of the product shall be subject to the
product you received. Please forgive us that we won't inform you again if
there are any technology or software updates on our product.
STAIR CLIMBING CHAIR

- 2 -
SAFETY INSTRUCTIONS
Antes de la operación inicial
● Lea el manual del usuario y tenga en cuenta todas las advertencias e
instrucciones de seguridad.
● Tenga en cuenta los datos técnicos, ya que no se puede superar la
capacidad de elevación.
● Verifique todas las funciones electrónicas, los frenos de seguridad y la
posición de la vía de ascenso.
Mientras opera la unidad
● Nunca cambie la configuración mientras sube o baja escaleras.
● Nunca coloque ninguna parte del cuerpo, especialmente los pies, debajo
de las vías de escalada.
● Si los elementos impulsores se bloquean, apague la unidad
inmediatamente.
57. Recomendamos encarecidamente que sólo personal capacitado y
certificado opere la silla de escalera . ¡El personal no capacitado puede
causar lesiones o daños!
58. Preste atención al manejo suave.
59. Cuando transporte pacientes con esta máquina , asegúrese de
cerrarla firmemente , abrocharle el cinturón de seguridad por seguridad y
decirle que se sujete al pasamanos.
60. No se mueva demasiado rápido al pasar por zonas con baches.
61. Cuando haya una falla, el personal no profesional no podrá
desmontarlo a voluntad .
62. Puede agregar un poco de aceite lubricante al mecanismo de
transmisión de la rueda motriz para aumentar la vida útil .
63. Cuando trabaje, no realice otros trabajos en ambos lados del
automóvil para evitar accidentes .
64. Después de completar la operación, verifique si el auto trepador
eléctrico está normal y apáguelo .
65. No golpee, pinche, pise, modifique, exponga la batería al sol, no

- 3 -
coloque la batería en el microondas, alta presión y otros ambientes.
66. Mantener alejado de llamas descubiertas.
67. Utilice calzado antideslizante y opere siempre con ambas manos.
68. No lo utilice bajo la lluvia, en condiciones húmedas o sobre nieve o
hielo.
69. No lo utilice en escaleras mecánicas o pasillos móviles.
70. El salvaescaleras para sillas de ruedas no debe utilizarse para el
transporte de carga.
MODEL AND PARAMETERS
Modelo
YHR-LD02
Máx. Carga
150 kilos
Ángulo de las correas con
orugas de caucho
20°
Aporte
CA 100-240 V 50/60 Hz
Motor
CC 24 V/120 W; 3 velocidades diferentes
ajustables.
Batería
Batería de Litio; CC 24 V/13 Ah
Cargador
CC 29,4 V/2 A.
Altura del marco de agarre
telescópico
Alto 108 cm, alto 126 cm, alto 145 cm y alto
163 cm.
Plataforma de carga
33,5x31,5cm
Tamaño plegable
109x45x30cm
Materiales
Aleación de aluminio
Peso
35kg
DIMENSION AND DIAGRAM
- 4 -
Unidad: mm
COMPONENTS
No.
Nombre
1
2
3
5
4
6
7
8

- 5 -
1
Manija y panel de control
2
Asa de transporte trasera
3
Cinturón de seguimiento
4
Ruedas traseras (5 pulgadas)
5
Portador de ruedas
6
Cinturón de seguridad
7
Cierre de bloqueo
8
Ruedas delanteras (2 pulgadas)
INITIAL OPERATION
NOTE: Before the initial operation, please ensure the STAIR LIFT
will be operated in an environment higher than 0°C.
Turning the Unit On: The power switch
is located on the battery, press red
button to turn on the power supply.

- 6 -
OPERATION
13. Nunca deje a un usuario de silla de ruedas desatendido en la unidad y
utilice siempre los cinturones de seguridad suministrados.
14. El salvaescaleras para sillas de ruedas sólo debe ser utilizado por
personal capacitado.
15. La unidad debe operarse con las dos manos en todo momento.
NOTA: La batería debe cargarse completamente antes de usar la unidad
por primera vez.
A. Cargar a un usuario de silla de ruedas
Checking the Battery Charge: Press
the round button on the battery charge
indicator panel. The green lights will
illuminate if there is a charge.
1 light= 25% charge
2 lights= 50% charge
3 lights= 75% charge
4 lights= 100% charge
Ensure the unit is charged prior to use.
The battery tester on top handle,
confirm the Percentage of
Charge more than 25%.

- 7 -
Coloque la unidad cerca de las
escaleras pero lo suficientemente
alejada para permitir cargar al usuario
de silla de ruedas de manera segura.
Bloquee las ruedas de la unidad.
13. Extienda la manija de operación
presionando la parte inferior de la
varilla roja en la parte posterior del
marco (como se muestra) y tirando
de la manija hacia arriba.
14. Cuando alcance la posición
deseada, suelte la varilla roja.
15. Hay 3 alturas que se pueden
seleccionar.
Asegúrese de que la manija de
operación esté bloqueada en su
posición tirando de la manija con la
varilla liberada.
Ajuste cada pestillo de bloqueo al
tamaño apropiado para la silla de
ruedas con un h tornillo hexagonal
para ajustar el soporte del pestillo
hacia arriba o hacia abajo, ac tornillo
de cabeza para deslizar el pestillo de
bloqueo hacia afuera o hacia adentro
según sea necesario.

- 8 -
Tire del anillo de bloqueo hacia arriba
fuera del pestillo para ajustar el
pestillo.
Ajuste la posición de cada bandeja de
carga de ruedas tirando del anillo de
bloqueo hacia afuera de la unidad y
deslizando
la bandeja de carga al ancho
deseado.
Maniobrar la silla de ruedas hacia la
unidad como se muestra.
Las ruedas principales de la silla de
ruedas deben estar firmemente
asentadas en las bandejas de carga.
Los pestillos de bloqueo deben
asegurar el respaldo de la silla de
ruedas.
El reposacabezas debe estar en una
posición cómoda para el usuario de
silla de ruedas.
Realice los ajustes necesarios antes
de mover la silla.

- 9 -
Asegure la silla de ruedas y al usuario
en su lugar utilizando los cinturones
de seguridad.
Bloquee las ruedas principales del
salvaescaleras.
J. Subiendo escaleras
13. Nunca toque ninguna parte de las vías de escalada cuando la unidad
esté encendida.
14. Asegúrese siempre de que todas las piezas de la unidad estén
firmemente bloqueadas en su lugar, especialmente los rieles para subir
escaleras, antes de subir escaleras.
15. Practique operar sin carga y a BAJA velocidad inicialmente.
Coloque la unidad en la base de
las escaleras.
Bloquee las ruedas de la unidad.
Inspeccione visualmente las
escaleras para asegurarse de que
no haya riesgos de seguridad,

- 10 -
incluidos escombros, hielo o agua.
Libera las vías de escalada
pisando la placa roja.
Asegúrese de que las vías para
subir estén lo más cerca posible de
las escaleras y firmemente
bloqueadas en su posición.
Un botón rojo en el mango
superior, enciende la unidad de
control presionando el botón rojo
de ENCENDIDO.
Incline la unidad hacia atrás hasta
que el riel para subir esté en
contacto con las escaleras.
- 11 -
Presione el botón ARRIBA en la
unidad de control para comenzar a
moverse.
25. Cuando haya llegado a la cima de las escaleras, maniobre la
unidad completamente hacia el rellano y regrésela a la posición
vertical.
26. Presione el botón rojo de ENCENDIDO para apagar las pistas de
escalada.
27. Aleje la unidad lo suficiente de las escaleras para permitir que el
usuario de silla de ruedas se descargue de manera segura.
28. Bloquee las ruedas de la unidad.
29. Desabroche los cinturones de seguridad y desenganche los
seguros de las ruedas de la silla de ruedas y los pestillos de bloqueo
de la unidad.
30. Empuje la silla de ruedas hacia adelante hasta que se aleje de la
unidad.
K. Escaleras descendentes
9. Nunca toque ninguna parte de las vías de escalada cuando la unidad
esté encendida.
10. Asegúrese siempre de que todas las piezas de la unidad estén
firmemente bloqueadas en su lugar, especialmente los rieles para subir
escaleras, antes de subir escaleras.

- 12 -
Coloque la unidad en lo alto de las
escaleras.
Bloquee las ruedas de la unidad.
Inspeccione visualmente las
escaleras para asegurarse de que
no haya riesgos de seguridad,
incluidos escombros, hielo o agua.
Suelte las vías de escalada (como
se describe arriba) y asegúrelas
firmemente en su posición.
Encienda la unidad de control
presionando el botón rojo de
ENCENDIDO.
Incline la unidad hacia atrás y
empújela con cuidado hacia las
escaleras hasta que los rieles para
subir se enganchen en las
escaleras.
Presione el botón ABAJO en la
unidad de control para comenzar a
moverse.

- 13 -
29. Si es posible, coloque a una segunda persona en las escaleras
para estabilizar la unidad mientras la coloca en su posición.
30. Cuando haya llegado al final de las escaleras, vuelva a colocar la
unidad en posición vertical.
31. Presione el botón rojo de ENCENDIDO para apagar las pistas de
escalada.
32. Aleje la unidad lo suficiente de las escaleras para permitir que el
usuario de silla de ruedas se descargue de manera segura.
33. Bloquee las ruedas de la unidad.
34. Desabroche los cinturones de seguridad y desenganche los
seguros de las ruedas de la silla de ruedas y los pestillos de bloqueo de
la unidad.
35. Empuje la silla de ruedas hacia adelante hasta que se aleje de la
unidad.
FOLDING THE UNIT
Retire cada bandeja de carga de
ruedas tirando del anillo de
bloqueo hacia afuera de la unidad y
deslizando la bandeja
completamente para liberarla de la
unidad.
Coloque la unidad en el suelo.
Debajo de la plataforma de carga
hay una varilla roja ; tire de la
varilla hacia arriba y luego presione
ligeramente la plataforma de carga.
La unidad se plegará.

- 14 -
BATTERY CHARGING
Do not use wet hands when operating the equipment.
21. Cargue la unidad después de cada uso . El porcentaje MÍNIMO de
cargo es del 25%.
22. Proteja el cargador y los cables de carga del aceite, grasa, detergente,
diluyente o cualquier líquido potencialmente dañino.
23. Mantenga siempre los enchufes secos .
24. Siga las instrucciones de funcionamiento para cargar la batería.
25. La nueva batería alcanzará su estado óptimo tras varios ciclos de
carga y descarga.
Apaga el interruptor principal.
17. El puerto de carga está
ubicado al lado del interruptor de
encendido.
18. Desenrosque la tapa del
puerto de carga.
19. Conecte el cable de carga al
puerto de carga. Conecte el cable
de carga a una toma de corriente.
20. Cuando la batería esté
cargada, retire el cable de carga y
vuelva a atornillar la tapa del
puerto de carga en su lugar.
- 15 -
La batería tiene dos llaves y se
puede usar para bloquear la
batería en la unidad.
TROUBLESHOOTING
Fallos
Detección y S oluciones
La unidad no arranca o no
puedo subir ni bajar escaleras .
Asegúrese de que el interruptor de
alimentación principal de la
plataforma de carga esté en la
posición ON. La luz indicadora
debería brillar en rojo.
Verifique la carga de la batería.
Si muestra baja potencia (<25%),
cargue la unidad.
Si a la batería le queda > 25% de
carga y la unidad no puede
arrancar, comuníquese con el
fabricante.
La batería no se puede
recargar .
Por favor contacte al fabricante.
MAINTENANCE

- 16 -
21. Mantener limpio como rutina.
22. Compruebe con frecuencia si hay piezas sueltas .
23. Si no se utiliza durante un período prolongado, cargue completamente
la batería, sáquela y guárdela en un lugar fresco y seco. Tenga cuidado
con la entrada de agua en la batería de litio.
24. Limpie la unidad y sus piezas con un paño limpio o un cepillo suave y
agua tibia y jabón. Enjuague con agua tibia y seque al aire.
25. No limpiar con productos que contengan lejía o fenol. Si es necesario,
se puede utilizar un cepillo de cerdas duras.


- 2 -
Wsparcie techniczne i certyfikat e-gwarancji
www.vevor.com/support
KRZESŁO DO WSPINACZKI PO
SCHODACH
MODEL: YHR-LD02
We continue to be committed to provide you tools with competitive price.
"Save Half", "Half Price" or any other similar expressions used by us only represents an
estimate of savings you might benefit from buying certain tools with us compared to the major
top brands and does not necessarily mean to cover all categories of tools offered by us. You
are kindly reminded to verify carefully when you are placing an order with us if you are
actually saving half in comparison with the top major brands.

- 1 -
MODEL: YHR-LD02
Have product questions? Need technical support? Please feel free to
contact us:
Technical Support and E-Warranty Certificate
www.vevor.com/support
NEED HELP? CONTACT US!
This is the original instruction, please read all manual instructions
carefully before operating. VEVOR reserves a clear interpretation of our
user manual. The appearance of the product shall be subject to the
product you received. Please forgive us that we won't inform you again if
there are any technology or software updates on our product.
STAIR CLIMBING CHAIR

- 2 -
SAFETY INSTRUCTIONS
Przed pierwszym uruchomieniem
● Przeczytaj instrukcję obsługi i zanotuj wszystkie ostrzeżenia i instrukcje
dotyczące bezpieczeństwa.
● Należy przestrzegać danych technicznych, ponieważ nie można
przekroczyć udźwigu.
● Sprawdź wszystkie funkcje elektroniczne, hamulce bezpieczeństwa i
położenie toru wspinaczkowego.
Podczas obsługi urządzenia
● Nigdy nie zmieniaj ustawień podczas wchodzenia lub schodzenia po
schodach.
● Nigdy nie wkładaj żadnej części ciała, zwłaszcza stóp, pod szyny
wspinaczkowe.
● Jeśli elementy napędowe zablokują się, natychmiast wyłącz urządzenie.
71. Zdecydowanie zalecamy, aby krzesło Stair obsługiwał wyłącznie
certyfikowany, przeszkolony personel . Nieprzeszkolony personel może
spowodować obrażenia lub szkody!
72. Zwróć uwagę na płynną obsługę.
73. Podczas przenoszenia pacjentów na tym urządzeniu pamiętaj o
szczelnym zapięciu pasa bezpieczeństwa i powiedz mu, aby trzymał się
poręczy.
74. Nie poruszaj się zbyt szybko, mijając dziury.
75. W przypadku awarii nieprofesjonalny personel nie może być
demontowany według własnego uznania .
76. Aby zwiększyć żywotność, do mechanizmu przekładni koła
napędowego można dodać trochę oleju smarowego .
77. Podczas pracy nie wykonuj innych prac po obu stronach samochodu,
aby uniknąć wypadków .
78. Po zakończeniu operacji sprawdź, czy elektryczny wózek
wspinaczkowy działa prawidłowo i wyłącz zasilanie .
79. Nie uderzaj, nie igłuj, nie stąpaj, nie modyfikuj, nie wystawiaj baterii na

- 3 -
słońce, nie umieszczaj baterii w kuchence mikrofalowej, pod wysokim
ciśnieniem ani w innych środowiskach.
80. Trzymać z dala od otwartego ognia.
81. Noś obuwie antypoślizgowe i zawsze obsługuj obiema rękami.
82. Nie używaj go w deszczu, wilgoci lub na śniegu lub lodzie.
83. Nie używaj go na schodach ruchomych ani chodnikach.
84. Podnośnika schodowego dla wózków inwalidzkich nie należy używać
do transportu ładunków.
MODEL AND PARAMETERS
Model
YHR-LD02
Maks. Obciążenie
150 kg
Kąt pasów z gąsienicami
gumowymi
20°
Wejście
AC 100-240 V 50/60 Hz
Silnik
DC 24 V / 120 W; 3 różne prędkości
regulowane
Bateria
Bateria litowa; DC 24V / 13Ah
Ładowarka
DC29,4V / 2A
Wysokość ramy
teleskopowej
Wys. 108 cm, wys. 126 cm, wys. 145 cm i wys.
163 cm
Platforma ładunkowa
33,5 x 31,5 cm
Rozmiar składany
109x45x30cm
Materiały
Stop aluminium
Waga
35 kg
DIMENSION AND DIAGRAM

- 4 -
Jednostka: mm
COMPONENTS
NIE.
Nazwa
1
2
3
5
4
6
7
8

- 5 -
1
Uchwyt i panel sterowania
2
Tylny uchwyt do przenoszenia
3
Pas gąsienicowy
4
Koła tylne (5 cali)
5
Nośnik koła
6
Pas bezpieczeństwa
7
Zaczep blokujący
8
Przednie koła (2 cale)
INITIAL OPERATION
NOTE: Before the initial operation, please ensure the STAIR LIFT
will be operated in an environment higher than 0°C.
Turning the Unit On: The power switch
is located on the battery, press red
button to turn on the power supply.
- 6 -
OPERATION
16. Nigdy nie pozostawiaj osoby poruszającej się na wózku inwalidzkim
bez opieki w urządzeniu i zawsze korzystaj z dostarczonych pasów
bezpieczeństwa.
17. Podnośnik schodowy dla wózków inwalidzkich powinien być
obsługiwany wyłącznie przez przeszkolony personel.
18. Urządzenie należy zawsze obsługiwać dwiema rękami.
UWAGA: Przed pierwszym użyciem urządzenia akumulator powinien być
w pełni naładowany.
Checking the Battery Charge: Press
the round button on the battery charge
indicator panel. The green lights will
illuminate if there is a charge.
1 light= 25% charge
2 lights= 50% charge
3 lights= 75% charge
4 lights= 100% charge
Ensure the unit is charged prior to use.
The battery tester on top handle,
confirm the Percentage of
Charge more than 25%.
- 7 -
A. Ładowanie użytkownika na wózku inwalidzkim
Umieść urządzenie blisko schodów,
ale wystarczająco daleko, aby
umożliwić bezpieczny załadunek
osoby na wózku inwalidzkim.
Zablokuj koła urządzenia.
16. Wysuń uchwyt operacyjny,
naciskając dolną część czerwonego
pręta z tyłu ramy (jak pokazano) i
pociągając uchwyt do góry.
17. Po osiągnięciu żądanej pozycji
zwolnij czerwony pręt.
18. Można wybrać 3 wysokości .
Upewnij się, że uchwyt operacyjny
jest zablokowany w odpowiedniej
pozycji, pociągając za uchwyt przy
zwolnionym drążku.
Dopasuj każdy zatrzask blokujący do
odpowiedniego rozmiaru dla wózka
inwalidzkiego za pomocą a h śruba
sześciokątna do regulacji wspornika
zaczepu w górę lub w dół, śruba ap
do przesuwania zaczepu blokującego
na zewnątrz lub do środka, zgodnie z
wymaganiami.

- 8 -
Pociągnij pierścień blokujący do góry
poza zatrzask zamka, aby
wyregulować zatrzask zamka.
Wyreguluj położenie każdej tacy
ładującej koła, odciągając pierścień
blokujący od urządzenia i
przesuwając
tacę załadowczą na żądaną
szerokość.
Wprowadzić wózek inwalidzki na
urządzenie, jak pokazano.
Główne koła wózka inwalidzkiego
powinny być stabilnie osadzone w
korytkach załadunkowych.
Zatrzaski blokujące powinny
zabezpieczać tył wózka.
Zagłówek powinien znajdować się w
pozycji wygodnej dla osoby
poruszającej się na wózku
inwalidzkim.
Przed przesunięciem krzesła należy
dokonać wszelkich niezbędnych

- 9 -
regulacji.
Zabezpiecz wózek inwalidzki i
użytkownika za pomocą pasów
bezpieczeństwa.
Zablokuj główne koła windy
schodowej.
L. Wchodzenie po schodach
16. Nigdy nie dotykaj żadnej części torów wspinaczkowych, gdy
urządzenie jest zasilane.
17. Przed wejściem po schodach należy zawsze upewnić się, że
wszystkie części urządzenia są bezpiecznie zamocowane na swoim
miejscu, zwłaszcza szyny do wchodzenia po schodach.
18. przećwicz pracę bez obciążenia i przy NISKIEJ prędkości.
Umieść urządzenie u podstawy
schodów.
Zablokuj koła urządzenia.
Sprawdź wzrokowo schody, aby
upewnić się, że nie ma na nich
żadnych zagrożeń dla

- 10 -
bezpieczeństwa, w tym gruzu, lodu
lub wody.
Zwolnij tory wspinaczkowe,
wchodząc na czerwoną płytę.
Upewnij się, że tory wspinaczkowe
znajdują się jak najbliżej schodów i
są mocno zablokowane.
Czerwony przycisk na górnym
uchwycie. Włącz jednostkę
sterującą, naciskając czerwony
przycisk ZASILANIE.
Przechyl urządzenie do tyłu, aż
szyna wspinaczkowa zetknie się ze
schodami.
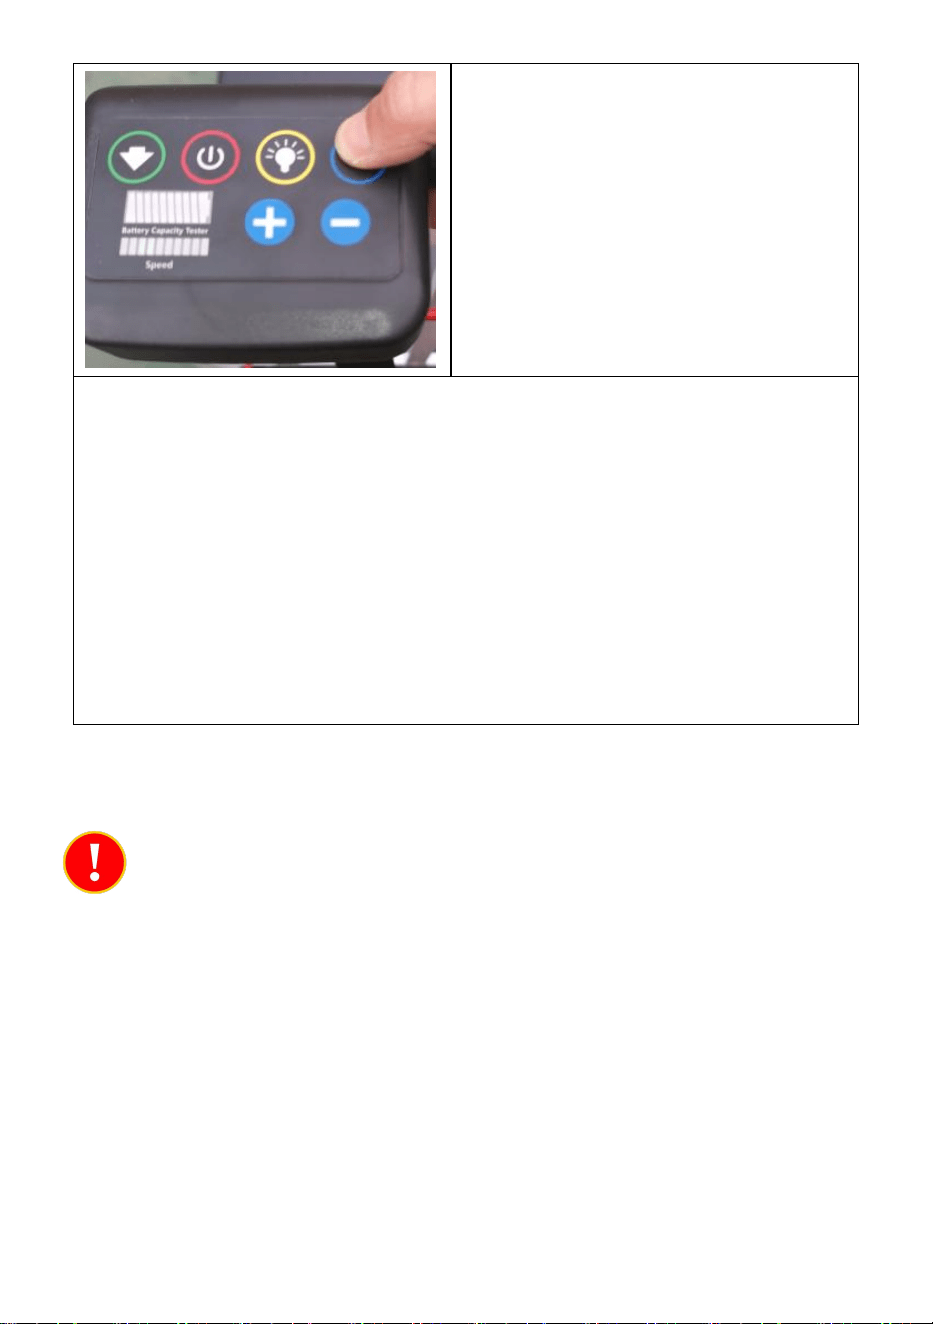
- 11 -
Naciśnij przycisk UP na jednostce
sterującej, aby rozpocząć jazdę.
31. Po dotarciu na szczyt schodów wsuń urządzenie całkowicie na
podest i ustaw je w pozycji pionowej.
32. Naciśnij czerwony przycisk POWER, aby wyłączyć tory
wspinaczkowe.
33. Odsuń urządzenie na odpowiednią odległość od schodów, aby
umożliwić bezpieczny wyładunek osoby na wózku inwalidzkim.
34. Zablokuj koła urządzenia.
35. Odpiąć pasy bezpieczeństwa i zwolnić blokady kół wózka
inwalidzkiego oraz zaczepy blokujące na urządzeniu.
36. Pchnij wózek do przodu, aż wysunie się z jednostki.
M. Schody schodzące
11. Nigdy nie dotykaj żadnej części torów wspinaczkowych, gdy
urządzenie jest zasilane.
12. Przed wejściem po schodach należy zawsze upewnić się, że
wszystkie części urządzenia są bezpiecznie zamocowane na swoim
miejscu, zwłaszcza szyny do wchodzenia po schodach.
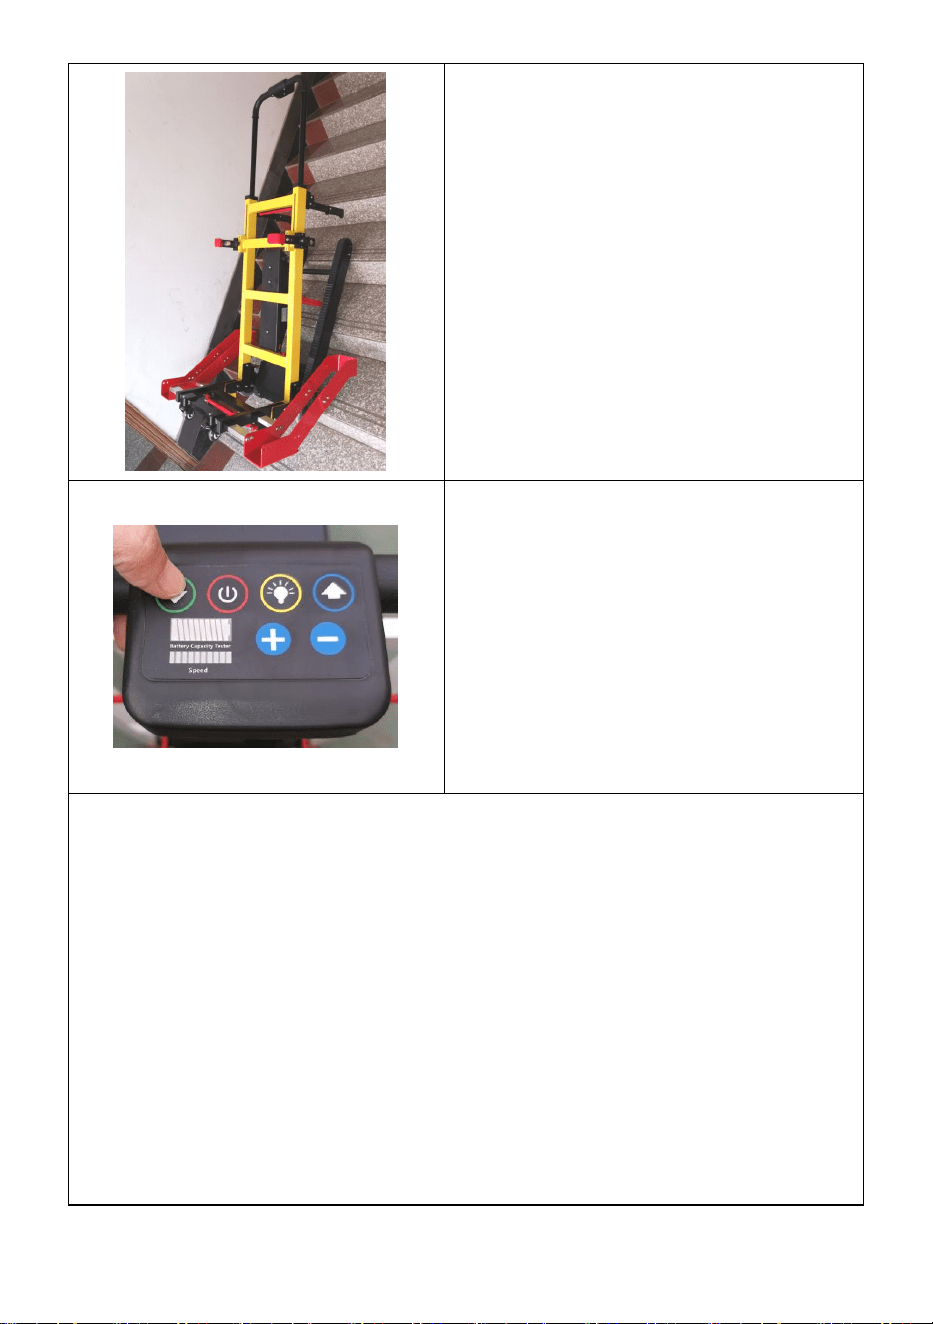
- 12 -
Umieść urządzenie na szczycie
schodów.
Zablokuj koła urządzenia.
Sprawdź wzrokowo schody, aby
upewnić się, że nie ma na nich
żadnych zagrożeń dla
bezpieczeństwa, w tym gruzu, lodu
lub wody.
Zwolnij szyny wspinaczkowe (jak
opisano powyżej) i mocno zablokuj
je w odpowiedniej pozycji.
Włącz centralę wciskając czerwony
przycisk ZASILANIE.
Przechyl urządzenie do tyłu i
ostrożnie popchnij je w stronę
schodów, aż szyny wspinaczkowe
zatrzasną się na schodach.
Naciśnij przycisk W DÓŁ na
jednostce sterującej, aby rozpocząć
jazdę.
36. Jeśli to możliwe, poproś drugą osobę, aby ustabilizowała
urządzenie podczas ustawiania go na schodach.
37. Po dotarciu na dół schodów ustaw urządzenie w pozycji pionowej.
38. Naciśnij czerwony przycisk POWER, aby wyłączyć tory
wspinaczkowe.
39. Odsuń urządzenie na odpowiednią odległość od schodów, aby
umożliwić bezpieczny wyładunek osoby na wózku inwalidzkim.
40. Zablokuj koła urządzenia.
41. Odpiąć pasy bezpieczeństwa i zwolnić blokady kół wózka
inwalidzkiego oraz zaczepy blokujące na urządzeniu.
42. Pchnij wózek do przodu, aż wysunie się z jednostki.
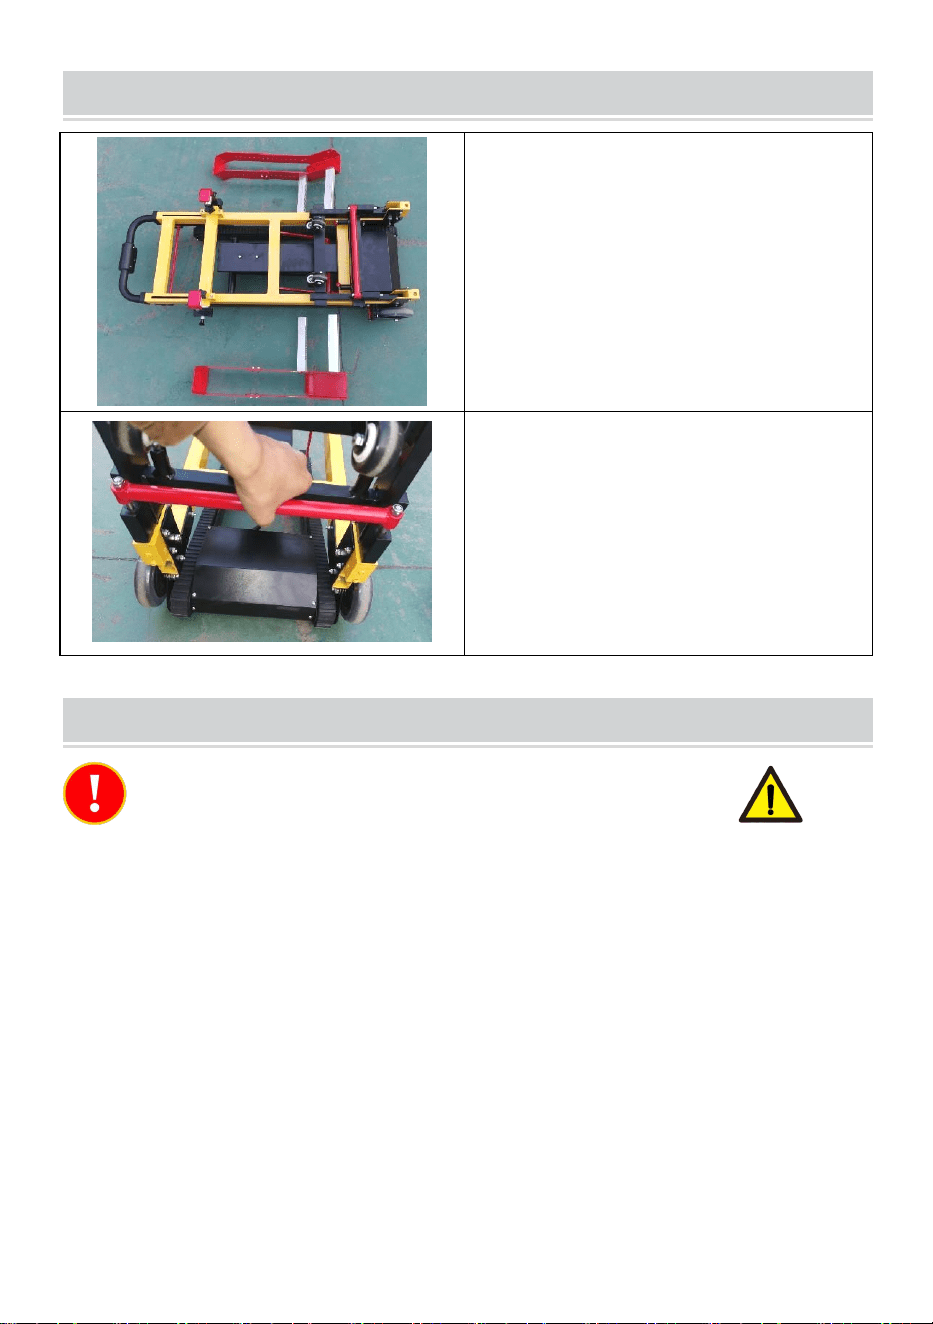
- 13 -
FOLDING THE UNIT
Wyjmij każdą tacę załadunkową na
kółkach, odciągając pierścień
blokujący od urządzenia i
całkowicie wysuwając tacę z
jednostki.
Połóż urządzenie na ziemi.
Pod paletą załadunkową znajduje
się czerwony drążek ; pociągnij
drążek do góry, a następnie lekko
naciśnij paletę załadunkową.
Jednostka złoży się.
BATTERY CHARGING
Do not use wet hands when operating the equipment.
26. Ładuj urządzenie po każdym użyciu . MINIMALNY procent
naładowania wynosi 25%.
27. Chroń ładowarkę i przewody ładowania przed olejem, smarem,
detergentem, rozcieńczalnikiem lub innymi potencjalnie szkodliwymi
płynami.
28. Zawsze utrzymuj gniazdka w suchości .
29. Postępuj zgodnie z instrukcją obsługi, aby naładować akumulator.
30. Nowy akumulator osiągnie optymalny stan po kilku cyklach ładowania i
rozładowywania.
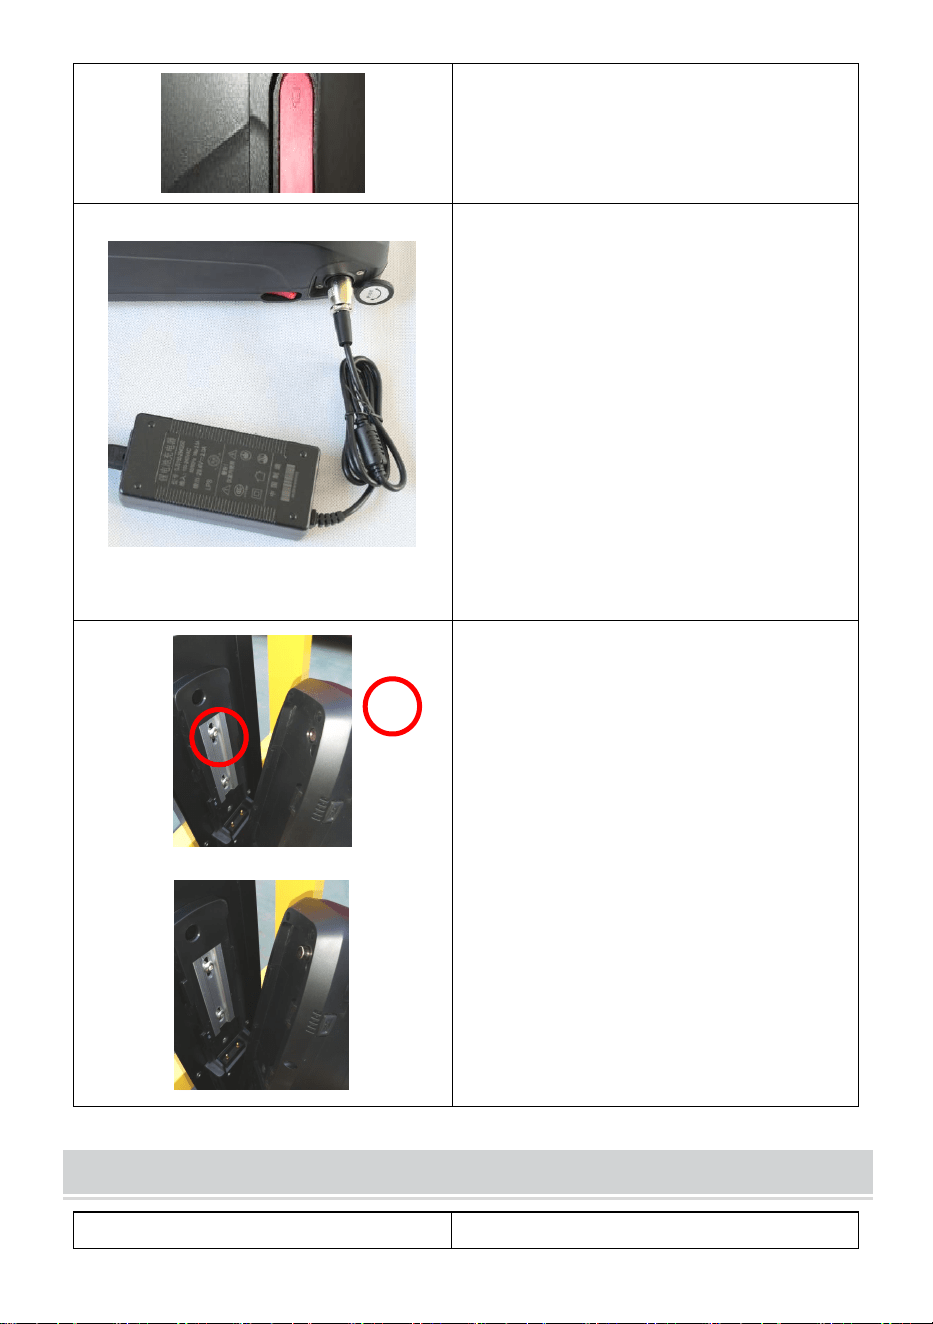
- 14 -
Wyłącz główny wyłącznik.
21. Port ładowania znajduje się
obok włącznika zasilania.
22. Odkręć osłonę portu
ładowania.
23. Podłącz kabel ładujący do
portu ładowania Podłącz kabel
ładujący do gniazdka
elektrycznego.
24. Po naładowaniu akumulatora
odłącz kabel ładujący i przykręć
pokrywę portu ładowania z
powrotem na miejsce.
Bateria posiada dwa klucze,
którymi można zablokować baterię
w urządzeniu.
TROUBLESHOOTING
Usterki
Wykrywanie i rozwiązywanie _

- 15 -
Urządzenie nie uruchamia się
lub nie mogę iść w górę ani w
dół schody .
Upewnij się, że główny wyłącznik
zasilania na palecie ładującej jest w
pozycji WŁ. Lampka kontrolna
powinna świecić na czerwono.
Sprawdź poziom naładowania
akumulatora.
Jeśli pokazuje niski poziom
naładowania (<25%), naładuj
urządzenie.
Jeżeli poziom naładowania
akumulatora wynosi > 25%, a
urządzenia nie można uruchomić,
należy skontaktować się z
producentem.
Baterii nie można naładować .
Prosimy o kontakt z producentem.
MAINTENANCE
26. Utrzymuj czystość jak zwykle.
27. Często sprawdzaj, czy nie ma luźnych części .
28. Jeśli nie będziesz używać urządzenia przez dłuższy czas, naładuj
całkowicie akumulator, wyjmij go i przechowuj w chłodnym i suchym
miejscu. Uważaj na przedostanie się wody do baterii litowej.
29. Urządzenie i jego części należy czyścić czystą szmatką lub miękką
szczoteczką i ciepłą wodą z mydłem. Spłukać ciepłą wodą i wysuszyć na
powietrzu.
30. Nie czyścić produktami zawierającymi wybielacz lub fenol. W razie
potrzeby można użyć pędzla ze sztywnym włosiem.


- 2 -
Technische ondersteuning en e-garantiecertificaat
www.vevor.com/support
TRAPLOPEN STOEL
MODEL: YHR-LD02
We continue to be committed to provide you tools with competitive price.
"Save Half", "Half Price" or any other similar expressions used by us only represents an
estimate of savings you might benefit from buying certain tools with us compared to the major
top brands and does not necessarily mean to cover all categories of tools offered by us. You
are kindly reminded to verify carefully when you are placing an order with us if you are
actually saving half in comparison with the top major brands.

- 1 -
MODEL: YHR-LD02
Have product questions? Need technical support? Please feel free to
contact us:
Technical Support and E-Warranty Certificate
www.vevor.com/support
NEED HELP? CONTACT US!
This is the original instruction, please read all manual instructions
carefully before operating. VEVOR reserves a clear interpretation of our
user manual. The appearance of the product shall be subject to the
product you received. Please forgive us that we won't inform you again if
there are any technology or software updates on our product.
STAIR CLIMBING CHAIR

- 2 -
SAFETY INSTRUCTIONS
Vóór de eerste inbedrijfstelling
● Lees de gebruikershandleiding en neem alle waarschuwingen en
veiligheidsinstructies in acht.
● Houd rekening met de technische gegevens, aangezien het
hefvermogen niet mag worden overschreden.
● Controleer alle elektronische functies, veiligheidsremmen en de positie
van de klimbaan.
Terwijl u het apparaat bedient
● Wijzig nooit instellingen terwijl u een trap op- of afgaat.
● Plaats nooit enig lichaamsdeel, vooral voeten, onder de klimrails.
● Als de aandrijfelementen blokkeren, schakel het apparaat dan
onmiddellijk uit.
85. Wij raden ten zeerste aan dat alleen gecertificeerd en opgeleid
personeel de trapstoel bedient . Ongetraind personeel kan letsel of schade
veroorzaken!
86. Let op een vlotte bediening.
87. Wanneer u patiënten met deze machine vervoert , zorg er dan voor dat
u de patiënt stevig vastmaakt , de veiligheidsgordel vastmaakt voor de
veiligheid en hem vertelt dat hij zich aan de leuning moet vasthouden.
88. Beweeg niet te snel bij het passeren van kuilen.
89. Wanneer er een storing optreedt, mag niet-professioneel personeel
niet naar believen worden gedemonteerd .
90. Om de levensduur te verlengen, kunt u wat smeerolie aan het
transmissiemechanisme van het aandrijfwiel toevoegen .
91. Voer tijdens het werken geen andere werkzaamheden uit aan beide
zijden van de auto om ongelukken te voorkomen .
92. Controleer na voltooiing van de operatie of de elektrische klimauto
normaal is en schakel de stroom uit .
93. Niet kloppen, prikken, betreden, wijzigen, de batterij niet in de zon
plaatsen, de batterij niet in de magnetron, onder hoge druk en in andere

- 3 -
omgevingen plaatsen.
94. Verwijderd houden van open vuur.
95. Draag antislipschoenen en bedien de machine altijd met beide handen.
96. het niet in regen, natte omstandigheden of op sneeuw of ijs.
97. het niet op roltrappen of roltrappen.
98. De rolstoeltraplift mag niet worden gebruikt voor het vervoeren van
vracht.
MODEL AND PARAMETERS
Model
YHR-LD02
Max. Laden
150 kg
Hoek van rubberen
rupsbanden
20°
Invoer
Wisselstroom 100-240V 50/60Hz
Motor
DC 24V / 120W; 3 verschillende snelheden
instelbaar
Accu
Lithium batterij; Gelijkstroom 24V / 13Ah
Oplader
DC29,4V / 2A
Telescopische
grijpframehoogte
H108cm, H126cm, H145cm en H163cm
Vrachtplatform
33,5x31,5cm
Opvouwbare maat
109x45x30cm
Materialen
Aluminium legering
Gewicht
35 kg
DIMENSION AND DIAGRAM
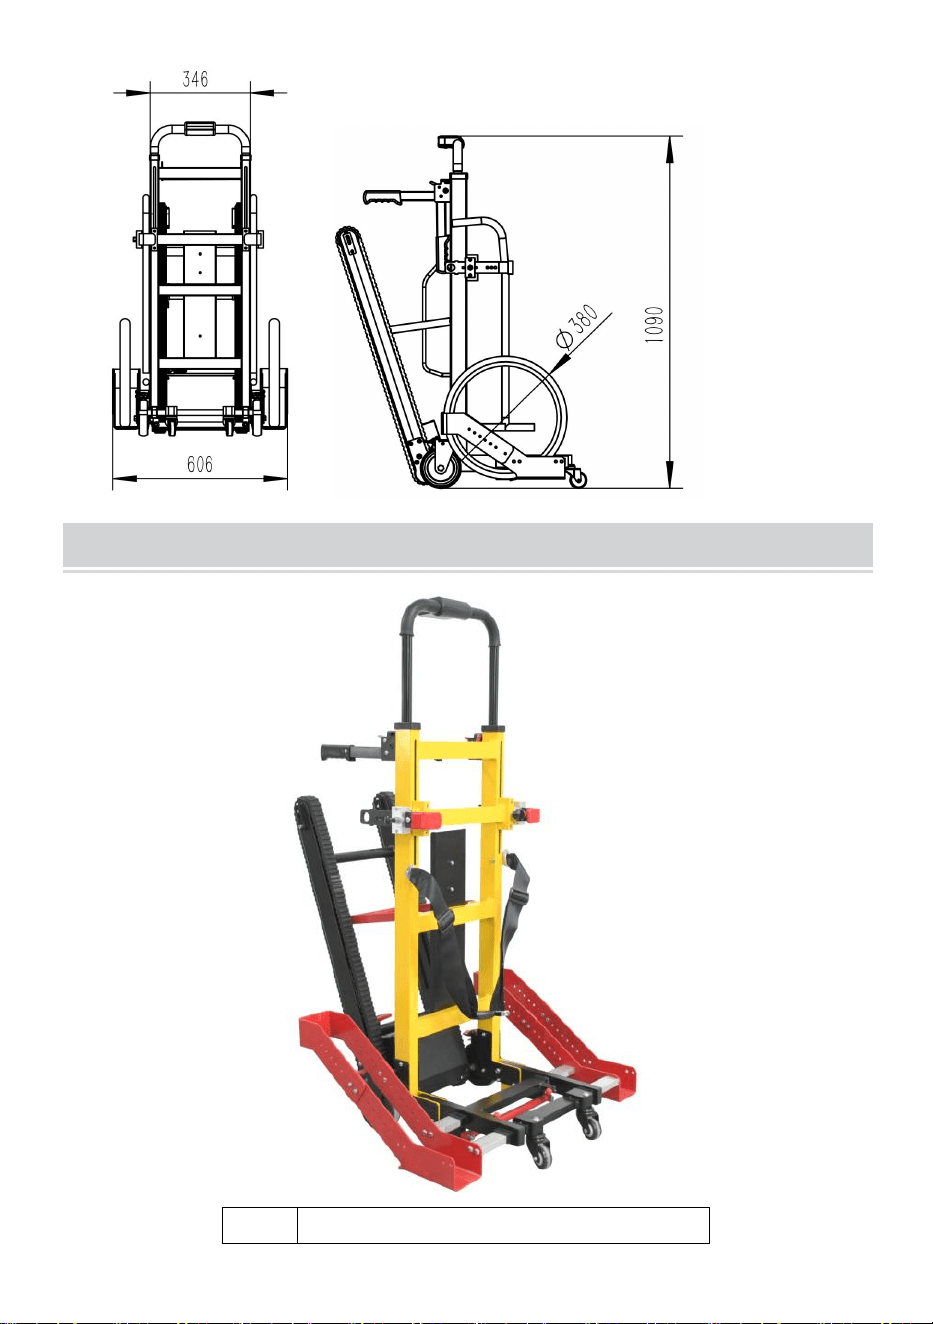
- 4 -
Eenheid: mm
COMPONENTS
Nee.
Naam
1
2
3
5
4
6
7
8

- 5 -
1
Handgreep en bedieningspaneel
2
Draaggreep aan de achterkant
3
Spoorriem
4
Achterwielen (5in)
5
Wieldrager
6
Veiligheidsgordel
7
Vergrendelingsvangst
8
Voorwielen (2 inch)
INITIAL OPERATION
NOTE: Before the initial operation, please ensure the STAIR LIFT
will be operated in an environment higher than 0°C.
Turning the Unit On: The power switch
is located on the battery, press red
button to turn on the power supply.

- 6 -
OPERATION
19. Laat een rolstoelgebruiker nooit zonder toezicht achter in de unit en
maak altijd gebruik van de meegeleverde veiligheidsgordels.
20. De rolstoeltraplift mag alleen worden bediend door opgeleid
personeel.
21. Het apparaat moet te allen tijde met twee handen worden bediend.
OPMERKING: De batterij moet volledig worden opgeladen voordat u het
apparaat voor de eerste keer gebruikt.
A. Het laden van een rolstoelgebruiker
Checking the Battery Charge: Press
the round button on the battery charge
indicator panel. The green lights will
illuminate if there is a charge.
1 light= 25% charge
2 lights= 50% charge
3 lights= 75% charge
4 lights= 100% charge
Ensure the unit is charged prior to use.
The battery tester on top handle,
confirm the Percentage of
Charge more than 25%.

- 7 -
Plaats het apparaat dicht bij de trap,
maar ver genoeg weg zodat de
rolstoelgebruiker veilig kan worden
geladen.
Vergrendel de wielen van het
apparaat.
19. Verleng de bedieningshendel
door op de onderkant van de rode
stang aan de achterkant van het
frame te drukken (zoals afgebeeld) en
de hendel omhoog te trekken.
20. Wanneer de gewenste positie is
bereikt, laat u de rode staaf los.
21. Er zijn 3 hoogtes die
geselecteerd kunnen worden.
Zorg ervoor dat de bedieningshendel
op zijn plaats is vergrendeld door aan
de hendel te trekken terwijl de stang
is losgelaten.
Pas elke vergrendeling aan de juiste
maat voor de rolstoel aan met een
zeskantschroef om de
vergrendelingssteun naar boven of
naar beneden te verstellen, ac
apschroef om de vergrendeling naar
wens naar buiten of naar binnen te
schuiven.
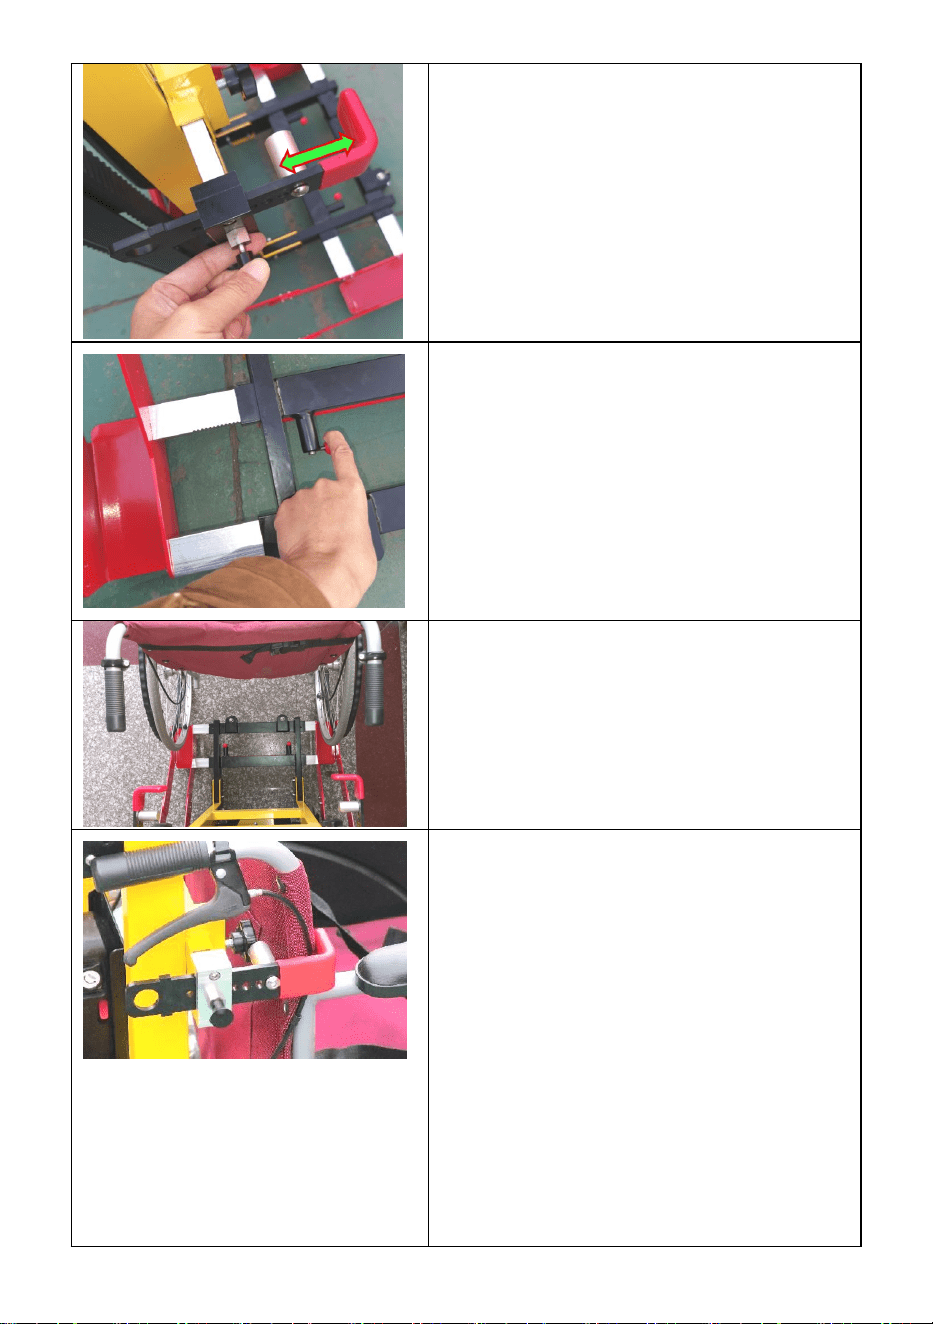
- 8 -
Trek de borgring naar boven uit de
slotpal om de slotpal af te stellen.
Pas de positie van elke wiellaadbak
aan door de borgring van de eenheid
weg te trekken en te verschuiven
de laadbak op de gewenste breedte.
Manoeuvreer de rolstoel op het
apparaat zoals afgebeeld.
De hoofdwielen van de rolstoel
moeten stevig in de laadbakken
zitten.
De vergrendelingen moeten de
achterkant van de rolstoel vastzetten.
De hoofdsteun moet in een
comfortabele positie staan voor de
rolstoelgebruiker.
Voer eventuele aanpassingen uit
voordat u de stoel verplaatst.
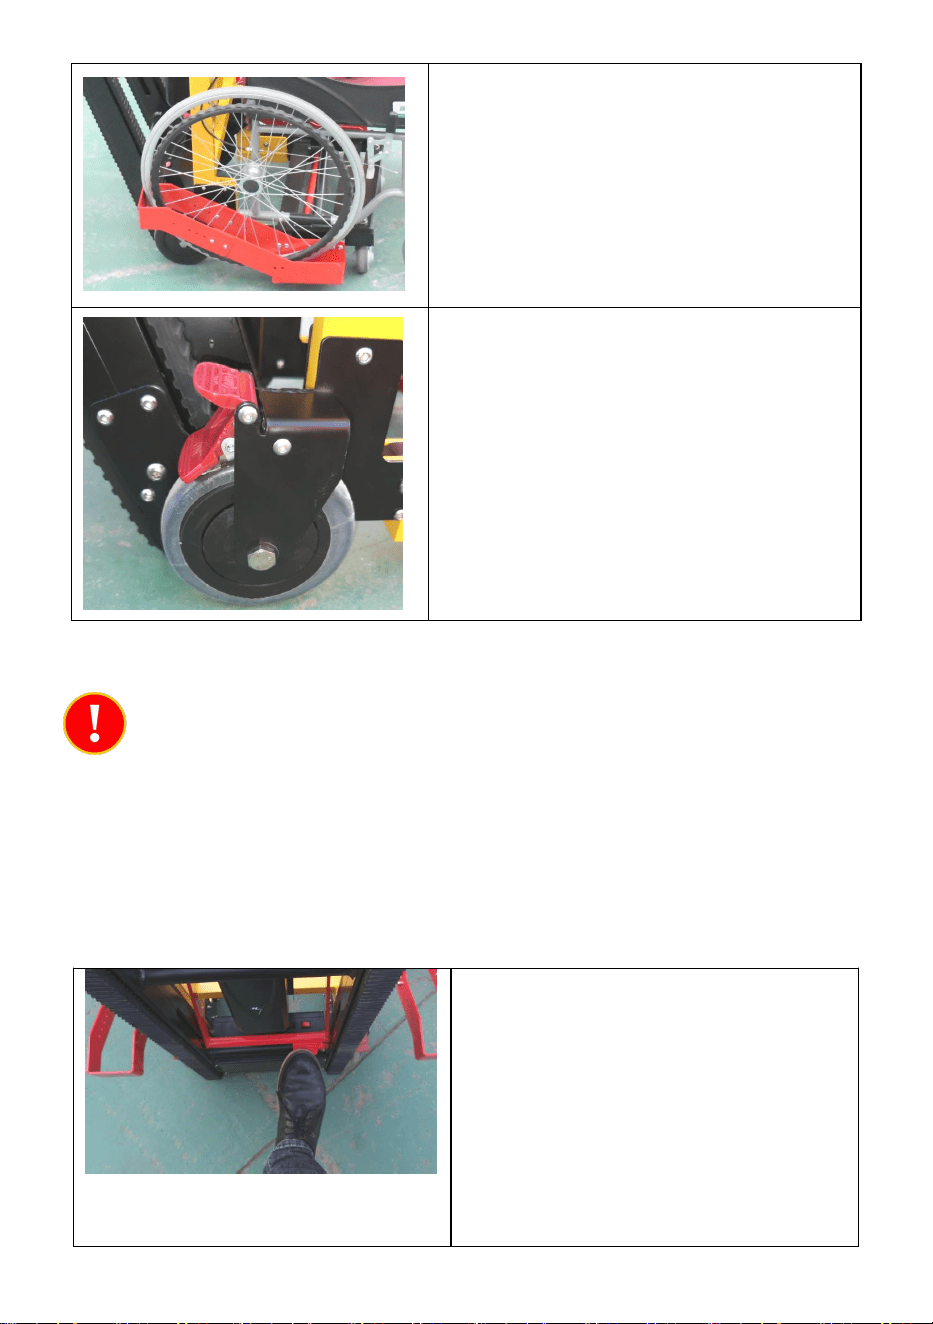
- 9 -
Zet de rolstoel en gebruiker vast met
de veiligheidsgordels.
Vergrendel de hoofdwielen van de
traplift.
N. Trappen beklimmen
19. Raak nooit enig deel van de klimbanen aan als het apparaat onder
stroom staat.
20. Zorg er altijd voor dat alle onderdelen van het apparaat veilig op hun
plaats zijn vergrendeld, vooral de traplooprails, voordat u een trap beklimt.
21. Oefen het werken zonder last en aanvankelijk met een LAGE snelheid.
Plaats het apparaat onder aan de
trap.
Vergrendel de wielen van het
apparaat.
Inspecteer de trap visueel om er
zeker van te zijn dat er geen
veiligheidsrisico's zijn, zoals puin,

- 10 -
ijs of water.
Maak de klimbanen los door op de
rode plaat te stappen.
Zorg ervoor dat de klimrails zich zo
dicht mogelijk bij de trap bevinden
en stevig op hun plaats zitten.
Een rode knop op de bovenste
handgreep. Schakel de
besturingseenheid in door op de
rode AAN/UIT-knop te drukken.
Kantel het apparaat naar achteren
totdat de klimrail contact maakt met
de trap.
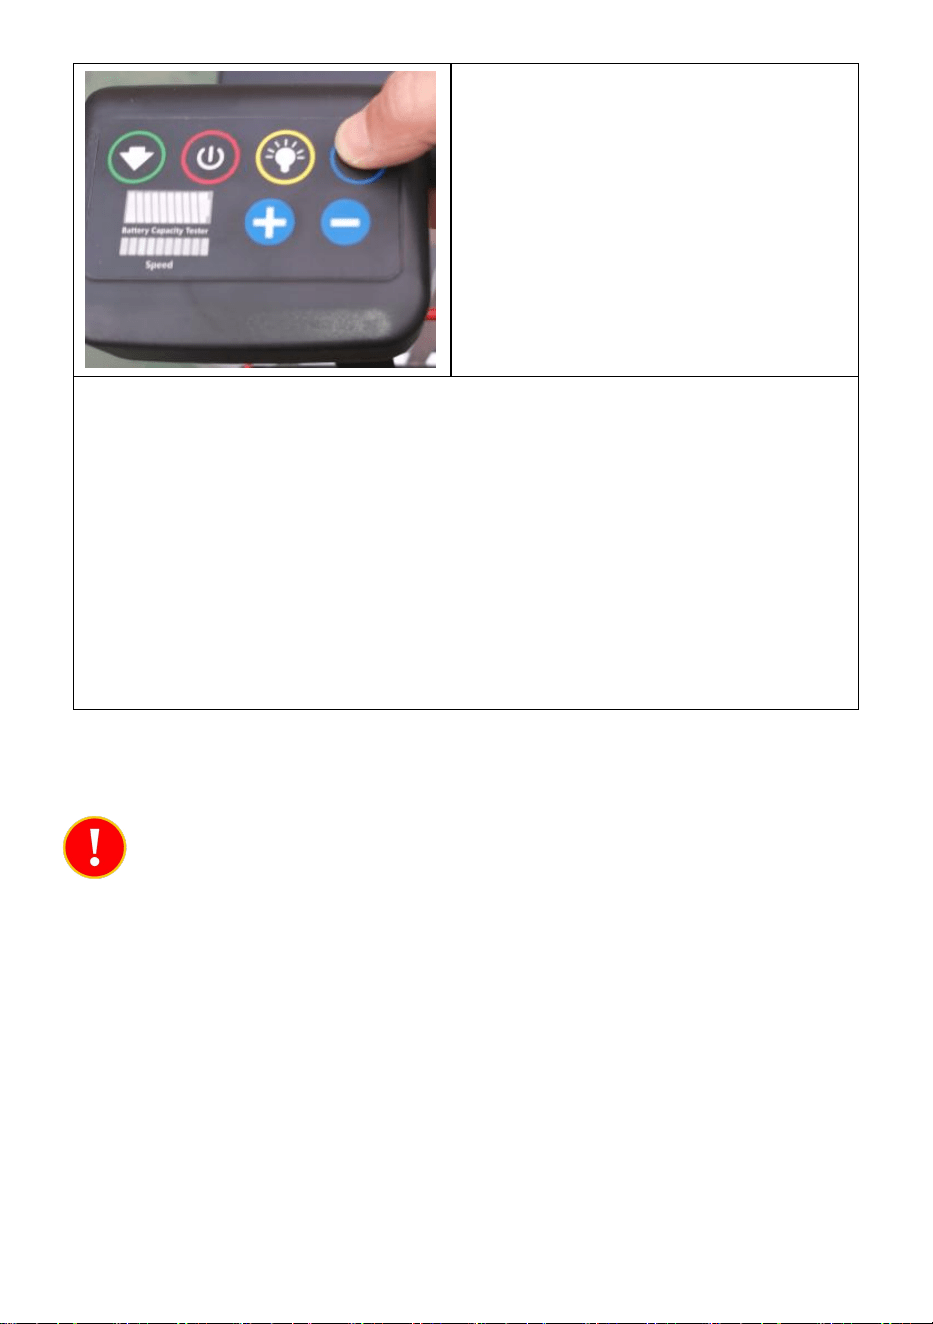
- 11 -
Druk op de UP-knop op de
besturingseenheid om te beginnen
met bewegen.
37. Wanneer u de bovenkant van de trap heeft bereikt, manoeuvreert
u het toestel volledig op de overloop en zet u het toestel weer rechtop.
38. Druk op de rode POWER-knop om de klimbanen uit te schakelen.
39. Plaats het apparaat ver genoeg van de trap af, zodat de
rolstoelgebruiker veilig kan worden uitgeladen.
40. Vergrendel de wielen van het apparaat.
41. Maak de veiligheidsgordels los en maak de wielvergrendelingen
van de rolstoel en de vergrendelingen op het apparaat los.
42. Duw de rolstoel naar voren totdat deze vrij is van het apparaat.
O. Aflopende trap
13. Raak nooit enig deel van de klimbanen aan als het apparaat onder
stroom staat.
14. Zorg er altijd voor dat alle onderdelen van het apparaat veilig op hun
plaats zijn vergrendeld, vooral de traplooprails, voordat u een trap beklimt.
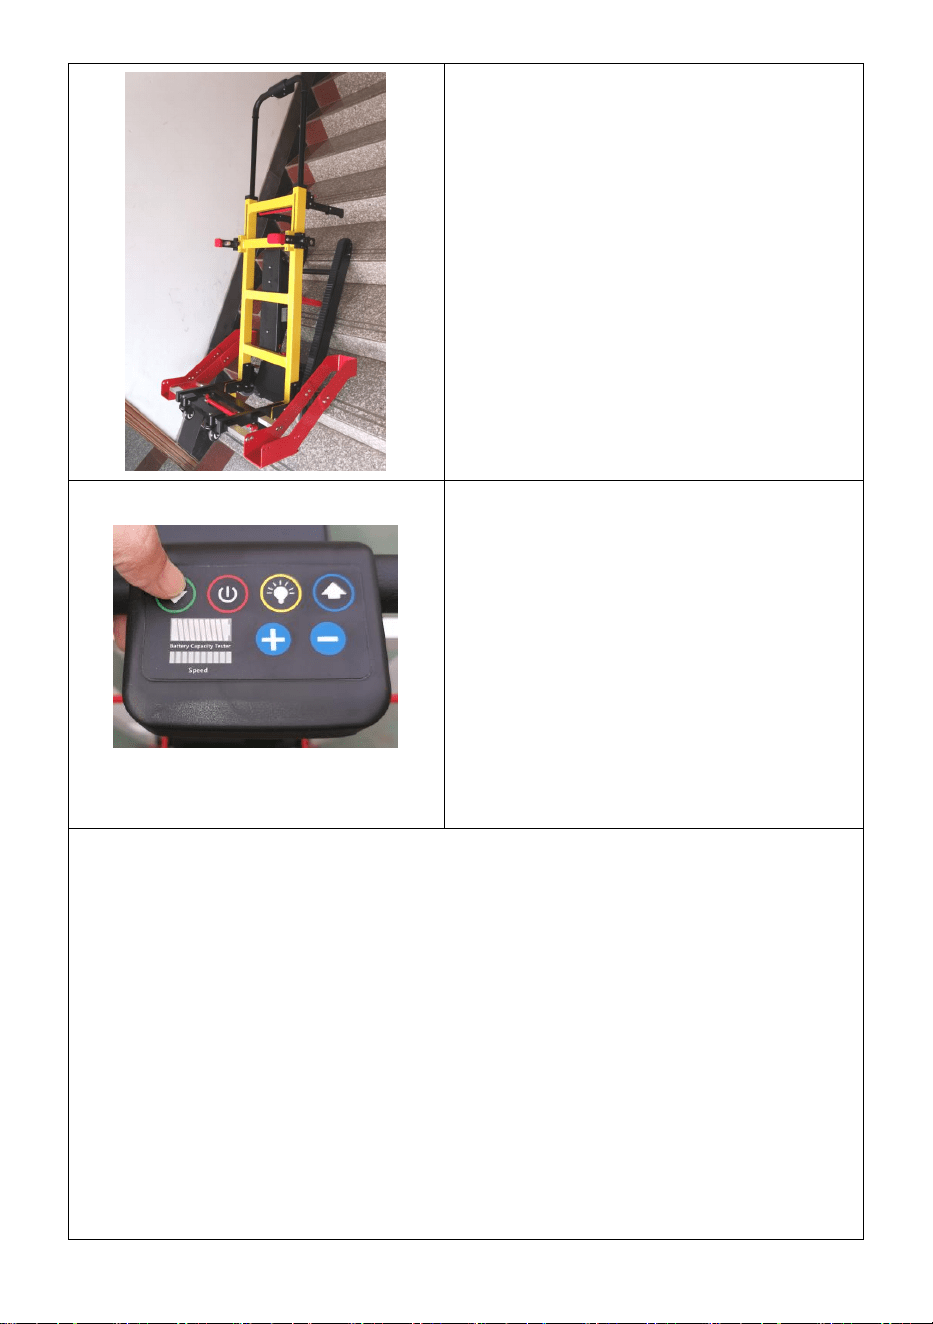
- 12 -
Plaats het apparaat bovenaan de
trap.
Vergrendel de wielen van het
apparaat.
Inspecteer de trap visueel om er
zeker van te zijn dat er geen
veiligheidsrisico's zijn, zoals puin, ijs
of water.
Maak de klimrails los (zoals
hierboven beschreven) en
vergrendel ze stevig op hun plaats.
Schakel de besturingseenheid in
door op de rode POWER-knop te
drukken.
Kantel het apparaat naar achteren
en duw het apparaat voorzichtig
richting de trap totdat de klimrails in
de trap grijpen.
Druk op de OMLAAG-knop op de
besturingseenheid om te beginnen
met bewegen.
43. Laat indien mogelijk een tweede persoon op de trap staan om het
apparaat stabiel te houden terwijl u het op zijn plaats manoeuvreert.
44. Wanneer u de onderkant van de trap heeft bereikt, zet u het
apparaat weer rechtop.
45. Druk op de rode POWER-knop om de klimbanen uit te schakelen.
46. Plaats het apparaat ver genoeg van de trap af, zodat de
rolstoelgebruiker veilig kan worden uitgeladen.
47. Vergrendel de wielen van het apparaat.
48. Maak de veiligheidsgordels los en maak de wielvergrendelingen
van de rolstoel en de vergrendelingen op het apparaat los.
49. Duw de rolstoel naar voren totdat deze vrij is van het apparaat.
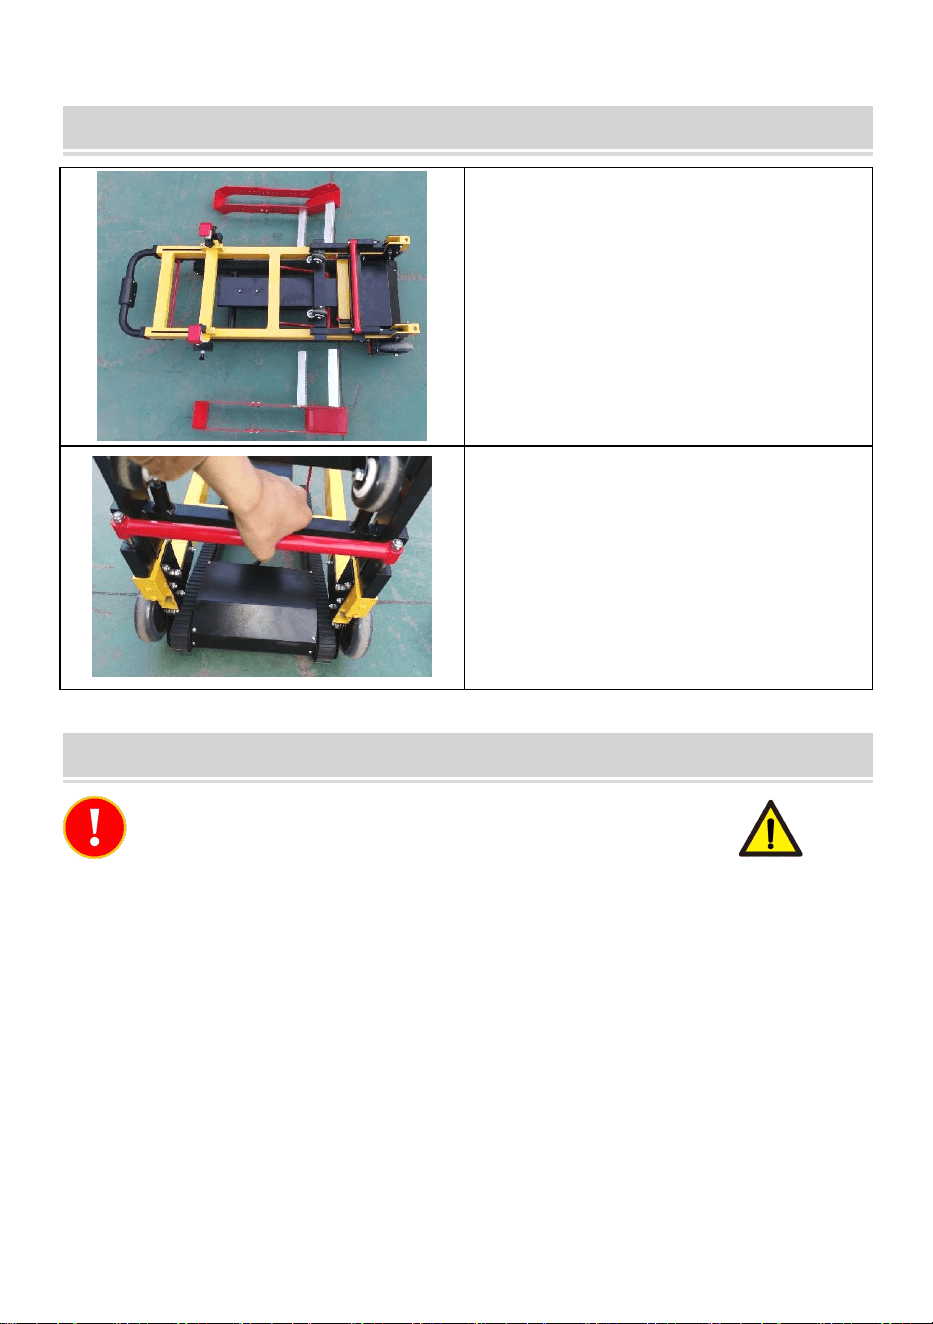
- 13 -
FOLDING THE UNIT
Verwijder elke wiellaadbak door de
borgring van de unit weg te trekken
en de bak volledig uit de unit te
schuiven.
Leg het apparaat op de grond.
Onder het laadpallet bevindt zich
een rode stang ; trek de stang
omhoog en druk vervolgens lichtjes
op het laadpallet. De unit klapt in.
BATTERY CHARGING
Do not use wet hands when operating the equipment.
31. Laad het apparaat na elk gebruik op . H et MINIMUM-laadpercentage
bedraagt 25%.
32. Bescherm de oplader en de oplaaddraden tegen olie, vet,
schoonmaakmiddelen, verdunner of mogelijk schadelijke vloeistoffen.
33. Houd stopcontacten altijd droog .
34. Volg de gebruiksaanwijzing om de batterij op te laden.
35. De nieuwe batterij zal zijn optimale staat bereiken na verschillende
laad- en ontlaadcycli.

- 14 -
Zet de hoofdschakelaar uit.
25. De oplaadpoort bevindt zich
naast de aan/uit-schakelaar.
26. Schroef het deksel van de
oplaadpoort los.
27. Sluit de oplaadkabel aan op de
oplaadpoort. Steek de oplaadkabel
in een stopcontact.
28. Wanneer de batterij is
opgeladen, verwijdert u de
oplaadkabel en schroeft u het
deksel van de oplaadpoort weer op
zijn plaats.
De batterij heeft twee sleutels en
kan worden gebruikt om de batterij
op het apparaat te vergrendelen.
TROUBLESHOOTING
Storingen
Detectie en oplossingen _

- 15 -
Het apparaat start niet of kan
niet omhoog of omlaag trap .
Zorg ervoor dat de
hoofdschakelaar op de laadpallet in
de AAN-positie staat. Het
indicatielampje moet rood
oplichten.
Controleer de batterijlading.
Als het apparaat een laag
vermogen aangeeft (<25%), laadt u
het apparaat op.
Als de batterij nog > 25%
opgeladen is en het apparaat niet
kan starten, neem dan contact op
met de fabrikant.
De batterij kan niet worden
opgeladen .
Neem contact op met de fabrikant.
MAINTENANCE
31. Houd schoon als routine.
32. Controleer regelmatig op losse onderdelen .
33. Als u de batterij langere tijd niet gebruikt, laadt u de batterij volledig op,
verwijdert u de batterij en bewaart u deze op een koele en droge plaats.
Pas op dat er water in de lithiumbatterij terechtkomt.
34. Reinig het apparaat en de onderdelen ervan met een schone doek of
zachte borstel en warm zeepsop. Spoel af met warm water en laat aan de
lucht drogen.
35. Maak niet schoon met producten die bleekmiddel of fenol bevatten.
Indien nodig kan een stijve borstel worden gebruikt.


- 2 -
Teknisk support och e-garanticertifikat
www.vevor.com/support
TRAPPKLÄTTERSTOL
MODELL: YHR-LD02
We continue to be committed to provide you tools with competitive price.
"Save Half", "Half Price" or any other similar expressions used by us only represents an
estimate of savings you might benefit from buying certain tools with us compared to the major
top brands and does not necessarily mean to cover all categories of tools offered by us. You
are kindly reminded to verify carefully when you are placing an order with us if you are
actually saving half in comparison with the top major brands.

- 1 -
MODELL: YHR-LD02
Have product questions? Need technical support? Please feel free to
contact us:
Technical Support and E-Warranty Certificate
www.vevor.com/support
NEED HELP? CONTACT US!
This is the original instruction, please read all manual instructions
carefully before operating. VEVOR reserves a clear interpretation of our
user manual. The appearance of the product shall be subject to the
product you received. Please forgive us that we won't inform you again if
there are any technology or software updates on our product.
STAIR CLIMBING CHAIR

- 2 -
SAFETY INSTRUCTIONS
Innan den första driften
● Läs bruksanvisningen och notera alla varningar och
säkerhetsanvisningar.
● Observera tekniska data eftersom lyftkapaciteten inte kan överskridas.
● Kontrollera alla elektroniska funktioner, säkerhetsbromsar och
klätterbanans läge.
När du använder enheten
● Ändra aldrig inställningar när du klättrar eller går ner i trappor.
● Placera aldrig någon kroppsdel, särskilt inte fötter, under klätterbanorna.
● Om drivelementen låser sig, stäng omedelbart av enheten.
99. Vi rekommenderar starkt att endast certifierad utbildad personal
använder trappstolen . Outbildad personal kan orsaka skador eller skador!
100. Var uppmärksam på smidig hantering.
101. När du bär patienter med den här maskinen , se till att låsa ordentligt ,
spänn fast säkerhetsbältet för säkerhet och säg åt honom att hålla i
ledstången.
102. Rör dig inte för snabbt när du passerar gropar.
103. Vid fel får icke-professionell personal inte demonteras efter behag .
104. Du kan tillsätta lite smörjolja till drivhjulets transmissionsmekanism för
att öka livslängden .
105. Vid arbete, utför inte annat arbete på båda sidor av bilen för att
undvika olyckor .
106. Efter avslutad operation, kontrollera om den elektriska klätterbilen är
normal och stäng av strömmen .
107. Slå inte, nål, trampa, modifiera, sola batteriet, placera inte batteriet i
mikrovågsugn , högtryck eller andra miljöer.
108. Håll borta från öppen låga.
109. Bär halkfria skor och arbeta alltid med båda händerna.
110. den inte i regn, våta förhållanden eller på snö eller is.
111. den inte på rulltrappor eller rulltrappor.
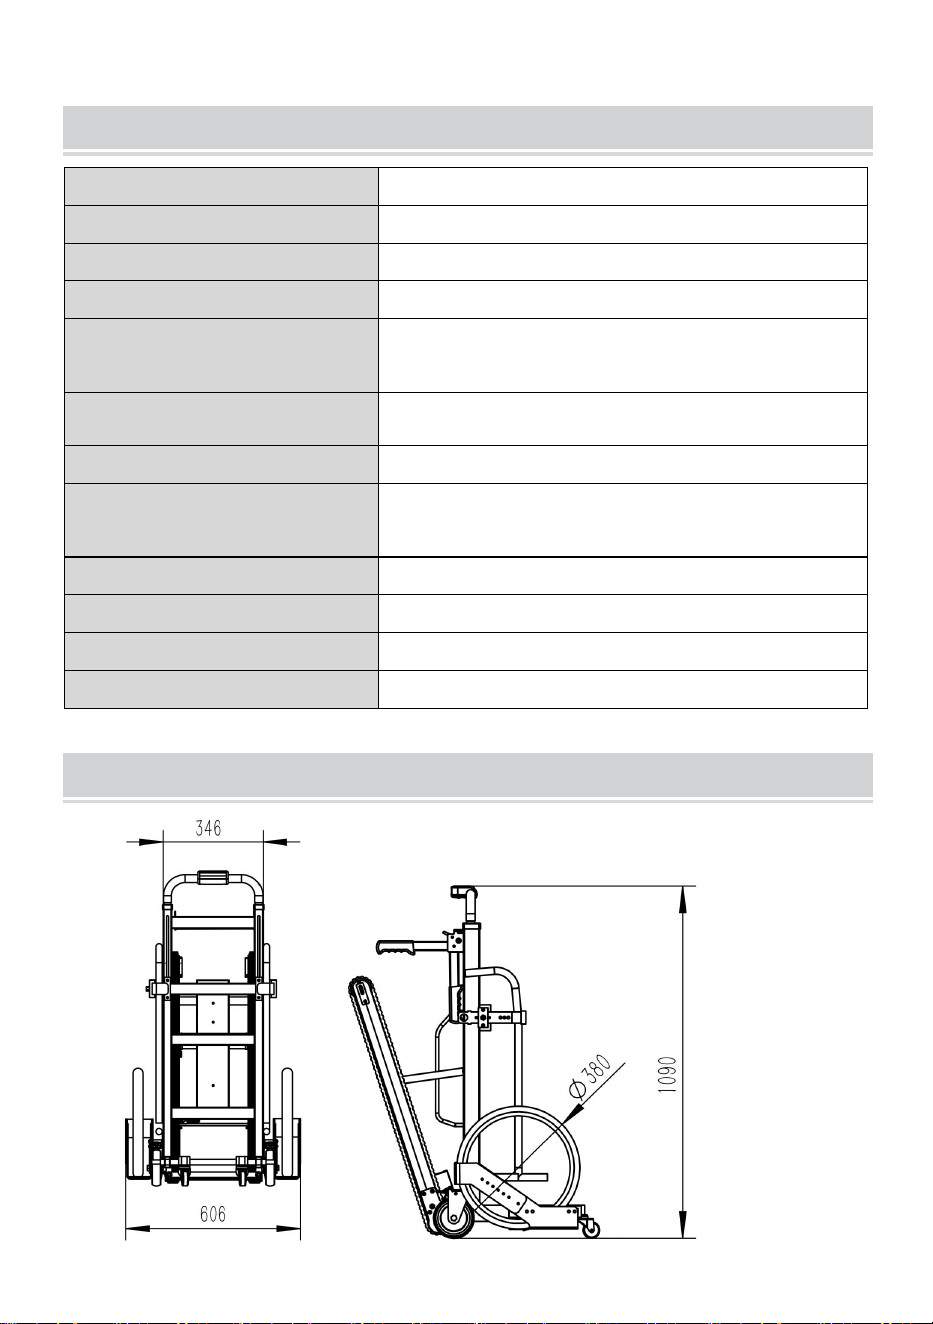
- 3 -
112. Rullstolstrapphissen ska inte användas för transport av gods.
MODEL AND PARAMETERS
Modell
YHR-LD02
Max. Ladda
150 kg
Vinkel för bälten med
gummiband
20°
Inmatning
AC 100-240V 50/60Hz
Motor
DC 24V / 120W;3-olika hastighetsjusterbar
Batteri
Litiumbatteri; DC 24V / 13Ah
Laddare
DC29,4V / 2A
Teleskopisk greppramhöjd
H108cm, H126cm, H145cm och H163cm
Lastplattform
33,5x31,5cm
Vikbar storlek
109x45x30cm
Material
Aluminiumlegering
Vikt
35 kg
DIMENSION AND DIAGRAM
Enhet: mm

- 4 -
COMPONENTS
Nej.
namn
1
Handtag och kontrollpanel
2
Bakre bärhandtag
3
Spårbälte
4
Bakhjul (5 tum)
5
Hjulhållare
6
Säkerhetsbälte
7
Låsande hake
8
Framhjul (2 tum)
1
2
3
5
4
6
7
8
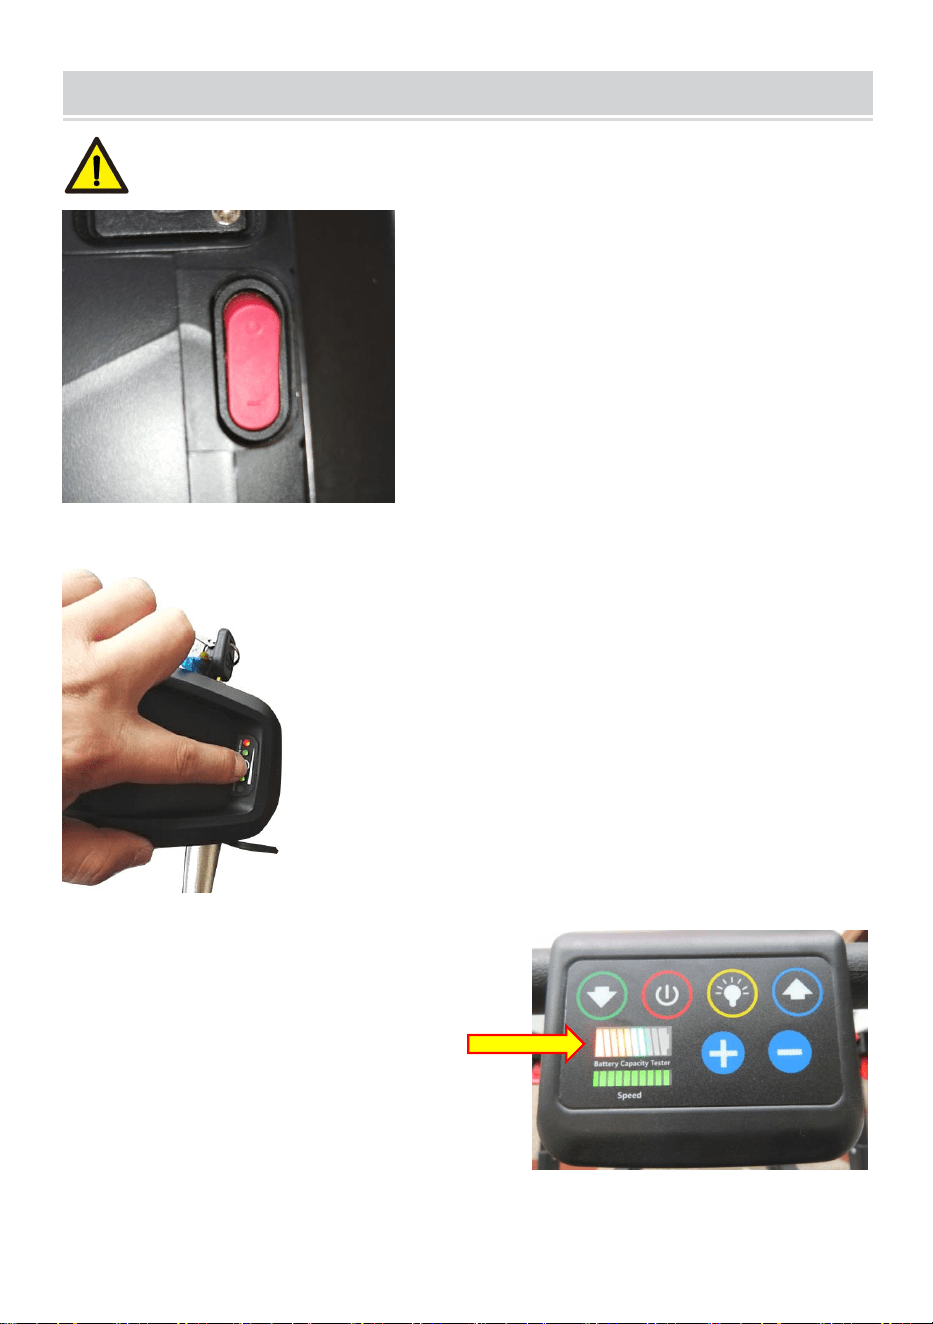
- 5 -
INITIAL OPERATION
NOTE: Before the initial operation, please ensure the STAIR LIFT
will be operated in an environment higher than 0°C.
Turning the Unit On: The power switch
is located on the battery, press red
button to turn on the power supply.
Checking the Battery Charge: Press
the round button on the battery charge
indicator panel. The green lights will
illuminate if there is a charge.
1 light= 25% charge
2 lights= 50% charge
3 lights= 75% charge
4 lights= 100% charge
Ensure the unit is charged prior to use.
The battery tester on top handle,
confirm the Percentage of
Charge more than 25%.

- 6 -
OPERATION
22. Lämna aldrig en rullstolsanvändare obevakad i enheten och använd
alltid de medföljande säkerhetsbältena.
23. Rullstolstrapplyften får endast användas av utbildad personal.
24. Enheten måste alltid användas med två händer.
OBS: Batteriet ska vara fulladdat innan du använder enheten för första
gången.
A. Lasta en rullstolsanvändare
Placera enheten nära trappan men
tillräckligt långt bort för att
rullstolsanvändaren ska kunna lastas
säkert.
Lås hjulen på enheten.
22. Förläng manöverhandtaget
genom att trycka på den nedre delen
av den röda stången på baksidan av
ramen (enligt bilden) och dra upp
handtaget.
23. När önskad position har nåtts,
släpp den röda stången.
24. Det finns 3 höjder som kan
väljas.
Se till att manöverhandtaget är låst i
läge genom att dra i handtaget med
stången frigjord.

- 7 -
Justera varje låsspärr till lämplig
storlek för rullstolen med en h
exagonskruv för att justera
spärrstödet uppåt eller nedåt, ac
apskruv för att skjuta ut eller in
spärren efter behov.
Dra låsringen uppåt utanför låshaken
för att justera låshaken.
Justera positionen för varje
hjullastningsbricka genom att dra bort
låsringen från enheten och skjuta
lastbrickan till önskad bredd.
Manövrera rullstolen på enheten
enligt bilden.
Rullstolens huvudhjul ska sitta stadigt
i lasttrågen.
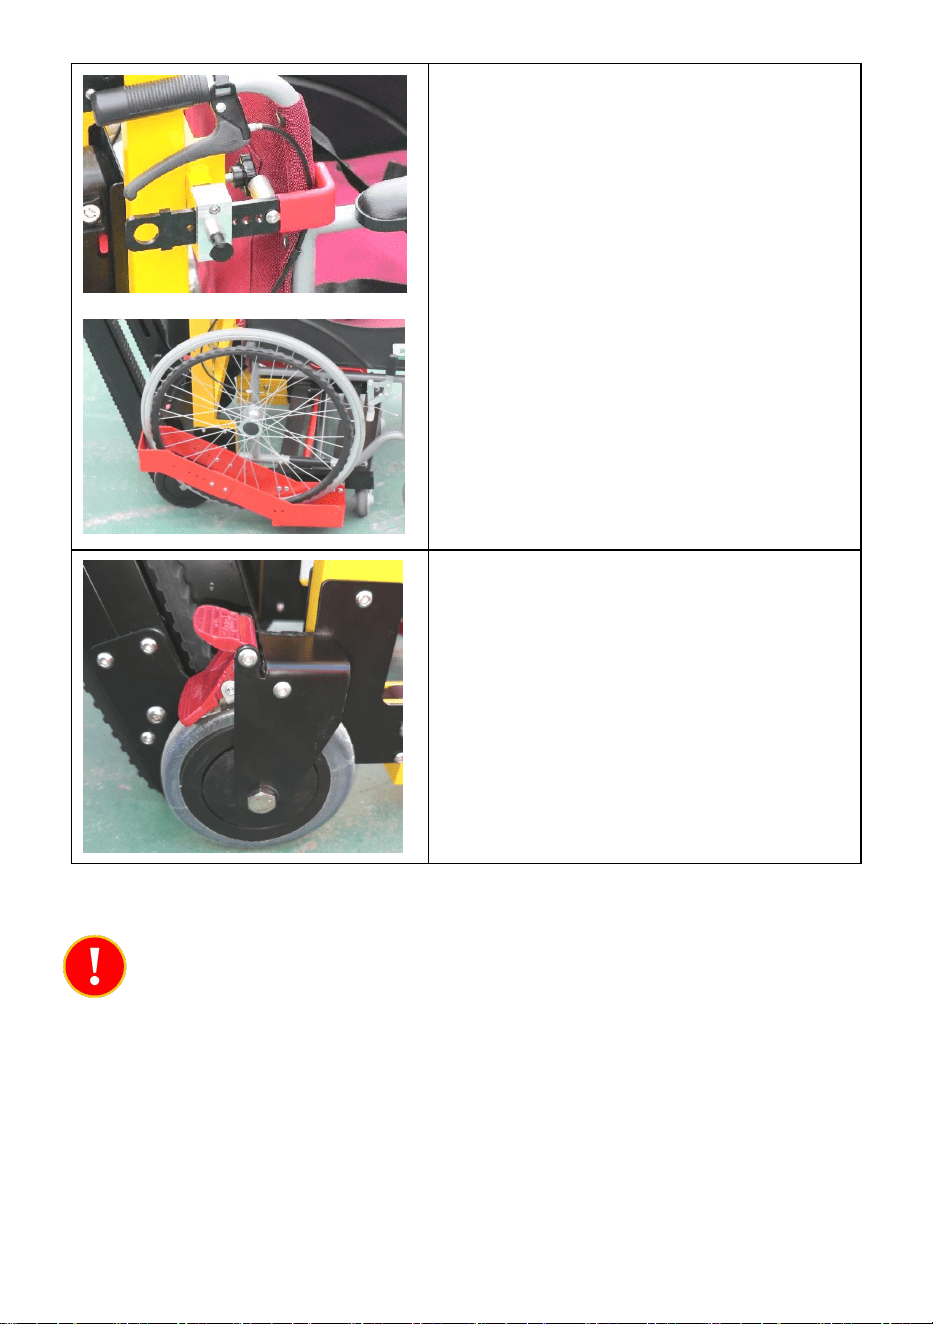
- 8 -
Låsspärrarna ska säkra baksidan av
rullstolen.
Nackstödet ska sitta i en bekväm
position för rullstolsanvändaren.
Gör eventuella justeringar innan du
flyttar stolen.
Säkra rullstolen och användaren på
plats med hjälp av säkerhetsbälten.
Lås trapphissens huvudhjul.
P. Gå i trappor
22. Rör aldrig någon del av klätterbanorna när enheten är påslagen.
23. Se alltid till att alla delar av enheten är säkert låsta på plats, särskilt
trappklättringsbanorna, innan du går i trappor.
24. Öva på att arbeta utan last och med LÅG hastighet initialt.
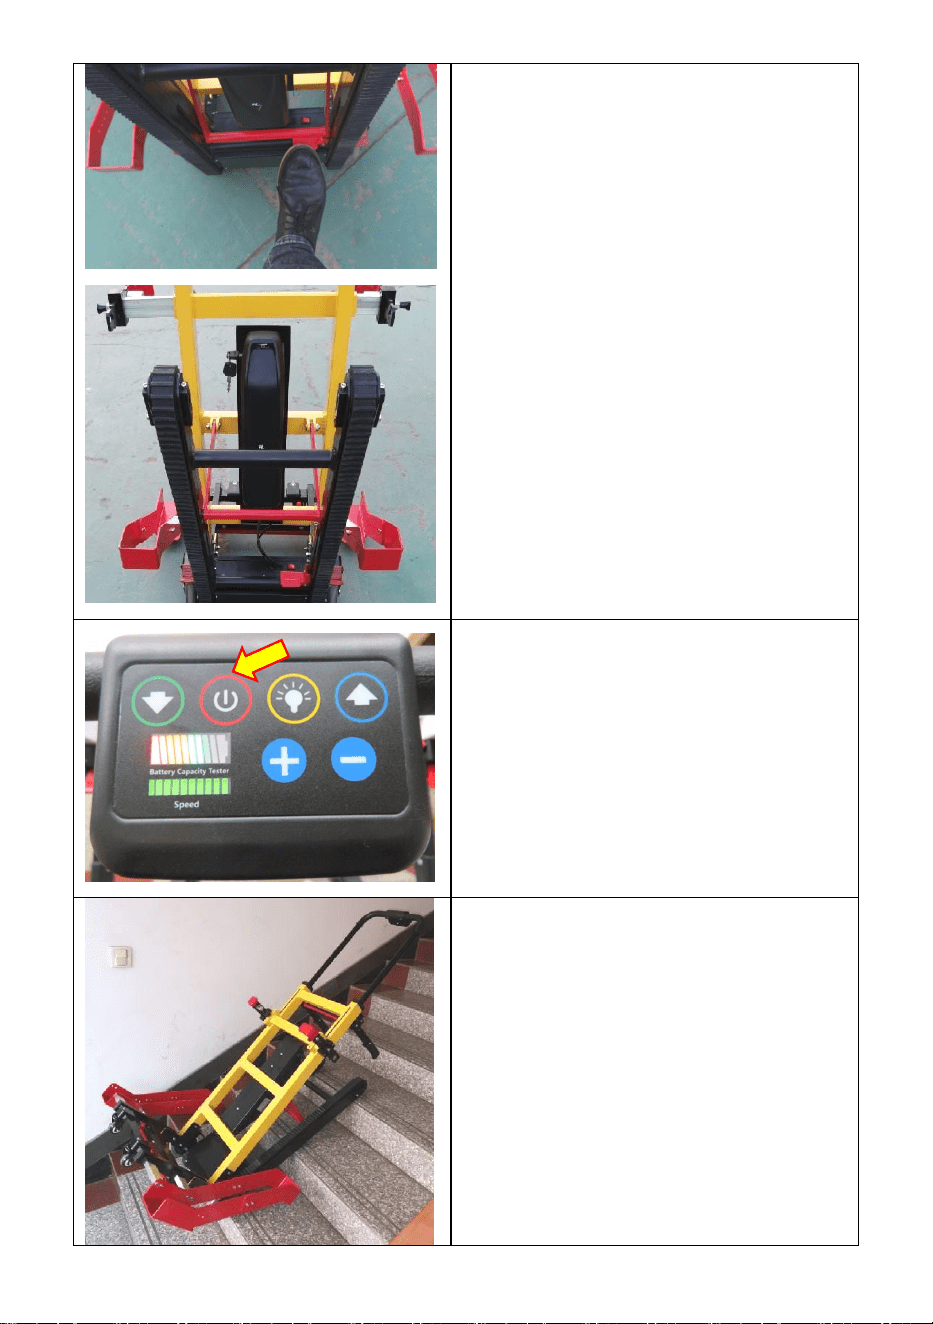
- 9 -
Placera enheten vid foten av
trappan.
Lås hjulen på enheten.
Inspektera trappan visuellt för att
säkerställa att det inte finns några
säkerhetsrisker, inklusive skräp, is
eller vatten.
Släpp klätterbanorna genom att
trampa på den röda plattan.
Se till att klätterbanorna är så nära
trappan som möjligt och ordentligt
låsta.
En röd knapp på det övre
handtaget, Slå på kontrollenheten
genom att trycka på den röda
POWER-knappen.
Luta enheten bakåt tills
klätterbanan är i kontakt med
trappan.

- 10 -
Tryck på UPP-knappen på
kontrollenheten för att börja flytta.
43. När du har nått toppen av trappan, manövrera enheten helt upp på
trappavsatsen och återställ enheten till upprätt läge.
44. Tryck på den röda POWER-knappen för att stänga av
klättringsbanorna.
45. Flytta enheten tillräckligt långt bort från trappan så att
rullstolsanvändaren kan lastas av på ett säkert sätt.
46. Lås hjulen på enheten.
47. Lossa säkerhetsbältena och koppla ur rullstolens hjullås och
låsspärrarna på enheten.
48. Skjut rullstolen framåt tills den är fri från enheten.
Q. Fallande trappa
15. Rör aldrig någon del av klätterbanorna när enheten är påslagen.
16. Se alltid till att alla delar av enheten är säkert låsta på plats, särskilt
trappklättringsbanorna, innan du går i trappor.

- 11 -
Placera enheten på toppen av
trappan.
Lås hjulen på enheten.
Inspektera trappan visuellt för att
säkerställa att det inte finns några
säkerhetsrisker, inklusive skräp, is
eller vatten.
Lossa klätterbanorna (enligt
beskrivningen ovan) och lås dem
ordentligt på plats.
Slå på kontrollenheten genom att
trycka på den röda
POWER-knappen.
Luta enheten bakåt och tryck
försiktigt enheten mot trappan tills
klätterbanorna griper in i trappan.
Tryck på NED-knappen på
kontrollenheten för att börja röra på
sig.
50. Om möjligt, ha en andra person placerad på trappan för att
stabilisera enheten när du manövrerar den på plats.
51. När du har nått botten av trappan sätter du tillbaka enheten i
upprätt läge.
52. Tryck på den röda POWER-knappen för att stänga av
klättringsbanorna.
53. Flytta enheten tillräckligt långt bort från trappan så att
rullstolsanvändaren kan lastas av på ett säkert sätt.
54. Lås hjulen på enheten.
55. Lossa säkerhetsbältena och koppla ur rullstolens hjullås och
låsspärrarna på enheten.
56. Skjut rullstolen framåt tills den är fri från enheten.

- 12 -
FOLDING THE UNIT
Ta bort varje hjullastningsbricka
genom att dra bort låsringen från
enheten och skjuta brickan helt fri
från enheten.
Lägg enheten på marken.
Under lastpallen finns en röd
stång ; dra stången uppåt och tryck
sedan lätt på lastpallen. Enheten
fälls ihop.
BATTERY CHARGING
Do not use wet hands when operating the equipment.
36. Ladda enheten efter varje användning . D e MINIMUM Procentandel
av avgifter är 25 %.
37. Skydda laddaren och laddningskablarna från olja, fett,
rengöringsmedel, thinner eller potentiellt skadliga vätskor.
38. Håll alltid uttag torra .
39. Följ bruksanvisningen för att ladda batteriet.
40. Det nya batteriet kommer att nå sitt optimala tillstånd efter flera
laddnings- och urladdningscykler.
Stäng av huvudströmbrytaren.
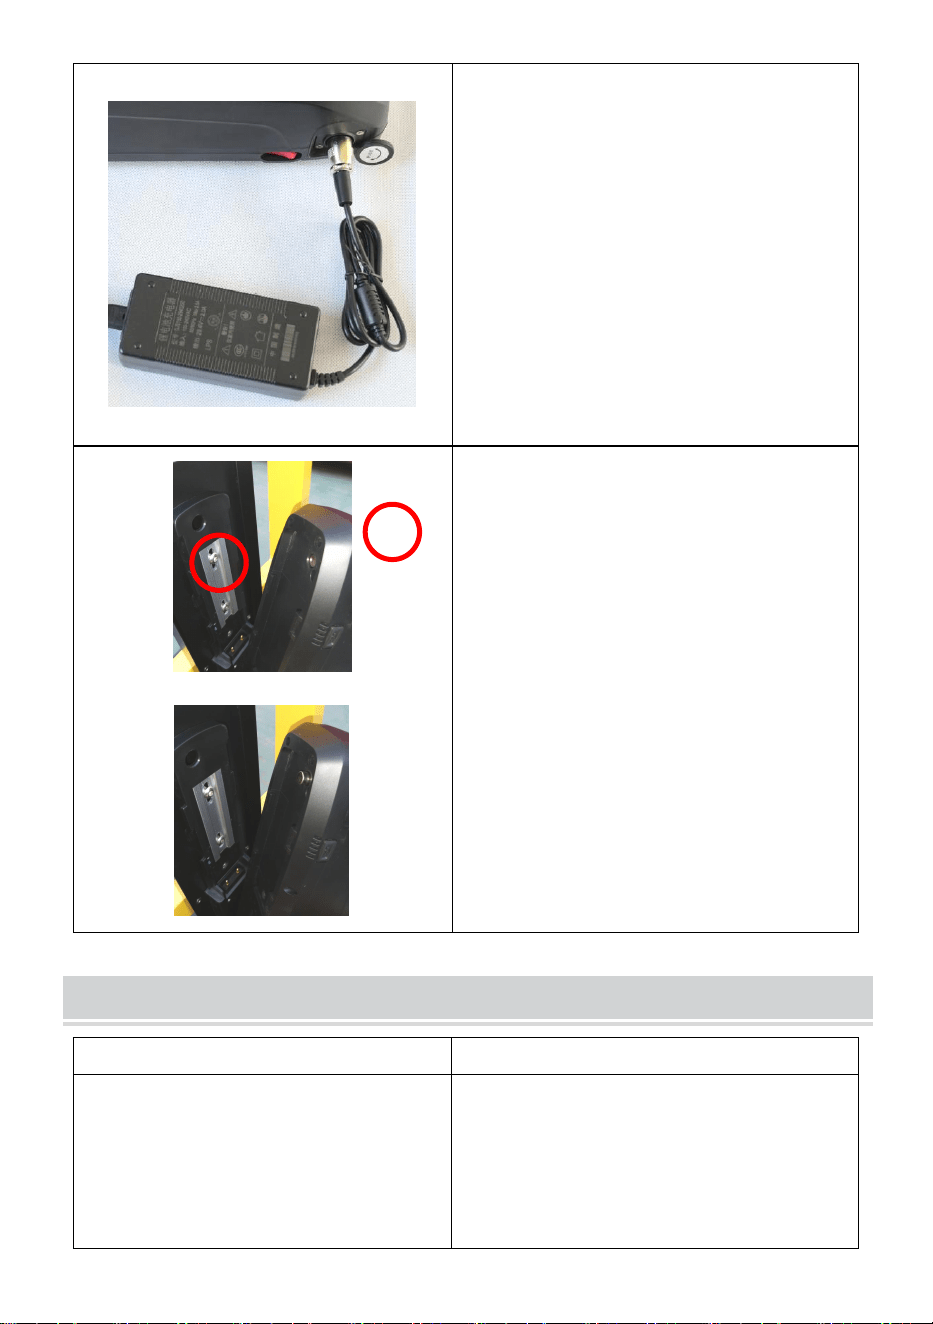
- 13 -
29. Laddningsporten är placerad
bredvid strömbrytaren.
30. Skruva av locket till
laddningsporten.
31. Anslut laddningskabeln till
laddningsporten Anslut
laddningskabeln till ett eluttag.
32. När batteriet är laddat, ta bort
laddningskabeln och skruva
tillbaka laddningsportkåpan på
plats.
Batteriet har två nycklar och kan
användas för att låsa batteriet på
enheten.
TROUBLESHOOTING
Fel
Detektion och lösning s
Enheten startar inte eller kan
inte gå upp eller ner trappor .
Se till att huvudströmbrytaren på
lastpallen är i PÅ-läget.
Indikatorlampan ska lysa rött.
Kontrollera batteriladdningen.
Om den visar låg effekt (<25%),

- 14 -
ladda enheten.
Om batteriet har > 25 % laddning
kvar och enheten inte kan starta,
kontakta tillverkaren.
Batteriet kan inte laddas .
Kontakta tillverkaren.
MAINTENANCE
36. Håll rent som rutin.
37. Kontrollera ofta för lösa delar .
38. Om det inte används under en längre tid, ladda batteriet helt och ta ut
batteriet och förvara det på en sval och torr plats. Se upp för att vatten
kommer in i litiumbatteriet.
39. Rengör enheten och dess delar med en ren trasa eller mjuk borste och
varmt tvålvatten. Skölj med varmt vatten och lufttorka.
40. Rengör inte med produkter som innehåller blekmedel eller fenol. En
styv borste kan användas vid behov.