OWNER’S INSTRUCTIONS
1000W Halogen
Work Light with Tripod
CAUTION: Read all instructions and warnings before Operating
SAVE THESE INSTRUCTIONS! READ ALL INSTRUCTIONS!
SKU No : 370-1958
IMPORTANT: When installing the new bulb, wear clean gloves or use a clean
cloth to avoid getting oil from your hands onto the bulb. If the bulb comes into
contact with your skin, clean with alcohol to remove any oil residue on the
bulb. Failure to do this will greatly reduce the life of the bulb.
1. Remove the screw on the back side of the frame behind the SMART
ELECTRICIAN logo. The front panel will swing down exposing the bulb.
2.Remove the bulb from its box and wrapper, being careful not to touc
h the
bulb glass with your bare hands.
3.Install the right end of the bulb against the right side contact of the socket
and push very gently until the left end of the bulb is free to come into
contact with the left socket.
4.Ensure both ends of the bulb are securely seated against both socket
contacts.
5.Close the front panel and reinstall the assembly screw to securely hold it in
place.
CAUTION: Use only 500W Bulb or smaller.
WARNING: RISK OF FIRE / INJURY TO PERSONS. KEEP AWAY
FROM CO
MBUSTIBLES. UNPLUG FIXTURE TO CHANGE THE BULB. DO
NOT OPERATE WITHOUT THE COMPLETE BULB ENCLOSURE IN PLACE
OR IF THE LENS IS DAMAGED.
When the Work Light is used outdoors basic safety precautions should always
be followed to reduce the risk of fire, electric shock and personal injury,
including the following:
1. Use only three wire outdoor extension cords that have three prong
grounding plugs and grounded receptacles that accept the appliance’s plug.
2. Ground Fault Circuit Interrupter (GFCI) pr
otection should be provided
when using this this Work Light outdoors or in wet locations.
3. Use only with extension cord rated for outdoor use, such as an extension
cord type SW, SOW, STW, STOW, SJW, SJOW,SJTW, SJTOW, SJEOW,
SEOW.
1. Always wear safety glasses while working in close proximity of the Work
Light or when changing the lamp.
2. Keep fixture 18 inches from combustible materials such as cloth, wood or
paper. Lighted fixture gets hot! T
his fixture should not be used inside
dwelling.
3. Do not look directly at the lighted bulb. Prolonged exposure may damage
eyes.
4. Keep fixture away from children.
5. Do Not touch glass cover while work light is on. It its very hot and may cause
serious burns.
6. When replacing the bulb in this fixture always turn off and give ample time
for lamp to cool. Also unplug fixture from power source. Do not t
ouch the
bulb with your fingers as oil from your skin will damage the bulb and greatly
shorten bulb life. Always close face of fixture securely before turning power
back on.
7. Do not operate the fixture without the glass cover or wire safety grill.
8. This fixture is not intended for use nor safe to use in potentially dangerous
locations such as places with explosive or flammable atmospheres.
9. Do no
t handle this fixture when standing on wet or damp surfaces or in
water. To reduce the risk of electrical shock, this light should always be
plugged into a properly grounded 3 wire outlet. Do not remove the ground
wire or grounded plug from the fixture. Always use a UL listed 3 wire
grounded cord with electrical capacity to properly handle this light and other
tools you might be using. Never use the lig
ht around swimming pool, hot
tubs or saunas.
10. Never operate the Work Light near flammable liquids such as gasoline,
turpentine etc.
11. Never install a replacement lamp with a higher wattage rating than is set for
this Work Light.
12. When an extension cord is used with this light, the maximum cord length
shall not exceed 50 feet (15.2 m) .
IMPORTANT SAFETY INSTRUCTIONS FOR HALOGEN
WORK LIGHTS
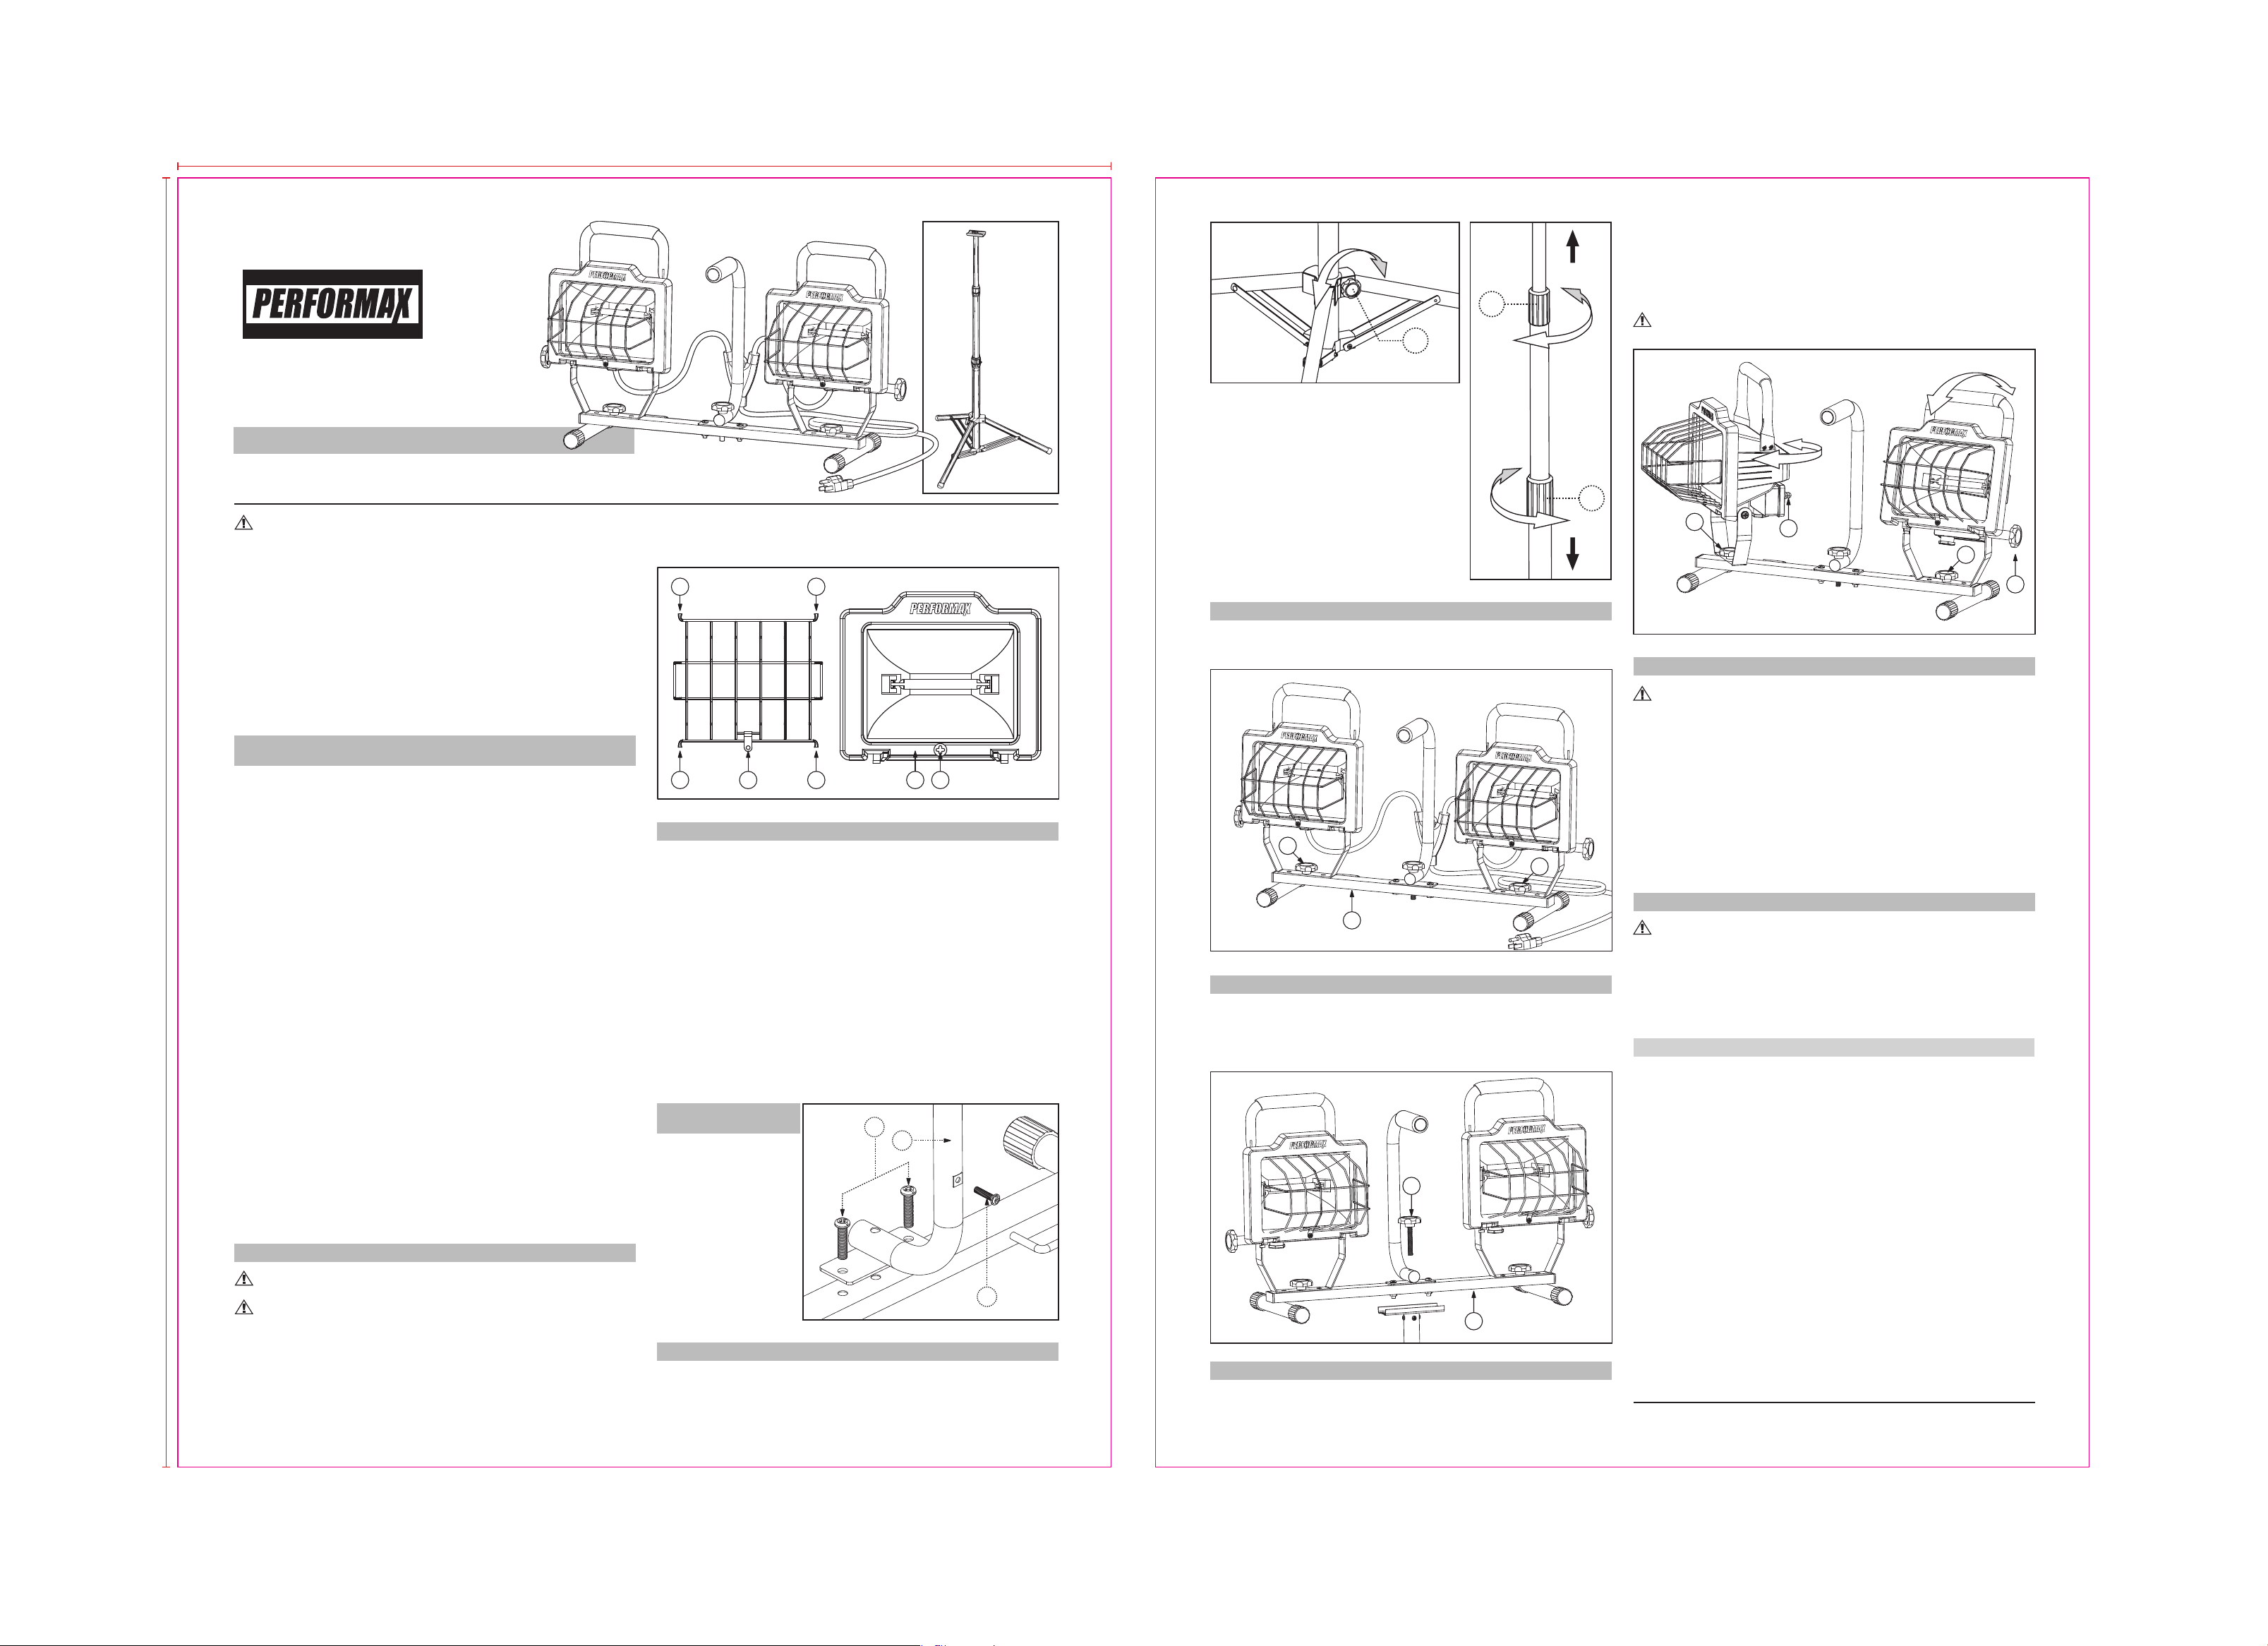
CENTER HANDLE
ASSEMBLY (Fig. 2)
TRIPOD STAND SET UP (Fig 3. & Fig. 4)
1. Loosen the Knob (D) located at the bottom junction of the three legs
(Fig. 2). Fully spread the legs apart by pulling the legs outward to start and
then pushing down on the Bottom Junction. Tighten the knob until snug. Do
1. The Center Handle (A) is
provided unassembled.
Remove the two bolts (B)
from the "H" Sled. Fasten
the Handle to the Sled
with the bolts as shown.
2. Attach of the cord to the
handle by using the
screw (C) to pass
through the hole i
n the
Y cord connector.
WIRE SAFETY GRILL INSTALLATION
WARNING: GRILL MUST BE INSTALLED ON WORKLIGHT BEFORE
OPERATION
WARNING – THIS FIXTURE GETS VERY HOT!!!
Never use this fixture without the safety grill in place. The safety wire
grill provides protection in the event that the fixture tips over and also
protects against someone touching the hot safety glass.
1. There is a tab (A) at the bottom edge of the grill. Insert the wire tips (B)
adjacent to the tab, into the slots at the bottom edge of the fro
nt cover (D).
2. Compress the grill to allow the top wire tips (C) to insert into the slots at the
top edge of the front cover (D).
HALOGEN BULB INSTALLATION
3.Use a screw driver to remove the screw (E) , then put the screw through the
clip and tighten it on the frame of the Work Light. The grill is then firmly
installed to the Work Light.
AB B
C C
D
Fig 1
E
WARNING: UNPLUG UNIT BEFORE PERFORMING ANY MAINTE-
NANCE.
Remove dirt and grime as soon as it accumulates. Use a soft, damp cloth and
a mild soap, if needed. Be sure not to get the electrical plug wet. NEVER
submerge any part of the Work Light in any solution to clean it. DO NOT USE
solvents such as gasoline, turpentine, etc., to clean unit.
DRY THOROUGHTLY BEFORE PLUGGING BACK INTO OUTLET!
06/2023
MAINTENANCE
© 2023 Distributed by Menard, Inc.
5106 Old Mill Center
Eau Claire, WI 54703
Assembly or operation questions?
Call 1-888-722-5089 Email customer-service@ewccglobal.com.cn
FIVE-YEAR LIMITED WARRANTY:
If this PERFORMAX
®
product fails due to a defect in materials or
workmanship, PERFORMAX
®
will at its option repair it or replace it with
the same or comparable model, free of charge. Warranty does not cover light
bulbs.
For repair or replacement under warranty, return to the retail establishment
where the product was purchased.
This warranty gi
ves you specific legal rights and you may have other rights
that vary from state to state.
This warranty is void if damage or defect has resulted from accident, abuse,
misuse or faulty repair. In no event will PERFORMAX
®
be liable for any
consequential, special, incidental, or indirect damages of any kind arising out
of the use or misuse of this product. Maximum liability shall not in any case
exceed the purchase price of the product. Some states do not allow the
exclusion or limitation of incidental or consequential damage
s so the above
exclusion or limitation may not apply to you.
FIG. 4
F
E
FIG. 3
D
Remove the two Knobs (A) from the "H" Sled (B). Fasten the lights to the "H"
Sled with the Knobs (A) as shown and tighten until snug.
Fig.5
B
A
A
B
A
Fig.6
A
B
C
C
Swivels
Tilt
Fig.7
WARNING: Risk of severe burns! The Work Light’s housing and bulb are
extremely hot during the use. Touching housing or bulb with bare hands while
the unit is lit can cause severe burns. Unplug light and allow it to cool
completely before attempting to change bulb.
1.Turn Off the light and allow the unit to cool.
2.Remove the center screw at the top of the lamp head and lower the hinged
lens cover.
3.Using a cloth to safety grasp the burned out bulb, gently push the lamp to
the left. You
will fill the bulb holder spring retract, freeing the other end of
the bulb.
4. Push bulb to one side and remove.
5.To install a new lamp, follow the instruction HALOGEN BULB INSTALLATION
section of this manual.
1. Plug the power cord into a standard 125V AC grounded outlet, press the
switch (A) on the back of the Work Light to turn the light on. Each of the light
OPERATION (Fig. 7)
Place the Work Light Assembly on the tripod rectangular mounting shoe (B).
Align the center sled hole to the ho
le at the top of the Tripod Stand. Insert the
Knob with threaded Bolt (A) through the Sled and into the tripod center hole.
Twist and tighten the knob until snug.
MOUNTING WORK LIGHT TO THE TRIPOD (Fig.6)
WORK LIGHT SLED BASE ASSEMBLY(Fig. 5)
not over tighten.
2. To adjust the height of the Tripod Stand , loosen
the lower Twist Grip (E) and raise the tube until
the proper height is achieved. Tighten the Twist
Knob enough so the tube wil
l hold its position. If
additional height is needed, follow the same
procedure with the upper Twist Knob (F). The
maximum height of the stand, both sections fully
extended, is 54 inches.
3. Place the stand on a firm, level surface.
CAUTION: Never place the tripod on a steep
incline or unstable surface. The tripod may tip
causing injury.
WARNING: Risk of personal injury. To avoid being burned, always hold
the l
ight head by its cushioned grip handle when making adjustment.
BULB REMOVAL AND REPLACEMENT
heads has an ON/OFF switch. This provides two levels of light when
operating one light or two lights. Always turn each light head off before
unplugging the Work Light.
2. To adjust the direction of the LED Light Heads. Loosen the Knobs (C) to
swivel or Knobs (B) to tilt the Light Heads to the desired position. Retighten
the Knob(s) to hold the position
290 mm
210 mm
2023/5/22
B
C
A
FIG. 2