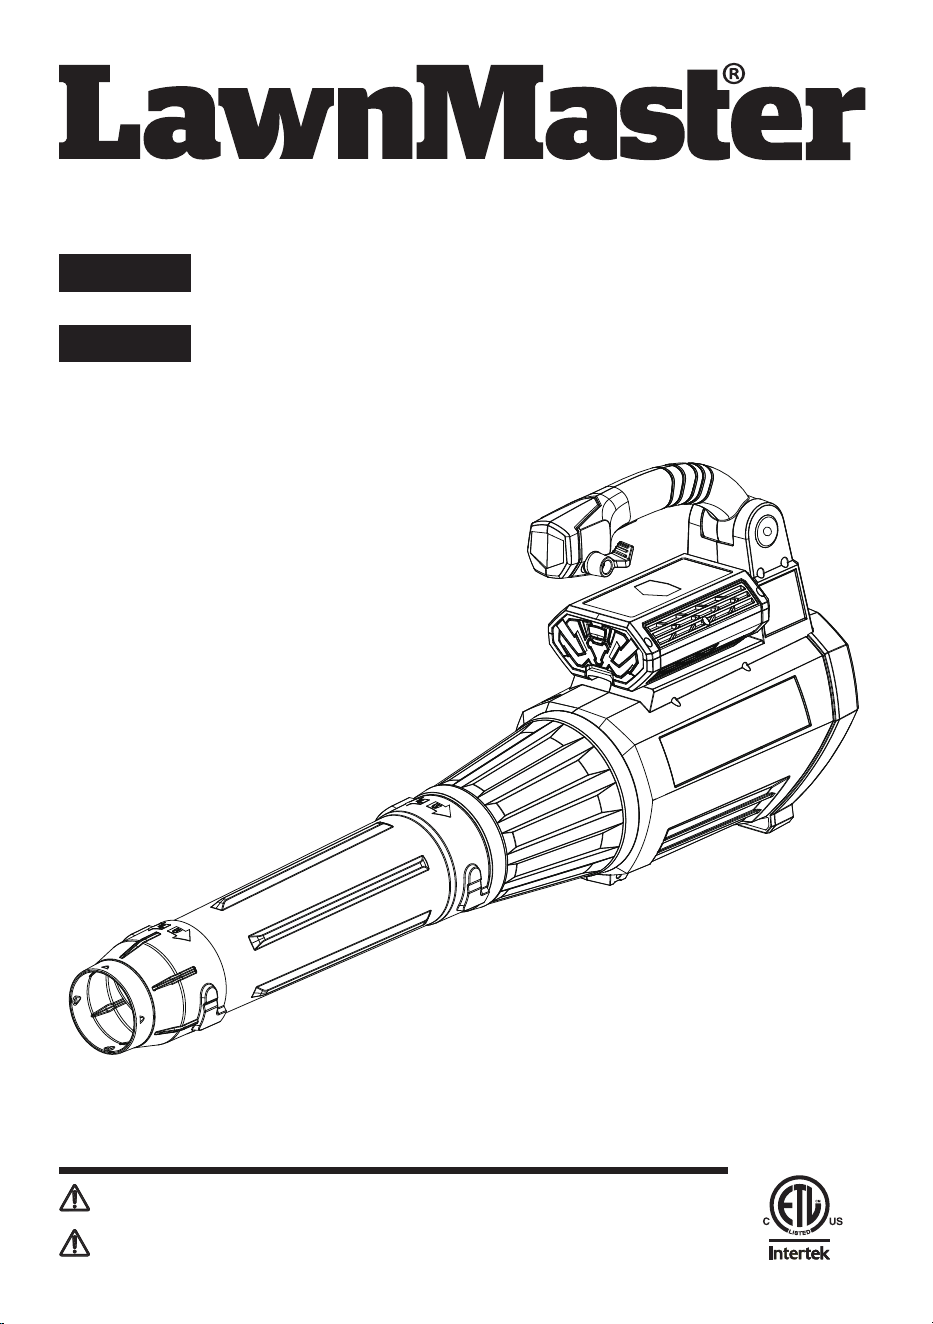
Operator's Manual / Manual del Operador
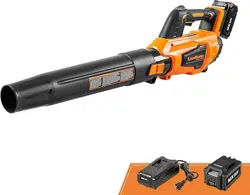
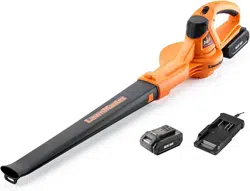
60V MAX* LITHIUM-ION CORDLESS AXIAL BLOWER
CLBL6015A
EN p. 2
Read all safety rules and instructions carefully before operating this tool.
Distributed By Cleva North America 601 Regent Park Court Greenville, SC 29607 1-866-384-8432
Lea todas las reglas e instrucciones de seguridad cuidadosamente antes de utilizar esta herramienta.
Distribuido por Cleva North America 601 Regent Park Court Greenville, SC 29607 1-866-384-8432
Battery Model Number is 60LB2021-S. / El número de modelo de la batería es 60LB2021-S.
Charger Model Number is 60LFC01-ETL. / El número de modelo del cargador es 60LFC01-ETL.
Save this manual for future reference
* Maximum initial battery workload voltage
(measured without a workload) is 60 volts.
Nominal voltage is 54 volts.
Conserve este manual para futura referencia.
* La tensión inicial máxima de la batería (medida sin
carga) es 60 voltios.
La tensión de trabajo nominal es 54 volts.
60V MÁX* ION DE LITIO SOPLADORA INALÁMBRICA AXIAL
CLBL6015A
ES p. 25
By Nisha Mistry at 10:44 am, May 31, 2019

2
TABLE OF CONTENTS
Table of Contents
2
Specications
3
Important Safety Instructions
4-7
Symbols
8-9
Know Your Blower
10
Assembly
11-13
Battery Pack and Charger 13-15
Operation
16-17
Maintenance
18
Environmentally Safe Battery Disposal 19
Troubleshooting
20
LawnMaster
®
60V Warranty 21
Exploded View
22
Parts List 23
Notes 24

3
SPECIFICATIONS
Type Cordless, Battery-powered
Motor 60V Max* D.C.
Max Air Volume 440 CFM
Max Air Speed
110 MPH
Weight with Battery 9.04 lbs (4.1 kg)
Weight without Battery 6.83 lbs (3.1 kg)
Operating Temperature Range 40°F (4°C) to 100°F (38°C)
BATTERY
Model Number 60LB2021-S
Battery Type 60V Max Lithium-Ion, 2.0Ah
CHARGER
Model Number 60LFC01-ETL
Rated Input Voltage 120V~60Hz
Rated Output Voltage 60V Max* D.C.
Rated Output Current 2.0A
Charging Time from Zero to Full Charge 70 minutes
* Maximum initial battery workload voltage (measured without a workload) is 60 volts.
Nominal voltage is 54 volts.
60V MAX* CORDLESS AXIAL BLOWER

4
READ AND UNDERSTAND ALL INSTRUCTIONS.
Failure to follow all instructions listed below may result in electric shock, re and/or serious personal
injury:
IMPORTANT SAFETY INSTRUCTIONS
WARNING
■ Know your blower. Read the Operator’s Manual carefully. Learn its applications and limitations, as
well as the specic potential hazards related to this blower. Following this rule will reduce the risk of
electric shock, re, or serious injury.
■ Do not leave the blower unattended when turned on.
■ Do not allow the blower to be used as a toy. Close attention is necessary when used near children.
■ Use only as described in this manual. Use only manufacturer’s recommended attachments.
Accessories that may be suitable for one blower may create a risk of injury when used with another
blower.
■ If the blower is not working as it should, has been dropped, damaged, left outdoors, or dropped into
water, do not try to operate and take it to a service center.
■ Do not handle the battery or blower with wet hands.
■ Do not put any object into openings. Do not use if any of the openings are blocked; keep free of
dust, lint, hair, and anything that may reduce air ow.
■ Keep hair, loose clothing, jewelry, ngers, and all parts of body away from openings and moving
parts.
■ Turn off all controls before removing battery.
■ Use extra care when cleaning whilst going up or down steps or walking on uneven surfaces.
■ Do not use the blower to blow ammable or combustible liquids, such as gasoline, or use in areas
where they may be present.
■ Do not use the blower for any job except that for which it is intended.
■ Do not force the blower. It will do the job better and with less likelihood of a risk of injury at the rate
for which it was designed.
■ Keep children away. All persons apart from the operator should be kept at a distance from work
area.
■ Stay alert and pay close attention to the task when you are operating the blower. Do not operate
blower when you are tired.
■ Use safety glasses. Always use face or dust mask if operation is dusty.
■ Avoid using the blower in a dangerous environment. Do not use the tool in damp or wet locations.
Do not use in rain.
■ Do not overreach; keep proper footing and balance at all times.
■ Maintain the blower with care. Follow instructions for lubricating and changing accessories.
■ Check for damaged parts. Before further use of the blower and its accessories, damaged parts,
should be carefully checked to determine that it will operate properly and perform its intended
function. Check for alignment of moving parts, binding of moving parts, breakage of parts, mounting,
and any other condition that may affect its operation. Any part that is damaged should be properly
repaired or replaced by an authorized service center unless indicated elsewhere in this manual.
■ When not in use, blowers should be stored indoors in a dry, and high or locked-up place, out of
reach of children.
■ Prevent unintentional starting. Ensure the switch is in the off-position before connecting to battery

5
IMPORTANT SAFETY INSTRUCTIONS
pack, picking up or carrying the blower. Carrying the blower with your nger on the switch invites
accidents.
■ Disconnect the battery pack from the blower before making any adjustments, changing accessories,
or storing blower. Such preventive safety measures reduce the risk of starting the blower
accidentally.
■ Keep your work area well lit. Cluttered or dark work areas invite accidents.
■ Always wear eye protection. Dust mask, non-skid safety shoes, hard hat, or hearing protection must
be used for appropriate conditions.
■ Do not use on a ladder, rooftop, tree, or other unstable support. Stable footing on a solid surface
enables better control of the blower in unexpected situations.
■ Do not use blower if switch does not turn it on or off. A blower that cannot be controlled with the
switch is dangerous and must be repaired.
■ For residential use only.
■ Remove or disconnect battery before servicing, cleaning or removing material from the tool. Such
preventive safety measures reduce the risk of starting the blower accidentally.
■ When battery pack is not in use, keep it away from other metal objects, like paper clips, coins, keys,
nails, screws, or other small metal objects that can make a connection from one terminal to another.
Shorting the battery terminals together may cause burns or a re.
■ Check for misalignment or binding of moving parts, breakage of parts, and any other condition
that may affect the blower’s operation. If damaged, have the blower serviced before using. Many
accidents are caused by poorly maintained blowers.
■ Keep the blower and its handle dry, clean, and free from oil and grease. Always use a clean cloth
when cleaning. Never use brake uids, gasoline, petroleum-based products, or any strong solvents
to clean your blower. Following this rule will reduce the risk of loss of control and deterioration of the
enclosure plastic.
■ Do not operate the equipment while barefoot or when wearing sandals or similar lightweight
footwear. Wear protective footwear that will protect your feet and improve footing on slippery
surfaces.
■ Check the work area before each use. Remove all objects such as rocks, broken glass, nails, wire,
or string which can be thrown or become entangled in the machine.
■ Do not point the blower in the direction of people or pets.
■ Never run the unit without the proper equipment attached. Always ensure the blower tubes are
installed.
■ Do not store outside or in vehicles.
■ Do not incinerate this blower even if it is severely damaged. The battery can explode in a re.
■ Blower service must be performed only by qualied repair personnel. Service or maintenance
performed by unqualied personnel may result in a risk of injury.
■ When servicing a blower, use only identical replacement parts mentioned in the Operators’ Manual.
Follow instructions in the Maintenance section of this manual. Use of unauthorized parts or failure to
follow Maintenance Instructions may create a risk of shock or injury.
■ Battery blowers do not have to be plugged into an electrical outlet; therefore, they are always in
operating condition. Beware of possible hazards when not using your battery powered blower or
when changing accessories. Following this rule will reduce the risk of electric shock, re, or serious
personal injury.
■ Never use any blower near re or hot ashes. Using the blower near res or ashes can spread res
and result in serious injury and/or property damage.
■ Never use the blower to spread chemicals, fertilizers, or any other toxic substances. Spreading

6
IMPORTANT SAFETY INSTRUCTIONS
these substances could result in serious injury to the operator or bystanders.
■ Never place the blower on any surface, except a hard, clean surface when motor is running. Gravel,
sand, and other debris can be picked up by the air inlet and thrown at the operator or bystanders,
causing possible serious injuries.
BATTERY PACK
■ The battery pack is only compatible with 60LFC01-ETL or 60LFC02-ETL chargers.
■ Recharge only with the charger specied by the manufacturer and listed in this manual. A charger
that is suitable for one type of battery pack may create a risk of re when used with another battery
pack.
■ Do not charge battery in a damp or wet location. Following this rule will reduce the risk of electric
shock.
■ Do not place battery powered blowers or their batteries near re or heat. This will reduce the risk of
explosion and possibly injury.
■ Do not open or mutilate the battery. Released electrolyte is corrosive and may cause damage to the
eyes or skin. It may be toxic if swallowed.
■ Do not dispose of battery packs in re. They will explode or leak and cause injury. Liquid ejected
from the battery may cause irritation or burns.
■ Do not crush, drop or damage the battery pack. Do not use a battery pack or charger that has been
dropped or received a sharp blow. A damaged battery is subject to explosion. Properly dispose of a
dropped or damaged battery immediately.
■ Batteries can explode in the presence of a source of ignition, such as a pilot light. To reduce the
risk of serious personal injury, never use any cordless product in the presence of open ame. An
exploded battery can propel debris and chemicals. If exposed, ush with water immediately.
■ Under extreme usage or temperature conditions, battery leakage may occur. If liquid comes in
contact with your skin, wash immediately with soap and water. If liquid gets into your eyes, ush
them with clean water for at least 10 minutes, then seek immediate medical attention. Following this
rule will reduce the risk of serious personal injury.
■ When the battery pack is not in use, keep it away from other metal objects, like paper clips, coins,
keys, nails, screws, or other small metal objects, that can make a connection from one terminal to
another. Shorting the battery terminals together may cause burns or a re.
■ Do not expose a battery pack or blower to re or excessive temperature. Exposure to re or
temperature above 265°F (130°C) may cause an explosion.
■ Do not modify or attempt to repair the blower or the battery pack (as applicable) except as indicated
in the instructions for use and care.
■ Follow all charging instructions and do not charge the battery pack or blower outside of the
temperature range specied in the instructions. Charging improperly or at temperatures outside of
the specied range may damage the battery and increase the risk of re.
■ All tool services should be performed by a qualied repair person using only identical replacement
parts. This will ensure that the safety of the product is maintained.
BATTERY CHARGER
■ This charger is only compatible with 60LB2021-S, 60LB2521-S or 60LB5025-S lithium-ion batteries.
■ To reduce the risk of injury, charge only the specied lithium-ion rechargeable batteries. Other types
of batteries may burst, causing personal injury or damage.
■ Keep cord and charger away from heat to prevent damage to housing or internal parts.

7
IMPORTANT SAFETY INSTRUCTIONS
■ Do not operate charger with a damaged cord or plug, which could cause shorting and electric shock.
If damaged, immediately discontinue use. Replace the charger with the identical unit as listed in the
Parts List of this manual.
■ Do not use a charger that has been dropped or received a sharp blow.
■ Do not disassemble charger. Take it to a qualied service center for check or replacement. Incorrect
reassembly may result in a risk of electric shock or re.
■ Do not abuse the charger cord. Never use the cord for carrying, pulling or unplugging.
■ Keep cord away from heat, oil, sharp edges or moving parts. Damaged or entangled cords increase
the risk of electric shock. If the charger cord is damaged, replace the charger with an identical
model as listed in this manual.
■ A charger that is suitable for one type of battery pack may create a risk of re when used with
another battery pack.
■ Charge the battery at the normal charging temperature between 40°F (4°C) and 100°F (38°C).
■ Under abusive conditions, liquid may be ejected from the battery; avoid contact. If contact
accidentally occurs, ush with water. If liquid contacts eyes, additionally seek medical help. Liquid
ejected from the battery may cause irritation or burns.
FCC COMPLIANCE
■ This device complies with Part 15 of the FCC Rules. Operation is subject to the following two
conditions:
- This device may not cause harmful interference, and
- This device must accept any interference received, including interference that may cause
undesired operation.
NOTE: This equipment has been tested and found to comply with the limits for a Class B digital device,
pursuant to Part 15 of the FCC Rules. These limits are designed to provide reasonable protection
against harmful interference in a residential installation.
■ This equipment generates, uses and can radiate radio frequency energy and, if not installed and
used in accordance with the instructions, may cause harmful interference to radio communications.
However, there is no guarantee that interference will not occur in a particular installation. If
this equipment does cause harmful interference to radio or television reception, which can be
determined by turning the equipment off and on, the user is encouraged to try to correct the
interference by one or more of the following measures:
- Reorient or relocate the receiving antenna.
- Increase the separation between the equipment and receiver.
- Connect the equipment into an outlet on a circuit different from that of the receiver.
- Consult the dealer or an experienced radio/ TV technician for help.
SAVE THESE INSTRUCTIONS
Refer to them frequently and use them to instruct others who may use this tool. If you loan someone this
tool, loan them these instructions also.
8
SYMBOLS
SYMBOL NAME DESIGNATION/EXPLANATION
V Volts Voltage
A Amperes Current
Hz Hertz Frequency(cycles per second)
W Watt Power
hrs Hours Time
/min Per Minute
Revolution, strokes, surface speed, orbits etc, per
minute
Alternating Current Type of current
Direct Current Type or a characteristic of current
Lithium-Ion Battery
Recycling
Designates that this tool is in compliance with
Lithium-Ion battery recycling program requirements.
Safety Alert Indicates a potential personal injury hazard.
Read The Operator’s
Manual
To reduce the risk of injury user must read and
understand Operator’s Manual before using this
product.
Eye and Hearing
Protection
Always wear eye protection with side shields marked
to comply with ANSI Z87.1, along with hearing
protection.
Wet Conditions Alert Do not expose to rain or use in damp locations.
Keep Bystanders Away Keep all bystanders at least 50ft. away.
Long Hair
Failure to keep long hair away from the air inlet could
result in personal injury.
Blower Tubes Do not operate without tubes in place.
Loose Clothing
Failure to keep loose clothing from being drawn into
air intake could result in personal injury.
Some of the following symbols may be used on this product. Please study them and
learn their meaning. Proper interpretation of these symbols will allow you to operate
the product better and safer.

9
SYMBOLS
SYMBOL NAME DESIGNATION/EXPLANATION
Keep Away From Water
Do not dispose of battery packs in rivers or immerse
in water.
Keep Away From Fire
Do not dispose of battery packs in re. They will
explode or leak and cause injury.
Heat Alert
Do not expose battery packs to heat in excess of
140°F (60°C).
Recycle Symbol
This product uses lithium-ion batteries. Local, state,
or federal laws may prohibit disposal of batteries in
ordinary trash. Consult your local waste authority
for information regarding available recycling and/or
disposal options.
SYMBOL SIGNAL MEANING
DANGER
Indicates an imminently hazardous situation, which, if not
avoided, will result in death or serious injury.
WARNING
Indicates a potentially hazardous situation, which, if not
avoided, could result in death or serious injury.
CAUTION
Indicates a potentially hazardous situation, which, if not
avoided, may result in minor or moderate injury.
NOTICE
(Without Safety Alert Symbol) Indicates a situation that may
result in property damage.
The following signal words and meanings are intended to explain the levels of risk
associated with this product.
10
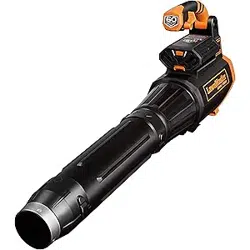
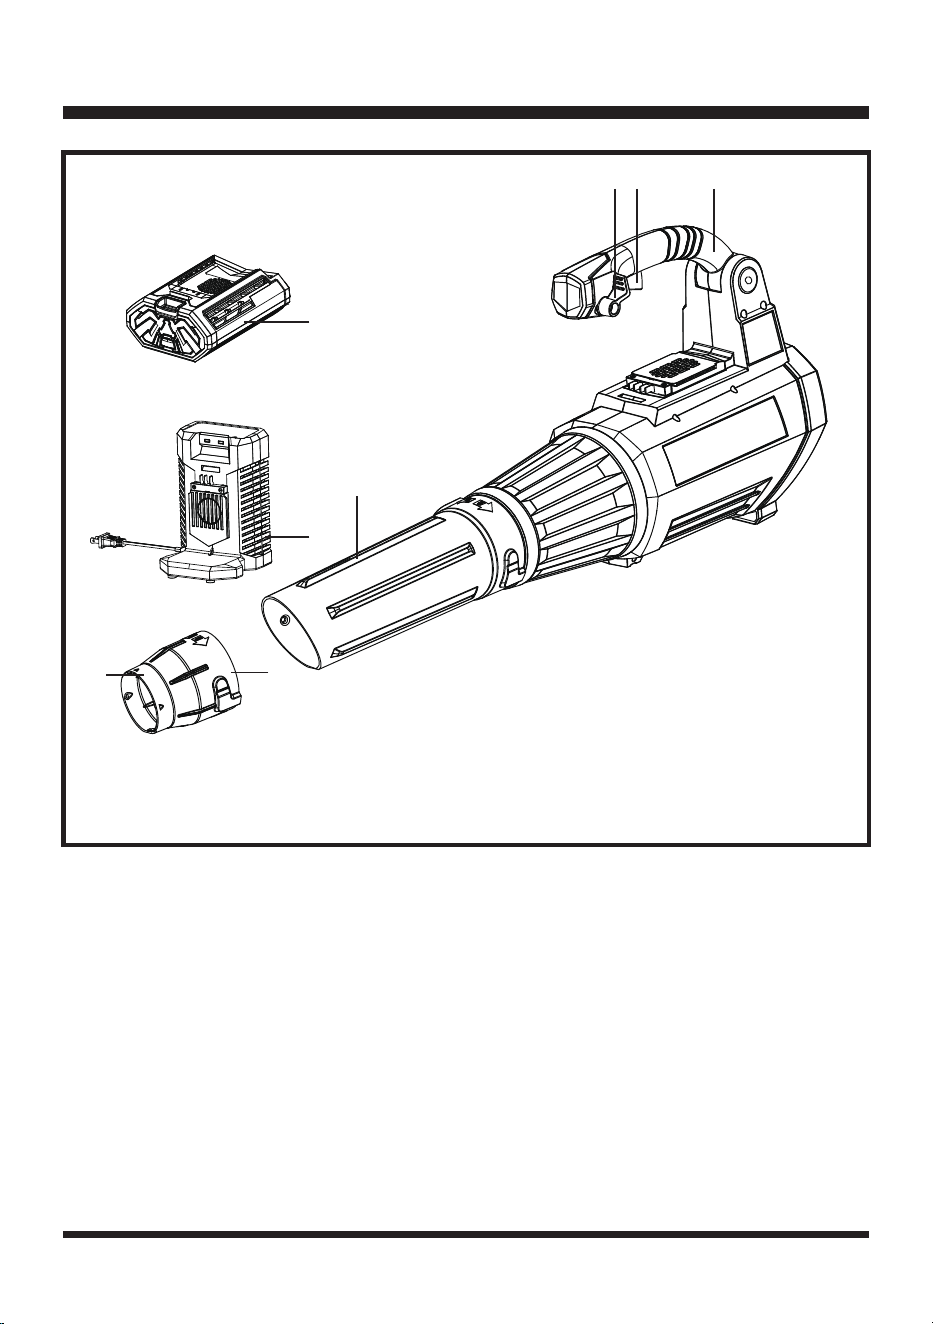
KNOW YOUR BLOWER
KNOW YOUR BLOWER
The safe use of this product requires an understanding of the information on the product labeling and
in this Operator’s Manual as well as the knowledge of the project you are attempting. Before use of
this product, familiarize yourself with all operating features and safety rules.
CORDLESS BLOWER
The cordless blower has an ultra-lightweight design which is great for extended use and creates less
fatigue.
BLOWER TUBE
The blower tube can be installed on the blower without using any tools.
Components
1. Cruise Control Lever
2. Trigger Switch
1
5
6
7
8
2 3
4
3. Handle
4. Blower Tube
5. Battery Pack
6. Battery Charger
7. Concentrator Nozzle
8. Debris Scraper

11
ASSEMBLY
WARNING
Do not use this product if any parts on the Packing List are already assembled
to your product when you unpack it. Parts on this list are not assembled to the
product by the manufacturer and require customer installation. Use of a product
that may have been improperly assembled could result in serious personal injury.
■ Inspect the product carefully to make sure no breakage or damage occurred during shipping.
■ Do not discard the packing material until you have carefully inspected and satisfactorily operated
the product.
■ If any parts are damaged or missing, do not operate the product. Return it for replacement to the
retailer from which it was purchased.
PACKING LIST
(1) 60V Cordless Axial Blower
(1) Blower Tube
(1) Concentrator Nozzle (with Debris Scraper)
(1) 60V Max* 2.0Ah Lithium-ion Battery
(1) 60V Max* Battery Charger
(1) Operator's Manual
UNPACKING
This product requires assembly.
■ Carefully remove the product and any accessories from the box. Make sure that all items listed in
the packing list are included.
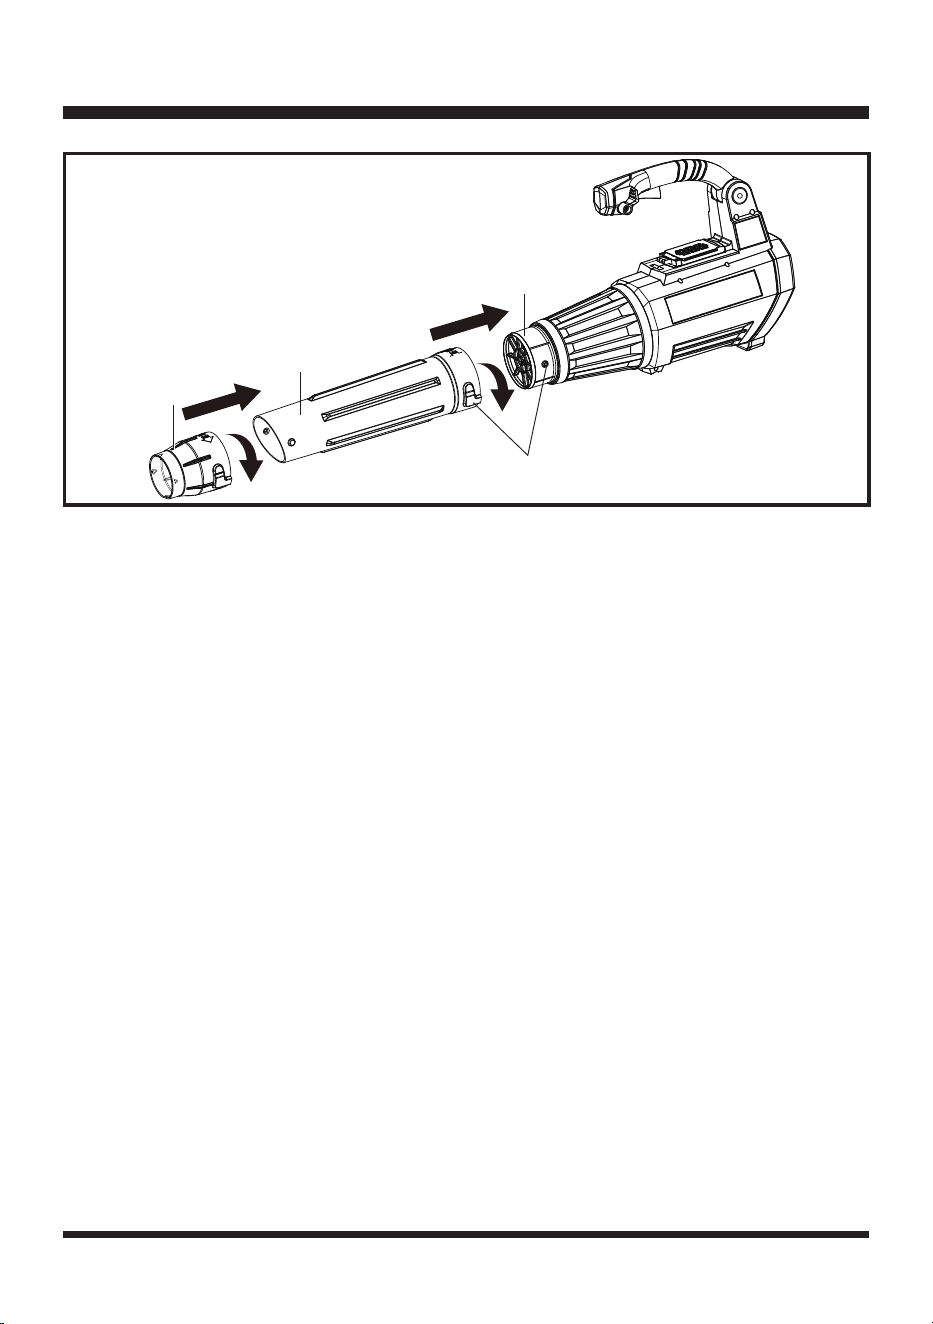
FOR BLOWING (See Figure 1)
Insert the widest end to the blower tube into the front opening on the blower. Align the indexing tabs with
correct sized index channels; once achieved, turn clockwise to lock into place. Then insert the concentrator
nozzle into the blower tube. Align the indexing tabs with correct sized index channels; once achieved, turn
clockwise to lock into place (Fig. 1).
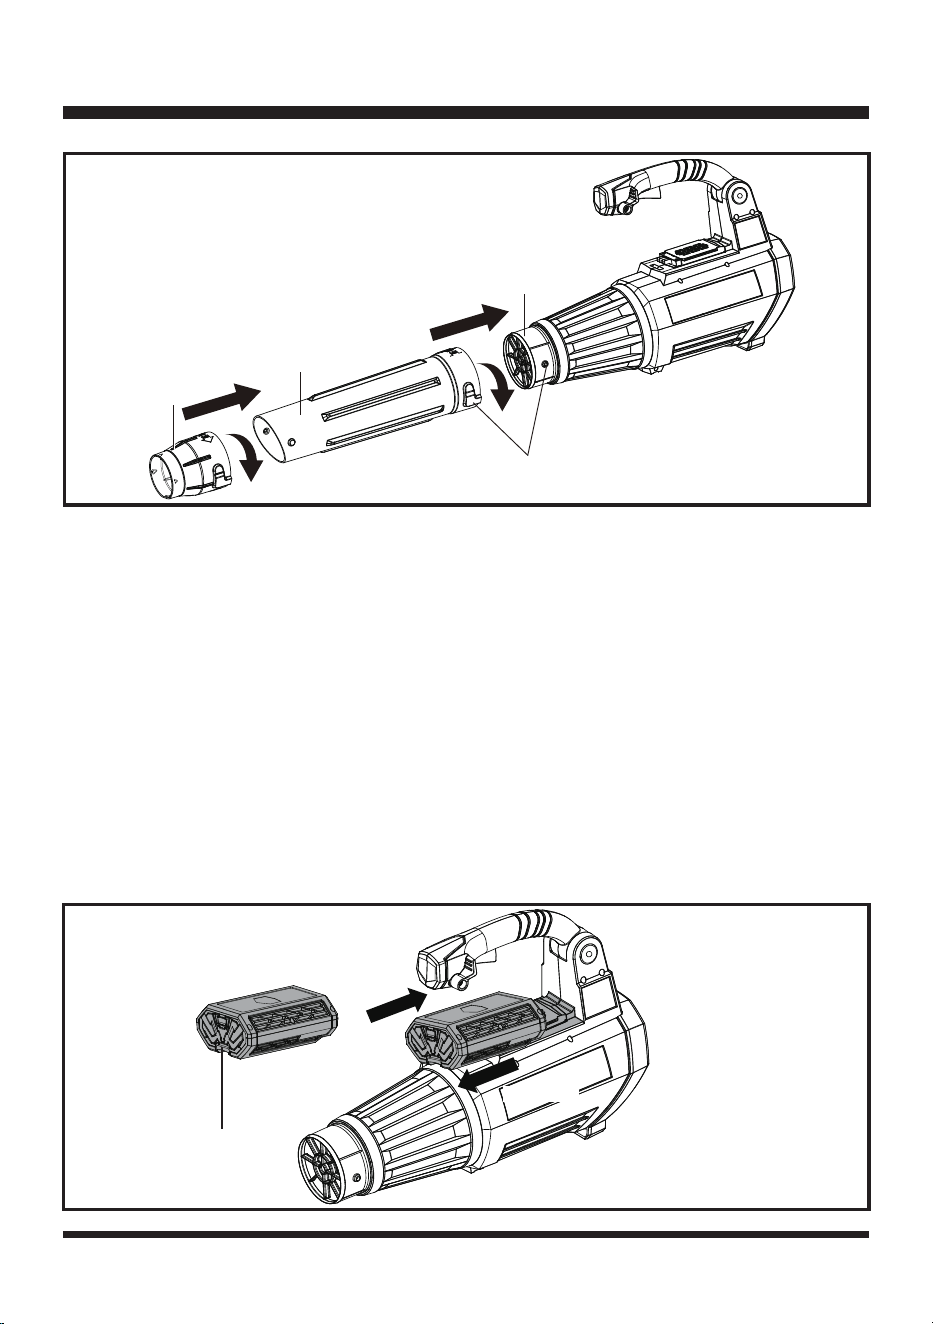
12
ASSEMBLY
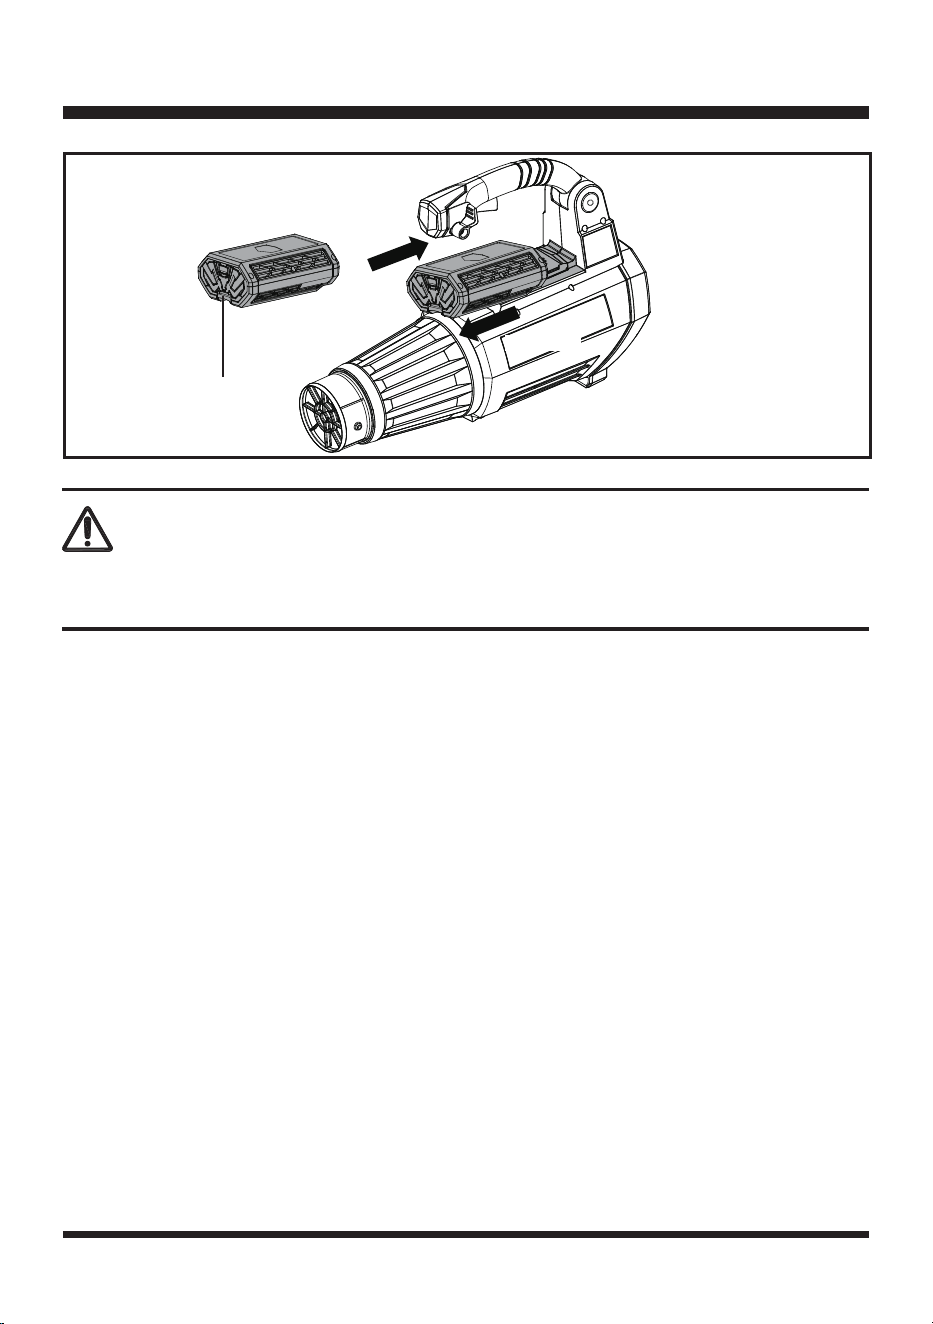
INSTALLING / REMOVING THE BATTERY PACK (See Figure 2)
IMPORTANT! The battery pack is not charged when it is purchased. Before using the blower, read all
safety precautions and follow the instructions in the Battery Pack and Charger section. With regular
use, it will need shorter charging time. If storing for a prolonged period of time, remove the battery.
When ready to use again, charge the battery pack for at least 70 min again.
To install battery pack:
■ Grasp the blower rmly.
■ Slide the battery pack onto the tool, as shown until the latch locks into place (Fig. 2).
■ Do not use force when inserting the battery pack. It should slide into position and “click”.
To remove battery pack:
■ Press the release button on the battery pack and remove it from the tool (Fig. 2).
■ Grasp the blower rmly, and pull the battery pack away from the tool.
NOTE: The battery pack ts onto the blower snugly in order to prevent accidental dislodging. It may
require a strong pull to remove it.
Fig 2
A
1
1
2
Index
2
B
C
A - Concentrator Nozzle
B - Blower Tube
C - Cordless Axial Blower
Battery Release Button
Install
Fig 1
Remove

13
ASSEMBLY
BATTERY PACK AND CHARGER
BATTERY CHARGING
■ Use only with 60V LawnMaster
®
battery chargers. The battery charger supplied is specically
designed for the lithium-ion battery used in this tool.
■ Check the power voltage! This battery charger operates on 120V.
■ The battery is charged between 40°F (4°C) and 100°F (38°C). This ensures an optimum battery
service life.
■ Protect the battery from heat, from continuous exposure to sun, and keep away from radiation or
other heat sources. Do not leave the battery in the tool in direct sunlight over long periods.
■ The battery is supplied partially charged. To ensure full capacity of the battery, charge the battery
before using your tool for the rst time. The lithium-ion battery can be charged at any time without
reducing its service life. Interrupting the charging procedure does not affect the battery.
■ Always leave it fully charged if kept on the charger for storage.
LED CHARGER STATUS
■ If the battery is not inserted into the charger, a continuous red LED light indicates that the outlet plug
is plugged into an outlet socket and the battery charger is ready for operation.
■ Charging: a ashing green LED on the charger indicates that the battery is charging normally.
■ Charged: continuous green LED on the charger indicates that the battery is ready for use.
■ Technical Issue: a ashing red LED light on the charger indicates that battery pack has a charging
WARNING
Follow these instructions in order to avoid injury and to reduce the risk of electric
shock or re:
■ Replace the battery pack or the charger immediately if the battery case or charger cord is damaged.
■ Verify that the switch is in the OFF position before inserting or removing the battery pack.
■ Verify that the battery pack is removed and the switch is in the OFF position before inspecting,
adjusting, or performing maintenance on any part of the blower.
■ Read, understand, and follow the instructions contained in the section entitled Battery Charging.
14
BATTERY PACK AND CHARGER
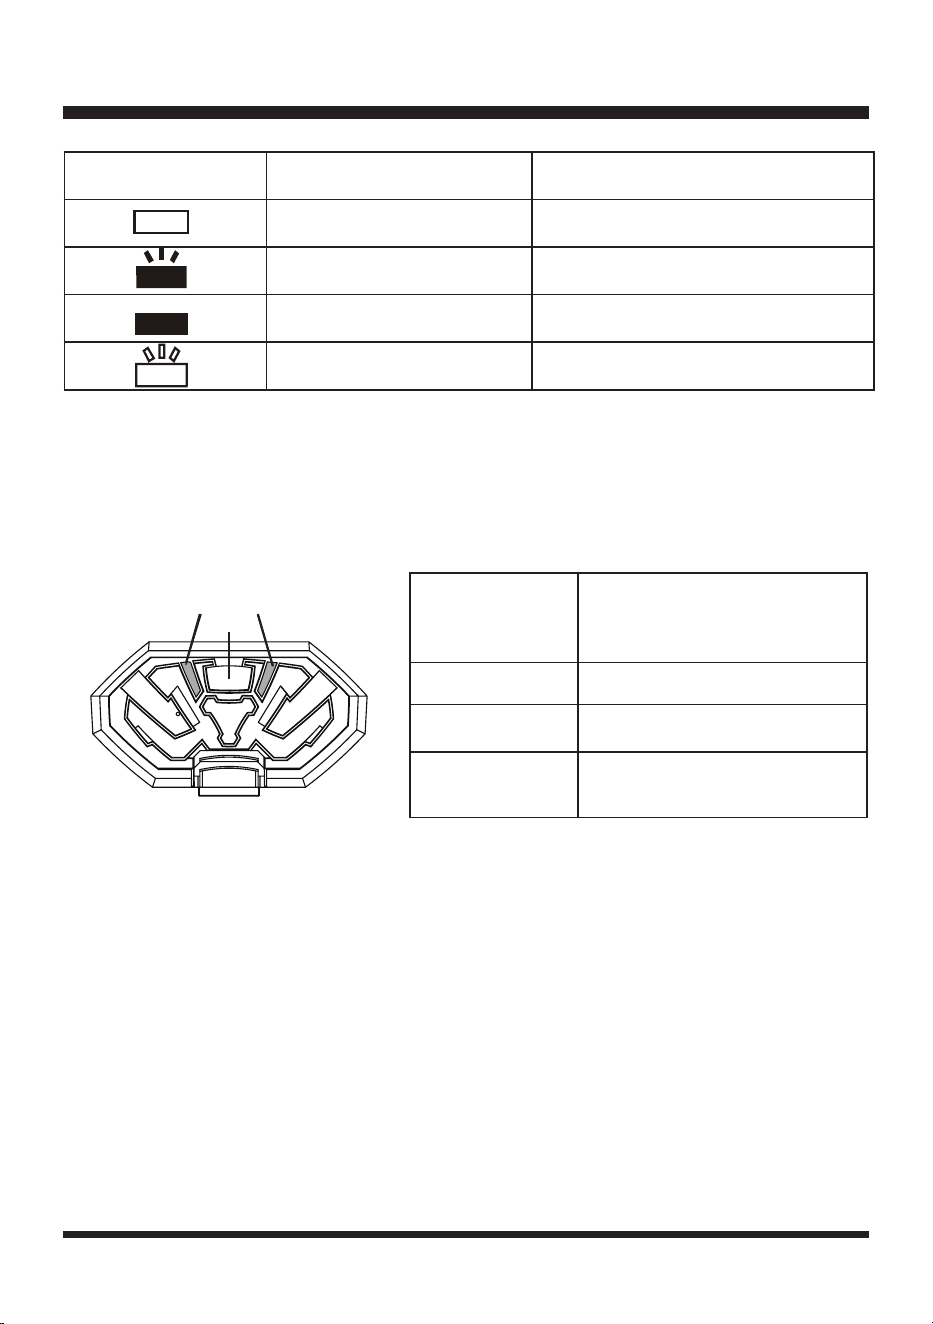
BATTERY LED PANEL
The panel consists of 2 LEDs on the battery. Press and release the charger button on the battery to
activate the charger indicator level. The battery’s charge level can be checked either when the battery
is attached on the machine or removed from the machine.
SYMBOL
Green, continuous Fully charged
Connected to power supply
Charging problem:
See Technical Issue
Red, blinking
Red, continuous
Green, blinking Charging
INDICATOR LIGHTS STATUS
problem or might be defective.
a) One possible condition is the battery temperature is not within the charging temperature range
of 40°F (4°C) and 100°F (38°C) or the charging current is too high. As soon as the permitted
temperature and the charging current ranges are reached, the battery charger will automatically
switch to charging.
b) If the temperature range and charging current are correct and ashing red LED light continues,
then remove and reinstall the battery pack. If the LED status repeats a second time, try to charge
another identical battery. If the battery charges normally, dispose of the defective battery pack (see
Environmental Safe Battery Disposal section).
c) If the ashing red light continues after installing the second battery, the charger may be defective.
Replace with a new one.
■ After continuous or repeated charging cycles without interruption, the charger may warm up. This is
normal and does not indicate a technical defect of the battery charger.
The indicator lights on the charger show the charger status:
Button
Power Indicator
LEDs on battery
(Continuous lighting)
Battery Capacity
Green 50%~100%
Orange 25%~ 50%
Red 0-25% (Recharge required)

15
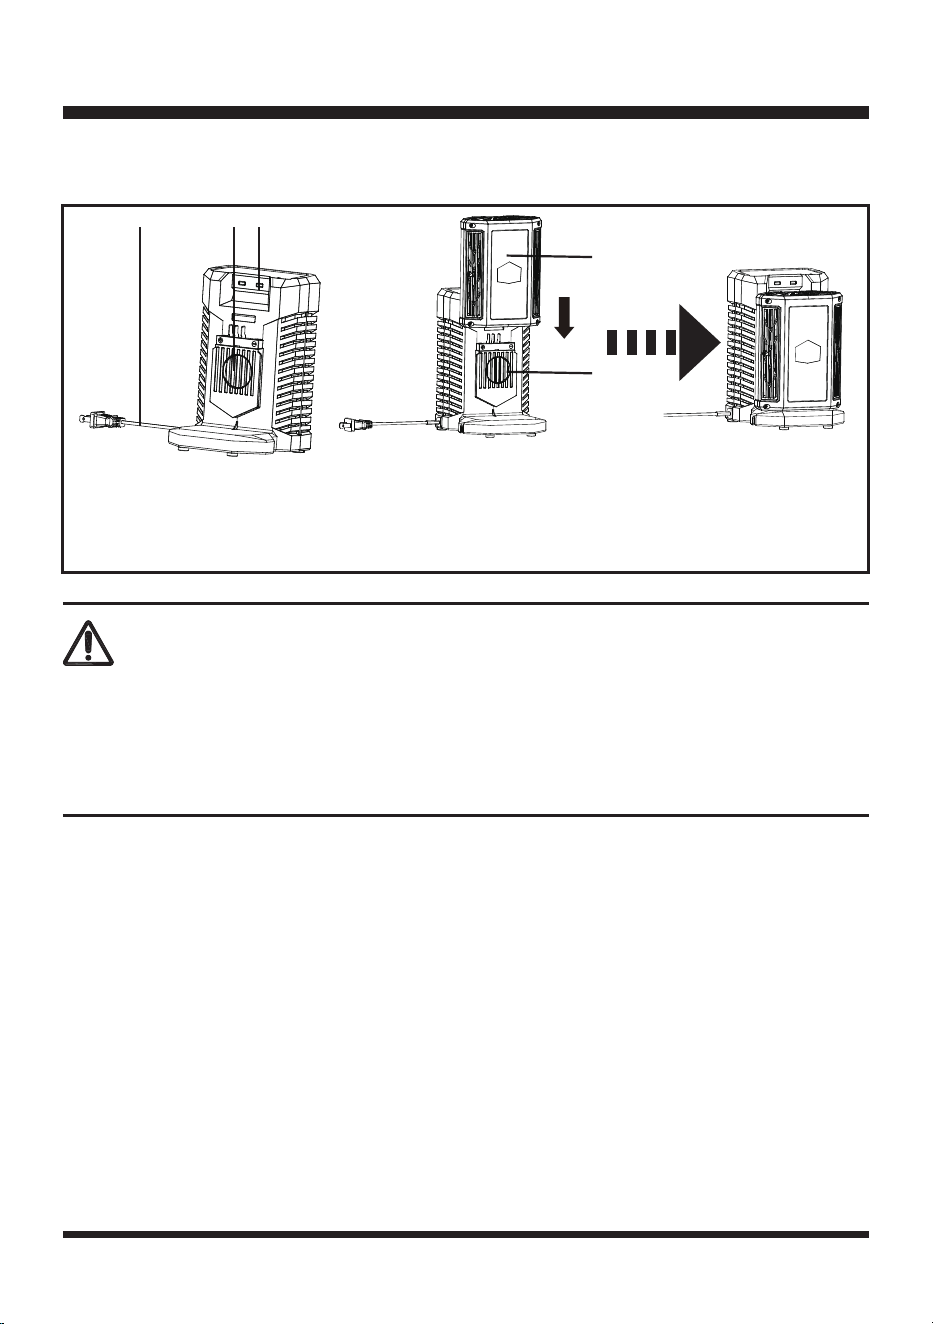
CHARGING THE BATTERY PACK (See Figure 3)
BATTERY PACK AND CHARGER
A CB
B
A
Fig 3
A - Power Cord with Plug
B - Charger T-rail
C - Indicator Lights
A - Battery Pack
B - Charger T-rail
WARNING
If any part of the charger is missing or damaged, do not operate it! Replace the
charger with a new one. Failure to heed this warning could result in possible
serious injury.
Check the voltage! The voltage must comply with the information on the rating
label.
■ Align the C-slot of the battery pack with the T-rail on the charger. Slide the C-slot onto the T-rail until
the battery pack secures into place (Fig. 3).
■ Connect the charger to the power supply.
■ Allow sufcient charging time (see Specications), and then disconnect the charger from the power
supply.
■ Press the release button on the battery pack and remove it from the charger.
NOTE: It is normal for the battery pack and the charger to become warm (but not hot) during charging
process. If the battery does not charge properly, check to make sure the electrical outlet is operational.
Always charge the battery before storage!
Trigger Switch
Cruise Control Lever
Low Power
Max Power
Low Power
Max Power
16
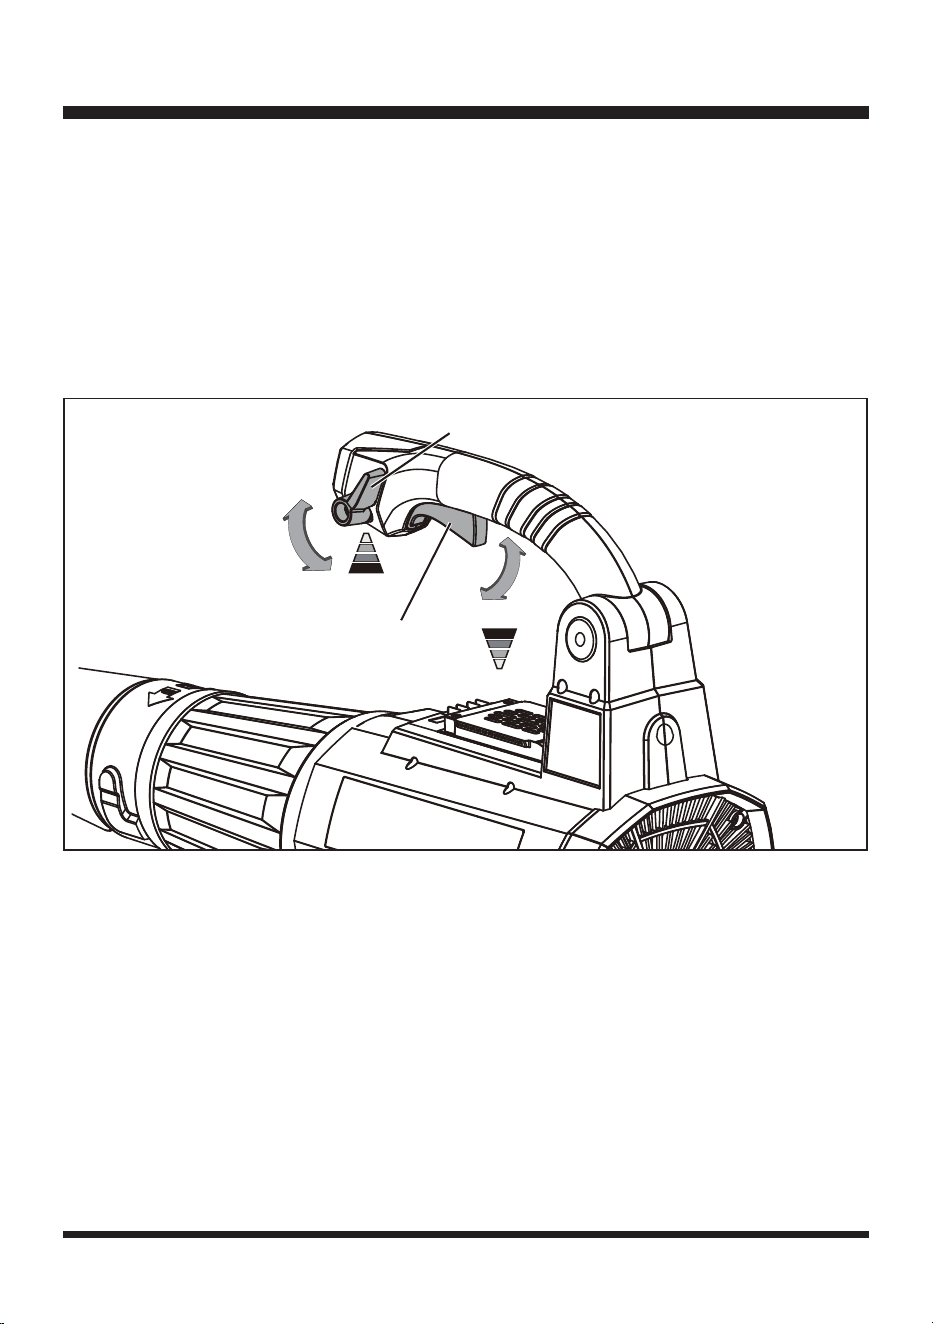
STARTING / STOPPING THE BLOWER (See Figure 4)
■ The trigger switch and cruise control lever have the same function, but the cruise control function
keeps the blower working without keeping the trigger switch depressed. The blower power could be
adjusted by either one.
■ Press the trigger switch or turn the cruise control lever to turn on the blower and control the power
by increasing or decreasing the travel of switch.
■ To turn off the blower, release the trigger switch and make sure the cruise control lever is in the
upward position. Do not overexert the trigger switch once the blower has reached the maximal
power (Fig. 4).
CRUISE CONTROL LEVER
Squeeze the trigger switch and move the cruise control lever toward the suitable speed position for
blowing.
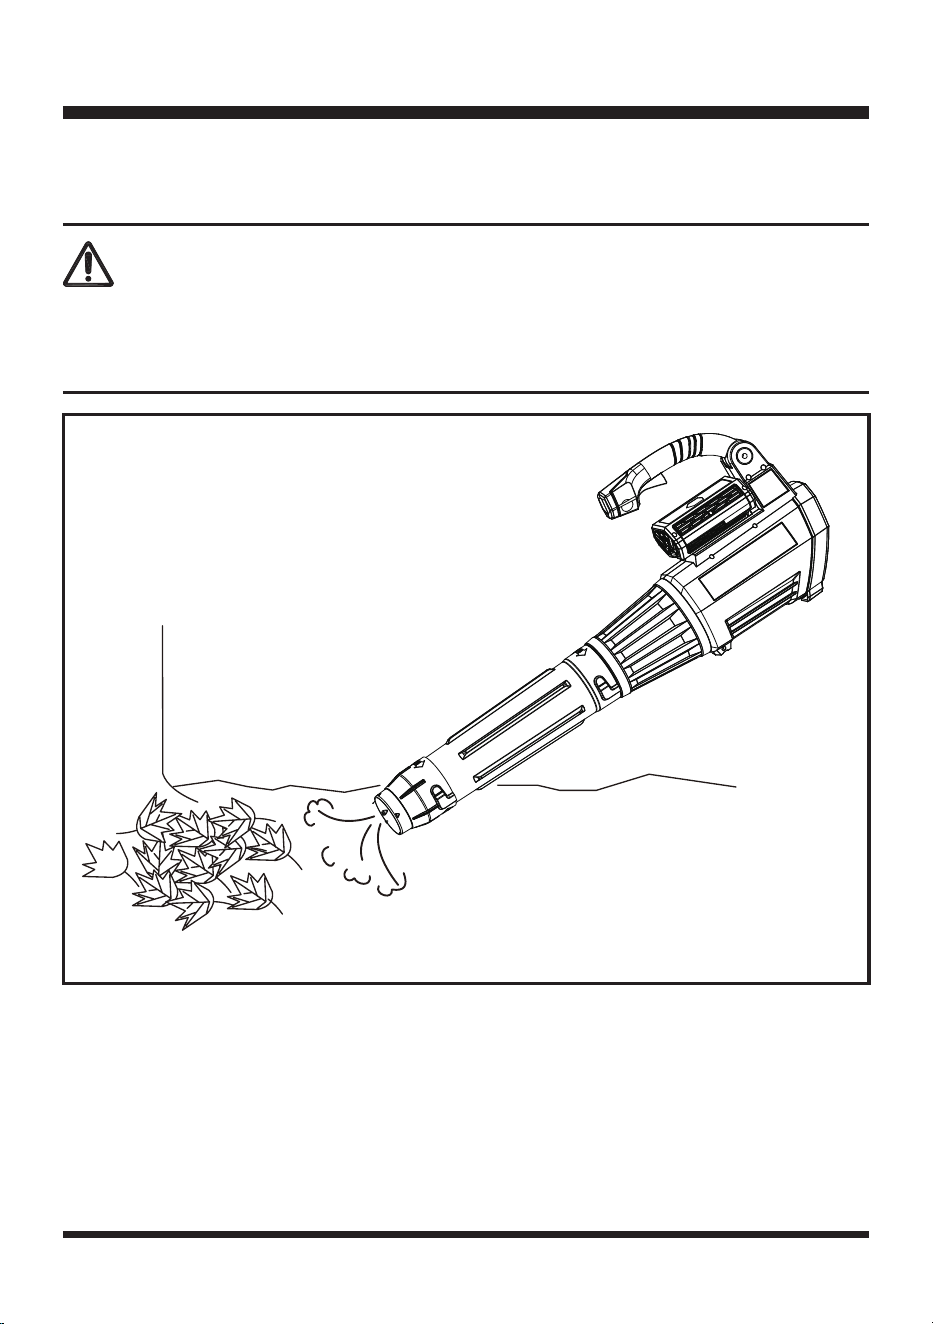
USING THE BLOWER (See Figure 5)
■ Press the trigger switch or cruise control lever to turn on the blower. For instructions on using the
cruise control feature, see page 16.
■ Blow debris or grass clippings off of driveways, sidewalks, patios, etc.
■ Gather grass clippings, or leaves into piles. Blow debris from corners, around joints, and between
bricks (Fig. 5).
■ Release the trigger switch and make sure the cruise control lever is in the up position to turn off the
blower.
NOTE: Your Lawnmaster® blower is designed to blow and clean hard surfaces; such as patios,
driveways, decks, garages, and sidewalks.
OPERATION
Fig 4
17
OPERATION
Fig 5
WARNING
Always wear eye protection with side shields marked to comply with ANSI Z87.1,
along with hearing protection. Failure to do so could result in objects being thrown
into your eyes, resulting in possible serious injury.

18
MAINTENANCE
WARNING
WARNING
When servicing, use only identical replacement parts. Use of any other parts may
create a hazard or cause product damage.
To avoid serious personal injury, always remove the battery pack from the tool
when cleaning or performing any maintenance.
GENERAL MAINTENANCE
■ Remove the battery pack.
■ Brush or blow dust and debris out of the air vents using compressed air or a vacuum. Keep the air
vents free of obstructions, sawdust, and wood chips. Do not spray, wash, or immerse the air vents in
water.
■ Wipe off the housing and the plastic components using a moist, soft cloth. Do not use strong solvents
or detergents on the plastic housing or plastic components. Certain household cleaners may cause
damage, and may cause a shock hazard.
■ Store the blower, the charger and the battery at a temperature between 40°F (4°C) and 100°F (38°C).
BATTERY PACK MAINTENANCE
■ Fully charge the battery before placing in storage.
■ Recharge the battery pack whenever there is a noticeable reduction in the performance. Do not allow
the battery pack to become completely discharged.
■ Do not recharge a battery pack that is already fully charged. Overcharging shortens battery life.
■ Once the battery pack is fully charged, remove the battery from the charger and disconnect the
charger from the outlet.
■ Do not store the battery pack on the tool or on the charger.
■ If the battery pack is hot, allow it to cool down before recharging.
CHARGER MAINTENANCE
■ Keep the charger clean and clear of debris. Do not allow foreign material into the recessed cavity or
on the contacts. Wipe with a dry cloth. Do not use solvents, water, or place in wet conditions.
■ Always unplug the charger when the battery pack is not installed on the charger.
■ Do not store the charger in excessive heat. Do not use in direct sunlight.
■ Disconnect the charger from the AC power outlet when not in use and once battery has reached a full
charge.
19
ENVIRONMENTALLY SAFE BATTERY DISPOSAL
WARNING
WARNING
All toxic materials must be disposed of in a specic manner to prevent
contamination of the environment. Before disposing of damaged or worn out
lithium-ion battery packs, contact your local waste disposal agency, or the local
Environment Protection Agency for information and specic instructions.
If the battery pack cracks or breaks, with or without leaks, do not recharge it and
do not use. Dispose of it and replace with a new battery pack.
DO NOT ATTEMPT TO REPAIR IT!
The following toxic and corrosive materials are in the batteries used in this battery pack:
lithium-ion, a toxic material.
To avoid injury and risk of re, explosion, or electric shock, and to avoid damage to the
environment:
■ Cover the battery terminals with heavy-duty adhesive tape.
■ DO NOT attempt to remove or destroy any of the battery pack components.
■ DO NOT attempt to open the battery pack.
■ If a leak develops, the released electrolytes are corrosive and toxic. DO NOT get the solution in the
eyes or on skin, and do not swallow it.
■ DO NOT place damaged or defective batteries in your regular household trash.
■ DO NOT incinerate.
■ DO NOT place batteries where they will become part of any waste landll or municipal solid waste stream.
■ Take batteries to a certied recycling or disposal center.
20
TROUBLESHOOTING
Problem
Unit will not start
when trigger switch is
depressed.
To secure the battery pack,
make sure the latches on
the bottom of the battery
pack snap into place.
Take it to an authorized service
center. If within the warranty
period, call Customer Service
(Toll Free Number 866-384-
8432).
Remove battery and clear
debris from in and around
tube.
Replace with a new,
charged battery.
Charge the battery pack
according to the instructions
in the Operator’s Manual.
The battery is not secure.
The battery is defective.
The battery is not charged.
Defective trigger mechanism.
The tube is blocked.Unit will not blow.
Possible Cause Solution
Suspected malfunctions are often due to causes that the user can x themselves.
Therefore check the product using this section. In most cases the problem can be
solved quickly.
WARNING
Only perform the steps described within these instructions!
All further inspection, maintenance and repair work must be performed by an
authorized service center or a similarly qualied specialist if you cannot solve the
problem yourself!

21
LawnMaster
®
60V Warranty
LawnMaster
®
60V LIMITED WARRANTY
We take pride in producing a high quality, durable product. This LawnMaster
®
product carries a
limited four (4) year warranty against defects in workmanship and materials from date of purchase
under normal household use. This product carries a ninety (90) day warranty from date of purchase
when used for commercial purposes. This warranty is void if this product is ever used for rental
purposes. Batteries and chargers carry a two-year warranty against defects in workmanship
and materials from date of purchase. Batteries must be charged in accordance with the Operator's
Manual directions and regulations in order to be valid. Warranty does not apply to defects due to
alterations, direct or indirect abuse, negligence, misuse, accidents, repairs and, lack of maintenance.
Please keep your receipt/packing list as proof of purchase. This warranty gives you specic legal
rights, and you may have other rights, which vary from state to state. For product service call Customer
Service at (866) 384-8432.
Items not covered by warranty :
1. Any part that has become inoperative due to alteration, misuse, commercial use, abuse, neglect,
accident, or improper maintenance.
2. The unit, if it has not been operated and/or maintained in accordance with the Operator's Manual.
3. Normal wear, except as noted below.
4. Routine maintenance items such as lubricants, blade sharpening, etc.
5. Normal deterioration of the exterior nish due to use or exposure.
6. Parts that can wear out from normal use within the warranty period, such as the blades, collection
bags, spools, spool covers, etc.
Transportation Charges : Transportation charges for the movement of any power equipment unit or
attachment are the responsibility of the purchaser. It is the purchaser’s responsibility to pay
transportation charges for any part submitted for replacement under this warranty unless such
return is requested in writing by LawnMaster
®
.
THIS WARRANTY ONLY APPLIES TO ORIGINAL PURCHASER WITH PROOF OF PURCHASE.
THIS WARRANTY IS VOID WITHOUT PROOF OF PURCHASE.
22
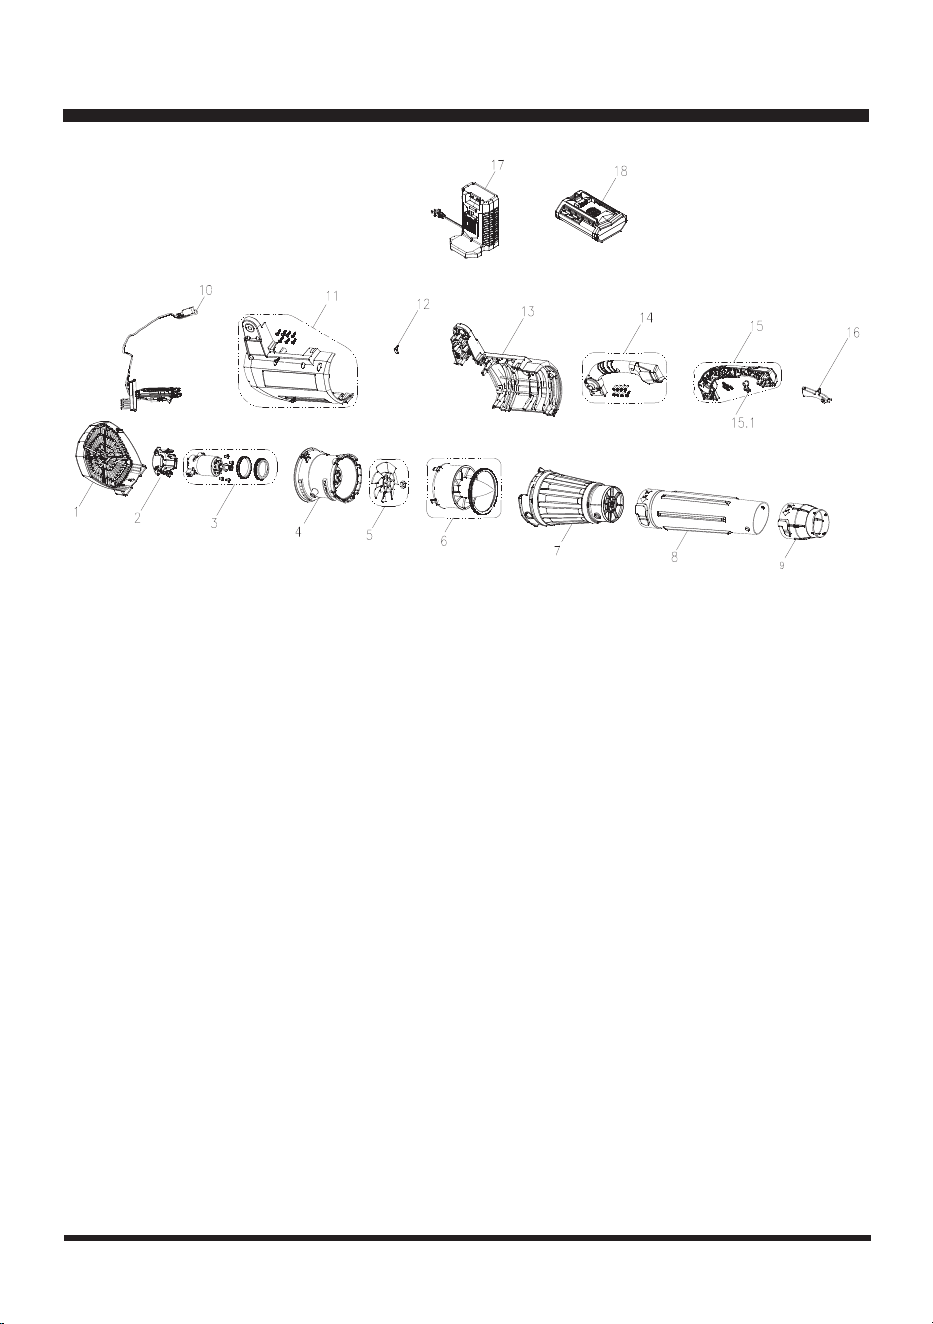
EXPLODED VIEW

23
PARTS LIST
1
2
3
4
5
6
7
8
9
10
11
12
13
14
15
15.1
16
17
18
1
1
1
1
1
1
1
1
1
1
1
1
1
1
1
1
1
1
1
Key Number
* Parts highlighted in gray are available for after sales purchase.
Drawing Number
231005001
231005002
231005003
231005004
231005005
231005006
231005007
231005008
231005009
231005010
231005011
181005110
231005012
231005013
231005014
231005016
231005015
60LFC01-ETL
60LB2021-S
Rear Cover Assembly
Cowling
Motor Assembly
Intake-Tube
Impeller Assembly
Air Ducting Assembly
Connecting Pipe
Blower Tube
Concentrator Nozzle Assembly
Inner Cable Assembly
Right Housing Assembly
Pressing Line Plate
Left Housing Assembly
Right handle Assembly
Left Handle Assembly
Cruise Control Lever
Trigger Switch
60V Lithium-Ion Battery Charger
60V Lithium-Ion Battery
Description Quantity

24
NOTES

25
TABLA DE CONTENIDOS
TABLA DE CONTENIDOS 25
ESPECIFICACIONES 26
INSTRUCCIONES IMPORTANTE DE SEGURIDAD 27-31
SÍMBOLOS 32-33
CONOZCA SU SOPLADORA 34
ARMADO 35-37
PAQUETE DE BATERÍAS Y CARGADOR 38-40
FUNCIONAMIENTO 41-42
MANTENIMIENTO 43
ELIMINACIÓN AMBIENTALMENTE SEGURA DE LA BATERÍA 44
RESOLUCIÓN DE PROBLEMAS 45
GARANTÍA DEL LawnMaster
®
60V 46
VISTA DE DESPIECE ORDENADO 47
LISTA DE PIEZAS 48
NOTAS 49

26
ESPECIFICACIONES
Tipo Concentradora, Batería-pueden
Motor 60V MÁX.* cc
Máximo volumen de aire 440CFM
Máxima velocidad del aire 110 MPH
Peso con batería 9.04 lbs (4.1 kg)
Peso sin batería 6.83 lbs (3,1 kg)
Rango de temperatura de funcionamiento 40°F (4°C) a 100°F (38°C)
BATERÍA
N° de modelo 60LB2021-S
Tipo 60V MAX* Iones de Litio, 2,0 Ah
CARGADOR
N° de modlo 60LFC01-ETL
Voltaje de entrada nominal 120V~60Hz
Voltaje de salida nominal 60V Máx* CC
Corriente de entrada nominal 2.0A
Tiempo de carga de cero a carga completa 70 minutos
* El voltaje máximo inicial carga de trabajo batería (medida sin carga de trabajo) es de 60 voltios.
Voltaje nominal es 54 volts.
SOPLADORA AXIAL INALÁMBRICA DE 60V MÁX*

27
LEA Y COMPRENDA TODAS LAS INSTRUCCIONES.
No seguir las instrucciones detalladas abajo puede derivar en descargas eléctricas, incendios y/ o
lesiones graves:
INSTRUCCIONES IMPORTANTE DE SEGURIDAD
¡ADVERTENCIA!
■ Conozca su sopladora. Lea atentamente el Manual del Operador. Aprenda sus aplicaciones y
limitaciones, así como también los posibles peligros relacionados con esta sopladora. Siga esta
regla y reducirá el riesgo de descargas eléctricas, incendios o lesiones graves.
■ No deje la sopladora sin supervisión mientras esté encendida.
■ No permita que se utilice como un juguete. Se debe prestar estricta atención cuando el se use
cerca de niños.
■ Utilícela solo cmo se descrbe en este Manual. Utilice solo accesorios recomendados por el
fabricante. Los accesorios que puedan ser adecuados para una sopladora podrían generar riesgos
si se usan en otras sopladoras.
■ Si la sopladora no está funcionando como debería, se ha caído o dañado, ha sido dejada al aire
libre o ha caído en el agua, no intente utilizarla y llévela a un centro de servicio.
■ No manipule la batería o la sopladora con las manos mojadas.
■ No ponga objetos sobre las aberturas. No la use si alguna de las aberturas está bloqueada,
mantenga las
■ Mantenga su cabello, ropas holgadas, dedos y partes de su cuerpo lejos de las aberturas y piezas
móviles del producto.
■ Apague todos los controles antes de extraer la batería.
■ Tenga precaución adicional al limpiar en escaleras al subir o bajar o al caminar en supercies
desiguales.
■ No use la sopladora para soplar líquidos inamables o combustibles, como la gasolina, ni en áreas
donde puedan estar presentes.
■ No utilice el aparato en actividades para las cuales no fue diseñado.
■ No fuerce el aparato.Hará el trabajo de mejor manera y con menor probabilidad de lesiones al ritmo
para el cual se diseñó.
■ Mantenga a los niños alejados. Todas las personas aparte del operador deben mantenerse alejadas
del área de trabajo.
■ Manténgase alerta y preste mucha atención a la tarea cuando esté operando la sopladora. No
opere la sopladora cuando esté cansado.
■ Use gafas de seguridad. Siempre use máscara facial o contra el polvo si la operación es
polvorienta.
■ Evite utilizar la sopladora en un entorno peligroso. No utilice la herramienta en lugares húmedos o
mojados. No la use bajo la lluvia.
■ No se extienda demasiado, mantenga la postura y el equilibrio en todo momento.
■ Dé mantenimiento a la sopladora con cuidado. Siga las instrucciones para lubricar y cambiar los
accesorios.
■ Revise si hay piezas dañadas. Antes de seguir utilizando la sopladora y sus accesorios, las piezas
dañadas, deben revisarse cuidadosamente para determinar si funcionará correctamente y cumplirá
su función prevista. Verique la alineación de las partes móviles, la unión de las partes móviles, la
rotura de las partes, el montaje y cualquier otra condición que pueda afectar su funcionamiento.

28
INSTRUCCIONES IMPORTANTE DE SEGURIDAD
Cualquier parte que esté dañada debe ser reparada o reemplazada adecuadamente por un centro
de servicio autorizado, a menos que se indique lo contrario en este Manual.
■ Cuando no estén en uso, las sopladoras deben almacenarse en interiores, en un lugar seco, alto o
cerrado, fuera del alcance de los niños.
■ Evite el arranque involuntario. Asegúrese de que el interruptor esté en la posición de apagado
antes de conectar el paquete de baterías, levantar o transportar la sopladora. Sujetar la sopladora
con el dedo en el interruptor puede provocar accidentes.
■ Desconecte la batería de la sopladora antes de realizar cualquier ajuste, cambiar accesorios o
guardarla. Dichas medidas de seguridad preventivas reducen el riesgo de que la sopladora se
arranque accidentalmente.
■ Mantenga su área de trabajo bien iluminada. Áreas de trabajo desordenadas u oscuras invitan a los
accidentes.
■ Siempre use protección para los ojos. Deben usarse máscara antipolvo, zapatos de seguridad
antideslizantes, casco o protección auditiva para las condiciones apropiadas.
■ No la use en una escalera, techo, árbol u otro soporte inestable. Una base estable sobre una
supercie sólida permite un mejor control de la sopladora en situaciones inesperadas.
■ No use la sopladora si el interruptor no lo enciende o apaga. Una sopladora que no se puede
controlar con el interruptor es peligroso y debe repararse.
■ Solo para uso residencial.
■ Retire o desconecte la batería antes de reparar, limpiar o retirar material de la herramienta.
Dichas medidas de seguridad preventivas reducen el riesgo de que la sopladora se arranque
accidentalmente.
■ Cuando la batería no esté en uso, manténgala alejada de otros objetos metálicos, como clips,
monedas, llaves, clavos, tornillos u otros objetos metálicos pequeños que puedan hacer una
conexión de un borne a otro. Cortocircuitar los bornes de la batería puede causar quemaduras o un
incendio.
■ Verique la desalineación o la unión de las partes móviles, la rotura de las partes y cualquier otra
condición que pueda afectar el funcionamiento de la sopladora. Si está dañada, haga que sea
revisada antes de usarla. Muchos accidentes son causados por sopladoras mal mantenidas.
■ Mantenga la sopladora y su mango secos, limpios y sin aceite ni grasa. Siempre use un paño limpio
al limpiar. Nunca use líquidos de frenos, gasolina, productos a base de petróleo o solventes fuertes
para limpiar su soplador. Seguir esta regla reducirá el riesgo de pérdida de control y deterioro del
plástico de la carcasa.
■ No use el equipo con los pies descalzos o cuando porte sandalias o calzado ligero similar. Use
calzado de protección que proteja sus pies y mejore el equilibrio en supercies resbaladizas.
■ Revise el área de trabajo antes de cada uso. Retire todos los objetos, como rocas, vidrios rotos,
clavos, cables o cuerdas que puedan lanzarse o enredarse en la máquina.
■ No apunte la sopladora hacia personas ni mascotas.
■ Nunca haga funcionar la unidad sin el equipo adecuado conectado. Asegúrese siempre de que los
tubos de la sopladora estén instalados.
■ No la almacene en el exterior ni en vehículos.
■ No incinere esta sopladora aún cuando esté severamente dañada. La batería puede explotar y
causar un incendio.
■ El mantenimiento a la sopladora debe ser realizado únicamente por personal de reparación
calicado. El servicio o mantenimiento realizado por personal no calicado podría resultar en un
riesgo de lesiones.
■ Al reparar una sopladora, use solo las piezas de repuesto idénticas mencionadas en el Manual del

29
INSTRUCCIONES IMPORTANTE DE SEGURIDAD
Operador. Siga las instrucciones en la sección de Mantenimiento de este Manual. El uso de piezas
no autorizadas o el incumplimiento de las instrucciones de mantenimiento pueden crear un riesgo
de descarga eléctrica o lesiones.
■ Los sopladores de baterías no tienen que estar conectados a un tomacorriente; por lo tanto,
siempre están en condiciones de funcionamiento. Tenga cuidado con los posibles peligros cuando
no use su sopladora, la batería o cuando cambie los accesorios. Seguir esta regla reducirá el
riesgo de descarga eléctrica, incendio o lesiones personales graves.
■ Nunca use ninguna sopladora cerca del fuego o cenizas calientes. El uso de la sopladora cerca de
incendios o cenizas puede propagar incendios y causar lesiones graves y/o daños a la propiedad.
■ Nunca use la sopladora para esparcir químicos, fertilizantes o cualquier otra sustancia tóxica. La
propagación de estas sustancias podría provocar lesiones graves al operador o a otras personas.
■ Nunca coloque la sopladora en ninguna supercie, excepto en una supercie dura y limpia cuando
el motor está en funcionamiento. Ya que grava, arena y otros residuos pueden ser recogidos por la
entrada de aire y arrojados al operador o transeúntes, causando posibles lesiones graves.
PAQUETE DE BATERÍASEl
■ Paquete de batería solo es compatible con los cargadores 60LFC01-ETL o 60LFC02-ETL.
■ Recargue solo con el cargador especicado por el fabricante y listado en este manual. Un cargador
adecuado para un tipo de paquete de baterías puede crear un riesgo de incendio cuando se usa
con otro paquete de baterías.
■ No cargue la batería en un lugar húmedo o mojado. Seguir esta regla reducirá el riesgo de
descarga eléctrica.
■ No coloque sopladoras de baterías o sus baterías cerca del fuego o el calor. Esto reducirá el riesgo
de explosión y posiblemente lesiones.
■ No abra ni mutile la batería. El electrolito liberado es corrosivo y puede causar daño a los ojos o la
piel. Puede ser tóxico si se ingiere.
■ No arroje los paquetes de baterías al fuego. Explotarán o se derramarán causando lesiones. El
líquido expulsado de la batería puede causar irritación o quemaduras.
■ No aplaste, deje caer o dañe la batería. No utilice un paquete de baterías o un cargador que se
haya caído o recibido un golpe fuerte. Una batería dañada está sujeta a explosión. Deseche de
forma adecuada una batería caída o dañada de inmediato.
■ Las baterías pueden explotar en presencia de una fuente de ignición, como una luz piloto. Para
reducir el riesgo de lesiones personales graves, nunca utilice productos inalámbricos en presencia
de llamas abiertas. Una batería explotada puede propulsar desechos y productos químicos. Si ha
estado expuesto, enjuáguese con agua inmediatamente
■ En condiciones extremas de uso o temperatura, puede producirse una fuga de la batería. Si el
líquido entra en contacto con su piel, lávese inmediatamente con agua y jabón. Si le entra líquido
en los ojos, lávelos con agua limpia durante al menos 10 minutos, luego busque atención médica
de inmediato. Seguir esta regla reducirá el riesgo de lesiones personales graves.
■ Cuando la batería no esté en uso, manténgala alejada de otros objetos metálicos, como clips,
monedas, llaves, clavos, tornillos u otros objetos metálicos pequeños, que puedan hacer una
conexión de un borne a otro. Cortocircuitar los bornes de la batería puede causar quemaduras o un
incendio.
■ No exponga un paquete de baterías o una sopladora al fuego ni a temperaturas excesivas. La
exposición al fuego o una temperatura superior a 265 °F (130 °C) puede causar una explosión.
■ No modique ni intente reparar la sopladora o la batería (según corresponda), excepto lo que se
indica en las instrucciones de uso y cuidado.

30
INSTRUCCIONES IMPORTANTE DE SEGURIDAD
■ Siga todas las instrucciones de carga y no cargue la batería o la sopladora fuera del rango de
temperatura especicado en las instrucciones. La carga incorrecta o a temperaturas fuera del rango
especicado puede dañar la batería y aumentar el riesgo de incendio.
■ Todos los servicios de herramientas deben ser realizados por un técnico de reparaciones calicado
que use solo repuestos idénticos. Esto garantizará que se mantenga la seguridad del producto.
CARGADOR DE LA BATERÍA
■ Este cargador solo es compatible con baterías de iones de litio 60LB2021-S, 60LB2521-S o
60LB5025-S
■ Para reducir el riesgo de lesiones, cargue solo las baterías recargables de iones de litio
especicadas. Otros tipos de baterías podrían explotar y causar lesiones personales o daños.
■ Mantenga el cable y el cargador lejos del calor para evitar daños en la carcasa o en las piezas
internas.
■ No use el cargador con un cable o enchufe dañado, ya que podría provocar un cortocircuito y una
descarga eléctrica. Si está dañado, deje de usarlo inmediatamente. Reemplace el cargador con la
unidad idéntica que se indica en la Lista de piezas de este Manual.
■ No use un cargador que se haya caído o recibido un golpe fuerte.
■ No desmonte el cargador. Llévelo a un centro de servicio calicado para su revisión o reemplazo.
El montaje incorrecto puede provocar un riesgo de descarga eléctrica o incendio.
■ No maltrate el cable del cargador. Nunca utilice el cable para cargar, jalar o desenchufar.
■ Mantenga el cable lejos del calor, aceite, bordes alados o piezas móviles. Los cables dañados
o enredados aumentan el riesgo de descarga eléctrica. Si el cable del cargador está dañado,
reemplace el cargador con un modelo idéntico como se indica en este Manual.
■ Un cargador que sea adecuado para un tipo de paquete de baterías puede presentar un riesgo de
incendio cuando se usa con otro paquete de baterías.
■ Cargue la batería a la temperatura de carga normal entre 40°F (4°C) y 100°F (38°C).
■ En condiciones de abuso, el líquido puede ser expulsado de la batería; evitar el contacto. En caso
de contacto accidental, enjuague con agua. Si el líquido entra en contacto con los ojos, también
busque ayuda médica. El líquido expulsado de la batería puede causar irritación o quemaduras.
CUMPLIMIENTO CON LA FCC
■ Este dispositivo cumple con la Parte 15 de las Reglas de la FCC. La operación está sujeta a las
siguientes dos condiciones:
- Este dispositivo no puede causar interferencias dañinas, y
- Este dispositivo debe aceptar cualquier interferencia recibida, incluidas las interferencias que
puedan causar un funcionamiento no deseado.
NOTA: este equipo ha sido probado y cumple con los límites para un dispositivo digital de Clase
B de conformidad con la Parte 15 de las Regulaciones de la FCC. Estos límites están diseñados
para proporcionar una protección razonable contra interferencias perjudiciales en una instalación
residencial.
■ Este equipo genera, utiliza y puede emitir energía de radiofrecuencia y, si no se instala y utiliza de
acuerdo con las instrucciones, puede causar interferencias perjudiciales en las comunicaciones de
radio. Sin embargo, no hay garantía de que no se produzcan interferencias en una instalación en
particular. Si este equipo causa interferencias perjudiciales en la recepción de radio o televisión, lo
cual puede determinarse encendiendo y apagando el equipo, se recomienda al usuario que intente
corregir la interferencia tomando una o más de las siguientes medidas:

31
INSTRUCCIONES IMPORTANTE DE SEGURIDAD
- Reoriente o reubique la antena receptora.
- Aumente la separación entre el equipo y el receptor.
- Conecte el equipo a una toma de corriente en un circuito diferente al del receptor.
- Consulte con el distribuidor o con un técnico de radio/TV experimentado para recibir ayuda.
GUARDE ESTAS INSTRUCCIONES
Consúltelas con frecuencia y utilícelas para instruir a otros en el uso de esta herramienta. Si le presta
esta herramienta a alguien, también préstele estas instrucciones.
32
SÍMBOLOS
SÍMBOLO NOMBRE NOMBRE/EXPLICACIÓN
V Volts Voltaje
A Amperes Corriente
Hz Hertz Frecuencia (ciclos por segundo)
W Vatio Energía
hrs Horas Tiempo
/min Por minuto
Revoluciones, golpes, velocidad de la supercie,
órbitas, etc., por minuto
Corriente alterna Tipo de corriente
Corriente continua Tipo o característica de la corriente
Reciclaje de la batería
de iones de litio
Indica que esta herramienta cumple con los
requisitos del programa de reciclaje de baterías de
iones de litio
Alerta de seguridad Indica un riesgo potencial de lesiones a la persona.
Lea el manual de uso
Para reducir el riesgo de lesiones, el usuario debe
leer y comprender el manual de uso antes de utilizar
este producto.
Protección ocular y
auditiva
Use siempre protección ocular con escudos laterales
para cumplir con l normativa ANSI Z78.1, junto con
protección auditiva.
Alerta de condiciones
húmedas
No exponer a la lluvia ni usar en lugares húmedos.
Mantenga a las
personas alejadas
Mantenga a todas las personas alejadas al menos
50 pies (15 metros).
Cabello largo
El no mantener el cabello alejado de la toma de aire
puede causar lesiones personales.
Tubos de la sopladora No usar sin los tubos.
Ropa holgada
El no mantener la ropa holgada lejos de la toma de
aire puede causar lesiones personales.
Algunos de los siguientes símbolos podrían aparecer en este producto. Estúdielos
y aprenda su signicado. La interpretación adecuada de estos símbolos le permitirá
utilizar el producto de mejor manera y con más seguridad.
33
SÍMBOLOS
SÍMBOLO NOMBRE NOMBRE/EXPLICACIÓN
Mantener alejado del
agua
No elimine las baterías lanzándolas a ríos ni las
sumerja en agua.
Mantener alejado del
fuego
No elimine las baterías utilizando fuego. Explotarán
o tendrán fugas y provocarán lesiones.
Alerta de calor
No exponga las baterías a un calor superior a 140°F
(60°C).
Símbolo de reciclaje
Este producto utiliza baterías de iones de litio. Las
leyes locales, estatales o federales podrían prohibir
la eliminación de baterías junto con la basura
común. Consulte a su autoridad de eliminaciónlocal
para obtener información sobre la disponibilidad de
opciones de reciclaje o eliminación.
SÍMBOLO SEÑAL SIGNIFICADO
PELIGRO
Indicates an imminently hazardous situation, which, if not
avoided, will result in death or serious injury.
ADVERTENCIA
Indicates a potentially hazardous situation, which, if not
avoided, could result in death or serious injury.
CAUTION
Indicates a potentially hazardous situation, which, if not
avoided, may result in minor or moderate injury.
AVISO
(Without Safety Alert Symbol) Indicates a situation that
may result in property damage.
Las siguientes palabras y signicados están diseñados para explicar los niveles de
riesgo asociados a este producto.

34
CONOZCA SU SOPLADORA
CONOZCA SU SOPLADORA
El uso seguro de este producto requiere un entendimiento de la información en la etiqueta del
producto y en este Manual del operador, así como el conocimiento del proyecto que tiene previsto.
Antes de usar este producto, familiarícese con todas las funciones operativas y reglas de seguridad.
SOPLADORA INALÁMBRICA
La sopladora inalámbrica posee un diseño ultraligero que es genial para un uso prolongado, al crear
una menor fatiga.
TUBO DE LA SOPLADORA
El tubo de la sopladora se puede instalar sin necesidad de usar herramientas.
1. Palanca de control de crucero
2. Interruptor de gatillo
3. Manilla
1
5
6
7
8
2 3
4
4. Tubo de la sopladora
5. Batería
6. Paquete de baterías
7. Boquilla Concentradora
8. Raspador de sedimentos

35
ARMADO
¡ADVERTENCIA!
No utilice este producto si alguna de las piezas mencionadas en la lista de
componentes del empaque ya está ensamblada en el producto al desempacarlo.
Las piezas mencionadas en esta lista no vienen ensambladas al producto
y requiere que el cliente las instale. Usar un producto que podría haberse
ensamblado de manera errónea podría causar graves lesiones.
■ Inspeccione el producto cuidadosamente para asegurarse de que no se haya roto o dañado
durante el transporte.
■ No bote el material del empaque hasta que haya inspeccionado completamente y utilizado
satisfactoriamente el producto.
■ No utilice el producto si alguna de las piezas está dañada o falta. Devuélvala para que el vendedor
a quien compró la herramienta la repare.
CLBL6015A (KIT) LISTA DE EMPAQUE
(1) Sopladora axial inalámbrica de 60 V
(1) Tubo de la sopladora
(1) Boquilla concentradora
(1) Batería de iones de litio de 60 V Máx.* y 2,0 Ah
(1) Cargador de batería de 60 V Máx.*
(1) Manual del usuario
DESEMBALAJE
Este producto requiere armado.
■ Con cuidado, extraiga el producto y todos sus accesorios de la caja. Asegúrese de que todos los
elementos mencionados en la lista de componentes del empaque estén incluidos.
PARA SOPLAR (Consulte la Figura 1)
Inserte el extremo más ancho del tubo de la sopladora en la abertura frontal de la sopladora. Alinee las
pestañas de indexación con los canales de índice de tamaño correcto, una vez logrado, gire hacia la derecha
para bloquear en su lugar. Luego inserte la boquilla del concentrador en el tubo de la sopladora. Alinee las
pestañas de indexación con los canales de índice de tamaño correcto; Una vez logrado, gire en el sentido de
las agujas del reloj para bloquearlo en su lugar (Fig. 1).
36
ARMADO
INSTALACIÓN/ELIMINACIÓN DEL PAQUETE DE BATERÍA (Consulte la
Figura 2)
¡IMPORTANTE! Cuando adquiera el producto, la batería no vendrá con carga. Antes de usar la
sopladora, asegúrese de leer todas las precauciones de seguridad y seguir las instrucciones de la
sección Cargador y Batería. Con el uso regular, necesitará menos tiempo de carga. Si la almacenará
por un periodo de tiempo prolongado, extraiga la batería. Cuando esté lista para volver a usarla,
cargue la batería nuevamente por al menos 70 minutos.
Para instalar el paquete de baterías:
■ Agarre la sopladora rmemente.
■ Deslice el paquete de batería en la herramienta, como se muestra hasta que el pestillo se bloquee
en su lugar (Fig. 2).
■ No use la fuerza al insertar el paquete de batería. Deberá deslizarse en su lugar y se oirá un clic.
Para extraer el paquete de la batería:
■ Presione el botón de liberación en la batería y sáquela de la herramienta (Fig. 2).
■ Agarre la sopladora fírmemente y jale el paquete de la batería hacia afuera de la herramienta.
NOTA: La batería calza en la sopladora de manera ajustada para evitar que se caiga por accidente.
Podría tener que jalar fuertemente para extraerla.
A
1
1
2
Index
2
B
C
A - Boquilla Concentradora
B - Tubo De La Sopladora
C - Sopladora axial inalámbrica
Fig 1
37
ARMADO
Fig 2
Botón de liberación
Instalar
Quitar
¡ADVERTENCIA!
Siga estas instrucciones para evitar lesiones y reducir el riesgo de descarga
eléctrica o incendio:
■ Reemplace la batería o cargador inmediatamente en caso de que la carcasa de la batería o cable
del cargador se dañen.
■ Verique que el interruptor esté en posición de apagado antes de insertar o extraer la batería.
■ Antes de inspeccionar, ajustar o realizar mantenimiento a alguna parte de la sopladora, revise que
la batería se haya extraído.
■ Lea, comprenda y siga las instrucciones contenidas en la sección bajo el título Carga de la batería.

38
PAQUETE DE BATERÍAS Y CARGADOR
CARGA DE LA BATERÍA
■ Use solo con cargadores de batería de 60V LawnMaster®. El cargador de batería suministrado
está diseñado especícamente para la batería de iones de litio utilizada en esta herramienta
■ ¡Revise el voltaje! Los cargadores de baterías operan en 120 V.
■ La batería se carga entre 40°F (4°C) y 100°F (38°C). Esto garantiza una vida útil óptima de la
batería.
■ Proteja la batería del calor y de la exposición continua al sol, y manténgala alejada de radiaciones
u otras fuentes de calor. No deje la batería en la herramienta bajo luz solar directa durante largos
periodos de tiempo.
■ La batería se suministra parcialmente cargada. Para garantizar la capacidad total de la batería,
cárguela antes de usar su herramienta por primera vez. La batería de iones de litio se puede cargar
en cualquier momento sin reducir su vida útil. Interrumpir el proceso de carga no afecta a la batería.
■ Déjela siempre completamente cargada si la deja guardada en el cargador.
LED DE ESTADO DE CARGA
■ Si la batería no está insertada en el cargador, una luz LED roja continua indica que el enchufe está
conectado en una toma de corriente y que el cargador está listo para funcionar.
■ Carga: un indicador LED verde parpadeante en el cargador indica que la batería está cargando con
normalidad.
■ Cargada: un indicador LED verde continuo en el cargador indica que la batería está lista para
usarse.
■ Problema técnico: una luz LED roja parpadeante en el cargador indica que la batería tiene un
problema de carga o que podría estar defectuosa.
- Una condición posible es que la temperatura de la batería no se encuentre dentro del rango
de temperatura de carga que es de 40°F (4°C) y 100°F (38°C) o la corriente de carga sea
demasiado alta. Apenas se alcance la temperatura permitida y se logren los rangos de corriente
de carga, el cargador comenzará a cargar la batería automáticamente.
- Si el rango de temperatura y la corriente de carga son correctas y la luz LED continúa
parpadeando de color rojo, extraiga y reinserte la batería. Si el estado del LED se repite una
segunda vez, intente cargar otra batería idéntica. Si la batería carga normalmente, deseche la
batería defectuosa (consulte la sección Eliminación ambientalmente segura de la batería).c)
If the ashing red light continues after installing the second battery, the charger may be defective.
Replace with a new one.
- Si la luz roja parpadeante continúa tras instalar una segunda batería, el cargador podría estar
defectuoso. Cámbielo por otro nuevo.
■ Después de ciclos de carga continuos o repetidos sin interrupción, el cargador puede que se
caliente. Esto es normal y no indica defecto técnico alguno de la batería.
Las luces del cargador indican su estado de carga:
39
PAQUETE DE BATERÍAS Y CARGADOR
PANEL LED DE LA BATERÍA
El panel consta de 2 LED en la batería. Presione y suelte el botón del cargador de la batería para
activar el nivel del indicador del cargador. El nivel de carga de la batería puede conrmarse cuando la
batería está colocada en la máquina o cuando es extraída de la máquina.
SÍMBOLO
LUCES INDICADORAS ESTADO
Rojo,
Continuo
Conectado a la toma de energía
Verde, parpadeo Cargando
Verde, continuo Totalmente cargado
Rojo, parpadeo Problema de carga: Consulte Problema
técnico en LEDS DEL CARGADOR
Botón
LEDS indicadores de potencia
Los LEDs de la
batería
(Iluminación
continua)
CAPACIDAD DE LA BATERÍA
Verde 50%~100 %
Naranja 25%~ 50%
Rojo 0-25 % (se debe recargar)
40
CARGA DEL PAQUETE DE BATERÍAS (Consulte la Figura 3)
PAQUETE DE BATERÍAS Y CARGADOR
A CB
B
A
Fig 3
A - Cable de alimentación con enchufe
B - El riel en T del Cargador
C - Luces Indicadoras
A - Batería
B - Elriel en T del Cargador
¡ADVERTENCIA!
Si falta alguna parte del cargador o está dañada, ¡no la utilice! Reemplace el
cargador por uno nuevo. Si no se toma en cuenta esta advertencia, podrían
ocurrir lesiones graves.
¡Revise el voltaje! El voltaje debe cumplir con la información en la etiqueta de
datos técnicos.
■ Alinee la ranura C del paquete de baterías con el riel en T del cargador. Deslice la ranura C en el
riel en T hasta que la batería quede asegurada en su lugar (Fig. 3).
■ Conecte el cargador a la fuente de alimentación.
■ Permita un tiempo de carga suciente (consulte las Especicaciones) y luego desconecte el
cargador de la fuente de alimentación.
■ Presione el botón de liberación de la batería y extráigalo del cargador.
NOTA: Es normal que la batería y el cargador se calienten (pero no se calienten) durante el proceso
de carga. Si la batería no se carga correctamente, verique que la toma eléctrica tenga electricidad.
¡Siempre cargue la batería antes de almacenarla!
Trigger
Control crucero
Potencia máxima
Potencia máxima
APAGADO
APAGADO
41
INICIAR/DETENER LA SOPLADORA (Consulte la Figura 3)
■ El interruptor de gatillo y la palanca de control de crucero tienen la misma función, pero la función
de control de crucero mantiene el ventilador en funcionamiento sin mantener presionado el
interruptor de gatillo. La potencia de la sopladora se puede ajustar por cualquiera.
■ Presione el interruptor de gatillo o gire la palanca de control de crucero para encender la sopladora
y controle la potencia aumentando o disminuyendo el recorrido del interruptor.
■ Para apagar la sopladora, suelte el interruptor de gatillo y asegúrese de que la palanca de control
de crucero esté hacia arriba. No presione demasiado el interruptor de gatillo una vez que la
sopladora haya alcanzado la potencia máxima (Fig. 4).
PALANCA DE CONTROL DE CRUCERO
Presione el interruptor del gatillo y mueva la palanca de control de crucero hacia la posición de
velocidad adecuada para soplar.
CÓMO USAR LA SOPLADORA (Consulte la Figura 5)
■ Presione el interruptor de gatillo o la palanca de control de crucero para encender la sopladora.
Para ver las instrucciones sobre el uso de la función de control de crucero, consulte la página 41.
■ Sople los residuos o recortes de césped de caminos, aceras, patios, etc.
■ Junte el pasto cortado u hojas sueltas en montones. Sople los residuos de las esquinas, alrededor
de las juntas y entre los ladrillos (Fig. 5).
■ Suelte el interruptor de gatillo y asegúrese de que la palanca de control de crucero esté en la
posición superior para apagar la sopladora.
FUNCIONAMIENTO
Fig 4
42
FUNCIONAMIENTO
Fig 5
¡ADVERTENCIA!
Siempre use protección para los ojos con protectores laterales marcados para
cumplir con la norma ANSI Z87.1, junto con protección auditiva. De lo contrario,
podría arrojar objetos hacia sus ojos, lo que podría ocasionar lesiones graves.
NOTA: su sopladora Lawnmaster
®
está diseñada para soplar y limpiar supercies duras; como patios,
calzadas, cubiertas, garajes y aceras.

43
MANTENIMIENTO
¡ADVERTENCIA!
¡ADVERTENCIA!
Al realizar mantenimiento, utilice solo piezas de repuesto idénticas. El uso de otras
piezas podría generar un peligro o dañar al producto.
Para evitar graves lesiones personales, extraiga siempre la batería de la
herramienta al limpiarla o realizar tareas de mantenimiento.
MANTENIMIENTO GENERAL
■ Extraiga la batería.
■ Cepille o sople el polvo y basuras que pueda haber en las ventilas de aire utilizando aire comprimido
o una aspiradora. Mantenga las ventilas libres de obstrucciones, polvo y trozos de manera. No rocíe,
lave o sumerja las ventilas bajo el agua.
■ Limpie la carcasa y componentes plásticos utilizando un paño suave y húmedo. No utilice solventes
fuertes o detergentes sobre la carcasa plástica o sobre los componentes. Ciertos productos de
limpieza domésticos pueden causar daños y provocar riesgo de descarga eléctrica.
■ Guarde la sopladora, el cargador y la batería a una temperatura entre 40 °F (4 °C) y 100 °F (38 °C).
MANTENIMIENTO DEL PAQUETE DE BATERÍAS
■ Cargue completamente la batería antes de almacenarla.
■ Recargue la batería cuando haya una reducción notable en su desempeño. No deje que las baterías
se descarguen por completo.
■ No recargue una batería que ya se ha cargado por completo. Sobrecargar las baterías acorta su vida
útil.
■ Cuando la batería se cargue por completo, extraiga la batería del cargador y desconéctelo de la toma
de corriente.
■ No almacene la batería en la herramienta o en el cargador.
■ Recargue la batería a una temperatura ambiente entre 39.2 ˚F y 104 ˚F (4 °C - 40 °C). Si la batería
está caliente, deje que se enfríe antes de recargarla.
MANTENIMIENTO DEL CARGADOR
■ Mantenga el cargador limpio y libre de residuos. No permita que entren materiales extraños en la
cavidad ni en los contactos. Límpielo con un paño seco. No utilice disolventes, agua o lugar en
condiciones húmedas.
■ Siempre desenchufe el cargador cuando la batería no esté instalada en el cargador.
■ No guarde el cargador con calor excesivo. No lo use bajo la luz solar directa.
■ Desconecte el cargador de la toma de corriente de CA cuando no esté en uso y una vez que la
batería haya alcanzado la carga completa.
44
ELIMINACIÓN AMBIENTALMENTE SEGURA DE LA BATERÍA
¡ADVERTENCIA!
¡ADVERTENCIA!
Todos los materiales tóxicos deben eliminarse de la manera especicada a n de evitar contaminación
al ambiente. Antes de desechar paquetes de baterías de iones de litio dañados o desgastados,
comuníquese con su agencia local de eliminación de desechos o con la Agencia de Protección del
Medio Ambiente local para obtener información e instrucciones especícas.
Si la batería se rompe o parte, con o sin fugas, no la recargue ni tampoco la use.
Elimínela y reemplácela con una batería nueva.
¡NO INTENTE REPARARLA!
Los siguientes materiales tóxicos y corrosivos están presentes en esta batería:
Iones de litio, un material tóxico.
Para evitar el riesgo de incendio, explosión, descarga eléctrica y daños al medioambiente:
■ Cubra las terminales de la batería con cinta adhesiva aislante.
■ NO intente extraer ni destruir alguno de los componentes de la batería.
■ NO intente abrir la batería.
■ Si se produce una fuga, los electrolitos liberados son corrosivos y tóxicos. NO aplique la solución en
los ojos o en la piel, y no la ingiera.
■ NO coloque baterías dañadas o defectuosas en la basura normal de su casa
■ NO incinerar.
■ NO deje las baterías en un lugar donde se recojan para ser llevadas a algún relleno sanitario o
sistema municipal para desechos sólidos.
■ Llévelas a un centro de reciclaje o eliminación certicado.
45
RESOLUCIÓN DE PROBLEMAS
Problema
La unidad no arranca
cuando se presiona el
interruptor de gatillo.
Para jar la batería, asegúrese
de que los pestillos en la parte
inferior de la batería encajen
en su lugar.
Llévela a un centro de servicio
autorizado. Si está dentro del
período de garantía, llame a
Servicio al Cliente (Número
gratuito) 866-384-8432).
Retire la batería y limpie
los residuos de dentro y
alrededor del tubo.
Reemplace con una
batería nueva, cargada.
Cargue la batería de acuerdo
con las instrucciones del
Manual del Operador.
La batería no es segura.
La batería está defectuosa.
La batería no está cargada.
Mecanismo de disparo
defectuoso.
El tubo esta bloqueado.La unidad no soplará.
Causa posible Solución
Las sospechas de malfuncionamiento a menudo se deben a causas que el usuario puede solucionar.
Por lo tanto, revise su producto utilizando esta sección. En la mayoría de los casos el problema puede
resolverse rápidamente.
¡ADVERTENCIA!
¡Solo realice los pasos descritos en estas instrucciones!
Todos los trabajos adicionales de inspección, mantenimiento y reparación deben ser realizados por
un Centro de Servicio Autorizado o un especialista similar calicado si no puede resolver el problema
usted mismo.

46
GARANTÍA DEL LawnMaster
®
60V
Garantía del LawnMaster
®
60V
Nos sentimos orgullosos de ofrecer a usted un producto de alta calidad y durabilidad. Este producto
Lawnmaster ® posee una garantía limitada de cuatro (4) años contra defectos de fabricación y
materiales a contar de la fecha de compra, bajo uso doméstico normal. Este producto tiene una
garantía de noventa (90) días a partir de la fecha de compra cuando se utiliza con nes comerciales.
Esta garantía es nula si este producto se alquila a un tercero. Las baterías y cargadores tienen una
garantía limitada de dos años contra defectos de mano de obra y materiales a contar de la fecha de
compra. Las baterías deben cargarse de acuerdo con las instrucciones y regulaciones del Manual del
operador para que sean válidas. La garantía no se aplica a defectos debidos a alteraciones, abuso
directo o indirecto, negligencia, mal uso, accidentes, reparaciones y falta de mantenimiento. Conserve
su recibo/lista de empaque como prueba de su compra. Esta garantía le entrega derechos legales
especicos que pueden variar según su estado (podría tener otros derechos adicionales). Para
contactar con nuestra atención al cliente, marque el 1-866-384-8432.
Elementos no cubiertos por la garantía:
1. Cualquier parte que esté inoperativa por culpa de una alteración, mal uso, uso comercial, abuso,
negligencia, accidentes o mantenimiento inadecuado.
2. La unidad, si no ha sido utilizada y/o recibido mantenimiento de acuerdo con el Manual del
Operador.
3. Desgaste normal, a excepción de lo que se señala a continuación.
4. Articulos de mantenimiento rutinario tales como lubricantes, sladores de aspas, etc.
5. Deteríoro normal del acabado exterior debido al uso o exposición.
6. Las piezas que pueden desgastarse con el uso normal dentro del periodo de la garantía como las
aspas, bolsas recolectoras, carretes, tapas de carretes, etc.
Cobros por transporte: Los cobros por transporte para cualquier unidad o aditamento son
responsabilidad del comprador. Es responsabilidad del comprador pagar los cargos de transporte
de cualquier pieza de repuesto enviada conforme a esta Garantía, a menos que la devolución sea
solicitada por escrito por LawnMaster
®
.
ESTA GARANTÍA SE APLICA SOLO AL COMPRADOR ORIGINAL CON UNA PRUEBA DE
COMPRA.
ESTA GARANTÍA QUEDA NULA SI NO POSEE UNA PRUEBA DE COMPRA.

47
VISTA DE DESPIECE ORDENADO

48
LISTA DE PIEZAS
1
2
3
4
5
6
7
8
9
10
12
13
14
15
15.1
16
17
18
1
1
1
1
1
1
1
1
1
1
1
1
1
1
1
1
1
1
Key Number
CantidadNúmero de dibujo Descripción
* Las piezas resaltadas en gris se pueden adquirir como compra posventa.
231005001
231005002
231005003
231005004
231005005
231005006
231005007
231005008
231005009
231005010
181005110
231005012
231005013
231005014
231005016
231005015
60LFC01-ETL
60LB2021-S
Tapa de ventilación posterior
Carenado
Conjunto de piezas del motor
Tubo de admisión
Conjunto de piezas del propulsor
Conjunto de piezas de los ductos de aire
Tubería de conexión
Tubo de la sopladora
Boquilla concentradora
Conjunto de piezas del cable interno
Conjunto de piezas de la carcasa del
motor del lado derecho
Placa de la línea de presión
Conjunto de piezas de la manilla izquierda
Right handle Assembly
Conjunto de piezas de la manilla derecha
Control crucero
Gatillo
Cagargador para batería de Iones de Litio de 60 V
Batería de Iones de Litio de 60 V
11 1
231005011

49
NOTAS