
Technical Support and E-Warranty Certificate www.vevor.com/support
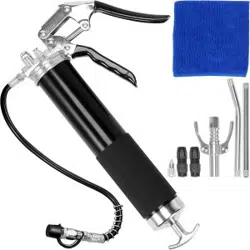
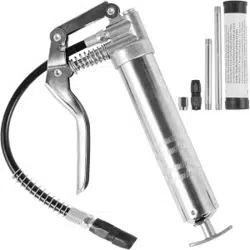
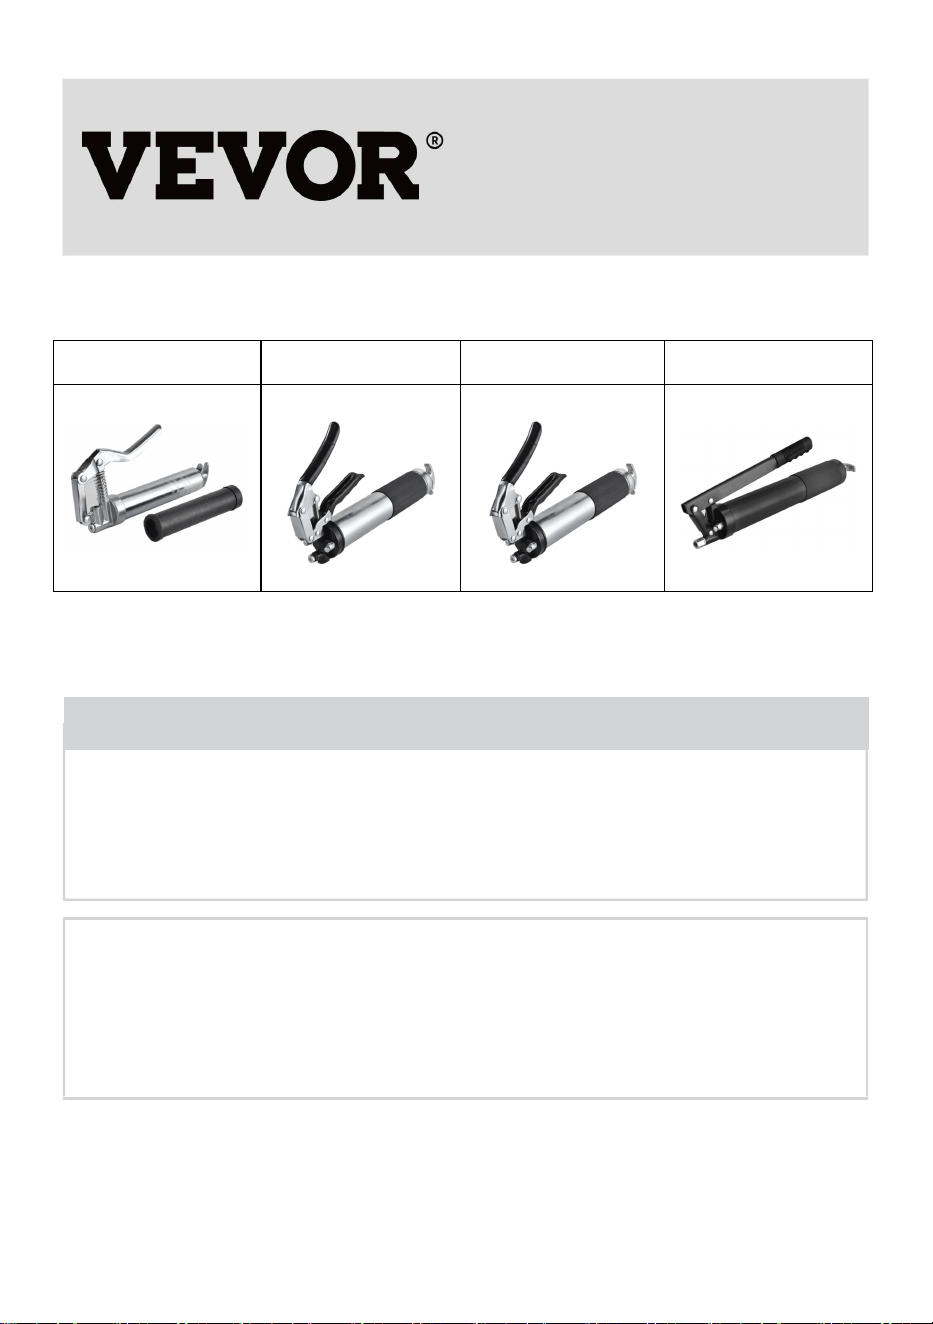
GREASE GUN
USER MANUAL
We continue to be committed to provide you tools with competitive price.
"Save Half", "Half Price" or any other similar expressions used by us only represents an
estimate of savings you might benefit from buying certain tools with us compared to the major
top brands and does not necessarily mean to cover all categories of tools offered by us. You
are kindly reminded to verify carefully when you are placing an order with us if you are
actually saving half in comparison with the top major brands.

- 1 -
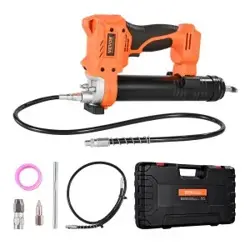
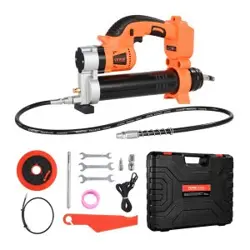
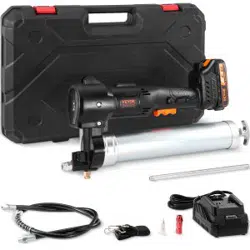
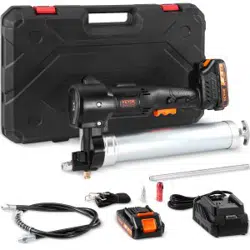
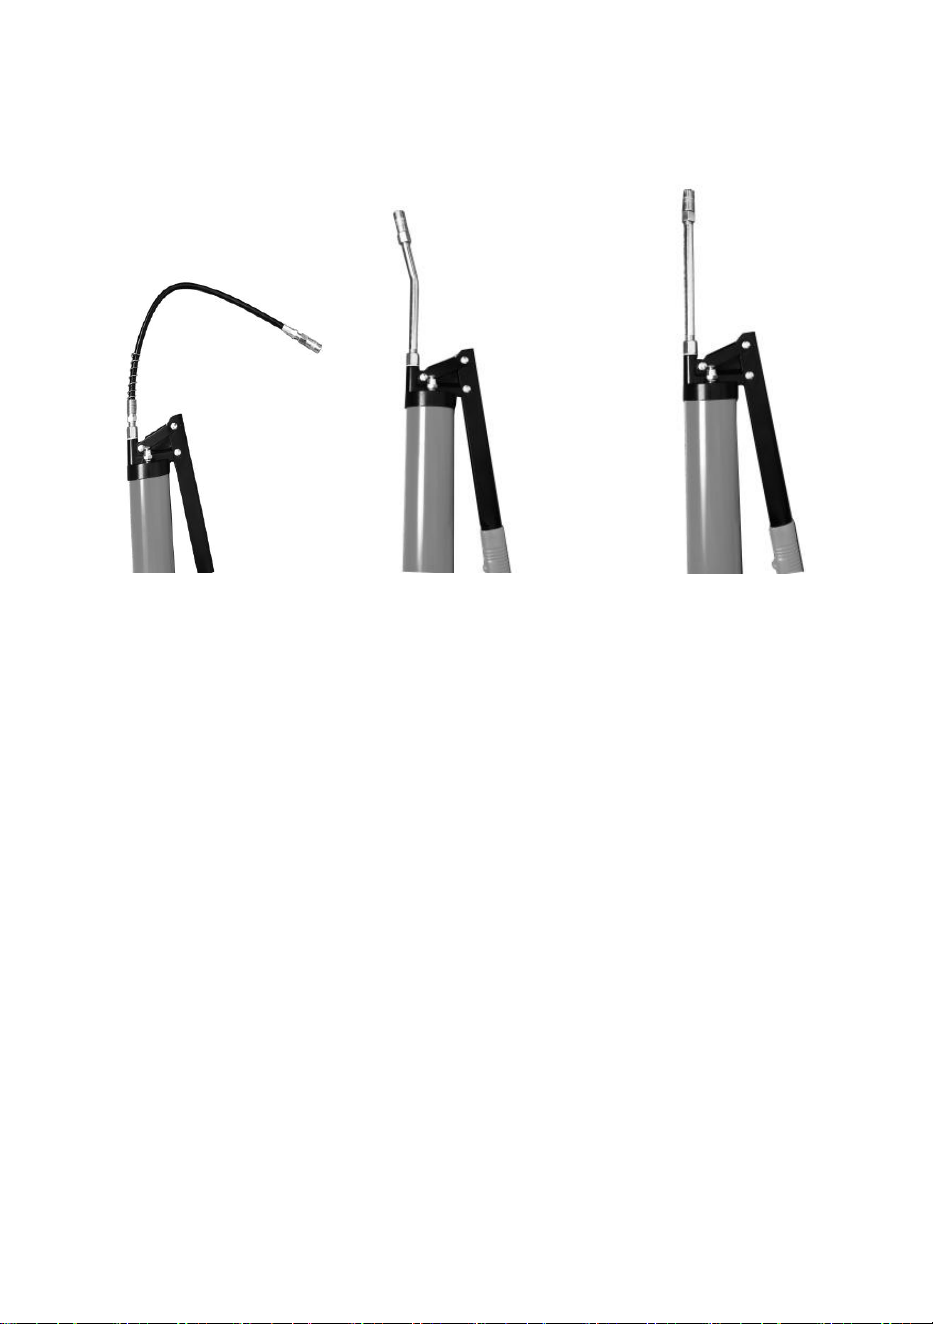
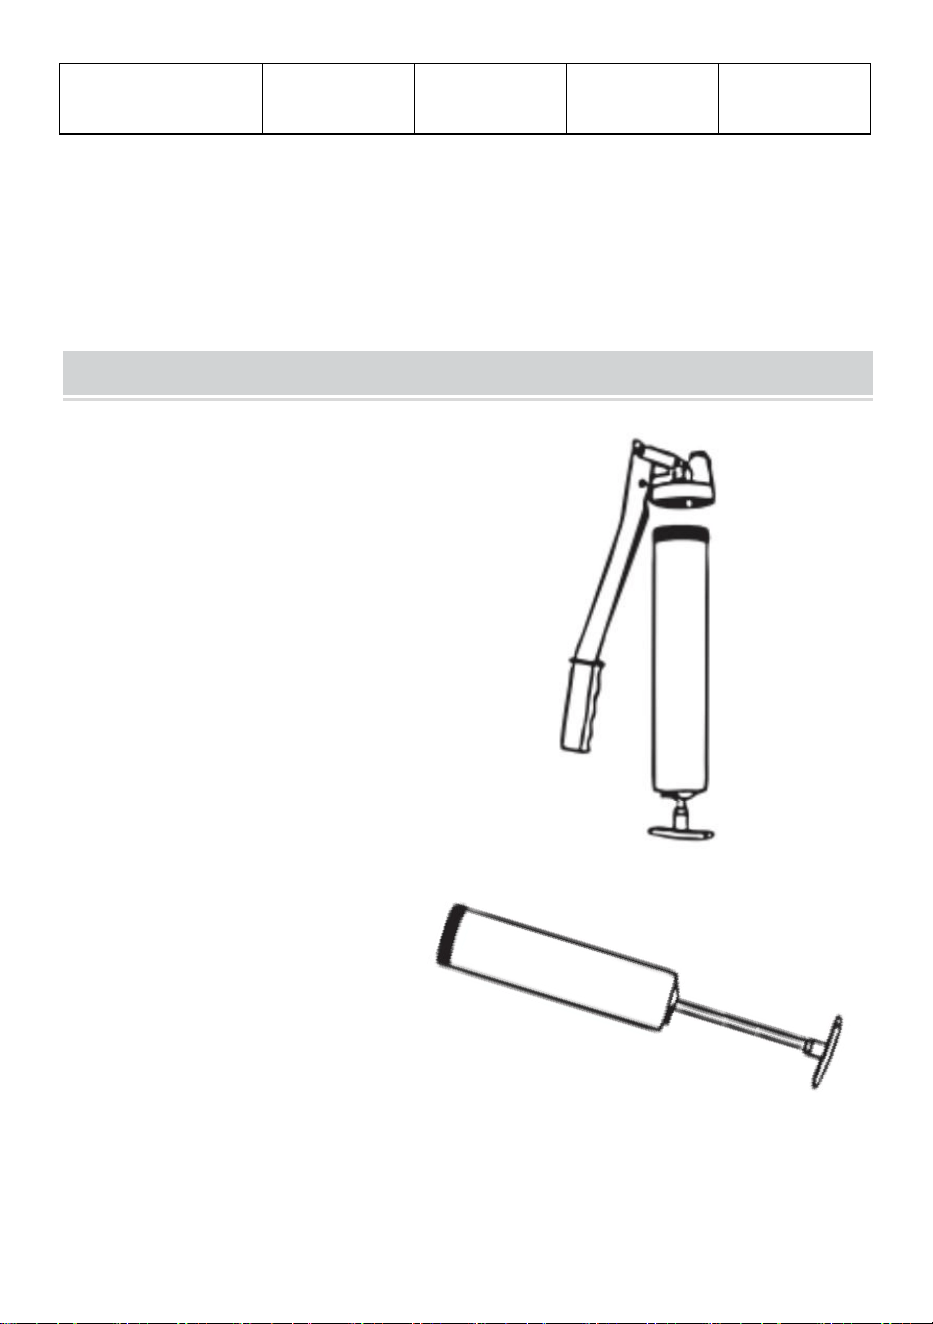
MODEL: LD-868,LD-867A,LD-867B,LD-2710
LD-868
LD-867A
LD-867B
LD-2710
Have product questions? Need technical support? Please feel free to
contact us:
Technical Support and E-Warranty Certificate
www.vevor.com/support
NEED HELP? CONTACT US!
This is the original instruction, please read all manual instructions
carefully before operating. VEVOR reserves a clear interpretation of our
user manual. The appearance of the product shall be subject to the
product you received. Please forgive us that we won't inform you again if
there are any technology or software updates on our product.
Grease Gun

- 2 -
1. Read carefully and understand all ASSEMBLY AND OPERATION
INSTRUCTIONS before operating.
2. Failure to follow the safety rules and other basic safety precautions
may result in serious personal injury.
GENERAL SAFETY RULES
WARNING: Read and understand all instructions. Failure to follow
all instructions listed below may result in serious injury.
Various dangers may occur if the hand lever grease gun is improperly
handled during installation, commissioning and daily operation.
Risk of injury and damage to material property because of improper
handling.
Hold the manual at the disposal of the operating staff at the usage site of
the unit.
Country-specific safety measures and accident prevention regulations
must be observed.
Only qualified and authorized persons are allowed to operate the grease
gun.
Persons are qualified if they are, due to their training, experience,
instruction and knowledge of the relevant standards, able to assess
assigned tasks and to identify potentially hazardous situations.
All persons charged with installation, operation, maintenance and repair
work, must have read and understood this operation instructions.
The grease gun is designed exclusively for the delivery of grease
lubricants.
Any use beyond these parameters can lead to serious risks and is

- 3 -
regarded as use that is contrary to the intended purpose.
The operator is responsible for damages resulting from use other than the
intended use.
CAUTION: Excess pressure can result in the bursting of the grease gun
head and of accessories!
Excess pressure at the greasing point can damage the grease nipple and
even the machine.
Comply with the machine manufacturer‘s maintenance and service
instructions
Defective accessories can lead to personal injury and material damage.
Grease hoses must not be kinked, twisted or stretched.
During their period of use, accessories must be checked for wear,cracks,
and other damage.
Defective accessories should be replaced immediately.
Do not open the grease gun when it is under pressure!
Every time that the grease gun head and barrel are to be separated, the
push rod must be fully retracted and automatically locked by means of the
safety catch.
Excess pressure can result in the bursting of the grease gun head and of
Equipment.
When using the grease gun, use suitable equipment such as protective
gloves and eye protection
SAVE THESE INSTRUCTIONS.

- 4 -
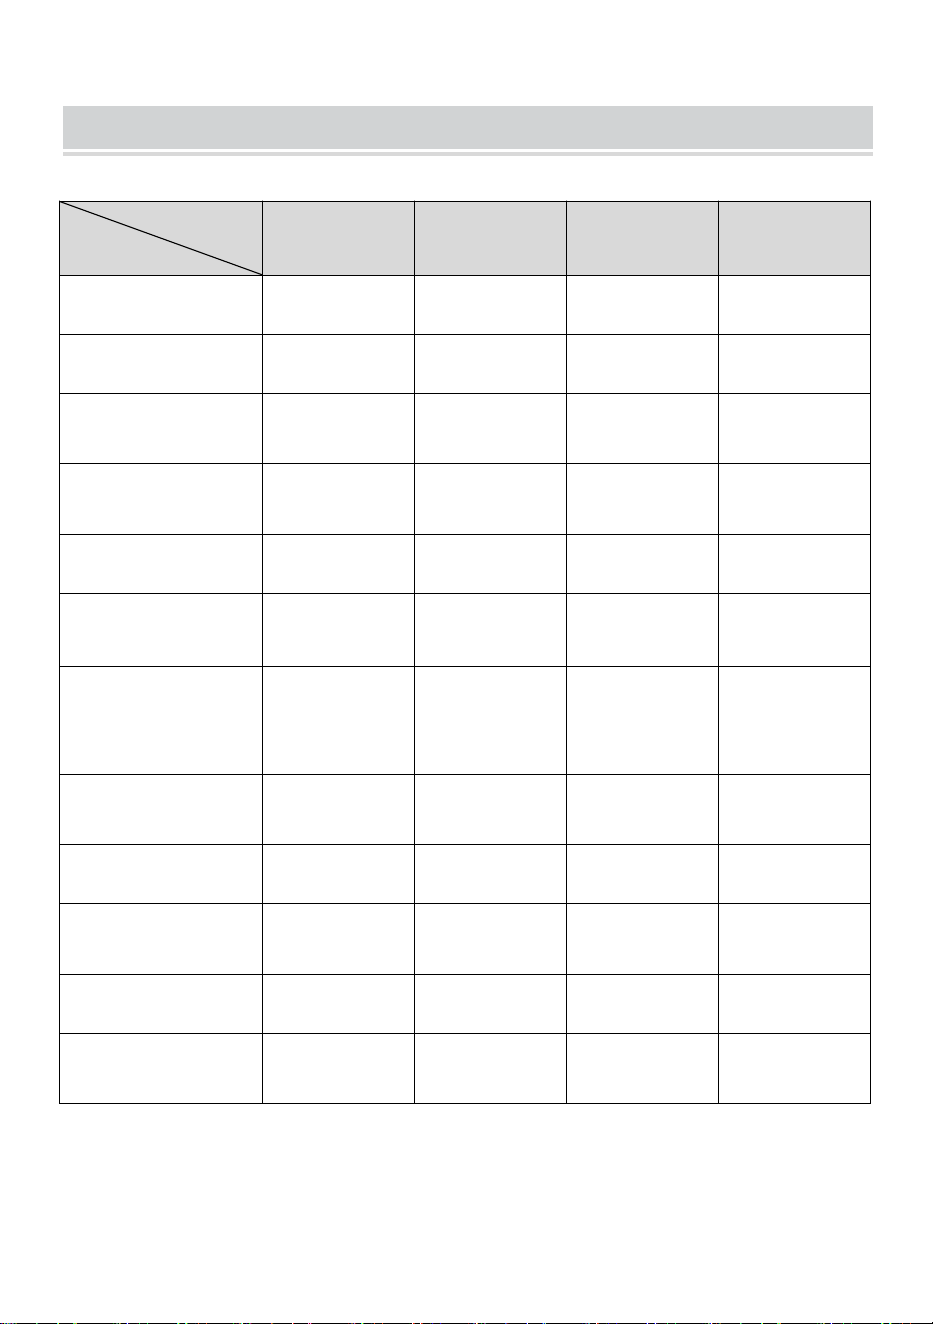
MODEL AND PARAMETERS
Model
LD-867A
LD-867B
LD-2710
LD-868
Capacity
400CC
400CC
600CC
120CC
Maximum
Pressure
6000PSI
6000PSI
10000PSI
3500PSI
Grease gun
discharge
connection
NPT 1/8
NPT 1/8
NPT 1/8
NPT 1/8
Grease Filling
Options
Cartridge
Loading
Cartridge
Loading
Cartridge
Loading
Cartridge
Loading
Suction Fill
Suction Fill
Suction Fill
/
Filler Device
Loading
Filler Device
Loading
/
/
Material
Steel+Aluminium Alloy
Color
Black+Silver
Black+Silver
Black
Silver
- 5 -
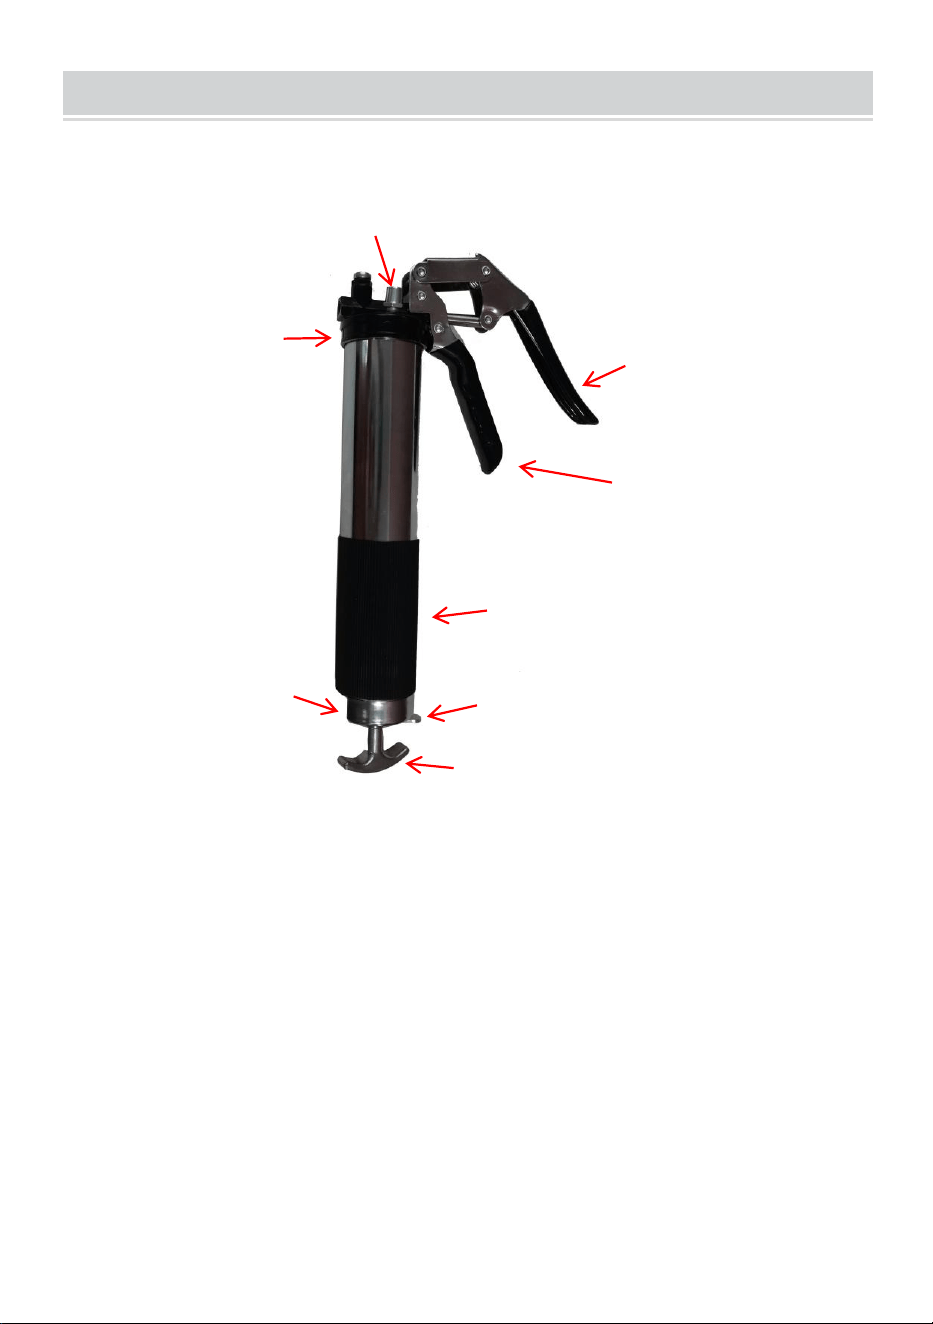
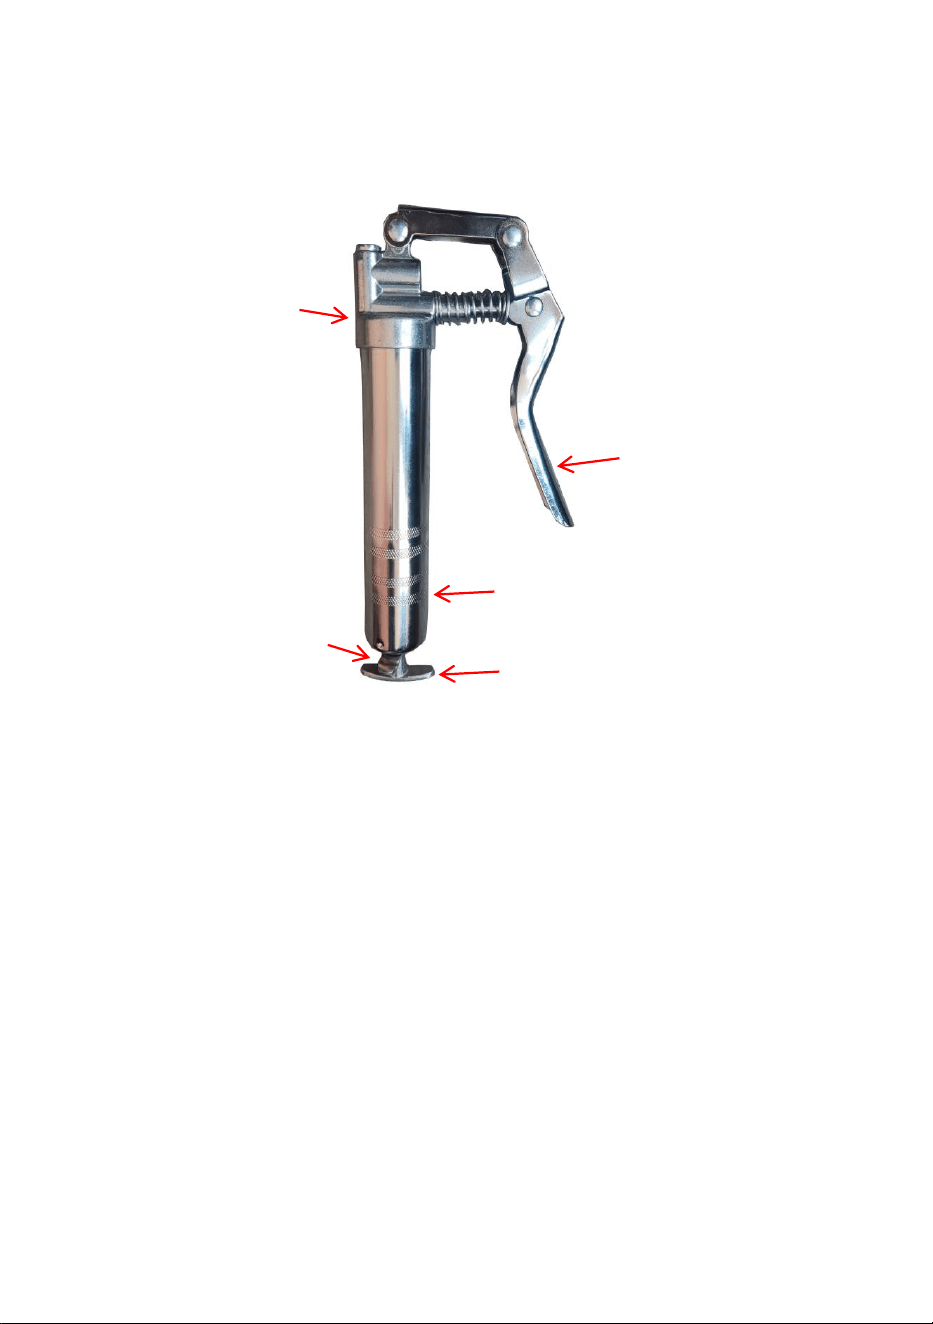
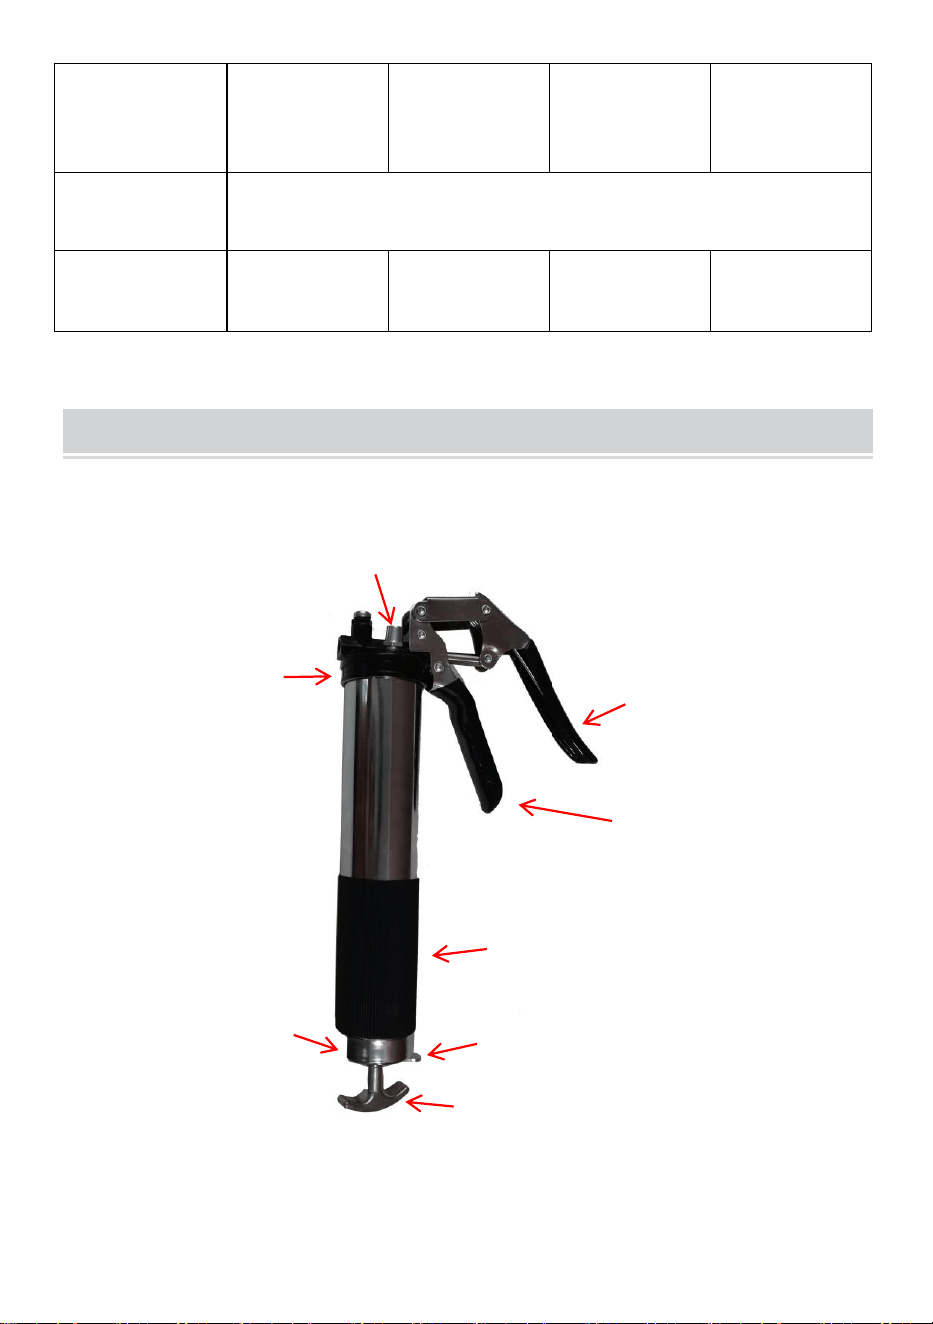
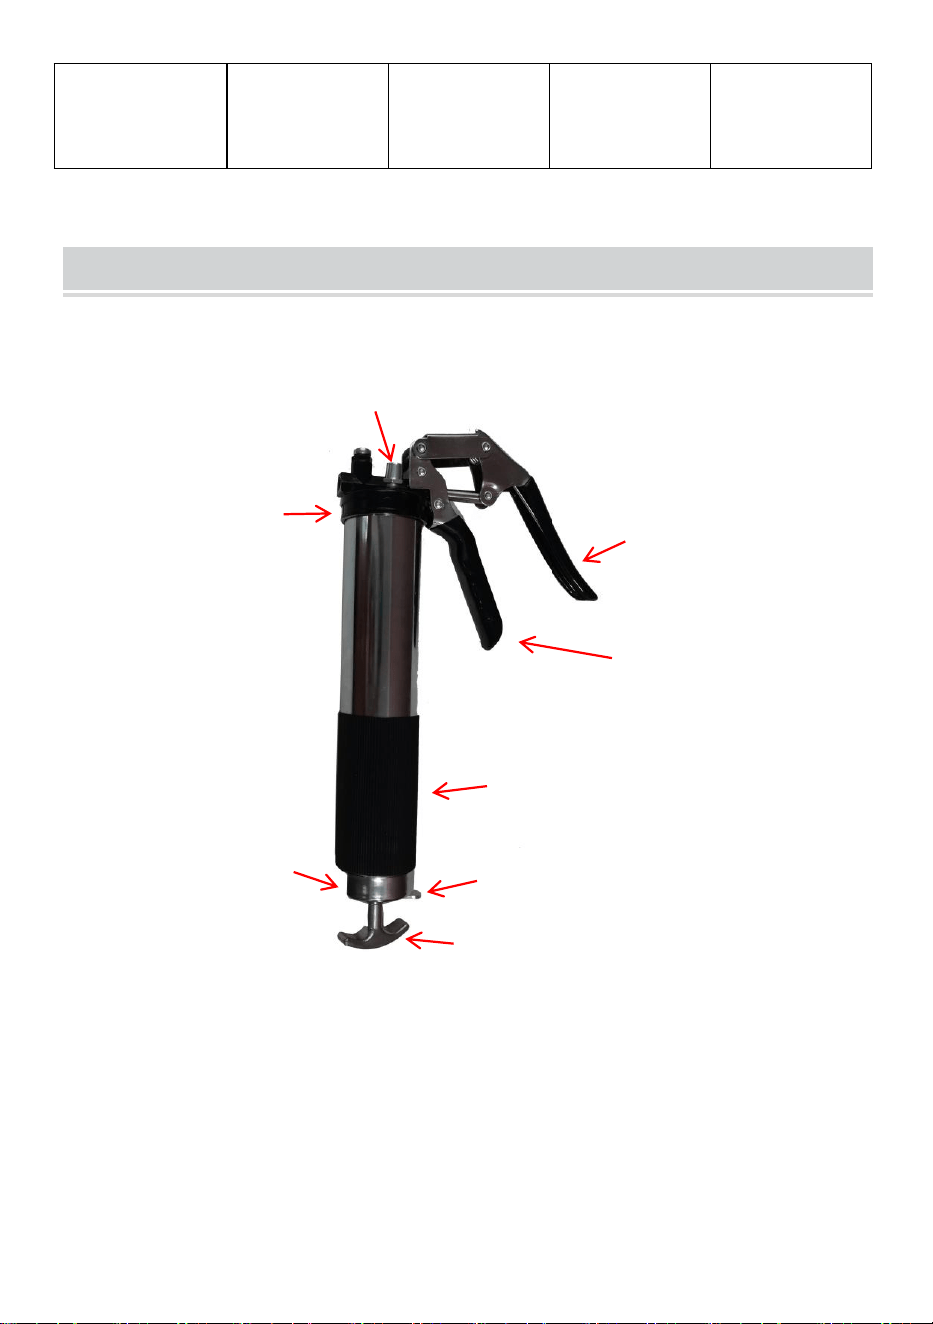
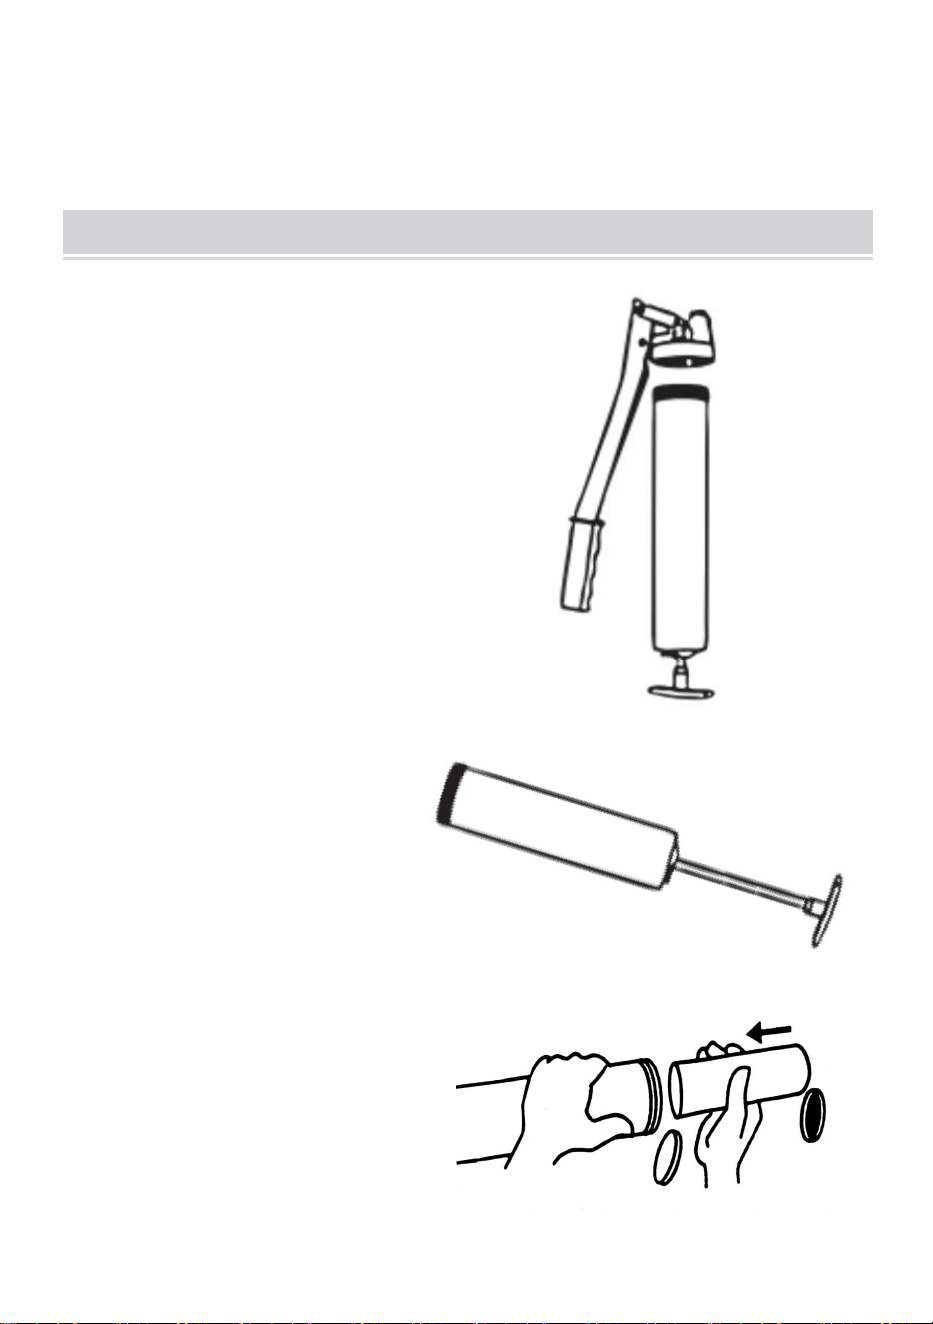
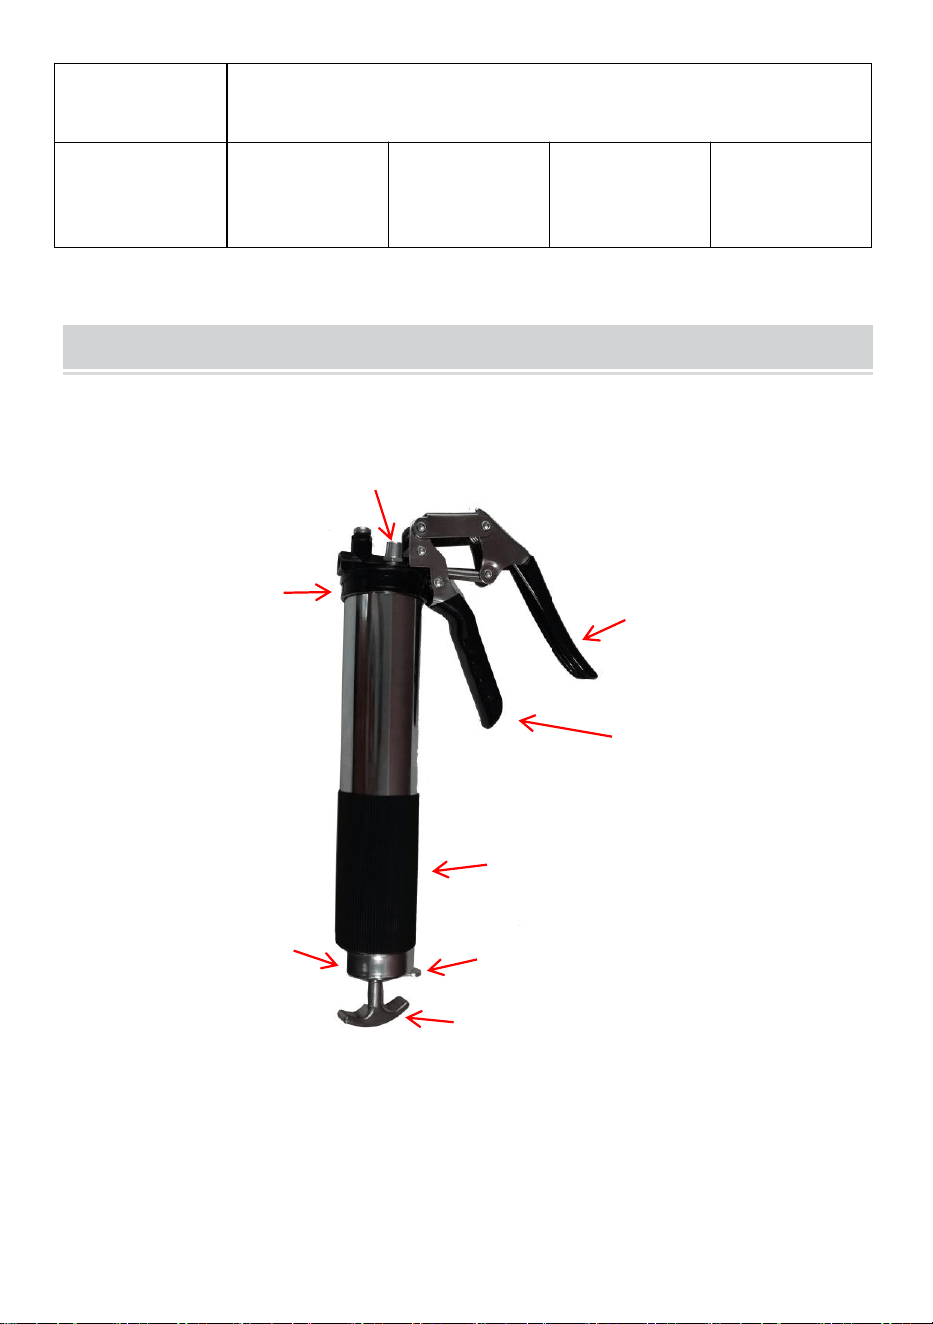
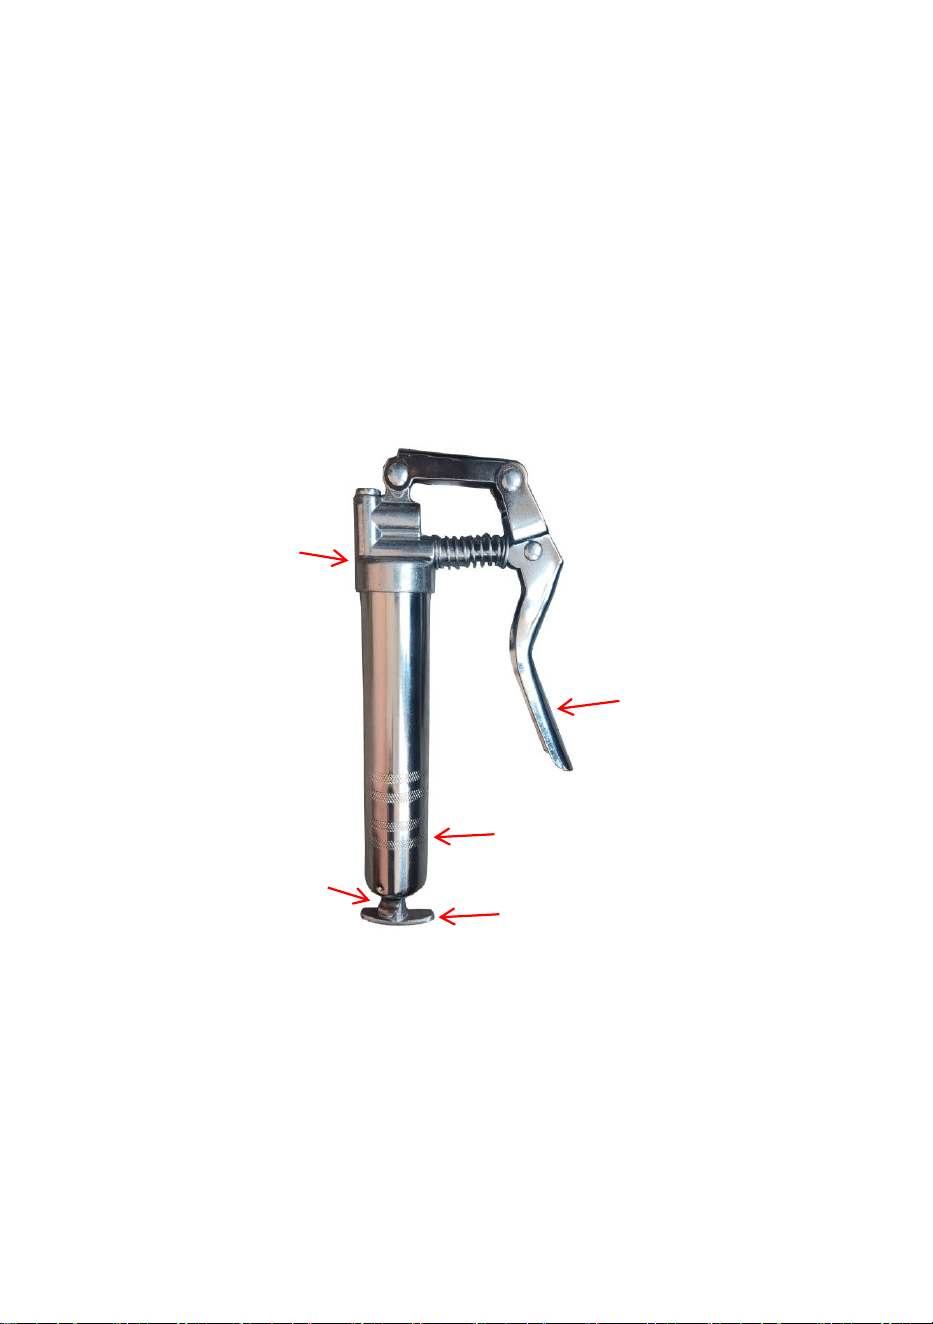
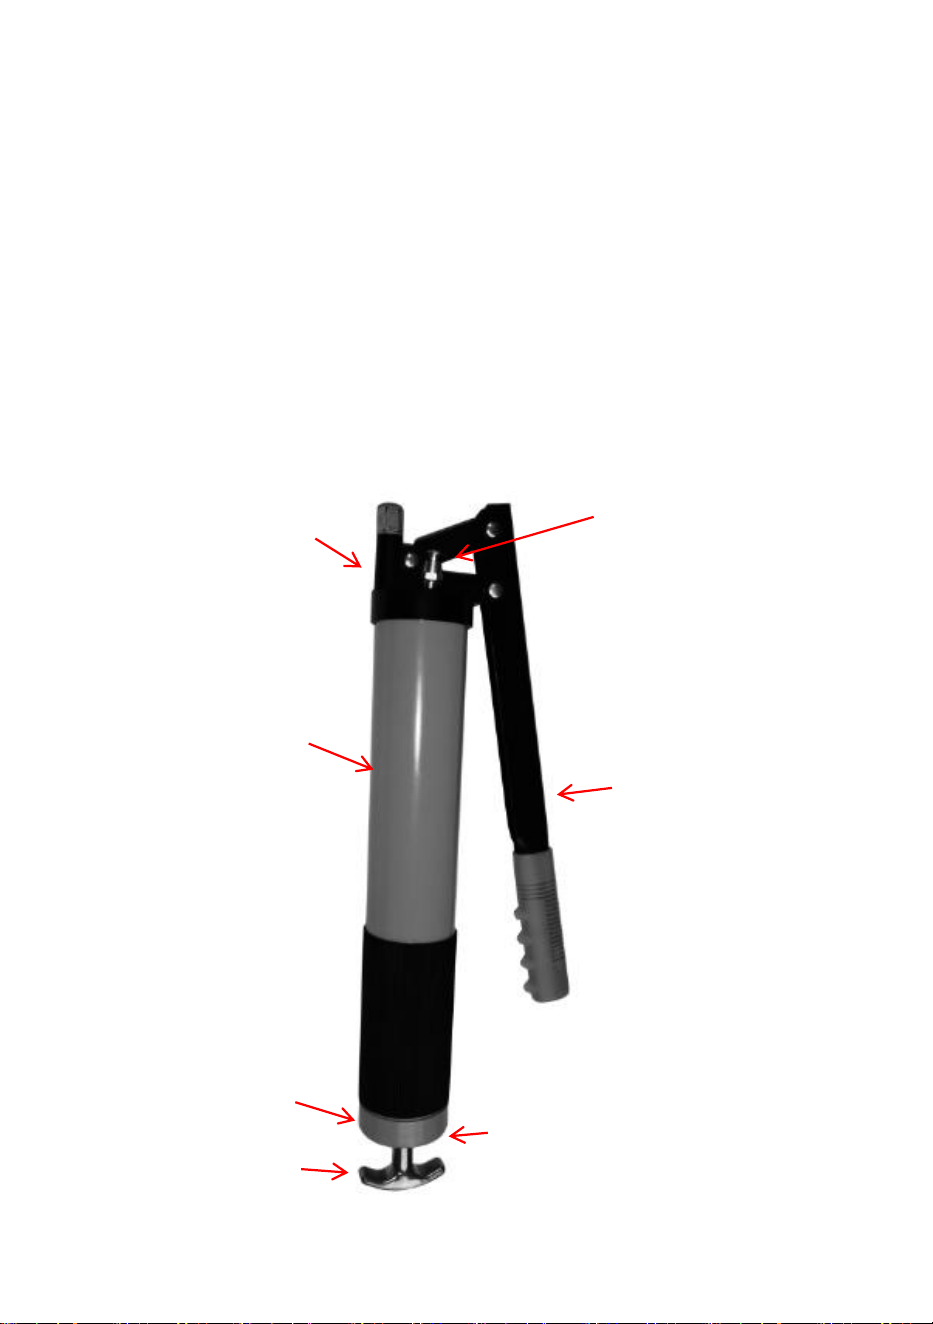
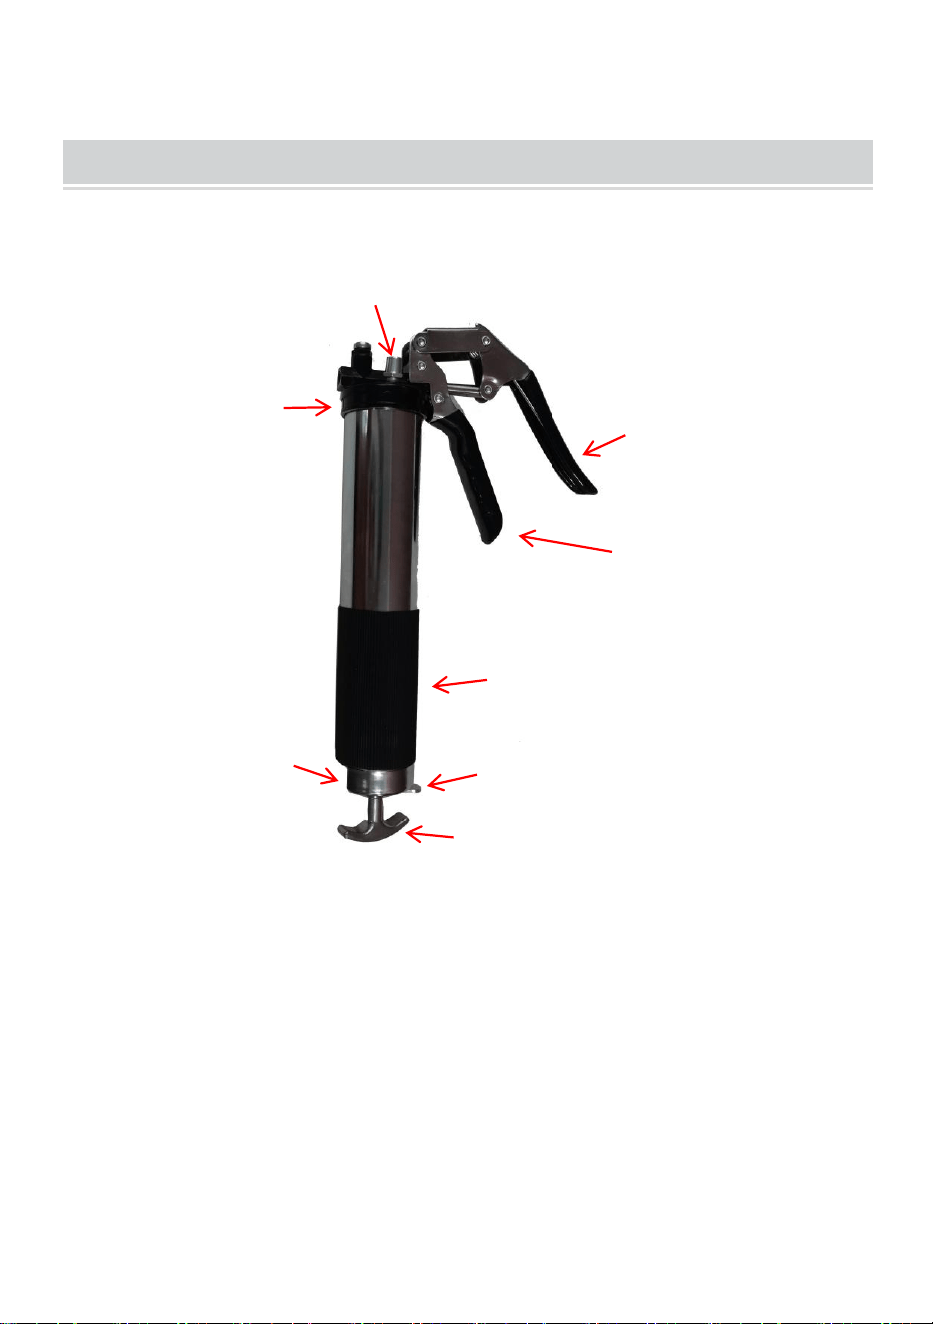
STRUCTURE DIAGRAM
LD-867A,LD-867B
1. Head
2. Air Release Valve
3. Movable Handle
4. Fix Handle
5. Barrel
6. Safety Catch
7. Plunger Rod Handle
8. End Cap
1
2
3
4
5
6
7
8
- 6 -
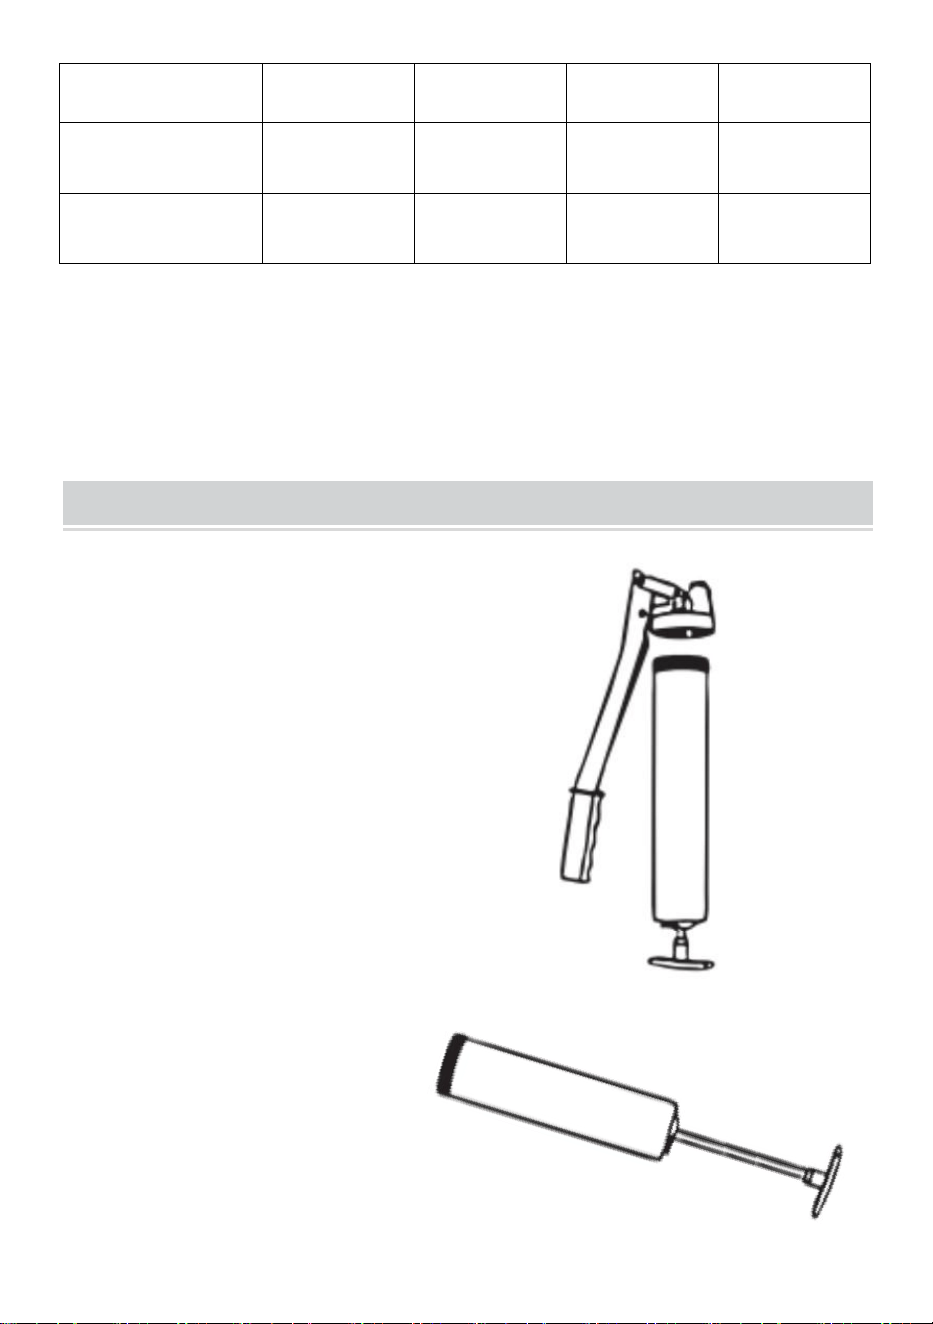
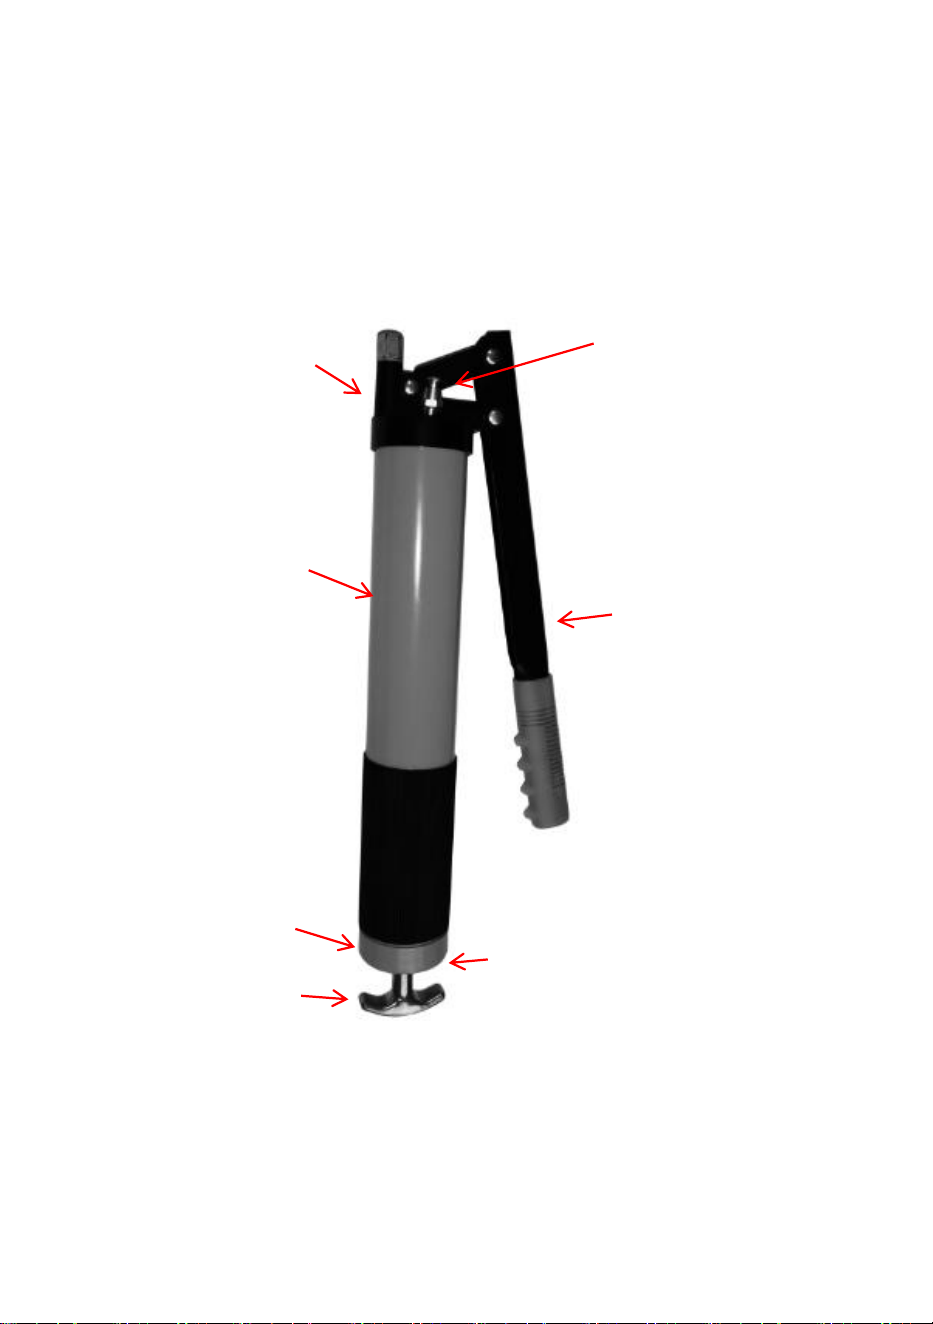
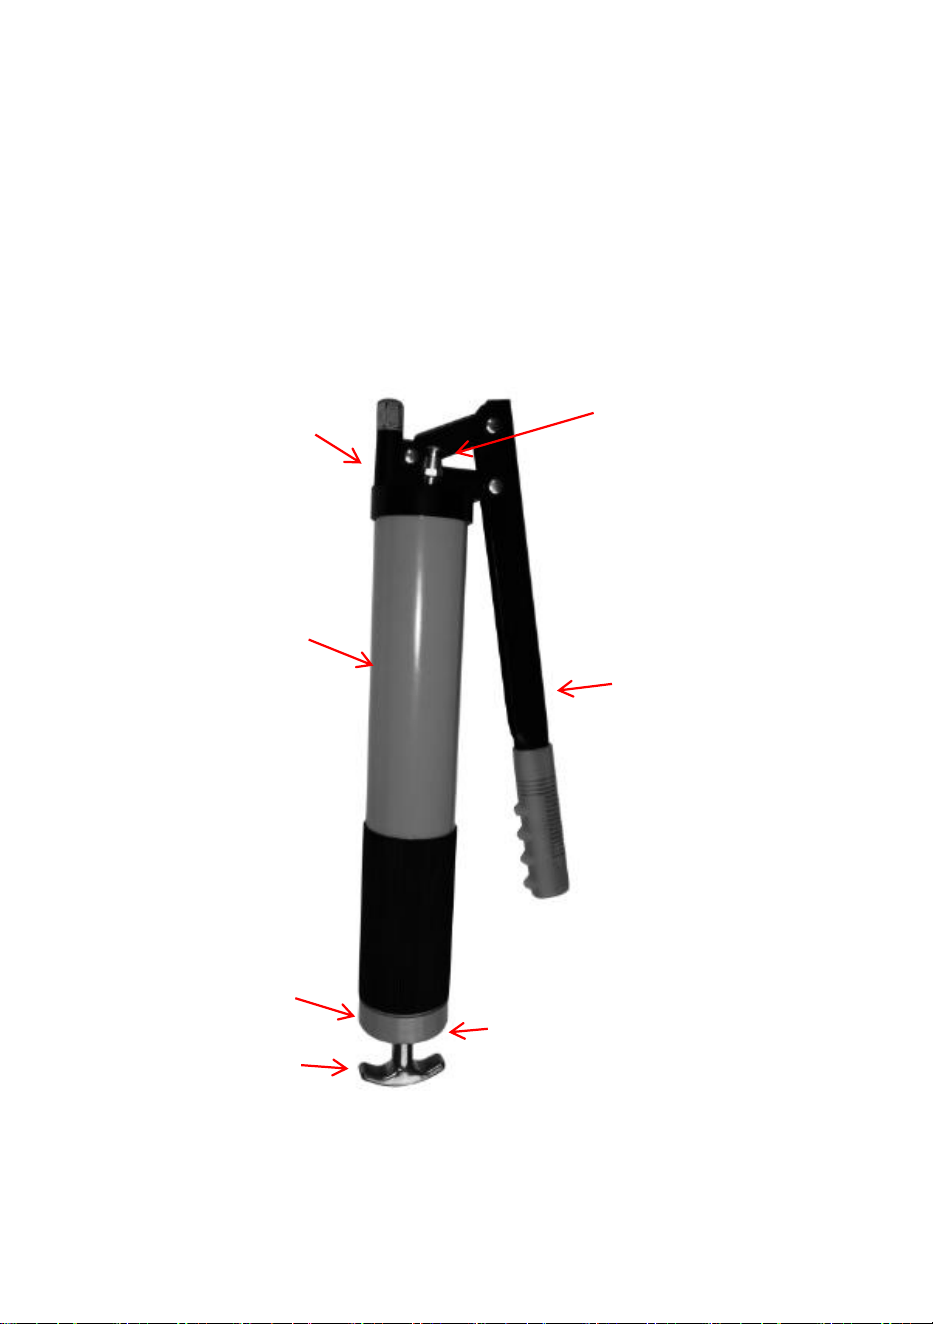
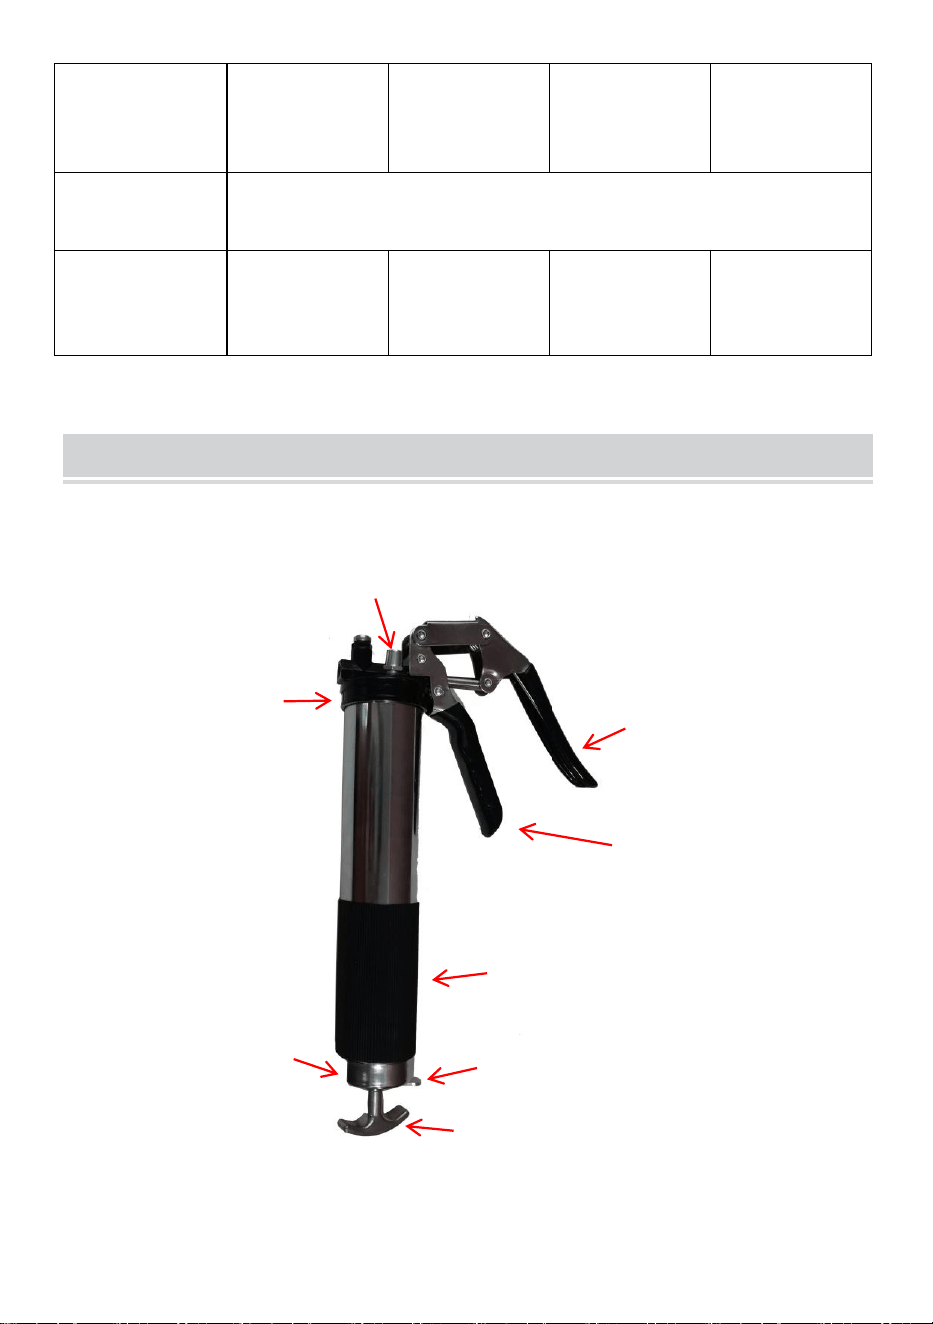
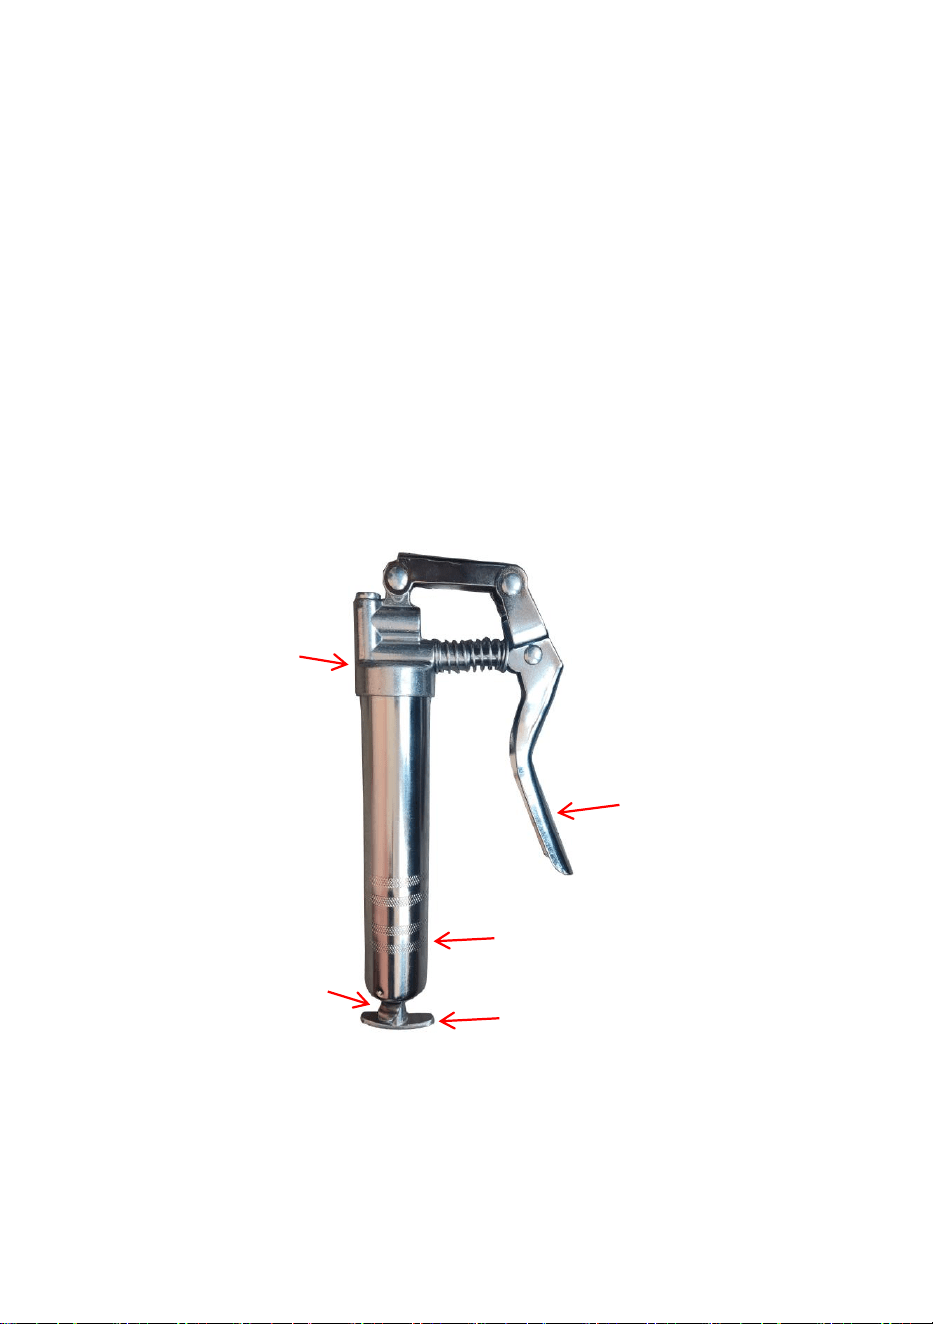
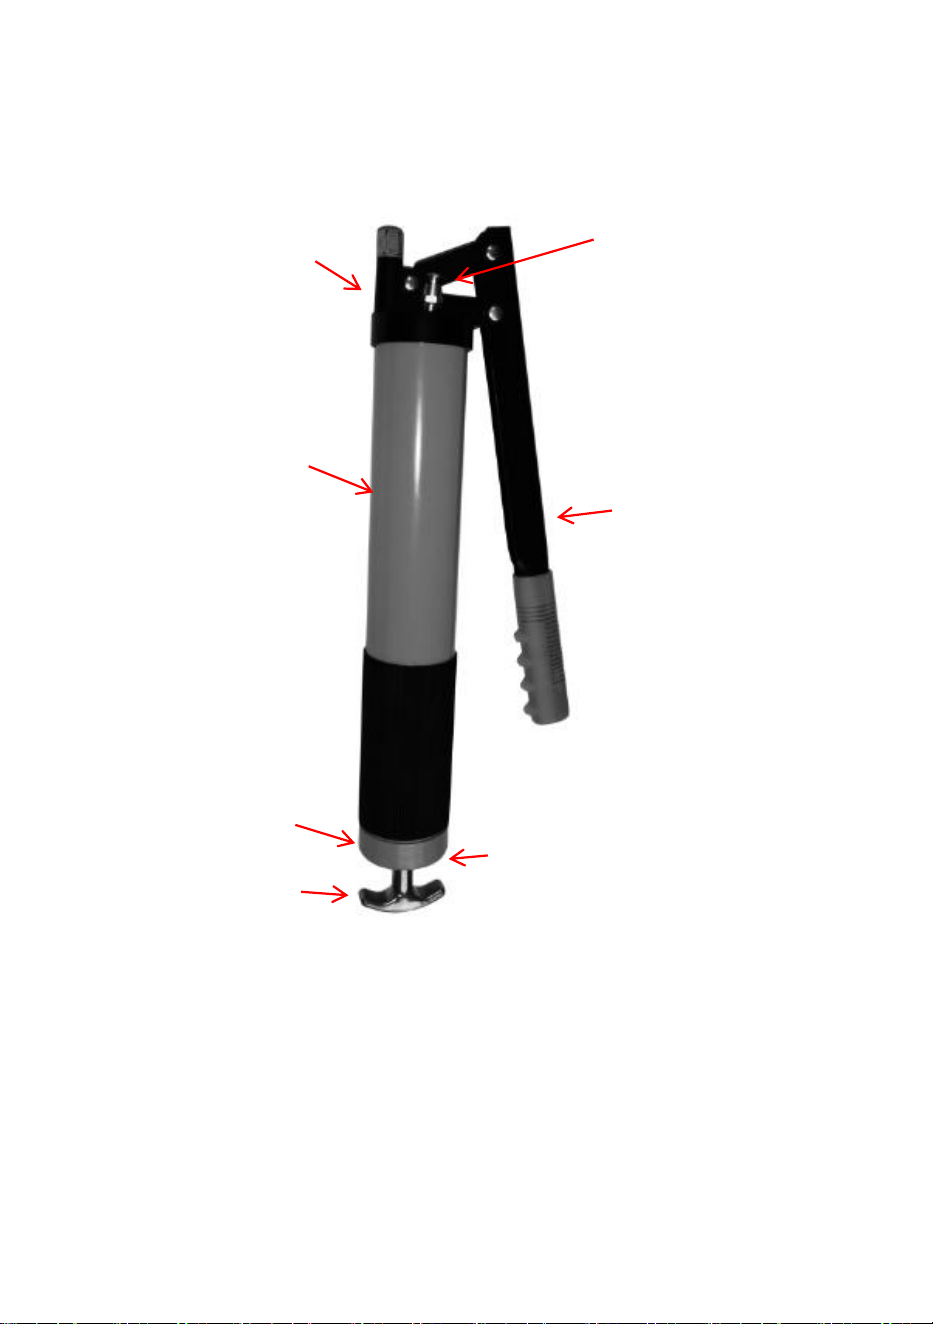
LD-2710
1. Head
2. Air Release Valve
3. Handle
4. Safety Catch
5. Plunger Rod Handle
6. End Cap
7. Barrel
1
2
3
7
6
4
5
- 7 -
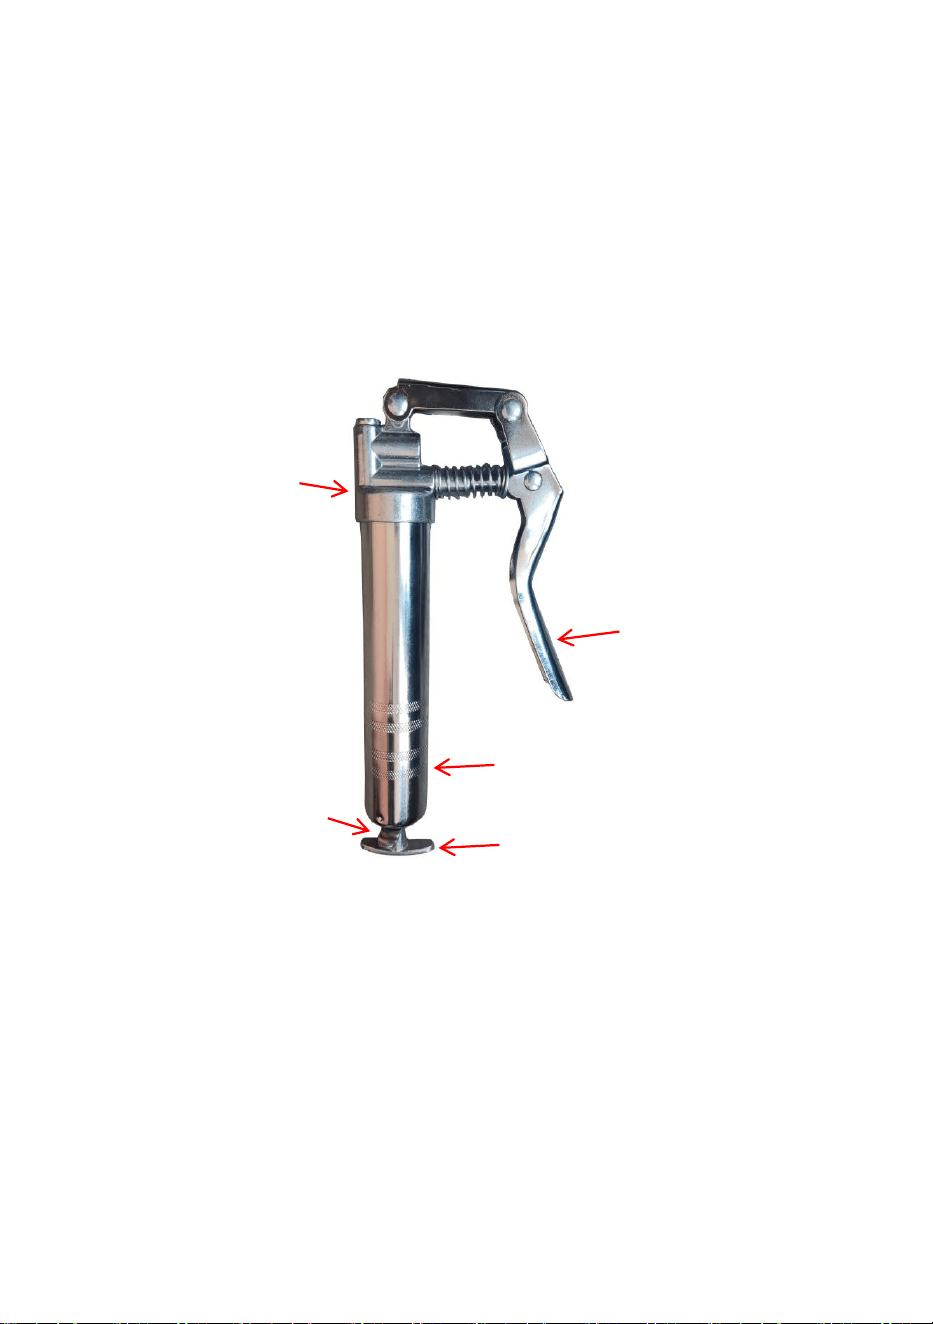
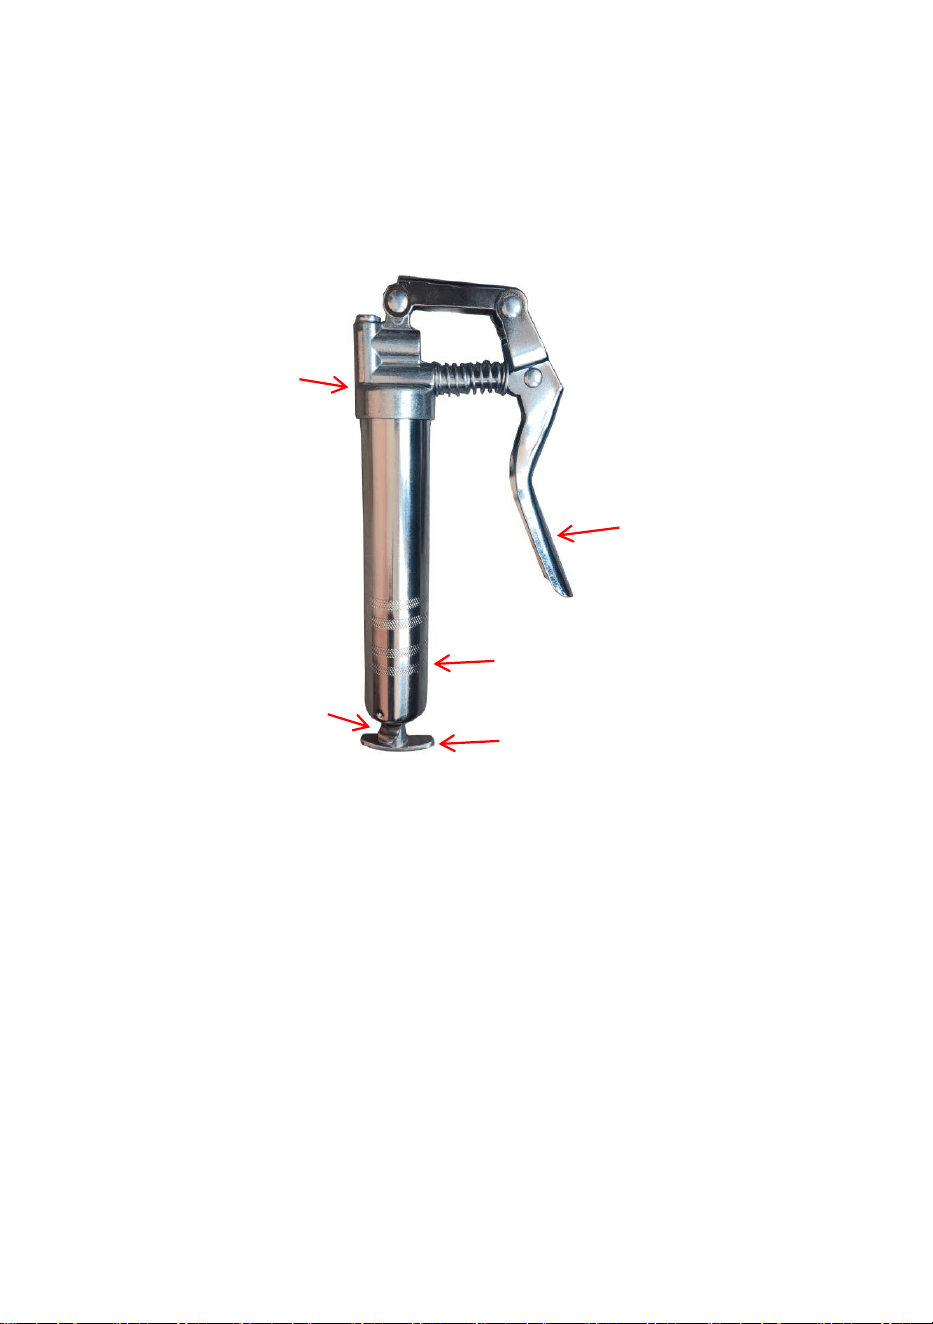
LD-868
1. Head
2. Handle
3. Barrel
4. Plunger Rod Handle
5. Safety Catch
1
2
3
4
5
- 8 -
COMPONENTS
LD-867A
LD-867B
LD-2710
LD-868
Grease Gun
1
1
1
1
Grease Hose
1
1
1
1
Straight Metal
Pipe
1
/
1
2
Bent Metal Pipe
1
1
/
/
Coupler
2
1
2
2
Pointed Coupler
1
1
/
/
Locking Clamp
Coupler
1
/
/
/
Cleaning Cloth
1
/
/
/
Leakproof cap
1
1
/
/
Reinforced
Nozzle
/
/
/
1
Grease
Cartridge
/
/
/
1
User Manual
1
1
1
1
Mode
l
Parts
- 9 -
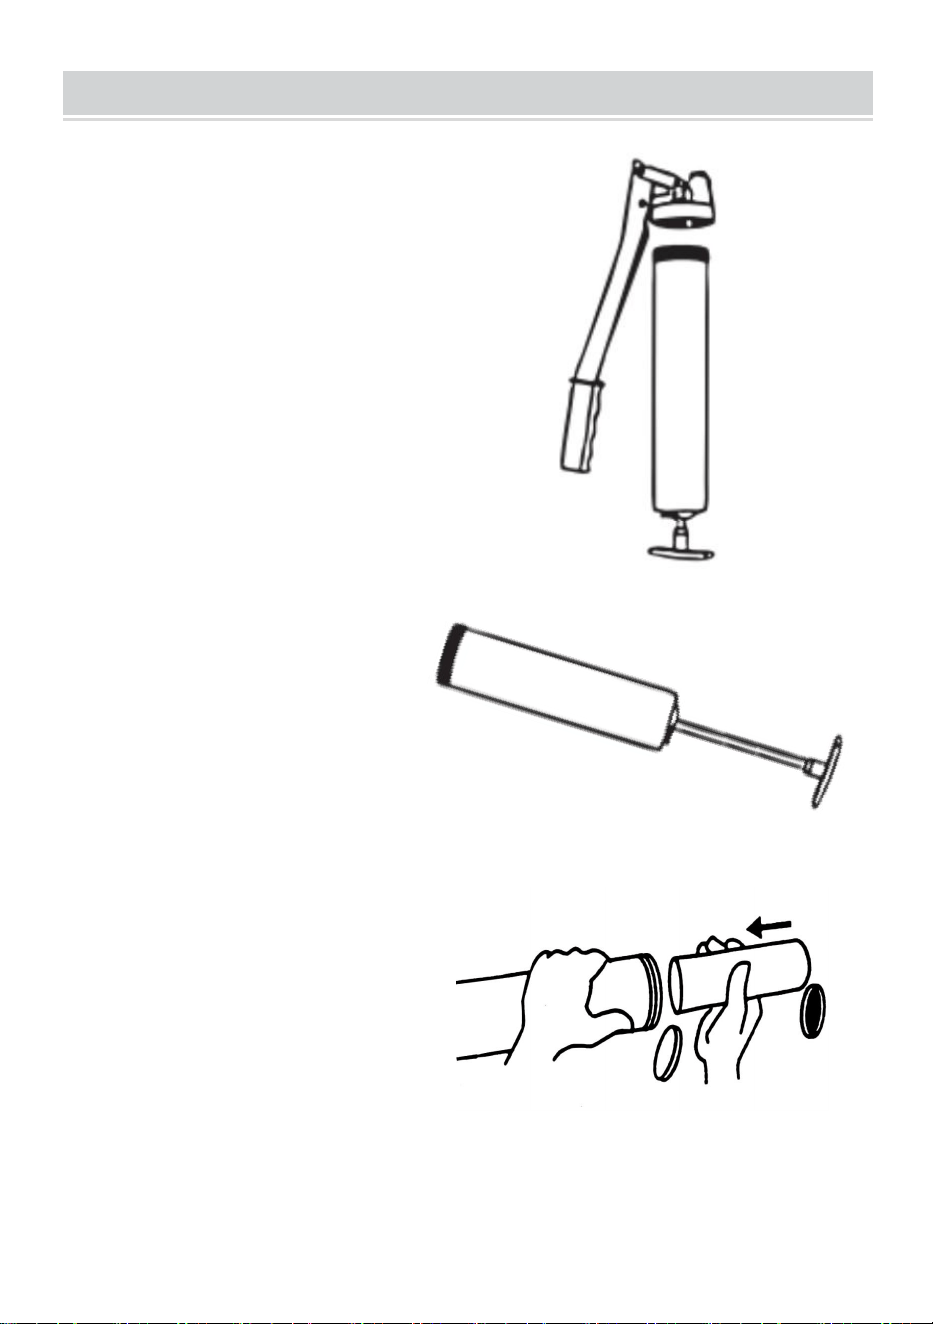
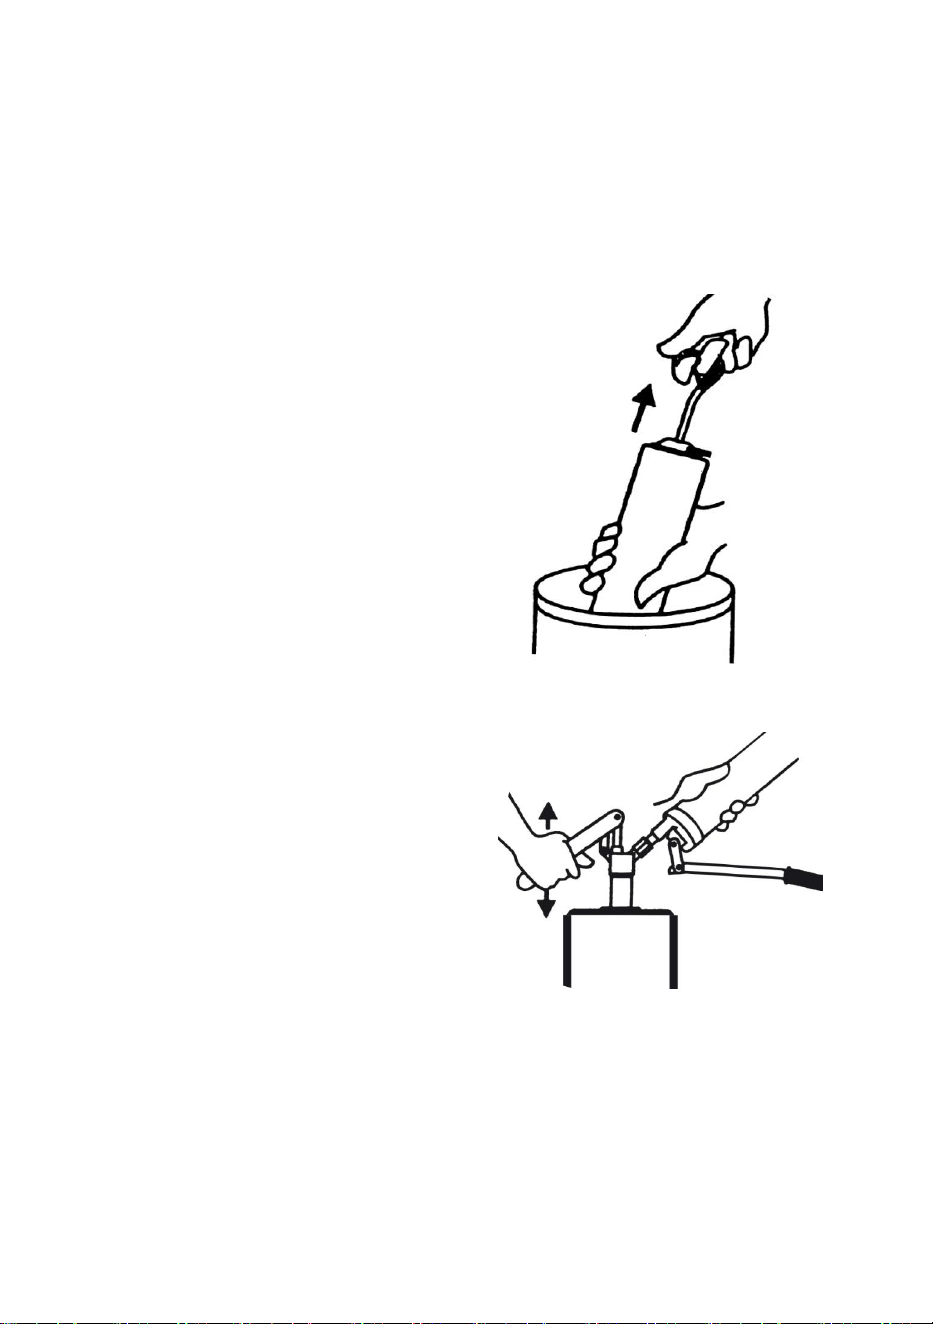
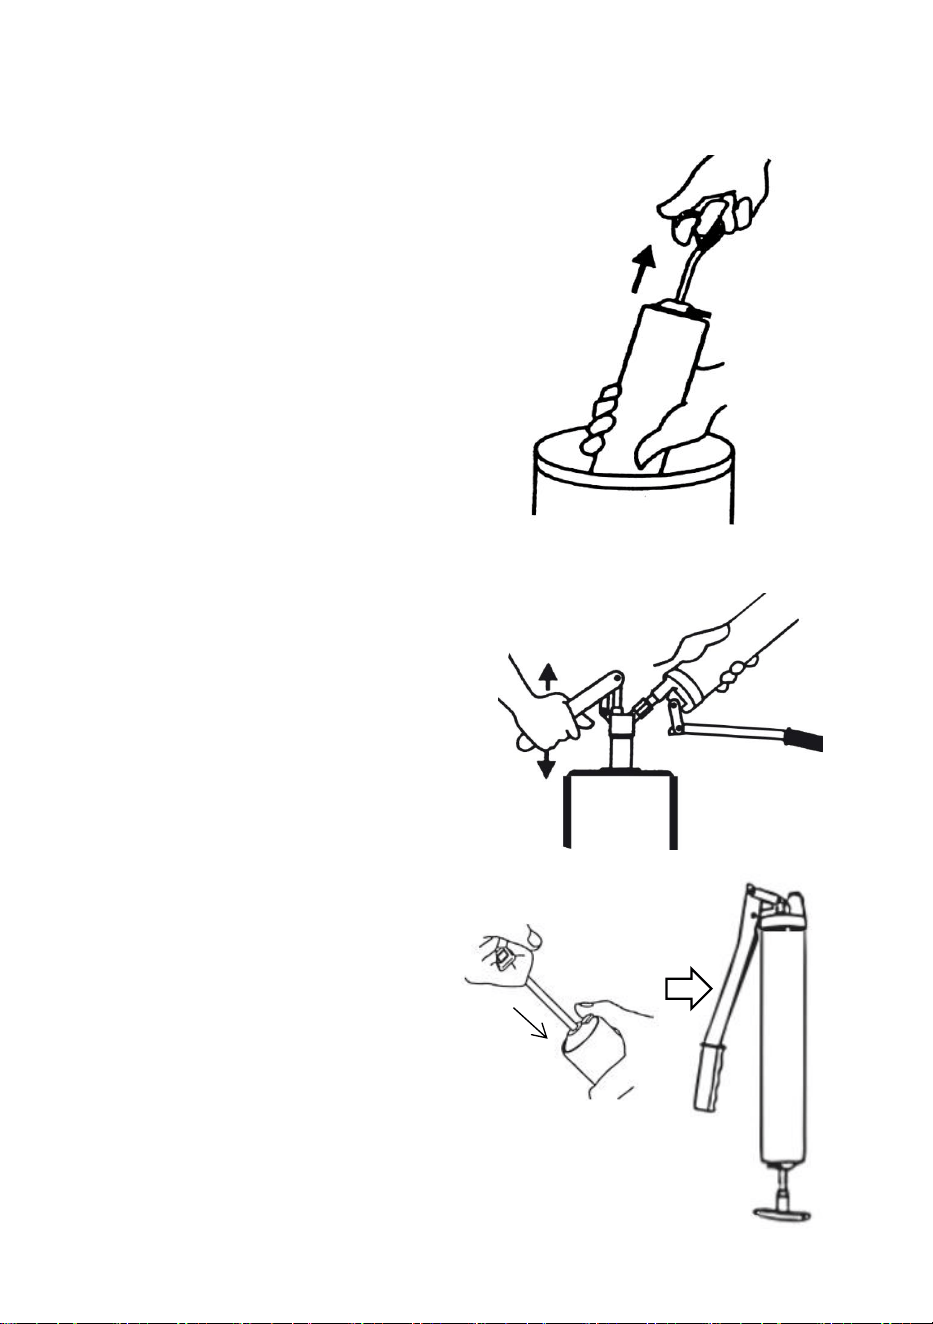
OPERATING INSTRUCTIONS
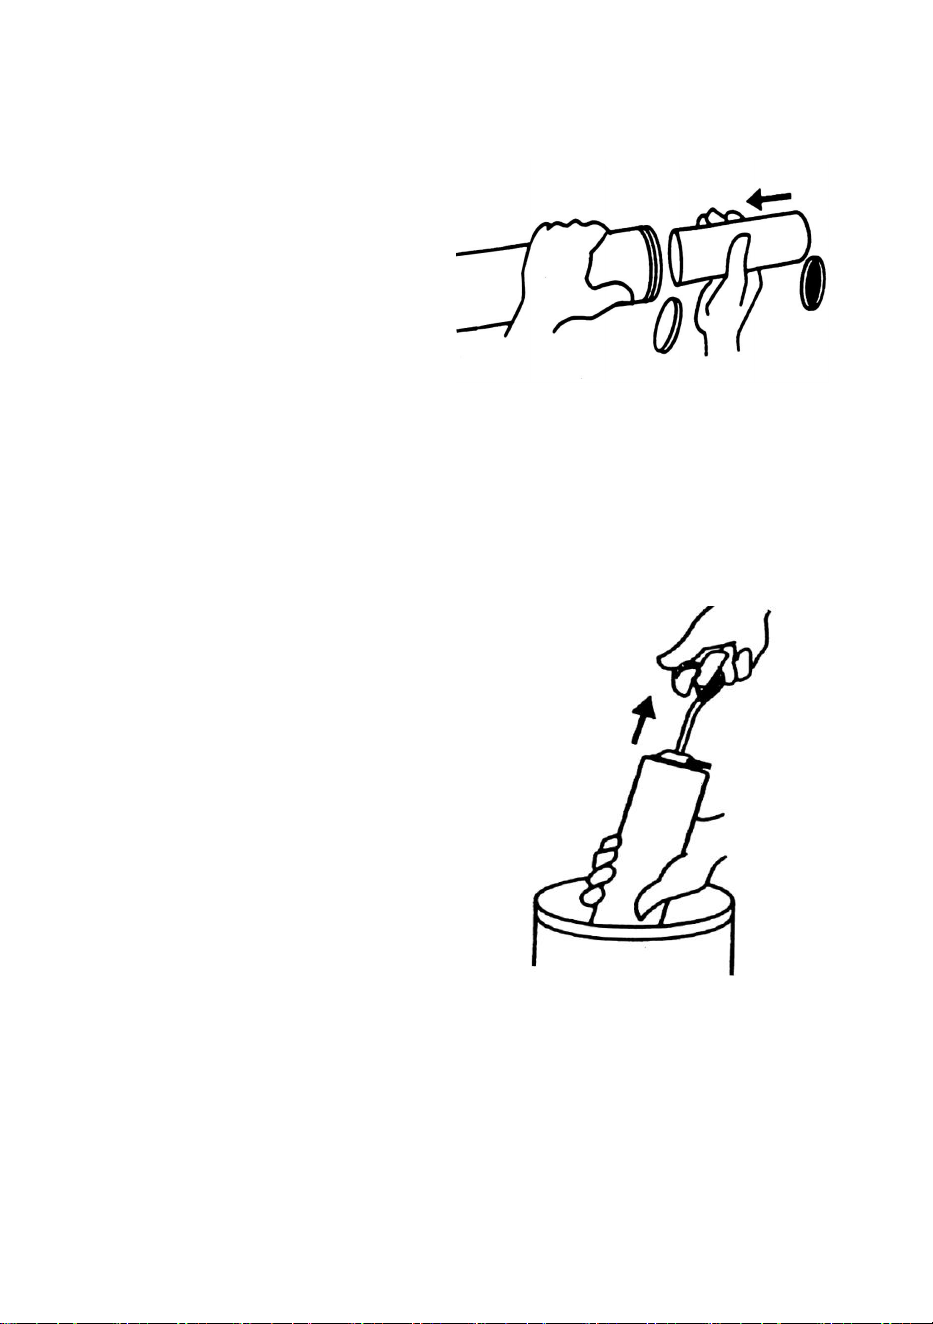
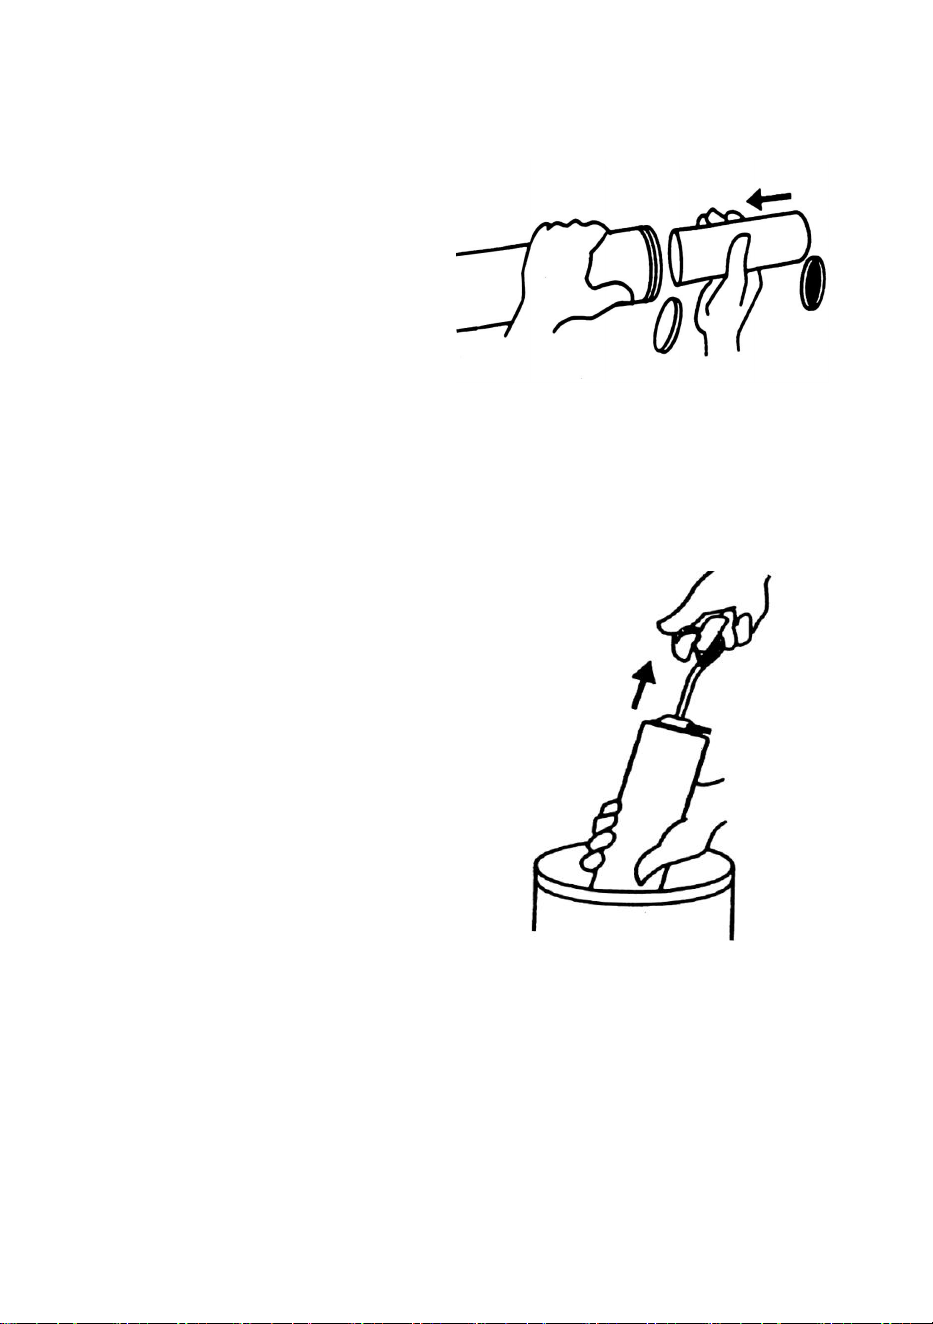
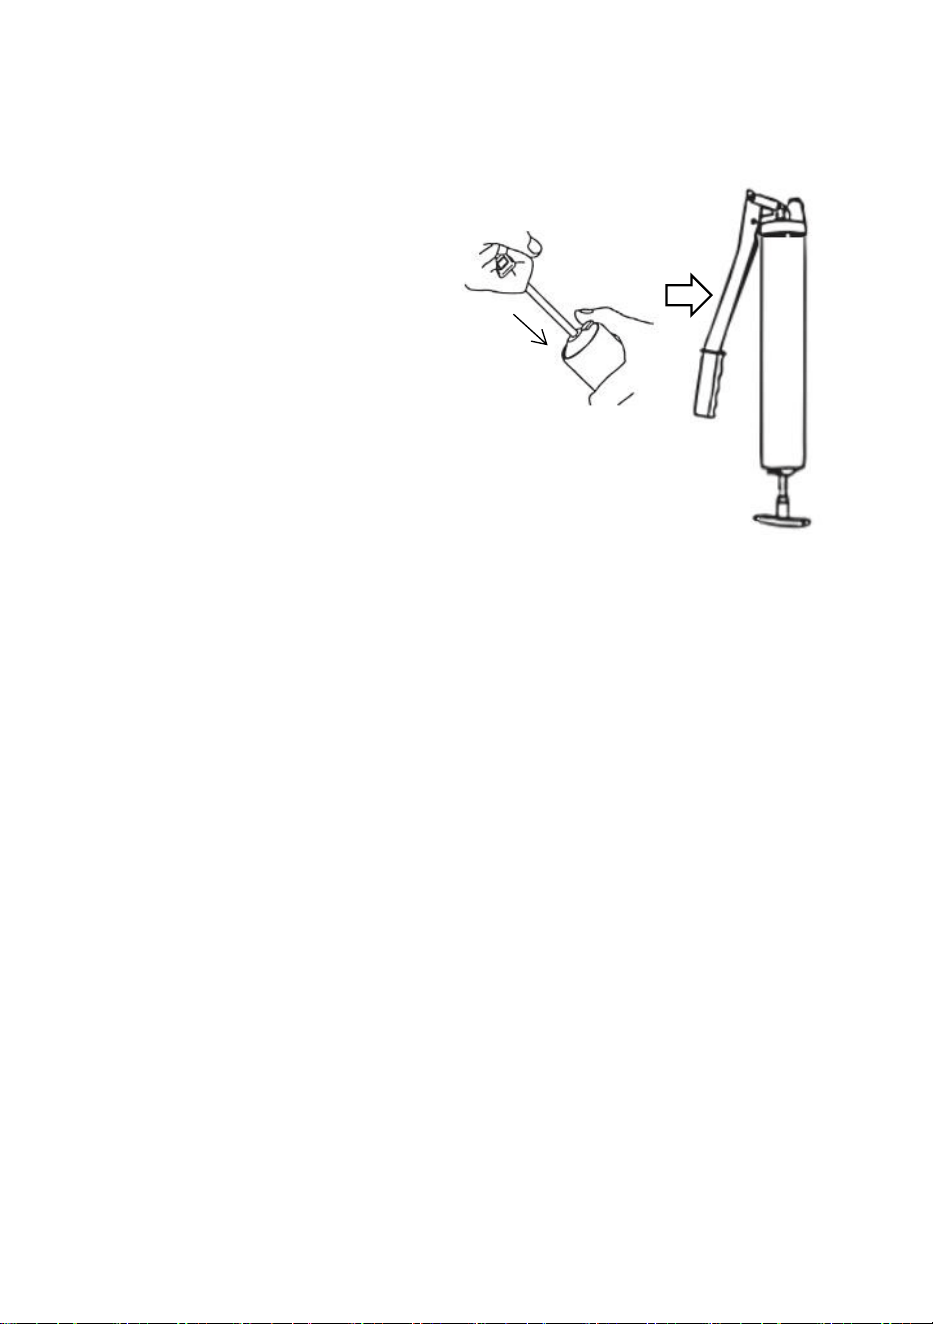
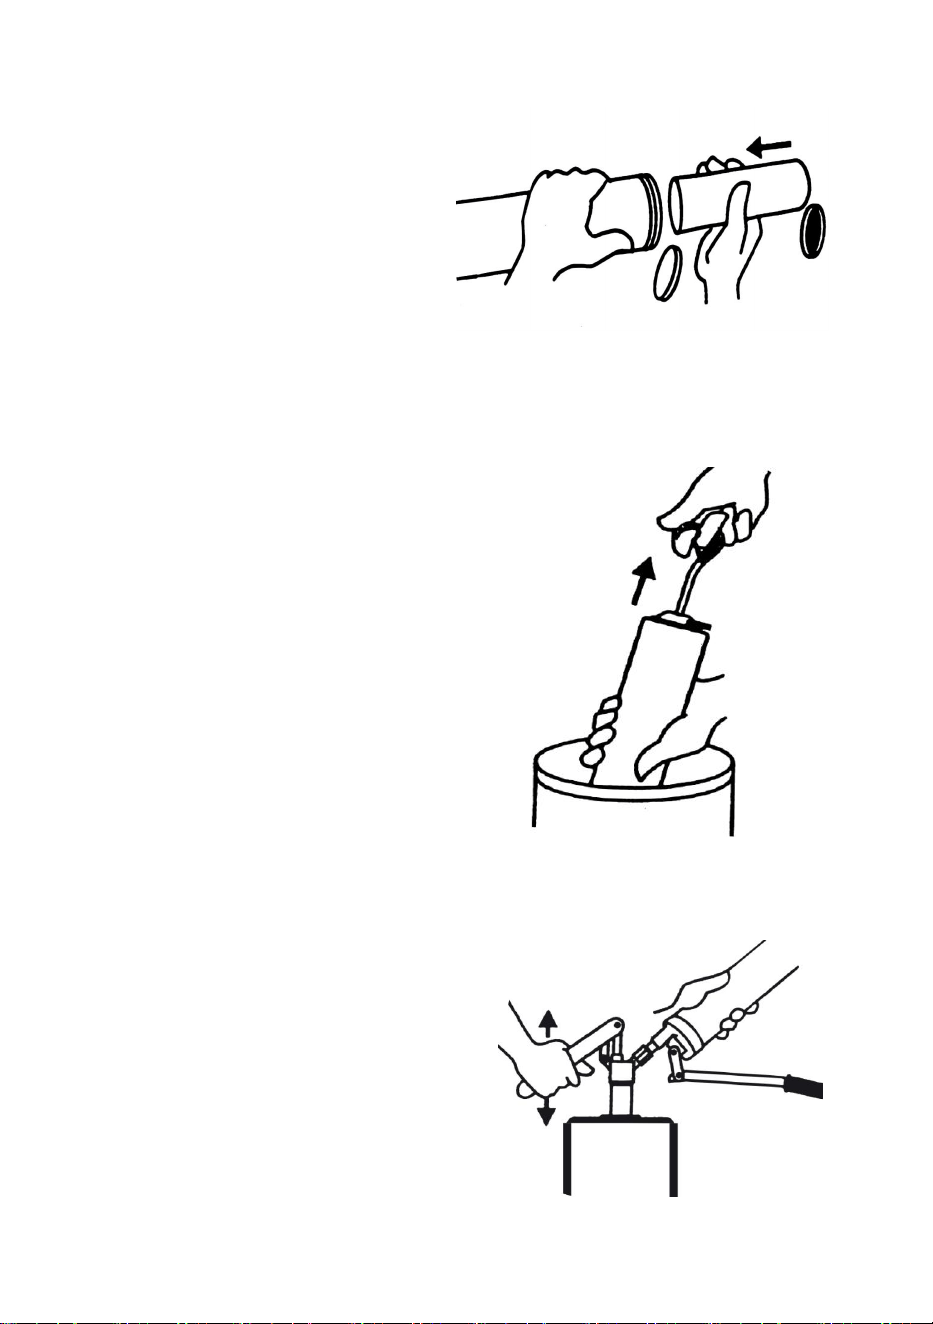
Step1: Hold the head of the
grease gun and unscrew the
barrel.
Take LD-2710 as an example.
Step2: Pull back the plunger
rod handle and fill the barrel
with grease.
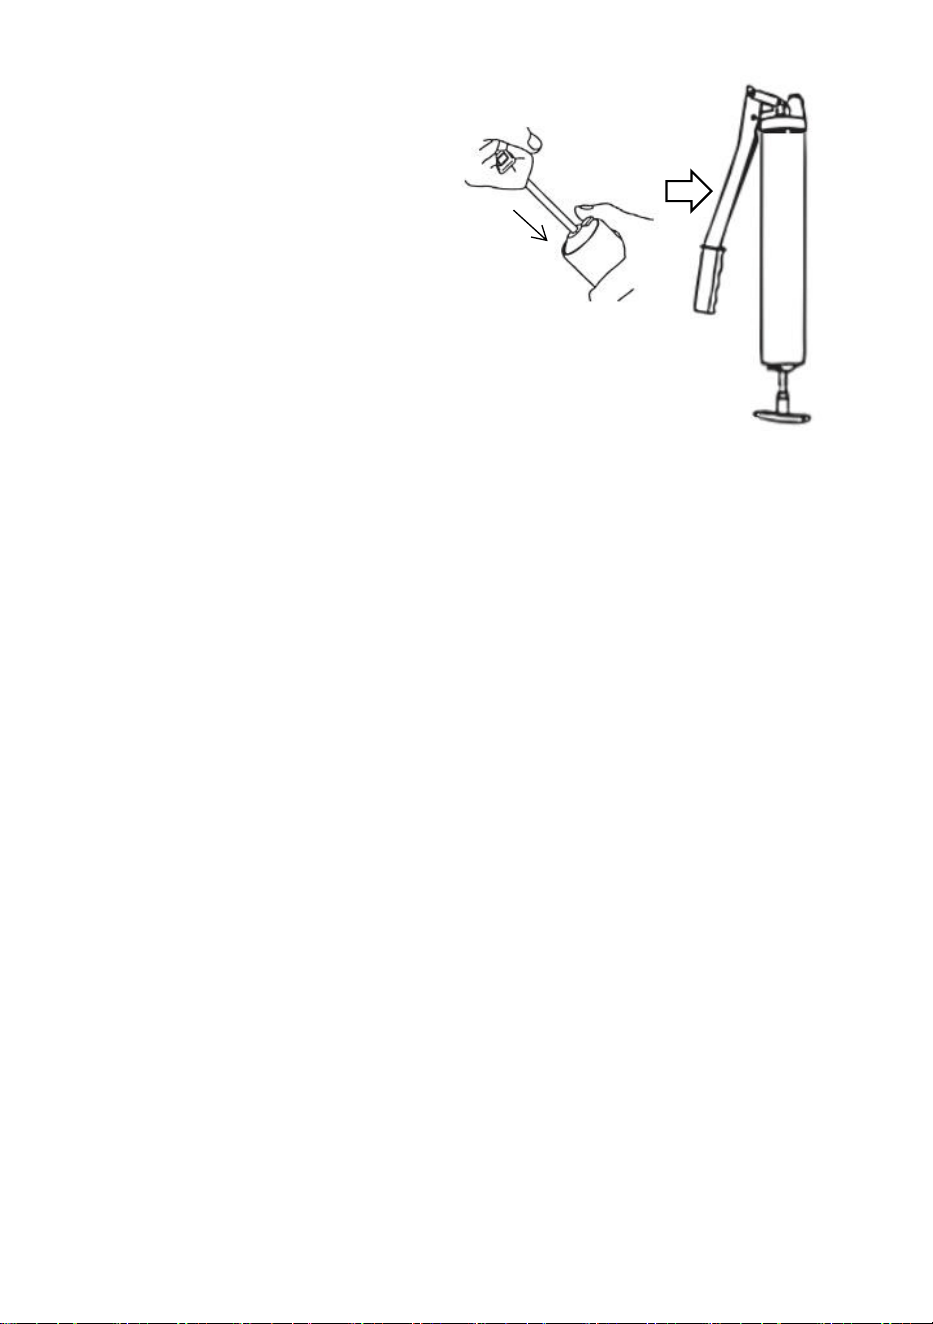
Grease filling options:
Cartridge Loading: Remove
the plastic cap from the
cartridge
and insert the open end of the
cartridge into the grease gun
barrel until the rim of the
pull-tab end meets the rim of
the barrel.
- 10 -
Suction Fill: Insert the open end of
the barrel about 2” into the grease
container.Slowly pull the plunger
rod handle to draw in grease into
the empty barrel while pushing the
barrel deeper into the grease until
the plunger rod is completely
extended.The outside surface
may have a lot of grease stuck to
it and should be wiped clean for
safety.
Grease Gun Filling Device: Place
the grease gun onto the filling
valve of the grease gun filling unit,
and hold it in place with light
counter pressure.
Fill the grease gun by activating
the filling device.
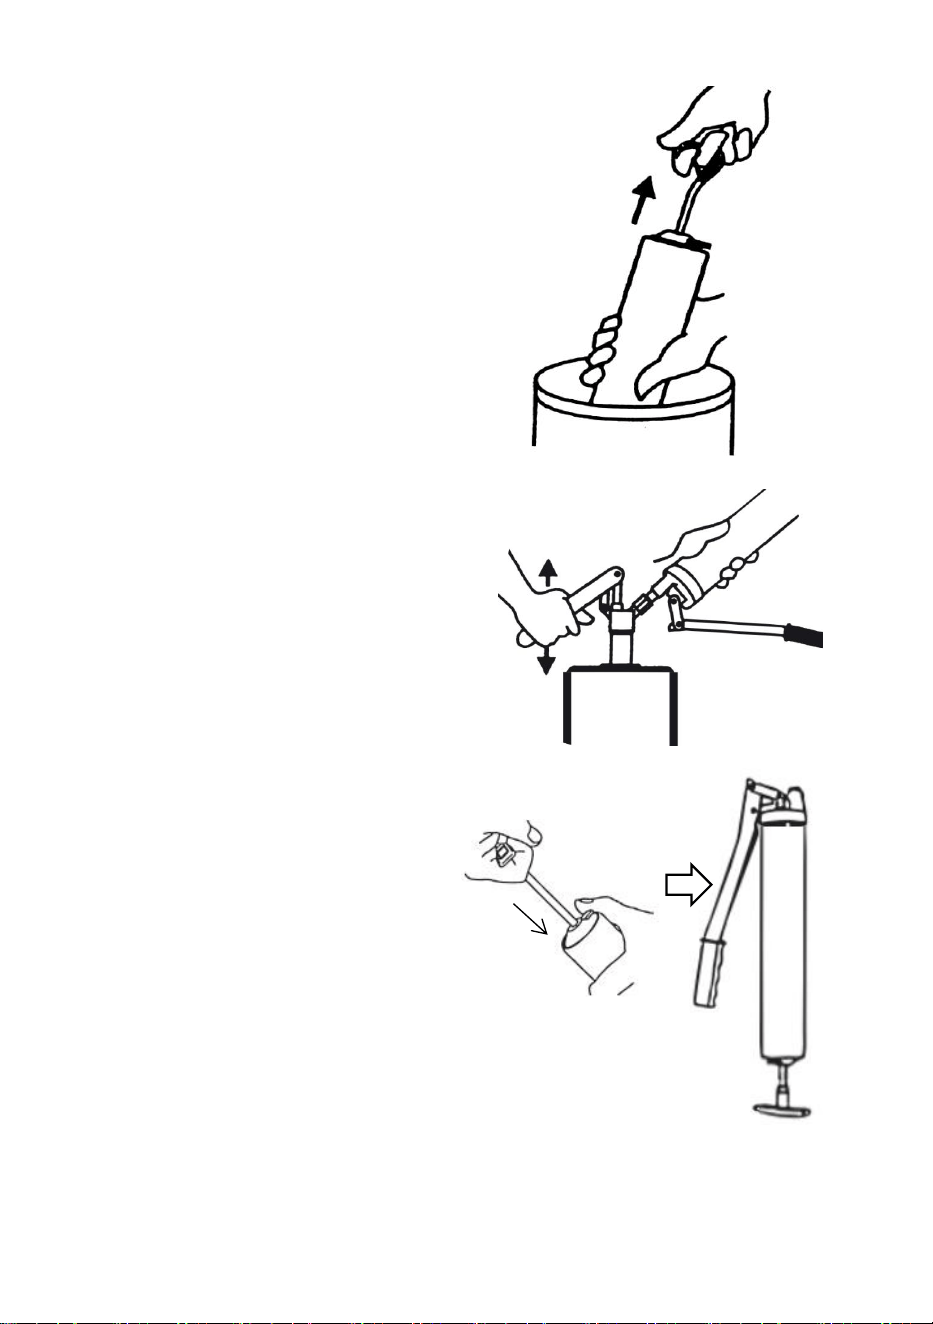
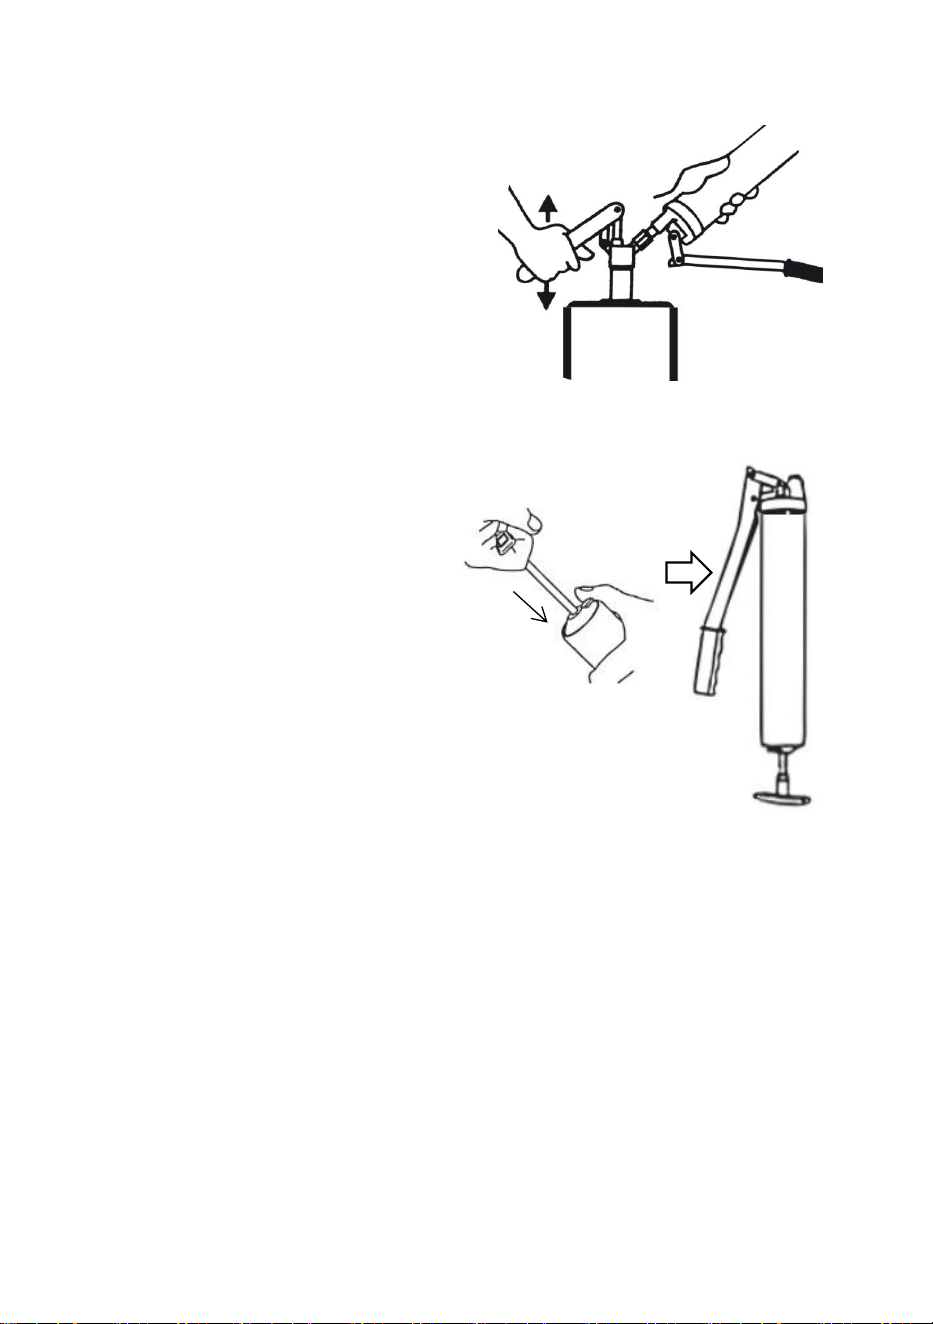
Step3: Assemble the barrel back
into the grease gun.Activate the
safety catch and push the push
rod back into the Barrel.
- 11 -
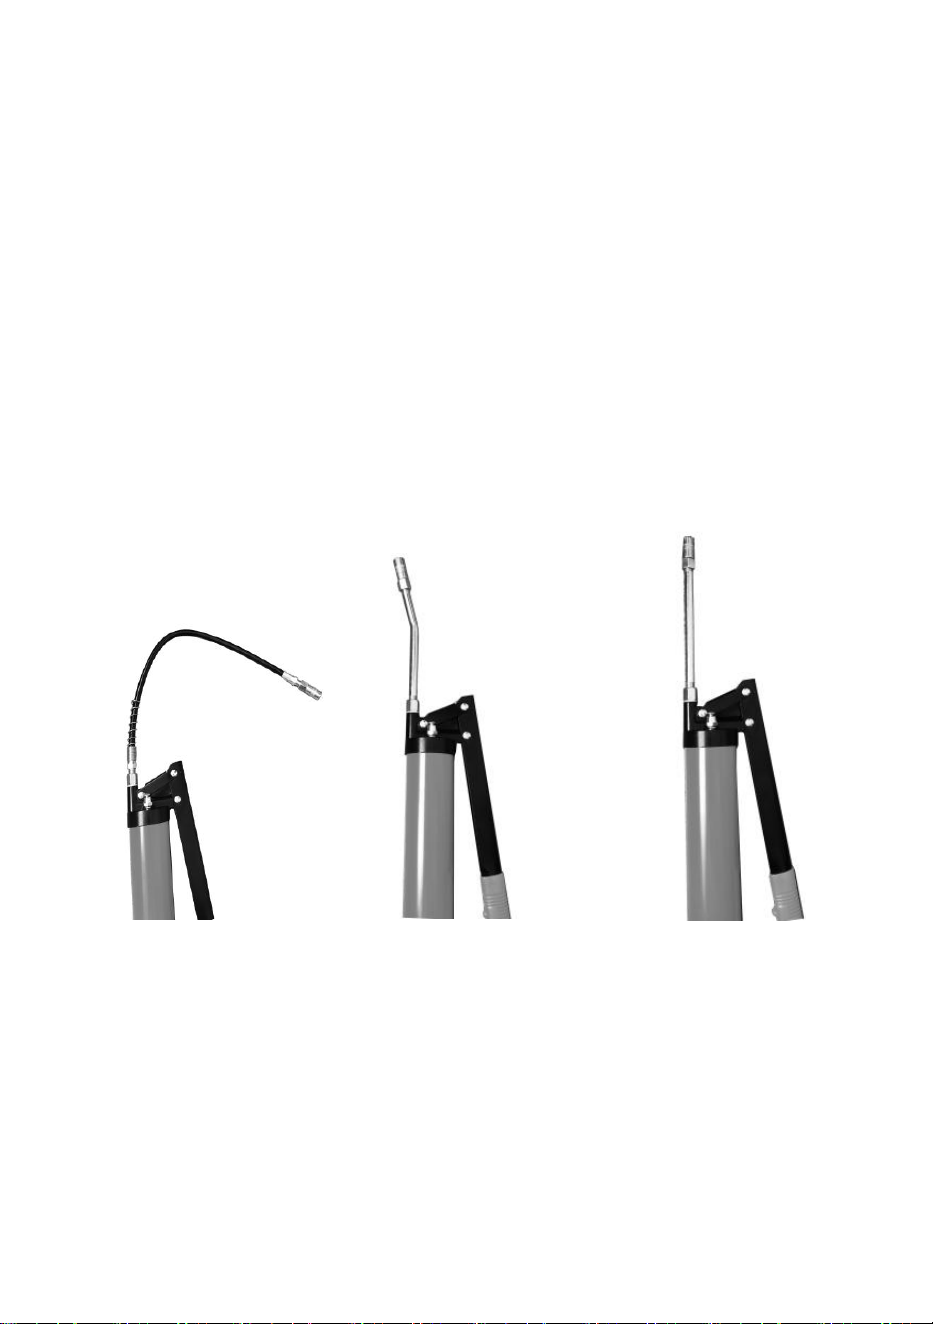
Step4: Exhaust air by pressing the air release valve or loosening the gun
head and barrel (half a turn maximum) or by repeatedly actuating the
handle.
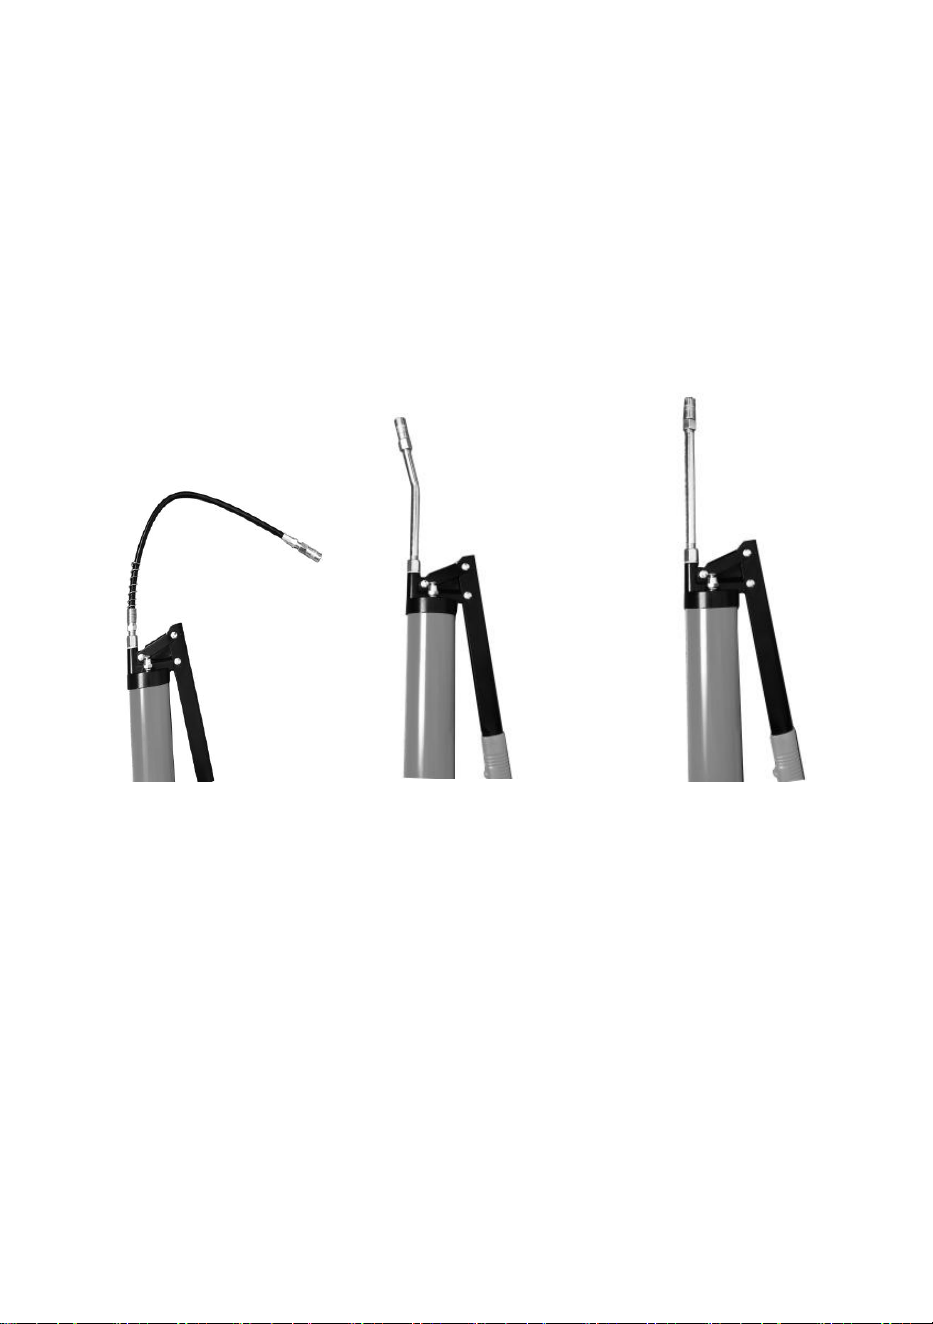
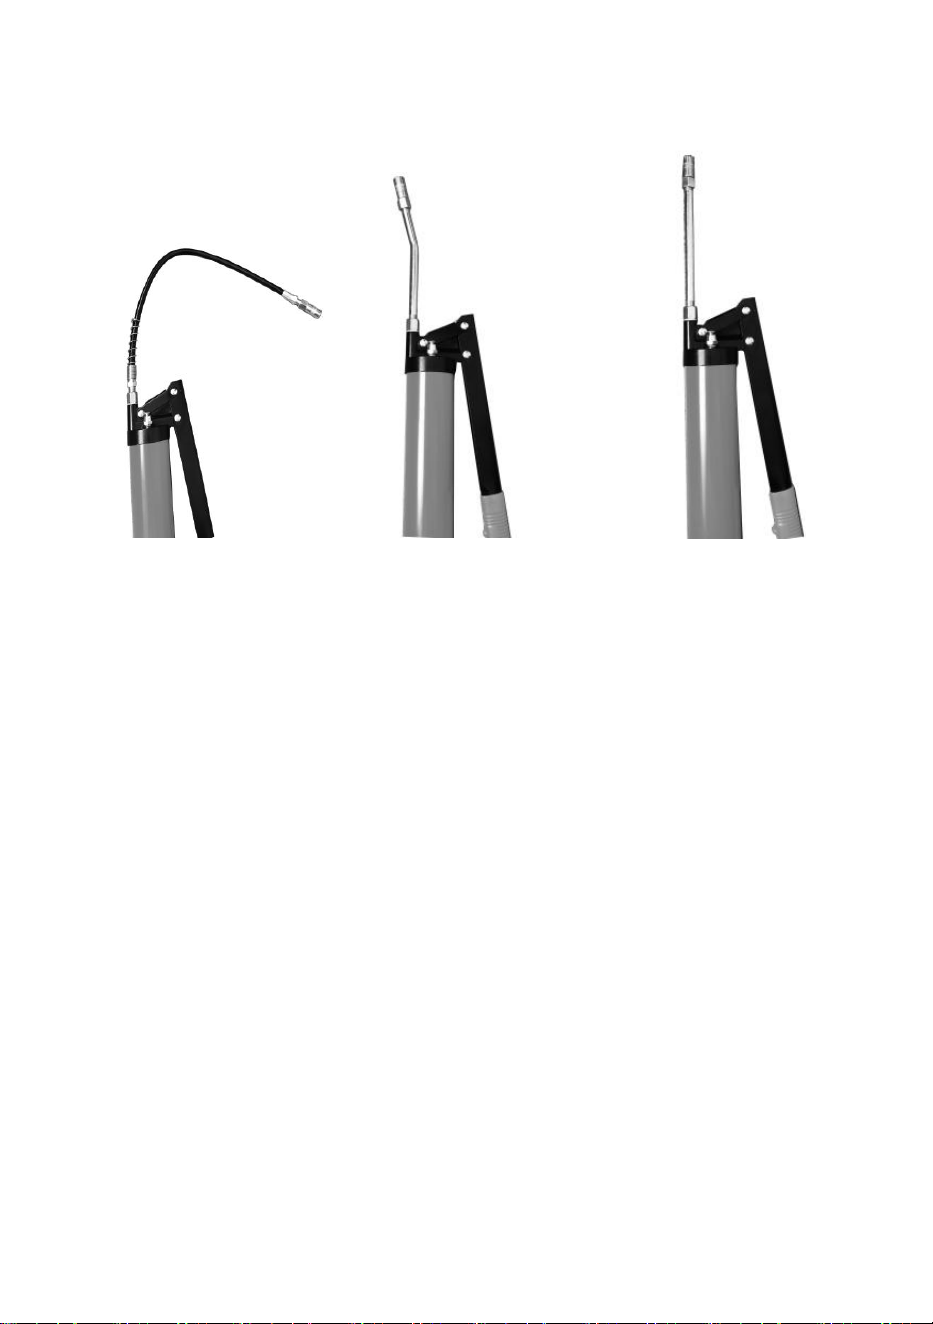
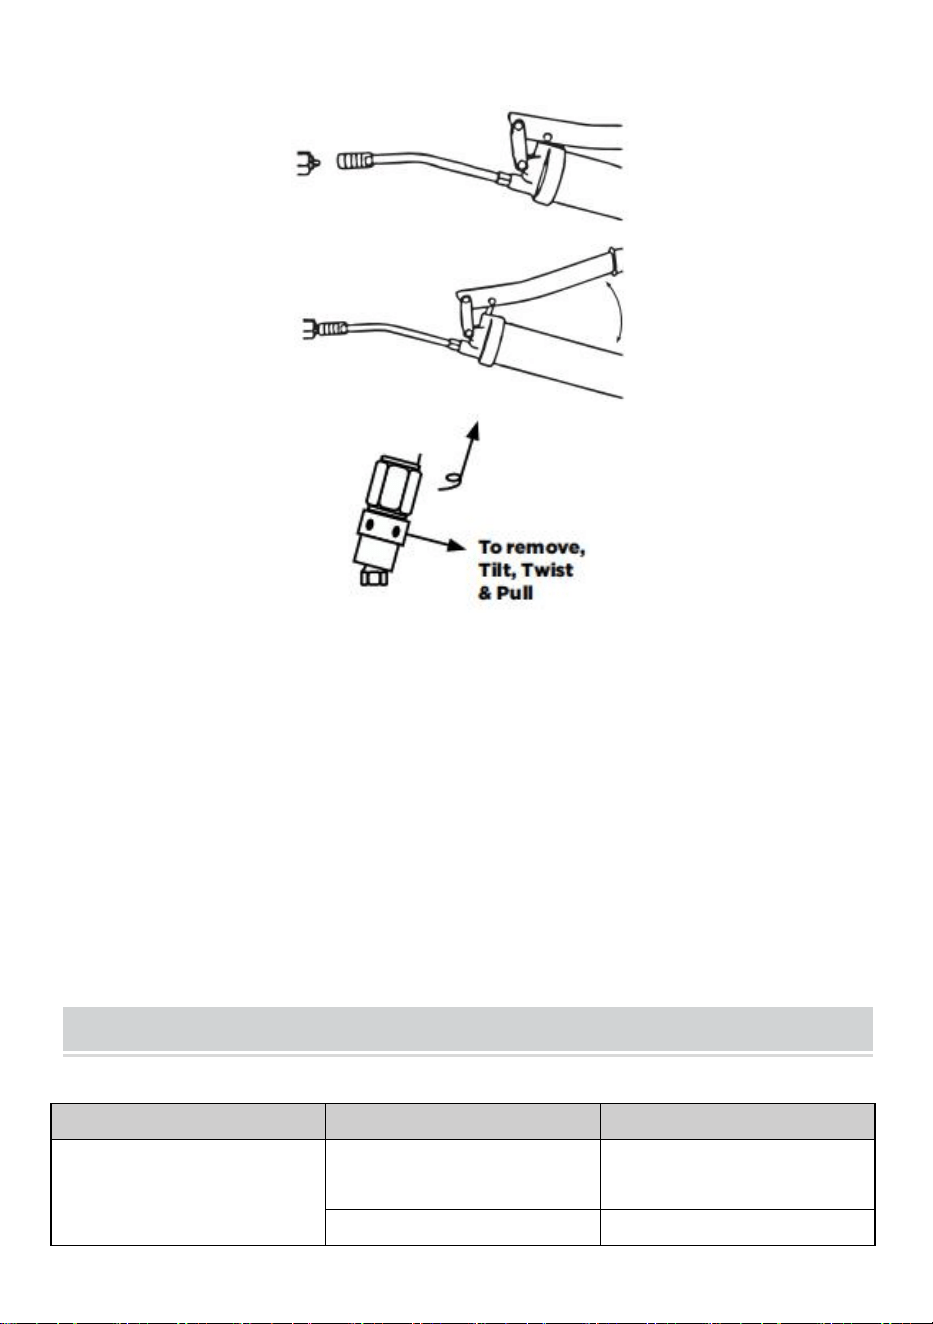
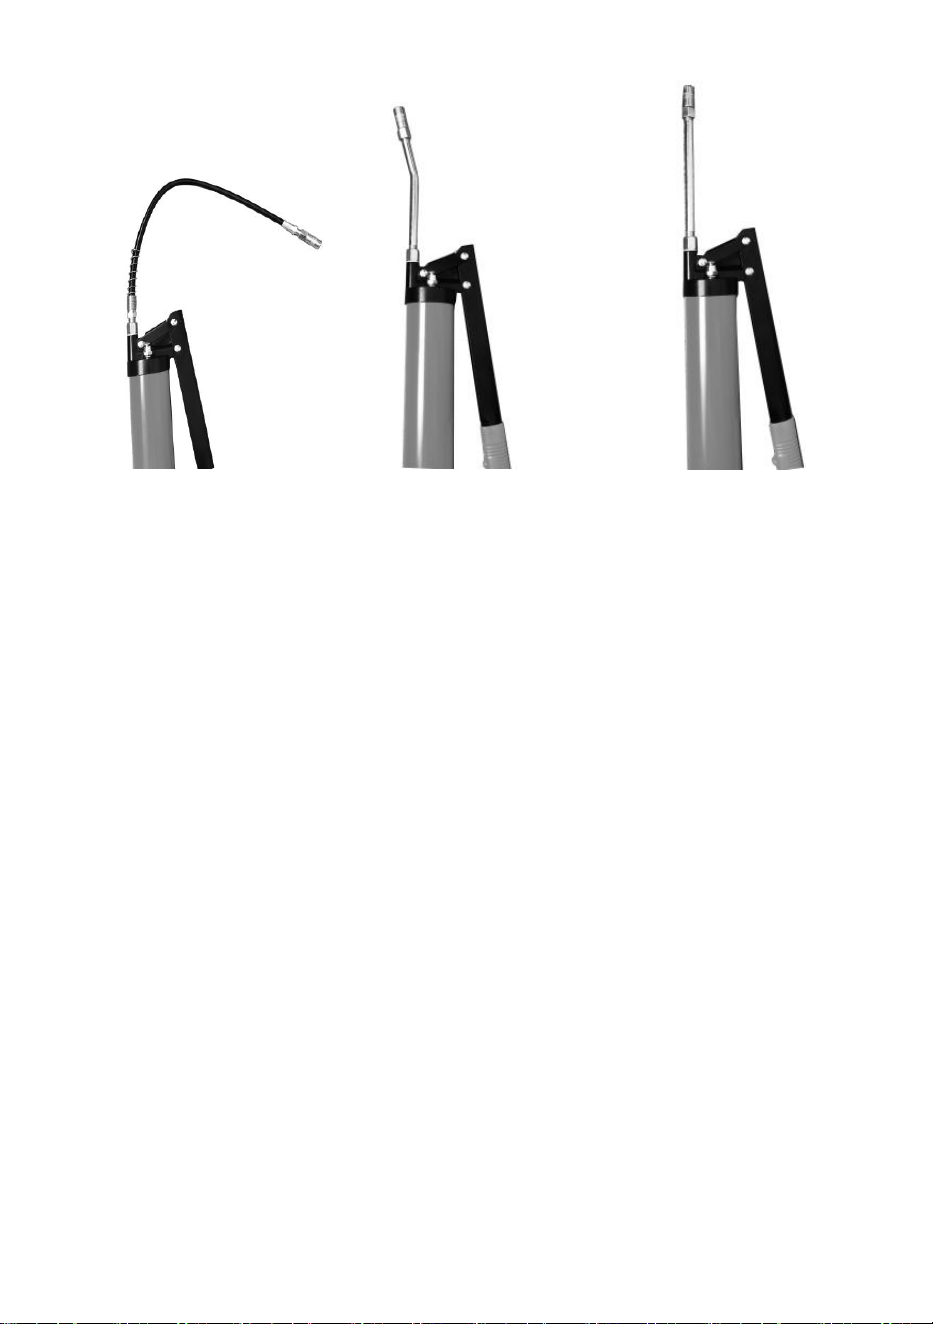
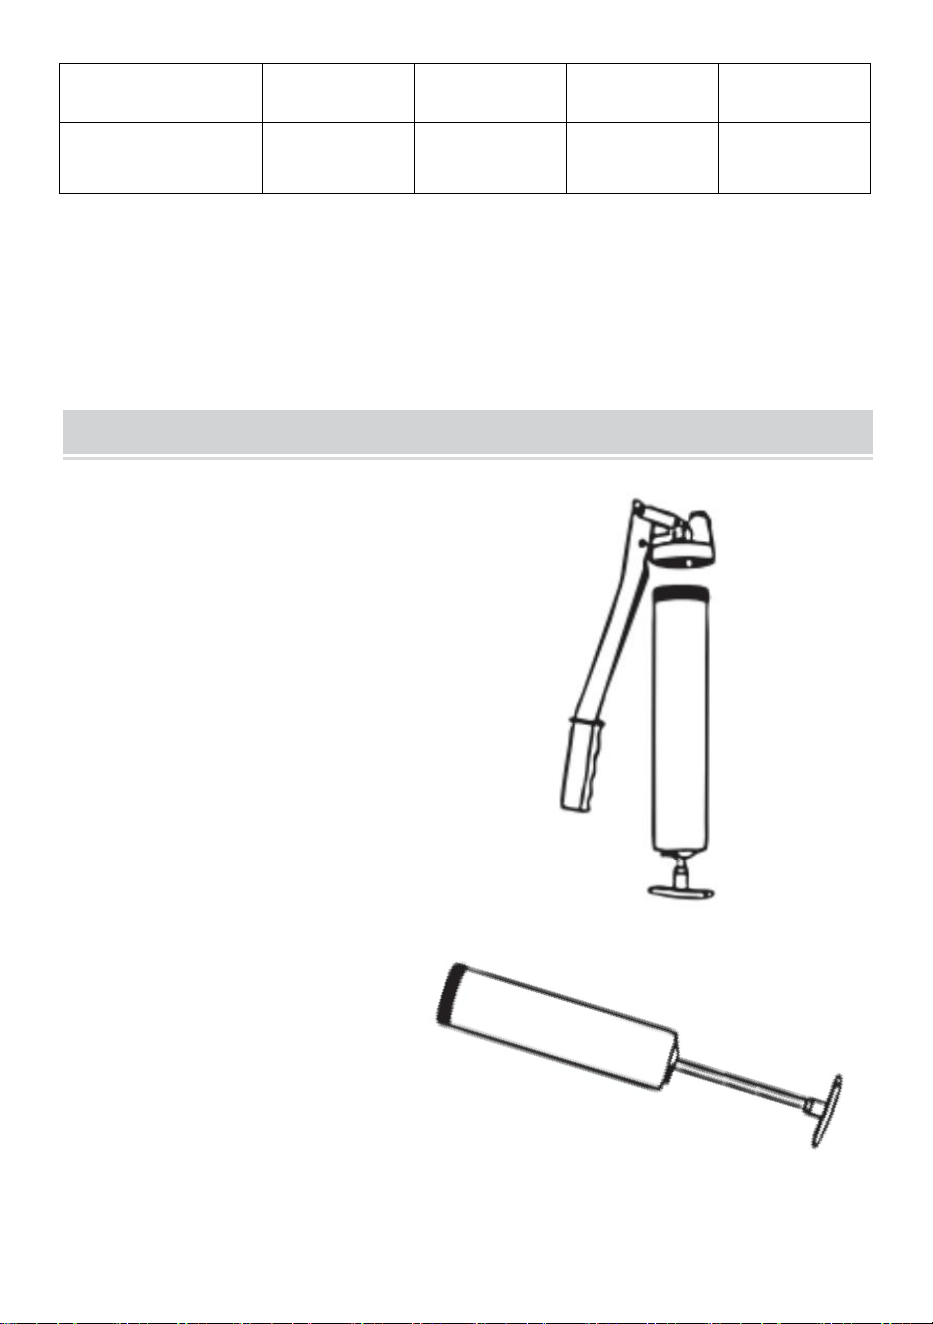
Step5: Install the required fittings as required as shown below.(Fig 1,Fig 2,
Fig 3)
Note: If necessary, wrap 3~5 loops of raw material tape around the joint.
Fig 1. Fig 2. Fig 3.
- 12 -
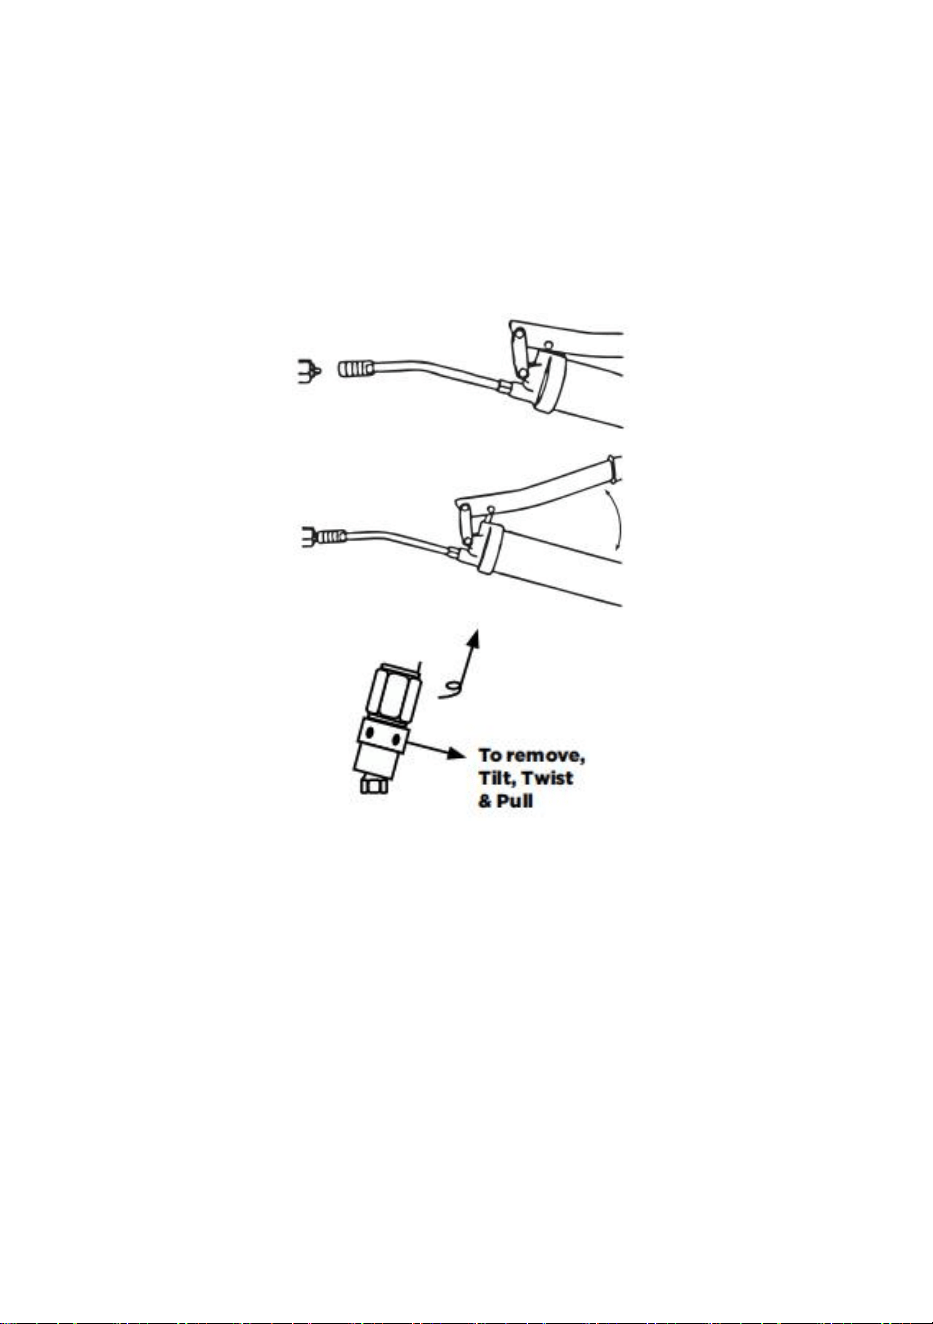
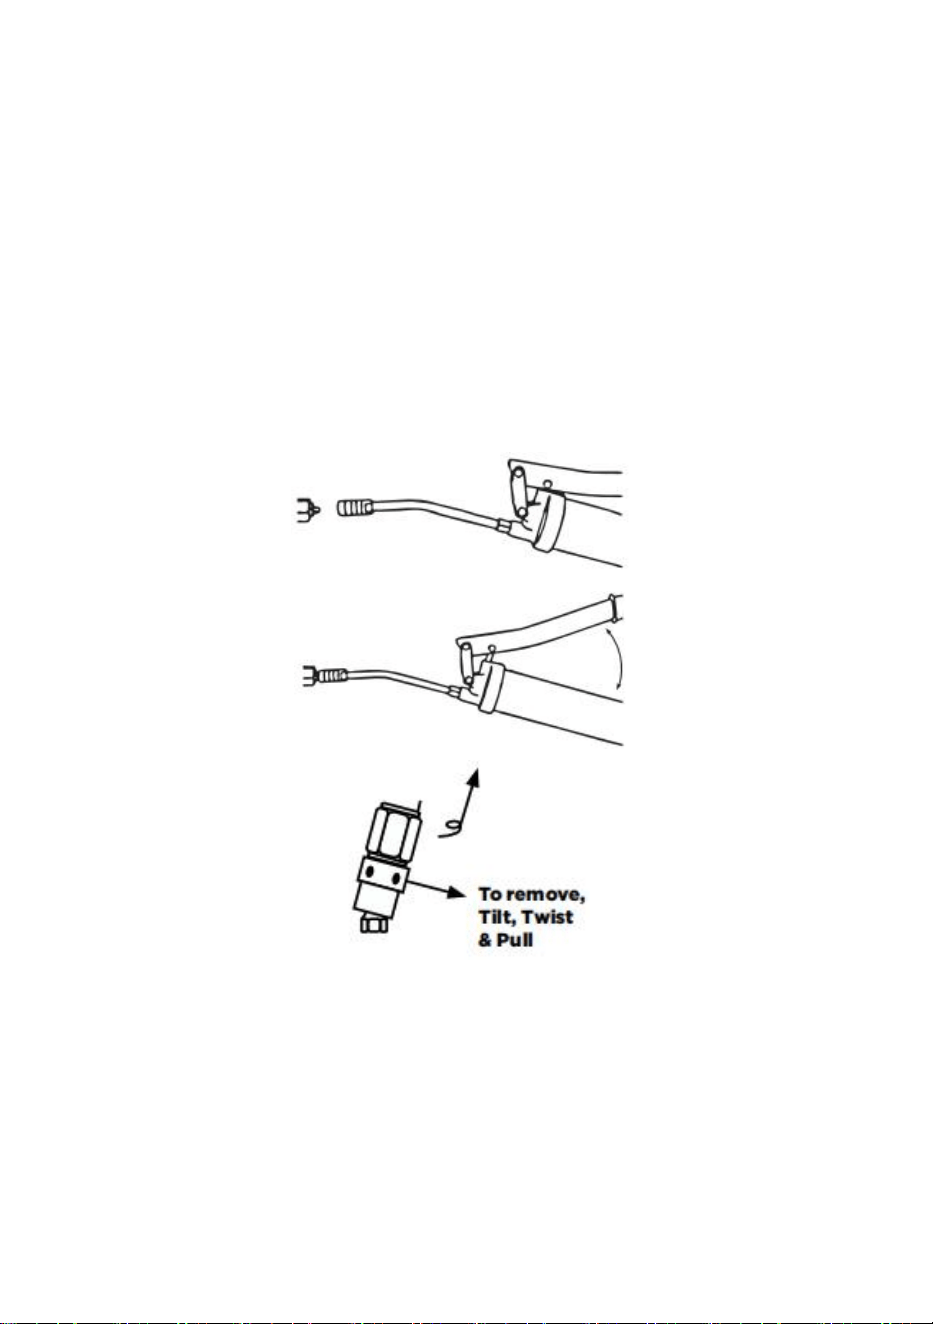
Step6: Press the coupler straight onto the grease fitting,Start operating the
handle for grease filling.
Once greasing is done, slightly tilt the coupler, twist and pull back. The tilt
and twist action will allow easy removal of the coupler from the grease
fitting.
Above are the LD-2710 operations.The operations of the LD-868,
LD-867A,LD-867B are the same as that of LD-2710.

- 13 -
TROUBLESHOOTING
Problem
Possible Cause
Possible Solution
Grease gun pumps little
or no grease
Air is trapped in grease
Empty air
Blocked hose
Clean or replace the
hose
Grease too thick or cold
Store grease gun and
grease away from
extreme cold or use
thinner grease
Excessive grease leaks
out from the back side of
the grease gun around
the plunger rod
Rubber follower is
damaged
Replace the grease gun
Grease leaks from the
connection between the
grease gun head & the
extension or between
extension & coupler
Loose connection
Tighten the connection
using raw material tape

- 14 -
MAINTENANCE
Before each use, inspect general condition of Grease Gun. Check for
cracked or damaged parts, misaligned or bending of moving parts, leaking
connections, and any other condition that may affect product’s safe
operation. If a problem occurs, have the problem corrected before further
use.Do not use damaged equipment.
After every use, dry with a soft cloth, remove all grease and debris from
Grease Gun. Do not use solvents to clean or immerse in any liquids.
When storing, keep in a clean, dry and safe location away from children.
All maintenance, service, and repairs not discussed in manual should only
be performed by qualified service technician.
Sanven Technology Ltd.
Address: Suite 250, 9166 Anaheim Place,
Rancho Cucamonga, CA 91730


- 2 -
Assistance technique et certificat de garantie électronique
www.vevor.com/support
PISTOLET À GRAISSE
MANUEL D'UTILISATION
We continue to be committed to provide you tools with competitive price.
"Save Half", "Half Price" or any other similar expressions used by us only represents an
estimate of savings you might benefit from buying certain tools with us compared to the major
top brands and does not necessarily mean to cover all categories of tools offered by us. You
are kindly reminded to verify carefully when you are placing an order with us if you are
actually saving half in comparison with the top major brands.

- 1 -
MODÈLE : LD-8 68, LD-867A , LD-867 B, LD-2710
LD-8 68
LD-867A
LD-867 B
LD-2710
Have product questions? Need technical support? Please feel free to
contact us:
Technical Support and E-Warranty Certificate
www.vevor.com/support
NEED HELP? CONTACT US!
This is the original instruction, please read all manual instructions
carefully before operating. VEVOR reserves a clear interpretation of our
user manual. The appearance of the product shall be subject to the
product you received. Please forgive us that we won't inform you again if
there are any technology or software updates on our product.
Grease Gun

- 2 -
3. Lisez attentivement et comprenez toutes les INSTRUCTIONS
D'ASSEMBLAGE ET D'UTILISATION avant l'utilisation.
4. Le non-respect des règles de sécurité et des autres précautions de
sécurité de base peut entraîner des blessures corporelles graves.
GENERAL SAFETY RULES
AVERTISSEMENT : Lisez attentivement toutes les instructions. Le
non-respect de toutes les instructions ci-dessous peut entraîner des
blessures graves .
Différents dangers peuvent survenir si le pistolet à graisse à levier manuel
est manipulé de manière incorrecte lors de l'installation, de la mise en
service et du fonctionnement quotidien.
Risque de blessure et de dommages matériels en raison d'une
manipulation incorrecte.
Tenir le manuel à la disposition du personnel exploitant sur le lieu
d’utilisation de l’appareil.
Les mesures de sécurité et les réglementations de prévention des
accidents spécifiques à chaque pays doivent être respectées.
Seules les personnes qualifiées et autorisées sont autorisées à utiliser le
pistolet à graisse.
Les personnes sont qualifiées si elles sont, en raison de leur formation, de
leur expérience, de leur instruction et de leur connaissance des normes
pertinentes, capables d’évaluer les tâches assignées et d’identifier les
situations potentiellement dangereuses.
Toutes les personnes chargées des travaux d'installation, d'exploitation,
d'entretien et de réparation doivent avoir lu et compris ces instructions
d'utilisation.

- 3 -
Le pistolet à graisse est conçu exclusivement pour la distribution de
lubrifiants à base de graisse.
Toute utilisation au-delà de ces paramètres peut entraîner des risques
graves et est considérée comme une utilisation contraire à l’usage prévu.
L'exploitant est responsable des dommages résultant d'une utilisation
autre que celle prévue.
ATTENTION : Une pression excessive peut entraîner l'éclatement de la
tête du pistolet à graisse et des accessoires !
Une pression excessive au point de graissage peut endommager le
graisseur et même la machine.
Respecter les instructions d'entretien et de maintenance du fabricant de la
machine
Des accessoires défectueux peuvent entraîner des blessures corporelles
et des dommages matériels.
Les tuyaux de graisse ne doivent pas être pliés, tordus ou étirés.
Pendant leur période d'utilisation, les accessoires doivent être vérifiés
pour détecter l'usure, les fissures et autres dommages.
Les accessoires défectueux doivent être remplacés immédiatement.
N'ouvrez pas le pistolet à graisse lorsqu'il est sous pression !
Chaque fois que la tête et le corps du pistolet à graisse doivent être
séparés, la tige de poussée doit être entièrement rétractée et verrouillée
automatiquement au moyen du loquet de sécurité .
Une pression excessive peut entraîner l'éclatement de la tête du pistolet à
graisse et
Équipement.
Lors de l'utilisation du pistolet à graisse, utilisez un équipement approprié
tel qu'un équipement de protection.

- 4 -
gants et protection des yeux
CONSERVEZ CES INSTRUCTIONS.
MODEL AND PARAMETERS
Modèle
LD-867A
LD-867B
LD-2710
LD-8 68
Capacité
400CC
400CC
600CC
120CC
Pression
maximale
6000 PSI
6000 PSI
10000PSI
3500 PSI
Raccord de
décharge du
pistolet à
NPT 1/8
NPT 1/8
NPT 1/8
NPT 1/8
Options de
remplissage
de graisse
Chargement
de la
cartouche
Chargement
de la
cartouche
Chargement
de la
cartouche
Chargement
de la
cartouche
Remplissage
par aspiration
Remplissage
par aspiration
Remplissage
par aspiration
/
Dispositif de
remplissage
et de
Dispositif de
remplissage
et de
/
/

- 6 -
11. Poignée mobile
12. Poignée fixe
13. Baril
14. Cran de sécurité
15. Poignée de tige de piston
16. Embout
LD-2710
1
2
3
7
6
4
5

- 7 -
7. Tête
8. Soupape de décharge d'air
9. Poignée
10.Cran de sécurité
11.Poignée de tige de piston
12.Embout
7. Baril
LD-8 68
5. Tête
6. Poignée
7. Baril
1
2
3
4
5

- 8 -
8. Poignée de tige de piston
5. Cran de sécurité
COMPONENTS
LD-867A
LD-867B
LD-2710
LD-8 68
Pistolet à
graisse
1
1
1
1
Tuyau de graisse
1
1
1
1
Tube métallique
droit
1
/
1
2
Tube métallique
courbé
1
1
/
/
Coupleur
2
1
2
2
Coupleur
pointu
1
1
/
/
Coupleur de
serrage de
verrouillage
1
/
/
/
Chiffon de
nettoyage
1
/
/
/
Étanche
capuchon
1
1
/
/
Mode
l
Parts
- 9 -
OPERATING INSTRUCTIONS
Étape 1 : Tenez la tête du
pistolet à graisse et dévissez le
canon.
Prenons l’exemple du
LD-2710.
Étape 2 : Tirez la poignée de la
tige du piston vers l’arrière et
remplissez le canon de
graisse.
Buse renforcée
/
/
/
1
Cartouche de
graisse
/
/
/
1
Manuel d'
utilisation
1
1
1
1
- 10 -
Options de remplissage de
graisse :
Chargement de la cartouche :
retirez le capuchon en
plastique de la cartouche
et insérez l'extrémité ouverte
de la cartouche dans le canon
du pistolet à graisse jusqu'à ce
que le bord de l'extrémité de la
languette de traction rencontre
le bord du canon.
Remplissage par aspiration :
insérez l'extrémité ouverte du
barillet d'environ 2 pouces dans le
récipient à graisse. Tirez
lentement sur la poignée de la tige
du piston pour aspirer la graisse
dans le barillet vide tout en
poussant le barillet plus
profondément dans la graisse
jusqu'à ce que la tige du piston
soit complètement étendue. La
surface extérieure peut avoir
beaucoup de graisse collée et doit
être nettoyée pour des raisons de
sécurité.
- 11 -
Dispositif de remplissage du
pistolet à graisse : placez le
pistolet à graisse sur la valve de
remplissage de l'unité de
remplissage du pistolet à graisse
et maintenez-le en place avec une
légère contre-pression.
Remplissez le pistolet à graisse
en activant le dispositif de
remplissage.
Étape 3 : Remontez le canon
dans le pistolet à graisse. Activez
le
relâchez le cran de sécurité et
repoussez la tige de poussée
dans le canon.
Étape 4 : Évacuez l'air en appuyant sur la soupape de décharge d'air ou
en desserrant le pistolet
tête et canon (demi-tour maximum) ou en actionnant plusieurs fois la
poignée.
Étape 5 : Installez les raccords requis comme indiqué ci-dessous. (Fig 1,
Fig 2, Fig 3)
Remarque : si nécessaire, enroulez 3 à 5 boucles de ruban de matière
- 12 -
première autour du joint.
Fig 1. Fig 2. Fig 3.
Étape 6 : Appuyez le coupleur directement sur le graisseur, commencez à
actionner la poignée pour le remplissage de graisse.
Une fois le graissage terminé, inclinez légèrement le coupleur, tournez-le
et tirez-le vers l'arrière. L'action d'inclinaison et de rotation permettra de
retirer facilement le coupleur du graisseur.

- 13 -
Ci-dessus se trouvent les LD-2710 Fonctionnement s.Le fonctionnement
du LD-868, LD-867A, LD - 867B est le même que celui du LD -2710 .
TROUBLESHOOTING
Problème
Cause possible
Solution possible
Pompe à graisse avec
peu ou pas de graisse
De l'air est emprisonné
dans la graisse
Air vide
Tuyau bouché
Nettoyer ou remplacer le
tuyau

- 14 -
Graisse trop épaisse ou
froide
Conservez le pistolet à
graisse et la graisse à
l'abri du froid extrême ou
utilisez une graisse plus
fine.
Une quantité excessive
de graisse s'échappe de
l'arrière du pistolet à
graisse autour de la tige
du piston
Le suiveur en
caoutchouc est
endommagé
Remplacer le pistolet à
graisse
Fuites de graisse au
niveau de la connexion
entre la tête du pistolet à
graisse et la rallonge ou
entre la rallonge et le
coupleur
Connexion lâche
Serrez la connexion à
l'aide de ruban adhésif
de matière première
MAINTENANCE
Avant chaque utilisation, inspectez l'état général du pistolet graisseur.

- 15 -
Vérifiez qu'il n'y a pas de pièces fissurées ou endommagées, de pièces
mobiles mal alignées ou pliées, de raccords qui fuient et de toute autre
condition pouvant affecter le fonctionnement sûr du produit. Si un
problème survient, faites-le corriger avant toute nouvelle utilisation.
N'utilisez pas d'équipement endommagé.
Après chaque utilisation, séchez avec un chiffon doux, retirez toute la
graisse et les débris de
Pistolet à graisse. N'utilisez pas de solvants pour nettoyer et ne plongez
pas dans des liquides.
Lors du stockage, conserver dans un endroit propre, sec et sûr, hors de
portée des enfants.
Tous les travaux d'entretien, de réparation et de maintenance non décrits
dans le manuel doivent être effectués uniquement par un technicien de
maintenance qualifié.
Sanven Technologie Ltée.
Adresse : Suite 250, 9166 Anaheim Place,
Rancho Cucamonga, Californie 91730


- 2 -
Technischer Support und E-Garantie-Zertifikat www.vevor.com/support
FETTPRESSE
BEDIENUNGSANLEITUNG
We continue to be committed to provide you tools with competitive price.
"Save Half", "Half Price" or any other similar expressions used by us only represents an
estimate of savings you might benefit from buying certain tools with us compared to the major
top brands and does not necessarily mean to cover all categories of tools offered by us. You
are kindly reminded to verify carefully when you are placing an order with us if you are
actually saving half in comparison with the top major brands.
- 1 -
MODELL: LD-8 68, LD-867A , LD-867 B, LD-2710
LD-8 68
LD-867A
LD-867 B
LD-2710
Have product questions? Need technical support? Please feel free to
contact us:
Technical Support and E-Warranty Certificate
www.vevor.com/support
NEED HELP? CONTACT US!
This is the original instruction, please read all manual instructions
carefully before operating. VEVOR reserves a clear interpretation of our
user manual. The appearance of the product shall be subject to the
product you received. Please forgive us that we won't inform you again if
there are any technology or software updates on our product.
Grease Gun

- 2 -
5. Lesen Sie alle MONTAGE- UND BEDIENUNGSANLEITUNGEN vor
der Inbetriebnahme sorgfältig durch und stellen Sie sicher, dass Sie sie
verstanden haben .
6. Die Nichtbeachtung der Sicherheitsregeln und anderer grundlegender
Sicherheitsvorkehrungen kann zu schweren Verletzungen führen.
GENERAL SAFETY RULES
ACHTUNG : Lesen und verstehen Sie alle Anweisungen. Die
Nichtbeachtung der unten aufgeführten Anweisungen kann zu schweren
Verletzungen führen .
Bei unsachgemäßer Handhabung der Handhebelfettpresse können bei
der Installation, Inbetriebnahme und im täglichen Betrieb verschiedene
Gefahren entstehen.
Verletzungsgefahr und Sachschäden durch unsachgemäße Handhabung.
Halten Sie die Anleitung für das Bedienpersonal am Einsatzort des
Gerätes bereit.
Landesspezifische Sicherheitsmaßnahmen und
Unfallverhütungsvorschriften sind zu beachten.
Die Bedienung der Fettpresse ist ausschließlich qualifiziertem und
autorisiertem Personal gestattet.
Qualifiziert ist eine Person, wenn sie aufgrund ihrer Ausbildung, Erfahrung,
Unterweisung und Kenntnis der einschlägigen Normen die ihr
übertragenen Aufgaben beurteilen und mögliche Gefahrensituationen
erkennen kann.
Alle mit der Installation, Bedienung, Wartung und Reparatur beauftragten
Personen müssen diese Betriebsanleitung gelesen und verstanden
haben.

- 3 -
Die Fettpresse ist ausschließlich für die Abgabe von Fettschmierstoffen
bestimmt.
Jede darüber hinausgehende Verwendung kann zu erheblichen Risiken
führen und gilt als nicht bestimmungsgemäße Verwendung.
Für Schäden, die durch nicht bestimmungsgemäße Verwendung
entstehen, haftet der Betreiber.
ACHTUNG: Überdruck kann zum Platzen des Fettpressenkopfes und des
Zubehörs führen!
Durch zu hohen Druck an der Schmierstelle kann es zu Schäden am
Schmiernippel oder sogar an der Maschine kommen.
Beachten Sie die Wartungs- und Serviceanweisungen des
Maschinenherstellers
Defektes Zubehör kann zu Personen- und Sachschäden führen.
Fettschläuche dürfen nicht geknickt, verdreht oder gedehnt werden.
Zubehörteile müssen während der Nutzungsdauer auf Verschleiß, Risse
und sonstige Beschädigungen überprüft werden.
Defektes Zubehör sollte umgehend ausgetauscht werden.
Fettpresse nicht unter Druck öffnen!
Bei jeder Trennung von Fettpressenkopf und Rohr muss die Schubstange
vollständig eingefahren und durch die Sicherungssperre automatisch
verriegelt werden .
Überdruck kann zum Bersten des Fettpressenkopfes und der
Ausrüstung.
Verwenden Sie bei der Verwendung der Fettpresse geeignete Ausrüstung
wie Schutzhandschuhe.
Handschuhe und Augenschutz

- 4 -
BEWAHREN SIE DIESE ANLEITUNG AUF.
MODEL AND PARAMETERS
Modell
LD-867A
LD-867B
LD-2710
LD-8 68
Kapazität
400 CC
400 CC
600 cm3
120 CC
Maximaler
Druck
6000PSI
6000PSI
10.000 PSI
3500PSI
Fettpressen-A
uslassanschlu
ss
NPT 1/8
NPT 1/8
NPT 1/8
NPT 1/8
Fettfülloptione
n
Laden der
Patrone
Laden der
Patrone
Laden der
Patrone
Laden der
Patrone
Saugbefüllun
g
Saugbefüllun
g
Saugbefüllun
g
/
Beladung des
Füllgeräts
Beladung des
Füllgeräts
/
/
Material
Stahl + Aluminiumlegierung
- 5 -
Farbe
Schwarz +
Silber
Schwarz +
Silber
Schwarz
Silber
STRUCTURE DIAGRAM
LD-867A , LD-867 B
17. Kopf
18. Entlüftungsventil
19. Beweglicher Griff
20. Griff befestigen
21. Fass
22. Sicherungsbügel
23. Kolbenstangengriff
1
2
3
4
5
6
7
8
- 6 -
24. Endkappe
LD-2710
13.Kopf
14.Entlüftungsventil
15.Handhaben
16.Sicherungsbügel
1
2
3
7
6
4
5
- 7 -
17.Kolbenstangengriff
18.Endkappe
7. Fass
LD-8 68
9. Kopf
10.Handhaben
11.Fass
12.Kolbenstangengriff
5. Sicherheitsverschluss
1
2
3
4
5
- 8 -
COMPONENTS
LD-867A
LD-867B
LD-2710
LD-8 68
Fettpresse
1
1
1
1
Fettschlauch
1
1
1
1
Gerades
Metallrohr
1
/
1
2
Gebogenes
Metallrohr
1
1
/
/
Koppler
2
1
2
2
Spitzkupplung
1
1
/
/
Verriegelungskla
uenkupplung
1
/
/
/
Reinigungstuch
1
/
/
/
Dicht Kappe
1
1
/
/
Verstärkte Düse
/
/
/
1
Fettkartusche
/
/
/
1
Benutzerhandbu
ch
1
1
1
1
Mode
l
Parts
- 9 -
OPERATING INSTRUCTIONS
Schritt 1 : Halten Sie den Kopf
der Fettpresse fest und
schrauben Sie den Zylinder ab.
Nehmen Sie LD-2710 als
Beispiel.
Schritt 2 : Ziehen Sie den
Kolbenstangengriff zurück und
füllen Sie den Zylinder mit Fett.
Möglichkeiten der
Fettbefüllung:
Einlegen der Patrone:
Entfernen Sie die Plastikkappe
von der Patrone
und führen Sie das offene
Ende der Kartusche in den
Lauf der Fettpresse ein, bis der
- 10 -
Rand des Endes mit der
Aufreißlasche den Rand des
Laufs berührt.
Saugbefüllung: Führen Sie das
offene Ende des Fasses etwa 2
Zoll in den Fettbehälter ein.
Ziehen Sie langsam am Griff der
Kolbenstange, um Fett in das
leere Fass zu ziehen, während
Sie das Fass tiefer in das Fett
drücken, bis die Kolbenstange
ganz ausgefahren ist. An der
Außenfläche kann viel Fett haften
bleiben, daher sollte diese aus
Sicherheitsgründen sauber
gewischt werden.
Fettpressen-Füllgerät: Fettpresse
auf das Füllventil des
Fettpressen-Füllgerätes aufsetzen
und mit leichtem Gegendruck
festhalten.
Füllen Sie die Fettpresse, indem
Sie die Füllvorrichtung betätigen.
- 11 -
Schritt 3 : Setzen Sie das Fass
wieder in die Fettpresse ein.
Aktivieren Sie die
Sicherungshebel und schieben
Sie die Schubstange zurück in
den Lauf.
Schritt 4 : Lassen Sie die Luft ab, indem Sie das Luftablassventil drücken
oder die Pistole lösen.
Kopf und Lauf (maximal eine halbe Umdrehung) oder durch mehrmaliges
Betätigen des Griffes.
Schritt 5 : Installieren Sie die erforderlichen Armaturen wie unten gezeigt.
(Abb. 1, Abb. 2, Abb. 3)
Hinweis: Wickeln Sie bei Bedarf 3 bis 5 Schlaufen Rohmaterialband um
die Verbindung.

- 12 -
Abb. 1. Abb. 2. Abb. 3.
Schritt 6 : Drücken Sie die Kupplung direkt auf die Schmiernippel und
beginnen Sie, den Griff zum Einfüllen des Fetts zu betätigen.
Sobald die Schmierung abgeschlossen ist, kippen Sie die Kupplung leicht,
drehen Sie sie und ziehen Sie sie zurück. Durch Kippen und Drehen lässt
sich die Kupplung leicht von der Schmiernippel lösen.

- 13 -
Oben sind die LD-2710 Operationen : Die Operationen des LD-868,
LD-867A und LD-867B sind dieselben wie die des LD -2710 .
TROUBLESHOOTING
Problem
Mögliche Ursache
Mögliche Lösung
Fettpresse pumpt wenig
oder kein Fett
Luft ist im Fett
eingeschlossen
Leere Luft
Verstopfter Schlauch
Reinigen oder ersetzen
Sie den Schlauch

- 14 -
Fett zu dick oder kalt
Lagern Sie Fettpresse
und Fett vor extremer
Kälte geschützt oder
verwenden Sie dünneres
Fett
Überschüssiges Fett tritt
aus der Rückseite der
Fettpresse um die
Kolbenstange herum aus
Gummistößel ist
beschädigt
Ersetzen Sie die
Fettpresse
Fett tritt aus der
Verbindung zwischen
Fettpressenkopf und
Verlängerung oder
zwischen Verlängerung
und Kupplung aus
Wackelkontakt
Die Verbindung mit
Rohmaterialband
festziehen
MAINTENANCE
Überprüfen Sie vor jedem Gebrauch den allgemeinen Zustand der
Fettpresse. Achten Sie auf Risse oder Beschädigungen,

- 15 -
Fehlausrichtungen oder Verbiegungen beweglicher Teile, undichte
Verbindungen und andere Zustände, die den sicheren Betrieb des
Produkts beeinträchtigen könnten. Wenn ein Problem auftritt, lassen Sie
es vor der weiteren Verwendung beheben. Verwenden Sie keine
beschädigten Geräte.
Nach jedem Gebrauch mit einem weichen Tuch abtrocknen, Fett und
Schmutz entfernen
Fettpresse. Zum Reinigen keine Lösungsmittel verwenden und die Presse
nicht in Flüssigkeiten eintauchen.
Bewahren Sie die Lagerung an einem sauberen, trockenen und sicheren
Ort außerhalb der Reichweite von Kindern auf.
Alle Wartungs-, Service- und Reparaturarbeiten, die nicht im Handbuch
beschrieben sind, sollten nur von qualifizierten Servicetechnikern
durchgeführt werden.
Sanven Technology Ltd.
Adresse: Suite 250, 9166 Anaheim Place,
Rancho Cucamonga, Kalifornien 91730


- 2 -
Supporto tecnico e certificato di garanzia elettronica www.vevor.com/support
PISTOLA PER GRASSO
MANUALE D'USO
We continue to be committed to provide you tools with competitive price.
"Save Half", "Half Price" or any other similar expressions used by us only represents an
estimate of savings you might benefit from buying certain tools with us compared to the major
top brands and does not necessarily mean to cover all categories of tools offered by us. You
are kindly reminded to verify carefully when you are placing an order with us if you are
actually saving half in comparison with the top major brands.
- 1 -
MODELLO: LD-8 68, LD-867A , LD-867 B, LD-2710
LD-8 68
Modello
LD-867A
LD-867B .
LD-2710
Have product questions? Need technical support? Please feel free to
contact us:
Technical Support and E-Warranty Certificate
www.vevor.com/support
NEED HELP? CONTACT US!
This is the original instruction, please read all manual instructions
carefully before operating. VEVOR reserves a clear interpretation of our
user manual. The appearance of the product shall be subject to the
product you received. Please forgive us that we won't inform you again if
there are any technology or software updates on our product.
Grease Gun

- 2 -
7. leggere attentamente e comprendere tutte le ISTRUZIONI DI
MONTAGGIO E FUNZIONAMENTO .
8. La mancata osservanza delle norme di sicurezza e di altre precauzioni
di sicurezza di base può causare gravi lesioni personali.
GENERAL SAFETY RULES
AVVERTENZA : leggere e comprendere tutte le istruzioni. La
mancata osservanza di tutte le istruzioni elencate di seguito può causare
gravi lesioni .
Possono verificarsi diversi pericoli se la pistola per grasso a leva manuale
viene maneggiata in modo improprio durante l'installazione, la messa in
servizio e il funzionamento quotidiano.
Rischio di lesioni e danni ai beni materiali a causa di una manipolazione
impropria.
Tenere il manuale a disposizione del personale operativo nel luogo di
utilizzo dell'unità.
È necessario rispettare le misure di sicurezza e le norme antinfortunistiche
specifiche del Paese.
Solo personale qualificato e autorizzato può utilizzare la pistola per
grasso.
Le persone sono qualificate se, grazie alla loro formazione, esperienza,
istruzione e conoscenza delle norme pertinenti, sono in grado di valutare i
compiti assegnati e di identificare situazioni potenzialmente pericolose.
Tutte le persone incaricate dei lavori di installazione, funzionamento,
manutenzione e riparazione devono aver letto e compreso le presenti
istruzioni per l'uso.

- 3 -
La pistola per grasso è progettata esclusivamente per l'erogazione di
grassi lubrificanti.
Ogni utilizzo al di fuori di questi parametri può comportare gravi rischi ed è
considerato un utilizzo contrario allo scopo previsto.
L'operatore è responsabile dei danni derivanti da un utilizzo diverso da
quello previsto.
ATTENZIONE: una pressione eccessiva può causare lo scoppio della
testa della pistola per grasso e degli accessori!
Una pressione eccessiva nel punto di ingrassaggio può danneggiare
l'ingrassatore e perfino la macchina.
Rispettare le istruzioni di manutenzione e assistenza del produttore della
macchina
Gli accessori difettosi possono causare lesioni personali e danni materiali.
I tubi flessibili del grasso non devono essere piegati, attorcigliati o
allungati.
Durante il periodo di utilizzo, gli accessori devono essere controllati per
verificare che non presentino usura, crepe o altri danni.
Gli accessori difettosi devono essere sostituiti immediatamente.
Non aprire la pistola per grasso quando è sotto pressione!
Ogni volta che si desidera separare la testa e il corpo della pistola per
grasso, l'asta di spinta deve essere completamente retratta e bloccata
automaticamente mediante il dispositivo di sicurezza .
Una pressione eccessiva può causare lo scoppio della testa della pistola
per grasso e di
Attrezzatura.
Quando si utilizza la pistola per grasso, utilizzare attrezzature idonee
come protezioni
guanti e protezione per gli occhi

- 4 -
CONSERVARE LE ISTRUZIONI .
MODEL AND PARAMETERS
Modello
Modello
LD-867A
Modello
LD-867B
LD-2710
LD-8 68
Capacità
400CC
400CC
600CC
120CC
Pressione
massima
6000PSI
6000PSI
10000PSI
3500PSI
Attacco di
scarico della
pistola per
NPT 1/8
NPT 1/8
NPT 1/8
NPT 1/8
Opzioni di
riempimento
del grasso
Caricamento
della
cartuccia
Caricamento
della
cartuccia
Caricamento
della
cartuccia
Caricamento
della
cartuccia
Riempimento
ad
aspirazione
Riempimento
ad
aspirazione
Riempimento
ad
aspirazione
/
Caricamento
del
dispositivo di
riempimento
Caricamento
del
dispositivo di
riempimento
/
/
- 6 -
30. Chiusura di sicurezza
31. Maniglia dell'asta dello stantuffo
32. Tappo terminale
LD-2710
19.Testa
20.Valvola di rilascio dell'aria
1
2
3
7
6
4
5

- 7 -
21.Maniglia
22.Chiusura di sicurezza
23.Maniglia dell'asta dello stantuffo
24.Tappo terminale
7. Barile
LD-8 68
13.Testa
14.Maniglia
15.Barile
16.Maniglia dell'asta dello stantuffo
5. Dispositivo di sicurezza
1
2
3
4
5
- 8 -
COMPONENTS
Modello
LD-867A
Modello
LD-867B
LD-2710
LD-8 68
Pistola per
grasso
1
1
1
1
Tubo flessibile
per grasso
1
1
1
1
Tubo metallico
dritto
1
/
1
2
Tubo metallico
piegato
1
1
/
/
Accoppiatore
2
1
2
2
Accoppiatore a
punta
1
1
/
/
Accoppiatore
per lampada a
clip di
bloccaggio
1
/
/
/
Panno per la
pulizia
1
/
/
/
A prova di
perdite berretto
1
1
/
/
Ugello rinforzato
/
/
/
1
Mode
l
Parts

- 9 -
OPERATING INSTRUCTIONS
Fase 1 : tenere ferma la testa
della pistola per grasso e
svitare la canna.
Prendiamo come esempio
LD-2710.
Fase 2 : Tirare indietro la
maniglia dell'asta dello
stantuffo e riempire il cilindro di
grasso.
Cartuccia di
grasso
/
/
/
1
Manuale d' uso
1
1
1
1
- 10 -
Opzioni di riempimento del
grasso:
Caricamento della cartuccia:
rimuovere il tappo di plastica
dalla cartuccia
e inserire l'estremità aperta
della cartuccia nella canna
della pistola per grasso finché
il bordo dell'estremità con la
linguetta di estrazione non
tocca il bordo della canna.
Riempimento ad aspirazione:
inserire l'estremità aperta del
barile per circa 2" nel contenitore
del grasso. Tirare lentamente la
maniglia dell'asta dello stantuffo
per aspirare il grasso nel barile
vuoto, spingendo al contempo il
barile più in profondità nel grasso
fino a quando l'asta dello stantuffo
non è completamente estesa. La
superficie esterna potrebbe avere
molto grasso attaccato e deve
essere pulita per sicurezza.

- 11 -
Dispositivo di riempimento della
pistola per grasso: posizionare la
pistola per grasso sulla valvola di
riempimento dell'unità di
riempimento della pistola per
grasso e tenerla in posizione
esercitando una leggera
contropressione.
Riempire la pistola per grasso
attivando il dispositivo di
riempimento.
Fase 3 : Rimontare la canna nella
pistola per grasso. Attivare la
di sicurezza e spingere
nuovamente l'asta di spinta nella
canna.
Fase 4 : Scaricare l'aria premendo la valvola di rilascio dell'aria o
allentando la pistola
testa e canna (mezzo giro massimo) oppure azionando ripetutamente la
maniglia.
Fase 5 : installare i raccordi richiesti come mostrato di seguito. (Fig. 1, Fig.
2, Fig. 3)
- 12 -
Nota: se necessario, avvolgere 3-5 giri di nastro di materia prima attorno
al giunto.
Figura 1. Figura 2. Figura 3.
Fase 6 : Premere l'accoppiatore direttamente sul raccordo del grasso,
iniziare ad azionare la maniglia per il riempimento del grasso.
Una volta terminata la lubrificazione, inclinare leggermente l'accoppiatore,
ruotare e tirare indietro. L'azione di inclinazione e rotazione consentirà una
facile rimozione dell'accoppiatore dal raccordo di lubrificazione.
- 13 -
Qui sopra ci sono i LD-2710 operazioni . Le operazioni di LD-868, LD -
867A, LD - 867B sono le stesse di quelle di LD-2710 .
TROUBLESHOOTING
Problema
Possibile causa
Possibile soluzione
La pistola per grasso
pompa poco o niente
grasso
L'aria è intrappolata nel
grasso
Aria vuota
Tubo flessibile bloccato
Pulire o sostituire il tubo

- 14 -
Grasso troppo denso o
freddo
Conservare la pistola per
grasso e il grasso
lontano dal freddo
estremo oppure utilizzare
grasso più sottile
Fuoriesce grasso in
eccesso dalla parte
posteriore della pistola
per grasso attorno
all'asta dello stantuffo
Il supporto in gomma è
danneggiato
Sostituire la pistola per
grasso
Perdite di grasso dal
collegamento tra la testa
della pistola per grasso e
l'estensione o tra
l'estensione e
l'accoppiatore
Collegamento allentato
Stringere la connessione
utilizzando nastro di
materia prima
MAINTENANCE

- 15 -
Prima di ogni utilizzo, ispezionare le condizioni generali della pistola per
grasso. Controllare eventuali parti incrinate o danneggiate, parti mobili non
allineate o piegate, connessioni che perdono e qualsiasi altra condizione
che possa influire sul funzionamento sicuro del prodotto. Se si verifica un
problema, farlo correggere prima di un ulteriore utilizzo. Non utilizzare
apparecchiature danneggiate.
Dopo ogni utilizzo, asciugare con un panno morbido, rimuovere tutto il
grasso e i detriti dal
Pistola per grasso. Non usare solventi per pulire o immergere in liquidi.
Durante lo stoccaggio, conservare in un luogo pulito, asciutto e sicuro,
lontano dalla portata dei bambini.
Tutti gli interventi di manutenzione, assistenza e riparazione non trattati
nel manuale devono essere eseguiti esclusivamente da un tecnico
qualificato.
Azienda
Indirizzo: Suite 250, 9166 Anaheim Place,
Rancho Cucamonga, CA 91730


- 2 -
Soporte técnico y certificado de garantía electrónica www.vevor.com/support
PISTOLA DE GRASA
MANUAL DE USUARIO
We continue to be committed to provide you tools with competitive price.
"Save Half", "Half Price" or any other similar expressions used by us only represents an
estimate of savings you might benefit from buying certain tools with us compared to the major
top brands and does not necessarily mean to cover all categories of tools offered by us. You
are kindly reminded to verify carefully when you are placing an order with us if you are
actually saving half in comparison with the top major brands.

- 1 -
MODELO: LD-868 , LD-867A , LD-867B , LD-2710
LD-8 68
LD-867A
LD-867 B
LD-2710
Have product questions? Need technical support? Please feel free to
contact us:
Technical Support and E-Warranty Certificate
www.vevor.com/support
NEED HELP? CONTACT US!
This is the original instruction, please read all manual instructions
carefully before operating. VEVOR reserves a clear interpretation of our
user manual. The appearance of the product shall be subject to the
product you received. Please forgive us that we won't inform you again if
there are any technology or software updates on our product.
Grease Gun

- 2 -
9. Lea atentamente y comprenda todas las INSTRUCCIONES DE
MONTAJE Y OPERACIÓN antes de operar.
10. El incumplimiento de las normas de seguridad y otras precauciones
de seguridad básicas puede provocar lesiones personales graves.
GENERAL SAFETY RULES
ADVERTENCIA : Lea y comprenda todas las instrucciones. Si no
sigue todas las instrucciones que se indican a continuación, puede sufrir
lesiones graves .
Pueden producirse diversos peligros si la pistola engrasadora de palanca
manual se manipula incorrectamente durante la instalación, la puesta en
servicio y el funcionamiento diario.
Riesgo de lesiones y daños a la propiedad material debido a una
manipulación inadecuada.
Mantenga el manual a disposición del personal operativo en el lugar de
uso de la unidad.
Se deben tener en cuenta las medidas de seguridad específicas de cada
país y las normas de prevención de accidentes.
Sólo personal calificado y autorizado puede operar la pistola de engrase.
Las personas están cualificadas si, debido a su formación, experiencia,
instrucción y conocimiento de las normas pertinentes, son capaces de
evaluar las tareas asignadas e identificar situaciones potencialmente
peligrosas.
Todas las personas encargadas de trabajos de instalación, operación,
mantenimiento y reparación deben haber leído y comprendido estas
instrucciones de operación.

- 3 -
La pistola de engrase está diseñada exclusivamente para el suministro de
lubricantes de grasa.
Cualquier uso que vaya más allá de estos parámetros puede entrañar
graves riesgos y se considera uso contrario a la finalidad prevista.
El operador es responsable de los daños resultantes de un uso distinto al
previsto.
PRECAUCIÓN: ¡El exceso de presión puede provocar la explosión del
cabezal de la pistola de engrase y de los accesorios!
El exceso de presión en el punto de engrase puede dañar el engrasador e
incluso la máquina.
Cumplir con las instrucciones de mantenimiento y servicio del fabricante
de la máquina.
Los accesorios defectuosos pueden provocar lesiones personales y
daños materiales.
Las mangueras de grasa no deben doblarse, torcerse ni estirarse.
Durante su período de uso, los accesorios deben revisarse para detectar
desgaste, grietas y otros daños.
Los accesorios defectuosos deben reemplazarse inmediatamente.
¡No abra la pistola de engrase cuando esté bajo presión!
Cada vez que se deban separar el cabezal de la pistola de engrase y el
cañón, la varilla de empuje debe retraerse completamente y bloquearse
automáticamente mediante el pestillo de seguridad .
El exceso de presión puede provocar la explosión del cabezal de la pistola
de engrase y
Equipo.
Al utilizar la pistola de engrase, utilice equipo adecuado, como gafas de
protección.
guantes y protección para los ojos

- 4 -
GUARDE ESTAS INSTRUCCIONES.
MODEL AND PARAMETERS
Modelo
LD-867A
LD-867B
LD-2710
LD-8 68
Capacidad
400 cc
400 cc
600 cc
120 cc
Presión
máxima
6000 PSI
6000 PSI
10000 PSI
3500 PSI
Conexión de
descarga de la
pistola de
TNP 1/8
TNP 1/8
TNP 1/8
TNP 1/8
Opciones de
llenado de
grasa
Carga de
cartuchos
Carga de
cartuchos
Carga de
cartuchos
Carga de
cartuchos
Relleno de
succión
Relleno de
succión
Relleno de
succión
/
Carga del
dispositivo de
llenado
Carga del
dispositivo de
llenado
/
/


- 6 -
38. Cierre de seguridad
39. Mango de varilla de émbolo
40. Tapa final
LD-2710
25.Cabeza
26.Válvula de liberación de aire
1
2
3
7
6
4
5
- 7 -
27.Manejar
28.Cierre de seguridad
29.Mango de varilla de émbolo
30.Tapa final
7. Barril
LD-8 68
17.Cabeza
18.Manejar
19.Barril
20.Mango de varilla de émbolo
5. Cierre de seguridad
1
2
3
4
5
- 8 -
COMPONENTS
LD-867A
LD-867B
LD-2710
LD-8 68
Pistola de grasa
1
1
1
1
Manguera de
grasa
1
1
1
1
Tubo de metal
recto
1
/
1
2
Tubo de metal
doblado
1
1
/
/
Acoplador
2
1
2
2
Acoplador
puntiagudo
1
1
/
/
Acoplador de
abrazadera de
bloqueo
1
/
/
/
Paño de
limpieza
1
/
/
/
A prueba de
fugas tapa
1
1
/
/
Boquilla
reforzada
/
/
/
1
Cartucho de
grasa
/
/
/
1
Mode
l
Parts
- 9 -
OPERATING INSTRUCTIONS
Paso 1 : Sujete la cabeza de la
pistola de engrase y
desenrosque el cañón.
Tomemos como ejemplo el
LD-2710.
Paso 2 : Tire hacia atrás el
mango del émbolo y llene el
cañón con grasa.
Manual del
usuario
1
1
1
1

- 10 -
Opciones de llenado de
grasa:
Carga del cartucho: Retire la
tapa de plástico del cartucho.
e inserte el extremo abierto del
cartucho en el cañón de la
pistola de engrase hasta que
el borde del extremo de la
lengüeta de tiro coincida con el
borde del cañón.
Llenado por succión: inserte el
extremo abierto del barril
aproximadamente 2” dentro del
contenedor de grasa. Tire
lentamente del mango del émbolo
para aspirar la grasa dentro del
barril vacío mientras empuja el
barril más profundamente dentro
de la grasa hasta que el émbolo
esté completamente extendido.
La superficie exterior puede tener
mucha grasa adherida y debe
limpiarse por seguridad.
Dispositivo de llenado de pistola
engrasadora: Coloque la pistola
engrasadora sobre la válvula de
llenado de la unidad de llenado de
pistola engrasadora y manténgala
en su lugar con una ligera
contrapresión.
Llene la pistola de engrase
- 11 -
activando el dispositivo de
llenado.
Paso 3 : Vuelva a montar el cañón
en la pistola de engrase. Active el
Coloque el pestillo de seguridad y
empuje la varilla de empuje
nuevamente dentro del cañón.
Paso 4 : Extraiga el aire presionando la válvula de liberación de aire o
aflojando la pistola.
cabeza y cañón (media vuelta máximo) o accionando repetidamente el
mango.
Paso 5 : Instale los accesorios necesarios como se muestra a
continuación (Fig. 1, Fig. 2, Fig. 3).
Nota: Si es necesario, envuelva de 3 a 5 vueltas de cinta de materia prima
alrededor de la unión.
- 12 -
Figura 1. Figura 2. Figura 3.
Paso 6 : Presione el acoplador directamente sobre el accesorio de grasa.
Comience a operar la manija para llenar con grasa.
Una vez realizado el engrase, incline levemente el acoplador, gírelo y tire
hacia atrás. La acción de inclinación y giro permitirá retirar fácilmente el
acoplador del engrasador.

- 13 -
Arriba están los LD-2710 Las operaciones del LD-868, LD- 867A , LD -
867B son las mismas que las del LD - 2710 .
TROUBLESHOOTING
Problema
Posible causa
Posible solución
La pistola engrasadora
bombea poca o ninguna
grasa
El aire queda atrapado
en la grasa.
Aire vacío
Manguera bloqueada
Limpie o reemplace la
manguera

- 14 -
Grasa demasiado
espesa o fría
Guarde la pistola de
engrase y la grasa lejos
del frío extremo o utilice
grasa más fina.
Se filtra grasa en exceso
por la parte trasera de la
pistola de engrase
alrededor de la varilla del
émbolo.
El seguidor de goma está
dañado
Reemplace la pistola de
engrase
Fugas de grasa de la
conexión entre el cabezal
de la pistola de engrase y
la extensión o entre la
extensión y el acoplador
Conexión suelta
Apriete la conexión
utilizando cinta de
materia prima.
MAINTENANCE
Antes de cada uso, inspeccione el estado general de la pistola
engrasadora. Verifique que no haya piezas agrietadas o dañadas, piezas
móviles desalineadas o dobladas, conexiones con fugas y cualquier otra

- 15 -
condición que pueda afectar el funcionamiento seguro del producto. Si
ocurre un problema, solucione el problema antes de seguir usándolo. No
utilice equipos dañados.
Después de cada uso, seque con un paño suave, elimine toda la grasa y
los residuos.
Pistola engrasadora. No utilice disolventes para limpiarla ni la sumerja en
ningún líquido.
Al guardarlo, manténgalo en un lugar limpio, seco y seguro, fuera del
alcance de los niños.
Todo mantenimiento, servicio y reparación no descrito en el manual sólo
debe ser realizado por técnicos de servicio calificados.
Tecnología Sanven Ltd.
Dirección: Suite 250, 9166 Anaheim Place,
Rancho Cucamonga, CA 91730


- 2 -
Wsparcie techniczne i certyfikat e-gwarancji www.vevor.com/support
SMAROWNICA
INSTRUKCJA OBSŁUGI
We continue to be committed to provide you tools with competitive price.
"Save Half", "Half Price" or any other similar expressions used by us only represents an
estimate of savings you might benefit from buying certain tools with us compared to the major
top brands and does not necessarily mean to cover all categories of tools offered by us. You
are kindly reminded to verify carefully when you are placing an order with us if you are
actually saving half in comparison with the top major brands.

- 1 -
MODEL: LD-8 68, LD-867A , LD-867 B, LD-2710
LD-8 68
LD-867A
LD- 867B
LD-2710
Have product questions? Need technical support? Please feel free to
contact us:
Technical Support and E-Warranty Certificate
www.vevor.com/support
NEED HELP? CONTACT US!
This is the original instruction, please read all manual instructions
carefully before operating. VEVOR reserves a clear interpretation of our
user manual. The appearance of the product shall be subject to the
product you received. Please forgive us that we won't inform you again if
there are any technology or software updates on our product.
Grease Gun

- 2 -
11. należy uważnie przeczytać i zrozumieć całą INSTRUKCJĘ
MONTAŻU I OBSŁUGI .
12. Nieprzestrzeganie zasad bezpieczeństwa i innych podstawowych
środków ostrożności może skutkować poważnymi obrażeniami ciała.
GENERAL SAFETY RULES
OSTRZEŻENIE : Przeczytaj i zrozum wszystkie instrukcje.
Nieprzestrzeganie wszystkich poniższych instrukcji może skutkować
poważnymi obrażeniami .
Nieprawidłowe obchodzenie się ze smarownicą ręczną podczas instalacji,
uruchamiania i codziennej eksploatacji może wiązać się z różnymi
zagrożeniami.
Ryzyko obrażeń ciała i uszkodzenia mienia wskutek niewłaściwego
obchodzenia się.
Instrukcję należy przechowywać do dyspozycji personelu obsługującego
w miejscu użytkowania urządzenia.
Należy przestrzegać przepisów bezpieczeństwa i zapobiegania
wypadkom obowiązujących w danym kraju.
Tylko osoby wykwalifikowane i upoważnione mogą obsługiwać
smarownicę.
Osoby są wykwalifikowane, jeżeli ze względu na swoje przeszkolenie,
doświadczenie, wykształcenie i znajomość odpowiednich norm są w
stanie ocenić powierzone im zadania i zidentyfikować potencjalnie
niebezpieczne sytuacje.
Wszystkie osoby zajmujące się pracami instalacyjnymi, eksploatacyjnymi,
konserwacyjnymi i naprawczymi muszą zapoznać się z niniejszą
instrukcją obsługi i ją zrozumieć.

- 3 -
Pistolet smarowy przeznaczony jest wyłącznie do tłoczenia smarów
stałych.
Jakiekolwiek użycie wykraczające poza te parametry może wiązać się z
poważnym ryzykiem i jest uważane za użycie niezgodne z
przeznaczeniem.
Za szkody powstałe w wyniku użytkowania niezgodnego z
przeznaczeniem odpowiada operator.
UWAGA: Nadmierne ciśnienie może spowodować pęknięcie głowicy
smarownicy i akcesoriów!
Nadmierne ciśnienie w punkcie smarowania może uszkodzić
smarowniczkę, a nawet całą maszynę.
Stosować się do instrukcji producenta maszyny dotyczących konserwacji i
serwisu.
Wadliwe akcesoria mogą być przyczyną obrażeń ciała i szkód
materialnych.
Węże smarowe nie mogą być załamane, skręcone ani rozciągnięte.
W trakcie użytkowania należy sprawdzać akcesoria pod kątem zużycia,
pęknięć i innych uszkodzeń.
Uszkodzone akcesoria należy natychmiast wymienić.
Nie otwieraj smarownicy, gdy jest pod ciśnieniem!
Za każdym razem, gdy głowica smarownicy i lufa mają zostać rozdzielone,
popychacz musi zostać całkowicie schowany i automatycznie
zablokowany za pomocą zatrzasku zabezpieczającego .
Nadmierne ciśnienie może spowodować pęknięcie głowicy pistoletu
smarowego i
Sprzęt.
Podczas używania smarownicy należy używać odpowiedniego sprzętu, np.

- 4 -
osłony ochronnej.
rękawice i ochrona oczu
ZAPISZ INSTRUKCJĘ SE .
MODEL AND PARAMETERS
Model
LD-867A
LD-867B
LD-2710
LD-8 68
Pojemność
400 cm3
400 cm3
600 cm3
120 cm3
Maksymalne
ciśnienie
6000PSI
6000PSI
10000PSI
3500PSI
Podłączenie
wylotu
smarownicy
NPT1/8
NPT1/8
NPT1/8
NPT1/8
Opcje
napełniania
tłuszczem
Ładowanie
wkładu
Ładowanie
wkładu
Ładowanie
wkładu
Ładowanie
wkładu
Napełnianie
ssące
Napełnianie
ssące
Napełnianie
ssące
/
Ładowanie
urządzenia
Ładowanie
urządzenia
/
/
- 6 -
43. Ruchomy uchwyt
44. Napraw uchwyt
45. Beczka
46. Zaczep bezpieczeństwa
47. Uchwyt tłoczyska
48. Zaślepka
LD-2710
1
2
3
7
6
4
5
- 7 -
31.Głowa
32.Zawór odpowietrzający
33.Uchwyt
34.Zaczep bezpieczeństwa
35.Uchwyt tłoczyska
36.Zaślepka
7. Beczka
LD-8 68
21.Głowa
22.Uchwyt
23.Beczka
1
2
3
4
5
- 8 -
24.Uchwyt tłoczyska
5. Zaczep bezpieczeństwa
COMPONENTS
LD-867A
LD-867B
LD-2710
LD-8 68
Smarownica
1
1
1
1
Wąż smarowy
1
1
1
1
Prosta rura
metalowa
1
/
1
2
Wygięta rura
metalowa
1
1
/
/
Łącznik
2
1
2
2
Złącze
spiczaste
1
1
/
/
Zacisk blokujący
Lampa
Sprzęgło
1
/
/
/
Ściereczka do
czyszczenia
1
/
/
/
Szczelny czapka
1
1
/
/
Wzmocniona
dysza
/
/
/
1
Mode
l
Parts
- 9 -
OPERATING INSTRUCTIONS
Krok 1 : Trzymając głowicę
smarownicy odkręć lufę.
Weźmy na przykład LD-2710.
Krok 2 : Odciągnij uchwyt tłoka
i napełnij lufę smarem.
Wkład smarowy
/
/
/
1
Instrukcja
obsługi
1
1
1
1
- 10 -
Opcje napełniania
tłuszczem:
Ładowanie wkładu: Zdejmij
plastikową nasadkę z wkładu
i wsuń otwarty koniec wkładu
do lufy smarownicy, aż
krawędź końca z uchwytem
zetknie się z krawędzią lufy.
Napełnianie ssące: Włóż otwarty
koniec beczki na głębokość około
2 cali do pojemnika na smar.
Powoli pociągnij za uchwyt
tłoczyska, aby zassać smar do
pustej beczki, jednocześnie
wpychając beczkę głębiej w smar,
aż tłoczysko zostanie całkowicie
wysunięte. Zewnętrzna
powierzchnia może być pokryta
dużą ilością smaru i należy ją ze
względów bezpieczeństwa
wytrzeć do czysta.
Urządzenie do napełniania
smarownicy: Umieść smarownicę
na zaworze napełniającym
urządzenia do napełniania
smarownicy i przytrzymaj ją,
wywierając lekki nacisk.
Napełnij smarownicę poprzez
aktywację urządzenia
napełniającego.

- 11 -
Krok 3 : Ponownie zamontuj lufę
w pistoletu smarowym. Aktywuj
zamknij blokadę bezpieczeństwa i
wsuń pręt popychający z
powrotem do lufy.
Krok 4 : Wypuść powietrze naciskając zawór odpowietrzający lub
poluzowując pistolet
głowicę i lufę (maksymalnie pół obrotu) lub przez wielokrotne naciskanie
uchwytu.
Krok 5 : Zainstaluj wymagane elementy zgodnie z poniższym rysunkiem.
(Rys. 1, rys. 2, rys. 3)
Uwaga: W razie konieczności owiń złącze 3–5 pętlami taśmy klejącej.

- 12 -
Rys. 1. Rys. 2. Rys. 3.
Krok 6 : Nałóż złączkę bezpośrednio na smarowniczkę i zacznij używać
uchwytu do napełniania smarem.
Po zakończeniu smarowania lekko przechyl sprzęgło, przekręć i odciągnij.
Przechylenie i przekręcenie umożliwi łatwe wyjęcie sprzęgu ze
smarowniczki.

- 13 -
Powyżej znajdują się modele LD-2710 Operacje . Operacje modeli LD-868,
LD-867A, LD - 867B są takie same jak w przypadku modelu LD-2710 .
TROUBLESHOOTING
Problem
Możliwa przyczyna
Możliwe rozwiązanie
Pistolet smarowy
pompuje mało smaru lub
wcale go nie pompuje
Powietrze jest uwięzione
w smarze
Puste powietrze
Zablokowany wąż
Wyczyść lub wymień wąż

- 14 -
Smar zbyt gęsty lub
zimny
Przechowuj pistolet
smarowy i smar w
miejscu, w którym nie są
narażone na ekstremalne
zimno lub używaj
rzadszego smaru.
Nadmierna ilość smaru
wycieka z tylnej strony
pistoletu smarowego
wokół tłoczyska
Uszkodzony gumowy
popychacz
Wymień pistolet smarowy
Wyciek smaru z
połączenia między
głowicą pistoletu
smarowego a
przedłużeniem lub
między przedłużeniem a
łącznikiem
Luźne połączenie
Dokręć połączenie za
pomocą taśmy
surowcowej
MAINTENANCE

- 15 -
Przed każdym użyciem sprawdź ogólny stan Grease Gun. Sprawdź, czy
nie ma pękniętych lub uszkodzonych części, czy ruchome części nie są
źle wyrównane lub wygięte, czy nie ma nieszczelnych połączeń i czy nie
ma innych warunków, które mogą mieć wpływ na bezpieczną pracę
produktu. Jeśli wystąpi problem, należy go usunąć przed dalszym użyciem.
Nie używaj uszkodzonego sprzętu.
Po każdym użyciu należy osuszyć miękką ściereczką, usunąć cały tłuszcz
i zanieczyszczenia.
Smarownica. Nie używaj rozpuszczalników do czyszczenia ani nie
zanurzaj w żadnych płynach.
Przechowywać w czystym, suchym i bezpiecznym miejscu, niedostępnym
dla dzieci.
Wszelkie prace konserwacyjne, serwisowe i naprawy nieopisane w
instrukcji powinny być wykonywane wyłącznie przez wykwalifikowanego
technika serwisowego.
Sanven Technology Ltd.
Adres: Suite 250, 9166 Anaheim Place,
Rancho Cucamonga, Kalifornia 91730


- 2 -
Technische ondersteuning en e-garantiecertificaat www.vevor.com/support
VETSPUIT
GEBRUIKSAANWIJZING
We continue to be committed to provide you tools with competitive price.
"Save Half", "Half Price" or any other similar expressions used by us only represents an
estimate of savings you might benefit from buying certain tools with us compared to the major
top brands and does not necessarily mean to cover all categories of tools offered by us. You
are kindly reminded to verify carefully when you are placing an order with us if you are
actually saving half in comparison with the top major brands.

- 1 -
MODEL: LD-868 , LD-867A , LD-867B , LD-2710
LD-8 68
LD-867A
LD- 867B
LD-2710
Have product questions? Need technical support? Please feel free to
contact us:
Technical Support and E-Warranty Certificate
www.vevor.com/support
NEED HELP? CONTACT US!
This is the original instruction, please read all manual instructions
carefully before operating. VEVOR reserves a clear interpretation of our
user manual. The appearance of the product shall be subject to the
product you received. Please forgive us that we won't inform you again if
there are any technology or software updates on our product.
Grease Gun

- 2 -
13. Lees alle MONTAGE- EN GEBRUIKSAANWIJZINGEN zorgvuldig
door en zorg dat u ze begrijpt voordat u het apparaat gaat gebruiken.
14. Het niet naleven van de veiligheidsregels en andere elementaire
veiligheidsmaatregelen kan leiden tot ernstig persoonlijk letsel.
GENERAL SAFETY RULES
W AARSCHUWING : Lees en begrijp alle instructies. Het niet
opvolgen van alle onderstaande instructies kan leiden tot ernstig letsel .
Als de handbediende vetspuit tijdens de installatie, inbedrijfstelling en
dagelijkse bediening verkeerd wordt gehanteerd, kunnen er verschillende
gevaren ontstaan.
Gevaar voor letsel en schade aan materiële goederen door ondeskundig
gebruik.
Houd de handleiding ter beschikking van het bedieningspersoneel op de
plaats waar het apparaat wordt gebruikt.
Er moet rekening worden gehouden met de landspecifieke
veiligheidsmaatregelen en ongevallenpreventievoorschriften.
Alleen gekwalificeerde en bevoegde personen mogen het vetspuitpistool
bedienen.
Personen zijn gekwalificeerd als zij op grond van hun opleiding, ervaring,
instructie en kennis van de relevante normen in staat zijn de toegewezen
taken te beoordelen en potentieel gevaarlijke situaties te identificeren.
Alle personen die belast zijn met installatie-, bedienings-, onderhouds- en
reparatiewerkzaamheden, dienen deze gebruiksaanwijzing gelezen en
begrepen te hebben.
Het vetspuitpistool is uitsluitend ontworpen voor het doseren van

- 3 -
smeermiddelen met vet.
Elk gebruik dat buiten deze parameters valt, kan leiden tot ernstige risico's
en wordt beschouwd als gebruik dat in strijd is met het beoogde doel.
De exploitant is aansprakelijk voor schade die ontstaat door gebruik
anders dan het beoogde gebruik.
LET OP: Te hoge druk kan leiden tot het barsten van de vetspuitkop en
accessoires!
Overmatige druk bij het smeerpunt kan de smeernippel en zelfs de
machine beschadigen.
Volg de onderhouds- en service-instructies van de machinefabrikant op
Defecte accessoires kunnen leiden tot persoonlijk letsel en materiële
schade.
Vetslangen mogen niet geknikt, gedraaid of uitgerekt worden.
Tijdens de gebruiksperiode moeten accessoires worden gecontroleerd op
slijtage, scheuren en andere beschadigingen.
Defecte accessoires moeten onmiddellijk worden vervangen.
Open het vetspuitpistool niet als het onder druk staat!
Iedere keer dat de vetspuitkop en de loop van het vetpistool van elkaar
gescheiden worden, moet de duwstang volledig worden ingetrokken en
automatisch worden vergrendeld door middel van de veiligheidspal .
Overmatige druk kan ertoe leiden dat de kop van het vetspuitpistool barst
en
Apparatuur.
Gebruik bij het gebruik van het vetspuitpistool geschikte uitrusting, zoals
een beschermende uitrusting.
handschoenen en oogbescherming
BEWAAR DE SE -INSTRUCTIES.

- 4 -
MODEL AND PARAMETERS
Model
LD-867A
LD-867B
LD-2710
LD-8 68
Capaciteit
400CC
400CC
600CC
120CC
Maximale druk
6000
PSI-druk
6000
PSI-druk
10000PSI
3500PSI
Aansluiting
voor afvoer
van vetspuit
NPT-1/8
NPT-1/8
NPT-1/8
NPT-1/8
Opties voor
het vullen van
vet
Cartridge
laden
Cartridge
laden
Cartridge
laden
Cartridge
laden
Zuigvulling
Zuigvulling
Zuigvulling
/
Vulapparaat
laden
Vulapparaat
laden
/
/
Materiaal
Staal + aluminiumlegering
Kleur
Zwart + Zilver
Zwart + Zilver
Zwart
Zilver
- 5 -
STRUCTURE DIAGRAM
LD-867A , LD- 867B
49. Hoofd
50. Luchtventiel
51. Beweegbare handgreep
52. Vaste handgreep
53. Loop
54. Veiligheidspal
55. Zuigerstang handvat
56. Eindkap
1
2
3
4
5
6
7
8
- 6 -
LD-2710
37.Hoofd
38.Luchtventiel
39.Hendel
40.Veiligheidspal
41.Zuigerstang handvat
42.Eindkap
7. Vat
1
2
3
7
6
4
5
- 7 -
LD-8 68
25.Hoofd
26.Hendel
27.Loop
28.Zuigerstang handvat
5. Veiligheidspal
1
2
3
4
5
- 8 -
COMPONENTS
LD-867A
LD-867B
LD-2710
LD-8 68
Vetspuit
1
1
1
1
Smeer slang
1
1
1
1
Rechte metalen
buis
1
/
1
2
Gebogen
metalen pijp
1
1
/
/
Koppeling
2
1
2
2
Puntige
koppeling
1
1
/
/
Vergrendelingsk
lemkoppeling
1
/
/
/
Reinigingsdoekj
e
1
/
/
/
Lekvrij pet
1
1
/
/
Versterkte
spuitmond
/
/
/
1
Vetpatroon
/
/
/
1
Gebruikershandl
eiding
1
1
1
1
Mode
l
Parts

- 9 -
OPERATING INSTRUCTIONS
Stap 1 : Houd de kop van het
vetspuit vast en schroef de
loop los.
Neem LD-2710 als voorbeeld.
Stap 2 : Trek de
zuigerstanghendel terug en vul
de cilinder met vet.
Opties voor het vullen van
vet:
Cartridge laden: Verwijder de
plastic dop van de cartridge
en steek het open uiteinde van
de patroon in de loop van het
vetspuitpistool totdat de rand
van het treklipje de rand van
de loop raakt.
- 10 -
Vulling door zuigen: Steek het
open uiteinde van het vat
ongeveer 2 inch in de
vetcontainer. Trek langzaam aan
de hendel van de plunjerstang om
vet in het lege vat te zuigen terwijl
u het vat dieper in het vet duwt
totdat de plunjerstang volledig is
uitgeschoven. Het
buitenoppervlak kan veel vet
bevatten en moet voor de
veiligheid worden
schoongeveegd.
Vulinrichting voor vetspuiten:
Plaats de vetspuit op de vulklep
van de vuleenheid voor vetspuiten
en houd deze op zijn plaats met
lichte tegendruk.
Vul het vetspuitje door het
vulmechanisme te activeren.
Stap 3 : Monteer de cilinder terug
in het vetspuitpistool. Activeer de
veiligheidspal en duw de
duwstang terug in de cilinder.
- 11 -
Stap 4 : Laat de lucht ontsnappen door op de ontluchtingsklep te drukken
of door het pistool los te draaien
kop en loop (maximaal een halve slag) of door herhaaldelijk aan de hendel
te draaien.
Stap 5 : Installeer de benodigde fittingen zoals hieronder weergegeven
(Fig. 1,Fig. 2,Fig. 3)
Let op: Wikkel indien nodig 3 tot 5 lussen ruwe tape om de verbinding.
Figuur 1. Figuur 2. Figuur 3.
- 12 -
Stap 6 : Druk de koppeling recht op de smeernippel en begin met het
bedienen van de hendel voor het bijvullen van vet.
Zodra het invetten is gedaan, kantelt u de koppeling lichtjes, draait u en
trekt u deze terug. De kantel- en draaiactie zorgt ervoor dat de koppeling
eenvoudig van de smeernippel kan worden verwijderd.
Hierboven ziet u de LD-2710 bedieningen . De bedieningen van de
LD-868, LD-867A en LD-867B zijn hetzelfde als die van de LD - 2710 .

- 13 -
TROUBLESHOOTING
Probleem
Mogelijke oorzaak
Mogelijke oplossing
Vetspuit pompt weinig of
geen vet
Er zit lucht in vet
Lege lucht
Verstopte slang
Maak de slang schoon of
vervang deze
Vet te dik of te koud
Bewaar het
vetspuitpistool en het vet
op een plek waar het niet
extreem koud is, of
gebruik dunner vet.
Overtollig vet lekt uit de
achterkant van het
vetspuitpistool rond de
plunjerstang
Rubberen volger is
beschadigd
Vervang het vetspuitje
Er lekt vet uit de
verbinding tussen de
vetspuitkop en het
verlengstuk of tussen het
verlengstuk en de
koppeling
Losse verbinding
Maak de verbinding vast
met behulp van ruwe
materiaaltape

- 14 -
MAINTENANCE
Controleer voor elk gebruik de algemene staat van de Grease Gun.
Controleer op gebarsten of beschadigde onderdelen, verkeerd uitgelijnde
of gebogen bewegende onderdelen, lekkende verbindingen en andere
omstandigheden die de veilige werking van het product kunnen
beïnvloeden. Als er een probleem optreedt, laat het probleem dan
verhelpen voordat u het verder gebruikt. Gebruik geen beschadigde
apparatuur.
Na elk gebruik afdrogen met een zachte doek, alle vet en vuil verwijderen
Vetspuit. Gebruik geen oplosmiddelen om schoon te maken en dompel ze
niet onder in vloeistoffen.
Bewaar het product op een schone, droge en veilige plaats, buiten bereik
van kinderen.
Onderhoud, service en reparaties die niet in de handleiding worden
besproken, mogen uitsluitend worden uitgevoerd door een
gekwalificeerde servicetechnicus.
Sanven Technologie Ltd.
Adres: Suite 250, 9166 Anaheim Place,
Rancho Cucamonga, CA 91730

- 15 -


- 2 -
Teknisk support och e-garanticertifikat www.vevor.com/support
FETTPISTOL
ANVÄNDARMANUAL
We continue to be committed to provide you tools with competitive price.
"Save Half", "Half Price" or any other similar expressions used by us only represents an
estimate of savings you might benefit from buying certain tools with us compared to the major
top brands and does not necessarily mean to cover all categories of tools offered by us. You
are kindly reminded to verify carefully when you are placing an order with us if you are
actually saving half in comparison with the top major brands.

- 1 -
MODELL: LD-8 68, LD-867A , LD-867 B, LD-2710
LD-8 68
LD-867A
LD-867 B
LD-2710
Have product questions? Need technical support? Please feel free to
contact us:
Technical Support and E-Warranty Certificate
www.vevor.com/support
NEED HELP? CONTACT US!
This is the original instruction, please read all manual instructions
carefully before operating. VEVOR reserves a clear interpretation of our
user manual. The appearance of the product shall be subject to the
product you received. Please forgive us that we won't inform you again if
there are any technology or software updates on our product.
Grease Gun

- 2 -
15. Läs noggrant och förstå alla MONTERINGS- OCH
DRIFTINSTRUKTIONER innan användning.
16. Underlåtenhet att följa säkerhetsreglerna och andra grundläggande
säkerhetsåtgärder kan resultera i allvarliga personskador.
GENERAL SAFETY RULES
VARNING : Läs och förstå alla instruktioner . Underlåtenhet att
följa alla instruktioner som anges nedan kan resultera i allvarliga skador .
Olika faror kan uppstå om handspakens fettspruta hanteras felaktigt under
installation, idrifttagning och daglig drift.
Risk för personskador och skador på materiell egendom på grund av
felaktig hantering.
Håll bruksanvisningen till förfogande för driftpersonalen på enhetens
användningsplats.
Landsspecifika säkerhetsåtgärder och föreskrifter för förebyggande av
olyckor måste följas.
Endast kvalificerade och auktoriserade personer får använda fettsprutan.
Personer är kvalificerade om de på grund av sin utbildning, erfarenhet,
instruktion och kunskap om relevanta standarder kan bedöma tilldelade
uppgifter och identifiera potentiellt farliga situationer.
Alla personer som ansvarar för installation, drift, underhåll och
reparationer måste ha läst och förstått denna bruksanvisning.
Fettsprutan är enbart konstruerad för leverans av fettsmörjmedel.
All användning utöver dessa parametrar kan leda till allvarliga risker och
betraktas som användning som strider mot det avsedda syftet.
Operatören är ansvarig för skador som orsakas av annan användning än

- 3 -
den avsedda användningen.
FÖRSIKTIGHET: Övertryck kan leda till att fettsprutans huvud och
tillbehör brister!
Övertryck vid smörjpunkten kan skada smörjnippeln och till och med
maskinen.
Följ maskintillverkarens underhålls- och serviceinstruktioner
Defekta tillbehör kan leda till personskador och materiella skador.
Fettslangar får inte vara knäckta, vridna eller sträckta.
Under användningstiden måste tillbehören kontrolleras för slitage, sprickor
och andra skador.
Defekta tillbehör bör bytas ut omedelbart.
Öppna inte fettsprutan när den är under tryck!
Varje gång fettsprutans huvud och pipa ska separeras måste tryckstången
dras in helt och automatiskt låsas med hjälp av säkerhetsspärren .
Övertryck kan resultera i att fettsprutans huvud och av
Utrustning.
När du använder fettsprutan, använd lämplig utrustning såsom skydd
handskar och ögonskydd
SPARA SE- INSTRUKTIONERNA.
MODEL AND PARAMETERS
Modell
LD-867A
LD-867B
LD-2710
LD-8 68

- 4 -
Kapacitet
400 CC
400 CC
600 CC
120 CC
Maximalt tryck
6000PSI
6000PSI
10 000 PSI
3500PSI
Utloppsanslutn
ing för
fettspruta
NPT 1/8
NPT 1/8
NPT 1/8
NPT 1/8
Alternativ för
fettfyllning
Patron laddas
Patron laddas
Patron laddas
Patron laddas
Sugfyllning
Sugfyllning
Sugfyllning
/
Fyllningsenh
et laddas
Fyllningsenh
et laddas
/
/
Material
Stål+ Aluminiumlegering
Färg
Svart + Silver
Svart + Silver
Svart
Silver
STRUCTURE DIAGRAM
LD-867A , LD-867 B
2
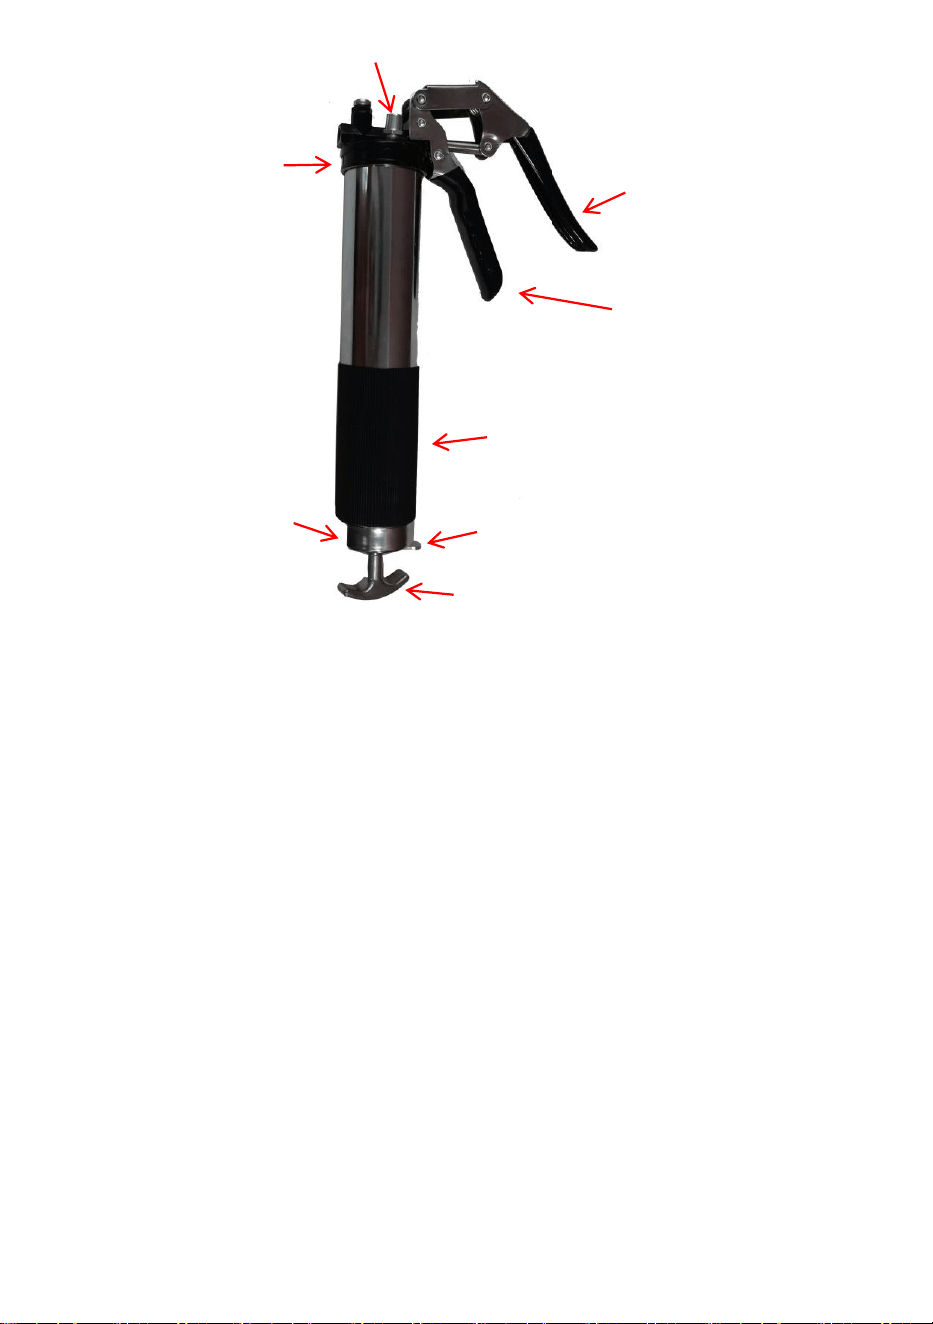
- 5 -
57. Huvud
58. Luftutsläppsventil
59. Rörligt handtag
60. Fixa handtag
61. Fat
62. Säkerhetsspärr
63. Kolvstångshandtag
64. Ändlock
LD-2710
1
3
4
5
6
7
8
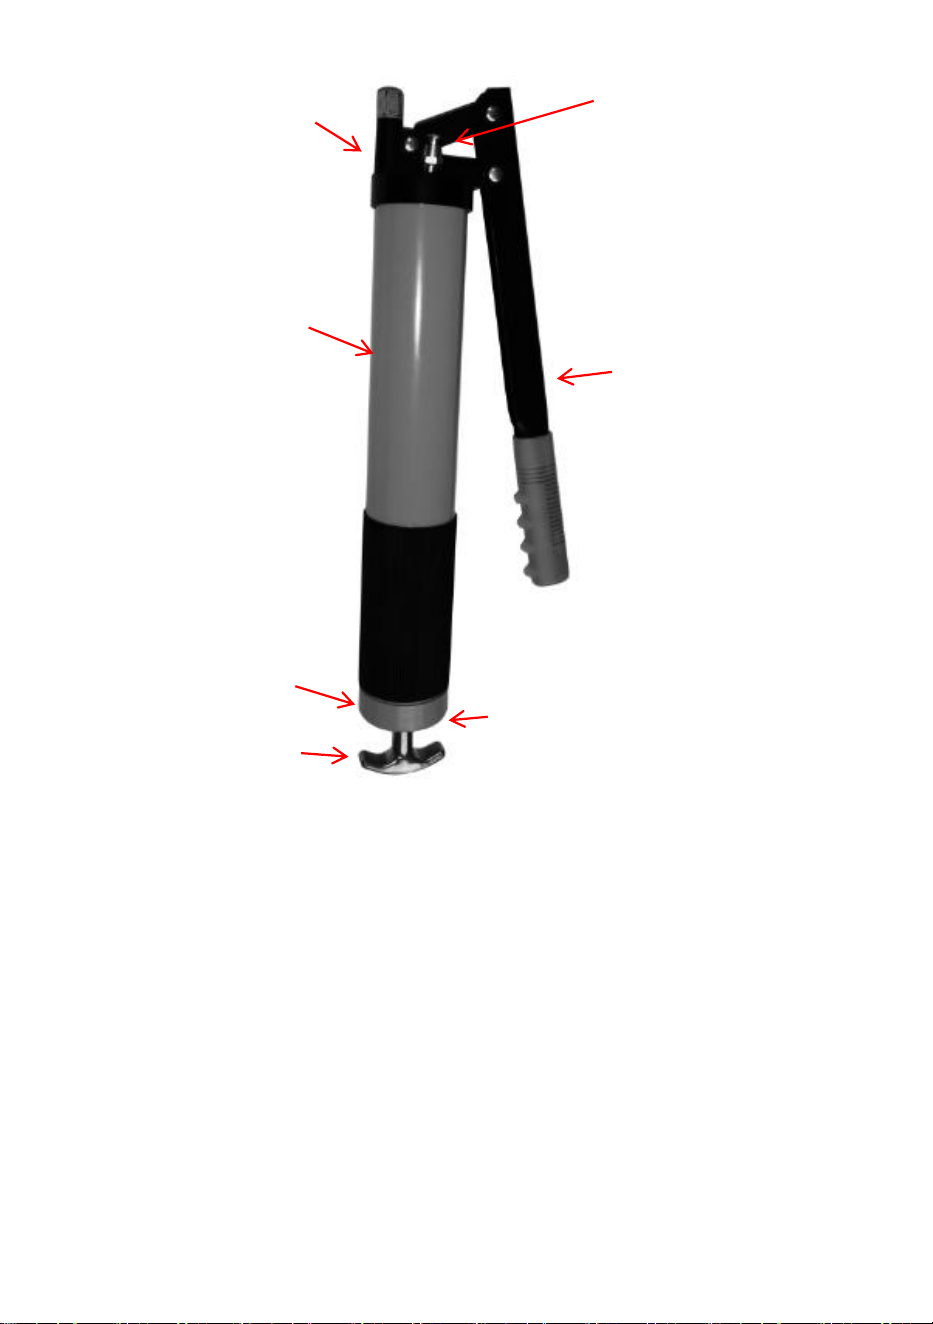
- 6 -
43.Huvud
44.Luftutsläppsventil
45.Hantera
46.Säkerhetsspärr
47.Kolvstångshandtag
48.Ändlock
7. Tunna
LD-8 68
1
2
3
7
6
4
5
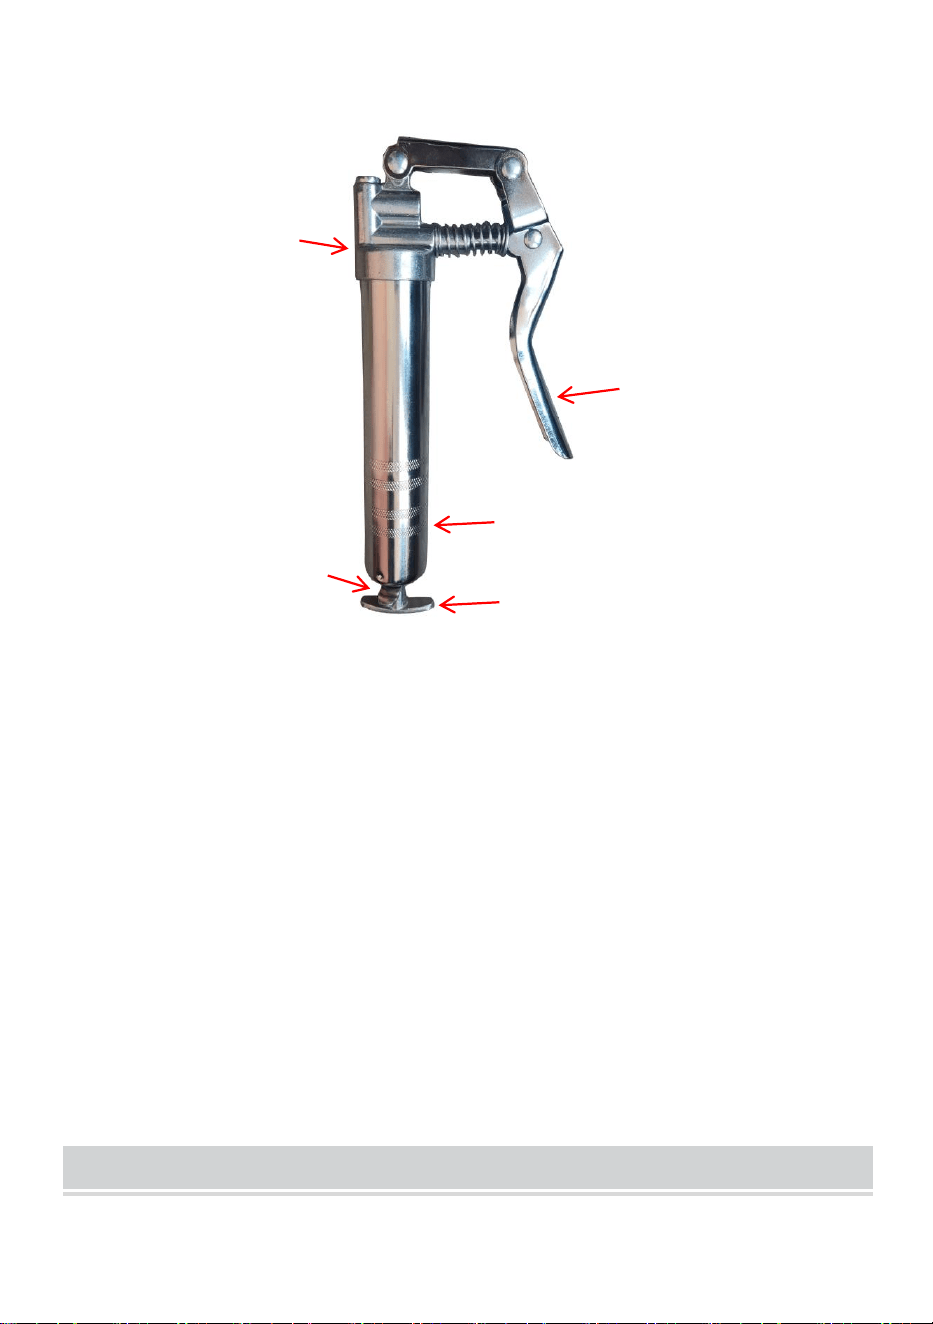
- 7 -
29.Huvud
30.Hantera
31.Fat
32.Kolvstångshandtag
5. Säkerhetsspärr
COMPONENTS
1
2
3
4
5
- 8 -
OPERATING INSTRUCTIONS
LD-867A
LD-867B
LD-2710
LD-8 68
Fettpistol
1
1
1
1
Fettslang
1
1
1
1
Rak metallrör
1
/
1
2
Böjt metallrör
1
1
/
/
Kopplare
2
1
2
2
Spetsiga
kopplingar
1
1
/
/
Låsande C -
lampa C oupler
1
/
/
/
Rengöringsduk
1
/
/
/
Läcksäker lock
1
1
/
/
Förstärkt
munstycke
/
/
/
1
Fettpatron
/
/
/
1
Användarmanua
l
1
1
1
1
Mode
l
Parts

- 9 -
Steg 1 : Håll i huvudet på
fettpistolen och skruva av
pipan.
Ta LD-2710 som ett exempel.
Steg 2 : Dra tillbaka
kolvstångens handtag och fyll
cylindern med fett.
Alternativ för fettfyllning:
Patronladdning: Ta bort
plastlocket från patronen
och för in den öppna änden av
patronen i fettsprutans cylinder
tills kanten på dragfliksänden
möter kanten på cylindern.

- 10 -
Sugpåfyllning: Sätt in den öppna
änden av cylindern ca 2" i
fettbehållaren. Dra sakta i
kolvstångens handtag för att dra
in fett i den tomma cylindern
samtidigt som du trycker in
cylindern djupare in i fettet tills
kolvstången är helt utdragen.
Utsidan ytan kan ha mycket fett
fast på sig och bör torkas ren för
säkerhets skull.
Påfyllningsanordning för
fettspruta: Placera fettsprutan på
påfyllningsventilen på fettsprutans
påfyllningsenhet och håll den på
plats med lätt mottryck.
Fyll på fettsprutan genom att
aktivera påfyllningsanordningen.
Steg 3 : Sätt tillbaka pipan i
fettpistolen. Aktivera
säkerhetsspärr och tryck tillbaka
tryckstången i cylindern.
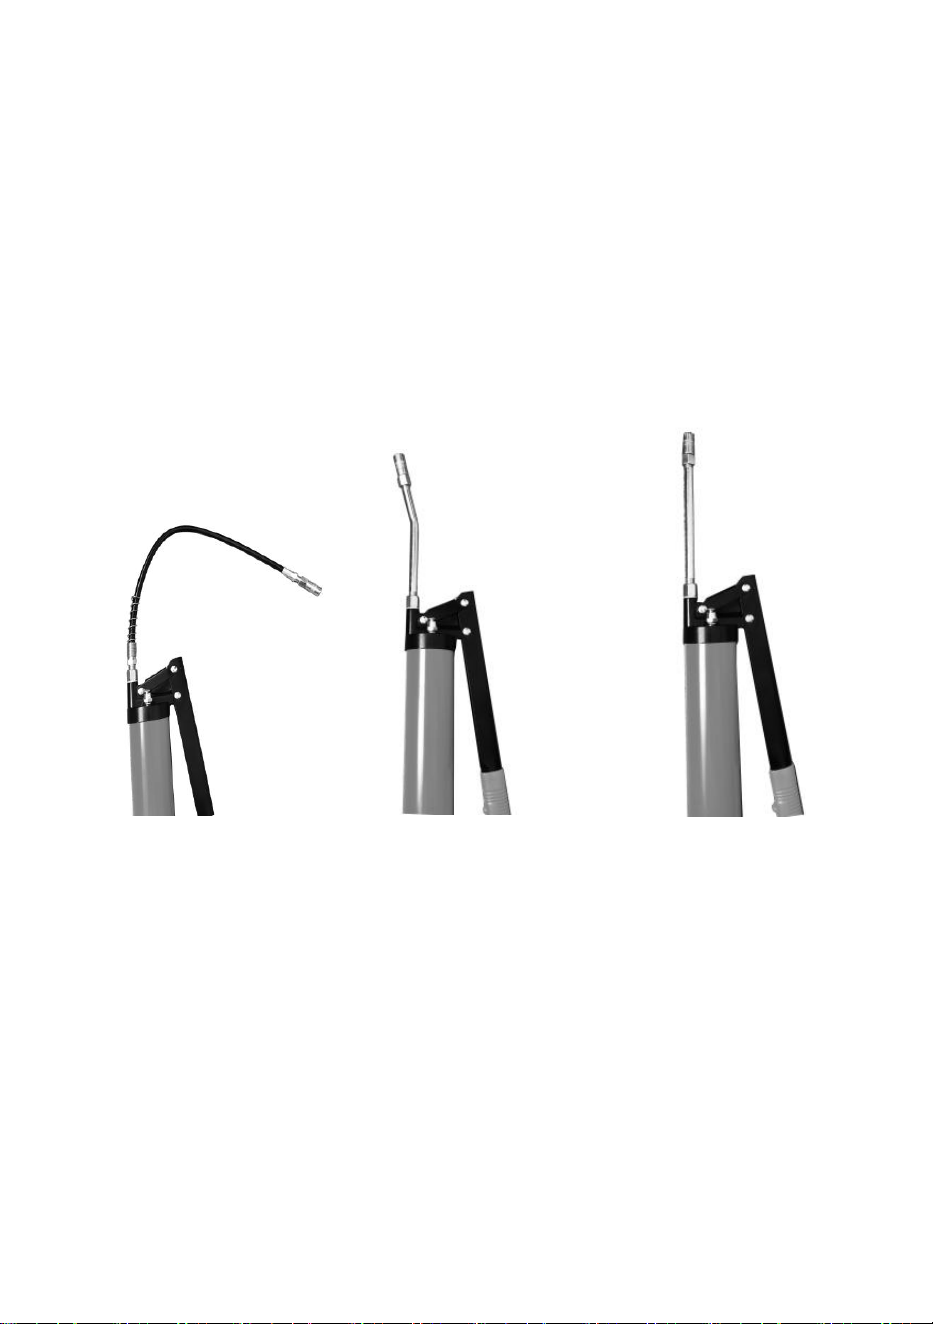
- 11 -
Steg 4 : Sug ut luft genom att trycka på luftutlösningsventilen eller lossa
pistolen
huvud och pipa (max ett halvt varv) eller genom att manövrera handtaget
upprepade gånger.
Steg 5 : Installera de nödvändiga beslagen enligt vad som visas nedan.
(Fig 1, Fig 2, Fig 3)
Obs: Vid behov, vira 3~5 öglor av råmaterialtejp runt fogen.
Fig 1. Fig 2. Fig 3.
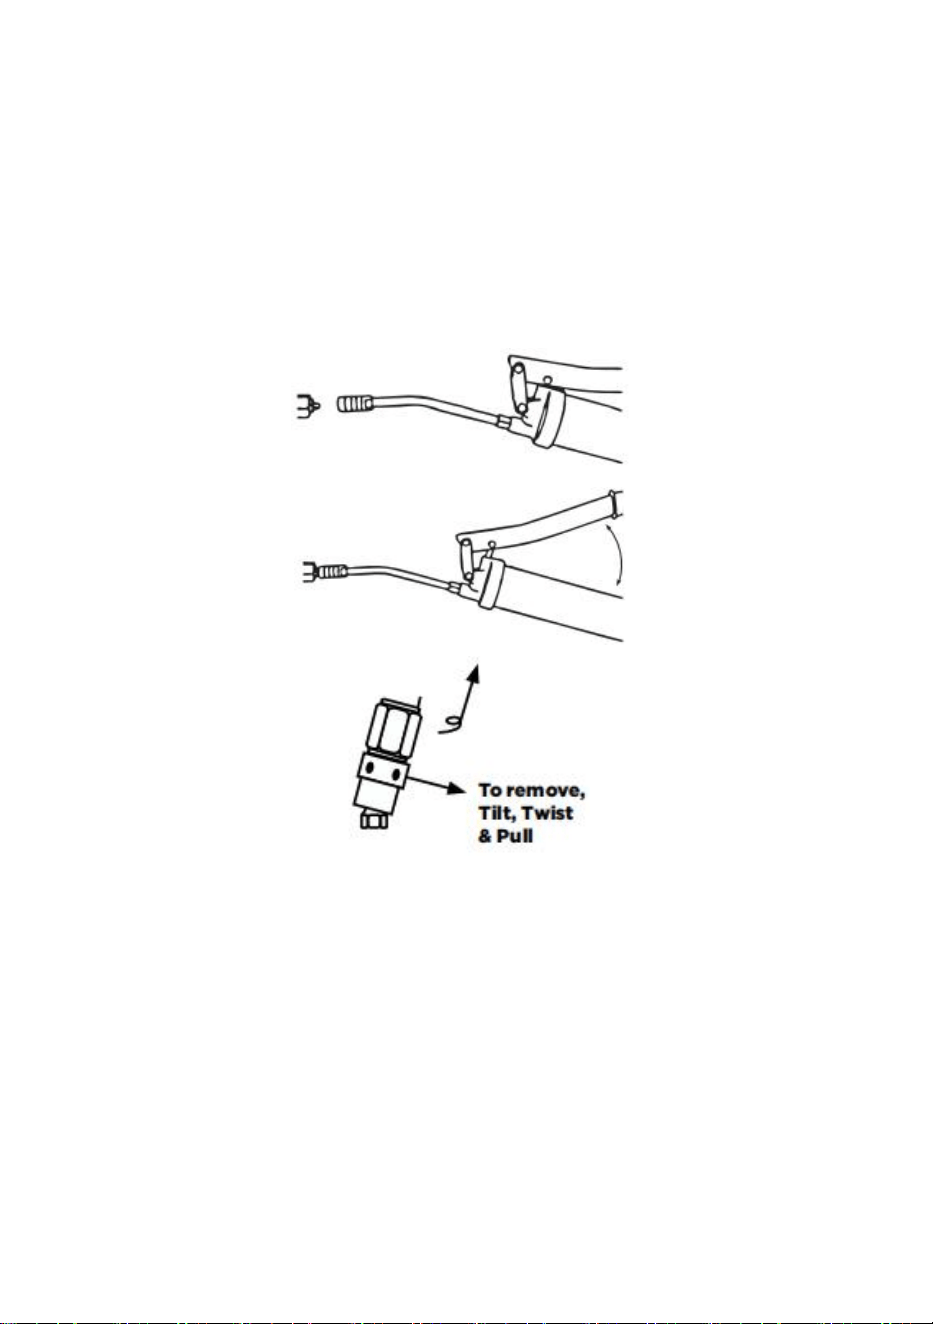
- 12 -
Steg 6 : Tryck kopplingen rakt på smörjnippeln, börja använda handtaget
för fettpåfyllning.
När smörjningen är klar, luta kopplingen något, vrid och dra tillbaka.
Lutningen och vridningen gör det enkelt att ta bort kopplingen från
smörjnippeln.
Ovan är LD -2710 operationer . Operationerna för LD-868, LD - 867A ,
LD-867B är desamma som för LD - 2710 .

- 13 -
TROUBLESHOOTING
Problem
Möjlig orsak
Möjlig lösning
Fettpistol pumpar lite
eller inget fett
Luften är instängd i fett
Tom luft
Blockerad slang
Rengör eller byt ut
slangen
Smörj för tjockt eller kallt
Förvara fettspruta och
fett borta från extrem kyla
eller använd tunnare fett
För mycket fett läcker ut
från baksidan av
fettpistolen runt
kolvstången
Gummiföljaren är skadad
Byt ut fettsprutan
Fett läcker från
anslutningen mellan
fettsprutans huvud och
förlängningen eller
mellan förlängningen och
kopplingen
Lös anslutning
Dra åt anslutningen med
råmaterialtejp

- 14 -
MAINTENANCE
Inspektera fettpistolens allmänna skick före varje användning. Kontrollera
om det finns spruckna eller skadade delar, felinriktade eller böjda rörliga
delar, läckande anslutningar och andra tillstånd som kan påverka
produktens säkra funktion. Om ett problem uppstår, låt problemet åtgärdas
innan du använder det igen. Använd inte skadad utrustning.
Efter varje användning, torka med en mjuk trasa, ta bort allt fett och skräp
från
Fettpistol. Använd inte lösningsmedel för att rengöra eller sänka ner i
någon vätska.
Vid förvaring, förvara på en ren, torr och säker plats borta från barn.
Allt underhåll, service och reparationer som inte diskuteras i manualen bör
endast utföras av kvalificerad servicetekniker.
Sanven Technology Ltd.
Adress: Suite 250, 9166 Anaheim Place,
Rancho Cucamonga, CA 91730