
Technical Support and E-Warranty Certificate
www.vevor.com/support
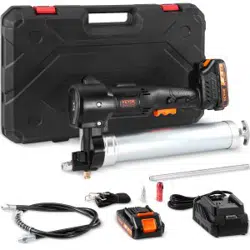
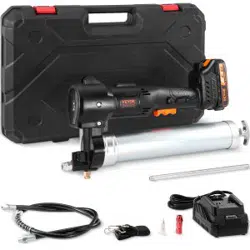
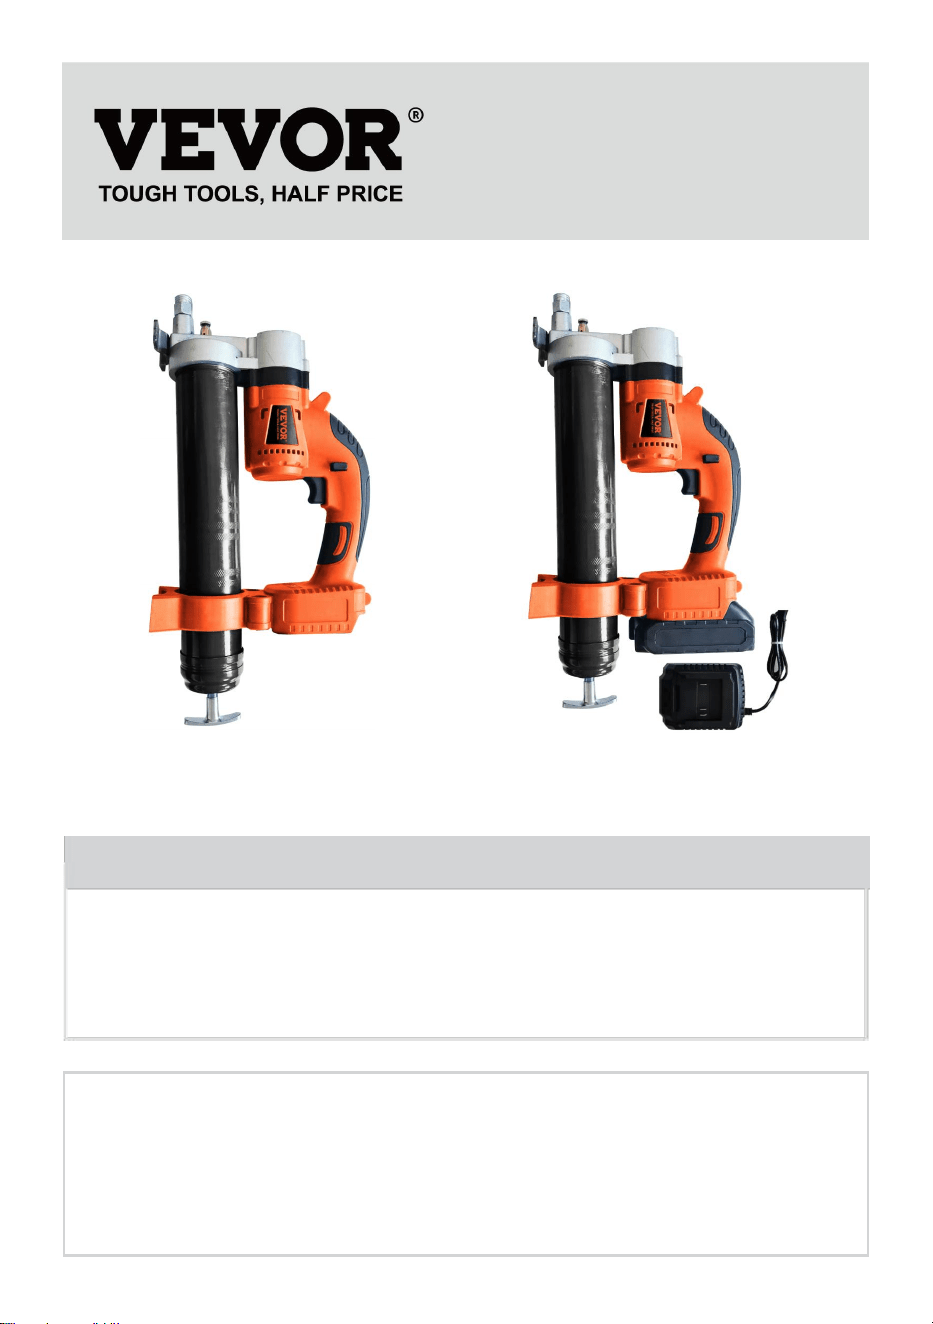
CORDLESS GREASE GUN
USER MANUAL
We continue to be committed to provide you tools with competitive price.
"Save Half", "Half Price" or any other similar expressions used by us only
represents an estimate of savings you might benefit from buying certain tools
with us compared to the major top brands and does not necessarily mean to cover
all categories of tools offered by us. You are kindly reminded to verify carefully
when you are placing an order with us if you are actually Saving
Half in comparison with the top major brands.

- 1 -
Model: LD-8207
,
LD-8207A / LD-8207B
LD-8207
LD-8207A / LD-8207B
Photo for reference
NEED HELP? CONTACT US!
Have product questions? Need technical support? Please feel free to
contact us:
Technical Support and E-Warranty Certificate
www.vevor.com/support
This is the original instruction, please read all manual instructions
carefully before operating. VEVOR reserves a clear interpretation of our
user manual. The appearance of the product shall be subject to the
product you received. Please forgive us that we won't inform you again if
there are any technology or software updates on our product.
Cordless Grease Gun
- 2 -
1. Read carefully and understand all ASSEMBLY AND OPERATION
INSTRUCTIONS before operating.
2. Failure to follow the safety rules and other basic safety precautions
may result in serious personal injury.
Specification
Model:
LD-8207/ LD-8207A/ LD-8207B used 18V-21V is acceptable. And our
tool’s can be matched with Makita's battery
Model
With
Battery
or not
Plug
type
Power
Charger
Input
Output
LD-8207
No
Without
18.5V DC
Without
LD-8207A
Yes
US
18.5V 2.0ah
AC100-240V
50/60Hz
DC21V,2A
LD-8207B
Yes
EU
18.5V 2.0ah
AC220-240V
50/60Hz
DC21V,2A
The product has the following characteristics
Photo for reference
Stable oil injection
Stable exhaust ensures smooth
oil injection
Strong pressure
High oil injection pressure,
continuous balance, quick and
effective
Be easy to carry about
Comes with the car, saves time
and effort, and is convenient and
fast
Flexible and efficient use
It can be injected into any part of
the nozzle that can be extended
oil in place
- 3 -
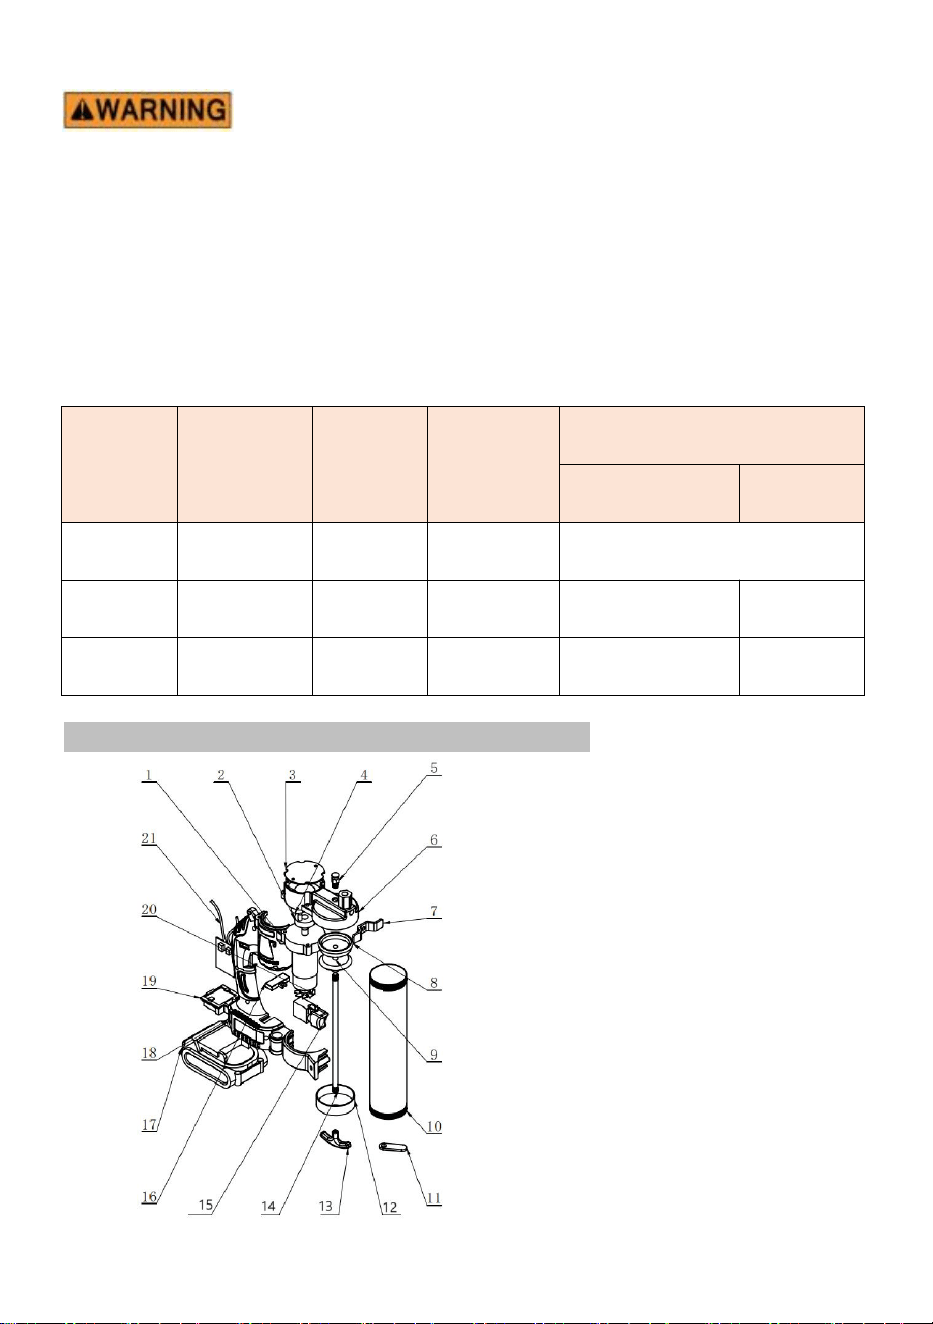
SN
Part No
Qty
SN
Part No
Qty
1
Gearbox
1
12
Oil cylinder cover
1
2
Eccentric axle wheel
1
13
Aluminum handle
1
3
Pump body cover
1
14
pull rod
1
4
Eccentric core rod sleeve
1
15
switch button
1
5
Exhaust valve
1
16
Card components
1
6
Aluminum pump body
1
17
Lithium battery pack
1
7
Foot support
1
18
Shell - Left
1
8
Rubber piston
1
19
Battery box interface
1
9
Fixed components
1
20
electric machinery
1
10
Oil storage cylinder
1
21
Control board
1
11
Insurance card
1
Before using the inspection method, check if the work light will light up
when the product is plugged in with a battery. In the case of no load, is the
machine running normally
Instructions for using butter balls
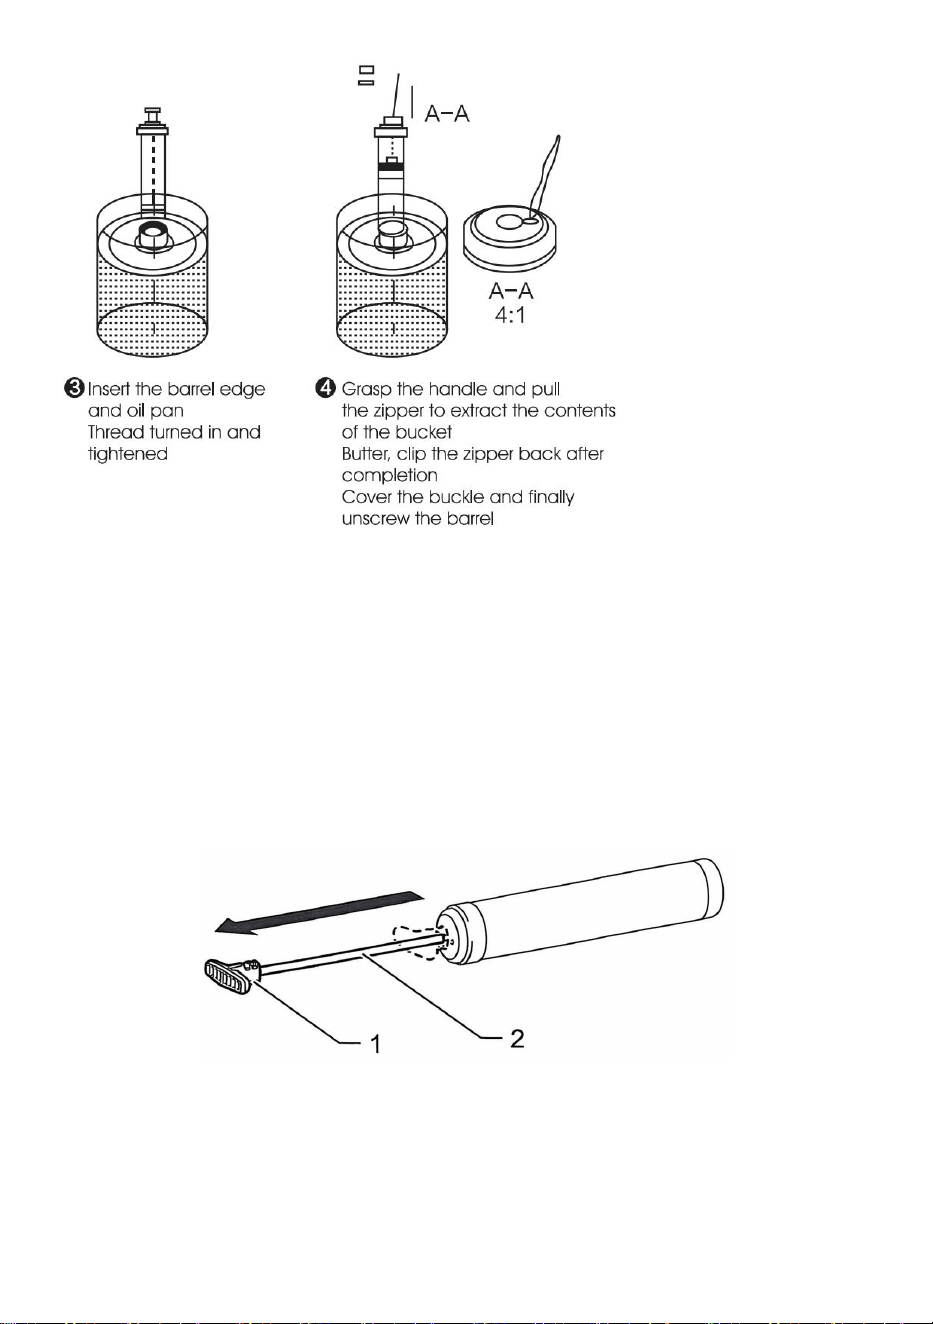
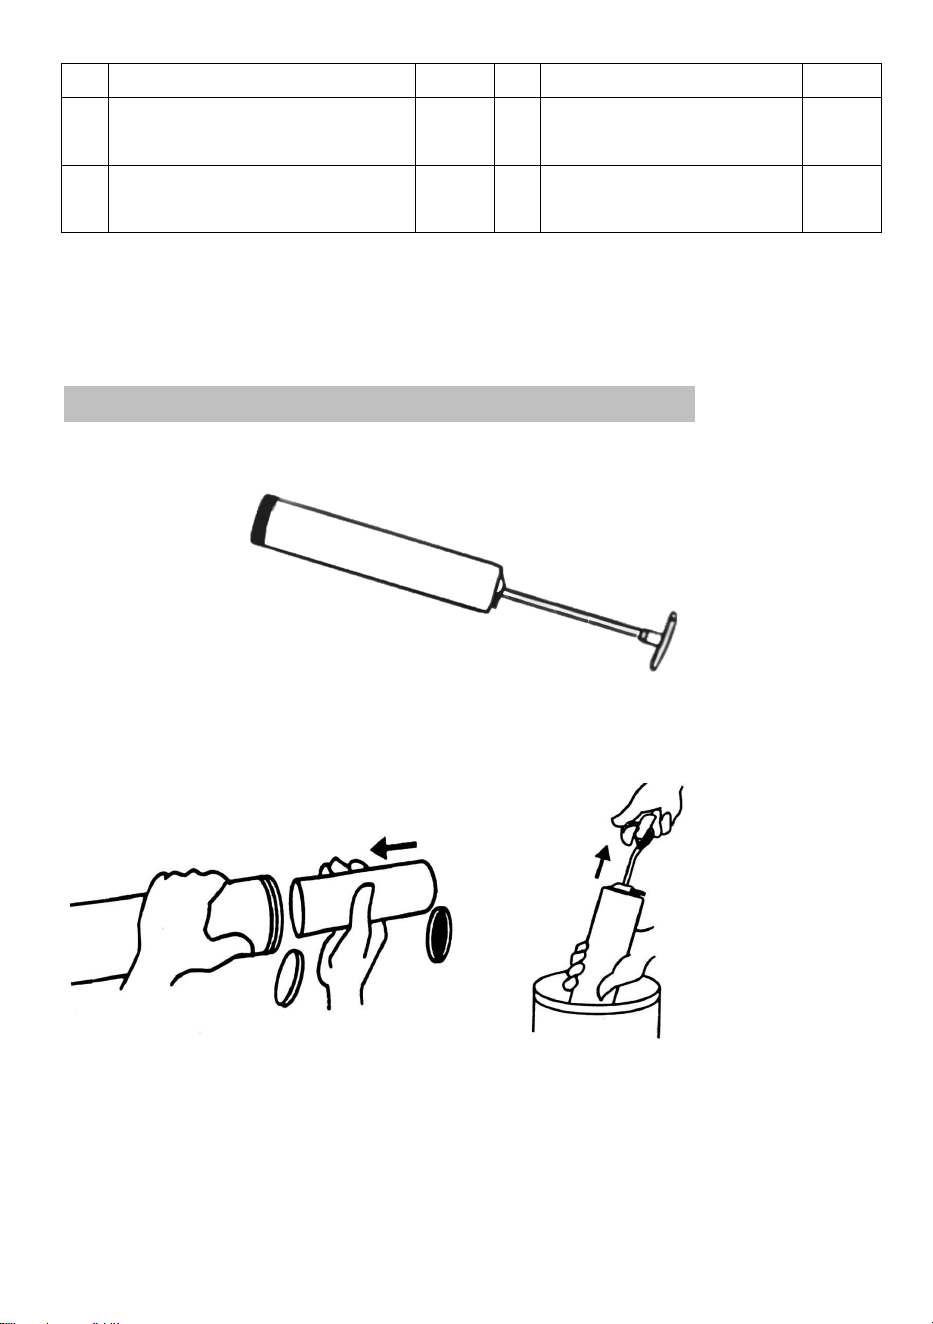
step 1. Pull back the plunger rod handle and fill the barrel with grease.
Grease filling options:
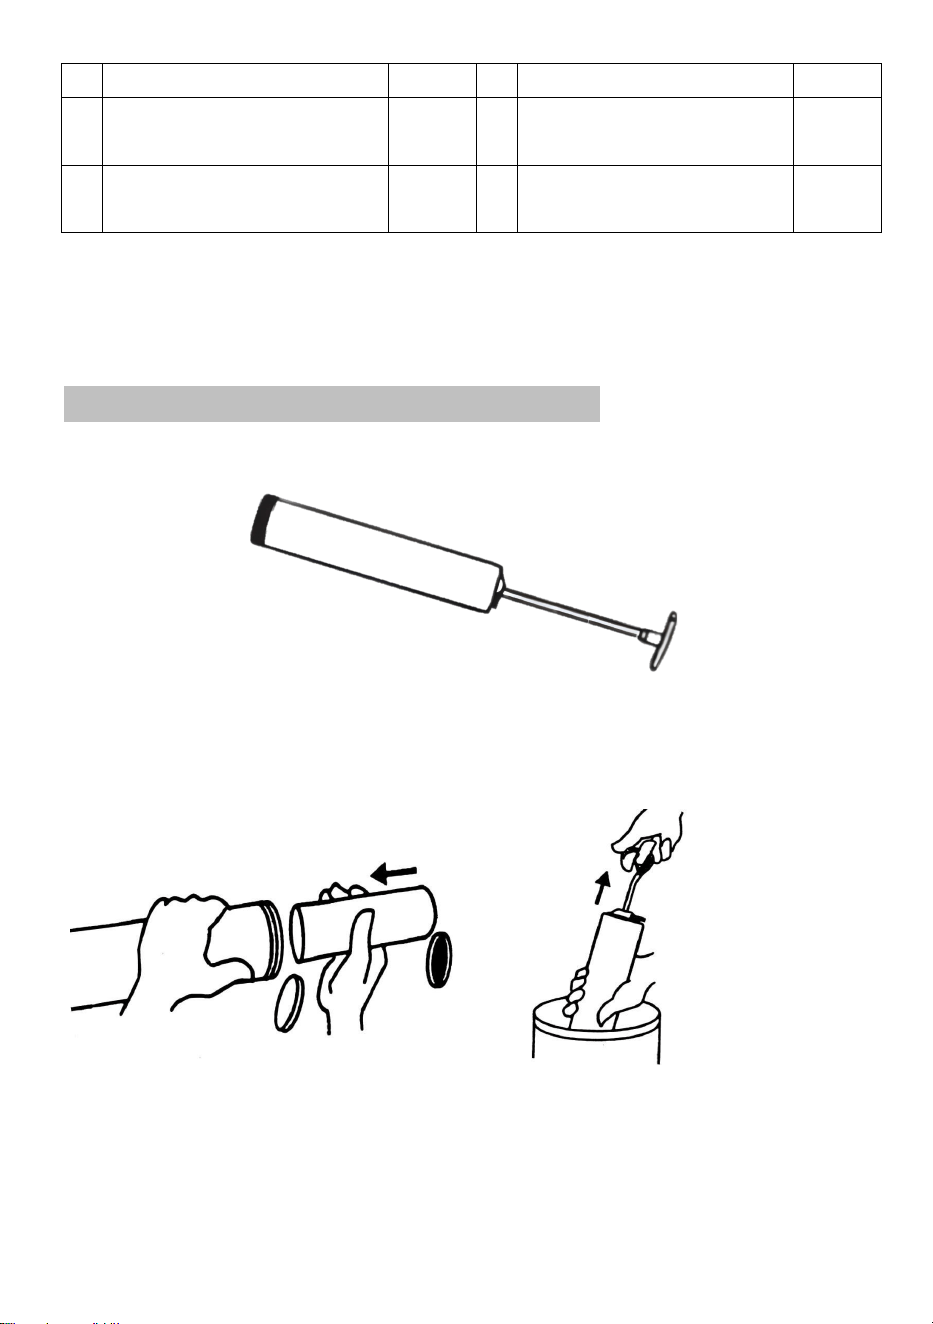
1) Cartridge Loading: Remove the plastic cap from the cartridge and insert the
open end of the cartridge into the grease gun barrel until the rim of the pull-tab
end meets the rim of the barrel.
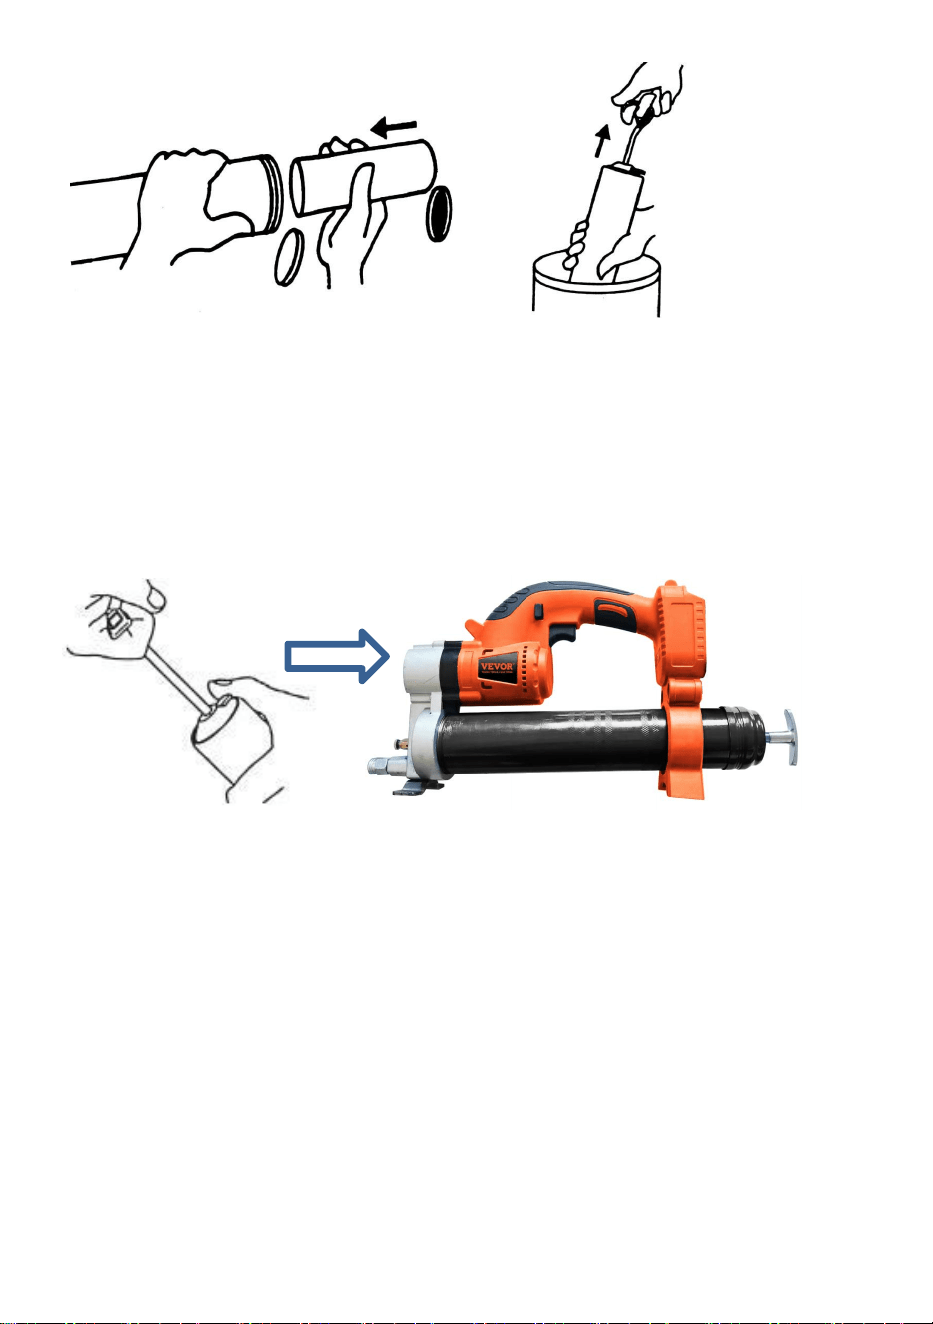
- 4 -
1) 2)
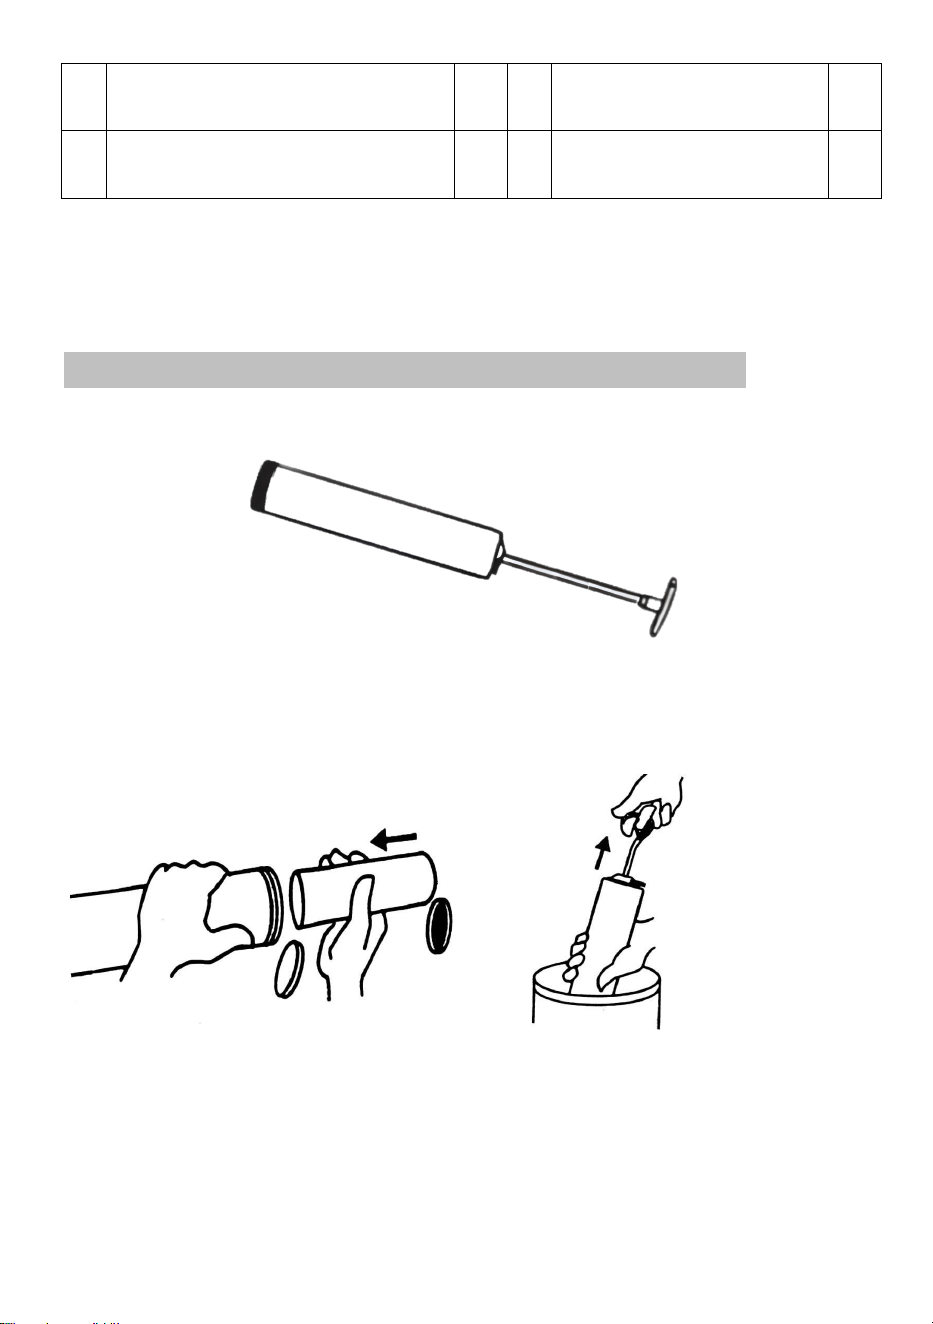
2) Suction Fill: Insert the open end of the barrel about 2” into the grease
container.Slowly pull the plunger rod handle to draw in grease into the empty
barrel while pushing the barrel deeper into the grease until the plunger rod is
completely extended.The outside surface may have a lot of grease stuck to it and
should be wiped clean for safety
Step2:Assemble the barrel back into the grease gun.Activate the safety catch
and push the push rod back into the Barrel.
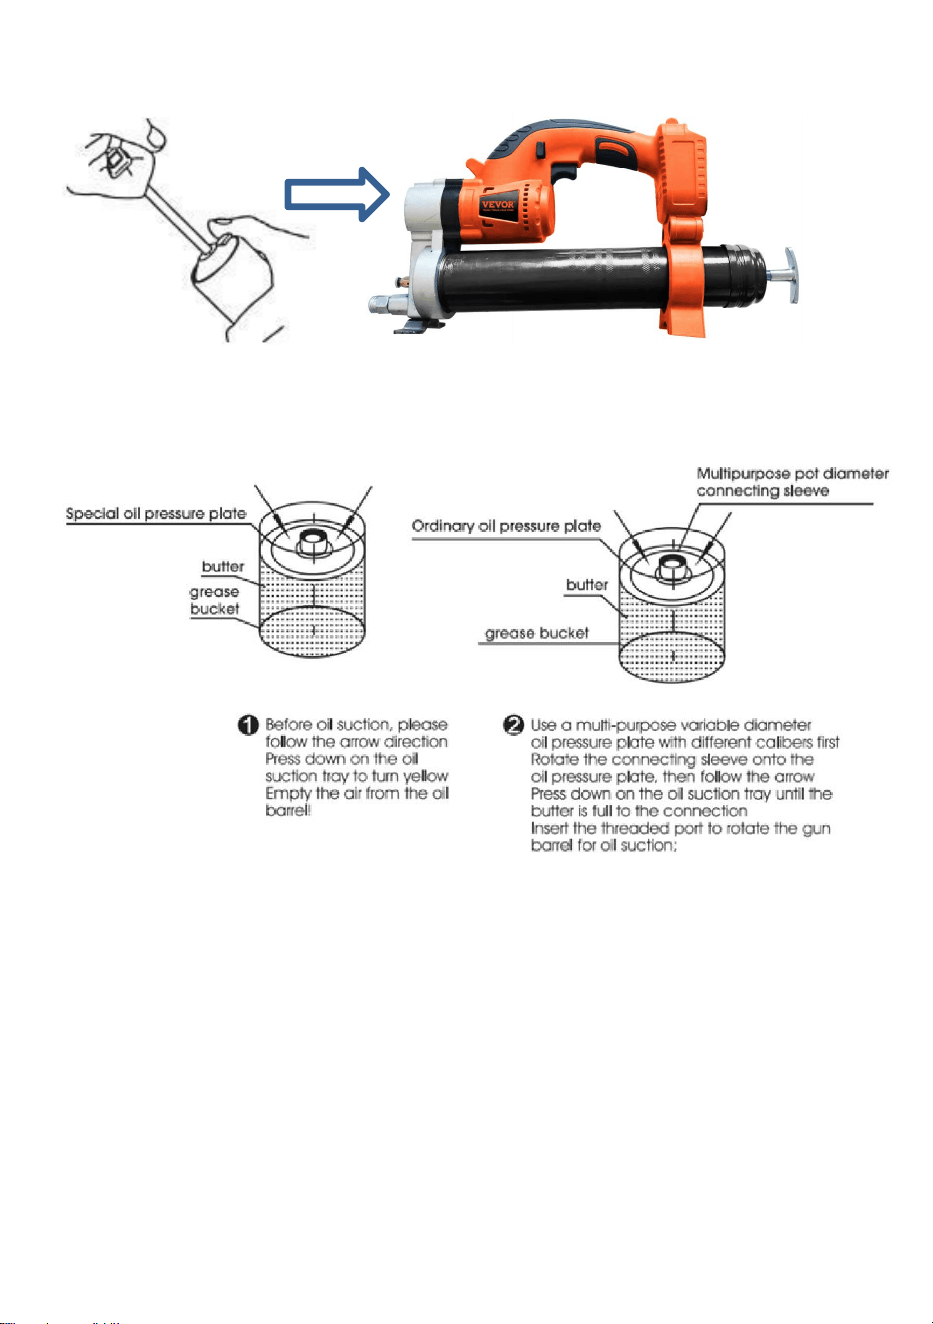
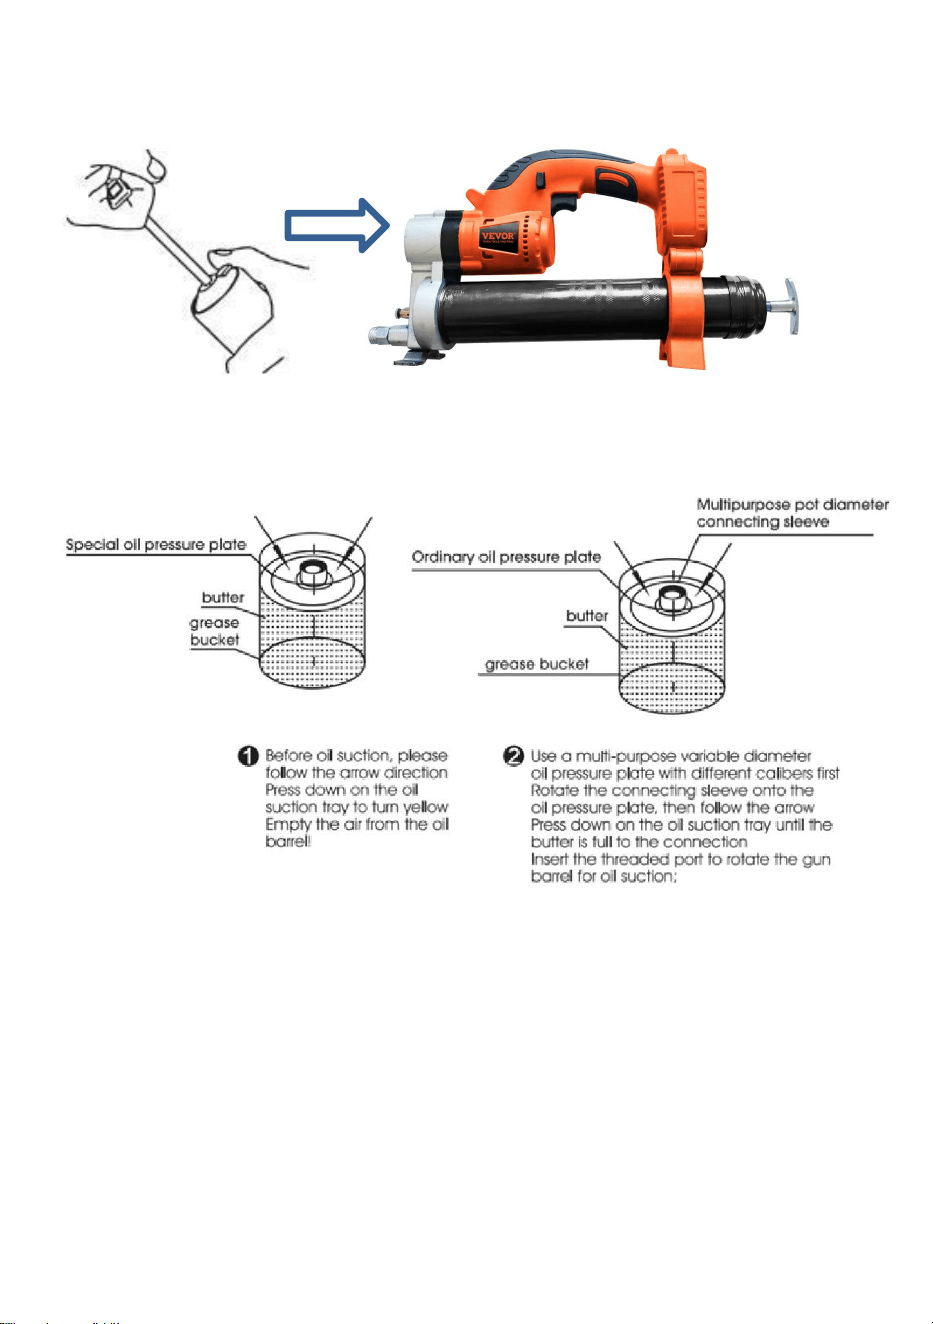
Oil pressure pan use method
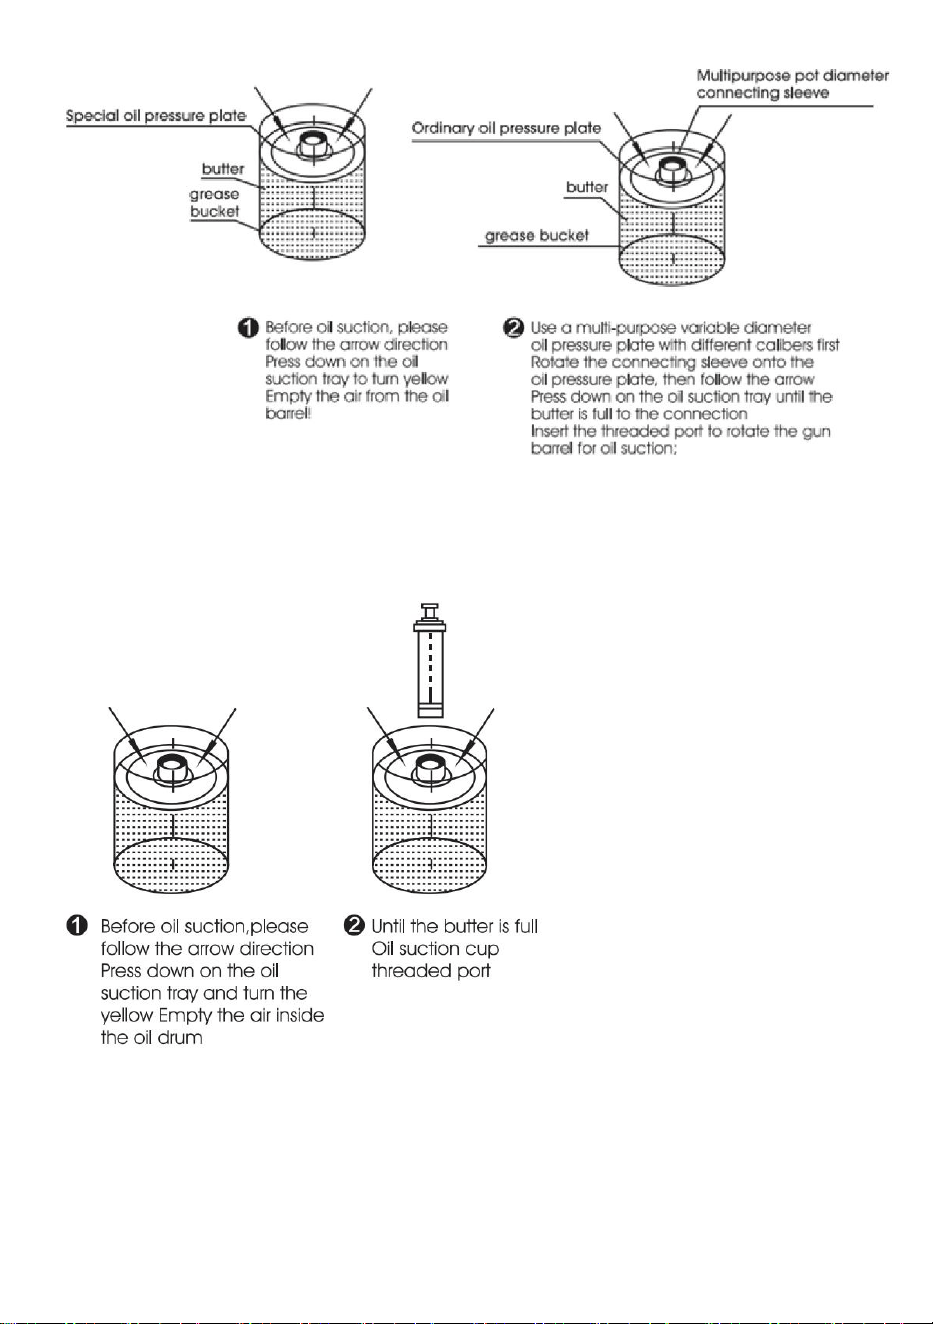
- 5 -
The usage method of a multi-purpose variable diameter connecting sleeve: Use it
with ordinary oil suction cups of different diameters. Lithium battery dual-purpose
grease gun Special oil suction tray does not need to be used).
- 6 -
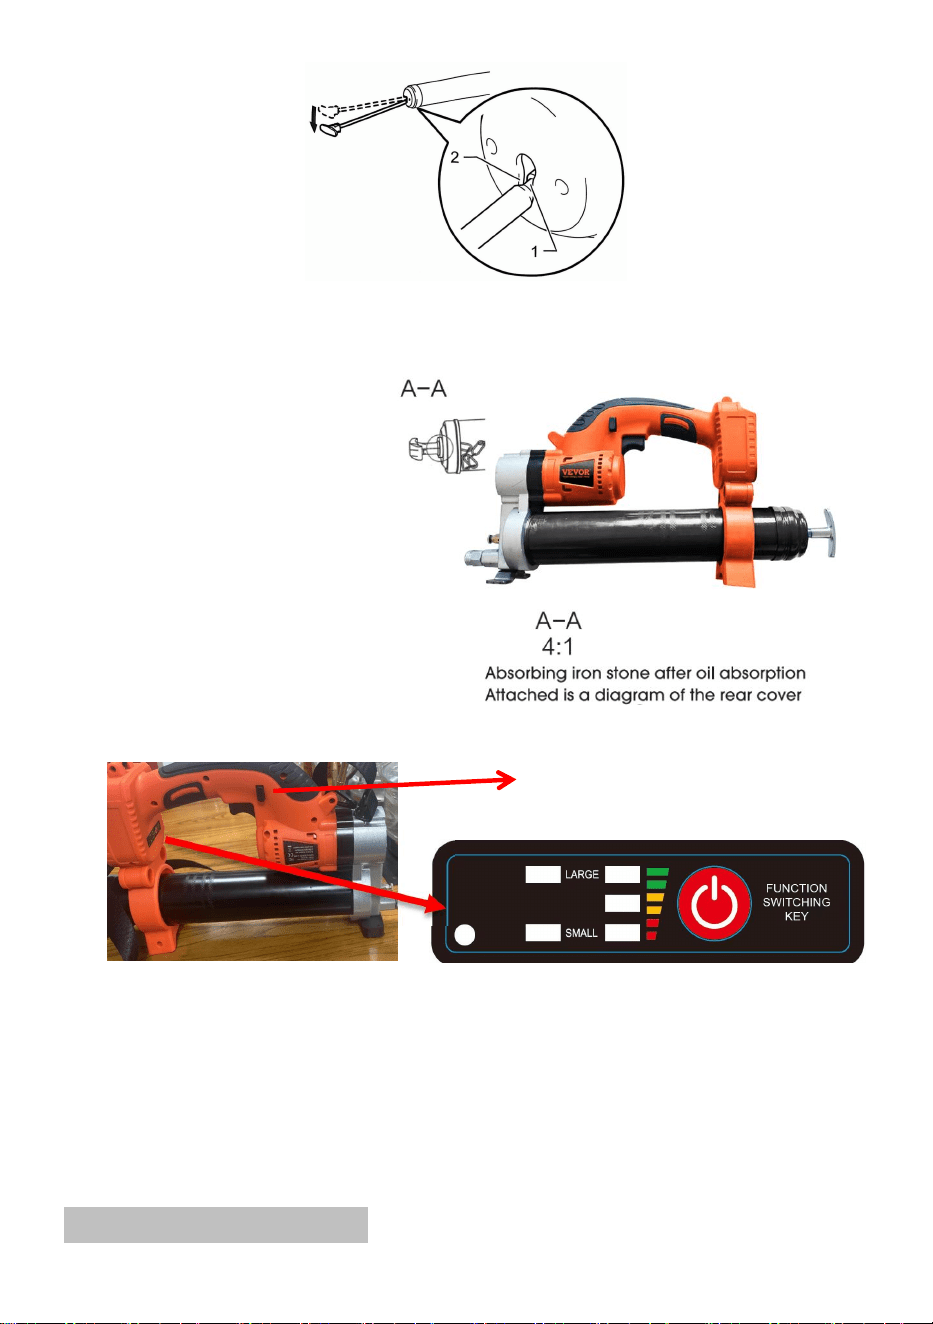
The usage method for breaking up and filing oil, as shown in the figure: Rotate
the gun barrel to the specially equipped oil suction plate (when the oil suction
plate is waiting for oil suction, please first put the butter bucket into it. Evacuate
the air until the butter is full and the oil suction effect is better at the threaded port
of the oil suction plate.If the oil suction tray is not pressed to discharge the air
inside the bucket, the air inside the tube will increase during oil suction, which is
not due to poor suction of the product; consumers who purchase this product
area advised to be aware of this
3
.
Rod handle
1) Pull the rod handle when installing grease in the barrel.
1. Rod handle 2. Rod
2) To lock the rod handle fully pulled, pull the rod handle until the groove on the
rod can be seen, and then hook the groove onto the slot. To unlock the rod
handle. unhook the groove so the rod moves forward.
- 7 -
1. Groove 2. Slot
As shown in the figure: After
pulling the zipper to the bottom
and securing it firmly, rotate it
onto the gun head, Release the
zipper and put it back into the
bucket, then use a magnet to
attach it Above the back
cover,you can easily apply oil.
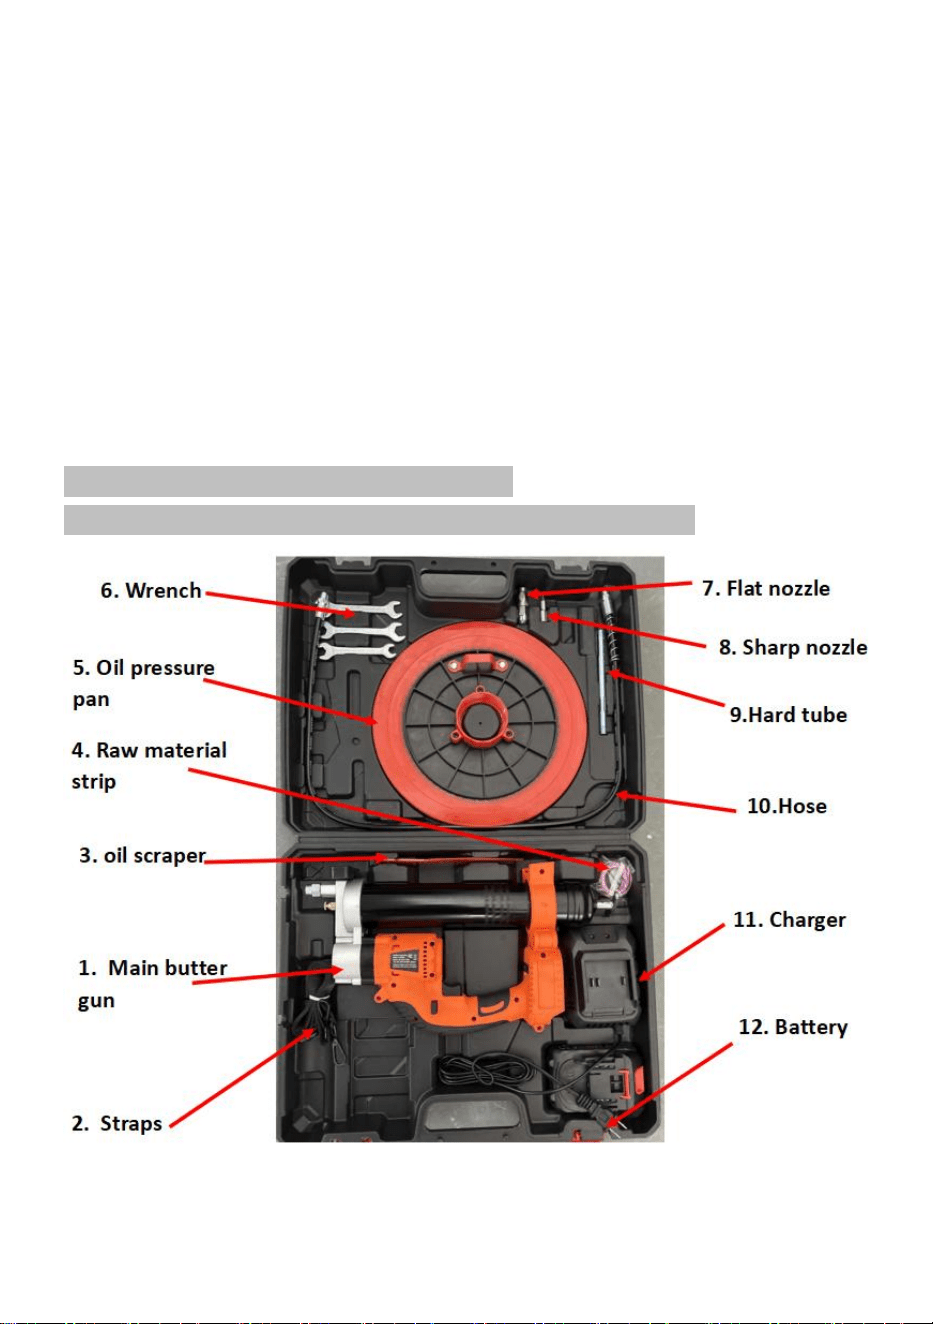
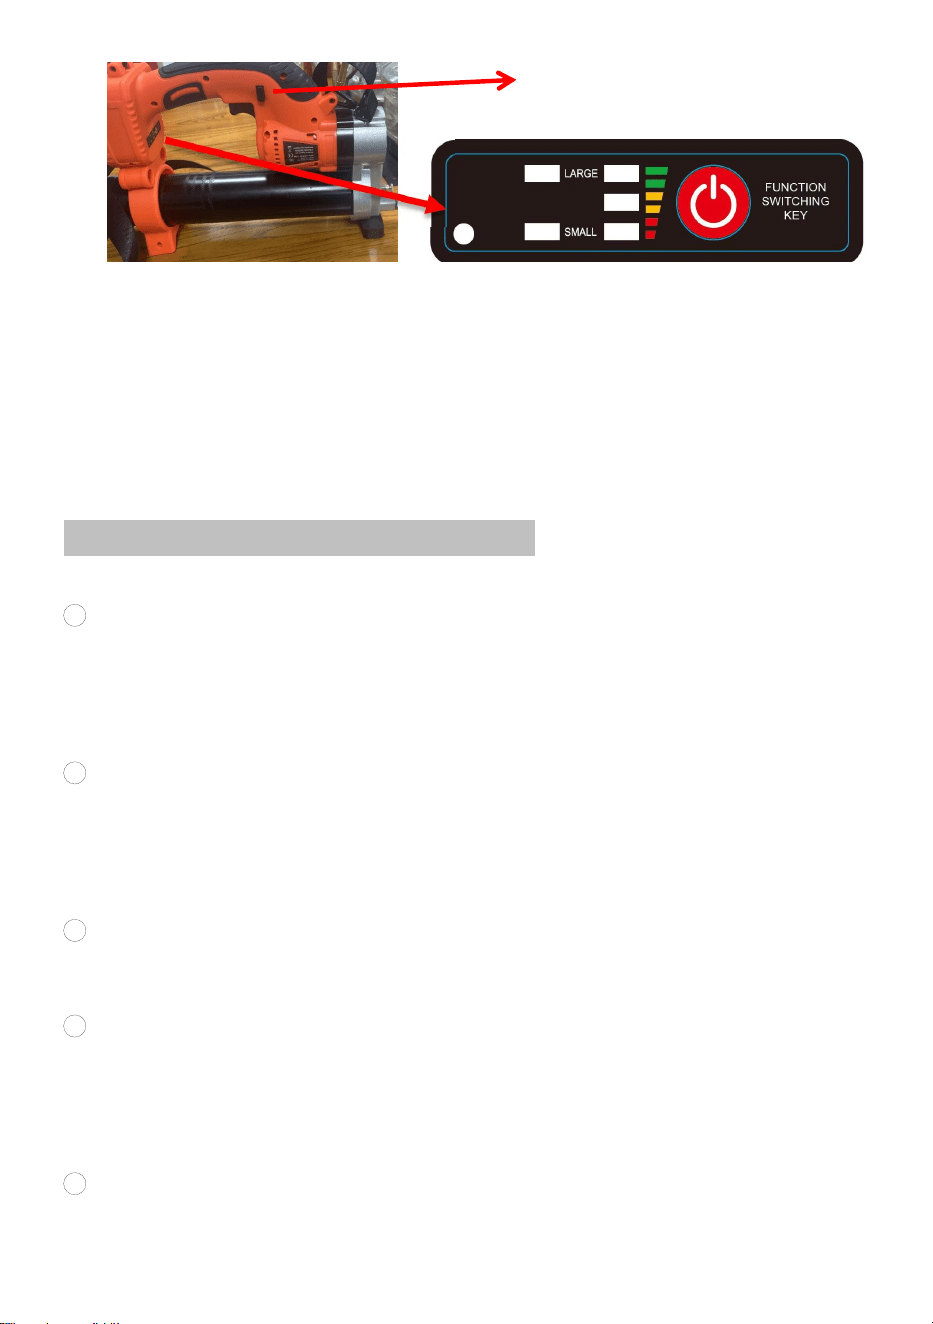
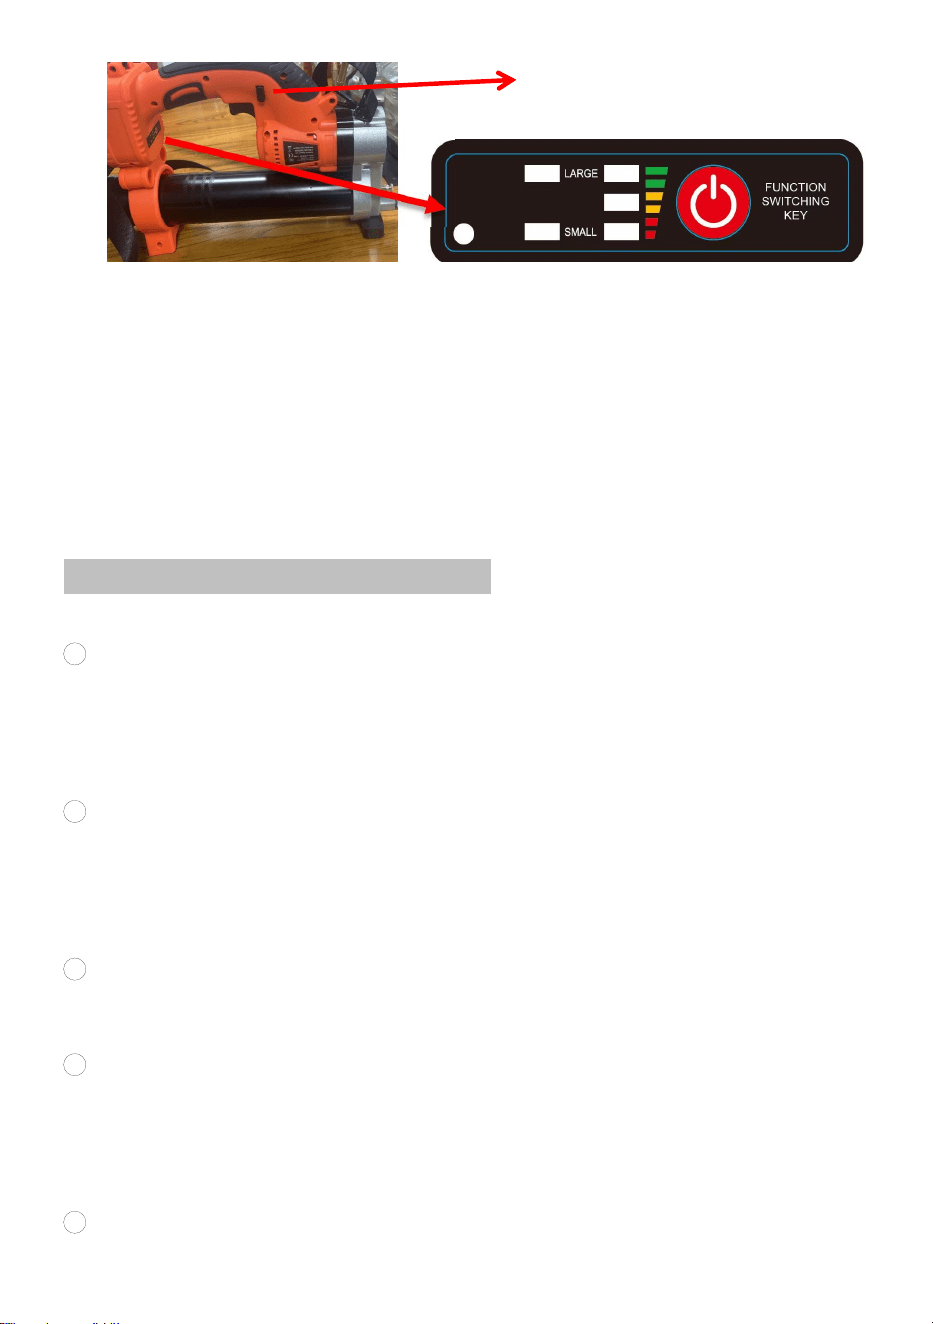
Function panel:
1) When button turn left, click the switch key , ① The indicator light is displayed
in a large position, the tools can shoot Grease fast continuous, ②The
indicator light is displayed in a small position, the tools can shoot Grease
slowly continuous,
2) When the switch key turn right,click the switch key, ①. when the indicator
light on the left lower corner is closed , the tools can shoot Grease fast
continuous, ②. when the indicator light on the left lower corner is opened, the
tools can shoot Grease discontinuous,
Battery usage method
button

- 8 -
Electrical safety:
1
The charging method of the battery needs to be known: the plug of the lithium
battery tool must match the socket. Please do not modify the plug; do not
connect electric tools with grounding wires to any transformer plug Used together.
Using unmodified plugs and matching sockets can reduce the danger of electric
shock.
2 The charging method of the battery needs to be known: the plug of the lithium
battery tool must match the socket. Please do not modify the plug; do not
connect electric tools with grounding wires to any transformer plug Used together.
Using unmodified plugs and matching sockets can reduce the danger of electric
shock.
3
Lithium-ion tools should not be exposed to rain. Do not place it in a damp
environment; water should flow into the electric tool Will increase the risk of
electric shock.
4
When charging, the battery is strictly prohibited from being close to flammable,
explosive, or corrosive materials, with a circumference of 15 meters. No debris
should be placed inside, and multiple batteries should not be charged to prevent
overloading of the circuit. Use to cause wire heating.
5
It is strictly prohibited to charge batteries on wooden, plastic, or other items.
Photo for reference
To charge the battery, line up the slot
of the battery with the slot of the
charger and slide into place.
The battery indicator light should turn from
green to red when the battery is charging.
When the indicator light has turned green the
battery should be fully charged.

- 9 -
WARNING: Allow the battery to cool down before charging if the battery is hot
after continuous use.
Charging method:
Before using the lithium grease gun, please charge the battery according to the
following method
1
insert the power plug of the battery charger into an appropriate AC voltage
source, and the charging indicator light will turn green.
2
Insert the DC plug of the charger into the DC socket of the battery box.
3
When connected to the power supply, the charger indicator light will turn red,
and charging will begin. During the charging process, the indicator light will
remain stable, and the red light will remain on.
4
When the charger indicator light changes from red to green, it indicates that
the charging cycle is complete.
5
After charging, please unplug the power plug of the charger from the power
plug.

- 10 -
Attention:
The battery charger is only used to charge the original factory battery box. Do not
use it for other purposes or charge it with batteries from other manufacturers,
when it comes to new products. When charging the battery case, it may not be
fully charged. Please fully discharge it and charge it several times before
charging. If charging a rechargeable battery that has just been used or has been
exposed to direct sunlight or heat for a long time, the charging indicator light can
be used. It will light up and turn green. Please wait for a while, as the battery
pack will start charging once it cools down.
Problems that will occur during the oiling process and the solutions
1. Problem: The butter gun operates normally during use, but there is no butter
discharged from the oil outlet nozzle.Reason: lt may be due to the phenomenon
of air being sucked in by the pipe during the oil suction process, causing the
butter to be unable to be discharged normally or checking if the tail chain is stuck
2. Problem: Motor speed slows down. Reason: Oil circuit blockage, insufficient
battery power
Press the switch to the exhaust and oil discharge diagram
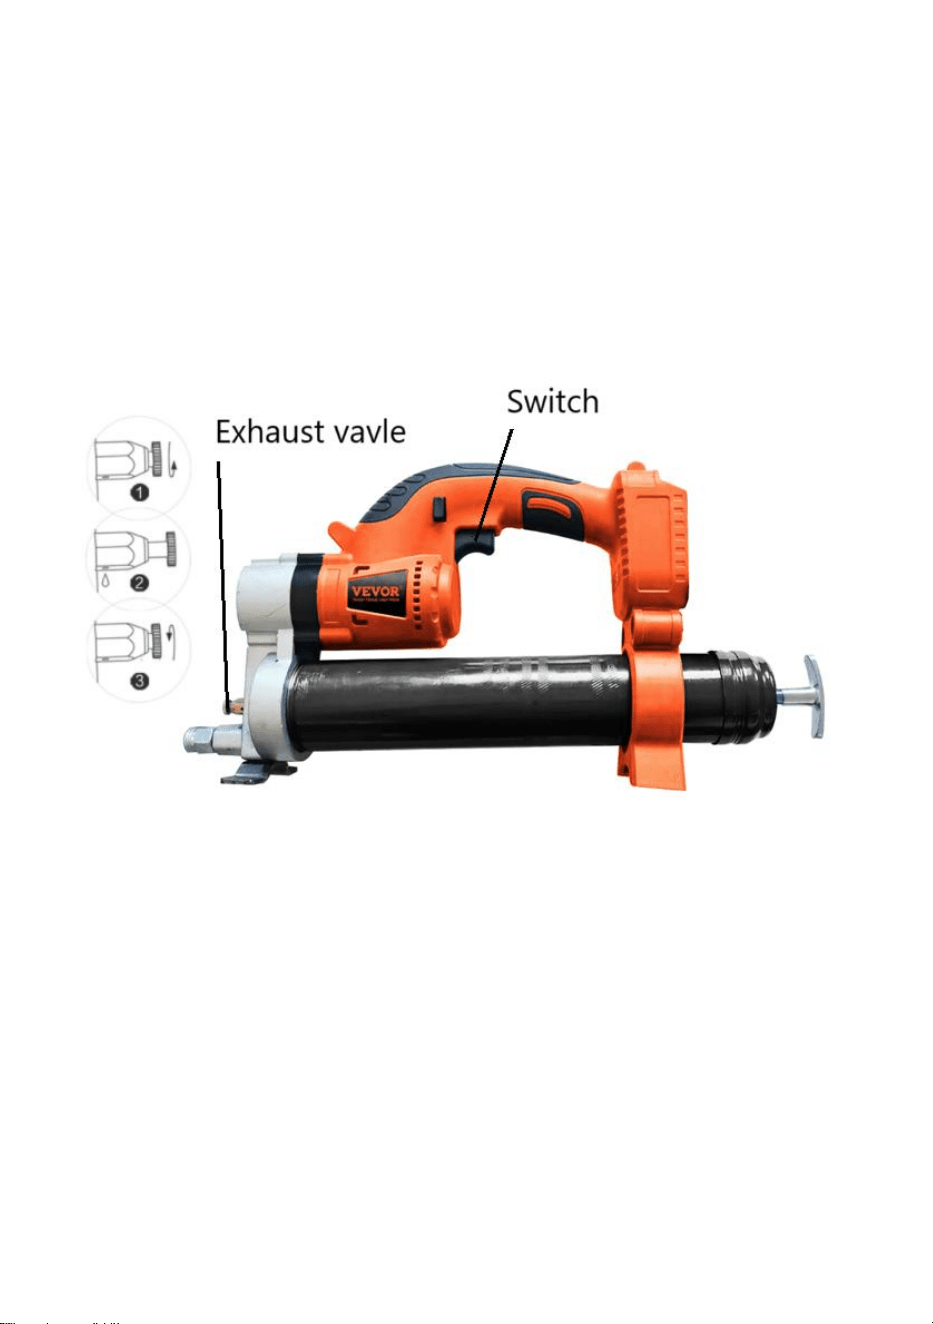
Air exhaust operation method, as shown in the figure: Open the exhaust valve as
shown in figure 9, rotate the exhaust valve twice, press the main switch until the
exhaust valve releases to air and a small amount of grease, and then it can be
used normally. If the oil still cannot be discharged normally, repeat this operation
method to ensure normal discharge.

- 11 -
Product parameters of 18.5V lithium dual-purpose electric grease gun
Model: LD-8207,LD-8207A / LD-8207B
How many pipes of oil can be filled under no-load conditions: with a flat nozzle
and a hose, six pipes can be filled. How many pipes of oil can be filled under a
load of 800 PSI: with a hose and a flat nozzle, four pipes can be filled.
Motor model: LY4815A
Battery voltage: 18.5v
Maximum working pressure: 6000PSI-8000PSI
Oil output per battery: 3200g with hose and flat nozzle+Oil output per minute:
110g-130g
Total oil output of two batteries: 6400g
Motor service life: over 140 hours
Time required to fully charge the battery: about1.5h
Battery charging output: 21V
Maximum pressure of hose: 8000PSI
Battery charging input: 100~240V/50Hz for US version,220~240V/50Hz for EU
version
Product material: Alloy steel
Working temperature: -20℃~50℃
Working current: 4A-24A
1
、
Daily maintenance
1) After each use of the oil gun, wipe the outer shell clean and place it in the
toolbox for proper storage
2) When not in use for a long time, drain the grease inside the transparent gun
barrel completely.
2、Precautions
①Non professionals, please do not disassemble or repair the host. If there are
quality issues that require repair, please contact the dealer and manufacturer's
repair personnel.
②When using the product, please handle it with care and do not throw it high at
will.
③ Use the specified type of grease according to the product specifications.
- 12 -
④Please wear professional protective equipment before using this product on
construction sites and operating sites
⑤ Please do not aim the oil gun at the person's face during operation for safe
operation
⑥ After the product is not in use, please remove the lithium battery. The lithium
battery should be charged every 3 days, and the accessories of the product and
the operation of the body should be checked regularly.
⑦Product storage conditions: ventilated and dry, independent storage, not
mixed with other products.
⑧ Do not drop or collide the battery pack, and keep it away from sources of fire.
⑨ Regularly check the hose and do not excessively bend it during use.
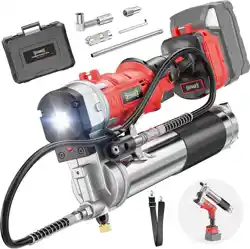
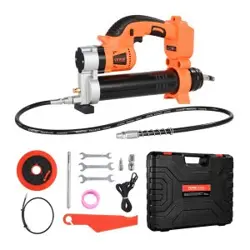
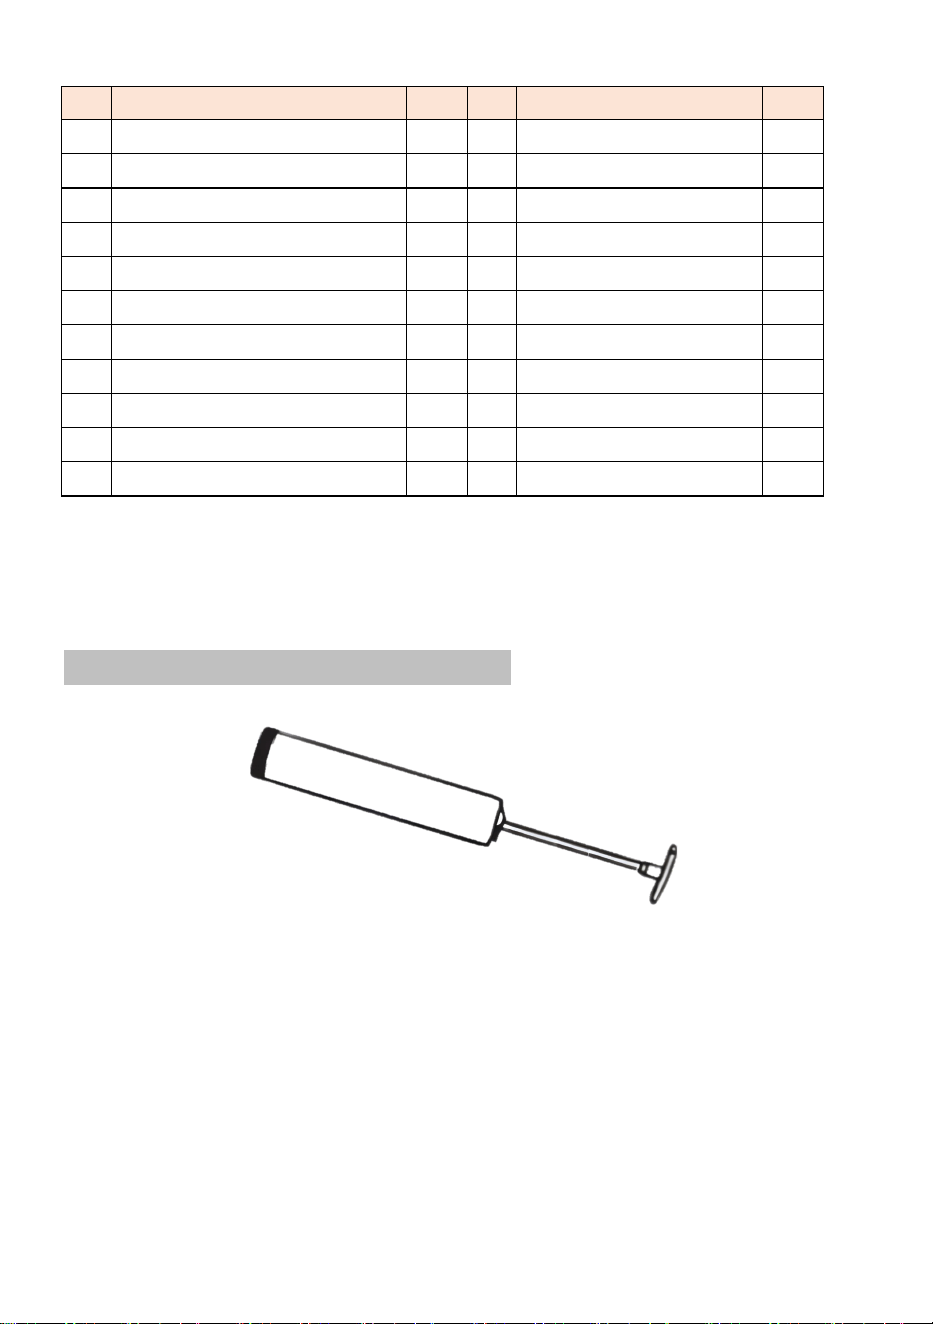
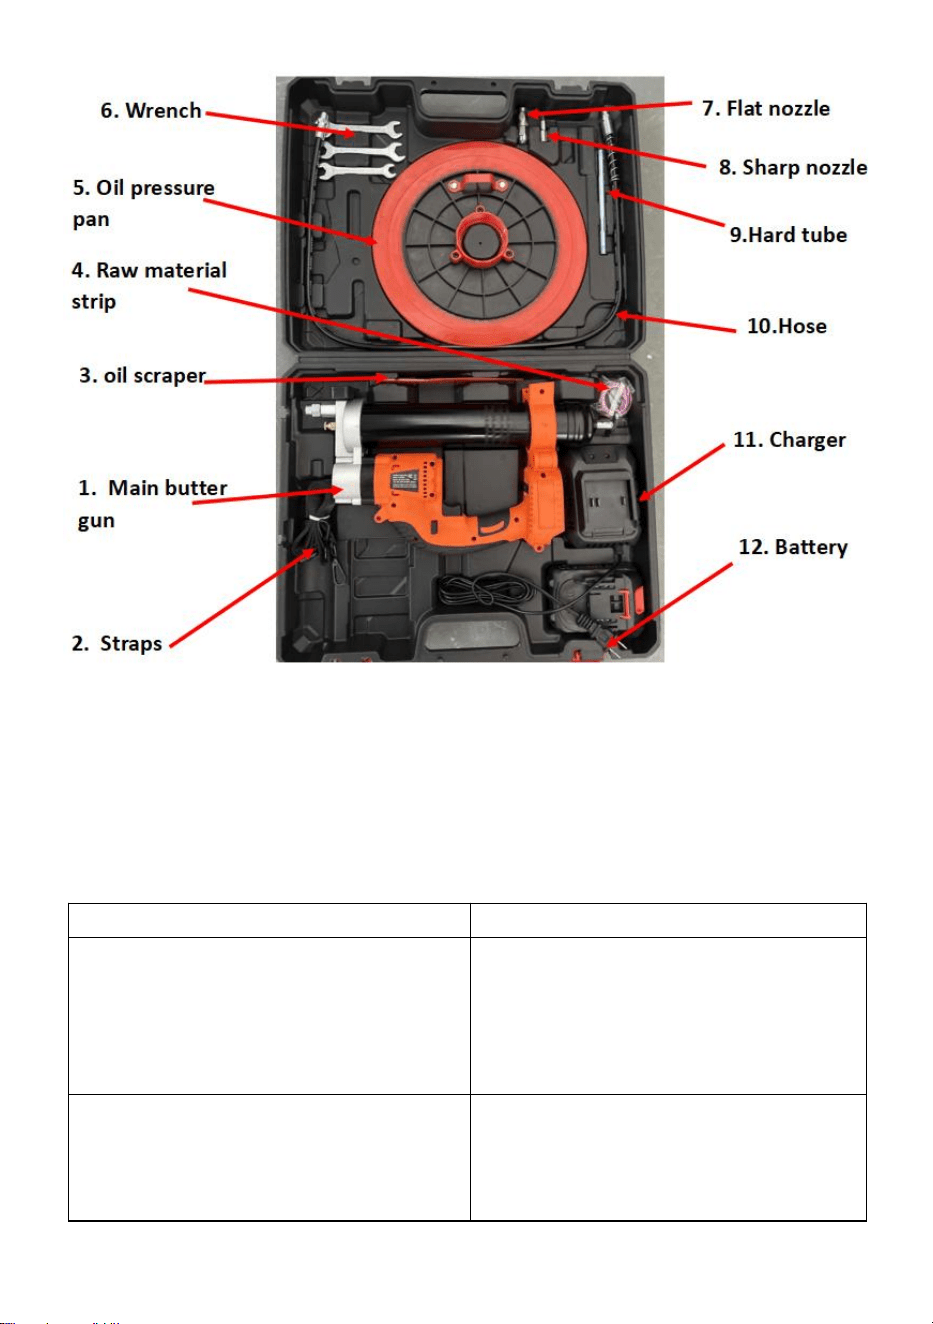
Introduction to Product Auxiliary Tools
(Only top of the line products include all accessories)
1. Main butter gun 2. Straps 3. Oil scraper,
4. Raw material strip 5. oil pressure pan 6. Wrench
7. lat nozzle 8. Sharp nozzle . 9 Hard tube,

- 13 -
10, Hose 11, Charger 12. Battery,
Comparison of benefits between electric butter guns and manual butter
guns in one year
Project: 20 ton excavator
Electric
Manual
①
Working hours and lost time:
8 minutes/day*219 days=29
hours*180yuan/hour=5220 yuan/year
25 minutes/day*219 days=91
hours*180yuan/hour=16400
yuan/year
②Fuel consumption:2900
grams/day*219 days=197
kilograms=13 barrels*200 yuan=2180
yuan/year
500 grams/day*219 days=109
kilograms=7barrels*200 yuan=1400
yuan/year
③
Machine maintenance+repair
costs+loss of work costs
4 axles*2000 yuan/axle=8000
yuan/2years (repair cost)2400
yuan/day * 4 days=9600 yuan/2years
(loss of work fee)Total: 13600
yuan/year
4 axles * 2000 yuan/axle=8000
yuan/year(repair cost)2400 yuan/day
* 4 days=9600 yuan/year(loss of work
fee)Total: 27200 yuan/year
④Purchase price electric:
1000 yuan/unit=500 yuan (2 years per
unit)
150 yuan * 2=300 yuan (2 pieces per
year)
Total:
5220+2180+13600+500=21500
yuan/year
Total:
16400+1400+27200+300=45300
yuan/year
Total price difference: 45300-21500= 23800 yuan/year
Comparison of benefits between electric grease guns and manual grease guns.
Warning - To reduce the risk of injury, user must read instructions
manual carefully

- 14 -
Wear head protection
FCC Information:
CAUTION: Changes or modifications not expressly approved by the party
responsible for compliance could void the user's authority to operate the
equipment!
This device complies with Part 15 of the FCC Rules. Operation is subject to the
following two conditions:
1) This product may cause harmful interference.
2)This product must accept any interference received, including interference that
may cause undesired operation.
WARNING: Changes or modifications to this product not expressly approved by
the party responsible for compliance could void the user's authority to operate the
product.
Note: This product has been tested and found to comply with the limits for a
Class B digital device pursuant to Part 15 of the FCC Rules. These limits are
designed to provide reasonable protection against harmful interference in a
residential installation.
This product generates, uses and can radiate radio frequency energy, and if not
installed and used in accordance with the instructions, it may cause harmful
interference to radio communications. However, there is no guarantee that
interference will not occur in a particular installation. If this product does cause
harmful interference to radio or television reception, which can be determined by
turning the product off and on, the user is encouraged to try to correct the
interference by one or more of the following measures.
· Reorient or relocate the receiving antenna.
· Increase the distance between the product and receiver.
· Connect the product to an outlet on a circuit different from that to which the
receiver is connected.
· Consult the dealer or an experienced radio/TV technician for assistance.
CORRECT DISPOSAL
This product is subject to the provision of European Directive
2012/19/EU. The symbol showing a wheelie bin crossed through
indicates that the product requires separate refuse collection in the
European Union. This applies to the product and all accessories marked
with this symbol. Products marked as such may not be discarded with
normal domestic waste, but must be taken to a collection point for recycling
electrical and electronic devices.

- 15 -
Manufacturer: Shanghaimuxinmuyeyouxiangongsi
Address: Shuangchenglu 803nong11hao1602A-1609shi, baoshanqu, shanghai
200000 CN.
Imported to AUS: SIHAO PTY LTD. 1 ROKEVA STREETEASTWOOD NSW
2122 Australia
Imported to USA: Sanven Technology Ltd. Suite 250, 9166 Anaheim Place,
Rancho Cucamonga, CA 91730
REP
EC
E-CrossStu GmbH
Mainzer Landstr.69, 60329 Frankfurt am Main.
REP
UK
YH CONSULTING LIMITED.
C/O YH Consulting Limited Office 147, Centurion House,
London Road, Staines-upon-Thames, Surrey, TW18 4AX
Technical Support and E-Warranty Certificate
www.vevor.com/support

- 16 -
Technique Certificat d'assistance et de garantie électronique
www.vevor.com/support
PISTOLET À GRAISSE SANS FIL
UTILISATEUR MANUEL
Nous continuons à nous engager à vous fournir des outils à des prix compétitifs.
« Économisez la moitié », « Moitié prix » ou toute autre expression similaire utilisée par
nous uniquement
représente une estimation des économies que vous pourriez réaliser en achetant certains
outils
avec nous par rapport aux grandes marques et ne signifie pas nécessairement couverture
Toutes les catégories d'outils que nous proposons. Veuillez vérifier soigneusement
lorsque vous passez une commande chez nous si vous êtes réellement Économie
Moitié en comparaison avec les plus grandes marques.
- 1 -
Modèle : LD-8207, LD-8207A / LD-8207B
LD-8207
LD-8207A / LD-8207B
Photo pour référence
BESOIN Besoin d'aide ? Contactez-nous
NOUS!
Avoir produit des questions? Besoin technique soutien? S'il te plaît
sentir gratuit à contact nous:
Assistance technique et certificat de garantie
électronique
www.vevor.com/support
C'est l'original instruction, s'il vous plaît lisez tout manuel instructions
soigneusement avant utilisation. VEVOR se réserve le droit
d'interpréter clairement ce manuel d'utilisation. L'apparence du produit
doit être soumis à la
produit que vous reçu. S'il vous plaît pardonnez nous que nous ne le
Cordless Grease Gun

- 2 -
ferons pas vous informer à nouveau s'il existe une technologie ou un
logiciel mises à jour sur notre produit.
1. Lisez attentivement et comprenez tout l' ASSEMBLAGE ET
OPÉRATION INSTRUCTIONS avant l'utilisation.
2. Non-respect des règles de sécurité et autres mesures de sécurité de
base précautions peut résultat en termes personnels sérieux blessure.
Spécification
Modèle : LD-8207 / LD-8207 A / LD-8207 B. Une alimentation 18 V-21 V est
acceptable. Nos outils sont compatibles avec les batteries Makita .
Modèle
Avec
ou sans
batterie
Type de
prise
Pouvoir
Chargeur
Saisir
Sortir
LD-8207
Non
Sans
18,5 V CC
Sans
LD-8207A
Oui
NOUS
18,5 V 2,0 Ah
CA 100-240 V
50/60 Hz
CC 21 V, 2 A
LD-8207B
Oui
UE
18,5 V 2,0 Ah
CA 220-240 V
50/60 Hz
CC 21 V, 2 A
Le produit présente les caractéristiques suivantes

- 3 -
Photo pour référence
Injection d'huile stable
L'échappement stable assure une
injection d'huile en douceur
Forte pression
Pression d'injection d'huile élevée,
équilibrage continu , rapide et
efficace
Soyez facile à transporter
Livré avec la voiture, permet
d'économiser du temps et des
efforts, et est pratique et rapide
Utilisation flexible et
efficace
Il peut être injecté dans n’importe
quelle partie de la buse peut être
étendu huile en place
S
N
Numéro de pièce
Qt
é
S
N
Numéro de pièce
Qt
é
1
Boîte de vitesse
1
1
2
Couvercle de cylindre
d'huile
1
2
Roue à essieu excentrique
1
1
3
Poignée en aluminium
1
3
Couvercle du corps de la
pompe
1
1
4
tige de traction
1
4
Manchon de tige de noyau
excentrique
1
1
5
bouton de
commutation
1
5
soupape d'échappement
1
1
6
Composants de la carte
1
6
Corps de pompe en
aluminium
1
1
7
Pack de batteries au
lithium
1
7
Support pour les pieds
1
1
8
Coquille - Gauche
1
8
piston en caoutchouc
1
1
9
Interface du boîtier de
batterie
1
9
Composants fixes
1
2
0
machines électriques
1
- 4 -
1
0
cylindre de stockage d'huile
1
2
1
Tableau de contrôle
1
1
1
Carte d'assurance
1
Avant d'utiliser la méthode d'inspection, vérifiez si la lampe de travail
s'allume Lorsque le produit est branché sur batterie, l' appareil fonctionne-t
-il normalement ?
Instructions pour l'utilisation des boules de beurre
Étape 1. Tirez la poignée de la tige du piston vers l'arrière et remplissez le canon
de graisse.
Options de remplissage de graisse :
1) Chargement de la cartouche : retirez le capuchon en plastique de la cartouche
et insérez l'extrémité ouverte de la cartouche dans le canon du pistolet à graisse
jusqu'à ce que le bord de l'extrémité de la languette de traction rencontre le bord
du canon.
1) 2)
2) Remplissage par aspiration : Insérez l'extrémité ouverte du barillet d'environ 2
pouces dans le récipient à graisse. Tirez lentement sur la poignée de la tige du
piston pour aspirer la graisse dans le barillet vide tout en poussant le barillet plus
profondément dans la graisse jusqu'à ce que la tige du piston soit complètement
déployée. La surface extérieure peut être très graisseuse et doit être nettoyée par
mesure de sécurité.
- 5 -
Étape 2 : Remontez le canon dans le pistolet à graisse. Activez le loquet de
sécurité et repoussez la tige de poussée dans le canon.
Méthode d'utilisation du carter sous pression d'huile
Méthode d'utilisation d' un manchon de raccordement à diamètre variable
polyvalent : Utilisez -le avec Ventouses à huile ordinaires de différents diamètres.
Pompe à graisse double usage à batterie au lithium. Il n'est pas nécessaire
d'utiliser un bac d'aspiration d'huile spécial .

- 6 -
La méthode d'utilisation pour briser et remplir l'huile, comme indiqué sur la figure :
Tournez le canon du pistolet dans la direction spécialement plaque d'aspiration d'
huile équipée (lorsque la plaque d'aspiration d'huile attend l' aspiration d'huile,
veuillez d'abord y mettre le seau à beurre) . Évacuez l'air jusqu'à ce que le beurre
soit plein et que l'effet d'aspiration d'huile soit meilleur au niveau de l'orifice fileté
de la plaque d'aspiration d'huile. Si le plateau d'aspiration d' huile n'est pas
pressé pour évacuer l'air à l'intérieur du seau, l'air à l'intérieur le tube augmentera
pendant l'aspiration d'huile, ce qui n'est pas dû à une mauvaise aspiration du

- 7 -
produit ; il est conseillé aux consommateurs qui achètent ce produit d' en être
conscients
3. Poignée de tige
3) Tirez sur la poignée de la tige lors de l'installation de la graisse dans le canon.
1. Poignée de tige 2. Tige
4) Pour verrouiller la poignée de la tige complètement tirée, tirez sur la poignée
de la tige jusqu'à ce que la rainure sur la tige soit visible, puis accrochez la
rainure sur la fente. Pour déverrouiller la poignée de la tige. décrocher la
rainure pour que la tige avance.
1. Rainure 2. Fente
Comme le montre la figure :
Après avoir tiré la fermeture
éclair jusqu'en bas et l'avoir
fixée fermement, faites-le
pivoter sur la tête du pistolet,
relâchez le fermeture éclair et
remettez-la dans le seau, puis
utilisez un aimant pour le fixer
Au-dessus du couvercle arrière,
vous pouvez facilement
appliquer de l'huile.
de fonctions :
- 8 -
3) Lorsque le bouton tourne à gauche, cliquez sur l'interrupteur clé, 1 Le voyant
lumineux s'affiche en grande position , les outils peuvent tirer de la graisse
rapidement en continu, 2 Le voyant lumineux s'affiche en petite position , les
outils peuvent tirer de la graisse lentement en continu,
4) Lorsque la clé de l'interrupteur tourne à droite , cliquez sur l'interrupteur clé ,
1. lorsque le voyant lumineux dans le coin inférieur gauche est fermé , les
outils peuvent tirer de la graisse rapidement et en continu, 2. lorsque le
voyant lumineux dans le coin inférieur gauche est ouvert , les outils peuvent
tirer de la graisse discontinu ,
Méthode d'utilisation de la batterie
Sécurité électrique :
6 La méthode de charge de la batterie doit être connue : La fiche de l'outil à
batterie au lithium doit correspondre à la prise. Veuillez ne pas modifier la fiche ;
ne connectez pas les outils électriques à la terre. fils à n'importe quelle prise de
transformateur utilisés ensemble. Utilisation de prises non modifiées et des
prises adaptées peuvent réduire le risque de choc électrique.
7
La méthode de charge de la batterie doit être connue : La fiche de l'outil à
batterie au lithium doit correspondre à la prise. Veuillez ne pas modifier la fiche ;
ne connectez pas les outils électriques à la terre. fils à n'importe quelle prise de
transformateur utilisés ensemble. Utilisation de prises non modifiées et des
prises adaptées peuvent réduire le risque de choc électrique .
8
lithium -ion ne doivent pas être exposés à la pluie. Ne les placez pas dans un
endroit humide. environnement ; l'eau doit s'écouler dans l'outil électrique
Augmentera la risque de choc électrique.
9 Lors de la charge, il est strictement interdit de placer la batterie à proximité de
matériaux inflammables, explosifs ou corrosifs. d'une circonférence de 15 mètres
. Aucun débris ne doit être placé à l'intérieur et il est déconseillé de charger
plusieurs batteries. pour éviter la surcharge du circuit. Utilisé pour provoquer un
échauffement du fil.
10
Il est strictement interdit de charger des batteries sur des objets en bois, en
plastique ou autres.
button

- 9 -
Photo pour référence
Pour charger la batterie, alignez la
fente du batterie avec la fente du
chargeur et la glissière en place.
Le voyant de la batterie doit passer de du vert
au rouge lorsque la batterie est en charge.
Lorsque le voyant est devenu vert la batterie
doit être complètement chargée.
AVERTISSEMENT : Laissez la batterie refroidir avant de la charger si elle est
chaude après une utilisation continue.
Méthode de chargement :
Avant d'utiliser le pistolet à graisse au lithium, veuillez charger la batterie selon la
méthode suivante
6
insérez la fiche d'alimentation du chargeur de batterie dans une source de
tension alternative appropriée et l'indicateur de charge la lumière deviendra verte.
7 Insérez la fiche CC du chargeur dans la prise CC du boîtier de batterie.
8
Une fois connecté à l'alimentation, le voyant du chargeur devient rouge et la
charge commence. processus de charge, le voyant lumineux restera stable et le
voyant rouge restera allumé.
9
Lorsque le voyant du chargeur passe du rouge au vert, cela indique que le
cycle de charge est terminé.
10 Après la charge, veuillez débrancher la fiche d'alimentation du chargeur de la
prise d'alimentation.

- 10 -
Attention:
Le chargeur de batterie sert uniquement à recharger le boîtier de batterie
d'origine. Ne l'utilisez pas à d'autres fins. avec ça batteries d'autres fabricants ,
lorsqu'il s'agit de nouveaux produits. Lors du chargement du boîtier de batterie , il
se peut qu'il ne être complètement chargée. Veuillez la décharger complètement
et la charger plusieurs fois avant de la recharger. Si vous chargez une batterie
rechargeable Si la batterie vient d'être utilisée ou a été exposée à la lumière
directe du soleil ou à la chaleur pendant une longue période, le voyant de charge
peut être utilisé . Il s'allumera et deviendra vert . Veuillez patienter un instant, car
la batterie commencera à se charger une fois refroidie .
Problèmes qui surviendront pendant le processus de huilage et les
solutions
3. Problème : Le pistolet à beurre fonctionne normalement pendant l'utilisation,
mais il n'y a pas de beurre qui sort de la buse de sortie d'huile.Raison : Cela peut
être dû au phénomène de l'air étant aspiré par le tuyau pendant le processus
d'aspiration de l'huile, empêchant le beurre d'être évacué normalement ou vérifier
si la chaîne de queue est coincée
4. Problème : Le moteur ralentit . Raison : Blocage du circuit d'huile, batterie
déchargée.
Appuyez sur l'interrupteur pour accéder au schéma d'échappement
et de décharge d'huile

- 11 -
Méthode de fonctionnement de l'échappement d'air, comme indiqué sur la figure :
Ouvrez la soupape d'échappement comme indiqué sur la figure 9, faites tourner
la soupape d'échappement deux fois, appuyez sur l'interrupteur principal jusqu'à
ce que la soupape d'échappement libère de l'air et une petite quantité de graisse,
puis elle peut être utilisé normalement . Si l' huile ne peut toujours pas être
évacuée normalement, répétez cette méthode d'opération pour assurer une
évacuation normale .
Paramètres du produit du pistolet à graisse électrique à double usage au
lithium 18,5 V
Modèle : LD-8207, LD-8207A / LD-8207B
Combien de tuyaux d'huile peuvent être remplis dans des conditions de charge
nulle : Avec une buse plate et un tuyau, on peut remplir six tubes . Combien de
tubes d'huile peuvent être remplis sous une charge de 800 PSI ? avec un tuyau
et une buse plate, quatre tuyaux peuvent être remplis .
Modèle de moteur : LY4815A
Tension de la batterie : 18,5 V
de service maximale : 6 000 PSI -8 000 PSI
Débit d'huile par batterie : 3200 g avec tuyau et buse plate + Débit d'huile par
minute : 110 g-130 g
Rendement total d'huile des deux batteries : 6400 g
Durée de vie du moteur : plus de 140 heures
Temps nécessaire pour charger complètement la batterie : environ 1,5 h
Sortie de charge de batterie : 21 V
Pression maximale du tuyau : 80 00 PSI
Entrée de charge de la batterie : 100~240 V/50 Hz pour la version américaine,
220 ~240 V/50 Hz pour la version européenne
Matériau du produit : Acier allié
Température de fonctionnement : -20 ℃ ~ 50 ℃
Courant de fonctionnement : 4A-24A
1
、
Entretien quotidien
1 ) Après chaque utilisation du pistolet à huile, essuyez la coque extérieure et
placez-la dans la boîte à outils pour un stockage approprié
2 ) Lorsque vous ne l'utilisez pas pendant une longue période, vidangez
complètement la graisse à l'intérieur du canon transparent du pistolet.

- 12 -
2、 Précautions
1. Les non-professionnels ne doivent pas démonter ni réparer l'hôte. En cas de
problème de qualité nécessitant une réparation , veuillez contacter le revendeur
et le service de réparation du fabricant.
2.Lorsque vous utilisez le produit, veuillez le manipuler avec précaution et ne le
jetez pas en l' air .
③ Utilisez le type de graisse spécifié conformément aux spécifications du produit.
④ Veuillez porter un équipement de protection professionnel avant d'utiliser ce
produit sur les chantiers de construction et les sites d'exploitation
⑤ Veuillez ne pas diriger le pistolet à huile vers le visage de la personne pendant
le fonctionnement pour un fonctionnement en toute sécurité
6. Après utilisation du produit, veuillez retirer la batterie au lithium. Celle-ci doit
être rechargée toutes les 3 heures. jours, et les accessoires du produit ainsi que
le fonctionnement du corps doivent être vérifiés régulièrement.
7. Conditions de stockage du produit : aéré et sec, stockage indépendant, non
mélangé avec d'autres produits.
⑧ Ne laissez pas tomber ou ne heurtez pas la batterie et tenez-la à l'écart des
sources d'incendie .
⑨ Vérifiez régulièrement le tuyau et ne le pliez pas excessivement pendant
l'utilisation.
Introduction aux outils auxiliaires du produit
(Seuls les produits haut de gamme incluent tous les accessoires)
- 13 -
1. Pistolet à beurre principal 2. Sangles 3. Grattoir à huile,
4. Bande de matière première 5. carter de pression d'huile 6. Clé
7. buse plate 8. Buse pointue . 9 Tube dur ,
10, Tuyau 11, Chargeur r 12. Batterie ,
Comparaison des avantages entre pistolets à beurre électriques et manuels
armes en un an
Projet : excavatrice de 20 tonnes
Électrique
Manuel
1 Heures de travail et temps perdu :
8 minutes/jour*219 jours=29
heures*180 yuans/heure=5220
yuans/an
25 minutes/jour*219 jours=91
heures*180 yuans/heure=16400
yuans/an
2 Consommation de carburant :
2 900 grammes/jour x 219 jours = 197
kilogrammes = 13 barils x 200 yuans
= 2 180 yuans/an
500 grammes/jour*219 jours=109
kilogrammes=7 barils*200
yuans=1400 yuans/an

- 14 -
③
Entretien de la machine + frais
de réparation + frais de perte de
travail
4 essieux * 2000 yuans/essieu = 8000
yuans/2 ans (frais de réparation) 2400
yuans/jour * 4 jours = 9600 yuans/2
ans (frais de perte de travail) Total :
13600 yuans/an
4 essieux * 2000 yuans/essieu =
8000 yuans/an (frais de réparation)
2400 yuans/jour * 4 jours = 9600
yuans/an (frais de perte de travail)
Total : 27200 yuans/an
④ Prix d'achat électrique :
1000 yuans/unité = 500 yuans (2 ans
par unité)
150 yuans * 2 = 300 yuans (2 pièces
par an)
Total :
5220+2180+13600+500=21500
yuans/an
Total : 16 400 + 1 400 + 27 200 +
300 = 45 300 yuans/an
Différence de prix totale : 45 300-21 500 = 23 800 yuans/an
Comparaison des avantages entre les pistolets à graisse électriques et graisse
manuelle armes à feu.
Avertissement - Pour réduire le risque de blessure, l'utilisateur doit
lire attentivement le manuel d'instructions
Porter une protection pour la tête
Informations FCC :
ATTENTION : Les changements ou modifications non expressément approuvés
par la partie responsable de la conformité pourraient annuler le droit de
l'utilisateur à utiliser l'équipement !
Cet appareil est conforme à la partie 15 de la réglementation FCC. Son utilisation
est soumise aux deux conditions suivantes :
1) Ce produit peut provoquer des interférences nuisibles.
2) Ce produit doit accepter toute interférence reçue, y compris les interférences
susceptibles de provoquer un fonctionnement indésirable.
AVERTISSEMENT : Les changements ou modifications apportés à ce produit
non expressément approuvés par le tiers responsable de la conformité pourrait
annuler l'autorisation de l'utilisateur à utiliser le produit.

- 15 -
Remarque : Ce produit a été testé et déclaré conforme aux limites imposées aux
appareils numériques de classe B, conformément à la partie 15 de la
réglementation FCC . Ces limites visent à assurer une protection raisonnable
contre les interférences nuisibles dans une installation résidentielle.
Ce produit génère, utilise et peut émettre des radiofréquences. S'il n'est pas
installé et utilisé conformément aux instructions, il peut provoquer des
interférences nuisibles aux communications radio. Cependant, rien ne garantit
l'absence d'interférences dans une installation particulière. Si ce produit provoque
des interférences nuisibles à la réception radio ou télévision, qui peut être
déterminé en éteignant et en rallumant le produit, l'utilisateur est encouragé à
essayer de corriger l'interférence par une ou plusieurs des mesures suivantes.
· Réorienter ou déplacer l’antenne de réception.
· Augmenter la distance entre le produit et le récepteur.
· Branchez le produit sur une prise d’un circuit différent de celui sur lequel le
récepteur est branché.
· Consultez le revendeur ou un technicien radio/TV expérimenté pour obtenir de
l’aide.
ÉLIMINATION CORRECTE
Ce produit est soumis aux dispositions de la directive européenne
2012/19/UE. Le symbole représentant une poubelle barrée indique que
le produit doit faire l'objet d'une collecte sélective dans l'Union
européenne. Ceci s'applique au produit et à tous les accessoires
marqués de ce symbole. Les produits ainsi marqués ne doivent pas être
jetés avec les ordures ménagères, mais doivent être déposés dans un centre de
collecte. point de collecte pour le recyclage des appareils électriques et
électroniques.

- 16 -
Fabricant : Shanghaimuxinmuyeyouxiangongsi
Adresse : Shuangchenglu 803nong11hao1602A-1609shi, baoshanqu, shanghai
200000 CN.
Importé en Australie : SIHAO PTY LTD. 1 ROKEVA STREET, ASTWOOD NSW
2122, Australie
Importé aux États-Unis : Sanven Technology Ltd. Suite 250, 9166 Anaheim
Place, Rancho Cucamonga, CA 91730
REP
EC
E-CrossStu GmbH
Mainzer Landstr.69, 60329 Frankfurt am Main.
REP
UK
YH CONSULTING LIMITED.
C/O YH Consulting Limited Office 147, Centurion House,
London Road, Staines-upon-Thames, Surrey, TW18 4AX
Technique Certificat d'assistance et de garantie électronique
www.vevor.com/support

- 17 -
Technisch Support- und E-Warranty-Zertifikat
www.vevor.com/support
AKKU-FETTPRESSE
BENUTZER HANDBUCH
Wir sind weiterhin bestrebt, Ihnen Werkzeuge zu wettbewerbsfähigen Preisen anzubieten.
"Sparen Sie die Hälfte", "Halber Preis" oder andere ähnliche Ausdrücke, die wir nur
verwenden
stellt eine Schätzung der Einsparungen dar, die Sie durch den Kauf bestimmter
Werkzeuge erzielen könnten
bei uns im Vergleich zu den großen Top-Marken und bedeutet nicht unbedingt Abdeckung
alle von uns angebotenen Werkzeugkategorien. Wir erinnern Sie freundlich daran, zu
überprüfen sorgfältig
wenn Sie bei uns eine Bestellung aufgeben, wenn Sie tatsächlich Speichern
Hälfte im Vergleich mit den Top-Großmarken.

- 1 -
Modell: LD-8207
,
LD-8207A / LD-8207B
LD-8207
LD-8207A / LD-8207B
Foto als Referenz
BRAUCHEN HILFE? KONTAKT UNS!
Haben Produkt Fragen? Brauchen technisch Unterstützung? Bitte
fühlen frei Zu Kontakt uns:
Technischer Support und E-Garantie-
Zertifikat www.vevor.com/support
Dies ist das Original Anweisung, bitte alles lesen Handbuch
Anweisungen
sorgfältig vor der Inbetriebnahme. VEVOR behält sich eine klare
Auslegung unserer Bedienungsanleitung vor. Das Aussehen des
Produkts soll unterliegen dem
Produkt Sie erhalten. Bitte verzeihen Sie uns, dass wir nicht informiere
Cordless Grease Gun

- 2 -
euch nochmal wenn es Technologien oder Software gibt Updates zu
unserem Produkt.
1. Lesen Sie sorgfältig und verstehen Sie alle MONTAGE UND BETRIEB
Lesen Sie vor der Inbetriebnahme die ANLEITUNG .
2. Nichtbeachtung der Sicherheitsvorschriften und anderer grundlegender
Vorsichtsmaßnahmen Mai Ergebnis in ernsten persönlichen Verletzung.
Spezifikation
Modell : LD-8207 / LD-8207 A / LD-8207 B verwendet 18V-21V ist akzeptabel.
Und unsere Werkzeuge können mit Makitas Akku kombiniert werden
Modell
Mit
Batteri
e
oder
nicht
Steckerty
p
Leistung
Ladegerät
Eingang
Ausgabe
LD-8207
NEIN
Ohne
18,5 V
Gleichspannung
Ohne
LD-
8207A
Ja
UNS
18,5 V 2,0 Ah
AC100-240V
50/60Hz
DC 21 V, 2
A
LD-
8207B
Ja
EU
18,5 V 2,0 Ah
AC220-240V
50/60Hz
DC 21 V, 2
A
Das Produkt hat folgende Eigenschaften

- 3 -
Foto als Referenz
Stabile Öleinspritzung
Stabiler Auspuff sorgt für eine
reibungslose Öleinspritzung
Starker Druck
Hoher Öleinspritzdruck,
kontinuierlicher Ausgleich ,
schnell und effektiv
Leicht zu transportieren
Kommt mit dem Auto, spart Zeit
und Mühe und ist bequem und
schnell
Flexibler und effizienter
Einsatz
Es kann in jeden Teil der Düse
eingespritzt werden, der kann
verlängert werden o il an Ort und
Stelle
S
N
Teilenummer
Meng
e
S
N
Teilenummer
Meng
e
1
Getriebe
1
1
2
Ölzylinderdeckel
1
2
Exzentrisches Achsrad
1
1
3
Aluminiumgriff
1
3
Pumpengehäusedeckel
1
1
4
Zugstange
1
4
Exzentrische
Kernstangenhülse
1
1
5
Schalterknopf
1
5
Auslassventil
1
1
6
Kartenkomponenten
1
6
Pumpenkörper aus
Aluminium
1
1
7
Lithium-Akkupack
1
7
Fußstütze
1
1
8
Schale - Links
1
8
Gummikolben
1
1
9
Batteriekastenschnittst
elle
1
9
Feste Komponenten
1
2
elektrische Maschinen
1
- 4 -
0
1
0
Ölvorratsbehälter
1
2
1
Steuerplatine
1
1
1
Versicherungskarte
1
Bevor Sie die Inspektionsmethode verwenden, prüfen Sie, ob das
Arbeitslicht leuchtet Wenn das Produkt mit einer Batterie verbunden ist,
läuft die Maschine im Leerlauf normal.
Anleitung zur Verwendung von Butterbällchen
Schritt 1. Ziehen Sie den Kolbenstangengriff zurück und füllen Sie den Zylinder
mit Fett.
Fettfüllmöglichkeiten:
1) Laden der Kartusche: Entfernen Sie die Plastikkappe von der Kartusche und
stecken Sie das offene Ende der Kartusche in den Lauf der Fettpresse, bis der
Rand des Aufreißlaschenendes den Rand des Laufs berührt.
1) 2)
2) Saugfüllung: Führen Sie das offene Ende des Fasses etwa 2 Zoll in den
Fettbehälter ein. Ziehen Sie langsam am Griff der Kolbenstange, um Fett in das
leere Fass zu ziehen, während Sie das Fass tiefer in das Fett drücken, bis die
Kolbenstange vollständig ausgefahren ist. An der Außenfläche kann viel Fett
haften bleiben und sollte aus Sicherheitsgründen sauber gewischt werden.

- 5 -
Schritt 2 : Setzen Sie das Fass wieder in die Fettpresse ein. Aktivieren Sie die
Sicherheitsverriegelung und drücken Sie die Schubstange zurück in das Fass.
Methode zur Verwendung der Öldruckwanne
Die Verwendung einer Mehrzweck-Verbindungsmuffe mit variablem
Durchmesser: Verwenden Sie sie mit gewöhnliche Ölsaugnäpfe mit
unterschiedlichen Durchmessern. Lithiumbatterie-Mehrzweck - Fettpresse (Der
Einsatz einer speziellen Ölabsaugwanne ist nicht erforderlich . )

- 6 -
Die Verwendungsmethode zum Aufbrechen und Feilen von Öl, wie in der
Abbildung gezeigt: Drehen Sie den Pistolenlauf auf die speziell Ausgestattete
Ölsaugplatte (wenn die Ölsaugplatte auf das Ansaugen von Öl wartet , stellen
Sie bitte zuerst den Buttereimer hinein) . Evakuieren Sie die Luft, bis die Butter
voll ist und der Ölsaugeffekt am Gewindeanschluss der Ölsaugplatte besser ist.
Wenn die Ölsaugschale nicht gedrückt wird, um die Luft im Eimer abzulassen,
wird die Luft im Inneren Der Schlauch wird sich beim Ansaugen von Öl
vergrößern , was nicht auf eine schlechte Saugkraft des Produkts zurückzuführen

- 7 -
ist . Verbraucher, die dieses Produkt kaufen, werden darauf hingewiesen, sich
dessen bewusst zu sein .
3. Stangengriff
5) Ziehen Sie beim Einfüllen des Fetts in den Lauf am Stangengriff.
1. Stangengriff 2. Stange
6) Um den Stangengriff vollständig herauszuziehen, ziehen Sie den Stangengriff
bis die Nut an der Stange sichtbar ist, und haken Sie dann Die Nut in den
Schlitz stecken. Zum Entriegeln des Stangengriffs. Lösen Sie die Nut, damit
sich die Stange nach vorne bewegt.
1. Nut 2. Schlitz
Wie in der Abbildung gezeigt:
Nachdem Sie den
Reißverschluss bis zum Boden
gezogen und gesichert haben
fest, drehen Sie es auf den
Pistolenkopf, lassen Sie die
Reißverschluss und legen Sie
es zurück in den Eimer, dann
verwenden Sie eine Magnet zur
Befestigung. Über der
Rückseite können Sie ganz
einfach Öl auftragen.
Funktionspanel :

- 8 -
5) Wenn die Taste nach links dreht, klicken Sie auf den Schalter Taste, 1 Die
Kontrollleuchte leuchtet groß , das Werkzeug kann kontinuierlich und schnell
Fett abfeuern, 2 Die Kontrollleuchte leuchtet klein , das Werkzeug kann
kontinuierlich und langsam Fett abfeuern,
6) Wenn der Schalter nach rechts dreht , klicken Sie auf den Schalter Taste , 1.
Wenn die Kontrollleuchte in der linken unteren Ecke aus ist , können die
Werkzeuge kontinuierlich und schnell Fett abfeuern , 2. Wenn die
Kontrollleuchte in der linken unteren Ecke an ist , können die Werkzeuge Fett
abfeuern diskontinuierlich ,
Batterienutzungsmethode
Elektrische Sicherheit:
11 Die Lademethode des Akkus muss bekannt sein: Der Stecker des Lithium-
Akku-Werkzeugs muss in die Steckdose passen. Bitte verändern Sie den Stecker
nicht ; schließen Sie keine Elektrowerkzeuge mit Erdung an Kabel an jeden
Transformatorstecker. Gemeinsam verwendet. Mit unveränderten Steckern und
passende Steckdosen können die Gefahr eines Stromschlags verringern.
12
Die Lademethode des Akkus muss bekannt sein: Der Stecker des Lithium-
Akku-Werkzeugs muss in die Steckdose passen. Bitte verändern Sie den Stecker
nicht ; schließen Sie keine Elektrowerkzeuge mit Erdung an Kabel an jeden
Transformatorstecker. Gemeinsam verwendet. Mit unveränderten Steckern und
passende Steckdosen können die Gefahr eines Stromschlags verringern .
13
Lithium - Ionen-Geräte sollten nicht dem Regen ausgesetzt werden. Lagern
Sie sie nicht in feuchten Umgebung ; Wasser sollte in das Elektrowerkzeug
fließen. Erhöht die Es besteht die Gefahr eines Stromschlags.
14 Beim Laden darf sich die Batterie nicht in der Nähe von brennbaren,
explosiven oder ätzenden Materialien befinden. mit einem Umfang von 15 Metern
. Es dürfen keine Abfälle hineingelegt werden und mehrere Batterien dürfen nicht
geladen werden um eine Überlastung des Stromkreises zu verhindern. Wird
verwendet, um eine Drahterhitzung zu verursachen.
15
Das Laden von Batterien auf Gegenständen aus Holz, Kunststoff oder
anderen Materialien ist strengstens verboten .
button

- 9 -
Foto als Referenz
Um den Akku aufzuladen, richten Sie
den Schlitz des Akku in den Schlitz des
Ladegeräts ein und schieben an
seinen Platz.
Die Batterieanzeige sollte von Grün bis Rot,
wenn der Akku geladen wird. Wenn die
Kontrollleuchte grün leuchtet der Akku sollte
vollständig geladen sein.
WARNUNG:
Lassen Sie den Akku vor dem Laden abkühlen, wenn er nach
längerem Gebrauch heiß ist.
Lademethode:
Bevor Sie die Lithium-Fettpresse verwenden, laden Sie bitte den Akku gemäß
der folgenden Methode auf
11 Stecken Sie den Netzstecker des Batterieladegeräts in eine geeignete
Wechselspannungsquelle , und die Ladeanzeige Die Ampel leuchtet grün.
12
Stecken Sie den DC-Stecker des Ladegerätes in die DC-Buchse der Akkubox.
13
Sobald das Gerät an die Stromversorgung angeschlossen ist, leuchtet die
Ladekontrollleuchte rot und der Ladevorgang beginnt. Während des Während
des Ladevorgangs bleibt die Anzeigeleuchte stabil und das rote Licht leuchtet
dauerhaft.
14
Wenn die Anzeigeleuchte des Ladegeräts von Rot auf Grün wechselt, zeigt
dies an, dass der Ladezyklus abgeschlossen ist.
15
Nach dem Laden ziehen Sie bitte den Netzstecker des Ladegerätes aus der
Steckdose.

- 10 -
Aufmerksamkeit:
Das Ladegerät dient ausschließlich zum Laden des originalen Batteriefachs.
Verwenden Sie es nicht für andere Zwecke oder zum Laden es mit Batterien
anderer Hersteller , wenn es sich um Neuprodukte handelt. Beim Laden des
Akkugehäuses kann es sein, dass vollständig geladen sein. Bitte entladen Sie
den Akku vollständig und laden Sie ihn mehrmals auf, bevor Sie ihn wieder
aufladen. Wenn Sie einen Akku laden Bei einem Akku , der gerade verwendet
wurde oder längere Zeit direkter Sonneneinstrahlung oder Hitze ausgesetzt war,
kann die Ladeanzeige verwendet werden . Sie leuchtet grün . Bitte warten Sie
einen Moment, da der Akku nach dem Abkühlen aufgeladen wird .
Probleme, die während des Ölvorgangs auftreten und die Lösungen
5. Problem: Die Butterpistole funktioniert während des Gebrauchs normal, aber
es kommt keine Butter aus der Ölaustrittsdüse. Grund: Es kann daran liegen,
dass Luft beim Ölansaugvorgang durch das Rohr angesaugt, wodurch die Butter
nicht normal entladen werden kann oder prüfen, ob die Heckkette feststeckt
6. Problem: Die Motordrehzahl nimmt ab . Ursache: Verstopfung des Ölkreislaufs,
unzureichende Batterieleistung
Drücken Sie den Schalter, um zum Abgas- und Ölablassdiagramm zu
gelangen
Vorgehensweise beim Ablassen der Luft, wie in der Abbildung dargestellt :
Öffnen Sie das Ablassventil wie in Abbildung 9 dargestellt, drehen Sie das
Ablassventil zweimal, drücken Sie den Hauptschalter, bis das Ablassventil Luft

- 11 -
und eine kleine Menge Fett freigibt , und dann kann es normal verwendet werden
. Wenn das Öl immer noch nicht normal abgelassen werden kann, wiederholen
Sie diesen Vorgang , um eine normale Ablassrate sicherzustellen .
Produktparameter der 18,5 V Lithium-Mehrzweck-Elektro-Fettpresse
Modell: LD-8207,LD-8207A / LD-8207B
Wie viele Ölleitungen können im Leerlauf gefüllt werden: Mit einer Flachdüse und
einem Schlauch können sechs Rohre gefüllt werden . Wie viele Rohre können
unter einer Last von 800 P SI mit Öl gefüllt werden : mit einem Schlauch und
einer Flachdüse können vier Rohre befüllt werden .
Motormodell: LY4815A
Batteriespannung: 18,5 V
Maximaler Arbeitsdruck: 6000 PSI -8 0 00 PSI
Ölleistung pro Akku: 3200g mit Schlauch und Flachdüse+Ölleistung pro Minute:
110g-130g
Gesamtölleistung von zwei Batterien: 6400 g
Motorlebensdauer: über 140 Stunden
Benötigte Zeit zum vollständigen Aufladen des Akkus: ca. 1,5 Stunden
Batterieladeausgang: 21 V
Maximaler Schlauchdruck : 80.000 PSI
Batterieladeeingang: 100~240 V/50 Hz für US-Version, 220 ~240 V/50 Hz für EU-
Version
Produktmaterial: Legierter Stahl
Arbeitstemperatur: -20 ℃ ~ 50 ℃
Arbeitsstrom: 4A-24A
1. Tägliche Wartung
1 ) Nach jedem Gebrauch der Ölpistole die Außenhülle sauber wischen und
Legen Sie es in den Werkzeugkasten, um es ordnungsgemäß aufzubewahren
2 ) Lassen Sie bei längerem Nichtgebrauch das Fett im transparenten
Pistolenlauf vollständig ab.
2. Vorsichtsmaßnahmen
① Nichtfachleute sollten den Host nicht zerlegen oder reparieren. Bei
Qualitätsproblemen, die eine Reparatur erfordern , wenden Sie sich bitte an den
Händler und das Reparaturpersonal des Herstellers.

- 12 -
② Gehen Sie bei der Verwendung des Produkts vorsichtig damit um und werfen
Sie es nicht willkürlich hoch .
③ Verwenden Sie den angegebenen Fetttyp gemäß den Produktspezifikationen.
④ Bitte tragen Sie professionelle Schutzausrüstung, bevor Sie dieses Produkt
auf Baustellen und Betriebsstätten verwenden
⑤ Bitte richten Sie die Ölpistole während des Betriebs nicht auf das Gesicht der
Person, um einen sicheren Betrieb zu gewährleisten
⑥ Nachdem das Produkt nicht verwendet wird, entnehmen Sie bitte die
Lithiumbatterie. Die Lithiumbatterie sollte alle 3 Tage, und das Zubehör des
Produkts sowie die Funktion des Körpers sollten regelmäßig überprüft werden.
⑦ Lagerbedingungen des Produkts: belüftet und trocken, unabhängige
Lagerung, nicht mit anderen Produkten vermischt.
⑧ Lassen Sie den Akku nicht fallen, stoßen Sie ihn nicht an und halten Sie ihn
von Feuerquellen fern .
⑨ Überprüfen Sie den Schlauch regelmäßig und biegen Sie ihn während des
Gebrauchs nicht übermäßig.
Einführung in Produkthilfstools
(Nur Spitzenprodukte enthalten sämtliches Zubehör)

- 13 -
1. Hauptbutterpistole 2. Riemen 3. Ölschaber,
4. Rohmaterialstreifen 5. Öldruckwanne 6. Schraubenschlüssel
7. Lat-Düse 8. Scharfe Düse . 9 Hartrohr ,
10, Schlauch 11, Ladung r 12. Batterie ,
Vergleich der Vorteile zwischen elektrische Butterpistolen und manuelle
Butter Waffen in einem Jahr
Projekt: 20 Tonnen Bagger
Elektrisch
Handbuch
① Arbeitszeit und verlorene Zeit:
8 Minuten/Tag * 219 Tage = 29
Stunden * 180 Yuan/Stunde = 5220
Yuan/Jahr
25 Minuten/Tag * 219 Tage = 91
Stunden * 180 Yuan/Stunde = 16400
Yuan/Jahr
2. Kraftstoffverbrauch: 2900
Gramm/Tag * 219 Tage = 197
Kilogramm = 13 Barrel * 200 Yuan =
2180 Yuan/Jahr
500 Gramm/Tag*219 Tage=109
Kilogramm=7 Barrel*200 Yuan=1400
Yuan/Jahr

- 14 -
3. Maschinenwartung +
Reparaturkosten +
Arbeitsausfallkosten
4 Achsen * 2000 Yuan/Achse = 8000
Yuan/2 Jahre (Reparaturkosten) 2400
Yuan/Tag * 4 Tage = 9600 Yuan/2
Jahre (Arbeitsausfallgebühr) Gesamt:
13600 Yuan/Jahr
4 Achsen * 2000 Yuan/Achse = 8000
Yuan/Jahr (Reparaturkosten) 2400
Yuan/Tag * 4 Tage = 9600 Yuan/Jahr
(Arbeitsausfallgebühr) Gesamt:
27200 Yuan/Jahr
④ Kaufpreis Strom:
1000 Yuan/Einheit = 500 Yuan (2
Jahre pro Einheit)
150 Yuan * 2 = 300 Yuan (2 Stück
pro Jahr)
Gesamt: 5220 + 2180 + 13600 + 500
= 21500 Yuan/Jahr
Gesamt: 16400 + 1400 + 27200 +
300 = 45300 Yuan/Jahr
Gesamtpreisunterschied: 45300-21500 = 23800 Yuan/Jahr
Vergleich der Vorteile zwischen elektrischen Fettpressen und manuelles Fett Waffen.
Warnung - Um das Verletzungsrisiko zu verringern, muss der
Benutzer die Bedienungsanleitung sorgfältig lesen
Kopfschutz tragen
FCC-Informationen:
ACHTUNG
: Änderungen oder Modifikationen, die nicht ausdrücklich von der für
die Konformität verantwortlichen Partei genehmigt wurden, können zum
Erlöschen der Berechtigung des Benutzers zum Betrieb des Geräts führen!
Dieses Gerät entspricht Teil 15 der FCC-Bestimmungen. Der Betrieb unterliegt
den folgenden zwei Bedingungen:
1) Dieses Produkt kann schädliche Störungen verursachen.
2) Dieses Produkt muss alle empfangenen Störungen tolerieren, einschließlich
Störungen, die einen unerwünschten Betrieb verursachen können.
WARNUNG: Änderungen oder Modifikationen an diesem Produkt, die nicht
ausdrücklich von der Partei genehmigt wurden Die für die Einhaltung der
Vorschriften verantwortliche Person kann zum Erlöschen der Berechtigung des
Benutzers zum Betrieb des Produkts führen.

- 15 -
Hinweis: Dieses Produkt wurde getestet und entspricht den Grenzwerten für
digitale Geräte der Klasse B gemäß Teil 15 der FCC-Vorschriften . Diese
Grenzwerte sollen einen angemessenen Schutz vor schädlichen Störungen bei
der Installation in Wohngebäuden bieten.
Dieses Produkt erzeugt, verwendet und strahlt möglicherweise
Hochfrequenzenergie ab. Bei unsachgemäßer Installation und Verwendung kann
es zu Störungen des Funkverkehrs kommen. Es besteht jedoch keine Garantie
dafür, dass bei einer bestimmten Installation keine Störungen auftreten. Sollte
dieses Produkt Störungen des Radio- oder Fernsehempfangs verursachen, Dies
kann durch Aus- und Einschalten des Produkts festgestellt werden. Dem
Benutzer wird empfohlen, zu versuchen, die Störung durch eine oder mehrere der
folgenden Maßnahmen zu beheben.
· Richten Sie die Empfangsantenne neu aus oder verlegen Sie den Standort.
· Vergrößern Sie den Abstand zwischen Produkt und Empfänger.
· Schließen Sie das Produkt an eine Steckdose eines anderen Stromkreises an
als den Empfänger.
· Wenden Sie sich an den Händler oder einen erfahrenen Radio-
/Fernsehtechniker, um Hilfe zu erhalten.
RICHTIGE ENTSORGUNG
Dieses Produkt unterliegt der Europäischen Richtlinie 2012/19/EU. Das
Symbol einer durchgestrichenen Mülltonne weist darauf hin, dass
dieses Produkt in der Europäischen Union einer getrennten
Müllentsorgung unterliegt. Dies gilt für das Produkt und alle mit diesem
Symbol gekennzeichneten Zubehörteile. Entsprechend
gekennzeichnete Produkte dürfen nicht im Hausmüll entsorgt werden, sondern
müssen einer Sammelstelle zugeführt werden. Sammelstelle für das Recycling
von elektrischen und elektronischen Geräten.

- 16 -
Hersteller: Shanghaimuxinmuyeyouxiangongsi
Adresse: Shuangchenglu 803nong11hao1602A-1609shi, baoshanqu, Shanghai
200000 CN.
Importiert nach AUS: SIHAO PTY LTD. 1 ROKEVA STREETEASTWOOD NSW
2122 Australien
Importiert in die USA: Sanven Technology Ltd. Suite 250, 9166 Anaheim Place,
Rancho Cucamonga, CA 91730
REP
EC
E-CrossStu GmbH
Mainzer Landstr.69, 60329 Frankfurt am Main.
REP
UK
YH CONSULTING LIMITED.
C/O YH Consulting Limited Office 147, Centurion House,
London Road, Staines-upon-Thames, Surrey, TW18 4AX
Technisch Support- und E-Warranty-Zertifikat
www.vevor.com/support

- 17 -
Tecnico Supporto e certificato di garanzia elettronica
www.vevor.com/support
PISTOLA PER GRASSO SENZA FILI
UTENTE MANUALE
Continuiamo a impegnarci per fornirvi strumenti a prezzi competitivi.
"Risparmia la metà", "Metà prezzo" o altre espressioni simili utilizzate solo da noi
rappresenta una stima dei risparmi che potresti ottenere acquistando determinati strumenti
con noi rispetto ai grandi marchi top e non significa necessariamente copertina
tutte le categorie di strumenti da noi offerti. Ti ricordiamo cortesemente di verificare
accuratamente
quando effettui un ordine con noi se sei effettivamente Risparmio
Metà rispetto ai marchi più importanti.

- 1 -
Modello: LD-8207
,
LD-8207A / LD-8207B
Codice articolo: LD-8207
Modello LD-8207A / LD-8207B
Foto di riferimento
BISOGNO AIUTO? CONTATTO NOI!
Avere prodotto domande? Bisogno tecnico supporto? Per favore
Tatto gratuito A contatto noi:
Supporto tecnico e certificato di garanzia
elettronica
www.vevor.com/support
Questo è l'originale istruzione, per favore leggi tutto manuale istruzioni
accuratamente prima di operare. VEVOR si riserva una chiara
interpretazione del nostro manuale utente. L'aspetto del prodotto deve
essere soggetto al
prodotto tu ricevuto. Per favore perdonami noi che non lo faremo
informarti di nuovo se ci sono tecnologie o software aggiornamenti sui
Cordless Grease Gun

- 2 -
nostri prodotto.
1. Leggere attentamente e comprendere tutto il MONTAGGIO E
OPERAZIONE ISTRUZIONI prima di operare.
2. Mancato rispetto delle norme di sicurezza e di altre misure di sicurezza
di base precauzioni Maggio risultato in caso di gravi problemi personali
infortunio.
Specificazione
Modello : LD-8207 / LD-8207 A / LD-8207 B utilizzato 18V-21V è accettabile. E il
nostro utensile può essere abbinato alla batteria Makita
Modello
Con
batter
ia
o no
Tipo di
spina
Energia
Caricabatterie
Ingresso
Produzio
ne
Codice articolo: LD-
8207
NO
Senza
18,5 V CC
Senza
Modello LD-8207A
SÌ
NOI
18,5 V 2,0
Ah
AC100-240V
50/60Hz
DC21V,2
A
Modello LD-8207B
SÌ
Unione
Europea
18,5 V 2,0
Ah
AC220-240V
50/60Hz
DC21V,2
A
Il prodotto ha le seguenti caratteristiche

- 3 -
Foto di riferimento
Iniezione di olio stabile
Scarico stabile assicura
un'iniezione di olio fluida
Forte pressione
Elevata pressione di iniezione
dell'olio, bilanciamento continuo ,
rapido ed efficace
Essere facile da
trasportare
Viene fornito con l'auto, fa
risparmiare tempo e fatica ed è
comodo e veloce
Utilizzo flessibile ed
efficiente
Può essere iniettato in qualsiasi
parte dell'ugello che può essere
esteso olio in posizione
S
N
Numero di parte
Quant
ità
S
N
Numero di parte
Quant
ità
1
Cambio
1
1
2
Copertura del cilindro
dell'olio
1
2
Ruota con asse
eccentrico
1
1
3
Maniglia in alluminio
1
3
Coperchio corpo pompa
1
1
4
tirante
1
4
Manicotto eccentrico
dell'asta centrale
1
1
5
pulsante di
commutazione
1
5
Valvola di scarico
1
1
6
Componenti della carta
1
6
Corpo pompa in
alluminio
1
1
7
Pacco batteria al litio
1
7
Supporto per il piede
1
1
8
Guscio - Sinistra
1
8
Pistone di gomma
1
1
9
Interfaccia della scatola
della batteria
1
9
Componenti fissi
1
2
macchinario elettrico
1
- 4 -
0
1
0
Cilindro di stoccaggio
dell'olio
1
2
1
Scheda di controllo
1
1
1
Tessera assicurativa
1
Prima di utilizzare il metodo di ispezione, verificare se la luce di lavoro si
accende quando il prodotto è collegato a una batteria. In caso di assenza di
carico , la macchina funziona normalmente
Istruzioni per l'uso delle palline di burro
fase 1. Tirare indietro la maniglia dell'asta dello stantuffo e riempire la canna di
grasso.
Opzioni di riempimento del grasso:
1) Caricamento della cartuccia: rimuovere il tappo di plastica dalla cartuccia e
inserire l'estremità aperta della cartuccia nella canna della pistola per grasso
finché il bordo dell'estremità con la linguetta di estrazione non tocca il bordo della
canna.
1) 2)
2) Riempimento ad aspirazione: inserire l'estremità aperta del barile per circa 2"
nel contenitore del grasso. Tirare lentamente la maniglia dell'asta dello stantuffo
per aspirare il grasso nel barile vuoto, spingendo il barile più in profondità nel
grasso fino a quando l'asta dello stantuffo non è completamente estesa. La
superficie esterna potrebbe avere molto grasso attaccato e dovrebbe essere
pulita per sicurezza.
- 5 -
Fase 2 : Rimontare la canna nella pistola per grasso. Attivare la sicura e spingere
l'asta di spinta nella canna.
Metodo di utilizzo della coppa dell'olio a pressione
Metodo di utilizzo di un manicotto di collegamento multiuso a diametro variabile:
utilizzarlo con ventose per olio ordinarie di diversi diametri. Pistola per grasso a
doppio uso con batteria al litio (Non è necessario utilizzare una speciale
vaschetta di aspirazione dell'olio) .

- 6 -
Il metodo di utilizzo per rompere e limatura dell'olio, come mostrato nella figura:
ruotare la canna della pistola nella posizione appositamente Piastra di
aspirazione dell'olio dotata di apposito supporto (quando la piastra di aspirazione
dell'olio è in attesa dell'aspirazione dell'olio, prima di tutto posizionare il secchio
del burro al suo interno . Evacuare l'aria fino a quando il burro è pieno e l'effetto
di aspirazione dell'olio è migliore nella porta filettata della piastra di aspirazione
dell'olio. Se il vassoio di aspirazione dell'olio non viene premuto per scaricare
l'aria all'interno del secchio, l'aria all'interno il tubo aumenterà durante

- 7 -
l'aspirazione dell'olio, il che non è dovuto alla scarsa aspirazione del prodotto ; si
consiglia ai consumatori che acquistano questo prodotto di esserne consapevoli
3. Manico dell'asta
7) Tirare la maniglia dell'asta quando si installa il grasso nella canna.
1. Manico dell'asta 2. Asta
8) Per bloccare la maniglia dell'asta completamente estratta, tirare la maniglia
dell'asta fino a quando non si vede la scanalatura sull'asta, quindi agganciare
la scanalatura sulla fessura. Per sbloccare la maniglia dell'asta. sganciare la
scanalatura in modo che l'asta si muova in avanti.
1. Scanalatura 2. Fessura
Come mostrato nella figura:
Dopo aver tirato la cerniera
verso il basso e averla fissata
saldamente, ruotarlo sulla testa
della pistola, rilasciare il
cerniera e rimettila nel secchio,
quindi usa un magnete per
fissarlo Sopra la cover
posteriore, puoi facilmente
applicare l'olio.
funzione :
- 8 -
7) Quando il pulsante gira a sinistra, fai clic sull'interruttore tasto, ① La spia
luminosa è visualizzata in una posizione grande , gli utensili possono sparare
grasso velocemente e in modo continuo, ② La spia luminosa è visualizzata in
una posizione piccola , gli utensili possono sparare grasso lentamente e in
modo continuo,
8) Quando la chiave dell'interruttore gira a destra , fai clic sull'interruttore tasto ,
①. quando la spia luminosa nell'angolo inferiore sinistro è chiusa , gli utensili
possono sparare grasso in modo rapido e continuo, ②. quando la spia
luminosa nell'angolo inferiore sinistro è aperta , gli utensili possono sparare
grasso discontinuo ,
Metodo di utilizzo della batteria
Sicurezza elettrica:
16
È necessario conoscere il metodo di carica della batteria: la spina dell'utensile
a batteria al litio deve corrispondere alla presa. P er favore non modificare la
spina ; non collegare utensili elettrici con messa a terra fili a qualsiasi spina del
trasformatore Utilizzati insieme. Utilizzando spine non modificate e prese adatte
possono ridurre il rischio di scosse elettriche.
17
È necessario conoscere il metodo di carica della batteria: la spina dell'utensile
a batteria al litio deve corrispondere alla presa. P er favore non modificare la
spina ; non collegare utensili elettrici con messa a terra fili a qualsiasi spina del
trasformatore Utilizzati insieme. Utilizzando spine non modificate e prese di
corrente adatte possono ridurre il rischio di scosse elettriche .
18
litio -i non devono essere esposti alla pioggia. Non metterli in un luogo umido
ambiente ; l'acqua dovrebbe fluire nell'utensile elettrico Aumenterà la rischio di
scossa elettrica.
19 Durante la carica, è severamente vietato avvicinare la batteria a materiali
infiammabili, esplosivi o corrosivi , con una circonferenza di 15 metri . Non
devono essere posizionati detriti all'interno e non devono essere caricate più
batterie per evitare il sovraccarico del circuito. Utilizzare per causare il
riscaldamento del filo.
20
È severamente vietato caricare le batterie su oggetti di legno, plastica o altro .
button

- 9 -
Foto di riferimento
Per caricare la batteria, allineare lo slot
del batteria con lo slot del
caricabatterie e far scorrere al suo
posto.
La spia della batteria dovrebbe spegnersi da
verde a rosso quando la batteria è in carica.
Quando la spia luminosa diventa verde la
batteria dovrebbe essere completamente
carica.
ATTENZIONE: se
la batteria risulta calda dopo un uso continuo, lasciarla
raffreddare prima di caricarla.
Metodo di ricarica:
Prima di utilizzare la pistola per grasso al litio, caricare la batteria secondo il
seguente metodo
16 inserire la spina di alimentazione del caricabatteria in una fonte di tensione CA
appropriata e l' indicatore di carica la luce diventerà verde.
17
Inserire la spina CC del caricabatterie nella presa CC del vano batteria.
18
Quando è collegato all'alimentazione, la spia del caricabatterie diventerà rossa
e la carica avrà inizio. Durante la processo di ricarica, la spia luminosa rimarrà
stabile e la luce rossa rimarrà accesa.
19 Quando la spia luminosa del caricabatteria passa da rossa a verde, significa
che il ciclo di carica è completato.
20
Dopo la ricarica, scollegare la spina del caricabatterie dalla presa di corrente.
- 10 -
Attenzione:
Il caricabatteria è utilizzato solo per caricare la batteria originale di fabbrica. Non
utilizzarlo per altri scopi o per caricare con esso batterie di altri produttori ,
quando si tratta di nuovi prodotti. Durante la carica della custodia della batteria ,
potrebbe non essere completamente carica. Scaricarla completamente e
caricarla più volte prima di caricarla. Se si carica una batteria ricaricabile ba t tery
che è stata appena utilizzata o è stata esposta alla luce solare diretta o al calore
per un lungo periodo, la spia di carica può essere utilizzata . Si accenderà e
diventerà verde. Attendere un po', poiché la batteria inizierà a caricarsi una volta
raffreddata .
Problemi che si verificano durante il processo di oliatura e le
soluzioni
7. Problema: la pistola per burro funziona normalmente durante l'uso, ma non
esce burro dall'ugello di uscita dell'olio. Motivo: Potrebbe essere dovuto al
fenomeno dell'aria che è aspirato dal tubo durante il processo di aspirazione
dell'olio, impedendo al burro di fuoriuscire normalmente o controllare se la catena
di coda è bloccata
8. Problema: la velocità del motore rallenta . Motivo: blocco del circuito dell'olio,
potenza della batteria insufficiente
Premere l'interruttore per visualizzare lo schema di scarico e scarico
dell'olio

- 11 -
Metodo di funzionamento dello scarico dell'aria, come mostrato nella figura :
aprire la valvola di scarico come mostrato nella figura 9, ruotare due volte la
valvola di scarico , premere l'interruttore principale finché la valvola di scarico non
rilascia aria e una piccola quantità di grasso, quindi può essere utilizzato
normalmente . Se l' olio non può ancora essere scaricato normalmente, ripetere
questa operazione per garantire uno scarico normale .
Parametri del prodotto della pistola elettrica per grasso a doppio scopo al
litio da 18,5 V
Modello: LD-8207,LD-8207A / LD-8207B
Quanti tubi di olio possono essere riempiti in condizioni di vuoto: con un ugello
piatto e un tubo flessibile, si possono riempire sei tubi . Quanti tubi di olio si
possono riempire con un carico di 800 P SI : con un tubo flessibile e un ugello
piatto si possono riempire quattro tubi .
Modello motore: LY4815A
Tensione della batteria: 18,5 V
Pressione massima di esercizio: 6000 PSI -8 0 00 PSI
Portata olio per batteria: 3200 g con tubo flessibile e ugello piatto + Portata olio al
minuto: 110 g-130 g
Produzione totale di olio da due batterie: 6400 g
Durata del motore: oltre 140 ore
Tempo necessario per caricare completamente la batteria: circa 1,5 ore
Uscita di carica della batteria: 21V
Pressione massima del tubo: 80 00 PSI
Ingresso carica batteria: 100~240 V/50Hz per la versione USA, 220 ~240 V/50Hz
per la versione UE
Materiale del prodotto: acciaio legato
Temperatura di lavoro: -20 ℃ ~50 ℃
Corrente di lavoro: 4A-24A
1、 Manutenzione giornaliera
1 ) Dopo ogni utilizzo della pistola per olio, pulire la calotta esterna e riporla nella
cassetta degli attrezzi per una corretta conservazione
2 ) Quando non si utilizza l'arma per un lungo periodo, far scolare completamente
il grasso presente all'interno della canna trasparente della pistola.

- 12 -
2. Precauzioni
①Non professionisti, si prega di non smontare o riparare l'host. Se ci sono
problemi di qualità che richiedono una riparazione , si prega di contattare il
rivenditore e il personale addetto alle riparazioni del produttore.
②Quando si utilizza il prodotto, maneggiarlo con cura e non lanciarlo in alto a
piacimento .
③ Utilizzare il tipo di grasso specificato in base alle specifiche del prodotto.
④ Si prega di indossare dispositivi di protezione professionale prima di utilizzare
questo prodotto nei cantieri edili e nei siti operativi
⑤ Per un funzionamento sicuro, non puntare la pistola per olio verso il viso della
persona durante il funzionamento.
⑥ Dopo che il prodotto non è in uso, rimuovere la batteria al litio. La batteria al
litio deve essere caricata ogni 3 giorni, e gli accessori del prodotto e il
funzionamento della carrozzeria devono essere controllati regolarmente.
⑦ Condizioni di conservazione del prodotto: ventilato e asciutto, stoccaggio
indipendente, non miscelato con altri prodotti.
⑧ Non far cadere o urtare la batteria e tenerla lontano da fonti di calore .
⑨ Controllare regolarmente il tubo flessibile e non piegarlo eccessivamente
durante l'uso.
Introduzione agli strumenti ausiliari del prodotto
(Solo i prodotti di alta gamma includono tutti gli accessori)

- 13 -
1. Pistola per burro principale 2. Cinghie 3. Raschietto dell'olio,
4. Striscia di materia prima 5. coppa dell'olio 6. Chiave inglese
7. ugello lat 8. Ugello affilato . 9 Tubo rigido ,
10, Tubo flessibile 11, Carica r 12. Batteria ,
Confronto dei benefici tra pistole per burro elettriche e burro manuale armi
in un anno
Progetto: escavatore da 20 tonnellate
Elettrico
Manuale
① Ore di lavoro e tempo perso:
8 minuti/giorno*219 giorni=29 ore*180
yuan/ora=5220 yuan/anno
25 minuti/giorno*219 giorni=91
ore*180yuan/ora=16400 yuan/anno
② Consumo di carburante: 2900
grammi/giorno*219 giorni=197
chilogrammi=13 barili*200 yuan=2180
yuan/anno
500 grammi/giorno*219 giorni=109
chilogrammi=7 barili*200 yuan=1400
yuan/anno

- 14 -
③
Manutenzione della macchina +
costi di riparazione + costi di
perdita di lavoro
4 assi * 2000 yuan / asse = 8000 yuan
/ 2 anni (costo di riparazione) 2400
yuan / giorno * 4 giorni = 9600 yuan /
2 anni (tariffa per perdita di lavoro)
Totale: 13600 yuan / anno
4 assi * 2000 yuan/asse = 8000
yuan/anno (costo di riparazione)
2400 yuan/giorno * 4 giorni = 9600
yuan/anno (perdita di lavoro) Totale:
27200 yuan/anno
④ Prezzo di acquisto elettrico:
1000 yuan/unità=500 yuan (2 anni per
unità)
150 yuan * 2=300 yuan (2 pezzi
all'anno)
Totale:
5220+2180+13600+500=21500
yuan/anno
Totale:
16400+1400+27200+300=45300
yuan/anno
Differenza di prezzo totale: 45300-21500 = 23800 yuan/anno
Confronto dei vantaggi tra pistole per grasso elettriche e grasso manuale armi da
fuoco.
Attenzione - Per ridurre il rischio di lesioni, l'utente deve leggere
attentamente il manuale di istruzioni
Indossare una protezione per la testa
Informazioni FCC:
ATTENZIONE : Cambiamenti o modifiche non espressamente approvati dalla
parte responsabile della conformità potrebbero invalidare il diritto dell'utente a
utilizzare l'apparecchiatura!
Questo dispositivo è conforme alla Parte 15 delle Norme FCC. Il funzionamento è
soggetto alle seguenti due condizioni:
1) Questo prodotto può causare interferenze dannose.
2) Questo prodotto deve accettare qualsiasi interferenza ricevuta, comprese
quelle che potrebbero causare un funzionamento indesiderato.
ATTENZIONE: Cambiamenti o modifiche a questo prodotto non espressamente
approvati dalla parte responsabile della conformità potrebbe invalidare il diritto
dell'utente a utilizzare il prodotto.

- 15 -
Nota: questo prodotto è stato testato e ritenuto conforme ai limiti per un
dispositivo digitale di Classe B ai sensi della Parte 15 delle Norme FCC . Questi
limiti sono concepiti per fornire una protezione ragionevole contro interferenze
dannose in un'installazione residenziale.
Questo prodotto genera, utilizza e può irradiare energia a radiofrequenza e, se
non installato e utilizzato in conformità alle istruzioni, può causare interferenze
dannose alle comunicazioni radio. Tuttavia, non vi è alcuna garanzia che non si
verifichino interferenze in una particolare installazione. Se questo prodotto causa
interferenze dannose alla ricezione radiofonica o televisiva, che può essere
determinato accendendo e spegnendo il prodotto, si consiglia all'utente di provare
a correggere l'interferenza adottando una o più delle seguenti misure.
· Riorientare o riposizionare l'antenna ricevente.
· Aumentare la distanza tra il prodotto e il ricevitore.
· Collegare il prodotto a una presa di corrente su un circuito diverso da quello a
cui è collegato il ricevitore.
· Per assistenza, consultare il rivenditore o un tecnico radio/TV esperto.
SMALTIMENTO CORRETTO
Questo prodotto è soggetto alle disposizioni della Direttiva europea
2012/19/UE. Il simbolo raffigurante un bidone della spazzatura barrato
indica che il prodotto richiede la raccolta differenziata dei rifiuti
nell'Unione europea. Ciò si applica al prodotto e a tutti gli accessori
contrassegnati con questo simbolo. I prodotti contrassegnati come tali
non possono essere smaltiti con i normali rifiuti domestici, ma devono essere
portati in un punto di raccolta per il riciclaggio di apparecchiature elettriche ed
elettroniche.

- 16 -
Produttore: Shanghaimuxinmuyeyouxiangongsi
Indirizzo: Shuangchenglu 803nong11hao1602A-1609shi, baoshanqu, shanghai
200000 CN.
Importato in AUS: SIHAO PTY LTD. 1 ROKEVA STREETEASTWOOD NSW
2122 Australia
Importato negli USA: Sanven Technology Ltd. Suite 250, 9166 Anaheim Place,
Rancho Cucamonga, CA 91730
REP
EC
E-CrossStu GmbH
Mainzer Landstr.69, 60329 Frankfurt am Main.
REP
UK
YH CONSULTING LIMITED.
C/O YH Consulting Limited Office 147, Centurion House,
London Road, Staines-upon-Thames, Surrey, TW18 4AX
Tecnico Supporto e certificato di garanzia elettronica
www.vevor.com/support

- 17 -
Técnico Certificado de soporte y garantía electrónica
www.vevor.com/support
PISTOLA DE GRASA INALÁMBRICA
USUARIO MANUAL
Seguimos comprometidos a brindarle herramientas a precios competitivos.
"Ahorra la mitad", "Mitad de precio" o cualquier otra expresión similar utilizada únicamente
por nosotros
Representa una estimación de los ahorros que podría obtener al comprar ciertas
herramientas.
con nosotros en comparación con las principales marcas líderes y no significa
necesariamente cubrir
Todas las categorías de herramientas que ofrecemos. Le recordamos que debe verificar
con cuidado
Cuando realiza un pedido con nosotros, si realmente está Ahorro
Medio en comparación con las principales marcas principales.

- 1 -
Modelo: LD-8207, LD-8207A / LD-8207B
LD-8207
LD-8207A / LD-8207B
Foto de referencia
NECESIDAD ¿AYUDA? CONTACTO ¡A
NOSOTROS!
Tener producto ¿preguntas? Necesidad técnico ¿apoyo? Por favor
sentir gratis a contacto a nosotros:
Soporte técnico y certificado de garantía
electrónica
www.vevor.com/support
Este es el original instrucción, Por favor lea todo manual instrucciones
con cuidado Antes de operar. VEVOR se reserva una interpretación
clara de nuestro manual de usuario. La apariencia del producto... estar
sujeto a la
producto que usted recibió. Por favor perdona nosotros que no lo
Cordless Grease Gun

- 2 -
haremos informarle nuevamente Si hay alguna tecnología o software
actualizaciones sobre nuestro producto.
1. Lea atentamente y comprenda todo el CONJUNTO Y OPERACIÓN
INSTRUCCIONES antes de operar.
2. No seguir las normas de seguridad y otras medidas básicas de
seguridad. precauciones puede resultado en serio personal lesión.
Especificación
Modelo : LD-8207 / LD-8207 A / LD-8207 B. Se aceptan baterías de 18 V a 21 V.
Nuestras herramientas son compatibles con las baterías Makita .
Modelo
Con
batería
o sin
ella
Tipo de
enchufe
Fuerza
Cargador
Aporte
Producción
LD-8207
No
Sin
18,5 V CC
Sin
LD-8207A
Sí
A NOSOTROS
18,5 V 2,0 Ah
CA 100-240 V
50/60 Hz
CC 21 V, 2 A
LD-8207B
Sí
UE
18,5 V 2,0 Ah
CA 220-240 V
50/60 Hz
CC 21 V, 2 A
El producto tiene las siguientes características

- 3 -
Foto de referencia
Inyección de aceite estable
El escape estable garantiza una
inyección de aceite suave
Fuerte presión
Alta presión de inyección de
aceite, equilibrio continuo , rápido
y efectivo.
Ser fácil de llevar.
Viene con el coche, ahorra tiempo
y esfuerzo, y es conveniente y
rápido
Uso flexible y eficiente
Se puede inyectar en cualquier
parte de la boquilla que se puede
ampliar aceite en el lugar
S
N
Número de pieza
Canti
dad
S
N
Número de pieza
Canti
dad
1
Caja de cambios
1
1
2
Tapa del cilindro
de aceite
1
2
Rueda de eje excéntrico
1
1
3
Mango de
aluminio
1
3
Tapa del cuerpo de la
bomba
1
1
4
varilla de tracción
1
4
Manguito de varilla de
núcleo excéntrico
1
1
5
botón de cambio
1
5
válvula de escape
1
1
6
Componentes de
la tarjeta
1
6
Cuerpo de bomba de
aluminio
1
1
7
Paquete de
baterías de litio
1
7
Soporte para pies
1
1
8
Concha -
Izquierda
1
8
Pistón de goma
1
1
9
Interfaz de caja de
batería
1
9
Componentes fijos
1
2
0
maquinaria
eléctrica
1
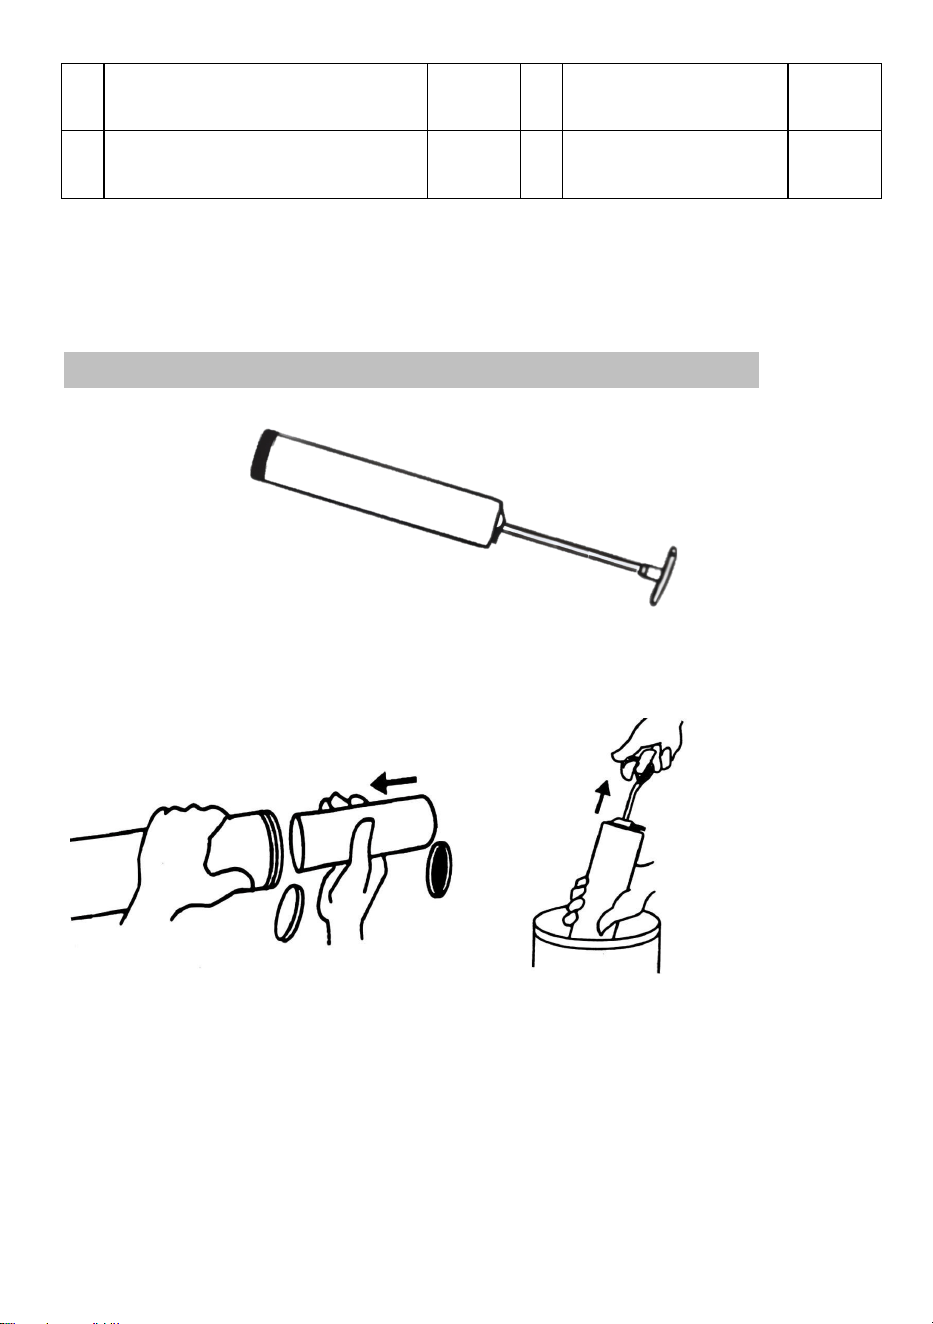
- 4 -
1
0
Cilindro de almacenamiento
de aceite
1
2
1
Placa de control
1
1
1
Tarjeta de seguro
1
Antes de utilizar el método de inspección, verifique si la luz de trabajo se
enciende. Se enciende cuando el producto está enchufado a la batería. En
caso de no tener carga , ¿ la máquina funciona normalmente ?
Instrucciones para utilizar las bolas de mantequilla
Paso 1. Tire hacia atrás la manija del émbolo y llene el cañón con grasa.
Opciones de llenado de grasa:
1) Carga del cartucho: Retire la tapa plástica del cartucho e inserte el extremo
abierto del cartucho en el cañón de la pistola de engrase hasta que el borde del
extremo de la lengüeta de tiro coincida con el borde del cañón.
1) 2)
2) Llenado por succión: Inserte el extremo abierto del barril aproximadamente 2”
en el contenedor de grasa. Tire lentamente de la manija del émbolo para aspirar
la grasa hacia el barril vacío mientras empuja el barril más profundamente en la
grasa hasta que el émbolo esté completamente extendido. La superficie exterior
puede tener mucha grasa adherida y debe limpiarse por seguridad.
Paso 2 : Vuelva a ensamblar el cañón en la pistola de engrase. Active el seguro y
empuje la varilla de empuje nuevamente dentro del cañón.

- 5 -
Método de uso del cárter de presión de aceite
El método de uso de un manguito de conexión de diámetro variable
multipropósito: Úselo con Ventosas de aceite comunes de diferentes diámetros.
Pistola engrasadora de doble propósito con batería de litio. (No es necesario
utilizar bandeja especial de succión de aceite) .
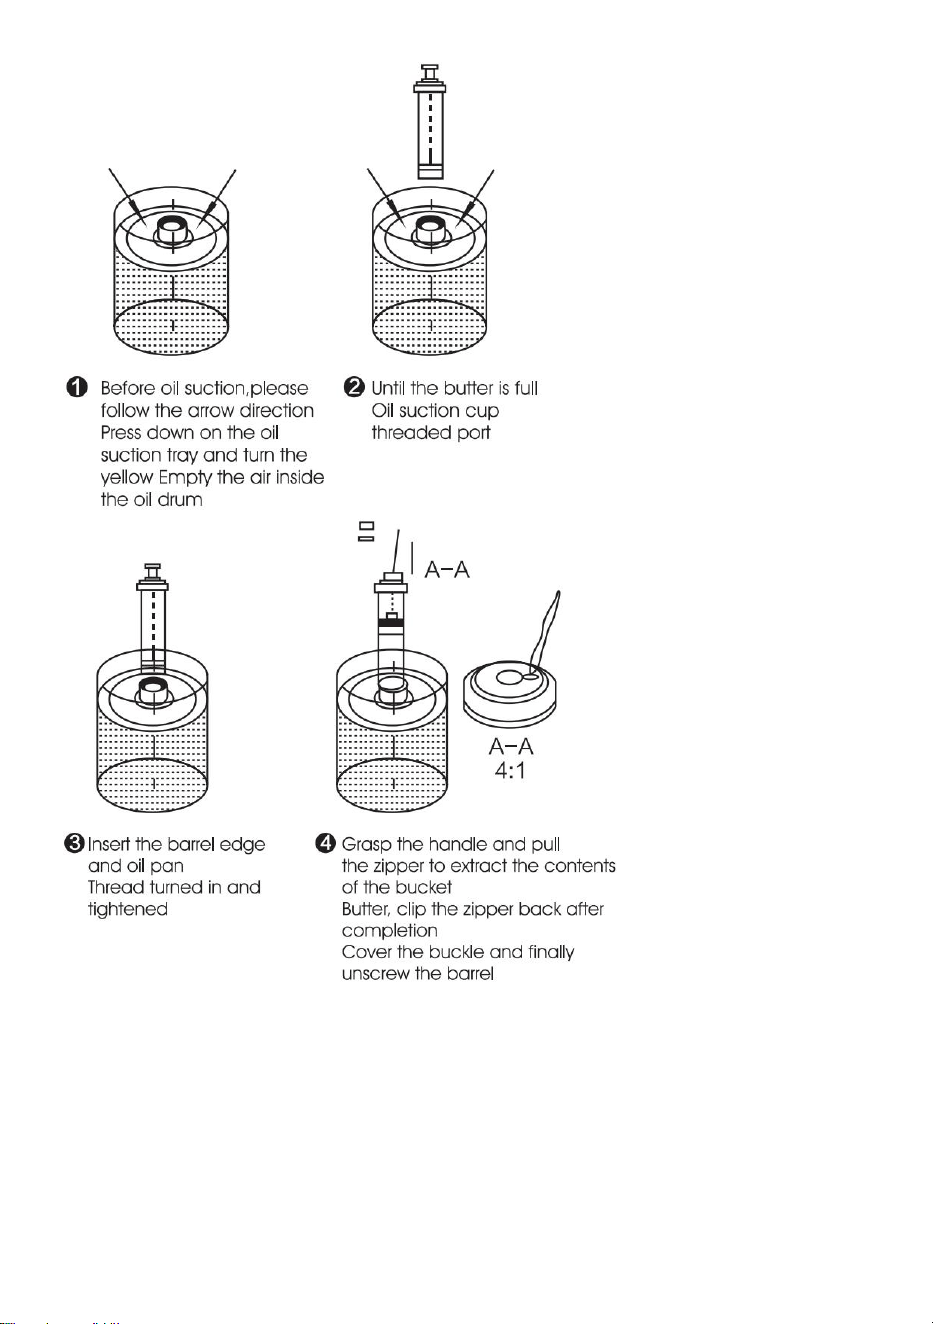
- 6 -
El método de uso para disolver y rellenar el aceite, como se muestra en la figura:
Gire el cañón de la pistola hacia la dirección especialmente indicada. Placa de
succión de aceite equipada (cuando la placa de succión de aceite esté
esperando la succión de aceite, primero coloque el balde de mantequilla en ella )
. Evacue el aire hasta que la mantequilla esté llena y el efecto de succión de
aceite sea mejor en el puerto roscado de la placa de succión de aceite. Si la
bandeja de succión de aceite no se presiona para descargar el aire dentro del
balde, el aire dentro El tubo aumentará durante la succión de aceite, lo que no se

- 7 -
debe a una succión deficiente del producto ; se recomienda a los consumidores
que compren este producto que tengan en cuenta esto .
3. Mango de varilla
9) Tire de la manija de la varilla al instalar la grasa en el cañón.
1. Mango de varilla 2. Varilla
10) Para bloquear la manija de la varilla completamente tirada, tire de la manija
de la varilla hasta que se pueda ver la ranura en la varilla y luego enganche
Coloque la ranura en la ranura para desbloquear la manija de la varilla.
Desenganche la ranura para que la varilla se mueva hacia adelante.
1. Ranura 2. Ranura
Como se muestra en la
figura: Después de tirar de la
cremallera hasta abajo y
asegurarla firmemente, gírelo
sobre el cabezal de la pistola y
suelte el cierre y vuelva a
colocarlo en el cubo, luego use
un Imán para fijarlo Por encima
de la tapa trasera, puedes
aplicar aceite fácilmente.
de funciones :

- 8 -
9) Cuando el botón gire a la izquierda, haga clic en el interruptor tecla, ① La luz
indicadora se muestra en una posición grande , las herramientas pueden
disparar grasa de forma rápida y continua, ② La luz indicadora se muestra
en una posición pequeña , las herramientas pueden disparar grasa de forma
lenta y continua,
10) Cuando la llave del interruptor gire a la derecha , haga clic en el interruptor
tecla , 1. cuando la luz indicadora en la esquina inferior izquierda está
cerrada , las herramientas pueden disparar grasa de forma rápida y continua,
2. cuando la luz indicadora en la esquina inferior izquierda está abierta , las
herramientas pueden disparar grasa discontinuo ,
Método de uso de la batería
Seguridad eléctrica:
21
Es necesario conocer el método de carga de la batería: El enchufe de la
herramienta de batería de litio debe coincidir con la toma de corriente. No
modifique el enchufe ni conecte herramientas eléctricas con toma de tierra .
Cables a cualquier enchufe de transformador. Se usan juntos. Se usan enchufes
sin modificar. Y los enchufes adecuados pueden reducir el riesgo de descarga
eléctrica.
22
Es necesario conocer el método de carga de la batería: El enchufe de la
herramienta de batería de litio debe coincidir con la toma de corriente. No
modifique el enchufe ni conecte herramientas eléctricas con toma de tierra .
Cables a cualquier enchufe de transformador. Se usan juntos. Se usan enchufes
sin modificar. Y los enchufes adecuados pueden reducir el peligro de descarga
eléctrica .
23
batería de litio -i no deben exponerse a la lluvia. No las coloque en un lugar
húmedo. Medio ambiente ; el agua debe fluir hacia la herramienta eléctrica. Esto
aumentará la riesgo de descarga eléctrica.
24
Durante la carga, está estrictamente prohibido acercar la batería a materiales
inflamables, explosivos o corrosivos . Con una circunferencia de 15 metros . No
se deben depositar residuos en el interior ni cargar varias baterías. Para evitar la
sobrecarga del circuito. Se utiliza para calentar el cable.
button

- 9 -
25
Está estrictamente prohibido cargar baterías en elementos de madera,
plástico u otros .
Foto de referencia
Para cargar la batería, alinee la ranura
de la Batería con la ranura del
cargador y deslice en su lugar.
La luz indicadora de la batería debe apagarse
Verde a rojo cuando la batería se está
cargando. Cuando la luz indicadora se vuelve
verde La batería debe estar completamente
cargada.
ADVERTENCIA: Deje que la batería se enfríe antes de cargarla si está
caliente después de un uso continuo.
Método de carga:
Antes de utilizar la pistola de grasa de litio, cargue la batería de acuerdo con el
siguiente método
21
Inserte el enchufe de alimentación del cargador de batería en una fuente de
voltaje de CA adecuada y el indicador de carga La luz se pondrá verde.
22
Inserte el enchufe de CC del cargador en el enchufe de CC de la caja de la
batería.
23
Cuando se conecta a la fuente de alimentación, la luz indicadora del cargador
se volverá roja y comenzará la carga. Durante el Durante el proceso de carga, la
luz indicadora permanecerá estable y la luz roja permanecerá encendida.
24
Cuando la luz indicadora del cargador cambia de rojo a verde, indica que el
ciclo de carga está completo.
25
Después de cargar, desconecte el cargador del enchufe de alimentación.

- 10 -
Atención:
El cargador de batería solo se utiliza para cargar la batería original de fábrica. No
lo utilice para otros fines ni para cargarla. con eso baterías de otros fabricantes ,
cuando se trata de productos nuevos. Al cargar el estuche de la batería , es
posible que no estar completamente cargada. Descárguela completamente y
cárguela varias veces antes de cargarla. Si está cargando una batería recargable
Si la batería se acaba de usar o ha estado expuesta a la luz solar directa o al
calor durante un tiempo prolongado, se puede usar la luz indicadora de carga .
Se encenderá en verde. Espere un momento, ya que la batería comenzará a
cargarse una vez que se enfríe .
Problemas que se presentarán durante el proceso de lubricación y
las soluciones
9. Problema: La pistola de mantequilla funciona normalmente durante el uso,
pero no sale mantequilla por la boquilla de salida de aceite.Razón: Puede
deberse al fenómeno del aire. succionado por la tubería durante el proceso de
succión de aceite, Provocando que la mantequilla no pueda descargarse
normalmente o comprobar si la cadena de cola está atascada
10. Problema: La velocidad del motor disminuye . Motivo: Obstrucción del circuito
de aceite, batería insuficiente.
Presione el interruptor para ver el diagrama de escape y descarga de
aceite.

- 11 -
Método de funcionamiento del escape de aire, como se muestra en la figura :
Abra la válvula de escape como se muestra en la figura 9, gire la válvula de
escape dos veces, presione el interruptor principal hasta que la válvula de
escape libere aire y una pequeña cantidad de grasa, y luego puede ser utilizado
normalmente . Si el aceite aún no puede descargarse normalmente, repita este
método de operación para asegurar una descarga normal .
Parámetros del producto de la pistola de grasa eléctrica de doble
propósito de litio de 18,5 V
Modelo: LD-8207, LD-8207A / LD-8207B
¿Cuántas tuberías de aceite se pueden llenar en vacío? Con una boquilla plana
y una manguera, se pueden llenar seis tuberías . ¿Cuántas tuberías de aceite se
pueden llenar con una carga de 800 PSI ? Con una manguera y una boquilla
plana se pueden llenar cuatro tubos .
Modelo de motor: LY4815A
Voltaje de la batería: 18,5 V
de trabajo: 6000 PSI - 8000 PSI
Salida de aceite por batería: 3200 g con manguera y boquilla plana + Salida de
aceite por minuto: 110 g-130 g
Producción total de aceite de dos baterías: 6400 g
Vida útil del motor: más de 140 horas
Tiempo necesario para cargar completamente la batería: aproximadamente 1,5 h
Salida de carga de batería: 21 V
Presión máxima de la manguera: 80 00 PSI
Entrada de carga de batería: 100 ~ 240 V/50 Hz para la versión de EE. UU., 220
~ 240 V/50 Hz para la versión de la UE
Material del producto: acero de aleación
Temperatura de trabajo: -20 ℃ ~50 ℃
Corriente de trabajo: 4A-24A
1
、
Mantenimiento diario
1 ) Después de cada uso de la pistola de aceite, limpie la carcasa exterior y
colóquela en la caja de herramientas para un almacenamiento adecuado
2 ) Cuando no se utilice durante un tiempo prolongado, drene completamente la
grasa del interior del cañón transparente de la pistola.

- 12 -
2、 Precauciones
1. Si no es profesional, no desmonte ni repare el host. Si detecta algún problema
de calidad que requiera reparación , póngase en contacto con el distribuidor y el
personal de reparación del fabricante.
②Al utilizar el producto, manipúlelo con cuidado y no lo arroje alto por ningún
motivo .
③ Utilice el tipo de grasa especificado según las especificaciones del producto.
④ Utilice equipo de protección profesional antes de utilizar este producto en
sitios de construcción y de operación.
⑤ Para una operación segura, no apunte la pistola de aceite a la cara de la
persona durante el funcionamiento.
⑥ Después de no utilizar el producto, retire la batería de litio. Debe cargarla
cada 3 días, y los accesorios del producto y el funcionamiento del cuerpo deben
revisarse periódicamente.
⑦ Condiciones de almacenamiento del producto: ventilado y seco,
almacenamiento independiente, no mezclado con otros productos.
⑧ No deje caer ni golpee la batería y manténgala alejada de fuentes de fuego .
⑨ Revise periódicamente la manguera y no la doble excesivamente durante su
uso.
Introducción a las herramientas auxiliares del producto
(Solo los productos de primera línea incluyen todos los accesorios)

- 13 -
1. Pistola de mantequilla principal 2. Correas 3. Raspador de aceite,
4. Tira de materia prima 5. cárter de presión de aceite 6. Llave inglesa
7. boquilla plana 8 . Boquilla afilada . 9 Tubo duro ,
10, Manguera 11, Carga r 12. Batería ,
Comparación de beneficios entre Pistolas de mantequilla eléctricas y
pistolas de mantequilla manuales armas en un año
Proyecto: Excavadora de 20 toneladas
Eléctrico
Manual
① Horas de trabajo y tiempo
perdido:
8 minutos/día * 219 días = 29 horas *
180 yuanes/hora = 5220 yuanes/año
25 minutos/día*219 días=91
horas*180 yuanes/hora=16400
yuanes/año
② Consumo de combustible: 2900
gramos/día*219 días = 197
kilogramos = 13 barriles*200 yuanes
= 2180 yuanes/año
500 gramos/día*219 días=109
kilogramos=7 barriles*200
yuanes=1400 yuanes/año

- 14 -
③
Mantenimiento de la máquina +
costos de reparación + costos de
pérdida de trabajo
4 ejes * 2000 yuanes / eje = 8000
yuanes / 2 años (costo de reparación)
2400 yuanes / día * 4 días = 9600
yuanes / 2 años (tarifa de pérdida de
trabajo) Total: 13600 yuanes / año
4 ejes * 2000 yuanes/eje = 8000
yuanes/año (costo de reparación)
2400 yuanes/día * 4 días = 9600
yuanes/año (tarifa por pérdida de
trabajo) Total: 27200 yuanes/año
④ Precio de compra eléctrico:
1000 yuanes/unidad = 500 yuanes (2
años por unidad)
150 yuanes * 2 = 300 yuanes (2
piezas por año)
Total:
5220+2180+13600+500=21500
yuanes/año
Total:
16400+1400+27200+300=45300
yuanes/año
Diferencia de precio total: 45300-21500 = 23800 yuanes/año
Comparación de beneficios entre las pistolas de engrase eléctricas y grasa manual
armas de fuego.
Advertencia: para reducir el riesgo de lesiones, el usuario debe leer
atentamente el manual de instrucciones.
Use protección para la cabeza
Información de la FCC:
PRECAUCIÓN : Los cambios o modificaciones no aprobados expresamente por
la parte responsable del cumplimiento podrían anular la autoridad del usuario
para operar el equipo.
Este dispositivo cumple con la Parte 15 de las Normas de la FCC. Su
funcionamiento está sujeto a las dos condiciones siguientes:
1) Este producto puede causar interferencias dañinas.
2)Este producto debe aceptar cualquier interferencia recibida, incluida aquella
que pueda provocar un funcionamiento no deseado.
ADVERTENCIA: Los cambios o modificaciones a este producto no aprobados
expresamente por la parte La responsabilidad del cumplimiento podría anular la
autoridad del usuario para operar el producto.

- 15 -
Nota: Este producto ha sido probado y cumple con los límites para dispositivos
digitales de Clase B, según la Parte 15 de las Normas de la FCC . Estos límites
están diseñados para brindar una protección razonable contra interferencias
perjudiciales en una instalación residencial.
Este producto genera, utiliza y puede radiar energía de radiofrecuencia. Si no se
instala y utiliza según las instrucciones, puede causar interferencias perjudiciales
en las comunicaciones por radio. Sin embargo, no se garantiza que no se
produzcan interferencias en una instalación específica. Si este producto causa
interferencias perjudiciales en la recepción de radio o televisión, lo cual se puede
determinar encendiendo y apagando el producto, se recomienda al usuario que
intente corregir la interferencia mediante una o más de las siguientes medidas.
· Reorientar o reubicar la antena receptora.
· Aumentar la distancia entre el producto y el receptor.
· Conecte el producto a una toma de corriente de un circuito diferente a aquel al
que está conectado el receptor.
· Consulte al distribuidor o a un técnico de radio/TV experimentado para obtener
ayuda.
ELIMINACIÓN CORRECTA
Este producto está sujeto a las disposiciones de la Directiva Europea
2012/19/UE. El símbolo de un contenedor de basura tachado indica
que el producto requiere recogida selectiva de residuos en la Unión
Europea. Esto se aplica al producto y a todos los accesorios marcados
con este símbolo. Los productos marcados como tales no pueden
desecharse con la basura doméstica normal, sino que deben entregarse a un
centro de reciclaje. Punto de recogida para el reciclaje de aparatos eléctricos y
electrónicos.

- 16 -
Fabricante: Shanghaimuxinmuyeyouxiangongsi
Dirección: Shuangchenglu 803nong11hao1602A-1609shi, baoshanqu, shanghai
200000 CN.
Importado a AUS: SIHAO PTY LTD. 1 ROKEVA STREET, EASTWOOD, NSW
2122, Australia
Importado a EE. UU.: Sanven Technology Ltd. Suite 250, 9166 Anaheim Place,
Rancho Cucamonga, CA 91730
REP
EC
E-CrossStu GmbH
Mainzer Landstr.69, 60329 Frankfurt am Main.
REP
UK
YH CONSULTING LIMITED.
C/O YH Consulting Limited Office 147, Centurion House,
London Road, Staines-upon-Thames, Surrey, TW18 4AX
Técnico Certificado de soporte y garantía electrónica
www.vevor.com/support

- 17 -
Techniczny Wsparcie i certyfikat e-gwarancji
www.vevor.com/support
SMAROWNICA AKUMULATOROWA
UŻYTKOWNIK PODRĘCZNIK
Nadal staramy się oferować Państwu narzędzia w konkurencyjnych cenach.
„Oszczędź połowę”, „Połowa ceny” lub jakiekolwiek inne podobne wyrażenia używane
wyłącznie przez nas
przedstawia szacunkowe oszczędności, jakie możesz uzyskać kupując określone
narzędzia
z nami w porównaniu do głównych, najlepszych marek i niekoniecznie oznacza to okładka
wszystkie kategorie narzędzi oferowanych przez nas. Przypominamy o sprawdzeniu
ostrożnie
gdy składasz u nas zamówienie, jeśli faktycznie Oszczędność
Połowa w porównaniu z wiodącymi markami.

- 1 -
Modele: LD-8207, LD-8207A / LD-8207B
LD-8207
LD-8207A / LD-8207B
Zdjęcie w celach informacyjnych
POTRZEBOWAĆ POMOCY? KONTAKT NAS!
Mieć produkt pytania? Potrzebować techniczny wsparcie? Proszę
czuć bezpłatny Do kontakt nas:
Wsparcie techniczne i certyfikat e-gwarancji
www.vevor.com/support
To jest oryginał instrukcja, proszę przeczytać wszystko podręcznik
instrukcje
ostrożnie przed uruchomieniem. VEVOR zastrzega sobie prawo do
jednoznacznej interpretacji naszej instrukcji obsługi. Wygląd produktu
powinien podlegać
produkt ty otrzymane. Proszę wybaczyć nas, że nie będziemy
Cordless Grease Gun

- 2 -
poinformuję cię ponownie jeśli istnieje jakaś technologia lub
oprogramowanie Aktualizacje na naszym produkt.
1. Przeczytaj uważnie i zrozum całą instrukcję MONTAŻU I DZIAŁANIE
INSTRUKCJE przed użyciem.
2. Nieprzestrzeganie zasad bezpieczeństwa i innych podstawowych zasad
bezpieczeństwa środki ostrożności móc wynik poważnie osobiście
obrażenia.
Specyfikacja
Model : LD-8207 / LD-8207 A / LD-8207 B używany 18V-21V jest akceptowalny.
A nasze narzędzia mogą być dopasowane do akumulatora Makita
Model
Z
bateri
ą
czy
bez
Typ
wtyczki
Moc
Rumak
Wejści
e
Wyjście
LD-8207
NIE
Bez
18,5 V prądu
stałego
Bez
LD-
8207A
Tak
NAS
18,5 V 2,0 Ah
Prąd
zmienny
100-240
V 50/60
Hz
Prąd stały 21 V, 2
A
LD-
8207B
Tak
UE
18,5 V 2,0 Ah
AC220-
240V
50/60Hz
Prąd stały 21 V, 2
A
Produkt posiada następujące cechy
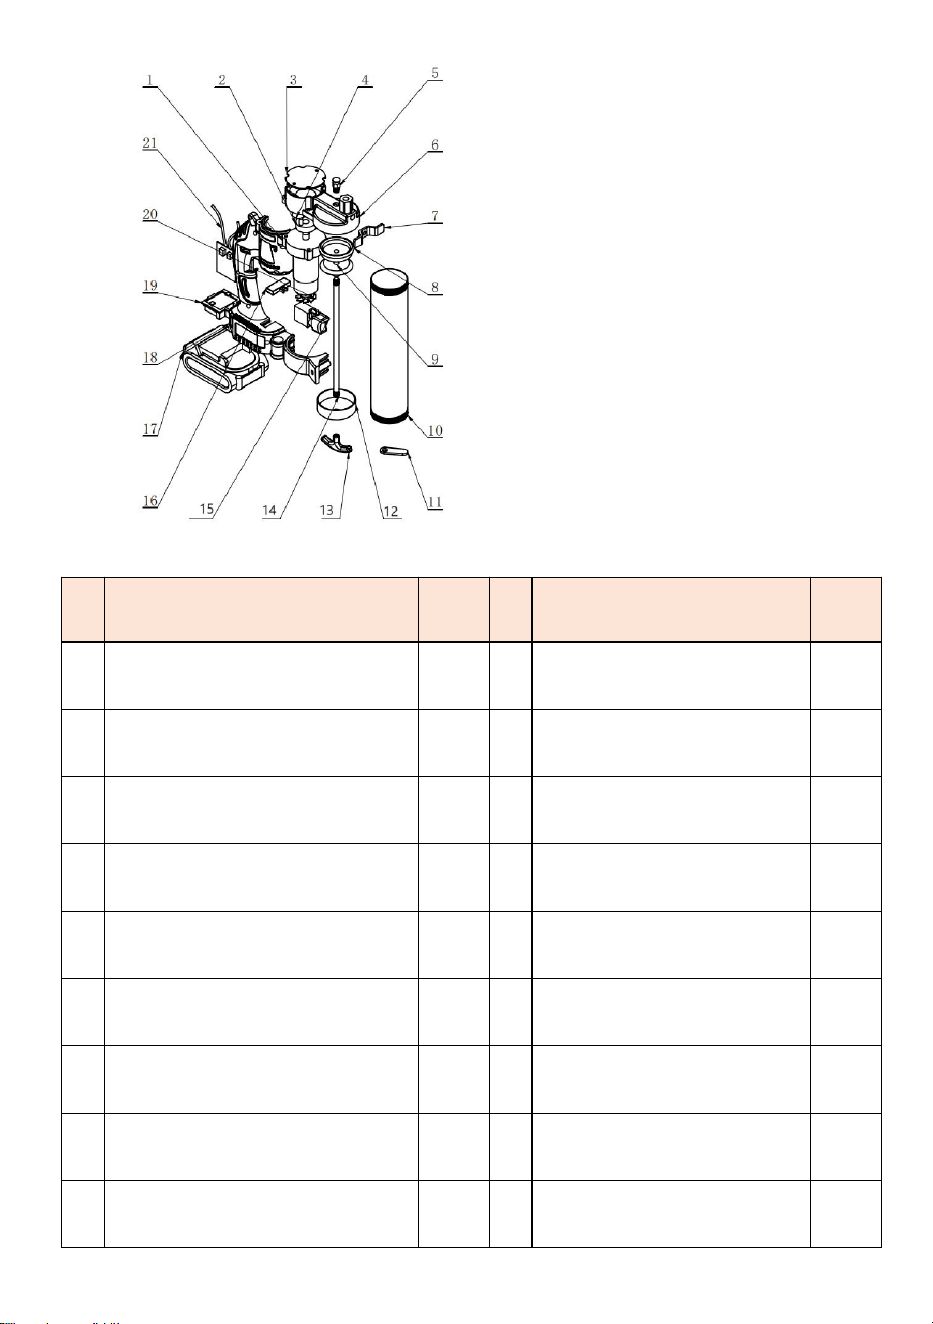
- 3 -
Zdjęcie w celach informacyjnych
Stabilny wtrysk oleju
Stabilny układ wydechowy
zapewnia płynny wtrysk oleju
Silny nacisk
Wysokie ciśnienie wtrysku oleju,
ciągła równowaga , szybkość i
skuteczność
Bądź łatwy do noszenia
W zestawie z samochodem,
oszczędza czas i wysiłek, a także
jest wygodne i szybkie
Elastyczne i wydajne
wykorzystanie
Można go wstrzykiwać do
dowolnej części dyszy, można
rozszerzyć olej na miejscu
S
N
Numer części
Ilo
ść
S
N
Numer części
Ilo
ść
1
Skrzynia biegów
1
1
2
Pokrywa cylindra
olejowego
1
2
Ko
ł
o osi mimo
ś
rodowej
1
1
3
Uchwyt aluminiowy
1
3
Pokrywa korpusu pompy
1
1
4
dr
ąż
ek poci
ą
gowy
1
4
Tuleja pr
ę
ta rdzenia
mimo
ś
rodowego
1
1
5
przycisk prze
łą
cznika
1
5
Zawór wydechowy
1
1
6
Komponenty karty
1
6
Korpus pompy aluminiowy
1
1
7
Zestaw baterii litowych
1
7
Podparcie stóp
1
1
8
Muszla - Lewa
1
8
T
ł
ok gumowy
1
1
9
Interfejs skrzynki
akumulatorowej
1
9
Sta
ł
e komponenty
1
2
0
maszyny elektryczne
1
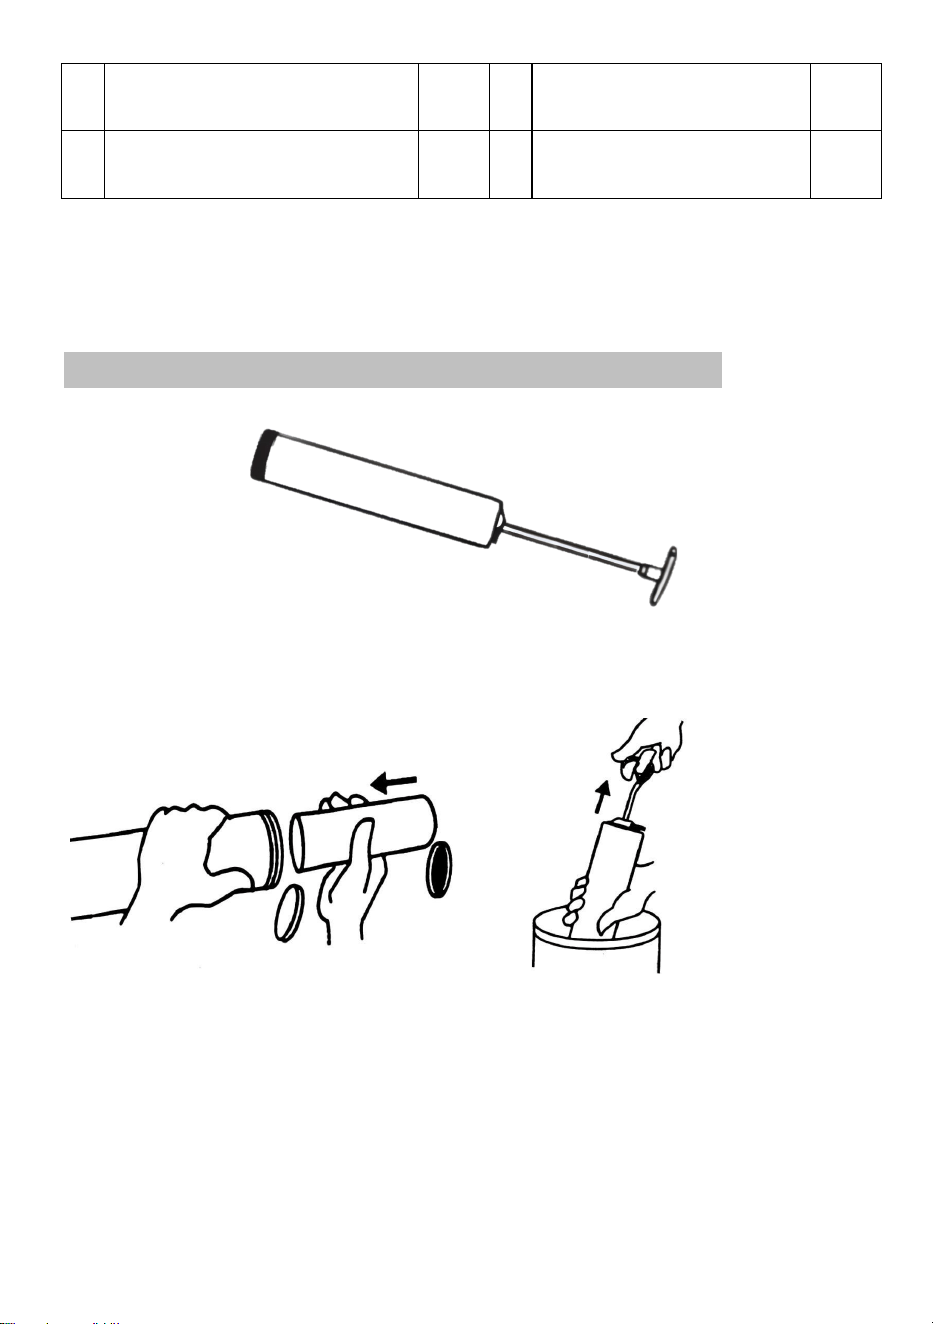
- 4 -
1
0
Cylinder do
przechowywania oleju
1
2
1
P
ł
yta sterownicza
1
1
1
Karta ubezpieczeniowa
1
Przed użyciem metody inspekcji sprawdź, czy lampa robocza się zaświeci
włącza się, gdy produkt jest podłączony do zasilania z baterią. W przypadku
braku obciążenia , urządzenie działa normalnie
Instrukcje dotyczące używania kulek maślanych
krok 1. Odciągnij uchwyt tłoka i napełnij lufę smarem.
Opcje napełniania tłuszczem:
1) Ładowanie wkładu: Zdejmij plastikową zatyczkę z wkładu i wsuń otwarty koniec
wkładu do lufy pistoletu smarowniczego, aż krawędź końca z uchwytem zetknie
się z krawędzią lufy.
1) 2)
2) Napełnianie ssące: Włóż otwarty koniec beczki około 2” do pojemnika na smar.
Powoli pociągnij za uchwyt tłoczyska, aby wciągnąć smar do pustej beczki,
jednocześnie wpychając beczkę głębiej w smar, aż tłoczysko zostanie całkowicie
wysunięte. Zewnętrzna powierzchnia może być pokryta dużą ilością
przyklejonego smaru i należy ją wyczyścić ze względów bezpieczeństwa.
Krok 2 : Zamontuj lufę z powrotem w pistoletu smarowym. Włącz zabezpieczenie
i wsuń pręt popychający z powrotem do lufy.
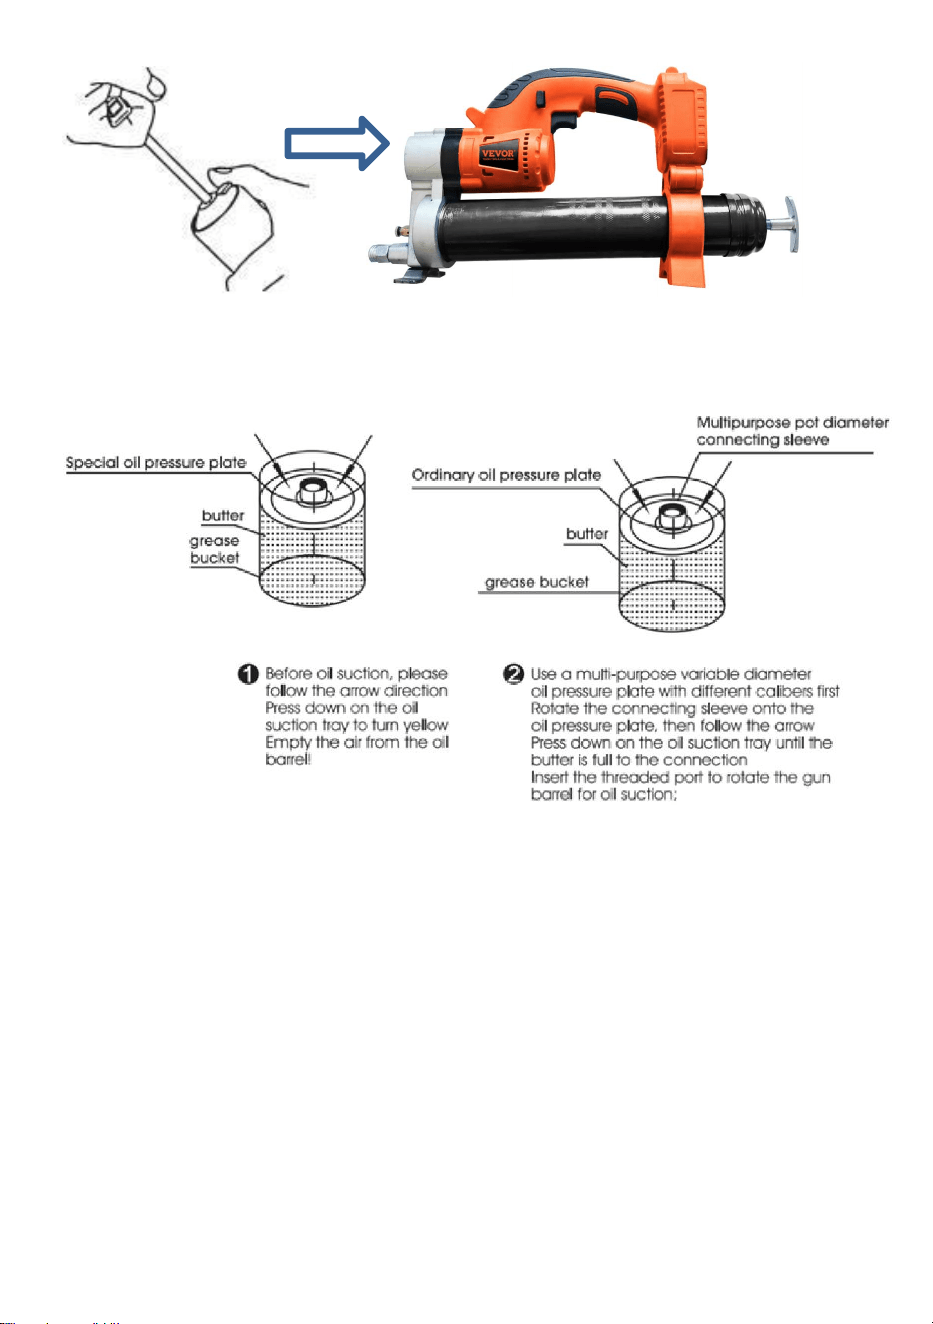
- 5 -
Metoda użycia miski olejowej
Sposób użycia uniwersalnej tulei łączącej o zmiennej średnicy: Używaj jej z
zwykłe przyssawki olejowe o różnych średnicach. Dwufunkcyjny pistolet smarowy
na baterie litowe Nie ma potrzeby stosowania specjalnej tacy do odsysania oleju)
.

- 6 -
Sposób użycia do rozbijania i piłowania oleju, jak pokazano na rysunku: Obróć
lufę pistoletu w kierunku specjalnie wyposażona w płytę ssącą olej (gdy płyta
ssąca olej czeka na zassanie oleju, należy najpierw umieścić na niej wiadro z
masłem . Odpompuj powietrze, aż masło będzie pełne, a efekt zasysania oleju
będzie lepszy w gwintowanym otworze płyty ssącej olej. Jeśli tacka ssąca olej nie
zostanie dociśnięta, aby odpompować powietrze z wnętrza wiadra, powietrze
wewnątrz rurka będzie się powiększać podczas zasysania oleju, co nie jest
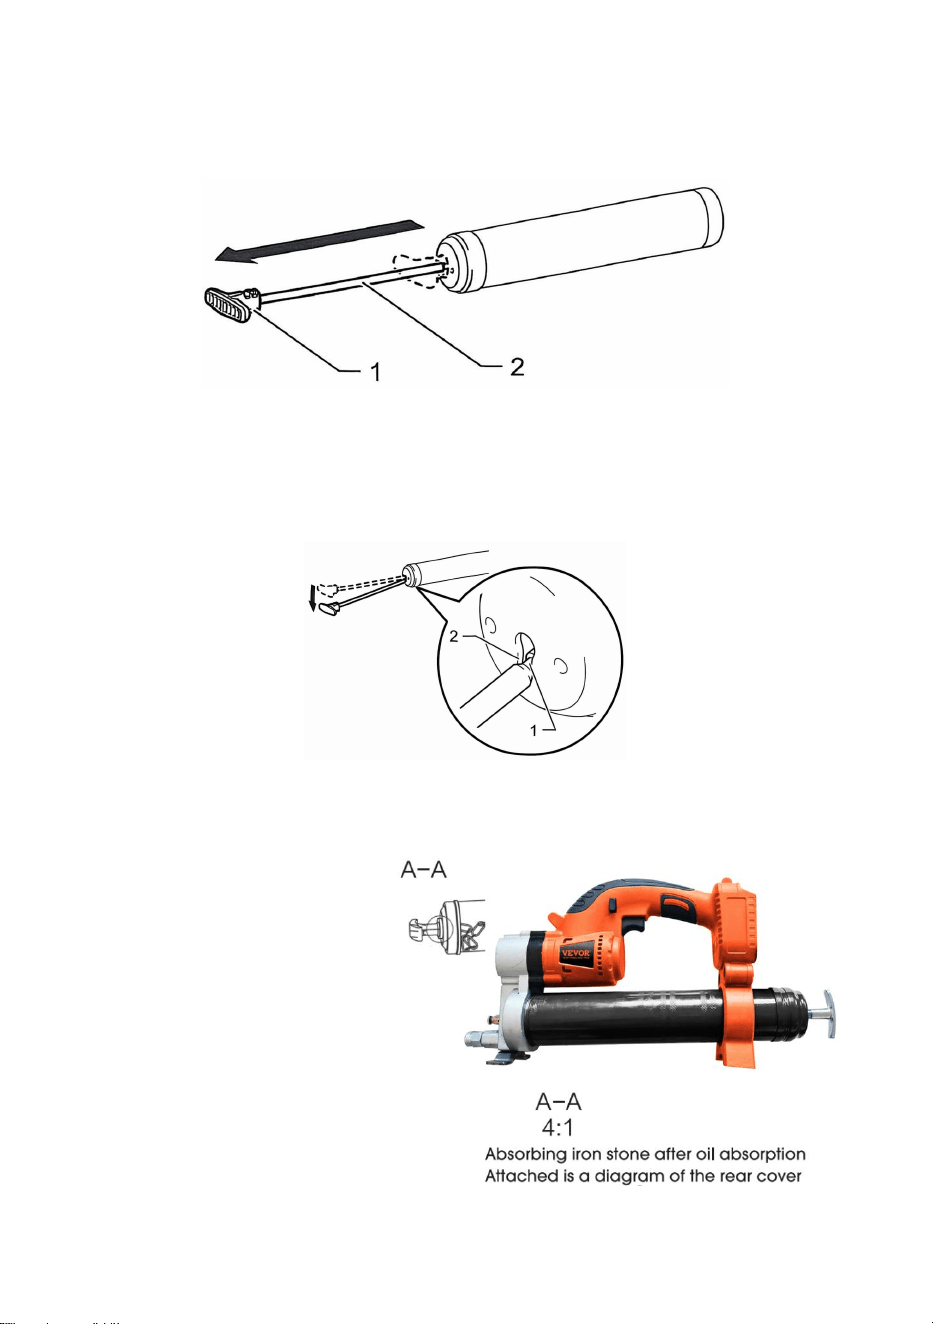
- 7 -
spowodowane słabym zasysaniem produktu ; konsumenci, którzy kupią ten
produkt, powinni o tym wiedzieć
3. Uchwyt pręta
11) Podczas nakładania smaru na lufę należy pociągnąć za uchwyt pręta.
1. Uchwyt drążka 2. Drążek
12) Aby zablokować uchwyt wędki w pozycji całkowicie wyciągniętej, pociągnij za
uchwyt wędki aż do momentu, gdy rowek na pręcie będzie widoczny, a
następnie zahacz rowek na szczelinę. Aby odblokować uchwyt pręta. odczep
rowek tak, aby pręt przesunął się do przodu.
1. Rowek 2. Szczelina
Jak pokazano na rysunku: Po
ściągnięciu zamka do dołu i
zabezpieczeniu mocno, obróć
go na głowicę pistoletu, zwolnij
zamek błyskawiczny i włóż go z
powrotem do wiadra, a
następnie użyj magnes do
przymocowania. Nad tylną
pokrywą można łatwo nałożyć
olej.
funkcji :

- 8 -
11) Gdy przycisk przekręcisz w lewo, kliknij przełącznik klawisz, ① Kontrolka jest
wyświetlana w dużej pozycji , narzędzia mogą strzelać smarem szybko i
ciągle, ② Kontrolka jest wyświetlana w małej pozycji , narzędzia mogą
strzelać smarem powoli i ciągle,
12) Gdy klucz przełącznika zostanie przekręcony w prawo , kliknij przełącznik
klawisz , ①. gdy kontrolka w lewym dolnym rogu jest zamknięta , narzędzia
mogą strzelać smarem szybko i ciągle, ②. gdy kontrolka w lewym dolnym
rogu jest otwarta , narzędzia mogą strzelać smarem nieciągły ,
Sposób wykorzystania baterii
Bezpieczeństwo elektryczne:
26
ładowania akumulatora: Wtyczka narzędzia zasilanego baterią litową musi
pasować do gniazda. P rzestępnie nie modyfikuj wtyczki ; nie podłączaj narzędzi
elektrycznych do uziemienia przewody do dowolnej wtyczki transformatora
Używane razem. Używanie niezmodyfikowanych wtyczek a odpowiednie
gniazdka mogą zredukować ryzyko porażenia prądem.
27
Należy znać metodę ładowania akumulatora: Wtyczka narzędzia z baterią
litową musi pasować do gniazda. P rzestępnie nie modyfikuj wtyczki ; nie
podłączaj narzędzi elektrycznych do uziemienia przewody do dowolnej wtyczki
transformatora Używane razem. Używanie niezmodyfikowanych wtyczek a
odpowiednie gniazdka mogą zredukować ryzyko porażenia prądem .
28
litowo - jonowe nie powinny być narażone na deszcz. Nie umieszczaj ich w
wilgotnym miejscu. środowisko ; woda powinna płynąć do elektronarzędzia.
Zwiększy to ryzyko porażenia prądem.
29 Podczas ładowania akumulator nie może znajdować się w pobliżu materiałów
łatwopalnych, wybuchowych lub żrących, o obwodzie 15 metrów . Nie należy
umieszczać wewnątrz żadnych śmieci, a także nie należy ładować wielu baterii
aby zapobiec przeciążeniu obwodu. Używaj, aby spowodować nagrzanie
przewodu.
30 Surowo zabrania się ładowania akumulatorów na przedmiotach drewnianych,
plastikowych i innych .
button
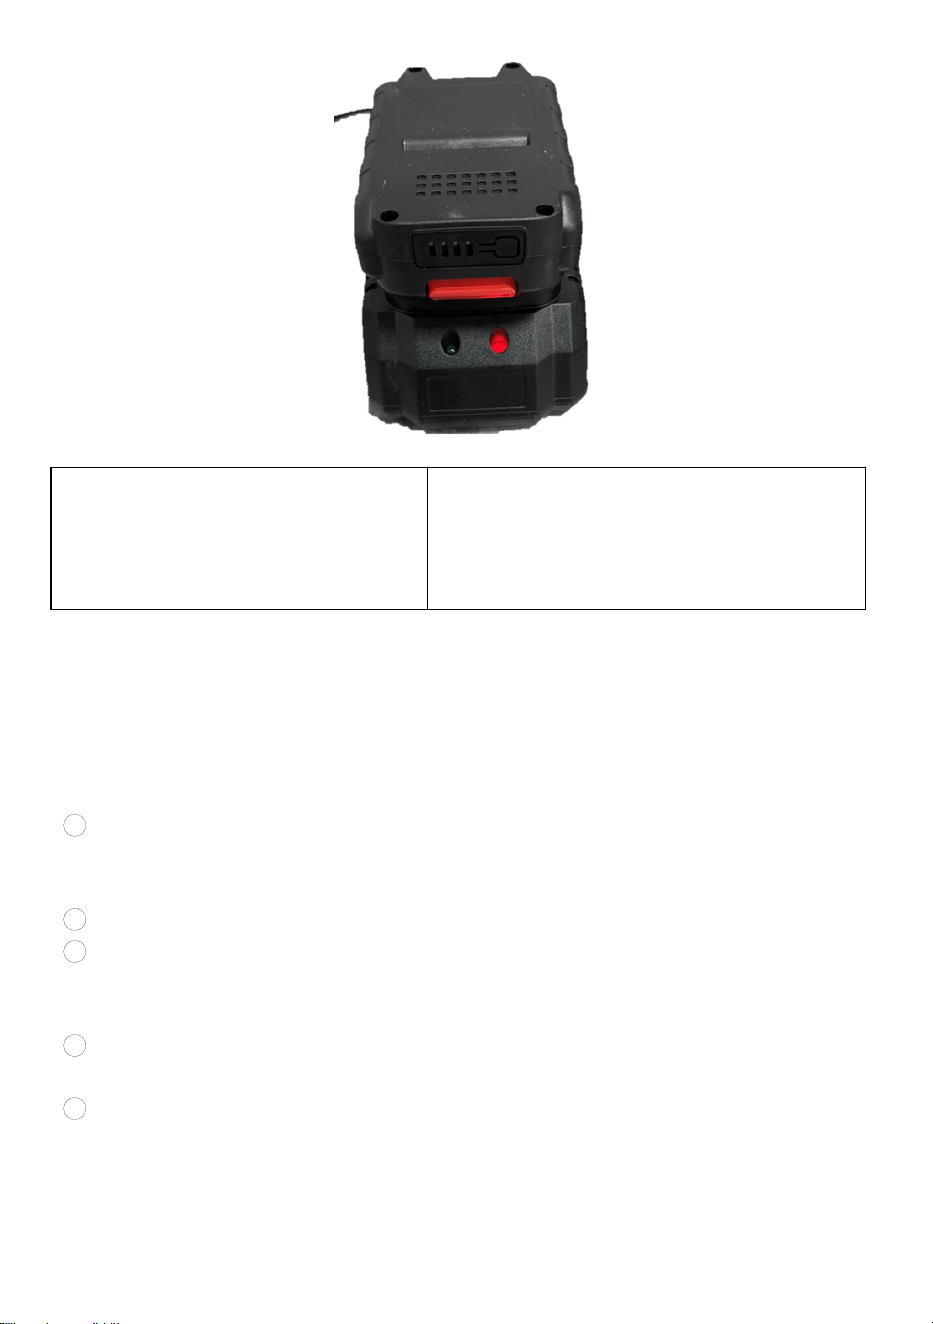
- 9 -
Zdjęcie w celach informacyjnych
Aby naładować akumulator, należy
ustawić gniazdo w jednej linii
akumulator z gniazdem ładowarki i
suwakiem na miejsce.
Kontrolka akumulatora powinna zmienić kolor
z od zielonego do czerwonego, gdy
akumulator jest ładowany. Gdy kontrolka
zaświeci się na zielono Akumulator powinien
być w pełni naładowany.
OSTRZEŻENIE: Jeśli
akumulator jest gorący po dłuższym użytkowaniu, przed
ładowaniem należy odczekać, aż ostygnie.
Metoda ładowania:
Przed użyciem smarownicy litowej należy naładować akumulator zgodnie z
poniższą metodą
26
podłącz wtyczkę zasilającą ładowarki akumulatorów do odpowiedniego źródła
napięcia prądu przemiennego , a wskaźnik ładowania światło zmieni się na
zielone.
27 Włóż wtyczkę DC ładowarki do gniazda DC w obudowie akumulatora.
28
Po podłączeniu do zasilania kontrolka ładowarki zaświeci się na czerwono , a
ładowanie się rozpocznie. Podczas Podczas ładowania kontrolka będzie świecić
stabilnie , a czerwone światło pozostanie włączone.
29 Gdy kontrolka ładowarki zmieni kolor z czerwonego na zielony, oznacza to, że
cykl ładowania został zakończony.
30
Po naładowaniu należy odłączyć wtyczkę zasilającą ładowarki od gniazdka
sieciowego.

- 10 -
Uwaga:
Ładowarka baterii służy wyłącznie do ładowania oryginalnego fabrycznego
pojemnika na baterie. Nie należy jej używać do innych celów ani do ładowania to
z baterie innych producentów , jeśli chodzi o nowe produkty. Podczas ładowania
obudowy akumulatora może nie być być w pełni naładowany. Proszę całkowicie
rozładować i naładować kilka razy przed ładowaniem. Jeśli ładowanie
akumulatora akumulator , który był niedawno używany lub był wystawiony na
bezpośrednie działanie promieni słonecznych lub ciepła przez długi czas, można
użyć kontrolki ładowania . Zaświeci się i zmieni kolor na zielony. Proszę
odczekać chwilę, ponieważ akumulator zacznie się ładować po ostygnięciu .
Problemy, które mogą wystąpić podczas procesu olejowania i
rozwiązania
11. Problem: Pistolet do masła działa normalnie podczas użytkowania, ale z
dyszy wylotowej oleju nie wydostaje się masło.Powód: Może to być
spowodowane zjawiskiem powietrza zasysane przez rurę w procesie zasysania
oleju, powodując, że masło nie może być normalnie wypompowane lub
sprawdzanie, czy łańcuch ogonowy jest zablokowany
12. Problem: Prędkość silnika spada . Przyczyna: Zablokowanie obwodu
olejowego, niewystarczająca moc akumulatora
Naciśnij przełącznik, aby przejść do schematu wydechu i
odprowadzania oleju

- 11 -
Sposób działania układu wydechowego, jak pokazano na rysunku : Otwórz zawór
wydechowy, jak pokazano na rysunku 9, obróć zawór wydechowy dwa razy,
naciśnij główny wyłącznik, aż zawór wydechowy zostanie zwolniony do powietrza
i niewielkiej ilości smaru, a następnie może być używanym normalnie . Jeżeli
nadal nie można normalnie odprowadzić oleju, należy powtórzyć tę metodę
operacji , aby zapewnić normalne odprowadzenie .
Parametry produktu 18,5 V litowo-polimerowej elektrycznej dwufunkcyjnej
smarownicy
Modele: LD-8207, LD-8207A / LD-8207B
Ile rur olejowych można napełnić w warunkach bez obciążenia: za pomocą
płaskiej dyszy i węża można napełnić sześć rur . Ile rur oleju można napełnić pod
obciążeniem 800 P SI : przy użyciu węża i płaskiej dyszy można napełnić cztery
rury .
Model silnika: LY4815A
Napięcie akumulatora: 18,5 V
Maksymalne ciśnienie robocze: 6000 PSI -8 0 00 PSI
Wydajność oleju na akumulator: 3200 g z wężem i płaską dyszą + Wydajność
oleju na minutę: 110 g-130 g
Całkowita wydajność oleju dwóch baterii: 6400g
Żywotność silnika: ponad 140 godzin
Czas potrzebny do pełnego naładowania akumulatora: ok. 1,5 godz.
Wyjście ładowania akumulatora: 21 V
Maksymalne ciśnienie węża: 80 00 PSI
Wejście ładowania akumulatora: 100~240 V/50Hz dla wersji amerykańskiej, 220
~240 V/50Hz dla wersji europejskiej
Materiał produktu: Stal stopowa
Temperatura pracy: -20 ℃ ~50 ℃
Prąd roboczy: 4A-24A
1. Codzienna konserwacja
1 ) Po każdym użyciu pistoletu do oleju należy wyczyścić zewnętrzną obudowę i
umieścić ją w w skrzynce narzędziowej w celu prawidłowego przechowywania
2 ) Jeśli broń nie będzie używana przez dłuższy czas, należy całkowicie
odsączyć smar z przezroczystej lufy.
2. Środki ostrożności

- 12 -
①Nieprofesjonaliści, prosimy nie demontować ani nie naprawiać hosta. Jeśli
występują problemy z jakością, które wymagają naprawy , prosimy o kontakt z
personelem naprawczym sprzedawcy i producenta.
②Podczas korzystania z produktu należy obchodzić się z nim ostrożnie i nie
rzucać nim wysoko .
③ Stosuj odpowiedni rodzaj smaru zgodnie ze specyfikacją produktu.
④ Przed użyciem tego produktu na placach budowy i placach operacyjnych
należy założyć profesjonalny sprzęt ochronny .
⑤ Aby zapewnić bezpieczeństwo podczas pracy, nie należy kierować pistoletu
na olej w stronę twarzy osoby obsługującej urządzenie.
⑥ Po nieużywaniu produktu należy wyjąć baterię litową. Baterię litową należy
ładować co 3 dni, a akcesoria produktu i działanie korpusu należy sprawdzać
regularnie.
⑦ Warunki przechowywania produktu: w miejscu wentylowanym i suchym, w
oddzielnym pomieszczeniu, nie mieszać z innymi produktami.
⑧ Nie upuszczaj akumulatora, nie uderzaj nim i trzymaj go z dala od źródeł ognia
.
⑨ Regularnie sprawdzaj wąż i nie wyginaj go nadmiernie podczas użytkowania.
Wprowadzenie do narzędzi pomocniczych produktu
(Tylko produkty najwyższej jakości zawierają wszystkie akcesoria)

- 13 -
1. Główny pistolet do masła 2. Paski 3. Skrobak do oleju,
4. Pas surowcowy 5. miska olejowa 6. Klucz
7. końcówka do lat 8. Ostra dysza . 9 Twarda rura ,
10, Wąż 11, Opłata r 12. Bateria ,
Porównanie korzyści pomiędzy elektryczne pistolety do masła i ręczne
pistolety do masła broni w ciągu jednego roku
Projekt: Koparka 20 ton
Elektryczny
Podręcznik
① Godziny pracy i czas stracony:
8 minut/dzień*219 dni=29 godzin*180
juanów/godzina=5220 juanów/rok
25 minut/dzień*219 dni=91
godzin*180 juanów/godzina=16400
juanów/rok
② Zużycie paliwa: 2900
gramów/dzień*219 dni=197
kilogramów=13 baryłek*200
juanów=2180 juanów/rok
500 gramów/dzień*219 dni=109
kilogramów=7 baryłek*200
juanów=1400 juanów/rok

- 14 -
③
Konserwacja maszyny + koszty
naprawy + koszty utraty pracy
4 osie*2000 juanów/oś=8000
juanów/2 lata (koszt naprawy)2400
juanów/dzień * 4 dni=9600 juanów/2
lata (opłata za utratę pracy)Razem:
13600 juanów/rok
4 osie * 2000 juanów/oś = 8000
juanów/rok (koszt naprawy) 2400
juanów/dzień * 4 dni = 9600
juanów/rok (opłata za utratę pracy)
Razem: 27200 juanów/rok
④ Cena zakupu energii
elektrycznej:
1000 juanów/sztuka = 500 juanów (2
lata za sztukę)
150 juanów * 2=300 juanów (2 sztuki
rocznie)
Razem:
5220+2180+13600+500=21500
juanów/rok
Razem:
16400+1400+27200+300=45300
juanów/rok
Całkowita różnica w cenie: 45300-21500 = 23800 juanów/rok
Porównanie korzyści pomiędzy elektrycznymi pistoletami smarowymi i smar ręczny
broń.
Ostrzeżenie – Aby zmniejszyć ryzyko obrażeń, użytkownik musi
uważnie przeczytać instrukcję obsługi.
Noś ochronę głowy
Informacje FCC:
UWAGA
: Zmiany lub modyfikacje wykonane bez wyraźnej zgody strony
odpowiedzialnej za zgodność mogą spowodować unieważnienie prawa
użytkownika do korzystania ze sprzętu!
To urządzenie jest zgodne z częścią 15 przepisów FCC. Jego działanie podlega
następującym dwóm warunkom:
1) Produkt ten może powodować szkodliwe zakłócenia.
2) Produkt ten musi być odporny na wszelkie zakłócenia, w tym zakłócenia
mogące powodować niepożądane działanie.
OSTRZEŻENIE: Zmiany lub modyfikacje tego produktu nie są wyraźnie
zatwierdzone przez stronę odpowiedzialność za zgodność może spowodować
unieważnienie prawa użytkownika do korzystania z produktu.

- 15 -
Uwaga: Ten produkt został przetestowany i uznany za zgodny z limitami dla
urządzeń cyfrowych klasy B zgodnie z częścią 15 przepisów FCC . Limity te mają
na celu zapewnienie rozsądnej ochrony przed szkodliwymi zakłóceniami w
instalacjach domowych.
Ten produkt generuje, wykorzystuje i może emitować energię o częstotliwości
radiowej, a jeśli nie zostanie zainstalowany i używany zgodnie z instrukcją, może
powodować szkodliwe zakłócenia w komunikacji radiowej. Nie ma jednak
gwarancji, że zakłócenia nie wystąpią w konkretnej instalacji. Jeśli ten produkt
powoduje szkodliwe zakłócenia w odbiorze radia lub telewizji, co można
stwierdzić poprzez wyłączenie i ponowne włączenie produktu, zaleca się, aby
użytkownik spróbował skorygować zakłócenia, stosując jeden lub więcej z
następujących środków.
· Zmiana orientacji lub położenia anteny odbiorczej.
· Zwiększ odległość między produktem a odbiornikiem.
· Podłączyć produkt do gniazdka w innym obwodzie niż ten, do którego
podłączony jest odbiornik.
· Aby uzyskać pomoc, należy zwrócić się do sprzedawcy lub doświadczonego
technika radiowo-telewizyjnego.
PRAWIDŁOWA UTYLIZACJA
Ten produkt podlega postanowieniom dyrektywy europejskiej
2012/19/UE. Symbol przedstawiający przekreślony kosz na śmieci na
kółkach oznacza, że produkt wymaga oddzielnej zbiórki odpadów w Unii
Europejskiej. Dotyczy to produktu i wszystkich akcesoriów oznaczonych
tym symbolem. Produktów oznaczonych w ten sposób nie można
wyrzucać razem ze zwykłymi odpadami domowymi, ale należy je oddać do
punktu zbiórki odpadów. punkt zbiórki sprzętu elektrycznego i elektronicznego
przeznaczonego do recyklingu.

- 16 -
Producent: Shanghaimuxinmuyeyouxiangongsi
Adres: Shuangchenglu 803nong11hao1602A-1609shi, baoshanqu, szanghaj
200000 CN.
Importowane do AUS: SIHAO PTY LTD. 1 ROKEVA STREETEASTWOOD
NSW 2122 Australia
Importowane do USA: Sanven Technology Ltd. Suite 250, 9166 Anaheim Place,
Rancho Cucamonga, CA 91730
REP
EC
E-CrossStu GmbH
Mainzer Landstr.69, 60329 Frankfurt am Main.
REP
UK
YH CONSULTING LIMITED.
C/O YH Consulting Limited Office 147, Centurion House,
London Road, Staines-upon-Thames, Surrey, TW18 4AX
Techniczny Wsparcie i certyfikat e-gwarancji
www.vevor.com/support

- 17 -
Technisch Ondersteuning en E-garantiecertificaat
www.vevor.com/support
SNOERLOOS VETSPUIT
GEBRUIKER HANDMATIG
Wij streven er voortdurend naar om u gereedschappen tegen concurrerende prijzen te
leveren.
"Bespaar de helft", "halve prijs" of andere soortgelijke uitdrukkingen die alleen door ons
worden gebruikt
geeft een schatting van de besparingen die u kunt behalen door bepaalde
gereedschappen te kopen
bij ons vergeleken met de grote topmerken en betekent niet per se dat omslag
alle categorieën van tools die wij aanbieden. U wordt vriendelijk verzocht om te verifiëren
voorzichtig
wanneer u een bestelling bij ons plaatst, als u daadwerkelijk Besparing
Half in vergelijking met de grote topmerken.

- 1 -
Model: LD-8207
,
LD-8207A / LD-8207B
LD-8207
LD-8207A / LD-8207B
Foto ter referentie
BEHOEFTE HULP? CONTACT ONS!
Hebben product vragen? Behoefte technisch steun? Alsjeblieft
gevoel vrij naar contact ons:
Technische ondersteuning en e-
garantiecertificaat
www.vevor.com/support
Dit is het origineel instructie, lees alles alstublieft handmatig instructies
voorzichtig voor gebruik. VEVOR behoudt zich een duidelijke
interpretatie van onze gebruikershandleiding voor. Het uiterlijk van het
product moet onderworpen zijn aan de
product jij ontvangen. Vergeef me alsjeblieft ons dat we niet zullen u
opnieuw informeren als er technologie of software is updates over onze
Cordless Grease Gun

- 2 -
product.
1. Lees alle MONTAGE-instructies zorgvuldig door en begrijp ze. EN
WERKING GEBRUIKSAANWIJZING vóór gebruik.
2. Het niet naleven van de veiligheidsregels en andere
basisveiligheidsvoorschriften voorzorgsmaatregelen kunnen resultaat in
serieuze persoonlijke blessure.
Specificatie
Model : LD-8207 / LD -8207 A/ LD-8207 B gebruikt 18V-21V is acceptabel. En
onze gereedschappen kunnen worden gecombineerd met Makita's accu
Model
of
zonde
r
batteri
j
Stekkertyp
e
Stroom
Oplader
Invoer
Uitvoer
LD-8207
Nee
Zonder
18,5 V
gelijkstroom
Zonder
LD-
8207A
Ja
ONS
18,5V 2,0Ah
AC100-240V
50/60Hz
DC21V,2A
LD-
8207B
Ja
EU
18,5V 2,0Ah
AC220-240V
50/60Hz
DC21V,2A
Het product heeft de volgende kenmerken
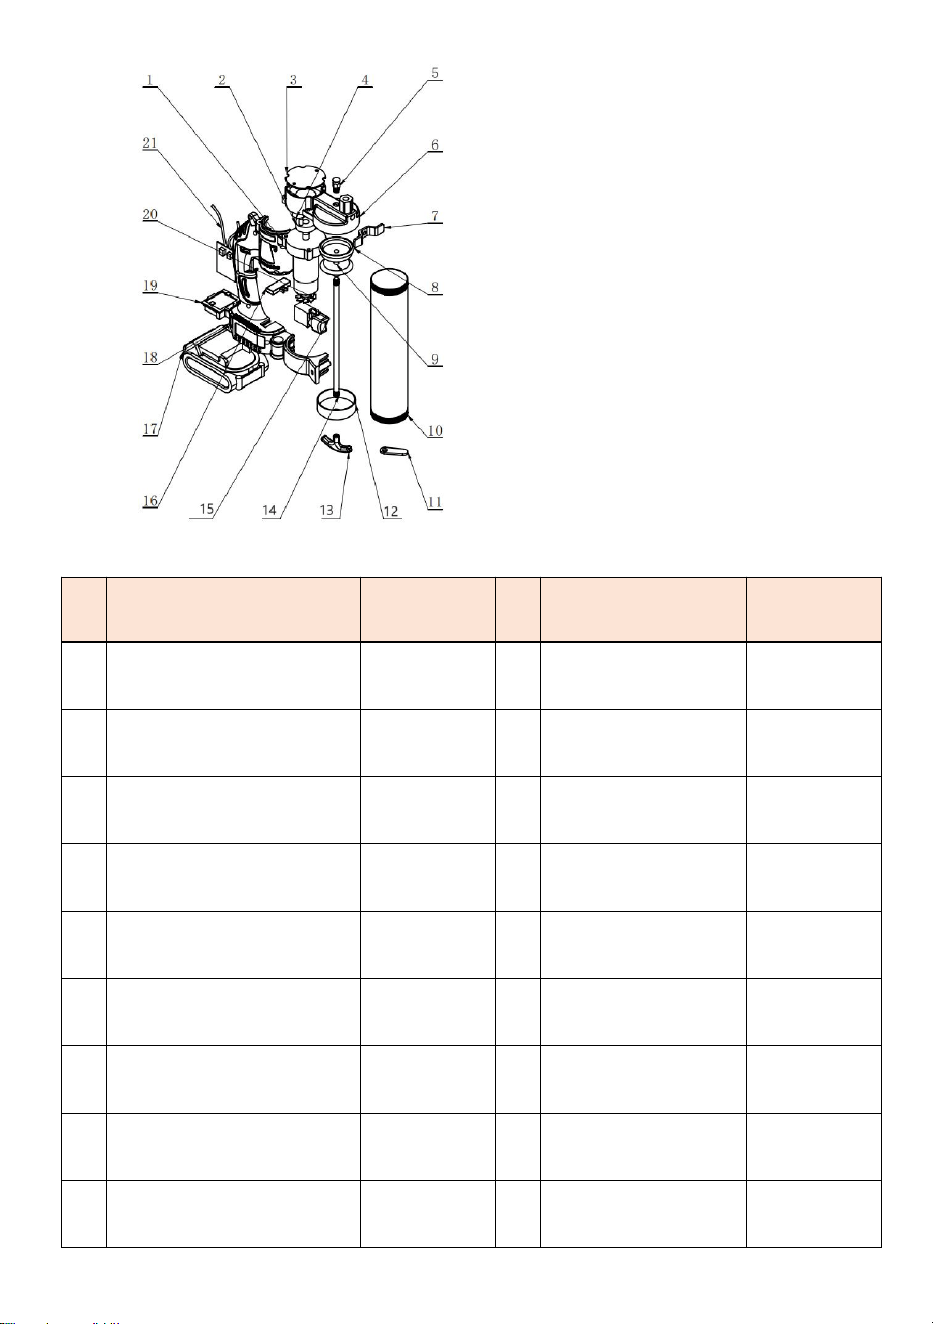
- 3 -
Foto ter referentie
Stabiele olie-injectie
Stabiele uitlaat zorgt voor een
soepele olie-injectie
Sterke druk
Hoge olie-injectiedruk, continue
balans , snel en effectief
Gemakkelijk mee te nemen
Wordt geleverd met de auto,
bespaart tijd en moeite en is
handig en snel
Flexibel en efficiënt
gebruik
Het kan in elk deel van de
spuitmond worden geïnjecteerd
kan worden verlengd o il op zijn
plaats
S
N
Onderdeelnr.
Hoeveelhe
id
S
N
Onderdeelnr.
Hoeveelhe
id
1
Versnellingsbak
1
1
2
Olie cilinder
deksel
1
2
Excentrische as wiel
1
1
3
Aluminium
handvat
1
3
Pompbehuizing
deksel
1
1
4
trekstang
1
4
Excentrische
kernstanghuls
1
1
5
schakelknop
1
5
Uitlaatklep
1
1
6
Kaartcomponent
en
1
6
Aluminium pomphuis
1
1
7
Lithium-
accupakket
1
7
Voetondersteuning
1
1
8
Schelp - Links
1
8
Rubberen zuiger
1
1
9
Batterijdoosinterf
ace
1
9
Vaste componenten
1
2
0
elektrische
machines
1
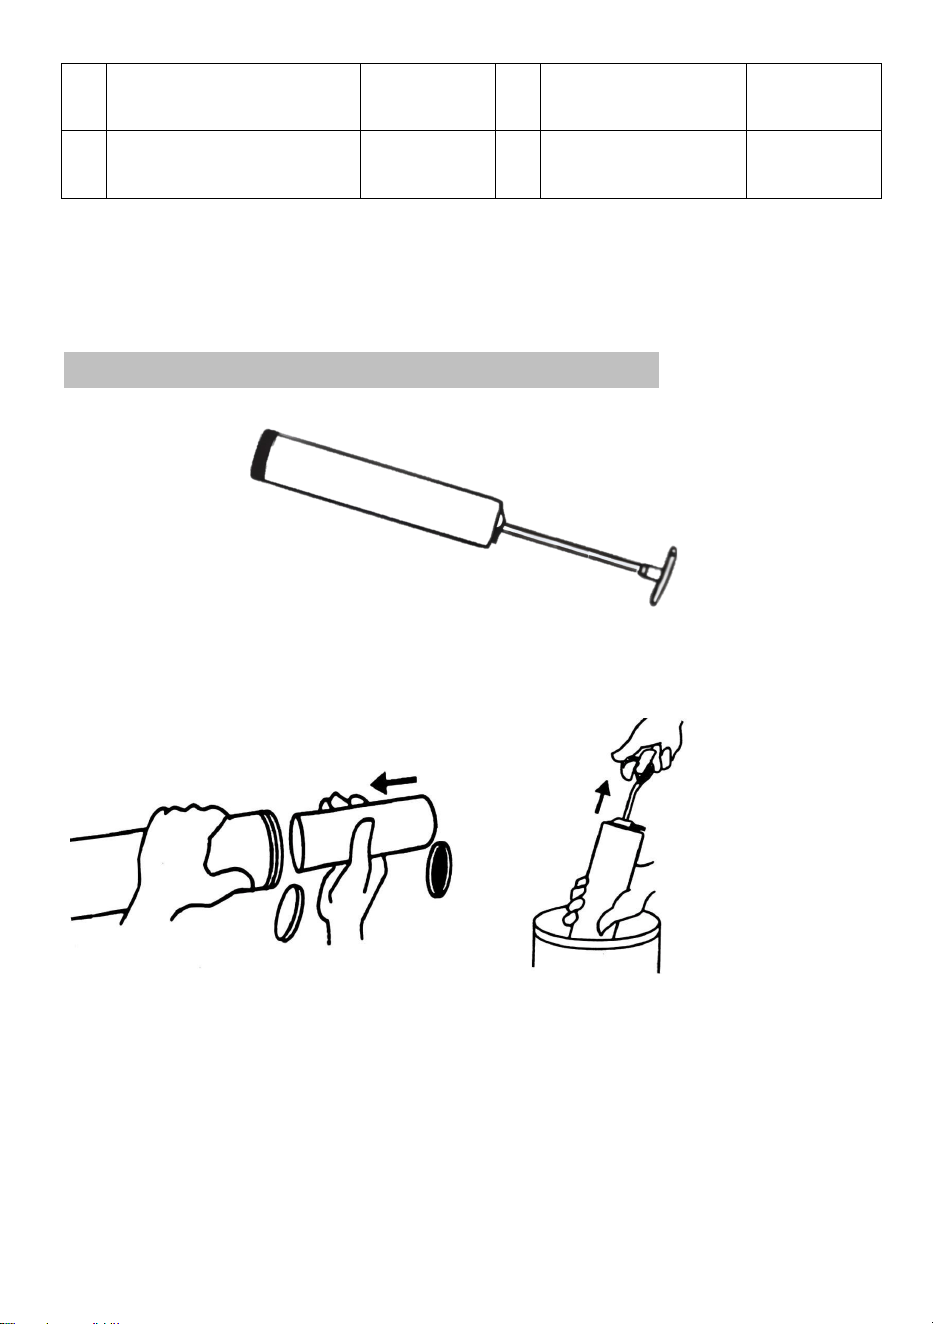
- 4 -
1
0
Olieopslagcilinder
1
2
1
Bedieningspanee
l
1
1
1
Verzekeringskaart
1
Controleer voordat u de inspectiemethode gebruikt of de werklamp gaat
branden omhoog wanneer het product is aangesloten met een batterij. In
het geval van geen belasting , is de machine normaal aan het draaien
Instructies voor het gebruik van boterballen
stap 1. Trek de zuigerstanghendel terug en vul de cilinder met vet.
Opties voor het vullen van vet:
1) Het vullen van de patroon: Verwijder de plastic dop van de patroon en steek
het open uiteinde van de patroon in de loop van het vetspuitpistool totdat de rand
van het treklipje de rand van de loop raakt.
1) 2)
2) Vulling door zuigen: Steek het open uiteinde van het vat ongeveer 2 inch in de
vetcontainer. Trek langzaam aan de zuigerstanghendel om vet in het lege vat te
zuigen terwijl u het vat dieper in het vet duwt totdat de zuigerstang volledig is
uitgeschoven. Het buitenoppervlak kan veel vet bevatten en moet voor de
veiligheid worden schoongeveegd.
Stap 2 : Plaats de cilinder terug in het vetspuitpistool. Activeer de veiligheidspal
en duw de duwstang terug in de cilinder.

- 5 -
Methode voor het gebruik van de oliepan
De gebruiksmethode van een multifunctionele variabele diameter verbindingsmof:
Gebruik het met gewone oliezuignappen van verschillende diameters. Lithium-
batterij dual -p urpose vetspuit Er hoeft geen speciale olie-aanzuigbak gebruikt te
worden .

- 6 -
De gebruiksmethode voor het opbreken en vijlen van olie, zoals weergegeven in
de afbeelding: Draai de geweerloop naar de speciaal Uitgeruste olie-
aanzuigplaat (wanneer de olie-aanzuigplaat wacht op olie-aanzuiging, plaats dan
eerst de boteremmer erin . Laat de lucht ontsnappen totdat de boter vol is en het
olie-zuigeffect beter is bij de schroefdraadpoort van de olie-zuigplaat. Als de olie -
zuigbak niet wordt ingedrukt om de lucht in de emmer af te voeren, zal de lucht in
de emmer de buis zal groter worden tijdens het aanzuigen van olie, wat niet te
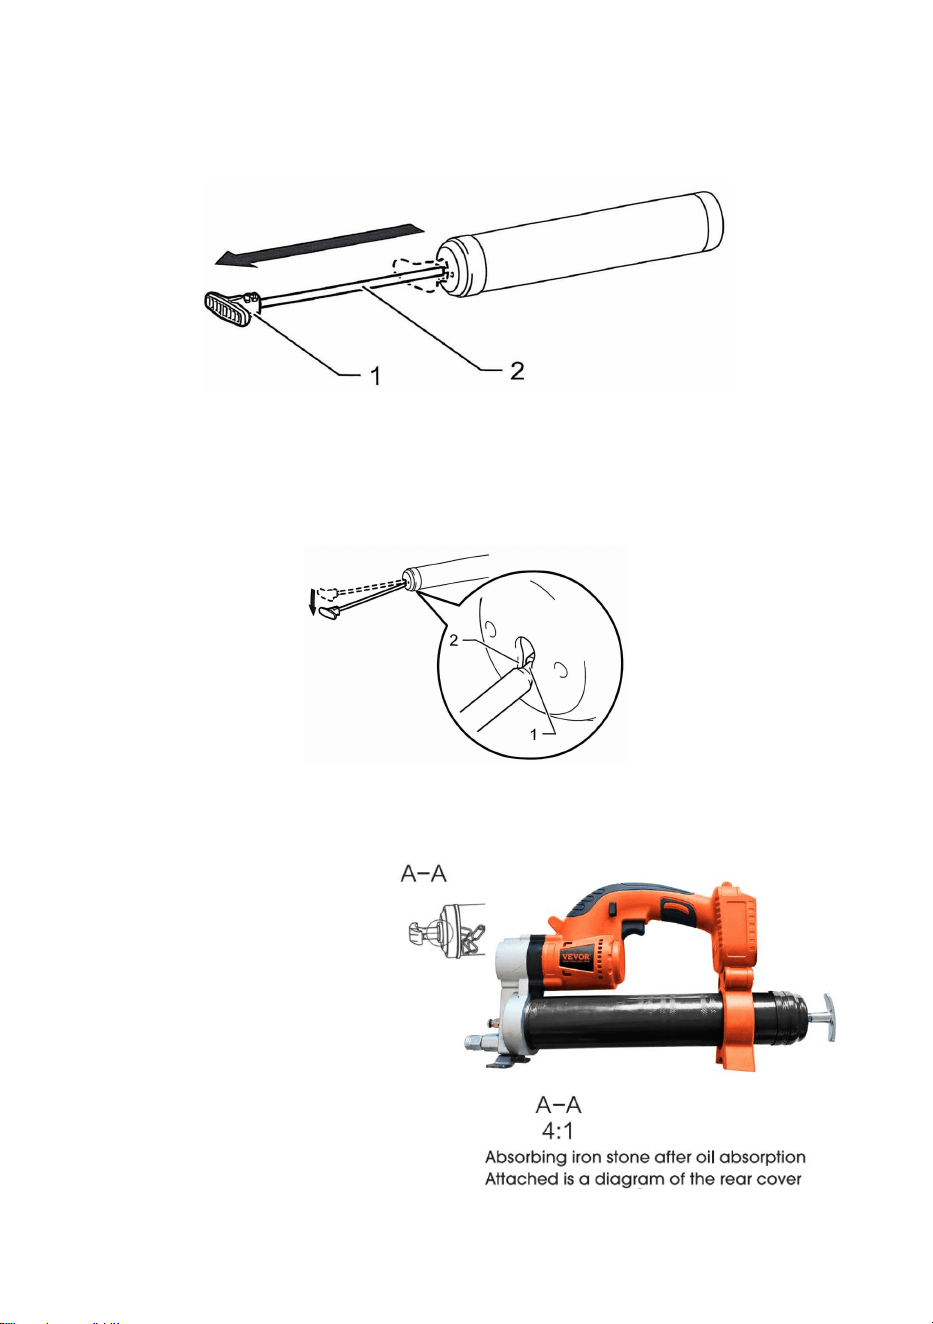
- 7 -
wijten is aan een slechte aanzuiging van het product ; consumenten die dit
product kopen, wordt aangeraden zich hiervan bewust te zijn
3. Stanggreep
13) Trek aan de stanghendel wanneer u vet in de cilinder aanbrengt.
1. Stanggreep 2. Stang
14) Om de stanghendel volledig te vergrendelen, trekt u aan de stanghendel
totdat de groef op de staaf zichtbaar is, en haak dan de groef op de sleuf. Om
de stanghendel te ontgrendelen. Maak de groef los zodat de stang naar voren
beweegt.
1. Groef 2. Sleuf
Zoals weergegeven in de
afbeelding: Nadat u de rits
naar beneden hebt getrokken
en vastgezet draai het stevig op
de kop van het pistool, laat het
los rits en doe het terug in de
emmer, gebruik dan een
Magneet om het te bevestigen
Boven de achterkant kunt u
eenvoudig olie aanbrengen.
Functiepaneel :

- 8 -
13) Wanneer u op de knop naar links draait, klikt u op de schakelaar sleutel, ①
Het indicatielampje wordt in een grote positie weergegeven , de
gereedschappen kunnen snel en continu vet schieten, ② Het indicatielampje
wordt in een kleine positie weergegeven , de gereedschappen kunnen
langzaam en continu vet schieten ,
14) Wanneer de schakelaar naar rechts draait , klikt u op de schakelaar sleutel ,
①. wanneer het indicatielampje in de linkerbenedenhoek gesloten is , kunnen
de gereedschappen snel en continu vet afschieten, ②. wanneer het
indicatielampje in de linkerbenedenhoek geopend is , kunnen de
gereedschappen vet afschieten onderbroken ,
Batterijgebruikmethode
Elektrische veiligheid:
31
De oplaadmethode van de batterij moet bekend zijn: de stekker van het
lithiumbatterijgereedschap moet in het stopcontact passen. Wijzig de stekker niet ;
sluit geen elektrisch gereedschap aan met een aardingsaansluiting . draden naar
elke transformatorstekker Samen gebruikt. Ongewijzigde stekkers gebruiken en
bijpassende stopcontacten kunnen het gevaar van een elektrische schok
verkleinen.
32 De oplaadmethode van de batterij moet bekend zijn: de stekker van het
lithiumbatterijgereedschap moet in het stopcontact passen. Wijzig de stekker niet ;
sluit geen elektrisch gereedschap aan met een aardingsaansluiting . draden naar
elke transformatorstekker Samen gebruikt. Ongewijzigde stekkers gebruiken en
bijpassende stopcontacten kunnen het gevaar van een elektrische schok
verminderen .
33
Lithium -i- gereedschap mag niet worden blootgesteld aan regen. Plaats het
niet in een vochtige ruimte. milieu ; water moet in het elektrische gereedschap
stromen Zal de risico op elektrische schokken.
34
Tijdens het opladen is het ten strengste verboden de accu in de buurt van
ontvlambare, explosieve of corrosieve materialen te houden. met een omtrek van
15 meter . Er mag geen vuil in worden geplaatst en er mogen geen meerdere
batterijen worden opgeladen om overbelasting van het circuit te voorkomen.
Gebruik om draadverwarming te veroorzaken.
button
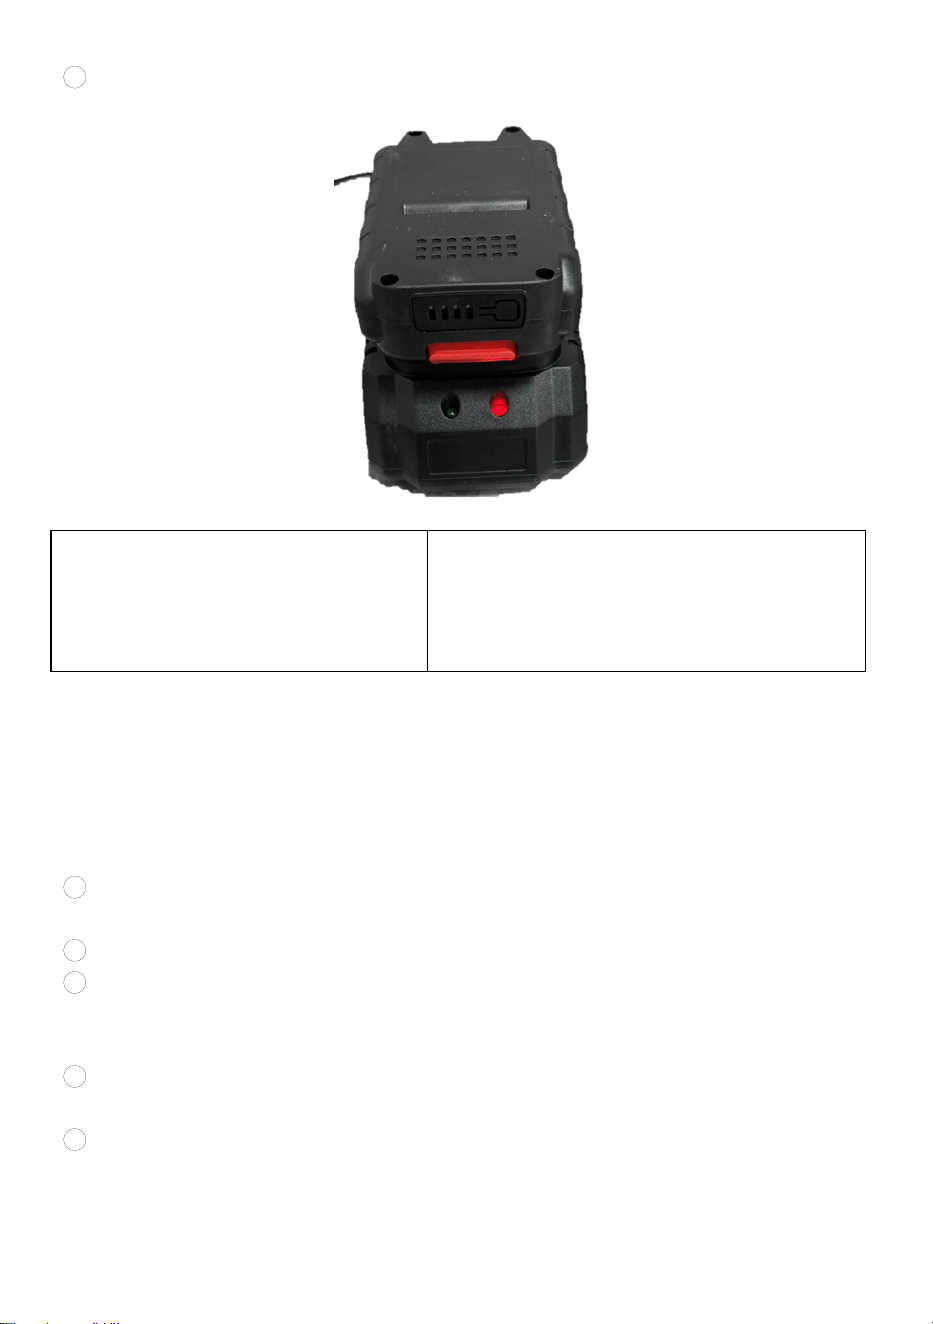
- 9 -
35
Het is ten strengste verboden om batterijen op te laden op houten, plastic of
andere voorwerpen.
Foto ter referentie
Om de batterij op te laden, lijnt u de
sleuf van de batterij met de sleuf van
de lader en schuif op zijn plaats.
Het batterij-indicatielampje moet van groen
naar rood wanneer de batterij wordt
opgeladen. Wanneer het indicatielampje
groen is geworden De batterij moet volledig
opgeladen zijn.
WAARSCHUWING: Laat de batterij afkoelen voordat u deze oplaadt, als de
batterij door continu gebruik heet is geworden.
Oplaadmethode:
Voordat u het lithiumvetspuitpistool gebruikt, moet u de accu volgens de
volgende methode opladen
31
Steek de stekker van de acculader in een geschikte wisselspanningsbron en
de laadindicator Het licht wordt groen.
32
Steek de DC-stekker van de lader in de DC-aansluiting van de batterijdoos.
33
Wanneer aangesloten op de voeding, zal het laderindicatielampje rood worden
en zal het opladen beginnen. Tijdens de Tijdens het laadproces blijft het
indicatielampje stabiel en blijft het rode lampje branden.
34
Wanneer het oplaadindicatielampje van rood naar groen verandert, is de
oplaadcyclus voltooid.
35
Haal na het opladen de stekker van de oplader uit het stopcontact.

- 10 -
Aandacht:
De batterijlader wordt alleen gebruikt om de originele fabrieksbatterijdoos op te
laden. Gebruik hem niet voor andere doeleinden of laad hem niet op. het met
batterijen van andere fabrikanten , als het om nieuwe producten gaat. Bij het
opladen van de batterijhouder is het mogelijk dat deze niet volledig opgeladen
zijn. Ontlaad het volledig en laad het meerdere keren op voordat u het oplaadt.
Als u een oplaadbare batterij oplaadt, batterij die net is gebruikt of die lange tijd is
blootgesteld aan direct zonlicht of hitte, kan het oplaadindicatielampje worden
gebruikt . Het zal oplichten en groen worden. Wacht even, want het batterijpakket
begint met opladen zodra het is afgekoeld .
Problemen die zich tijdens het olieproces kunnen voordoen en de
oplossingen
13. Probleem: Het boterpistool functioneert normaal tijdens gebruik, maar er komt
geen boter uit het olie-uitlaatmondstuk. Reden: Het kan komen door het
fenomeen van lucht die aangezogen door de pijp tijdens het olie-aanzuigproces,
waardoor de boter niet normaal afgevoerd kan worden of controleren of de
staartketting vastzit
14. Probleem: Motorsnelheid vertraagt . Reden: Verstopping van het oliecircuit,
onvoldoende batterijvermogen
Druk op de schakelaar naar het uitlaat- en olie-afvoerdiagram
Werkwijze voor de werking van de luchtafvoer, zoals weergegeven in de
afbeelding : Open de uitlaatklep zoals weergegeven in afbeelding 9, draai de

- 11 -
uitlaatklep twee keer, druk op de hoofdschakelaar totdat de uitlaatklep lucht en
een kleine hoeveelheid vet vrijgeeft , en dan kan het normaal gebruikt worden .
Als de olie nog steeds niet normaal afgevoerd kan worden, herhaal dan deze
bewerking om een normale afvoer te garanderen .
Productparameters van 18,5 V lithium-dubbeldoel elektrisch vetspuit
Model: LD-8207,LD-8207A / LD-8207B
Hoeveel olieleidingen kunnen er gevuld worden zonder belasting: met een platte
sproeier en een slang kunnen zes pijpen worden gevuld . Hoeveel pijpen olie
kunnen worden gevuld onder een belasting van 800 P SI : Met een slang en een
plat mondstuk kunnen vier buizen gevuld worden .
Motormodel: LY4815A
Accuspanning: 18,5 V
Maximale werkdruk: 6000 PSI -8 0 00 PSI
Olieopbrengst per batterij: 3200 g met slang en vlak mondstuk + Olieopbrengst
per minuut: 110 g-130 g
Totale olieopbrengst van twee batterijen: 6400 g
Motorlevensduur: meer dan 140 uur
Tijd die nodig is om de batterij volledig op te laden: ongeveer 1,5 uur
Acculaadvermogen: 21V
Maximale druk van de slang: 80 00 PSI
Batterijlaadingang: 100~240 V/50Hz voor Amerikaanse versie, 220 ~240 V/50Hz
voor EU-versie
Productmateriaal: gelegeerd staal
Werktemperatuur: -20 ℃ ~50 ℃
Werkstroom: 4A-24A
1. Dagelijks onderhoud
1 ) Veeg na elk gebruik van het oliepistool de buitenkant schoon en plaats het in
de gereedschapskist voor een goede opslag
2 ) Wanneer u het geweer gedurende een langere tijd niet gebruikt, laat u het vet
in de transparante loop volledig weglopen.
2. Voorzorgsmaatregelen
①Niet-professionals, demonteer of repareer de host niet. Als er
kwaliteitsproblemen zijn die reparatie vereisen , neem dan contact op met de
dealer en het reparatiepersoneel van de fabrikant.

- 12 -
②Ga voorzichtig om met het product wanneer u het gebruikt en gooi het niet
zomaar hoog .
③ Gebruik het voorgeschreven type vet volgens de productspecificaties.
④ Draag professionele beschermende uitrusting voordat u dit product op
bouwplaatsen en werklocaties gebruikt.
⑤ Richt het oliepistool tijdens het gebruik niet op het gezicht van de persoon
voor een veilige werking
⑥ Verwijder de lithiumbatterij nadat het product niet meer in gebruik is. De
lithiumbatterij moet elke 3 dagen, en de accessoires van het product en de
werking van de carrosserie moeten regelmatig worden gecontroleerd.
⑦ Opslagomstandigheden van het product: geventileerd en droog,
onafhankelijke opslag, niet gemengd met andere producten.
⑧ Laat de batterij niet vallen, laat er geen botsingen mee plaatsvinden en houd
deze uit de buurt van vuurbronnen .
⑨ Controleer de slang regelmatig en buig deze niet te veel tijdens gebruik.
Inleiding tot producthulpmiddelen
(Alleen topproducten zijn inclusief alle accessoires)

- 13 -
1. Hoofdboterkanon 2. Bandjes 3. Olieschraper,
4. Ruwe materiaalstrook 5. oliedrukpan 6. Moersleutel
7. lat-sproeikop 8. Scherpe spuitmond . 9 Harde buis ,
10, Slang 11, Laad r 12. Batterij ,
Vergelijking van voordelen tussen elektrische boterpistolen en handmatige
boter geweren in één jaar
Project: 20 tons graafmachine
Elektrisch
Handmatig
① Werkuren en verloren tijd:
8 minuten/dag*219 dagen=29
uur*180yuan/uur=5220 yuan/jaar
25 minuten/dag*219 dagen=91
uur*180yuan/uur=16400 yuan/jaar
② Brandstofverbruik: 2900
gram/dag*219 dagen=197
kilogram=13 vaten*200 yuan=2180
yuan/jaar
500 gram/dag*219 dagen=109
kilogram=7 vaten*200 yuan=1400
yuan/jaar

- 14 -
③
Machineonderhoud +
reparatiekosten + kosten voor
verlies van werk
4 assen * 2000 yuan / as = 8000 yuan
/ 2 jaar (reparatiekosten) 2400 yuan /
dag * 4 dagen = 9600 yuan / 2 jaar
(kosten voor verlies van werk) Totaal:
13600 yuan / jaar
4 assen * 2000 yuan/as = 8000
yuan/jaar (reparatiekosten) 2400
yuan/dag * 4 dagen = 9600 yuan/jaar
(kosten voor verlies van werk) Totaal:
27200 yuan/jaar
④ Aankoopprijs elektrisch:
1000 yuan/eenheid = 500 yuan (2 jaar
per eenheid)
150 yuan * 2 = 300 yuan (2 stuks per
jaar)
Totaal:
5220+2180+13600+500=21500
yuan/jaar
Totaal:
16400+1400+27200+300=45300
yuan/jaar
Totaal prijsverschil: 45300-21500 = 23800 yuan/jaar
Vergelijking van de voordelen tussen elektrische vetspuiten en handmatig vet
geweren.
Waarschuwing - Om het risico op letsel te verminderen, moet de
gebruiker de gebruiksaanwijzing zorgvuldig lezen
Draag hoofdbescherming
FCC-informatie:
LET OP : Wijzigingen of aanpassingen die niet uitdrukkelijk zijn goedgekeurd
door de partij die verantwoordelijk is voor de naleving, kunnen de bevoegdheid
van de gebruiker om het apparaat te bedienen ongeldig maken!
Dit apparaat voldoet aan Deel 15 van de FCC-regels. De werking is onderworpen
aan de volgende twee voorwaarden:
1) Dit product kan schadelijke interferentie veroorzaken.
2) Dit product moet alle ontvangen interferentie accepteren, inclusief interferentie
die ongewenste werking kan veroorzaken.
WAARSCHUWING: Wijzigingen of aanpassingen aan dit product die niet
uitdrukkelijk door de partij zijn goedgekeurd verantwoordelijk is voor de naleving,
kan de bevoegdheid van de gebruiker om het product te bedienen ongeldig
maken.

- 15 -
Let op: Dit product is getest en voldoet aan de limieten voor een digitaal apparaat
van klasse B volgens Deel 15 van de FCC-regels . Deze limieten zijn ontworpen
om redelijke bescherming te bieden tegen schadelijke interferentie in een
residentiële installatie.
Dit product genereert, gebruikt en kan radiofrequentie-energie uitstralen, en als
het niet volgens de instructies wordt geïnstalleerd en gebruikt, kan het schadelijke
interferentie veroorzaken in radiocommunicatie. Er is echter geen garantie dat er
geen interferentie zal optreden in een bepaalde installatie. Als dit product
schadelijke interferentie veroorzaakt in radio- of televisieontvangst, Als er
storingen optreden die kunnen worden vastgesteld door het product uit en weer in
te schakelen, wordt de gebruiker aangeraden om de interferentie te verhelpen
door een of meer van de volgende maatregelen te nemen.
· Heroriënteer of verplaats de ontvangstantenne.
· Vergroot de afstand tussen het product en de ontvanger.
· Sluit het product aan op een stopcontact van een ander circuit dan waarop de
ontvanger is aangesloten.
· Raadpleeg de dealer of een ervaren radio-/tv-technicus voor hulp.
CORRECTE VERWIJDERING
Dit product is onderworpen aan de bepalingen van de Europese richtlijn
2012/19/EU. Het symbool met een doorgestreepte afvalbak geeft aan
dat het product in de Europese Unie gescheiden afvalinzameling vereist.
Dit geldt voor het product en alle accessoires die met dit symbool zijn
gemarkeerd. Producten die als zodanig zijn gemarkeerd, mogen niet
met het normale huishoudelijke afval worden weggegooid, maar moeten naar een
inzamelpunt voor het recyclen van elektrische en elektronische apparaten.

- 16 -
Fabrikant: Shanghaimuxinmuyeyouxiangongsi
Adres: Shuangchenglu 803nong11hao1602A-1609shi, baoshanqu, shanghai
200000 CN.
Geïmporteerd naar AUS: SIHAO PTY LTD. 1 ROKEVA STREETEASTWOOD
NSW 2122 Australië
Geïmporteerd naar de VS: Sanven Technology Ltd. Suite 250, 9166 Anaheim
Place, Rancho Cucamonga, CA 91730
REP
EC
E-CrossStu GmbH
Mainzer Landstr.69, 60329 Frankfurt am Main.
REP
UK
YH CONSULTING LIMITED.
C/O YH Consulting Limited Office 147, Centurion House,
London Road, Staines-upon-Thames, Surrey, TW18 4AX
Technisch Ondersteuning en E-garantiecertificaat
www.vevor.com/support

- 17 -
Teknisk Support och e-garanticertifikat
www.vevor.com/support
SLADDLÖS FETTPISTOL
ANVÄNDARE MANUELL
Vi fortsätter att vara engagerade i att ge dig verktyg till konkurrenskraftiga priser.
"Spara hälften", "Halva priset" eller andra liknande uttryck som endast används av oss
representerar en uppskattning av besparingar du kan dra nytta av att köpa vissa verktyg
med oss jämfört med de stora toppmärkena och betyder inte nödvändigtvis att täcka
alla kategorier av verktyg som erbjuds av oss. Du påminns vänligen om att verifiera
försiktigt
när du gör en beställning hos oss om du faktiskt gör det Sparande
Halv i jämförelse med de främsta varumärkena.

- 1 -
Modell: LD-8207, LD-8207A / LD-8207B
LD-8207
LD-8207A / LD-8207B
Foto för referens
BEHOV HJÄLP? KONTAKTA USA!
Ha produkt frågor? Behov tekniskt stöd? Behaga känsla gratis till
kontakta oss:
Teknisk support och e-garanticertifikat
www.vevor.com/support
Detta är originalet instruktion, snälla läs allt manuell instruktioner
försiktigt före drift. VEVOR reserverar sig för en tydlig tolkning av vår
användarmanual. Produktens utseende ska vara föremål för
produkt dig mottagen. Snälla förlåt oss att vi inte gör det informera dig
igen om det finns någon teknik eller programvara uppdateringar på vår
produkt.
Cordless Grease Gun
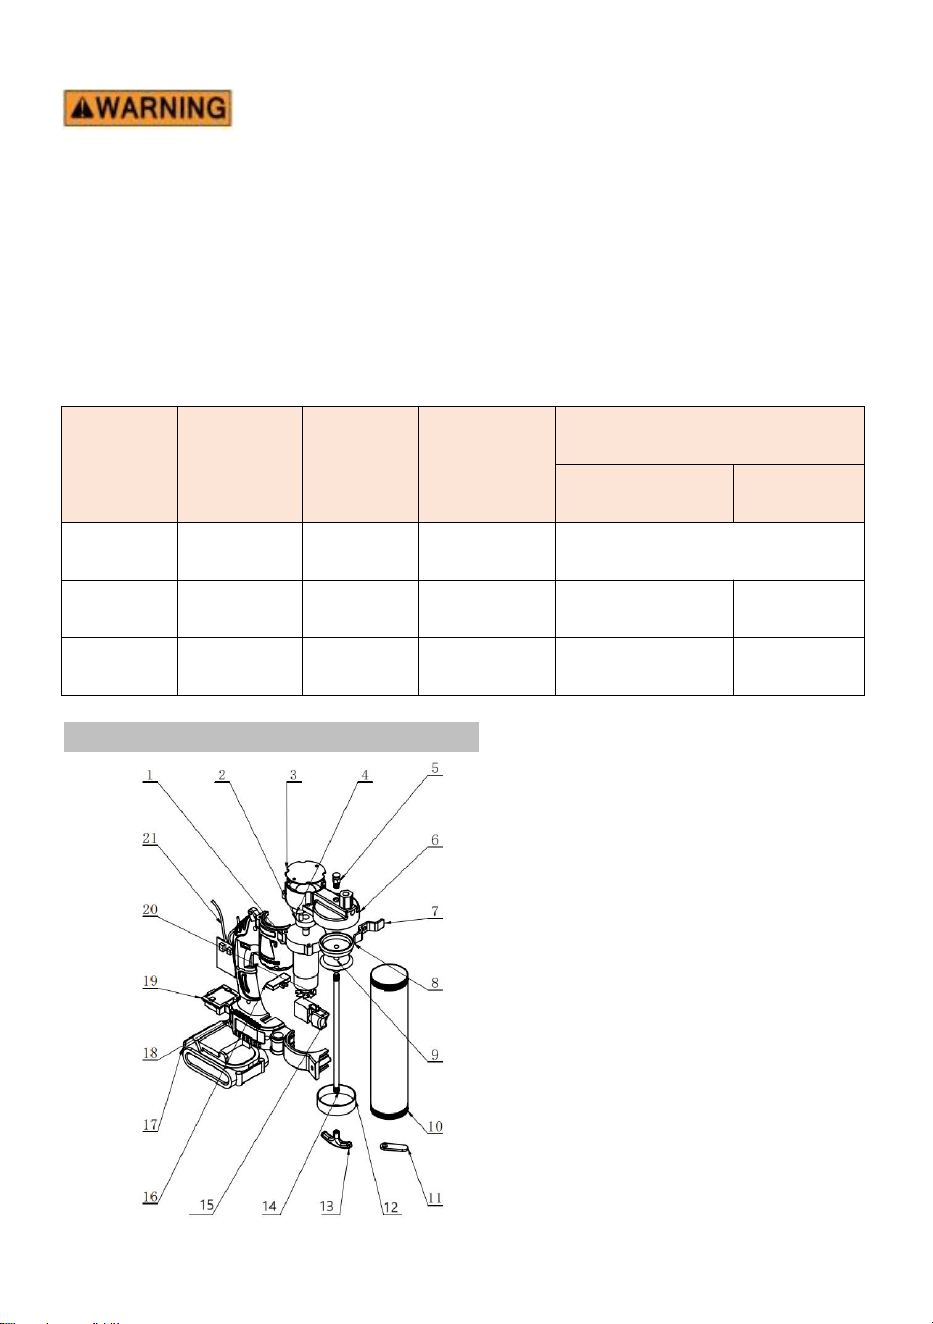
- 2 -
1. Läs noggrant och förstå A ll MONTERING OCH DRIFT
INSTRUKTIONER före användning.
2. Underlåtenhet att följa säkerhetsreglerna och annan grundläggande
säkerhet försiktighetsåtgärder maj resultat på seriös person skada.
Specifikation
Modell :
LD-8207 / LD-8207 A/ LD-8207 B använd 18V-21V är acceptabelt. Och
våra verktyg kan matchas med Makitas batteri
Modell
Med
batteri
eller inte
Plugg
typ
Driva
Laddare
Input
Produktion
LD-8207
Inga
Utan
18,5 V DC
Utan
LD-8207A
Ja
USA
18,5 V 2,0ah
AC100-240V
50/60Hz
DC21V,2A
LD-8207B
Ja
EU
18,5 V 2,0ah
AC220-240V
50/60Hz
DC21V,2A
Produkten har följande egenskaper
Foto för referens
Stabil oljeinjektion
Stabilt avgas säkerställer smidig
oljeinsprutning
Starkt tryck
Högt oljeinsprutningstryck,
kontinuerlig balans , snabb och
effektiv
B e lätt att bära med sig
Kommer med bilen, sparar tid och
ansträngning, och är bekvämt och
snabbt
Flexibel och effektiv
användning
Det kan injiceras i vilken del av
munstycket som helst kan
förlängas o il på plats

- 3 -
S
N
Delnr
Anta
l
S
N
Delnr
Anta
l
1
Växellåda
1
1
2
Oljecylinderkåpa
1
2
Excentriskt axelhjul
1
1
3
Handtag i aluminium
1
3
Kåpa till pumphuset
1
1
4
dragstång
1
4
Excentrisk
kärnstångshylsa
1
1
5
växlingsknapp
1
5
Avgasventil
1
1
6
Kortkomponenter
1
6
Pumphus i aluminium
1
1
7
Litiumbatteripaket
1
7
Fotstöd
1
1
8
Skal - vänster
1
8
Gummi kolv
1
1
9
Gränssnitt för
batterilåda
1
9
Fasta komponenter
1
2
0
elektriska maskiner
1
1
0
Oljelagringscylinder
1
2
1
Styrkort
1
1
1
Försäkringskort
1
Innan du använder inspektionsmetoden, kontrollera om arbetslampan
tänds upp när produkten är ansluten med ett batteri. Vid ingen belastning
är maskinen igång normalt
Instruktioner för användning av smörbollar
steg 1. Dra tillbaka kolvstångens handtag och fyll cylindern med fett.
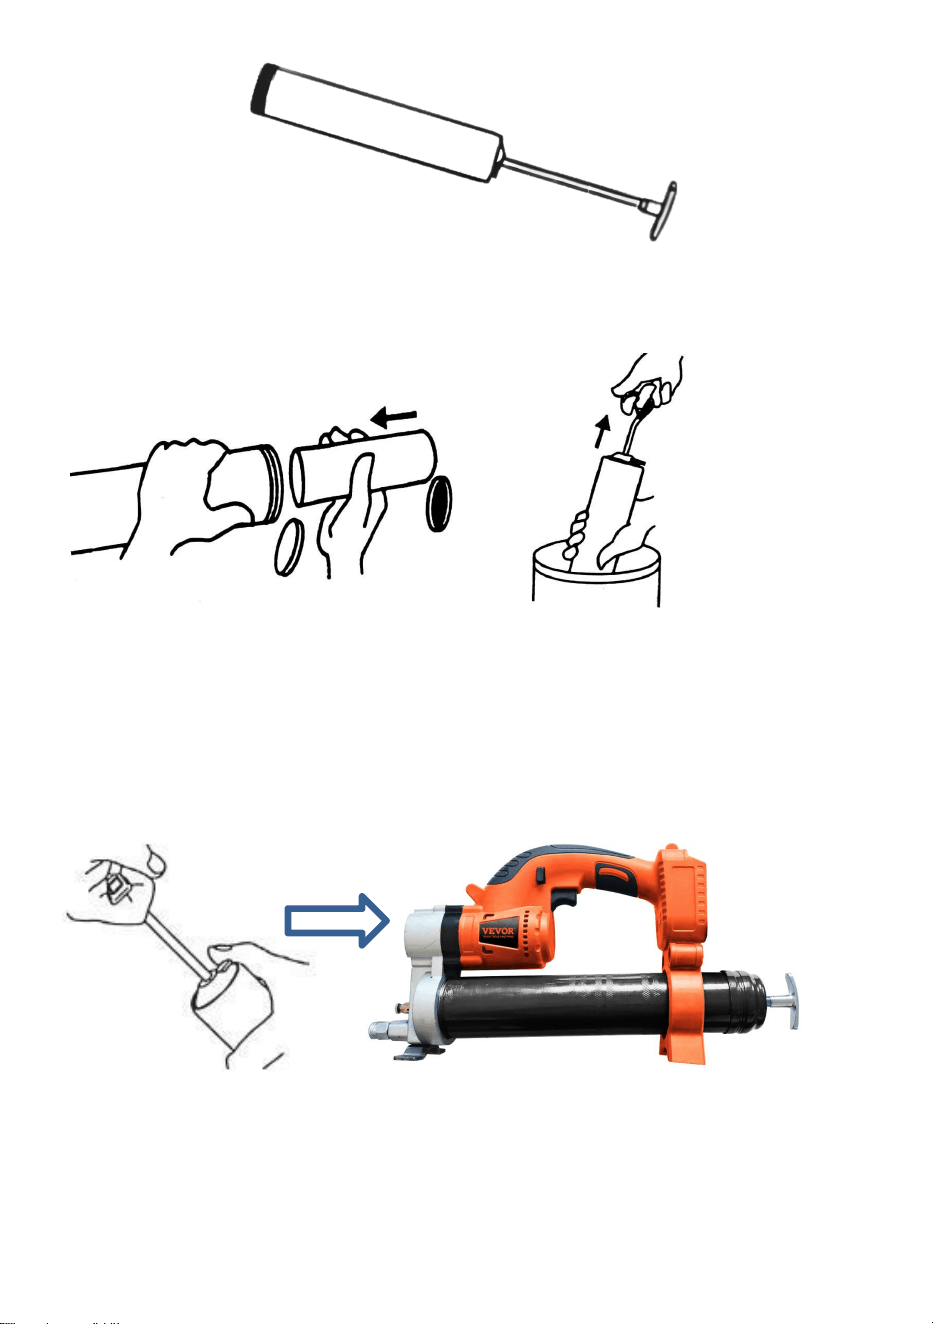
- 4 -
Alternativ för fettfyllning:
1) Patronladdning: Ta bort plastlocket från patronen och för in den öppna änden
av patronen i fettsprutans cylinder tills kanten på dragfliksänden möter kanten på
cylindern.
1) 2)
2) Sugfyllning: Sätt in den öppna änden av cylindern ca 2" i fettbehållaren. Dra
sakta i kolvstångens handtag för att dra in fett i den tomma cylindern samtidigt
som du trycker in cylindern djupare in i fettet tills kolvstången är helt utdragen.
Ytan kan ha mycket fett fastnat på den för säkerhets skull och bör torkas av.
Steg 2 : Sätt tillbaka pipan i fettpistolen. Aktivera säkerhetsspärren och tryck
tillbaka tryckstången in i pipan.
Användningsmetod för oljetryckskärl
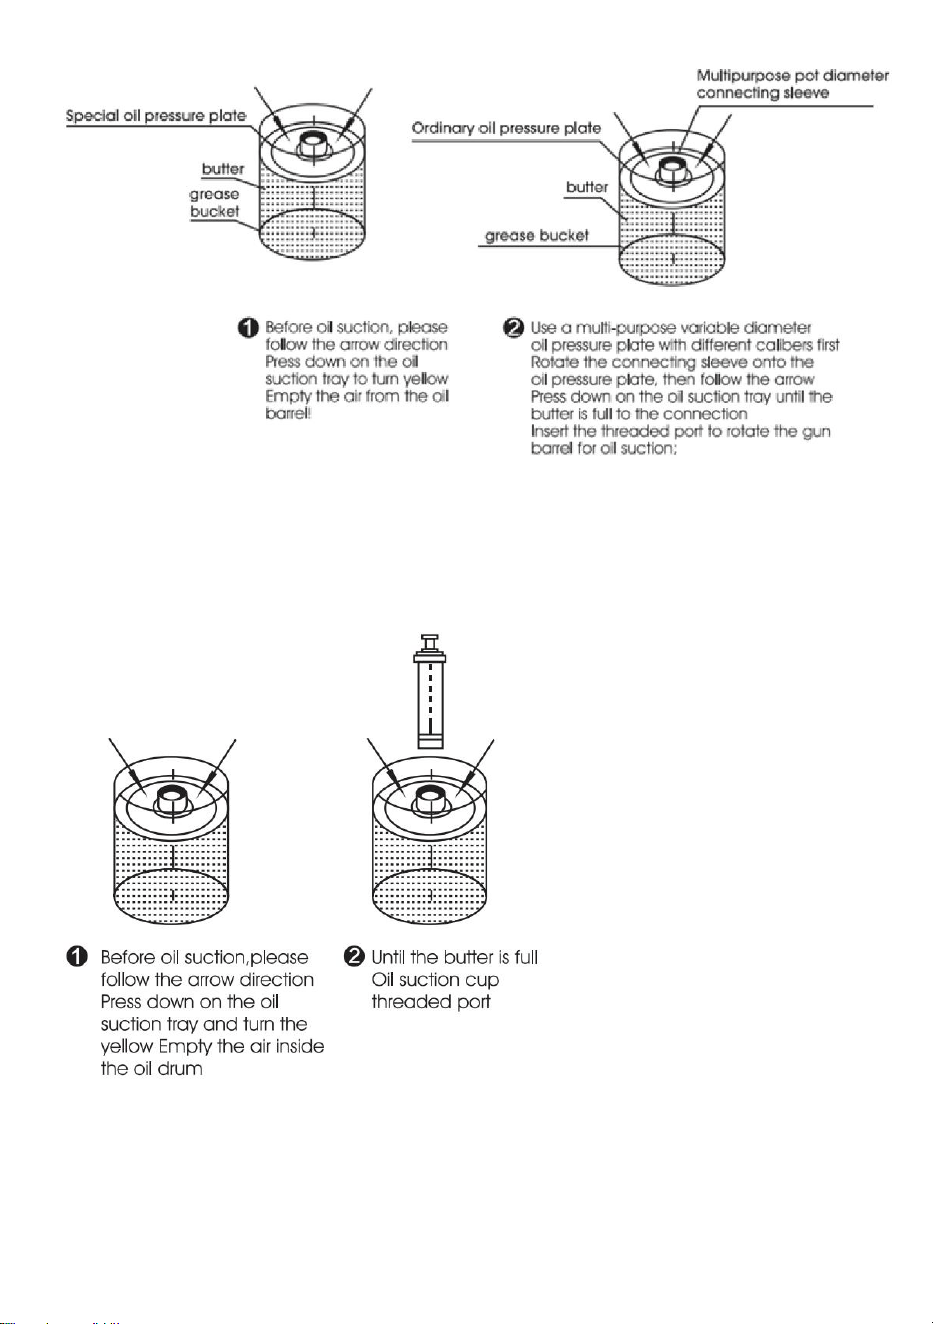
- 5 -
Användningsmetoden för en multifunktionell anslutningshylsa med variabel
diameter: Använd den med vanliga oljesugkoppar med olika diametrar.
Litiumbatteri med dubbla funktioner fettspruta Special oljesug behöver inte
användas) .
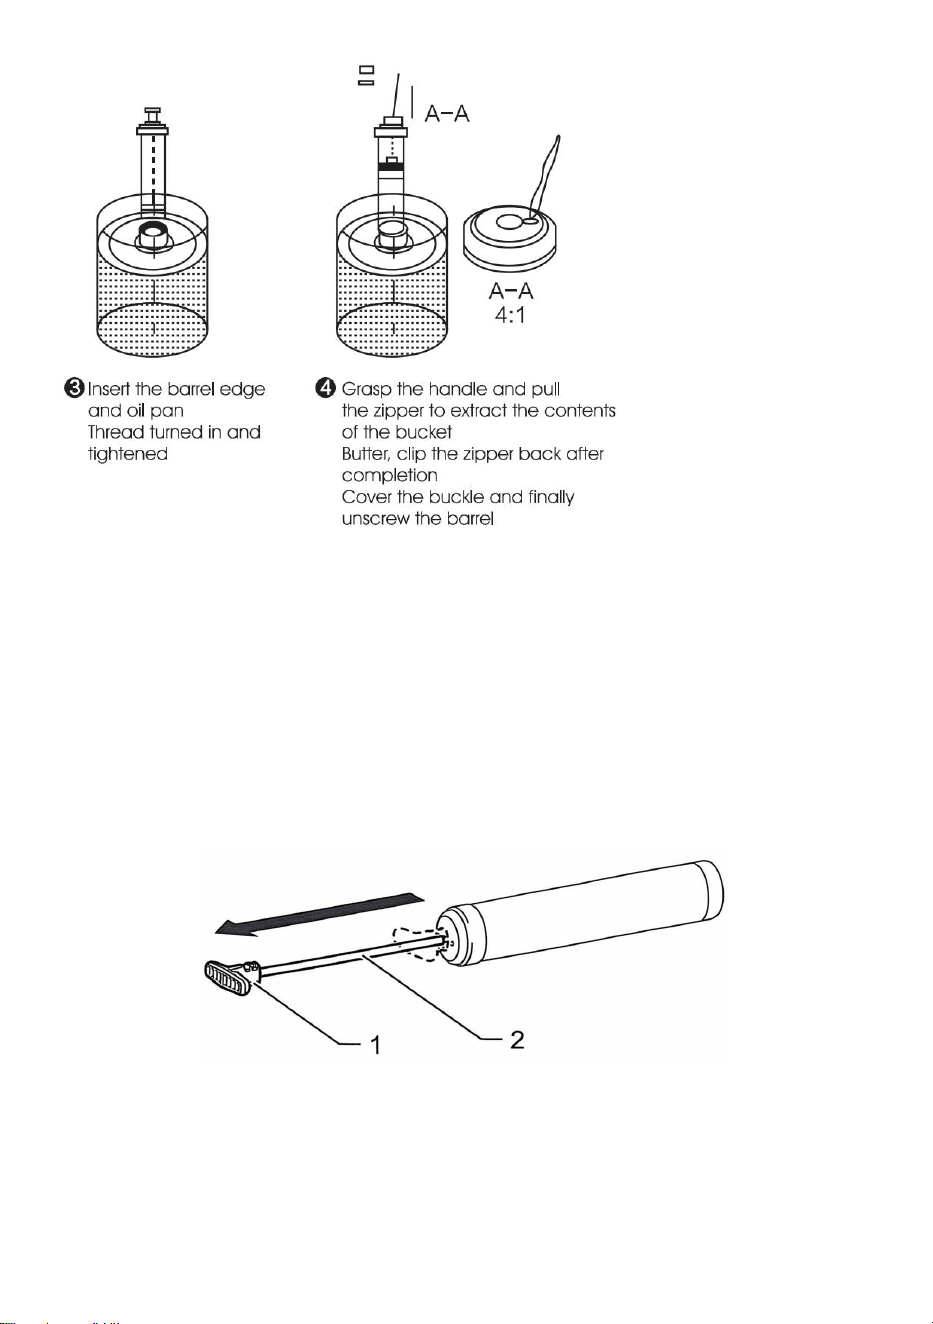
- 6 -
Användningsmetoden för att bryta upp och fila olja, som visas i figuren: Vrid
pistolpipan till den speciella Utrustad oljesugplatta (när oljesugplattan väntar på
oljesugning, lägg först smörhinken i den . Evakuera luften tills smöret är fullt och
oljesugningseffekten är bättre vid den gängade porten på oljesugplattan. Om
oljesugtråget inte pressas för att släppa ut luften inuti hinken, kommer luften inuti
röret kommer att öka under oljesugning, vilket inte beror på dålig sugning av
produkten ; konsumenter som köper detta produktområde uppmanas att vara
medvetna om detta
3
.
Stånghandtag
15) Dra i stavhandtaget när du installerar fett i fatet.
1. Stånghandtag 2. Stång
16) För att låsa spöhandtaget helt utdraget, dra i spöhandtaget tills spåret på
stången kan ses, och kroka sedan spåret på spåret. För att låsa upp
stavhandtaget. haka av spåret så att stången rör sig framåt.
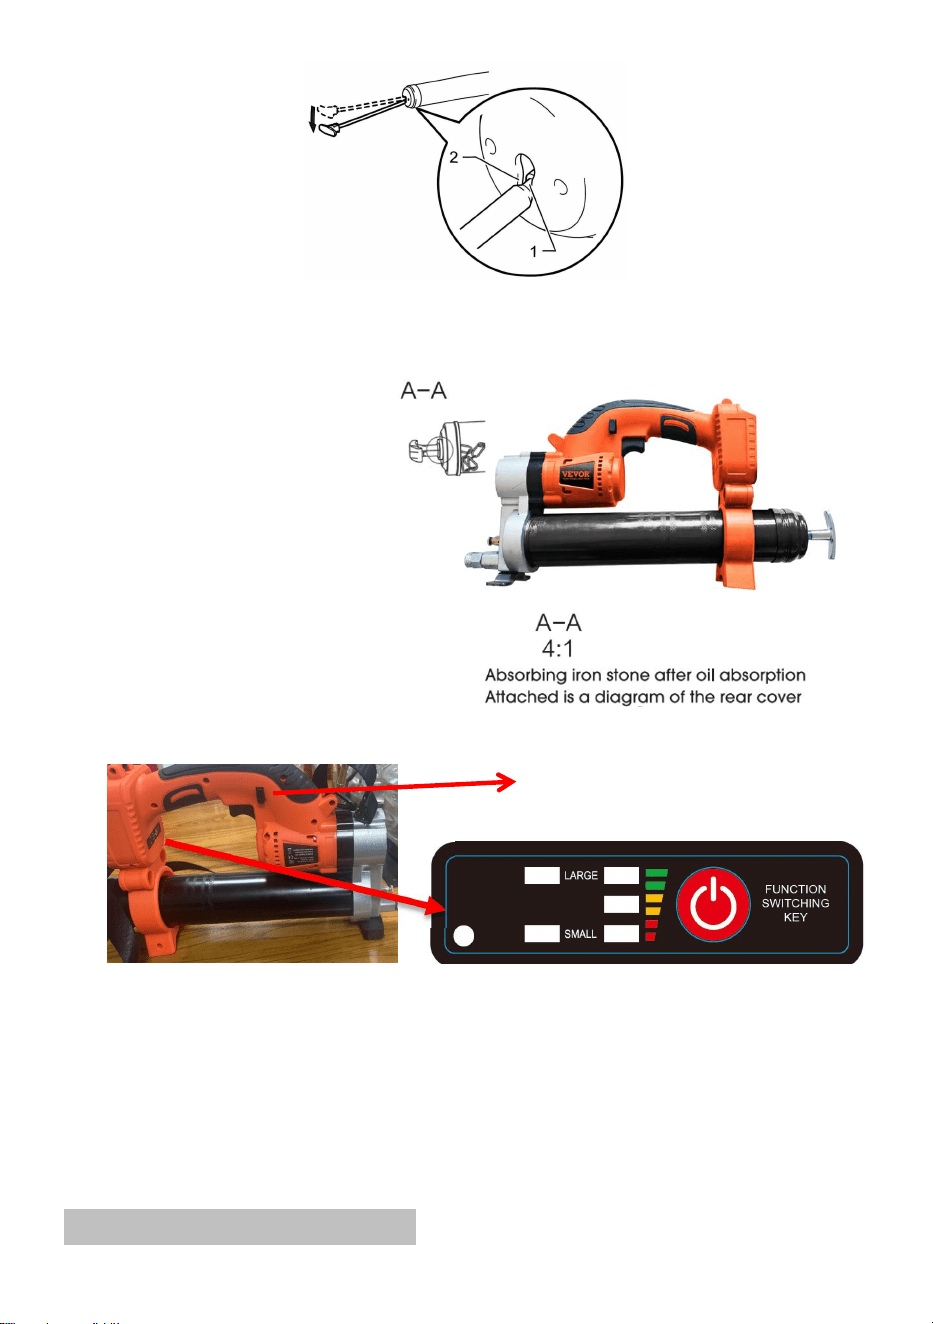
- 7 -
1. Spår 2. Spår
Som visas i figuren: Efter att
ha dragit dragkedjan till botten
och säkrat den ordentligt, rotera
den på pistolhuvudet, Släpp
dragkedja och sätt tillbaka den i
hinken, använd sedan en
magnet för att fästa den
Ovanför bakstycket kan du
enkelt applicera olja.
Funktionspanel :
15) När knappen svänger till vänster klickar du på omkopplaren nyckel , ①
Indikeringslampan visas i ett stort läge , verktygen kan skjuta Fett snabbt
kontinuerligt, ② Indikatorlampan visas i ett litet läge , verktygen kan skjuta
Fett långsamt kontinuerligt,
16) När omkopplarnyckeln vrids åt höger klickar du på omkopplaren nyckel , ①.
när indikatorlampan i det nedre vänstra hörnet är stängd kan verktygen skjuta
Grease fast kontinuerligt, ②. när indikatorlampan i det nedre vänstra hörnet
öppnas kan verktygen skjuta Grease diskontinuerlig ,
Batterianvändningsmetod
button
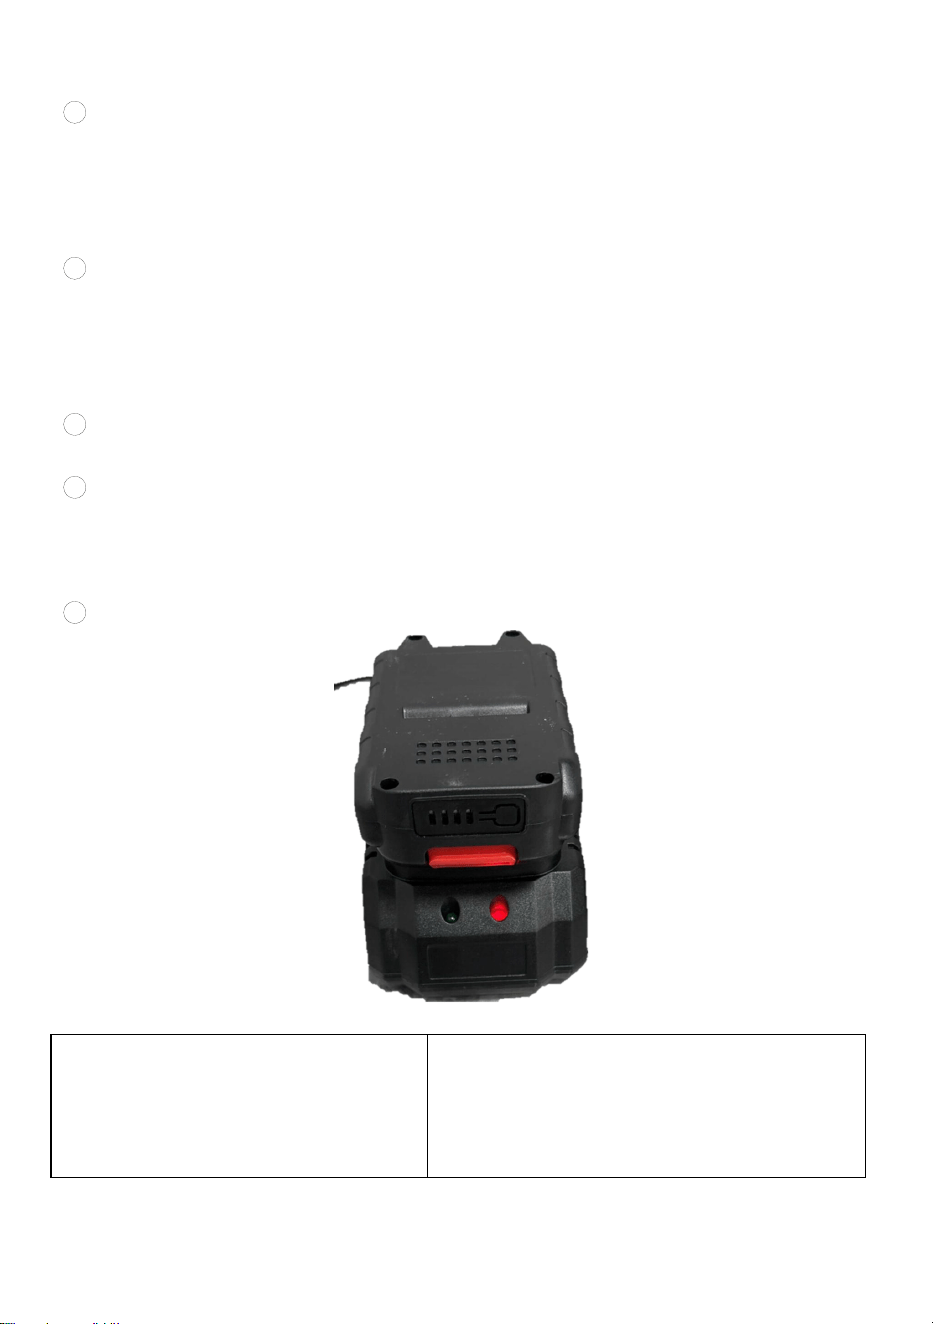
- 8 -
Elsäkerhet:
36
Batteriets laddningsmetod måste vara känd : kontakten på
litiumbatteriverktyget måste matcha uttaget. Vänligen modifiera inte kontakten ;
anslut inte elverktyg med jord ledningar till valfri transformatorkontakt Används
tillsammans. Använd omodifierade pluggar och matchande uttag kan minska
risken för elektriska stötar.
37
Batteriets laddningsmetod måste vara känd: kontakten på
litiumbatteriverktyget måste matcha uttaget. Vänligen modifiera inte kontakten ;
anslut inte elverktyg med jord ledningar till valfri transformatorkontakt Används
tillsammans. Använd omodifierade pluggar och matchande uttag kan minska
risken för elektriska stötar .
38
Litium -i på verktyg bör inte utsättas för regn. Placera den inte i en fuktig miljö ;
vatten ska rinna in i elverktyget kommer att öka risk för elektriska stötar.
39 Vid laddning är batteriet strängt förbjudet från att vara i närheten av
brandfarliga, explosiva eller frätande material, med en omkrets av 15 meter .
Inget skräp ska placeras inuti och flera batterier ska inte laddas för att förhindra
överbelastning av kretsen. Används för att orsaka trådvärmning.
40
Det är strängt förbjudet att ladda batterier på trä, plast eller andra föremål.
Foto för referens
För att ladda batteriet, ställ in
öppningen på enheten batteri med
öppningen på laddaren och skjut på
plats.
Batteriets indikatorlampa ska släckas grönt till
rött när batteriet laddas. När indikatorlampan
har blivit grön batteriet ska vara fulladdat.

- 9 -
VARNING: Låt batteriet svalna innan det laddas om batteriet är varmt efter
kontinuerlig användning.
Laddningsmetod:
Innan du använder litiumfettsprutan, ladda batteriet enligt följande metod
36
batteriladdarens strömkontakt i en lämplig AC - spänningskälla och
laddningsindikatorn lampan blir grön.
37
Sätt i laddarens DC-kontakt i DC-uttaget på batterilådan.
38
När den är ansluten till strömförsörjningen blir laddarens indikatorlampa röd
och laddningen börjar. Under laddningsprocessen förblir indikatorlampan stabil
och den röda lampan förblir tänd.
39
När laddarens indikatorlampa ändras från rött till grönt, indikerar det att
laddningscykeln är klar.
40 Efter laddning, koppla ur laddarens nätkontakt från strömkontakten.

- 10 -
Uppmärksamhet:
Batteriladdaren används endast för att ladda den ursprungliga fabriksbatterilådan.
Använd den inte för andra ändamål eller avgifter det med batterier från andra
tillverkare när det gäller nya produkter. När du laddar batterifodralet kanske det
inte gör det vara fulladdad. Vänligen ladda ur den helt och ladda den flera gånger
innan du laddar den. Jag laddar en uppladdningsbar Batteri som precis har
använts eller har utsatts för direkt solljus eller värme under lång tid, kan
laddningsindikatorlampan användas . Jag kommer att lysa upp och bli grön.
Vänta ett tag, eftersom batteripaketet kommer att börja laddas när det svalnat .
Problem som kommer att uppstå under oljningsprocessen och
lösningarna
15. Problem: Smörpistolen fungerar normalt under användning, men det kommer
inget smör ur oljeutloppsmunstycket. Orsak: Det kan bero på fenomenet med luft
sugs in av röret under oljesugningsprocessen, vilket gör att smöret inte kan
tömmas normalt eller kontrollera om svanskedjan sitter fast
16. Problem: Motorhastigheten saktar ner . Orsak: Blockering av oljekretsen,
otillräcklig batterikraft
Tryck på omkopplaren till diagrammet för avgas- och oljeutsläpp
Driftsmetod för luftutsläpp, som visas i figuren : Öppna avgasventilen som visas i
figur 9, vrid avgasventilen två gånger, tryck på huvudströmbrytaren tills
avgasventilen släpper till luft och en liten mängd fett, och sedan kan den

- 11 -
användas normalt . Om oljan fortfarande inte kan tömmas normalt, upprepa
denna operationsmetod för att säkerställa normal utsläpp .
Produktparametrar för 18,5 V litium dubbla ändamål elektrisk fettspruta
Modell: LD-8207, LD-8207A / LD-8207B
Hur många oljerör kan fyllas utan belastning: med ett platt munstycke och en
slang kan sex rör fyllas . Hur många oljerör kan fyllas under en belastning på 800
P SI : med en slang och ett platt munstycke kan fyra rör fyllas .
Motormodell: LY4815A
Batterispänning: 18,5 v
Max arbetstryck: 6000 PSI -8 0 00 PSI
Oljeeffekt per batteri: 3200g med slang och platt munstycke+Oljemängd per
minut: 110g-130g
Total oljeproduktion för två batterier: 6400g
Motorns livslängd: över 140 timmar
Tid som krävs för att ladda batteriet helt: ca 1,5h
Batteriladdning: 21V
Max tryck på slang: 80 00 PSI
Batteriladdningsingång: 100~240 V/50Hz för amerikansk version, 220 ~240
V/50Hz för EU-version
Produktmaterial: Legerat stål
Arbetstemperatur: -20 ℃ ~50 ℃
Arbetsström: 4A-24A
1
、
Dagligt underhåll
1 ) Efter varje användning av oljepistolen, torka av det yttre skalet och placera det
den i verktygslådan för korrekt drift
2 ) När den inte används under en längre tid, dränera fettet inuti den
genomskinliga pistolpipan helt.
2
、
Försiktighetsåtgärder
①Icke proffs, vänligen ta inte isär eller reparera värden. Om det finns
kvalitetsproblem som kräver reparation , kontakta återförsäljaren och tillverkarens
reparationspersonal.
②När du använder produkten, vänligen hantera den med försiktighet och kasta
den inte högt när du vill .
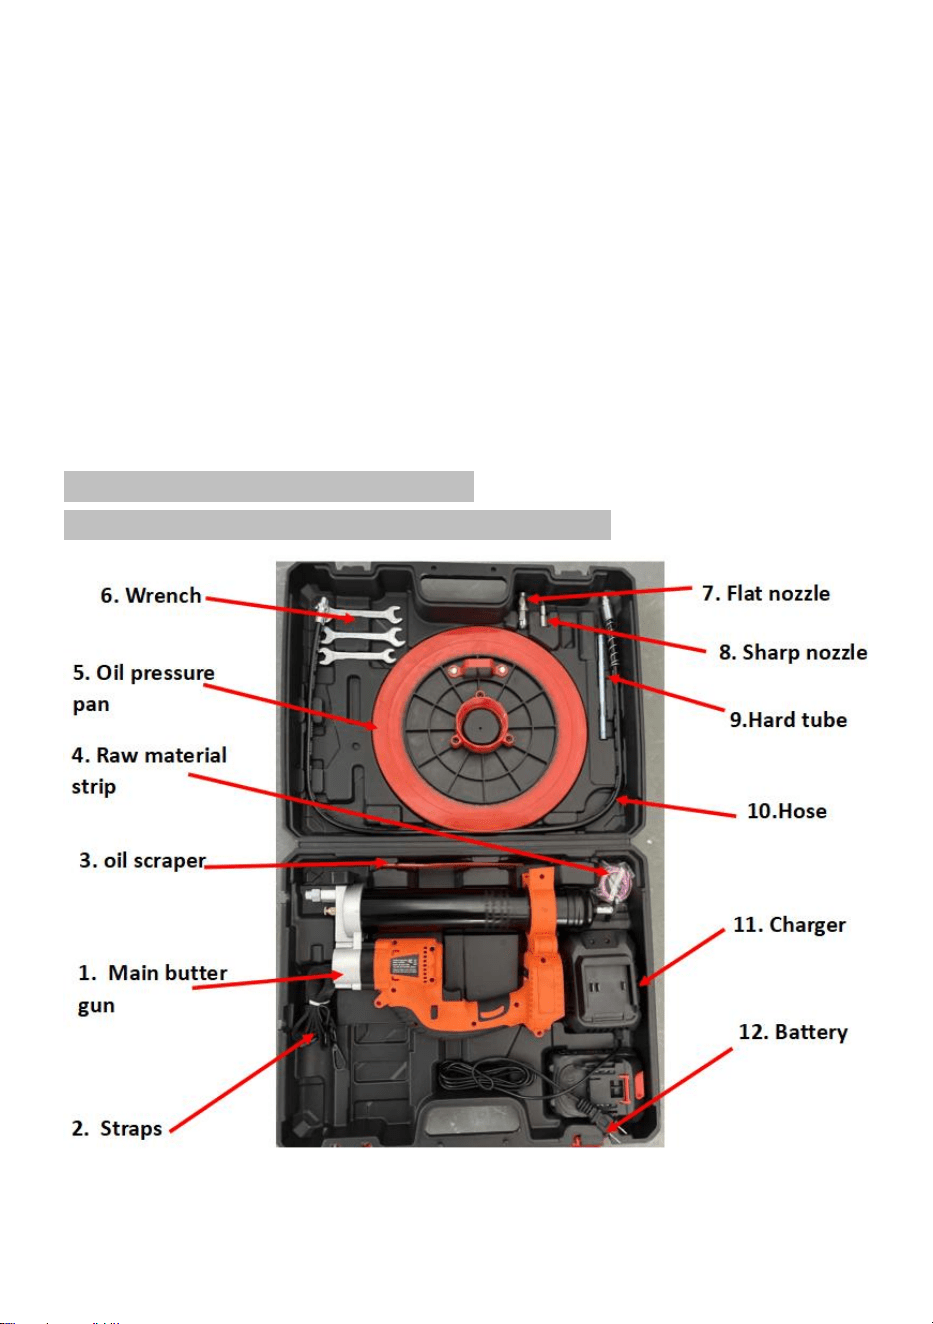
- 12 -
③ Använd den specificerade typen av fett enligt produktspecifikationerna.
④ Bär professionell skyddsutrustning innan du använder denna produkt på
byggarbetsplatser och arbetsplatser
⑤ Rikta inte oljepistolen mot personens ansikte under drift för säker drift
⑥ Ta bort litiumbatteriet efter att produkten inte används. Litiumbatteriet ska
laddas var tredje dagar, och produktens tillbehör och kroppens funktion bör
kontrolleras regelbundet.
⑦ Förvaringsförhållanden för produkten: ventilerad och torr, oberoende förvaring,
ej blandad med andra produkter.
⑧ Tappa eller krock inte med batteripaketet och håll det borta från brandkällor .
⑨ Kontrollera regelbundet slangen och böj den inte för mycket under användning.
Introduktion till produkthjälpverktyg
(Endast toppprodukter inkluderar alla tillbehör)
1. Huvudsmörpistol 2. Remmar 3. Oljeskrapa,
4. Råvaruband 5. oljetryckstråg 6. Skiftnyckel
7. lat munstycke 8 . Skarpt munstycke . 9 Hårt rör ,

- 13 -
10, Slang 11, Ladda r 12. Batteri ,
Jämförelse av förmåner mellan elektriska smörpistoler och manuellt smör
vapen på ett år
Projekt: 20 tons grävmaskin
Elektrisk
Manuell
①
Arbetstid och förlorad tid:
8 minuter/dag*219 dagar=29
timmar*180yuan/timme=5220 yuan/år
25 minuter/dag*219 dagar=91
timmar*180yuan/timme=16400
yuan/år
② Bränsleförbrukning: 2900
gram/dag*219 dagar=197
kilogram=13 fat*200 yuan=2180
yuan/år
500 gram/dag*219 dagar=109
kilogram=7 fat*200 yuan=1400
yuan/år
③
Maskinunderhåll+reparationskostn
ader+förlust av arbetskostnader
4 axlar*2000 yuan/axel=8000
yuan/2år (reparationskostnad)2400
yuan/dag * 4 dagar=9600 yuan/2år
(förlust av arbetsavgift)Totalt: 13600
yuan/år
4 axlar * 2000 yuan/axel=8000
yuan/år (reparationskostnad) 2400
yuan/dag * 4 dagar=9600 yuan/år
(förlust av arbetsavgift) Totalt: 27200
yuan/år
④ Inköpspris elektrisk:
1000 yuan/enhet=500 yuan (2 år per
enhet)
150 yuan * 2=300 yuan (2 stycken
per år)
Totalt:
5220+2180+13600+500=21500
yuan/år
Totalt:
16400+1400+27200+300=45300
yuan/år
Total prisskillnad: 45300-21500= 23800 yuan/år
Jämförelse av fördelar mellan elektriska fettsprutor och manuellt fett vapen.
Varning - För att minska risken för skada måste användaren läsa
bruksanvisningen noggrant

- 14 -
Bär huvudskydd
FCC-information:
FÖRSIKTIGHET : Ändringar eller modifieringar som inte uttryckligen godkänts
av den part som ansvarar för efterlevnaden kan upphäva användarens behörighet
att använda utrustningen!
Denna enhet uppfyller del 15 av FCC-reglerna. Driften är föremål för följande två
villkor:
1) Denna produkt kan orsaka skadliga störningar.
2) Denna produkt måste acceptera alla mottagna störningar, inklusive störningar
som kan orsaka oönskad funktion.
VARNING: Ändringar eller modifieringar av denna produkt som inte uttryckligen
godkänts av parten ansvarig för efterlevnad kan ogiltigförklara användarens
behörighet att använda produkten.
Obs: Denna produkt har testats och befunnits följa gränserna för en digital enhet
av klass B enligt del 15 av FCC-reglerna . Dessa gränser är utformade för att ge
rimligt skydd mot skadliga störningar i en bostadsinstallation.
Denna produkt genererar, använder och kan utstråla radiofrekvensenergi, och om
den inte installeras och används i enlighet med instruktionerna kan den orsaka
skadliga störningar på radiokommunikation. Det finns dock ingen garanti för att
störningar inte kommer att inträffa i en viss installation. Om denna produkt
orsakar skadliga störningar på radio- eller tv-mottagning, vilket kan fastställas
genom att stänga av och på produkten, uppmanas användaren att försöka
korrigera störningen med en eller flera av följande åtgärder.
· Rikta om eller flytta mottagningsantennen.
· Öka avståndet mellan produkten och mottagaren.
· Anslut produkten till ett uttag på en annan krets än den som mottagaren är
ansluten till.
· Kontakta återförsäljaren eller en erfaren radio/TV-tekniker för hjälp.
KORREKT AVFALLSHANTERING
Denna produkt omfattas av bestämmelserna i det europeiska direktivet
2012/19/EU. Symbolen som visar en soptunna korsad anger att
produkten kräver separat sophämtning i EU. Detta gäller för produkten
och alla tillbehör märkta med denna symbol. Produkter märkta som
sådana får inte slängas tillsammans med vanligt hushållsavfall utan ska
lämnas till en insamlingsställe för återvinning av elektriska och elektroniska
apparater.

Tillverkare: Shanghaimuxinmuyeyouxiangongsi
Adress: Shuangchenglu 803nong11hao1602A-1609shi, baoshanqu, shanghai
200000 CN.
Importerad till AUS: SIHAO PTY LTD. 1 ROKEVA STREETEASTWOOD NSW
2122 Australien
Importerad till USA: Sanven Technology Ltd. Suite 250, 9166 Anaheim Place,
Rancho Cucamonga, CA 91730
REP
EC
E-CrossStu GmbH
Mainzer Landstr.69, 60329 Frankfurt am Main.
REP
UK
YH CONSULTING LIMITED.
C/O YH Consulting Limited Office 147, Centurion House,
London Road, Staines-upon-Thames, Surrey, TW18 4AX
Teknisk Support och e-garanticertifikat
www.vevor.com/support