
Technical Support and E-Warranty Certificate www.vevor.com/support
GREASE GUN
USER MANUAL
We continue to be committed to provide you tools with competitive price.
"Save Half", "Half Price" or any other similar expressions used by us only represents an
estimate of savings you might benefit from buying certain tools with us compared to the major
top brands and doses not necessarily mean to cover all categories of tools offered by us. You
are kindly reminded to verify carefully when you are placing an order with us if you are
actually saving half in comparison with the top major brands.

- 1 -
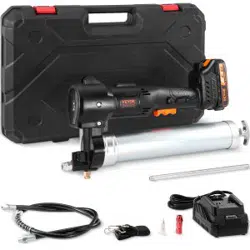
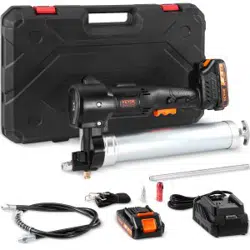
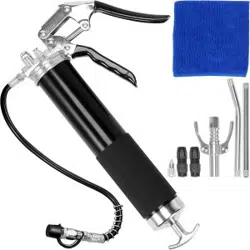
MODEL: LD-868,LD-867A,LD-867B,LD-2710
LD-868
LD-867A
LD-867B
LD-2710
Have product questions? Need technical support? Please feel free to
contact us:
CustomerService@vevor.com
NEED HELP? CONTACT US!
This is the original instruction, please read all manual instructions
carefully before operating. VEVOR reserves a clear interpretation of our
user manual. The appearance of the product shall be subject to the
product you received. Please forgive us that we won't inform you again if
there are any technology or software updates on our product.
Grease Gun
- 2 -
1. Read carefully and understand all ASSEMBLY AND OPERATION
INSTRUCTIONS before operating.
2. Failure to follow the safety rules and other basic safety precautions
may result in serious personal injury.
GENERAL SAFETY RULES
WARNING: Read and understand all instructions. Failure to follow
all instructions listed below may result in serious injury.
Various dangers may occur if the hand lever grease gun is improperly
handled during installation, commissioning and daily operation.
Risk of injury and damage to material property because of improper
handling.
Hold the manual at the disposal of the operating staff at the usage site of
the unit.
Country-specific safety measures and accident prevention regulations
must be observed.
Only qualified and authorized persons are allowed to operate the grease
gun.
Persons are qualified if they are, due to their training, experience,
instruction and knowledge of the relevant standards, able to assess
assigned tasks and to identify potentially hazardous situations.
All persons charged with installation, operation, maintenance and repair
work, must have read and understood this operation instructions.
The grease gun is designed exclusively for the delivery of grease
lubricants.
Any use beyond these parameters can lead to serious risks and is

- 3 -
regarded as use that is contrary to the intended purpose.
The operator is responsible for damages resulting from use other than the
intended use.
CAUTION: Excess pressure can result in the bursting of the grease gun
head and of accessories!
Excess pressure at the greasing point can damage the grease nipple and
even the machine.
Comply with the machine manufacturer‘s maintenance and service
instructions
Defective accessories can lead to personal injury and material damage.
Grease hoses must not be kinked, twisted or stretched.
During their period of use, accessories must be checked for wear,cracks,
and other damage.
Defective accessories should be replaced immediately.
Do not open the grease gun when it is under pressure!
Every time that the grease gun head and barrel are to be separated, the
push rod must be fully retracted and automatically locked by means of the
safety catch.
Excess pressure can result in the bursting of the grease gun head and of
Equipment.
When using the grease gun, use suitable equipment such as protective
gloves and eye protection
SAVE THESE INSTRUCTIONS.
- 4 -
MODEL AND PARAMETERS
Model
LD-867A
LD-867B
LD-2710
LD-868
Capacity
400CC
400CC
600CC
120CC
Maximum
Pressure
6000PSI
6000PSI
10000PSI
3500PSI
Grease gun
discharge
connection
NPT 1/8
NPT 1/8
NPT 1/8
NPT 1/8
Grease Filling
Options
Cartridge
Loading
Cartridge
Loading
Cartridge
Loading
Cartridge
Loading
Suction Fill
Suction Fill
Suction Fill
/
Filler Device
Loading
Filler Device
Loading
/
/
Material
Steel+Aluminium Alloy
Color
Black+Silver
Black+Silver
Black
Silver

- 5 -
STRUCTURE DIAGRAM
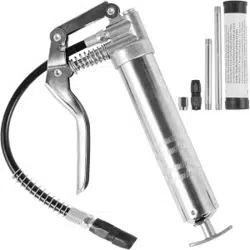
LD-867A,LD-867B
1. Head
2. Air Release Valve
3. Movable Handle
4. Fix Handle
5. Barrel
6. Safety Catch
7. Plunger Rod Handle
8. End Cap
1
2
3
4
5
6
7
8

- 6 -
LD-2710
1. Head
2. Air Release Valve
3. Handle
4. Safety Catch
5. Plunger Rod Handle
6. End Cap
7. Barrel
1
2
3
7
6
4
5

- 7 -
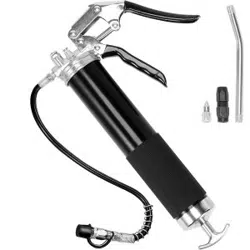
LD-868
1. Head
2. Handle
3. Barrel
4. Plunger Rod Handle
5. Safety Catch
1
2
3
4
5

- 8 -
COMPONENTS
LD-867A
LD-867B
LD-2710
LD-868
Grease Gun
1
1
1
1
Grease Hose
1
1
1
1
Straight Metal
Pipe
1
/
1
2
Bent Metal Pipe
1
1
/
/
Coupler
2
1
2
2
Pointed Coupler
1
1
/
/
Locking Clamp
Coupler
1
/
/
/
Cleaning Cloth
1
/
/
/
Leakproof cap
1
1
/
/
Reinforced
Nozzle
/
/
/
1
Grease
Cartridge
/
/
/
1
User Manual
1
1
1
1
Mode
l
Parts

- 9 -
OPERATING INSTRUCTIONS
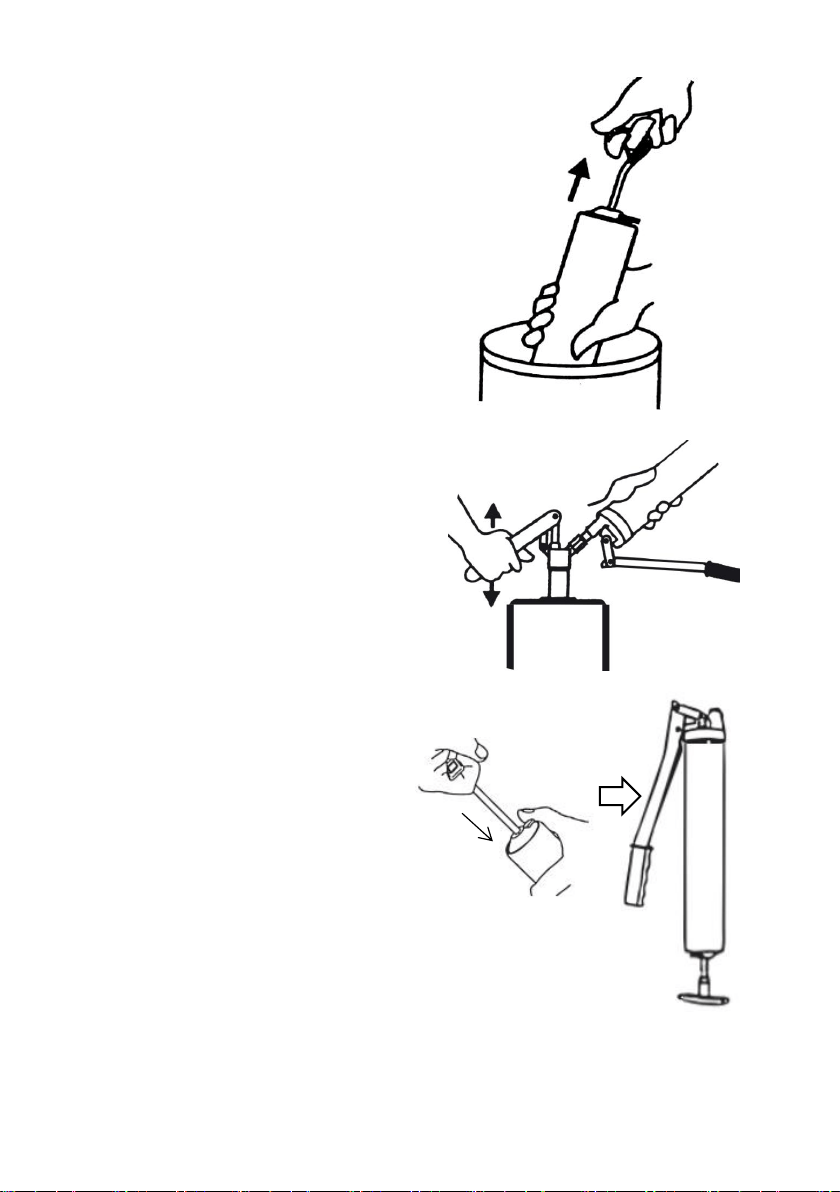
Step1: Hold the head of the
grease gun and unscrew the
barrel.
Take LD-2710 as an example.
Step2: Pull back the plunger
rod handle and fill the barrel
with grease.
Grease filling options:
Cartridge Loading: Remove
the plastic cap from the
cartridge
and insert the open end of the
cartridge into the grease gun
barrel until the rim of the
pull-tab end meets the rim of
the barrel.
- 10 -
Suction Fill: Insert the open end of
the barrel about 2” into the grease
container.Slowly pull the plunger
rod handle to draw in grease into
the empty barrel while pushing the
barrel deeper into the grease until
the plunger rod is completely
extended.The outside surface
may have a lot of grease stuck to
it and should be wiped clean for
safety.
Grease Gun Filling Device: Place
the grease gun onto the filling
valve of the grease gun filling unit,
and hold it in place with light
counter pressure.
Fill the grease gun by activating
the filling device.
Step3: Assemble the barrel back
into the grease gun.Activate the
safety catch and push the push
rod back into the Barrel.

- 11 -
Step4: Exhaust air by pressing the air release valve or loosening the gun
head and barrel (half a turn maximum) or by repeatedly actuating the
handle.
Step5: Install the required fittings as required as shown below.(Fig 1,Fig 2,
Fig 3)
Note: If necessary, wrap 3~5 loops of raw material tape around the joint.
Fig 1. Fig 2. Fig 3.

- 12 -
Step6: Press the coupler straight onto the grease fitting,Start operating the
handle for grease filling.
Once greasing is done, slightly tilt the coupler, twist and pull back. The tilt
and twist action will allow easy removal of the coupler from the grease
fitting.
Above are the LD-2710 operations.The operations of the LD-868,
LD-867A,LD-867B are the same as that of LD-2710.

- 13 -
TROUBLESHOOTING
Problem
Possible Cause
Possible Solution
Grease gun pumps little
or no grease
Air is trapped in grease
Empty air
Blocked hose
Clean or replace the
hose
Grease too thick or cold
Store grease gun and
grease away from
extreme cold or use
thinner grease
Excessive grease leaks
out from the back side of
the grease gun around
the plunger rod
Rubber follower is
damaged
Replace the grease gun
Grease leaks from the
connection between the
grease gun head & the
extension or between
extension & coupler
Loose connection
Tighten the connection
using raw material tape

- 14 -
MAINTENANCE
Before each use, inspect general condition of Grease Gun. Check for
cracked or damaged parts, misaligned or bending of moving parts, leaking
connections, and any other condition that may affect product’s safe
operation. If a problem occurs, have the problem corrected before further
use.Do not use damaged equipment.
After every use, dry with a soft cloth, remove all grease and debris from
Grease Gun. Do not use solvents to clean or immerse in any liquids.
When storing, keep in a clean, dry and safe location away from children.
All maintenance, service, and repairs not discussed in manual should only
be performed by qualified service technician.
VEVOR STORE INC
9448 RINCHMOND PL #E RANCHO CUCAMONGA, California, 91730
United States of America
Made in China