

Height Adjustable Standing Desk Converter
Höhenverstellbarer Stehschreibtisch-Converter
Convertidor de escritorio con pata de altura ajustable
Convertisseur de bureau assis-debout réglable en hauteur
Convertitore per Standing desk ad altezza regolabile
1 (201) 379-4900 · RIF6.com/support · [email protected]
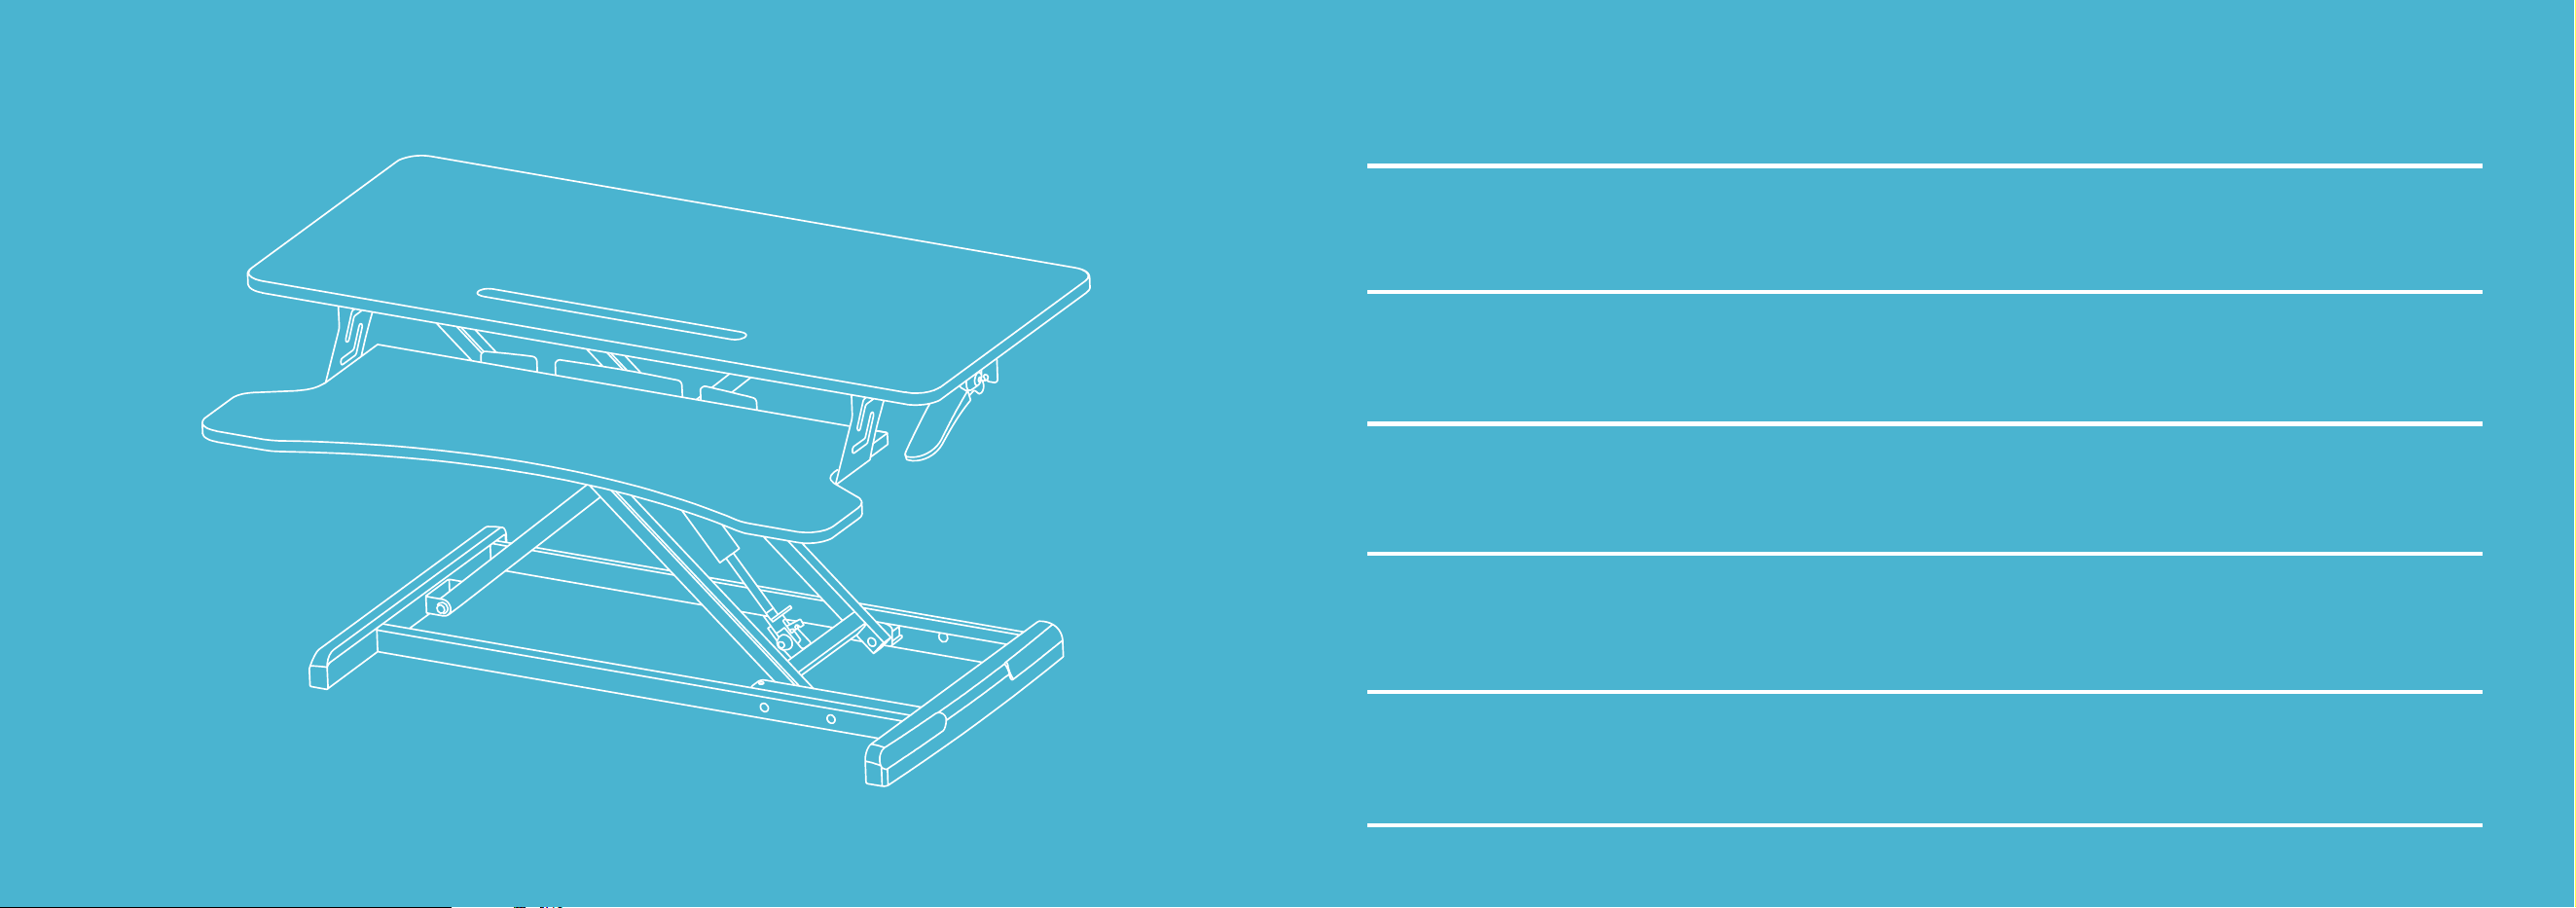
TABLE OF CONTENTS
04
EN
DE
ES
FR
IT
37
48
15
26
04 Important Safety instructions 13 Specifications
05 Assembly Instructions 14 Warranty Information
10 Set Up Your Devices 14 Warning
15 Wichtige sicherheitshinweise 24 Technische Daten
16 Montageanweisungen 25 Gewährleistung
21 Ihre Geräte aufstellen 25 Warnung
26 Instrucciones importantes de seguridad 35 Especificaciones
27 Instrucciones de montaje 36 Información sobre la garantía
32 Prepare s us dispositivos 36 Advertencia
37 Consignes de sécurité importantes 46 Spécifications
38 Instructions de montage 47 Informations relatives à la garantie
43 Installer vos appareils 47 Avertissement
48 Istruzioni di sicurezza importanti 57 Specifiche
49 Istruzioni per il montaggio 58 Informazioni sulla garanzia
54 Configurazione dei dispositivi 58 Avvertenza
HEIGHT ADJUSTABLE STANDING DESK CONVERTER | 4
HEIGHT ADJUSTABLE STANDING DESK CONVERTER | 5
EN
EN
IMPORTANT SAFETY INSTRUCTIONS
Read the entire manual before you start installation and assembly. If you have any questions regarding any of the instructions or
warnings, contact Customer Service.
CAUTION: DO NOT place items heavier than 33 pounds on the desk. Overloading the desk could result in instability and injury.
• Closely follow the assembly instructions. Improper installation may result in damages or serious personal injuries.
• Make sure that the supporting surface will safely support the combined weight of the equipment and all attached hardware and
components.
• Use the mounting screws provided. DO NOT OVER TIGHTEN the mounting screws.
• This product contains small items that could be choking hazards if swallowed. Keep these items away from children.
• This product is intended for indoor use only. Outdoor use could lead to product failure and personal injury.
IMPORTANT: Ensure that you have received all parts according to the component checklist prior to installation. If any parts are missing or faulty,
please contact Customer Service for a replacement.
MAINTENANCE: Regularly check that the product is secure and safe to use (at least every 3 months).
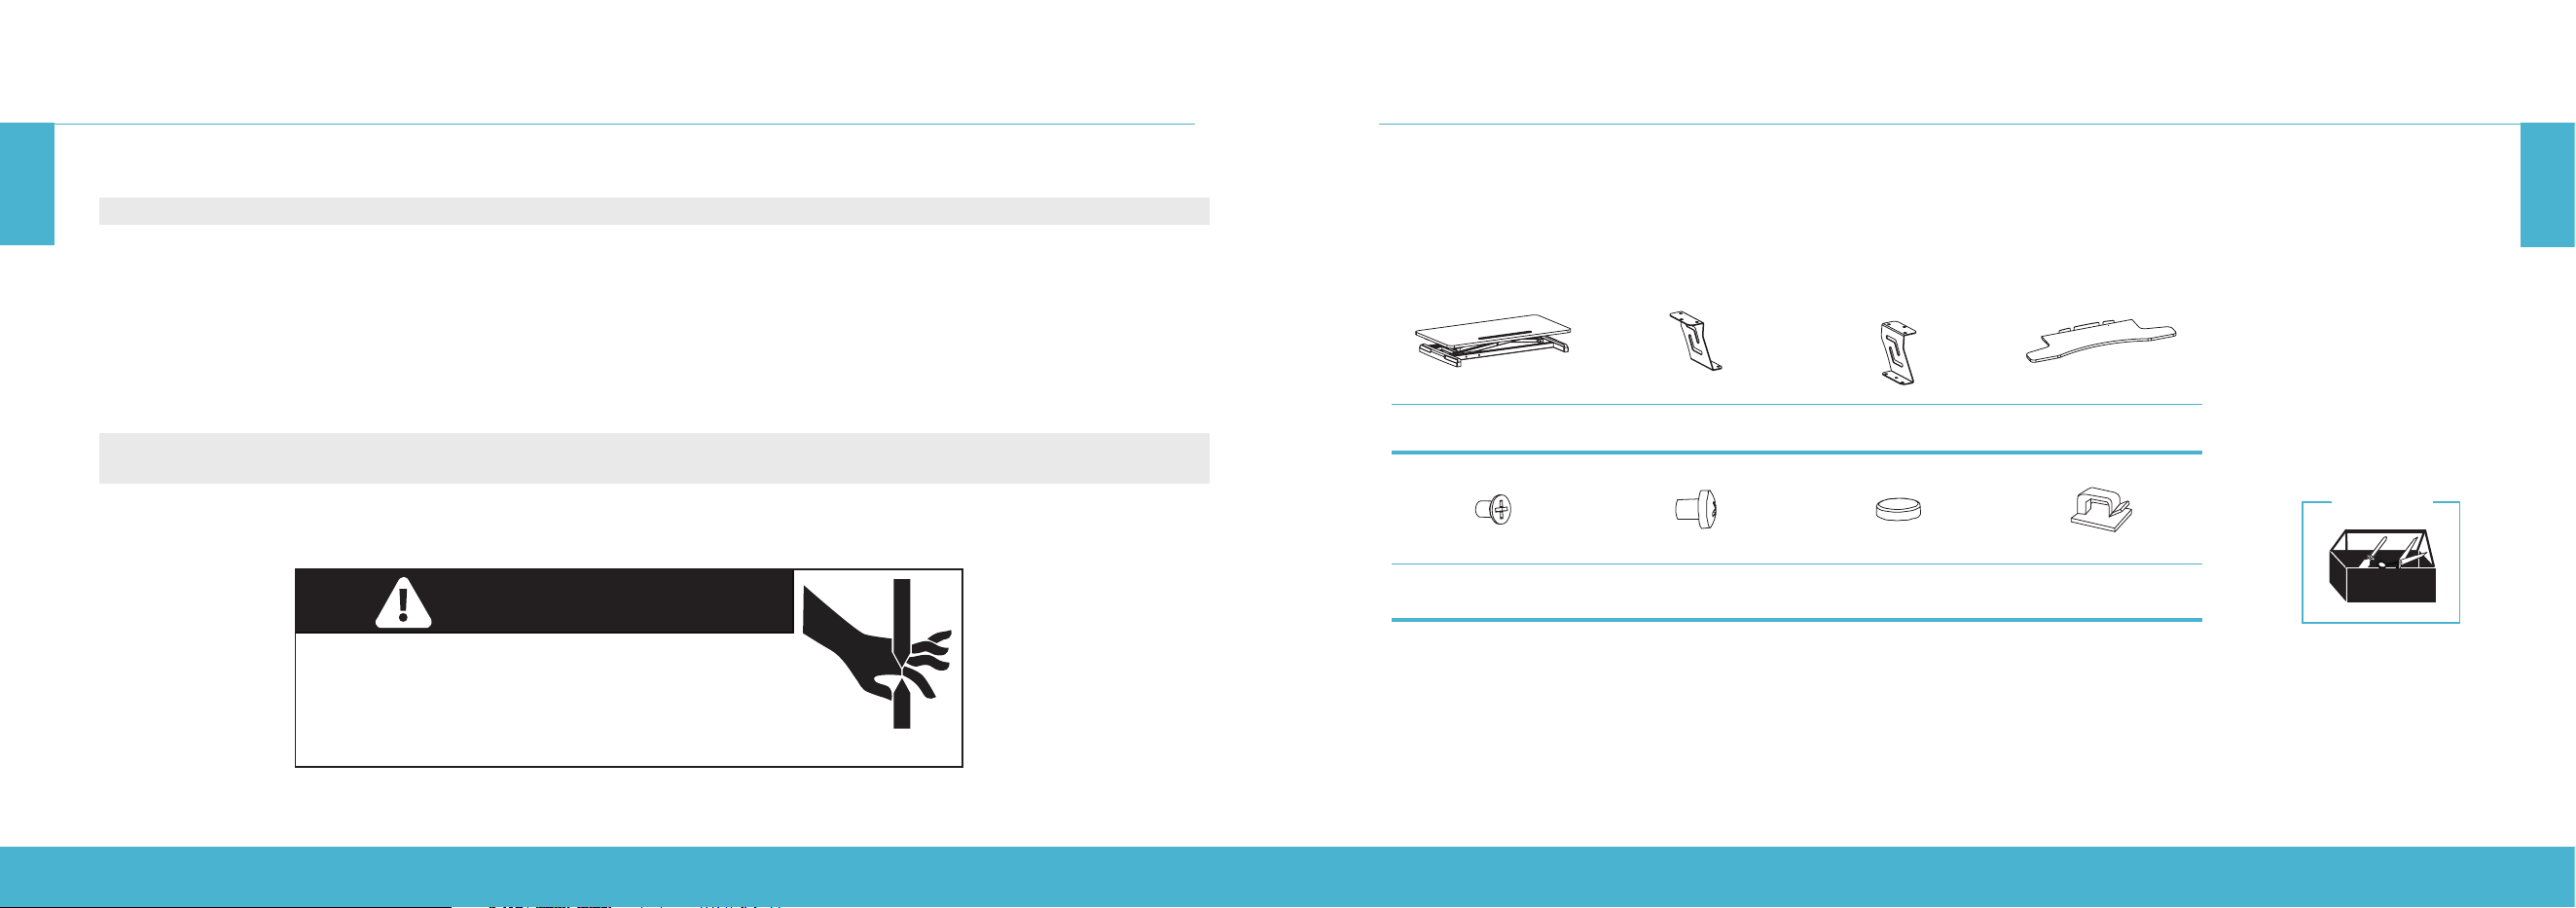
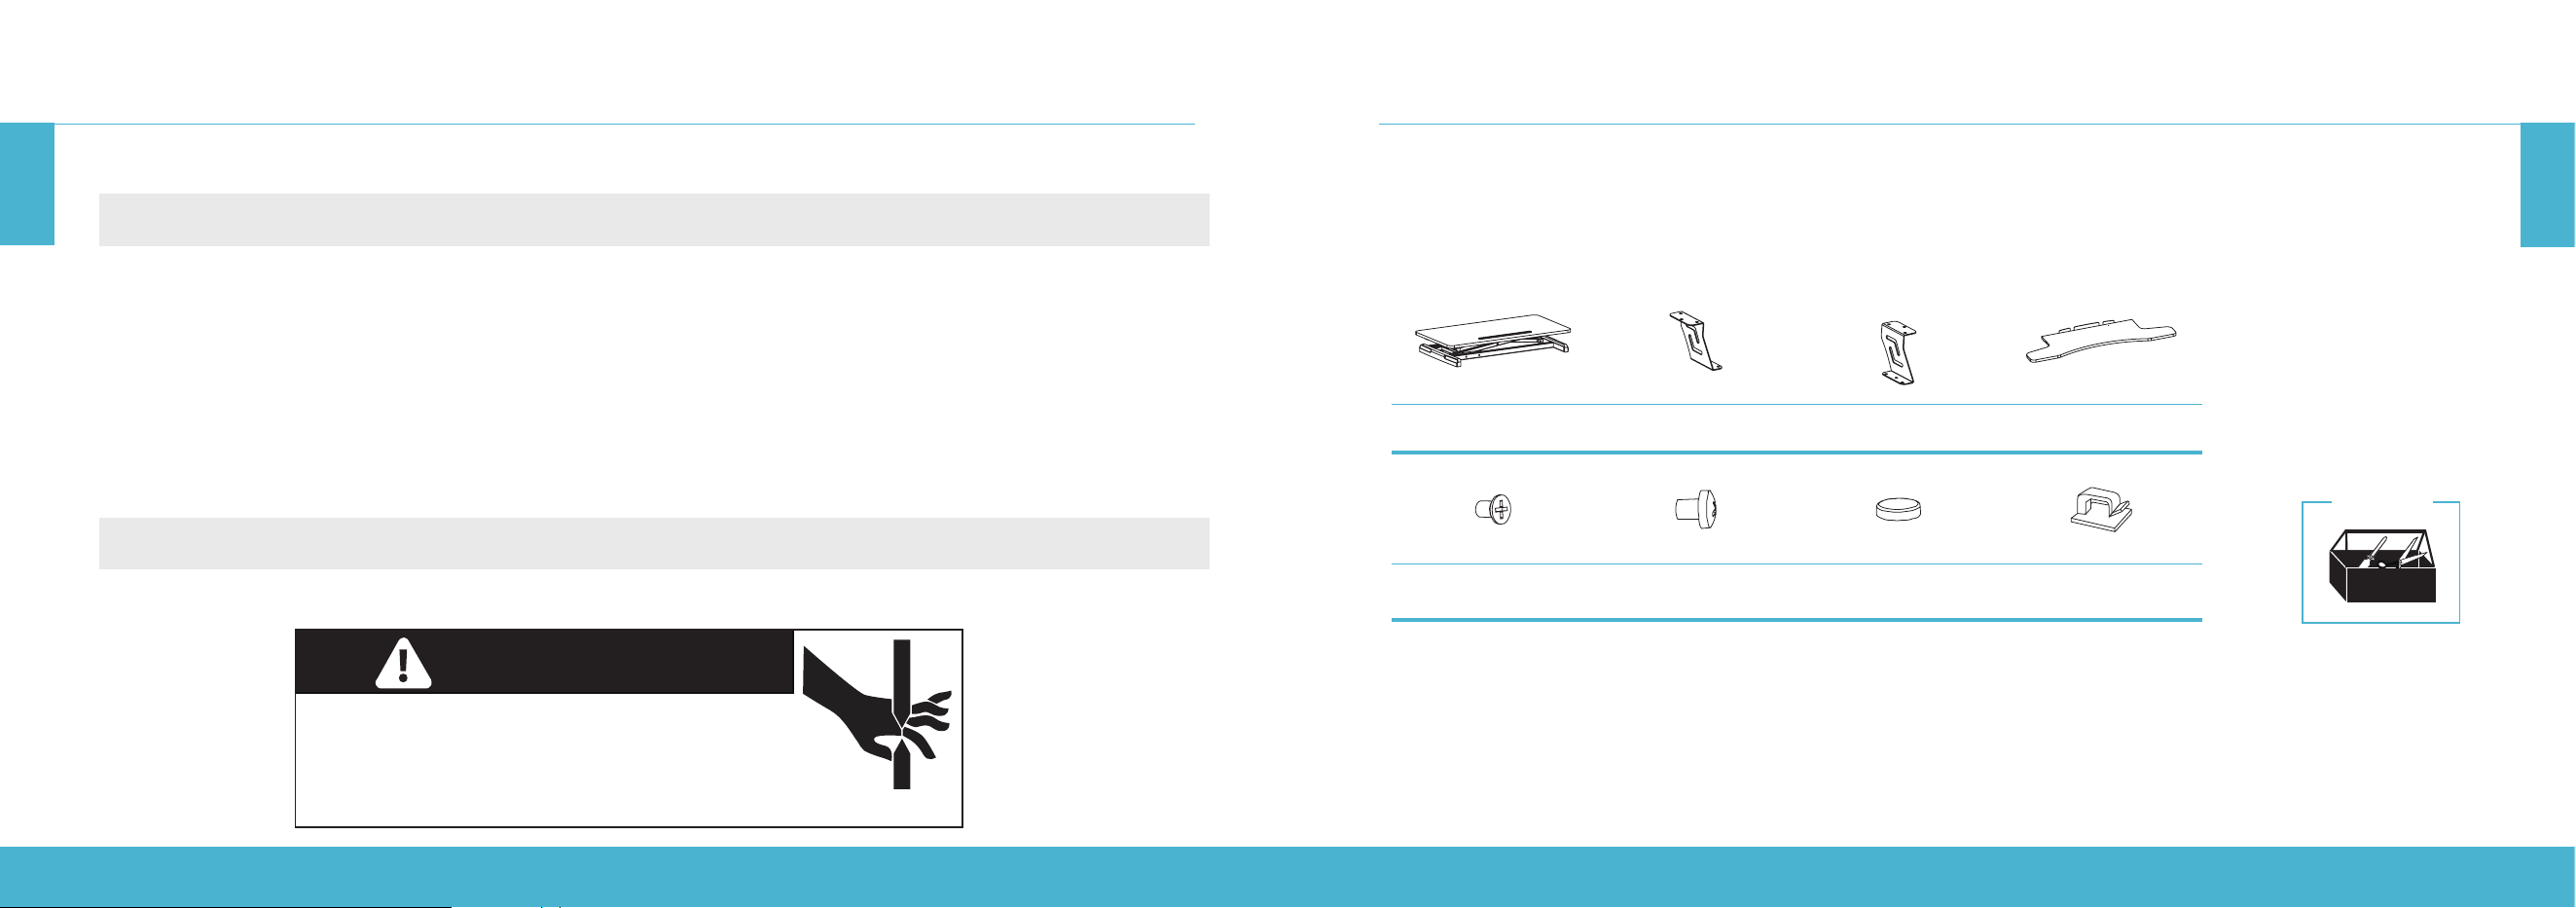
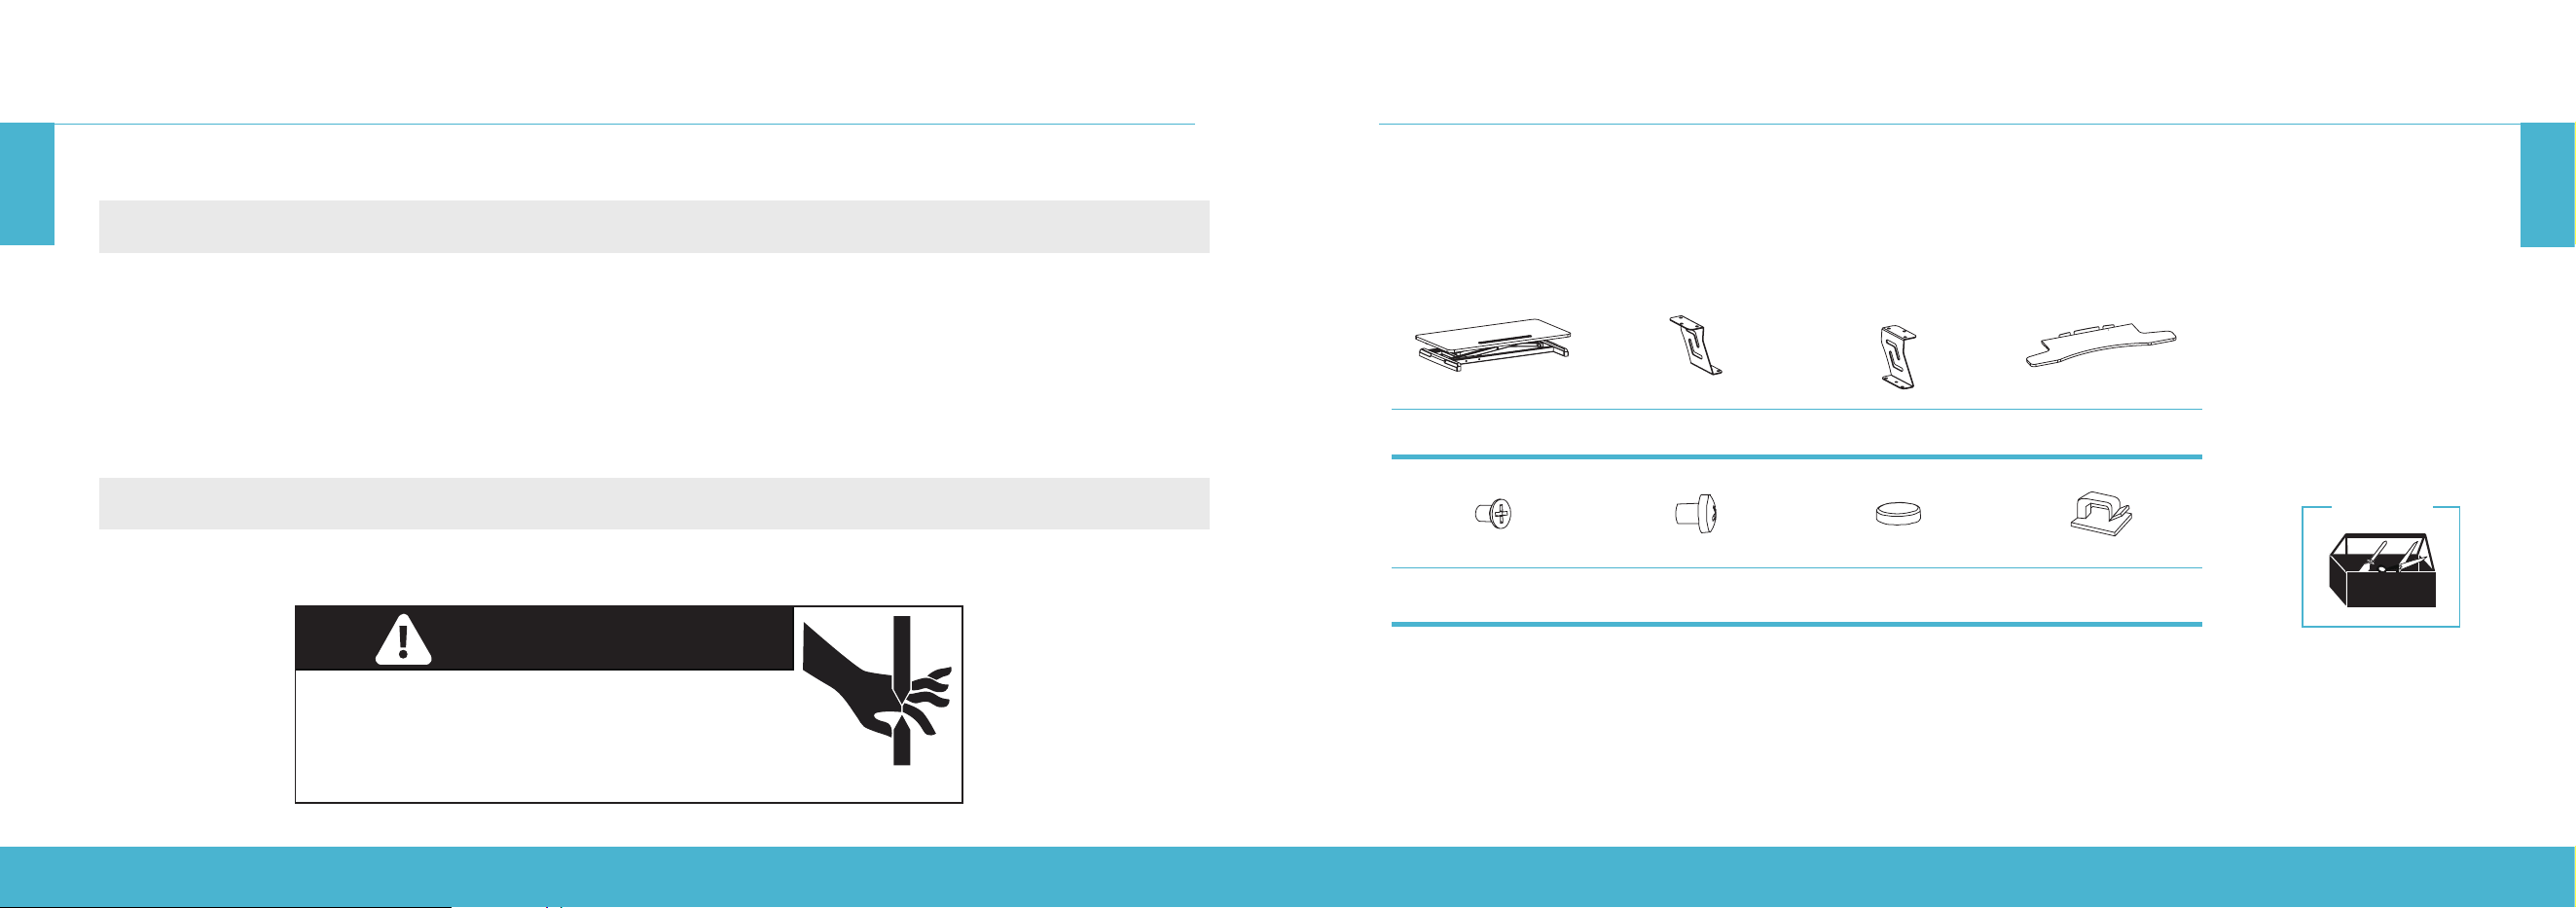
ASSEMBLY INSTRUCTIONS
A (× 1)
Desktop
B (× 1)
Clamp (Left)
C (× 1)
Clamp (Right)
D (× 1)
Keyboard Tray
E (× 6)
Cross Recessed Head Screw
F (× 6)
Cross Pan Head Screw
G (× 2)
Foot Pad
H (× 2)
Cable Clip
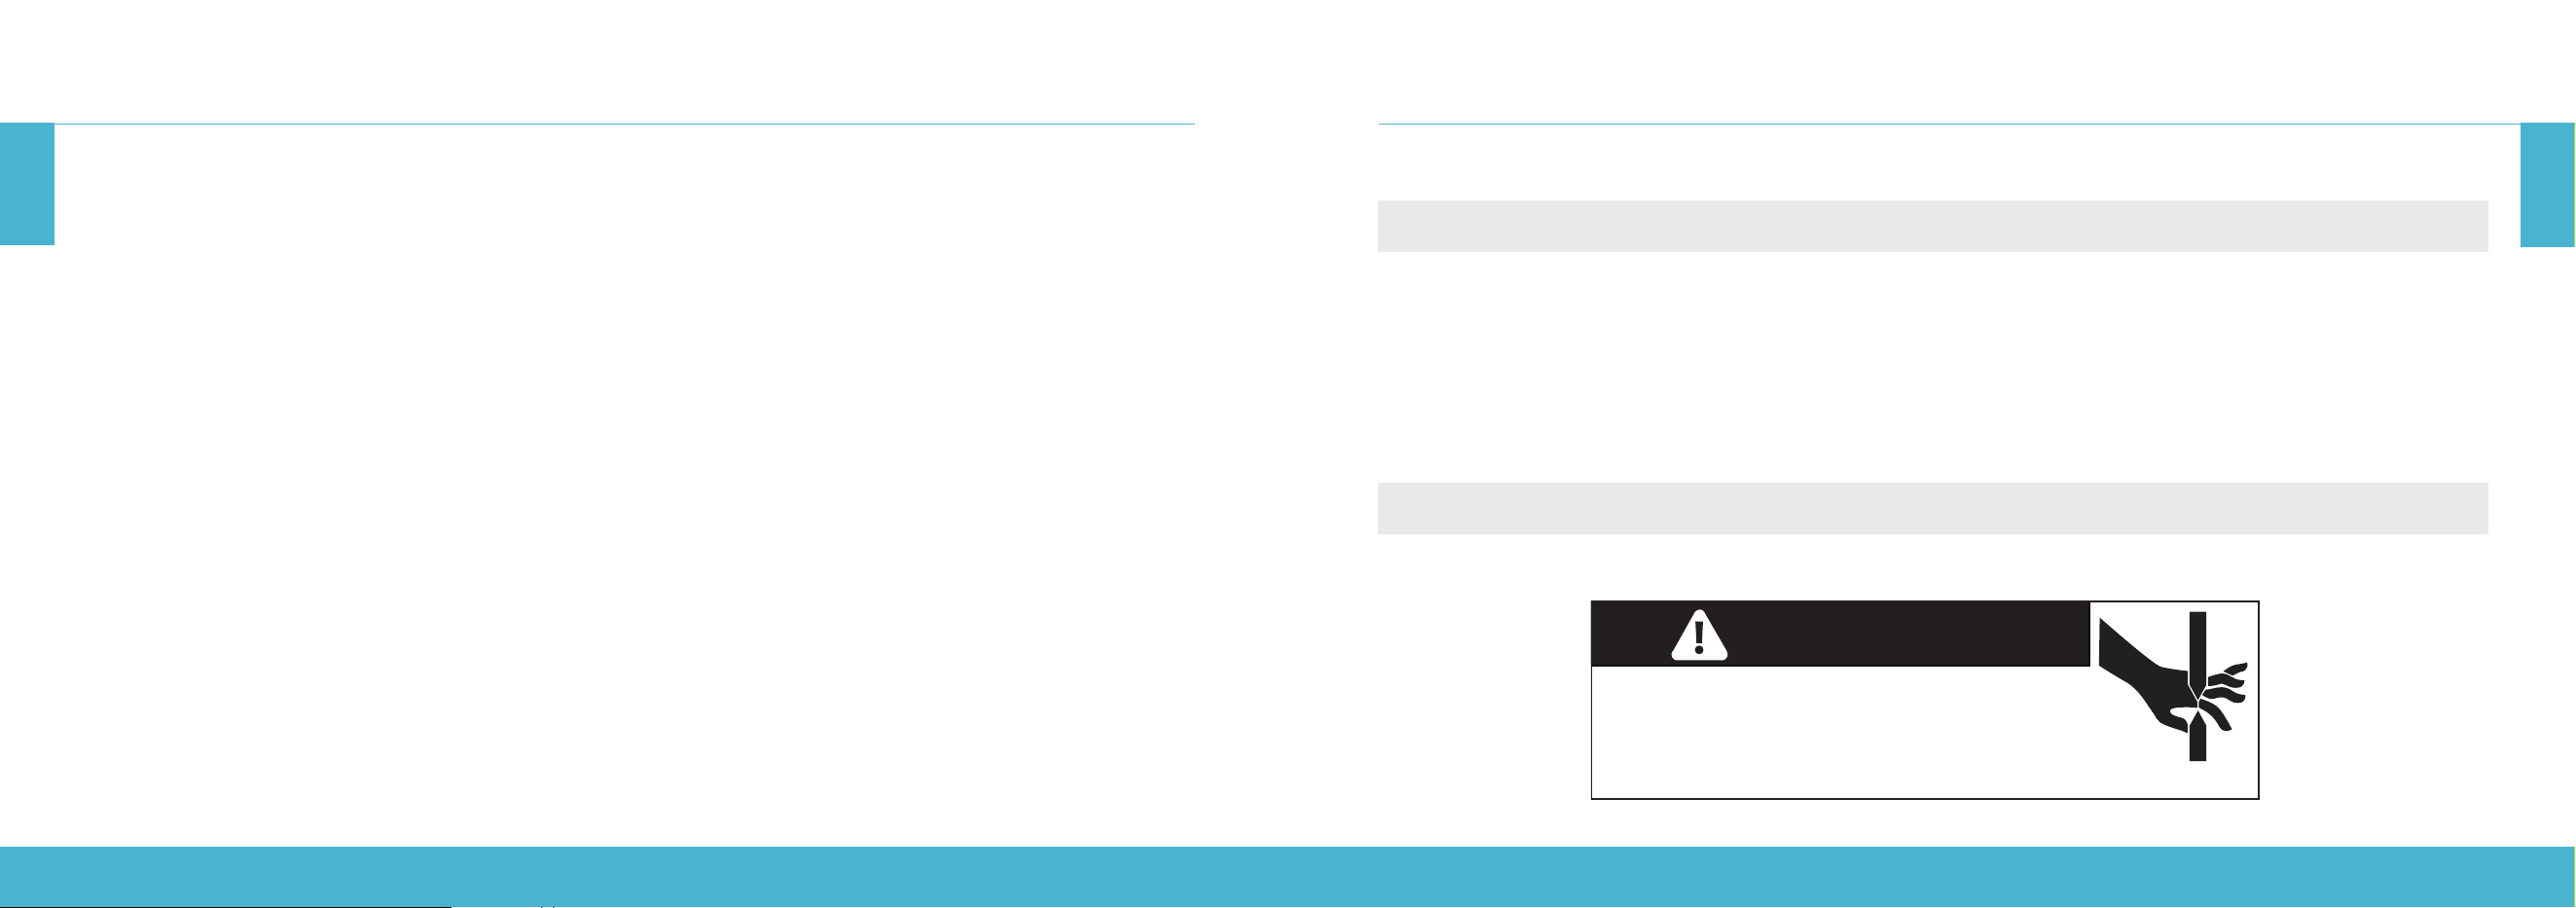
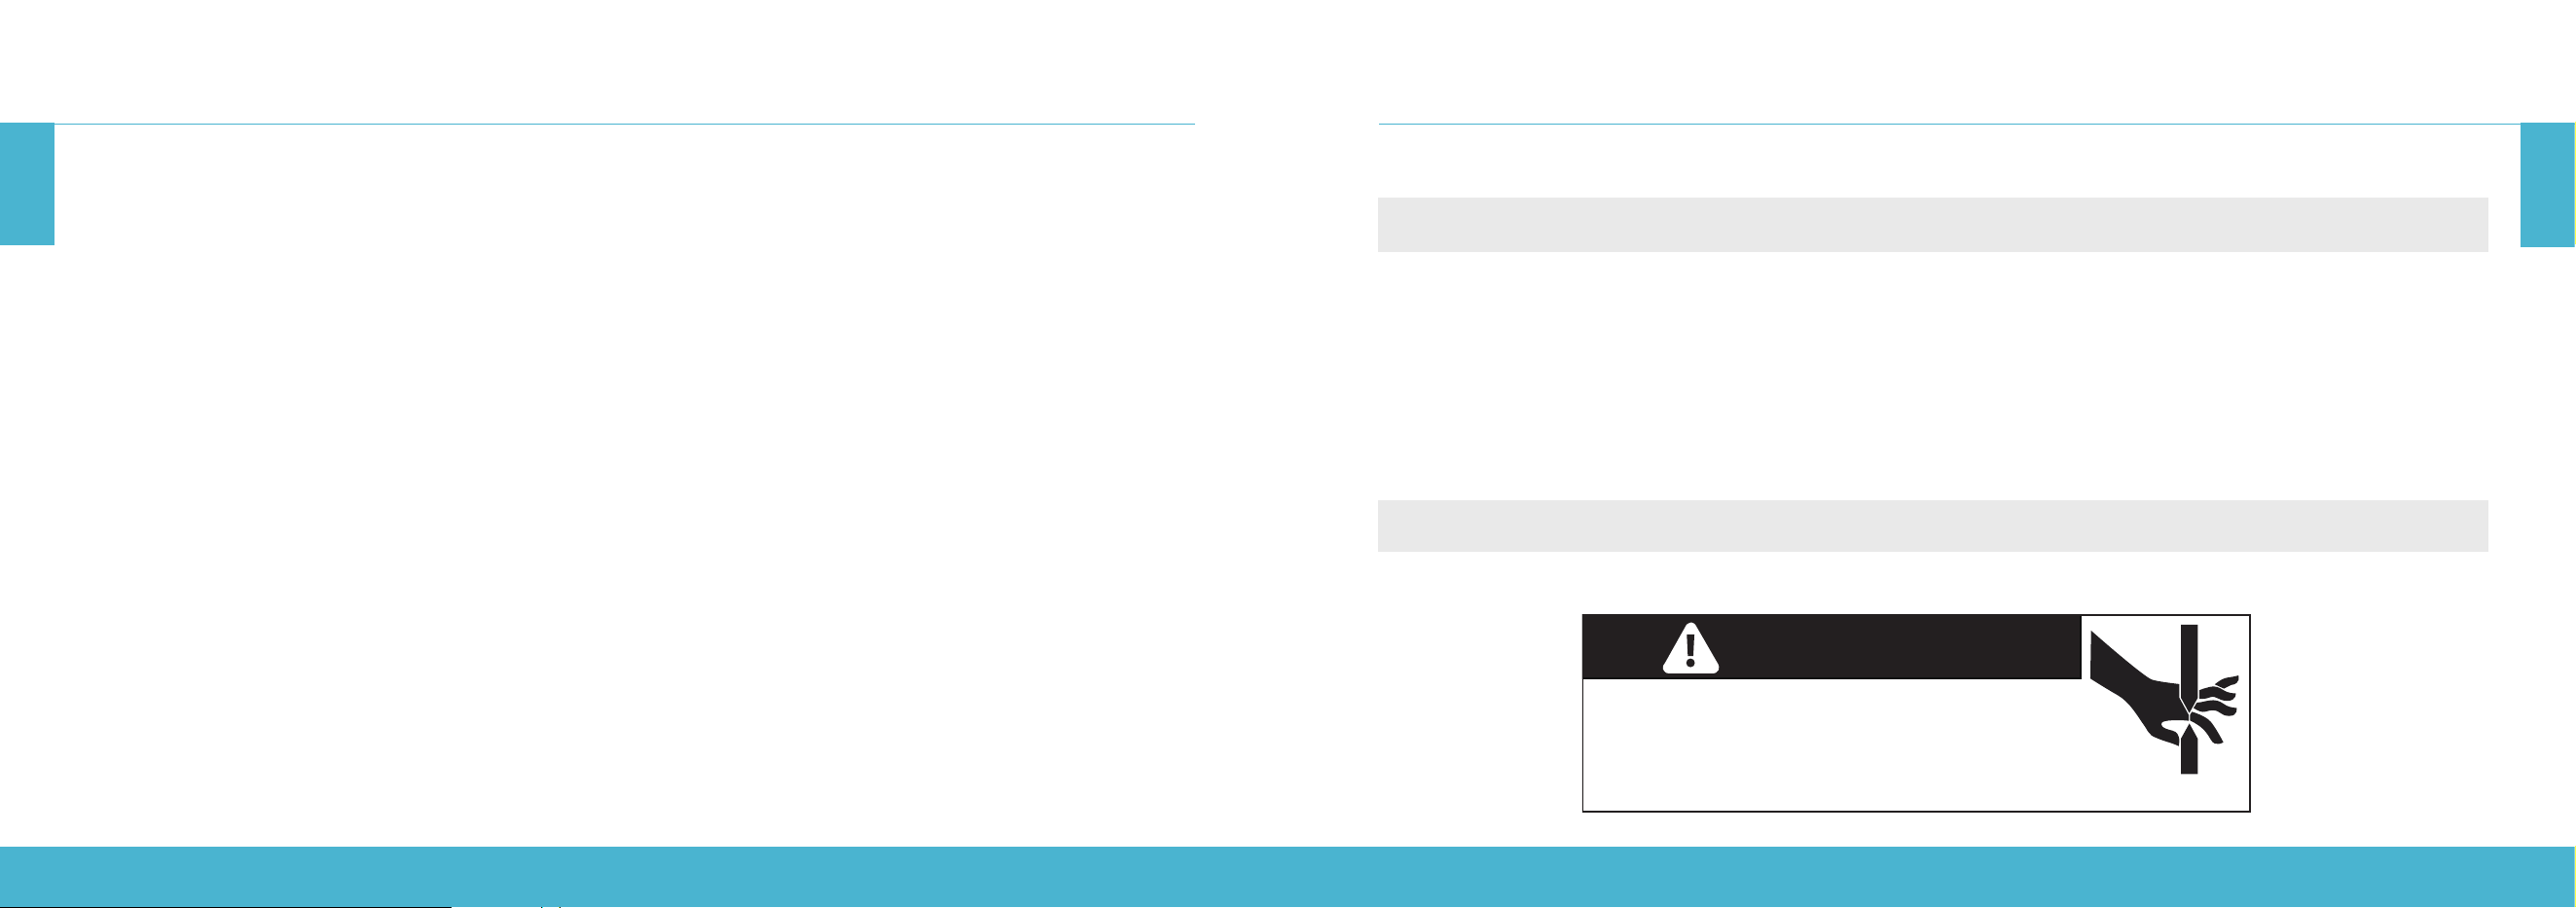
PINCH POINT
DO NOT place hands on or near support bars. Pinch
points are created during lifting and lowering the
worksurface. Failure to follow these instructions may
result in serious personal injury.
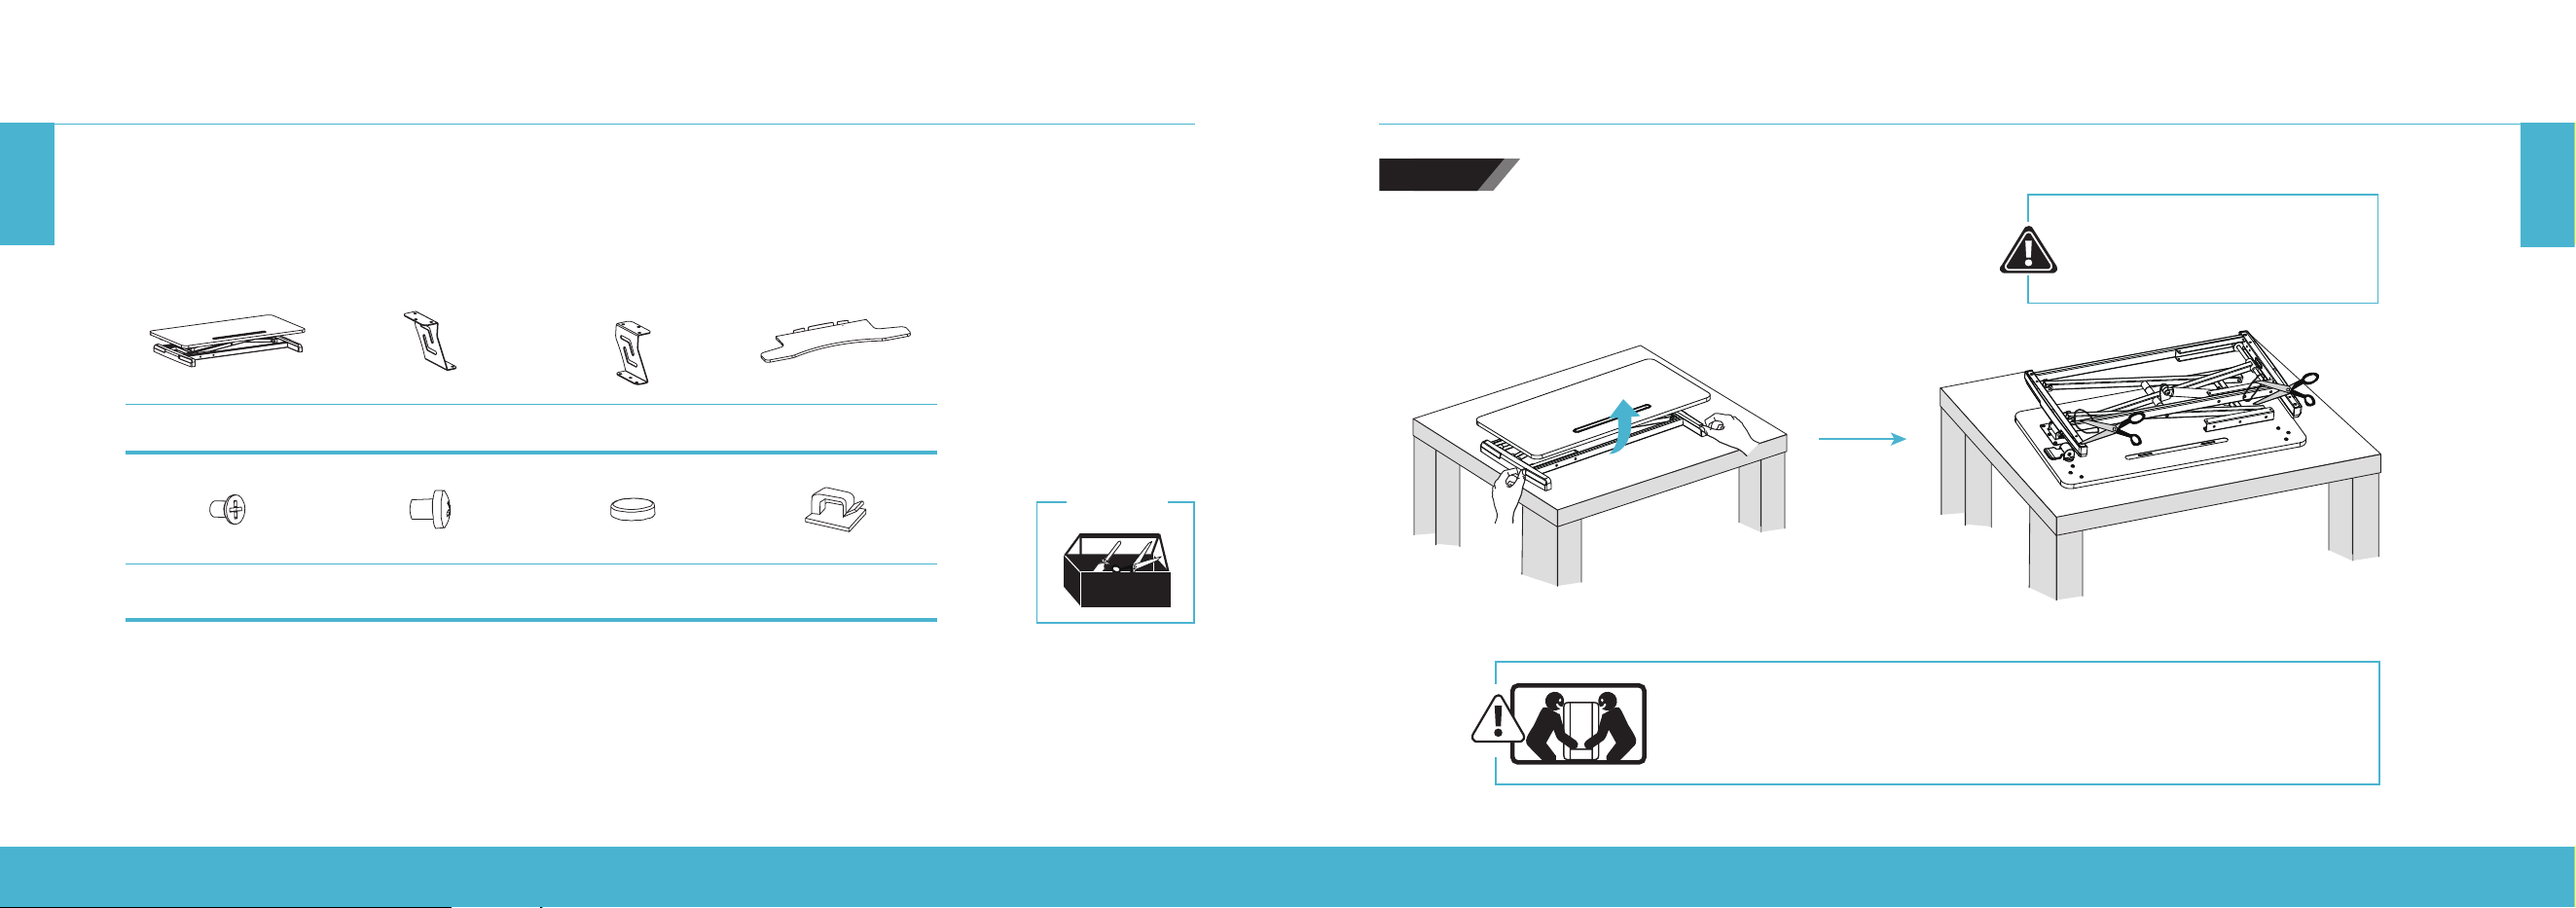
Prior to starting the assembly process, take all the parts out of the box, remove the parts from the plastic bags, and lay
everything out on the floor to become familiar with the components.
As your desk is a heavy piece of equipment, ask someone for help during the assembly. Follow the instructions on this
manual to reduce any problems that may occur.
Tools Needed
WARNING
HEIGHT ADJUSTABLE STANDING DESK CONVERTER | 6
HEIGHT ADJUSTABLE STANDING DESK CONVERTER | 7
EN
EN
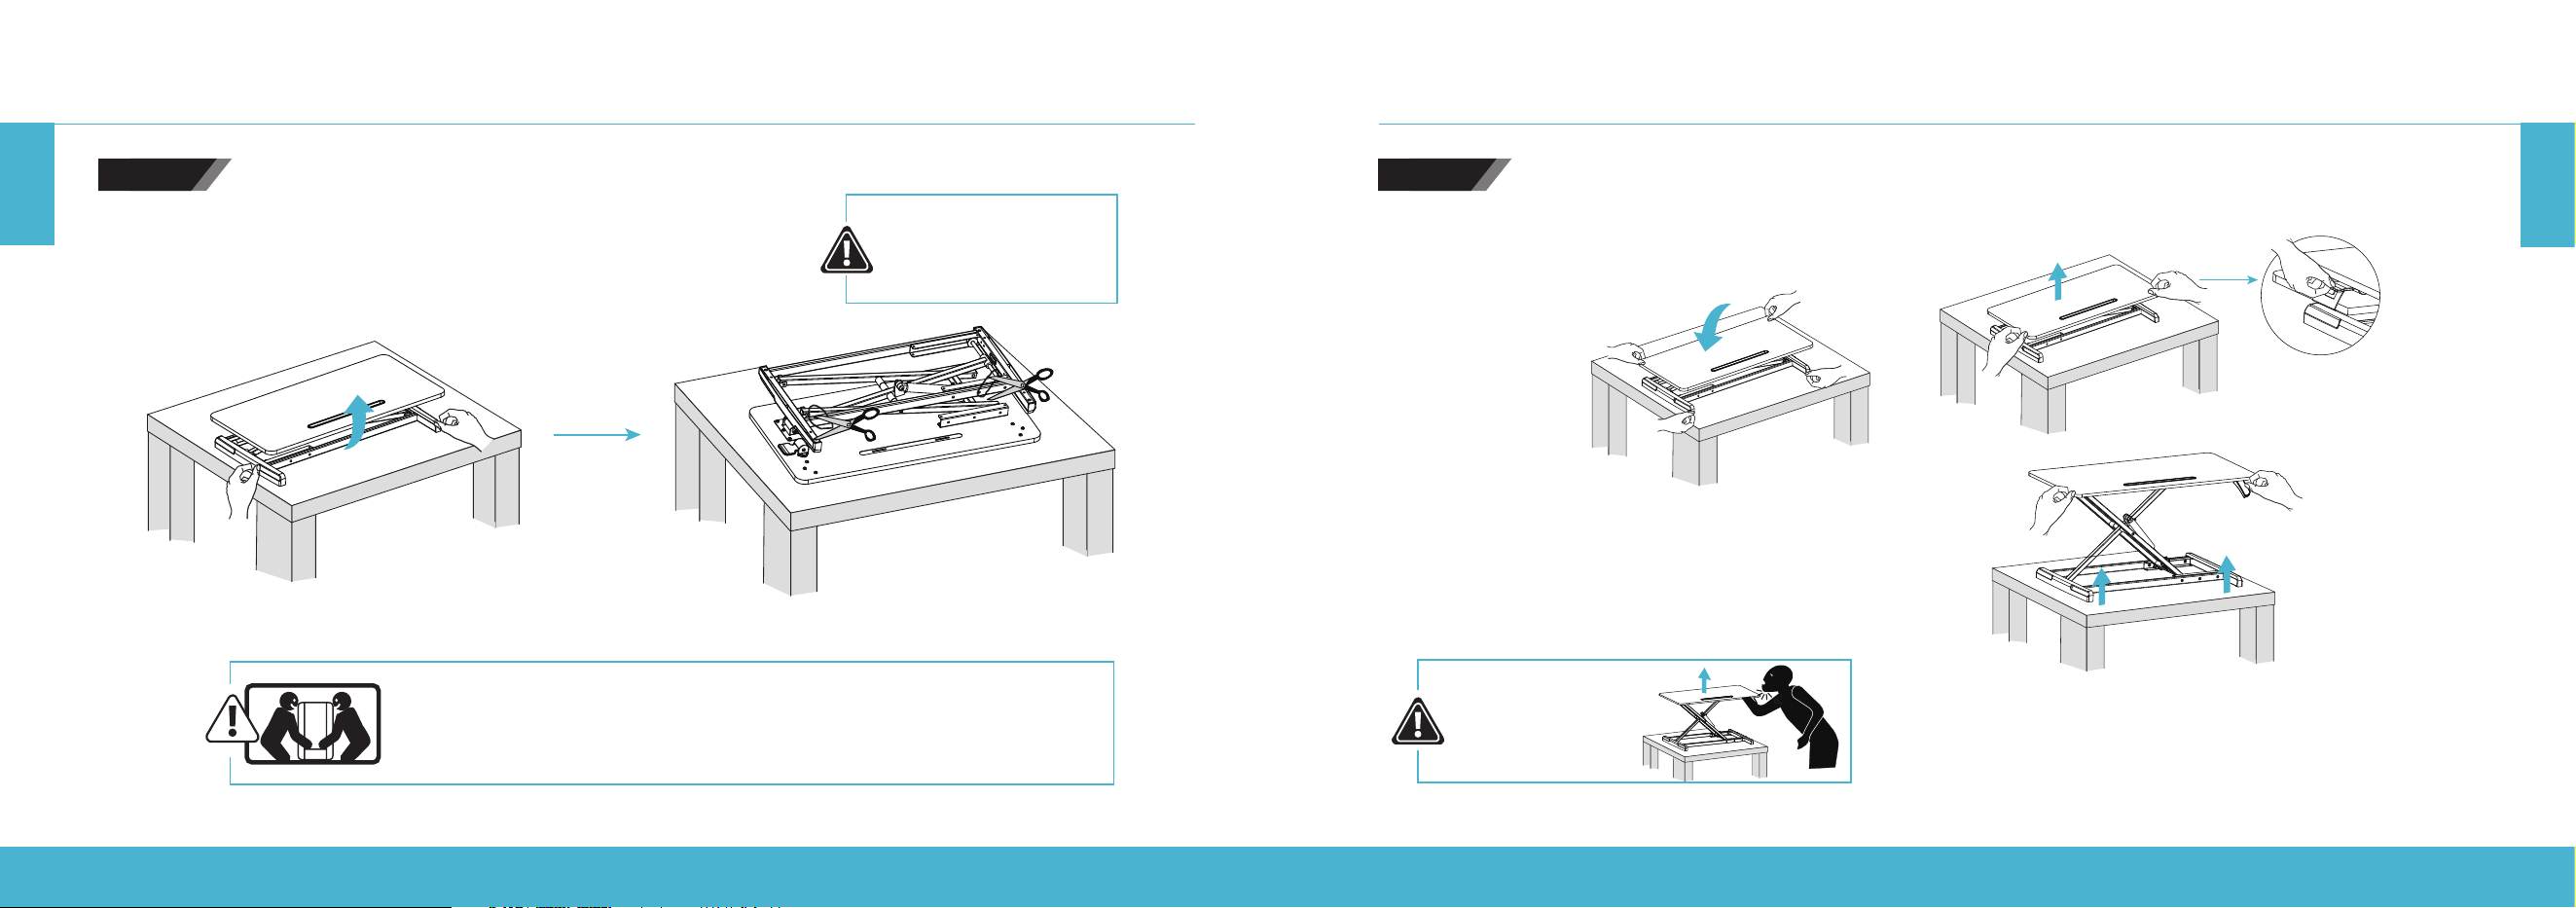
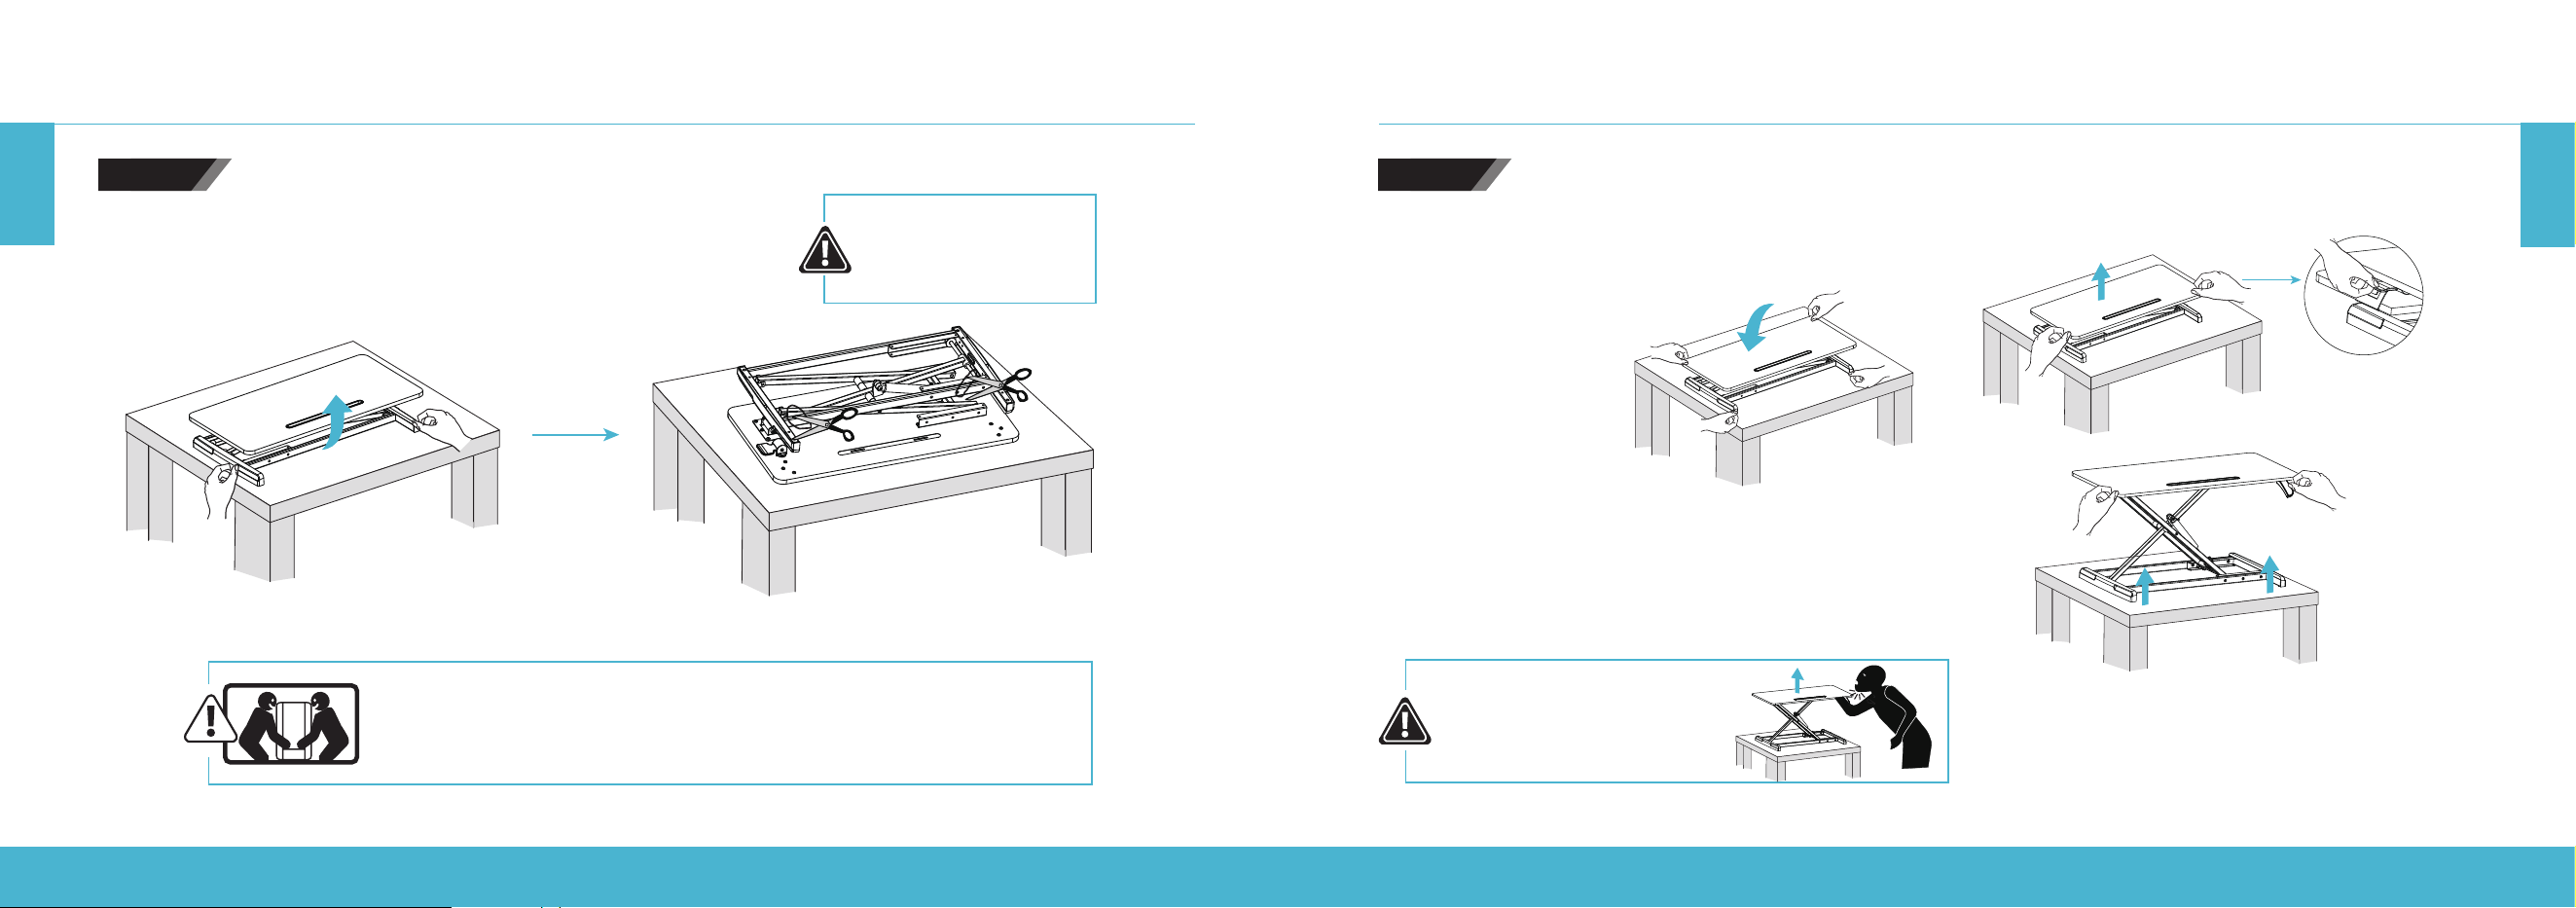
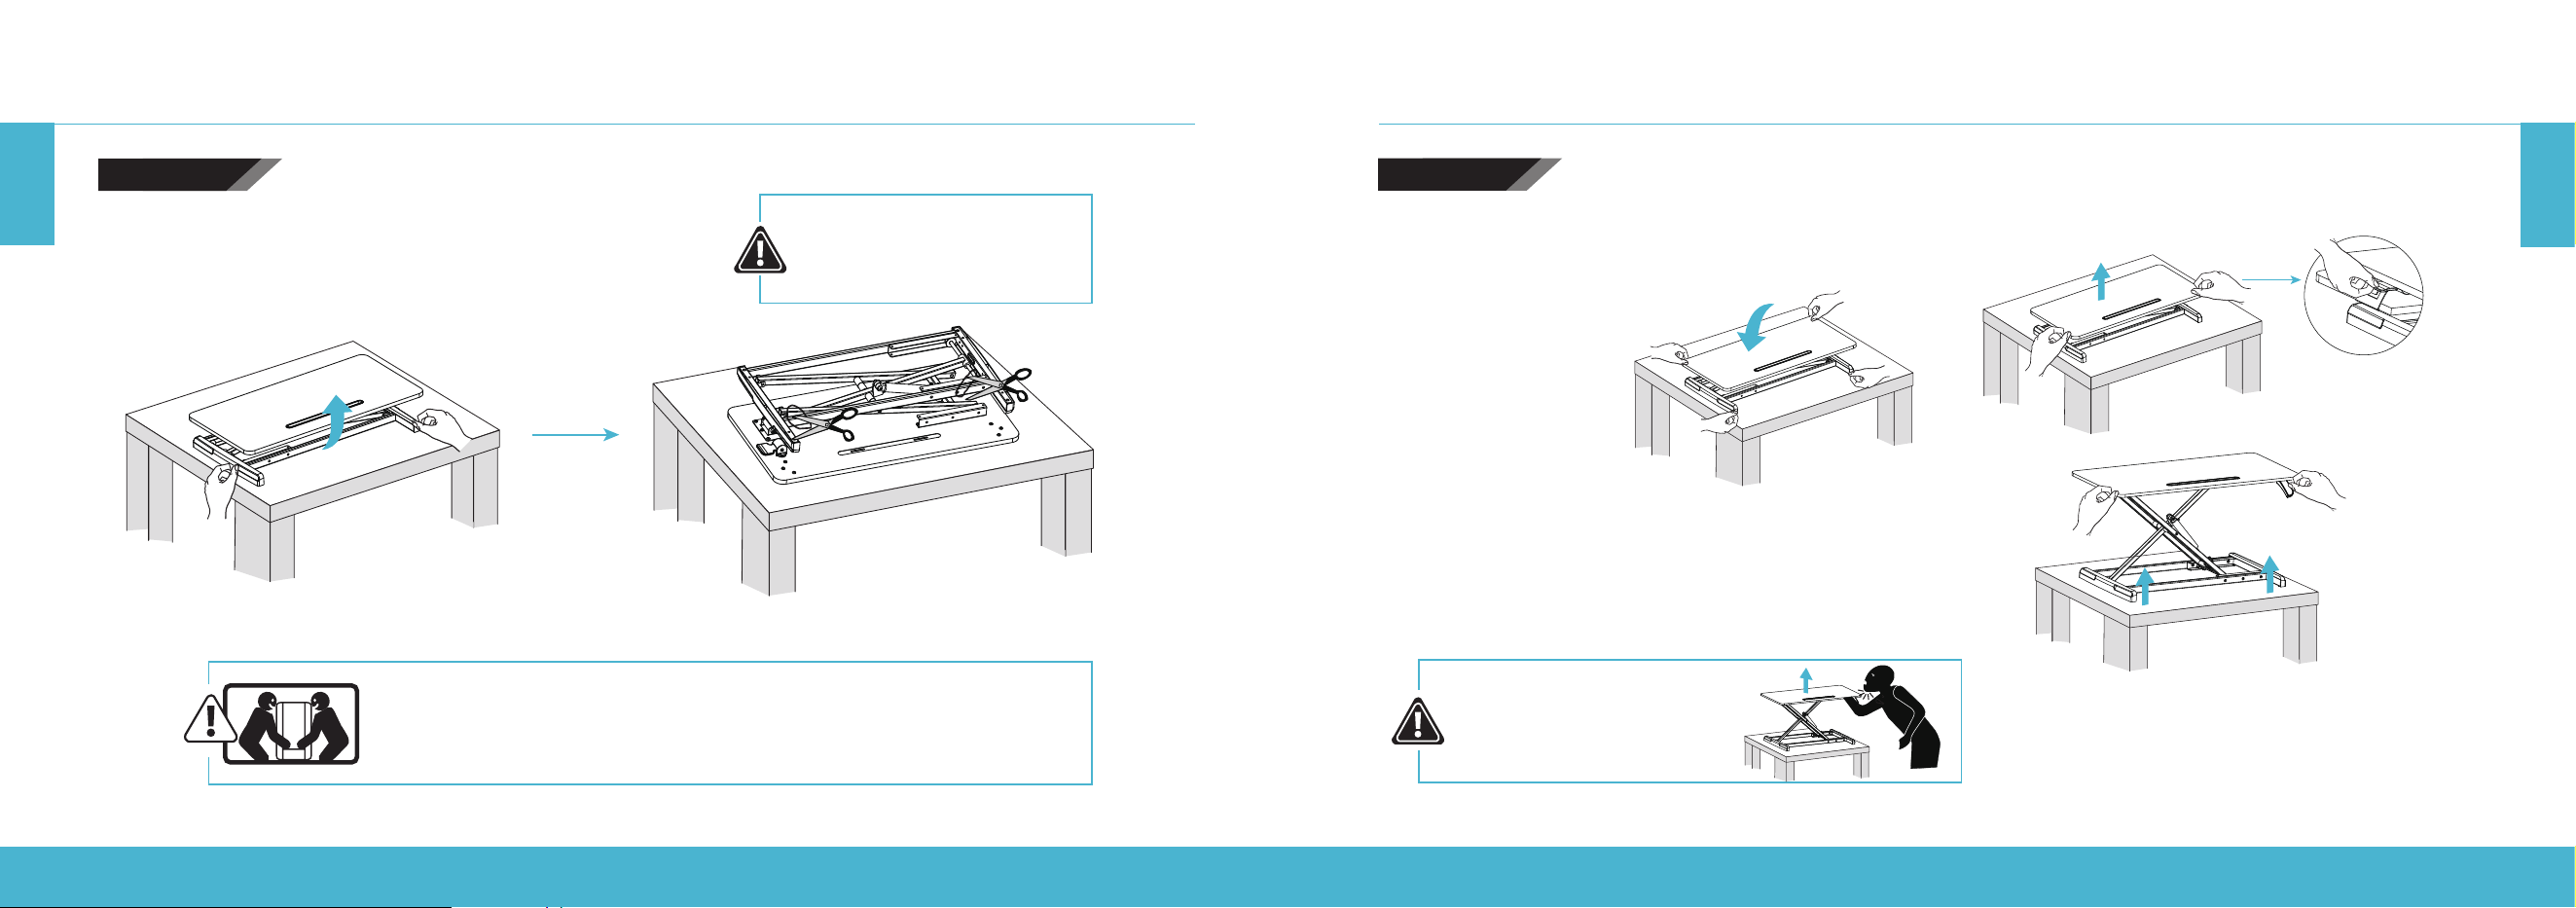
ASSEMBLY INSTRUCTIONS
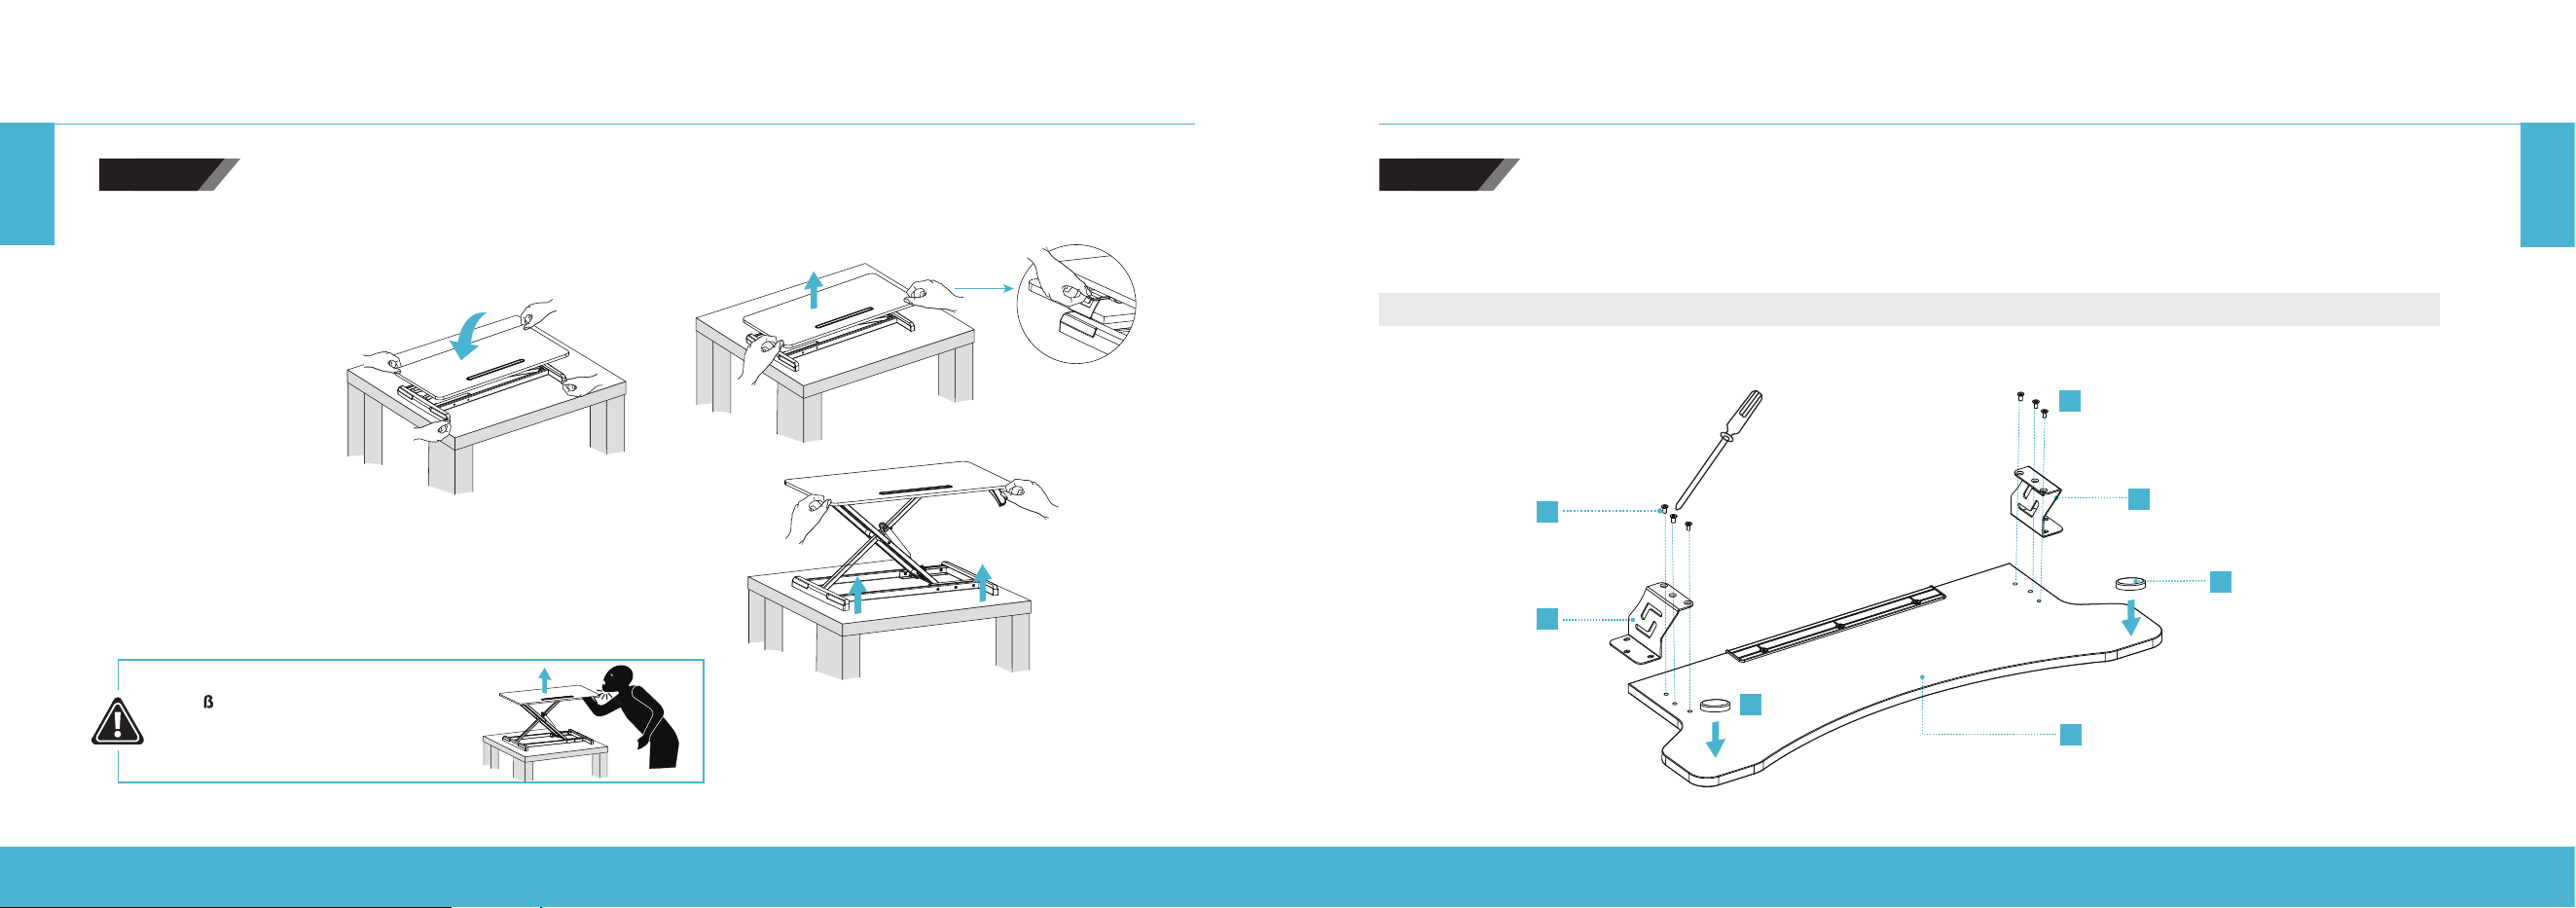
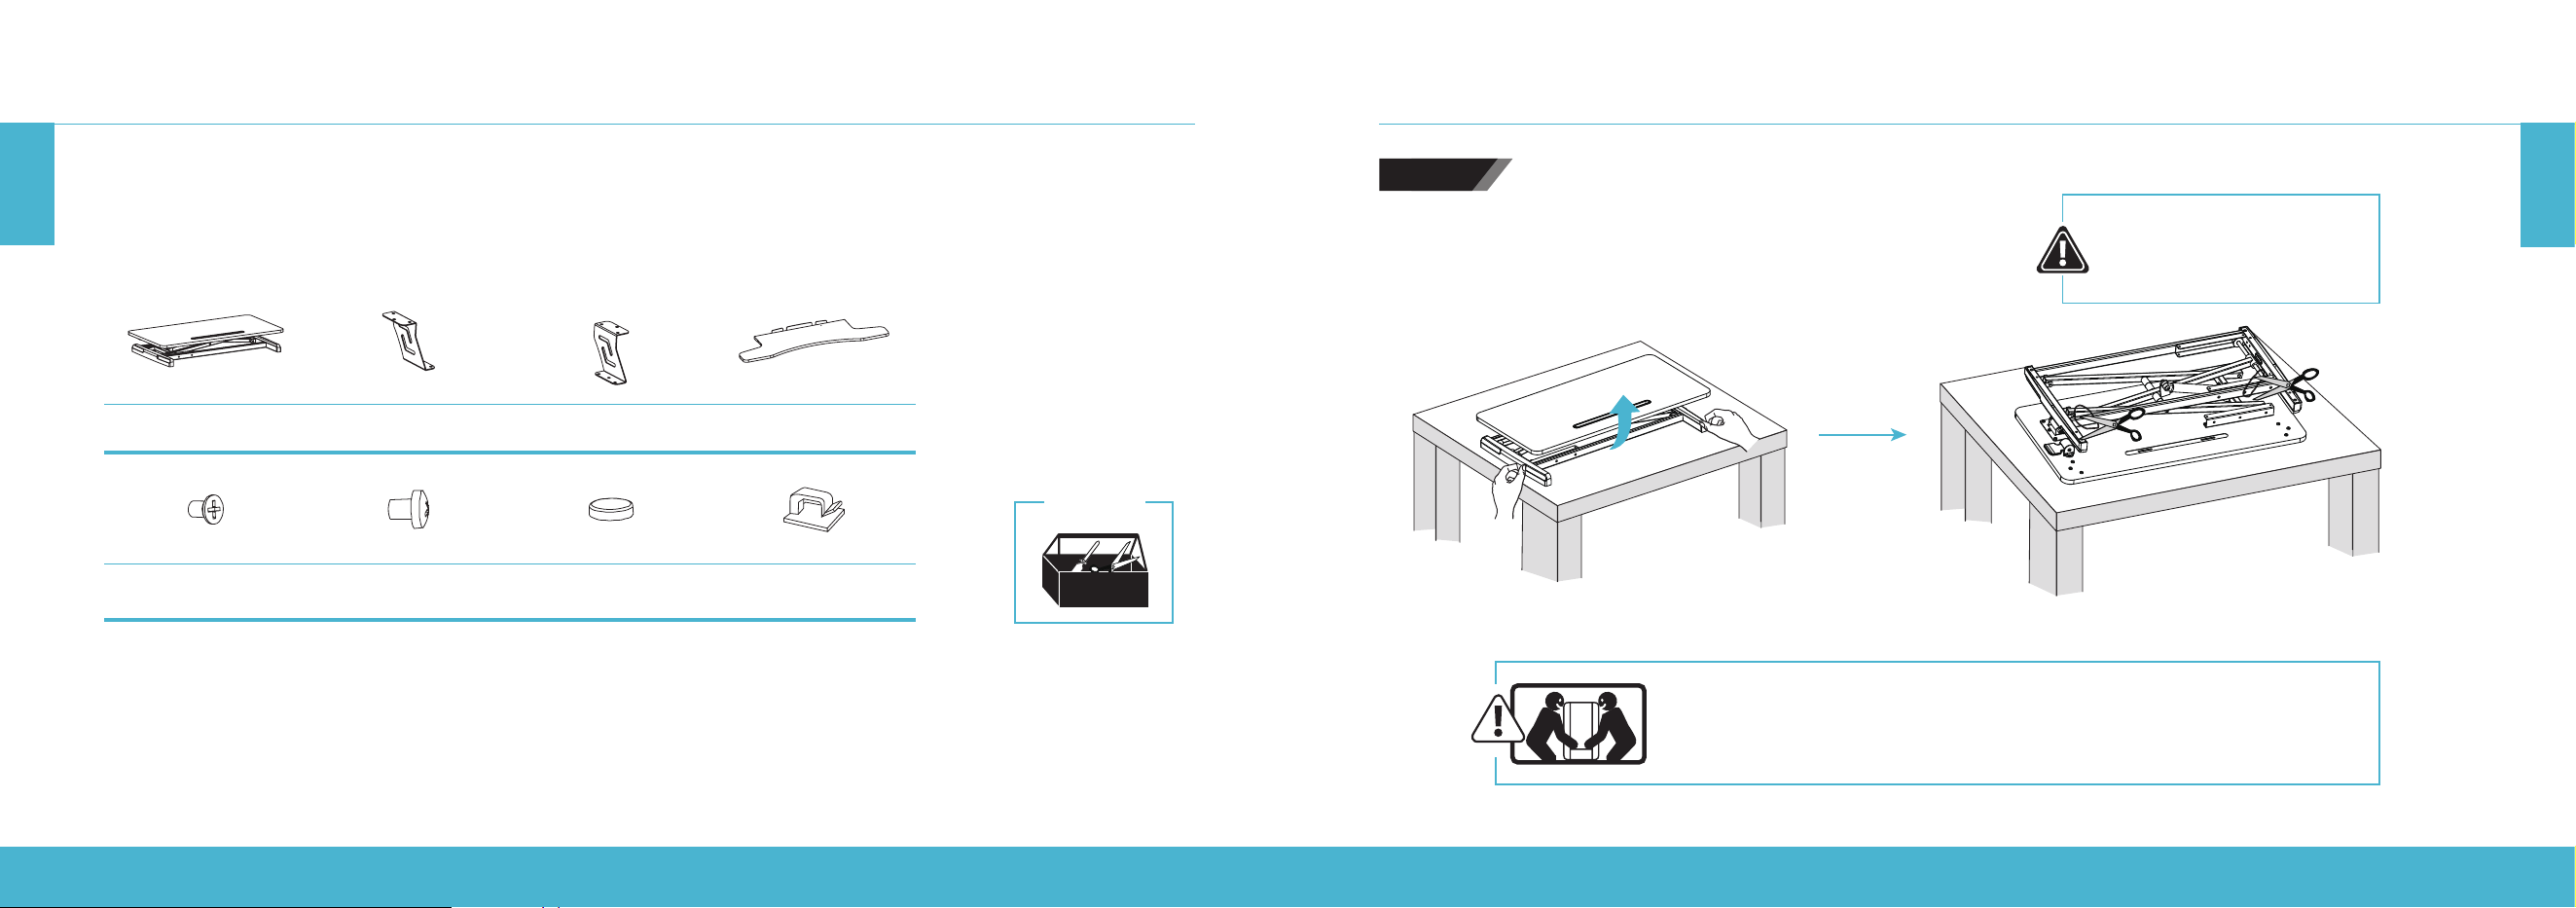
When carrying the standing desk, be sure to hold the bottom with both hands to
avoid possible damage or injury.
Flip the desktop and cut o the cable ties.
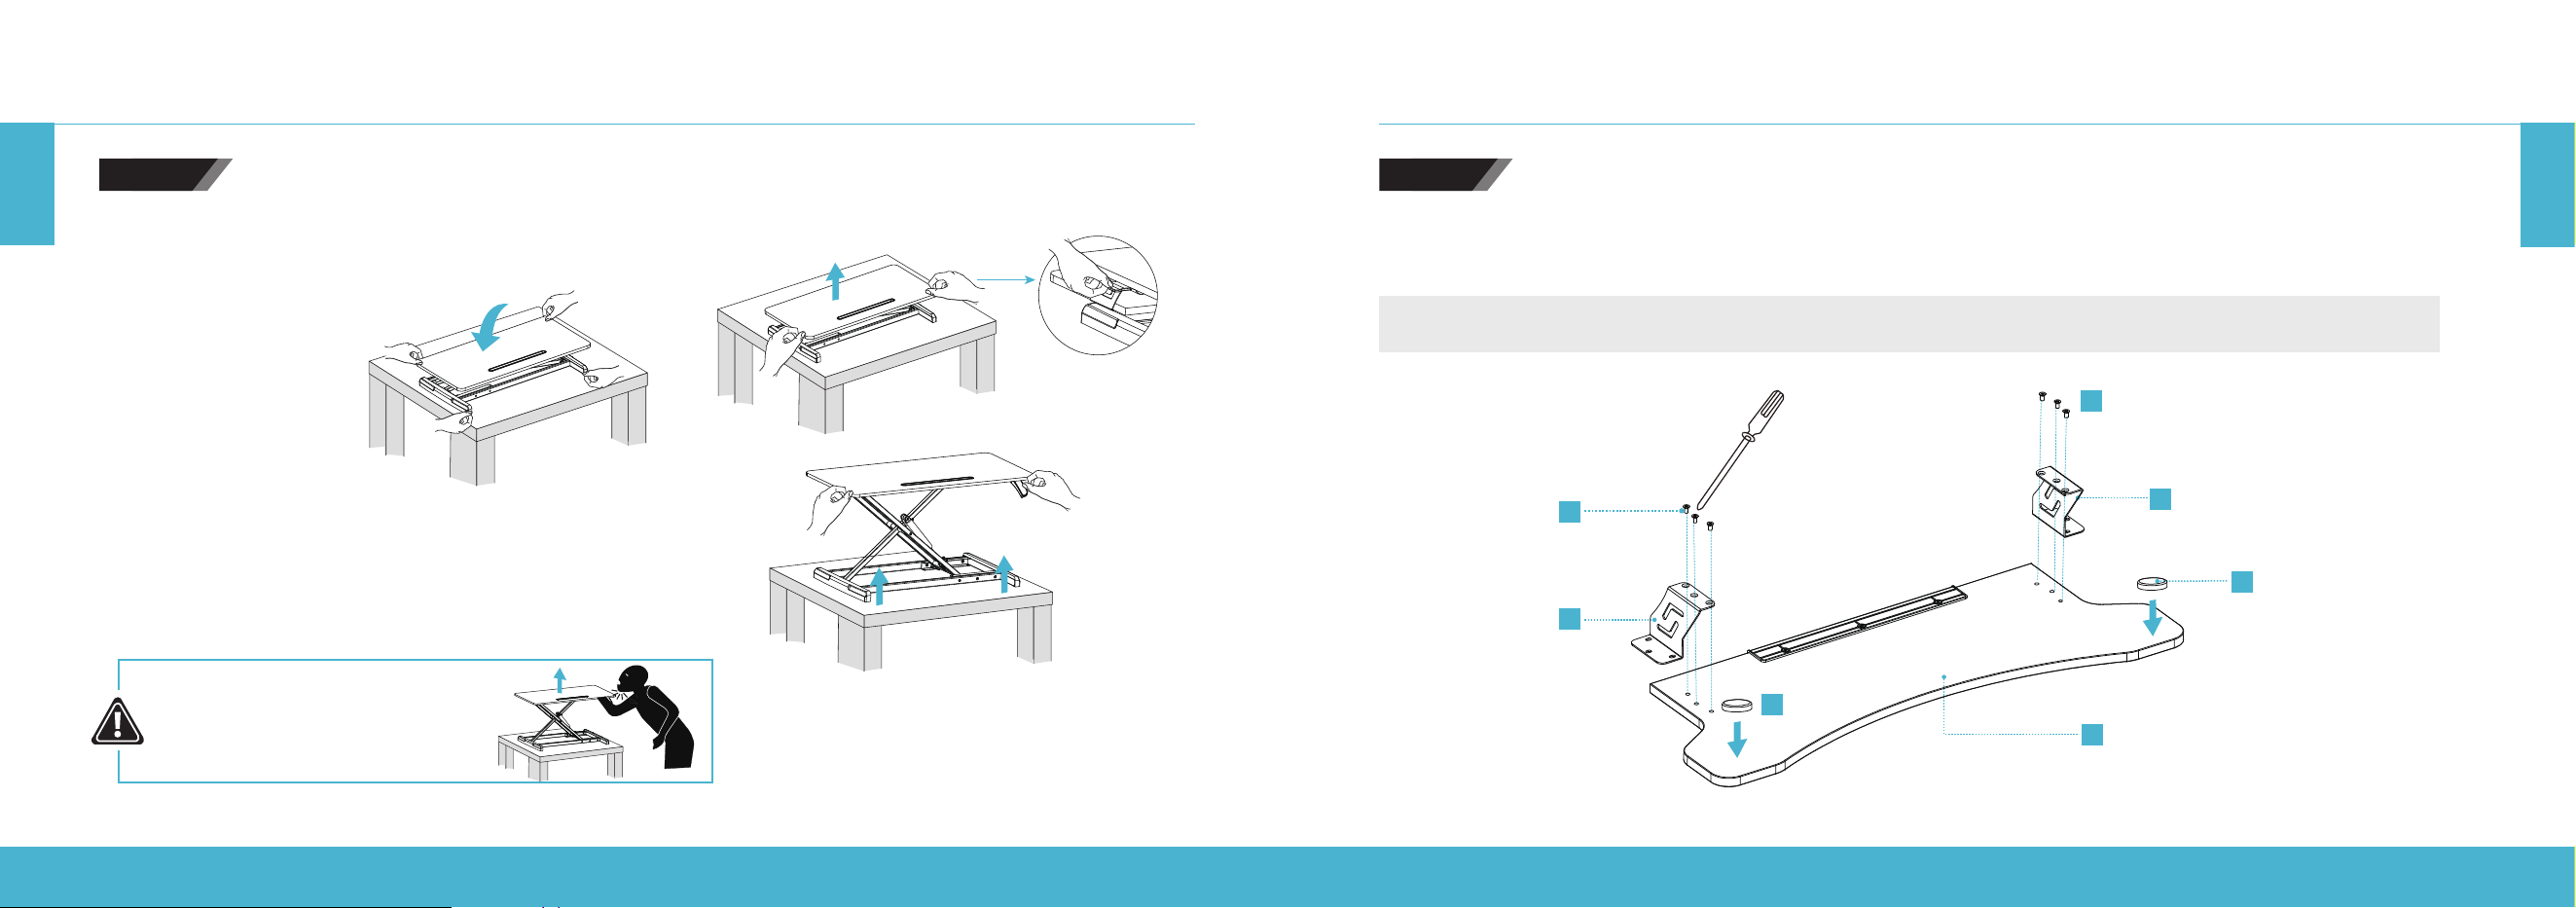
Press the release handle to lift up the desktop.
DO NOT raise the desktop too quickly to avoid injury.
To lower the desktop, press the handle as well as pressing
down both the left and right side of the desktop.
DO NOT press the
release handle while
cutting o the cable ties.
STEP 1
ASSEMBLY INSTRUCTIONS
IMPACT HAZARD!
MOVING PARTS CAN
CRUSH OR CUT.
STEP 2
HEIGHT ADJUSTABLE STANDING DESK CONVERTER | 8
HEIGHT ADJUSTABLE STANDING DESK CONVERTER | 9
EN
EN
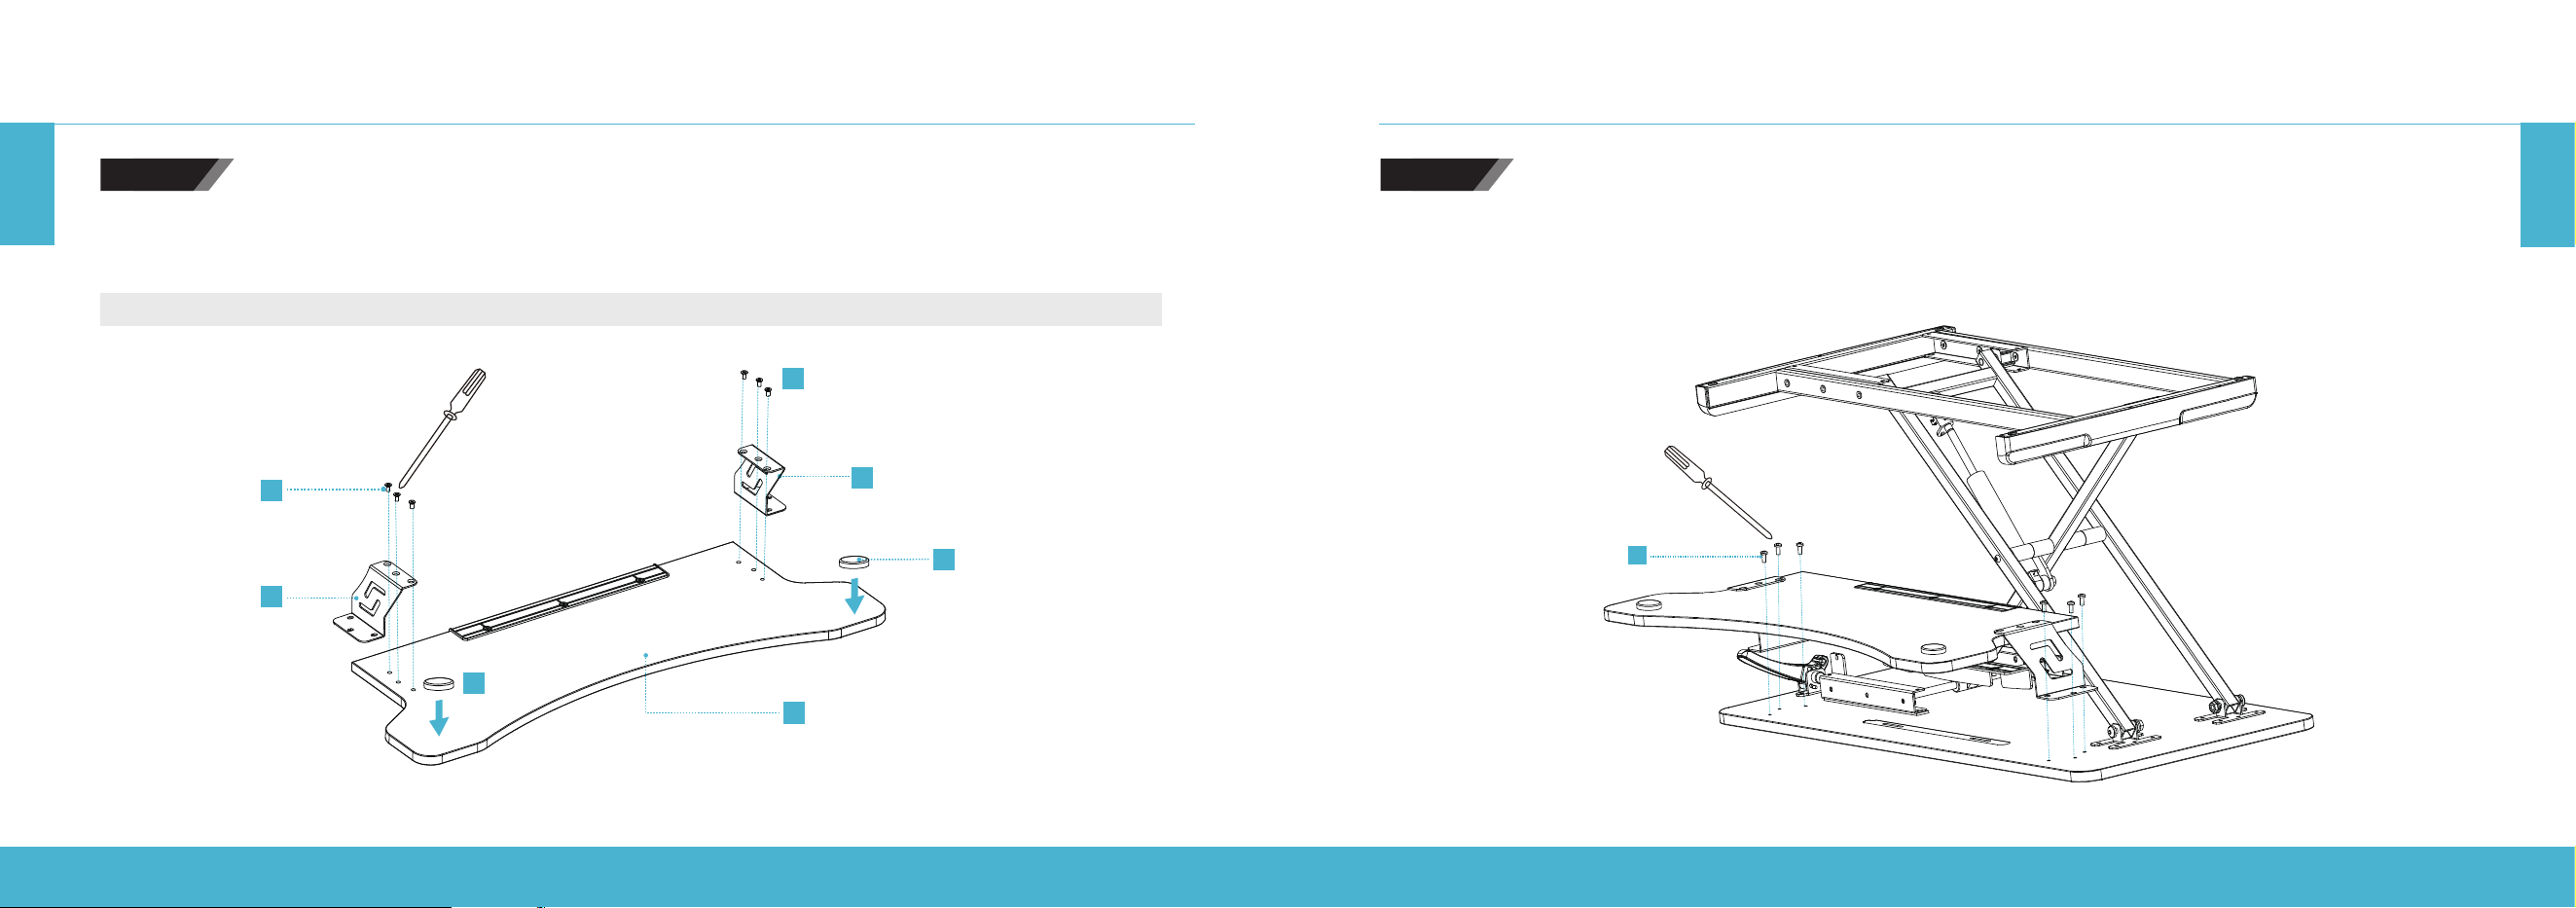
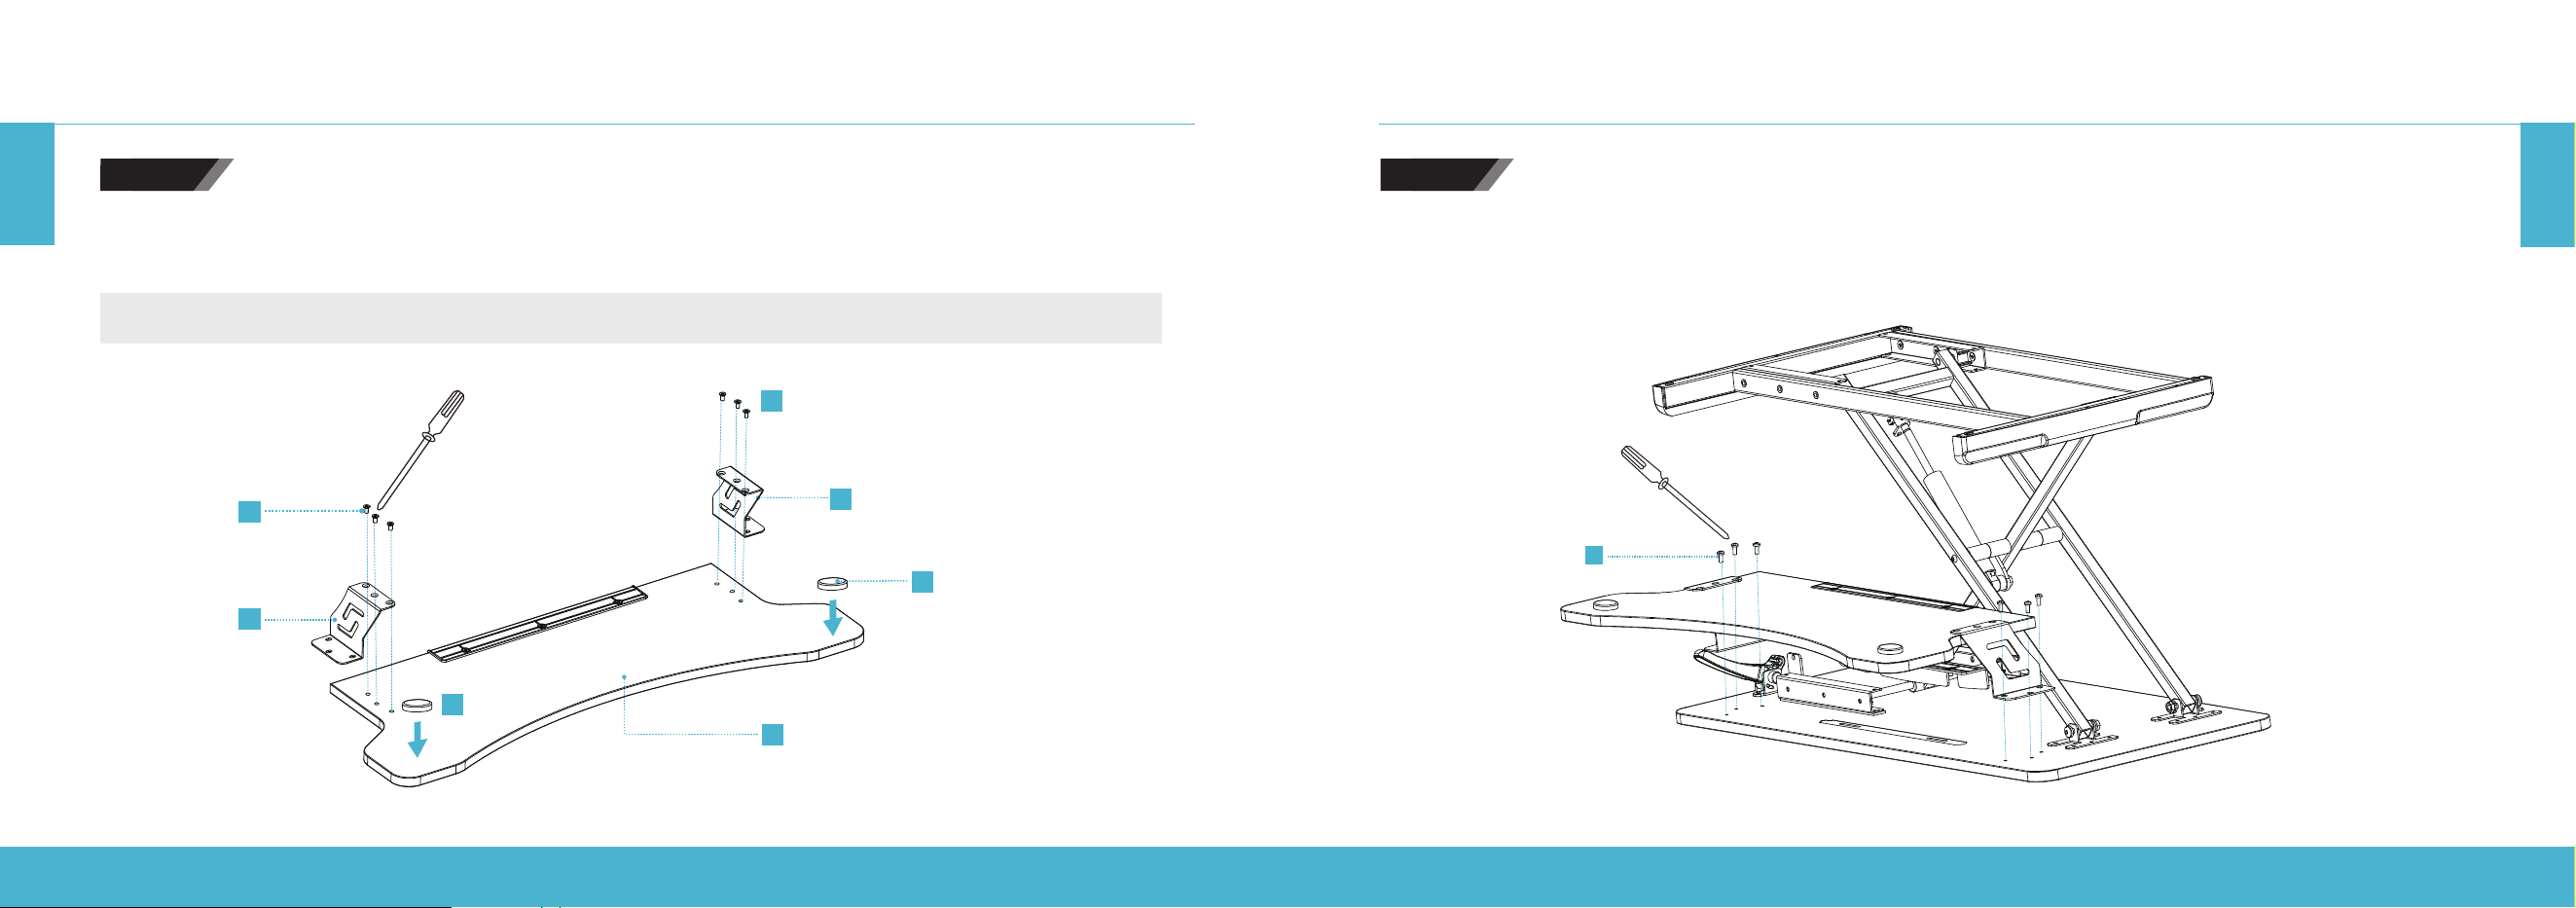
ASSEMBLY INSTRUCTIONS
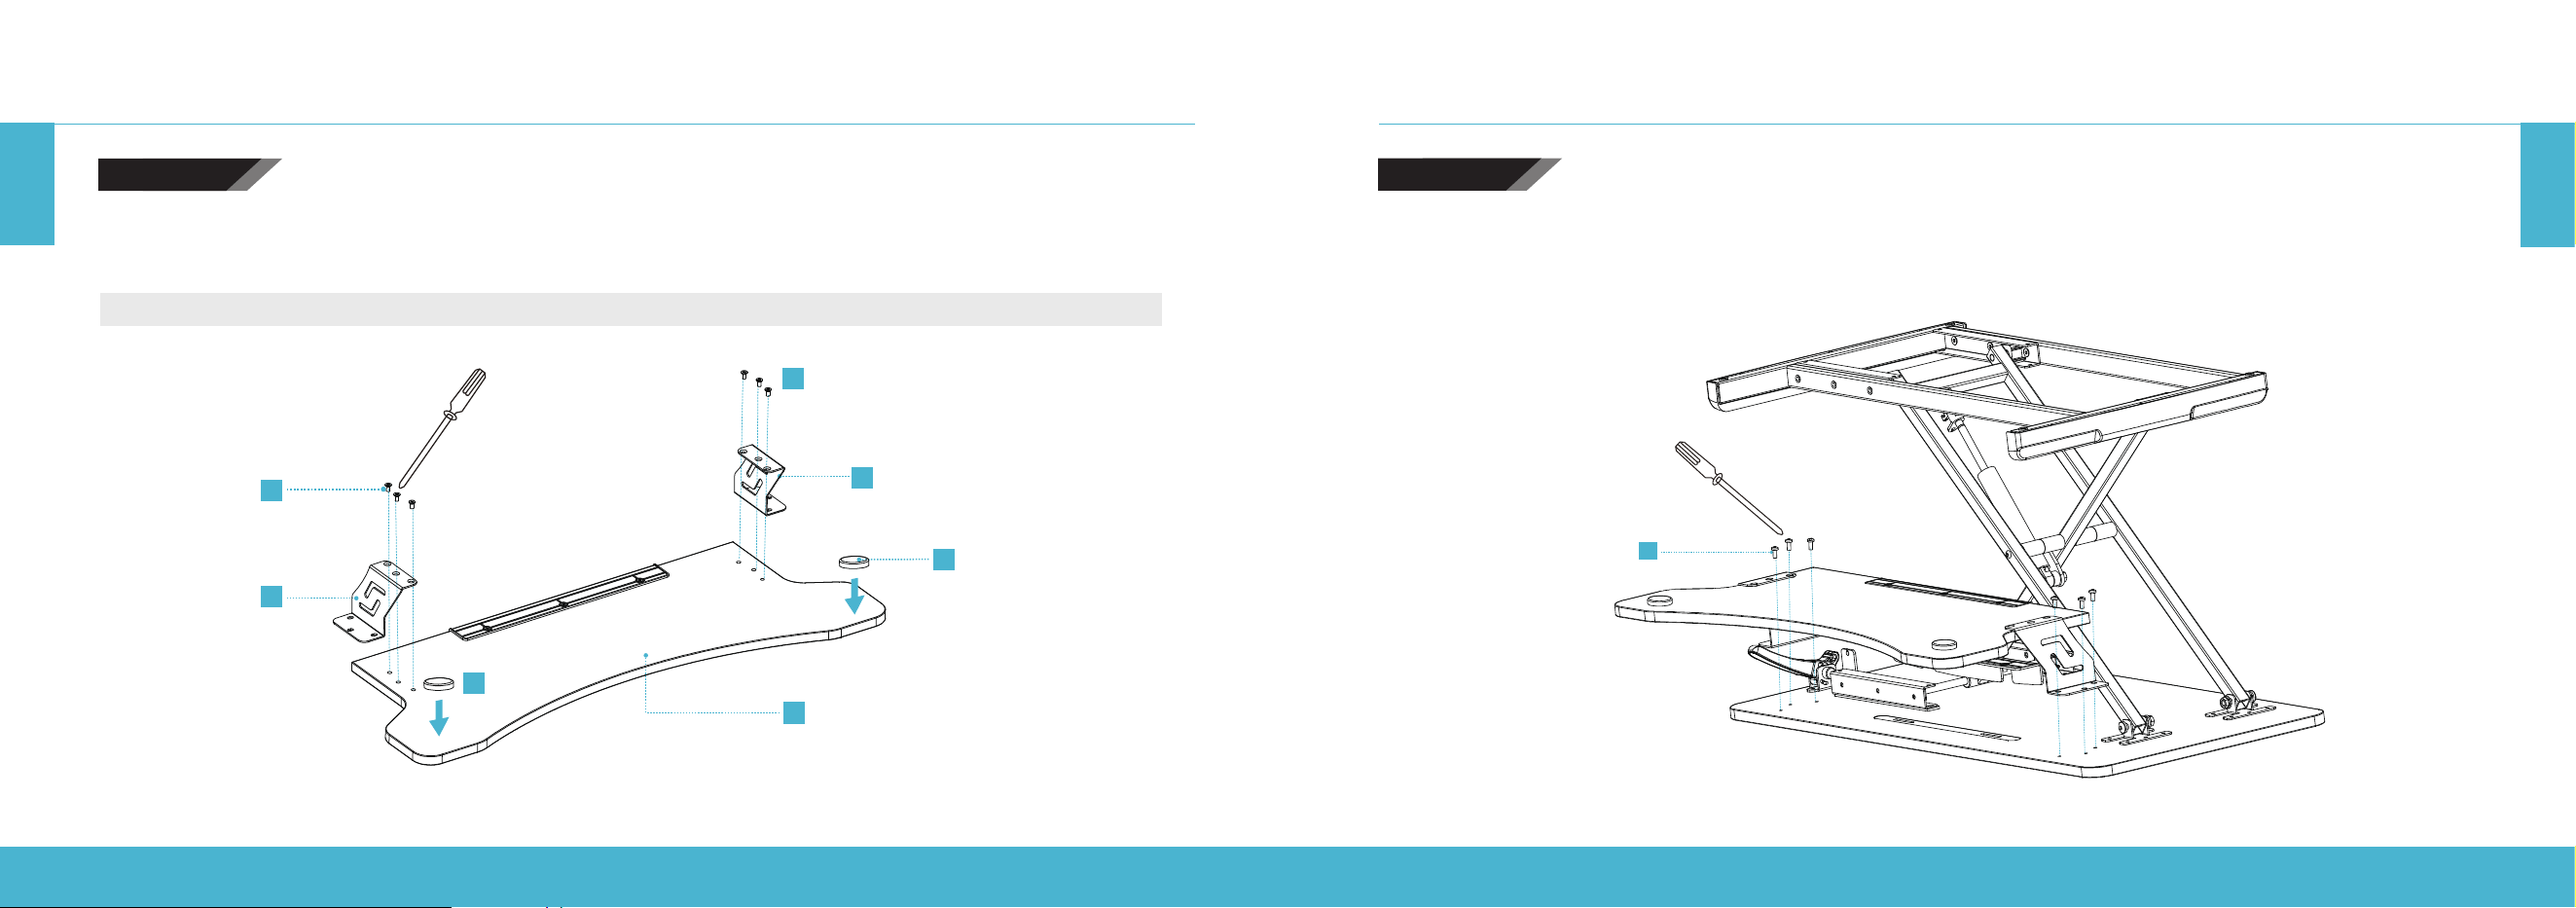
STEP 4STEP 3
F
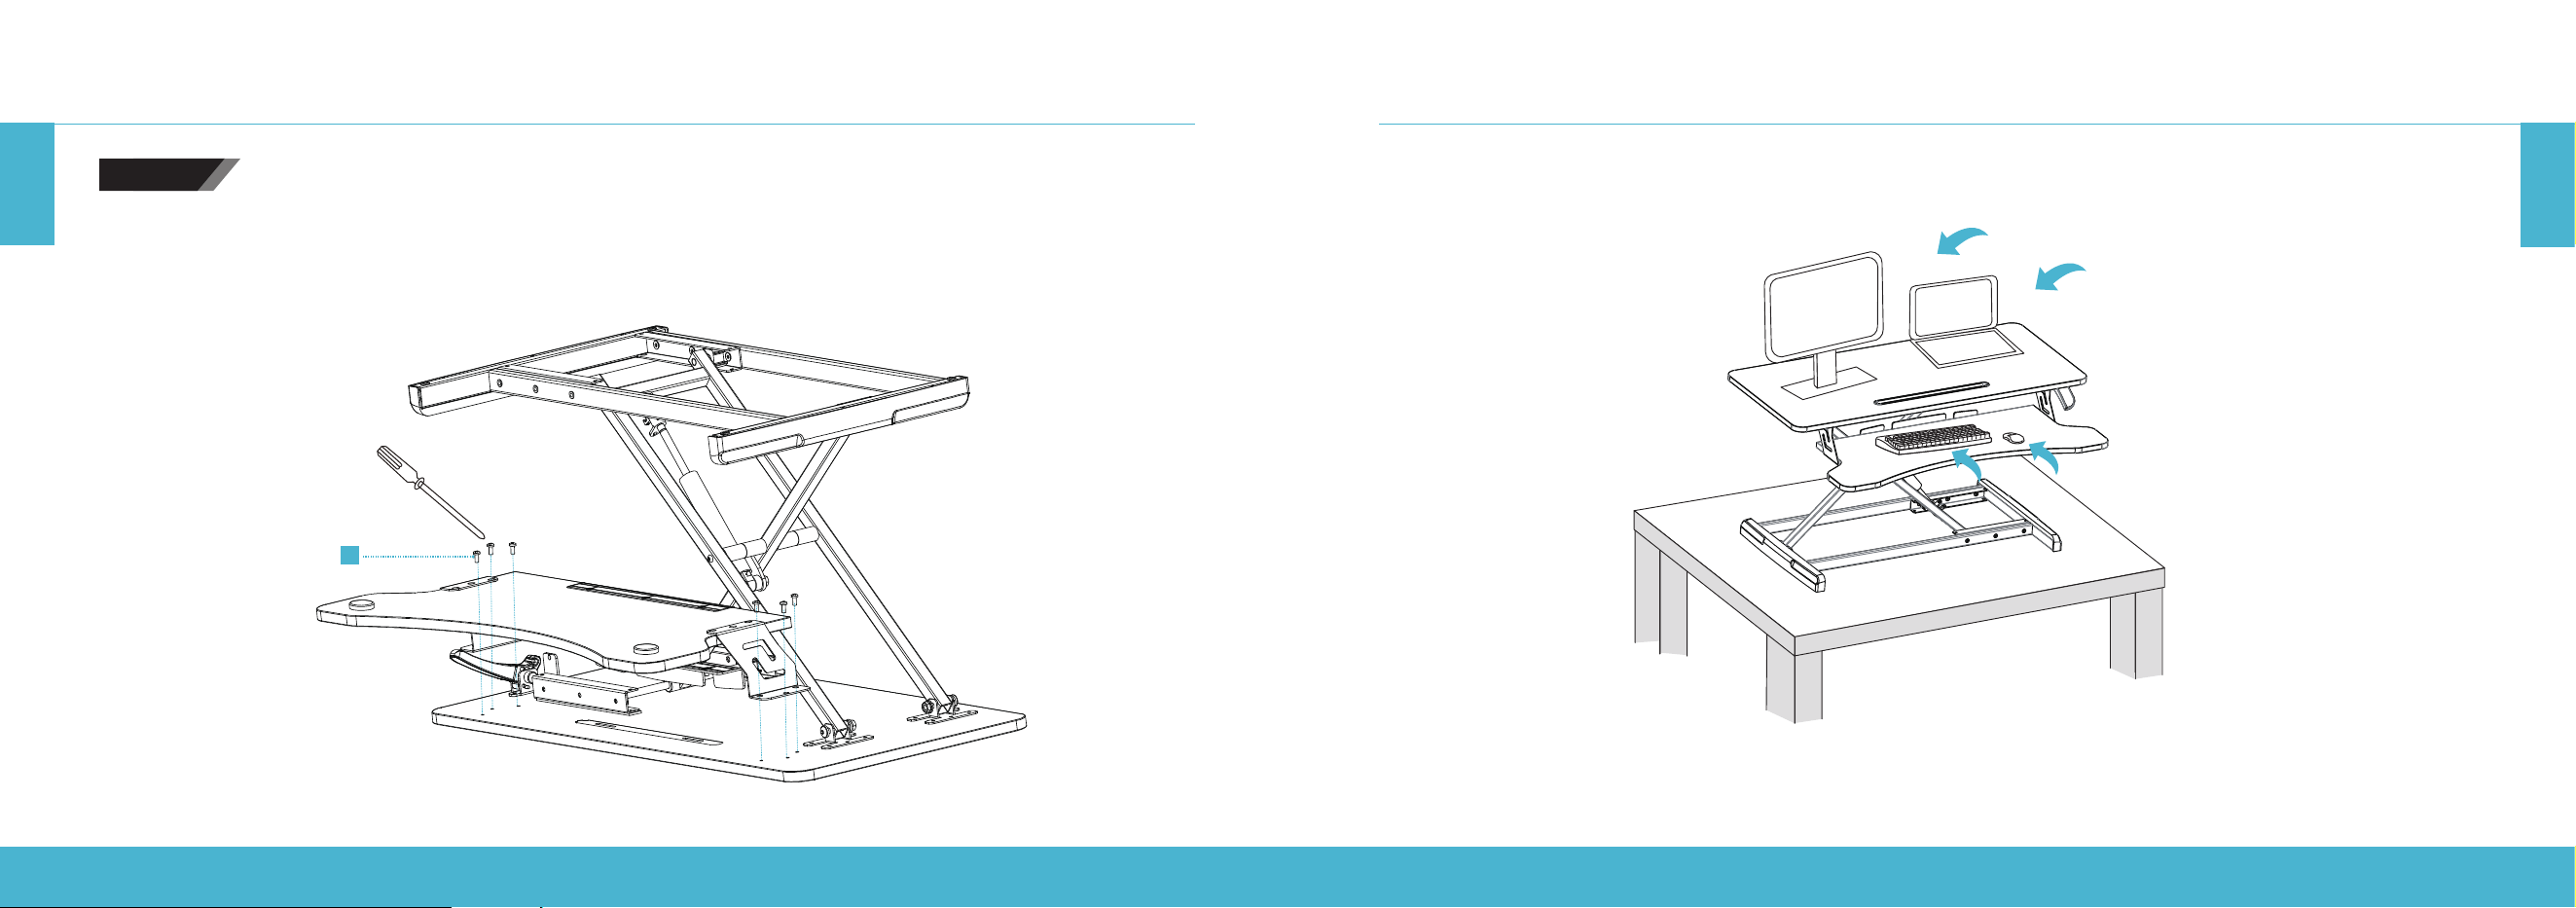
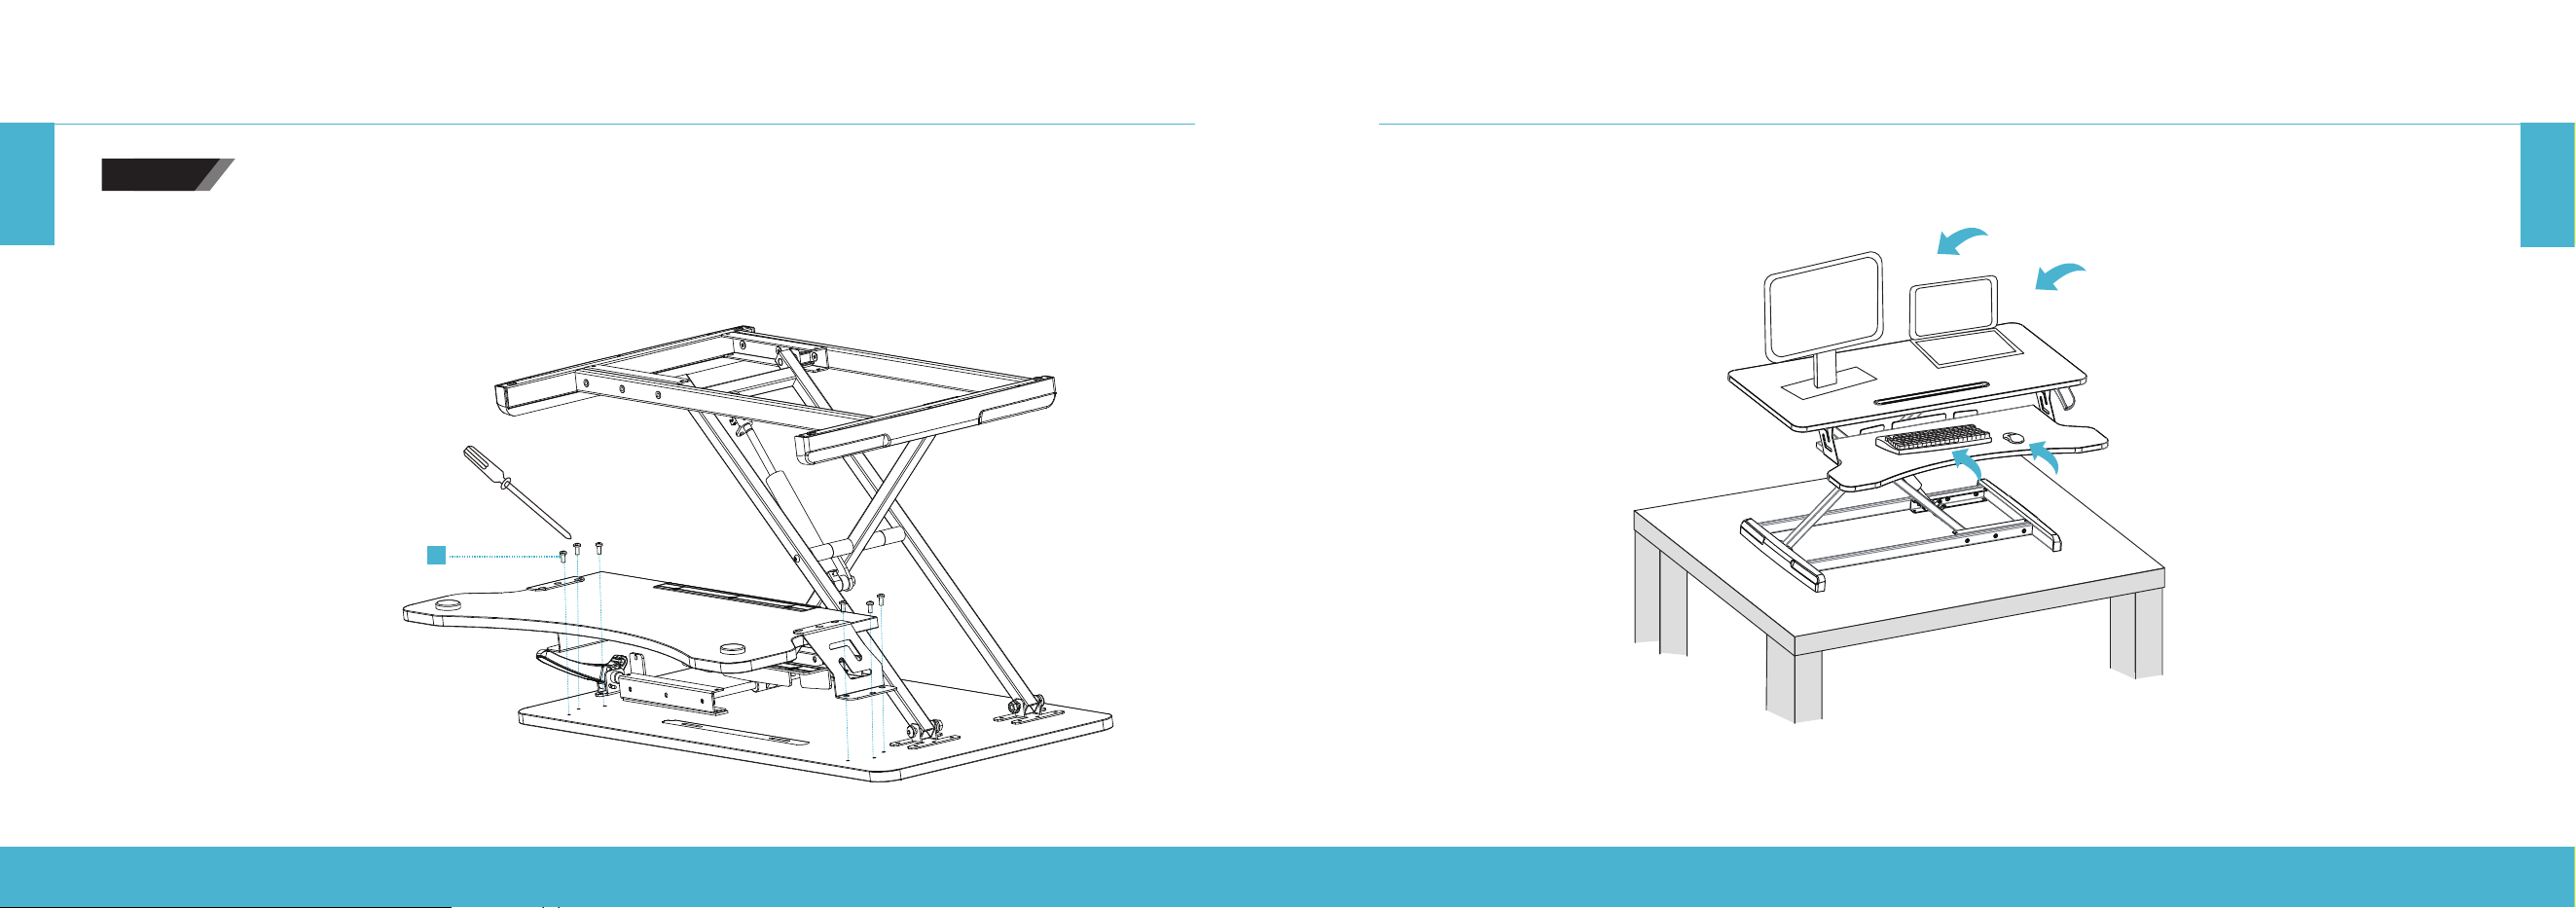
Mount the keyboard tray to the desktop:
Tighten the left and right clamps to the desktop firmly using Screw (F).
Attach the left and right clamps to the keyboard tray. Tighten the screws firmly.
Attach the foot pads to the bottom of the keyboard tray as shown in the figure below.
Note: Do not fully tighten the keyboard screws until all screws have been inserted and are in position in the keyboard tray.
E
C
E
B
D
G
G
Round Screw
Hole
Round Screw Hole
ASSEMBLY INSTRUCTIONS
HEIGHT ADJUSTABLE STANDING DESK CONVERTER | 10
HEIGHT ADJUSTABLE STANDING DESK CONVERTER | 11
EN
EN
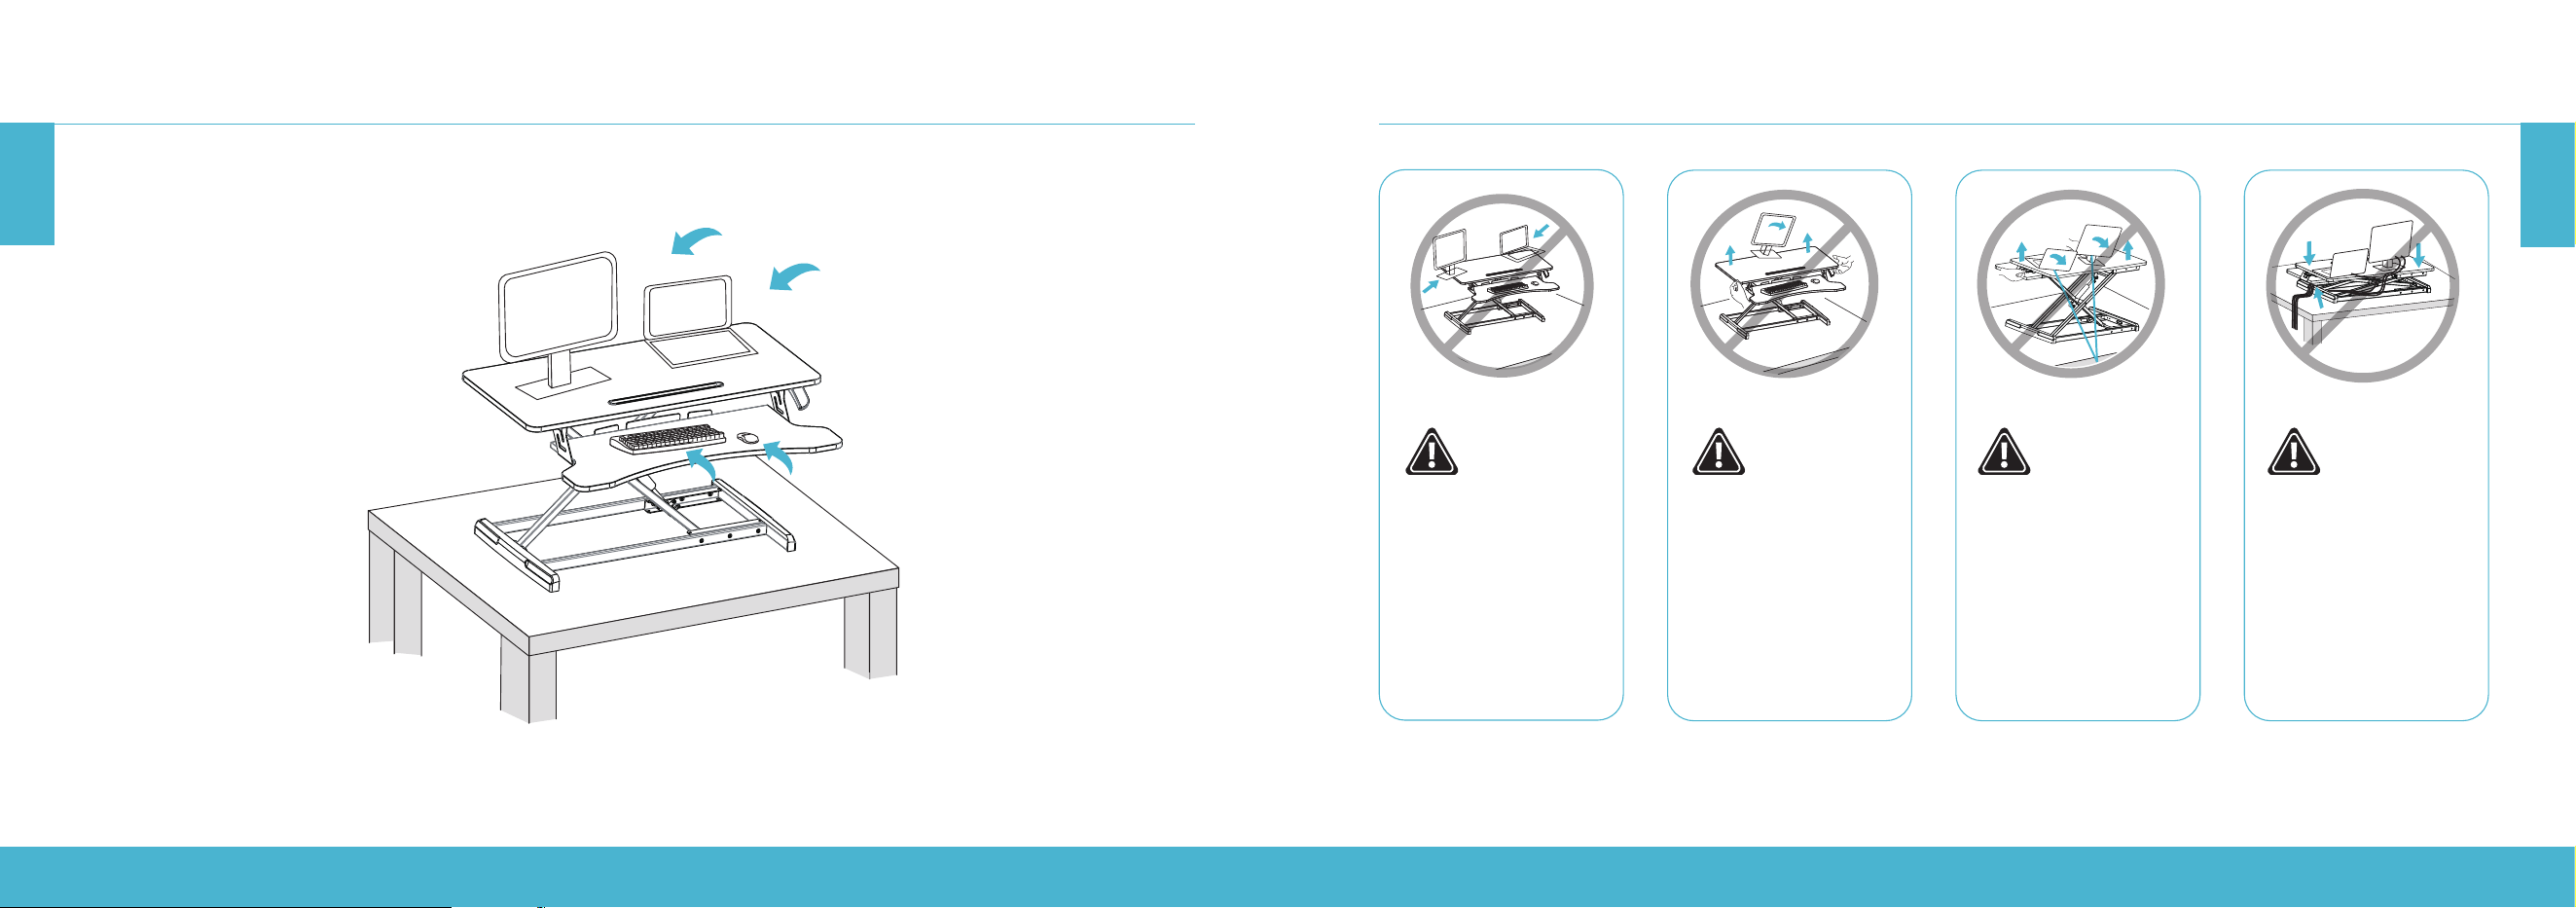
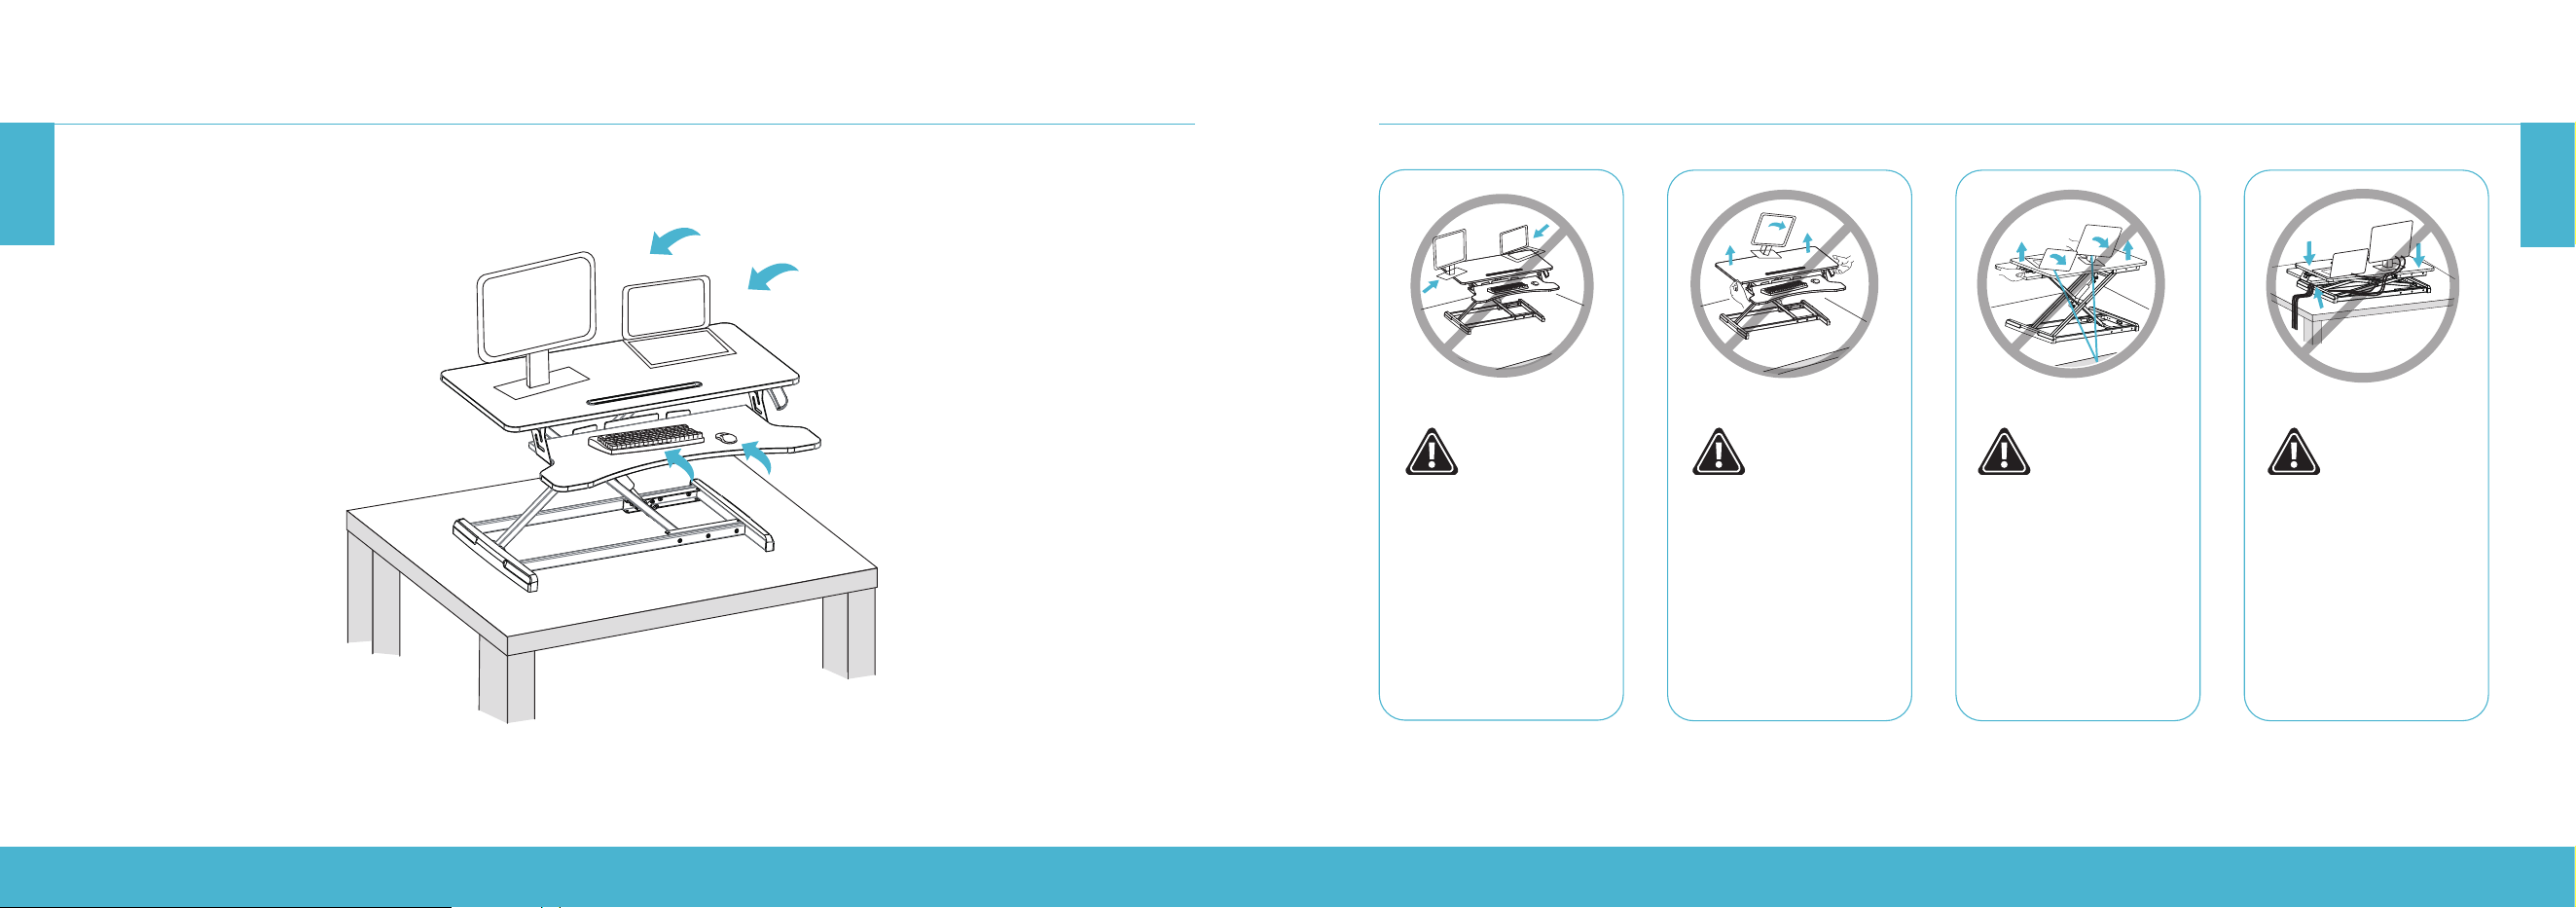
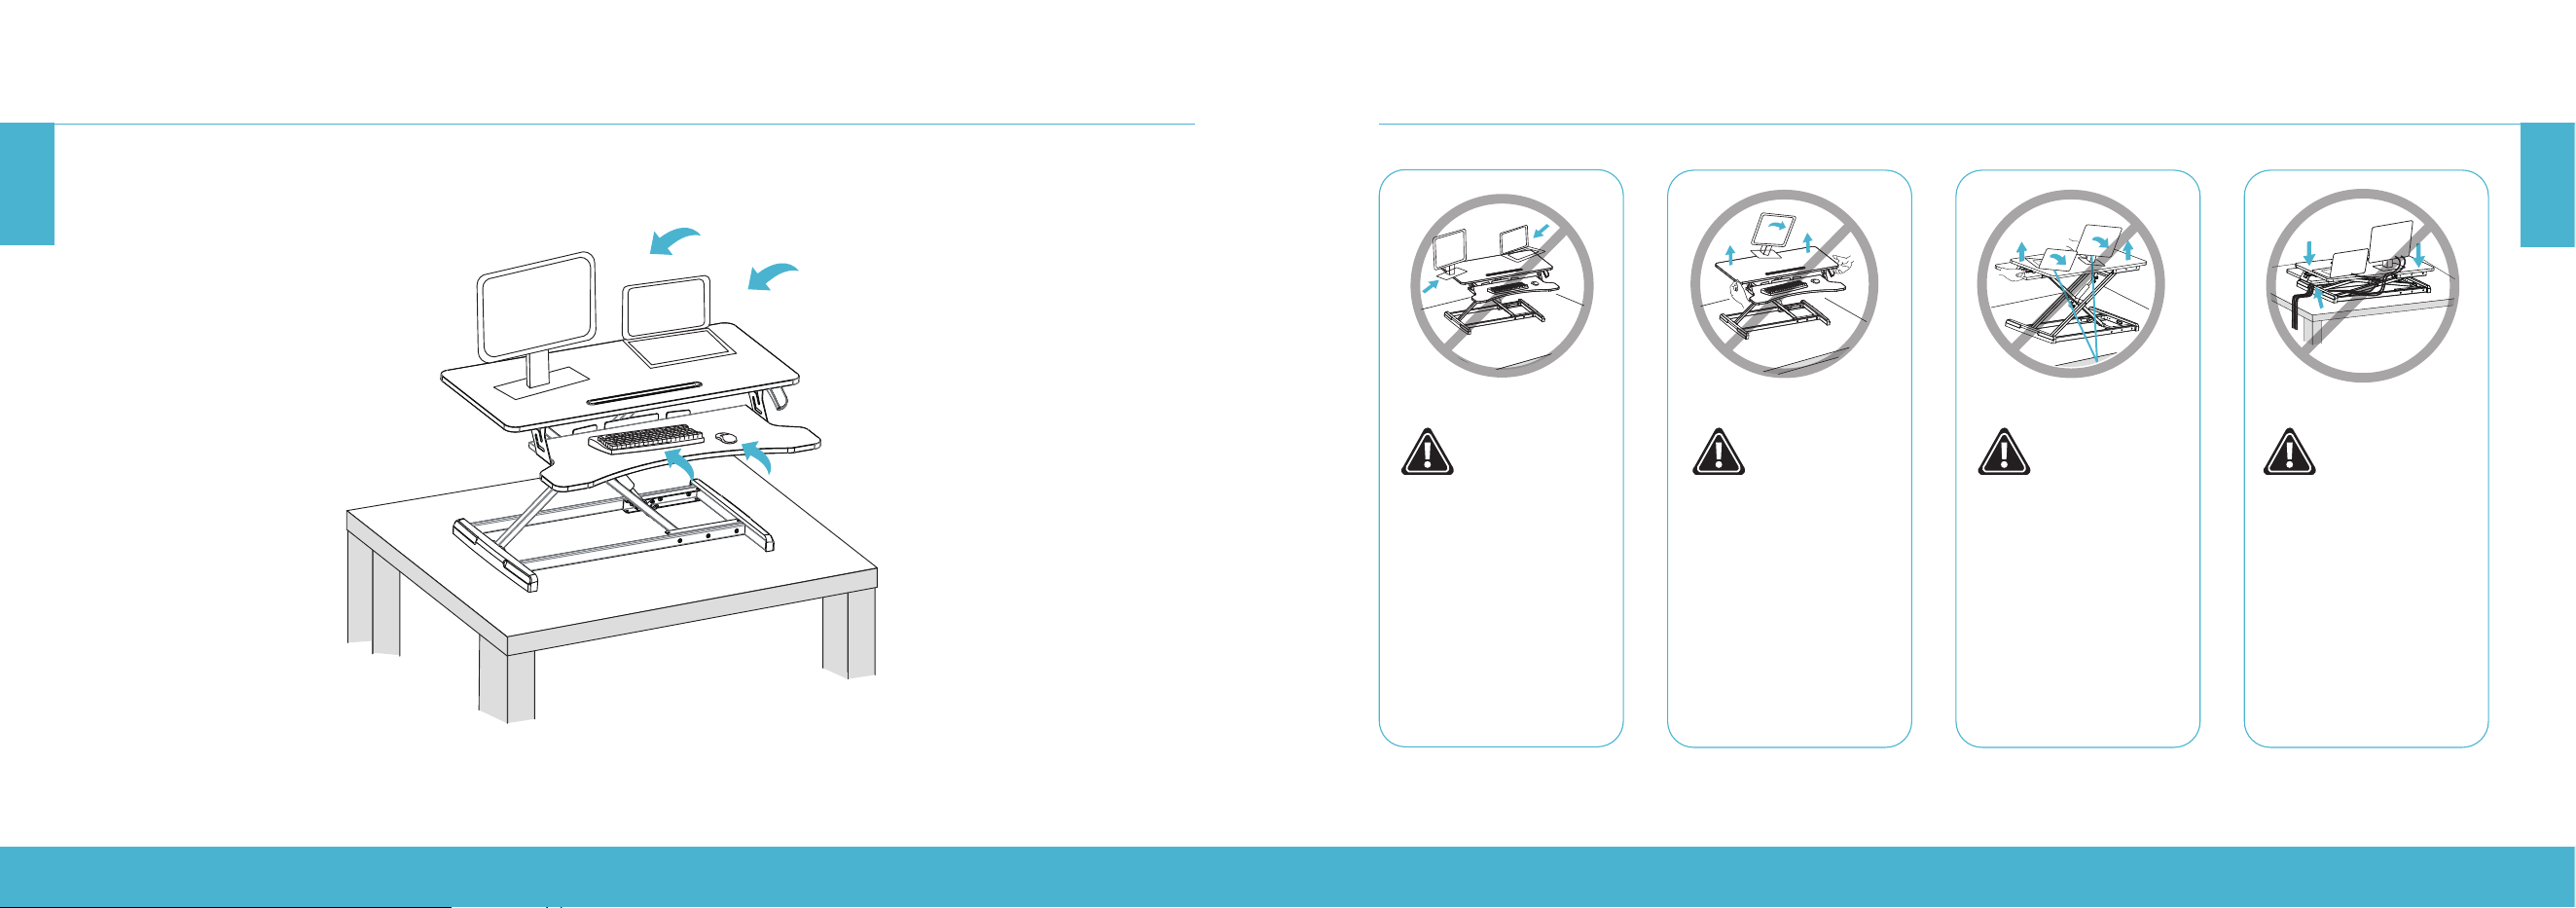
SET UP YOUR DEVICES SET UP YOUR DEVICES
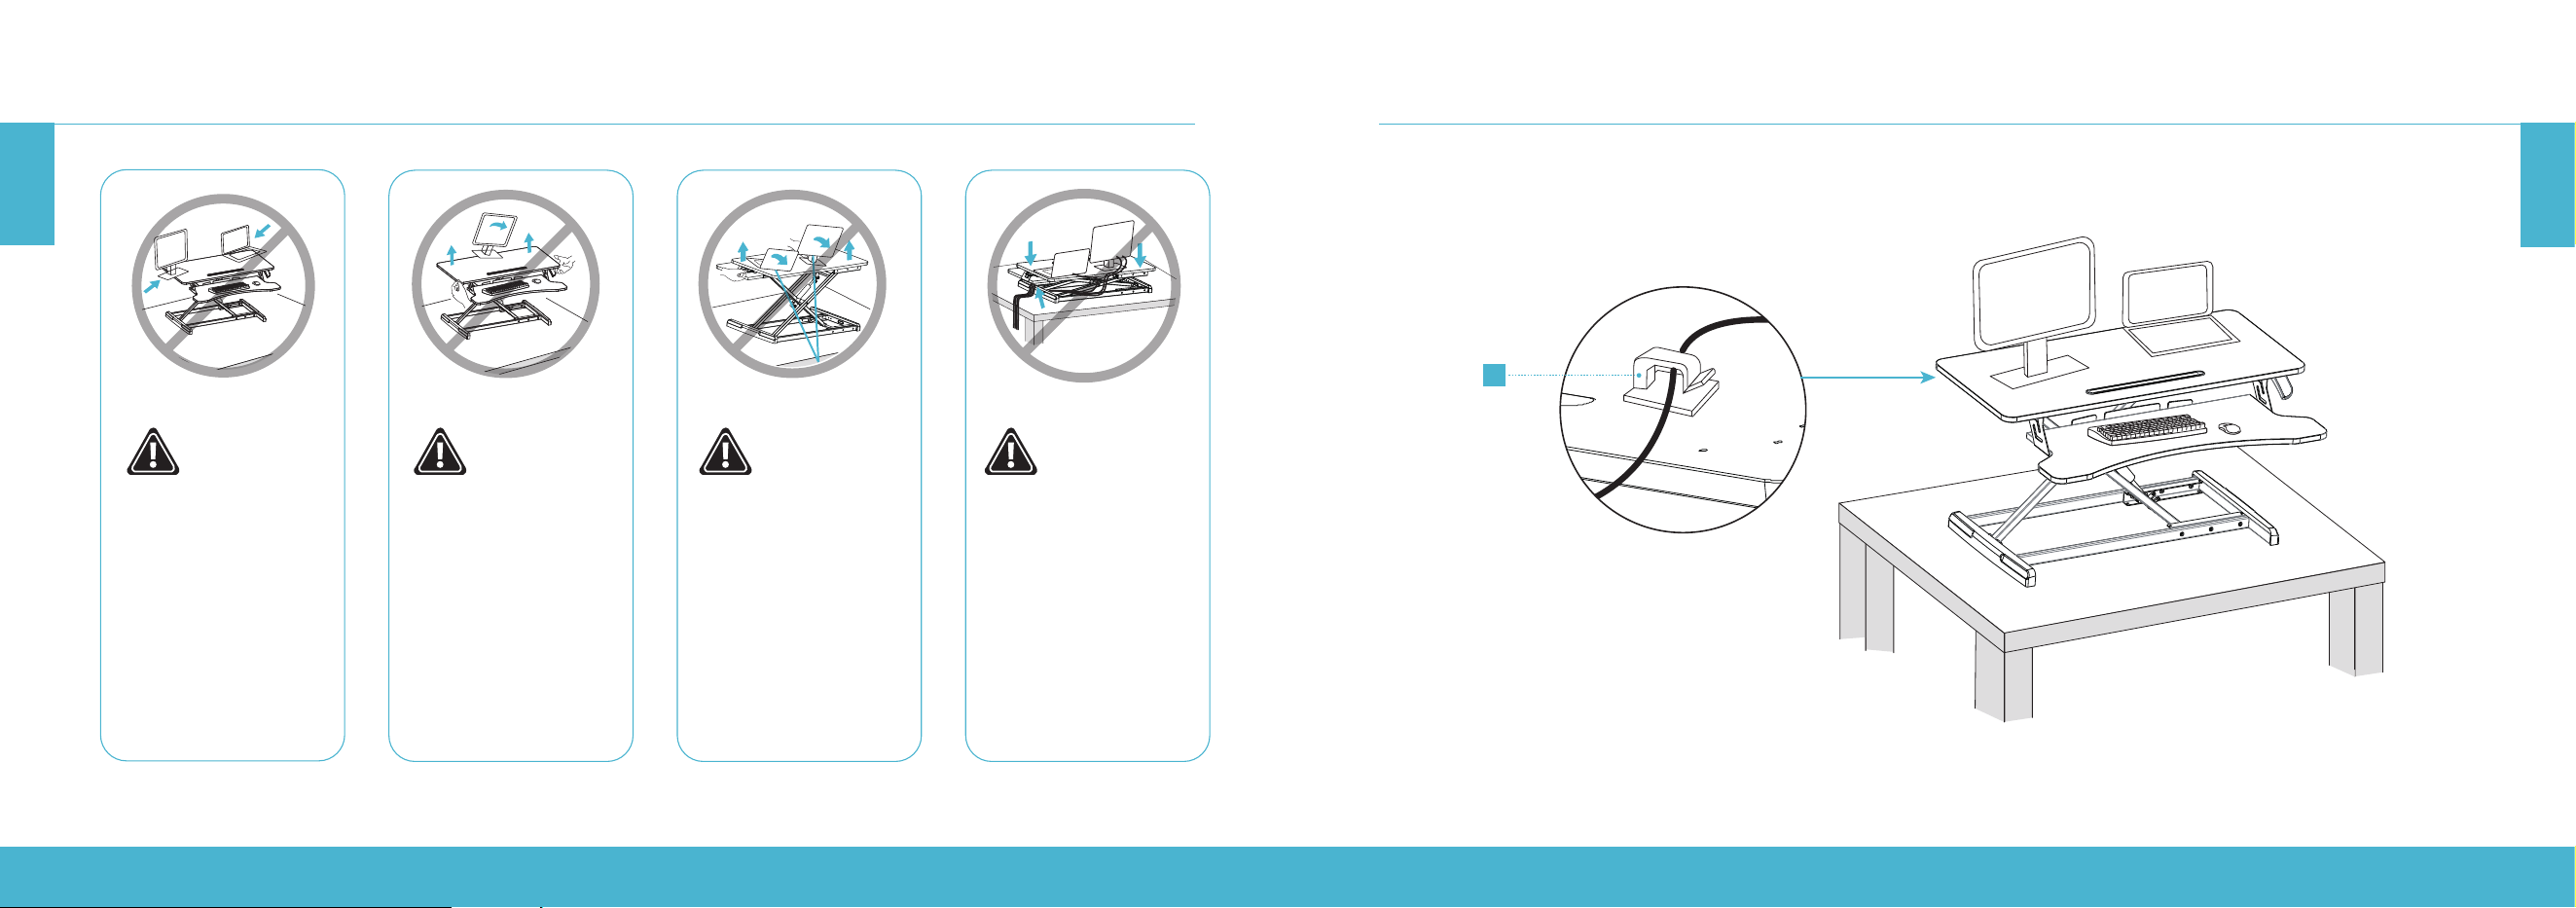
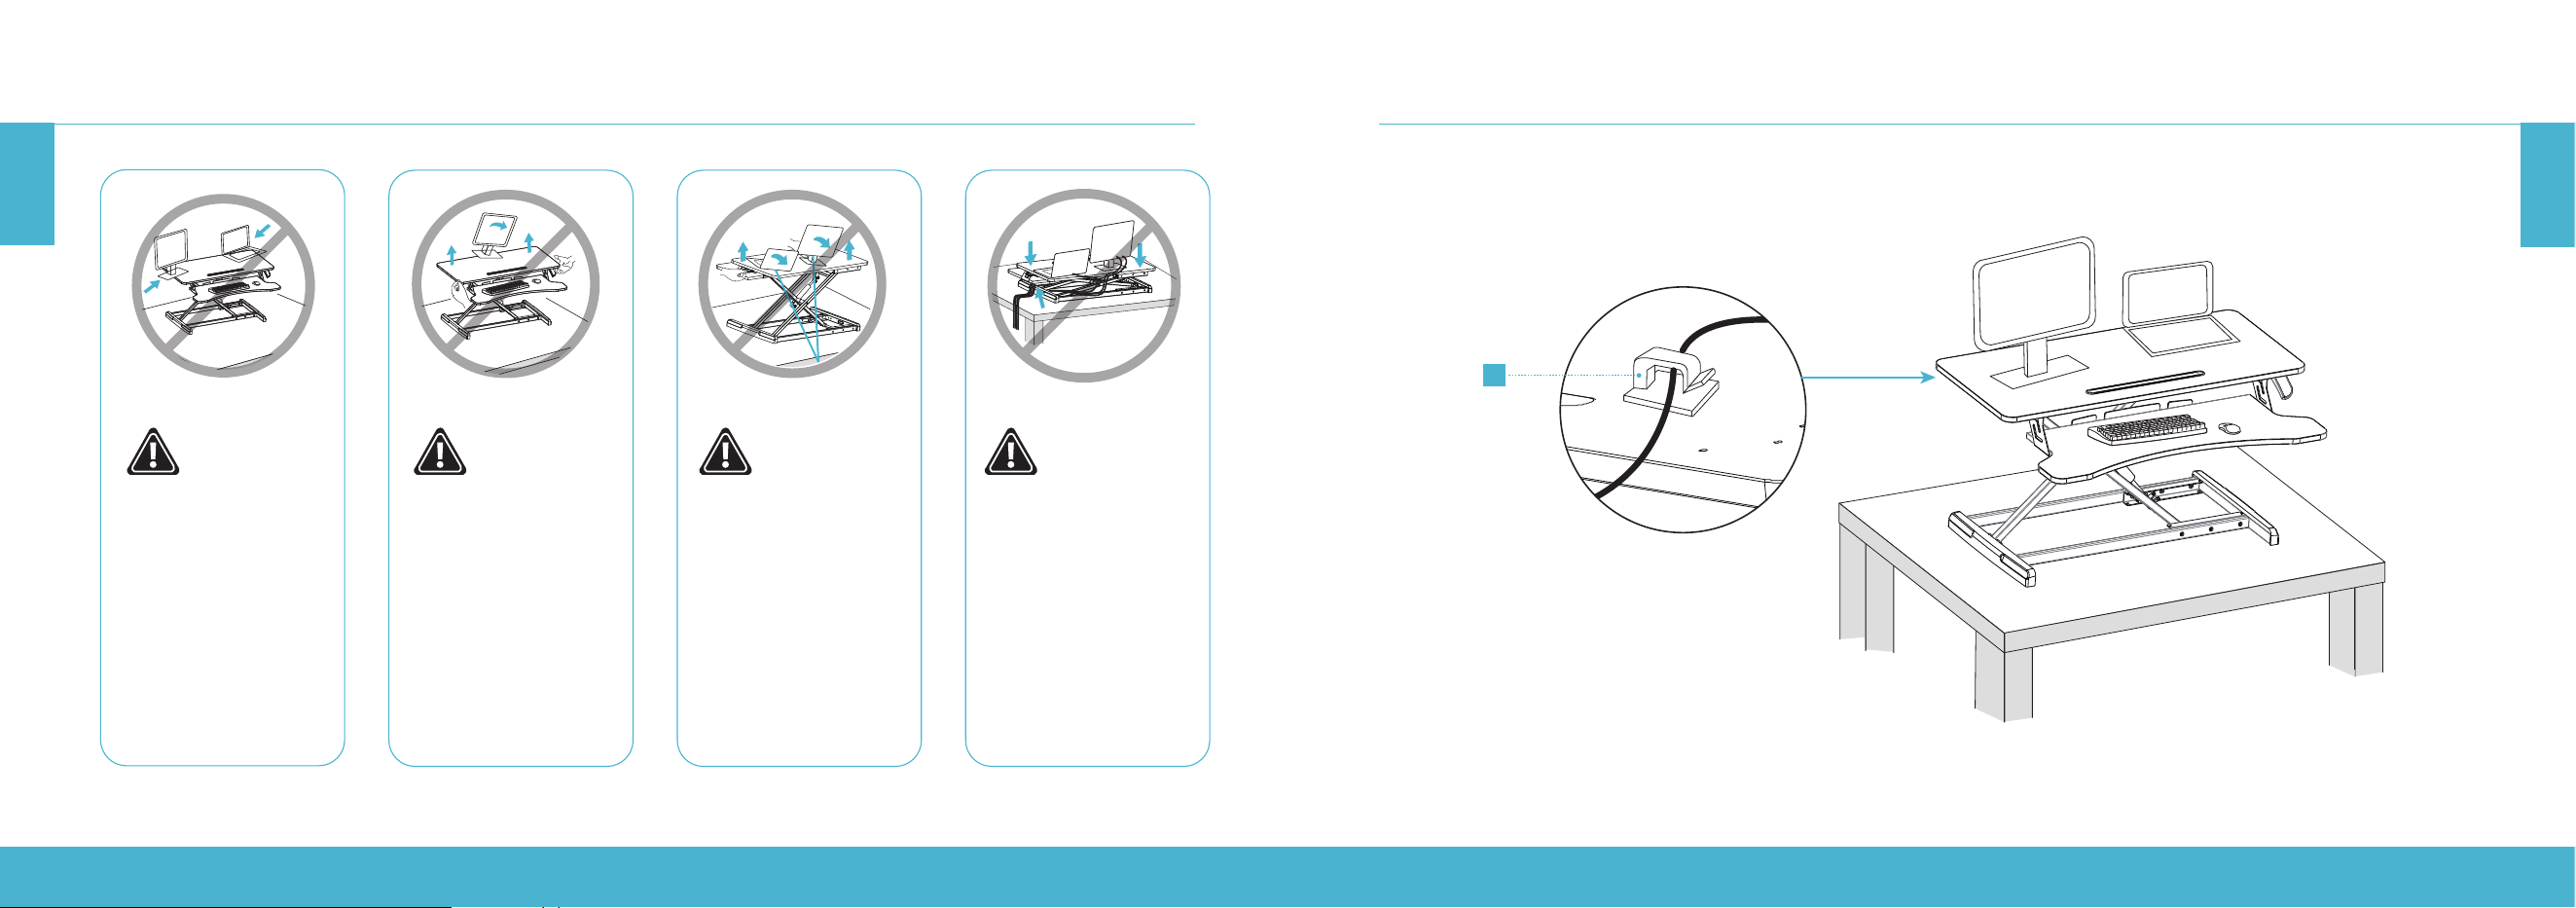
Keep the monitor
and laptop base fully
on the worksurface.
Allowing any part of
the base or stand to
hang o the edge
may result in property
damage or personal
injury.
Raise the worksurface
slowly. Raising the
worksurface too fast
may create an unstable
situation and result in
property damage or
personal injury.
Leave enough slack in
cable to allow for full
range of vertical motion
(19.3
"
/ 49 cm). Failure
to heed this warning
may result in property
damage or personal
injury.
To avoid the accidental
cable pinch, it is
important to follow the
cable routing instructions
in this manual. Failure to
follow these instructions
may result in property
damage or personal
injury.
HEIGHT ADJUSTABLE STANDING DESK CONVERTER | 12
HEIGHT ADJUSTABLE STANDING DESK CONVERTER | 13
EN
EN
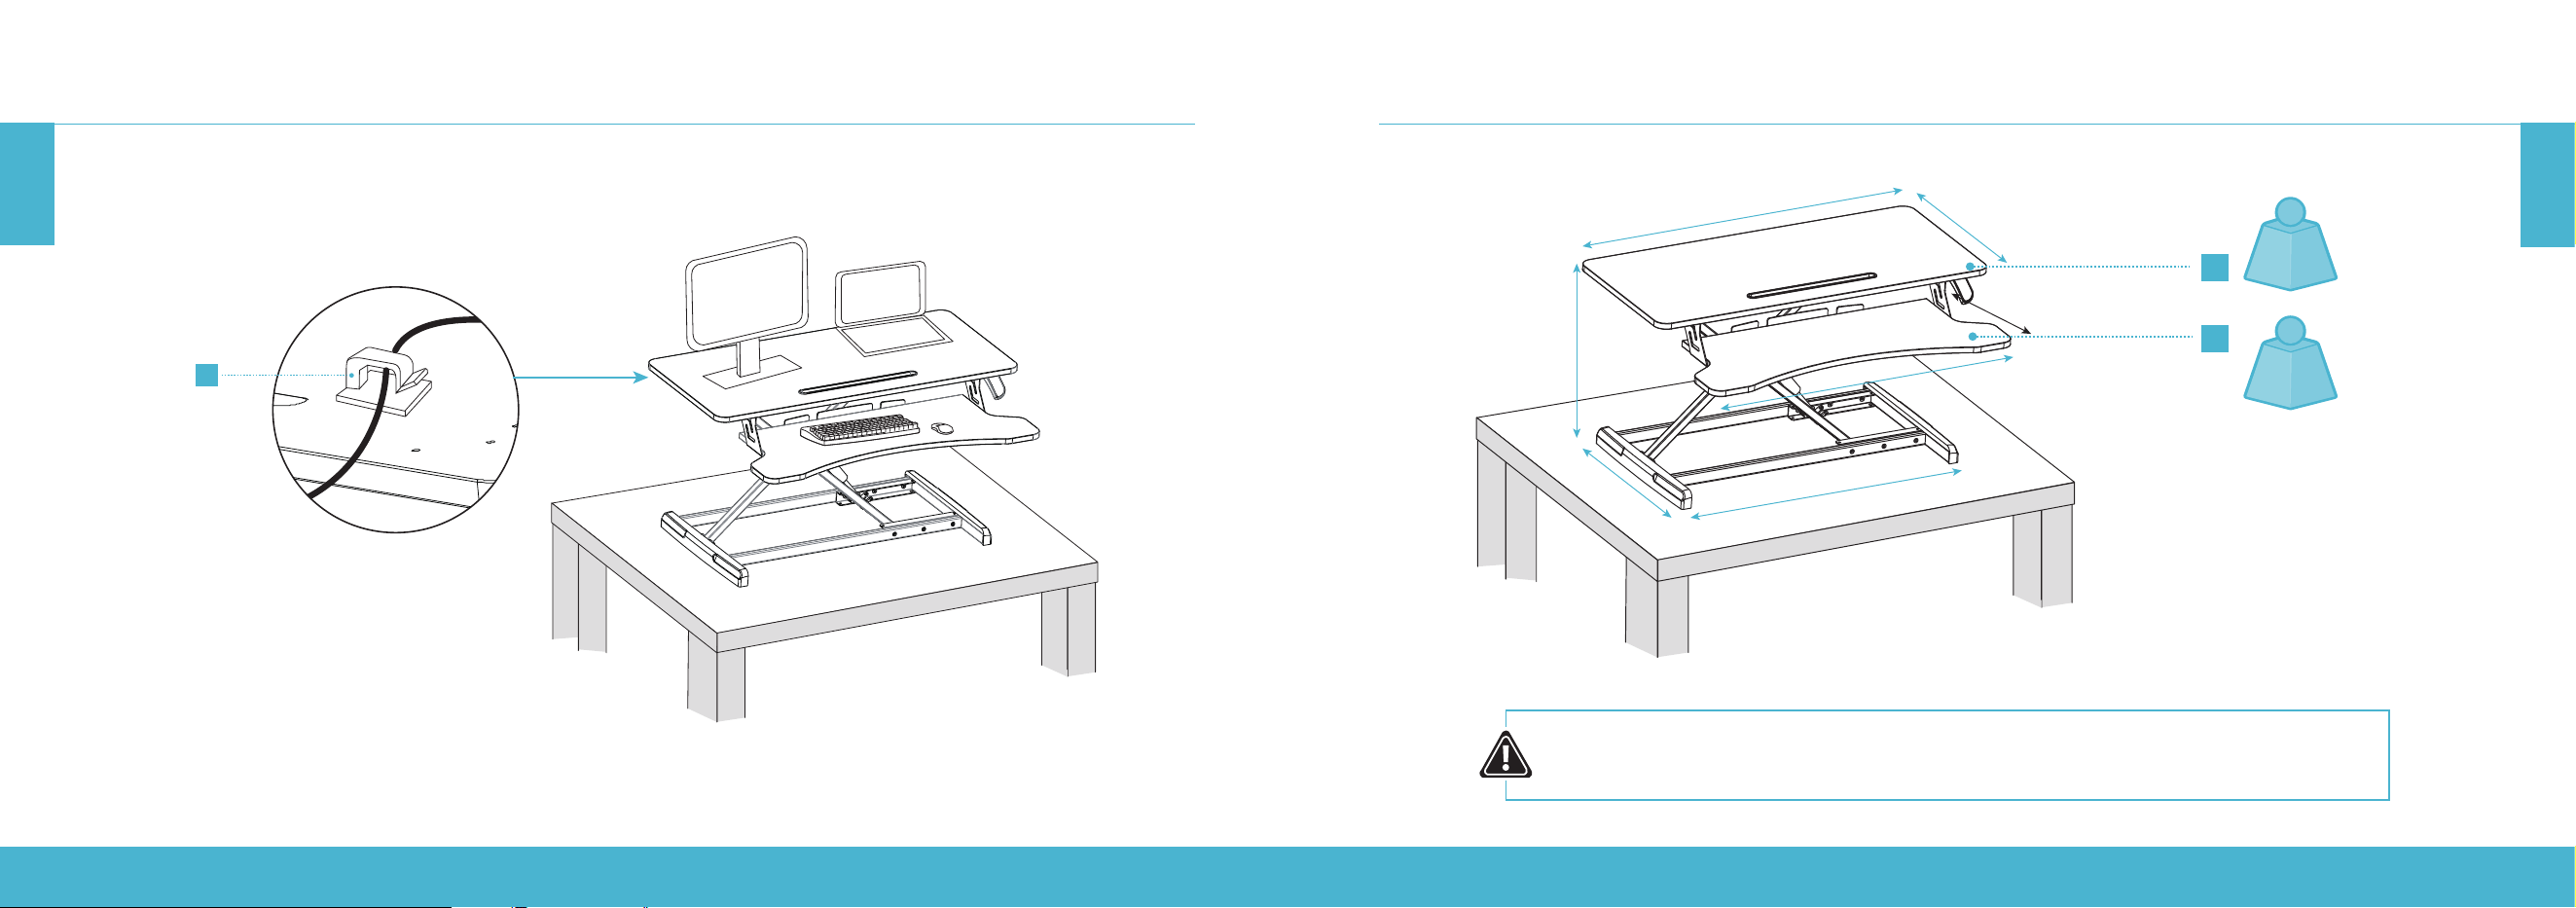
SET UP YOUR DEVICES
H
Organize the cables with the supplied cable clips (H).
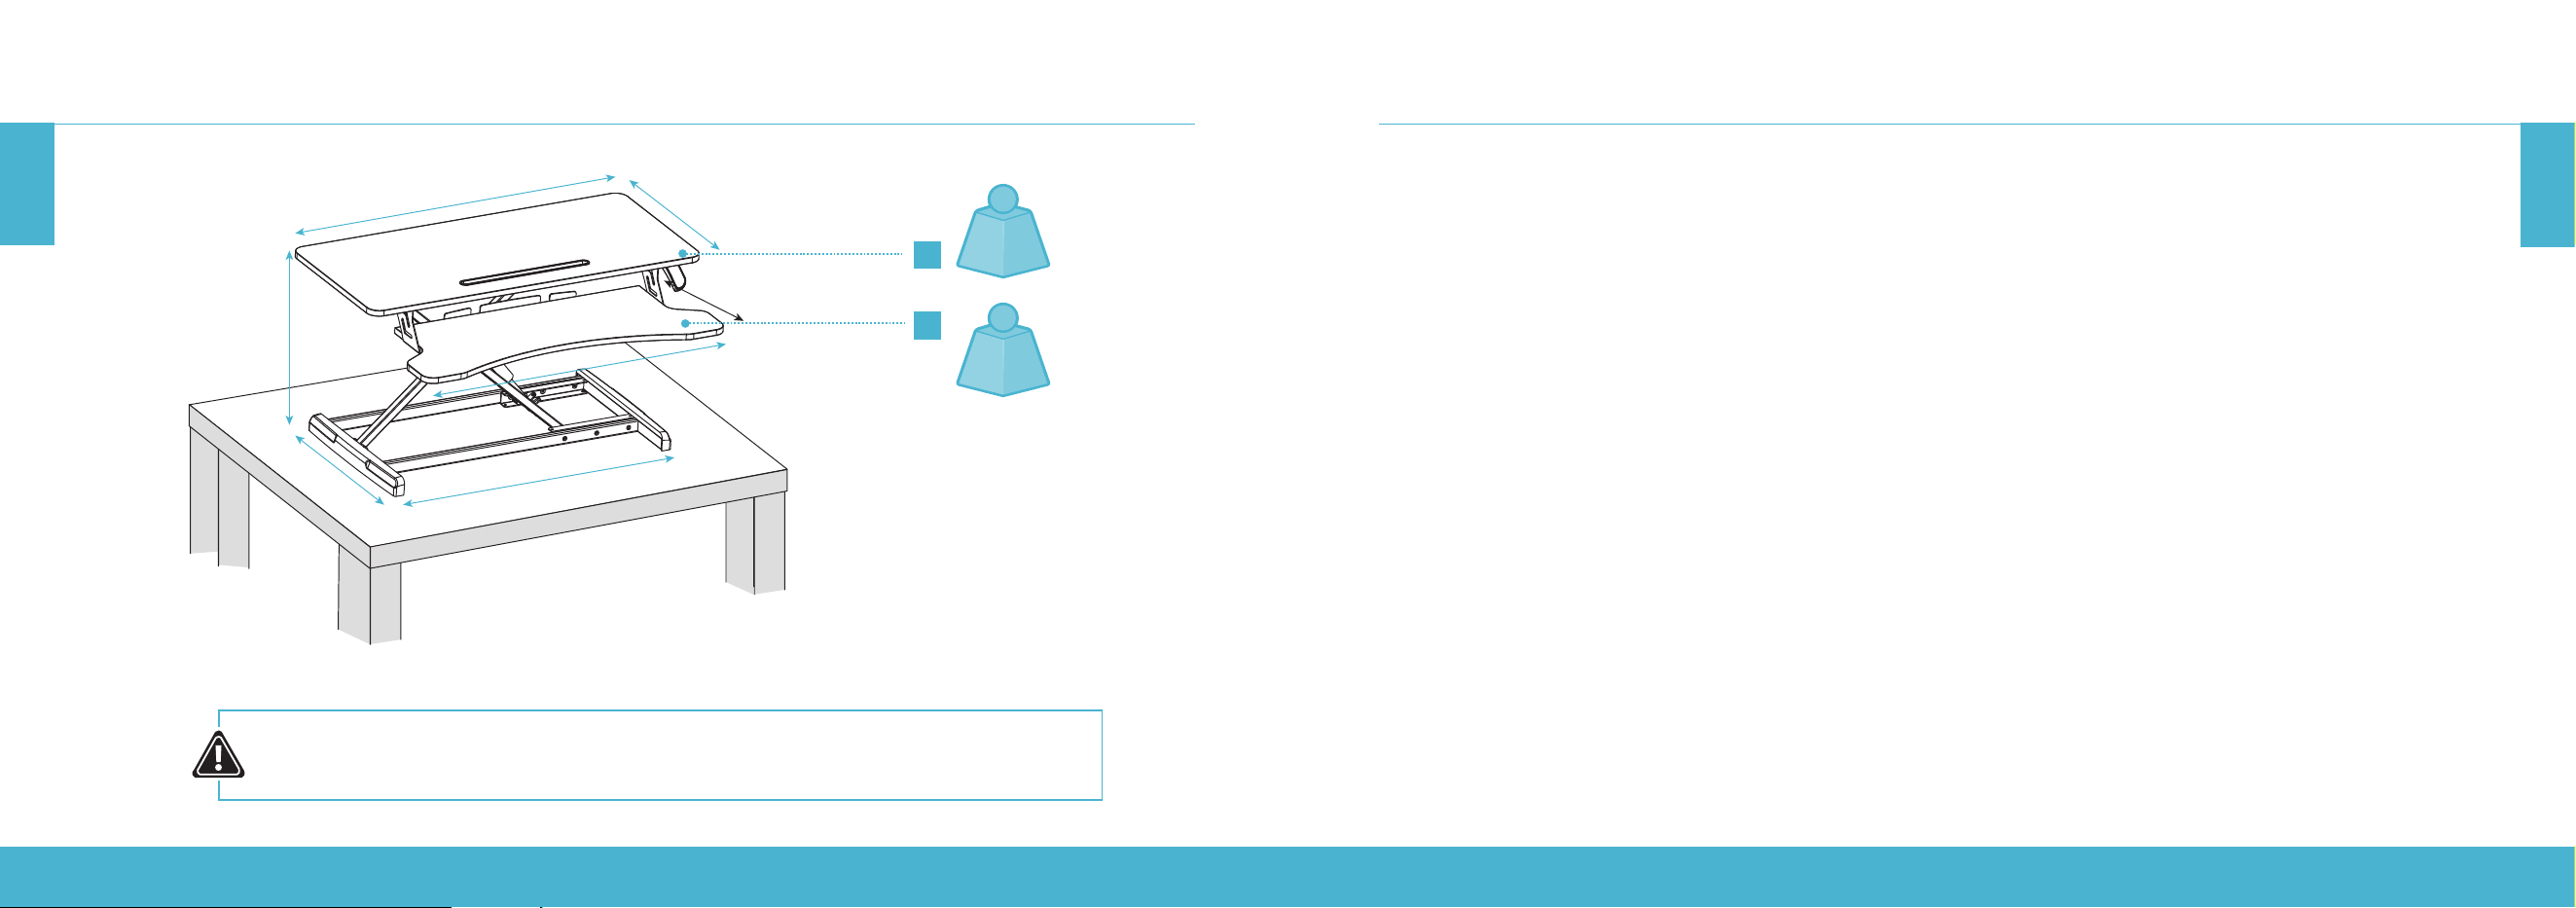
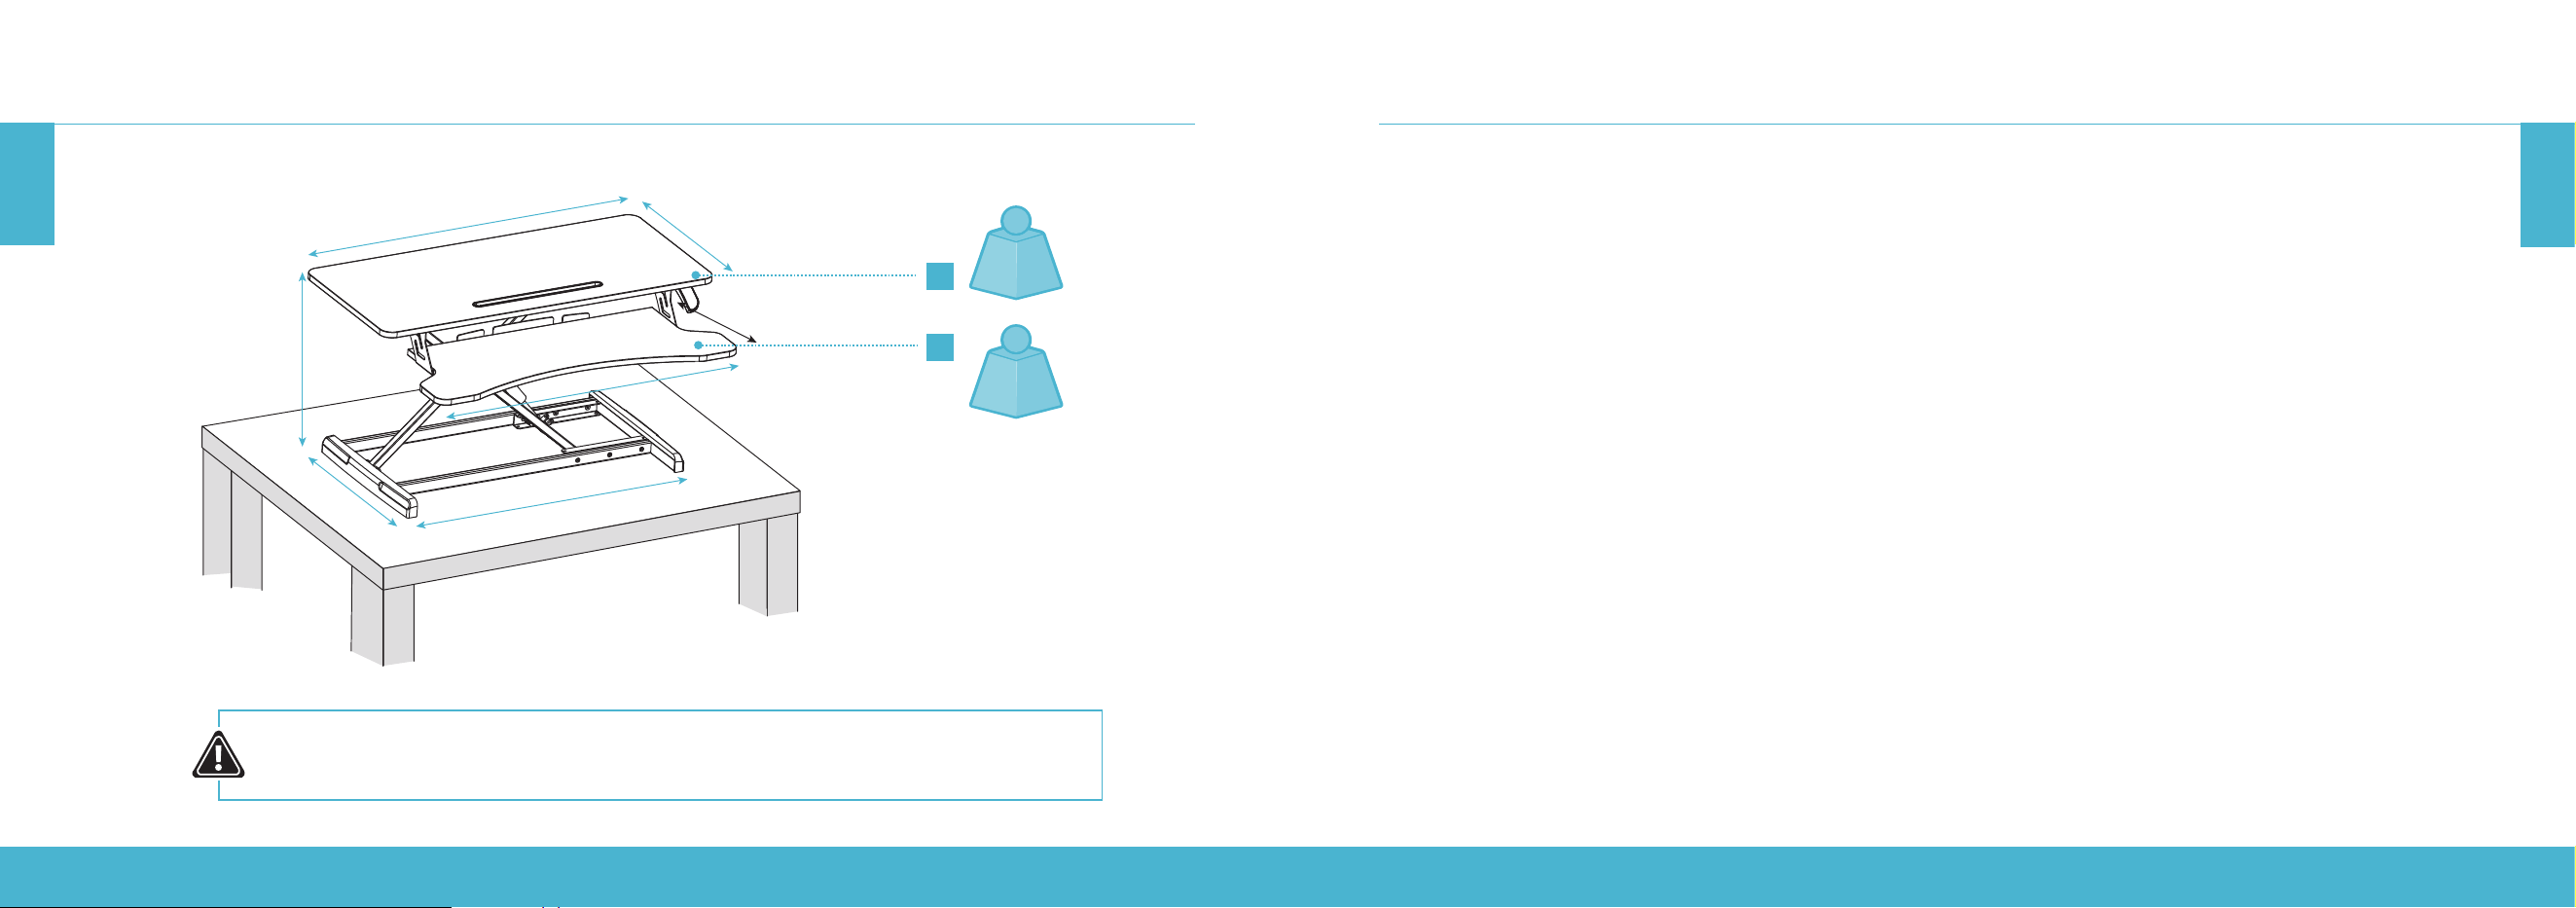
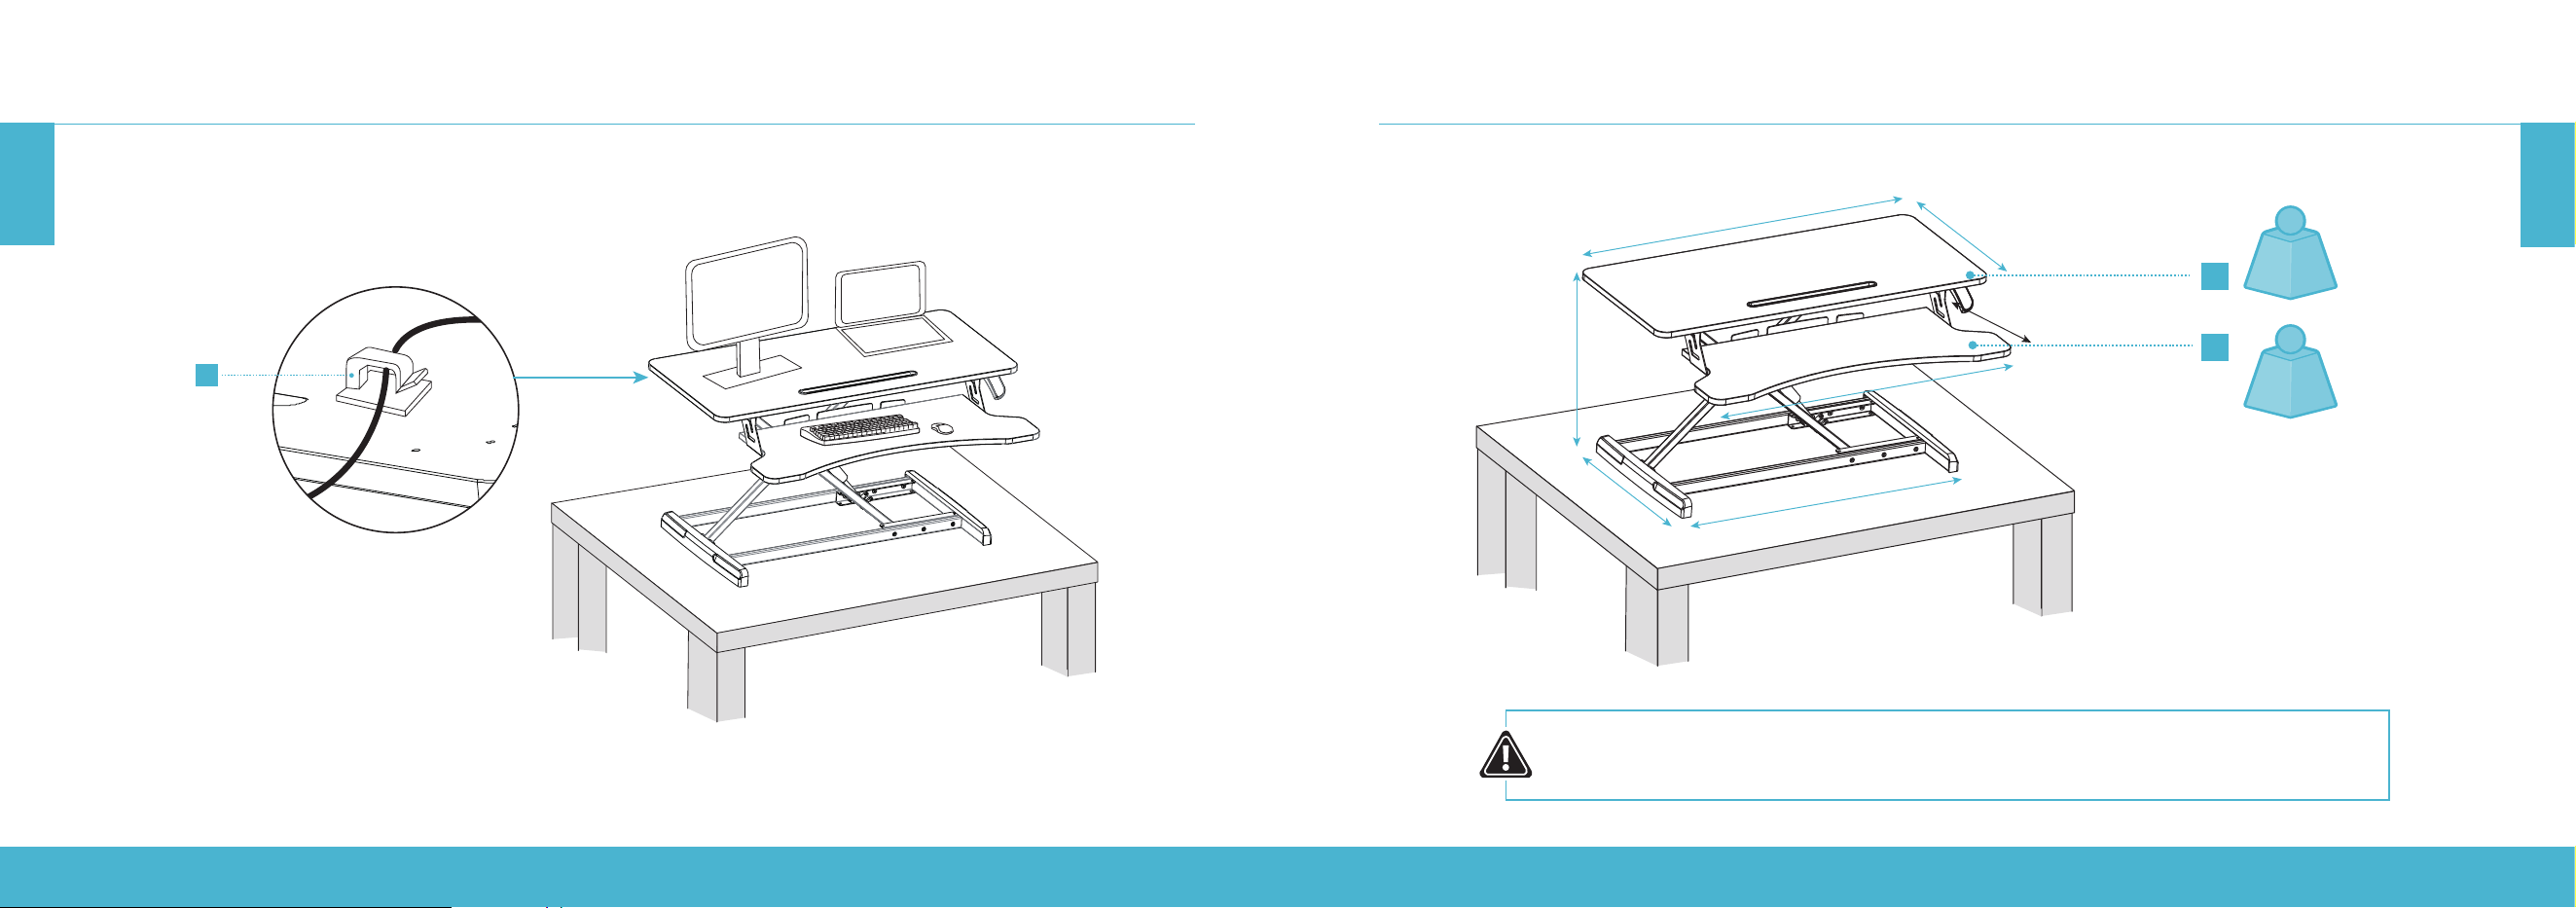
SPECIFICATIONS
CAUTION:
DO NOT EXCEED THE MAXIMUM WEIGHT CAPACITY AS SERIOUS INJURY OR PROPERTY
DAMAGE MAY OCCUR!
A
B
34.6”
31.5”
4.7–19.3”
16.5”
25.6”
15.7”
11.8”
33 lb
(15 kg)
RATED
≤4.4 lb
(≤2 kg)
RATED
HÖHENVERSTELLBARER STEHSCHREIBTISCH-CONVERTER | 14
HÖHENVERSTELLBARER STEHSCHREIBTISCH-CONVERTER | 15
DE
HEIGHT ADJUSTABLE STANDING DESK CONVERTER | 14
EN
RIF6 oers a one-year warranty on all of our products purchased new and unused from RIF6 or an authorized reseller, with
an original proof of purchase and where a defect has arisen, wholly or substantially, as a result of faulty manufacturing, parts
or workmanship during the one-year warranty period. The warranty does not apply where damage is caused by other factors,
including but without limitation to: (a) normal wear and tear; (b) abuse, mishandling, accident or failure to follow operating
instructions; (c) exposure to liquid or infiltration of foreign particles; (d) servicing or modification of the product other than by
RIF6. These are our general terms for the warranty service, but we always urge our customers to reach out to us with any issue,
regardless of warranty terms. If you experience an issue with a RIF6 product, please contact us at support@RIF6. com, and we
will do our best to resolve it for you.
WARRANTY INFORMATION
WARNING
This manual covers all items with the model number:
RIF090532N RIF090533N
Keep all plastic bags away from children.
WICHTIGE SICHERHEITSHINWEISE
Lesen Sie das gesamte Handbuch, bevor Sie mit der Montage beginnen. Falls Sie Fragen in Bezug auf die Anweisungen oder
Warnungen haben, kontaktieren Sie den Kundendienst.
VORSICHT: Stellen Sie KEINE Gegenstände auf den Tisch, die mehr als 15kg wiegen. Eine Überlastung des Tisches kann zu Instabilität und
Verletzungen führen.
• Folgen Sie genau den Montageanweisungen. Eine unsachgemäße Montage kann zu Personen- und Sachschäden führen.
• Stellen Sie sicher, dass die Aufstellfläche das kombinierte Gewicht des Produkts und der gesamten Hardware und Komponenten trägt.
• Nutzen Sie die beiliegenden Montageschrauben. Ziehen Sie die Montageschrauben NICHT ZU FEST.
• Dieses Produkt enthält kleine Elemente, von denen bei Verschlucken eine Erstickungsgefahr ausgeht. Halten Sie diese Elemente
von Kindern fern.
• Dieses Produkt ist nur für die Verwendung in Innenräumen vorgesehen. Eine Verwendung im Freien kann zu Produktversagen
und Personenschäden führen.
WICHTIG: Vergewissern Sie sich vor der Montage, dass alle Teile entsprechend der Komponentenliste beiliegen. Falls Teile fehlen oder fehlerhaft
sind, kontaktieren Sie den Kundendienst, um einen Ersatz zu erhalten.
WARTUNG: Überprüfen Sie regelmäßig (mindestens alle 3Monate), ob das Produkt sicher ist und gefahrlos verwendet werden kann.
QUETSCHGEFAHR
Legen Sie Ihre Hände NICHT auf die oder in die Nähe der
Stützleisten. Beim Heben und Absenken der Arbeitsfläche
entstehen Quetschpunkte. Eine Nichtbeachtung dieser
Anweisungen kann zu ernsthaften Verletzungen führen.
WARNUNG
HÖHENVERSTELLBARER STEHSCHREIBTISCH-CONVERTER | 16
HÖHENVERSTELLBARER STEHSCHREIBTISCH-CONVERTER | 17
DE
DE
MONTAGEANWEISUNGEN
A (×1)
Schreibtisch
B (×1)
Klemme (links)
C (×1)
Klemme (rechts)
D (×1)
Tastaturschublade
E (×6)
Flachkopf-Kreuzschraube
E (×6)
Rundkopf-Kreuzschraube
G (×2)
Fußpolster
H (×2)
Kabelklemme
Entnehmen Sie vor der Montage alle Teile aus der Verpackung. Entfernen Sie die Plastikbeutel und legen Sie die Teile vor
sich auf den Boden, um sich mit ihnen vertraut zu machen.
Da der Schreibtisch sehr schwer ist, bitten Sie für die Montage um Unterstützung. Folgen Sie den Anweisungen in diesem
Handbuch, um eventuell auftretende Probleme zu reduzieren.
Benötigte
Werkzeuge
MONTAGEANWEISUNGEN
Achten Sie beim Tragen des Stehtisches darauf, die Unterseite mit beiden
Händen zu halten, um mögliche Verletzungen oder Beschädigungen zu
vermeiden.
Drehen Sie den Schreibtisch herum und schneiden
Sie die Kabelbinder ab.
Drücken Sie beim Abschneiden
der Kabelbinder NICHT den
Auslösegri.
SCHRITT1
HÖHENVERSTELLBARER STEHSCHREIBTISCH-CONVERTER | 18
HÖHENVERSTELLBARER STEHSCHREIBTISCH-CONVERTER | 19
DE
DE
Befestigen Sie die linke und rechte Klemme an der Tastaturschublade. Ziehen Sie die Schrauben fest.
Befestigen Sie die Fußpolster an der Unterseite der Tastaturschublade wie in der unteren Abbildung dargestellt.
Hinweis: Ziehen Sie die Tastaturschrauben erst fest, wenn alle Schrauben in der Tastaturschublade eingesetzt und positioniert wurden.
E
C
E
B
D
G
G
Bohrloch für
Rundkopfschraube
Bohrloch für
Rundkopfschraube
MONTAGEANWEISUNGEN
Drücken Sie den Auslösegri, um den Schreibtisch anzuheben.
Heben Sie den Schreibtisch NICHT zu schnell an, um Verletzungen
zu vermeiden.
Um den Schreibtisch abzusenken, betätigen Sie den Gri und
drücken Sie die linke und rechte Seite des Tischs nach unten.
MONTAGEANWEISUNGEN
STO GEFAHR QUETSCH- UND
SCHNITTGEFAHR DURCH
BEWEGLICHE TEILE.
SCHRITT2 SCHRITT3
HÖHENVERSTELLBARER STEHSCHREIBTISCH-CONVERTER | 20
HÖHENVERSTELLBARER STEHSCHREIBTISCH-CONVERTER | 21
DE
DE
IHRE GERÄTE AUFSTELLENMONTAGEANWEISUNGEN
F
Montieren Sie die Tastaturschublade am Schreibtisch:
Ziehen Sie die linke und rechte Klemme mithilfe der Schraube (F) am Schreibtisch fest.
SCHRITT4
HÖHENVERSTELLBARER STEHSCHREIBTISCH-CONVERTER | 22
HÖHENVERSTELLBARER STEHSCHREIBTISCH-CONVERTER | 23
DE
DE
IHRE GERÄTE AUFSTELLEN
H
Organisieren Sie die Kabel mit den beiliegenden Kabelklemmen (H).
IHRE GERÄTE AUFSTELLEN
Achten Sie darauf,
dass der Monitorfuß
und der Laptop
vollständig auf der
Arbeitsfläche stehen.
Wenn ein Teil des
Gerätes über die
Kante hinausragt, kann
es zu Verletzungen
oder Beschädigungen
kommen.
Heben Sie die
Arbeitsfläche langsam
an. Ein zu schnelles
Anheben der
Arbeitsfläche kann den
Tisch instabil machen
und zu Verletzungen
oder Beschädigungen
führen.
Lassen Sie das Kabel so
weit durchhängen, dass
es vertikal verschoben
werden kann (49cm).
Ein Nichtbeachten
dieser Warnung kann
zu Verletzungen oder
Beschädigungen führen.
Um Kabel nicht
einzuklemmen, ist es
wichtig, die Anweisungen
zur Kabelführung in
diesem Handbuch
zu beachten. Ein
Nichtbeachten dieser
Anweisungen kann
zu Verletzungen oder
Beschädigungen führen.
HÖHENVERSTELLBARER STEHSCHREIBTISCH-CONVERTER | 24
HÖHENVERSTELLBARER STEHSCHREIBTISCH-CONVERTER | 25
DE
DE
RIF6 bietet für alle unsere Produkte, die neu und unbenutzt von RIF6 oder von einem autorisierten Händler erworben
wurden, eine Gewährleistung von einem Jahr. Dies gilt, wenn der Originalkaueleg vorgezeigt wird und der
Schaden ausschließlich oder weitgehend durch Herstellungs-, Material- oder handwerkliche Fehler während des
Gewährleistungszeitraums verursacht wurde. Die Gewährleistung ist bei Beschädigungen ausgeschlossen, die durch andere
Faktoren verursacht wurden, einschließlich, aber nicht beschränkt auf: (a) normale Abnutzung, (b) Missbrauch, falsche
Handhabung, Unfall oder unsachgemäßen Betrieb, (c) Eindringen von Flüssigkeiten oder von Fremdkörpern (d) Wartung oder
bauliche Änderungen des Produkts, die nicht von RIF6 durchgeführt wurden. Dies sind unsere allgemeinen Bedingungen für
den Gewährleistungsservice. Wir möchten unsere Kunden jedoch bitten, unabhängig von den Gewährleistungsbedingungen
in jedem Fall mit uns Kontakt aufzunehmen, wenn ein Problem auftritt. Wenn Sie ein Problem mit einem RIF6-Produkt haben,
wenden Sie sich unter [email protected] an uns. Wir werden unser Bestes geben, um Ihnen zu helfen.
GEWÄHRLEISTUNG
ACHTUNG
Dieses Handbuch gilt für alle Artikel mit den folgenden Modellnummern:
RIF090532N RIF090533N
Bitte bewahren Sie alle Plastikbeutel außerhalb der Reichweite von Kindern auf.
TECHNISCHE DATEN
VORSICHT:
ÜBERSCHREITEN SIE NICHT DIE MAXIMALE BELASTBARKEIT, DA ANDERENFALLS
VERLETZUNGEN ODER BESCHÄDIGUNGEN AUFTRETEN KÖNNEN!
A
B
34.6”
31.5”
4.7–19.3”
16.5”
25.6”
15.7”
11.8”
15kg
(33lb)
NENNLAST
≤2kg
(≤4,4lb)
NENNLAST
CONVERTIDOR DE ESCRITORIO CON PATA DE ALTURA AJUSTABLE | 26
CONVERTIDOR DE ESCRITORIO CON PATA DE ALTURA AJUSTABLE | 27
ES
ES
INSTRUCCIONES IMPORTANTES DE SEGURIDAD
Lea el manual íntegramente antes de comenzar la instalación y el montaje. Si tiene alguna pregunta relacionada con las
instrucciones o las advertencias, póngase en contacto con el servicio de atención al cliente.
PRECAUCIÓN: NO coloque objetos que pesen más de 14,96kg (33lb) encima del escritorio. Colocar demasiado peso encima del escritorio
puede provocar inestabilidad y lesiones.
• Siga las instrucciones de montaje al pie de la letra. Una instalación incorrecta podría provocar daños personales o materiales
importantes.
• Asegúrese de que la superficie de apoyo pueda soportar de manera segura el peso combinado de los equipos y de todo el
hardware y los componentes que se conectarán.
• Utilice los tornillos de montaje suministrados. NO APRIETE los tornillos en EXCESO.
• Este producto incluye piezas de tamaño pequeño que podrían suponer un peligro de atragantamiento si se ingieren. Mantenga
estos elementos fuera del alcance de los niños.
• Este producto se ha diseñado para uso en interiores únicamente. El uso en exteriores podría hacer que no funcionara
correctamente y podría provocar daños personales.
IMPORTANTE: Asegúrese de haber recibido todas las piezas que se indican en la lista de verificación de componentes antes de la instalación. Si falta
alguna pieza o está defectuosa, póngase en contacto con el servicio de atención al cliente para que le faciliten el repuesto.
MANTENIMIENTO: Compruebe regularmente que el producto se puede utilizar de manera segura (al menos cada 3 meses).
INSTRUCCIONES DE MONTAJE
A (× 1)
Escritorio
B (× 1)
Abrazadera (izquierda)
B (× 1)
Abrazadera (derecha)
D (× 1)
Bandeja para el teclado
E (× 6)
Tornillo de estrella
F (× 6)
Tornillo de cabeza plana
G (× 2)
Base de apoyo para los pies
H (× 2)
Sujetacables
Antes de empezar el proceso de montaje, saque todas las piezas de la caja y luego de las bolsas de plástico, y déjelas en
el suelo para familiarizarse con los componentes.
Como su escritorio es un equipo pesado, pídale a alguien que le ayude a montarlo. Siga las instrucciones de este manual
para minimizar los problemas que puedan surgir.
Herramientas
necesarias
PUNTO DE ATRAPAMIENTO
NO coloque las manos encima o cerca de las barras de soporte.
Los puntos de atrapamiento se producen durante la elevación y el
descenso de la superficie de trabajo. El incumplimiento de estas
instrucciones podría provocar daños personales importantes.
ADVERTENCIA
CONVERTIDOR DE ESCRITORIO CON PATA DE ALTURA AJUSTABLE | 28
CONVERTIDOR DE ESCRITORIO CON PATA DE ALTURA AJUSTABLE | 29
ES
ES
INSTRUCCIONES DE MONTAJE
Al cargar el escritorio de sobremesa, asegúrese de sujetar la parte inferior con
ambas manos para evitar posibles daños o lesiones.
Dele la vuelta al escritorio y corte las bridas
sujetacables.
Presione la palanca de desbloqueo para elevar el escritorio.
NO suba el escritorio demasiado rápido para evitar lesiones.
Para bajar el escritorio, presione la palanca y la parte
izquierda y derecha del escritorio al mismo tiempo.
NO presione la palanca
de desbloqueo al cortar
las bridas sujetacables.
PASO 1
INSTRUCCIONES DE MONTAJE
¡PELIGRO DE IMPACTOS!
LAS PIEZAS MÓVILES
PUEDEN PROVOCAR
APLASTAMIENTOS O CORTES.
PASO 2
CONVERTIDOR DE ESCRITORIO CON PATA DE ALTURA AJUSTABLE | 30
CONVERTIDOR DE ESCRITORIO CON PATA DE ALTURA AJUSTABLE | 31
ES
ES
INSTRUCCIONES DE MONTAJE
PASO 4PASO 3
F
Monte la bandeja para el teclado en el escritorio:
Apriete bien las abrazaderas izquierda y derecha al escritorio mediante el tornillo (F).
Fije las abrazaderas izquierda y derecha a la bandeja para el teclado. Apriete bien los tornillos.
Fije a la parte inferior de la bandeja para el teclado tal y como se muestra en la figura de abajo.
Aviso: No apriete por completo los tornillos del teclado hasta que haya introducido todos los tornillos y se hayan colocado en su posición
en la bandeja para el teclado.
E
C
E
B
D
G
G
Orificio para
tornillo redondo
Orificio para
tornillo redondo
INSTRUCCIONES DE MONTAJE
CONVERTIDOR DE ESCRITORIO CON PATA DE ALTURA AJUSTABLE | 32
CONVERTIDOR DE ESCRITORIO CON PATA DE ALTURA AJUSTABLE | 33
ES
ES
PREPARE SUS DISPOSITIVOS PREPARE SUS DISPOSITIVOS
Mantenga la base del
monitor y del portátil
fijos sobre la superficie
de trabajo. Dejar
alguna parte de la
base o del soporte que
sobresale del borde
podría provocar daños
materiales o personales.
Suba la superficie de
trabajo poco a poco.
Subir la superficie de
trabajo demasiado
rápido podría crear
una situación de
inestabilidad y provocar
daños materiales o
personales.
Deje suficiente holgura
en el cable para permitir
un rango completo de
movimiento vertical
(49
cm
/ 19,3"). Hacer
caso omiso a esta
advertencia podría
provocar daños
materiales y personales.
Para evitar que el cable
quede atrapado por
accidente, es importante
seguir las instrucciones
del enrutamiento de
cables de este manual.
El incumplimiento de
estas instrucciones
podría provocar daños
materiales y personales.

CONVERTIDOR DE ESCRITORIO CON PATA DE ALTURA AJUSTABLE | 34
CONVERTIDOR DE ESCRITORIO CON PATA DE ALTURA AJUSTABLE | 35
ES
ES
PREPARE SUS DISPOSITIVOS
H
Organice los cables con los sujetacables suministrados (H).
ESPECIFICACIONES
PRECAUCIÓN:
NO SUPERE LA CAPACIDAD DE CARGA MÁXIMA. SI LO HACE, PODRÍA PROVOCAR
DAÑOS PERSONALES O MATERIALES IMPORTANTES.
A
B
34.6”
31.5”
4.7–19.3”
16.5”
25.6”
15.7”
11.8”
15kg
(33lb)
CAPACIDAD
DE CARGA
≤2kg
(≤4,4lb)
CAPACIDAD
DE CARGA
CONVERTISSEUR DE BUREAU ASSIS-DEBOUT RÉGLABLE EN HAUTEUR | 36
CONVERTISSEUR DE BUREAU ASSIS-DEBOUT RÉGLABLE EN HAUTEUR | 37
FR
CONVERTIDOR DE ESCRITORIO CON PATA DE ALTURA AJUSTABLE | 36
CONVERTIDOR DE ESCRITORIO CON PATA DE ALTURA AJUSTABLE | 37
ES
RIF6 ofrece una garantía de un año en todos nuestros productos nuevos y sin uso que se nos compren directamente RIF6
o a través de un vendedor autorizado, con una factura de compra original y, en caso de que haya algún defecto, íntegro
o sustancial, como resultado de un fallo de fábrica, en las piezas o en la mano de obra durante el periodo de garantía de
un año. La garantía no es válida cuando el daño lo provocan otros factores, entre los que incluyen, sin limitación alguna,
los siguientes: (a) desgaste normal; (b) abuso, uso incorrecto, accidente o incumplimiento de las instrucciones de uso; (c)
exposición a líquidos o ingreso de partículas externas; (d) mantenimiento o modificaciones del producto a cargo de terceros
en lugar de RIF6. En este documento se detallan los términos generales del servicio de garantía, pero en caso de tener
algún inconveniente, siempre recomendamos a nuestros clientes que se pongan en contacto con nosotros, sin importar los
términos de la garantía. Si tiene algún problema con un producto RIF6, póngase en contacto con nosotros en support@RIF6.
com y haremos todo lo posible para ayudarle a resolverlo.
INFORMACIÓN SOBRE LA GARANTÍA
ADVERTENCIA
Este manual cubre todos los artículos cuyo número de modelo sea:
RIF090532N RIF090533N
Mantenga las bolsas de plástico fuera del alcance de los niños.
CONSIGNES DE SÉCURITÉ IMPORTANTES
Lisez le manuel dans son intégralité avant de commencer l’installation et le montage. Pour toute question concernant les
instructions ou les avertissements, contactez le service après-vente.
ATTENTION: NE placez PAS d’objets d’un poids supérieur à 15kg sur le bureau. La surcharge du bureau pourrait entraîner une instabilité et
des blessures.
• Suivez attentivement les instructions de montage. Une installation incorrecte peut entraîner des dommages ou des blessures
corporelles graves.
• Assurez-vous que la surface d’appui peut supporter en toute sécurité le poids combiné de l’équipement et de l’ensemble du
matériel et des composants qui y sont fixés.
• Utilisez les vis de montage fournies. NE SERREZ PAS TROP les vis de montage.
• Ce produit contient des pièces de petite taille qui pourraient présenter un risque d’étouement en cas d’ingestion. Gardez ces
pièces hors de portée des enfants.
• Ce produit est destiné à un usage intérieur uniquement. L’utilisation à l’extérieur peut entraîner une défaillance du produit et des blessures.
IMPORTANT: Assurez-vous d’avoir reçu toutes les pièces indiquées dans la liste de vérification des composants avant de procéder à
l’installation. Si des pièces sont manquantes ou défectueuses, contactez le service après-vente pour les remplacer.
ENTRETIEN: Vérifiez régulièrement (au moins tous les trois mois) que le produit est sûr et que son utilisation ne présente aucun danger.
POINT DE PINCEMENT
NE placez PAS les mains sur ou près des barres de soutien.
Des points de pincement se forment lorsque la surface de
travail monte et descend. Si ces instructions ne sont pas
respectées, vous risquez de vous blesser gravement.
AVERTISSEMENT
CONVERTISSEUR DE BUREAU ASSIS-DEBOUT RÉGLABLE EN HAUTEUR | 38
CONVERTISSEUR DE BUREAU ASSIS-DEBOUT RÉGLABLE EN HAUTEUR | 39
FR
FR
INSTRUCTIONS DE MONTAGE
A (× 1)
Bureau
B (× 1)
Attache de serrage (Gauche)
B (× 1)
Attache de serrage (Droite)
D (× 1)
Support de clavier
E (× 6)
Vis à tête fraisée cruciforme
E (× 6)
vis à tête cylindrique
bombée cruciforme
G (× 2)
Patin
H (× 2)
Serre-câble
Avant de procéder au montage, sortez toutes les pièces de la boîte, retirez-les des sacs en plastique et disposez le tout sur
le sol pour vous familiariser avec les composants.
Votre bureau est un équipement lourd, demandez à quelqu’un de vous aider pendant le montage. Suivez les instructions
de ce manuel afin de limiter tout problème éventuel.
Outils
nécessaires
INSTRUCTIONS DE MONTAGE
Lorsque vous transportez le bureau assis-debout, veillez à tenir la partie
inférieure à deux mains pour éviter tout dommage ou toute blessure.
Retournez le bureau et coupez les attaches de câbles.
ÉTAPE1
N’appuyez PAS sur la poignée
de déverrouillage lorsque vous
coupez les attaches de câbles.
CONVERTISSEUR DE BUREAU ASSIS-DEBOUT RÉGLABLE EN HAUTEUR | 40
CONVERTISSEUR DE BUREAU ASSIS-DEBOUT RÉGLABLE EN HAUTEUR | 41
FR
FR
ÉTAPE3
Fixez les attaches de serrage gauche et droite au support de clavier. Serrez les vis fermement.
Fixez les patins sur la partie inférieure du support de clavier comme indiqué dans la figure ci-dessous.
Remarque: Ne serrez pas complètement les vis du clavier avant d’avoir inséré toutes les vis et de les avoir mises en place
dans le support de clavier.
E
C
E
B
D
G
G
Trou de vis rond
Trou de vis rond
INSTRUCTIONS DE MONTAGE
Appuyez sur la poignée de déverrouillage pour soulever le bureau.
NE levez PAS le bureau trop rapidement pour éviter de vous blesser.
Pour abaisser le bureau, appuyez sur la poignée tout en
appuyant sur les côtés gauche et droit du bureau.
INSTRUCTIONS DE MONTAGE
RISQUE D’IMPACT! LES PIÈCES
EN MOUVEMENT PEUVENT
PRÉSENTER DES RISQUES
D’ÉCRASEMENT OU DE COUPURE.
ÉTAPE2
CONVERTISSEUR DE BUREAU ASSIS-DEBOUT RÉGLABLE EN HAUTEUR | 42
CONVERTISSEUR DE BUREAU ASSIS-DEBOUT RÉGLABLE EN HAUTEUR | 43
FR
FR
INSTALLER VOS APPAREILSINSTRUCTIONS DE MONTAGE
ÉTAPE4
F
Montez le support de clavier sur le bureau:
Serrez fermement les attaches de serrage gauche et droite du bureau à l’aide de la vis (F).
CONVERTISSEUR DE BUREAU ASSIS-DEBOUT RÉGLABLE EN HAUTEUR | 44
CONVERTISSEUR DE BUREAU ASSIS-DEBOUT RÉGLABLE EN HAUTEUR | 45
FR
FR
INSTALLER VOS APPAREILS
H
Organisez les câbles à l’aide des serre-câbles fournis (H).
INSTALLER VOS APPAREILS
Gardez l’écran et le
socle de l’ordinateur
portable entièrement
sur la surface de
travail. Des dommages
matériels ou corporels
peuvent survenir si
une partie du socle ou
du support dépasse
du bord.
Levez lentement la
surface de travail.
Si vous levez trop
rapidement la surface
de travail, vous risquez
de créer une situation
instable et de provoquer
des dommages
matériels ou corporels.
Laissez susamment
de mou dans le câble
pour permettre un
mouvement vertical
complet (49cm). Si vous
ne respectez pas cet
avertissement, vous
risquez de subir des
dommages matériels ou
corporels.
Pour éviter le pincement
accidentel du câble,
il est important de
suivre les instructions
d’acheminement du
câble figurant dans ce
manuel. Si vous ne suivez
pas ces instructions,
vous risquez de subir des
dommages matériels ou
corporels.
CONVERTISSEUR DE BUREAU ASSIS-DEBOUT RÉGLABLE EN HAUTEUR | 46
CONVERTISSEUR DE BUREAU ASSIS-DEBOUT RÉGLABLE EN HAUTEUR | 47
FR
FR
RIF6 ore une garantie d’un an sur tous nos produits achetés neufs et non utilisés auprès de RIF6 ou d’un revendeur agréé,
avec une preuve d’achat originale et lorsqu'un défaut apparaît, entièrement ou en grande partie, à la suite d'un défaut de
fabrication, de pièces ou de main-d'œuvre pendant la période de garantie d'un an. La garantie ne s’applique pas lorsque
les dommages sont causés par d’autres facteurs, y compris mais sans s’y limiter: (a) usure normale; (b) abus, mauvaise
manipulation, accident ou non-respect des consignes d’utilisation; (c) exposition à un liquide ou infiltration de particules
étrangères; (d) entretien ou modification du produit autrement que par le RIF6. Les présentes conditions générales
s’appliquent au service de garantie. Cependant, nous invitons toujours nos clients à nous contacter en cas de problème,
quelles que soient les modalités de la garantie. Pour tout problème concernant un produitRIF6, veuillez nous contacter à
[email protected], et nous ferons tout notre possible pour trouver une solution.
INFORMATIONS RELATIVES À LA GARANTIE
AVERTISSEMENT
Ce manuel concerne tous les articles portant le numéro de modèle suivant:
RIF090532N RIF090533N
Gardez tous les sacs en plastique hors de portée des enfants.
SPÉCIFICATIONS
ATTENTION:
NE DÉPASSEZ PAS LA CAPACITÉ DE POIDS MAXIMALE, CAR DES BLESSURES GRAVES
OU DES DOMMAGES MATÉRIELS POURRAIENT SURVENIR!
A
B
34.6”
31.5”
4.7–19.3”
16.5”
25.6”
15.7”
11.8”
15kg
NOMINAL
(≤ 2kg)
NOMINAL
CONVERTITOREPER STANDING DESK ADALTEZZAREGOLABILE | 48
CONVERTITOREPER STANDING DESK ADALTEZZAREGOLABILE | 49
IT
IT
ISTRUZIONI DI SICUREZZA IMPORTANTI
Prima di iniziare l'installazione e il montaggio, leggere l'intero manuale. In caso di domande relative alle istruzioni o alle avvertenze,
contattare il Servizio clienti.
ATTENZIONE: NON posizionare sulla scrivania oggetti con un peso superiore ai 15 kg. Il sovraccarico della scrivania potrebbe causare instabilità
e lesioni personali.
• Seguire attentamente le istruzioni per il montaggio. Un'installazione errata potrebbe comportare gravi danni o lesioni personali.
• Assicurarsi che la superficie di supporto possa sostenere in modo sicuro il peso combinato dell'apparecchiatura e di tutta la
bulloneria e dei componenti collegati.
• Utilizzare le viti di montaggio fornite. NON SERRARE ECCESSIVAMENTE le viti di montaggio.
• Questo prodotto contiene oggetti di piccole dimensioni che, se ingeriti, potrebbero comportare un pericolo di soocamento.
Tenere questi oggetti fuori dalla portata dei bambini.
• Questo prodotto è progettato solo per uso interno. L'utilizzo all'aperto potrebbe comportare danni al prodotto e lesioni personali.
IMPORTANTE: prima dell'installazione, assicurarsi di aver ricevuto tutte le parti in base alla lista di controllo dei componenti. In caso di parti
mancanti o difettose, contattare il Servizio clienti per la sostituzione.
MANUTENZIONE: Verificare regolarmente che il prodotto possa essere utilizzato in sicurezza (almeno ogni 3 mesi).
ISTRUZIONI PER IL MONTAGGIO
A (× 1)
Scrivania
B (× 1)
Morsetto (Sinistra)
C (× 1)
Morsetto (Destra)
D (× 1)
Ripiano della tastiera
E (× 6)
Vite a testa piatta con
intaglio a croce
F (× 6)
Vite a testa svasata
piana con intaglio a croce
G (× 2)
Piedini
H (× 2)
Fermacavo
PERICOLO DI SCHIACCIAMENTO
NON posizionare le mani sulle barre di supporto o in prossimità
di esse. Durante il sollevamento e l’abbassamento della
superficie di lavoro, vengono creati punti in cui sussiste il
pericolo di schiacciamento. La mancata osservanza delle
presenti istruzioni può comportare gravi lesioni personali.
Prima di iniziare il procedimento di montaggio, estrarre tutte le parti dalla scatola, rimuovere le parti dai sacchetti di plastica
e disporre tutto sul pavimento per familiarizzare con i componenti.
Poiché la scrivania è un'apparecchiatura pesante, chiedere aiuto a qualcuno durante il montaggio. Seguire le istruzioni
contenute in questo manuale per ridurre eventuali problemi che potrebbero verificarsi.
Strumenti
necessari
AVVERTENZA:
CONVERTITOREPER STANDING DESK ADALTEZZAREGOLABILE | 50
CONVERTITOREPER STANDING DESK ADALTEZZAREGOLABILE | 51
IT
IT
ISTRUZIONI PER IL MONTAGGIO
Quando si trasporta la standing desk, assicurarsi di tenere la base con
entrambe le mani per evitare possibili danni o lesioni personali.
Capovolgere la scrivania e tagliare i fermacavi.
Premere la maniglia di rilascio per sollevare la scrivania.
NON sollevare la scrivania troppo rapidamente per evitare
lesioni personali.
Per abbassare la scrivania, premere la maniglia e i lati sinistro
e destro della scrivania.
NON premere la maniglia di
rilascio mentre si tagliano i
fermacavi.
PASSAGGIO 1
ISTRUZIONI PER IL MONTAGGIO
PERICOLO DI IMPATTO!
LE PARTI IN MOVIMENTO
POTREBBERO CAUSARE
SCHIACCIAMENTI O TAGLI.
PASSAGGIO 2
CONVERTITOREPER STANDING DESK ADALTEZZAREGOLABILE | 52
CONVERTITOREPER STANDING DESK ADALTEZZAREGOLABILE | 53
IT
IT
ISTRUZIONI PER IL MONTAGGIO
F
Montare il ripiano della tastiera sulla scrivania:
Serrare il morsetto destro e sinistro sulla scrivania utilizzando la vite (F).
Fissare i morsetti sinistro e destro al ripiano della tastiera. Serrare le viti saldamente.
Fissare i piedini alla parte inferiore del ripiano della tastiera come mostrato nella figura sotto.
Nota: Non serrare completamente le viti del ripiano della tastiera finché non sono state inserite tutte e non sono in posizione,
E
C
E
B
D
G
G
Foro vite rotonda
Foro vite rotonda
ISTRUZIONI PER IL MONTAGGIO
PASSAGGIO 3
PASSAGGIO 4
CONVERTITOREPER STANDING DESK ADALTEZZAREGOLABILE | 54
CONVERTITOREPER STANDING DESK ADALTEZZAREGOLABILE | 55
IT
IT
CONFIGURAZIONE DEI DISPOSITIVI CONFIGURAZIONE DEI DISPOSITIVI
Tenere la base del monitor
e del laptop appoggiati
completamente sulla
superficie della scrivania.
Se una qualsiasi parte
della base o del supporto
rimanesse fuori dai
bordi, questo potrebbe
comportare danni materiali
o lesioni personali.
Sollevare lentamente la
superficie della scrivania.
Se la superficie viene
sollevata troppo
velocemente, si
potrebbe creare
una certa instabilità
e comportare danni
materiali o lesioni
personali.
Lasciare il cavo
sucientemente allentato
per consentire diversi
movimenti verticali
(19,3" / 49 cm). La
mancata osservanza
della presente avvertenza
potrebbe comportare
danni materiali o lesioni
personali.
Per evitare lo
schiacciamento accidentale
del cavo, è importante
seguire le istruzioni per il
passaggio dei cavi indicate
nel presente manuale. La
mancata osservanza della
presenti istruzioni potrebbe
comportare danni materiali
o lesioni personali.
CONVERTITOREPER STANDING DESK ADALTEZZAREGOLABILE | 56
CONVERTITOREPER STANDING DESK ADALTEZZAREGOLABILE | 57
IT
IT
CONFIGURAZIONE DEI DISPOSITIVI
H
Organizzare i cavi tramite i fermacavi forniti (H).
SPECIFICHE
ATTENZIONE:
NON SUPERARE LA CAPACITÀ DI PESO MASSIMA IN QUANTO POTREBBERO INSORGERE
GRAVI LESIONI PERSONALI O DANNI MATERIALI!
A
B
34.6”
31.5”
4.7–19.3”
16.5”
25.6”
15.7”
11.8”
33 lb
(15 kg)
NOMINALE
≤4.4 lb
(≤2 kg)
NOMINALE

CONVERTITOREPER STANDING DESK ADALTEZZAREGOLABILE | 58
CONVERTITOREPER STANDING DESK ADALTEZZAREGOLABILE | 59
IT
RIF6 ore una garanzia di 1 anno su tutti i nostri prodotti acquistati nuovi e inutilizzati da RIF6 o da un rivenditore autorizzato,
con una prova di acquisto originale e laddove sia stato rilevato un difetto, integrale o sostanziale, derivante dai difetti
di fabbricazione, dai componenti oppure dalla lavorazione durante il periodo di garanzia di 1 anno. La garanzia non è
applicabile se il danno è stato causato da altri fattori, inclusi, a mero titolo esemplificativo: (a) normale usura; (b) abuso,
utilizzo improprio, incidente o mancato rispetto delle istruzioni operative; (c) esposizione a liquidi o infiltrazioni di corpi
estranei; (d) servizio assistenza o modifica del prodotto non eettuati da RIF6. Questi sono i nostri termini generali per il
servizio di garanzia, tuttavia invitiamo sempre i nostri clienti a contattarci per qualsiasi problema, indipendentemente da essi.
Se si riscontra un problema con un prodotto RIF6, contattarci tramite l'indirizzo e-mail [email protected] e faremo del nostro
meglio per risolverlo.
INFORMAZIONI SULLA GARANZIA
AVVERTENZA
Il presente manuale deve essere utilizzato con tutti i componenti con codice di modello:
RIF090532N RIF090533N
Tenere tutti i sacchetti di plastica fuori dalla portata dei bambini.

learn more at rif6.com
