
Color Laser Printer
Pantum PT14C1A Series
CP2100 Series

I
Preface
Welcome to the Pantum Series products!
We heartily appreciate your using of Pantum Series products!
To protect your vital interests, please carefully read the following statements.
For more information, please visit our official website (
www.pantum.com).
Legal Notice
Trademark
Pantum and Pantum logos are registered trademarks of Zhuhai Pantum Electronics Co., Ltd.
Microsoft
®
, Windows
®
, Windows Server
®
and Windows Vista
®
are trademarks registered by
Microsoft Corporation in the United States or other countries/regions.
Apple, AirPrint, Mac, and macOS are trademarks of Apple Inc., registered in the U.S. and other
countries.Use of the Works with Apple badge means that an accessory has been designed to work
specifically with the technology identified in the badge and has been certified by the developer to
meet Apple performance standards.
The Mopria™ word mark and the Mopria™ Logo are registered and/or unregistered trademarks of
Mopria Alliance, Inc. in the United States and other countries. Unauthorized use is strictly
prohibited.
The Bluetooth
®
word mark and logos are registered trademarks owned by Bluetooth SIG,Inc. and
any use of such marks by Zhuhai Pantum Electronics Co., Ltd. is under license. Other trademarks
and trade names are those of their respective owners.
Wi-Fi Direct,Wi-Fi Protected Setup(WPS),WPA,WPA2,WPA3 and Wi-Fi Protected Access are marks
of the Wi-Fi Alliance.
The ownership to the names of the software in this User Guide belongs to their respective
companies in accordance with corresponding license agreement, and they are referred for
instructions only.
All other product and brand names herein may be the registered trademarks, trademarks or service
marks of their respective owners, and they are referred for instructions only.
Copyright
The Copyright of this User Guide is owned by Zhuhai Pantum Electronics Co., Ltd.
It is prohibited to copy, translate, modify and transmit this User Guide by any means or in any form
without the prior written consent of Zhuhai Pantum Electronics Co., Ltd.
Version:V2.1

II
Disclaimer
For a better user experience, Zhuhai Pantum Electronics Co., Ltd. reserves the right to make
changes to the User Guide. The information contained herein is subject to change without notice.
Users are responsible for any damages arising from failing to follow this User Guide. Meanwhile,
except the express warranty made in the product maintenance manual or service commitment,
Zhuhai Pantum Electronics Co., Ltd. does not make any express or implied warranty or guarantee
to this User Guide (including composing or words).
Using this product to copy, print, scan certain documents or images or make other forms of
operations may be prohibited by the local laws. If you are uncertain about the legality of using this
product for certain documents or images, you should consult your legal advisor in advance.
III
Safety Precautions
Disconnect the power supply
The product should be placed close to or easily accessible to power sockets, so as to allow easy
disconnection of power supply!
Laser Safety
The laser radiation is harmful to the human body. Since laser components are completely sealed in
the printer, laser radiation will not leak. To avoid laser radiation, please do not randomly
disassemble the printer!
Caution – Use of controls or adjustments or performance of procedures other than those specified
herein may result in hazardous radiation exposure.
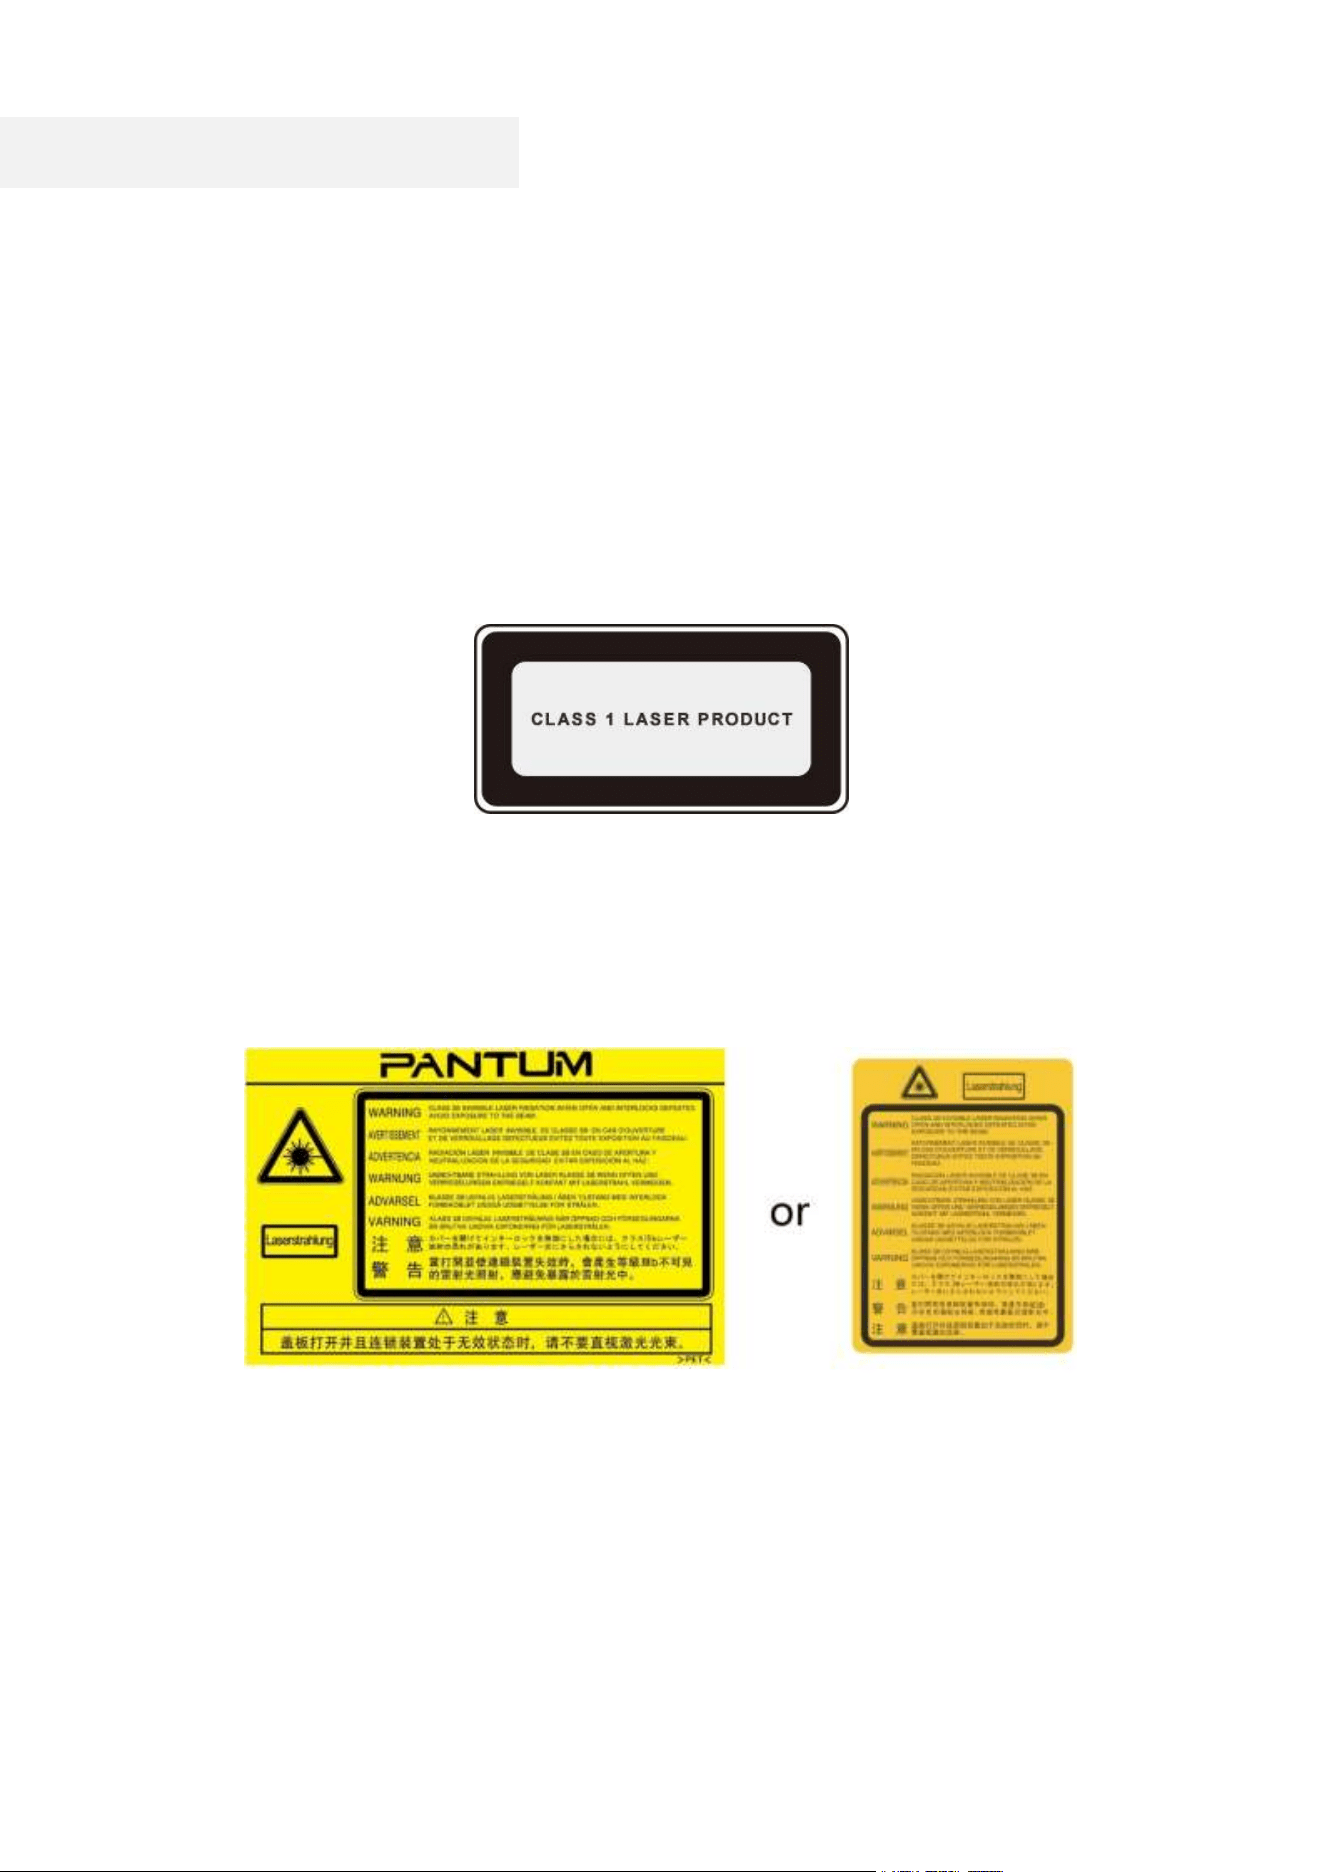
The printer follows the provisions of Class 1 laser products under CFR standard.
The printer has a Class 3B laser diode, which has no laser radiation leakage among laser
components. The laser components shall complies with the requirements of: U.S. Code of Federal
Regulations, 21 CFR 1040, IEC 60825-1.
The following label is attached to the laser components inside the printer:
IV
Safety Warning
Please note the following safety warnings before using the printer:
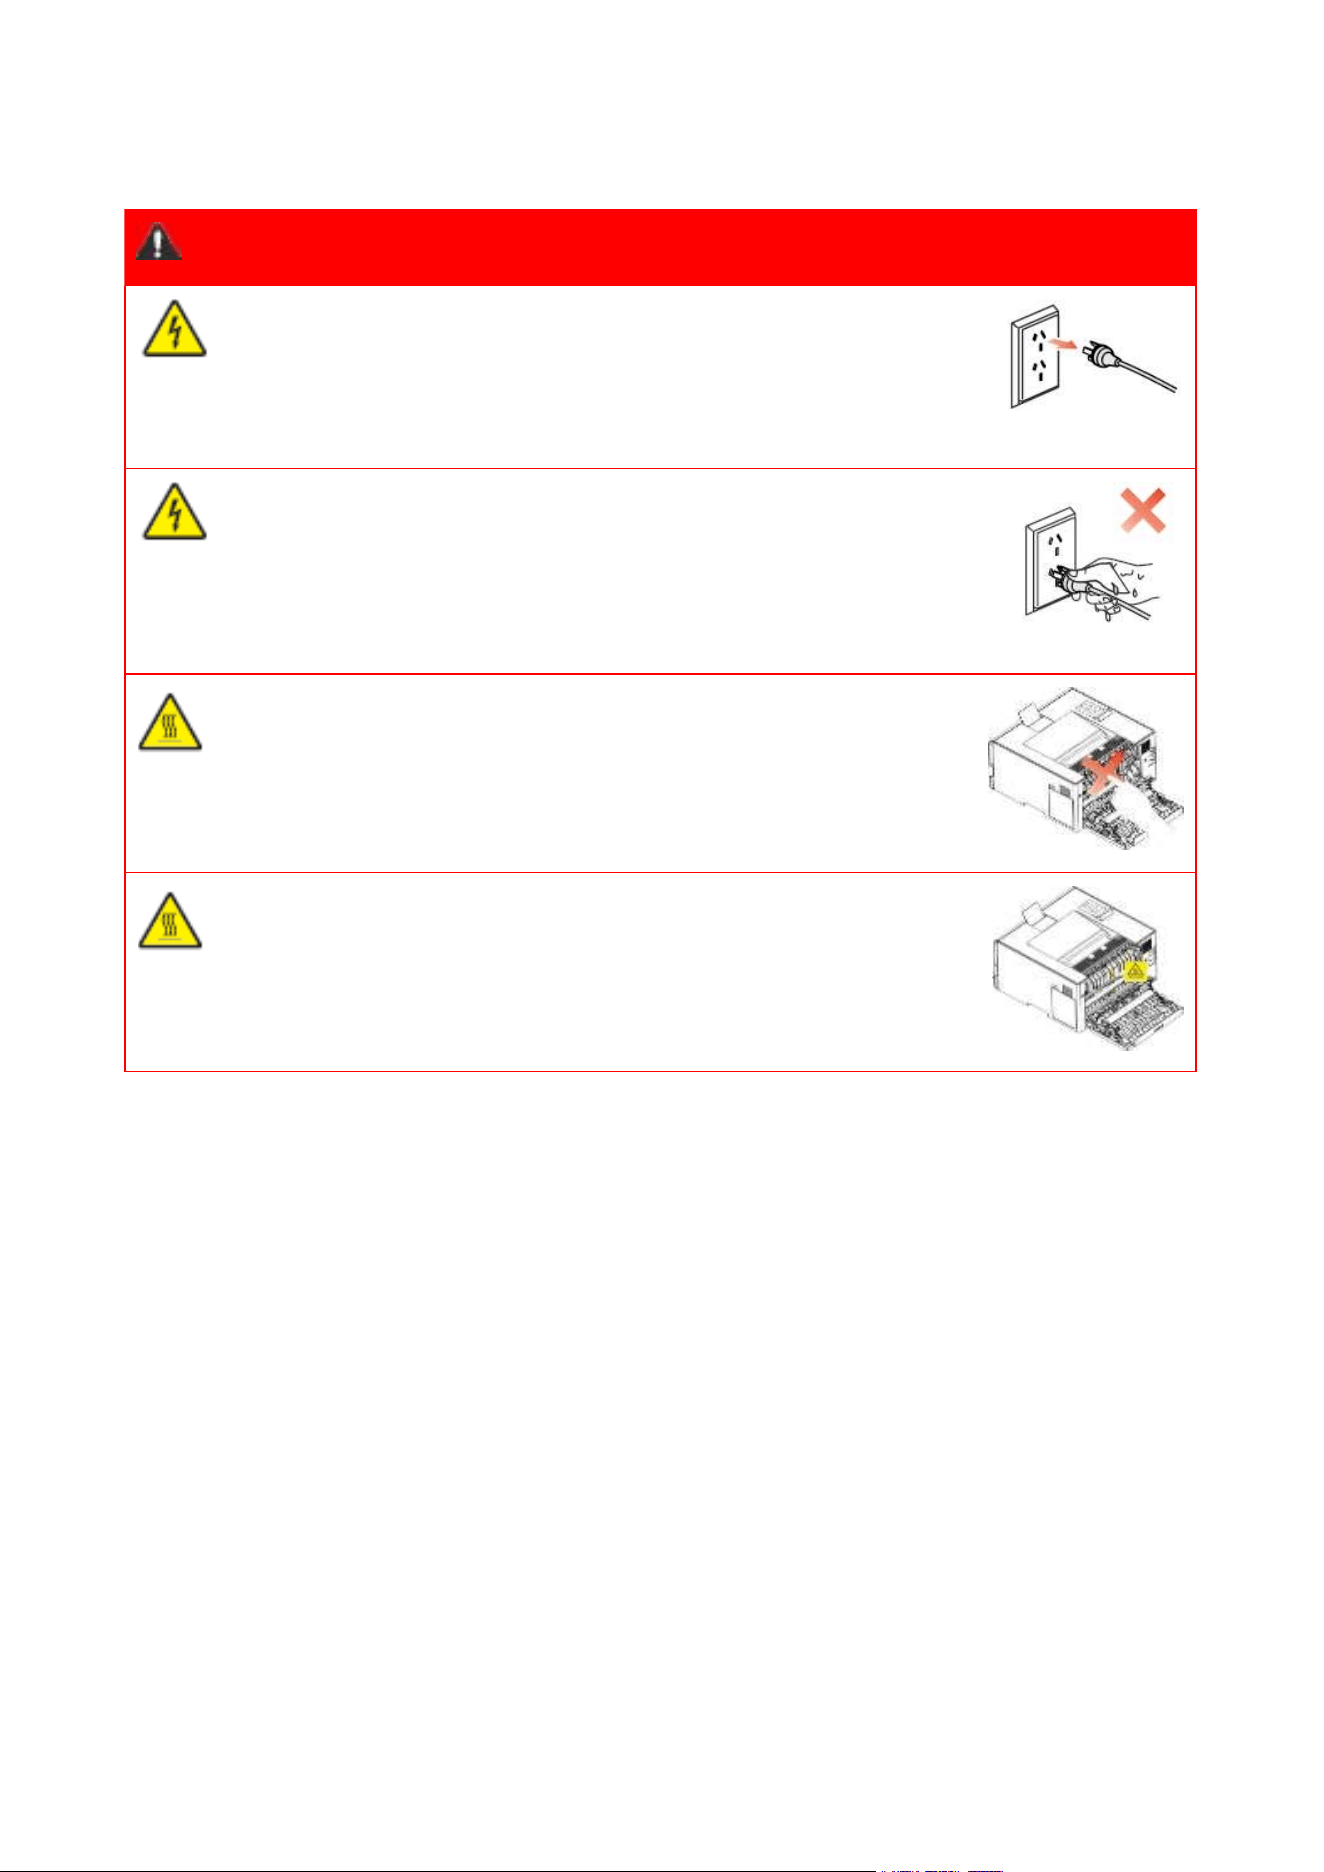
Warning
There is high-voltage electrode inside the printer. Before cleaning the
printer, make sure the power is turned off!
Plugging and unplugging the power cord plug with a wet hand can
result in an electric shock.
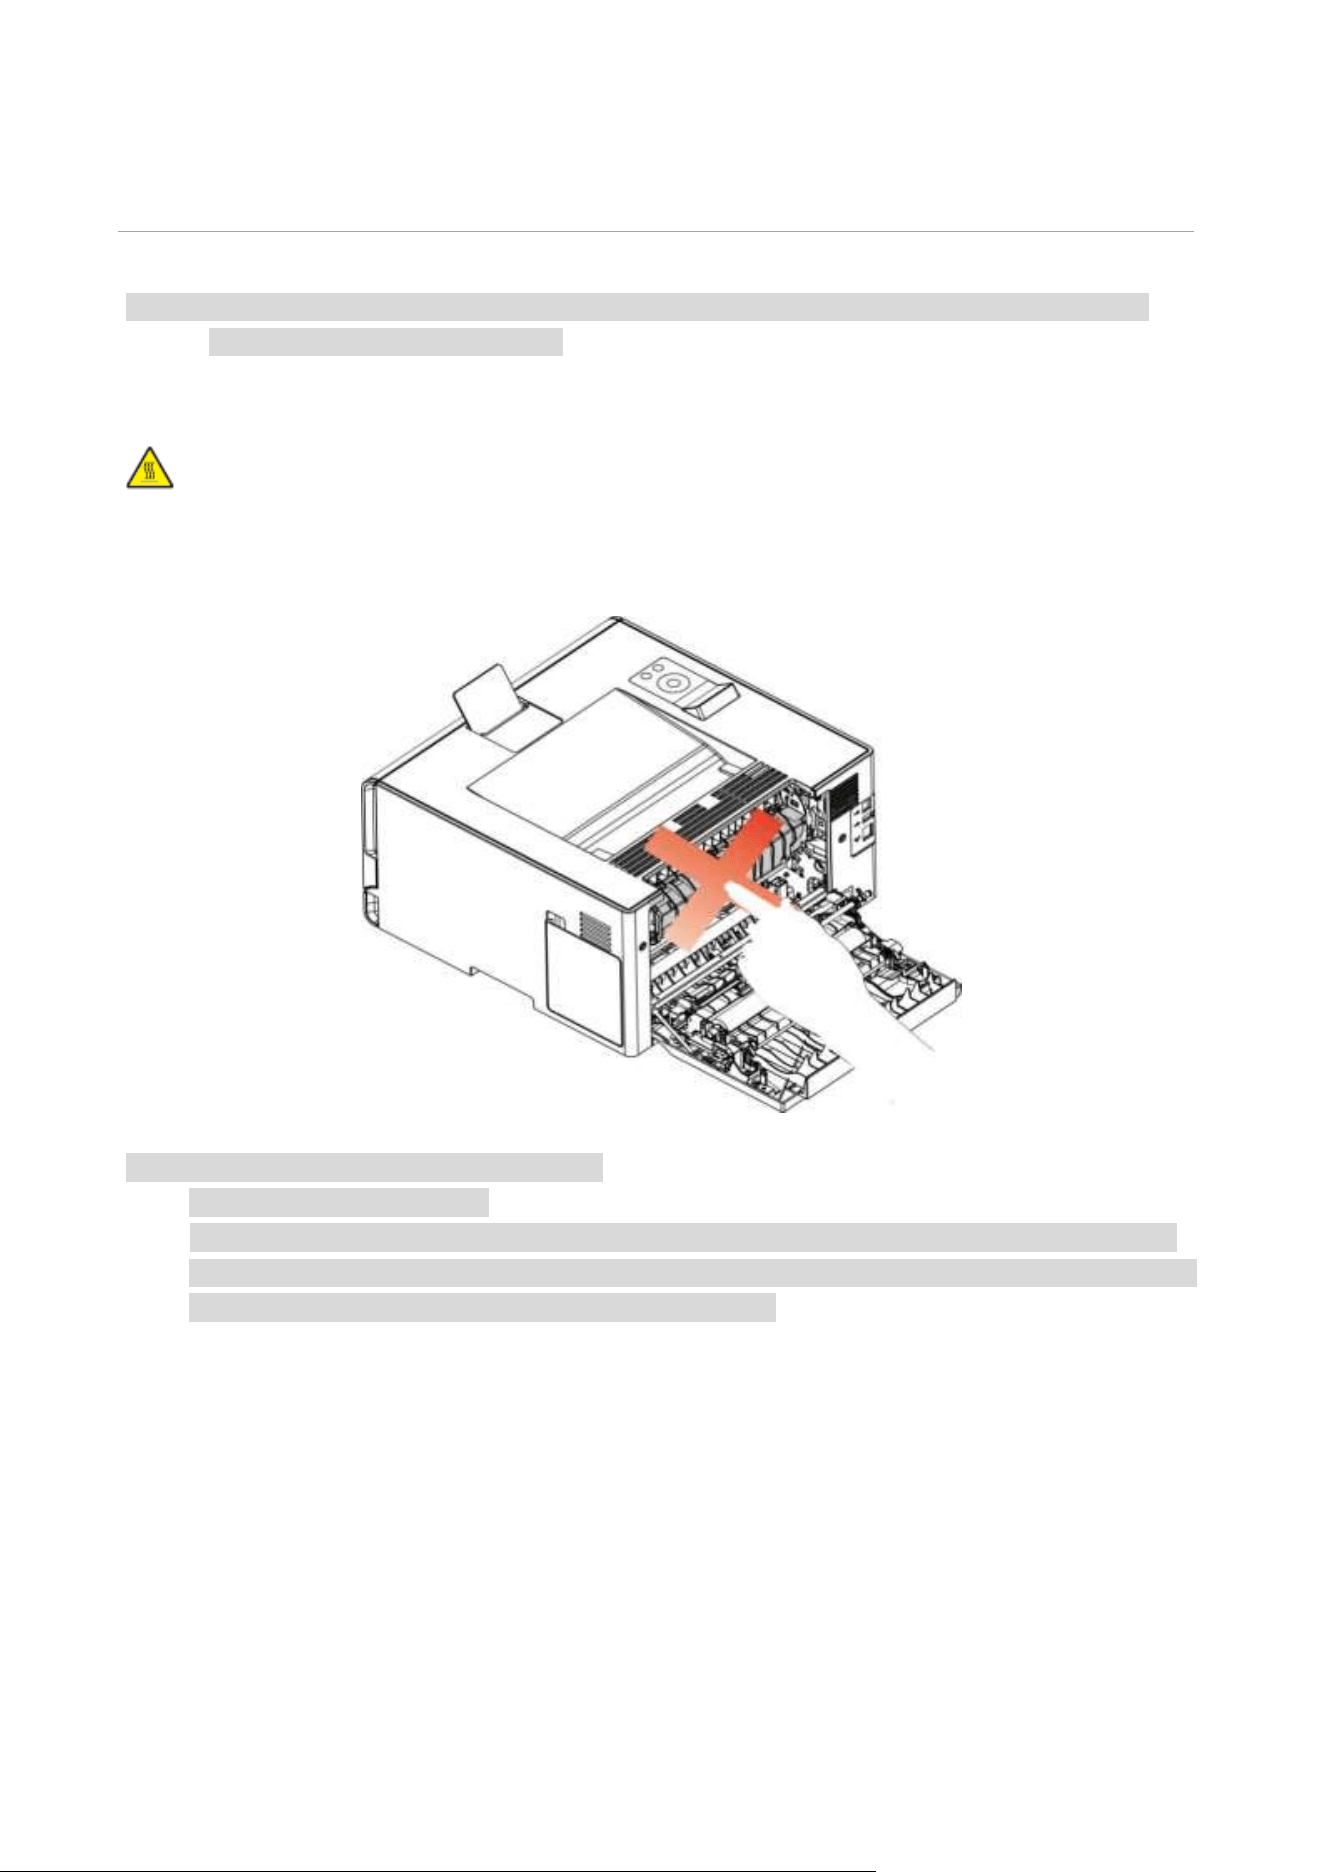
The fuser unit is hot when and after printing. Touching the fuser unit
(the shaded area as shown) may cause burns!
The fuser unit is attached with a high temperature warning label.
Please do not remove or damage this label.
V
Safety Information
Conventions
CAUTION: A caution indicates a potentially hazardous situation that could injure you.
Note:A note indicates the information that could help you or something that could damage the
product hardware or software.
Different types of caution statements include:
CAUTION - POTENTIAL INJURY: Indicates a risk of injury.
CAUTION - SHOCK HAZARD: Indicates a risk of electrical shock.
CAUTION - HOT SURFACE: Indicates a risk of burn if touched.
CAUTION - TIPPING HAZARD: Indicates a crush hazard.
CAUTION - PINCH HAZARD: Indicates a risk of being caught between moving parts.
CAUTION - ROTATING FAN BLADES: Indicates a risk of being lacerated by moving fan
blades.
Disclaimer
CAUTION - POTENTIAL INJURY: To avoid the risk of fire or electrical shock, connect the
power cord to an appropriately rated and properly grounded electrical outlet that is near the
product and easily accessible.
CAUTION - POTENTIAL INJURY: To avoid the risk of fire or electrical shock, use only the
power cord provided with this product or the manufacturer’s authorized replacement.
CAUTION - POTENTIAL INJURY: Do not use this product with extension cords, multioutlet
power strips, multioutlet extenders, or UPS devices. The power capacity of these types of
accessories can be easily overloaded by a laser printer and may result in a risk of fire, property
damage, or poor printer performance.
CAUTION - POTENTIAL INJURY: Do not use this product with an inline surge protector. The
use of a surge protection device may result in a risk of fire, property damage, or poor printer
performance.
CAUTION - SHOCK HAZARD: To avoid the risk of electrical shock, do not place or use this
product near water or wet locations.
CAUTION - SHOCK HAZARD: To avoid the risk of electrical shock, do not set up this product
or make any electrical or cabling connections during a lightning storm.
CAUTION - POTENTIAL INJURY: Do not cut, twist, bind, crush, or place heavy objects on the
power cord. Do not subject the power cord to abrasion or stress. Do not pinch the power cord

VI
between objects such as furniture and walls. If any of these things happen, it could result in a risk
of fire or electrical shock. Inspect the power cord regularly for signs of such problems. Remove the
power cord from the electrical outlet before inspecting it.
CAUTION - SHOCK HAZARD: To avoid the risk of electrical shock, make sure that all external
connections (such as Ethernet) are properly installed in their marked plug-in ports.
CAUTION - SHOCK HAZARD: To avoid the risk of electrical shock, if you are accessing the
controller board or installing optional hardware or memory devices after setting up the printer, turn
the printer off, and unplug the power cord from the electrical outlet before continuing. If you have
any other devices attached to the printer, turn them off as well, and unplug any cables going into
the printer.
CAUTION - SHOCK HAZARD: To avoid the risk of electrical shock when cleaning the exterior
of the printer, unplug the power cord from the electrical outlet and disconnect all cables from the
printer before proceeding.
CAUTION - POTENTIAL INJURY: If the printer weighs more than 18 kg, then it requires two or
more trained personnel to lift it safely.
CAUTION - POTENTIAL INJURY: When moving the printer, follow these guidelines to avoid
personal injury or printer damage:
• Make sure that all covers and trays are closed.
• Turn off the printer, and then unplug the power cord from the electrical outlet.
• Disconnect all cords and cables from the printer.
• If the printer has casters on its base, then carefully move it to the new location. Use caution when
passing over thresholds and breaks in flooring.
• Always use the handholds on the printer to lift it.
• Any cart used to move the printer must have a surface able to support the full footprint of the
printer.
• Keep the printer upright.
• Avoid violent vibrations when moving.
• Make sure that your fingers are not under the printer when you set it down.
• Make sure that there is adequate clearance around the printer.
CAUTION - HOT SURFACE: The inside of the printer might be hot. To reduce the risk of injury
by a hot component, allow the surface to cool before touching it.
CAUTION - HOT SURFACE: Some parts of the printer are still in high temperature within a
short time after use. To prevent burns, please don’t directly touch places labeled with high
temperature warning in contact with internal components after opening the printer’s front or rear
cover.

VII
CAUTION - PINCH HAZARD: To avoid the risk of a pinch injury, use caution in areas marked
with this label. Pinch injuries may occur around moving parts, such as gears, covers, trays, and
covers.
CAUTION - ROTATING FAN BLADES: To avoid the risk of laceration from moving fan blades,
turn off the printer and unplug the power cord from the electrical outlet before accessing areas
marked with this symbol.
CAUTION - POTENTIAL INJURY: This product uses lasers. Use of controls or adjustments or
performance of procedures other than those specified in the User’s Guide may result in hazardous
radiation exposure.
This product is designed, tested, and approved to meet strict global safety standards with the use
of specific manufacturer’s components.The safety features of some parts may not always be
obvious.The manufacturer is not responsible for any adverse consequences caused by using parts
of other manufacturers. For services or repairs other than those described in the user document,
please contact the Customer Service Center.
This product uses a printing process that heats the print media, and the heat may cause the media
to release emissions.Please read and understand the section in your operating instructions that
discusses the guidelines for selecting print media properly to avoid the possibility of harmful
emissions.
This product may produce a small amount of ozone during normal operation, and may be equipped
with a filter designed to limit ozone concentrations to levels well below the recommended
exposure limits.To avoid high ozone concentration levels during extensive usage, install this
product in a well-ventilated area and replace the ozone and exhaust filters if instructed to do so in
the product maintenance instructions.If there are no references to filters in the product
maintenance instructions, then it is not required to replace the filter for this product.
Please keep these safety instructions.

VIII
Precautions
Precautions before Using the Printer:
1. Read and understand all instructions;
2. Familiarize yourself with the basic principles associated with operating electrical appliances;
3. Comply with all warnings and instructions marked on the equipment or specified in the manual
supplied with the equipment;
4. If the operating instructions conflict with the safety information, please refer back to the safety
information, as you may have misunderstood the operating instructions. If you cannot resolve the
conflicts, please call the Customer Service Hotline or contact a service representative for help;
5. Before cleaning the equipment, remove the power cord from the AC power supply outlet. Do not
use liquid or aerosol cleaners;
6. Please make sure that the equipment is put on a stable desktop surface to avoid serious
damage caused by the falling of the equipment;
7. Do not put the equipment near a radiator, an air conditioner, or a ventilation pipe;
8. Do not put any articles on the power cord. Do not put the equipment at the place where its power
cord could be stepped on by people;
9. Outlets and extension cords must not be overloaded. This may reduce performance and could
result in fire or electric shock;
10. Do not allow pets to chew on the AC power cord or the computer interface cable;
11. Do not allow sharp objects piercing equipment slot, so as to avoid contact with the
high-voltage device, which otherwise may result in fire or electric shock. Take care not to spill
liquids onto the equipment;
12. Do not disassemble the equipment so as to avoid the risk of electric shock. Necessary repairs
may only be carried out by professional maintenance personnel. Opening or removing the cover
could result in an electric shock or other potential hazards. Incorrect disassembly and assembly
could also result in an electric shock during future use;
13. If any one of the following occurs, disconnect the equipment from the computer and pull out
the power cord from the AC wall socket and contact a qualified member of the service personnel
for maintenance:
• Liquid has been spilled into the equipment.
• The equipment has been exposed to rain or water.
• The equipment falls, or the cover is damaged.
• Significant changes in the equipment’s performance.
14. Only adjust the control mentioned in the instructions. Incorrect adjustment of other controls
may result in damage and mean that professional maintenance personnel need to spend more
time fixing it;
15. Do not use the equipment in a thunderstorm so as to avoid the risk of an electric shock. If
possible, pull out the AC power cord during a thunderstorm;
16. If you continuously print multiple pages, the surface of the tray will become very hot. Take care
not to touch this surface, and keep children away from this surface;
17. The signal wire of the device connected with the printer can not be connected to the outdoors;
18. Please ensure timely ventilation in case of a prolonged use or printing huge amounts of
documents in a poorly ventilated room;

IX
19. In standby status, the product will automatically enter into the power saving (sleep) mode if it
does not receive any job order for a while (such as 1 minute); and it can realize zero power
consumption only if it has not been connected with any external input power supply;
20. As the Class 1 equipment, the product must be connected to the power supply outlet with
protective grounding line when using;
21. This product should be placed according to the shipping marks on the product package box
during delivery;
22. This product is a kind of low-voltage equipment. When using this product below the specified
voltage range,please refer to the product precautions or call Pantum Aftersales Service Centre, if
the toner comes off the printed contents, or the equipment starts slowly;
23. This product is sold as a complete machine. The consumers can go to Pantum Aftersales
Service Centre to purchase parts they need. If the product sold is inconsistent with the package list,
please go to the specified Aftersales Service Centre to solve the problem;
24. Install this product in a place with the temperature between 10°C and 35°C and the relative
humidity between 20% and 80%;
25. The power consumption of the product with wireless function is 8.00W / without wireless
function is 2.00W in networked standby if all wired network ports are connected and all wireless
network ports are activated.
26.
RF Radiation Exposure Statement Caution:To maintain compliance with the RF exposure
guidelines, place the product at least 20cm from nearby persons.
27. To avoid the danger of fire or electric shock, please only use the power cord provided with this
product or authorized replacements approved by the manufacturer.
28. The power cord provided with this product is intended for this product only. Do not use it with
other devices as it may cause fire, electric shock, or other injuries.
29. Do not use flammable sprays or combustible solvents near or inside the machine. Additionally,
do not place them near or inside the machine as it may cause fire or electric shock.
30. Please keep this User Guide properly.
X
Legal Information
This symbol indicates that, at the end of your product’s life, it must not be discarded as
domestic waste. Instead, you should dispose of your used equipment at a designated
collection point for the recycling of waste electrical and electronic equipment. Ref: EU
Directive 2002/96/EC on Waste Electrical and Electronic Equipment (WEEE). Please
contact your distributor / supplier for further information.
This symbol indicates that the product is applicable to indoor use instead of outdoor
use.
European Community (EC) directives conformity
This symbol indicates that the product complies with the protection requirements
related to electromagnetic compatibility and safety of electrical device (for use within a
specific voltage range) in the approximate and harmonized regulations of members of
Directive 2014/30/EU and Directive 2014/35/EU of the European Parliament and of the
Council.
Radio Equipment Directive 2014/53/EU is only applicable to models with Wireless
function.
The manufacturer of this product is: Zhuhai Pantum Electronics Co., Ltd., Building 02,06
and 08,No.888 Shengping Avenue, Pingsha Town, Zhuhai City, Guangdong Province,
519000 PR China
A declaration of conformity to the requirements of the Directives is available upon
request from the Authorized Representative.
This product satisfies the Class B limits of EN 55032 / EN 55035 and safety
requirements of EN 62368-1.

XI
Table of Contents
01 Before Using the Printer ................................................................................................................. 1
Product View ................................................................................................................................. 1
Control Panel ................................................................................................................................ 3
Overview of control panel ..................................................................................................... 3
Functions of consumable status indicator ......................................................................... 5
Functions of paper status indicator .................................................................................... 5
Functions of printer status indicator ................................................................................... 6
Wi-Fi indicator/Toner Save indicator ................................................................................... 7
Functions of power indicator ............................................................................................... 7
02 Paper and Print Media .................................................................................................................... 8
Paper Specification ...................................................................................................................... 8
Special Paper ................................................................................................................................ 9
Loading Paper ............................................................................................................................. 10
Load in the standard feed tray ........................................................................................... 10
Install the multipurpose feed tray ...................................................................................... 12
03 Driver installation and uninstallation ........................................................................................... 14
Driver Setup ................................................................................................................................. 14
One-click Installation (For Windows and macOS) ............................................................ 14
Uninstall Driver ............................................................................................................................ 15
Method to uninstall driver under Windows ....................................................................... 15
04 Wired network setup (applicable to wired network models) ..................................................... 16
Set IP Address ............................................................................................................................ 16
Automatic Setting ............................................................................................................... 16
Manual Setting .................................................................................................................... 16
05 Wireless network setup (applicable to Wi-Fi models) ................................................................ 17
Basic structure mode ................................................................................................................. 17
Wireless network setup tools ............................................................................................. 18
Preliminary preparations .................................................................................................... 18
Setup methods of wireless network setup tools .............................................................. 18
How to disable the Wi-Fi network connected ........................................................................... 18
06 Web server ..................................................................................................................................... 19
Visit the embedded Web server................................................................................................. 19
07 Print ................................................................................................................................................ 20
Print Function.............................................................................................................................. 20
Duplex 21

XII
Print without margins ......................................................................................................... 22
Red Auto Enhancement function ....................................................................................... 23
Set transfer print parameters ............................................................................................. 25
08 Routine Maintenance .................................................................................................................... 27
leaning the Printer ...................................................................................................................... 27
Please use mild detergents ................................................................................................ 28
Replacing parts and consumables ............................................................................................ 29
Replacing the toner cartridge ............................................................................................. 30
Replace the tray .................................................................................................................. 35
Move the printer.......................................................................................................................... 36
Move the printer to another location ................................................................................. 36
Transporting the printer ..................................................................................................... 36
09 Troubleshooting ............................................................................................................................ 37
Avoiding jams ............................................................................................................................. 37
Correct loading of paper..................................................................................................... 37
Use recommended paper ................................................................................................... 38
Locate jammed paper ................................................................................................................ 39
Cleaning Jammed Paper............................................................................................................ 40
Paper jam in the automatic tray......................................................................................... 40
The paper is jammed in the manual feed tray .................................................................. 42
Paper jam in the manual tray ............................................................................................. 44
Paper jam in the rear cover ................................................................................................ 45
Software Failure.......................................................................................................................... 48
Error Message............................................................................................................................. 48
Common Troubleshooting ......................................................................................................... 49
Common Problems ............................................................................................................. 49
Image Defects ..................................................................................................................... 51
10 Product Specifications ................................................................................................................. 56
Overview of the Specifications .................................................................................................. 56
1
01 Before Using the Printer
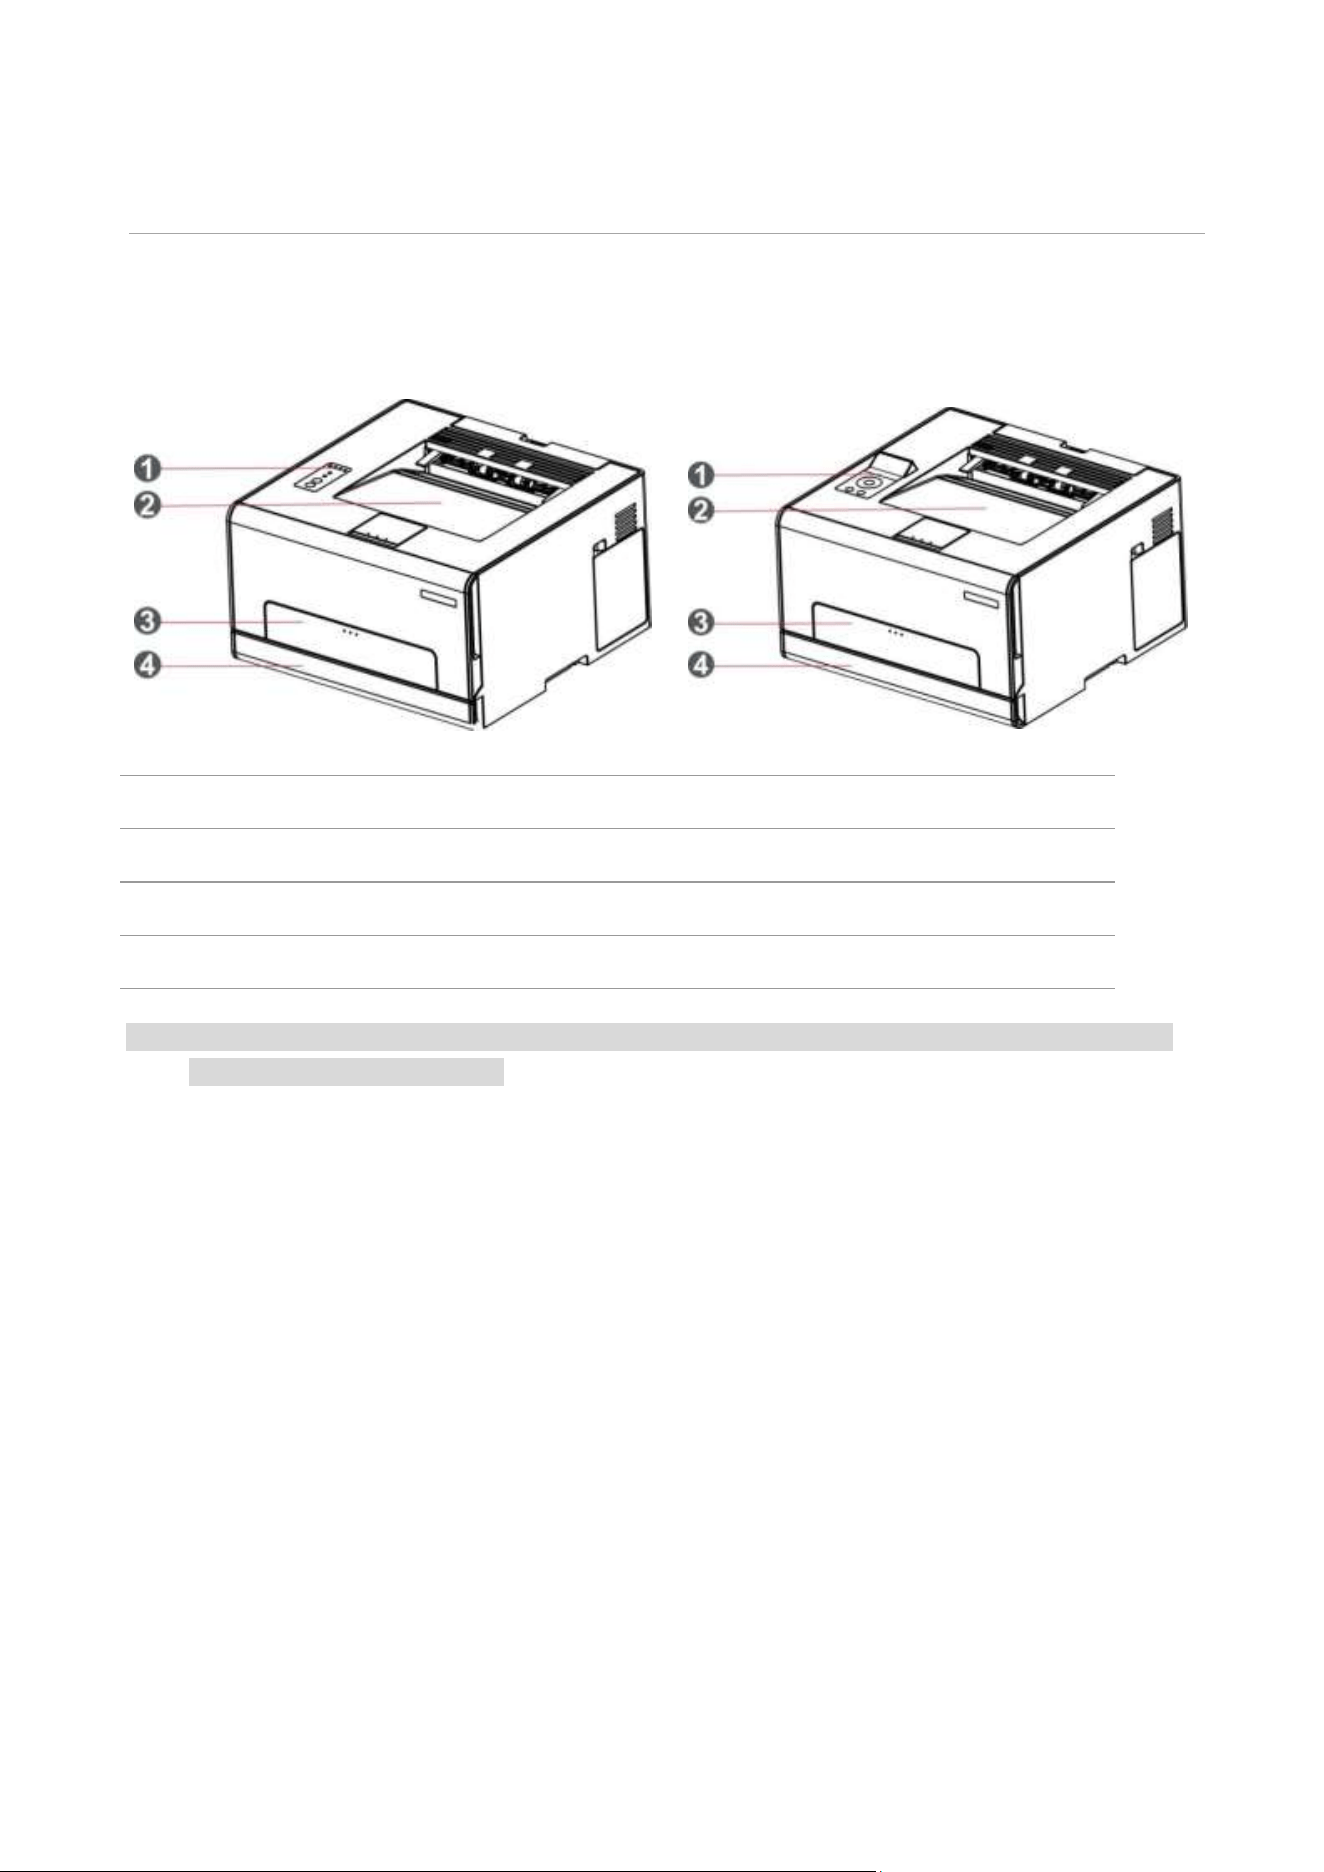
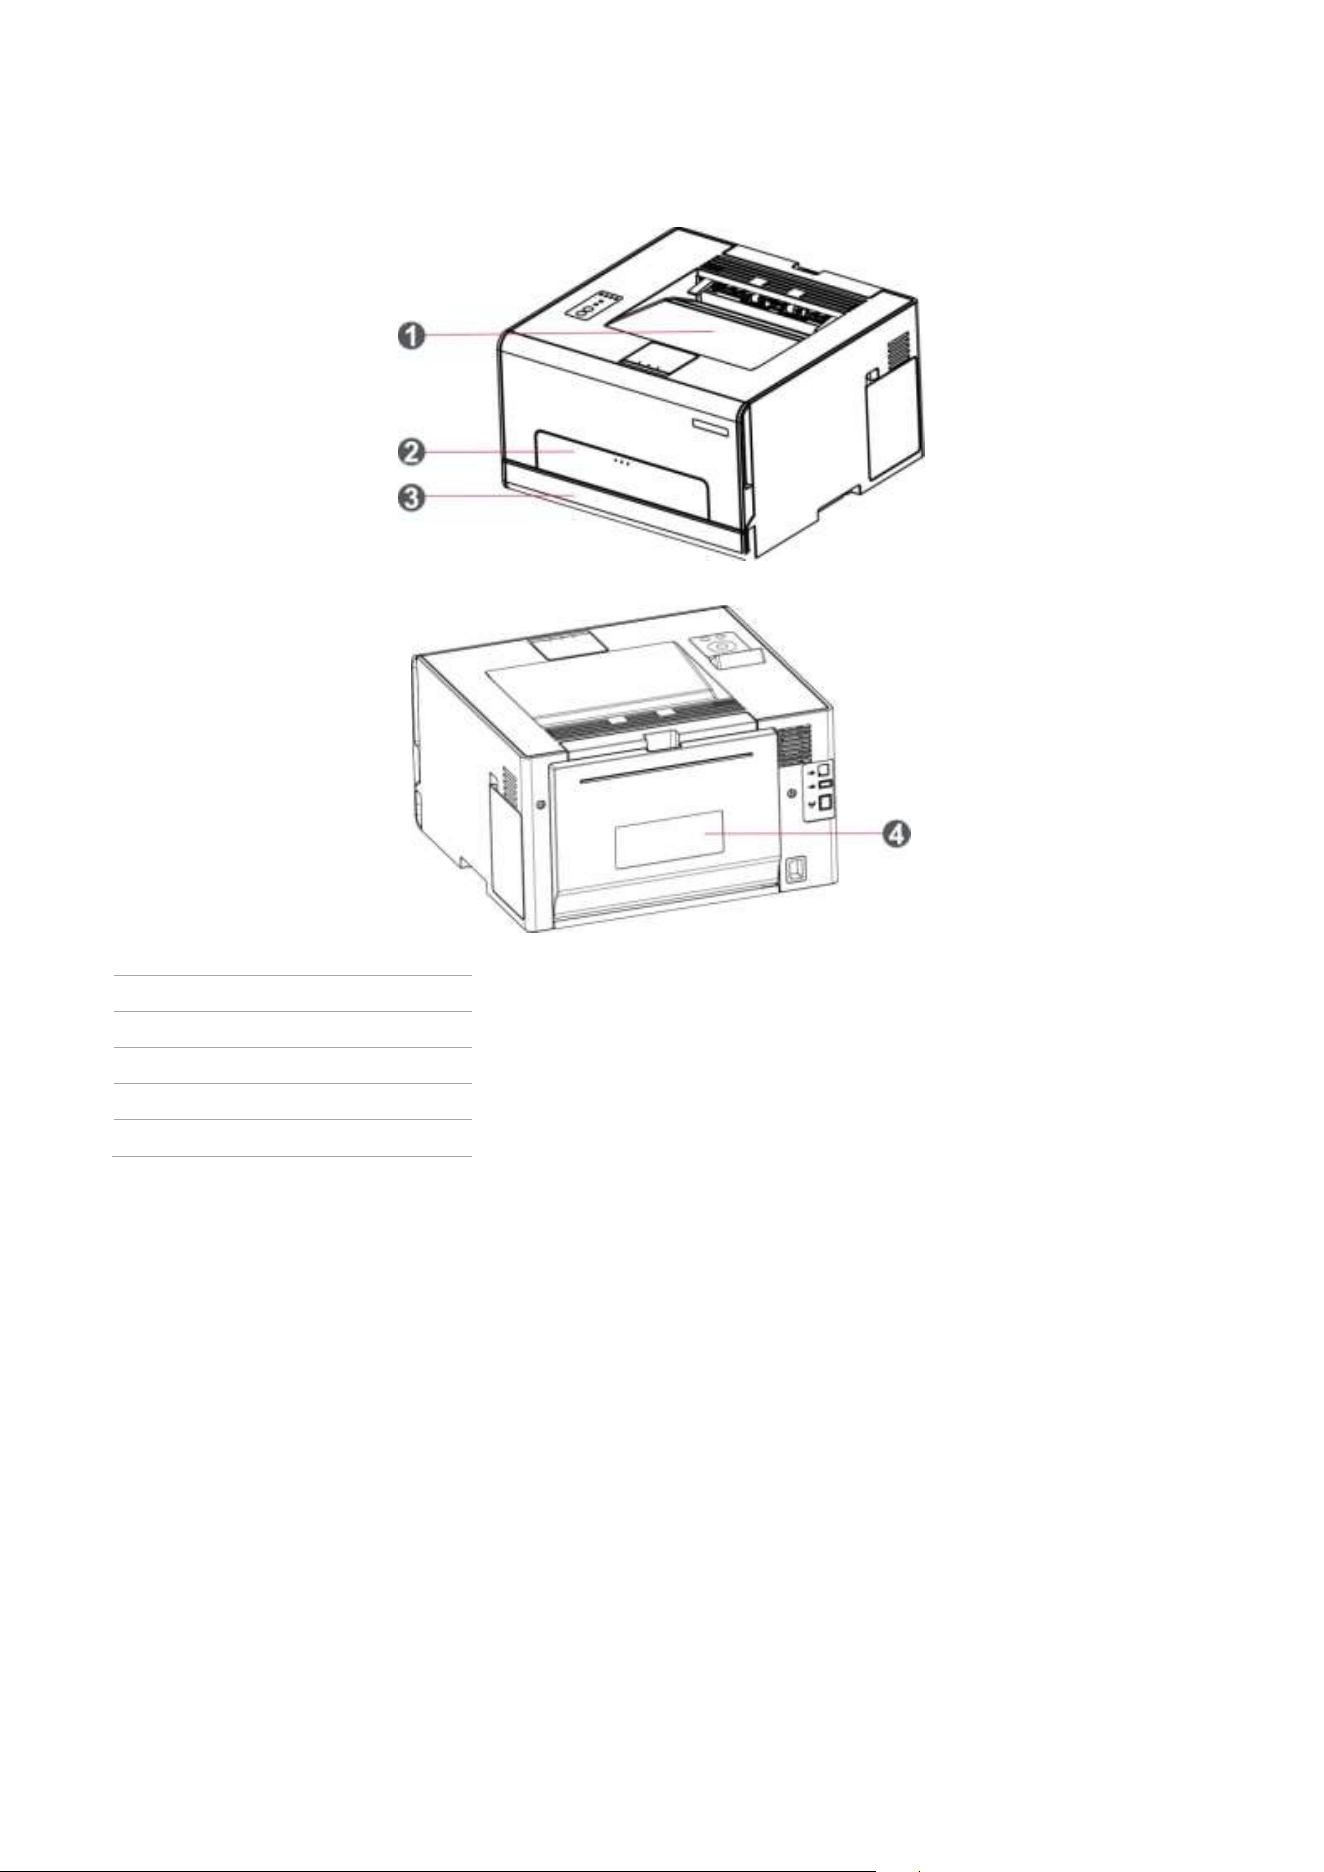
Product View
Side view
1
Control Panel
Indicate printer status to conduct set operation.
2
Standard exit
For storing the printed paper.
3
Multipurpose feed tray
For placing media to be printed in multi-purpose tray.
4
Standard feed tray
For placing the media for printing from the standard feed tray.
Note: • Printer appearance may vary depending on the printer model and configuration; the schematic
diagram is for reference only.
2
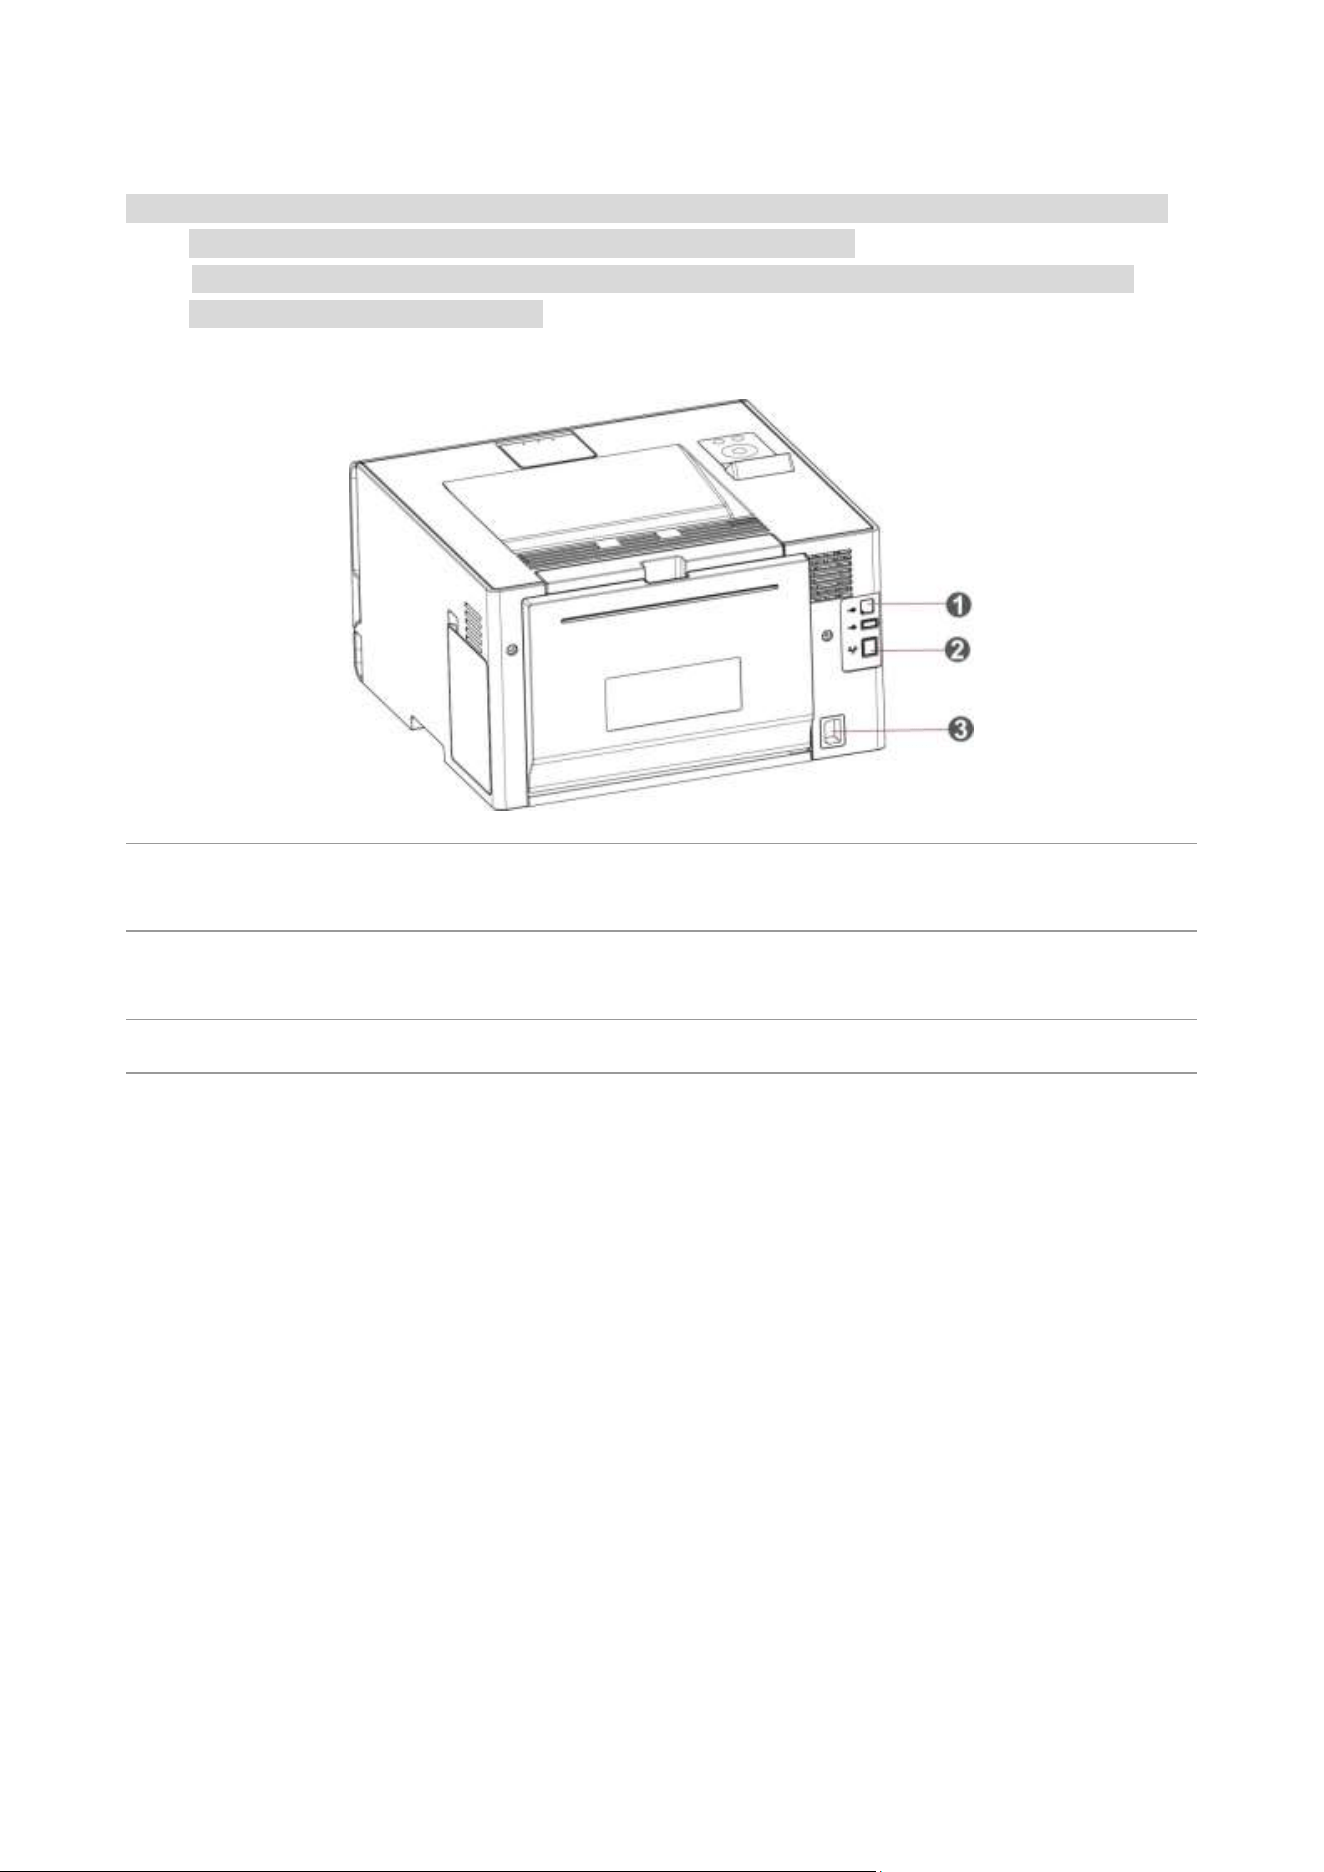
Rear View
Note: • To avoid loss of data or printer malfunction, do not touch the USB cable, any wireless network
adapter, or the printer in the areas shown in the printing process.
• Printer appearance may differ because of various models and functions, so the schematic
diagram is only for your reference.
1
USB Interface
For connecting product to computer with USB
cable.
2
Network Interface(applicable to models
supporting network function)
For connecting product to network with network
cable.
3
Power Interface
For connecting product to power with power cord.
3
Control Panel
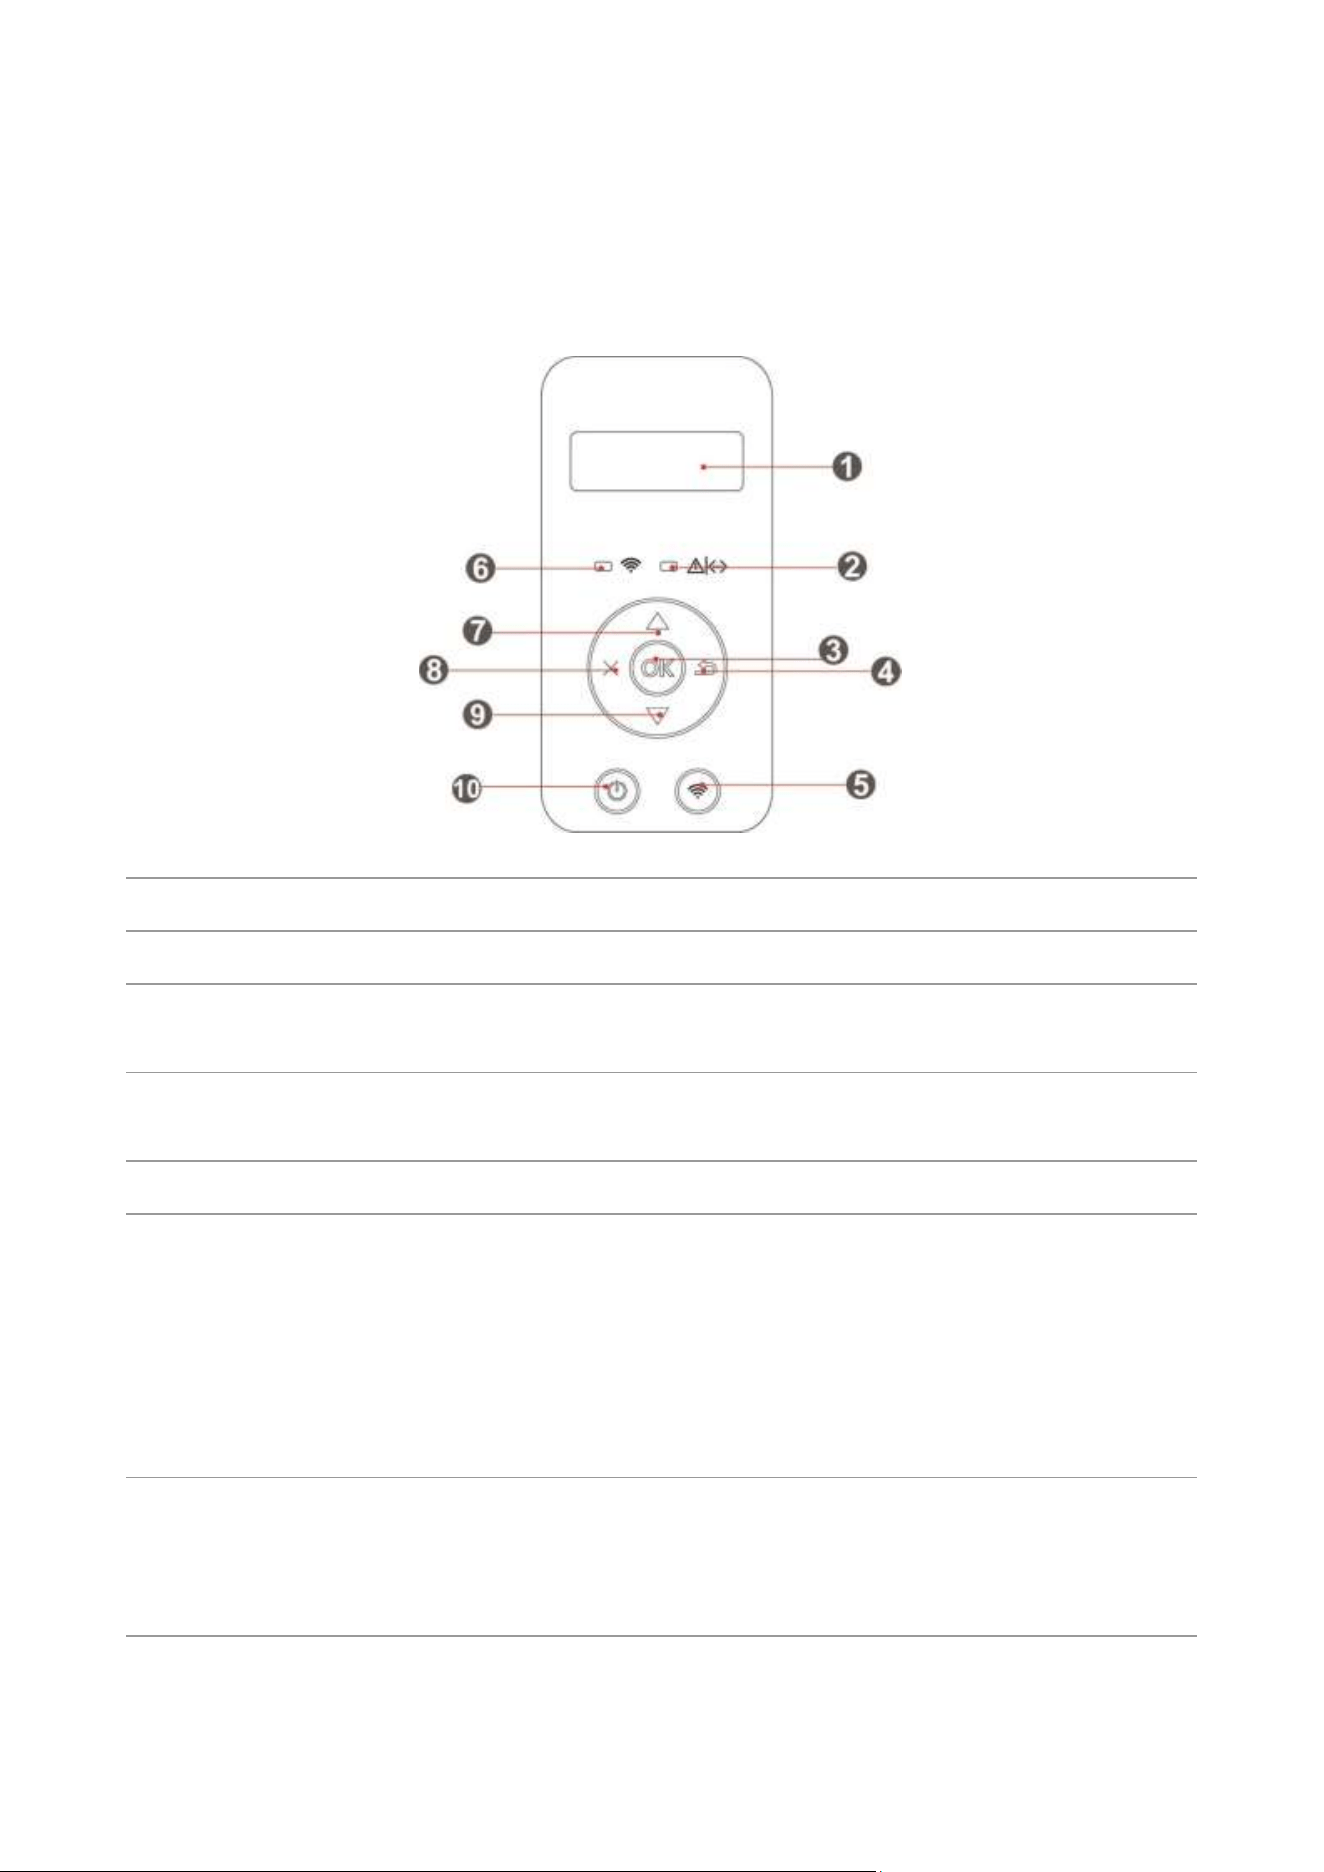
Overview of control panel
The layout of the printer control panel is shown below:
LCD control panel
No.
Name
Functions
1
LCD Display
Display operation interface and product information.
2
Toner cartridge/status
indicator
Indicate the status of toner cartridge and printer
3
OK
Confirm the selection on the screen/open the main menu on the
control panel.
4
Back
Return to the previous menu.
5
Wi-Fi key/save toner key
Short press Wi-Fi button to turn on direct Wi-Fi connection of
the printer and automatically print out "Mobile Device Wi-Fi
Connection Wizard" page (for models with Wi-Fi function only).
Long press Wi-Fi button for over 2s to start WPS when Wi-Fi is
not connected or to disconnect Wi-Fi when it has already been
connected (for models with Wi-Fi function only).
Open save toner function(applicable to non-Wi-Fi model only).
6
Wi-Fi indicator/save toner
indicator
Indicate Wi-Fi connection status (applicable to Wi-Fi model
only).
Indicate the on/off of save toner function (applicable to
non-Wi-Fi model only).
4
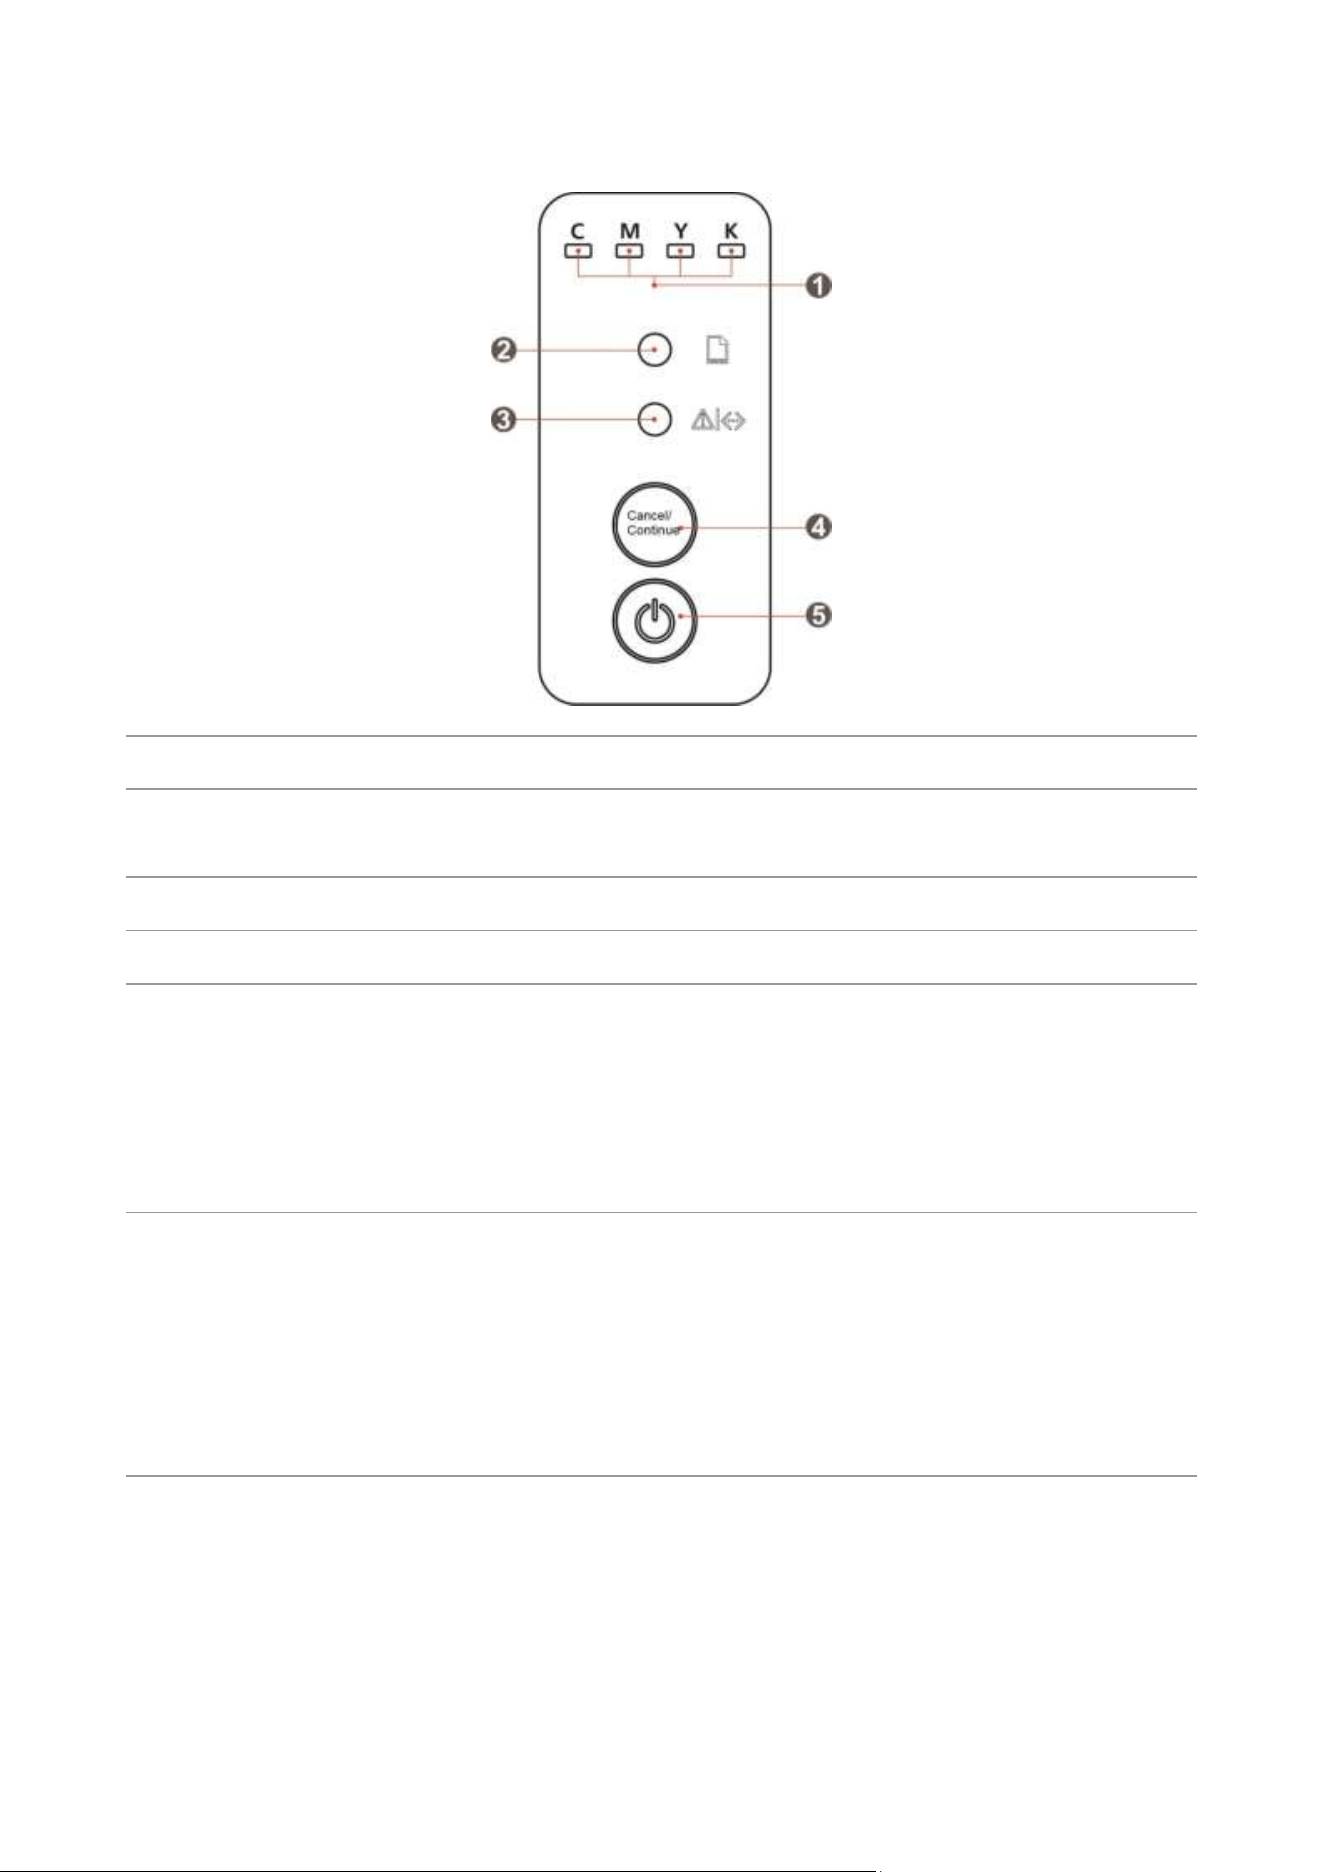
LED control panel
No.
Name
Functions
1
Consumable status
indicator
Indicate the status of consumables
2
Paper status indicator
Indicate the status of paper
3
Printer status indicator
Indicate the status of printer
4
“Cancel/Continue” button
If the printer is in sleep state, press or long press this button to wake
it up.
Press and hold this button during printing to cancel the current print
job.
When the printer is in ready state, long press this button to print the
information page.
5
“Power” button
• Turn on or off the printer.
Note: Press and hold this button for more than 2 seconds to turn off
the printer.
• When the printer is in ready state, short press this button, and the
printer enters the sleep state.
• When the printer is in sleep state, short press this button to wake up
the printer.
5
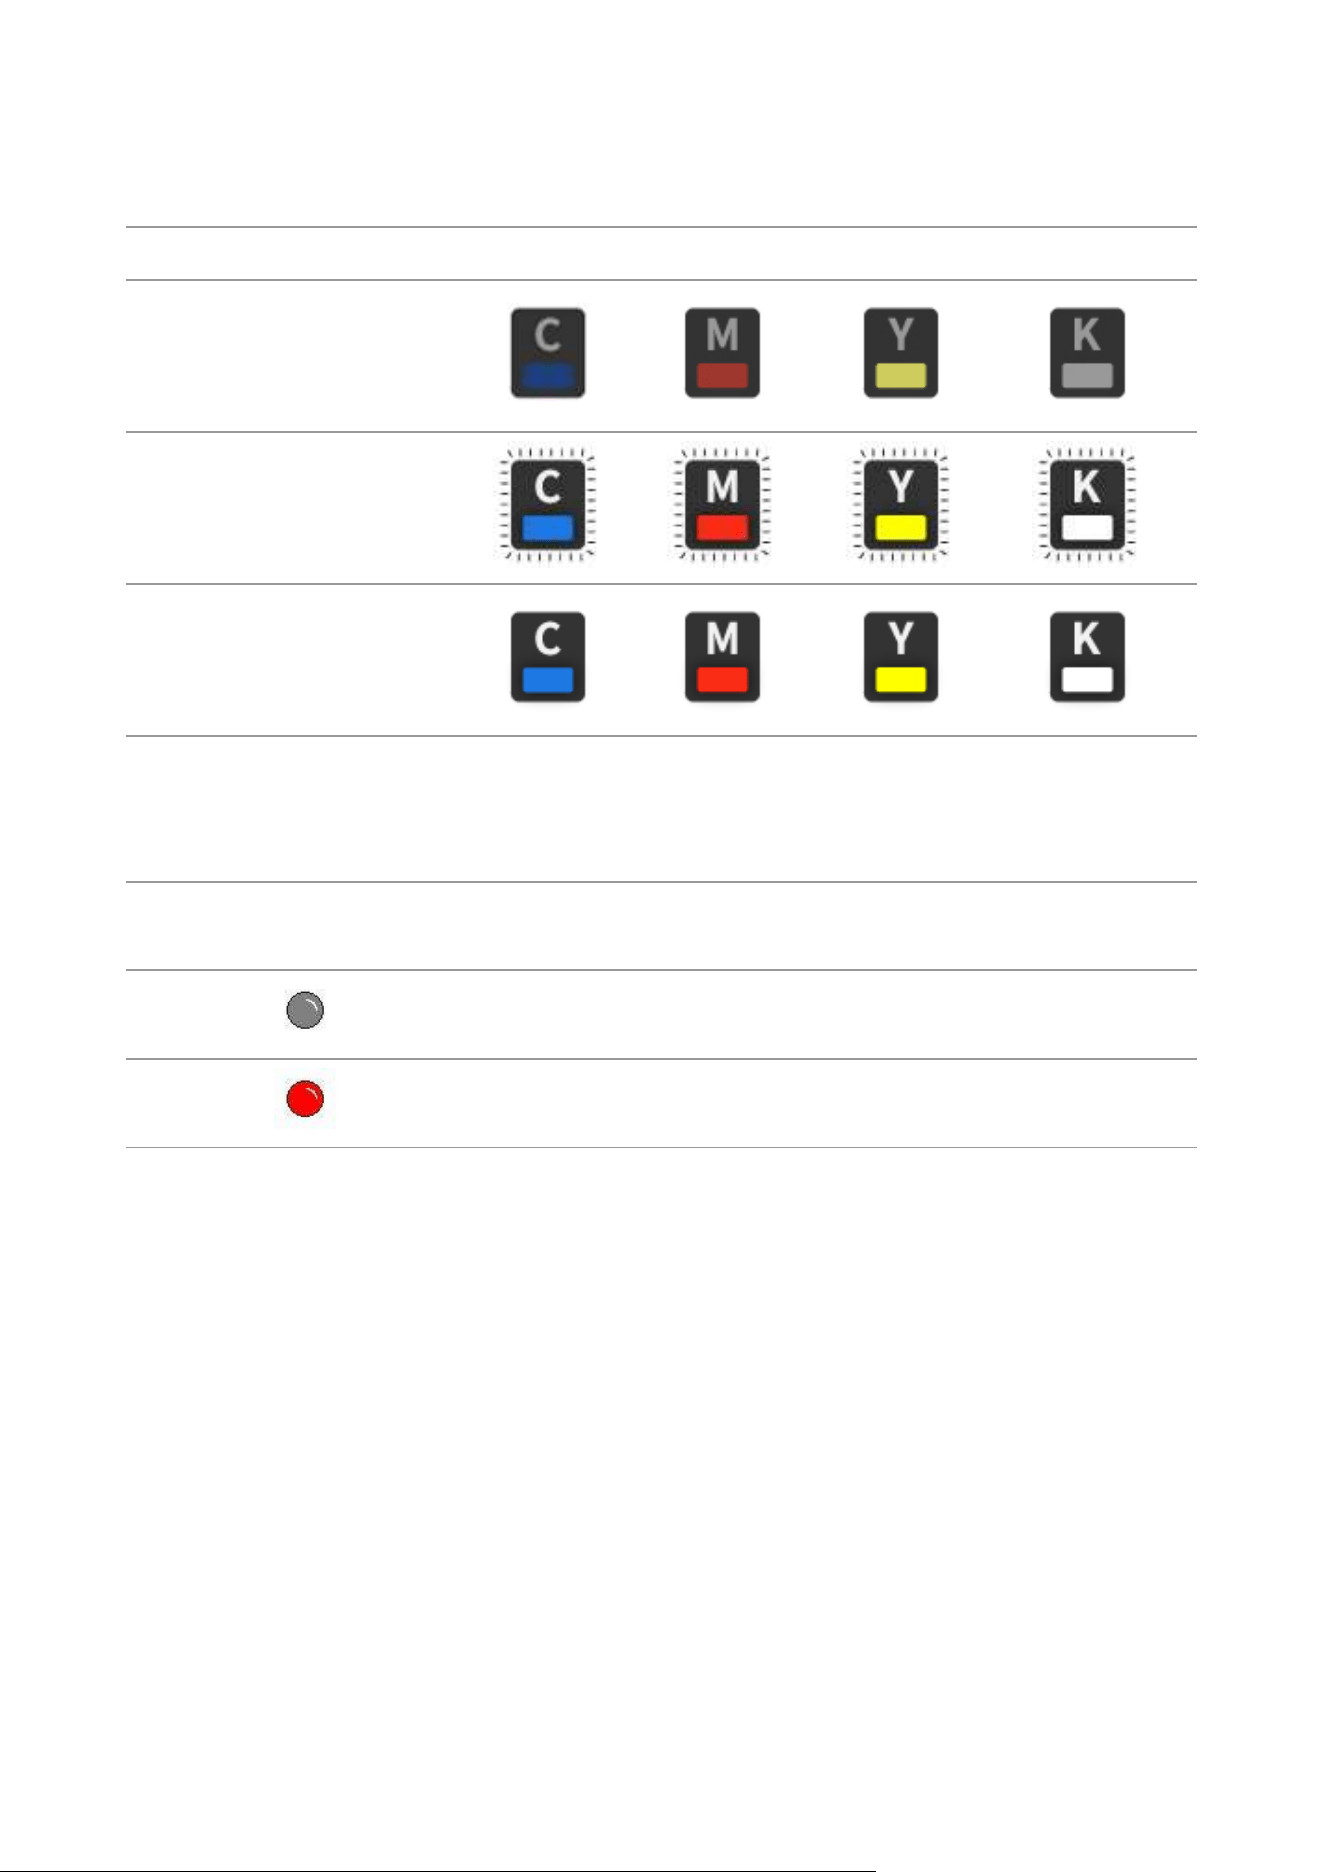
Functions of consumable status indicator
LED consumable status indicator
Status and status description
C - Cyan
M - Magenta
Y - Yellow
K – Black
Light off: Normal
Flashing:Toner is running out
Light on: Toner used up, no
toner cartridge detected, or
toner cartridge mismatched
Functions of paper status indicator
LED paper status indicator
No.
Status
indicators
Status
Status description
1
Die out
No paper abnormalities in the printer
2
Red indicator
normally on
Abnormalities in the printer tray, such as paper jam,
paper out or feed failure.

6
Functions of printer status indicator
LCD printer status indicator
No.
Status
indicators
Status
Status description
1
Die out
The printer is turned off or in “Sleep” mode.
2
Green indicator
normally on
Printer is ready.
3
Green indicator blinks
The printer is warming up, printing, processing,
canceling, and calibrating.
4
Red indicator normally
on
Printer failure.
5
Orange indicator
normally on
Indicate that the printer’s toner cartridge is abnormal
(not found, mismatched, life expired) and that the waste
toner box is full or not found.
6
Orange indicator
blinks
When the printer is in a warning state (the toner in
cartridge runs low or the waste toner bottle is nearly
full).
LED printer status indicator
No.
Status
indicators
Status
Status description
1
Die out
The printer is turned off or in “Sleep” mode.
2
Green indicator
normally on
Printer is ready.
3
Green indicator
blinks
The printer is warming up, printing, processing,
canceling, and calibrating.
4
Red indicator
normally on
Printer failure (except for waste toner bottle failure).
5
Orange indicator
normally on
The waste toner bottle is not installed in the printer, and
the waste toner bottle is full.
6
Orange indicator
blinks
The waste toner bottle is nearly full.

7
Wi-Fi indicator/Toner Save indicator
No.
Status
indicators
Status
Status description
(applicable to Wi-Fi model
only)
Status description (applicable
to non-Wi-Fi model only)
1
Die out
Wi-Fi disconnected and
sleep mode
Turn save toner state function
and sleep mode
2
Green indicator
blinks
Wi-Fi connecting
None
3
Green indicator
normally on
Wi-Fi connected
Turn on save toner function
Functions of power indicator
No.
Status
displayed by
power
indicator
Status
Status description
1
Die out
The printer is powered off.
2
Always on
Printer is not in sleep state (printer ready, printing,
processing, etc.).
3
Blink
The printer is in sleep state.

8
02 Paper and Print Media
Paper Specification
Standard
feed tray
Media Type
Plain paper1(70 89g/m²), Plain paper2(90 105g/m²),thin
paper(60
69g/m²)
Media size
A4,A5, A6,Legal,Letter,JIS-B5, ISO B5, Executive , Folio , Oficio ,
Statement ,16K,32K, Big 16K, Big 32K, B6,Customize paper
Media weight
660 105 g/m²
Maximum
capacity of the
tray
250 pages (80 g/m²)
Multipurpose
feed tray
Media Type
Plain paper1(70 89g/m²), Plain paper2(90 105g/m²),thin
paper(60
69g/m²),thick paper1(106 130g/m²), thick
paper2(130
176g/m²),transparent film,carton paper,label paper,
envelope
Media size
A4, A5, A6, Legal, Letter, JIS-B5, ISO B5, Executive , Folio , Oficio ,
Statement ,16K,32K, Big 16K, Big 32K, No.10 Env., Monarch Env, DL
Env, C5 Env, C6 Env, ZL, Janpanese Postcard, Yougata4, Younaga3,
Nagagata3, Yougata2, Postcard, B6, Customize paper
Media weight
660 200 g/m²
Maximum
capacity of the
tray
1 pages
Note: • 80 g/m² standard paper is recommended for this printer.
• It is not recommended to use special paper extensively, which may affect the service life of the
printer.
• The print media that does not meet the guidelines listed in this User Guide may result in poor
print quality, increased paper jam and excessive wear of the printer.
• Properties such as weight, composition, texture and humidity are important factors affecting
the printer performance and output quality.

9
Special Paper
This printer supports using the special paper for printing. Special paper includes: label
paper,envelope, transparent film, thick paper,carton paper, thin paper.
Note: • When using special paper or print media, be sure to select matched print type and size in the
print settings so as to get the best print effect.
Please observe the following standards:
Types of Print
Media
Correct Practices
Incorrect Practices
Label Paper
Use labels with no exposed lining paper
only.
Labels shall be put flat when using.
Use labels of full sheet only.
There is no guarantee that all the labels
in the market can meet corresponding
requirements.
Use wrinkled, blistered or damaged label
papers.
Envelope
Envelopes should be loaded evenly.
Use only unsealed envelope paper.
Use wrinkled, nicked, stuck or damaged
envelopes.
Use envelopes with clips, snaps, windows,
or coated linings.
Use envelopes with self-adhesive stickers
or other synthetic materials.
Transparent
Film
Only use transparent films approved for
use in laser printers.
Use transparent print media that is not
suitable for laser printers.
Thick Paper,
carton paper
Only use heavy paper that is approved
for use in laser printers and meets the
weight specifications of this printer.
Use the paper whose weight is more than
the specification of the media
recommended for this printer, unless the
paper is approved for use in this printer.
10
Loading Paper
Note: • Printer appearance may differ because of various models and functions, so the schematic
diagram is only for your reference.
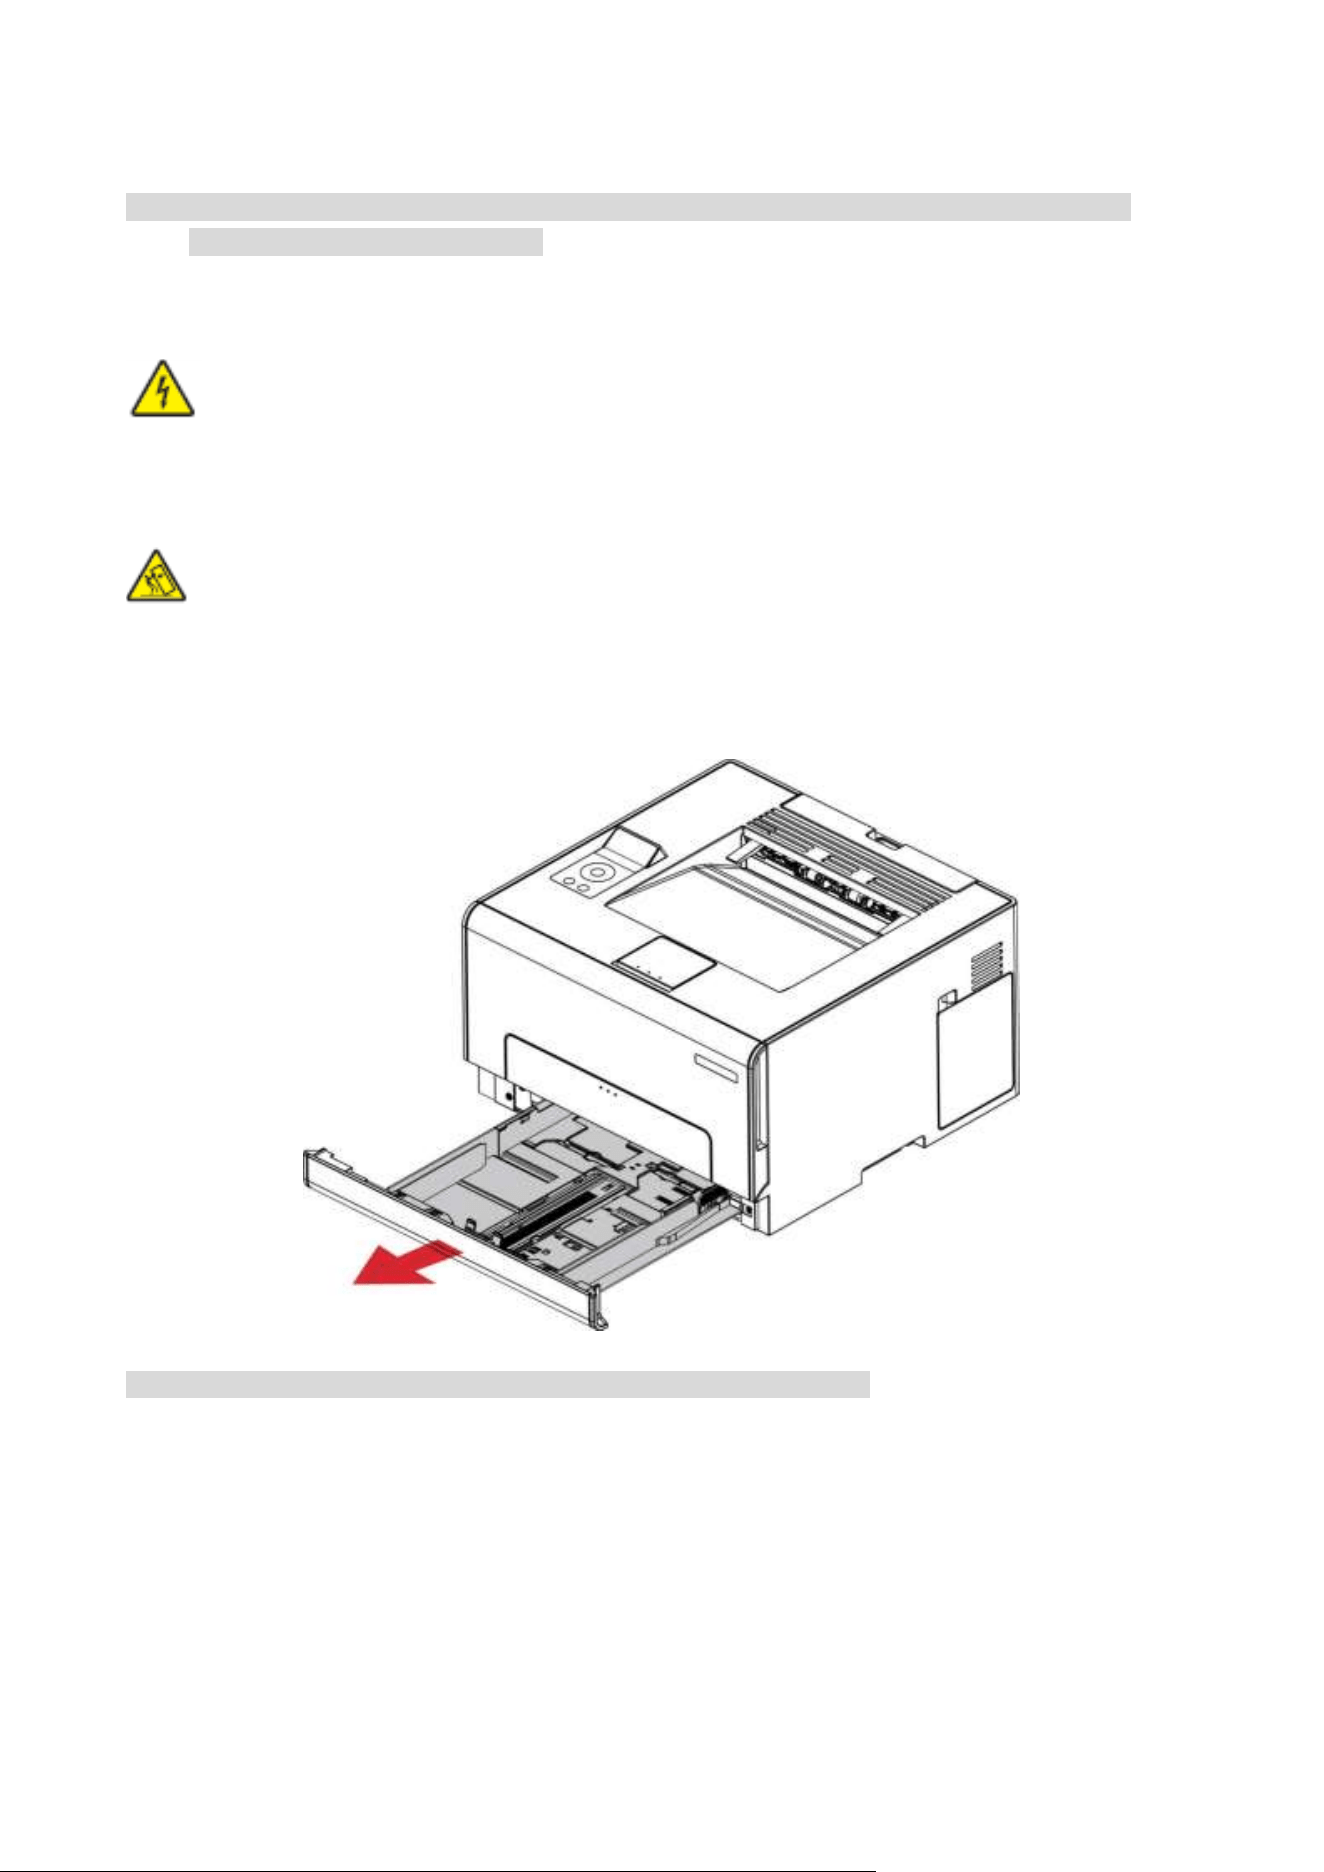
Load in the standard feed tray
:To avoid the risk of electrical shock, if you are accessing the controller board or memory
devices after setting up the printer, turn the printer off, and unplug the power cord from the
electrical outlet before continuing. If you have any other devices attached to the printer, turn them
off as well, and unplug any cables going into the printer.
:To reduce the risk of equipment instability, load each tray separately. Keep all other trays
closed until needed.
1. Remove the standard feed tray from the printer completely.
Note:• To avoid paper jams, do not remove the tray while the printer is busy.
11
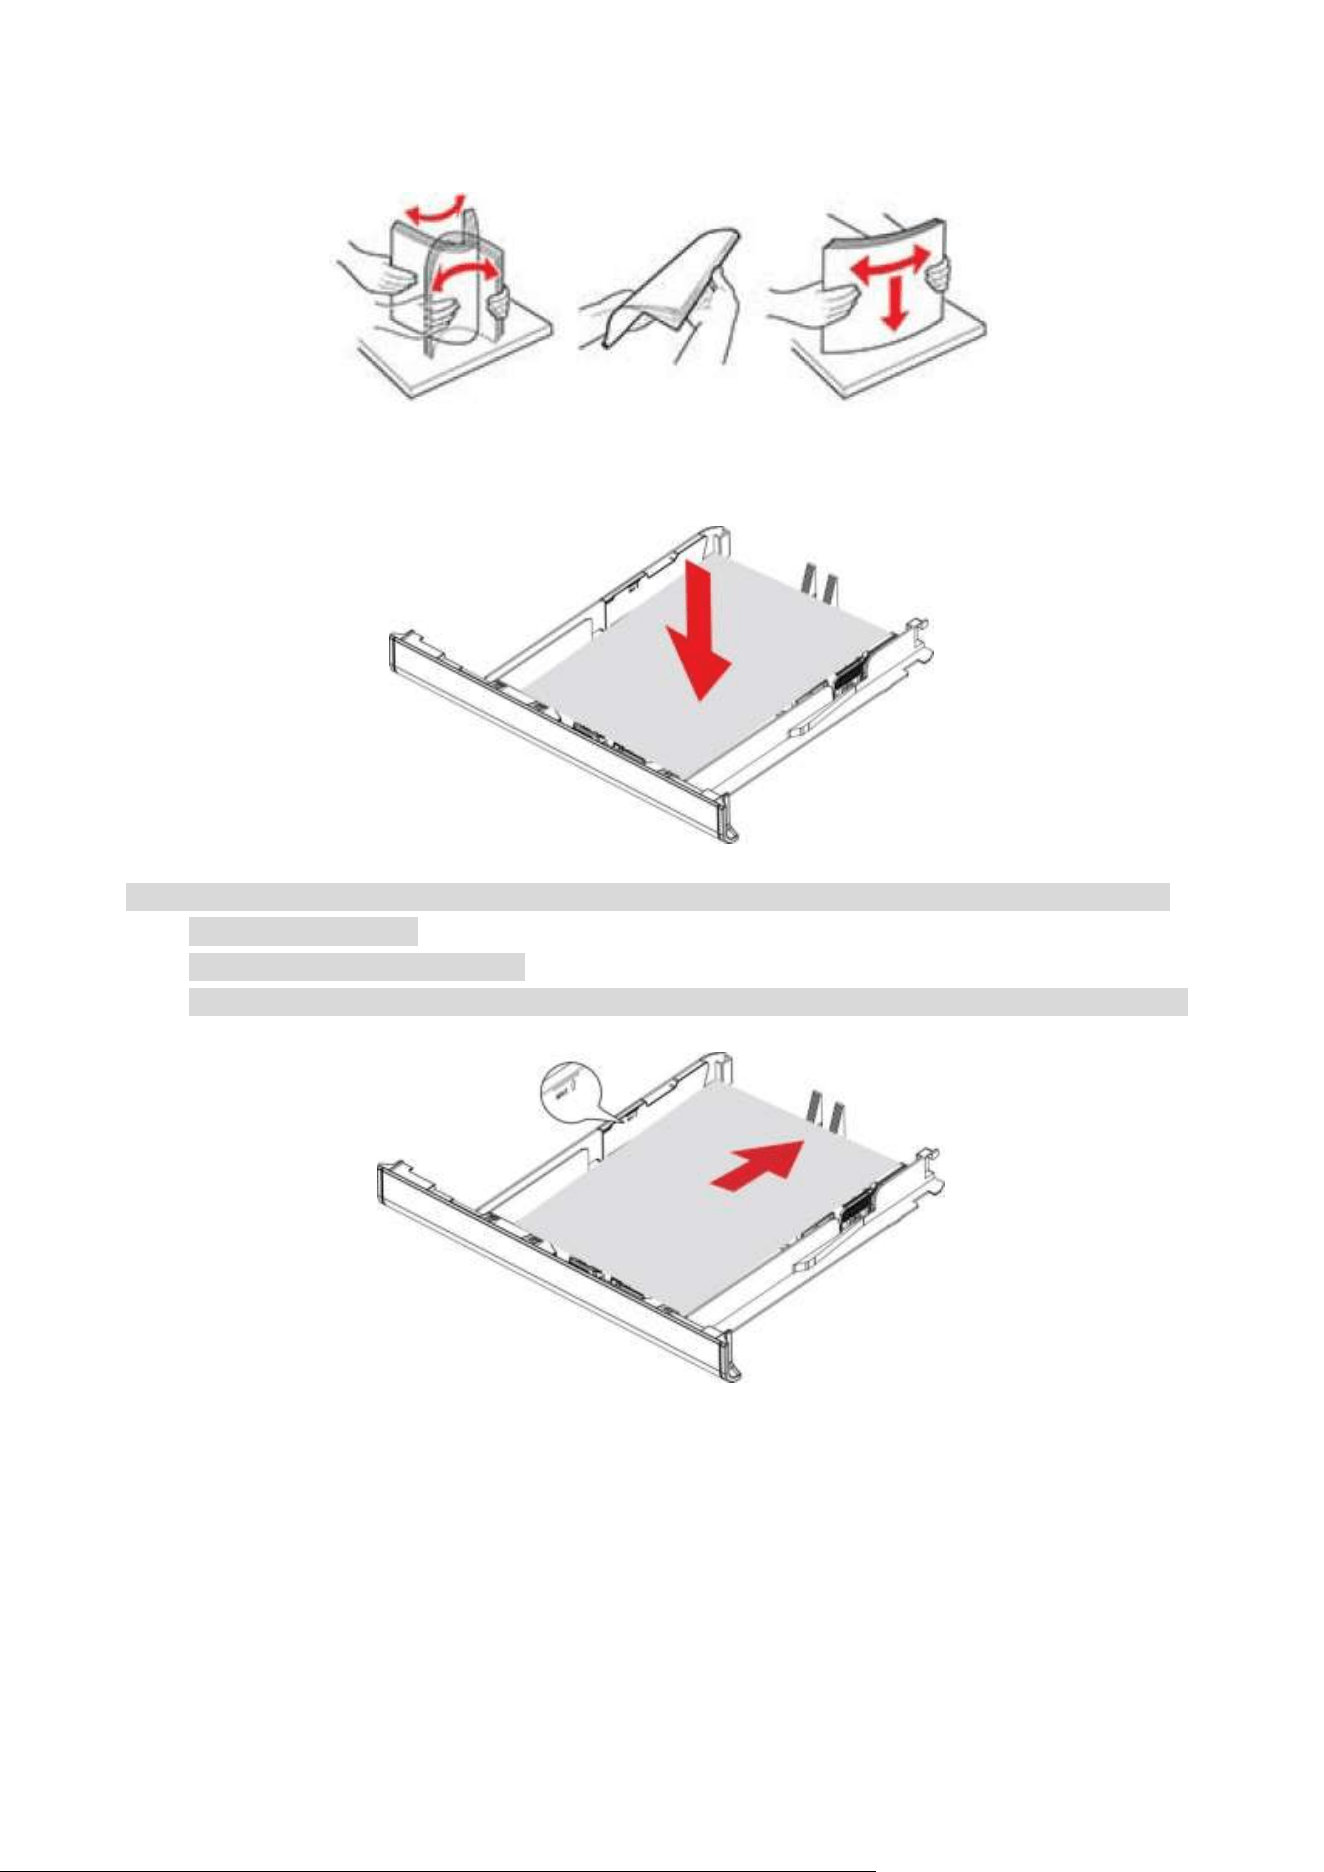
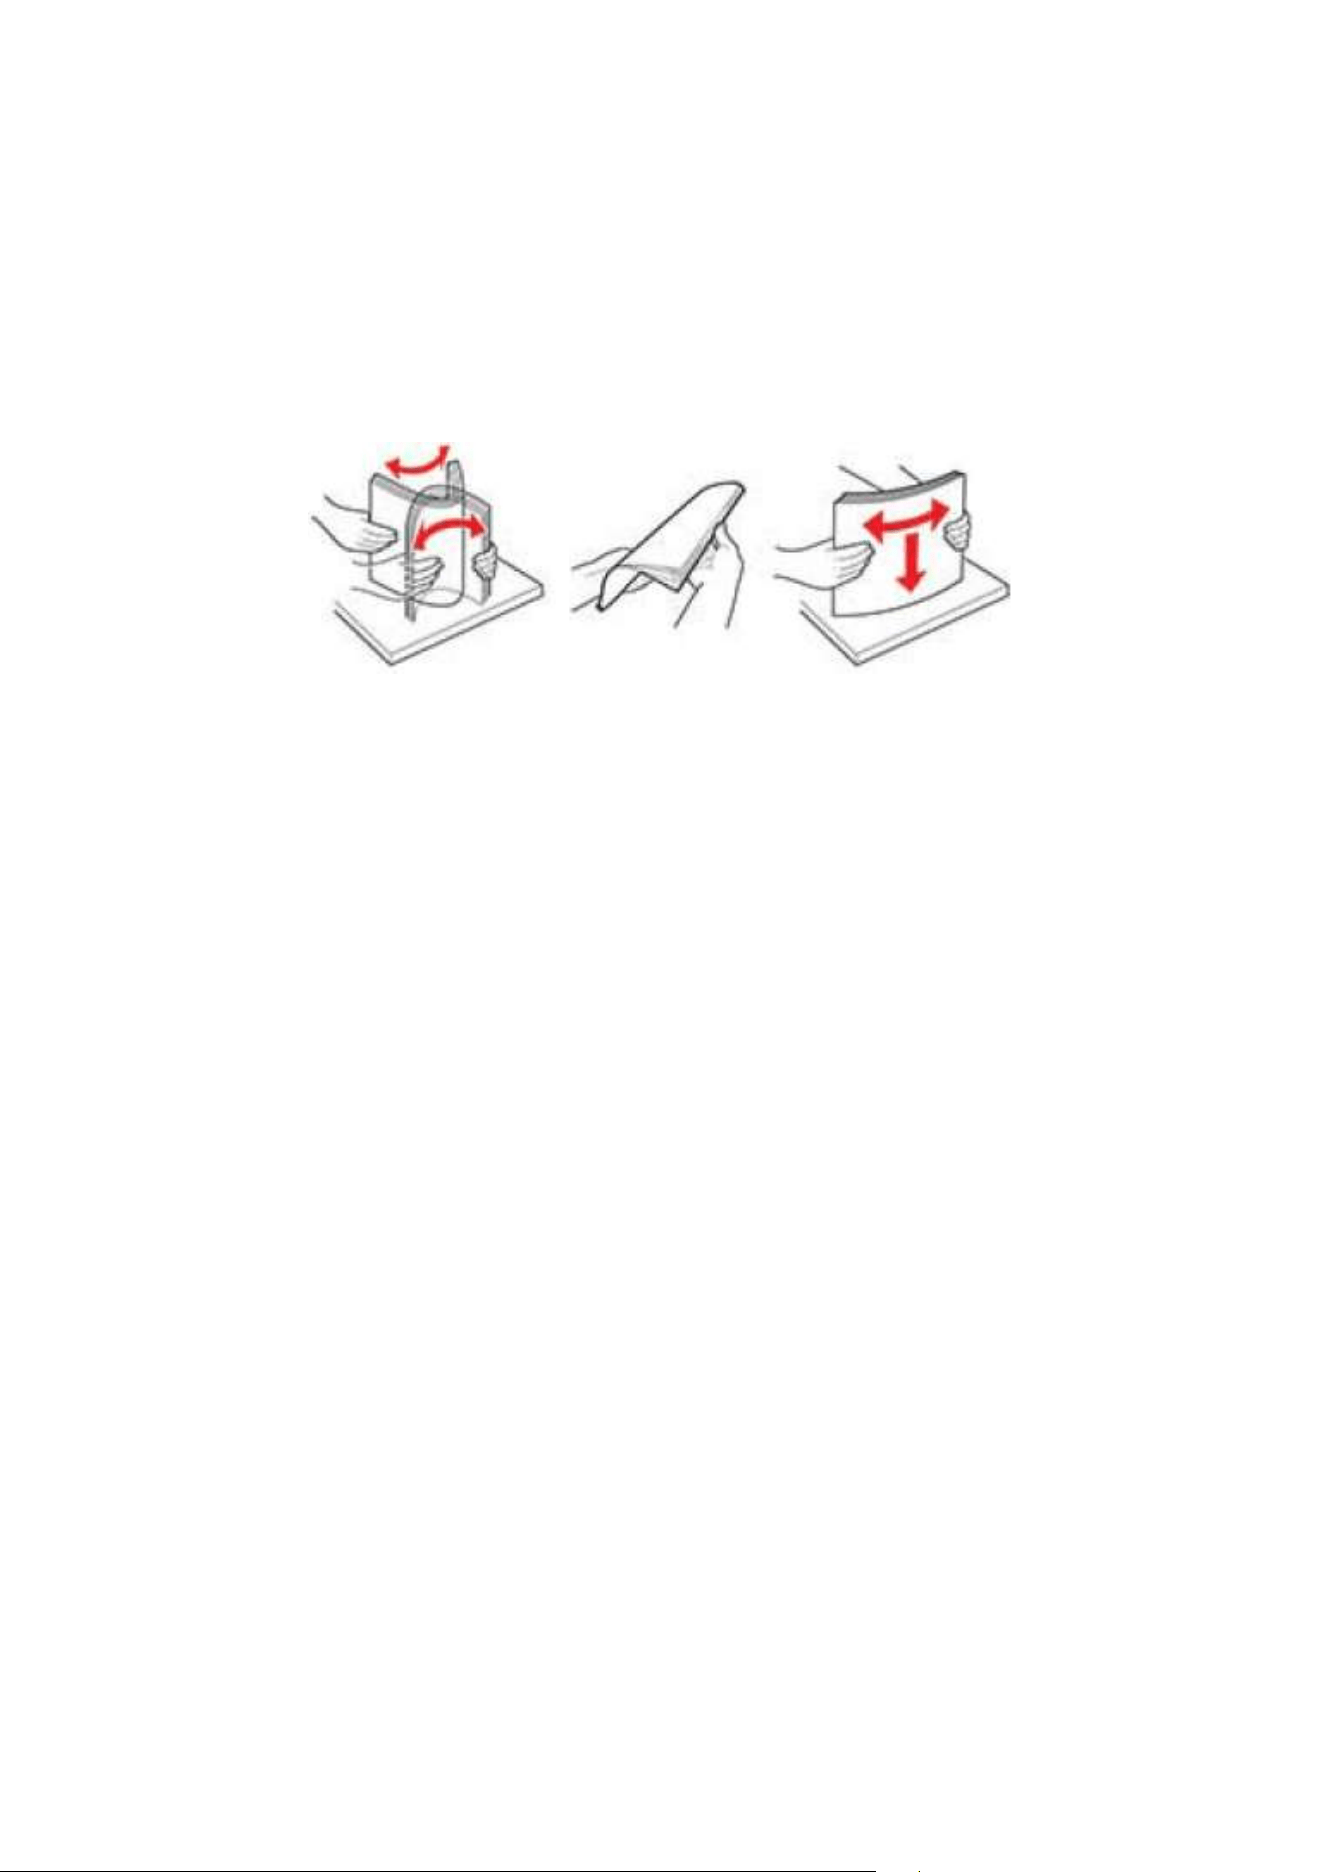
2. Flex, fan out and align the paper edges before loading.
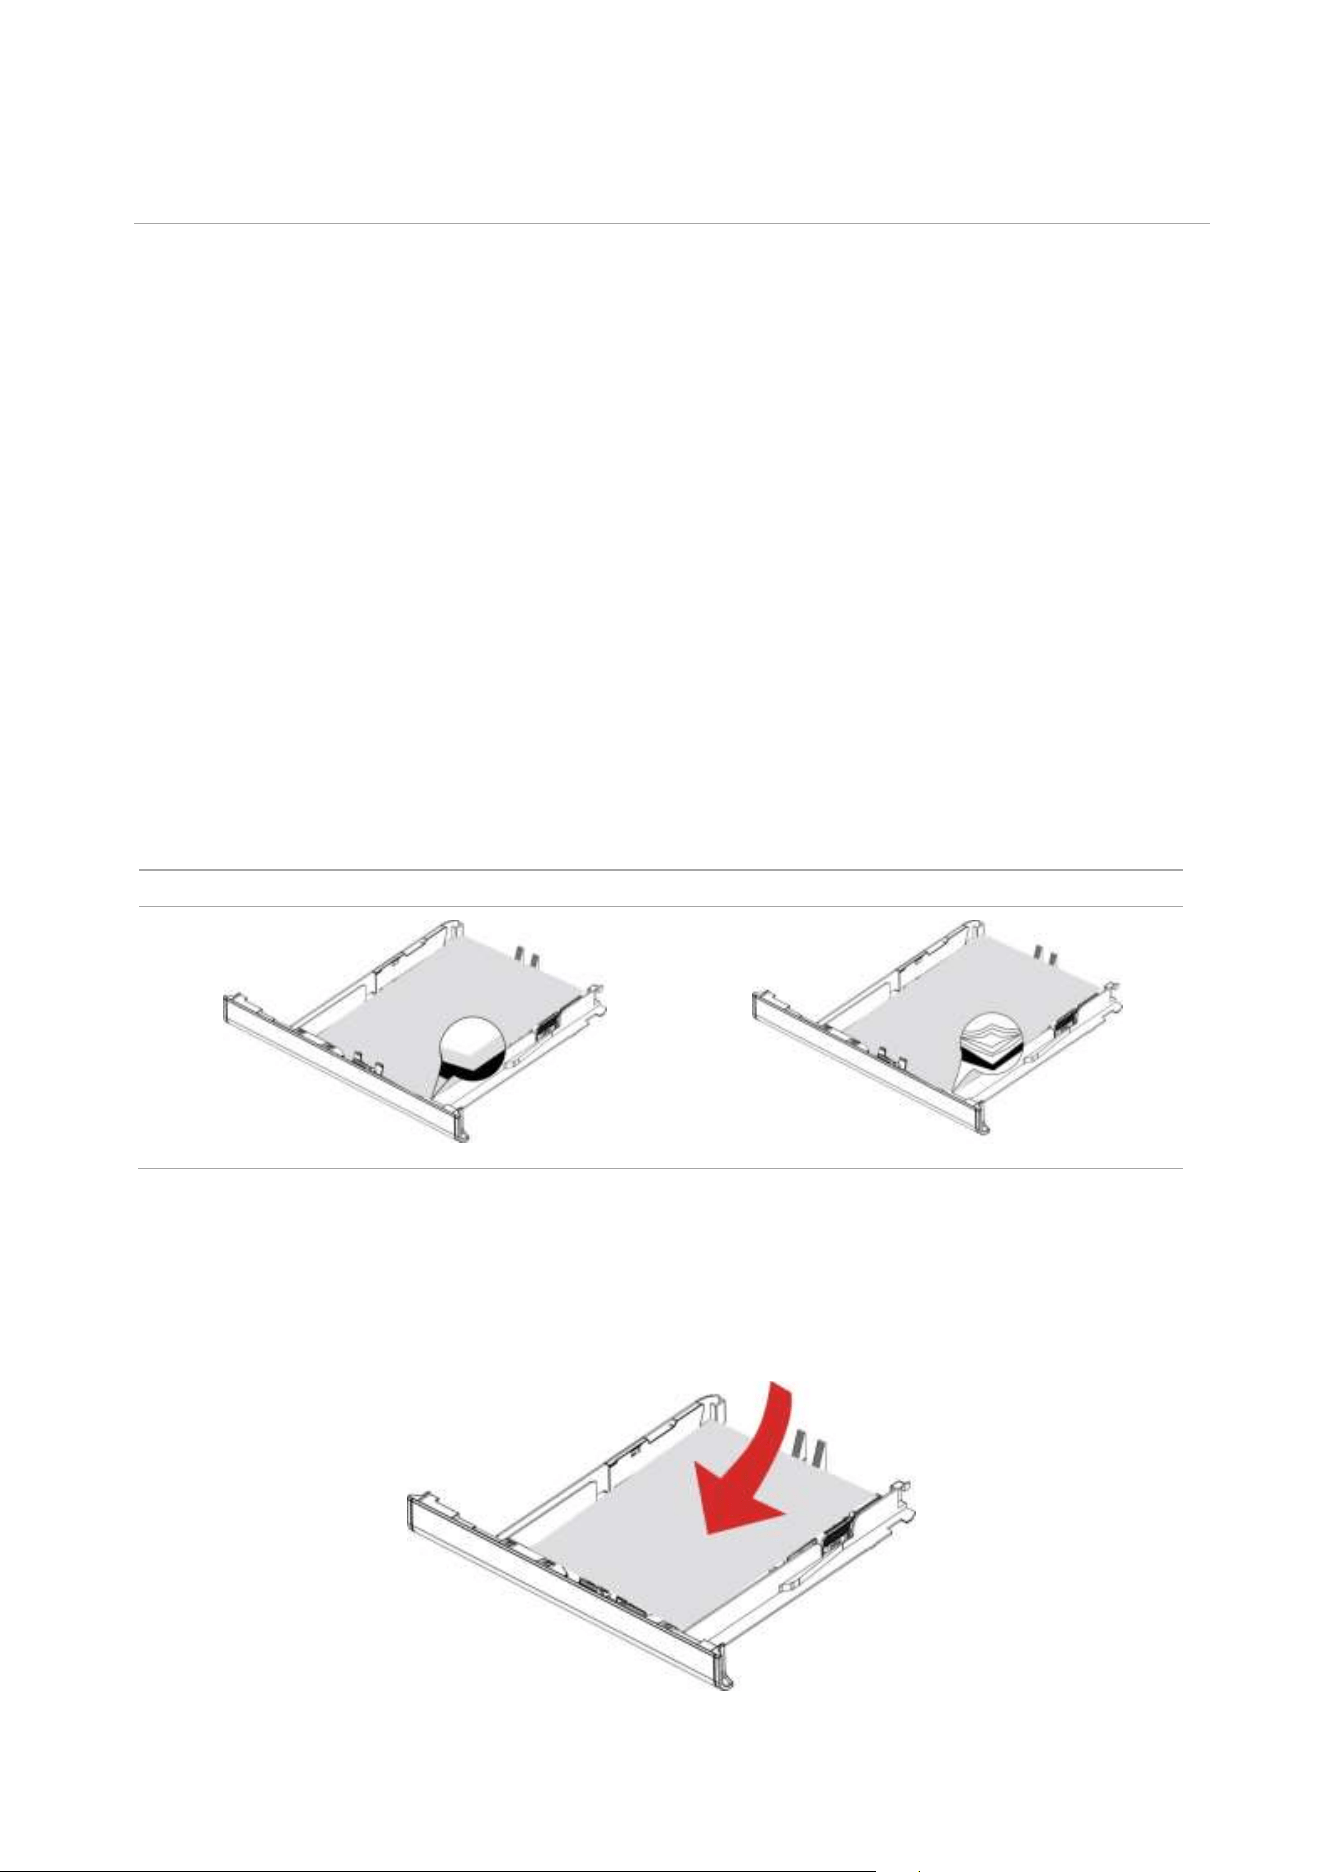
3. Load the paper with the printable side facing up.
Note: • For single-sided printing, load the paper with the printing side facing up and the header facing
the inside of the tray.
• Do not slide paper into the tray.
• To avoid paper jams, make sure that the stack height is below the maximum paper fill indicator.
12
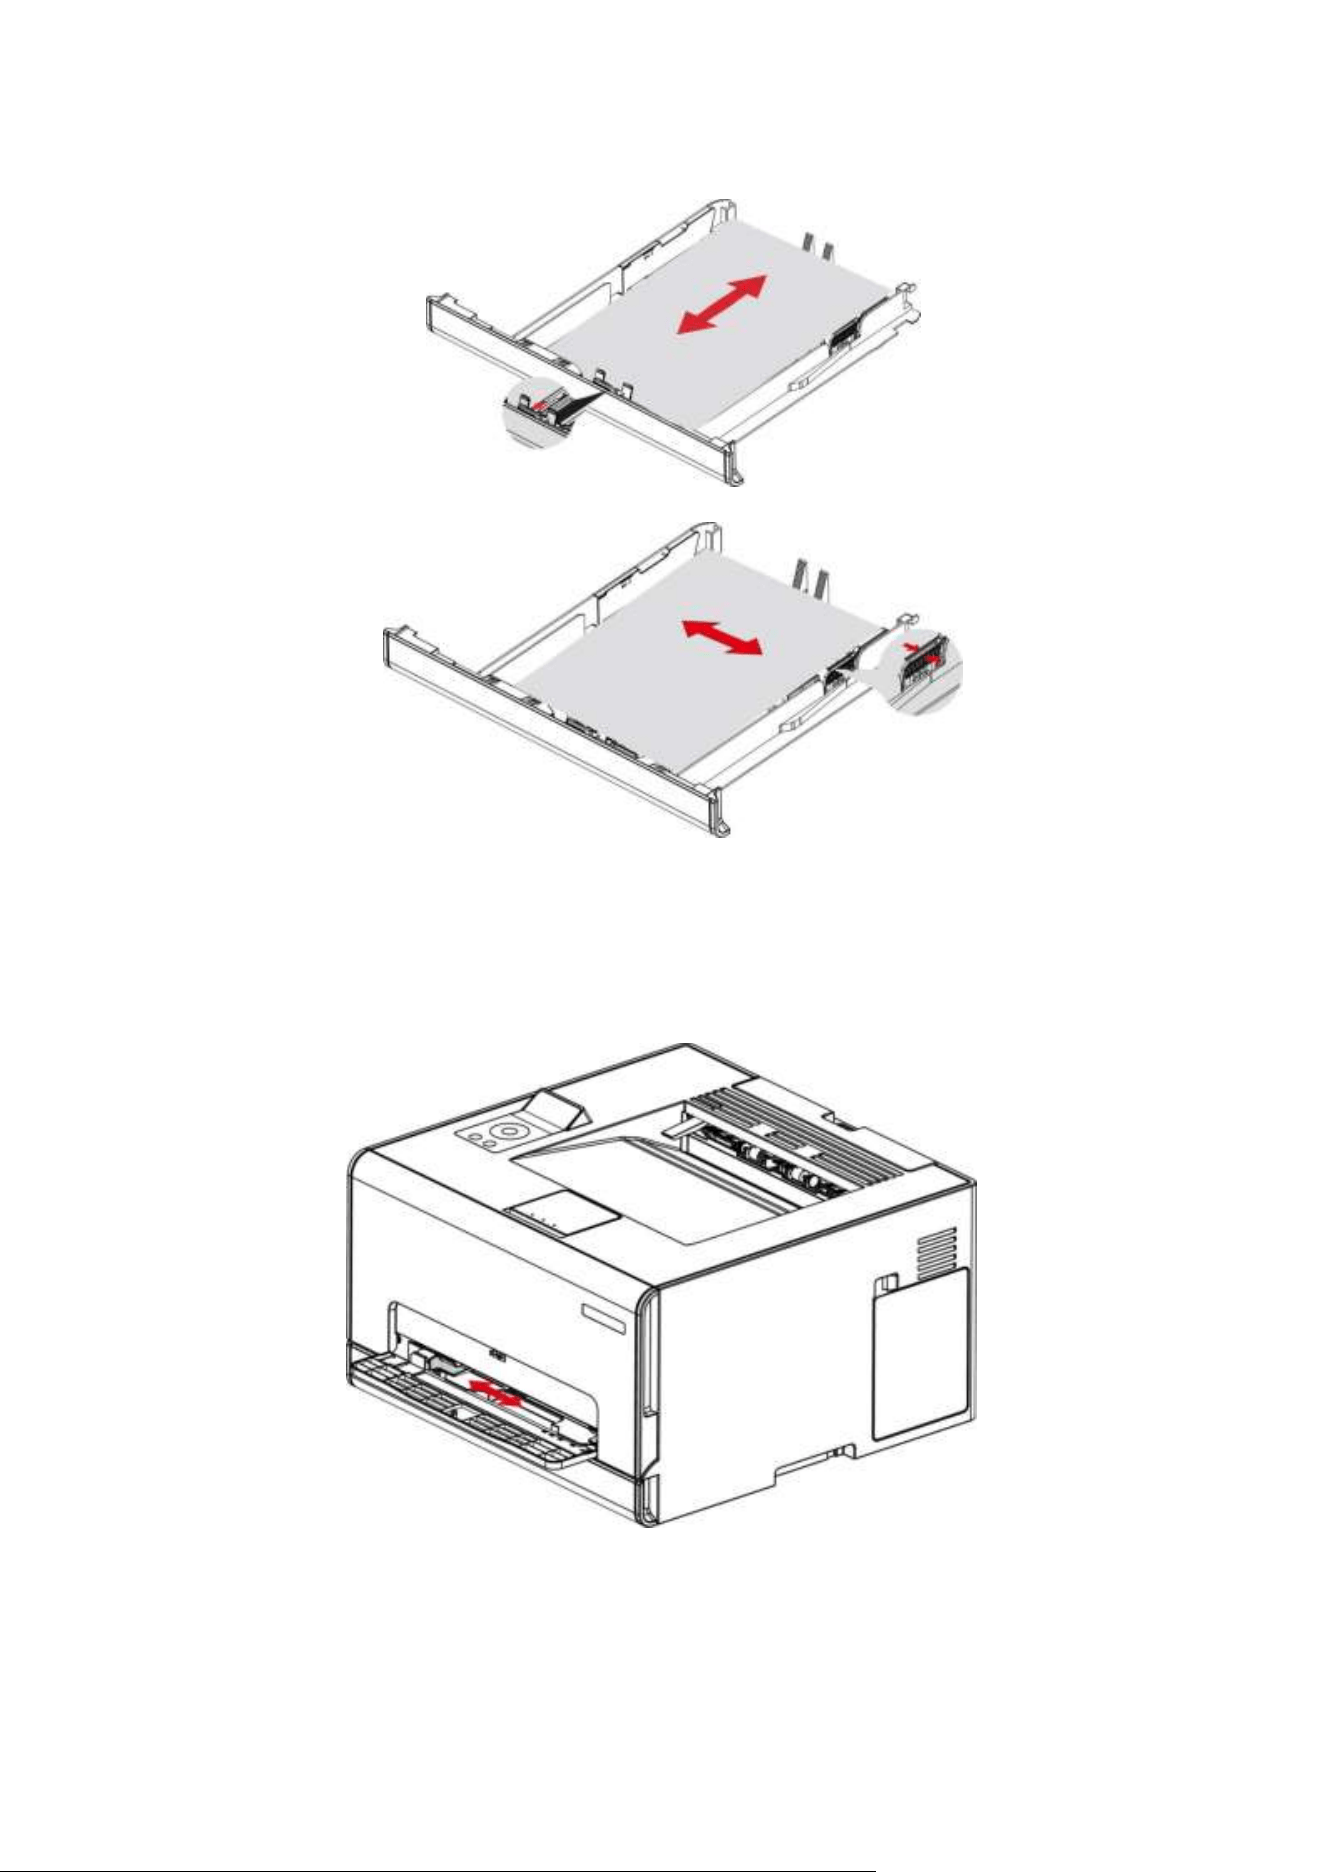
4. Adjust the guide to match the size of the loaded paper.
5. Insert the tray.
Install the multipurpose feed tray
1. Adjust the guide to match the size of the loaded paper.
13
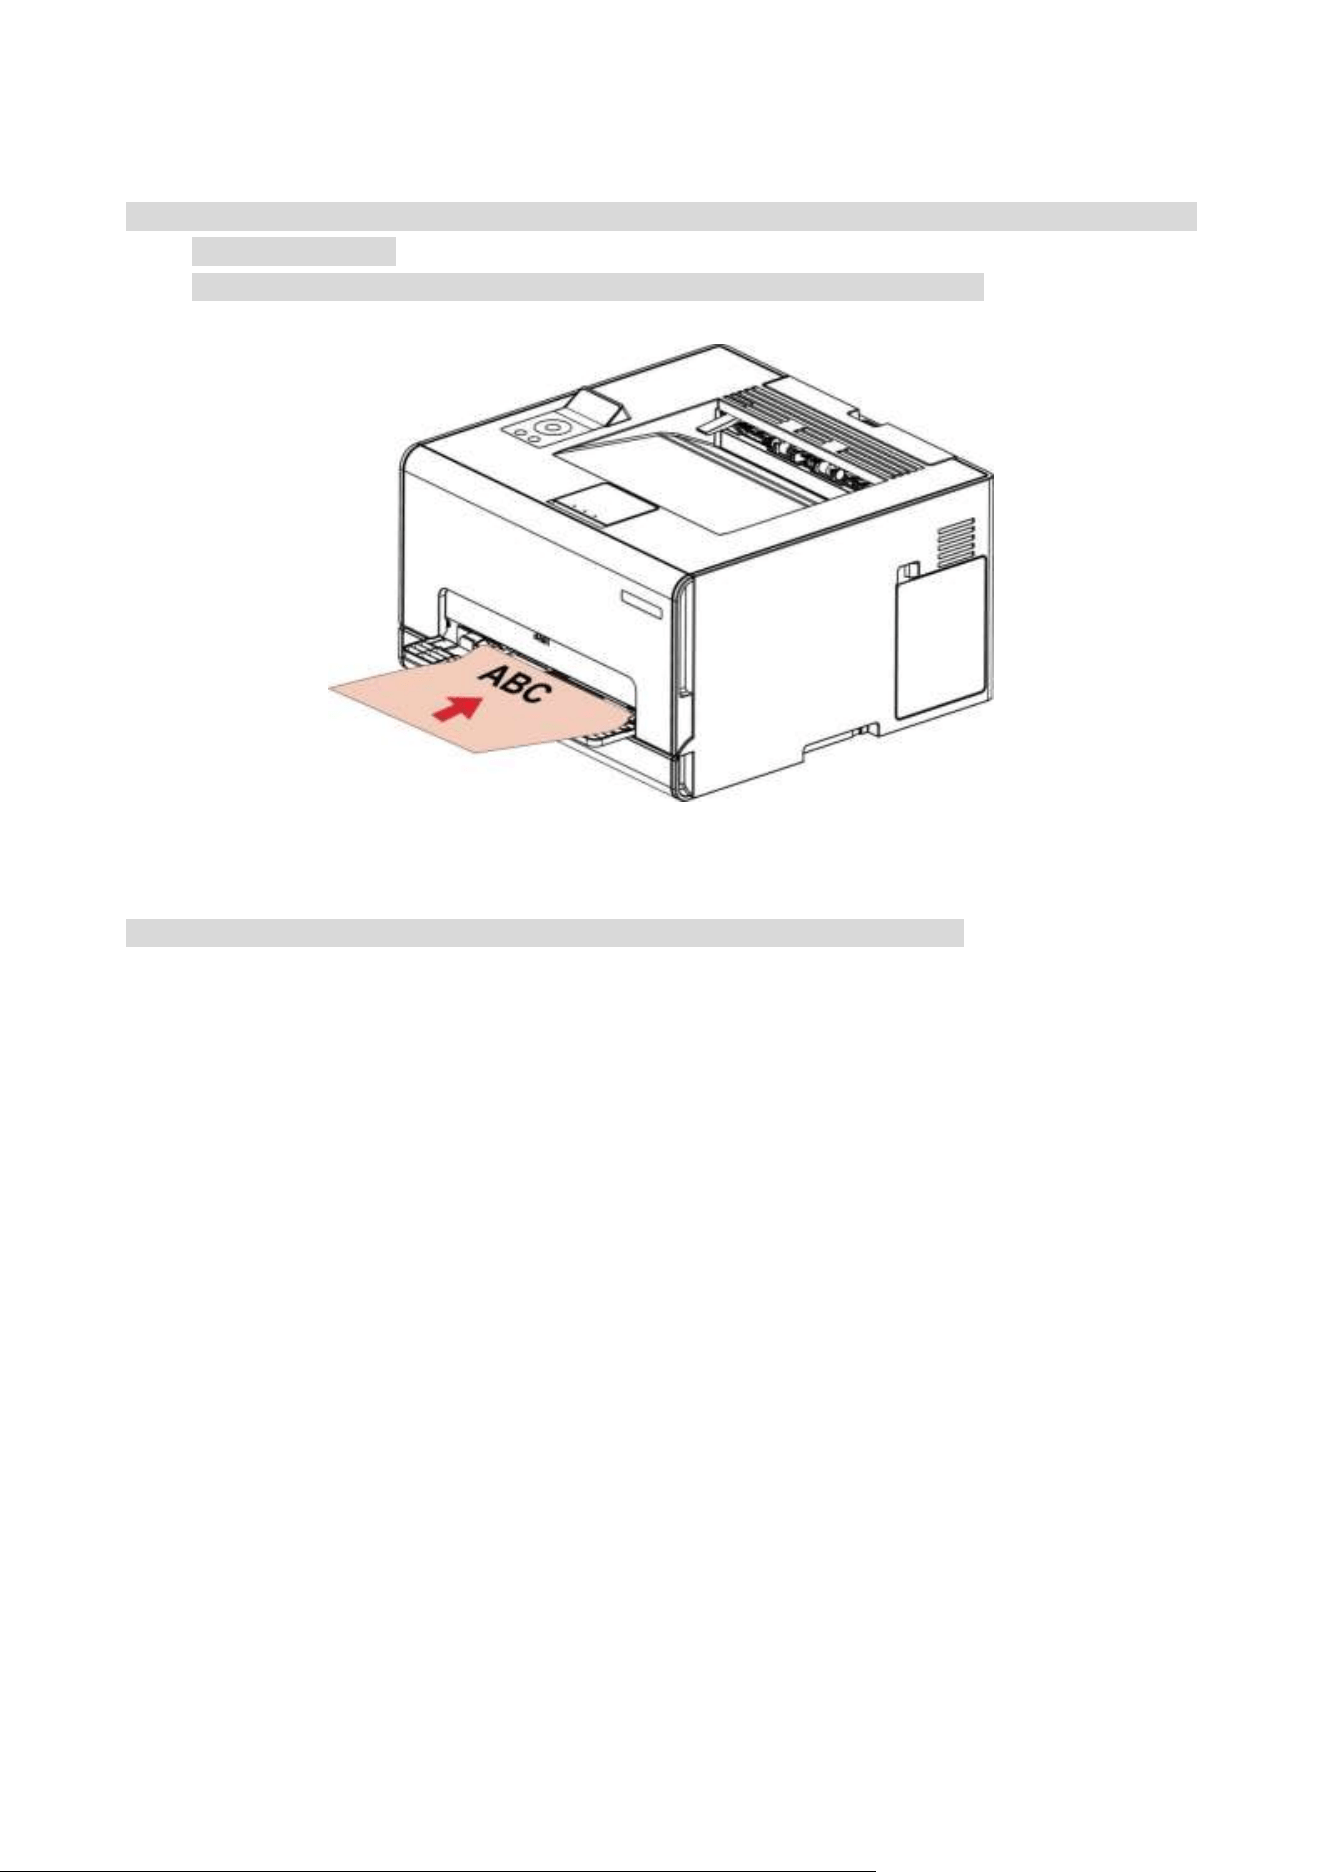
2. Load a sheet of paper with the printable side facing up.
Note: • For single-sided printing, load the paper with the printable side facing up and the top edge going
into the printer first.
• For better printing effect, it is recommended to use new, undamaged paper.
3. Feed the paper until its front edge is pulled in.
Note: • Do not force the paper into the multi-purpose feed tray to avoid paper jam.

14
03 Driver installation and uninstallation
Driver Setup
This software provides a one-click installation method for driver installation on Windows and
macOS systems, which can help you automatically complete the driver installation faster and more
easily.
Note: • Driver installation interface may differ because of different models and functions, so the
schematic diagram is only for your reference.
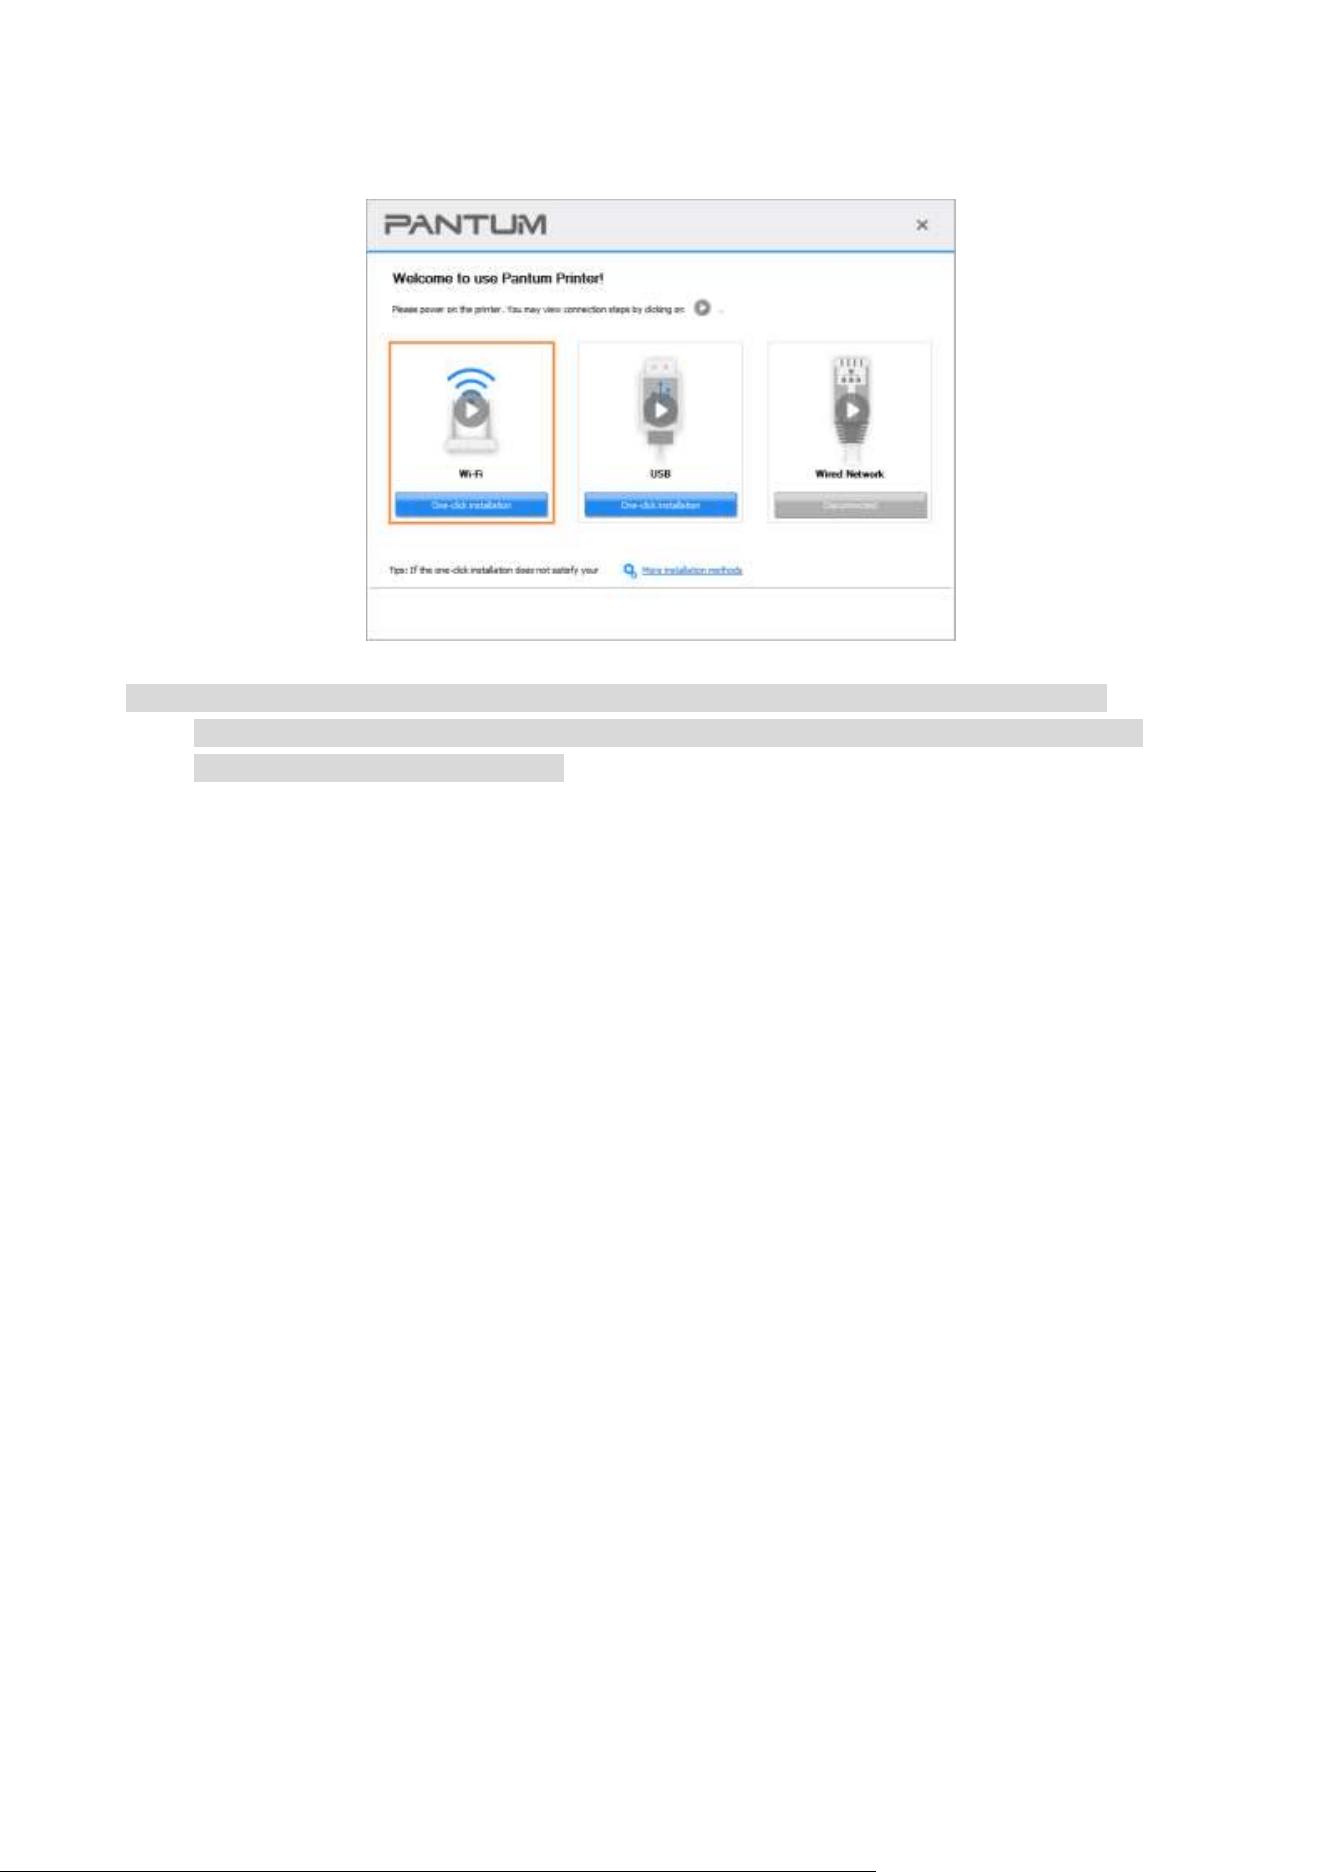
One-click Installation (For Windows and macOS)
One-click installation provides you with three installation methods: "Wi-Fi", "USB", and "Wired
Network". This manual focuses on the "Printer Installation by Wi-Fi Connection".
Connect printer via Wi-Fi
Configure Wi-Fi and install driver via USB cable
1. Computer is already connected to router via Wi-Fi.
Note: • Printers only support 2.4 GHz network when it is configured with Wi-Fi network.
• You can print "Network configuration page" to confirm printer network connection status to see
if printer is connected with network.
2. Connect the printer to computer via USB cable, then power the printer on.
3. Insert the accompanying installation disk into the computer CD drive, or log in to Pantum official
website (www.pantum.com) to download the drive.
4. Read and agree to the terms contained in the End User License Agreement and the Privacy
Policy, click the “Next” button in the lower right corner of the interface to enter the driver
installation interface.
15
5. Click on “One-click installation” button under Wi-Fi to install the driver.
Note: • You can put your mouse cursor in the "One-click installation" button to check the popup
information in order to confirm if the current printer is the one you need to install through IP
address before you click the button.
Uninstall Driver
Method to uninstall driver under Windows
Windows 7 is taken as the example in the following operation. The information on your computer
screen may differ because of multiple operating systems.
1. Click the Start menu of computer and then click All programs.
2. Click Pantum, and then Click Pantum XXX Series.
Pantum XXX Series where XXX represents product model.
3. Click uninstall to delete the driver according to instructions on uninstall window.
4. Restart computer after finishing unloading.
Method to uninstall driver under macOS
macOS10.14 is taken as the example in the following operation. The information on your computer
screen may differ because of multiple operating systems.
1. Click "Go" - "Applications" - "Pantum" - "Utilities" - "Pantum Un-install Tool".
2. Delete the driver as instructed in the pop-up Uninstall window.
3. Uninstall complete.

16
04 Wired network setup (applicable to wired
network models)
In case printers support wired network printing, they can be connected to network to control printer
to print in wired network mode.
Set IP Address
The IP address of the printer may be automatically obtained through DHCP function or set
manually.
Automatic Setting
DHCP automatic setting function is enabled by default on the printer.
1.Connect the printer to the network through a network cable and complete the startup preparation
work.
2. The printer will receive the IP address assigned by server automatically. It may take server
minutes to receive IP address under the influence of network environment.
You can check the IP address of printer by printing "Network setup page" out,or check network
information by viewing the control panel of printer. If the IP address is not listed, please check
network environment and then try again after waiting for several minutes.
Note: • If DHCP server fails to assign IP address automatically, the printer will get the link-local address
assigned by printer automatically: 169.254.xxx.xxx.
Manual Setting
To set up IP address for printer through the control panel of printer manually.
To set up IP address for printer through the embedded Web server manually.
17
05 Wireless network setup (applicable to Wi-Fi
models)
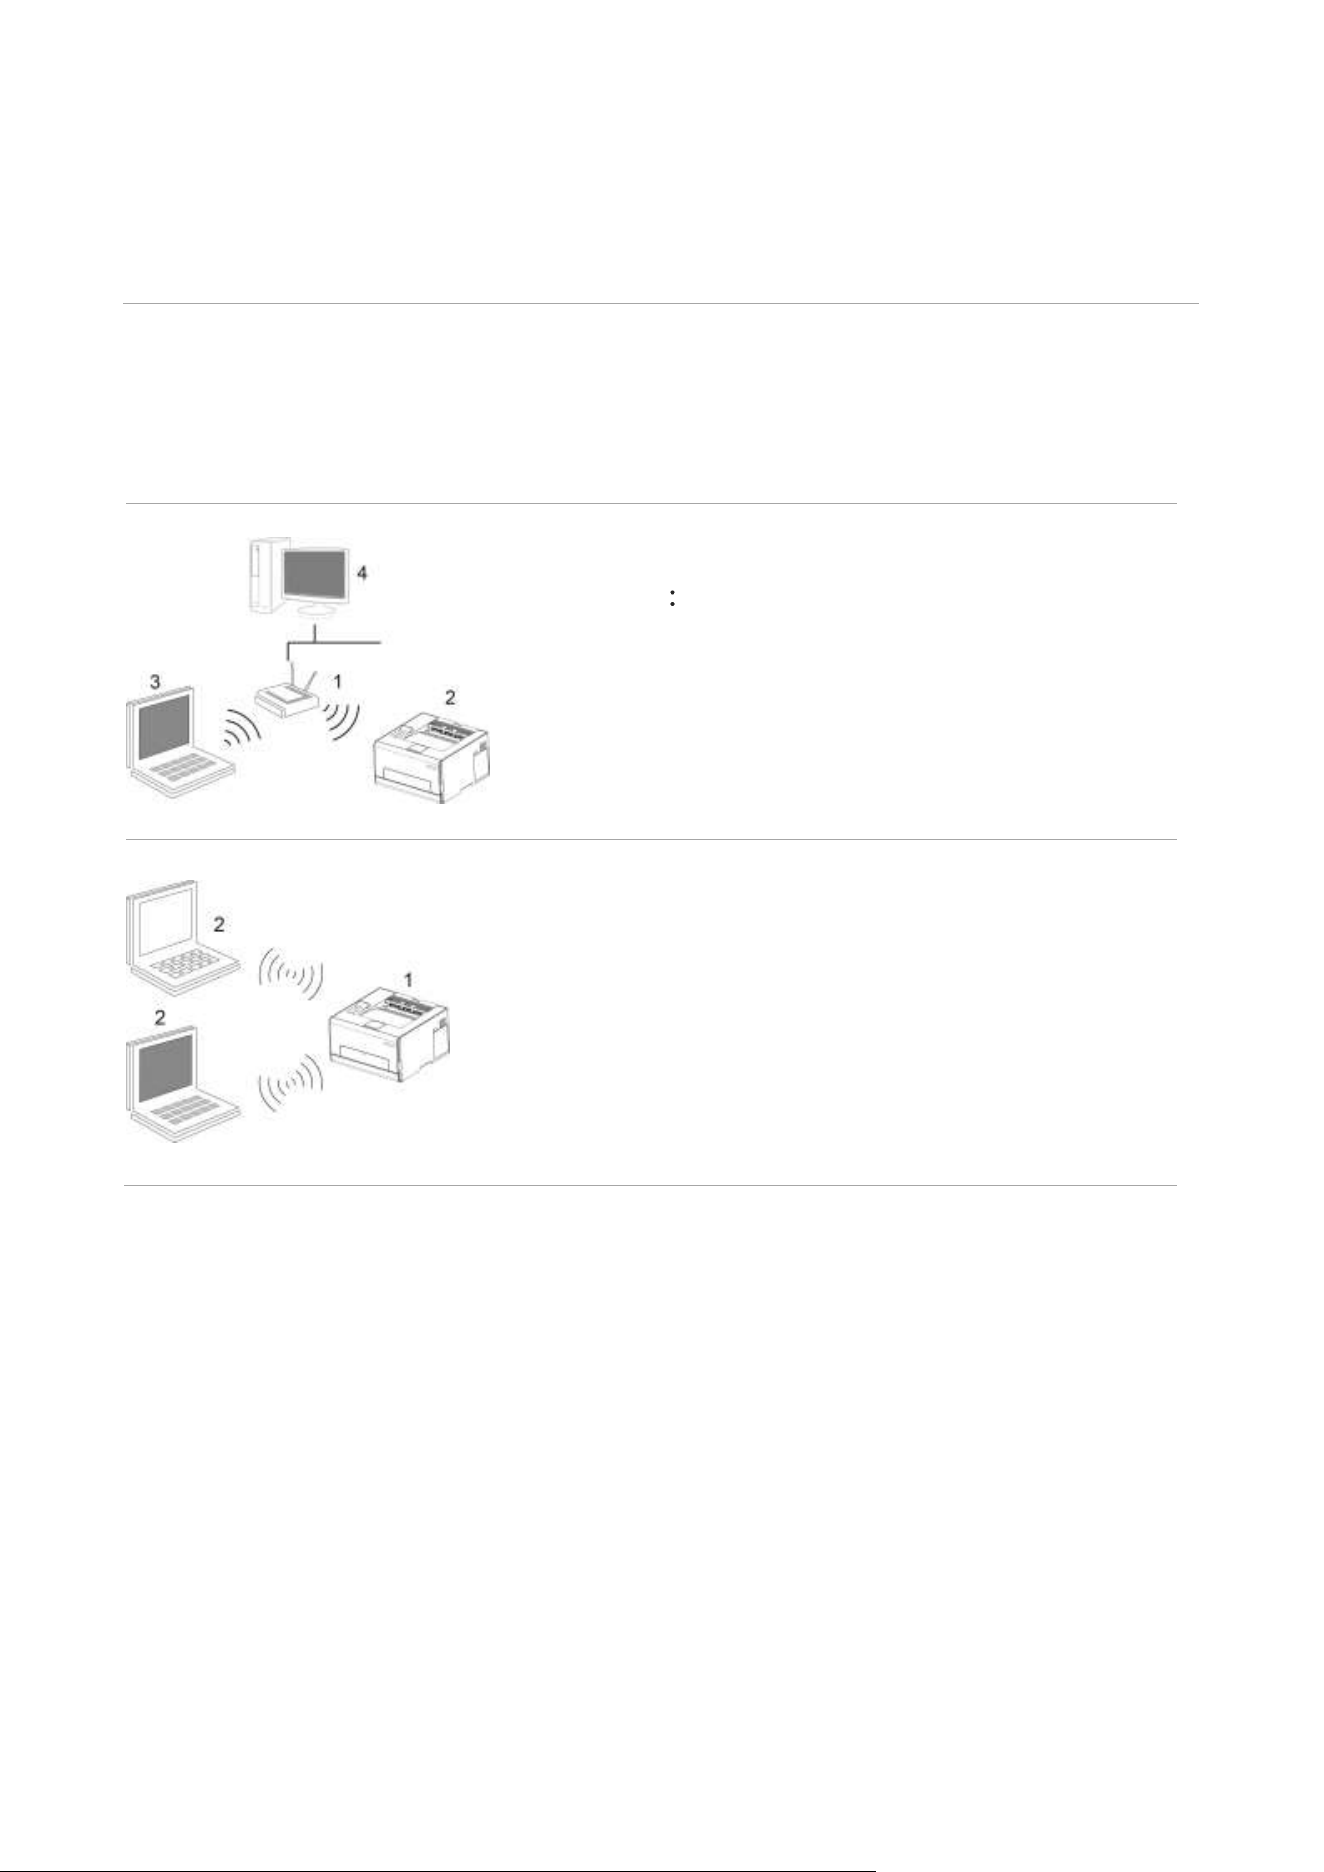
Based on the model, the printer model with Wi-Fi print function supports two types of wireless
network connection: Wi-Fi Station and Wi-Fi Direct. Usually, only one connection is enabled
between the computer and the printer at a time.
Wi-Fi Station connecting to a wireless device via router
1. Access point (wireless router)
2. Wireless network printer
3. Computer connecting to access point via wireless network
4. Computer connecting to access point via network cable
Wi-Fi Direct mode: wireless client is connecting to a printer
with Wi-Fi function
1. Wireless network printer
2. Wireless client is directly connecting to a wireless network
printer
Basic structure mode
You can connect a computer to your printer via access point (wireless router) as the medium.
Access point (wireless router) connection is divided into wireless network setup and Wi-Fi
Protected Setup (WPS).
Important: Before wireless network installation, you must learn about the service set identifier
(SSID) and password of your access point in order to use them during wireless network setup. If
they cannot be determined, please consult your network administrator or a.

18
Wireless network setup tools
If your computer has been installed with a driver and had been connected to wireless network, but
the wireless network was changed, you can set it again with wireless network setup tools.
Preliminary preparations
1. Access point (wireless router)
2. A computer that has been connected to network.
3. A printer that has wireless network function.
Setup methods of wireless network setup tools
1. Take the wireless network setup tool in computer.
1) Windows system: Click the “Start menu” – “All programs” - “Pantum”- Product name –
“Wireless network setup tool”.
2) macOS system: click "Go" - "Applications" - "Pantum" - "Utilities" - "Wireless Network
Configuration Tool" on the computer Finder menu bar.
How to disable the Wi-Fi network connected
Connect the wireless network in infrastructure mode by the steps above. If connected, the Wi-Fi
light on the control panel is normally on. Press and hold this button for more than 2s to disconnect
from Wi-Fi network (Wi-Fi light will be off).
19
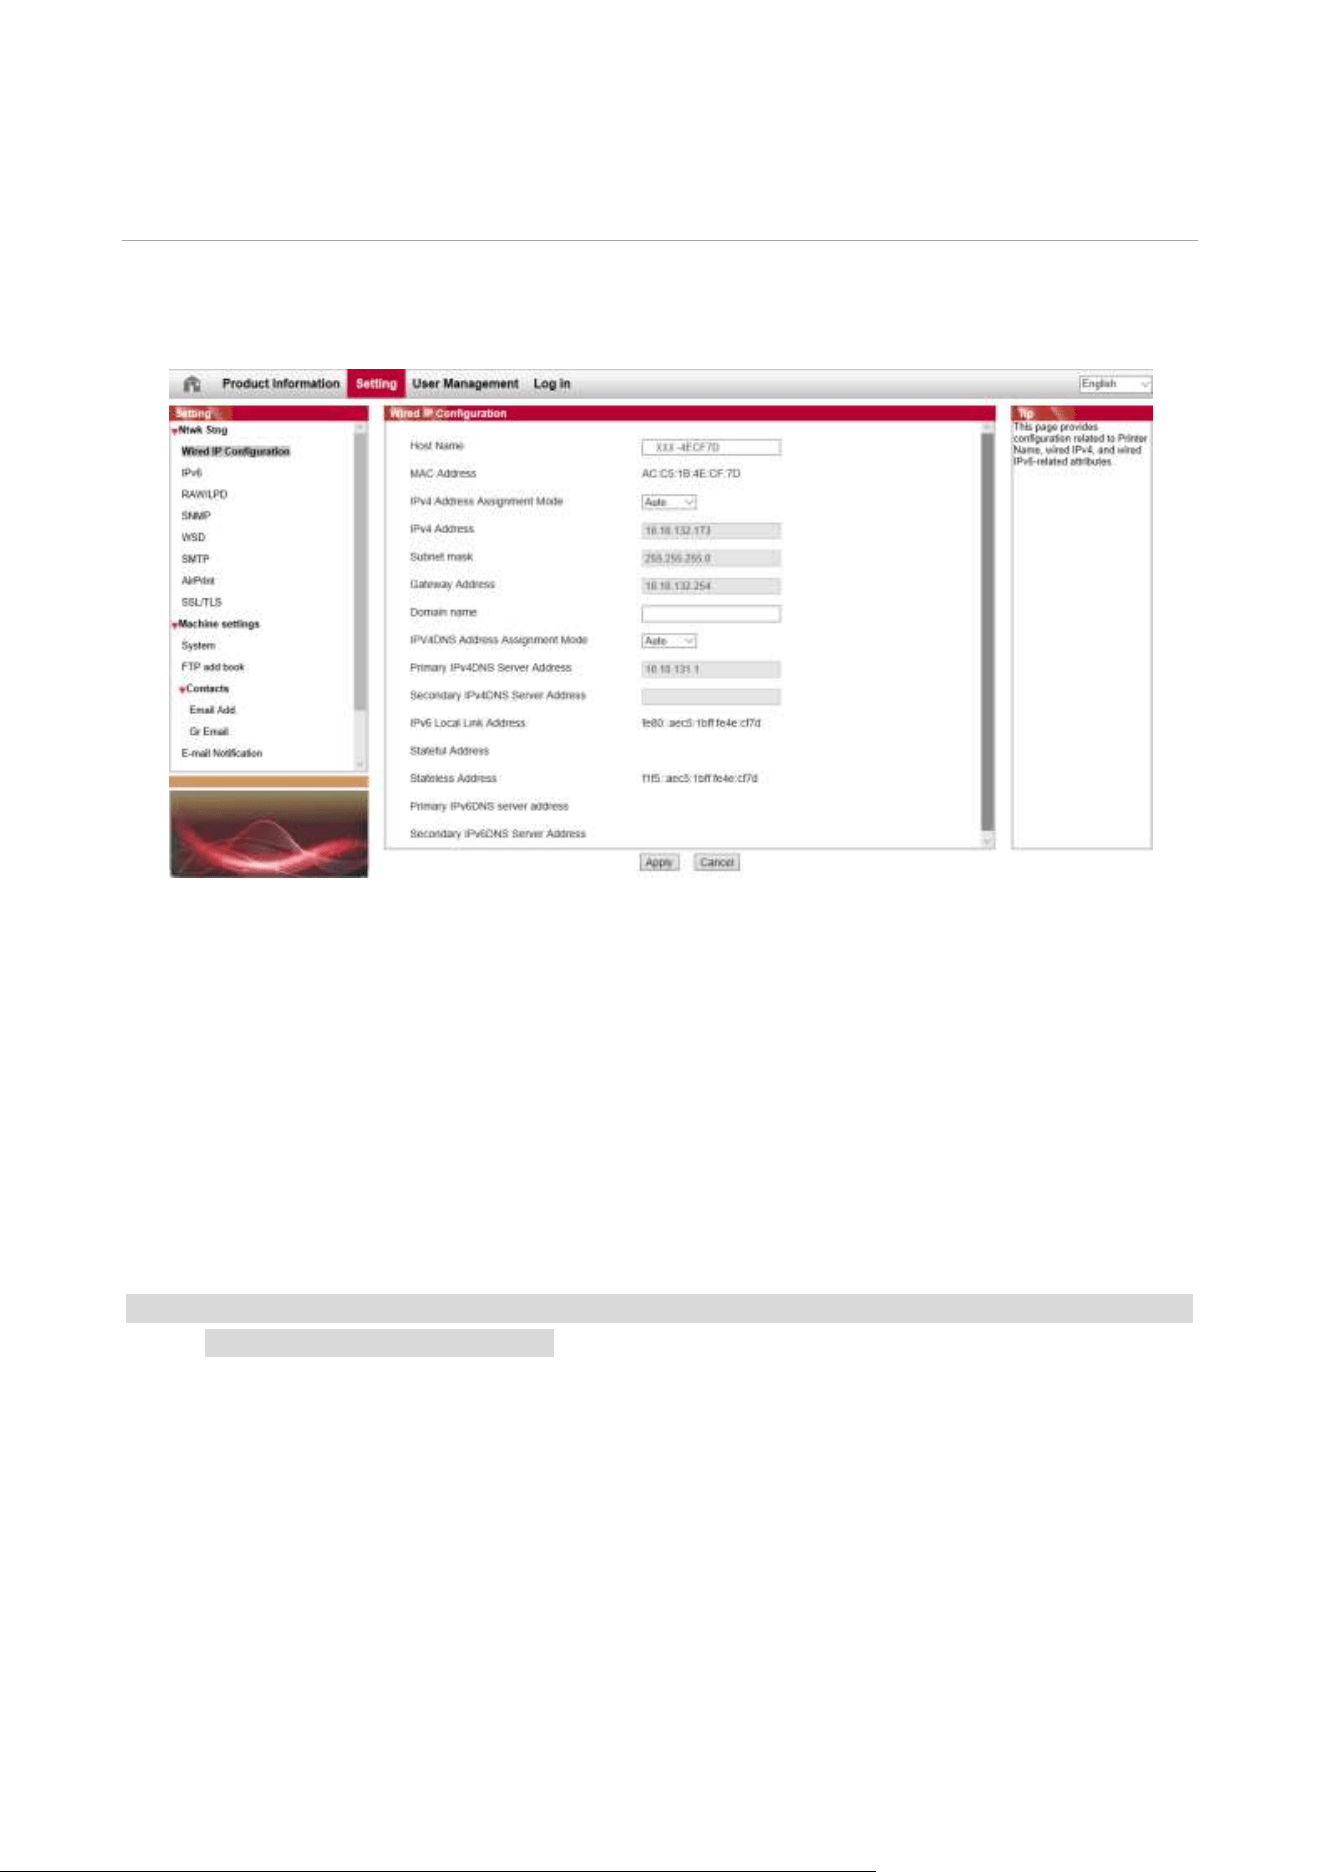
06 Web server
You can manage printer setup via the embedded Web server.
Visit the embedded Web server
1. Turn on the power of printer and computer.
2. Connect the printer to network to ensure that the printer is connected to the network where the
computer is connected to.
3. Input the IP address of printer in the address bar of Web browser to visit the Web server
imbedded in printer.
4. Click “Log in” option, input user name and password (the default user name is admin and the
initial password is 000000) and click “Log in”.
Note: • For safety reasons, you are suggested to change the default password, which can be finished in
the “User Management” interface.
20
07 Print
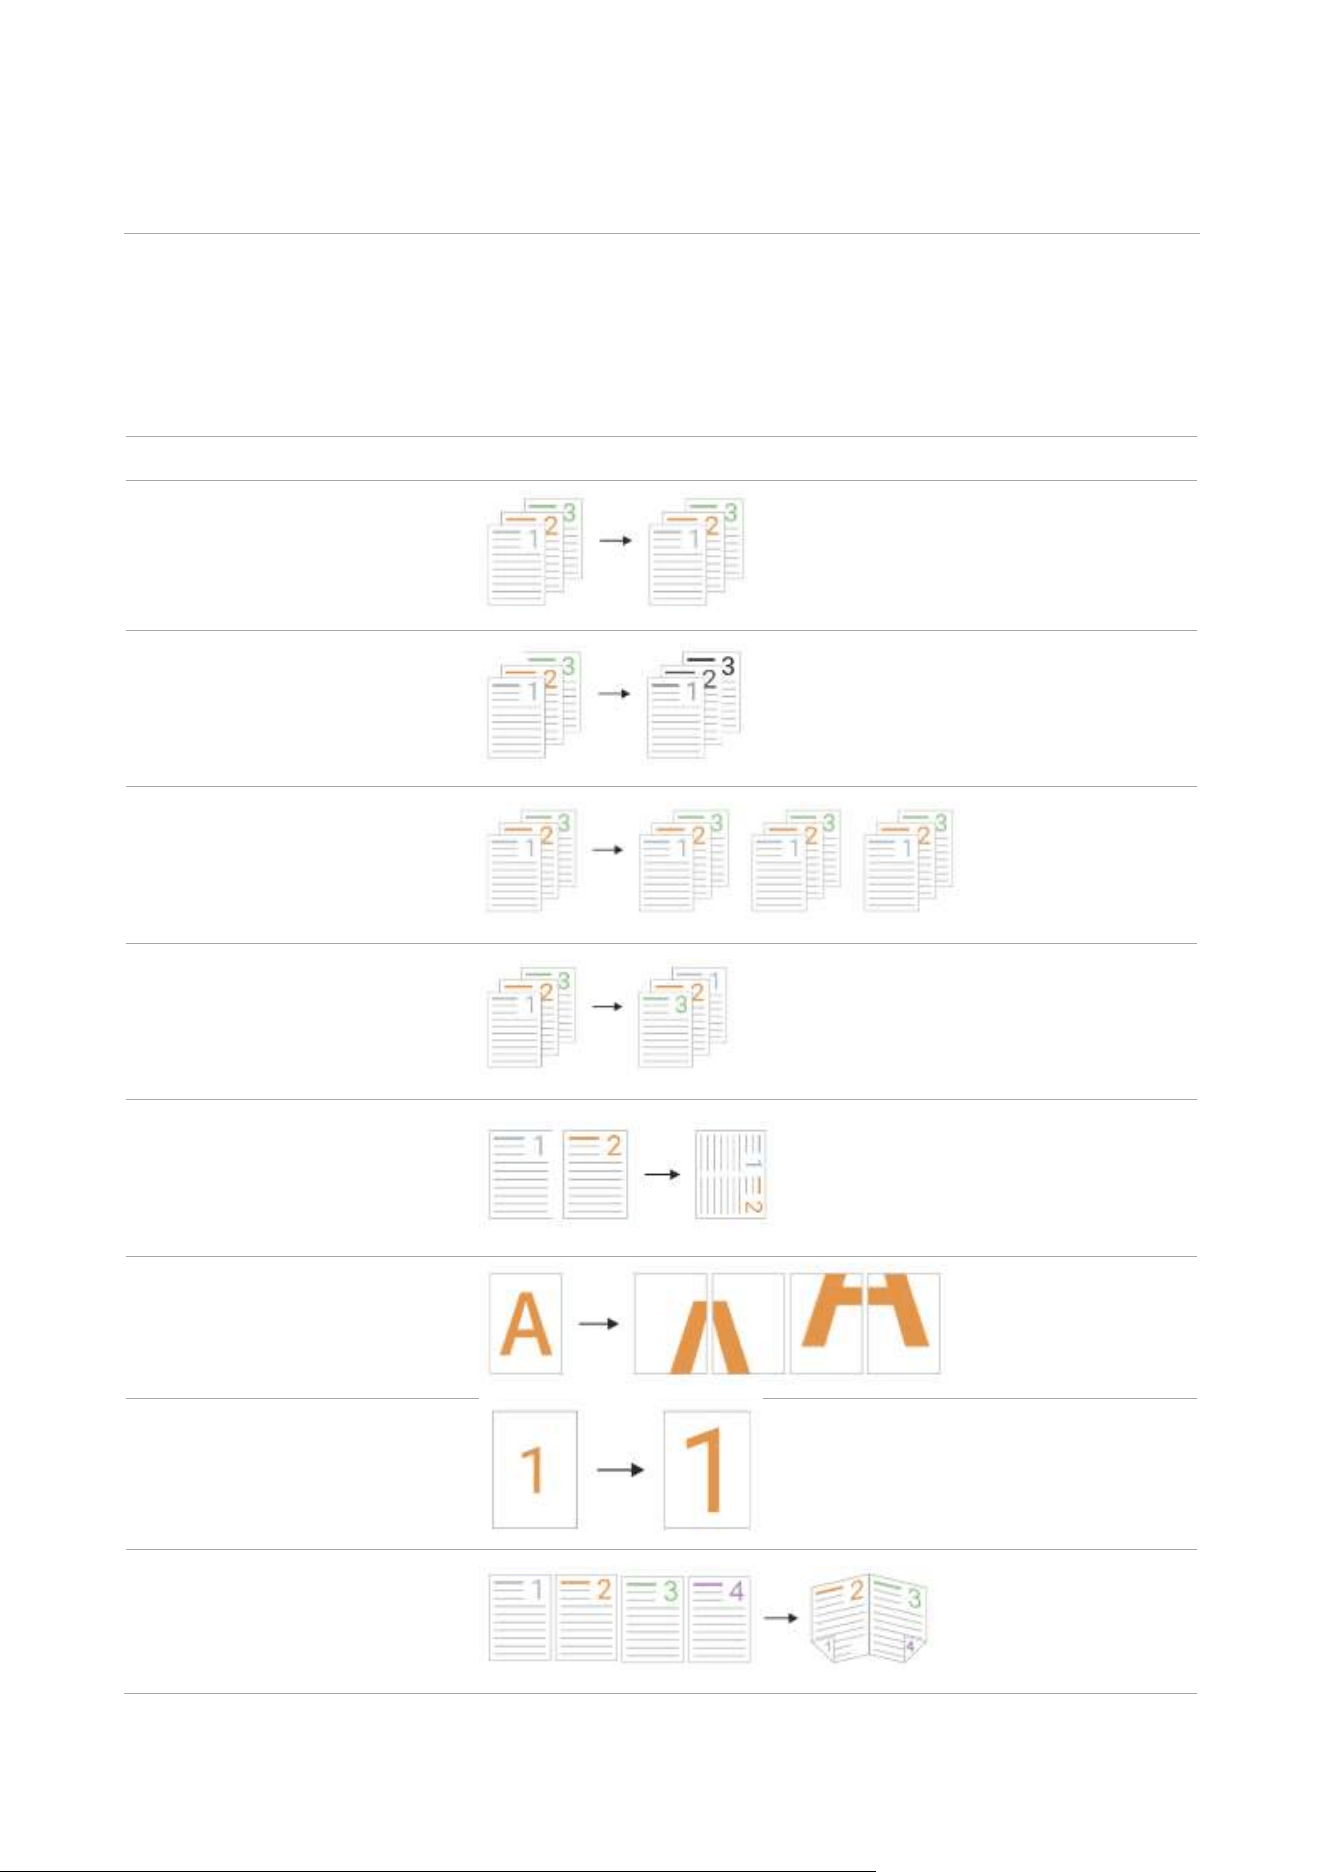
Print Function
You can set the print function through "Start"-"Devices and Printers"- select corresponding
printerright click – set print function in "Printing preferences". Some functions are as follows:
Functions
Diagram
Color Printing
1
Monocolor printing
Collate Print
Reverse Print
N-in-1
Poster Print(for Windows
Operation System only)
Zoom Print
Booklet printing

21
Custom Size
Note: • Windows 7 is taken as example in the above description.
• You can realize poster printing feature by selecting 2x2 poster printing in multipage.
• You can enable printing preference and click the help button to view detailed function
description
• Note 1: When the Cyan (C), Magenta (M) or Yellow (Y) laser toner cartridge cannot be replaced
promply after its life is expired, you can choose to continue printing in black and white.
Duplex
The printer supports duplex printing of plain paper. Paper size supported by the duplex printing: A4,
Letter, Legal, Folio, Oficio.
Note: • Some paper media are not suitable for duplex printing, and trying duplex printing may result in
damage to the printer.
• Duplex is not available for poster printing.
• For information about the paper types and printing media in the feed tray for paper feeding,
please refer to Paper and Print Media
How to carry out auto duplex printing
1. Open the print job to be printed.
2.
Select Print from the File menu.
3. Select printer of the corresponding model
4. Click "Printer Properties" to configure the print setting.
5. Select "Duplex Print" under the "Basics" tab, and choose either "Long Edge" or "Short Edge"
option.
6.
Single click “OK” to finish printing setup. Click “Print” to realize auto duplex printing.
22
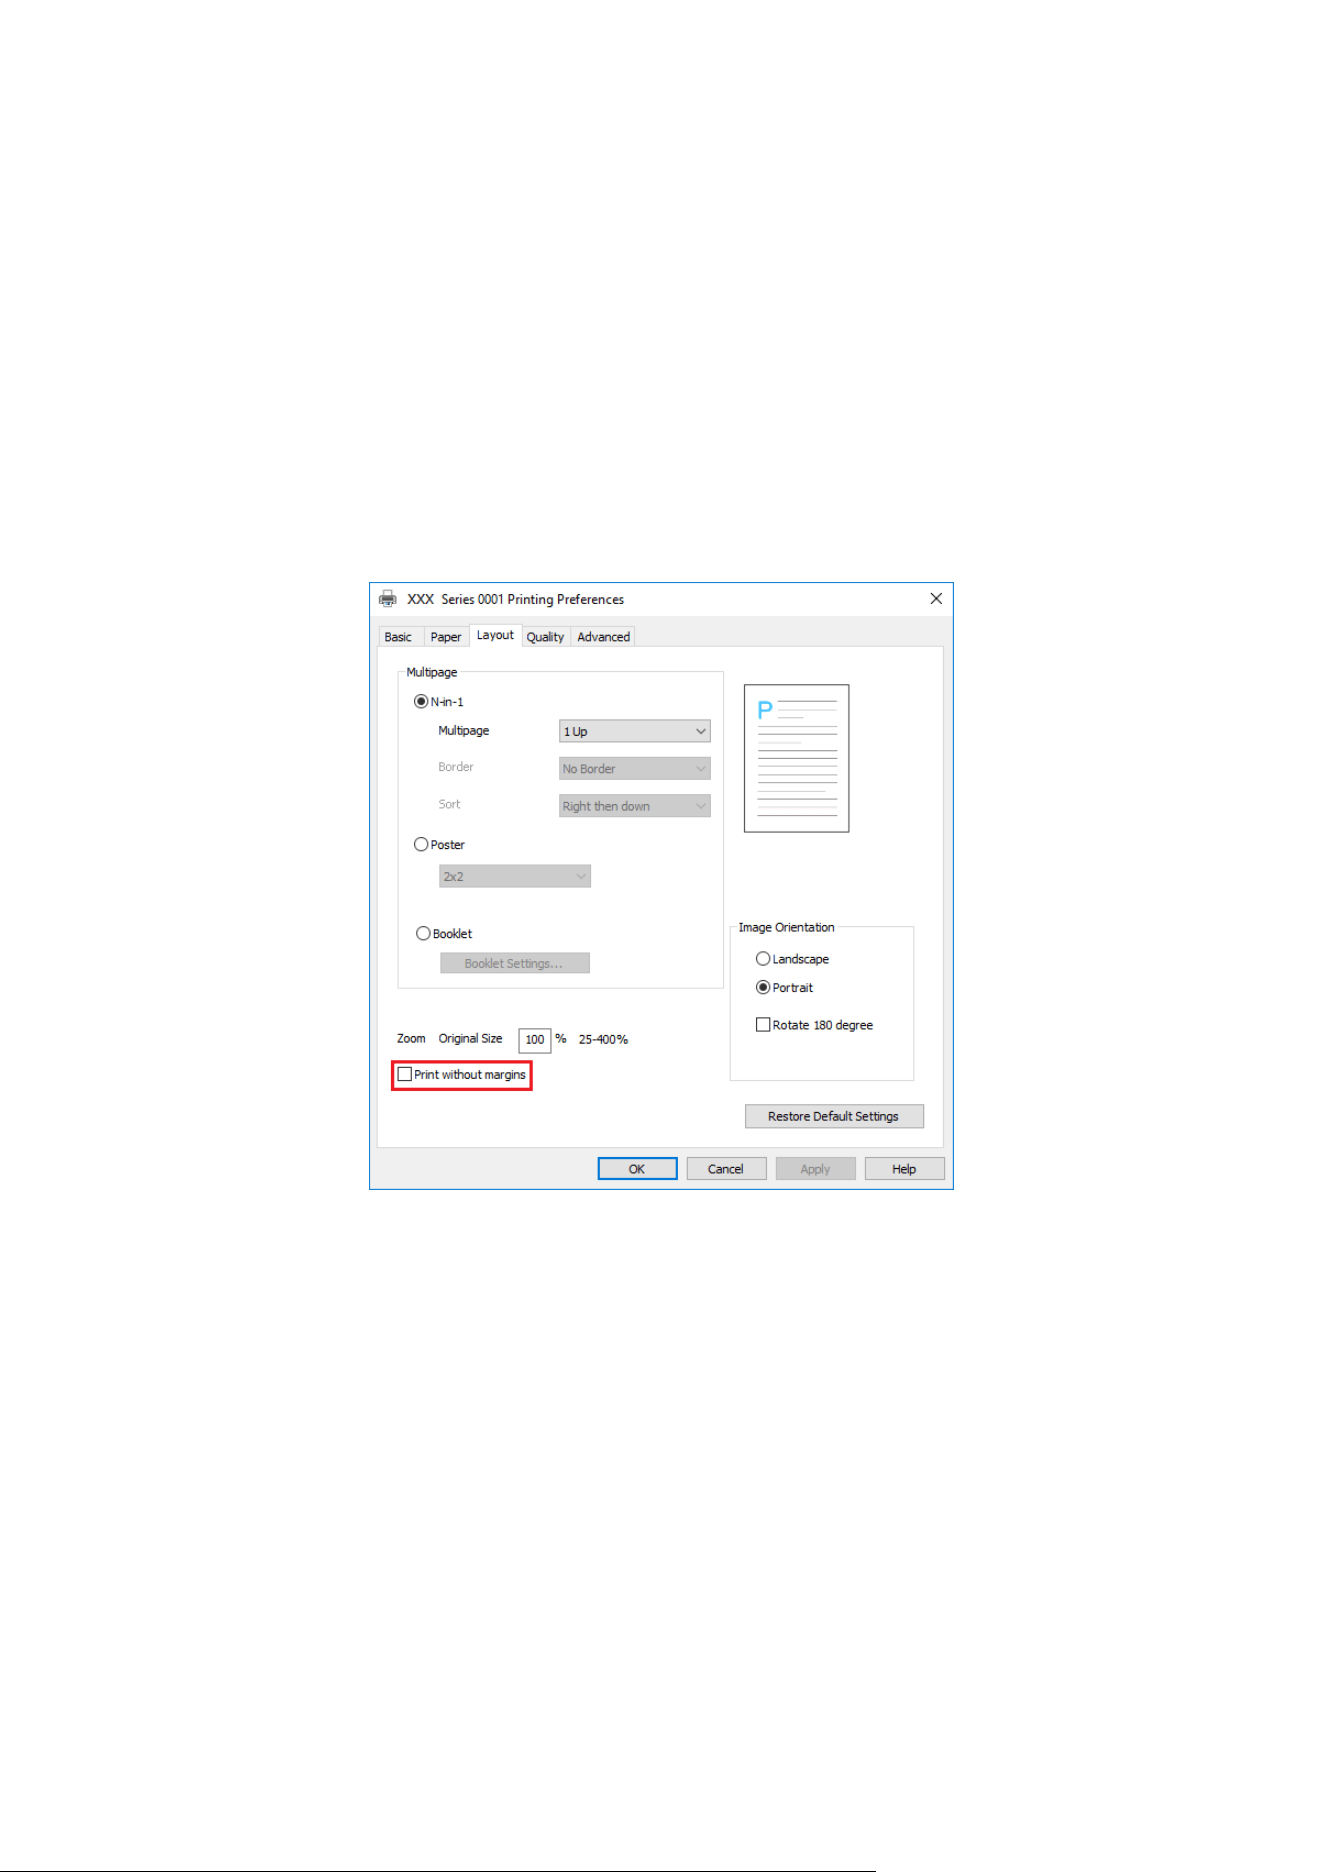
Print without margins
This printer supports borderless printing, so you can set the margins for the printed image by
following these steps.
The operation steps are as follows:
The Windows 10 system is taken as an example in the following steps. The information indicated
on your computer screen may vary from operating system to operating system.
1. Open the file you want to print. Click the "File" menu in the upper left corner. Select "Print" to
bring up the print driver.
2. Select the corresponding printer model.
3. Click "Printer Properties/Preferences" to configure the printing.
4. Enter the "Layout" option interface, check "Printing without Margins", and click "OK".
23
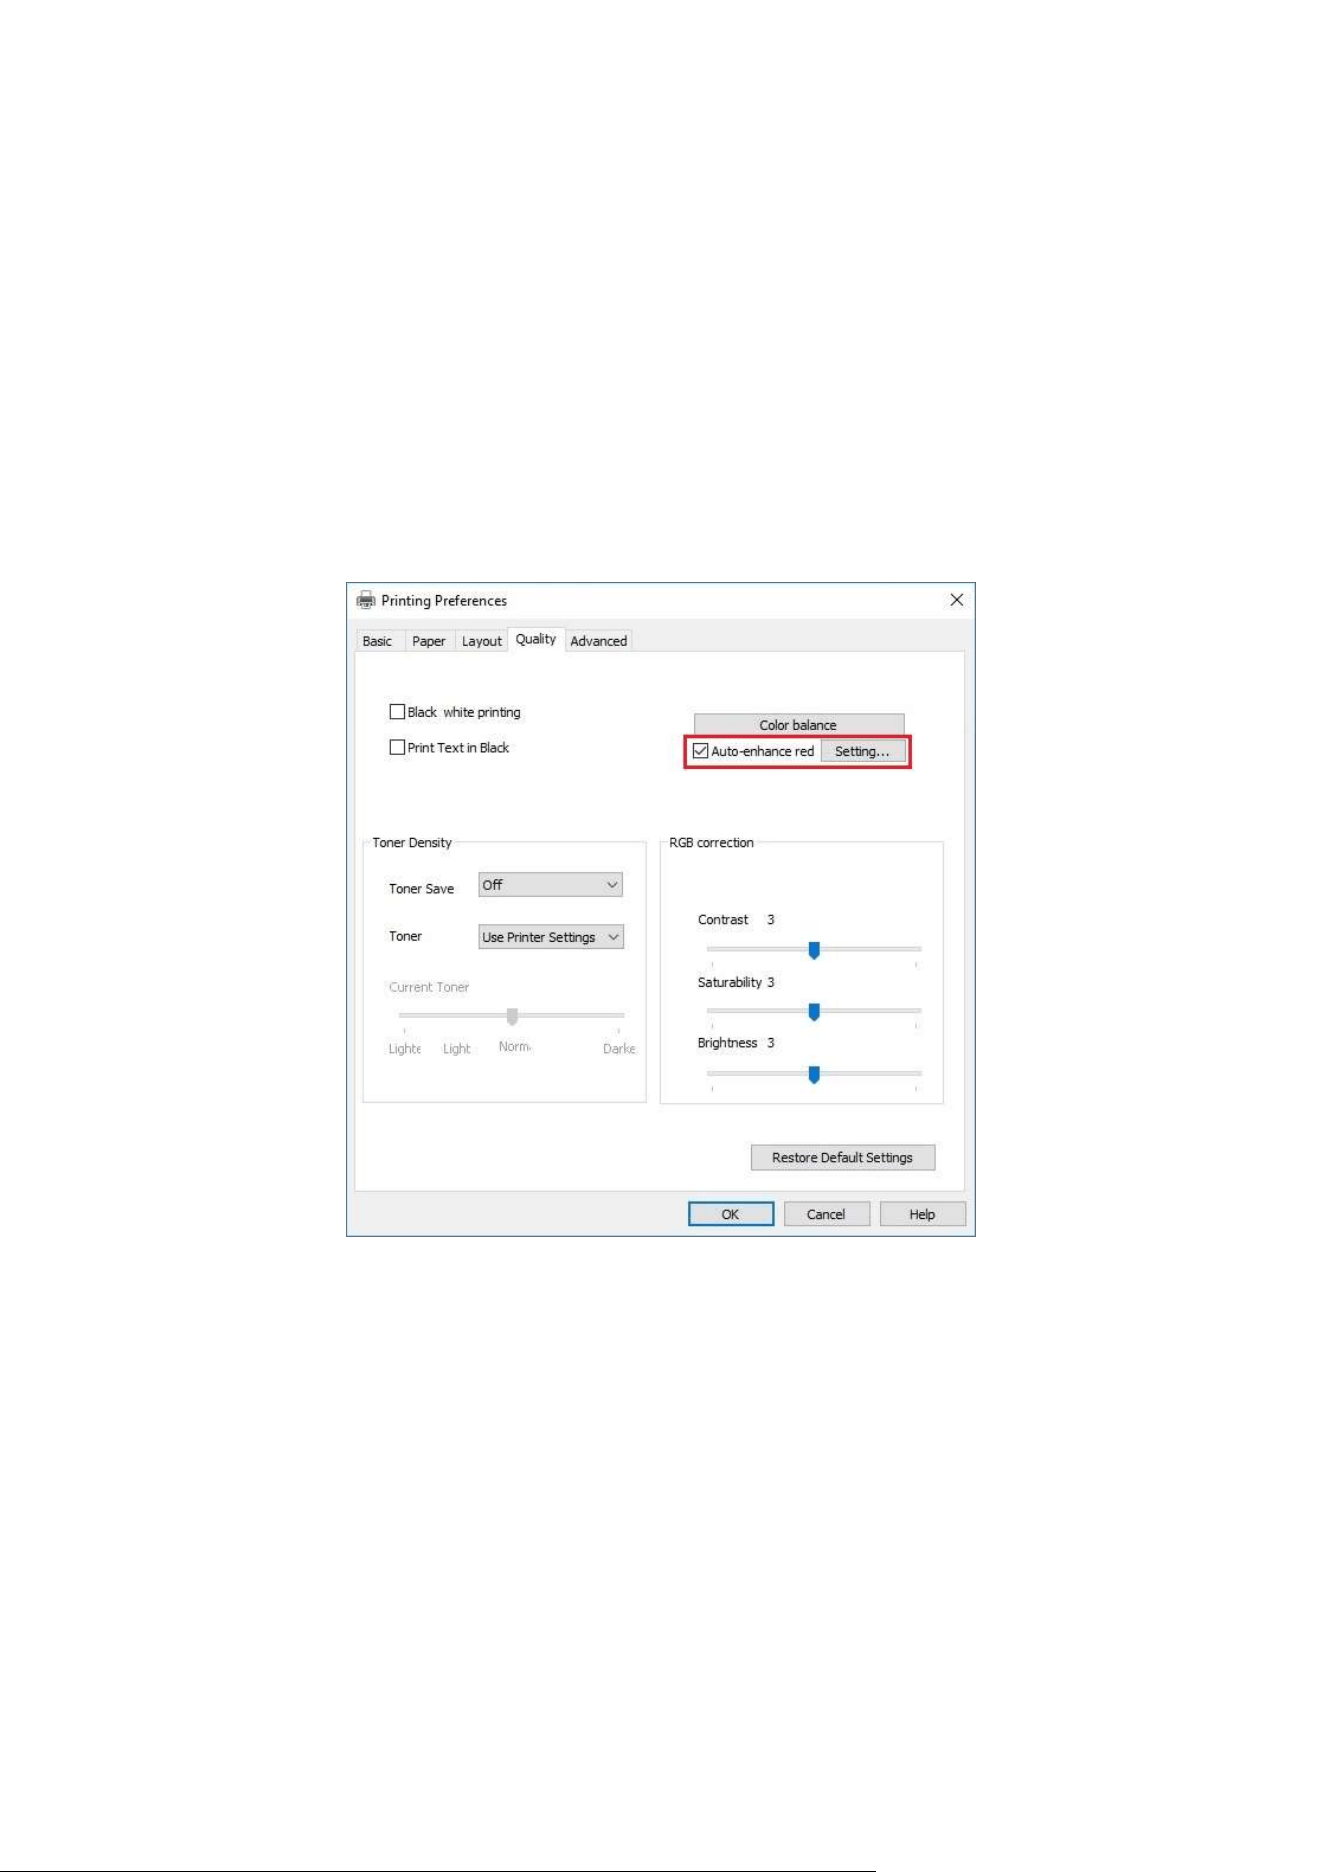
Red Auto Enhancement function
When the red content on the printed portrait does not meet the expectation, you can try to adjust
the color of the portrait via the "Red Auto Enhancement" function. The operation steps are as
follows:
The Windows 7 system is taken as an example in the following steps. The information indicated on
your computer screen may vary from operating system to operating system.
1. Open the file you want to print. Click the "File" menu in the upper left corner. Select "Print" to
bring up the print driver.
2. Select the corresponding printer model.
3. Click "Printer Properties/Preferences" to configure the printing.
4. Enter the "Quality" option interface. Check "Red Auto Enhancement" and click "Settings".
24
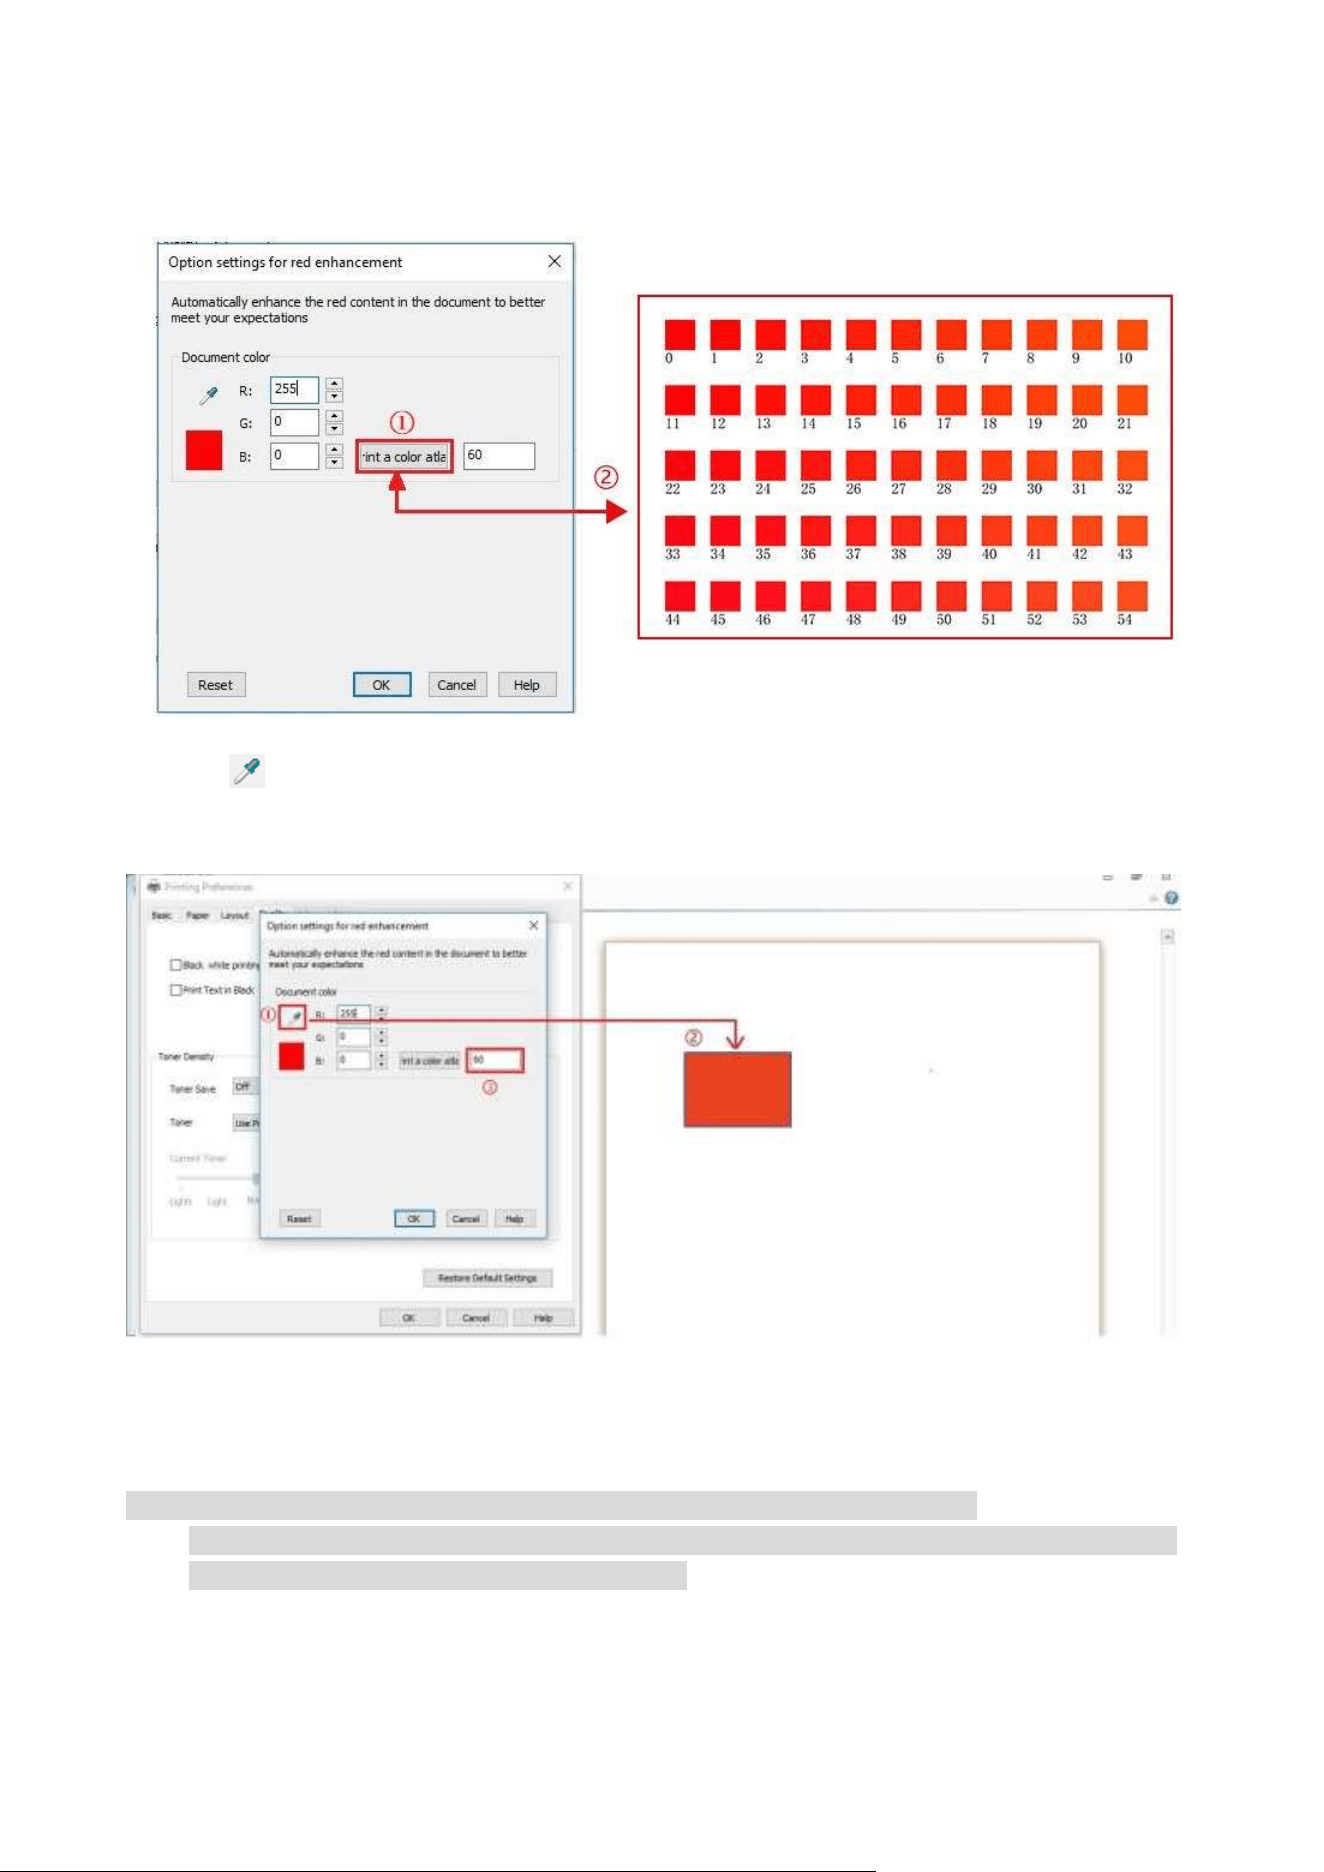
5. In the interface of "Red Enhancement Option Setting", click the "Print A Color Atlas" button to
print the color atlas.
6. Drag " " onto the portrait to be adjusted, and adjust the value of "Print A Color Atlas" as
required by referring to the printed color atlas.
7. Click the "OK"/"Apply" button in the bottom left corner to complete the printing setup. Click
"Print" to enable the "Red Auto Enhancement" printing feature.
Note: • Red enhancement printing only works for a single RGB value of the portrait.
• Click the "Print A Color Atlas" button to print a test page of color atlas. The value of color atlas
ranges from 0 to 120, and 0 represents pure red.
25
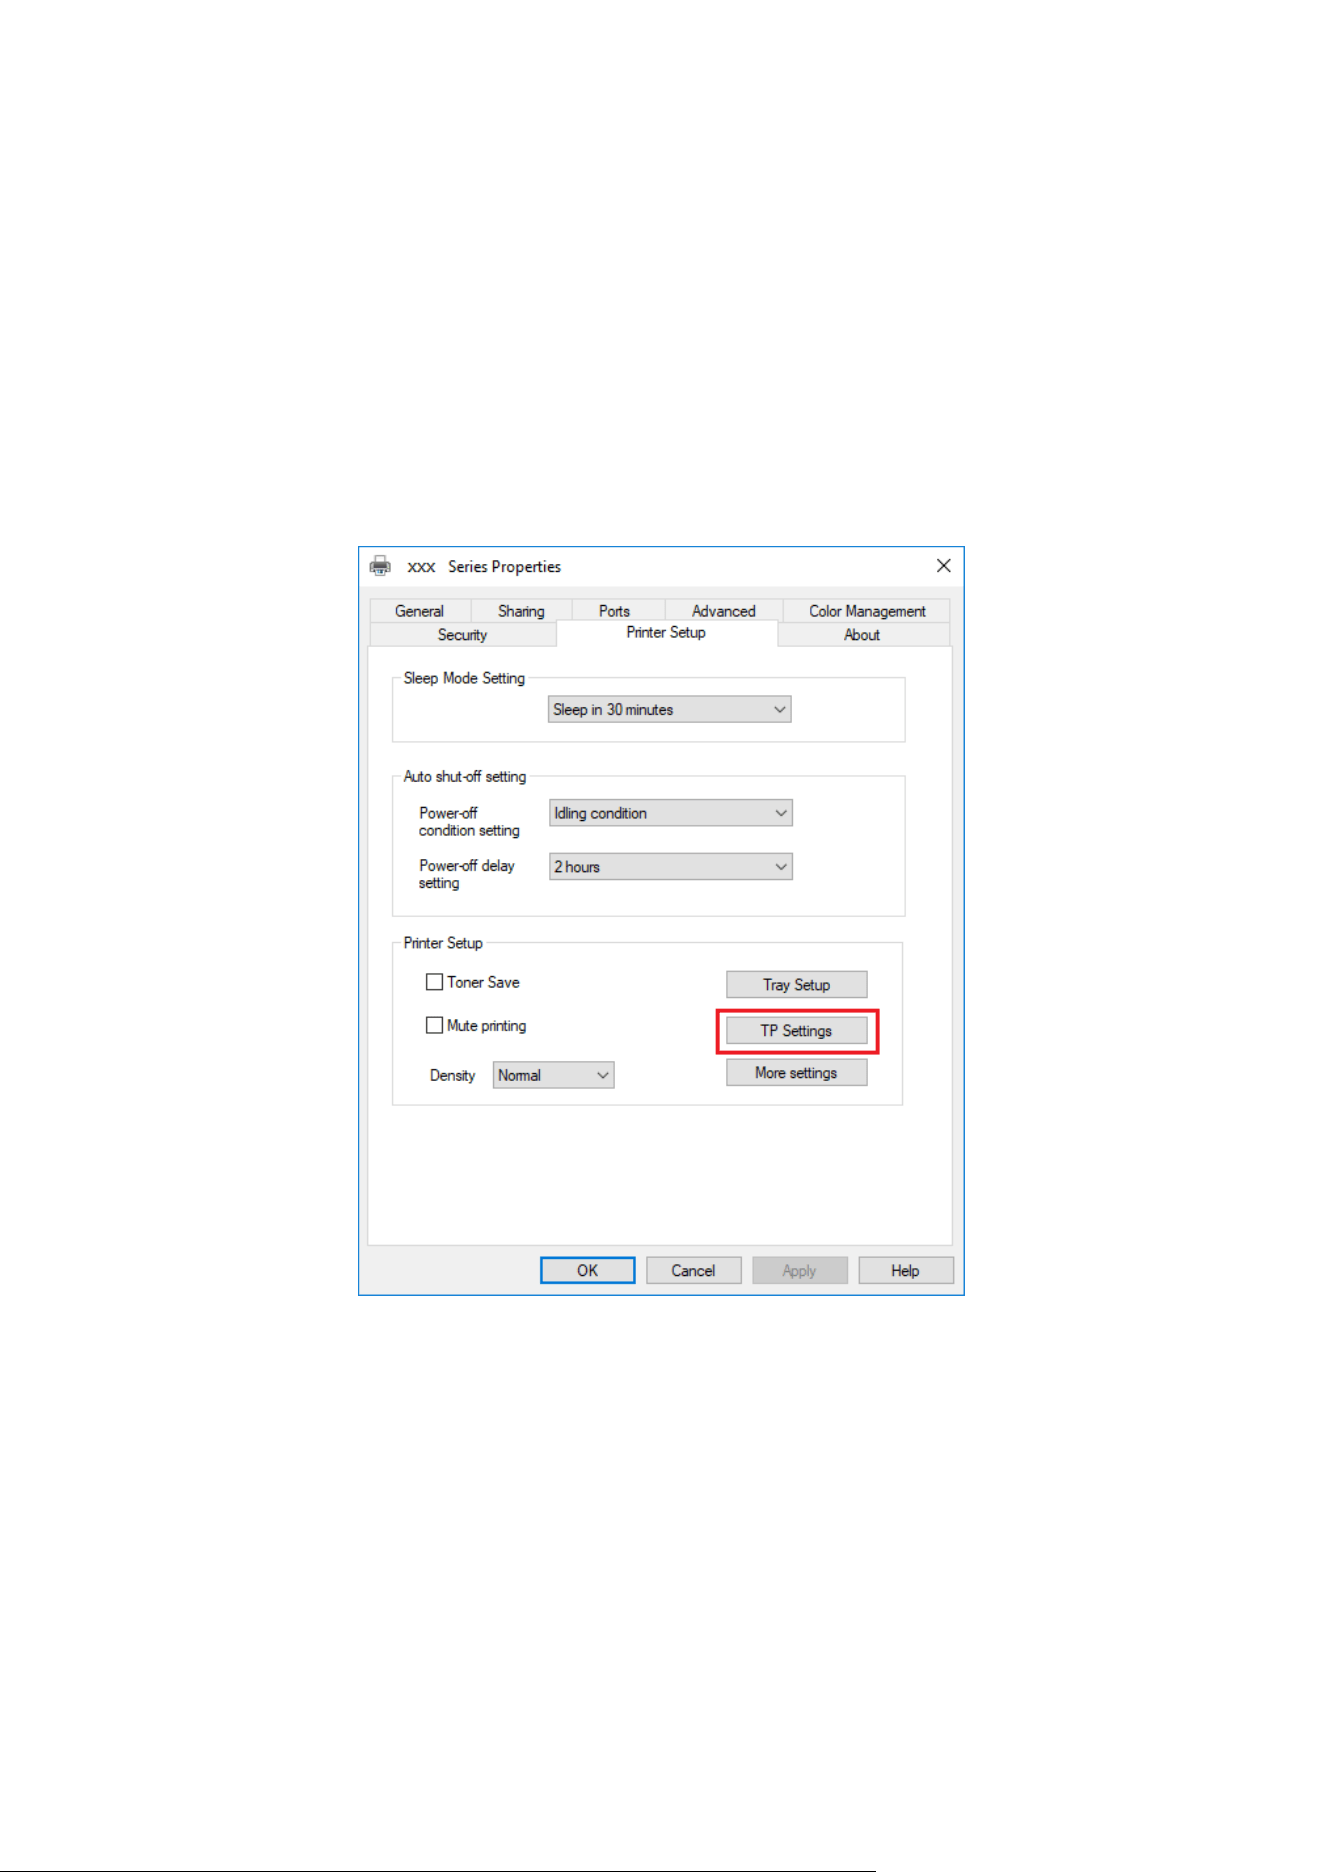
Set transfer print parameters
If the printed image is mottled or blotchy-looking, you can try to adjust the transfer print
parameters through Printer Setup.
The steps are as follows: (Suitable for printers installed via USB connection)
Windows 7 is taken as the example in the following operation. The information on your computer
screen may differ because of multiple operating systems.
1. Enter the “Start menu” – “Control Panel” –view “Devices and Printers”.
2. Right click printer and select “Printer properties” in the pull-down menu.
3. Enter “Printer Setup” option.
4. Click “Transfer Settings” to adjust the transfer parameters.
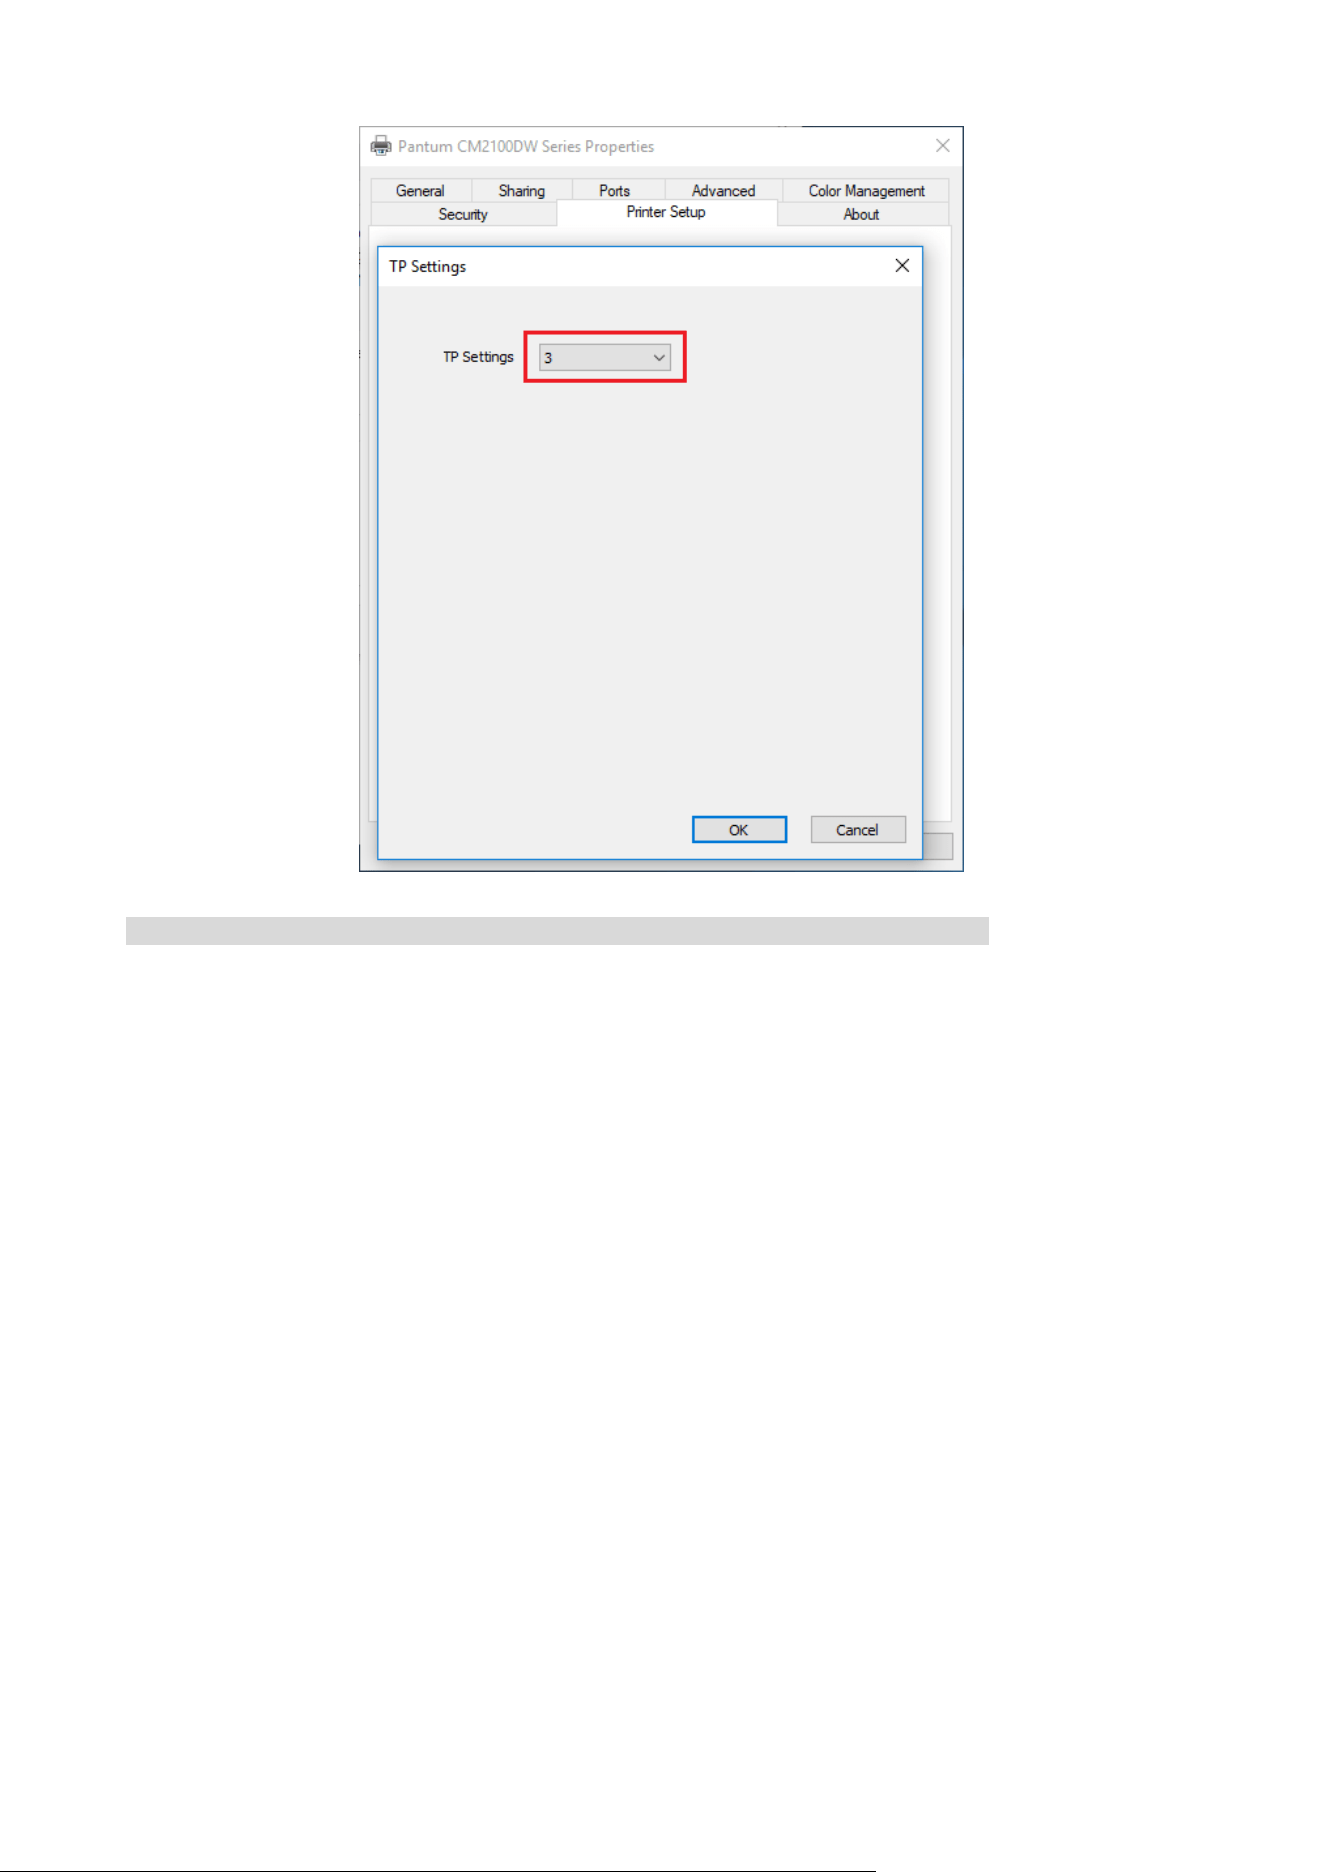
26
Note: • You can also set transfer print parameters through buttons on control panel.
27
08 Routine Maintenance
Note: • Printer appearance may differ because of different models and functions, so the schematic
diagram is only for your reference.
leaning the Printer
:Some parts of the printer are still in high temperature within a short time after use. To prevent
burns, please don’t directly touch places labeled with high temperature warning in contact with
internal components after opening the printer’s front or rear.
Note: • Disconnect the printer before cleaning.
• Please use mild detergents.
• Use caution when using the printer display to prevent pressing or damaging the touch display.
Please use a soft dry cloth or dip in a neutral detergent or ethanol to clean the display surface. Do
not use any organic solvents, acidic or alkaline solutions.
28
Please use mild detergents
:To avoid the risk of electrical shock when cleaning the exterior of the printer, unplug the
power cord from the electrical outlet and disconnect all cables from the printer before
proceeding.
Note: • Please perform this job every few months.
• Damage to the printer caused by improper handling is not covered by the printer warranty.
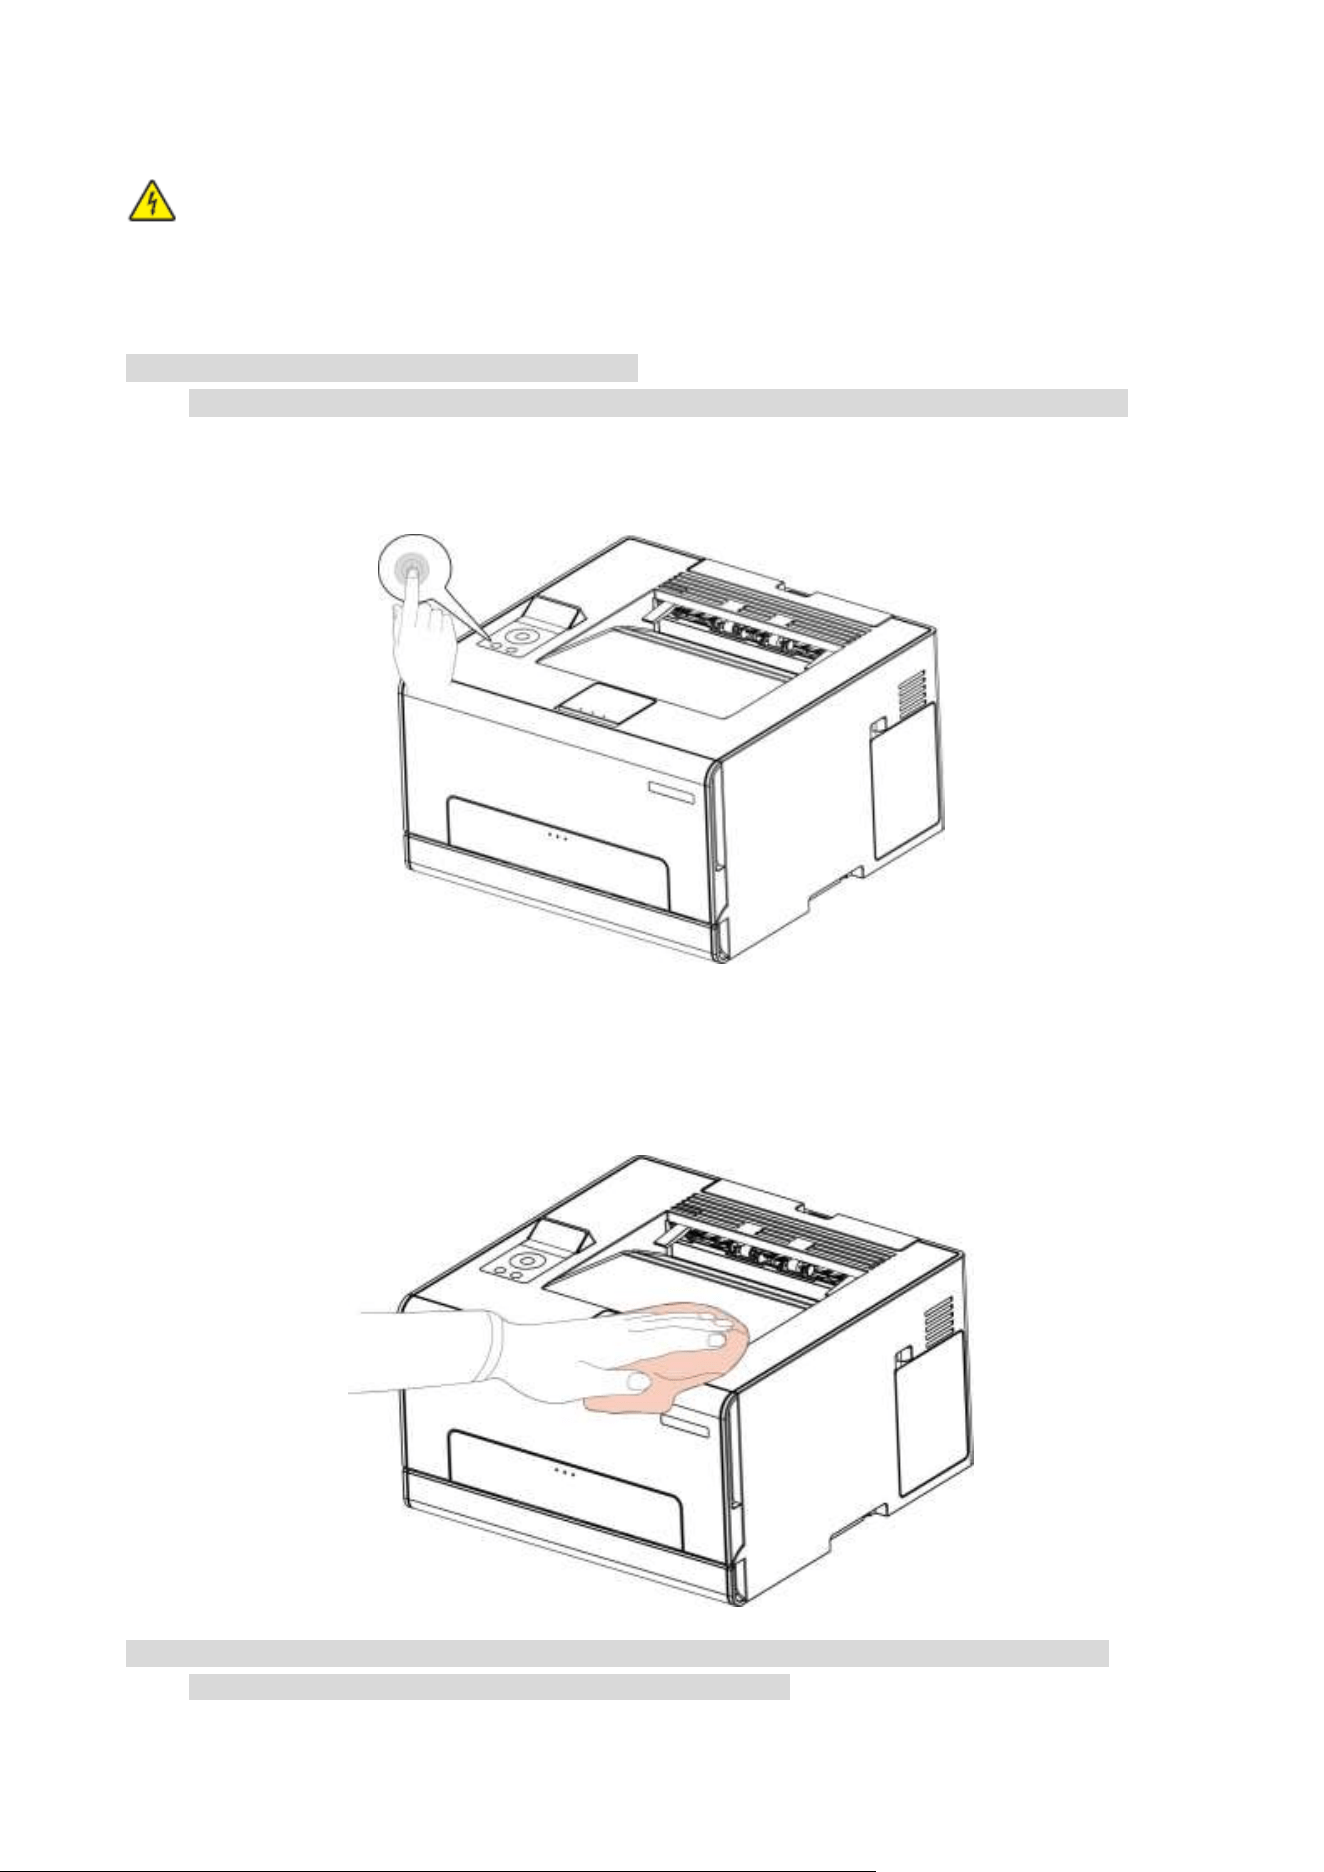
1. Turn off the printer, and then unplug the power cord from the electrical outlet.
2. Remove the paper from the standard exit and feed tray.
3. Remove any dust, lint, and pieces of paper around the printer using a soft brush or vacuum.
4. Wipe the outside of the printer with a damp, soft, lint-free cloth.
Note: • Do not use household cleaners or detergents, as they may damage the surface of the printer.
• Make sure that all areas of the printer are dry after cleaning.

29
5. Connect the power cord to the electrical outlet, and then turn on the printer.
To avoid the risk of fire or electrical shock, connect the power cord to an appropriately rated
and properly grounded electrical outlet that is near the product and easily accessible.
Replacing parts and consumables
1. Use and maintenance of toner cartridge.
Please use the original toner cartridge for better printing quality.
Please pay attention to the following items while using the toner cartridge:
• Please keep the toner cartridge in a dry and dark place.
• Do not refill the toner cartridge without permission; otherwise, the damages caused will not be
included in the scope of warranty of the printer.
• Please place the toner cartridge in cool and dry places.
• Please do not place the toner cartridge near ignition sources, as the toner inside it is inflammable
and may cause fire.
• Please pay attention to toner leakage while it is taking out or disassembled. In case of toner
leakage, skin contact with toner or spattering into eyes or mouth, please wash it with clear water
immediately, or see a doctor if feeling unwell.
• When placing the cartridge, please stay away from children may contact area.
2. Service life of toner cartridge
• The service life of toner cartridge is depending on the toner quantity needed by printing.
• When a prompt that "The Toner Cartridge life Expired" appears on the display, it indicates its
service life expires. So please replace it.
30
Replacing the toner cartridge
Note: • If the tray is unfolded, remove it before replacing the toner cartridge.
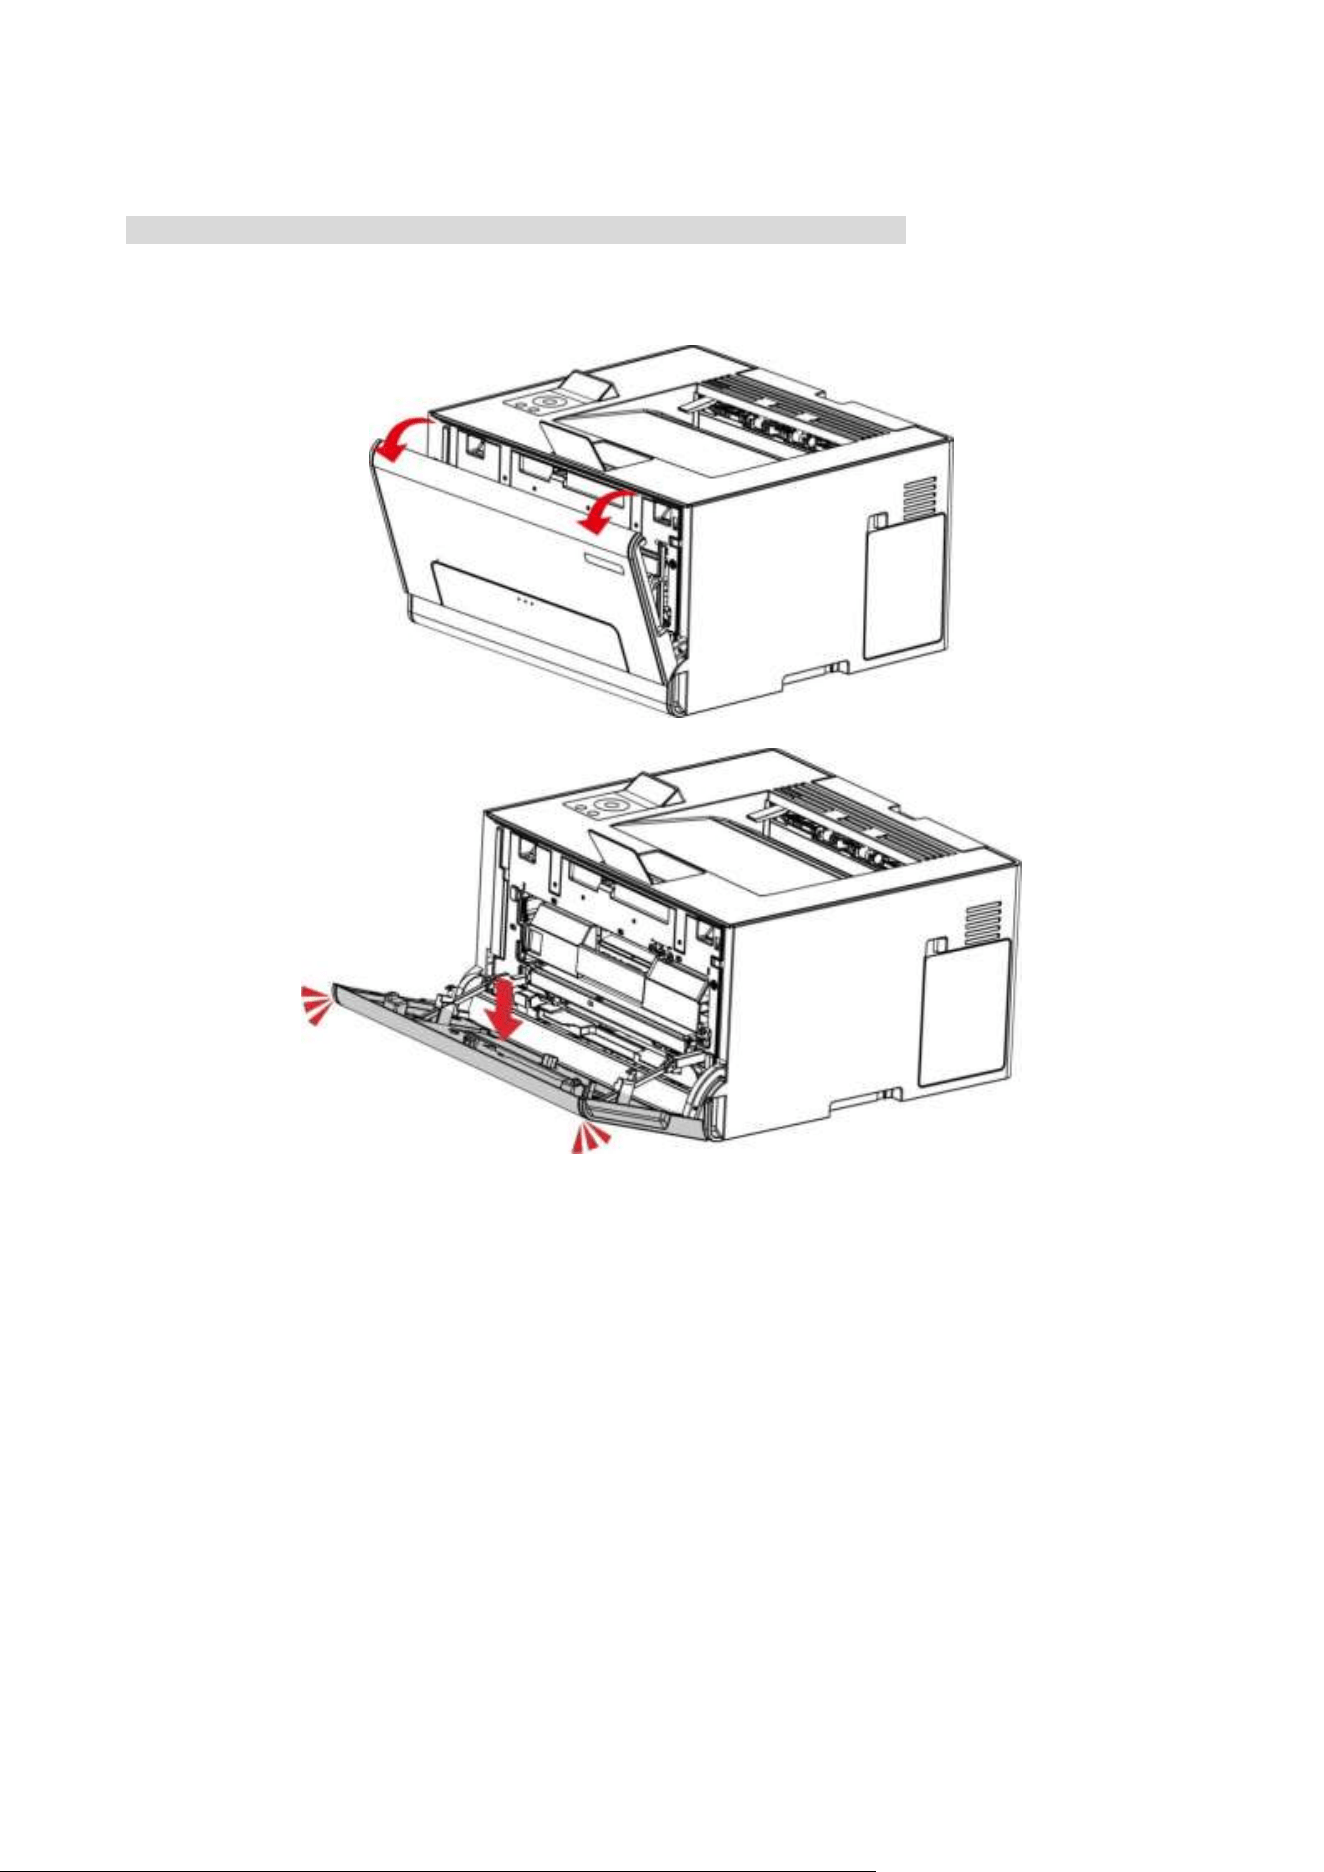
1. Open the front cover, and then push it down hard.
31
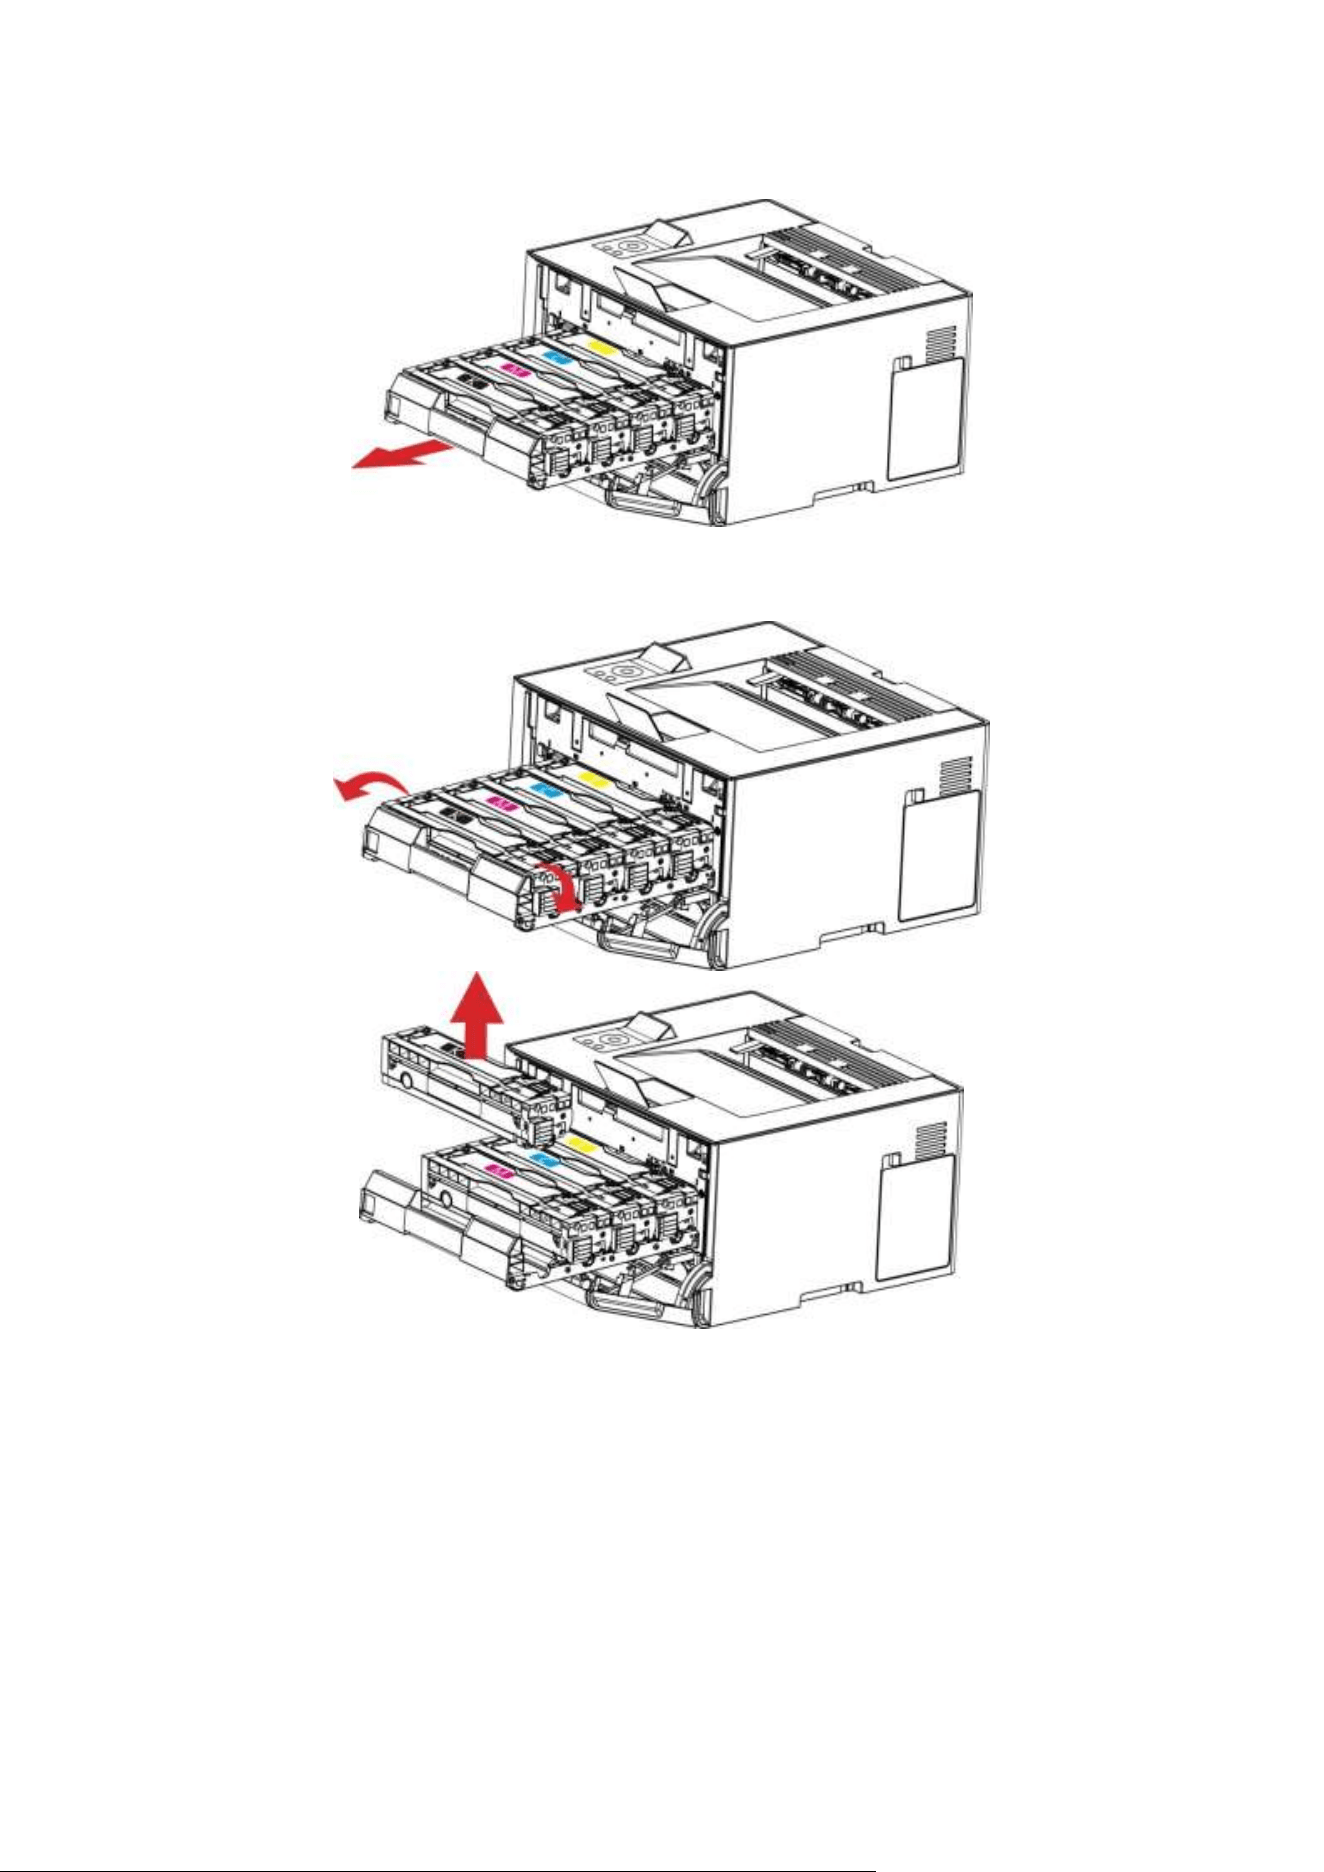
2. Pull out the toner cartridge tray.
3. Remove the used toner cartridge.
32
4. Unpack the new toner cartridge.
Note: • Do not expose the bottom of the toner cartridge to direct light. Prolonged exposure to light may
cause print quality problems.
• Do not touch the bottom of the toner cartridge. Otherwise it will affect the quality of future
print jobs.
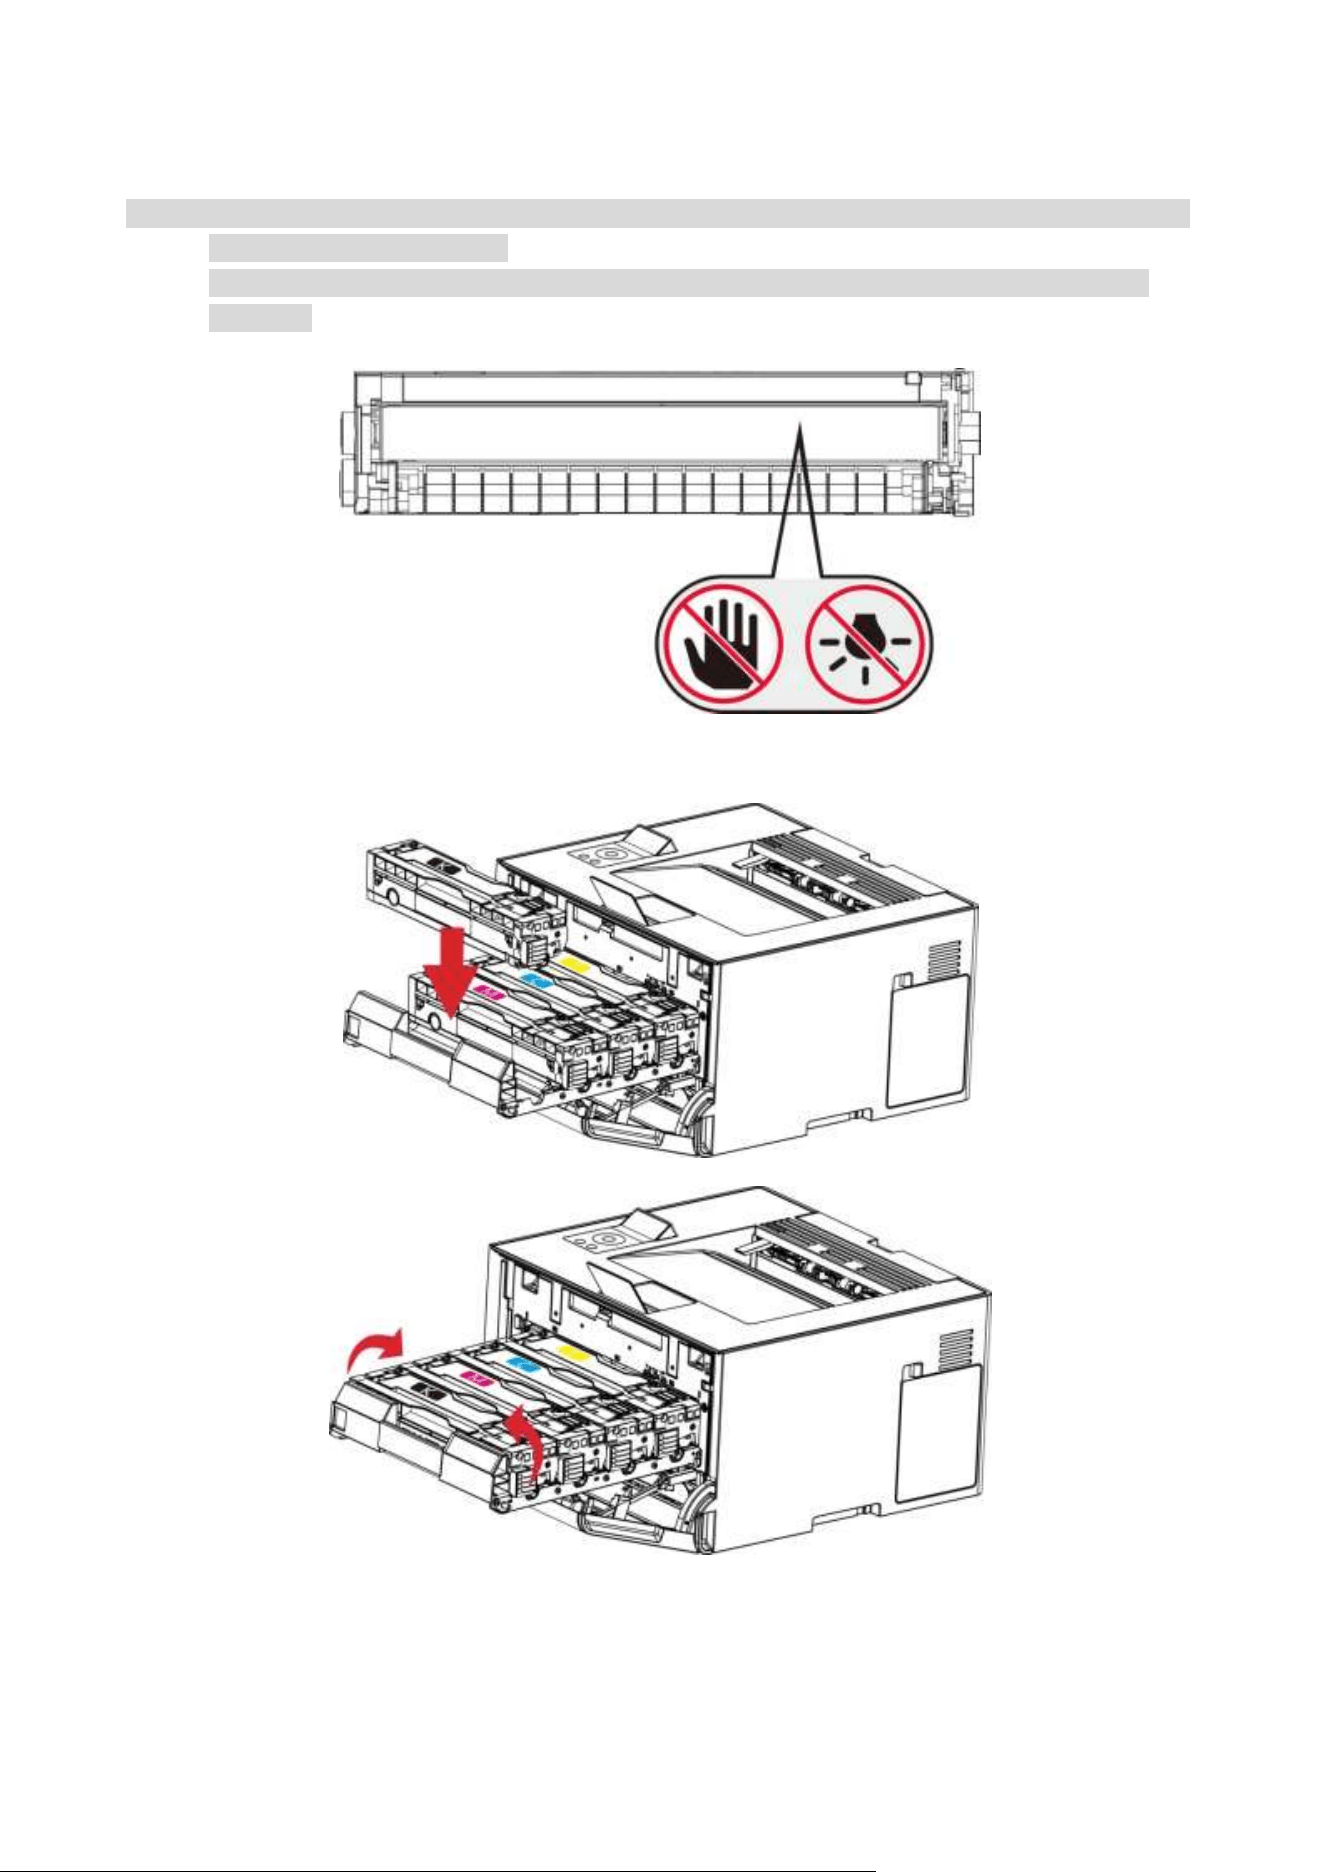
5. Insert a new toner cartridge.
33
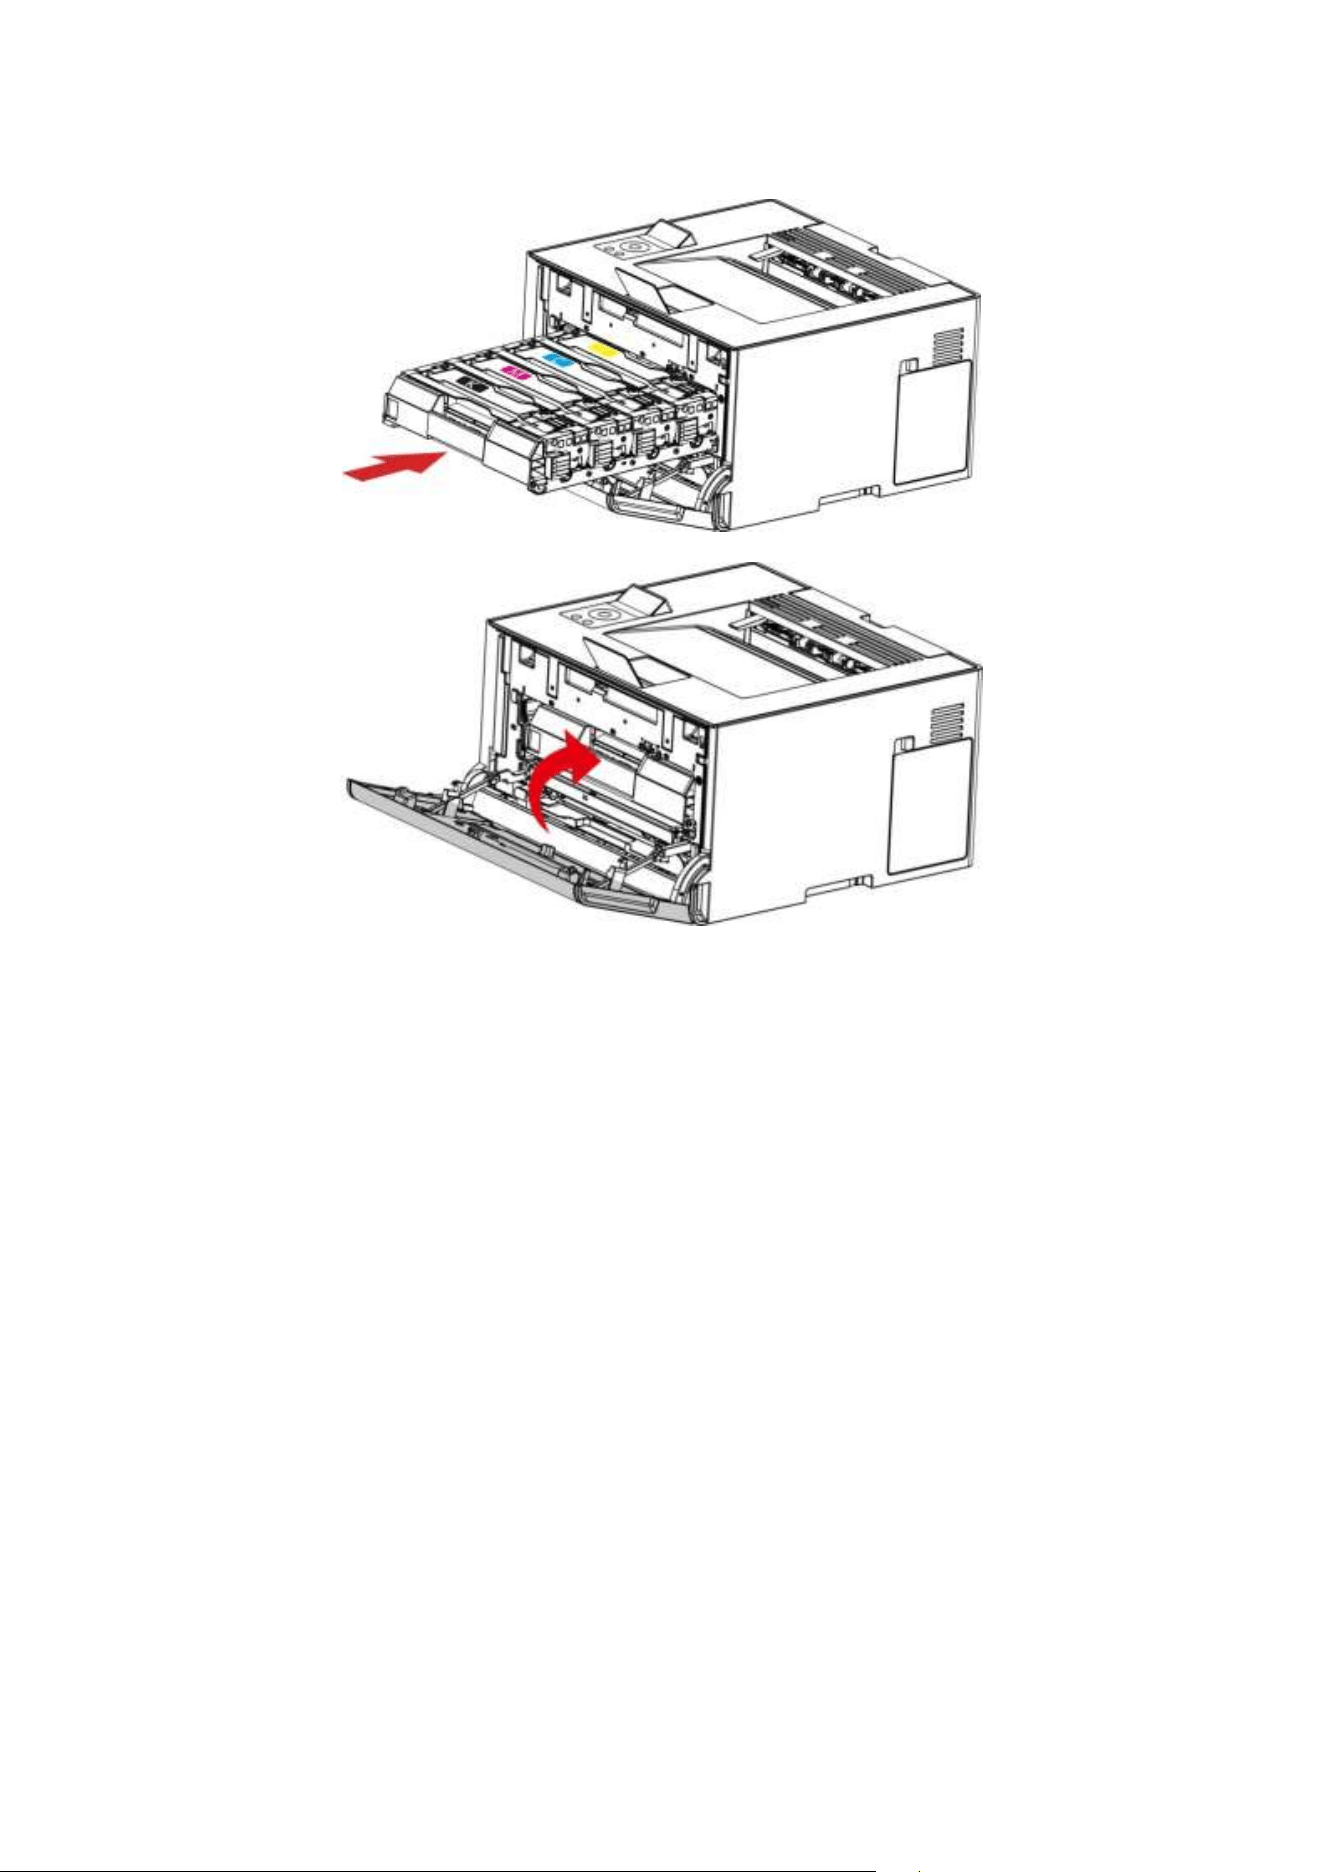
6. Insert the toner cartridge tray, and then close the cover.
34
Replacing the waste toner bottle
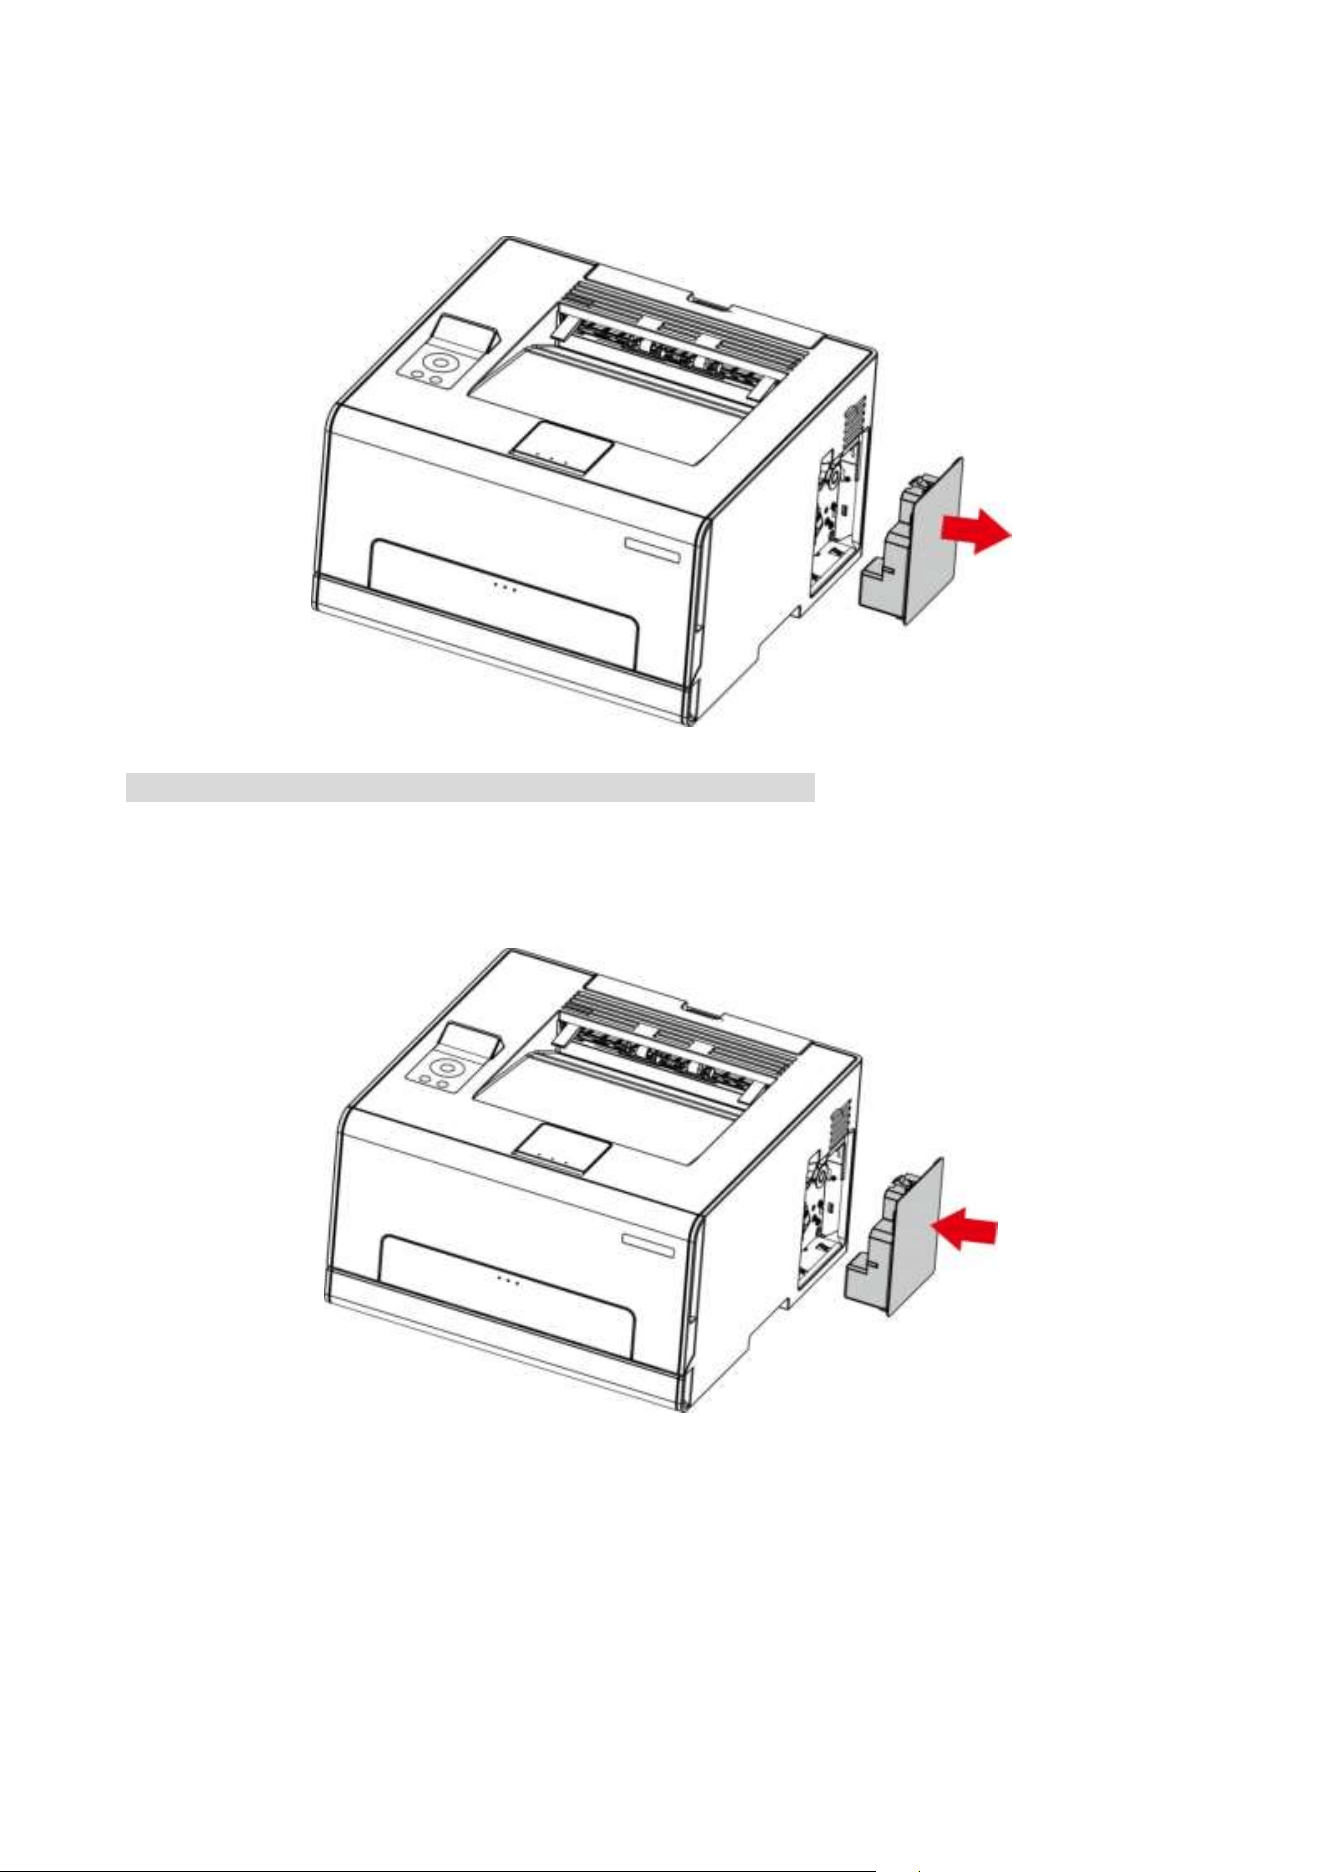
1. Remove the used waste toner bottle.
Note: • To avoid toner leakage, keep the waste toner bottle upright.
2. Unpack the new waste toner bottle.
3. Insert a new waste toner bottle.
35
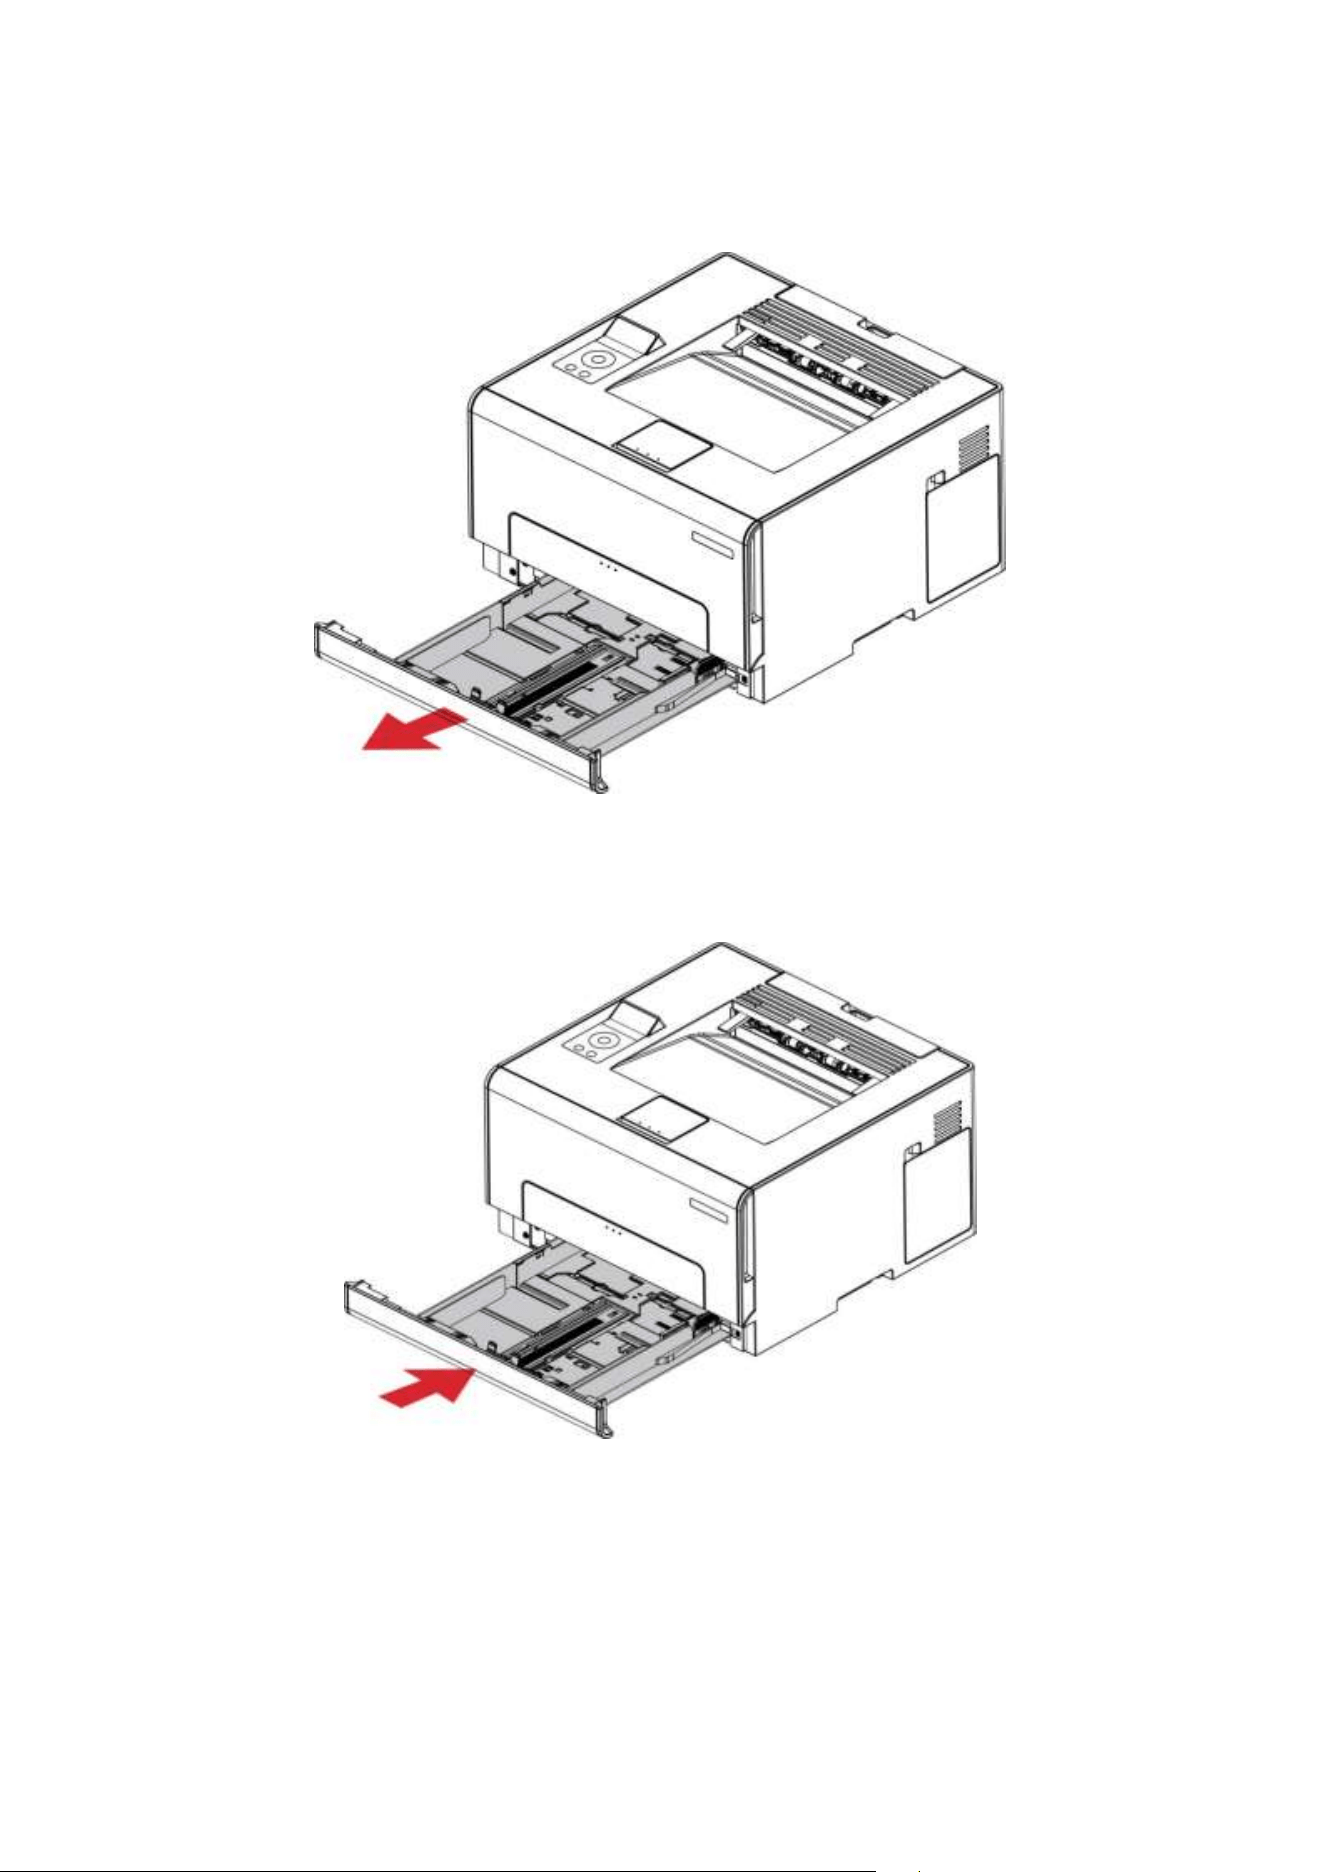
Replace the tray
1. Remove the used tray.
2. Unpack the new tray.
3. Insert a new tray.

36
Move the printer
Move the printer to another location
:To avoid the risk of electrical shock, do not place or use this product near water or wet
locations.
:If the printer weighs more than 18 kg, then it requires two or more trained personnel to lift it
safely.
:To avoid the risk of fire or electrical shock, use only the power cord provided with this
product or the manufacturer’s authorized replacement.
:When moving the printer, follow these guidelines to avoid personal injury or printer damage:
• Make sure that all covers and trays are closed.
• Turn off the printer, and then unplug the power cord from the electrical outlet.
• Disconnect all cords and cables from the printer.
• If the printer has casters on its base, then carefully move it to the new location. Use caution when
passing over thresholds and breaks in flooring.
• Always use the handholds on the printer to lift it.
• Any cart used to move the printer must have a surface able to support the full footprint of the
printer.
• Keep the printer upright.
• Avoid violent vibrations when moving.
• Make sure that your fingers are not under the printer when you set it down.
• Make sure that there is adequate clearance around the printer.
Note: • Damage to the printer caused by improper handling is not covered by the printer warranty.
Transporting the printer
When transporting the printer, use the original packaging.
37
09 Troubleshooting
Please read this section carefully. It may help you to solve common problems encountered during
the printing process. If the problems persist, please contact Pantum Aftersales Service Centre.
Prior to handling common problems, first check that:
• The power cord is connected correctly and the printer is powered on.
• All of the protective parts are removed.
• The toner cartridge is installed correctly.
• The paper is correctly loaded into the tray.
• The interface cable between the printer and the computer is connected correctly.
• The correct printer driver has been selected and installed properly.
• The computer port is properly configured and is connected to the correct printer port.
Avoiding jams
Correct loading of paper
Make sure that the paper lies flat in the tray.
Correct loading of paper
Incorrect loading of paper
• Do not load or remove a tray while the printer is printing.
• Do not load too much paper. Make sure that the stack height is below the maximum paper fill
indicator.
• Do not slide paper into the tray. Load paper as shown in the figure.
38
• Make sure that the paper guides are positioned correctly and are not pressing tightly against the
paper or envelopes.
• After loading the paper, push the tray into the printer.
Use recommended paper
• Use only recommended paper or special media.
• Do not load paper that is wrinkled, creased, damp, bent, or curled.
• Flex, fan out and align the paper edges before loading.
• Do not use paper that has been cut or trimmed by hand.
• Do not mix paper sizes, weights, or types in the same tray
• Make sure that the paper size and type are set correctly on the computer or printer control panel.
• Store paper according to manufacturer recommendations.
39
Locate jammed paper
No.
Paper jam locations
1
Standard exit
2
Multipurpose feed tray
3
Standard feed tray
4
Rear cover

40
Cleaning Jammed Paper
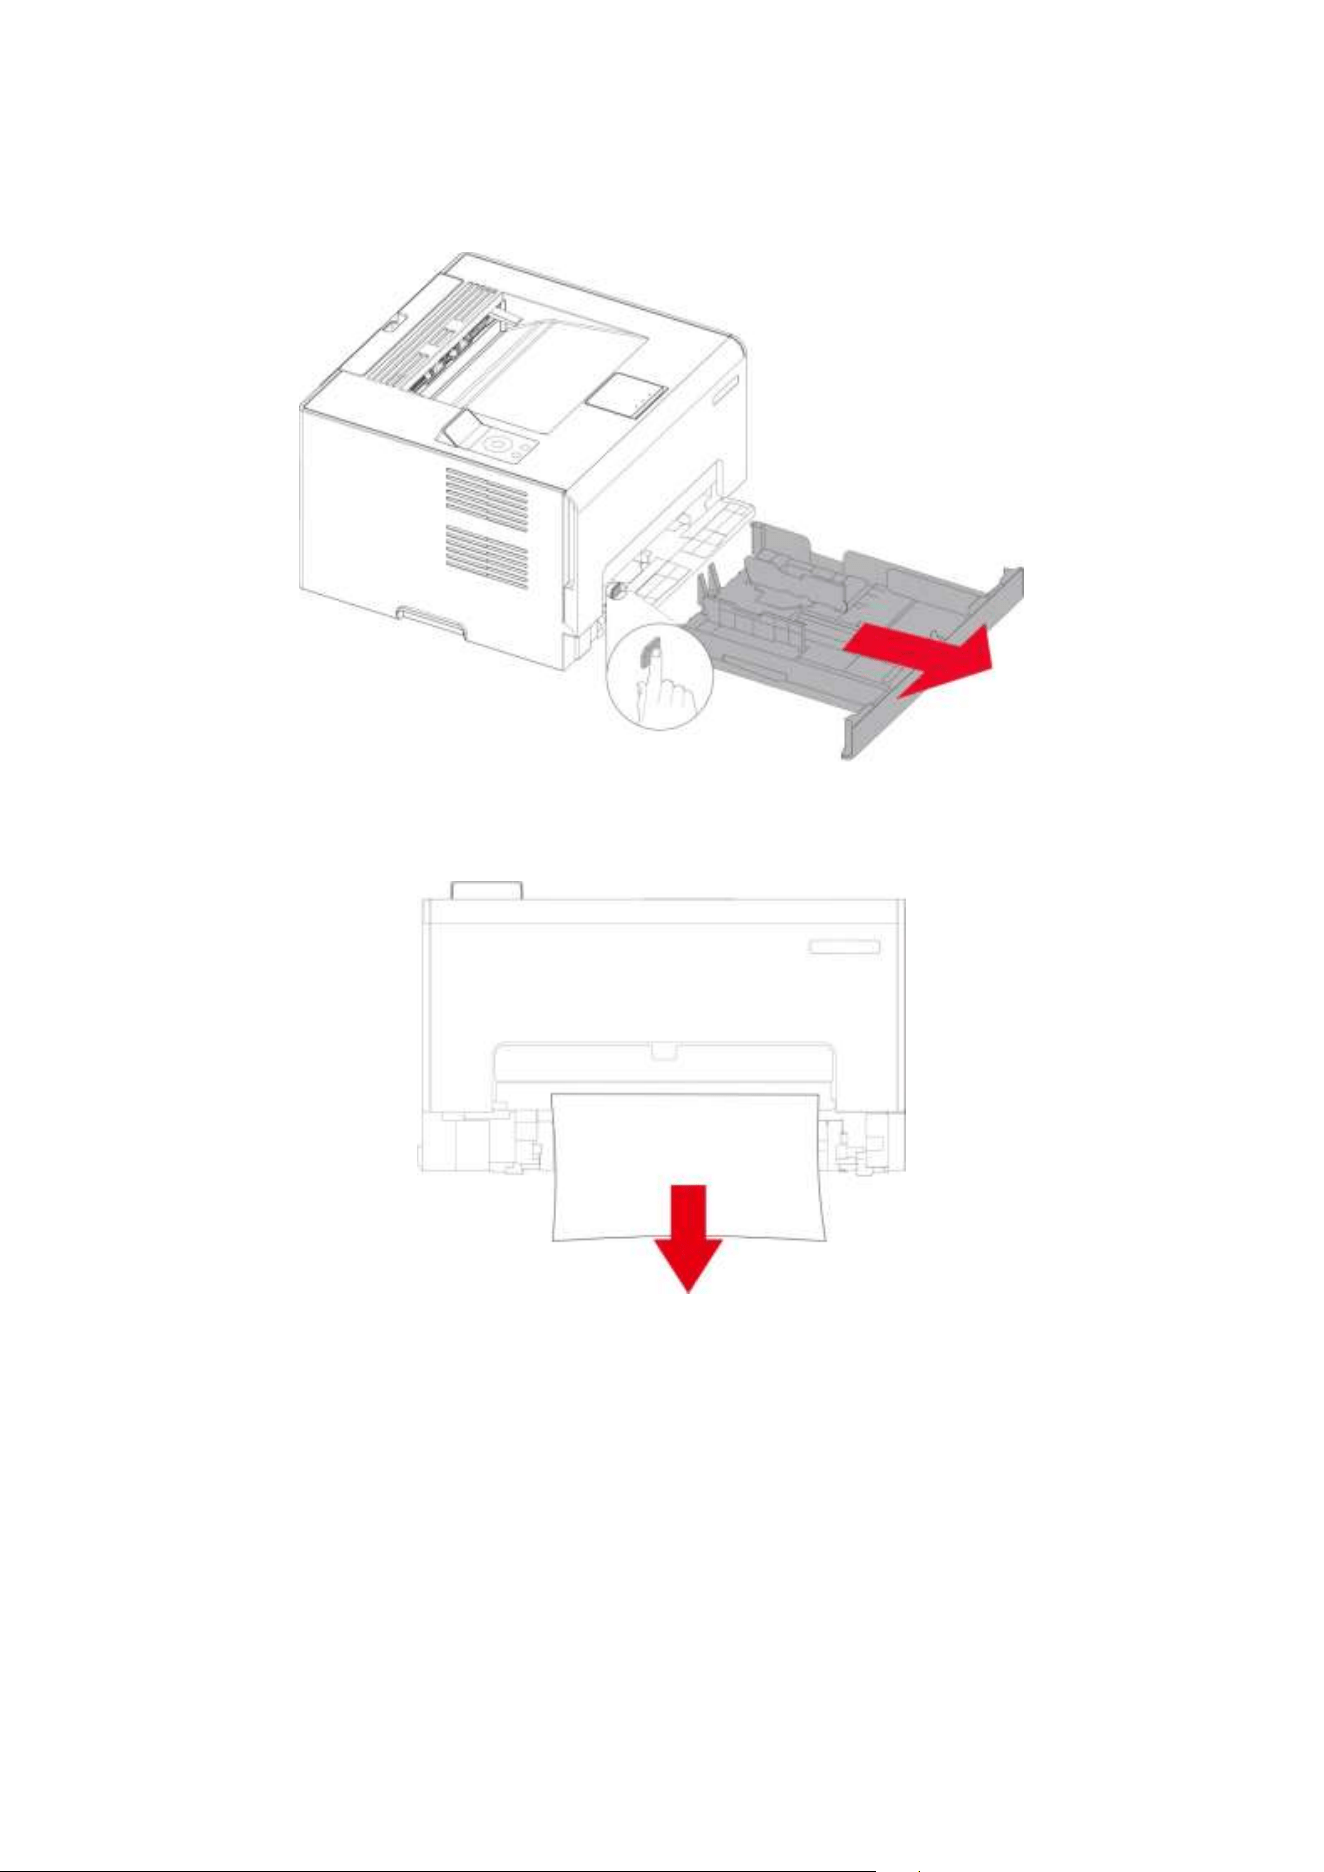
Paper jam in the automatic tray
1. Remove the tray.
2. Remove the jammed paper.
Note: • Make sure that all paper fragments are removed.
3. Insert the tray.
41
4. Open the rear cover.
The inside of the printer might be hot. To reduce the risk of injury by a hot component, allow
the surface to cool before touching it.
5. Remove the jammed paper.
Note: • Make sure that all paper fragments are removed.
6. Close the cover.
42
The paper is jammed in the manual feed tray
1. Remove the standard feed tray and press the blue unlock button on the left.
2. Pull out the jammed paper.

43
3. Press and push up the metal plate to return it to its original position.
4. Push the standard feed tray in.
44
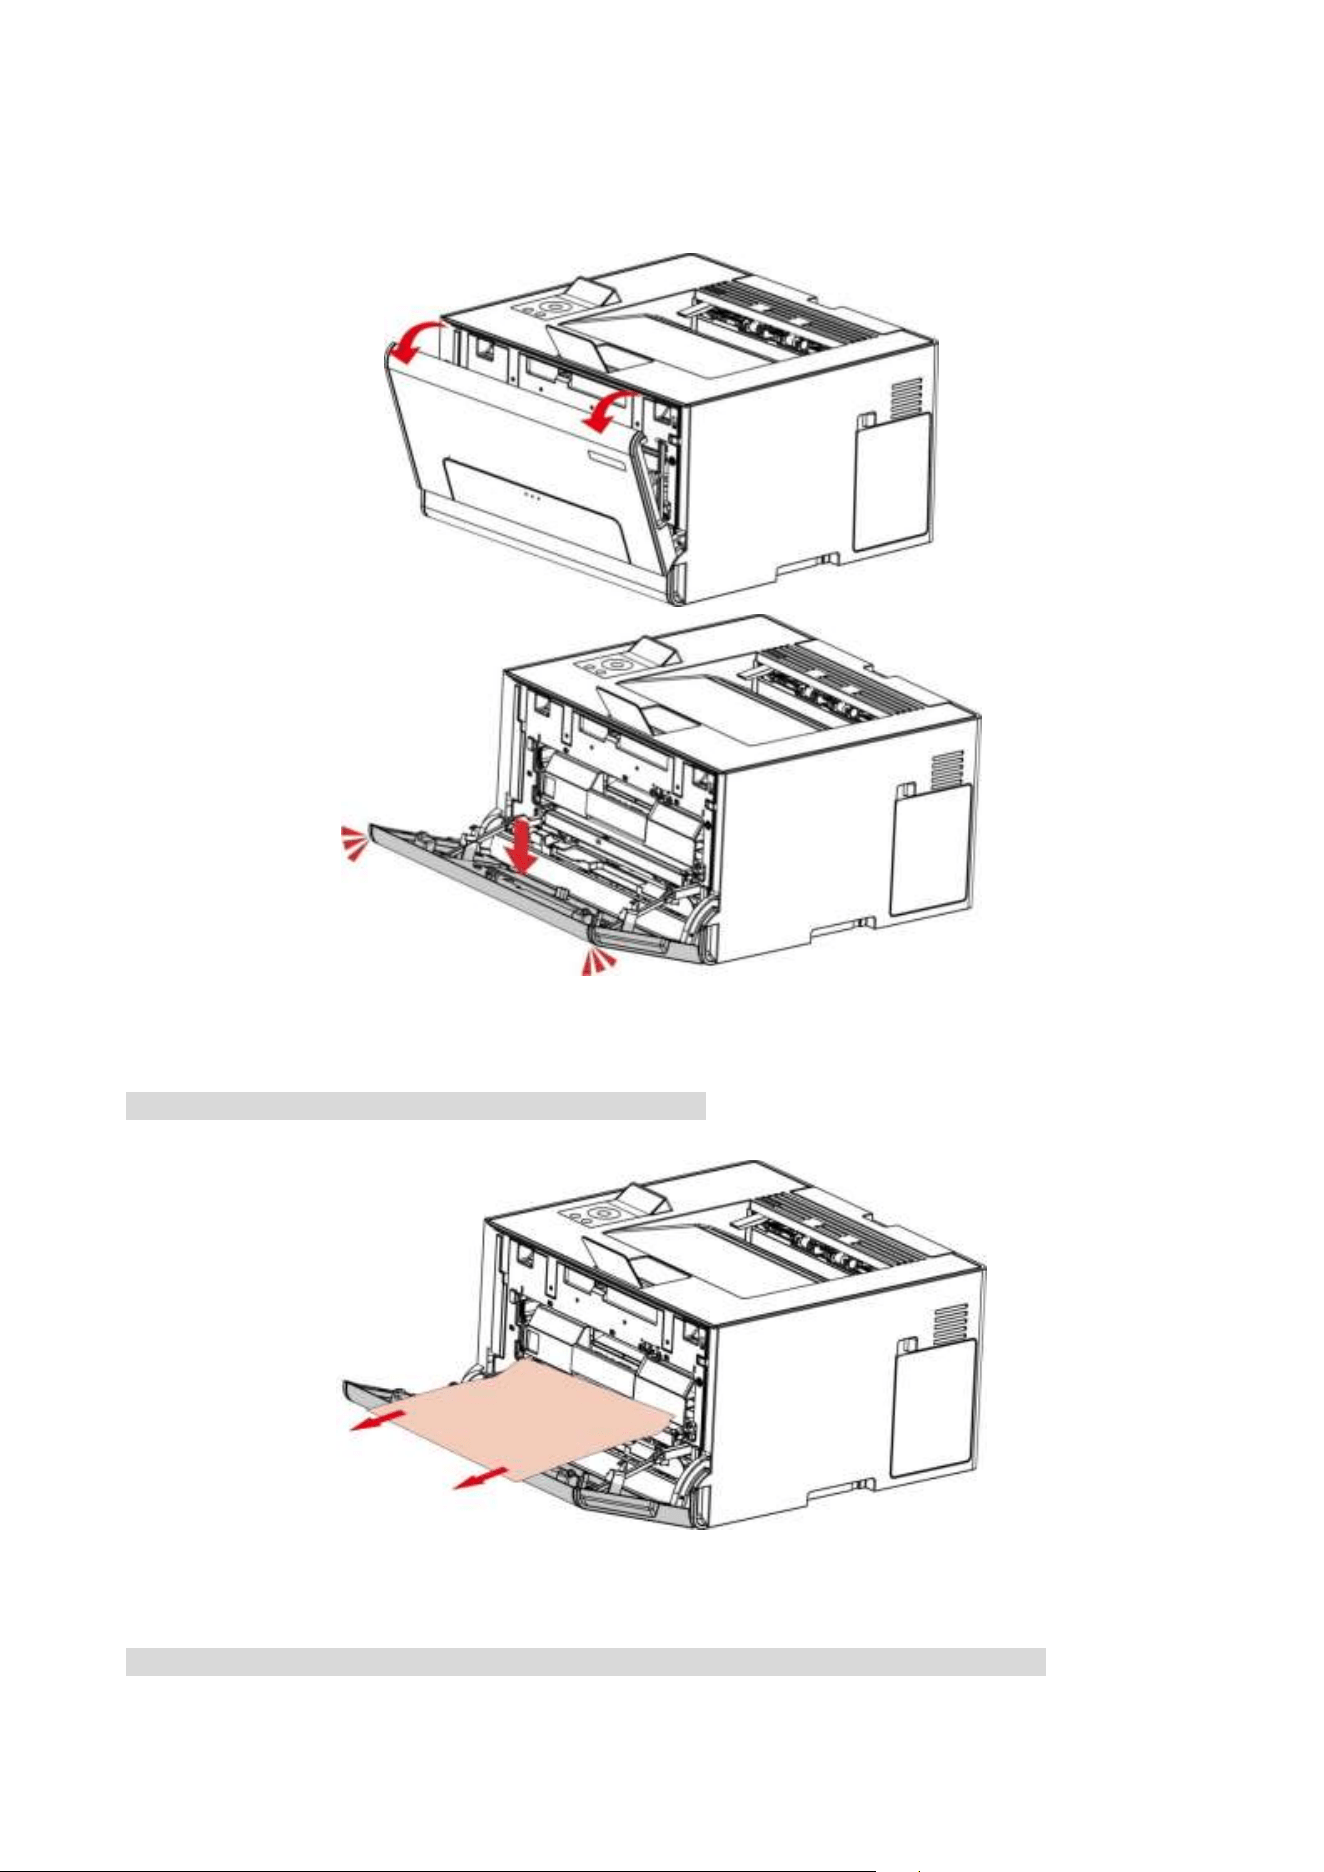
Paper jam in the manual tray
1. Open the front cover, and then push it down hard.
2. Remove the jammed paper.
Note: • Make sure that all paper fragments are removed.
3. Close the front cover.
Note: • If the problem still cannot be solved, please contact the customer services center.
45
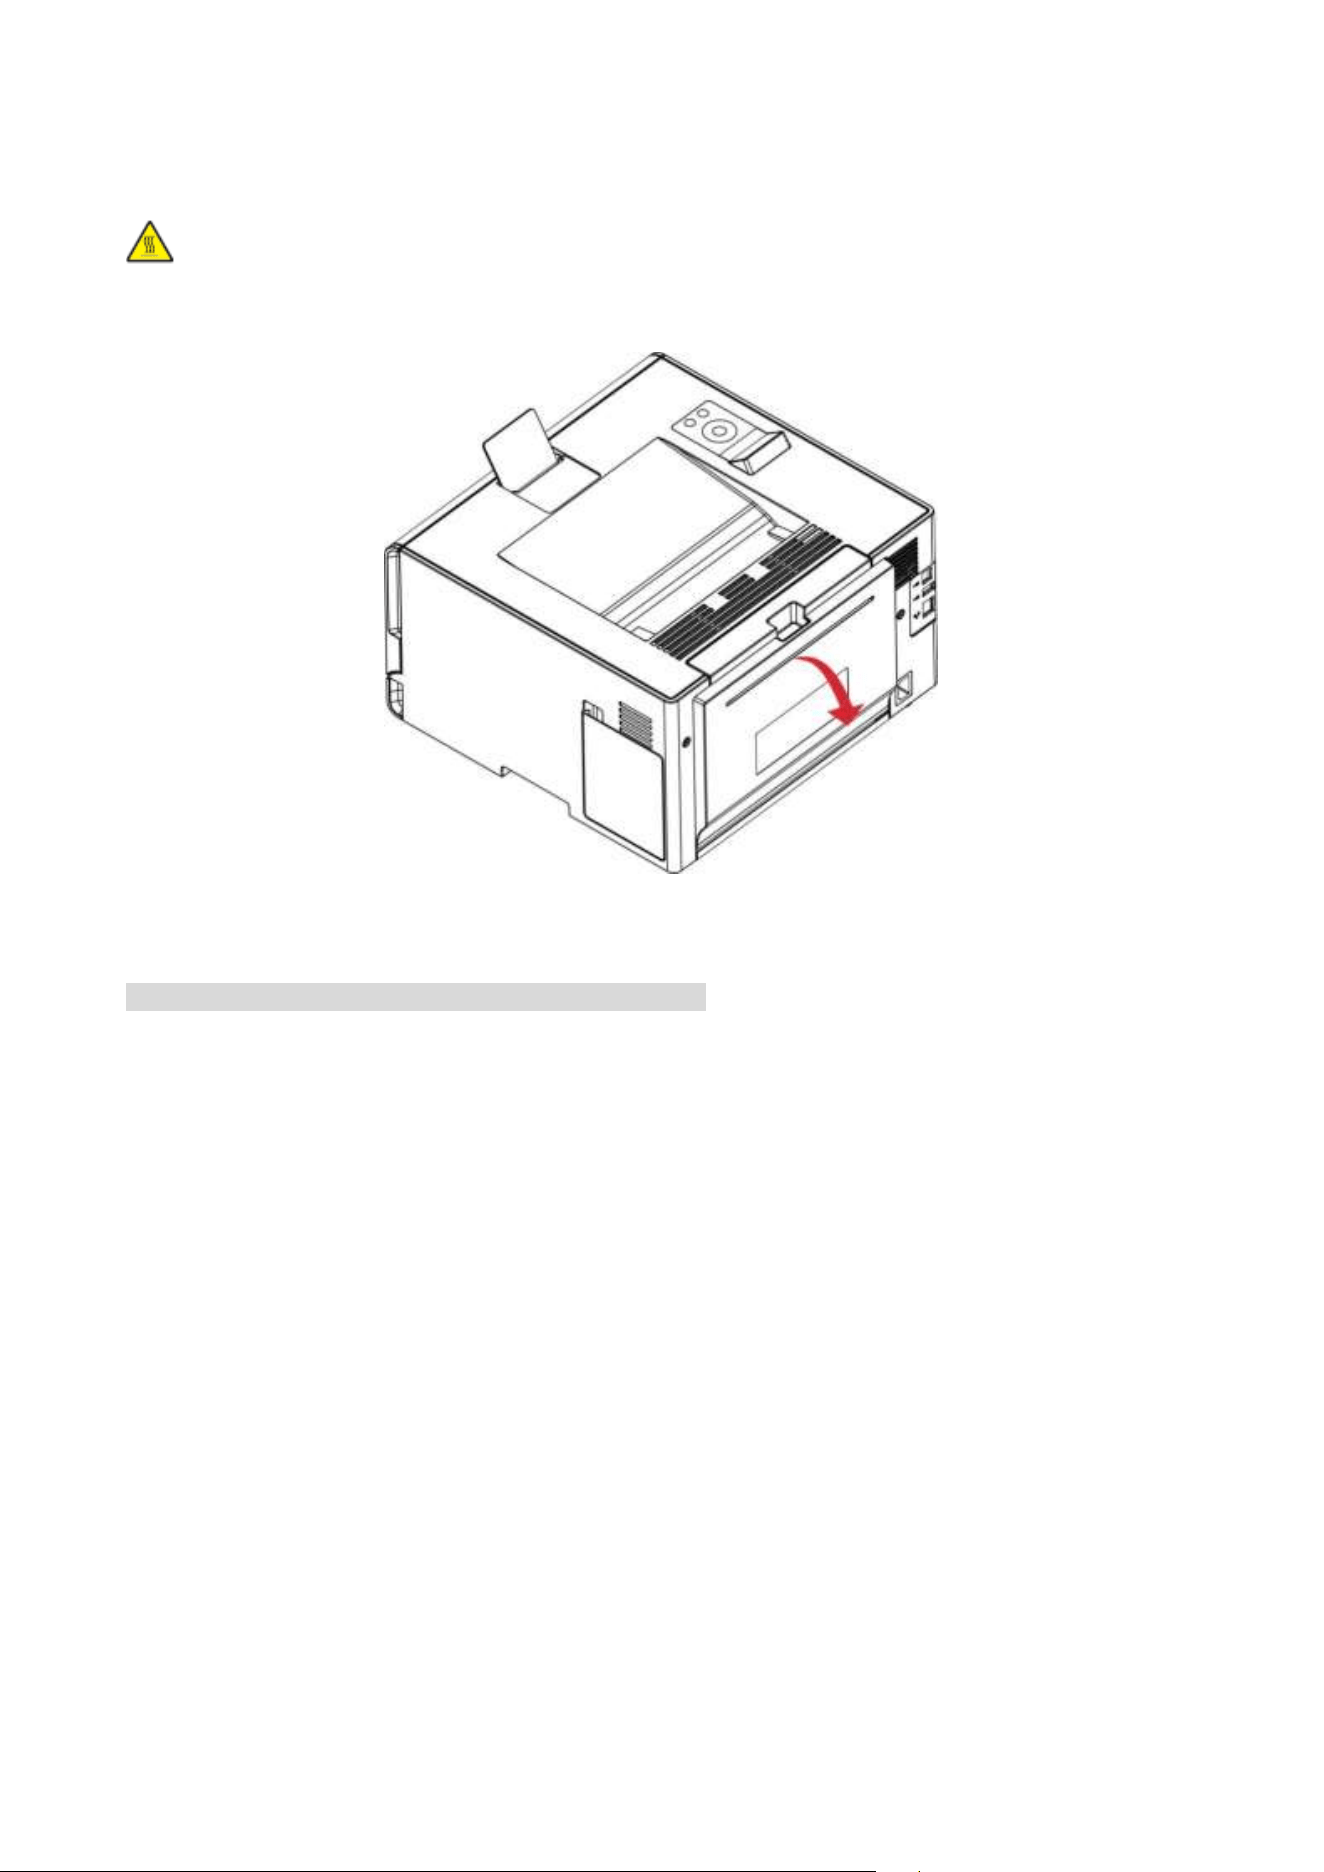
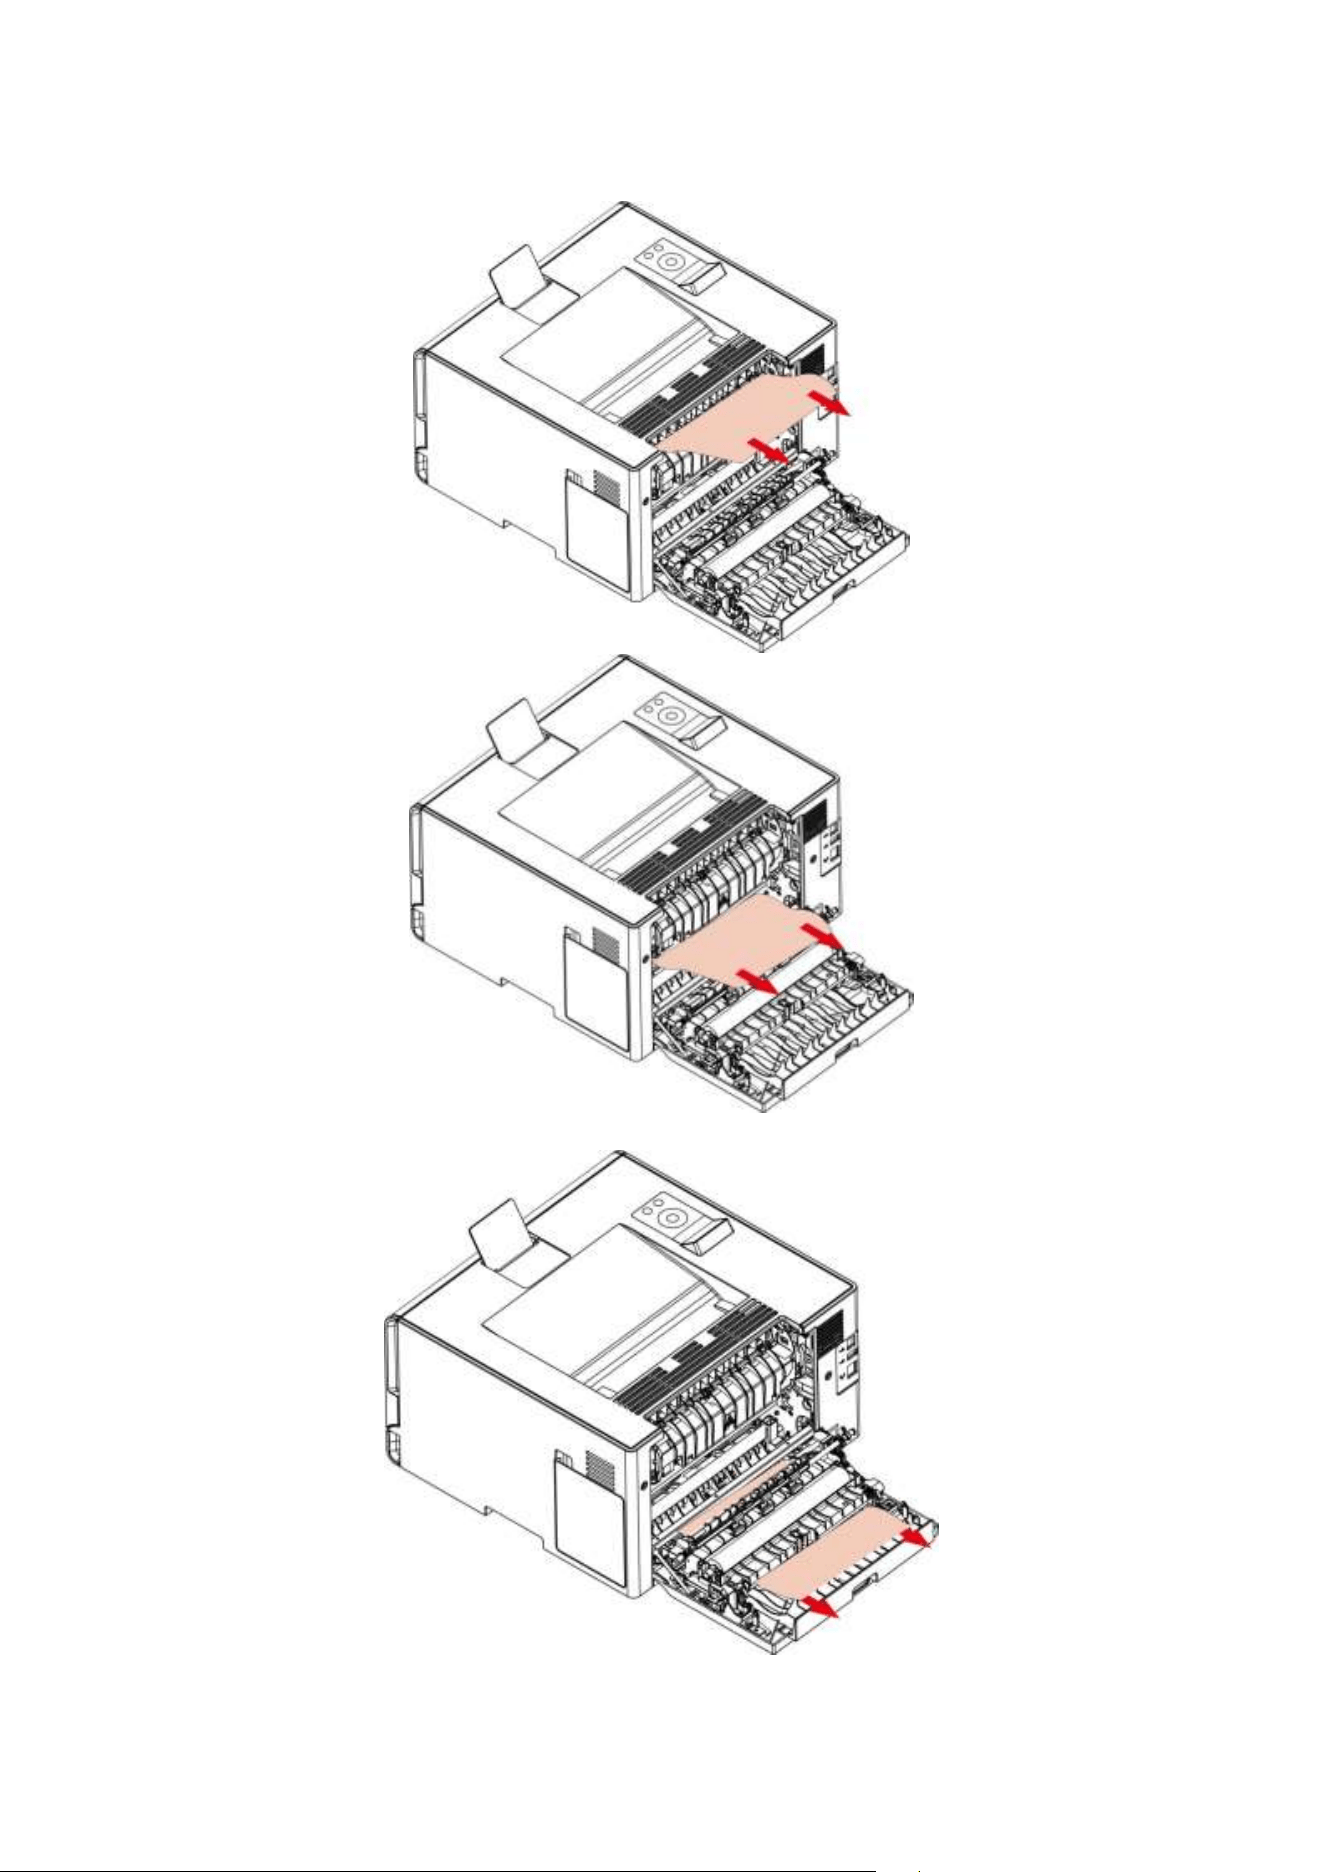
Paper jam in the rear cover
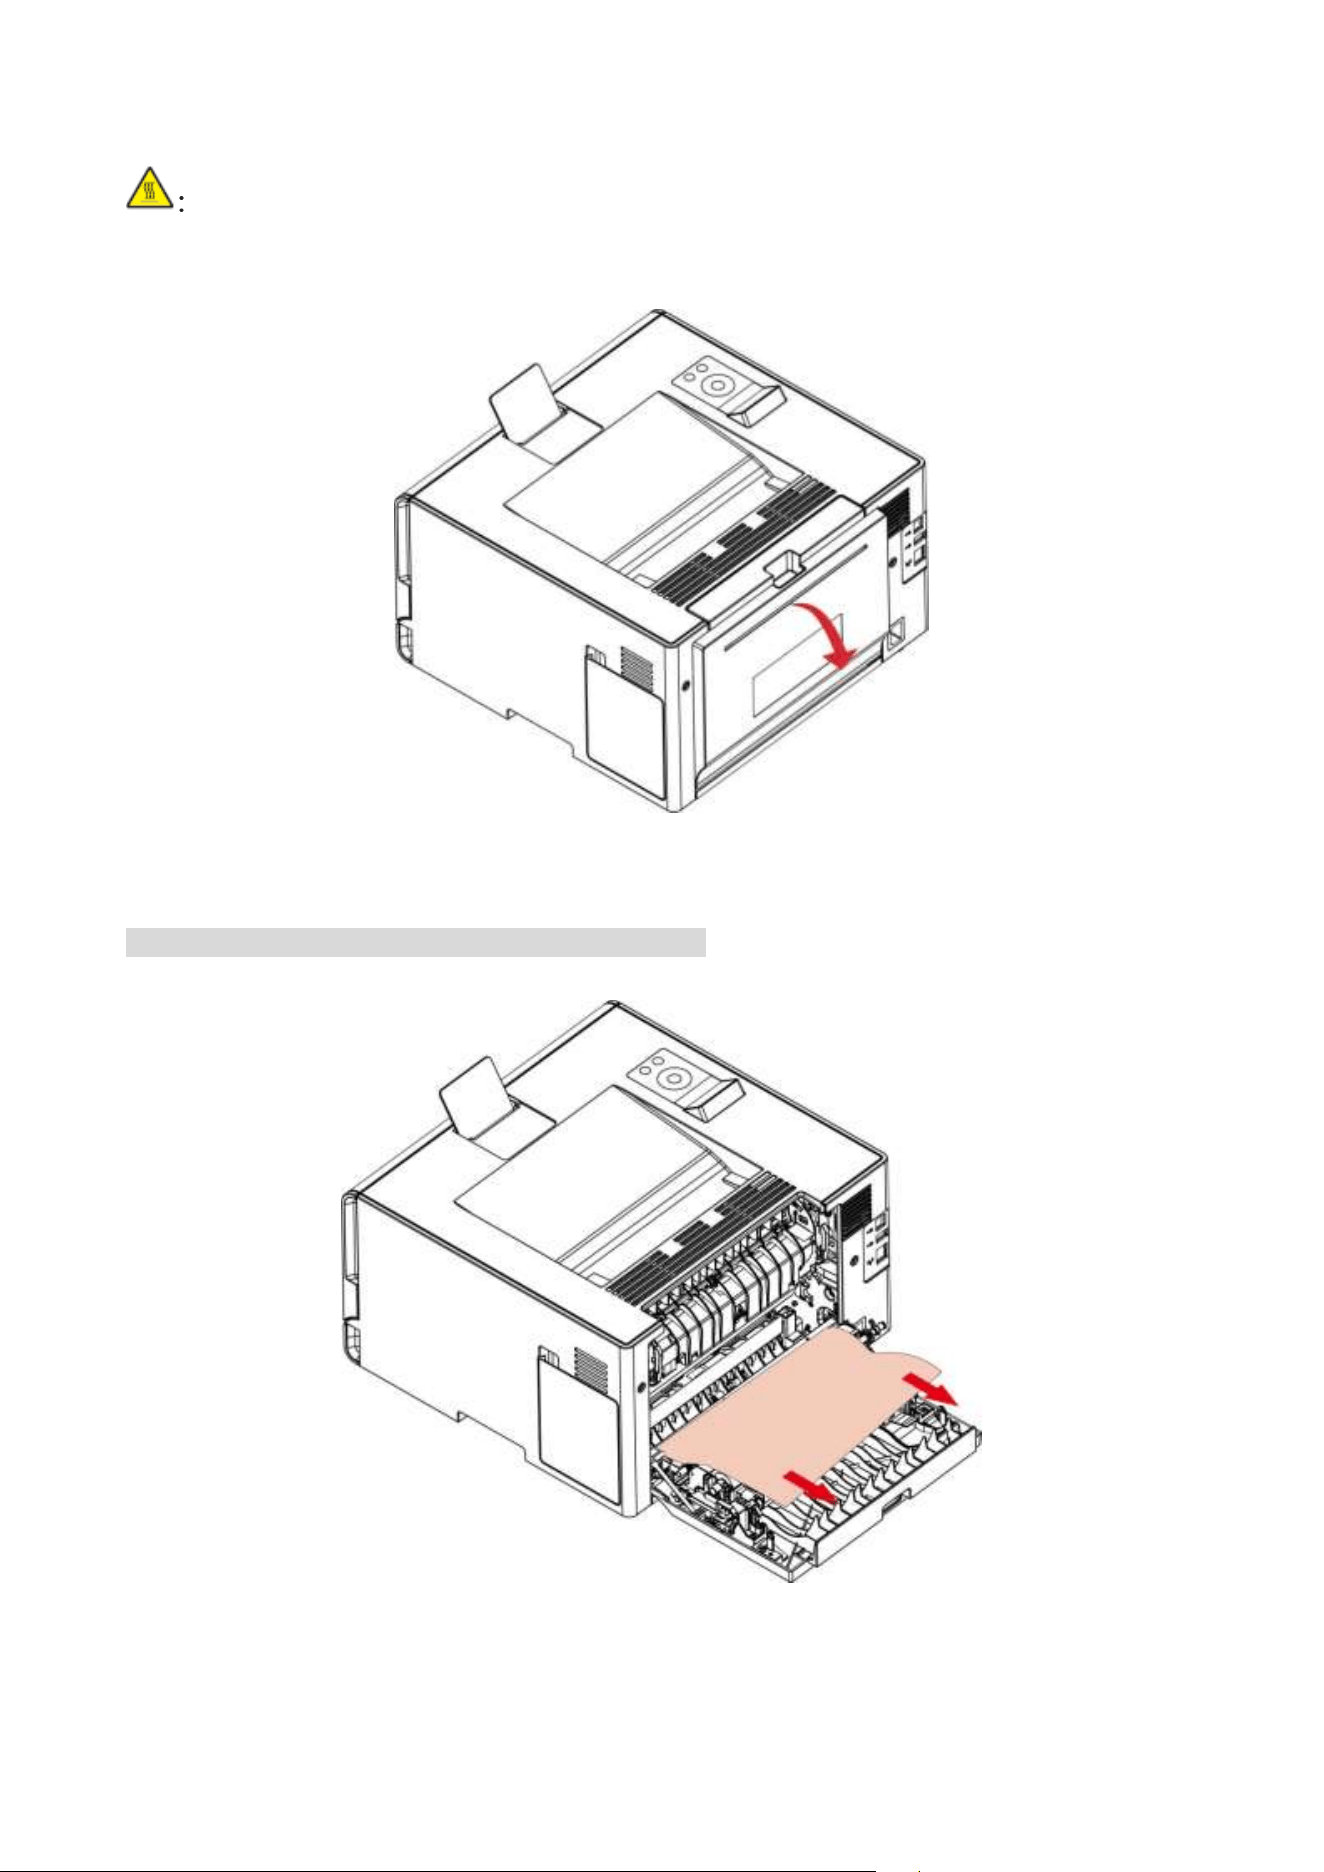
1. Open the rear cover.
:The inside of the printer might be hot. To reduce the risk of injury by a hot component, allow
the surface to cool before touching it.
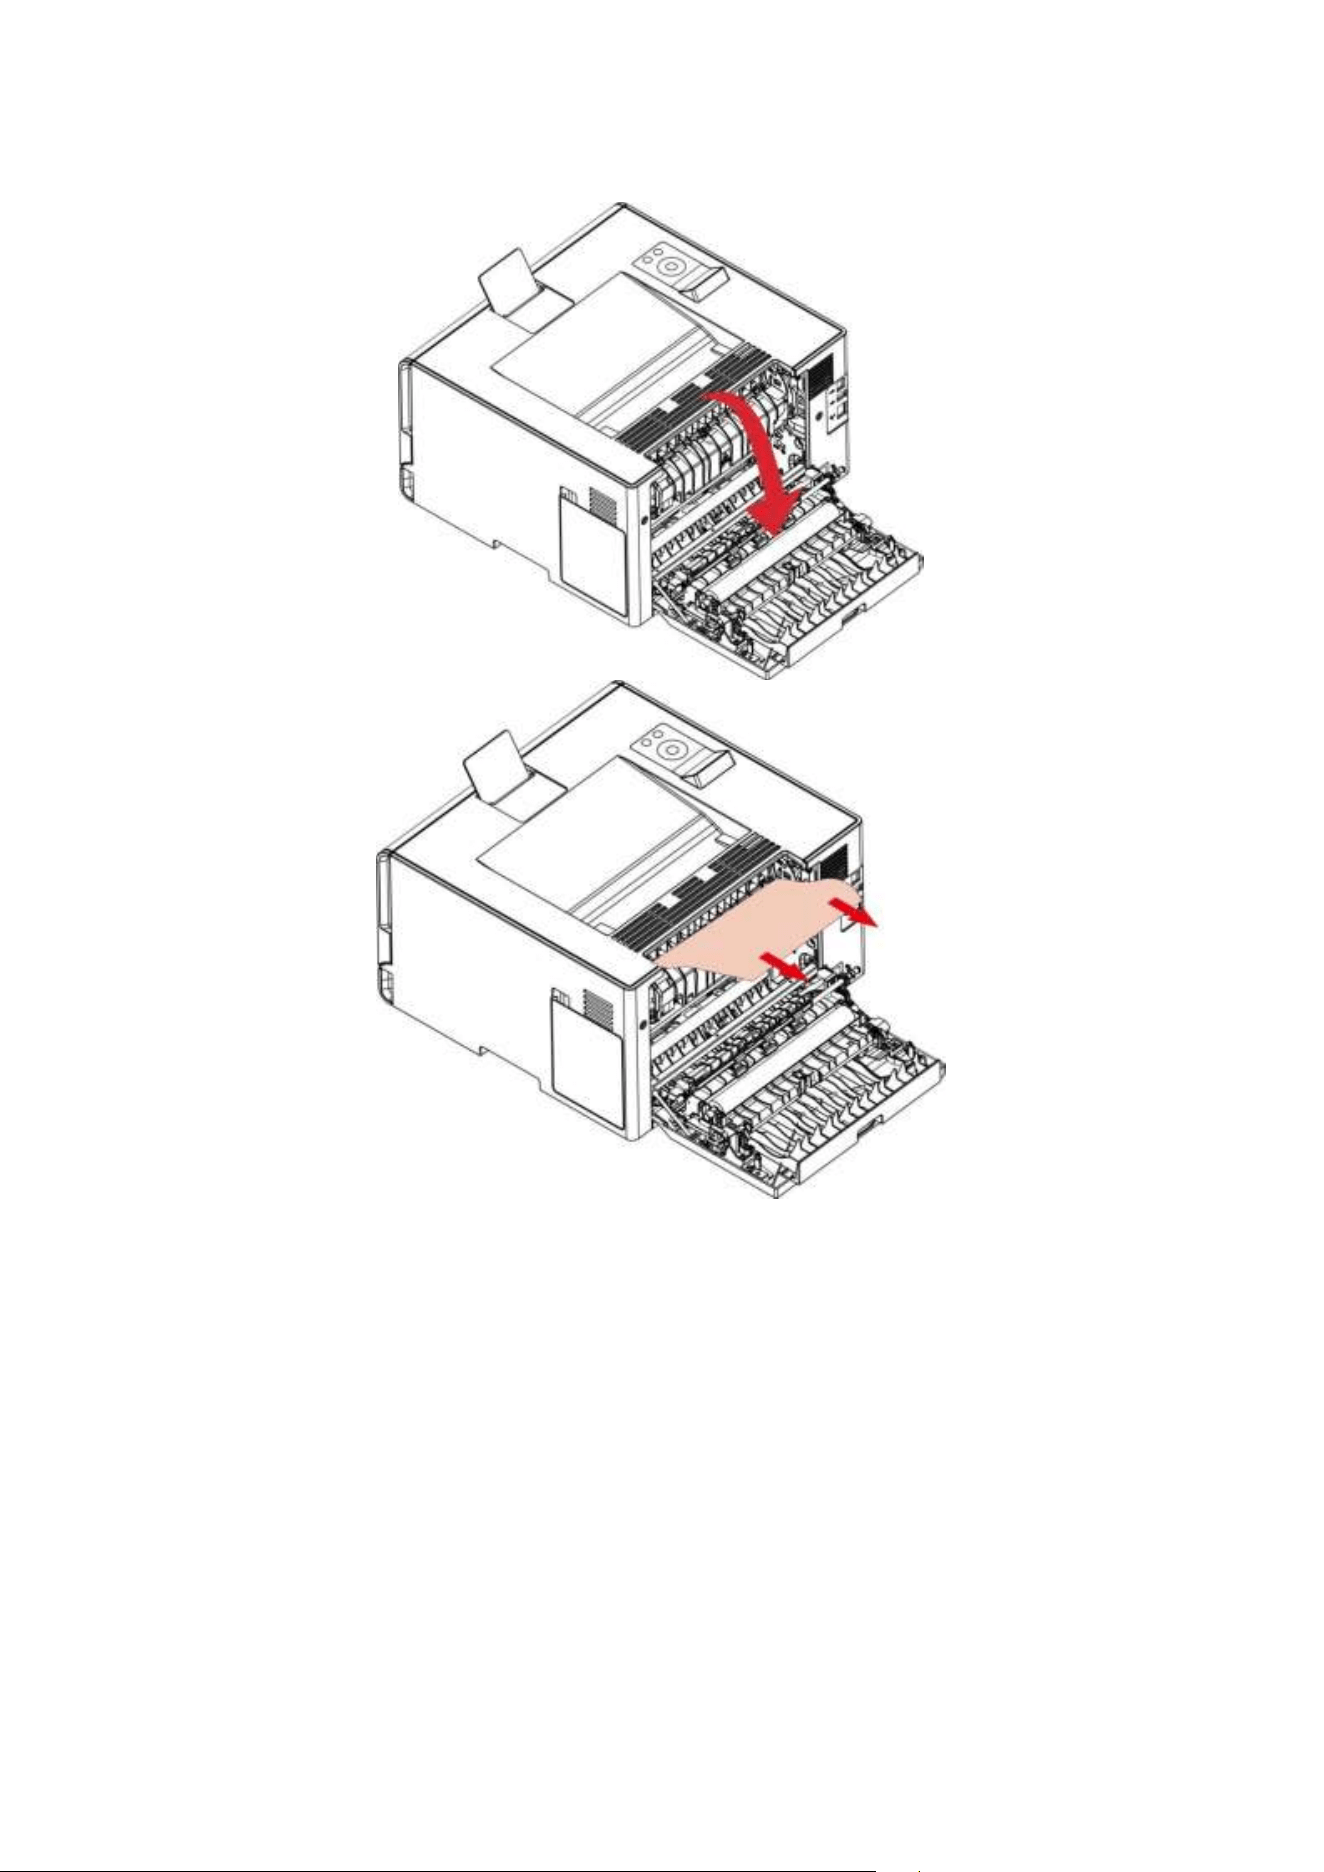
2. Remove the jammed paper.
Note: • Make sure that all paper fragments are removed.
46
• Fuser area
47
• Below the fuser area
• Duplex unit
3. Close the cover.

48
Software Failure
Problem
Solution
The printer icon is not displayed in the
“Device and Printer” folder.
Reinstall the printer driver.
Ensure that the USB interface cable and the power cord are
properly connected.
The printer is in Ready mode but it will
not perform any print job.
If the failure still exists after restarting the printer, please
reinstall the printer driver.
Make sure the network cable of USB cable is connected
correctly.
Failed to install the driver
Check whether the print spooler service is enabled.
Check the power supply and the connection of the printer.
The driver cannot be used if the IP
address of the printer has been
changed
Modify the port IP address of the printer driver.
If the above method does not work, please reinstall the
printer driver.
It is recommended that a fixed IP address should be set to
the network printer.
In the DHCP network, it is recommended to bind the IP
address with the MAC address of the printer.
Error Message
Error Message
Cause
Measure
No Cartridge
The toner cartridge is not installed correctly
or the toner cartridge is damaged.
Install the toner cartridge correctly or
replace it with a new one.
Toner Low
Any toner cartridge is running low on toner.
Please prepare a corresponding new
toner cartridge.
Cartridge Err
The printer does not support the toner
cartridge.
Please replace the toner cartridge
supported by the printer.
Toner life end
Toner has been used up.
Replace the toner cartridge.
Feed Failure
Paper is not installed correctly. Paper is
beyond the specification.
Please install the paper correctly.
Paper jam in
printer
Paper is not installed correctly.
Please install the paper correctly.
Waste toner
bottle is nearly
full
Waste toner bottle works under capacity.
Please prepare a new waste toner
bottle.
Waste tone bottle
life ended
Waste toner bottle is full.
Please replace the waste toner
bottle.

49
Note: • If the problem persists, please contact the customer service center. See the Three Guarantees
certificate for contact details.
Common Troubleshooting
Common Problems
Trouble Type
Cause
Solution
Problems in
printing
Poor print
quality
See details in Image Defects.
See details in Image Defects.
The printer
does not work
• The cable between the computer
and the printer is not connected
properly.
• Error in specifying the print port.
• The printer is offline and User Guide
of Printer is checked.
• The printer has not recovered from
an internal error, such as a paper jam,
paper empty, etc.
• Driver program of printer is not
installed correctly.
• Disconnect and then reconnect the printer
cable.
• Check the Windows printer settings to
ensure that the print job has been sent to the
correct port. If the computer has more than
one port, make sure that the printer is
connected to the correct port.
• Make sure that the printer is in the normal
online status.
• Please eliminate errors so that the printer
can recover to its normal state.
• Unload and reinstall the driver program of
printer.
Problems with
Paper
Handling
Paper feed
failure
• The print media has been loaded
incorrectly.
• The print media is out of the
supported media range.
• The feed roller is dirty.
• Too many papers in paper tray.
• Please install printing medium correctly;
please print with manual feed tray if special
printing medium is used to print.
• Please use the print media within the
specification range.
• Clean the feed roller.
• Remove excess paper from the tray. For
printing on special print media, use the
manual tray.

50
Paper Jam
• Too many papers in paper tray.
• The print media is out of the
supported media range.
• There is foreign matter in the paper
path.
• The feed roller is dirty.
• Internal parts failure.
• Remove excess paper from the tray. For
printing on special print media, use the
manual tray.
• Make sure to use the paper that meets
specifications. For printing on special print
media, use the manual tray.
• Clean the paper path.
• Clean the feed roller.
Print
multipage feed
• Excessive static electricity on the
print media.
• The print media is damp and is
sticking together.
• Internal parts failure.
• Separate the print media to eliminate some
static electricity. It is suggested that you use
the recommended print media.
• Separate the print media or use better
quality and dry print media.
Note: • If the problem persists, please contact the customer service center. See the Guarantees
certificate for contact details.
51
Image Defects
Problem
Cause
Solution
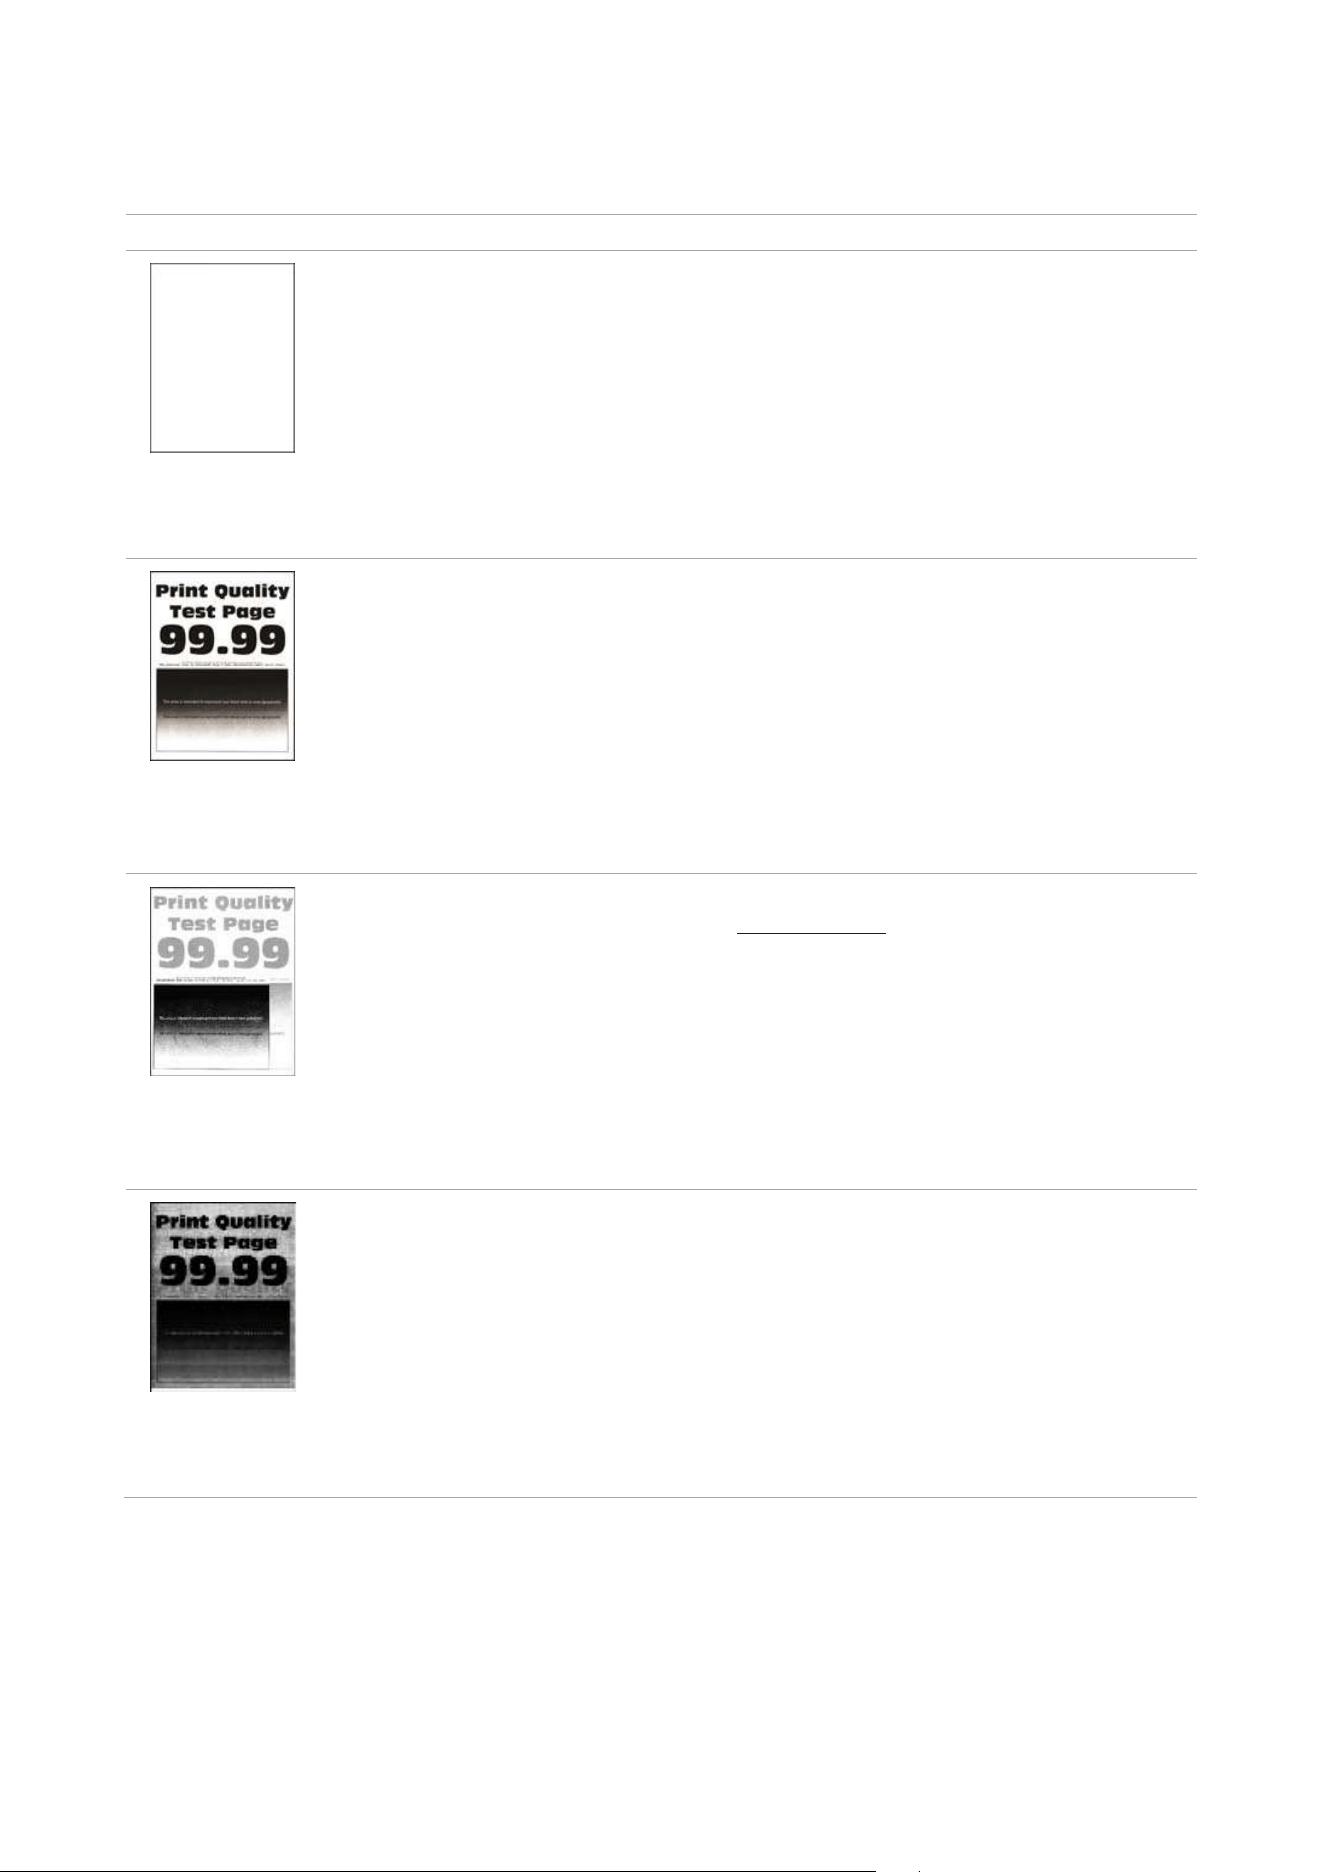
Blank or white
pages
• Toner cartridge is not installed
properly.
• Pull out the toner cartridge tray, remove
the toner cartridge, then insert the toner
cartridge, and insert the toner cartridge
tray.
Dark print
• A higher density is set when
printing.
• The print media does not meet
the usage specification. For
example, the print media is
textured, damp, or too rough.
• The paper used has been
stored in the air for a prolonged
time.
• Adjust the toner density from “Printing
Preferences” according to your operating
system, or by selecting “Print Density” on
the control panel.
• Please correctly use the medium
conforming to the specifications.
• Keep the paper in its original wrapper
before use.
• Make the "Full Calibration" settings.
Ghost images
• The tray fails to load the media
properly.
• Toner cartridge is not installed
properly.
• Please load the paper correctly. See
Paper Feeding for how to feed the paper
correctly.
• Pull out the toner cartridge tray, remove
the toner cartridge, then insert the toner
cartridge, and insert the toner cartridge
tray.
• Make "Position Calibration" or "Full
Calibration" settings.
Gray or colored
background
• Toner cartridge is not installed
properly.
• The paper path is dirty.
• Scanning exposure.
• If a gray or colored background
appears during copying or
scanning, the glass platen may
be dirty.
• Pull out the toner cartridge tray, remove
the toner cartridge, then insert the toner
cartridge, and insert the toner cartridge
tray.
• Clean the paper path.
• Please close the cover on the manuscript,
and then carry out copying and scanning.
• Clean the platen glass.
52
Incorrect margins
• The tray fails to load the media
properly.
• The print margin is set incorrectly.
• Please load the paper correctly. See
Paper Feeding for how to feed the
paper correctly.
• Please set the correct print margin.
•
Make "Position Calibration" or "Full
Calibration" settings.
Light print
• A lower density is set when
printing.
• The print media does not meet the
usage specification. For example,
the print media is textured, damp,
or too rough.
• The resolution in the print
program is set too low, and the
density is set too low.
• The paper used has been stored
in the air for a prolonged time.
• Toner cartridge is not installed
properly.
• Toner Save set is checked.
• Please correctly use the medium
conforming to the specifications.
• Adjust the toner density from
“Printing Preferences” according to
your operating system, or by selecting
“Print Density” on the control panel.
• Keep the paper in its original wrapper
before use.
• Pull out the toner cartridge tray,
remove the toner cartridge, then insert
the toner cartridge, and insert the
toner cartridge tray.
• Please check whether the Toner Save
mode is enabled.
• Make the "Full Calibration" settings..
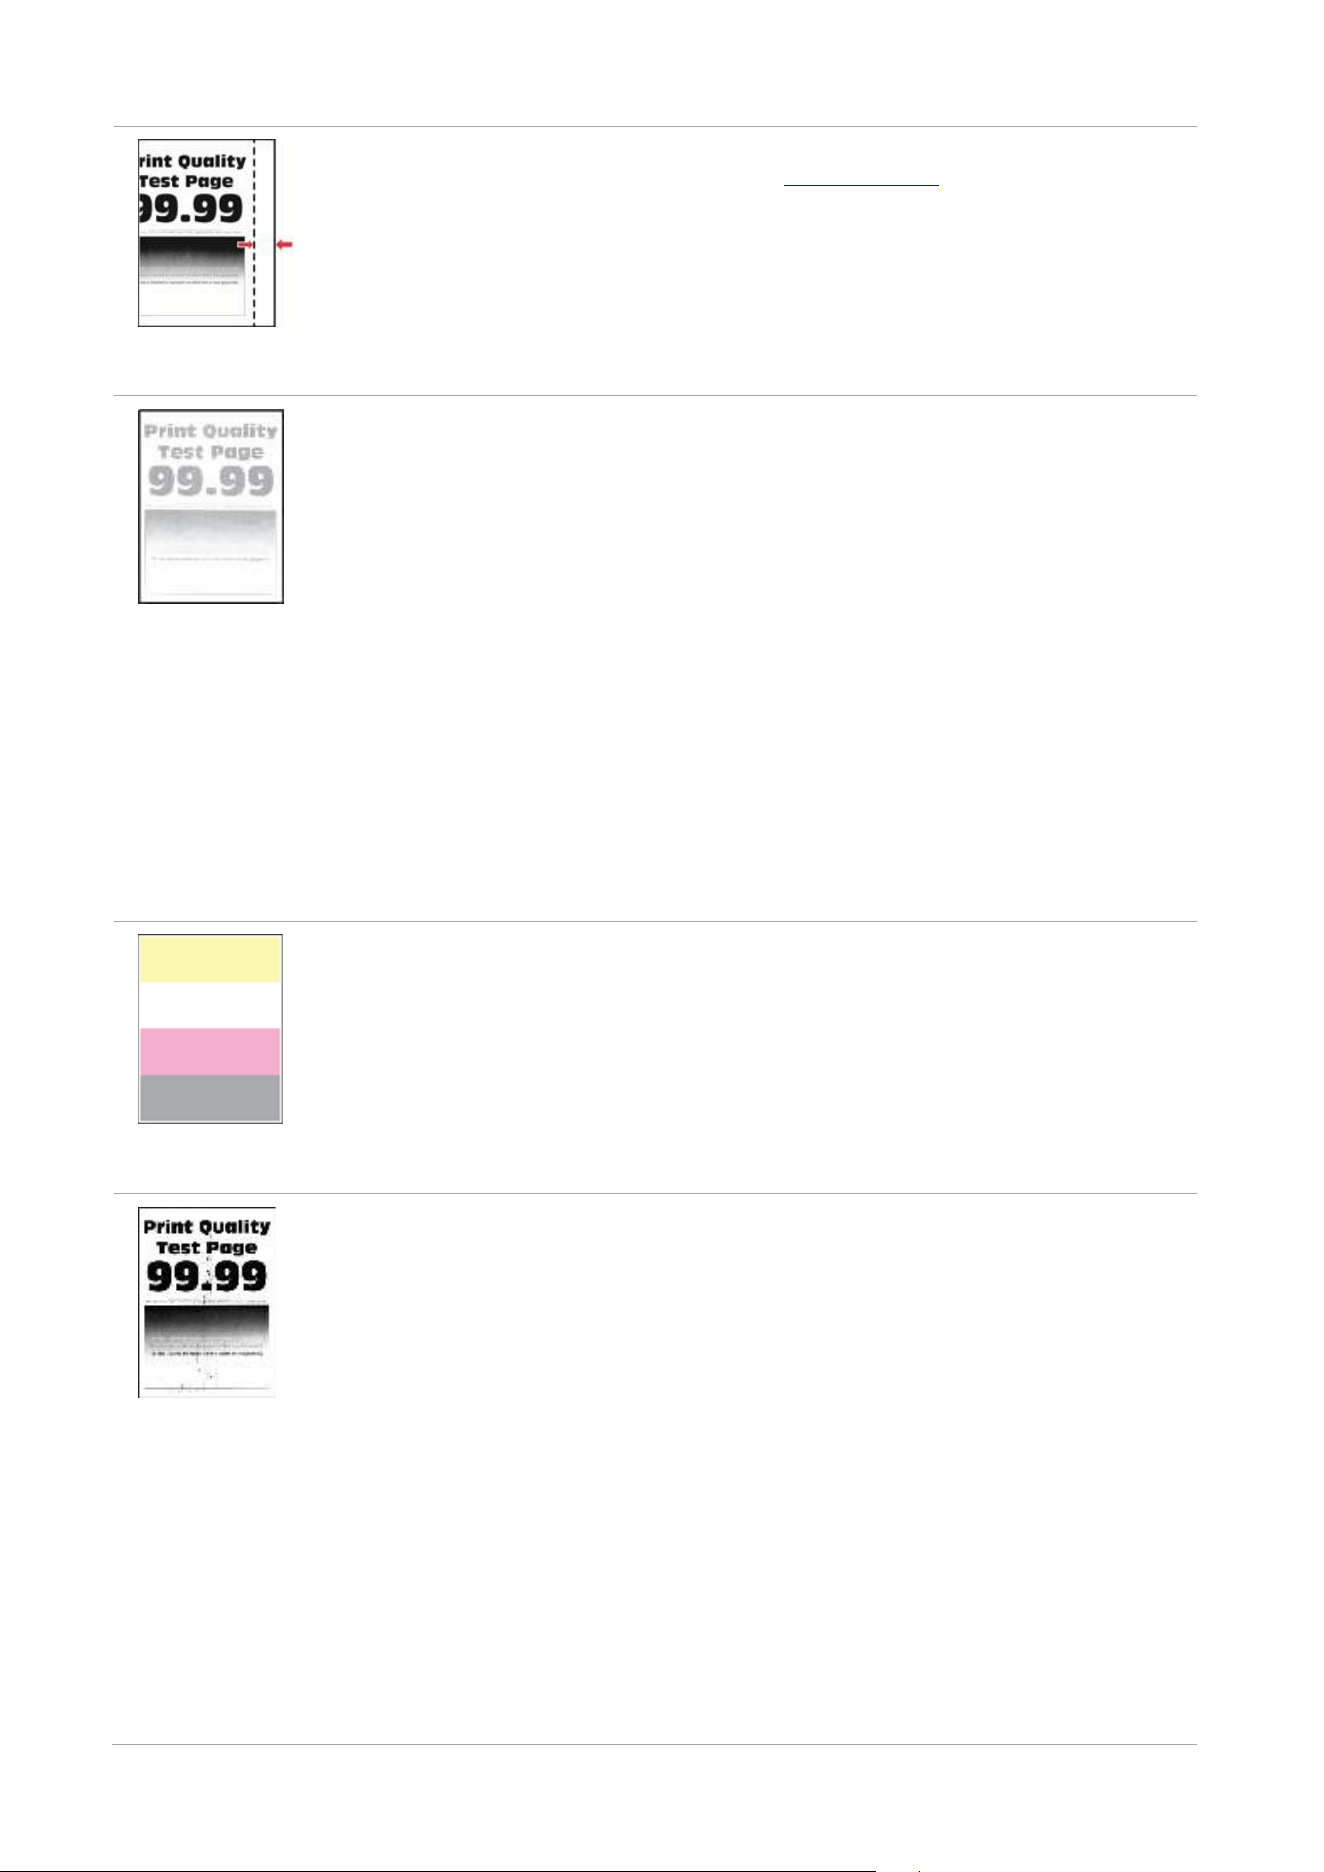
Missing color
• Toner cartridge is not installed
properly.
• The developing unit of the missing
color is not installed properly.
• Pull out the toner cartridge tray,
remove the toner cartridge, then
insert the toner cartridge, and insert
the toner cartridge tray.
• Please remove the developing unit of
the missing color and re-insert it.
Mottles and spots
• The toner cartridge is dirty or
leaks toner.
• The print media does not meet
the usage specification. For
example, the print media is
textured, damp, or too rough.
• The paper used has been stored
in the air for a prolonged time.
• Toner cartridge is not installed
properly.
• Incorrect transfer print settings.
• The paper path is dirty.
• If toner spots appear when
copying and scanning, the platen
glass may be dirty.
• Please contact the customer
service center.
• Please correctly use the medium
conforming to the specifications.
• Keep the paper in its original
wrapper before use.
• Pull out the toner cartridge tray,
remove the toner cartridge, then
insert the toner cartridge, and insert
the toner cartridge tray.
•
Readjust the transfer parameters.
Please refer to
Transfer Parameter
Settings
for how to adjust them.
• Clean the paper path.
• Clean the platen glass.
53
• The scanner is dirty or damaged.
Paper crooked
• The tray fails to load the media
properly.
• The paper used has been stored
in the air for a prolonged time.
• Please load the paper correctly. See
Paper Feeding for how to feed the
paper correctly.
• Keep the paper in its original
wrapper before use.
Print is crooked or
skewed
• The tray fails to load the media
properly.
• The print media does not meet
the usage specification. For
example, the print media is
textured, damp, or too rough.
• The paper used has been stored
in the air for a prolonged time.
• The paper path is dirty.
• Please load the paper correctly. See
Paper Feeding for how to feed the
paper correctly.
•
Please correctly use the medium
conforming to the specifications.
• Keep the paper in its original
wrapper before use.
• Clean the paper path.
Single color or black
images
• Toner cartridge is not installed
properly.
• If all-black image appear when
copying and scanning, maybe it is
scanning exposure, and the cover
on the manuscript is not properly
closed.
• The scanner is damaged.
• Pull out the toner cartridge tray,
remove the toner cartridge, then
insert the toner cartridge, and
insert the toner cartridge tray.
• Please close the cover on the
manuscript, and then carry out
copying and scanning.
• Please contact Pantum Customer
Service.
Text or image cut off
• The tray fails to load the media
properly.
• Toner cartridge is not installed
properly.
• There are foreign objects inside
the printer.
• Please load the paper correctly.
See
Paper Feeding for how to feed
the paper correctly.
• Pull out the toner cartridge tray,
remove the toner cartridge, then
insert the toner cartridge, and
insert the toner cartridge tray.
• Please contact the customer
service center.
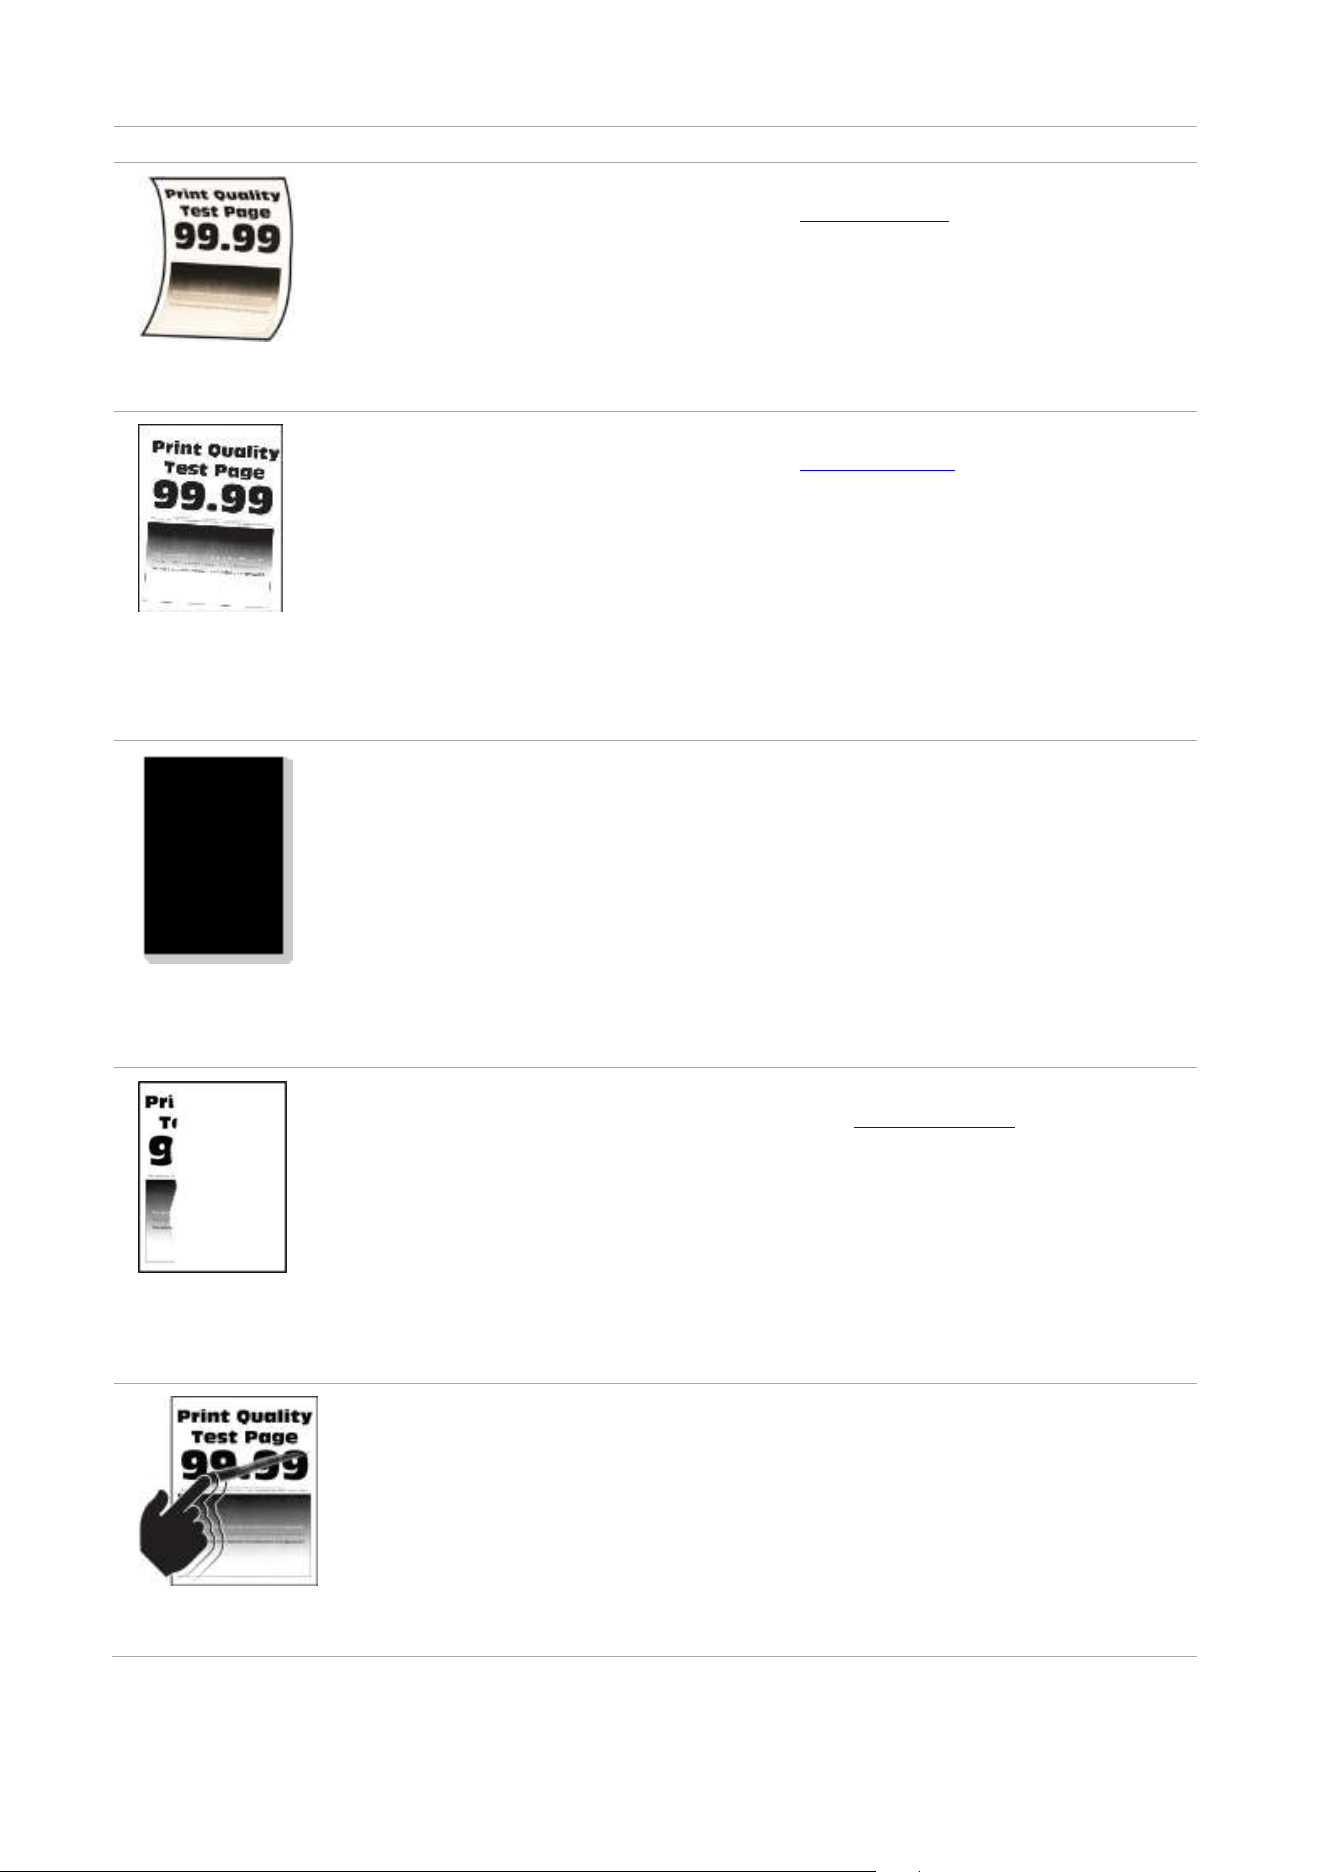
Toner comes off easily
• Print media that does not meet
the specifications is used. For
example, the media weight is not
supported by the printer.
• The paper used has been stored
in the air for a prolonged time.
• Please correctly use the medium
conforming to the specifications.
•
Keep the paper in its original
wrapper before use.
54
Uneven print density
• Toner cartridge is not installed
properly.
• Pull out the toner cartridge tray,
remove the toner cartridge, then
insert the toner cartridge, and
insert the toner cartridge tray.
•
Make the "Full Calibration"
settings.
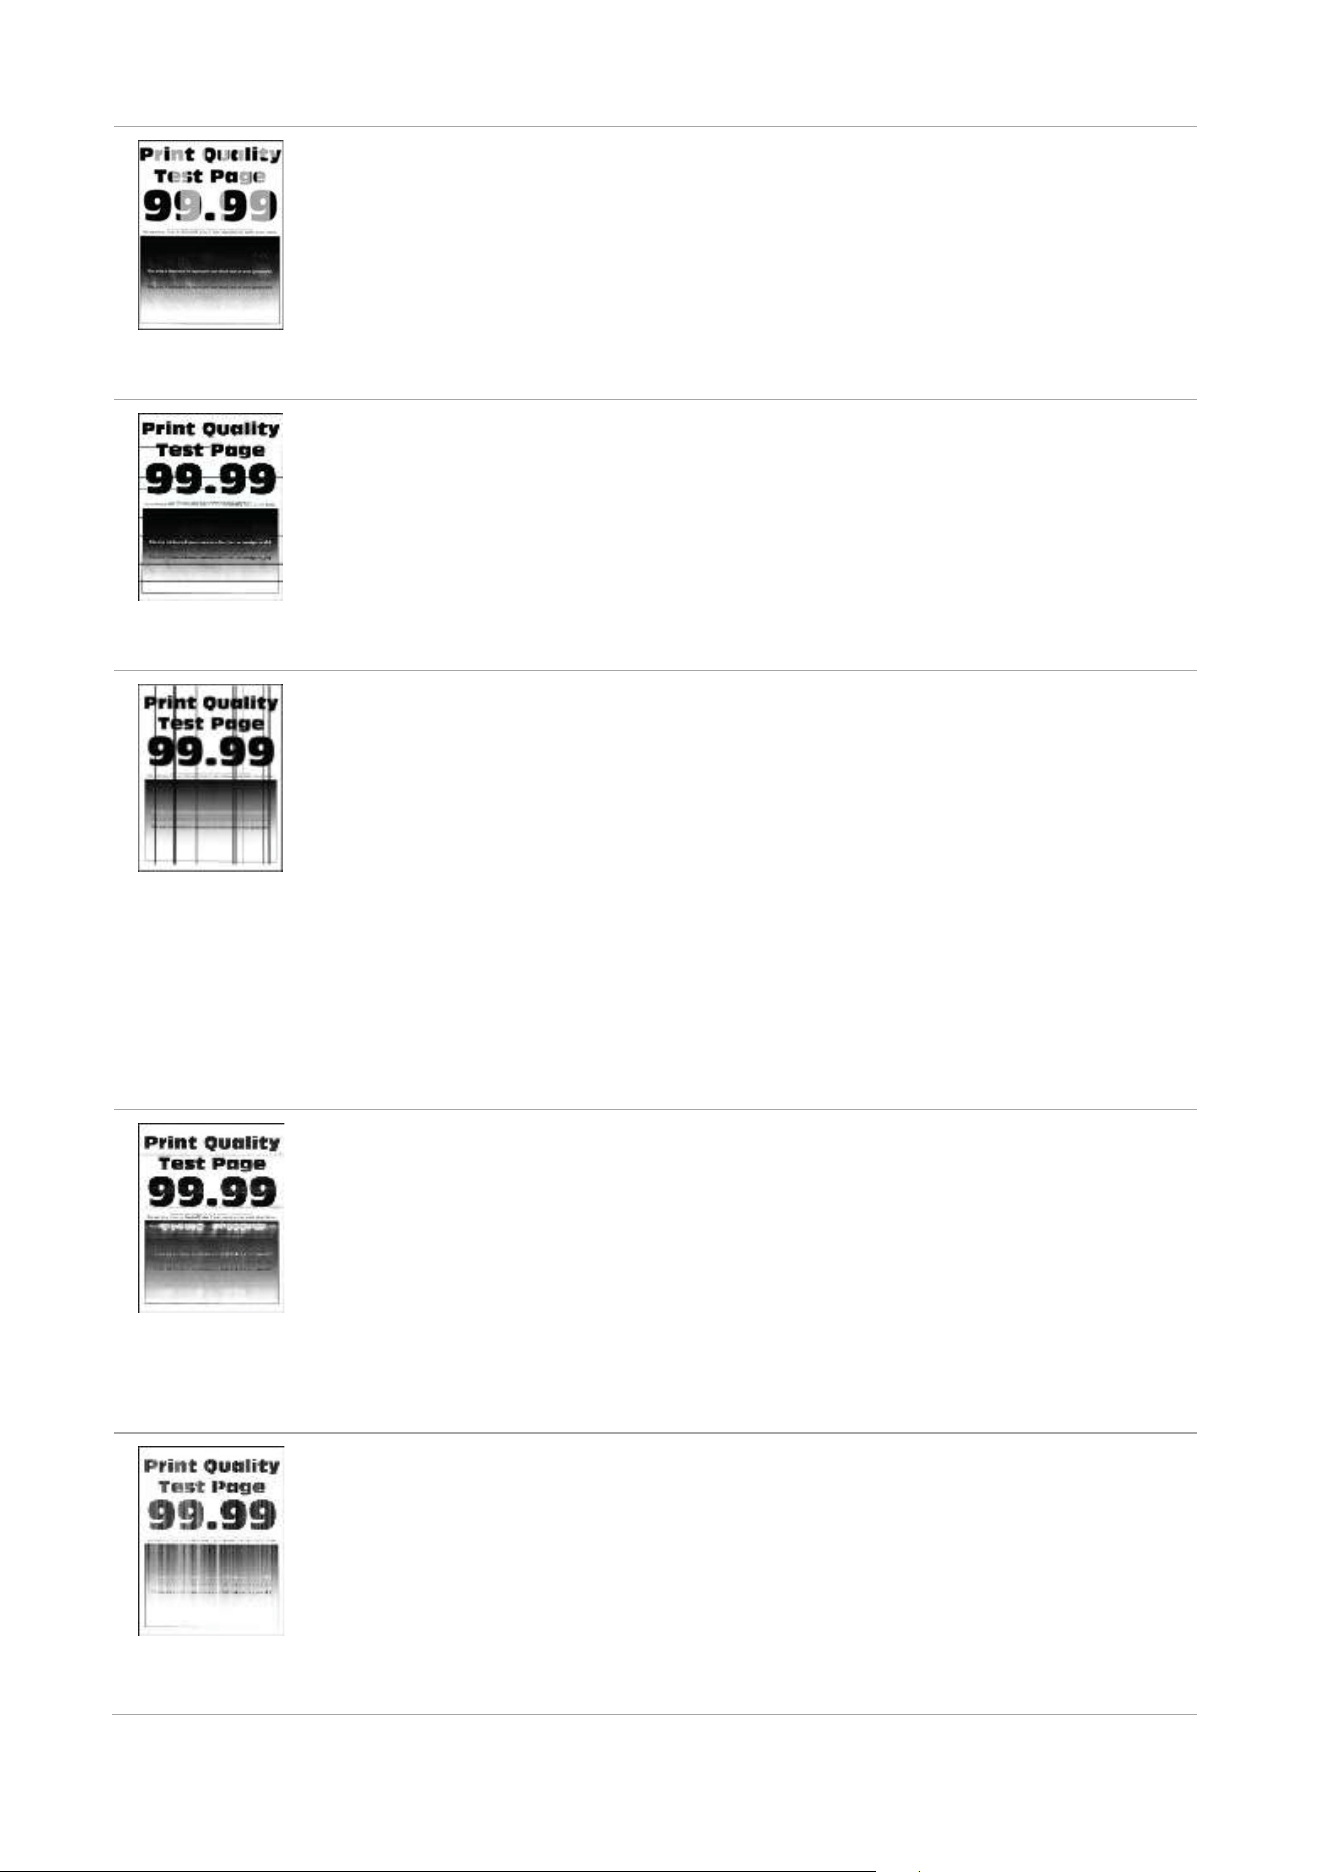
Horizontal dark lines
• The paper used has been stored
in the air for a prolonged time.
• Toner cartridge is not installed
properly.
• Keep the paper in its original
wrapper before use.
• Pull out the toner cartridge tray,
remove the toner cartridge, then
insert the toner cartridge, and insert
the toner cartridge tray.
Vertical dark lines
• The paper used has been stored
in the air for a prolonged time.
• Toner cartridge is not installed
properly.
• The paper path is dirty.
• If black vertical stripes appear
when copying or scanning, the
scanner or the platen glass may
be dirty.
• Scanner Light bulb has
smudges.
• The scanner is damaged.
• Keep the paper in its original
wrapper before use.
• Pull out the toner cartridge
tray, remove the toner cartridge,
then insert the toner cartridge,
and insert the toner cartridge
tray.
• Clean the paper path.
• Clean the scanner or the platen
glass.
• Please contact Pantum
Customer Service.
Horizontal
white lines
• Toner cartridge is not installed
properly.
• Pull out the toner cartridge
tray, remove the toner
cartridge, then insert the toner
cartridge, and insert the toner
cartridge tray.
Vertical white lines
• The print media does not meet
the usage specification. For
example, the print media is
textured, damp, or too rough.
• Toner cartridge is not installed
properly.
• Please correctly use the
medium conforming to the
specifications.
• Pull out the toner cartridge
tray, remove the toner cartridge,
then insert the toner cartridge,
and insert the toner cartridge
tray.

55
Repetitive defects
• The toner cartridge
is damaged.
• It is recommended to replace
with the original toner cartridge.
• Please contact Pantum Customer
Service.
Note: • The faults above can be mitigated by cleaning or replacing the cartridge. If the problem persists,
please contact the customer service center. See the Three Guarantees certificate for contact
details.

56
10 Product Specifications
Note: • Specification values are slightly different for different models of printers with different functions.
These values are based on the initial data. For more information about the latest specification,
please visit: www.pantum.com.
Overview of the Specifications
Product Size(W*D*H)
401*400*225mm
Product weight (including
cartridge, excluding the
package)
15.3kg
Print Environment
Print temperature range:10-35°C
Print humidity range:20%RH~80%RH
Power Voltage
110V Model:AC100-127V,50Hz/60Hz,8A
220V Model:AC220-240V,50Hz/60Hz,4A
Noise(SPL)
Printing:≤52dB(A)
Standby:≤30dB(A)
Mute mode:≤47dB(A)
Enter network standby time
1 minute
Default automatic shutdown
time(for EU only)
4 hours
Power Consumption
Network standby:wireless<8.00W;without wireless<2.00W
Standby: ≤12.00W
Shutdown: ≤0.15W
TEC:conforming to requirements of Energy Star and Chinese energy
efficency rating
Operating system
Microsoft Windows XP/ Windows 7/ Windows 8.1/ Windows 10/
Windows 11/Windows Server 2012/2016/2019/2022(32/64 Bit)
macOS10.10/10.11/10.12/10.13/10.14/10.15/11.5/11.6/12.0.1/12.3/1
2.4/12.5/12.6/13.1
Linux Ubuntu 16.04(32/64 Bit)/ Ubuntu 18.04/Ubuntu 20.04/Ubuntu
22.04(64 Bit)
iOS 11.0-16.0
Android 6.0-12.0
HarmonyOS 2.0-3.0
Communication interface
USB 2.0(High Speed)
IEEE802.3 10 /100Base-Tx
IEEE802.11b/g/n(support WPS)
Bluetooth:BLE
Print Time of First Page
Mono:≤10s
Color:≤11s
Maximum printable size
216mm*356mm

57
Frequency Band
BLE: 2400MHz – 2483.5MHz
Wi-Fi 2.4GHz : 2400MHz – 2483.5MHz
Note The above frequency bands are common frequency bands, and different markets will restrict the
use of certain frequency bands according to the country's regulatory requirements.
Maximum output power
(Declaration for EU
Compliance)
BLE: ≤10.00dBm EIRP
WLAN 2.4GHz : ≤20.00dBm EIRP

1