
Technical Support and E-Warranty Certificate www.vevor.com/support
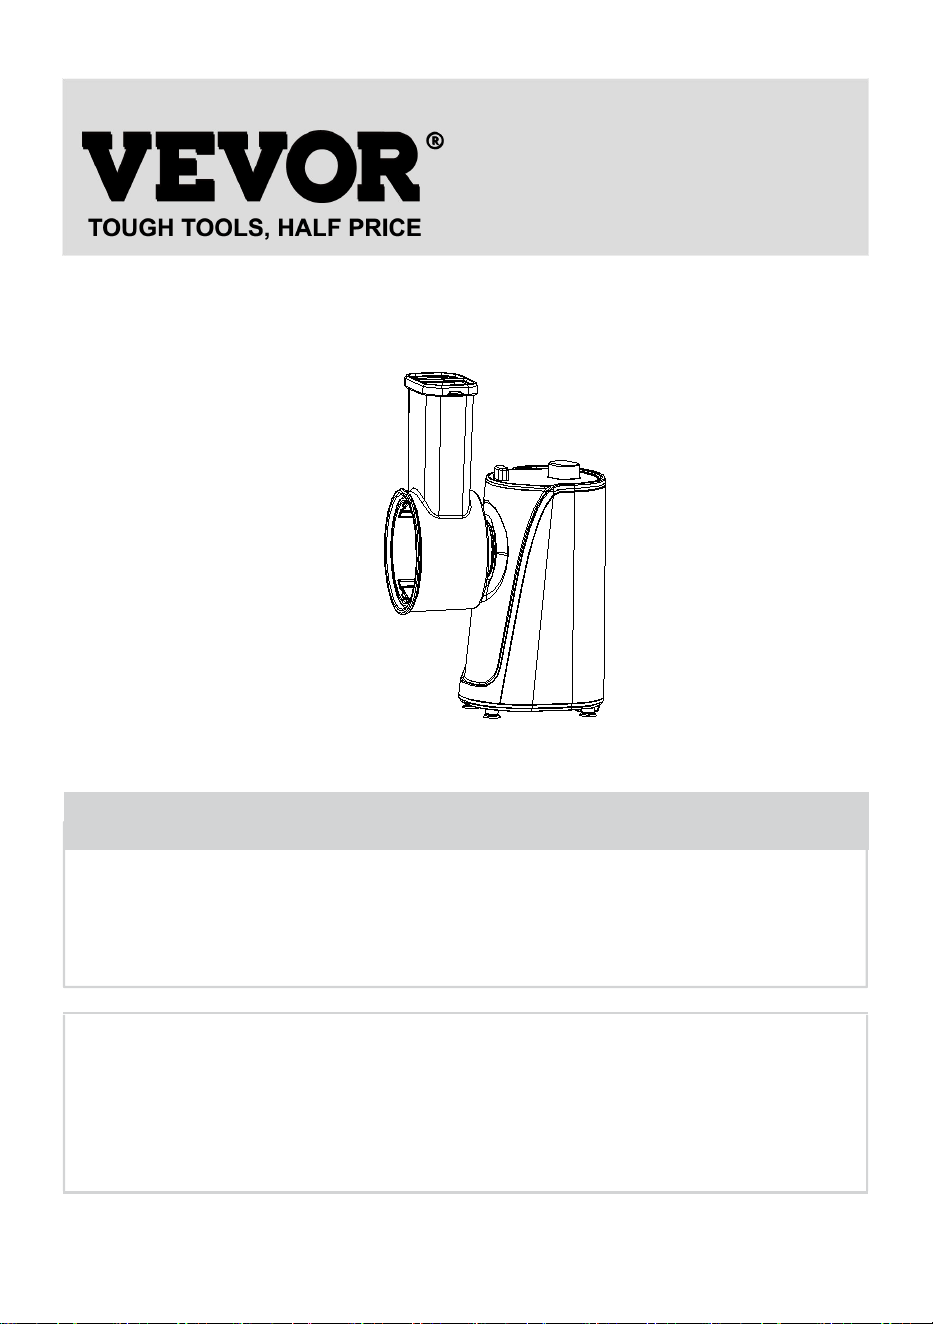
Electric Vegetable Slicer
MODEL:VS1J-S
We continue to be committed to provide you tools with competitive price.
"Save Half", "Half Price" or any other similar expressions used by us only represents an
estimate of savings you might benefit from buying certain tools with us compared to the major
top brands and does not necessarily mean to cover all categories of tools offered by us. You
are kindly reminded to verify carefully when you are placing an order with us if you are
actually saving half in comparison with the top major brands.

- 1 -
MODEL:VS1J-S
Have product questions? Need technical support? Please feel free to
contact us:
Technical Support and E-Warranty Certificate
www.vevor.com/support
NEED HELP? CONTACT US!
This is the original instruction, please read all manual instructions
carefully before operating. VEVOR reserves a clear interpretation of our
user manual. The appearance of the product shall be subject to the
product you received. Please forgive us that we won't inform you again if
there are any technology or software updates on our product.
Electric Vegetable Slicer
- 2 -
Warning-To reduce the risk of injury, the user must read the
instructions manual carefully.
Indoor Use Only
This product is of protection class II. That means it is equipped
with enhanced or double insulation.
CORRECT DISPOSAL
This product is subject to the provision of European Directive
2012/19/EU. The symbol showing a wheelie bin crossed
through indicates that the product requires separate refuse
collection in the European Union. This applies to the product
and all accessories marked with this symbol. Products marked
as such may not be discarded with normal domestic waste, but
must be taken to a collection point for recycling electrical and
electronic devices.
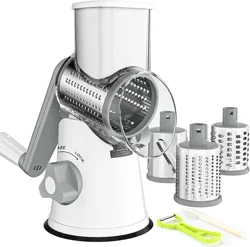
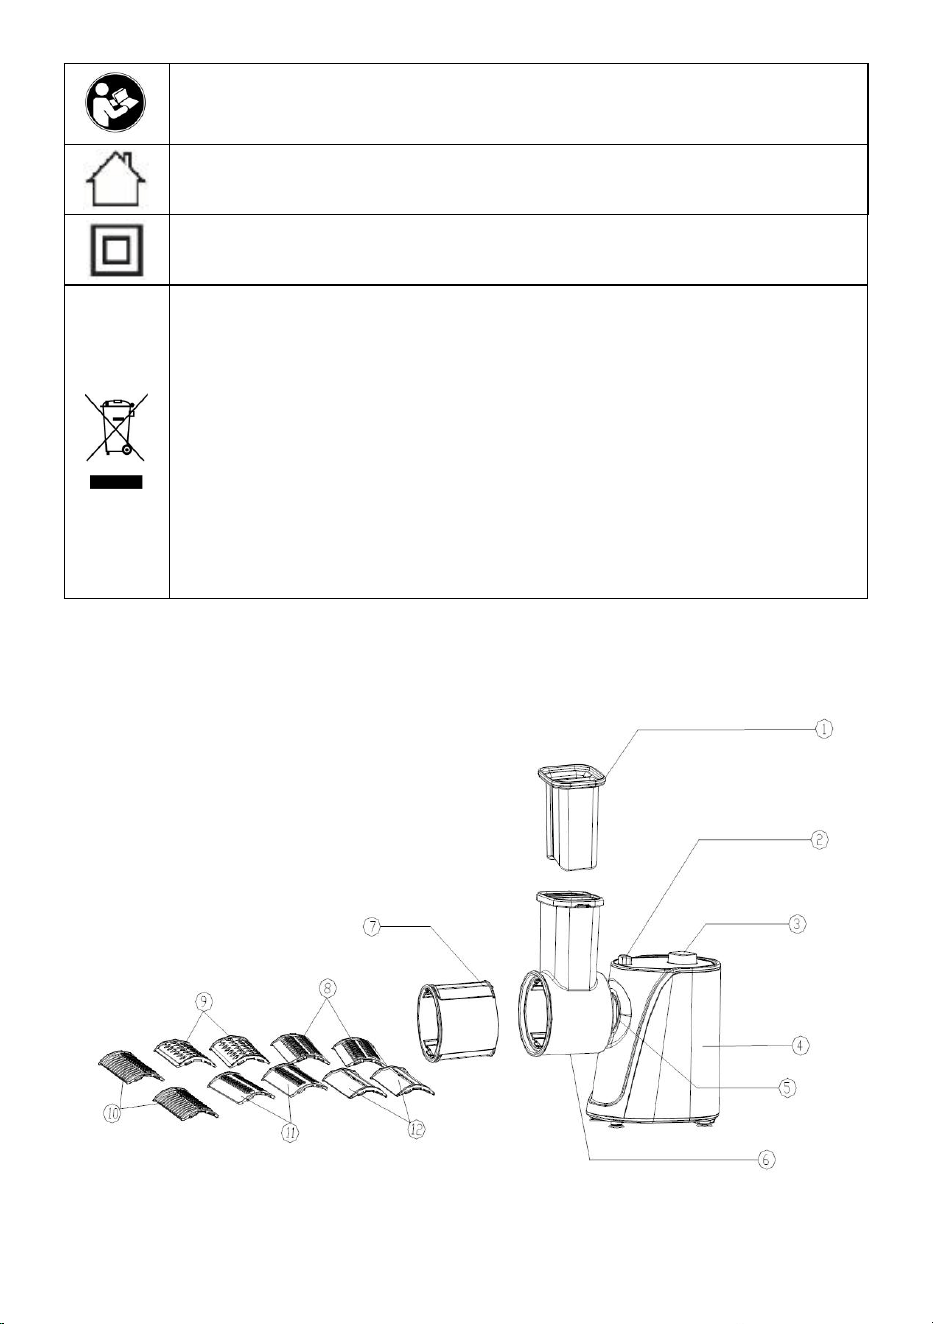
DESCRIPTION

- 3 -
1.Vegetable pusher
2.Fasten button
3. ON/OFF switch
4. Body
5. Gear box head
6. Vegetable cutting of the head
7.Cutter tube
8.Strip cutter (coarse)
9.Reticular cutter
10.Waved cutter
11.Strip cutter (fine)
12.Sliced cutter
IMPORTANT SAFEGUARDS
• Home use only. Do not use for industrial purposes.
• Unplug when assembling and disassembling the unit.
• Close supervision is necessary when any appliance is used near children.
• When carrying the unit, be sure to hold the body with both hands. Do not
carry the unit by the Vegetable head.
• Never push products by hand. Use Vegetable pusher.
• Che continuous running of the vegetable salad grinder should not be
more than 10 minutes, with the following 10-minute intervals for motor
cooling.
• To avoid jamming, do not force to operate the unit with excessive
pressure.
• When the circuit breaker activates, do not switch on.
• Never try to replace the parts and repair the unit by yourself.
• This appliance is not intended for use by persons(including children) with
reduced physical, sensory, or mental capabilities or lack of experience and
knowledge unless they have been given supervision or instruction
concerning the use of the appliance by a person responsible for their
safety.
• Children should be supervised to ensure that they do not play with the
appliance.
• Do not operate this appliance if the cord or plug is damaged. Return it to
the store of service or repair by the professional serviceman.
- 4 -
FOR THE FIRST TIME
• Check that voltage indicated on the rating label corresponds to the mains
voltage in your home.
• Wash all parts (except body) in warm soapy water.
• Before plug in, ensure the ON/OFF switch is in "OFF" position.
INSTRUCTION FOR USE
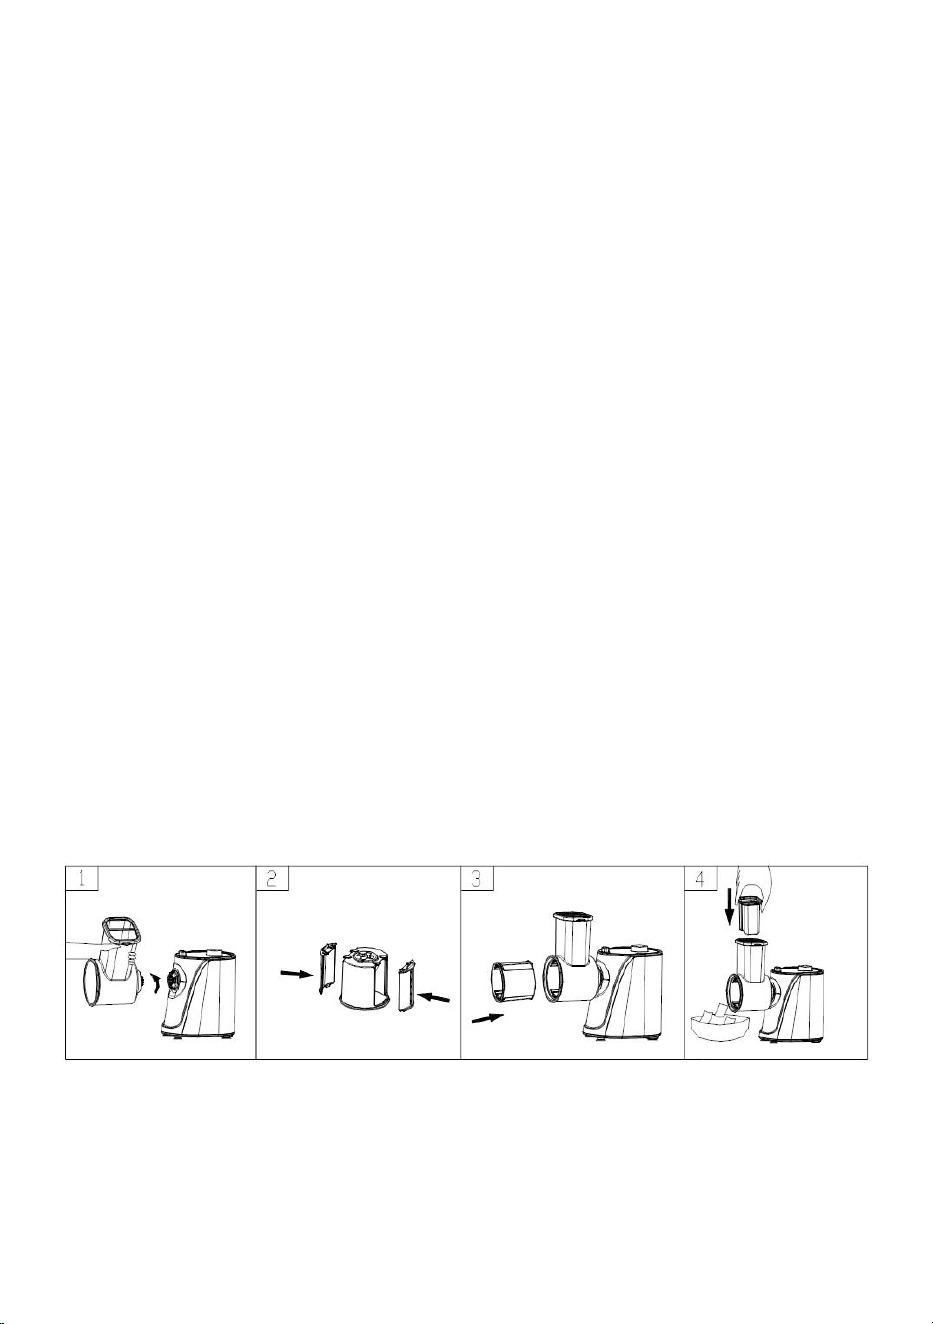
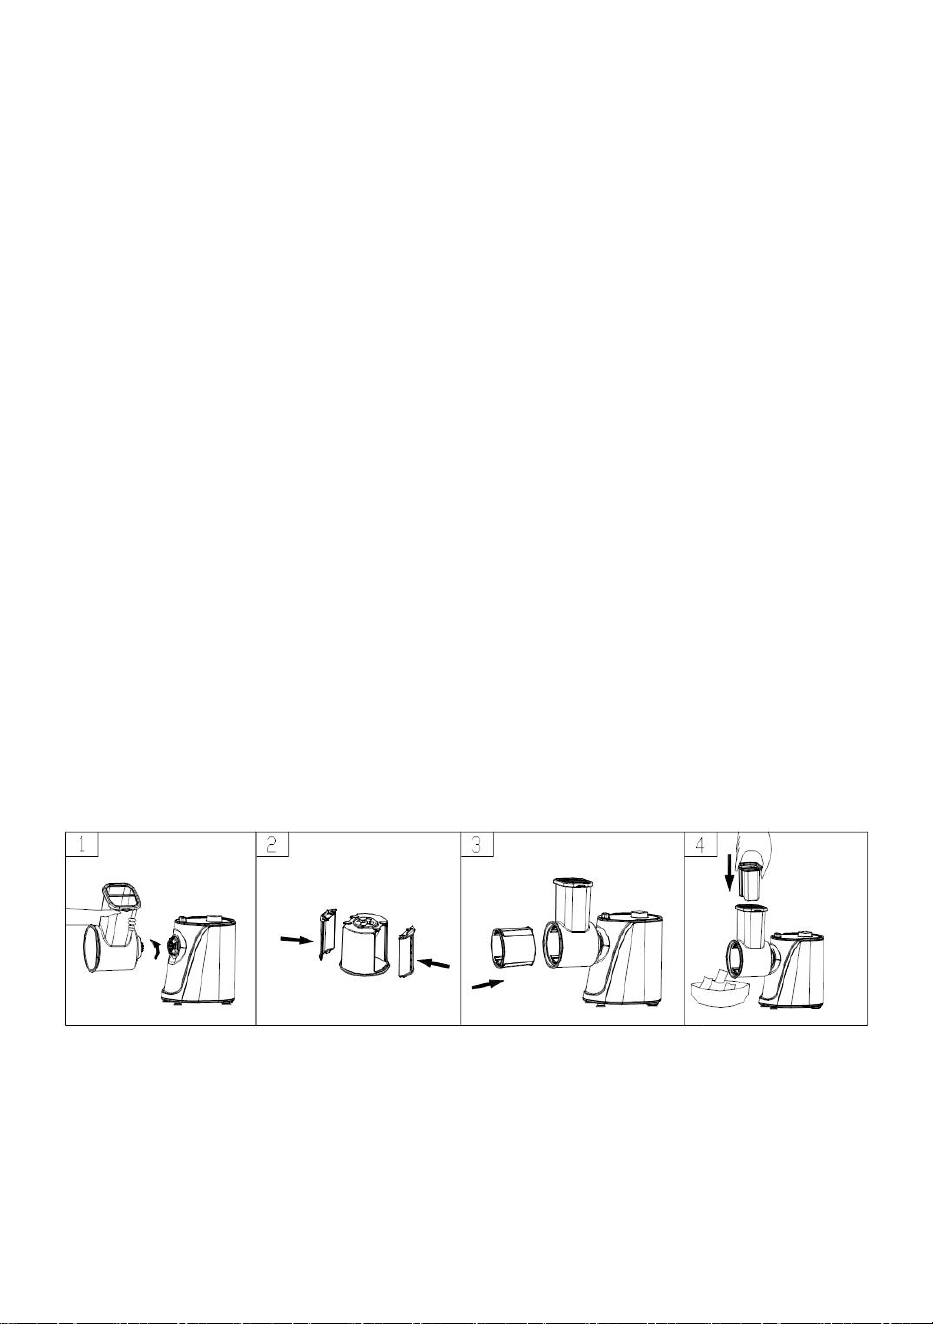
ASSEMBLING
• Press the fasten button, hold the head, and insert it into the inlet(when
inserting pls, pay attention the head must be slanted as per the arrow
indicated on the top; see Fig. 1), then move the head anticlockwise so that
the head is fastened tightly. The fasten button won't move that has been
locked up!
• Put the cutter into the cutter tube. After the two buckle positions in the
lower direction are aligned, press the top position of the cutter. (fig.2)
• Put the cutter tube attachments into the cutting head. Note: Must be in
place. (fig.3)
• Switch ON/OFF to the "ON" position when cutting. Push the food into the
feeder, and then push down the food. (fig.4)
• After use, switch the unit off and unplug it from the power supply.
MINCING VEGETABLES
• Cut all vegetable into strips, smaller than the cutting of the head, so that

- 5 -
they will easily put into the cutting of the head
• Plug the unit on and switch ON/OFF to the "ON" position.
• Feed foods into the cutting head. Use the Vegetable pusher only.
• After use, switch the unit off and unplug it from the power supply.
CLEANING AND MAINTENANCE DISMANTLE
DISMANTLE
• Determine that the motor is completely stationary.
• Unplug the power plug.
• Dismantle as described in Figure 1-4, reverse step.
• Press the fasten button and turn the Head clockwise to dismantle it.
CLEANING
• Remove vegetable residue and other items, and clean all the parts
(except the main body) with warm, clean water.
•
Can not put the main body into the water; can only wipe with a wet cloth.
•
Do not use thinner and gasoline to clean the machine.
FCC Information:
• CAUTION: Changes or modifications not expressly approved by the party
responsible for compliance could void the user's authority to operate the
equipment!
• This device complies with Part 15 of the FCC Rules. Operation is subject
to the following two conditions:
1) This product may cause harmful interference.
2)This product must accept any interference received, including
interference that may cause undesired operation.
• WARNING: Changes or modifications to this product not expressly
approved by the party. Responsible for compliance could void the user's
authority to operate the product.
• Note: This product has been tested and found to comply with the limits for
a Class B digital device pursuant to Part 15 of the FCC Rules. These limits

- 6 -
are designed to provide reasonable protection against harmful interference
in a residential installation.
• This product generates, uses and can radiate radio frequency energy,
and if not installed and used in accordance with the instructions, may
cause harmful interference to radio communications. However, there is no
guarantee that interference will not occur in a particular installation. If this
product does cause harmful interference to radio or television reception,
which can be determined by turning the product off and on, the user is
encouraged to try to correct the interference by one or more of the
following measures.
• Reorient or relocate the receiving antenna.
• Increase the distance between the product and the receiver.
• Connect the product to an outlet on a circuit different from that to which
the receiver is connected.
• Consult the dealer or an experienced radio/TV technician for assistance.
Manufacturer: Shanghaimuxinmuyeyouxiangongsi
Address: Baoshanqu Shuangchenglu 803long 11hao 1602A-1609shi
Shanghai
Imported to AUS: SIHAO PTY LTD. 1 ROKEVA STREETEASTWOOD
NSW 2122 Australia
Imported to USA: Sanven Technology Ltd. Suite 250, 9166 Anaheim
Place, Rancho Cucamonga, CA 91730
Made In China


- 8 -
Technique Assistance et certificat de garantie électronique
www.vevor.com/support
Électrique Légume Trancheuse
MODÈLE : VS1J-S
We continue to be committed to provide you tools with competitive price.
"Save Half", "Half Price" or any other similar expressions used by us only represents an
estimate of savings you might benefit from buying certain tools with us compared to the major
top brands and does not necessarily mean to cover all categories of tools offered by us. You
are kindly reminded to verify carefully when you are placing an order with us if you are
actually saving half in comparison with the top major brands.

- 1 -
MODÈLE : VS1J-S
Have product questions? Need technical support? Please feel free to
contact us:
Technical Support and E-Warranty Certificate
www.vevor.com/support
NEED HELP? CONTACT US!
This is the original instruction, please read all manual instructions
carefully before operating. VEVOR reserves a clear interpretation of our
user manual. The appearance of the product shall be subject to the
product you received. Please forgive us that we won't inform you again if
there are any technology or software updates on our product.
Electric Vegetable Slicer

- 2 -
Avertissement - Pour réduire le risque de blessure, l'
utilisateur doit lire attentivement le manuel d'instructions.
Utilisation en intérieur uniquement
Ce produit est de classe de protection II. Cela signifie qu'il est
équipé d'une isolation renforcée ou double.
ÉLIMINATION CORRECTE
Ce produit est soumis aux dispositions de la directive
européenne 2012/19/UE. Le symbole représentant une
poubelle barrée indique que le produit nécessite une collecte
sélective des déchets dans l'Union européenne. Ceci
s'applique au produit et à tous les accessoires marqués de ce
symbole. Les produits marqués comme tels ne doivent pas
être jetés avec les ordures ménagères normales, mais doivent
être apportés à un centre de collecte. point de collecte pour le
recyclage des appareils électriques et électroniques.
DESCRIPTION

- 3 -
1. Poussoir à légumes
2. Bouton de fixation
3 . ALLUMÉ ÉTEINT changer
4 . Corps
5 . Tête de boîte de vitesses
6 . Coupe de légumes de la tête
7. Tube de coupe
8 . Coupe-bande (grossier)
9 . Coupeur réticulaire
dix . _ Coupeur ondulé
1 1 . Coupe-bande (fin)
1 2 . Coupe-tranches
GARANTIES IMPORTANTES
• Usage domestique uniquement. Ne pas utiliser à des fins industrielles.
• Débranchez lors du montage et du démontage de l'appareil.
• Une surveillance étroite est nécessaire lorsqu'un appareil est utilisé à
proximité d'enfants.
• Lorsque vous transportez l'appareil, veillez à tenir le corps à deux mains.
Ne transportez pas l'appareil par la tête végétale .
• Ne poussez jamais les produits à la main. Utilisez un pousse -légumes .
• C Le fonctionnement continu du hachoir à salade de légumes ne doit pas
durer plus de 10 minutes, avec les intervalles suivants de 10 minutes pour
le refroidissement du moteur .
• Pour éviter les blocages, ne forcez pas pour faire fonctionner l’appareil
avec une pression excessive .
• Lorsque le disjoncteur s'active, ne pas allumer.
• N'essayez jamais de remplacer les pièces et de réparer l'appareil par
vous-même.
• Cet appareil n'est pas destiné à être utilisé par des personnes (y compris
des enfants) ayant des capacités physiques, sensorielles ou mentales
réduites ou un manque d'expérience et de connaissances, à moins qu'elles
n'aient reçu une surveillance ou des instructions concernant l'utilisation de
l'appareil par une personne responsable de leur sécurité. .
• Les enfants doivent être surveillés pour s'assurer qu'ils ne jouent pas
avec l'appareil.
• N'utilisez pas cet appareil si le cordon ou la fiche est endommagé.

- 4 -
Retournez-le au magasin de service ou de réparation par le réparateur
professionnel.
POUR LA PREMIÈRE FOIS
• Vérifiez que la tension indiquée sur la plaque signalétique correspond à
la tension du secteur de votre maison.
• Lavez toutes les pièces (sauf le corps) à l'eau tiède savonneuse.
• Avant de brancher, assurer la marche/arrêt L'interrupteur est en position
« OFF ».
INSTRUCTIONS D'UTILISATION
ASSEMBLAGE
• Appuyez sur le bouton de fixation, maintenez la tête et insérez-la dans
l'entrée (lors de l'insertion, faites attention à ce que la tête soit inclinée
selon la flèche indiquée en haut ; voir Fig. 1), puis déplacez la tête dans le
sens inverse des aiguilles d'une montre de sorte que la tête est bien fixée.
Le bouton de fermeture ne bouge pas s'il est verrouillé !
• Placez le cutter dans le tube du cutter. Une fois que les deux positions de
boucle dans la direction inférieure sont alignées, appuyez sur la position
supérieure du cutter. (fig.2)
• Placez les accessoires du tube de coupe dans la tête de coupe.
Remarque : Doit être en place. (fig.3)
• Mettez l'interrupteur ON/OFF sur la position "ON" lors de la coupe.
Poussez les aliments dans la mangeoire, puis poussez les aliments vers le
bas. (fig.4)
• Après utilisation, éteignez l'appareil et débranchez-le de l'alimentation
électrique .

- 5 -
HACHER LES LÉGUMES
• Coupez tous les légumes en lanières , plus petites que la coupe de la tête,
afin qu'ils puissent être facilement mis dans la coupe de la tête .
• Branchez l'appareil et allumez/éteignez. en position « ON ».
• Introduisez les aliments dans la tête de coupe. Utilisez uniquement le
pousse-légumes.
• Après utilisation, éteignez l'appareil et débranchez-le de l'alimentation
électrique .
NETTOYAGE ET ENTRETIEN DÉMONTAGE
DÉMANTELER
• Vérifiez que le moteur est complètement stationnaire.
• Débranchez la fiche d'alimentation.
• Démontez comme décrit à la Figure 1-4, étape inverse .
• Appuyez sur le bouton de fixation et tourne la tête dans le sens des
aiguilles d'une montre pour démonter il.
NETTOYAGE
• Retirez les résidus de légumes et autres éléments et nettoyez toutes les
pièces (sauf le corps principal) avec de l'eau tiède et propre.
•
Impossible de mettre le corps principal dans l'eau ; ne peut essuyer
qu'avec un chiffon humide.
•
N'utilisez pas de diluant ni d'essence pour nettoyer la machine .

- 6 -
Informations FCC :
• ATTENTION : Les changements ou modifications non expressément
approuvés par la partie responsable de la conformité pourraient annuler le
droit de l'utilisateur à utiliser l'équipement !
• Cet appareil est conforme à la partie 15 des règles FCC. L’exploitation est
soumise aux deux conditions suivantes :
1) Ce produit peut provoquer des interférences nuisibles.
2) Ce produit doit accepter toute interférence reçue, y compris les
interférences susceptibles de provoquer un fonctionnement indésirable.
• AVERTISSEMENT: Changements ou modifications apportés à ce produit
non expressément approuvés par la partie. L e responsable de la
conformité pourrait annuler l'autorité de l'utilisateur à utiliser le produit .
• Note: Ce produit a été testé et déclaré conforme aux limites d'un appareil
numérique de classe B conformément à la partie 15 des règles FCC . Ces
limites sont conçues pour fournir une protection raisonnable contre les
interférences nuisibles dans une installation résidentielle.
• Ce produit génère, utilise et peut émettre de l'énergie radiofréquence et,
s'il n'est pas installé et utilisé conformément aux instructions, il peut
provoquer des interférences nuisibles aux communications radio.
Cependant, rien ne garantit que des interférences ne se produiront pas
dans une installation particulière. Si ce produit provoque des interférences
nuisibles à la réception radio ou télévision, ce qui peut être déterminé en
éteignant et rallumant le produit, l'utilisateur est encouragé à essayer de
corriger les interférences en prenant une ou plusieurs des mesures
suivantes.
• Réorientez ou déplacez l'antenne de réception.
• Augmentez la distance entre le produit et le récepteur.
• Connectez le produit à une prise sur un circuit différent de celui auquel le
récepteur est connecté.
• Consultez le revendeur ou un technicien radio/TV expérimenté pour
obtenir de l'aide.

- 7 -
Fabricant : Shanghaimuxinmuyeyouxiangongsi
Adresse : Baoshanqu Shuangchenglu 803long 11hao 1602A-1609shi
Shanghai
Importé en Australie : SIHAO PTY LTD. 1 ROKEVA STREETASTWOOD
NSW 2122 Australie
Importé aux États-Unis : Sanven Technology Ltd. Suite 250, 9166
Anaheim Place, Rancho Cucamonga, CA 91730
Fabriqué en Chine


- 9 -
Technisch Support- und E-Garantie-Zertifikat www.vevor.com/support
Elektrisch Gemüse Slicer
MODELL: VS1J-S
We continue to be committed to provide you tools with competitive price.
"Save Half", "Half Price" or any other similar expressions used by us only represents an
estimate of savings you might benefit from buying certain tools with us compared to the major
top brands and does not necessarily mean to cover all categories of tools offered by us. You
are kindly reminded to verify carefully when you are placing an order with us if you are
actually saving half in comparison with the top major brands.

- 1 -
MODELL: VS1J-S
Have product questions? Need technical support? Please feel free to
contact us:
Technical Support and E-Warranty Certificate
www.vevor.com/support
NEED HELP? CONTACT US!
This is the original instruction, please read all manual instructions
carefully before operating. VEVOR reserves a clear interpretation of our
user manual. The appearance of the product shall be subject to the
product you received. Please forgive us that we won't inform you again if
there are any technology or software updates on our product.
Electric Vegetable Slicer
- 2 -
Warnung: Um das Verletzungsrisiko zu verringern, muss der
Benutzer die Bedienungsanleitung sorgfältig lesen .
Nur Innen benutzen
Dieses Produkt entspricht der Schutzklasse II. Das heißt, es
ist mit einer verstärkten oder doppelten Isolierung
ausgestattet.
RICHTIGE ENTSORGUNG
Dieses Produkt unterliegt den Bestimmungen der
europäischen Richtlinie 2012/19/EU. Das Symbol einer
durchgestrichenen Mülltonne weist darauf hin, dass das
Produkt in der Europäischen Union einer getrennten
Müllsammlung bedarf. Dies gilt für das Produkt und alle
Zubehörteile, die mit diesem Symbol gekennzeichnet sind. Als
solche gekennzeichnete Produkte dürfen nicht über den
normalen Hausmüll entsorgt werden, sondern müssen zu
einem Recyclinghof gebracht werden Sammelstelle für das
Recycling von Elektro- und Elektronikgeräten.
BESCHREIBUNG
- 3 -
1. Gemüseschieber
2. Knopf befestigen
3 . AN AUS schalten
4 . Körper
5 . Getriebekopf _
6 . Gemüseschneiden des
Kopfes
7. Schneidrohr
8 . Streifenschneider (grob)
9 . Netzschneider
1 0 . Wellenschneider
1 1 . Streifenschneider (fein)
1 2 . Geschnittener Fräser
WICHTIGE SICHERHEITSMASSNAHMEN
• Nur für den Heimgebrauch. Nicht für industrielle Zwecke verwenden.
• Ziehen Sie den Netzstecker, wenn Sie das Gerät zusammenbauen und
demontieren.
• Wenn ein Gerät in der Nähe von Kindern verwendet wird, ist eine strenge
Aufsicht erforderlich.
• Halten Sie das Gerät beim Tragen unbedingt mit beiden Händen am
Körper fest . Tragen Sie das Gerät nicht am Gemüsekopf .
• Schieben Sie Produkte niemals mit der Hand. Verwenden Sie einen
Gemüsestopfer .

- 4 -
• Der Dauerbetrieb der Gemüsesalatmühle sollte nicht länger als 10
Minuten dauern, mit folgenden 10-Minuten-Intervallen zur Motorkühlung .
• Um Blockaden zu vermeiden, Versuchen Sie nicht, das Gerät mit
übermäßigem Druck zu betreiben .
• Wenn der Leistungsschalter aktiviert wird, nicht einschalten.
• Versuchen Sie niemals, die Teile selbst auszutauschen und das Gerät zu
reparieren.
• Dieses Gerät ist nicht für die Verwendung durch Personen (einschließlich
Kinder) mit eingeschränkten körperlichen, sensorischen oder geistigen
Fähigkeiten oder mangelnder Erfahrung und Wissen bestimmt, es sei denn,
sie werden von einer für ihre Sicherheit verantwortlichen Person
beaufsichtigt oder in die Verwendung des Geräts eingewiesen .
• Kinder sollten beaufsichtigt werden, um sicherzustellen, dass sie nicht mit
dem Gerät spielen.
• Betreiben Sie dieses Gerät nicht, wenn das Kabel oder der Stecker
beschädigt ist. Bringen Sie das Gerät zur Wartung oder zur Reparatur
durch einen professionellen Servicetechniker zurück.
ZUM ERSTEN MAL
• Überprüfen Sie, ob die auf dem Typenschild angegebene Spannung mit
der Netzspannung in Ihrem Zuhause übereinstimmt.
• Waschen Sie alle Teile (außer Gehäuse) in warmem Seifenwasser.
• Vor dem Einstecken Stellen Sie sicher, dass EIN/AUS Der Schalter
befindet sich in der Position „ AUS “.
BEDIENUNGSANLEITUNG
MONTAGE
• Drücken Sie den Befestigungsknopf, halten Sie den Kopf fest und
stecken Sie ihn in den Einlass (bitte achten Sie beim Einsetzen darauf,
- 5 -
dass der Kopf gemäß dem oben angezeigten Pfeil geneigt sein muss;
siehe Abb. 1), und bewegen Sie dann den Kopf gegen den Uhrzeigersinn,
um ihn zu entfernen Der Kopf ist fest befestigt. Der Verschlussknopf lässt
sich nicht bewegen, wenn er verriegelt ist!
• Setzen Sie das Messer in das Messerrohr ein. Nachdem die beiden
Schnallenpositionen in der unteren Richtung ausgerichtet sind, drücken
Sie die obere Position des Schneiders. (Abb.2)
• Stecken Sie die Schneidrohraufsätze in den Schneidkopf. Hinweis: Muss
vorhanden sein. (Abb. 3)
• Schalten Sie beim Schneiden den EIN/AUS-Schalter auf die Position
„EIN“. Schieben Sie das Futter in den Futterautomaten und dann nach
unten. (Abb.4)
• Schalten Sie das Gerät nach Gebrauch aus und trennen Sie es vom
Stromnetz .
Gemüse zerkleinern
• Schneiden Sie das gesamte Gemüse in Streifen , die kleiner als der
Kopfausschnitt sind, damit es leicht in den Kopfausschnitt passt
• Schließen Sie das Gerät an und schalten Sie es ein/aus auf die Position
„ON“ stellen.
• Führen Sie Lebensmittel in den Schneidkopf ein. Verwenden Sie
ausschließlich den Gemüseschieber.
• Schalten Sie das Gerät nach Gebrauch aus und trennen Sie es vom
Stromnetz .
REINIGUNG UND WARTUNG DEMONTIEREN

- 6 -
ABBAUEN
• Stellen Sie sicher, dass der Motor vollständig stillsteht.
• Ziehen Sie den Netzstecker.
• Demontieren Sie wie in Abbildung 1-4 beschrieben, umgekehrter Schritt .
• Drücken Sie den Befestigungsknopf und drehe den Kopf zum Zerlegen
im Uhrzeigersinn Es.
REINIGUNG
• Entfernen Sie Gemüsereste und andere Rückstände und reinigen Sie alle
Teile (außer dem Hauptgehäuse) mit warmem, sauberem Wasser.
• Der Hauptkörper kann nicht ins Wasser gestellt werden; kann nur mit
einem feuchten Tuch abgewischt werden.
• Verwenden Sie zum Reinigen der Maschine keinen Verdünner und kein
Benzin .
FCC-Informationen:
• VORSICHT: Änderungen oder Modifikationen, die nicht ausdrücklich von
der für die Einhaltung verantwortlichen Partei genehmigt wurden, können
zum Erlöschen der Berechtigung des Benutzers zum Betrieb des Geräts
führen!
• Dieses Gerät entspricht Teil 15 der FCC-Bestimmungen. Der Betrieb
unterliegt den folgenden zwei Bedingungen:
1) Dieses Produkt kann schädliche Störungen verursachen.
2) Dieses Produkt muss alle empfangenen Störungen akzeptieren,
einschließlich Störungen, die zu unerwünschtem Betrieb führen können.
• WARNUNG: Änderungen oder Modifikationen an diesem Produkt, die
nicht ausdrücklich von der Partei genehmigt wurden. Wenn der Benutzer
für die Einhaltung der Vorschriften verantwortlich ist, erlischt unter
Umständen die Berechtigung zum Betrieb des Produkts .
• Notiz: Dieses Produkt wurde getestet und entspricht den Grenzwerten für
ein digitales Gerät der Klasse B gemäß Teil 15 der FCC-Bestimmungen .
Diese Grenzwerte sollen einen angemessenen Schutz vor schädlichen
Störungen in einer Wohnanlage bieten.

- 7 -
• Dieses Produkt erzeugt und verwendet Hochfrequenzenergie und kann
diese ausstrahlen. Wenn es nicht gemäß den Anweisungen installiert und
verwendet wird, kann es schädliche Störungen der Funkkommunikation
verursachen. Es gibt jedoch keine Garantie dafür, dass bei einer
bestimmten Installation keine Störungen auftreten. Wenn dieses Produkt
schädliche Störungen beim Radio- oder Fernsehempfang verursacht, was
durch Aus- und Einschalten des Produkts festgestellt werden kann, wird
dem Benutzer empfohlen, zu versuchen, die Störung durch eine oder
mehrere der folgenden Maßnahmen zu beheben.
• Richten Sie die Empfangsantenne neu aus oder versetzen Sie sie.
• Erhöhen Sie den Abstand zwischen Produkt und Empfänger .
• Schließen Sie das Produkt an eine Steckdose eines anderen
Stromkreises an als den, an den der Empfänger angeschlossen ist.
• Bitten Sie Ihren Händler oder einen erfahrenen Radio-/TV-Techniker um
Hilfe.
Hersteller: Shanghaimuxinmuyeyouxiangongsi
Adresse: Baoshanqu Shuangchenglu 803long 11hao 1602A-1609shi
Shanghai
Importiert nach AUS: SIHAO PTY LTD. 1 ROKEVA STREETEASTWOOD
NSW 2122 Australien
In die USA importiert: Sanven Technology Ltd. Suite 250, 9166 Anaheim
Place, Rancho Cucamonga, CA 91730
In China hergestellt


- 9 -
Tecnico Supporto e certificato di garanzia elettronica www.vevor.com/support
Elettrico Verdura Affettatrice
MODELLO: VS1J-S
We continue to be committed to provide you tools with competitive price.
"Save Half", "Half Price" or any other similar expressions used by us only represents an
estimate of savings you might benefit from buying certain tools with us compared to the major
top brands and does not necessarily mean to cover all categories of tools offered by us. You
are kindly reminded to verify carefully when you are placing an order with us if you are
actually saving half in comparison with the top major brands.

- 1 -
MODELLO: VS1J-S
Have product questions? Need technical support? Please feel free to
contact us:
Technical Support and E-Warranty Certificate
www.vevor.com/support
NEED HELP? CONTACT US!
This is the original instruction, please read all manual instructions
carefully before operating. VEVOR reserves a clear interpretation of our
user manual. The appearance of the product shall be subject to the
product you received. Please forgive us that we won't inform you again if
there are any technology or software updates on our product.
Electric Vegetable Slicer
- 2 -
Avvertenza- Per ridurre il rischio di lesioni, l' utente deve
leggere attentamente il manuale di istruzioni.
Solo per uso interno
Questo prodotto appartiene alla classe di protezione II. Ciò
significa che è dotato di isolamento potenziato o doppio.
CORRETTO SMALTIMENTO
Questo prodotto è soggetto alle disposizioni della Direttiva
Europea 2012/19/UE. Il simbolo del bidone della spazzatura
barrato indica che nell'Unione Europea il prodotto richiede la
raccolta differenziata dei rifiuti. Ciò vale per il prodotto e tutti gli
accessori contrassegnati da questo simbolo. I prodotti
contrassegnati come tali non possono essere smaltiti con i
normali rifiuti domestici, ma devono essere portati a punto di
raccolta per il riciclaggio di dispositivi elettrici ed elettronici.
DESCRIZIONE

- 3 -
1. Spingiverdure
2. Fissare il pulsante
3 . ACCESO SPENTO
interruttore
4 . Corpo
5 . Testa della scatola
ingranaggi
6 . Taglio vegetale della testa
7. Tubo tagliente
8 . Tagliastrisce (grossolano)
9 . Taglierina reticolare
1 0 . Taglierina ondulata
1 1 . Tagliastrisce (fine)
1 2 . Tagliere a fette
TUTELA IMPORTANTE
• Solo uso domestico. Non utilizzare per scopi industriali.
• Scollegare durante il montaggio e lo smontaggio dell'unità.
• È necessaria un'attenta supervisione quando un apparecchio viene
utilizzato vicino a bambini.
• Quando si trasporta l'unità, assicurarsi di sorreggerne il corpo con
entrambe le mani. Non trasportare l'unità tenendola per la testata
vegetale .
• Non spingere mai i prodotti manualmente. Utilizzare lo spingiverdure .
• La durata di funzionamento continuo del tritatutto per insalata di verdure
non deve superare i 10 minuti, con successivi intervalli di 10 minuti per il
raffreddamento del motore .
• Per evitare inceppamenti, non forzare il funzionamento dell'unità con una
pressione eccessiva .
• Quando l'interruttore si attiva, non accendere.
• Non tentare mai di sostituire le parti o riparare l'unità da soli.
• Questo apparecchio non è destinato all'uso da parte di persone
(compresi i bambini) con capacità fisiche, sensoriali o mentali ridotte o con
mancanza di esperienza e conoscenza, a meno che non abbiano ricevuto
supervisione o istruzioni relative all'uso dell'apparecchio da una persona
responsabile della loro sicurezza. .
• I bambini devono essere sorvegliati per assicurarsi che non giochino con
l'apparecchio.
• Non utilizzare questo apparecchio se il cavo o la spina sono danneggiati.

- 4 -
Restituirlo al negozio di assistenza o ripararlo da parte di un tecnico
professionista.
PER LA PRIMA VOLTA
• Controlla che la tensione indicata sulla targhetta corrisponda alla
tensione di rete della tua casa.
• Lavare tutte le parti (eccetto il corpo) in acqua tiepida e sapone.
• Prima di collegarlo, garantire l' accensione/spegnimento l'interruttore è in
posizione " OFF ".
ISTRUZIONI PER L'USO
ASSEMBLAGGIO
• Premere il pulsante di fissaggio, tenere la testa e inserirla nell'ingresso
(quando si inserisce, prestare attenzione che la testa deve essere inclinata
secondo la freccia indicata in alto; vedere Fig. 1), quindi spostare la testa
in senso antiorario in modo che la testa è fissata saldamente. Il pulsante di
fissaggio non si muoverà se è stato bloccato!
• Mettere la taglierina nel tubo della taglierina. Dopo aver allineato le due
posizioni della fibbia nella direzione inferiore, premere la posizione
superiore della taglierina. (fig.2)
• Inserire gli attacchi del tubo di taglio nella testa di taglio. Nota: deve
essere a posto. (fig.3)
• Accendere/spegnere in posizione "ON" durante il taglio. Spingere il cibo
nella mangiatoia, quindi spingerlo verso il basso. (fig.4)
• Dopo l'uso, spegnere l'unità e scollegarla dalla presa di corrente .
- 5 -
TRITARE LE VERDURE
• Tagliare tutte le verdure a listarelle , più piccole del taglio della testa, in
modo che possano essere facilmente inserite nel taglio della testa
• Collegare l'unità e accenderla/spegnerla alla posizione "ON".
• Introdurre gli alimenti nella testa di taglio. Utilizzare solo lo spingiverdure.
• Dopo l'uso, spegnere l'unità e scollegarla dalla presa di corrente .
PULIZIA E MANUTENZIONE SMONTAGGIO
SMANTELLARE
• Verificare che il motore sia completamente fermo.
• Scollegare la spina di alimentazione.
• Smontare come descritto nella Figura 1-4, passaggio inverso .
• Premere il pulsante di fissaggio e girare la testa in senso orario per
smontare Esso.
PULIZIA
• Rimuovere i residui vegetali e altri oggetti e pulire tutte le parti (eccetto il
corpo principale) con acqua calda e pulita.
•
Non è possibile mettere il corpo principale in acqua; può pulire solo con
un panno umido.
•
Non utilizzare solventi e benzina per pulire la macchina .
Informazioni FCC:
• ATTENZIONE: cambiamenti o modifiche non espressamente approvati

- 6 -
dalla parte responsabile della conformità potrebbero invalidare il diritto
dell'utente a utilizzare l'apparecchiatura!
• Questo dispositivo è conforme alla Parte 15 delle norme FCC. Il
funzionamento è soggetto alle seguenti due condizioni:
1) Questo prodotto può causare interferenze dannose.
2) Questo prodotto deve accettare qualsiasi interferenza ricevuta,
comprese le interferenze che potrebbero causare un funzionamento
indesiderato.
• AVVERTIMENTO: Cambiamenti o modifiche a questo prodotto non
espressamente approvati dalla parte. Il responsabile della conformità
potrebbe invalidare l'autorità dell'utente a utilizzare il prodotto .
• Nota: Questo prodotto è stato testato ed è risultato conforme ai limiti di
un dispositivo digitale di Classe B ai sensi della Parte 15 delle Norme
FCC . Questi limiti sono progettati per fornire una protezione ragionevole
contro interferenze dannose in un'installazione residenziale.
• Questo prodotto genera, utilizza e può irradiare energia in radiofrequenza
e, se non installato e utilizzato in conformità con le istruzioni, può causare
interferenze dannose alle comunicazioni radio. Tuttavia, non vi è alcuna
garanzia che non si verifichino interferenze in una particolare installazione.
Se questo prodotto causa interferenze dannose alla ricezione radiofonica o
televisiva, cosa che può essere determinata spegnendo e accendendo il
prodotto, si consiglia all'utente di provare a correggere l'interferenza
adottando una o più delle seguenti misure.
• Riorientare o riposizionare l'antenna ricevente.
• Aumentare la distanza tra il prodotto e il ricevitore.
• Collegare il prodotto a una presa su un circuito diverso da quello a cui è
collegato il ricevitore.
• Consultare il rivenditore o un tecnico radio/TV esperto per assistenza.
Produttore: Shanghaimuxinmuyeyouxiangongsi
Indirizzo: Baoshanqu Shuangchenglu 803long 11hao 1602A-1609shi
Shanghai

- 7 -
Importato in AUS: SIHAO PTY LTD. 1 ROKEVA STREETEASTWOOD
NSW 2122 Australia
Importato negli Stati Uniti: Sanven Technology Ltd. Suite 250, 9166
Anaheim Place, Rancho Cucamonga, CA 91730
Made in China


- 9 -
Técnico Soporte y certificado de garantía electrónica www.vevor.com/support
Eléctrico Verdura rebanador
MODELO: VS1J-S
We continue to be committed to provide you tools with competitive price.
"Save Half", "Half Price" or any other similar expressions used by us only represents an
estimate of savings you might benefit from buying certain tools with us compared to the major
top brands and does not necessarily mean to cover all categories of tools offered by us. You
are kindly reminded to verify carefully when you are placing an order with us if you are
actually saving half in comparison with the top major brands.
- 1 -
MODELO: VS1J-S
Have product questions? Need technical support? Please feel free to
contact us:
Technical Support and E-Warranty Certificate
www.vevor.com/support
NEED HELP? CONTACT US!
This is the original instruction, please read all manual instructions
carefully before operating. VEVOR reserves a clear interpretation of our
user manual. The appearance of the product shall be subject to the
product you received. Please forgive us that we won't inform you again if
there are any technology or software updates on our product.
Electric Vegetable Slicer

- 2 -
Advertencia: para reducir el riesgo de lesiones, el usuario
debe leer atentamente el manual de instrucciones.
Solamente para uso en interiores
Este producto es de clase de protección II. Eso significa que
está equipado con aislamiento reforzado o doble.
ELIMINACIÓN CORRECTA
Este producto está sujeto a las disposiciones de la Directiva
europea 2012/19/UE. El símbolo que muestra un contenedor
con ruedas tachado indica que el producto requiere recogida
selectiva de basura en la Unión Europea. Esto se aplica al
producto y a todos los accesorios marcados con este símbolo.
Los productos marcados como tales no podrán desecharse
con la basura doméstica normal, sino que deberán llevarse a
un Punto de recogida para el reciclaje de aparatos eléctricos y
electrónicos.
DESCRIPCIÓN

- 3 -
1. Empujador de verduras
2. Abrochar el botón
3 . ENCENDIDO APAGADO
cambiar
4 . Cuerpo
5 . cabeza de caja de cambios
6 . Corte vegetal de la cabeza.
7. Tubo cortador
8 . Cortador de tiras (grueso)
9 . cortador reticular
1 0 . cortador ondulado
1 1 . Cortador de tiras (fino)
1 2 . cortador en rodajas
CONSIDERACIONES IMPORTANTES
• Uso doméstico únicamente. No utilizar con fines industriales.
• Desenchufe al montar y desmontar la unidad.
• Es necesaria una estrecha supervisión cuando se utiliza cualquier
aparato cerca de niños.
• Cuando transporte la unidad, asegúrese de sujetar el cuerpo con ambas
manos. No transporte la unidad por el cabezal de verduras .
• Nunca empuje los productos con la mano. Utilice empujador de
verduras .
• El funcionamiento continuo de la picadora de ensalada de verduras no
debe ser superior a 10 minutos, con los siguientes intervalos de 10
minutos para el enfriamiento del motor .
• Para evitar atascos, No fuerce el funcionamiento de la unidad con
presión excesiva .
• Cuando se activa el disyuntor, no encienda.
• Nunca intente reemplazar las piezas ni reparar la unidad usted mismo.
• Este aparato no está diseñado para que lo utilicen personas (incluidos
niños) con capacidades físicas, sensoriales o mentales reducidas o con
falta de experiencia y conocimiento, a menos que hayan recibido
supervisión o instrucciones sobre el uso del aparato por parte de una
persona responsable de su seguridad. .
• Se debe supervisar a los niños para asegurarse de que no jueguen con
el aparato.
• No opere este aparato si el cable o el enchufe están dañados.

- 4 -
Devuélvalo al taller de servicio o reparación por parte de un técnico
profesional.
POR PRIMERA VEZ
• Compruebe que la tensión indicada en la etiqueta de clasificación se
corresponde con la tensión de red de su vivienda.
• Lave todas las partes (excepto el cuerpo) en agua tibia y jabón.
• Antes de enchufar, asegúrese de que el encendido/apagado El
interruptor está en la posición " OFF ".
INSTRUCCIONES DE USO
MONTAJE
• Presione el botón de fijación, sostenga el cabezal e insértelo en la
entrada (al insertarlo, preste atención al cabezal debe estar inclinado
según la flecha indicada en la parte superior; consulte la Fig. 1), luego
mueva el cabezal en sentido contrario a las agujas del reloj para que La
cabeza está bien sujeta. ¡El botón de fijación no se moverá porque ha sido
bloqueado!
• Coloque el cortador en el tubo del cortador. Después de que las dos
posiciones de la hebilla en la dirección inferior estén alineadas, presione la
posición superior del cortador. (Figura 2)
• Coloque los accesorios del tubo cortador en el cabezal de corte. Nota:
Debe estar en su lugar. (Fig. 3)
• Cambie ON/OFF a la posición "ON" al cortar. Empuje la comida dentro
del comedero y luego empújela hacia abajo. (figura 4)
• Después de su uso, apague la unidad y desconéctela de la fuente de
alimentación .

- 5 -
PICAR VERDURAS
• Corte todas las verduras en tiras , más pequeñas que el corte de la
cabeza, para que se coloquen fácilmente en el corte de la cabeza.
• Conecte la unidad y enciéndala/apagúela. a la posición "ON".
• Introduzca alimentos en el cabezal de corte. Utilice únicamente el
empujador de verduras.
• Después de su uso, apague la unidad y desconéctela de la fuente de
alimentación .
LIMPIEZA Y MANTENIMIENTO DESMONTAJE
DESMANTELAR
• Determine que el motor esté completamente estacionario.
• Desenchufe el enchufe de alimentación.
• Desmonte como se describe en la Figura 1-4, paso inverso .
• Presione el botón de fijación y girar la cabeza en el sentido de las agujas
del reloj para desmontar él.
LIMPIEZA
• Retire los residuos de vegetales y otros elementos y limpie todas las
piezas (excepto el cuerpo principal) con agua limpia y tibia.
•
No se puede poner el cuerpo principal en el agua; Solo se puede limpiar
con un paño húmedo.
•
No utilice diluyente ni gasolina para limpiar la máquina .

- 6 -
Información de la FCC:
• PRECAUCIÓN: ¡ Los cambios o modificaciones no aprobados
expresamente por la parte responsable del cumplimiento podrían anular la
autoridad del usuario para operar el equipo!
• Este dispositivo cumple con la Parte 15 de las normas de la FCC. La
operación está sujeta a las dos condiciones siguientes:
1) Este producto puede causar interferencias perjudiciales.
2) Este producto debe aceptar cualquier interferencia recibida, incluidas
las interferencias que puedan causar un funcionamiento no deseado.
• ADVERTENCIA: Cambios o modificaciones a este producto no
aprobados expresamente por la parte. El responsable del cumplimiento
podría anular la autoridad del usuario para operar el producto .
• Nota: Este producto ha sido probado y cumple con los límites para un
dispositivo digital Clase B de conformidad con la Parte 15 de las normas
de la FCC . Estos límites están diseñados para proporcionar una
protección razonable contra interferencias dañinas en una instalación
residencial.
• Este producto genera, usa y puede irradiar energía de radiofrecuencia y,
si no se instala y usa de acuerdo con las instrucciones, puede causar
interferencias dañinas en las comunicaciones por radio. Sin embargo, no
hay garantía de que no se produzcan interferencias en una instalación en
particular. Si este producto causa interferencias dañinas en la recepción
de radio o televisión, lo cual se puede determinar apagando y
encendiendo el producto, se recomienda al usuario que intente corregir la
interferencia mediante una o más de las siguientes medidas.
• Reorientar o reubicar la antena receptora.
• Aumente la distancia entre el producto y el receptor.
• Conecte el producto a una toma de corriente de un circuito diferente al
que está conectado el receptor.
• Consulte al distribuidor o a un técnico experimentado en radio/TV para
obtener ayuda.

- 7 -
Fabricante: Shanghaimuxinmuyeyouxiangongsi
Dirección: Baoshanqu Shuangchenglu 803long 11hao 1602A-1609shi
Shanghai
Importado a AUS: SIHAO PTY LTD. 1 ROKEVA STREETASTWOOD
NSW 2122 Australia
Importado a EE. UU.: Sanven Technology Ltd. Suite 250, 9166 Anaheim
Place, Rancho Cucamonga, CA 91730
Hecho en china


- 9 -
Techniczny Certyfikat wsparcia i e-gwarancji www.vevor.com/support
Elektryczny Warzywo Krajalnica
MODEL: VS1J-S
We continue to be committed to provide you tools with competitive price.
"Save Half", "Half Price" or any other similar expressions used by us only represents an
estimate of savings you might benefit from buying certain tools with us compared to the major
top brands and does not necessarily mean to cover all categories of tools offered by us. You
are kindly reminded to verify carefully when you are placing an order with us if you are
actually saving half in comparison with the top major brands.

- 1 -
MODEL: VS1J-S
Have product questions? Need technical support? Please feel free to
contact us:
Technical Support and E-Warranty Certificate
www.vevor.com/support
NEED HELP? CONTACT US!
This is the original instruction, please read all manual instructions
carefully before operating. VEVOR reserves a clear interpretation of our
user manual. The appearance of the product shall be subject to the
product you received. Please forgive us that we won't inform you again if
there are any technology or software updates on our product.
Electric Vegetable Slicer

- 2 -
Ostrzeżenie — aby zmniejszyć ryzyko obrażeń, użytkownik
musi uważnie przeczytać instrukcję obsługi.
Do użytku wewnątrz
Produkt posiada II klasę ochrony. Oznacza to, że jest
wyposażony w podwyższoną lub podwójną izolację.
PRAWIDŁOWA UTYLIZACJA
Ten produkt podlega postanowieniom Dyrektywy Europejskiej
2012/19/UE. Symbol przekreślonego kosza na śmieci
oznacza, że produkt wymaga selektywnej zbiórki śmieci na
terenie Unii Europejskiej. Dotyczy to produktu i wszystkich
akcesoriów oznaczonych tym symbolem. Produktów
oznaczonych jako takie nie można wyrzucać razem ze
zwykłymi odpadami domowymi, lecz należy je oddać do: punkt
zbiórki sprzętu elektrycznego i elektronicznego
przeznaczonego do recyklingu.
OPIS

- 3 -
1. Popychacz warzyw
2. Zapnij guzik
3 . WŁ./WYŁ przełącznik
4 . Ciało
5 . Głowica skrzyni biegów
6 . Cięcie warzyw głowy
7. Rura obcinająca
8 . Krajarka do pasków (gruba)
9 . Frez siatkowy
1 0 . Falowany nóż
1 1 . Krajarka do pasków
(drobna)
1 2 . Krajalnica w plasterkach
WAŻNI OCHRONIARZE
• Tylko do użytku domowego. Nie używać do celów przemysłowych.
• Odłączaj wtyczkę podczas montażu i demontażu urządzenia.
• Jeśli jakiekolwiek urządzenie jest używane w pobliżu dzieci, konieczny
jest ścisły nadzór.
• Podczas przenoszenia urządzenia należy trzymać korpus obiema rękami.
Nie przenoś urządzenia trzymając za głowicę warzywniczą .
• Nigdy nie pchaj produktów ręcznie. Użyj popychacza do warzyw .
• C on ciągła praca młynka do sałatek warzywnych nie powinna trwać
dłużej niż 10 minut, z następującymi 10-minutowymi przerwami na
chłodzenie silnika .
• Aby uniknąć zakleszczenia, nie zmuszaj urządzenia do pracy przy
nadmiernym ciśnieniu .
• Kiedy wyłącznik automatyczny się załączy, nie włączaj.
• Nigdy nie próbuj samodzielnie wymieniać części i naprawiać urządzenia.
• To urządzenie nie jest przeznaczone do użytku przez osoby (w tym dzieci)
o ograniczonych zdolnościach fizycznych, sensorycznych lub umysłowych
lub nieposiadających doświadczenia i wiedzy, chyba że znajdują się one
pod nadzorem lub zostały poinstruowane w zakresie użytkowania
urządzenia przez osobę odpowiedzialną za ich bezpieczeństwo .
• Dzieci należy nadzorować, aby mieć pewność, że nie bawią się
urządzeniem.
• Nie używaj tego urządzenia, jeśli przewód lub wtyczka są uszkodzone.

- 4 -
Zwróć go do punktu serwisowego lub do naprawy przez profesjonalnego
serwisanta.
PO RAZ PIERWSZY
• Sprawdź, czy napięcie wskazane na tabliczce znamionowej odpowiada
napięciu sieciowemu w Twoim domu.
• Umyj wszystkie części (z wyjątkiem korpusu) w ciepłej wodzie z mydłem.
• Przed podłączeniem, upewnij się, że jest włączony/wyłączony przełącznik
znajduje się w pozycji „ OFF ”.
INSTRUKCJA UŻYTKOWANIA
ZŁOŻENIE
• Wcisnąć przycisk mocowania, przytrzymać głowicę i włożyć ją do otworu
(przy zakładaniu należy zwrócić uwagę, aby głowica była pochylona
zgodnie ze strzałką na górze; patrz rys. 1), a następnie przesunąć głowicę
w kierunku przeciwnym do ruchu wskazówek zegara tak, aby głowa jest
mocno przymocowana. Przycisk zapinania nie przesuwa się, jeśli został
zablokowany!
• Włóż nóż do rurki tnącej. Po zrównaniu się dwóch pozycji klamry w
dolnym kierunku, naciśnij górną pozycję noża. (rys.2)
• Włóż nasadki rurki tnącej do głowicy tnącej. Uwaga: musi być na swoim
miejscu. (rys.3)
• Podczas cięcia przełącznik ON/OFF znajduje się w pozycji „ON”. Włóż
żywność do podajnika, a następnie wciśnij ją w dół. (rys. 4)
• Po użyciu wyłącz urządzenie i odłącz je od źródła zasilania .

- 5 -
MIELENIE WARZYW
• Wszystkie warzywa pokroić w paski mniejsze od odcięcia główki, tak aby
łatwo wchodziły w wycięcie główki
• Podłącz urządzenie i włącz/wyłącz do pozycji „ON”.
• Wprowadzaj żywność do głowicy tnącej. Używaj wyłącznie popychacza
do warzyw.
• Po użyciu wyłącz urządzenie i odłącz je od źródła zasilania .
CZYSZCZENIE I KONSERWACJA DEMONTAŻ
ZDEMONTOWAĆ
• Ustalić, czy silnik jest całkowicie nieruchomy.
• Odłącz wtyczkę zasilania.
• Zdemontować zgodnie z opisem na rysunku 1-4, krok w odwrotnej
kolejności .
• Naciśnij przycisk zapinania i obróć głowę zgodnie z ruchem wskazówek
zegara, aby zdemontować To.
CZYSZCZENIE
• Usuń pozostałości warzyw i inne przedmioty, a następnie umyj wszystkie
części (z wyjątkiem głównego korpusu) ciepłą, czystą wodą.
•
Nie można włożyć głównego korpusu do wody; można wycierać jedynie
wilgotną szmatką.
•
Do czyszczenia urządzenia nie używaj rozcieńczalnika ani benzyny .

- 6 -
Informacje FCC:
• UWAGA: Zmiany lub modyfikacje, które nie zostały wyraźnie
zatwierdzone przez stronę odpowiedzialną za zgodność, mogą unieważnić
uprawnienia użytkownika do obsługi urządzenia!
• To urządzenie jest zgodne z częścią 15 przepisów FCC. Działanie
podlega następującym dwóm warunkom:
1) Ten produkt może powodować szkodliwe zakłócenia.
2) Ten produkt musi akceptować wszelkie odbierane zakłócenia, w tym
zakłócenia, które mogą powodować niepożądane działanie.
• OSTRZEŻENIE: Zmiany lub modyfikacje tego produktu, które nie zostały
wyraźnie zatwierdzone przez stronę. Osoba odpowiedzialna za zgodność
może unieważnić uprawnienia użytkownika do obsługi produktu .
• Notatka: Ten produkt został przetestowany i stwierdzono, że spełnia
ograniczenia dla urządzeń cyfrowych klasy B zgodnie z częścią 15
przepisów FCC . Ograniczenia te mają na celu zapewnienie rozsądnej
ochrony przed szkodliwymi zakłóceniami w instalacjach domowych.
• Ten produkt generuje, wykorzystuje i może emitować energię o
częstotliwości radiowej, a jeśli nie zostanie zainstalowany i nie będzie
używany zgodnie z instrukcją, może powodować szkodliwe zakłócenia w
komunikacji radiowej. Nie ma jednak gwarancji, że w konkretnej instalacji
nie wystąpią zakłócenia. Jeśli produkt powoduje szkodliwe zakłócenia w
odbiorze radia lub telewizji, co można stwierdzić poprzez wyłączenie i
włączenie produktu, zachęca się użytkownika do podjęcia próby
skorygowania zakłóceń za pomocą jednego lub kilku z poniższych
środków.
• Zmień orientację lub położenie anteny odbiorczej.
• Zwiększ odległość pomiędzy produktem a odbiornikiem .
• Podłącz produkt do gniazdka w innym obwodzie niż ten, do którego
podłączony jest odbiornik.
• Skonsultuj się ze sprzedawcą lub doświadczonym technikiem
radiowo-telewizyjnym w celu uzyskania pomocy.

- 7 -
Producent: Shanghaimuxinmuyeyouxiangongsi
Adres: Baoshanqu Shuangchenglu 803long 11hao 1602A-1609shi
Szanghaj
Import do AUS: SIHAO PTY LTD. 1 ROKEVA STREETEASTWOOD NSW
2122 Australia
Import do USA: Sanven Technology Ltd. Suite 250, 9166 Anaheim Place,
Rancho Cucamonga, CA 91730
Wyprodukowano w Chinach


- 9 -
Technisch Ondersteuning en e-garantiecertificaat www.vevor.com/support
Elektrisch Groente Snijmachine
MODEL: VS1J-S
We continue to be committed to provide you tools with competitive price.
"Save Half", "Half Price" or any other similar expressions used by us only represents an
estimate of savings you might benefit from buying certain tools with us compared to the major
top brands and does not necessarily mean to cover all categories of tools offered by us. You
are kindly reminded to verify carefully when you are placing an order with us if you are
actually saving half in comparison with the top major brands.

- 1 -
MODEL: VS1J-S
Have product questions? Need technical support? Please feel free to
contact us:
Technical Support and E-Warranty Certificate
www.vevor.com/support
NEED HELP? CONTACT US!
This is the original instruction, please read all manual instructions
carefully before operating. VEVOR reserves a clear interpretation of our
user manual. The appearance of the product shall be subject to the
product you received. Please forgive us that we won't inform you again if
there are any technology or software updates on our product.
Electric Vegetable Slicer

- 2 -
Waarschuwing- Om het risico op letsel te verminderen, moet
de gebruiker de gebruiksaanwijzing zorgvuldig lezen .
Alleen binnenshuis te gebruiken
Dit product valt onder beschermingsklasse II. Dat betekent dat
het is voorzien van verbeterde of dubbele isolatie.
CORRECTE VERWIJDERING
Dit product valt onder de bepalingen van de Europese richtlijn
2012/19/EU. Het symbool met een doorgestreepte
afvalcontainer geeft aan dat het product in de Europese Unie
een aparte afvalinzameling vereist. Dit geldt voor het product
en alle accessoires die met dit symbool zijn gemarkeerd.
Producten die als zodanig zijn gemarkeerd mogen niet bij het
normale huisvuil worden gegooid, maar moeten worden
afgevoerd naar een inzamelpunt voor recycling van elektrische
en elektronische apparaten.
BESCHRIJVING

- 3 -
1. Groentenduwer
2. Maak de knoop vast
3 . AAN UIT schakelaar
4 . Lichaam
5 . Versnellingsbak kop
6 . Groenten snijden van het
hoofd
7. Snijbuis
8 . Strokensnijder (grof)
9 . Reticulaire snijder
1 0 . Gegolfde snijder
1 1 . Strokensnijder (fijn)
1 2 . Gesneden snijder
BELANGRIJKE VEILIGHEIDSMAATREGELEN
• Alleen thuisgebruik. Niet gebruiken voor industriële doeleinden.
• Haal de stekker uit het stopcontact wanneer u het apparaat monteert en
demonteert.
• Als een apparaat in de buurt van kinderen wordt gebruikt, is streng
toezicht noodzakelijk.
• Wanneer u het apparaat draagt, zorg er dan voor dat u het lichaam met
beide handen vasthoudt . Draag het apparaat niet aan de groentekop .
• Duw producten nooit met de hand aan. Gebruik een groenteduwer .
• Het continu draaien van de groentesalademolen mag niet langer duren
dan 10 minuten, met de volgende intervallen van 10 minuten voor
motorkoeling .
• Om vastlopen te voorkomen, Forceer het apparaat niet met overmatige
druk .
• Wanneer de stroomonderbreker wordt geactiveerd, niet inschakelen.
• Probeer nooit zelf de onderdelen te vervangen en het apparaat te
repareren.
• Dit apparaat is niet bedoeld voor gebruik door personen (inclusief
kinderen) met verminderde fysieke, zintuiglijke of mentale capaciteiten of
een gebrek aan ervaring en kennis, tenzij ze toezicht of instructies hebben
gekregen over het gebruik van het apparaat door een persoon die
verantwoordelijk is voor hun veiligheid. .
• Er moet toezicht gehouden worden op kinderen om ervoor te zorgen dat
ze niet met het apparaat spelen.

- 4 -
• Gebruik dit apparaat niet als het snoer of de stekker beschadigd is. Breng
het terug naar de winkel waar het wordt onderhouden of gerepareerd door
een professionele onderhoudsmonteur.
VOOR DE EERSTE KEER
• Controleer of de spanning aangegeven op het typeplaatje overeenkomt
met de netspanning in uw huis.
• Was alle onderdelen (behalve de behuizing) in warm zeepsop.
• Voordat u de stekker in het stopcontact steekt, Zorg voor AAN/UIT
schakelaar staat in de " UIT "-positie.
GEBRUIKSAANWIJZING
IN ELKAAR ZETTEN
• Druk op de bevestigingsknop, houd de kop vast en steek deze in de inlaat
(let er bij het insteken op dat de kop schuin moet staan zoals aangegeven
op de pijl bovenaan; zie Fig. 1), beweeg vervolgens de kop tegen de klok in
zodat het hoofd is stevig vastgemaakt. De vastzetknop beweegt niet als hij
op slot zit!
• Plaats de snijder in de snijderbuis. Nadat de twee gespposities in de
onderste richting zijn uitgelijnd, drukt u op de bovenste positie van het mes.
(Fig. 2)
• Plaats de snijbuisopzetstukken in de snijkop. Opmerking: moet op zijn
plaats zijn. (fig.3)
• Schakel AAN/UIT naar de "AAN"-positie tijdens het snijden. Duw het
voedsel in de voerbak en duw het vervolgens naar beneden. (fig.4)
• Schakel het apparaat na gebruik uit en haal de stekker uit het
stopcontact .

- 5 -
GROENTEN HAKEN
• Snij alle groenten in reepjes , kleiner dan de kopstekje, zodat ze makkelijk
in de kopstekje passen
• Sluit het apparaat aan en schakel het AAN/UIT naar de "AAN"-positie.
• Voer voedsel in de snijkop. Gebruik alleen de groenteduwer.
• Schakel het apparaat na gebruik uit en haal de stekker uit het
stopcontact .
REINIGING EN ONDERHOUD DEMONTEREN
DEMONTEREN
• Stel vast dat de motor volledig stationair is.
• Haal de stekker uit het stopcontact.
• Demonteer zoals beschreven in Figuur 1-4, stap in omgekeerde
volgorde .
• Druk op de bevestigingsknop en draai het hoofd met de klok mee om te
demonteren Het.
SCHOONMAAK
• Verwijder groenteresten en andere voorwerpen en reinig alle onderdelen
(behalve het hoofdgedeelte) met warm, schoon water.
•
Kan het hoofdgedeelte niet in het water plaatsen; kan alleen worden
afgeveegd met een natte doek.
•
Gebruik geen verdunner en benzine om de machine schoon te maken .

- 6 -
FCC-informatie:
• LET OP: Wijzigingen of aanpassingen die niet uitdrukkelijk zijn
goedgekeurd door de partij die verantwoordelijk is voor naleving kunnen de
bevoegdheid van de gebruiker om de apparatuur te bedienen ongeldig
maken!
• Dit apparaat voldoet aan Deel 15 van de FCC-regels. De werking is
onderworpen aan de volgende twee voorwaarden:
1) Dit product kan schadelijke interferentie veroorzaken.
2) Dit product moet alle ontvangen interferentie accepteren, inclusief
interferentie die een ongewenste werking kan veroorzaken.
• WAARSCHUWING: Wijzigingen of aanpassingen aan dit product die niet
uitdrukkelijk zijn goedgekeurd door de partij. Verantwoordelijkheid voor
naleving kan de bevoegdheid van de gebruiker om het product te bedienen
ongeldig maken .
• Opmerking: Dit product is getest en voldoet aan de limieten voor een
digitaal apparaat van Klasse B overeenkomstig Deel 15 van de
FCC-regels . Deze limieten zijn bedoeld om redelijke bescherming te
bieden tegen schadelijke interferentie in een residentiële installatie.
• Dit product genereert, gebruikt en kan radiofrequentie-energie uitstralen,
en als het niet wordt geïnstalleerd en gebruikt in overeenstemming met de
instructies, kan het schadelijke interferentie aan radiocommunicatie
veroorzaken. Er is echter geen garantie dat er geen interferentie zal
optreden in een bepaalde installatie. Als dit product schadelijke
interferentie veroorzaakt aan radio- of televisieontvangst, wat kan worden
vastgesteld door het product uit en weer in te schakelen, wordt de
gebruiker aangeraden te proberen de interferentie te corrigeren door een
of meer van de volgende maatregelen.
• Heroriënteer of verplaats de ontvangstantenne.
• Vergroot de afstand tussen het product en de ontvanger.
• Sluit het product aan op een stopcontact op een ander circuit dan dat
waarop de ontvanger is aangesloten.
• Raadpleeg de dealer of een ervaren radio-/tv-technicus voor hulp.

- 7 -
Fabrikant: Shanghaimuxinmuyeyouxiangongsi
Adres: Baoshanqu Shuangchenglu 803long 11hao 1602A-1609shi
Shanghai
Geïmporteerd naar AUS: SIHAO PTY LTD. 1 ROKEVA
STREETEASTWOOD NSW 2122 Australië
Geïmporteerd naar de VS: Sanven Technology Ltd. Suite 250, 9166
Anaheim Place, Rancho Cucamonga, CA 91730
Gemaakt in China


- 9 -
Teknisk Support och e-garanticertifikat www.vevor.com/support
Elektrisk Grönsak Skivmaskin
MODELL: VS1J-S
We continue to be committed to provide you tools with competitive price.
"Save Half", "Half Price" or any other similar expressions used by us only represents an
estimate of savings you might benefit from buying certain tools with us compared to the major
top brands and does not necessarily mean to cover all categories of tools offered by us. You
are kindly reminded to verify carefully when you are placing an order with us if you are
actually saving half in comparison with the top major brands.

- 1 -
MODELL: VS1J-S
Have product questions? Need technical support? Please feel free to
contact us:
Technical Support and E-Warranty Certificate
www.vevor.com/support
NEED HELP? CONTACT US!
This is the original instruction, please read all manual instructions
carefully before operating. VEVOR reserves a clear interpretation of our
user manual. The appearance of the product shall be subject to the
product you received. Please forgive us that we won't inform you again if
there are any technology or software updates on our product.
Electric Vegetable Slicer

- 2 -
Varning- För att minska risken för skada måste användaren
läsa bruksanvisningen noggrant.
Endast för inomhusbruk
Denna produkt är av skyddsklass II. Det betyder att den är
utrustad med förbättrad eller dubbel isolering.
KORREKT AVFALLSHANTERING
Denna produkt omfattas av bestämmelserna i det europeiska
direktivet 2012/19/EU. Symbolen som visar en soptunna
korsad anger att produkten kräver separat sophämtning i EU.
Detta gäller för produkten och alla tillbehör märkta med denna
symbol. Produkter märkta som sådana får inte slängas
tillsammans med vanligt hushållsavfall utan ska lämnas till en
insamlingsställe för återvinning av elektriska och elektroniska
apparater.
BESKRIVNING

- 3 -
1. Grönsaksskjutare
2. Fäst knappen
3 . PÅ AV växla
4 . Kropp
5 . Växellådans huvud
6 . Grönsaksskärning av
huvudet
7. Skärrör
8 . Remskärare (grov)
9 . Retikulär skärare
1 0 . Vinkade skärare
1 1 . Remskärare (fin)
1 2 . Skivad skärare
VIKTIGA SÄKERHETSÅTGÄRDER
• Endast hemmabruk. Använd inte för industriella ändamål.
• Dra ut kontakten vid montering och demontering av enheten.
• Noggrann övervakning är nödvändig när någon apparat används nära
barn.
• När du bär enheten, se till att hålla i kroppen med båda händerna. Bär
inte enheten i grönsakshuvudet .
• Skjut aldrig produkter för hand. Använd grönsaksskjutare .
• Den kontinuerliga driften av grönsakssalladskvarnen bör inte vara mer än
10 minuter, med följande 10-minutersintervall för motorkylning .
• För att undvika stopp, tvinga inte att använda enheten med överdrivet
tryck .
• När strömbrytaren aktiveras, slå inte på.
• Försök aldrig byta ut delarna och reparera enheten själv.
• Apparaten är inte avsedd att användas av personer (inklusive barn) med
nedsatta fysiska, sensoriska eller mentala förmågor eller bristande
erfarenhet och kunskap, såvida de inte har fått övervakning eller
instruktioner angående användningen av apparaten av en person som
ansvarar för deras säkerhet. .
• Barn bör övervakas för att säkerställa att de inte leker med apparaten.
• Använd inte denna apparat om sladden eller kontakten är skadad. Lämna
tillbaka den till butiken för service eller reparation av en professionell
serviceman.
- 4 -
FÖR FÖRSTA GÅNGEN
• Kontrollera att spänningen som anges på märkskylten motsvarar
nätspänningen i ditt hem.
• Tvätta alla delar (utom kroppen) i varmt tvålvatten.
• Innan du ansluter, se till att PÅ/AV omkopplaren är i läge " OFF ".
BRUKSANVISNING
MONTERING
• Tryck på fästknappen, håll i huvudet och för in det i inloppet (när du sätter
in, var uppmärksam på att huvudet måste vara lutande enligt pilen som
anges på toppen; se Fig. 1), flytta sedan huvudet moturs så att huvudet
fästs hårt. Fästknappen rör sig inte som har låsts!
• Sätt in skäraren i skärröret. Efter att de två spännens lägen i den nedre
riktningen är inriktade, tryck på knivens övre position. (fig.2)
• Sätt in skärrörsfästena i skärhuvudet. Obs: Måste vara på plats. (fig.3)
• Slå PÅ/AV till läget "PÅ" när du skär. Skjut in maten i mataren och tryck
sedan ner maten. (fig.4)
• Efter användning, stäng av enheten och koppla bort den från
strömförsörjningen .
FÄRS GRÖNSAKER
• Skär all grönsak i remsor som är mindre än huvudets skärning, så att de
lätt kommer in i huvudets skärning

- 5 -
• Sätt på enheten och slå PÅ/AV till läget "ON".
• Mata in mat i skärhuvudet. Använd endast grönsaksskjutaren.
• Efter användning, stäng av enheten och koppla bort den från
strömförsörjningen .
RENGÖRING OCH UNDERHÅLL DEMONTERING
DEMONTERA
• Kontrollera att motorn står helt stilla.
• Dra ur strömkontakten.
• Demontera enligt beskrivning i figur 1-4, omvänd steg .
• Tryck på fästknappen och vrid på huvudet medurs för att demontera Det.
RENGÖRING
• Ta bort grönsaksrester och andra föremål och rengör alla delar (förutom
huvuddelen) med varmt, rent vatten.
•
Kan inte sätta huvudkroppen i vattnet; kan bara torka med en våt trasa.
•
Använd inte thinner och bensin för att rengöra maskinen .
FCC-information:
• FÖRSIKTIGHET: Ändringar eller modifieringar som inte uttryckligen
godkänts av den part som ansvarar för efterlevnaden kan upphäva
användarens behörighet att använda utrustningen!
• Denna enhet uppfyller del 15 av FCC-reglerna. Driften är föremål för
följande två villkor:
1) Denna produkt kan orsaka skadliga störningar.
2) Denna produkt måste acceptera alla mottagna störningar, inklusive
störningar som kan orsaka oönskad funktion.
• VARNING: Ändringar eller modifieringar av denna produkt som inte
uttryckligen godkänts av parten. Ansvarig för efterlevnad kan ogiltigförklara
användarens behörighet att använda produkten .
• Notera: Denna produkt har testats och befunnits överensstämma med
gränserna för en digital enhet av klass B i enlighet med del 15 av FCC:s

- 6 -
regler . Dessa gränser är utformade för att ge rimligt skydd mot skadliga
störningar i en bostadsinstallation.
• Denna produkt genererar, använder och kan utstråla radiofrekvensenergi,
och om den inte installeras och används i enlighet med instruktionerna kan
den orsaka skadliga störningar på radiokommunikation. Det finns dock
ingen garanti för att störningar inte kommer att inträffa i en viss installation.
Om denna produkt orsakar skadliga störningar på radio- eller
tv-mottagning, vilket kan fastställas genom att stänga av och på produkten,
uppmanas användaren att försöka korrigera störningarna med en eller
flera av följande åtgärder.
• Rikta om eller flytta mottagningsantennen.
• Öka avståndet mellan produkten och mottagaren .
• Anslut produkten till ett uttag på en annan krets än den som mottagaren
är ansluten till.
• Kontakta återförsäljaren eller en erfaren radio-/TV-tekniker för hjälp.
Tillverkare: Shanghaimuxinmuyeyouxiangongsi
Adress: Baoshanqu Shuangchenglu 803long 11hao 1602A-1609shi
Shanghai
Importerad till AUS: SIHAO PTY LTD. 1 ROKEVA STREETEASTWOOD
NSW 2122 Australien
Importerad till USA: Sanven Technology Ltd. Suite 250, 9166 Anaheim
Place, Rancho Cucamonga, CA 91730
Tillverkad i Kina