
Technical Support and E-Warranty Certificate www.vevor.com/support
ICE CREAM MACHINE
MODEL:BQL-7200T
We continue to be committed to provide you tools with competitive price.
"Save Half", "Half Price" or any other similar expressions used by us only represents an
estimate of savings you might benefit from buying certain tools with us compared to the major
top brands and doses not necessarily mean to cover all categories of tools offered by us. You
are kindly reminded to verify carefully when you are placing an order with us if you are
actually saving half in comparison with the top major brands.

- 1 -
MODEL:BQL-7200T
Have product questions? Need technical support? Please feel free to
contact us:
Technical Support and E-Warranty Certificate
www.vevor.com/support
NEED HELP? CONTACT US!
This is the original instruction, please read all manual instructions
carefully before operating. VEVOR reserves a clear interpretation of our
user manual. The appearance of the product shall be subject to the
product you received. Please forgive us that we won't inform you again if
there are any technology or software updates on our product.
ICE CREAM MACHINE

- 2 -
Warning-To reduce the risk of injury, user must read
instructions manual carefully.
CORRECT DISPOSAL
This product is subject to the provision of European Directive
2012/19/EC. The symbol showing a wheelie bin crossed
through indicates that the product requires separate refuse
collection in the European Union. This applies to the product
and all accessories marked with this symbol. Products marked
as such may not be discarded with normal domestic waste, but
must be taken to a collection point for recycling electrical and
electronic devices
Table of Contents
I.Safety Precautions--------------------------------------------------------------------2
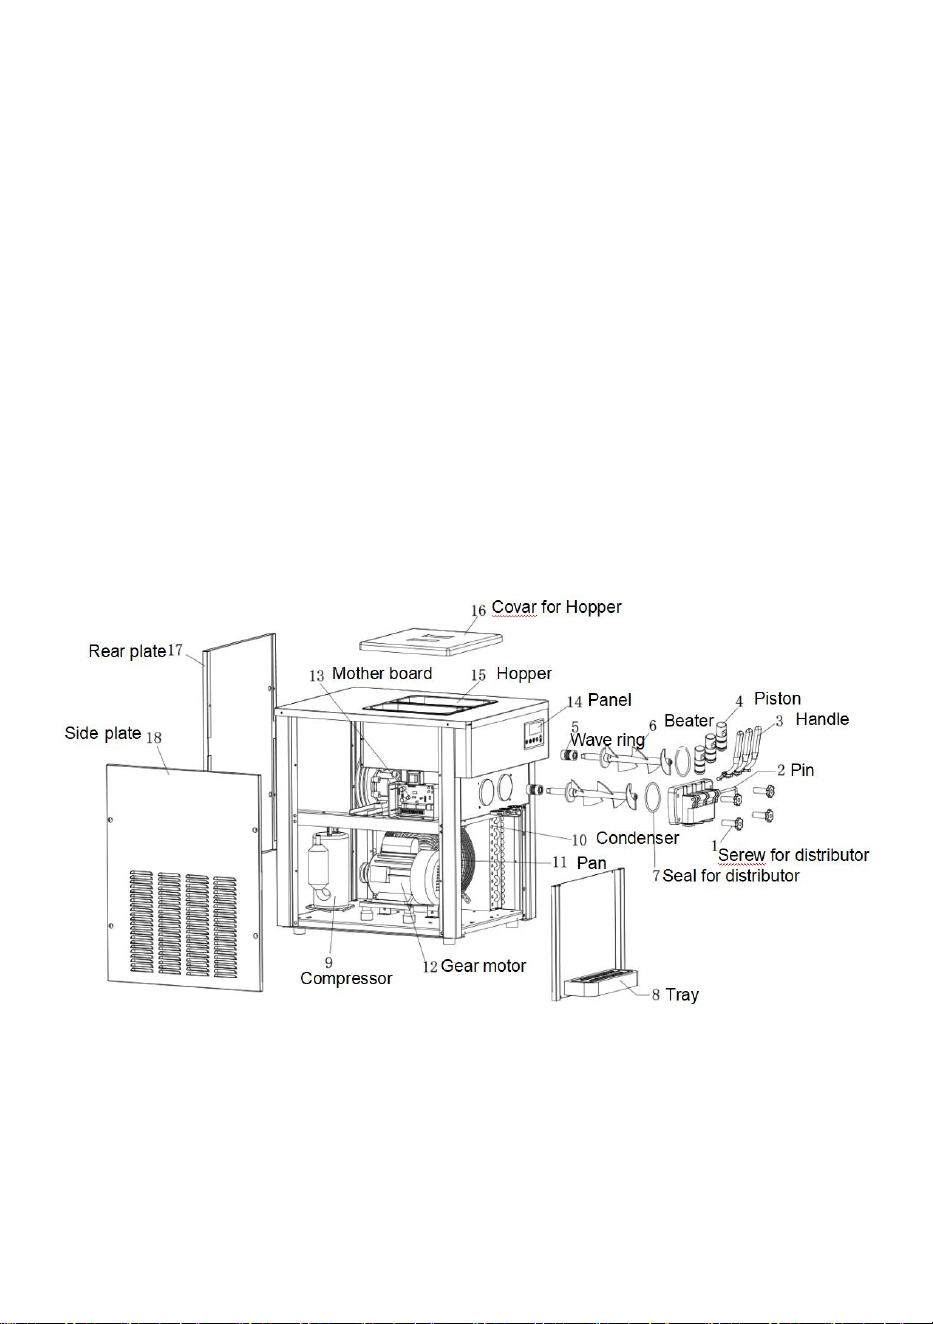
II.Product Structure Diagram --------------------------------------------------------7
III.Operation Panel & Functions ----------------------------------------------------8
IV.How to Make Ice Cream ---------------------------------------------------------10
V.Cleaning & Maintenance-----------------------------------------------------------11
VI.Troubleshooting & Solutions ---------------------------------------------------12
VII.Accessories -----------------------------------------------------------------------17
I. Safety Precautions
·Before using the appliance, please read this user manual to ensure that
you gain the maximum benefit from it.
1. WARNING:
1. This appliance is not intended for use by persons (including children)
with reduced physical, sensory or mental capabilities, or lack of experience
and knowledge, unless they have been given supervision or instruction
concerning use of the appliance by a person responsible for their safety.

- 3 -
2. Children should be supervised to ensure that they do not play with the
appliance.
3. This appliance can be used by children aged from 8 years and above
and persons with reduced physical, sensory or mental capabilities or lack
of experience and knowledge if they have been given supervision or
instruction concerning use of the appliance in a safe way and understand
the hazards involved. Children shall not play with the appliance. Cleaning
and user maintenance shall not be made by children without supervision.
4. If the supply cord is damaged, it must be replaced by the manufacturer,
its service agent or similarly qualified persons in order to avoid a hazard.
5. To avoid a hazard due to instability of the appliance, it must be fixed in
accordance with the instructions.
6. When positioning the appliance, ensure the supply cord is not trapped or
damaged.
7. Do not locate multiple portable socket-outlets or portable power supplies
at the rear of the appliance.
8. Keep ventilation openings, in the appliance enclosure or in the built-in
structure, clear of obstruction.
9. Do not damage the refrigerant circuit.
10. Do not store explosive substances such as aerosol cans with a
flammable propellant in this appliance.
11. Children aged from 3 to 8 years are allowed to load and unload
refrigerating appliances.
·Note: This appliance contains flammable refrigerant R290 and foaming
agent cyclopentane.
Please avoid contact fire when you transport and use it.
Please ask professional for servicing when the machine broke down.
Please send it to your local appointed disposal station when you discard it.
During using, service and disposal the appliance, please pay
attention to symbol similar as left side, which is located
on rear of appliance (rear panel or compressor) and with
yellow or orange color. It’s risk of fire warning symbol.

- 4 -
There are flammable materials in refrigerant pipes and compressor.
Please be far away fire source during using, service and disposal.
2. FCC Information
CAUTION: Changes or modifications not expressly approved by the party
responsible for compliance could void the user's authority to operate the
equipment!
This device complies with Part 15 of the FCC Rules. Operation is subject to
the following two conditions:
1) This product may cause harmful interference.
2)This product must accept any interference received, including
interference that may cause undesired operation.
WARNING: Changes or modifications to this product not expressly
approved by the party.responsible for compliance could void the user's
authority to operate the product.
Note: This product has been tested and found to comply with the limits for
a Class B digital device pursuant to Part 15 of the FCC Rules, These limits
are designed to provide reasonable protection against harmful interference
in a residential installation.
This product generates, uses and can radiate radio frequency energy, and
if not installed and used in accordance with the instructions, may cause
harmful interference to radio communications. However, there is no
guarantee that interference will not occur in a particular installation. If this
product does cause harmful interference to radio or television
reception,which can be determined by turning the product off and on, the
user is encouraged to try to correct the interference by one or more of the
following measures.
· Reorient or relocate the receiving antenna.
· Increase the distance between the product and receiver.
· Connect the product to an outlet on a circuit different from that to which
the receiver is connected.
· Consult the dealer or an experienced radio/TV technician for assistance.
- 5 -
3. Unpacking & Inspection
1) Cut and unfasten the straps and planks securing the carton; remove the
carton, foam boards, and packing bags to see if there is any damage to the
device's appearance. (Note: The device must not be tilted more than 45°
during transportation.)
2) Open the cylinder cover and check whether all the accessories
contained in the packing list are available.
3) Remove the upper and lower panels at the rear of the device to check
whether the internal motors, belts, compressors, and other components
areloose due to transportation. If any abnormalities are found, contact the
supplier in time to solve the problem.
(Note: When installing or removing each panel, insert an internal
hexagonal wrench or cross screwdriver into the screw groove on the panel,
then press slightly and rotate to loosen or fasten)
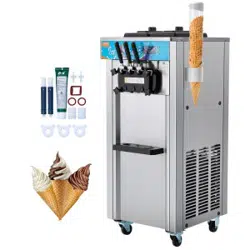
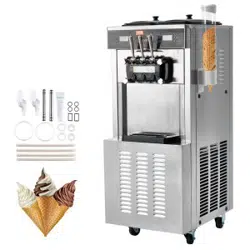
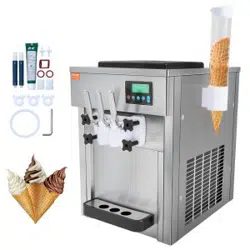
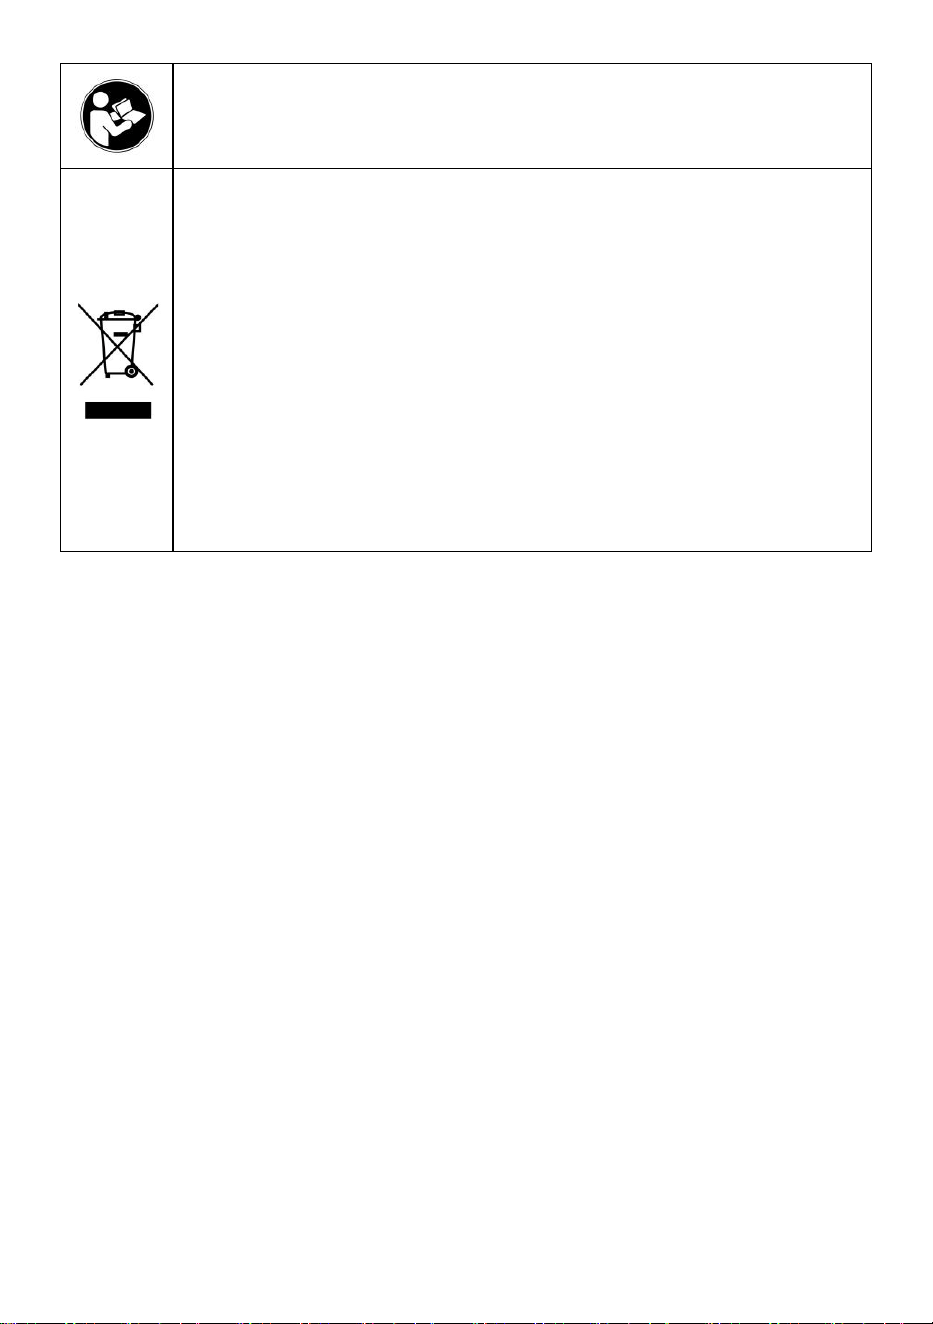
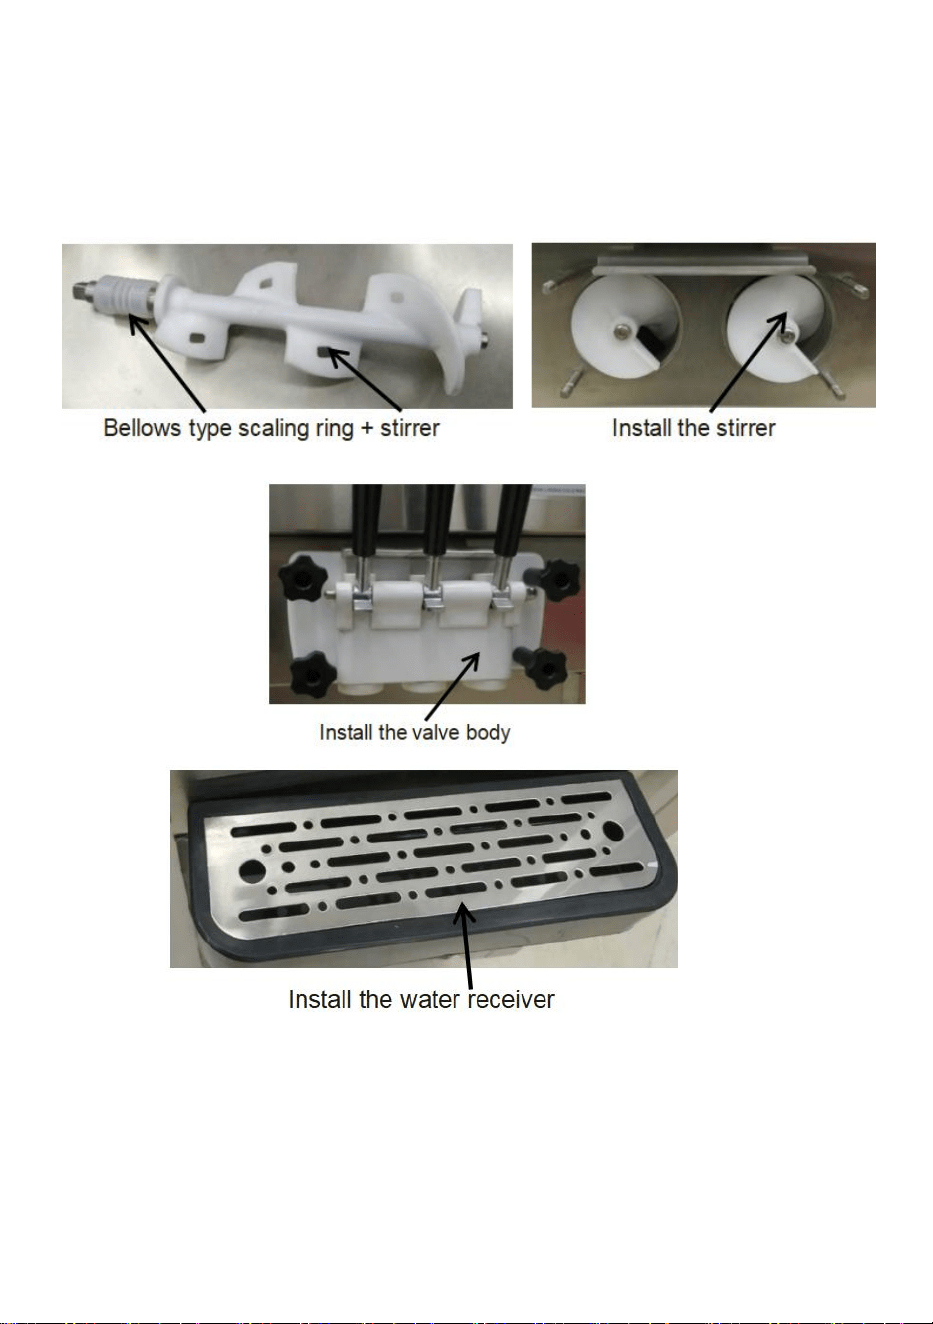
4) Install the stirrer and valve body to the device (Fig. A & B).
Note: Do not forget to install the scaling ring
Fig. A
Fig. B
- 6 -
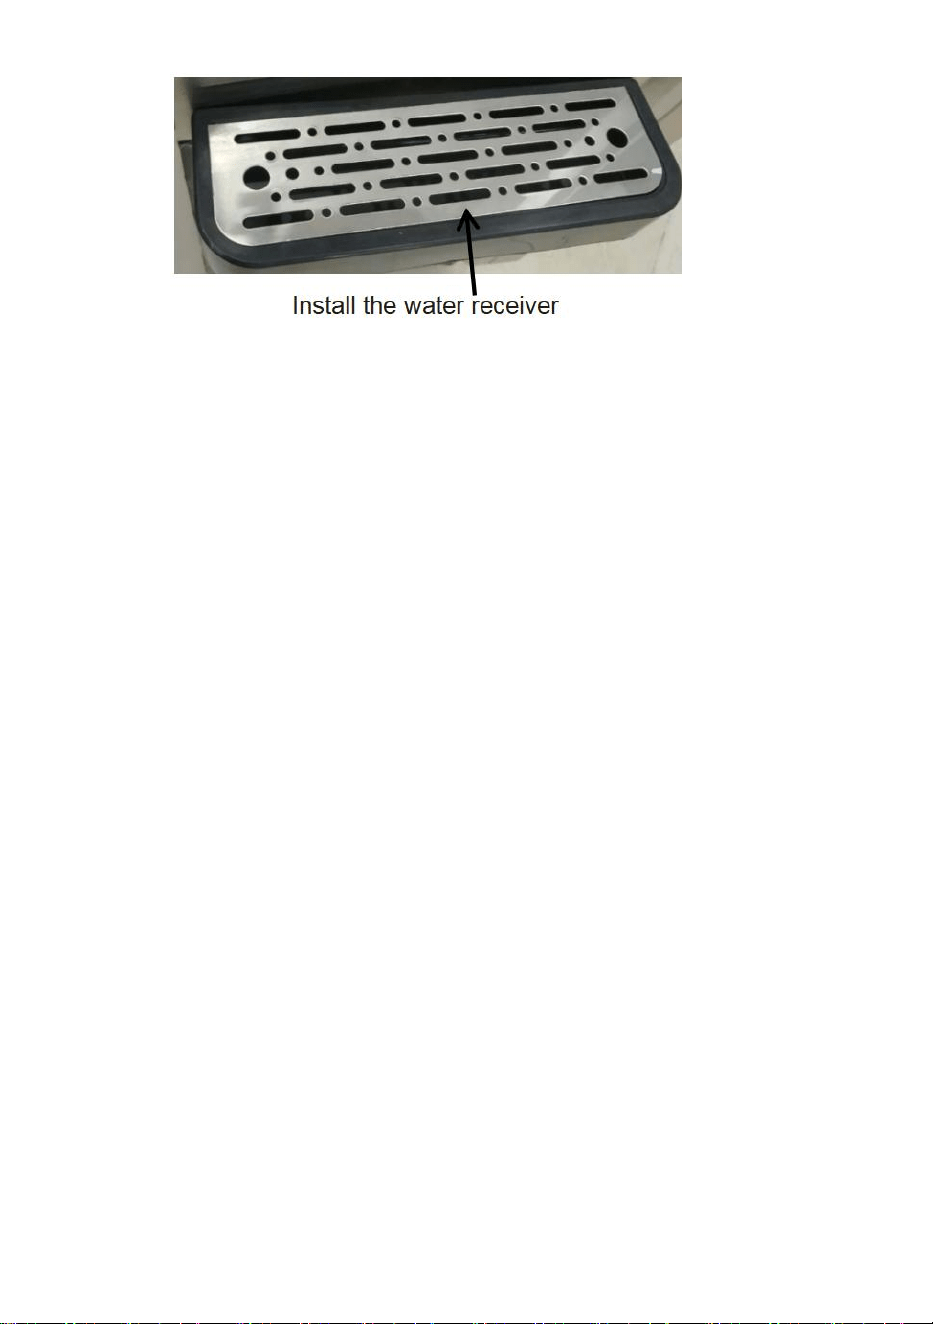
Fig. C
5) Install the water receiver as shown in (Fig. C).
6) Check the nameplate affixed to the rear panel of the device and ensure
that the voltage specified on the device matches the local supply voltage.
7) Be sure the dispenser is properly grounded. Otherwise, an electric
shock may occur in the event of a malfunction or electric leakage.(For
some models ,the grounding line is the yellow-and-green line at the
bottom)
8) Never damage, break, twist or stretch the soft power cord.
4. Operating Environment
1) The minimum operating temperature is 10 ℃ , and the maximum
operating temperature is 35℃. Never use the device in moist environment
or places exposed to rain. Do not use in places exposed to much sulfuric
acid or salt, such as hot springs areas, or gulf areas.
2) The minimum slurry temperature is 5℃ and the highest is 40 ℃; low
temperature storage is preferred to improve the production efficiency of ice
cream.
3) Please put on a level and firm surface in a well-ventilated place.
4) A clearance of at least 80cm behind the Ice-cream Dispenser, and a
clearance of no less than 30cm on both sides shall be ensured, for in-flow
of cold air and discharging of hot air to facilitate the device's condensation
cycle;regular cleaning of the dust on the condenser is suggested.
Note: The device will inevitably be oscillated during transportation,so it is
suggested to place stably for 4 hours prior to initial use.

- 7 -
5. Power Connection
All the internal wires have been fully connected before delivery of our
Bingzhile Ice-cream Dispensers. The only thing for users to do is to select
proper wires according to the required power and connect with the power
cord at the bottom rear-end of the device, in addition to proper grounding.
Note: All external wiring,plugs and sockets shall comply with the
requirements of national standards
6. Power Voltage Requirements
The deviation of the rated voltage of the incoming power supply shall not
be too high or too low. If so, the indicator (red) will flash and an alarm
(buzzing) will be given, resulting in failure of the refrigerating function.
7. Refrigerating Conditions
a. Refrigeration is not allowed when the stirring shaft is in the empty
cylinder.
b. Refrigeration is not allowed when there is water in the cylinder.
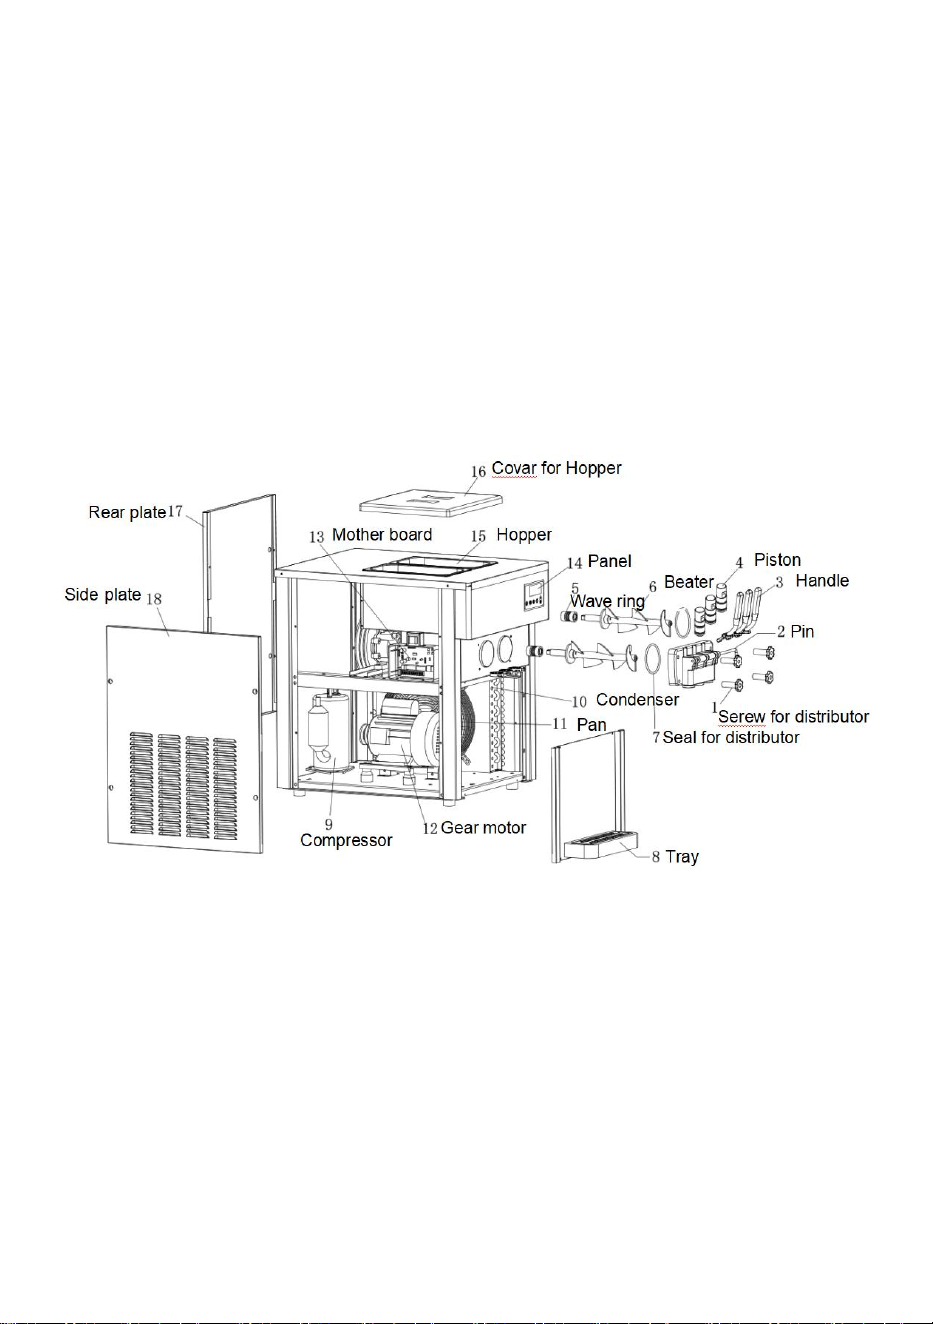
II . Product Structure Diagram

- 8 -
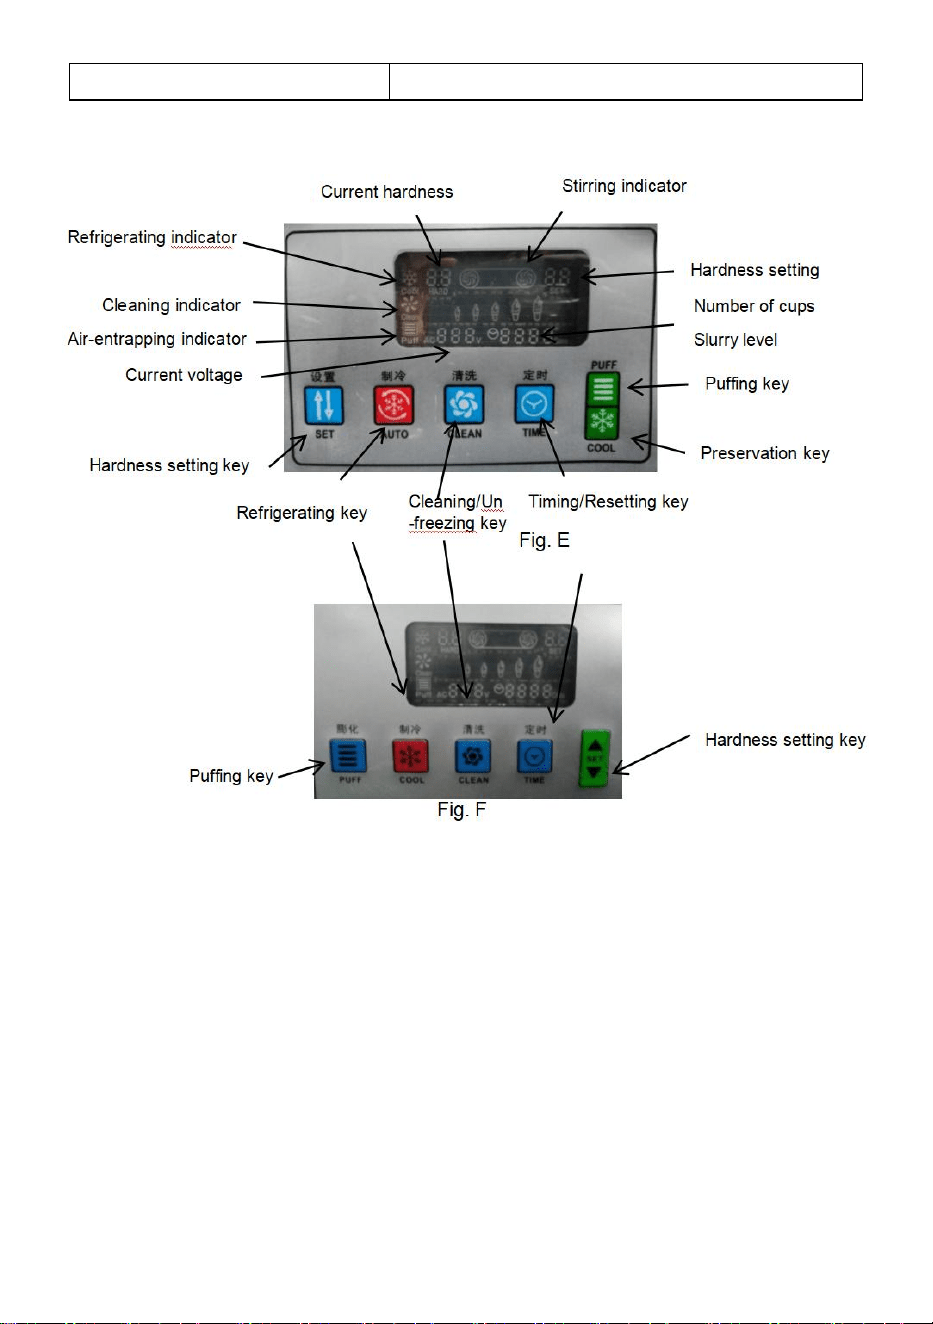
III. Operation Panel & Functions
The operation panel is divided into a key fluorescent screen and an LCD
screen (select the corresponding operation)
Operate as shown in Fig. D, E, and F
1) Cleaning/Unfreezing key:
In standby mode, press the key to trigger cleaning mode. As the cleaning
indicator lights on with a buzzing sound, the stirring motor starts running,
and the LCD screen displays the current value of the stirring motor. Press
this key again to enter the standby mode.
Hold down the key for 5 seconds to launch the unfreezing function with the
cleaning icon flashing, followed by pressing the key again to close the
unfreezing function.(Only applicable for models with this function)
2) Refrigerating key:
In standby mode, press the refrigerating key to trigger refrigerating mode.
As the refrigerating indicator lights on with a buzzing sound, the stirring
motor, compressor, and fan motor start running,and the LCD screen
displays the current value of the stirring motor. Press this key again to
enter the standby mode.
3) Puffing key;
If you press the "puffing" key with the air pump indicator lighting on in
standby mode, the air pump will be disabled; If you press the puffing key in
cleaning or refrigerating mode, the pump indicator will flash to indicate the
air pump is enabled. (Only applicable for models with this function)
4) Hardness setting key:
Hold down “△” or “ ”for I second to trigger hardness parameter setting
mode, followed by pressing the key again to change the hardness value.
The greater the hardness value is, the harder the ice cream will be, and
vice versa.
5) Preservation key:
In standby state, press the "preservation" key,and the preservation
indicator lights on with a buzzing sound.Delay start occurs to the stirring
motor, compressor, and fan motor, and the current value of the stirring
- 9 -
motor is shown on the LCD screen. Press this key again to enter the
standby mode. (Only applicable for models with this function)
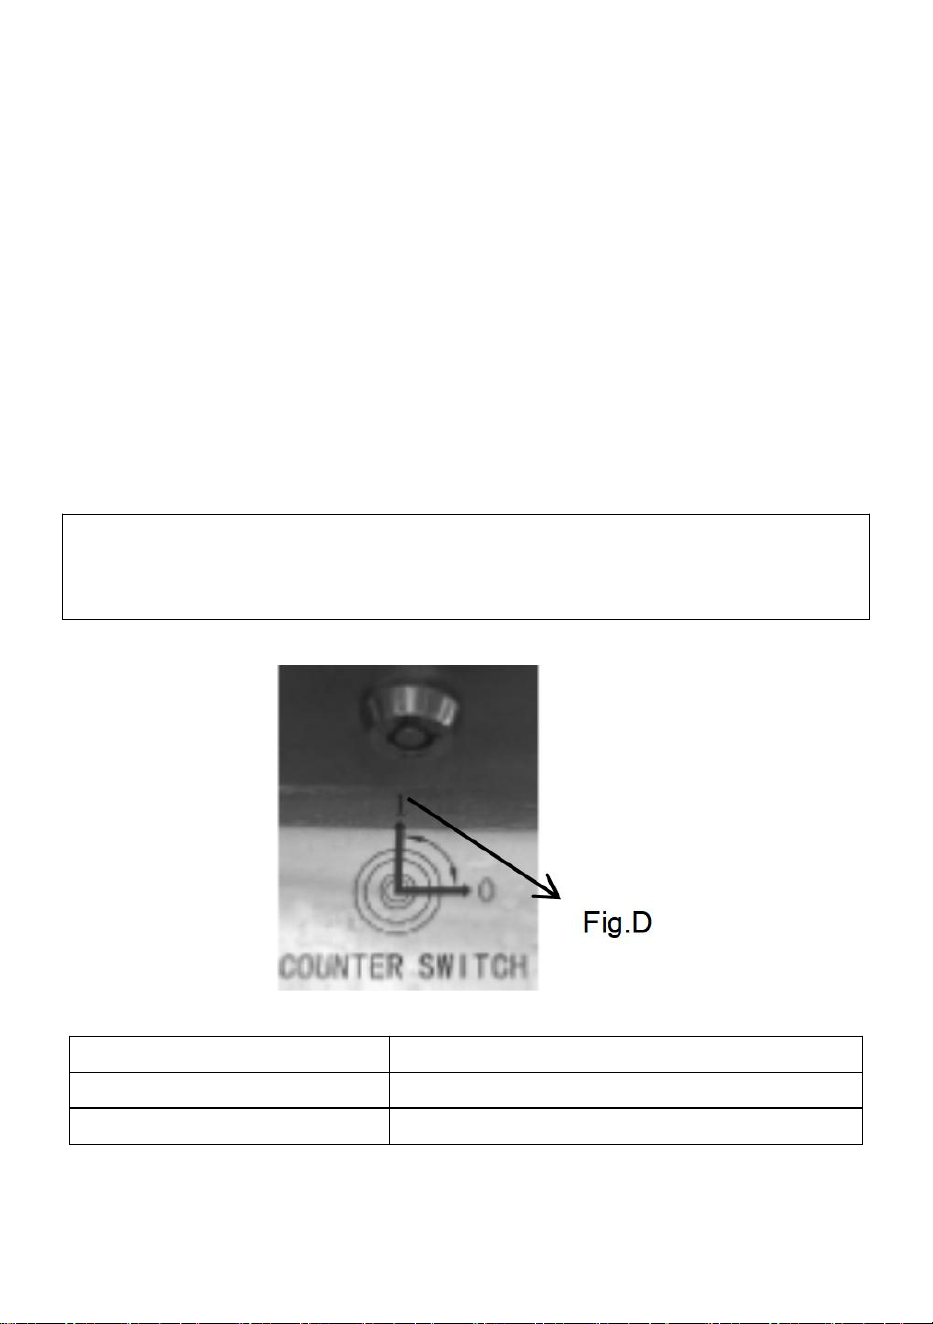
6) Timing/Resetting key
In standby mode, press this key to trigger timer resetting mode. Press this
key again to change the timer resetting value.
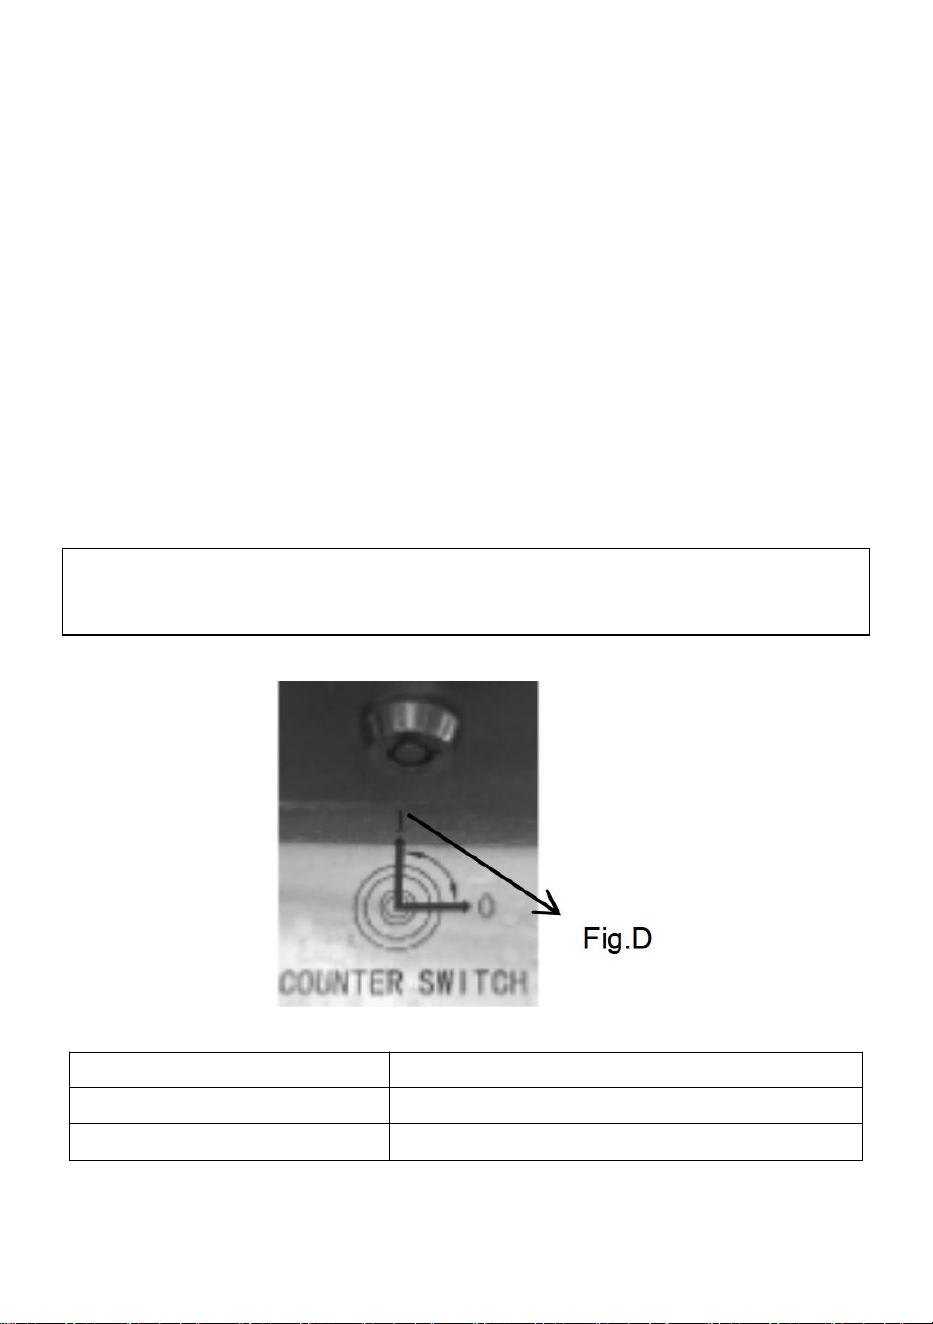
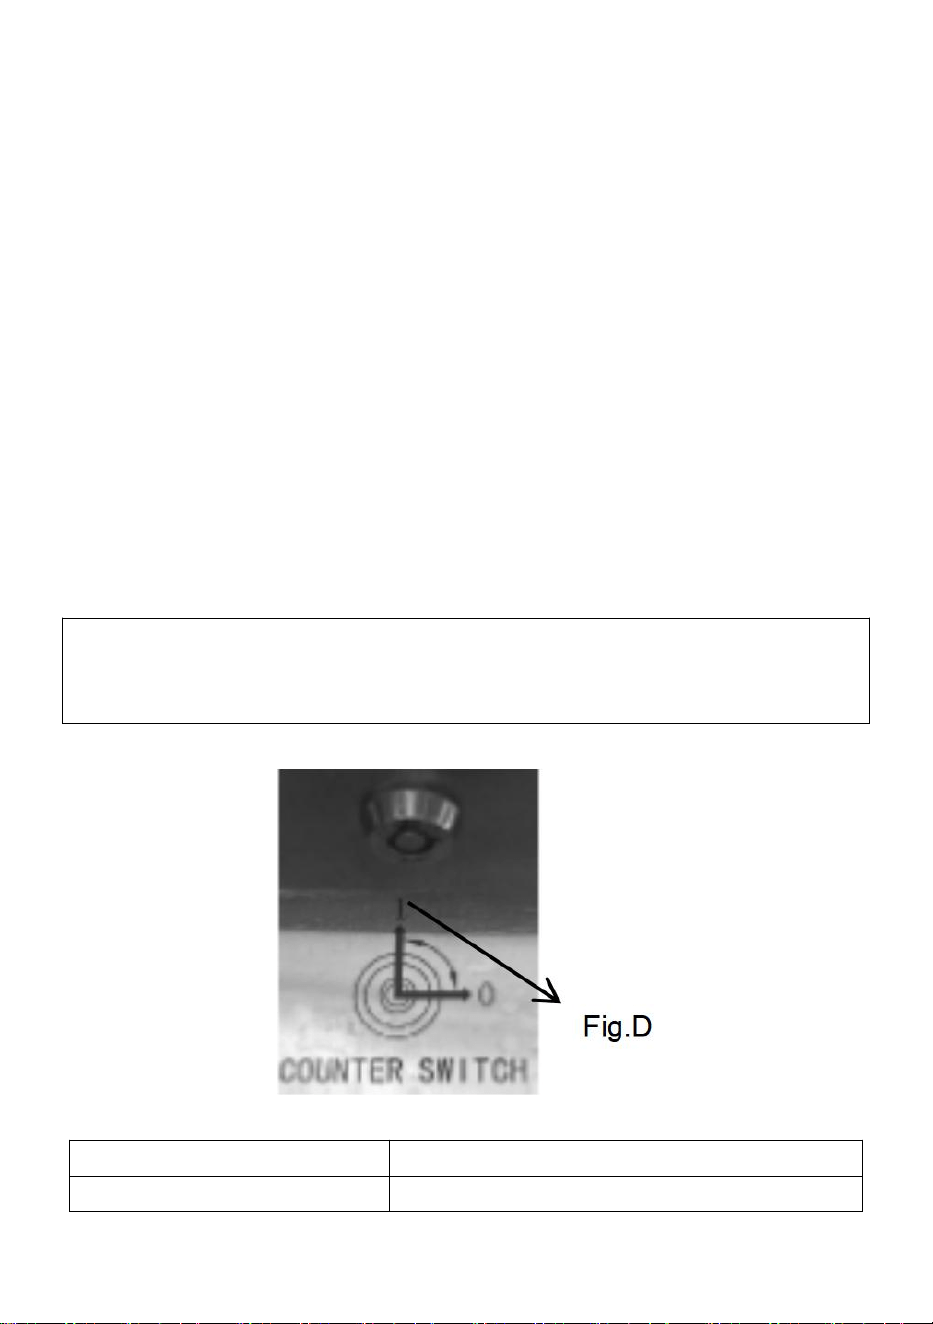
Hold down this key for 10 seconds to reset the number of cups. (Resetting
switch for some models are shown as Fig. D)
7) The number of ice creams display:
Every cup of ice cream discharged will be automatically recorded.
Slurry level/shortage display (Only applicable for models with this function):
When the device is short of slurry, the code of shortage will be displayed in
the cup-number display area and the buzzer will give an alarm
intermittently.
Insert the resetting key into the switch at the bottom of the display panel
and turn it clockwise 90° to reset the ice cream record.
CLI
Slurry shortage in left cylinder
CL2
Slurry shortage in right cylinder
CL3
Slurry shortage in both eylinders

- 10 -
IV. How to Make Ice Cream
1) Leave the prepared ice cream slurry standing for 15 minutes before
pouring it into both cylinders at the top of Ice-cream Dispenser; Note: The
slurry shall not cake.
2) Power on the Ice-cream Dispenser to enter the standby mode, then
press the "cleaning key" to let the device run for 3-5 minutes. After that,
hold down the handle to discharge 2-3 cups of slurry and pour them into
the upper cylinder again to prevent the water from icing at the discharging
outlet, which may affect the production of ice cream; Note: The slurry shall
be prepared in accordance with the mixing ratio specified in the Manual of
ice-cream powder.
3) Press the "refrigerating" key to trigger the refrigerating mode; Hold
down"△" or " " key for 1 second to adjust the hardness of the ice

- 11 -
cream as required.
Note: In the previous cleaning mode, you are required to keep an eye on
the "current hardness" value displayed on the screen. If the "current
hardness" displayed is 2.2, the hardness of ice cream shall be set between
3.5-5.0; if the "current hardness" is 3.5, the hardness of ice cream shall be
set between 4.5-6.5.
4)When the hardness of the ice cream reaches the set value, the device
will automatically pause; The intermittence between pauses may be varied
from 3 to 9minutes. At this moment, time adjustment key can be pressed to
set the time for the machine to enter the next refrigeration cycle. The time
will be increased by one minute for each pressing, until 9 minutes. And the
value will return to 3 minute if pressing again.
Note: When in hot weather, a shorter pause interval is preferred;when in
cold weather, a longer pause interval is preferred.
Place a cone or a cup under the outlet of discharging valve and hold down
the discharging handle to squeeze out ice cream. Release the handle to
close.
V. Cleaning & Maintenance
1. Cleaning of refrigerating cylinder
To ensure the health of ice-cream consumers and extend the service life of
the Dispenser, the refrigerating cylinder must be cleaned and disinfected
after every use.
1) Press the cleaning key to discharge all the slurry in the cylinder, and
press it again and pause for a while.
2) Add lukewarm water mixed with an appropriate amount of liquid
antiseptic into the cylinders to fill both cylinders with approximately the
same amount of water.
3) Press the cleaning key again to stir for about 5 minutes before
discharging the cleaning fluid.
4) Use lukewarm water instead to rinse the machine for 2—3 times. Pause
for a while.

- 12 -
5) Power off,disassemble and wash the parts:
Loosen the four screws on the outlet valve and disassemble the outlet
valve unit.
Take out handle fastening pin, handle, valve rod, seal ring from the outlet
valve in tuns.
Take out the stirrer from the refrigerating cylinder.
Clean all the disassembled parts. Replace the damaged part with new one.
Re-assemble the parts in reversed order.
2. Cleaning of the dispenser body
What consumers need is a fine-looking. clean and sanitary device. Please
keep the body clean. A warm towel can be used to wipe the machine body
and remove stains. Never rinse directly with water to prevent the device
from malfunctioning.
3. Cleaning of condenser
The condenser will be covered with dust after operating for a period of time,
resulting in poor heat dissipation and refrigeration, so it must be cleaned
every two months. It is best to ask a professional cleaning worker to clean
it. Before cleaning, be sure to cut
off the power and not to damage the condenser fins.
4. Adjustment of the belt
After operating for a period of time, the drive belt of the stirring system may
be lengthened and loosened, which shall be adjusted in time, preferably by
a professional technician. The dispenser must be cut off from power supply
before being adjusted. If you still feel that the belt is too loose,you shall
replace with a belt of the same type.
VI. Troubleshooting Analysis & Solution
S/N
Problems
Causes
Solutions

- 13 -
1
The
dispenser
fails to start
1.The power cord is not
properly connected
1. Check the power
cord and re-connect it
2. The null linc is not
connected
2. Check the null line
and make sure it's
properly connected
3. The function switch is
not turned on
3. Turn on the
function switch
4. Problems with function
switch plug and conncction
4. Check the plug
and wire connection
5. Problems with the PCB
5. Replace the PCB
2
Cleaning
function
fails to work
1. Loose connection
1. Reconnect
2. The motor or capacitor
is broken
2. Repair or replace
the motor or capacitor
3. The contactor is broken
3. Replace the
contactor
3
The
compressor
fails to
opcrate
1. Low voltage
1. Check the supply
voltage
2. The contactor is broken
2. Replace the
contactor
3. Problems with the PCB
3. Replace the PCB
4. The capacitor
malfunctions(220V series)
4. Replace the
capacitor
5. The compressor is
broke
5. Replace the
compressor
4
The
compressor
fails to work
1. Loose connection of
function switch
1. Reconnect the
function switch wire
2. Problems with the PCB
2. Replace the PCB

- 14 -
5
The
dispenser
fails to
refrigeratc
1. Refrigerant lcakage
1. Repair the leakage
and vacuumize it to
replenish the
refrigerant
2. Condenser blockage
2. Clean the
condenser
3. The fan fails to operate
3. Repair or replace
the fan
6
The belt
slips
1. The belt is too loose
1. Adjust the belt or
replace the belt
2. Problems with the
reducer
2. Repair or replace
reducer
3. Frozen cylinder, stirring
shaft crack
3. Replace the stirring
shaft
S/N
Problems
Causes
Solutions
7
Fail to make ice
cream
1. No slurry in the
cylinder
1. Add slurry to the
cylinder
2. The puffing
discharging pipe for
slurry is blocked
2. Remove the
discharging pipe and
clean it
3. Improper slurry
ratio, too thick
3. Prepare new
qualified slurry
4. The travel switch of
the panel is broken or
disconnected
4. Reconnect the line
or replace the travel
switch
5. The belt is too
loose and slips
5.Adjust the belt or
replace the belt
6. Problems with the
reducer
6. Repair or replace
reducer

- 15 -
8
Poor puffing
effect
1. The puffing pipe is
not inserted
1. Rcinsert puffing
pipe
2.The puffing switch is
not turned on
2. Turn on the puffing
switch
9
Ice cream is too
soft
1. The slurry ratio is
wrong
1. Prepare new
qualified slurry
2. Improper hardness
setting
2. Set the hardness
value again
3. Motor current is too
large and there is a
short circuit
3. Repair or replace
the motor
10
Ice cream is too
hard
1. Too much water is
added in the slurry
1. Prepare new
qualified slurry
2. Improper hardness
setting
2. Set the hardness
value again
11
Slurry Leakage
1. Outlet valve leaks
1. Replace the seal
ring of the outlet valve
2. The valve rod leaks
2. Replace the valve
rod
3. Slurry Icakage
3. Replace the seal
ring of the outlet valve
4. The seal ring of the
stirring shaft is broken
4.Replace the seal
ring
12
LCD screen fails
to display
1. Problems with the
PCB
1. Replace the PCB
2.The plug is loose
2. Check the
connection plug
13
Word missing in
the LCD
1. The LCD monitor is
damaged
1. Replace the
monitor
- 16 -
14
The compressor
stops after the
ice cream is
formed, but the
motor does not
stop
1. The travel switch
contact is connected
1. Repair or replace
the travel switch
15
When making ice
cream, the motor
does not operate
and no cream
comes out
1. The travel switch is
damaged
1. Repair or
replace the
travel switch
16
Stirring shaft
cracks
It will not happen under
normal circumstances. The
abnormal situation is as
follows:
Rcplace the
stirring shaft
1. There are too much water
in the slurry,cylinder frozen
2. Press the refrigerating key
by mistake when cleaning,
resulting in
refrigeration with water
3. Refrigeration with one
cylinder filled and the other
empty
4. Refrigeration with no slurry
5. Abuse of one cylinder when
making ice cream
6. Hot slurry is poured into the
cylinder for rapid refrigeration
7. Refrigerating of slurry with
the motor reversely
connected
- 17 -
VII.Accessories
1. An intenal hexagonal wrench
2. A set of scal rings
3. A Uscr's manual
4. A warranty card
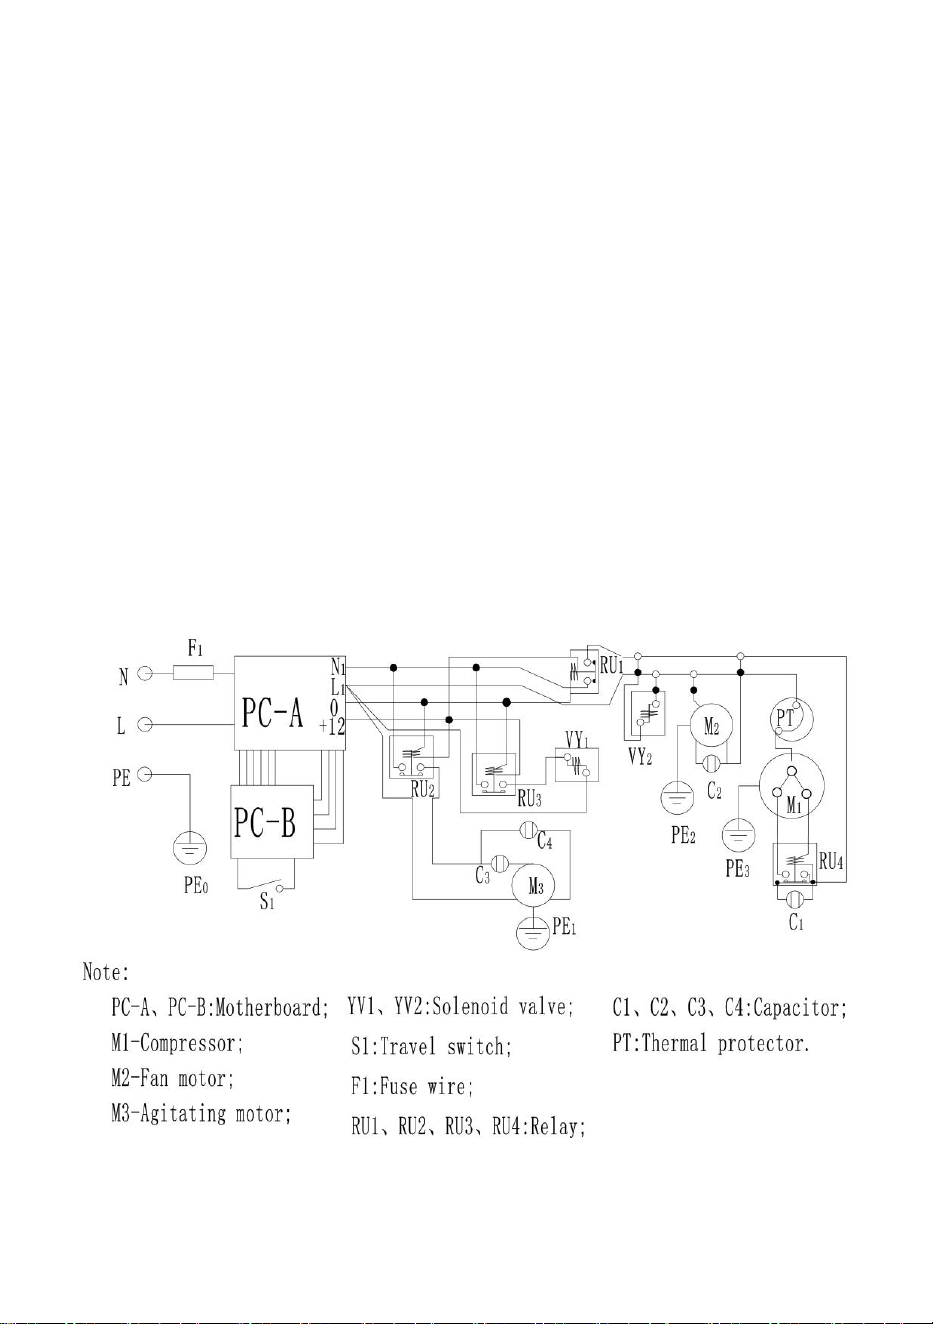
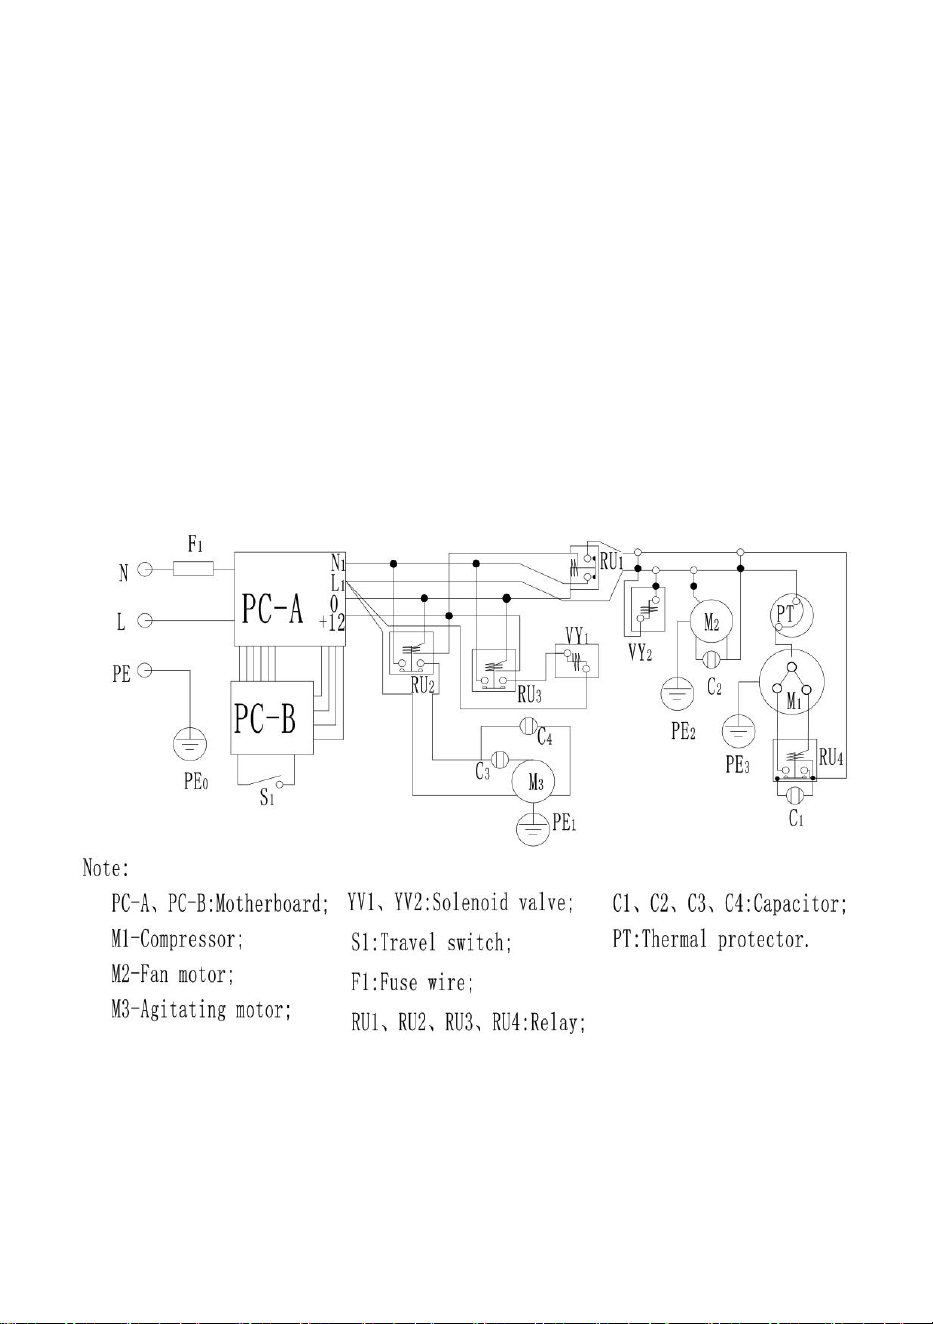
Technical Parameters:
Please refer to the nameplate for specific technical parameters and
refrigerant performance.
Circuit Diagram of Ice Cream Maker

- 18 -
Made In China


- 20 -
Technique Assistance et certificat de garantie électronique
www.vevor.com/support
MACHINE À GLACE
MODÈLE : BQL-7200T
We continue to be committed to provide you tools with competitive price.
"Save Half", "Half Price" or any other similar expressions used by us only represents an
estimate of savings you might benefit from buying certain tools with us compared to the major
top brands and doses not necessarily mean to cover all categories of tools offered by us. You
are kindly reminded to verify carefully when you are placing an order with us if you are
actually saving half in comparison with the top major brands.

- 21 -

- 1 -
MODÈLE : BQL-7200T
Have product questions? Need technical support? Please feel free to
contact us:
Technical Support and E-Warranty Certificate
www.vevor.com/support
NEED HELP? CONTACT US!
This is the original instruction, please read all manual instructions
carefully before operating. VEVOR reserves a clear interpretation of our
user manual. The appearance of the product shall be subject to the
product you received. Please forgive us that we won't inform you again if
there are any technology or software updates on our product.
ICE CREAM MACHINE
- 2 -
Avertissement - Pour réduire le risque de blessure,
l'utilisateur doit lire attentivement le manuel d'instructions.
ÉLIMINATION CORRECTE
Ce produit est soumis aux dispositions de la directive
européenne 2012/19/CE. Le symbole représentant une
poubelle barrée indique que le produit nécessite une collecte
sélective des déchets dans l'Union européenne. Ceci
s'applique au produit et à tous les accessoires marqués de ce
symbole. Les produits marqués comme tels ne peuvent pas
être jetés avec les ordures ménagères normales, mais doivent
être déposés dans un point de collecte pour le recyclage des
appareils électriques et électroniques.
Table des matières
I. Précautions de sécurité -------------------------------------------------------------
- - - - - - - - - - - - - - - - - - - - - - 2
II. Diagramme de structure du produit --------- --------------------------------------
- - - - - - - - - 7
I I I . P a n n e a u d e c o m m a n d e e t f o n c t i o n s - - - - - - - - -
- - - - - - - - - - - - - - - - - - - - - - - - - - - - - - - - - - - - - - - - - - - - - - - - - - - - - - - - - - 8
I V. C o m m e n t f a i r e d e l a c r è m e g l a c é e - - - - - - - - - - - - - - - - - - -
- - - - - - - - - - - - - - - - - - - - - - - - - - - - - - - - - - - - - - - - - - - d i x
V. Nettoyage et entretien------ --------------------------------------- ---------11
VI. Dépannage et solutions ------- --------------------------------------------- ----12
VII . Ac cessoi res ------- --- --------------- -- ----- -------- -------- -
- - - - - - - - - - - - - - - - - - - - - - 1 7
II. Précautions de sécurité
·Avant d'utiliser l'appareil, veuillez lire ce manuel d'utilisation pour vous

- 3 -
assurer que vous en tirez le maximum d'avantages.
3. AVERTISSEMENT:
1. Cet appareil n'est pas destiné à être utilisé par des personnes (y
compris des enfants) ayant des capacités physiques, sensorielles ou
mentales réduites, ou un manque d'expérience et de connaissances, à
moins qu'elles n'aient reçu une supervision ou des instructions concernant
l'utilisation de l'appareil par une personne responsable de leur sécurité.
2. Les enfants doivent être surveillés pour s'assurer qu'ils ne jouent pas
avec l'appareil.
3. Cet appareil peut être utilisé par des enfants âgés de 8 ans et plus et
des personnes ayant des capacités physiques, sensorielles ou mentales
réduites ou un manque d'expérience et de connaissances s'ils ont reçu
une supervision ou des instructions concernant l'utilisation de l'appareil en
toute sécurité et comprennent les dangers encourus. Les enfants ne
doivent pas jouer avec l'appareil. Le nettoyage et l'entretien par l'utilisateur
ne doivent pas être effectués par des enfants sans surveillance.
4. Si le cordon d'alimentation est endommagé, il doit être remplacé par le
fabricant, son agent de service ou des personnes de qualification similaire
afin d'éviter tout danger.
5. Pour éviter tout danger dû à l'instabilité de l'appareil, celui-ci doit être
fixé conformément aux instructions.
6. Lors du positionnement de l'appareil, assurez-vous que le cordon
d'alimentation n'est pas coincé ou endommagé.
7. Ne placez pas plusieurs prises de courant portables ou blocs
d'alimentation portables à l'arrière de l'appareil.
8. Gardez les ouvertures de ventilation, dans l'enceinte de l'appareil ou
dans la structure intégrée, dégagées de toute obstruction.
9. N'endommagez pas le circuit réfrigérant.
10. Ne stockez pas de substances explosives telles que des bombes
aérosol contenant un propulseur inflammable dans cet appareil.
11. Les enfants âgés de 3 à 8 ans sont autorisés à charger et décharger
les appareils frigorifiques.

- 4 -
·Remarque : Cet appareil contient du réfrigérant inflammable R290 et un
agent moussant cyclopentane.
Veuillez éviter tout contact avec le feu lorsque vous le transportez et
l'utilisez.
Veuillez demander un entretien à un professionnel en cas de panne de la
machine. Veuillez l'envoyer à votre station d'élimination désignée locale
lorsque vous le jetez.
Lors de l'utilisation, de l'entretien et de la mise au rebut de l'appareil,
veuillez faire attention au symbole similaire au côté
gauche, situé à l'arrière de l'appareil (panneau arrière ou
compresseur) et de couleur jaune ou orange. C'est un
symbole d'avertissement de risque d'incendie. Il y a des
matériaux inflammables dans les tuyaux de réfrigérant et le
compresseur. Veuillez vous éloigner de la source d'incendie pendant
l'utilisation, l'entretien et l'élimination.
4. Informations FCC
ATTENTION : Les changements ou modifications non expressément
approuvés par la partie responsable de la conformité pourraient annuler le
droit de l'utilisateur à utiliser l'équipement !
Cet appareil est conforme à la partie 15 des règles FCC. L’exploitation est
soumise aux deux conditions suivantes :
1) Ce produit peut provoquer des interférences nuisibles.
2) Ce produit doit accepter toute interférence reçue, y compris les
interférences susceptibles de provoquer un fonctionnement indésirable.
AVERTISSEMENT : les changements ou modifications apportés à ce
produit non expressément approuvés par la partie responsable de la
conformité pourraient annuler l'autorité de l'utilisateur à utiliser le produit.
Remarque : Ce produit a été testé et déclaré conforme aux limites d'un
appareil numérique de classe B conformément à la partie 15 des règles de
la FCC. Ces limites sont conçues pour fournir une protection raisonnable
contre les interférences nuisibles dans une installation résidentielle.

- 5 -
Ce produit génère, utilise et peut émettre de l'énergie radiofréquence et,
s'il n'est pas installé et utilisé conformément aux instructions, il peut
provoquer des interférences nuisibles aux communications radio.
Cependant, rien ne garantit que des interférences ne se produiront pas
dans une installation particulière. Si ce produit provoque des interférences
nuisibles à la réception radio ou télé, ce qui peut être déterminé en
éteignant et rallumant le produit, l'utilisateur est encouragé à essayer de
corriger les interférences en prenant une ou plusieurs des mesures
suivantes.
· Réorientez ou déplacez l'antenne de réception.
· Augmentez la distance entre le produit et le récepteur.
· Connectez le produit à une prise sur un circuit différent de celui auquel le
récepteur est connecté.
· Consultez le revendeur ou un technicien radio/TV expérimenté pour
obtenir de l'aide.
3 . Déballage et inspection
1) Couper et détacher les sangles et planches fixant le carton ; retirez le
carton, les panneaux de mousse et les sacs d'emballage pour voir si
l'apparence de l'appareil est endommagée. (Remarque : l'appareil ne doit
pas être incliné de plus de 45° pendant le transport.)
2) Ouvrez le couvercle du cylindre et vérifiez si tous les accessoires
contenus dans la liste de colisage sont disponibles.
3) Retirez les panneaux supérieur et inférieur à l'arrière de l'appareil pour
vérifier si les moteurs internes, les courroies, les compresseurs et autres
composants sont desserrés en raison du transport. Si des anomalies sont
détectées, contactez le fournisseur à temps pour résoudre le problème.
(Remarque : lors de l'installation ou du retrait de chaque panneau, insérez
une clé hexagonale interne ou un tournevis cruciforme dans la rainure de
vis sur le panneau, puis appuyez légèrement et tournez pour desserrer ou
fixer.)
4) Installez l'agitateur et le corps de vanne sur l'appareil (Fig. A et B).
Remarque : N'oubliez pas d'installer la bague de mise à l'échelle

- 6 -
Figure A
Figure B
Figure C
5) Installez le réservoir d'eau comme indiqué sur (Fig. C).
6) Vérifiez la plaque signalétique apposée sur le panneau arrière de
l'appareil et assurez-vous que la tension spécifiée sur l'appareil
correspond à la tension d'alimentation locale.
7) Assurez-vous que le distributeur est correctement mis à la terre. Sinon,
un choc électrique peut survenir en cas de dysfonctionnement ou de fuite
électrique. (Pour certains modèles, la ligne de mise à la terre est la ligne
jaune et verte en bas)
8) N’endommagez, ne cassez, ne tordez ou n’étirez jamais le cordon
d’alimentation souple.

- 7 -
4 . Environnement d'exploitation
1) La température de fonctionnement minimale est de 10 ℃ et la
température de fonctionnement maximale est de 35 ℃. N'utilisez jamais
l'appareil dans un environnement humide ou dans des endroits exposés à
pluie. Ne pas utiliser dans des endroits exposés à beaucoup d'acide
sulfurique ou de sel, tels que les zones de sources chaudes ou les zones
de golfe.
2) La température minimale de la boue est de 5 ℃ et la plus élevée est de
40 ℃ ; le stockage à basse température est préféré pour améliorer
l'efficacité de la production de crème glacée.
3) Veuillez le poser sur une surface plane et ferme dans un endroit bien
ventilé.
4) Un espace libre d'au moins 80 cm derrière le distributeur de glace et un
espace libre d'au moins 30 cm des deux côtés doivent être assurés pour
l'entrée d'air froid et l'évacuation de l'air chaud afin de faciliter le cycle de
condensation de l'appareil ; régulier un nettoyage de la poussière sur le
condenseur est suggéré.
Remarque : l'appareil oscillera inévitablement pendant le transport, il est
donc suggéré de le placer de manière stable pendant 4 heures avant la
première utilisation.
5 . Connexion électrique
Tous les fils internes ont été entièrement connectés avant la livraison de
nos distributeurs de glace Bingzhile. La seule chose que les utilisateurs
doivent faire est de sélectionner les fils appropriés en fonction de la
puissance requise et de les connecter au cordon d'alimentation situé en
bas à l'arrière de l'appareil, en plus d'une mise à la terre appropriée.
Remarque : Tous les câbles externes, fiches et prises doivent être
conformes aux exigences des normes nationales.
6 . Exigences de tension d'alimentation
L'écart de la tension nominale de l'alimentation entrante ne doit être ni trop
- 8 -
élevé ni trop faible. Si tel est le cas, l'indicateur (rouge) clignotera et une
alarme (bourdonnement) sera émise, entraînant une défaillance de la
fonction de réfrigération.
7 . Conditions de réfrigération
un. La réfrigération n'est pas autorisée lorsque l'arbre d'agitation se trouve
dans le cylindre vide.
b. La réfrigération n'est pas autorisée lorsqu'il y a de l'eau dans le cylindre.
II. Diagramme de structure du produit
III. Panneau de commande et fonctions
Le panneau de commande est divisé en un écran fluorescent à touches et
un écran LCD (sélectionnez l'opération correspondante)
Fonctionner comme indiqué sur les figures D, E et F
1) Touche Nettoyage/Dégel :
En mode veille, appuyez sur la touche pour déclencher le mode nettoyage.
Lorsque l'indicateur de nettoyage s'allume avec un bourdonnement, le
moteur d'agitation commence à fonctionner et l'écran LCD affiche la valeur

- 9 -
actuelle du moteur d'agitation. Appuyez à nouveau sur cette touche pour
passer en mode veille.
Maintenez la touche enfoncée pendant 5 secondes pour lancer la fonction
de dégel avec l'icône de nettoyage clignotant, puis appuyez à nouveau sur
la touche pour fermer la fonction de dégel. (Uniquement applicable pour
les modèles dotés de cette fonction)
2) Touche réfrigération :
En mode veille, appuyez sur la touche réfrigération pour déclencher le
mode réfrigération. Lorsque le voyant de réfrigération s'allume avec un
bourdonnement, le moteur d'agitation, le compresseur et le moteur du
ventilateur commencent à fonctionner et l'écran LCD affiche la valeur
actuelle du moteur d'agitation. Appuyez à nouveau sur cette touche pour
passer en mode veille.
3) Touche soufflante ;
Si vous appuyez sur la touche « gonflage » avec le voyant de la pompe à
air allumé en mode veille, la pompe à air sera désactivée ; Si vous
appuyez sur la touche de soufflage en mode nettoyage ou réfrigération,
l'indicateur de la pompe clignote pour indiquer que la pompe à air est
activée. (Uniquement applicable aux modèles dotés de cette fonction)
4) Touche de réglage de la dureté :
Maintenez enfoncé « △ » ou « » pendant une seconde pour déclencher le
mode de réglage des paramètres de dureté, puis appuyez à nouveau sur
la touche pour modifier la valeur de dureté. Plus la valeur de dureté est
élevée, plus la glace sera dure et vice versa.
5) Clé de conservation :
En état de veille, appuyez sur la touche « préservation » et l'indicateur de
conservation s'allume avec un bourdonnement. Le démarrage différé se
produit sur le moteur d'agitation, le compresseur et le moteur du ventilateur,
et la valeur actuelle du moteur d'agitation est affichée sur l'écran LCD. .
Appuyez à nouveau sur cette touche pour passer en mode veille.
(Uniquement applicable aux modèles dotés de cette fonction)
6) Clé de synchronisation/réinitialisation
En mode veille, appuyez sur cette touche pour déclencher le mode de
- 10 -
réinitialisation de la minuterie. Appuyez à nouveau sur cette touche pour
modifier la valeur de réinitialisation de la minuterie.
Maintenez cette touche enfoncée pendant 10 secondes pour réinitialiser le
nombre de tasses. (Le commutateur de réinitialisation pour certains
modèles est illustré comme Fig. D)
7) Affichage du nombre de glaces :
Chaque tasse de glace déchargée sera automatiquement enregistrée.
Affichage du niveau de lisier/manque (uniquement applicable aux modèles
dotés de cette fonction) :
Lorsque l'appareil manque de lisier, le code de pénurie s'affichera dans la
zone d'affichage du numéro de gobelet et le buzzer déclenchera une
alarme par intermittence.
Insérez la clé de réinitialisation dans l'interrupteur en bas du panneau
d’affichage et tournez-le dans le sens des aiguilles d'une montre à 90°
pour réinitialiser le record de glace.
CLI
Manque de lisier dans le cylindre gauche
NC2
Manque de lisier dans le cylindre droit
NC3
Manque de lisier dans les deux cylindres

- 11 -
IV. Comment faire de la glace
1) Laissez reposer la pâte de glace préparée pendant 15 minutes avant de
la verser dans les deux cylindres en haut du distributeur de glace ;
Remarque : La bouillie ne doit pas s'agglutiner.
2) Allumez le distributeur de glace pour passer en mode veille, puis
appuyez sur la « touche de nettoyage » pour laisser l'appareil fonctionner
pendant 3 à 5 minutes. Après cela, maintenez la poignée enfoncée pour
évacuer 2 à 3 tasses de bouillie et versez-les à nouveau dans le cylindre
supérieur pour éviter que l'eau ne gèle à la sortie de décharge, ce qui
pourrait affecter la production de crème glacée ; Remarque : La bouillie
doit être préparée conformément au rapport de mélange spécifié dans le
Manuel de la poudre de crème glacée.
3) Appuyez sur la touche « réfrigération » pour déclencher le mode

- 12 -
réfrigération ; Maintenez enfoncé "△" ou " " pendant 1 seconde pour
régler la dureté de la glace selon vos besoins.
Remarque : Dans le mode de nettoyage précédent, vous devez garder un
œil sur la valeur « dureté actuelle » affichée à l'écran. Si la « dureté
actuelle » affichée est de 2,2, la dureté de la crème glacée doit être réglée
entre 3,5 et 5,0 ; si la « dureté actuelle » est de 3,5, la dureté de la crème
glacée doit être réglée entre 4,5 et 6,5.
4) Lorsque la dureté de la glace atteint la valeur définie, l'appareil se met
automatiquement en pause ; L'intermittence entre les pauses peut varier
de 3 à 9 minutes. À ce moment, la touche de réglage de l'heure peut être
enfoncée pour régler l'heure à laquelle la machine entre dans le prochain
cycle de réfrigération. Le temps sera augmenté d'une minute à chaque
pression, jusqu'à 9 minutes. Et la valeur reviendra à 3 minutes si vous
appuyez à nouveau.
Remarque : par temps chaud, un intervalle de pause plus court est
préférable ; par temps froid, un intervalle de pause plus long est préférable.
Placez un cornet ou une tasse sous la sortie de la valve de décharge et
maintenez la poignée de décharge enfoncée pour faire sortir la crème
glacée. Relâchez la poignée pour fermer.
V. Nettoyage et entretien
1. Nettoyage du cylindre frigorifique
Pour garantir la santé des consommateurs de glaces et prolonger la durée
de vie du distributeur, le cylindre réfrigérant doit être nettoyé et désinfecté
après chaque utilisation.
1) Appuyez sur la touche de nettoyage pour évacuer toute la boue dans le
cylindre, puis appuyez à nouveau dessus et faites une pause pendant un
moment.
2) Ajoutez de l'eau tiède mélangée à une quantité appropriée
d'antiseptique liquide dans les cylindres pour remplir les deux cylindres
avec approximativement la même quantité d'eau.
3) Appuyez à nouveau sur la touche de nettoyage pour remuer pendant

- 13 -
environ 5 minutes avant de évacuer le liquide de nettoyage.
4) Utilisez plutôt de l'eau tiède pour rincer la machine 2 à 3 fois. Faites une
pause un moment.
5) Éteignez, démontez et lavez les pièces :
Desserrez les quatre vis de la vanne de sortie et démontez l'unité de vanne
de sortie.
Retirez la goupille de fixation de la poignée, la poignée, la tige de valve et
la bague d'étanchéité de la valve de sortie dans les bidons.
Sortez l'agitateur du cylindre réfrigérant.
Nettoyez toutes les pièces démontées. Remplacez la pièce endommagée
par une neuve.
Remontez les pièces dans l’ordre inverse.
2. Nettoyage du corps du distributeur
Ce dont les consommateurs ont besoin, c'est d'une belle apparence.
appareil propre et hygiénique. Veuillez garder le corps propre. Une
serviette chaude peut être utilisée pour essuyer le corps de la machine et
éliminer les taches. Ne rincez jamais directement à l’eau pour éviter un
dysfonctionnement de l’appareil.
3. Nettoyage du condenseur
Le condenseur sera recouvert de poussière après un certain temps de
fonctionnement, ce qui entraînera une mauvaise dissipation thermique et
une mauvaise réfrigération, il doit donc être nettoyé tous les deux mois. Il
est préférable de demander à un nettoyeur professionnel de le nettoyer.
Avant le nettoyage, assurez-vous de couper
hors tension et pour ne pas endommager les ailettes du condenseur.
4. Ajustement de la ceinture
Après un certain temps de fonctionnement, la courroie d'entraînement du
système d'agitation peut être allongée et desserrée, qui doit être ajustée à
temps, de préférence par un technicien professionnel. Le distributeur doit
être coupé de l’alimentation électrique avant d’être réglé. Si vous sentez

- 14 -
toujours que la courroie est trop lâche, vous devez la remplacer par une
courroie du même type.
VI. Analyse et solution de dépannage
S/N
Problèmes
Causes
Solutions
1
Le
distributeur
ne démarre
pas
1.Le cordon d’alimentation
n’est pas correctement
connecté
1. Vérifiez le cordon
d'alimentation et
rebranchez-le
2. La connexion nulle n'est
pas connectée
2. Vérifiez la ligne
nulle et assurez-vous
qu'elle est
correctement
connectée
3. L'interrupteur de
fonction n'est pas allumé
3. Allumez
l'interrupteur de
fonction
4. Problèmes avec la fiche
du commutateur de
fonction et connexion
4. Vérifiez la fiche et
la connexion du fil
5. Problèmes avec le PCB
5. Remplacez le PCB
2
La fonction
de nettoyage
ne
fonctionne
pas
1. Connexion lâche
1. Reconnectez-vous
2. Le moteur ou le
condensateur est cassé
2. Réparer ou
remplacer le moteur
ou le condensateur
3. Le contacteur est cassé
3. Remplacez le
contacteur
3
Le
compresseur
ne
fonctionne
1. Basse tension
1. Vérifiez la tension
d'alimentation
2. Le contacteur est cassé
2. Remplacez le
contacteur

- 15 -
pas
3. Problèmes avec le PCB
3. Remplacez le PCB
4. Le condensateur
fonctionne mal (série 220
V)
4. Remplacez le
condensateur
5. Le compresseur est en
panne
5. Remplacez le
compresseur
4
Le
compresseur
ne
fonctionne
pas
1. Connexion lâche du
commutateur de fonction
1. Rebranchez le fil
du commutateur de
fonction
2. Problèmes avec le PCB
2. Remplacez le PCB
5
Le
distributeur
ne parvient
pas à
réfrigérer
1. Réservoir de réfrigérant
1. Réparez la fuite et
passez-la sous vide
pour reconstituer le
réfrigérant
2. Blocage du condenseur
2. Nettoyer le
condenseur
3. Le ventilateur ne
fonctionne pas
3. Réparer ou
remplacer le
ventilateur
6
La ceinture
glisse
1. La ceinture est trop
lâche
1. Ajustez la ceinture
ou remplacez la
ceinture
2. Problèmes avec le
réducteur
2. Réparer ou
remplacer le
réducteur
3. Cylindre gelé, fissure de
l'arbre en remuant
3. Remplacez l'arbre
d'agitation
S/N
Problèmes
Causes
Solutions

- 16 -
7
Impossible de
faire de la glace
crème
1. Pas de boue dans
le cylindre
1. Ajoutez du lisier au
cylindre
2. La décharge
bouffante le tuyau
pour le lisier est
bloqué
2. Retirez le tuyau de
décharge et
nettoyez-le
3. Un rapport de
bouillie inapproprié
également épais
3. Préparer une
nouvelle bouillie
qualifiée
4. L'interrupteur de
déplacement du le
panneau est cassé ou
débranché
4. Rebranchez la
ligne ou remplacez
l'interrupteur de
voyage
5. La ceinture est trop
lâche et glisse
5. Ajustez la courroie
ou remplacez la
ceinture
6. Problèmes avec le
réducteur
6. Réparer ou
remplacer le
réducteur
8
Mauvais effet
gonflé
1. Le tuyau de
soufflage n'est pas
inséré
1. Insérez le tuyau de
soufflage
2. L'interrupteur de
soufflage n'est pas
allumé
2. Allumez
l'interrupteur de
soufflage
9
La glace est trop
molle
1. Le rapport de boue
est erroné
1. Préparer une
nouvelle bouillie
qualifiée
2. Dureté
inappropriée
paramètre
2. Réglez à nouveau
la valeur de dureté

- 17 -
3. Le courant du
moteur est trop
important et il y a un
court-circuit
3. Réparer ou
remplacer le moteur
dix
La glace est trop
dure
1. Trop d’eau est
ajoutée dans la
bouillie
1. Préparer une
nouvelle bouillie
qualifiée
2. Dureté
inappropriée
paramètre
à nouveau la valeur
de dureté
11
Fuite de boue
1. Fuites de la vanne
de sortie
1. Remplacez la
bague d'étanchéité
de la vanne de sortie
2. La tige de valve fuit
2. Remplacez la tige
de valve
3. Gâteau au lisier
3. Remplacez la
bague d'étanchéité
de la vanne de sortie
4. La bague
d'étanchéité de l'arbre
d'agitation est cassé
4. Remplacez la
bague d'étanchéité
12
Écran LCD
l'écran ne
parvient pas à
afficher
1. Problèmes avec le
PCB
1. Remplacez le PCB
2. La fiche est
desserrée
2. Vérifiez la
connexion prise
13
Mot manquant
dans le Écran
LCD
1. Le moniteur LCD
est endommagé
1. Remplacez le
moniteur
14
Le le
compresseur
s'arrête après
que la glace soit
formé, mais le
1. L'interrupteur de
voyage le contact est
connecté
1. Réparez ou
remplacez le
interrupteur de
voyage
- 18 -
moteur ne
s'arrête pas
15
Lors de la
préparation de
glaces, le moteur
ne fonctionne
pas et aucune
crème ne sort
1. L'interrupteur de voyage
est endommagé
1. Réparez
ou remplacez
l'interrupteur
de voyage
16
Fissures de
l'arbre d'agitation
Cela n’arrivera pas dans des
circonstances normales. La
situation anormale est la
suivante :
Remplacer
l'arbre
d'agitation
1. Il y a trop d'eau dans la
boue, le cylindre est gelé
2. Appuyez par erreur sur la
touche de réfrigération lors du
nettoyage, ce qui entraîne
réfrigération avec de l'eau
3. Réfrigération avec un
cylindre rempli et l'autre vide
4. Réfrigération sans lisier
5. Abus d'un cylindre lors de
la préparation de la glace
6. La boue chaude est versée
dans le cylindre pour une
réfrigération rapide
7. Réfrigération du lisier avec
le moteur connecté de
manière inversée
VII.Accessoires
1. Une clé hexagonale interne
- 19 -
2. Un ensemble d'anneaux d'écailles
3. Un manuel de l'Uscr
4. Une carte de garantie
Paramètres techniques:
Veuillez vous référer à la plaque signalétique pour les paramètres
techniques spécifiques et les performances du réfrigérant.
Schéma de circuit de la sorbetière
Fabriqué en Chine


- 21 -
Technisch Support- und E-Garantie-Zertifikat www.vevor.com/support
EIS-MASCHIENE
MODELL: BQL-7200T
We continue to be committed to provide you tools with competitive price.
"Save Half", "Half Price" or any other similar expressions used by us only represents an
estimate of savings you might benefit from buying certain tools with us compared to the major
top brands and doses not necessarily mean to cover all categories of tools offered by us. You
are kindly reminded to verify carefully when you are placing an order with us if you are
actually saving half in comparison with the top major brands.

- 1 -
MODELL: BQL-7200T
Have product questions? Need technical support? Please feel free to
contact us:
Technical Support and E-Warranty Certificate
www.vevor.com/support
NEED HELP? CONTACT US!
This is the original instruction, please read all manual instructions
carefully before operating. VEVOR reserves a clear interpretation of our
user manual. The appearance of the product shall be subject to the
product you received. Please forgive us that we won't inform you again if
there are any technology or software updates on our product.
ICE CREAM MACHINE
- 2 -
Warnung: Um das Verletzungsrisiko zu verringern, muss der
Benutzer die Bedienungsanleitung sorgfältig lesen.
RICHTIGE ENTSORGUNG
Dieses Produkt unterliegt den Bestimmungen der
europäischen Richtlinie 2012/19/EG. Das Symbol einer
durchgestrichenen Mülltonne weist darauf hin, dass das
Produkt in der Europäischen Union einer getrennten
Müllsammlung bedarf. Dies gilt für das Produkt und alle
Zubehörteile, die mit diesem Symbol gekennzeichnet sind. Als
solche gekennzeichnete Produkte dürfen nicht über den
normalen Hausmüll entsorgt werden, sondern müssen an
einer Sammelstelle für das Recycling von Elektro- und
Elektronikgeräten abgegeben werden
Inhaltsverzeichnis
I. Sicherheitsvorkehrungen -------------------------------- --------2
II. Produktstrukturdiagramm --------- -------------------------------------- ---------7
III. Bedienfeld und Funktionen --------- ------------------------------------- ------8
IV. Wie man Eis macht -------------- ------------------------------- ------------10
V. Reinigung und Wartung ------ --------------------------------------- --------------11
VI. Fehlerbehebung und Lösungen ------- ----------------------------------------
- - - - 1 2
VII. Zubehör ------- -------------------- ----- ----------------- --------17
III.Sicherheitsvorkehrungen
· Bevor Sie das Gerät verwenden, lesen Sie bitte diese
Bedienungsanleitung durch, um sicherzustellen, dass Sie den
größtmöglichen Nutzen daraus ziehen.
5. WARNUNG:

- 3 -
1. Dieses Gerät ist nicht für die Verwendung durch Personen
(einschließlich Kinder) mit eingeschränkten körperlichen, sensorischen
oder geistigen Fähigkeiten oder mangelnder Erfahrung und Wissen
bestimmt, es sei denn, sie werden von einer für sie verantwortlichen
Person beaufsichtigt oder in die Verwendung des Geräts eingewiesen
Sicherheit.
2. Kinder sollten beaufsichtigt werden, um sicherzustellen, dass sie nicht
mit dem Gerät spielen.
3. Dieses Gerät kann von Kindern ab 8 Jahren und von Personen mit
eingeschränkten körperlichen, sensorischen oder geistigen Fähigkeiten
oder mangelnder Erfahrung und Wissen verwendet werden, wenn sie
beaufsichtigt werden oder in die sichere Verwendung des Geräts
eingewiesen wurden und diese verstehen welche Gefahren damit
verbunden sind. Kinder dürfen nicht mit dem Gerät spielen. Reinigung und
Benutzerwartung dürfen nicht von Kindern ohne Aufsicht durchgeführt
werden.
4. Wenn das Netzkabel beschädigt ist, muss es vom Hersteller, seinem
Kundendienst oder ähnlich qualifizierten Personen ersetzt werden, um
Gefahren zu vermeiden.
5. Um eine Gefahr durch Instabilität des Geräts zu vermeiden, muss es
gemäß den Anweisungen befestigt werden.
6. Achten Sie beim Aufstellen des Geräts darauf, dass das Netzkabel nicht
eingeklemmt oder beschädigt wird.
7. Platzieren Sie nicht mehrere tragbare Steckdosen oder tragbare
Netzteile an der Rückseite des Geräts.
8. Halten Sie Lüftungsöffnungen im Gerätegehäuse oder in der
Einbaukonstruktion frei von Hindernissen.
9. Den Kältemittelkreislauf nicht beschädigen.
10. Lagern Sie in diesem Gerät keine explosiven Stoffe wie Aerosoldosen
mit brennbarem Treibmittel.
11. Kindern im Alter von 3 bis 8 Jahren ist das Be- und Entladen von
Kühlgeräten gestattet.

- 4 -
·Hinweis: Dieses Gerät enthält das brennbare Kältemittel R290 und den
Schaumbildner Cyclopentan.
Bitte vermeiden Sie Kontaktfeuer, wenn Sie es transportieren und
verwenden.
Wenn die Maschine ausgefallen ist, wenden Sie sich bitte an einen
Fachmann zur Wartung. Wenn Sie es entsorgen, schicken Sie es bitte zu
Ihrer örtlichen Entsorgungsstelle.
Achten Sie bei der Verwendung, Wartung und Entsorgung des Geräts
bitte auf das Symbol auf der linken Seite, das sich auf
der Rückseite des Geräts (Rückwand oder Kompressor)
befindet und gelb oder orange ist. Es ist ein Warnsymbol
für Brandgefahr. In den Kältemittelleitungen und im
Kompressor befinden sich brennbare Materialien. Bitte halten Sie
sich während der Verwendung, Wartung und Entsorgung weit von
einer Feuerquelle entfernt.
6. FCC-Informationen
VORSICHT: Änderungen oder Modifikationen, die nicht ausdrücklich von
der für die Einhaltung verantwortlichen Partei genehmigt wurden, können
zum Erlöschen der Berechtigung des Benutzers zum Betrieb des Geräts
führen!
Dieses Gerät entspricht Teil 15 der FCC-Bestimmungen. Der Betrieb
unterliegt den folgenden zwei Bedingungen:
1) Dieses Produkt kann schädliche Störungen verursachen.
2) Dieses Produkt muss alle empfangenen Störungen akzeptieren,
einschließlich Störungen, die zu unerwünschtem Betrieb führen können.
WARNUNG: Änderungen oder Modifikationen an diesem Produkt, die
nicht ausdrücklich von der für die Einhaltung verantwortlichen Partei
genehmigt wurden, können zum Erlöschen der Berechtigung des
Benutzers zum Betrieb des Produkts führen.
Hinweis: Dieses Produkt wurde getestet und entspricht den Grenzwerten
für ein digitales Gerät der Klasse B gemäß Teil 15 der FCC-Bestimmungen.

- 5 -
Diese Grenzwerte sollen einen angemessenen Schutz vor schädlichen
Störungen in einer Wohnanlage bieten.
Dieses Produkt erzeugt und verwendet Hochfrequenzenergie und kann
diese ausstrahlen. Wenn es nicht gemäß den Anweisungen installiert und
verwendet wird, kann es schädliche Störungen der Funkkommunikation
verursachen. Es gibt jedoch keine Garantie dafür, dass bei einer
bestimmten Installation keine Störungen auftreten. Wenn dieses Produkt
schädliche Störungen beim Radio- oder Fernsehempfang verursacht, was
durch Aus- und Einschalten des Produkts festgestellt werden kann, wird
dem Benutzer empfohlen, zu versuchen, die Störung durch eine oder
mehrere der folgenden Maßnahmen zu beheben.
· Richten Sie die Empfangsantenne neu aus oder versetzen Sie sie.
· Erhöhen Sie den Abstand zwischen Produkt und Empfänger.
· Schließen Sie das Produkt an eine Steckdose an, die zu einem anderen
Stromkreis gehört als dem, an den der Empfänger angeschlossen ist.
· Wenden Sie sich für Hilfe an den Händler oder einen erfahrenen
Radio-/TV-Techniker.
3 . Auspacken und Inspektion
1) Schneiden und lösen Sie die Gurte und Bretter, mit denen der Karton
befestigt ist. Entfernen Sie den Karton, die Schaumstoffplatten und die
Verpackungsbeutel, um festzustellen, ob das Erscheinungsbild des Geräts
beschädigt ist. (Hinweis: Das Gerät darf beim Transport nicht mehr als 45°
geneigt werden.)
2) Öffnen Sie den Flaschendeckel und prüfen Sie, ob alle in der Packliste
enthaltenen Zubehörteile vorhanden sind.
3) Entfernen Sie die obere und untere Abdeckung an der Rückseite des
Geräts, um zu prüfen, ob die internen Motoren, Riemen, Kompressoren
und andere Komponenten aufgrund des Transports locker sind. Sollten
Unregelmäßigkeiten festgestellt werden, wenden Sie sich rechtzeitig an
den Lieferanten, um das Problem zu beheben.
(Hinweis: Führen Sie beim Installieren oder Entfernen jeder Platte einen
Innensechskantschlüssel oder Kreuzschraubendreher in die Schraubennut
- 6 -
an der Platte ein, drücken Sie dann leicht darauf und drehen Sie sie, um
sie zu lösen oder zu befestigen.)
4) Installieren Sie den Rührer und das Ventilgehäuse am Gerät (Abb. A und
B).
Hinweis: Vergessen Sie nicht, den Skalierungsring zu installieren
Abb. A
Abb. B
Abb. C
5) Installieren Sie den Wasserbehälter wie in (Abb. C) gezeigt.
6) Überprüfen Sie das Typenschild auf der Rückseite des Geräts und
stellen Sie sicher, dass die auf dem Gerät angegebene Spannung mit der
örtlichen Versorgungsspannung übereinstimmt.
7) Stellen Sie sicher, dass der Spender ordnungsgemäß geerdet ist.

- 7 -
Andernfalls kann es im Falle einer Fehlfunktion oder eines Stromlecks zu
einem Stromschlag kommen. (Bei einigen Modellen ist die Erdungsleitung
die gelb-grüne Linie unten.)
8) Beschädigen, brechen, verdrehen oder dehnen Sie das weiche
Netzkabel niemals.
4 . Betriebsumgebung
1) Die minimale Betriebstemperatur beträgt 10 °C und die maximale
Betriebstemperatur beträgt 35 °C. Benutzen Sie das Gerät niemals in
feuchter Umgebung oder an Orten, an denen es der Witterung ausgesetzt
ist Regen. Nicht an Orten verwenden, die viel Schwefelsäure oder Salz
ausgesetzt sind, z. B. in Gegenden mit heißen Quellen oder am Golf.
2) Die minimale Schlammtemperatur beträgt 5℃ und die höchste 40℃;
Um die Produktionseffizienz von Eiscreme zu verbessern, wird eine
Lagerung bei niedrigen Temperaturen bevorzugt.
3) Bitte stellen Sie es auf eine ebene und feste Oberfläche an einem gut
belüfteten Ort.
4) Es muss ein Abstand von mindestens 80 cm hinter dem Eisspender und
ein Abstand von mindestens 30 cm auf beiden Seiten gewährleistet sein,
damit kalte Luft einströmen und heiße Luft austreten kann, um den
Kondensationszyklus des Geräts zu erleichtern; regelmäßig Es wird
empfohlen, den Staub vom Kondensator zu entfernen.
Hinweis: Das Gerät wird während des Transports unweigerlich in
Schwingungen geraten. Es wird daher empfohlen, es vor der ersten
Verwendung vier Stunden lang stabil aufzustellen.
5 . Netzanschluss
Alle internen Kabel wurden vor der Auslieferung unserer
Bingzhile-Eisspender vollständig angeschlossen. Der Benutzer muss
lediglich die richtigen Kabel entsprechend der erforderlichen Leistung
auswählen und sie mit dem Netzkabel an der unteren Rückseite des
Geräts verbinden sowie für eine ordnungsgemäße Erdung sorgen.
Hinweis: Alle externen Kabel, Stecker und Steckdosen müssen den
- 8 -
Anforderungen der nationalen Normen entsprechen
6 . Anforderungen an die Netzspannung
Die Abweichung der Nennspannung der eingehenden Stromversorgung
darf nicht zu hoch oder zu niedrig sein. Wenn dies der Fall ist, blinkt die
Anzeige (rot) und es ertönt ein Alarm (Summen), was zu einem Ausfall der
Kühlfunktion führt.
7 . Kühlbedingungen
A. Wenn sich die Rührwelle im leeren Zylinder befindet, ist die Kühlung
nicht gestattet.
B. Kühlen ist nicht erlaubt, wenn sich Wasser in der Flasche befindet.
II. Produktstrukturdiagramm
III. Bedienfeld und Funktionen
Das Bedienfeld ist in einen Tasten-Fluoreszenzbildschirm und einen
LCD-Bildschirm unterteilt (wählen Sie den entsprechenden Vorgang aus).
Gehen Sie wie in Abb. D, E und F gezeigt vor

- 9 -
1) Reinigungs-/Auftautaste:
Drücken Sie im Standby-Modus die Taste, um den Reinigungsmodus
auszulösen. Wenn die Reinigungsanzeige mit einem summenden Ton
aufleuchtet, beginnt der Rührmotor zu laufen und auf dem LCD-Bildschirm
wird der aktuelle Wert des Rührmotors angezeigt. Drücken Sie diese Taste
erneut, um in den Standby-Modus zu gelangen.
Halten Sie die Taste 5 Sekunden lang gedrückt, um die Auftaufunktion zu
starten, während das Reinigungssymbol blinkt. Drücken Sie anschließend
die Taste erneut, um die Auftaufunktion zu schließen. (Gilt nur für Modelle
mit dieser Funktion.)
2) Kühlschlüssel:
Drücken Sie im Standby-Modus die Kühltaste, um den Kühlmodus
auszulösen. Wenn die Kühlanzeige mit einem summenden Ton aufleuchtet,
beginnen der Rührmotor, der Kompressor und der Lüftermotor zu laufen
und auf dem LCD-Bildschirm wird der aktuelle Wert des Rührmotors
angezeigt. Drücken Sie diese Taste erneut, um in den Standby-Modus zu
gelangen.
3) Puffing-Taste;
Wenn Sie im Standby-Modus die Taste „Puffen“ drücken, während die
Luftpumpenanzeige leuchtet, wird die Luftpumpe deaktiviert; Wenn Sie im
Reinigungs- oder Kühlmodus die Puff-Taste drücken, blinkt die
Pumpenanzeige, um anzuzeigen, dass die Luftpumpe aktiviert ist. (Gilt nur
für Modelle mit dieser Funktion)
4) Taste zur Härteeinstellung:
Halten Sie „△“ oder „ “ eine Sekunde lang gedrückt, um den
Härteparameter-Einstellmodus auszulösen, und drücken Sie anschließend
die Taste erneut, um den Härtewert zu ändern. Je größer der Härtewert ist,
desto härter wird das Eis und umgekehrt.
5) Konservierungsschlüssel:
Drücken Sie im Standby-Zustand die Taste „Konservierung“, woraufhin die
Konservierungsanzeige mit einem Summton aufleuchtet. Der Rührmotor,
der Kompressor und der Lüftermotor werden verzögert gestartet und der
aktuelle Wert des Rührmotors wird auf dem LCD-Bildschirm angezeigt .
- 10 -
Drücken Sie diese Taste erneut, um in den Standby-Modus zu gelangen.
(Gilt nur für Modelle mit dieser Funktion)
6) Timing-/Reset-Taste
Drücken Sie im Standby-Modus diese Taste, um den Timer-Reset-Modus
auszulösen. Drücken Sie diese Taste erneut, um den Timer-Rückstellwert
zu ändern.
Halten Sie diese Taste 10 Sekunden lang gedrückt, um die Tassenanzahl
zurückzusetzen. (Der Rücksetzschalter für einige Modelle ist in Abb. D
dargestellt.)
7) Die Anzahl der Eissorten wird angezeigt:
Jede ausgegebene Tasse Eis wird automatisch erfasst.
Güllestand-/Mangelanzeige (gilt nur für Modelle mit dieser Funktion):
Wenn dem Gerät die Gülle fehlt, wird der Mangelcode im Anzeigebereich
für die Bechernummer angezeigt und der Summer gibt zeitweise einen
Alarm aus.
Stecken Sie den Rückstellschlüssel in den Schalter Unterseite des
Anzeigefelds und drehen Sie es um 90° im Uhrzeigersinn, um den
Eiscreme-Datensatz zurückzusetzen.
CLI
Güllemangel im linken Zylinder
CL2
Güllemangel im rechten Zylinder
- 11 -
CL3
Güllemangel in beiden Eylindern
IV. Wie man Eis macht
1) Lassen Sie die vorbereitete Eisbrei 15 Minuten lang stehen, bevor Sie
sie in beide Zylinder oben am Eisspender gießen. Hinweis: Die
Aufschlämmung darf nicht zusammenbacken.
2) Schalten Sie den Eisspender ein, um in den Standby-Modus zu
wechseln, und drücken Sie dann die „Reinigungstaste“, um das Gerät 3–5
Minuten lang laufen zu lassen. Halten Sie anschließend den Griff gedrückt,
um 2–3 Tassen Brei auszugeben, und gießen Sie diese erneut in den
oberen Zylinder, um zu verhindern, dass das Wasser am Auslass vereist,
was die Eisproduktion beeinträchtigen könnte. Hinweis: Die

- 12 -
Aufschlämmung muss gemäß dem im Handbuch für Speiseeispulver
angegebenen Mischungsverhältnis zubereitet werden.
3) Drücken Sie die Taste „Kühlen“, um den Kühlmodus auszulösen; Halten
Sie „△“ oder „ gedrückt "-Taste 1 Sekunde lang gedrückt, um den
Härtegrad des Eises nach Bedarf anzupassen.
Hinweis: Im vorherigen Reinigungsmodus müssen Sie den auf dem
Bildschirm angezeigten Wert „aktuelle Härte“ im Auge behalten. Wenn die
angezeigte „aktuelle Härte“ 2,2 beträgt, muss die Eishärte auf einen Wert
zwischen 3,5 und 5,0 eingestellt werden; Wenn die „aktuelle Härte“ 3,5
beträgt, muss die Eishärte auf einen Wert zwischen 4,5 und 6,5 eingestellt
werden.
4)Wenn die Härte des Eises den eingestellten Wert erreicht, schaltet das
Gerät automatisch auf Pause; Der Abstand zwischen den Pausen kann
zwischen 3 und 9 Minuten variiert werden. In diesem Moment kann die
Zeiteinstelltaste gedrückt werden, um die Zeit einzustellen, zu der die
Maschine in den nächsten Kühlzyklus eintritt. Mit jedem Tastendruck
verlängert sich die Zeit um eine Minute, bis sie 9 Minuten beträgt. Durch
erneutes Drücken wird der Wert auf 3 Minuten zurückgesetzt.
Hinweis: Bei heißem Wetter empfiehlt sich ein kürzeres Pausenintervall;
bei kaltem Wetter empfiehlt sich ein längeres Pausenintervall.
Stellen Sie eine Eistüte oder einen Becher unter den Auslass des
Auslassventils und halten Sie den Auslassgriff gedrückt, um das Eis
herauszudrücken. Lassen Sie den Griff los, um ihn zu schließen.
V. Reinigung und Wartung
1. Reinigung des Kühlzylinders
Um die Gesundheit der Eiskonsumenten zu gewährleisten und die
Lebensdauer des Spenders zu verlängern, muss der Kühlzylinder nach
jedem Gebrauch gereinigt und desinfiziert werden.
1) Drücken Sie die Reinigungstaste, um die gesamte Flüssigkeit im
Zylinder zu entleeren, drücken Sie sie erneut und halten Sie eine Weile
inne.

- 13 -
2) Geben Sie lauwarmes Wasser gemischt mit einer geeigneten Menge
flüssigem Antiseptikum in die Zylinder, um beide Zylinder mit ungefähr der
gleichen Menge Wasser zu füllen.
3) Drücken Sie erneut die Reinigungstaste, um etwa 5 Minuten lang zu
rühren, bevor die Reinigungsflüssigkeit austritt.
4) Verwenden Sie stattdessen lauwarmes Wasser, um die Maschine zwei-
bis dreimal auszuspülen. Halten Sie eine Weile inne.
5) Ausschalten, zerlegen und die Teile waschen:
Lösen Sie die vier Schrauben am Auslassventil und zerlegen Sie die
Auslassventileinheit.
Nehmen Sie den Griffbefestigungsstift, den Griff, die Ventilstange und den
Dichtungsring nach und nach aus dem Auslassventil heraus.
Nehmen Sie den Rührer aus dem Kühlzylinder.
Reinigen Sie alle demontierten Teile. Ersetzen Sie das beschädigte Teil
durch ein neues.
Bauen Sie die Teile in umgekehrter Reihenfolge wieder zusammen.
2. Reinigung des Spenderkörpers
Was Verbraucher brauchen, ist ein gutes Aussehen. sauberes und
hygienisches Gerät. Bitte halten Sie den Körper sauber. Mit einem warmen
Handtuch kann das Maschinengehäuse abgewischt und Flecken entfernt
werden. Spülen Sie niemals direkt mit Wasser ab, um Fehlfunktionen des
Geräts zu vermeiden.
3. Reinigung des Kondensators
Der Kondensator ist nach längerem Betrieb mit Staub bedeckt, was zu
einer schlechten Wärmeableitung und Kühlung führt. Daher muss er alle
zwei Monate gereinigt werden. Beauftragen Sie am besten eine
professionelle Reinigungskraft mit der Reinigung. Vor dem Reinigen
unbedingt schneiden
schalten Sie den Strom aus und achten Sie darauf, dass die
Kondensatorlamellen nicht beschädigt werden.

- 14 -
4. Einstellung des Riemens
Nach einer gewissen Betriebsdauer kann der Antriebsriemen des
Rührsystems verlängert und gelockert werden, was rechtzeitig,
vorzugsweise von einem professionellen Techniker, angepasst werden
muss. Vor der Einstellung muss der Spender von der Stromversorgung
getrennt werden. Wenn Sie immer noch das Gefühl haben, dass der
Riemen zu locker ist, müssen Sie ihn durch einen Riemen desselben Typs
ersetzen.
VI. Fehlerbehebungsanalyse und -lösung
Seriennum
mer
Probleme
Ursachen
Lösungen
1
Der Spender
startet nicht
1. Das Netzkabel ist
nicht richtig
angeschlossen
1. Überprüfen Sie
das Netzkabel und
schließen Sie es
erneut an
2. Der Null-Link ist
nicht verbunden
2. Überprüfen Sie
die Nullleitung und
stellen Sie sicher,
dass sie richtig
angeschlossen ist
3. Der
Funktionsschalter
ist nicht
eingeschaltet
3. Schalten Sie
den
Funktionsschalter
ein
4. Probleme mit
Funktionsschalterst
ecker und
Verbindung
4. Überprüfen Sie
die Stecker- und
Kabelverbindung
5. Probleme mit der
Platine
5. Tauschen Sie
die Platine aus

- 15 -
2
Die
Reinigungsfunk
tion funktioniert
nicht
1. Lose Verbindung
1. Stellen Sie die
Verbindung wieder
her
2. Der Motor oder
Kondensator ist
defekt
2. Reparieren oder
ersetzen Sie den
Motor oder
Kondensator
3. Das Schütz ist
defekt
3. Tauschen Sie
das Schütz aus
3
Der
Kompressor
funktioniert
nicht
1. Niederspannung
1. Überprüfen Sie
die
Versorgungsspann
ung
2. Das Schütz ist
defekt
2. Tauschen Sie
das Schütz aus
3. Probleme mit der
Platine
3. Tauschen Sie
die Platine aus
4. Fehlfunktionen
des Kondensators
(220-V-Serie)
4. Tauschen Sie
den Kondensator
aus
5. Der Kompressor
ist kaputt
5. Ersetzen Sie
den Kompressor
4
Der
Kompressor
funktioniert
nicht
1. Lose Verbindung
des
Funktionsschalters
1. Schließen Sie
das
Funktionsschalterk
abel wieder an
2. Probleme mit der
Platine
2. Tauschen Sie
die Platine aus
5
Der Spender
kühlt nicht
1. Kältemittelstau
1. Reparieren Sie
das Leck und
saugen Sie es ab,
um das Kältemittel

- 16 -
wieder aufzufüllen
2. Verstopfung des
Kondensators
2. Reinigen Sie
den Kondensator
3. Der Lüfter
funktioniert nicht
3. Reparieren oder
ersetzen Sie den
Lüfter
6
Der Riemen
rutscht
1. Der Riemen ist zu
locker
1. Stellen Sie den
Riemen ein oder
tauschen Sie ihn
aus
2. Probleme mit
dem Reduzierstück
2. Reparieren oder
ersetzen Sie das
Reduzierstück
3. Gefrorener
Zylinder, Riss der
Rührwelle
3. Tauschen Sie
die Rührwelle aus
Seriennummer
Probleme
Ursachen
Lösungen
7
Es gelingt nicht,
Eis zuzubereiten
Creme
1. Keine Gülle im
Zylinder
1. Gülle in den
Zylinder füllen
2. Die stoßende
Entladung Rohr
für Gülle ist
verstopft
2. Entfernen Sie
das Auslassrohr
und reinige es
3. Auch das
Gülleverhältnis
ist falsch dick
3. Bereiten Sie
eine neue,
qualifizierte
Gülle vor
4. Der
Fahrschalter des
Platte ist kaputt
oder getrennt
4. Schließen Sie
die Leitung
wieder an oder
ersetzen Sie sie

- 17 -
den Fahrschalter
5. Der Riemen ist
zu locker und
rutscht aus
5. Stellen Sie
den Riemen ein
oder ersetzen
Sie ihn Gürtel
6. Probleme mit
dem Reduzierer
6. Reparieren
oder ersetzen
Sie das
Reduzierstück
8
Schlechte
Puffwirkung
1. Das Puffrohr
ist nicht
vorhanden
eingefügt
1. Puffrohr
wieder einsetzen
2. Der
Puff-Schalter ist
nicht aktiviert
eingeschaltet
2. Schalten Sie
den
Puff-Schalter ein
9
Eis ist zu weich
1. Das
Gülleverhältnis
ist falsch
1. Bereiten Sie
eine neue,
qualifizierte
Gülle vor
2. Unzureichende
Härte Einstellung
2. Stellen Sie
den Härtewert
erneut ein
3. Der
Motorstrom ist zu
groß und es liegt
ein Kurzschluss
vor
3. Reparieren
oder ersetzen
Sie den Motor

- 18 -
10
Eis ist zu hart
1. Es wurde zu
viel Wasser
hinzugefügt in
der Gülle
1. Bereiten Sie
eine neue,
qualifizierte
Gülle vor
2. Unzureichende
Härte Einstellung
2. Stellen Sie
den Härtewert
erneut ein
11
Schlammleckage
1. Auslassventil
undicht
1. Ersetzen Sie
den
Dichtungsring
des
Auslassventils
2. Die
Ventilstange ist
undicht
2. Ersetzen Sie
die Ventilstange
3. Gülle-Icakage
3. Ersetzen Sie
den
Dichtungsring
des
Auslassventils
4. Der
Dichtungsring der
Rührwelle ist
kaputt
4.Ersetzen Sie
den
Dichtungsring
12
LCD Der
Bildschirm
funktioniert nicht
Anzeige
1. Probleme mit
der Platine
1. Tauschen Sie
die Platine aus
2. Der Stecker ist
locker
2. Überprüfen
Sie die
Verbindung
Stecker
13
Wort fehlt in der
LCD
1. Der
LCD-Monitor ist
beschädigt
1. Ersetzen Sie
den Monitor
- 19 -
14
Der Kompressor
stoppt nach dem
Eis gebildet,
aber der Motor
hört nicht auf
1. Der
Fahrschalter
Kontakt ist in
Verbindung
gebracht
1. Reparieren
oder ersetzen
Sie das
Fahrschalter
15
Bei der
Eiszubereitung
läuft der Motor
nicht und es
kommt keine
Sahne heraus
1. Der Fahrschalter ist
beschädigt
1. Reparieren
oder
ersetzen Sie
den
Fahrschalter
16
Rührwelle reißt
Unter normalen Umständen
wird das nicht passieren. Die
ungewöhnliche Situation ist
wie folgt:
Setzen Sie
die Rührwelle
wieder ein
1. Die Aufschlämmung enthält
zu viel Wasser, der Zylinder
ist gefroren
2. Drücken Sie beim Reinigen
versehentlich die Kühltaste,
was zu Folgendem führt:
Kühlung mit Wasser
3. Kühlung mit einer gefüllten
und der anderen leeren
Flasche
4. Kühlung ohne Gülle
5. Missbrauch eines Zylinders
bei der Eiszubereitung
6. Zur schnellen Abkühlung
wird heiße Aufschlämmung in
den Zylinder gegossen
7. Kühlung der Gülle bei
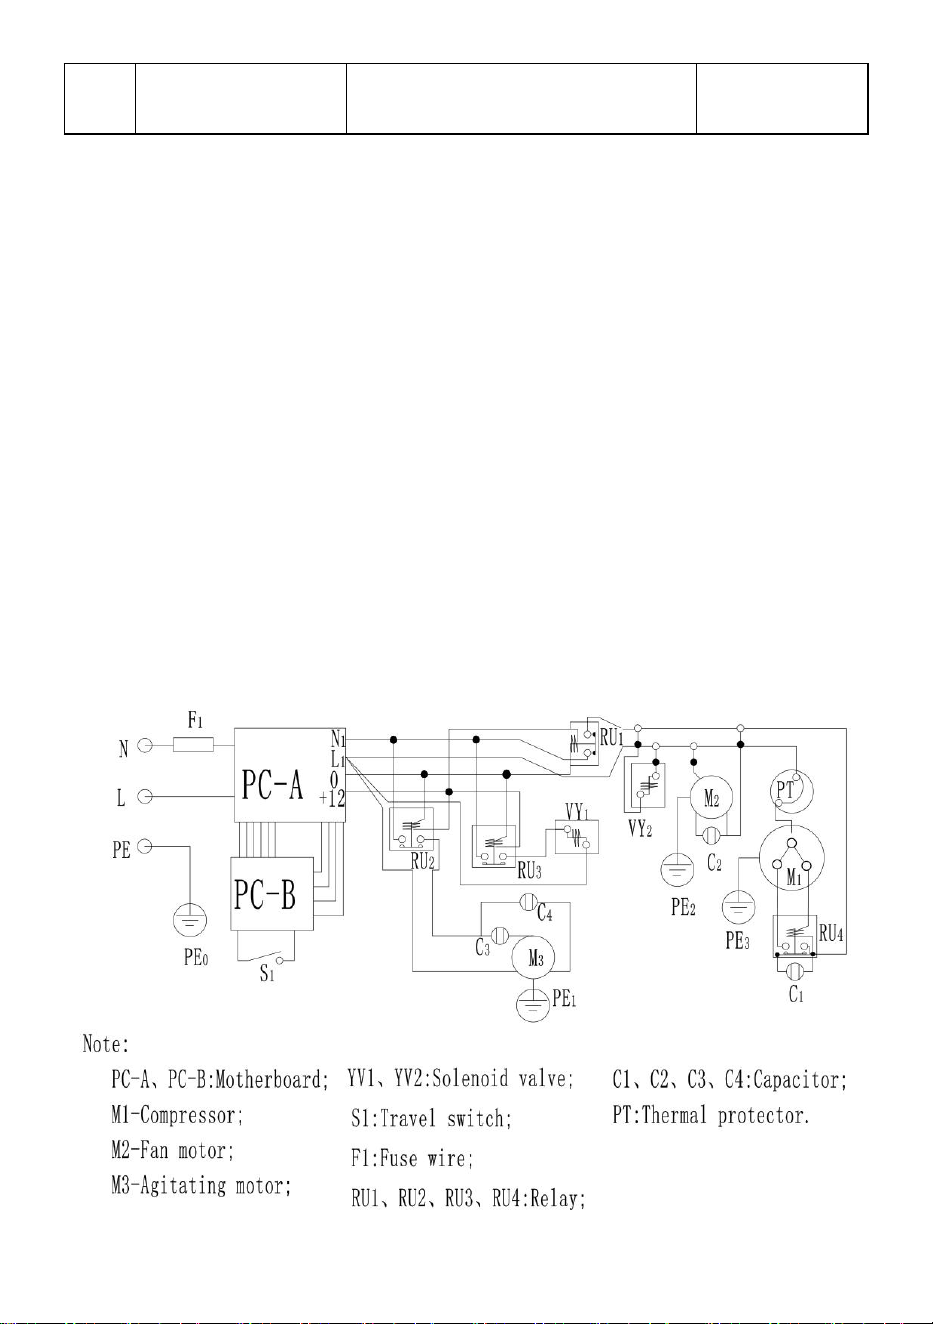
- 20 -
umgekehrt angeschlossenem
Motor
VII.Zubehör
1. Ein Innensechskantschlüssel
2. Ein Satz Skalenringe
3. Ein Uscr-Handbuch
4. Eine Garantiekarte
Technische Parameter:
Spezifische technische Parameter und Kältemittelleistung entnehmen Sie
bitte dem Typenschild.
Schaltplan der Eismaschine

- 21 -
In China hergestellt


- 23 -
Tecnico Supporto e certificato di garanzia elettronica www.vevor.com/support
MACCHINA PER IL GELATO
MODELLO: BQL-7200T
We continue to be committed to provide you tools with competitive price.
"Save Half", "Half Price" or any other similar expressions used by us only represents an
estimate of savings you might benefit from buying certain tools with us compared to the major
top brands and doses not necessarily mean to cover all categories of tools offered by us. You
are kindly reminded to verify carefully when you are placing an order with us if you are
actually saving half in comparison with the top major brands.

- 1 -
MODELLO: BQL-7200T
Have product questions? Need technical support? Please feel free to
contact us:
Technical Support and E-Warranty Certificate
www.vevor.com/support
NEED HELP? CONTACT US!
This is the original instruction, please read all manual instructions
carefully before operating. VEVOR reserves a clear interpretation of our
user manual. The appearance of the product shall be subject to the
product you received. Please forgive us that we won't inform you again if
there are any technology or software updates on our product.
ICE CREAM MACHINE
- 2 -
Avvertenza: per ridurre il rischio di lesioni, l'utente deve
leggere attentamente il manuale di istruzioni.
CORRETTO SMALTIMENTO
Questo prodotto è soggetto alle disposizioni della Direttiva
Europea 2012/19/CE. Il simbolo del bidone della spazzatura
barrato indica che nell'Unione Europea il prodotto richiede la
raccolta differenziata dei rifiuti. Ciò vale per il prodotto e tutti gli
accessori contrassegnati da questo simbolo. I prodotti
contrassegnati come tali non possono essere smaltiti con i
normali rifiuti domestici, ma devono essere portati in un punto
di raccolta per il riciclaggio di dispositivi elettrici ed elettronici
Sommario
I. Precauzioni di sicurezza -----------------------------------------------------
- - - - - - - - - - - - - - - - - - - - - - - 2
I I . D i a g r a m m a d e l l a s t r u t t u r a d e l p r o d o t t o - - - - - - - - -
- - - - - - - - - - - - - - - - - - - - - - - - - - - - - - - - - - - - - - - - - - - - - - - 7
III. Pannello operativo e funzioni --------- ------------------------------------- ------8
IV. Come fare il gelato -------------- ------------------------------- ------------10
V. Pulizia e manutenzione ------ --------------------------------------- --------------11
V I . R i s o l u z i o n e d e i p r o b l e m i e s o l u z i o n i - - - - - - -
- - - - - - - - - - - - - - - - - - - - - - - - - - - - - - - - - - - - - - - - - - - - 1 2
VII. Accessori ------- -------------------- ----- ----------------- -----------------------17
IV. Misure di sicurezza
·Prima di utilizzare l'apparecchio, leggere questo manuale utente per
assicurarsi di trarne il massimo beneficio.
7. AVVERTIMENTO:
1. Questo apparecchio non è destinato all'uso da parte di persone

- 3 -
(compresi i bambini) con capacità fisiche, sensoriali o mentali ridotte, o con
mancanza di esperienza e conoscenza, a meno che non abbiano ricevuto
supervisione o istruzioni relative all'uso dell'apparecchio da una persona
responsabile della loro sicurezza.
2. I bambini devono essere sorvegliati per assicurarsi che non giochino
con l'apparecchio.
3. Questo apparecchio può essere utilizzato da bambini di età pari o
superiore a 8 anni e da persone con ridotte capacità fisiche, sensoriali o
mentali o con mancanza di esperienza e conoscenza se hanno ricevuto
supervisione o istruzioni relative all'uso dell'apparecchio in modo sicuro e
hanno compreso i pericoli coinvolti. I bambini non devono giocare con
l'apparecchio. La pulizia e la manutenzione da parte dell'utente non
devono essere effettuate da bambini senza supervisione.
4. Se il cavo di alimentazione è danneggiato, deve essere sostituito dal
produttore, dal suo agente di assistenza o da persone similmente
qualificate per evitare pericoli.
5. Per evitare pericoli dovuti all'instabilità dell'apparecchio, è necessario
fissarlo secondo le istruzioni.
6. Quando si posiziona l'apparecchio, assicurarsi che il cavo di
alimentazione non sia intrappolato o danneggiato.
7. Non collocare prese multiple portatili o alimentatori portatili sul retro
dell'apparecchio.
8. Mantenere le aperture di ventilazione, nell'involucro dell'apparecchio o
nella struttura integrata, libere da ostruzioni.
9. Non danneggiare il circuito frigorifero.
10. Non conservare sostanze esplosive come bombolette aerosol con
propellente infiammabile in questo apparecchio.
11. I bambini di età compresa tra 3 e 8 anni sono autorizzati a caricare e
scaricare apparecchi di refrigerazione.
·Nota: questo apparecchio contiene refrigerante infiammabile R290 e
agente schiumogeno ciclopentano.
Si prega di evitare il fuoco da contatto durante il trasporto e l'utilizzo.

- 4 -
Rivolgersi a un professionista per la manutenzione in caso di guasto della
macchina. Si prega di inviarlo al centro di smaltimento locale designato
quando lo si smaltisce.
Durante l'utilizzo, la manutenzione e lo smaltimento dell'apparecchio,
prestare attenzione al simbolo simile al lato sinistro, che
si trova sul retro dell'apparecchio (pannello posteriore o
compressore) e di colore giallo o arancione. È un
simbolo di pericolo di incendio. Sono presenti materiali
infiammabili nei tubi del refrigerante e nel compressore. Si prega di
stare lontano da fonti di incendio durante l'uso, la manutenzione e lo
smaltimento.
8. Informazioni FCC
ATTENZIONE: cambiamenti o modifiche non espressamente approvati
dalla parte responsabile della conformità potrebbero invalidare il diritto
dell'utente a utilizzare l'apparecchiatura!
Questo dispositivo è conforme alla Parte 15 delle norme FCC. Il
funzionamento è soggetto alle seguenti due condizioni:
1) Questo prodotto può causare interferenze dannose.
2)Questo prodotto deve accettare qualsiasi interferenza ricevuta,
comprese le interferenze che potrebbero causare un funzionamento
indesiderato.
AVVERTENZA: cambiamenti o modifiche a questo prodotto non
espressamente approvati dalla parte responsabile della conformità
potrebbero annullare l'autorità dell'utente a utilizzare il prodotto.
Nota: questo prodotto è stato testato ed è risultato conforme ai limiti per un
dispositivo digitale di Classe B ai sensi della Parte 15 delle norme FCC.
Questi limiti sono progettati per fornire una protezione ragionevole contro
interferenze dannose in un'installazione residenziale.
Questo prodotto genera, utilizza e può irradiare energia in radiofrequenza
e, se non installato e utilizzato in conformità con le istruzioni, può causare
interferenze dannose alle comunicazioni radio. Tuttavia, non vi è alcuna

- 5 -
garanzia che non si verifichino interferenze in una particolare installazione.
Se questo prodotto causa interferenze dannose alla ricezione radiofonica o
televisiva, cosa che può essere determinata spegnendo e accendendo il
prodotto, si consiglia all'utente di provare a correggere l'interferenza
adottando una o più delle seguenti misure.
· Riorientare o riposizionare l'antenna ricevente.
· Aumentare la distanza tra il prodotto e il ricevitore.
· Collegare il prodotto ad una presa su un circuito diverso da quello a cui è
collegato il ricevitore.
· Consultare il rivenditore o un tecnico radio/TV esperto per assistenza.
3 . Disimballaggio e ispezione
1) Tagliare e slacciare le reggette e le assi che fissano il cartone; rimuovere
il cartone, i pannelli in schiuma e i sacchetti di imballaggio per verificare se
sono presenti danni all'aspetto del dispositivo. (Nota: il dispositivo non
deve essere inclinato più di 45° durante il trasporto.)
2) Aprire il coperchio della bombola e verificare se sono disponibili tutti gli
accessori contenuti nella bolla di accompagnamento.
3) Rimuovere i pannelli superiore e inferiore sul retro del dispositivo per
verificare se i motori interni, le cinghie, i compressori e gli altri componenti
sono allentati a causa del trasporto. Se si riscontrano anomalie, contattare
in tempo il fornitore per risolvere il problema.
(Nota: durante l'installazione o la rimozione di ciascun pannello, inserire
una chiave esagonale interna o un cacciavite a croce nella scanalatura
della vite sul pannello, quindi premere leggermente e ruotare per allentare
o fissare)
4) Installare l'agitatore e il corpo della valvola sul dispositivo (Fig. A e B).
Nota: non dimenticare di installare l'anello di scalatura

- 6 -
Figura A
Figura B
Figura C
5) Installare il ricevitore dell'acqua come mostrato in (Fig. C).
6) Controllare la targhetta affissa sul pannello posteriore del dispositivo e
assicurarsi che la tensione specificata sul dispositivo corrisponda alla
tensione di alimentazione locale.
7) Assicurarsi che il distributore sia adeguatamente messo a terra.
Altrimenti, potrebbe verificarsi una scossa elettrica in caso di
malfunzionamento o dispersione elettrica. (Per alcuni modelli, la linea di
messa a terra è la linea gialla e verde in basso)
8) Non danneggiare, rompere, torcere o allungare mai il cavo di
alimentazione morbido.

- 7 -
4 . Ambiente operativo
1) La temperatura operativa minima è 10 ℃ e la temperatura operativa
massima è 35 ℃. Non utilizzare mai il dispositivo in ambienti umidi o luoghi
esposti a piovere. Non utilizzare in luoghi esposti a una quantità eccessiva
di acido solforico o sale, come aree di sorgenti termali o aree del golfo.
2) La temperatura minima del liquame è 5 ℃ e la massima è 40 ℃; è
preferibile la conservazione a bassa temperatura per migliorare l'efficienza
produttiva del gelato.
3) Posizionarlo su una superficie piana e solida in un luogo ben ventilato.
4) Deve essere garantito uno spazio di almeno 80 cm dietro il Distributore
Gelato e uno spazio non inferiore a 30 cm su entrambi i lati per l'ingresso
dell'aria fredda e lo scarico dell'aria calda per facilitare il ciclo di
condensazione del dispositivo; regolare si consiglia la pulizia della polvere
sul condensatore.
Nota: il dispositivo oscillerà inevitabilmente durante il trasporto, quindi si
consiglia di posizionarlo stabilmente per 4 ore prima dell'uso iniziale.
5 . Connessione di alimentazione
Tutti i cavi interni sono stati completamente collegati prima della consegna
dei nostri dispenser per gelato Bingzhile. L'unica cosa che gli utenti devono
fare è selezionare i cavi adeguati in base alla potenza richiesta e collegarli
al cavo di alimentazione nella parte posteriore inferiore del dispositivo,
oltre ad una corretta messa a terra.
Nota: tutti i cablaggi, le spine e le prese esterne devono essere conformi ai
requisiti degli standard nazionali
6 . Requisiti di tensione di alimentazione
La deviazione della tensione nominale dell'alimentazione in ingresso non
deve essere né troppo alta né troppo bassa. In tal caso, l'indicatore (rosso)
lampeggerà e verrà emesso un allarme (cicalino), con conseguente guasto
della funzione di refrigerazione.
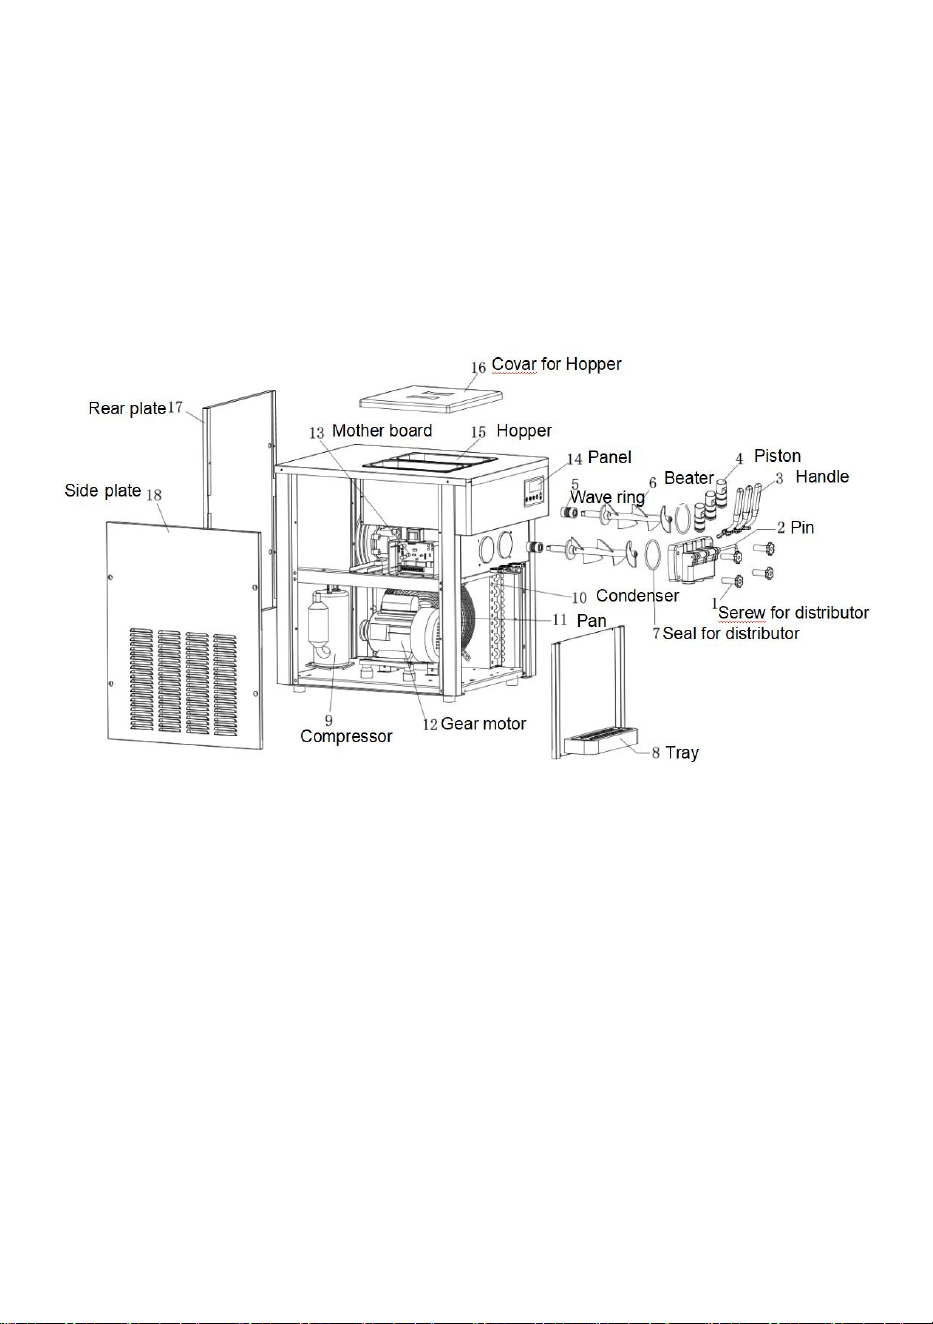
- 8 -
7 . Condizioni di refrigerazione
UN. La refrigerazione non è consentita quando l'asta di agitazione si trova
nel cilindro vuoto.
B. La refrigerazione non è consentita quando è presente acqua nel
cilindro.
II. Diagramma della struttura del prodotto
III. Pannello operativo e funzioni
Il pannello operativo è diviso in uno schermo fluorescente con tasti e uno
schermo LCD (selezionare l'operazione corrispondente)
Operare come mostrato nelle Fig. D, E e F
1) Tasto pulizia/scongelamento:
In modalità standby, premere il tasto per attivare la modalità di pulizia.
Quando l'indicatore di pulizia si accende emettendo un ronzio, il motore di
agitazione inizia a funzionare e lo schermo LCD visualizza il valore
corrente del motore di agitazione. Premere nuovamente questo tasto per
accedere alla modalità standby.
Tenere premuto il tasto per 5 secondi per avviare la funzione di

- 9 -
scongelamento con l'icona di pulizia lampeggiante, quindi premere
nuovamente il tasto per chiudere la funzione di scongelamento.
(Applicabile solo ai modelli con questa funzione)
2) Tasto refrigerazione:
In modalità standby, premere il tasto di refrigerazione per attivare la
modalità di refrigerazione. Quando l'indicatore di refrigerazione si accende
emettendo un ronzio, il motore di agitazione, il compressore e il motore
della ventola iniziano a funzionare e lo schermo LCD visualizza il valore
corrente del motore di agitazione. Premere nuovamente questo tasto per
accedere alla modalità standby.
3) Tasto soffio;
Se si preme il tasto "sbuffo" con l'indicatore della pompa dell'aria acceso in
modalità standby, la pompa dell'aria verrà disattivata; Se si preme il tasto di
sbuffo in modalità pulizia o refrigerazione, l'indicatore della pompa
lampeggerà per indicare che la pompa dell'aria è abilitata. (Applicabile solo
ai modelli con questa funzione)
4) Tasto impostazione durezza:
Tenere premuto “△” o “ ”per un secondo per attivare la modalità di
impostazione dei parametri di durezza, quindi premere nuovamente il tasto
per modificare il valore di durezza. Maggiore è il valore della durezza, più
duro risulterà il gelato e viceversa.
5) Chiave di conservazione:
In stato di standby, premere il tasto "conservazione" e l'indicatore di
conservazione si accende con un ronzio. L'avvio ritardato avviene per il
motore di agitazione, il compressore e il motore della ventola e il valore
corrente del motore di agitazione viene visualizzato sullo schermo LCD .
Premere nuovamente questo tasto per accedere alla modalità standby.
(Applicabile solo ai modelli con questa funzione)
6) Tasto di cronometraggio/reset
In modalità standby, premere questo tasto per attivare la modalità di
ripristino del timer. Premere nuovamente questo tasto per modificare il
valore di ripristino del timer.
Tenere premuto questo tasto per 10 secondi per azzerare il numero di
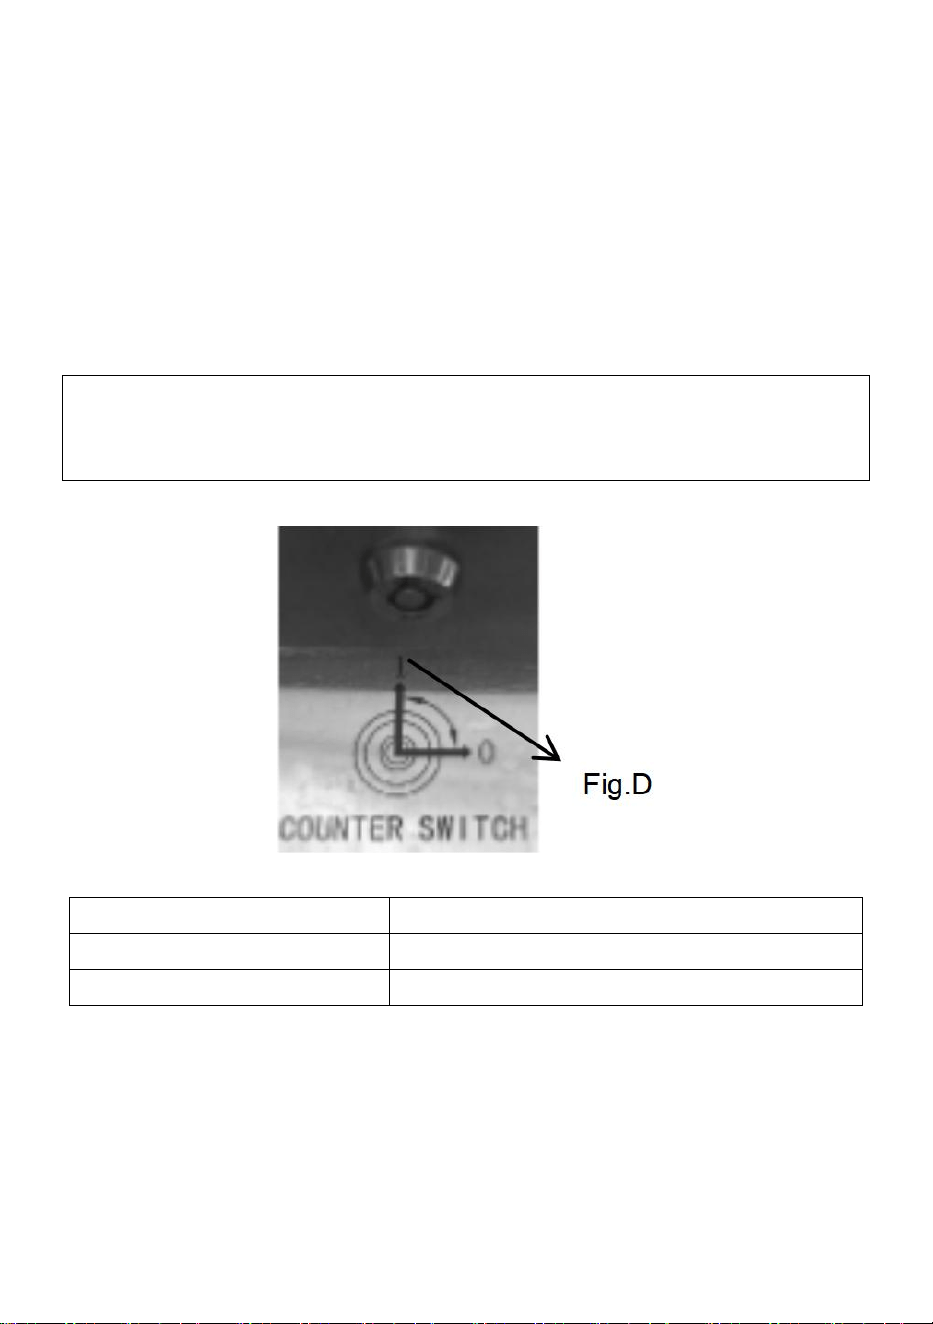
- 10 -
tazze. (L'interruttore di ripristino per alcuni modelli è mostrato in Fig. D)
7) Visualizzazione del numero di gelati:
Ogni coppetta di gelato erogata verrà registrata automaticamente.
Visualizzazione del livello/carenza del liquame (applicabile solo ai modelli
con questa funzione):
Quando il dispositivo è a corto di liquame, il codice di carenza verrà
visualizzato nell'area di visualizzazione del numero della tazza e il cicalino
emetterà un allarme in modo intermittente.
Inserire la chiave di ripristino nell'interruttore in basso parte inferiore del
pannello del display e girarlo in senso orario di 90° per reimpostare il
record del gelato.
CLI
Mancanza di liquame nel cilindro sinistro
CL2
Carenza di liquame nel cilindro destro
CL3
Carenza di liquame in entrambi i cilindri
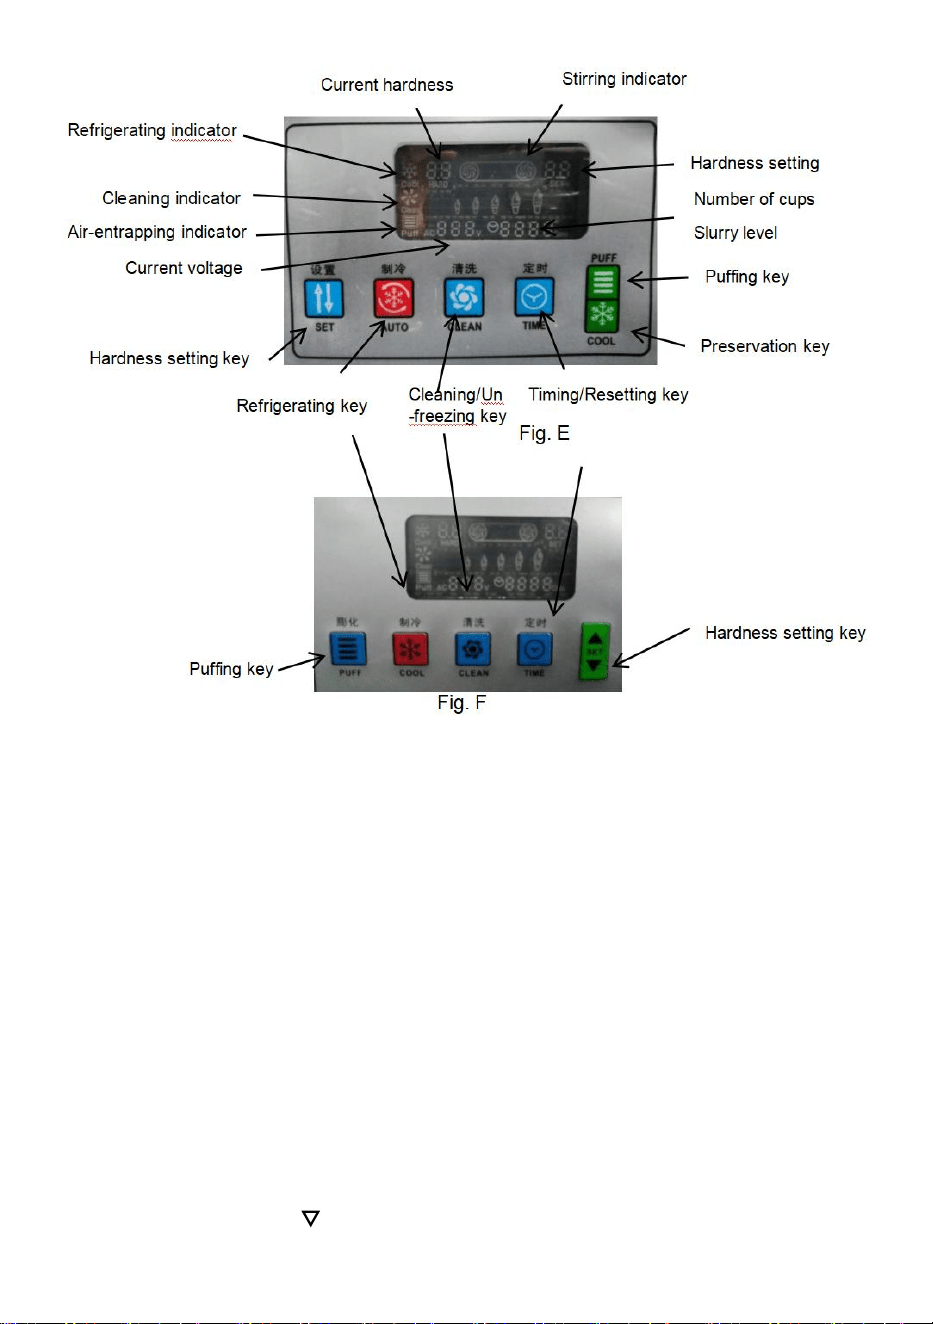
- 11 -
IV. Come fare il gelato
1) Lasciare riposare la poltiglia di gelato preparata per 15 minuti prima di
versarla in entrambi i cilindri nella parte superiore del Dispenser Gelato;
Nota: l'impasto non deve formare grumi.
2) Accendere il distributore di gelato per entrare in modalità standby, quindi
premere il "tasto di pulizia" per far funzionare il dispositivo per 3-5 minuti.
Successivamente, tenere premuta la maniglia per scaricare 2-3 tazze di
impasto e versarle nuovamente nel cilindro superiore per evitare che
l'acqua si ghiacci all'uscita di scarico, compromettendo la produzione del
gelato; Nota: l'impasto deve essere preparato secondo il rapporto di
miscelazione specificato nel Manuale del gelato in polvere.
3) Premere il tasto "refrigerazione" per attivare la modalità di refrigerazione;
Tieni premuto"△" o " " per 1 secondo per regolare la durezza del

- 12 -
gelato secondo necessità.
Nota: nella modalità di pulizia precedente è necessario tenere d'occhio il
valore della "durezza attuale" visualizzato sullo schermo. Se la "durezza
attuale" visualizzata è 2,2, la durezza del gelato sarà impostata tra 3,5 e
5,0; se la "durezza attuale" è 3,5, la durezza del gelato dovrà essere
impostata tra 4,5 e 6,5.
4)Quando la durezza del gelato raggiunge il valore impostato, il dispositivo
andrà automaticamente in pausa; L'intermittenza tra le pause può essere
variata da 3 a 9 minuti. In questo momento, è possibile premere il tasto di
regolazione dell'ora per impostare l'ora in cui la macchina entrerà nel ciclo
di refrigerazione successivo. Il tempo verrà incrementato di un minuto ad
ogni pressione, fino a 9 minuti. E il valore tornerà a 3 minuti se si preme
nuovamente.
Nota: quando fa caldo, è preferibile un intervallo di pausa più breve;
quando fa freddo, è preferibile un intervallo di pausa più lungo.
Posizionare un cono o una coppetta sotto l'uscita della valvola di scarico e
tenere premuta la maniglia di scarico per spremere il gelato. Rilasciare la
maniglia per chiudere.
V. Pulizia e manutenzione
1. Pulizia del cilindro refrigerante
Per garantire la salute dei consumatori di gelato e prolungare la durata del
Dispenser, il cilindro refrigerante deve essere pulito e disinfettato dopo
ogni utilizzo.
1) Premere il tasto di pulizia per scaricare tutto il liquame nel cilindro,
quindi premerlo nuovamente e fare una pausa per un po'.
2) Aggiungere acqua tiepida mescolata con una quantità adeguata di
antisettico liquido nei cilindri per riempire entrambi i cilindri con circa la
stessa quantità di acqua.
3) Premere nuovamente il tasto di pulizia per mescolare per circa 5 minuti
prima di scaricare il liquido detergente.
4) Utilizzare invece acqua tiepida per risciacquare la macchina per 2-3

- 13 -
volte. Pausa per un po'.
5) Spegnere, smontare e lavare le parti:
Allentare le quattro viti sulla valvola di uscita e smontare il gruppo valvola
di uscita.
Estrarre il perno di fissaggio della maniglia, la maniglia, l'asta della valvola,
l'anello di tenuta dalla valvola di scarico nei barattoli.
Estrarre l'agitatore dal cilindro refrigerante.
Pulire tutte le parti smontate. Sostituire la parte danneggiata con una
nuova.
Rimontare le parti in ordine inverso.
2. Pulizia del corpo erogatore
Ciò di cui i consumatori hanno bisogno è un bell'aspetto. dispositivo pulito
e igienico. Per favore, mantieni il corpo pulito. È possibile utilizzare un
asciugamano caldo per pulire il corpo della macchina e rimuovere le
macchie. Non sciacquare mai direttamente con acqua per evitare
malfunzionamenti del dispositivo.
3. Pulizia del condensatore
Il condensatore sarà coperto di polvere dopo aver funzionato per un
periodo di tempo, con conseguente scarsa dissipazione del calore e
refrigerazione, quindi deve essere pulito ogni due mesi. È meglio chiedere
a un addetto alle pulizie professionista di pulirlo. Prima di pulire, assicurati
di tagliare
togliere l'alimentazione e non danneggiare le alette del condensatore.
4. Regolazione della cintura
Dopo aver funzionato per un periodo di tempo, la cinghia di trasmissione
del sistema di agitazione può essere allungata e allentata, che dovrà
essere regolata in tempo, preferibilmente da un tecnico professionista.
L'erogatore deve essere scollegato dall'alimentazione elettrica prima di
essere regolato. Se ritieni ancora che la cintura sia troppo allentata,
sostituiscila con una cintura dello stesso tipo.

- 14 -
VI. Analisi e soluzione dei problemi
S/N
I problemi
Cause
Soluzioni
1
Il distributore
non si avvia
1.Il cavo di alimentazione
non è collegato
correttamente
1. Controllare il cavo
di alimentazione e
ricollegarlo
2. Il collegamento nullo
non è collegato
2. Controlla la linea
nulla e assicurati che
sia collegata
correttamente
3. L'interruttore di funzione
non è acceso
3. Accendere
l'interruttore di
funzione
4. Problemi con la spina
dell'interruttore di funzione
e connessione
4. Controllare la spina
e il collegamento del
cavo
5. Problemi con il PCB
5. Sostituire la
scheda PCB
2
La funzione
di pulizia non
funziona
1. Connessione allentata
1. Riconnettiti
2. Il motore o il
condensatore sono rotti
2. Riparare o
sostituire il motore o il
condensatore
3. Il contattore è rotto
3. Sostituire il
contattore
3
Il
compressore
non funziona
1. Bassa tensione
1. Controllare la
tensione di
alimentazione
2. Il contattore è rotto
2. Sostituire il
contattore
3. Problemi con il PCB
3. Sostituire la

- 15 -
scheda PCB
4. Il condensatore non
funziona correttamente
(serie 220 V)
4. Sostituire il
condensatore
5. Il compressore è rotto
5. Sostituire il
compressore
4
Il
compressore
non funziona
1. Collegamento allentato
dell'interruttore di funzione
1. Ricollegare il cavo
dell'interruttore di
funzione
2. Problemi con il PCB
2. Sostituire la
scheda PCB
5
Il dispenser
non refrigera
1. Contenitore del
refrigerante
1. Riparare la perdita
e aspirarla per
reintegrare il
refrigerante
2. Blocco del
condensatore
2. Pulire il
condensatore
3. La ventola non funziona
3. Riparare o
sostituire la ventola
6
La cintura
scivola
1. La cintura è troppo
allentata
1. Regolare la cinghia
o sostituirla
2. Problemi con il riduttore
2. Riparare o
sostituire il riduttore
3. Cilindro congelato,
fessura dell'albero di
agitazione
3. Sostituire l'albero
di agitazione
S/N
I problemi
Cause
Soluzioni
7
Impossibile
produrre il
ghiaccio crema
1. Nessun liquame
nel cilindro
1. Aggiungere
l'impasto liquido al
cilindro

- 16 -
2. Lo scarico del
soffio il tubo del
liquame è ostruito
2. Rimuovere il tubo
di scarico e pulirlo
3. Anche il rapporto
del liquame non è
corretto spesso
3. Preparare il nuovo
liquame qualificato
4. L'interruttore di
marcia del il pannello
e l è rotto o
disconnesso
4. Ricollegare la linea
o sostituirla
l'interruttore di
viaggio
5. La cintura è troppo
lenta e scivola
5.Regolare la cinghia
o sostituirla cintura
6. Problemi con
riduttore
6. Riparare o
sostituire il riduttore
8
Scarso effetto di
sbuffo
1. La pipa da sbuffo
no inserito
1. Inserire il tubo di
sbuffo
2.L'interruttore del
soffio non lo è acceso
2. Accendi
l'interruttore del soffio
9
Il gelato è troppo
morbido
1. Il rapporto del
liquame è sbagliato
1. Preparare un
nuovo liquame
qualificato
2. Durezza impropria
collocamento
2. Impostare
nuovamente il valore
di durezza
3. La corrente del
motore è troppo
elevata e c'è un
cortocircuito
3. Riparare o
sostituire il motore
10
Il gelato è troppo
duro
1. È stata aggiunta
troppa acqua nel
liquame
1. Preparare un
nuovo liquame
qualificato

- 17 -
2. Durezza impropria
collocamento
2. Impostare
nuovamente il valore
della durezza
11
Perdita di
liquame
1. La valvola di uscita
perde
1. Sostituire l'anello di
tenuta della valvola di
uscita
2. L'asta della valvola
perde
2. Sostituire l'asta
della valvola
3. Icakage di liquame
3. Sostituire l'anello di
tenuta della valvola di
uscita
4. L'anello di tenuta
dell'albero di
agitazione è rotta
4.Sostituire l'anello di
tenuta
12
schermo LCD lo
schermo non
riesce a farlo
Schermo
1. Problemi con il
PCB
1. Sostituire la
scheda PCB
2. La spina è allentata
2. Controllare la
connessione tappo
13
Parola mancante
nel schermo
LCD
1. Il monitor LCD è
danneggiato
1. Sostituire il monitor
14
IL il compressore
si ferma dopo
che il gelato è
formato, ma il
motore non si
ferma
1. L'interruttore di
marcia il contatto è
collegato
1. Riparare o
sostituire il
interruttore di viaggio
15
Durante la
preparazione del
gelato il motore
non funziona e
non esce la
1. L'interruttore di marcia è
danneggiato
1. Riparare o
sostituire
l'interruttore
di corsa
- 18 -
crema
16
Crepe nell'albero
di agitazione
Ciò non accadrà in
circostanze normali. La
situazione anomala è la
seguente:
Sostituire
l'albero di
agitazione
1. C'è troppa acqua nel
liquame, il cilindro è congelato
2. Premere per errore il tasto
di refrigerazione durante la
pulizia, con conseguente
refrigerazione con acqua
3. Refrigerazione con una
bombola piena e l'altra vuota
4. Refrigerazione senza
residui
5. Abuso di una bombola nella
preparazione del gelato
6. L'impasto liquido caldo
viene versato nel cilindro per
una rapida refrigerazione
7. Refrigerazione dei liquami
con il motore collegato
inversamente
VII.Accessori
1. Una chiave esagonale interna
2. Una serie di anelli di scala
3. Un manuale dell'Uscr
4. Una scheda di garanzia
Parametri tecnici:
Fare riferimento alla targhetta per i parametri tecnici specifici e le
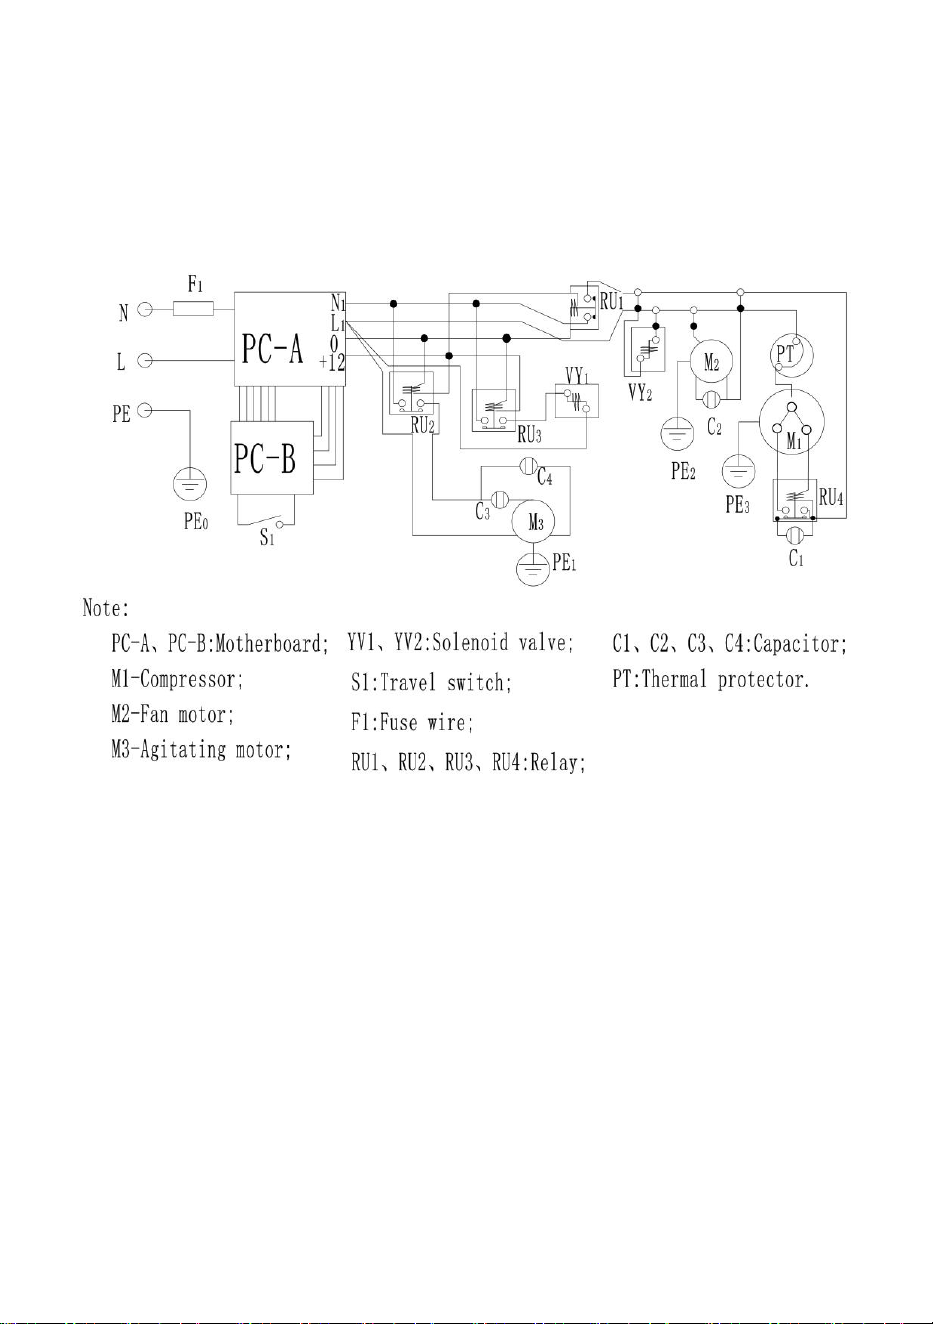
- 19 -
prestazioni del refrigerante.
Schema elettrico della gelatiera
Made in China


- 21 -
Técnico Soporte y certificado de garantía electrónica www.vevor.com/support
MAQUINA DE HELADOS
MODELO: BQL-7200T
We continue to be committed to provide you tools with competitive price.
"Save Half", "Half Price" or any other similar expressions used by us only represents an
estimate of savings you might benefit from buying certain tools with us compared to the major
top brands and doses not necessarily mean to cover all categories of tools offered by us. You
are kindly reminded to verify carefully when you are placing an order with us if you are
actually saving half in comparison with the top major brands.

- 1 -
MODELO: BQL-7200T
Have product questions? Need technical support? Please feel free to
contact us:
Technical Support and E-Warranty Certificate
www.vevor.com/support
NEED HELP? CONTACT US!
This is the original instruction, please read all manual instructions
carefully before operating. VEVOR reserves a clear interpretation of our
user manual. The appearance of the product shall be subject to the
product you received. Please forgive us that we won't inform you again if
there are any technology or software updates on our product.
ICE CREAM MACHINE

- 2 -
Advertencia: para reducir el riesgo de lesiones, el usuario
debe leer atentamente el manual de instrucciones.
ELIMINACIÓN CORRECTA
Este producto está sujeto a las disposiciones de la Directiva
Europea 2012/19/CE. El símbolo que muestra un contenedor
con ruedas tachado indica que el producto requiere recogida
selectiva de basura en la Unión Europea. Esto se aplica al
producto y a todos los accesorios marcados con este símbolo.
Los productos marcados como tales no podrán desecharse
con la basura doméstica normal, sino que deberán llevarse a
un punto de recogida para el reciclaje de aparatos eléctricos y
electrónicos.
Tabla de contenido
I. Precauciones de seguridad ----------------------------------------------
- - - - - - - - - - - - - - - - - - - - - - 2
I I . D i a g r a m a d e e s t r u c t u r a d e l p r o d u c t o - - - - - - - - -
- - - - - - - - - - - - - - - - - - - - - - - - - - - - - - - - - - - - - - - - - - - - - - - 7
III. Panel de operaciones y funciones --------- -------------------------------------
- - - - - - 8
IV. Cómo hacer helado -------------- ------------------------------- ------------10
V. Limpieza y mantenimiento------ ---------------------------------------
- - - - - - - - - - - - - - 1 1
V I . S o l u c i ó n d e p r o b l e m a s y s o l u c i o n e s - - - - - - -
- - - - - - - - - - - - - - - - - - - - - - - - - - - - - - - - - - - - - - - - - - - - 1 2
VII. Accesorios ------- -------------------- ----- ----------------- ----------------------17
V. Precauciones de seguridad
·Antes de utilizar el aparato, lea este manual del usuario para asegurarse

- 3 -
de obtener el máximo beneficio.
9. ADVERTENCIA:
1. Este aparato no está diseñado para que lo utilicen personas (incluidos
niños) con capacidades físicas, sensoriales o mentales reducidas, o con
falta de experiencia y conocimiento, a menos que hayan recibido
supervisión o instrucciones sobre el uso del aparato por parte de una
persona responsable de su seguridad.
2. Se debe supervisar a los niños para asegurarse de que no jueguen con
el aparato.
3. Este aparato puede ser utilizado por niños a partir de 8 años y personas
con capacidades físicas, sensoriales o mentales reducidas o con falta de
experiencia y conocimiento si han recibido supervisión o instrucciones
sobre el uso del aparato de forma segura y comprenden los peligros
involucrados. Los niños no deben jugar con el aparato. La limpieza y el
mantenimiento del usuario no deben ser realizados por niños sin
supervisión.
4. Si el cable de alimentación está dañado, debe ser reemplazado por el
fabricante, su agente de servicio o personas igualmente calificadas para
evitar riesgos.
5. Para evitar un peligro debido a la inestabilidad del aparato, debe fijarse
de acuerdo con las instrucciones.
6. Al colocar el aparato, asegúrese de que el cable de alimentación no
quede atrapado ni dañado.
7. No ubique múltiples tomas de corriente portátiles o fuentes de
alimentación portátiles en la parte posterior del aparato.
8. Mantenga las aberturas de ventilación, en el recinto del aparato o en la
estructura integrada, libres de obstrucciones.
9. No dañar el circuito frigorífico.
10. No almacene sustancias explosivas como latas de aerosol con un
propulsor inflamable en este aparato.
11. Los niños de 3 a 8 años pueden cargar y descargar aparatos
frigoríficos.

- 4 -
·Nota: Este aparato contiene refrigerante inflamable R290 y agente
espumante ciclopentano.
Evite el contacto con el fuego cuando lo transporte y utilice.
Solicite servicio profesional cuando la máquina se averíe. Envíelo a su
estación de eliminación designada local cuando lo deseche.
Durante el uso, mantenimiento y eliminación del aparato, preste
atención al símbolo similar al del lado izquierdo, que se
encuentra en la parte trasera del aparato (panel trasero o
compresor) y de color amarillo o naranja. Es un símbolo
de advertencia de riesgo de incendio. Hay materiales
inflamables en las tuberías de refrigerante y en el compresor.
Manténgase alejado de la fuente de fuego durante el uso, servicio y
eliminación.
10. Información de la FCC
PRECAUCIÓN: ¡ Los cambios o modificaciones no aprobados
expresamente por la parte responsable del cumplimiento podrían anular la
autoridad del usuario para operar el equipo!
Este dispositivo cumple con la Parte 15 de las normas de la FCC. La
operación está sujeta a las dos condiciones siguientes:
1) Este producto puede causar interferencias perjudiciales.
2) Este producto debe aceptar cualquier interferencia recibida, incluidas
las interferencias que puedan causar un funcionamiento no deseado.
ADVERTENCIA: Los cambios o modificaciones a este producto que no
estén aprobados expresamente por la parte responsable del cumplimiento
podrían anular la autoridad del usuario para operar el producto.
Nota: Este producto ha sido probado y cumple con los límites para un
dispositivo digital Clase B de conformidad con la Parte 15 de las reglas de
la FCC. Estos límites están diseñados para brindar una protección
razonable contra interferencias dañinas en una instalación residencial.
Este producto genera, usa y puede irradiar energía de radiofrecuencia y, si
no se instala y usa de acuerdo con las instrucciones, puede causar

- 5 -
interferencias dañinas en las comunicaciones por radio. Sin embargo, no
hay garantía de que no se produzcan interferencias en una instalación en
particular. Si este producto causa interferencias dañinas en la recepción
de radio o televisión, lo cual se puede determinar apagando y
encendiendo el producto, se recomienda al usuario que intente corregir la
interferencia mediante una o más de las siguientes medidas.
· Reorientar o reubicar la antena receptora.
· Aumentar la distancia entre el producto y el receptor.
· Conecte el producto a una toma de corriente de un circuito diferente al
que está conectado el receptor.
· Consulte al distribuidor o a un técnico experimentado en radio/TV para
obtener ayuda.
3 . Desembalaje e inspección
1) Cortar y desabrochar las correas y tablones que sujetan la caja; Retire
la caja, las tablas de espuma y las bolsas de embalaje para ver si hay
algún daño en la apariencia del dispositivo. (Nota: el dispositivo no debe
inclinarse más de 45° durante el transporte).
2) Abra la tapa del cilindro y verifique si todos los accesorios contenidos en
la lista de empaque están disponibles.
3) Retire los paneles superior e inferior en la parte posterior del dispositivo
para verificar si los motores internos, correas, compresores y otros
componentes están sueltos debido al transporte. Si encuentra alguna
anomalía, comuníquese con el proveedor a tiempo para resolver el
problema.
(Nota: al instalar o quitar cada panel, inserte una llave hexagonal interna o
un destornillador de estrella en la ranura para tornillos del panel, luego
presione ligeramente y gire para aflojar o fijar)
4) Instale el agitador y el cuerpo de la válvula en el dispositivo (Fig. A y B).
Nota: No olvide instalar el anillo escalador.

- 6 -
Figura A
Figura B
Figura C
5) Instale el receptor de agua como se muestra en (Fig. C).
6) Verifique la placa de identificación fijada en el panel posterior del
dispositivo y asegúrese de que el voltaje especificado en el dispositivo
coincida con el voltaje de suministro local.
7) Asegúrese de que el dispensador esté correctamente conectado a tierra.
De lo contrario, se puede producir una descarga eléctrica en caso de un
mal funcionamiento o una fuga eléctrica. (Para algunos modelos, la línea
de conexión a tierra es la línea amarilla y verde en la parte inferior).
8) Nunca dañe, rompa, tuerza ni estire el cable de alimentación suave.

- 7 -
4 . Entorno operativo
1) La temperatura mínima de funcionamiento es 10 ℃ y la temperatura
máxima de funcionamiento es 35 ℃. Nunca utilice el dispositivo en
ambientes húmedos o lugares expuestos a lluvia. No lo use en lugares
expuestos a mucho ácido sulfúrico o sal, como áreas de aguas termales o
áreas del golfo.
2) La temperatura mínima de la lechada es de 5 ℃ y la más alta es de
40 ℃; Se prefiere el almacenamiento a baja temperatura para mejorar la
eficiencia de producción del helado.
3) Colóquelo sobre una superficie nivelada y firme en un lugar bien
ventilado.
4) Se debe garantizar un espacio libre de al menos 80 cm detrás del
dispensador de helado y un espacio libre de no menos de 30 cm en ambos
lados para la entrada de aire frío y la descarga de aire caliente para
facilitar el ciclo de condensación del dispositivo; Se sugiere limpiar el polvo
del condensador.
Nota: El dispositivo inevitablemente oscilará durante el transporte, por lo
que se sugiere colocarlo de manera estable durante 4 horas antes del uso
inicial.
5 . Conexión eléctrica
Todos los cables internos se conectaron completamente antes de la
entrega de nuestros dispensadores de helado Bingzhile. Lo único que
deben hacer los usuarios es seleccionar los cables adecuados de acuerdo
con la potencia requerida y conectarlos con el cable de alimentación en la
parte inferior trasera del dispositivo, además de una conexión a tierra
adecuada.
Nota: Todo el cableado externo, enchufes y tomas de corriente deberán
cumplir con los requisitos de las normas nacionales.
6 . Requisitos de voltaje de alimentación
La desviación del voltaje nominal de la fuente de alimentación entrante no
debe ser ni demasiado alta ni demasiado baja. Si es así, el indicador (rojo)
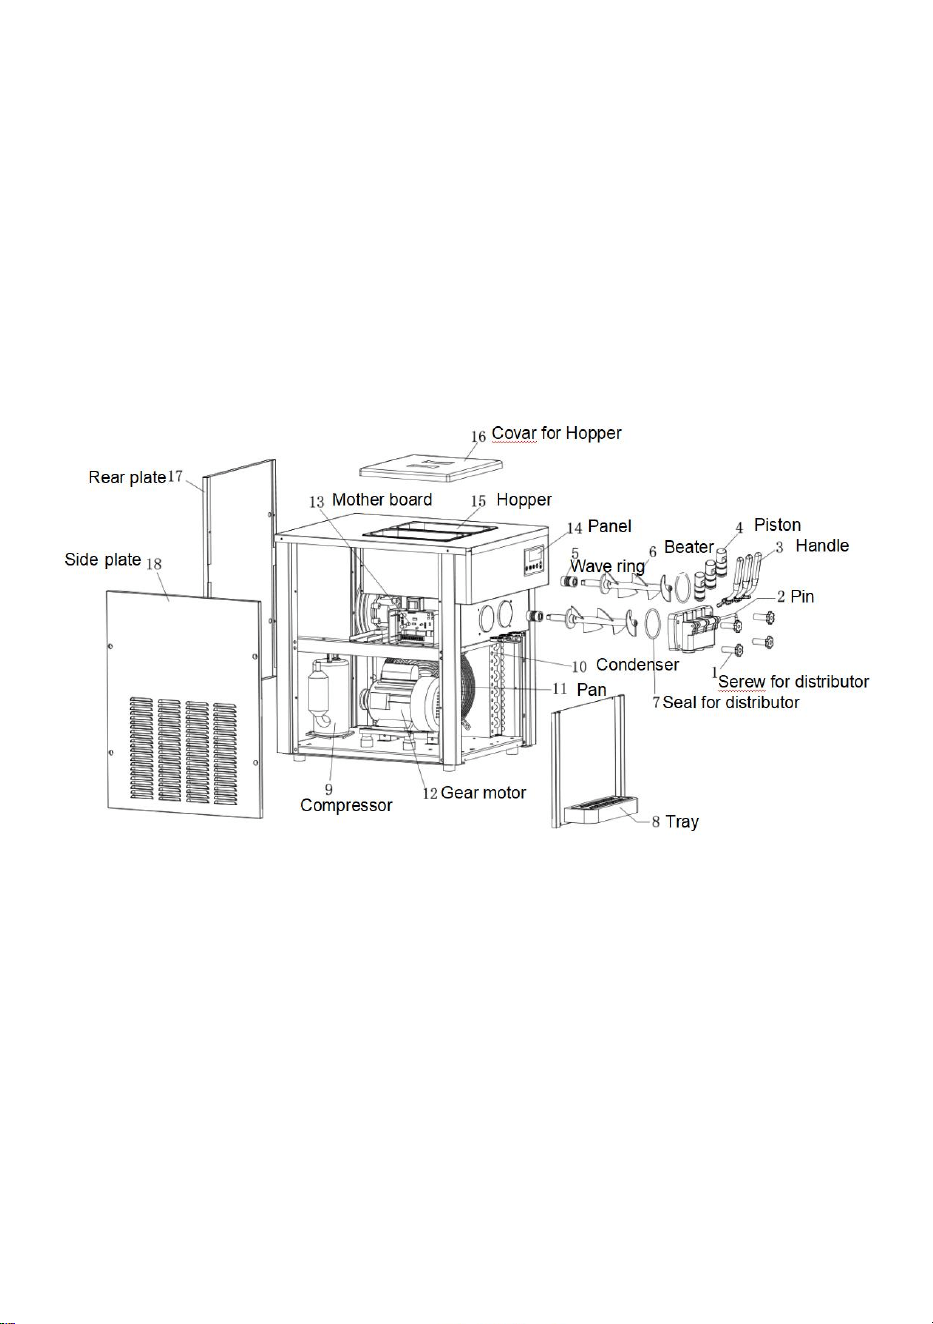
- 8 -
parpadeará y se emitirá una alarma (zumbido), lo que provocará una falla
en la función de refrigeración.
7 . Condiciones de refrigeración
a. No se permite la refrigeración cuando el eje agitador está en el cilindro
vacío.
b. No se permite la refrigeración cuando hay agua en el cilindro.
II. Diagrama de estructura del producto
III. Panel de operación y funciones
El panel de operación está dividido en una pantalla fluorescente clave y
una pantalla LCD (seleccione la operación correspondiente)
Opere como se muestra en las Fig. D, E y F.
1) Tecla Limpieza/Descongelación:
En el modo de espera, presione la tecla para activar el modo de limpieza.
Cuando el indicador de limpieza se enciende con un zumbido, el motor de
agitación comienza a funcionar y la pantalla LCD muestra el valor actual
del motor de agitación. Presione esta tecla nuevamente para ingresar al

- 9 -
modo de espera.
Mantenga presionada la tecla durante 5 segundos para iniciar la función
de descongelación con el ícono de limpieza parpadeando, luego presione
la tecla nuevamente para cerrar la función de descongelación. (Solo
aplicable para modelos con esta función)
2) Tecla de refrigeración:
En el modo de espera, presione la tecla de refrigeración para activar el
modo de refrigeración. Cuando el indicador de refrigeración se enciende
con un zumbido, el motor de agitación, el compresor y el motor del
ventilador comienzan a funcionar y la pantalla LCD muestra el valor actual
del motor de agitación. Presione esta tecla nuevamente para ingresar al
modo de espera.
3) Tecla de soplo;
Si presiona la tecla "soplar" con el indicador de la bomba de aire iluminado
en el modo de espera, la bomba de aire se desactivará; Si presiona la
tecla de soplo en el modo de limpieza o refrigeración, el indicador de la
bomba parpadeará para indicar que la bomba de aire está habilitada. (Solo
aplicable para modelos con esta función)
4) Tecla de ajuste de dureza:
Mantenga presionado “△” o “ ” durante un segundo para activar el modo
de configuración del parámetro de dureza, y luego presione la tecla
nuevamente para cambiar el valor de dureza. Cuanto mayor sea el valor
de dureza, más duro quedará el helado y viceversa.
5) Clave de conservación:
En estado de espera, presione la tecla "preservación" y el indicador de
preservación se enciende con un zumbido. Se produce un inicio retardado
en el motor de agitación, el compresor y el motor del ventilador, y el valor
actual del motor de agitación se muestra en la pantalla LCD. . Presione
esta tecla nuevamente para ingresar al modo de espera. (Solo aplicable
para modelos con esta función)
6) Tecla de temporización/reinicio
En el modo de espera, presione esta tecla para activar el modo de reinicio
del temporizador. Presione esta tecla nuevamente para cambiar el valor de
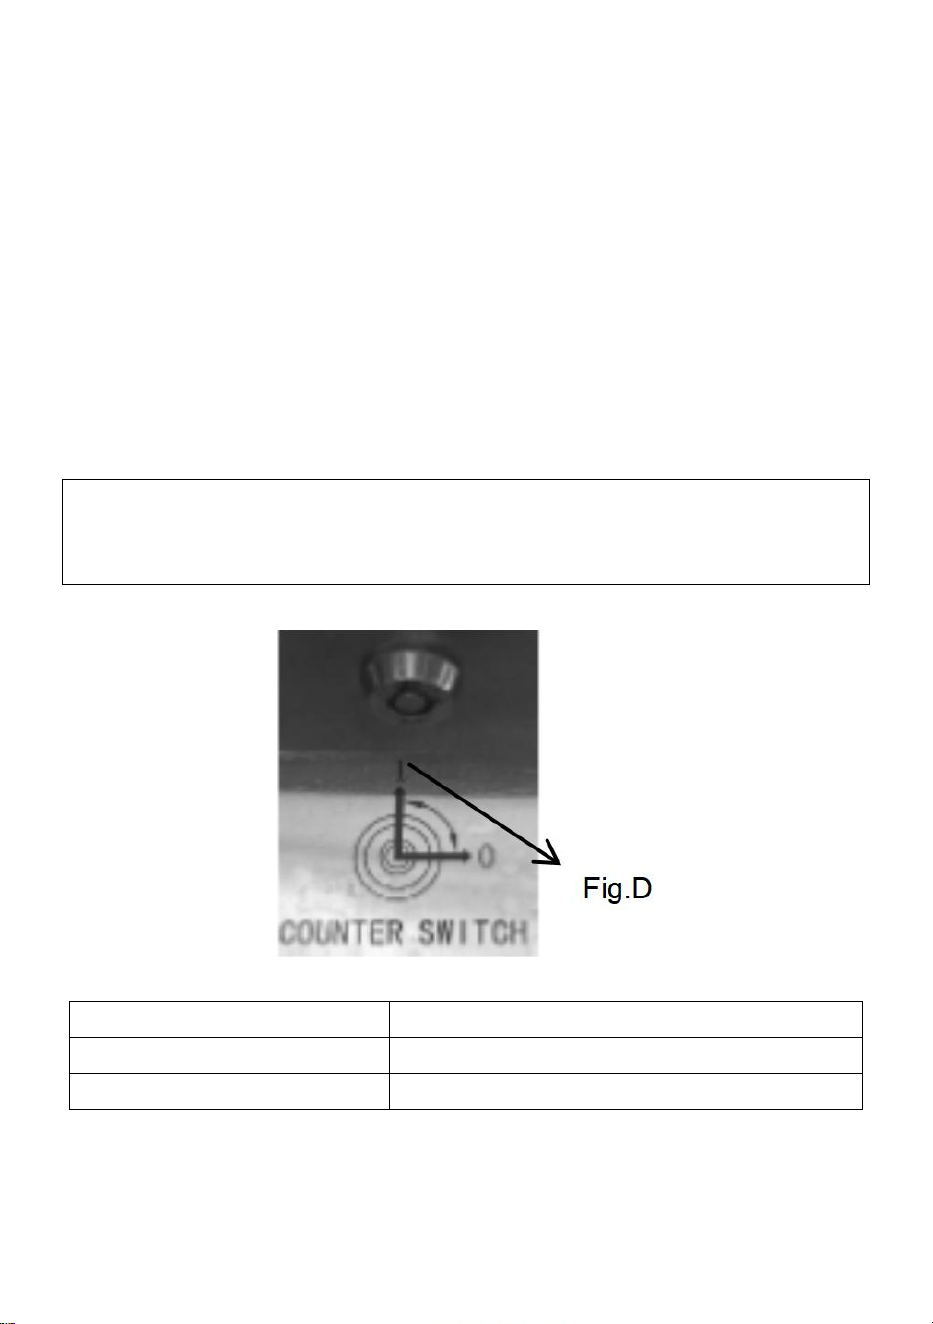
- 10 -
reinicio del temporizador.
Mantenga presionada esta tecla durante 10 segundos para restablecer el
número de tazas. (El interruptor de reinicio para algunos modelos se
muestra en la Fig. D)
7) Se muestra el número de helados:
Cada taza de helado descargada se registrará automáticamente.
Visualización de nivel/falta de lodo (Solo aplicable para modelos con esta
función):
Cuando al dispositivo le falta lechada, el código de escasez se mostrará
en el área de visualización del número de taza y el timbre emitirá una
alarma de forma intermitente.
Inserte la llave de reinicio en el interruptor en la parte inferior del panel
de visualización y gírelo 90° en el sentido de las agujas del reloj para
restablecer el registro de helado.
CLI
Falta de lodo en el cilindro izquierdo
CL2
Falta de lodo en el cilindro derecho
CL3
Escasez de purín en ambos cilindros
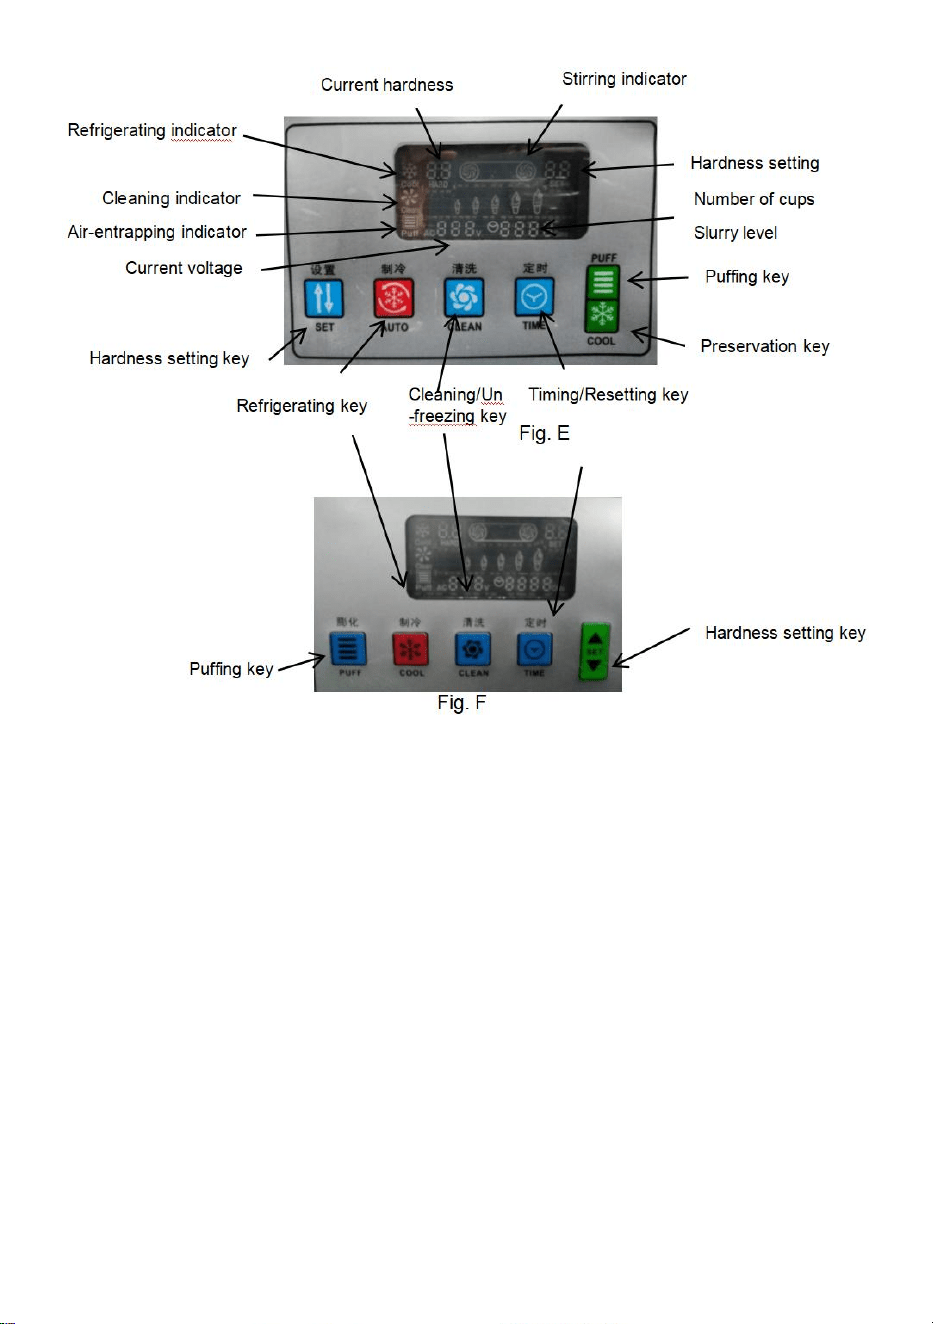
- 11 -
IV. Cómo hacer helado
1) Deje reposar la mezcla de helado preparada durante 15 minutos antes
de verterla en ambos cilindros en la parte superior del dispensador de
helado; Nota: La mezcla no se apelmaza.
2) Encienda el dispensador de helado para ingresar al modo de espera,
luego presione la "tecla de limpieza" para dejar que el dispositivo funcione
durante 3 a 5 minutos. Después de eso, mantenga presionada la manija
para descargar 2-3 tazas de lechada y viértalas nuevamente en el cilindro
superior para evitar que el agua se congele en la salida de descarga, lo
que puede afectar la producción de helado; Nota: La papilla se preparará
de acuerdo con la proporción de mezcla especificada en el Manual de
helado en polvo.
3) Presione la tecla "refrigeración" para activar el modo de refrigeración;

- 12 -
Mantenga presionado"△" o " " durante 1 segundo para ajustar la
dureza del helado según sea necesario.
Nota: En el modo de limpieza anterior, debe estar atento al valor de
"dureza actual" que se muestra en la pantalla. Si la "dureza actual" que se
muestra es 2,2, la dureza del helado se establecerá entre 3,5 y 5,0; si la
"dureza actual" es 3,5, la dureza del helado se establecerá entre 4,5 y 6,5.
4) Cuando la dureza del helado alcance el valor establecido, el dispositivo
se detendrá automáticamente; La intermitencia entre pausas podrá variar
de 3 a 9 minutos. En este momento, se puede presionar la tecla de ajuste
de tiempo para configurar el tiempo para que la máquina ingrese al
siguiente ciclo de refrigeración. El tiempo se incrementará en un minuto
por cada pulsación, hasta llegar a los 9 minutos. Y el valor volverá a 3
minutos si presiona nuevamente.
Nota: Cuando hace calor, se prefiere un intervalo de pausa más corto;
cuando hace frío, se prefiere un intervalo de pausa más largo.
Coloque un cono o una taza debajo de la salida de la válvula de descarga
y mantenga presionada la manija de descarga para exprimir el helado.
Suelte la manija para cerrar.
V. Limpieza y mantenimiento
1. Limpieza del cilindro frigorífico.
Para garantizar la salud de los consumidores de helado y prolongar la vida
útil del Dispensador, el cilindro frigorífico debe limpiarse y desinfectarse
después de cada uso.
1) Presione la tecla de limpieza para descargar toda la lechada en el
cilindro, presiónela nuevamente y haga una pausa por un momento.
2) Agregue agua tibia mezclada con una cantidad adecuada de antiséptico
líquido en los cilindros para llenar ambos cilindros con aproximadamente
la misma cantidad de agua.
3) Presione la tecla de limpieza nuevamente para revolver durante
aproximadamente 5 minutos antes de descargar el líquido de limpieza.
4) Utilice agua tibia para enjuagar la máquina 2 o 3 veces. Haga una

- 13 -
pausa por un momento.
5) Apagar, desmontar y lavar las piezas:
Afloje los cuatro tornillos de la válvula de salida y desmonte la unidad de la
válvula de salida.
Retire el pasador de sujeción de la manija, la manija, la varilla de la válvula
y el anillo de sellado de la válvula de salida en barriles.
Saque el agitador del cilindro frigorífico.
Limpiar todas las piezas desmontadas. Reemplace la pieza dañada por
una nueva.
Vuelva a montar las piezas en orden inverso.
2. Limpieza del cuerpo dispensador.
Lo que los consumidores necesitan es una buena apariencia. dispositivo
limpio y sanitario. Por favor mantenga el cuerpo limpio. Se puede utilizar
una toalla tibia para limpiar el cuerpo de la máquina y quitar las manchas.
Nunca enjuague directamente con agua para evitar que el dispositivo
funcione mal.
3. Limpieza del condensador
El condensador quedará cubierto de polvo después de funcionar durante
un período de tiempo, lo que provocará una mala disipación de calor y
refrigeración, por lo que debe limpiarse cada dos meses. Lo mejor es
pedirle a un trabajador de limpieza profesional que lo limpie. Antes de
limpiar, asegúrese de cortar
cortar la alimentación y no dañar las aletas del condensador.
4. Ajuste del cinturón
Después de operar por un período de tiempo, la correa de transmisión del
sistema de agitación se puede alargar y aflojar, lo cual deberá ser ajustado
a tiempo, preferiblemente por un técnico profesional. El dispensador debe
desconectarse del suministro eléctrico antes de ser ajustado. Si todavía
siente que el cinturón está demasiado flojo, deberá reemplazarlo con un
cinturón del mismo tipo.

- 14 -
VI. Análisis y solución de problemas
S/N
Problemas
Causas
Soluciones
1
El
dispensador
no arranca
1.El cable de alimentación
no está conectado
correctamente
1. Verifique el cable
de alimentación y
vuelva a conectarlo.
2. El enlace nulo no está
conectado.
2. Verifique la línea
nula y asegúrese de
que esté conectada
correctamente
3. El interruptor de función
no está encendido.
3. Encienda el
interruptor de
función.
4. Problemas con el
enchufe del interruptor de
función y conexión
4. Verifique el
enchufe y la conexión
de cables.
5. Problemas con la PCB
5. Reemplace la PCB
2
La función
de limpieza
no funciona
1. Conexión floja
1. Reconectar
2. El motor o condensador
está roto.
2. Reparar o
reemplazar el motor o
capacitor.
3. El contactor está roto
3. Reemplace el
contactor
3
El
compresor
no funciona
1. Bajo voltaje
1. Verifique el voltaje
de suministro
2. El contactor está roto
2. Reemplace el
contactor
3. Problemas con la PCB
3. Reemplace la PCB

- 15 -
4. El condensador no
funciona correctamente
(serie de 220 V)
4. Reemplace el
condensador
5. El compresor está roto.
5. Reemplace el
compresor
4
El
compresor
no funciona
1. Conexión floja del
interruptor de función
1. Vuelva a conectar
el cable del
interruptor de
función.
2. Problemas con la PCB
2. Reemplace la PCB
5
El
dispensador
no refrigera
1. Falta de refrigerante
1. Repare la fuga y
aspire para reponer
el refrigerante.
2. Bloqueo del
condensador
2. Limpiar el
condensador
3. El ventilador no
funciona
3. Reparar o
reemplazar el
ventilador
6
El cinturón
se desliza
1. El cinturón está
demasiado flojo
1. Ajuste el cinturón o
reemplace el
cinturón.
2. Problemas con el
reductor
2. Reparar o
reemplazar el
reductor
3. Cilindro congelado, eje
de agitación agrietado
3. Reemplace el eje
agitador.
S/N
Problemas
Causas
Soluciones
No hacer hielo
crema
1. Sin lodo en el
cilindro
1. Agregue lechada al
cilindro.

- 16 -
7
2. La descarga de
resoplidos La tubería
de lodo está
bloqueada.
2. Retire el tubo de
descarga. y limpiarlo
3. También una
proporción de
lechada inadecuada
grueso
3. Prepare una nueva
lechada calificada.
4. El interruptor de
viaje del el panel está
roto o desconectado
4. Vuelva a conectar
la línea o reemplace
el interruptor de viaje
5. El cinturón está
demasiado flojo y
resbalones
5.Ajuste la correa o
reemplace la cinturón
6. Problemas con el
reductor
6. Reparar o
reemplazar el
reductor
8
Pobre efecto de
inflado
1. La pipa de fumar
no es insertado
1. Inserte la pipa de
soplo
2.El interruptor de
soplo no está
encendido
2. Encienda el
interruptor de soplo.
9
El helado es
demasiado
blando.
1. La proporción de
lechada es incorrecta
1. Prepare una nueva
lechada calificada
2. Dureza inadecuada
configuración
2. Configure
nuevamente el valor
de dureza.
3. La corriente del
motor es demasiado
grande y hay un
cortocircuito.
3. Reparar o
reemplazar el motor.

- 17 -
10
El helado es
demasiado duro.
1. Se agrega
demasiada agua en la
lechada
1. Prepare una nueva
lechada calificada
2. Dureza inadecuada
configuración
2. Configure
nuevamente el valor
de dureza.
11
Fuga de lodo
1. La válvula de salida
tiene fugas
1. Reemplace el
anillo de sello de la
válvula de salida
2. La varilla de la
válvula tiene fugas.
2. Reemplace la
varilla de la válvula.
3. Contenido de lodo
3. Reemplace el
anillo de sello de la
válvula de salida
4. El anillo de sellado
del eje agitador. está
roto
4.Reemplace el anillo
de sello
12
LCD la pantalla
no mostrar
1. Problemas con la
PCB
1. Reemplace la PCB
2. El enchufe está
suelto
2. Verifique la
conexión enchufar
13
Falta palabra en
el LCD
1. El monitor LCD
está dañado.
1. Reemplace el
monitor
14
El el compresor
se detiene
después de que
el helado esté
formado, pero el
motor no para
1. El interruptor de
viaje contacto es
conectado
1. Repare o
reemplace el
interruptor de viaje
15
Al hacer helado
el motor no
funciona y no
1. El interruptor de viaje está
dañado.
1. Repare o
reemplace el
interruptor de
- 18 -
sale crema
viaje.
dieciséis
Grietas en el eje
agitador
No sucederá en
circunstancias normales. La
situación anormal es la
siguiente:
Rccoloque el
eje agitador
1. Hay demasiada agua en
la mezcla, el cilindro está
congelado.
2. Presione la tecla de
refrigeración por error al
limpiar, lo que provocará
refrigeración con agua
3. Refrigeración con un
cilindro lleno y el otro vacío
4. Refrigeración sin lechada
5. Abuso de un cilindro al
hacer helado
6. Se vierte lechada caliente
en el cilindro para una
refrigeración rápida.
7. Refrigeración del purín
con el motor conectado al
revés
VII.Accesorios
1. Una llave hexagonal interna
2. Un juego de anillos escalares.
3. Un manual de usuario
4. Una tarjeta de garantía
Parámetros técnicos:
Consulte la placa de identificación para conocer los parámetros técnicos
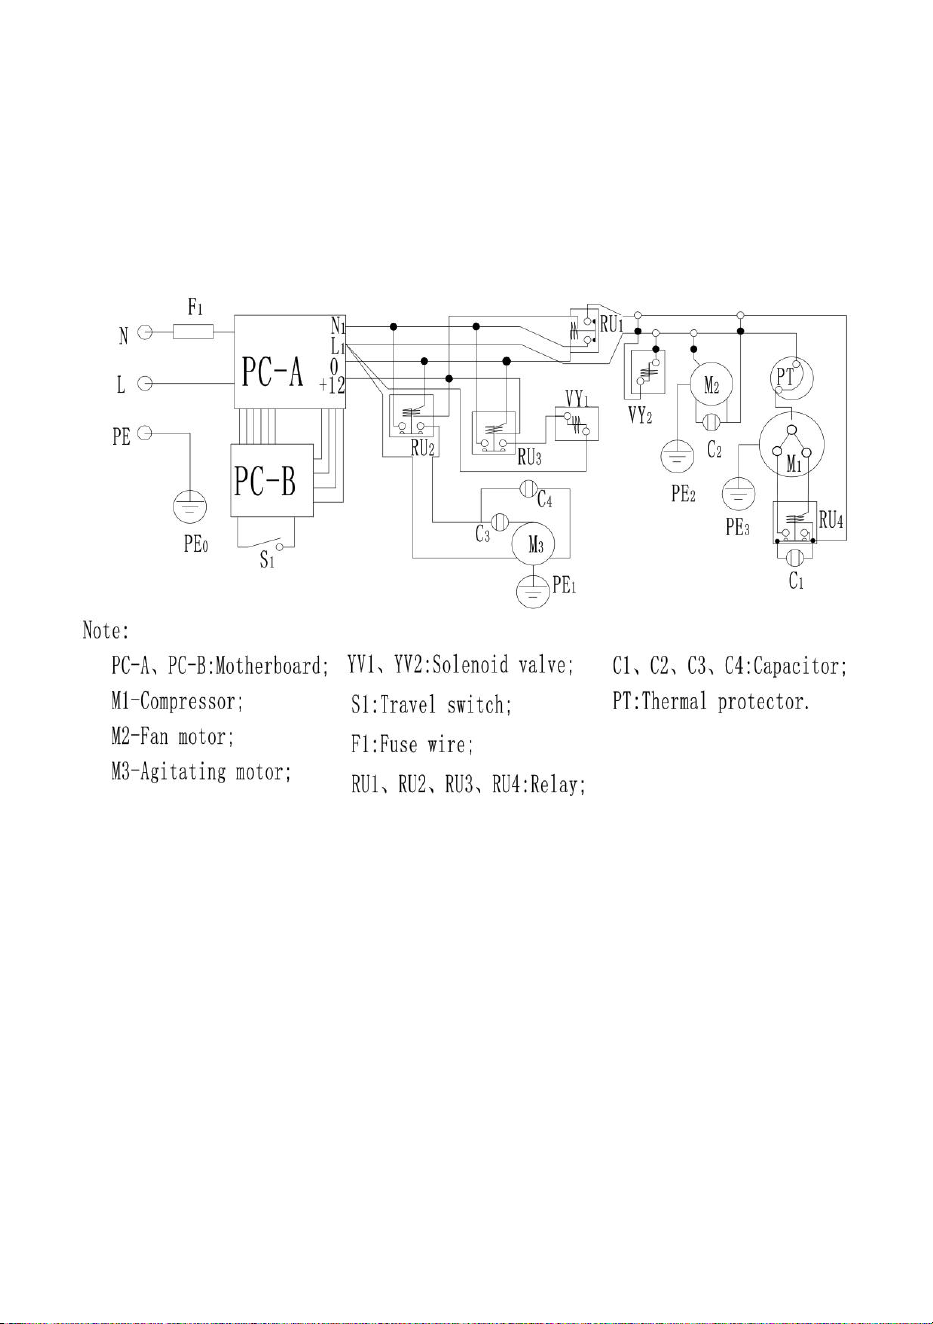
- 19 -
específicos y el rendimiento del refrigerante.
Diagrama de circuito de la máquina para hacer
helados
Hecho en china


- 21 -
Techniczny Certyfikat wsparcia i e-gwarancji www.vevor.com/support
MASZYNA DO LODÓW
MODEL: BQL-7200T
We continue to be committed to provide you tools with competitive price.
"Save Half", "Half Price" or any other similar expressions used by us only represents an
estimate of savings you might benefit from buying certain tools with us compared to the major
top brands and doses not necessarily mean to cover all categories of tools offered by us. You
are kindly reminded to verify carefully when you are placing an order with us if you are
actually saving half in comparison with the top major brands.
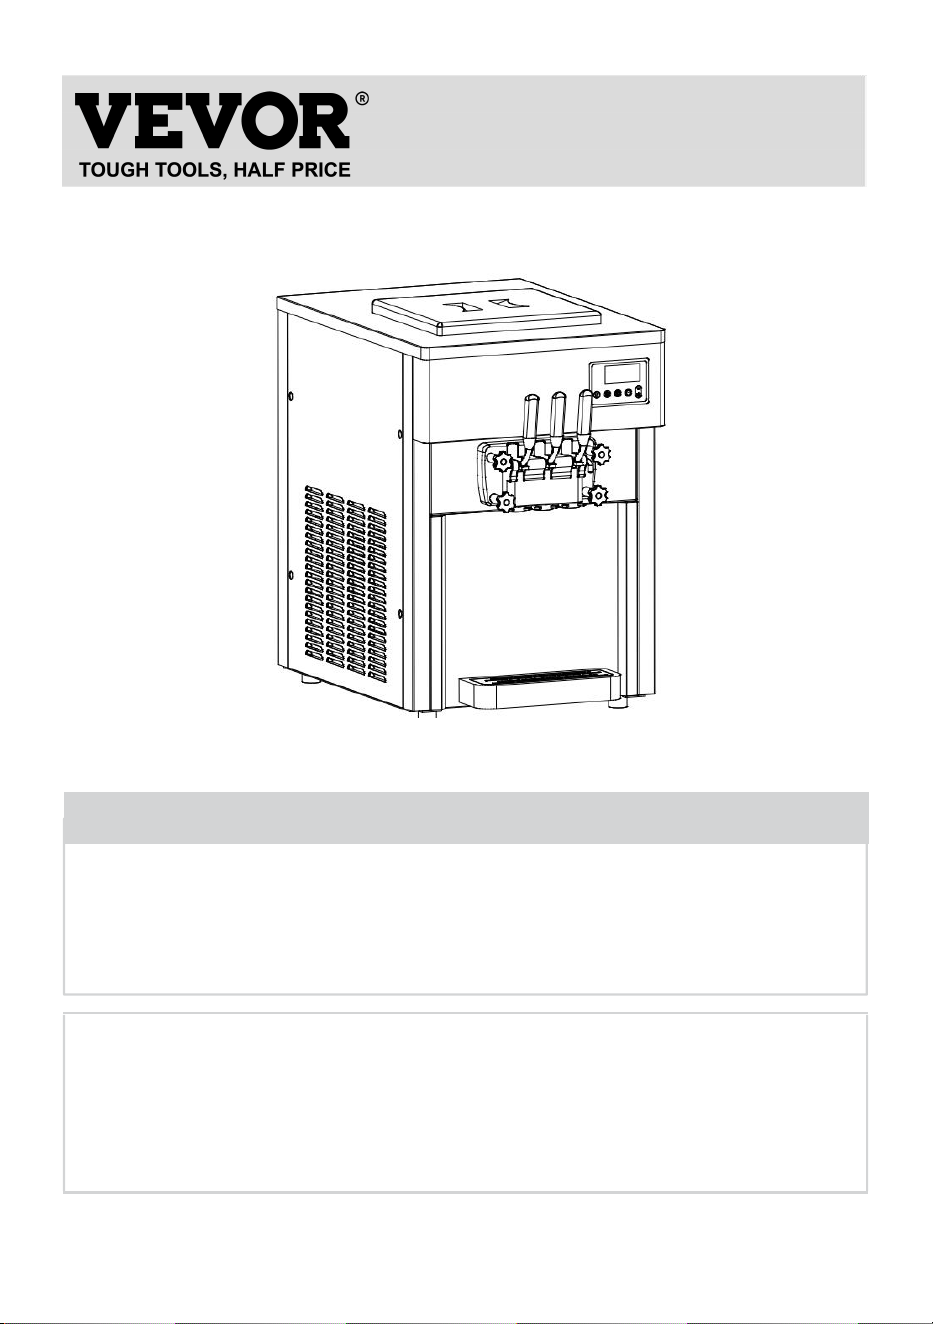
- 1 -
MODEL: BQL-7200T
Have product questions? Need technical support? Please feel free to
contact us:
Technical Support and E-Warranty Certificate
www.vevor.com/support
NEED HELP? CONTACT US!
This is the original instruction, please read all manual instructions
carefully before operating. VEVOR reserves a clear interpretation of our
user manual. The appearance of the product shall be subject to the
product you received. Please forgive us that we won't inform you again if
there are any technology or software updates on our product.
ICE CREAM MACHINE

- 2 -
Ostrzeżenie — aby zmniejszyć ryzyko obrażeń, użytkownik
musi uważnie przeczytać instrukcję obsługi.
PRAWIDŁOWA UTYLIZACJA
Ten produkt podlega przepisom Dyrektywy Europejskiej
2012/19/EC. Symbol przekreślonego kosza na śmieci
oznacza, że produkt wymaga selektywnej zbiórki śmieci na
terenie Unii Europejskiej. Dotyczy to produktu i wszystkich
akcesoriów oznaczonych tym symbolem. Produktów
oznaczonych jako takie nie można wyrzucać razem ze
zwykłymi odpadami domowymi, lecz należy je oddać do
punktu zbiórki w celu recyklingu urządzeń elektrycznych i
elektronicznych
Spis treści
I. Środki ostrożności --------------------------------------------------------
- - - - - - - - - - - - - - - - - - - - - - 2
II. Schemat struktury produktu --------- --------------------------------------
- - - - - - - - - 7
III. Panel operacyjny i funkcje --------- ------------------------------------ ------8
IV. Jak zrobić lody -------------- ---------------------------------------- ------------10
V. Czyszczenie i konserwacja------ --------------------------------------------------
- - - - - - - - - - - - - - 1 1
V I . R o z w i ą z y w a n i e p r o b l e m ó w i r o z w i ą z a n i a - - - - - - -
- - - - - - - - - - - - - - - - - - - - - - - - - - - - - - - - - - - - - - - - - - - - 1 2
VII. Akcesoria ------- -------------------- ----- ----------------- ----------------------17
VI. Środki ostrożności
·Przed użyciem urządzenia prosimy o zapoznanie się z niniejszą instrukcją
obsługi, aby w pełni wykorzystać jego możliwości.

- 3 -
11. OSTRZEŻENIE:
1. To urządzenie nie jest przeznaczone do użytku przez osoby (w tym
dzieci) o ograniczonych zdolnościach fizycznych, sensorycznych lub
umysłowych lub nieposiadających doświadczenia i wiedzy, chyba że
znajdują się one pod nadzorem lub zostały poinstruowane w zakresie
użytkowania urządzenia przez osobę odpowiedzialną za ich
bezpieczeństwo.
2. Dzieci należy nadzorować, aby mieć pewność, że nie bawią się
urządzeniem.
3. Z tego urządzenia mogą korzystać dzieci w wieku od 8 lat i starsze oraz
osoby o ograniczonych zdolnościach fizycznych, sensorycznych lub
umysłowych lub nieposiadające doświadczenia i wiedzy, jeżeli znajdują się
pod nadzorem lub zostały pouczone dotyczące bezpiecznego użytkowania
urządzenia i rozumieją związane z tym zagrożenia. Dzieciom nie wolno
bawić się urządzeniem. Czyszczenie i konserwacja nie mogą być
wykonywane przez dzieci bez nadzoru.
4. Jeżeli przewód zasilający jest uszkodzony, musi zostać wymieniony
przez producenta, jego przedstawiciela serwisowego lub podobnie
wykwalifikowaną osobę, aby uniknąć zagrożenia.
5. Aby uniknąć zagrożeń wynikających z niestabilności urządzenia, należy
je zamocować zgodnie z instrukcją.
6. Ustawiając urządzenie, upewnij się, że przewód zasilający nie jest
przytrzaśnięty ani uszkodzony.
7. Nie umieszczaj wielu przenośnych gniazdek elektrycznych ani
przenośnych zasilaczy z tyłu urządzenia.
8. Otwory wentylacyjne w obudowie urządzenia lub w konstrukcji do
zabudowy powinny być drożne.
9. Nie uszkadzaj obwodu czynnika chłodniczego.
10. Nie przechowuj w tym urządzeniu substancji wybuchowych, takich jak
puszki aerozolowe z łatwopalnym gazem pędnym.
11. Dzieciom w wieku od 3 do 8 lat przysługuje prawo do załadunku i
rozładunku urządzeń chłodniczych.

- 4 -
·Uwaga: To urządzenie zawiera łatwopalny czynnik chłodniczy R290 i
środek spieniający cyklopentan.
Podczas transportu i użytkowania należy unikać kontaktu z ogniem.
W przypadku awarii maszyny poproś specjalistę o serwis. Po wyrzuceniu
należy go przekazać do wyznaczonego lokalnego punktu utylizacji.
Podczas użytkowania, serwisowania i utylizacji urządzenia należy
zwrócić uwagę na symbol podobny do lewego boku,
który znajduje się z tyłu urządzenia (panel tylny lub
sprężarka) i ma kolor żółty lub pomarańczowy. Jest to
symbol ostrzegawczy dotyczący zagrożenia pożarowego.
W rurach czynnika chłodniczego i sprężarce znajdują się materiały
łatwopalne. Podczas użytkowania, serwisowania i utylizacji należy
znajdować się z dala od źródła ognia.
12. Informacje FCC
UWAGA: Zmiany lub modyfikacje, które nie zostały wyraźnie zatwierdzone
przez stronę odpowiedzialną za zgodność, mogą unieważnić uprawnienia
użytkownika do obsługi urządzenia!
To urządzenie jest zgodne z częścią 15 przepisów FCC. Działanie podlega
następującym dwóm warunkom:
1) Ten produkt może powodować szkodliwe zakłócenia.
2) Ten produkt musi akceptować wszelkie odbierane zakłócenia, w tym
zakłócenia, które mogą powodować niepożądane działanie.
OSTRZEŻENIE: Zmiany lub modyfikacje tego produktu, które nie zostały
wyraźnie zatwierdzone przez stronę odpowiedzialną za zgodność, mogą
unieważnić uprawnienia użytkownika do obsługi produktu.
Uwaga: ten produkt został przetestowany i stwierdzono, że spełnia
ograniczenia dla urządzeń cyfrowych klasy B zgodnie z częścią 15
przepisów FCC. Ograniczenia te mają na celu zapewnienie rozsądnej
ochrony przed szkodliwymi zakłóceniami w instalacjach domowych.
Ten produkt generuje, wykorzystuje i może emitować energię o
częstotliwości radiowej, a jeśli nie zostanie zainstalowany i nie będzie

- 5 -
używany zgodnie z instrukcją, może powodować szkodliwe zakłócenia w
komunikacji radiowej. Nie ma jednak gwarancji, że w konkretnej instalacji
nie wystąpią zakłócenia. Jeśli produkt powoduje szkodliwe zakłócenia w
odbiorze radia lub telewizji, co można stwierdzić poprzez wyłączenie i
włączenie produktu, zachęca się użytkownika do podjęcia próby
skorygowania zakłóceń za pomocą jednego lub kilku z poniższych
środków.
· Zmień orientację lub położenie anteny odbiorczej.
· Zwiększ odległość pomiędzy produktem a odbiornikiem.
· Podłącz produkt do gniazdka w innym obwodzie niż ten, do którego
podłączony jest odbiornik.
· Skonsultuj się ze sprzedawcą lub doświadczonym technikiem
radiowo-telewizyjnym w celu uzyskania pomocy.
3 . Rozpakowanie i kontrola
1) Przetnij i odepnij pasy i deski mocujące karton; zdejmij karton, płyty
piankowe i torby do pakowania, aby sprawdzić, czy urządzenie nie uległo
uszkodzeniu. (Uwaga: podczas transportu urządzenie nie może być
przechylone o więcej niż 45°.)
2) Otwórz pokrywę cylindra i sprawdź, czy dostępne są wszystkie
akcesoria zawarte na liście przewozowej.
3) Zdejmij górny i dolny panel z tyłu urządzenia, aby sprawdzić, czy
wewnętrzne silniki, paski, sprężarki i inne elementy nie są poluzowane w
czasie transportu. W przypadku wykrycia jakichkolwiek nieprawidłowości
należy na czas skontaktować się z dostawcą w celu rozwiązania problemu.
(Uwaga: podczas instalowania lub zdejmowania każdego panelu włóż
wewnętrzny klucz sześciokątny lub śrubokręt krzyżowy w rowek śruby na
panelu, a następnie lekko naciśnij i obróć, aby poluzować lub zamocować)
4) Zamontuj mieszadło i korpus zaworu na urządzeniu (Rys. A i B).
Uwaga: Nie zapomnij zainstalować pierścienia skalującego

- 6 -
Ryc. A
Ryc. B
Rys. C
5) Zamontuj zbiornik wody jak pokazano na (Rys. C).
6) Sprawdź tabliczkę znamionową umieszczoną na tylnym panelu
urządzenia i upewnij się, że napięcie podane na urządzeniu odpowiada
napięciu w lokalnej sieci zasilającej.
7) Upewnij się, że dozownik jest prawidłowo uziemiony. W przeciwnym
razie może dojść do porażenia prądem w przypadku nieprawidłowego
działania lub upływu prądu. (W przypadku niektórych modeli linią
uziemiającą jest żółto-zielona linia na dole)
8) Nigdy nie uszkadzaj, nie łam, nie skręcaj ani nie rozciągaj miękkiego
przewodu zasilającego.

- 7 -
4 . Środowisko działania
1) Minimalna temperatura robocza wynosi 10 ℃, a maksymalna
temperatura robocza to 35 ℃. Nigdy nie używaj urządzenia w wilgotnym
środowisku lub miejscach narażonych na działanie deszcz. Nie stosować
w miejscach narażonych na działanie dużej ilości kwasu siarkowego lub
soli, takich jak obszary gorących źródeł lub obszary zatok.
2) Minimalna temperatura szlamu wynosi 5 ℃, a najwyższa 40 ℃; W celu
poprawy wydajności produkcji lodów preferowane jest przechowywanie w
niskiej temperaturze.
3) Proszę położyć na równej i twardej powierzchni w dobrze
wentylowanym miejscu.
4) Należy zapewnić prześwit co najmniej 80 cm za dozownikiem lodów i
prześwit nie mniejszy niż 30 cm po obu stronach dla dopływu zimnego
powietrza i odprowadzania gorącego powietrza, aby ułatwić cykl
kondensacji urządzenia; regularnie zaleca się oczyszczenie skraplacza z
kurzu.
Uwaga: urządzenie będzie nieuchronnie drgać podczas transportu,
dlatego zaleca się jego stabilne ustawienie na 4 godziny przed pierwszym
użyciem.
5 . Podłączenie zasilania
Wszystkie przewody wewnętrzne zostały w pełni podłączone przed
dostawą naszych dozowników lodów Bingzhile. Jedyne, co użytkownik
musi zrobić, to wybrać odpowiednie przewody w zależności od wymaganej
mocy i podłączyć je do przewodu zasilającego w dolnej części tylnej części
urządzenia, oprócz odpowiedniego uziemienia.
Uwaga: Całe zewnętrzne okablowanie, wtyczki i gniazda muszą spełniać
wymagania norm krajowych
6 . Wymagania dotyczące napięcia zasilania
Odchylenie napięcia znamionowego zasilania wejściowego nie może być
zbyt duże ani zbyt małe. Jeżeli tak, wskaźnik (czerwony) zacznie migać i
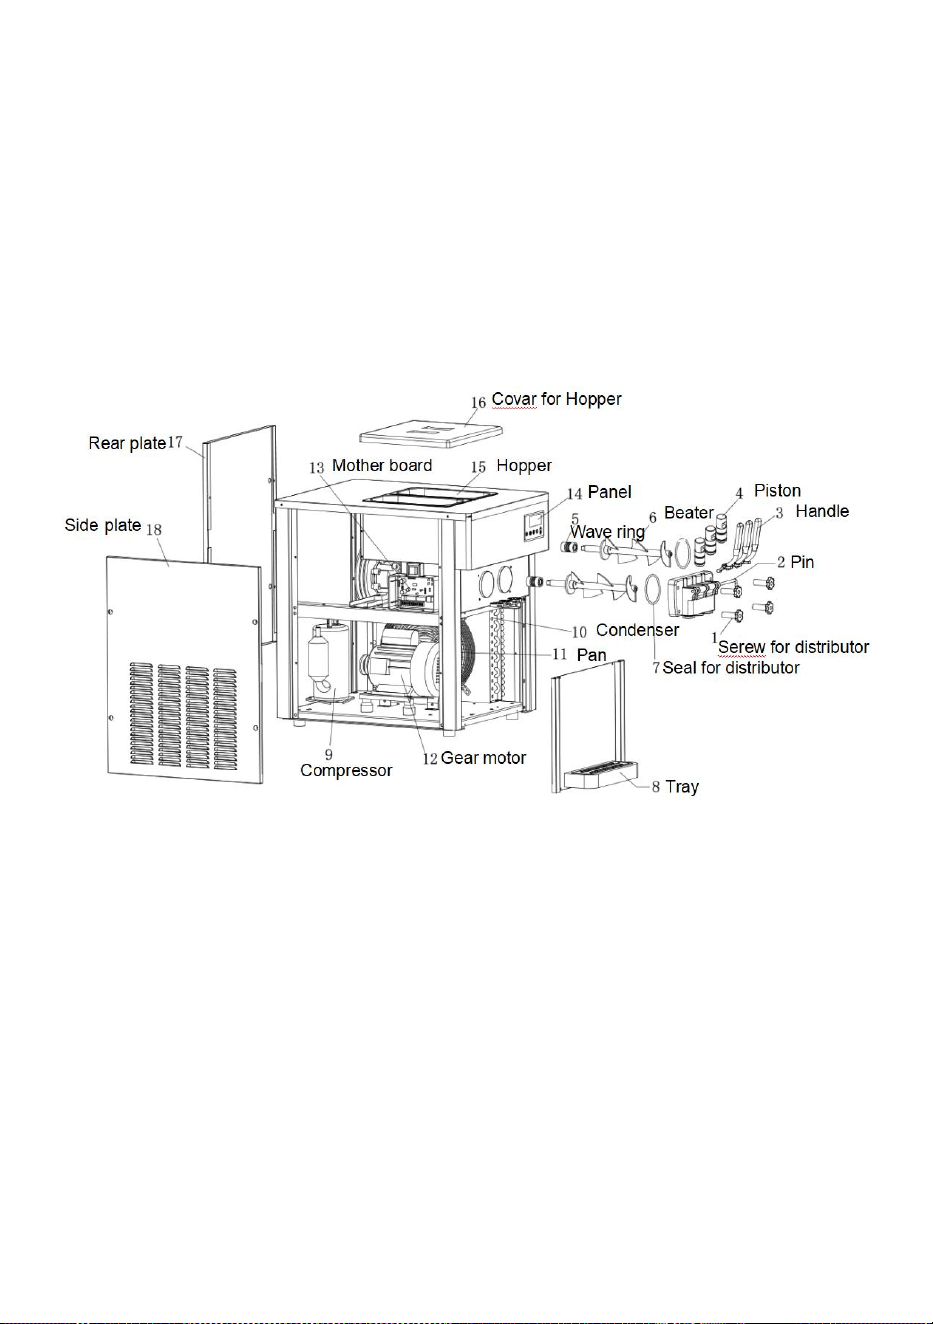
- 8 -
włączy się alarm (brzęczyk), co spowoduje awarię funkcji chłodzenia.
7 . Warunki chłodnicze
A. Chłodzenie nie jest dozwolone, gdy wał mieszający znajduje się w
pustej butli.
B. Chłodzenie nie jest dozwolone, jeśli w butli znajduje się woda.
II. Schemat struktury produktu
III. Panel operacyjny i funkcje
Panel operacyjny jest podzielony na kluczowy ekran fluorescencyjny i
ekran LCD (wybierz odpowiednią operację)
Postępuj zgodnie z rys. D, E i F
1) Przycisk czyszczenia/rozmrażania:
W trybie gotowości naciśnij klawisz, aby uruchomić tryb czyszczenia. Gdy
wskaźnik czyszczenia zaświeci się i rozlegnie się brzęczący dźwięk, silnik
mieszający zacznie pracować, a na ekranie LCD pojawi się bieżąca
wartość silnika mieszającego. Naciśnij ten klawisz ponownie, aby przejść
do trybu gotowości.

- 9 -
Przytrzymaj klawisz przez 5 sekund, aby uruchomić funkcję odmrażania,
gdy ikona czyszczenia miga, a następnie naciśnij ponownie klawisz, aby
zamknąć funkcję odmrażania. (Dotyczy tylko modeli z tą funkcją)
2) Klucz chłodniczy:
W trybie gotowości naciśnij przycisk chłodzenia, aby włączyć tryb
chłodzenia. Gdy wskaźnik chłodzenia zapala się i słychać brzęczenie,
silnik mieszający, sprężarka i silnik wentylatora zaczynają działać, a na
ekranie LCD wyświetlana jest aktualna wartość silnika mieszającego.
Naciśnij ten klawisz ponownie, aby przejść do trybu gotowości.
3) Klawisz dmuchania;
Jeżeli w trybie czuwania naciśniesz przycisk „zaciągania”, gdy świeci się
kontrolka pompy powietrza, pompa powietrza zostanie wyłączona; Jeśli
naciśniesz przycisk zaciągania w trybie czyszczenia lub chłodzenia,
wskaźnik pompy zacznie migać, wskazując, że pompa powietrza jest
włączona. (Dotyczy tylko modeli z tą funkcją)
4) Klucz do ustawiania twardości:
Przytrzymaj „△” lub „ ” przez jedną sekundę, aby uruchomić tryb
ustawiania parametrów twardości, a następnie naciśnij ponownie klawisz,
aby zmienić wartość twardości. Im większa jest wartość twardości, tym
twardsze będą lody i odwrotnie.
5) Klucz konserwacyjny:
W stanie gotowości naciśnij przycisk „konserwacja”, a wskaźnik
konserwacji zaświeci się i wygenerowany zostanie sygnał dźwiękowy.
Silnik mieszający, sprężarka i silnik wentylatora zostaną uruchomione z
opóźnieniem, a aktualna wartość silnika mieszającego zostanie
wyświetlona na ekranie LCD . Naciśnij ten klawisz ponownie, aby przejść
do trybu gotowości. (Dotyczy tylko modeli z tą funkcją)
6) Klawisz pomiaru czasu/resetowania
W trybie gotowości naciśnij ten przycisk, aby uruchomić tryb resetowania
timera. Naciśnij ten przycisk ponownie, aby zmienić wartość resetowania
timera.
Przytrzymaj ten przycisk przez 10 sekund, aby zresetować liczbę filiżanek.
(Przełącznik resetowania w niektórych modelach pokazano na rys. D)

- 10 -
7) Wyświetlana liczba lodów:
Każda wypuszczona filiżanka lodów zostanie automatycznie
zarejestrowana.
Wskaźnik poziomu/niedoboru gnojowicy (dotyczy tylko modeli z tą
funkcją):
Gdy w urządzeniu zabraknie gnojowicy, w obszarze wyświetlania numeru
kubka zostanie wyświetlony kod braku, a brzęczyk będzie co jakiś czas
emitował alarm.
Włóż klucz resetujący do przełącznika na dolnej części panelu
wyświetlacza i obróć go zgodnie z ruchem wskazówek zegara o 90°, aby
zresetować rekord lodów.
interfejs wiersza polecenia
Brak gnojowicy w lewym cylindrze
CL2
Brak szlamu w prawym cylindrze
CL3
Niedobór gnojowicy w obu powiekach

- 11 -
IV. Jak zrobić lody
1) Pozostaw przygotowaną zawiesinę lodową na 15 minut, a następnie
wlej ją do obu cylindrów na górze dozownika lodów; Uwaga: Zawiesina nie
powinna się zbrylać.
2) Włącz dozownik lodów, aby przejść w tryb gotowości, a następnie
naciśnij „przycisk czyszczenia”, aby urządzenie działało przez 3-5 minut.
Następnie przytrzymaj uchwyt, aby wylać 2-3 szklanki gnojowicy i wlej je
ponownie do górnego cylindra, aby zapobiec oblodzeniu wody na wylocie,
co może mieć wpływ na produkcję lodów; Uwaga: Zawiesinę należy
przygotować zgodnie z proporcjami mieszania określonymi w Instrukcji
lodów w proszku.
3) Naciśnij przycisk „chłodzenie”, aby włączyć tryb chłodzenia; Przytrzymaj
„△” lub „ " przez 1 sekundę, aby dostosować twardość lodów do

- 12 -
potrzeb.
Uwaga: W poprzednim trybie czyszczenia należy zwracać uwagę na
wyświetlaną na ekranie wartość „aktualnej twardości”. Jeżeli wyświetlana
„aktualna twardość” wynosi 2,2, twardość lodów należy ustawić w
przedziale 3,5–5,0; jeżeli „aktualna twardość” wynosi 3,5, twardość lodów
ustala się w przedziale 4,5–6,5.
4) Gdy twardość lodów osiągnie ustawioną wartość, urządzenie
automatycznie się zatrzyma; Przerwa pomiędzy pauzami może wynosić od
3 do 9 minut. W tym momencie można nacisnąć przycisk regulacji czasu,
aby ustawić czas wejścia urządzenia w kolejny cykl chłodzenia. Każde
naciśnięcie powoduje zwiększenie czasu o jedną minutę, aż do 9 minut. Po
ponownym naciśnięciu wartość powróci do 3 minut.
Uwaga: w czasie upałów preferowana jest krótsza przerwa, a w chłodne
dni preferowana jest dłuższa przerwa.
Umieść stożek lub filiżankę pod wylotem zaworu spustowego i przytrzymaj
uchwyt spustowy, aby wycisnąć lody. Zwolnij uchwyt, aby zamknąć.
V. Czyszczenie i konserwacja
1. Czyszczenie cylindra chłodniczego
Aby zapewnić zdrowie konsumentów lodów i przedłużyć żywotność
Dozownika, cylinder chłodniczy należy czyścić i dezynfekować po każdym
użyciu.
1) Naciśnij przycisk czyszczenia, aby usunąć całą zawiesinę z cylindra, a
następnie naciśnij go ponownie i zatrzymaj się na chwilę.
2) Do cylindrów dodać letnią wodę zmieszaną z odpowiednią ilością
płynnego środka antyseptycznego, aby napełnić obie butle mniej więcej
taką samą ilością wody.
3) Naciśnij ponownie przycisk czyszczenia i mieszaj przez około 5 minut
przed wypuszczeniem płynu czyszczącego.
4) Zamiast tego użyj letniej wody i przepłucz maszynę 2–3 razy. Zatrzymaj
się na chwilę.
5) Wyłącz, zdemontuj i umyj części:

- 13 -
Poluzuj cztery śruby na zaworze wylotowym i zdemontuj zespół zaworu
wylotowego.
Wyjmij sworzeń mocujący uchwyt, uchwyt, pręt zaworu i pierścień
uszczelniający z zaworu wylotowego w kadziach.
Wyjąć mieszadło z cylindra chłodniczego.
Wyczyść wszystkie zdemontowane części. Wymień uszkodzoną część na
nową.
Zmontuj ponownie części w odwrotnej kolejności.
2. Czyszczenie korpusu dozownika
Konsumenci potrzebują ładnego wyglądu. urządzenie czyste i higieniczne.
Proszę, utrzymuj ciało w czystości. Do wytarcia korpusu maszyny i
usunięcia plam można użyć ciepłego ręcznika. Nigdy nie spłukuj
bezpośrednio wodą, aby zapobiec nieprawidłowemu działaniu urządzenia.
3. Czyszczenie skraplacza
Po pewnym czasie pracy skraplacz pokryje się kurzem, co spowoduje
słabe odprowadzanie ciepła i chłodzenie, dlatego należy go czyścić co dwa
miesiące. O wyczyszczenie najlepiej zlecić profesjonalnej firmie
sprzątającej. Przed czyszczeniem należy przeciąć
odłączyć zasilanie i nie uszkodzić żeberek skraplacza.
4. Regulacja paska
Po pewnym czasie pracy pasek napędowy układu mieszającego można
wydłużyć i poluzować, co należy w odpowiednim czasie wyregulować,
najlepiej przez wykwalifikowanego technika. Przed regulacją dozownik
należy odłączyć od zasilania. Jeśli nadal uważasz, że pasek jest za luźny,
należy go wymienić na pasek tego samego typu.
VI. Analiza i rozwiązanie problemów
S/N
Problemy
Powoduje
Rozwiązania

- 14 -
1
Dozownik
nie
uruchamia
się
1. Przewód zasilający nie
jest prawidłowo
podłączony
1. Sprawdź przewód
zasilający i podłącz
go ponownie
2. Linia zerowa nie jest
podłączona
2. Sprawdź linię
zerową i upewnij się,
że jest prawidłowo
podłączona
3. Przełącznik funkcji nie
jest włączony
3. Włącz przełącznik
funkcji
4. Problemy z wtyczką
przełącznika funkcji i
połączenie
4. Sprawdź wtyczkę i
połączenie
przewodów
5. Problemy z płytką PCB
5. Wymień płytkę
drukowaną
2
Funkcja
czyszczenia
nie działa
1. Luźne połączenie
1. Połącz ponownie
2. Silnik lub kondensator
jest uszkodzony
2. Napraw lub
wymień silnik lub
kondensator
3. Stycznik jest
uszkodzony
3. Wymienić stycznik
3
Sprężarka
nie działa
1. Niskie napięcie
1. Sprawdź napięcie
zasilania
2. Stycznik jest
uszkodzony
2. Wymienić stycznik
3. Problemy z płytką PCB
3. Wymień płytkę
drukowaną
4. Awaria kondensatora
(seria 220 V)
4. Wymień
kondensator
5. Sprężarka jest zepsuta
5. Wymienić
sprężarkę

- 15 -
4
Sprężarka
nie działa
1. Luźne połączenie
przełącznika funkcji
1. Podłącz ponownie
przewód przełącznika
funkcji
2. Problemy z płytką PCB
2. Wymień płytkę
drukowaną
5
Dozownik
nie chłodzi
1. Pojemność czynnika
chłodniczego
1. Napraw wyciek i
odkurz go, aby
uzupełnić czynnik
chłodniczy
2. Blokada skraplacza
2. Wyczyść skraplacz
3. Wentylator nie działa
3. Napraw lub
wymień wentylator
6
Pasek się
ślizga
1. Pasek jest za luźny
1. Wyreguluj pasek
lub wymień pasek
2. Problemy z reduktorem
2. Napraw lub
wymień reduktor
3. Zamrożony cylinder,
pęknięcie wału
mieszającego
3. Wymień wał
mieszający
S/N
Problemy
Powoduje
Rozwiązania
7
Nie udało się
zrobić lodu krem
1. Brak zawiesiny w
cylindrze
1. Dodaj gnojowicę
do cylindra
2. Rozładowywanie
zasysające rura do
gnojowicy jest
zablokowana
2. Zdjąć rurę
odprowadzającą i
wyczyść go
3. Niewłaściwy
stosunek zawiesiny
gruby
3. Przygotuj nową
odpowiednią
zawiesinę

- 16 -
4. Przełącznik jazdy
pan e l jest
uszkodzony lub
bezładny
4. Podłącz ponownie
linię lub wymień
przełącznik podróżny
5. Pasek jest za luźny
i kąpielówki
5.Wyreguluj pasek
lub wymień pasek
6. Problemy z
reduktor
6. Napraw lub
wymień reduktor
8
Słaby efekt
zaciągania
1. Rura tłocząca nie
jest wstawiony
1. Włóż rurkę do
przedmuchu
2. Przełącznik
zaciągania nie jest
włączone
2. Włącz przełącznik
zaciągania
9
Lody są zbyt
miękkie
1. Nieprawidłowy
stosunek zawiesiny
1. Przygotuj nową
kwalifikowaną
zawiesinę
2. Niewłaściwa
twardość ustawienie
2. Ustaw ponownie
wartość twardości
3. Prąd silnika jest za
duży i nastąpiło
zwarcie
3. Napraw lub
wymień silnik
10
Lody są za
twarde
1. Dodano za dużo
wody w szlamie
1. Przygotuj nową
kwalifikowaną
zawiesinę
2. Niewłaściwa
twardość ustawienie
Ustaw ponownie
wartość twardości
11
Wyciek szlamu
1. Nieszczelny zawór
wylotowy
1. Wymień pierścień
uszczelniający
zaworu wylotowego
2. Nieszczelny trzpień
zaworu
2. Wymień trzpień
zaworu

- 17 -
3. Gnojowica Icakage
3. Wymień pierścień
uszczelniający
zaworu wylotowego
4. Pierścień
uszczelniający wału
mieszającego Jest
zepsuty
4.Wymień pierścień
uszczelniający
12
LCD ekran nie
działa
wyświetlacz
1. Problemy z płytką
PCB
1. Wymień płytkę
drukowaną
2. Wtyczka jest luźna
2. Sprawdź
połączenie wtyczka
13
Brak słowa w
LCD
1. Monitor LCD jest
uszkodzony
1. Wymień monitor
14
The sprężarka
zatrzymuje się
po lodach
uformowany, ale
silnik nie
przestaje
1. Przełącznik jazdy
kontakt jest połączony
1. Napraw lub
wymień przełącznik
podróżny
15
Podczas robienia
lodów silnik nie
działa i nie
wypływa
śmietanka
1. Przełącznik jazdy jest
uszkodzony
1. Napraw
lub wymień
przełącznik
jazdy
Pęknięcia wału
mieszającego
Nie stanie się to w
normalnych okolicznościach.
Nienormalna sytuacja
wygląda następująco:
1. W zawiesinie jest za dużo
wody, cylinder zamarznięty
2. Podczas czyszczenia
omyłkowo naciśnij przycisk
- 18 -
16
Rczałóż wał
mieszający
chłodzenia, co spowoduje
chłodzenie wodą
3. Chłodzenie z jedną butlą
napełnioną, a drugą pustą
4. Chłodzenie bez szlamu
5. Nadużycie jednego cylindra
podczas robienia lodów
6. Do cylindra wlewa się
gorącą zawiesinę w celu
szybkiego schłodzenia
7. Chłodzenie gnojowicy przy
odwrotnym podłączeniu
silnika
VII.Akcesoria
1. Wewnętrzny klucz sześciokątny
2. Zestaw pierścieni łuskowych
3. Podręcznik Uscr
4. Karta gwarancyjna
Parametry techniczne:
Szczegółowe parametry techniczne i działanie czynnika chłodniczego
znajdują się na tabliczce znamionowej.
Schemat obwodu maszyny do lodów

- 19 -
Wyprodukowano w Chinach


- 21 -
Technisch Ondersteuning en e-garantiecertificaat www.vevor.com/support
IJSMACHINE
MODEL: BQL-7200T
We continue to be committed to provide you tools with competitive price.
"Save Half", "Half Price" or any other similar expressions used by us only represents an
estimate of savings you might benefit from buying certain tools with us compared to the major
top brands and doses not necessarily mean to cover all categories of tools offered by us. You
are kindly reminded to verify carefully when you are placing an order with us if you are
actually saving half in comparison with the top major brands.

- 1 -
MODEL: BQL-7200T
Have product questions? Need technical support? Please feel free to
contact us:
Technical Support and E-Warranty Certificate
www.vevor.com/support
NEED HELP? CONTACT US!
This is the original instruction, please read all manual instructions
carefully before operating. VEVOR reserves a clear interpretation of our
user manual. The appearance of the product shall be subject to the
product you received. Please forgive us that we won't inform you again if
there are any technology or software updates on our product.
ICE CREAM MACHINE

- 2 -
Waarschuwing- Om het risico op letsel te verminderen, moet
de gebruiker de handleiding zorgvuldig lezen.
CORRECTE VERWIJDERING
Dit product valt onder de bepalingen van de Europese richtlijn
2012/19/EG. Het symbool met een doorgestreepte
afvalcontainer geeft aan dat het product in de Europese Unie
een aparte afvalinzameling vereist. Dit geldt voor het product
en alle accessoires die met dit symbool zijn gemarkeerd.
Producten die als zodanig gemarkeerd zijn, mogen niet met
het normale huisvuil worden weggegooid, maar moeten naar
een inzamelpunt voor recycling van elektrische en
elektronische apparaten worden gebracht
Inhoudsopgave
I. Veiligheidsmaatregelen ------------------------------------------
- - - - - - - - - - - - - - - - - - - - - - 2
II. Productstructuurdiagram --------- ------------------------------------ ---------7
III. Bedieningspaneel en functies --------- ----------------------------------- ------8
IV. IJs maken -------------- ----------------------------- ------------10
V. Reiniging en onderhoud ------ ------------------------------------- --------------11
VI. Probleemoplossing en oplossingen ------- -------------------------------------
- - - - 1 2
VII. Accessoires ------- -------------------- ----- ---------------- ----------------------17
VII. Veiligheidsmaatregelen
·Lees deze gebruikershandleiding voordat u het apparaat gebruikt, zodat u
er optimaal profijt van kunt hebben.
13. WAARSCHUWING:
1. Dit apparaat is niet bedoeld voor gebruik door personen (inclusief

- 3 -
kinderen) met verminderde fysieke, zintuiglijke of mentale capaciteiten, of
een gebrek aan ervaring en kennis, tenzij zij toezicht hebben gekregen of
instructies hebben gekregen over het gebruik van het apparaat door een
persoon die verantwoordelijk is voor hun veiligheid.
2. Houd toezicht op kinderen om ervoor te zorgen dat ze niet met het
apparaat spelen.
3. Dit apparaat kan worden gebruikt door kinderen van 8 jaar en ouder en
door personen met verminderde lichamelijke, zintuiglijke of geestelijke
vermogens of een gebrek aan ervaring en kennis, als zij onder toezicht
staan of instructies hebben gekregen over het veilige gebruik van het
apparaat en de de gevaren die daarmee gepaard gaan. Kinderen mogen
niet met het apparaat spelen. Reiniging en gebruikersonderhoud mogen
niet door kinderen zonder toezicht worden uitgevoerd.
4. Als het netsnoer beschadigd is, moet het worden vervangen door de
fabrikant, zijn serviceagent of gelijkwaardig gekwalificeerde personen om
gevaar te voorkomen.
5. Om gevaar als gevolg van instabiliteit van het apparaat te voorkomen,
moet het worden bevestigd volgens de instructies.
6. Zorg er bij het plaatsen van het apparaat voor dat het netsnoer niet klem
komt te zitten of beschadigd raakt.
7. Plaats niet meerdere draagbare stopcontacten of draagbare
stroomvoorzieningen aan de achterkant van het apparaat.
8. Houd ventilatieopeningen in de behuizing van het apparaat of in de
ingebouwde structuur vrij van obstakels.
9. Beschadig het koelcircuit niet.
10. Bewaar geen explosieve stoffen zoals spuitbussen met brandbaar
drijfgas in dit apparaat.
11. Kinderen van 3 tot 8 jaar mogen koelapparaten laden en lossen.
·Opmerking: Dit apparaat bevat het ontvlambare koelmiddel R290 en
schuimmiddel cyclopentaan.
Vermijd contactvuur wanneer u het transporteert en gebruikt.
Vraag een professional om onderhoud als de machine kapot is gegaan.

- 4 -
Stuur het naar het plaatselijke aangewezen afvalverwerkingsstation als u
het weggooit.
Let tijdens gebruik, onderhoud en afvoer van het apparaat op het
symbool dat lijkt op de linkerkant, dat zich op de
achterkant van het apparaat bevindt (achterpaneel of
compressor) en geel of oranje van kleur is. Het is een
risico op brandwaarschuwingssymbool. Er bevinden
zich brandbare materialen in de koelmiddelleidingen en de
compressor. Zorg ervoor dat u tijdens gebruik, service en
verwijdering ver weg bent van de brandhaard.
14. FCC-informatie
LET OP: Wijzigingen of aanpassingen die niet uitdrukkelijk zijn
goedgekeurd door de partij die verantwoordelijk is voor naleving kunnen de
bevoegdheid van de gebruiker om de apparatuur te bedienen ongeldig
maken!
Dit apparaat voldoet aan Deel 15 van de FCC-regels. De werking is
onderworpen aan de volgende twee voorwaarden:
1) Dit product kan schadelijke interferentie veroorzaken.
2)Dit product moet alle ontvangen interferentie accepteren, inclusief
interferentie die een ongewenste werking kan veroorzaken.
WAARSCHUWING: Wijzigingen of aanpassingen aan dit product die niet
uitdrukkelijk zijn goedgekeurd door de partij die verantwoordelijk is voor
naleving kunnen de bevoegdheid van de gebruiker om het product te
bedienen ongeldig maken.
Opmerking: Dit product is getest en voldoet aan de limieten voor een
digitaal apparaat van Klasse B overeenkomstig Deel 15 van de FCC-regels.
Deze limieten zijn bedoeld om redelijke bescherming te bieden tegen
schadelijke interferentie in een residentiële installatie.
Dit product genereert, gebruikt en kan radiofrequentie-energie uitstralen,
en als het niet wordt geïnstalleerd en gebruikt in overeenstemming met de
instructies, kan het schadelijke interferentie aan radiocommunicatie

- 5 -
veroorzaken. Er is echter geen garantie dat er geen interferentie zal
optreden in een bepaalde installatie. Als dit product schadelijke
interferentie veroorzaakt aan radio- of televisieontvangst, wat kan worden
vastgesteld door het product uit en weer in te schakelen, wordt de
gebruiker aangeraden te proberen de interferentie te corrigeren door een
of meer van de volgende maatregelen.
· Heroriënteer of verplaats de ontvangstantenne.
· Vergroot de afstand tussen het product en de ontvanger.
· Sluit het product aan op een stopcontact op een ander circuit dan dat
waarop de ontvanger is aangesloten.
· Raadpleeg de dealer of een ervaren radio-/tv-technicus voor hulp.
3 . Uitpakken en inspectie
1) Knip de banden en planken waarmee de doos vastzit door en maak
deze los; verwijder de doos, de schuimkartonplaten en de
verpakkingszakken om te zien of er schade is aan het uiterlijk van het
apparaat. (Opmerking: Het apparaat mag tijdens transport niet meer dan
45° worden gekanteld.)
2) Open het cilinderdeksel en controleer of alle accessoires uit de paklijst
aanwezig zijn.
3) Verwijder de bovenste en onderste panelen aan de achterkant van het
apparaat om te controleren of de interne motoren, riemen, compressoren
en andere componenten loszitten als gevolg van transport. Indien er
afwijkingen worden geconstateerd, neem dan tijdig contact op met de
leverancier om het probleem op te lossen.
(Opmerking: Wanneer u elk paneel installeert of verwijdert, steekt u een
interne inbussleutel of kruisschroevendraaier in de schroefgroef op het
paneel, drukt u vervolgens lichtjes en draait u deze los of vast)
4) Installeer het roerwerk en het klephuis op het apparaat (Fig. A en B).
Opmerking: Vergeet niet de schaalring te installeren

- 6 -
Afb. A
Afb. B
Afb. C
5) Installeer de waterontvanger zoals weergegeven in (Fig. C).
6) Controleer het typeplaatje dat op het achterpaneel van het apparaat is
aangebracht en zorg ervoor dat de op het apparaat aangegeven spanning
overeenkomt met de plaatselijke voedingsspanning.
7) Zorg ervoor dat de dispenser goed geaard is. Anders kan er een
elektrische schok optreden in het geval van een storing of een elektrische
lekkage. (Bij sommige modellen is de aardleiding de geel-groene lijn
onderaan)
8) Beschadig, breek, draai of rek het zachte netsnoer nooit.

- 7 -
4 . Bedrijfsomgeving
1) De minimale bedrijfstemperatuur is 10 ℃ en de maximale
bedrijfstemperatuur is 35 ℃. Gebruik het apparaat nooit in een vochtige
omgeving of op plaatsen waar het wordt blootgesteld regen. Niet gebruiken
op plaatsen die zijn blootgesteld aan veel zwavelzuur of zout, zoals
gebieden met warmwaterbronnen of golfgebieden.
2) De minimale slurrytemperatuur is 5℃ en de hoogste is 40 ℃; Opslag bij
lage temperaturen heeft de voorkeur om de productie-efficiëntie van ijs te
verbeteren.
3) Zet het apparaat op een vlakke en stevige ondergrond in een goed
geventileerde plaats.
4) Er moet een ruimte van minimaal 80 cm achter de ijsdispenser en een
ruimte van niet minder dan 30 cm aan beide zijden worden gewaarborgd,
voor de instroom van koude lucht en de afvoer van warme lucht om de
condensatiecyclus van het apparaat te vergemakkelijken; regelmatig Het
wordt aanbevolen om het stof op de condensor te verwijderen.
Opmerking: Het apparaat zal tijdens het transport onvermijdelijk heen en
weer bewegen. Daarom wordt aanbevolen om het apparaat vóór het
eerste gebruik gedurende 4 uur stabiel te plaatsen.
5 . Stroomaansluiting
Alle interne draden zijn volledig aangesloten vóór de levering van onze
Bingzhile-ijsdispensers. Het enige dat gebruikers moeten doen, is de juiste
draden selecteren op basis van het vereiste vermogen en deze aansluiten
op het netsnoer aan de onderkant van het apparaat, naast de juiste
aarding.
Opmerking: Alle externe bedrading, stekkers en stopcontacten moeten
voldoen aan de eisen van nationale normen
6 . Vereisten voor stroomspanning
De afwijking van de nominale spanning van de inkomende voeding mag
niet te hoog of te laag zijn. Als dit het geval is, gaat de indicator (rood)
knipperen en wordt er een alarm gegeven (zoemend), waardoor de
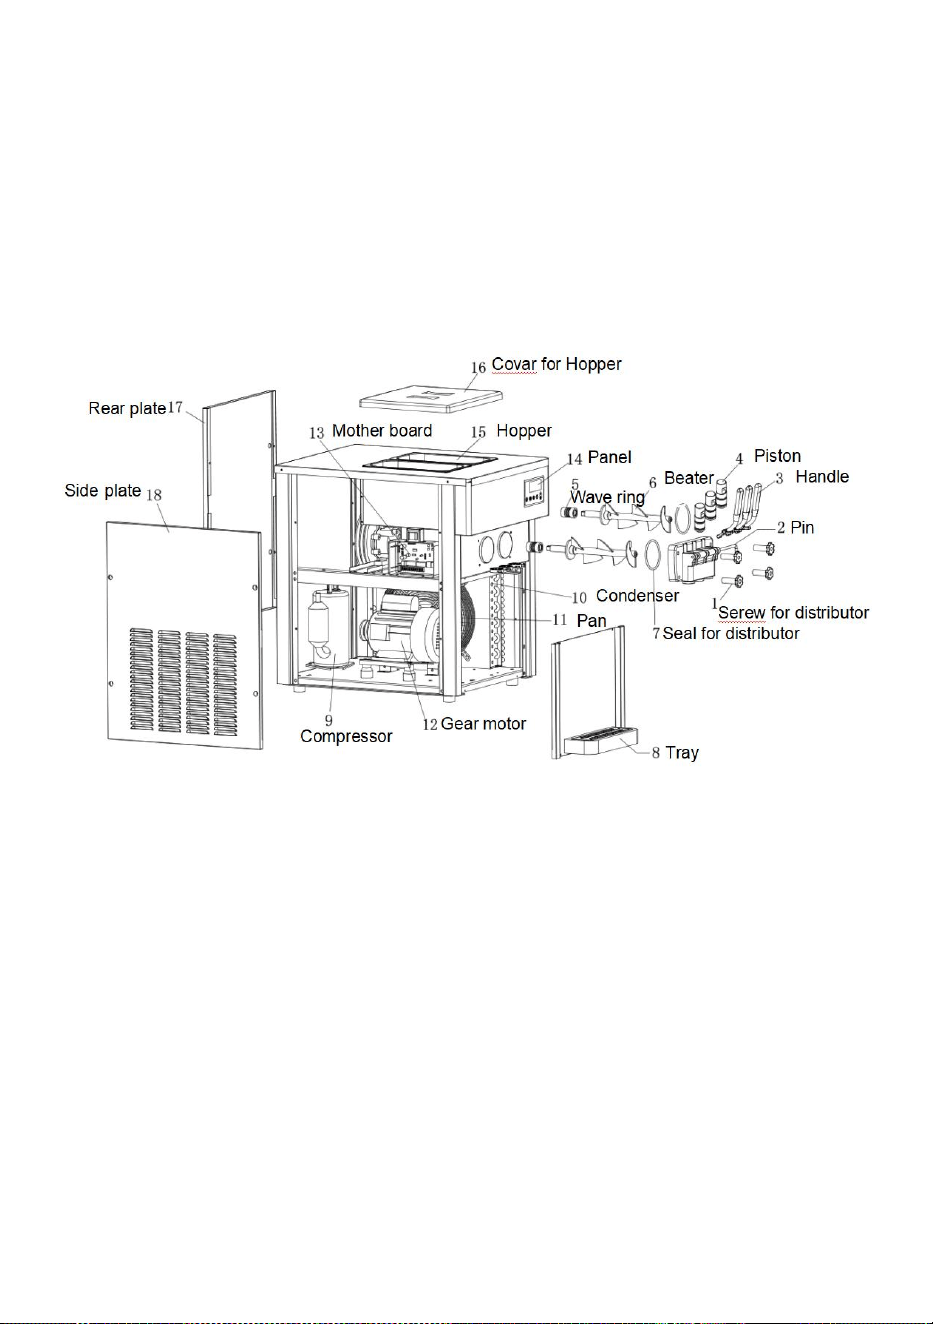
- 8 -
koelfunctie uitvalt.
7 . Koelomstandigheden
A. Koelen is niet toegestaan als de roeras zich in de lege cilinder bevindt.
B. Er mag niet worden gekoeld als er water in de cilinder zit.
II. Productstructuurdiagram
III. Bedieningspaneel en functies
Het bedieningspaneel is verdeeld in een fluorescerend toetsscherm en een
LCD-scherm (selecteer de bijbehorende bewerking)
Ga te werk zoals getoond in Afb. D, E en F
1) Toets voor reinigen/ontdooien:
Druk in de stand-bymodus op de toets om de reinigingsmodus te activeren.
Terwijl de reinigingsindicator met een zoemend geluid oplicht, begint de
roermotor te draaien en geeft het LCD-scherm de huidige waarde van de
roermotor weer. Druk nogmaals op deze toets om naar de standby-modus
te gaan.
Houd de toets 5 seconden ingedrukt om de ontdooifunctie te starten terwijl

- 9 -
het reinigingspictogram knippert, gevolgd door nogmaals op de toets te
drukken om de ontdooifunctie te sluiten. (Alleen van toepassing op
modellen met deze functie)
2) Koelsleutel:
Druk in de standby-modus op de koeltoets om de koelmodus te activeren.
Terwijl de koelindicator met een zoemend geluid gaat branden, beginnen
de roermotor, de compressor en de ventilatormotor te draaien en geeft het
LCD-scherm de huidige waarde van de roermotor weer. Druk nogmaals op
deze toets om naar de standby-modus te gaan.
3) Puffende sleutel;
Als u op de "puff"-toets drukt terwijl het indicatielampje van de luchtpomp
brandt in de stand-bymodus, wordt de luchtpomp uitgeschakeld; Als u in de
reinigings- of koelmodus op de pufftoets drukt, knippert de pompindicator
om aan te geven dat de luchtpomp is ingeschakeld. (Alleen van toepassing
op modellen met deze functie)
4) Toets voor het instellen van de hardheid:
Houd “△” of “ ” gedurende 1 seconde ingedrukt om de instelmodus voor de
hardheidsparameters te activeren, gevolgd door nogmaals op de toets te
drukken om de hardheidswaarde te wijzigen. Hoe groter de
hardheidswaarde, hoe harder het ijs zal zijn, en omgekeerd.
5) Bewaarsleutel:
Druk in de standby-status op de toets "conservering" en de
conserveringsindicator licht op met een zoemend geluid. Er vindt een
vertraagde start plaats bij de roermotor, de compressor en de
ventilatormotor, en de huidige waarde van de roermotor wordt
weergegeven op het LCD-scherm . Druk nogmaals op deze toets om naar
de standby-modus te gaan. (Alleen van toepassing op modellen met deze
functie)
6) Timing-/resettoets
Druk in de standby-modus op deze toets om de timer-resetmodus te
activeren. Druk nogmaals op deze toets om de resetwaarde van de timer
te wijzigen.
Houd deze toets 10 seconden ingedrukt om het aantal kopjes te resetten.
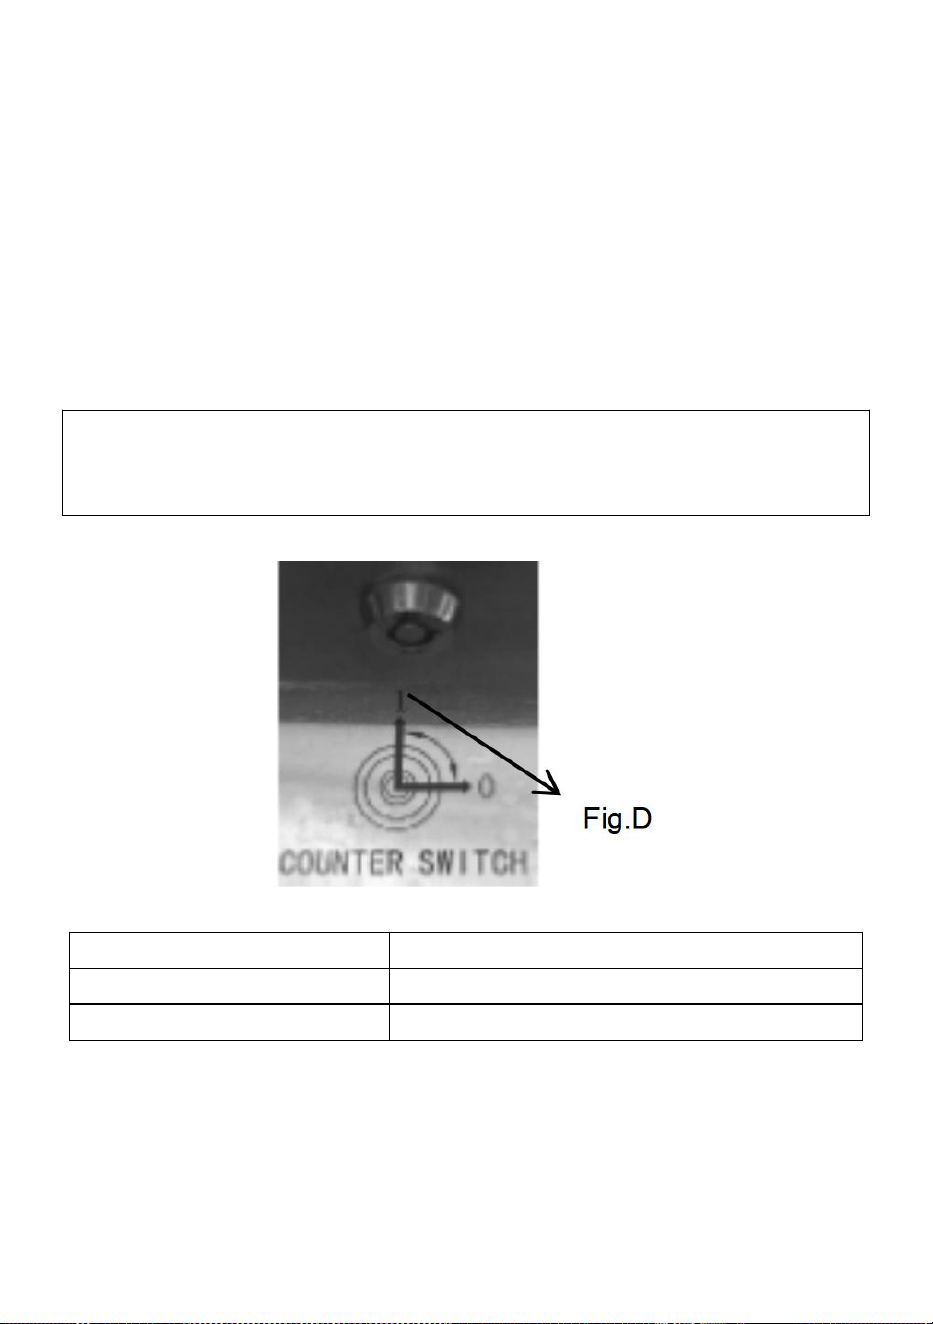
- 10 -
(De resetschakelaar wordt voor sommige modellen weergegeven in Afb.
D)
7) Het aantal ijsjes wordt weergegeven:
Ieder gelost kopje ijs wordt automatisch geregistreerd.
Weergave mestniveau/tekort (Alleen van toepassing op modellen met
deze functie):
Wanneer het apparaat een tekort aan mest heeft, wordt de code van het
tekort weergegeven in het weergavegebied met het bekernummer en geeft
de zoemer met tussenpozen een alarm.
Steek de resetsleutel in de schakelaar bij de onderkant van het
beeldschermpaneel en draai het 90° met de klok mee om het ijsrecord te
resetten.
CLI
Drijfmesttekort in linker cilinder
CL2
Drijfmesttekort in rechter cilinder
CL3
Drijfmesttekort in beide eylinders

- 11 -
IV. Hoe ijs te maken
1) Laat de bereide ijsbrij 15 minuten staan voordat u deze in beide cilinders
bovenaan de ijsdispenser giet; Opmerking: De slurry mag niet aankoeken.
2) Schakel de ijsdispenser in om naar de stand-bymodus te gaan en druk
vervolgens op de "reinigingstoets" om het apparaat 3-5 minuten te laten
werken. Houd daarna de hendel ingedrukt om 2-3 kopjes slurry af te
voeren en giet ze opnieuw in de bovenste cilinder om te voorkomen dat het
water bevriest bij de afvoeruitlaat, wat de productie van ijs kan beïnvloeden;
Opmerking: De slurry moet worden bereid in overeenstemming met de
mengverhouding zoals vermeld in de Handleiding voor ijspoeder.
3) Druk op de toets "koelen" om de koelmodus te activeren; Houd "△" of "
ingedrukt " 1 seconde ingedrukt houden om de hardheid van het ijs
naar wens aan te passen.

- 12 -
Let op: In de vorige reinigingsmodus moet u de waarde van de "huidige
hardheid" in de gaten houden die op het scherm wordt weergegeven. Als
de weergegeven "huidige hardheid" 2,2 is, moet de hardheid van het ijs
worden ingesteld tussen 3,5 en 5,0; als de "huidige hardheid" 3,5 is, moet
de hardheid van het ijs worden ingesteld tussen 4,5 en 6,5.
4) Wanneer de hardheid van het ijs de ingestelde waarde bereikt, pauzeert
het apparaat automatisch; De pauze tussen pauzes kan worden
gevarieerd van 3 tot 9 minuten. Op dit moment kan de tijdinsteltoets
worden ingedrukt om de tijd in te stellen waarop de machine naar de
volgende koelcyclus moet gaan. Bij elke druk op de knop wordt de tijd met
één minuut verlengd, tot 9 minuten. En de waarde keert terug naar 3
minuten als u nogmaals op drukt.
Opmerking: Bij warm weer heeft een korter pauze-interval de voorkeur; bij
koud weer heeft een langer pauze-interval de voorkeur.
Plaats een kegel of een kopje onder de uitlaat van de afvoerklep en houd
de afvoerhendel ingedrukt om het ijs eruit te persen. Laat de hendel los om
te sluiten.
V. Reiniging en onderhoud
1. Reiniging van de koelcilinder
Om de gezondheid van de ijsconsumenten te garanderen en de
levensduur van de Dispenser te verlengen, moet de koelcilinder na elk
gebruik worden gereinigd en gedesinfecteerd.
1) Druk op de reinigingstoets om alle mest uit de cilinder te laten lopen,
druk er nogmaals op en pauzeer even.
2) Voeg lauw water gemengd met een geschikte hoeveelheid vloeibaar
antisepticum toe aan de cilinders om beide cilinders met ongeveer
dezelfde hoeveelheid water te vullen.
3) Druk nogmaals op de reinigingsknop en roer ongeveer 5 minuten
voordat de reinigingsvloeistof wordt afgevoerd.
4) Gebruik in plaats daarvan lauw water om de machine 2 à 3 keer te
spoelen. Pauzeer even.

- 13 -
5) Schakel de onderdelen uit, demonteer en was ze:
Draai de vier schroeven op de uitlaatklep los en demonteer de
uitlaatklepeenheid.
Haal de bevestigingspen van de handgreep, de handgreep, de klepstang
en de afdichtingsring uit de uitlaatklep in tonnen.
Haal de roerder uit de koelcilinder.
Maak alle gedemonteerde onderdelen schoon. Vervang het beschadigde
onderdeel door een nieuw exemplaar.
Monteer de onderdelen weer in omgekeerde volgorde.
2. Reiniging van het dispenserlichaam
Wat consumenten nodig hebben is een mooi uiterlijk. schoon en
hygiënisch apparaat. Houd het lichaam schoon. U kunt een warme
handdoek gebruiken om de machinebehuizing af te vegen en vlekken te
verwijderen. Spoel nooit rechtstreeks met water om te voorkomen dat het
apparaat defect raakt.
3. Reiniging van de condensor
De condensor zal na enige tijd in bedrijf zijn bedekt met stof, wat resulteert
in een slechte warmteafvoer en koeling. Daarom moet deze elke twee
maanden worden gereinigd. Voor het schoonmaken kunt u het beste een
professionele schoonmaakmedewerker vragen. Zorg ervoor dat u snijdt
voordat u gaat schoonmaken
de stroom uit te schakelen en de condensorribben niet te beschadigen.
4. Aanpassing van de riem
Na enige tijd in bedrijf te zijn geweest, kan de aandrijfriem van het
roersysteem worden verlengd en losgemaakt, wat op tijd moet worden
afgesteld, bij voorkeur door een professionele technicus. De dispenser
moet worden afgesloten van de stroomvoorziening voordat deze wordt
afgesteld. Als u nog steeds het gevoel heeft dat de riem te los zit, moet u
deze vervangen door een riem van hetzelfde type.

- 14 -
VI. Analyse en oplossing van probleemoplossing
S/N
Problemen
Oorzaken
Oplossingen
1
De dispenser
start niet
1. Het netsnoer is niet
goed aangesloten
1. Controleer het
netsnoer en sluit het
opnieuw aan
2. De nullijn is niet
aangesloten
2. Controleer de
nullijn en zorg ervoor
dat deze goed is
aangesloten
3. De functieschakelaar is
niet ingeschakeld
3. Zet de
functieschakelaar
aan
4. Problemen met
functieschakelaarstekker
en verbinding
4. Controleer de
stekker- en
draadverbinding
5. Problemen met de
printplaat
5. Vervang de
printplaat
2
De
reinigingsfunctie
werkt niet
1. Losse verbinding
1. Maak opnieuw
verbinding
2. De motor of
condensator is kapot
2. Repareer of
vervang de motor of
condensator
3. De contactor is kapot
3. Vervang de
contactor
3
De compressor
werkt niet
1. Lage spanning
1. Controleer de
voedingsspanning
2. De contactor is kapot
2. Vervang de
contactor
3. Problemen met de
printplaat
3. Vervang de
printplaat

- 15 -
4. De condensator werkt
niet goed (220V-serie)
4. Vervang de
condensator
5. De compressor is kapot
5. Vervang de
compressor
4
De compressor
werkt niet
1. Losse aansluiting van
functieschakelaar
1. Sluit de draad van
de functieschakelaar
opnieuw aan
2. Problemen met de
printplaat
2. Vervang de
printplaat
5
De dispenser
kan niet worden
gekoeld
1. Koudemiddellekkage
1. Repareer de
lekkage en zuig
deze op met een
vacuüm om het
koelmiddel aan te
vullen
2. Verstopping van de
condensor
2. Reinig de
condensor
3. De ventilator werkt niet
3. Repareer of
vervang de ventilator
6
De riem slipt
1. De riem zit te los
1. Stel de riem af of
vervang de riem
2. Problemen met het
verloopstuk
2. Repareer of
vervang het
verloopstuk
3. Bevroren cilinder, barst
in de roeras
3. Vervang de roeras
S/N
Problemen
Oorzaken
Oplossingen
Het lukt niet om
ijs te maken
1. Geen slurry in de
cilinder
1. Voeg mest toe aan
de cilinder

- 16 -
7
room
2. Het puffen ontladen
leiding voor mest is
verstopt
2. Verwijder de
afvoerleiding en
maak het schoon
3. Ook een onjuiste
mestverhouding dik
3. Bereid nieuwe
gekwalificeerde slurry
voor
4. De rijschakelaar
van de pan e l is
gebroken of
losgekoppeld
4. Sluit de leiding
opnieuw aan of
vervang deze de
reisschakelaar
5. De riem zit te los en
glijdt uit
5. Pas de riem aan of
vervang de riem riem
6. Problemen met de
verloopstuk
6. Repareer of
vervang het
verloopstuk
8
Slecht puffend
effect
1. De puffende pijp
niet ingevoegd
1. Plaats de puffpijp
terug
2.De puffende
schakelaar is dat niet
Opgewonden
2. Zet de
puffschakelaar aan
9
IJs is te zacht
1. De mestverhouding
klopt niet
1. Bereid nieuwe
gekwalificeerde slurry
voor
2. Onjuiste hardheid
instelling
2. Stel de
hardheidswaarde
opnieuw in
3. De motorstroom is
te groot en er is
kortsluiting
3. Repareer of
vervang de motor
10
IJs is te hard
1. Er is te veel water
toegevoegd in de
1. Bereid nieuwe
gekwalificeerde slurry

- 17 -
slurry
voor
2. Onjuiste hardheid
instelling
2. Stel de
hardheidswaarde
opnieuw in
11
Slurry lekkage
1. Uitlaatklep lekt
1. Vervang de
afdichtring van de
uitlaatklep
2. De klepstang lekt
2. Vervang de
klepstang
3. Drijfmest
3. Vervang de
afdichtring van de
uitlaatklep
4. De afdichtring van
de roeras is kapot
4. Vervang de
afdichtring
12
LCD-scherm
scherm lukt niet
weergave
1. Problemen met de
printplaat
1. Vervang de
printplaat
2. De stekker zit los
2. Controleer de
verbinding plug
13
Woord ontbreekt
in de
LCD-scherm
1. De LCD-monitor is
beschadigd
1. Vervang de
monitor
14
De compressor
stopt nadat het
ijs is gevormd,
maar de motor
stopt niet
1. De rijschakelaar
contactpersoon is
verbonden
1. Repareer of
vervang de
reisschakelaar
15
Bij het maken
van ijs werkt de
motor niet en
komt er geen
1. De rijschakelaar is
beschadigd
1. Repareer
of vervang de
rijschakelaar
- 18 -
room uit
16
Scheuren in de
roeras
Onder normale
omstandigheden zal dit niet
gebeuren. De abnormale
situatie is als volgt:
Plaats de
roeras terug
1. Er zit te veel water in de
mest, de cilinder is bevroren
2. Druk tijdens het reinigen
per ongeluk op de koeltoets
koeling met water
3. Koeling waarbij één cilinder
gevuld is en de andere leeg
4. Koeling zonder slurry
5. Misbruik van één cilinder bij
het maken van ijs
6. Hete slurry wordt in de
cilinder gegoten voor snelle
koeling
7. Koelen van drijfmest met
de motor omgekeerd
aangesloten
VII.Accessoires
1. Een opzettelijke inbussleutel
2. Een set scalaringen
3. Een handleiding voor de Gebruiker
4. Een garantiekaart
Technische parameters:
Raadpleeg het typeplaatje voor specifieke technische parameters en
koelmiddelprestaties.
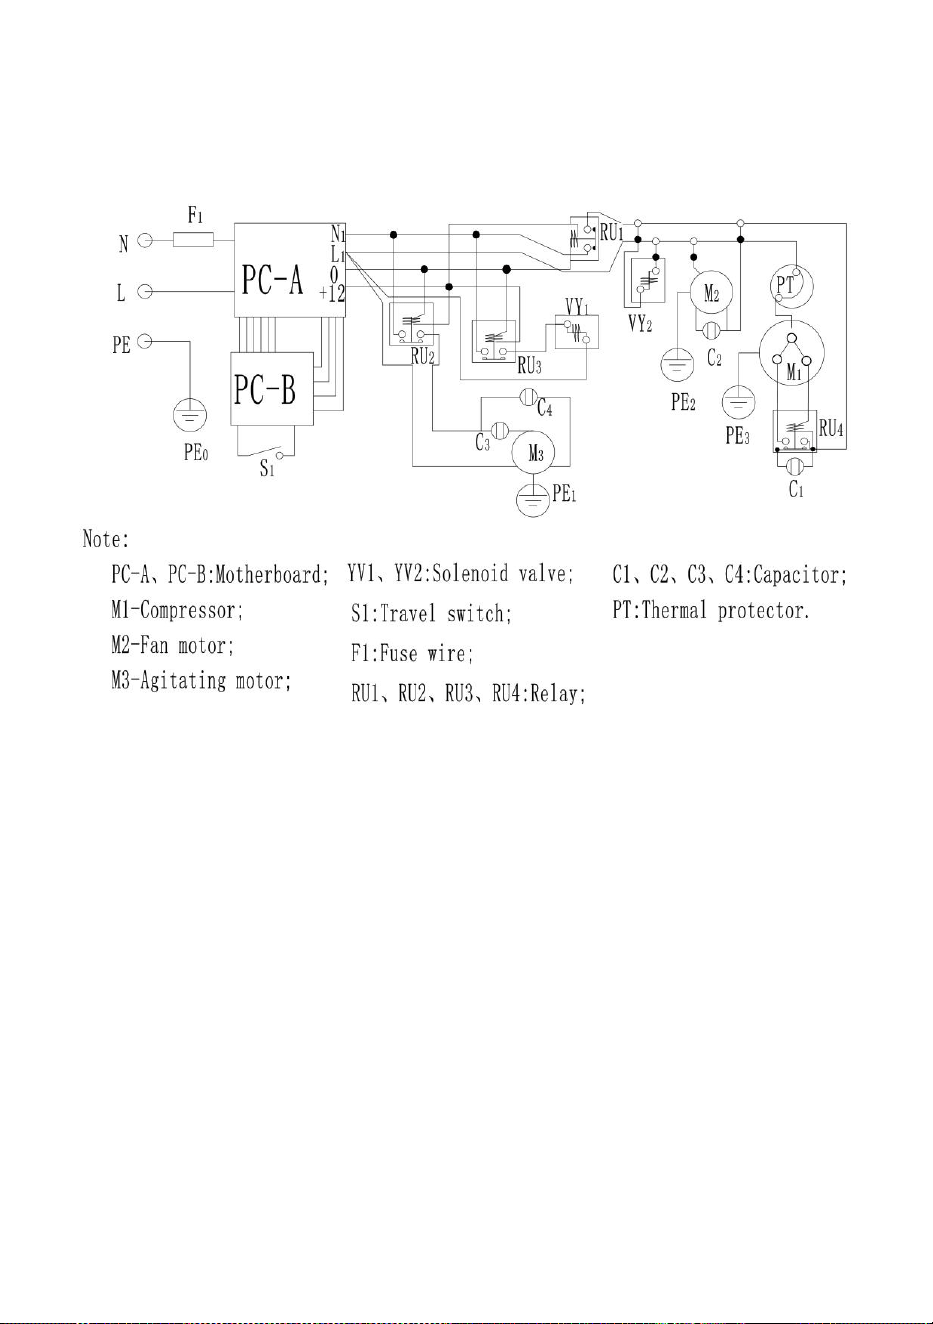
- 19 -
Schakelschema van de ijsmachine
Gemaakt in China


- 21 -
Teknisk Support och e-garanticertifikat www.vevor.com/support
GLASSMASKIN
MODELL: BQL-7200T
We continue to be committed to provide you tools with competitive price.
"Save Half", "Half Price" or any other similar expressions used by us only represents an
estimate of savings you might benefit from buying certain tools with us compared to the major
top brands and doses not necessarily mean to cover all categories of tools offered by us. You
are kindly reminded to verify carefully when you are placing an order with us if you are
actually saving half in comparison with the top major brands.

- 1 -
MODELL: BQL-7200T
Have product questions? Need technical support? Please feel free to
contact us:
Technical Support and E-Warranty Certificate
www.vevor.com/support
NEED HELP? CONTACT US!
This is the original instruction, please read all manual instructions
carefully before operating. VEVOR reserves a clear interpretation of our
user manual. The appearance of the product shall be subject to the
product you received. Please forgive us that we won't inform you again if
there are any technology or software updates on our product.
ICE CREAM MACHINE
- 2 -
Varning- För att minska risken för skada måste användaren
läsa bruksanvisningen noggrant.
KORREKT AVFALLSHANTERING
Denna produkt omfattas av bestämmelserna i det europeiska
direktivet 2012/19/EC. Symbolen som visar en soptunna
korsad anger att produkten kräver separat sophämtning i EU.
Detta gäller för produkten och alla tillbehör märkta med denna
symbol. Produkter märkta som sådana får inte slängas
tillsammans med vanligt hushållsavfall, utan måste lämnas till
en insamlingsplats för återvinning av elektriska och
elektroniska apparater
Innehållsförteckning
I. Säkerhetsföreskrifter ----------------------------------------------------
- - - - - - - - - - - - - - - - - - - - - - - - - - - - 2
II. Produktstrukturdiagram ---------- --------------------------------------------
- - - - - - - - - - 7
III. Manöverpanel och funktioner ---------- --------------------------------------------
- - - - - - 8
IV. Hur man gör glass ------------------------------------------------------------
- - - - - - - - - - - - 1 0
V. Rengöring och underhåll------ ----------------------------------------------------
- - - - - - - - - - - - - - 1 1
VI. Felsökning och lösningar ---------------------------------------------------- ----12
VII. Ti l l b e h ö r ------- -- - - - - - - - - - - - - - - - - - - - -- -- - - - - - - - - - - - - - - - - -
- - - - - - - - - - - - - - - - - - - - - - - - - - - - 1 7
VIII. Säkerhetsåtgärder
· Innan du använder apparaten, läs denna bruksanvisning för att

- 3 -
säkerställa att du får maximal nytta av den.
15. VARNING:
1. Denna apparat är inte avsedd att användas av personer (inklusive barn)
med nedsatt fysisk, sensorisk eller mental förmåga, eller bristande
erfarenhet och kunskap, såvida de inte har fått övervakning eller
instruktioner om användningen av apparaten av en person som ansvarar
för deras säkerhet.
2. Barn bör övervakas för att säkerställa att de inte leker med apparaten.
3. Denna apparat kan användas av barn från 8 år och uppåt och personer
med nedsatt fysisk, sensorisk eller mental förmåga eller bristande
erfarenhet och kunskap om de har fått övervakning eller instruktioner om
hur man använder apparaten på ett säkert sätt och förstår de inblandade
farorna. Barn får inte leka med apparaten. Rengöring och
användarunderhåll får inte utföras av barn utan tillsyn.
4. Om nätsladden är skadad måste den bytas ut av tillverkaren, dess
servicerepresentant eller liknande kvalificerade personer för att undvika
fara.
5. För att undvika en fara på grund av apparatens instabilitet, måste den
fixeras i enlighet med instruktionerna.
6. När du placerar apparaten, se till att nätsladden inte fastnar eller skadas.
7. Placera inte flera bärbara uttag eller bärbara nätaggregat på baksidan
av apparaten.
8. Håll ventilationsöppningar, i apparatens hölje eller i den inbyggda
strukturen fria från hinder.
9. Skada inte köldmediekretsen.
10. Förvara inte explosiva ämnen såsom aerosolburkar med ett
brandfarligt drivmedel i denna apparat.
11. Barn i åldrarna 3 till 8 år får lasta och lossa kylapparater.
·Obs: Denna apparat innehåller brandfarligt köldmedium R290 och
skummedel cyklopentan.
Undvik kontakt med brand när du transporterar och använder den.
Be fackman om service när maskinen gått sönder. Skicka den till din lokala

- 4 -
återvinningsstation när du kasserar den.
Under användning, service och kassering av apparaten, vänligen
uppmärksamma symbolen som liknar den vänstra sidan,
som är placerad på baksidan av apparaten (bakpanelen
eller kompressorn) och med gul eller orange färg. Det är
risk för brand varningssymbol. Det finns brandfarliga
material i köldmedierör och kompressor. Vänligen var långt borta från
brandkällan under användning, service och kassering.
16. FCC-information
FÖRSIKTIGHET: Ändringar eller modifieringar som inte uttryckligen
godkänts av den part som ansvarar för efterlevnaden kan upphäva
användarens behörighet att använda utrustningen!
Denna enhet uppfyller del 15 av FCC-reglerna. Driften är föremål för
följande två villkor:
1) Denna produkt kan orsaka skadliga störningar.
2) Denna produkt måste acceptera alla mottagna störningar, inklusive
störningar som kan orsaka oönskad funktion.
VARNING: Ändringar eller modifieringar av denna produkt som inte
uttryckligen godkänts av den part som är ansvarig för efterlevnaden kan
upphäva användarens behörighet att använda produkten.
Obs: Denna produkt har testats och befunnits överensstämma med
gränserna för en digital enhet av klass B i enlighet med del 15 av
FCC-reglerna. Dessa gränser är utformade för att ge rimligt skydd mot
skadliga störningar i en bostadsinstallation.
Denna produkt genererar, använder och kan utstråla radiofrekvensenergi,
och om den inte installeras och används i enlighet med instruktionerna kan
den orsaka skadliga störningar på radiokommunikation. Det finns dock
ingen garanti för att störningar inte kommer att inträffa i en viss installation.
Om denna produkt orsakar skadliga störningar på radio- eller
tv-mottagning, vilket kan fastställas genom att stänga av och på produkten,
uppmanas användaren att försöka korrigera störningen med en eller flera
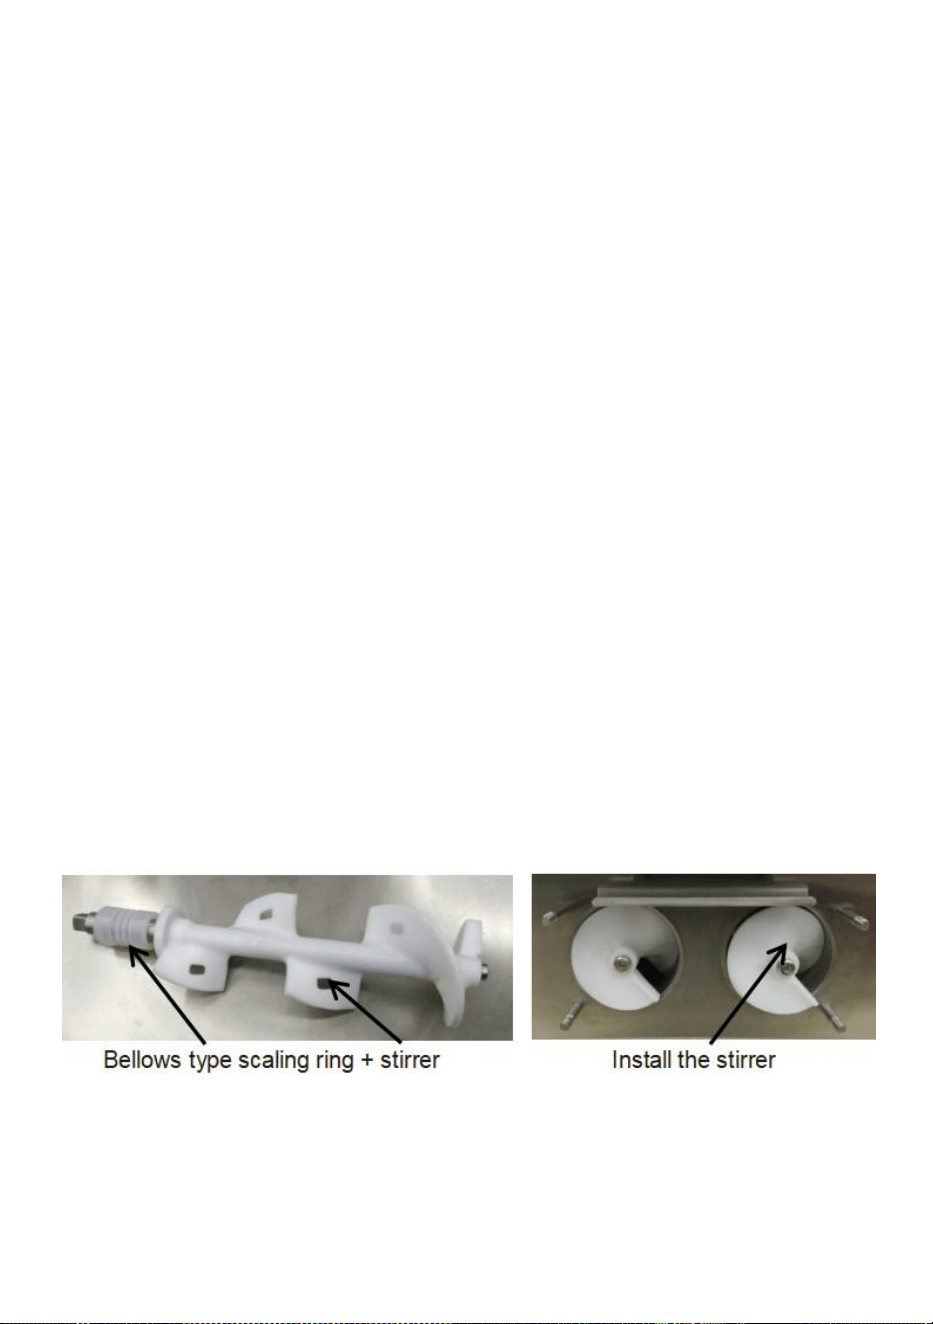
- 5 -
av följande åtgärder.
· Rikta om eller flytta mottagningsantennen.
· Öka avståndet mellan produkten och mottagaren.
· Anslut produkten till ett uttag på en annan krets än den som mottagaren
är ansluten till.
· Kontakta återförsäljaren eller en erfaren radio/TV-tekniker för hjälp.
3 . Uppackning & inspektion
1) Klipp och lossa remmarna och plankorna som håller fast kartongen; ta
bort kartongen, skumskivorna och förpackningspåsarna för att se om det
finns några skador på enhetens utseende. (Obs: Enheten får inte lutas mer
än 45° under transport.)
2) Öppna cylinderkåpan och kontrollera om alla tillbehör som finns i
packlistan är tillgängliga.
3) Ta bort de övre och nedre panelerna på enhetens baksida för att
kontrollera om de interna motorerna, remmarna, kompressorerna och
andra komponenter är lösa på grund av transport. Om några avvikelser
upptäcks, kontakta leverantören i tid för att lösa problemet.
(Obs: När du installerar eller tar bort varje panel, sätt in en invändig
sexkantsnyckel eller tvärskruvmejsel i skruvspåret på panelen, tryck sedan
lätt och rotera för att lossa eller fästa)
4) Installera omröraren och ventilhuset på enheten (Fig. A & B).
Obs: Glöm inte att installera skalningsringen
Fig. A
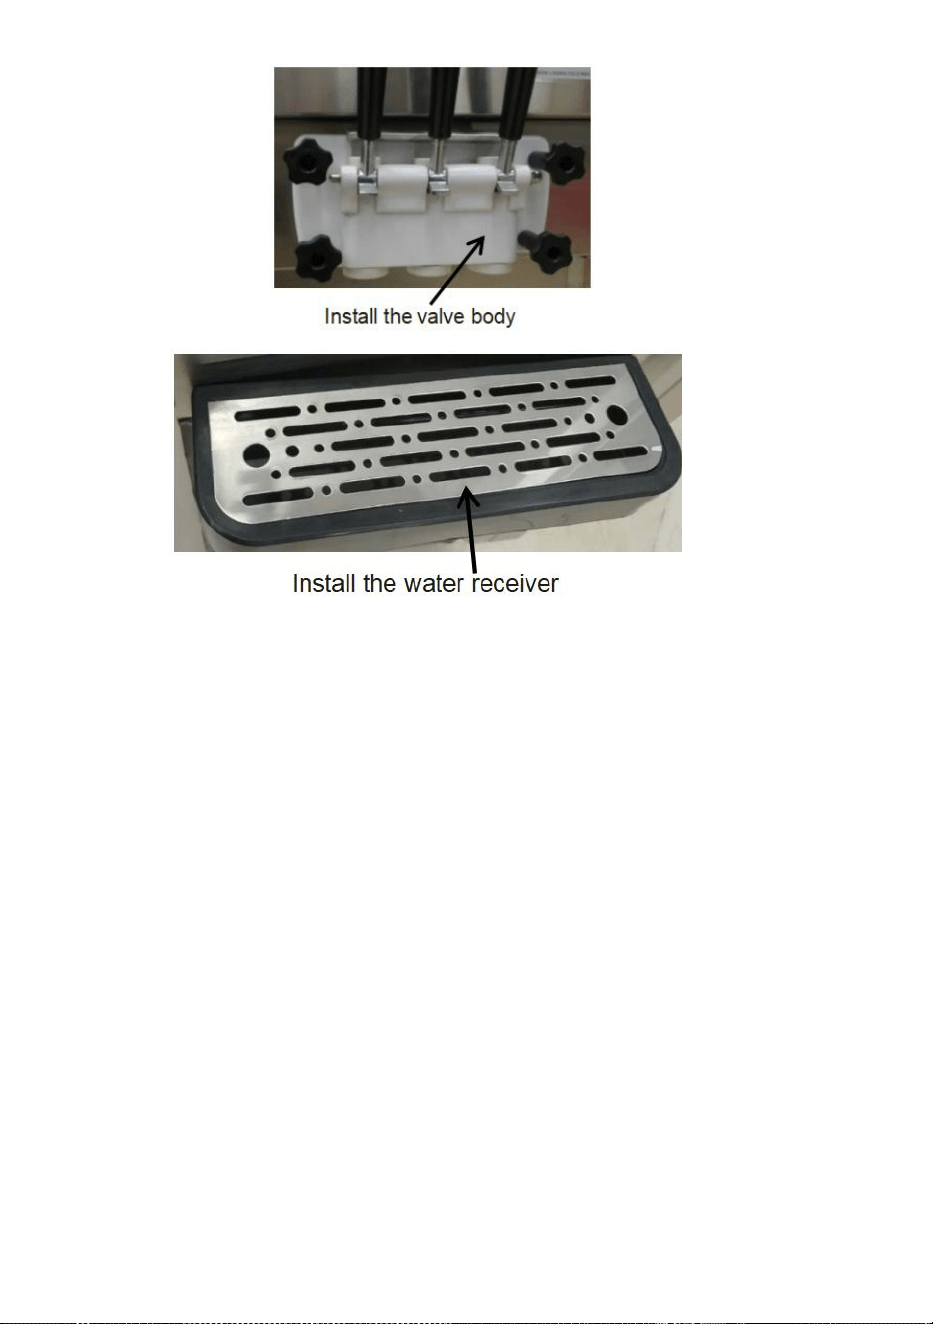
- 6 -
Fig. B
Fig. C
5) Installera vattenbehållaren som visas i (Fig. C).
6) Kontrollera märkskylten på enhetens baksida och se till att spänningen
som anges på enheten överensstämmer med den lokala
matningsspänningen.
7) Se till att dispensern är ordentligt jordad. Annars kan en elektrisk stöt
uppstå i händelse av ett fel eller elektriskt läckage. (För vissa modeller är
jordningslinjen den gul-gröna linjen längst ner)
8) Skada, bryt, vrid eller sträck aldrig den mjuka nätsladden.
4 . Driftmiljö
1) Den lägsta driftstemperaturen är 10 ℃ och den maximala
driftstemperaturen är 35 ℃. Använd aldrig enheten i fuktig miljö eller
platser som utsätts för regn. Använd inte på platser som utsätts för mycket
svavelsyra eller salt, såsom områden med varma källor eller områden med
viken.
2) Den lägsta uppslamningstemperaturen är 5 ℃ och den högsta är 40 ℃;
lagring vid låg temperatur är att föredra för att förbättra

- 7 -
produktionseffektiviteten för glass.
3) Placera på en jämn och fast yta på en väl ventilerad plats.
4) Ett fritt utrymme på minst 80 cm bakom glassdispensern och ett
utrymme på minst 30 cm på båda sidor ska säkerställas, för inflöde av kall
luft och utsläpp av varm luft för att underlätta enhetens kondensationscykel;
rengöring av dammet på kondensorn rekommenderas.
Obs: Enheten kommer oundvikligen att oscilleras under transport, så det
rekommenderas att den placeras stabilt i 4 timmar före första
användningen.
5 . Strömanslutning
Alla interna ledningar har varit helt anslutna innan leveransen av våra
Bingzhile glassdispensrar. Det enda för användarna att göra är att välja rätt
kablar i enlighet med den ström som krävs och ansluta med nätsladden
längst ner på enhetens baksida, förutom korrekt jordning.
Obs: Alla externa ledningar, kontakter och uttag ska uppfylla kraven i
nationella standarder
6 . Krav på strömspänning
Avvikelsen för den inkommande strömförsörjningens märkspänning får inte
vara för hög eller för låg. Om så är fallet kommer indikatorn (röd) att blinka
och ett larm (surr) kommer att avges, vilket resulterar i att kylfunktionen
misslyckas.
7 . Kylningsförhållanden
a. Kylning är inte tillåten när omröraraxeln är i den tomma cylindern.
b. Kylning är inte tillåten när det finns vatten i cylindern.
II . Produktstrukturdiagram
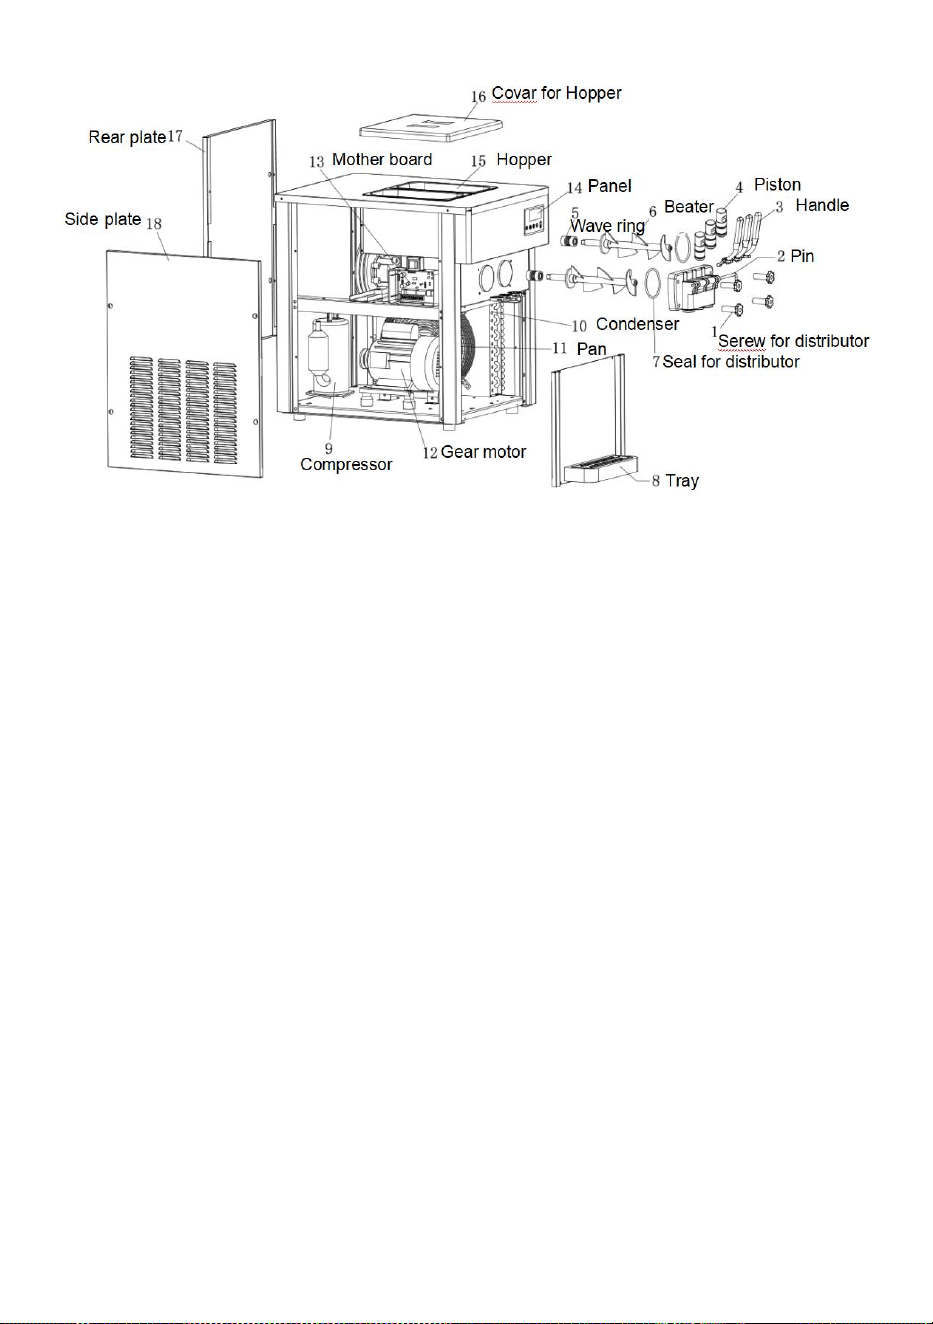
- 8 -
III. Manöverpanel och funktioner
Manöverpanelen är uppdelad i en fluorescerande nyckelskärm och en
LCD-skärm (välj motsvarande funktion)
Arbeta som visas i Fig. D, E och F
1) Rengöring/Unfrysningsnyckel:
I standbyläge, tryck på knappen för att aktivera rengöringsläget. När
rengöringsindikatorn tänds med ett surrande ljud börjar omrörarmotorn att
gå och LCD-skärmen visar det aktuella värdet för omrörningsmotorn. Tryck
på den här knappen igen för att gå in i standbyläge.
Håll ned knappen i 5 sekunder för att starta upplåsningsfunktionen med
rengöringsikonen blinkande, följt av att trycka på knappen igen för att
stänga uppfrysningsfunktionen.(Gäller endast modeller med denna
funktion)
2) Kylnyckel:
I standbyläge trycker du på kylknappen för att aktivera kylläget. När
kylindikatorn tänds med ett surrande ljud börjar omrörarmotorn,
kompressorn och fläktmotorn att gå, och LCD-skärmen visar det aktuella
värdet för omrörningsmotorn. Tryck på den här knappen igen för att gå in i

- 9 -
standbyläge.
3) Puffande nyckel;
Om du trycker på "puffing"-tangenten med luftpumpens indikatorlampa
tänd i standby-läge, kommer luftpumpen att inaktiveras; Om du trycker på
puffningsknappen i rengörings- eller kylläge, blinkar pumpindikatorn för att
indikera att luftpumpen är aktiverad. (Gäller endast modeller med denna
funktion)
4) Hårdhetsinställningsknapp:
Håll ned “△” eller “ ”i 1 sekund för att aktivera
hårdhetsparameterinställningsläget, följt av att trycka på knappen igen för
att ändra hårdhetsvärdet. Ju högre hårdhetsvärdet är, desto hårdare blir
glassen och vice versa.
5) Bevarandenyckel:
I standby-läge, tryck på knappen "konservering", och
konserveringsindikatorn tänds med ett surrande ljud. Fördröjd start inträffar
för omrörarmotorn, kompressorn och fläktmotorn, och det aktuella värdet
för omrörarmotorn visas på LCD-skärmen . Tryck på den här knappen igen
för att gå in i standbyläge. (Gäller endast modeller med denna funktion)
6) Timing/Återställningstangent
I standby-läge, tryck på denna knapp för att aktivera
timeråterställningsläget. Tryck på denna knapp igen för att ändra timerns
återställningsvärde.
Håll den här knappen intryckt i 10 sekunder för att återställa antalet koppar.
(Återställningsbrytare för vissa modeller visas som Fig. D)
7) Antalet glass som visas:
Varje kopp glass som töms kommer att registreras automatiskt.
Visning av slamnivå/brist (endast tillämpligt för modeller med denna
funktion):
När enheten har ont om slurry, kommer koden för brist att visas i
visningsområdet för koppnummer och summern kommer att avge ett larm
intermittent.
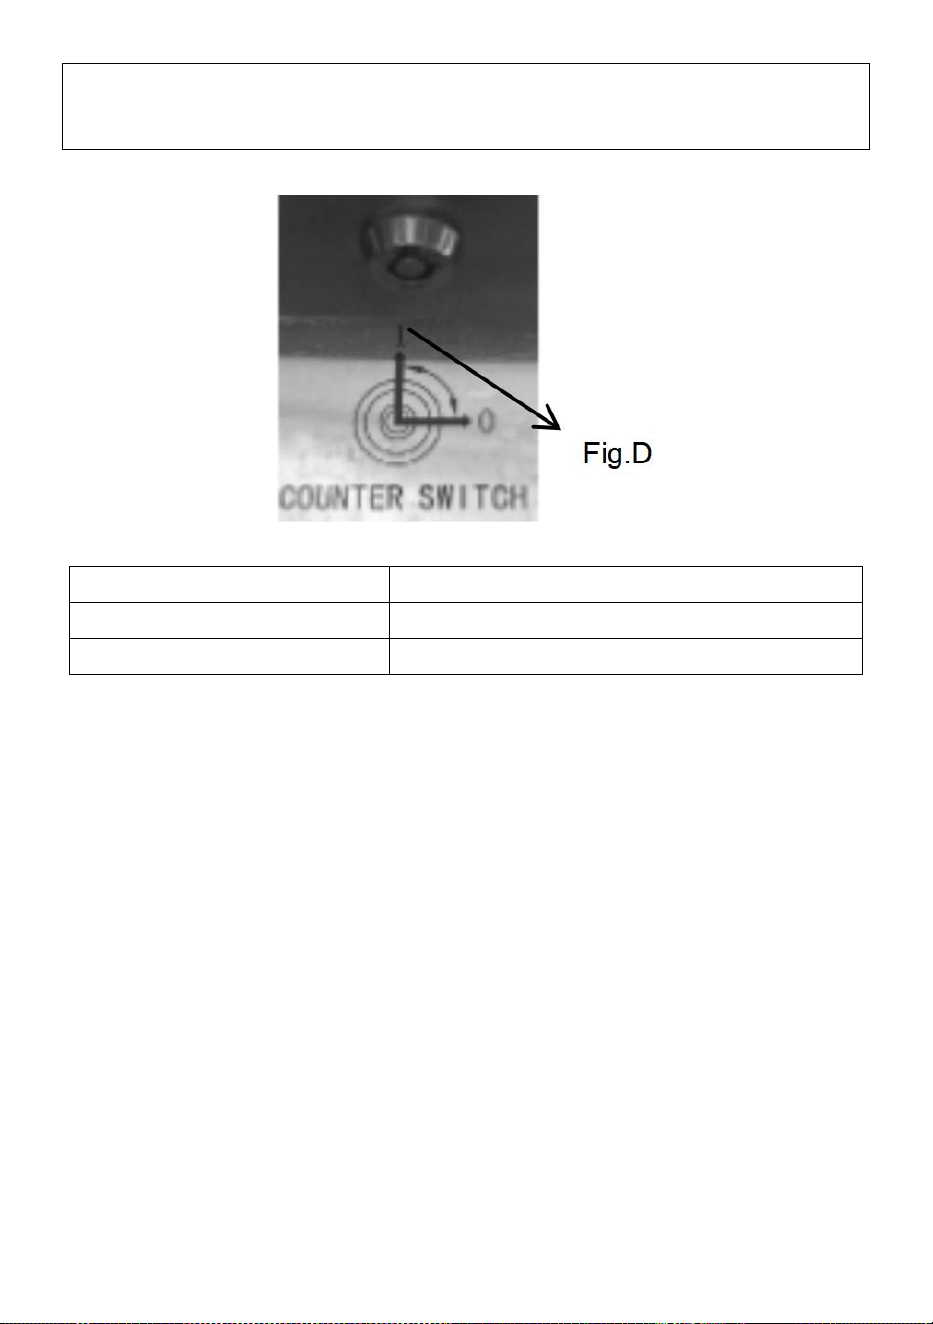
- 10 -
Sätt in återställningsnyckeln i omkopplaren vid botten av displaypanelen
och vrid den 90° medurs för att återställa glassrekordet.
CLI
Slambrist i vänster cylinder
CL2
Slambrist i höger cylinder
CL3
Slambrist i båda öppningarna

- 11 -
IV. Hur man gör glass
1) Låt den beredda glassuppslamningen stå i 15 minuter innan du häller
den i båda cylindrarna på toppen av glassdispensern; Obs:
Uppslamningen får inte kaka.
2) Slå på glassdispensern för att gå in i standby-läge, tryck sedan på
"rengöringsknappen" för att låta enheten gå i 3-5 minuter. Håll sedan ner
handtaget för att tömma 2-3 koppar slam och häll dem i den övre cylindern
igen för att förhindra att vattnet isar vid utloppet, vilket kan påverka
produktionen av glass; Obs: Uppslamningen ska beredas i enlighet med
det blandningsförhållande som anges i manualen för glasspulver.
3) Tryck på knappen "kylning" för att aktivera kylläget; Håll ned "△" eller "
" i 1 sekund för att justera hårdheten på glassen efter behov.

- 12 -
Obs: I det tidigare rengöringsläget måste du hålla ett öga på värdet för
"nuvarande hårdhet" som visas på skärmen. Om "nuvarande hårdhet" som
visas är 2,2, ska hårdheten på glass ställas in mellan 3,5-5,0; om
"nuvarande hårdhet" är 3,5 ska hårdheten på glass ställas in mellan
4,5-6,5.
4) När hårdheten på glassen når det inställda värdet pausar enheten
automatiskt; Intermittensen mellan pauser kan variera från 3 till 9 minuter. I
detta ögonblick kan tidsjusteringsknappen tryckas in för att ställa in tiden
för maskinen att gå in i nästa kylcykel. Tiden kommer att ökas med en
minut för varje tryckning, upp till 9 minuter. Och värdet återgår till 3 minuter
om du trycker igen.
Obs: Vid varmt väder är ett kortare pausintervall att föredra; vid kallt väder
är ett längre pausintervall att föredra.
Placera en kon eller en kopp under utloppet på utloppsventilen och håll
ned utmatningshandtaget för att pressa ut glass. Släpp handtaget för att
stänga.
V. Rengöring och underhåll
1. Rengöring av kylcylinder
För att säkerställa hälsan hos glasskonsumenter och förlänga dispenserns
livslängd måste kylcylindern rengöras och desinficeras efter varje
användning.
1) Tryck på rengöringsknappen för att tömma all slurry i cylindern, tryck på
den igen och pausa en stund.
2) Tillsätt ljummet vatten blandat med en lämplig mängd flytande
antiseptisk i cylindrarna för att fylla båda cylindrarna med ungefär samma
mängd vatten.
3) Tryck på rengöringsknappen igen för att röra om i ca 5 minuter innan
rengöringsvätskan töms ut.
4) Använd ljummet vatten istället för att skölja maskinen 2–3 gånger.
Pausa ett tag.
5) Stäng av, plocka isär och tvätta delarna:
Lossa de fyra skruvarna på utloppsventilen och demontera

- 13 -
utloppsventilenheten.
Ta ut handtagets fäststift, handtag, ventilstång, tätningsring från
utloppsventilen i tuns.
Ta ut omröraren från kylcylindern.
Rengör alla demonterade delar. Byt ut den skadade delen mot en ny.
Sätt tillbaka delarna i omvänd ordning.
2. Rengöring av dispenserkroppen
Vad konsumenterna behöver är ett snyggt utseende. ren och sanitär
anordning. Vänligen håll kroppen ren. En varm handduk kan användas för
att torka av maskinkroppen och ta bort fläckar. Skölj aldrig direkt med
vatten för att förhindra att enheten inte fungerar som den ska.
3. Rengöring av kondensor
Kondensorn kommer att täckas med damm efter att ha körts under en tid,
vilket resulterar i dålig värmeavledning och kylning, så den måste rengöras
varannan månad. Det är bäst att be en professionell städpersonal att
rengöra den. Se till att skära innan rengöring
stänga av strömmen och inte skada kondensorn.
4. Justering av bältet
Efter en tids drift kan omrörningssystemets drivrem förlängas och lossas,
vilket ska justeras i tid, helst av en professionell tekniker. Dispensern
måste stängas av från strömförsörjningen innan den justeras. Om du
fortfarande känner att bältet är för löst ska du byta ut det mot ett bälte av
samma typ.
VI. Felsökning Analys & Lösning
S/
N
Problem
Orsaker
Lösningar
1
Dispensern startar
1. Nätsladden är inte
1. Kontrollera

- 14 -
inte
korrekt ansluten
nätsladden och anslut
den igen
2. Nolllänken är inte
ansluten
2. Kontrollera
nolllinjen och se till att
den är ordentligt
ansluten
3.
Funktionsomkopplaren
är inte påslagen
3. Slå på
funktionsomkopplaren
4. Problem med
funktionsomkopplarko
ntakt och anslutning
4. Kontrollera
kontakten och
kabelanslutningen
5. Problem med PCB
5. Byt ut kretskortet
2
Rengöringsfunktio
nen fungerar inte
1. Lös anslutning
1. Återanslut
2. Motorn eller
kondensatorn är trasig
2. Reparera eller byt
ut motorn eller
kondensatorn
3. Kontaktorn är trasig
3. Byt ut kontaktorn
3
Kompressorn
fungerar inte
1. Låg spänning
1. Kontrollera
matningsspänningen
2. Kontaktorn är trasig
2. Byt ut kontaktorn
3. Problem med PCB
3. Byt ut kretskortet
4. Kondensatorn
fungerar inte
(220V-serien)
4. Byt ut kondensatorn
5. Kompressorn är
trasig
5. Byt ut kompressorn
4
Kompressorn
fungerar inte
1. Lös anslutning av
funktionsomkopplare
1. Återanslut
funktionsomkopplarka

- 15 -
beln
2. Problem med PCB
2. Byt ut kretskortet
5
Dispensern kan
inte kylas
1. Köldmediekaka
1. Reparera läckaget
och dammsug det för
att fylla på köldmediet
2.
Kondensorblockering
2. Rengör kondensorn
3. Fläkten fungerar inte
3. Reparera eller byt
ut fläkten
6
Bältet slirar
1. Bältet är för löst
1. Justera bältet eller
byt ut bältet
2. Problem med
reduceraren
2. Reparera eller byt
ut reducering
3. Frusen cylinder,
spricka i omröraraxeln
3. Byt omröraraxeln
S/N
Problem
Orsaker
Lösningar
7
Misslyckas med
att göra is
grädde
1. Ingen slurry i
cylindern
1. Tillsätt slurry till
cylindern
2. Den puffande
urladdningen röret för
flytgödsel är blockerat
2. Ta bort utloppsröret
och rengör den
3. Felaktigt
gödselförhållande
också tjock
3. Förbered ny
kvalificerad slurry
4. Körströmbrytaren
på pan e l är trasig
eller
osammanhängande
4. Återanslut
ledningen eller byt ut
resebrytaren

- 16 -
5. Bältet är för löst och
halkar
5.Justera bältet eller
byt ut bälte
6. Problem med
reducerare
6. Reparera eller byt
ut reducering
8
Dålig puffeffekt
1. Puffröret är det inte
insatt
1. Sätt i puffröret
2.Puffing-omkopplaren
är det inte påslagen
2. Slå på
puffningsbrytaren
9
Glass är för mjuk
1. Slamförhållandet är
fel
1. Förbered ny
kvalificerad slurry
2. Felaktig hårdhet
miljö
2. Ställ in
hårdhetsvärdet igen
3. Motorströmmen är
för stor och det finns
en kortslutning
3. Reparera eller byt
ut motorn
10
Glass är för hårt
1. För mycket vatten
tillsätts i slurryn
1. Förbered ny
kvalificerad slurry
2. Felaktig hårdhet
miljö
Ställ in
hårdhetsvärdet igen
11
Slamläckage
1. Utloppsventil läcker
1. Byt ut
tätningsringen av
utloppsventilen
2. Ventilstången läcker
2. Byt ut
ventilstången
3. Slurry Icakage
3. Byt ut
tätningsringen av
utloppsventilen
4. Omröraraxelns
tätningsring är bruten
4.Sätt tillbaka
tätningsringen

- 17 -
12
LCD skärmen
misslyckas visa
1. Problem med PCB
1. Byt ut kretskortet
2. Pluggen är lös
2. Kontrollera
anslutningen plugg
13
Ord saknas i
LCD
1. LCD-skärmen är
skadad
1. Byt ut monitorn
14
De kompressorn
stannar efter
glassen är
bildas, men
motorn slutar
inte
1. Körströmbrytaren
kontakt är ansluten
1. Reparera eller byt
ut resebrytare
15
När man gör
glass fungerar
inte motorn och
ingen grädde
kommer ut
1. Körströmbrytaren är
skadad
1. Reparera
eller byt ut
färdbrytaren
16
Omrörningsaxeln
spricker
Det kommer inte att hända
under normala
omständigheter. Den
onormala situationen är som
följer:
Rcplacera
omröraraxeln
1. Det finns för mycket vatten i
slammet, flaskan är frusen
2. Tryck på kylknappen av
misstag vid rengöring, vilket
resulterar i
kylning med vatten
3. Kylning med en cylinder
fylld och den andra tom
4. Kylning utan slam
5. Missbruk av en cylinder när
man gör glass

- 18 -
6. Varm slurry hälls i cylindern
för snabb kylning
7. Kylning av flytgödsel med
motorn omvänt kopplad
VII.Tillbehör
1. En invändig sexkantnyckel
2. En uppsättning skalringar
3. En Uscrs manual
4. Ett garantikort
Tekniska parametrar:
Se typskylten för specifika tekniska parametrar och köldmedieprestanda.
Kretsdiagram för glassmaskin
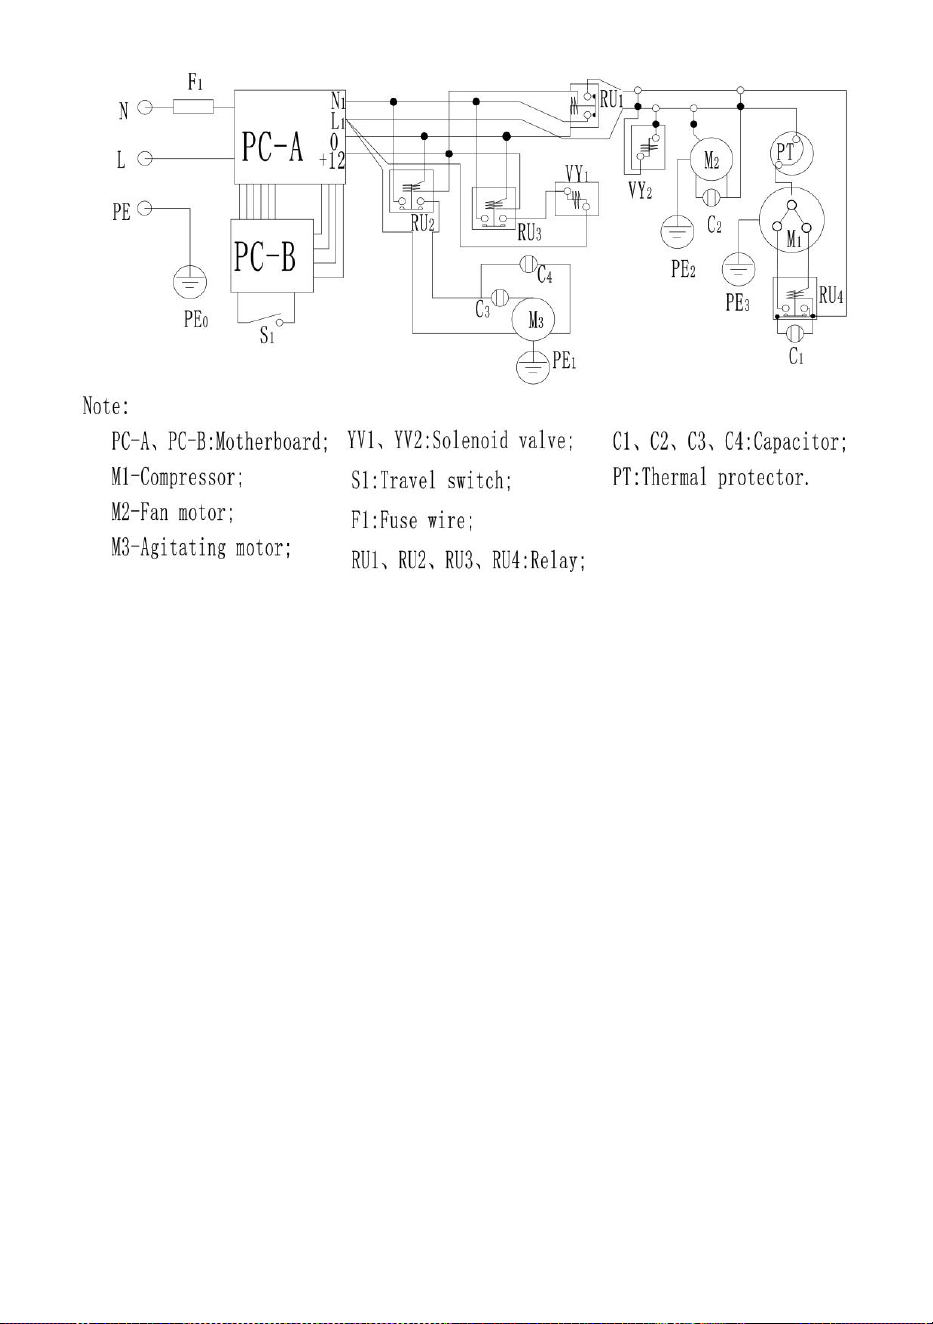
- 19 -
Tillverkad i Kina