
Frigidaire.com USA 1-800-374-4432 Frigidaire.ca Canada 1-800-265-8352
use
&
care
Air Purifier
Introduction...................................................... 2
Important Safety Instructions.................... 3
Parts and Feature List.................................. 5
Operating Instructions................................. 6
Care And Cleaning........................................ 9
Storage............................................................. 10
Before You Call............................................. 11
Warranty......................................................... 13

2 INTRODUCTION
Welcome to our
family
Model Number
Serial Number
Purchase Date
Thank you for bringing Frigidaire® into your
home! We see your purchase as the
beginning of a long relationship together.
This manual is your resource for the use and
care of your product. Please read it before
using your appliance. Keep it handy for quick
reference. If something doesn’t seem right,
the troubleshooting section will help you
with common issues.
FAQs, helpful tips and videos, cleaning
products, and kitchen and home accessories
are available at www.frigidaire.com.
We are here for you! Visit our website, chat
with an agent, or call us if you need help. We
may be able to help you avoid a service visit.
If you do need service, we can get that
started for you.
Let’s make it official! Be sure to register your
product.
Keep your product info here so it’s easy to
find.
3IMPORTANT SAFETY INSTRUCTIONS
SAFETY INFORMATION
This USER MANUAL provides specific
operating instructions for your model. Use
the unit only as instructed in this USER
MANUAL. These instructions are not meant
to cover every possible condition and
situation that may occur. Common sense
and caution must be practiced when
installing, operating, and maintaining any
appliance.
WARNING
• Do not store or use gasoline or other
flammable vapors and liquids in the
vicinity of this or any other appliance.
Read product labels for flammability and
other warnings.
• Do not let water or any other liquid or
flammable detergent enter the appliance
to avoid electric shock and/or a fire
hazard.
• Do not touch the fan blade when
removing the filter.
• Disconnect the appliance from the power
supply before servicing.
• Do not operate the appliance with a
damaged cord, plug or adapter. Return to
an authorized service facility for
examination and repair.
• Do not run cord under carpeting. Do not
cover cord with throw rugs, runners, or
similar covering. Do not route cord under
furniture or appliances. Arrange cord
away from traffic area and where it will not
be tripped over.
• To reduce the risk of fire, electric shock or
injury to persons, do not use replacement
parts that have not been recommended
by the manufacturer.
Children and Vulnerable People Safety
WARNING
• WARNING! Risk of suffocation, injury or
permanent disability.
• This appliance can be used by children
aged from 8 years and above and persons
with reduced physical, sensory or mental
capabilities or lack of experience and
knowledge if they have been given
supervision or instruction concerning use
of the appliance in a safe way and
understand the hazards involved.
• Children shall not play with the appliance.
• Cleaning and user maintenance shall not
be made by children without supervision.
• Children under 3 years of age should be
kept away from the appliance unless
continuously supervised.
• Keep all packaging away from children.
SAFETY PRECAUTIONS
• This equipment should be inspected
frequently and collected dirt removed
from it regularly to prevent excessive
accumulation that may result in flashover
or a risk of fire.
• RISK OF ELECTRIC SHOCK – These
servicing instructions are for use by
qualified personnel only. To reduce the
risk of electric shock, do not perform any
servicing other than that contained in the
operating instructions unless you are
qualified to do so.
• Do not alter the adapter in any way.
• This device complies with Part 15 of the
FCC Rule / ISED standard(s).
Operation is subject to the following two
conditions: (1) this device may not cause
harmful interference, and (2) this device
must accept any interference received,
including interference that may cause
undesired operation.
• Changes or modifications not expressly
approved by the party responsible for
compliance could void the user's authority
READ AND SAVE THESE INSTRUCTIONS
The electronic copy can be obtained on
www.Frigidaire.com

to operate the equipment.
• This equipment has been tested and found
to comply with the limits for a Class B
digital device, pursuant to part 15 of the
FCC Rules. These limits are designed to
provide reasonable protection against
harmful interference in a residential
installation. This equipment generates
uses and can radiate radio frequency
energy and, if not installed and used in
accordance with the instructions, may
cause harmful interference to radio
communications. However, there is no
guarantee that interference will not occur
in a particular installation. If this
equipment does cause harmful
interference to radio or television
reception, which can be determined by
turning the equipment off and on, the user
is encouraged to try to correct the
interference by one or more of the
following measures:
- Reorient or relocate the receiving
antenna.
- Increase the separation between the
equipment and receiver.
- Connect the equipment into an outlet
on a circuit different from that to which
the receiver is connected.
- Consult the dealer or an experienced
radio/TV technician for help.
4 IMPORTANT SAFETY INSTRUCTIONS
5PARTS AND FEATURE LIST
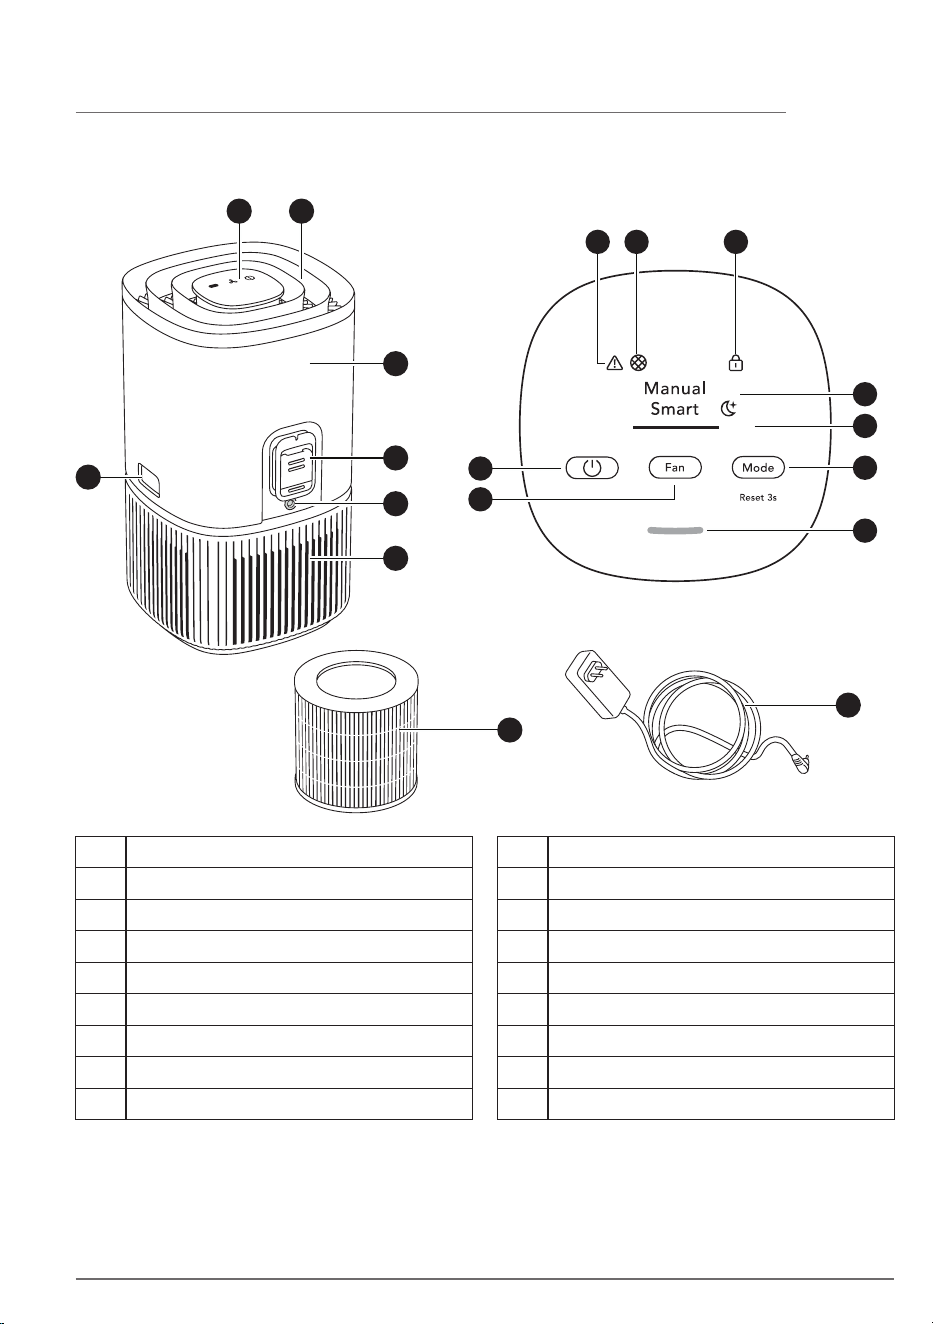
Parts and Feature List
A B
D
E
F
G
C
H
I
A Control panel display
B Air flow guide (Air outlet)
C Release buttons
D Main body (top)
E Sensor box
F Adapter jack
G Main body (bottom)
H Adapter
I Filter (inside)
L MODE button
K FAN button
J ON/OFF button
M Warning alert icon
N Filter change icon
O Child lock icon
P Mode display
Q FAN SPEED indicator
R Air quality indicator
M N O
L
R
P
Q
K
J
6 OPERATING INSTRUCTIONS
Always use original accessories and spare
parts to get the best results. This product is
designed with the environment in mind. All
plastic parts are marked for recycling
purposes.
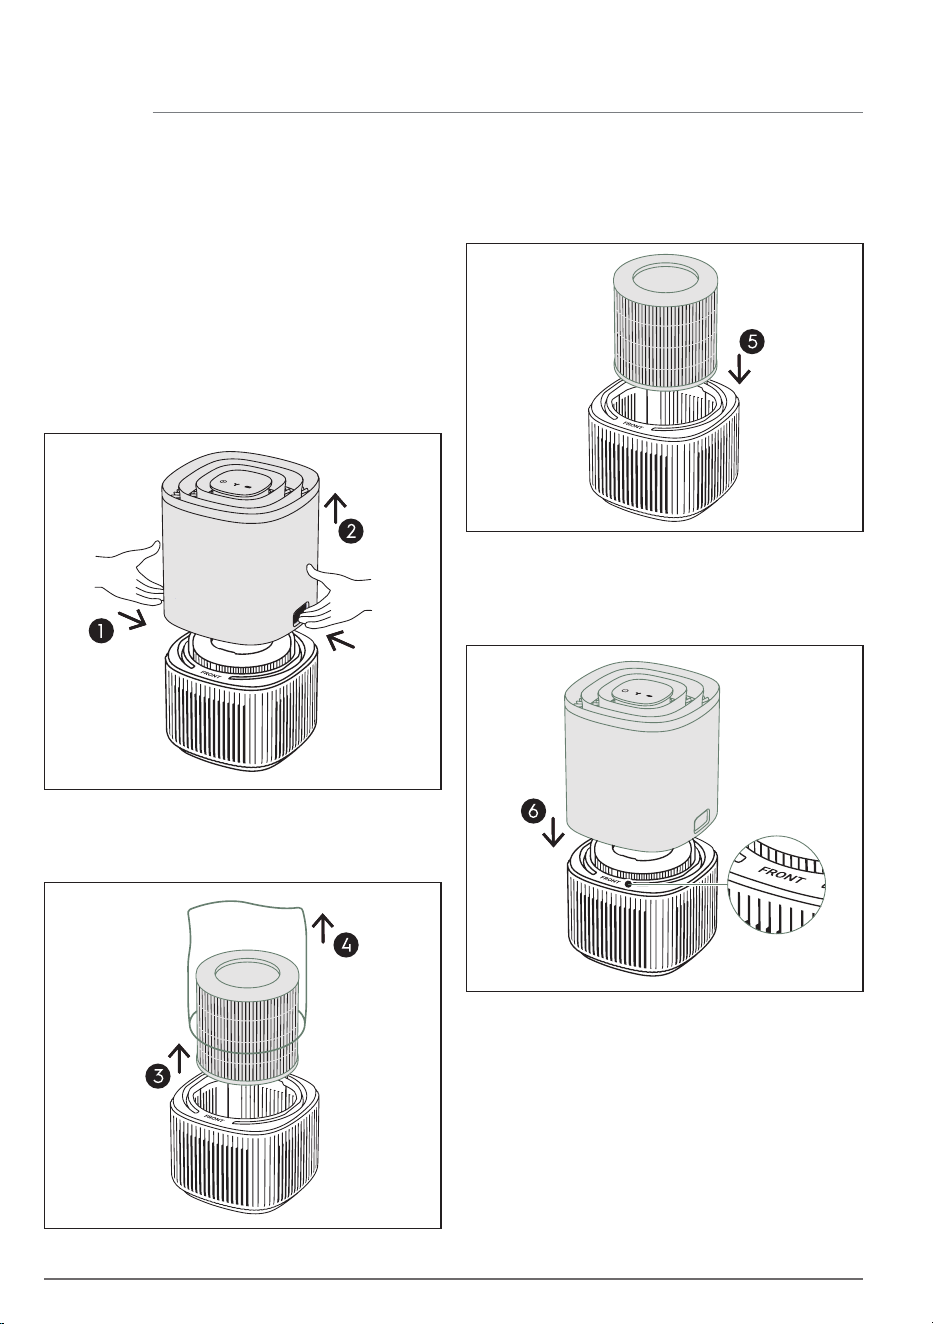
Carefully insert the filter back into the
product (either end of the filter works). Make
sure that the filter is placed in the center of
the cavity.
Put back the top part of the main body to
close the product till it is securely in place.
The mark "FRONT" should be facing the front
side of the product.
Place the product according to the
instructions below for optimal operation and
results:
• Operate the air purifier in an enclosed area.
Close all doors, windows, and other
openings connecting to the outside of the
room.
Open the product by pressing the release
buttons on the sides of the unit, then lift up
the top part of the main body.
Take out the filter. Carefully remove the
plastic bag around the filter and discard
appropriately.
Remove the plastic protective bag from the
HEPA Filter:
Select location
When use for the first time
Operating Instructions
• Place the air purifier in a location that does
not restrict the airflow through the top of
the appliance.
• The appliance must be placed on a leveled
floor that can support it.
• There should be a minimum of 12 in (30 cm)
of clearance around the appliance.
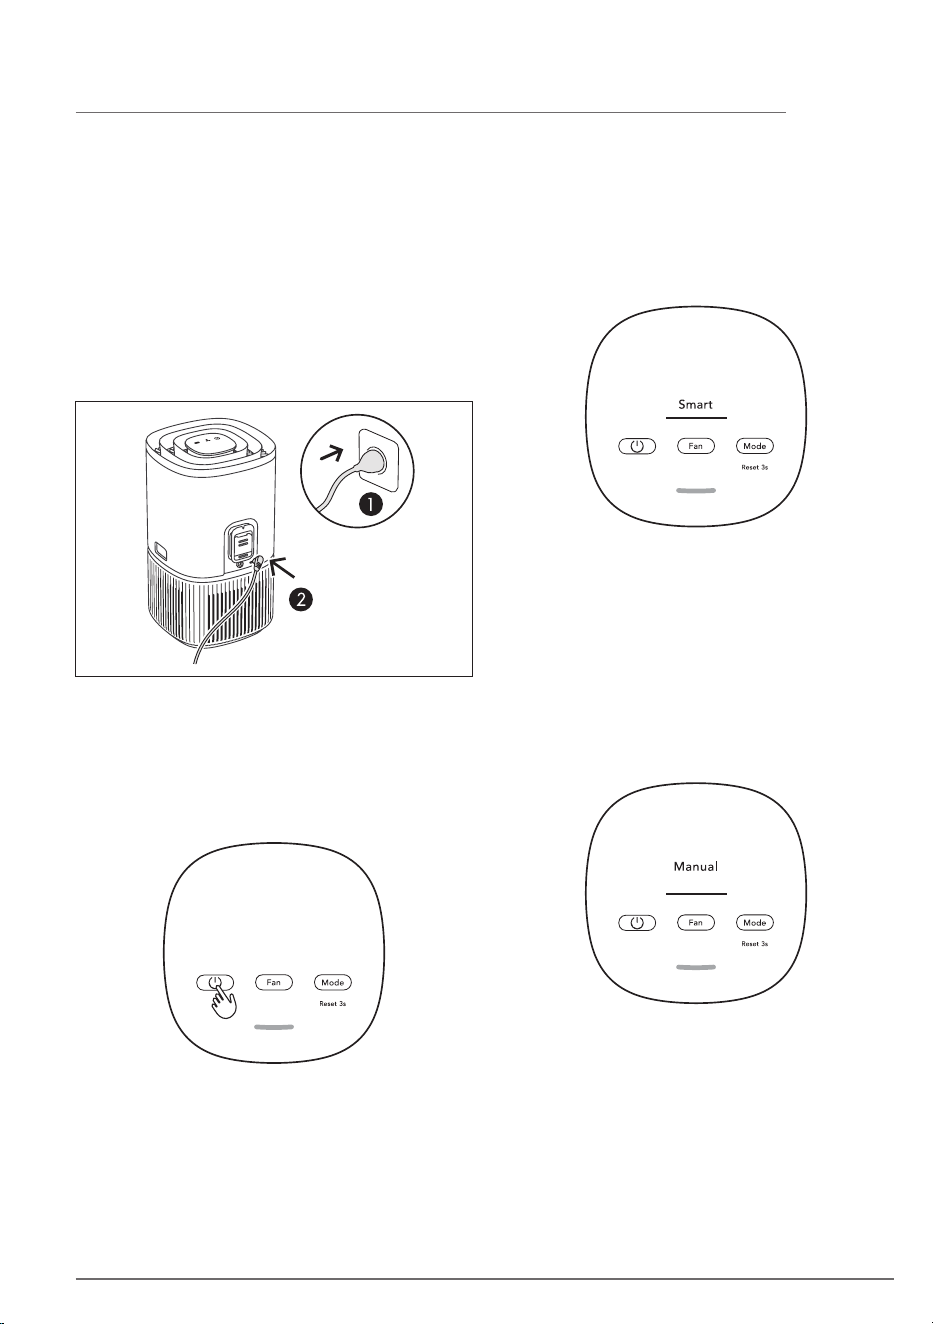
Connect the power plug.
Press the MODE button to choose MANUAL
mode.
In the MANUAL mode, the unit will utilize the
sensor data as input only to show the air
quality level via the air quality indicator but
will not self-adjust the fan speed. This mode is
best utilized for a quick burst of cleaning,
especially when the user anticipates an
increase in particulate matter in the room due
to household chores (e.g. vacuuming).
Press the ON/OFF button to turn ON the air
purifier, the unit will run in default setting
(SMART mode) when using the product the
first time. Next time you start the unit it will
resume the last settings you had before
turning OFF the product.
NOTE: When turning ON the air purifier, it will
take about 10 seconds for the sensors to
calibrate and analyze the air quality. During
this time, the air quality indicator will pulsate
slowly in white.
7OPERATING INSTRUCTIONS
In the SMART mode, the unit will utilize the
sensor data as input to decide on the
appropriate fan speed, depending on the air
quality in the room. The fan speed can not be
adjusted by the user under this mode. Please
see the AIR QUALITY INDICATOR section for
more details.
While in MANUAL mode, Press the FAN
button to adjust the fan speed, the fan speed
indicator will show the fan speed.
The unit has 3 levels fan speed.
NOTE: The unit will ramp up OR down to
chosen speed setting gradually.
8 OPERATING INSTRUCTIONS
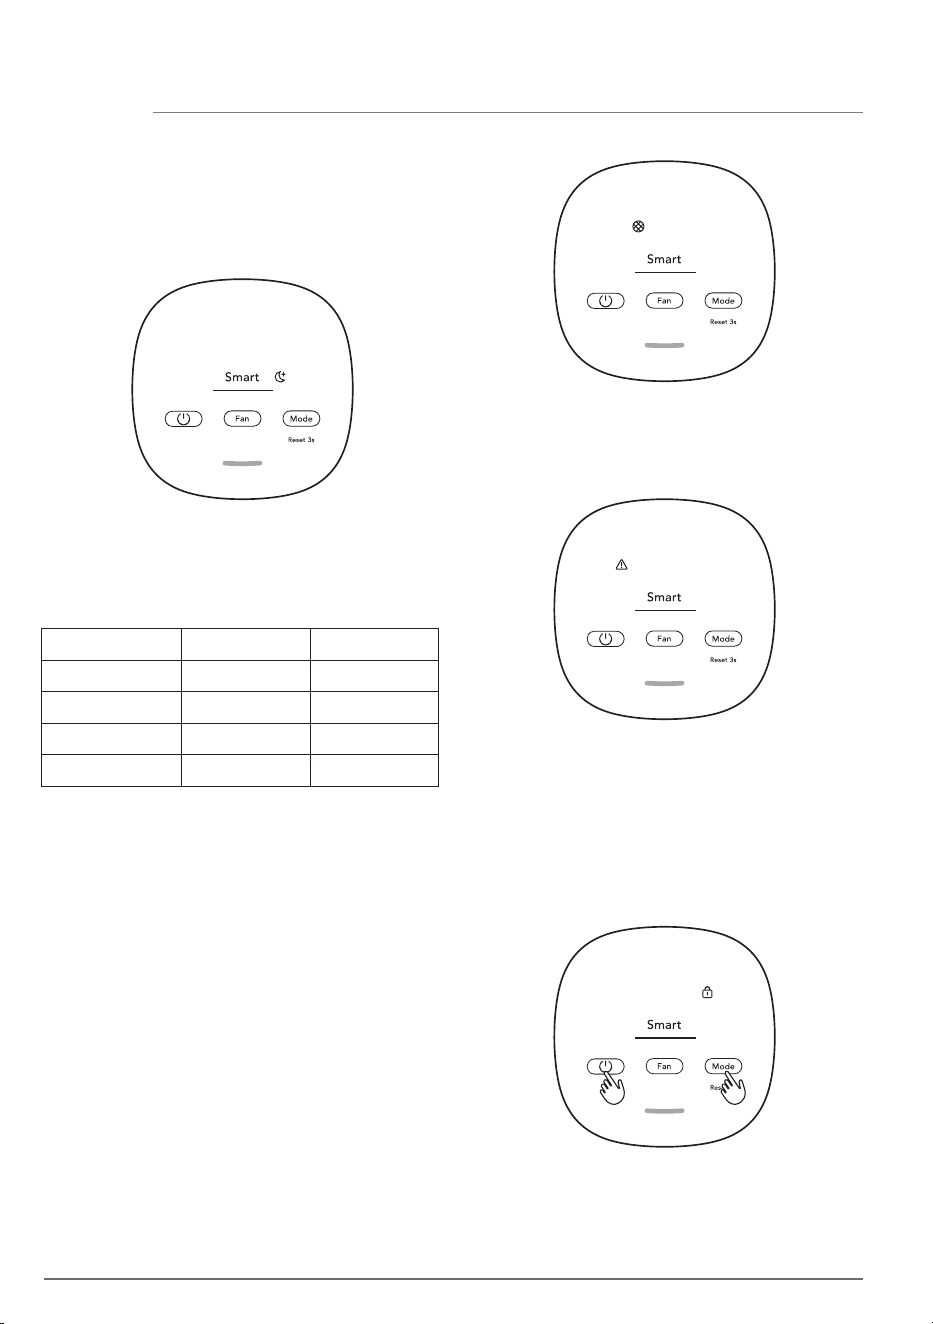
Press the MODE button to choose Smart
Quiet mode.
In the SMART QUIET mode, the unit will run as
quiet (control panel indicators dimmed &
lower fan speed) as possible to allow for
sleep.
The appliance has an air quality sensor that
analyzes the air quality.
The air quality light will show the real-time air
quality through different colors of light. As
shown below:
ALERT ICON
The alert icon will light up to alert you of a
possible electrical or electronic error with
your unit. Please contact our service center.
CHILD LOCK
The unit is equipped with a safety lock feature
to disable the product control panel to avoid
unintended pressing. Press and hold MODE &
POWER button simultaneously for 5 seconds
to activate or deactivate the child lock
feature. The child lock icon will light up when
the feature is activated.
FILTER CHANGE and RESET
The filter in the unit cannot be washed, they
can only be replaced. The filter change icon
will light up to remind you to change your
filter. Always ensure the plastic protective
bag is removed before its use in the unit.
After the used filter is replaced, long press the
MODE button for 3 seconds and filter change
indicator will reset.
NOTE: Please ensure regular cleaning of the
sensor window to ensure it does not get
clogged with dust and sensors keep
performing accurately.
LIGHT'S COLOR
Green
Yellow
Orange
PM 2.5 (μg/m
3
) AIR QUALITY
0-12 Good
13-35 Average
36-55
Poor
Red >56 Very Poor
9OPERATING INSTRUCTIONS & CARE AND CLEANING
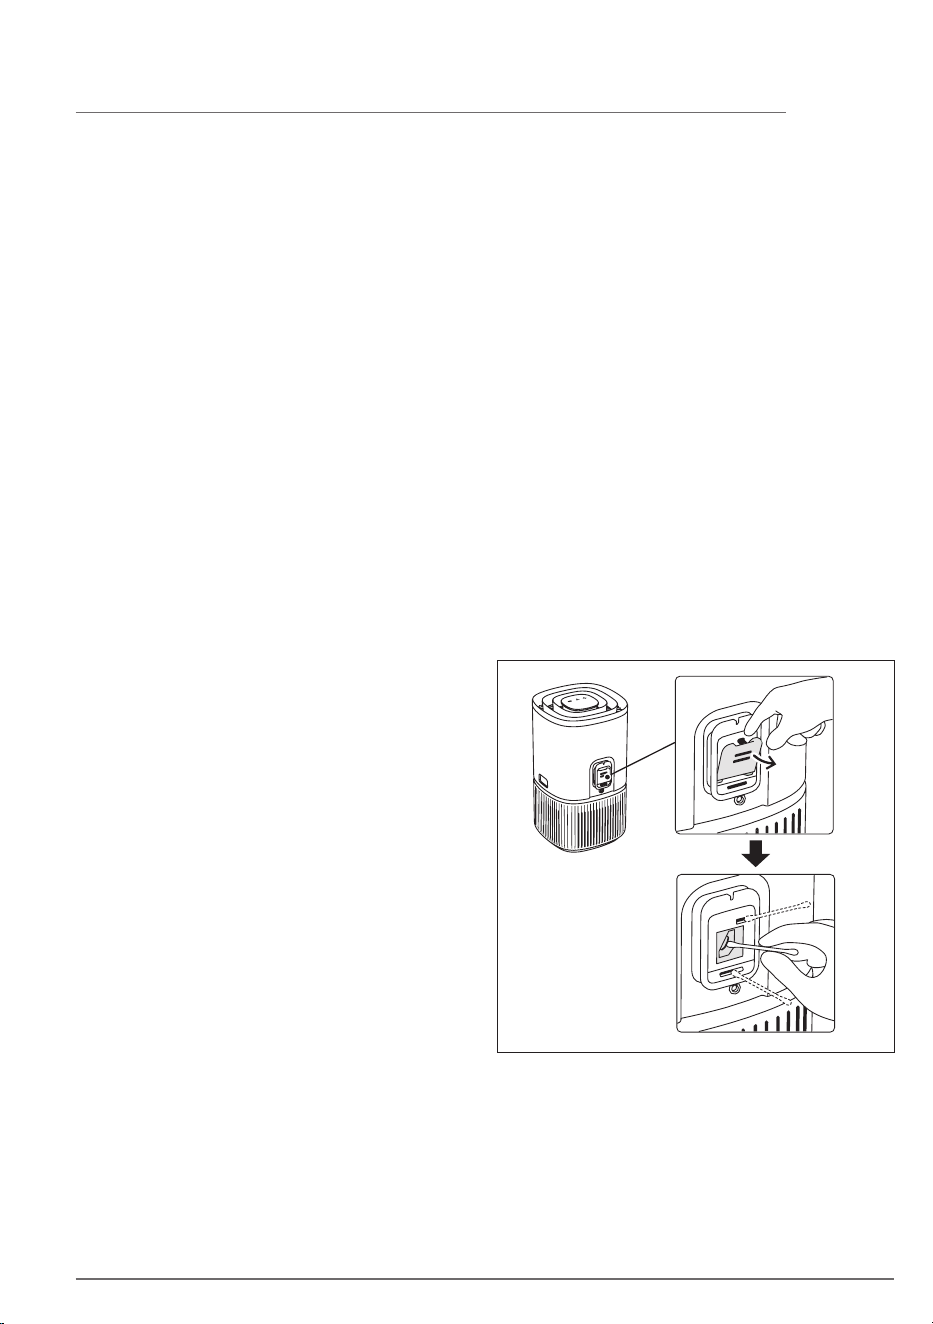
REPLACING FILTER
The filter cannot be washed and must always
be replaced when at end of life. Visit our local
website to order your replacement filter.
When the filter is at end of life, the filter
change icon will light up on the product
control panel to indicate the need for
replacement. When filter is at end of life, the
unit’s fan speed may be reduced in SMART
mode.
The used filter might be heavily coated with
dust and particulate matter so before
opening the main unit, please ensure a
disposable bag or packaging is at hand to
place the used filter in.
Turn OFF the air purifier or unplug the unit
before changing the filters. Remove the top
part of the main body put it aside. Next
remove the filter which is at end of life and
place it in a disposable bag at hand. (ref. page
6).
Next, please remove the plastic bag from the
replacement filter and insert the filter in to the
product. Reinsert back the top part of the
main body and turn ON the unit. Reset the
filter change icon on the product control
panel by long pressing the MODE button for 3
seconds.
Discard the used filter as well as any plastic
packaging according to local recycling
guidelines.
Always unplug the air purifier before cleaning
to prevent shock or fire hazards. Never use
abrasive, harsh detergents OR wax for
cleaning the unit. The high efficiency filters
cannot be washed, they must always be
replaced when at the end of life.
Cleaning the air quality sensor box and sensor
Clean every 1-2 months to maintain the
performance of the air quality sensor.
Ensure that the air quality sensor is kept clean
and unclogged for optimal performance of
the unit. It is natural for dust to accumulate in
this area, vacuuming of the sensor box inlet
grill with a vacuum cleaner that has a narrow
nozzle/brush.
Open the sensor box inlet grill with finger and
clean the lens, inlet and outlet with wet
cotton swab.
Use dry cotton swab to remove any excess
water from the sensor.
CARE AND CLEANING

10 CARE AND CLEANING
After having cleaned the sensor box, we
recommend to vacuum clean the filter at the
same time.
If you are not planning to use the appliance
for a long time, cover it with plastic or return
it to its carton.
The plastic parts of the unit should be cleaned
with an oil-free dry cloth. For stains on plastic
parts, use a slightly damp soft microfiber
cloth to gently rub against the stain.
The area around the air inlet on the bottom of
the unit may accumulate more dust than
some other parts and hence may require
more frequent cleaning to ensure optimal
performance. The filter is equipped with a
mesh filter and should occasionally be wiped
off or cleaned with a vacuum cleaner to avoid
loss of performance.
STORAGE
11BEFORE YOU CALL
The air purifier’s alert
icon is lit.
The air purifier is
running at max fan
speed all the time for
extended periods
The air purifier is
running at lowest fan
speed all the time for
extended periods
Generally, the unit comes with a variety of
sophisticated sensors, electronics and other electrical
components and if one of these is malfunctioning, you
will see the alert icon on the product control panel
light up.
If in MANUAL mode, please check the fan speed slider
on the product control panel and adjust it to desired
level.
If in SMART mode, please check if the sensor is
clogged. Please clean the sensor as described under
care and cleaning section.
Please have at hand the
unit’s PNC and SERIAL
number if you need to
contact service
organisation for
support.
The PM sensor in the
unit is highly accurate
and sensitive and it is
normal for the purifier
to react to poor air
quality by ramping up
the fan speed – to get
your indoor air quality
back to safe levels.
If in MANUAL mode, please check the fan speed on
the product control panel display and adjust it to
desired level.
If in SMART mode, please check air quality indicator
on the product control panel if the air quality is very
good, fan speed will be lowest! If the air quality is bad
and the unit is still operating at lowest fan speed, then
please check filter change icon on the product control
panel. And if lit, please replace used filter with a new
one. This should resolve the specific fan speed issue.
The unit is designed so
that when a filter is at
end of life, it will
discourage usage till
the filter is replaced, by
limiting the fan speed
so as not to reintroduce
the captured
particulate matter back
into the air.
When fault indicators show that the system is not operating properly, perform the following
check.
The table below is only a limited list. For the latest and complete section on troubleshooting,
FAQ and error guide please refer to the corresponding section on our website.
SOLUTION NOTESOCCURRENCE
The air purifier
produces a loud or
abnormal noise
Please ensure that the plastic bag around the filter has
been removed, ensure the air inlet grill and air outlet
grill (top of the unit) are unobstructed and that there
is a clearance of at least 30 cm between the unit and
the nearest surface.
If there is an abnormal
noise in your product,
even after checking the
steps in the trouble
shoot guide, please
contact an authorized
service center for
further support.
The air purifier or fan
does not operate
Ensure that the unit is receiving power. If needed, try
pushing the power plug firmly into the wall socket to
check if this resolves the issue. Check that the fuse of
your home has not blown or that the circuit breaker
has been tripped. Replace fuse or reset circuit breaker
if needed.
12 BEFORE YOU CALL
If These Solutions Fail, Call 1-800-374-4432(US)/1-800-265-8352(Canada)
For Frigidaire® Service.
SOLUTION NOTESOCCURRENCE
The air purifier is
running but the air
quality does not
improve
If you do not see any improvement of the air quality
values according to the air quality light.
Change to MANUAL mode and adjust the fan speed to
a higher level to see if this helps resolve the issue.
If you still do not see any improvement. Close any
open doors OR windows to the outside of the room
and rerun the unit at the highest fan speed for 20
minutes. If this resolves the issue, we recommend that
you operate the unit in this sealed environment as
much as possible, till the air quality is also at a good
level.
If the unit is placed in a
room larger than the
recommended size, it
will take longer for the
air quality to improve –
please be patient and
maintain the unit at the
highest feasible speed.
The air purifier
produces or emits a
strange smell
The first time you run the unit, you may perceive a
plastic, glue or paint smell - especially near the air
outlet grill - this is unavoidable in some cases (like the
'new car smell') but should disappear quickly.
If you perceive a burning smell, please disconnect the
unit and contact authorized service center for further
support.
The VOC filter is in the end of life. Please change to a
new filter.
Always ensure that the
filter are covered in
appropriate packaging
while stored away
between uses, and that
all parts are dry to
avoid smell or mould
build up.
The filter icon is lit,
even though I
recently changed the
filters
After having changed the filter, long press the MODE
button for 3 seconds and the filter indication will be
reset.
It is important to turn
OFF the unit before
changing the filter, in
order to reset the
product.

13
Limited Warranty
Your appliance is covered by a one year limited warranty. For one year from your original date of delivery,
Electrolux will pay all costs for repairing or replacing any parts of this appliance that prove to be defective in
materials or workmanship when such appliance is installed, used and maintained in accordance with the
provided instructions.
Exclusions
This warranty does not cover the following:
1. Products with original serial numbers that have been removed, altered or cannot be readily determined.
2. Product that has been transferred from its original owner to another party or removed outside the USA
or Canada.
3. Rust on the interior or exterior of the unit.
4. Products purchased “as-is” are not covered by this warranty.
5. Products used in a commercial setting.
6. Service calls which do not involve malfunction or defects in materials or workmanship, or for appliances not in
ordinary household use or used other than in accordance with the provided instructions.
7. Service calls to correct the installation of your appliance or to instruct you how to use your appliance.
8. Expenses for making the appliance accessible for servicing, such as removal of trim, cupboards, shelves,
etc., which are not a part of the appliance when it is shipped from the factory.
9. Service calls to repair or replace appliance light bulbs, air filters, other consumables, or knobs, handles, or
other cosmetic parts.
10. Pickup and delivery costs; your appliance is designed to be repaired in the home.
11. Surcharges including, but not limited to, any after hour, weekend, or holiday service calls, tolls, ferry trip
charges, or mileage expense for service calls to remote areas, including the state of Alaska.
12. Damages to the finish of appliance or home incurred during transportation or installation, including but not
limited to floors, cabinets, walls, etc.
13. Damages caused by: services performed by unauthorized service companies; use of parts other than
genuine Electrolux parts or parts obtained from persons other than authorized service companies; or external
causes such as abuse, misuse, inadequate power supply, accidents, fires, or acts of God.
DISCLAIMER OF IMPLIED WARRANTIES; LIMITATION OF REMEDIES
CUSTOMER’S SOLE AND EXCLUSIVE REMEDY UNDER THIS LIMITED WARRANTY SHALL BE REPAIR
OR REPLACEMENT AS PROVIDED HEREIN. CLAIMS BASED ON IMPLIED WARRANTIES, INCLUDING
WARRANTIES OF MERCHANTABILITY OR FITNESS FOR A PARTICULAR PURPOSE, ARE LIMITED TO ONE
YEAR OR THE SHORTEST PERIOD ALLOWED BY LAW, BUT NOT LESS THAN ONE YEAR. ELECTROLUX
SHALL NOT BE LIABLE FOR CONSEQUENTIAL OR INCIDENTAL DAMAGES SUCH AS PROPERTY DAMAGE
AND INCIDENTAL EXPENSES RESULTING FROM ANY BREACH OF THIS WRITTEN LIMITED WARRANTY
OR ANY IMPLIED WARRANTY. SOME STATES AND PROVINCES DO NOT ALLOW THE EXCLUSION OR
LIMITATION OF INCIDENTAL OR CONSEQUENTIAL DAMAGES, OR LIMITATIONS ON THE DURATION OF
IMPLIED WARRANTIES, SO THESE LIMITATIONS OR EXCLUSIONS MAY NOT APPLY TO YOU. THIS WRITTEN
WARRANTY GIVES YOU SPECIFIC LEGAL RIGHTS. YOU MAY ALSO HAVE OTHER RIGHTS THAT VARY FROM
STATE TO STATE.
If You Need Service
Keep your receipt, delivery slip, or some other appropriate payment record to establish the warranty period should
service be required. If service is performed, it is in your best interest to obtain and keep all receipts. Service under
this warranty must be obtained by contacting Electrolux at the addresses or phone numbers below.
This warranty only applies in the USA, Puerto Rico and Canada. In the USA and Puerto Rico, your appliance is
warranted by Electrolux Major Appliances North America, a division of Electrolux Home Products, Inc. In Canada,
your appliance is warranted by Electrolux Canada Corp. Electrolux authorizes no person to change or add to
any obligations under this warranty. Obligations for service and parts under this warranty must be performed by
Electrolux or an authorized service company. Product features or specifications as described or illustrated are
subject to change without notice.
Canada
1-800 896 9756
Electrolux Canada Corp.
5855 Terry Fox Way
Mississauga, Ontario,
Canada L5V 3E4
USA
1-800-374-4432
Electrolux Appliances North America
10200 David Taylor Drive
Charlotte, NC 28262
welcome
home
Frigidaire.com
1-800-374-4432
Frigidaire.ca
1-800-265-8352
owner support
accessories
service
Our home is your home. Visit us if you
need help with any of these things:
registration
(See your registration card
for more information.)
(Nov. 2024)
