~Z~JIRUSHI
MICOM
RICE
COOKER
&
WARMER
OPERATING
INSTRUCTIONS
NS-WAC10 / NS-WAC18
INDEX
IMPORTANT SAFEGUARDS 2
PARTS NAMES AND FUNCTIONS 6
EXPLANATION OF RICE 8
TIPS
TO
COOKING
GREAT
·
TASTING
RICE
(PREPARATION
&
KEEP
WARM)
9
HOW TO COOK RICE:
BASIC COOKING STEPS 10
HOW
TO
COOK RINSE-FREE RICE 12
TIPS
TO
COOKING
GREAT-TASTING
RICE
BY
MENUS
13
HOW
TO
SET THE CLOCK 14
SOUND SIGNALS & HOW
TO
CHANGE THEM 15
REGULAR KEEP WARM
& EXTENDED KEEP WARM 16
USING THE TIMER 17
RECIPES:
MIXED
RICE/
HAND-ROLLED SUSHl 18
PAELLA/
GREEN TEA PORRIDGE 19
SWEET RICE COOKED WITH ADZUKI BEANS /
MIXED BROWN RICE 20
CLEANING AND MAINTENANCE
21
CLEANING
AND
MAINTENANCE
/
REPLACEMENT
PARTS
22
TROUBLESHOOTING GUIDE 23
ERROR DISPLAYS AND THEIR MEANINGS 24
SPECIFICATIONS 25
........................................
................................
..........
..
....
..
.....
..
..................
..
.
.•.•.
..........................................
...................... ...
..
....
.........................................
.........
....
.... .....
..
......
..
.....
..
.............
..
......
..
....
. ...................
..........................
. .
..
...
..
...
..
...
..
...
..
...
..
...
..
...
..
...
..
..
...............................
....
........
..
........
..
.................
..............
.
..
.
..
.
..
.
..
..
..
.
..
.
..
.
..
.
..
.
..
.
..
..
..
.
..
.
..
.
..
.
..
.
..
.
..
.
ZOJIRUSHI CORPORATION
BEFORE USE
IMPORTANT
SAFEGUARDS
BASIC SAFETY PRECAUTIONS SHOULD ALWAYS
BE
FOLLOWED WHEN
USING ELECTRICAL APPLIANCES, INCLUDING THE FOLLOWING:
1
Read
all
instructions
thoroughly.
2
Avoid
touching
hot
surfaces
and
do
not
close
or
clog
the
steam
vent
opening
under
any
circumstances.
The
handles
and
knobs
are
provided
for
your
safety
and
protection.
3
To
prevent
hazardous
operation
or
electric
shock,
do
not
immerse
power
cord,
power
plug,
or
rice
cooker
(except
inner
cooking
pan)
in
water
or
other
liquids.
4
Close
supervision
is
recommended
when
the
appliance
is
used
by
or
near
children.
5
Unplug
from
outlet
when
not
in
use
and
before
cleaning.
Allow
the
appliance
to
cool
before
adding
or
removing
parts,
and
before
cleaning
the
appliance.
Make
sure
appliance
is
OFF
when
not
in
use,
before
putting
on
or
taking
off
parts,
and
before
cleaning.
6
Do
not
use
or
operate
the
appliance
with
a
damaged
cord
or
plug.
If
the
appliance
malfunctions
or
has
been
damaged
in
any
manner,
unplug
the
appliance
and
return
it
to
the
nearest
authorized
service
facility
or
dealer
for
examination,
repair
or
adjustment.
7
The
use
of
accessories or attachments
not
recommended
by
the
appliance
manufacturer
may
be
hazardous
or
may
cause
malfunction.
8
Do
not
use
outdoors.
9
Keep
the
power
cord
away
from
hot
surfaces
and
do
not
let
the
cord
hang
over
the
edge
of
tables
or
counters.
10
Do
not
place
the
appliance
on
or
near
a
heated
surface
such
as
a
gas
or
electric
stove,
or
in
a
heated
oven.
11
Always
use
extreme
caution
when
moving
appliances
containing
hot
contents
or
liquids.
12
Plug
the
cord
into
a
household
electrical
outlet.
To
disconnect,
turn
the
power
control
to
OFF,
then
remove
plug
from
wall
outlet.
13
Do
not
use
the
appliance
for
other
than
intended
or
specified
purposes.
14
To
reduce
the
risk
of
electric
shock,
use
only
the
supplied
inner
cooking
pan.
15
The
plug
to
the
appliance
should
be
attached
first
before
plugging
the
cord
into
a
wall
outlet.
SAVE
THESE
INSTRUCTIONS
THIS APPLIANCE
IS
FOR HOUSEHOLD USE ONLY.
This
appliance
is
supplied
with
a
short
power
cord
to
reduce
the
risk
of
becoming
entangled
in
or
tripping
over.
Extension
cords
may
be
used
if
care
is
exercised
in
their
use.
If
an
extension
cord
is
used,
the
marked
electrical
rating
of
the
cord
should
be
at
least
as
great
as
the
electrical
rating
of
the
appliance,
and
a
longer
cord
should
be
arranged
so
that
it
will
not
drape
over
the
countertop
or
tabletop
where
it
can
be
pulled
on
by
children
or
tripped
over
unintentionally.
This
appliance
has
a
polarized
plug
(one
blade
is
wider
than
the
other).
To
reduce
the
risk
of
electric
shock,
this
plug
was
designed
to
fit
into
a
polarized
outlet
in
only
one
direction.
If
the
plug
does
not
fit
fully
into
the
outlet,
do
not
attempt
to
force
it
or
modify
it
in
any
way.
Simply
reverse
the
plug
and
insert.
If
it
still
does
not
fit,
contact
a
qualified
electrician.
2
IMPORTANTES
MESURES
DE
SECURITE
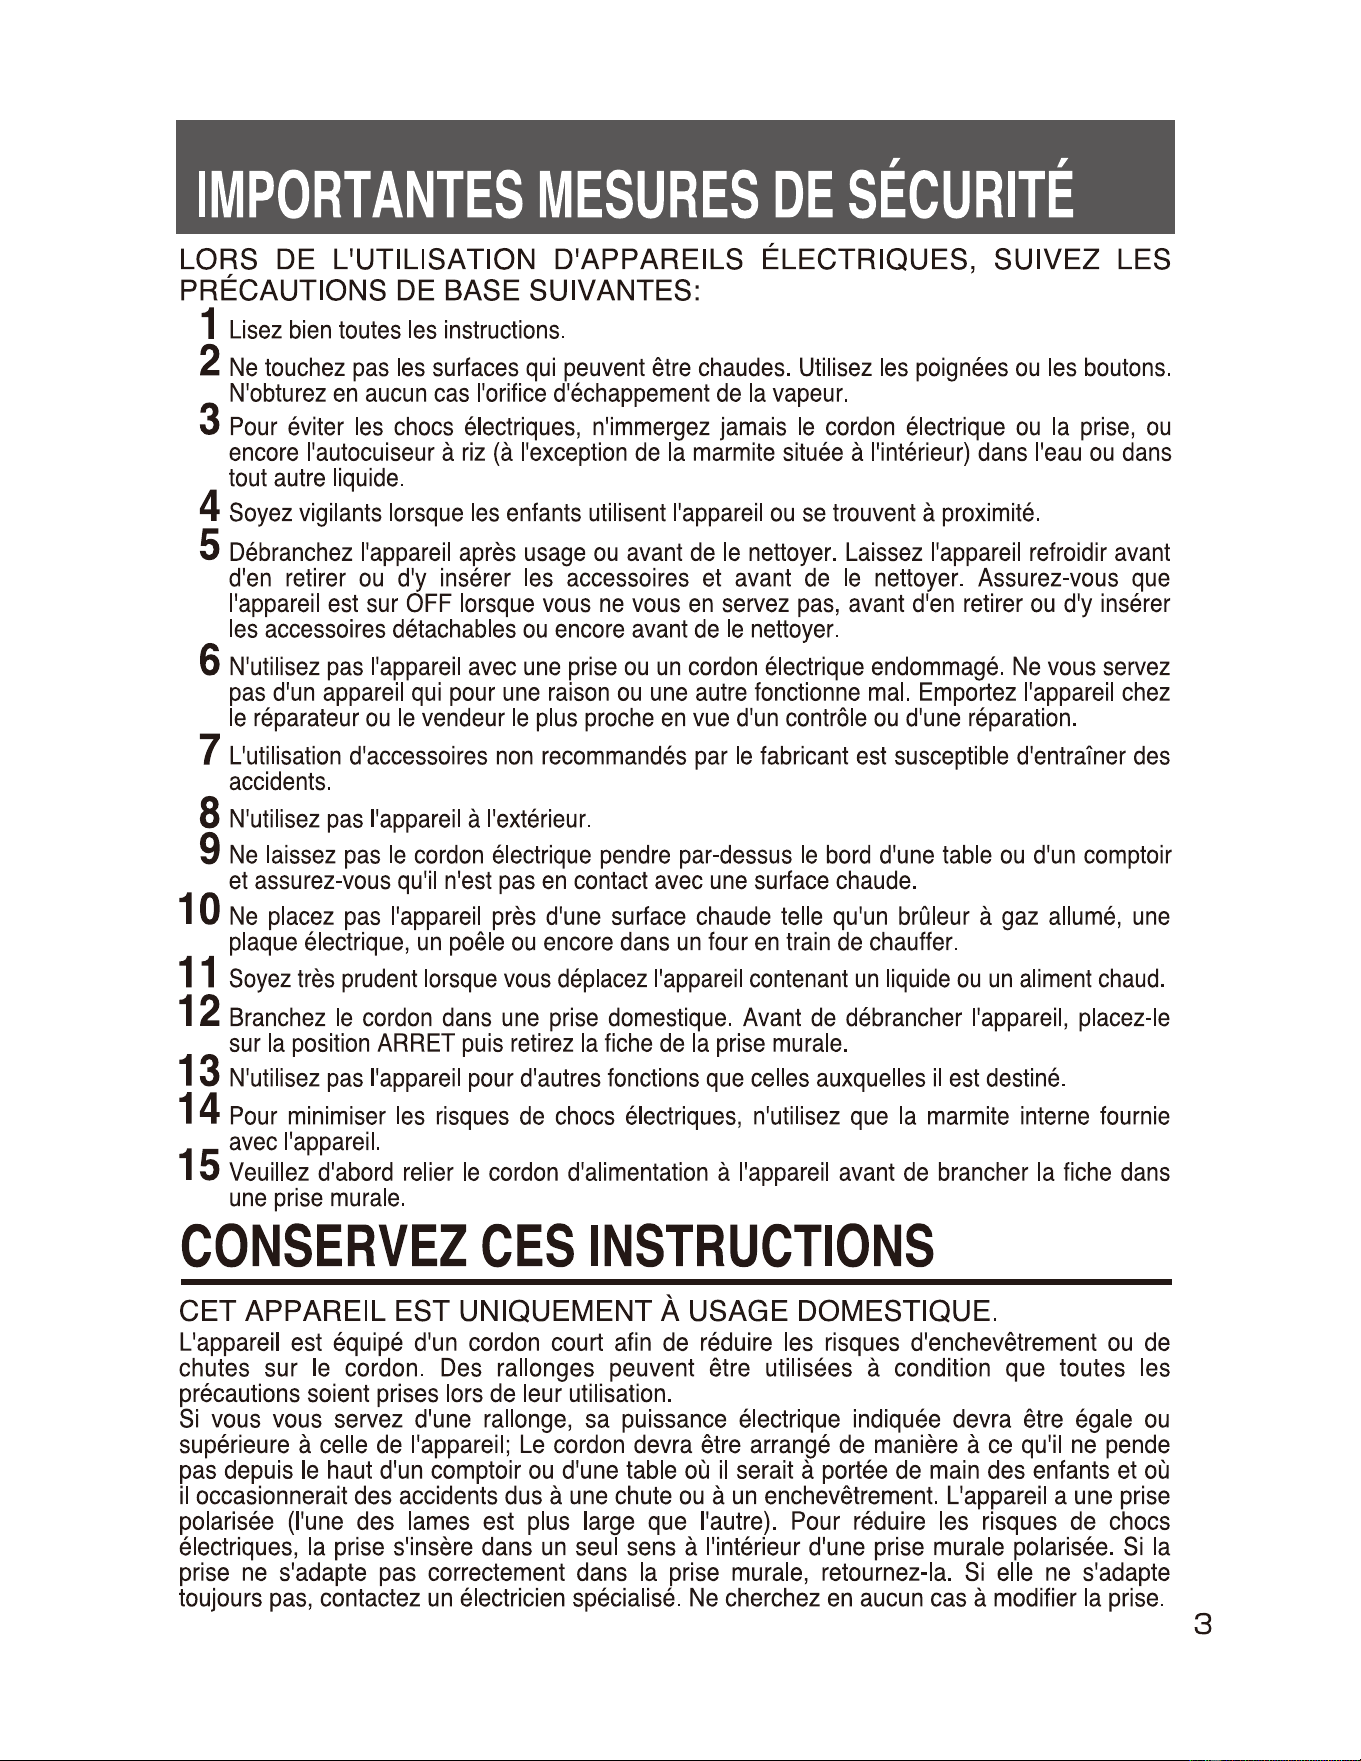
LORS DE L'UTILISATION D'APPAREILS ELECTRIQUES, SUIVEZ LES
PRECAUTIONS
DE
BASE SUIVANTES:
1
Lisez
bien
toutes
les
instructions.
2
Ne
touchez
pas
les
surfaces
qui
peuvent
etre
chaudes.
Utilisez
les
poignees
ou
les
boutons.
N'obturez
en
aucun
cas
!'orifice
d'echappement
de
la
vapeur.
3
Pour
eviter
les
chocs
electriques,
n'immergez
jamais
le
cordon
electrique
ou
la
prise,
ou
encore
l'autocuiseur
a
riz
(a
!'exception
de
la
marmite
situee
a
l'interieur)
dans
l'eau
ou
dans
tout
autre
liquide.
4
Soyez
vigilants
lorsque
les
enfants
utilisent
l'appareil
ou
se
trouvent
a
proximite.
5
Debranchez
l'appareil
apres
usage
ou
avant
de
le
nettoyer.
Laissez
l'appareil
refroidir
avant
d'en
retirer
ou
d'y
inserer
les
accessoires
et
avant
de
le
nettoyer.
Assurez-vous
que
l'appareil
est
sur
OFF
lorsque
vous
ne
vous
en
servez
pas,
avant
d'en
retirer
ou
d'y
inserer
les
accessoires
detachables
ou
encore
avant
de
le
nettoyer.
6
N'utilisez
pas
l'appareil
avec
une
prise
ou
un
cordon
electrique
endommage.
Ne
vous
servez
pas
d'un
appareil
qui
pour
une
raison
ou
une
autre
fonctionne
mal.
Emportez
l'appareil
chez
le
reparateur
ou
le
vendeur
le
plus
proche
en
vue
d'un
controle
ou
d'une
reparation.
7
L'utilisation
d'accessoires
non
recommandes
par
le
fabricant
est
susceptible
d'entrainer
des
accidents.
8
N'utilisez
pas
l'appareil
a
l'exterieur.
9
Ne
laissez
pas
le
cordon
electrique
pendre
par-dessus
le
bord
d'une
table
ou
d'un
comptoir
et
assurez-vous
qu'il
n'est
pas
en
contact
avec
une
surface
chaude.
10
Ne
placez
pas
l'appareil
pres
d'une
surface
chaude
telle
qu'un
bruleur
a
gaz
allume,
une
plaque
electrique,
un
poele
ou
encore
dans
un
four
en
train
de
chauffer.
11
Soyez
tres
prudent
lorsque
vous
deplacez
l'appareil
contenant
un
liquide
ou
un
aliment
chaud.
12
Branchez
le
cordon
dans
une
prise
domestique.
Avant
de
debrancher
l'appareil,
placez-le
sur
la
position
ARRET
puis
retirez
la
fiche
de
la
prise
murale.
13
N'utilisez
pas
l'appareil
pour
d'autres
fonctions
que
celles
auxquelles
ii
est
destine.
14
Pour
minimiser
les
risques
de
chocs
electriques,
n'utilisez
que
la
marmite
interne
fournie
avec
l'appareil.
15
Veuillez
d'abord
relier
le
cordon
d'alimentation
a
l'appareil
avant
de
brancher
la
fiche
dans
une
prise
murale
.
CONSERVEZ
CES
INSTRUCTIONS
CET APPAREIL EST UNIQUEMENT A USAGE DOMESTIQUE.
L'appareil
est
equipe
d'un
cordon
court
afin
de
reduire
les
risques
d'enchevetrement
ou
de
chutes
sur
le
cordon.
Des
rallonges
peuvent
etre
utilisees a
condition
que
toutes
les
precautions
soient
prises
lors
de
leur
utilisation.
Si
vous
vous
servez
d'une
rallonge,
sa
puissance
electrique
indiquee
devra
etre
egale
ou
superieure
a
celle
de
l'appareil;
Le
cordon
devra
etre
arrange
de
maniere
ace
qu'il
ne
pende
pas
depuis
le
haut
d'un
comptoir
ou
d'une
table
ou
ii
serait
a
portee
de
main
des
enfants
et
ou
ii
occasionnerait
des
accidents
dus
a
une
chute
ou
a
un
enchevetrement.
L'appareil
a
une
prise
polarisee
(l'une
des
lames
est
plus
large
que
l'autre).
Pour
reduire
les
risques
de
chocs
electriques,
la
prise
s'insere
dans
un
seul
sens
a
l'interieur
d'une
prise
murale
polarisee.
Si
la
prise
ne
s'adapte
pas
correctement
dans
la
prise
murale,
retournez-la.
Si
elle
ne
s'adapte
toujours
pas,
contactez
un
electrician
specialise.
Ne
cherchez
en
aucun
cas
a
modifier
la
prise.
3
BEFORE USE
IMPORTANT
SAFEGUARDS
~~~~~ir~~:~~~~
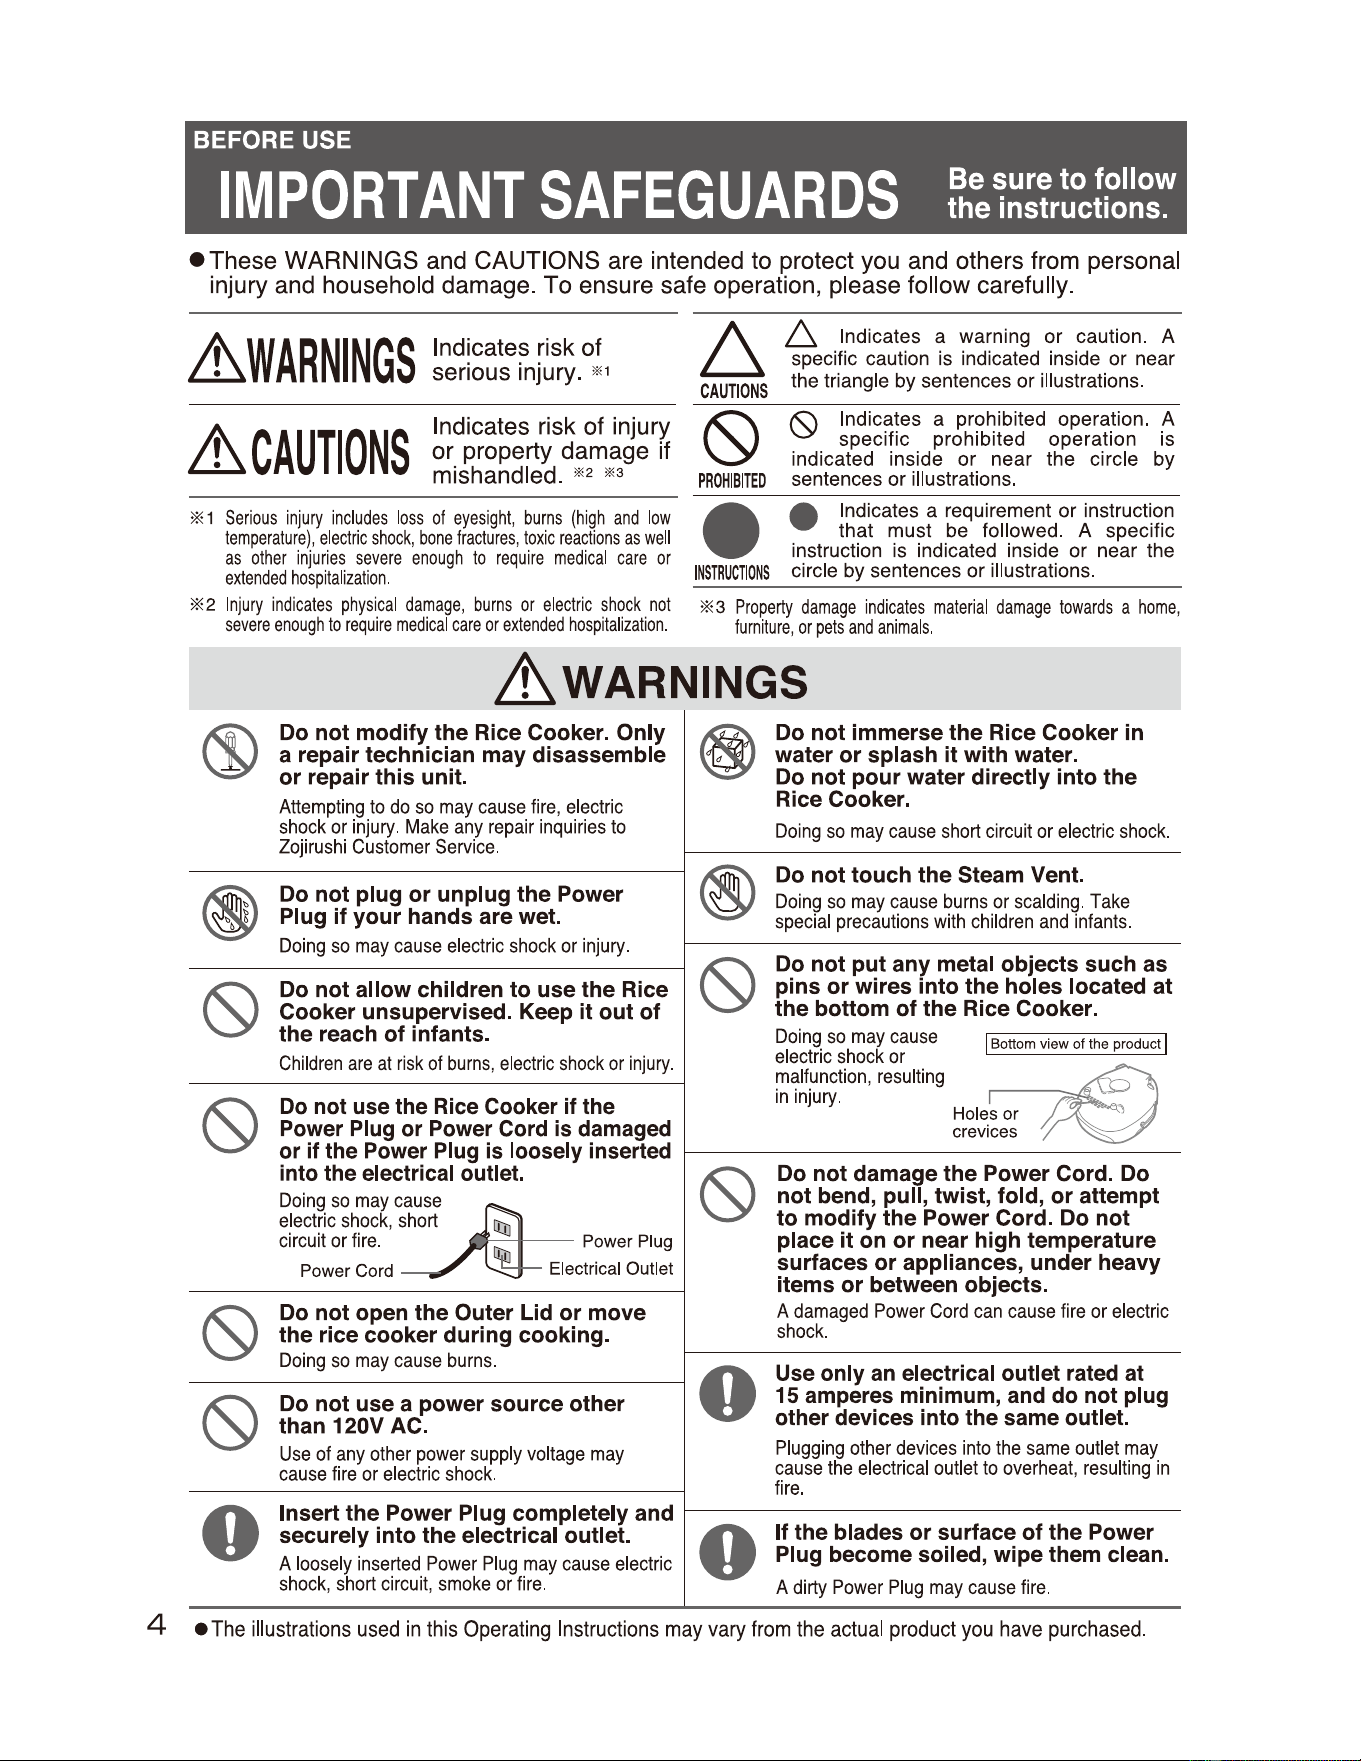
•These
WARNINGS and CAUTIONS are intended to protect you and others from personal
injury and household damage. To ensure safe operation, please follow carefully.
~WARNINGS
Indicates risk of
serious injury.
01
~CAUTIONS
Indicates risk of injury
or property damage if
mishandled.
02
0 3
6
CAUTIONS
6,
Indicates a warning or caution. A
specific caution
is
indicated inside or near
the triangle
by
sentences or illustrations.
(9
PROHIBITED
S) Indicates a prohibited operation. A
specific prohibited operation is
indicated inside or near the circle by
sentences or illustrations.
INSTRUCTIONS
•
• Indicates a
requ
irement or instruction
that must
be
followed. A specific
instruction is indicated inside or near the
circle by sentences or illustrations.
* 1
Serious
injury
includes
loss
of
eyesight
,
burns
(high
and
low
temperature)
,
electric
shock
,
bone
fractures,
toxic
reactions
as
well
as
other
injuries
severe
enough
to
require
medical
care
or
extended
hospitalization
.
* 2
Injury
indicates
physical
damage
,
burns
or
electric
shock
not
severe
enough
to
require
medical
care
or
extended
hospitalization
.
* 3
Property
damage
indicates
material
damage
towards
a
home
,
furniture,
or
pets
and
animals
.
~WARNINGS
©
Do not modify
the
Rice Cooker. Only
a repair technician may disassemble
or
repair this unit.
Attempting
to
do
so
may
cause
fire
,
electric
shock
or
injury
.
Make
any
repair
inquiries
to
Zojirushi
Customer
Service
.
~
Do not plug
or
unplug
the
Power
Plug if your hands are wet.
Doing
so
may
cause
electric
shock
or
injury
.
(9
Do not allow children
to
use
the
Rice
Cooker unsupervised. Keep it out of
the
reach of infants.
Children
are
at
risk
of
burns,
electric
shock
or
injury
.
I I
(9
Do not use the Rice Cooker if the
Power Plug or Power Cord is damaged
or if the Power Plug is loosely inserted
into the electrical outlet.
Doing
so
may
cause
electric
shock,
~
circuit
or
fire
.
Power
Cord
Power
Plug
Electrical
Outlet
(9
Do not open
the
Outer Lid or move
the
rice cooker during cooking.
Doing
so
may
cause
burns
.
(9
Do not use a power source other
than 120V AC.
Use
of
any
other
power
supply
voltage
may
cause
fire
or
electric
shock
.
0
Insert
the
Power Plug completely and
securely into
the
electrical outlet.
A
loosely
inserted
Power
Plug
may
cause
electric
shock,
short
circuit
,
smoke
or
fire
.
@
Do not immerse
the
Rice Cooker
in
water
or
splash it with water.
Do not pour water directly into
the
Rice Cooker.
Doing
so
may
cause
short
circuit
or
electric
shock
.
®
Do not touch
the
Steam Vent.
Doing
so
may
cause
burns
or
scalding
.
Take
special
precautions
with
children
and
infants
.
(9
Do not put any metal objects such as
pins
or
wires into the holes located at
the
bottom of
the
Rice Cooker.
Doing
so
may
cause
electric
shock
or
!"~lfimction
,
resulting
1n
lnJUry
.
Bottom view of the product
~
Holes
or
crevices
(9
Do not damage
the
Power Cord. Do
not bend, pull, twist, fold,
or
attempt
to
modify
the
Power Cord. Do not
place it on
or
near high temperature
surfaces
or
appliances, under heavy
items or between objects.
A
damaged
Power
Cord
can
cause
fire
or
electric
shock
.
0
Use only an electrical outlet rated at
15 amperes minimum, and do not plug
other devices into the same outlet.
Plugging
other
devices
into
the
same
outlet
may
cause
the
electrical
outlet
to
overheat,
resulting
in
fire
.
0
If the blades or surface of
the
Power
Plug become soiled, wipe them clean.
A
dirty
Power
Plug
may
cause
fire
.
4 •
The
illustrations
used
in
this
Operating
Instructions
may
vary
from
the
actual
product
you
have
purchased.
Lh
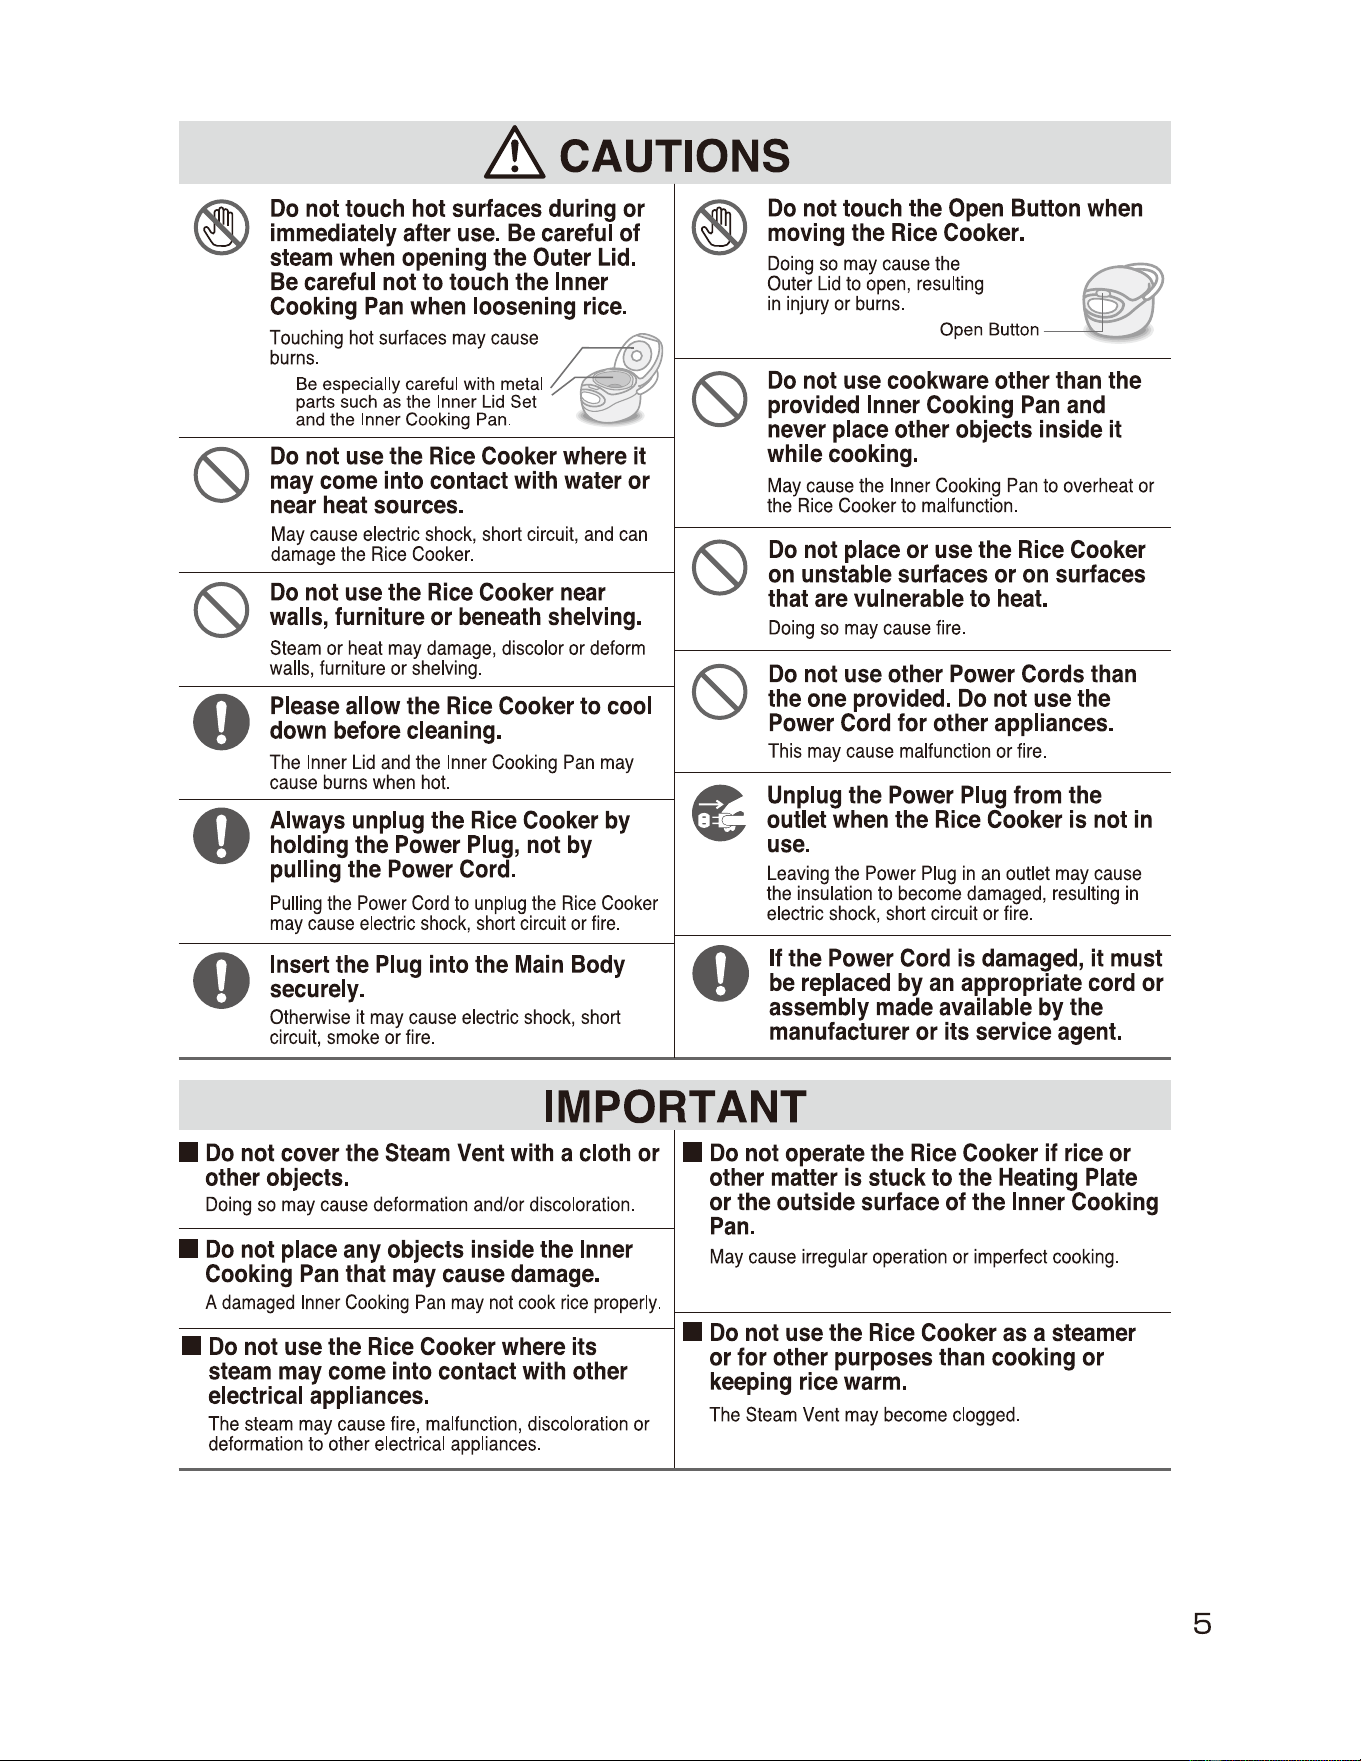
CAUTIONS
-
Do
not
touch
hot
surfaces
during
or
immediately
after
use.
Be
careful
of
steam
when
opening
the
Outer
Lid.
Be
careful
not
to
touch
the
Inner
Cooking
Pan
when
loosening
rice.
Touch;ng
hotsurtaces
may
cause
burns
.
Be
espec
i
ally
careful
with
metal
parts
such
as
the
Inner
Lid
Set
and
the
Inner
Cooking
Pan
.
o
® ®
~
~
~
~
Do
not
use
the
Rice
Cooker
where
it
may
come
into
contact
with
water
or
near
heat
sources.
May
cause
electric
shock,
short
circuit
,
and
can
damage
the
Rice
Cooker
.
~
~
Do
not
use
the
Rice
Cooker
near
walls,
furniture
or
beneath
shelving.
Steam
or
heat
may
damage
,
discolor
or
deform
walls
,
furniture
or
shelving
.
~
0
Please
allow
the
Rice
Cooker
to
cool
down
before
cleaning.
The
Inner
Lid
and
the
Inner
Cooking
Pan
may
cause
burns
when
ho
t.
0
Always
unplug
the
Rice
Cooker
by
holding
the
Power
Plug,
not
by
pulling
the
Power
Cord.
Pulling
the
Power
Cord
to
unplug
the
Rice
Cooker
may
cause
electric
shock,
short
circuit
or
fire
.
0
Insert
the
Plug
into
the
Main
Body
securely.
Otherwise
it
may
cause
electric
shock,
short
circuit
,
smoke
or
fire
.
Do
not
touch
the
Open
Button
when
moving
the
Rice
Cooker.
Do;ng
so
may
cause
the
Outer
Lid
to
open,
resulting
in
injury
or
burns
.
Open
Button
Do
not
use
cookware
other
than
the
provided
Inner
Cooking
Pan
and
never
place
other
objects
inside
it
while
cooking.
May
cause
the
Inner
Cooking
Pan
to
overheat
or
the
Rice
Cooker
to
malfunction
.
Do
not
place
or
use
the
Rice
Cooker
on
unstable
surfaces
or
on
surfaces
that
are
vulnerable
to
heat.
Doing
so
may
cause
fire
.
Do
not
use
other
Power
Cords
than
the
one
provided.
Do
not
use
the
Power
Cord
for
other
appliances.
This
may
cause
malfunction
or
fire
.
~
Unplug
the
Power
Plug
from
the
outlet
when
the
Rice
Cooker
is
not
in
use.
Leaving
the
Power
Plug
in
an
outlet
may
cause
the
insulation
to
become
damaged
,
resulting
in
electric
shock
,
short
ci
rcuit
or
fire
.
If
the
Power
Cord
is
damaged,
it
must
be
replaced
by
an
appropriate
cord
or
assembly
made
available
by
the
manufacturer
or
its
service
agent.
0
IMPORTANT
■
Do
not
cover
the
Steam
Vent
with
a
cloth
or
other
objects.
Doing
so
may
cause
deformation
and/or
discoloration
.
■
Do
not
place
any
objects
inside
the
Inner
Cooking
Pan
that
may
cause
damage.
A
damaged
Inner
Cooking
Pan
may
not
cook
rice
properly
.
■
Do
not
use
the
Rice
Cooker
where
its
steam
may
come
into
contact
with
other
electrical
appliances.
The
steam
may
cause
fire
,
malfunction
,
discoloration
or
deformation
to
other
electrical
appliances
.
■
Do
not
operate
the
Rice
Cooker
if
rice
or
other
matter
is
stuck
to
the
Heating
Plate
or
the
outside
surface
of
the
Inner
Cooking
Pan.
May
cause
i
rregular
operation
or
imperfect
cooking
.
f-------------------
■
Do
not
use
the
Rice
Cooker
as
a
steamer
or
for
other
purposes
than
cooking
or
keeping
rice
warm.
The
Steam
Vent
may
become
clogged
.
5
6
BEFORE USE
PARTS
NAMES
AND
FUNCTIONS
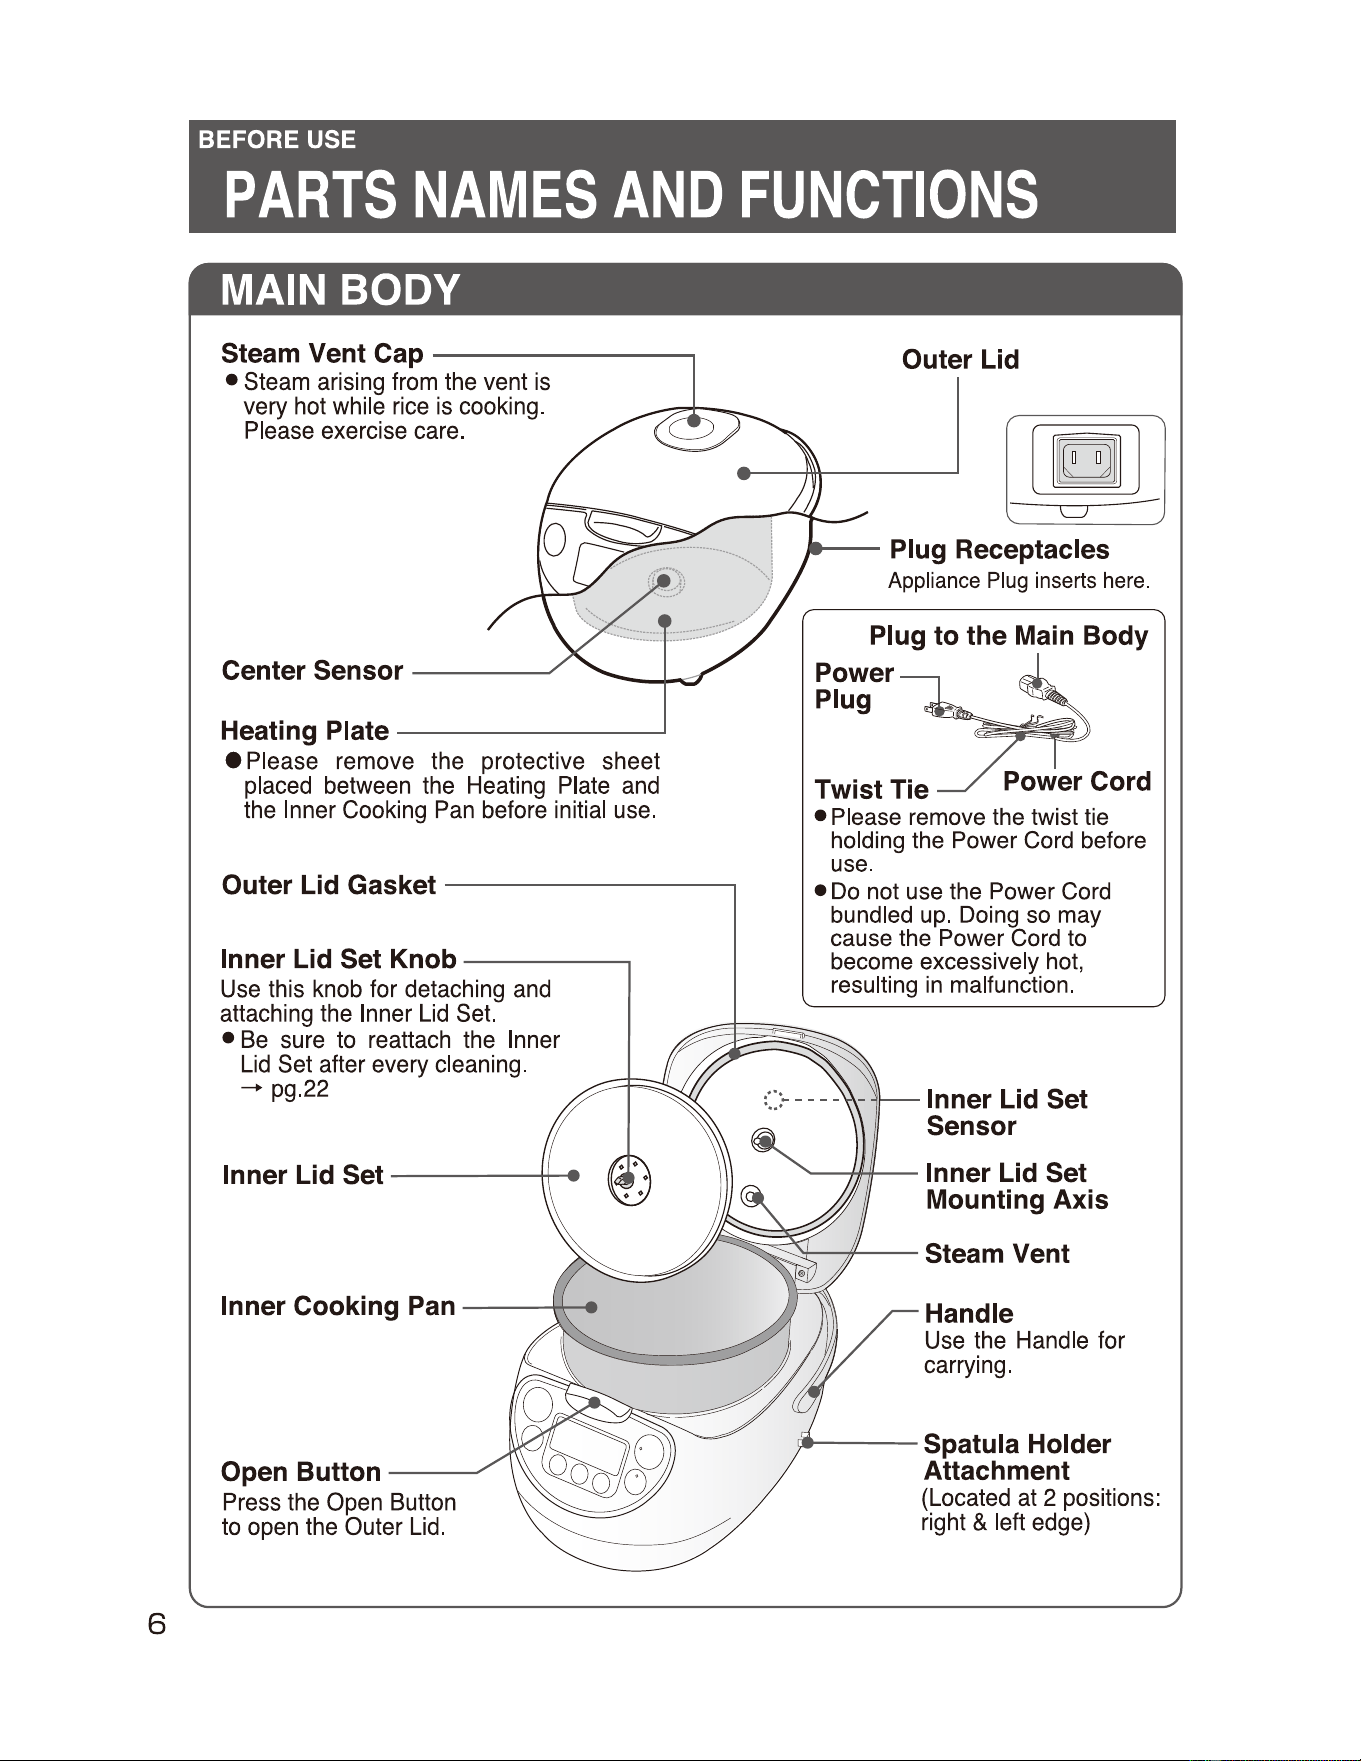
MAIN BODY
Steam Vent Cap
•
Steam
arising
from
the
vent
is
very
hot
while
rice
is
cooking.
Please
exercise
care
.
Center Sensor
------
Heating Plate
_______
___.
• Please remove the protective sheet
placed
between
the
Heating
Plate
and
the
Inner Cooking
Pan
before initial
use.
Outer
Lid
[
[CJ_
]
--
Plug
Receptacles
Appliance
Plug
inserts
here.
Plug
to the
Main
Body
Power
Plug
•
Please
remove
the
twist
tie
holding
the
Power
Cord
before
use.
•
Do
not
use
the
Power
Cord
bundled
up.
Doing
so
may
cause
the
Power
Cord
to
become
excessively
hot,
resulting
in
malfunction.
---------.
Outer
Lid
Gasket
----------.
Inner
Lid
Set
Knob
-------.
Use
this
knob
for detaching
and
attaching
the
Inner
Lid
Set.
•
Be
sure
to
reattach
the
Inner
Lid
Set
after every cleaning.
-+
pg.22
Open
Button
---
Press
the
Open
Button
to
open
the
Outer
Lid.
Inner
Lid
Set
Sensor
----
Inner
Lid
Set
Mounting Axis
--------~---,--- Steam Vent
Handle
Use
the
Handle
for
carrying.
Spatula Holder
Attachment
(Located
at
2 positions:
right & left
edge)
----
CONTROL PANEL
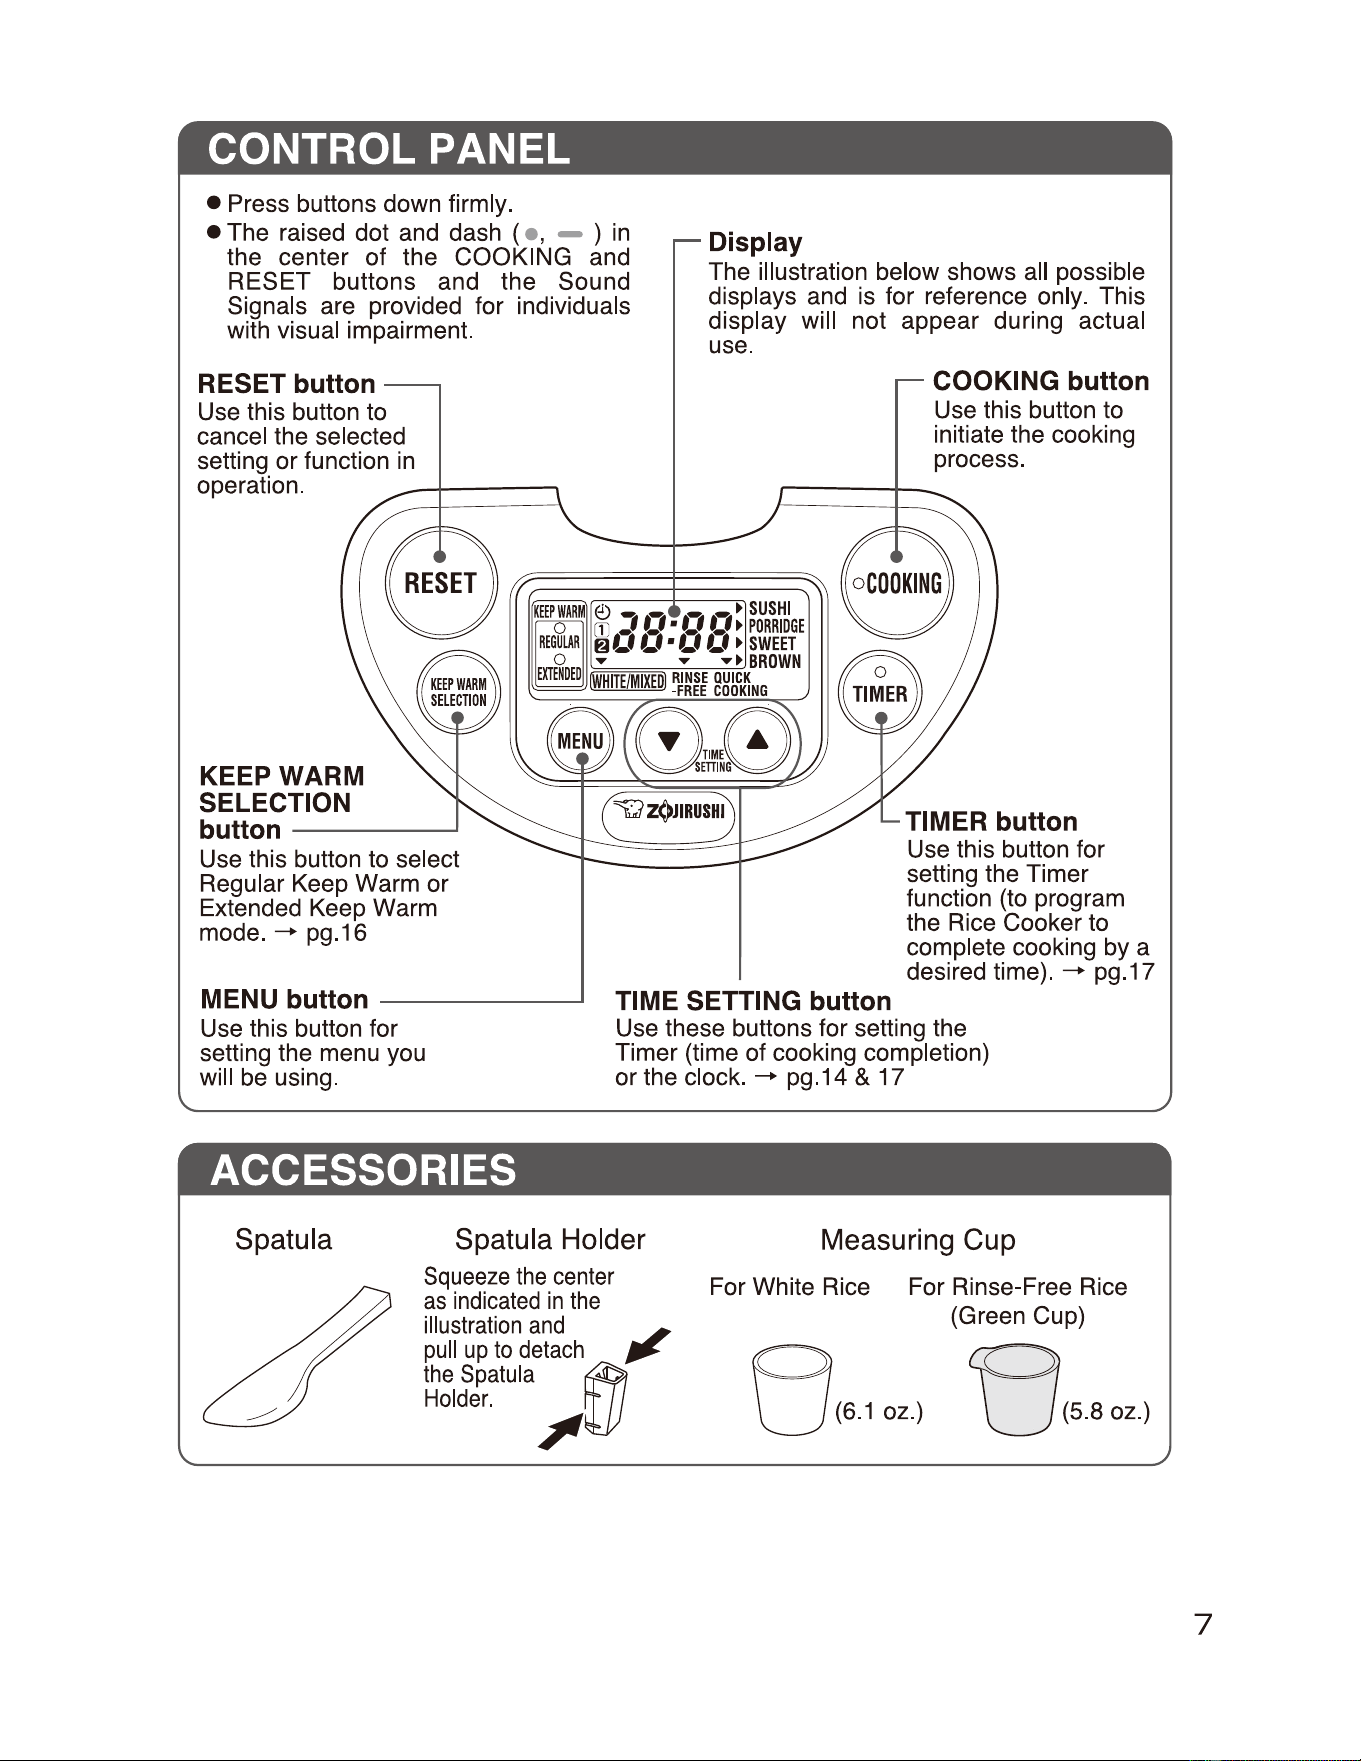
• Press buttons down firmly.
• The raised dot and dash ( • , - )
in
the center of the COOKING and
RESET buttons and the Sound
Signals are provided for individuals
with visual impairment.
RESET button
Use this button to
cancel the selected
setting or function
in
operation.
KEEP WARM
SELECTION
button
-------J
Use this button to select
Regular Keep Warm or
Extended Keep Warm
mode. - pg.16
MENU button
Use this button for
setting the menu you
will be using.
_____
__,
Display
The illustration below shows all possible
displays and is for reference only. This
display will not appear during actual
use.
COOKING button
Use this button to
initiate the cooking
process.
TIMER button
Use this button for
setting the Timer
function (to program
the Rice Cooker to
complete cooking by a
desired time). - pg.17
TIME SETTING button
Use these buttons for setting the
Timer (time of cooking completion)
or the clock. - pg.14
& 17
ACCESSORIES
Spatula Spatula Holder
Squeeze
the
center
as
indicated
in
the
illustration
and
pull
up
to
detach
the
Spatula
Holder.
~
,
rP
?
Measuring Cup
For White Rice
(6.1
oz.)
For Rinse-Free Rice
(Green Cup)
(5.8oz.) e
B
7
8
BEFORE USE
EXPLANATION
OF
RICE
TYPES OF RICE
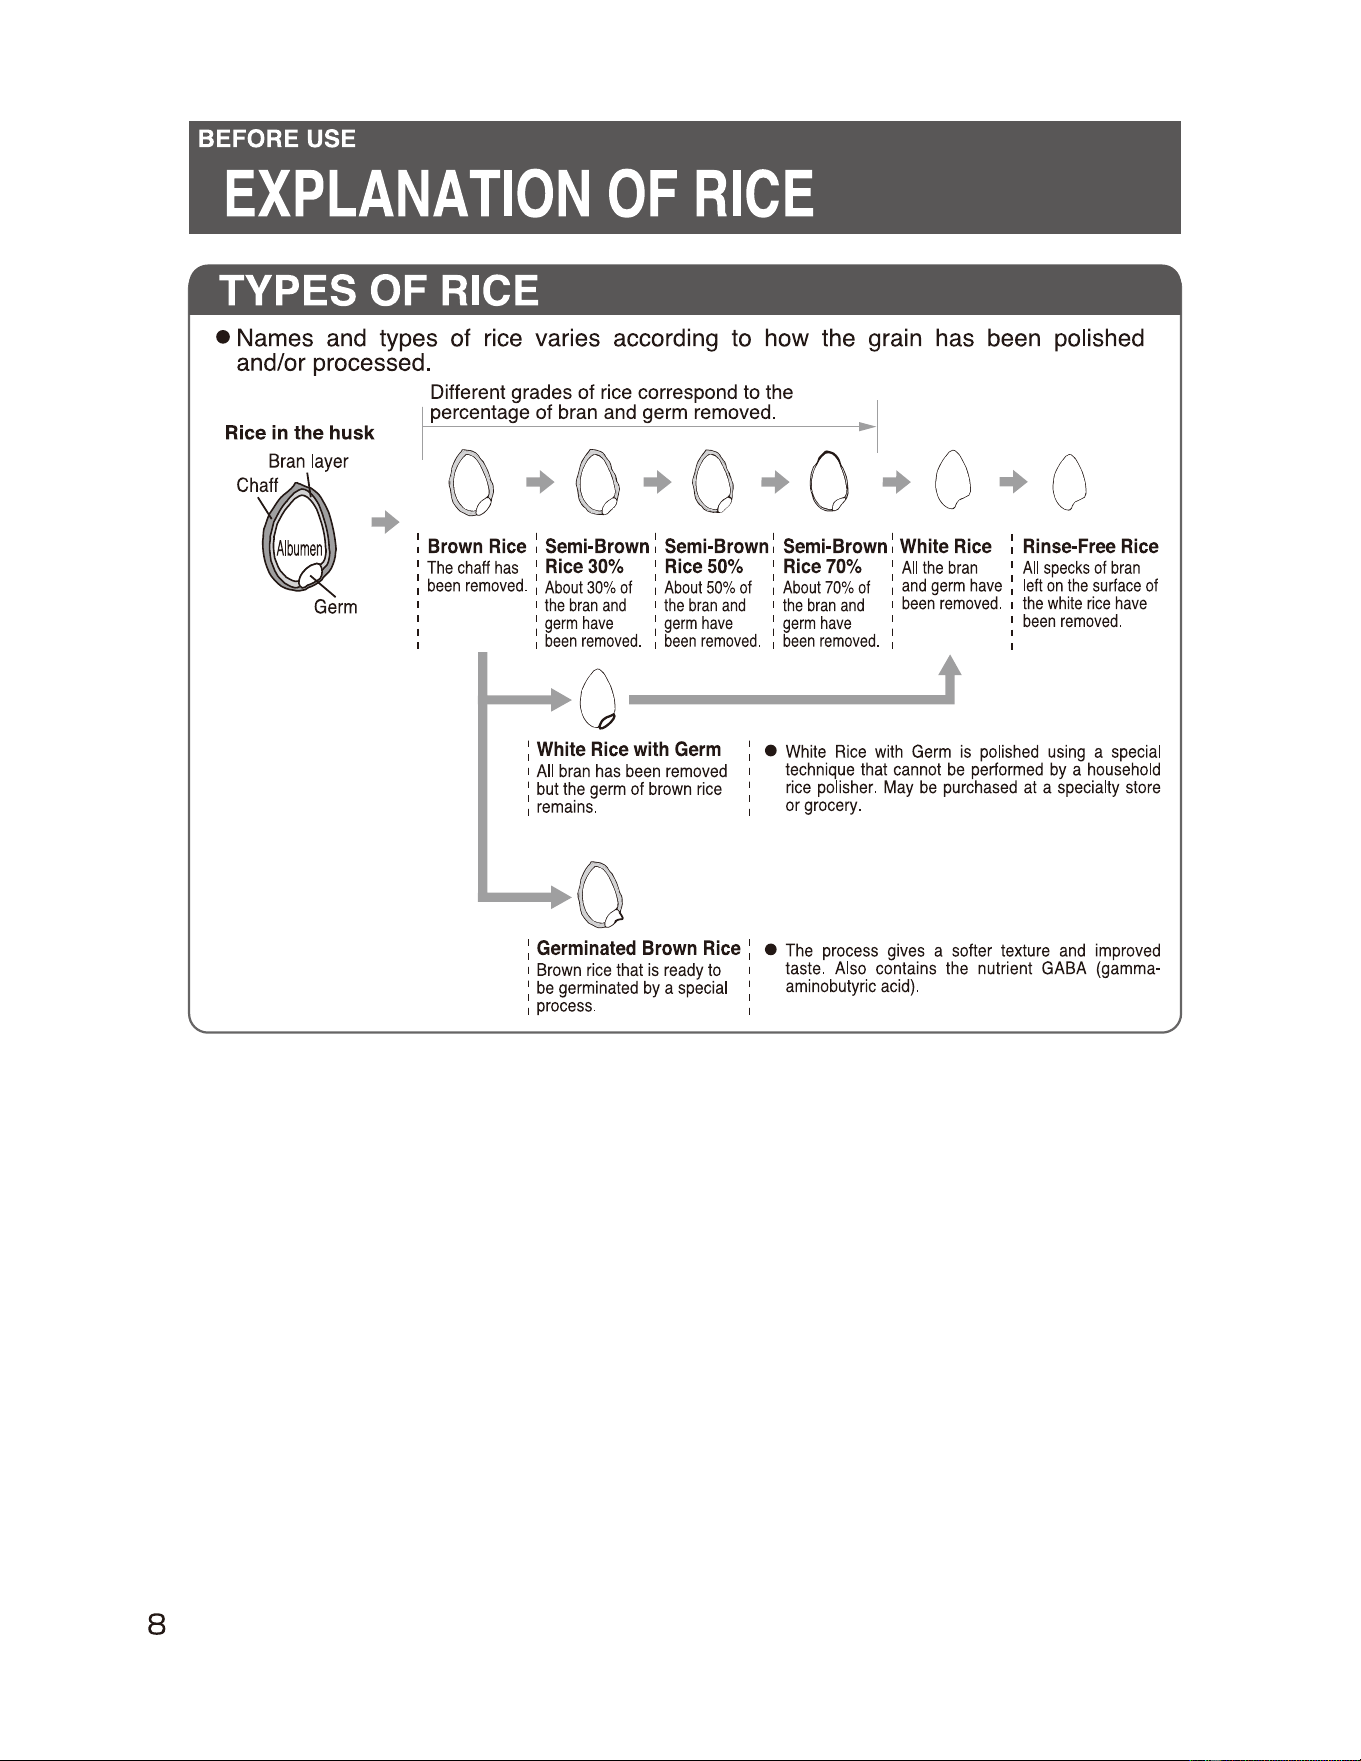
• Names
and
types of rice varies according
to
how the grain
has
been
polished
and/or processed.
Rice
in
the
husk
..
Germ
Different grades
of
rice correspond to the
I percentage
of
bran and germ removed.
0
0
:
Brown
Rice
:
Semi-Brown
:
Semi-Brown: Semi-Brown:
White
Rice
:
Rinse-Free
Rice
:
The
chaff
has
:
Rice
30%
:
Rice
50%
:
Rice
70%
:
All
the
bran
:
All
specks
of
bran
,
been
removed
. ,
About
30%
of
,
About
50%
of
,
About
70%
of
,
and
germ
have
,
left
on
the
sur1ace
of
,
the
bran
and
,
the
bran
and
,
the
bran
and
,
been
removed
. ,
the
white
rice
have
:
germ
have
:
germ
have
:
germ
have
' :
been
removed.
,
been
removed
. ,
been
removed
. ,
been
removed
.
......-..
o
---'
:
White
Rice
with
Germ
,
All
bran
has
been
removed
,
:
but
the
germ
of
brown
rice
,
remains
.
........
a
:
Germinated
Brown
Rice
:
,
Brown
rice
that
is
ready
to
:
be
germinated
by
a
special
'
,
process.
•
White
Rice
with
Germ
is
polished
using
a
special
technique
that
cannot
be
performed
by
a
household
rice
polisher.
May
be
purchased
at
a
specialty
store
or
grocery.
•
The
process
gives
a
softer
texture
and
improved
taste
.
Also
contains
the
nutrient
GABA
(gamma-
aminobutyric
acid)
.
TIPS
TO
COOKING
GREAT-TASTING
RICE
(:~~~~!
1
~~)
HOW TO COOK GREAT-TASTING RICE
Measure
rice
accurately
Be
sure
to
use
the Measuring Cup provided, as other measuring cups may differ.
Level the rice off at the top of the cup to maintain accuracy.
Rinse
rice
quickly
The first rinse should
be
done quickly, swishing and stirring the rice by hand with
plenty of water. Drain the water immediately afterwards. Then rinse the rice 4-5
times with fresh water to clean out the bran.
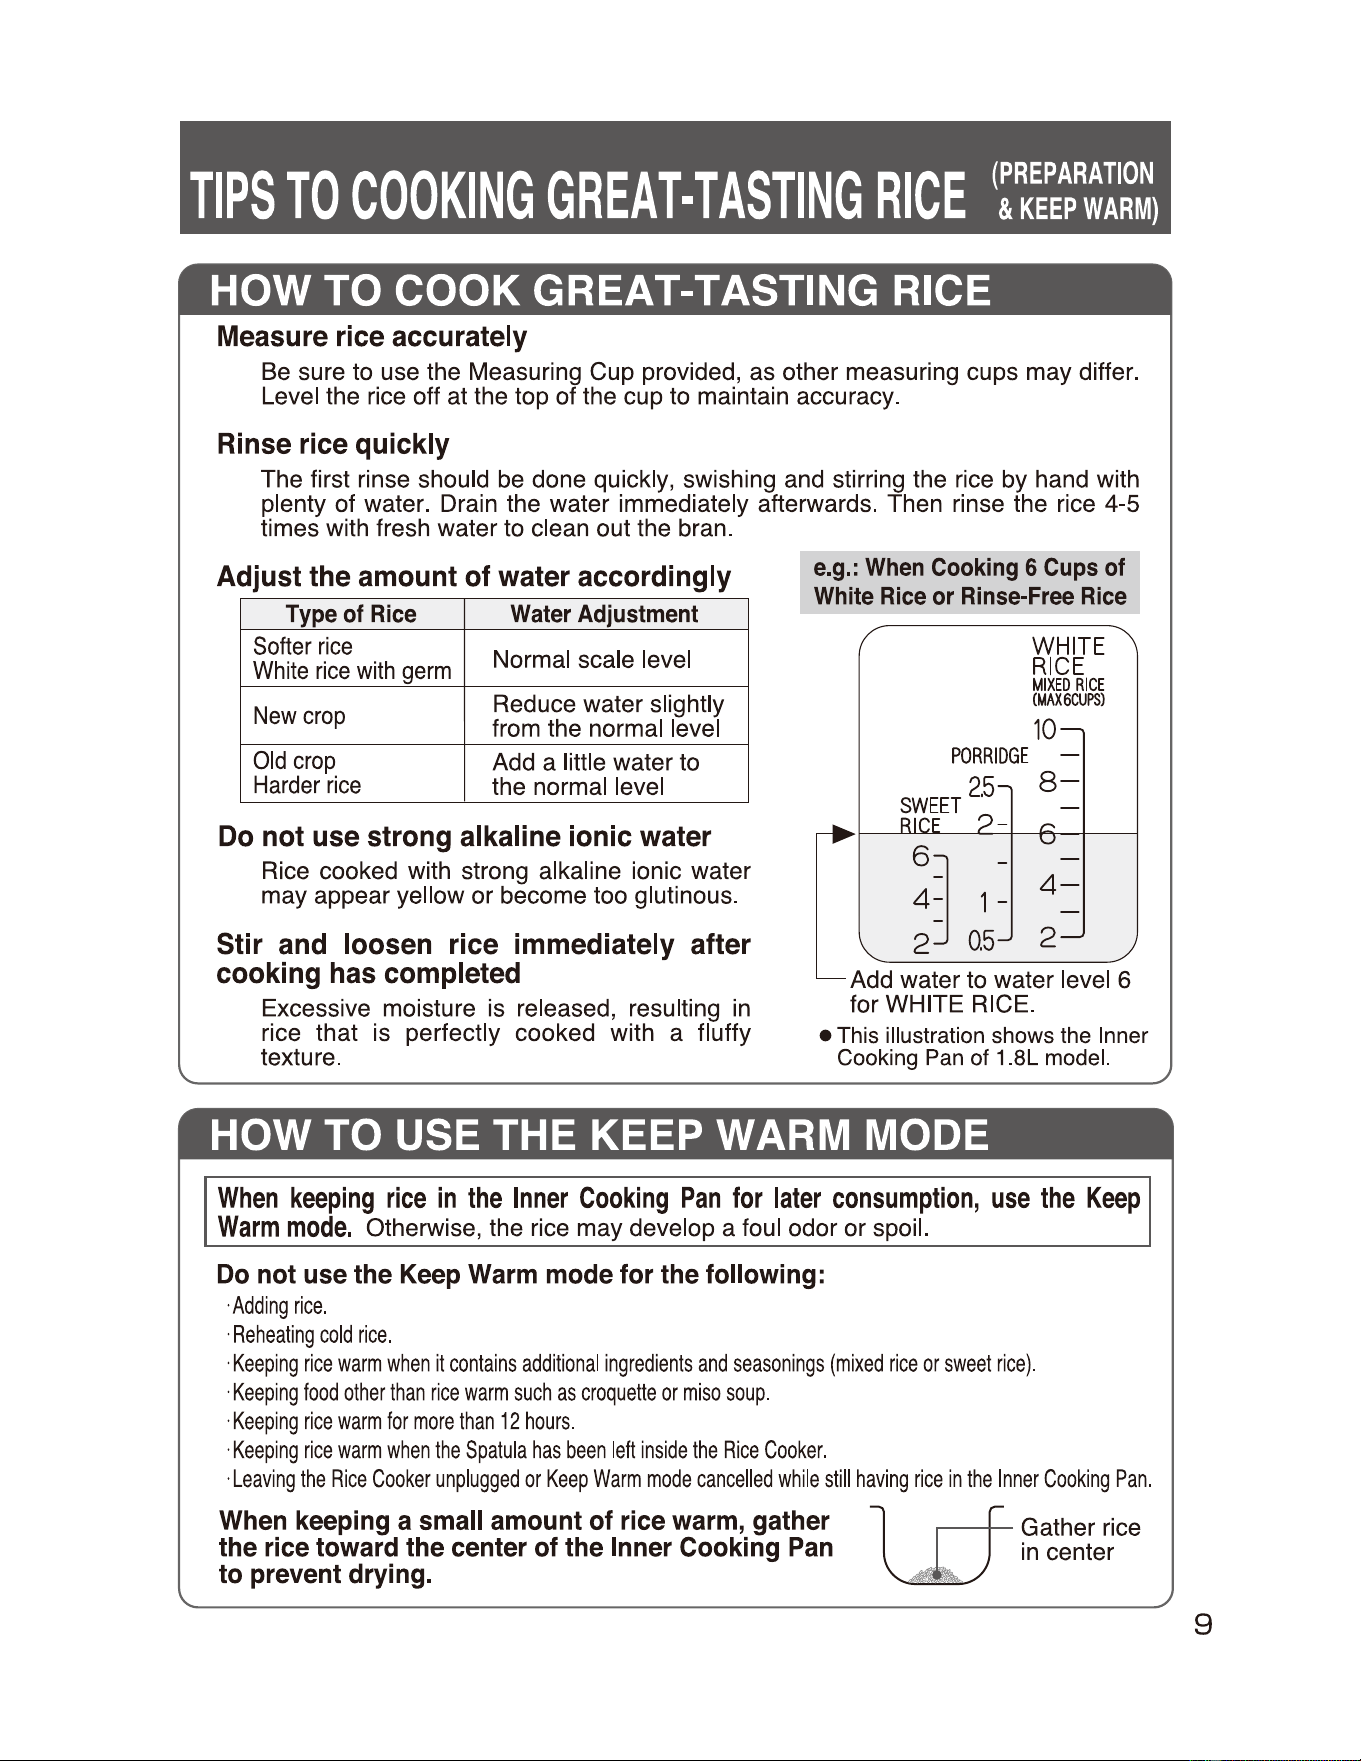
Adjust
the
amount
of
water
accordingly
Type
of
Rice
Water
Adjustment
Softer
rice
White
rice
with
germ
Normal scale level
New
crop
Reduce water slightly
from the normal level
Old
crop
Harder
rice
Add
a little water to
the normal level
e.g.:
When
Cooking
6
Cups
of
White
Rice
or
Rinse-Free
Rice
WHITE
RICE
MIXED
RICE
CMAX6CUPS)
10
PORRIDGE
-
SWEET
2.5
8-
4=
1-
4-
6~
-
2
0.5
2
Add
water to water level 6
for WHITE
RICE.
• This illustration shows the Inner
Cooking Pan of 1.BL model.
Do
not
use
strong
alkaline
ionic
water
Rice
cooked with strong alkaline ionic water
may appear yellow or become too glutinous.
Stir
and
loosen
rice
immediately after
cooking
has
completed
Excessive moisture is released, resulting
in
rice that is perfectly cooked with a fluffy
texture.
HOW TO USE THE KEEP WARM MODE
When
keeping
rice
in
the
Inner
Cooking
Pan
for
later
consumption,
use
the
Keep
Warm
mode.
Otherwise, the rice may develop a foul odor or spoil.
Do
not
use
the
Keep
Warm
mode
for
the
following:
·
Adding
rice
.
·
Reheating
cold
rice.
·
Keeping
rice
warm
when
it
contains
additional
ingredients
and
seasonings
(mixed
rice
or
sweet
rice).
·
Keeping
food
other
than
rice
warm
such
as
croquette
or
miso
soup.
·
Keeping
rice
warm
for
more
than
12
hours.
·
Keeping
rice
warm
when
the
Spatula
has
been
left
inside
the
Rice
Cooker
.
·
Leaving
the
Rice
Cooker
unplugged
or
Keep
Warm
mode
cancelled
while
still
having
rice
in
the
Inner
Cooking
Pan.
When
keeping
a
small
amount
of
rice
warm,
gather
the
rice
toward
the
center
of
the
Inner
Cooking
Pan
to
prevent
drying.
7 r-F,-
~
Gather rice
incenter
9
10
HOW TO USE
HOW
TO
COOK
RICE
BASIC
COOKING
STEPS
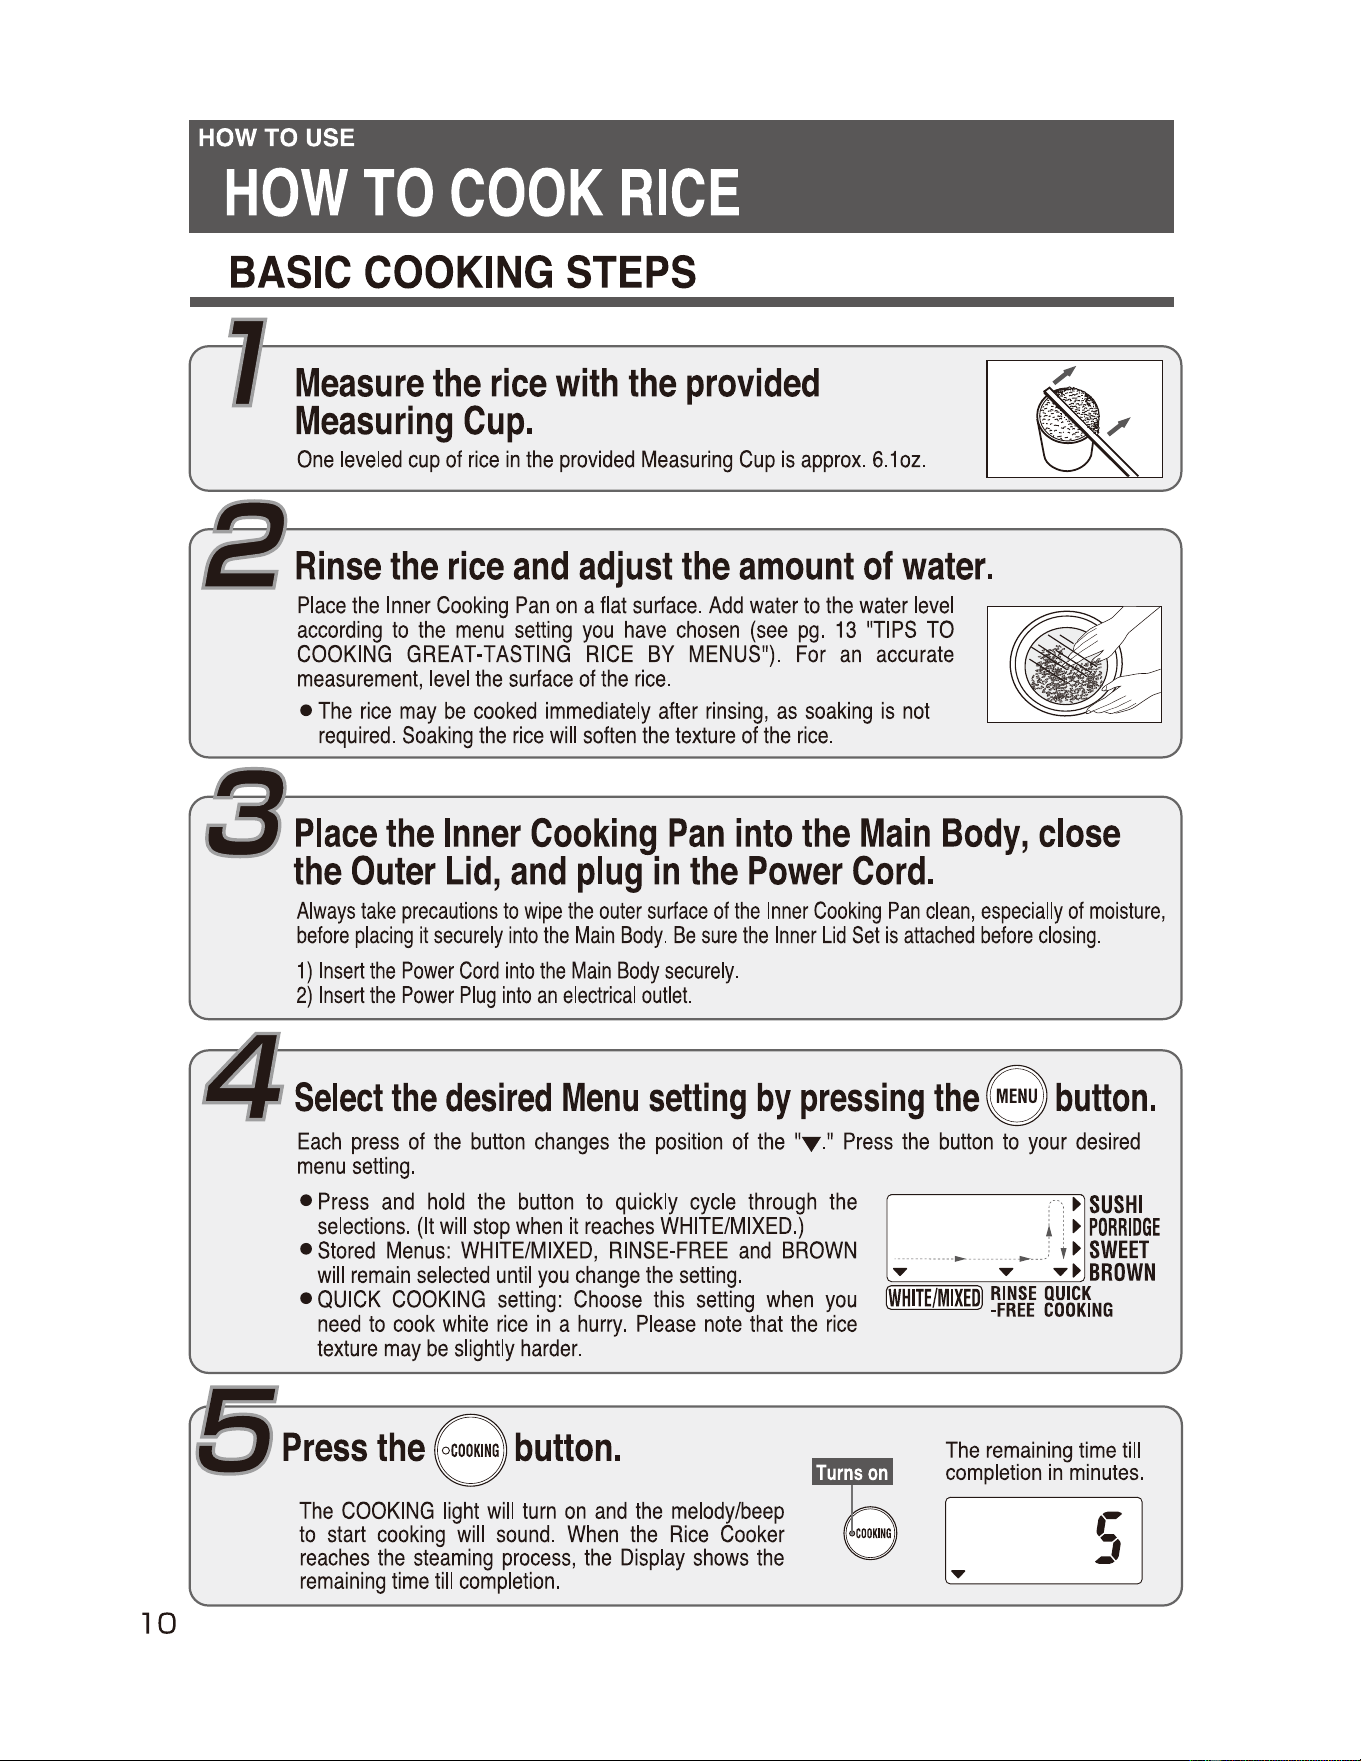
Measure
the
rice
with
the
provided
Measuring
Cup.
One
leveled
cup
of
rice
in
the
provided
Measuring
Cup
is
approx.
6.1
oz.
Rinse
the
rice
and
adjust
the
amount
of
water.
Place
the
Inner
Cooking
Pan
on
a
flat
surface
.
Add
water
to
the
water
level
according
to
the
menu
setting
you
have
chosen
(see
pg.
13
"TIPS
TO
COOKING
GREAT-TASTING
RICE
BY
MENUS").
For
an
accurate
measurement,
level
the
surface
of
the
rice.
•
The
rice
may
be
cooked
immediately
after
rinsing,
as
soaking
is
not
required.
Soaking
the
rice
will
soften
the
texture
of
the
rice.
Place
the
Inner
Cooking
Pan
into
the
Main
Body,
close
the
Outer
Lid,
and
plug
in
the
Power
Cord.
Always
take
precautions
to
wipe
the
outer
surface
of
the
Inner
Cooking
Pan
clean,
especially
of
moisture,
before
placing
it
securely
into
the
Main
Body.
Be
sure
the
Inner
Lid
Set
is
attached
before
closing.
1)
Insert
the
Power
Cord
into
the
Main
Body
securely
.
2)
Insert
the
Power
Plug
into
an
electrical
outlet.
Select
the
desired
Menu
setting
by
pressing
thee
button.
Each
press
of
the
button
changes
the
position
of
the
"T
."
Press
the
button
to
your
desired
menu
setting
.
•
Press
and
hold
the
button
to
quickly
cycle
through
the
selections
.
(It
will
stop
when
it
reaches
WHITE/MIXED
.)
•
Stored
Menus:
WHITE/MIXED,
RINSE-FREE
and
BROWN
will
remain
selected
until
you
change
the
setting.
•
QUICK
COOKING
setting:
Choose
this
setting
when
you
need
to
cook
white
rice
in
a
hurry
.
Please
note
that
the
rice
texture
may
be
slightly
harder
.
Press
the
button.
8
The
COOKING
light
will
turn
on
and
the
melody/beep
to
start
cooking
will
sound.
When
the
Rice
Cooker
reaches
the
steaming
process,
the
Display
shows
the
remaining
time
till
completion
.
~
The
remaining
time
till
completion
in
minutes
.
sJ
s
I.
When
the
melody
or
beep
to
indicate
the
cooking
completion
sounds,
stir
and
loosen
the
rice
immediately
to
give
the
rice
a
deliciously
fluffy
texture.
The
Rice
Cooker
automatically
switches
to
the
Keep
Warm
mode
after
cooking
has
completed
and
the
REGULAR
KEEP
WARM
light
turns
on.
The
Display
will
show
the
elapsed
Keep
Warm
time
in
hour(s).
Stir
the
rice
and
loosen
it
immediately
to
release
excessive
moisture
for
fluffy
rice
.
Elapsed
time
of
the
Keep
Warm
mode
.
•
When
keeping
rice
in
the
Rice
Cooker,
be
sure
to
use
the
Keep
Warm
mode;
otherwise
the
rice
may
produce
an
odor.-+
Please
see
pg.
9
"HOW
TO
USE
THE
KEEP
WARM
MODE"
or
pg.
16
"REGULAR
KEEP
WARM
&
EXTENDED
KEEP
WARM."
•
To
see
the
current
time
display
during
the
Keep
Warm
mode,
press
the
0
or
0
button
.
Then
press
the
0
or
0
button
to
return
to
the
Keep
Warm
display
mode
.
Please
note
that
this
display
will
not
automatically
return
to
the
Keep
Warm
display
mode
and
must
be
done
manually.
Displays
can
only
be
changed
during
the
Keep
Warm
mode.
•
If
you
cancel
the
Keep
Warm
mode
and
press
the
KEEP
WARM
SELECTION
button
again,
the
Display
shows
O
hours.
•
The
sound
setting
can
also
be
changed
(see
pg
.
15
"SOUND
SIGNALS
&
HOW
TO
CHANGE
THEM
"
for
details)
.
After
use,
press
the
button,
then
unplug
the
Power
Cord.
8
•
Do
not
hold
the
Power
Plug
if
your
hands
are
wet.
(Doing
so
may
cause
short
circuit
or
electric
shock.)
Estimated cooking time from start to completion:
--------
Lenath of Cookina Time
1.0L size 1.8L si
ze
Wh
ite Rice
approx.
50
minutes-1
hour
Mixed Rice
approx.
50
minutes-1
hour
Rinse-Free Rice approx.
55
minutes-1
hour 5 minutes
Quick Cookina
aPProx
.
29-40
minutes annrox.
30-45
minutes
Sushi Rice
aPProx.
50
minutes-1
hour
Porridae
annrox.
55
minutes-1
hour 10 minutes
Sweet Rice annrox.
50-55
minutes
Brown Rice
aoorox. 1 hour
25
minutes-1
hour
50
minutes
Germinated Brown Rice
approx. 1
hour-1
hour 10 minutes
I
I
· The above table is
0
based
on
the testing conditions of 120 volts, a room temperature of
68
°
F,
and water at a starting
temperature of 64.4 F.
· The above lengths of time are counted from Cooking till the Keep Warm process. Actual times may vary depending
on
the
voltage, room temperature, season, and the amount of water used.
Please Follow:
•
Do
not
open
the
Outer
Lid
during
cooking
to
prevent
imperfect
cooking
results.
•
When
cooking
more
than
one
pot
of
rice
consecutively
,
allow
the
Main
Body
and
the
Outer
Lid
to
cool
down
to
body
temperature
;
otherwise
it
will
not
cook
well.
•
To
prevent
breakdown,
do
not
press
the
COOKING
button
when
the
Inner
Cooking
Pan
is
empty.
•
Depending
on
cooking
conditions
,
the
bottom
portion
of
the
rice
may
become
slightly
browned
.
1 1
12
HOW TO USE
HOW
TO
COOK
RICE
(cont.)
HOW
TO
COOK
RINSE-FREE
RICE
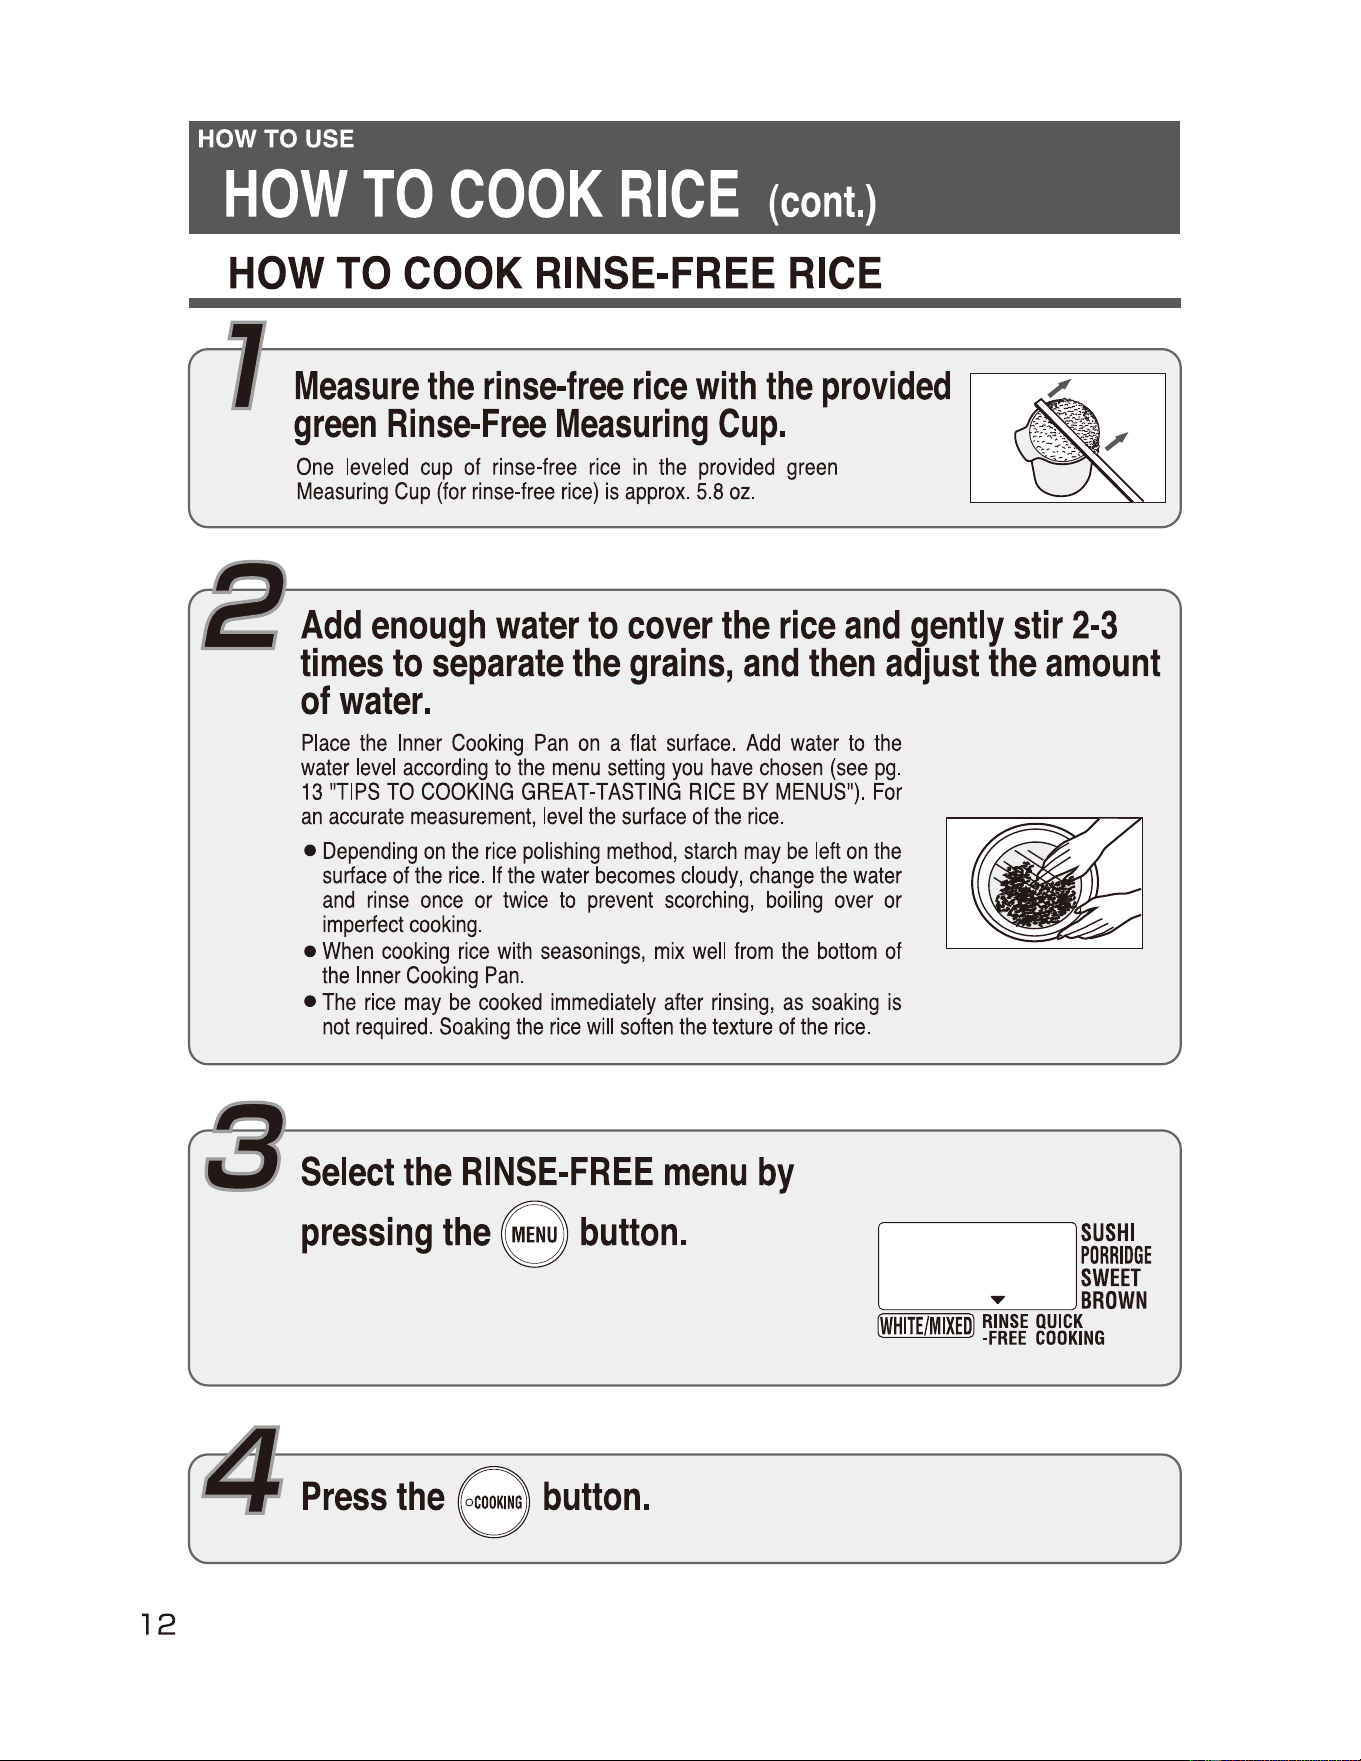
Measure
the
rinse-free
rice
with
the
provided
green
Rinse-Free
Measuring
Cup.
One
leveled
cup
of
rinse-free
rice
in
the
provided
green
Measuring
Cup
(for
rinse-free
rice)
is
approx.
5.8
oz
.
Add
enough
water
to
cover
the
rice
and
gently
stir
2-3
times
to
separate
the
grains,
and
then
adjust
the
amount
of
water.
Place
the
Inner
Cooking
Pan
on
a
flat
surface.
Add
water
to
the
water
level
according
to
the
menu
setting
you
have
chosen
(see
pg.
13
"TIPS
TO
COOKING
GREAT-TASTING
RICE
BY
MENUS").
For
an
accurate
measurement,
level
the
surface
of
the
rice.
•
Depending
on
the
rice
polishing
method,
starch
may
be
left
on
the
surface
of
the
rice.
If
the
water
becomes
cloudy,
change
the
water
and
rinse
once
or
twice
to
prevent
scorching,
boiling
over
or
imperfect
cooking
.
•
When
cooking
rice
with
seasonings,
mix
well
from
the
bottom
of
the
Inner
Cooking
Pan.
•
The
rice
may
be
cooked
immediately
after
rinsing,
as
soaking
is
not
required.
Soaking
the
rice
will
soften
the
texture
of
the
rice.
Select
the
RINSE-FREE
menu
by
pressing
the
button.
]
SUSHI
PORRIDGE
SWEET
""'
BROWN
[WHITE/MIXED]
~J~~l
gMhcK~NG
Press
the
button.
8
8
HOW TO USE
HOW
TO
COOK
RICE
(cont.)
TIPS
TO
COOKING
GREAT-TASTING
RICE
BY
MENUS
When cooking Rinse-Free rice, use the same water level for WHITE RICE. See pg.12
"HOW
TO
COOK
RINSE-FREE RICE."
• Measure the rice accurately with the provided Measuring Cups.
White, brown and germinated brown rice
-+
Use the Measuring Cup for white rice.
Rinse-free rice
-+
Use the green Measuring Cup for rinse-free rice.
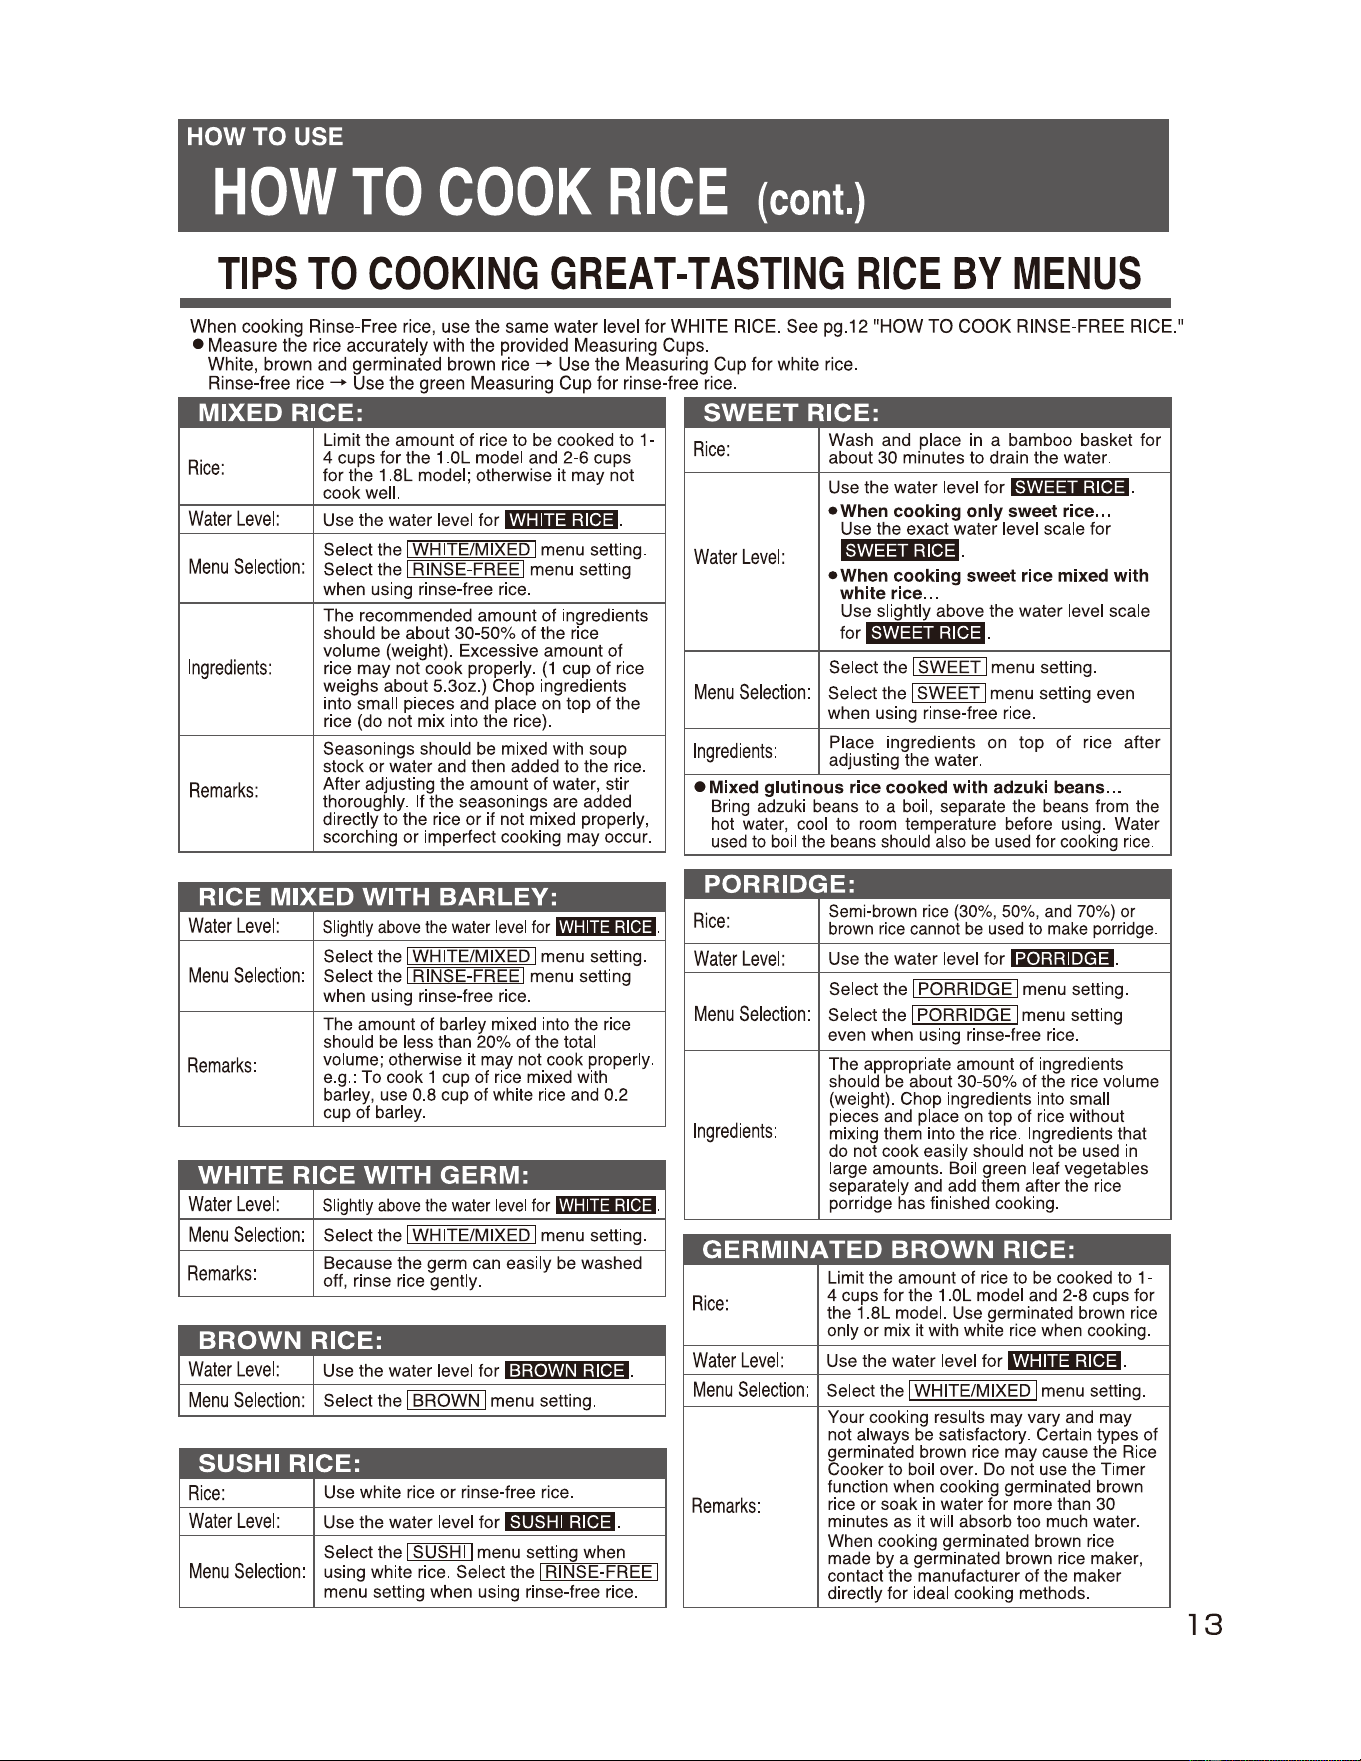
MIXED
RICE:
Rice
:
Limit the amount of rice to be cooked to 1-
4 cups for the 1.0L model and 2-6 cups
for the 1.
8L
model; otherwise it may not
cook well.
Water
Level
: Use the water level for WHITE RICE
Menu
Selection:
Select the
I WHITE/MIXED I menu setting.
Select the
I RINSE-FREEi menu setting
when using rinse-free rice.
Ingredients:
The recommended amount of ingredients
should be about 30-50%
of
the rice
volume (weight). Excessive amount of
rice may not cook properly.
(1
cup of rice
weighs about 5.3oz.) Chop ingredients
into small pieces and place on top of the
rice (do not mix into the rice).
Remarks:
Seasonings should be mixed with soup
stock or water and then added to the rice.
After adjusting the amount of water, stir
thoroughly. If the seasonings are added
directly to the rice or if not mixed properly,
scorching or imperfect cooking may occur.
SWEET
RICE:
Rice:
Wash and place
in
a bamboo basket for
about
30
minutes to drain the water.
Water
Level
:
Use the water level for
SWEET RICE
•When
cooking only sweet rice ...
Use the exact water level scale for
-it1:l=ii;l@l=i
.
i
•When
cooking sweet rice mixed with
white rice ...
Use slightly above the water level scale
for
i-i't9:lii;l[H:I
-
Menu
Selection:
Select the
I SWEET I menu setting.
Select the
I SWEET I menu setting even
when using rinse-free rice.
Ingredients:
Place ingredients on top
of
rice after
adjusting the water.
• Mixed glutinous rice cooked with adzuki beans
...
Bring adzuki beans to a boil, separate the beans from the
hot water, cool to room temperature before using. Water
used to boil the beans should also
be
used for cooking rice.
RICE
MIXED
WITH
BARLEY:
Water
Level
:
Slightly
above
the
water
level
for
!ll:lmlillil§I
.
Menu
Selection:
Select the I WHITE/MIXED I menu setting.
Select the
I RINSE-FREEi menu setting
when using rinse-free rice.
Remarks
:
The amount of barley mixed into the rice
should
be
less than 20% of the total
volume; otherwise it may not cook properly.
e.g.: To cook 1 cup of rice mixed with
barley, use 0.8 cup of white rice and 0.2
cup of barley.
l
PORRIDGE:
Rice:
Semi-brown rice
(30%,
50%,
and 70%) or
brown rice cannot
be
used
to
make porridge.
Water
Level
:
Use the water level for
iZ•lilill•J!II
.
Menu
Selection:
Select the
I PORRIDGE I menu setting.
Select the
I PORRIDGE I menu setting
even when using rinse-free rice.
Ingredients:
The appropriate amount of ingredients
should be about 30-50% of the rice volume
(weight). Chop ingredients into small
pieces and place on top of rice without
mixing them into the rice. Ingredients that
do not cook easily should not be used
in
large amounts. Boil green leaf vegetables
separately and add them after the rice
porridge has finished cooking.
l
WHITE
RICE
WITH
GERM:
Water
Level
:
Slightly
above
the
water
level
for
l'll:lmlil[i]§I
.
Menu
Selection:
Select the
I WHITE/MIXED I menu setting.
Remarks
:
Because the germ can easily be washed
off, rinse rice gently.
SUSHI
RICE:
Rice
:
Use white rice
or
rinse-free rice.
Water
Level
: Use the water level for
Menu
Selection:
Select the SUSHI menu setting when
using white rice. Select the
I RINSE-FREE
menu setting when using rinse-free rice.
1§11[;1:llill!ll.
I I
I
GERMINATED
BROWN
RICE:
Rice
:
Limit the amount of rice to be cooked to 1-
4 cups for the 1.0L model and 2-8 cups for
the 1.
8L
model. Use germinated brown rice
only or mix it with white rice when cooking.
Water
Level
: Use the water level for
f+'l:lil!ilill!ll
.
Menu
Selection: Select the I WHITE/MIXED I menu setting.
Remarks
:
Your cooking results may vary and may
not always be satisfactory. Certain types of
germinated brown rice may cause the Rice
Cooker to boil over. Do not use the Timer
function when cooking germinated brown
rice or soak
in
water for more than 30
minutes as it will absorb too much water.
When cooking germinated brown rice
made by a germinated brown rice maker,
contact the manufacturer of the maker
directly for ideal cooking methods.
13
14
HOW TO USE
HOW
TO
SET
THE
CLOCK
It
is
important to set the clock first before cooking rice with the Timer. Although the clock is
set before shipment from the factory, certain conditions may cause it to display
an
inaccurate time.
If
the clock is inaccurate, set the correct time as shown below.
• The clock cannot
be
adjusted during Cooking, Regular
Keep
Warm, Extended Keep
Warm and Timer Cooking settings.
e.g.:
If
the
current
time
is
15:01
but
displays
14:58.
r
I J
Set
the
Inner
Cooking
Pan
and
plug
in
the
Power
Cord.
1)
Insert
the
Power
Cord
into
the
Main
Body
securely
.
2)
Insert
the
Power
Plug
into
an
electrical
outlet.
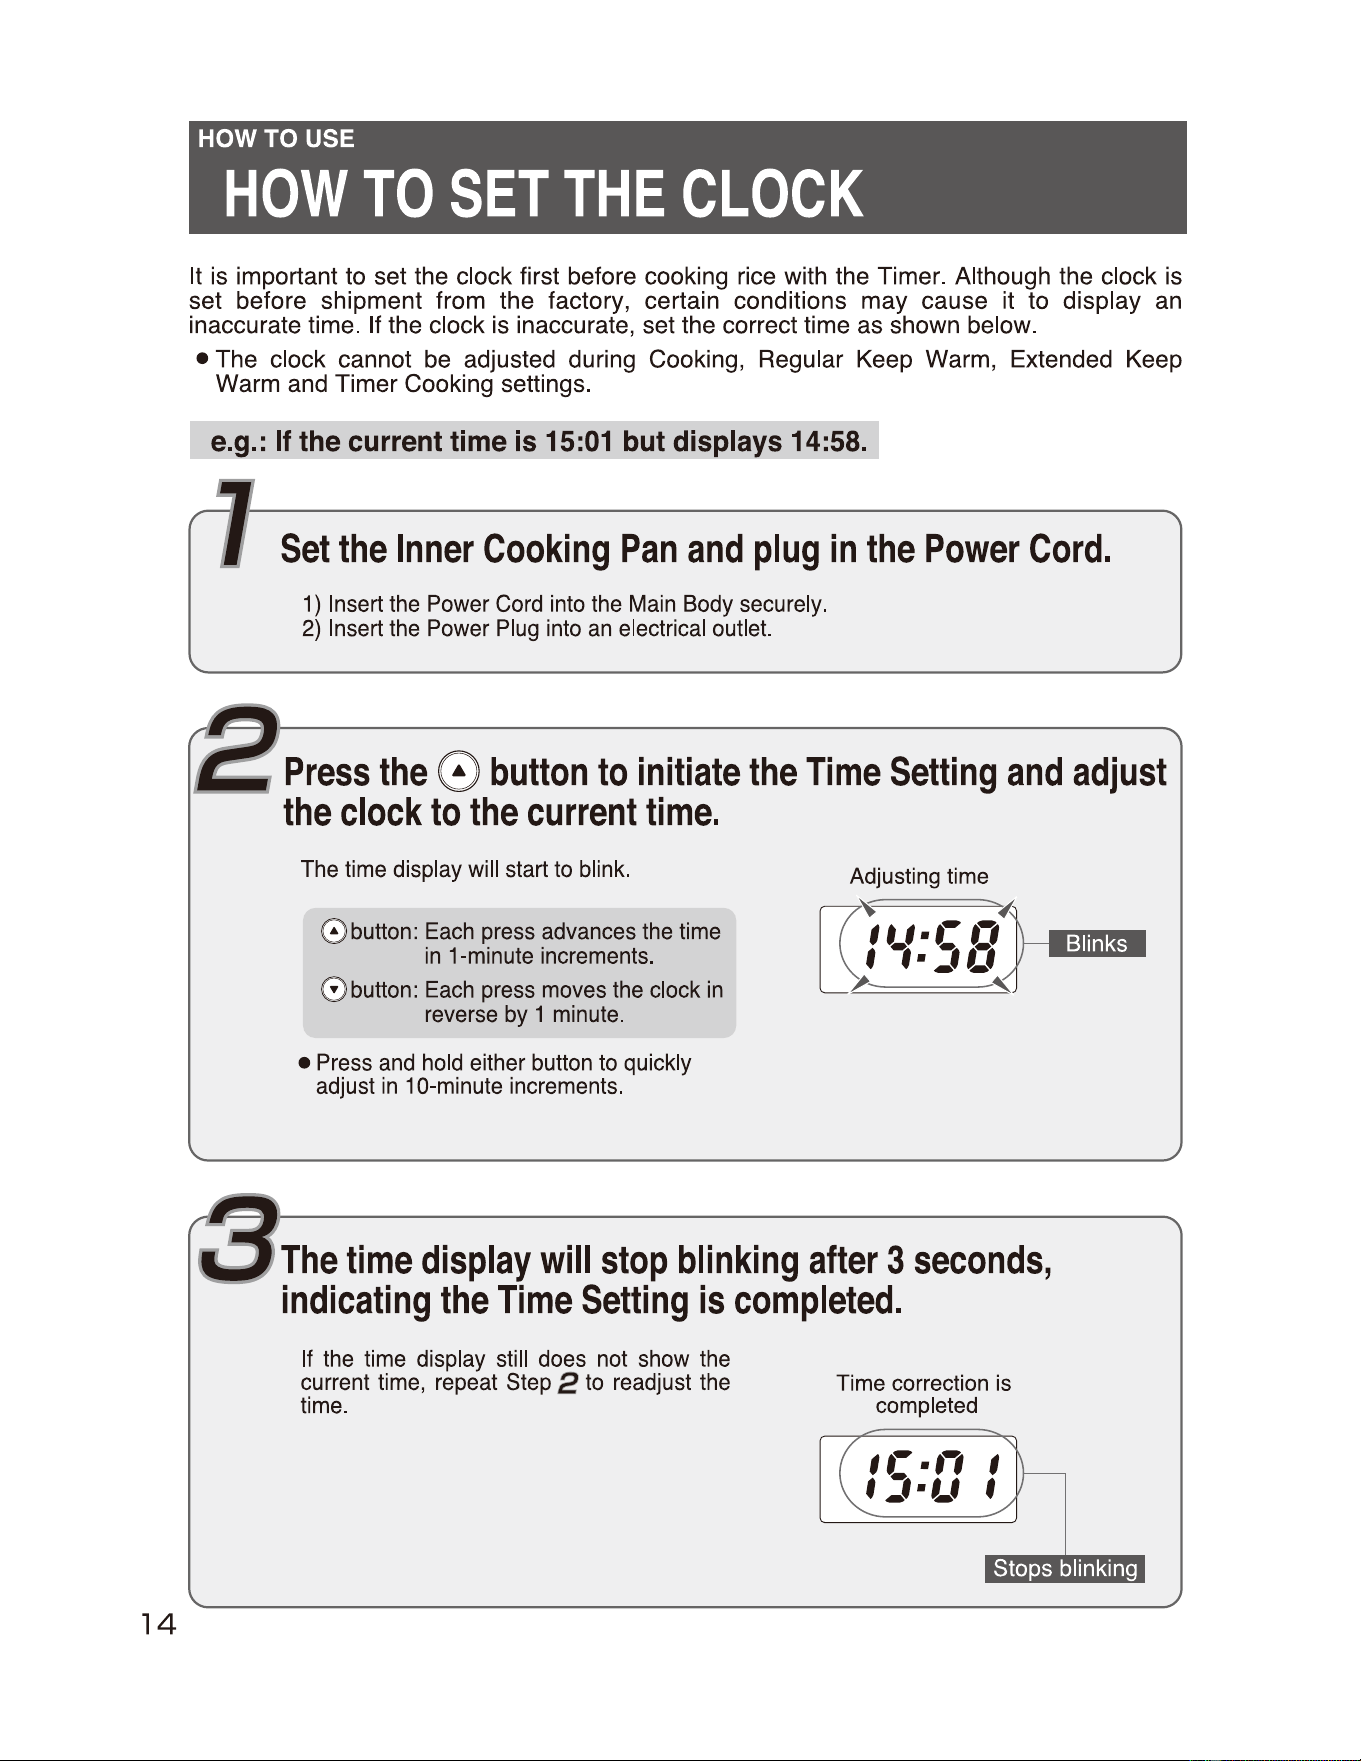
Press
the
0
button
to
initiate
the
Time
Setting
and
adjust
the
clock
to
the
current
time.
The
time
display
will
start
to
blink.
©
button:
Each
press
advances
the
time
in
1-minute
increments.
0
button:
Each
press
moves
the
clock
in
reverse
by
1
minute.
Adjusting
time
~
..
,.co~}---
•
,.
_,
,_,
~
~
•
Press
and
hold
either
button
to
quickly
adjust
in
10-minute
increments
.
The
time
display
will
stop
blinking
after
3
seconds,
indicating
the
Time
Setting
is
completed.
If
the
time
display
still
does
not
show
the
current
time,
repeat
Step
2
to
readjust
the
time
.
Time
correction
is
completed
Stops blinking
SOUND
SIGNALS
&
HOW
TO
CHANGE
THEM
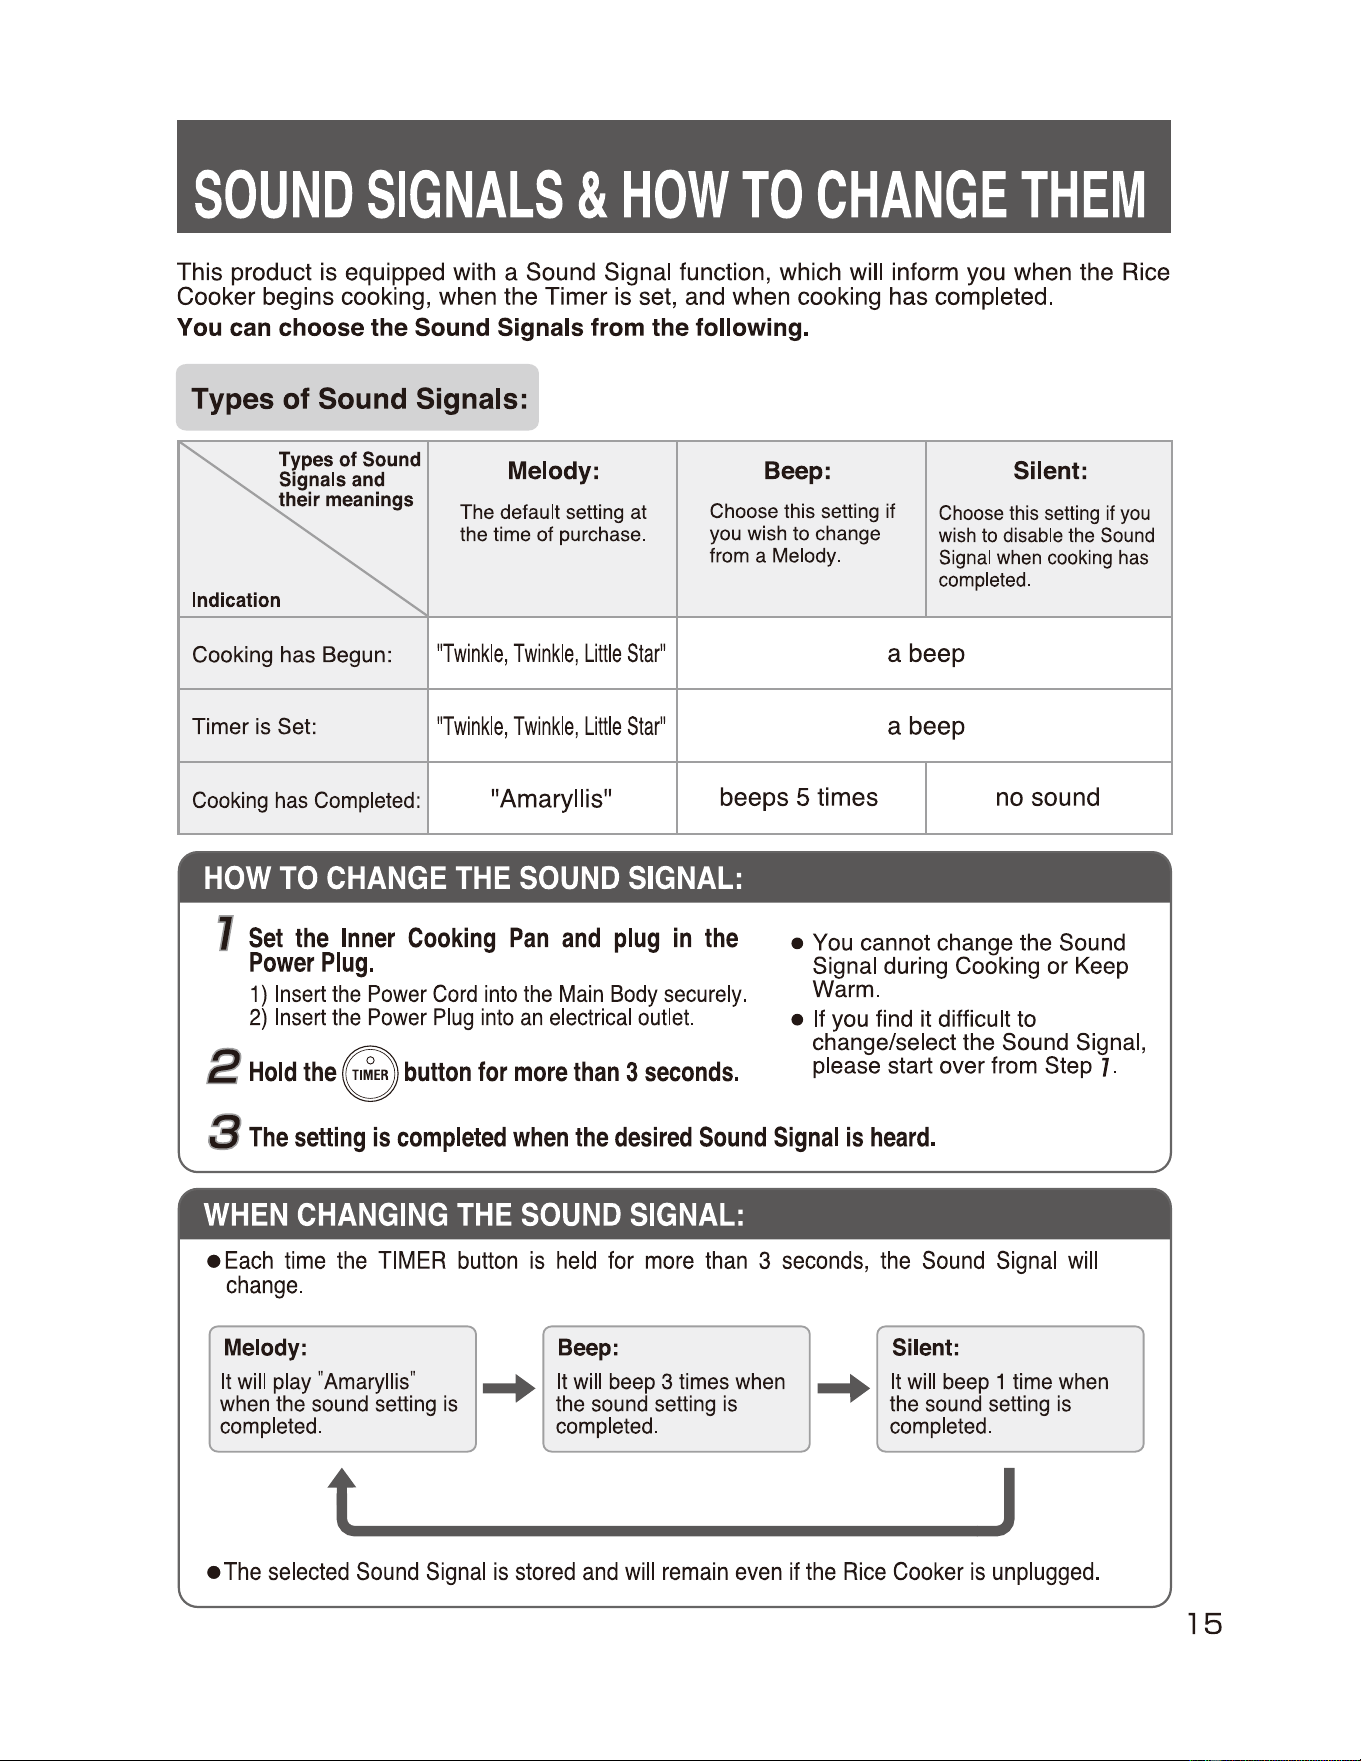
This product is equipped with a Sound Signal function, which will inform you when the Rice
Cooker begins cooking, when the Timer is set, and when cooking has completed.
You can choose the Sound Signals from the following.
Types of Sound Signals:
Types
of
Sound
Signals
and
their
meanings
Indication
Melody:
The
default
setting
at
the
time
of
purchase
.
Beep:
Choose
this
setting
if
you
wish
to
change
from
a
Melody
.
Silent:
Choose
this
setting
if
you
wish
to
disable
the
Sound
Signal
when
cooking
has
completed
.
Cooking
has
Begun:
"Twinkle,
Twinkle,
Little
Star"
a beep
Timer
is
Set:
"Twinkle,
Twinkle,
Little
Star"
a beep
Cooking
has
Completed
: "Amaryllis"
beeps 5 times no sound
HOW
TO
CHANGE
THE
SOUND
SIGNAL:
J
Set
the
Inner
Cooking
Pan
and
plug
in
the
Power
Plug.
1)
Insert
the
Power
Cord
into
the
Main
Body
securely.
2)
Insert
the
Power
Plug
into
an
electrical
outlet.
•
You
cannot change the Sound
Signal during Cooking or
Keep
Warm.
•
If
you
find it difficult
to
change/select the Sound Signal,
please start over from Step
J.
2
Hold
the@button
for
more
than
3
seconds.
3
The
setting
is
completed
when
the
desired
Sound
Signal
is
heard.
WHEN
CHANGING
THE
SOUND
SIGNAL:
•
Each
time
the
TIMER
button
is
held
for
more
than
3
seconds,
the
Sound
Signal
will
change.
Melody:
It
will
play
"Amaryllis
"
when
the
sound
setting
is
completed
.
t
-+
Beep:
It
will
beep
3
times
when
the
sound
setting
is
completed.
-+
Silent:
It
will
beep
1
time
when
the
sound
setting
is
completed
.
J
•
The
selected
Sound
Signal
is
stored
and
will
remain
even
if
the
Rice
Cooker
is
unplugged.
15
16
HOW TO USE
REGULAR
KEEP
WARM
&
EXTENDED
KEEP
WARM
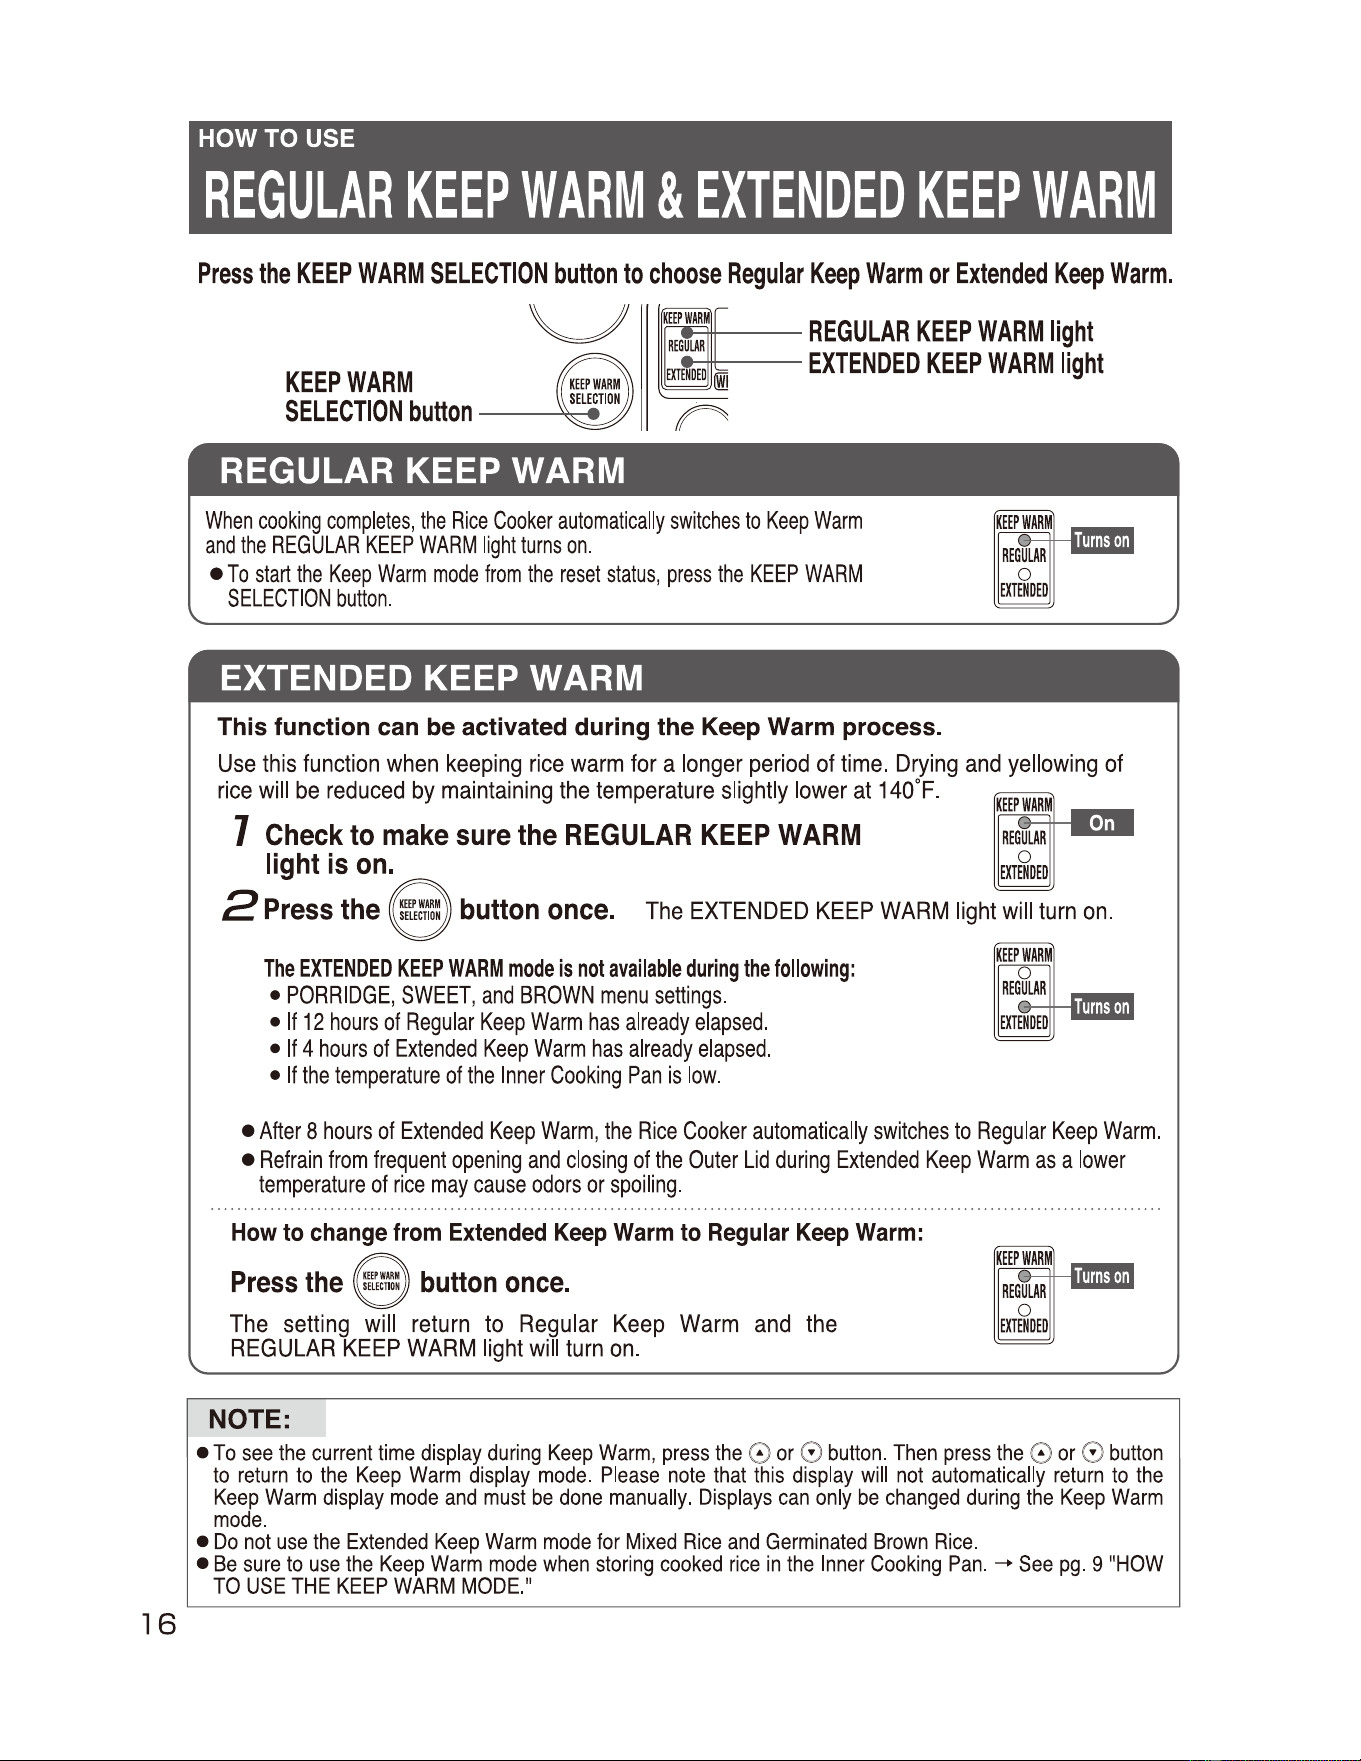
Press
the
KEEP
WARM
SELECTION
button
to
choose
Regular
Keep
Warm
or
Extended
Keep
Warm.
KEEP
WARM
SELECTION
button
_
...,.....
11
,----.:
---
_
~--
REGULAR
KEEP
WARM
light
EXTENDED
KEEP
WARM
light
-
REGULAR KEEP WARM
When
cooking
completes,
the
Rice
Cooker
automatically
switches
to
Keep
Warm
and
the
REGULAR
KEEP
WARM
light
turns
on.
•
To
start
the
Keep
Warm
mode
from
the
reset
status,
press
the
KEEP
WARM
SELECTION
button.
EXTENDED KEEP WARM
This function can be activated during the Keep Warm process.
Use
this
function
when
keeping
rice
warm
for
a
longer
period
of
time
.
Drying
and
yellowing
of
rice
will
be
reduced
by
maintaining
the
temperature
slightly
lower
at
140°F
.
]
Check
to
make
sure
the
REGULAR
KEEP
WARM
light
is
on.
2
Press
the button
once.
The
EXTENDED
KEEP
WARM
light
will
turn
on.
The
EXTENDED
KEEP
WARM
mode
is
not
available
during
the
following:
•
PORRIDGE,
SWEET,
and
BROWN
menu
settings.
•
If
12
hours
of
Regular
Keep
Warm
has
already
elapsed.
•
If
4
hours
of
Extended
Keep
Warm
has
already
elapsed.
•
If
the
temperature
of
the
Inner
Cooking
Pan
is
low.
•
After
8
hours
of
Extended
Keep
Warm,
the
Rice
Cooker
automatically
switches
to
Regular
Keep
Warm.
•
Refrain
from
frequent
opening
and
closing
of
the
Outer
Lid
during
Extended
Keep
Warm
as
a
lower
temperature
of
rice
may
cause
odors
or
spoiling.
How
to
change
from
Extended
Keep
Warm
to
Regular
Keep
Warm:
The
setting
will
return
to
Regular
Keep
Warm
and
the
REGULAR
KEEP
WARM
light
will
turn
on.
NOTE: I
•
To
see
the
current
time
display
during
Keep
Warm,
press
the
0
or
0
button.
Then
press
the
0
or
0
button
to
return
to
the
Keep
Warm
display
mode
.
Please
note
that
this
display
will
not
automatically
return
to
the
Keep
Warm
display
mode
and
must
be
done
manually.
Displays
can
only
be
changed
during
the
Keep
Warm
mode
.
•
Do
not
use
the
Extended
Keep
Warm
mode
for
Mixed
Rice
and
Germinated
Brown
Rice
.
•
Be
sure
to
use
the
Keep
Warm
mode
when
storing
cooked
rice
in
the
Inner
Cooking
Pan.
-
See
pg.
9
"HOW
TO
USE
THE
KEEP
WARM
MODE
."

CLEANING
AND
MAINTENANCE
Any
other
servicing
should
be
performed
by
an
authorized
service
representative.
•
Be
sure
to
unplug
the
Power
Cord
and
allow
the
Main
Body
and
the
Inner
Cooking
Pan
to
cool
down.
•
Do
not
use
a
thinner,
benzene,
abrasive
cleaners
and
brushes
(nylon/metal),
bleach
or
anything
that
may
damage
the
surface
of
the
Rice
Cooker.
HOW TO CLEAN THE EXTERIOR
Soak
a
cloth
in
mild
detergent,
wring
out
all
excess
moisture,
and
wipe
clean.
Use
a
dry
soft
cloth
to
wipe
the
control
button
area.
e
1f
using
a
cloth
that
is
chemically
treated,
use
sparingly
to
avoid
transferring
the
chemical
smell
and
do
not
scrub
the
Rice
Cooker
forcefully.
Open
Button
If
the
Open
Button
becomes
clogged
with
rice
or
other
matter,
remove
with
a
toothpick
or
chopstick.
•Otherwise
the
Outer
Lid
may
not
open.
Steam Vent Cap
Soak
in
cold
or
warm
water,
wash
with
a
sponge
and
wipe
off
excess
moisture.
- Plug to the
Main
Body
Power Cord
Power Plug
Wipe
the
Power
Cord
with
a
dry
cloth.
HOW TO CLEAN THE INTERIOR
Inner
Lid
Set
Soak
the
Inner
Lid
in
warm
or
cold
water
and
wash
with
a
sponge.
If
it
is
clogged
with
rice
or
other
matter,
remove
using
a
bamboo
stick
or
a
chopstick.
•
Be
sure
to
clean
the
Inner
Lid
Set
after
every
use;
otherwise,
the
lid
may
rust
or
become
discolored.
Inside of the
Main
Body (interior)
Wipe
it
with
a
well-
wrung
cloth.
Center Sensor
Wipe
with
a
well-wrung
cloth.
If
it
becomes
clogged
with
rice
or
other
matter,
remove
with
a
bamboo
stick
or
chopstick.
Outer
Lid
Gasket
Outer
Lid
and Steam
Vent
Hold
the
Outer
Lid
securely
and
wipe
with
a
well-wrung
cloth.
Remove
any
rice
or
residue
on
the
inside
of
the
Outer
Lid
.
Heating Plate
Wipe
with
a
well-wrung
cloth.
If
rice
or
any
objects
become
stuck
to
the
Heating
Plate,
lightly
polish
them
off
with
a
sand
paper
of
about
No.320
after
dipping
in
water.
----------.
______
__,
---
-----+--,!,-,,,,,>----
21
USING
THE
TIMER
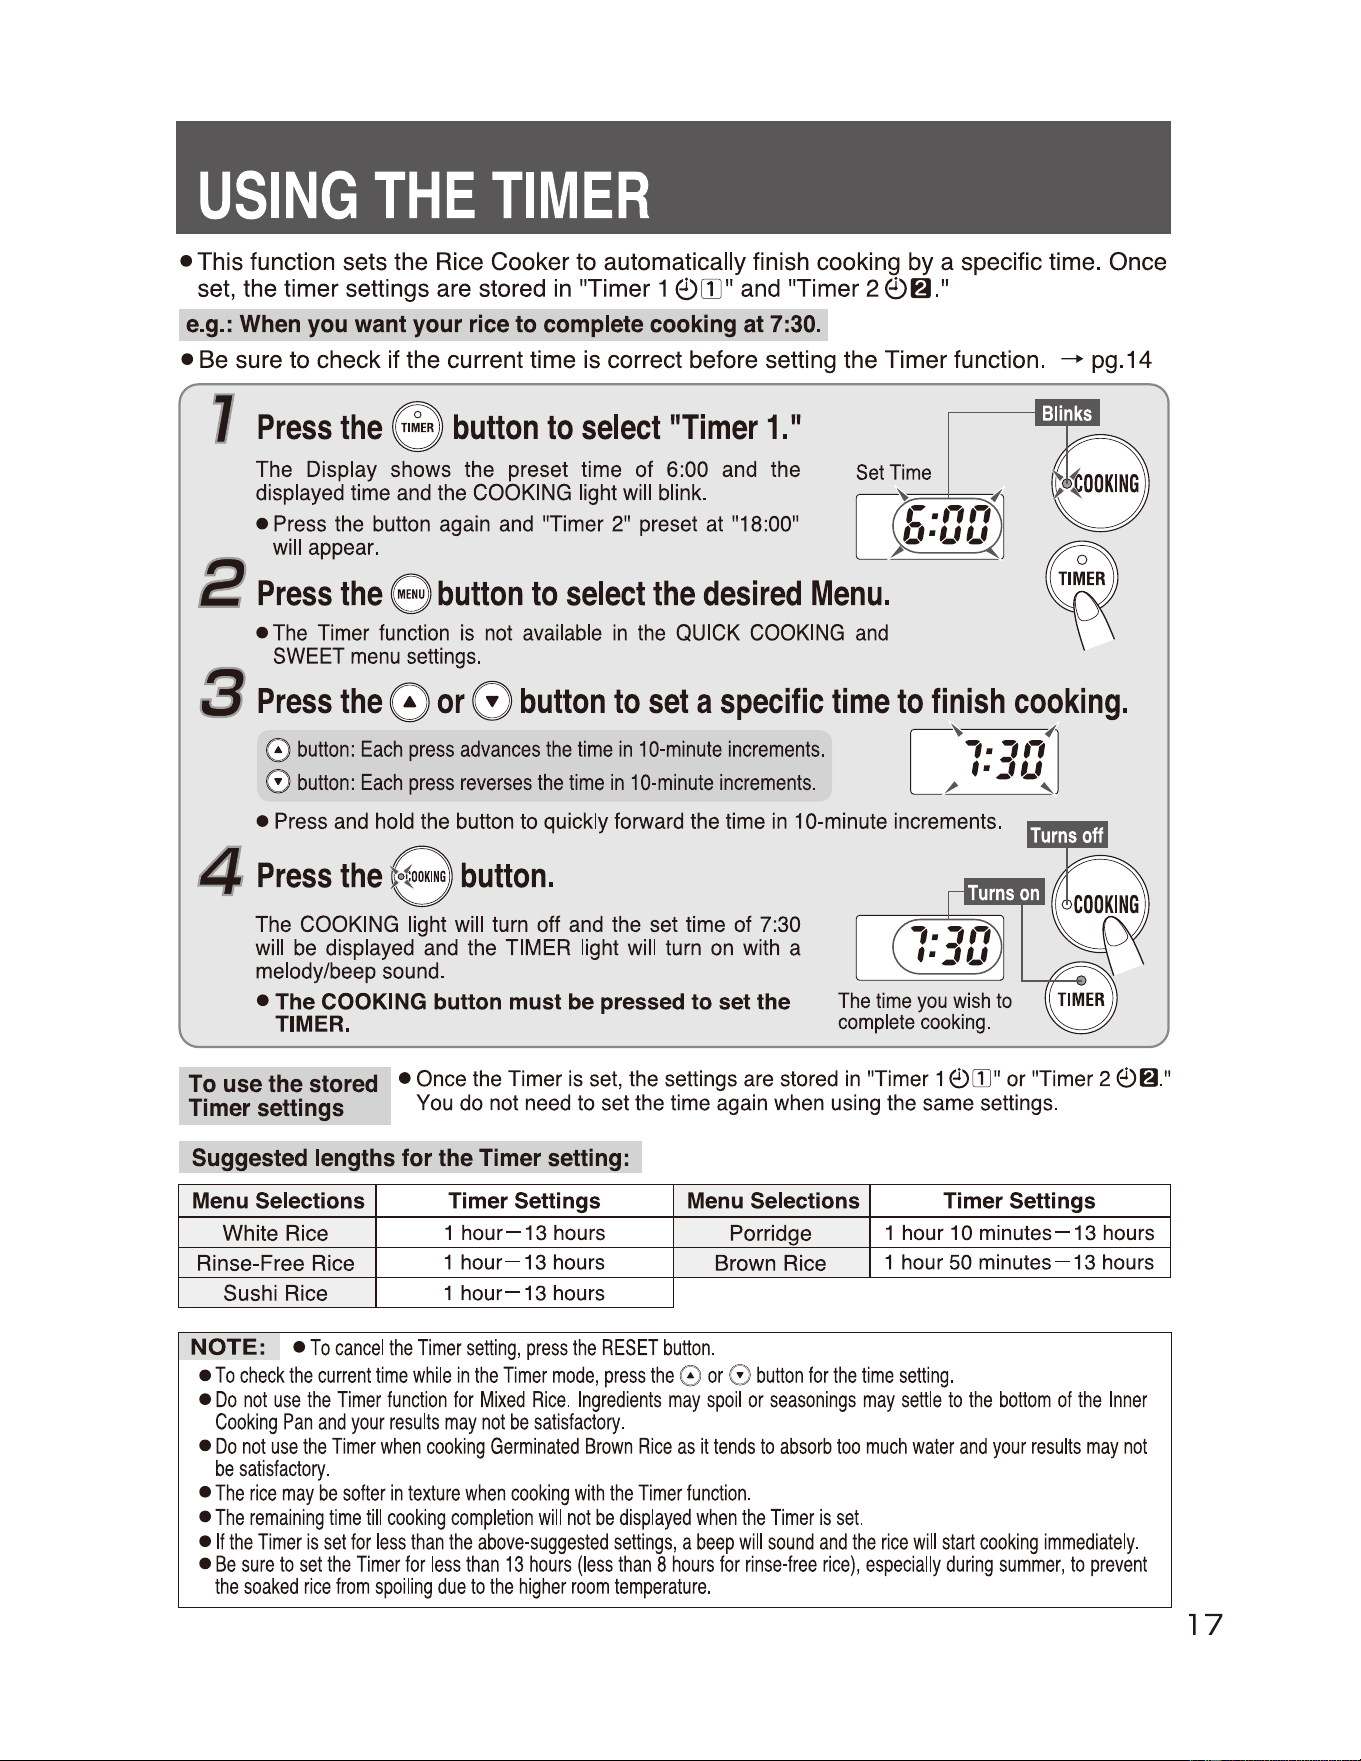
• This function sets the Rice Cooker to automatically finish cooking by a specific time. Once
set, the timer settings are stored
in
"Timer 1 ©IIl" and "Timer 2 ©~."
e.g.:
When
you
want
your
rice
to
complete
cooking
at
7:30.
• Be sure to check if the current time is correct before setting the Timer function. - pg.14
J
Press
the
button
to
select
"Timer
1."
@
The
Display
shows
the
preset time of 6:
00
and
the
displayed
time
and
the
COOKING
light
will
blink
.
Set
Time
□
~
-
✓-
1
C.
,-, ,-,
U•UU
- - -
~
R
•
Press
the
button
again
and
"Timer
2"
preset
at
"1
a·OO"
will
appear.
. ·
2
Press
the
button
to
select
the
desired
Menu.
e
•
The
Timer
function
is
not
available
in
the
QUICK
COOKING
and
SWEET
menu
settings.
3
Press
the
0
or
0
button
to
set
a
specific
time
to
finish
cooking.
0
button:
Each
press
advances
the
time
in
10-minute
increments.
[ ~
-,
•
:,
,,-
✓
-
1
0
button:
Each
press
reverses
the
time
in
10-minute
increments.
;
1
•
-'
'-'
~
•
Press
and
hold
the
button
to
quickly
forward
the
time
in
10-minute
increments.
4
Press
the
~o{
ooKING
button.
The
COOKING
light
will
turn
off
and
the
set
time
of
7:30
will
be
displayed
and
the
TIMER
light
will
turn
on
with
a
melody/beep
sound
.
•
The
COOKING button must be pressed to set the
TIMER.
To
use
the
stored
Timer
settings
•
Once
the
Timer
is
set
,
the
settings
are
stored
in
"Timer 1
E!)
[I]
"
or
"Timer 2
©~
."
You
do
not
need
to
set
the
time
again
when
using
the
same
settings.
Suggested
lengths
for
the
Timer
setting:
Menu Selections Timer Settings
White
Rice
1
hour-13
hours
Rinse-Free
Rice
1
hour-13
hours
Sushi
Rice
1
hour-13
hours
Menu Selections Timer Settings
Porridge
1
hour
10
minutes-13
hours
Brown
Rice
1
hour
50
minutes-13
hours
NOTE:
•
To
cancel
the
Timer
setting
,
press
the
RESET
button
.
•
To
check
the
current
time
while
in
the
Timer
mode,
press
the
0
or
0
button
for
the
time
setting
.
•
Do
not
use
the
Timer
function
for
Mixed
Rice.
Ingredients
may
spoil
or
seasonings
may
settle
to
the
bottom
of
the
Inner
Cooking
Pan
and
your
results
may
not
be
satisfactory
.
•
Do
not
use
the
Timer
when
cooking
Germinated
Brown
Rice
as
it
tends
to
absorb
too
much
water
and
your
results
may
not
be
satisfactory
.
•
The
rice
may
be
softer
in
texture
when
cooking
with
the
Timer
function.
•
The
remaining
time
till
cooking
completion
will
not
be
di
splayed
when
the
Timer
is
set.
•
If
the
Timer
is
set
for
less
than
the
above-suggested
settings,
a
beep
will
sound
and
the
rice
will
start
cooking
immediately
.
•
Be
sure
to
set
the
Timer
for
less
than
13
hours
(less
than
8
hours
for
rinse-free
rice)
,
especially
during
summer
,
to
prevent
the
soaked
rice
from
spoiling
due
to
the
higher
room
temperature.
17
R
EC
I P
ES
Measure
the
rice
with
the
provided
Measuring
Cups
.
White
,
brown
and
germinated
brown
rice
-->
Use
the
Measuring
Cup
for
white
rice
.
(1
Cup=
approx.
6.1
oz
.)
Rinse-free
rice-->
Use
the
Measuring
Cup
for
rinse-free
rice
.
(1
Cup=
approx
. 5.8
oz
.)
The
measurements
used
in
these
Recipes:
e 1
Tablespoon=
o.s
oz.
e 1
teaspoon=
0.2
oz
.
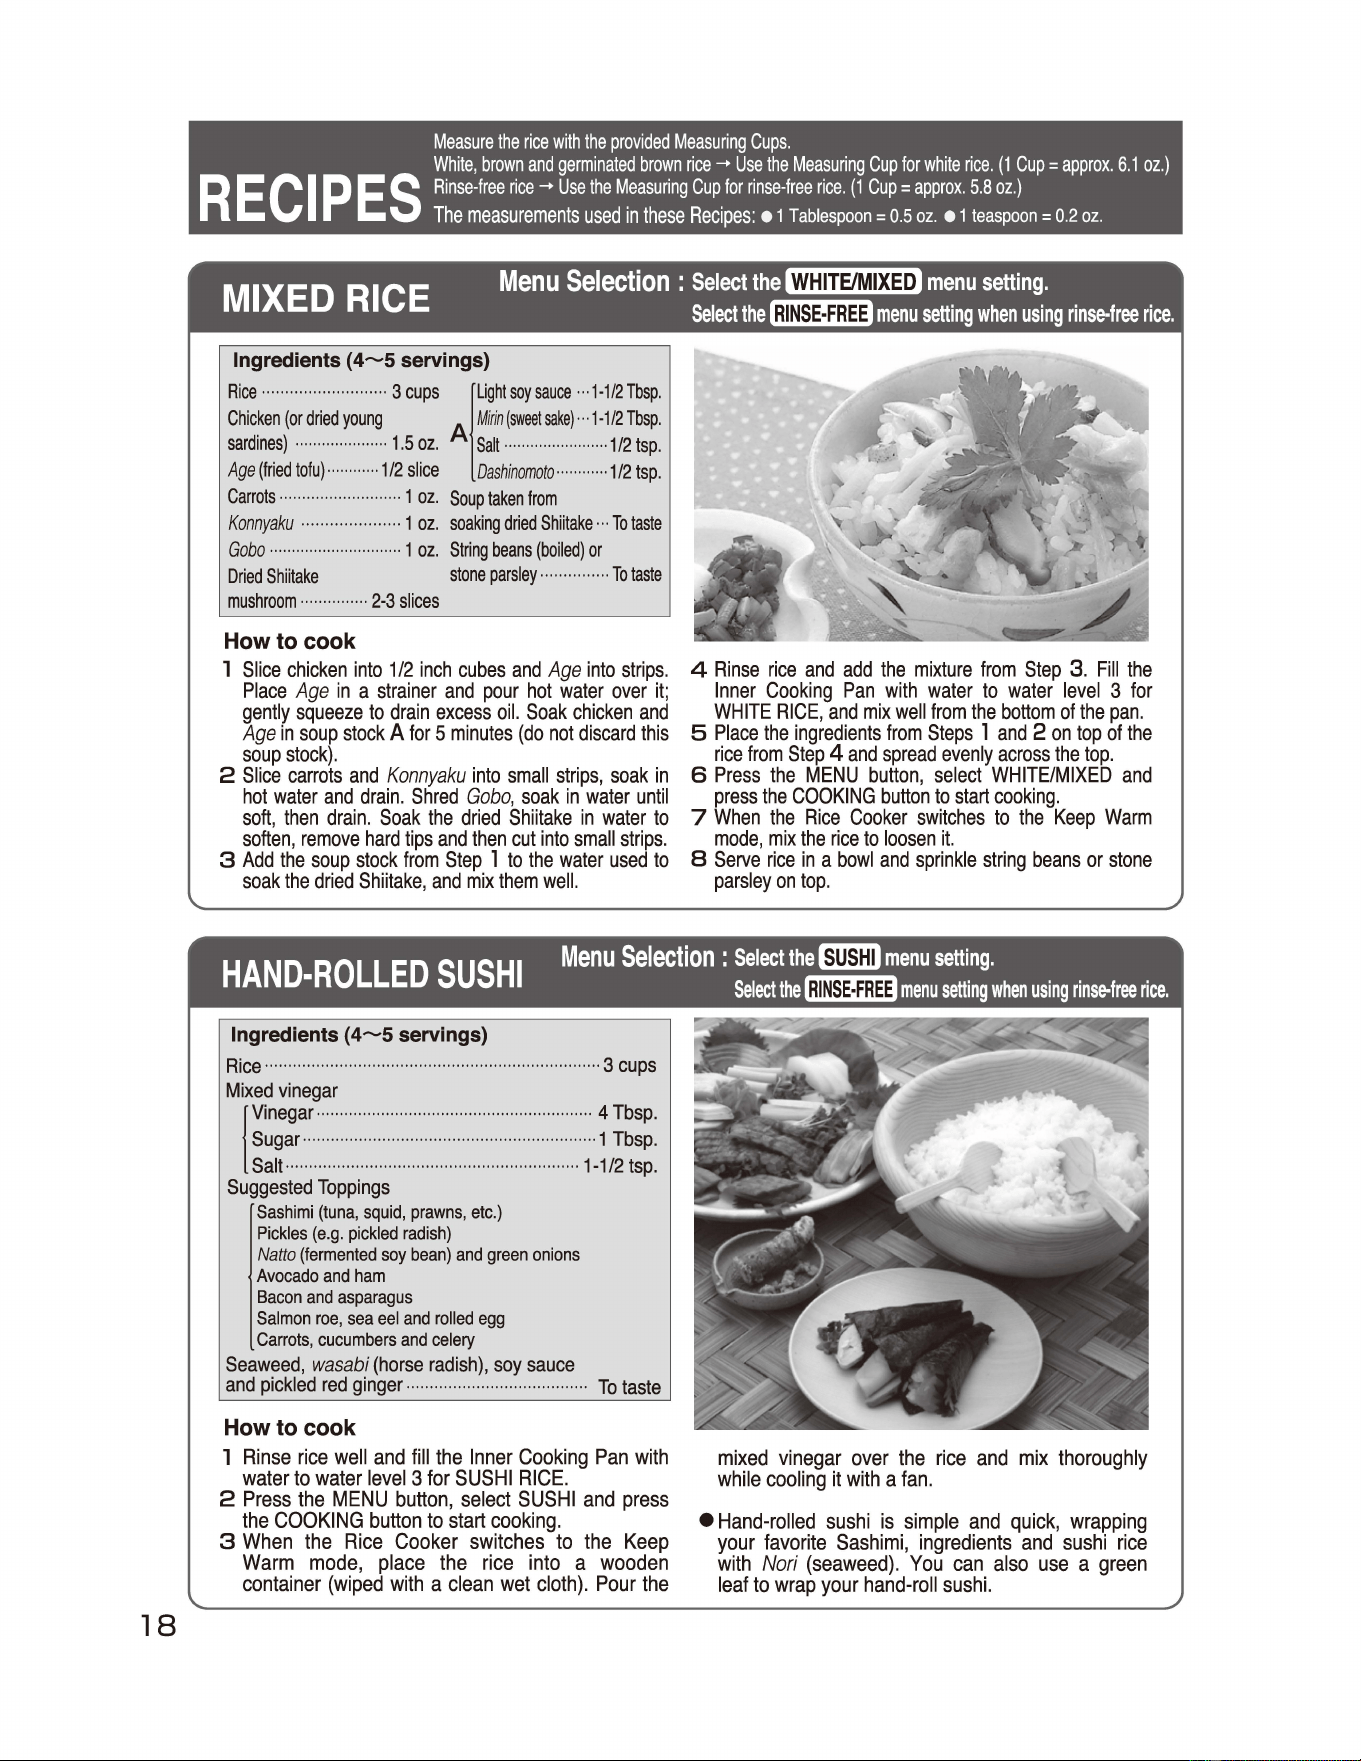
MIXED
RICE
Menu
Selection:
Select
the
WHITE/M
menu
setting.
Select
the
INSE-FREE
menu
setting
when
using
rinse-free
rice.
Ingredients
(4~5
servings)
Rice
3
cups
Chicken
(or
dried
young
sardines)
1.5
oz
.
Age
(fried
tofu)
1/2
slice
Carrots
1
oz.
Kannyaku
1
oz.
Gaba
1
oz.
Dried
Shiitake
mushroom
2-3
slices
...........................
A
[Light
soy
sauce
...
1-1/2
Tbsp
.
Mirin(sweetsake)
..
·
1-1/2Tbsp
.
Salt
1/2
tsp
.
Oashinamata
112
tsp
.
.....................
........................
............
............
..........................
·
Soup
taken
from
soaking
dried
Shiitake
To
taste
String
beans
(boiled)
or
stone
parsley
To
taste
....................
·
..
·
....................
....
......
···············
..
........ ....
·
How to cook
1
Slice
chicken
into
1/2
inch
cubes
and
Age
into
strips
.
Place
Age
in
a
strainer
and
pour
hot
water
over
it;
gently
squeeze
to
drain
excess
oil.
Soak
chicken
and
Age
in
soup
stock
A
for
5
minutes
(do
not
discard
this
soup
stock)
.
2
Slice
carrots
and
Konnyaku
into
small
strips,
soak
in
hot
water
and
drain
.
Shred
Gobo,
soak
in
water
until
soft,
then
drain
.
Soak
the
dried
Shiitake
in
water
to
soften,
remove
hard
tips
and
then
cut
into
small
strips.
3
Add
the
soup
stock
from
Step
1
to
the
water
used
to
soak
the
dried
Shiitake,
and
mix
them
well.
4
Rinse
rice
and add
the
mixture
from
Step
3.
Fill
the
Inner
Cooking
Pan
with
water
to
water
level
3
for
WHITE
RICE,
and
mix
well
from
the
bottom
of
the
pan.
5
Place
the
ingredients
from
Steps
1
and
2
on
top
of
the
rice
from
Step
4
and
spread
evenly
across
the
top.
6
Press
the
MENU
button,
select
WHITE/MIXED
and
press
the
COOKING
button
to
start
cooking
.
7
When
the
Rice
Cooker
switches
to
the
Keep
Warm
mode,
mix
the
rice
to
loosen
it.
8
Serve
rice
in
a
bowl
and
sprinkle
string
beans
or
stone
parsley
on
top
.
HAND-R
0
LLED
S
U
S
HI
Menu
Selection
:
Select
the~
menu
setting.
Selectthe~menusettingwhenusingrinse-freerice
.
Ingredients
(4~5
servings)
Rice
3
cups
Mixed
vinegar
Vinegar
4
Tbsp.
Sugar
1
Tbsp.
Salt
1-1I2
tsp.
.......
......
..................
..
..
.....................
....
............
I
...............
.
.....
..
....
..
....
..
.........................
..............
..
....
......
..
.....
..
....
..
.. ..
.
..
..
..
...
........
..............................................
.
...............
.
Suggested
Toppings
Sashimi
(tuna
,
squid,
prawns
,
etc
.)
Pickles
(e.g
.
pickled
radish)
Natto
(fermented
soy
bean)
and
green
onions
Avocado
and
ham
Bacon
and
asparagus
Salmon
roe
,
sea
eel
and
rolled
egg
Carrots
,
cucumbers
and
celery
Seaweed,
wasabi
(horse
radish),
soy
sauce
and
pickled
red
ginger.
To
taste
How to cook
1
Rinse
rice
well
and
fill
the
Inner
Cooking
Pan
with
water
to
water
level
3
for
SUSHI
RICE.
2
Press
the
MENU
button,
select
SUSHI
and
press
the
COOKING
button
to
start
cooking
.
3
When
the
Rice
Cooker
switches
to
the
Keep
Warm
mode,
place
the
rice
into
a
wooden
container
(wiped
with
a
clean
wet
cloth)
.
Pour
the
mixed
vinegar
over
the
rice
and
mix
thoroughly
while
cooling
it
with
a
fan.
•
Hand-rolled
sushi
is
simple
and
quick,
wrapping
your
favorite
Sashimi,
ingredients
and
sushi
rice
with
Nori
(seaweed).
You
can
also
use
a
green
leaf
to
wrap
your
hand-roll
sushi.
......................................
18
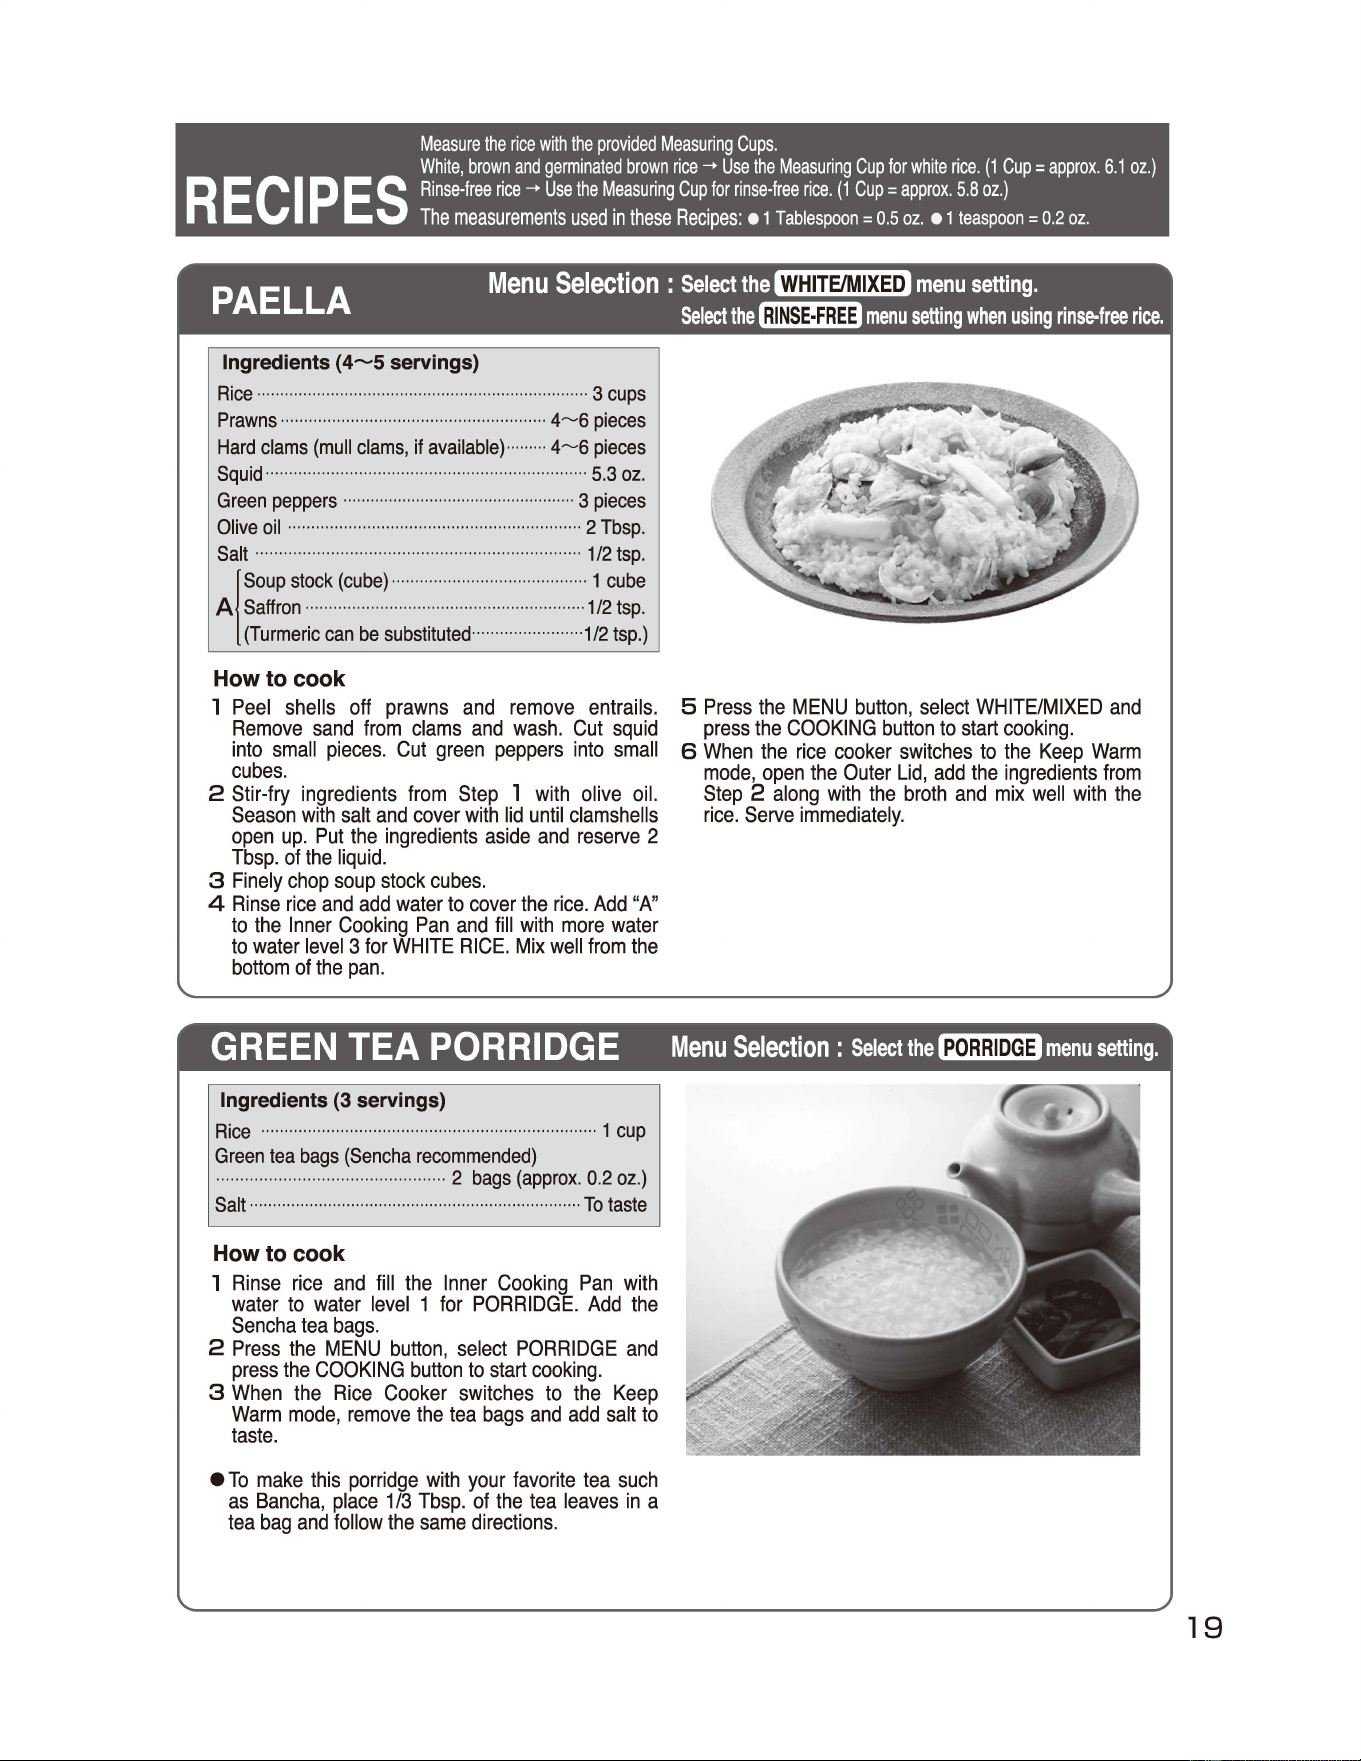
R
EC
I
P
ES
Measure
the
rice
with
the
provided
Measuring
Cups
.
White,
brown
and
germinated
brown
rice
--.
Use
the
Measuring
Cup
for
white
rice.
(1
Cup"
approx
.
6.1
oz
.)
Rinse-free
rice
--.
Use
the
Measuring
Cup
for
rinse-free
rice
.
(1
Cup"
approx.
5.8
oz
.)
The
measurements
used
in
these
Recipes
: 1
Tablespoon=
o.s
oz
. 1
teaspoon"
0.2
oz.
e e
PAELLA
Menu
Selection:
Select
the
WHITE/M
menu
setting.
Select
the
INSE-FREE
menu
setting
when
using
rinse-free
rice.
Ingredients
(4~5
servings)
Rice
3
cups
Prawns
4~6
pieces
Hard
clams
(mull
clams,
if
available)
4~6
pieces
Squid
5.3
oz.
Green
peppers
3
pieces
Olive
oil
2
Tbsp.
Salt
1/2
tsp.
A
Soup
stock
(cube)
1
cube
Saffron
1/2
tsp.
{Turmeric
can
be
substituted
1/2
tsp
.)
..
......
....
.....
..
................................
...
..................
..
..
..
..
..
..
..
..
..
......
...
..
..
......
..
..
..
..
..
......
..
..
..
......
.
......................
..
..................
..
............
..
...........
...................................................
..
..
..
..
......
..
..
..
..
..
..
.
..
...
......
..
..
.
....
.
..
......
..
..
..
.
.....................................
.
...
..
........
.. ..
.
....
..
.......
!
··
..
··
..
··
...
·
..
.
...
..
..
..
..
..
..
...
.
..
..
..
........................
..
........
.
................
.
........
..
..
..
..
.
....
...
..
..
..
..
How to cook
1
Peel
shells
off
prawns
and
remove
entrails
.
Remove
sand
from
clams
and
wash.
Cut
squid
into
small
pieces
.
Cut
green
peppers
into
small
cubes
.
2 Stir-fry
ingredients
from
Step
l
with
olive
oil.
Season
with
salt
and
cover
with
lid
until
clamshells
open
up
.
Put
the
ingredients
aside
and
reserve
2
Tbsp
.
of
the
liquid
.
3
Finely
chop
soup
stock
cubes
.
4
Rinse
rice
and
add
water
to
cover
the
rice
.
Add
"A"
to
the
Inner
Cooking
Pan
and
fill
with
more
water
to
water
level
3
for
WHITE
RICE.
Mix
well
from
the
bottom
of
the
pan.
5
Press
the
MENU
button,
select
WHITE/MIXED
and
press
the
COOKING
button
to
start
cooking
.
6
When
the
rice
cooker
switches
to
the
Keep
Warm
mode,
open
the
Outer
Lid,
add
the
ingredients
from
Step
2
along
with
the
broth
and
mix
well
with
the
rice
.
Serve
immediately
.
GREEN
TEA
PORRIDGE
Menu
Selection:
Select
the
Ingredients (3 servings)
Rice
1
cup
Green
tea
bags
(Sencha
recommended)
2
bags
(approx
. 0.2
oz
.)
Salt
To
taste
How to cook
1
Rinse
rice
and
fill
the
Inner
Cooking
Pan
with
water
to
water
level
1
for
PORRIDGE
.
Add
the
Sencha
tea
bags
.
2
Press
the
MENU
button
,
select
PORRIDGE
and
press
the
COOKING
button
to
start
cooking
.
3
When
the
Rice
Cooker
switches
to
the
Keep
Warm
mode
,
remove
the tea
bags
and
add
salt
to
taste.
•
To
make
this
porridge
with
your
favorite
tea
such
as
Bancha
,
place
1
/3
Tbsp
.
of
the
tea
leaves
in
a
tea
bag
and
follow
the
same
directions
.
·
··
··
··
··
··
··
··
··
··
··
··
··
··
··
··
···
·
··
···
·
···
·
···
··
·
··
···
·
···
·
···
··
··
··
··
................................................
.
.. ..
...
.
.......
....
.......
.
....
....
..
...
..
.
.......
.
.. ..
...
.
..
.
....
.
....
19
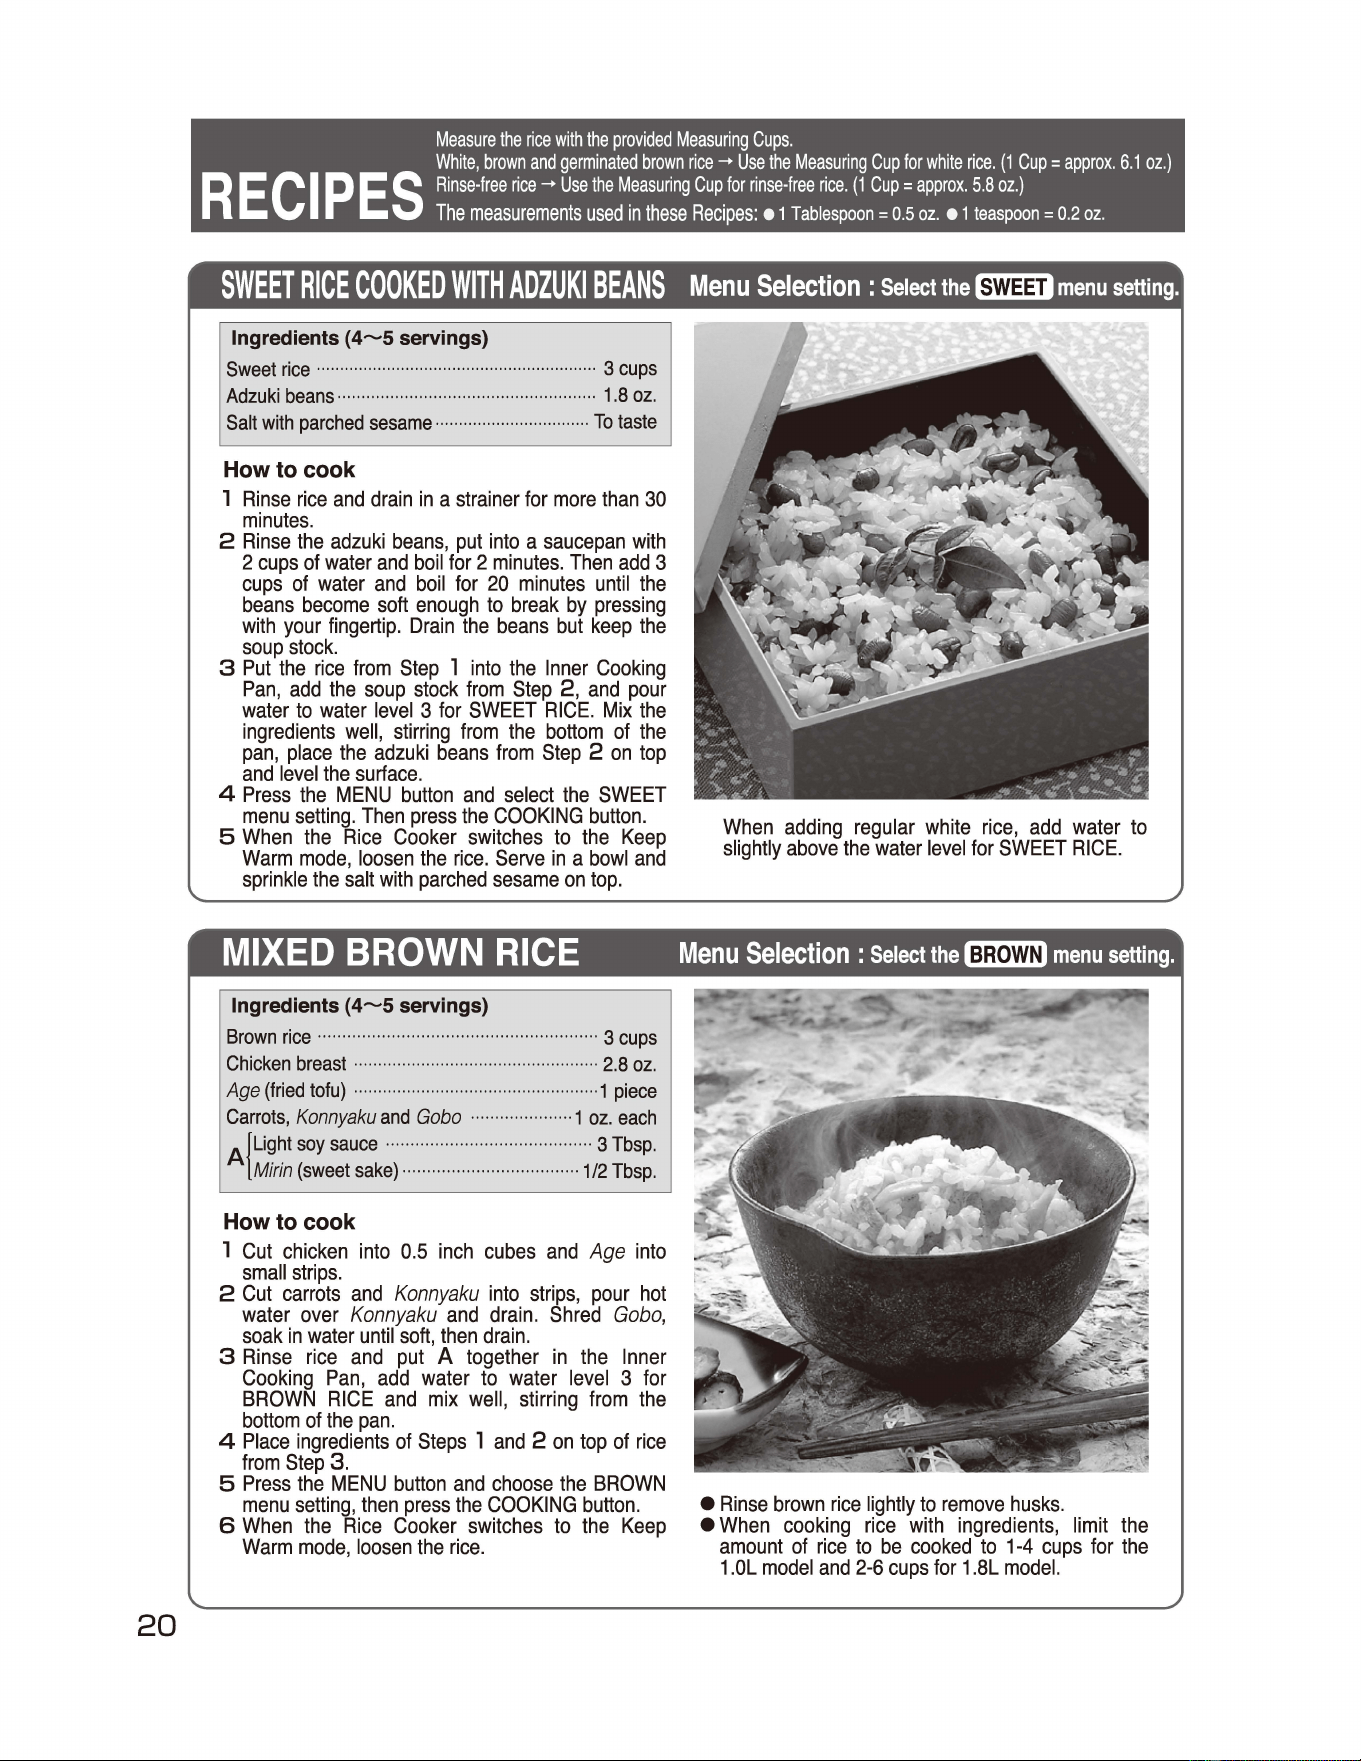
R
EC
I
PE
S
20
Measure
the
rice
with
the
provided
Measuring
Cups.
White,
brown
and
germinated
brown
rice
➔
Use
the
Measuring
Cup
for
white
rice
.
(1
Cup=
approx.
6.1
oz.)
Rinse-free
rice
...
Use
the
Measuring
Cup
for
rinse-free
rice
.
(1
Cup=
approx
.
5.8
oz.)
The
measurements
used
in
these
Recipes:
e 1
Tablespoon=
0.5
oz.
e 1
teaspoon=
0.2
oz
.
SWEET
RICE
COOKED
WITH
ADZUKI
BEANS
Menu
Selection
:
Select
the
SWEET
Ingredients
(4~5
servings)
Sweet
rice
3
cups
Adzuki
beans
1.8
oz
.
Salt
with
parched
sesame
To
taste
..
..
..
..
..
..
..
..
..
..
..
..
..
..
..
..
..
..
..
..
..
......
.
....
..
..
..
.
..............................
.. .. .. .. .. .. .. .. ..
......
..
..
..
........
..
....
..
......
.. ..
•
How to cook
l
Rinse
rice
and
drain
in
a
strainer
for
more
than
30
minutes
.
2
Rinse
the
adzuki
beans
,
put
into
a
saucepan
with
2
cups
of
water
and
boil
for
2
minutes
.
Then
add
3
cups
of
water
and
boil
for
20
minutes
until
the
beans
become
soft
enough
to
break
by
pressing
with
your
fingertip.
Drain
the
beans
but
keep
the
soup
stock
.
3
Put
the
rice
from
Step
1
into
the
Inner
Cooking
Pan,
add
the
soup
stock
from
Step
2,
and
pour
water
to
water
level
3
for
SWEET
RICE.
Mix
the
ingredients
well,
stirring
from
the
bottom
of
the
pan
,
place
the
adzuki
beans
from
Step
2
on
top
and
level
the
surface
.
4
Press
the
MENU
button
and
select
the
SWEET
menu
setting
.
Then
press
the
COOKING
button
.
5
When
the
Rice
Cooker
switches
to
the
Keep
Warm
mode
,
loosen
the
rice
.
Serve
in
a
bowl
and
sprinkle
the
salt
with
parched
sesame
on
top.
When
adding
regular
white
rice,
add
water
to
slightly
above
the
water
level
for
SWEET
RICE.
MIXED
BROWN
RICE
Menu
Selection:
Select
the
Ingredients
(4~5
servings)
Brown
rice
3
cups
Chicken
breast
2.8
oz
.
Age
(fried
tofu)
1
piece
Carrots,
Kannyaku
and
Gaba
1
oz
.
each
A
Light
soy
sauce
3
Tbsp
.
Mirin
(sweet
sake)
1/2
Tbsp
.
..
...
.. .. .. .. .. .. ..
......
.. .. .. .. .. ..
....
.. .. .. ..
.......
·
· · · · · · · · · · · · · · · · · · · · · · · · · · · · · · · · · · · · · · · · · · · · · · · · · · ·
...................................................
....
............
....
·
{
··
....................
..
..............
.. ..
...........
.
.....
..
........
..
..
.....
How to cook
l
Cut
chicken
into
0.5
inch
cubes
and
Age
into
small
strips
.
2
Cut
carrots
and
Konnyaku
into
strips
,
pour
hot
water
over
Konnyaku
and
drain
.
Shred
Gobo,
soak
in
water
until
soft,
then
drain
.
3
Rinse
rice
and
put
A
together
in
the
Inner
Cooking
Pan,
add
water
to
water
level
3
for
BROWN
RICE
and
mix
well
,
stirring
from
the
bottom
of
the
pan
.
4
Place
ingredients
of
Steps
1
and
2
on
top
of
rice
from
Step
3.
5
Press
the
MENU
button
and
choose
the
BROWN
menu
setting,
then
press
the
COOKING
button
.
6
When
the
Rice
Cooker
switches
to
the
Keep
Warm
mode
,
loosen
the
rice
.
•
Rinse
brown
rice
lightly
to
remove
husks
.
•
When
cooking
rice
with
ingredients
,
limit
the
amount
of
rice
to
be
cooked
to
1-4
cups
for
the
1.
0L
model
and
2-6
cups
for
1.
8L
model.
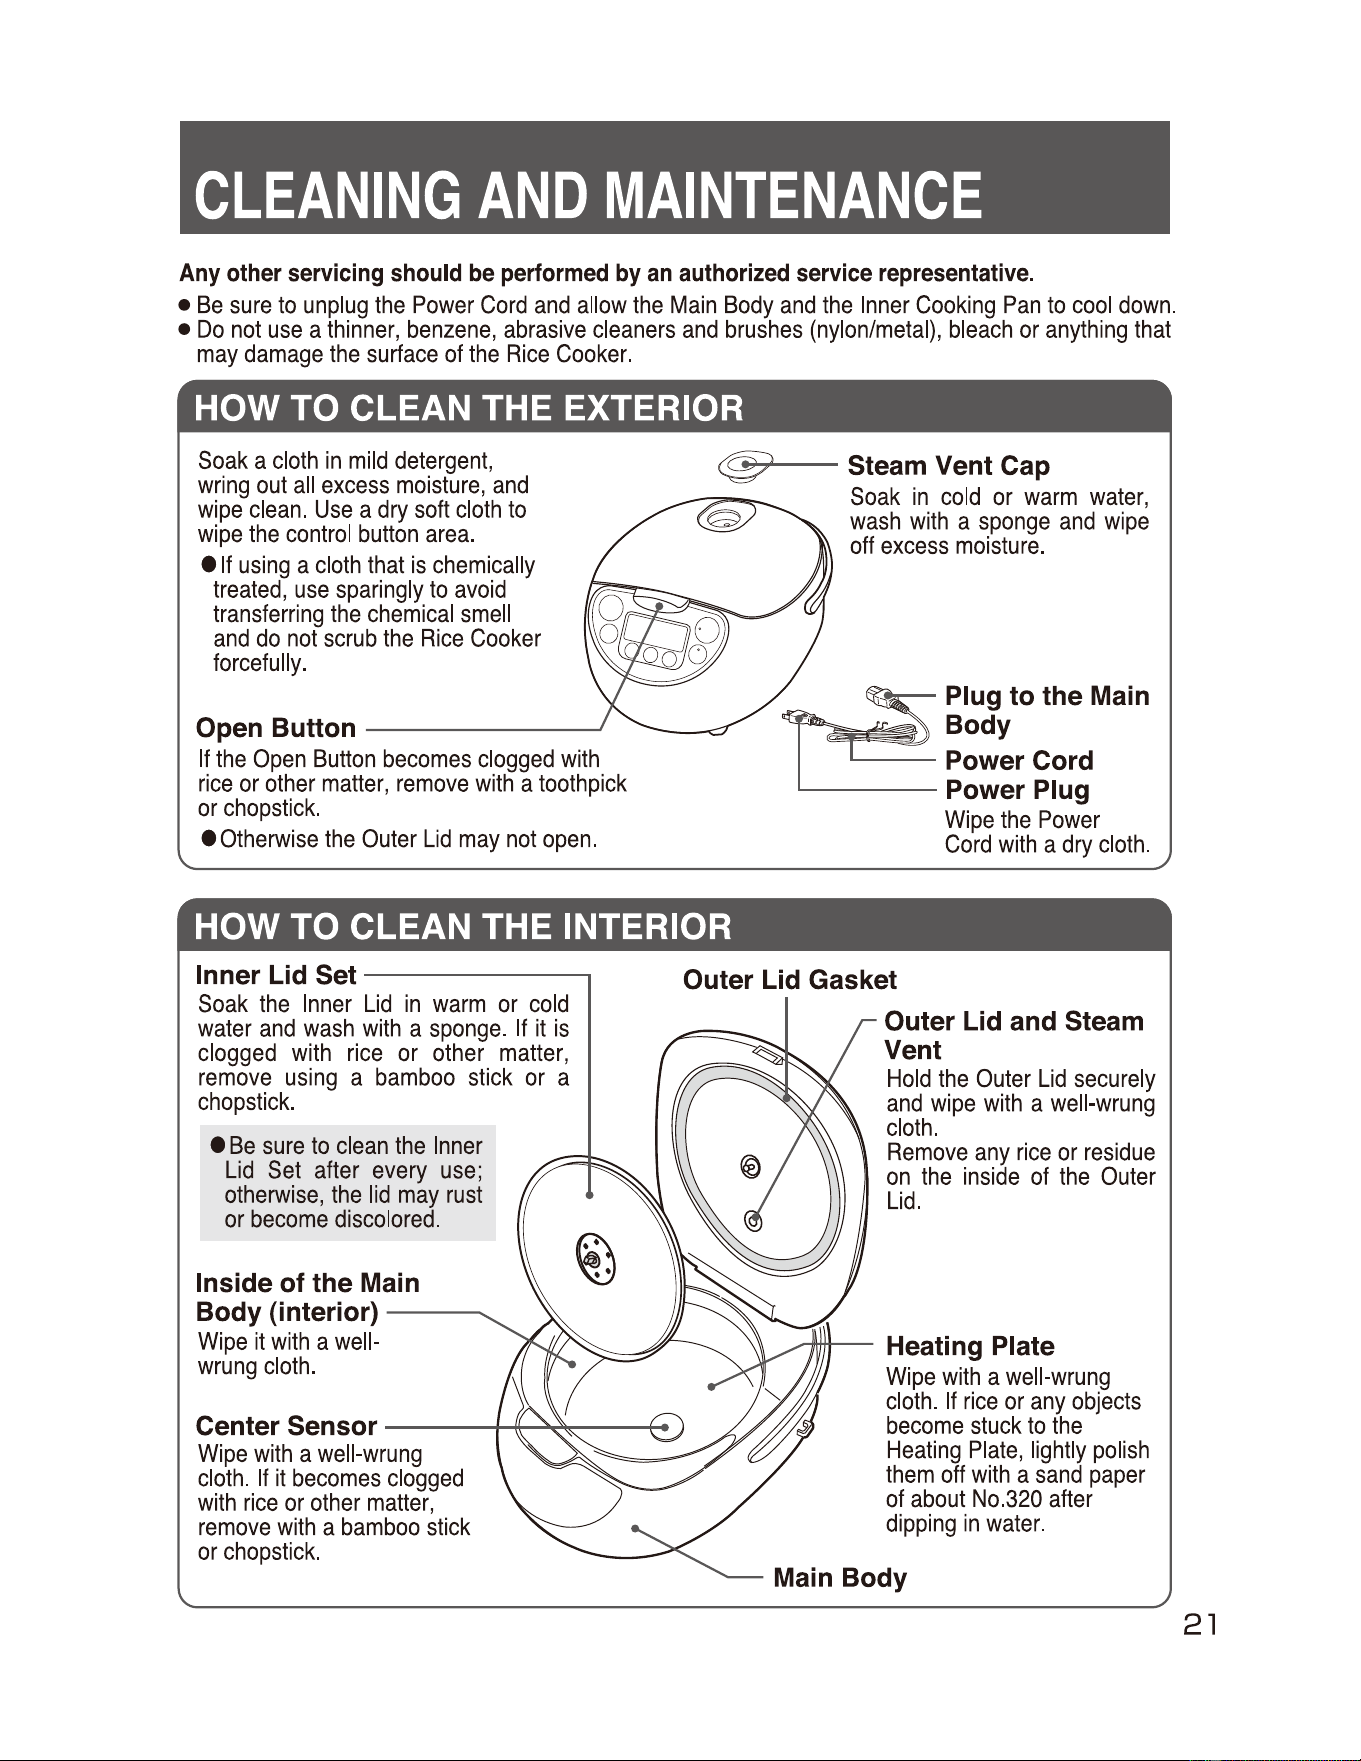
CLEANING
AND
MAINTENANCE
Any
other
servicing
should
be
performed
by
an
authorized
service
representative.
•
Be
sure
to
unplug
the
Power
Cord
and
allow
the
Main
Body
and
the
Inner
Cooking
Pan
to
cool
down.
•
Do
not
use
a
thinner,
benzene,
abrasive
cleaners
and
brushes
(nylon/metal),
bleach
or
anything
that
may
damage
the
surface
of
the
Rice
Cooker.
HOW TO CLEAN THE EXTERIOR
Soak
a
cloth
in
mild
detergent,
wring
out
all
excess
moisture,
and
wipe
clean.
Use
a
dry
soft
cloth
to
wipe
the
control
button
area.
e
1f
using
a
cloth
that
is
chemically
treated,
use
sparingly
to
avoid
transferring
the
chemical
smell
and
do
not
scrub
the
Rice
Cooker
forcefully.
Open
Button
______
__,
If
the
Open
Button
becomes
clogged
with
rice
or
other
matter,
remove
with
a
toothpick
or
chopstick.
•Otherwise
the
Outer
Lid
may
not
open.
Steam Vent Cap
Soak
in
cold
or
warm
water,
wash
with
a
sponge
and
wipe
off
excess
moisture.
- Plug to the
Main
Body
Power Cord
Power Plug
Wipe
the
Power
Cord
with
a
dry
cloth.
HOW TO CLEAN THE INTERIOR
Inner
Lid
Set
Soak
the
Inner
Lid
in
warm
or
cold
water
and
wash
with
a
sponge.
If
it
is
clogged
with
rice
or
other
matter,
remove
using
a
bamboo
stick
or
a
chopstick.
•
Be
sure
to
clean
the
Inner
Lid
Set
after
every
use;
otherwise,
the
lid
may
rust
or
become
discolored.
Inside of the
Main
Body (interior)
Wipe
it
with
a
well-
wrung
cloth.
Center Sensor
Wipe
with
a
well-wrung
cloth.
If
it
becomes
clogged
with
rice
or
other
matter,
remove
with
a
bamboo
stick
or
chopstick.
Outer
Lid
Gasket
Outer
Lid
and Steam
Vent
Hold
the
Outer
Lid
securely
and
wipe
with
a
well-wrung
cloth.
Remove
any
rice
or
residue
on
the
inside
of
the
Outer
Lid
.
Heating Plate
Wipe
with
a
well-wrung
cloth.
If
rice
or
any
objects
become
stuck
to
the
Heating
Plate,
lightly
polish
them
off
with
a
sand
paper
of
about
No.320
after
dipping
in
water.
----------.
---
-----+--,!,-,,,,,>----
21
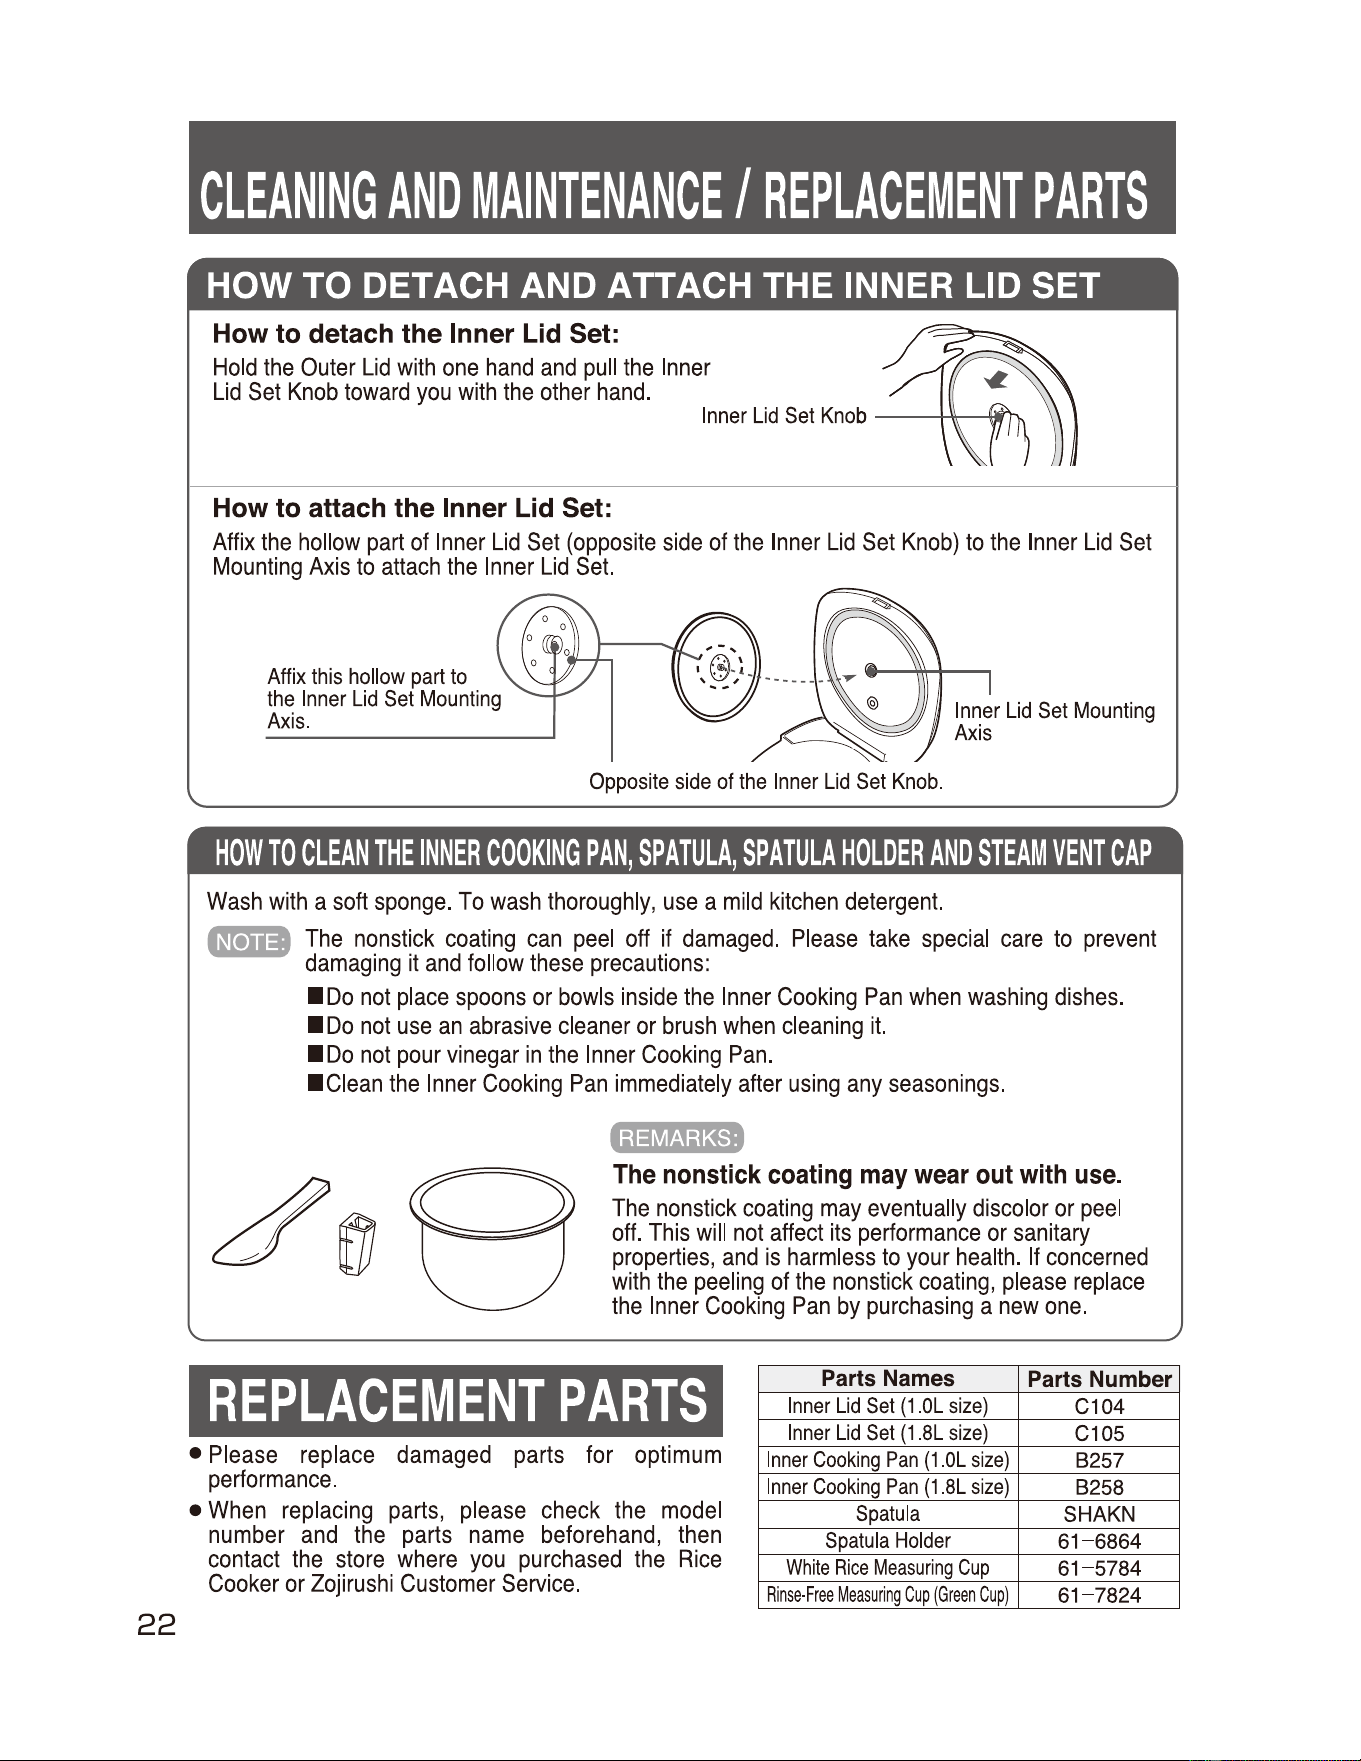
22
CLEANING
AND
MAINTENANCE/
REPLACEMENT
PARTS
HOW TO DETACH AND ATTACH THE INNER LID SET
How to detach the Inner Lid Set:
Hold
the
Outer
Lid
with
one
hand
and
pull
the
Inner
Lid
Set
Knob
toward
you
with
the
other
hand.
How to attach the Inner Lid Set:
Affix
the
hollow
part
of
Inner
Lid
Set
(opposite
side
of
the
Inner
Lid
Set
Knob)
to
the
Inner
Lid
Set
Mounting
Axis
to
attach
the
Inner
Lid
Set.
Affix
this
hollow
part
to
the
Inner
Lid
Set
Mounting
Axis
.
Inner
Lid
Set
Mounting
Axis
Opposite
side
of
the
Inner
Lid
Set
Knob.
"
HOW
TO
CLEAN
THE
INNER
COOKING
PAN,
SPATULA,
SPATULA
HOLDER
AND
STEAM
VENT
CAP
Wash
with
a
soft
sponge.
To
wash
thoroughly,
use
a
mild
kitchen
detergent.
Ut•u:j
The
nonstick
coating
can
peel
off
if
damaged
.
Please
take
special
care
to
prevent
damaging
it
and
follow
these
precautions:
■
Do
not
place
spoons
or
bowls
inside
the
Inner
Cooking
Pan
when
washing
dishes.
■
Do
not
use
an
abrasive
cleaner
or
brush
when
cleaning
it.
■
Do
not
pour
vinegar
in
the
Inner
Cooking
Pan.
■
Clean
the
Inner
Cooking
Pan
immediately
after
using
any
seasonings.
hi§IM;JK-1
The
nonstick
coating
may
wear
out
with
use.
The
nonstick
coating
may
eventually
discolor
or
peel
off.
This
will
not
affect
its
performance
or
sanitary
properties,
and
is
harmless
to
your
health.
If
concerned
with
the
peeling
of
the
nonstick
coating,
please
replace
the
Inner
Cooking
Pan
by
purchasing
a
new
one.
REPLACEMENT
PARTS
•
Please
replace
damaged
parts
for
optimum
performance.
•
When
replacing
parts,
please
check
the
model
number
and
the
parts
name
beforehand,
then
contact
the
store
where
you
purchased
the
Rice
Cooker
or
Zojirushi
Customer
Service.
Parts Names
Parts Number
Inner
Lid
Set
(1
.
0L
size)
C104
Inner
Lid
Set
(1
.
8L
size)
C105
Inner
Cooking
Pan
(1
.
0L
size)
8257
Inner
Cooking
Pan
(1
.
8L
size)
8258
Spatula
SHAKN
Spatula
Holder
61-6864
White
Rice
Measuring
Cup
61-5784
Rinse-Free
Measuring
Cup
(Green
Cup)
61-7824
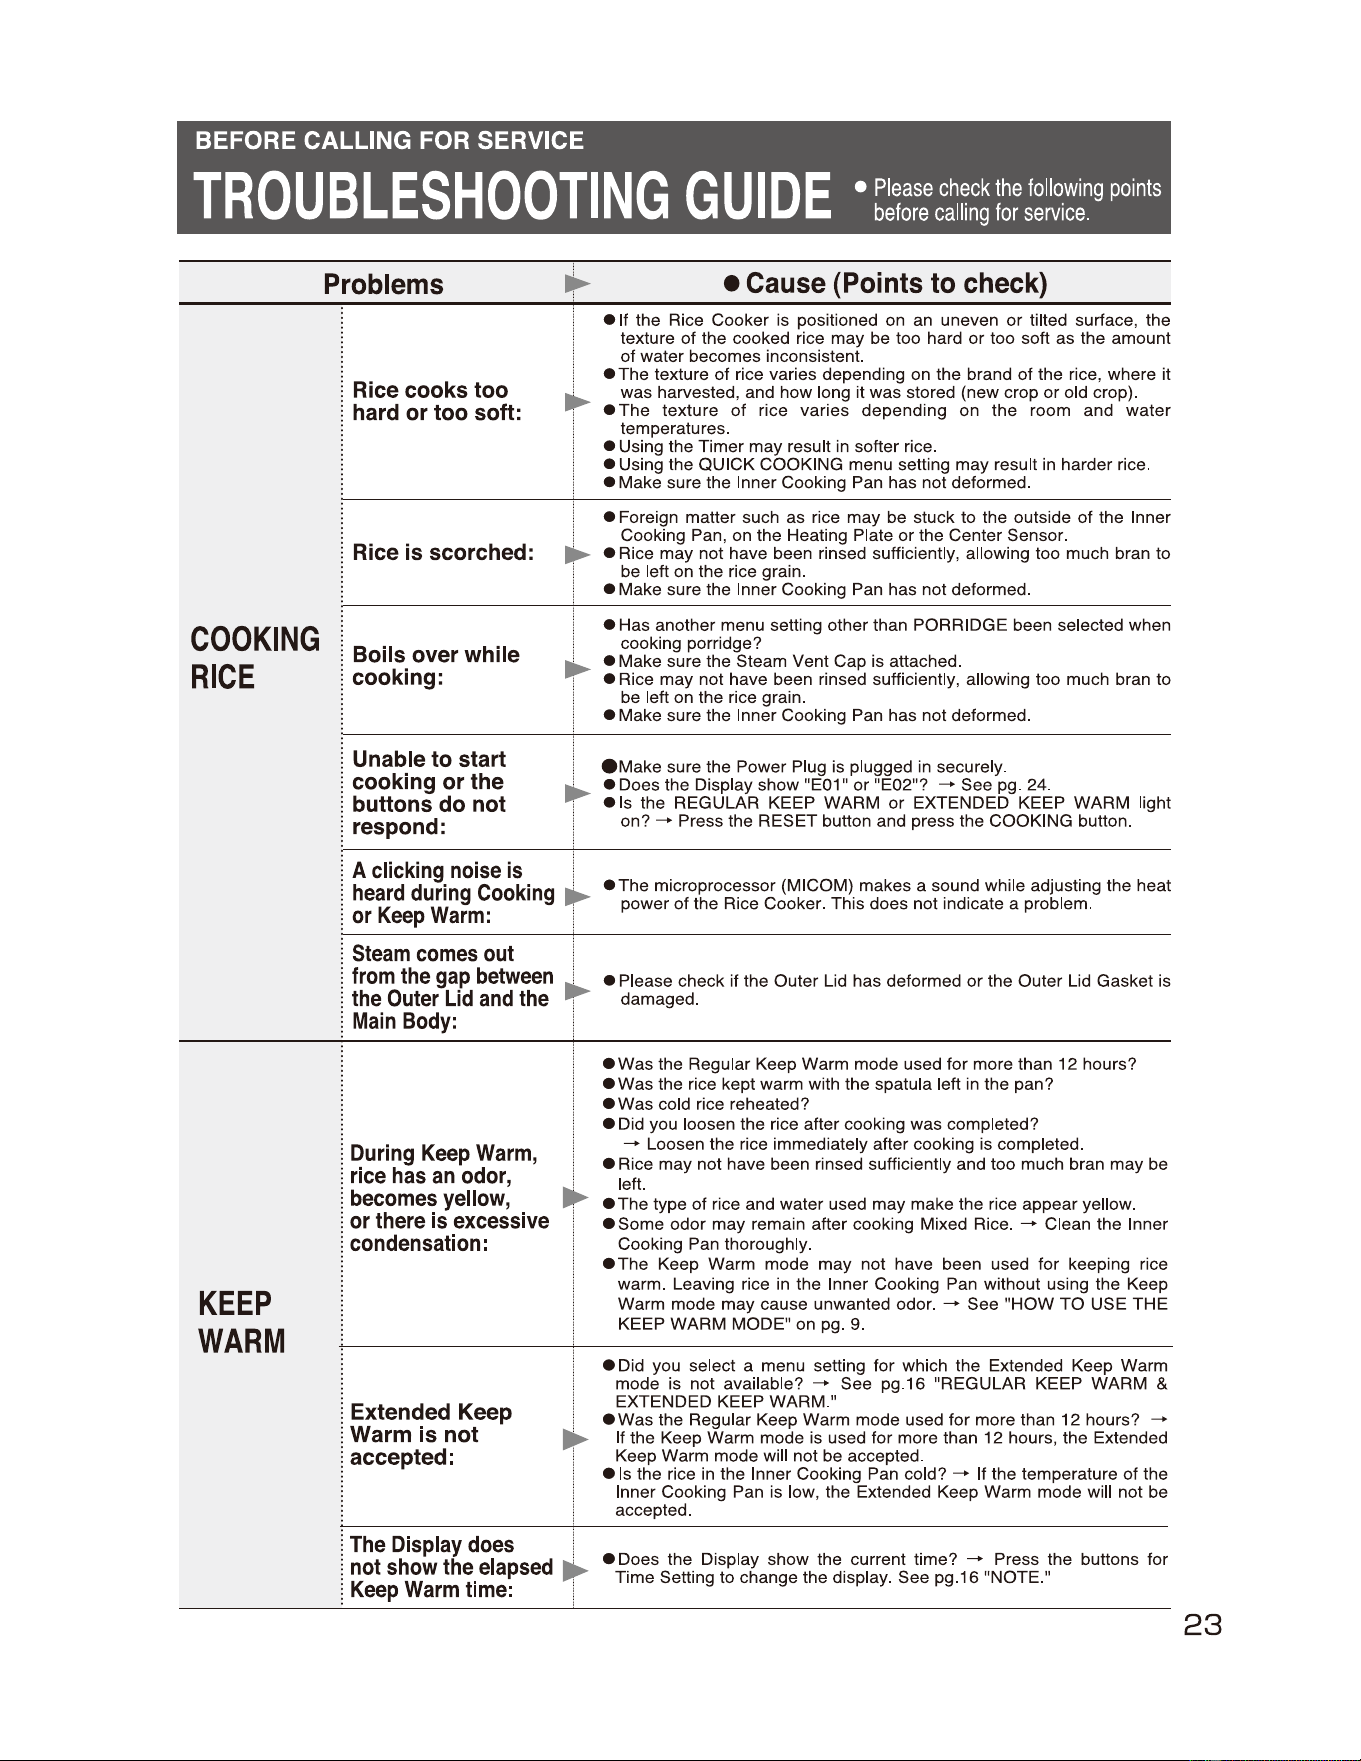
BEFORECALLINGFORSER~CE
TROUBLESHOOTING
GUIDE
•
Pleasech~ckthefoll~wing
points
before
calling
for
service.
►
Problems
•
Cause
(Points
to
check)
COOKING
RICE
Rice
cooks
too
hard
or
too
soft:
• It the Rice Cooker is positioned on an uneven or tilted surface, the
texture
of
the cooked rice may be too hard
or
too soft as the amount
of water becomes inconsistent.
• The texture
of
rice varies depending on the brand of the rice, where it
was harvested, and how long it was stored (new crop or old crop) .
•The
texture
of
rice varies depending on the room and water
temperatures.
• Using the Timer may result
in
softer rice.
• Using the QUICK COOKING menu setting may result
in
harder rice.
• Make sure the Inner Cooking Pan has not deformed.
Rice
is
scorched:
• Foreign matter such as rice may be stuck to the outside
of
the Inner
Cooking Pan, on the Heating Plate or the Center Sensor.
• Rice may not have been rinsed sufficiently, allowing too much bran to
be left on the rice grain.
• Make sure the Inner Cooking Pan has not deformed.
Boils
over while
cooking:
• Has another menu setting other than PORRIDGE been selected when
cooking porridge?
• Make sure the Steam Vent Cap is attached.
• Rice may not have been rinsed sufficiently, allowing too much bran to
be left on the rice grain.
• Make sure the Inner Cooking Pan has not deformed.
Unable
to
start
cooking
or
the
buttons
do
not
respond:
•Make
sure the Power Plug is plugged in securely.
• Does the Display show "E01"
or
"E02"?
-+
See
pg
. 24.
e Is the REGULAR KEEP WARM
or
EXTENDED KEEP WARM light
on?
-+
Press the RESET button and press the COOKING button.
A
clicking
noise
is
heard
during
Cooking
or
Keep
Warm:
• The microprocessor (MICOM) makes a sound while adjusting the heat
power of the Rice Cooker. This does not indicate a problem.
Steam
comes
out
from
the
gap
between
the
Outer
Lid
and
the
Main
Body:
• Please check if the Outer Lid has deformed
or
the Outer Lid Gasket is
damaged.
KEEP
WARM
During
Keep
Warm,
rice
has
an
odor,
becomes
yellow,
or
there
is
excessive
condensation:
•was
the Regular Keep Warm mode used for more than 12 hours?
•was
the rice kept warm with the spatula left in the pan?
•was
cold rice reheated?
• Did you loosen the rice after cooking was completed?
-+
Loosen the rice immediately after cooking is completed.
• Rice may not have been rinsed sufficiently and too much bran may be
left.
•The
type of rice and water used may make the rice appear yellow.
• Some odor may remain after cooking Mixed Rice.
-+
Clean the Inner
Cooking Pan thoroughly.
•The
Keep Warm mode may not have been used for keeping rice
warm. Leaving rice in the Inner Cooking Pan without using the Keep
Warm mode may cause unwanted odor.
-+
See "HOW
TO
USE THE
KEEP WARM MODE" on pg. 9.
Extended
Keep
Warm
is
not
accepted:
• Did you select a menu setting for which the Extended Keep Warm
mode is not available?
-+
See pg.16 "REGULAR KEEP WARM &
EXTENDED KEEP WARM."
•was
the Regular Keep Warm mode used for more than 12 hours?
-+
If the Keep Warm mode is used for more than 12 hours, the Extended
Keep Warm mode will not be accepted.
e Is the rice in the Inner Cooking Pan cold?
-+
If the temperature
of
the
Inner Cooking Pan is low, the Extended Keep Warm mode will not be
accepted.
The
Display
does
not
show
the
elapsed
Keep
Warm
time:
• Does the Display show the current time? - Press the buttons tor
Time Setting to change the display. See pg.16 "NOTE."
,
....._
,
Ill!""""
I
23
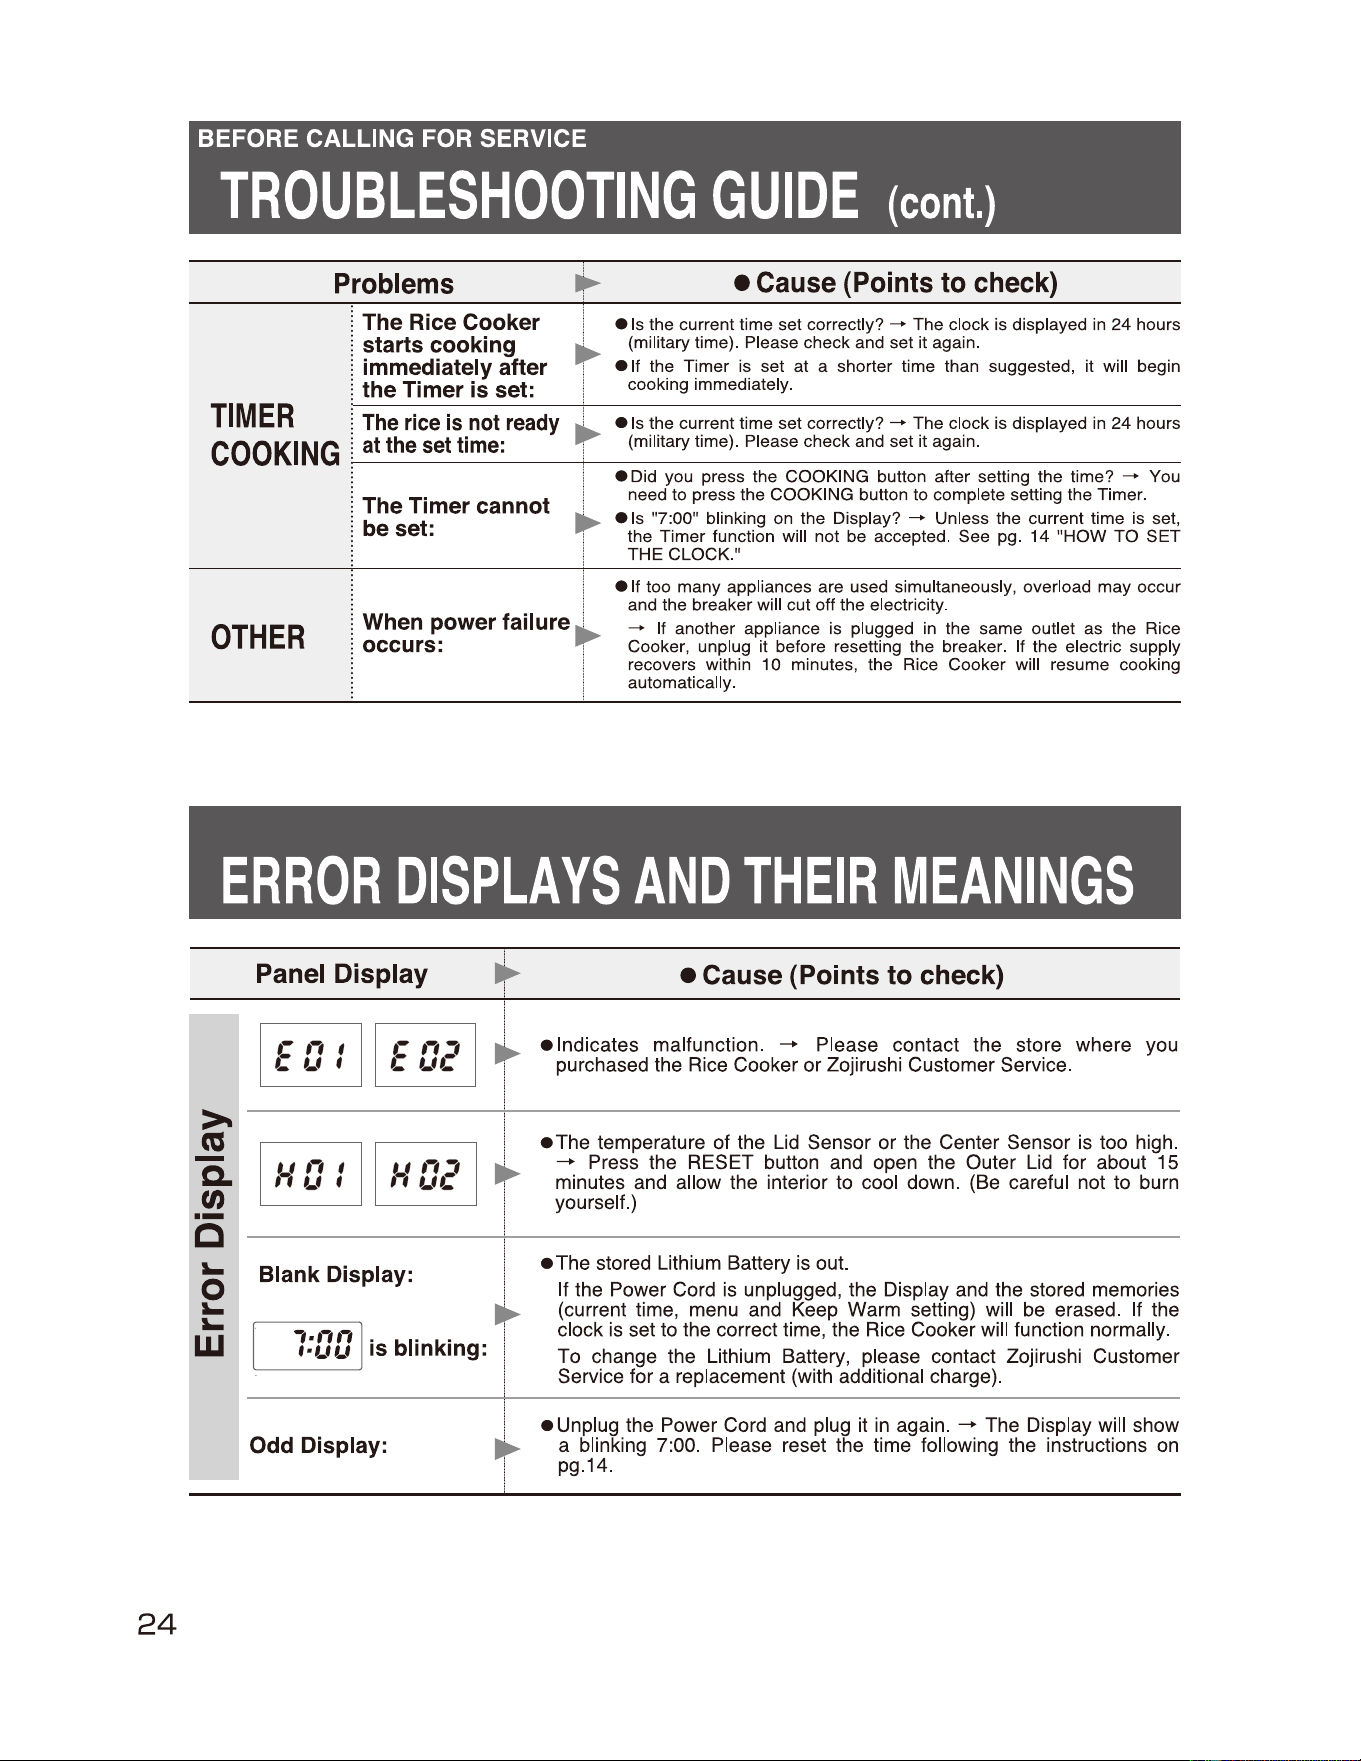
24
BEFORE CALLING FOR SERVICE
TROUBLESHOOTING
GUIDE
(cont.)
Problems
i
•
Cause
(Points
to
check)
TIMER
COOKING
The
Rice Cooker
starts cooking
immediately after
the
Timer is set:
e
1s
the current time set correctly?
--+
The clock is displayed in 24 hours
(military time). Please check and set it again.
•
If
the Timer is set at a shorter time than suggested, it will begin
cooking immediately.
The
rice
is
not
ready
at
the
set
time:
•
Is
the current time set correctly?
--+
The clock is displayed in 24 hours
(military time). Please check and set it again.
The
Timer cannot
beset:
eDid you press the COOKING button after setting the time?
--+
You
need to press the COOKING button to complete setting the Timer.
e
1s
"7:00" blinking on the Display?
--+
Unless the current time is set,
the Timer function will not be accepted. See pg.
14
"HOW TO SET
THE CLOCK."
OTHER
When power failure
occurs:
•
If
too many appliances are used simultaneously, overload may occur
and the breaker will cut off the electricity.
-+
If another appliance is plugged in the same outlet as the Rice
Cooker, unplug it before resetting the breaker. If the electric supply
recovers within 10 minutes, the Rice Cooker
will
resume cooking
automatically.
i
l
i
►
►
j
►
:
i
I
►
j
►
i
I
ERROR
DISPLAYS
AND
THEIR
MEANINGS
Panel
Display
• Cause (Points
to
check)
~
w
~
0
~
c
u,
·-
C.
m
-
~
C
,,
,
L
Lf
f
C
,,
,
L LtC
• Indicates malfunction. -+ Please contact the store where you
purchased the Rice Cooker or Zojirushi Customer Service.
H
,,
.:»
LIC
•The
temperature of the
Lid
Sensor or the Center Sensor
is
too high.
-+ Press the RESET button
and
open the Outer
Lid
for about
15
minutes and allow the interior to cool down.
(Be
careful not to burn
yourself.)
Blank Display:
,.nn
f•UU
I·
IS
bl"
m
k"
mg:
• The stored Lithium Battery is out.
If
the Power Cord
is
unplugged, the Display and the stored memories
(current time,
menu
and Keep Warm setting) will
be
erased. If the
clock
is
set to the correct time, the Rice Cooker will function normally.
To change the Lithium Battery, please contact Zojirushi Customer
Service for a replacement (with additional charge).
Odd Display:
►
•Unplug
the Power Cord and plug it
in
again. -+ The Display will show
a blinking
7:00. Please reset the time following the instructions
on
pg
.14.
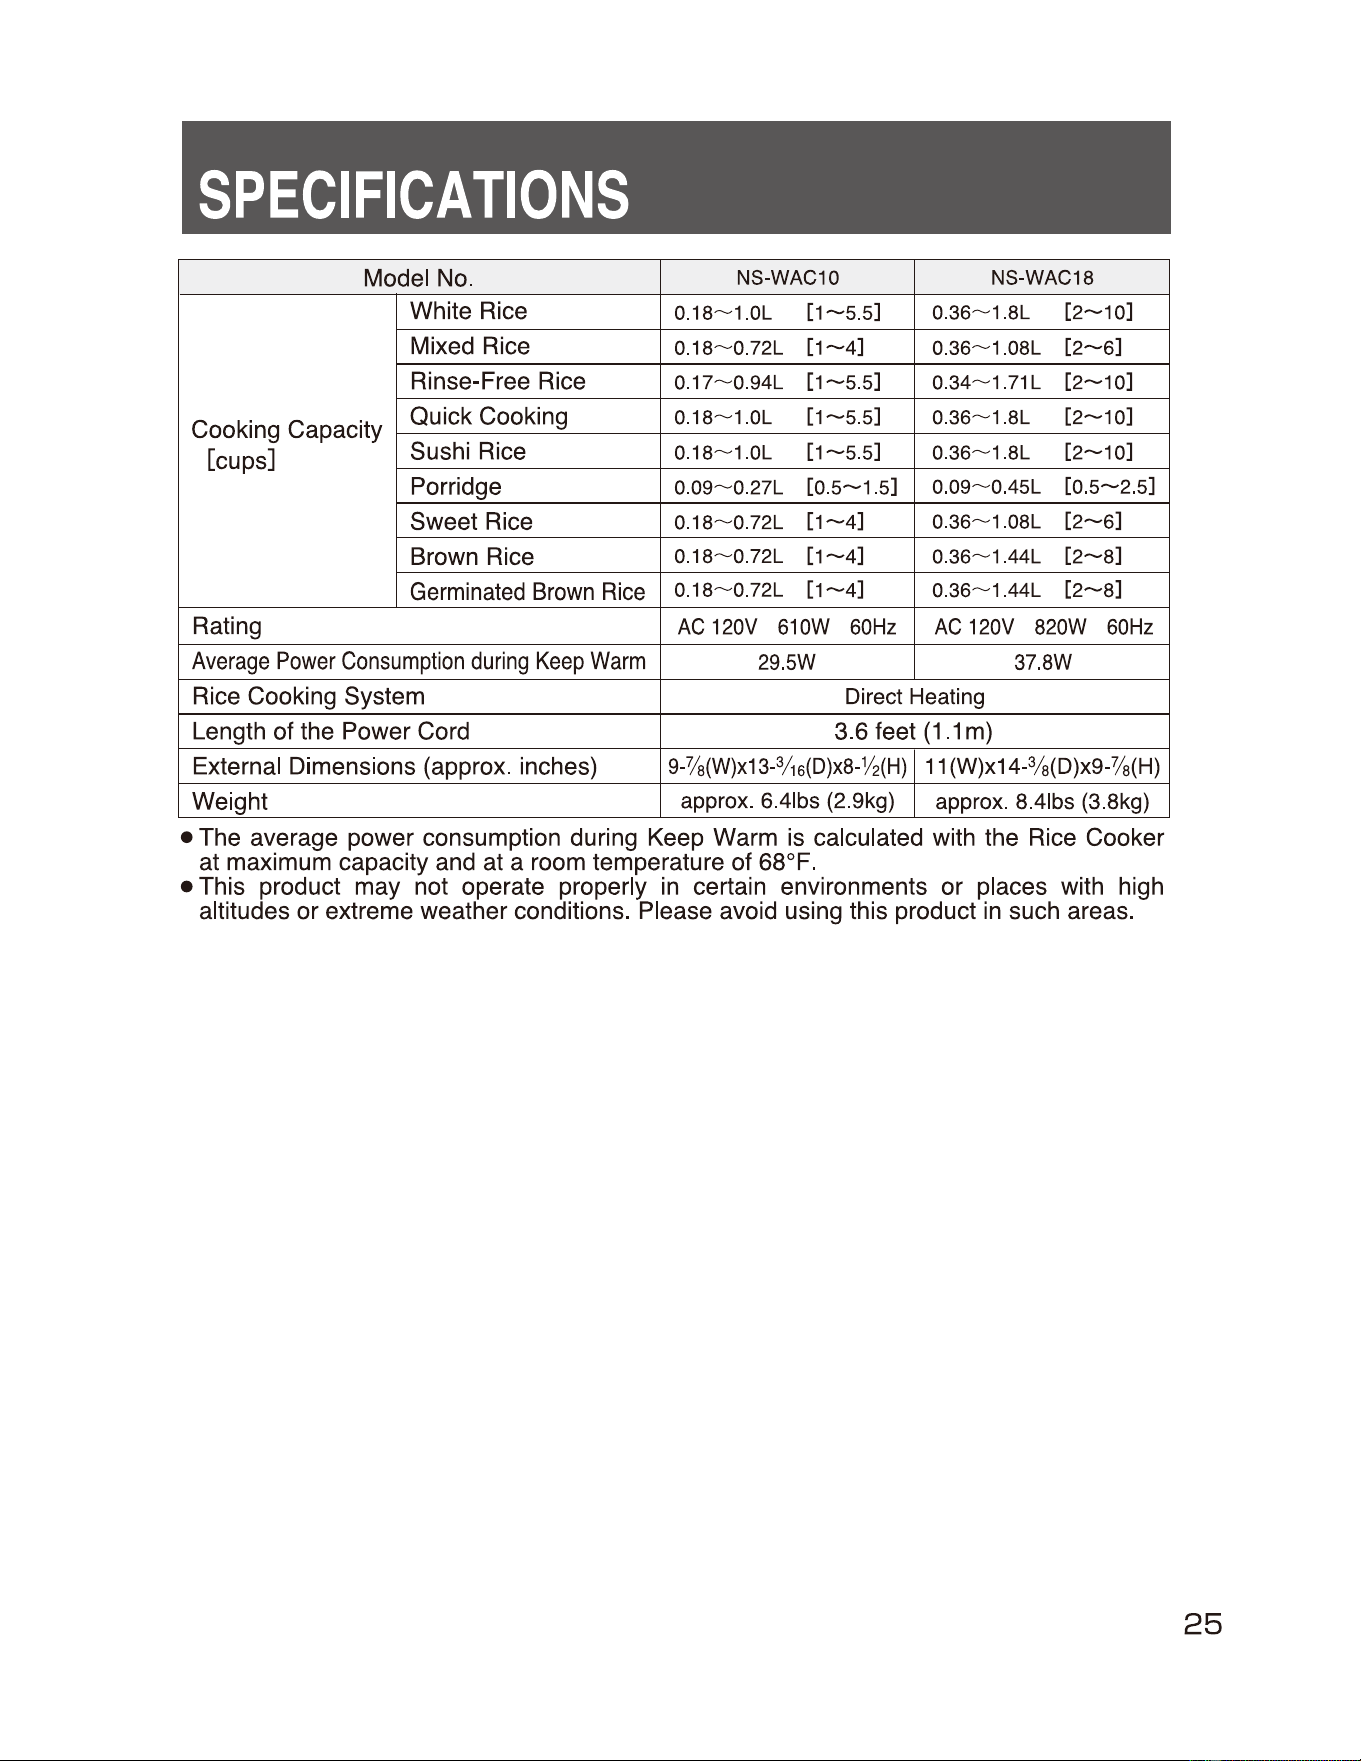
SPECIFICATIONS
Model No.
NS-WAC10
NS-WAC18
Cooking Capacity
[cups]
White Rice
0.
18~1
.
0L
[1~5
.5]
0.
36~1
.8L
[2~10]
Mixed Rice
0.18~0.72L
[1~4]
0.36~1.08L
[2~6]
Rinse-Free Rice
0.
17~0
.94L
[1~5
.5]
0.
34~1
.
71
L
[2~10]
Quick Cooking
0.
18~1
.
0L
[1~5
.5]
0.
36~1
.8L
[2~10]
Sushi Rice
0.
18~1
.
0L
[1~5
.5]
0.
36~1
.8L
[2~10]
Porridge
0.
09~0
.27L
[0.
5~1
.5]
0.09~0.45L
[0.
5~2.5]
Sweet Rice
0.
18~0
.72L
[1~4]
0.
36~1
.08L
[2~6]
Brown Rice
0.18~0
.72L
[1~4]
0.
36~1.44L
[2~8]
Germinated
Brown
Rice
0.
18~0
.72L
[1~4]
0.36~1.44L
[2~8]
Rating
AC
120V
610W
60Hz
AC
120V
820W
60Hz
Average
Power
Consumption
during
Keep
Warm
29
.
5W
37
.
8W
Rice Cooking System Direct Heating
Length of the Power Cord 3.6 feet
(1.1
m)
External Dimensions (approx. inches)
g-7/a(W)x13-
3
i15(D)x8-½(H)
11(W)x14-%(D)x9-1/a(H)
Weight
approx.
6.41bs
(2.9kg)
approx.
8.41bs
(3
.8kg)
• The average power consumption during Keep Warm is calculated with the Rice Cooker
at maximum capacity and at a room temperature of 68°F.
• This product may not operate properly
in
certain environments or places with high
altitudes or extreme weather conditions. Please avoid using this product
in
such areas.
25