Z 05914_V1_05_2016
Z 05914
DE
Gebrauchsanleitung
ab Seite 3
EN
Instruction manual
starting on page 13
FR
Mode d’emploi
à partir de la page 23
NL
Handleiding
vanaf pagina 33

3 DE
Bestimmungsgemäßer Gebrauch
• Das Gerät ist zum Grillen von Döner, Gyros, ganzen Hähnchen und Schaschlikspie-
ßen bestimmt.
• Das Gerät ist für den Privatgebrauch, nicht für eine gewerbliche Nutzung geeignet.
• Nutzen Sie das Gerät nur für den angegebenen Zweck und nur wie in der Anleitung
beschrieben. Jede weitere Verwendung gilt als bestimmungswidrig.
• Von der Gewährleistung ausgeschlossen sind alle Mängel, die durch unsachgemäße
Behandlung, Beschädigung oder Reparaturversuche entstehen. Dies gilt auch für
den normalen Verschleiß.
Inhalt
Bestimmungsgemäßer Gebrauch __________ 3
Sicherheitshinweise _____________________ 4
Geräteübersicht & Lieferumfang ____________ 7
Vor dem ersten Gebrauch ________________ 7
Zusammenbau _________________________ 8
Benutzung _____________________________ 9
Reinigung und Aufbewahrung _____________ 11
Fehlerbehebung _______________________ 12
Technische Daten ______________________ 12
Entsorgung ___________________________ 12
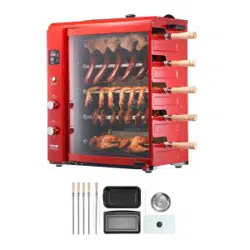
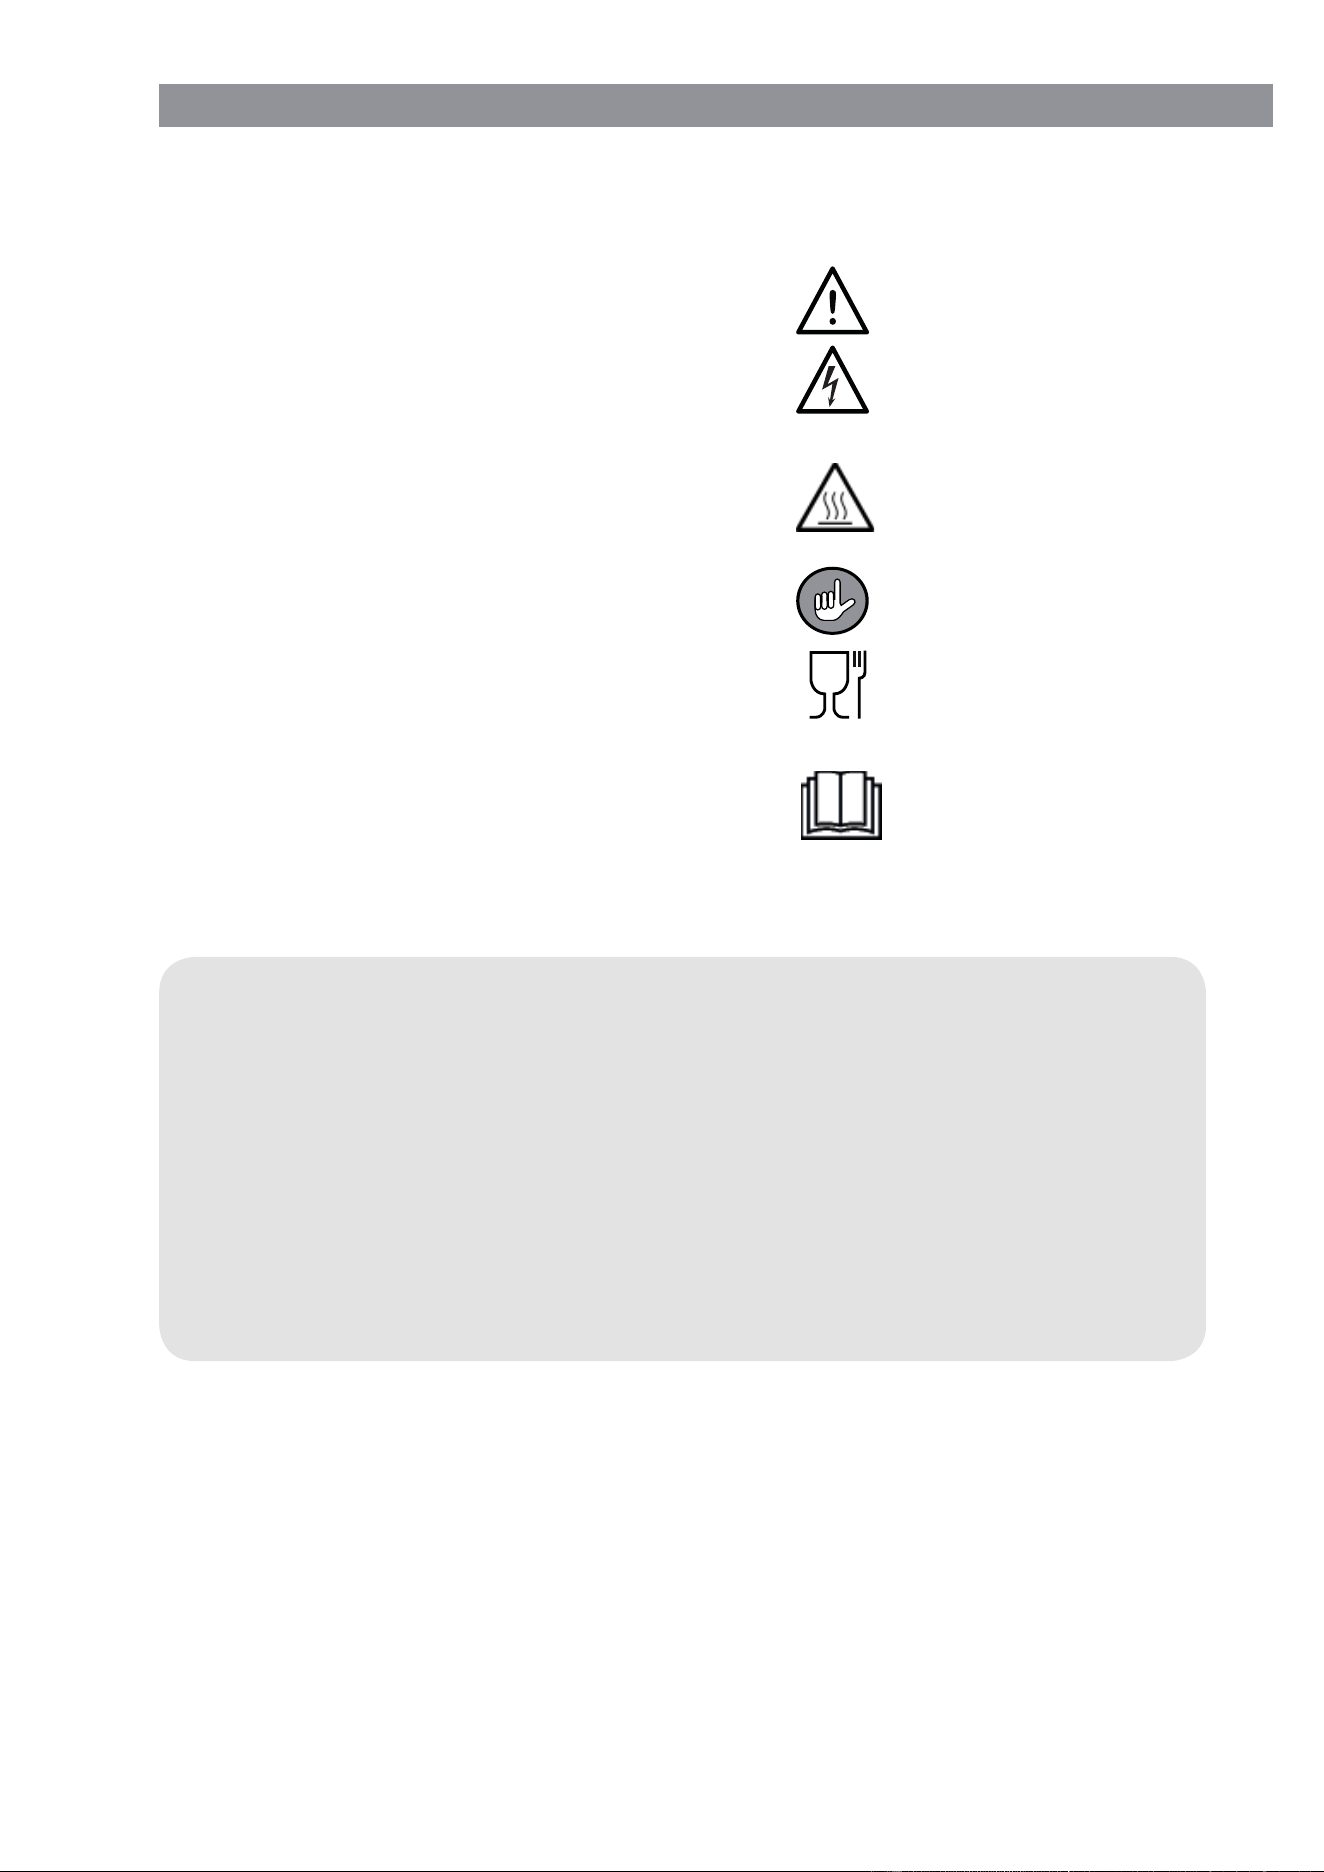
Symbolerklärung
Sicherheitshinweise:
Lesen Sie diese aufmerk-
sam durch und halten Sie
sich an sie, um Perso-
nen- und Sachschäden
zu vermeiden.
Warnung vor heißen
Oberfl ächen!
Ergänzende Informationen
Für Lebensmittel geeig-
net.
Bedienungsanleitung vor
Gebrauch lesen!
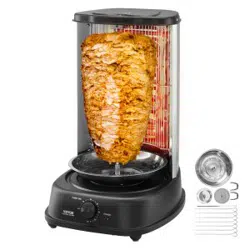
Sehr geehrte Kundin, sehr geehrter Kunde,
wir freuen uns, dass Sie sich für diesen Grill entschieden haben.
Lesen Sie vor dem ersten Gebrauch des Gerätes die Anleitung sorgfältig durch und
bewahren Sie sie zum späteren Nachlesen auf. Bei Weitergabe des Gerätes ist auch
diese Anleitung mitzugeben. Hersteller und Importeur übernehmen keine Haftung,
wenn die Angaben in dieser Anleitung nicht beachtet werden.
Sollten Sie Fragen zum Gerät sowie zu Ersatz- / Zubehörteilen haben, kontaktieren
Sie den Kundenservice über unsere Webseite:
www.service-shopping.de

DE 4
Sicherheitshinweise
■ Dieses Gerät kann von Kindern ab 8 Jahren sowie von Personen
mit reduzierten physischen, sensorischen oder mentalen
Fähigkeiten oder Mangel an Erfahrung und/oder Wissen benutzt
werden, wenn sie beaufsichtigt oder bezüglich des sicheren
Gebrauchs des Gerätes unterwiesen wurden und die daraus
resultierenden Gefahren verstanden haben.
■ Kinder dürfen nicht mit dem Gerät spielen.
■ Reinigung und Benutzer-Wartung dürfen nicht durch Kinder
durchgeführt werden, es sei denn, sie sind älter als 8 Jahre und
werden beaufsichtigt.
■ Kinder jünger als 8 Jahre und Tiere sind vom Gerät und dem
Netzkabel fernzuhalten.
Warnung vor heißen Oberfl ächen! Das Gerät wird
während des Gebrauchs sehr heiß. Achten Sie unbedingt
darauf, dass Sie während und nach der Benutzung des
Gerätes nicht mit aufgeheizten Teilen in Berührung
kommen.
Wir empfehlen Küchenhandschuhe für den Umgang mit
dem Gerät.
■ Das Gerät ist bei nicht vorhandener Aufsicht und vor dem
Zusammenbau, dem Auseinandernehmen oder Reinigen stets
vom Netz zu trennen.
■ Nehmen Sie keine Veränderungen am Gerät vor. Tauschen
Sie auch das Netzkabel nicht selbst aus. Wenn das Gerät, das
Netzkabel oder der Stecker des Gerätes beschädigt ist, muss
es durch den Hersteller oder Kundenservice oder eine ähnlich
qualifi zierte Person (z. B. Fachwerkstatt) ersetzt werden, um
Gefährdungen zu vermeiden.
■ Das Gerät ist nicht dazu bestimmt, mit einer externen Zeitschalt-
uhr oder einem separaten Fernwirksystem betrieben zu werden.
■ ACHTUNG: Reinigungshinweise im Kapitel „Reinigung und
Aufbewahrung“ beachten!
5 DE
Verletzungsgefahren
■ Halten Sie Kinder und Tiere vom Gerät und Verpackungsmaterial fern! Es besteht
Verletzungs- und Erstickungsgefahr.
■ ACHTUNG Verbrennungsgefahr durch heiße Oberfl ächen! Während des
Betriebes werden auch die Kunststoffgriffe der Schaschlikspieße heiß. Warten
Sie bis sie abkühlen, bevor Sie die Schaschlikspieße aus dem Gerät nehmen. Wir
empfehlen Küchenhandschuhe für den Umgang mit dem Gerät.
■ ACHTUNG Die Spieße sind spitz. Seien Sie vorsichtig, wenn Sie sie benutzen oder
reinigen.
■ Achten Sie darauf, dass das angeschlossene Netzkabel keine Stolpergefahr dar-
stellt. Das Kabel darf nicht von der Aufstellfl äche herabhängen, um ein Herunterrei-
ßen des Gerätes zu verhindern.
■ Lassen Sie das Gerät immer genügend abkühlen, bevor Sie es reinigen und / oder
verstauen.
Stromschlag- und Brandgefahr
■ Verwenden Sie das Gerät nur in geschlossenen Räumen.
■ Stellen Sie das Gerät immer mit ausreichendem Freiraum zu allen Seiten und
Freiraum nach oben auf (ca. 30 cm).
■ Schließen Sie das Gerät nur an eine vorschriftsmäßig installierte Steckdose
mit Schutzkontakten an. Die Steckdose muss auch nach dem Anschließen gut
zugänglich sein, damit die Netzverbindung schnell getrennt werden kann. Die
Netzspannung muss mit den technischen Daten des Gerätes übereinstimmen.
■ Verwenden Sie kein Verlängerungskabel mit dem Gerät.
■ Tauchen Sie das Gerät, das Netzkabel und den Stecker niemals in Wasser oder
andere Flüssigkeiten ein und stellen Sie sicher, dass diese nicht in Wasser fallen
oder nass werden können.
■ Sollte das Gerät ins Wasser fallen, unterbrechen Sie sofort die Stromzufuhr.
Versuchen Sie nicht, es aus dem Wasser zu ziehen, während es am Stromnetz
angeschlossen ist!
■ Berühren Sie das Gerät, das Netzkabel und den Stecker niemals mit feuchten
Händen, wenn diese Komponenten an das Stromnetz angeschlossen sind.
■ Verwenden Sie das Gerät nicht, wenn es eine Fehlfunktion hatte, heruntergefallen
oder ins Wasser gefallen ist. Lassen Sie es vor der Inbetriebnahme in einer
Fachwerkstatt überprüfen.
■ Schalten Sie das Gerät aus und ziehen Sie den Netzstecker aus der Steckdose,
wenn während des Betriebes ein Fehler auftritt oder vor einem Gewitter.
■ Ziehen Sie immer am Stecker und nie am Netzkabel.
■ Verwenden Sie das Gerät nicht in Räumen, in denen sich leichtentzündlicher Staub
oder giftige sowie explosive Dämpfe befi nden.
■ Betreiben Sie das Gerät nicht in einer sehr feuchten Umgebung oder in der Nähe
von brennbarem Material.
■ Decken Sie das Gerät während des Betriebs nicht ab, um einen Gerätebrand zu
vermeiden. Sorgen Sie für ausreichende Belüftung, während das Gerät in Betrieb ist.

DE 6
■ Im Brandfall:
– Ziehen Sie unbedingt sofort den Netzstecker.
– Heißes Fett / Öl kann sich bei Überhitzen entzünden. Löschen Sie brennendes
Fett / Öl nicht mit Wasser, sondern ersticken Sie die Flammen mit einer Löschdecke
o. Ä. oder löschen Sie einen Fettbrand mit einem Feuerlöscher, der zum Löschen
von Speisefettbränden geeignet ist!
– Verwenden Sie zum Löschen KEIN Wasser, da durch den Wasserdampf zusätzlich
Verbrühungsgefahr entsteht.
– Entsorgen Sie das Gerät.
■ Legen Sie keine brennbaren Materialien, wie z. B. Pappe, Kunststoff, Papier oder
Kerzen, auf oder in das Gerät.
■ Legen Sie Nahrungsmittel nicht in Frischhaltefolie, Plastikbeuteln oder Alufolie
verpackt in oder auf das Gerät.
■ Überprüfen Sie das Gerät vor jeder Inbetriebnahme auf Beschädigungen. Benutzen
Sie es nur, wenn das Gerät, das Netzkabel und der Stecker keine Schäden
aufweisen!
Vermeiden von Material-, Sach- und Geräteschäden
■ Stellen Sie das Gerät immer auf einem trockenen, ebenen, festen und
hitzeunempfi ndlichen Untergrund auf.
■ Halten Sie ausreichend Abstand zu anderen Wärmequellen, wie z. B. Herdplatten
oder Öfen, um Geräteschäden zu vermeiden.
■ Setzen Sie das Gerät keinen extremen Temperaturen, starken Temperaturschwan-
kungen, direkter Sonneneinstrahlung oder Feuchtigkeit aus.
■ Lassen Sie das Gerät nicht fallen und setzen Sie es keinen starken Stößen aus.
■ Lassen Sie das Gerät während des Betriebes nie unbeaufsichtigt!
■ Das Gerät darf während des Betriebes nicht bewegt werden.
■ Ziehen oder tragen Sie das Gerät nicht am Netzkabel.
■ Wickeln Sie das Netzkabel nicht um das Gerät.
■ Achten Sie darauf, dass das Netzkabel nicht gequetscht, geknickt oder über scharfe
Kanten gelegt wird und nicht mit heißen Flächen in Berührung kommt.
■ Verwenden Sie nur die mitgelieferten Zubehörteile vom Hersteller. Bei Benutzung
von nicht durch den Hersteller autorisierten Zubehörteilen entfällt jeglicher
Gewährleistungs- und Garantieanspruch.
■ Verwenden Sie zum Reinigen des Gerätes keine ätzenden oder scheuernden
Reinigungsmittel. Diese können die Oberfl äche beschädigen.
Hygienehinweise
■ Gerät vor dem ersten Gebrauch reinigen. Es kann mit möglichen Produktionsrück-
ständen behaftet sein. Beachten Sie hierbei unbedingt die Reinigungshinweise im
Kapitel „Vor dem ersten Gebrauch“.
■ Reinigen Sie das Gerät nach jedem Gebrauch, um Keimbildung vorzubeugen (siehe
Kapitel „Reinigung und Aufbewahrung“).
■ Halten Sie das Gerät sauber.

7 DE
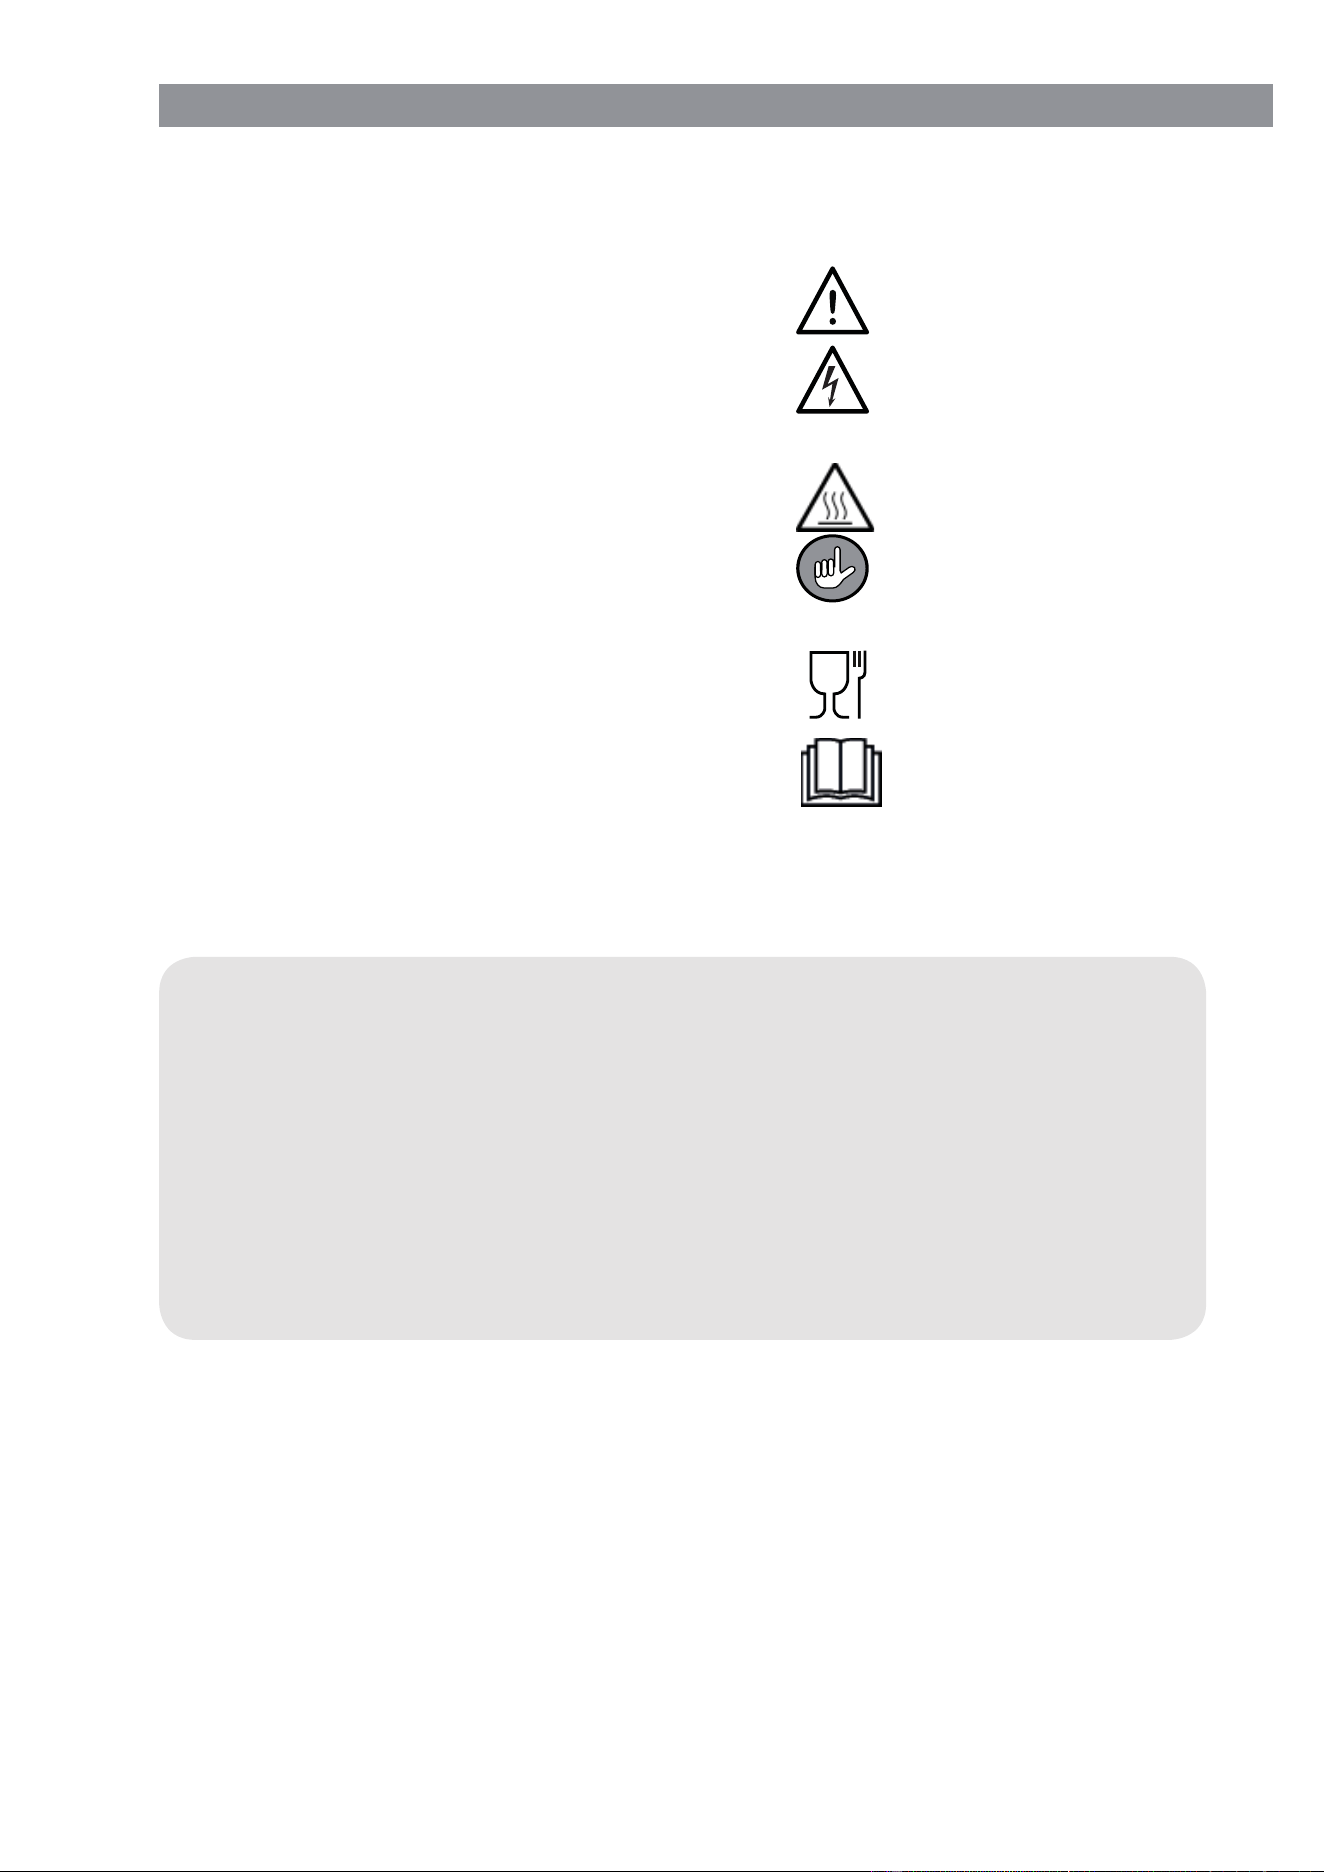
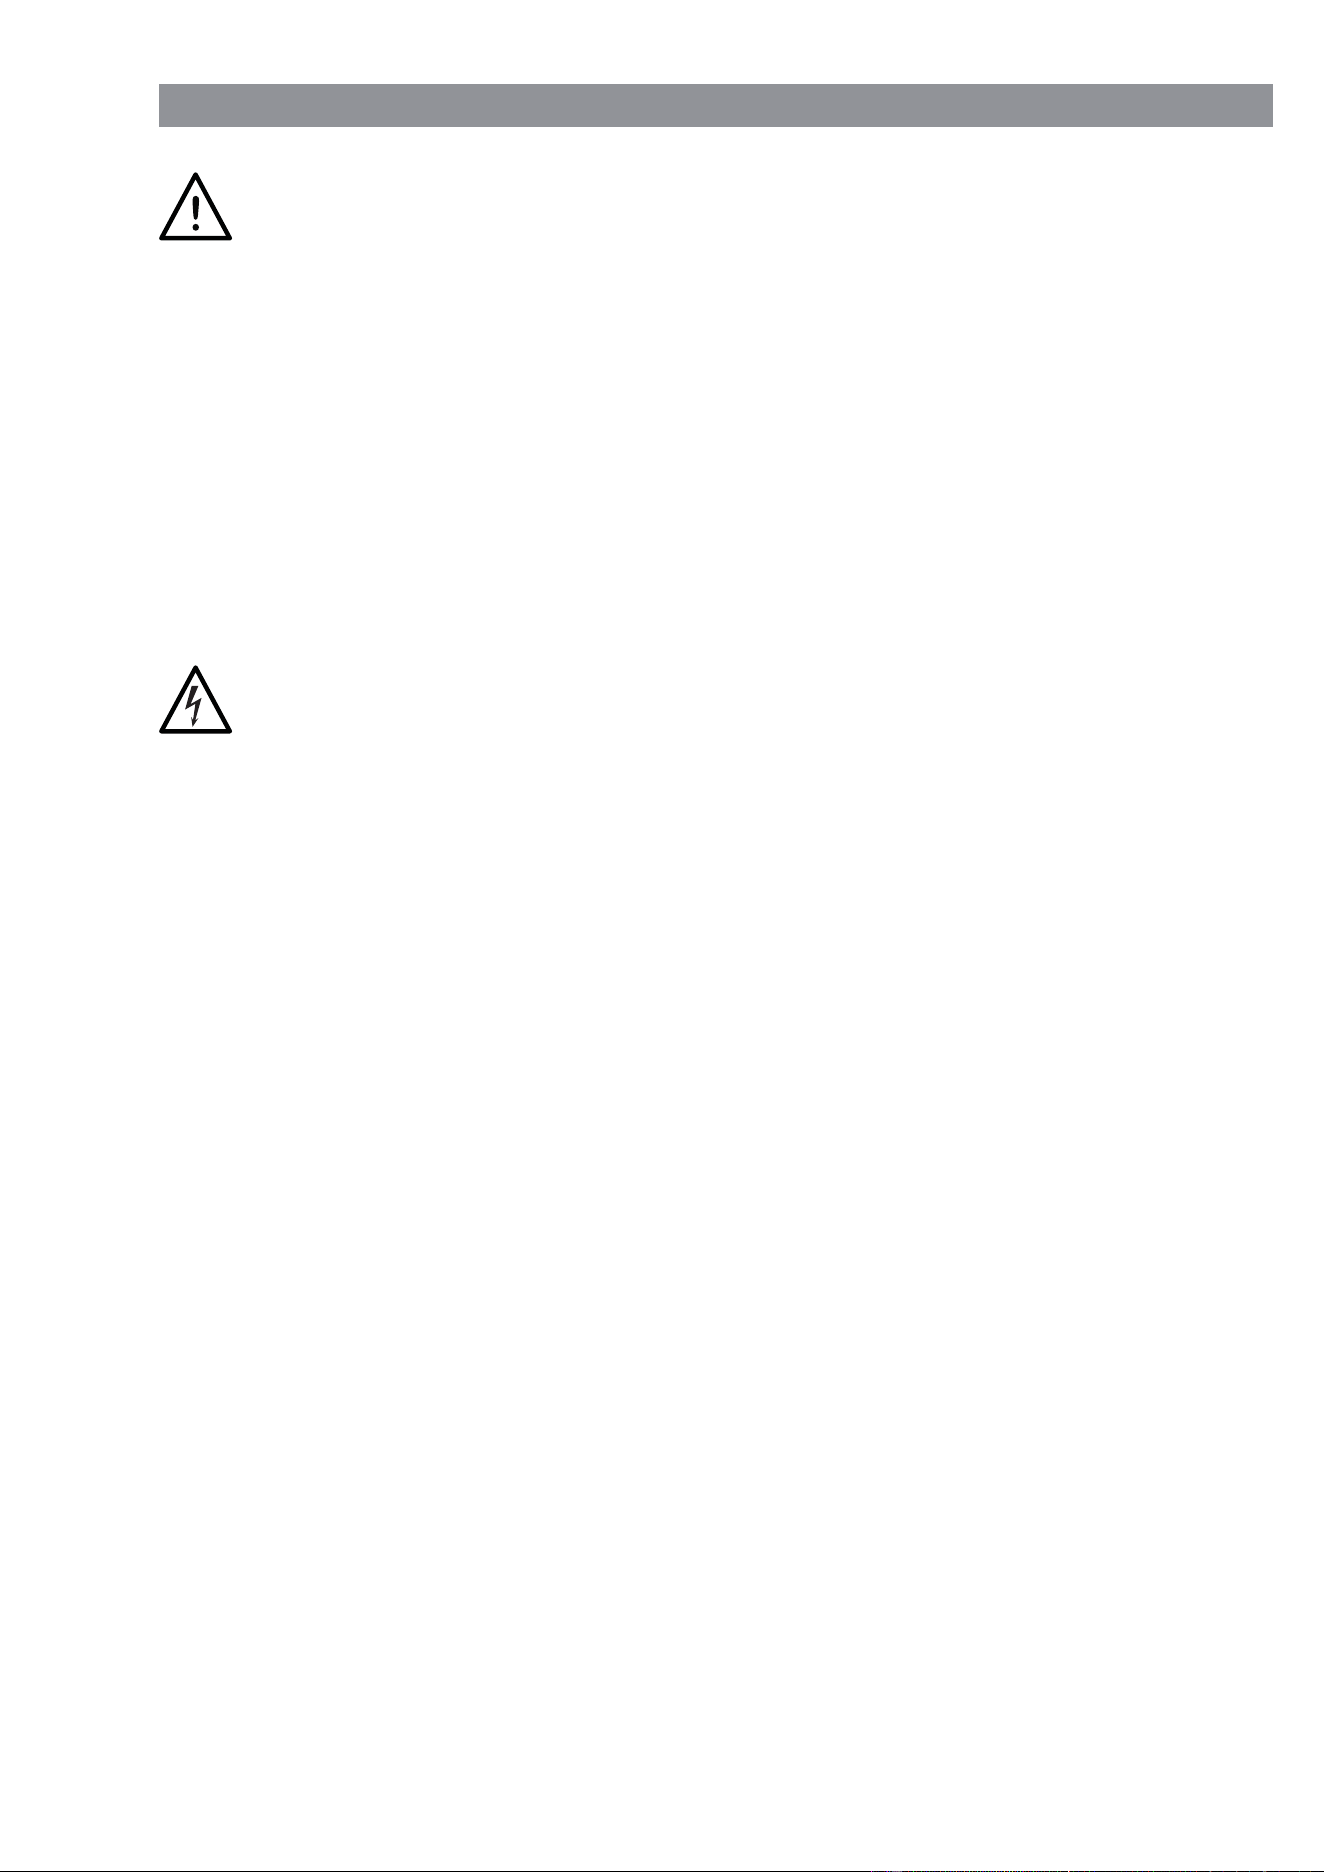
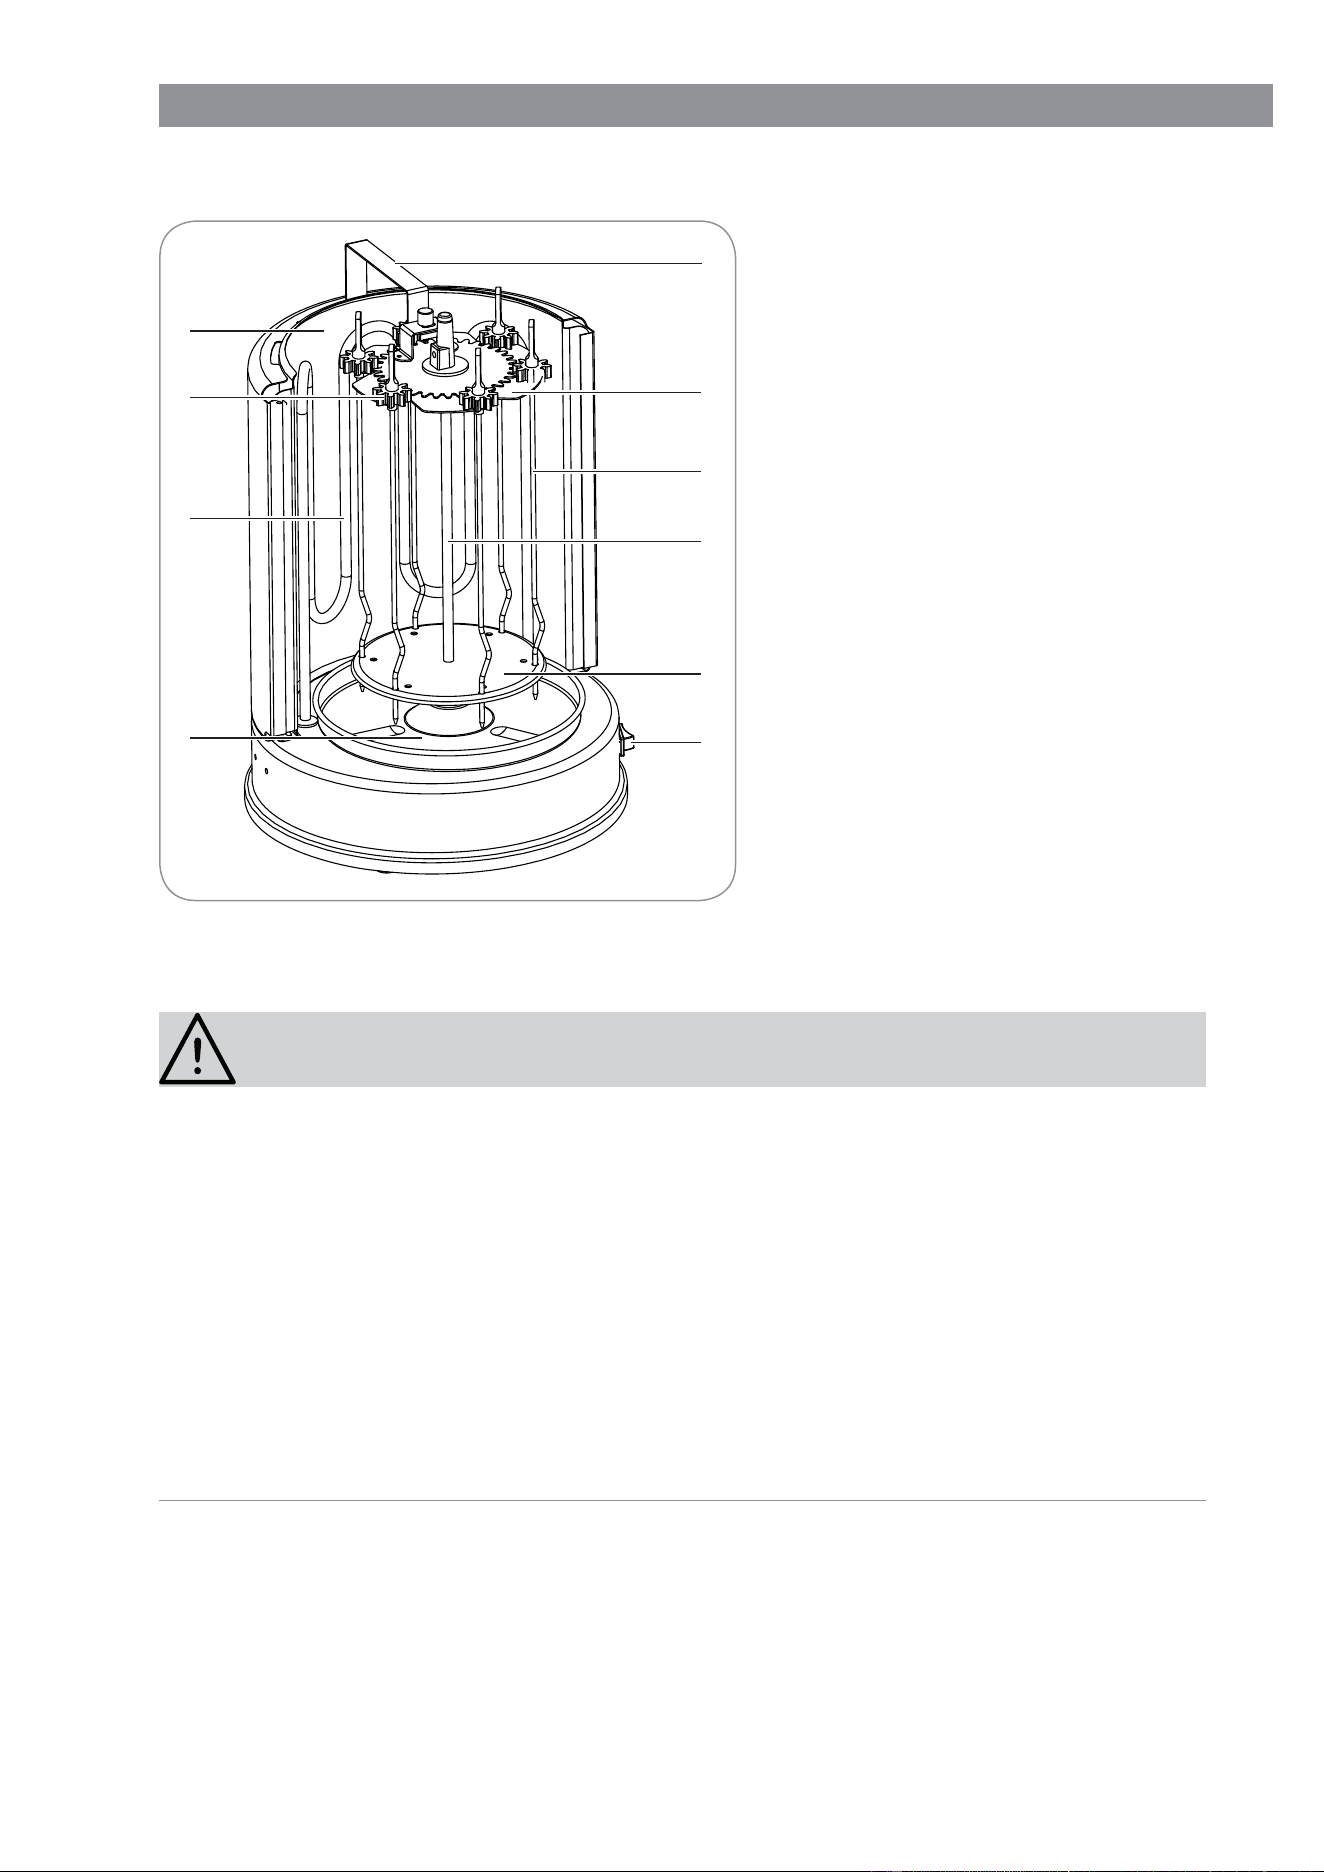
Geräteübersicht & Lieferumfang
1 Halterung
2 Mittelspieß-Zahnrad
3 Schaschlikspieße (6x)
4 Mittelspieß
5 Spießteller
6 Ein-/Ausschalter I / O mit
Betriebsleuchte
7 Fettauffangschale
8 Heizelement
9 Kunststoffzahnrad des
Schaschlikspießes (6x)
10 Hitzeschutz
Nicht abgebildet:
• Netzkabel mit Stecker
1
2
3
8
4
5
6
7
10
9
Vor dem ersten Gebrauch
ACHTUNG!
■ Halten Sie Kinder und Tiere vom Verpackungsmaterial fern. Es besteht u.a.
Erstickungsgefahr!
■ Bitte beachten Sie: Bei der ersten Benutzung kann es zu einer Geruchsentwicklung
kommen. Wir empfehlen Ihnen deshalb, das Gerät zunächst einige Minuten OHNE
Inhalt zu betreiben, um eventuelle Produktionsrückstände durch Hitze zu beseitigen.
Sorgen Sie dabei für einen gut durchlüfteten Raum, z. B. durch weit geöffnete
Fenster!
■ Das Gerät kann mit möglichen Produktionsrückständen behaftet sein. Um
gesundheitliche Beeinträchtigungen zu vermeiden, reinigen Sie es gründlich vor
dem ersten Gebrauch.
■ Der Mittelspieß mit Spießteller, die Schaschlikspieße und die Fettauffangschale sind
spülmaschinengeeignet.
1. Nehmen Sie das Gerät aus der Verpackung und entfernen Sie alle eventuell
vorhandenen Folien und Aufkleber. Überprüfen Sie das Gerät auf Transportschäden.
Falls es Schäden aufweisen sollte, verwenden Sie es nicht(!), sondern kontaktieren
Sie unseren Kundenservice.
2. Nehmen Sie das Gerät ggf. auseinander (siehe Kapitel „Zusammenbau“).
DE 8
3. Reinigen Sie das Gerät mit einem weichen, feuchten Tuch und etwas mildem
Spülmittel. Reinigen Sie die Zubehörteile mit etwas Spülmittel und warmem Wasser.
Trocknen Sie das Gerät und die Zubehörteile anschließend gut ab.
4. Stellen Sie das Gerät auf eine trockene und hitzebeständige, ebene Fläche mit aus-
reichend Abstand zu allen Seiten und nach oben (ca. 30 cm) auf.
5. Stecken Sie den Netzstecker in eine vorschriftsmäßig installierte Steckdose.
6. Schalten Sie das Gerät ein, indem Sie den Ein-/Ausschalter (6) auf die Position I (An)
stellen. Die Betriebsleuchte leuchtet. Lassen Sie das Gerät ca. 5 Minuten aufheizen,
um eventuelle Produktionsrückstände zu beseitigen.
7. Schalten Sie das Gerät aus, indem Sie den Ein-/Ausschalter (6) auf die Position 0
(Aus) stellen.
8. Ziehen Sie den Netzstecker aus der Steckdose.
9. Lassen Sie das Gerät abkühlen und reinigen Sie es anschließend erneut.
Zusammenbau
ACHTUNG!
■ ACHTUNG Verletzungsgefahr! Die Spieße sind spitz. Seien Sie vorsichtig, wenn
Sie sie benutzen oder reinigen.
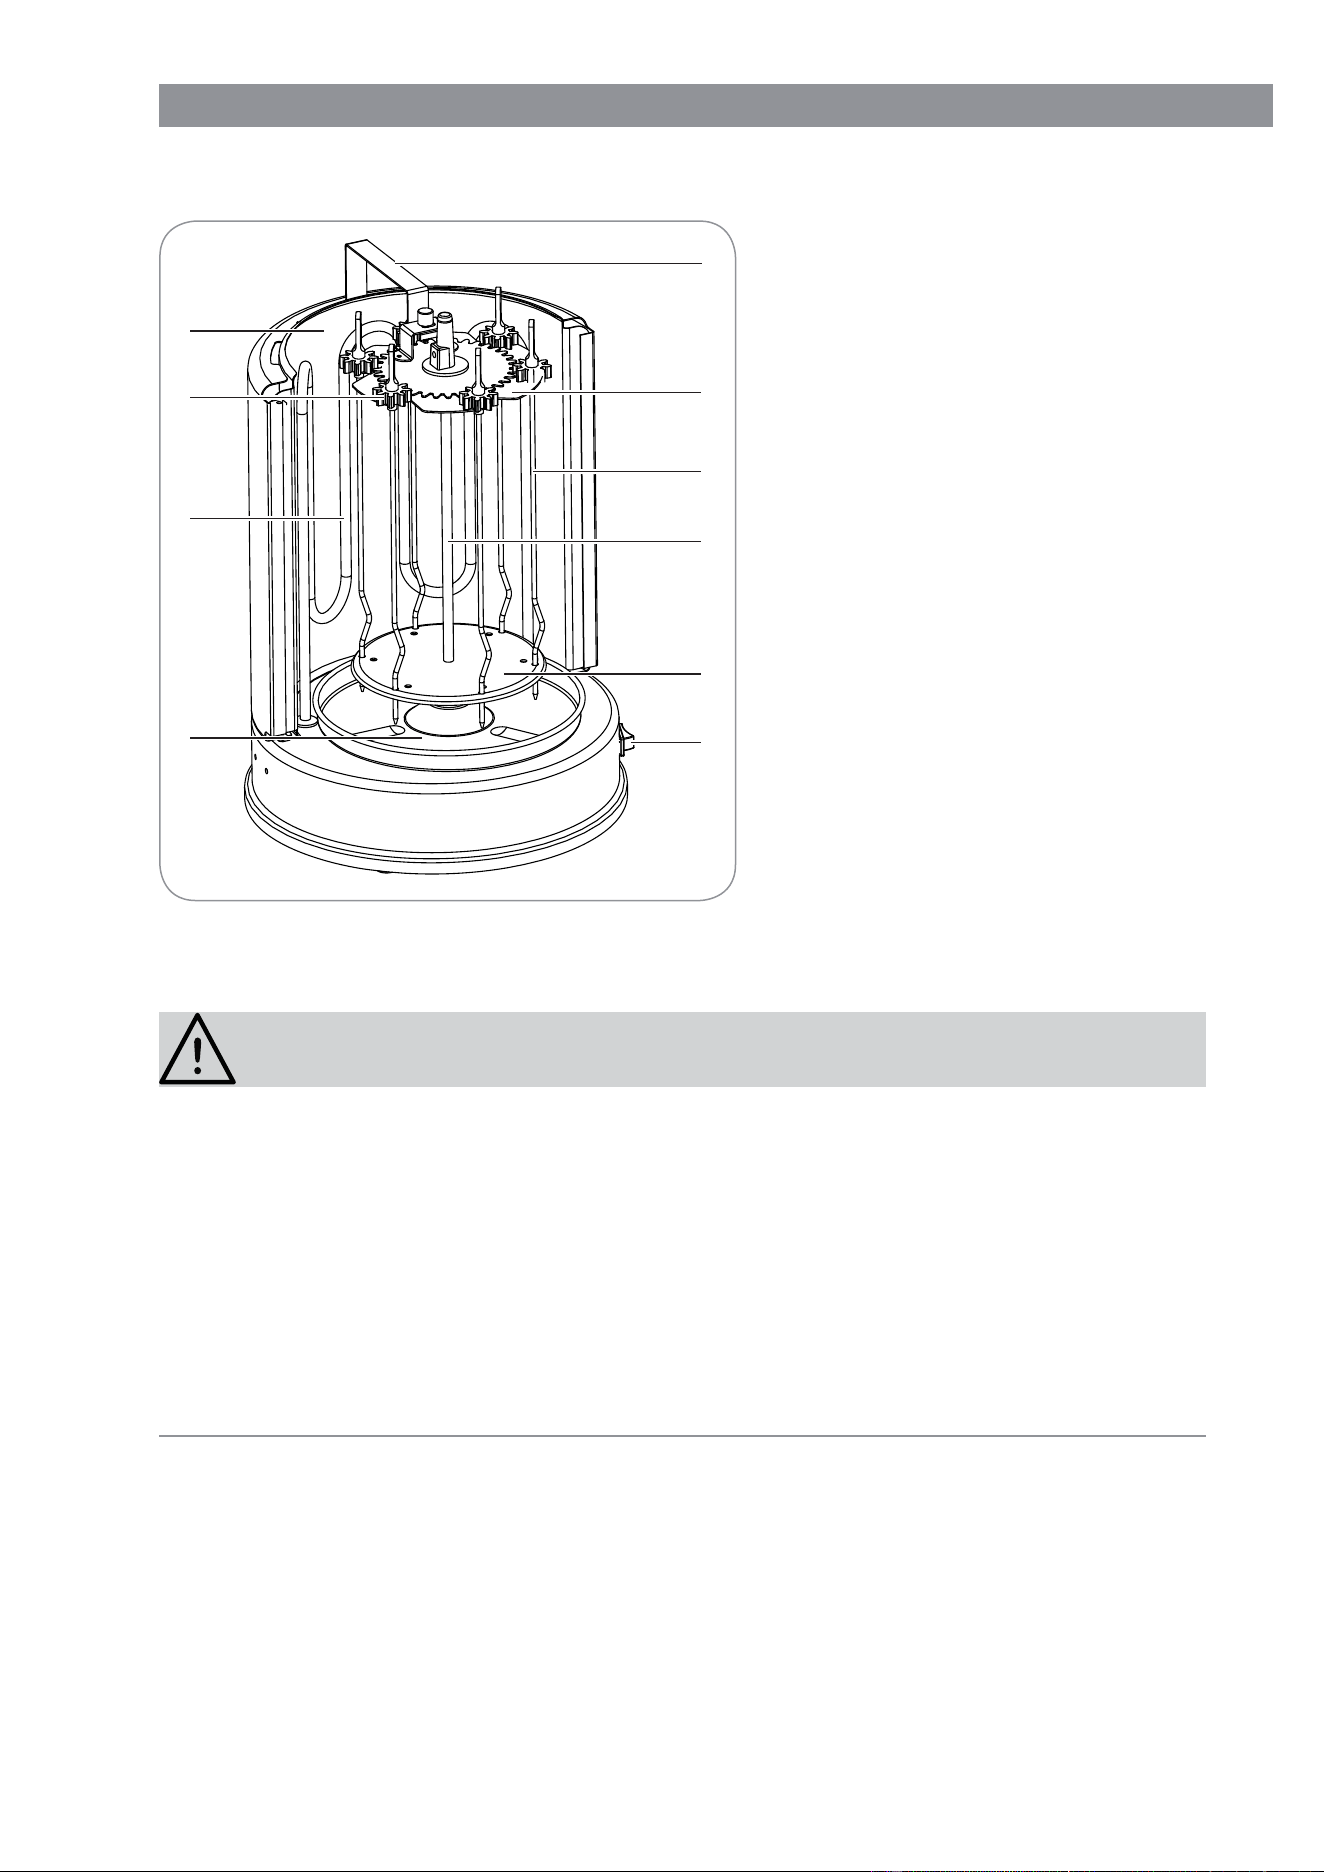
1. Stellen Sie das Gerät auf eine trockene und hitzebeständige, ebene Fläche mit
ausreichend Abstand zu allen Seiten und nach oben (ca. 30 cm) auf.
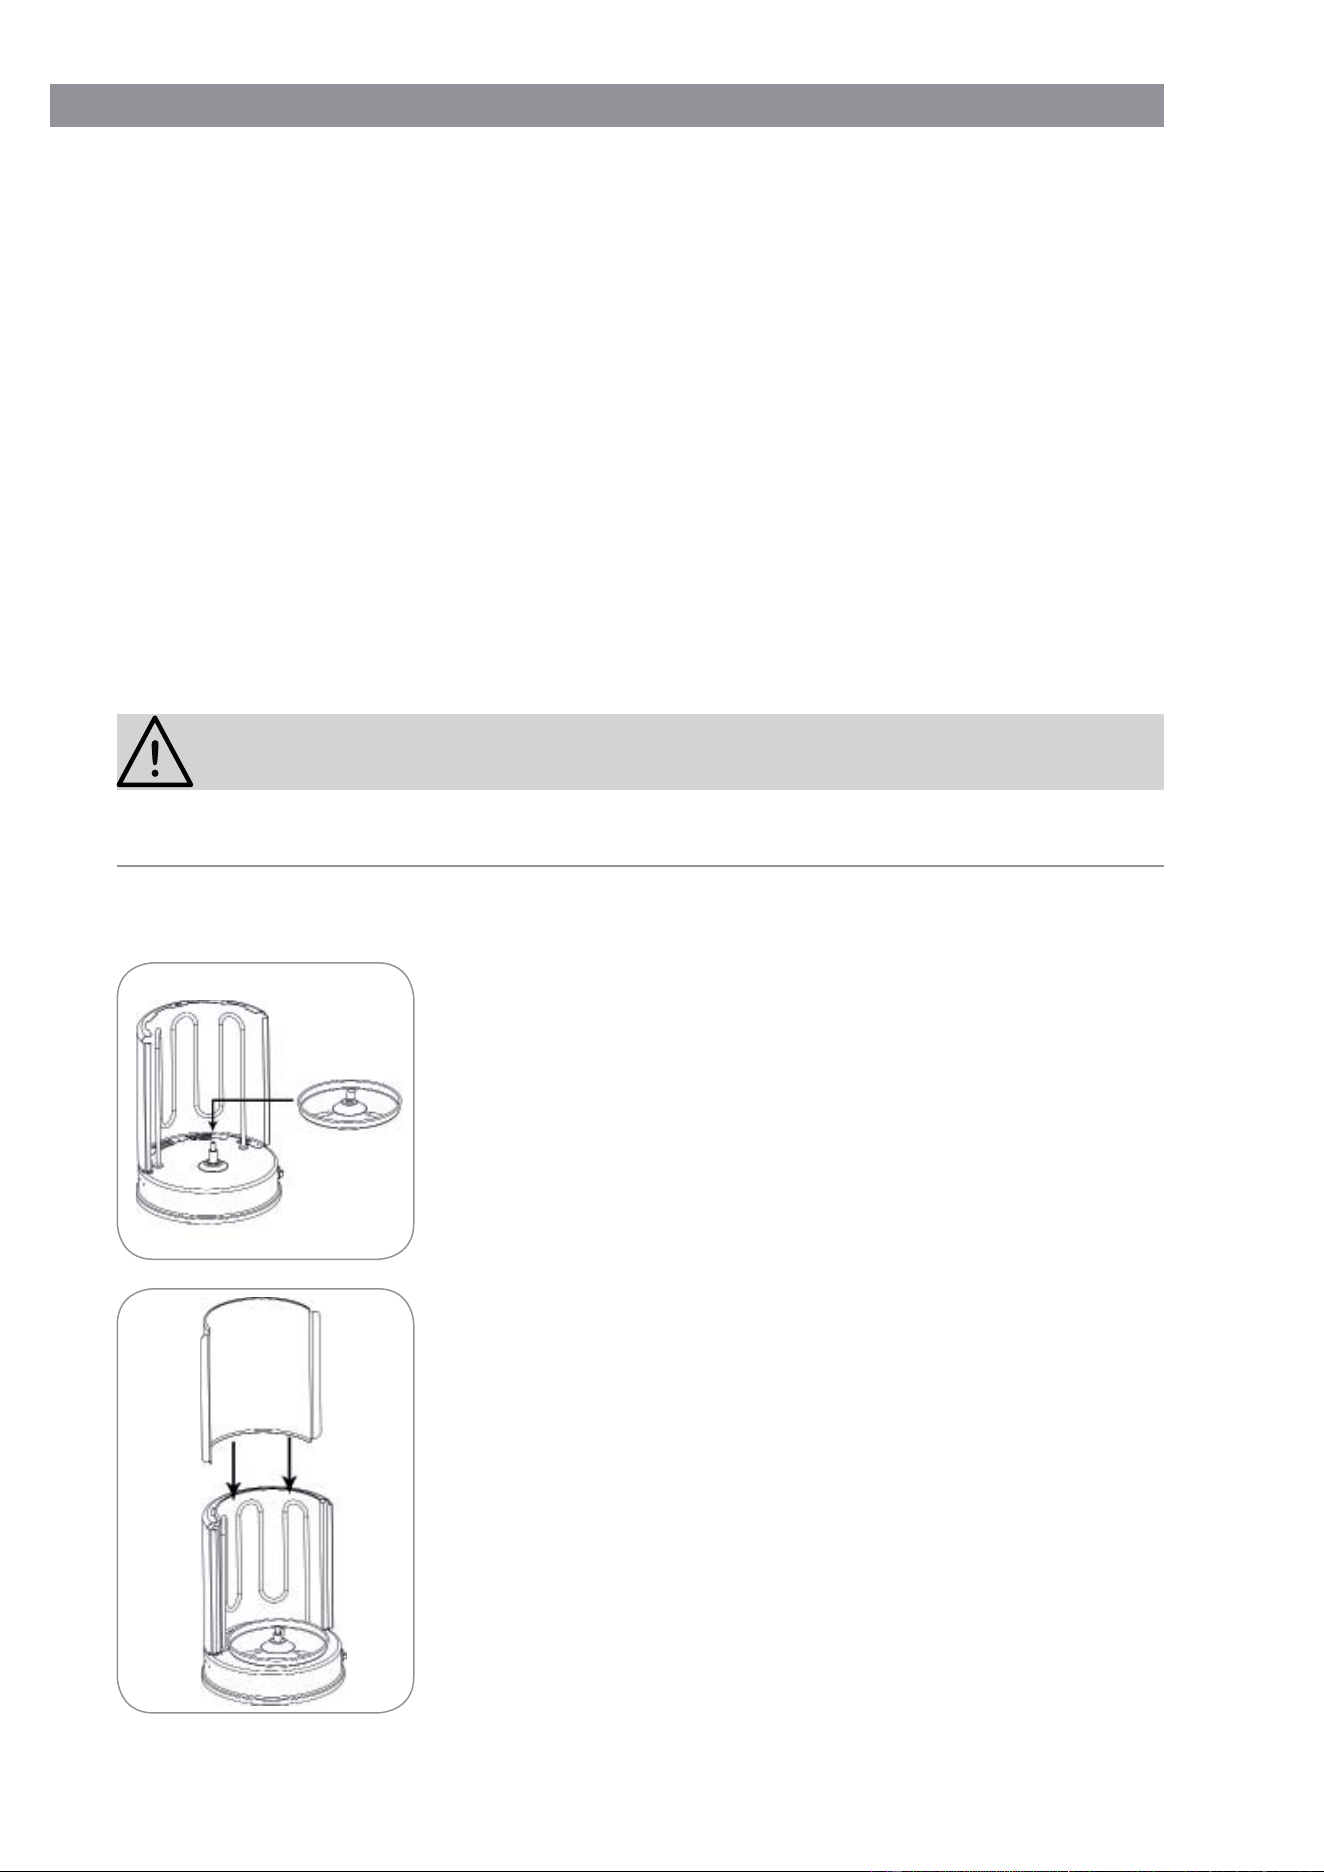
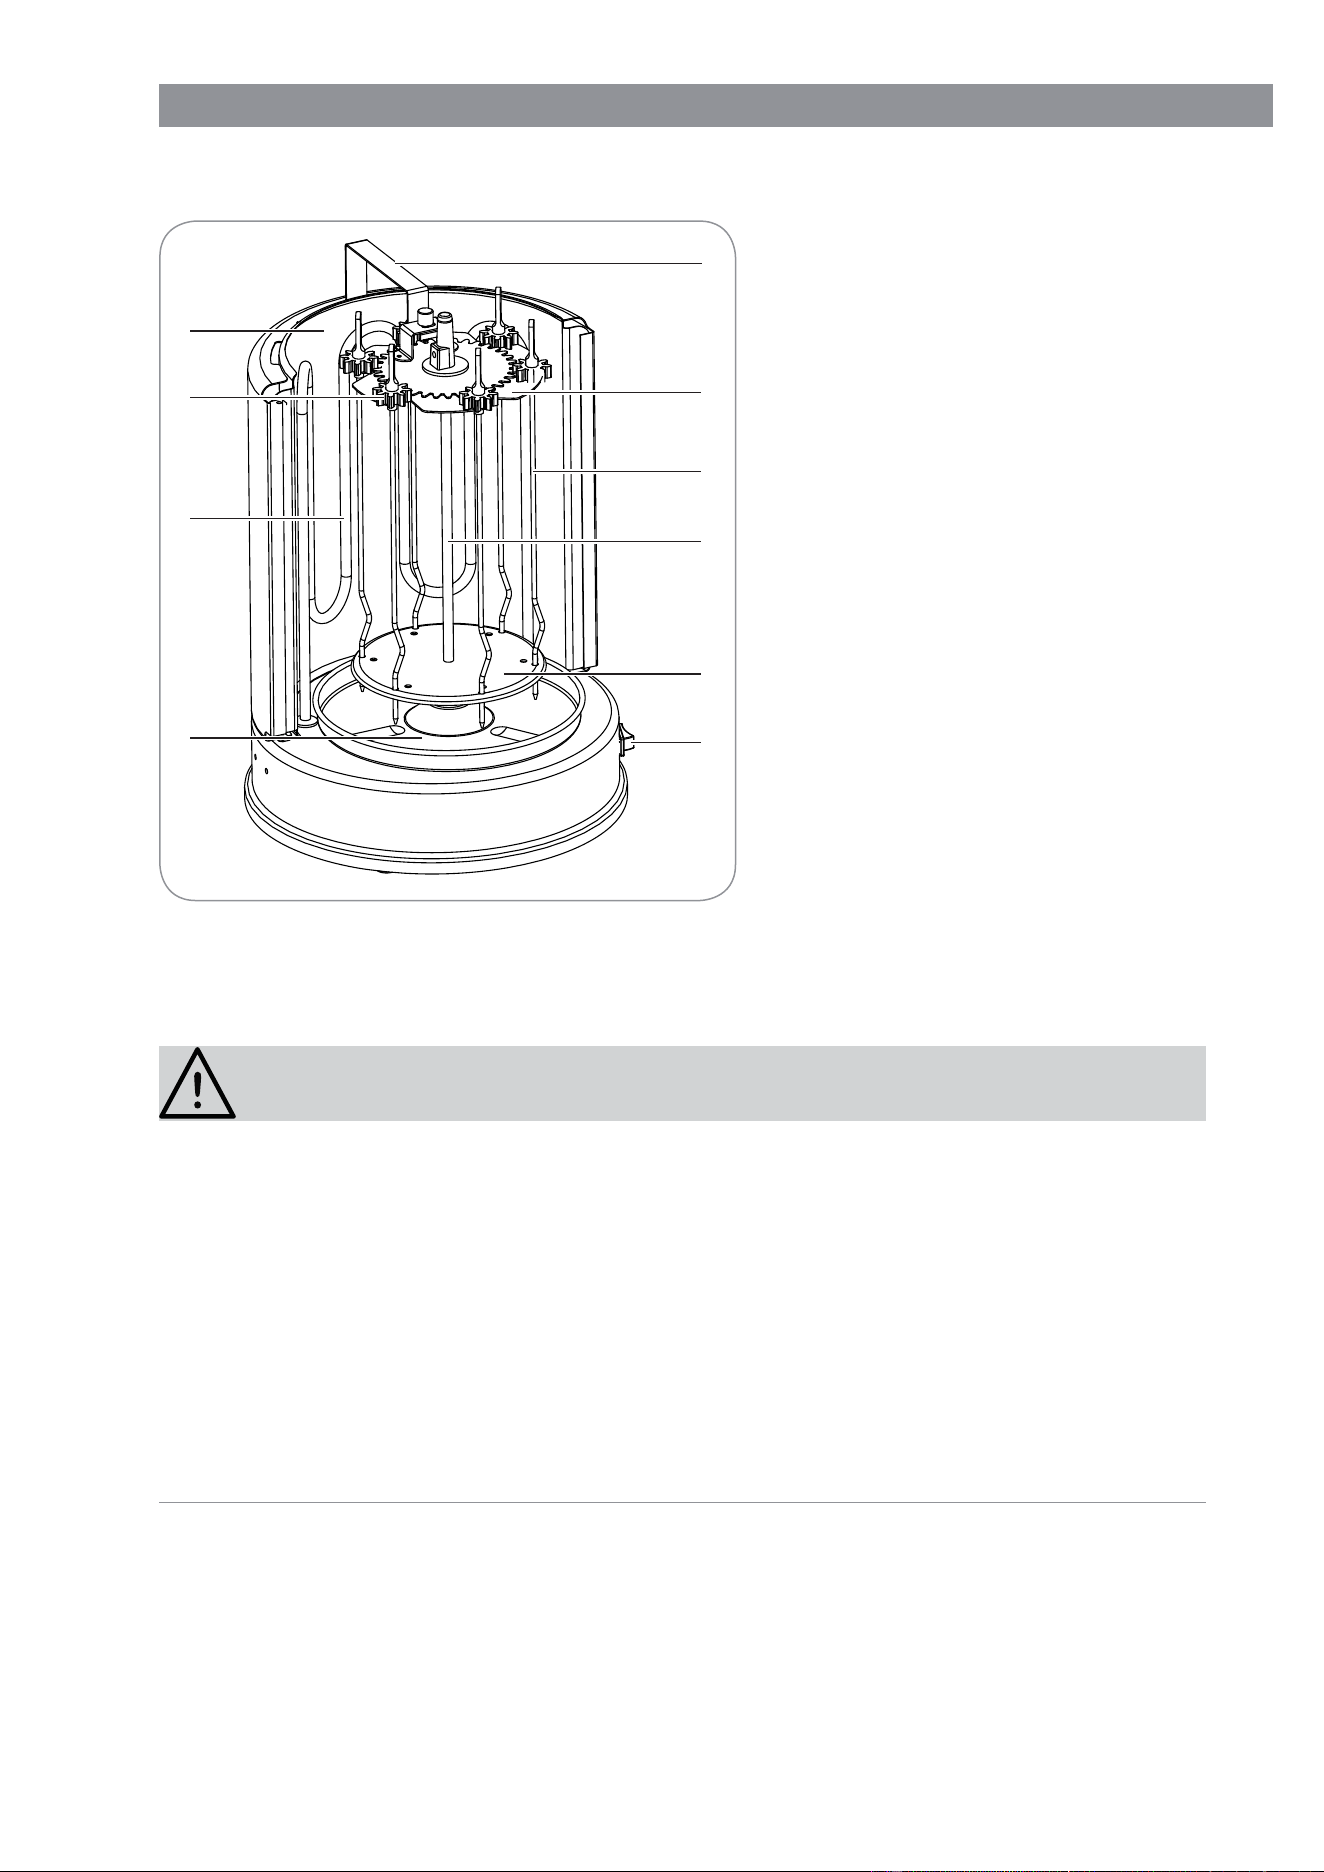
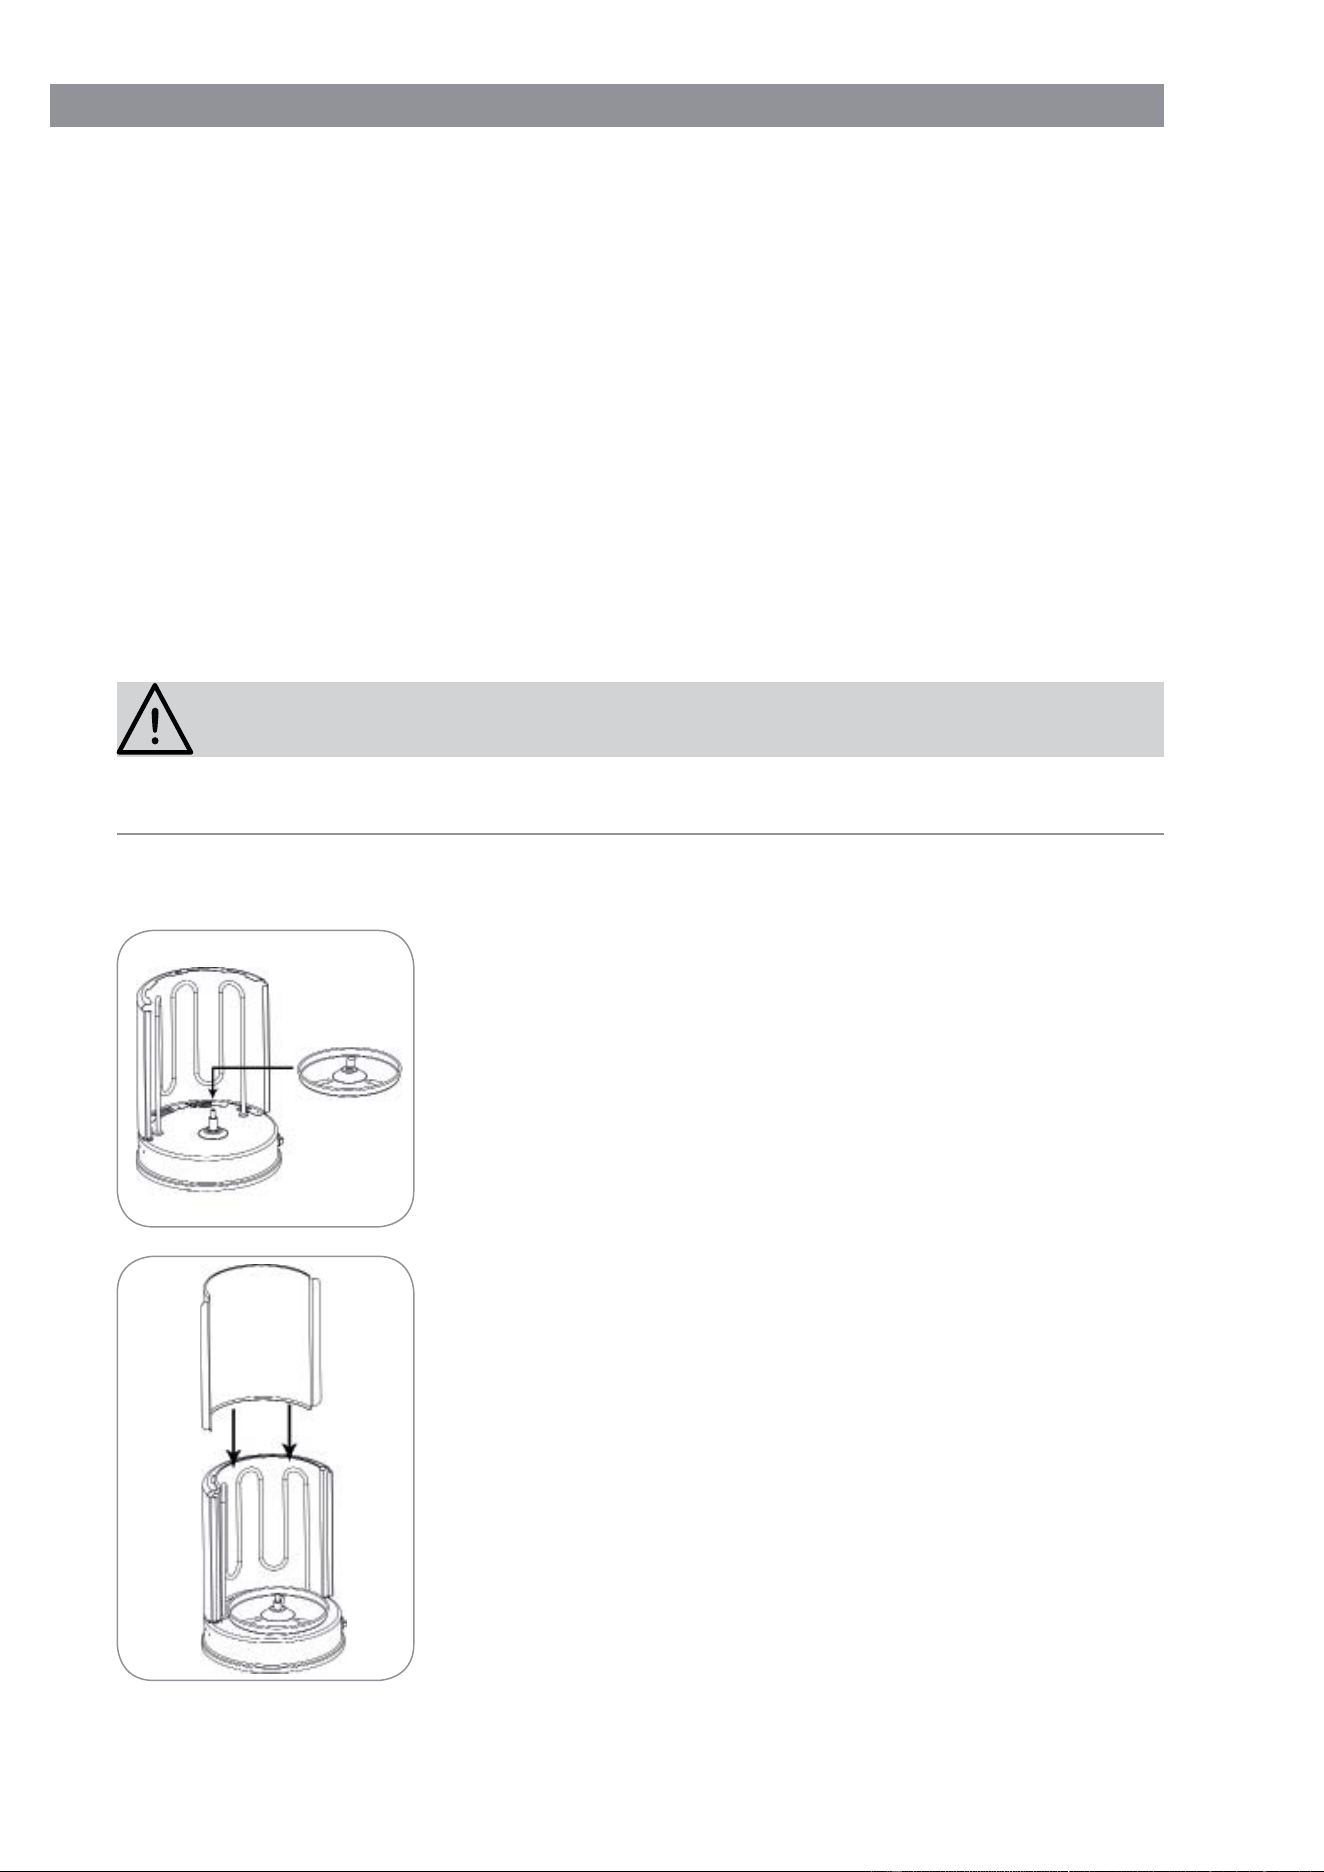
2. Setzen Sie die Fettauffangschale (7) auf die Nabe des
Mittelspießes im Geräteboden.
3. Stecken Sie ggf. den Hitzeschutz (10) zwischen das
Heizelement (8) und die Rückwand des Gerätes.

9 DE
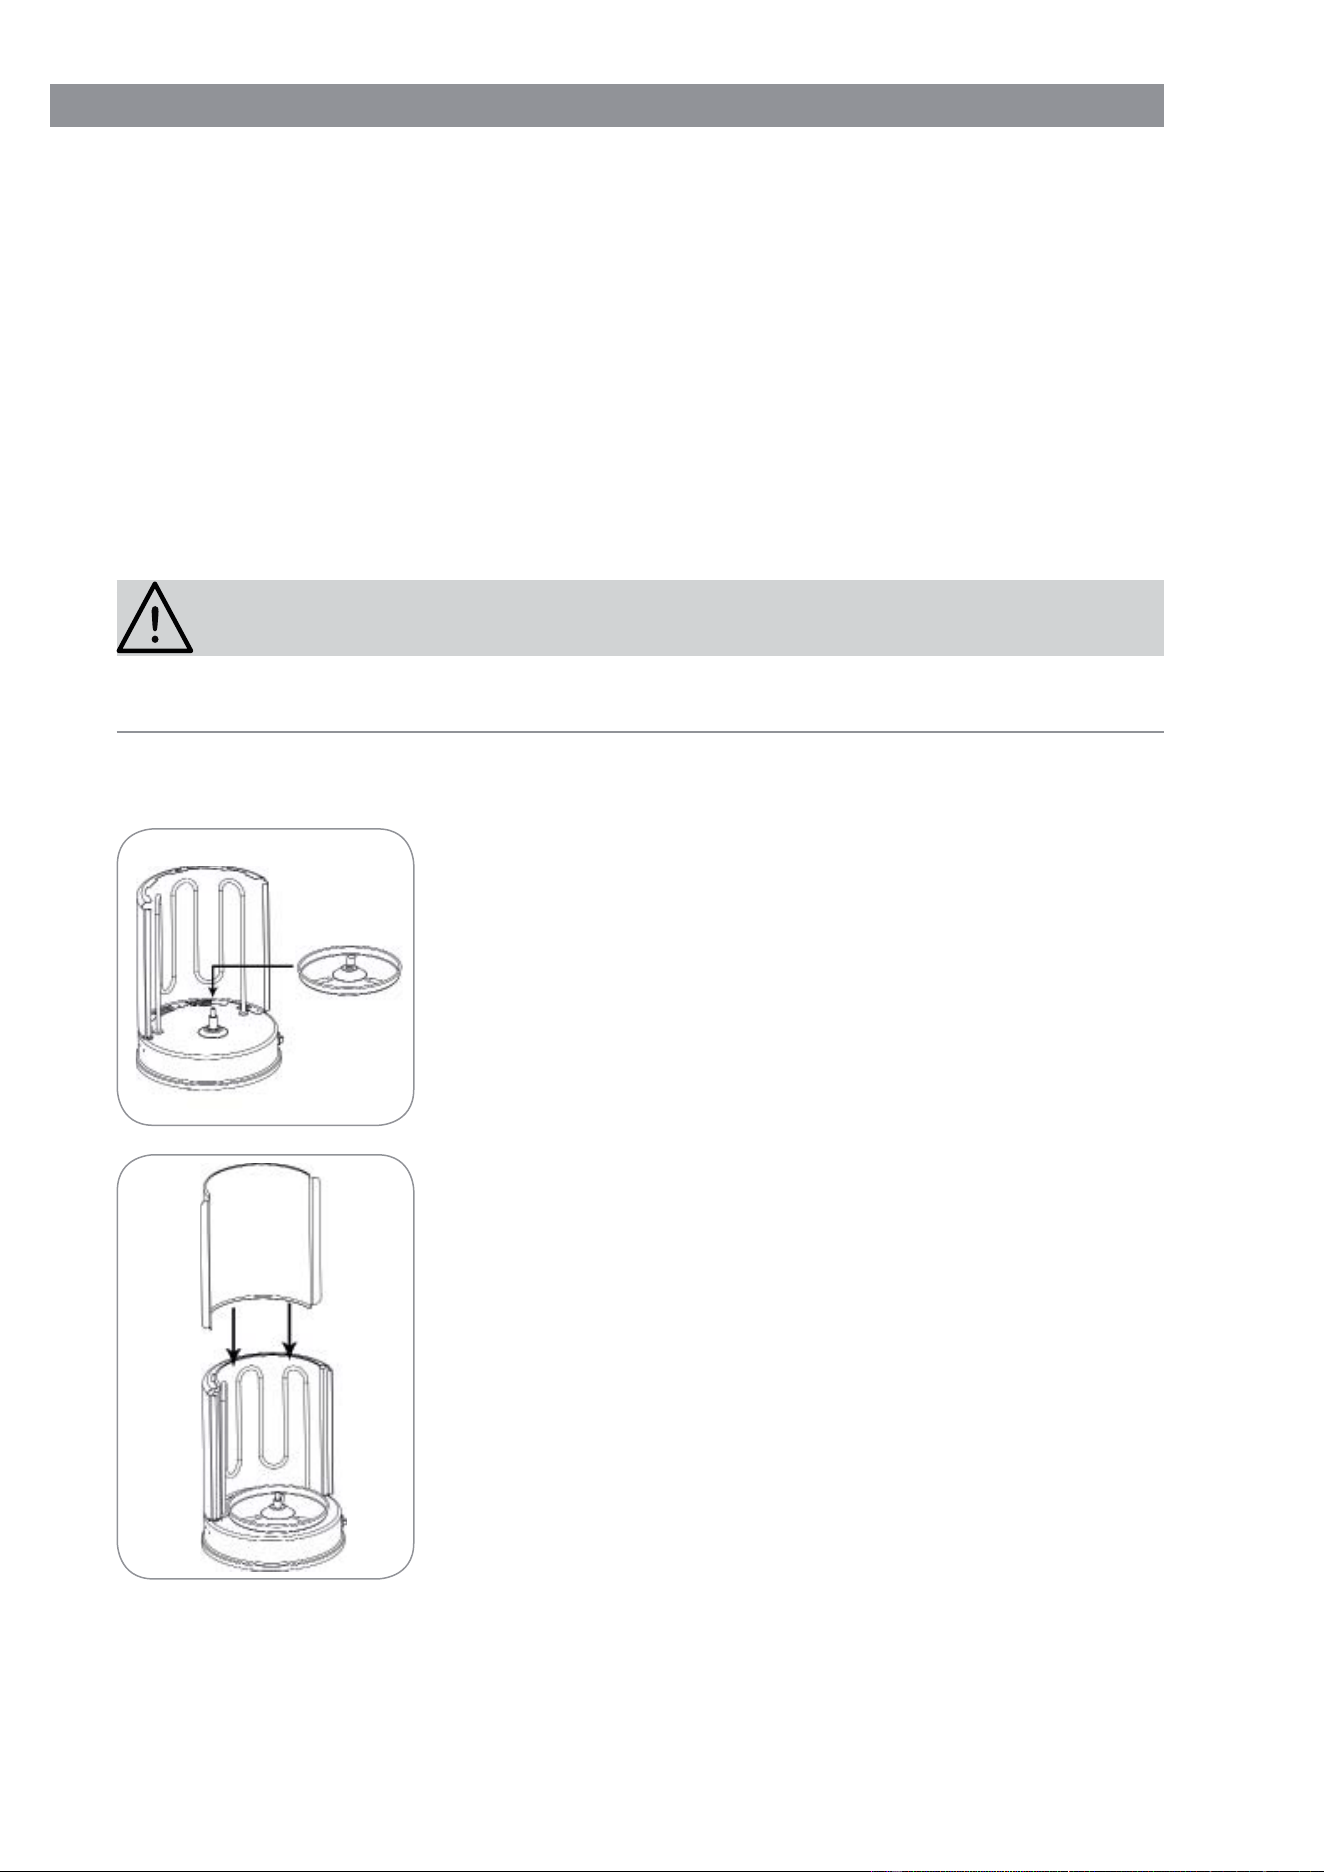
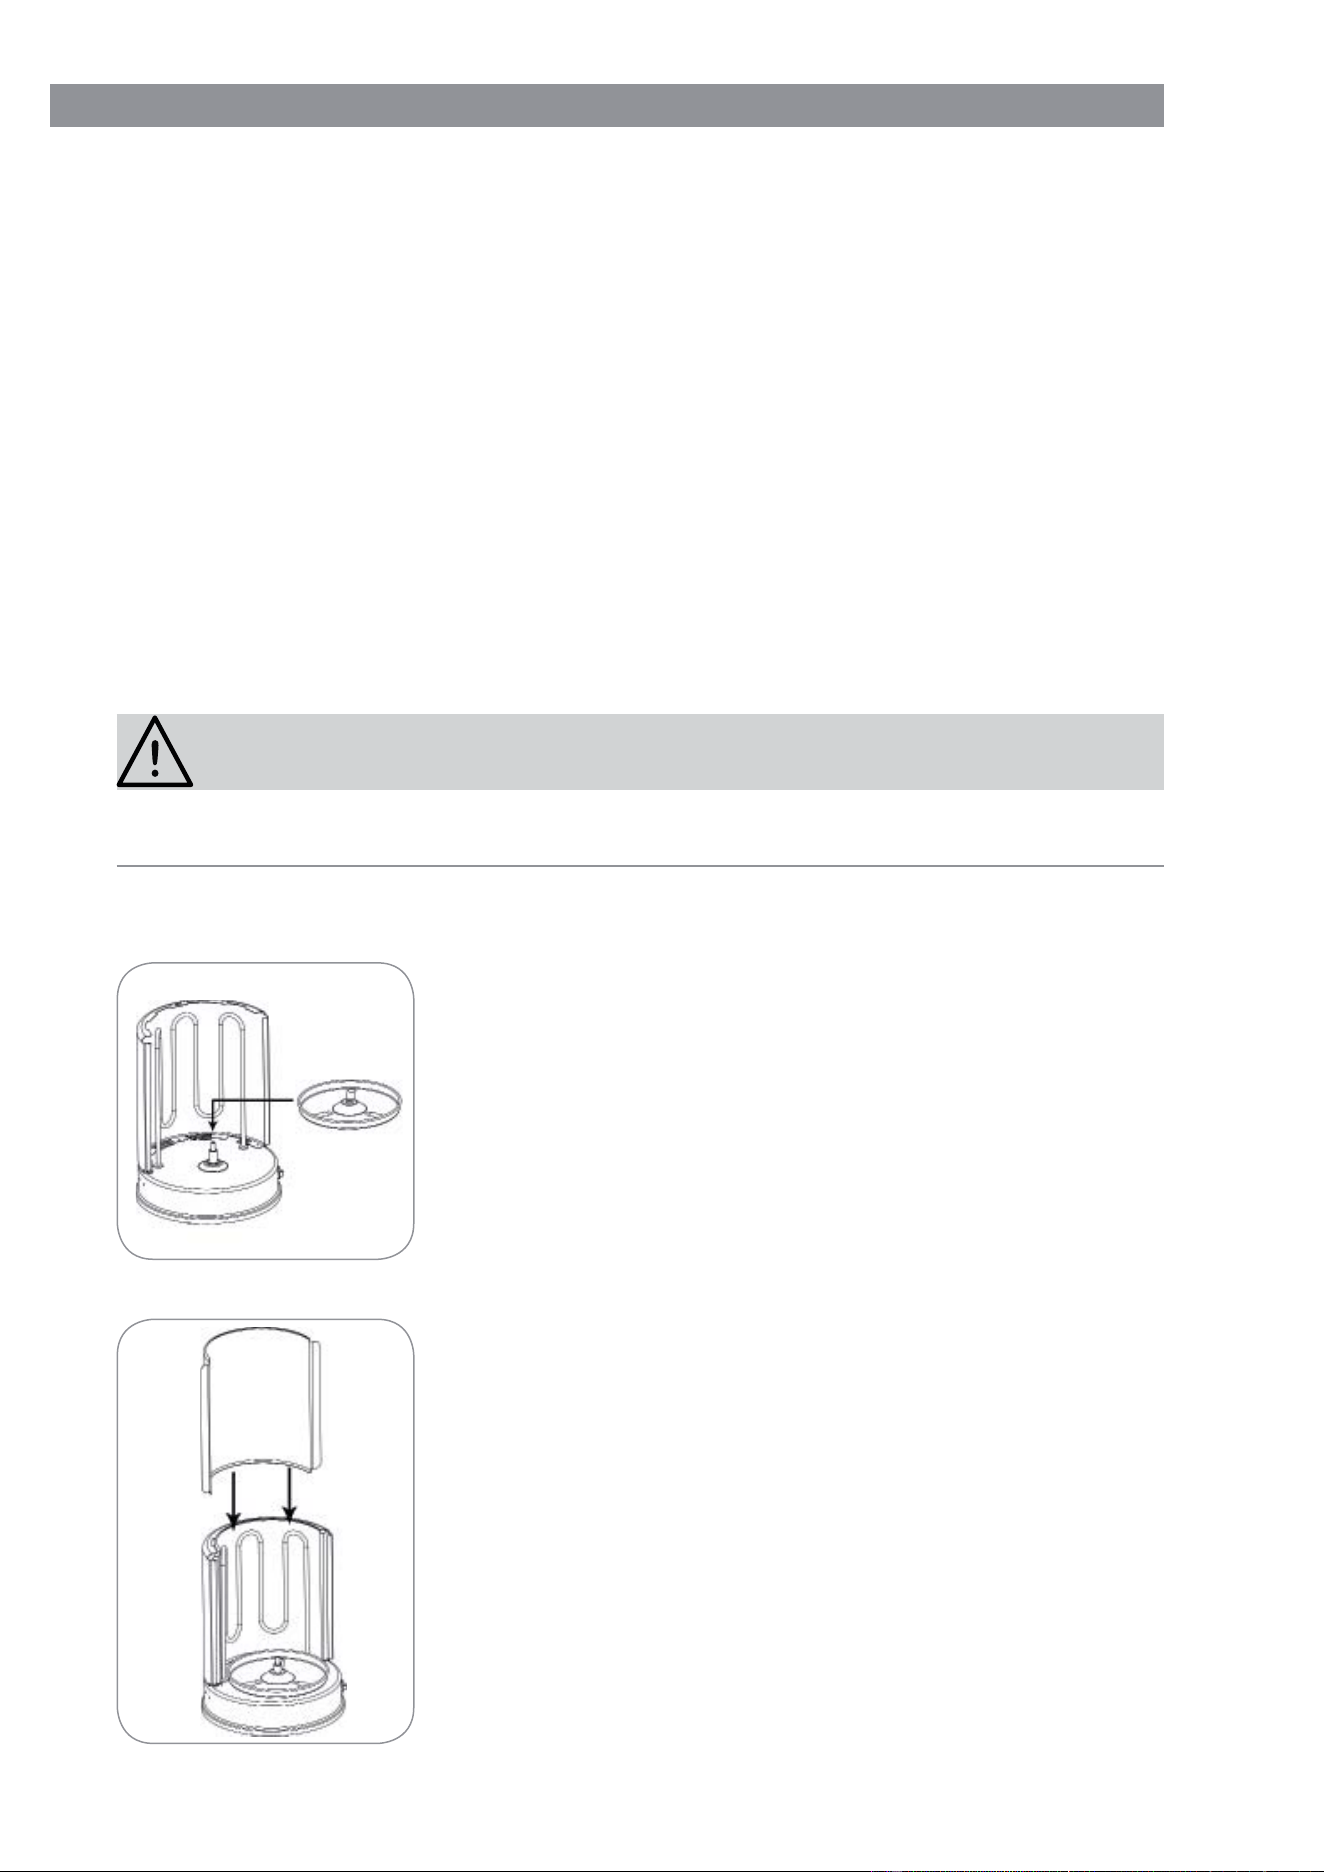
4. Stecken Sie den Mittelspieß (4) mit dem unteren Ende in
die Nabe im Geräteboden.
5. Setzen Sie das Mittelspieß-Zahnrad (2) auf das obere
Ende des Mittelspießes (4).
6. Setzen Sie die Halterung (1) mit dem längeren Ende in
den Schlitz in die Rückenwand des Gerätes.
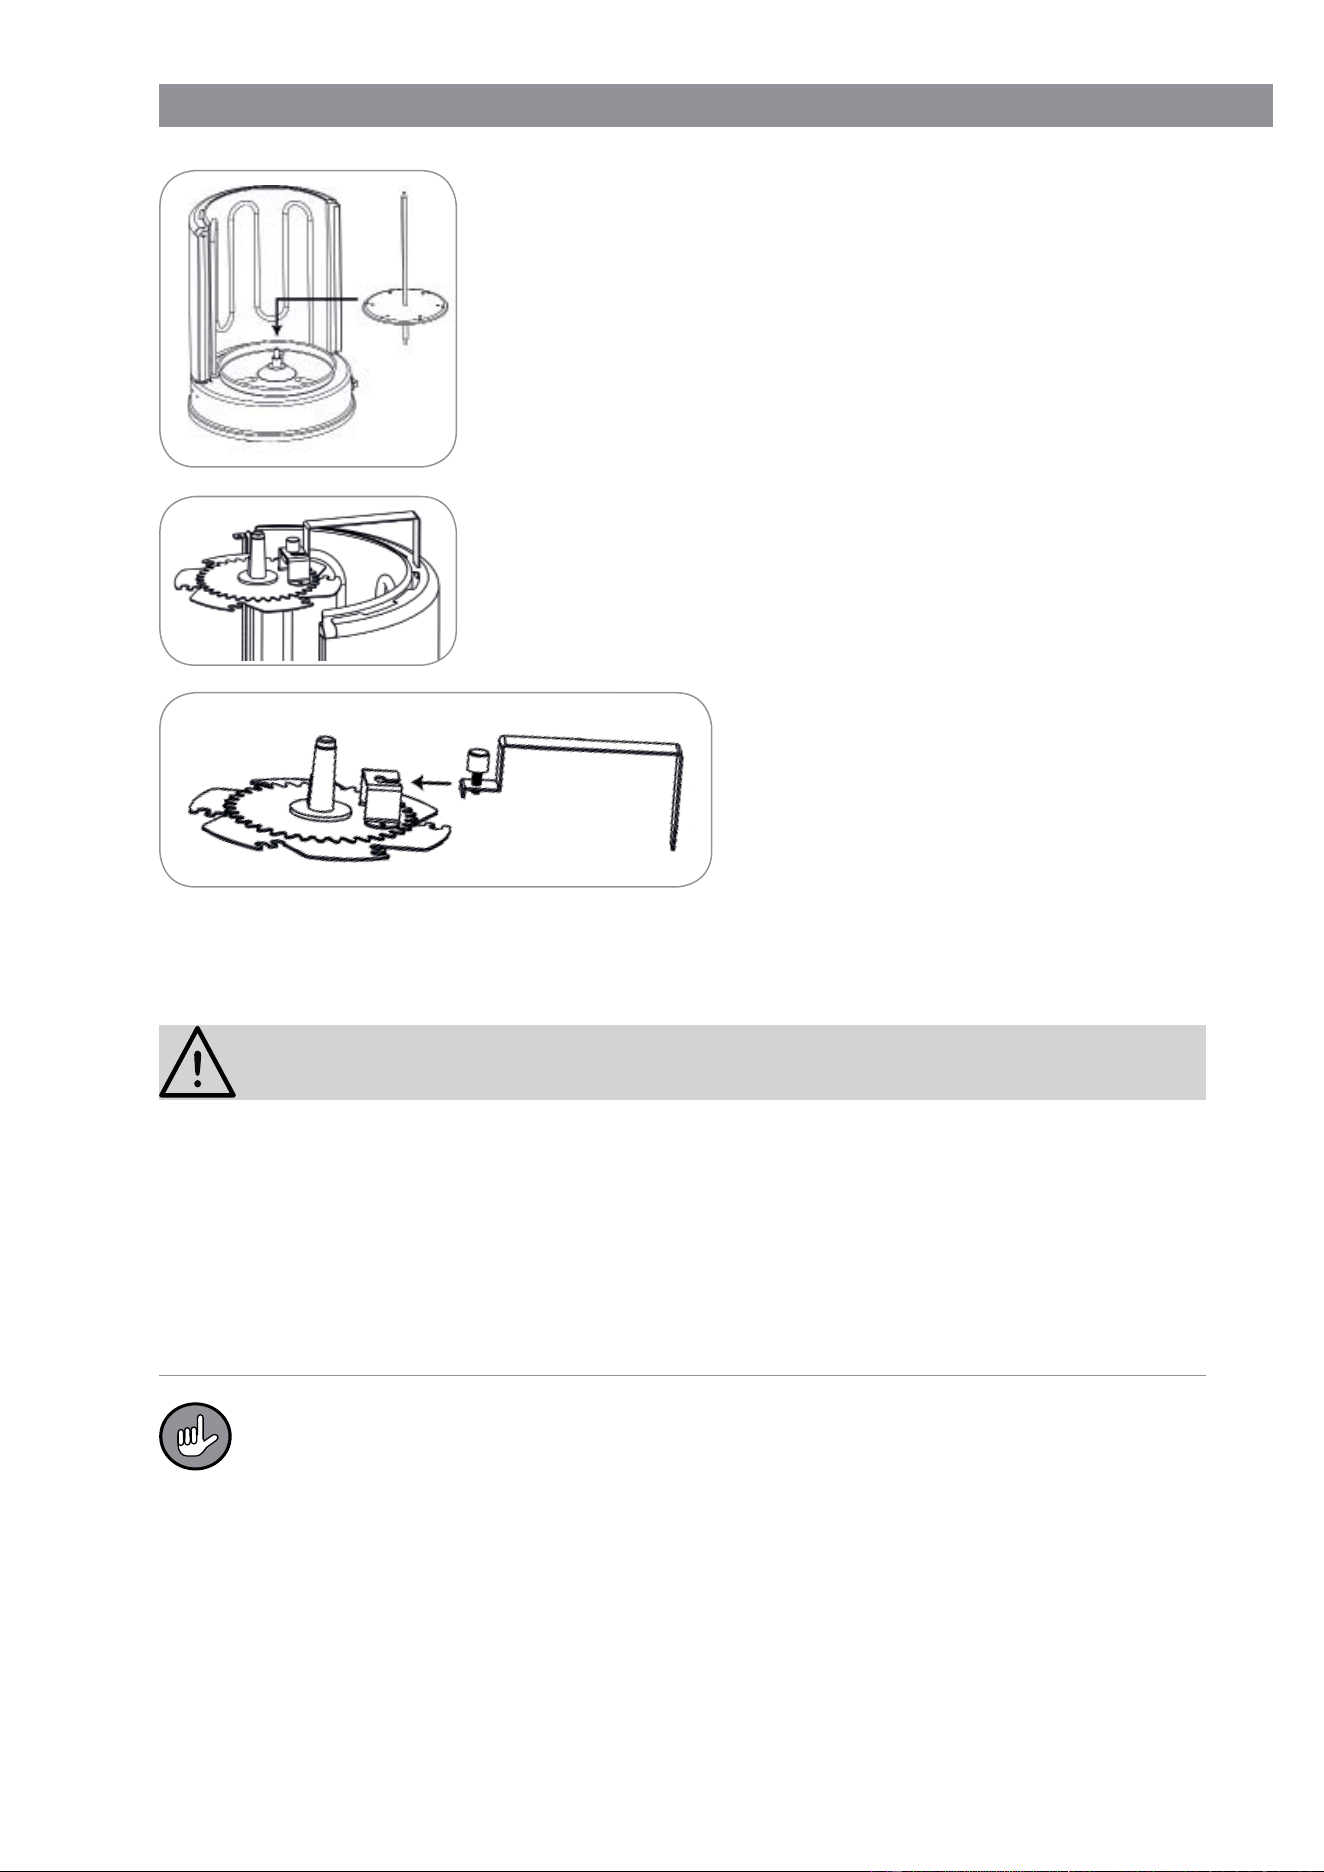
7. Führen Sie die Schraube am
anderen Ende der Halterung (1)
in die Aussparung des Bügels am
Mittelspieß-Zahnrad (2). Haken Sie
die Schraube rechts ein.
8. Drehen Sie die Schraube fest, um
die Halterung (1) zu fi xieren.
Um das Gerät auseinanderzubauen, gehen Sie in umgekehrter Reihenfolge vor.
Benutzung
ACHTUNG!
■ ACHTUNG Benutzen Sie das Gerät niemals ohne Hitzeschutz. Beachten Sie, dass
er richtig befestigt ist, bevor Sie das Gerät in Betrieb nehmen.
■ ACHTUNG Verbrennungsgefahr! Das Gerät wird während des Gebrauchs heiß.
Achten Sie unbedingt darauf, dass Sie während und nach der Benutzung des Gerätes
nicht mit aufgeheizten Teilen, wie dem Gehäuse oder Zubehörteilen, in Berührung
kommen. Wir empfehlen Küchenhandschuhe für den Umgang mit dem Gerät.
Reinigen, transportieren und verstauen Sie das Gerät und die Zubehörteile nur, wenn
sie vollständig abgekühlt ist.
• Auf dem Mittelspieß können Sie bis zu 4 kg Fleisch oder ein ganzes
Hähnchen grillen.
• Schneiden Sie die Fleischscheiben nicht zu dick, damit Sie sie einfacher auf
den Spieß aufspießen können.
• Benutzen Sie die Schaschlikspieße für gemischte und vegetarische Spieße,
Würstchen oder Kebab zu grillen.

DE 10
Döner / Gyros grillen
1. Schneiden Sie das gewünschte Fleisch in Scheiben.
2. Spießen Sie die Fleischscheiben nacheinander auf den Mittelspieß. Beachten Sie,
dass die Fleischscheiben nicht über den Spießtellerrand hinausragen.
3. Bauen Sie das Gerät wie in der Anleitung beschrieben zusammen (siehe Kapitel
„Zusammenbau“).
4. Stecken Sie den Netzstecker in eine vorschriftsmäßig installierte Steckdose.
5. Schalten Sie das Gerät ein, indem Sie den Ein-/Ausschalter (6) auf die Position I
(An) stellen. Das Gerät beginnt zu heizen. Die Betriebsleuchte leuchtet und der
Mittelspieß (4) rotiert. Das Fleisch wird gegrillt.
Wenn der Mittelspieß (4) nicht frei rotieren kann, bauen Sie das Gerät
auseinander und wieder zusammen. Beachten Sie, dass die Halterung (1) fest in
der Rückwand sitzt und richtig am Mittelspieß-Zahnrad (2) befestigt ist.
6. Wenn der gewünschte Bräunungsgrad erreicht ist, schalten Sie das Gerät aus,
indem Sie den Ein- / Ausschalter (6) auf die Position 0 (Aus) stellen. Schneiden Sie
mit einem scharfen Messer die äußere Schicht des Fleisches ab und fangen Sie das
Fleisch mit einem passenden Gefäß auf. Schalten Sie das Gerät wieder ein.
Wiederholen Sie diesen Schritt, bis das Fleisch vollständig gegrillt wurde.
7. Schalten Sie das Gerät aus, indem Sie den Ein-/Ausschalter (6) auf die Position 0
(Aus) stellen.
8. Trennen Sie das Gerät nach der Benutzung vom Stromnetz und lassen Sie es
abkühlen, bevor Sie es reinigen und verstauen.
Hähnchen grillen
1. Spießen Sie das Hähnchen senkrecht auf den Mittelspieß. Beachten Sie, dass es
nicht über den Spießtellerrand hinausragt.
2. Bauen Sie das Gerät wie in der Anleitung beschrieben zusammen (siehe Kapitel
„Zusammenbau“).
3. Stecken Sie den Netzstecker in eine vorschriftsmäßig installierte Steckdose.
4. Schalten Sie das Gerät ein, indem Sie den Ein- / Ausschalter (6) auf die Position I
(An) stellen. Das Gerät beginnt zu heizen. Die Betriebsleuchte leuchtet und der
Mittelspieß (4) rotiert. Das Hähnchen wird gegrillt.
Wenn der Mittelspieß (4) nicht frei rotieren kann, bauen Sie das Gerät
auseinander und wieder zusammen. Beachten Sie, dass die Halterung (1) fest in
der Rückwand sitzt und richtig am Mittelspieß-Zahnrad (2) befestigt ist.
5. Schalten Sie das Gerät aus, indem Sie den Ein-/Ausschalter (6) auf die Position
0 (Aus) stellen.
6. Lassen Sie das Gerät abkühlen.
7. Nehmen Sie die Halterung ab (siehe Kapitel „Zusammenbau“) und entnehmen Sie
das fertig gegrillte Hähnchen.
8. Trennen Sie das Gerät nach der Benutzung vom Stromnetz und lassen Sie es
abkühlen, bevor Sie es reinigen und verstauen.
11 DE
Schaschlikspieße grillen
1. Stecken Sie die Kunststoffzahnräder (9) von oben auf die Schaschlikspieße (3). Die
glatte Seite des Zahnrades muss nach oben zeigen und es muss vollständig ein-
rasten.
2. Spießen Sie die gewünschten Lebensmittel auf die Schaschlikspieße (3).
3. Bauen Sie das Gerät wie in der Anleitung beschrieben zusammen (siehe Kapitel
„Zusammenbau“).
4. Führen Sie die unteren Enden der Schaschlikspieße (3) in die äußeren Löcher des
Spießtellers (5).
5. Hängen Sie die Schaschlikspieße (3) mit den Griffen in die äußeren Aussparungen
am Mittelspieß-Zahnrad (2). Beachten Sie, dass das Kunststoffzahnrad des
Schaschlikspießes (9) und das Mittelspieß-Zahnrad (2) ineinandergreifen.
6. Schalten Sie das Gerät ein, indem Sie den Ein- / Ausschalter (6) auf die Position I
(An) stellen. Das Gerät beginnt zu heizen. Die
Betriebsleuchte leuchtet und der
Mittelspieß (4) rotiert. Die Schaschlikspieße (3) werden gegrillt.
Wenn der Mittelspieß (4) nicht frei rotieren kann, bauen Sie das Gerät
auseinander und wieder zusammen. Beachten Sie, dass die Halterung (1) fest in
der Rückwand sitzt und richtig am Mittelspieß-Zahnrad (2) befestigt ist.
7. Schalten Sie das Gerät aus, indem Sie den Ein-/Ausschalter (6) auf die Position
0 (Aus) stellen.
Die Griffe der Schaschlikspieße (3) werden während des Gebrauch heiß! Lassen
Sie sie abkühlen, bevor Sie die Schaschlikspieße (3) entnehmen. Wir empfehlen
Küchenhandschuhe für den Umgang mit dem Gerät.
8. Trennen Sie das Gerät nach der Benutzung vom Stromnetz und lassen Sie es
abkühlen, bevor Sie es reinigen und verstauen.
Reinigung und Aufbewahrung
ACHTUNG!
■ Ziehen Sie vor dem Reinigen immer den Netzstecker und lassen Sie das Gerät
abkühlen.
■ Der Mittelspieß mit Spießteller, die Schaschlikspieße und die Fettauffangschale sind
spülmaschinengeeignet.
■ Sprühen Sie keine Reinigungsmittel direkt auf das Gerät.
■ ACHTUNG Tauchen Sie das Gerät, das Kabel oder den Netzstecker nie in Wasser
oder andere Flüssigkeiten ein. Es besteht die Gefahr eines elektrischen Schlages.
■ Verwenden Sie zum Reinigen keine ätzenden oder scheuernden Reinigungsmittel,
rauhe Schwämme oder Messer. Diese können die Oberfl ächen beschädigen.
■ Wickeln Sie das Kabel niemals eng um das Gerät, wenn Sie es verstauen.
1. Vergewissern Sie sich, dass das Gerät komplett abgeküht, ausgeschaltet und vom
Stromnetz getrennt ist!
2. Nehmen Sie das Gerät auseinander (siehe Kapitel „Zusammenbau“).
3. Reinigen Sie das Gerät mit einem weichen Tuch und etwas mildem Spülmittel.
4. Reinigen Sie die Zubehörteile mit etwas Spülmittel und warmem Wasser.
DE 12
Mit der Zeit können sich Fettreste auf dem Hitzeschutz (10) festbrennen. Das
führt zu Verfärbungen, schränkt die Funktionsfähigkeit des Gerätes jedoch nicht
ein.
5. Trocknen Sie das Gerät und die Zubehörteile gründlich ab, bevor Sie alles verstauen.
6. Bewahren Sie das Gerät an einem trockenen, vor Sonne geschützten sowie für
Kinder und Tiere unzugänglichen Ort auf.
Fehlerbehebung
Sollte das Gerät nicht ordnungsgemäß funktionieren, überprüfen Sie zunächst, ob Sie
ein Problem selbst beheben können.
Führen Sie keine eigenständigen Reparaturen am Gerät, am Anschlusskabel
oder am Netzstecker durch!
Problem mögliche Ursache / Lösung
Das Gerät funktioniert nicht.
Die Betriebsleuchte leuchtet
nicht auf.
• Steckt der Netzstecker richtig in der Steckdose?
• Ist die Steckdose defekt? Probieren Sie eine
andere Steckdose.
• Überprüfen Sie die Sicherung Ihres
Netzanschlusses.
Der Mittelspieß rotiert nicht.
• Ragt das Grillgut über den Spießtellerrand hinaus?
• Sind die Zahnräder an den Schaschlikspießen
richtig montiert? Die glatte Fläche muss nach oben
zeigen!
Technische Daten
Modell: HS-R10A
Artikelnr.: Z 05914
Spannungsversorgung: 220 – 240 V ~ 50 Hz
Leistung: max. 1400 W
Schutzklasse: I
Entsorgung
Das Verpackungsmaterial ist wiederverwertbar. Entsorgen Sie die Ver packung
umweltgerecht und führen Sie sie der Wertstoffsammlung zu.
Entsorgen Sie das Gerät umweltgerecht, wenn Sie sich von ihm trennen
möchten. Das Gerät gehört nicht in den Hausmüll. Entsorgen Sie es an einem
Recyclinghof für elektrische und elektronische Altgeräte. Nähere Informationen
erhalten Sie bei Ihrer örtlichen Gemeindever waltung.
Kundenservice / Importeur:
DS Produkte GmbH
Am Heisterbusch 1
19258 Gallin
Deutschland
Tel.: +49 38851 314650
(0 – 30 Ct. / Min. in das dt.
Festnetz. Kosten variieren je nach
Anbieter.)
Alle Rechte vorbehalten.
13 EN
Intended Use
• The device is intended for grilling kebabs, döner kebab and whole chickens.
• This device is for personal use only and is not intended for commercial applications.
• Use the device only for the intended purpose and as described in the instructions.
Any other use is deemed to be improper.
• The following are excluded from the warranty: all defects caused by improper
handling, damage or unauthorised attempts at repair. This also applies to normal
wear and tear.
Contents
Intended Use _________________________ 13
Safety instructions ______________________ 14
Device Overview & Items Supplied _________ 17
Before Initial Use ______________________ 17
Assembly _____________________________ 18
Use _________________________________ 19
Cleaning and Storage ___________________ 21
Troubleshooting ________________________ 22
Technical Data _________________________ 22
Disposal ______________________________ 22
Explanation of Sym-
bols
Safety instructions:
Please read these
carefully and comply with
them in order to prevent
personal injury and
damage to property.
Warning of hot surfaces!
Supplementary informa-
tion
Suitable for food use.
Read operating instruc-
tions before use!
Dear Customer,
We are delighted that you have chosen this grill.
Before using the device for the fi rst time, please read the instructions through carefully
and keep them for future reference. If the device is given to someone else, these
instructions should also be handed over with it. The manufacturer and importer do not
accept any liability if the information in these instructions is not complied with.
If you have any questions about the device and about spare parts/accessories, contact
the customer service department via our website:
www.service-shopping.de

EN 14
Safety instructions
■ This device may be used by children aged 8 and over and by
people with reduced physical, sensory or mental abilities or a
lack of experience and/or knowledge if they are supervised or
have received instruction on how to use the device safely and
have understood the dangers resulting from this.
■ Children must not play with the device.
■ Cleaning and user maintenance may not be performed by
children, unless they are older than 8 years of age and are
supervised.
■ Children younger than 8 years of age and animals must be kept
away from the device and the mains cable.
Warning of hot surfaces! The device will become very
hot during use. Make absolutely sure that you do not come
into contact with any heated parts during and after use of
the device.
We recommend that you wear oven gloves when handling
the device.
■ The device must always be disconnected from the mains power
when it is left unattended and before assembling, disassembling
or cleaning the device.
■ Do not make any changes to the device. Also do not replace the
mains cable yourself. If the device, the mains cable or the plug of
the device is damaged, it must be replaced by the manufacturer
or customer service department or a similarly qualifi ed person
(e.g. specialist workshop) in order to avoid any hazards.
■ The device is not designed to be operated with an external timer
or a separate remote control system.
■ CAUTION: Note the cleaning instructions in the “Cleaning and
Storage” chapter!

15 EN
Danger of Injury
■ Keep the device and packaging material away from children and animals! There is a
risk of injury and suffocation.
■ CAUTION: Risk of burns from hot surfaces! During operation the plastic handles
of the skewers also become hot. Wait until the skewers cool down before removing
them from the device. We recommend that you wear oven gloves when handling the
device.
■ CAUTION The skewers have sharp points. Be careful when you use or clean them.
■ Make sure that the connected mains cable does not present a trip hazard. The cable
must not hang down from the surface on which the device is placed in order to prevent
the device from being pulled down.
■ Always allow the device to cool down suffi ciently before you clean it and/or store it
away.
Danger of Electric Shock and Fire
■ Use the device only in closed rooms.
■ Always set up the device with a suffi cient amount of clear space on all sides and clear
space above it (approx. 30 cm).
■ The device should only be connected to a properly installed plug socket with safety
contacts. The plug socket must also be readily accessible after connection so that the
connection to the mains can quickly be isolated. The mains voltage must match the
technical data of the device.
■ You should not use an extension cable with the device.
■ Never immerse the device, mains cable or plug in water or other liquids and ensure
that they cannot fall into water or become wet.
■ Should the device fall into water, switch off the power supply immediately. Do not
attempt to pull it out of the water while it is still connected to the mains power!
■ Never touch the device, mains cable or plug with wet hands when these components
are connected to the mains power.
■ Do not use the device if it has malfunctioned or been dropped in water. Have it
checked in a specialist workshop before using it again.
■ Switch off the device and pull the mains plug out of the plug socket if an error occurs
during operation or before a thunderstorm.
■ Always pull the plug and never the mains cable.
■ Do not use the device in rooms containing easily ignitable dust or poisonous and
explosive fumes.
■ Do not operate the device in a very damp environment or in the vicinity of combustible
material.
■ Do not cover the device during operation in order to prevent it from catching fi re.
Provide adequate ventilation while the device is in operation.

EN 16
■ In the event of a fi re:
– It is essential to remove the mains plug immediately.
– Hot fat / oil may catch fi re if it is overheated. Do not extinguish burning fat / oil with
water, but smother the fl ames with a fi re blanket or similar cloth or extinguish a fat
fi re with a fi re extinguisher which is capable of extinguishing fi res involving cooking
fat!
– Do NOT use water to extinguish the fi re as the steam can pose an additional risk
of scalding.
– Dispose of the device correctly.
■ Do not place any combustible materials, such as cardboard, plastic, paper or candles,
on or in the device.
■ Do not place food that is wrapped in cling fi lm, plastic bags or aluminium foil in or on
the device.
■ Always check the device for damage before putting it into operation. Only use it if the
device, mains cable and plug have no signs of damage!
Avoiding Damage to Material, Property and the Device
■ Always place the device on a dry, fl at and fi rm surface that is not sensitive to heat.
■ Maintain suffi cient clearance from other sources of heat such as hotplates or stoves
in order to avoid damage to the device.
■ Do not expose the device to extreme temperatures, strong temperature fl uctuations,
direct sunlight or moisture.
■ Do not drop the device or allow it to be knocked violently.
■ Never leave the device unsupervised during operation!
■ The device must not be moved during operation.
■ Do not pull or carry the device by the mains cable.
■ Do not wrap the cable around the device.
■ Make sure that the mains cable is not squashed, bent or laid over sharp edges and
does not come into contact with hot surfaces.
■ Only the accessory parts supplied by the manufacturer should be used. If accessory
parts which are not authorised by the manufacturer are used, all warranty and
guarantee claims are void.
■ Do not use any caustic or abrasive cleaning agents to clean the device. These can
damage the surface.
Notes on Hygiene
■ The device should be cleaned before you use it for the fi rst time. It is possible that
production residues may still be adhering to the surfaces. It is essential that you
follow the cleaning instructions in the "Before Initial Use" chapter.
■ Clean the device after each use to prevent germ formation (see the "Cleaning and
Storage" chapter).
■ Keep the device clean.
17 EN
Device Overview & Items Supplied
1 Retaining bracket
2 Cog – central spit
3 Skewers (6x)
4 Central spit
5 Skewer plate
6 On/Off switch I / O with
operating lamp
7 Fat collecting tray
8 Heating element
9 Plastic cogs for skewers (6x)
10 Heat shield
Not shown:
• Mains cable with plug
1
2
3
8
4
5
6
7
10
9
Before Initial Use
CAUTION!
■ Keep children and animals away from the packaging material. There is a danger of
suffocation!
■ Please note: You may notice a strange smell the fi rst time you use the device. We
therefore recommend that you initially operate the device for a few minutes WITHOUT
any contents in order to burn off any production residues that may remain. During this
time, make sure the room is well ventilated, e.g. with wide-open windows!
■ There may still be some production residues on the device. To avoid harmful effects
to your health, thoroughly clean the device before you use it for the fi rst time.
■ The central spit with the skewer plate, the skewers and the fat collecting tray are
suitable for the dishwasher.
1. Take the device out of the packaging and remove all fi lm and stickers that may be
present. Inspect the device for transport damage. If you notice any damage, do not
use the device(!), but contact our customer service department.
2. Dismantle the device if necessary (see the "Assembly” chapter ).
3. Clean the device with a soft cloth and a little mild washing-up liquid. Clean the
accessory parts with a little washing-up liquid and warm water. Then dry the device
and accessories well.
EN 18
4. Place the device on a dry, heat-resistant, fl at surface with suffi cient clearance on all
sides and above (around 30 cm).
5. Insert the plug into a properly installed socket.
6. Switch the device on by moving the On/Off switch (6) to Position I (On). The operating
lamp lights up. Allow the device to heat up for around 5 minutes to remove any
production residues.
7. Switch the device off by moving the On/Off switch (6) to Position 0 (Off).
8. Remove the plug from the socket.
9. Allow the device to cool down and then clean it again.
Assembly
CAUTION!
■ CAUTION Danger of injury! The skewers have sharp points. Be careful when you
use or clean them.
1. Place the device on a dry, heat-resistant, fl at surface with suffi cient clearance on all
sides and above (around 30 cm).
2. Place the fat collecting tray (7) in the hub of the central spit
in the base of the device.
3. Place the heat shield (10) between the heating element (8)
and the rear wall of the device.
19 EN
4. Place the lower end of the central spit (4) in the hub in the
base of the device.
5. Place the cog of the central spit (2) on the upper end of the
central spit (4).
6. Place the longer end of the retaining bracket (1) into the
slit in the rear wall of the device.
7. Place the screw at the other end
of the retaining bracket (1) into the
opening in the clamp on the cog of
the central spit (2). Slide the screw
into position on the right.
8. Tighten the screw to fi x the retaining
bracket (1) into place.
Perform the steps in reverse order to dismantle the device.
Use
CAUTION!
■ CAUTION Never operate the device without the heat shield. Make sure that it is fi tted
correctly before operating the device.
■ CAUTION Danger of burns! The device will become hot during use. Make absolutely
sure that you do not come into contact with any heated parts such as the housing
or the accessories during and after use of the device. We recommend that you wear
oven gloves when handling the device. Only clean, transport and store away the
device and the accessories after they have cooled down completely.
• On the central spit you can grill up to 4 kg meat or a whole chicken.
• Make sure the meat is not cut too thickly, so that it fi ts easily on the spit.
• Use the skewers to grill sausages or meat/mixed/vegetarian kebabs.
Grilling döner kebab
1. Cut the meat into slices.
2. Place the slices on the central spit one after the other. Make sure that the slices of
meat do not protrude beyond the edge of the skewer plate.
3. Assemble the device (see the "Assembly” chapter).
4. Insert the plug into a properly installed socket.

EN 20
5. Switch the device on by moving the On/Off switch (6) to Position I (On). The device
starts to heat up. The operating lamp lights up and the central spit (4) rotates. The
meat is grilled.
If the central spit (4) cannot rotate freely, you should dismantle the device and
assemble it again. Make sure that the retaining bracket (1) is fi tted correctly to the
cog of the central spit (2).
6. When the meat is brown enough, switch the device off by moving the On/Off switch (6)
to Position 0 (Off). Use a sharp knife to cut off the outer layer of the meat, and catch
the meat in a suitable container. Switch the device on again.
Repeat the procedure until all the meat has been grilled.
7. Switch the device off by moving the On/Off switch (6) to Position 0 (Off).
8. Disconnect the device from the mains power after use and allow it to cool down
before you clean it.
Grilling a whole chicken
1. Skewer the chicken vertically on the central spit. Make sure that it does not
protrude above the edge of the skewer plate.
2. Assemble the device (see the "Assembly" chapter).
3. Insert the plug into a properly installed socket.
4. Switch the device on by moving the On/Off switch (6) to Position I (On). The device
starts to heat up. The operating lamp lights up and the central spit (4) rotates. The
chicken is grilled.
If the central spit (4) cannot rotate freely, you should dismantle the device and
assemble it again. Make sure that the retaining bracket (1) is fi tted correctly to the
cog of the central spit (2).
5. Switch the device off by moving the On/Off switch (6) to Position 0 (Off).
6. Allow the device to cool down.
7. Remove the retaining bracket (see the "Assembly” chapter) and remove the grilled
chicken.
8. Disconnect the device from the mains power after use and allow it to cool down
before you clean it.
Grilling kebabs
1. Place the plastic cogs (9) on the skewers (3) from above. The smooth side of the cog
must be facing upwards and the cog has to click into place completely.
2. Place the food on the skewers (3).
3. Assemble the device (see the "Assembly" chapter).
4. Insert the base of the skewers (3) into the outer holes of the skewer plate (5).
5. Fit the handles of the skewers (3) into the outer gaps in the cog of the central spit (2).
Make sure that the plastic cog of each skewer (9) and the cog of the central spit (2)
mesh correctly.
6. Switch the device on by moving the On/Off switch (6) to Position I (On). The device
starts to heat up. The operating lamp lights up and the central spit (4) rotates. The
kebabs (3) are grilled.
21 EN
If the central spit (4) cannot rotate freely, you should dismantle the device and
assemble it again. Make sure that the retaining bracket (1) is fi tted correctly to the
cog of the central spit (2).
7. Switch the device off by moving the On/Off switch (6) to Position 0 (Off).
During operation the handles of the skewers (3) become hot! Allow them to cool
down before you remove the skewers (3). We recommend that you wear oven
gloves when handling the device.
8. Disconnect the device from the mains power after use and allow it to cool down
before you clean it.
Cleaning and Storage
CAUTION!
■ Before cleaning the device, always remove the mains plug from the mains socket and
allow the device to cool down.
■ The central spit with the skewer plate, the skewers and the fat collecting tray are
suitable for the dishwasher.
■ Do not spray cleaning agents directly onto the device.
■ CAUTION The device, the cable and the plug should never be immersed in water or
other liquids. There is the risk of an electric shock.
■ Do not use corrosive or abrasive cleaning agents, rough sponges or knives to clean
the device. These could damage the surfaces.
■ Never wind the cable tightly around the device when you put it away.
1. Make sure that the device has completely cooled down, is switched off and has been
disconnected from the mains power!
2. Dismantle the device (see the "Assembly” chapter).
3. Clean the device with a soft cloth and a little mild washing-up liquid.
4. Clean the accessory parts with a little washing-up liquid and warm water.
Over time residues of fat can burn into the heat shield (10). This leads to
discolouration, but does not affect the performance of the device.
5. Dry the device and the accessories thoroughly before you store them all away.
6. Store the device in a dry place that is protected from sunlight and is not accessible
to children and animals.
EN 22
Troubleshooting
If the device stops working properly, fi rst check whether you are able to correct the
problem yourself.
Do not carry out any repairs yourself to the device, the connecting cable or
the mains plug!
Problem possible cause / solution
The device does not work.
The operating lamp does not
light up.
• Is the plug inserted in the socket correctly?
• Is the socket defective? Try another socket.
• Check the fuse of your mains connection.
The central spit does not
rotate.
• Does the food protrude beyond the edge of the
skewer plate?
• Are the cogs fi tted correctly to the skewers? The
smooth surface must be facing upwards!
Technical Data
Model: HS-R10A
Article No.: Z 05914
Voltage supply: 220 – 240 V ~ 50 Hz
Power: max. 1400 W
Protection class: I
Disposal
The packaging material is recyclable. Please dispose of it in an environmentally
friendly manner and take it to a recycling centre.
Dispose of the device in an environmentally friendly manner if you do not wish to
use it any more. It should not be disposed of alongside general household waste.
Dispose of it at a recycling centre for used electrical and electronic devices. You
can obtain more information from your local authorities.
Customer Service / Importer:
DS Produkte GmbH
Am Heisterbusch 1
19258 Gallin
Germany
Tel.: +49 38851 314650
(Calls to German landlines are
subject to charges. The cost varies
depending on the service provider.)
All rights reserved.
23 FR
Utilisation conforme
• L’appareil est destiné à faire griller la viande à kebab, gyros, les poulets entiers et
les brochettes.
• L’appareil est conçu pour un usage exclusivement domestique, non professionnel.
• Cet appareil doit être utilisé uniquement dans le but indiqué et tel que stipulé dans le
présent mode d’emploi. Toute autre utilisation est considérée comme non conforme.
• Tout défaut imputable à une utilisation non conforme, à une détérioration ou à des
tentatives de réparation est exclu de la garantie. L’usure normale est également
exclue de la garantie.
Contenu
Utilisation conforme ____________________ 23
Consignes de sécurité ___________________ 24
Vue générale de l’appareil & composition ____ 27
Avant la première utilisation ______________ 27
Assemblage ___________________________ 28
Utilisation _____________________________ 29
Nettoyage et rangement _________________ 31
Dépannage ___________________________ 32
Caractéristiques techniques ______________ 32
Mise au rebut __________________________ 32
Explication des sym-
boles utilisés
Consignes de sécurité :
lisez attentivement ces
consignes de sécurité et
observez-les minutieu-
sement afi n d'éviter tout
risque de blessure ou de
dégâts matériels.
Attention aux surfaces
chaudes !
Informations complémen-
taires
Pour usage alimentaire.
Consultez le mode d'em-
ploi avant l'utilisation !
Chère cliente, cher client,
Nous vous félicitons d'avoir fait l'acquisition de ce gril.
Veuillez lire attentivement le présent mode d’emploi avant la première utilisation de
l’appareil et le conserver précieusement pour toute consultation ultérieure. Si vous
donnez ou prêtez cet appareil à une tierce personne, n'oubliez pas d'y joindre ce
mode d'emploi. Le fabricant et l'importateur déclinent toute responsabilité en cas de
non-observation des instructions qu'il contient.
Pour toute question concernant l'appareil et ses pièces de rechange et accessoires,
vous pouvez contacter le service après-vente à partir de notre site Internet :
www.service-shopping.de
FR 24
Consignes de sécurité
■ Cet appareil peut être utilisé par les enfants à partir de 8 ans
et les personnes dont les capacités physiques, sensorielles
ou mentales sont réduites ou manquant d’expérience et/ou de
connaissances lorsqu’elles sont sous surveillance ou qu’elles
ont été instruites quant à l’utilisation de l’appareil en toute
sécurité et qu’elles ont compris les risques en découlant.
■ Les enfants ne doivent pas jouer avec l’appareil.
■ Le nettoyage et l’entretien utilisateur ne doivent pas être réalisés
par les enfants sauf s’ils ont plus de 8 ans et qu’ils sont sous
surveillance.
■ Tenez l’appareil et son cordon d’alimentation hors de portée des
animaux et des enfants de moins de 8 ans.
Attention aux surfaces chaudes ! À l’utilisation, l’appareil
devient très chaud. Veillez impérativement à ne pas entrer
en contact avec des parties chaudes pendant ou après
l’utilisation de l’appareil.
Nous recommandons d’utiliser des gants pour manipuler
l’appareil.
■ L’appareil doit toujours être débranché du secteur lorsqu’il n’est
pas sous surveillance, avant d’être assemblé, démonté ou
nettoyé.
■ Ne procédez à aucune modifi cation sur l’appareil. Ne remplacez
pas vous-même le cordon d’alimentation. Si l’appareil lui-même,
son cordon d’alimentation ou sa fi che sont endommagés, c’est
au fabricant, au service après-vente ou à toute personne aux
qualifi cations similaires (par ex. un atelier spécialisé) qu’il
revient de le réparer afi n d’éviter tout danger.
■ L’appareil n’est pas conçu pour une utilisation avec un minuteur
auxiliaire ou un système de commande à distance externe.
■ ATTENTION : respectez les consignes de nettoyage
mentionnées au paragraphe « Nettoyage et rangement » !
25 FR
Risques de blessure
■ Ne laissez pas l’appareil et son emballage à la portée des enfants ou des animaux.
Ils risqueraient de se blesser et de s’étouffer avec !
■ ATTENTION, risque de brûlures au contact des surfaces chaudes ! Durant
l’utilisation, les poignées en plastique des pics à brochettes peuvent également être
chaudes. Laissez-les refroidir avant de retirer les brochettes de l’appareil. Nous
recommandons d’utiliser des gants pour manipuler l’appareil.
■ ATTENTION, les broches sont pointues ! Faites preuve de prudence lorsque vous
les utilisez ou les nettoyez.
■ Afi n que personne ne risque de trébucher, veillez à ce que le cordon d’alimentation
branché ne gêne pas le passage. Le cordon ne doit pas pendre de la surface d’appui
pour ne pas risquer d’entraîner l’appareil et de le faire tomber.
■ Laissez l’appareil suffi samment refroidir avant de le nettoyer et/ou de le ranger.
Risque d’électrocution et risque d’incendie
■ Utilisez l’appareil uniquement dans une pièce fermée.
■ Placez toujours l’appareil avec un espace libre suffi sant tout autour et au-dessus
(env. 30 cm).
■ Branchez l’appareil uniquement sur une prise installée de façon réglementaire et mise
à la terre. La prise doit rester facilement accessible même après le branchement de
sorte à pouvoir rapidement couper l’alimentation de l’appareil. La tension du secteur
doit correspondre aux caractéristiques techniques de l’appareil.
■ N’utilisez pas de rallonge électrique sur l’appareil.
■ Ne plongez jamais l’appareil, le cordon d’alimentation et la fi che dans l’eau ou tout
autre liquide et assurez-vous qu’ils ne risquent pas de tomber dans l’eau ou d’être
mouillés.
■ Si l’appareil tombe dans l’eau, coupez immédiatement l’alimentation électrique.
N’essayez pas de le sortir de l’eau tant qu’il est encore raccordé au réseau électrique !
■ Ne saisissez jamais l’appareil, le cordon d’alimentation et la fi che à mains humides
lorsque ces composants sont raccordés au réseau électrique.
■ N’utilisez pas l’appareil en cas de dysfonctionnement, s’il est tombé par terre ou
encore dans l’eau. Avant toute remise en service, faites-le contrôler dans un atelier
spécialisé.
■ Arrêtez l’appareil et retirez la fi che de la prise de courant si un dysfonctionnement
survient en cours d’utilisation ou en cas d’orage.
■ Pour débrancher l’appareil, tirez toujours sur la fi che, jamais sur le cordon
d’alimentation électrique.
■ N’utilisez pas l’appareil dans des locaux renfermant des poussières facilement
infl ammables ou des vapeurs nocives ou explosives.
■ Ne faites pas fonctionner l’appareil dans un environnement très humide ni à proximité
de matières infl ammables.
■ Afi n d’éviter tout risque d’incendie de l’appareil, ne le couvrez pas lorsqu’il est en
cours de fonctionnement. Veillez à une ventilation suffi sante durant le fonctionnement
de l’appareil.

FR 26
■ En cas d’incendie :
– Il faut impérativement débrancher sans délai la fi che de la prise de courant.
– La graisse ou l’huile très chaude peuvent s’enfl ammer en cas de surchauffe. Ne
cherchez pas à éteindre de la graisse ou de l’huile en fl ammes avec de l’eau, mais
étouffez les fl ammes par exemple à l’aide d’une couverture ignifuge, ou éteignez
la graisse ou l’huile en feu à l’aide d’un extincteur adapté aux feux causés par la
graisse alimentaire.
– N’utilisez PAS D’EAU pour éteindre le feu car la vapeur d’eau créerait un risque de
brûlure supplémentaire.
– Mettez l’appareil au rebut.
■ Ne mettez pas de matières infl ammables telles que du carton, du papier, du plastique
ou des bougies sur l’appareil, ni à l’intérieur.
■ Ne mettez pas dans ou sur l’appareil des aliments enveloppés dans un fi lm protecteur
ou un sac en plastique ou de l’alu.
■ Avant chaque utilisation, vérifi ez que l’appareil ne présente aucun dommage. Utilisez-
le uniquement lorsque l’appareil, le cordon d’alimentation et la fi che ne présentent
aucun dommage.
Évitez les détériorations de l’appareil et du matériel
■ Placez toujours l’appareil sur une surface sèche, plane, solide et résistante à la
chaleur.
■ Pour ne pas risquer d’endommager l’appareil, placez-le à une distance suffi sante
d’autres sources de chaleur, par ex. des plaques de cuisson ou d’un four.
■ N’exposez pas l’appareil à des températures extrêmes, à des variations de
température importantes, au rayonnement direct du soleil ou à l’humidité.
■ Ne faites pas tomber l’appareil et ne lui faites pas subir de chocs violents.
■ Ne laissez jamais l’appareil sans surveillance lorsqu’il est en marche !
■ Il est interdit de déplacer l’appareil lorsqu’il est en marche.
■ Ne tirez pas sur l’appareil et ne le portez pas en le tenant par le cordon.
■ N’enroulez pas le cordon autour de l’appareil même.
■ Veillez à ce que le cordon ne soit ni pincé, ni coincé, ni posé sur des bords saillants
et qu’il n’entre pas en contact avec des surfaces chaudes.
■ Utilisez uniquement les accessoires fournis par le fabricant. L’utilisation d’accessoires
non autorisés par le fabricant provoque l’extinction de toute prise en charge et fait
perdre tout droit à la garantie.
■ Pour nettoyer l’appareil, n’utilisez pas de produits corrosifs ou abrasifs. Ces derniers
risqueraient d’endommager la surface de l’appareil.
Consignes en matière d’hygiène
■ Nettoyez l’appareil avant la première utilisation. Il peut en effet être contaminé par
des résidus de production. Il faut alors impérativement respecter les consignes de
nettoyage du paragraphe intitulé « Avant la première utilisation ».
■ Nettoyez soigneusement l’appareil après chaque utilisation afi n de prévenir toute
formation de germes (voir paragraphe « Nettoyage et rangement »).
■ Gardez l’appareil propre.
27 FR
Vue générale de l’appareil & composition
1 Support
2 Roue dentée de la broche
médiane
3 Pics à brochette (6x)
4 Broche médiane
5 Socle de la broche tournante
6 Interrupteur marche/arrêt I / O
avec témoin lumineux
indicateur de l'état de marche
7 Bac de récupération de la
graisse
8 Résistance thermique
9 Roue dentée en plastique des
pics à broche (6x)
10 Protection thermique
Non illustré :
• Cordon d'alimentation avec
fi che
1
2
3
8
4
5
6
7
10
9
Avant la première utilisation
ATTENTION !
■ Ne laissez pas les emballages à la portée des enfants ou des animaux. Ils risqueraient
notamment de s’étouffer avec !
■ Veuillez noter : à la première utilisation, un dégagement d’odeur peut se produire.
C’est pourquoi nous vous recommandons de faire d’abord fonctionner l’appareil
pendant quelques minutes SANS contenu afi n d’éliminer par la chaleur les éventuels
résidus de production. Veillez ce faisant à bien ventiler la pièce par ex. en laissant la
fenêtre grande ouverte.
■ Des résidus de production peuvent encore adhérer à l’appareil. Afi n éviter tout risque
pour la santé, nettoyez-le intégralement avant la première utilisation.
■ La broche médiane avec le socle de broche tournante, les pics à brochette et le bac
de récupération de la graisse sont lavables au lave-vaisselle.
1. Retirez l’appareil de son emballage et enlevez tous les fi lms protecteurs et les
adhésifs éventuellement présents. Assurez-vous que l’appareil ne présente aucun
dommage imputable au transport. En cas de dommage, ne l’utilisez pas (!), contactez
notre service après-vente.
2. Démontez l’appareil, le cas échéant (voir paragraphe « Assemblage »).
FR 28
3. Nettoyez l’appareil avec un chiffon doux humide et un peu de produit vaisselle. Net-
toyez les accessoires à l’eau chaude avec un produit vaisselle doux. Après cela,
essuyez soigneusement l’appareil et ses accessoires.
4. Placez l’appareil sur une surface sèche, plane et insensible à la chaleur avec un
espace libre suffi sant tout autour et en hauteur (environ 30 cm).
5. Branchez la fi che de l’appareil sur une prise installée de façon réglementaire.
6. Mettez l’appareil en marche en plaçant l’interrupteur marche/arrêt (6) sur la position I
(marche). Le témoin lumineux indicateur de l’état de marche s’allume. Laissez
l’appareil chauffer à vide pendant env. 5 minutes de sorte à éliminer tous les éventuels
résidus de production.
7. Arrêtez l’appareil en plaçant l’interrupteur marche/arrêt (6) sur la position 0 (arrêt).
8. Retirez la fi che de la prise de courant.
9. Laissez refroidir l’appareil et nettoyez-le ensuite à nouveau.
Assemblage
ATTENTION !
■ ATTENTION, risque de blessure ! Les broches sont pointues ! Faites preuve de
prudence lorsque vous les utilisez ou les nettoyez.
1. Placez l’appareil sur une surface sèche, plane et insensible à la chaleur avec un
espace libre suffi sant tout autour et en hauteur (environ 30 cm).
2. Placez le bac de récupération de la graisse (7) sur
le moyeu de la broche médiane placé sur le socle de
l’appareil.
3. Insérez le cas échéant la protection thermique (10) entre
la résistance thermique (8) et la paroi arrière de l’appareil.
29 FR
4. Insérez l’extrémité inférieure de la broche médiane (4)
dans le moyeu placé sur le socle de l’appareil.
5. Placez la roue dentée de la broche médiane (2) sur
l’extrémité supérieure de la broche médiane (4).
6. Positionnez l’extrémité la plus longue du support (1) dans
la fente de la paroi arrière de l’appareil.
7. Introduisez la vis à l’autre extrémité
du support (1) dans l’évidement de
l’étrier logé sur la roue dentée de la
broche médiane (2). Accrochez la
vis à droite.
8. Vissez-la afi n de fi xer le support (1).
Pour démonter l’appareil, procédez aux mêmes étapes dans l’ordre inverse.
Utilisation
ATTENTION !
■ ATTENTION, n’utilisez jamais l’appareil sans protection thermique. Assurez-vous
que celle-ci soit correctement en place avant de vous servir de l’appareil.
■ ATTENTION, risque de brûlures ! À l’utilisation, l’appareil devient chaud. Veillez
impérativement à ne pas entrer en contact avec des parties chaudes, telles que le
corps de l’appareil ou les accessoires, pendant ou après l’utilisation de l’appareil.
Nous recommandons d’utiliser des gants pour manipuler l’appareil. Procédez
au nettoyage, au transport et au rangement de l’appareil et de ses accessoires
seulement après leur refroidissement intégral.
• La broche médiane vous permet de faire griller jusqu’à 4 kg de viande ou un
poulet entier.
• Ne tranchez pas la viande trop épaisse, ceci facilitant la confection des
brochettes.
• Utilisez les pics à brochettes pour la cuisson de brochettes mixtes et
végétariennes, de saucisses ou de kebab.

FR 30
Préparation de kebab / gyros
1. Coupez la viande de votre choix en tranches.
2. Embrochez les tranches les unes sur les autres sur la broche médiane. Veillez à ce
que les tranches de viande ne dépassent pas le socle de la broche tournante.
3. Assemblez l’appareil tel qu’indiqué dans le mode d’emploi (voir paragraphe
« Assemblage »).
4. Branchez la fi che de l’appareil sur une prise installée de façon réglementaire.
5. Mettez l’appareil en marche en plaçant l’interrupteur marche/arrêt (6) sur la position I
(marche). L’appareil commence à chauffer. Le témoin lumineux indicateur de l’état de
marche s’allume et la broche médiane (4) tourne. La viande grille.
Lorsque la broche médiane (4) ne peut pas tourner librement, démontez l’appareil
et remontez-le. Veillez à ce que le support (1) soit bien calé dans la paroi arrière
et bien fi xé à la roue dentée de la broche médiane (2).
6. Une fois le degré de rôtissage atteint, arrêtez l’appareil en plaçant l’interrupteur
marche/arrêt (6) sur la position 0 (arrêt). Détachez à l’aide d’un couteau affûté la
partie extérieure de la viande grillée en prenant soin de rassembler les morceaux
dans un récipient approprié. Redémarrez l’appareil.
Répétez l’opération jusqu’à ce que toute la viande ait grillé.
7. Arrêtez l’appareil en plaçant l’interrupteur marche/arrêt (6) sur la position 0 (arrêt).
8. Débranchez l’appareil de la prise de courant après utilisation et laissez-le refroidir
avant de le nettoyer et de le ranger.
Cuisson du poulet
1. Embrochez le poulet à la verticale sur la broche médiane. Veillez à ce qu’il ne
dépasse pas le socle de la broche tournante.
2. Assemblez l’appareil tel qu’indiqué dans le mode d’emploi (voir paragraphe
« Assemblage »).
3. Branchez la fi che de l’appareil sur une prise installée de façon réglementaire.
4. Mettez l’appareil en marche en plaçant l’interrupteur marche/arrêt (6) sur la position I
(marche). L’appareil commence à chauffer. Le témoin lumineux indicateur de l’état de
marche s’allume et la broche médiane (4) tourne. Le poulet grille.
Lorsque la broche médiane (4) ne peut pas tourner librement, démontez l’appareil
et remontez-le. Veillez à ce que le support (1) soit bien calé dans la paroi arrière
et bien fi xé à la roue dentée de la broche médiane (2).
5. Arrêtez l’appareil en plaçant l’interrupteur marche/arrêt (6) sur la position 0 (arrêt).
6. Laissez l’appareil refroidir.
7. Retirez le support (voir paragraphe « Assemblage ») et extrayez le poulet cuit.
8. Débranchez l’appareil de la prise de courant après utilisation et laissez-le refroidir
avant de le nettoyer et de le ranger.
Cuisson de brochettes
1. Positionnez les roues dentées en plastique (9) par le haut sur les pics à brochette (3).
La face lisse de la roue dentée doit être orientée vers le haut et la roue doit
s’enclencher intégralement.
2. Embrochez les aliments de votre choix sur les pics à brochette (3).
31 FR
3. Assemblez l’appareil tel qu’indiqué dans le mode d’emploi (voir paragraphe
« Assemblage »).
4. Introduisez les extrémités inférieures des pics à brochette (3) dans les perforations
extérieures du socle de broche tournante (5).
5. Suspendez les pics à brochette (3), les poignées reposant dans les évidements
extérieurs de la roue dentée de la broche médiane (2). Veillez à ce que la roue
dentée en plastique des pics à brochette (9) et la roue dentée de la broche médiane
(2) soient bien engagées l’une dans l’autre.
6. Mettez l’appareil en marche en plaçant l’interrupteur marche/arrêt (6) sur la position I
(marche). L’appareil commence à chauffer. Le témoin lumineux indicateur de l’état de
marche s’allume et la broche médiane (4) tourne. Les brochettes (3) grillent.
Lorsque la broche médiane (4) ne peut pas tourner librement, démontez l’appareil
et remontez-le. Veillez à ce que le support (1) soit bien calé dans la paroi arrière
et bien fi xé à la roue dentée de la broche médiane (2).
7. Arrêtez l’appareil en plaçant l’interrupteur marche/arrêt (6) sur la position 0 (arrêt).
Les poignées des pics à brochettes (3) deviennent chaudes durant l’utilisation !
Laissez-les refroidir avant de retirer les pics à brochettes (3). Nous recommandons
d’utiliser des gants pour manipuler l’appareil.
8. Débranchez l’appareil de la prise de courant après utilisation et laissez-le refroidir
avant de le nettoyer et de le ranger.
Nettoyage et rangement
ATTENTION !
■ Avant le nettoyage, débranchez toujours la fi che et laissez l’appareil refroidir.
■ La broche médiane avec le socle de broche tournante, les pics à brochette et le bac
de récupération de la graisse sont lavables au lave-vaisselle.
■ Ne pulvérisez pas de détergent directement sur l’appareil.
■ ATTENTION, ne plongez jamais l’appareil, le cordon ou la fi che dans l’eau ou dans
tout autre liquide. Ceci présente un fort risque d’électrocution.
■ N’utilisez pas de produits ni de disques de nettoyage corrosifs ou abrasifs, d’éponges
rugueuses ni de couteaux pour l’entretien. De tels produits risquent d’endommager
les surfaces.
■ N’enroulez jamais trop étroitement le cordon autour de l’appareil lorsque vous le
rangez.
1. Assurez-vous que l’appareil a complètement refroidi, qu’il est éteint et débranché du
secteur.
2. Démontez l’appareil (voir paragraphe « Assemblage »).
3. Nettoyez l’appareil avec un chiffon doux et un peu de produit vaisselle.
4. Nettoyez les accessoires à l’eau chaude avec un produit vaisselle doux.
Avec le temps, des résidus graisseux peuvent encrasser la protection
thermique (10). Cela cause des décolorations sans toutefois restreindre le bon
fonctionnement de l’appareil.
FR 32
5. Essuyez soigneusement l’appareil et ses accessoires avant de tout ranger.
6. Rangez l’appareil dans un endroit sec à l’abri du soleil, hors de portée des enfants et
des animaux domestiques.
Dépannage
Si l’appareil ne fonctionne pas correctement, examinez tout d’abord le problème pour
constater si vous pouvez y remédier vous-même.
Si l’appareil, le cordon d’alimentation ou la fi che sont défectueux, n’essayez
pas de les réparer vous-même!
Problème Cause possible/solution
L’appareil ne fonctionne
pas. Le témoin lumineux
indicateur de l’état de marche
ne s’allume pas.
• La fi che est-elle correctement introduite dans la
prise de courant ?
• La prise est-elle défectueuse ? Essayez avec une
autre prise de courant.
• Contrôlez le fusible du secteur.
La broche médiane ne tourne
pas.
• La viande à griller dépasse-t-elle du socle de la
broche tournante ?
• Les roues dentées sont-elles correctement
assemblées sur les pics à broche ? La surface lisse
doit être orientée vers le haut !
Caractéristiques techniques
Modèle : HS-R10A
Réf. art : Z 05914
Tension d’alimentation : 220 – 240 V ~ 50 Hz
Puissance : max. 1400 W
Classe de protection : I
Mise au rebut
Les matériaux d’emballage sont recyclables. Débarrassez-vous de l’emballage
dans le respect de l’environnement en le déposant à un point de collecte prévu
à cet effet.
Mettez cet appareil au rebut conformément aux prescriptions pour la protection
de l’environnement lorsque vous désirez vous en séparer. Ne le jetez pas
avec les ordures ménagères. Remettez-le à une station de collecte et de
recyclage d’appareils électriques et électroniques usagés. Pour de plus amples
renseignements à ce sujet, adressez-vous aux services municipaux compétents.
Service après-vente /
importateur :
DS Produkte GmbH
Am Heisterbusch 1
19258 Gallin
Allemagne
Tél. : +49 38851 314650
(Prix d‘un appel vers le réseau
fi xe allemand. Coût variable
selon le prestataire.)
Tous droits réservés.
33 NL
Doelmatig gebruik
• Het apparaat is bedoeld voor het grillen van döner, gyros, hele kippen en
sjasliekspiesen.
• Het apparaat is ontworpen voor particulier gebruik, niet voor commerciële doeleinden.
• Gebruik het apparaat uitsluitend waarvoor het is bedoeld en zoals beschreven in de
handleiding. Elk ander gebruik geldt als niet-doelmatig.
• Alle gebreken die zijn ontstaan door onvakkundige behandeling, beschadiging
of reparatiepogingen, zijn uitgesloten van garantie. Dit geldt ook voor de normale
slijtage.
Inhoud
Doelmatig gebruik ______________________ 33
Veiligheidsaanwijzingen __________________ 34
Apparaatoverzicht & leveringsomvang ______ 37
Vóór het eerste gebruik _________________ 37
Montage ______________________________ 38
Gebruik ______________________________ 39
Reinigen en opbergen ___________________ 41
Storingen verhelpen ____________________ 42
Technische gegevens ___________________ 42
Afvoeren _____________________________ 42
Verklaring van sym-
bolen
Veiligheidsaanwijzingen:
lees deze aandachtig
door en houdt u zich hier-
aan om lichamelijk letsel
en materiële schade te
voorkomen.
Waarschuwing voor hete
oppervlakken!
Aanvullende informatie
Geschikt voor levensmid-
delen.
Bedieningshandleiding
vóór gebruik lezen!
Geachte klant,
Wij zijn blij dat u hebt besloten tot de aankoop van deze grill.
Gelieve vóór het eerste gebruik van het apparaat de handleiding zorgvuldig door lezen
en deze te bewaren om later nog eens na te kunnen nalezen. Wanneer u het apparaat
aan iemand anders geeft, moet tevens deze handleiding worden overhandigd.
Fabrikant en importeur aanvaarden geen aansprakelijkheid wanneer de informatie in
deze handleiding niet in acht wordt genomen.
Neem bij vragen over het apparaat en over reserveonderdelen/toebehoren contact op
met de klantenservice via onze website:
www.service-shopping.de

NL 34
Veiligheidsaanwijzingen
■ Dit apparaat kan worden gebruikt door kinderen vanaf 8 jaar
alsook door personen met beperkte lichamelijke, sensorische
of geestelijke vermogens of kinderen die niet beschikken
over ervaring en/of kennis, wanneer zij onder toezicht staan
en instructies hebben gekregen over hoe het apparaat op
veilige wijze kan worden gebruikt en wanneer zij de daaruit
voortvloeiende gevaren hebben begrepen.
■ Kinderen mogen niet spelen met het apparaat.
■ Reiniging en gebruikersonderhoud mogen niet worden
uitgevoerd door kinderen, tenzij zij ouder zijn dan 8 jaar en
onder toezicht staan.
■ Kinderen jonger dan 8 jaar en dieren moeten uit de buurt worden
gehouden van het apparaat en het netsnoer.
Waarschuwing voor hete oppervlakken! Het apparaat
wordt tijdens het gebruik erg heet. Let er absoluut op dat u
tijdens en na het gebruik van het apparaat niet in aanraking
komt met opgewarmde delen.
Voor de hantering van het apparaat raden wij aan om
keukenhandschoenen te gebruiken.
■ Wanneer het apparaat niet onder toezicht staat, en vóór het
monteren, demonteren of reinigen moet het altijd van het
stroomnet worden geïsoleerd.
■ Breng geen veranderingen aan het apparaat aan. Verwissel ook
niet zelf het netsnoer. Wanneer het apparaat, het netsnoer of de
stekker van het apparaat is beschadigd, dan moeten deze door
de fabrikant of klantenservice of een soortgelijk gekwalifi ceerde
persoon (bijv. gespecialiseerde werkplaats) worden vervangen,
om gevaren te voorkomen.
■ Het apparaat is niet bedoeld om te worden gebruikt in
combinatie met een externe tijdschakelaar of een apart
afstandsbedieningssysteem.
■ OPGELET: reinigingsinstructies opvolgen in het hoofdstuk
“Reinigen en opbergen”!

35 NL
Gevaar voor verwondingen
■ Houd kinderen en dieren uit de buurt van het apparaat en het verpakkingsmateriaal.
Er bestaat verwondings- en verstikkingsgevaar.
■ OPGELET Verbrandingsgevaar door hete oppervlakken! Tijdens het gebruik
worden ook de kunststof grepen van de sjasliekspiesen heet. Wacht tot ze zijn
afgekoeld voordat u de sjasliekspiesen uit het apparaat neemt. Voor de hantering
van het apparaat raden wij aan om keukenhandschoenen te gebruiken.
■ OPGELET De spiesen zijn puntig. Wees voorzichtig wanneer u deze gebruikt en
reinigt.
■ Let erop dat niemand kan struikelen over het aangesloten netsnoer. Het snoer mag
niet naar beneden hangen vanaf de plaats waar het apparaat is geplaatst, om te
voorkomen dat het apparaat naar beneden wordt getrokken.
■ Laat het apparaat altijd voldoende afkoelen voordat u het reinigt en / of opbergt.
Gevaar voor elektrische schokken en brand
■ Gebruik het apparaat uitsluitend binnenshuis.
■ Plaats het apparaat altijd met voldoende vrije ruimte naar alle kanten en vrije ruimte
naar boven (ca. 30 cm).
■ Sluit het apparaat alleen aan op een contactdoos met aardingscontacten die is
geïnstalleerd volgens de voorschriften. De contactdoos moet ook na het aansluiten
goed toegankelijk zijn, zodat de verbinding met het stroomnet snel kan worden
geïsoleerd. De netspanning moet overeenstemmen met de technische gegevens
van het apparaat.
■ Gebruik geen verlengsnoeren met het apparaat.
■ Dompel het apparaat, het netsnoer en de stekker nooit in water of andere vloeistoffen,
en zorg ervoor dat deze niet in het water kunnen vallen of nat kunnen worden.
■ Mocht het apparaat in het water vallen, onderbreekt u meteen de stroomtoevoer.
Probeer niet om het uit het water te trekken, wanneer het is aangesloten op het
stroomnet!
■ Raak het apparaat, het netsnoer en de stekker nooit aan met vochtige handen, als
deze componenten zijn aangesloten op het stroomnet.
■ Gebruik het apparaat niet wanneer het niet goed functioneert, in het water of
naar beneden is gevallen. Laat het vóór ingebruikneming controleren in een
gespecialiseerde werkplaats.
■ Schakel het apparaat uit en trek de netstekker uit de contactdoos, wanneer tijdens
het gebruik een storing optreedt of vóór een onweersbui.
■ Trek altijd aan de stekker en nooit aan het netsnoer.
■ Gebruik het apparaat niet in ruimten, waarin zich licht ontvlambaar stof of giftige
alsook explosieve dampen bevinden.
■ Gebruik het apparaat niet in een zeer vochtige omgeving of in de buurt van brandbaar
materiaal.
■ Dek het apparaat tijdens het bedrijf niet af, om ontbranden van het apparaat te
voorkomen. Zorg voor voldoende ventilatie, wanneer het apparaat in bedrijf is.

NL 36
■ Bij brand:
– Trek onmiddellijk de netstekker eruit.
– Heet vet / hete olie kan bij oververhitting ontbranden. Blus brandend vet / brandende
olie niet met water maar doof de vlammen met een blusdeken en dergelijke of blus
een vetbrand met een brandblusser die is geschikt voor het blussen van branden
met spijsolie!
– Gebruik voor het blussen GEEN water omdat door de waterdamp extra
verbrandingsgevaar ontstaat.
– Verwijder het apparaat op milieuvriendelijke wijze.
■ Leg geen brandbare materialen, zoals karton, kunststof, papier of kaarsen op of in
het apparaat.
■ Voedingsmiddelen niet in vershoudfolie, plastic zakjes of aluminiumfolie verpakt in of
op het apparaat leggen.
■ Controleer het apparaat op beschadigingen, elke keer voordat u het in gebruik
neemt. Gebruik het alleen als het apparaat, het netsnoer en de stekker geen schade
vertonen!
Voorkomen van materiële schade en schade aan het apparaat
■ Zet het apparaat altijd op een droge, vlakke, stevige ondergrond die ongevoelig is
voor warmte.
■ Houd voldoende afstand tot andere warmtebronnen zoals kookplaten of ovens, om
schade aan het apparaat te voorkomen.
■ Stel het apparaat niet bloot aan extreme temperaturen, sterke temperatuurschomme-
lingen, direct zonlicht of vocht.
■ Laat het apparaat niet vallen en stel het niet bloot aan sterke schokken.
■ Laat het apparaat tijdens de werking nooit zonder toezicht!
■ Het apparaat mag tijdens het bedrijf niet worden bewogen.
■ Trek of draag het apparaat niet aan het netsnoer.
■ Wikkel het netsnoer niet rond het apparaat.
■ Let erop dat het netsnoer niet bekneld raakt, geknikt wordt of op scherpe randen
wordt gelegd, en dat het niet in aanraking komt met hete oppervlakken.
■ Gebruik alleen de bijgeleverde toebehoren van de fabrikant. Bij gebruik van niet door
de fabrikant toegelaten toebehoren vervalt elke aanspraak op garantie.
■ Gebruik voor het reinigen van het apparaat geen bijtende of schurende
reinigingsmiddelen. Deze kunnen het oppervlak beschadigen.
Aanwijzingen ten aanzien van hygiëne
■ Reinig het apparaat vóór het eerste gebruik. Er kunnen mogelijkerwijs productieresten
zijn achtergebleven. Neem hierbij beslist de reinigingsinstructies in het hoofdstuk
“Vóór het eerste gebruik” in acht.
■ Reinig het apparaat na elk gebruik, om de vorming van ziektekiemen te voorkomen
(zie hoofdstuk “Reinigen en opbergen”).
■ Houd het apparaat schoon.
37 NL
Apparaatoverzicht & leveringsomvang
1 Houder
2 Tandwiel van het draaispit
3 Sjasliekspiesen (6x)
4 Draaispit
5 Bord
6 Aan-/uitschakelaar I / O met
controlelampje
7 Vetopvangschaal
8 Verwarmingselement
9 Kunststof tandwiel van de
sjasliekspies (6x)
10 Hittebescherming
Niet afgebeeld:
• Netsnoer met stekker
1
2
3
8
4
5
6
7
10
9
Vóór het eerste gebruik
OPGELET!
■ Houd kinderen en dieren uit de buurt van het verpakkingsmateriaal. Er bestaat o.a.
verstikkingsgevaar!
■ Neem s.v.p. het volgende in acht: bij het eerste gebruik kan er geurontwikkeling
ontstaan. Wij raden u daarom aan, het apparaat eerst enkele minuten ZONDER
inhoud te gebruiken, om eventuele productieresten door hitte te verwijderen. Zorg
gedurende deze tijd voor een goed doorgeluchte ruimte, bijv. door middel van wijd
geopende ramen!
■ Er kunnen eventueel nog productieresten zijn achtergebleven op het apparaat. Om
schade aan de gezondheid te voorkomen, dient u het apparaat grondig te reinigen
alvorens het voor de eerste keer te gebruiken.
■ Het draaispit met bord, de sjasliekspiesen en de vetopvangschaal zijn geschikt voor
de vaatwasser.
1. Haal het apparaat uit de verpakking en verwijder alle eventueel aanwezige folie
en stickers. Controleer het apparaat op transportschade. Wanneer het apparaat is
beschadigd, gebruik het dan niet (!), maar neem contact op met onze klantenservice.
2. Haal het apparaat eventueel uit elkaar (zie hoofdstuk “Montage”).
NL 38
3. Reinig het apparaat met een zachte, vochtige doek en een beetje mild afwasmiddel.
Reinig de toebehoren met een beetje afwasmiddel en warm water. Droog het
apparaat en de toebehoren vervolgens goed af.
4. Plaats het apparaat op een droge en hittebestendige, vlakke ondergrond met
voldoende afstand aan alle kanten en naar boven (ca. 30 cm).
5. Steek de netstekker in een correct geïnstalleerde contactdoos.
6. Schakel het apparaat in door de aan-/uit-knop (6) op stand I (aan) te zetten. Het
controlelampje brandt. Laat het apparaat ca. 5 minuten opwarmen om eventuele
productieresten te verwijderen.
7. Schakel het apparaat uit door de aan-/uit-knop (6) op stand 0 (uit) te zetten.
8. Trek de netstekker uit de contactdoos.
9. Laat het apparaat afkoelen en reinig het vervolgens opnieuw.
Montage
OPGELET!
■ OPGELET Verwondingsgevaar! De spiesen zijn puntig. Wees voorzichtig wanneer
u deze gebruikt en reinigt.
1. Plaats het apparaat op een droge en hittebestendige, vlakke ondergrond met
voldoende afstand aan alle kanten en naar boven (ca. 30 cm).
2. Plaats de vetopvangschaal (7) op de naaf van het draaispit
in de bodem van het apparaat.
3. Plaats eventueel de hittebescherming (10) tussen het
verwarmingselement (8) en de achterwand van het
apparaat.

39 NL
4. Plaats het draaispit (4) met het onderste uiteinde in de
naaf van de bodem van het apparaat.
5. Plaats het tandwiel van het draaispit (2) op het bovenste
uiteinde van het draaispit (4).
6. Plaats de houder (1) met het langere uiteinde in de gleuf in
de achterwand van het apparaat.
7. Leid de schroef op het andere
uiteinde van de houder (1) in de
uitsparing van de beugel op het
tandwiel van het draaispit (2). Haak
de schroef rechts in.
8. Draai de schroef vast om de
houder (1) te fi xeren.
Om het apparaat te demonteren gaat u in de omgekeerde volgorde te werk.
Gebruik
OPGELET!
■ OPGELET Gebruik het apparaat nooit zonder hittebescherming. Let erop dat hij juist
is bevestigd voordat u het apparaat in bedrijf neemt.
■ OPGELET Verbrandingsgevaar! Het apparaat wordt heet tijdens het gebruik. Let
er beslist op dat u tijdens en na het gebruik van het apparaat niet in aanraking komt
met opgewarmde delen zoals de behuizing of toebehoren. Voor de hantering van het
apparaat raden wij aan om keukenhandschoenen te gebruiken. Reinig, transporteer
of berg het apparaat en de toebehoren alleen op als deze volledig zijn afgekoeld.
• Op het draaispit kunt u tot 4 kg vlees of een hele kip grillen.
• Snijd de plakken vlees niet te dik zodat u ze eenvoudiger op het draaispit
kunt prikken.
• Gebruik de sjasliekspiesen om gemengde of vegetarische spiesen, worstjes
of kebab te grillen.

NL 40
Döner / gyros grillen
1. Snijd het gewenste vlees in plakken.
2. Prik de plakken vlees één voor één op het draaispit. Let erop dat de plakken vlees
niet uitsteken over de rand van het bord.
3. Monteer het apparaat zoals beschreven in de handleiding (zie hoofdstuk “Montage”).
4. Steek de netstekker in een correct geïnstalleerde contactdoos.
5. Schakel het apparaat in door de aan-/uit-knop (6) op stand I (aan) te zetten. Het
apparaat begint op te warmen. Het controlelampje brandt en het draaispit (4) draait.
Het vlees wordt gegrild.
Wanneer het draaispit (4) niet vrij kan draaien, neemt u het apparaat uit elkaar en
zet u het weer in elkaar. Let erop dat de houder (1) vast in de achterwand zit en
op de juiste wijze is bevestigd op het tandrad van het draaispit (2).
6. Wanneer de gewenste bruiningsgraad is bereikt, schakelt u het apparaat uit door de
aan-/uit-knop (6) op stand 0 (uit) te zetten. Snijd met een scherp mes de buitenste
laag van het vlees eraf en vang het vlees op met een passende container. Schakel
het apparaat weer in.
Herhaal deze stap tot het vlees volledig werd gegrild.
7. Schakel het apparaat uit door de aan-/uit-knop (6) op stand 0 (uit) te zetten.
8. Ontkoppel het apparaat na gebruik van het stroomnet en laat het afkoelen, voordat
u het reinigt en opbergt.
Kip grillen
1. Prik de kip loodrecht op het draaispit. Let erop dat deze niet uitsteekt over de rand
van het bord.
2. Monteer het apparaat zoals beschreven in de handleiding (zie hoofdstuk “Montage”).
3. Steek de netstekker in een correct geïnstalleerde contactdoos.
4. Schakel het apparaat in door de aan-/uit-knop (6) op stand I (aan) te zetten. Het
apparaat begint op te warmen. Het controlelampje brandt en het draaispit (4) draait.
De kip wordt gegrild.
Wanneer het draaispit (4) niet vrij kan draaien, neemt u het apparaat uit elkaar en
zet u het weer in elkaar. Let erop dat de houder (1) vast in de achterwand zit en
op de juiste wijze is bevestigd op het tandrad van het draaispit (2).
5. Schakel het apparaat uit door de aan-/uit-knop (6) op stand 0 (uit) te zetten.
6. Laat het apparaat afkoelen.
7. Verwijder de houder (zie hoofdstuk “Montage”) en neem de gegrilde kip eraf.
8. Ontkoppel het apparaat na gebruik van het stroomnet en laat het afkoelen, voordat
u het reinigt en opbergt.
Sjasliekspiesen grillen
1. Breng de kunststof tandwielen (9) van bovenaf aan op de sjasliekspiesen (3).
De gladde zijde van het tandwiel moet naar boven wijzen en het moet volledig
vastklikken.
2. Prik de gewenste levensmiddelen op de sjasliekspiesen (3).
3. Monteer het apparaat zoals beschreven in de handleiding (zie hoofdstuk “Montage”).
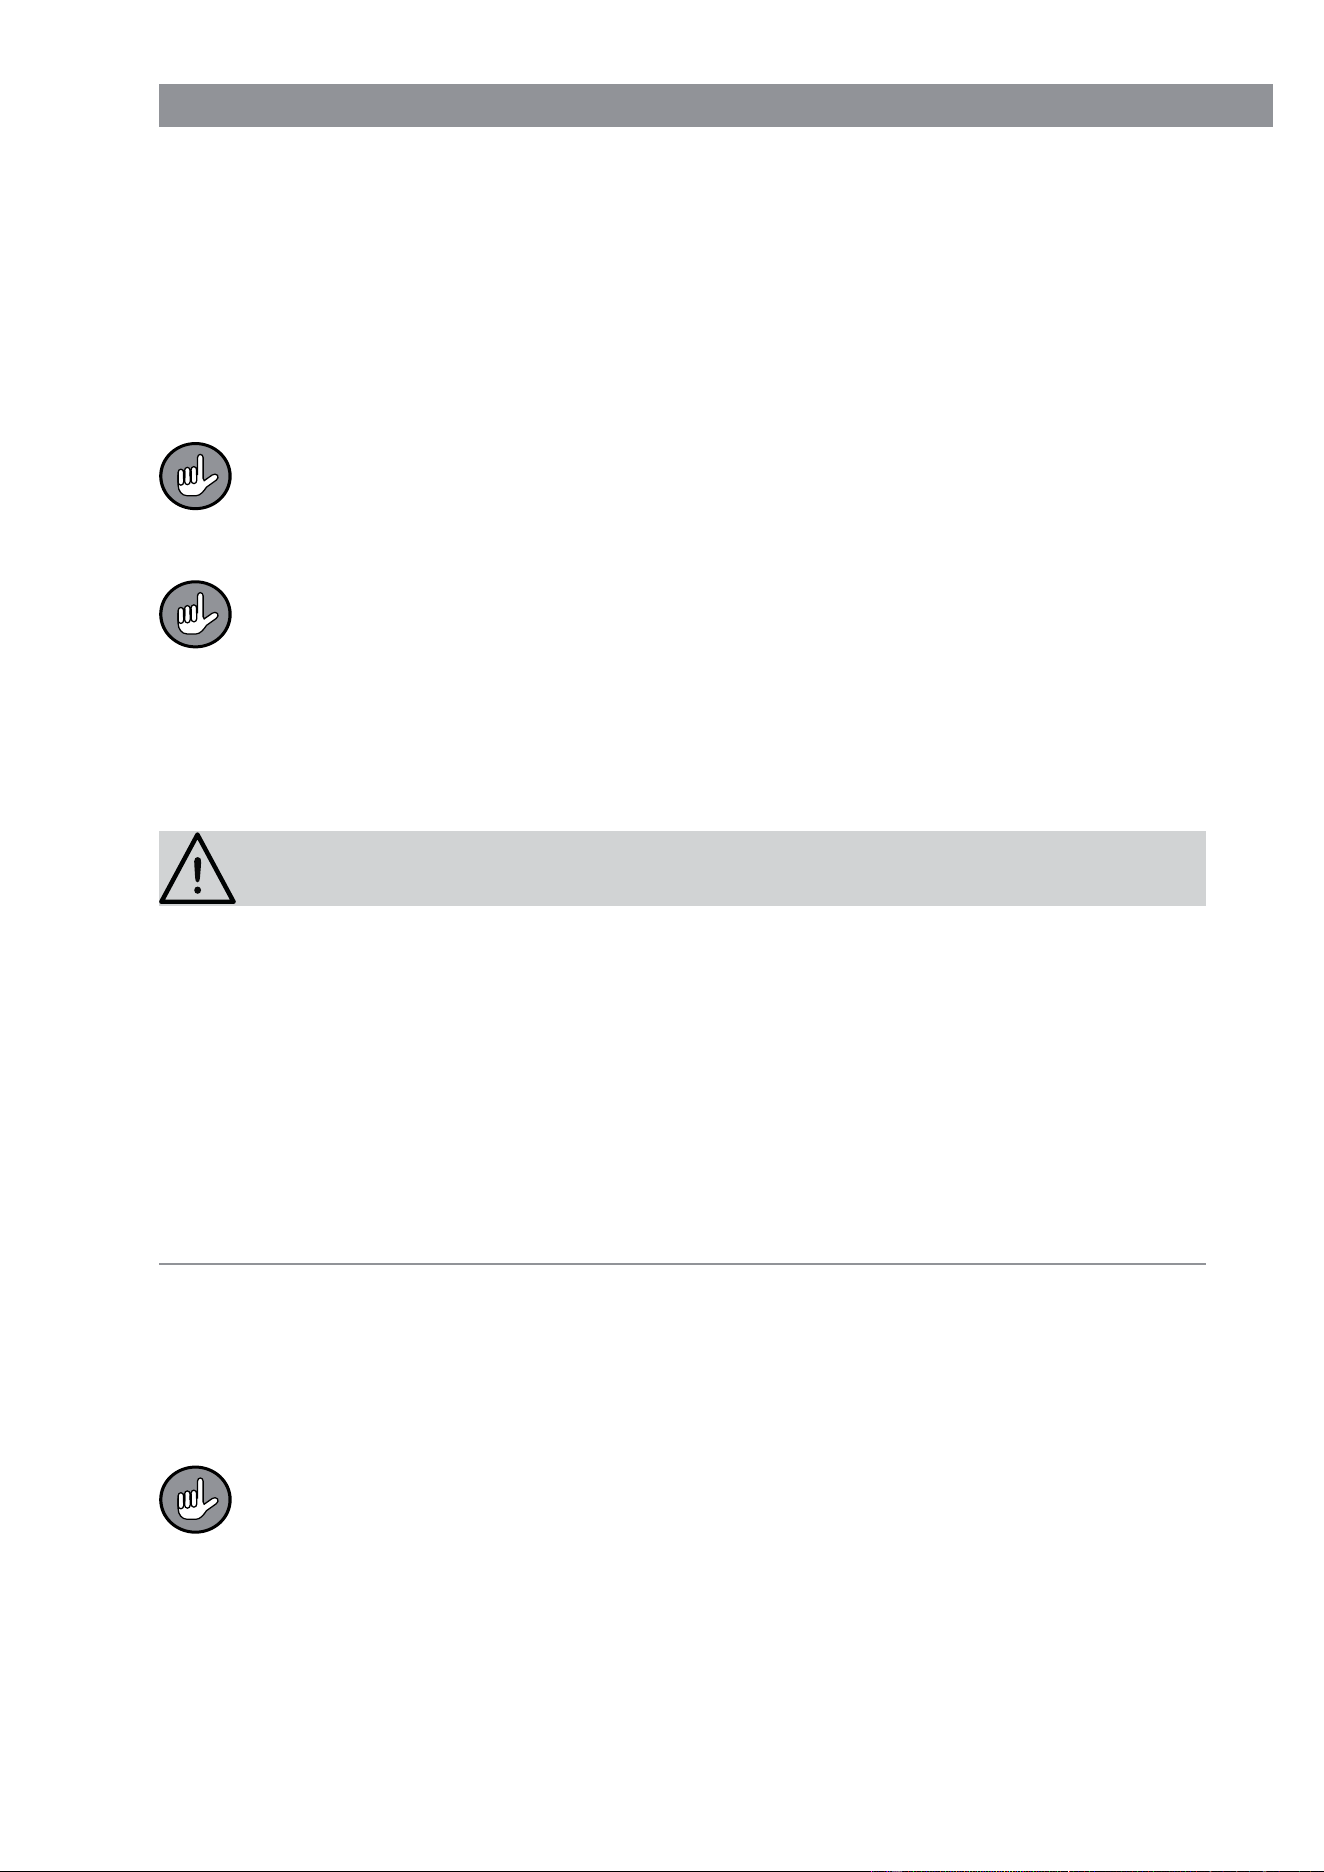
41 NL
4. Leid de onderste uiteinden van de sjasliekspiesen (3) in de buitenste gaten van het
bord (5).
5. Hang de sjasliekspiesen (3) met de grepen in de buitenste uitsparingen op het tandwiel
van het draaispit (2). Let erop dat het kunststof tandwiel van de sjasliekspies (9) en
het tandwiel van het draaispit (2) in elkaar grijpen.
6. Schakel het apparaat in door de aan-/uit-knop (6) op stand I (aan) te zetten. Het
apparaat begint op te warmen. Het controlelampje brandt en het draaispit (4) draait.
De sjasliekspiesen (3) worden gegrild.
Wanneer het draaispit (4) niet vrij kan draaien, neemt u het apparaat uit elkaar en
zet u het weer in elkaar. Let erop dat de houder (1) vast in de achterwand zit en
op de juiste wijze is bevestigd op het tandrad van het draaispit (2).
7. Schakel het apparaat uit door de aan-/uit-knop (6) op stand 0 (uit) te zetten.
De grepen van de sjasliekspiesen (3) worden tijdens het gebruik heet! Laat ze
afkoelen, voordat u de sjasliekspiesen (3) verwijdert. Voor de hantering van het
apparaat raden wij aan om keukenhandschoenen te gebruiken.
8. Ontkoppel het apparaat na gebruik van het stroomnet en laat het afkoelen, voordat
u het reinigt en opbergt.
Reinigen en opbergen
OPGELET!
■ Trek vóór het reinigen altijd de netstekker uit de contactdoos en laat het apparaat
afkoelen.
■ Het draaispit met bord, de sjasliekspiesen en de vetopvangschaal zijn geschikt voor
de vaatwasser.
■ Sproei geen schoonmaakproducten rechtstreeks op het apparaat.
■ OPGELET Dompel het apparaat, het snoer of de netstekker nooit in water of andere
vloeistoffen. Er bestaat gevaar voor een elektrische schok.
■ Gebruik voor het reinigen geen bijtende of schurende reinigingsmiddelen, ruwe
sponsen of messen. Deze zouden de oppervlakken kunnen beschadigen.
■ Wikkel het snoer nooit strak om het apparaat, wanneer u het opbergt.
1. Zorg ervoor dat het apparaat volledig is afgekoeld, uitgeschakeld en de stekker uit de
contactdoos is getrokken!
2. Haal het apparaat uit elkaar (zie hoofdstuk “Montage”).
3. Reinig het apparaat met een zachte doek en een beetje mild afwasmiddel.
4. Reinig de toebehoren met een beetje afwasmiddel en warm water.
Na verloop van tijd kunnen vetresten op de hittebescherming (10) vastbranden.
Dat leidt tot verkleuringen, maar beïnvloedt de werking van het apparaat echter
niet.
5. Droog het apparaat en de toebehoren grondig af, voordat u alles opbergt.
6. Bewaar het apparaat op een droge, tegen zonlicht beschermde alsook voor kinderen
en dieren onbereikbare plaats.
NL 42
Storingen verhelpen
Wanneer het apparaat niet naar behoren functioneert, gelieve dan eerst na te gaan of u
een probleem zelf kunt verhelpen.
Voer niet zelfstandig reparaties uit aan het apparaat, het aansluitsnoer of
de netstekker!
Probleem Mogelijke oorzaak / oplossing
Het apparaat werkt niet. Het
controlelampje gaat branden.
• Zit de netstekker goed in de contactdoos?
• Is de contactdoos defect? Probeer een andere
contactdoos.
• Controleer de zekering van uw netaansluiting.
Het centrale spit draait niet.
• Steekt het te grillen levensmiddel uit over de rand
van het bord?
• Zijn de tandwielen op de sjasliekspiesen juist
gemonteerd? De gladde zijde moet naar boven
wijzen!
Technische gegevens
Model: HS-R10A
Artikelnr.: Z 05914
Spanningsvoorziening: 220 – 240 V ~ 50 Hz
Vermogen: max. 1400 W
Beschermingsklasse: I
Afvoeren
Het verpakkingsmateriaal kan worden gerecycled. Voer de verpakking op
milieuvriendelijke wijze af en breng deze naar een recyclepunt.
Voer het apparaat op milieuvriendelijke wijze af, wanneer u er geen gebruik
meer van wilt maken. Het apparaat hoort niet bij het huisvuil. Breng het naar
een recyclingbedrijf voor oude elektrische en elektronische apparaten. Meer
informatie krijgt u bij uw plaatselijke gemeenteadministratie.
Klantenservice / importeur:
DS Produkte GmbH
Am Heisterbusch 1
19258 Gallin
Duitsland
Tel.: +49 38851 314650
(Niet gratis voor Duitse vaste lijnen.
Kosten variëren per aanbieder.)
Alle rechte voorbehouden.