
MOTORCYCLE WHEEL CHOCK
USER MANUA
Technical Support and E-Warranty Certificate www.vevor.com/support
L
Model: TYGJ210084
We continue to be committed to provide you tools with competitive price. "Save Half", "Half
Price" or any other similar expressions used by us only represents an estimate of savings you
might benefit from buying certain tools with us compared to the major top brands and does
not necessarily mean to cover all categories of tools offered by us. You are kindly reminded to
verify carefully when you are placing an order with us if you are actually saving half in
comparison with the top major brands.
Have product questions? Need technical support? Please feel free to
contact us:
TechnicalSupportandE-WarrantyCertificate
www.vevor.com/support
NEED HELP? CONTACT US!
This is the original instruction, please read all manual instructions
carefully before operating. VEVOR reserves a clear interpretation of our
user manual. The appearance of the product shall be subject to the
product you received. Please forgive us that we won't inform you again if
there are any technology or software updates on our product.
Model: TYGJ21008
Motorcycle
Wheel Chock
4

Safety & Warning
Read and understand this entire manual before assembling, installing,
operating, or servicing this product. Failure to follow these warnings
and instructions can cause death, personal injury or damage to
valuable property.
Keep this manual for the safety warnings and precautions.The
manual offers important information on how to assemble, use and
maintain this product. Support load by appropriate means after lifting.
Do not exceed rated capacity.
Use safety equipment.Safety shoes, hard hat and work gloves must be
used for applicable conditions.
Dress appropriately. Never wear loose fitting clothing or jewelry when
working. Contain long hair, and keep hair, clothing and gloves away
from moving parts.Use common sense when working. Stay alert and
concentrate when setting up and using the Motorcycle Wheel
Chock.Never work while under the influence of alcohol, drugs or
medications.
Before transporting a motorcycle in a truck bed, secure the motorcycle
with ropes, and/or tie-downs (not included). The vehicle’s engine must
be OFF and parking brake set before loading or unloading the
motor-cycle into or out of the Wheel Chock. Do not exceed 55 MPH
while transporting a motor-cycle in a truck bed.
Keep in mind that the warnings previously discussed cannot cover
all possible events and circumstances. It is important that the
person setting up and using this Motorcycle Wheel Chock use
common sense at all times.

Specifications
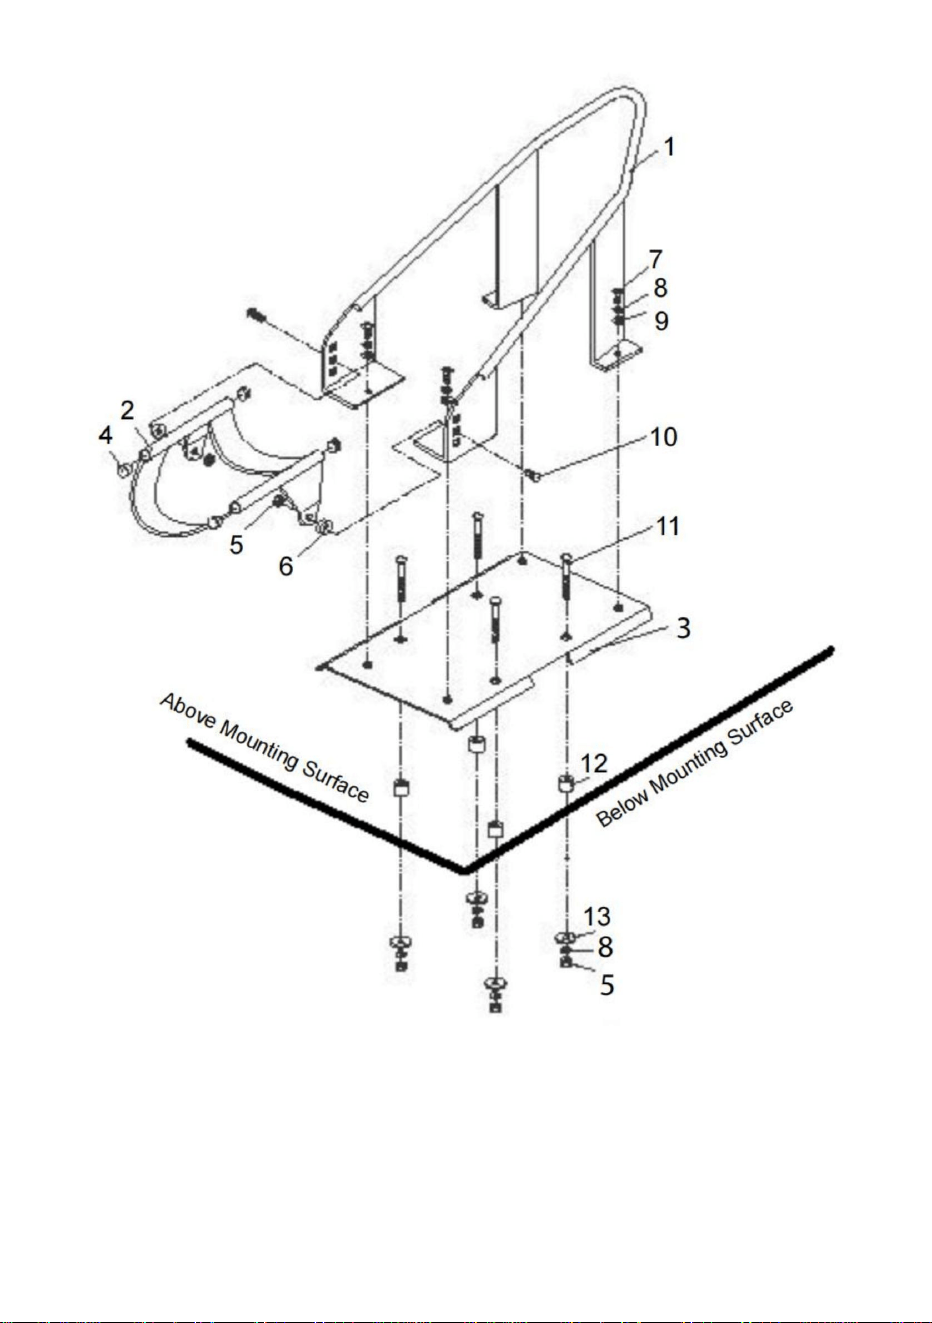
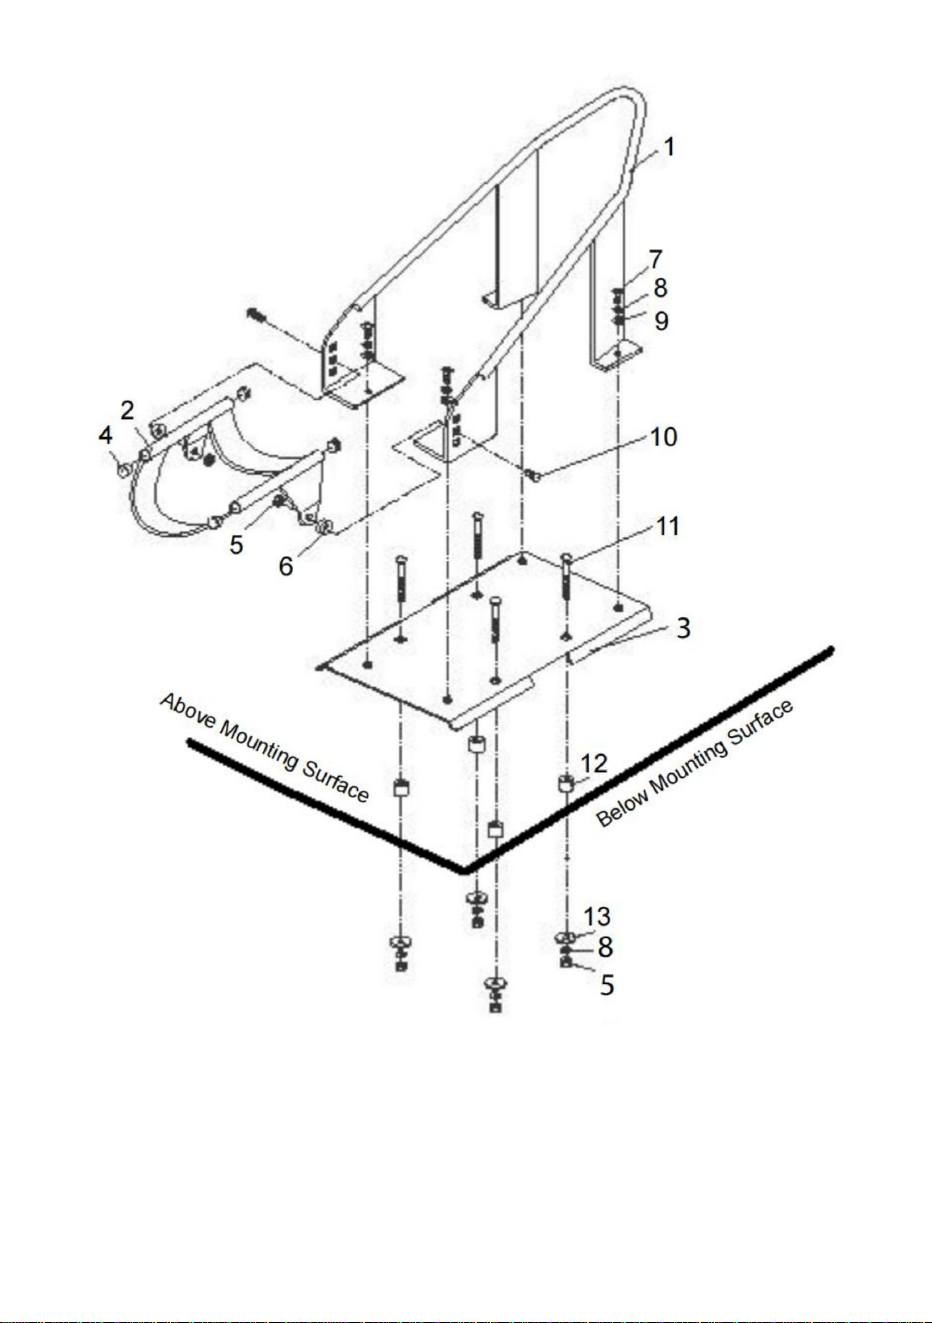
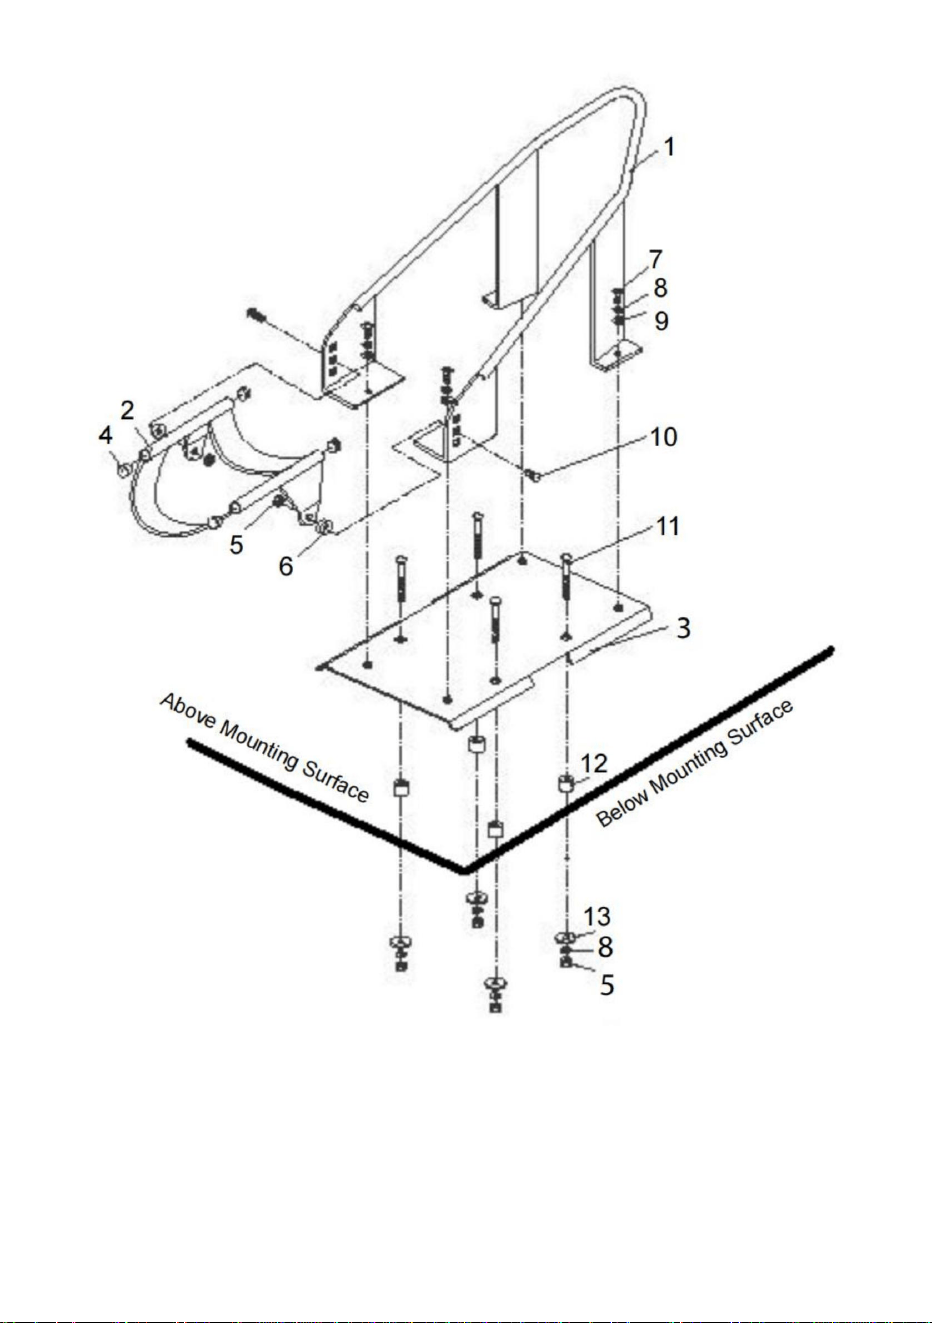
Parts List
Part
Description
Qty
Part
Description
Qty
1
Frame
1
8
Spring Washer
8
2
Pivoting Bracket
1
9
Flat Washer
4
3
Stand
1
10
Bolt M10x30
2
4
Cover
4
11
Bolt M10x70
4
5
Hex Nut M10
6
12
Nylon Sleeve
4
6
Nylon Washer
2
13
Large Washer
4
7
Hex Bolt
M10x20
4
Model Series
TYGJ210084
Maximum Load Capacity (lb)
1800
Fit Tire Diameter (inch)
15-21
Fit Tire Width (inch)
3-6.5
Net Weight (kg)
5.4
Gross Weight (kg)
6.6

Mounting the Motorcycle Wheel Chock
1. This Wheel Chock must be mounted to a solid, level surface. It is
designed to be of a truck, or on a motorcycle lift.
2. When mounting to a truck bed or on a motorcycle lift:

A. Find the desired location and place the Stand (3) in the
proper position.Use the 4 holes in the Stand as a
template to mark where drilled holes need to be.
B. Using a steel cutting drill bit, drill the proper size holes for
Bolts M10 (11).
C. Attach the Stand (3) to the surface by first inserting 4
Bolts (11)through the top of the Stand; put Nylon Sleeve
(12) on each bolt from the underside of Stand.
D. Secure all Bolts by adding Large Washer (13), Spring
Washer (8) and Hex Nut (5), all from underneath the truck
bed or lift surface.
3. When mounting to a concrete floor:
A. Locate the desired position for the Wheel Chock; consider size of
the motorcycle and how much room is needed to maneuver the
motorcycle in and out of the Wheel Chock. The concrete surface
must be level,solid and capable of supporting heavy equipment.
B. Concrete anchors (not included) will be needed to secure the Stand
(3) into the concrete.
C. Find the desired location and place the Stand (3) in the proper
position. Use the 4 holes in the Stand as a template to mark where
drilled holes need to be.
D.
Use concrete drill bit to drill the appropriate sized holes.
E. Follow hardware manufacturer’s instructions for properly
securing concrete anchors in the cement. Then mount the
Stand (3) to the concrete using the concrete anchors.

Using the Motorcycle Wheel Chock
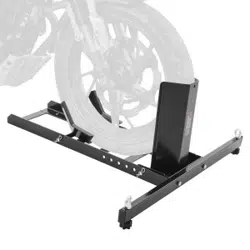
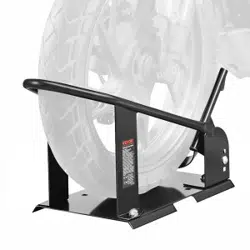
1.See bracket adjustment positions in the photo on this page.
The Pivoting Bracket can be adjusted to one of three positions de-
pending on the size of the motorcycle wheel. Find the position that
best locks the wheel in place when the wheel is rolled in and the
Bracket pivots up to it’s closed position.
2.The motorcycle is slowly rolled into the Wheel Chock when
the Pivoting Bracket (2) is in the open, horizontal position as shown
in the photo. As the wheel rolls in, the Pivoting Bracket will pivot
upward and close, securing the motorcycle in the Wheel Chock.
3
.
If the motorcycle is going to be stored in the Wheel Chock for
a length of time, it is recommended that additional stability sup- ports
are used (straps or rope).
4
.
To release the motorcycle from the Wheel Chock, slowly roll
back the motorcycle away from the Wheel Chock.
Maintaining the Wheel Chock
Frequently check the condition of the Motorcycle Wheel Chock.
Make sure all components are in good condition. If the Wheel
Chock becomes damaged through accident,or if any weld damage is
noted, the product should be replaced. Check to make sure that all
hardware is tightly secured in place.Keep the Wheel Chock clean.


UTILISATEURRÉUSSI
CALEDEROUEDEMOTO
L
Nousnousengageonsàvousfournirdesoutilsàdesprixcompétitifs.«Économisezlamoitié»,«Moitié
prix»outouteautreexpressionsimilaireutiliséeparnousnereprésentequ'uneestimationdeséconomiesque
vouspourriezréaliserenachetantcertainsoutilscheznousparrapportauxgrandesmarquesetnesignifie
pasnécessairementcouvrirtouteslescatégoriesd'outilsquenousproposons.Nousvousrappelonsdebien
vouloirvérifiersoigneusementlorsquevouspassezunecommandecheznoussivouséconomisez
réellementlamoitiéparrapportauxgrandesmarques.
Modèle:TYGJ210084
Assistancetechniqueetcertificatdegarantieélectroniquewww.vevor.com/support
Machine Translated by Google

Vousavezdesquestionssurnosproduits?Vousavezbesoind'assistancetechnique?N'hésitezpasà
nouscontacter:
Modèle:TYGJ210084
Ils'agitdelanoticed'utilisationd'origine.Veuillezlireattentivementtouteslesinstructionsdu
manuelavantdel'utiliser.VEVORseréserveledroitd'interpréterclairementnotremanueld'utilisation.
L'apparenceduproduitdépendduproduitquevousavezreçu.Veuilleznousexcuser,nousne
vousinformeronsplusencasdemiseàjourtechnologiqueoulogicielledenotreproduit.
Assistancetechniqueetcertificatdegarantie
électroniquewww.vevor.com/support
Moto
Calederoue
BESOIND'AIDE?CONTACTEZNOUS!
Machine Translated by Google

Nepasdépasserlacapaciténominale.
Utiliserunéquipementdesécurité.Deschaussuresdesécurité,uncasqueetdesgantsdetravaildoiventêtreportés.
êtreéteintetlefreindestationnementserréavantdechargeroudedéchargerle
motodansouhorsdelacalederoue.Nepasdépasser55MPH
utilisépourlesconditionsapplicables.
Habillezvousdemanièreappropriée.Neportezjamaisdevêtementsamplesnidebijouxlorsque
travailler.Contenezlescheveuxlongsetgardezlescheveux,lesvêtementsetlesgantsàl'écart
despiècesmobiles.Faitespreuvedebonsenslorsquevoustravaillez.Restezvigilantet
lorsdutransportd'unemotodanslabenned'uncamion.
Gardezàl’espritquelesavertissementsévoquésprécédemmentnepeuventpascouvrir
Lisezetcomprenezl'intégralitédecemanuelavantd'assembler,d'installer,d'utiliserou
d'entretenirceproduit.Lenonrespectdecesavertissements
concentrezvouslorsdelaconfigurationetdel'utilisationdelarouedemoto
touslesévénementsetcirconstancespossibles.Ilestimportantquele
Netravaillezjamaissousl'influencedel'alcool,dedroguesoudedrogues.
etlesinstructionspeuvententraînerlamort,desblessurescorporellesoudesdommagesà
personneinstallantetutilisantcecalerouedemoto
lebonsensàtoutmoment.
propriétédevaleur.
Conservezcemanuelpourlesavertissementsetprécautionsdesécurité.
Lemanuelfournitdesinformationsimportantessurlamanièred'assembler,d'utiliseret
médicaments.
Avantdetransporterunemotodansunebennedecamion,fixezlamoto
Entretenirceproduit.Soutenirlachargepardesmoyensappropriésaprèslelevage.
avecdescordeset/oudesattaches(nonincluses).Lemoteurduvéhiculedoit
Sécuritéetavertissement
Machine Translated by Google

Cadre
Supportpivotant
10
7
8
4
4
ÉcrouhexagonalM106
1
5
12
Couverture
3
BoulonM10x70
Boulonhexagonal
BoulonM10x302
1
Rester
Rondelleplate9
Rondelleélastique8
1
13Granderondelle
6
Rondelleennylon2
44 4
M10x20
42
1
11
4
Manchonennylon
Diamètredupneuadapté(pouces)
Poidsnet(kg)
Poidsbrut(kg)
1800
TYGJ210084
Largeurdupneuadaptée(pouces)
Capacitédechargemaximale(lb)
Sériedemodèles
1521
36,5
5.4
6.6
Listedespièces
DescriptionQtéPièceDescriptionQté
Partie
Caractéristiques
Machine Translated by Google

Montagedelacalederouedemoto
2.Lorsdumontagesuruneplateformedecamionousurunélévateuràmoto:
1.Cettecalederouedoitêtremontéesurunesurfacesolideetplane.
conçupourêtresuruncamionousurunélévateuràmoto.
Machine Translated by Google

fixerlesancragesenbétondansleciment.Montezensuitele
E.Suivezlesinstructionsdufabricantdumatérielpouruneinstallationcorrecte.
3.Lorsdumontagesurunsolenbéton:
Fixez(3)lesupportaubétonàl'aidedesancragesàbéton.
Boulons(11)àtraverslehautdusupport;placezlemanchonennylon
doitêtredeniveau,solideetcapabledesupporterdel'équipementlourd.
B.Desancragesenbéton(noninclus)serontnécessairespourfixerlestand
(12)surchaqueboulondudessousdusupport.
D.Fixeztouslesboulonsenajoutantunegranderondelle(13)etunressort
A.Trouvezl'emplacementsouhaitéetplacezlesupport(3)dansle
Rondelle(8)etécrouhexagonal(5),tousprovenantdudessousducamion
(3)danslebéton.
C.Trouvezl'emplacementsouhaitéetplacezlesupport(3)danslebon
positioncorrecte.Utilisezles4trousdusupportcomme
surfacedulitoudel'ascenseur.
position.Utilisezles4trousdusupportcommegabaritpourmarqueroù
destrousdoiventêtrepercés.
gabaritpourmarquerl'emplacementdestrousàpercer.
D.Utilisezunforetàbétonpourpercerdestrousdetailleappropriée.
B.Àl'aided'unforetenacier,percezdestrousdetailleappropriéepour
BoulonsM10(11).
A.Localisezlapositionsouhaitéepourlacalederoue;tenezcomptedelataillede
lamotoetcombiend'espaceestnécessairepourmanœuvrerla
C.Fixezlesupport(3)àlasurfaceeninsérantd'abord4
motodansethorsdelacalederoue.Lasurfaceenbéton
Machine Translated by Google

lesupportpivotant(2)estenpositionouverteethorizontalecommeindiqué
Vérifiezfréquemmentl’étatdelacalederouedelamoto.
Assurezvousquetouslescomposantssontenbonétat.Silaroue
surlaphoto.Aufuretàmesurequelaroueroule,lesupportpivotantpivote
verslehautetfermez,enfixantlamotodanslacalederoue.
3.Silamotodoitêtrestockéedanslacalederouependant
Lacaleestendommagéeparaccidentousiunesoudureestendommagée.
notezqueleproduitdoitêtreremplacé.Vérifiezquetousles
1.Voirlespositionsderéglagedusupportsurlaphotodecettepage.
pendantunepériodedonnée,ilestrecommandéd'utiliserdessupportsdestabilitésupplémentaires
lematérielestsolidementfixéenplace.Gardezlacalederouepropre.
sontutilisés(sanglesoucordes).
Lesupportpivotantpeutêtreréglésurl'unedestroispositionsenfonctiondelataille
delarouedelamoto.Trouvezlapositionqui
verrouilleaumieuxlaroueenplacelorsquelaroueestenrouléeetla
Lesupportpivotejusqu'àsapositionfermée.
4.Pourlibérerlamotodelacalederoue,faitesroulerlentement
reculezlamotoloindelacalederoue.
2.Lamotoestlentementrouléedanslacalederouelorsque
Entretiendelacalederoue
Utilisationdelacalederouedemoto
Machine Translated by Google


ERFOLGREICHER BENUTZER
UNTERLEGSCHEIBE FÜR MOTORRÄDER
M
Modell: TYGJ210084
Technischer Support und E-Garantie-Zertifikat www.vevor.com/support
Wir sind weiterhin bestrebt, Ihnen Werkzeuge zu wettbewerbsfähigen Preisen anzubieten. „Sparen Sie die
Hälfte“, „Halber Preis“ oder andere ähnliche Ausdrücke, die wir verwenden, stellen nur eine Schätzung der
Ersparnis dar, die Sie beim Kauf bestimmter Werkzeuge bei uns im Vergleich zu den großen Topmarken
erzielen können, und decken nicht notwendigerweise alle von uns angebotenen Werkzeugkategorien ab. Wir
möchten Sie freundlich daran erinnern, bei einer Bestellung bei uns sorgfältig zu prüfen, ob Sie im
Vergleich zu den großen Topmarken tatsächlich die Hälfte sparen.
Machine Translated by Google

Brauchen Sie Hilfe? Kontaktieren Sie uns!
Unterlegkeil
Motorrad
Technischer Support und E-Garantie-
Zertifikat www.vevor.com/support
Dies ist die Originalanleitung. Bitte lesen Sie alle Anweisungen sorgfältig durch, bevor Sie
das Gerät in Betrieb nehmen. VEVOR behält sich eine klare Auslegung unserer Bedienungsanleitung
vor. Das Erscheinungsbild des Produkts richtet sich nach dem Produkt, das Sie erhalten
haben. Bitte verzeihen Sie uns, dass wir Sie nicht erneut informieren, wenn es Technologie- oder
Software-Updates für unser Produkt gibt.
Modell: TYGJ21008 4
Sie haben Fragen zu unseren Produkten? Sie benötigen technischen Support? Dann kontaktieren
Sie uns gerne:
Machine Translated by Google

Sicherheit und Warnung
ÿ Bevor Sie ein Motorrad auf der Ladefläche eines LKWs transportieren, sichern Sie das Motorrad
Motorrad in oder aus dem Unterlegkeil. Überschreiten Sie nicht die Geschwindigkeit von 55 MPH
Handbuch enthält wichtige Informationen zur Montage, Verwendung und
Warten Sie dieses Produkt. Stützen Sie die Last nach dem Anheben mit geeigneten Mitteln.
und Anweisungen können zu Tod, Verletzungen oder Schäden am
Arbeiten Sie niemals unter dem Einfluss von Alkohol, Drogen oder
mit Seilen und/oder Zurrgurten (nicht im Lieferumfang enthalten). Der Motor des Fahrzeugs muss
Person, die diesen Motorrad-Radkeil einbaut und benutzt,
wertvolles Eigentum. ÿ
Bewahren Sie dieses Handbuch auf, um die Sicherheitshinweise und Vorsichtsmaßnahmen
Medikamente.
gesunder Menschenverstand.
von beweglichen Teilen.Verwenden Sie bei der Arbeit gesunden Menschenverstand. Bleiben Sie wachsam und
Arbeiten. Halten Sie lange Haare fern und halten Sie Haare, Kleidung und Handschuhe fern
beim Transport eines Motorrads auf der Ladefläche eines LKWs.
ÿ Lesen Sie das gesamte Handbuch sorgfältig durch, bevor Sie das Produkt zusammenbauen, installieren,
bedienen oder warten. Die Nichtbeachtung dieser Warnungen
Konzentrieren Sie sich beim Einrichten und Benutzen des Motorrad-Rades
Beachten Sie, dass die zuvor besprochenen Warnungen nicht abdecken können
alle möglichen Ereignisse und Umstände. Es ist wichtig, dass die
ÿ Die zulässige Tragfähigkeit darf nicht überschritten
werden. ÿ Sicherheitsausrüstung verwenden. Sicherheitsschuhe, Schutzhelm und Arbeitshandschuhe müssen
vor dem Be- oder Entladen des Fahrzeugs ausgeschaltet und die Feststellbremse angezogen sein.
für die jeweiligen Bedingungen verwendet
werden. ÿ Kleiden Sie sich angemessen. Tragen Sie niemals lose Kleidung oder Schmuck, wenn
Machine Translated by Google

Schraube M10x30 2
Unterlegscheibe9
Federscheibe 8
1
13 Große Unterlegscheibe
6
Nylon-Unterlegscheibe 2
4
44 4
M10x20
4
Schwenkbare Halterung
10
2
1
11
7
8
4
Rahmen
4
Sechskantmutter M10 6
12
1
5
Abdeckung
3
Schraube M10x70
Sechskantschraube
1
Stand
Passender Reifendurchmesser (Zoll)
Nettogewicht (kg)
Bruttogewicht (kg)
15-21
Maximale Tragfähigkeit (lb)
Passende Reifenbreite (Zoll)
TYGJ210084Modellreihe
5.4
6.6
3-6,5
1800
Teil
Beschreibung Menge Teilebeschreibung Menge
Ersatzteilliste
Technische Daten
Nylonhülle
Machine Translated by Google
konzipiert für die Montage auf einem LKW oder einer Motorradhebebühne.
1. Dieser Unterlegkeil muss auf einer festen, ebenen Fläche montiert werden. Er ist
2. Bei der Montage auf einer LKW-Ladefläche oder einer Motorradhebebühne:
Montage des Motorrad-Unterlegkeils
Machine Translated by Google

E. Befolgen Sie die Anweisungen des Hardwareherstellers für die ordnungsgemäße
Befestigung von Betonankern im Zement. Anschließend montieren Sie die
3. Bei der Montage auf einem Betonboden:
Ständer (3) mit Hilfe von Betonankern am Beton befestigen.
das Motorrad und wie viel Platz zum Manövrieren des
B. Zur Befestigung des Ständers werden Betonanker (nicht im Lieferumfang enthalten) benötigt
Schrauben M10 (11).
C. Befestigen Sie den Ständer (3) an der Oberfläche, indem Sie zuerst 4
Schablone zum Markieren der erforderlichen Bohrlöcher.
Motorrad in und aus dem Unterlegkeil. Die Betonoberfläche
Es müssen Löcher gebohrt werden.
B. Bohren Sie mit einem Stahlbohrer Löcher der richtigen Größe für
A. Suchen Sie die gewünschte Position für den Unterlegkeil. Berücksichtigen Sie dabei die Größe
D. Verwenden Sie einen Betonbohrer, um Löcher der entsprechenden Größe zu bohren.
A. Suchen Sie den gewünschten Standort und platzieren Sie den Ständer (3) in der
Unterlegscheibe (8) und Sechskantmutter (5), alle von der Unterseite des LKWs
D. Sichern Sie alle Bolzen mit einer großen Unterlegscheibe (13), Feder
(3) in den Beton ein.
Die 4 Löcher im Ständer dienen als
Bett- oder Liftoberfläche.
C. Suchen Sie den gewünschten Standort und platzieren Sie den Ständer (3) an der richtigen
Position. Verwenden Sie die 4 Löcher im Ständer als Vorlage, um zu markieren, wo
Schrauben Sie die Schrauben (11) durch die Oberseite des Ständers; stecken Sie die Nylonhülse
muss eben, stabil und in der Lage sein, schwere Geräte zu tragen.
(12) an jeder Schraube an der Unterseite des Ständers.
Machine Translated by Google

Fahren Sie mit dem Motorrad vom Unterlegkeil weg.
Stellen Sie sicher, dass alle Komponenten in gutem Zustand sind. Wenn das Rad
Die Halterung schwenkt nach oben in die geschlossene Position.
2. Das Motorrad wird langsam in den Unterlegkeil gerollt, wenn
Die Schwenkhalterung kann je nach Größe des Motorradrads in drei Positionen eingestellt
werden. Finden Sie die Position, die
verwendet werden (Gurte oder Seile).
Die beste Fixierung des Rades erfolgt durch Einrollen des Rades und
4. Um das Motorrad vom Unterlegkeil zu lösen, rollen Sie es langsam
3. Wenn das Motorrad für eine längere Zeit im Unterlegkeil gelagert wird,
nach oben und nahe, um das Motorrad im Unterlegkeil zu sichern.
Der Unterlegkeil wird durch einen Unfall beschädigt oder es treten Schweißschäden auf.
1. Siehe die Einstellpositionen der Halterung auf dem Foto auf dieser Seite.
über einen längeren Zeitraum wird empfohlen, zusätzliche Stabilitätsstützen
festgestellt, muss das Produkt ausgetauscht werden. Überprüfen Sie, ob alle
Die Hardware ist fest an ihrem Platz gesichert. Halten Sie den Unterlegkeil sauber.
die Schwenkhalterung (2) befindet sich in der geöffneten, horizontalen Position, wie gezeigt
Überprüfen Sie regelmäßig den Zustand des Motorrad-Unterlegkeils.
auf dem Foto. Wenn das Rad einrollt, schwenkt die Schwenkhalterung
Verwenden des Motorrad-Unterlegkeils
Wartung des Unterlegkeils
Machine Translated by Google


UTENTE DI SUCCESSO
CUNEO PER RUOTE MOTO
L
Modello: TYGJ210084
Supporto tecnico e certificato di garanzia elettronica www.vevor.com/support
Continuiamo a impegnarci a fornirti utensili a prezzi competitivi. "Risparmia la metà", "Metà prezzo"
o qualsiasi altra espressione simile da noi utilizzata rappresenta solo una stima del risparmio che
potresti ottenere acquistando determinati utensili con noi rispetto ai principali marchi principali e
non significa necessariamente coprire tutte le categorie di utensili da noi offerti. Ti ricordiamo
gentilmente di verificare attentamente quando effettui un ordine con noi se stai effettivamente
risparmiando la metà rispetto ai principali marchi principali.
Machine Translated by Google

HAI BISOGNO DI AIUTO? CONTATTACI!
Cuneo per ruota
Motociclo
Supporto tecnico e certificato di garanzia
elettronica www.vevor.com/support
Questa è l'istruzione originale, si prega di leggere attentamente tutte le istruzioni del
manuale prima di utilizzare. VEVOR si riserva una chiara interpretazione del nostro manuale
utente. L'aspetto del prodotto sarà soggetto al prodotto ricevuto. Vi preghiamo di
perdonarci se non vi informeremo di nuovo se ci sono aggiornamenti tecnologici o software sul
nostro prodotto.
Modello: TYGJ21008 4
Hai domande sui prodotti? Hai bisogno di supporto tecnico? Non esitare a contattarci:
Machine Translated by Google

Sicurezza e avvertenza
da parti in movimento.Usa il buon senso quando lavori. Resta vigile e
lavorando. Contenere i capelli lunghi e tenere lontani capelli, vestiti e guanti
durante il trasporto di una motocicletta sul cassone di un camion.
ÿ Leggere e comprendere l'intero manuale prima di assemblare, installare, utilizzare o effettuare
la manutenzione di questo prodotto. La mancata osservanza di queste avvertenze
concentrarsi durante l'installazione e l'utilizzo della ruota della motocicletta
Tieni presente che gli avvertimenti precedentemente discussi non possono coprire
tutti gli eventi e le circostanze possibili. È importante che il
ÿ Non superare la capacità nominale. ÿ
Utilizzare dispositivi di sicurezza. Scarpe antinfortunistiche, casco e guanti da lavoro devono essere
essere spento e il freno di stazionamento inserito prima di caricare o scaricare il
utilizzato per le condizioni applicabili.
ÿ Vestirsi in modo appropriato. Non indossare mai abiti larghi o gioielli quando
motocicletta dentro o fuori dal Wheel Chock. Non superare le 55 MPH
ÿ Prima di trasportare una motocicletta sul cassone di un camion, fissare la motocicletta
Il manuale offre informazioni importanti su come assemblare, utilizzare e
effettuare la manutenzione del prodotto. Dopo il sollevamento, sostenere il carico con mezzi adeguati.
e le istruzioni possono causare morte, lesioni personali o danni a
Non lavorare mai sotto l'effetto di alcol, droghe o
con corde e/o cinghie di fissaggio (non incluse). Il motore del veicolo deve
persona che installa e utilizza questo cuneo per ruota di motocicletta
proprietà di valore. ÿ
Conservare questo manuale per le avvertenze e le precauzioni di sicurezza.
farmaci.
buon senso in ogni momento.
Machine Translated by Google

Diametro pneumatico adatto (pollici)
Peso netto (kg)
Peso lordo (kg)
6.6
Numero di modello: TYGJ210084
Larghezza pneumatico adatta (pollici)
Capacità di carico massima (lb)
Serie di modelli
5.4
3-6.5
1800
15-21
Copertina
3
Rondella in nylon 2
Bullone M10x70
Bullone esagonale
1
In piedi
Bullone M10x30 2
Rondella piatta
7
8
4
Telaio
4
Dado esagonale M10 6
12
1
5
4
44 4
M10x20
4
Staffa girevole
11
10
2
1
9
Rondella elastica 8
1
13 Grande rondella
6
Elenco delle parti
Descrizione Qtà Parte Descrizione Qtà
Parte
Specifiche
Manicotto in nylon
Machine Translated by Google

Montaggio del cuneo per ruota della motocicletta
progettato per essere montato su un camion o su un ponte sollevatore per motociclette.
1. Questo cuneo per ruote deve essere montato su una superficie solida e piana. È
2. Quando si monta sul cassone di un camion o su un sollevatore per motociclette:
Machine Translated by Google

A. Trova la posizione desiderata e posiziona il supporto (3) nella
D. Fissare tutti i bulloni aggiungendo la rondella grande (13), la molla
Rondella (8) e dado esagonale (5), tutti da sotto il camion
(3) nel calcestruzzo.
posizione corretta. Utilizzare i 4 fori nel supporto come
superficie del letto o dell'elevatore.
C. Trovare la posizione desiderata e posizionare il supporto (3) nella posizione corretta
posizione. Utilizzare i 4 fori nel supporto come modello per contrassegnare dove
Bulloni (11) attraverso la parte superiore del supporto; mettere il manicotto in nylon
deve essere livellato, solido e in grado di sostenere attrezzature pesanti.
(12) su ogni bullone dalla parte inferiore del supporto.
B. Per fissare il supporto saranno necessari ancoraggi in cemento (non inclusi)
la motocicletta e quanto spazio è necessario per manovrarla
Bulloni M10 (11).
C. Fissare il supporto (3) alla superficie inserendo prima 4
modello per contrassegnare i punti in cui devono essere praticati i fori.
moto dentro e fuori dal Wheel Chock. La superficie in cemento
è necessario praticare dei fori.
B. Utilizzando una punta da trapano per il taglio dell'acciaio, praticare fori delle dimensioni adeguate per
A. Individuare la posizione desiderata per il cuneo; considerare le dimensioni di
D. Utilizzare una punta da trapano per cemento per praticare fori delle dimensioni appropriate.
fissaggio degli ancoraggi in cemento nel cemento. Quindi montare il
E. Seguire le istruzioni del produttore dell'hardware per un corretto
3. In caso di montaggio su pavimento in cemento:
Fissare (3) al calcestruzzo utilizzando gli ancoraggi per calcestruzzo.
Machine Translated by Google

Manutenzione del cuneo per ruote
Utilizzo del cuneo per ruota della motocicletta
3. Se la motocicletta verrà riposta nel cuneo per ruote per
verso l'alto e chiudere, fissando la motocicletta nel cuneo.
Il cuneo si danneggia a causa di un incidente o se si verifica un danno alla saldatura
1. Vedere le posizioni di regolazione della staffa nella foto in questa pagina.
per un periodo di tempo prolungato, si consiglia di utilizzare supporti di stabilità aggiuntivi
notato, il prodotto dovrebbe essere sostituito. Controllare per assicurarsi che tutti
l'hardware sia fissato saldamente in posizione. Mantenere pulito il cuneo.
la staffa girevole (2) è in posizione aperta e orizzontale come mostrato
Controllare frequentemente le condizioni del cuneo fermaruota della motocicletta.
nella foto. Mentre la ruota entra, la staffa girevole ruoterà
Assicurarsi che tutti i componenti siano in buone condizioni. Se la ruota
allontanare la motocicletta dal cuneo.
La staffa ruota verso l'alto fino alla posizione chiusa.
2. La motocicletta viene lentamente posizionata nel cuneo quando
La staffa girevole può essere regolata in una delle tre posizioni a seconda delle
dimensioni della ruota della motocicletta. Trova la posizione che
vengono utilizzate (cinghie o corda).
blocca meglio la ruota in posizione quando la ruota viene fatta rotolare e la
4. Per liberare la motocicletta dal cuneo, farla rotolare lentamente
Machine Translated by Google


Modelo:TYGJ210084
Seguimoscomprometidosaofrecerleherramientasaprecioscompetitivos."Ahorrelamitad","mitadde
precio"ocualquierotraexpresiónsimilarqueutilicemossolorepresentaunaestimacióndelosahorrosque
podríaobteneralcomprarciertasherramientasconnosotrosencomparaciónconlasprincipalesmarcasy
nonecesariamentesignificaquecubratodaslascategoríasdeherramientasqueofrecemos.Lerecordamos
queverifiquecuidadosamentecuandorealiceunpedidoconnosotrossirealmenteestáahorrandola
mitadencomparaciónconlasprincipalesmarcas.
USUARIOEXITOSO
CALZOPARARUEDADEMOTOCICLETA
yo
Soportetécnicoycertificadodegarantíaelectrónicawww.vevor.com/support
Machine Translated by Google

¿NECESITAAYUDA?¡CONTÁCTENOS!
Calzoderueda
Motocicleta
Soportetécnicoycertificadodegarantía
electrónicawww.vevor.com/support
¿Tienepreguntassobreelproducto?¿Necesitaasistenciatécnica?Nodudeenponerseencontacto
connosotros:
Modelo:TYGJ210084
Estassonlasinstruccionesoriginales,leaatentamentetodaslasinstruccionesdelmanual
antesdeutilizarelproducto.VEVORsereservaunainterpretaciónclaradenuestromanualde
usuario.Laaparienciadelproductoestarásujetaalproductoquerecibió.Perdónenosporno
informarlenuevamentesihayactualizacionesdetecnologíaosoftwareennuestroproducto.
Machine Translated by Google

Seguridadyadvertencias
Mantengaesteproducto.Sostengalacargaconlosmediosadecuadosdespuésdelevantarla.
concuerdasy/oamarres(noincluidos).Elmotordelvehículodebe
Elmanualofreceinformaciónimportantesobrecómoensamblar,usary
Antesdetransportarunamotocicletaenlaplataformadeuncamión,asegurelamotocicleta
sentidocomúnentodomomento.
propiedadvaliosa.
Conserveestemanualparaconocerlasadvertenciasyprecaucionesdeseguridad.
medicamentos.
Chock.Nuncatrabajebajolainfluenciadelalcohol,drogaso
ylasinstruccionespuedencausarlamuerte,lesionespersonalesodañosa
Lapersonaqueinstalayutilizaestecalzopararuedademotocicletadebe
Tengaencuentaquelasadvertenciasdiscutidasanteriormentenopuedencubrir
Leaycomprendatodoestemanualantesdeensamblar,instalar,operarorealizartareasde
mantenimientoenesteproducto.Sinosigueestasadvertencias
Concéntresealconfiguraryutilizarlaruedadelamotocicleta
todosloseventosycircunstanciasposibles.Esimportantequeel
trabajando.Contengaelcabellolargoymantengaelcabello,laropaylosguantesalejados
delaspiezasmóviles.Utiliceelsentidocomúnaltrabajar.Manténgasealertay
mientrastransportabaunamotocicletaenlacajadeuncamión.
Entrarosalirdelamotocicletaenelcalzoderueda.Noexcedalas55MPH
Seutilizaparalascondicionesaplicables.
Vístaseapropiadamente.Nuncauseropasueltanijoyascuando
Noexcedalacapacidadnominal.Utilice
equipodeseguridad.Sedebenutilizarzapatosdeseguridad,cascoyguantesdetrabajo.
EstarAPAGADOyelfrenodeestacionamientopuestoantesdecargarodescargarelvehículo.
Machine Translated by Google

TuercahexagonalM106
12
44 4
4
M10x20
2
1
11
Soportepivotante
10
4
9
Arandelaelástica8
1
13Lavadoragrande
6
Arandeladenailon2
Cubrir
3
PernoM10x70
PernoM10x302
Arandelaplana
Pernohexagonal
1
Pararse
Marco
7
8
4
4
1
5
Mangadenailon
Ajustedelanchodelneumático(pulgadas)
Pesobruto(kg)
Diámetrodelneumáticodeajuste(pulgadas)
1800
Capacidadmáximadecarga(lb)
Pesoneto(kg)
TYGJ210084Seriedemodelos
1521
36.5
5.4
6.6
Parte
DescripciónCant.PiezaDescripciónCant.
Listadepiezas
Presupuesto
Machine Translated by Google

Diseñadoparasercolocadoenuncamiónoenunelevadordemotocicletas.
1.Estacuñapararuedadebemontarsesobreunasuperficiesólidaynivelada.
2.Almontarloenlaplataformadeuncamiónoenunelevadordemotocicletas:
Cómomontarelcalzopararuedademotocicleta
Machine Translated by Google

Fijacióndelosanclajesdehormigónenelcemento.Acontinuación,monteel
E.Sigalasinstruccionesdelfabricantedelhardwarepararealizarelmontajecorrectamente.
3.Almontarlosobreunpisodeconcreto:
Coloque(3)elsoportesobreelhormigónutilizandolosanclajes.
C.Fijeelsoporte(3)alasuperficieinsertandoprimero4
motocicletadentroyfueradelcalzoderueda.Lasuperficiedehormigón
PernosM10(11).
Lamotocicletaycuántoespaciosenecesitaparamaniobrarla.
D.Utiliceunabrocaparahormigónparaperforaragujerosdeltamañoadecuado.
B.Conunabrocadecortedeacero,taladreagujerosdeltamañoadecuadopara
A.Ubiquelaposicióndeseadaparaelcalzoderueda;considereeltamañode
Esnecesarioperforaragujeros.
Plantillaparamarcardondedebenrealizarselosagujeros.
C.Busquelaubicacióndeseadaycoloqueelsoporte(3)enellugaradecuado.
Posiciónadecuada.Utilicelos4orificiosdelsoportecomo
superficiedecamaoascensor.
Posición.Utilicelos4orificiosdelsoportecomoplantillaparamarcardónde
D.Aseguretodoslospernosagregandounaarandelagrande(13)yunresorte.
A.Busquelaubicacióndeseadaycoloqueelsoporte(3)enel
Arandela(8)ytuercahexagonal(5),todasdedebajodelcamión
B.Senecesitaránanclajesdehormigón(noincluidos)paraasegurarelStand
(12)encadapernodesdelaparteinferiordelsoporte.
(3)enelhormigón.
Pernos(11)atravésdelapartesuperiordelsoporte;coloquelafundadenailon
Debesernivelado,sólidoycapazdesoportarequipopesado.
Machine Translated by Google

2.Lamotocicletaseintroducelentamenteenelcalzoderuedacuando
Elsoportegirahastasuposicióncerrada.
Alejelamotocicletadelcalzoderueda.
bloqueamejorlaruedaensulugarcuandosegiralaruedahaciaadentroyla
4.Paraliberarlamotocicletadelcalzoderueda,gírelalentamente
seutilizan(correasocuerdas).
Elsoportepivotantesepuedeajustaraunadetresposicionessegúneltamañodelarueda
delamotocicleta.Encuentrelaposiciónque
Sedebetenerencuentaqueelproductodebereemplazarse.Verifiquequetodoslos
Duranteunperíododetiempoprolongado,serecomiendautilizarsoportesdeestabilidadadicionales.
1.Vealasposicionesdeajustedelsoporteenlafotodeestapágina.
Elhardwareestábienaseguradoensulugar.Mantengalimpioelcalzodelarueda.
haciaarribaycerrar,asegurandolamotocicletaenelcalzoderueda.
3.Silamotocicletasevaaalmacenarenelcalzoderuedadurante
Lacuñasedañaporaccidenteosiseproducealgúndañoenlasoldadura.
Asegúresedequetodosloscomponentesesténenbuenascondiciones.Silarueda
Enlafoto.Amedidaquelaruedagira,elsoportepivotantegirará.
Elsoportepivotante(2)estáenposiciónabiertayhorizontalcomosemuestra
Compruebeconfrecuenciaelestadodelcalzodelaruedadelamotocicleta.
Mantenimientodelcalzoderueda
Usodelcalzopararuedademotocicleta
Machine Translated by Google


Model: TYGJ210084
Nadal staramy się dostarczać Ci narzędzia w konkurencyjnych cenach. „Oszczędź połowę”, „Połowa
ceny” lub inne podobne wyrażenia używane przez nas stanowią jedynie szacunkowe oszczędności,
jakie możesz uzyskać, kupując u nas określone narzędzia w porównaniu z głównymi markami i
niekoniecznie oznaczają one objęcie wszystkich kategorii narzędzi oferowanych przez nas. Uprzejmie
przypominamy, aby dokładnie sprawdzić, czy składając u nas zamówienie faktycznie
oszczędzasz połowę w porównaniu z najlepszymi markami.
SZCZĘŚLIWY UŻYTKOWNIK
KLIN POD KOŁA MOTOCYKLOWE
L
Wsparcie techniczne i certyfikat gwarancji elektronicznej www.vevor.com/support
Machine Translated by Google

Masz pytania dotyczące produktu? Potrzebujesz wsparcia technicznego? Skontaktuj się z
nami:
Modele: TYGJ21008 4
To jest oryginalna instrukcja, przed użyciem należy uważnie przeczytać wszystkie
instrukcje. VEVOR zastrzega sobie jasną interpretację naszej instrukcji obsługi. Wygląd
produktu będzie zależał od produktu, który otrzymałeś. Prosimy o wybaczenie, że nie
poinformujemy Cię ponownie, jeśli w naszym produkcie pojawią się jakiekolwiek aktualizacje
technologiczne lub oprogramowania.
Wsparcie techniczne i gwarancja elektroniczna
Certyfikat www.vevor.com/support
Motocykl
Klin pod koło
POTRZEBUJESZ POMOCY? SKONTAKTUJ SIĘ Z NAMI!
Machine Translated by Google

instrukcja zawiera ważne informacje dotyczące sposobu montażu, użytkowania i
stosowane w odpowiednich
warunkach. Ubieraj się odpowiednio. Nigdy nie zakładaj luźnej odzieży ani biżuterii, gdy
motocyklem wjeżdżającym lub wyjeżdżającym z klina pod koła. Nie przekraczać prędkości 55 mil na godzinę
Nie przekraczać znamionowego
udźwigu. Stosować sprzęt ochronny. Należy nosić obuwie ochronne, kask i rękawice robocze.
przed załadunkiem lub rozładunkiem wyłącz silnik i zaciągnij hamulec postojowy
Przed montażem, instalacją, obsługą lub serwisowaniem tego produktu należy
przeczytać i zrozumieć całą instrukcję. Nieprzestrzeganie tych ostrzeżeń
skoncentruj się podczas ustawiania i używania koła motocyklowego
Należy pamiętać, że ostrzeżenia omówione wcześniej nie mogą obejmować
wszystkie możliwe zdarzenia i okoliczności. Ważne jest, aby
z ruchomych części.Podczas pracy należy zachować zdrowy rozsądek. Zachowaj czujność i
pracujące. Trzymaj długie włosy, ubrania i rękawice z dala od
podczas transportu motocykla na pace ciężarówki.
cenna własność.
Zachowaj tę instrukcję ze względu na ostrzeżenia i środki ostrożności dotyczące bezpieczeństwa.
Leki.
zdrowy rozsądek w każdej sytuacji.
i instrukcje mogą spowodować śmierć, obrażenia ciała lub uszkodzenie
Zablokuj. Nigdy nie pracuj pod wpływem alkoholu, narkotyków lub
osoba montująca i używająca tego klina pod koło motocyklowe używa
konserwować ten produkt. Po podniesieniu ładunku należy go podeprzeć odpowiednimi środkami.
Przed transportem motocykla na pace samochodu ciężarowego należy zabezpieczyć motocykl
z linami i/lub pasami mocującymi (nie są dołączone). Silnik pojazdu musi
Bezpieczeństwo i ostrzeżenia
Machine Translated by Google

4
7 4
2
1
11
Uchwyt obrotowy
10
4 4 4
4
M10x20
4
6
Podkładka nylonowa 2
Podkładka sprężysta 8
1
9
13 Duża podkładka
Śruba M10x30 2
Podkładka płaska
1
Podstawka
3
Okładka Śruba M10x70
Śruba sześciokątna
Nakrętka sześciokątna M10 6
12
1
5
Rama 8
Rękaw nylonowy
Masa netto (kg)
Szerokość dopasowanej opony (cale)
Masa brutto (kg)
1800
Maksymalna ładowność (funty)
Średnica pasującej opony (cale)
TYGJ210084Seria modeli
15-21
3-6,5
6.6
5.4
Część
Lista części
Specyfikacje
Opis Ilość Opis części Ilość
Machine Translated by Google
przeznaczony do montażu na ciężarówce lub na podnośniku motocyklowym.
1. Ten klin pod koło musi być zamontowany na solidnej, równej powierzchni.
2. W przypadku montażu na skrzyni ładunkowej samochodu ciężarowego lub na podnośniku motocyklowym:
Montaż klina pod koło motocyklowe
Machine Translated by Google

Śruby M10 (11).
(12) na każdej śrubie od spodu stojaka.
B. Do zabezpieczenia stojaka potrzebne będą kotwy betonowe (nie dołączone)
Śruby (11) przez górną część stojaka; załóż tuleję nylonową
musi być równa, stabilna i nośna dla ciężkiego sprzętu.
powierzchnia łóżka lub windy.
odpowiednią pozycję. Użyj 4 otworów w stojaku jako
C. Znajdź żądane miejsce i umieść podstawkę (3) w odpowiednim miejscu.
pozycja. Użyj 4 otworów w stojaku jako szablonu, aby zaznaczyć, gdzie
A. Znajdź żądane miejsce i umieść w nim podstawkę (3).
D. Zabezpiecz wszystkie śruby, dodając dużą podkładkę (13), sprężynę
Podkładka (8) i nakrętka sześciokątna (5), wszystkie od spodu ciężarówki
B. Używając wiertła do cięcia stali, wywierć otwory o odpowiedniej średnicy
A. Znajdź żądane miejsce na klin pod koło, biorąc pod uwagę jego rozmiar
(3) do betonu.
D. Za pomocą wiertła do betonu wywierć otwory o odpowiedniej średnicy.
szablon do zaznaczenia miejsc, w których należy wywiercić otwory.
należy wywiercić otwory.
C. Przymocuj podstawkę (3) do powierzchni, wkładając najpierw 4
motocykla i ile miejsca potrzeba na manewrowanie
motocykl w i poza kołem klinowym. Powierzchnia betonowa
mocowanie kotew betonowych w cemencie. Następnie zamontuj
Przymocuj (3) do betonu za pomocą kotew betonowych.
E. Postępuj zgodnie z instrukcjami producenta sprzętu, aby prawidłowo
3. W przypadku montażu na podłożu betonowym:
Machine Translated by Google

Konserwacja klina pod koło
Używanie klina pod koło motocyklowe
Uchwyt obraca się do góry, aż do pozycji zamkniętej.
na zdjęciu. Gdy koło się toczy, uchwyt obrotowy będzie się obracał
Upewnij się, że wszystkie komponenty są w dobrym stanie. Jeśli koło
Uchwyt obrotowy (2) znajduje się w pozycji otwartej, poziomej, jak pokazano
Często sprawdzaj stan klina pod koło motocyklowe.
1. Zobacz pozycje regulacji wspornika na zdjęciu na tej stronie.
przez dłuższy czas, zaleca się stosowanie dodatkowych podpór stabilizujących
zauważono, że produkt powinien zostać wymieniony. Sprawdź, czy wszystkie
osprzęt jest mocno zamocowany na miejscu.Utrzymuj klin pod koło w czystości.
3. Jeśli motocykl będzie przechowywany w klinie pod koła,
do góry i blisko, zabezpieczając motocykl w klinie pod koło.
Klin ulega uszkodzeniu w wyniku wypadku lub uszkodzenia spoiny
najlepiej blokuje koło na miejscu, gdy koło jest wtaczane i
4. Aby uwolnić motocykl z klina pod koło, powoli przetocz się
Wspornik obrotowy można ustawić w jednej z trzech pozycji, w zależności od
rozmiaru koła motocykla. Znajdź pozycję, która
są stosowane (paski lub lina).
2. Motocykl powoli wtacza się na klin pod koła, gdy
wycofaj motocykl od klina pod koło.
Machine Translated by Google


SUCCESVOLLE GEBRUIKER
MOTORFIETSWIELKAST
Ik
Model: TYGJ210084
Technische ondersteuning en e-garantiecertificaat www.vevor.com/support
Wij blijven ons inzetten om u gereedschappen te leveren tegen concurrerende prijzen. "Save Half", "Half Price" of
andere soortgelijke uitdrukkingen die wij gebruiken, vertegenwoordigen slechts een schatting van de besparingen
die u kunt behalen door bepaalde gereedschappen bij ons te kopen in vergelijking met de grote topmerken en
betekenen niet noodzakelijkerwijs dat alle categorieën gereedschappen die wij aanbieden, worden gedekt. Wij
herinneren u eraan om zorgvuldig te controleren of u daadwerkelijk de helft bespaart in vergelijking met de
grote topmerken wanneer u een bestelling bij ons plaatst.
Machine Translated by Google

HULP NODIG? NEEM CONTACT MET ONS OP!
Wielblok
Motorfiets
Technische ondersteuning en e-
garantiecertificaat www.vevor.com/support
Dit is de originele instructie, lees alle handleidingen zorgvuldig door voordat u het product
gebruikt. VEVOR behoudt zich een duidelijke interpretatie van onze gebruikershandleiding voor.
Het uiterlijk van het product is afhankelijk van het product dat u hebt ontvangen. Vergeef ons
dat we u niet opnieuw zullen informeren als er technologie- of software-updates voor ons product zijn.
Model: TYGJ21008 4
Heeft u vragen over het product? Heeft u technische ondersteuning nodig? Neem dan gerust
contact met ons op:
Machine Translated by Google

Veiligheid en waarschuwing
van bewegende delen. Gebruik uw gezond verstand bij het werken. Blijf alert en
werkend. Houd lang haar tegen en houd haar, kleding en handschoenen uit de buurt
terwijl er een motorfiets in de laadbak van een vrachtwagen werd vervoerd.
ÿ Lees en begrijp deze hele handleiding voordat u dit product monteert, installeert, bedient of
onderhoudt. Het niet opvolgen van deze waarschuwingen
concentreer je bij het opzetten en gebruiken van het Motorfietswiel
Houd er rekening mee dat de eerder besproken waarschuwingen niet van toepassing zijn op:
alle mogelijke gebeurtenissen en omstandigheden. Het is belangrijk dat de
ÿ Overschrijd de nominale capaciteit niet. ÿ
Gebruik veiligheidsuitrusting. Veiligheidsschoenen, een helm en werkhandschoenen moeten worden gedragen.
moet UIT staan en de parkeerrem moet aangetrokken zijn voordat u de auto in- of uitlaadt.
gebruikt voor toepasselijke
omstandigheden. ÿ Kleed u gepast. Draag nooit loszittende kleding of sieraden wanneer
motorfiets in of uit de wielklem. Rijd niet harder dan 55 MPH
ÿ Voordat u een motorfiets in een vrachtwagenlaadbak vervoert, moet u de motorfiets goed vastzetten
handleiding biedt belangrijke informatie over hoe u het apparaat moet monteren, gebruiken en
Onderhoud dit product. Ondersteun de last met geschikte middelen na het tillen.
en instructies kunnen de dood, persoonlijk letsel of schade aan uw kind veroorzaken.
Chock. Werk nooit onder invloed van alcohol, drugs of
met touwen en/of spanbanden (niet inbegrepen). De motor van het voertuig moet
persoon die deze Motorfiets Wielklem opzet en gebruikt
waardevolle
eigendommen. ÿ Bewaar deze handleiding voor de veiligheidswaarschuwingen en voorzorgsmaatregelen.
medicijnen.
altijd gezond verstand gebruiken.
Machine Translated by Google

Nylon ring 2
3
Bout M10x70Omslag
Zeskantbout
1
Stellage
Bout M10x30 2
Vlakke ring
7
8Kader
4
4
Zeskantmoer M10 65
1
12
4
44 4
M10x20
4
Draaibare beugel
2
1
11
10
9
Veerring 8
1
13 Grote ring
6
Nylon mouw
Banddiameter (inch)
Nettogewicht (kg)
Brutogewicht (kg)
5.4
TYGJ210084
Bandbreedte aanpassen (inch)
Maximale draagkracht (lb)
Modelserie
15-21
6.6
1800
3-6.5
Onderdelenlijst
Omschrijving Aantal Onderdeel Omschrijving Aantal
Deel
Specificaties
Machine Translated by Google

ontworpen voor een vrachtwagen of een motorlift.
1. Deze wielklem moet op een stevig, vlak oppervlak worden gemonteerd.
2. Bij montage op een vrachtwagenbed of op een motorlift:
Montage van de motorfietswielblokkering
Machine Translated by Google

de motorfiets en hoeveel ruimte er nodig is om te manoeuvreren
(12) op elke bout vanaf de onderkant van de standaard.
B. Betonankers (niet inbegrepen) zijn nodig om de standaard vast te zetten
Bouten (11) door de bovenkant van de standaard; plaats de nylon huls
moet waterpas, stevig en in staat zijn om zwaar materieel te dragen.
C. Zoek de gewenste locatie en plaats de standaard (3) op de juiste plaats.
juiste positie. Gebruik de 4 gaten in de standaard als een
bed of liftoppervlak.
positie. Gebruik de 4 gaten in de standaard als sjabloon om te markeren waar
D. Bevestig alle bouten door een grote ring (13) en een veer toe te voegen
A. Zoek de gewenste locatie en plaats de standaard (3) in de
Ring (8) en zeskantmoer (5), allemaal van onder de vrachtwagen
(3) in het beton.
D. Gebruik een betonboor om gaten van de juiste grootte te boren.
B. Boor met een staalboor de gaten van de juiste maat voor
A. Bepaal de gewenste positie voor de wielklem; houd rekening met de grootte van
geboorde gaten moeten zijn.
sjabloon om te markeren waar de gaten geboord moeten worden.
C. Bevestig de standaard (3) aan het oppervlak door eerst 4
motorfiets in en uit de wielklem. Het betonnen oppervlak
Bouten M10 (11).
betonankers in het cement vastzetten. Monteer vervolgens de
E. Volg de instructies van de hardwarefabrikant voor een correcte installatie.
3. Bij montage op een betonnen vloer:
Ga (3) met behulp van de betonankers op het beton staan.
Machine Translated by Google

Het gebruik van de motorfietswielblokkering
Onderhoud van de wielblokkering
Rijd de motorfiets achteruit, weg van de wielblokkering.
op de foto. Terwijl het wiel naar binnen rolt, zal de Pivoting Bracket draaien
Zorg ervoor dat alle componenten in goede staat zijn. Als het wiel
De draaibare beugel (2) bevindt zich in de open, horizontale positie zoals afgebeeld
Controleer regelmatig de staat van het wielblok van uw motorfiets.
opgemerkt, moet het product vervangen worden. Controleer of alle
1. Zie de foto op deze pagina voor de afstellingsposities van de beugels.
gedurende een langere tijd wordt aanbevolen om extra stabiliteitsondersteuningen te gebruiken
Zorg dat de hardware stevig vastzit. Houd de wielblok schoon.
omhoog en dicht, zodat de motorfiets vastzit in de wielklem.
3. Als de motorfiets voor langere tijd in de wielklem wordt gestald,
De wig is beschadigd door een ongeluk of als er schade is aan de lasnaden.
vergrendelt het wiel het beste op zijn plaats wanneer het wiel is ingerold en de
4. Om de motorfiets uit de wielblokkering te halen, rolt u langzaam
worden gebruikt (riemen of touw).
De draaibare beugel kan worden aangepast naar een van de drie posities, afhankelijk
van de grootte van het motorwiel. Zoek de positie die
2. De motorfiets wordt langzaam in de wielklem gerold wanneer
De beugel draait omhoog tot de gesloten positie.
Machine Translated by Google


Modell: TYGJ210084
Vi fortsätter att vara engagerade i att ge dig verktyg till konkurrenskraftiga priser. "Spara hälften",
"halva priset" eller andra liknande uttryck som används av oss representerar bara en uppskattning av
besparingar du kan dra nytta av att köpa vissa verktyg hos oss jämfört med de stora toppmärkena
och betyder inte nödvändigtvis att täcka alla kategorier av verktyg som erbjuds av oss. Du påminns
vänligen om att noggrant kontrollera när du gör en beställning hos oss om du faktiskt sparar
hälften i jämförelse med de främsta stora varumärkena.
LYCKAD ANVÄNDARE
MOTORCYKEL HJULKLOCK
L
Teknisk support och e-garanticertifikat www.vevor.com/support
Machine Translated by Google

Har du produktfrågor? Behöver du teknisk support? Kontakta oss gärna:
Modell: TYGJ21008 4
Detta är den ursprungliga instruktionen, läs alla instruktioner noggrant innan du
använder den. VEVOR reserverar sig för en tydlig tolkning av vår användarmanual. Utseendet
på produkten är beroende av den produkt du fått. Ursäkta oss att vi inte kommer att
informera dig igen om det finns någon teknik eller mjukvaruuppdateringar på vår produkt.
Teknisk supportochE-garanticertifikat
www.vevor.com/support
Motorcykel
Hjulklossar
BEHÖVER HJÄLP? KONTAKTA OSS!
Machine Translated by Google

ÿ Säkra motorcykeln innan du transporterar en motorcykel i en lastbil
används för tillämpliga förhållanden.
ÿ Klä dig lämpligt. Bär aldrig löst sittande kläder eller smycken när
motorcykel in i eller ut ur hjulblocket. Överskrid inte 55 MPH
ÿ Överskrid inte den nominella
kapaciteten. ÿ Använd säkerhetsutrustning. Skyddsskor, hjälm och arbetshandskar ska vara
vara AV och parkeringsbromsen ansatt innan du lastar eller lossar
Tänk på att de tidigare diskuterade varningarna inte kan täcka
ÿ Läs och förstå hela denna manual innan du monterar, installerar, använder eller servar
denna produkt. Underlåtenhet att följa dessa varningar
koncentrera dig när du ställer upp och använder motorcykelhjulet
alla möjliga händelser och omständigheter. Det är viktigt att
arbetssätt. Innehåll långt hår och håll hår, kläder och handskar borta
från rörliga delar. Använd sunt förnuft när du arbetar. Håll dig alert och
när du transporterar en motorcykel i en lastbilsflak.
sunt förnuft hela tiden.
värdefull egendom.
ÿ Spara denna handbok för säkerhetsvarningar och försiktighetsåtgärder
mediciner.
Chock.Arbeta aldrig när du är påverkad av alkohol, droger eller
och instruktioner kan orsaka dödsfall, personskada eller skada på
underhålla denna produkt. Stöd lasten på lämpligt sätt efter lyft.
med rep, och/eller tie-downs (ingår ej). Fordonets motor måste
person som ställer upp och använder denna motorcykelhjulkloss
manualen ger viktig information om hur man monterar, använder och
Säkerhet och varning
Machine Translated by Google

Bult M10x30 2
Platt bricka
1
Stå
Bult M10x70
3
Täcka
Sexkantsbult
1
5 Sexkantsmutter M10 6
12
Ram
7
8
4
4
2
1
11
Svängbart fäste
10
4
44 4
4
M10x20
6
Nylonbricka 2
9
Fjäderbricka 8
1
13 Stor bricka
Nylonhylsa
Nettovikt (kg)
Bruttovikt (kg)
Passa däcksbredd (tum)
1800
Maximal lastkapacitet (lb)
Passa däcksdiameter (tum)
TYGJ210084Modellserie
15-21
3-6,5
5.4
6.6
Del
Delarlista
Specifikationer
Beskrivning Antal Del Beskrivning Antal
Machine Translated by Google
Montering av motorcykelklossen
utformad för att vara av en lastbil eller på en motorcykelhiss.
1. Denna hjulkloss måste monteras på en stadig, jämn yta. Det är det
2. När du monterar på en lastbilsflak eller på en motorcykelhiss:
Machine Translated by Google

(12) på varje bult från undersidan av stativet.
B. Betongankare (ingår ej) kommer att behövas för att säkra stativet
Bultar (11)genom toppen av stativet; sätta nylonhylsa
måste vara jämn, solid och kunna bära tung utrustning.
C. Hitta önskad plats och placera stativet (3) på rätt plats
korrekt position. Använd de 4 hålen i stativet som en
D. Fäst alla bultar genom att lägga till stor bricka (13), fjäder
säng eller lyftyta.
(3) in i betongen.
A. Hitta önskad plats och placera stativet (3) i
Bricka (8) och sexkantsmutter (5), allt från undersidan av lastbilen
placera. Använd de 4 hålen i stativet som mall för att markera var
B. Använd en skärborr i stål och borra hål i rätt storlek
A. Leta upp önskad position för hjulblocket; överväga storleken på
D. Använd betongborr för att borra hål av lämplig storlek.
mall för att markera var borrade hål måste vara.
borrade hål måste vara.
C. Fäst stativet (3) på ytan genom att först sätta i 4
motorcykel in och ut ur hjulblocket. Betongytan
Bultar M10 (11).
motorcykeln och hur mycket utrymme som behövs för att manövrera
fästa betongankare i cementen. Montera sedan
Stå (3) till betongen med hjälp av betongankarna.
E. Följ maskinvarutillverkarens instruktioner för korrekt
3. Vid montering på betonggolv:
Machine Translated by Google

Underhålla stoppklossen
Använda motorcykelklossen
på bilden. När hjulet rullar in kommer den svängbara fästet att svänga
Se till att alla komponenter är i gott skick. Om hjulet
det vridbara fästet (2) är i öppet, horisontellt läge som visas
Kontrollera regelbundet skicket på motorcykelklossen.
noteras, produkten bör bytas ut. Kontrollera att alla
1ÿSe positioner för justering av fästen på bilden på den här sidan.
uppåt och stäng, säkrar motorcykeln i hjulklossen.
under en längre tid rekommenderas att ytterligare stabilitet stödjer
Bromsblocket skadas genom olycka, eller om någon svetsskada är
3ÿOm motorcykeln ska förvaras i hjulblocket för
hårdvaran är ordentligt fastsatt på plats. Håll klossen ren.
låser bäst hjulet på plats när hjulet rullas in och
4ÿFör att frigöra motorcykeln från hjulblocket, rulla långsamt
Det vridbara fästet kan justeras till ett av tre lägen beroende på
storleken på motorcykelhjulet. Hitta positionen som
används (remmar eller rep).
2. Motorcykeln rullas långsamt in i hjulblocket när
Fästet svänger upp till sitt stängda läge.
backa bort motorcykeln från hjulklossen.
Machine Translated by Google