
- 1 -
Technical Support and E-Warranty Certificate www.vevor.com/support
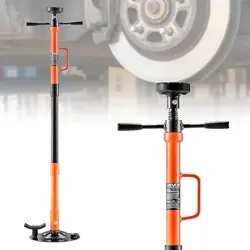
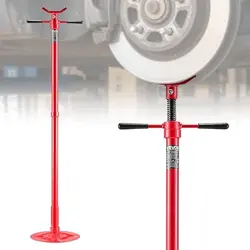
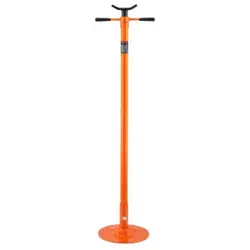
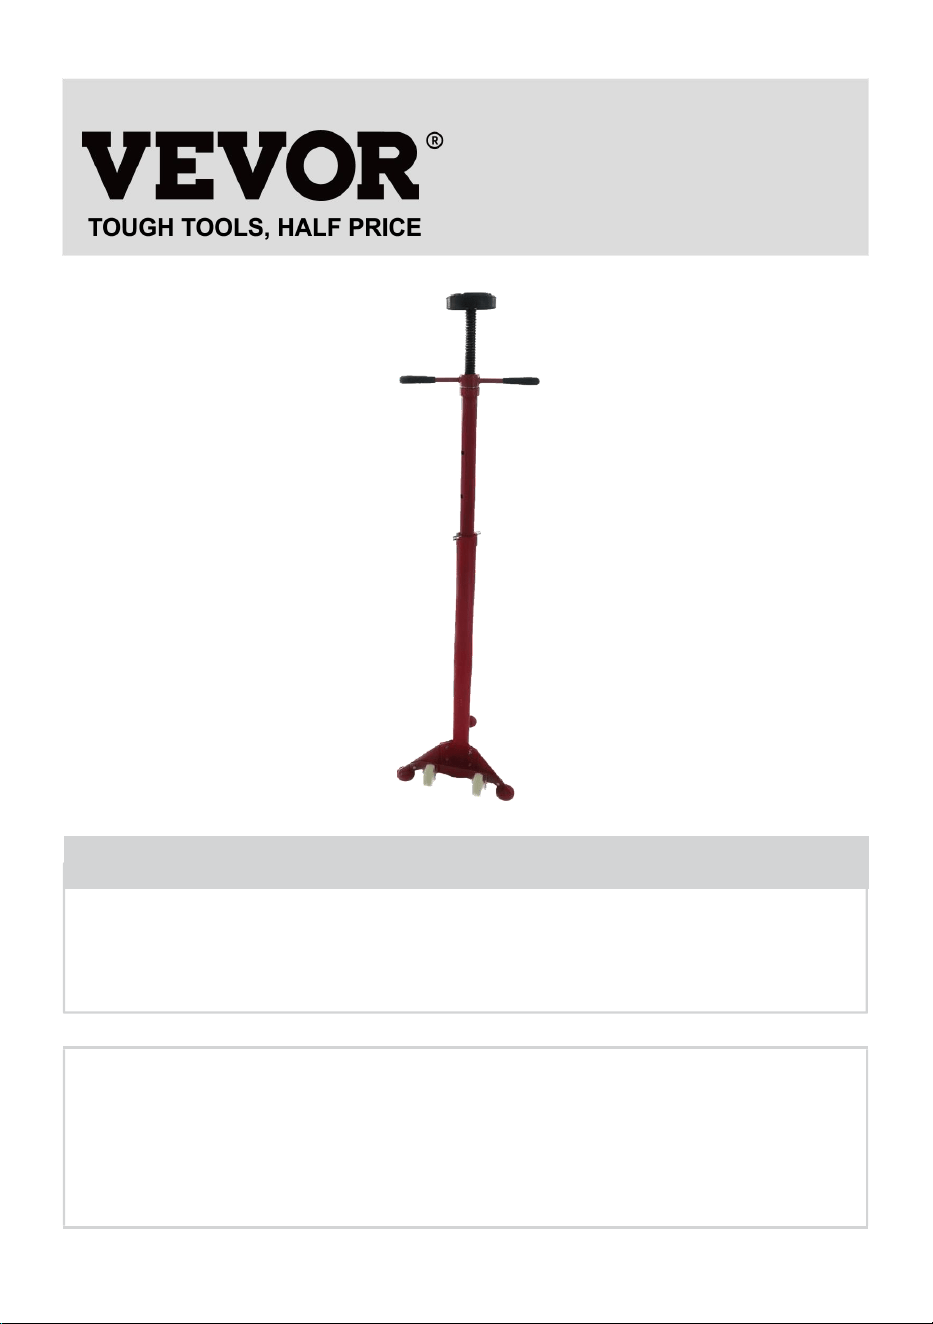
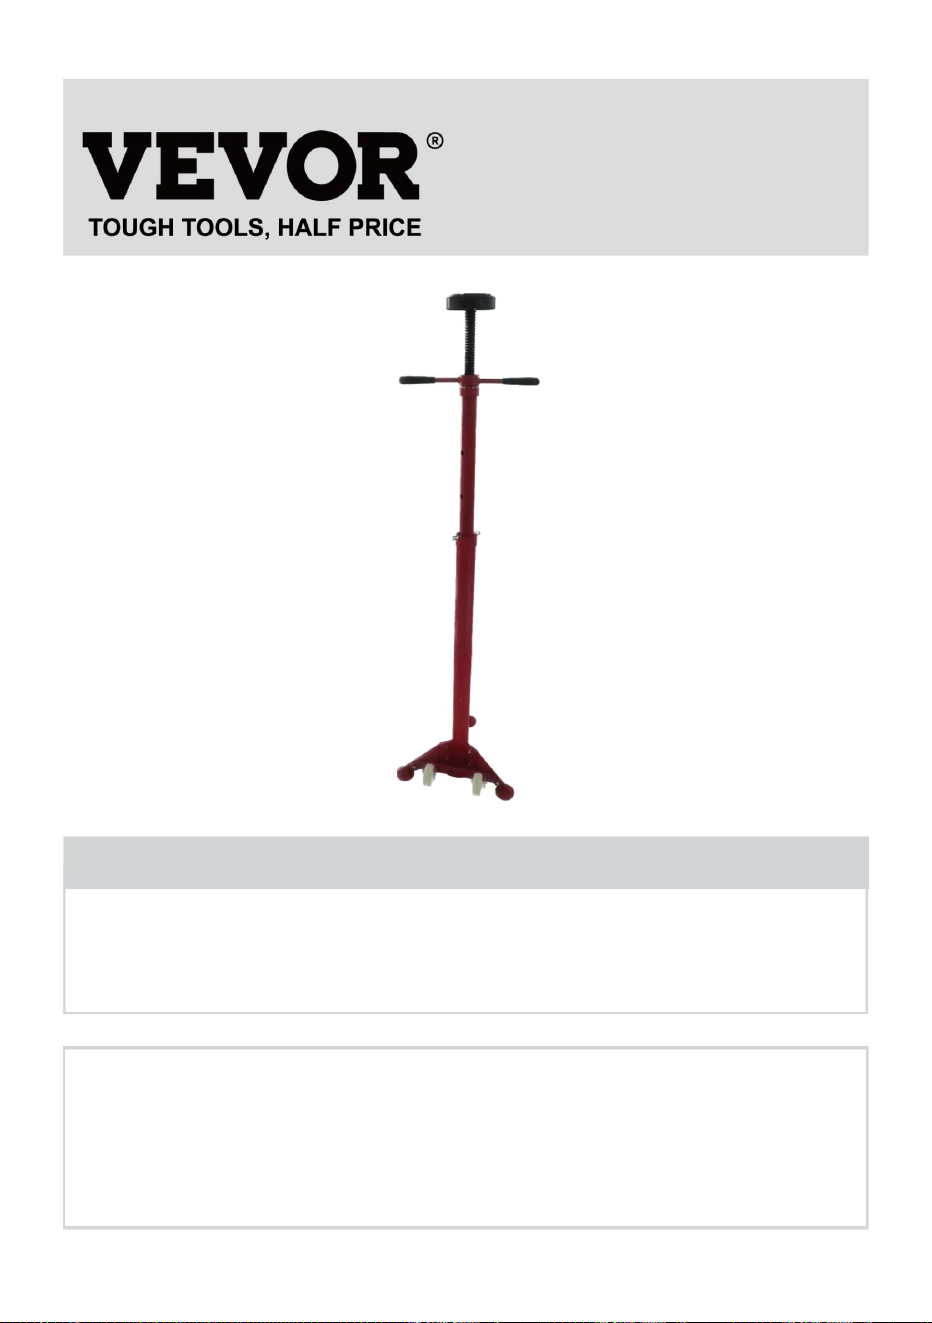
UNDERHOIST STAND
MODEL: SJS-10
We continue to be committed to provide you tools with competitive price.
"Save Half", "Half Price" or any other similar expressions used by us only represents an
estimate of savings you might benefit from buying certain tools with us compared to the major
top brands and does not necessarily mean to cover all categories of tools offered by us. You
are kindly reminded to verify carefully when you are placing an order with us if you are
actually saving half in comparison with the top major brands.
- 2 -
MODEL:S JS-10
Have product questions? Need technical support? Please feel free to
contact us: Technical Support and E-Warranty Certificate
www.vevor.com/support
NEED HELP? CONTACT US!
This is the original instruction, please read all manual instructions
carefully before operating. VEVOR reserves a clear interpretation of our
user manual. The appearance of the product shall be subject to the
product you received. Please forgive us that we won't inform you again if
there are any technology or software updates on our product.
UNDERHOIST STAND

- 3 -
Warning-To reduce the risk of injury, the user must read instructions
manual carefully.
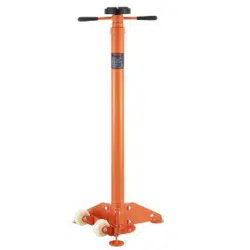
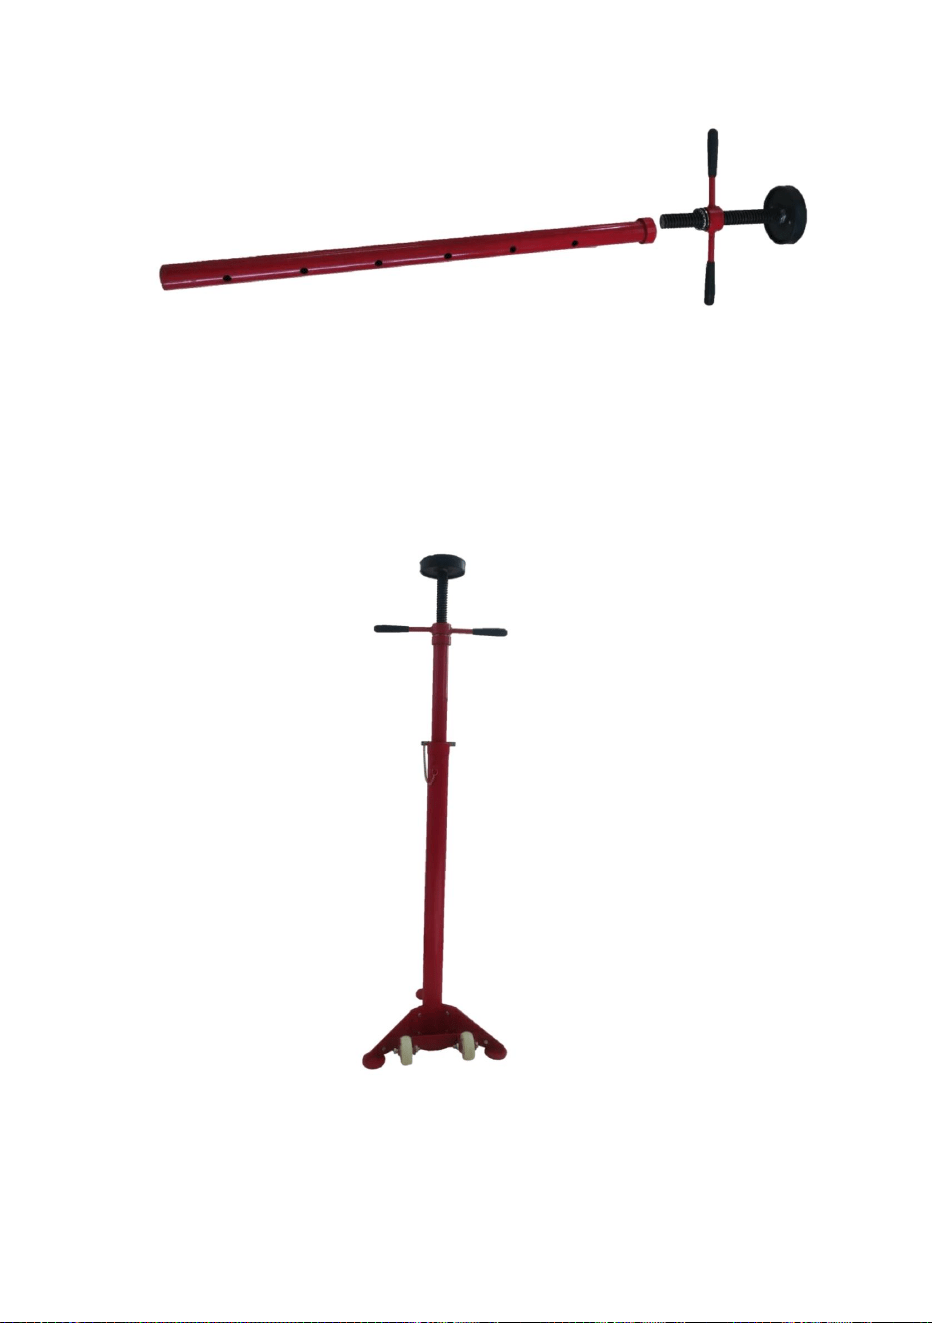
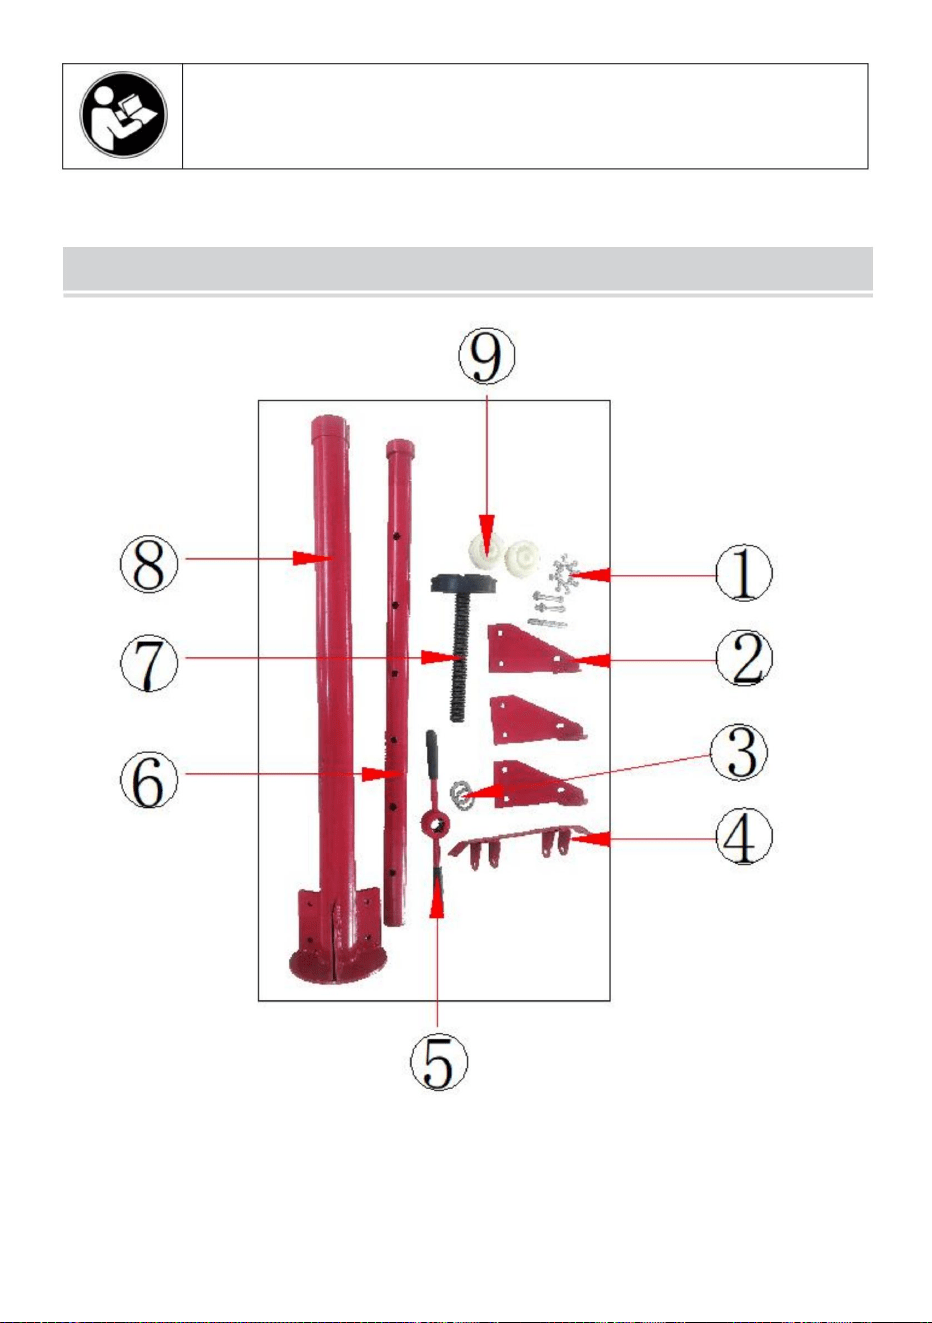
PRODUCT DETAILS

- 4 -
TECHNICAL PARAMETERS
Model
SJS-10
Maximum Load Bearing(t)
0.75
Maximum Height(mm)
1900
Minimum Height(mm)
975
Product Size(mm)
360*360*1000
Net Weight(kg)
10.7
SAFETY ADVICES
OWNER/USER RESPONSIBILITY
The owner and/or user must have a thorough understanding of the manufacturer's
operating instructions and warnings before using the adjustable underhoist stand.
Personnel involved in the use and operation of equipment shall be careful,
competent, trained, and qualified in the safe operation of the equipment and its
proper use when servicing motor vehicles and their components. Warning
information hould be emphasized and understood. If the operator is not fluent in
English, the manufacturer's instructions and warnings shall be read to and
number
name
quantity
1
M8 Bolt*8 M8 Nut*8
M10-70 Bolt*2 M10 Nut*2, Bolt*1
2
Fixed leg
1
3
Bearing
1
4
Wheel holder
1
5
Height Adjusting Lever
1
6
compensating pipe
1
7
Lead screw top plate
1
8
Base tube
1
9
wheel
2

- 5 -
discussed with the operator in the operator's native language by the
purchaser/owner, making sure that the operator comprehends its contents.
Owner and/or user must study and maintain for future reference the
manufacturer's instructions and pertinent warning information. The owner and/or
user is responsible for keeping all warning labels and instruction manuals legible
and intact. Replacement labels and literature are available from the manufacturer.
1. Read the instructions carefully: Before use, read and understand the
instructions and operating guidelines for the safety bracket. Make sure that you
understand the usage limitations, installation requirements, and procedures of the
stent.
2. Choose the right bracket: Choose the right bracket according to your car type
and lifting requirements. Ensure that the bearing capacity of the bracket meets the
requirements of your vehicle and that it is applicable to the vehicle lifts you use.
3. Check the stent integrity: Before use, carefully check the integrity and structure
of the stent for any damage or wear. If any problems are found, do not use the
bracket but replace or repair it.
4. Install the bracket correctly: Install the bracket correctly according to the
instructions. Ensure that the bracket is firmly attached to the vehicle elevator and
that the bracket is placed at the specified support point.
5. Use double supports: Always use two safety supports to support the vehicle.
One stent alone can cause instability and danger.
6. Balanced vehicle: Ensure the vehicle is balanced when placing it on the
support. Adjust the height of the bracket to make the vehicle stable and the
support points are evenly distributed.
7. Regular stent inspection: regularly check the status and reliability of the stent.
Ensure that the support is not rusted, deformed, or otherwise damaged. If any
problems are found, replace or repair the bracket.
8. No overweight load: ensure not to exceed the bearing capacity of the stent.
Overloaded use of stents may lead to stent rupture or collapse, causing a serious
safety risk.

- 6 -
9. Follow the operating guidelines: Always follow the operating guidelines and
safety regulations when using the vehicle elevator safety brackets. Make sure that
you know the right way to use it, and take the necessary security measures.
10. Training and skills: Ensure that the operators are trained and have the correct
operation skills and knowledge. Personnel unfamiliar with the operation should not
use the vehicle elevator safety bracket.
SAVE THESE INSTRUCTIONS
INSTALLATION INSTRUCTIONS
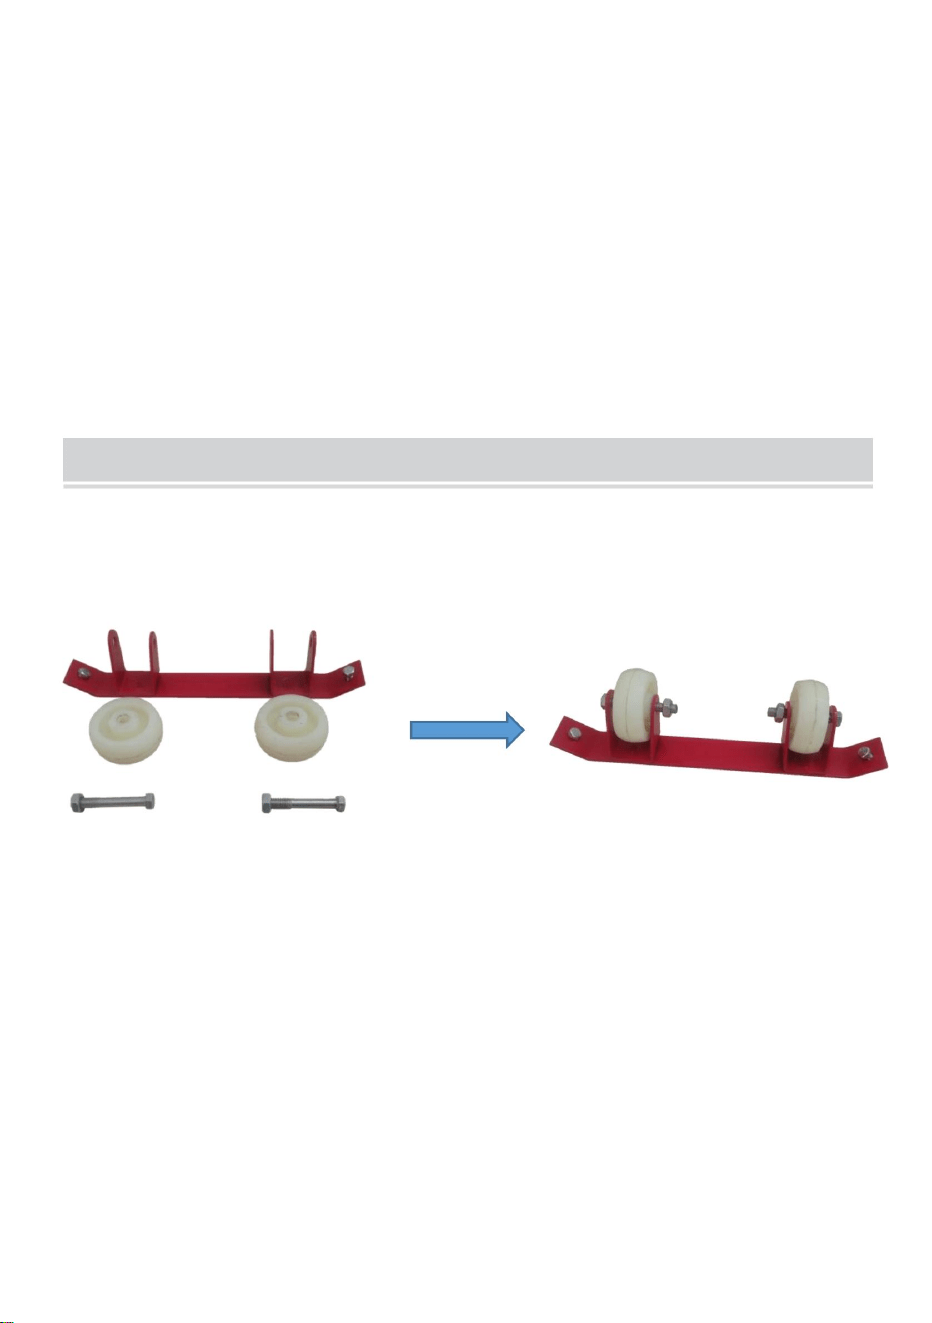
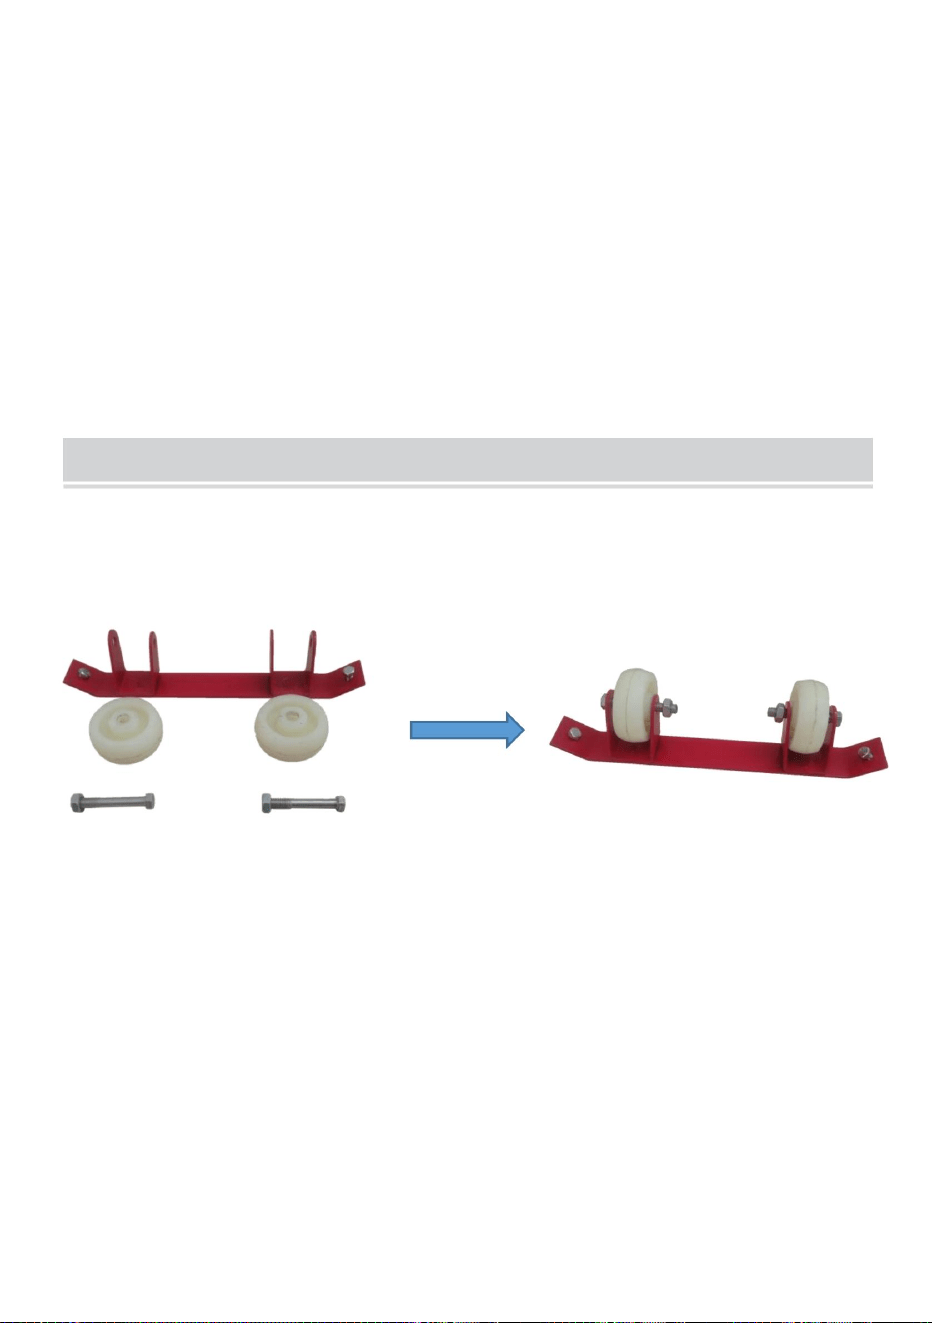
Step 1: Install two wheels to wheel holders (2 M10 nuts, 2 M10 * 70 screws, using
14mm and 17mm open wrench or socket wrench).
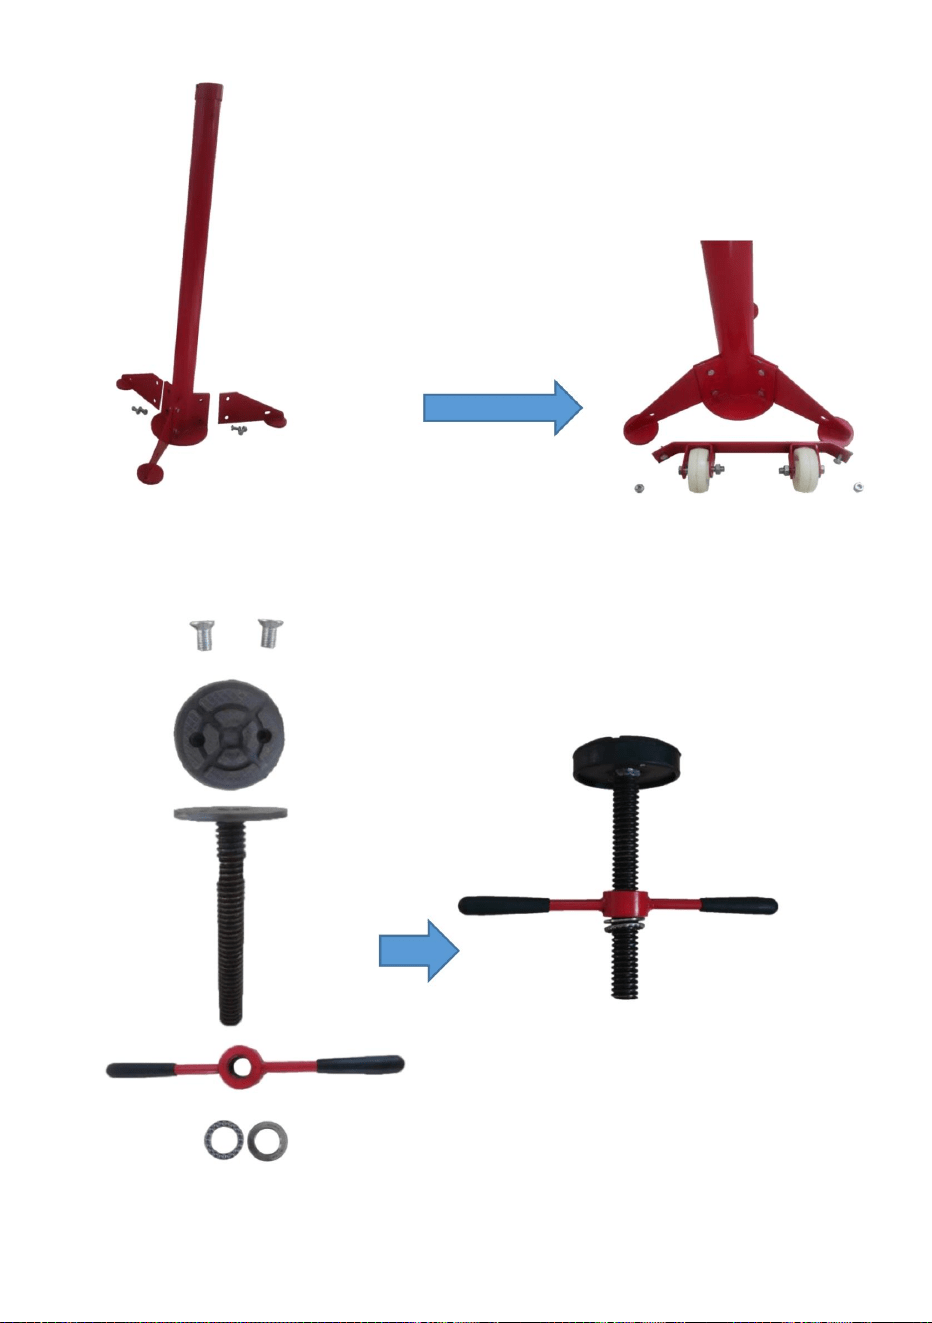
Step 2: Install three feet to the base (6 M8 * 20 bolts, 6 nuts M8, 12mm and 14mm
open wrench or socket wrench) and assemble the base with bolts (M8 * 20 bolts, 2
bolts, and 2 M8 nuts).

- 7 -
Step 3: Install the rubber pad to the disc on the top of the screw (2 M8 * 15 screws)
and attach the height adjustment and bearing to the screw.

- 8 -
Step 4: Screw the wire into the adjustment tube.
Step 5: Install the assembled adjustment pipe to the seat pipe and fix it with a pin.
Assembly finished.
For more detailed installation steps, please refer to the video on the
website.

- 9 -
DIRECTION FOR USE
1. Understand the bracket types: different vehicle lift bracket types may have
different designs and use requirements. Make sure that you understand the
characteristics and features of the type of stent you use.
2. Check for stent integrity: Carefully check the integrity and structure of the stent
before using it. Ensure no cracks, deformation, or other obvious damage. If you
find any problems, please do not use the stent but rather replace or fix it.
3. Select Support Point: Determine the support point position on your vehicle.
These support points are usually located in the vehicle chassis, such as the
vehicle base or wheel arch. Ensure that the bracket support point corresponds to
the vehicle support point.
4. Position placement: Place the stent on the selected support point. Ensure that
the stent is in close contact with the support point and is firmly placed. Adjust the
height of the bracket as required to enable it to safely support the vehicle.
5. Safe locking: According to the stent design, ensure that the stent is in a locked
state to prevent accidental sliding or loosening. Some stent types may be
equipped with locking devices or other safety mechanisms; please read the
instructions carefully and operate correctly.
6. Balanced vehicle: Ensure that the vehicle is balanced and stable on the support.
Adjust the height of the bracket to keep the vehicle balanced and avoid roll or
instability. The vehicle shall be in a stable and stable state before the lifting
operation.
7. Use multiple supports: Always use at least two safety brackets to support the
vehicle. One stent alone can cause instability and danger. Ensure that the bracket
is evenly distributed over the support point of the vehicle.
8. Regular inspection: regularly check the status and reliability of the stent. Make
sure they are not rusty, damaged, or worn out. If any problems are found, replace
or repair the bracket.
9. Compliance with safety regulations: Always follow the relevant safety
regulations and operating guidelines when using the vehicle elevator safety

- 10 -
bracket. Make sure you have the right skills and knowledge and your personal
safety.
INSPECTION ——
Visual inspection should be made before each use of the stand. Any stand which
appears to be damaged in any way, is found to be badly worn or operates
abnormally MUST BE REMOVED FROM SERVICE. If the stand is subjected to
abnormal load or shock, it must be inspected by a manufacturer's authorized
repair facility immediately. It is recommended that an annual inspection of the
stand is made by a manufacturer's authorized repair facility and that missing
decals or warning labels be replaced with the manufacturer's specified parts. A list
of authorized repair facilities is available from the manufacturer.
OPERATING INSTRUCTIONS
To Raise:
Turn the adjusting handle clockwise until the saddle contacts load. Continue
turning the handle to raise the load to the required height.
To Lower:
Turn to adjust the handle counterclockwise.
Made In China


MODÈLE:SJS10
1
SUPPORTSOUSLEVAGE
Assistancetechniqueetcertificatdegarantieélectroniquewww.vevor.com/support
«Économisezlamoitié»,«Moitiéprix»outouteautreexpressionsimilaireutiliséeparnousnereprésente
qu'uneestimationdeséconomiesquevouspourriezréaliserenachetantcertainsoutilscheznousparrapport
auxgrandesmarquesetnecouvrepasnécessairementtouteslescatégoriesd'outilsquenousproposons.
Nousvousrappelonsdebienvouloirvérifiersoigneusementlorsquevouspassezunecommandechez
noussivouséconomisezréellementlamoitiéparrapportauxgrandesmarques.
Nouscontinuonsànousengageràvousfournirdesoutilsàdesprixcompétitifs.
Machine Translated by Google
Ils'agitdelanoticed'utilisationd'origine.Veuillezlireattentivementtoutesles
instructionsdumanuelavantdel'utiliser.VEVORseréserveledroitd'interpréter
clairementnotremanueld'utilisation.L'apparenceduproduitdépendduproduit
quevousavezreçu.Veuilleznousexcuser,nousnevousinformeronsplusencasde
miseàjourtechnologiqueoulogicielledenotreproduit.
MODÈLE:SJS10
BESOIND'AIDE?CONTACTEZNOUS!
Vousavezdesquestionssurnosproduits?Vousavezbesoind'assistancetechnique?
N'hésitezpasànouscontacter:Assistancetechniqueetcertificatdegarantie
électroniquewww.vevor.com/support
SUPPORTSOUSLEVAGE
2
Machine Translated by Google

DÉTAILS
AvertissementPourréduirelerisquedeblessure,l'utilisateurdoitlirelesinstructions
manuelavecsoin.PRODUIT
3
Machine Translated by Google

PARAMÈTRESTECHNIQUES
roue
CONSEILSDESÉCURITÉ
Hauteurminimale(mm)
Lepersonnelimpliquédansl'utilisationetlefonctionnementdel'équipementdoitêtreprudent,
compétent,forméetqualifiépourl'utilisationsûredel'équipementetdeses
1
3
Plaquesupérieuredelavismère
quantité
1
1
360*360*1000
Lepropriétaireet/oul'utilisateurdoitavoirunecompréhensionapprofondiedesinstructionsdufabricant.
Palier
8
2
1900
BoulonM1070*2ÉcrouM10*2,boulon*1
SJS10
6
1
Hauteurmaximale(mm)
Tailleduproduit(mm)
utilisationappropriéelorsdel'entretiendesvéhiculesàmoteuretdeleurscomposants.Avertissement
Lesinstructionsetlesavertissementsdufabricantdoiventêtreluset
4
BoulonM8*8
1
Tubedebase
1
10.7
instructionsd'utilisationetavertissementsavantd'utiliserlesupportdelevageréglable.
nomdunuméro
2
Levierderéglagedelahauteur
dutubedecompensation
Supportderoue
9
975
RESPONSABILITÉDUPROPRIÉTAIRE/UTILISATEUR
Jambefixe
7
Poidsnet(kg)
1
0,75
lesinformationsdoiventêtresoulignéesetcomprises.Sil'opérateurneparlepascouramment
1
ÉcrouM8*8
5
Modèle
Chargemaximale(t)
4
Machine Translated by Google

5
l'acheteur/propriétaire,ens'assurantquel'opérateurencomprendlecontenu.
2.Choisissezlebonsupport:Choisissezlebonsupportenfonctiondevotretypedevoiture
desproblèmessontdétectés,remplacezouréparezlesupport.
comprendreleslimitesd'utilisation,lesexigencesd'installationetlesprocéduresdu
instructions.Assurezvousquelesupportestfermementfixéàl'élévateurduvéhiculeet
5.Utilisezdessupportsdoubles:Utiliseztoujoursdeuxsupportsdesécuritépoursoutenirlevéhicule.
1.Lisezattentivementlesinstructions:Avantutilisation,lisezetcomprenezles
supportmaisremplacezleouréparezle.
7.Inspectionrégulièredustent:vérifiezrégulièrementl’étatetlafiabilitédustent.
l'utilisateurestresponsabledelalisibilitédetouteslesétiquettesd'avertissementetdesmanuelsd'instructions
3.Vérifiezl'intégritédustent:Avantutilisation,vérifiezsoigneusementl'intégritéetlastructure
support.Ajustezlahauteurdusupportpourrendrelevéhiculestableetle
etlesexigencesdelevage.Assurezvousquelacapacitéportantedusupportrépondaux
Lepropriétaireet/oul'utilisateurdoitétudieretconserverpourréférenceultérieurele
Unseulstentpeutprovoqueruneinstabilitéetundanger.
8.Pasdechargeexcessive:veillezànepasdépasserlacapacitéportantedustent.
quelesupportsoitplacéaupointdesupportspécifié.
risquedesécurité.
discutéavecl'opérateurdanslalanguematernelledel'opérateurparle
stent.
Assurezvousquelesupportn'estpasrouillé,déforméouautrementendommagé.Si
instructionsetconsignesd'utilisationdusupportdesécurité.Assurezvousquevous
4.Installezcorrectementlesupport:Installezcorrectementlesupportselonles
etintact.Desétiquettesetdesdocumentsderemplacementsontdisponiblesauprèsdufabricant.
dustentpourtoutdommageouusure.Sidesproblèmessontdétectés,n'utilisezpasle
lespointsd'appuisontrépartisuniformément.
6.Véhiculeéquilibré:Assurezvousquelevéhiculeestéquilibrélorsquevousleplacezsurle
instructionsdufabricantetlesinformationsd'avertissementpertinentes.Lepropriétaireet/ou
exigencesdevotrevéhiculeetqu'ellessontapplicablesauxélévateursdevéhiculesquevousutilisez.
L'utilisationexcessivedestentspeutentraîneruneruptureouuneffondrementdustent,provoquantuneblessuregrave.
Machine Translated by Google
CONSERVEZCESINSTRUCTIONS
INSTRUCTIONSD'INSTALLATION
utiliserlesupportdesécuritédel'élévateurdevéhicule.
Étape1:Installezdeuxrouessurlessupportsderoues(2écrousM10,2clésouvertes
ouclésàdouilleM10de14mmet17mm).
compétencesetconnaissancesopérationnelles.Lepersonnelnonfamiliariséavecl'opérationnedoitpas
*
vousconnaissezlabonnefaçondel'utiliseretprenezlesmesuresdesécuriténécessaires.
10.Formationetcompétences:Assurezvousquelesopérateurssontformésetdisposentdescompétences
règlesdesécuritélorsdel'utilisationdessupportsdesécuritédel'élévateurdevéhicule.Assurezvousque
9.Suivezlesconsignesd'utilisation:Suiveztoujourslesconsignesd'utilisationet
*
20boulons,6écrousM8,12mmet14mm
Étape2:Installeztroispiedssurlabase(cléouverte
M86oucléàdouille)etassemblezlabaseavecdesboulons(boulonsM8*20,2
70vis,enutilisant
boulonset2écrousM8).
6
Machine Translated by Google

7
*
Étape3:Installezletamponencaoutchoucsurledisqueenhautdelavis(2M8
etfixezleréglagedelahauteuretleroulementàlavis.
15vis)
Machine Translated by Google

Pourdesétapesd'installationplusdétaillées,veuillezvousréféreràlavidéosurlesiteWeb.
Étape5:Installezletubederéglageassemblésurletubedeselleetfixezleavecunegoupille.
Étape4:Vissezlefildansletubederéglage.
Assemblageterminé.
8
Machine Translated by Google

baseduvéhiculeoupassagederoue.Assurezvousquelepointdesupportdusupportcorrespondà
6.Véhiculeéquilibré:Assurezvousquelevéhiculeestéquilibréetstablesurlesupport.
ouréparerlesupport.
8.Inspectionrégulière:vérifiezrégulièrementl'étatetlafiabilitédustent.
3.Sélectionnezlepointdesupport:déterminezlapositiondupointdesupportsurvotrevéhicule.
équipésdedispositifsdeverrouillageoud'autresmécanismesdesécurité;veuillezlireles
avantdel'utiliser.Assurezvousqu'iln'yapasdefissures,dedéformationsoud'autresdommagesévidents.Sivous
5.Verrouillagesécurisé:selonlaconceptiondustent,assurezvousquelestentestverrouillé
véhicule.Unseulstentpeutprovoqueruneinstabilitéetundanger.Assurezvousquelesupport
9.Respectdesrèglesdesécurité:Respecteztoujourslesconsignesdesécuritéenvigueur.
opération.
lestentestencontactétroitaveclepointd'appuietestfermementplacé.Ajustezle
caractéristiquesetparticularitésdutypedestentquevousutilisez.
Cespointsdesupportsontgénéralementsituésdanslechâssisduvéhicule,commele
Lisezattentivementlesinstructionsetutilisezlescorrectement.
assurezvousqu'ilsnesontpasrouillés,endommagésouusés.Sidesproblèmessontdétectés,remplacezles
1.Comprendrelestypesdesupports:différentstypesdesupportsdelevagedevéhiculepeuventavoir
lepointd'appuiduvéhicule.
Sivoustrouvezunproblème,veuilleznepasutiliserlestent,maisplutôtleremplacerouleréparer.
pourévitertoutglissementoudesserrageaccidentel.Certainstypesdestentspeuventêtre
Ajustezlahauteurdusupportpourmaintenirlevéhiculeenéquilibreetéviterleroulisou
estrépartieuniformémentsurlepointd'appuiduvéhicule.
2.Vérifiezl'intégritédustent:vérifiezsoigneusementl'intégritéetlastructuredustent
hauteurdusupportselonlesbesoinspourluipermettredesoutenirlevéhiculeentoutesécurité.
7.Utilisezplusieurssupports:utiliseztoujoursaumoinsdeuxsupportsdesécuritépoursoutenirle
4.Positionnement:placezlestentsurlepointdesupportsélectionné.Assurezvousque
différentesconceptionsetexigencesd'utilisation.Assurezvousdebiencomprendreles
instabilité.Levéhiculedoitêtredansunétatstableetstableavantlelevage
réglementationsetconsignesd'utilisationlorsdel'utilisationdel'élévateurdevéhiculeentoutesécurité
MODED'EMPLOI
9
Machine Translated by Google

10
Tournezlapoignéederéglagedanslesensdesaiguillesd'unemontrejusqu'àcequelaselleentreencontact
aveclacharge.Continuezàtournerlapoignéepouréleverlachargeàlahauteurrequise.
Pourabaisser:
Pourélever:
Tournezpourréglerlapoignéedanslesensinversedesaiguillesd'unemontre.
Uneinspectionvisuelledoitêtreeffectuéeavantchaqueutilisationdusupport.Toutsupportquisemble
endommagédequelquefaçonquecesoit,quiesttrèsuséouquifonctionneanormalementDOIT
ÊTRERETIRÉDUSERVICE.Silesupportestsoumisàunechargeouàunchocanormal,ildoitêtre
inspectéimmédiatementparunatelierderéparationagrééparlefabricant.Ilestrecommandéde
procéderàuneinspectionannuelledusupportparunatelierderéparationagrééparlefabricantetde
remplacerlesautocollantsouétiquettesd'avertissementmanquantsparlespiècesspécifiéesparle
fabricant.Unelistedesateliersderéparationagréésestdisponibleauprèsdufabricant.
MODED'EMPLOI
INSPECTION——
Assurezvousd'avoirlescompétencesetlesconnaissancesnécessairesetd'assurervotresécurité
personnelle.
FabriquéenChine
Machine Translated by Google


Unterzugständer
MODELL: SJS-10
Technischer Support und E-Garantie-Zertifikat www.vevor.com/support
„Sparen Sie die Hälfte“, „Halber Preis“ oder andere ähnliche Ausdrücke, die wir verwenden, stellen nur eine
Schätzung der Ersparnis dar, die Sie beim Kauf bestimmter Werkzeuge bei uns im Vergleich zu den großen
Topmarken erzielen können, und decken nicht unbedingt alle von uns angebotenen Werkzeugkategorien ab. Wir
möchten Sie freundlich daran erinnern, bei Ihrer Bestellung bei uns sorgfältig zu prüfen, ob Sie im Vergleich
zu den großen Topmarken tatsächlich die Hälfte sparen.
Wir sind weiterhin bestrebt, Ihnen Werkzeuge zu wettbewerbsfähigen Preisen anzubieten.
- 1 -
Machine Translated by Google

Brauchen Sie Hilfe? Kontaktieren Sie uns!
Dies ist die Originalanleitung. Bitte lesen Sie alle Anweisungen sorgfältig durch,
bevor Sie das Gerät in Betrieb nehmen. VEVOR behält sich eine klare Auslegung unserer
Bedienungsanleitung vor. Das Erscheinungsbild des Produkts richtet sich nach
dem Produkt, das Sie erhalten haben. Bitte verzeihen Sie uns, dass wir Sie nicht erneut
informieren, wenn es Technologie- oder Software-Updates für unser Produkt gibt.
MODELL: S JS-10
Haben Sie Fragen zum Produkt? Benötigen Sie technischen Support? Bitte
kontaktieren Sie uns: Technischer Support und E-Garantie-
Zertifikat www.vevor.com/support
Unterzugständer
- 2 -
Machine Translated by Google

DETAILS
Handbuch sorgfältig durch.PRODUKT
Warnung-Um das Verletzungsrisiko zu verringern, muss der Benutzer die Anweisungen lesen
- 3 -
Machine Translated by Google

TECHNISCHE PARAMETER
Rad
SICHERHEITSHINWEISE
VERANTWORTUNG DES EIGENTÜMERS/BENUTZERS
9
Radhalter
Höhenverstellhebel
Ausgleichsrohr
Nummer Name
2
975
10.7
1
Basisrohr
Lesen Sie vor der Verwendung des verstellbaren Untergestells die Bedienungsanleitung und Warnhinweise.
Das mit der Nutzung und Bedienung der Geräte befasste Personal muss sorgfältig, kompetent,
geschult und qualifiziert sein für die sichere Bedienung der Geräte und ihrer
Maximale Traglast (t)
1
M8 Mutter * 8
5
Modell
Mindesthöhe (mm)
Informationen sollten hervorgehoben und verstanden werden. Wenn der Bediener nicht fließend in
Nettogewicht (kg)
1
Festes Bein
7
0,75
1900
Lager
8
2
Obere Platte der Leitspindel
Menge
3
1
1
1
4
M8 Bolzen * 8
1
360*360*1000
Der Eigentümer und/oder Benutzer muss die Herstelleranweisungen genau kennen.
Maximale Höhe (mm)
SJS-10
6
1
M10-70 Schraube * 2 M10 Mutter * 2, Schraube * 1
Produktgröße (mm)
ordnungsgemäße Verwendung bei der Wartung von Kraftfahrzeugen und deren Komponenten. Warnung
Die Anweisungen und Warnungen des Herstellers müssen in englischer Sprache gelesen und
- 4 -
Machine Translated by Google

- 5 -
4. Installieren Sie die Halterung richtig: Installieren Sie die Halterung richtig gemäß der
Hinweise zur Handhabung der Sicherheitshalterung. Stellen Sie sicher, dass Sie
Stellen Sie sicher, dass die Halterung nicht verrostet, verformt oder anderweitig beschädigt ist.
mit dem Betreiber in dessen Muttersprache besprochen.
Stent.
dass die Halterung am angegebenen Auflagepunkt platziert wird.
8. Keine Überbelastung: Achten Sie darauf, die Tragfähigkeit des Stents nicht zu überschreiten.
Eine Überlastung des Stents kann zu einem Bruch oder Kollaps des Stents führen und zu schweren
6. Ausbalanciertes Fahrzeug: Stellen Sie sicher, dass das Fahrzeug ausbalanciert ist, wenn Sie es auf den
Herstelleranweisungen und die entsprechenden Warnhinweise. Der Eigentümer und/oder
Anforderungen Ihres Fahrzeugs und ob diese für die von Ihnen verwendeten Hebebühnen anwendbar sind.
Die Stützpunkte sind gleichmäßig verteilt.
und intakt. Ersatzetiketten und -literatur sind beim Hersteller erhältlich.
des Stents auf Beschädigungen oder Verschleiß. Wenn Probleme festgestellt werden, verwenden Sie den
1. Lesen Sie die Anweisungen sorgfältig durch: Lesen und verstehen Sie vor der Verwendung die
Halterung, sondern ersetzen oder reparieren Sie sie.
7. Regelmäßige Stentinspektion: Überprüfen Sie regelmäßig den Status und die Zuverlässigkeit des Stents.
Wenn Probleme auftreten, ersetzen oder reparieren Sie die Halterung.
verstehen Sie die Nutzungsbeschränkungen, Installationsanforderungen und Verfahren der
2. Wählen Sie die richtige Halterung: Wählen Sie die richtige Halterung entsprechend Ihrem Autotyp
Käufer/Eigentümer, und stellen Sie sicher, dass der Betreiber den Inhalt versteht.
5. Doppelte Stützen verwenden: Verwenden Sie zum Abstützen des Fahrzeugs immer zwei Sicherheitsstützen.
Anweisungen. Stellen Sie sicher, dass die Halterung fest am Fahrzeuglift befestigt ist und
und Hebeanforderungen. Stellen Sie sicher, dass die Tragfähigkeit der Halterung den
Eigentümer und/oder Benutzer müssen die
Ein einziger Stent kann zu Instabilität und Gefahr führen.
Sicherheitsrisiko.
3. Überprüfen Sie die Integrität des Stents: Überprüfen Sie vor dem Gebrauch sorgfältig die Integrität und Struktur
Stütze. Passen Sie die Höhe der Halterung an, um das Fahrzeug stabil zu machen und die
Der Benutzer ist dafür verantwortlich, dass alle Warnhinweise und Bedienungsanleitungen lesbar bleiben
Machine Translated by Google

INSTALLATIONSANLEITUNG
BEWAHREN SIE DIESE ANWEISUNGEN AUF
Bedienungskenntnisse und -fähigkeiten. Personal, das mit der Bedienung nicht vertraut ist, sollte nicht
Verwenden Sie die Sicherheitshalterung des Fahrzeuglifts.
Schritt 1: Befestigen Sie zwei Räder an den Radhaltern (2 M10-Muttern, 2 M10-
Maulschlüssel oder Steckschlüssel 14 mm und 17 mm).
*
Sie wissen, wie Sie es richtig verwenden und die erforderlichen Sicherheitsmaßnahmen treffen.
10. Schulung und Fähigkeiten: Stellen Sie sicher, dass die Bediener geschult sind und über die richtigen
Sicherheitsvorschriften bei der Verwendung der Fahrzeuglift-Sicherheitshalterungen. Stellen Sie sicher, dass
9. Befolgen Sie die Betriebsanleitung: Befolgen Sie stets die Betriebsanleitung und
70 Schrauben, mit
Schritt 2: Installieren Sie drei Füße an der Basis (6 M8
Maulschlüssel oder Steckschlüssel) und montieren Sie die Basis mit Schrauben (M8 * 20 Schrauben, 2
Schrauben und 2 M8-Muttern).
*
20 Schrauben, 6 Muttern M8, 12mm und 14mm
- 6 -
Machine Translated by Google
- 7 -
*
Schritt 3: Montieren Sie die Gummiauflage an der Scheibe oben auf der Schraube (2 M8) und
befestigen Sie die Höhenverstellung und das Lager an der Schraube.
15 Schrauben)
Machine Translated by Google

Ausführlichere Installationsschritte finden Sie im Video auf der
Website.
Schritt 5: Montieren Sie das montierte Einstellrohr am Sattelrohr und fixieren Sie es mit einem Stift.
Schritt 4: Schrauben Sie den Draht in das Einstellrohr.
Montage abgeschlossen.
- 8 -
Machine Translated by Google

mit Verriegelungsvorrichtungen oder anderen Sicherheitsmechanismen ausgestattet sind; bitte lesen Sie die
3. Stützpunkt auswählen: Bestimmen Sie die Position des Stützpunkts an Ihrem Fahrzeug.
8. Regelmäßige Inspektion: Überprüfen Sie regelmäßig den Status und die Zuverlässigkeit des Stents. Machen
Fahrzeugboden oder Radkasten. Stellen Sie sicher, dass der Stützpunkt der Halterung mit dem
6. Ausbalanciertes Fahrzeug: Stellen Sie sicher, dass das Fahrzeug ausbalanciert und stabil auf der Stütze steht.
oder die Halterung reparieren.
9. Einhaltung der Sicherheitsvorschriften: Beachten Sie stets die entsprechenden Sicherheitshinweise
Betrieb.
Eigenschaften und Merkmale des von Ihnen verwendeten Stenttyps.
der Stent liegt eng am Auflagepunkt an und sitzt fest. Passen Sie die
Fahrzeug. Ein Stent allein kann Instabilität und Gefahr verursachen. Stellen Sie sicher, dass die Halterung
bevor Sie es verwenden. Stellen Sie sicher, dass keine Risse, Verformungen oder andere offensichtliche Schäden vorhanden sind. Wenn Sie
5. Sichere Verriegelung: Achten Sie je nach Stentdesign darauf, dass der Stent in einer verriegelten
Sollten Sie Probleme feststellen, verwenden Sie den Stent bitte nicht, sondern ersetzen oder reparieren Sie ihn.
Zustand, um ein versehentliches Verrutschen oder Lösen zu verhindern. Einige Stenttypen können
wird gleichmäßig auf die Auflagepunkte des Fahrzeugs verteilt.
Stellen Sie sicher, dass sie nicht rostig, beschädigt oder abgenutzt sind. Wenn Probleme festgestellt werden, ersetzen Sie
Diese Stützpunkte befinden sich in der Regel im Fahrzeugchassis, wie zum Beispiel dem
1. Verstehen Sie die Halterungstypen: Verschiedene Fahrzeughebehalterungstypen können
der Fahrzeugstützpunkt.
Passen Sie die Höhe der Halterung an, um das Fahrzeug im Gleichgewicht zu halten und ein Rollen oder
Lesen Sie die Bedienungsanleitung sorgfältig durch und bedienen Sie sie ordnungsgemäß.
4. Platzierung der Position: Platzieren Sie den Stent am ausgewählten Stützpunkt. Stellen Sie sicher, dass
unterschiedliche Designs und Nutzungsanforderungen. Stellen Sie sicher, dass Sie die
Instabilität. Das Fahrzeug muss sich in einem stabilen und stabilen Zustand befinden, bevor das Heben
Vorschriften und Betriebsrichtlinien bei der Nutzung der Fahrzeugaufzugsicherheit
Passen Sie die Höhe der Halterung entsprechend an, damit diese das Fahrzeug sicher tragen kann.
7. Verwenden Sie mehrere Stützen: Verwenden Sie immer mindestens zwei Sicherheitshalterungen zur Unterstützung der
2. Überprüfen Sie die Integrität des Stents: Überprüfen Sie sorgfältig die Integrität und Struktur des Stents
GEBRAUCHSANWEISUNG
- 9 -
Machine Translated by Google

In China hergestellt
Erhöhen:
Drehen Sie den Einstellgriff im Uhrzeigersinn, bis der Sattel die Last berührt. Drehen Sie
den Griff weiter, um die Last auf die gewünschte Höhe anzuheben.
Zum Absenken:
Zum Verstellen des Griffs drehen Sie den Griff gegen den Uhrzeigersinn.
INSPEKTION ——
BEDIENUNGSANLEITUNG
Vor jeder Verwendung des Ständers sollte eine Sichtprüfung durchgeführt werden. Jeder Ständer,
der in irgendeiner Weise beschädigt zu sein scheint, stark abgenutzt ist oder nicht normal
funktioniert, MUSS AUS DEM BETRIEB GENOMMEN WERDEN. Wenn der Ständer einer
anormalen Belastung oder Erschütterung ausgesetzt ist, muss er unverzüglich von einer
autorisierten Reparaturwerkstatt des Herstellers überprüft werden. Es wird empfohlen, den
Ständer einmal jährlich von einer autorisierten Reparaturwerkstatt des Herstellers überprüfen
zu lassen und fehlende Aufkleber oder Warnschilder durch die vom Hersteller angegebenen Teile
zu ersetzen. Eine Liste autorisierter Reparaturwerkstätten ist beim Hersteller erhältlich.
Halterung. Stellen Sie sicher, dass Sie über die richtigen Fähigkeiten und Kenntnisse verfügen und auf Ihre persönliche
Sicherheit achten.
- 10 -
Machine Translated by Google


MODELLO: SJS-10
"Risparmia la metà", "Metà prezzo" o qualsiasi altra espressione simile da noi utilizzata rappresenta
solo una stima del risparmio che potresti ottenere acquistando determinati utensili con noi rispetto ai
principali marchi principali e non significa necessariamente coprire tutte le categorie di utensili da noi
offerti. Ti ricordiamo gentilmente di verificare attentamente quando effettui un ordine con noi se
stai effettivamente risparmiando la metà rispetto ai principali marchi principali.
Continuiamo a impegnarci per fornirvi strumenti a prezzi competitivi.
SUPPORTO SOTTOPARCO
Supporto tecnico e certificato di garanzia elettronica www.vevor.com/support
- 1 -
Machine Translated by Google

Questa è l'istruzione originale, si prega di leggere attentamente tutte le
istruzioni del manuale prima di utilizzare. VEVOR si riserva una chiara
interpretazione del nostro manuale utente. L'aspetto del prodotto sarà
soggetto al prodotto ricevuto. Vi preghiamo di perdonarci se non vi informeremo di
nuovo se ci sono aggiornamenti tecnologici o software sul nostro prodotto.
MODELLO:S JS-10
- 2 -
HAI BISOGNO DI AIUTO? CONTATTACI!
SUPPORTO SOTTOPARCO
Hai domande sul prodotto? Hai bisogno di supporto tecnico? Non esitare
a contattarci: Supporto tecnico e certificato di garanzia
elettronica www.vevor.com/support
Machine Translated by Google

DETTAGLI
manuale con attenzione.PRODOTTO
Attenzione - Per ridurre il rischio di lesioni, l'utente deve leggere le istruzioni
- 3 -
Machine Translated by Google

PARAMETRI TECNICI
ruota
CONSIGLI DI SICUREZZA
le informazioni devono essere enfatizzate e comprese. Se l'operatore non è fluente in
Gamba fissa
7
Peso netto (kg)
1
0,75
Carico massimo sopportabile (t)
Il personale coinvolto nell'uso e nel funzionamento dell'attrezzatura deve essere attento,
competente, formato e qualificato nel funzionamento sicuro dell'attrezzatura e del suo
1
Dado M8*8
5
Modello
numero nome
2
10.7
1
Tubo di base
Altezza minima (mm)
istruzioni per l'uso e avvertenze prima di utilizzare il supporto sottoparanco regolabile.
9
Supporto ruota
Leva di regolazione dell'altezza
tubo di compensazione
975
Bullone M10-70*2 Dado M10*2, Bullone*1
RESPONSABILITÀ DEL PROPRIETARIO/UTENTE
SJS-10
6
1
Dimensioni del prodotto (mm)
Inglese, le istruzioni e le avvertenze del produttore devono essere lette e
4
Bullone M8*8
1
Altezza massima (mm)
uso corretto durante la manutenzione di veicoli a motore e dei loro componenti. Attenzione
Piastra superiore della vite di comando
quantità
1
360*360*1000
Il proprietario e/o l'utente devono avere una conoscenza approfondita delle istruzioni del produttore
1
3
8
2
1
Cuscinetto
1900
- 4 -
Machine Translated by Google

- 5 -
e intatto. Etichette e documentazione sostitutive sono disponibili presso il produttore.
dello stent per eventuali danni o usura. Se si riscontrano problemi, non utilizzare lo
i punti di supporto sono distribuiti uniformemente.
L'uso eccessivo di stent può portare alla rottura o al collasso dello stent, causando un grave
6. Veicolo bilanciato: assicurarsi che il veicolo sia bilanciato quando lo si posiziona sul
istruzioni del produttore e le informazioni di avvertenza pertinenti. Il proprietario e/o
requisiti del tuo veicolo e che sia applicabile ai sollevatori per veicoli che utilizzi.
discusso con l'operatore nella lingua madre dell'operatore dall'
stent.
che la staffa sia posizionata nel punto di supporto specificato.
8. Nessun carico in sovrappeso: assicurarsi di non superare la capacità portante dello stent.
4. Installare correttamente la staffa: installare correttamente la staffa secondo le istruzioni
istruzioni e linee guida operative per la staffa di sicurezza. Assicurarsi di
Assicurarsi che il supporto non sia arrugginito, deformato o altrimenti danneggiato. Se presente
l'utente è responsabile di mantenere leggibili tutte le etichette di avvertenza e i manuali di istruzioni
3. Controllare l'integrità dello stent: prima dell'uso, controllare attentamente l'integrità e la struttura
supporto. Regolare l'altezza della staffa per rendere il veicolo stabile e il
e requisiti di sollevamento. Assicurarsi che la capacità portante della staffa soddisfi i
Il proprietario e/o l'utente devono studiare e conservare per riferimento futuro il
Anche un solo stent può causare instabilità e pericoli.
rischio per la sicurezza.
se vengono riscontrati problemi, sostituire o riparare la staffa.
comprendere le limitazioni di utilizzo, i requisiti di installazione e le procedure del
istruzioni. Assicurarsi che la staffa sia saldamente fissata all'elevatore del veicolo e
acquirente/proprietario, assicurandosi che l'operatore ne comprenda il contenuto.
2. Scegli la staffa giusta: Scegli la staffa giusta in base al tipo di auto
staffa ma sostituirla o ripararla.
7. Ispezione regolare dello stent: controllare regolarmente lo stato e l'affidabilità dello stent.
5. Utilizzare doppi supporti: utilizzare sempre due supporti di sicurezza per sostenere il veicolo.
1. Leggere attentamente le istruzioni: prima dell'uso, leggere e comprendere le
Machine Translated by Google

ISTRUZIONI PER L'INSTALLAZIONE
SALVA QUESTE ISTRUZIONI
utilizzare la staffa di sicurezza dell'elevatore per veicoli.
Fase 1: installare due ruote sui supporti ruota (2 dadi M10, 2 chiavi aperte M10
da 14 mm e 17 mm o chiave a bussola).
competenze e conoscenze operative. Il personale non esperto in tale operazione non deve
*
sai come usarlo correttamente e adotti le misure di sicurezza necessarie.
10. Formazione e competenze: assicurarsi che gli operatori siano formati e abbiano le competenze corrette
norme di sicurezza quando si utilizzano le staffe di sicurezza dell'elevatore del veicolo. Assicurarsi che
9. Seguire le linee guida operative: seguire sempre le linee guida operative e
20 bulloni, 6 dadi M8, 12mm e 14mm
*
Fase 2: installare tre piedini sulla base (6 chiavi aperte
M8 o chiavi a bussola) e assemblare la base con bulloni (M8 * 20 bulloni, 2
bulloni e 2 dadi M8).
70 viti, utilizzando
- 6 -
Machine Translated by Google

15 viti)Fase 3: Installare il cuscinetto in gomma sul disco nella parte superiore della
vite (2 M8) e fissare la regolazione dell'altezza e il cuscinetto alla vite.
*
- 7 -
Machine Translated by Google

- 8 -
Fase 5: Installare il tubo di regolazione assemblato sul tubo del sedile e fissarlo con un perno.
Fase 4: Avvitare il filo nel tubo di regolazione.
Montaggio completato.
Per istruzioni più dettagliate sulla procedura di installazione, fare riferimento al video
sul sito web.
Machine Translated by Google

- 9 -
ISTRUZIONI PER L'USO
prima di utilizzarlo. Assicurarsi che non vi siano crepe, deformazioni o altri danni evidenti. Se
5. Bloccaggio sicuro: in base al design dello stent, assicurarsi che lo stent sia bloccato
veicolo. Un solo stent può causare instabilità e pericolo. Assicurarsi che la staffa
9. Rispetto delle norme di sicurezza: seguire sempre le norme di sicurezza pertinenti.
operazione.
caratteristiche e peculiarità del tipo di stent utilizzato.
lo stent è a stretto contatto con il punto di supporto ed è saldamente posizionato. Regolare il
base del veicolo o passaruota. Assicurarsi che il punto di supporto della staffa corrisponda a
6. Veicolo bilanciato: assicurarsi che il veicolo sia bilanciato e stabile sul supporto.
o riparare la staffa.
dotati di dispositivi di bloccaggio o altri meccanismi di sicurezza; leggere attentamente le istruzioni
3. Seleziona il punto di supporto: determina la posizione del punto di supporto sul tuo veicolo.
8. Ispezione regolare: controllare regolarmente lo stato e l'affidabilità dello stent.
2. Controllare l'integrità dello stent: controllare attentamente l'integrità e la struttura dello stent
altezza della staffa tale da consentirle di sostenere il veicolo in modo sicuro.
7. Utilizzare più supporti: utilizzare sempre almeno due staffe di sicurezza per sostenere il
4. Posizionamento della posizione: posizionare lo stent sul punto di supporto selezionato. Assicurarsi che
diversi design e requisiti di utilizzo. Assicurati di aver compreso il
instabilità. Il veicolo deve essere in uno stato stabile e stabile prima del sollevamento
norme e linee guida operative per l'utilizzo in sicurezza dell'elevatore per veicoli
assicurati che non siano arrugginiti, danneggiati o usurati. Se si riscontrano problemi, sostituiscili
Questi punti di supporto si trovano solitamente nel telaio del veicolo, come ad esempio
seguire attentamente le istruzioni e utilizzarle correttamente.
1. Comprendere i tipi di staffa: diversi tipi di staffa di sollevamento del veicolo possono avere
il punto di supporto del veicolo.
stato per impedire lo scivolamento o l'allentamento accidentale. Alcuni tipi di stent possono essere
è distribuito uniformemente sul punto di appoggio del veicolo.
Regolare l'altezza della staffa per mantenere il veicolo in equilibrio ed evitare il rollio o
Se si riscontrano problemi, si prega di non utilizzare lo stent, ma di sostituirlo o ripararlo.
Machine Translated by Google

- 10 -
Girare la maniglia di regolazione in senso orario finché la sella non tocca il carico.
Continuare a girare la maniglia per sollevare il carico all'altezza richiesta.
Per abbassare:
Per aumentare:
L'ispezione visiva deve essere effettuata prima di ogni utilizzo del supporto. Qualsiasi supporto
che sembri danneggiato in qualsiasi modo, che risulti molto usurato o che funzioni in
modo anomalo DEVE ESSERE RIMOSSO DAL SERVIZIO. Se il supporto è sottoposto a carichi
o urti anomali, deve essere immediatamente ispezionato da un centro di riparazione
autorizzato dal produttore. Si raccomanda di far effettuare un'ispezione annuale del supporto
da un centro di riparazione autorizzato dal produttore e di sostituire le decalcomanie o le
etichette di avvertenza mancanti con le parti specificate dal produttore. Un elenco dei centri di
riparazione autorizzati è disponibile presso il produttore.
ISTRUZIONI PER L'USO
ISPEZIONE ——
staffa. Assicurati di avere le giuste competenze e conoscenze e la tua sicurezza personale.
Per regolare la maniglia, ruotarla in senso antiorario.
Made in China
Machine Translated by Google


SOPORTEDEBAJODELELEVADOR
MODELO:SJS10
Soportetécnicoycertificadodegarantíaelectrónicawww.vevor.com/support
"Ahorrelamitad","mitaddeprecio"ocualquierotraexpresiónsimilarqueutilicemossolorepresenta
unaestimacióndelahorroquepodríaobteneralcomprarciertasherramientasconnosotrosencomparación
conlasprincipalesmarcasynonecesariamentesignificaquecubratodaslascategoríasdeherramientas
queofrecemos.Lerecordamosque,alrealizarunpedidoconnosotros,verifiquecuidadosamentesi
realmenteestáahorrandolamitadencomparaciónconlasprincipalesmarcas.
Seguimoscomprometidosabrindarleherramientasaprecioscompetitivos.
1
Machine Translated by Google
¿NECESITAAYUDA?¡CONTÁCTENOS!
Estassonlasinstruccionesoriginales,leaatentamentetodaslas
instruccionesdelmanualantesdeutilizarelproducto.VEVORsereservauna
interpretaciónclaradenuestromanualdeusuario.Laaparienciadel
productoestarásujetaalproductoquerecibió.Perdónenospornoinformarle
nuevamentesihayactualizacionesdetecnologíaosoftwareennuestroproducto.
MODELO:SJS10
¿Tienepreguntassobreelproducto?¿Necesitaasistenciatécnica?Nodudeenponerse
encontactoconnosotros:Asistenciatécnicaycertificadodegarantía
electrónicawww.vevor.com/support
SOPORTEDEBAJODELELEVADOR
2
Machine Translated by Google

DETALLES
Advertencia:Parareducirelriesgodelesiones,elusuariodebeleerlasinstrucciones.
manualconcuidado.PRODUCTO
3
Machine Translated by Google

PARÁMETROSTÉCNICOS
rueda
CONSEJOSDESEGURIDAD
Instruccionesdefuncionamientoyadvertenciasantesdeutilizarelsoportedeelevacióninferiorajustable.
Alturamáxima(mm)
4
PernoM8*8
1
Usoadecuadoduranteelmantenimientodevehículosdemotorysuscomponentes.Advertencia
SJS10
6
1
PernoM1070*2TuercaM10*2,Perno*1
Tamañodelproducto(mm)
Lasinstruccionesyadvertenciasdelfabricantedebenleerseatentamentey
1900
Cojinete
8
2
3
1
1
Placasuperiordeltornillodeavance
cantidad
1
TuercaM8*8
5
1
Modelo
360*360*1000
Alturamínima(mm)
Capacidaddecargamáxima(t)
Pesoneto(kg)
1
Piernafija
7
0,75
Elpropietarioy/ousuariodebetenerunconocimientoprofundodelasinstruccionesdelfabricante.
Elpersonalinvolucradoenelusoyoperacióndelequipodeberásercuidadoso,competente,
capacitadoycalificadoenlaoperaciónseguradelequipoysus
Lainformacióndebeserenfatizadaycomprendida.Sieloperadornodominaelidioma
RESPONSABILIDADDELPROPIETARIO/USUARIO
9
Portaruedas
Tubocompensadorcon
palancadeajustedealtura
975
10.7
1
nombredelnumero
2
Tubobase
4
Machine Translated by Google

5
yrequisitosdeelevación.Asegúresedequelacapacidaddecargadelsoportecumplaconlosrequisitos
Elpropietarioy/ousuariodebeestudiarymantenerparareferenciafuturael
Unsolostentpuedecausarinestabilidadypeligro.
riesgodeseguridad.
3.Verifiquelaintegridaddelstent:antesdeusarlo,verifiquecuidadosamentelaintegridadylaestructura.
soporte.Ajustelaalturadelsoporteparaqueelvehículoquedeestabley
Elusuarioesresponsabledemantenerlegiblestodaslasetiquetasdeadvertenciaymanualesdeinstrucciones.
1.Leaatentamentelasinstrucciones:Antesdeusar,leaycomprendalas
soporteperoreempláceloorepárelo.
7.Inspecciónperiódicadelstent:compruebeperiódicamenteelestadoylafiabilidaddelstent.
2.Elijaelsoporteadecuado:Elijaelsoporteadecuadosegúnsutipodecoche.
comprador/propietario,asegurándosedequeeloperadorcomprendesucontenido.
5.Utilicesoportesdobles:Utilicesiempredossoportesdeseguridadparasostenerelvehículo.
Siseencuentranproblemas,reemplaceorepareelsoporte.
comprenderlaslimitacionesdeuso,losrequisitosdeinstalaciónylosprocedimientosdel
Instrucciones.Asegúresedequeelsoporteestéfirmementefijadoalelevadordelvehículoy
instruccionesdelfabricanteylainformacióndeadvertenciapertinente.Elpropietarioy/o
requisitosdesuvehículoyqueseaaplicablealoselevadoresdevehículosqueutiliza.
6.Vehículoequilibrado:Asegúresedequeelvehículoestéequilibradoalcolocarloenelsuelo.
Elusoexcesivodestentspuedeprovocarlarupturaoelcolapsodelstent,loquecausaundañograve.
Lospuntosdeapoyoestándistribuidosuniformemente.
yenperfectoestado.Elfabricantedisponedeetiquetasydocumentaciónderepuesto.
delstentparadetectarcualquierdañoodesgaste.Siseencuentraalgúnproblema,noutiliceelstent.
4.Instaleelsoportecorrectamente:Instaleelsoportecorrectamentedeacuerdoconlas
Instruccionesypautasdefuncionamientodelsoportedeseguridad.Asegúresede
Asegúresedequeelsoportenoestéoxidado,deformadoodañadodecualquierotraforma.
queelsoporteestécolocadoenelpuntodeapoyoespecificado.
discutidoconeloperadorenelidiomanativodeloperadorporel
stent.
8.Sincargadesobrepeso:asegúresedenoexcederlacapacidaddecargadelstent.
Machine Translated by Google

INSTRUCCIONESDEINSTALACIÓN
GUARDEESTASINSTRUCCIONES
Habilidadesyconocimientosdeoperación.Elpersonalquenoestéfamiliarizadoconlaoperaciónnodebe
Utiliceelsoportedeseguridaddelelevadordevehículos.
Paso1:Instaledosruedasenlossoportesderuedas(2tuercasM10,2llavesde
bocaodetuboM10de14mmy17mm).
*
Normasdeseguridadalutilizarlossoportesdeseguridaddelelevadordevehículos.Asegúresedeque
10.Capacitaciónyhabilidades:Asegúresedequelosoperadoresesténcapacitadosytenganlashabilidades
Sabelaformacorrectadeusarloytomarlasmedidasdeseguridadnecesarias.
9.Sigalaspautasdefuncionamiento:Sigasiemprelaspautasdefuncionamientoy
70tornillos,utilizando
20tornillos,6tuercasM8,12mmy14mm
Paso2:Instaletrespiesenlabase(llaveabiertaM86
ollavedetubo)yensamblelabaseconpernos(pernosM8*20,2
pernosy2tuercasM8).
*
6
Machine Translated by Google

7
*
Paso3:Instalelaalmohadilladegomaeneldiscoenlapartesuperiordel
tornillo(2M8yfijeelajustedealturayelcojinetealtornillo.
15tornillos)
Machine Translated by Google
Paraconocerpasosdeinstalaciónmásdetallados,consulteelvideoenelsitioweb.
Paso5:Instaleeltubodeajusteensambladoeneltubodelasientoyfíjeloconunpasador.
Paso4:Atornilleelcableeneltubodeajuste.
Montajeterminado.
8
Machine Translated by Google

Siencuentraalgúnproblema,noutiliceelstent,reempláceloorepárelo.
estadoparaevitardeslizamientosoaflojamientosaccidentales.Algunostiposdestentpuedenser
sedistribuyeuniformementesobreelpuntodeapoyodelvehículo.
1.Comprendalostiposdesoporte:losdiferentestiposdesoportesdeelevacióndevehículospuedentener
elpuntodeapoyodelvehículo.
Ajustelaalturadelsoporteparamantenerelvehículoequilibradoyevitarquesevuelqueosecaiga.
Asegúresedequenoesténoxidados,dañadosnidesgastados.Siencuentraalgúnproblema,reemplácelos.
Estospuntosdeapoyosuelenestarubicadosenelchasisdelvehículo,comoporejemploel
Lealasinstruccionescuidadosamenteyoperecorrectamente.
4.Colocacióndelaposición:Coloqueelstentenelpuntodeapoyoseleccionado.Asegúresedeque
diferentesdiseñosyrequisitosdeuso.Asegúresedecomprenderlos
inestabilidad.Elvehículodeberáestarenunestadoestableyestableantesdelaelevación.
Normasypautasdefuncionamientoalutilizarelelevadordevehículosdeseguridad
alturadelsoportesegúnseanecesarioparapermitirquesostengaelvehículodeformasegura.
7.Utilicevariossoportes:Utilicesiemprealmenosdossoportesdeseguridadparasujetarel
2.Verifiquelaintegridaddelstent:Verifiquecuidadosamentelaintegridadylaestructuradelstent.
equipadoscondispositivosdebloqueouotrosmecanismosdeseguridad;lealas
3.Seleccionarpuntodeapoyo:Determinelaposicióndelpuntodeapoyoensuvehículo.
8.Inspecciónperiódica:compruebeperiódicamenteelestadoylafiabilidaddelstent.
6.Vehículoequilibrado:Asegúresedequeelvehículoestéequilibradoyestablesobreelsoporte.
basedelvehículoopasoderueda.Asegúresedequeelpuntodeapoyodelsoportecorresponda
orepararelsoporte.
operación.
Característicasyparticularidadesdeltipodestentqueutilice.
Elstentestáencontactocercanoconelpuntodeapoyoyestácolocadofirmemente.Ajusteel
9.Cumplimientodelasnormasdeseguridad:Sigasiemprelasnormasdeseguridadpertinentes.
vehículo.Unsolostentpuedecausarinestabilidadypeligro.Asegúresedequeelsoporte
Antesdeusarlo,asegúresedequenopresentegrietas,deformacionesuotrosdañosevidentes.
5.Bloqueoseguro:Deacuerdoconeldiseñodelstent,asegúresedequeelstentestébloqueado.
MODODEEMPLEO
9
Machine Translated by Google

10
Paraelevar:
Girelamanijadeajusteenelsentidodelasagujasdelrelojhastaqueelsillínentreencontactocon
lacarga.Continúegirandolamanijaparaelevarlacargaalaalturarequerida.
Parabajar:
Sedeberealizarunainspecciónvisualantesdecadausodelsoporte.Cualquiersoportequeparezcaestar
dañadodecualquiermanera,queseencuentremuydesgastadooquefuncionedemanera
anormalDEBESERRETIRADODELSERVICIO.Sielsoportesesometeaunacargaoimpactoanormal,
debeserinspeccionadoporuntallerdereparaciónautorizadoporelfabricantedeinmediato.Se
recomiendaqueuntallerdereparaciónautorizadoporelfabricanterealiceunainspecciónanualdel
soporteyquelascalcomaníasoetiquetasdeadvertenciafaltantessereemplacenconlaspiezas
especificadasporelfabricante.Elfabricanteofreceunalistadetalleresdereparaciónautorizados.
INSTRUCCIONESDEUSO
INSPECCIÓN——
soporte.Asegúresedetenerlashabilidadesylosconocimientosadecuadosydesuseguridadpersonal.
Gireparaajustarelmangoensentidoantihorario.
Hechoenchina
Machine Translated by Google


PODNOŚNIK PODNOŚNIKOWY
MODEL: SJS-10
Wsparcie techniczne i certyfikat gwarancji elektronicznej www.vevor.com/support
Nadal staramy się oferować Państwu narzędzia w konkurencyjnych cenach.
„Oszczędź połowę”, „Połowa ceny” lub inne podobne wyrażenia używane przez nas stanowią
jedynie szacunkowe oszczędności, jakie możesz uzyskać, kupując u nas określone narzędzia w
porównaniu z głównymi markami i niekoniecznie oznaczają one objęcie wszystkich kategorii narzędzi
oferowanych przez nas. Uprzejmie przypominamy, aby dokładnie sprawdzić, czy składając u nas
zamówienie faktycznie oszczędzasz połowę w porównaniu z głównymi markami.
- 1 -
Machine Translated by Google

POTRZEBUJESZ POMOCY? SKONTAKTUJ SIĘ Z NAMI!
To jest oryginalna instrukcja, przed użyciem należy uważnie przeczytać
wszystkie instrukcje. VEVOR zastrzega sobie jasną interpretację naszej instrukcji
obsługi. Wygląd produktu będzie zależał od produktu, który otrzymałeś.
Prosimy o wybaczenie, że nie poinformujemy Cię ponownie, jeśli w naszym produkcie
pojawią się jakiekolwiek aktualizacje technologiczne lub oprogramowania.
MODEL:S JS-10
PODNOŚNIK PODNOŚNIKOWY
Masz pytania dotyczące produktu? Potrzebujesz wsparcia technicznego?
Skontaktuj się z nami: Wsparcie techniczne i certyfikat E-
Gwarancji www.vevor.com/support
- 2 -
Machine Translated by Google
BLIŻSZE DANE
instrukcję obsługi dokładnie.PRODUKT
Ostrzeżenie – aby zmniejszyć ryzyko obrażeń, użytkownik musi przeczytać instrukcję
- 3 -
Machine Translated by Google

WSKAZÓWKI DOTYCZĄCE BEZPIECZEŃSTWA
koło
PARAMETRY TECHNICZNE
1
Śruba M8*8
4
1
Rura bazowa
instrukcje obsługi i ostrzeżenia przed użyciem regulowanego stojaka podnośnika.
Maksymalna wysokość (mm)
SJS-10
6
1
Śruba M10-70*2 Nakrętka M10*2, Śruba*1
Rozmiar produktu (mm)
prawidłowe użytkowanie podczas serwisowania pojazdów mechanicznych i ich podzespołów. Ostrzeżenie
Należy zapoznać się z instrukcjami i ostrzeżeniami producenta w języku angielskim.
1900
Łożysko
8
2
Płyta górna śruby pociągowej
ilość
1
3
1
1
360*360*1000
Właściciel i/lub użytkownik musi dokładnie zapoznać się z instrukcją producenta.
Personel zajmujący się użytkowaniem i obsługą sprzętu powinien być ostrożny, kompetentny,
przeszkolony i wykwalifikowany w zakresie bezpiecznej obsługi sprzętu i jego
Maksymalne obciążenie (t)
1
Nakrętka M8*8
5
Model
Minimalna wysokość (mm)
informacje powinny być podkreślane i zrozumiane. Jeśli operator nie jest biegły w
Masa netto (kg)
1
Stała noga
7
0,75
ODPOWIEDZIALNOŚĆ WŁAŚCICIELA/UŻYTKOWNIKA
9
Uchwyt na koło
Dźwignia regulacji
wysokości, rura kompensacyjna
nazwa numeru
2
975
10.7
- 4 -
Machine Translated by Google

- 5 -
zrozumieć ograniczenia użytkowania, wymagania instalacyjne i procedury
instrukcje. Upewnij się, że uchwyt jest mocno przymocowany do windy pojazdu i
instrukcje producenta i stosowne informacje ostrzegawcze. Właściciel i/lub
wymagania dotyczące Twojego pojazdu i że będzie ono miało zastosowanie do podnośników samochodowych, których używasz.
6. Wyważony pojazd: Upewnij się, że pojazd jest wyważony podczas stawiania go na
Nadmierne stosowanie stentów może prowadzić do pęknięcia lub zapadnięcia się stentu, co może spowodować poważne
punkty podparcia są równomiernie rozłożone.
i nienaruszone. Etykiety zamienne i literatura są dostępne u producenta.
stentu pod kątem uszkodzeń lub zużycia. W przypadku stwierdzenia jakichkolwiek problemów nie należy używać
4. Prawidłowo zamontuj uchwyt: Prawidłowo zamontuj uchwyt zgodnie z
instrukcje i wytyczne dotyczące obsługi wspornika bezpieczeństwa. Upewnij się, że
Upewnij się, że podpora nie jest zardzewiała, zdeformowana lub w inny sposób uszkodzona. Jeśli tak,
że wspornik jest umieszczony w określonym punkcie podparcia.
omówione z operatorem w jego ojczystym języku przez
stent.
8. Brak nadmiernego obciążenia: należy upewnić się, że nie przekracza ono nośności stentu.
i wymagania dotyczące podnoszenia. Upewnij się, że nośność wspornika spełnia
Właściciel i/lub użytkownik musi zapoznać się z treścią dokumentu i zachować go do wykorzystania w przyszłości.
Już jeden stent może być przyczyną niestabilności i zagrożenia.
ryzyko bezpieczeństwa.
3. Sprawdź integralność stentu: Przed użyciem dokładnie sprawdź integralność i strukturę stentu.
podpora. Dostosuj wysokość wspornika, aby pojazd był stabilny i
użytkownik jest odpowiedzialny za utrzymanie czytelności wszystkich etykiet ostrzegawczych i instrukcji obsługi
1. Przeczytaj uważnie instrukcję: Przed użyciem przeczytaj i zrozum
wspornik, ale wymień go lub napraw.
7. Regularna kontrola stentu: należy regularnie sprawdzać stan i niezawodność stentu.
2. Wybierz odpowiedni uchwyt: Wybierz odpowiedni uchwyt w zależności od typu swojego samochodu
nabywca/właściciel, upewniając się, że operator rozumie jego treść.
5. Stosuj podwójne podpory: Zawsze stosuj dwie podpory bezpieczeństwa, aby podeprzeć pojazd.
W przypadku stwierdzenia jakichkolwiek problemów należy wymienić lub naprawić wspornik.
Machine Translated by Google

INSTRUKCJA INSTALACJI
ZAPISZ TE INSTRUKCJE
umiejętności i wiedzy operacyjnej. Personel niezaznajomiony z operacją nie powinien
użyj uchwytu bezpieczeństwa windy samochodowej.
Krok 1: Zamontuj dwa koła w uchwytach kół (2 nakrętki M10, 2 klucze płaskie lub
nasadowe M10 14 mm i 17 mm).
*
przepisy bezpieczeństwa podczas korzystania z uchwytów bezpieczeństwa windy samochodowej. Upewnij się, że
10. Szkolenie i umiejętności: Upewnij się, że operatorzy są przeszkoleni i mają odpowiednie uprawnienia.
wiesz jak go prawidłowo używać i podejmujesz niezbędne środki bezpieczeństwa.
9. Postępuj zgodnie z wytycznymi dotyczącymi obsługi: Zawsze postępuj zgodnie z wytycznymi dotyczącymi obsługi i
70 śrub, przy użyciu
Krok 2: Zamontuj trzy nóżki do podstawy (6 kluczy płaskich
M8 lub nasadowych) i zamontuj podstawę za pomocą śrub (śruby M8 * 20, 2
śruby i 2 nakrętki M8).
20 śrub, 6 nakrętek M8, 12 mm i 14 mm
*
- 6 -
Machine Translated by Google

- 7 -
15 śrub)Krok 3: Zamontuj gumową podkładkę na tarczy na górze śruby (2 M8) i
zamocuj regulację wysokości i łożysko do śruby.
*
Machine Translated by Google

Dokładniejsze instrukcje dotyczące instalacji znajdziesz w filmie na stronie internetowej.
Krok 5: Zamontuj zmontowaną rurę regulacyjną na rurze podsiodłowej i zamocuj ją za pomocą szpilki.
Krok 4: Wkręć przewód do rurki regulacyjnej.
Montaż zakończony.
- 8 -
Machine Translated by Google

6. Wyważony pojazd: Upewnij się, że pojazd jest wyważony i stabilny na podporze.
różne projekty i wymagania użytkowe. Upewnij się, że rozumiesz
4. Umiejscowienie: Umieść stent w wybranym punkcie podparcia. Upewnij się, że
niestabilność. Pojazd musi być w stanie stabilnym i stabilnym przed podniesieniem
lub napraw wspornik.
przepisy i wytyczne dotyczące użytkowania windy samochodowej w zakresie bezpieczeństwa
wysokość wspornika w stopniu umożliwiającym bezpieczne podparcie pojazdu.
7. Stosuj wiele wsporników: Zawsze stosuj co najmniej dwa wsporniki zabezpieczające, aby podeprzeć
2. Sprawdź integralność stentu: Dokładnie sprawdź integralność i strukturę stentu
Jeśli znajdziesz jakiekolwiek problemy, nie używaj stentu, lecz wymień go lub napraw.
stan, aby zapobiec przypadkowemu przesuwaniu się lub poluzowaniu. Niektóre typy stentów mogą być
jest równomiernie rozłożona w punkcie podparcia pojazdu.
upewnij się, że nie są zardzewiałe, uszkodzone lub zużyte. Jeśli zostaną znalezione jakiekolwiek problemy, wymień je
Te punkty podparcia znajdują się zazwyczaj w podwoziu pojazdu, np.
uważnie przeczytaj instrukcję i postępuj zgodnie z nią prawidłowo.
1. Zrozum rodzaje uchwytów: różne rodzaje uchwytów podnośnika samochodowego mogą mieć
punkt podparcia pojazdu.
Wyreguluj wysokość uchwytu, aby utrzymać równowagę pojazdu i uniknąć przechyłów lub
9. Przestrzeganie przepisów bezpieczeństwa: Zawsze przestrzegaj odpowiednich zasad bezpieczeństwa.
działanie.
charakterystykę i cechy używanego przez Państwa rodzaju stentu.
stent jest w bliskim kontakcie z punktem podparcia i jest mocno osadzony. Dostosuj
pojazd. Jeden stent sam w sobie może spowodować niestabilność i niebezpieczeństwo. Upewnij się, że wspornik
przed użyciem. Upewnij się, że nie ma pęknięć, odkształceń ani innych widocznych uszkodzeń. Jeśli
5. Bezpieczne blokowanie: zgodnie z konstrukcją stentu należy upewnić się, że stent jest zablokowany
wyposażone w urządzenia blokujące lub inne mechanizmy bezpieczeństwa; prosimy o zapoznanie się z
3. Wybierz punkt podparcia: Określ położenie punktu podparcia w swoim pojeździe.
8. Regularna kontrola: regularnie sprawdzaj stan i niezawodność stentu.
podstawa pojazdu lub nadkole. Upewnij się, że punkt podparcia wspornika odpowiada
SPOSÓB UŻYCIA
- 9 -
Machine Translated by Google

Wyprodukowano w Chinach
Podnieść:
Obróć uchwyt regulacyjny zgodnie z ruchem wskazówek zegara, aż siodło zetknie się z obciążeniem.
Kontynuuj obracanie uchwytu, aby podnieść ładunek na wymaganą wysokość.
Aby obniżyć:
Obróć uchwyt w kierunku przeciwnym do ruchu wskazówek zegara, aby go wyregulować.
Przed każdym użyciem stojaka należy przeprowadzić kontrolę wizualną. Każdy stojak, który wydaje się być
uszkodzony w jakikolwiek sposób, jest mocno zużyty lub działa nieprawidłowo, MUSI ZOSTAĆ
WYCOFANY Z UŻYTKOWANIA. Jeśli stojak zostanie poddany nienormalnemu obciążeniu lub wstrząsowi,
musi zostać natychmiast sprawdzony przez autoryzowany przez producenta zakład naprawczy. Zaleca
się, aby coroczna kontrola stojaka była przeprowadzana przez autoryzowany przez producenta zakład
naprawczy i aby brakujące naklejki lub etykiety ostrzegawcze zostały zastąpione częściami określonymi
przez producenta. Lista autoryzowanych zakładów naprawczych jest dostępna u producenta.
INSTRUKCJA OBSŁUGI
INSPEKCJA ——
nawias. Upewnij się, że posiadasz odpowiednie umiejętności i wiedzę oraz swoje bezpieczeństwo
osobiste.
- 10 -
Machine Translated by Google


MODEL: SJS-10
- 1 -
ONDERHIJSSTANDAARD
Technische ondersteuning en e-garantiecertificaat www.vevor.com/support
"Save Half", "Half Price" of andere soortgelijke uitdrukkingen die wij gebruiken, geven alleen een schatting van de
besparingen die u kunt behalen door bepaalde gereedschappen bij ons te kopen in vergelijking met de grote topmerken
en betekent niet noodzakelijkerwijs dat alle categorieën gereedschappen die wij aanbieden, worden gedekt. Wij
herinneren u eraan om zorgvuldig te controleren of u daadwerkelijk de helft bespaart in vergelijking met de grote
topmerken wanneer u een bestelling bij ons plaatst.
Wij streven er voortdurend naar om u gereedschappen tegen concurrerende prijzen te leveren.
Machine Translated by Google

Dit is de originele instructie, lees alle handleidingen zorgvuldig door
voordat u het product gebruikt. VEVOR behoudt zich een duidelijke interpretatie
van onze gebruikershandleiding voor. Het uiterlijk van het product is
afhankelijk van het product dat u hebt ontvangen. Vergeef ons dat we u niet
opnieuw zullen informeren als er technologie- of software-updates voor ons product zijn.
MODEL:S JS-10
- 2 -
HULP NODIG? NEEM CONTACT MET ONS OP!
Heeft u vragen over het product? Heeft u technische ondersteuning nodig? Neem
dan gerust contact met ons op: Technische ondersteuning en E-
garantiecertificaat www.vevor.com/support
ONDERHIJSSTANDAARD
Machine Translated by Google

DETAILS
handleiding zorgvuldig.PRODUCT
Waarschuwing - Om het risico op letsel te verminderen, moet de gebruiker de instructies lezen
- 3 -
Machine Translated by Google

TECHNISCHE PARAMETERS
wiel
VEILIGHEIDSADVIEZEN
Minimale hoogte (mm)
Personeel dat betrokken is bij het gebruik en de bediening van apparatuur moet voorzichtig,
bekwaam, getraind en gekwalificeerd zijn in de veilige bediening van de apparatuur en de bijbehorende apparatuur.
1
3
Bovenplaat van de leidspindel
1
hoeveelheid
1
360*360*1000
De eigenaar en/of gebruiker moet een grondig begrip hebben van de richtlijnen van de fabrikant.
Handelswijze
8
2
1900
M10-70 bout*2 M10 moer*2, bout*1
SJS-10
6
1
Maximale hoogte (mm)
Productgrootte (mm)
correct gebruik bij het onderhouden van motorvoertuigen en hun componenten. Waarschuwing
Engels, de instructies en waarschuwingen van de fabrikant moeten aan en
4
M8 bout*8
1
Basisbuis
1
10.7
Lees de gebruiksaanwijzing en waarschuwingen aandachtig door voordat u de verstelbare onderhijsstandaard gebruikt.
nummer naam
2
9
Wielhouder
Hoogteverstelhendel
compensatiebuis
975
VERANTWOORDELIJKHEID VAN DE EIGENAAR/GEBRUIKER
Vaste poot
7
Nettogewicht (kg)
1
0,75
informatie moet worden benadrukt en begrepen. Als de operator niet vloeiend is in
1
M8 moer*8
5
Model
Maximale belasting (t)
- 4 -
Machine Translated by Google

- 5 -
koper/eigenaar, waarbij ervoor gezorgd wordt dat de exploitant de inhoud ervan begrijpt.
2. Kies de juiste beugel: Kies de juiste beugel volgens uw autotype
Als er problemen worden gevonden, vervang of repareer dan de beugel.
5. Gebruik dubbele steunen: Gebruik altijd twee veiligheidssteunen om het voertuig te ondersteunen.
de gebruiksbeperkingen, installatievereisten en procedures van de
instructies. Zorg ervoor dat de beugel stevig aan de voertuiglift is bevestigd en
1. Lees de instructies zorgvuldig door: Lees en begrijp de instructies voor gebruik.
beugel, maar vervang of repareer deze.
7. Regelmatige stentinspectie: controleer regelmatig de status en betrouwbaarheid van de stent.
De gebruiker is verantwoordelijk voor het leesbaar houden van alle waarschuwingslabels en instructiehandleidingen
3. Controleer de integriteit van de stent: Controleer vóór gebruik zorgvuldig de integriteit en structuur
ondersteuning. Pas de hoogte van de beugel aan om het voertuig stabiel te maken en de
en hijsvereisten. Zorg ervoor dat het draagvermogen van de beugel voldoet aan de
De eigenaar en/of gebruiker moet de informatie bestuderen en bewaren voor toekomstig gebruik.
Eén stent kan al instabiliteit en gevaar veroorzaken.
8. Geen overbelasting: zorg ervoor dat het draagvermogen van de stent niet wordt overschreden.
dat de beugel op het aangegeven steunpunt wordt geplaatst.
veiligheidsrisico.
besproken met de operator in de moedertaal van de operator door de
stent.
4. Installeer de beugel correct: Installeer de beugel correct volgens de
instructies en bedieningsrichtlijnen voor de veiligheidsbeugel. Zorg ervoor dat u
Zorg ervoor dat de steun niet verroest, vervormd of anderszins beschadigd is. Als er
en intact. Vervangende labels en literatuur zijn verkrijgbaar bij de fabrikant.
van de stent op schade of slijtage. Als er problemen worden gevonden, gebruik de
steunpunten gelijkmatig verdeeld zijn.
6. Gebalanceerd voertuig: Zorg ervoor dat het voertuig in balans is wanneer u het op de grond plaatst.
instructies van de fabrikant en relevante waarschuwingsinformatie. De eigenaar en/of
eisen van uw voertuig en dat deze van toepassing is op de autohefbruggen die u gebruikt.
Overbelast gebruik van stents kan leiden tot scheuring of instorting van de stent, wat ernstige gevolgen kan hebben.
Machine Translated by Google
INSTALLATIE-INSTRUCTIES
BEWAAR DEZE INSTRUCTIES
Gebruik de veiligheidsbeugel van de voertuiglift.
Stap 1: Monteer twee wielen op de wielhouders (2 M10 moeren, 2 M10 14mm en
17mm steeksleutels of dopsleutels).
operationele vaardigheden en kennis. Personeel dat niet bekend is met de operatie mag niet
*
U weet hoe u het op de juiste manier moet gebruiken en u neemt de nodige veiligheidsmaatregelen.
10. Opleiding en vaardigheden: Zorg ervoor dat de operators zijn opgeleid en de juiste vaardigheden hebben
veiligheidsvoorschriften bij het gebruik van de veiligheidsbeugels van de voertuiglift. Zorg ervoor dat
9. Volg de bedieningsrichtlijnen: Volg altijd de bedieningsrichtlijnen en
Stap 2: Monteer drie voeten aan de basis (6 M8
steeksleutels of dopsleutels) en monteer de basis met bouten (M8 * 20 bouten, 2
*
bouten en 2 M8 moeren).
20 bouten, 6 moeren M8, 12mm en 14mm
70 schroeven, met behulp van
- 6 -
Machine Translated by Google

- 7 -
15 schroeven)Stap 3: Plaats het rubberen kussentje op de schijf bovenop de schroef (2 M8) en bevestig
de hoogteverstelling en het lager aan de schroef.
*
Machine Translated by Google

Voor meer gedetailleerde installatiestappen kunt u de video op de website bekijken.
Stap 5: Monteer de gemonteerde afstelbuis op de zadelbuis en zet deze vast met een pen.
Stap 4: Schroef de draad in de verstelbuis.
Montage voltooid.
- 8 -
Machine Translated by Google

voertuigbasis of wielkast. Zorg ervoor dat het beugelondersteuningspunt overeenkomt met
of de beugel repareren.
6. Voertuig in evenwicht: Zorg ervoor dat het voertuig in evenwicht is en stabiel op de steun staat.
uitgerust met vergrendelingsmechanismen of andere veiligheidsmechanismen; lees de
3. Selecteer het ondersteuningspunt: Bepaal de positie van het ondersteuningspunt op uw voertuig.
8. Regelmatige inspectie: controleer regelmatig de status en betrouwbaarheid van de stent.
voordat u het gebruikt. Zorg ervoor dat er geen scheuren, vervormingen of andere zichtbare schade zijn. Als u
5. Veilige vergrendeling: Zorg ervoor dat de stent, afhankelijk van het ontwerp van de stent, in een vergrendelde positie staat
voertuig. Eén stent alleen kan instabiliteit en gevaar veroorzaken. Zorg ervoor dat de beugel
9. Naleving van de veiligheidsvoorschriften: Volg altijd de relevante veiligheidsvoorschriften.
operatie.
kenmerken en eigenschappen van het type stent dat u gebruikt.
de stent staat in nauw contact met het steunpunt en is stevig geplaatst. Pas de
Deze steunpunten bevinden zich meestal in het chassis van het voertuig, zoals de
instructies zorgvuldig door en voer ze correct uit.
zorg ervoor dat ze niet roestig, beschadigd of versleten zijn. Als er problemen worden gevonden, vervang ze dan
1. Begrijp de beugeltypen: verschillende soorten beugels voor voertuigliften kunnen
het ondersteuningspunt van het voertuig.
Pas de hoogte van de beugel aan om het voertuig in evenwicht te houden en om kantelen of
Als u problemen ondervindt, mag u de stent niet gebruiken, maar moet u deze vervangen of repareren.
staat om onbedoeld schuiven of losraken te voorkomen. Sommige stenttypen kunnen
gelijkmatig verdeeld is over het steunpunt van het voertuig.
2. Controleer de integriteit van de stent: Controleer zorgvuldig de integriteit en structuur van de stent
de hoogte van de beugel aanpassen, zodat deze het voertuig veilig kan ondersteunen.
7. Gebruik meerdere steunen: Gebruik altijd minstens twee veiligheidsbeugels om de
4. Positie plaatsing: Plaats de stent op het geselecteerde steunpunt. Zorg ervoor dat
verschillende ontwerpen en gebruiksvereisten. Zorg ervoor dat u de
instabiliteit. Het voertuig moet in een stabiele en stabiele toestand zijn voordat het wordt opgetild
voorschriften en bedieningsrichtlijnen bij het gebruik van de voertuigliftveiligheid
GEBRUIKSAANWIJZING
- 9 -
Machine Translated by Google

- 10 -
Draai de afstelhendel met de klok mee totdat het zadel de lading raakt. Blijf de hendel draaien
om de lading naar de gewenste hoogte te brengen.
Om te verlagen:
Om te verhogen:
Visuele inspectie moet worden uitgevoerd vóór elk gebruik van de standaard. Elke standaard die op
enigerlei wijze beschadigd lijkt, ernstig versleten blijkt te zijn of abnormaal functioneert, MOET
UIT GEBRUIK WORDEN GEHAALD. Als de standaard wordt blootgesteld aan abnormale belasting
of schokken, moet deze onmiddellijk worden geïnspecteerd door een geautoriseerde
reparatiefaciliteit van de fabrikant. Het wordt aanbevolen om de standaard jaarlijks te laten
inspecteren door een geautoriseerde reparatiefaciliteit van de fabrikant en ontbrekende stickers
of waarschuwingslabels te vervangen door de door de fabrikant gespecificeerde onderdelen. Een lijst
met geautoriseerde reparatiefaciliteiten is verkrijgbaar bij de fabrikant.
GEBRUIKSAANWIJZING
INSPECTIE ——
bracket. Zorg ervoor dat u de juiste vaardigheden en kennis hebt en uw persoonlijke veiligheid.
Draai de hendel tegen de klok in om deze te verstellen.
Gemaakt in China
Machine Translated by Google


UNDERHOISTSTÄLL
MODELL: SJS-10
Teknisk support och e-garanticertifikat www.vevor.com/support
"Spara hälften", "halva priset" eller andra liknande uttryck som används av oss representerar
bara en uppskattning av besparingar du kan dra nytta av att köpa vissa verktyg hos oss jämfört med
de stora toppmärkena och betyder inte nödvändigtvis att täcka alla kategorier av verktyg som erbjuds
av oss. Du påminns vänligen om att noggrant kontrollera när du gör en beställning hos oss om
du faktiskt sparar hälften i jämförelse med de främsta stora varumärkena.
Vi fortsätter att vara engagerade i att ge dig verktyg till konkurrenskraftiga priser.
- 1 -
Machine Translated by Google

BEHÖVER HJÄLP? KONTAKTA OSS!
Detta är den ursprungliga instruktionen, läs alla instruktioner noggrant
innan du använder den. VEVOR reserverar sig för en tydlig tolkning av vår
användarmanual. Utseendet på produkten är beroende av den produkt
du fått. Ursäkta oss att vi inte kommer att informera dig igen om det finns
någon teknik eller mjukvaruuppdateringar på vår produkt.
MODELL:S JS-10
UNDERHOISTSTÄLL
Har du produktfrågor? Behöver du teknisk support? Kontakta oss
gärna: Teknisk support och e-garanticertifikat
www.vevor.com/support
- 2 -
Machine Translated by Google

- 3 -
manual noggrant.PRODUKT
Varning - För att minska risken för skada måste användaren läsa instruktionerna
DETALJER
Machine Translated by Google

- 4 -
1
M8 Bult*8
4
1
Basrör
bruksanvisning och varningar innan du använder det justerbara underlyftstativet.
Maximal höjdÿmmÿ
SJS-10
6
1
M10-70 Bult*2 M10 Mutter*2ÿ Bult*1
Produktstorlek ÿmmÿ
korrekt användning vid service av motorfordon och deras komponenter. Varning
engelska, skall tillverkarens instruktioner och varningar läsas till och
1900
Lager
8
2
Toppplatta med blyskruv
kvantitet
1
3
1
1
360*360*1000
Ägaren och/eller användaren måste ha en grundlig förståelse för tillverkarens
Personal som är involverad i användning och drift av utrustning ska vara försiktig,
kompetent, utbildad och kvalificerad i säker användning av utrustningen och dess
Maximalt belastningslagerÿtÿ
1
M8 Mutter*8
5
Modell
Minsta höjdÿmmÿ
information bör betonas och förstås. Om operatören inte är flytande
Nettovikt (kg)
1
Fast ben
7
0,75
ÄGARE/ANVÄNDARANSVAR
9
Hjulhållare
Höjdjusteringsspakskompensationsrör
nummernamn
2
975
10.7
SÄKERHETSRÅD
hjul
TEKNISKA PARAMETRAR
Machine Translated by Google

att fästet placeras vid angiven stödpunkt.
Ägare och/eller användare måste studera och underhålla för framtida referens
och lyftkrav. Se till att konsolens bärighet motsvarar
Enbart en stent kan orsaka instabilitet och fara.
8. Ingen överviktsbelastning: se till att inte överskrida stentens bärförmåga.
säkerhetsrisk.
3. Kontrollera stentens integritet: Kontrollera noggrant integriteten och strukturen före användning
stöd. Justera höjden på fästet för att göra fordonet stabilt och
Användaren ansvarar för att hålla alla varningsskyltar och bruksanvisningar läsliga
1. Läs instruktionerna noggrant: Före användning, läs och förstå
fästet men byt ut eller reparera det.
7. Regelbunden stentinspektion: kontrollera regelbundet stentens status och tillförlitlighet.
problem hittas, byt ut eller reparera fästet.
förstå användningsbegränsningarna, installationskraven och procedurerna för
instruktioner. Se till att fästet är ordentligt fastsatt på fordonets hiss och
2. Välj rätt fäste: Välj rätt fäste efter din biltyp
köparen/ägaren, se till att operatören förstår dess innehåll.
5. Använd dubbla stöd: Använd alltid två säkerhetsstöd för att stödja fordonet.
Överbelastad användning av stentar kan leda till att stenten brister eller kollapsar, vilket orsakar en allvarlig
6. Balanserat fordon: Se till att fordonet är balanserat när du placerar det på
tillverkarens instruktioner och relevant varningsinformation. Ägaren och/eller
kraven på ditt fordon och att det är tillämpligt på de fordonslyftar du använder.
stödpunkterna är jämnt fördelade.
och intakt. Ersättningsetiketter och litteratur finns tillgängliga från tillverkaren.
av stenten för eventuella skador eller slitage. Om några problem upptäcks, använd inte
4. Montera konsolen korrekt: Installera konsolen korrekt enligt
instruktioner och bruksanvisningar för säkerhetsfästet. Se till att du
Se till att stödet inte är rostigt, deformerat eller på annat sätt skadat. Om någon
diskuteras med operatören på operatörens modersmål av
stent.
- 5 -
Machine Translated by Google

- 6 -
operativa färdigheter och kunskaper. Personal som inte är bekant med operationen bör inte
använd säkerhetsfästet för fordonshissen.
Steg 1: Montera två hjul på hjulhållarna (2 M10 muttrar, 2 M10 14 mm
och 17 mm öppen skiftnyckel eller hylsnyckel).
*
du vet det rätta sättet att använda det och vidtar nödvändiga säkerhetsåtgärder.
10. Utbildning och färdigheter: Se till att operatörerna är utbildade och har rätt
säkerhetsföreskrifter vid användning av säkerhetsfästen för fordonshissen. Se till att
9. Följ bruksanvisningarna: Följ alltid bruksanvisningarna och
70 skruvar, med hjälp av
*
20 bultar, 6 muttrar M8, 12mm och 14mm
Steg 2: Montera tre fötter på basen (6 M8 öppen
skiftnyckel eller hylsnyckel) och montera basen med bultar (M8 * 20 bultar, 2
bultar och 2 M8 muttrar).
INSTALLATIONSINSTRUKTIONER
SPARA DESSA INSTRUKTIONER
Machine Translated by Google

*
Steg 3: Montera gummikudden på skivan på toppen av skruven (2 M8
och fäst höjdjusteringen och lagret på skruven.
15 skruvar)
- 7 -
Machine Translated by Google

- 8 -
Steg 5: Montera det monterade justeringsröret på sätesröret och fixera det med en stift.
Steg 4: Skruva fast tråden i justeringsröret.
Monteringen avslutad.
För mer detaljerade installationssteg, se videon på webbplatsen.
Machine Translated by Google

4. Positionsplacering: Placera stenten på den valda stödpunkten. Se till att
olika design och användningskrav. Se till att du förstår
instabilitet. Fordonet ska vara i ett stabilt och stabilt tillstånd före lyftet
föreskrifter och driftriktlinjer vid användning av fordonets hisssäkerhet
höjden på fästet som krävs för att det ska kunna stödja fordonet på ett säkert sätt.
7. Använd flera stöd: Använd alltid minst två säkerhetsfästen för att stödja
2. Kontrollera stentens integritet: Kontrollera noggrant stentens integritet och struktur
hitta några problem, använd inte stenten utan byt ut eller fixa den.
tillstånd för att förhindra oavsiktlig glidning eller lossning. Vissa stenttyper kan vara
är jämnt fördelad över fordonets stödpunkt.
1. Förstå konsoltyperna: olika typer av fordonslyftfästen kan ha
fordonets stödpunkt.
Justera höjden på fästet för att hålla fordonet balanserat och undvika rullning eller
att de inte är rostiga, skadade eller utslitna. Om några problem upptäcks, byt ut
Dessa stödpunkter är vanligtvis placerade i fordonets chassi, t.ex
instruktionerna noggrant och fungerar korrekt.
egenskaper och egenskaper hos den typ av stent du använder.
stenten är i nära kontakt med stödpunkten och är stadigt placerad. Justera
drift.
9. Överensstämmelse med säkerhetsföreskrifter: Följ alltid relevant säkerhet
fordon. Enbart en stent kan orsaka instabilitet och fara. Se till att fästet
innan du använder den. Se till att inga sprickor, deformationer eller andra uppenbara skador. Om du
5. Säker låsning: Se till att stenten är låst enligt stentens design
utrustad med låsanordningar eller andra säkerhetsmekanismer; läs gärna
3. Välj stödpunkt: Bestäm stödpunktens position på ditt fordon.
8. Regelbunden inspektion: kontrollera regelbundet stentens status och tillförlitlighet. Göra
6. Balanserat fordon: Se till att fordonet är balanserat och stabilt på stödet.
fordonsbas eller hjulhus. Se till att fästets stödpunkt motsvarar
eller reparera fästet.
BRUKSANVISNING
- 9 -
Machine Translated by Google

Tillverkad i Kina
Att höja:
Vrid justeringshandtaget medurs tills sadelkontakterna belastar. Fortsätt att vrida på handtaget
för att höja lasten till önskad höjd.
Att sänka:
Visuell inspektion bör göras före varje användning av stativet. Varje stativ som ser ut att vara skadat
på något sätt, visar sig vara hårt slitet eller fungerar onormalt MÅSTE BORTTAGAS FRÅN
SERVICE. Om stativet utsätts för onormal belastning eller stötar, måste det omedelbart inspekteras
av en auktoriserad tillverkare av reparationsverkstad. Det rekommenderas att en årlig inspektion
av stativet görs av en tillverkarens auktoriserade reparationsverkstad och att saknade dekaler
eller varningsetiketter byts ut mot tillverkarens specificerade delar. En lista över auktoriserade
reparationsverkstäder finns tillgänglig från tillverkaren.
DRIFTSINSTRUKTIONER
INSPEKTION ——
konsol. Se till att du har rätt kompetens och kunskap och din personliga säkerhet.
Vrid för att justera handtaget moturs.
- 10 -
Machine Translated by Google