
Technical Support and E-Warranty Certificate www.vevor.com/support
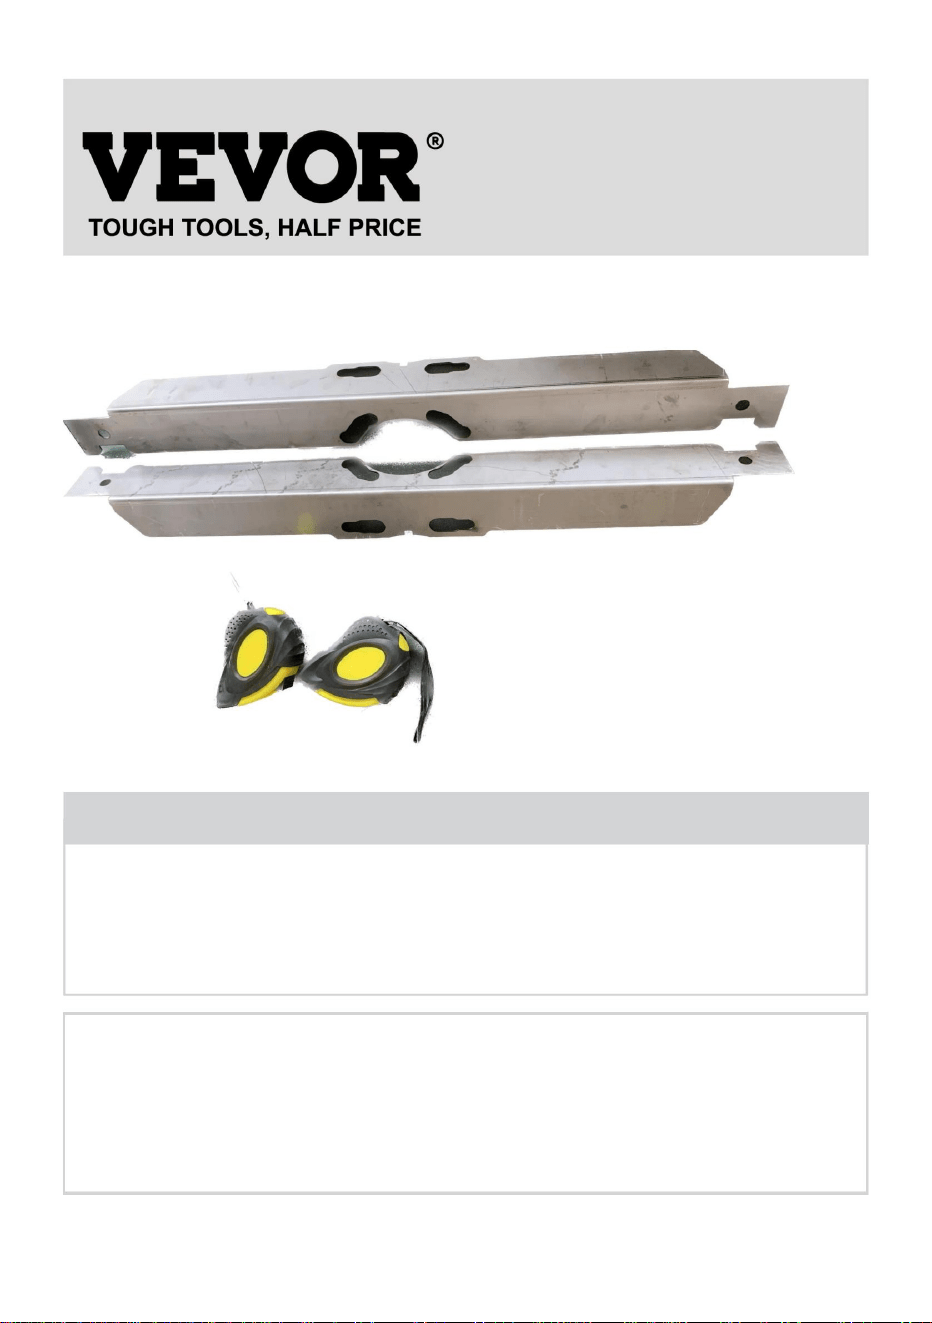
WHEEL ALIGNMENT SYSTEM
MODEL:WBS-009
We continue to be committed to provide you tools with competitive price.
"Save Half", "Half Price" or any other similar expressions used by us only represents an
estimate of savings you might benefit from buying certain tools with us compared to the major
top brands and does not necessarily mean to cover all categories of tools offered by us. You
are kindly reminded to verify carefully when you are placing an order with us if you are
actually saving half in comparison with the top major brands.

- 1 -
MODEL:WBS-09
Have product questions? Need technical support? Please feel free to
contact us:
Technical Support and E-Warranty Certificate
www.vevor.com/support
NEED HELP? CONTACT US!
This is the original instruction, please read all manual instructions
carefully before operating. VEVOR reserves a clear interpretation of our
user manual. The appearance of the product shall be subject to the
product you received. Please forgive us that we won't inform you again if
there are any technology or software updates on our product.
WHEEL ALIGNMENT
SYSTEM

- 2 -
IMPORTANT SAFEGUARDS
WARNING: Read and understand this entire manual before
operating or servicing this product. Failure to follow these
warnings and instructions can cause personal injury or
damage to valuable property.
Avoid children using the wheel alignment system. And this product is
not a toy. Do not allow children to play.
Keep away from sharp points, blades and other items.
Assembly precautions
1. Assemble only according to these instructions. Improper assembly can
create hazards.
2. Wear ANSI-approved safety goggles and heavy-duty work gloves during
assembly.
3. Keep assembly area clean and well-lit.
4. Keep bystanders out of the area during assembly.
5. Do not assemble when tired or when under the influence of alcohol,
drugs or medication.
6. Product capabilities apply to properly and completely assembled product
only.
7. For additional information regarding the parts listed in the following
pages, please refer to the Assembly Diagram of this manual. Unwrap and
separate all parts in a clean work area. Please keep small spare parts out
of children's reach.
SAVE THESE INSTRUCTIONS
- 3 -
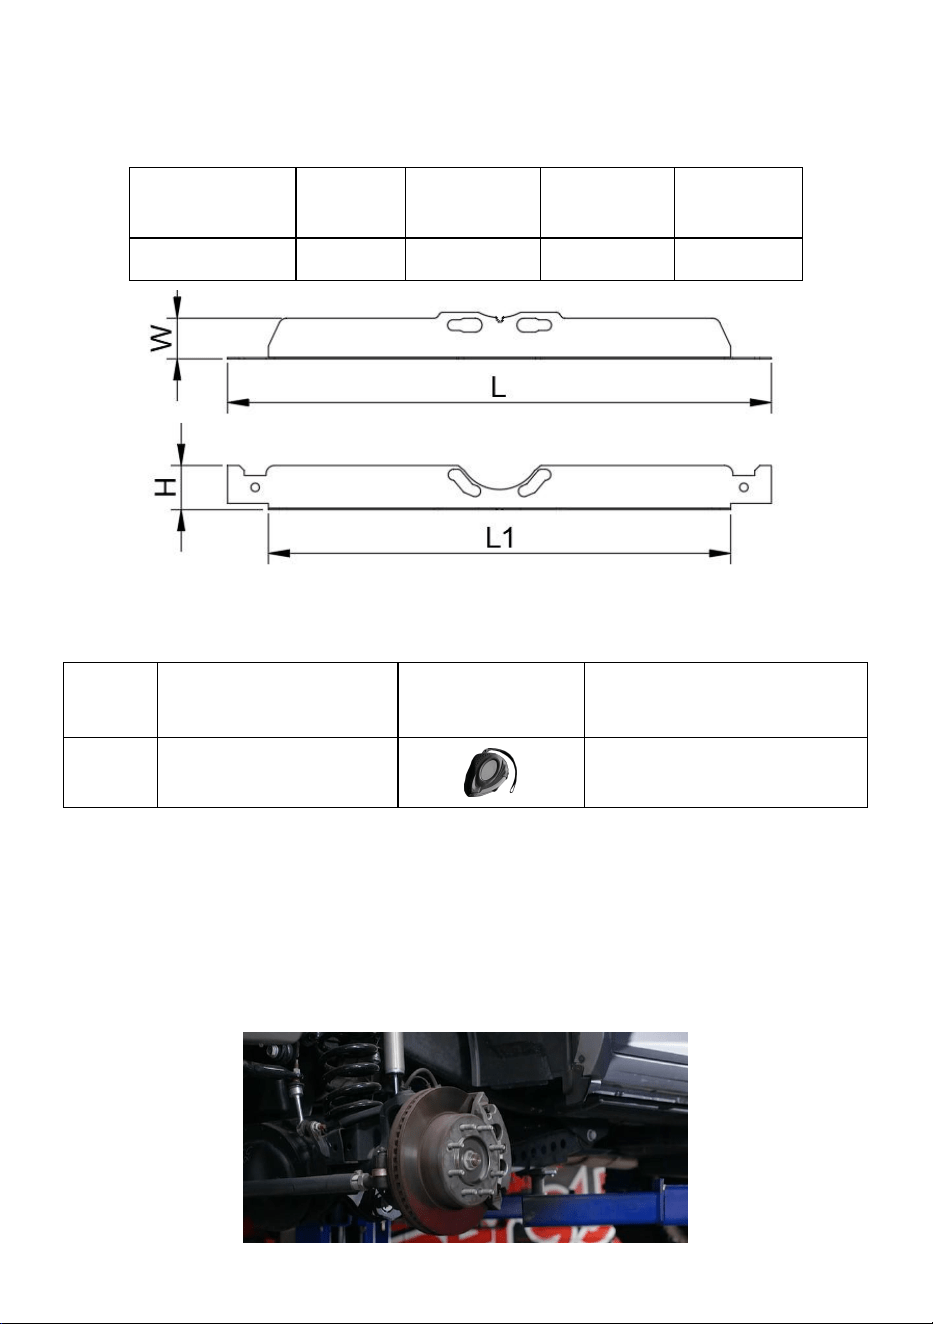
PRODUCT SPECIFICATIONS:
Model
L
(mm)
L1
(mm)
H
(mm)
W
(mm)
WBS-009
647
550
56.8
54
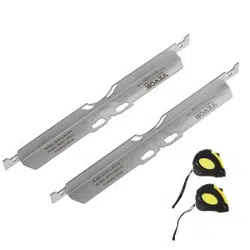
PACKAGE INCLUDE
No
Components
Picture
Q’ty
1
Tape measure
2pcs
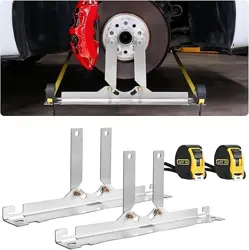
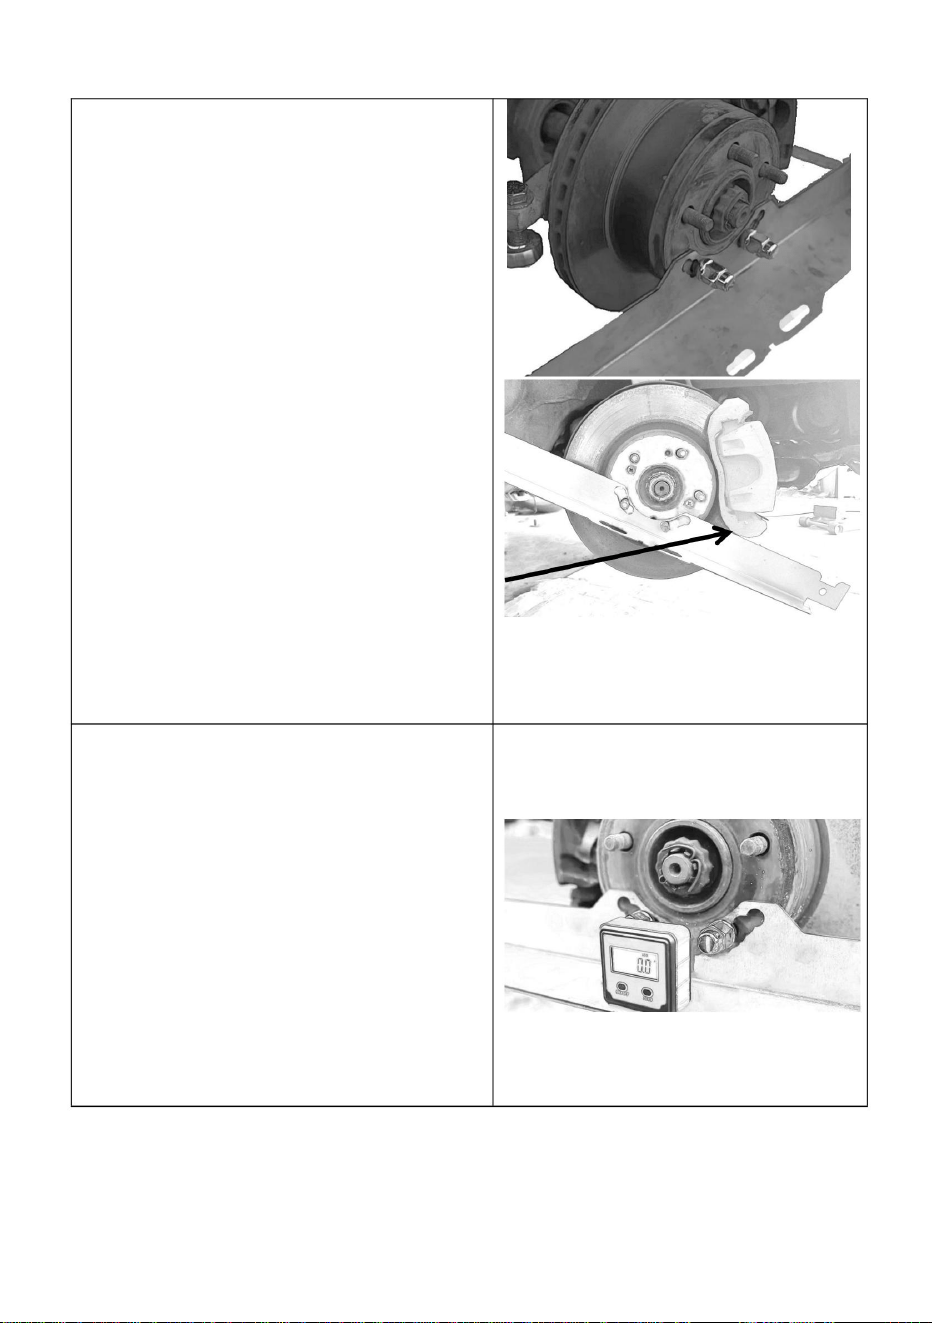
TOE PLATES TOE MEASUREMENT INSTRUCTIONS
Before you can start measuring the toe of your truck, you need to lift your
truck chassis, remove the 4 wheels, and clean the brake disc of the car,
and then you can start the toe measurement of the car.
Note: This tool is only available for suspension trucks and JEEP SUVs.

- 4 -
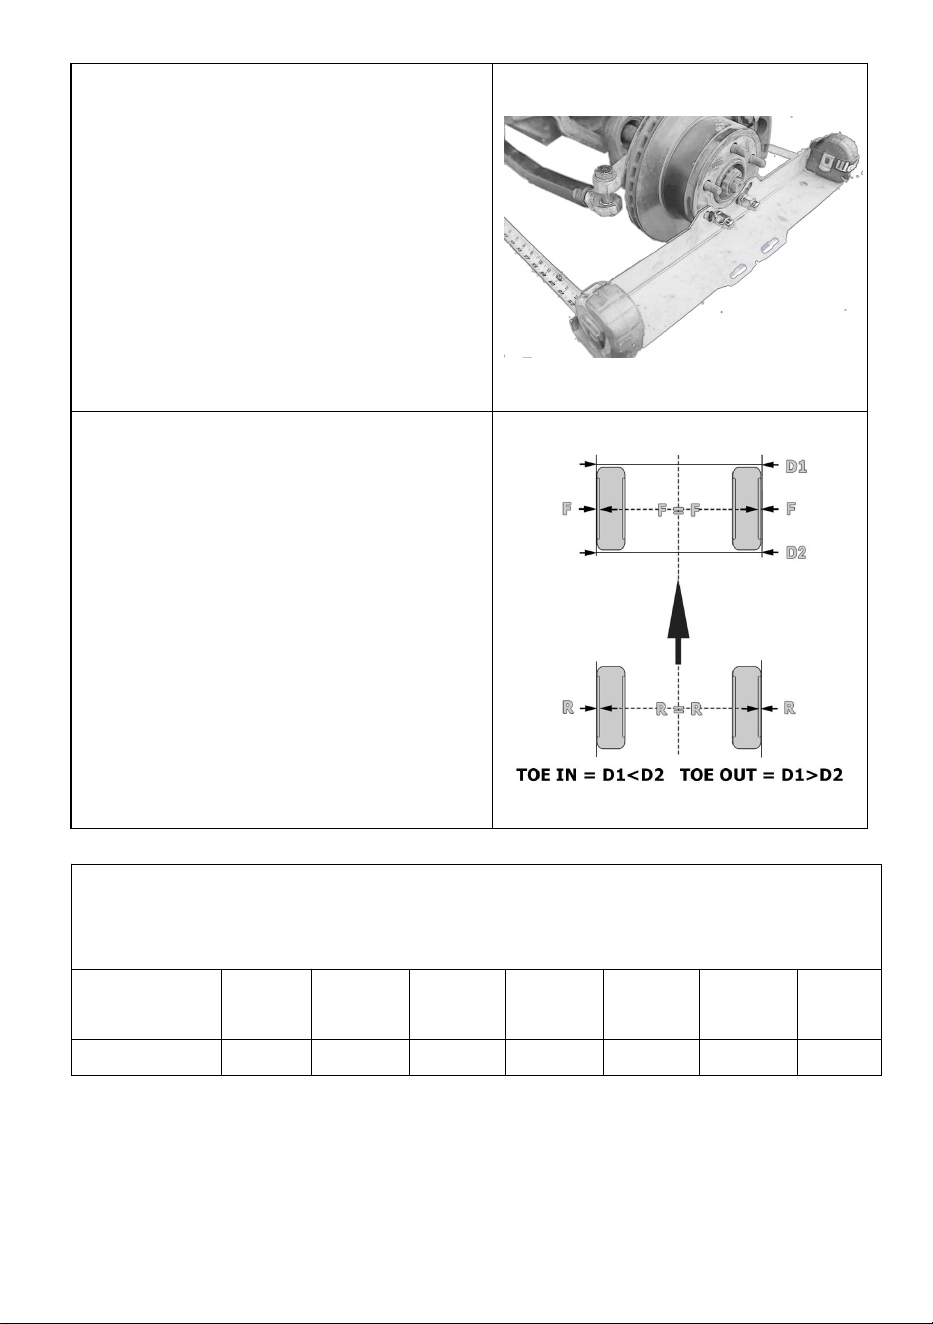
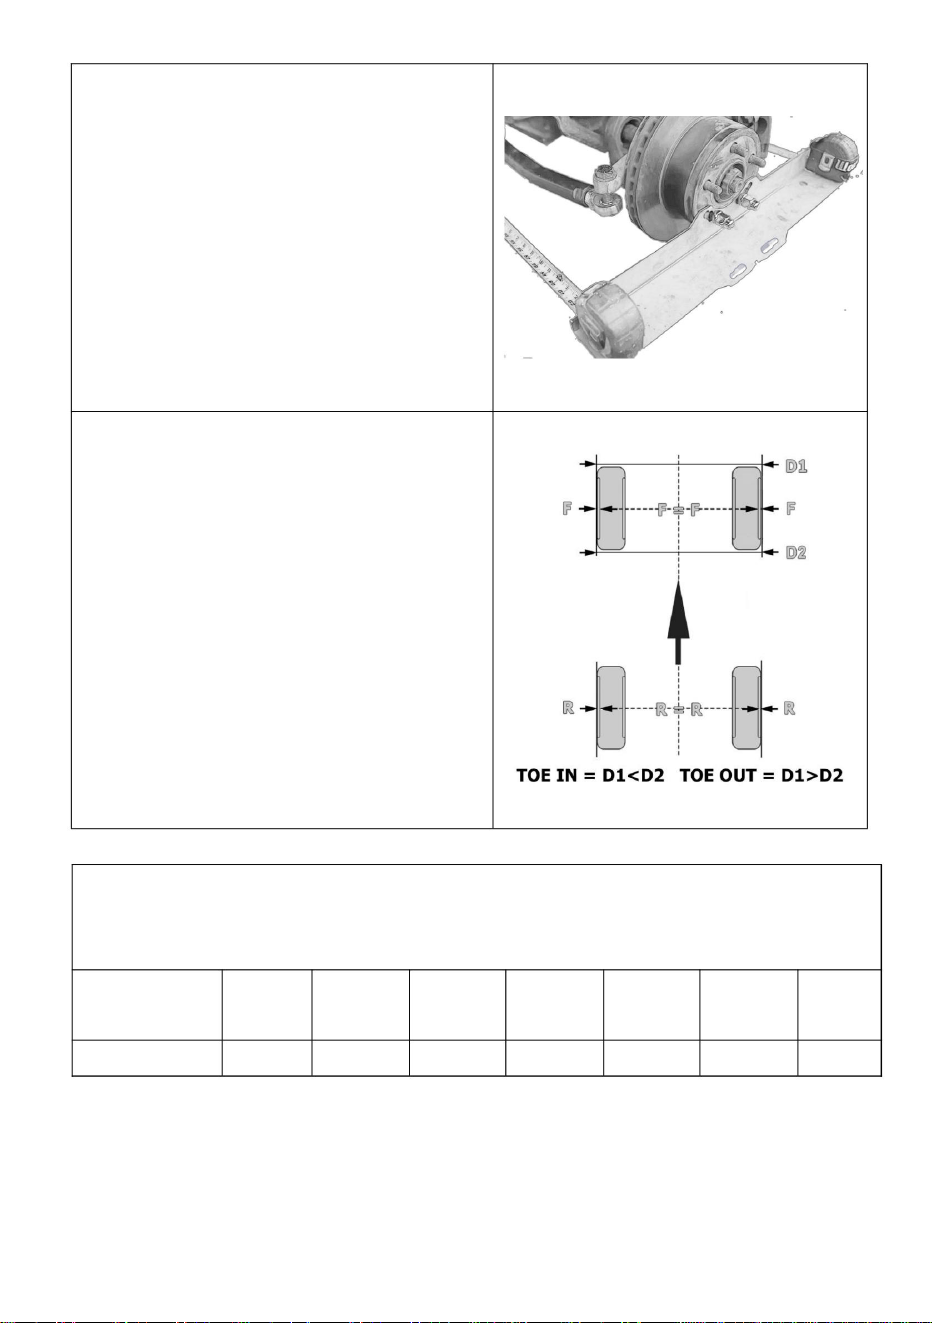
Step 1: Install toe plate
Insert the toe plate into the hub
mounting screw of the brake disc
and tighten it with the nut that comes
with the car.
It is recommended to install a flat
washer before the nut and the
measuring tool so that the tool is
more parallel to the brake disc.
CAUTION: In some cars, the brake
bracket may interfere with the
measuring tool, in which case a flat
washer can be placed between the
tool and the brake disc until the brake
disc can pass freely.
Note : The product is not equipped
with a flat washer, if necessary, you
need to obtain your own.
Step 2: Adjust the level
By turning the measuring tool to the
horizontal position, you can use a level
to adjust, which will make the tool as
level as possible, so that the value of the
measurement is more accurate.
Install the measuring tool on the other
side in the same way.
Note : The product is not equipped
with a Digital Protractor, if necessary,
you need to obtain your own.
- 5 -
TOE PLATE DEGREES TO INCH CONVERSION CHART
Example: If the vehicle specs specify 0.4 degrees the toe should be
half way between 1/8”and 3/16” measured by the toe plates.
Degrees
Specification
0
0.16
0.32
0.48
0.64
0.8
0.96
Equivalent
0
1/16”
1/8”
3/16”
1/4”
5/16”
3/8”
Note: When using alignment specs, note that the toe plates measure the
TOTAL toe, not the toe of each wheel. Thus, if your specs are given for each
wheel, you will need to add those values together.
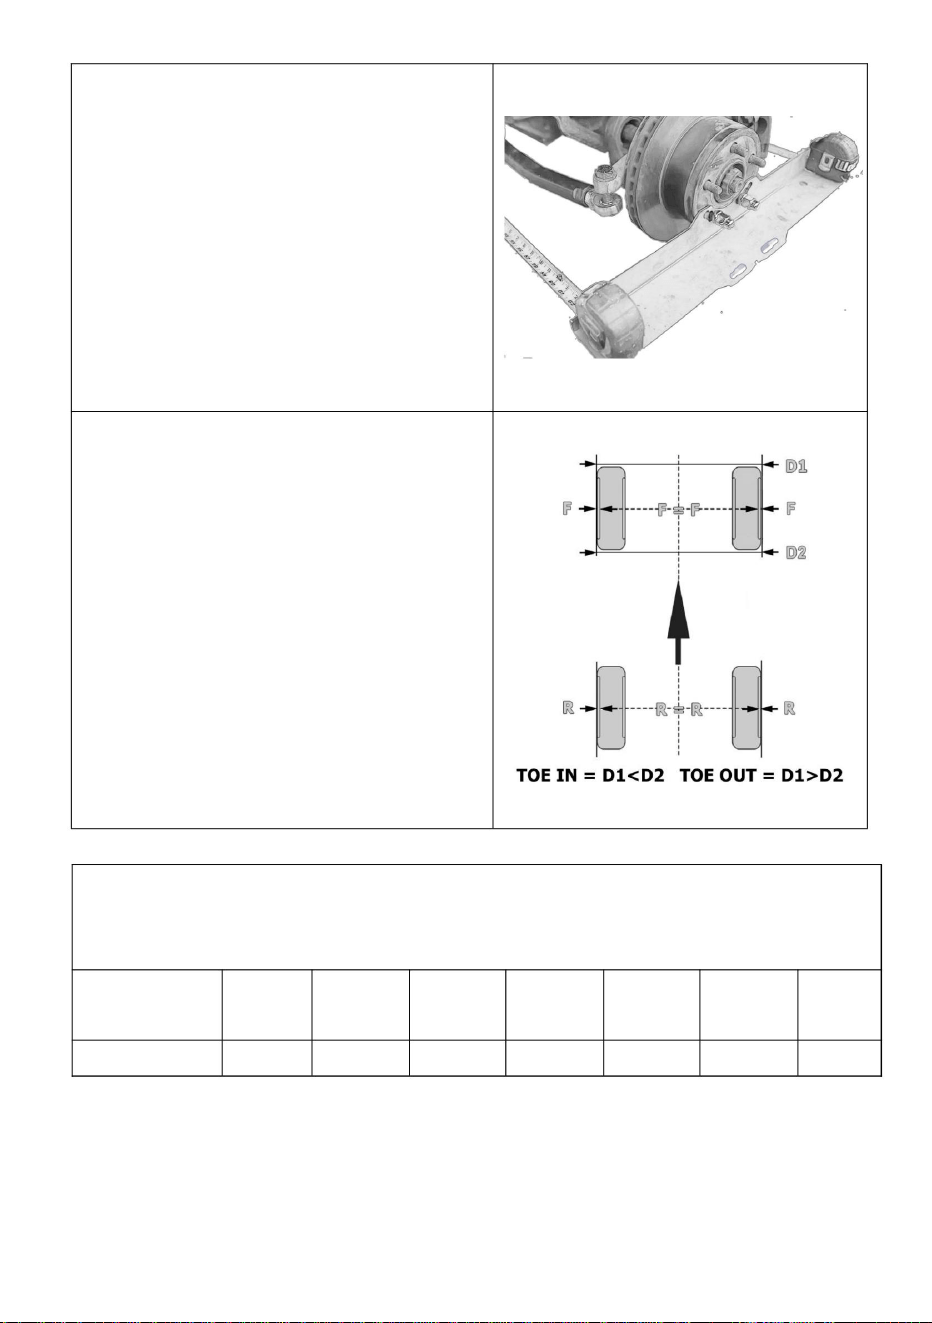
Step 3: Extend tape measures
Run the tape measures underneath the
car as shown, 80 inches should be
enough.
Unlock the tape measures and slide
them into the slots. DO NOT re-lock the
tape measures.
Leaving them unlocked will apply the
proper amount of tension. Pull on them
slightly and note the measurements.
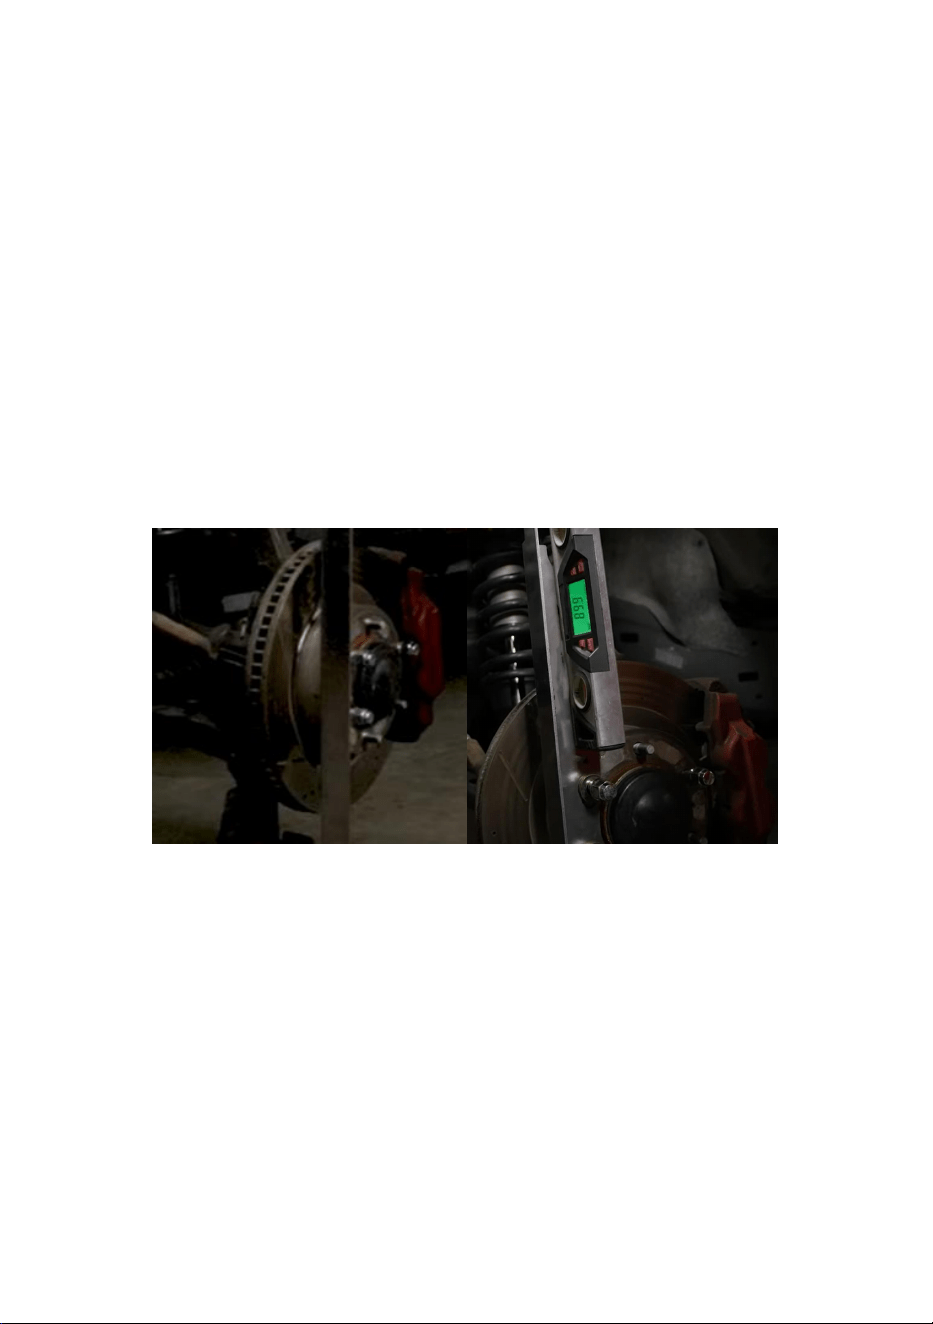
The rear tape measurement (side
towards the rear of the vehicle) minus
the front tape measurement(side closest
to the front of the vehicle) is the total toe
of the axle. A larger measurement on the
front side indicates toe out, and a larger
measurement on the rear side indicates
toe in.
For example, if the front measurement
D1 is 66” and the rear measurement D2
is 66 3/32 the axle has a total toe in of
3/32”
- 6 -
For example, if the toe-in of each wheel is supposed to be 0.15 degrees, then the
total toe should be 0.15+0.15= 0.3 degrees.
The optional alignment specs give total toe, so these specs do not need
modification; however, you should use the degree specifications, NOT the inch
specifications.
Tip: If the toe is correct, but the steering wheel is crooked, turn the tire rod
on one side in and the tie rod on the other side out an equal number of turns.
This will keep the toe measurement but adjust the position of the steering
wheel. Make sure to adjust it in the right direction!
Turn the toe plate to 90 degrees, with a level that you can also use to measure the
camber of the car.
Address: Shuangchenglu 803nong11hao1602A-1609shi, baoshanqu, shanghai
200000 CN.
Imported to AUS: SIHAO PTY LTD. 1 ROKEVA STREETEASTWOOD NSW 2122
Australia
Imported to USA: Sanven Technology Ltd. Suite 250, 9166 Anaheim Place,
Rancho Cucamonga, CA 91730


MODÈLE:WBS009
Nouscontinuonsànousengageràvousfournirdesoutilsàdesprixcompétitifs.
«Économisezlamoitié»,«Moitiéprix»outouteautreexpressionsimilaireutiliséeparnousnereprésente
qu'uneestimationdeséconomiesquevouspourriezréaliserenachetantcertainsoutilscheznousparrapport
auxgrandesmarquesetnecouvrepasnécessairementtouteslescatégoriesd'outilsquenousproposons.
Nousvousrappelonsdebienvouloirvérifiersoigneusementlorsquevouspassezunecommandechez
noussivouséconomisezréellementlamoitiéparrapportauxgrandesmarques.
SYSTÈMED'ALIGNEMENTDESROUES
Assistancetechniqueetcertificatdegarantieélectroniquewww.vevor.com/support
Machine Translated by Google

BESOIND'AIDE?CONTACTEZNOUS!
Assistancetechniqueetcertificatdegarantie
électroniquewww.vevor.com/support
Ils'agitdelanoticed'utilisationd'origine.Veuillezlireattentivementtouteslesinstructionsdu
manuelavantdel'utiliser.VEVORseréserveledroitd'interpréterclairementnotremanueld'utilisation.
L'apparenceduproduitdépendduproduitquevousavezreçu.Veuilleznousexcuser,nousne
vousinformeronsplusencasdemiseàjourtechnologiqueoulogicielledenotreproduit.
MODÈLE:WBS09
Vousavezdesquestionssurnosproduits?Vousavezbesoind'assistancetechnique?N'hésitezpasà
nouscontacter:
SYSTÈME
ALIGNEMENTDESROUES
1
Machine Translated by Google

séparertouteslespiècesdansunezonedetravailpropre.Veuillezgarderlespetitespiècesderechangeàl'écart
lesavertissementsetlesinstructionspeuvententraînerdesblessurescorporellesou
5.Nemontezpaslorsquevousêtesfatiguéousousl'influencedel'alcool,dedroguesoudemédicaments.
4.Gardezlesspectateurshorsdelazonependantlemontage.
d'utiliseroud'entretenirceproduit.Lenonrespectdeces
Cen'estpasunjouet.Nelaissezpaslesenfantsjouer
avec.Teniràl'écartdesobjetspointus,deslamesetautresobjetstranchants.
Précautionsd'assemblage
seulement.
dommagesauxbiensdevaleur.Évitez
quelesenfantsn'utilisentlesystèmed'alignementdesroues.Etceproduitest
6.Lescapacitésduproduits'appliquentauproduitcorrectementetcomplètementassemblé.
pages,veuillezvousréférerauschémad'assemblagedecemanuel.Déballezet
créerdesdangers.
1.Assemblezuniquementseloncesinstructions.Unassemblageincorrectpeut
7.Pourplusd'informationssurlespiècesrépertoriéescidessous
horsdeportéedesenfants.
AVERTISSEMENT:Lisezetcomprenezl'intégralitédecemanuelavant
3.Gardezlazonedemontagepropreetbienéclairée.
2.Portezdeslunettesdesécuritéapprouvéesparl'ANSIetdesgantsdetravailrobustespendant
assemblée.
MESURESDESÉCURITÉIMPORTANTES
CONSERVEZCESINSTRUCTIONS
2
Machine Translated by Google

Composants
1
ImageNon
Qté
Mètreàruban 2pièces
3
56,8647 54
(mm) (mm)(mm)
WBS009
L1
Modèle
H
châssisducamion,retirezles4rouesetnettoyezledisquedefreindelavoiture,puis
vouspouvezcommencerlamesuredel'orteildelavoiture.
550
Avantdepouvoircommenceràmesurerl'orteildevotrecamion,vousdevezsoulevervotre
L
(mm)
DANS
Remarque:cetoutilestuniquementdisponiblepourlescamionsàsuspensionetlesSUVJEEP.
LEFORFAITCOMPREND
CARACTÉRISTIQUESDUPRODUIT:
INSTRUCTIONSPOURLAMESUREDESORTEILS
Machine Translated by Google

ledisquepeutpasserlibrement.
Remarque:Leproduitn'estpaséquipéd'une
rondelleplate,sinécessaire,vousdevezvous
procurerlavôtre.
outiletledisquedefreinjusqu'àcequelefrein
outildemesureafinquel'outilsoitplusparallèle
audisquedefrein.
ATTENTION:Danscertainesvoitures,le
supportdefreinpeutinterféreravec
l'outildemesure,auquelcasunerondelleplate
peutêtreplacéeentreles
rondelleavantl'écrouetle
Ilestrecommandéd'installerunplat
Remarque:leproduitn'estpaséquipéd'un
rapporteurnumérique.Sinécessaire,vousdevez
vousprocurerlevôtre.
Installezl’outildemesuredel’autrecôtédela
mêmemanière.
Étape2:AjusterleniveauEntournantl'outil
demesureenpositionhorizontale,vouspouvez
utiliserunniveaupourrégler,cequirendral'outilaussiplat
quepossible,desortequelavaleurdelamesuresoit
plusprécise.
Étape1:Installerlaplaqued'orteil
Insérezlaplaqued'orteildanslavisdemontagedu
moyeududisquedefreinetserrezlaavecl'écrou
fourniaveclavoiture.
4
Machine Translated by Google
mètresruban.
lafaceavantindiquel'orteilversl'extérieuretuneplusgrande
0,64 0,8
Remarque:lorsquevousutilisezdesspécificationsd'alignement,notezquelesplaquesd'orteilsmesurentla
Spécification
quantitéappropriéedetension.Tirezdessus
orteildedans.
0
roue,vousdevrezadditionnercesvaleurs.
D1mesure66"etlamesurearrièreD2
Passezlerubanàmesurersousle
Lamesuredurubanarrière(côté
versl'arrièreduvéhicule)moins
voiturecommeindiqué,80poucesdevraientêtre
estde663/32l'essieuaunpincementtotalde
0,16
3/16”
Déverrouillezlesrubansàmesureretfaitesglisser
0,48
àl'avantduvéhicule)estlepincementtotal
5/16”
lamesuresurlafacearrièreindique
Leslaisserdéverrouillésappliquerale
Diplômes
0,96
PincementTOTAL,paslepincementdechaqueroue.Ainsi,sivosspécificationssontdonnéespourchaque
légèrementetnotezlesmesures.
1/16”
Parexemple,silamesureavant
Équivalent
0
1/8”
3/32”
assez.
lamesuredurubanavant(côtéleplusproche
0,32
1/4”
danslesfentes.NEreverrouillezPASles
del'essieu.Unemesureplusgrandesurle
3/8”
Exemple:Silesspécificationsduvéhiculeprécisent0,4degrés,l'orteildoitêtre
àmicheminentre1/8”et3/16”mesuréparlesplaquesd’orteils.
TABLEAUDECONVERSIONDESDEGRÉSDELAPLAQUED'EMBOUTENPOUCES
Étape3:Déployezlesmètresrubans
5
Machine Translated by Google
6
Parexemple,silepincementdechaqueroueestcenséêtrede0,15degrés,alorsle
Tournezlaplaqued'orteilà90degrés,avecunniveauquevouspouvezégalementutiliserpourmesurerle
modification;cependant,vousdevezutiliserlesspécificationsendegrés,PASenpouces
200000CN.
Lesspécificationsd'alignementfacultativesdonnentunpincementtotal,cesspécificationsn'ontdoncpasbesoin
Adresse:Shuangchenglu803nong11hao1602A1609shi,baoshanqu,Shanghai
Astuce:Sil'orteilestcorrect,maisquelevolantesttordu,tournezlatigedupneu
Australie
caractéristiques.
ImportéenAustralie:SIHAOPTYLTD.1ROKEVASTREETEASTWOODNSW2122
Celaconserveralamesuredel'orteilmaisajusteralapositiondeladirection
d'uncôtéversl'intérieuretlatigededirectiondel'autrecôtéversl'extérieurd'unnombreégaldetours.
ImportéauxÉtatsUnis:SanvenTechnologyLtd.Suite250,9166AnaheimPlace,RanchoCucamonga,
CA91730
l'orteiltotaldoitêtrede0,15+0,15=0,3degrés.
roue.Assurezvousdel'ajusterdanslebonsens!
carrossagedelavoiture.
Machine Translated by Google


MODELL:WBS-009
Wir sind weiterhin bestrebt, Ihnen Werkzeuge zu wettbewerbsfähigen Preisen anzubieten.
„Sparen Sie die Hälfte“, „Halber Preis“ oder andere ähnliche Ausdrücke, die wir verwenden, stellen nur eine
Schätzung der Ersparnis dar, die Sie beim Kauf bestimmter Werkzeuge bei uns im Vergleich zu den großen
Topmarken erzielen können, und decken nicht unbedingt alle von uns angebotenen Werkzeugkategorien ab. Wir
möchten Sie freundlich daran erinnern, bei Ihrer Bestellung bei uns sorgfältig zu prüfen, ob Sie im Vergleich
zu den großen Topmarken tatsächlich die Hälfte sparen.
ACHSENVERMESSUNGSSYSTEM
Technischer Support und E-Garantie-Zertifikat www.vevor.com/support
Machine Translated by Google

Brauchen Sie Hilfe? Kontaktieren Sie uns!
Technischer Support und E-Garantie-Zertifikat
www.vevor.com/support
Sie haben Fragen zu unseren Produkten? Sie benötigen technischen Support? Dann kontaktieren
Sie uns gerne:
MODELL:WBS-09
Dies ist die Originalanleitung. Bitte lesen Sie alle Anweisungen sorgfältig durch, bevor Sie
das Gerät in Betrieb nehmen. VEVOR behält sich eine klare Auslegung unserer Bedienungsanleitung
vor. Das Erscheinungsbild des Produkts richtet sich nach dem Produkt, das Sie erhalten
haben. Bitte verzeihen Sie uns, dass wir Sie nicht erneut informieren, wenn es Technologie- oder
Software-Updates für unser Produkt gibt.
ACHSENVERMESSUNG
SYSTEM
- 1 -
Machine Translated by Google

Gefahren schaffen.
Seiten finden Sie im Montagediagramm dieses Handbuchs. Auspacken und
1. Die Montage muss gemäß dieser Anleitung erfolgen. Eine unsachgemäße Montage kann
7. Weitere Informationen zu den im Folgenden aufgeführten Teilen finden Sie
außerhalb der Reichweite von Kindern.
WARNUNG: Lesen Sie das gesamte Handbuch sorgfältig durch, bevor Sie
2. Tragen Sie ANSI-zugelassene Schutzbrillen und schwere Arbeitshandschuhe während
3. Halten Sie den Versammlungsbereich sauber und gut beleuchtet.
Trennen Sie alle Teile in einem sauberen Arbeitsbereich. Bitte bewahren Sie kleine Ersatzteile
Montage.
Warnungen und Anweisungen können zu Verletzungen oder
5. Nicht montieren, wenn Sie müde sind oder unter dem Einfluss von Alkohol, Drogen oder
Medikamenten stehen.
Betrieb oder Wartung dieses Produkts. Die Nichtbeachtung dieser
4. Halten Sie während der Montage unbeteiligte Zuschauer vom Bereich fern.
kein Spielzeug. Erlauben Sie Kindern nicht, damit zu
spielen. ÿ Halten Sie das Gerät von scharfen Spitzen, Klingen und anderen Gegenständen
fern. ÿ Vorsichtsmaßnahmen bei der Montage
nur.
Schäden an wertvollem Eigentum. ÿ
Vermeiden Sie die Verwendung des Achsmesssystems durch Kinder. Und dieses Produkt ist
6. Die Produkteigenschaften gelten für ordnungsgemäß und vollständig montierte Produkte
BEWAHREN SIE DIESE ANWEISUNGEN AUF
WICHTIGE SICHERHEITSHINWEISE
- 2 -
Machine Translated by Google

Bild
1
Komponenten
NEIN
2 Stück
Menge
Bandmaß
- 3 -
H
LKW-Chassis, entfernen Sie die vier Räder und reinigen Sie die Bremsscheiben des Autos.
Dann können Sie mit der Spurmessung des Autos beginnen.
550
Bevor Sie mit der Messung der Spur Ihres LKWs beginnen können, müssen Sie Ihren
M IN
(mm)
Hinweis: Dieses Werkzeug ist nur für Lastwagen mit Federung und JEEP-SUVs verfügbar.
56,8 54647
(mm) (mm)(mm)
WBS-009
L1
Modell
PAKET BEINHALTET
PRODUKTSPEZIFIKATIONEN:
ZEHENPLATTEN ANLEITUNG ZUR ZEHENMESSUNG
Machine Translated by Google

und Bremsscheibe bis zum Anschlag
die Scheibe kann sich ungehindert bewegen.
Hinweis: Das Produkt ist nicht mit einer
Unterlegscheibe ausgestattet. Falls Sie eine
benötigen, müssen Sie sich selbst eine besorgen.
Montieren Sie das Messwerkzeug auf der anderen
Seite in gleicher Weise.
Unterlegscheibe vor der Mutter und der
ACHTUNG: Bei manchen Fahrzeugen kann
die Bremshalterung mit dem
Messwerkzeug in Konflikt geraten. In diesem
Fall kann eine Unterlegscheibe zwischen die
Messwerkzeug, sodass das Werkzeug paralleler
zur Bremsscheibe steht.
Es wird empfohlen, eine flache
Hinweis: Das Produkt ist nicht mit einem
digitalen Winkelmesser ausgestattet. Falls Sie
ihn benötigen, müssen Sie sich selbst einen besorgen.
Schritt 2: Wasserwaage einstellen
Indem Sie das Messwerkzeug in die horizontale
Position drehen, können Sie zur Einstellung eine
Wasserwaage verwenden, die das Werkzeug
möglichst waagerecht ausrichtet, sodass der
Messwert genauer ist.
Schritt 1: Trittblech montieren
Das Trittblech in die Nabenbefestigungsschraube
der Bremsscheibe einführen und mit der
mitgelieferten Mutter festziehen.
- 4 -
Machine Translated by Google

Auto wie gezeigt, 80 Zoll sollten
zum Fahrzeugheck hin) minus
beträgt 66 3/32 die Achse hat eine Gesamtvorspur von
0,16
3/16 Zoll
Entriegeln Sie das Maßband und schieben Sie es
zur Fahrzeugfront) ist die Gesamtspur
0,48
5/16”
Maßbänder.
Vorderseite zeigt die Spur an, und eine größere
0,8
Hinweis: Beachten Sie bei der Verwendung von Ausrichtungsspezifikationen, dass die Zehenplatten die
richtige Spannung. Ziehen Sie an ihnen
Vorspur nach innen.
Spezifikation
0
Rad, müssen Sie diese Werte addieren.
Führen Sie das Maßband unter dem
Das hintere Maßband (seitlich
D1 ist 66" und das hintere Maß D2
0
1/8 Zoll
genug.
3/32 Zoll
das vordere Maßband (Seite, die am nächsten liegt
0,32
1/4 Zoll
sie in die Schlitze. Verriegeln Sie die
der Achse. Ein größeres Maß an der
0,64
3/8”
Wenn Sie sie entsperrt lassen, wird die
Die Messung auf der Rückseite zeigt
Abschlüsse
0,96
TOTALE Spur, nicht die Spur jedes Rades. Wenn Ihre Angaben also für jedes Rad angegeben sind,
leicht und notieren Sie die Maße.
Wenn beispielsweise die Frontmessung
Äquivalent
1/16 Zoll
Beispiel: Wenn die Fahrzeugspezifikationen 0,4 Grad vorschreiben, sollte die Vorspur
auf halbem Weg zwischen 1/8 Zoll und 3/16 Zoll, gemessen an den Zehenplatten.
UMRECHNUNGSTABELLE „GRAD IN ZOLL“
Schritt 3: Maßbänder verlängern
- 5 -
Machine Translated by Google

- 6 -
Nach AUS importiert: SIHAO PTY LTD. 1 ROKEVA STREETEASTWOOD NSW 2122
Dadurch bleibt die Spurweite erhalten, aber die Position des Lenkgelenks wird angepasst.
auf der einen Seite hinein und die Spurstange auf der anderen Seite um die gleiche Anzahl Umdrehungen heraus.
Importiert in die USA: Sanven Technology Ltd. Suite 250, 9166 Anaheim Place, Rancho
Cucamonga, CA 91730
Die Gesamtspur sollte 0,15 + 0,15 = 0,3 Grad betragen.
Sturz des Autos.
Rad. Achten Sie auf die richtige Einstellung!
Wenn beispielsweise die Vorspur jedes Rades 0,15 Grad betragen soll, dann
Drehen Sie die Zehenplatte um 90 Grad, mit einer Wasserwaage, mit der Sie auch die
Modifikation; Sie sollten jedoch die Gradangaben verwenden, NICHT die Zollangaben
200000 CN.
Adresse: Shuangchenglu 803nong11hao1602A-1609shi, Baoshanqu, Shanghai
Die optionalen Achsmesswerte geben die Gesamtspur an, daher müssen diese Werte nicht
Tipp: Wenn die Spur richtig ist, aber das Lenkrad schief ist, drehen Sie die Reifenstange
Australien
Spezifikationen.
Machine Translated by Google


MODELLO:WBS-009
Continuiamo a impegnarci per fornirvi strumenti a prezzi competitivi.
"Risparmia la metà", "Metà prezzo" o qualsiasi altra espressione simile da noi utilizzata rappresenta
solo una stima del risparmio che potresti ottenere acquistando determinati utensili con noi rispetto ai
principali marchi principali e non significa necessariamente coprire tutte le categorie di utensili da noi
offerti. Ti ricordiamo gentilmente di verificare attentamente quando effettui un ordine con noi se
stai effettivamente risparmiando la metà rispetto ai principali marchi principali.
SISTEMA DI ALLINEAMENTO DELLE RUOTE
Supporto tecnico e certificato di garanzia elettronica www.vevor.com/support
Machine Translated by Google

HAI BISOGNO DI AIUTO? CONTATTACI!
Supporto tecnico e certificato di garanzia
elettronica www.vevor.com/support
Hai domande sui prodotti? Hai bisogno di supporto tecnico? Non esitare a contattarci:
MODELLO:WBS-09
Questa è l'istruzione originale, si prega di leggere attentamente tutte le istruzioni del
manuale prima di utilizzare. VEVOR si riserva una chiara interpretazione del nostro manuale
utente. L'aspetto del prodotto sarà soggetto al prodotto ricevuto. Vi preghiamo di
perdonarci se non vi informeremo di nuovo se ci sono aggiornamenti tecnologici o software sul
nostro prodotto.
ALLINEAMENTO RUOTE
SISTEMA
- 1 -
Machine Translated by Google

6. Le capacità del prodotto si applicano al prodotto correttamente e completamente assemblato
creare pericoli.
pagine, fare riferimento allo schema di montaggio di questo manuale. Scartare e
1. Montare solo secondo queste istruzioni. Un montaggio improprio può
7. Per ulteriori informazioni sulle parti elencate di seguito
dalla portata dei bambini.
ATTENZIONE: leggere e comprendere l'intero manuale prima
3. Mantenere l'area di assemblaggio pulita e ben illuminata.
2. Indossare occhiali di sicurezza approvati ANSI e guanti da lavoro resistenti durante
assemblaggio.
separare tutte le parti in un'area di lavoro pulita. Si prega di tenere piccole parti di ricambio fuori
le avvertenze e le istruzioni possono causare lesioni personali o
5. Non riunirsi quando si è stanchi o sotto l'effetto di alcol, droghe o farmaci.
4. Tenere gli astanti fuori dall'area durante l'assemblea.
funzionamento o la manutenzione di questo prodotto. La mancata osservanza di queste
non è un giocattolo. Non permettere ai bambini di
giocare. ÿ Tenere lontano da punte affilate, lame e altri oggetti. ÿ Precauzioni
di montaggio
soltanto.
danni a beni di valore. ÿ Evitare che i
bambini utilizzino il sistema di allineamento delle ruote. E questo prodotto è
SALVA QUESTE ISTRUZIONI
IMPORTANTI MISURE DI SICUREZZA
- 2 -
Machine Translated by Google

Immagine
1
Componenti
NO
2 pezzi
Qtà
Nastro di misurazione
- 3 -
Modello
H
telaio del camion, rimuovere le 4 ruote e pulire il disco del freno dell'auto, dopodiché è
possibile iniziare la misurazione della convergenza dell'auto.
550
Prima di poter iniziare a misurare la punta del tuo camion, devi sollevarlo
L IN
Nota: questo strumento è disponibile solo per camion con sospensioni e SUV JEEP.
(mm)
56,8647 54
(mm)(mm) (mm)
Codice WBS-009
L1
IL PACCHETTO INCLUDE
SPECIFICHE DEL PRODOTTO:
ISTRUZIONI PER LA MISURAZIONE DELLE DITA DELLE PIASTRE PER LE DITA
Machine Translated by Google

utensile e il disco del freno fino al freno
il disco può passare liberamente.
Nota: il prodotto non è dotato di rondella
piana, se necessario, è necessario
procurarsela in proprio.
Installare lo strumento di misura sull'altro lato
nello stesso modo.
rondella prima del dado e del
ATTENZIONE: In alcune auto, la staffa del
freno potrebbe interferire con lo
strumento di misura, nel qual caso è possibile
posizionare una rondella piatta tra
strumento di misurazione in modo che l'utensile
sia più parallelo al disco del freno.
Si consiglia di installare un piatto
Nota: il prodotto non è dotato di goniometro
digitale, se necessario, è necessario
procurarsene uno proprio.
Fase 2: Regolare il livello Ruotando
lo strumento di misurazione in posizione
orizzontale, è possibile utilizzare una livella per la
regolazione, che renderà lo strumento il più
livellato possibile, in modo che il valore della
misurazione sia più preciso.
Fase 1: installare la piastra di
supporto Inserire la piastra di supporto
nella vite di montaggio del mozzo del disco del
freno e serrarla con il dado in dotazione con l'auto.
- 4 -
Machine Translated by Google

punta verso l'interno.
Specificazione
Abbastanza.
3/32"
la misurazione del nastro anteriore (lato più vicino
0
0,32
0 1/8"
negli slot. NON ribloccare il
dell'asse. Una misura più grande sul
0,64
1/4"
3/8"
ruota, dovrai sommare quei valori.
Lasciandoli sbloccati verrà applicato il
la misurazione sul lato posteriore indica
Gradi
0,96
Convergenza TOTALE, non la convergenza di ogni ruota. Quindi, se le tue specifiche sono fornite per ogni
Ad esempio, se la misurazione frontale
Equivalente
1/16"
leggermente e annota le misure.
3/16"
auto come mostrato, 80 pollici dovrebbero essere
verso la parte posteriore del veicolo) meno
è 66 3/32 l'assale ha una convergenza totale di
0,16
Sbloccare i metri a nastro e far scorrere
alla parte anteriore del veicolo) è la convergenza totale
0,48
5/16"
metri a nastro.
il lato anteriore indica la punta verso l'esterno e una più grande
0,8
Nota: quando si utilizzano le specifiche di allineamento, tenere presente che le piastre di punta misurano la
Passare il metro a nastro sotto il
La misurazione del nastro posteriore (laterale
D1 è 66" e la misura posteriore D2
la giusta quantità di tensione. Tirali
Esempio: se le specifiche del veicolo specificano 0,4 gradi, la convergenza dovrebbe essere
a metà strada tra 1/8” e 3/16” misurata dalle piastre di punta.
TABELLA DI CONVERSIONE DA GRADI A POLLICI DELLA PIASTRA DI MISURA
Passaggio 3: estendere i metri a nastro
- 5 -
Machine Translated by Google

- 6 -
Importato in AUS: SIHAO PTY LTD. 1 ROKEVA STREETEASTWOOD NSW 2122
Ciò manterrà la misurazione della convergenza ma regolerà la posizione dello sterzo
da un lato dentro e il tirante dall'altro lato fuori per un numero uguale di giri.
Importato negli USA: Sanven Technology Ltd. Suite 250, 9166 Anaheim Place, Rancho
Cucamonga, CA 91730
la convergenza totale dovrebbe essere 0,15+0,15= 0,3 gradi.
campanatura della vettura.
ruota. Assicurati di regolarla nella direzione giusta!
Ad esempio, se si suppone che la convergenza di ciascuna ruota sia di 0,15 gradi, allora
Ruotare la piastra di 90 gradi, con una livella che puoi usare anche per misurare la
modifica; tuttavia, dovresti usare le specifiche in gradi, NON in pollici
200000 NC.
Indirizzo: Shuangchenglu 803nong11hao1602A-1609shi, baoshanqu, shanghai
Le specifiche di allineamento opzionali forniscono la convergenza totale, quindi queste specifiche non sono necessarie
Suggerimento: se la convergenza è corretta, ma il volante è storto, girare la barra dello pneumatico
Australia
specifiche.
Machine Translated by Google


MODELO:WBS009
SISTEMADEALINEACIÓNDERUEDAS
Soportetécnicoycertificadodegarantíaelectrónicawww.vevor.com/support
"Ahorrelamitad","mitaddeprecio"ocualquierotraexpresiónsimilarqueutilicemossolorepresenta
unaestimacióndelahorroquepodríaobteneralcomprarciertasherramientasconnosotrosencomparación
conlasprincipalesmarcasynonecesariamentesignificaquecubratodaslascategoríasdeherramientas
queofrecemos.Lerecordamosque,alrealizarunpedidoconnosotros,verifiquecuidadosamentesi
realmenteestáahorrandolamitadencomparaciónconlasprincipalesmarcas.
Seguimoscomprometidosabrindarleherramientasaprecioscompetitivos.
Machine Translated by Google
¿NECESITAAYUDA?¡CONTÁCTENOS!
¿Tienepreguntassobreelproducto?¿Necesitaasistenciatécnica?Nodudeenponerseencontacto
connosotros:
MODELO:WBS09
Estassonlasinstruccionesoriginales,leaatentamentetodaslasinstruccionesdelmanual
antesdeutilizarelproducto.VEVORsereservaunainterpretaciónclaradenuestromanualde
usuario.Laaparienciadelproductoestarásujetaalproductoquerecibió.Perdónenosporno
informarlenuevamentesihayactualizacionesdetecnologíaosoftwareennuestroproducto.
SISTEMA
ALINEACIÓNDERUEDAS
1
Soportetécnicoycertificadodegarantía
electrónicawww.vevor.com/support
Machine Translated by Google

4.Mantengaalostranseúntesfueradeláreaduranteelmontaje.
operarorepararesteproducto.Elincumplimientodeestas
fueradelalcancedelosniños.
Lasadvertenciaseinstruccionespuedencausarlesionespersonaleso
5.Nosereúnacuandoestécansadoobajolainfluenciadelalcohol,drogasomedicamentos.
6.Lascapacidadesdelproductoseaplicanaproductosensambladosdemaneracorrectaycompleta.
dañosabienesvaliosos.Eviteque
losniñosutilicenelsistemadealineaciónderuedas.Yesteproductoes
Noesunjuguete.Nopermitaquelosniñosjueguen
conél.Manténgaloalejadodepuntasafiladas,cuchillasyotroselementos.
Precaucionesdemontaje
solo.
1.Realiceelmontajeúnicamentedeacuerdoconestasinstrucciones.Unmontajeincorrectopuede
7.Paraobtenerinformaciónadicionalsobrelaspiezasenumeradasacontinuación,
páginas,consulteeldiagramadeensamblajedeestemanual.Desenvuelvay
crearpeligros
asamblea.
2.UsegafasdeseguridadaprobadasporANSIyguantesdetrabajoresistentesdurante
ADVERTENCIA:Leaycomprendatodoestemanualantesde
3.Mantengaeláreadereuniónlimpiaybieniluminada.
Separetodaslaspiezasenunáreadetrabajolimpia.Mantengalaspiezasderepuestopequeñasfueradelalcance.
MEDIDASDESEGURIDADIMPORTANTES
GUARDEESTASINSTRUCCIONES
2
Machine Translated by Google

Componentes
cantidad
ImagenNo
Cintamétrica 2piezas
1
(mm)(mm)
647 54
Modelo
L1
(mm)
EDT009
550
Antesdequepuedascomenzaramedirlaconvergenciadetucamión,debeslevantarlo.
chasisdelcamión,retirelas4ruedasylimpieeldiscodefrenodelautomóvil,yluegopuede
comenzarlamedicióndelaconvergenciadelautomóvil.
yo
56.8
Nota:EstaherramientasoloestádisponibleparacamionesconsuspensiónySUVJEEP.
(mm)
yo EN
ELPAQUETEINCLUYE
ESPECIFICACIONESDELPRODUCTO:
INSTRUCCIONESPARALAMEDICIÓNDELOSDEDOSDELOSPIES
3
Machine Translated by Google

PRECAUCIÓN:Enalgunosautomóviles,elsoporte
delfrenopuedeinterferirconlaherramienta
demedición,encuyocasosepuedecolocaruna
arandelaplanaentreelsoporteylaherramientademedición.
Eldiscopuedepasarlibremente.
Nota:Elproductonoestáequipadoconuna
arandelaplana,siesnecesario,deberáobtener
lasuyapropia.
Instalelaherramientademediciónenelotro
ladodelamismamanera.
herramientademediciónparaquelaherramienta
estémásparalelaaldiscodefreno.
herramientayeldiscodefrenohastaqueelfreno
arandelaantesdelatuercayla
Serecomiendainstalarunpiso
Nota:Elproductonoestáequipadoconun
transportadordigital,siesnecesario,deberá
obtenerelsuyopropio.
Paso2:AjusteelnivelAlgirarla
herramientademediciónalaposición
horizontal,puedeusarunnivelparaajustar,lo
queharáquelaherramientaestélomás
niveladaposible,paraqueelvalordelamedición
seamáspreciso.
Paso1:Instalarlaplacadebase
Insertelaplacadebaseeneltornillode
montajedelcubodeldiscodefrenoyapriételo
conlatuercaquevieneconelautomóvil.
4
Machine Translated by Google

0,48
alfrentedelvehículo)eslaconvergenciatotal
Desbloqueelascintasmétricasydeslícelas
5/16”
3/16”
hacialapartetraseradelvehículo)menos
cochecomosemuestra,80pulgadasdebenser
es663/32elejetieneunaconvergenciatotalde
0,16
D1mide66”ylamedidatraseraD2
Paselascintasmétricaspordebajodela
Lacintamétricatrasera(lateral
Especificación
lacantidadadecuadadetensión.Tiredeellos
puntahaciaadentro
0
rueda,necesitarássumaresosvalores.
Nota:Alutilizarespecificacionesdealineación,tengaencuentaquelasplacasdepunteramidenla
0,8
Cintasmétricas.
Lapartefrontalindicalapuntahaciaafuerayunamayor
0,64
enlasranuras.NOvuelvaabloquearel
deleje.Unamedidamásgrandeenel
3/8”
3/32”
suficiente.
lacintamétricafrontal(ladomáscercano)
0,32
1/4”
0
1/8”1/16”
Porejemplo,silamedidafrontal
Equivalente
ligeramenteytengaencuentalasmedidas.
TOTALdeconvergencia,nolaconvergenciadecadarueda.Porlotanto,sisusespecificacionessedanparacada
Lamedidaenlapartetraseraindica
Dejarlosdesbloqueadosaplicaráel
Grados
0,96
Ejemplo:Silasespecificacionesdelvehículoespecifican0,4grados,laconvergenciadebeser
TABLADECONVERSIÓNDEGRADOSAPULGADASDELAPLACADEPIE
Paso3:Extiendelascintasmétricas
amitaddecaminoentre1/8”y3/16”medidoporlasplacasdelosdedos.
5
Machine Translated by Google

6
Dirección:Shuangchenglu803nong11hao1602A1609shi,baoshanqu,shanghai
Lasespecificacionesdealineaciónopcionalesproporcionanunaconvergenciatotal,porloquenoesnecesarioutilizarestasespecificaciones.
modificación;sinembargo,debeutilizarlasespecificacionesengrados,NOenpulgadas
200000MN.
ImportadoaAustralia:SIHAOPTYLTD.1ROKEVASTREETEASTWOODNSW2122
presupuesto.
Consejo:Silaconvergenciaescorrecta,peroelvolanteestátorcido,girelavarilladelneumático
Australia
enunladohaciaadentroyeltiranteenelotroladohaciaafueraunnúmeroigualdevueltas.
ImportadoaEE.UU.:SanvenTechnologyLtd.Suite250,9166AnaheimPlace,Rancho
Cucamonga,CA91730
Estomantendrálamedidadelaconvergenciaperoajustarálaposicióndeladirección.
Porejemplo,sisesuponequelaconvergenciadecadaruedadebeserde0,15grados,entonces
Girelaplacadelapunteraa90grados,conunnivelquetambiénpuedeusarparamedirla
rueda.¡Asegúresedeajustarlaenladireccióncorrecta!
Laconvergenciatotaldebeser0,15+0,15=0,3grados.
inclinacióndelcoche.
Machine Translated by Google


MODEL:WBS-009
„Oszczędź połowę”, „Połowa ceny” lub inne podobne wyrażenia używane przez nas stanowią
jedynie szacunkowe oszczędności, jakie możesz uzyskać, kupując u nas określone narzędzia w
porównaniu z głównymi markami i niekoniecznie oznaczają one objęcie wszystkich kategorii narzędzi
oferowanych przez nas. Uprzejmie przypominamy, aby dokładnie sprawdzić, czy składając u nas
zamówienie faktycznie oszczędzasz połowę w porównaniu z głównymi markami.
Nadal staramy się oferować Państwu narzędzia w konkurencyjnych cenach.
SYSTEM USTAWIANIA GEOMETRII KÓŁ
Wsparcie techniczne i certyfikat gwarancji elektronicznej www.vevor.com/support
Machine Translated by Google

Masz pytania dotyczące produktu? Potrzebujesz wsparcia technicznego? Skontaktuj się z
nami:
MODEL:WBS-09
To jest oryginalna instrukcja, przed użyciem należy uważnie przeczytać wszystkie
instrukcje. VEVOR zastrzega sobie jasną interpretację naszej instrukcji obsługi. Wygląd
produktu będzie zależał od produktu, który otrzymałeś. Prosimy o wybaczenie, że nie
poinformujemy Cię ponownie, jeśli w naszym produkcie pojawią się jakiekolwiek aktualizacje
technologiczne lub oprogramowania.
Wsparcie techniczne i certyfikat gwarancji
elektronicznej www.vevor.com/support
POTRZEBUJESZ POMOCY? SKONTAKTUJ SIĘ Z NAMI!
USTAWIANIE GEOMETRII KÓŁ
SYSTEM
- 1 -
Machine Translated by Google

montaż.
ostrzeżenia i instrukcje mogą spowodować obrażenia ciała lub
5. Nie przychodź na spotkania, jeśli jesteś zmęczony lub pod wpływem alkoholu, narkotyków lub
leków.
obsługi lub serwisowania tego produktu. Nieprzestrzeganie tych
4. Podczas montażu nie dopuszczaj osób postronnych na teren montażu.
nie jest zabawką. Nie pozwalaj dzieciom się bawić.
Trzymaj z dala od ostrych punktów, ostrzy i innych przedmiotów. Środki
ostrożności podczas montażu
tylko.
uszkodzenia cennego mienia. Unikaj
korzystania z systemu ustawiania zbieżności kół przez dzieci. Ten produkt jest
6. Możliwości produktu odnoszą się do produktu prawidłowo i całkowicie zmontowanego
stwarzać zagrożenia.
strony, zapoznaj się ze schematem montażu w tym podręczniku. Rozpakuj i
1. Montaż należy wykonywać wyłącznie zgodnie z niniejszą instrukcją. Nieprawidłowy montaż może
7. Aby uzyskać dodatkowe informacje dotyczące części wymienionych poniżej,
niedostępny dla dzieci.
OSTRZEŻENIE: Przed przystąpieniem do użytkowania należy przeczytać i zrozumieć całą instrukcję.
2. Podczas pracy należy nosić okulary ochronne i wytrzymałe rękawice robocze zgodne z normą ANSI.
3. Utrzymuj miejsce zgromadzenia w czystości i zapewnij dobre oświetlenie.
oddzielić wszystkie części w czystym miejscu pracy. Proszę trzymać małe części zamienne z dala
WAŻNE ZABEZPIECZENIA
ZAPISZ TE INSTRUKCJE
- 2 -
Machine Translated by Google

Zdjęcie
1
Komponenty
NIE
2 szt.
Ilość
Taśma miernicza
- 3 -
56,8647 54
(mm) (mm)(mm)
WBS-009
L1
Model
H
podwozie ciężarówki, zdejmij 4 koła i wyczyść tarczę hamulcową samochodu, a
następnie możesz rozpocząć pomiar zbieżności kół samochodu.
550
Zanim zaczniesz mierzyć czubek samochodu ciężarowego, musisz go podnieść.
L
(mm)
W
Uwaga: To narzędzie jest dostępne tylko dla ciężarówek z zawieszeniem i SUV-ów JEEP.
PŁYTKI DO PALCÓW INSTRUKCJA POMIARU PALCÓW
DANE TECHNICZNE PRODUKTU:
ZAWARTOŚĆ PAKIETU
Machine Translated by Google
narzędzie i tarczę hamulcową aż do momentu zadziałania hamulca
dysk może się swobodnie poruszać.
Uwaga: Produkt nie jest wyposażony w
podkładkę płaską, w razie potrzeby należy
dokupić ją samodzielnie.
Zainstaluj narzędzie pomiarowe po drugiej
stronie w ten sam sposób.
podkładka przed nakrętką i
UWAGA: W niektórych samochodach wspornik
hamulca może kolidować z narzędziem
pomiarowym, w takim przypadku można
umieścić podkładkę płaską pomiędzy
narzędzie pomiarowe, tak aby było bardziej
równoległe do tarczy hamulcowej.
Zaleca się montaż płaski
Uwaga: Produkt nie jest wyposażony w
kątomierz cyfrowy. W razie potrzeby należy nabyć
własny.
Krok 2: Wyreguluj poziom Obrócenie
narzędzia pomiarowego do pozycji poziomej
umożliwia regulację za pomocą poziomicy, dzięki
czemu narzędzie będzie jak najbardziej
wypoziomowane, a wartość pomiaru będzie
dokładniejsza.
Krok 1: Montaż osłony przedniej
Włóż osłonę przednią do śruby mocującej
piastę tarczy hamulcowej i dokręć ją nakrętką
dostarczoną wraz z samochodem.
- 4 -
Machine Translated by Google

Pozostawienie ich odblokowanych spowoduje zastosowanie
pomiar na tylnej stronie wskazuje
Stopnie
0,96
CAŁKOWITY palec u nogi, nie palec u nogi każdego koła. Tak więc, jeśli Twoje specyfikacje są podane dla każdego
lekko i zanotuj pomiary.
Na przykład, jeżeli pomiar przedni
Równowartość
1/16”
0
1/8”
pomiar taśmy przedniej (strona najbliższa)
wystarczająco.
3/32”
0,32
1/4”
je do gniazd. NIE blokuj ponownie
osi. Większy pomiar na
0,64
3/8”
miary krawieckie.
strona przednia wskazuje na palec u nogi na zewnątrz i większy
0,8
Uwaga: Podczas korzystania ze specyfikacji ustawień należy pamiętać, że płytki palców mierzą
odpowiednia ilość napięcia. Pociągnij za nie
Specyfikacja
palcem wskazującym do środka.
0
koła, należy dodać te wartości do siebie.
D1 wynosi 66”, a tylny pomiar D2
Przeciągnij taśmę mierniczą pod spodem
Pomiar taśmy tylnej (bocznej)
samochód jak na zdjęciu, 80 cali powinno być
(w kierunku tyłu pojazdu) minus
66 3/32 oś ma całkowity zbieżność
0,16
3/16”
Odblokuj miarki i przesuń
do przodu pojazdu) to całkowita odległość między kołami
0,48
5/16”
Przykład: Jeżeli specyfikacja pojazdu określa 0,4 stopnia, zbieżność powinna wynosić
w połowie odległości między 1/8” a 3/16” mierzonej przy płytkach noskowych.
TABELA KONWERSJI STOPNI PŁYTY TOE NA CALE
Krok 3: Rozciągnij miary taśmowe
- 5 -
Machine Translated by Google

- 6 -
Na przykład, jeżeli zbieżność każdego koła ma wynosić 0,15 stopnia, to
Obróć płytę podnóżka o 90 stopni, używając poziomicy, której możesz użyć również do pomiaru
modyfikacja; należy jednak używać specyfikacji stopni, NIE cali
200000 CN.
Opcjonalne specyfikacje ustawienia dają całkowity palec u nogi, więc te specyfikacje nie są potrzebne
Adres: Shuangchenglu 803nong11hao1602A-1609shi, baoshanqu, Szanghaj
Wskazówka: Jeśli zbieżność jest prawidłowa, ale kierownica jest krzywa, obróć drążek kierownicy
Australia
specyfikacje.
Importowane do AUS: SIHAO PTY LTD. 1 ROKEVA STREETEASTWOOD NSW 2122
Dzięki temu zachowany zostanie pomiar palców, ale zostanie dostosowana pozycja kierownicy.
po jednej stronie do środka, a po drugiej stronie na zewnątrz, wykonując taką samą liczbę obrotów.
Importowane do USA: Sanven Technology Ltd. Suite 250, 9166 Anaheim Place, Rancho Cucamonga,
CA 91730
całkowity kąt nachylenia palca powinien wynosić 0,15+0,15= 0,3 stopnia.
koło. Upewnij się, że ustawisz je we właściwym kierunku!
pochylenie samochodu.
Machine Translated by Google


MODEL:WBS-009
WIELUITLIJNINGSSYSTEEM
Technische ondersteuning en e-garantiecertificaat www.vevor.com/support
"Save Half", "Half Price" of andere soortgelijke uitdrukkingen die wij gebruiken, geven alleen een schatting van de
besparingen die u kunt behalen door bepaalde gereedschappen bij ons te kopen in vergelijking met de grote topmerken
en betekent niet noodzakelijkerwijs dat alle categorieën gereedschappen die wij aanbieden, worden gedekt. Wij
herinneren u eraan om zorgvuldig te controleren of u daadwerkelijk de helft bespaart in vergelijking met de grote
topmerken wanneer u een bestelling bij ons plaatst.
Wij streven er voortdurend naar om u gereedschappen tegen concurrerende prijzen te leveren.
Machine Translated by Google

HULP NODIG? NEEM CONTACT MET ONS OP!
Dit is de originele instructie, lees alle handleidingen zorgvuldig door voordat u het product
gebruikt. VEVOR behoudt zich een duidelijke interpretatie van onze gebruikershandleiding voor.
Het uiterlijk van het product is afhankelijk van het product dat u hebt ontvangen. Vergeef ons
dat we u niet opnieuw zullen informeren als er technologie- of software-updates voor ons product zijn.
MODEL:WBS-09
Heeft u vragen over het product? Heeft u technische ondersteuning nodig? Neem dan gerust
contact met ons op:
SYSTEEM
WIELUITLIJNING
Technische ondersteuning en e-
garantiecertificaat www.vevor.com/support
- 1 -
Machine Translated by Google

- 2 -
BELANGRIJKE VEILIGHEIDSMAATREGELEN
BEWAAR DEZE INSTRUCTIES
4. Houd omstanders uit de buurt tijdens de montage.
het bedienen of onderhouden van dit product. Het niet naleven van deze
van het bereik van kinderen.
waarschuwingen en instructies kunnen persoonlijk letsel of
5. Kom niet bijeen als u moe bent of onder invloed van alcohol, drugs of medicijnen.
6. Producteigenschappen zijn van toepassing op een correct en volledig gemonteerd product
schade aan waardevolle eigendommen.
ÿ Vermijd dat kinderen het wieluitlijnsysteem gebruiken. En dit product is
geen speelgoed. Laat kinderen niet spelen. ÿ Houd
uit de buurt van scherpe punten, messen en andere voorwerpen. ÿ
Montagevoorzorgsmaatregelen
alleen.
1. Monteer alleen volgens deze instructies. Onjuiste montage kan
7. Voor aanvullende informatie over de onderdelen die in de volgende lijst staan vermeld,
pagina's, raadpleeg dan het montageschema van deze handleiding. Uitpakken en
gevaren creëren.
montage.
2. Draag tijdens het werk een door de ANSI goedgekeurde veiligheidsbril en stevige werkhandschoenen.
WAARSCHUWING: Lees en begrijp deze hele handleiding voordat u
3. Zorg ervoor dat de montageplek schoon en goed verlicht is.
scheid alle onderdelen in een schone werkruimte. Houd kleine reserveonderdelen buiten
Machine Translated by Google

(mm)(mm)
54647
Model
L1
(mm)
WBS-009
550
Voordat u de teen van uw vrachtwagen kunt meten, moet u uw
vrachtwagenchassis, verwijder de 4 wielen en maak de remschijf van de auto schoon.
Vervolgens kunt u beginnen met het meten van de teenbreedte van de auto.
H
56.8
Let op: Deze tool is alleen beschikbaar voor verende vrachtwagens en JEEP SUV's.
(mm)
Ik IN
Afbeelding
Aantal
Componenten
Nee
1
Meetlint 2 stuks
PAKKET INBEGREPEN
PRODUCTSPECIFICATIES:
TEENPLATEN TEENMEETINSTRUCTIES
- 3 -
Machine Translated by Google

Let op: Het product is niet voorzien van een
platte ring. Indien nodig dient u deze zelf aan
te schaffen.
LET OP: Bij sommige auto's kan de
rembeugel de meettool hinderen. In
dat geval kan er een platte ring tussen de
rembeugel worden geplaatst.
schijf vrij kan passeren.
Monteer het meetgereedschap op dezelfde
manier aan de andere kant.
ring voor de moer en de
gereedschap en de remschijf totdat de rem
Meetgereedschap zodat het gereedschap meer
parallel aan de remschijf staat.
Het is aan te raden om een vlakke vloer te installeren
Let op: Het product is niet uitgerust met een
digitale gradenboog. Indien nodig dient u deze
zelf aan te schaffen.
Stap 2: Pas de waterpas aan Door
het meetgereedschap in de horizontale positie
te draaien, kunt u een waterpas gebruiken om het
gereedschap zo waterpas mogelijk te maken,
zodat de waarde van de meting nauwkeuriger is.
Stap 1: Monteer de teenplaat
Plaats de teenplaat in de
naafbevestigingsschroef van de remschijf en
draai deze vast met de moer die bij de auto is
geleverd.
- 4 -
Machine Translated by Google

0,8
Let op: Houd er bij het gebruik van uitlijningsspecificaties rekening mee dat de teenplaten de volgende afmetingen hebben:
meetlinten.
voorkant geeft teen naar buiten aan, en een grotere
D1 is 66” en de achterste maat D2
Laat de meetlinten onder de
De achterste meetlintmaat (zijkant)
juiste hoeveelheid spanning. Trek eraan
Specificatie
teen naar binnen.
0
3/16”
wiel, dan moet u deze waarden bij elkaar optellen.
auto zoals afgebeeld, 80 inch zou moeten zijn
(naar de achterkant van het voertuig) min
is 66 3/32 de as heeft een totale toespoor van
0,16
aan de voorkant van het voertuig) is de totale teen
0,48
5/16”
Ontgrendel de meetlinten en schuif
TOTALE teen, niet de teen van elk wiel. Dus als uw specificaties voor elk wiel zijn gegeven
Als u ze ontgrendeld laat, wordt de
meting aan de achterzijde geeft aan
Graden
0,96
Als de voorste meting bijvoorbeeld
Equivalent
1/16”
lichtjes en noteer de afmetingen.
genoeg.
de voorste meetlint (zijde het dichtst bij)
3/32”
0,32
1/4”
0
1/8”
0,64
3/8”
ze in de sleuven. Vergrendel de
van de as. Een grotere meting op de
CONVERSIETABEL VAN GRADEN NAAR INCH VAN TEENSPLAAT
Voorbeeld: Als de specificaties van het voertuig 0,4 graden voorschrijven, moet de toespoor
Stap 3: Verleng de meetlinten
halverwege tussen 1/8” en 3/16” gemeten door de teenplaten.
- 5 -
Machine Translated by Google

- 6 -
Adres: Shuangchenglu 803nong11hao1602A-1609shi, baoshanqu, shanghai
De optionele uitlijningsspecificaties geven een totale teen, dus deze specificaties hoeven niet
wijziging; u dient echter de gradenspecificaties te gebruiken, NIET de inch
200000 CN.
Geïmporteerd naar AUS: SIHAO PTY LTD. 1 ROKEVA STREETEASTWOOD NSW 2122
specificaties.
Tip: Als de teenpositie correct is, maar het stuurwiel scheef staat, draai dan de bandenstang
Australië
aan de ene kant in en de spoorstang aan de andere kant uit een gelijk aantal slagen.
Geïmporteerd naar de VS: Sanven Technology Ltd. Suite 250, 9166 Anaheim Place, Rancho
Cucamonga, CA 91730
Hierdoor blijft de teenmaat behouden, maar wordt de positie van de besturing aangepast
Als de toespoor van elk wiel bijvoorbeeld 0,15 graden moet zijn, dan
Draai de teenplaat 90 graden, met een waterpas die u ook kunt gebruiken om de
wiel. Zorg ervoor dat je het in de juiste richting afstelt!
De totale teenhoek moet 0,15 + 0,15 = 0,3 graden zijn.
camber van de auto.
Machine Translated by Google


MODELL:WBS-009
HJULINSTÄLLNINGSSYSTEM
Teknisk support och e-garanticertifikat www.vevor.com/support
Vi fortsätter att vara engagerade i att ge dig verktyg till konkurrenskraftiga priser.
"Spara hälften", "halva priset" eller andra liknande uttryck som används av oss representerar
bara en uppskattning av besparingar du kan dra nytta av att köpa vissa verktyg hos oss jämfört med
de stora toppmärkena och betyder inte nödvändigtvis att täcka alla kategorier av verktyg som erbjuds
av oss. Du påminns vänligen om att noggrant kontrollera när du gör en beställning hos oss om
du faktiskt sparar hälften i jämförelse med de främsta stora varumärkena.
Machine Translated by Google

BEHÖVER HJÄLP? KONTAKTA OSS!
Detta är den ursprungliga instruktionen, läs alla instruktioner noggrant innan du
använder den. VEVOR reserverar sig för en tydlig tolkning av vår användarmanual. Utseendet
på produkten är beroende av den produkt du fått. Ursäkta oss att vi inte kommer att
informera dig igen om det finns någon teknik eller mjukvaruuppdateringar på vår produkt.
MODELL:WBS-09
Har du produktfrågor? Behöver du teknisk support? Kontakta oss gärna:
SYSTEM
HJULINSTÄLLNING
Teknisk support och e-garanticertifikat
www.vevor.com/support
- 1 -
Machine Translated by Google

använda eller serva denna produkt. Underlåtenhet att följa dessa
4. Håll åskådare borta från området under monteringen.
av barns räckvidd.
varningar och instruktioner kan orsaka personskada eller
5. Sätt dig inte ihop när du är trött eller påverkad av alkohol, droger eller mediciner.
6. Produktegenskaper gäller för korrekt och färdigmonterad produkt
skada på värdefull egendom. ÿ
Undvik att barn använder hjulinställningssystemet. Och den här produkten är
inte en leksak. Låt inte barn leka. ÿ Håll dig
borta från vassa spetsar, knivar och andra föremål. ÿ Försiktighetsåtgärder
vid montering
endast.
1. Montera endast enligt dessa instruktioner. Felaktig montering kan
7. För ytterligare information om delarna som listas nedan
skapa faror.
sidorna, se monteringsdiagrammet i denna manual. Packa upp och
montering.
2. Bär ANSI-godkända skyddsglasögon och kraftiga arbetshandskar under
separera alla delar i ett rent arbetsområde. Vänligen håll små reservdelar borta
VARNING: Läs och förstå hela denna manual innan
3. Håll monteringsområdet rent och väl upplyst.
SPARA DESSA INSTRUKTIONER
VIKTIGA SÄKERHETSÅTGÄRDER
- 2 -
Machine Translated by Google

Bild
Antal
Komponenter
Inga
1
Måttband 2 st
(mm) (mm)
647 54
Modell
L1
(mm)
WBS-009
550
Innan du kan börja mäta tån på din lastbil måste du lyfta din
H
lastbilschassi, ta bort de 4 hjulen och rengör bromsskivan på bilen, och sedan
kan du börja tåmätningen på bilen.
56,8
(mm)
Obs: Detta verktyg är endast tillgängligt för fjädrande lastbilar och JEEP-SUV:ar.
IL
PAKET INGÅR
PRODUKTSPECIFIKATIONER:
TÅPLATOR TÅMÄTINSTRUKTIONER
- 3 -
Machine Translated by Google

Obs: Produkten är inte utrustad med en
platt bricka, om det behövs måste du skaffa
en egen.
VARNING: I vissa bilar kan bromsfästet
störa mätverktyget, i vilket fall en platt
bricka kan placeras mellan
skivan kan passera fritt.
mätverktyg så att verktyget är mer parallellt
med bromsskivan.
verktyg och bromsskiva tills bromsen
bricka före muttern och den
Det rekommenderas att installera en lägenhet
Obs: Produkten är inte utrustad med en
digital gradskiva, om nödvändigt måste du
skaffa en egen.
Montera mätverktyget på andra sidan på samma
sätt.
Steg 2: Justera nivån Genom att
vrida mätverktyget till horisontellt läge kan du
använda en nivå för att justera, vilket gör att
verktyget blir så jämnt som möjligt, så att värdet
på mätningen blir mer exakt.
Steg 1: Installera tåplattan Sätt in
tåplattan i navmonteringsskruven på
bromsskivan och dra åt den med muttern som
följer med bilen.
- 4 -
Machine Translated by Google
dem i spåren. Lås INTE igen
av axeln. Ett större mått på
0,8
måttband.
framsidan visar tå ut, och en större
Obs: När du använder inriktningsspecifikationer, observera att tåplattorna mäter
rätt mängd spänning. Dra i dem
tå in.
Specifikation
D1 är 66” och bakmåttet D2
Kör måttbandet under
Det bakre måttbandet (sidan
bil som visas ska 80 tum vara
bakåt på fordonet) minus
är 66 3/32 axeln har totalt tå in av
0,16
0
hjulet måste du lägga till dessa värden tillsammans.
3/16"
framtill på fordonet) är den totala tån
0,48
5/16"
Lås upp måttbandet och skjut
TOTAL tå, inte tån på varje hjul. Således, om dina specifikationer ges för varje
Om du lämnar dem olåsta tillämpas
mått på baksidan indikerar
Grader
lite och notera måtten.
0,96
Till exempel om frontmåttet
Ekvivalent
1/16"
0
1/8"
tillräckligt.
det främre måttbandet (sidan närmast
3/32"
0,32
1/4"
0,64
3/8"
TÅPLATSGRADER TILL INCH OMVANDLINGSSCHEMA
Exempel: Om fordonsspecifikationerna anger 0,4 grader ska tån vara
Steg 3: Förläng måttband
halvvägs mellan 1/8” och 3/16” mätt av tåplattorna.
- 5 -
Machine Translated by Google

- 6 -
De valfria inriktningsspecifikationerna ger total tå, så dessa specifikationer behöver inte
Adress: Shuangchenglu 803nong11hao1602A-1609shi, baoshanqu, shanghai
modifiering; dock bör du använda examensspecifikationerna, INTE tum
200 000 CN.
Importerad till AUS: SIHAO PTY LTD. 1 ROKEVA STREETEASTWOOD NSW 2122
specifikationer.
Tips: Om tån är rätt, men ratten är sned, vrid på däckstången
Australien
på ena sidan in och dragstången på andra sidan ut lika många varv.
Importerad till USA: Sanven Technology Ltd. Suite 250, 9166 Anaheim Place,
Rancho Cucamonga, CA 91730
Detta kommer att behålla tåmåttet men justera styrningens position
Till exempel, om ingången på varje hjul är tänkt att vara 0,15 grader, då
Vrid tåplattan till 90 grader, med en nivå som du också kan använda för att mäta
hjul. Se till att justera den i rätt riktning!
total tå ska vara 0,15+0,15= 0,3 grader.
camber av bilen.
Machine Translated by Google