
0
+
2
560 mm
R = Max. 10 mm
Min. 35 mm
560 mm
0
+
2
R = 11.5 mm
0
+
2
513 mm
Min. 480 mm
Max. 492 mm
50 mm
Min. 480 mm
Max. 492 mm
A
4 mm
551 mm
510 mm
479 mm
590 mm
R = Max. 10 mm
R = 11.5 mm
0
+
2
593 mm
6mm
A
OCTOSEAL S70
min. 45 mm
min. 550 mm
A-A
L
min. 35 mm
i
min. 400 mm
min.100 mm
min.
12 mm
min. 10 mm
min. 12 mm
min. 10 mm
min. 20 mm
min. 64 mm
min. 12 mm
min. 10 mm
min. 20 mm
A-A
min. 20 mm
min. 12 mm
min. 64 mm
A-A
min. 64 mm
min.
28 mm
min. 28 mm
20 mm
min. 10 mm
A-A
min. 64 mm
x4
1
x4
2
90°C
1
2
3
4
2
1
x4
XX 1234X XX
XXXX XXXX XXXX
XXXX XXXX XXXX
XXXX XXXX XXXX
Before using the appliance, read these safety
instructions. Keep them nearby for future reference.
These instructions and the appliance itself provide
important safety warnings to be observed at all times.
The manufacturer declines any liability for failure to
observe these safety instructions, for inappropriate use
of the appliance or incorrect setting of controls.
WARNING: If the hob surface is cracked, do not use
the appliance - risk of electric shock.
WARNING: Danger of re: Do not store items on the
cooking surfaces.
CAUTION: The cooking process has to be supervised.
A short cooking process has to be supervised
continuously.
WARNING: Unattended cooking on a hob with fat or
oil can be dangerous - risk of re. NEVER try to extinguish
a re with water: instead, switch o the appliance and
then cover ame e.g. with a lid or a re blanket.
Do not use the hob as a work surface or support.
Keep clothes or other ammable materials away from
the appliance, until all the components have cooled
down completely - risk of re.
Metallic objects such as knives, forks, spoons and
lids should not be placed on the hob surface since they
can get hot.
Very young children (0-3 years) should be kept away
from the appliance. Young children (3-8years) should
be kept away from the appliance unless continuously
supervised. Children from 8years old and above and
persons with reduced physical, sensory or mental
capabilities or lack of experience and knowledge can
use this appliance only if they are supervised or have
been given instructions on safe use and understand
the hazards involved. Children must not play with the
appliance. Cleaning and user maintenance must not be
carried out by children without supervision.
After use, switch o the hob element by its control
and do not rely on the pan detector.
WARNING: The appliance and its accessible parts
become hot during use. Care should be taken to avoid
touching heating elements. Children less than 8 years
of age shall be kept away unless continuously
supervised.
The food must not be left in or on the product for
more than one hour before or after cooking.
PERMITTED USE
CAUTION: the appliance is not intended to be
operated by means of an external switching device,
such as a timer, or separate remote controlled system.
This appliance is intended to be used in household
and similar applications such as: sta kitchen areas in
shops, oces and other working environments; farm
houses; by clients in hotels, motels, bed & breakfast and
other residential environments.
No other use is permitted (e.g. heating rooms).
This appliance is not for professional use. Do not use
the appliance outdoors.
WARNING: Induction hob may generate the acoustic
sound when something is left on the control panel.
Switch o the cooktop through the ON/OFF button.
INSTALLATION
The appliance must be handled and installed by two
or more persons - risk of injury. Use protective gloves to
unpack and install - risk of cuts.
Installation, including water supply (if any), electrical
connections and repairs must be carried out by a
qualied technician. Do not repair or replace any part
of the appliance unless specically stated in the user
manual. Keep children away from the installation site.
After unpacking the appliance, make sure that it has
not been damaged during transport. In the event of
problems, contact the dealer or your nearest After-sales
Service. Once installed, packaging waste (plastic,
styrofoam parts etc.) must be stored out of reach of
children - risk of suocation. The appliance must be
disconnected from the power supply before any
installation operation - risk of electric shock. During
installation, make sure the appliance does not damage
the power cable - risk of re or electric shock. Only
activate the appliance when the installation has been
completed.
Carry out all cabinet cutting operations before tting
the appliance and remove all wood chips and sawdust.
ELECTRICAL WARNINGS
It must be possible to disconnect the appliance from
the power supply by unplugging it if plug is accessible,
or by a multi-pole switch installed upstream of the
socket in accordance with the wiring rules and the
appliance must be earthed in conformity with national
electrical safety standards.
Do not use extension leads, multiple sockets or
adapters. The electrical components must not be
accessible to the user after installation. Do not use the
appliance when you are wet or barefoot. Do not operate
this appliance if it has a damaged power cable or plug,
if it is not working properly, or if it has been damaged or
dropped.
Installation using a power cable plug is not allowed
unless the product is already equipped with the one
provided by the Manufacturer.
If the supply cord is damaged, it must be replaced
with an identical one by the manufacturer, its service
agent or similarly qualied persons in order to avoid a
hazard - risk of electric shock.
CLEANING AND MAINTENANCE
WARNING: Ensure that the appliance is switched o
and disconnected from the power supply before
performing any maintenance operation; never use
steam cleaning equipment - risk of electric shock.
SAFETY INSTRUCTIONS
IMPORTANT TO BE READ AND OBSERVED
EN
Do not use abrasive or corrosive products, chlorine-
based cleaners or pan scourers.
DISPOSAL OF PACKAGING MATERIALS
The packaging material is 100% recyclable and is marked with the recycle
symbol
.
The various parts of the packaging must therefore be disposed of responsibly
and in full compliance with local authority regulations governing waste
disposal.
DISPOSAL OF HOUSEHOLD APPLIANCES
This appliance is manufactured with recyclable or reusable materials.
Dispose of it in accordance with local waste disposal regulations. For further
information on the treatment, recovery and recycling of household electrical
appliances, contact your local authority, the collection service for household
waste or the store where you purchased the appliance. This appliance is
marked in compliance with European Directive 2012/19/EU, Waste Electrical
and Electronic Equipment (WEEE) and with the Waste Electrical and Electronic
Equipment regulations 2013 (as amended).
By ensuring this product is disposed of correctly, you will help prevent
negative consequences for the environment and human health.
The symbol
on the product or on the accompanying documentation
indicates that it should not be treated as domestic waste but must be taken to
an appropriate collection center for the recycling of electrical and electronic
equipment.
ENERGY SAVING TIPS
Make the most of your hot plate’s residual heat by switching it o a few
minutes before you nish cooking.
The base of your pot or pan should cover the hot plate completely; a container
that is smaller than the hot plate will cause energy to be wasted.
Cover your pots and pans with tight-tting lids while cooking and use as
little water as possible. Cooking with the lid o will greatly increase energy
consumption.
Use only at-bottomed pots and pans.
DECLARATION OF CONFORMITY
This appliance meets Ecodesign requirements of European Regulation
66/2014 and The Ecodesign for Energy-Related Products and Energy
Information (Amendment) (EU Exit) Regulations 2019 in compliance with the
European standard EN 60350-2.
The information related to low power mode of the appliance in accordance
with Regulation (EU) 2023/826 can be found in the following link: https://docs.
emeaappliance-docs.eu.
NOTE
People with a pacemaker or similar medical device should use care when
standing near this induction cooktop while it is on. The electromagnetic
eld may aect the pacemaker or similar device. Consult your doctor, or
the manufacturer of the pacemaker or similar medical device for additional
information about its eects with electromagnetic elds of the induction
cooktop.
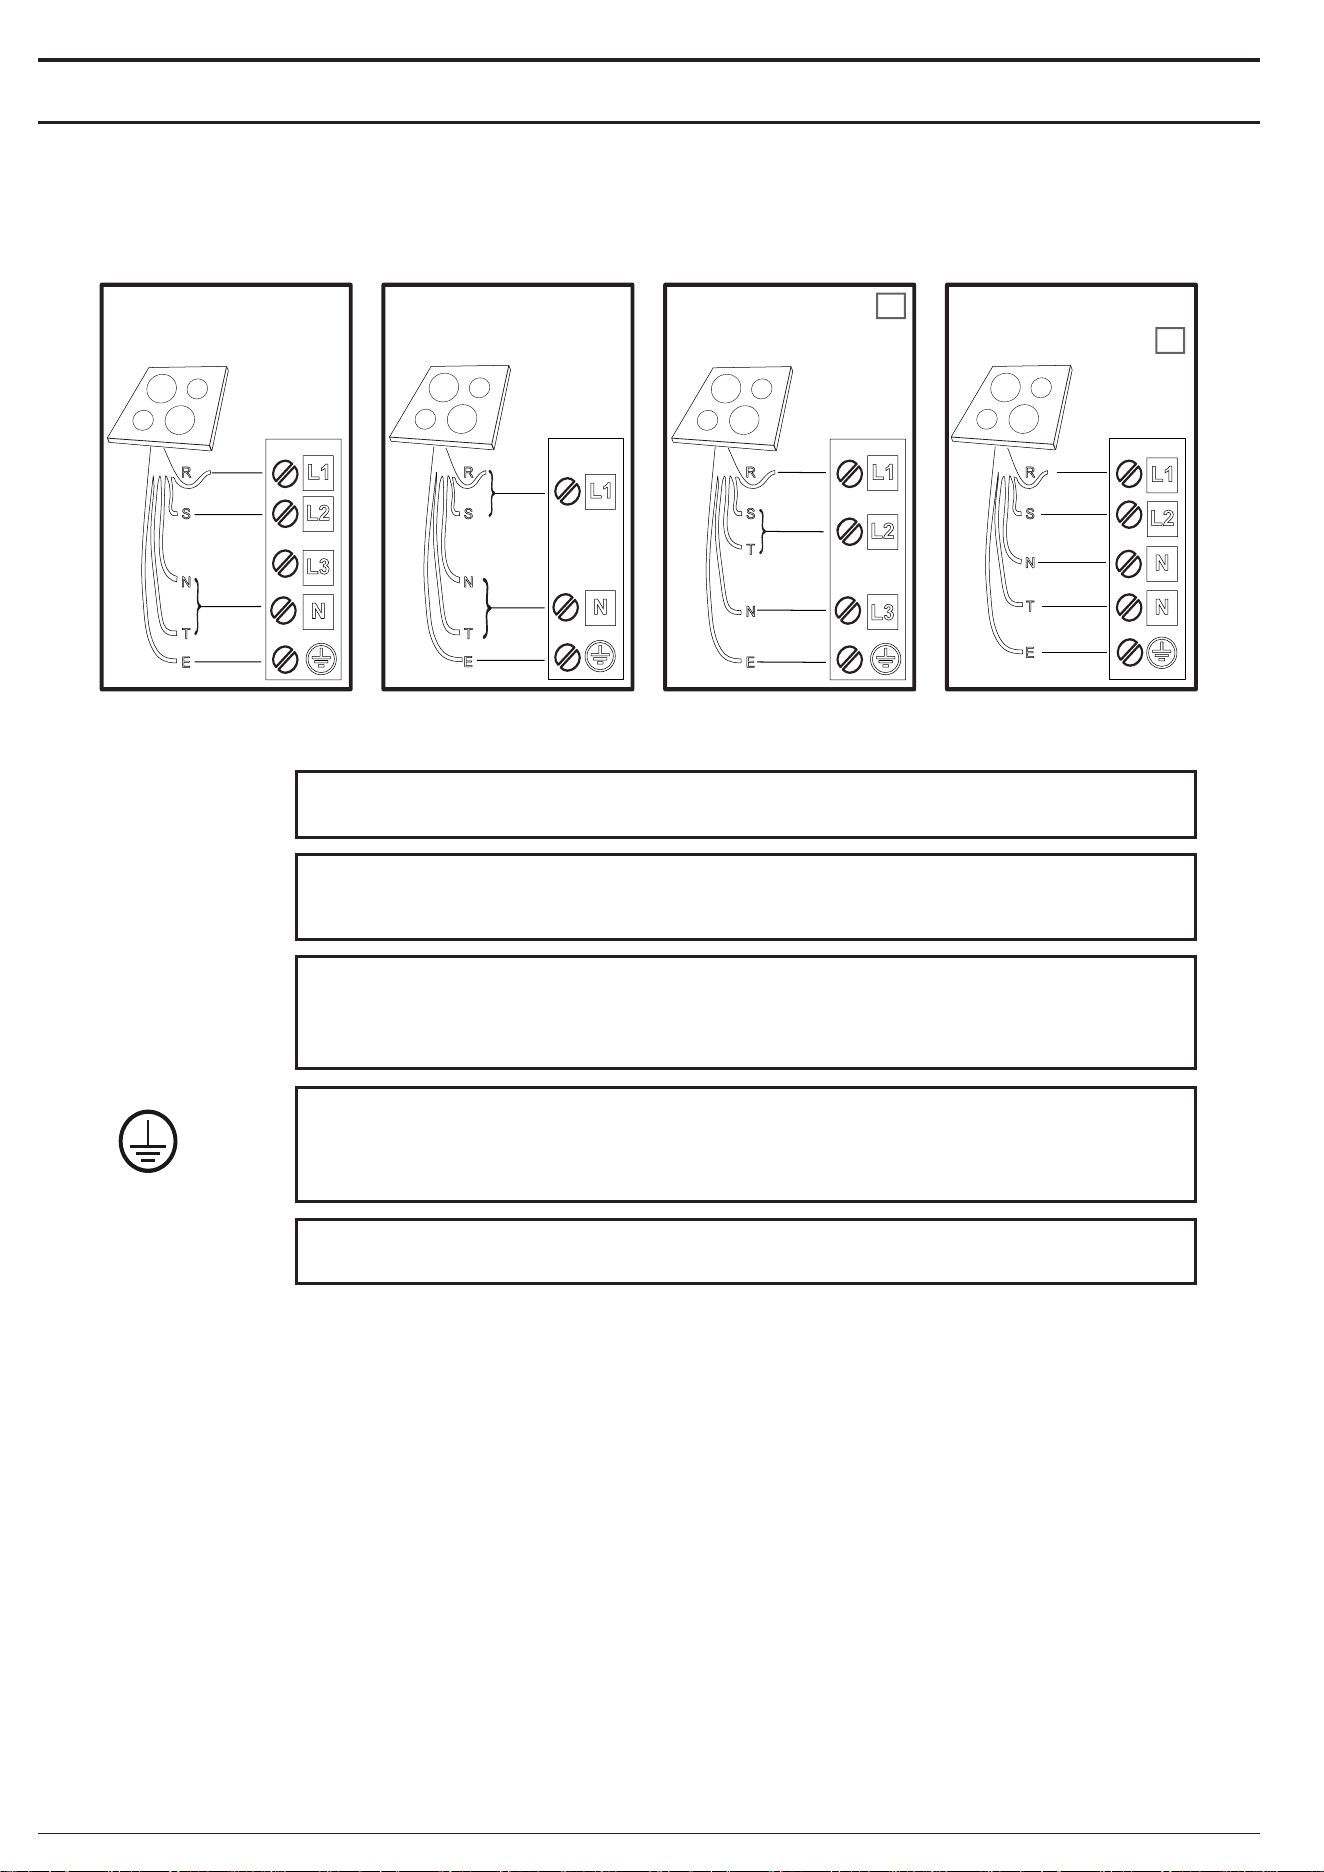
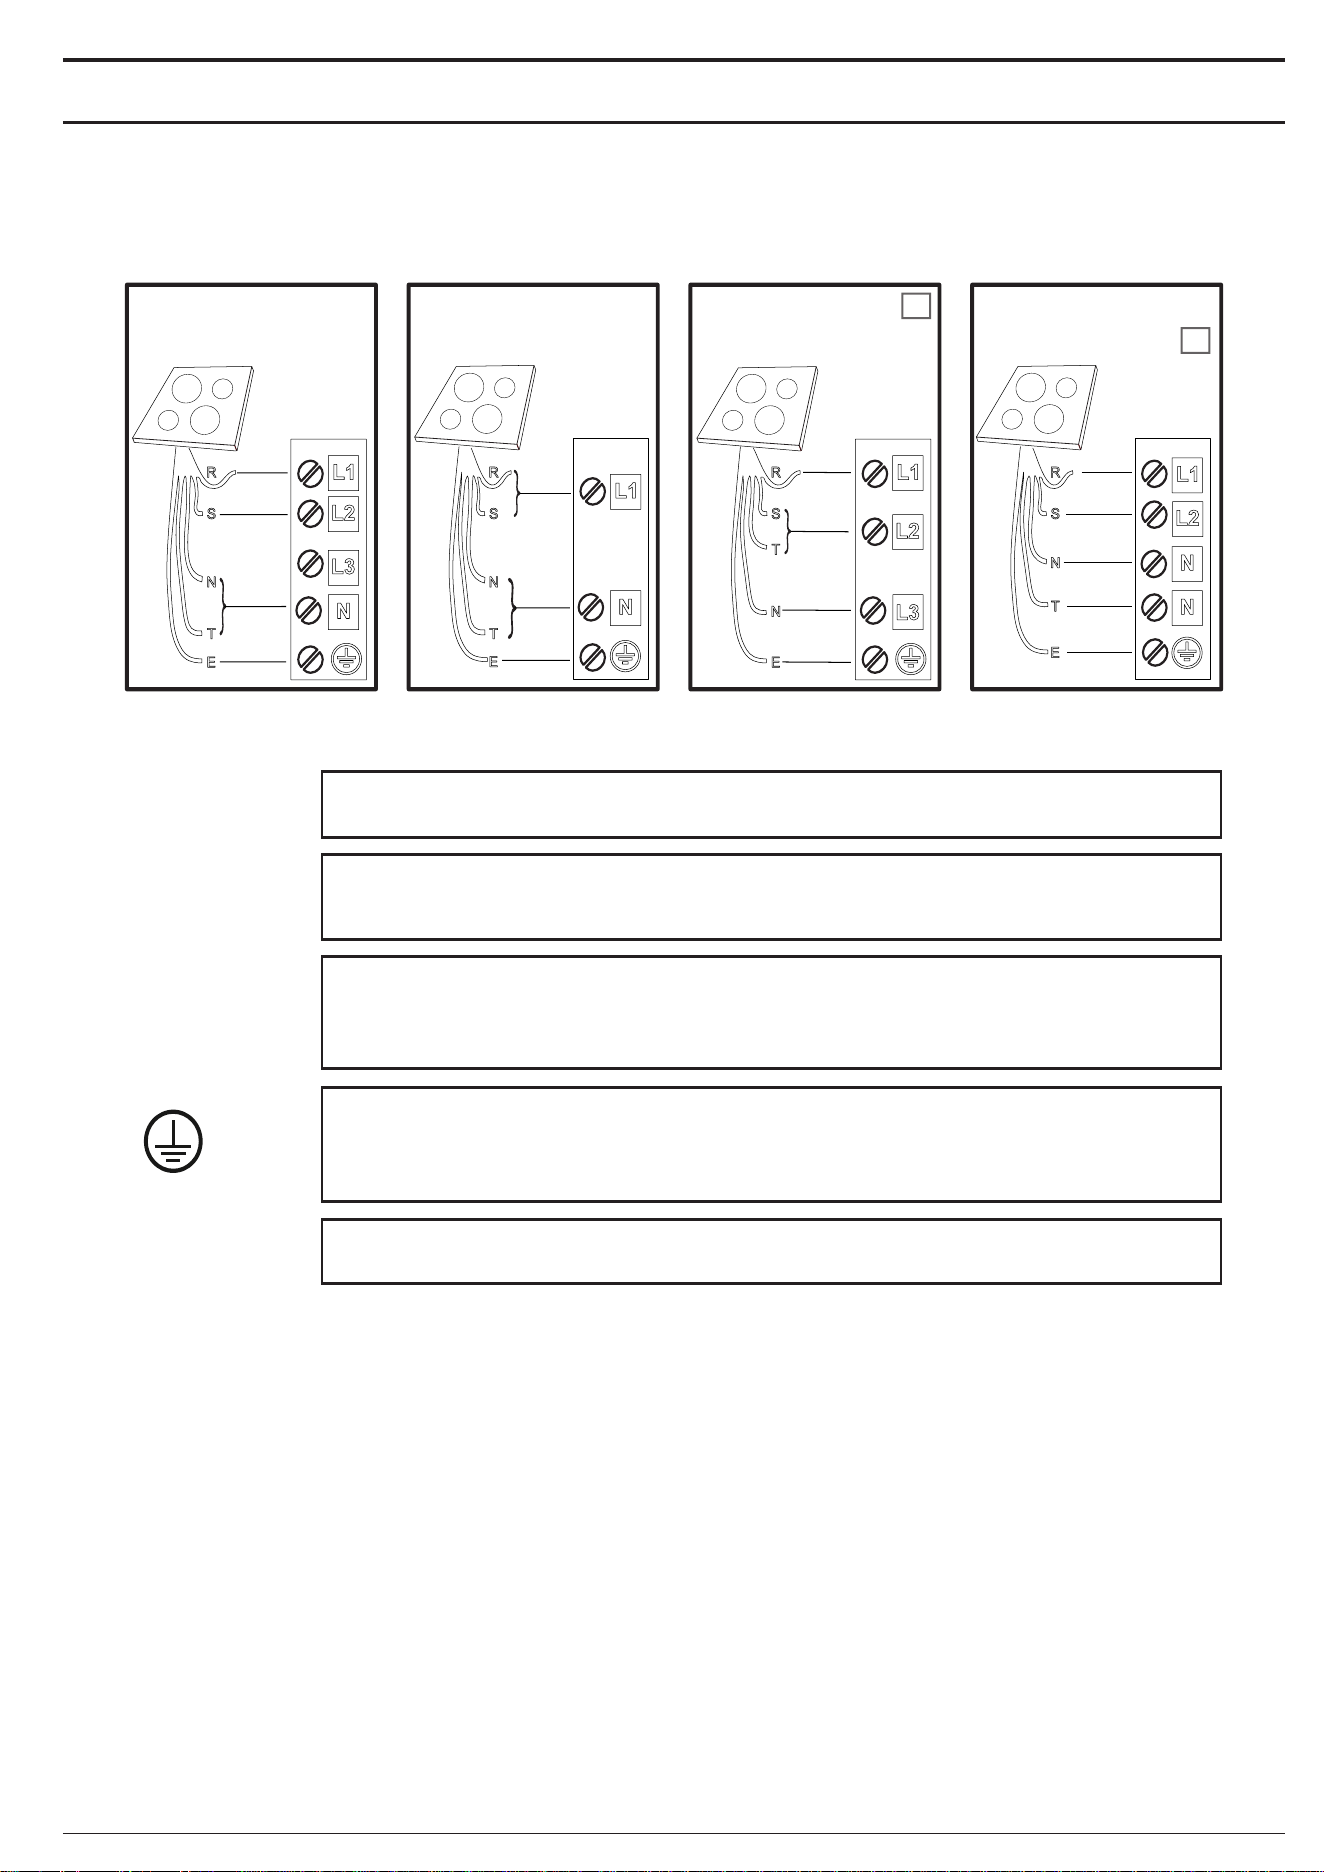
ELECTRICAL CONNECTION
Electrical connection must be made before connecting the appliance to the electricity supply.
Installation must be carried out by qualied personnel familiar with the current safety and installation regulations. Specically, installation must be carried out in
compliance with the regulations of the local electricity supply company.
Make sure the voltage specied on the data plate located on the bottom of the appliance is the same as that of the home.
Regulations require that the appliance be earthed; use conductors (including the earth conductor) of the appropriate size only.
220-240 V
~
220-240 V 3
~
230V 2 Phase 2N
~
380-415 V 2 N ~
BE
NL
380-415 V 3 N ~
blue-blu-azul-azul-μπλε-sinine-zila-mėlyna-niebieski-blau-bleu-blauw-albastru-синьо-плава-modro-
plava-синий-синій-көк-modrý-modrý-kék-blå-sininen-blå-blåt-mavi-gorm- blár-כחול
N
blue (gray)-blu (grigio)-azul (gris)-azul (cinza)-μπλε (γκρι)-sinine (hall)-zila (pelēka)-mėlyna (pilkas)-
niebieski (szary)-blau (grau)-bleu (gris)-blauw (grijs)-albastru (gri)-синьо (сиво)-плава (сива)-
modro (sivo)-plava (siva)-синий (серый)-синій (сірий)-көк (сұр)-modrý (šedá)-modrý (sivá)-
kék (szürke)-blå (grå)-sininen (harmaa)-blå (grå)-blåt (gråt)-mavi (gri)-gorm (liath)- blár (grár)-כחול (אפור)
T
yellow/green-giallo/verde-amarillo/verde-amarelo/verdeκίτρινο/πράσινο-kollane/roheline-dzeltens/zaļš-
geltona/žalia-żółty/zielony-gelb/grün-jaune/vert-geel/groen-galben/verde-жълто/зелено-жуто/зелена-
rumeno/zeleno-žuto/zelena-желтый/зеленый-жовтий/зелений-жасыл/сары-žlutá/zelená-žltá/zelená-
sárga/zöld-gul/grønn-keltainen/vihreä-gul/grön-gul/grøn-sarı/yeşil-buí/glas- gulur/grænn-צהוב/ירוק
E
=
black-nero-negro-preto-μαύροσ-must-melns-juodas-czarny-schwarz-noir-zwart-negru-черно-црн-
črna-crno-черный-чорний-қара-černá-čierna-fekete-svart-musta-svart-sort-siyah-dubh-svartur-שחור
brown-marrone-marrón-marrom-καφέ-pruun-brūns-rudas-brązowy-braunen-brun-bruin-maro-кaфяв-
браон-rjava-smeđ-коричневый-коричневий-қоңыр-hnědý-hnedý-barna-brunt-ruskea-brunt-brun-
kahverengi-donn-brúnn-חום
R
S
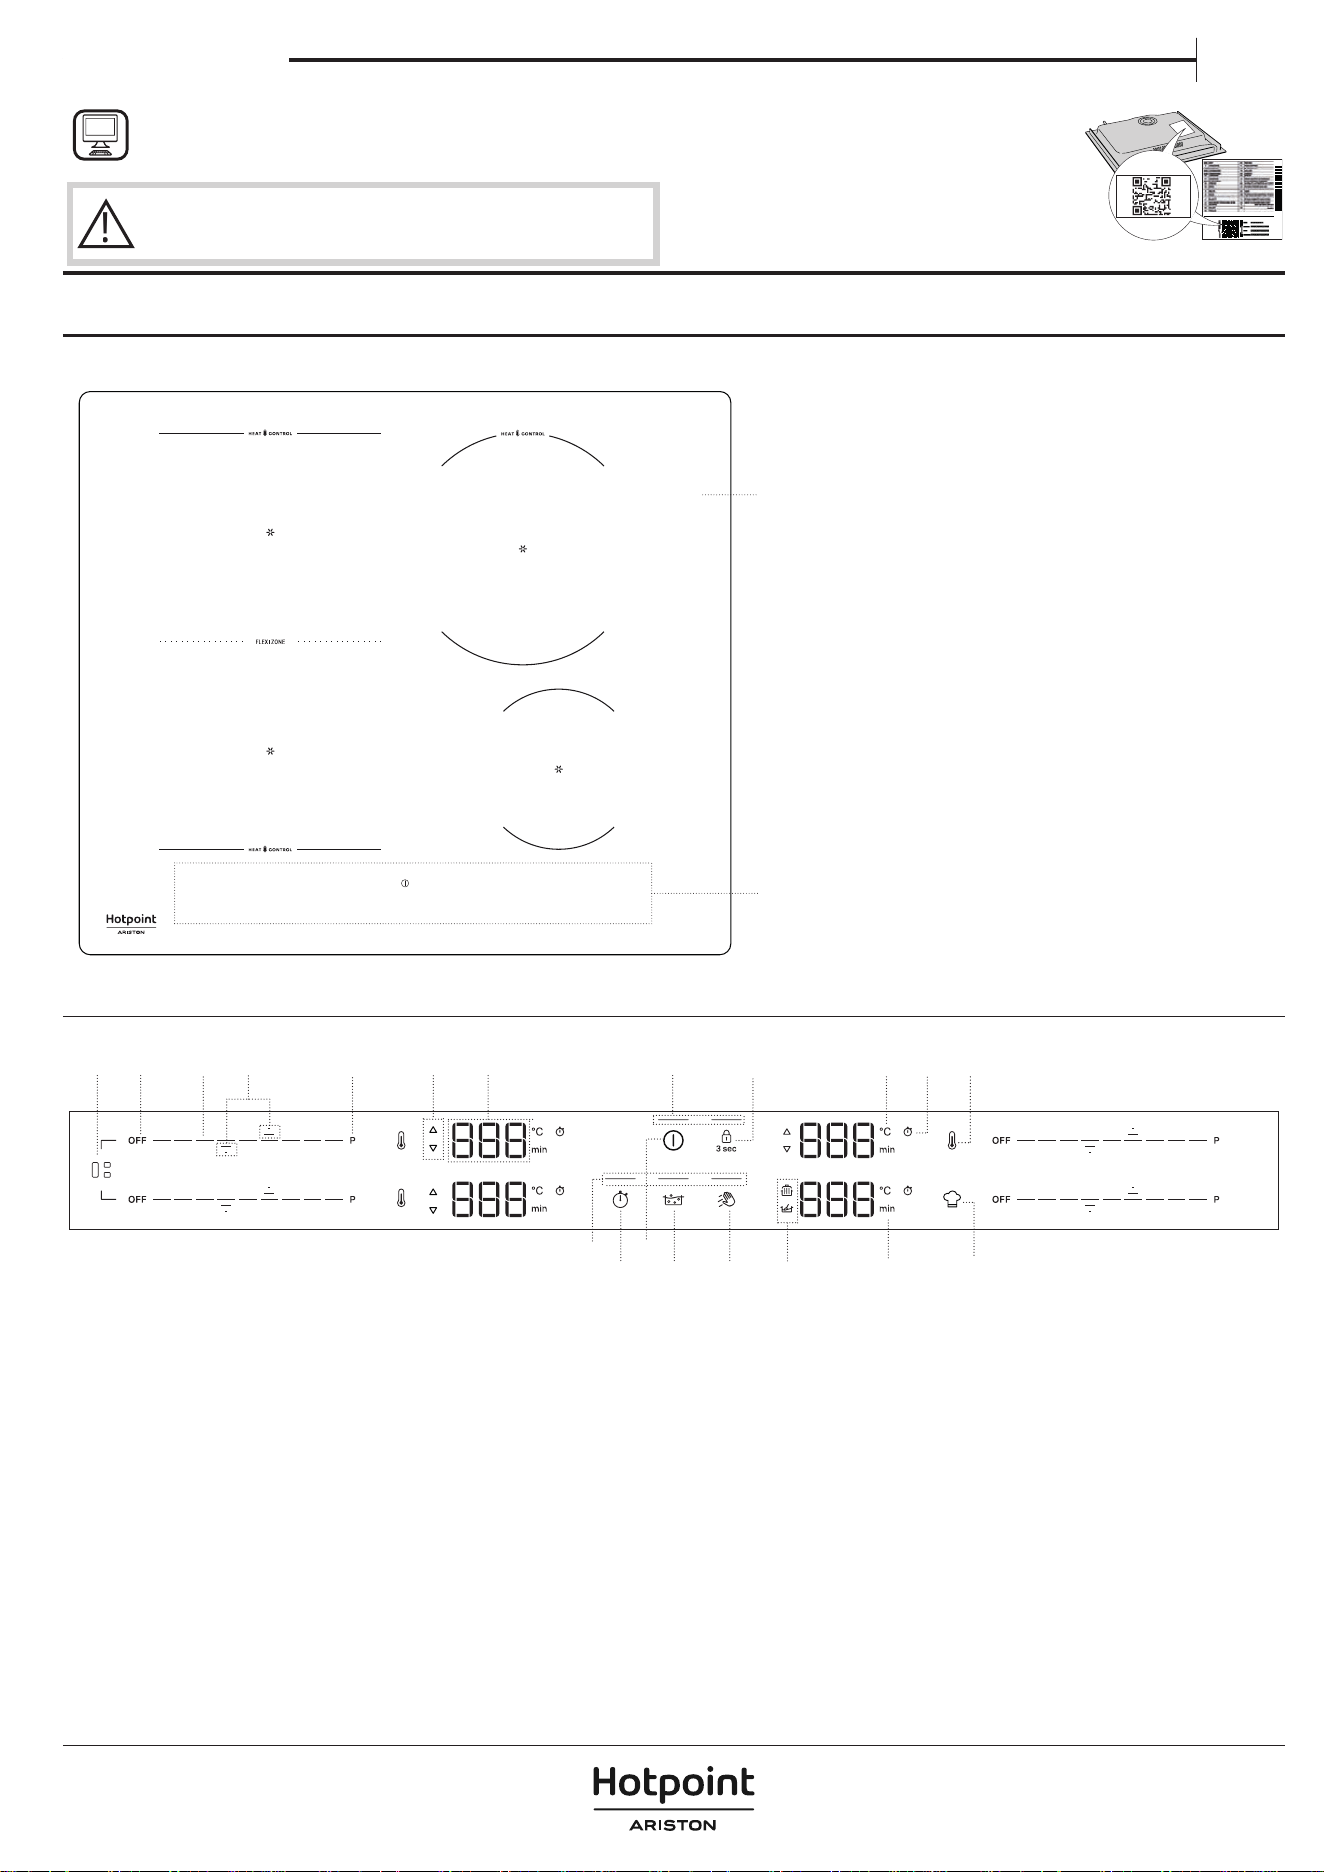
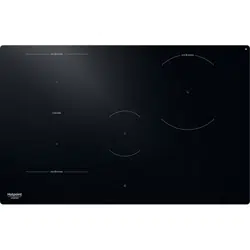
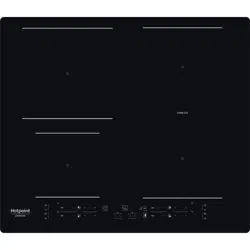
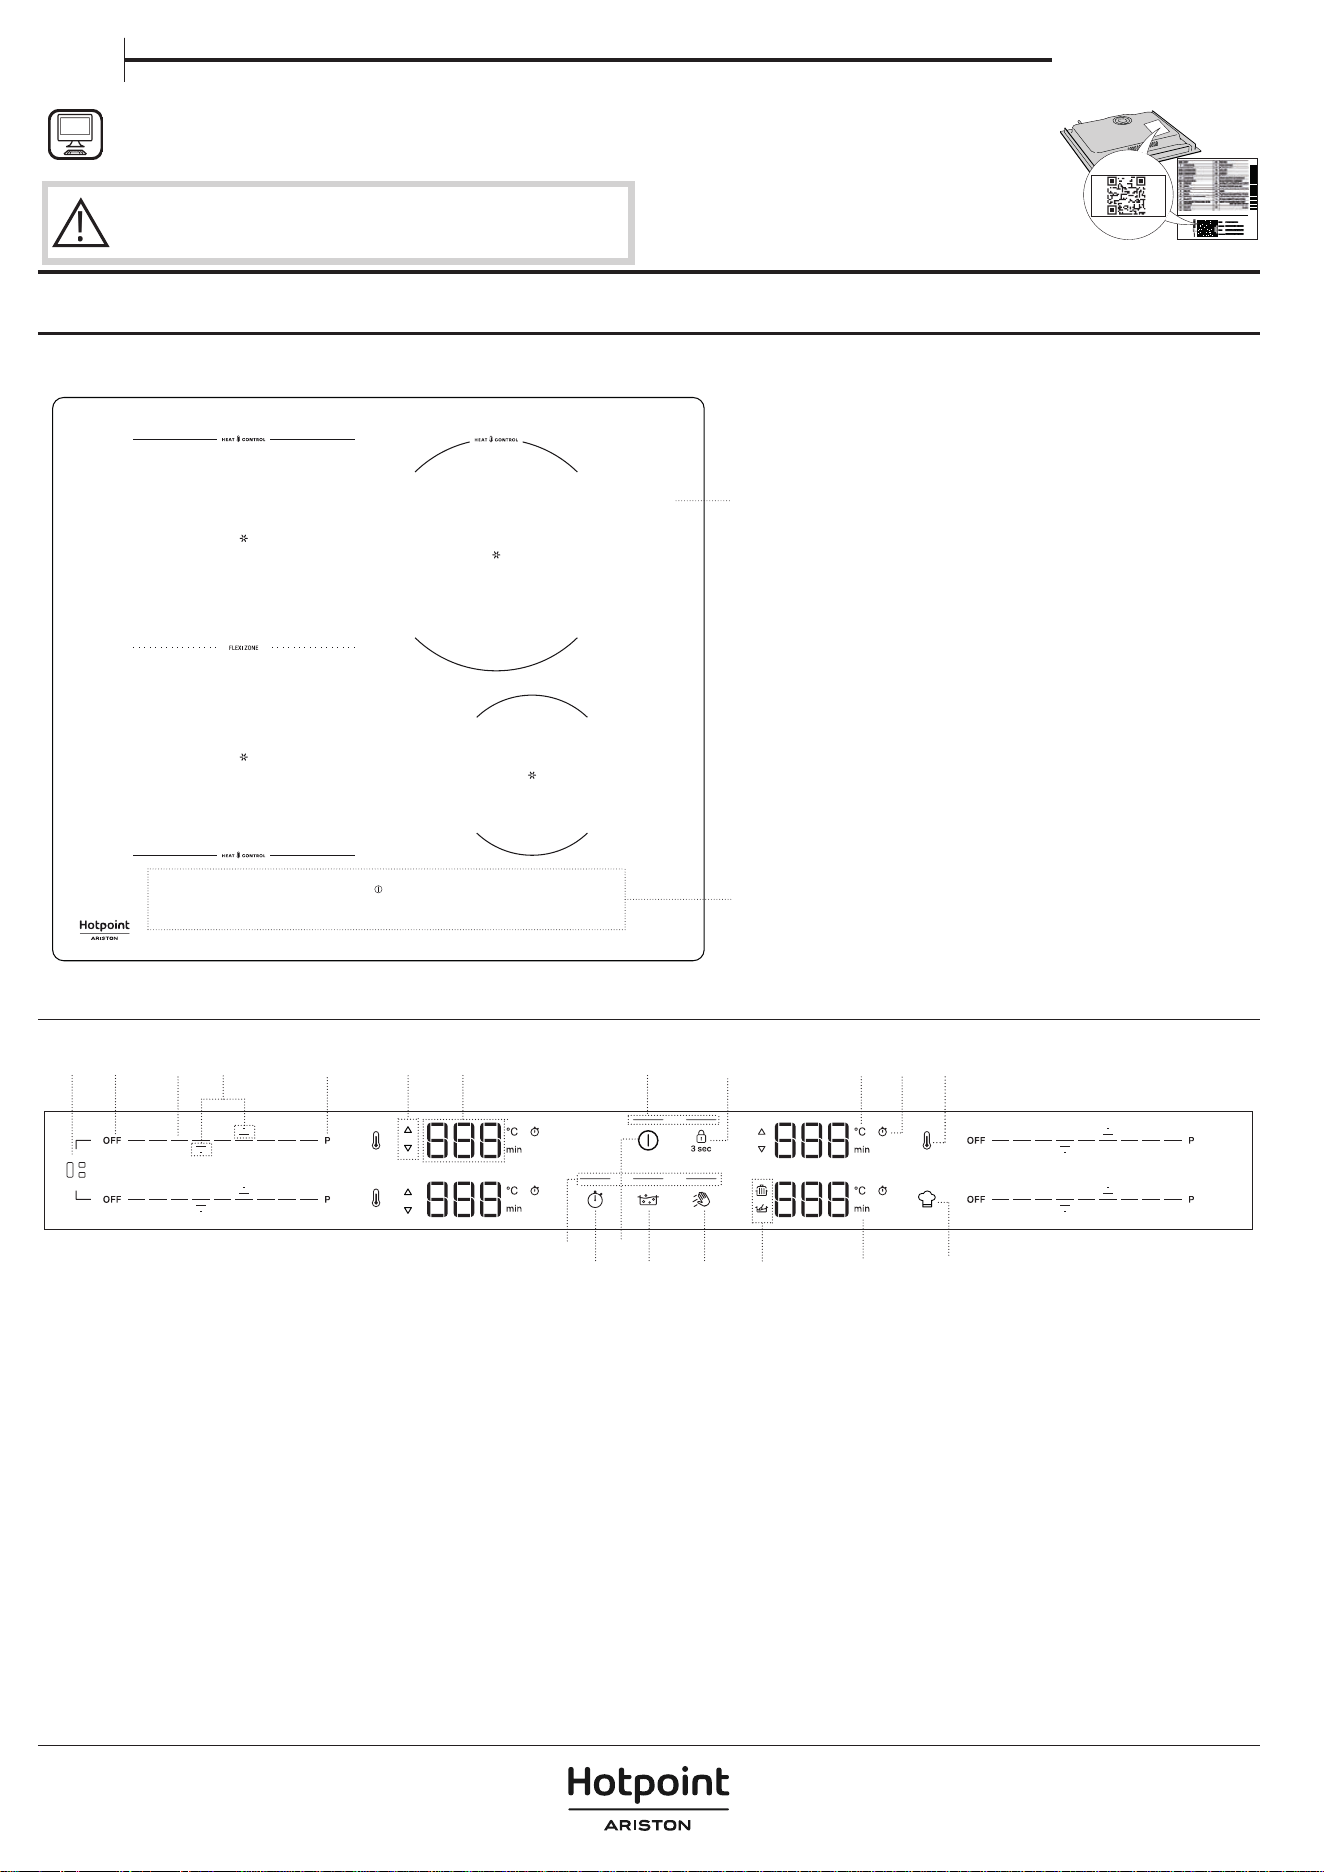
PRODUCT DESCRIPTION
1
2
1. Cooktop
2. Control panel
CONTROL PANEL
15
18
17
1
9
5
10
7
13
8
8
23
4
11 12 16 1914
6
1. Flexi Zone button
2. Cooking zone OFF button
3. Scroll keypad
4. Arrows to set Temperature/Timer
5. Fast heating button (Booster)
6. Preheat/Cool down indicator
7. Cooking zone display
8. Indicator light – function active
9. Timer button
10. On/O button
11. Assisted Boil (Boil&Cook) button
12. Wipe function button
13. Key lock button – 3 seconds
14. Symbols/Activation of special functions
15. Temperature indicator (degrees Celsius)
16. Minutes indicator
17. Timer indicator symbol
18. Heat control button
19. Special function button
NOTE: Press the ON/OFF button(10); all the available functions will become visible for a few moments, after which only the main ones will remain active. The
others can be used, and will be activated, during the subsequent use of the device.
IMPORTANT: All the available functions will be illuminated in dim light intensity, which will become more intense only when they are activated.
THANK YOU FOR BUYING A HOTPOINT/ARISTON
PRODUCT
In order to receive a more complete assistance, please register
your product on www.
register10.eu.
PLEASE SCAN THE QR CODE ON
YOUR APPLIANCE IN ORDER TO
REACH MORE INFORMATION
!
Before using the appliance carefully read the Safety
Instruction.
Owner's manual
EN
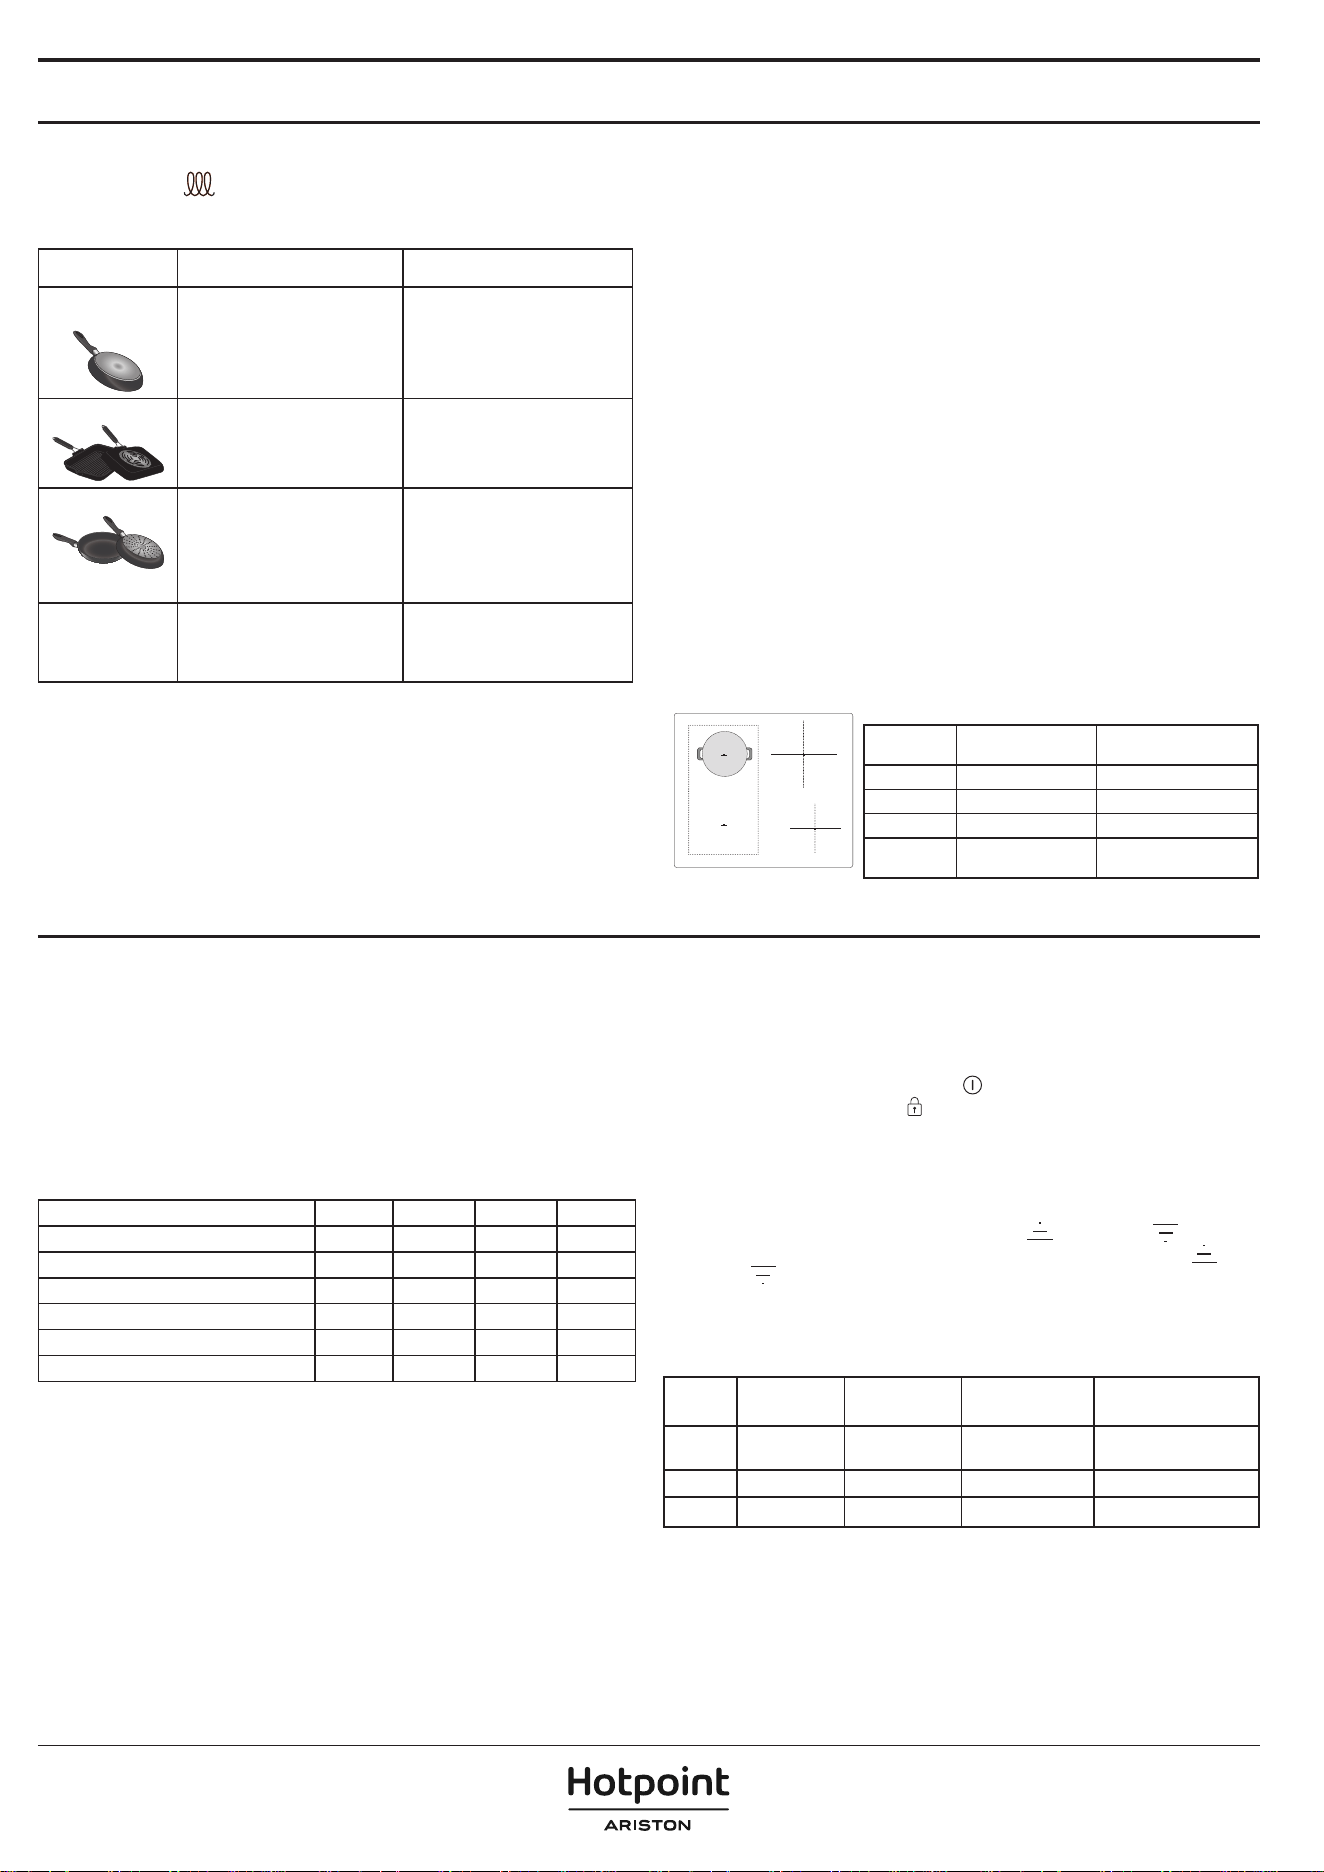
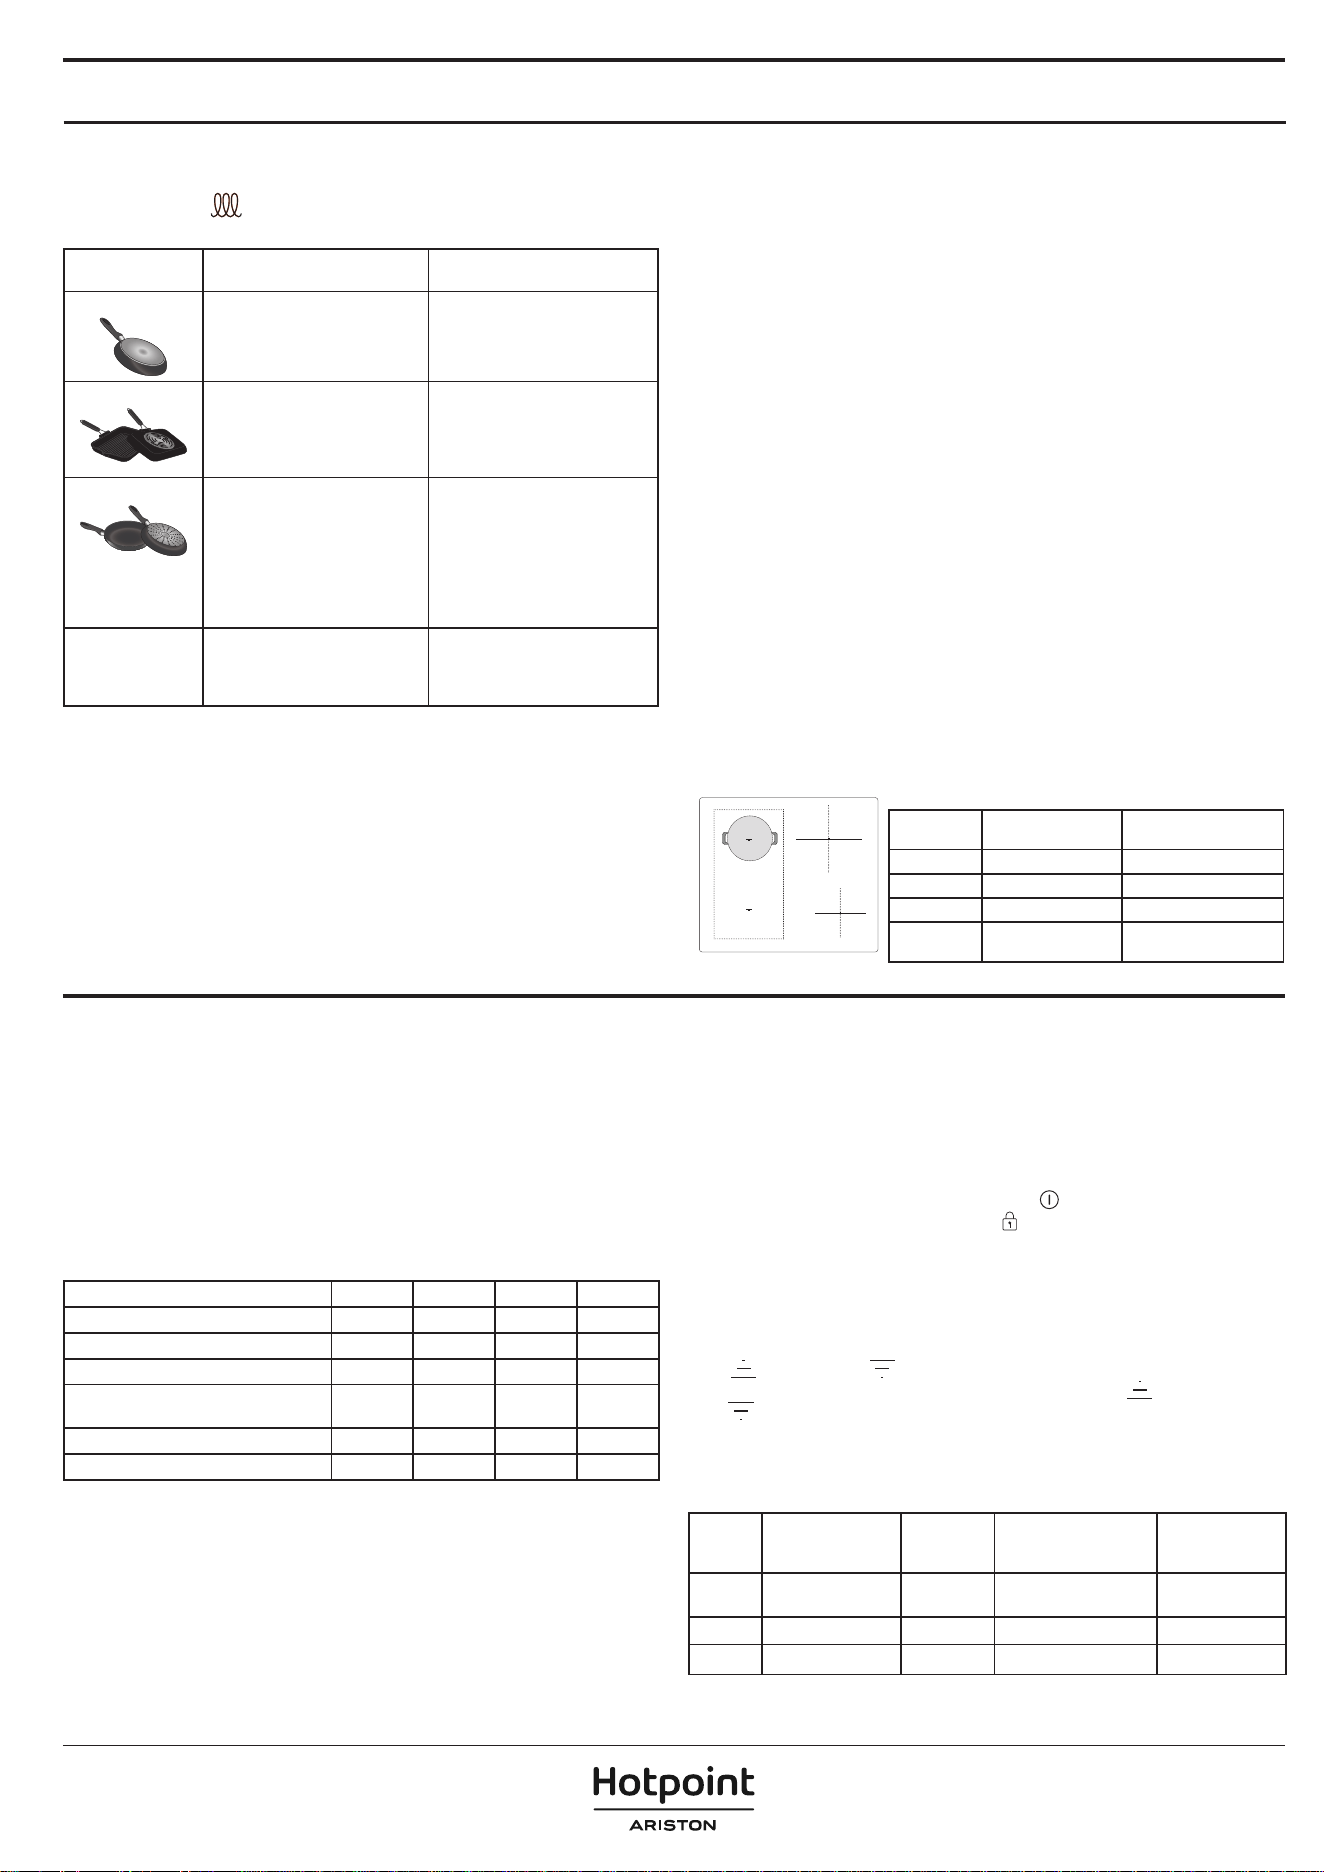
ACCESSORIES
Only use pots and pans made from ferromagnetic material suitable for induction
hobs. Check for the
symbol (generally stamped on the bottom) to determine
whether a pot is suitable. A magnet may also be used to check whether the
cookware base is magnetic.
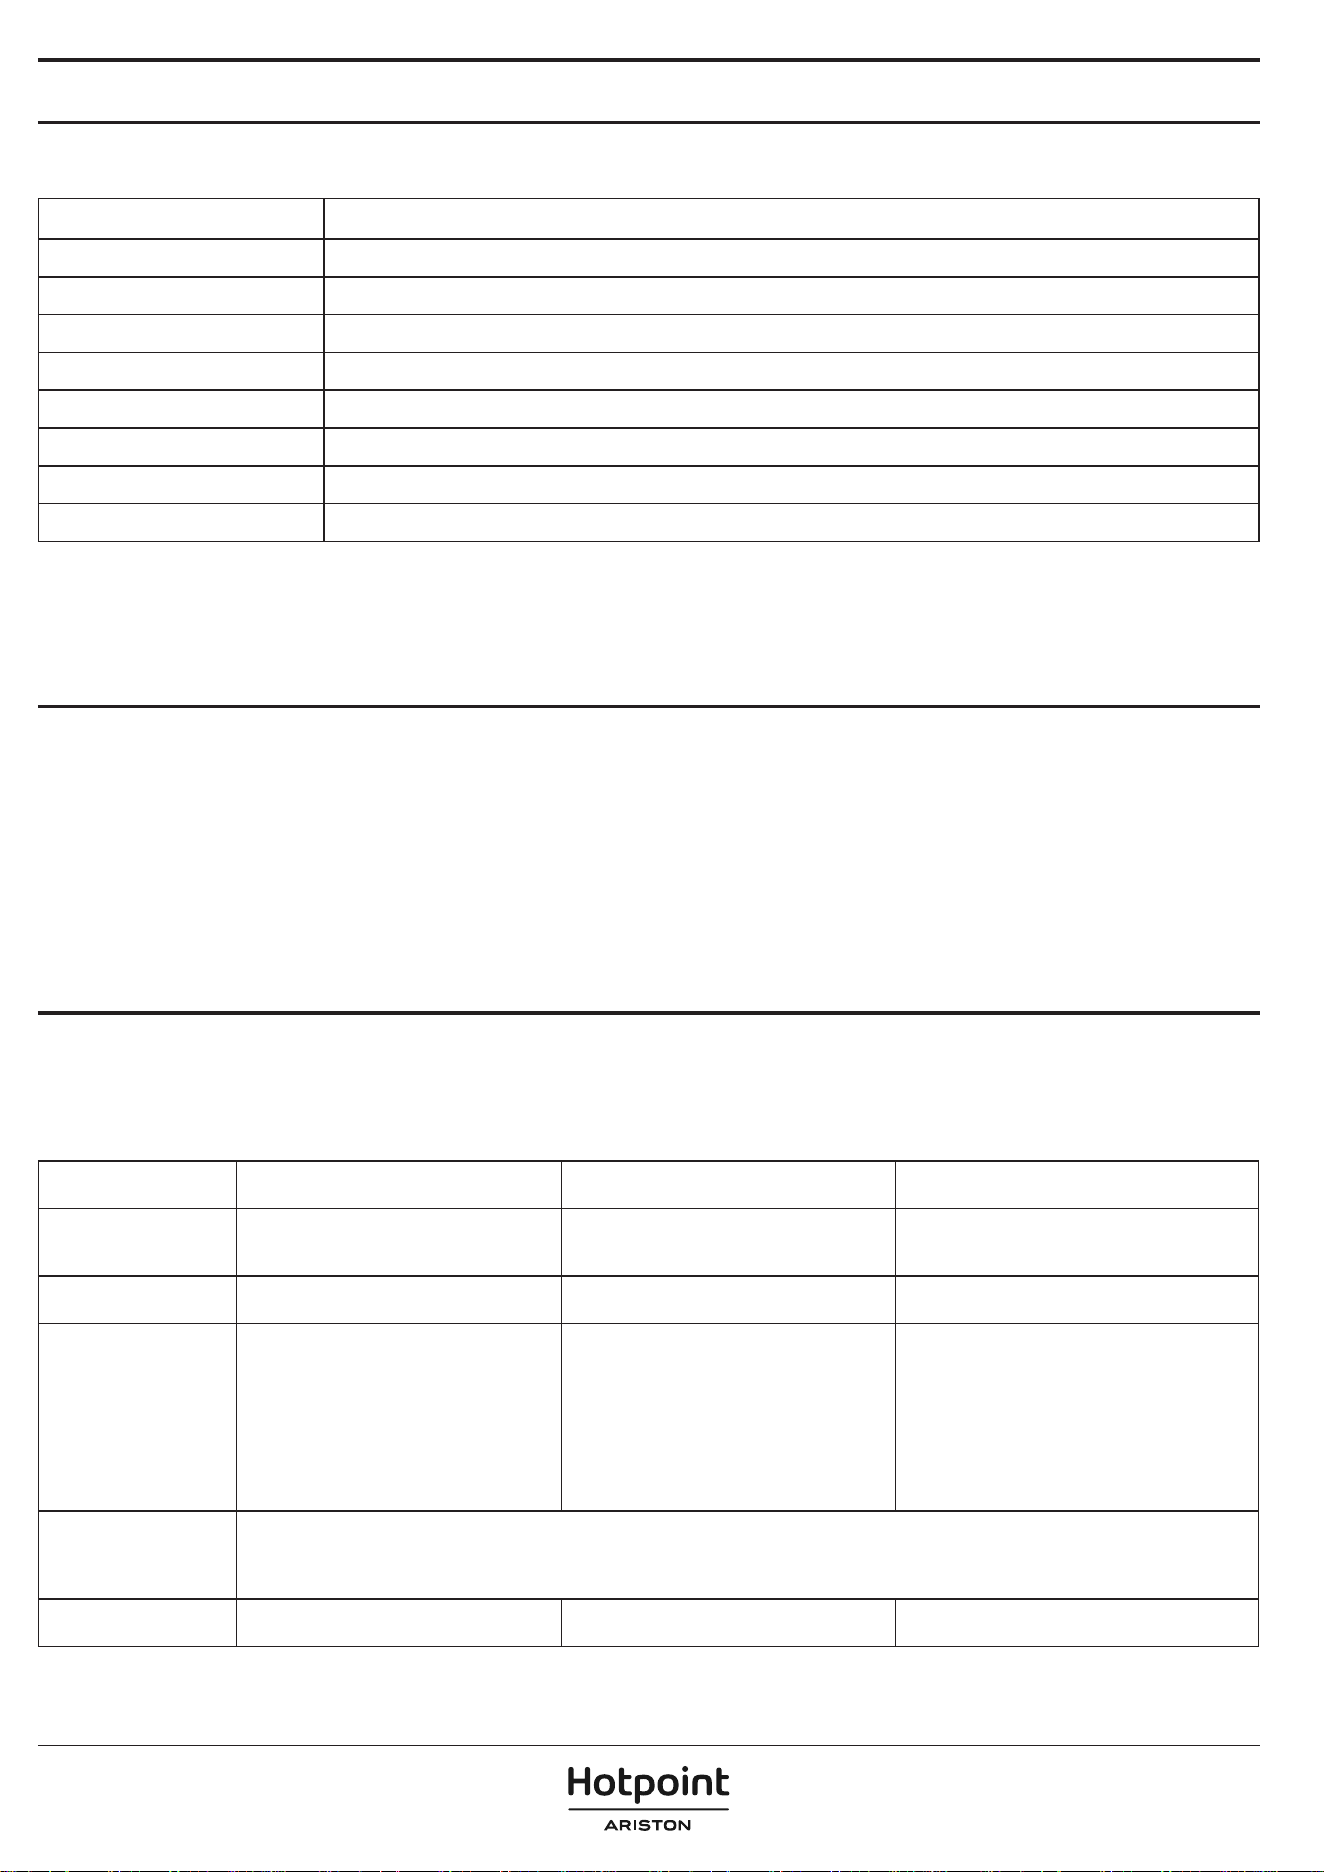
COOKWARE MATERIAL PROPERTIES
Recommended
cookware
Base made of stainless steel with
a sandwich design, enamelled
steel, cast iron.
Ensures optimum efficiency,
heats up quickly, and distributes
heat evenly.
Suitable cookware
Base not fully ferromagnetic
(magnet sticks only on part of the
cookware base).
Only the ferromagnetic area
heats up. As a result, may heat
up less quickly and heat may be
distributed less evenly.
Suitable cookware
Ferromagnetic base contains
areas with aluminium, or has a
recessed area in the centre.
The ferromagnetic area is smaller
than the actual cookware base
area. As a result, less power may
be delivered and cookware may
not heat suciently. Cookware
may not be detected.
Not suitable Normal thin steel, glass, clay,
copper, aluminium and other
non-ferromagnetic materials,
cookware with rubber feet.
Cookware is not detected and
will not heat up.
NOTE: All cookware must have a at base. Periodically check the base for any
sign of warping, as some cookware may undergo deformation due to high heat.
Using cookware that does not match the recommended sizes and properties
may signicantly aect cooking performance and cause unsatisfactory results.
ADAPTERS FOR POTS/PANS UNSUITABLE FOR INDUCTION
The use of adapter plates aects eciency and therefore increases the time
required to heat water or food. Make sure the ferromagnetic diameter of the
cookware base aligns with both the diameter of the adapter plate and the
diameter of the cooking zone. If these measurements don't match, eciency
and performance may be signicantly reduced. If these guidelines are not
followed, there may be a heat build-up that is not eectively transferred to the
pot or pan, potentially causing blackening of the plate and hob.
EMPTY POTS AND PANS
The hob is equipped with an internal safety system that activates the “Automatic
o” function when an over-high temperature is detected. The use of empty
pots and pans with a thin base is not recommended but, if they are used, the
temperature might rise quicker than the time needed for the “Automatic o” to
be triggered promptly, with the risk of damaging the pan or the hob surface. If
this happens, do not touch the pan or the hob surface. Wait for all components
to cool down. If any error message is displayed, call the Service Centre.
SUITABLE SIZE OF PAN/POT BASE FOR THE DIFFERENT COOKING
ZONES
To ensure that the hob works properly, use pots of a suitable base diameter for
each zone (refer to the table below). Please note that cookware manufacturers
often provide the size of the upper diameter of the cookware, rather than the
base diameter.
To ensure that the hob works as expected, always use a cooking zone with a size
matching the ferromagnetic size of the cookware base.
Centre the pan/pot correctly on the cooking zone in use. It is recommended
not to use pots larger than the size of the cooking zone.
2
1
3
4
COOKWARE USAGE BY ZONE
Zone Suitable cookware
shape
Suitable ferromagnetic
base (cm)
1 or 2 Round or Square 16 - 21
3 Round 16 - 21
4 Round 10 - 15
1+2
(Flexi Zone)
Oval or Rectangular
Short side 16 - 21
Long side 24 - 38
FIRST TIME USE
POWER MANAGEMENT
At the time of purchase, the hob is set to the maximum power. Adjust the
setting on the basis of the limits of your domestic electrical system, as explained
in the following paragraph.
NOTE: Depending on the power selected for the hob, some of the cooking
zone power levels and functions (e.g. boil or fast heating) may be automatically
limited to prevent the selected limit from being exceeded.
The table below shows the power used by each zone for each function, to help
you understand the possible usage limitations based on the chosen power
setting.
ZONE 1 or 2 1 + 2 3 4
POWER LEVEL 18 (KW) 2.2 2.2 2.5 1.5
BOOSTER (KW) 3.7 3.7 3.7 2.2
HEAT CONTROL (KW) 1.4 NA 1.4 NA
ASSISTED BOIL (BOIL&COOK) (KW) 3.0 NA 3.0 NA
MELTING (KW) NA NA NA 0.045
KEEP WARM (KW) NA NA NA 0.145
Examples with reference to the values in the table above:
If you set the “Power management setting” at 4 kW and activate multiple
cooking zones simultaneously, the hob will automatically adjust the power
levels not to exceed the overall power limit (e.g. 4 kW).
For example, with the “Power management setting” set at 4 kW, if you set zone
3 at “Booster” (=3.7 kW) and then try to activate zone 1 at level 18 (2.2 kW), the
overall power supplied would exceed the limit of 4 kW (3.7 + 2.2 = 5.9 kW). For
this reason, the hob will automatically adjust the power levels as follows: the
cooking zone set to “Booster” will be set at level 18 (=2.2 kW), while the second
cooking zone at level 15 (=1.6 kW, the maximum power level not to exceed
the 4 kW limitation).
Setting Menu: Changing the basic settings
Once you have connected the device to the main power supply, you can
change the default settings by entering the Setting menu within 60 seconds:
1. After connecting the hob to the main power supply, wait until all the LEDs
turn on and o consecutively.
2. Press and hold the On/O button (
)
to turn on the hob.
3. Press the Key-lock button (
) for at least 6 seconds to enter the Setting
menu. Ignore the key-lock activation sound that you will hear after 3 seconds
of pressing.
4. The setting type (eg."PL") will be shown on the top-left cooking zone
display, and its default (or current) value (eg."2_5") will appear on the
bottom-left cooking zone display.
5. You can select the setting type by using up (
) and down ( ) arrows of
the top-left cooking zone. You can change its value by using up (
) and
down (
) arrows of the bottom-left cooking zone. See the table below for
the setting types, default values and possible values.
6. Press the On/O button to conrm.
7. Without the conrmation, the hob will quit the Setting menu and return to
the previous values within 30 seconds.
ORDER
SETTING
TYPE
TOP-LEFT
BOTTOM-LEFT
(DEFAULT)
POSSIBLE VALUES
1
Power
Limitation
PL 7_4
2_5 kW ; 4_0 kW ;
6_0 kW ; 7_4 kW
2 Audio tone Aud On On/O
3 Demo mode dE O O/On
NOTE: once the demo mode function has been activated, it will remain ON
even if the main power supply is interrupted.
DAILY USE
SWITCHING THE HOB ON/OFF
To turn on the hob, press and hold the power button. The LED above the button
will turn on, and you will hear an acoustic signal. After a few seconds, you can
interact with the hob. To turn the hob o, press the same button again; all the
cooking zones will be deactivated.
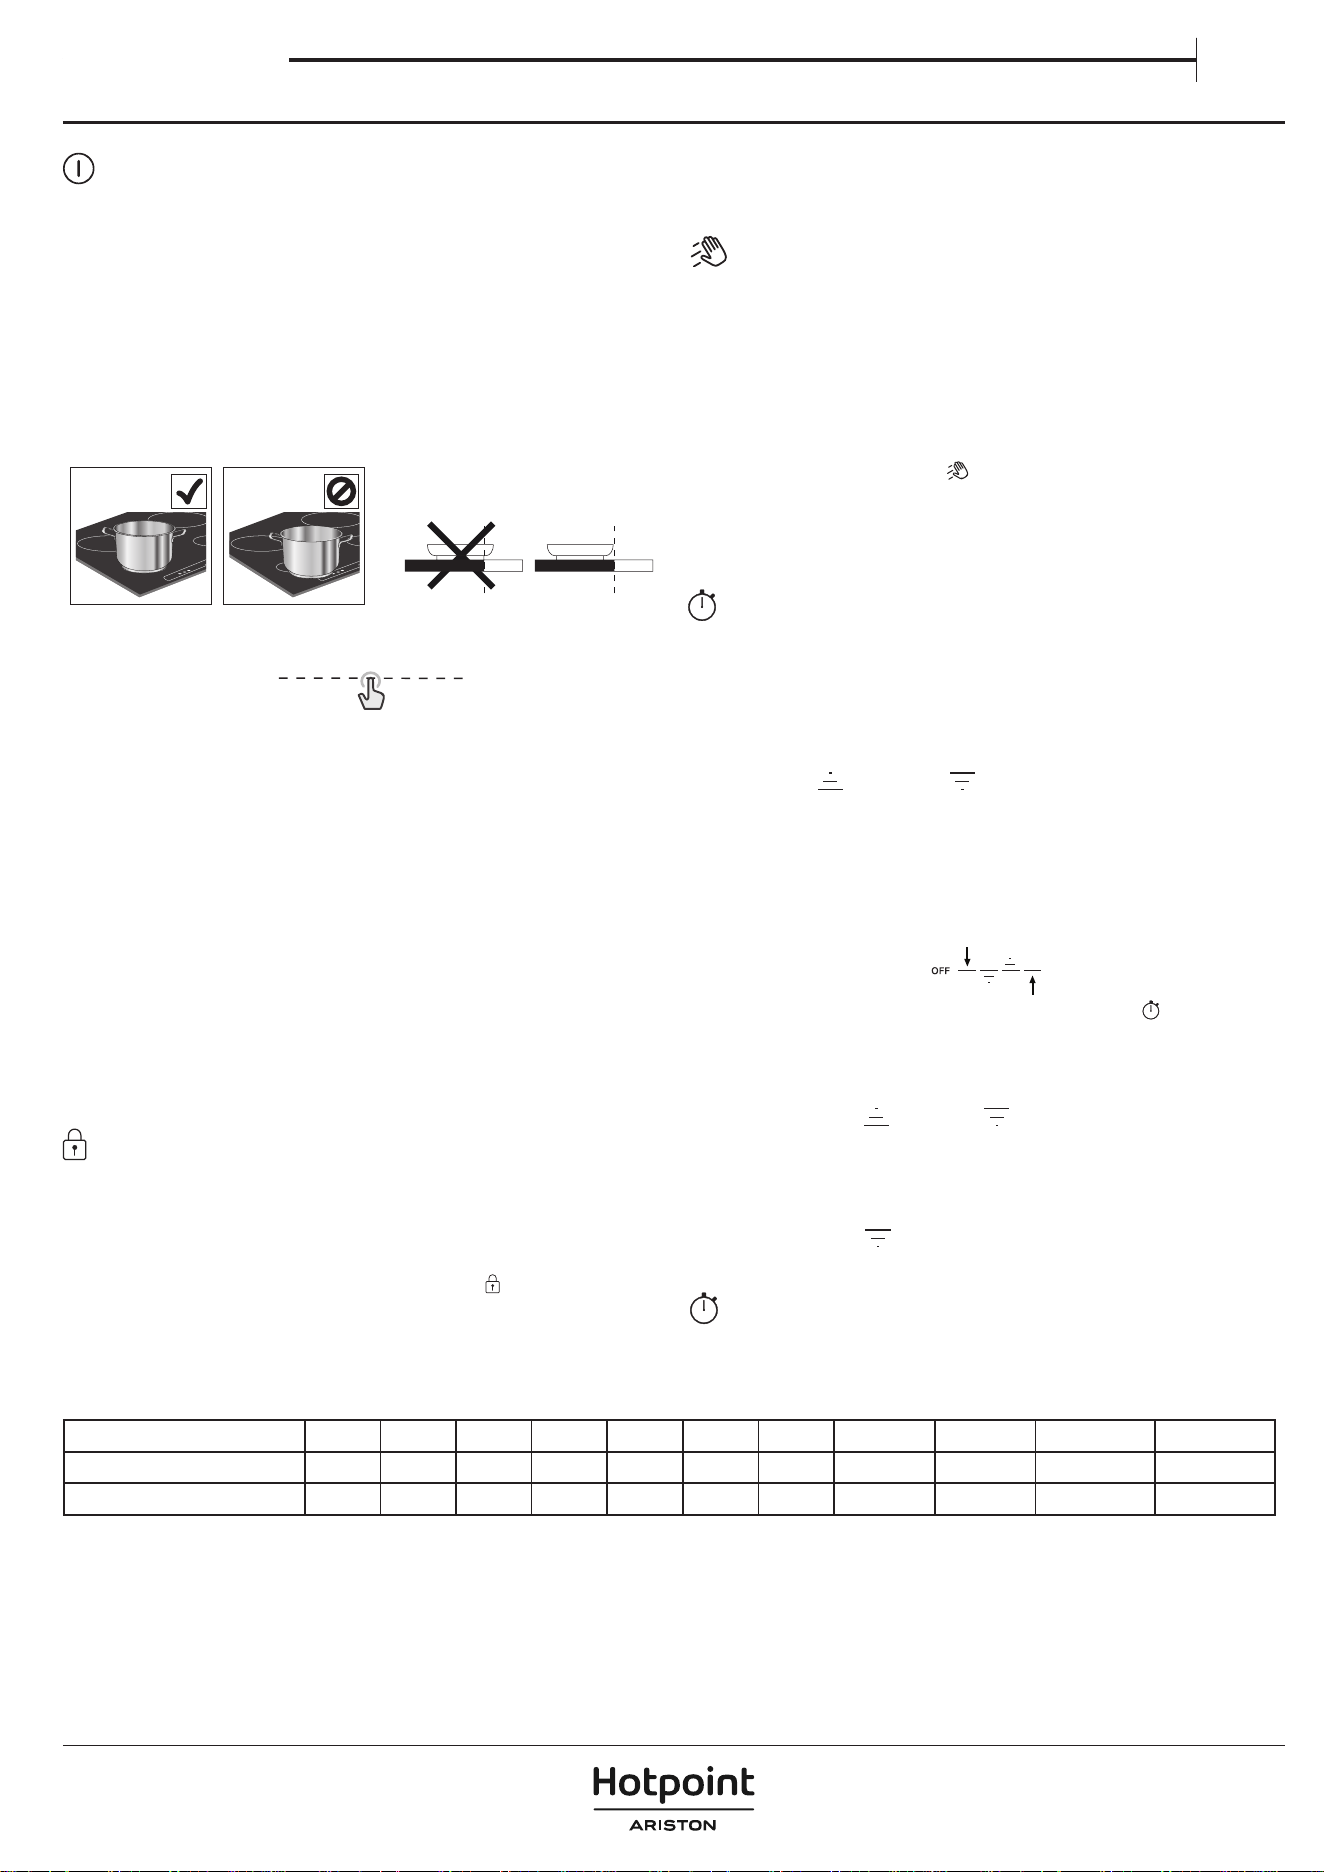
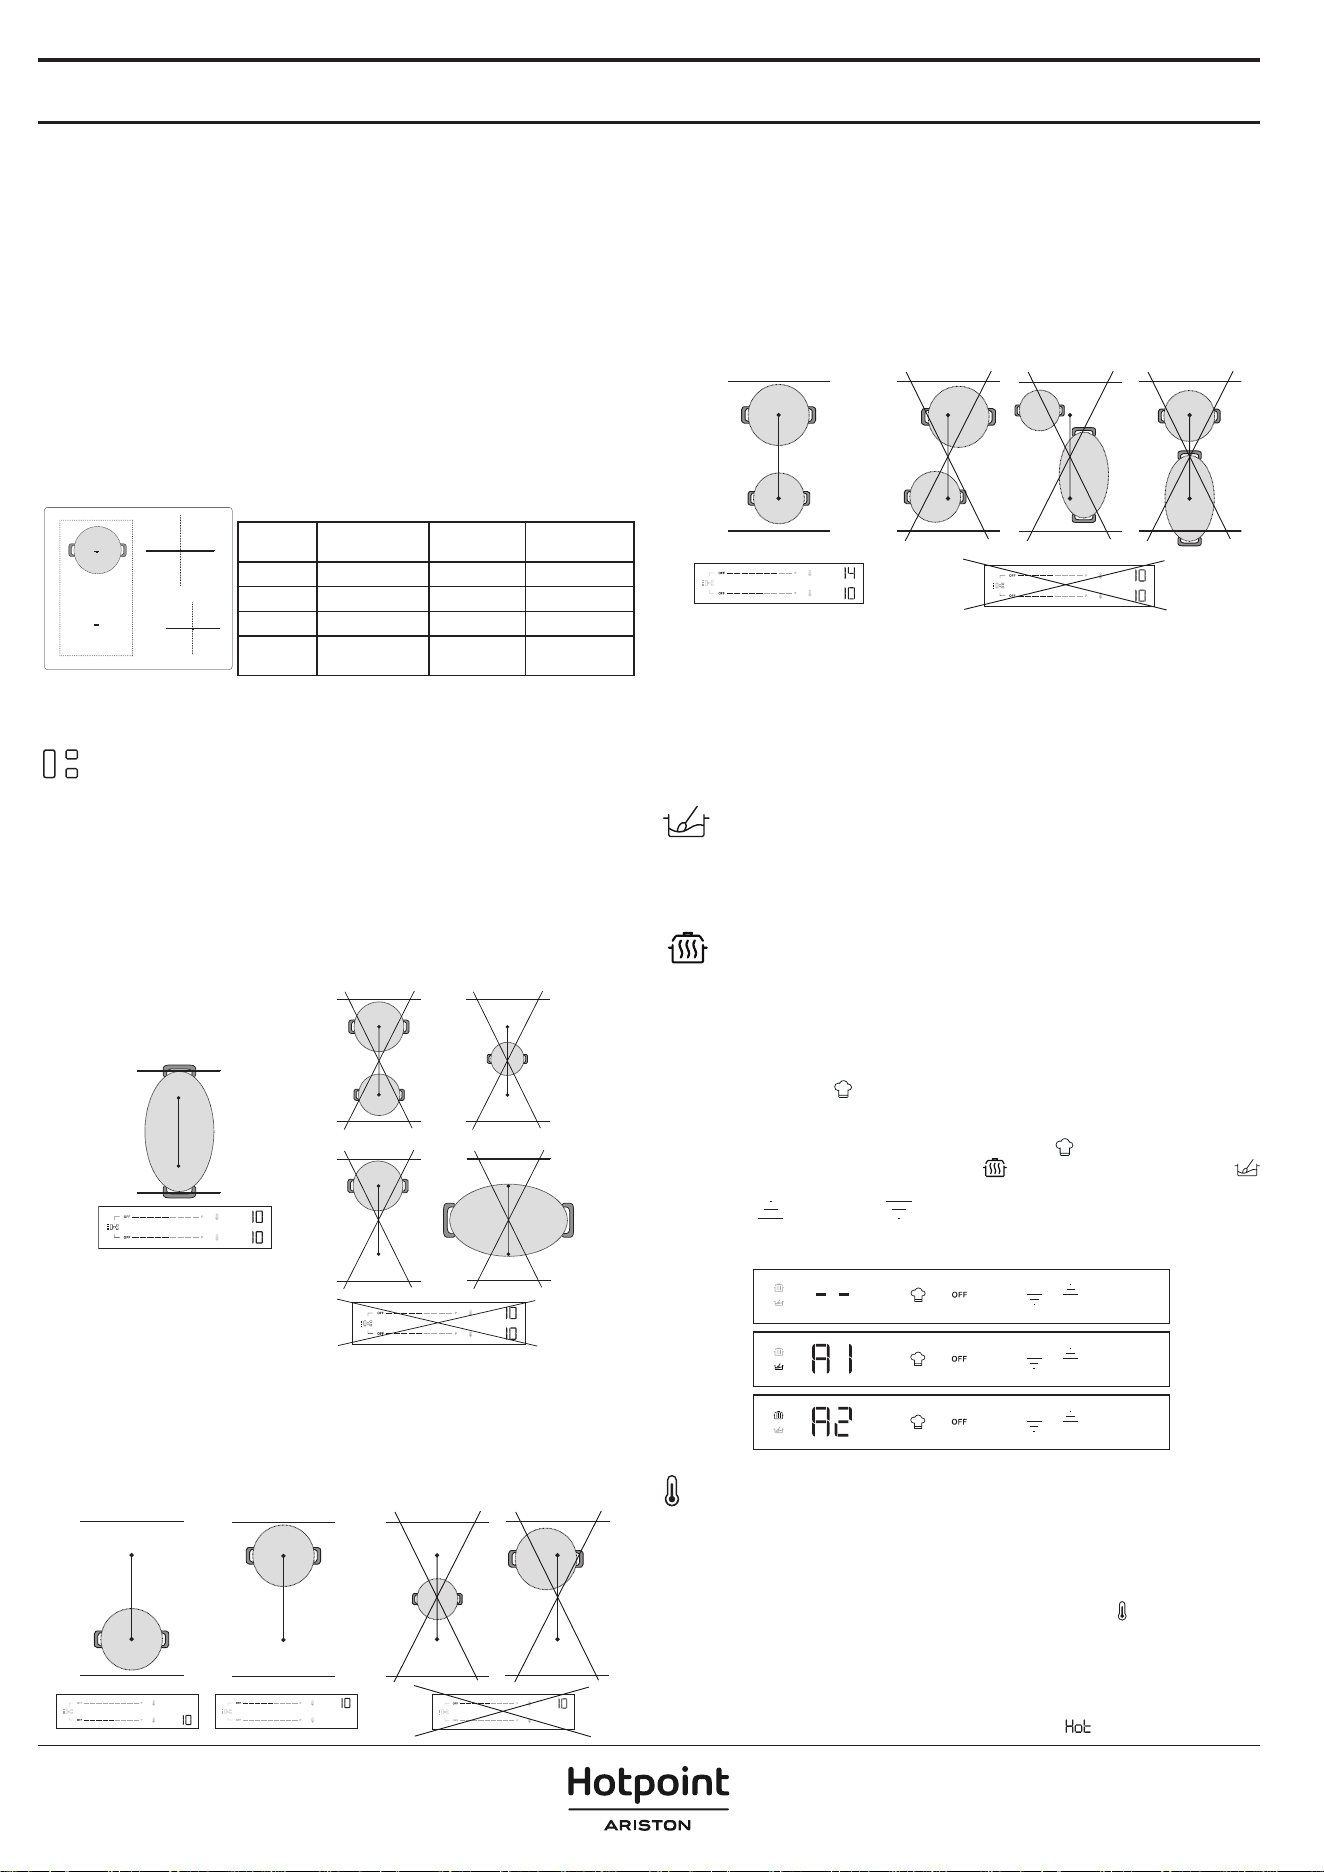
POSITIONING
Do not cover the control panel symbols with the cooking pot.
Note: In the cooking zones close to the control panel, it is advisable to keep
pots and pans inside the markings (taking into consideration both the bottom
of the pan and its upper edge, as this tends to be larger).
This prevents excessive overheating of the keypad. When grilling or frying, use
the rear cooking zones if possible.
ACTIVATING/DEACTIVATING COOKING ZONES AND ADJUSTING
POWER LEVELS
OFF
P
To activate the cooking zones:
When the hob is turned ON, the scroll keypad (SLIDER) of all available cooking
zones will turn ON in low luminosity. Place your nger on the scroll keypad
(SLIDER) of the zone you want to activate, and gently slide it to the right if you
want to increase the power level or to the left to decrease it. You will notice that
the control keypad segments will shift to high luminosity based on the selected
power level, and the display digits will show the number corresponding to the
power level selected (from 1 to 18).
The ”P” button can be used to select the fast heating function (Booster) to quickly
boil water.
To deactivate the cooking zones:
Select the “OFF“ button at the beginning of the scroll keypad.
NOTE: Water spillage, food overow and/or an object positioned on the
control panel buttons can mimic your nger and accidentally activate or
deactivate any of the hob buttons. If such elements are not removed within 8
seconds, the hob makes two short acoustic sounds and switches OFF by itself
while showing the "OFF" message.
CONTROL PANEL LOCK
The control panel lock function is designed to lock the hob settings, to prevent
accidental changes to the settings or the unintentional activation/deactivation
of the functions. You may need to use this function for example in case of
possible liquid or food spillage, or for safety reasons (children's accidental
interaction with the hob) to prevent any risk of the hob turning on by accident.
To use the control panel lock function press and hold the
button for 3 seconds.
The button switches to high luminosity and a beep and a light above the symbol
indicate that this function has been activated. To unlock the controls, repeat the
activation procedure.
NOTE: The control panel is locked except for the switching o function. If you
turn your hob o with the control panel lock active, press the ON/OFF button
and then press the lock button for 3 sec to unlock the hob.
WIPE FUNCTION
The wipe function temporarily locks the buttons of the user interface to prevent
accidental changes to the settings during the cleaning process. The function
doesn’t interrupt the cooking process.
Wipe function helps to prevent any sounds if water spills on the user interface
during the cooking process or during your habitual cleaning.
For safety reasons, the ON/OFF button can be activated, even involuntarily,
during cleaning.
To activate the Wipe function:
1. Press Wipe function button (
)
. You will hear an acoustic sound when
the function is active.
2. The LED above the button will turn on and stay on while the button itself
ashes for the entire duration of the function activity.
3. The control panel remains locked for 30 seconds.
TIMER
The timer controls all the active cooking zones.
To activate the timer:
1. Select the cooking zone and set the required power level.
2. The timer button will turn on approximately 5 seconds after the cookware
has been recognised. Press it until an indicator light turns on in line with
the specic symbol on the chosen cooking zone.
3. Use the up (
) and down ( ) arrows to set the time (don't press and
hold them for more than 8 seconds, otherwise the hob shows OFF. For more
information, refer to the "Troubleshooting" section). The time will change
from 000 seconds to 30 minutes, increasing by 1 minute each time; from 30
to 150 minutes, the time will increase in steps of 5 minutes. If you need to
change the time by 10 minutes, use the side dashes. The dash on the left
will subtract 10 minutes, while the dash on the right will add 10 minutes (see
following image).
4. To conrm the time set, you can press the clock button (
)
. Otherwise, the
time will be automatically conrmed after 5 seconds without any action.
5. You can change the time at any point and activate multiple timers
simultaneously.
6. During the countdown, tap with your nger on the slider to see the power
level. Tap the up (
) or down ( ) arrow to see the set temperature.
After 3 seconds, the countdown will reappear.
7. Once the timer has elapsed, a beep will sound, and the cooking zone will
switch o automatically.
To deactivate the timer:
Press the down arrow (
) until it shows 000, and it will be deactivated after 5
seconds.
TIMER INDICATOR
This LED (when ON) indicates that the timer has been set for the cooking zone.
MAXIMUM WORKING TIME OF COOKING ZONES AND FUNCTIONS
Power level or function OFF 1-3 4-6 7-9 10-12 13-15 16-18 Booster * Booster ** Melting Keep warm
Maximum working time - 8 h 6 h 4 h 3 h 2 h 1.5 h 10 min. 5 min. 8 h 8 h
Power level after time-out - 0 0 0 0 0 0 18 18 0 0
* Cooking Zone 1, 2, 3
** Cooking Zone 4
Examples regarding the values in the table above:
If you turn on a cooking zone and set its power to level 14, the cooking zone will continue working for a maximum of 2 hours. After 2 hours, the power level will drop to level
0 and the cooking zone will turn off automatically. If there are no other active cooking zones and there is no interaction with the control panel buttons within 30 seconds,
the hob will turn off automatically.
If you activate the Booster function on cooking zone 4, it will automatically drop to power level 18 after 5 minutes. On the other hand, if you activate the Booster function
on cooking zone 1, 2 or 3, it will automatically drop to power level 18 after 10 minutes. After 1.5 hours, the power level will drop to level 0 and the cooking zone will turn off
automatically. If there are no other active cooking zones, and there is no interaction with the control panel buttons within 30 seconds, the hob will turn off automatically.
Owner's manual
EN
FUNCTIONS
P BOOSTER FUNCTION
Booster is a special mode with a power level higher than level 18, for the fastest
heating. This mode can have a dierent duration depending on the zone used
(refer to table below). After the Booster time has elapsed, the power will be
automatically reduced to level 18.
IMPORTANT: Do not use with an empty pan or oil/butter. This function is ideal
for boiling water.
NOTE: Depending on the Power Management setting, the Booster function
may not be available for certain cooking zones. Furthermore, if you set one
cooking zone to Booster and then activate another zone, the rst one will
be reduced to the maximum level available (even much lower than level 18)
to allow the second one to be used. The second cooking zone will be set or
limited based on the remaining power available on that side of the hob.
Please bear in mind as well that the power delivery may vary according to the
size and material of the cookware being used.
2
1
3
4
ZONE DESCRIPTION
Zone Nominal power
(Level 18, kW)
Power
Booster (kW)
Booster
Duration (min.)
1 or 2 2.2 3.7 10
3 2.5 3.7 10
4 1.5 2.2 5
1+2
(Flexi Zone)
2.2 3.7 10
NOTE: the values in the table refer to testing conditions as described in the normative standard for
evaluating the performance of cooking appliances.
The power shown may vary depending on the size or material of the cookware used.
FLEXIBLE COOKING ZONE (FLEXI ZONE)
With this function you can combine two cooking zones into a single, longer one
to accommodate rectangular, oval or elongated cookware, and use a single
setting for the whole combined zone.
To ensure the correct results, use only pots and pans with a ferromagnetic base
long enough to cover the two zones at the same time. Place the cookware in
the centre of the exible cooking rectangular area.
Refer to the gure below for examples of correct and incorrect usage.
NOTE: A large round pot used in the middle may heat up less quickly and heat
may be distributed less evenly.
IMPORTANT: With pots and pans with a ferromagnetic base of 21 cm or
smaller, it is recommended to use the single cooking zones without activating
the exible cooking mode (Flexi Zone). Place the cookware on either the
front or rear zone, then activate that zone.
If the Flexi Zone is active, the Heat Control function will not be available or
displayed on the control panel.
Refer to the gure below for examples of correct and incorrect usage.
Flexi Zone used as two individual zones
When used with two pots or pans at the same time, it is advisable to place the
rst one on the rear zone and the second on the front zone (refer to gure
below). In this case, the zones should be activated without using the exible
cooking mode (Flexi Zone).
For optimal performance, make sure both pans are centred in their respective
zones. Do not move one pot/pan o-centre to make space for the other one.
When positioning the cookware, do not go outside the cooking zone area or on
top of the control panel.
Refer to the gure below for examples of correct and incorrect usage.
AUTOMATIC FUNCTIONS
This hob provides you with some automatic functions to assist you in the cooking
process. Please note that they may not be available, depending on the power
management setting (see "Power Management" section). For example, if power
management has been set at 2.5 kW and some zones are already being used, the
remaining power might not be enough to activate an automatic function. The
hob will notify you with an acoustic signal.
MELTING
The function automatically sets the ideal power for melting. It allows
you to melt delicate food such as chocolate or butter, and keep it melted
without the risk of it burning or sticking to the pot/pan.
KEEP WARM
The function automatically sets the ideal power for keeping food warm after
cooking and before serving. Note that liquids are reduced over time when food
is kept warm.
These automatic functions are only available on standard cooking zones
(zones with the icon
).
How to activate automatic functions:
To activate the automatic functions, press the icon
.
The display will show two dimly lit icons:
(keep warm) on the top and
(melting) on the bottom.
Use the up (
) and down ( ) arrows to select the required function.
The display will show “A1” for melting and “A2” for keep warm and the
corresponding icon will become brighter.
HEAT CONTROL - ASSISTED COOKING WITH TEMPERATURE
This function allows you to select and cook at the temperature you want (as you
would do with an oven), rather than using standard power levels.
With this feature, the hob will automatically adjust the heat and maintain a
stable cookware temperature, eliminating the need for constant adjustments.
This function is available only on cooking zones with the
icon .
NOTE: The displayed temperature refers to the centre of the empty cookware.
Depending on the specic cookware you are using, the temperature shown might
be dierent from the actual cookware temperature. For optimal performance, it is
advisable to place the cookware in the centre of the cooking zone and to activate
the function when there is no 'residual heat' indicator (
) active.

IMPORTANT: This function is not meant to be used for boiling water or deep-
frying. For this reason, the water won't boil even if a temperature higher than
100°C is selected. Refer to "Assisted Boil" section or use the Booster function
for quick boiling.
How to activate Heat Control:
1. Place the cookware on the zone with the
icon.
2. Press the
icon.
3. Use the up arrow (
) to select the required temperature. The default
setting is 45° C. You can increase the temperature up to 200°C, according
to your needs (refer to the table below for cooking tips). Use the down
arrow (
) to reduce the temperature.
4. During the heat-up phase, an up arrow (
) will ash next to the selected
temperature.
5. When the cookware has reached the set temperature, the hob will notify
you with an acoustic signal and the up arrow (
) will stop ashing. Now
you can add food.
6. Once the set point has been reached, you can use the up (
) and down
(
)arrows to adjust the selected temperature in steps of 5°C.
7. If the new selected temperature is lower than current one, a down arrow
(
) will ash next to the selected temperature until the new set point has
been reached. If the new selected temperature is higher than the current
one, an up arrow (
) will ash next to the selected temperature until the
new set point has been reached.
8. If you set a timer on a zone where the Heat Control function is active,
the timer will start only after the set point has been reached. The display
will show the timer countdown instead of the temperature. During
the countdown, tap the up (
) or down ( ) arrow to see the set
temperature. After 3 seconds, the countdown will reappear.
HEAT CONTROL - COOKING TIPS
The table below gives some suggestions on cooking techniques for each
temperature.
LOW HEAT MEDIUM HEAT HIGH HEAT
45°C 80°C 130°C 150°C 180°C 200°C
Melt
(chocolate,
butter)
Keep Warm
Gentle fry
(vegetable
base mix)
Scramble
(eggs)
Sauté
Stir-fry
Grill
(beef,
vegetables)
Defrost
(meat, sh)
Thickening,
Creaming
(risotto)
Cont
(vegetables)
Deglaze
Caramelise
(sugar,
vegetables)
Brown
(Pancakes,
Toast)
Sear
(steak, roast)
Simmer
(120°C)
Refer to "Assisted Boil" section or use the Booster function for quick boiling.
NOTE:
• The system is able to monitor the cooking temperature, but it is always
advisable to stay nearby when the hob is in use.
• Depending on the cooking zone activation sequence, the Heat Control
function might not be available. The hob will notify you with an acoustic signal.
Scan the QR code to unlock the secrets of cooking with
Heat Control. Discover how easy and rewarding it is to
cook with temperature by visiting our website, where
you can nd guidance on a variety of cooking techniques,
everyday meals and exciting new dishes through step-by-
step recipes.
ASSISTED BOIL (BOIL&COOK)
This function brings water to the boil and automatically adjusts the power to keep
it simmering until you are ready to add your food. This function also helps prevent
overboiling and wasted energy when compared to Booster mode. To save energy
and speed up the boiling process, we recommend covering the pan with a lid.
Assisted Boil is available only on cooking zones with the
icon.
NOTE: When using this function, the pot must have a base diameter of 160 - 210
mm and be filled with water to between 1/2 an d 3/4 of its volume. Consider that
the maximum volume that can be used with this function is about 4 lt. Do not add
salt to the water before it has reached the boil, as this will prevent the system from
working as expected.
For optimal performance, it is advisable to place the cookware in the centre of
the cooking zone, use water at room temperature, and activate the function
when there is no 'residual heat' indicator present.
IMPORTANT: This function is meant to be used for boiling water only, not for
milk or other types of liquid.
Based on the cookware available on the market, the function might not perform
as expected.
How to activate Assisted Boil:
1. Fill the pot with water (see the notes above).
2. Place the cookware on a cooking zone with the
icon.
3. Select the Assisted Boil button ( ).
4. Press the Assisted Boil button ( ) one time if Heat Control is available on
one cooking zone only. If Heat Control is available on more than one cooking
zone, press the
button several times until you reach the cooking zone
where you want to use the Assisted Boil function. A “-b-” indication will
appear in the display to guide you through the zones.
5. When the zone is selected, you will see -b- ashing on the zone display for a
few seconds and then the function will start automatically.
6. When the Assisted Boil function starts, an animation will appear in the
display during the heat-up phase.
7. Within 90 seconds from when the water starts boiling, the function will notify
you of the fact with an acoustic signal. The animation will disappear, and the
hob automatically sets the power level at 15 to maintain a gentle boil.
8. Depending on the cookware used, the power level may automatically drop to
level 15 without reaching the boiling point of the water. In order to reach boiling
point, you can increase the power level of the cooking zone in use. Alternatively,
you can try using another pan that is compatible with induction cooking. If the
conditions described above do not occur, we suggest switching the Boil&Cook
function off and setting the power levels manually to continue cooking.
9. Add your food and, if necessary, change the power level to adjust the
strength of the boil as required. The power selection will be limited to
those levels suitable for boil maintenance (i.e. levels 10 - 18).
NOTE:
• Whether the water is boiling or not, after about 15 minutes from the
activation of the function the hob automatically sets the power level to 15
and the animation disappears.
• Depending on the Power Management setting or the cooking zone
activation sequence, the Assisted Boil function might not be available. The
hob will notify you with an acoustic signal.
• When using this function, you will not be able to set a timer during the
water heat-up phase. The timer can only be enabled after receiving the
acoustic notication that the water has reached boiling point.
• The system is able to monitor the boiling process, but it is always advisable
to stay nearby when the hob is in use.
• If the hob oers the possibility of using Boil&Cook in multiple zones, only
one Boil&Cook function can be activated on each side. During the selection
process, the animation (snake) will still be displayed on the same side for a
few seconds without the function being able to be activated.
INDICATORS
RESIDUAL HEAT
If “Hot“ appears on the display, this means that the cooking zone is hot. The
indicator lights up even if the zone has not been activated but has been heated
(due to the use of adjacent zones or because a hot pot has been placed on it).
When the cooking zone has cooled down, the ”Hot” message disappears.
POT INCORRECTLY POSITIONED OR MISSING
This symbol appears if the pot is not suitable for induction cooking, is not
positioned correctly or is not of an appropriate size for the cooking zone
selected. If no pot is detected within 30seconds of making the selection, the
cooking zone switches o.
Owner's manual
EN
COOKING TABLE
The cooking table oers cooking tips for each power level. The actual power delivered for each power level depends on the cooking zone dimension and on the
cookware used.
POWER LEVEL COOKING TIPS
Maximum power (P) Booster* - Bring water to a boil as quickly as possible. Do not use with an empty pan or oil/butter.
17 − 18 Bring water to a boil, deep fry** frozen products.
15 − 16 Maintain a lively boil, sear, blister, stir-fry, brown.
10 − 14 Maintain a gentle boil, preheat, grill (for a long period of time), stir-fry, sauté, caramelise, brown, pancakes.
5 − 9 Simmer, stew, thicken, slow cook.
3 − 4 Keep warm, defrost.
1 − 2 Melting, creaming (risotto).
Zero power (OFF) Hob is in stand-by or o mode (possible end-of-cooking residual heat, indicated by “Hot“).
*Booster is a special mode that uses a power level higher than 18, to heat up water faster. This mode can be maintained for a maximum time of 10 min. depending
on the zone used. After this time, the power will be automatically reduced to level 18.
** For deep frying frozen products such as French fries, it is recommended to use non Flexi Zone cooking zones. If you want to deep fry using Flexi Zone cooking
zones, it is recommended to use the front one.
CLEANING AND MAINTENANCE
Important:
• Before cleaning, make sure the cooking zones are switched off and that
the residual heat indicator (“Hot“) is not displayed.
• Do not use abrasive sponges or scouring pads as they may damage the glass.
• After each use, clean the hob (when it is cool) to remove any food residue
deposits or stains.
• A surface that is not kept suitably clean may reduce the sensitivity of control
panel buttons.
• Only use a scraper if residue is stuck to the hob. Follow the scraper manufacturer's
instructions to avoid scratching the glass.
• Sugar or foods with a high sugar content can damage the hob and must be
removed immediately.
• Salt, sugar and sand might scratch the glass surface.
• Use a soft cloth, absorbent kitchen paper or a special hob cleaner (follow the
manufacturer’s instructions).
• Liquid spills in the cooking zones can cause the pots to move or vibrate.
• After cleaning the hob, dry thoroughly.
TROUBLESHOOTING
• Check that the electricity supply has not been shut o.
• If you cannot to turn the hob o after using it, disconnect it from the power
supply.
• If alphanumeric codes appear on the display when the hob is switched on,
consult the following table for instructions.
Please note: The presence of water, or liquid spilled from pots or any objects
resting on a hob button, can accidentally activate or deactivate the control
panel lock function.
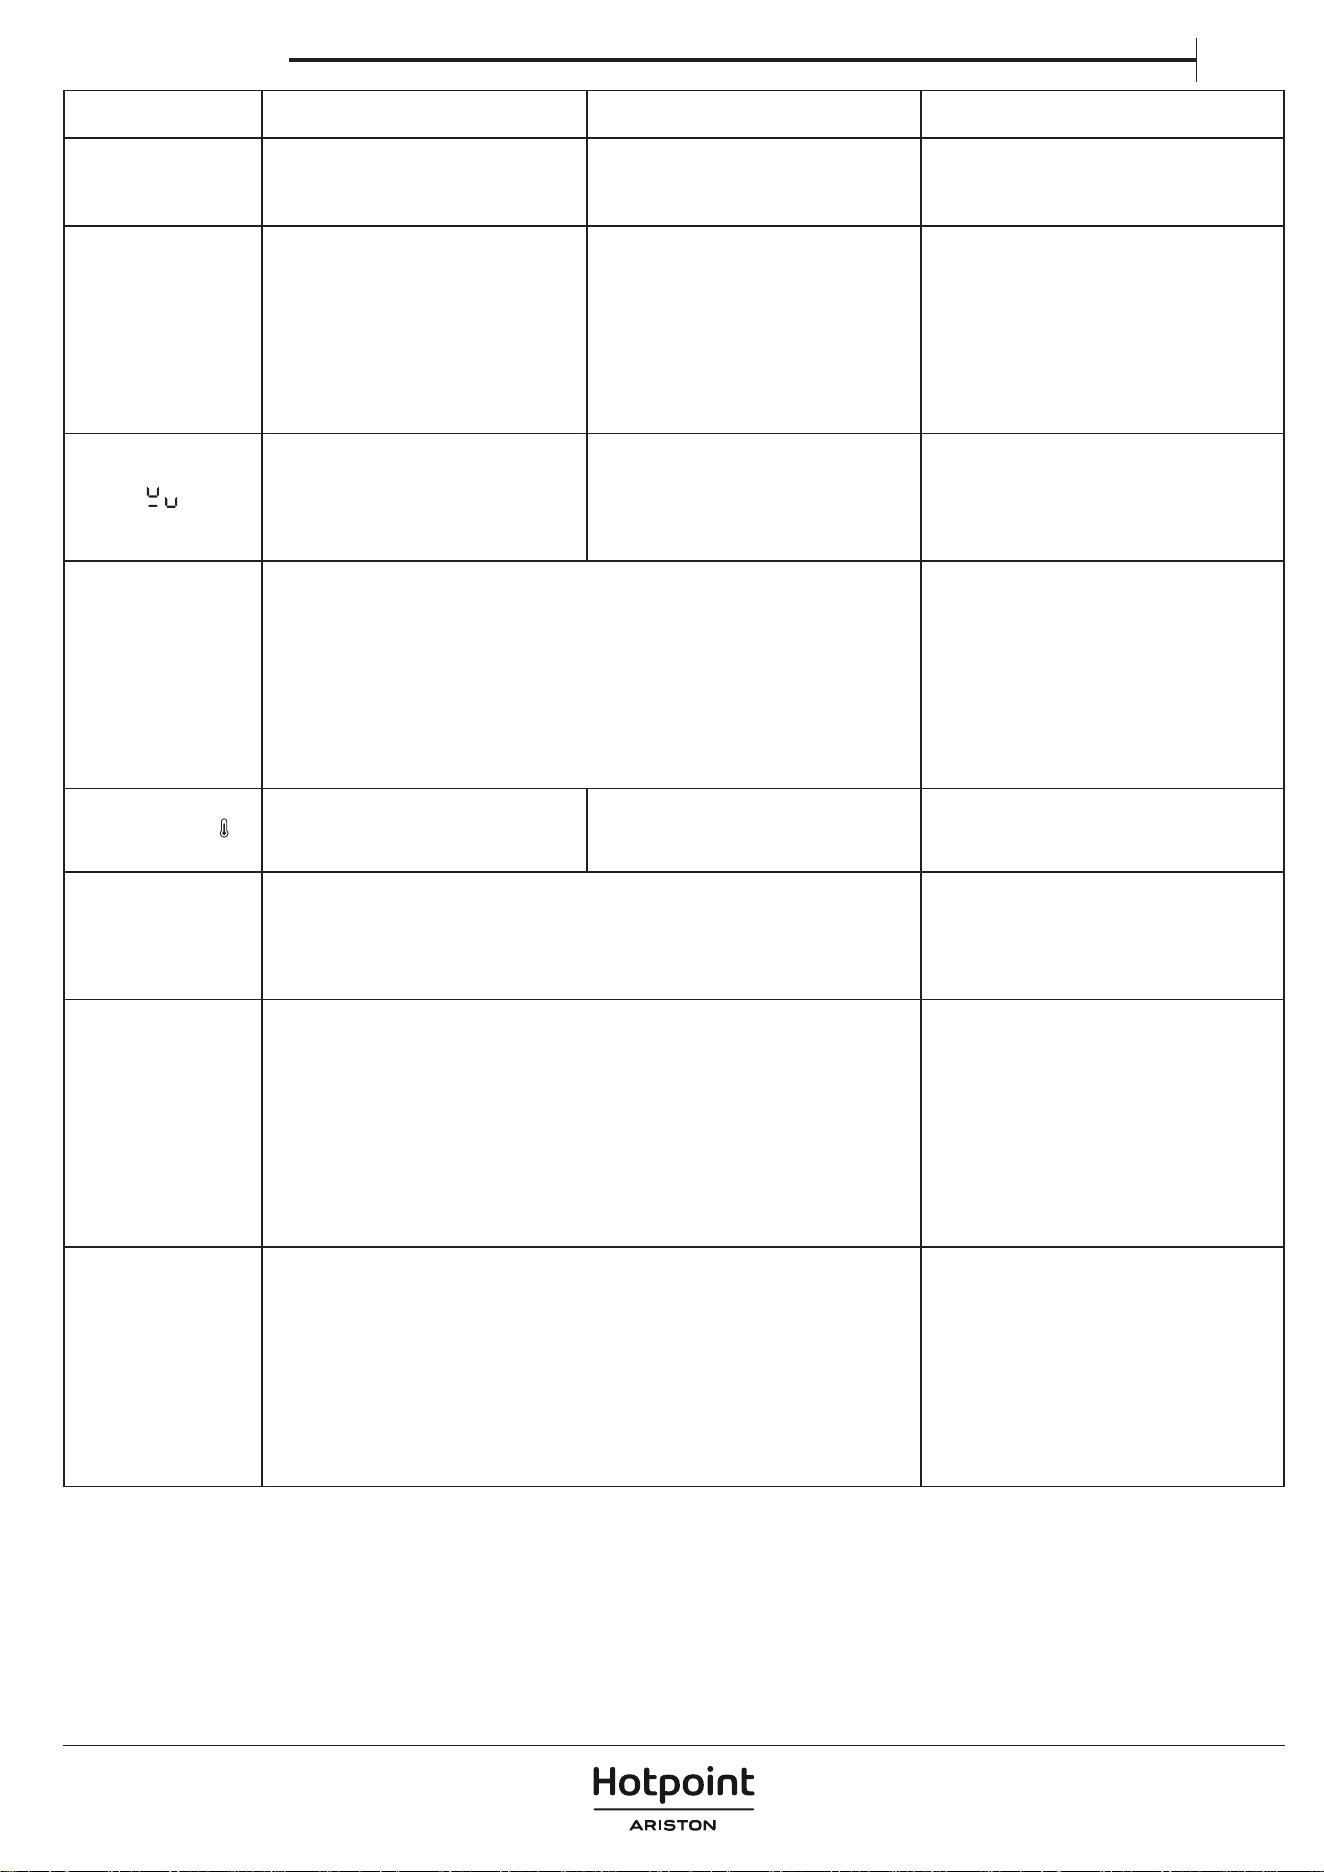
DISPLAY CODE/ISSUE
DETECTED
DESCRIPTION POSSIBLE CAUSES SOLUTION
F9E0 Wrong power cord connection.
The power supply connection is not exactly
as indicated in “Electrical connection“
section.
Make the power supply connection according to
the “Electrical connection“ section.
F0EA
The control panel switches off because of
excessively high temperatures.
The internal temperature of electronic parts
is too high.
Wait for the hob to cool down before using it
again.
F0E9
The power level
is automatically
decreased.
A cooking zone turns
OFF automatically.
The hob turns OFF
automatically.
The cooking zone turns off when the
temperatures are too high.
The power level is decreased, or the cooking
zone turns off or the hob turns off when the
temperatures are too high.
The internal temperature of electronic parts
is too high.
Hob ventilation may not be adequate to
ensure the proper functioning of the hob.
Wait for the cooking area to cool down before
using it again.
To ensure the appliance works properly, the
hob must receive adequate ventilation from a
sufficient fresh air supply. Check the hob has been
installed respecting the indications described in
the "Installation" section. Ensure that no object
is obstructing the rear and lower rear part of the
hob.
F0E2, F0E4, F0E6, F0E8,
F1E1, F2E1, F6E1, F6E2,
F7E5, F7E6, FCE1, FCE2,
FCE3
Disconnect the hob from the power supply.
Wait a few seconds (more than 10), then reconnect the hob to the power supply.
If the problem persists, call the service centre and specify the error code that appears on the display.
d E
[when the hob is off]
The hob does not heat up.
The functions do not come on.
DEMO MODE on.
Follow the instructions in the “First time use“
section.
DISPLAY CODE/ISSUE
DETECTED
DESCRIPTION POSSIBLE CAUSES SOLUTION
A special function does
not turn on and the hob
produces an acoustic
signal.
The hob does not allow a special function to
be activated.
The power regulator limits the special
function activation in accordance with the
power management setting selected for the
hob (e.g. 2.5 kW).
See the “Power management“ section.
When you choose
a power level or
use the Booster
function, the power
level automatically
decreases.
The hob automatically sets the maximum
available power level (even lower than the
set one) to ensure that the cooking zone
can be used.
The power regulator limits the special
function activation in accordance with the
power management setting selected for the
hob (e.g. 2.5 kW).
The Booster function can have a different
duration depending on the zone used. After
the Booster time has elapsed, the power will
be automatically reduced to level 18.
Hob ventilation may not be adequate to
ensure the proper functioning of the hob.
See the “Power management“ or "Booster
function" section.
To ensure the appliance works properly, the
hob must receive adequate ventilation from a
sufficient fresh air supply. Check the hob has been
installed respecting the indications described in
the "Installation" section. Ensure that no object
is obstructing the rear and lower rear part of the
hob.
Cookware is not detected.
Cooking zone switches off after 30 seconds.
This symbol appears if the pot is not suitable
for induction cooking, is not positioned
correctly or is not of an appropriate size
for the cooking zone selected. If no pot is
detected within 30 seconds of making the
selection, the cooking zone switches off.
If your cookware is suitable for induction cooking
(see the "Accessories" section) and correctly
positioned on the required cooking zone, try
using it on a smaller cooking zone. Otherwise,
please use appropriate cookware (See the
"Accessories" section).
The hob makes two short
acoustic sounds and then
switches OFF by itself.
The "OFF" message is
subsequently displayed
for up to 60 seconds,
during which time the
hob cannot be turned
back on and it repeats
the two short acoustic
sounds every 5 seconds.
Water spillage, food overflow and/or an object positioned on the control panel buttons
can mimic your finger and accidentally activate or deactivate any of the hob buttons:
• the ON/OFF button, causing the hob to turn off unintentionally,
• the key-lock button, causing the unwanted activation of the key-lock function if
pressed continuously for more than 3 seconds. The function remains active even after
the hob has switched off, with the key-lock icon and LED on,
• the scroll keypad, causing the unwanted change of power levels.
The hob switches off by itself (showing the "OFF" message) if it is not cleaned within 8
seconds.
Dry and/or clean and/or remove the object so
the hob can be turned back on 60 seconds after
the OFF message appeared.
If the key lock function has been accidentally
activated, press the key-lock button for 3 seconds
to disable it.
Press the ON/OFF button to switch on the hob.
Water does not boil
when Heat Control (
)
is used.
Water does not boil when the temperature
is set using the Heat Control function.
You are using Heat Control to boil water.
Use Assisted Boil (Boil&Cook) or Booster function.
A clicking and/or tick-tack
sound is heard when
cookware is positioned.
These continuous clicking and/or tick-tack noises occur when the pan is not able to receive
the full power delivered for the power level set.
The pan diameter may be lower than the minimum indicated in the user manual for specific
cooking zones. Even if you use a pan with the correct dimensions, some pan models have a
base partially covered by metal inserts (or without an even ferromagnetic distribution), and
they do not always perform as expected.
Use a pan with a diameter larger than the
minimum indicated in the manual for the specific
cooking zones, or use a more high-performing
pan (refer to the "Accessories" section).
The hob is turned o.
The hob will automatically turn off in the following situations:
• In the event of water spillage, food overow, or objects positioned on the control
panel buttons that could accidentally activate the ON/OFF button. If these items
are not removed within 8 seconds, the hob will automatically switch o while
producing a sound.
• If there is no interaction with the control panel for more than 30 seconds, and no
cooking zone is active.
• If no cookware has been detected for more than 30 seconds and there has been
no interaction with the control panel for the same time.
• The maximum working time for a power level or function has elapsed, and there
has been no interaction with the hob for more than 30 seconds.
• Other cases not specied here.
See the "Daily use" section for further information.
Turn on the hob manually.
While using the Assisted
boil (Boil&Cook) function,
the water does not reach
boiling point.
or
Depending on the cookware or the amount of water used, boiling point might not be
reached.
Whether the water is boiling or not, the power level may automatically drop to 15 after
about 15 minutes from when the function is activated.
If the water is not boiling, bring it to the boil by
increasing the power level of the cooking zone in
use. Alternatively, you can try using another pan
suitable for induction cooking.
The function does not
indicate that boiling
point has been reached
within about 90 seconds
from when the water
starts to boil.
If the function does not indicate boiling within
about 90 seconds from when the water starts
boiling, we suggest you switch off the Boil&Cook
function and use power levels to continue
cooking.
Owner's manual
EN

AFTER-SALES SERVICE
BEFORE CALLING THE AFTER-SALES SERVICE:
1. See if you can solve the problem by yourself with the help of the
TROUBLESHOOTING suggestions.
2. Switch the appliance o and back on again to see if the fault persists.
IF THE FAULT STILL OCCURS EVEN AFTER THE ABOVE CHECKS, GET IN
TOUCH WITH YOUR NEAREST AFTER-SALES SERVICE.
When contacting our customer after-sales service, always give:
• a brief description of the fault;
• the type and exact model of the appliance;
XXXXXXXXXXXXXXX
XXXXXXXXXXXXXXXXXXXXXX
Made in X
Type: XXXMod.: XXX
01
XXXX XXX XXXXXXX XXXX XXXXX
XXXXXXXXXXXXXXXXXXXX
XXXXXXXXXXXXXXXXXXXXXXXXXXXXXXXXXXXXXXXXXXXXXXXXXXXXXXXXXXXXXXXXXXXXXXXXX
• Ind. C.
• the serial number (number after the letters SN on the rating plate
located under the appliance). The serial number is also indicated in the
documentation;
Mod.
Ind.C.
SN:
Prod.N.
xxxx xxxx xxxx
xxxx xxxx xxxx
xxxx xxxx xxxx
xxx xxx
PRODUCT
INFORMATION
• your full address;
• your telephone number;
If any repairs are required, please contact an authorized after-sales service
(to guarantee that original spare parts will be used and repairs carried out
correctly).
400020020492
Policies, standard documentation and additional product information can be found by:
• Using QR code in your appliance;
• Visiting our website docs. hotpoint. eu;
• Alternatively, contact our After-sales Service (See phone number in the warranty booklet). When contacting our After-sales
Service, please state the codes provided on your product's identication plate.
Induction hobs may whistle or creak during normal operation.
These noises actually come from the cookware and are linked to the
characteristics of the pan bases (e.g. when the bottoms are made from dierent
layers of material, or are uneven).
They may vary according to the type of cookware used and the amount of food
contained, and are not the symptom of something wrong.
Induction hobs may produce continuous clicking and/or tick-tack sounds with a
positioned pot/pan. These sounds may occur when the pan is not able to receive
the full power delivered for the power level set. Use a pan with a diameter larger
than the minimum indicated in the manual for the specic cooking zones, or use
a more high-performing pan (refer to the "Accessories" section).
Water spillage, food overow and/or an object positioned on the control panel
buttons can mimic your nger and accidentally activate or deactivate any
of the hob buttons, as well as producing acoustic signals due to the contact
between the objects and the buttons. If these items are not removed within 8
seconds, the hob will automatically switch o while producing a sound which
will then be repeated every 5 seconds until the object or water is removed from
the control panel, even after switch-o. To avoid switch-o, remove any spilled
liquids from the user interface and thoroughly dry it within 8 seconds, or use the
Wipe function which gives you 30 seconds for cleaning and drying.
Remember that the ON/OFF button will always be active.
SOUNDS PRODUCED DURING OPERATION
Prima di utilizzare l’apparecchio, leggere le seguenti
norme di sicurezza. Conservarle per eventuali
consultazioni successive.
Queste istruzioni e l’apparecchio sono corredati da
importanti avvertenze di sicurezza, da leggere e
osservare sempre. Il fabbricante declina qualsiasi
responsabilità che derivi dalla mancata osservanza
delle presenti istruzioni di sicurezza, da usi impropri
dell’apparecchio o da errate impostazioni dei comandi.
AVVERTENZA: Se la supercie del piano cottura è
incrinata, non utilizzare l’apparecchio per evitare il
rischio di folgorazione.
AVVERTENZA: Pericolo di incendio: non appoggiare
oggetti sulle superci di cottura.
ATTENZIONE: Il processo di cottura deve essere
sorvegliato. I processi di cottura brevi richiedono una
supervisione continua.
AVVERTENZA: La cottura non sorvegliata su un
piano di cottura con grasso e olio può essere pericolosa
e generare incendi. Non tentare MAI di spegnere le
amme con acqua: piuttosto, spegnere l’apparecchio e
soocare le amme, ad esempio con un coperchio o
una coperta antincendio.
Non utilizzare il piano di cottura come supercie di
lavoro o appoggio. Non avvicinare all’apparecchio
stoe o altri materiali inammabili no a che tutti i
componenti non si siano completamente rareddati
per evitare il rischio di incendi.
Non poggiare oggetti metallici come coltelli,
forchette, cucchiai e coperchi sulla supercie del piano
di cottura perché potrebbero surriscaldarsi.
Tenere i bambini di età inferiore a 3 anni lontani
dall’apparecchio. Senza la sorveglianza costante di un
adulto tenere anche l’apparecchio fuori dalla portata
dei bambini di età compresa tra 3 e 8 anni. I bambini di
età superiore agli 8 anni, le persone con ridotte capacità
siche, sensoriali o mentali e le persone che non
abbiano esperienza o conoscenza dell’apparecchio
potranno utilizzarlo solo sotto sorveglianza, o quando
siano state istruite sull’utilizzo sicuro dell’apparecchio e
siano consapevoli dei rischi del suo utilizzo. Vietare ai
bambini di giocare con l’apparecchio. I bambini non
devono eseguire operazioni di pulizia e manutenzione
dell’apparecchio senza la sorveglianza di un adulto.
Dopo l’uso, spegnere l’elemento del piano di cottura
mediante il rispettivo comando e non fare adamento
sul rilevatore di tegami.
ATTENZIONE: L'apparecchio e i suoi componenti
accessibili possono diventare molto caldi durante l'uso.
Fare attenzione a non toccare gli elementi riscaldanti.
Tenere lontani i bambini di età inferiore agli 8 anni, a
meno che non siano costantemente sorvegliati.
L'alimento non deve essere lasciato nel o sul prodotto
per più di un'ora prima o dopo la cottura.
USO CONSENTITO
ATTENZIONE: l’apparecchio non è destinato ad
essere messo in funzione mediante un dispositivo di
commutazione esterno, ad esempio un temporizzatore,
o attraverso un sistema di comando a distanza separato.
L’apparecchio è destinato all’uso domestico e ad
applicazioni analoghe, quali: aree di cucina per il
personale di negozi, uci e altri contesti lavorativi;
agriturismi; camere di hotel, motel, bed & breakfast e
altri ambienti residenziali.
Non sono consentiti altri usi (ad es., il riscaldamento
di ambienti).
Questo apparecchio non è destinato ad applicazioni
professionali. Non utilizzare l’apparecchio all’aperto.
AVVERTENZA: Il piano di cottura a induzione può
generare un segnale acustico quando viene lasciato
qualcosa sul pannello di controllo. Spegnere il piano
cottura tramite il pulsante ON/OFF.
INSTALLAZIONE
Per evitare il rischio di lesioni personali, l’apparecchio
deve essere movimentato e installato da due o più
persone. Per le operazioni di disimballaggio e
installazione utilizzare i guanti protettivi per non
procurarsi tagli.
L’installazione, comprendente anche eventuali
raccordi per l’alimentazione idrica e i collegamenti
elettrici, e gli interventi di riparazione devono essere
eseguiti da personale qualicato. Non riparare o
sostituire qualsiasi parte dell’apparecchio se non
specicatamente richiesto nel manuale d’uso. Tenere i
bambini a distanza dal luogo dell’installazione. Dopo
aver disimballato l’apparecchio, controllare che
l’apparecchio non sia stato danneggiato durante il
trasporto. In caso di problemi, contattare il rivenditore
o il Servizio Assistenza Clienti. A installazione
completata, conservare il materiale di imballaggio
(parti in plastica, polistirolo, ecc.) fuori della portata dei
bambini per evitare il rischio di soocamento. Per
evitare rischi di scosse elettriche, prima di procedere
all’installazione scollegare l’apparecchio dalla rete
elettrica. Durante l’installazione, accertarsi che
l’apparecchio non possa danneggiare il cavo di
alimentazione e causare così rischi di scosse elettriche.
Attivare l’apparecchio solo dopo avere completato la
procedura di installazione.
Eseguire tutte le operazioni di taglio del mobile
prima di inserire l’apparecchio, avendo cura di rimuovere
trucioli o residui di segatura.
AVVERTENZE ELETTRICHE
Deve essere possibile scollegare l’apparecchio dalla
rete elettrica disinserendo la spina, se questa è
accessibile, o tramite un interruttore multipolare
installato a monte della presa nel rispetto dei
regolamenti elettrici vigenti; inoltre, la messa a terra
NORME DI SICUREZZA
IMPORTANTE: DA LEGGERE E OSSERVARE
IT

dell’apparecchio deve essere conforme alle norme di
sicurezza elettrica nazionali.
Non utilizzare cavi di prolunga, prese multiple o
adattatori. Una volta terminata l’installazione, i
componenti elettrici non devono più essere accessibili.
Non utilizzare l’apparecchio quando si è bagnati oppure
a piedi nudi. Non accendere l’apparecchio se il cavo di
alimentazione o la spina sono danneggiati, se si
osservano anomalie di funzionamento o se
l’apparecchio è caduto o è stato danneggiato.
L'installazione tramite spina del cavo di alimentazione
non è consentita a meno che il prodotto non sia già
dotato di quella fornita dal Produttore.
Se il cavo di alimentazione è danneggiato, deve
essere sostituito con uno dello stesso tipo dal
produttore, da un centro di assistenza autorizzato o
da un tecnico qualicato per evitare situazioni di
pericolo o rischi di scosse elettriche.
PULIZIA E MANUTENZIONE
AVVERTENZA: Per evitare rischi di folgorazione,
prima di qualsiasi intervento di manutenzione accertarsi
che l’apparecchio sia spento e scollegato
dall’alimentazione elettrica; inoltre, non usare in nessun
caso pulitrici a getto di vapore.
Non utilizzare prodotti abrasivi o corrosivi, prodotti a
base di cloro o pagliette.
SMALTIMENTO DEL MATERIALE DI IMBALLAGGIO
Il materiale di imballaggio è riciclabile al 100% ed è contrassegnato dal simbolo
del riciclaggio
.
Le varie parti dell’imballaggio devono pertanto essere smaltite
responsabilmente e in stretta osservanza delle norme stabilite dalle autorità
locali.
SMALTIMENTO DEGLI ELETTRODOMESTICI
Questo prodotto è stato fabbricato con materiale riciclabile o riutilizzabile.
Smaltire il prodotto rispettando le normative locali in materia. Per ulteriori
informazioni sul trattamento, il recupero e il riciclaggio degli elettrodomestici,
contattare l’ucio locale competente, il servizio di raccolta dei riuti domestici
o il negozio presso il quale il prodotto è stato acquistato. Questo apparecchio
è contrassegnato in conformità alla direttiva europea 2012/19/UE, Riuti di
apparecchiature elettriche ed elettroniche (RAEE) e alle norme sui riuti di
apparecchiature elettriche ed elettroniche 2013 (e successive modiche).
Assicurandosi che questo prodotto sia smaltito in modo corretto, l’utente
contribuisce a prevenire le conseguenze negative per l’ambiente e la salute.
Il simbolo
sul prodotto o sulla documentazione di accompagnamento
indica che questo apparecchio non deve essere smaltito come riuto
domestico, bensì conferito presso un centro di raccolta preposto al ritiro delle
apparecchiature elettriche ed elettroniche.
CONSIGLI PER IL RISPARMIO ENERGETICO
Per sfruttare al meglio il calore residuo delle piastre, spegnerle alcuni minuti
prima del termine della cottura.
La base della pentola o del tegame dovrebbe coprire completamente la piastra
di cottura; un recipiente con la base più piccola del diametro della piastra
causerà uno spreco di energia.
Durante la cottura, coprire pentole e tegami con un coperchio che chiuda bene
il recipiente e usare la minima quantità d’acqua possibile. La cottura senza
coperchio comporta un consumo di energia notevolmente superiore.
Utilizzare solo pentole e padelle con fondo piatto.
DICHIARAZIONE DI CONFORMITÀ
Questo apparecchio soddisfa i requisiti di Ecodesign del regolamento europeo
66/2014 e l'Ecodesign per i prodotti connessi all'energia e le informazioni
sull'energia (emendamento) (Uscita UE) Regolamenti 2019 in conformità con
la norma europea EN 60350-2.
Le informazioni relative alla modalità a basso consumo dell'apparecchio in
conformità con il Regolamento (UE) 2023/826 sono disponibili al seguente link:
https://docs.emeaappliance-docs.eu.
NOTA
Le persone con un pacemaker o un dispositivo medico simile devono prestare
attenzione quando si trovano in prossimità di questo piano di cottura a
induzione mentre è acceso. Il campo elettromagnetico può inuenzare il
pacemaker o un dispositivo simile. Consultare il proprio medico o il produttore
del pacemaker o un dispositivo medico simile per ulteriori informazioni sui
suoi eetti con i campi elettromagnetici del piano di cottura ad induzione.
COLLEGAMENTO ELETTRICO
Il collegamento elettrico deve essere eseguito prima di collegare l'apparecchio alla rete.
L'installazione deve essere eseguita da personale qualicato a conoscenza delle norme vigenti in materia di sicurezza e installazione. Nella fattispecie, l'installazione
deve essere eseguita in ottemperanza alle direttive della locale società di fornitura elettrica.
Controllare che la tensione indicata sulla targhetta matricola nella parte inferiore dell'apparecchio sia la stessa della rete elettrica domestica.
La messa a terra dell'apparecchio è obbligatoria per legge; utilizzare solo conduttori delle dimensioni appropriate (incluso il conduttore di terra).
220-240 V
~
220-240 V 3
~
230V 2 Phase 2N
~
380-415 V 2 N ~
BE
NL
380-415 V 3 N ~
blue-blu-azul-azul-μπλε-sinine-zila-mėlyna-niebieski-blau-bleu-blauw-albastru-синьо-плава-modro-
plava-синий-синій-көк-modrý-modrý-kék-blå-sininen-blå-blåt-mavi-gorm- blár-כחול
N
blue (gray)-blu (grigio)-azul (gris)-azul (cinza)-μπλε (γκρι)-sinine (hall)-zila (pelēka)-mėlyna (pilkas)-
niebieski (szary)-blau (grau)-bleu (gris)-blauw (grijs)-albastru (gri)-синьо (сиво)-плава (сива)-
modro (sivo)-plava (siva)-синий (серый)-синій (сірий)-көк (сұр)-modrý (šedá)-modrý (sivá)-
kék (szürke)-blå (grå)-sininen (harmaa)-blå (grå)-blåt (gråt)-mavi (gri)-gorm (liath)- blár (grár)-כחול (אפור)
T
yellow/green-giallo/verde-amarillo/verde-amarelo/verdeκίτρινο/πράσινο-kollane/roheline-dzeltens/zaļš-
geltona/žalia-żółty/zielony-gelb/grün-jaune/vert-geel/groen-galben/verde-жълто/зелено-жуто/зелена-
rumeno/zeleno-žuto/zelena-желтый/зеленый-жовтий/зелений-жасыл/сары-žlutá/zelená-žltá/zelená-
sárga/zöld-gul/grønn-keltainen/vihreä-gul/grön-gul/grøn-sarı/yeşil-buí/glas- gulur/grænn-צהוב/ירוק
E
=
black-nero-negro-preto-μαύροσ-must-melns-juodas-czarny-schwarz-noir-zwart-negru-черно-црн-
črna-crno-черный-чорний-қара-černá-čierna-fekete-svart-musta-svart-sort-siyah-dubh-svartur-שחור
brown-marrone-marrón-marrom-καφέ-pruun-brūns-rudas-brązowy-braunen-brun-bruin-maro-кaфяв-
браон-rjava-smeđ-коричневый-коричневий-қоңыр-hnědý-hnedý-barna-brunt-ruskea-brunt-brun-
kahverengi-donn-brúnn-חום
R
S
DESCRIZIONE PRODOTTO
1. Piano di cottura
2. Pannello di controllo
PANNELLO DI CONTROLLO
1. Pulsante Flexi Zone
2. Pulsante di spegnimento zona di cottura
3. Tastiera di scorrimento
4. Frecce per impostare Temperatura/Timer
5. Pulsante di riscaldamento rapido (Booster)
6. Indicatore di preriscaldamento/raffreddamento
7. Visualizzazione della zona di cottura
8. Spia luminosa funzione attiva
9. Pulsante timer
10. Tasto ON/OFF (Accensione/Spegnimento)
11. Pulsante Ebollizione assistita (Boil&Cook)
12. Pulsante funzione di pulizia
13. Pulsante di blocco tasti - 3 secondi
14. Icone/attivazione funzioni speciali
15. Indicatore di temperatura (gradi Celsius)
16. Indicatore minuti
17. Icona indicatore contaminuti
18. Pulsante Heat Control
19. Pulsante funzione speciale
GRAZIE PER AVERE ACQUISTATO UN PRODOTTO
HOTPOINT/ARISTON
Per ricevere un’assistenza più completa, registrare il
prodotto su www.register10.eu.
PER MAGGIORI INFORMAZIONI,
SCANSIONARE IL CODICE QR
SUL PROPRIO APPARECCHIO
!
Prima di utilizzare l’apparecchio leggere attentamente le
istruzioni di sicurezza.
15
18
17
1
9
5
10
7
13
8
8
23
4
11 12 16 1914
6
NOTA: Premere il pulsante ON/OFF (10); tutte le funzioni disponibili saranno visibili per alcuni istanti, dopodiché rimarranno attive solo quelle principali. Le altre
possono essere utilizzate, e saranno attivate, durante il successivo utilizzo del dispositivo.
IMPORTANTE: Tutte le funzioni disponibili saranno evidenziate da una luce di debole intensità, che diventerà più intensa solo quando saranno attivate.
1
2
Manuale d’uso
IT
PRIMO UTILIZZO
GESTIONE DELLA POTENZA
Al momento dell'acquisto, il piano di cottura è impostato sulla potenza massima.
Regolare l'impostazione in base ai limiti del proprio impianto elettrico domestico,
come spiegato nel seguente paragrafo.
NOTE: A seconda della potenza selezionata per il piano di cottura, alcuni livelli di
potenza e funzioni della zona di cottura (ad esempio, ebollizione o riscaldamento
rapido) potrebbero essere limitati automaticamente per evitare di superare il limite
selezionato.
La seguente tabella mostra la potenza utilizzata da ciascuna zona per ogni
funzione, per facilitare la comprensione dei possibili limiti di utilizzo in base
all'impostazione di potenza scelta.
ZONA 1 o 2 1 + 2 3 4
LIVELLO DI POTENZA 18 (KW) 2,2 2,2 2,5 1,5
BOOSTER (KW) 3,7 3,7 3,7 2,2
HEAT CONROL (KW) 1,4 ND 1,4 ND
EBOLLIZIONE ASSISTITA
(BOIL&COOK) (KW)
3,0 ND 3,0 ND
SCIOGLIMENTO (KW) ND ND ND 0,045
MANTENIMENTO IN CALDO (KW) ND ND ND 0,145
Esempi con riferimento ai valori della tabella precedente:
Se si imposta "Power management setting" (Impostazione gestione potenza) a
4 kW e si attivano più zone di cottura contemporaneamente, il piano di cottura
regolerà automaticamente i livelli di potenza per non superare il limite di potenza
complessivo (ad esempio, 4 kW).
Ad esempio, con "Power management setting" (Impostazione gestione potenza)
impostato a 4 kW, se si imposta la zona 3 su "Booster" (=3,7 kW) e poi si cerca di attivare
la zona 1 al livello 18 (2,2 kW), la potenza complessiva erogata supererebbe il limite di 4
kW (3,7 + 2,2 = 5,9 kW). Per questo motivo, il piano di cottura regolerà automaticamente
i livelli di potenza come segue: la zona di cottura impostata su "Booster" sarà impostata
al livello 18 (=2,2 kW), mentre la seconda zona di cottura al livello 15 (=1,6 kW, il livello
massimo di potenza per non superare la limitazione di 4 kW).
Menu Impostazioni: modica delle impostazioni di base
Una volta collegato il dispositivo all'alimentazione principale, è possibile modificare
le impostazioni predefinite accedendo al menu Impostazioni entro 60 secondi:
1. Dopo aver collegato il piano cottura alla rete elettrica, attendere che tutti i LED si
accendono e si spengono consecutivamente.
2. Premere e tenere premuto il pulsante On/Off (
) per accendere il piano cottura.
3. Premere il pulsante di blocco dei tasti ( ) per almeno 6 secondi per accedere
al menu Impostazioni. Ignorare il suono di attivazione del blocco dei tasti
che si sentirà dopo 3 secondi di pressione.
4. Il tipo di impostazione (ad esempio "PL") verrà visualizzato sul display della
zona di cottura in alto a sinistra e il suo valore predenito (o corrente) (ad
esempio "2_5") apparirà sul display della zona di cottura in basso a sinistra.
5. È possibile selezionare il tipo di impostazione utilizzando le frecce in alto
(
) e in basso ( ) della zona di cottura in alto a sinistra. È possibile
modificarne il valore utilizzando le frecce verso l'alto (
) e verso il basso
(
) della zona di cottura in basso a sinistra.. Vedere la seguente tabella per i
tipi di impostazione, i valori predefiniti e i valori possibili.
6. Premere il pulsante On/O per confermare.
7. Senza conferma, il piano di cottura uscirà dal menu Impostazioni e tornerà
ai valori precedenti entro 30 secondi.
SELE-
ZIONE
TIPO DI
IMPOSTAZIONE
IN ALTO A
SINISTRA
IN BASSO A SINISTRA
(IMPOSTAZIONE
PREDEFINITA)
VALORI
POSSIBILI
1
Limitazione della
potenza
PL 7_4
2_5 kW; 4_0 kW;
6_0 kW; 7_4 kW
2 Tono audio Aud On On/O
3 Modalità demo dE O O/On
NOTE: una volta attivata la funzione di modalità demo, questa rimarrà attiva
anche se l'alimentazione principale viene interrotta.
ACCESSORI
Utilizzare solo pentole e padelle in materiale ferromagnetico, adatte ai piani
di cottura a induzione. Per determinare se una pentola è adatta, vericare la
presenza dell'icona
(generalmente stampata sul fondo). È possibile utilizzare
anche un magnete per vericare se la base della pentola è magnetica.
RECIPIENTE DI
COTTURA
MATERIALE PROPRIETÀ
Pentola consigliate
La base è in acciaio inox con
design a sandwich, acciaio
smaltato, ghisa.
Assicura un'efficienza ottimale,
si riscalda rapidamente e
distribuisce il calore in modo
uniforme.
Pentola adatta
La base non è completamente
ferromagnetica (il magnete si
attacca solo su una parte della
base della pentola).
Solo l'area ferromagnetica si
riscalda. Di conseguenza, potrebbe
riscaldarsi meno rapidamente e il
calore potrebbe essere distribuito
in modo meno uniforme.
Pentola adatta La base ferromagnetica contiene
aree con alluminio o presenta
un'area incassata al centro.
L'area ferromagnetica è più
piccola dell'area della base
della pentola. Di conseguenza,
la potenza erogata potrebbe
essere inferiore e la pentola
potrebbe non riscaldarsi a
sucienza. La pentola potrebbe
non essere rilevata.
Non adatta Acciaio sottile normale, vetro,
argilla, rame, alluminio e altri
materiali non ferromagnetici o
pentola con piedini in gomma.
La pentola non viene rilevata e
non si riscalda.
NOTA: Tutte le pentole devono avere una base piatta. Controllare
periodicamente che la base non presenti segni di deformazione, poiché alcune
pentole possono subire deformazioni a causa del calore elevato.
L'utilizzo di pentole che non corrispondono alle dimensioni e alle proprietà
consigliate può inuire signicativamente sulle prestazioni di cottura e causare
risultati insoddisfacenti.
ADATTATORI PER PENTOLE/PADELLE NON ADATTE ALL'INDUZIONE
L'uso di piastre di adattamento influisce sull'efficienza e quindi aumenta il
tempo necessario per riscaldare l'acqua o gli alimenti. Assicurarsi che il diametro
ferromagnetico della base della pentola sia allineato con il diametro della piastra
di adattamento e con il diametro della zona di cottura. Se queste misure non
corrispondono, possono diminuire significativamente l'efficienza e le prestazioni.
La mancata osservanza di queste linee guida potrebbe causare un accumulo di
calore che non viene trasferito efficacemente alla pentola o alla padella, causando
potenzialmente l'annerimento della piastra e del piano di cottura.
PENTOLE E PADELLE VUOTE
Il piano di cottura è dotato di un sistema di sicurezza interno che attiva la funzione
"Automatic off" (Spegnimento automatico) quando viene rilevata una temperatura
troppo elevata. L'uso di pentole e padelle vuote con un fondo sottile non è
raccomandato ma, in caso di utilizzo, la temperatura potrebbe aumentare più
rapidamente del tempo necessario per l'attivazione tempestiva dello "Spegnimento
automatico", con il rischio di danneggiare la pentola o la superficie del piano cottura.
In tal caso, non toccare la pentola o la superficie del piano di cottura. Attendere
che tutti i componenti si raffreddino. Se viene visualizzato un messaggio di errore,
chiamare il Centro di assistenza.
DIMENSIONI ADEGUATE DELLA BASE DELLA PADELLA/PENTOLA PER
LE DIVERSE ZONE DI COTTURA
Per garantire il corretto funzionamento del piano di cottura, utilizzare pentole con un
diametro di base adeguato per ogni zona (fare riferimento alla tabella sottostante).
Tener presente che i produttori di pentole spesso forniscono le dimensioni del
diametro superiore della pentola, piuttosto che il diametro della base.
Per garantire che il piano di cottura funzioni come previsto, utilizzare sempre una
zona di cottura con una dimensione corrispondente alla dimensione ferromagnetica
del fondo della pentola.
Centrare correttamente la pentola sulla zona di cottura in uso. Si consiglia di
non utilizzare pentole più grandi della dimensione della zona di cottura.
2
1
3
4
UTILIZZO DELLE PENTOLE PER ZONA
Zona Forma della pentola
adatta
Base ferromagnetica
adatta (cm)
1 o 2 Rotonda o quadrata 16 - 21
3 Rotonda 16 - 21
4 Rotonda 10 - 15
1+2
(Zona Flexi)
Ovale o rettangolare
Lato corto 16 - 21
Lato lungo 24 - 38
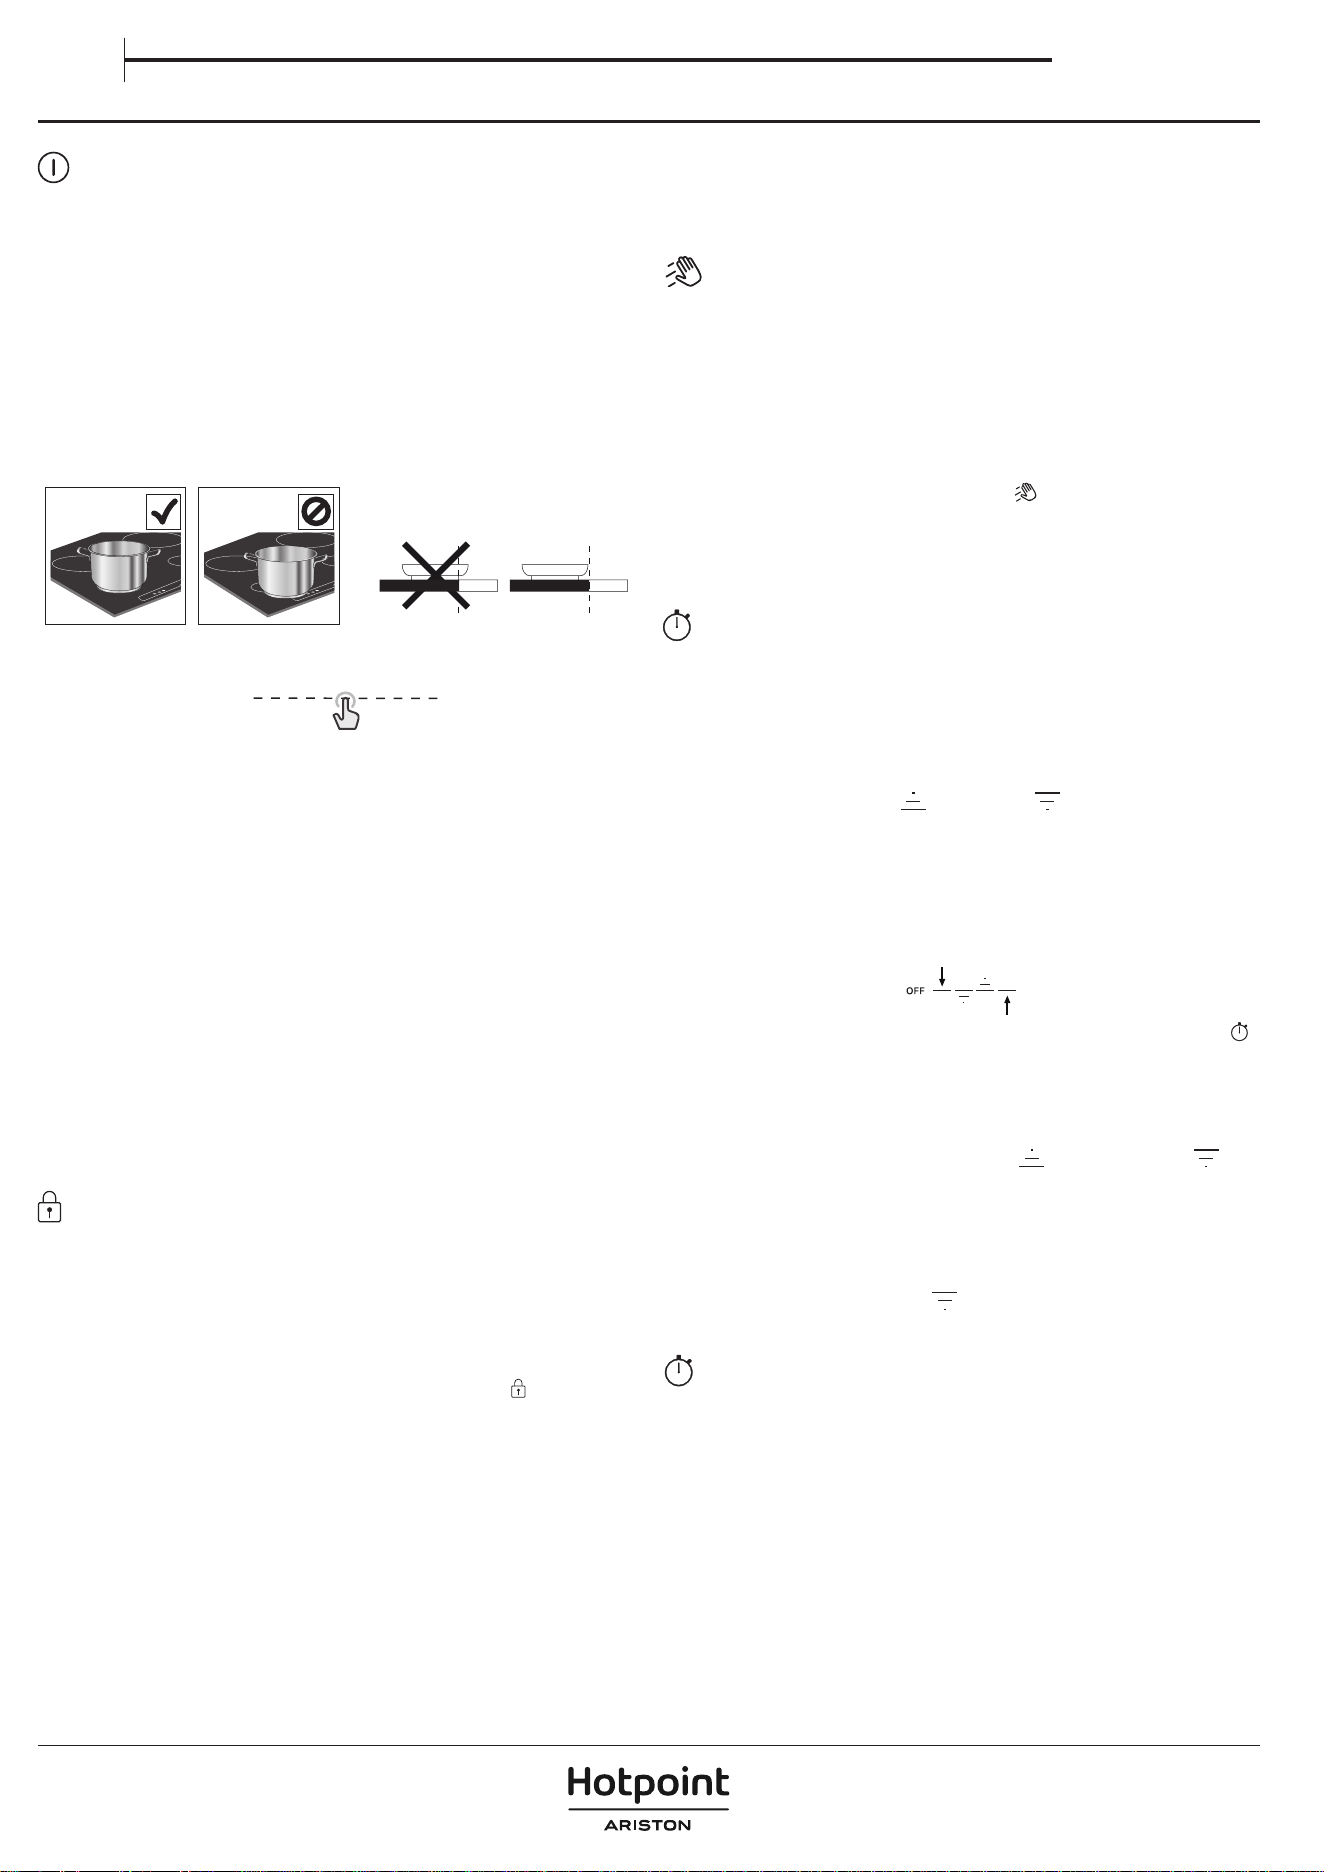
USO QUOTIDIANO
ACCENSIONE/SPEGNIMENTO DEL PIANO DI COTTURA
Per accendere il piano cottura, tenere premuto il pulsante di accensione. Il
LED sopra il pulsante si accende e si sente un segnale acustico. Dopo alcuni
secondi, può interagire con il piano di cottura. Per spegnere il piano di cottura,
premere di nuovo lo stesso pulsante; Tutte le zone di cottura si spegneranno.
POSIZIONAMENTO
Evitare di coprire con la pentola le icone del pannello di controllo.
Note: Nelle zone di cottura vicine al pannello di controllo, è consigliabile tenere
pentole e padelle all'interno della serigraa (prendendo in considerazione sia
il fondo della padella sia il suo bordo superiore, poiché questo tende ad essere
più grande).
Questo previene un eccessivo surriscaldamento della tastiera. Quando si
griglia o si frigge, utilizzare le zone di cottura posteriori, se possibile.
ATTIVAZIONE/DISATTIVAZIONE DELLE ZONE COTTURA E
REGOLAZIONE DELLA POTENZA
OFF
P
Per attivare le zone cottura:
Quando il piano di cottura viene acceso, la tastiera a scorrimento (SLIDER) di
tutte le zone di cottura disponibili si accende a bassa luminosità. Posizionare il
dito sul tastierino di scorrimento (SLIDER) della zona che si desidera attivare, e
farlo scorrere delicatamente verso destra se si desidera aumentare il livello di
potenza o verso sinistra per diminuirlo. Si noterà che i segmenti della tastiera di
controllo passeranno ad alta luminosità in base al livello di potenza selezionato,
e le cifre del display mostreranno il numero corrispondente al livello di potenza
selezionato (da 1 a 18).
Il pulsante "P" può essere utilizzato per selezionare la funzione di riscaldamento
rapido (Booster) per far bollire rapidamente l'acqua.
Per disattivare le zone cottura:
Selezionare il pulsante "OFF" all'inizio del tastierino di scorrimento.
NOTA: Il traboccamento dell'acqua, il traboccamento degli alimenti e/o un
oggetto posizionato sui pulsanti del pannello di controllo possono simulare il
proprio dito e attivare o disattivare accidentalmente uno qualsiasi dei pulsanti
del piano di cottura. Se tali elementi non vengono rimossi entro 8 secondi, il
piano di cottura emette due brevi suoni acustici e si spegne da solo, mostrando
il messaggio "OFF".
BLOCCO DEL PANNELLO COMANDI
La funzione di blocco del pannello di controllo è progettata per bloccare
le impostazioni del piano di cottura, per evitare modiche accidentali alle
impostazioni o l'attivazione/disattivazione involontaria delle funzioni.
Potrebbe essere necessario utilizzare questa funzione, ad esempio. In caso
di possibile traboccamento di liquidi o alimenti, o per motivi di sicurezza
(interazione accidentale dei bambini con il piano di cottura), per evitare il
rischio di accensione accidentale del piano di cottura. Per utilizzare la funzione
di blocco del pannello di controllo, tenere premuto il pulsante
per 3 secondi.
Il pulsante passa ad una luminosità elevata e un segnale acustico e una luce
sopra l'icona indicano che questa funzione è stata attivata. Per disattivare il
blocco comandi ripetere la procedura di attivazione.
NOTA: Il pannello comandi è bloccato a eccezione della funzione di spegnimento.
Se si spegne il piano di cottura con il blocco del pannello di controllo attivo,
premere il pulsante ON/OFF, quindi premere il pulsante di blocco per 3 secondi
per sbloccare il piano di cottura.
FUNZIONE DI PULIZIA
La funzione di pulizia blocca temporaneamente i pulsanti dell'interfaccia
utente per evitare modiche accidentali alle impostazioni durante il processo
di pulizia. La funzione non interrompe il processo di cottura.
La funzione di pulizia aiuta a prevenire eventuali rumori se l'acqua si rovescia
sull'interfaccia utente durante il processo di cottura o durante la pulizia abituale.
Per motivi di sicurezza, il pulsante ON/OFF può essere attivato, anche
involontariamente, durante la pulizia.
Per attivare la funzione di pulizia:
1. Premere il pulsante di Funzione di pulizia (
)
. Si sentirà un suono acustico
quando la funzione è attiva.
2. Il LED sopra il pulsante si accende e rimane acceso, mentre il pulsante stesso
lampeggia per tutta la durata dell'attività della funzione.
3. Il pannello di controllo rimane bloccato per 30 secondi.
CONTAMINUTI
Il timer controlla tutte le zone di cottura attive.
Per attivare il contaminuti:
1. Selezionare la zona cottura e impostare il livello di potenza desiderato.
2. Il pulsante del timer si accende circa 5 secondi dopo il riconoscimento
della pentola. Premerlo nché non si accende un indicatore luminoso in
linea con il simbolo specico della zona di cottura scelta.
3. Utilizzare le frecce in alto ( ) e in basso ( ) per impostare l'ora (non
tenerle premute per più di 8 secondi, altrimenti il piano di cottura mostrerà
OFF). Per maggiori informazioni, fare riferimento alla sezione "Risoluzione dei
problemi"). Il tempo passerà da 000 secondi a 30 minuti, aumentando di 1
minuto ogni volta; da 30 a 150 minuti, il tempo aumenterà a incrementi di
5 minuti. Se occorre modicare l'ora di 10 minuti, utilizzare i trattini laterali. Il
trattino a sinistra sottrarrà 10 minuti, mentre il trattino a destra aggiungerà 10
minuti (vedere l'immagine seguente).
4. Per confermare l'ora impostata, può premere il pulsante dell'orologio (
)
.
In caso contrario, l'ora verrà confermata automaticamente dopo 5 secondi
senza alcuna azione.
5. È possibile modicare l'ora in qualsiasi momento e attivare più timer
contemporaneamente.
6. Durante il conto alla rovescia, toccare con il dito il cursore per vedere il livello
di potenza. Toccare la freccia verso l'alto (
) o verso il basso ( ) per
visualizzare la temperatura impostata. Dopo 3 secondi, il conto alla rovescia
riapparirà.
7. Una volta scaduto il timer, verrà emesso un segnale acustico e la zona di
cottura si spegnerà automaticamente.
Per disattivare il contaminuti:
Premere la freccia verso il basso (
) no a visualizzare 000, dopodiché la
disattivazione avverrà dopo 5 secondi.
INDICATORE CONTAMINUTI
La spia luminosa relativa a questo indicatore, se attiva, segnala che è stato
impostato il contaminuti per la zona di cottura.
Manuale d’uso
IT
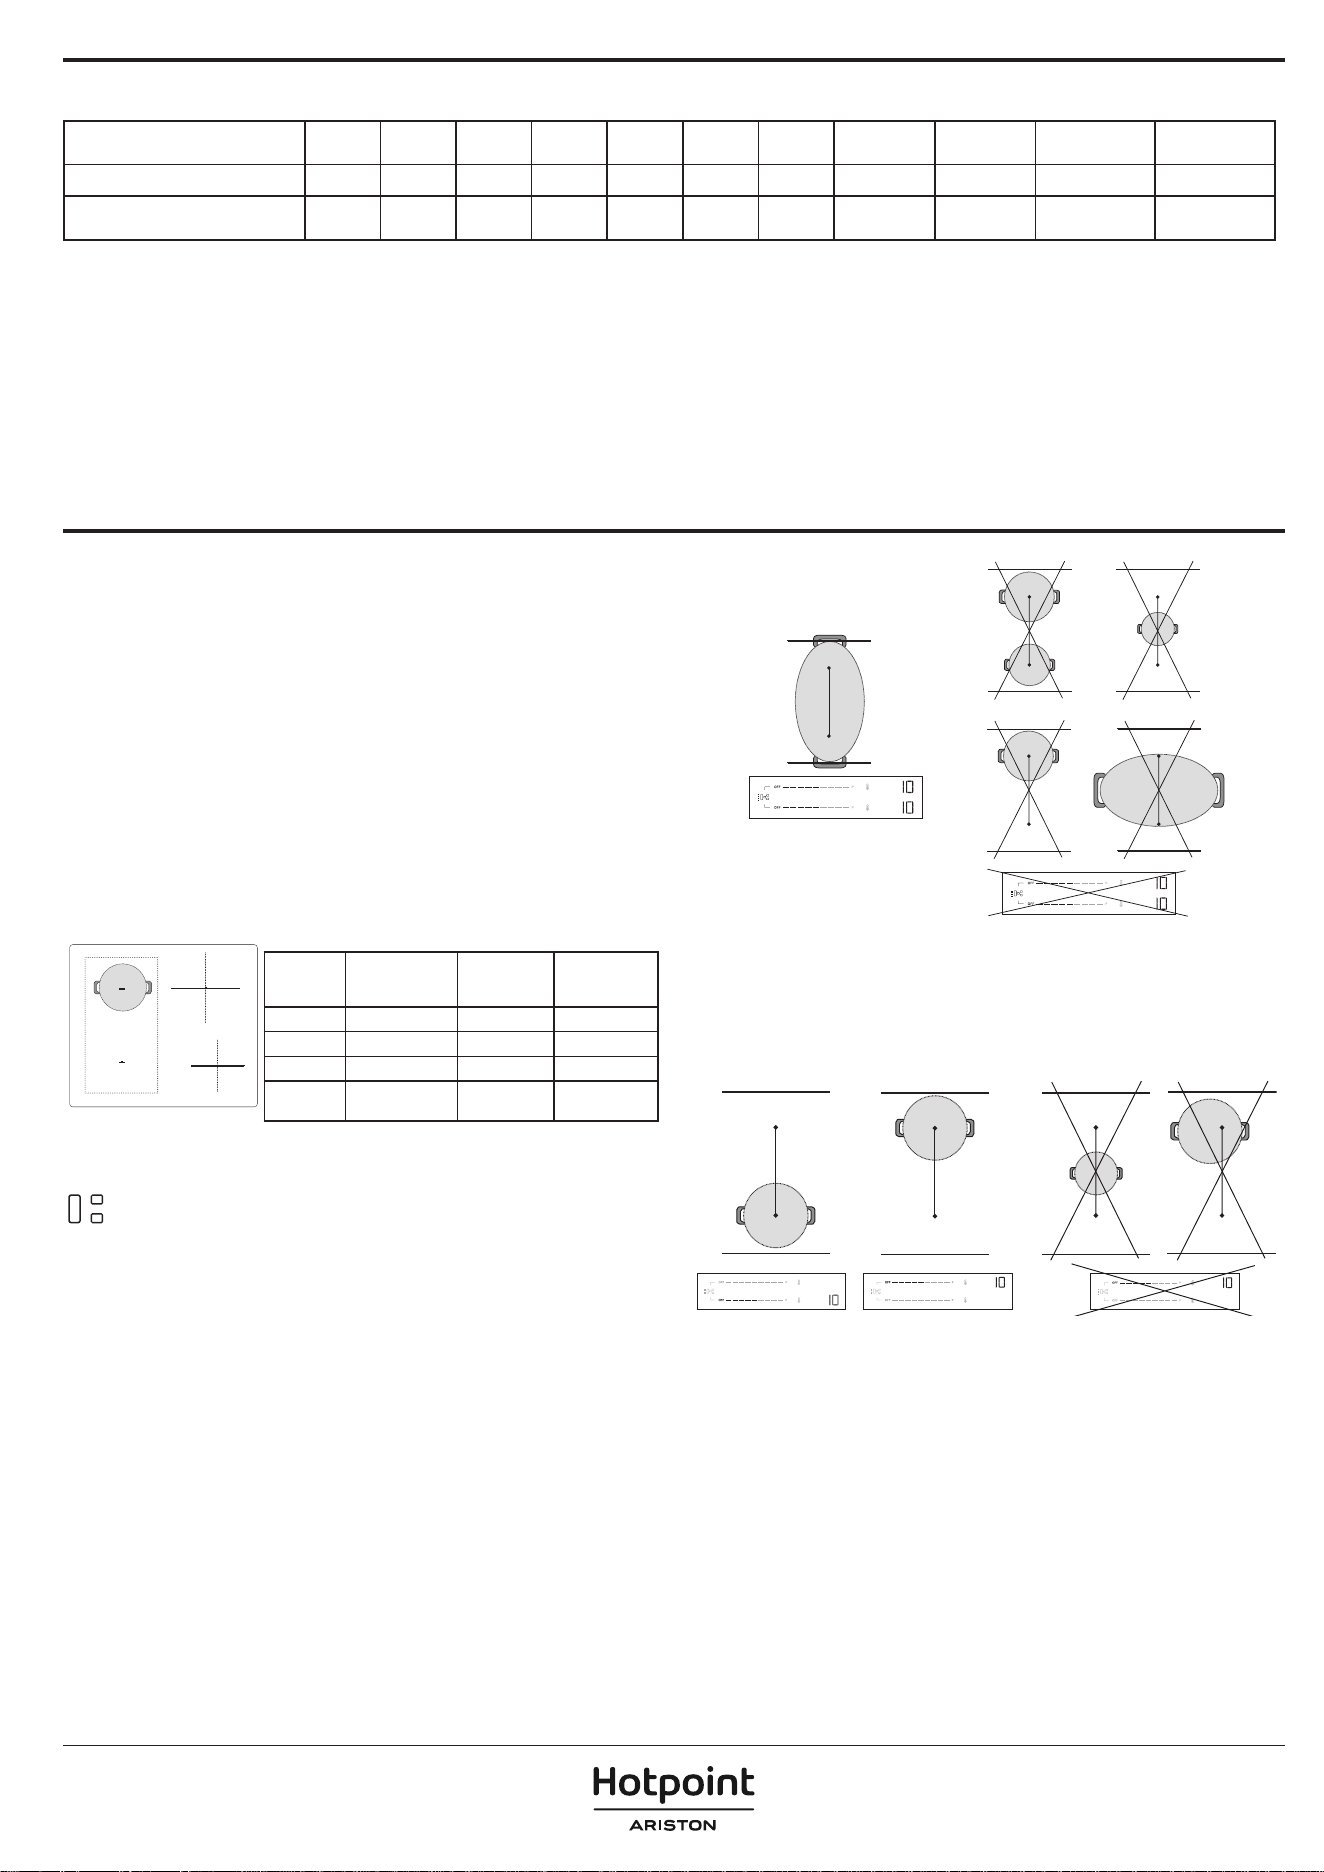
TEMPO MASSIMO DI LAVORO DELLE ZONE DI COTTURA E DELLE FUNZIONI
Livello di potenza o funzione OFF 1-3 4-6 7-9 10-12 13-15 16-18 Booster * Booster ** Scioglimento
Mantenere
caldo
Tempo di lavoro massimo - 8 ore 6 ore 4 ore 3 ore 2 ore 1,5 ore 10 min 5 min 8 ore 8 ore
Livello di potenza dopo il
timeout
- 0 0 0 0 0 0 18 18 0 0
* Zona di cottura 1, 2, 3
** Zona di cottura 4
Esempi relativi ai valori della tabella precedente:
Se si accende una zona di cottura e si imposta la sua potenza sul livello 14, la zona di cottura continuerà a funzionare per un massimo di 2 ore. Dopo 2 ore, il livello di potenza
scende a 0 e la zona di cottura si spegne automaticamente. Se non ci sono altre zone di cottura attive e non si interagisce con i pulsanti del pannello di controllo entro 30
secondi, il piano di cottura si spegne automaticamente.
Se si attiva la funzione Booster sulla zona di cottura 4, questa scenderà automaticamente al livello di potenza 18 dopo 5 minuti. D'altra parte, se si attiva la funzione Booster
sulla zona di cottura 1, 2 o 3, dopo 10 minuti scenderà automaticamente al livello di potenza 18. Dopo 1,5 ore, il livello di potenza scenderà al livello 0 e la zona di cottura
si spegnerà automaticamente. Se non ci sono altre zone di cottura attive e non si interagisce con i pulsanti del pannello di controllo entro 30 secondi, il piano cottura si
spegnerà automaticamente.
FUNZIONI
P FUNZIONE BOOSTER
Il Booster è una modalità speciale con un livello di potenza superiore al livello 18,
per un riscaldamento più rapido. Questa modalità può avere una durata diversa
a seconda della zona utilizzata (fare riferimento alla tabella sottostante). Una
volta trascorso il tempo di Booster, la potenza verrà automaticamente ridotta al
livello 18.
IMPORTANTE: Non utilizzare con una padella vuota o con olio/burro. Questa
funzione è ideale per far bollire l'acqua.
NOTA: A seconda dell'Impostazione della gestione della potenza, la funzione
Booster potrebbe non essere disponibile per alcune zone di cottura. Inoltre, se
si imposta una zona di cottura su Booster e poi si attiva un'altra zona, la prima
verrà ridotta al livello massimo disponibile (anche molto più basso del livello 18)
per consentire l'utilizzo della seconda. La seconda zona di cottura sarà impostata
o limitata in base alla potenza residua disponibile su quel lato del piano cottura.
Tenere inoltre presente che la potenza erogata può variare in base alle
dimensioni e al materiale delle pentole utilizzate.
2
1
3
4
DESCRIZIONE DELLE ZONE
Zona Potenza
nominale
(Livello 18, kW)
Booster di
potenza (kW)
Durata del
booster (min.)
1 o 2 2,2 3,7 10
3 2,5 3,7 10
4 1,5 2,2 5
1+2
(Zona Flexi)
2,2 3,7 10
NOTE: i valori della tabella si riferiscono alle condizioni di prova descritte nello standard normativo per
la valutazione delle prestazioni degli apparecchi di cottura.
La potenza indicata può variare a seconda delle dimensioni o del materiale delle pentole utilizzate.
ZONA DI COTTURA FLESSIBILE (FLEXI ZONE)
Con questa funzione è possibile combinare due zone di cottura in una sola, più
lunga, per accogliere pentole rettangolari, ovali o allungate, e utilizzare un'unica
impostazione per l'intera zona combinata.
Per garantire i risultati corretti, utilizzare solo pentole e padelle con una base
ferromagnetica abbastanza lunga da coprire le due zone contemporaneamente.
Posizionare la pentola al centro dell'area rettangolare di cottura essibile.
Fare riferimento alla gura seguente per esempi di utilizzo corretto e scorretto.
NOTA: una pentola rotonda di grandi dimensioni utilizzata al centro potrebbe
riscaldarsi meno rapidamente e il calore potrebbe essere distribuito in modo
meno uniforme.
IMPORTANTE: Con le pentole e le padelle con un fondo ferromagnetico di 21
cm o più piccolo, si raccomanda di utilizzare le zone di cottura singole senza
attivare la modalità di cottura essibile (Flexi Zone). Posizionare le pentole
sulla zona anteriore o posteriore, quindi attivare la zona in questione.
Se la Flexi Zone è attiva, la funzione Heat Control non sarà disponibile né visualizzata
sul pannello di controllo.
Fare riferimento alla gura seguente per esempi di utilizzo corretto e scorretto.
Flexi Zone utilizzata come due zone singole
Quando viene utilizzato con due pentole o padelle contemporaneamente, è
consigliabile posizionare la prima sulla zona posteriore e la seconda sulla zona
anteriore (fare riferimento alla figura sottostante). In questo caso, le zone devono
essere attivate senza utilizzare la modalità di cottura flessibile (Flexi Zone).
Per ottenere prestazioni ottimali, assicurarsi che entrambe le pentole siano
centrate nelle rispettive zone. Non spostare una pentola/padella fuori centro
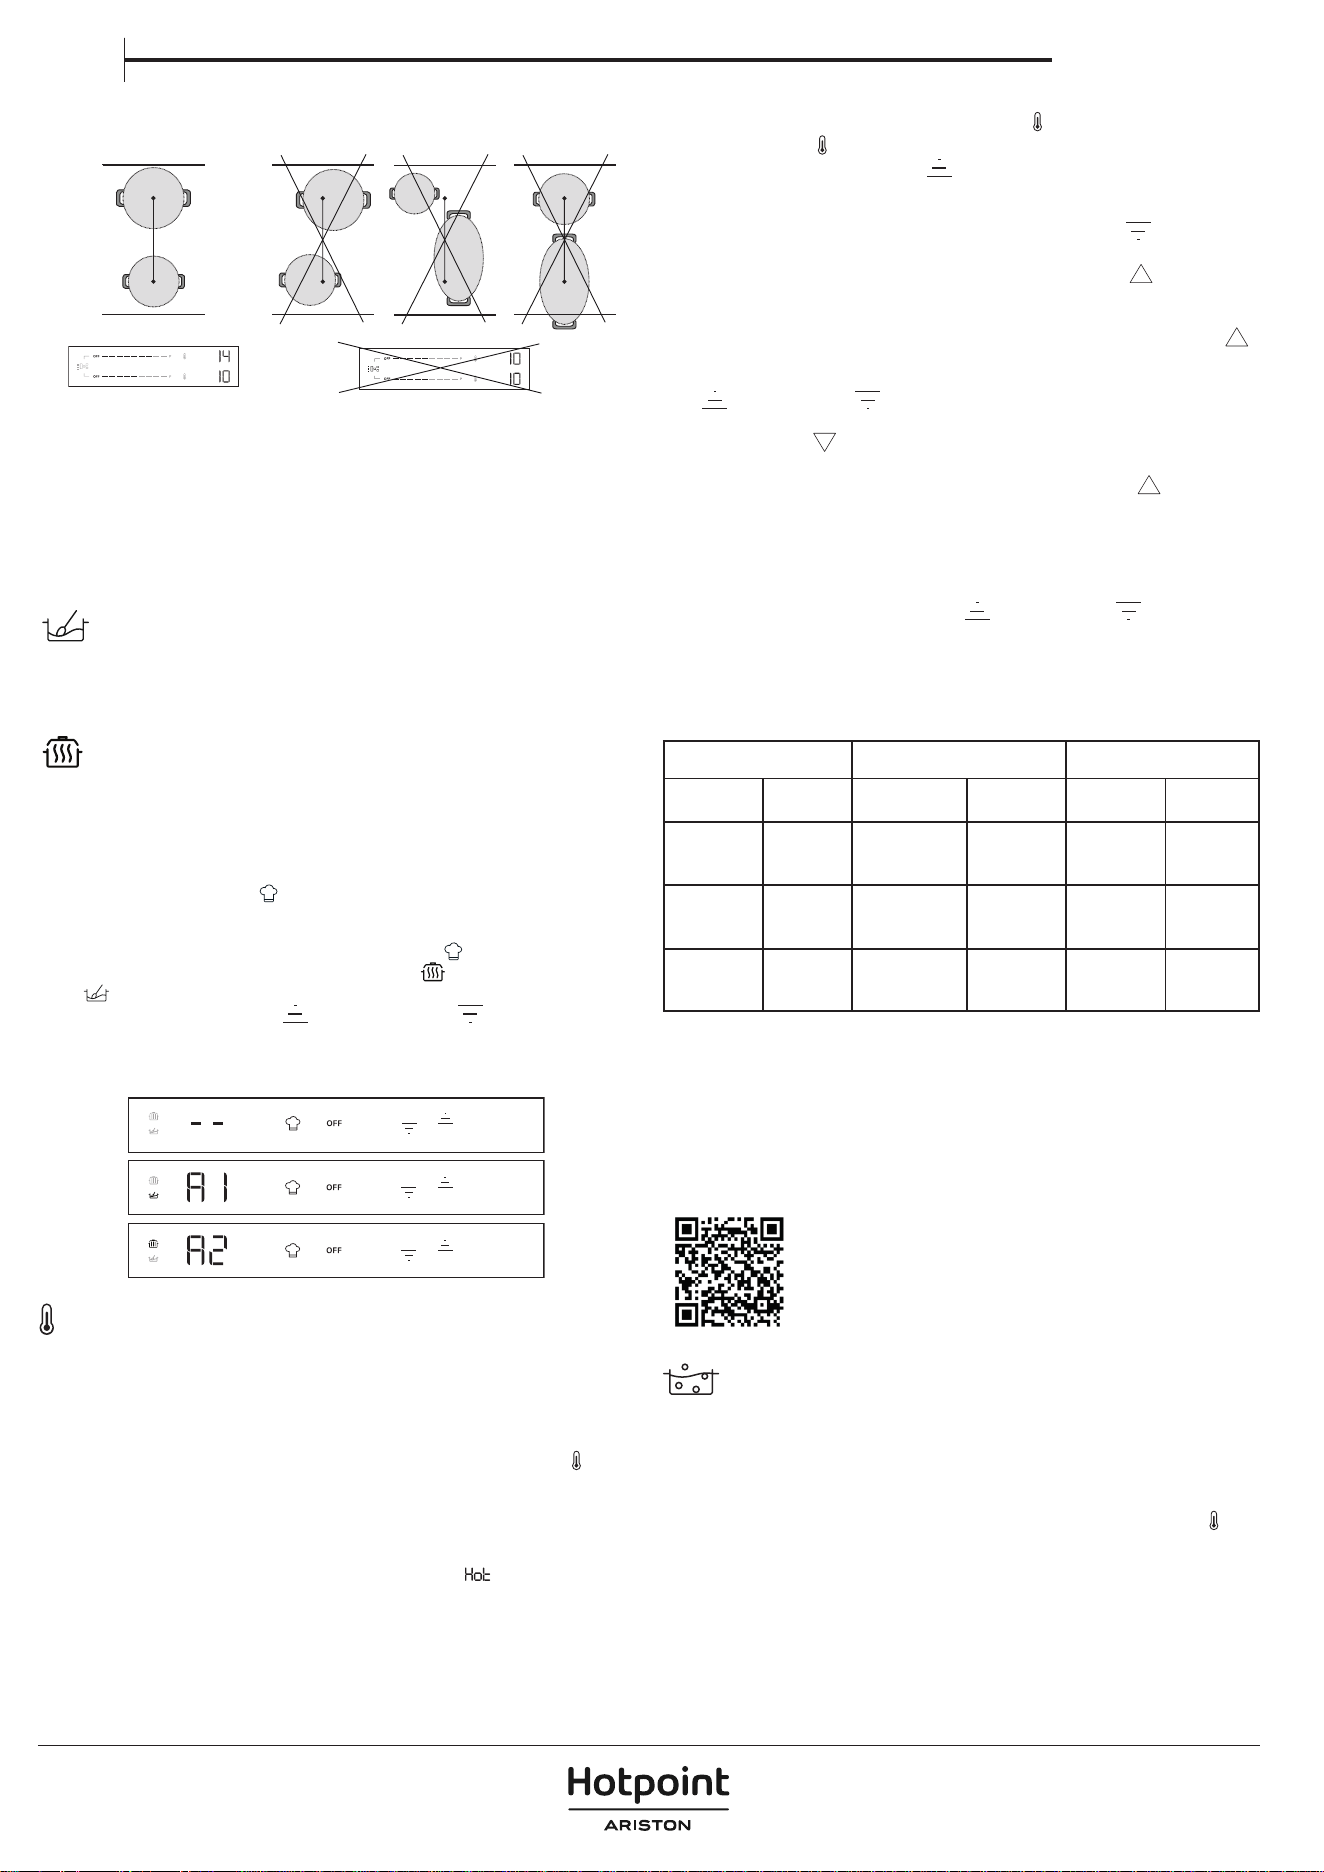
per fare spazio all'altra. Quando si posizionano le pentole, non uscire dall'area
della zona di cottura o dalla parte superiore del pannello di controllo.
Fare riferimento alla gura seguente per esempi di utilizzo corretto e scorretto.
FUNZIONI AUTOMATICHE
Questo piano di cottura ore alcune funzioni automatiche utili per assistere
l'utente nel processo di cottura. Tener presente che potrebbero non essere
disponibili, a seconda dell'impostazione della gestione della potenza (vedere
la sezione "Gestione della potenza"). Ad esempio, se la gestione della potenza
è stata impostata a 2,5 kW e alcune zone sono già utilizzate, la potenza residua
potrebbe non essere suciente per attivare una funzione automatica. Il piano
di cottura informerà con un segnale acustico.
SCIOGLIERE
Questa funzione imposta automaticamente il livello di potenza ideale per lo
scioglimento. Consente di sciogliere alimenti delicati, come il cioccolato o il burro,
e di mantenerli in fusione senza il rischio che si brucino o si attacchino alla pentola.
MANTENIMENTO IN CALDO
Questa funzione imposta automaticamente la potenza ideale per mantenere
i cibi caldi dopo la cottura e prima di servirli. Tener presente che i liquidi si
riducono nel tempo quando gli alimenti vengono mantenuti al caldo.
Queste funzioni automatiche sono disponibili solo sulle zone di cottura
standard (zone con l'icona
).
Come attivare le funzioni automatiche:
Per attivare le funzioni automatiche, premere l'icona
.
Il display visualizzerà due icone poco illuminate:
(mantenere in caldo) in
alto e
(sciogliere) in basso.
Utilizzare le frecce verso l'alto (
) e verso il basso ( ) per selezionare la
funzione richiesta.
Il display visualizzerà "A1" per sciogliere o "A2" per mantenere in caldo e l'icona
corrispondente diventerà più luminosa.
HEAT CONTROL - COTTURA ASSISTITA CON LA TEMPERATURA
Questa funzione consente di selezionare e cuocere alla temperatura desiderata
(come farebbe con un forno), anziché utilizzare i livelli di potenza standard.
Con questa funzione, il piano di cottura regolerà automaticamente il calore
e manterrà una temperatura stabile della pentola, eliminando la necessità di
continue regolazioni.
Questa funzione è disponibile solo sulle zone di cottura con l'icona
.
NOTA: La temperatura visualizzata si riferisce al centro della pentola vuota. A seconda
della pentola specifica che si sta utilizzando, la temperatura indicata potrebbe essere
diversa dalla temperatura effettiva della pentola. Per ottenere prestazioni ottimali,
si consiglia di posizionare le pentole al centro della zona di cottura e di attivare la
funzione quando non è attivo l'indicatore di "calore residuo" (
).
IMPORTANTE: Questa funzione non deve essere utilizzata per far bollire
l'acqua o per friggere. Per questo motivo, l'acqua non bollirà anche se si
seleziona una temperatura superiore a 100°C. Fare riferimento alla sezione
"Ebollizione assistita" o utilizzare la funzione Booster per un'ebollizione rapida.
Come attivare Heat Control:
1. Posizionare la pentola sulla zona con l'icona
.
2. Premere l'icona
.
3. Utilizzare la freccia verso l'alto (
) per selezionare la temperatura richiesta.
L'impostazione predefinita è 45° C. È possibile aumentare la temperatura fino
a 200°C, in base alle proprie esigenze (fare riferimento alla tabella sottostante
per i consigli di cottura). Utilizzare la freccia verso il basso (
) per ridurre la
temperatura.
4. Durante la fase di riscaldamento, una freccia verso l'alto (
) lampeggerà
accanto alla temperatura selezionata.
5. Quando le pentole hanno raggiunto la temperatura impostata, il piano di
cottura la informerà con un segnale acustico e la freccia verso l'alto (
)
smetterà di lampeggiare. Ora è possibile aggiungere gli alimenti.
6. Una volta raggiunto il punto stabilito, è possibile utilizzare le frecce verso l'alto
(
) e verso il basso ( ) per regolare la temperatura in incrementi di 5°C.
7. Se la nuova temperatura selezionata è inferiore a quella corrente, una freccia
verso il basso (
) lampeggerà accanto alla temperatura selezionata, fino
al raggiungimento del nuovo punto impostato. Se la nuova temperatura
selezionata è superiore a quella attuale, una freccia verso l'alto (
) lampeggerà
accanto alla temperatura selezionata, fino al raggiungimento del nuovo punto
impostato.
8. Se si imposta un timer su una zona in cui è attiva la funzione Heat Control, il
timer si avvierà solo dopo aver raggiunto il punto impostato. Il display mostrerà
il conto alla rovescia del timer invece della temperatura. Durante il conto alla
rovescia, toccare la freccia verso l'alto (
) o verso il basso ( ) per visualizzare
la temperatura impostata. Dopo 3 secondi, il conto alla rovescia riapparirà.
HEAT CONTROL - SUGGERIMENTI PER LA COTTURA
La seguente tabella fornisce alcuni suggerimenti sulle tecniche di cottura per
ogni temperatura.
CALORE BASSO CALORE MEDIO CALORE ALTO
45° C 80° C 130° C 150° C 180° C 200 °C
Sciogliere
(cioccolato,
burro)
Mantenere
caldo
Friggere
delicatamente
(soritto)
Strapazzare
(uova)
Sauté
Saltare in
padella
Grill
(manzo,
verdure)
Scongelare
(carne,
pesce)
Addensare,
mantecare
(risotto)
Cont
(verdure)
Deglassare
Caramellare
(zucchero,
verdure)
Dorare
(pancake,
toast)
Scottare
(bistecca,
arrosto)
Sobbollire
(120°C)
Fare riferimento alla sezione "Ebollizione assistita" o utilizzare la funzione Booster
per un'ebollizione rapida.
NOTE:
• Il sistema è in grado di monitorare la temperatura di cottura, ma è sempre
consigliabile rimanere nelle vicinanze quando il piano di cottura è in uso.
• A seconda della sequenza di attivazione della zona di cottura, la funzione
Heat Control potrebbe non essere disponibile. Il piano di cottura informerà
con un segnale acustico.
Scansionare il codice QR per svelare i segreti della cottura
con Heat Control. Per scoprire quanto sia facile e graticante
cucinare con la temperatura, visitare il nostro sito web, dove
è possibile trovare indicazioni su una varietà di tecniche
di cottura, pasti quotidiani e nuovi piatti entusiasmanti
attraverso ricette passo-passo.
EBOLLIZIONE ASSISTITA (BOIL&COOK)
Questa funzione porta l'acqua ad ebollizione e regola automaticamente la
potenza per mantenerla a fuoco lento no a quando non è pronto ad aggiungere
il cibo. Questa funzione aiuta anche a prevenire la bollitura eccessiva e lo spreco
di energia rispetto alla modalità Booster. Per risparmiare energia e accelerare
il processo di ebollizione, consigliamo di coprire la pentola con un coperchio.
L'ebollizione assistita è disponibile solo sulle zone di cottura con l'icona
.
NOTA: Quando si utilizza questa funzione, la pentola deve avere un diametro
di base di 160 - 210 mm e deve essere riempita d'acqua tra 1/2 e 3/4 del suo
volume. Considerare che il volume massimo utilizzabile con questa funzione
è di circa 4 litri. Non aggiungere sale all'acqua prima che abbia raggiunto
l'ebollizione, perché questo impedirà al sistema di funzionare come previsto.
Per ottenere prestazioni ottimali, si consiglia di posizionare le pentole al centro
della zona di cottura, di utilizzare acqua a temperatura ambiente e di attivare la
funzione quando non è presente l'indicatore di "calore residuo".
Manuale d’uso
IT

IMPORTANTE: Questa funzione deve essere utilizzata solo per far bollire
l'acqua, non per il latte o altri tipi di liquidi.
In base alle pentole disponibili sul mercato, la funzione potrebbe non operare
come previsto.
Come attivare l'ebollizione assistita:
1. Riempire la pentola d'acqua (vedere le note precedenti).
2. Posizionare la pentola su una zona di cottura con l'icona
.
3. Selezionare il pulsante di Ebollizione assistita ( ).
4. Premere il pulsante per l'Ebollizione assistita
( )
una volta se il Heat Control
è disponibile solo su una zona di cottura. Se il Heat Control è disponibile su più
di una zona di cottura, premere il pulsante
più volte no a raggiungere la
zona di cottura in cui si desidera utilizzare la funzione di Ebollizione assistita.
Un'indicazione "-b-" apparirà sul display per consentire la navigazione tra le
zone.
5. Quando la zona è selezionata, sul display della zona verrà visualizzata la
lettera -b- lampeggiante per alcuni secondi, quindi la funzione si avvierà
automaticamente.
6. Quando si avvia la funzione di Ebollizione assistita, sul display apparirà
un'animazione durante la fase di riscaldamento.
7. Entro 90 secondi da quando l'acqua inizia a bollire, la funzione avvertirà
l'utente con un segnale acustico. L'animazione scomparirà e il piano
di cottura imposterà automaticamente il livello di potenza a 15 per
mantenere un'ebollizione delicata.
8. A seconda della pentola utilizzata, il livello di potenza può scendere
automaticamente al livello 15 senza raggiungere il punto di ebollizione
dell'acqua. Per raggiungere il punto di ebollizione, è possibile aumentare
il livello di potenza della zona di cottura in uso. In alternativa, è possibile
provare a utilizzare un'altra padella compatibile con la cottura a induzione.
Se non si vericano le condizioni sopra descritte, suggeriamo di spegnere la
funzione di Boil&Cook e di impostare manualmente i livelli di potenza per
continuare a cucinare.
9. Aggiungere gli alimenti e, se necessario, cambiare il livello di potenza
per regolare l'intensità dell'ebollizione, come richiesto. La selezione della
potenza sarà limitata ai livelli adatti al mantenimento della bollitura (ovvero
i livelli 10 - 18).
NOTA:
• Che l'acqua stia bollendo o meno, dopo circa 15 minuti dall'attivazione
della funzione, il piano di cottura imposta automaticamente il livello di
potenza a 15 e l'animazione scompare.
• A seconda dell'Impostazione di gestione della potenza o della sequenza
di attivazione della zona di cottura, la funzione di Ebollizione assistita
potrebbe non essere disponibile. Il piano di cottura informerà con un
segnale acustico.
• Quando si utilizza questa funzione, non sarà possibile impostare un timer
durante la fase di riscaldamento dell'acqua. Il timer può essere attivato solo
dopo aver ricevuto la notica acustica che l'acqua ha raggiunto il punto di
ebollizione.
• Il sistema è in grado di monitorare il processo di ebollizione, ma è sempre
consigliabile rimanere nelle vicinanze quando il piano di cottura è in uso.
• Se il piano ore la possibilità di utilizzare il Boil&Cook in più zone, potrà
essere attivata solo una funzione Boil&Cook per lato. Durante il processo
di selezione verrà comunque visualizzata l’animazione (snake) sullo stesso
lato per qualche secondo, senza che la funzione possa essere attivata.
INDICATORI
CALORE RESIDUO
Se sul display viene visualizzato "Caldo", signica che la zona di cottura è
calda. L'indicatore si accende anche se la zona non è stata attivata, ma è stata
riscaldata (a causa dell'utilizzo di zone adiacenti o perché vi è stata collocata
una pentola calda).
Quando la zona di cottura si è rareddata, il messaggio "Hot" scompare.
PENTOLA NON CORRETTA O ASSENTE
Il simbolo appare se la pentola non è adatta per la cottura a induzione, non
è posizionata correttamente o non è delle dimensioni adeguate per la zona
di cottura prescelta. Entro 30 secondi dalla selezione, se non viene rilevata
nessuna pentola, la zona di cottura interessata si spegne.
TABELLA DI COTTURA
La tabella di cottura ore suggerimenti di cottura per ogni livello di potenza. La potenza eettiva erogata per ogni livello di potenza dipende dalle dimensioni
della zona di cottura e dalle pentole utilizzate.
LIVELLO DI POTENZA CONSIGLI PER LA COTTURA
Potenza massima (P) Booster* - Portare l'acqua a ebollizione il più rapidamente possibile. Non utilizzare con una padella vuota o con olio/burro.
17 − 18 Portare l'acqua a ebollizione, friggere** i prodotti surgelati.
15 − 16 Mantenere un'ebollizione sostenuta, scottare, rosolare, saltare in padella, dorare.
10 − 14
Mantenere una leggera ebollizione, preriscaldare, grigliare (per un lungo periodo di tempo), saltare, sauté, caramellare,
dorare, pancake.
5 − 9 Sobbollire, stufare, addensare, cuocere a fuoco lento.
3 − 4 Mantenere in caldo, scongelare.
1 − 2 Sciogliere, mantecare (risotto).
Potenza zero (OFF) Il piano cottura è in modalità standby o spento (possibile calore residuo di ne cottura, indicato da "Hot").
*Il Booster è una modalità speciale che utilizza un livello di potenza superiore a 18, per riscaldare l'acqua più velocemente. Questa modalità può essere mantenuta
per un tempo massimo di 10 minuti, a seconda della zona utilizzata. Dopo questo lasso di tempo, la potenza verrà automaticamente ridotta al livello 18.
** Per friggere prodotti surgelati come le patatine fritte, si raccomanda di utilizzare zone di cottura non-Flexi Zone. Se si desidera friggere utilizzando le zone di
cottura Flexi Zone, si consiglia di utilizzare quella anteriore.
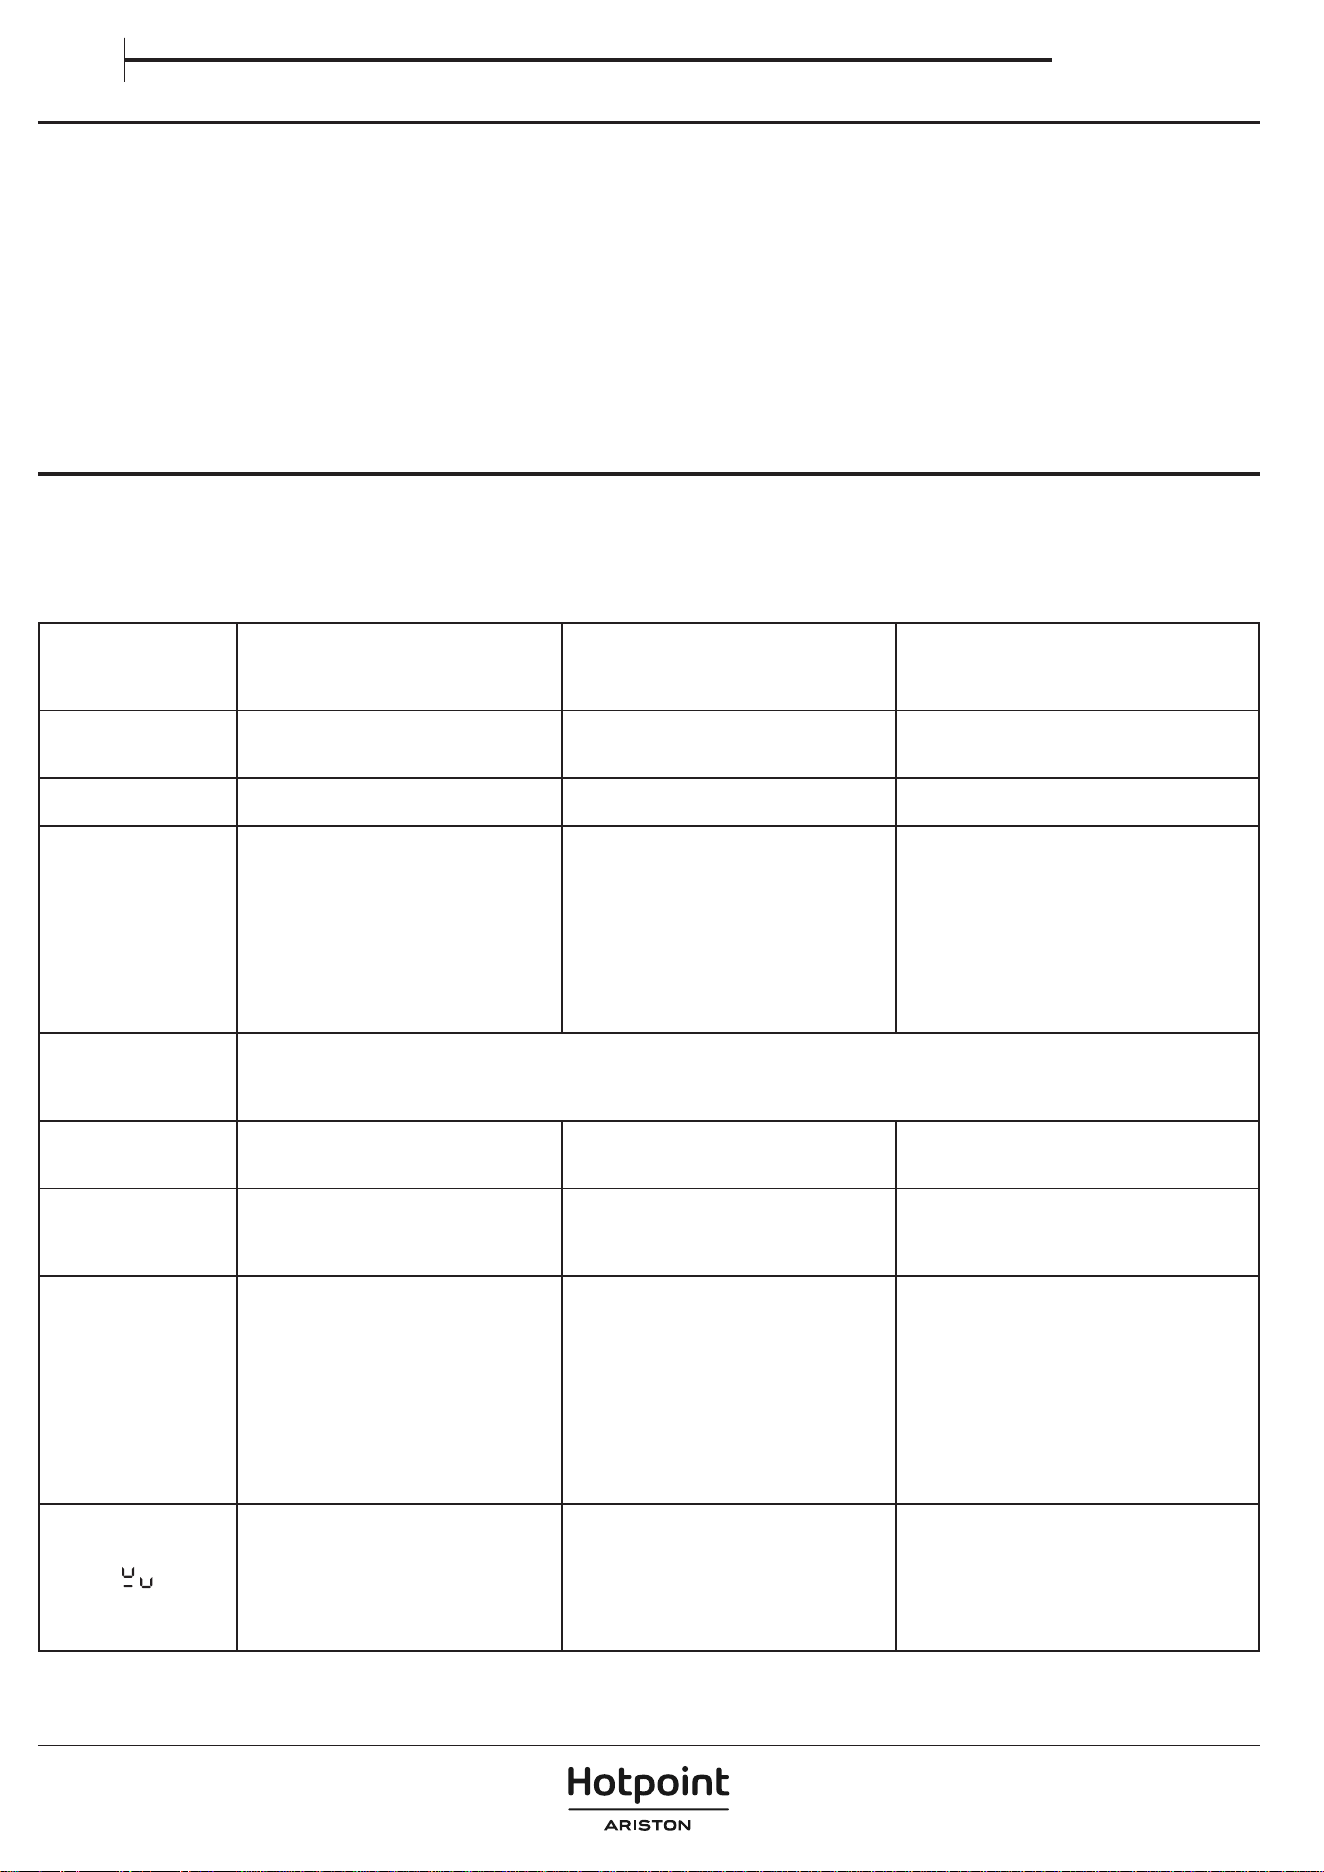
PULIZIA E MANUTENZIONE
Importante:
• Prima di procedere alla pulizia, assicurarsi che le zone di cottura siano
spente e che non compaia l'indicatore di calore residuo (“Hot”).
• Non utilizzare spugne abrasive o pagliette in quanto possono rovinare il
vetro.
• Dopo ciascun utilizzo, pulire il piano di cottura (quando è freddo) per
rimuovere eventuali depositi o macchie di residui di cibo.
• Una supercie non adeguatamente pulita può ridurre la sensibilità dei
pulsanti del pannello di controllo.
• Utilizzare un raschietto solo se il residuo è attaccato al piano di cottura.
Rispettare le istruzioni del produttore del raschietto per evitare di graare
il vetro.
• Lo zucchero o gli alimenti ad alto contenuto di zucchero possono
danneggiare il piano di cottura e devono essere eliminati immediatamente.
• Sale, zucchero e sabbia possono graare la supercie in vetro.
• Utilizzare un panno morbido, carta assorbente da cucina o uno specico
detergente per piani di cottura (seguire le istruzioni del produttore).
• Le tracimazioni di liquidi nelle zone di cottura possono far spostare o
vibrare le pentole.
• Dopo aver pulito il piano di cottura, asciugarlo accuratamente.
RISOLUZIONE DEI PROBLEMI
• Vericare che l'alimentazione elettrica non sia stata interrotta.
• Qualora non si riuscisse a spegnere il piano di cottura dopo l'uso, scollegarlo
dall'alimentazione.
• Se, quando il piano di cottura è acceso, sul display appaiono i codici
alfanumerici, consultare le seguente tabella per le istruzioni.
Note: La presenza di acqua, o di liquidi versati da pentole o da qualsiasi oggetto
appoggiato su un pulsante del piano di cottura, può accidentalmente attivare
o disattivare la funzione di blocco del pannello di controllo.
CODICE
VISUALIZZATO/
PROBLEMA
RILEVATO
DESCRIZIONE POSSIBILI CAUSE SOLUZIONE
F9E0
Collegamento errato del cavo di
alimentazione.
Il collegamento dell'alimentazione non è
esattamente come indicato nella sezione
"Collegamento elettrico".
Effettuare il collegamento dell'alimentazione in
base alla sezione "Collegamento elettrico.
F0EA
Il pannello comandi si spegne a causa di
temperature eccessivamente elevate.
La temperatura interna dei componenti
elettronici è troppo elevata.
Attendere che il piano di cottura si raffreddi
prima di utilizzarlo di nuovo.
F0E9
Il livello di potenza
viene diminuito
automaticamente.
Una zona di
cottura si spegne
automaticamente.
Il piano di
cottura si spegne
automaticamente.
La zona di cottura si spegne a causa di
temperature eccessivamente elevate.
Il livello di potenza viene diminuito, la zona
di cottura si spegne o il piano di cottura si
spegne quando le temperature sono troppo
elevate.
La temperatura interna dei componenti
elettronici è troppo elevata.
La ventilazione del piano di cottura
potrebbe non essere adeguata a garantire il
corretto funzionamento del piano di cottura.
Attendere che la zona di cottura si raffreddi prima
di utilizzarla di nuovo.
Per garantire il corretto funzionamento
dell'apparecchio, il piano di cottura deve
ricevere un'adeguata ventilazione da un
sufficiente apporto di aria fresca. Verificare che
il piano cottura sia stato installato rispettando le
indicazioni descritte nella sezione "Installazione".
Assicurarsi che nessun oggetto ostruisca la parte
posteriore e inferiore del piano di cottura.
F0E2, F0E4, F0E6, F0E8,
F1E1, F2E1, F6E1, F6E2,
F7E5, F7E6, FCE1, FCE2,
FCE3
Scollegare il piano di cottura dalla rete elettrica.
Attendere alcuni secondi (più di 10), quindi ricollegare il piano di cottura all'alimentazione.
Se il problema persiste, chiamare il centro assistenza e specificare il codice di errore che compare a display.
d E
[quando il piano di
cottura è spento]
Il piano di cottura non si riscalda.
Le funzioni non si attivano.
MODALITÀ DEMO attiva. Seguire le istruzioni della sezione "Primo utilizzo".
Una funzione speciale
non si attiva e il piano
di cottura emette un
segnale acustico.
Il piano di cottura non consente di attivare
una funzione speciale.
Il regolatore di potenza limita l'attivazione della
funzione speciale in base all'impostazione di
gestione della potenza selezionata per il piano
di cottura (ad esempio, 2,5 kW).
Vedere la sezione "Gestione della potenza".
Quando si sceglie un
livello di potenza o
si utilizza la funzione
Booster, il livello di
potenza diminuisce
automaticamente.
Il piano di cottura imposta automaticamente
il livello di potenza massimo disponibile
(anche inferiore a quello impostato) per
garantire l'utilizzo della zona di cottura.
Il regolatore di potenza limita l'attivazione della
funzione speciale in base all'impostazione di
gestione della potenza selezionata per il piano
di cottura (ad esempio, 2,5 kW).
La funzione Booster può avere una durata
diversa a seconda della zona utilizzata. Una
volta trascorso il tempo di Booster, la potenza
verrà automaticamente ridotta al livello 18.
La ventilazione del piano di cottura potrebbe
non essere adeguata a garantire il corretto
funzionamento del piano di cottura.
Vedere la sezione "Gestione della potenza" o
"Funzione Booster".
Per garantire il corretto funzionamento
dell'apparecchio, il piano di cottura deve ricevere
un'adeguata ventilazione da un sufficiente
apporto di aria fresca. Verificare che il piano cottura
sia stato installato rispettando le indicazioni
descritte nella sezione "Installazione". Assicurarsi
che nessun oggetto ostruisca la parte posteriore e
inferiore del piano di cottura.
La pentola non viene rilevata.
La zona di cottura si spegne dopo 30 secondi.
Il simbolo appare se la pentola non è adatta
per la cottura a induzione, non è posizionata
correttamente o non è delle dimensioni
adeguate per la zona di cottura prescelta.
Entro 30 secondi dalla selezione, se non
viene rilevata nessuna pentola, la zona di
cottura interessata si spegne.
Se la pentola è adatta alla cottura a induzione
(vedere la sezione "Accessori") e posizionata
correttamente sulla zona di cottura richiesta,
provare a utilizzarla su una zona di cottura più
piccola. Altrimenti, utilizzare pentole adeguate
(vedere la sezione "Accessori").
Manuale d’uso
IT
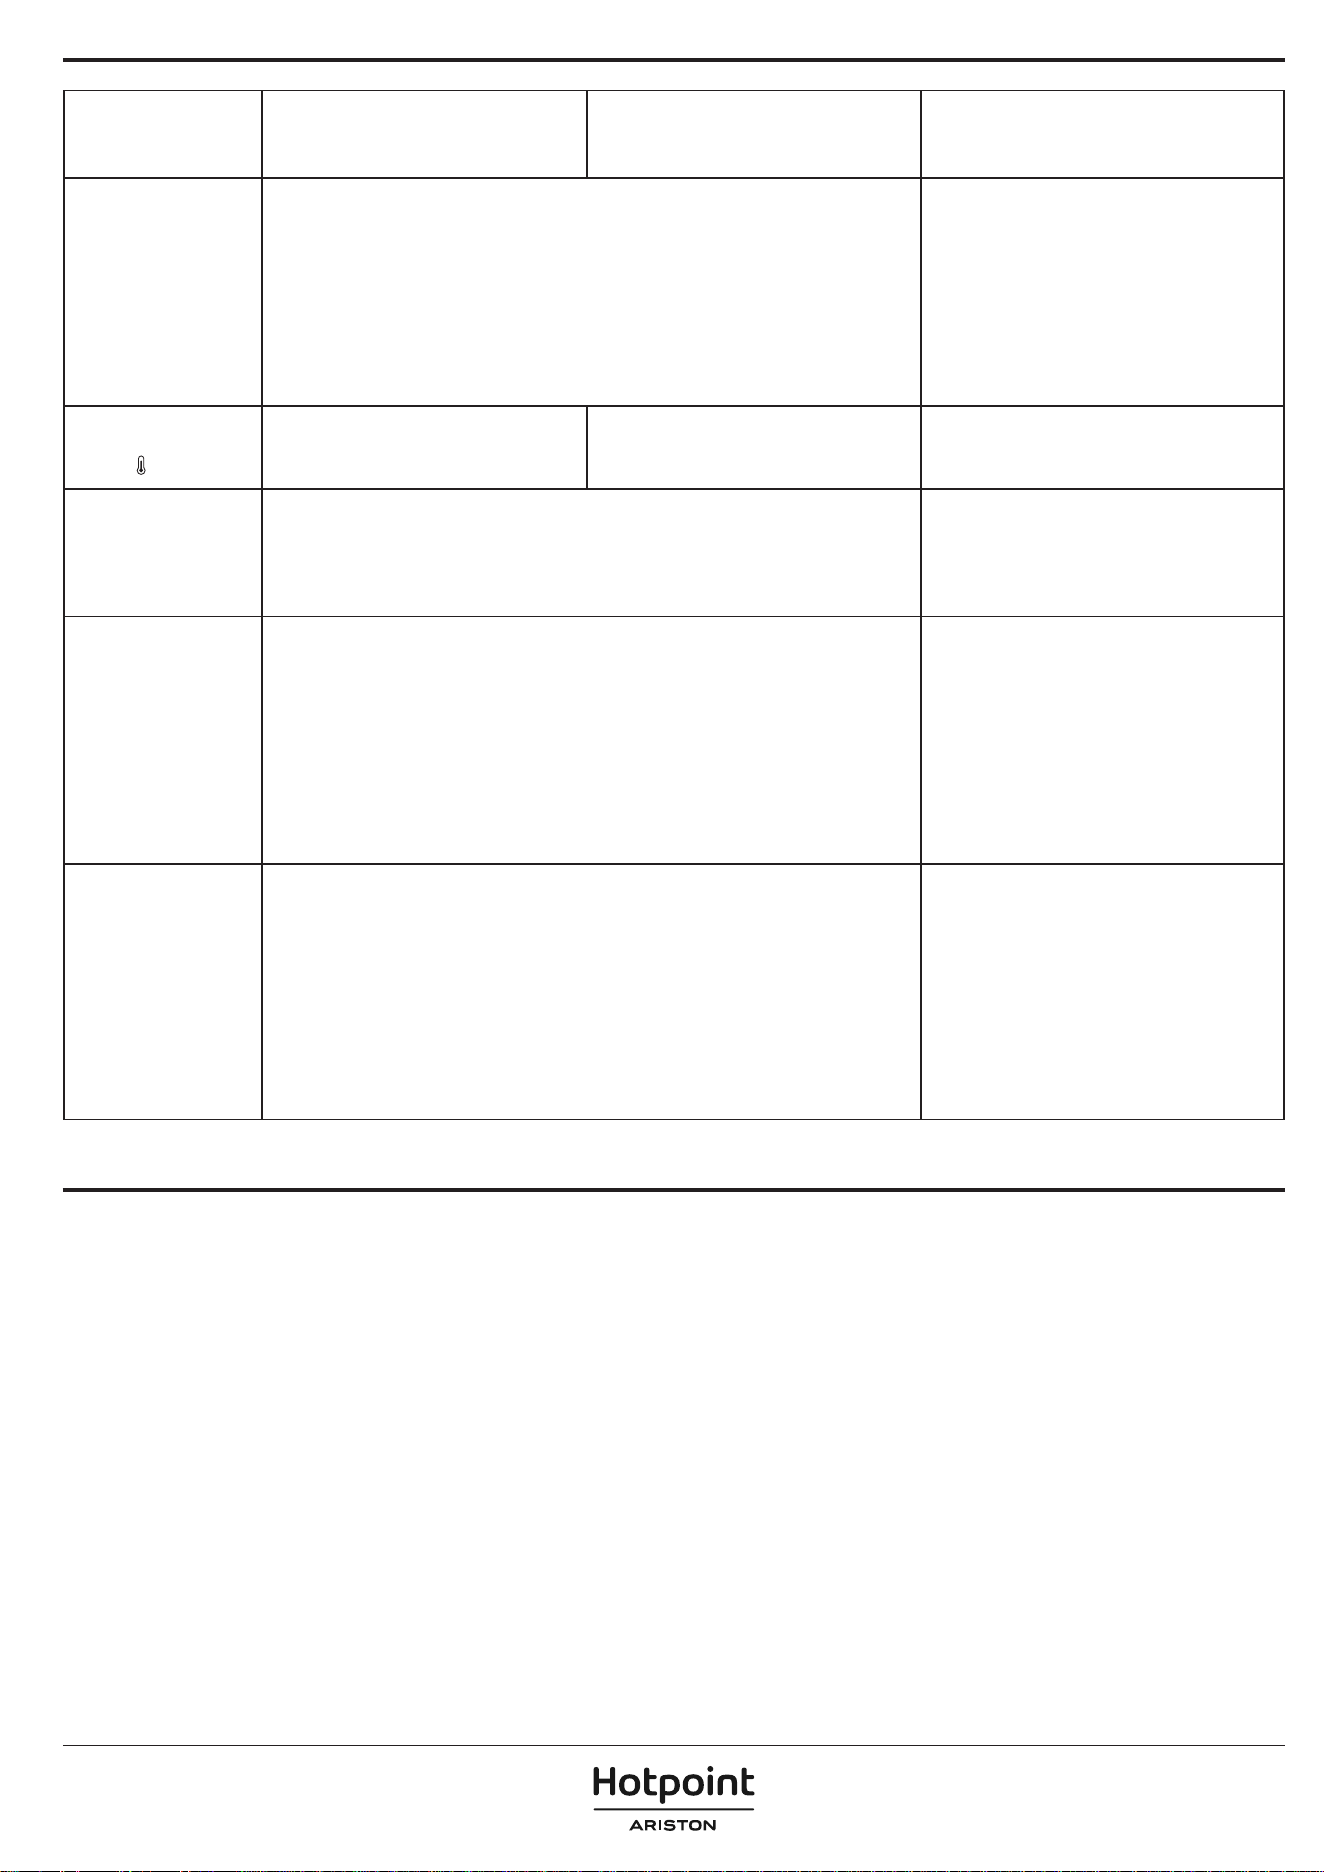
CODICE
VISUALIZZATO/
PROBLEMA
RILEVATO
DESCRIZIONE POSSIBILI CAUSE SOLUZIONE
Il piano di cottura emette
due brevi suoni acustici
e poi si spegne da solo. Il
messaggio "OFF" viene
quindi visualizzato per un
massimo di 60 secondi,
durante i quali il piano di
cottura non può essere
riacceso e ripete i due
brevi suoni acustici ogni
5 secondi.
Il traboccamento dell'acqua, il traboccamento degli alimenti e/o un oggetto posizionato
sui pulsanti del pannello di controllo possono simulare il proprio dito e attivare o disattivare
accidentalmente uno qualsiasi dei pulsanti del piano di cottura:
• il tasto ON/OFF, causando lo spegnimento involontario del piano di cottura;
• il pulsante di blocco dei tasti, causando l'attivazione indesiderata della funzione di
blocco dei tasti se premuto ininterrottamente per più di 3 secondi. La funzione rimane
attiva anche dopo lo spegnimento del piano di cottura, con l'icona del blocco tasti e il
LED acceso;
• il tastierino di scorrimento, causando una variazione indesiderata dei livelli di potenza.
Il piano di cottura si spegne da solo (mostrando il messaggio "OFF") se non viene pulito
entro 8 secondi.
Asciugare e/o pulire e/o rimuovere l'oggetto in
modo da poter riaccendere il piano di cottura 60
secondi dopo la comparsa del messaggio OFF.
Se la funzione di blocco dei tasti è stata attivata
accidentalmente, premere il pulsante di blocco
dei tasti per 3 secondi per disattivarla.
Prema il pulsante ON/OFF per accendere il piano
di cottura.
L'acqua non bolle
quando si utilizza Heat
Control (
).
L'acqua non bolle quando la temperatura è
impostata con la funzione Heat Control.
Si utilizza il Heat Control per far bollire l'acqua.
Utilizzare l'Ebollizione assistita (Boil&Cook) o la
funzione Booster.
Quando si posizionano
le pentole, si sente un
scatto e/o un ticchettio.
Questi continui scatti e/o ticchettii si verificano quando il piatto non è in grado di ricevere la
piena potenza erogata per il livello di potenza impostato.
Il diametro della pentola può essere inferiore al minimo indicato nel manuale d'uso per
determinate zone di cottura. Anche se si utilizza una padella con le dimensioni corrette,
alcuni modelli di padella hanno una base parzialmente coperta da inserti metallici (o senza
una distribuzione ferromagnetica uniforme), e non sempre funzionano come previsto.
Utilizzare una padella con un diametro superiore
al minimo indicato nel manuale per le zone di
cottura specifiche, oppure utilizzare una padella
più performante (fare riferimento alla sezione
"Accessori").
Il piano di cottura è
spento.
Il piano di cottura si spegnerà automaticamente nelle seguenti situazioni:
• In caso di traboccamento dell'acqua, di traboccamento degli alimenti o di oggetti
posizionati sui pulsanti del pannello di controllo che potrebbero attivare accidentalmente
il pulsante ON/OFF. Se questi elementi non vengono rimossi entro 8 secondi, il piano di
cottura si spegnerà automaticamente producendo un suono.
• In assenza di interazione con il pannello di controllo per più di 30 secondi, e nessuna
zona di cottura è attiva.
• Se non viene rilevata alcuna pentola per più di 30 secondi e non vi è stata alcuna
interazione con il pannello di controllo nello stesso periodo.
• Il tempo di lavoro massimo per un livello di potenza o una funzione è trascorso e non vi
è stata alcuna interazione con il piano di cottura per più di 30 secondi.
• Altri casi non specificati qui.
Per ulteriori informazioni, consultare la sezione
"Uso quotidiano".
Accendere il piano di cottura manualmente.
Durante l'utilizzo della
funzione
Ebollizione
assistita (Boil&Cook)
,
l'acqua non raggiunge il
punto di ebollizione.
o
A seconda della pentola o della quantità d'acqua utilizzata, il punto di ebollizione potrebbe
non essere raggiunto.
Che l'acqua sia in ebollizione o meno, il livello di potenza può scendere automaticamente
a 15 dopo circa 15 minuti dall'attivazione della funzione.
Se l'acqua non bolle, è possibile portarla a
ebollizione aumentando il livello di potenza della
zona di cottura in uso. In alternativa, si può provare
a utilizzare un'altra padella adatta alla cottura a
induzione.
La funzione non indica
che il punto di ebollizione
è stato raggiunto entro
circa 90 secondi da
quando l'acqua inizia a
bollire.
Se la funzione non indica l'ebollizione entro circa
90 secondi da quando l'acqua inizia a bollire, si
consiglia di disattivare la funzione Boil&Cook e
di utilizzare i livelli di potenza per continuare la
cottura.
I piani cottura a induzione possono produrre sibili o crepitii durante il normale
funzionamento.
Questi rumori provengono in realtà dalle pentole e sono legati alle caratteristiche
dei fondi delle padelle (ad esempio, quando i fondi sono composti da diversi
strati di materiale o sono irregolari).
Possono variare in base al tipo di pentola utilizzata e alla quantità di alimenti
contenuti, e non sono il sintomo di qualcosa di sbagliato.
I piani di cottura a induzione possono produrre continui scatti e/o ticchettii con
una pentola/padella posizionata. Questi suoni possono vericarsi quando il
piatto non è in grado di ricevere l'intera potenza erogata per il livello di potenza
impostato. Utilizzare una padella con un diametro superiore al minimo indicato
nel manuale per le zone di cottura speciche, oppure utilizzare una padella più
performante (fare riferimento alla sezione "Accessori").
Il traboccamento dell'acqua, il traboccamento degli alimenti e/o un oggetto
posizionato sui pulsanti del pannello di controllo possono simulare il proprio
dito e attivare o disattivare accidentalmente uno qualsiasi dei pulsanti del piano
di cottura, oltre a produrre segnali acustici dovuti al contatto tra gli oggetti e i
pulsanti. Se questi elementi non vengono rimossi entro 8 secondi, il piano di
cottura si spegne automaticamente producendo un suono che viene ripetuto
ogni 5 secondi nché l'oggetto o l'acqua non vengono rimossi dal pannello di
controllo, anche dopo lo spegnimento. Per evitare lo spegnimento, rimuovere
eventuali liquidi versati dall'interfaccia utente e asciugarla accuratamente entro
8 secondi, oppure utilizzare la funzione di pulizia che ore 30 secondi per la
pulizia e l'asciugatura.
Ricordarsi che il pulsante ON/OFF sarà sempre attivo.
SUONI PRODOTTI DURANTE IL FUNZIONAMENTO

SERVIZIO ASSISTENZA TECNICA
PRIMA DI CHIAMARE IL SERVIZIO ASSISTENZA TECNICA:
1. Provare a risolvere da soli il problema seguendo le indicazioni della sezione
RISOLUZIONE DEI PROBLEMI.
2. Spegnere e riaccendere l'apparecchio per accertarsi che l'inconveniente
persista.
SE IL GUASTO PERSISTE ANCHE DOPO I CONTROLLI DI CUI SOPRA,
CONTATTARE IL SERVIZIO ASSISTENZA TECNICA PIÙ VICINO.
Quando si contatta il nostro servizio assistenza tecnica, indicare sempre:
• una breve descrizione del guasto;
• il tipo e il modello esatto dell'apparecchio;
XXXXXXXXXXXXXXX
XXXXXXXXXXXXXXXXXXXXXX
Made in X
Type: XXXMod.: XXX
01
XXXX XXX XXXXXXX XXXX XXXXX
XXXXXXXXXXXXXXXXXXXX
XXXXXXXXXXXXXXXXXXXXXXXXXXXXXXXXXXXXXXXXXXXXXXXXXXXXXXXXXXXXXXXXXXXXXXXXX
• Ind. C.
• il numero di serie (il numero dopo le lettere SN sulla targhetta situata sotto
l'apparecchio). Il numero di serie è anche indicato nella documentazione;
Mod.
Ind.C.
SN:
Prod.N.
xxxx xxxx xxxx
xxxx xxxx xxxx
xxxx xxxx xxxx
xxx xxx
PRODUCT
INFORMATION
• il proprio indirizzo completo;
• il proprio numero di telefono.
Qualora si renda necessaria una riparazione, rivolgersi a un servizio assistenza
tecnica autorizzato (a garanzia dell'utilizzo di ricambi originali e di una corretta
riparazione).
Per le linee guida, la documentazione standard e altre informazioni sui prodotti:
• Utilizzando il codice QR nel proprio apparecchio;
• Visitando il nostro sito web docs. hotpoint. eu;
• Oppure, contattare il Servizio Assistenza Tecnica (al numero di telefono riportato sul libretto di garanzia). Prima di
contattare il Servizio Assistenza Clienti, prepararsi a fornire i codici riportati sulla targhetta matricola del prodotto.
400020020492
Manuale d’uso
IT