
Technical Support and E-Warranty Certificate
www.vevor.com/support
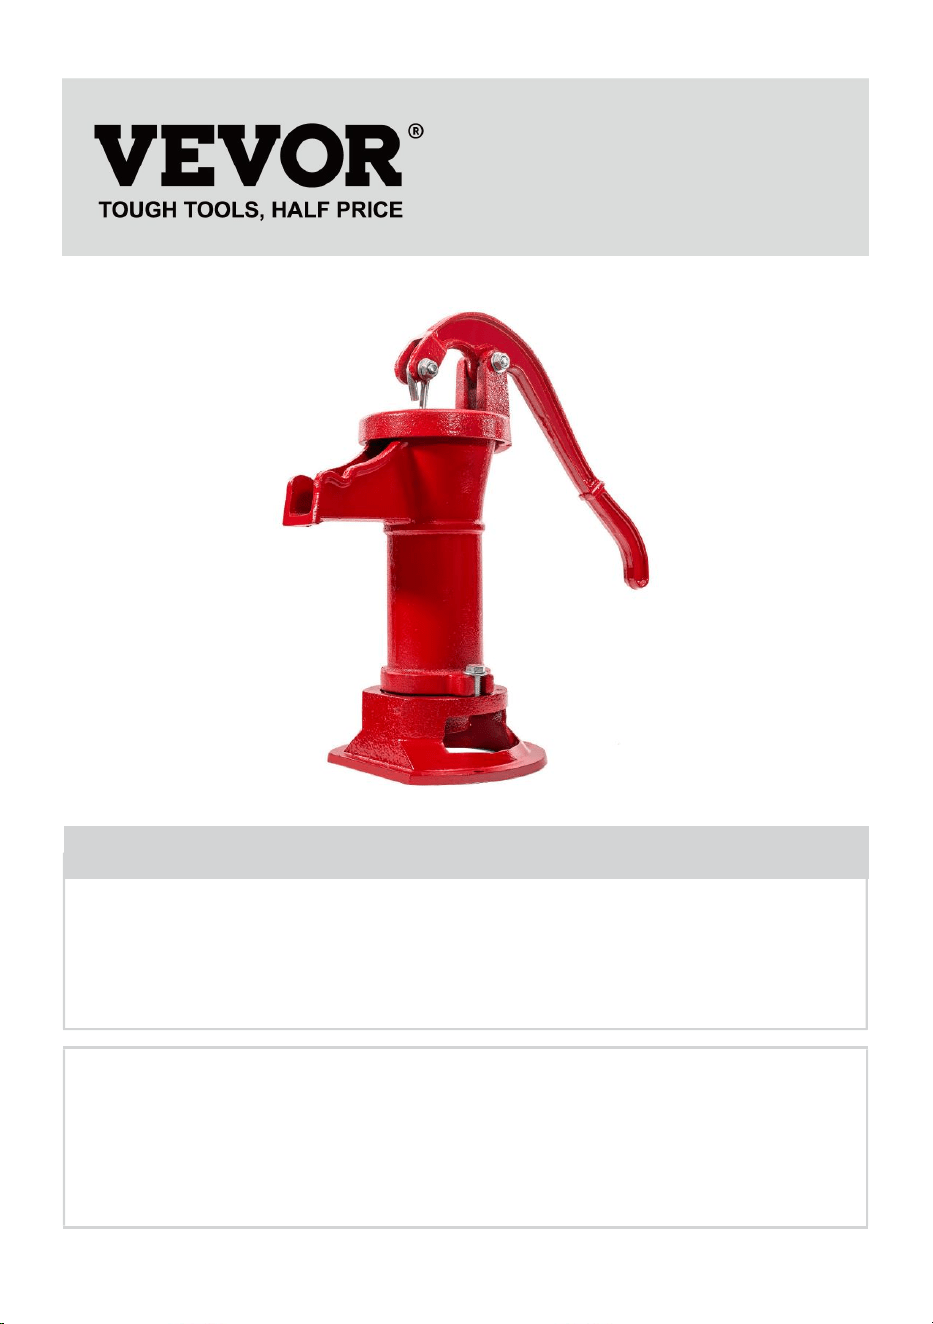
HAND WELL PUMP
OPERATION MANUAL
MODEL:HC-1005
We continue to be committed to provide you tools with competitive price.
"Save Half", "Half Price" or any other similar expressions used by us only represents an
estimate of savings you might benefit from buying certain tools with us compared to the major
top brands and does not necessarily mean to cover all categories of tools offered by us. You
are kindly reminded to verify carefully when you are placing an order with us if you are
actually saving half in comparison with the top major brands.
- 1 -
MODEL: HC-1005
Have product questions? Need technical support? Please feel free to
contact us:
Technical Support and E-Warranty Certificate
www.vevor.com/support
NEED HELP? CONTACT US!
This is the original instruction, please read all manual instructions
carefully before operating. VEVOR reserves a clear interpretation of our
user manual. The appearance of the product shall be subject to the
product you received. Please forgive us that we won't inform you again if
there are any technology or software updates on our product.
HAND WELL PUMP

- 2 -
Warning-To reduce the risk of injury, user must read instructions
manual carefully.
SAFETY WARNINGS
Read all safety warnings and instructions. Failure to follow the warnings
and instructions may result in injury and/or property damage. Save all
warnings and instructions for future reference.
The warning and safety instructions in this manual are not meant to cover
all possible conditions and situations that may occur. Common sense,
caution and care must be exercised when operating or cleaning tools and
equipment.
Always contact your dealer, distributor, service agent or manufacturer
about problems or conditions you do not understand before operating the
product.
Keep the work area clean and well lit. A cluttered work area may
cause accidents. Never allow children to use this product. When
operating this product, keep children and animals at a safe distance
from the work area.
When not in use, store product in a secure, dry and safe place. The
storage area should be out of the reach of children. Maintain this
product with care.
WARNING: This product contains or, when used, produces a chemical
known to the State of California to cause cancer and birth defects or
other reproductive harm. (California Health & SAFETY CODE §
25249.5, ET SEQ.)
Use for pumping water only.
Do not modify the pump.
Do not allow pump to freeze.
Periodically inspect pump for wear or damaged parts. Discontinue use
if worn or damaged.
- 3 -
Wear safety glasses at all times when working with the Pitcher Pump
Do not modify the machine.
Use for pumping water only.
Do not modify the machine.
SAVE THESE WARNINGS.
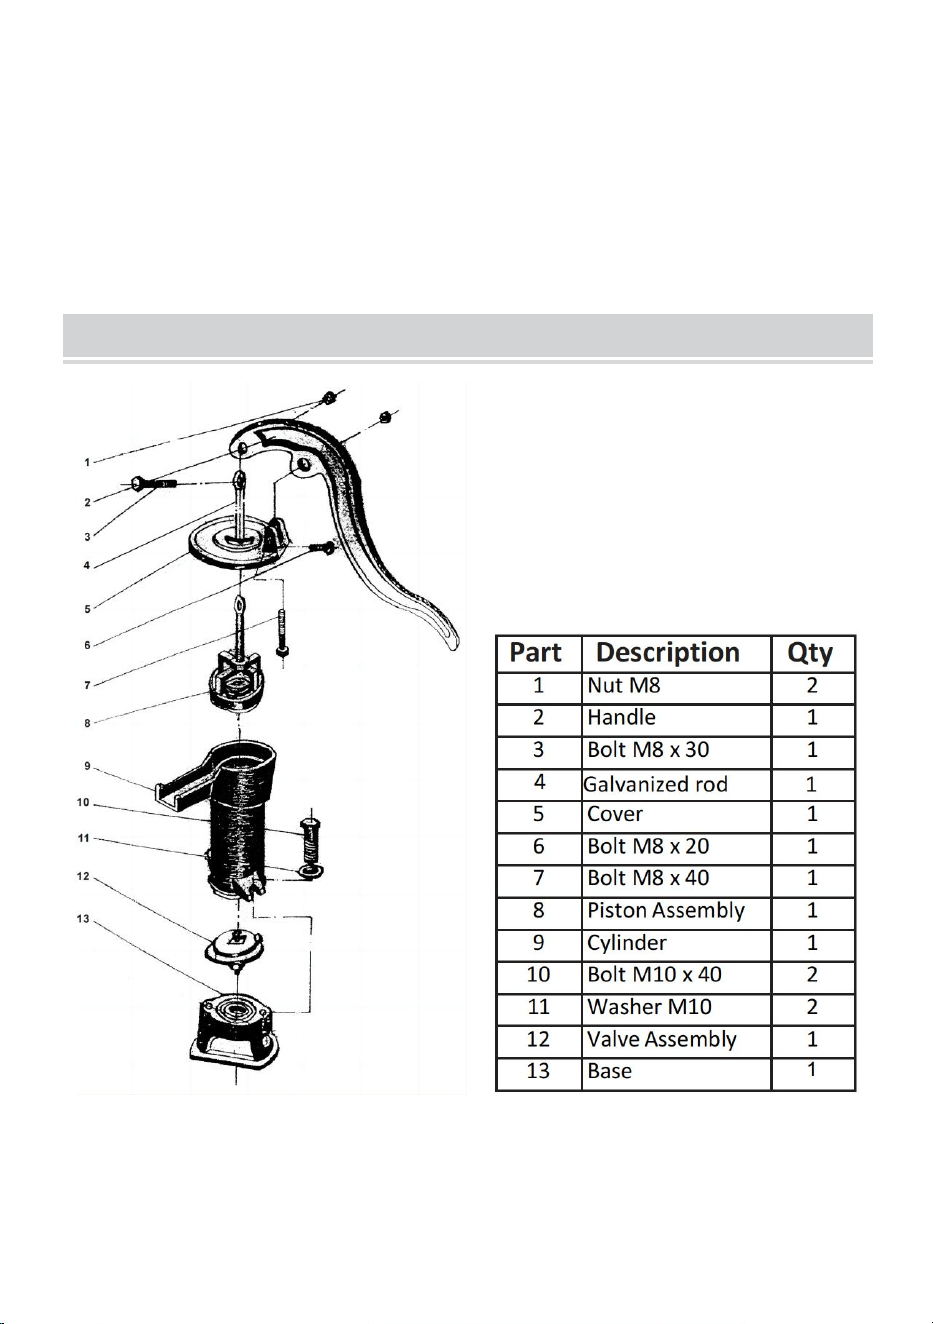
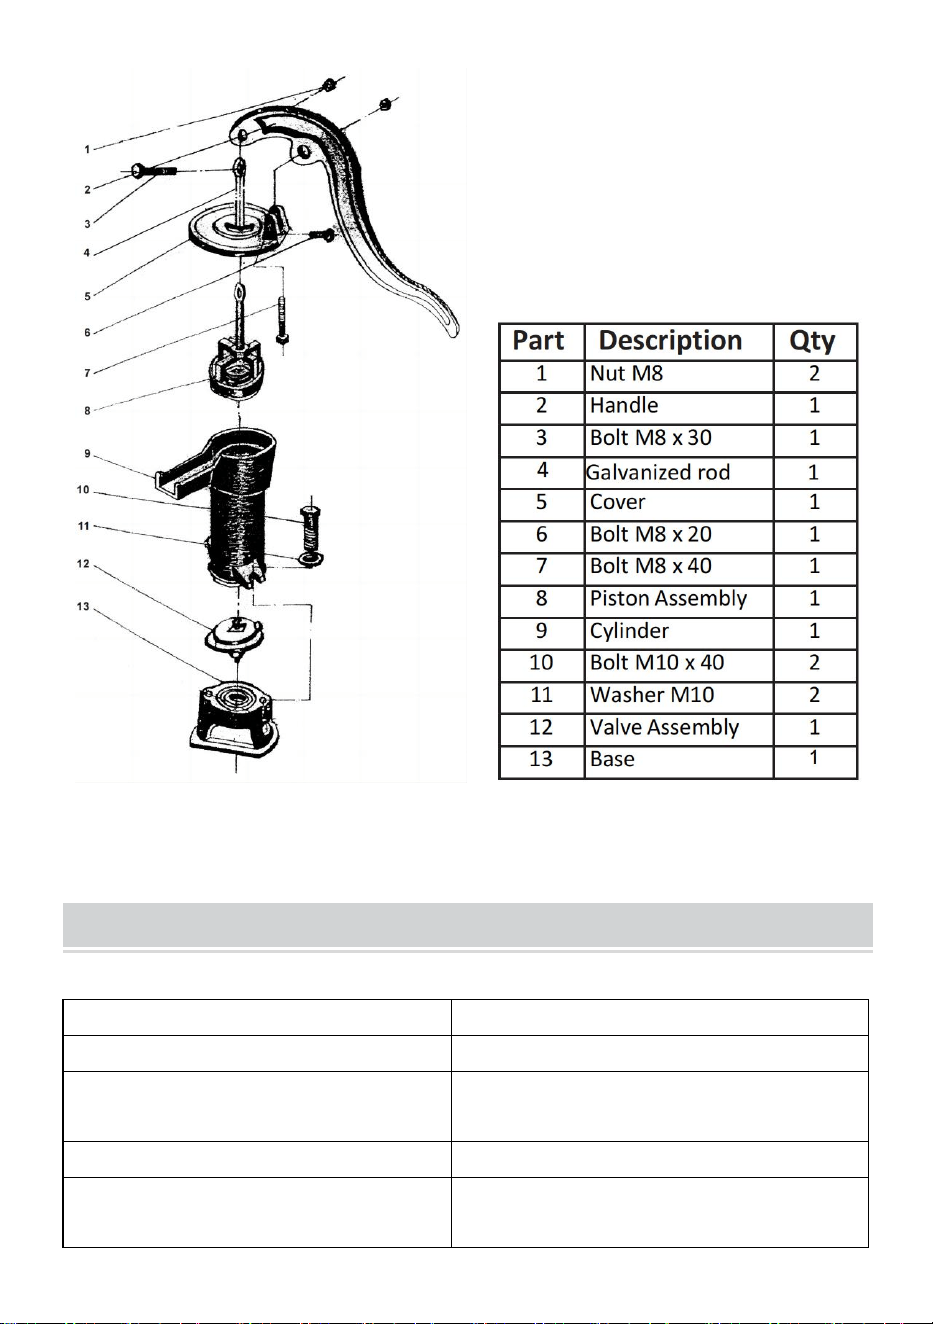
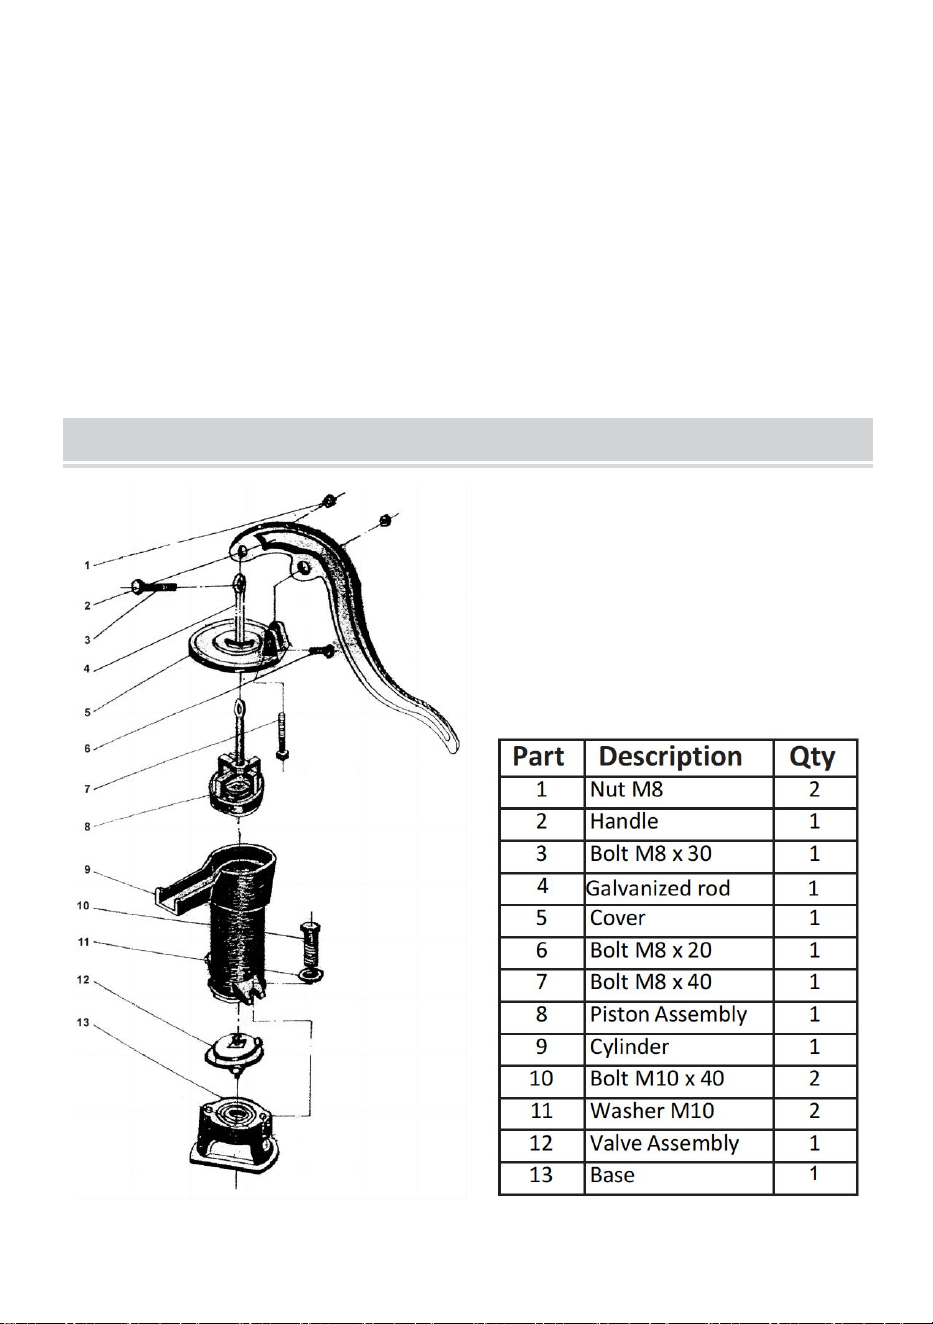
PARTS INFORMATION

- 4 -
SPECIFICATIONS OF THE PRODUCTS
Model
HC-1005
Max suction distance
7.6 m (25 ft)
Bottom internal thread caliber
G1-5/8"
Base diameter
185mm (7.3")
Mounting dimension
Bottom: 3*Փ8mm;
Hole distance: 148mm
ASSEMBLY / OPERATION
ASSEMBLY
1. Place the base (13) on a smooth, flat surface.
2. Set the 2. Valve Assembly (12) in the circle groove of the Base (13). It
will only fit with the metal plate up.
3. Put the Cylinder (9) on the Valve Assembly (12). Line up the Cylinder (9)
so that the bolt holders on each side of sit over the two drilled openings on
the Base (13). The spout on the Cylinder (9) should rest over the flat side
of the Base (13).
4. Slip a Bolt (10) and a Washer (11) into the bolt holder on the Cylinder (9).
Hand tighten. Repeat the procedure on the other side. Then, wrench
tighten both bolts (10).
5. Set the Piston Assembly (8) with the screw eyelet up, down into the
Cylinder (9).
6. Put the Cover (5) onto the Cylinder (9) so the screw eyelet on the Piston
Assembly (8) fits through the opening in the center of the cover (5). The
large bolt hole on the Cover (5) should sit opposite the spout on the
Cylinder (9) with a crescent wrench, tighten the large bolt (6) on the cover
(5) opposite the spout.

- 5 -
7. Attach the 7. Handle (2) to the Piston Assembly (8) using a Bolt (3) and
Nut (1). Make sure the hole on the Handle (2) that attaches to the Cover (5)
rests between the bolt housing on the Cover (5). If necessary, rotate
the screw eyelet on the Piston Assembly (8) to find the best fit. Tighten the
Nut (1). Next, run the Bolt (7) through the bolt housing on the Cover (5) and
the Handle (2) and tighten the Nut (1).
8. Attach 1-1/4” NPT threaded water source pipe onto the threaded inlet on
the bottom of the pump.
9. Secure the pump by screwing the base into a stable surface.
OPERATION
1.This pump needs to be primed before every use. Keep a pitcher (not
included) of water near the pump for this purpose. Pump the handle up and
down while pouring about a quart of water into the top of the pump to prime
it and start the water flow.
NOTE: DO NOT STOP PUMPING THE HANDLE UNTIL FINISHED.
Stopping, even momentarily, will cause the pump to lose its prime and no
longer work until primed again.
2. Do not pump drinking water from this pump.
ASSEMBLY / OPERATION
PLEASE READ THE FOLLOWING CAREFULLY
The manufacturer and/or distributor has provided the parts list and
assembly diagram in this manual as a reference tool only. Neither the
manufacturer nor distributor makes any representation or warranty of any
kind to the buyer that he or she is qualified to make any repairs to the
product or that he or she is qualified to replace any parts of the product. In
fact, the manufacturer and/or distributor expressly states that all repairs
and parts replacements should be undertaken by certified and licensed
technicians and not by the buyer. The buyer assumes all risk and liability
arising out of his or her repairs to the original product or replacement parts
thereto or arising out of his or her installation of replacement parts thereto.

- 6 -
Manufacturer: Shanghaimuxinmuyeyouxiangongsi
Address: Shuangchenglu 803nong11hao1602A-1609shi, baoshanqu,
shanghai 200000 CN.
EC REP: E-CrossStu GmbH.
Mainzer Landstr.69, 60329 Frankfurt am Main.
UK REP: YH CONSULTING LIMITED.
C/O YH Consulting Limited Office 147, Centurion House, London Road,
Staines-upon-Thames, Surrey, TW18 4AX
Imported to AUS: SIHAO PTY LTD.
1 ROKEVA STREETEASTWOOD NSW 2122 Australia
Imported to USA: Sanven Technology Ltd.
Suite 250, 9166 Anaheim Place, Rancho Cucamonga, CA 91730


- 2 -
Technique Certificat d'assistance et de garantie électronique
www.vevor.com/support
POMPE DE PUITS MANUELLE
MANUEL D'UTILISATION
MODÈLE : HC-1005
We continue to be committed to provide you tools with competitive price.
"Save Half", "Half Price" or any other similar expressions used by us only represents an
estimate of savings you might benefit from buying certain tools with us compared to the major
top brands and does not necessarily mean to cover all categories of tools offered by us. You
are kindly reminded to verify carefully when you are placing an order with us if you are
actually saving half in comparison with the top major brands.

- 1 -
MODÈLE: HC-1005
Have product questions? Need technical support? Please feel free to
contact us:
Technical Support and E-Warranty Certificate
www.vevor.com/support
NEED HELP? CONTACT US!
This is the original instruction, please read all manual instructions
carefully before operating. VEVOR reserves a clear interpretation of our
user manual. The appearance of the product shall be subject to the
product you received. Please forgive us that we won't inform you again if
there are any technology or software updates on our product.
HAND WELL PUMP

- 2 -
Avertissement - Pour réduire le risque de blessure, l'utilisateur
doit lire attentivement le manuel d'instructions.
SAFETY WARNINGS
Lisez tous les avertissements et instructions de sécurité. Le non-respect
des avertissements et des instructions peut entraîner des blessures et/ou
des dommages matériels. Conservez tous les avertissements et
instructions pour référence ultérieure.
Les avertissements et consignes de sécurité contenus dans ce manuel ne
sont pas destinés à couvrir toutes les conditions et situations possibles qui
peuvent se produire. Il convient de faire preuve de bon sens, de prudence
et de soin lors de l'utilisation ou du nettoyage des outils et équipements.
Contactez toujours votre revendeur, distributeur, agent de service ou
fabricant en cas de problèmes ou de conditions que vous ne comprenez
pas avant d’utiliser le produit.
Maintenez la zone de travail propre et bien éclairée. Une zone de
travail encombrée peut provoquer des accidents. Ne laissez jamais les
enfants utiliser ce produit. Lorsque vous utilisez ce produit, maintenez
les enfants et les animaux à une distance sécuritaire de la zone de
travail.
Lorsque vous ne l'utilisez pas, rangez le produit dans un endroit sûr,
sec et sécurisé. La zone de stockage doit être hors de portée des
enfants. Entretenez ce produit avec soin.
AVERTISSEMENT : Ce produit contient ou, lorsqu'il est utilisé, produit
une substance chimique reconnue par l'État de Californie comme
causant le cancer, des malformations congénitales ou d'autres
troubles de la reproduction. (CODE DE LA SANTÉ ET DE LA
SÉCURITÉ DE LA CALIFORNITÉ § 25249.5, ET SEQ.)
Utiliser uniquement pour pomper de l'eau.
Ne pas modifier la pompe.

- 3 -
Ne laissez pas la pompe geler.
Inspectez régulièrement la pompe pour détecter toute trace d'usure ou
de dommages. Cessez toute utilisation si les pièces sont usées ou
endommagées.
Portez toujours des lunettes de sécurité lorsque vous travaillez avec la
pompe à pichet
Ne pas modifier la machine.
Utiliser uniquement pour pomper de l'eau.
Ne pas modifier la machine.
CONSERVEZ CES AVERTISSEMENTS.
PARTS INFORMATION
- 4 -
SPECIFICATIONS OF THE PRODUCTS
Modèle
HC-1005
Distance d'aspiration maximale
7,6 m (25 pi)
Calibre de filetage interne
inférieur
G1-5/8"
Diamètre de la base
185 mm (7,3 po)
Dimensions de montage
Bas : 3*Փ8mm ;
Distance entre les trous : 148 mm

- 5 -
ASSEMBLY / OPERATION
ASSEMBLÉE
1. Placez la base (13) sur une surface lisse et plane.
2. Placez le 2ème ensemble de soupapes (12) dans la rainure circulaire de
la base (13). Il ne s'adaptera qu'avec la plaque métallique vers le haut.
3. Placez le cylindre (9) sur l'ensemble de soupape (12). Alignez le cylindre
(9) de manière à ce que les supports de boulon de chaque côté reposent
sur les deux ouvertures percées sur la base (13). Le bec du cylindre (9)
doit reposer sur le côté plat
de la Base (13).
4. Insérez un boulon (10) et une rondelle (11) dans le support de boulon du
cylindre (9). Serrez à la main. Répétez la procédure de l'autre côté.
Ensuite, serrez les deux boulons (10) à l'aide d'une clé.
5. Placez l'ensemble piston (8) avec l'œillet de vis vers le haut et vers le
bas dans le cylindre (9).
6. Placez le couvercle (5) sur le cylindre (9) de manière à ce que l'œillet de
vis de l' ensemble piston (8) passe par l'ouverture au centre du couvercle
(5). Le grand trou de boulon du couvercle (5) doit se trouver en face du bec
verseur du
Cylindre (9) avec une clé à molette, serrer le gros boulon (6) sur le
couvercle (5) en face du bec .
7. Fixez la poignée (2) à l'ensemble piston (8) à l'aide d'un boulon (3) et
d'un écrou (1). Assurez-vous que le trou de la poignée (2) qui se fixe au
couvercle (5) repose entre le boîtier du boulon sur le couvercle (5). Si
nécessaire, faites pivoter
l'œillet de vis sur l'ensemble piston (8) pour trouver le meilleur ajustement.
Serrez l'écrou (1). Ensuite, faites passer le boulon (7) à travers le boîtier du
boulon sur le couvercle (5) et la poignée (2) et serrez l'écrou (1).
8. Fixez le tuyau d’alimentation en eau fileté NPT de 1-1/4 po sur l’entrée
filetée située au bas de la pompe.
9. Fixez la pompe en vissant la base sur une surface stable.

- 6 -
OPÉRATION
1. Cette pompe doit être amorcée avant chaque utilisation. Gardez un
pichet (non inclus) d'eau à proximité de la pompe à cet effet. Pompez la
poignée de haut en bas tout en versant environ un litre d'eau dans le haut
de la pompe pour l'amorcer et démarrer le débit d'eau.
REMARQUE : NE PAS ARRÊTER DE POMPER LA POIGNÉE AVANT
D'AVOIR TERMINÉ. Un arrêt, même momentané, entraînerait la perte
d'amorçage de la pompe et son arrêt de fonctionnement jusqu'à ce qu'elle
soit à nouveau amorcée.
2. Ne pompez pas d’eau potable à partir de cette pompe.
ASSEMBLY / OPERATION
VEUILLEZ LIRE ATTENTIVEMENT CE QUI SUIT
Le fabricant et/ou le distributeur a fourni la liste des pièces et le schéma
d'assemblage dans ce manuel à titre d'outil de référence uniquement. Ni le
fabricant ni le distributeur ne font aucune déclaration ni ne donnent aucune
garantie à l'acheteur quant à sa qualification pour effectuer des réparations
sur le produit ou quant à sa qualification pour remplacer des pièces du
produit. En fait, le fabricant et/ou le distributeur déclare expressément que
toutes les réparations et tous les remplacements de pièces doivent être
effectués par des techniciens certifiés et agréés et non par l'acheteur.
L'acheteur assume tous les risques et responsabilités découlant de ses
réparations sur le produit d'origine ou des pièces de rechange de celui-ci
ou découlant de son installation de pièces de rechange sur celui-ci.
Fabricant : Shanghaimuxinmuyeyouxiangongsi
Adresse : Shuangchenglu 803nong11hao1602A-1609shi, baoshanqu,
Shanghai 200000 CN.
REPRÉSENTANT DE LA CE : E-CrossStu GmbH .
Mainzer Landstr.69, 60329 Francfort-sur-le-Main.

- 7 -
REPRÉSENTANT DU ROYAUME-UNI : YH CONSULTING LIMITÉE.
A/S YH Consulting Limited Bureau 147, Centurion House, London Road,
Staines-upon-Thames, Surrey, TW18 4AX
Importé en AUS : SIHAO PTY LTD.
1 ROKEVA STREET EASTWOOD NSW 2122 Australie
Importé aux États-Unis : Sanven Technology Ltd.
Suite 250, 9166 Anaheim Place, Rancho Cucamonga, CA 9173 0


- 2 -
Technisch Support und E-Garantie-Zertifikat
www.vevor.com/support
HANDBRUNNENPUMPE
BEDIENUNGSANLEITUNG
MODELL: HC-1005
We continue to be committed to provide you tools with competitive price.
"Save Half", "Half Price" or any other similar expressions used by us only represents an
estimate of savings you might benefit from buying certain tools with us compared to the major
top brands and does not necessarily mean to cover all categories of tools offered by us. You
are kindly reminded to verify carefully when you are placing an order with us if you are
actually saving half in comparison with the top major brands.

- 1 -
MODELL: HC-1005
Have product questions? Need technical support? Please feel free to
contact us:
Technical Support and E-Warranty Certificate
www.vevor.com/support
NEED HELP? CONTACT US!
This is the original instruction, please read all manual instructions
carefully before operating. VEVOR reserves a clear interpretation of our
user manual. The appearance of the product shall be subject to the
product you received. Please forgive us that we won't inform you again if
there are any technology or software updates on our product.
HAND WELL PUMP

- 2 -
Warnung: Um das Verletzungsrisiko zu verringern, muss der
Benutzer die Bedienungsanleitung sorgfältig lesen.
SAFETY WARNINGS
Lesen Sie alle Sicherheitshinweise und Anweisungen. Eine
Nichtbeachtung der Hinweise und Anweisungen kann zu Verletzungen
und/oder Sachschäden führen. Bewahren Sie alle Hinweise und
Anweisungen für die Zukunft auf.
Die Warn- und Sicherheitshinweise in diesem Handbuch decken nicht alle
möglichen Bedingungen und Situationen ab. Beim Bedienen und Reinigen
von Werkzeugen und Geräten ist gesunder Menschenverstand, Vorsicht
und Sorgfalt geboten.
Wenden Sie sich bei Problemen oder unklaren Umständen immer an Ihren
Händler, Vertriebspartner, Servicevertreter oder Hersteller, bevor Sie das
Produkt in Betrieb nehmen.
Halten Sie den Arbeitsbereich sauber und gut beleuchtet. Ein
unordentlicher Arbeitsbereich kann zu Unfällen führen. Erlauben Sie
Kindern niemals, dieses Produkt zu verwenden. Halten Sie Kinder und
Tiere während der Bedienung dieses Produkts in sicherem Abstand
vom Arbeitsbereich.
Bewahren Sie das Produkt bei Nichtgebrauch an einem sicheren,
trockenen und geschützten Ort auf. Der Lagerbereich sollte außerhalb
der Reichweite von Kindern liegen. Behandeln Sie das Produkt
sorgfältig.
WARNUNG: Dieses Produkt enthält oder erzeugt bei Verwendung
eine Chemikalie, von der im US-Bundesstaat Kalifornien bekannt ist,
dass sie Krebs und Geburtsfehler oder andere Fortpflanzungsschäden
verursacht. (California Health & SAFETY CODE § 25249.5, ET SEQ.)
Nur zum Pumpen von Wasser verwenden.
Nehmen Sie an der Pumpe keine Veränderungen vor.

- 3 -
Lassen Sie die Pumpe nicht einfrieren.
Überprüfen Sie die Pumpe regelmäßig auf Verschleiß oder
beschädigte Teile. Bei Verschleiß oder Beschädigung die Pumpe nicht
mehr verwenden.
Tragen Sie beim Arbeiten mit der Pitcherpumpe stets eine
Schutzbrille.
Nehmen Sie an der Maschine keine Änderungen vor.
Nur zum Pumpen von Wasser verwenden.
Nehmen Sie an der Maschine keine Änderungen vor.
BEWAHREN SIE DIESE WARNHINWEISE AUF.
PARTS INFORMATION

- 4 -
SPECIFICATIONS OF THE PRODUCTS
Modell
HC-1005
Maximale Saugdistanz
7,6 m (25 Fuß)
Unteres Innengewindekaliber
G1-5/8"
Basisdurchmesser
185 mm (7,3 Zoll)
Einbaumaß
Unten: 3 x 8 mm;
Lochabstand: 148mm

- 5 -
ASSEMBLY / OPERATION
MONTAGE
1. Stellen Sie die Basis (13) auf eine glatte, ebene Fläche.
2. Setzen Sie die 2. Ventileinheit (12) in die runde Nut der Basis (13). Sie
passt nur mit der Metallplatte nach oben.
3. Setzen Sie den Zylinder (9) auf die Ventileinheit (12). Richten Sie den
Zylinder (9) so aus, dass die Bolzenhalter auf jeder Seite über den beiden
gebohrten Öffnungen an der Basis (13) sitzen. Der Ausguss des Zylinders
(9) sollte über der flachen Seite liegen
der Basis (13).
4. Eine Schraube (10) und eine Unterlegscheibe (11) in die
Schraubenhalterung am Zylinder (9) stecken. Handfest anziehen. Den
Vorgang auf der anderen Seite wiederholen. Dann beide Schrauben (10)
mit einem Schraubenschlüssel festziehen.
5. Setzen Sie die Kolbenbaugruppe (8) mit der Schrauböse nach oben und
unten in den Zylinder (9) ein.
6. Setzen Sie die Abdeckung (5) auf den Zylinder (9), so dass die
Schrauböse der Kolbenbaugruppe (8) durch die Öffnung in der Mitte der
Abdeckung (5) passt. Das große Bolzenloch der Abdeckung (5) sollte
gegenüber der Tülle am Zylinder (9) liegen.
Zylinder (9) Mit einem verstellbaren Schraubenschlüssel die große
Schraube (6) an der Abdeckung (5) gegenüber dem Ausguss festziehen .
7. Befestigen Sie den 7. Griff (2) mit einer Schraube (3) und einer Mutter (1)
an der Kolbenbaugruppe (8). Stellen Sie sicher, dass das Loch am Griff (2),
das an der Abdeckung (5) befestigt ist, zwischen dem Bolzengehäuse an
der Abdeckung (5) liegt. Drehen Sie ggf.
die Schrauböse an der Kolbenbaugruppe (8), um die beste Passform zu
finden. Ziehen Sie die Mutter (1) fest. Führen Sie anschließend den Bolzen
(7) durch das Bolzengehäuse an der Abdeckung (5) und dem Griff (2) und
ziehen Sie die Mutter (1) fest.
8. Befestigen Sie das Wasserquellenrohr mit 1-1/4-Zoll-NPT-Gewinde am
Gewindeeinlass an der Unterseite der Pumpe.

- 6 -
9. Sichern Sie die Pumpe, indem Sie den Sockel auf einer stabilen
Oberfläche festschrauben.
BETRIEB
1. Diese Pumpe muss vor jedem Gebrauch entlüftet werden. Bewahren
Sie zu diesem Zweck einen Krug (nicht im Lieferumfang enthalten) mit
Wasser in der Nähe der Pumpe auf. Pumpen Sie den Griff auf und ab,
während Sie etwa einen Liter Wasser in die Oberseite der Pumpe gießen,
um sie zu entlüften und den Wasserfluss zu starten.
HINWEIS: BEENDEN SIE DAS PUMPEN DES GRIFFS NICHT, BIS SIE
FERTIG SIND. Wenn Sie auch nur kurz anhalten, verliert die Pumpe ihre
Saugleistung und funktioniert nicht mehr, bis sie erneut angesaugt wird.
2. Pumpen Sie mit dieser Pumpe kein Trinkwasser.
ASSEMBLY / OPERATION
BITTE LESEN SIE DAS FOLGENDE SORGFÄLTIG DURCH
Der Hersteller und/oder Händler hat die Teileliste und das
Montagediagramm in diesem Handbuch nur als Referenzwerkzeug
bereitgestellt. Weder der Hersteller noch der Händler geben dem Käufer
gegenüber Zusicherungen oder Garantien jeglicher Art, dass er oder sie
qualifiziert ist, Reparaturen am Produkt durchzuführen oder Teile des
Produkts auszutauschen. Tatsächlich erklärt der Hersteller und/oder
Händler ausdrücklich, dass alle Reparaturen und Teileaustausche von
zertifizierten und lizenzierten Technikern und nicht vom Käufer
durchgeführt werden sollten. Der Käufer übernimmt alle Risiken und
Haftungen, die sich aus seinen oder ihren Reparaturen am Originalprodukt
oder an Ersatzteilen daran oder aus dem Einbau von Ersatzteilen daran
ergeben.
Hersteller: Shanghaimuxinmuyeyouxiangongsi
Adresse : Shuangchenglu 803nong11hao1602A-1609shi, Baoshanqu,
Shanghai 200000 CN.

- 7 -
Vertreter der EG: E-CrossStu GmbH .
Mainzer Landstr.69, 60329 Frankfurt am Main.
UK REP: YH CONSULTING LIMITED.
C/O YH Consulting Limited Office 147, Centurion House, London Road,
Staines-upon-Thames, Surrey, TW18 4AX
Nach AUS importiert: SIHAO PTY LTD.
1 ROKEVA STREETEASTWOOD NSW 2122 Australien
In die USA importiert: Sanven Technology Ltd.
Suite 250, 9166 Anaheim Place, Rancho Cucamonga, CA 9173 0


- 2 -
Tecnico Supporto e certificato di garanzia elettronica
www.vevor.com/support
POMPA PER POZZO MANUALE
MANUALE OPERATIVO
MODELLO: HC-1005
We continue to be committed to provide you tools with competitive price.
"Save Half", "Half Price" or any other similar expressions used by us only represents an
estimate of savings you might benefit from buying certain tools with us compared to the major
top brands and does not necessarily mean to cover all categories of tools offered by us. You
are kindly reminded to verify carefully when you are placing an order with us if you are
actually saving half in comparison with the top major brands.

- 1 -
MODELLO: HC-1005
Have product questions? Need technical support? Please feel free to
contact us:
Technical Support and E-Warranty Certificate
www.vevor.com/support
NEED HELP? CONTACT US!
This is the original instruction, please read all manual instructions
carefully before operating. VEVOR reserves a clear interpretation of our
user manual. The appearance of the product shall be subject to the
product you received. Please forgive us that we won't inform you again if
there are any technology or software updates on our product.
HAND WELL PUMP

- 2 -
Attenzione: per ridurre il rischio di lesioni, l'utente deve leggere
attentamente il manuale di istruzioni.
SAFETY WARNINGS
Leggere tutte le avvertenze e le istruzioni di sicurezza. La mancata
osservanza delle avvertenze e delle istruzioni può causare lesioni e/o
danni alla proprietà. Conservare tutte le avvertenze e le istruzioni per
riferimento futuro.
Le avvertenze e le istruzioni di sicurezza contenute in questo manuale non
intendono coprire tutte le possibili condizioni e situazioni che potrebbero
verificarsi. È necessario usare buon senso, cautela e attenzione quando si
utilizzano o si puliscono utensili e attrezzature.
Contattare sempre il rivenditore, il distributore, l'agente di assistenza o il
produttore in caso di problemi o condizioni di cui non si è a conoscenza
prima di utilizzare il prodotto.
Mantenere l'area di lavoro pulita e ben illuminata. Un'area di lavoro
disordinata può causare incidenti. Non permettere mai ai bambini di
usare questo prodotto. Quando si utilizza questo prodotto, tenere
bambini e animali a una distanza di sicurezza dall'area di lavoro.
Quando non è in uso, conservare il prodotto in un luogo sicuro,
asciutto e protetto. L'area di stoccaggio deve essere fuori dalla portata
dei bambini. Mantenere questo prodotto con cura.
ATTENZIONE: questo prodotto contiene o, se utilizzato, produce una
sostanza chimica nota allo Stato della California come causa di cancro
e malformazioni congenite o altri danni all'apparato riproduttivo.
(CODICE DELLA SALUTE E SICUREZZA DELLA CALIFORNIA §
25249.5, ET SEQ.)
Utilizzare solo per pompare acqua.
Non modificare la pompa.
Non lasciare che la pompa si congeli.

- 3 -
Ispezionare periodicamente la pompa per verificare l'usura o le parti
danneggiate. Interrompere l'uso se usurate o danneggiate.
Indossare sempre occhiali di sicurezza quando si lavora con la pompa
Pitcher
Non modificare la macchina.
Utilizzare solo per pompare acqua.
Non modificare la macchina.
CONSERVATE QUESTI AVVERTIMENTI.
PARTS INFORMATION

- 4 -
SPECIFICATIONS OF THE PRODUCTS
Modello
HC-1005
Distanza massima di aspirazione
7,6 m (25 piedi)
Calibro filettatura interna inferiore
G1-5/8"
Diametro della base
185 mm (7,3")
Dimensioni di montaggio
Fondo: 3*Փ8mm;
Distanza tra i fori: 148 mm
ASSEMBLY / OPERATION
ASSEMBLAGGIO
1. Posizionare la base (13) su una superficie liscia e piana.
2. Posizionare il 2. Gruppo valvola (12) nella scanalatura circolare della
base (13). Si adatta solo con la piastra metallica rivolta verso l'alto.
3. Posizionare il cilindro (9) sul gruppo valvola (12). Allineare il cilindro (9)
in modo che i supporti dei bulloni su ciascun lato si trovino sopra le due
aperture forate sulla base (13). Il beccuccio sul cilindro (9) dovrebbe
poggiare sul lato piatto
della Base (13).
4. Infilare un bullone (10) e una rondella (11) nel porta bullone sul cilindro
(9). Serrare a mano. Ripetere la procedura sull'altro lato. Quindi, serrare
con la chiave entrambi i bulloni (10).
5. Posizionare il gruppo pistone (8) con l'occhiello della vite rivolto verso
l'alto e verso il basso nel cilindro (9).
6. Posizionare il coperchio (5) sul cilindro (9) in modo che l'occhiello della
vite sul gruppo pistone (8) passi attraverso l'apertura al centro del
coperchio (5). Il grande foro del bullone sul coperchio (5) dovrebbe trovarsi
di fronte al beccuccio sul

- 5 -
Cilindro (9) con una chiave a mezzaluna, serrare il bullone grande (6) sul
coperchio (5) opposto al beccuccio .
7. Fissare la 7. Maniglia (2) al gruppo pistone (8) utilizzando un bullone (3)
e un dado (1). Assicurarsi che il foro sulla maniglia (2) che si fissa al
coperchio (5) poggi tra l'alloggiamento del bullone sul coperchio (5). Se
necessario, ruotare
l'occhiello della vite sul gruppo pistone (8) per trovare la migliore vestibilità.
Serrare il dado (1). Quindi, far passare il bullone (7) attraverso
l'alloggiamento del bullone sul coperchio (5) e sulla maniglia (2) e serrare il
dado (1).
8. Collegare il tubo di alimentazione dell'acqua filettato NPT da 1-1/4"
all'ingresso filettato nella parte inferiore della pompa.
9. Fissare la pompa avvitando la base su una superficie stabile.
OPERAZIONE
1. Questa pompa deve essere innescata prima di ogni utilizzo. Tieni una
brocca (non inclusa) di acqua vicino alla pompa per questo scopo. Pompa
la maniglia su e giù mentre versi circa un quarto di gallone di acqua nella
parte superiore della pompa per innescarla e avviare il flusso d'acqua.
NOTA: NON FERMARE IL POMPAGGIO DELLA MANIGLIA FINO AL
TERMINE. L'arresto, anche momentaneo, farà sì che la pompa perda
l'adescamento e non funzioni più fino al successivo adescamento.
2. Non pompare acqua potabile da questa pompa.
ASSEMBLY / OPERATION
PER FAVORE LEGGERE ATTENTAMENTE QUANTO SEGUE
Il produttore e/o il distributore hanno fornito l'elenco delle parti e lo schema
di montaggio in questo manuale solo come strumento di riferimento. Né il
produttore né il distributore rilasciano alcuna dichiarazione o garanzia di
alcun tipo all'acquirente che lui o lei sia qualificato per effettuare riparazioni
al prodotto o che lui o lei sia qualificato per sostituire parti del prodotto.
Infatti, il produttore e/o il distributore dichiarano espressamente che tutte le
riparazioni e le sostituzioni di parti devono essere eseguite da tecnici

- 6 -
certificati e autorizzati e non dall'acquirente. L'acquirente si assume tutti i
rischi e le responsabilità derivanti dalle sue riparazioni al prodotto originale
o alle parti di ricambio dello stesso o derivanti dalla sua installazione di
parti di ricambio dello stesso.
Produttore: Shanghaimuxinmuyeyouxiangongsi
Indirizzo : Shuangchenglu 803nong11hao1602A-1609shi, baoshanqu,
shanghai 200000 CN.
RAPPRESENTANTE DELLA CE: E-CrossStu GmbH .
Mainzer Landstr.69, 60329 Francoforte sul Meno.
RAPPRESENTANZA DEL REGNO UNITO: CONSULENZA YH LIMITATA.
C/O YH Consulting Limited Ufficio 147, Centurion House, London Road,
Staines-upon-Thames, Surrey, TW18 4AX
Importato in AUS: SIHAO PTY LTD.
1 ROKEVA STREET EASTWOOD NSW 2122 Australia
Importato negli USA: Sanven Technology Ltd.
Suite 250, 9166 Anaheim Place, Rancho Cucamonga, CA 9173 0


- 2 -
Técnico Certificado de soporte y garantía electrónica
www.vevor.com/support
BOMBA DE POZO MANUAL
MANUAL DE OPERACIONES
MODELO: HC-1005
We continue to be committed to provide you tools with competitive price.
"Save Half", "Half Price" or any other similar expressions used by us only represents an
estimate of savings you might benefit from buying certain tools with us compared to the major
top brands and does not necessarily mean to cover all categories of tools offered by us. You
are kindly reminded to verify carefully when you are placing an order with us if you are
actually saving half in comparison with the top major brands.

- 1 -
MODELO: HC-1005
Have product questions? Need technical support? Please feel free to
contact us:
Technical Support and E-Warranty Certificate
www.vevor.com/support
NEED HELP? CONTACT US!
This is the original instruction, please read all manual instructions
carefully before operating. VEVOR reserves a clear interpretation of our
user manual. The appearance of the product shall be subject to the
product you received. Please forgive us that we won't inform you again if
there are any technology or software updates on our product.
HAND WELL PUMP

- 2 -
Advertencia: Para reducir el riesgo de lesiones, el usuario debe
leer atentamente el manual de instrucciones.
SAFETY WARNINGS
Lea todas las advertencias e instrucciones de seguridad. Si no sigue las
advertencias e instrucciones, pueden producirse lesiones o daños a la
propiedad. Guarde todas las advertencias e instrucciones para futuras
referencias.
Las advertencias e instrucciones de seguridad de este manual no
pretenden cubrir todas las posibles condiciones y situaciones que pueden
ocurrir. Se debe tener sentido común, precaución y cuidado al operar o
limpiar herramientas y equipos.
Siempre contacte a su distribuidor, concesionario, agente de servicio o
fabricante acerca de problemas o condiciones que no comprenda antes de
operar el producto.
Mantenga el área de trabajo limpia y bien iluminada. Un área de
trabajo desordenada puede causar accidentes. Nunca permita que los
niños utilicen este producto. Al utilizar este producto, mantenga a los
niños y animales a una distancia segura del área de trabajo.
Cuando no esté en uso, guarde el producto en un lugar seguro, seco y
protegido. El área de almacenamiento debe estar fuera del alcance de
los niños. Conserve este producto con cuidado.
ADVERTENCIA: Este producto contiene o, cuando se utiliza, produce
una sustancia química que el estado de California considera que
causa cáncer y defectos congénitos u otros daños reproductivos.
(CÓDIGO DE SEGURIDAD Y SALUD DE CALIFORNIA § 25249.5,
ET SEQ.)
Úselo únicamente para bombear agua.
No modifique la bomba.
No permita que la bomba se congele.

- 3 -
Inspeccione periódicamente la bomba para detectar desgaste o
piezas dañadas. Deje de usarla si está desgastada o dañada.
Utilice gafas de seguridad en todo momento cuando trabaje con la
bomba de jarra.
No modifique la máquina.
Úselo únicamente para bombear agua.
No modifique la máquina.
GUARDE ESTAS ADVERTENCIAS.
PARTS INFORMATION

- 4 -
SPECIFICATIONS OF THE PRODUCTS
Modelo
HC-1005
Distancia máxima de succión
7,6 m (25 pies)
Calibre de rosca interna inferior
G1-5/8"
Diámetro de la base
185 mm (7,3")
Dimensión de montaje
Parte inferior: 3 x 8 mm;
Distancia del orificio: 148 mm
ASSEMBLY / OPERATION
ASAMBLEA
1. Coloque la base (13) sobre una superficie lisa y plana.
2. Coloque el conjunto de válvula 2. (12) en la ranura circular de la base
(13). Solo encajará con la placa de metal hacia arriba.
3. Coloque el cilindro (9) en el conjunto de válvulas (12). Alinee el cilindro
(9) de modo que los soportes de los pernos de cada lado se asienten
sobre las dos aberturas perforadas en la base (13). El pico del cilindro (9)
debe descansar sobre el lado plano.
de la Base (13).
4. Deslice un perno (10) y una arandela (11) en el soporte del perno del
cilindro (9). Apriete con la mano. Repita el procedimiento en el otro lado.
Luego, apriete con una llave ambos pernos (10).
5. Coloque el conjunto del pistón (8) con el ojal del tornillo hacia arriba y
hacia abajo en el cilindro (9).
6. Coloque la tapa (5) sobre el cilindro (9) de manera que el ojal del tornillo
del conjunto del pistón (8) encaje en la abertura en el centro de la tapa (5).
El orificio grande para el perno de la tapa (5) debe quedar opuesto al pico
del conjunto del pistón (8).

- 5 -
Cilindro (9) con una llave inglesa, apriete el perno grande (6) en la tapa (5)
opuesta al pico .
7. Fije el mango (2) al conjunto del pistón (8) con un perno (3) y una tuerca
(1). Asegúrese de que el orificio del mango (2) que se fija a la cubierta (5)
quede entre la carcasa del perno de la cubierta (5). Si es necesario, gire
Apriete el ojal del tornillo en el conjunto del pistón (8) para encontrar el
ajuste óptimo. Apriete la tuerca (1). A continuación, pase el perno (7) a
través de la carcasa del perno en la cubierta (5) y el mango (2) y apriete la
tuerca (1).
8. Conecte el tubo de fuente de agua roscado NPT de 1-1/4” a la entrada
roscada en la parte inferior de la bomba.
9. Asegure la bomba atornillando la base a una superficie estable.
OPERACIÓN
1. Esta bomba debe cebarse antes de cada uso. Mantenga una jarra (no
incluida) de agua cerca de la bomba para este propósito. Bombee la
manija hacia arriba y hacia abajo mientras vierte aproximadamente un
cuarto de galón de agua en la parte superior de la bomba para cebarla y
comenzar el flujo de agua.
NOTA: NO DEJE DE BOMBEAR LA MANIJA HASTA TERMINAR. Si
deja de hacerlo, incluso por un momento, la bomba perderá su carga y
dejará de funcionar hasta que se la vuelva a cargar.
2. No bombee agua potable con esta bomba.
ASSEMBLY / OPERATION
POR FAVOR LEA LO SIGUIENTE CUIDADOSAMENTE
El fabricante y/o distribuidor ha proporcionado la lista de piezas y el
diagrama de montaje en este manual únicamente como herramienta de
referencia. Ni el fabricante ni el distribuidor realizan ninguna declaración ni
garantía de ningún tipo al comprador de que están calificados para realizar
reparaciones al producto o de que están calificados para reemplazar
alguna pieza del producto. De hecho, el fabricante y/o distribuidor declara
expresamente que todas las reparaciones y reemplazos de piezas deben

- 6 -
ser realizados por técnicos certificados y autorizados y no por el
comprador. El comprador asume todos los riesgos y responsabilidades
que surjan de sus reparaciones al producto original o de las piezas de
repuesto del mismo o de la instalación de piezas de repuesto del mismo.
Fabricante: Shanghaimuxinmuyeyouxiangongsi
Dirección : Shuangchenglu 803nong11hao1602A-1609shi, baoshanqu,
shanghai 200000 CN.
REPRESENTANTE CE: Empresa E-CrossStu GmbH .
Mainzer Landstr.69, 60329 Fráncfort del Meno.
REPRESENTANTE DEL REINO UNIDO: YH CONSULTING LIMITADA.
C/O YH Consulting Limited Oficina 147, Centurion House, London Road,
Staines-upon-Thames, Surrey, TW18 4AX
Importado a AUS: SIHAO PTY LTD.
1 ROKEVA STREET EASTWOOD NSW 2122 Australia
Importado a EE. UU.: Sanven Technology Ltd.
Suite 250, 9166 Anaheim Place, Rancho Cucamonga, CA 9173 0


- 2 -
Techniczny Wsparcie i certyfikat e-gwarancji
www.vevor.com/support
POMPA RĘCZNA
INSTRUKCJA OBSŁUGI
MODEL: HC-1005
We continue to be committed to provide you tools with competitive price.
"Save Half", "Half Price" or any other similar expressions used by us only represents an
estimate of savings you might benefit from buying certain tools with us compared to the major
top brands and does not necessarily mean to cover all categories of tools offered by us. You
are kindly reminded to verify carefully when you are placing an order with us if you are
actually saving half in comparison with the top major brands.

- 1 -
MODEL: HC-1005
Have product questions? Need technical support? Please feel free to
contact us:
Technical Support and E-Warranty Certificate
www.vevor.com/support
NEED HELP? CONTACT US!
This is the original instruction, please read all manual instructions
carefully before operating. VEVOR reserves a clear interpretation of our
user manual. The appearance of the product shall be subject to the
product you received. Please forgive us that we won't inform you again if
there are any technology or software updates on our product.
HAND WELL PUMP

- 2 -
Ostrzeżenie: Aby zminimalizować ryzyko obrażeń, użytkownik
powinien uważnie przeczytać instrukcję obsługi.
SAFETY WARNINGS
Przeczytaj wszystkie ostrzeżenia i instrukcje dotyczące bezpieczeństwa.
Nieprzestrzeganie ostrzeżeń i instrukcji może skutkować obrażeniami ciała
i/lub uszkodzeniem mienia. Zachowaj wszystkie ostrzeżenia i instrukcje do
wykorzystania w przyszłości.
Ostrzeżenia i instrukcje bezpieczeństwa zawarte w niniejszej instrukcji nie
mają na celu objęcia wszystkich możliwych warunków i sytuacji, które
mogą wystąpić. Podczas obsługi lub czyszczenia narzędzi i sprzętu należy
zachować zdrowy rozsądek, ostrożność i ostrożność.
Przed rozpoczęciem użytkowania produktu zawsze skontaktuj się ze
sprzedawcą, dystrybutorem, agentem serwisowym lub producentem w
przypadku wystąpienia problemów lub stanów, których nie rozumiesz.
Utrzymuj miejsce pracy w czystości i dobrym oświetleniu.
Zagracone miejsce pracy może być przyczyną wypadków. Nigdy nie
pozwalaj dzieciom używać tego produktu. Podczas obsługi tego
produktu trzymaj dzieci i zwierzęta w bezpiecznej odległości od
miejsca pracy.
Gdy nie jest używany, przechowuj produkt w bezpiecznym, suchym i
pewnym miejscu. Miejsce przechowywania powinno być poza
zasięgiem dzieci. Utrzymuj ten produkt ostrożnie.
OSTRZEŻENIE: Ten produkt zawiera lub, gdy jest używany, wytwarza
substancję chemiczną, o której stan Kalifornia wie, że powoduje raka i
wady wrodzone lub inne szkody reprodukcyjne. (California Health &
SAFETY CODE § 25249.5, ET SEQ.)
Stosować wyłącznie do pompowania wody.
Nie wolno modyfikować pompy.
Nie dopuścić do zamarznięcia pompy.
- 3 -
Okresowo sprawdzaj pompę pod kątem zużycia lub uszkodzeń części.
Zaprzestań używania, jeśli są zużyte lub uszkodzone.
Podczas pracy z pompą dzbankową należy zawsze nosić okulary
ochronne.
Nie modyfikuj urządzenia.
Stosować wyłącznie do pompowania wody.
Nie modyfikuj urządzenia.
ZACHOWAJ TE OSTRZEŻENIA.
PARTS INFORMATION

- 4 -
SPECIFICATIONS OF THE PRODUCTS
Model
HC-1005
Maksymalna odległość ssania
7,6 m (25 stóp)
Kaliber dolnego gwintu
wewnętrznego
G1-5/8"
Średnica podstawy
185 mm (7,3 cala)
Wymiar montażowy
Dół: 3*Փ8mm;
Odległość między otworami: 148mm
ASSEMBLY / OPERATION
MONTAŻ
1. Umieść podstawę (13) na gładkiej, płaskiej powierzchni.
2. Umieść zespół zaworu 2. (12) w rowku kołowym podstawy (13). Będzie
pasował tylko z płytą metalową skierowaną do góry.
3. Umieść cylinder (9) na zespole zaworów (12). Wyrównaj cylinder (9) tak,
aby uchwyty śrub po obu stronach znajdowały się nad dwoma
wywierconymi otworami w podstawie (13). Wylewka na cylindrze (9)
powinna spoczywać na płaskiej stronie
Bazy (13).
4. Wsuń śrubę (10) i podkładkę (11) do uchwytu śruby na cylindrze (9).
Dokręć ręcznie. Powtórz procedurę po drugiej stronie. Następnie dokręć
kluczem obie śruby (10).
5. Umieść zespół tłoka (8) oczkiem śruby skierowanym do góry i w dół w
cylindrze (9).
6. Załóż pokrywę (5) na cylinder (9) tak, aby oczko śruby na zespole tłoka
(8) pasowało do otworu w środku pokrywy (5). Duży otwór na śrubę w
pokrywie (5) powinien znajdować się naprzeciwko wylewki na

- 5 -
Cylinder (9) przy pomocy klucza płaskiego dokręcić dużą śrubę (6) na
pokrywie (5) naprzeciwko wylewki .
7. Przymocuj uchwyt 7. (2) do zespołu tłoka (8) za pomocą śruby (3) i
nakrętki (1). Upewnij się, że otwór w uchwycie (2), który mocuje się do
pokrywy (5), znajduje się między obudową śruby na pokrywie (5). W razie
potrzeby obróć
oczko śruby na zespole tłoka (8), aby znaleźć najlepsze dopasowanie.
Dokręć nakrętkę (1). Następnie przeciągnij śrubę (7) przez obudowę śruby
na pokrywie (5) i uchwycie (2) i dokręć nakrętkę (1).
8. Podłącz rurę doprowadzającą wodę z gwintem NPT o średnicy 1-1/4” do
gwintowanego otworu wlotowego znajdującego się na spodzie pompy.
9. Zabezpiecz pompę przykręcając podstawę do stabilnej powierzchni.
DZIAŁANIE
1. Pompę należy zalać przed każdym użyciem. W tym celu trzymaj
dzbanek (nie jest dołączony) z wodą w pobliżu pompy. Pompuj uchwytem
w górę i w dół, wlewając około kwarty wody do górnej części pompy, aby ją
zalać i rozpocząć przepływ wody.
UWAGA: NIE PRZESTAWAJ POMPOWAĆ UCHWYTU, DOPÓKI NIE
ZAKOŃCZYSZ. Zatrzymanie, nawet na chwilę, spowoduje, że pompa
straci swoje zasysanie i nie będzie działać, dopóki nie zostanie ponownie
zalana.
2. Nie wolno pompować wody pitnej za pomocą tej pompy.
ASSEMBLY / OPERATION
PROSZĘ UWAŻNIE PRZECZYTAĆ PONIŻSZE INFORMACJE
Producent i/lub dystrybutor udostępnili listę części i schemat montażu w
niniejszej instrukcji wyłącznie jako narzędzie odniesienia. Ani producent,
ani dystrybutor nie składają żadnych oświadczeń ani gwarancji
kupującemu, że jest on/ona uprawniony/a do dokonywania jakichkolwiek
napraw produktu lub że jest on/ona uprawniony/a do wymiany
jakichkolwiek części produktu. W rzeczywistości producent i/lub
dystrybutor wyraźnie stwierdza, że wszelkie naprawy i wymiany części

- 6 -
powinny być wykonywane przez certyfikowanych i licencjonowanych
techników, a nie przez kupującego. Kupujący przyjmuje na siebie wszelkie
ryzyko i odpowiedzialność wynikające z jego/jej napraw oryginalnego
produktu lub jego części zamiennych lub wynikające z jego/jej instalacji
części zamiennych.
Producent: Shanghaimuxinmuyeyouxiangongsi
Adres : Shuangchenglu 803nong11hao1602A-1609shi, baoshanqu, szanghaj
200000 CN.
Przedstawiciel KE: Firma E-CrossStu GmbH .
Mainzer Landstr.69, 60329 Frankfurt nad Menem.
REPUBLIKA WIELKIEJ BRYTANII: YH CONSULTING LIMITED.
C/O YH Consulting Limited Biuro 147, Centurion House, London Road,
Staines-upon-Thames, Surrey, TW18 4AX
Importowane do AUS: SIHAO PTY LTD.
1 ROKEVA STREETEASTWOOD NSW 2122 Australia
Importowane do USA: Sanven Technology Ltd.
Apartament 250, 9166 Anaheim Place, Rancho Cucamonga, CA 9173 0


- 2 -
Technisch Ondersteuning en E-garantiecertificaat
www.vevor.com/support
HANDPOMP VOOR PUTTEN
GEBRUIKSAANWIJZING
MODEL: HC-1005
We continue to be committed to provide you tools with competitive price.
"Save Half", "Half Price" or any other similar expressions used by us only represents an
estimate of savings you might benefit from buying certain tools with us compared to the major
top brands and does not necessarily mean to cover all categories of tools offered by us. You
are kindly reminded to verify carefully when you are placing an order with us if you are
actually saving half in comparison with the top major brands.

- 1 -
MODEL: HC-1005
Have product questions? Need technical support? Please feel free to
contact us:
Technical Support and E-Warranty Certificate
www.vevor.com/support
NEED HELP? CONTACT US!
This is the original instruction, please read all manual instructions
carefully before operating. VEVOR reserves a clear interpretation of our
user manual. The appearance of the product shall be subject to the
product you received. Please forgive us that we won't inform you again if
there are any technology or software updates on our product.
HAND WELL PUMP

- 2 -
Waarschuwing: om het risico op letsel te verkleinen, moet de
gebruiker de gebruiksaanwijzing zorgvuldig lezen.
SAFETY WARNINGS
Lees alle veiligheidswaarschuwingen en -instructies. Het niet opvolgen van
de waarschuwingen en instructies kan leiden tot letsel en/of schade aan
eigendommen. Bewaar alle waarschuwingen en instructies voor
toekomstig gebruik.
De waarschuwingen en veiligheidsinstructies in deze handleiding zijn niet
bedoeld om alle mogelijke omstandigheden en situaties te dekken die zich
kunnen voordoen. Gezond verstand, voorzichtigheid en zorg moeten
worden betracht bij het bedienen of reinigen van gereedschap en
apparatuur.
Neem altijd contact op met uw dealer, distributeur, serviceagent of
fabrikant als u problemen of omstandigheden ervaart die u niet begrijpt,
voordat u het product gaat gebruiken.
Houd het werkgebied schoon en goed verlicht. Een rommelig
werkgebied kan ongelukken veroorzaken. Laat kinderen dit product
nooit gebruiken. Houd kinderen en dieren op veilige afstand van het
werkgebied wanneer u dit product gebruikt.
Wanneer het product niet in gebruik is, bewaar het dan op een veilige,
droge en veilige plek. De opslagruimte moet buiten bereik van
kinderen zijn. Onderhoud dit product met zorg.
WAARSCHUWING: Dit product bevat of produceert bij gebruik een
chemische stof waarvan de staat Californië weet dat deze kanker,
geboorteafwijkingen of andere reproductieve schade kan veroorzaken.
(California Health & SAFETY CODE § 25249.5, ET SEQ.)
Alleen gebruiken voor het oppompen van water.
Wijzig de pomp niet.
Laat de pomp niet bevriezen.

- 3 -
Controleer de pomp regelmatig op slijtage of beschadigde onderdelen.
Stop met het gebruik als deze versleten of beschadigd zijn.
Draag te allen tijde een veiligheidsbril wanneer u met de Pitcher Pump
werkt
Breng geen wijzigingen aan de machine aan.
Alleen gebruiken voor het oppompen van water.
Breng geen wijzigingen aan de machine aan.
BEWAAR DEZE WAARSCHUWINGEN.
PARTS INFORMATION

- 4 -
SPECIFICATIONS OF THE PRODUCTS
Model
HC-1005
Maximale zuigafstand
7,6 meter (25 voet)
Kaliber onderste binnendraad
G1-5/8"
Basisdiameter
185 mm (7,3")
Montagemaat
Onderkant: 3*Փ8mm;
Gatafstand: 148mm
ASSEMBLY / OPERATION
MONTAGE
1. Plaats de basis (13) op een glad, vlak oppervlak.
2. Plaats de 2. Klepmontage (12) in de cirkelvormige groef van de Basis
(13). Deze past alleen met de metalen plaat omhoog.
3. Plaats de cilinder (9) op de klepconstructie (12). Lijn de cilinder (9) zo uit
dat de bouthouders aan elke kant over de twee geboorde openingen op de
basis (13) zitten. De tuit op de cilinder (9) moet over de platte kant rusten
van de basis (13).
4. Schuif een bout (10) en een ring (11) in de bouthouder op de cilinder (9).
Draai deze handvast. Herhaal de procedure aan de andere kant. Draai
vervolgens beide bouten (10) met een sleutel vast.
5. Plaats de zuigerconstructie (8) met het schroefoogje omhoog en omlaag
in de cilinder (9).
6. Plaats de afdekking (5) op de cilinder (9) zodat het schroefoog op de
zuigerassemblage (8) door de opening in het midden van de afdekking (5)
past. Het grote boutgat op de afdekking (5) moet tegenover de tuit op de
Cilinder (9) met een steeksleutel, draai de grote bout (6) op het deksel (5)
tegenover de tuit vast .

- 5 -
7. Bevestig de 7. Handgreep (2) aan de Zuigermontage (8) met behulp van
een Bout (3) en Moer (1). Zorg ervoor dat het gat op de Handgreep (2) dat
aan de Afdekking (5) is bevestigd, rust tussen de boutbehuizing op de
Afdekking (5). Draai indien nodig
de schroefoog op de zuigermontage (8) om de beste pasvorm te vinden.
Draai de moer (1) vast. Voer vervolgens de bout (7) door de boutbehuizing
op de afdekking (5) en de handgreep (2) en draai de moer (1) vast.
8. Bevestig de 1-1/4” NPT-waterbronbuis met schroefdraad aan de
schroefdraadinlaat aan de onderkant van de pomp.
9. Bevestig de pomp door de voet vast te schroeven op een stabiele
ondergrond.
WERKING
1. Deze pomp moet voor elk gebruik worden gevuld. Houd hiervoor een
kan (niet meegeleverd) met water bij de pomp. Pomp de hendel op en neer
terwijl u ongeveer een kwart liter water in de bovenkant van de pomp giet
om deze te vullen en de waterstroom te starten.
OPMERKING: STOP NIET MET HET POMPEN VAN DE HANDGREEP
TOTDAT U KLAAR BENT. Als u stopt, zelfs maar even, verliest de pomp
zijn aanzuiging en werkt deze niet meer totdat u hem weer aanzuigt.
2. Pomp geen drinkwater uit deze pomp.
ASSEMBLY / OPERATION
LEES HET VOLGENDE ZORGVULDIG DOOR
De fabrikant en/of distributeur heeft de onderdelenlijst en het
montageschema in deze handleiding alleen als referentiemateriaal
verstrekt. Noch de fabrikant noch de distributeur geeft enige verklaring of
garantie van welke aard dan ook aan de koper dat hij of zij gekwalificeerd
is om reparaties aan het product uit te voeren of dat hij of zij gekwalificeerd
is om onderdelen van het product te vervangen. De fabrikant en/of
distributeur stelt zelfs uitdrukkelijk dat alle reparaties en vervangingen van
onderdelen moeten worden uitgevoerd door gecertificeerde en erkende
technici en niet door de koper. De koper aanvaardt alle risico's en

- 6 -
aansprakelijkheid die voortvloeien uit zijn of haar reparaties aan het
originele product of vervangende onderdelen daarvan of die voortvloeien
uit zijn of haar installatie van vervangende onderdelen daarvan.
Fabrikant: Shanghaimuxinmuyeyouxiangongsi
Adres : Shuangchenglu 803nong11hao1602A-1609shi, baoshanqu, shanghai
200000 CN.
EC-REP: E-CrossStu GmbH .
Mainzer Landstr.69, 60329 Frankfurt am Main.
VK REP: YH CONSULTING LIMITED.
C/O YH Consulting Limited Kantoor 147, Centurion House, London Road,
Staines-upon-Thames, Surrey, TW18 4AX
Geïmporteerd naar AUS: SIHAO PTY LTD.
1 ROKEVA STRAAT EASTWOOD NSW 2122 Australië
Geïmporteerd naar de VS: Sanven Technology Ltd.
Suite 250, 9166 Anaheim Place, Rancho Cucamonga, CA 9173 0


- 2 -
Teknisk Support och e-garanticertifikat
www.vevor.com/support
HANDBRUNNSPUMP
BRUKSANVISNING
MODELL: HC-1005
We continue to be committed to provide you tools with competitive price.
"Save Half", "Half Price" or any other similar expressions used by us only represents an
estimate of savings you might benefit from buying certain tools with us compared to the major
top brands and does not necessarily mean to cover all categories of tools offered by us. You
are kindly reminded to verify carefully when you are placing an order with us if you are
actually saving half in comparison with the top major brands.

- 1 -
MODELL: HC-1005
Have product questions? Need technical support? Please feel free to
contact us:
Technical Support and E-Warranty Certificate
www.vevor.com/support
NEED HELP? CONTACT US!
This is the original instruction, please read all manual instructions
carefully before operating. VEVOR reserves a clear interpretation of our
user manual. The appearance of the product shall be subject to the
product you received. Please forgive us that we won't inform you again if
there are any technology or software updates on our product.
HAND WELL PUMP

- 2 -
Varning - För att minska risken för skada måste användaren
läsa instruktionerna noggrant.
SAFETY WARNINGS
Läs alla säkerhetsvarningar och instruktioner. Underlåtenhet att följa
varningarna och instruktionerna kan resultera i person- och/eller
egendomsskada. Spara alla varningar och instruktioner för framtida
referens.
Varnings- och säkerhetsinstruktionerna i denna handbok är inte avsedda
att täcka alla möjliga tillstånd och situationer som kan uppstå. Sunt förnuft,
försiktighet och försiktighet måste iakttas när du använder eller rengör
verktyg och utrustning.
Kontakta alltid din återförsäljare, distributör, serviceagent eller tillverkare
om problem eller förhållanden som du inte förstår innan du använder
produkten.
Håll arbetsområdet rent och väl upplyst. Ett rörigt arbetsområde
kan orsaka olyckor. Låt aldrig barn använda denna produkt. När du
använder denna produkt, håll barn och djur på säkert avstånd från
arbetsområdet.
När den inte används, förvara produkten på en säker, torr och säker
plats. Förvaringsområdet bör vara utom räckhåll för barn. Underhåll
denna produkt med omsorg.
VARNING: Denna produkt innehåller eller, när den används,
producerar en kemikalie som i delstaten Kalifornien är känd för att
orsaka cancer och fosterskador eller andra reproduktionsskador.
(Kalifornien Health & SAFETY CODE § 25249.5, ET SEQ.)
Använd endast för pumpning av vatten.
Modifiera inte pumpen.
Låt inte pumpen frysa.

- 3 -
Inspektera pumpen regelbundet för slitage eller skadade delar. Sluta
använda om den är sliten eller skadad.
Bär alltid skyddsglasögon när du arbetar med Pitcher Pump
Modifiera inte maskinen.
Använd endast för pumpning av vatten.
Modifiera inte maskinen.
SPARA DESSA VARNINGAR.
PARTS INFORMATION

- 4 -
SPECIFICATIONS OF THE PRODUCTS
Modell
HC-1005
Max sugsträcka
7,6 m (25 fot)
Nedre invändig gängkaliber
G1-5/8"
Basens diameter
185 mm (7,3")
Monteringsmått
Nederst: 3*Փ8mm;
Hålavstånd: 148mm
ASSEMBLY / OPERATION
MONTERING
1. Placera basen (13) på en slät, plan yta.
2. Sätt 2. ventilenheten (12) i cirkelspåret på basen (13). Den passar bara
med metallplattan uppåt.
3. Sätt cylindern (9) på ventilenheten (12). Rikta upp cylindern (9) så att
bulthållarna på varje sida av sitter över de två borrade öppningarna på
basen (13). Pipen på cylindern (9) ska vila över den platta sidan
av basen (13).
4. Sätt in en bult (10) och en bricka (11) i bulthållaren på cylindern (9). Dra
åt för hand. Upprepa proceduren på andra sidan. Dra sedan åt båda
bultarna (10) med en nyckel.
5. Sätt in kolvenheten (8) med skruvöglan uppåt, ner i cylindern (9).
6. Sätt locket (5) på cylindern (9) så att skruvöglan på kolvenheten (8)
passar genom öppningen i mitten av locket (5). Det stora bulthålet på
locket (5) ska sitta mittemot pipen på
Cylinder (9) med en halvmånenyckel, dra åt den stora bulten (6) på locket
(5) mittemot pipen .

- 5 -
7. Fäst 7. handtaget (2) till kolvenheten (8) med hjälp av en bult (3) och
mutter (1). Se till att hålet på handtaget (2) som fäster på locket (5) vilar
mellan bulthuset på locket (5). Vid behov, rotera
skruvöglan på kolvenheten (8) för att hitta den bästa passformen. Dra åt
muttern (1). Dra sedan bulten (7) genom bulthuset på locket (5) och
handtaget (2) och dra åt muttern (1).
8. Fäst 1-1/4” NPT-gängat vattenkällarrör på det gängade inloppet på
pumpens botten.
9. Säkra pumpen genom att skruva fast basen på en stabil yta.
DRIFT
1. Denna pump måste förberedas före varje användning. Håll en kanna
(ingår ej) med vatten nära pumpen för detta ändamål. Pumpa handtaget
upp och ner medan du häller ungefär en liter vatten i toppen av pumpen för
att fylla den och starta vattenflödet.
OBS: SLUTA INTE PUMPNING AV HANDTAGET FÖRrän du är klar. Ett
stopp, även tillfälligt, kommer att göra att pumpen förlorar sin fyllning och
inte längre fungerar förrän den har fyllts igen.
2. Pumpa inte dricksvatten från denna pump.
ASSEMBLY / OPERATION
LÄS FÖLJANDE NOGGRANT
Tillverkaren och/eller distributören har tillhandahållit reservdelslistan och
monteringsschemat i denna manual endast som ett referensverktyg.
Varken tillverkaren eller distributören ger någon utfästelse eller garanti av
något slag till köparen att han eller hon är kvalificerad att utföra några
reparationer på produkten eller att han eller hon är kvalificerad att byta ut
några delar av produkten. Faktum är att tillverkaren och/eller distributören
uttryckligen anger att alla reparationer och byten av delar ska utföras av
certifierade och licensierade tekniker och inte av köparen. Köparen påtar
sig all risk och ansvar som uppstår till följd av hans eller hennes
reparationer av originalprodukten eller reservdelar till denna eller till följd av
hans eller hennes installation av reservdelar till denna.

- 6 -
Tillverkare: Shanghaimuxinmuyeyouxiangongsi
Adress : Shuangchenglu 803nong11hao1602A-1609shi, baoshanqu,
shanghai 200000 CN.
EC REP: E-CrossStu GmbH .
Mainzer Landstr.69, 60329 Frankfurt am Main.
UK REP: YH CONSULTING LIMITED.
C/O YH Consulting Limited Office 147, Centurion House, London Road,
Staines-upon-Thames, Surrey, TW18 4AX
Importerad till AUS: SIHAO PTY LTD.
1 ROKEVA STREETEASTWOOD NSW 2122 Australien
Importerad till USA: Sanven Technology Ltd.
Suite 250, 9166 Anaheim Place, Rancho Cucamonga, CA 9173 0