
EN
Owner's Manual
THANK YOU FOR BUYING A HOTPOINT/ ARISTON
PRODUCT
In order to receive a more complete assistance, please
register your product on www .hotpoint. eu/ register
Before using the appliance carefully read the Safety
Instruction.
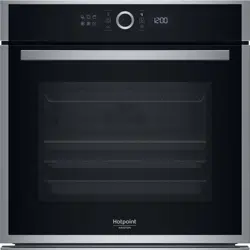
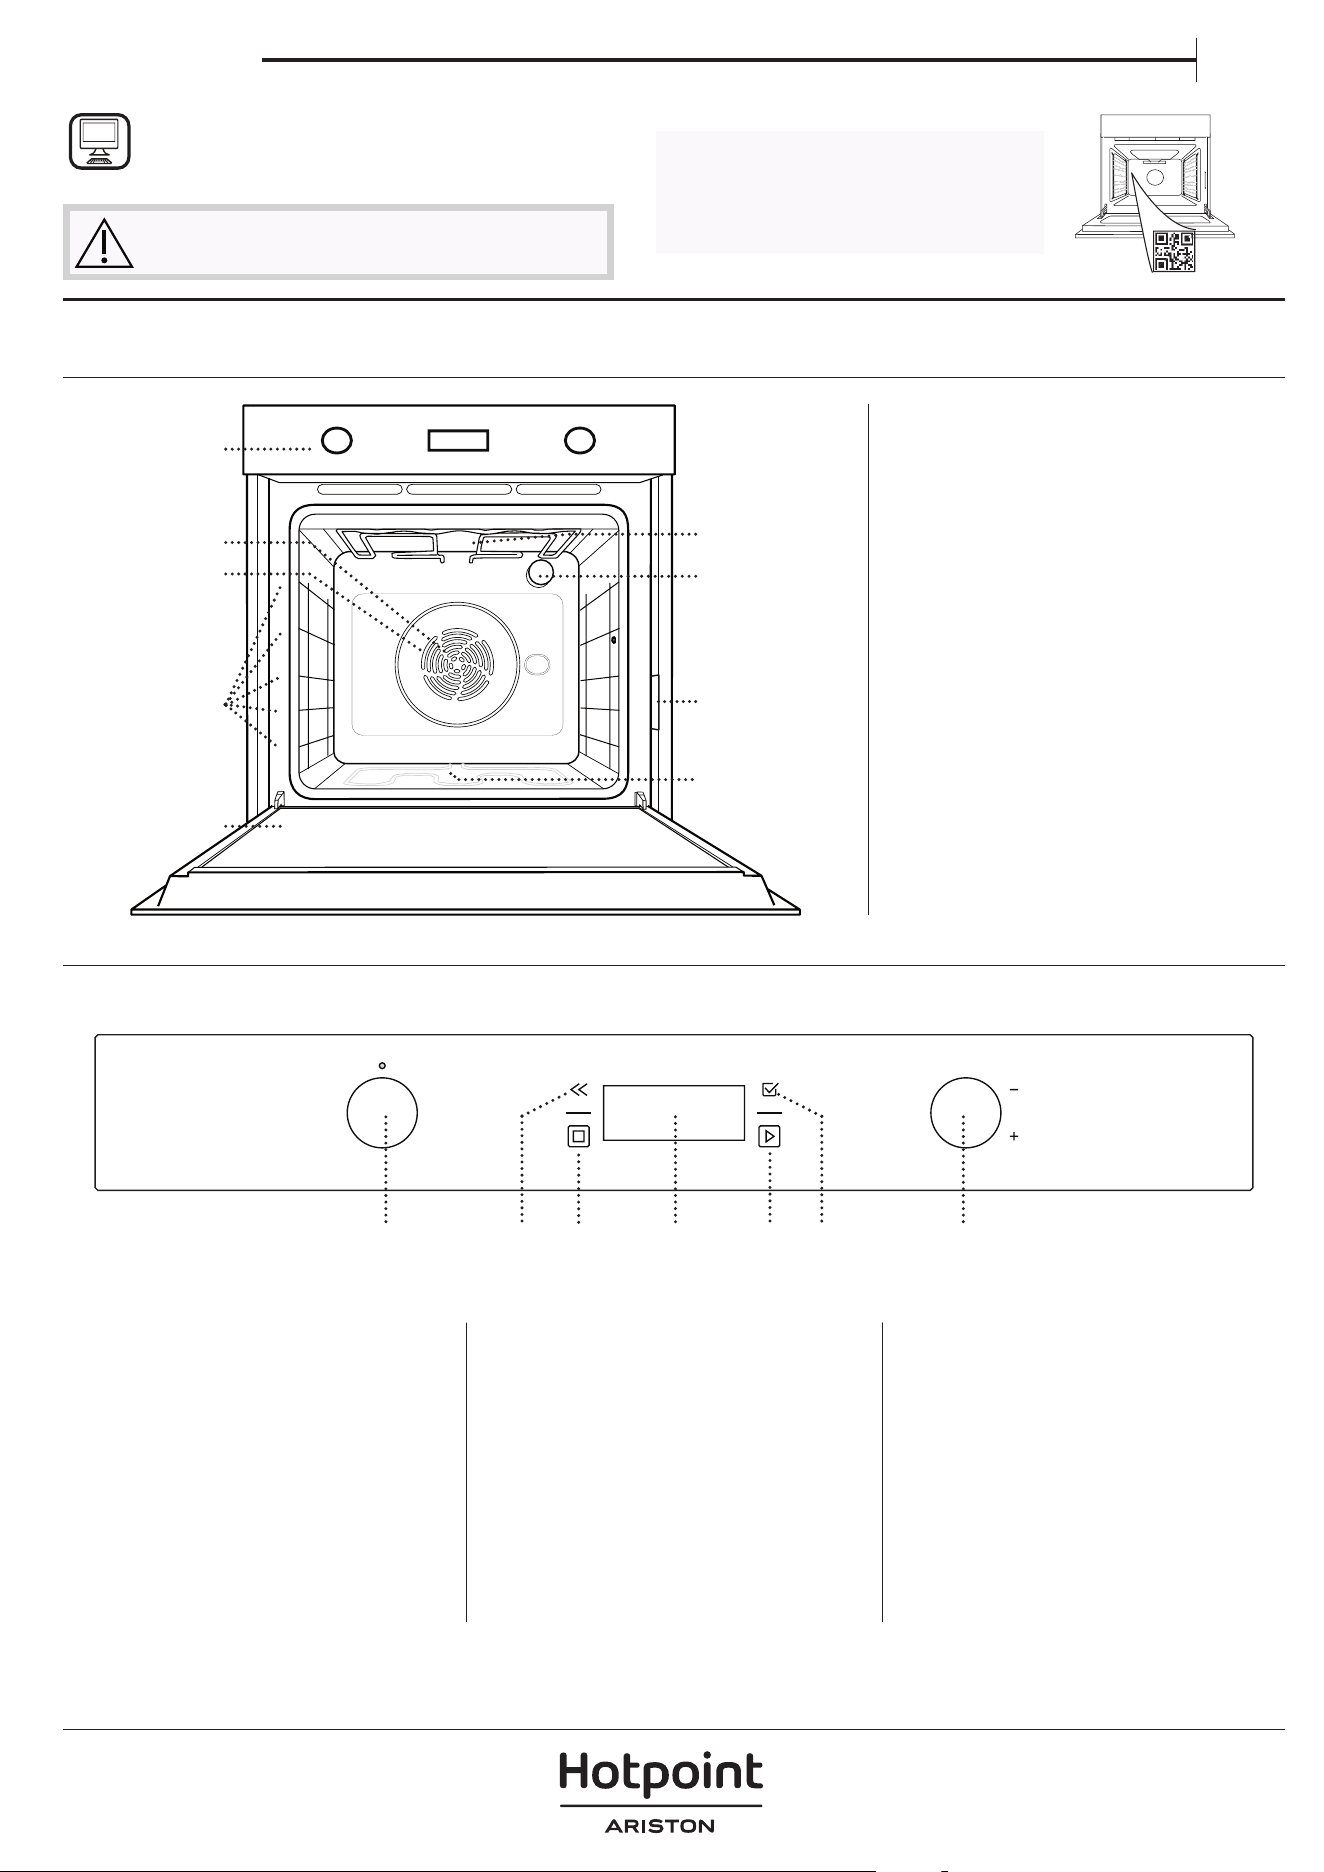
PRODUCT DESCRIPTION
CONTROL PANEL
1. Control panel
2. Fan
3. Circular heating element
(non-visible)
4. Shelf guides
(the level is indicated on the front
of the oven)
5. Door
6. Upper heating element/grill
7. Lamp
8. Identification plate
(do not remove)
9. Lower heating element
(non-visible)
1. SELECTION KNOB
For switching the oven on by
selecting a function. Turn to the
“0” position to switch the oven off.
2. BACK
For returning to the previous
screen.
During cooking, allows settings to
be changed.
3. STOP
For stopping the function that is
currently active.
4. DISPLAY
5. START
For immediately starting a
function.
6. CONFIRM
For confirming a selected function
or a set value.
7. ADJUSTMENT KNOB
For scrolling through the menus
and applying or changing settings.
5
4
3
2
1
5
4
3
2
1
1
2
3
4
5
8
9
7
6
1 2 3 4 5 6 7
Please note: All knobs are push-activated knobs. Push down on the centre of the knob to release it from its seating.
PLEASE SCAN THE QR CODE ON
YOUR APPLIANCE IN ORDER TO
REACH MORE INFORMATION
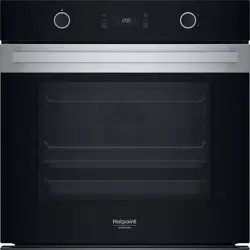
ACCESSORIES
WIRE SHELF DRIP TRAY BAKING TRAY* SLIDING RUNNERS*
Use to cook food or as a
support for pans, cake
tins and other ovenproof
items of cookware.
Use as an oven tray
for cooking meat, fish,
vegetables, focaccia, etc.
or position underneath
the wire shelf to collect
cooking juices.
Use for cooking all bread
and pastry products, but
also for roasts, fish en
papillotte, etc.
To facilitate inserting or
removing accessories.
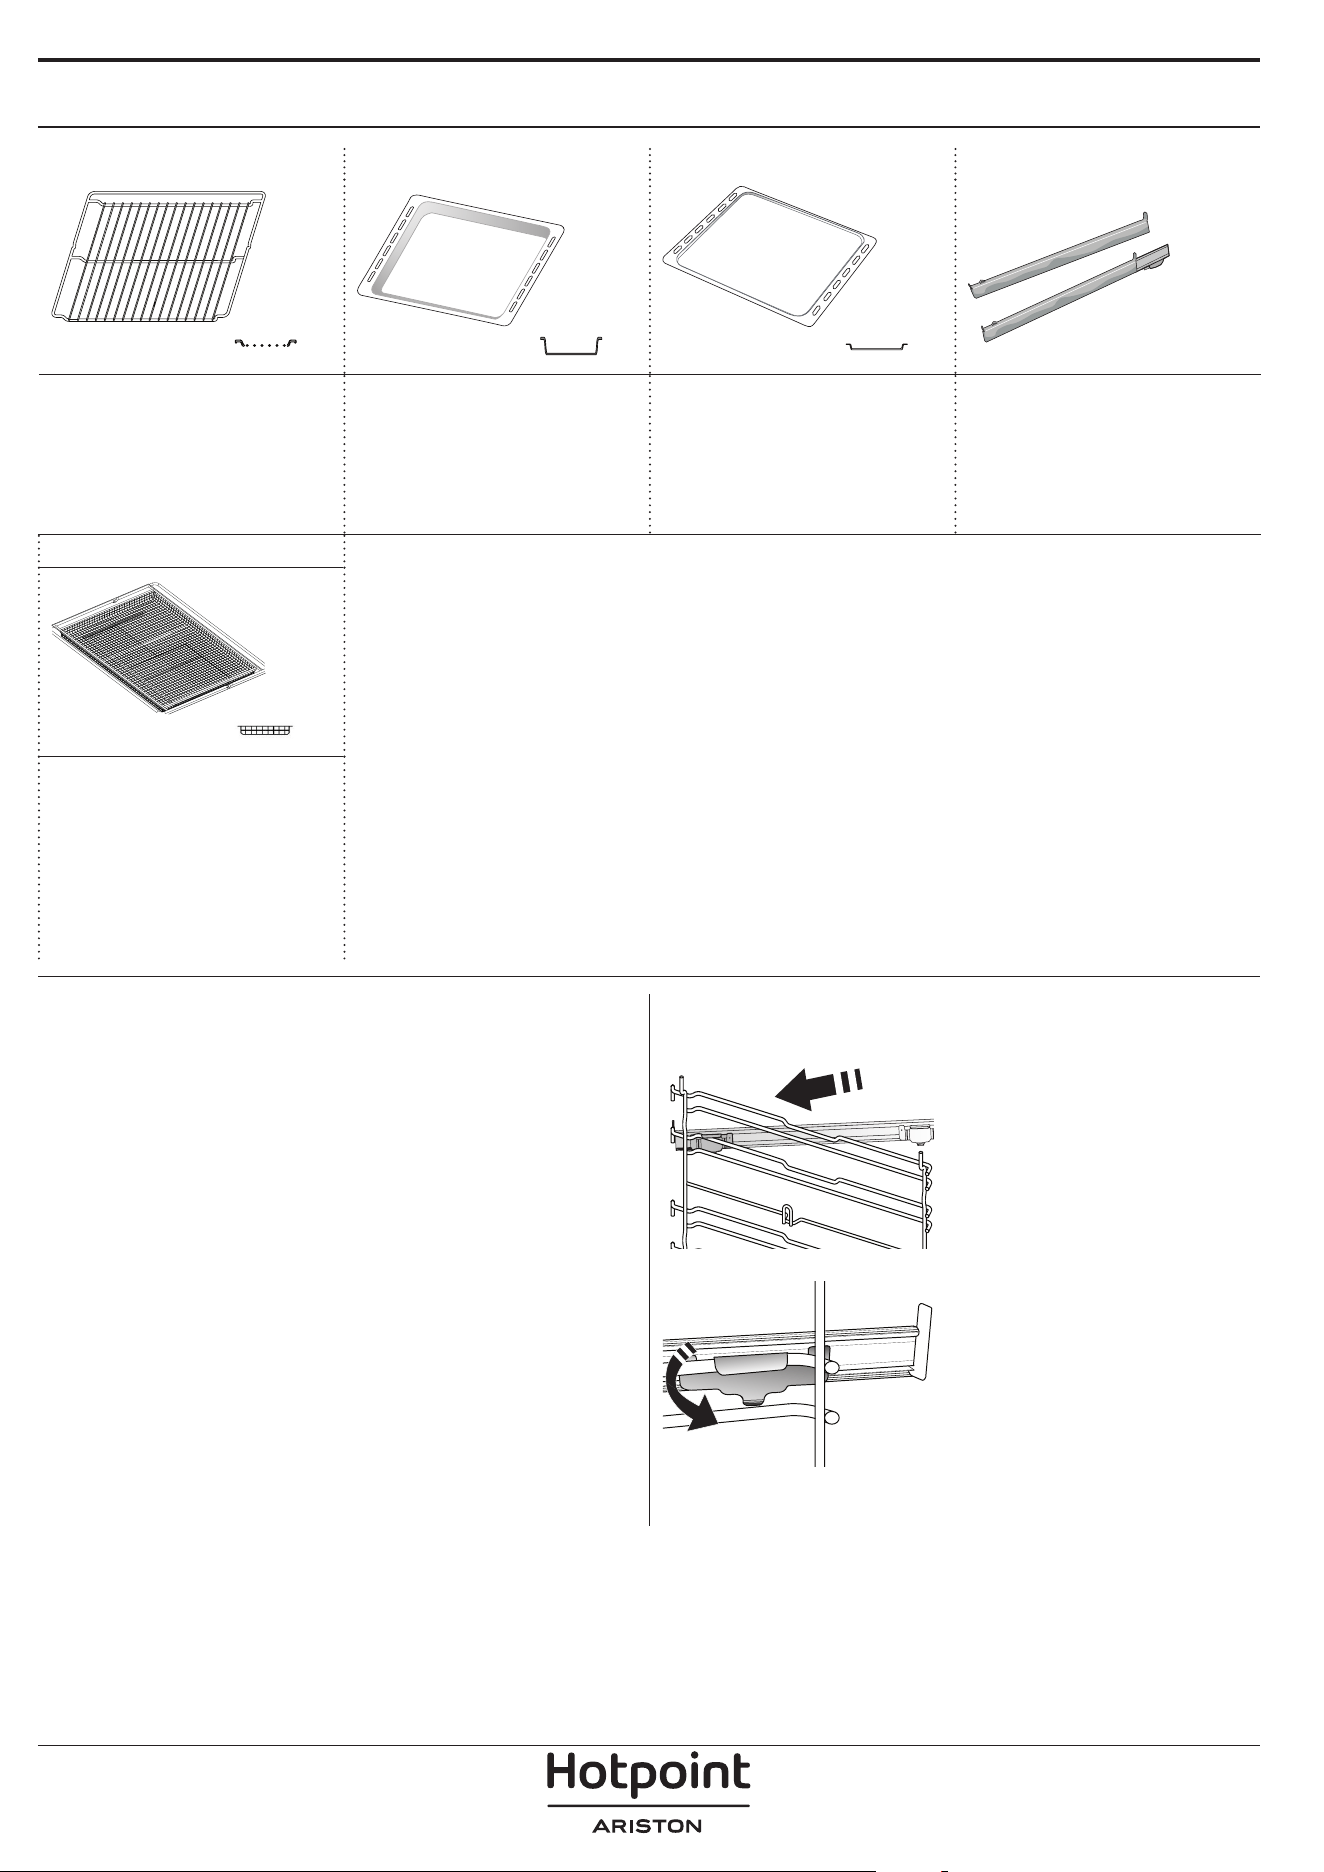
AIR FRY TRAY *
To be used when
cooking foods with Air
Fry function, with a
baking tray positioned
at a lower level to collect
possible crumbs and
drip. It can be cleaned in
the dishwasher.
INSERTING THE WIRE SHELF AND OTHER
ACCESSORIES
Insert the wire shelf horizontally by sliding it across
the shelf guides, making sure that the side with the
raised edge is facing upwards.
Other accessories, such as the drip tray and the
baking tray, are inserted horizontally in the same way
as the wire shelf.
REMOVING AND REFITTING THE SHELF GUIDES
• To remove the shelf guides, lift them up and pull the
lower parts out of their lodgings: The shelf guides can
now be removed.
• To refit the shelf guides, first fit them back into their
upper seating. Keeping them held up, slide them
into the cooking compartment, then lower them into
position in the lower seating.
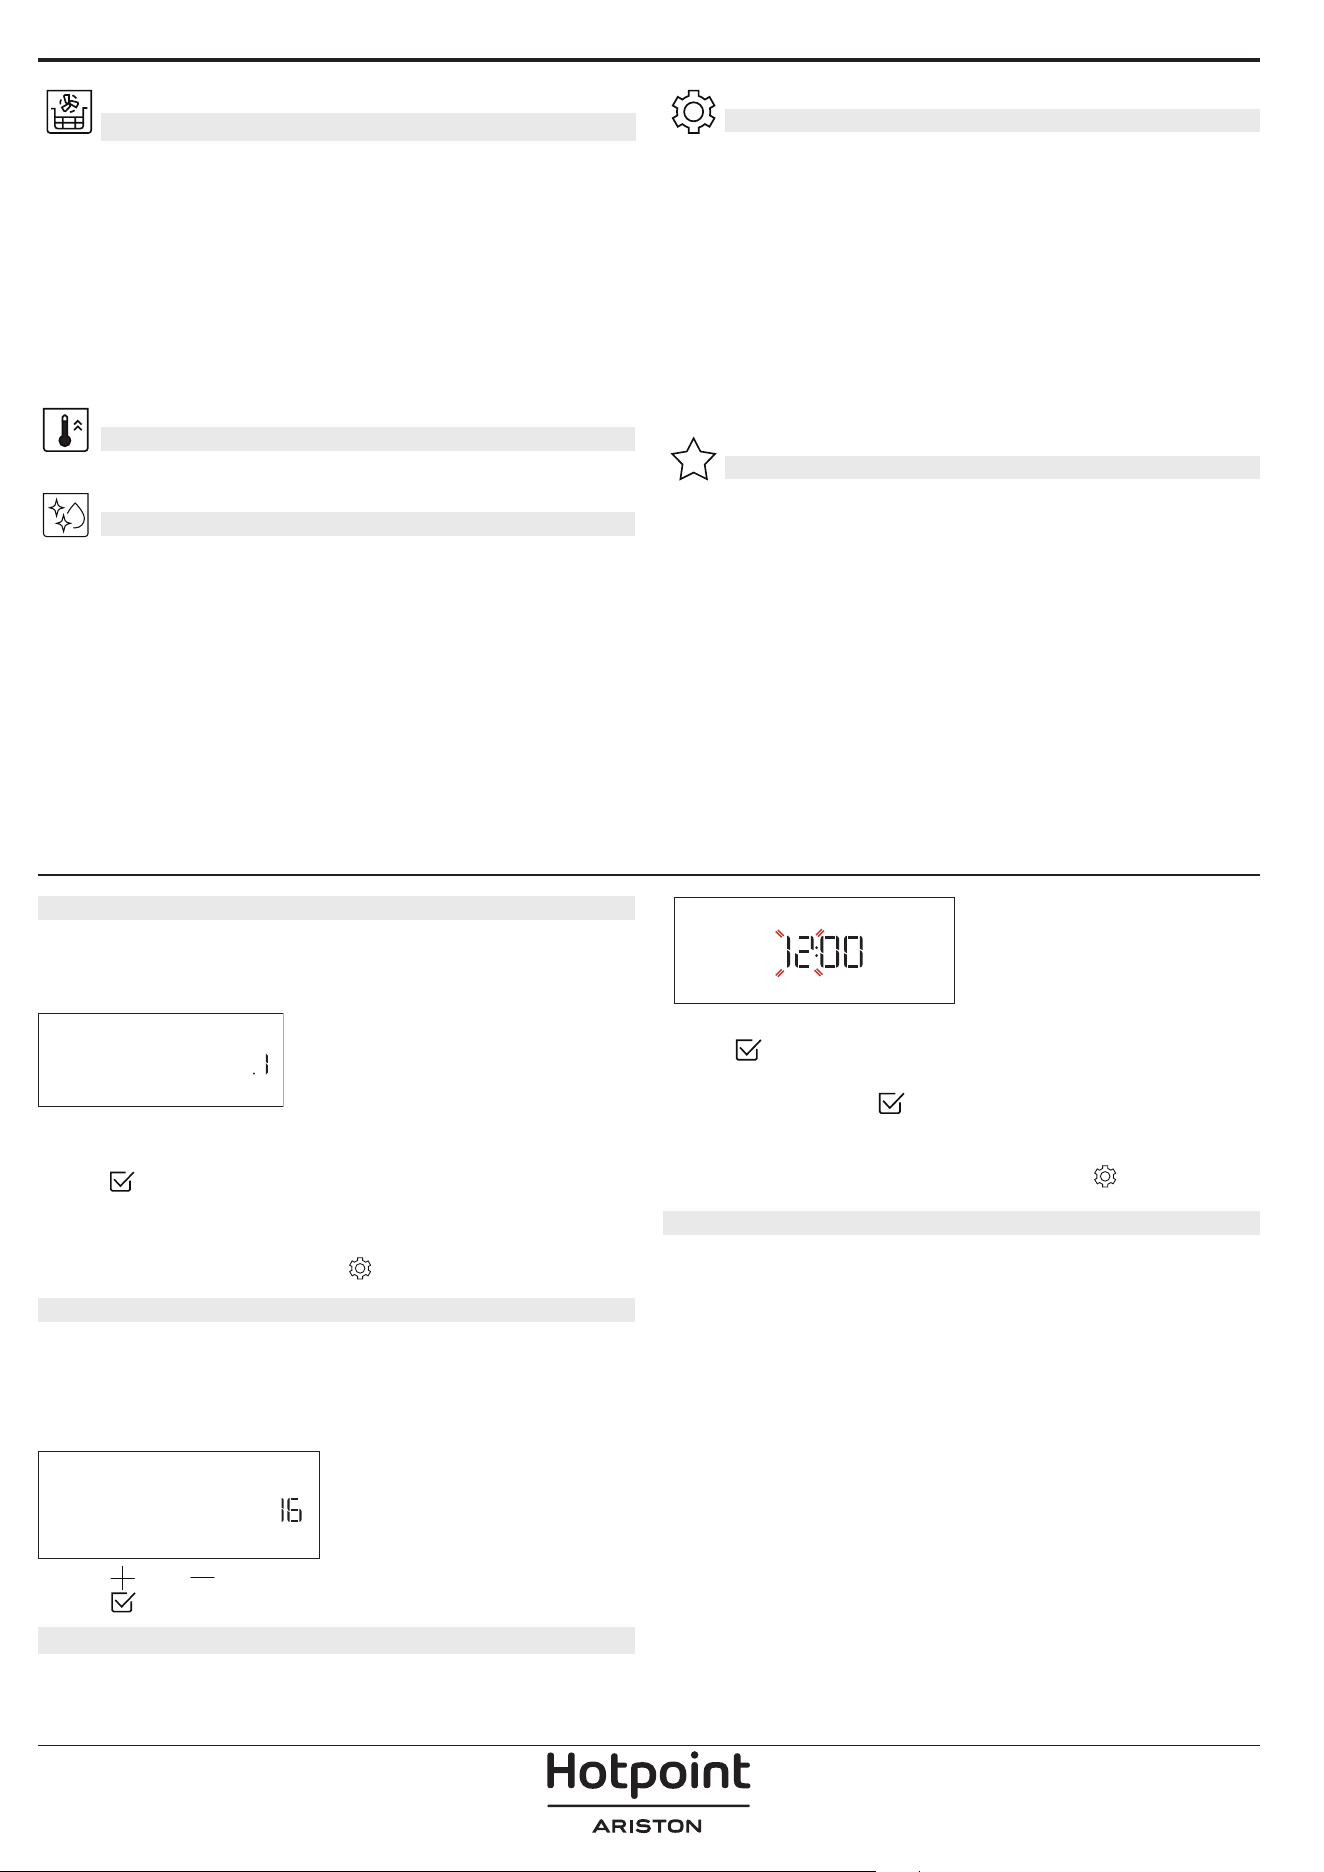
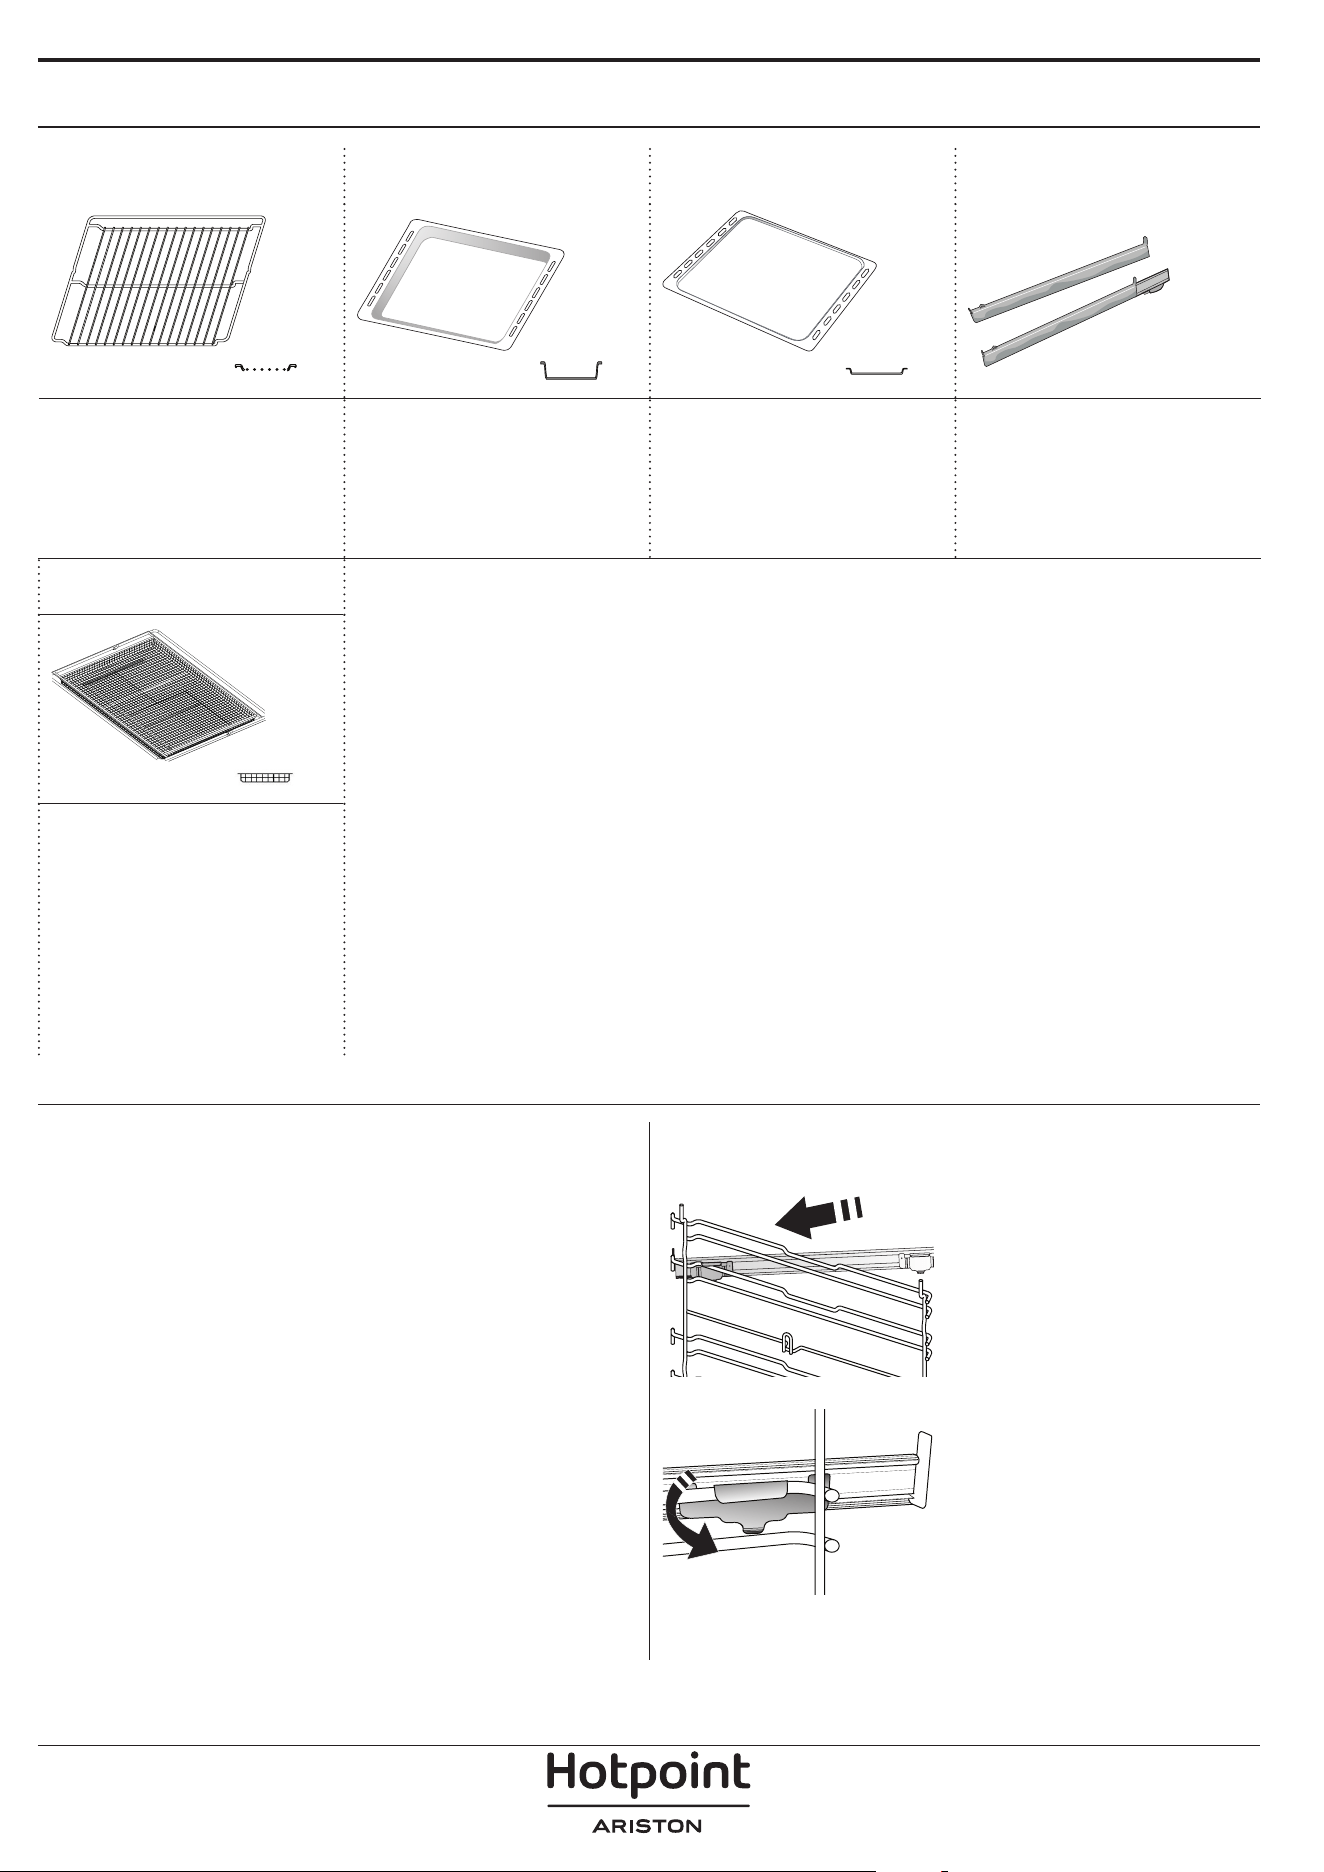
FITTING THE SLIDING RUNNERS
Remove the shelf guides
from the oven and remove
the protective plastic from
the sliding runners.
Fasten the upper clip of the
runner to the shelf guide
and slide it along as far as it
will go. Lower the other clip
into position.
To secure the guide, press
the lower portion of the clip
firmly against the shelf
guide. Make sure that the
runners can move freely.
Repeat these steps on the
other shelf guide on the
same level.
Please note: The sliding runners can be tted on any level.
The number and the type of accessories may vary
depending on which model is purchased.
Other accessories can be purchased separately; for
orders and information contact the after sales service .
* Available only in certain models

FUNCTIONS
CONVENTIONAL
For cooking any kind of dish on one shelf only.
FORCED AIR
For cooking different foods that require the same
cooking temperature on several shelves (maximum
three) at the same time. This function can be used to
cook different foods without odours being transferred
from one food to another.
GRILL
For grilling steaks, kebabs and sausages, cooking
vegetables au gratin or toasting bread. When grilling
meat, we recommend using a drip tray to collect the
cooking juices: Position the tray on any of the levels
below the wire shelf and add 500 ml of drinking
water.
MY MENU
These allow a fully automatic cooking for all types
of food (Lasagna, Meat, Fish, Vegetables, Cakes &
Pastries, Salt cakes, Bread, Pizza). To get the best from
this function, follow the indications on the relative
cooking table.
MANUAL FUNCTIONS
• CONVECT BAKE
For cooking meat, baking cakes with fillings on
one shelf only.
• TURBO GRILL
For roasting large joints of meat (legs, roast beef,
chicken). We recommend using a drip tray to
collect the cooking juices: Position the pan on any
of the levels below the wire shelf and add 500 ml
of drinking water.
• MULTIFLOW MENU
For cooking different foods that require the same
cooking temperature on four levels at the same
time. This function can be used to cook cookies,
cakes, round pizzas (also frozen) and to prepare a
complete meal. Follow the cooking table to obtain
the best results.
SPECIAL FUNCTIONS
• PIZZA
This function allows you to cook great homemade
pizza, in less than 10 minutes like in a restaurant.
The dedicated cooking cycle works at temperature
level above 300 degree Celsius, delivering pizza
soft inside, crunchy on the edges and with a
perfectly even browning.
Combining this function with the Pizza Stone
WPro accessory and preheating for 30 minutes
can bake a pizza in 5-8 min. (For orders and
information contact the after sales service or
www.hotpiont.eu.)
• FROZEN BAKE
The function automatically selects the ideal
cooking temperature and mode for 5 different
types of ready frozen food. The oven does not
have to be preheated.
• RISING
For optimal proving of sweet or savoury dough.
To maintain the quality of proving, do not activate
the function if the oven is still hot following a
cooking cycle.
• KEEP WARM
For keeping just-cooked food hot and crisp.
• DEFROST
To speed up defrosting of food. Place food on
the middle shelf. Leave food in its packaging to
prevent it from drying out on the outside.
• ECO CYCLE
For cooking stuffed roasting joints and fillets of
meat on a single shelf. When this Eco Cycle is
in use, the light will remain switched off during
cooking. To use the Eco Cycle and therefore
optimise power consumption, the oven door
should not be opened until the food is completely
cooked.
• MAXI COOKING
The function automatically selects the best
cooking mode and temperature to cook large
joints of meat (above 2.5 kg). It is advisable to
turn the meat over during cooking, to obtain
even browning on both sides. It is best to baste
the meat every now and again to prevent it from
drying out.
• SLOW COOKING
To gently cook meat and fish. This function cooks
food slowly to keep it tender and succulent. Due
to the low temperature, the food does not brown
on the outside and the end result is similar to
steam cooking. We recommend searing roast meat
in a pan first to brown the meat and help seal in
its natural juices. For best results, keep the oven
door closed during cooking in order to avoid heat
dispersion.Suggested cooking times ranges for
fish (300 g - 3 kg) are between 2-5 hours, for meat
(1-3 kg) between 4-7 hours.
AIR FRY
This function allows you to cook French fries, chicken
nuggets and more using less oil, resulting pleasantly
crispy. Heating elements cycle to properly heat the
cavity, while the fan circulates hot air. Best expected
cooking results can be achieved only by using an Air
Fry tray (provided with some models). Position the
food on the Air Fry tray in a single layer and follow Air
Fry Cooking Table instructions for best performances.
Avoid using more than one tray to prevent uneven
cooking.
FAST PREHEAT
For preheating the oven quickly.
DIAMOND CLEAN
The action of the steam released during this special
low-temperature cleaning cycle allows dirt and food
residues to be removed with ease. Pour 200 ml of
drinking water on the bottom of the oven and only
activate the function when the oven is cold.
SETTINGS
For adjusting the oven settings. When “ECO” mode is
active the brightness of the display will be reduced
to save energy and lamp switches off after 1 minute.
It will be reactivated automatically whenever any of
the buttons are pressed. When “DEMO” is “On” all
commands are active and menus available but the
oven doesn’t heat up. To deactivate this mode, access
“DEMO” from “SETTINGS” menu and select “Off”. By
selecting “FACTORY RESET”, the product switches off
and then it returns to first switch on. All settings will
be deleted.
FAVORITES
For retrieving the list of 10 favorite functions.
FIRST TIME USE
1. SELECT THE LANGUAGE
You will need to set the language and the time
when you switch on the appliance for the first time:
“English” will show on the display.
ENGLISH
Turn the adjustment knob to scroll through the list of
available languages and select the one you require.
Press
to confirm your selection.
Please note: The language can subsequently be changed
by selecting “LANGUAGE” in “SETTINGS” menu, available by
turning the selection knob on
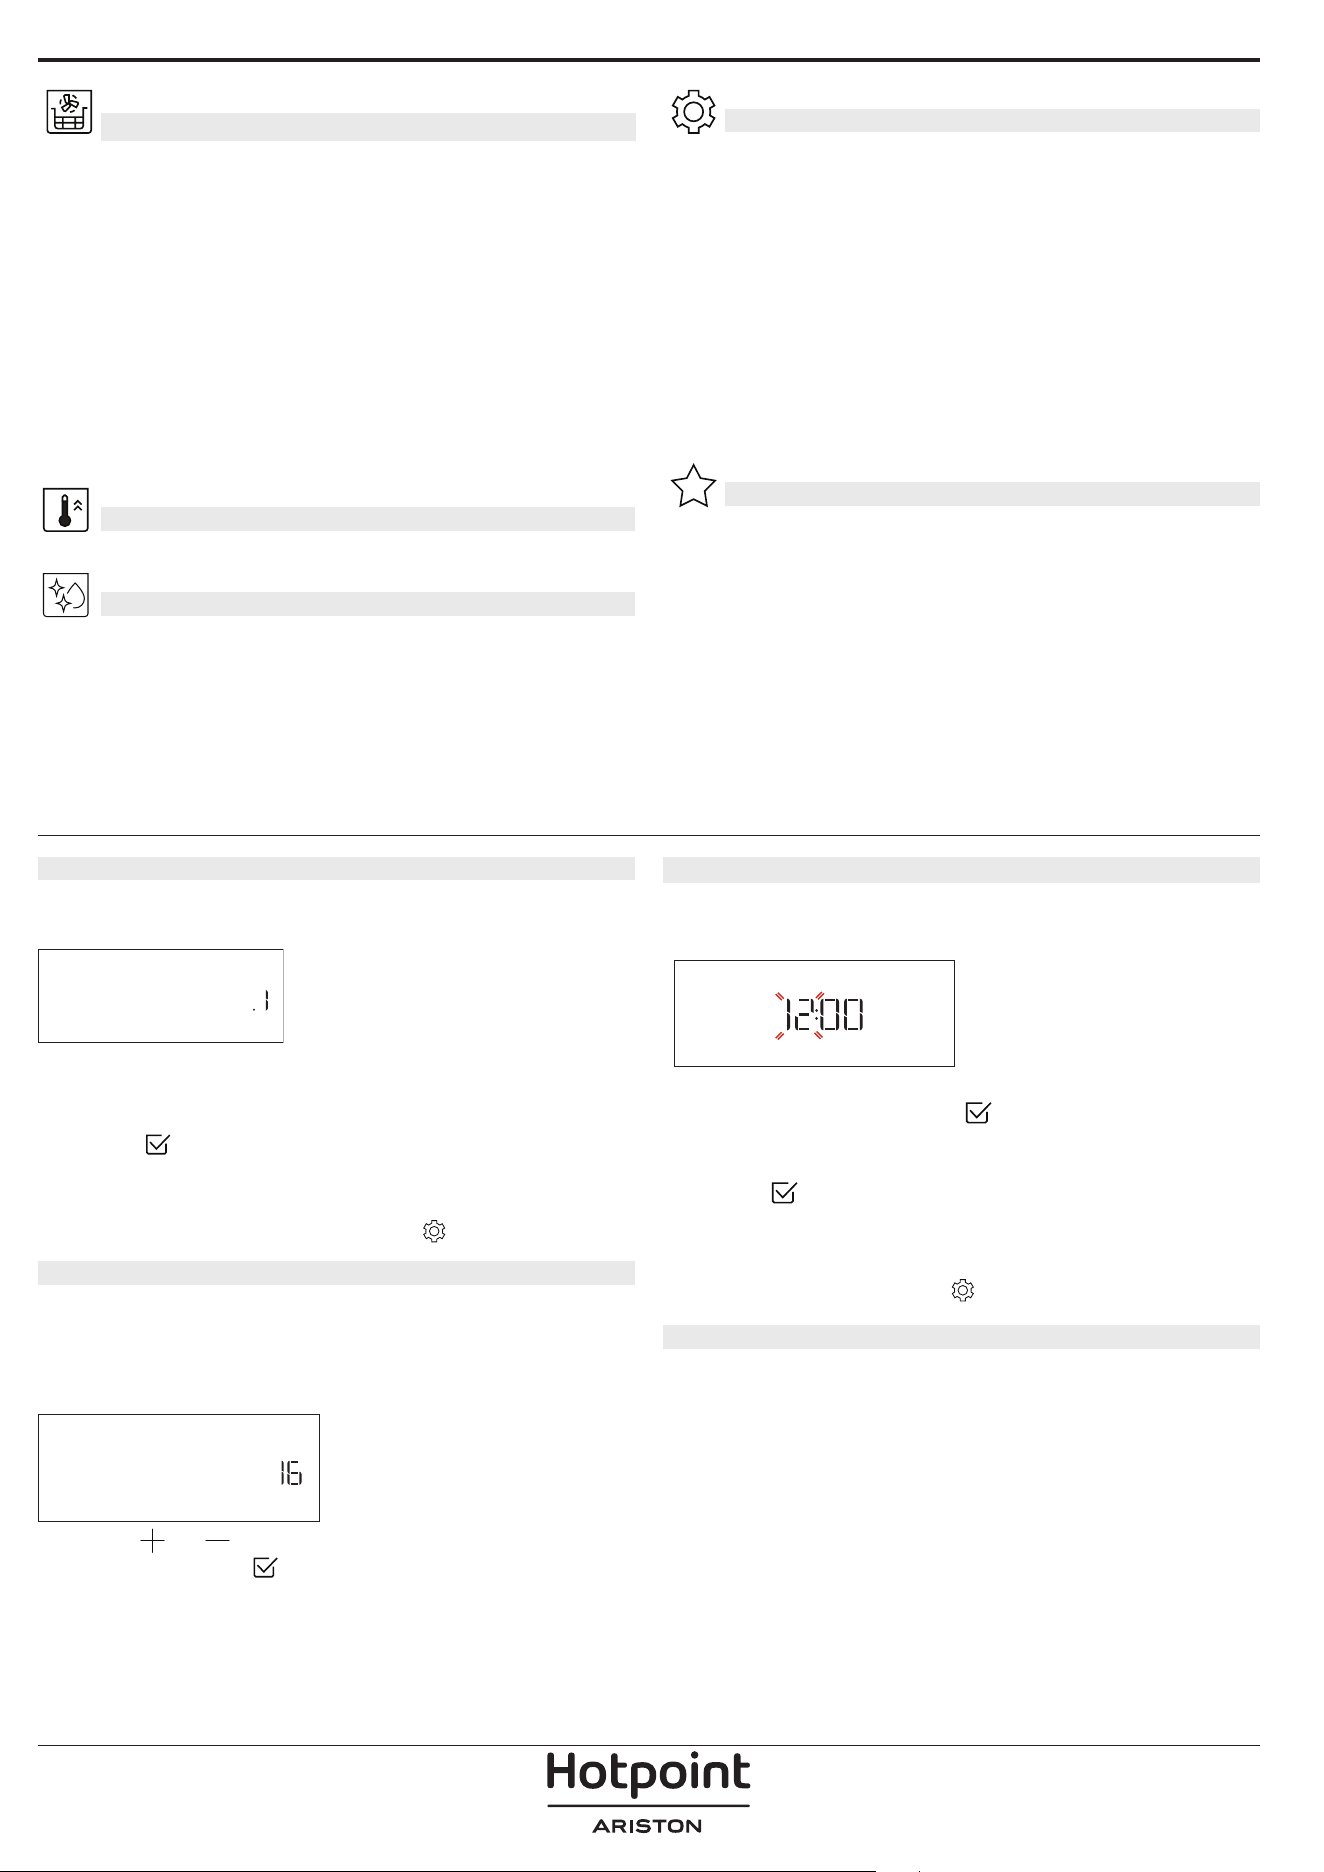
2. SET THE POWER CONSUMPTION
The oven is programmed to consume a level of
electrical power that is compatible with a domestic
network that has a rating of more than 3 kW (16): If
your household uses a lower power, you will need to
decrease this value (13).
POWER
Press or to select 16 “High” or 13 “Low” and
press
to confirm.
3. SET THE TIME
After selecting the language, you will need to set the
current time: The two digits for the hour will flash on
the display.
CLOCK
Turn the adjustment knob to set the correct hour and
press
: The two digits for the minutes will flash
on the display. Turn the adjustment knob to set the
minutes and press
to confirm.
Please note: You may need to set the time again following
lengthy power outages. Select “CLOCK” in “SETTINGS” menu,
available by turning the selection knob on
4. HEAT THE OVEN
A new oven may release odours that have been left
behind during manufacturing: This is completely
normal.
Before starting to cook food, we therefore
recommend heating the oven with it empty in
order to remove any possible odours.
Remove any
protective cardboard or transparent film from the
oven and remove any accessories from inside it. Heat
the oven to 200 °C for around one hour, ideally using
a function with air circulation (e.g. “Forced Air” or
“Convection Bake”).
Please note: It is advisable to air the room after using the
appliance for the rst time.
DAILY USE
1. SELECT A FUNCTION
Turn the selection knob to switch on the oven and
show the function you require on the display.
To select an item from a menu (the display will show
the first available item), turn the adjustment knob
until the item you require is shown.
The display will show the name of the function and its
basic settings: Press
to confirm.
2. SET A FUNCTION
After having selected the function you require, you
can change its settings. The display will show the
settings that can be changed in sequence. Pressing
allows you to change the previous setting again.
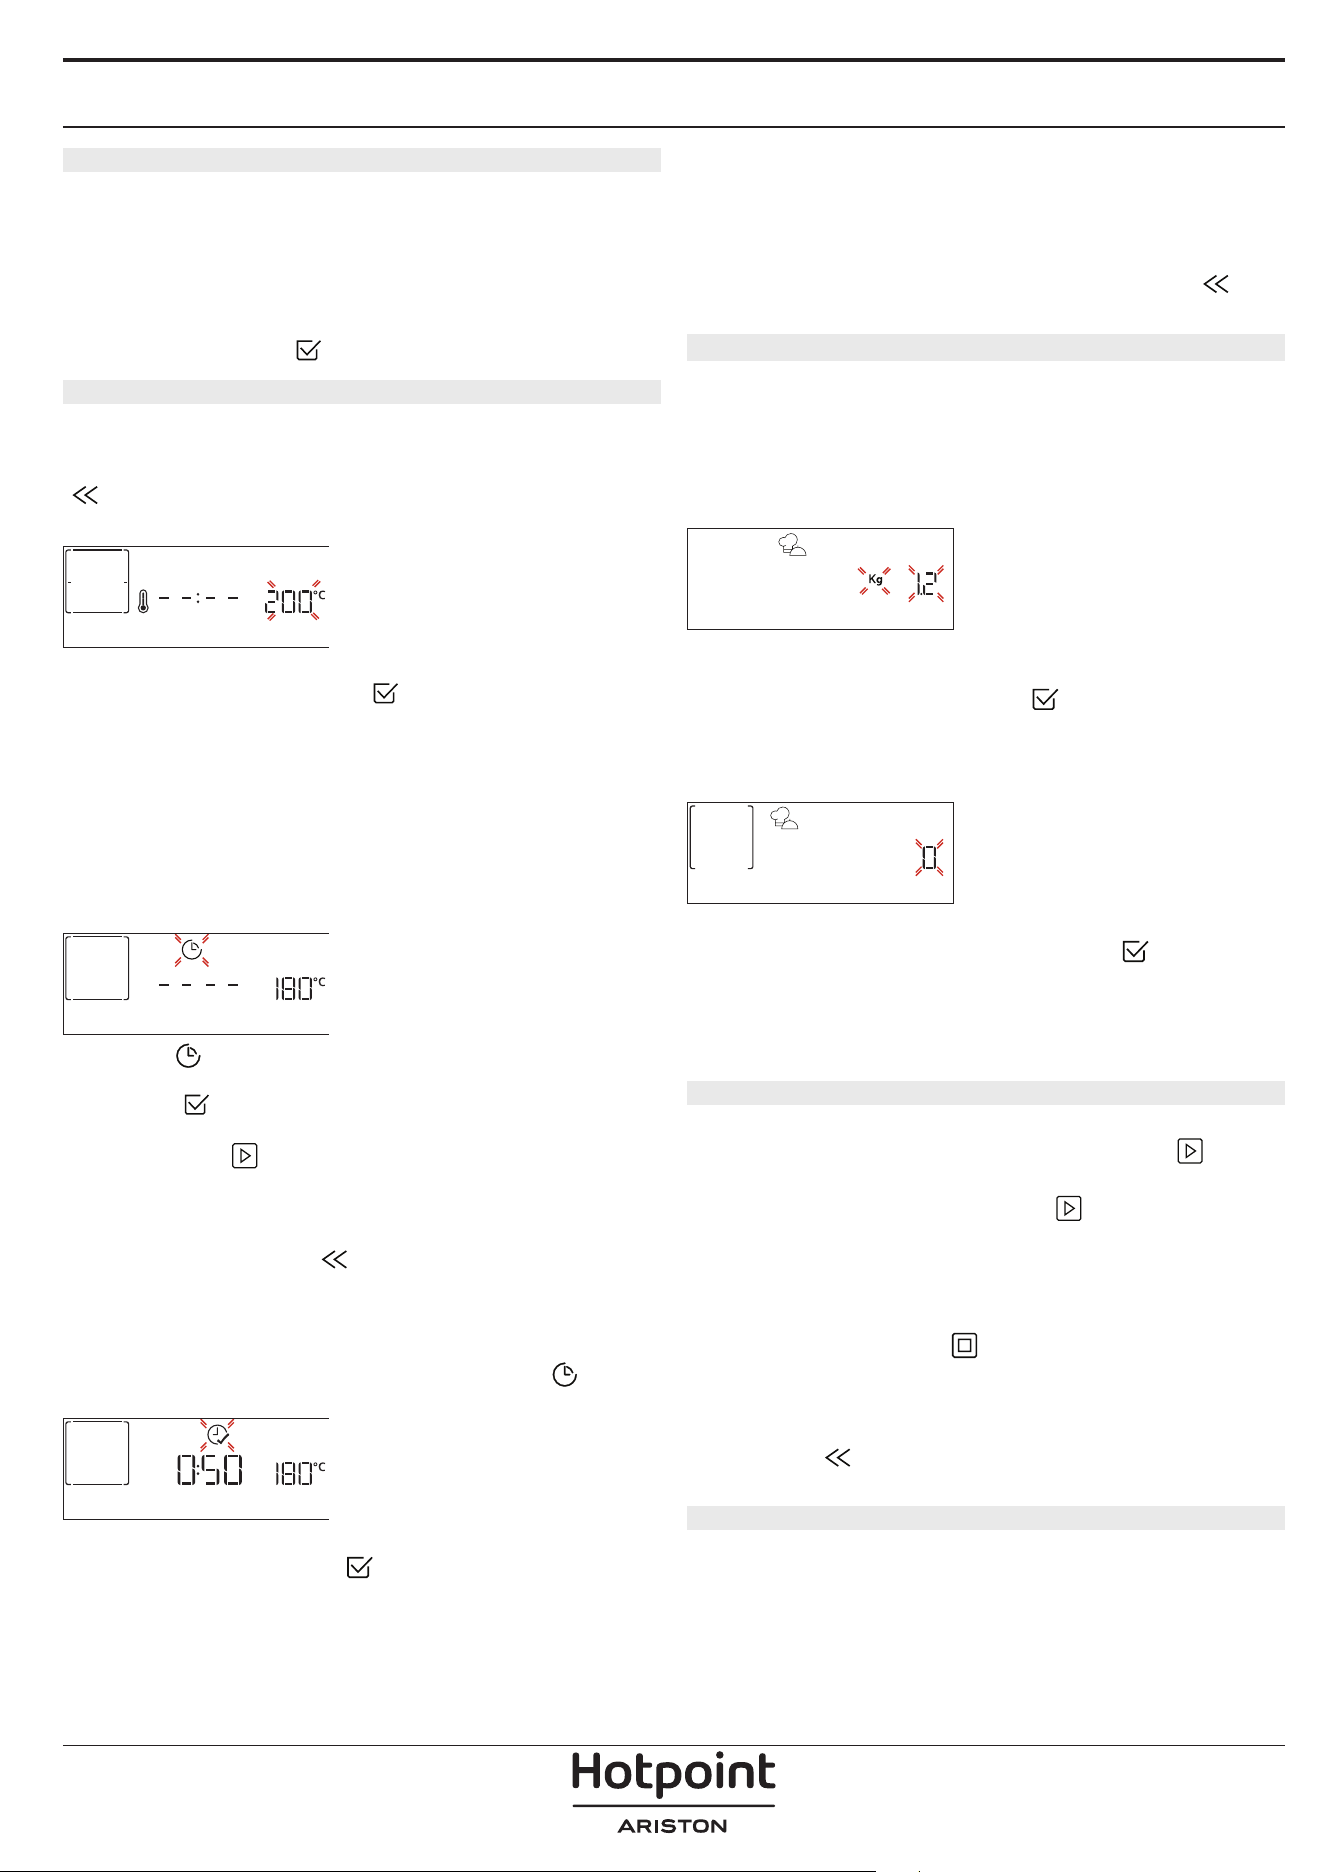
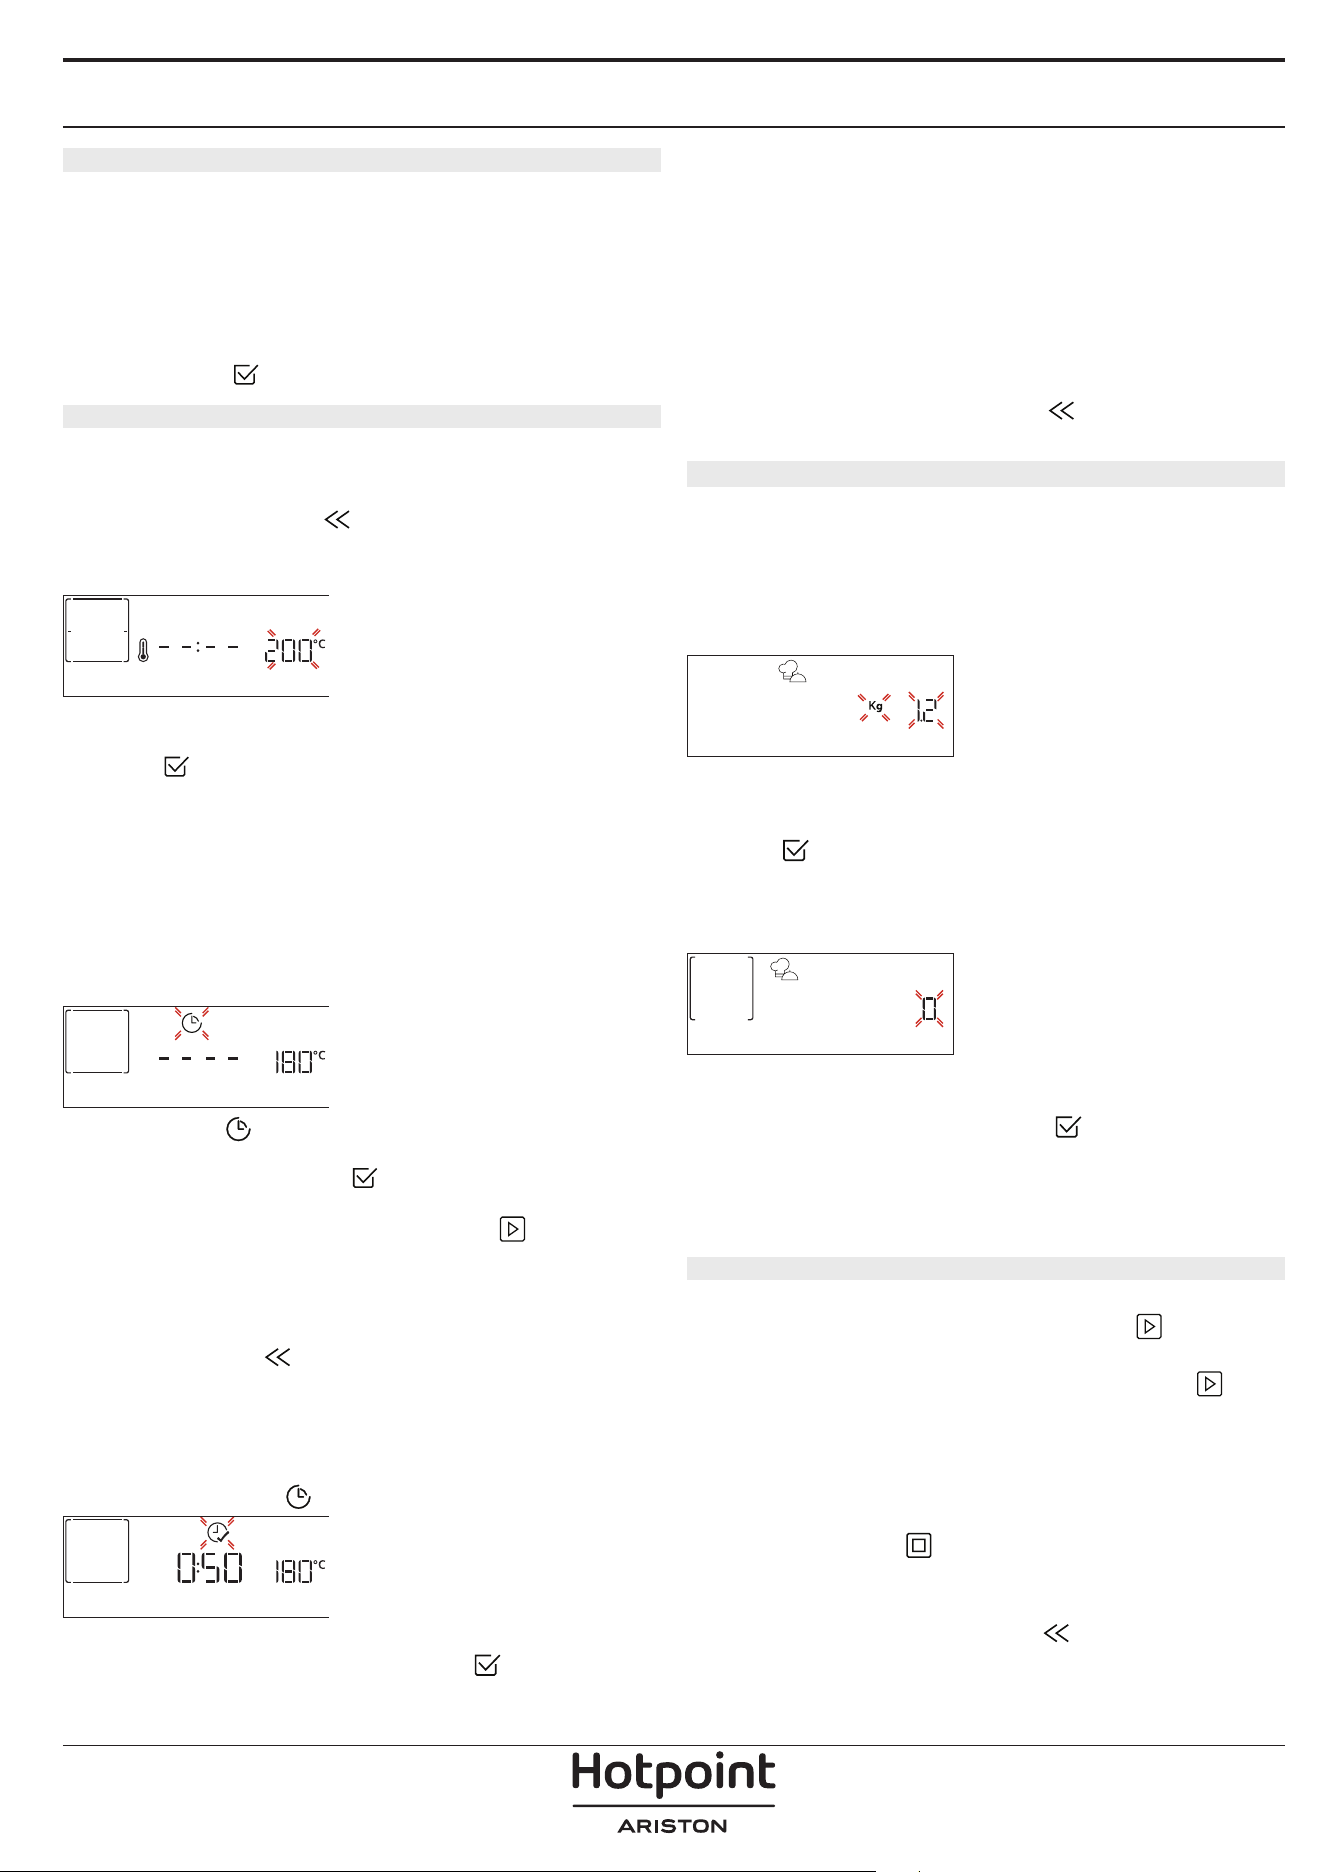
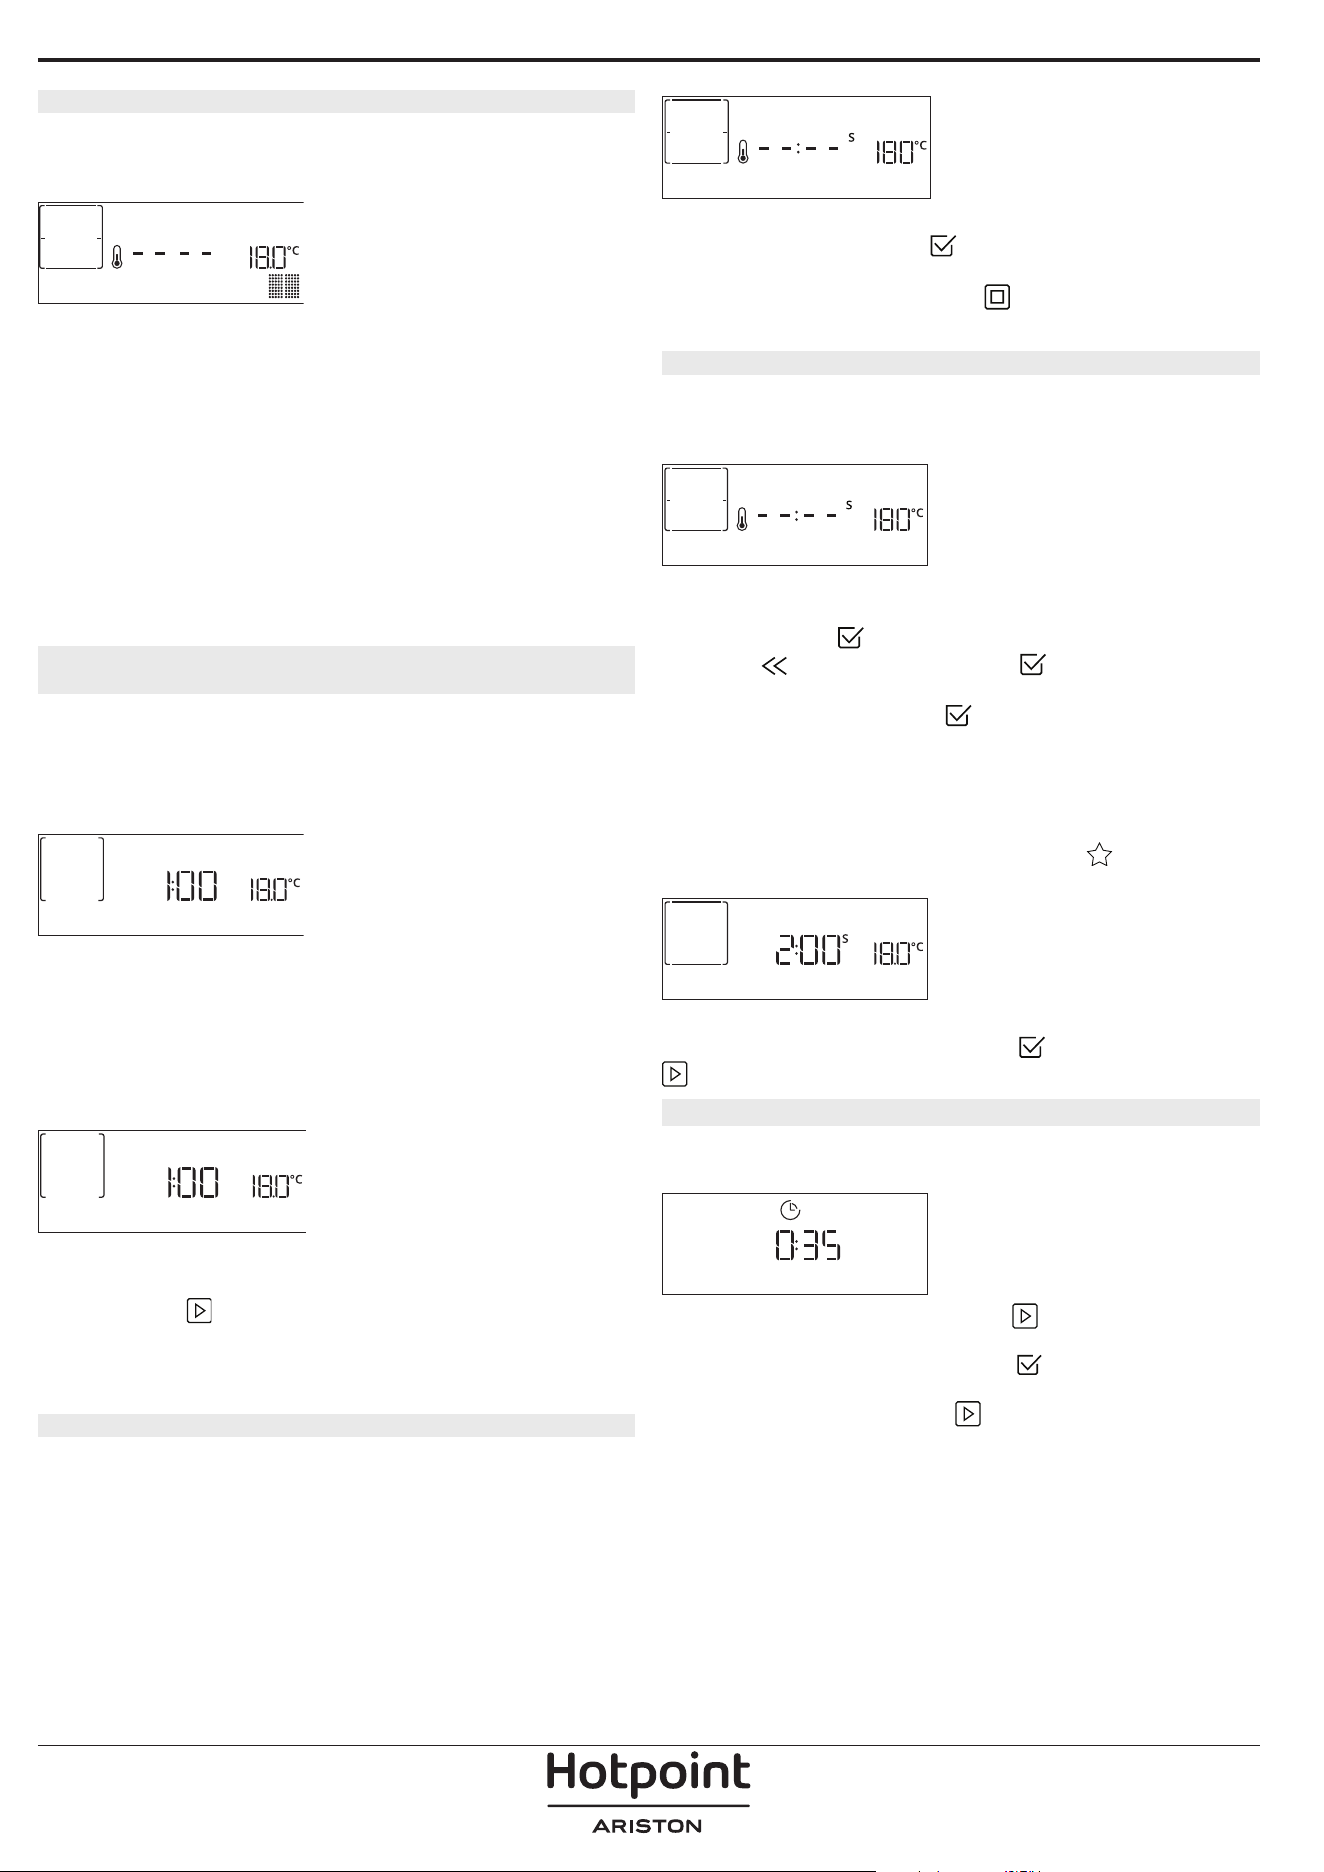
TEMPERATURE / GRILL LEVEL
TEMPERATURE
When the value ashes on the display, turn the adjustment
knob to change it, then press to conrm and
continue to alter the settings that follow (if possible).
Please note: Once the function has been activated,
the temperature/grill level can be changed using the
adjustment knob.
In the same way, it is possible to set the grill level: There
are three dened power levels for grilling: 3 (high), 2 (mid),
1 (low).
DURATION
DURATION
When the icon ashes on the display, use the
adjustment knob to set the cooking time you require and
then press to conrm. You do not have to set the
cooking time if you want to manage cooking manually
(untimed): Press
to conrm and start the function.
In this case, you cannot set the end cooking time by
programming a delayed start.
Please note: You can adjust the cooking time that has been
set during cooking: press
to change the settings.
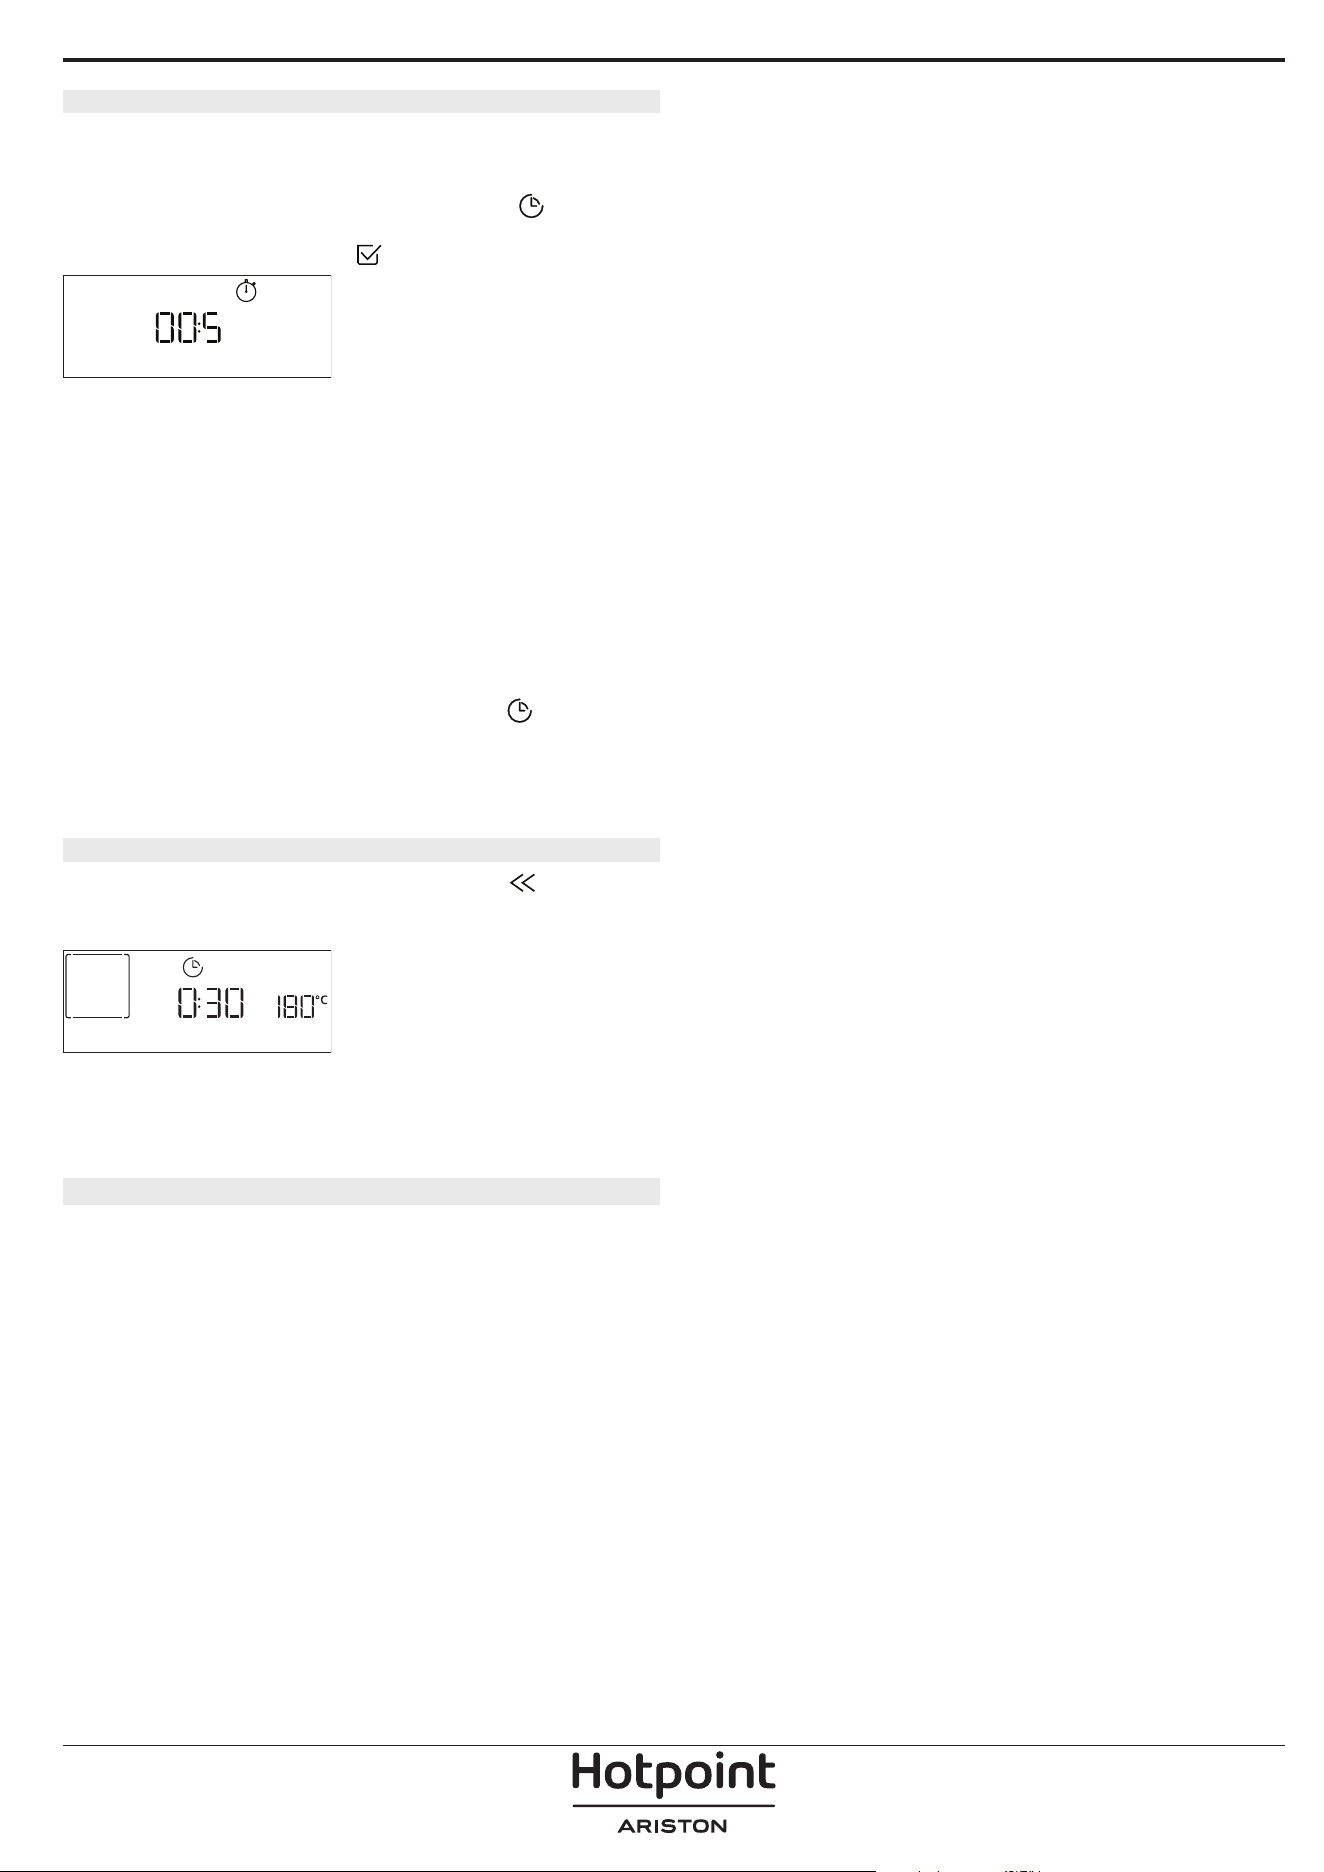
END TIME (START DELAY)
In many functions, once you have set a cooking time you
can delay starting the function by programming its end
time. The display shows the end time while the
icon
ashes.
END TIME
Turn the adjustment knob to set the time you want
cooking to end, then press
to conrm and activate
the function.
Place the food in the oven and close the door: The function
will start automatically after the period of time that has
been calculated in order for cooking to nish at the time
you have set.
Please note: Programming a delayed cooking start time will
disable the oven preheating phase: The oven will reach the
temperature you require gradually, meaning that cooking
times will be slightly longer than those listed in the cooking
table. During the waiting time, you can use the adjustment
knob to amend the programmed end time or press to
change the settings.
.MY MENU
These functions automatically select the best cooking
mode, temperature and duration to cook, roast or bake
all the dishes available.
When required, simply indicate the characteristic of
food to obtain an optimal result.
WEIGHT / HEIGHT (ROUND-TRAY-LAYERS)
KILOGRAMS
To set the function correctly, follow the indications on the
display, when prompted, and turn the adjustment knob to
set the required value then press
to conrm.
DONENESS / BROWNING
In some My Menu functions it is possible to adjust the
doneness level.
DONENESS
When prompted, turn the adjustment knob to level desired
between rare (-1) and well done (+1). Press
or to
conrm and start the function.
In the same way, where allowed, in some My Menu
functions, it’s possible to adjust the browning level
between low (-1) and high (+1).
3. START THE FUNCTION
At any time, if the default values are those desired or once
you have applied the settings you require, press
to
activate the function.
During the delay phase, by pressing
the oven will ask
if you want to skip this phase, starting immediately the
function.
Please note: Once cooking has started, the display will
recommend the most suitable level for each function.
At any time you can press
to stop the function that has
been activated.
Please note: If the oven is hot and the function requires a
specic maximum temperature, a message will shown on the
display. Press
to return to previous screen and select a
dierent function or wait for a complete cooling.
4. PREHEATING
Some functions have an oven preheating phase: Once
the function has started, the display indicates that the
preheating phase has been activated.
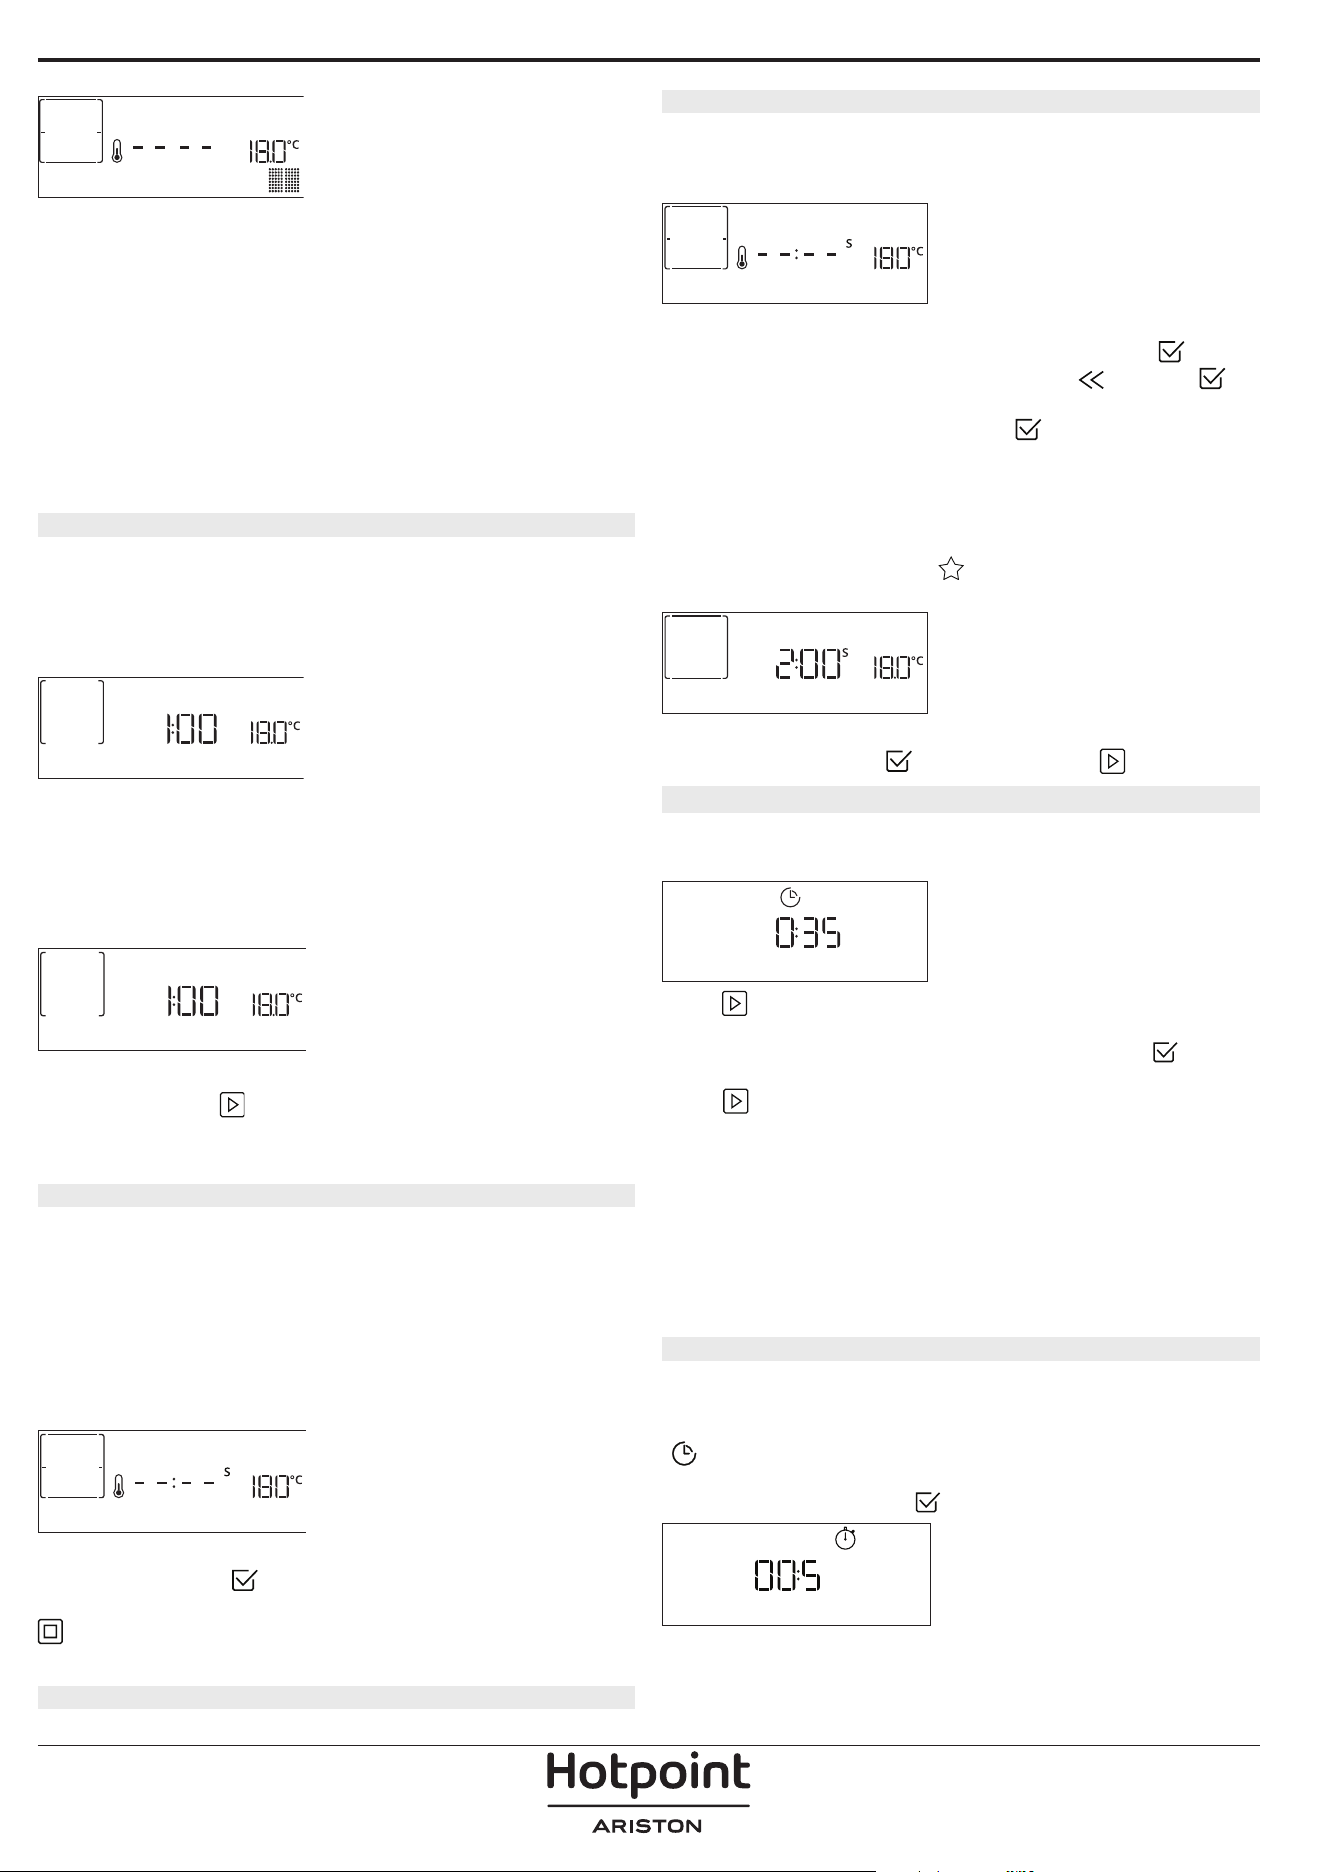
PREHEATING
Once this phase has nished, an audible signal will sound
and the display will indicate that the oven has reached the
set temperature, requiring to “ADD FOOD”. At this point,
open the door, place the food in the oven, close the door
and start cooking.
Please note: Placing the food in the oven before preheating
has nished may have an adverse eect on the nal cooking
result. Opening the door during the preheating phase will
pause it. The cooking time does not include a preheating
phase. You can always change the temperature you want the
oven to reach using the adjustment knob.
5. PAUSE COOKING / TURN OR CHECK FOOD
By opening the door, the cooking will be temporarily
paused through deactivating heating elements. To
resume the cooking, close the door. Some My Menu
functions will require the food to be turned during
cooking.
TURN FOOD
An audible signal will sound and the display shows
the action to be done: Open the door, do the action
prompted by the display, close the door, and resume
cooking.
In the same way, at 10% of time before the end of
cooking, the oven prompts you to check the food.
CHECK ON FOOD
Check the food, close the door and continue cooking.
Please note: Press
to skip these actions. Otherwise, if no
action is done after a certain time the oven will continue
the cooking.
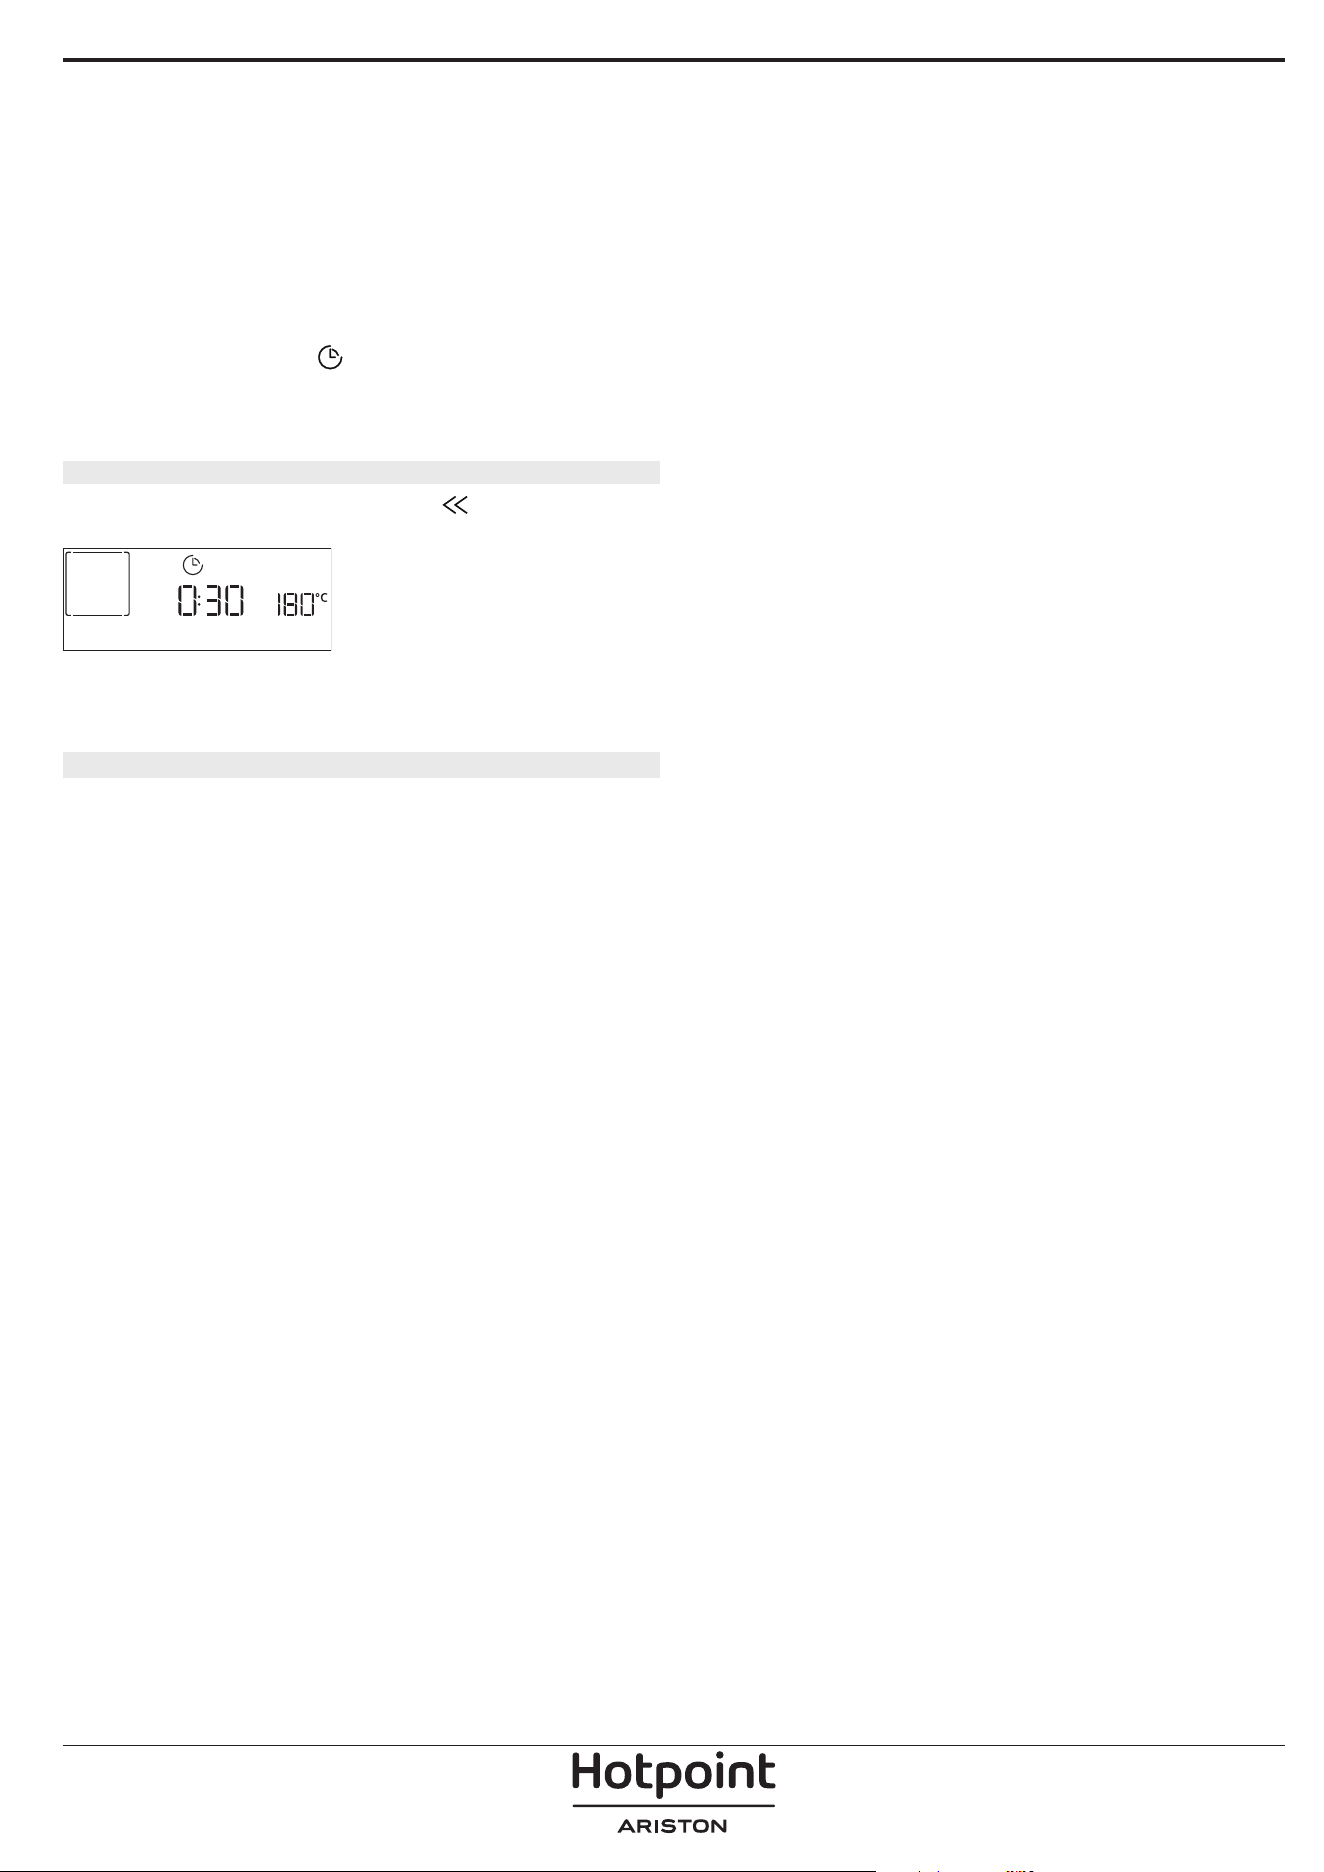
6. END OF COOKING
An audible signal will sound and the display will indicate
that cooking is complete. Turn the adjustment knob to
extend the cooking time by setting a new duration. In
both cases, the cooking parameters will be retained.
BROWNING
Some functions of the oven enable you to brown the
surface of the food by activating the grill once cooking is
complete.
PRESS v TO BROWN
When the display shows the relevant message, if
required press to
start a five-minute browning
cycle. You can stop the function at any time by pressing
or by turning the selection knob to “0” to switch the
oven off.
7. FAVORITE
Once cooking is complete the display will prompt you
to save the function in a number between 1 and 10 on
your list of favorites.
ADD FAVORITE?
If you would like to save a function as a favorite and
store the current settings for future use, press
otherwise, to ignore the request press
. Once
has been pressed, turn the adjustment knob to select
the number position, then press
to confirm.
Please note: If the memory is full or the number chosen
has already been taken, the oven will ask you to confirm
overwriting the previous function.
To call up the functions you have saved at a later time,
turn the function knob to
: The display will show
your list of favorite functions.
1. CONVENTIONAL
Turn the adjustment knob to select the function,
confirm by pressing
, and then press to activate.
8
.DIAMOND CLEAN
Turn the function knob to to show “Diamond Clean” on
the display.
Diamond clean
Press to activate the function: the display will prompt
you to do all actions needed to obtain the best cleaning
results: Follow the indications and then press when
done. Once you have done all steps, when required
press to activate the cleaning cycle.
Please note: It is recommended to do not open the oven
door during the cleaning cycle to avoid a loss of water vapor
and that could get an adverse eect on the nal cleaning
result.
An appropriate message will start flashing on the
display once the cycle has finished. Leave the oven to
cool and then wipe and dry the interior surfaces with a
cloth or sponge.
9.MINUTEMINDER
When the oven is switched off, the display can be used
as a timer. To activate this function, make sure that the
oven is switched off and turn the adjustment knob: The
icon will flash on the display.
Turn the adjustment knob to set the length of time you
require and then press to activate the timer.
MINUTE-MINDER
An audible signal will sound and the display will indicate
once the minuteminder has finished counting down the
selected time.
Please note: The minuteminder does not activate any of
the cooking cycles. Use the adjustment knob to change
the time set on the timer.
Once the minuteminder has been activated, you can
also select and activate a function. Turn the selection
knob to switch on the oven and then select the function
your require. Once the function has started, the timer
will continue to count down independently without
interfering with the function itself.
Please note: During this phase, it isn’t possible to see the
minuteminder (only the
icon will be displayed), that
will continue counting down in background. To retreive
the minuteminder screen turn the selection knob to “0” to
stop the function that is currently active.
10.KEYLOCK
To lock the keypad, press and hold for at least five
seconds. Do this again to unlock the keypad.
KEYLOCK
Please note: This function can also be activated during
cooking. For safety reasons, the oven can be switched off
at any time by turning the selection knob to “0”.
. NOTES
• Do not cover the inside of the oven with
aluminium foil.
• Never drag pots or pans across the bottom of the
oven as this could damage the enamel coating.
• Do not place heavy weights on the door and do
not hold on to the door.
• Due to the higher temperature of the Pizza cycle it
is expected to experience slightly higher cooling
fan noise.

USEFUL TIPS
HOW TO READ THE COOKING TABLE
The table lists the best function, accessories and level
to use to cook different types of food. Cooking times
start from the moment food is placed in the oven,
excluding preheating (where required). Cooking
temperatures and times are approximate and depend
on the amount of food and the type of accessory
used. Use the lowest recommended settings to
begin with and, if the food is not cooked enough,
then switch to higher settings. Use the accessories
supplied and preferably dark-coloured metal cake
tins and baking trays. You can also use Pyrex or
stoneware pans and accessories, but bear in mind
that cooking times will be slightly longer.
COOKING DIFFERENT FOODS AT THE SAME TIME
Using the “Forced Air” function, you can cook
different foods which require the same cooking
temperature at the same time (for example: fish and
vegetables), using different shelves. Remove the food
which requires a shorter cooking time and leave the
food which requires a longer cooking time in the
oven.
MEAT
Use any kind of oven tray or pyrex dish suited to the
size of the piece of meat being cooked. For roast
joints, it is best to add some stock to the bottom of
the dish, basting the meat during cooking for added
flavour. Please note that steam will be generated
during this operation. When the roast is ready, let it
rest in the oven for another 10-15 minutes, or wrap it
in aluminium foil.
When you want to grill meat, choose cuts with an
even thickness all over in order to achieve uniform
cooking results. Very thick pieces of meat require
longer cooking times. To prevent the meat from
burning on the outside, lower the position of the
wire shelf, keeping the food farther away from the
grill. Turn the meat two thirds of the way through
cooking. Take care when opening the door as steam
will escape.
To collect the cooking juices, we recommend placing
a dripping pan filled with half a litre of drinking water
directly underneath the wire shelf on which the food
is placed. Top-up when necessary.
DESSERTS
Cook delicate desserts with the conventional function
on one shelf only.
Use dark-coloured metal baking pans and always
place them on the wire shelf supplied. To cook on
more than one shelf, select the forced air function and
stagger the position of the cake tins on the shelves,
aiding optimum circulation of the hot air.
To check whether a leavened cake is cooked, insert a
wooden toothpick into the centre of the cake. If the
toothpick comes out clean, the cake is ready.
If using non-stick baking pans, do not butter the
edges as the cake may not rise evenly around the
edges.
If the item “swells” during baking, use a lower
temperature next time and consider reducing the
amount of liquid you add or stirring the mixture more
gently.
For desserts with moist fillings or toppings (such
as cheesecake or fruit tarts), use the “Convection
bake” function. If the base of the cake is soggy, lower
the shelf and sprinkle the bottom of the cake with
breadcrumbs or biscuit crumbs before adding the
filling.
RISING
It is always best to cover the dough with a damp cloth
before placing it in the oven. Dough proving time
with this function is reduced by approximately one
third compared to proving at room temperature (20-
25°C). The rising time for pizza starts at around one
hour for 1 kg of dough.
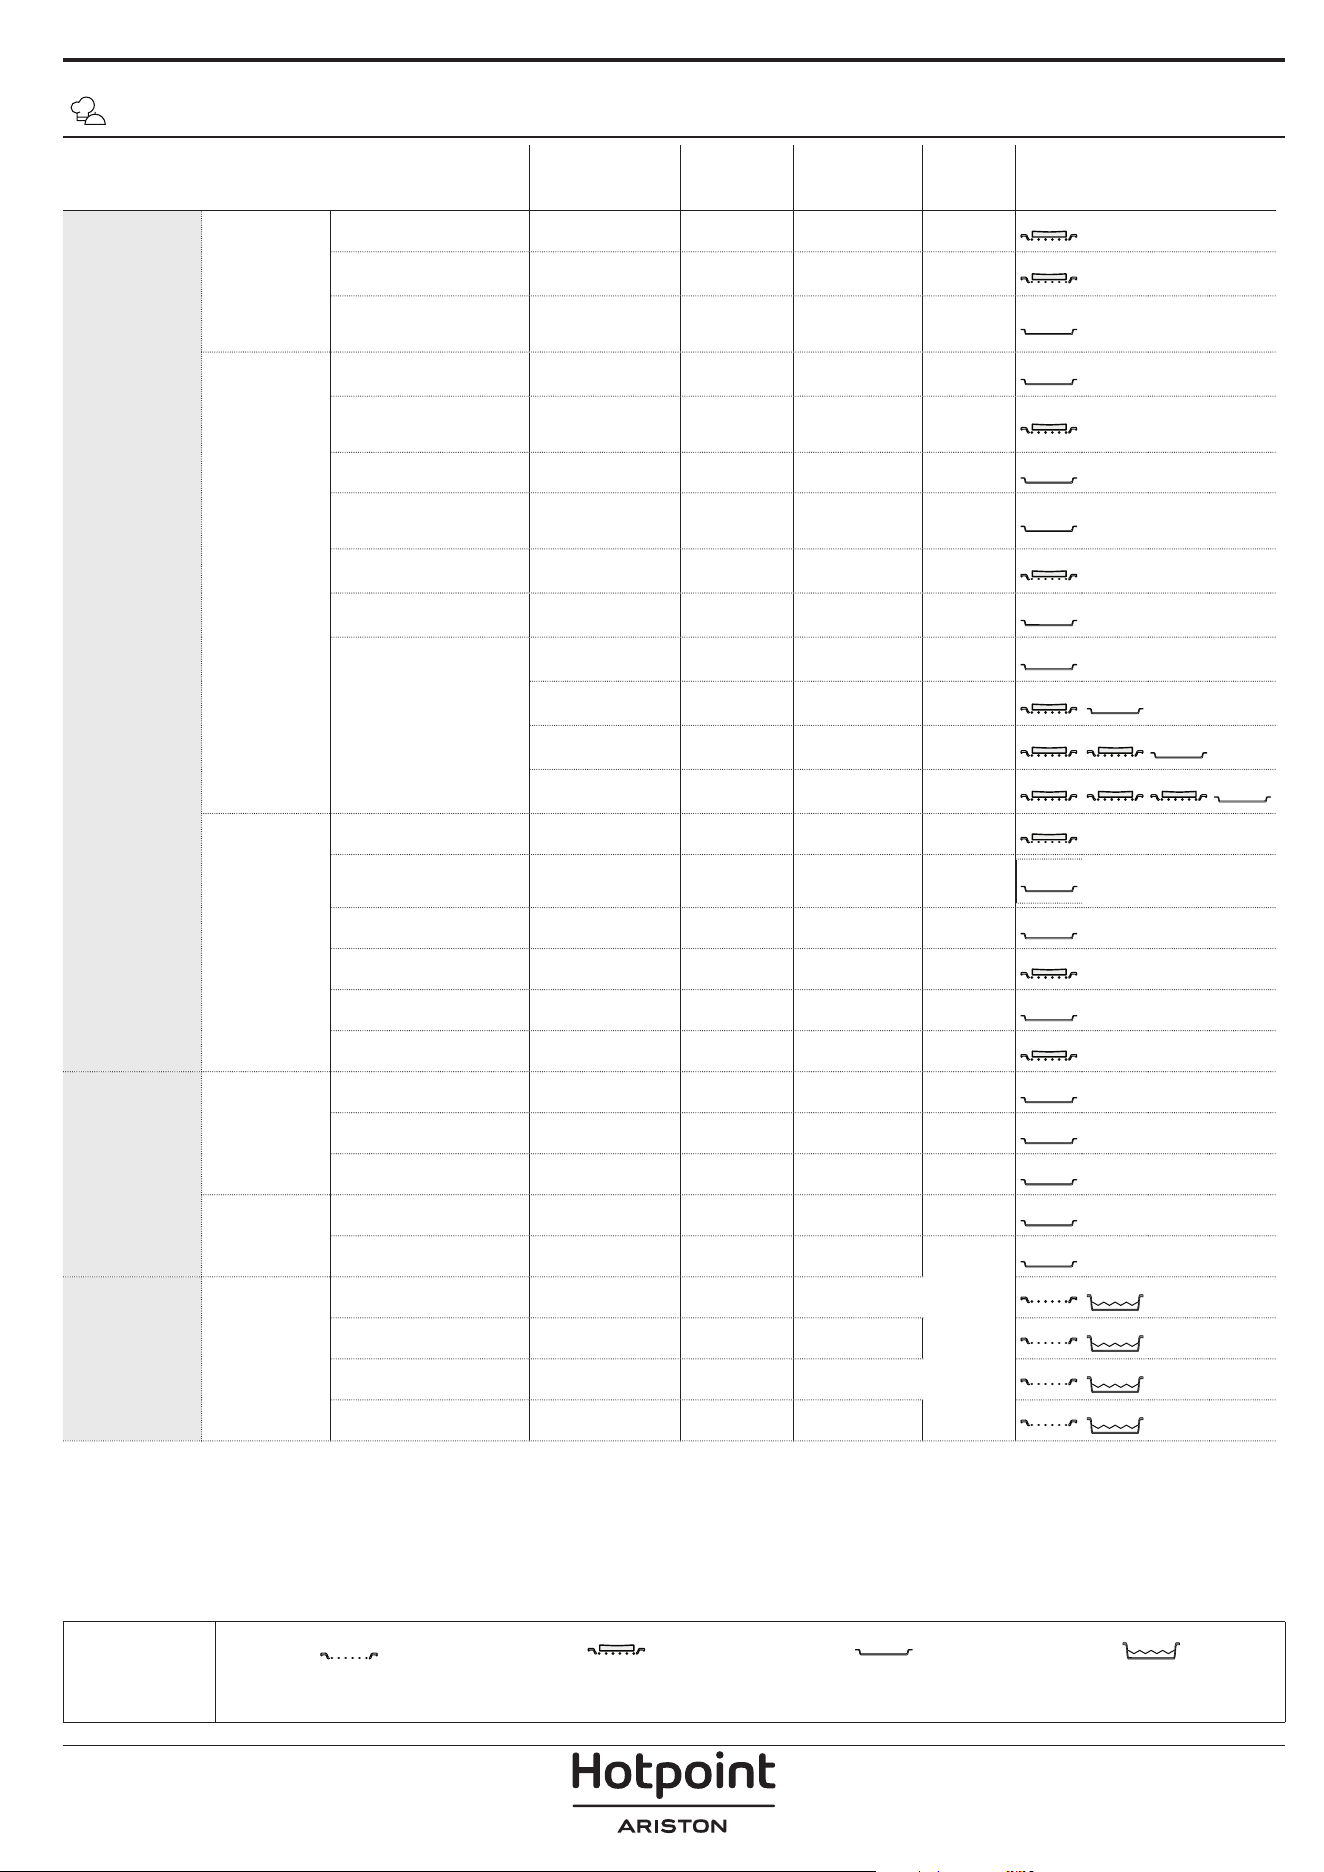
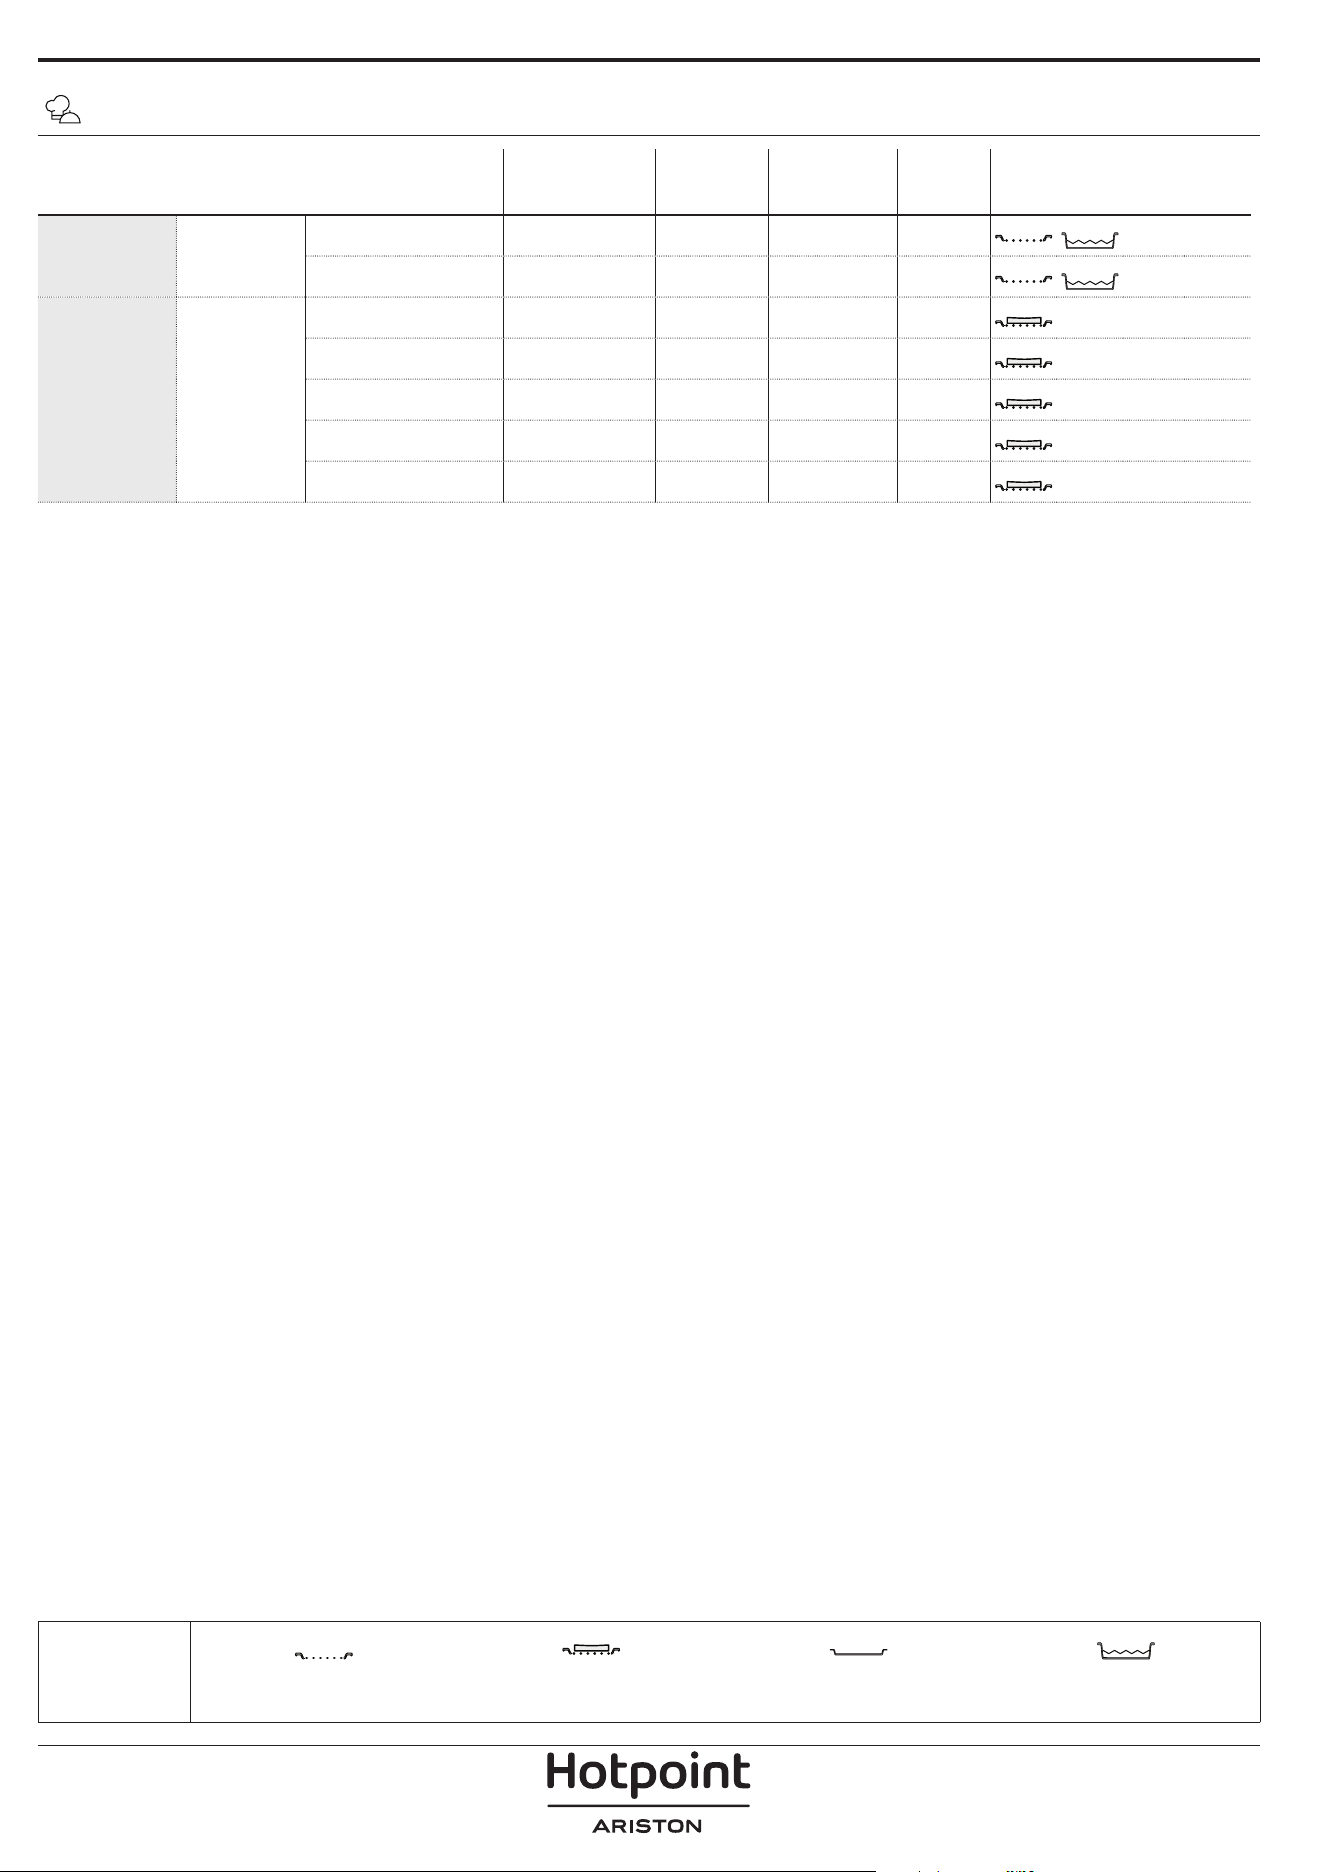
MY MENU COOKING TABLE
FOOD CATEGORIES QUANTITY
DONENESS
LEVEL
BROWNING
LEVEL
TURN
(OF COOK
TIME)
LEVEL AND ACCESSORIES
BAKED
MAIN DISHES
Lasagna 0.5 - 3 kg -
0
(-1; 0; +1)
-
2
Salty cakes 0.8 - 1.2 kg -
0
(-1; 0; +1)"
-
2
Stuffed Vegetables
0.1 - 0.5 kg
[each]
- - -
3
PIZZA &
BREAD
Bread Rolls 60 - 150g [each] - - -
3
Sandwich Loaf
400 - 600 g
[each]
- - -
2
Big Bread 0.7 - 2.0kg - - -
2
Baguettes
200 - 300g
[each]
- - -
3
Round Pizza round
2
Thick Pizza tray - - -
2
Pizza [frozen]
1 layer* - - -
2
2 layers*
4
1
3 layers*
5
3 1
4 layers*
5
4 2 1
SWEET
BAKERY
Sponge Cake 0.5 - 1.2 kg - - -
2
Cookies 0.2 - 0.6 kg - - -
3
Choux Pastry one tray* - - -
3
Tart 0.4 - 1.6kg - - -
2
Strudel 0.4 - 1.6kg - - -
3
Fruit Pie 0.5 -2 kg - - -
2
ROASTED
MEAT
Roast Beef 0.6 - 2 kg
0
(-1; 0; +1)
0
(-1; 0; +1)
-
3
Roast Pork 0.6 - 2.5 kg -
0
(-1; 0; +1)
-
3
Roast Chicken 0.6 - 3 kg -
0
(-1; 0; +1)
-
2
SIDE DISH
Roasted Vegetables 0.5 - 1.5 kg -
0
(-1; 0; +1)
-
3
Roasted Potatoes 0.5 - 1.5 kg -
0
(-1; 0; +1)
-
3
GRILLED MEAT
Burger 1.5 - 3 cm
0
(0; +1)
- 3/5
5
4
Sausages & Wurstel 1.5 - 4.5 cm - - 2/3
5
4
Kebabs one grid - - 1/2
5
4
Fillet & Breast 1 - 5 cm - -
2/3
5
4
* Suggested quantity
ACCESSORIES
Wire shelf
Oven tray / Cake tray / Round
pizza tray on wire shelf
Drip tray / Baking tray Drip tray with 500 ml of water
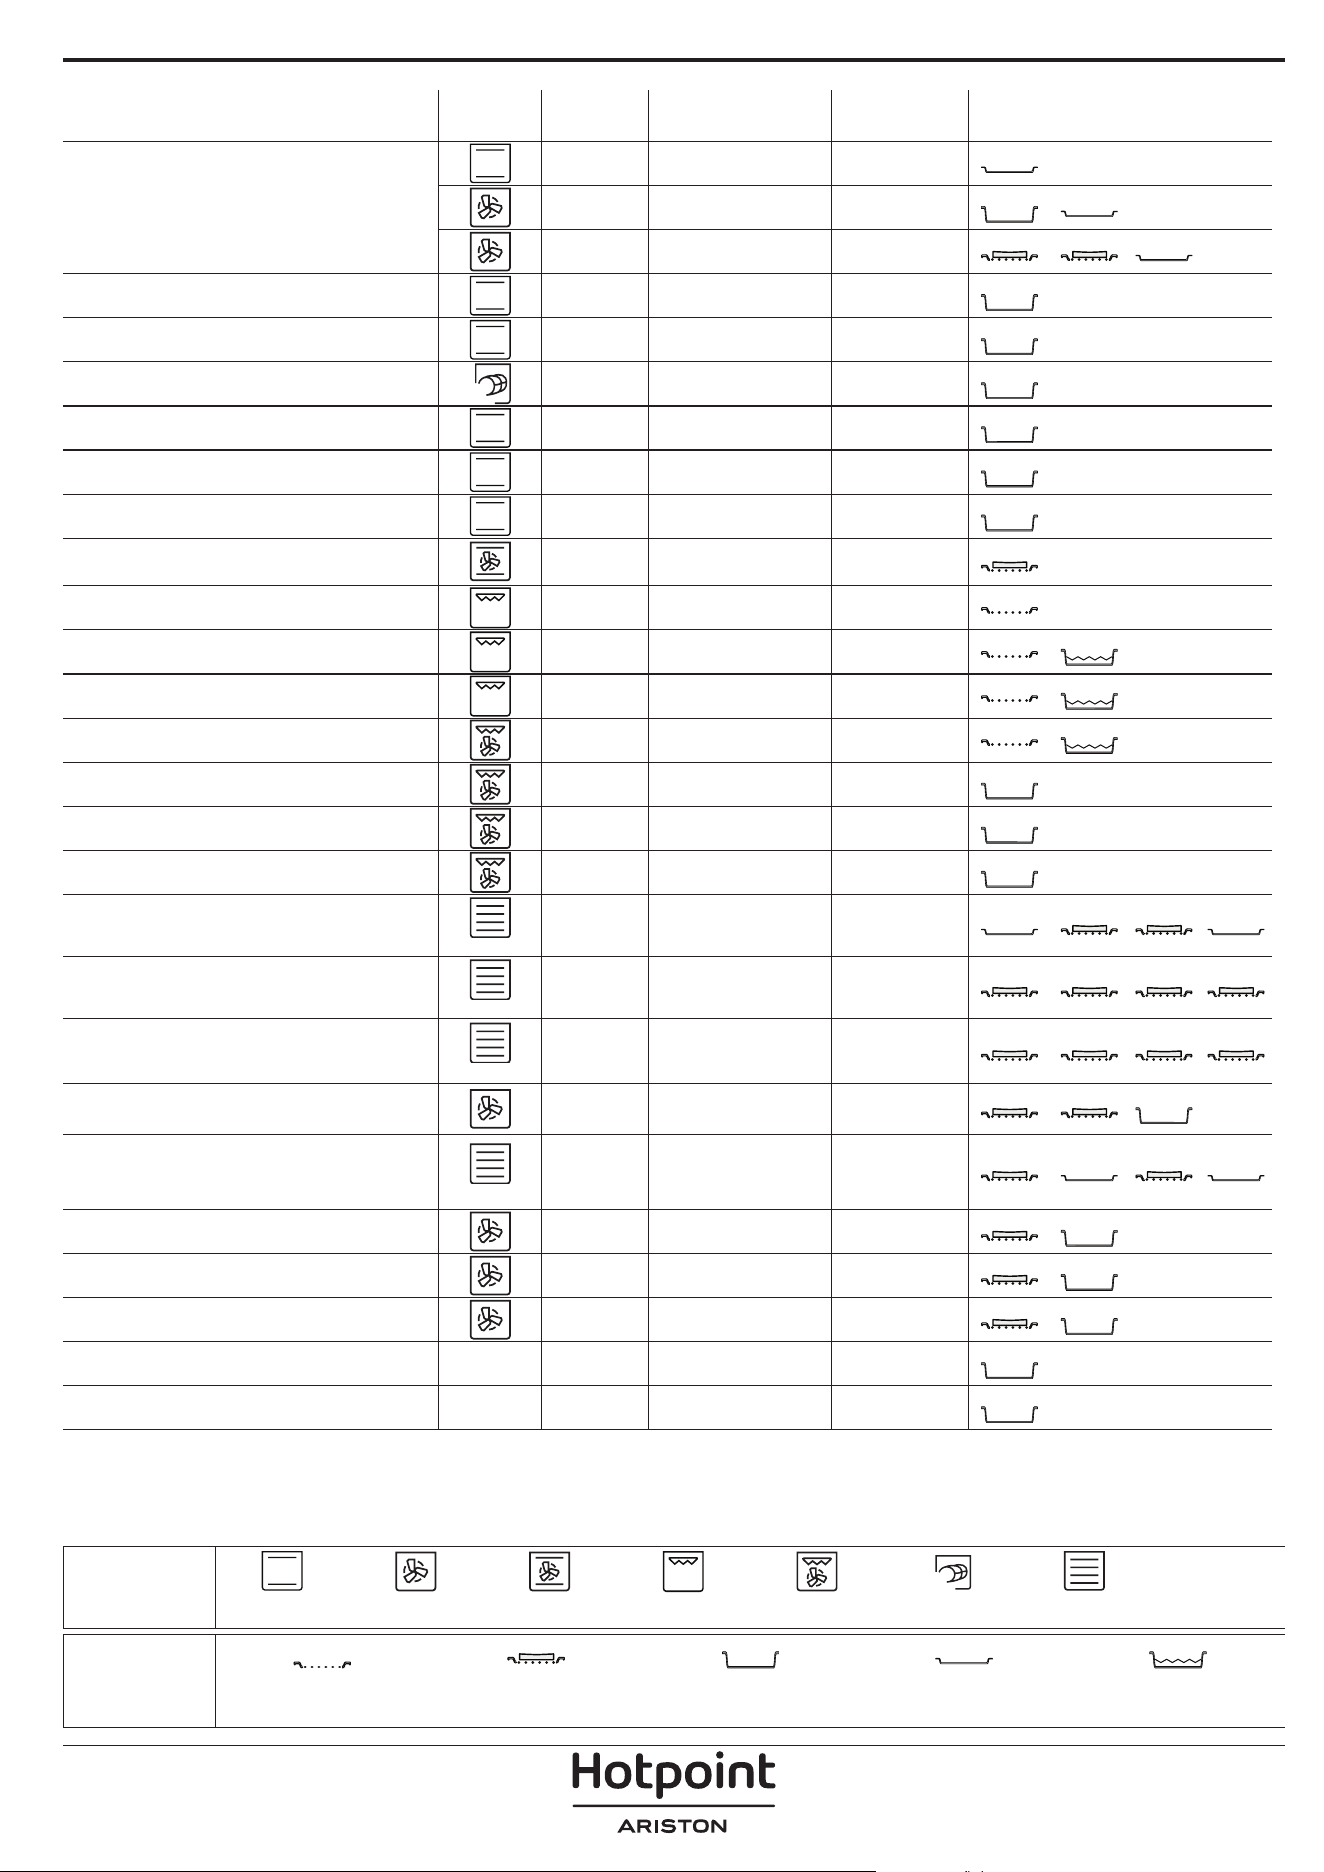
FOOD CATEGORIES QUANTITY
DONENESS
LEVEL
BROWNING
LEVEL
TURN
(OF COOK
TIME)
LEVEL AND ACCESSORIES
GRILLED
FISH &
SEAFOOD
Fillets 0.5 - 3 (cm) - - -
3
2
Fillets [frozen] 0.5 - 3 (cm) - - -
3
2
GRILLED SIDE DISH
Tomatoes Gratin one tray - - -
3
Peppers Gratin one tray - - -
3
Broccoli Gratin one tray - - -
3
Cauliflower Gratin one tray - - -
3
Vegetables Gratin one tray - - -
3
MY MENU COOKING TABLE
* Suggested quantity
ACCESSORIES
Wire shelf
Oven tray / Cake tray / Round
pizza tray on wire shelf
Drip tray / Baking tray Drip tray with 500 ml of water

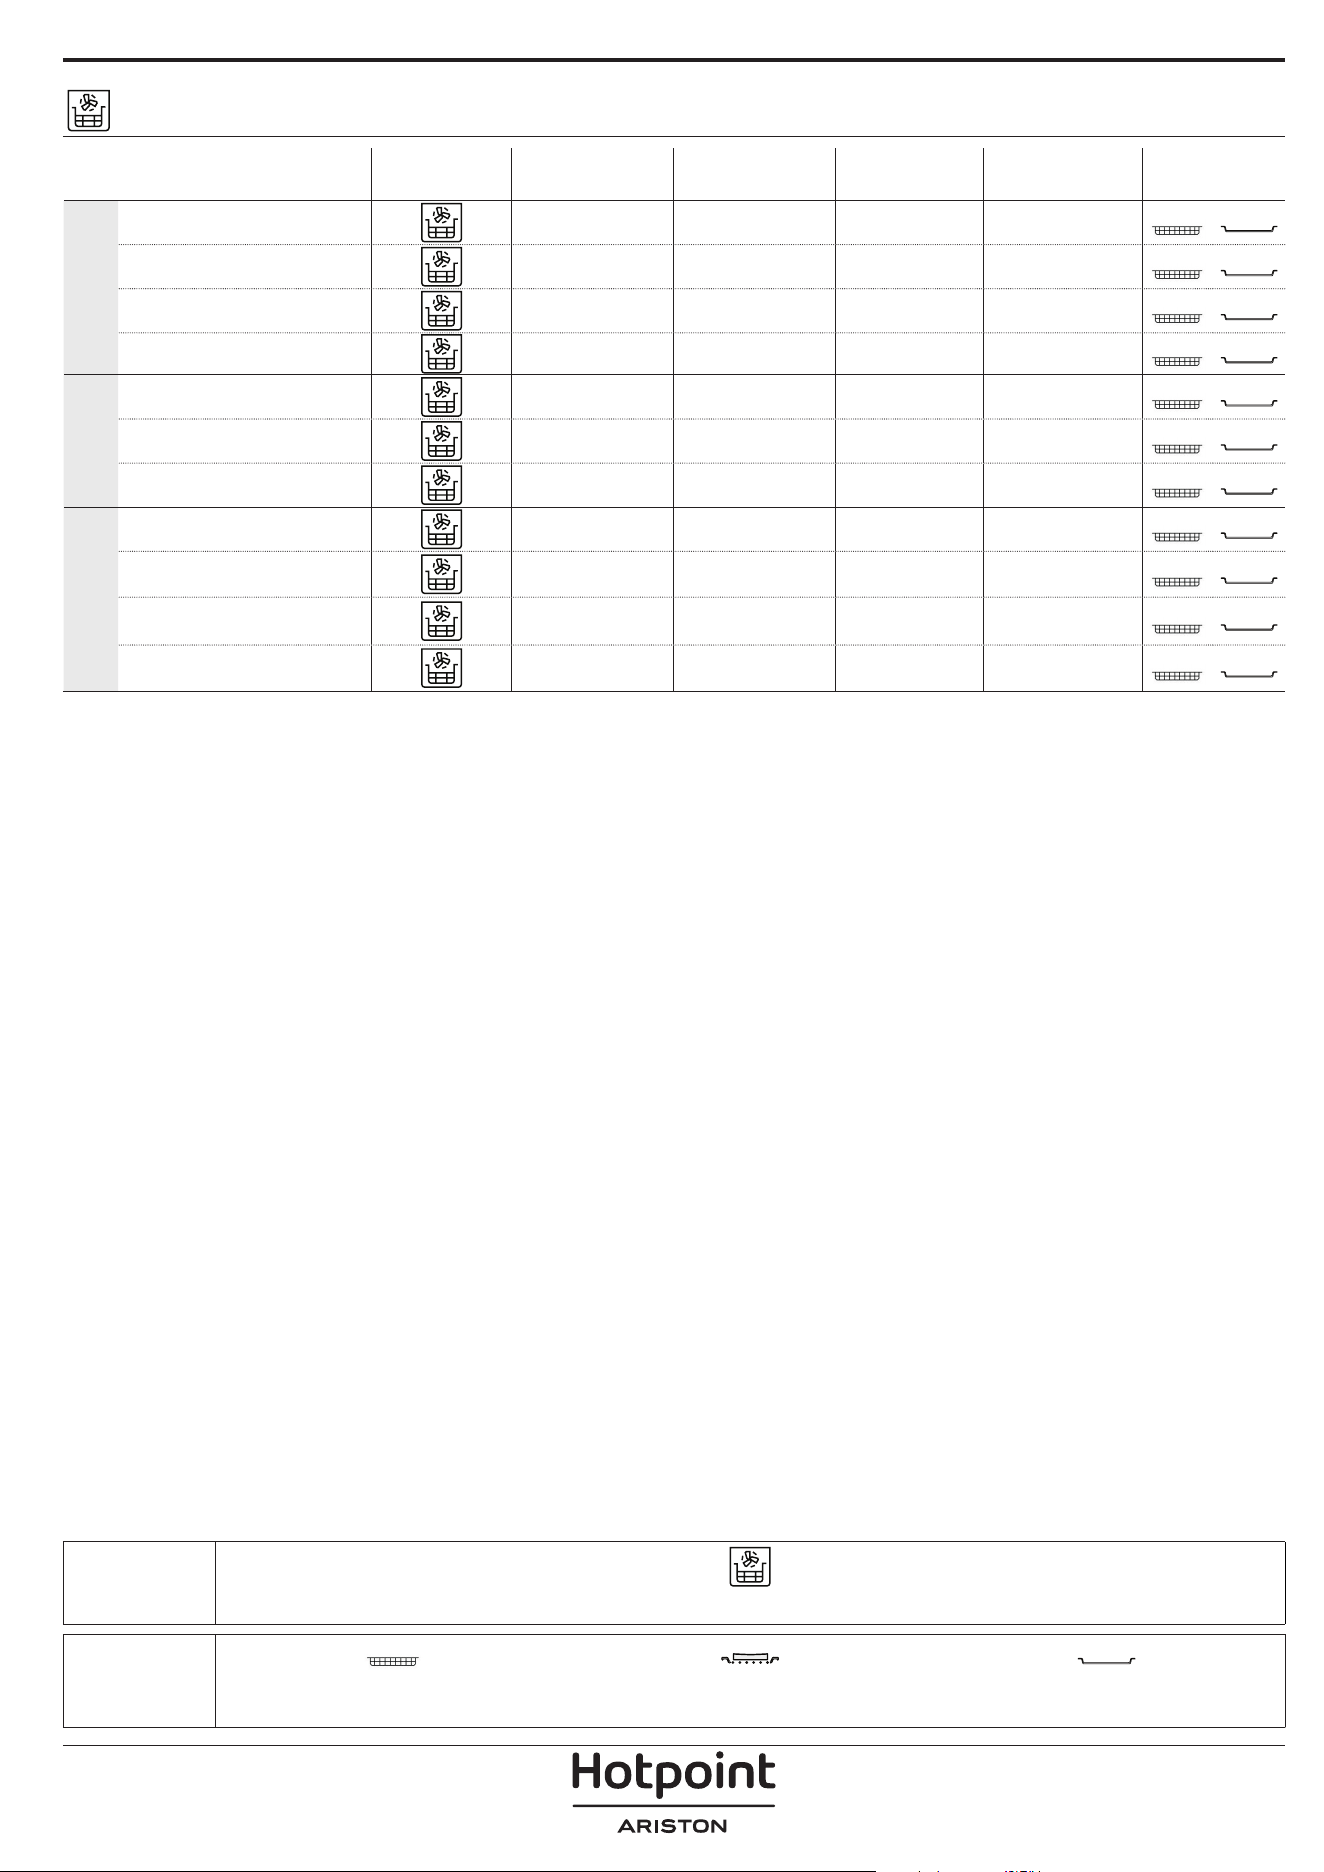
ACCESSORIES
Air Fry tray Oven tray or cake tray on wire shelf
Drip tray / Baking tray or
oven tray on wire shelf
AIR FRY COOKING TABLE
RECIPE FUNCTION
SUGGESTED
QUANTITY
PREHEAT
TEMPERATURE
(°C)
DURATION
(MIN.)
SHELF AND
ACCESSORIES
FROZEN FOOD
Frozen French Fries 650 - 850g Yes 200 25 - 30
4
2
Frozen Chicken Nugget
500g Yes 200 15 - 20
4
2
Fish Sticks 500g Yes 220 15 - 20
4
2
Onion Rings 500g Yes 200 15 - 20
4
2
VEGETABLES
Fresh Breaded Zucchini 400g Yes 200 15 - 20
4
2
Homemade Fries 300 - 800 g Yes 200 20 - 40
4
2
Mixed Vegetables 300 - 800 g Yes 200 20 - 30
4
2
MEAT AND FISH
Chicken Breasts 1 - 4 cm Yes 200 20 - 40
4
2
Chicken Wings 200 - 1500 g Yes 220 30 - 50
4
2
Breaded Cutlet 1 - 4 cm Yes 220 20 - 50
4
2
Fish Fillet 1 - 4 cm Yes 220 15 - 25
4
2
For cooking fresh or homemade foods, spread a thin layer of oil across the food surface.
In order to guarantee uniform cooking results, mix food halfway through the recommended cooking time.
FUNCTIONS
Air Fry
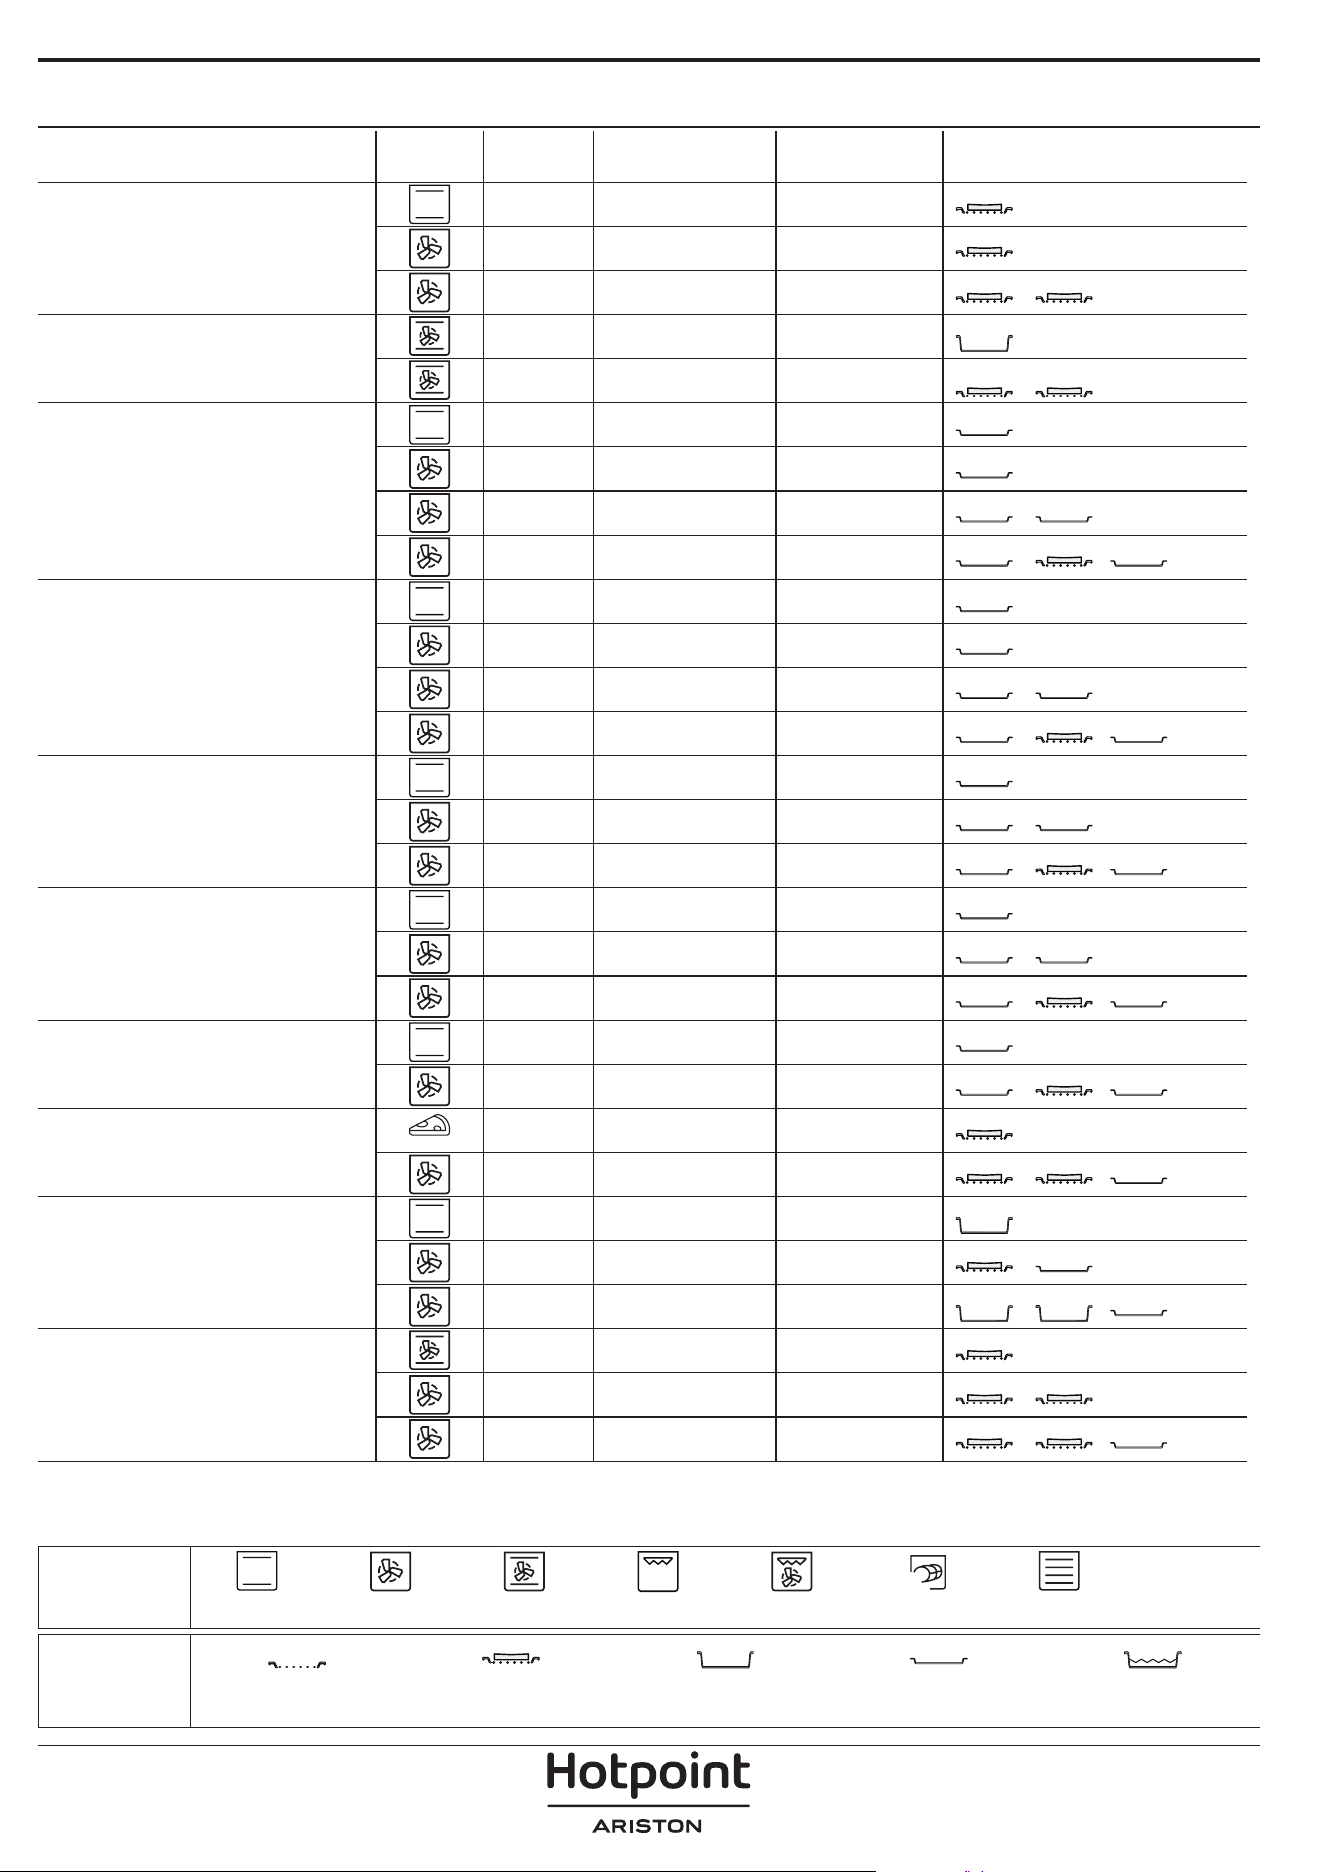
COOKING TABLE
RECIPE FUNCTION PREHEAT TEMPERATURE (°C) DURATION (MIN.) SHELF AND ACCESSORIES
Leavened cakes / Sponge cakes
Yes 170 30 - 50
2
Yes 160 30 - 50
2
Yes 160 30 - 50
4
1
Filled cakes
(cheesecake, strudel, apple pie)
Yes 160 - 200 30 - 85
3
Yes 160 - 200 30 - 90
4
1
Cookies
Yes 150 20 - 40
3
Yes 140 30 - 50
4
Yes 140 30 - 50
4
1
Yes 135 40 - 60
5
3 1
Small cakes / Mun
Yes 170 20 - 40
3
Yes 150 30 - 50
4
Yes 150 30 - 50
4
1
Yes 150 40 - 60
5
3 1
Choux buns
Yes 180 - 200 30 - 40
3
Yes 180 - 190 35 - 45
4
1
Yes 180 - 190 35 - 45 *
5
3 1
Meringues
Yes 90 110 - 150
3
Yes 90 130 - 150
4
1
Yes 90 140 - 160 *
5
3 1
Pizza / Bread / Focaccia
Yes 190 - 250 15 - 50
2
Yes 190 - 230 20 - 50
5
3 1
Pizza (Thin, thick, focaccia)
Yes 310 7 - 12
2
Yes 220 - 240 25 - 50 *
5
3 1
Frozen pizza
Yes 250 10 - 15
3
Yes 250 10 - 20
4
1
Yes 220 - 240 15 - 30
5
3 1
Savoury pies
(vegetable pie, quiche)
Yes 180 - 190 45 - 55
3
Yes 180 - 190 45 - 60
4
1
Yes 180 - 190 45 - 70 *
5
3 1
FUNCTIONS
XL
ECO
Conventional Forced Air Convection Bake Grill Turbo Grill MaxiCooking Multiflow Menu Eco Cycle
ACCESSORIES
Wire shelf
Oven tray or cake tray on
wire shelf
Drip tray / Baking tray or
oven tray on wire shelf
Drip tray / Baking tray
Drip tray with 500 ml of
water
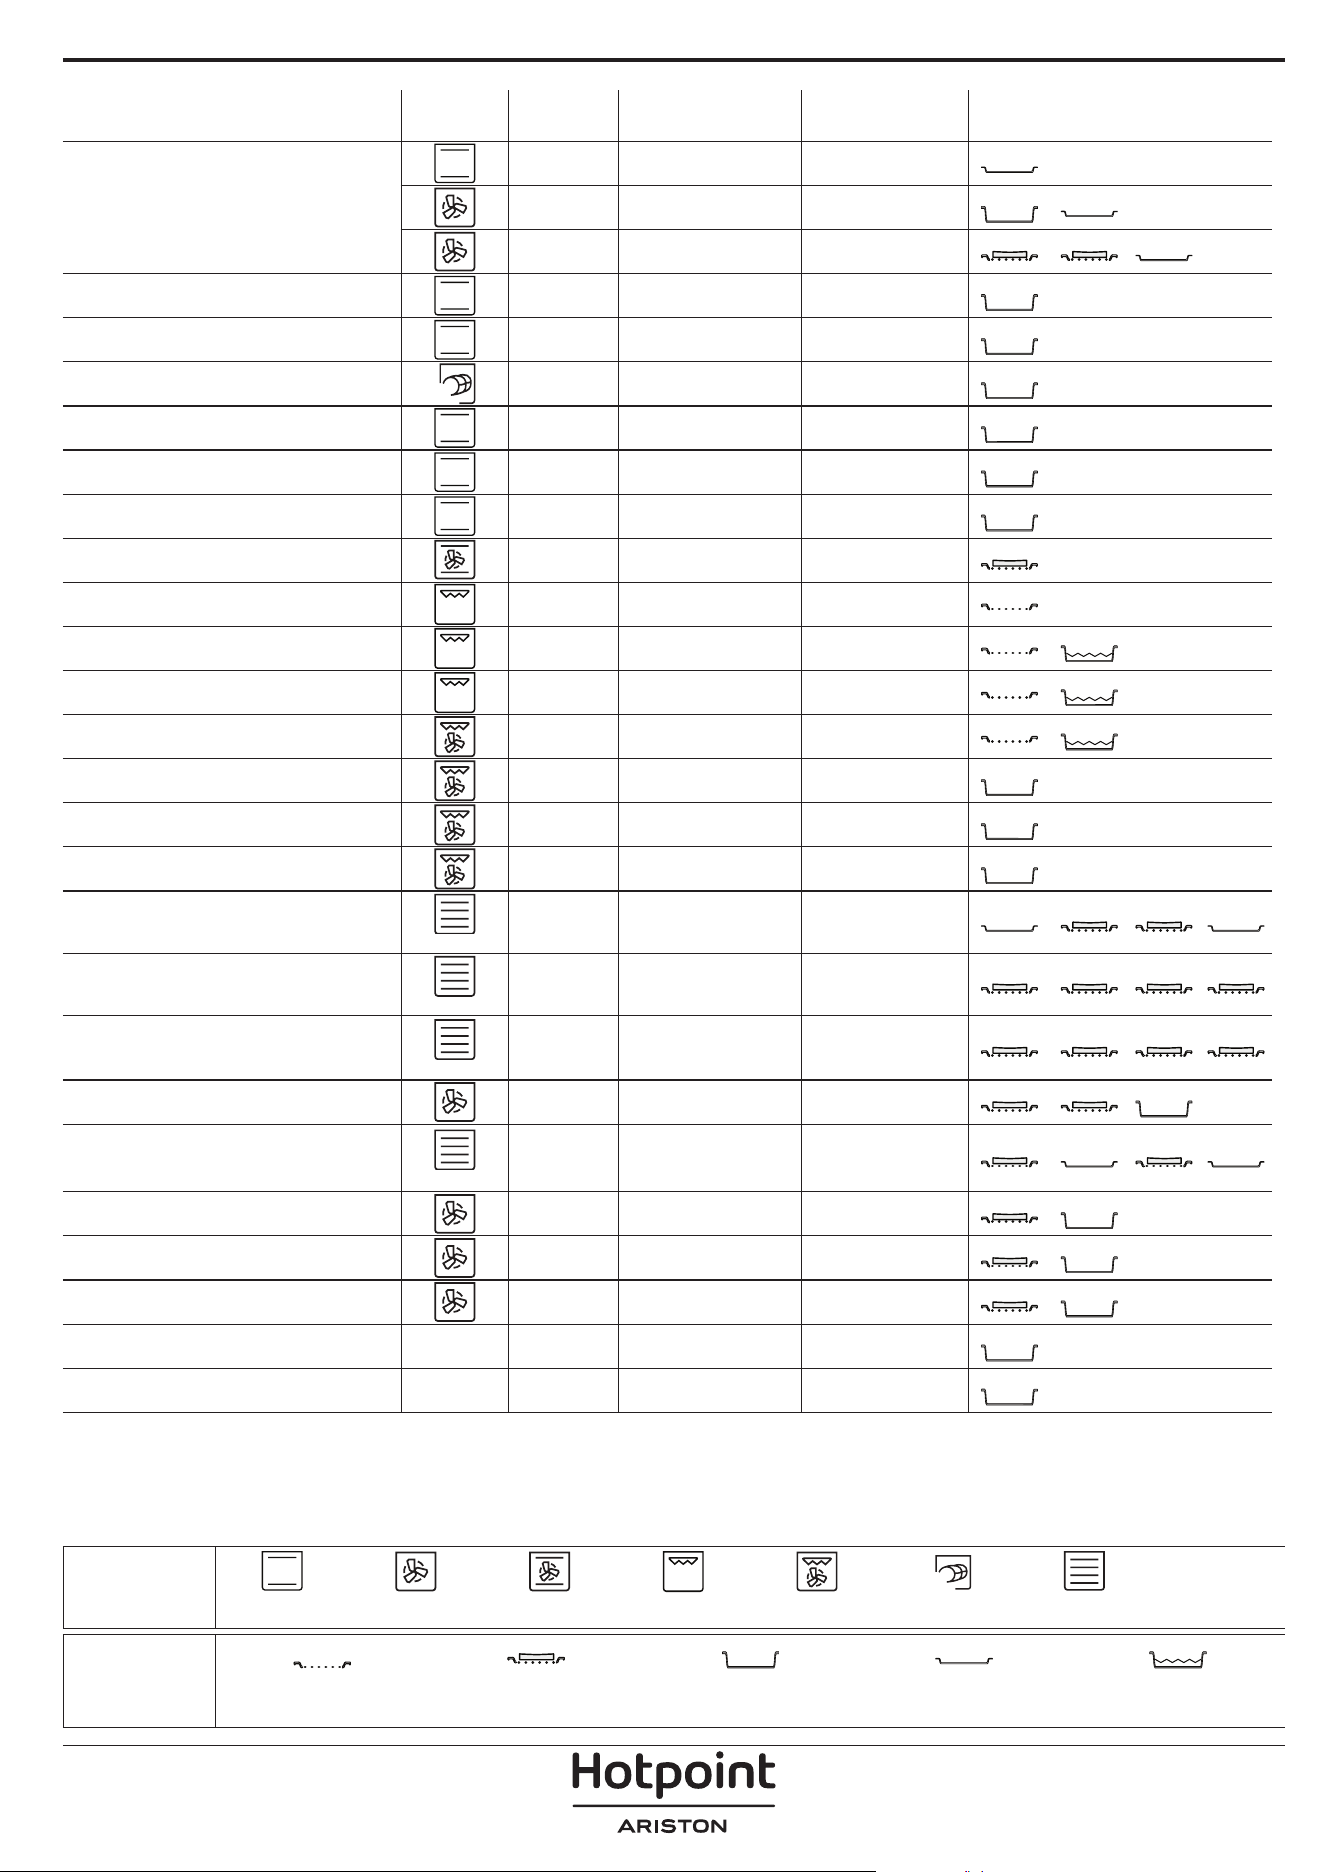
RECIPE FUNCTION PREHEAT TEMPERATURE (°C) DURATION (MIN.) SHELF AND ACCESSORIES
Vols-au-vent / Pu pastry crackers
Yes 190 - 200 20 - 30
3
Yes 180 - 190 20 - 40
4
1
Yes 180 - 190 20 - 40 *
5
3 1
Lasagna / Flans / Baked pasta /
Cannelloni
Yes 190 - 200 45 - 65
3
Lamb / Veal / Beef / Pork 1 kg Yes 190 - 200 80 - 110
3
Roast pork with crackling 2 kg
XL
- 170 110 - 150
2
Chicken / Rabbit / Duck 1 kg Yes 200 - 230 50 - 100
3
Turkey / Goose 3 kg Yes 190 - 200 80 - 130
2
Baked sh / en papillote (llets, whole) Yes 180 - 200 40 - 60
3
Stued vegetables
(tomatoes, courgettes, aubergines)
Yes 180 - 200 50 - 60
2
Toast - 3 (High) 3 - 6
5
Fish llets / Steaks - 2 (Mid) 20 - 30 **
4
3
Sausages / Kebabs / Spare ribs /
Hamburgers
- 2 - 3 (Mid - High) 15 - 30 **
5
4
Roast chicken 1-1.3 kg - 2 (Mid) 55 - 70 ***
2
1
Leg of lamb / Shanks - 2 (Mid) 60 - 90 ***
3
Roast potatoes - 2 (Mid) 35 - 55 ***
3
Vegetable gratin - 3 (High) 10 - 25
3
Cookies
Cookies
Yes 135 50 - 70
5
4 3 1
Tarts
Tarts
Yes 170 50 - 70
5
3 2 1
Round pizzas
Pizza
Yes 210 40 - 60
5
3 2 1
Complete meal: Fruit tart (level 5) /
lasagna (level 3) / meat (level 1)
Yes 190 40 - 120 *
5
3 1
Complete meal: Fruit tart (level 5) /
roasted vegetables (level 4) / lasagna
(level 2) / cuts of meat (level 1)
Menu
Yes 190 40 - 120 *
5
4 2 1
Lasagna & Meat Yes 200 50 - 100 *
4
1
Meat & Potatoes Yes 200 45 - 100 *
4
1
Fish & Vegetebles Yes 180 30 - 50 *
4
1
Stued roasting joints
ECO
- 200 80 - 120 *
3
Cuts of meat
(rabbit, chicken, lamb)
ECO
- 200 50 - 100 *
3
FUNCTIONS
XL
ECO
Conventional Forced Air Convection Bake Grill Turbo Grill MaxiCooking Multiflow Menu Eco Cycle
ACCESSORIES
Wire shelf
Oven tray or cake tray on
wire shelf
Drip tray / Baking tray or
oven tray on wire shelf
Drip tray / Baking tray
Drip tray with 500 ml of
water
* Estimated length of time: dishes can be removed from the oven at different times depending on personal preference.
** Turn food halfway through cooking.
*** Turn food two thirds of the way through cooking (if necessary).

EXTERIOR SURFACES
• Clean the surfaces with a damp microfibre cloth.
If they are very dirty, add a few drops of pH-neutral
detergent. Finish off with a dry cloth.
• Do not use corrosive or abrasive detergents. If any of
these products inadvertently comes into contact with
the surfaces of the appliance, clean immediately with
a damp microfibre cloth.
INTERIOR SURFACES
• After every use, leave the oven to cool and then
clean it, preferably while it is still warm, to remove
any deposits or stains caused by food residues. To
dry any condensation that has formed as a result of
cooking foods with a high water content, leave the
oven to cool completely and then wipe it with a cloth
or sponge.
• Activate the “Diamond Clean” function for optimum
cleaning of the internal surfaces. (Only in some
models).
• Clean the glass in the door with a suitable liquid
detergent.
• The oven door can be removed to facilitate cleaning.
ACCESSORIES
Soak the accessories in a washing-up liquid solution
after use, handling them with oven gloves if they
are still hot. Food residues can be removed using a
washing-up brush or a sponge.
Do not clean Food Probe or Meat Probe (if present) in
the dishwasher. Air Fry tray (if present) can be cleaned
in the dishwasher.
Make sure that the oven has
cooled down before carrying out
any maintenance or cleaning.
Do not use steam cleaners.
Do not use wire wool, abrasive
scourers or abrasive/corrosive
cleaning agents, as these could
damage the surfaces of the
appliance.
Wear protective gloves.
The oven must be disconnected
from the mains before carrying
out any kind of maintenance
work.
CLEANING AND MAINTENANCE
HOW TO READ THE COOKING TABLE
The table lists the best function, accessories and level to use to cook different types of food.
Cooking times start from the moment food is placed in the oven, excluding preheating (where required).
Cooking temperatures and times are approximate and depend on the amount of food and the type of accessory used.
Use the lowest recommended settings to begin with and, if the food is not cooked enough, then switch to higher
settings.
Use the accessories supplied and preferably darkcoloured metal cake tins and baking trays. You can also use Pyrex or
stoneware pans and accessories, but bear in mind that cooking times will be slightly longer.
REPLACING THE LAMP
For the replacement of the lamp, contact the after sales service.

REMOVING AND REFITTING THE DOOR
1. To remove the door, open it fully and lower the
catches until they are in the unlock position.
b
a
2. Close the door as much as you can.
Take a firm hold of the door with both hands – do not
hold it by the handle.
Simply remove the door by continuing to close it
while pulling it upwards at the same time until it is
released from its seating. Put the door to one side,
resting it on a soft surface.
a
b
~15°
3. Refit the door by moving it towards the oven,
aligning the hooks of the hinges with their seating
and securing the upper part onto its seating.
4. Lower the door and then open it fully.
Lower the catches into their original position: Make
sure that you lower them down completely.
b
a
Apply gentle pressure to check that the catches are in
the correct position.
“CLICK”
5. Try closing the door and check to make sure that it
lines up with the control panel. If it does not, repeat
the steps above: The door could become damaged if
it does not work properly.

Problem Possible cause Solution
The oven is not working.
Power cut.
Disconnection from the
mains.
Check for the presence of mains electrical power
and whether the oven is connected to the
electricity supply.
Turn off the oven and restart it to see if the fault
persists.
The door will not open.
Cleaning cycle in progress.
Fault with the door lock.
Wait for the function cycle to end and the oven
to cool down.
Turn off the oven and restart it to see if the fault
persists.
The display shows the letter “F”
followed by a number.
Software problem. Contact the Call Center and state the number
following the letter “F”.
Cooking cycle with probe
ended without evident cause
or error F3E3 is printed on the
screen.
Food Probe is not properly
connected.
Check connection of the food probe.
TROUBLESHOOTING
Policies, standard documentation and additional product information can be found by:
• Using the QR on your product
• Visiting our website docs . hotpoint. eu
• Alternatively, contact our After-sales Service (See phone number in the warranty booklet). When contacting
our After-sales Service, please state the codes provided on your product's identication plate.
400020004736
IT
Manuale d'uso
GRAZIE PER AVERE ACQUISTATO UN PRODOTTO
HOTPOINT/ARISTON
Per ricevere un’assistenza più completa, registrare il
prodotto su www . hotpoint. eu/ register
Prima di utilizzare l'apparecchio leggere
attentamente le istruzioni di sicurezza.
DESCRIZIONE DEL PRODOTTO
PANNELLO COMANDI
1. Pannello comandi
2. Ventola
3. Resistenza circolare
(non visibile)
4. Griglie laterali
(il livello è indicato sulla parte
frontale del forno)
5. Porta
6. Resistenza superiore / Grill
7. Luce
8. Targhetta matricola
(da non rimuovere)
9. Resistenza inferiore
(non visibile)
1. MANOPOLA DI SELEZIONE
Per accendere il forno
selezionando una funzione. Per
spegnere il forno, ruotare sulla
posizione “0”.
2. INDIETRO
Per tornare alla schermata
precedente.
Durante la cottura, permette di
modificare
le impostazioni.
3. STOP
Per interrompere la funzione
attualmente attiva.
4. DISPLAY
5. AVVIO
Per avviare immediatamente una
funzione.
6. CONFERMA
Per confermare una funzione
selezionata
o un valore impostato.
7. MANOPOLA DI
REGOLAZIONE
Per scorrere i menu
e applicare o modificare le
impostazioni.
5
4
3
2
1
5
4
3
2
1
1
2
3
4
5
8
9
7
6
1 2 3 4 5 6 7
Note: Le manopole sono a scomparsa; premere al centro delle stesse per estrarle dalla loro sede.
SCANSIONARE IL CODICE QR
SUL PROPRIO APPARECCHIO
PER OTTENERE MAGGIORI
INFORMAZIONI
ACCESSORI
GRIGLIA LECCARDA TEGLIA*
GUIDE DI
SCORRIMENTO*
Utilizzare per cuocere
gli alimenti o come
supporto per teglie,
tortiere e altre pentole
da forno.
Utilizzare come teglia da
forno per cucinare carne,
pesce, verdure, focacce,
ecc. o posizionare sotto
la griglia per raccogliere i
succhi di cottura.
Utilizzare per la cottura
di tutti i prodotti di
panetteria e pasticceria,
ma anche per arrosti,
pesce en papillotte, ecc.
Per facilitare
l'inserimento o la
rimozione degli
accessori.
LECCARDA FRITTURA
AD ARIA *
Da utilizzare quando
si cucinano alimenti
con la funzione Frittura
ad aria, con una teglia
posizionata a un livello
inferiore per raccogliere
eventuali briciole
e sgocciolamenti.
Può essere lavata in
lavastoviglie.
INSERIRE LA GRIGLIA E GLI ALTRI ACCESSORI
Inserire la griglia orizzontalmente facendola scivolare
sulle griglie laterali inserendo dapprima il lato rialzato
orientato verso l'alto.
Gli altri accessori, come la leccarda o la teglia, si
inseriscono orizzontalmente come la griglia.
SMONTAGGIO E RIMONTAGGIO DELLE GRIGLIE
LATERALI
• Per togliere le griglie, sollevare le griglie prima di
scostare la parte inferiore dalle proprie sedi: a questo
punto è possibile rimuovere le griglie.
• Per rimontare le griglie, inserirle dapprima nelle sedi
superiori. Avvicinarle alla cavità tenendo sollevato,
quindi abbassarle in posizione nelle sedi inferiori.
MONTARE LE GUIDE SCORREVOLI
Togliere dal forno le griglie
laterali e rimuovere la
protezione in plastica dalle
guide scorrevoli.
Ancorare alla griglia laterale
la clip superiore della guida
e farla scivolare fino a fine
corsa. Abbassare l'altra clip
in posizione.
Per fissare la guida, premere
la parte inferiore della clip
contro la griglia laterale.
Assicurarsi che le guide
possano scorrere
liberamente. Ripetere questa
operazione sull'altra griglia
laterale, allo stesso livello.
Note: le guide scorrevoli possono essere montate a
qualsiasi livello.
Il numero e il tipo di accessori possono variare a
seconda del modello acquistato.
Altri accessori possono essere acquistati separatamente; per
ordini e informazioni contattare il servizio assistenza clienti.
* Disponibile solo in alcuni modelli
FUNZIONI
STATICO
Per cuocere qualsiasi tipo di pietanza su un solo
ripiano.
TERMOVENTILATO
Per cuocere contemporaneamente su più ripiani
(massimo tre) alimenti diversi che richiedono la
medesima temperatura di cottura. Questa funzione
permette di eseguire la cottura senza trasmissione di
odori da un alimento all'altro.
GRILL
Per grigliare bistecche, spiedini e salsicce, cucinare
verdure gratinate o tostare il pane. Per la grigliatura
delle carni, si consiglia di utilizzare una leccarda
per raccogliere il liquido di cottura: posizionare la
leccarda un livello sotto la griglia e aggiungere 500
ml di acqua potabile.
MY MENU
Questa funzione permette la cottura completamente
automatica di tutte le pietanze (lasagna, carne, pesce,
verdure, torte & dolci, torte salate, pane, pizza). Per
utilizzare al meglio questa funzione si raccomanda di
seguire le indicazioni della tabella di cottura.
FUNZIONI MANUALI
• VENTILATO
Per cuocere carni o torte ripiene su un solo
ripiano.
• TURBO GRILL
Per arrostire grandi tagli di carne (cosce, roast
beef, pollo). Si consiglia di utilizzare una leccarda
per raccogliere il liquido di cottura: posizionarla
un livello sotto la griglia e aggiungere 500 ml di
acqua potabile.
• MULTIFLOW MENU
Per cuocere contemporaneamente su quattro
ripiani alimenti diversi che richiedono la medesima
temperatura di cottura.
Questa funzione può essere utilizzata per cuocere
biscotti, torte, pizze tonde (anche surgelate) e per
preparare un pasto completo. Per ottenere risultati
ottimali si raccomanda di seguire la tabella di
cottura.
FUNZIONI SPECIALI
• PIZZA
Questa funzione consente di cucinare un'ottima
pizza fatta in casa, in meno di 10 minuti come al
ristorante.
Il ciclo di cottura dedicato funziona a temperature
superiori a 300 gradi Celsius, garantendo una
pizza morbida all'interno, croccante sui bordi e
con una doratura perfettamente uniforme.
Combinando questa funzione con l'accessorio
Pizza Stone WPro e preriscaldando per 30 minuti,
può cuocere una pizza in 5-8 minuti (per ordini
e informazioni, contattare il servizio assistenza
clienti o www.hotpoint.eu.)
• CIBI SURGELATI
Questa funzione seleziona automaticamente la
temperatura e la modalità di cottura ottimali per 5
diverse categorie di alimenti pronti surgelati. Non
è necessario preriscaldare il forno.
• LIEVITAZIONE
Per ottenere una lievitazione ottimale di impasti
dolci o salati. Allo scopo di preservare la qualità
della lievitazione, non attivare la funzione se il
forno è ancora caldo dopo un ciclo di cottura.
• MANTENIMENTO IN CALDO
Per mantenere caldi e croccanti cibi appena cotti.
• SCONGELARE
Per velocizzare lo scongelamento degli alimenti.
Posizionare gli alimenti sul ripiano intermedio.
Si suggerisce di lasciare l'alimento nella sua
confezione per impedire che si asciughi
eccessivamente all'esterno.
• CICLO ECO
Per cuocere arrosti ripieni e filetti di carne in pezzi
su un solo ripiano. Quando questo Ciclo Eco è
in uso, la spia rimarrà spenta durante la cottura.
Per utilizzare il Ciclo Eco e quindi ottimizzare
il consumo di energia, la porta del forno non
deve essere aperta finché gli alimenti non sono
completamente cotti.
• MAXI COOKING
Questa funzione seleziona automaticamente la
migliore temperatura e modalità di cottura per
tagli di carne di grandi dimensioni (oltre 2,5 kg).
Si suggerisce di girare la carne durante la cottura
per ottenere una doratura omogenea su entrambi
i lati. È preferibile irrorarla di tanto in tanto con
il fondo di cottura per evitare che si asciughi
eccessivamente.
• COTTURA LENTA
Per cuocere delicatamente carne e pesce.
Questa funzione cuoce gli alimenti lentamente
per mantenerli teneri e saporiti. Grazie alla
bassa temperatura, la pietanza non si asciuga
esternamente e il risultato finale è simile a
quello che si ottiene con la cottura a vapore.
Per gli arrosti, si suggerisce di farli rosolare
prima in padella per creare una crosta esterna
che trattenga i succhi interni della carne. Per un
risultato ottimale, tenere chiusa la porta del forno
durante la cottura per evitare la dispersione del
calore. I tempi di cottura consigliati per il pesce
(300 g - 3 kg) variano tra 2 e 5 ore, per la carne
(1-3 kg) tra 4 e 7 ore.
FRITTURA AD ARIA
Questa funzione consente di cuocere patate fritte,
bocconcini di pollo e altro ancora utilizzando
meno olio, ottenendo un risultato piacevolmente
croccante. Gli elementi riscaldanti si attivano per
riscaldare adeguatamente la cavità, mentre la
ventola fa circolare l'aria calda. I migliori risultati di
cottura previsti si ottengono solo utilizzando una
leccarda Frittura ad aria (fornita con alcuni modelli).
Posizionare gli alimenti sulla leccarda Frittura ad aria
in un unico strato e seguire le istruzioni della tabella
di cottura Frittura ad aria per ottenere le migliori
prestazioni. Evitare di utilizzare più di una leccarda
per evitare una cottura non uniforme.
PRERISCALDAMENTO RAPIDO
Per preriscaldare rapidamente il forno.
DIAMOND CLEAN
L'azione del vapore rilasciato durante questo speciale
ciclo di pulizia a bassa temperatura permette di
rimuovere facilmente sporco e residui di cibo. Versare
200 ml di acqua potabile sul fondo del forno,
attivando la funzione a forno freddo.
IMPOSTAZIONI
Per regolare le impostazioni del forno. Attivando la
modalità "ECO", la luminosità del display si riduce e la
luce si spegne dopo 1 minuto per risparmiare energia.
Il display si riattiva automaticamente premendo un
tasto qualsiasi. Se la modalità "DEMO" è impostata
su "On", tutti i comandi sono operativi e i menu
sono disponibili ma il forno non viene riscaldato. Per
disattivare questa modalità, accedere a "DEMO" dal
menu "IMPOSTAZIONI" e scegliere "Off". Selezionando
"RESET", l'apparecchio si spegne e vengono
ripristinate le impostazioni della prima accensione.
Tutte le impostazioni successive vengono cancellate.
PREFERITI
Per richiamare la lista delle 10 funzioni preferite.
PRIMO UTILIZZO
1. SELEZIONE DELLA LINGUA
Alla prima accensione, è necessario impostare lingua
e ora: Sul display compare "English".
ITALIANO
Ruotare la manopola di regolazione per scorrere
la lista delle lingue disponibili e selezionare quella
desiderata.
Premere
per confermare la selezione.
Note: La lingua potrà essere cambiata successivamente
selezionando “LINGUA” nel menu “IMPOSTAZIONI”, accessibile
ruotando la manopola di selezione su
2. IMPOSTARE L'ASSORBIMENTO DI POTENZA
Il forno è programmato per assorbire una potenza
elettrica compatibile con una rete domestica di
capacità superiore a 3 kW (16): nel caso si disponga di
una potenza inferiore, è necessario diminuire questo
valore (13).
POTENZA
Premere o per selezionare 16 "Alto" o 13
"Basso" e premere
per confermare.
3. IMPOSTARE L'ORA
Dopo aver selezionato la lingua, sarà necessario
impostare l'ora corrente: sul display lampeggiano le
due cifre relative all'ora.
OROLOGIO
Ruotare la manopola di regolazione per impostare
l’ora desiderata e premere
: sul display
lampeggiano le due cifre relative ai minuti. Ruotare
la manopola di regolazione per impostare i minuti e
premere
per confermare.
Note: dopo una prolungata interruzione di corrente potrebbe
essere necessario impostare nuovamente l'ora. Selezionare
“OROLOGIO” nel menu “IMPOSTAZIONI”, accessibile ruotando
la manopola di selezione su
4. RISCALDAMENTO DEL FORNO
Un nuovo forno può rilasciare degli odori dovuti alla
lavorazione di fabbrica: questo è normale.
Prima di cucinare gli alimenti è dunque raccomandato
di riscaldare a vuoto il forno per rimuovere
ogni odore.
Rimuovere protezioni di cartone o
pellicole trasparenti e togliere gli accessori dal
forno. Riscaldare il forno a 200°C per circa un'ora
utilizzando preferibilmente una funzione ventilata
("Termoventilato" o "Ventilato").
Note: si consiglia di arieggiare il locale dopo il primo utilizzo
dell'apparecchio.
USO QUOTIDIANO
1. SELEZIONARE UNA FUNZIONE
Ruotare la manopola di selezione per accendere il
forno e visualizzare sul display la funzione desiderata.
Per selezionare una funzione da un menu (il display
mostrerà la prima voce disponibile) ruotare la
manopola di regolazione fino a visualizzare la voce
desiderata.
Il display mostrerà l'icona della funzione e i valori di
base: Premere
per confermare.
2. SELEZIONARE UNA FUNZIONE
Dopo avere selezionato la funzione desiderata è
possibile modificarne le impostazioni. Il display
mostra in sequenza le impostazioni che è possibile
modificare. premendo
è possibile modificare
nuovamente il valore precedente.
TEMPERATURA / LIVELLO GRILL
TEMPERATURA
Quando il valore lampeggia sul display, ruotare
lamanopola di regolazione per modicarlo, quindi
premere per confermare e continuare a modicare le
impostazioni che seguono (se possibile).
Note: una volta attivata la funzione, sarà possibile modicare
la temperatura o la potenza del grill utilizzando la manopola
di regolazione.
Usare la stessa procedura per impostare il livello grill:
Sono disponibili tre livelli di potenza per il grill: 3 (alto), 2
(medio), 1 (basso).
DURATA
DURATA
Quando l’icona lampeggia sul display, utilizzare
la manopola di regolazione per impostare la durata
desiderata, quindi premere per confermare. È
possibile non impostare la durata se si preferisce gestire
manualmente il tempo di cottura: Premere
per
confermare e avviare la funzione. In questo caso, non sarà
possibile impostare l'ora di ne cottura, programmando
l'avvio ritardato.
Note: durante la cottura è possibile regolare il tempo
impostato: premere
per modicare le impostazioni.
ORA DI FINE (AVVIO RITARDATO)
In molte funzioni, una volta impostato un tempo di
cottura è possibile posticipare l'avvio della funzione
programmando l'ora di ne cottura. Il display mostra l'ora
di ne mentre l'icona
lampeggia.
FINE COTTURA
Ruotare la manopola di regolazione per impostare l'ora di
ne cottura desiderata, quindi premere
per
confermare e attivare la funzione.
Posizionare gli alimenti nel forno e chiudere la porta: la
funzione si avvierà automaticamente dopo un periodo
di tempo calcolato per terminare la cottura all'orario
impostato.
Note: La programmazione dell'avvio ritardato di una cottura
disattiva la fase di preriscaldamento del forno: La temperatura
desiderata viene raggiunta gradualmente, quindi i tempi
di cottura si allungheranno leggermente rispetto a quanto
indicato nella tabella di cottura. Durante il tempo di attesa, è
possibile utilizzare la manopola di regolazione per regolare
l’ora di ne programmata o premere
per modicare i
valori impostati.
.MY MENU
Queste funzioni selezionano automaticamente la
modalità, la temperatura e la durata di cottura più
adatte per ottenere risultati ottimali.
All'occorrenza, è sufficiente indicare la caratteristica
dell'alimento per ottenere un risultato ottimale.
PESO / ALTEZZA (LIVELLI TEGLIA ROTONDA)
CHILOGRAMMI
Per impostare questa funzione correttamente, seguire le
indicazioni che compaiono sul display, impostare i valori
desiderati ruotando la manopola di regolazione, quindi
premere
per confermare.
GRADO DI COTTURA / DORATURA
In alcune funzioni My Menu it is è possibile regolare il
grado di cottura.
GRADO DI COTTURA
Alla richiesta, ruotare la manopola di regolazione per
selezionare il livello desiderato tra la cottura al sangue (-1) e
un risultato ben cotto (+1). Premere
o per confermare e
avviare la funzione.
Allo stesso modo, in alcune funzioni My Menu è possibile
regolare il grado di doratura tra un valore minimo (-1) e un
valore massimo (+1).
3. AVVIO DELLA FUNZIONE
Dopo avere confermato i valori predeniti o avere
applicato le impostazioni preferite, premere
per attivare
la funzione prescelta.
Se è stato impostato un avvio ritardato, premendo
il
forno chiederà se si desidera saltare questa fase, avviando
immediatamente la funzione.
Note: una volta avviata la cottura, il display consiglia il livello
più adatto per ogni funzione.
La funzione avviata può essere interrotta in qualsiasi
momento premendo
.
Note: Se il forno è caldo e la funzione prevede una
determinata temperatura massima, sul display compare un
messaggio corrispondente. Premere
per tornare alla
schermata precedente e selezionare un’altra funzione o
attendere il rareddamento completo.
4. PRERISCALDAMENTO
In alcune funzioni, è prevista una fase di preriscaldamento
del forno: una volta avviata la funzione, il display segnala
che si è attivata la fase di preriscaldamento.
PRERISCALDAMENTO
Al termine di questa fase, un segnale acustico e il display
indicheranno che il forno ha raggiunto la temperatura
impostata e comparirà la richiesta "AGG. ALIMENTO". A
questo punto, aprire la porta, inserire gli alimenti nel forno,
chiudere la porta e procedere alla cottura.
Note: inserire gli alimenti nel forno prima della ne del
preriscaldamento può compromettere i risultati di cottura.
Aprendo la porta durante la fase di preriscaldamento, questa
si interrompe temporaneamente. Il tempo di cottura non
comprende la fase di preriscaldamento. La temperatura nale
del forno può essere modicata utilizzando la manopola di
regolazione.
5. METTERE IN PAUSA LA COTTURA / GIRARE O
CONTROLLARE GLI ALIMENTI
Aprendo la porta, le resistenze vengono disattivate
e la cottura viene temporaneamente interrotta. Per
riprendere la cottura, chiudere la porta. Alcune funzioni
My Menu prevedono che gli alimenti vengano girati
durante la cottura.
GIRA ALIMENTO
Questa richiesta sarà segnalata da un segnale acustico
e da un messaggio corrispondente sul display. Aprire la
porta, eseguire l'azione richiesta dal display, chiudere la
porta e riprendere la cottura.
Allo stesso modo, quando manca il 10% del tempo di
cottura impostato, il forno richiede di controllare gli
alimenti.
CONTROLLARE IL CIBO
Controllare gli alimenti, chiudere la porta e continuare la
cottura.
Note: Premere
per saltare queste azioni. In ogni caso,
una volta trascorso un certo tempo senza che l'operazione
venga eseguita, il forno riprende automaticamente la
cottura.
6. FINE COTTURA
Allo scadere del tempo programmato, un segnale
acustico e il display indicheranno che la cottura è
terminata. Ruotare la manopola di regolazione per
prolungare la cottura impostando una nuova durata.
In entrambi i casi, i parametri di cottura saranno
mantenuti.
DORATURA
Con alcune funzioni, alla ne della cottura il forno consente
di dorare la supercie del cibo grazie all'utilizzo del grill.
PREMERE v PER DORARE
Quando il display visualizza il messaggio pertinente, se
necessario, premere per
avviare un ciclo di doratura
di cinque minuti. È possibile interrompere la funzione in
qualsiasi momento premendo
oppure ruotando la
manopola di selezione su "0" per spegnere il forno.
7. PREFERITI
Al termine della cottura, sul display compare un
messaggio che propone di salvare la funzione nella lista
dei preferiti con un numero da 1 a 10.
AGG. PREFERITO?
Se si desidera salvare una funzione come preferita
e memorizzare le impostazioni attuali per un uso
futuro, premere
altrimenti, per ignorare la richiesta
premere
. Una volta premuto , ruotare la
manopola di regolazione per selezionare la posizione
numerica, quindi premere
per confermare.
Note: se la memoria è piena o la posizione è già
occupata, viene chiesto di confermare la sovrascrittura
della funzione precedente.
Per richiamare in un momento successivo le funzioni già
salvate, ruotare la manopola funzioni su
: il display
mostrerà la lista delle funzioni preferite.
1. STATICO
Ruotare la manopola di regolazione per selezionare la
funzione, confermare premendo
, quindi premere
per attivare.
8
.DIAMOND CLEAN
Ruotare la manopola delle funzioni per visualizzare
“Diamond Clean” sul display.
DIAMOND CLEAN
Per attivare la funzione, premere : il display indicherà
le operazioni richieste per ottenere una pulizia ottimale:
Seguire le indicazioni e premere al termine. Una
volta eseguite tutte le operazioni preliminari, alla
richiesta del forno premere per attivare il ciclo di
pulizia.
Note: Si raccomanda di non aprire la porta del forno durante
il ciclo di pulizia, per evitare una perdita di vapore acqueo
che potrebbe avere un eetto negativo sul risultato nale
della pulizia.
A ciclo ultimato, il relativo messaggio di avviso
lampeggia sul display. Lasciar raffreddare il forno, quindi
pulire e asciugare le superfici interne con un panno o
una spugna.
9.CONTAMINUTI
Quando il forno è spento, il display può essere utilizzato
come contaminuti. Per attivare la funzione, assicurarsi
che il forno sia spento e ruotare la manopola di
regolazione: sul display lampeggia l’icona .
Ruotare la manopola di regolazione per impostare la durata
desiderata e quindi premere per avviare il timer.
CONTA MINUTI
Un segnale acustico e il display avviseranno che il conto
alla rovescia è terminato.
Note: il conta minuti non attiva nessun ciclo di cottura.
Utilizzare la manopola di regolazione per modificare l'ora
impostata sul timer.
Dopo avere attivato il conta minuti, è anche possibile
selezionare e attivare una funzione. Ruotare la
manopola di selezione per accendere il forno
selezionando la funzione desiderata. Una volta avviata
la funzione, il timer continuerà autonomamente il conto
alla rovescia senza interferire sulla funzione stessa.
Note: Durante questa fase non sarà possibile vedere
il contaminuti (sarà visualizzata solo l'icona
), che
continuerà il conteggio alla rovescia in background.
Per tornare a visualizzare il contaminuti, ruotare la
manopola di selezione su “0” per interrompere la funzione
correntemente attiva.
10.BLOCCO
Per bloccare il tastierino, tenere premuto per
almeno cinque secondi. Per disattivare, ripetere la stessa
procedura.
BLOCCO TASTI
Nota: questa funzione può essere attivata anche durante
la cottura. Per ragioni di sicurezza, è possibile spegnere
il forno in qualsiasi momento ruotando la manopola di
selezione su "0".
. NOTE
• Non coprire l'interno del forno con pellicola di
alluminio.
• Non trascinare pentole o tegami sul fondo del
forno, perché così facendo si potrebbe rovinare lo
smalto.
• Non appoggiare pesi elevati sulla porta e non
aggrapparsi ad essa.
• A causa della temperatura più elevata del ciclo
Pizza, si prevede che il rumore della ventola di
raffreddamento sarà leggermente più elevato.

CONSIGLI UTILI
COME LEGGERE LA TABELLA DI COTTURA
La tabella indica la funzione, gli accessori e il livello
migliore da utilizzare per cuocere svariati tipi di cibo.
I tempi di cottura si intendono dall'introduzione
degli alimenti nel forno, escluso il preriscaldamento
(dove richiesto). Le temperature e i tempi di cottura
sono indicativi e dipendono dalla quantità di cibo e
dal tipo di accessori. Utilizzare inizialmente i valori
più bassi consigliati e, se il risultato della cottura
non è quello desiderato, passare a quelli più alti. Si
consiglia di utilizzare gli accessori in dotazione e
tortiere o teglie possibilmente in metallo scuro. È
possibile utilizzare anche tegami e accessori in pyrex
o in ceramica, ma occorre considerare che i tempi di
cottura si allungheranno leggermente.
COTTURA SIMULTANEA DI PIETANZE DIVERSE
Utilizzando la funzione "Termoventilato", è possibile
cuocere contemporaneamente alimenti diversi (ad
esempio: pesce e verdure) che richiedono la stessa
temperatura, su differenti ripiani. Si potranno estrarre
prima gli alimenti che richiedono tempi di cottura più
brevi e lasciare continuare la cottura per quelli che
necessitano di tempi più lunghi.
CARNE
Utilizzare qualunque tipo di teglia o pirofila adatta
alle dimensioni della carne da cuocere. Per gli arrosti,
aggiungere preferibilmente del brodo sul fondo della
pirofila inumidendo la carne durante la cottura per
insaporirla. Fare attenzione al vapore che si sviluppa
durante tale operazione. Quando l'arrosto è pronto,
lasciarlo riposare in forno per altri 10-15 minuti
oppure avvolgerlo in un foglio di alluminio.
Per la cottura uniforme della carne alla griglia,
scegliere tagli dello stesso spessore. I pezzi di carne
molto spessi richiedono tempi di cottura più lunghi.
Per evitare che si brucino in superficie, allontanarli dal
grill disponendoli su ripiani più bassi. Girare la carne a
due terzi della cottura. Aprire con cautela la porta in
quanto può fuoriuscire vapore caldo.
Si consiglia di posizionare una leccarda con mezzo
litro d'acqua potabile direttamente sotto la griglia
sulla quale avete posizionato il cibo da grigliare, per
raccogliere il liquido di cottura. Rabboccare quando
necessario.
DESSERT
Cuocere i dessert delicati con la funzione statica su un
solo livello.
Utilizzare tortiere in metallo scuro e posizionarle
sempre sulla griglia in dotazione. Per la cottura su
più livelli selezionare la funzione termoventilato e
disporre le tortiere sfalsate sulle griglie, in modo da
favorire la circolazione dell'aria.
Per capire se la torta lievitata è cotta, inserire uno
stuzzicadenti nella parte centrale del dolce. Se lo
stuzzicadenti rimane asciutto, il dolce è pronto.
Se si utilizzano tortiere antiaderenti, non
imburrare i bordi, il dolce potrebbe non crescere
omogeneamente sui lati.
Se il dolce si "sgonfia" durante la cottura, la volta
successiva utilizzare una temperatura inferiore,
magari riducendo la quantità di liquido e mescolando
più delicatamente l'impasto.
I dessert con guarnitura succosa (torte al formaggio o
crostate di frutta) richiedono la funzione "Ventilato".
Se la base della torta risulta troppo umida, usare un
ripiano più basso e cospargere la base del dolce di
pan grattato o biscotti sbriciolati prima di aggiungere
il ripieno.
LIEVITAZIONE
Si consiglia di coprire l'impasto con un panno umido
prima di introdurlo nel forno. Con questa funzione,
i tempi di lievitazione si riducono di circa un terzo
rispetto ai tempi di lievitazione a temperatura
ambiente (20-25°C). Il tempo di lievitazione per un
impasto da pizza da 1 kg è di circa un'ora.
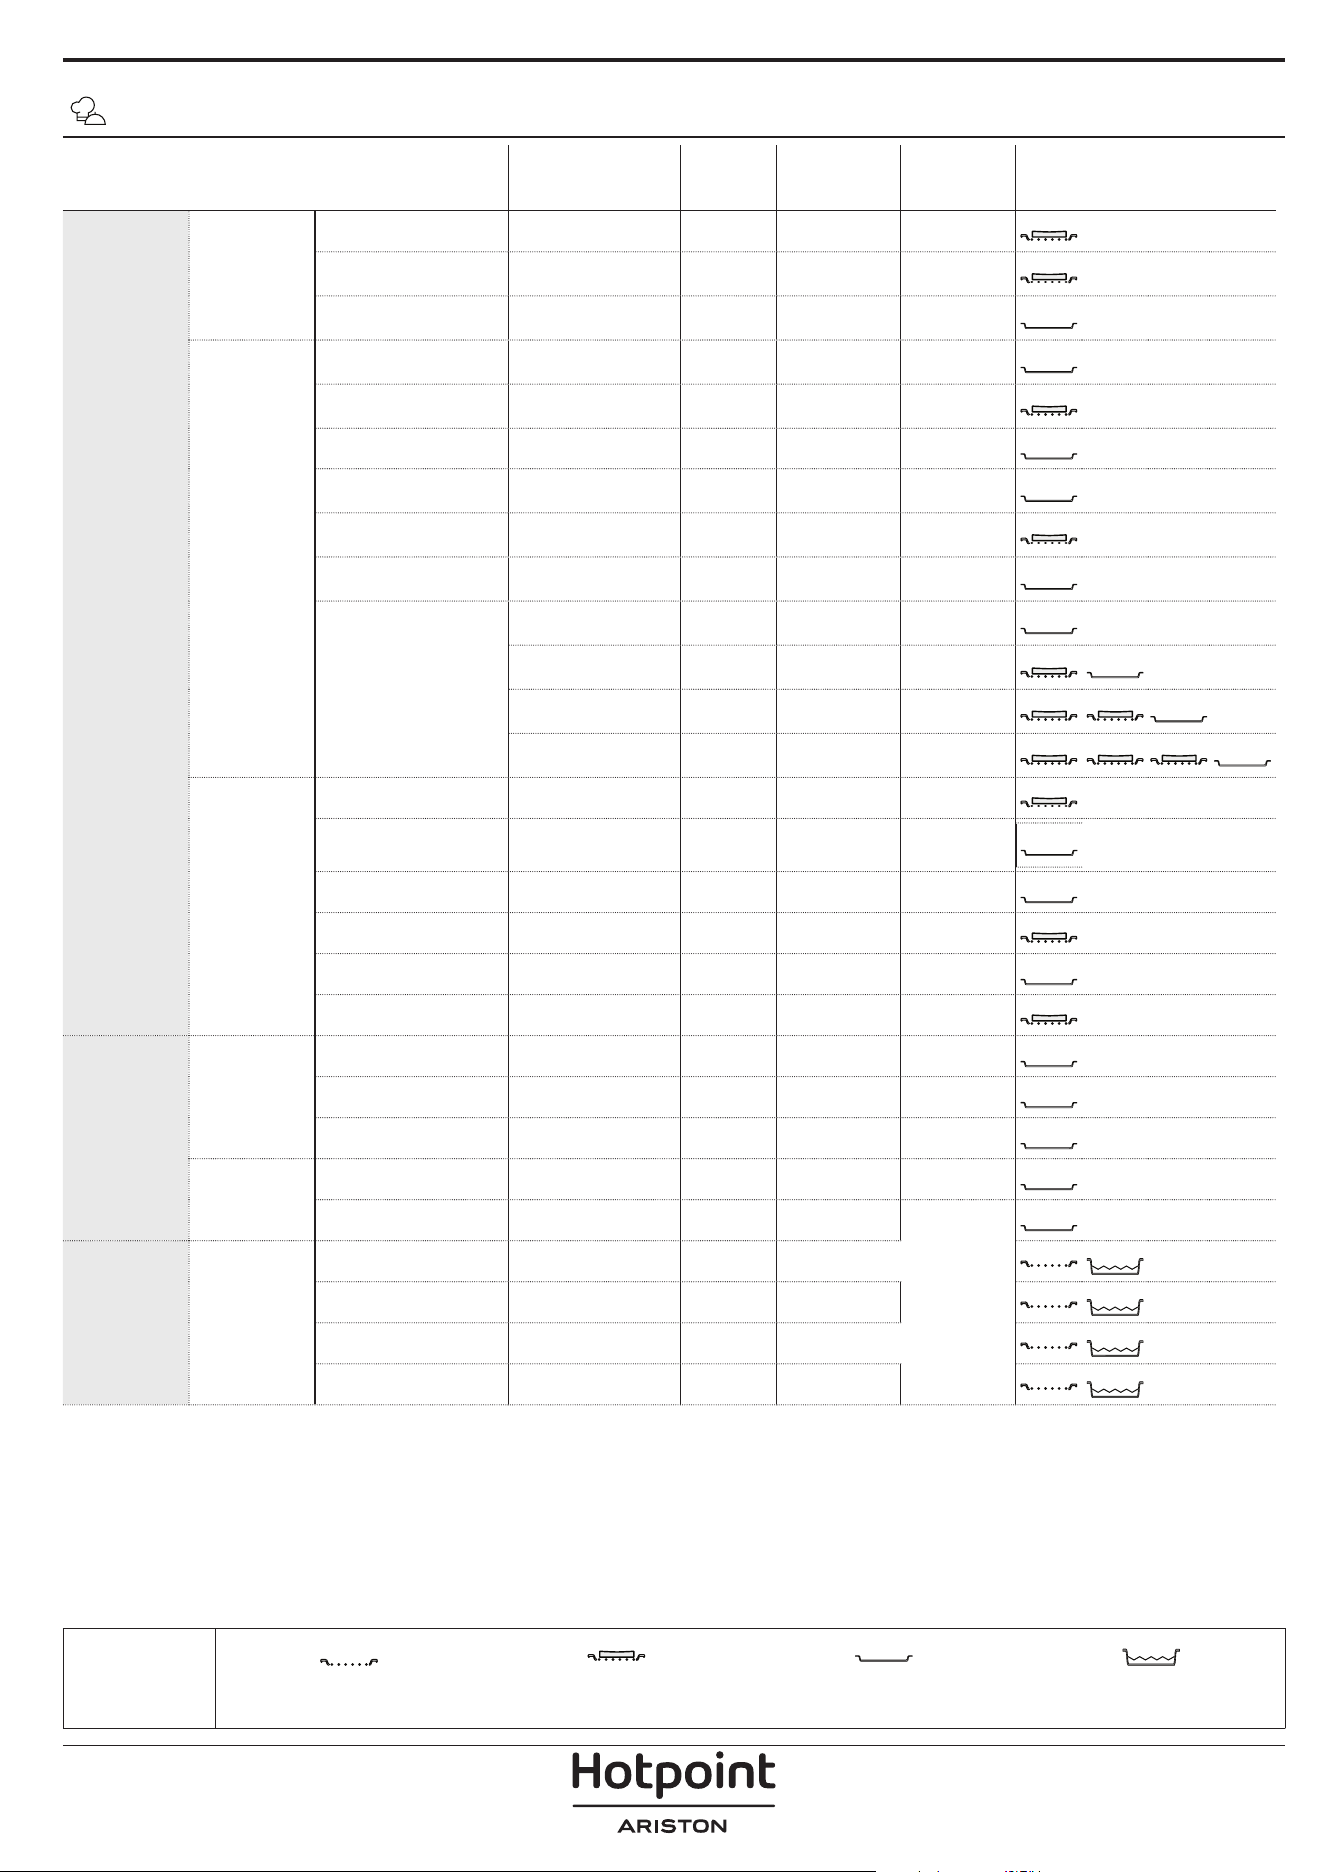
TABELLA DI COTTURA MY MENU
CATEGORIE DI ALIMENTI QUANTITÀ
GRADO DI
COTTURA
LIVELLO DI
DORATURA
GIRARE
(DEL TEMPO
DI COTTURA)
LIVELLO E ACCESSORI
COTTURA
TRADIZ.
PIATTI UNICI
Lasagna 0,5 - 3 kg -
0
(-1; 0; +1)
-
2
Torte salate 0,8 - 1,2 kg -
0
(-1; 0; +1)"
-
2
Verdure ripiene 0,1 - 0,5 kg [l'uno] - - -
3
PIZZA &
PANE
Panini 60 - 150 g [l'uno] - - -
3
Pane per tramezzini 400 - 600 g [l'uno] - - -
2
Pane Grande 0,7 - 2,0 kg - - -
2
Baguette 200 - 300 g [l'una] - - -
3
Pizza al piatto Rotonda
2
Pizza alta Leccarda - - -
2
Pizza [surgelata]
1 strato* - - -
2
2 strati*
4
1
3 strati*
5
3 1
4 strati*
5
4 2 1
PASTICCERIA
DOLCE
Pan di spagna 0,5 - 1,2 kg - - -
2
Biscotti 0,2 - 0,6 kg - - -
3
Bignè una teglia * - - -
3
Crostata 0,4 - 1,6 kg - - -
2
Strudel 0,4 - 1,6 kg - - -
3
Torta di frutta 0,5 - 2 kg - - -
2
ARROSTITI
CARNE
Roast Beef 0,6 - 2 kg
0
(-1; 0; +1)
0
(-1; 0; +1)
-
3
Arrosto di maiale 0,6 - 2,5 kg -
0
(-1; 0; +1)
-
3
Pollo arrosto 0,6 - 3 kg -
0
(-1; 0; +1)
-
2
CONTORNI
Verdure arrostite 0,5 - 1,5 kg -
0
(-1; 0; +1)
-
3
Patate arrosto 0,5 - 1,5 kg -
0
(-1; 0; +1)
-
3
GRIGLIATI CARNE
Burger 1,5 - 3 cm
0
(0; +1)
- 3/5
5
4
Salsicce & wurstel 1,5 - 4,5 cm - - 2/3
5
4
Spiedini una griglia - - 1/2
5
4
Filetto & petto 1 - 5 cm - -
2/3
5
4
* Quantità consigliata
ACCESSORI
Griglia
Pirofila / Tortiera / Teglia per pizza
tonda su griglia metallica
Leccarda / Teglia Leccarda con 500 ml di acqua

CATEGORIE DI ALIMENTI QUANTITÀ
GRADO DI
COTTURA
LIVELLO DI
DORATURA
GIRARE
(DEL TEMPO
DI COTTURA)
LIVELLO E ACCESSORI
GRIGLIATI
PESCE E
FRUTTI DI
MARE
Filetti 0,5 - 3 cm - - -
3
2
Filetti [surgelati] 0,5 - 3 cm - - -
3
2
GRIGLIATI CONTORNI
Pomodori al gratin una teglia - - -
3
Peperoni al gratin una teglia - - -
3
Broccoli al gratin una teglia - - -
3
Cavolfiori al gratin una teglia - - -
3
Verdure gratinate una teglia - - -
3
TABELLA DI COTTURA MY MENU
* Quantità consigliata
ACCESSORI
Griglia
Pirofila / Tortiera / Teglia per pizza
tonda su griglia metallica
Leccarda / Teglia Leccarda con 500 ml di acqua
ACCESSORI
Teglia frittura ad aria Pirofila o tortiera su griglia
Leccarda/piastra dolci o
teglia su griglia
TABELLA DI COTTURA PER FRITTURA AD ARIA
RICET TA FUNZIONE
QUANTITÀ
CONSIGLIATA
PRERISC.
TEMPERATURA
(°C)
DURATA
(MIN.)
RIPIANI E
ACCESSORI
ALIMENTI
SURGELATI
Patate fritte surgelate 650 - 850 g Sì 200 25 - 30
4
2
Nugget di pollo surgelati
500 g Sì 200 15 - 20
4
2
Bastoncini di pesce 500 g Sì 220 15 - 20
4
2
Anelli di cipolle 500 g Sì 200 15 - 20
4
2
VERDURE
Zucchini freschi impanati 400 g Sì 200 15 - 20
4
2
Patatine fritte fatte in casa 300 - 800 g Sì 200 20 - 40
4
2
Verdure miste 300 - 800 g Sì 200 20 - 30
4
2
CARNE E PESCE
Petti di pollo 1 - 4 cm Sì 200 20 - 40
4
2
Alette di pollo 200 - 1500 g Sì 220 30 - 50
4
2
Cotolette impanate 1 - 4 cm Sì 220 20 - 50
4
2
Filetti di pesce 1 - 4 cm Sì 220 15 - 25
4
2
Per cucinare alimenti freschi o fatti in casa, distribuire uno strato sottile di olio sulla superficie dell'alimento.
Per garantire risultati di cottura uniformi, mescolare gli alimenti a metà del tempo di cottura consigliato.
FUNZIONI
Frittura ad aria
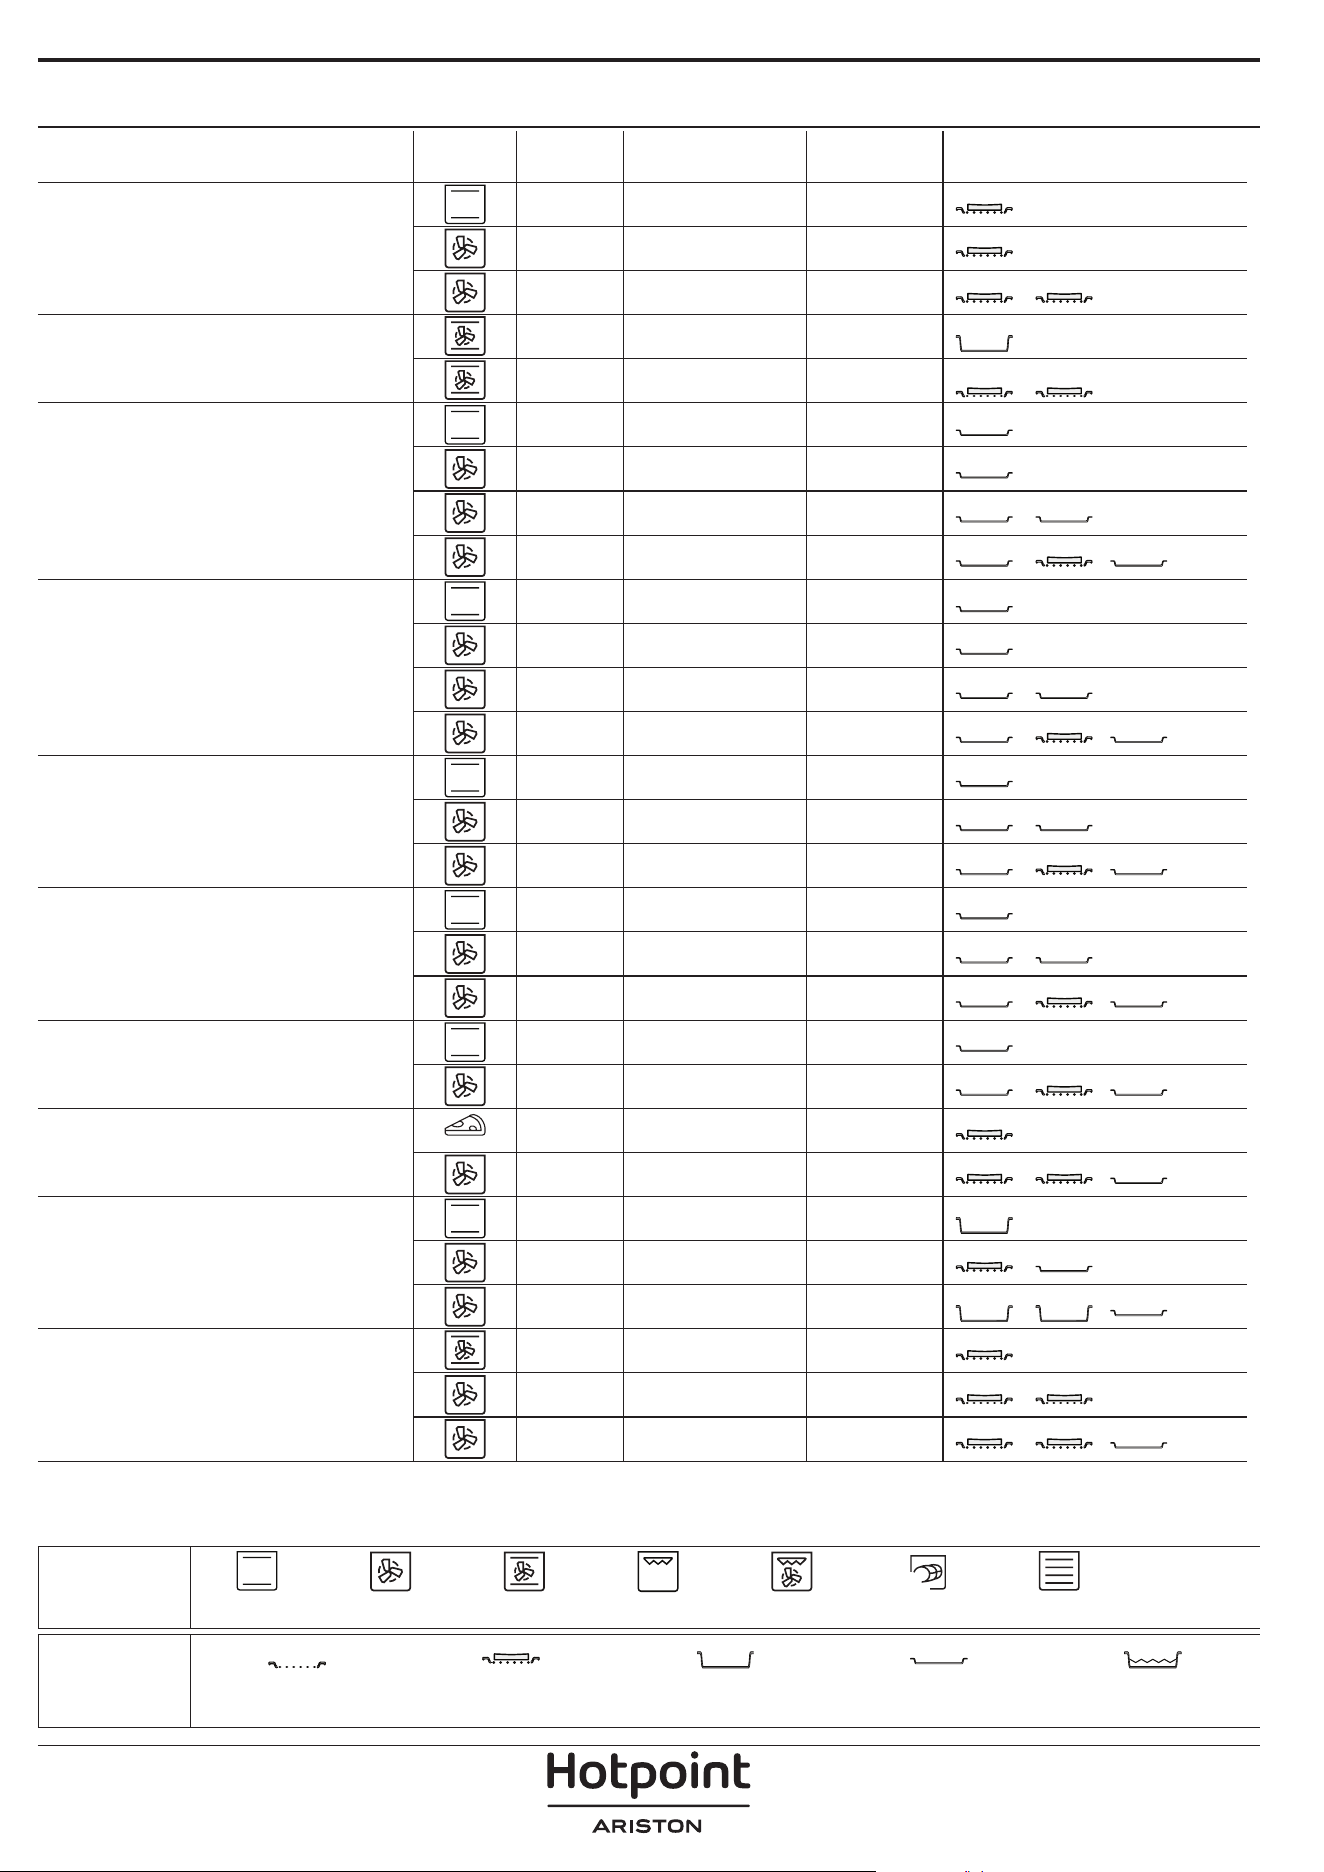
TABELLA DI COTTURA
RICETTA FUNZIONE PRERISC. TEMPERATURA (°C) DURATA (MIN.) RIPIANI E ACCESSORI
Torte lievitate / Pan di Spagna
Sì 170 30 - 50
2
Sì 160 30 - 50
2
Sì 160 30 - 50
4
1
Torte ripiene
(cheesecake, strudel, torta di mele)
Sì 160 – 200 30 - 85
3
Sì 160 – 200 30 - 90
4
1
Biscotti
Sì 150 20 - 40
3
Sì 140 30 - 50
4
Sì 140 30 - 50
4
1
Sì 135 40 - 60
5
3 1
Tortine / Mun
Sì 170 20 - 40
3
Sì 150 30 - 50
4
Sì 150 30 - 50
4
1
Sì 150 40 - 60
5
3 1
Bigné
Sì 180 - 200 30 - 40
3
Sì 180 - 190 35 - 45
4
1
Sì 180 - 190 35 - 45 *
5
3 1
Meringhe
Sì 90 110 - 150
3
Sì 90 130 - 150
4
1
Sì 90 140 - 160 *
5
3 1
Pizza / Pane / Focaccia
Sì 190 - 250 15 - 50
2
Sì 190 - 230 20 - 50
5
3 1
Pizza (sottile, alta, focaccia)
Sì 310 7 - 12
2
Sì 220 - 240 25 - 50 *
5
3 1
Pizza surgelata
Sì 250 10 - 15
3
Sì 250 10 - 20
4
1
Sì 220 - 240 15 - 30
5
3 1
Torte salate
(torta di verdure, quiche)
Sì 180 - 190 45 - 55
3
Sì 180 - 190 45 - 60
4
1
Sì 180 - 190 45 - 70 *
5
3 1
FUNZIONI
XL
ECO
Statico Termoventilato Ventilato Grill Turbo Grill Maxi Cooking Multiflow menu Ciclo ECO
ACCESSORI
Griglia Pirofila o tortiera su griglia
Leccarda / piastra dolci o
teglia su griglia
Leccarda / Teglia
Leccarda con 500 ml di
acqua
RICETTA FUNZIONE PRERISC. TEMPERATURA (°C) DURATA (MIN.) RIPIANI E ACCESSORI
Vols-au-vent / Salatini di pasta sfoglia
Sì 190 - 200 20 - 30
3
Sì 180 - 190 20 - 40
4
1
Sì 180 - 190 20 - 40 *
5
3 1
Lasagne / Sformati / Pasta al forno /
Cannelloni
Sì 190 - 200 45 - 65
3
Agnello / Vitello / Manzo / Maiale 1 kg Sì 190 - 200 80 - 110
3
Arrosto di maiale con cotenna 2 kg
XL
- 170 110 - 150
2
Pollo / Coniglio / Anatra 1 kg Sì 200 - 230 50 - 100
3
Tacchino / Oca 3 kg Sì 190 - 200 80 - 130
2
Pesce al forno / al cartoccio (letti, intero) Sì 180 - 200 40 - 60
3
Verdure ripiene
(pomodori, zucchine, melanzane)
Sì 180 - 200 50 - 60
2
Pane tostato - 3 (Alta) 3 - 6
5
Filetti di pesce / Bistecche - 2 (media) 20 - 30 **
4
3
Salsicce / Spiedini / Costine / Hamburger - 2 - 3 (media – alto) 15 - 30 **
5
4
Pollo arrosto (1-1,3 kg) - 2 (media) 55 - 70 ***
2
1
Coscia d'agnello / Stinco - 2 (media) 60 - 90 ***
3
Patate arrosto - 2 (media) 35 - 55 ***
3
Verdure gratinate - 3 (Alta) 10 - 25
3
Biscotti
Biscotti
Sì 135 50 - 70
5
4 3 1
Crostate
Crostate
Sì 170 50 - 70
5
3 2 1
Pizze tonde
Pizza
Sì 210 40 - 60
5
3 2 1
Pasto completo: Crostata di frutta (livello 5)
/ Lasagne (livello 3) / Carne (livello 1)
Sì 190 40 - 120 *
5
3 1
Pasto completo: Crostata di frutta (livello
5) / Verdure arrostite (livello 4) / Lasagne
(livello 2) / Tagli di carne (livello 1)
Menu
Sì 190 40 - 120 *
5
4 2 1
Lasagne e carne Sì 200 50 - 100 *
4
1
Carne e patate Sì 200 45 - 100 *
4
1
Pesce e verdure Sì 180 30 - 50 *
4
1
Arrosti ripieni
ECO
- 200 80 - 120 *
3
Carne in pezzi (coniglio, pollo, agnello)
ECO
- 200 50 - 100 *
3
FUNZIONI
XL
ECO
Statico Termoventilato Ventilato Grill Turbo Grill Maxi Cooking Multiflow menu Ciclo ECO
ACCESSORI
Griglia Pirofila o tortiera su griglia
Leccarda / piastra dolci o
teglia su griglia
Leccarda / Teglia
Leccarda con 500 ml di
acqua
* Il tempo di cottura è indicativo: i piatti possono essere estratti dal forno in momenti diversi, a seconda delle preferenze personali.
** Girare gli alimenti a metà cottura.
*** Girare gli alimenti a due terzi di cottura (se necessario).

SUPERFICI ESTERNE
• Pulire le superfici con un panno in microfibra umido.
Se molto sporche, aggiungere qualche goccia di
detergente con pH neutro. Asciugare con un panno.
• Non utilizzare detergenti corrosivi o abrasivi. Se
inavvertitamente uno di questi prodotti dovesse
venire a contatto con le superfici, pulire subito con un
panno in microfibra umido.
SUPERFICI INTERNE
• Dopo ogni uso, lasciare raffreddare il forno e
pulirlo preferibilmente quando è ancora tiepido per
rimuovere incrostazioni e macchie dovute a residui
di cibo. per asciugare la condensa dovuta alla cottura
di alimenti ad alto contenuto di acqua, usare a forno
freddo un panno o una spugna.
• Attivare la funzione "Diamond Clean" per una
pulizia ottimale delle superfici interne. (Solo in alcuni
modelli).
• Pulire i vetri della porta con detergenti liquidi
specifici.
• La porta del forno può essere rimossa per facilitare la
pulizia.
ACCESSORI
Mettere a bagno gli accessori con detersivo per piatti
dopo l'uso, maneggiandoli con guanti da forno, se
ancora caldi. I residui di cibo possono essere rimossi
con una spazzola per piatti o con una spugna.
Non pulire la sonda alimenti o la sonda carne (se
presente) in lavastoviglie. La teglia per frittura ad aria
(se presente) può essere lavata in lavastoviglie.
Assicurarsi che il forno si sia
rareddato prima di eettuare
qualsiasi intervento di
manutenzione o pulizia.
Non utilizzare apparecchi a
vapore.
Non usare pagliette metalliche,
panni abrasivi e detergenti
abrasivi o corrosivi che possano
danneggiare le superci.
Indossare guanti protettivi.
Il forno deve essere scollegato
dalla rete elettrica prima di
eettuare qualsiasi tipo di
manutenzione.
PULIZIA E MANUTENZIONE
COME LEGGERE LA TABELLA DI COTTURA
La tabella indica la funzione, gli accessori e il livello migliore da utilizzare per cuocere svariati tipi di cibo.
I tempi di cottura si intendono dall'introduzione degli alimenti nel forno, escluso il preriscaldamento (dove richiesto).
Le temperature e i tempi di cottura sono indicativi e dipendono dalla quantità di cibo e dal tipo di accessori.
Utilizzare inizialmente i valori più bassi consigliati e, se il risultato della cottura non è quello desiderato, passare a quelli
più alti.
Si consiglia di utilizzare gli accessori in dotazione e tortiere o teglie possibilmente in metallo scuro. È possibile utilizzare
anche tegami e accessori in pyrex o in ceramica, ma occorre considerare che i tempi di cottura si allungheranno
leggermente.
SOSTITUZIONE DELLA LAMPADINA
Per la sostituzione della lampadina, contattare il servizio assistenza.
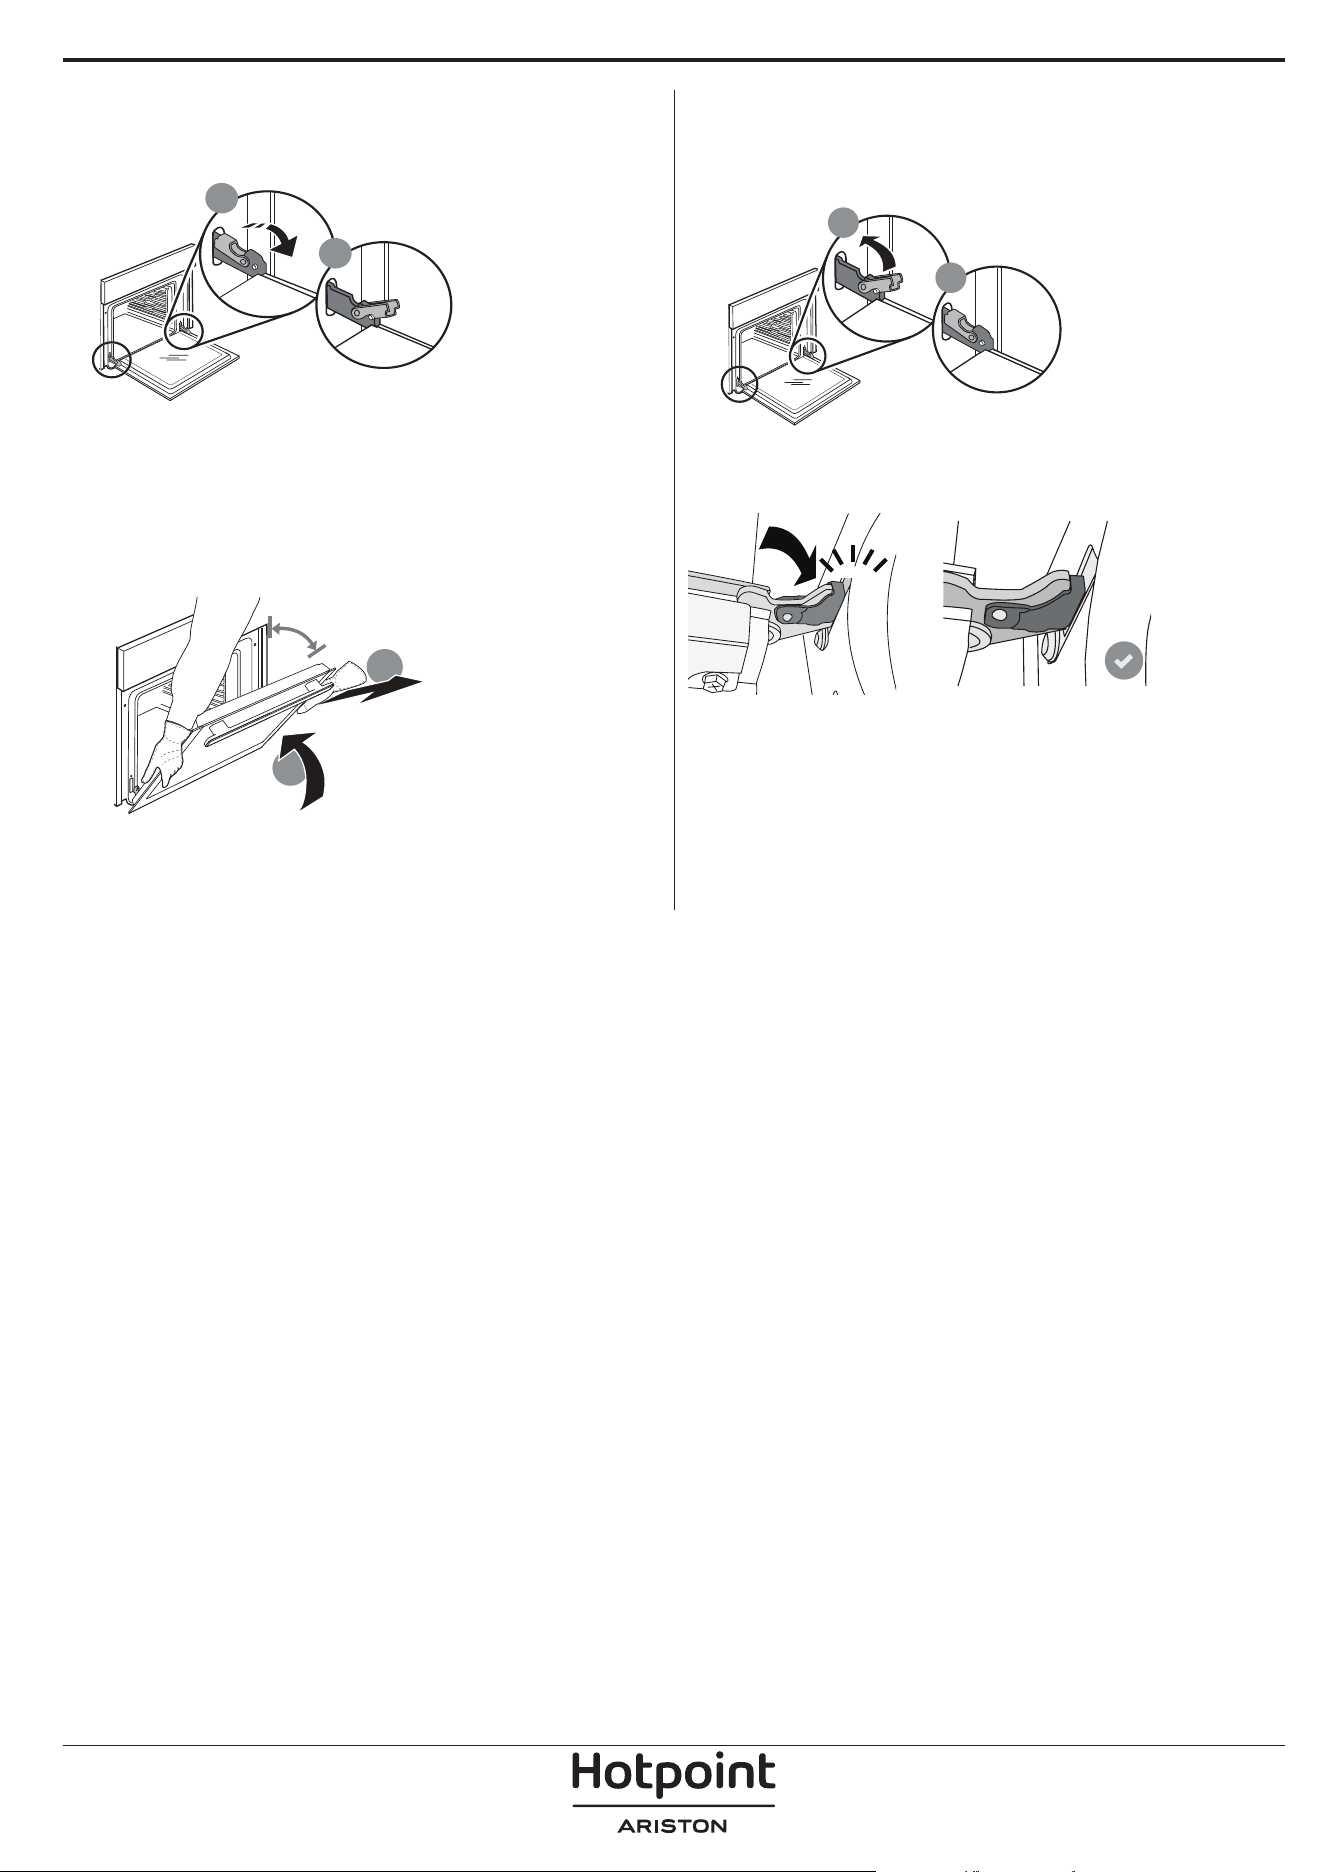
RIMOZIONE E MONTAGGIO DELLA PORTA
1. Per rimuovere la porta, aprirla completamente e
abbassare i fermi fino alla posizione di sblocco.
b
a
2. Chiudere la porta fino a quando è possibile.
Prendere saldamente la porta con entrambe le mani,
evitando di tenerla per la maniglia.
È sufficiente rimuovere la porta continuando a
chiuderla e tirandola contemporaneamente verso
l'alto, finché non si sgancia dalla propria sede. Togliere
la porta e appoggiarla su un piano morbido.
a
b
~15°
3. Per rimontare la porta, avvicinarla al forno
allineando i ganci delle cerniere alle proprie sedi e
ancorare la parte superiore agli alloggiamenti.
4. Abbassare la porta e poi aprirla completamente.
Abbassare i fermi nella posizione originale: fare
attenzione che siano completamente abbassati.
b
a
Sarà necessario applicare una leggera pressione per
assicurare il corretto posizionamento dei fermi.
“CLICK”
5. Provare a chiudere la porta, verificando che sia
allineata al pannello di controllo. Nel caso non lo
fosse, ripetere i passi sopra descritti: La porta
potrebbe danneggiarsi se non funziona
correttamente.

Problema Possibile causa Soluzione
Il forno non funziona.
Interruzione di corrente
elettrica.
Disconnessione dalla rete
principale.
Verificare che ci sia tensione in rete e che il forno
sia collegato all'alimentazione elettrica.
Spegnere e riaccendere il forno e verificare se
l'inconveniente persiste.
La porta non si apre.
Ciclo di pulizia attivo.
Guasto al blocca porta.
Attendere il termine della funzione e lasciare
raffreddare il forno.
Spegnere e riaccendere il forno e verificare se
l'inconveniente persiste.
Il display mostra la lettera "F"
seguita da un numero.
Problema software. Contattare il Call Center e indicare il numero che
segue la lettera "F".
Il ciclo di cottura con la sonda
è terminato senza una causa
evidente o l'errore F3E3 è
stampato sullo schermo.
La sonda alimenti non è
collegata correttamente.
Controllare il collegamento della sonda alimenti.
RISOLUZIONE DEI PROBLEMI
Per le linee guida, la documentazione standard e altre informazioni sui prodotti:
• Utilizzare il QR sul proprio prodotto
• Visitare il nostro sito web docs . hotpoint. eu
• Oppure, contattare il Servizio Assistenza Tecnica (al numero di telefono riportato sul libretto di garanzia).
Prima di contattare il Servizio Assistenza Clienti, prepararsi a fornire i codici riportati sulla targhetta matricola
del prodotto.
400020004736
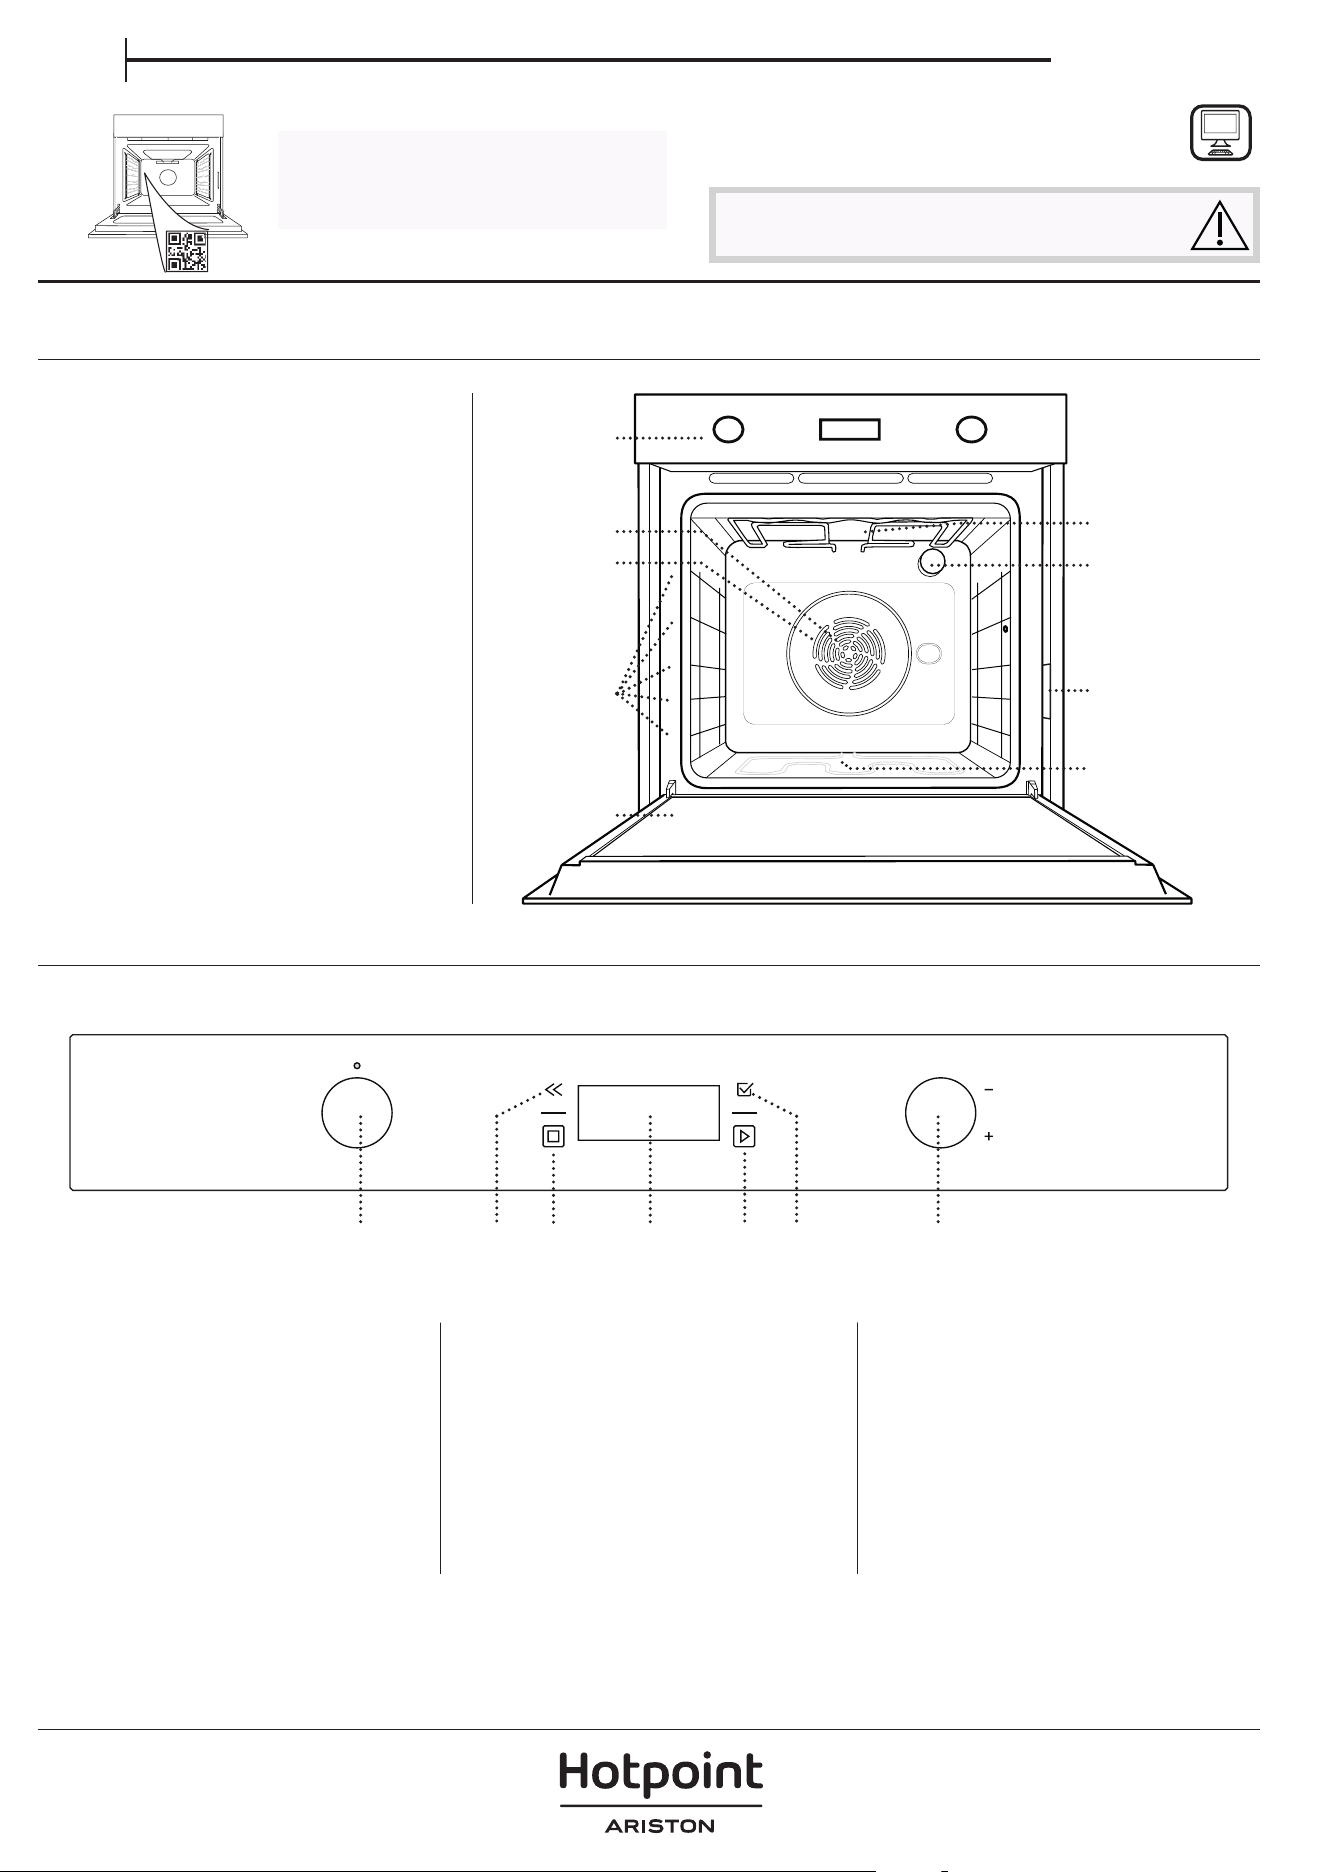
HE
שמתשמל ךירדמ
ARISTON/HOTPOINT לש רצומ תינקש הדות
רצומה תא םושרל שי ,רתוי המלש עויס תיווח לבקל ידכ
www . hotpoint. eu/ register on תבותכב
תוארוה תא ןויעב אורקל שי רישכמב שומישה ינפל
.תוחיטבה
רצומה רואית
הרקב חול
הרקב חול .1
ררוואמ .2
לוגע םומיח ףוג .3
)הארנ יתלב(
םיפדמ תוליסמ .4
)רונתה תיזחב ןיוצמ הבוגה(
תלד .5
לירג/ןוילע םומיח ףוג .6
הרונ .7
יוהיז תיחול .8
)ריסהל ןיא(
ןותחת םומיח ףוג .9
)הארנ יתלב(
היצקנופה תריחב רותפכ .1
.רונתה תא הקילדמ היצקנופ תריחב
תא תובכל ידכ 0 בצמל בוסל שי
.רונתה
הרזח .2
.ךסמ םדוקל הרזחל
תורדגה יוניש רשפאמ ,לושיבה ךלהמב
.תונשל ןתינ
רוצע .3
רמולכ היצקנופה תקספה לע
.עגרכ ליעפ
הגוצת .4
)הלחתה( START .5
תידיימ הלחתהל
.היצקנופ
רושיא .6
הרחבנש היצקנופ רושיאל
.םיכרע רדגה וא
ןונווכ רותפכ .7
םיטירפתב הלילגל
.תורדגה יוניש וא םושייו
5
4
3
2
1
5
4
3
2
1
1
2
3
4
5
8
9
7
6
1 2 3 4 5 6 7
.תבשותהמ ותוא ררחשל ידכ ןצחלה זכרמ לע הטמ ץוחלל שי .םינצחל םה םירותפכה לכ :תורעה
רישכמב QR-ה דוק תא קורס אנא
ףסונ עדימל
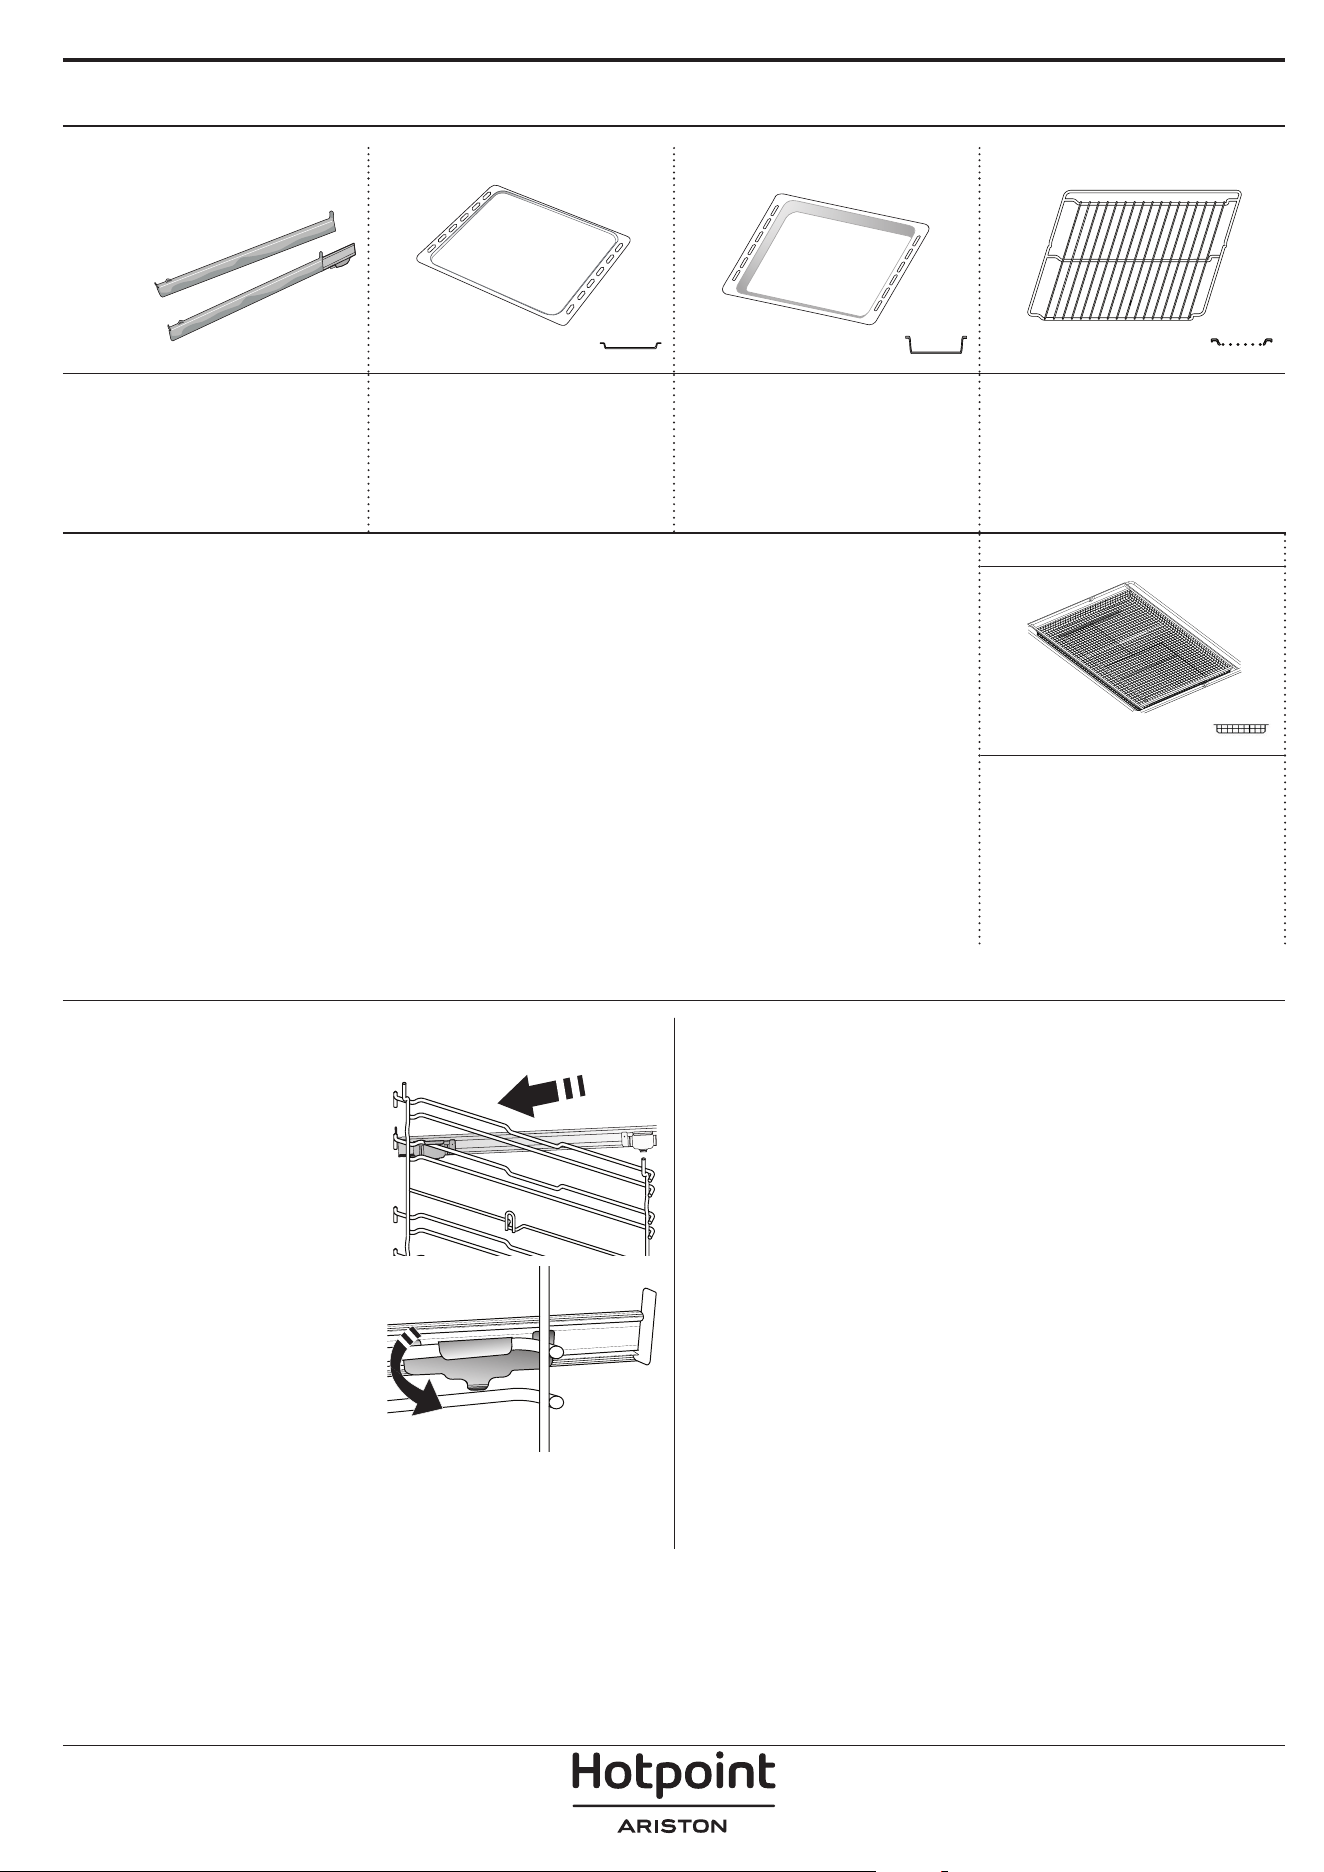
םירזיבא
תשר ףדמםיפוטפט שגמ* הייפא תינבת* תוענ תוליסמ
וא ןוזמ לושיבל שמשמ
,תוינבת רובע הכימתכ
לושיב ילכו הגוע תוינבת
.םוחב םידימעה םירחא
לושיבל רונתל שגמכ שמשמ
,תוקרי ,םיגד ,רשב
םוקימל וא 'וכו ה'צאקופ
ידכ תשרה ףדמל תחתמ
.לושיב ילזונ ףוסאל
םחל לש הייפאל תשמשמ
,ילצל םג לבא ,קצב יפאמו
.'וכו ריינב ףוטע גד
םירזיבא תסנכהל תועייסמ
.םתאצוה וא
) AIR FRY( יירפ רייא שגמ*
ןוזמ לושיב תעב שומישל
םע ,יירפ רייא תייצקנופ םע
סלפמב םקוממ הייפא שגמ
ףוסאל ידכ רתוי ךומנ
.ףוטפטלו םיירשפא םירוריפ
.םילכ חידמב ותוא תוקנל ןתינ
םיפסונ םירזיבאו תשרה ףדמ תסנכה
לע ותקלחה ידי-לע ןזואמ ןפואב תשרה ףדמ תא סינכהל שי
.הלעמ יפלכ הנופ הבגומה דצהש אדוול שי ,ףדמה תוליסמ
הייפאה שגמו םיפוטפטה שגמ ןוגכ ,םירחא םירזיבא
.תשרה ףדמ ומכ ןזואמ ןפואב םה םג םיסנכומ
ןתרזחהו םיפדמה תוליסמ תרסה
• הצוחה ךושמו ןתוא םרה ,םיפדמה תוליסמ תא ריסהל ידכ
תא איצוהל ןתינ וישכע :תובשותהמ םינותחתה םיקלחה תא
.םיפדמה תוליסמ
• ןריזחהל שי תישאר ,םיפדמה תוליסמ תא ריזחהל ידכ
,הלעמ יפלכ ןקיזחהל שי .תבשותה לש ןוילעה קלחל
ןתוא ךימנהל ןכמ רחאלו ,לושיבה את ךותל ןתוא קילחהל
.תבשותה לש ןותחתה קלחב ןמוקמל
תוענה תוליסמה תנקתה
םיפדמה תוליסמ תא איצוהל שי
ןגמה יוסיכ תא ריסהלו רונתהמ
.תוענה תוליסמהמ יטסלפה
לש ןוילעה ספתה תא קדהל שי
ףדמה תליסמל הענה הליסמה
.רשפאש לככ התוא קילחהלו
ינשה ספתה תא ךימנהל שי
.ומוקמל
שי ,הליסמה תא חטבאל ידכ
לש ןותחתה קלחה תא קדהל
שי .ףדמה תליסמ לא ספתה
םיענ תוליסמה ילגלגש אדוול
לע רוזחל שי .תוישפוחב
תליסמ רובע הלא םיבלש
.סלפמ ותואב היינשה ףדמה
.הבוג לכב תוענה תוליסמה תא ןיקתהל ןתינ :תורעה
.םגדל םאתהב תונתשהל םייושע םהלש גוסהו םירזיבאה רפסמ
הנפ עדימו תונמזהל ;דרפנב שוכרל ןתינ םירחא םירזיבא
.הריכמה רחאל תורישל
םימיוסמ םימגדב קר ןימז *

תויצקנופ
)ליגר( CONVENTIONAL
.דבלב דחא ףדמ לע הנמ לש גוס לכ לשבל ידכ
)ץלואמ ריווא( FORCED AIR
תרוטרפמט םישרודה םינוש םילכאמ לש תינמז-וב לושיבל
ןתינ .)רתויה לכל השולש( םיפדמ רפסמב ההז לושיב
ילבמ םינוש ןוזמ יגוס לשבל ידכ וז היצקנופב שמתשהל
.ינשל דחא ןוזממ ורבעי תוחירש
) לירג( GRILL
תוקרי לושיבל ,תויקינקנו םיבבק ,םיקייטס לש היילצל
שמתשהל ץלמומ ,רשב םילוצשכ .םחל תיילקל וא ןטרג
תא םקמ :לושיבה ילזונ תא ףוסאל ידכ םיפוטפט שגמב
ףסוהו תשרה ףדמל תחתמ אוהש סלפמ לכב שגמה
.הייתש ימ ל"מ 500
)ילש טירפתה( MY MENU
ןוזמה יגוס לכ רובע אלמ יטמוטוא לושיב םירשפאמ הלא
,חלמ תוגוע ,םיפאמו תוגוע ,תוקרי ,םיגד ,רשב ,הינזל(
בוקעל שי ,וז היצקנופמ ברמה תא קיפהל ידכ .)הציפ ,םחל
.המיאתמה לושיבה תלבטב תויחנהה רחא
תוינדי תויצקנופ
)םוח תעסהב הייפא( CONVECT BAKE
.דבלב דחא ףדמ לע תואלוממ תוגוע תייפא ,רשב לושיבל
)וברוט לירג( TURBO GRILL
ףוע ,ףיבטסור ,םייקוש( םילודג רשב יחתנ לש היילצל
ילזונ ףוסיאל םיפוטפט שגמב שמתשהל ץלמומ .)םלש
תחתמ אוהש סלפמ לכב תינבתה תא םקמ :לושיבה
.הייתש ימ לש ל"מ 500 ףסוהו תשרה ףדמל
הבורמ המירז טירפת
תרוטרפמט התואל םיקוקזש םינוש םילכאמ לושיבל
שמתשהל ןתינ .תינמז-וב םיסלפמ העבראב לושיב
םג( תולוגע תוציפ ,תוגוע ,תויגוע לושיבל וז היצקנופב
תואצותה תלבקל .המלש החורא ןיכהל ידכו )תואופק
.לושיבה תלבט ירחא בוקעל שי ,רתויב תובוטה
תודחוימ תויצקנופ
PIZZA
,תרדהנ תיתיב הציפ לשבל םכל תרשפאמ וז היצקנופ
.הדעסמב ומכ תוקד 10-מ תוחפב
לעמ הרוטרפמט תמרב לעופ ידועייה לושיבה רוזחמ
הכירפ ,םינפבמ הכר הציפ קפסמו ,סויזלצ תולעמ 300
.ןיטולחל הדיחא המחשה םעו תווצקב
WPro הציפ ןבא רזיבא םע וז היצקנופ לש בוליש
5-8 ךות הציפ תופאל לוכי תוקד 30 לש םדקומ םומיחו
וא הריכמה רחאל תורישל ונפ עדימו תונמזהל( .תוקד
)www.hotpiont.eu.
)האופק הייפא( FROZEN BAKE
תאו לושיבה בצמ תא יטמוטוא ןפואב תרחוב היצקנופה
ןוזמ יגוס השימח דע רובע בצמהו לושיבה תרוטרפמט
.רונתה לש שארמ םומיחב ךרוצ ןיא .אופק ןכומ
)החיפת( RISING
ידכ .חולמ וא קותמ קצב לש תילמיטפוא החפתה עוציבל
היצקנופה תא ליעפהל ןיא ,החיפתה תוכיא לע רומשל
.לושיב רוזחמ רחאל םח ןיידע רונתה םא
)םח רומש( KEEP WARM
.התע הז לשובש ןוזמ לש תוכירפהו םוחה לע הרימשל
)הרשפה( DEFROST
ףדמה לע ןוזמה תא חינהל שי .ןוזמ תרשפה זרזל ידכ
עונמל ידכ ותזיראב ןוזמה תא ריאשהל שי .יעצמאה
.תושבייתה
)ןוכסיח רוזחמ( ECO CYCLE
.דחא ףדמב רשב לש םיטליפו םיאלוממ םיחתנ תיילצל
יובכ ראשיי רואה ,שומישב וז ןוכסיח רוזחמ רשאכ
בטמלו ןוכסיחה רוזחמב שמתשהל ידכ .לושיבה ךלהמב
דע רונתה תלד תא חותפל ןיא ,למשחה תכירצ תא
.לושיבה םויסל
MAXI COOKING
לושיבה בצמ תא יטמוטוא ןפואב תרחוב היצקנופה
םילודג רשב יחתנ לושיבל רתויב םיבוטה הרוטרפמטהו
ךלהמב רשבה תא ךופהל ץלמומ .)ג"ק 2.5 לעמ(
.םידדצה ינשב הדיחא המחשה לבקל ידכ ,לושיבה
םעפ ידמ ולש םיצימב רשבה תא ביטרהל ץלמומ
.תושבייתה תעינמל
)יטיא לושיב( SLOW COOKING
תא תלשבמ וז היצקנופ .תונידעב םיגדו רשב רשבל ידכ
בקע .יסיסעו ךר וילע רומשל ידכ טאל ןוזמה
ץוחבמ םיחשמ וניא ןוזמה ,הכומנה הרוטרפמטה
לע םיצילממ ונא .יודיאב לושיבל המוד תיפוסה האצותהו
ומיחשהל ידכ תינבתב היילצל רשבה תבירצב ליחתהל
תואצותל .םינפב ולש םייעבטה םיצימה תמיטאב עייסלו
ךלהמב הרוגס רונתה תלד לע רומש שי ,רתויב תובוטה
לושיב ינמז .םוחה תורזפתהמ ענמיהל ידכ לושיבה
2-5 ןיב םיענ )ג"ק 3 – 'ג 300( םיגד רובע םיעצומ
.תועש 4-7 ןיב )ג"ק 1-3( רשב רובעו תועש
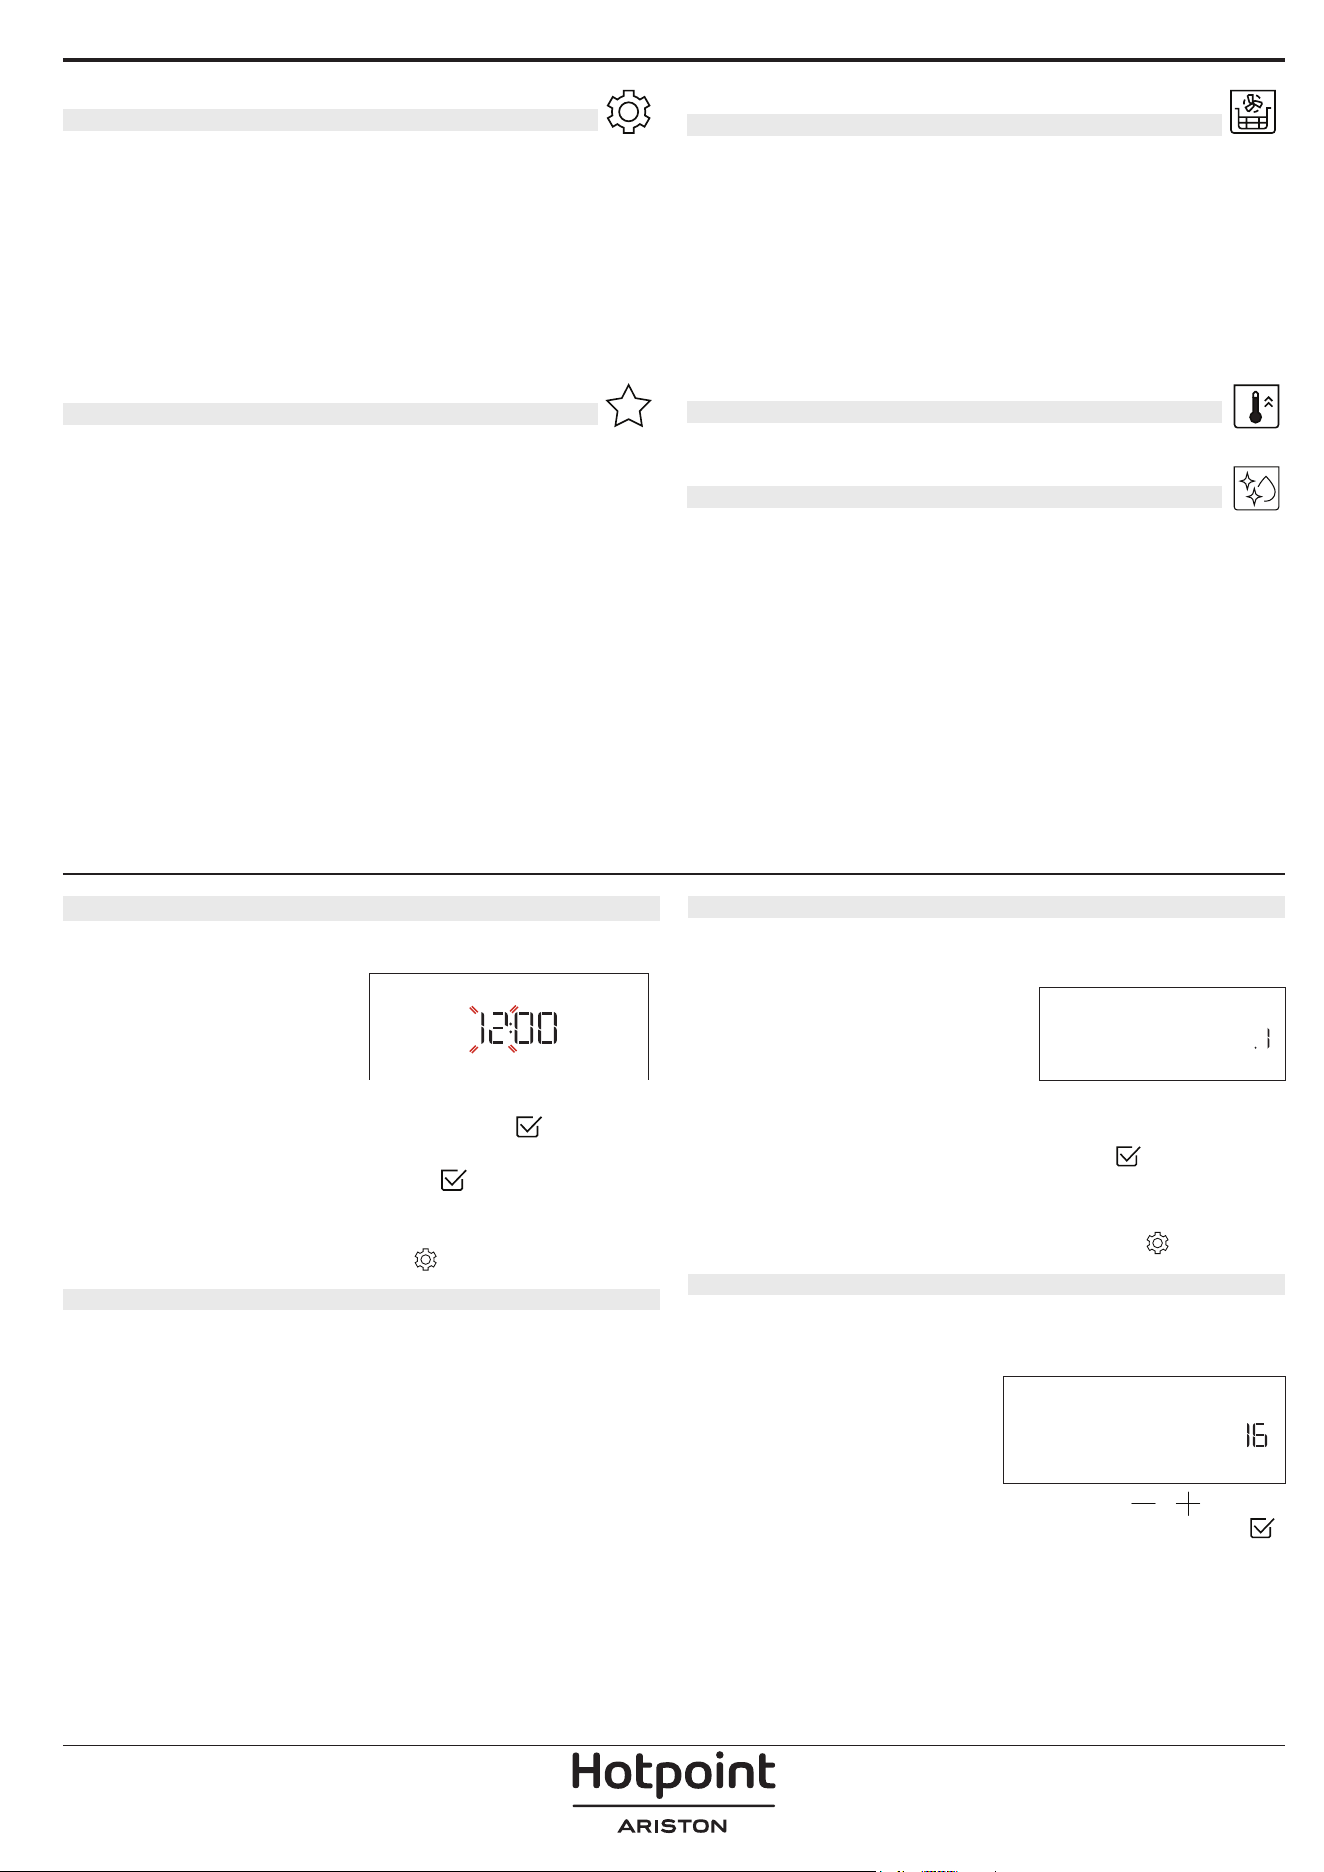
)ריוואב ןוגיט( AIR FRY
ךות דועו ףוע יסיגנ ,ספי'צ לשבל ךל תרשפאמ וז היצקנופ
םומיח יפוג .םיענ ךירפ ךכמ האצותכו ,ןמש תוחפב שומיש
דועב ,ללחה תא יוארכ םמחל ידכ תוירוזחמב םיבבותסמ
לושיבה תואצות תא גישהל ןתינ .םח ריווא םירזמ ררוואמה
יירפ רייא שגמב שומיש ידי לע קר רתויב תובוטה תויופצה
שגמ לע לכואה תא םקמ .)םימיוסמ םימגד םע קפוסמ(
לושיבה תלבט תוארוה יפל לעפו תחא הבכשב יירפ רייאה
שומישמ ענמיה .רתויב םיבוטה םיעוציבל יירפ רייא לש
.דיחא אל לושיב עונמל ידכ דחא שגממ רתויב
)ריהמ שארמ םומיח( FAST PREHEAT
.רונתה לש ריהמ שארמ םומיחל
)םולהי יוקינ( DIAMOND CLEAN
הז דחוימ יוקינ רוזחמ ךלהמב םיררחתשמה םידאה תלועפ
ךולכל לש הלק הרסה םירשפאמ ,הכומנ הרוטרפמטב
תיתחתב הייתש ימ לש ל"מ 200 ךופשל שי .ןוזמ יעקשמו
.רק רונתהשכ היצקנופה תא ליעפהלו רונתה
תורדגה
תוריהב ,לעופ 'ןוכסיח' בצמ רשאכ .רונתה תורדגה ןונווכל
הבכת הרונהו היגרנאב ךוסחל תנמ-לע םצמוצת הגוצתה
היהתשכ יטמוטוא ןפואב שדחמ לעפות איה .הקד ירחא
לכ ,לעפומ 'המגדה' בצמ רשאכ .והשלכ ןצחל לע הציחל
אל רונתה לבא םינימזש םיטירפתה לכו תוליעפ תודוקפה
טירפתמ 'המגדה'ל תשגל שי ,הז בצמ תיבשהל ידכ .םמחתי
'ןרצי תורדגהל סופיא' לש הריחב .'יובכ' רוחבלו 'תורדגה'
הלעפהל ותוא ריזחת ןכמ רחאלו ,רצומה תא הבכת
.וקחמיי תורדגהה לכ .הנושאר
םיפדעומ
.תופדעומה תויצקנופה 10 תמישר רוזחאל
ןושאר שומיש
הפש תריחב .1
תאו הפשה תא עובקל שי ,רישכמה לש הנושארה הלעפהב
.הגוצתב עיפוי English :העשה
תופשה תמישרב לולגל ידכ
ןונווכה רותפכ
תא בבוסל שי
ENGLISH
.הצוחנש וז תא רוחבלו תונימזה
.הריחבה תא רשאל ידכ
לע ץוחלל שי
'תופש'ב הריחב ידי-לע הפשה תא תונשל ןתינ ןכמ רחאל :תורעה
רותפכ בוביס ידי-לע עיגהל ןתינ הילא ,'תורדגה' טירפתב
ב הריחבה
למשחה תכירצ תרדגה .2
תיתיב תשרל תמאותש למשח תכירצ תמרל תנכותמ רונתה
תקפסא םא :)רפמא 16( טאווליק 3-מ רתוי לש גוריד תלעב
.)רפמא 13( הז ךרע דירוהל שי ,רתוי הכומנ תיבל חתמה
ץחל ו "ךומנ" 13 וא "הובג" 16 רוחבל ידכ
לע ץחל
POWER
.רשאל ידכ
העשה תרדגה .3
העשה תא רידגהל ךילע היהי ,הפשה תריחב רחאל
.הגוצתב ובהבהי העשה תורפס יתש :תיחכונה
הנוכנה העשה תא רידגהל ידכ
ןונווכה רותפכ
תא בבוסל שי
CLOCK
ובהבהי תוקדה רובע תורפסה יתש : לע ץוחללו
תא רידגהל ידכ
ןונווכה רותפ
כ תא בבוסל שי .הגוצתב
.רשאל ידכ
לע ץוחללו תוקדה
תקספה רחאל העשה תא בוש רידגהל ךרוצ היהיש ןכתיי :תורעה
בוביס ידי-לע ןימז ,'תורדגה' טירפתב 'ןועש' רוחבל שי .למשח
בצמל
הריחבה רותפכ
רונתה םומיח .4
הז :רוצייה ןמזב וב ורתונש תוחיר טולפל יושע שדח רונת
.ןיטולחל ליגר
רונתה תא םמחל ץלמומ ןוזמ לשבל םיליחתמש ינפל ,ןכל
תא אצוה
.םיירשפאה תוחירה תא קלסל ידכ קיר אוהשכ
לכ תאו רונתהמ תופוקשה תועיריה וא ןגמה ינוטרק
ךשמל 200°C-ל רונתה תא םמחל שי .וכותבש םירזיבאה
ריווא רורחס תלעב היצקנופ תועצמאה יוצר ,תחא העשכ
.)'הליגר הייפא' וא 'ץלואמ ריווא' לשמל(
םעפב רישכמב שומיש ירחא רדחה תא ררוואל ץלמומ :תורעה
.הנושארה

ימוימוי שומיש
היצקנופ תריחב .1
רונת התא ליעפהל ידכ הריחבה רותפכ תא בבוסל שי
.הגוצתב תשרדנה היצקנופה תא גיצהלו
עיפוי ןושארה ןימזה טירפה( טירפתמ טירפ רוחבל ידכ
.עיפוי שרדנה טירפהש דע
ןונווכה רותפכ
תא בבוסל שי ,)הגוצתב
:הגוצתב ועיפוי הלש תויסיסבה תורדגההו היצקנופה םש
.רשאל ידג
לע ץחל
היצקנופ תרדגה .2
תורדגהה תא תונשל ןתינ ,היוצרה היצקנופה תריחב רחאל
הציחל .תונשל ןתינש תורדגהה ףצרב ועיפוי הגוצתב .הלש
.תמדוקה הרדגהה תא בוש תונשל רשפאת
לע
לירג תמר/הרוטרפמט
ןונווכה רותפכ
תא בבוסל שי ,הגוצתב םיבהבהמ םיכרעה רשאכ
TEMPERATURE
ךישמהלו רשאל ידכ לע ץוחלל ןכמ רחאלו ,יוניש עצבל ידכ
.)רשפא םא( תואבה תורדגהה יונישב
/הרוטרפמטה תא תונשל ןתינ ,היצקנופה תלעפה רחאל :תורעה
.
ןונווכה רותפכ
תועצמאב לירגה תמר
המצוע תומר 3 שי :לירגה תמר תא רידגהל ןתינ ןפוא ותואב
.)ךומנ( 1 ,)יעצמא( 2 ,)הובג( 3 :לירגל
DURATION
רותפכב
שמתשהל שי ,הגוצתב בהבהמ למסה רשאכ
DURATION
לע ץוחלל ןכמ רחאלו ,יוצרה לושיבה ןמז תא רידגהל ידכ
ןונווכה
הנווכה םא לושיבה ךשמ תא רידגהל ךרוצ ןיא .רשאל ידכ
ידכ לע ץוחלל שי :)ןומזת אלל( ינדי ןפואב לושיבה תא להנל
תא רידגהל ןתינ אל ,הז הרקמב .היצקנופה תא ליחתהלו רשאל
.הלחתה תייהשה תונכת ידי-לע לושיבה םויס תעש
ץחל :לושיבה ךלהמב רדגוהש לושיבה ןמז תא ןנווכל ןתינ :תורעה
.תורדגהה תא תונשל ידכ
לע
)הלחת התייהשה( םויס תעש
תא תוהשהל ןתינ ,לושיב ןמז תרדגה רחאל ,תובר תויצקנופב
הגוצתב עיפוי ןמזה .םויסה ןמז תונכת ידי-לע היצקנופה תלחתה
.בהבהמ למסהש
ןמזב
,לושיבה םויס תעש תא רידגהל ידכ
ןונווכה רותפכ
תא בבוסל שי
END TIME
.היצקנופה תא ליעפהלו רשאל ידכ לע ץוחלל ןכמ רחאלו
ליחתת היצקנופה :תלדה תא רוגסלו רונתב ןוזמה תא חינהל שי
לושיבה תא םייסל ידכ בשוחש ןמזה םות רחאל יטמוטוא ןפואב
.תרדגהש דעומב
םומיחה םלש תא תיבשת תיהשומ לושיב תלחתה תעש תונכת :תורעה
תועמשמהו יתגרדה ןפואב היוצרה הרוטרפמטל עיגי רונתה :םדקומה
תלבטב םיעיפומה הלאמ רתוי םיכורא טעמ ויהי לושיבה ינמזש איה
ידכ
ןונווכה רותפכ
ב שמתשהל ןתינ ,הנתמהה ןמז ךלהמב .לושיבה
תא תונשל ידכ לע ץוחלל וא תתנכותמה םויסה תעש תא ןקתל
.תורדגהה
)ילש טירפתה( MY MENU.
בוטה לושיבה בצמ תא יטמוטוא ןפואב תורחוב הלא תויצקנופ
לכ לש הייפא וא היילצ ,לושיבה ךשמו הרוטרפמט ,רתויב
.תונימזה תונמה
לש ןייפאמה תא ןייצ טושפ ,ךרוצה תדימב
.תיבטימ האצות תגשהל ןוזמ
)תולוגע תוינבת תובכש( הבוג /לקשמ
תוארוהה רחא בוקעל שי ,הכלהכ היצקנופה תא רידגהל ידכ
KILOGRAMS
,שרדנה ךרעל
ןונווכה רותפכ
תא בבוסלו ,שקבתתשכ ,הגוצתב
.רשאל ידכ
לע ץוחלל ןכמ רחאלו
המחשה/היישע תמר
היישעה תמר תא ןנווכל ןתינ 'ילש טירפתה' תויצקנופב
. עוציב תמר
)1-( אנ ןיב היוצרה המרל ןונווכה רותפכ תא בבוס ,שקבתתשכ
DONENESS
ליחתהלו רשאל ידכ וא לע ץוחלל שי .)1+( בטיה יושע ןיבל
.היצקנופה תא
ןתינ ,'ילש טירפתה' תויצקנופמ קלחב ,רתומש ןכיה ,ןפוא ותואב
.)1+ ( ההובגל )1- ( הכומנ ןיב המחשהה תמר תא ןנווכל
היצקנופה תלחתה .3
תלחהש רחאל וא םייוצרה םה לדחמה תרירב יכרע םא ,תע לכב
.היצקנופה תא ליעפהל ידכ
לע ץוחלל שי ,תוצוחנה תורדגהה תא
לע גלדל םא לאשת רונתב
לע הציחל ,היהשהה בלש ךלהמב
.היצקנופה תא דימ ליעפהלו הז בלש
המרה לע ץילמת הגוצתה ,לושיבה תלחתה רחאל :תורעה
.היצקנופ לכ רובע רתויב המיאתמה
.הלעפוהש היצקנופה תא רוצעל ידכ
ץוחלל לכות תע לכב
הרוטרפמט תבייחמ היצקנופהו םח רונתה םא :תורעה
רוזחל ידכ
לע ץוחלל שי .הגוצתב העדוה עיפות ,תילמיסקמ
.טלחומ רוריקל דע ןיתמהל וא תרחא היצקנופ רוחבלו םדוקה ךסמל
PREHEATING .4
רחאל :רונתה לש שארמ םומיח תוכירצמ תויצקנופהמ קלח
.לעפוה שארמ םומיחה בלשש הארת הגוצת ,היצקנופה תלעפה
עיגה רונתהש ןייצת הגוצתהו ףוצפצ עמשיי ,הז בלש םויס רחאל
PREHEATING
חתפ וז הדוקנב .'ןוזמ ףיסוהל' ךרוצ שיו הרדגוהש הרוטרפמטל
.לשבל לחתהו תלדה תא רוגס ,רונתב ןוזמה תא חנה ,תלדה תא
שארמ םומיחה בלש םויס ינפל רונתל ןוזמה תסנכה :תורעה
םומיחה בלשב תלדה תחיתפ .לושיבה תואצותב עוגפל הלולע
םומיח לש בלש ללוכ וניא לושיבה ןמז .היהשהל םורגת שארמ
ךירצ רונתה הילאש הרוטרפמטה תא תונשל ןתינ דימת .שארמ
.
ןונוויכ רותפכ
תועצמאב עיגהל

ותקידב וא ןוזמה תכיפה / לושיב תייהשה .5
האצותכ ינמז ןפואב ההשוי לושיבה ,תלדה תחיתפ ידי-לע
תא רוגס ,לושיבב ךישמהל ידכ .םומיחה יפוג לש התבשהמ
ןוזמה תכיפה תובייחמ 'ילש טירפתה' תויצקנופמ קלח .תלדה
.לושיבה ךלהמב
חותפל שי :עצבל שיש הלועפה עיפות הגוצתבו ףוצפצ עמשיי
TURN FOOD
תא רוגסל ,הגוצתב העיפומה הלועפה תא עצבל ,תלדה תא
.לושיבב ךישמהלו תלדה
שקבי רונתה ,לושיבה םויס ינפל ןמזהמ %10-ב ,ןפוא ותואב
.ןוזמה תא קודבל
.לושיבב ךשמהו תלדה תא רוגס ,ןוזמה תא קודב
CHECK ON FOOD
אל םא ,תרחא .וז הלועפ לע גלדל ידכ לע ץחל :תורעה
ךישמי רונתה םיוסמ ןמז קרפ רחאל ,הלועפ לכ עצובת
.לושיבב
לושיבה םויס .6
שי .םייתסה לושיבהש ןייצל ידכ ףוצפצ עמשייו קלדית הגוצתה
ידי-לע לושיבה ןמז תא ךיראהל ידכ
ןונווכה רותפכ
תא בבוסל
.ורמשיי לושיבה ירטמרפ םירקמה ינשב .שדח ךשמ תרדגה
המחשה
ןוזמה לש חטשה ינפ תמחשה תורשפאמ רונתה תויצקנופמ קלח
.לושיבה םויסב לירגה תלעפה ידי-לע
שי ,ךרוצ שי םא ,הגוצתב העיפומ תיטנוולרה העדוהה רשאכ
PRESS v TO BROWN
.תוקד שמח לש המחשה רוזחמ ליחתהל ידכ לע ץוחלל
וא
לע הציחל ידי-לע תע לכב היצקנופה תא רוצעל ןתינ
.רונתה תא תובכל ידכ 0-ל הריחבה רותפכ בוביס ידי-לע
FAVORITE )ףדעומ( .7
ןיב רפסמל היצקנופה תא רומשל שקבתת ,לושיבה םויס רחאל
.םיפדעומה תמישרב 10-ל 1
תא ןסחאלו תפדעומכ היצקנופה תא רומשל הצרת םא
?ADD FAVORITE
, תרחא לע ץוחלל שי ,ידיתע שומישל תויחכונה תורדגהה
בבוס ,
לע הציחל רחאל . לע ץוחלל שי ,םלעתהל ידכ
ןכמ רחאלו ,רפסמה םוקימ תא רוחבל ידכ
ןונווכ רותפכ
תא
.רשאל ידכ
ץחל
,סופת רבכ רחבנש רפסמהש וא אלמ ןורכיזה םא :תורעה
.תמדוקה היצקנופה תא קוחמל רושיא שקבי רונתה
שי ,רתוי רחואמ דעומב תרמשש תויצקנופב שמתשהל ידכ
תויצקנופה תמישר :
לא
היצקנופה רותפכ
תא בבוסל
.הגוצתב עיפות תופדעומה
ידי לע רשא ,היצקנופה תא רוחבל ידכ
ןונווכ רותפכ
תא בבוס
1. CONVENTIONAL
. ליעפהל ידכ ץחל ןכמ רחאל , לע הציחל
)םולהי יוקינ( DIAMOND CLEAN
.8
גצויש ידכ לא תויצקנופה רותפכ תא בבוסל שי
.הגוצתב 'Diamond Clean'
ץילמת הגוצתה :היצקנופה תא ליעפהל ידכב
לע ץוחלל שי
DIAMOND CLEAN
יוקינה תואצות תלבק ךרוצל תוצוחנה תולועפה עוציב לע
ץוחלל ןכמ רחאלו ,תויחנהל םאתהב לועפל שי :רתויב תובוטה
ץוחלל שי ,שרדיתשכ ,םיבלשה לכ עוציב רחאל .םויסל לע
.יוקינה רוזחמ תא ליעפהל ידכ לע
יוקינה רוזחמ ךלהמב רונתה תלד תא חותפל אל ץלמומ :תורעה
תאצות לע הערל עיפשהל לולעש םימ ידא דוביאמ ענמיהל ידכ
.תיפוסה יוקינה
.רוזחמה םויס רחאל הגוצתב בהבהל ליחתת המיאתמ העדוה
םיחטשמה תא בגנל ןכמ רחאלו ,ררקתהל רונתל רשפאל שי
.גופסב וא תילטמב םיימינפה
MINUTEMINDER.9
ידכ .רמייטכ הגוצתב שמתשהל ןתינ ,יובכ רונתה רשאכ
רותפכ תא בבוסלו יובכ רונתהש אדוול שי ,וז היצקנופ ליעפהל
.הגוצתב בהבהי למסה :
ןונווכה
ןמזה ךשמ תא רידגהל ידכ
ןונווכה רותפכ
תא בבוסל שי
תא ליעפהל ידכ לע בוש ץוחלל ןכמ רחאלו ,שרדנה
.רמייטה
לש רוחאל הריפסה םויס תא ןייצת הגוצתהו ףוצפצ עמשוי
MINUTE-MINDER
.רמייטה
שי .לושיבה ירוזחממ דחא ףא ליעפמ אל רמייטה :תורעה
רדגומה ןמזה תא תונשל ידכ
ןונווכה רותפכ
ב שמתשהל
.רמייטב
ליעפהלו היצקנופ רוחבל םג ןתינ ,רמייטה תלעפה רחאל
,רונתה תא ליעפהל ידכ הריחבה רותפכ תא בבוסל שי .התוא
תלעפה רחאל .הצוחנה היצקנופה תא רוחבל ןכמ רחאלו
ילבמ דרפנב רוחאל הריפסה תא ךישמי רמייטה ,היצקנופה
..המצע היצקנופל עירפהל
קר( רמייטה תא תוארל ןתינ אל ,הז בלש ךלהמב :תורעה
ידכ .עקרב רוחאל הריפסה תא ךישמיש ,)גצוי
למסה
0-ל
הריחבה רותפכ
תא בבוסל שי ,רמייטה תגוצת תא ריזחהל
.עגרכ הליעפש היצקנופה תא רוצעל ידכ
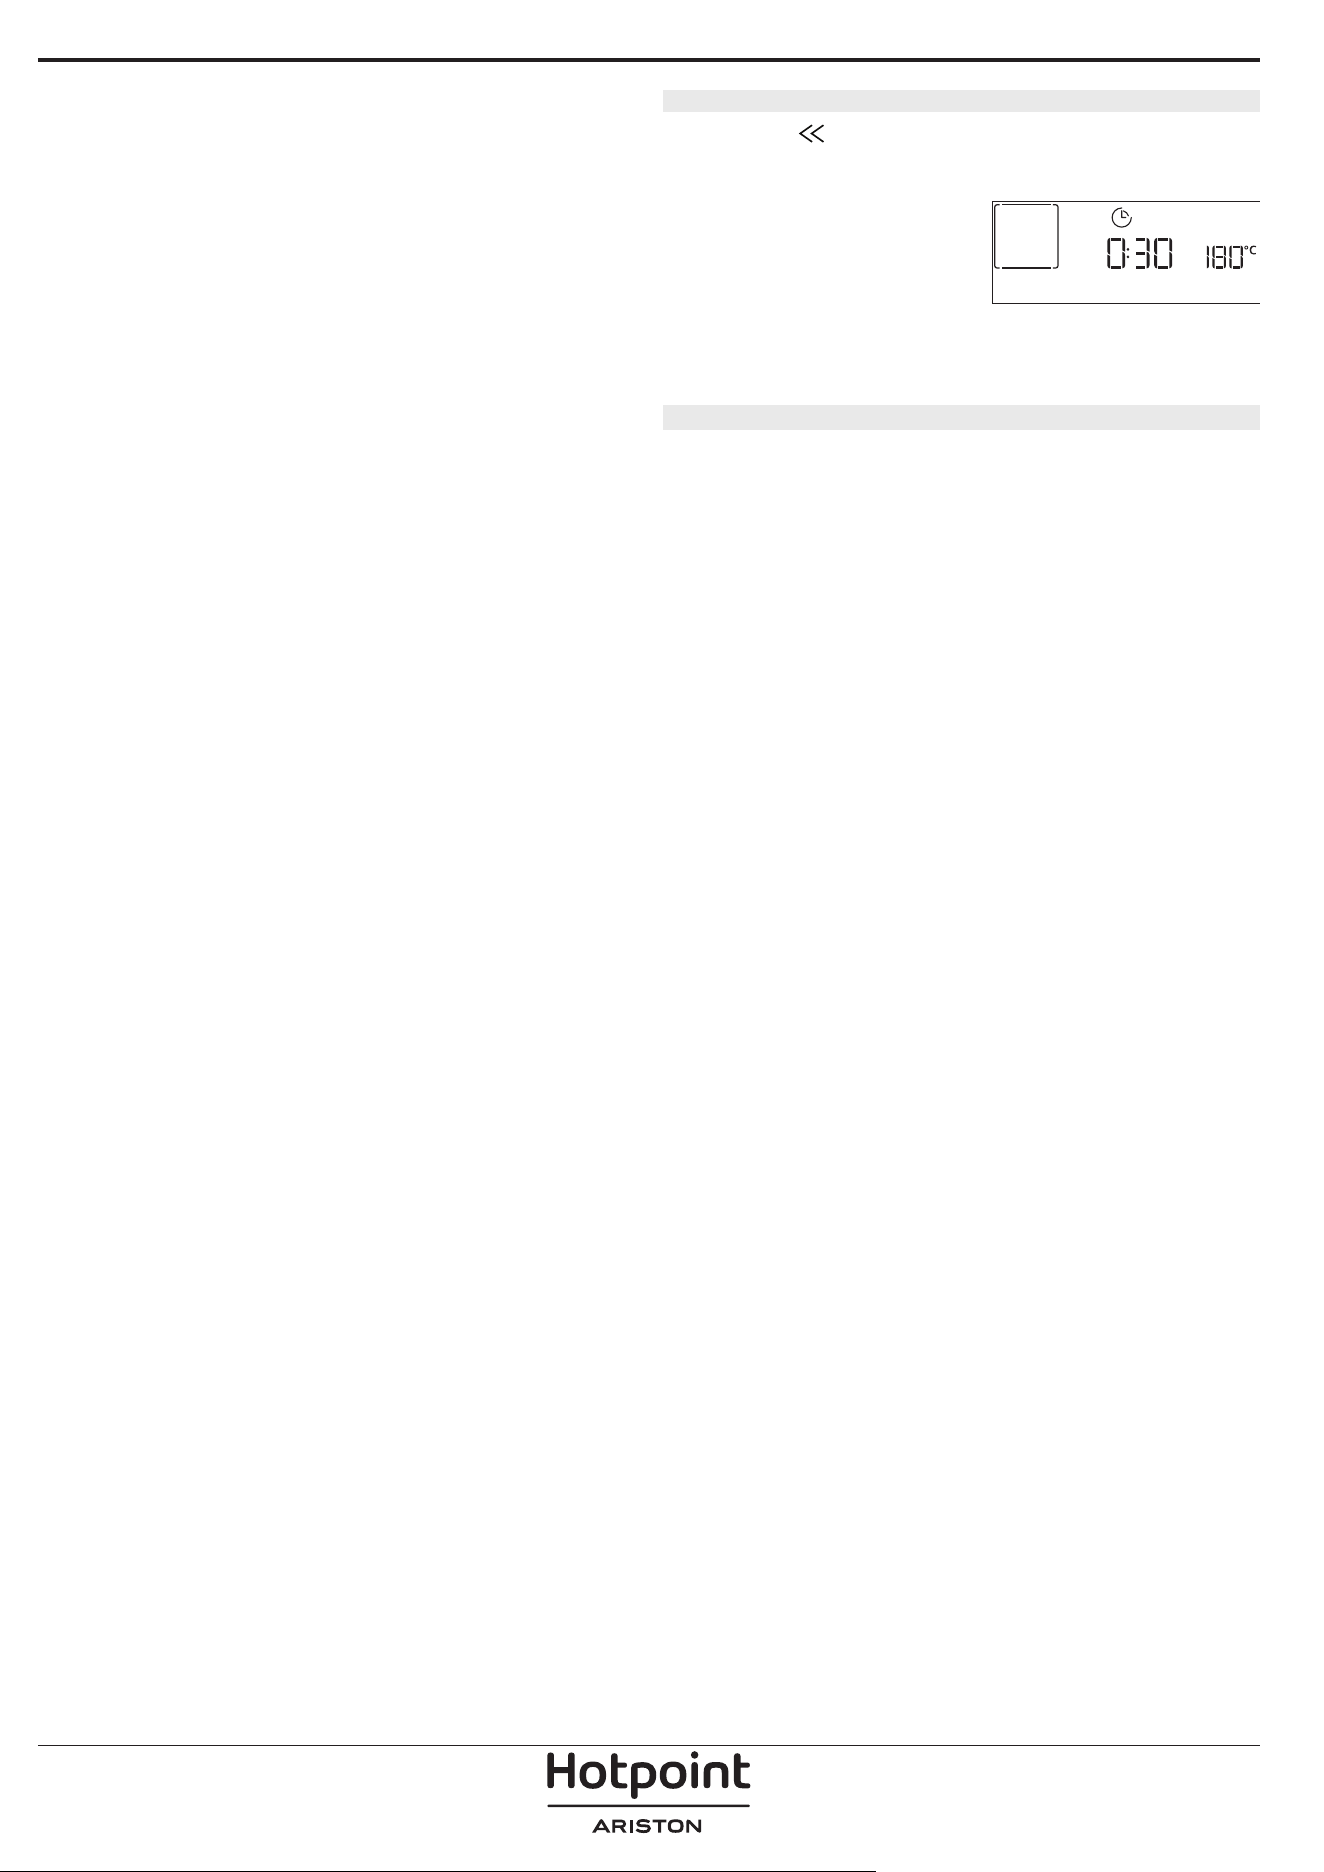
KEYLOCK.10
שמח ךשמל תא קזחהו ץחל ,םישקמה חול תא לוענל ידכ
חול תא ררחשל ידכ בוש תאז עצב .תוינש שמח תוחפל תוינש
.םישקמה
.לושיבה ךלהמב םג וז היצקנופ תיבשהל רשפא :בל םיש
KEYLOCK
בוביס ידי-לע תע לכב רונתה תא תובכל ןתינ ,תוחיטב תוביסמ
.0-ל
הריחבה רותפכ
תורעה
•.םוינימולא דידרב רונתה םינפ תא תוסכל ןיא
• תיתחת לע תוינבת וא םיריס רורגל ןיא םלועל
.ליימאה יופיצל קזנ םורגל לולע רבדה ןכש רונתה
•.תלדב קיזחת לאו תלדה לע םידבכ םילקשמ חינת לא
• הציפה רוזחמ לש רתוי ההובגה הרוטרפמטה לשב
.רתוי הובג טעמ רוריק ררוואמ שער תווחל יופצ אוה

תוישומיש תוצע
לושיבה תלבט תא אורקל דציכ
םיבוטה סלפמהו םירזיבאה ,היצקנופה תא הגיצמ הלבטה
לושיבה ינמז .םינוש ןוזמ יגוס לש לושיב רובע רתויב
םומיח ללוכ אל ,רונתב םשומ ןוזמה ובש עגרהמ םיליחתמ
םה םינמזהו לושיבה תורוטרפמט .)שרדנ רשאכ( שארמ
ןוזמה תומכל םאתהב תונתשהל םייושעו דבלב הכרעה
םדוק שמתשהל ץלמומ .םישמתשמ ובש רזיבאה גוסלו
לשובמ קיפסמ וניא ןוזמה םאו רתויב םיכומנה םיכרעב
םירזיבאב שמתשהל שי .רתוי םיהובגה םיכרעל רובעל
לושיבו הייפא תוינבתל תופידעב ,רונתה םע םיקפוסמה
םירזיבאו תוינבתב םג שמתשהל ןתינ .ההכ עבצב תויתכתמ
טעמ ויהי לושיבה ינמזש רוכזל שי לבא סרחמ וא סקרייפמ
.רתוי םיכורא
תינמז-וב ןוזמ לש םינוש םיגוס לושיב
תינמז-וב לשבל רשפא ,'ץלואמ ריווא' היצקנופב שומיש תעב
,המגודל( :הרוטרפמט התואל םיקוקזה םינוש ןוזמ יגוס
תא רונתהמ איצוהל שי .םינוש םיפדמ לע ,)תוקריו םיגד
ןוזמה תא ריאשהלו רתוי רצק לושיב ןמז שרודש ןוזמה
.רתוי ךורא לושיב ןמז בייחמה
MEAT
סקרייפ ילכ וא רונת תינבת לש גוס לכב שמתשהל ןתינ
םייולצ םיחתנ רובע .לשובמה רשבה חתנ לדוגל םיאתמה
ןמזב רשבה לע רזופיש תינבתה תיתחתל ריצ ףיסוהל ףידע
ורצוויי הז ךילהת ךלהמבש בל םיש .םעט תפסוהל לושיבה
10-15 ךשמל רונתב וריאשהל שי ,ןכומ ילצה רשאכ .םידא
.םוינימולא דידרב ותוא ףוטעל וא תוקד
דיחא יבוע ילעב םיחתנ רוחבל שי ,לירגב רשב לשבל ידכ
דואמ םיבע רשב יחתנ .תודיחא לושיב תואצות תלבקל
לש הפירש עונמל ידכ .רתוי םיכורא לושיב ינמז םישרוד
רומשלו תשרה ףדמ םוקימ תא ךימנהל שי ,ץוחבמ רשבה
תא ךופהל שי .לירגהמ ןוזמה לש רתוי לודג קחרמ לע
ןכש בל םיש .לושיבה ןמזמ שילש ינש רחאל רשבה
.רונתהמ םידא ואציי תלדה תחיתפב
תינבת חינהל םיצילממ ונא ,לושיבה יצימ תא ףוסאל ידכ
ףדמל תחתמ תורישי םימ רטיל יצח הכותבו םיפוטפט
.ךרוצה תדימב אלמל שי .ןוזמה חנומ וילעש תשרה
םיחוניק
ףדמ לע הליגרה היצקנופה תועצמאב םינידע םיחוניק לשב
.דבלב דחא
חינהל דימתו הייפאל תוהכ תכתמ תוינבתב שמתשהל שי
,דחא ףדממ רתוי לע לשבל ידכ .םייקה תשרה ףדמ לע ןתוא
תוינבת םוקימ תא גרדו ץלואמה ריוואה תייצקנופ תא רחב
.םחה ריוואה תעונתל עייסל תנמ-לע םיפדמה לע תוגועה
ךותל ץע םסיק סנכה ,הנכומ תחפתומ הגוע םא קודבל ידכ
.הנכומ הגועה ,יקנ אצוי םסיקה םא .הגועה זכרמ
ןיא ,הקבדה תוענומה הייפא תוינבתב שומיש השענ םא
ןפואב חופתל אל הגועל םורגי רבדה ןכש תווצקה תא ןמשל
.תווצקב דיחא
שמתשהל שי ,הייפאה ךלהמב "חפות" טירפה םא
לש םוצמצ לוקשלו האבה םעפב רתוי הכומנ הרוטרפמטב
.הלש ןידע רתוי בוברע וא תבורעתב םילזונה תומכ
ןוגכ( החל הנוילע הבכש וא חל יולימ ילעב םיחוניק רובע
היצקנופב שמתשהל שי ,)תוריפ טראט וא הניבג תגוע
שמתשהל שי ,םימ גופס הגועה סיסב םא .הליגר היפא'
ינפל הגועה תיתחתב תויגוע ירוריפ רזפלו רתוי ךומנ ףדמב
.יולימה תפסוה
)החיפת( RISING
.רונתב ותחנה ינפל החל תילטמב קצבה תא תוסכל ץלמומ
החיפת תמועל ישילשכב םצמטצמ וז היצקנופב החיפתה ןמז
הציפ רובע החיפתה ןמז .)20-25°C( רדחה תרוטרפמטב
.קצב ג"ק רובע העשכב ליחתמ
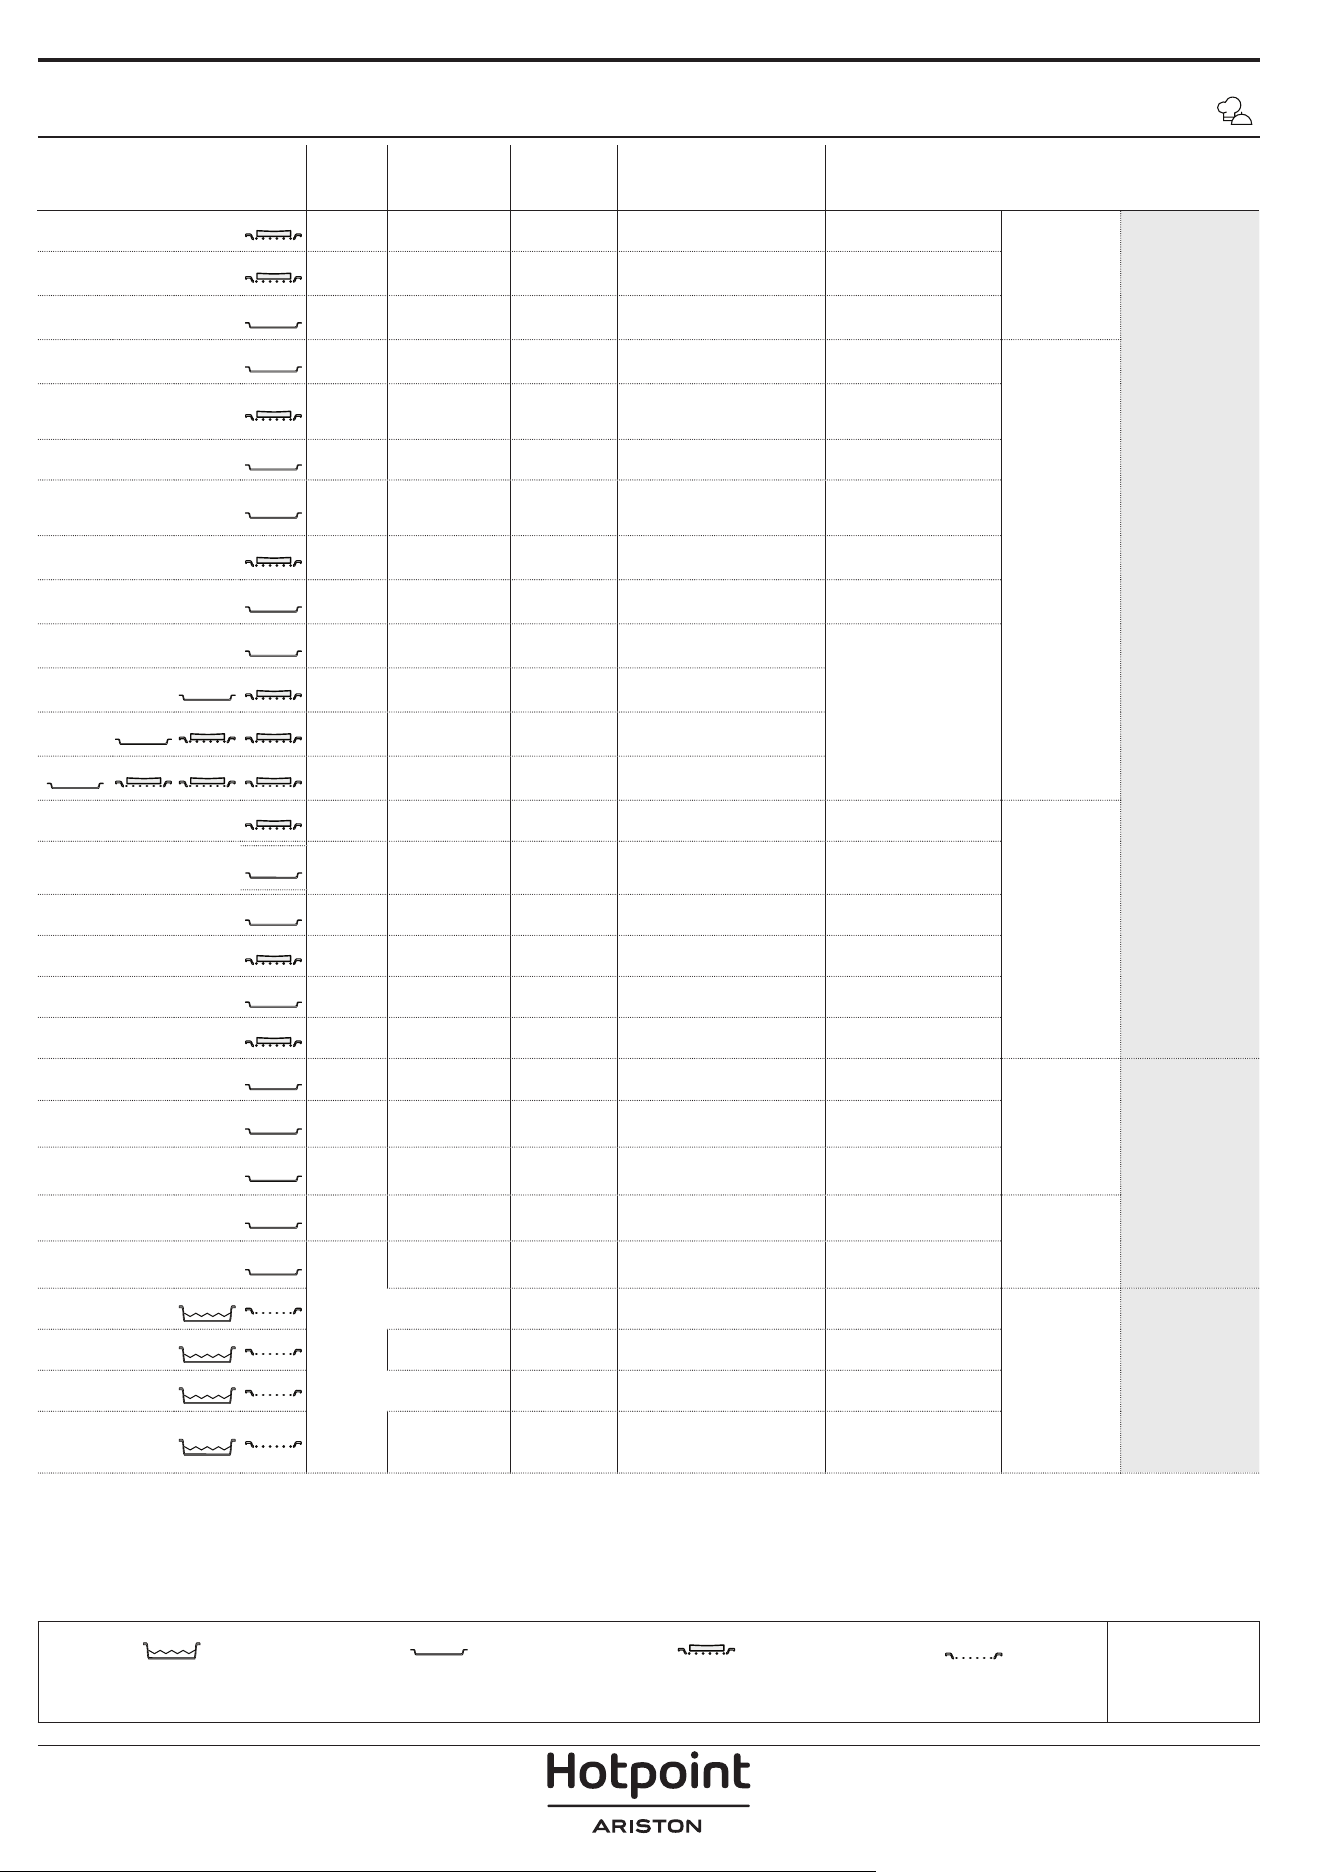
ילש טירפתה לש לושיבה תלבט
ןוזמ תוירוגטקתומכ
תמר
עוציב
המחשה תמר
הכיפה
ןמזמ(
)לושיבה
םירזיבאו סלפמ
יופא
תוירקיע תונמ
הינזלג"ק 0.5 – 3—
0
)1+ ;0 ;1-(
—
2
םיחולמ םיפאמג"ק 0.8 – 1.2—
0
")1+ ;0 ;1-(
—
2
םיאלוממ תוקרי]דחא לכ[ ג"ק 0.1 – 0.5———
3
םחלו הציפ
תוינמחל]דחא לכ[ םרג 60 – 150———
3
ךירכל רכיכ
םרג 400 – 600
]תחא לכ[
———
2
לודג םחל ג"ק 0.7 – 2.0———
2
)טגב( Baguettes
םרג 200 – 300
]דחא לכ[
———
3
Round Pizzaלוגע
2
הבע הציפשגמ———
2
]האופק[ הציפ
*1 הבכיש———
2
*תובכש 2
4
1
*תובכש 3
5
31
*תובכש 4
5
421
הקותמ הייפא
גופס תגועג"ק 0.5 – 1.2———
2
תויגועג"ק 0.2 – 0.6———
3
תוינזחפ קצב*דחא שגמ———
3
)טראט( Tartג"ק 0.4 – 1.6———
2
)לדורטש( Strudelג"ק 0.4 – 1.6———
3
תוריפ יאפג"ק 0.5 – 2———
2
םייולצ
MEAT
רקב ילצג"ק 0.6 – 2
0
)1+ ;0 ;1-(
0
)1+ ;0 ;1-(
—
3
ריזח ילצג"ק 0.6 – 2.5—
0
)1+ ;0 ;1-(
—
3
יולצ ףועג"ק 0.6 – 3—
0
)1+ ;0 ;1-(
—
2
תופסות
םייולצ תודריג"ק 0.5 – 1.5—
0
)1+ ;0 ;1-(
—
3
םייולצ המדא יחופתג"ק 0.5 – 1.5—
0
)1+ ;0 ;1-(
—
3
לירגMEAT
רגרובמהמ"ס 1.5 – 3
0
)1+ ;0(
—3/5
5
4
תויקינקנמ"ס 1.5 – 4.5——2/3
5
4
םיבבקתחא תשר——1/2
5
4
Fillet & breast
)הזחו הליפ(
מ"ס 1 – 5——
2/3
5
4
תעצומ תומכ *
םירזיבא
תשר ףדמ
הציפ שגמ / תוגוע שגמ / רונת שגמ
ףדמ לע לוגע
הייפא שגמ/םיפוטפט שגמםימ ל"מ 500 םע םיפוטפט שגמ
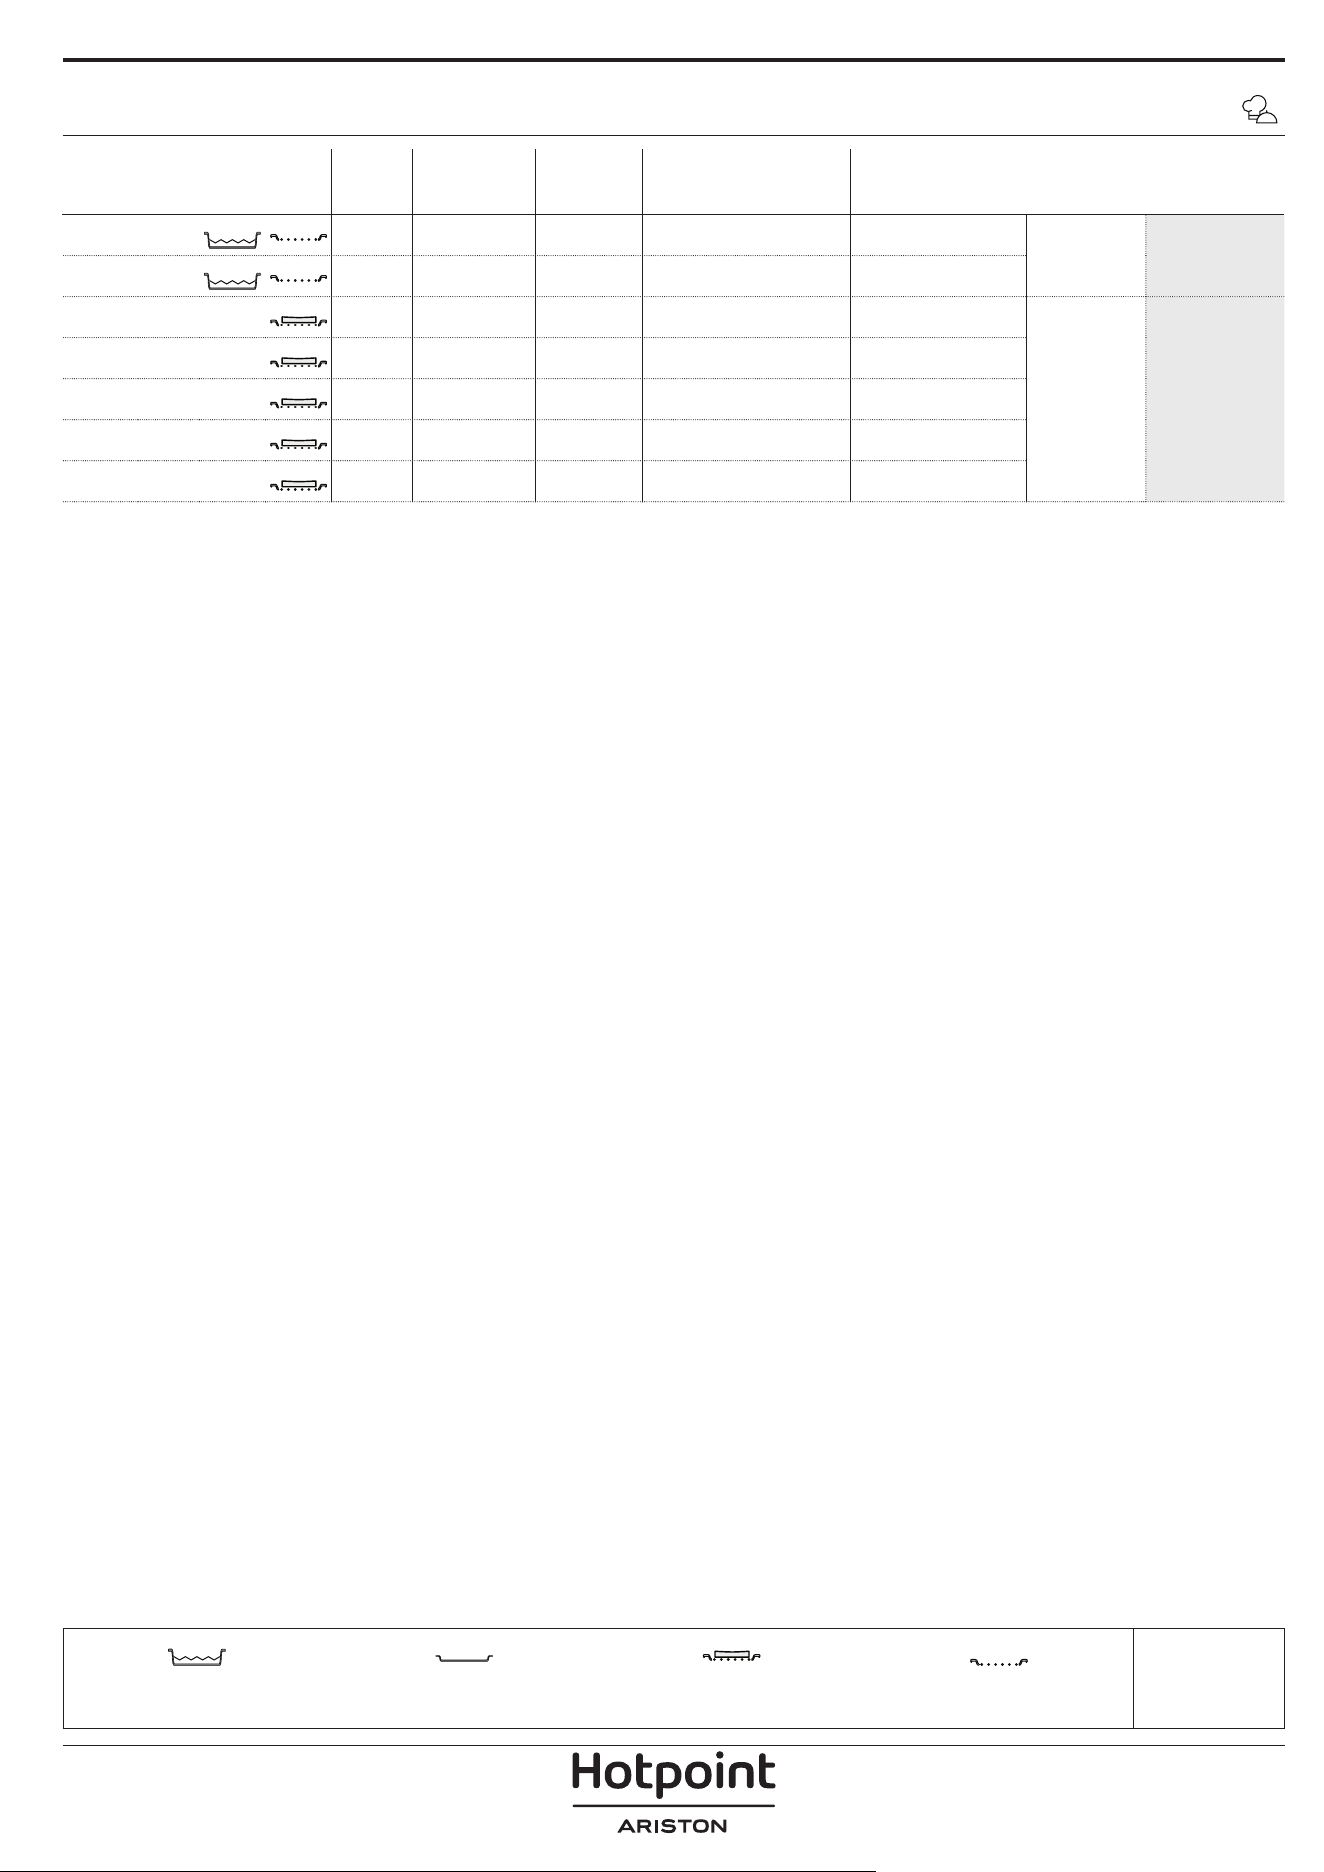
ןוזמ תוירוגטקתומכ
תמר
עוציב
המחשה תמר
הכיפה
ןמזמ(
)לושיבה
םירזיבאו סלפמ
לירג
תוריפו םיגד
םי
)הליפ( Filletsמ"ס 0.5 – 3———
3
2
]אופק[ הליפמ"ס 0.5 – 3———
3
2
לירגתופסות
תוינבגע ןטרגדחא שגמ———
3
םיפלפ ןטרגדחא שגמ———
3
ילוקורב ןטרגדחא שגמ———
3
תיבורכ ןטרגדחא שגמ———
3
תוקרי ןטרגדחא שגמ———
3
ילש טירפתה לש לושיבה תלבט
תעצומ תומכ *
םירזיבא
תשר ףדמ
הציפ שגמ / תוגוע שגמ / רונת שגמ
ףדמ לע לוגע
הייפא שגמ/םיפוטפט שגמםימ ל"מ 500 םע םיפוטפט שגמ
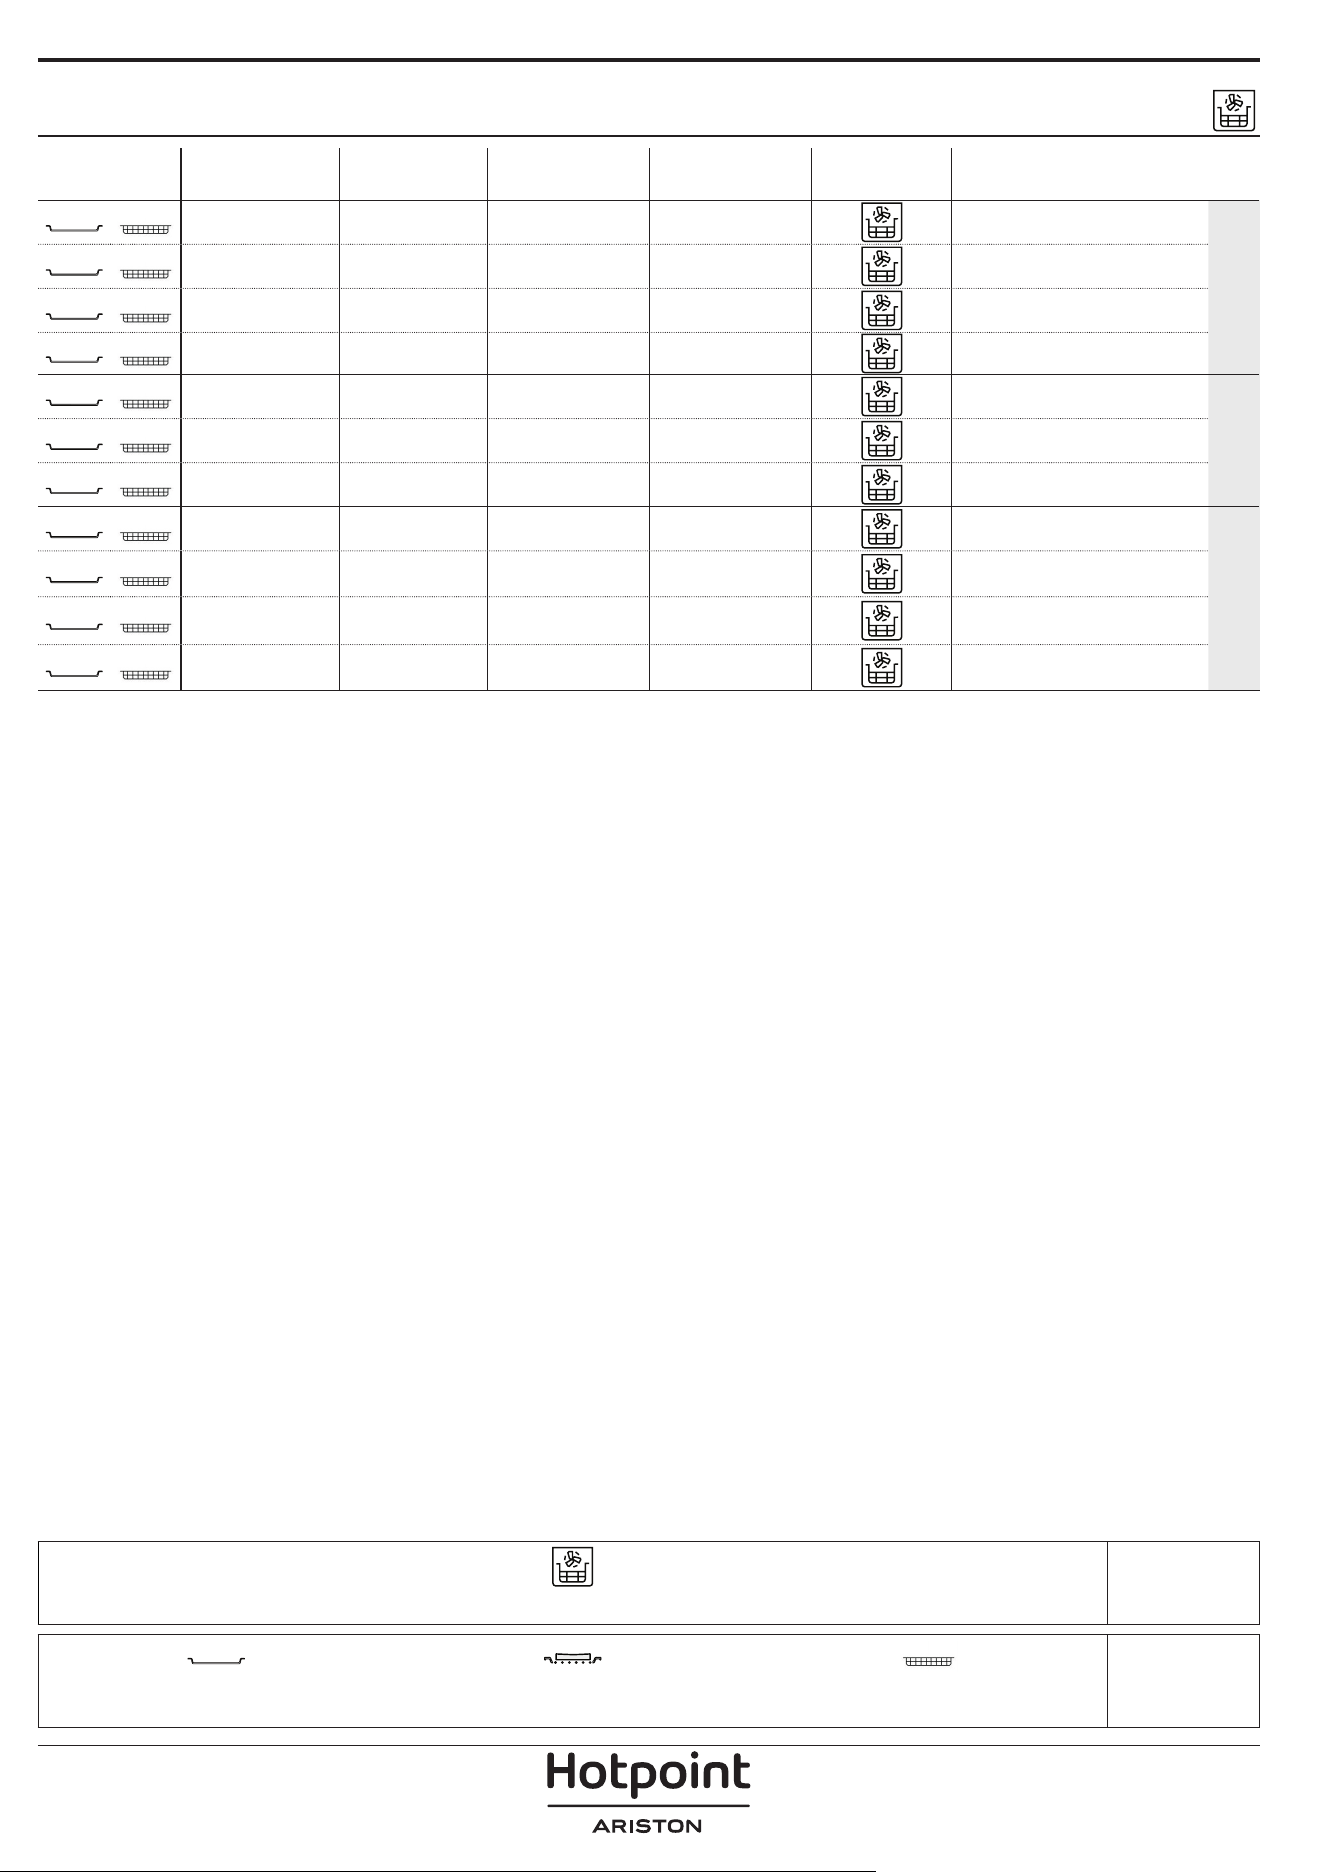
םירזיבא
)AIR FRY( יירפ רייא שגמתשר ףדמ לע הגועל תכתמ תינבת וא רונתל שגמ
וא הייפא שגמ/םיפוטפט שגמ
תשר ףדמ לע רונת שגמ
יירפ רייא לש לושיבה תלבט
ןוכתמהיצקנופ
תעצומ תומכשארמ םומיח)°C ( הרוטרפמט
DURATION
).'קד(
םירזיבאו ףדמ
FROZEN FOOD
)אופק ןוזמ(
םיאופק )ספי'צ( םינגוט'ג 650 – 850ןכ20025 – 30
4
2
םיאופק ףוע יסיגנ'ג 500ןכ20015 – 20
4
2
םיגד תועבצא'ג 500ןכ22015 – 20
4
2
לצב תועבט'ג 500ןכ20015 – 20
4
2
תוקרי
םיירט םיפוצמ יניקוז
'ג 400ןכ20015 – 20
4
2
םייתיב םינגוט'ג 300 – 800ןכ20020 – 40
4
2
תוקרי תבורעת'ג 300 – 800ןכ20020 – 30
4
2
םיגדו רשב
ףוע תוזחמ"ס 1 – 4ןכ200 20 – 40
4
2
ףוע יפנכ'ג 200 – 1500ןכ220 30 – 50
4
2
הפוצמ טלטוקמ"ס 1 – 4ןכ220 20 – 50
4
2
גד הליפמ"ס 1 – 4ןכ22015 – 25
4
2
.ןוזמה ינפ לע ןמש לש הקד הבכש םיחרומ ,תיב תרצות וא ירט ןוזמ לושיבל
.ץלמומה לושיבה ןמז עצמאב ןוזמ בברעל שי ,תודיחא לושיב תואצות חיטבהל תנמ לע
תויצקנופ
)יירפ רייא( Air Fry
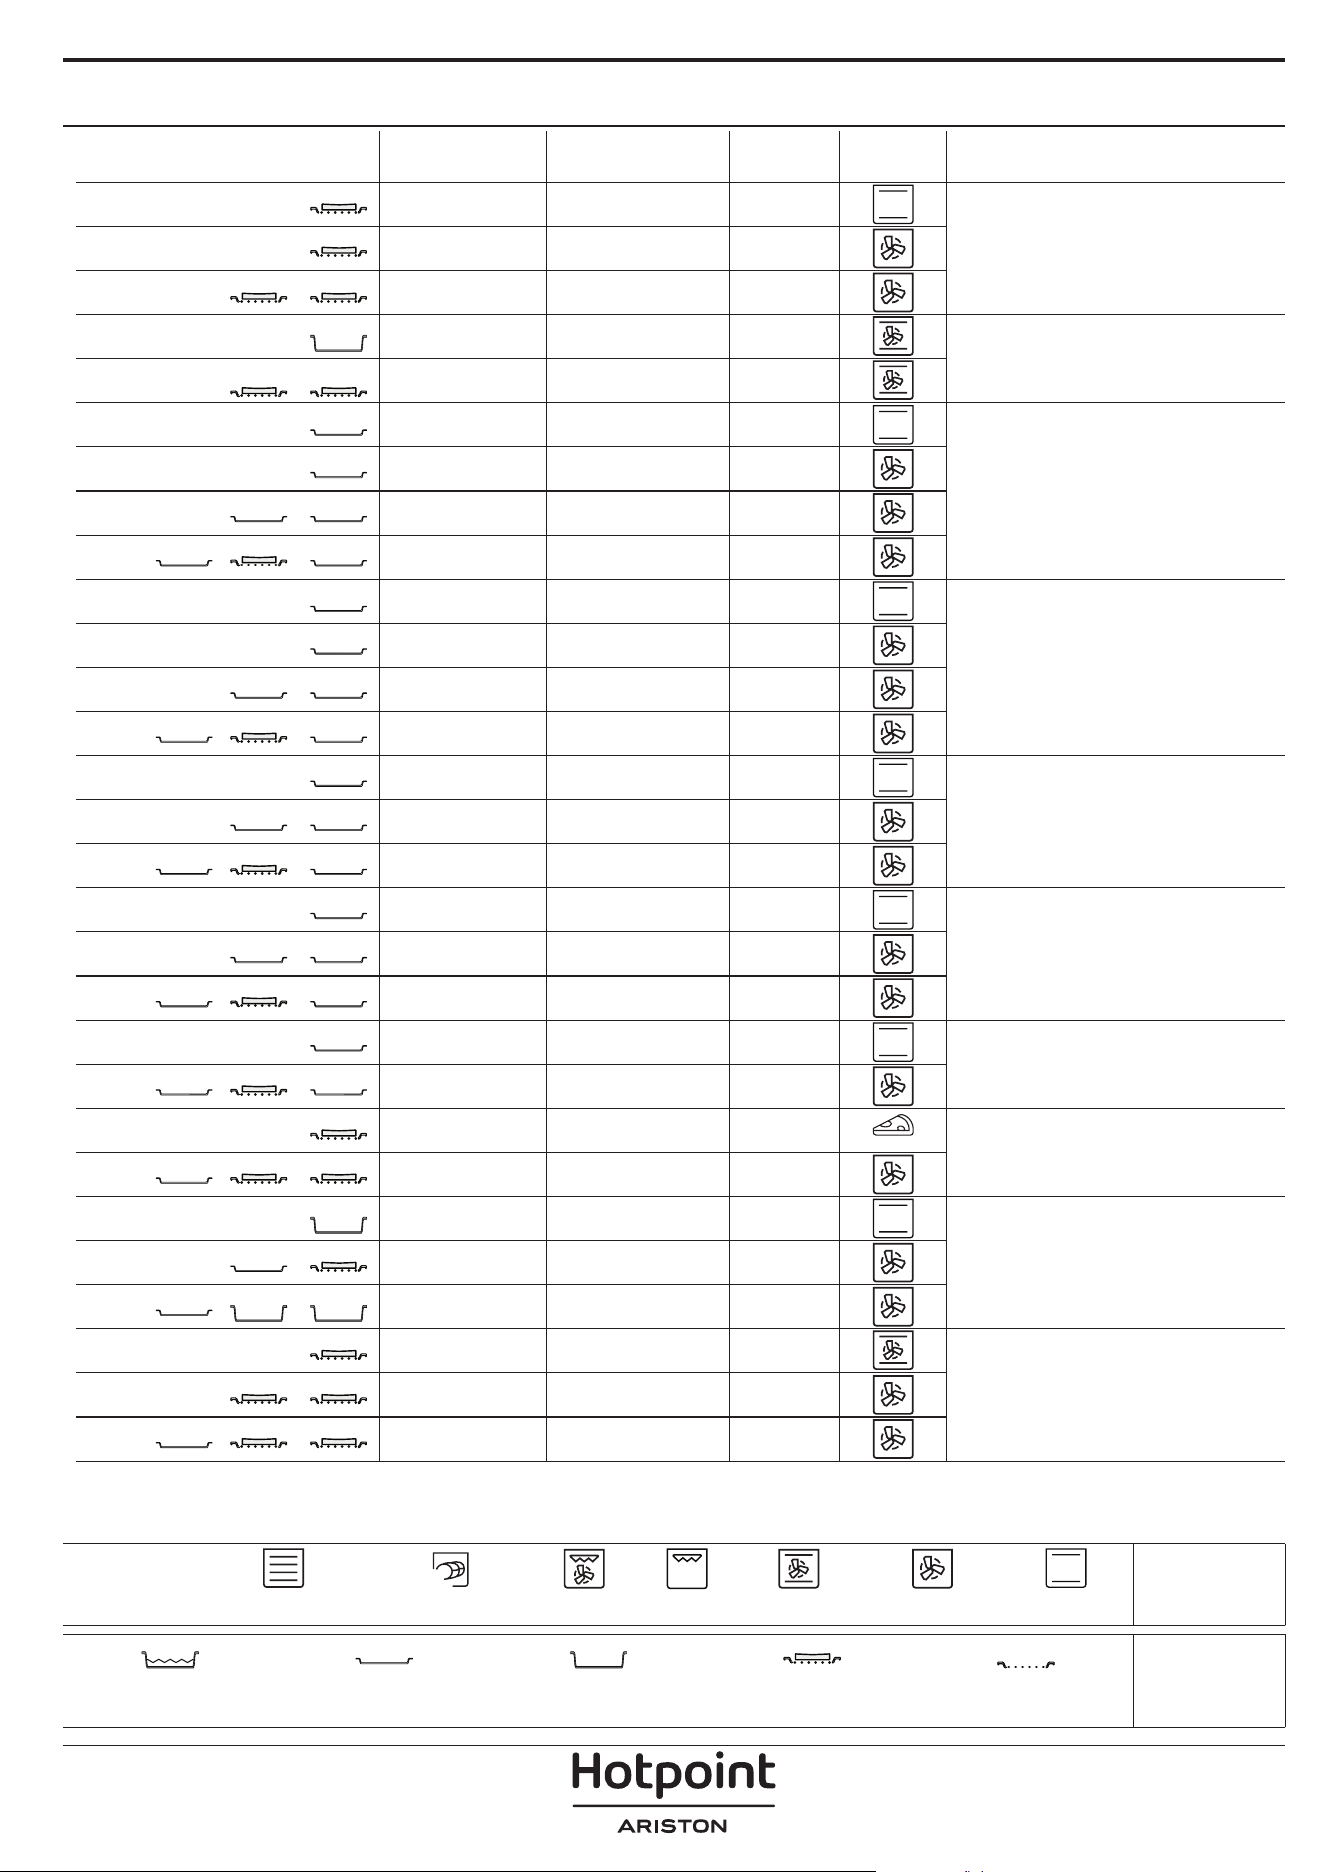
לושיב תלבט
ןוכתמהיצקנופשארמ םומיח)°C ( הרוטרפמט)'קד( ךשמםירזיבאו ףדמ
גופס תוגוע/תוחפתומ תוגוע
ןכ17030 – 50
2
ןכ16030 – 50
2
ןכ16030 – 50
4
1
תואלוממ תויגוע
)םיחופת יאפ ,לדורטש ,הניבג תגוע(
ןכ160 – 20030 – 85
3
ןכ160 – 20030 – 90
4
1
תויגוע
ןכ15020 – 40
3
ןכ14030 – 50
4
ןכ14030 – 50
4
1
ןכ13540 – 60
5
31
םיניפאמ/תונטק תוגוע
ןכ17020 – 40
3
ןכ15030 – 50
4
ןכ15030 – 50
4
1
ןכ15040 – 60
5
31
תוינזחפ
ןכ180 – 20030 – 40
3
ןכ180 – 19035 – 45
4
1
ןכ180 – 19035 – 45 *
5
31
גנרמ
ןכ90110 – 150
3
ןכ90130 – 150
4
1
ןכ90140 – 160 *
5
31
ה'צאקופ/םחל/הציפ
ןכ190 – 25015 – 50
2
ןכ190 – 23020 – 50
5
31
)ה'צאקופ ,הבע ,הקד( הציפ
ןכ3107 – 12
2
ןכ220 – 24025 – 50 *
5
31
האופק הציפ
ןכ25010 – 15
3
ןכ25010 – 20
4
1
ןכ220 – 24015 – 30
5
31
םיחולמ םייאפ
)שיק ,תוקרי יאפ(
ןכ180 – 19045 – 55
3
ןכ180 – 19045 – 60
4
1
ןכ180 – 19045 – 70 *
5
31
תויצקנופ
XL
ECO
הליגרץלואמ ריוואהיצקוונוקב הייפאלירגוברוט לירגMaxiCookingהבורמ המירז טירפתןוכסיח רוזחמ
םירזיבא
תשר ףדמ
תכתמ תינבת וא רונתל שגמ
תשר ףדמ לע הגועל
וא הייפא שגמ/םיפוטפט שגמ
תשר ףדמ לע רונת שגמ
הייפא שגמ/םיפוטפט שגמ
ל"מ 500 םע םיפוטפט שגמ
םימ
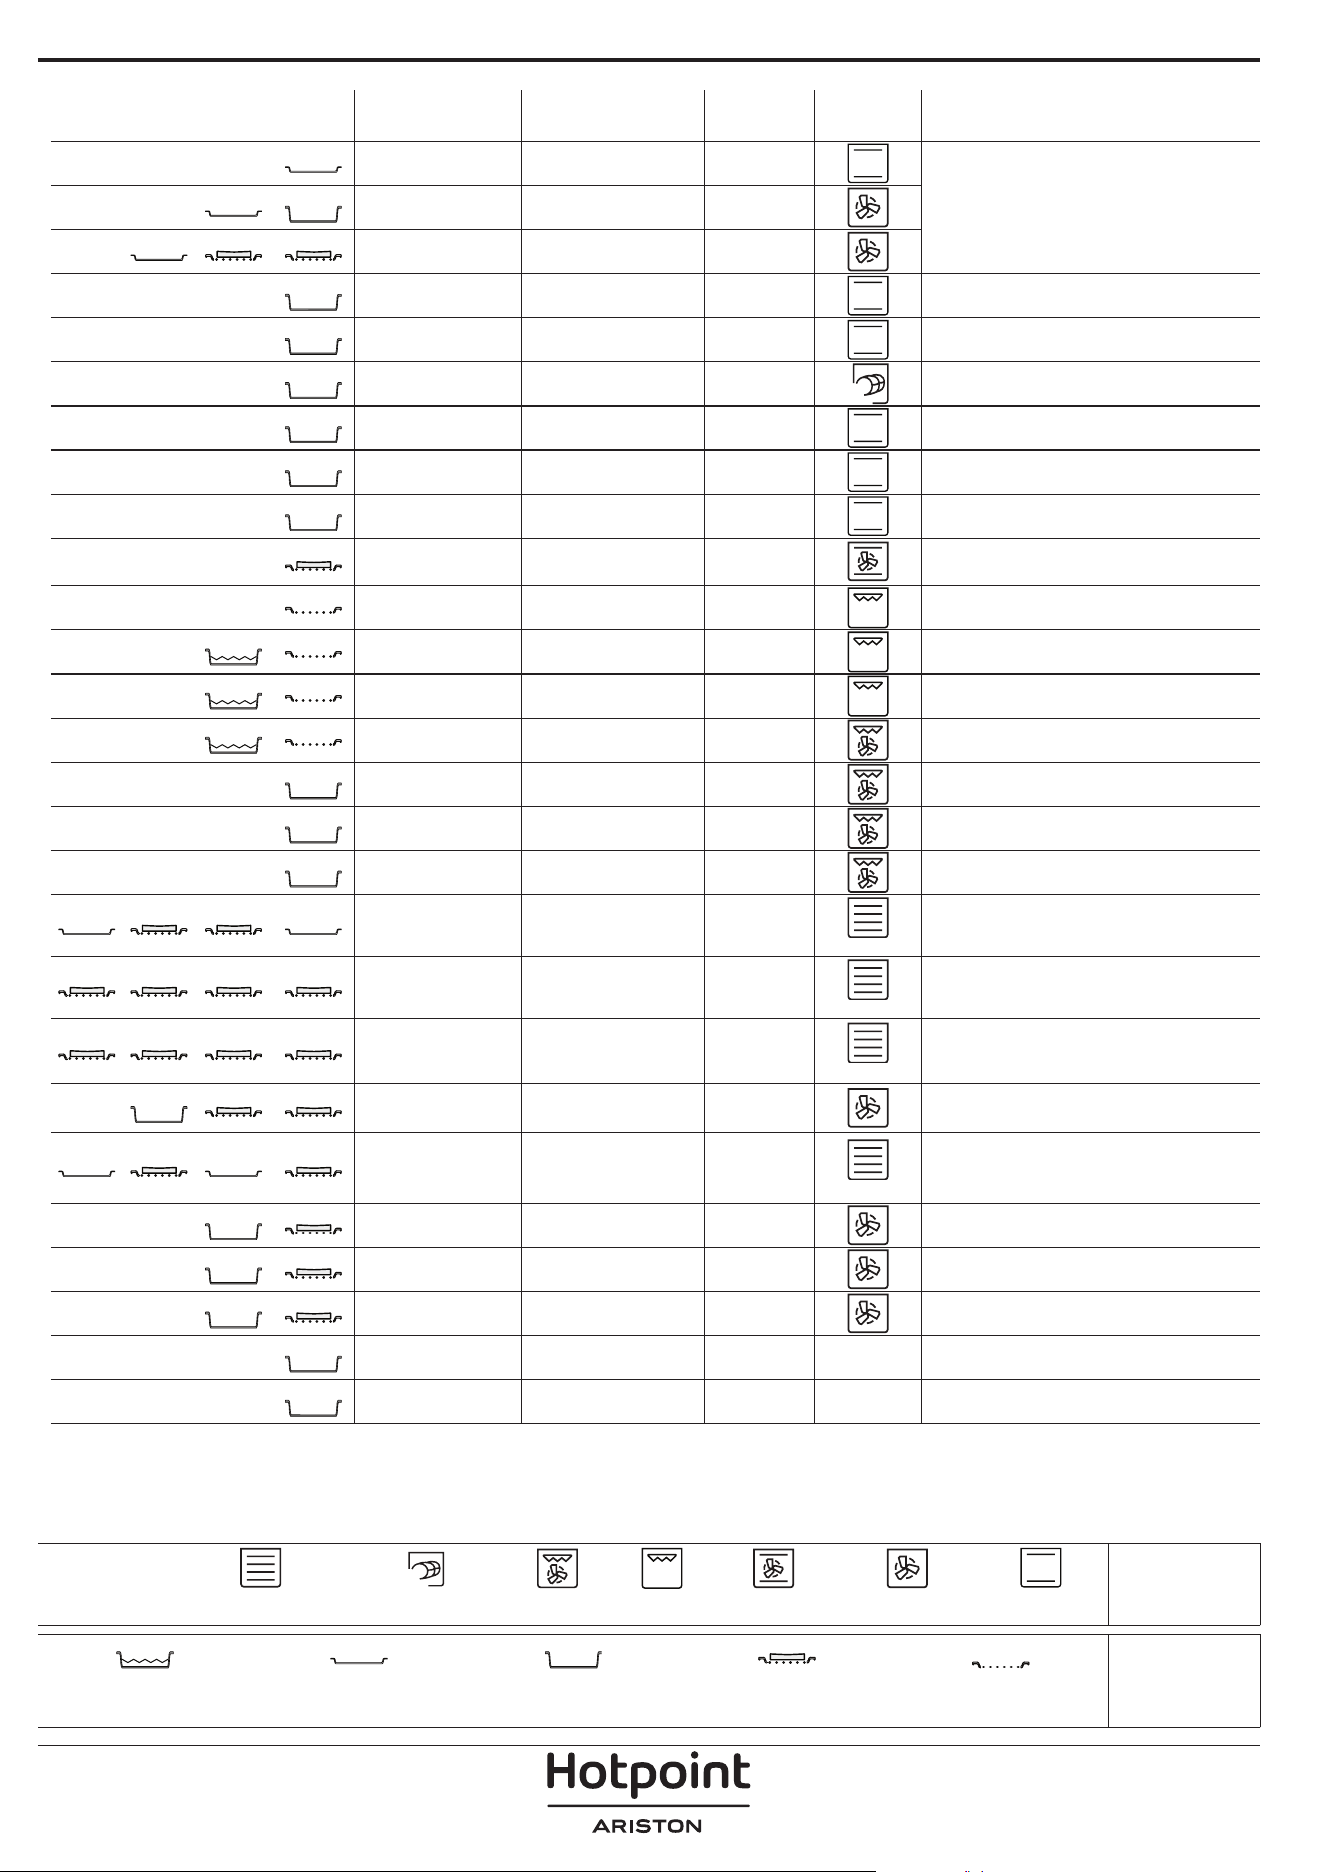
ןוכתמהיצקנופשארמ םומיח)°C ( הרוטרפמט)'קד( ךשמםירזיבאו ףדמ
םילע קצב יפאמ
ןכ190 – 20020 – 30
3
ןכ180 – 19020 – 40
4
1
ןכ180 – 19020 – 40 *
5
31
ינולנק/היופא הטספ /ןאלפ /הינזלןכ190 – 20045 – 65
3
ג"ק – 1 ריזח/רקב/לגע/הלטןכ190 – 20080 – 110
3
ג"ק 2 יולצ ריזח חתנ
XL
—170110 – 150
2
ג"ק 1 זוורב/תבנרא/ףועןכ200 – 23050 – 100
3
ג"ק 3 זווא/ודוהןכ190 – 20080 – 130
2
)םלש וא הליפ( הדואמ /יופא גדןכ180 – 20040 – 60
3
םיאלוממ תוקרי
)םיליצח ,םיאושיק ,תוינבגע(
ןכ180 – 20050 – 60
2
טסוט—)הובג( 33 – 6
5
גד קייטס/הליפ—)יעצמא( 220 – 30 **
4
3
םירגרובמה/תועלצ/םיבאבק/תויקינקנ—)הובג – ינוניב( 2 – 315 – 30 **
5
4
ג"ק 1-1.3 יולצ ףוע—)יעצמא( 255 – 70 ***
2
1
הלט לגר/קוש—)יעצמא( 260 – 90 ***
3
םייולצ המדא יחופת—)יעצמא( 235 – 55 ***
3
תוקרי ןטרג—)הובג( 310 – 25
3
תויגוע
תויגוע
ןכ13550 – 70
5
431
Tarts
Tarts
ןכ17050 – 70
5
321
תולוגע תוציפ
הציפ
ןכ21040 – 60
5
321
/ )5 סלפמ( תוריפ טראט :המלש החורא
)1 סלפמ( רשב / )3 סלפמ( הינזל
ןכ19040 – 120 *
5
31
/ )5 סלפמ( תוריפ טראט :המלש החורא
/ )2 סלפמ( הינזל / )4 סלפמ( םייולצ תוקרי
)1 סלפמ( רשב יחתנ
Menu
ןכ19040 – 120 *
5
421
רשבו הינזלןכ20050 – 100 *
4
1
המדא יחופתו רשבןכ20045 – 100 *
4
1
תוקריו םיגדןכ18030 – 50 *
4
1
היילצל םיאלוממ םיחתנ
ECO
—20080 – 120 *
3
)הלט ,ףוע ,תבנרא( רשב יחתנ
ECO
—20050 – 100 *
3
תויצקנופ
XL
ECO
הליגרץלואמ ריוואהיצקוונוקב הייפאלירגוברוט לירגMaxiCookingהבורמ המירז טירפתןוכסיח רוזחמ
םירזיבא
תשר ףדמ
תכתמ תינבת וא רונתל שגמ
תשר ףדמ לע הגועל
וא הייפא שגמ/םיפוטפט שגמ
תשר ףדמ לע רונת שגמ
הייפא שגמ/םיפוטפט שגמ
ל"מ 500 םע םיפוטפט שגמ
םימ
.תישיאה היישעה תדימל םאתהב םינוש םינמזב רונתהמ ןוזמ איצוהל ןתינ :רעושמ ןמז ךשמ *
.לושיבה עצמאב ןוזמה תא בבוסל שי **
.)ךרוצה תדימב( לושיבה ןמזמ שילש ינש ירחא ןוזמה תא ךופהל ץלמומ ***

םיינוציח םיחטשמ
• םא .החל רבייפורקימ תילטמב םיחטשמה תא תוקנל שי
םע יוקינ רמוח לש תופיט רפסמ ףסוה ,דואמ םיכלכולמ םה
.השבי תילטמב יוקינה תא םייסל שי .תילרטינ תויצמוח תמר
• דחא םא .םיקחוש וא םילכאמ יוקינ ירמוחב שמתשהל ןיא
רישכמה לש םיחטשמה םע עגמב אב הלאה םירצומהמ
.החל רבייפורקימ תילטמב דימ תוקנל שי ,תועטב
םיימינפ םיחטשמ
• .ותוא תוקנלו ררקתהל רונתל חינהל שי שומיש לכ ירחא
תא ריסהל ידכ םח טעמ ןיידע אוהשכ תאז תושעל ףידע
ידכ .ןוזמה תויראש ידי לע ורצונש םימתכה וא םיעקשמה
שי ,םימ ליכמה ןוזמ לושיבמ האצותכ ובעתהש םימ שבייל
.גופס וא תילטמ םע םתוא בגנלו ירמגל ררקתהל רונתל חינהל
• לש ילמיטפוא יוקינל 'םולהי יוקינ' היצקנופה תא ליעפהל שי
.)םימגדהמ קלחב קר( .םיימינפה םיחטשמה
•.םיאתמ ילזונ ןובס תועצמאב תלדה תיכוכז תא תוקנל שי
•.יוקינה לע לקהל ידכ רונתה תלד תא ריסהל ןתינ
םירזיבא
רחאל ןובסו םימ לש הסימתב םירזיבאה תא תורשהל שי
ריסהל ןתינ .םימח ןיידע םה םא תופפכב םקיזחהלו שומישה
.גופס וא תשרבמ תועצמאב ןוזמ יעקשמ
)םייק םא( רשב שושג תא וא ןוזמה שושג תא תוקנל ןיא
)םייק םא( יירפ רייא שגמ תא תוקנל ןתינ .םילכה חידמב
.םילכ חידמב
עוציב ינפל ררקתה רונתהש אדוול שי
.יוקינ וא הקוזחת תולועפ
.רוטיק יקנמב שמתשהל ןיא
םיפצרקמ ,הדלפ רמצב שמתשהל ןיא
/םיקחוש יוקינ ירמוח וא םיקחוש
קזנ םורגל םילולע םה ןכש ,םילכאמ
.רישכמה יחטשמל
.ןגמ תופפכב שמתשהל שי
למשחה רוקממ רונתה תא קתנל שי
.ןהשלכ הקוזחת תודובע עוציב ינפל
הקוזחתו יוקינ
לושיבה תלבט תא אורקל דציכ
.םינוש ןוזמ יגוס לש לושיב רובע רתויב םיבוטה סלפמהו םירזיבאה ,היצקנופה תא הגיצמ הלבטה
.)שרדנ רשאכ( שארמ םומיח ללוכ אל ,רונתב םשומ ןוזמה ובש עגרהמ םיליחתמ לושיבה ינמז
.םישמתשמ ובש רזיבאה גוסלו ןוזמה תומכל םאתהב תונתשהל םייושעו דבלב הכרעה םה םינמזהו לושיבה תורוטרפמט
.רתוי םיהובגה םיכרעל רובעל לשובמ קיפסמ וניא ןוזמה םאו רתויב םיכומנה םיכרעב םדוק שמתשהל ץלמומ
םג שמתשהל ןתינ .ההכ עבצב תויתכתמ לושיבו הייפא תוינבתל תופידעב ,רונתה םע םיקפוסמה םירזיבאב שמתשהל שי
.רתוי םיכורא טעמ ויהי לושיבה ינמזש רוכזל שי לבא סרחמ וא סקרייפמ םירזיבאו תוינבתב
הרונה תפלחה
.הריכמה רחאל תורישל הנפ ,הרונמה תפלחהל
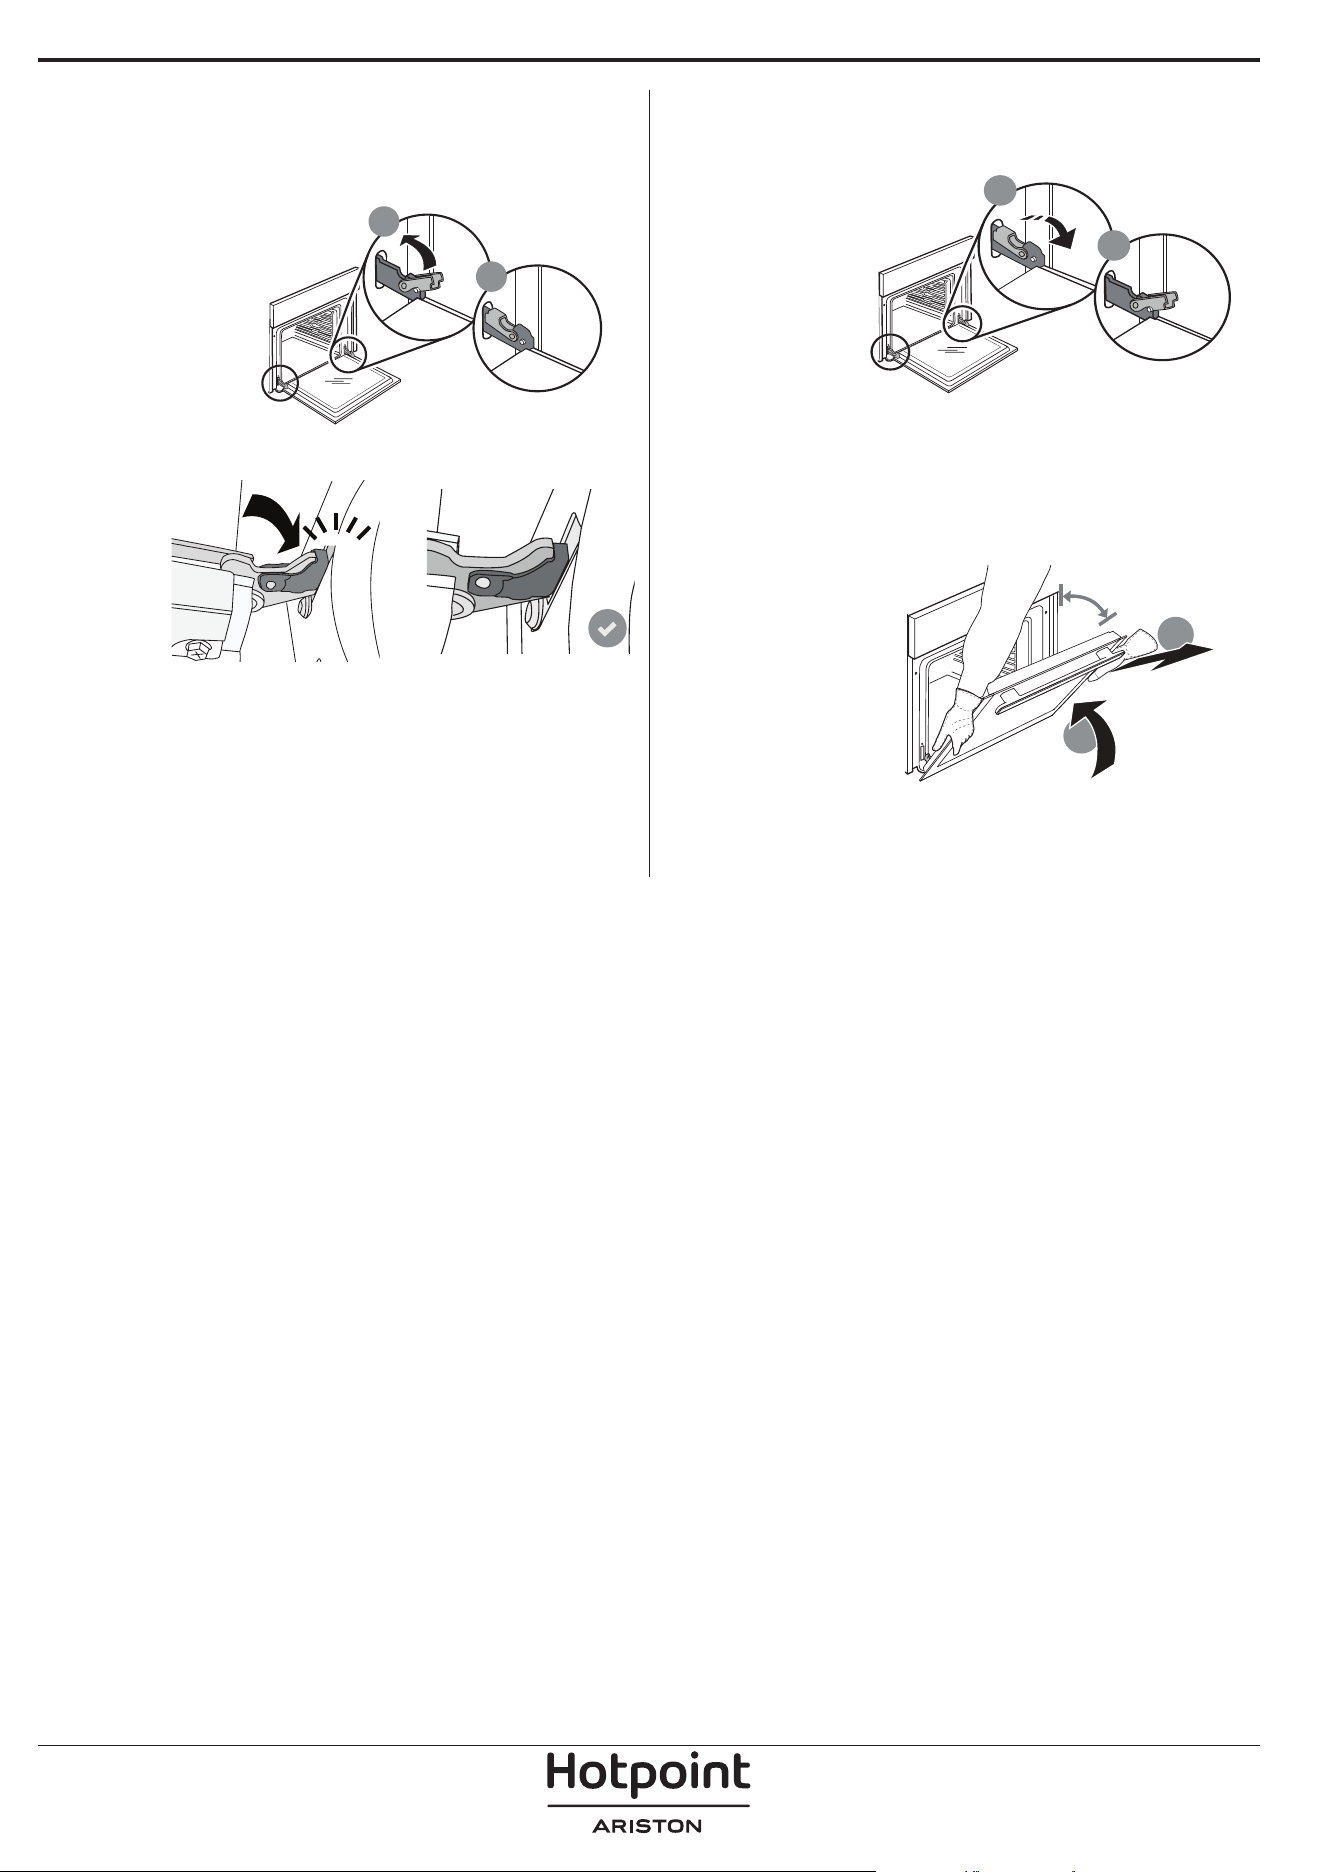
שדחמ הרוביחו תלדה תרסה
תא ךמנהו ףוסה דע התוא חתפ ,תלדה תא ריסהל ידכ .1
.ררחושמ בצמב ויהי םהש דע םיספתה
.ןתינש המכ דע תלדה תא רוגס
.2
b
a
התוא קיזחהל ןיא – םיידיה יתשב תלדה תא בוט קזחה
.תידיהמ
איהש דע הלעמ יפלכ הכישמ ידכ ךות תלדה תריגסב ךשמה
ןעשנ הלש דחא דצשכ תלדה תא חנה .תבשותהמ ררחתשת
.ךר חטשמ לע
הלש םיווה תא רשייל שי הרזחב תלדה תא רבחל ידכ
.3
a
b
~15°
סנכנ ןוילעה קלחהש אדוולו רונתבש תבשותבש םיריצה לומ
.תבשותל בטיה
.ףוסה דע התוא חותפלו תלדה תא דירוהל שי
.4
הכמנה אדוו :ירוקמה םמוקימל הרזחב םיספתה תא דרוה
.ףוסה דע
.ןוכנה םוקמב םיספתהש אדוול ידכ ןידע ץחל לעפה
b
a
חול לומ הרשי איהש קודבו תלדה תא רוגסל הסנ .5
“CLICK”
איה םא :ליעלש םיבלשה לע רוזחל שי ,אל איה םא .הרקבה
.תלדל קזנ םרגיהל לולע ,הכלהכ תלעופ הניא

היעבתירשפא הביסןורתפ
.לעופ אל רונתה
.למשח תקספה שי
.למשחהמ קתונמ רישכמה
.למשח תקפסאל רבוחמ רונתהשו ילמשח חתמ שיש אדוו
הלקתה םא תוארל ידכ שדחמ לעפהו רונתה תא הבכ
.תכשמנ
.תחתפנ אל תלדה
.יוקינ רוזחמ עצבתמ
.תלדה לוענמב הלקת
.רונתה תוררקתהלו היצקנופה רוזחמ םויסל ןתמה
הלקתה םא תוארל ידכ שדחמ לעפהו רונתה תא הבכ
.תכשמנ
םע F תואה העיפומ הגוצתב
.רפסמ
.הנכותב היעב שי."F" תואה רחאל רפסמה תא ןייצו ינופלטה דקומל הנפ
תישושגה םע לושיבה רוזחמ
האיגש וא הביס אלל םייתסה
.ךסמה לע ספדומ F3E3 הרורב
הניא ןוזמה תישושג
.יוארכ תרבוחמ
.ןוזמ תישושגה לש רוביחה תא קודב
תויעב ןורתפ
:ידי-לע רצומה לע ףסונ עדימו ליגר דועית ,תוינידמה יבתכ תא אוצמל ןתינ
•ךלש רצומה לע QR-ב שומיש
•docs . hotpoint. eu ונלש רתאב רוקיב
•.)תוירחאה תרבוחב ןופלט רפסמ האר( הריכמה רחאל תורישה םע רשק רוציל שי ,ןיפולחל
.רצומה לש יוהיזה תיחול יבג לע םימושרש םידוקה תא ןייצל שי ונלש תוחוקלה תוריש דקומל היינפ לכב
400020004736