1
Installation Instructions
Instrucciones de Instalación / Instructions d'installation /
Installationsanleitung / Istruzioni per l'installazione
N063-001-ENC-K1
N063-001-ENC-R
DIN-Rail Mounting
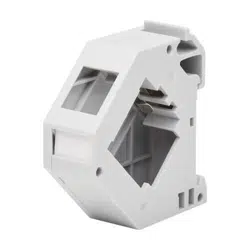
Enclosure Module
Módulo de carcasa para instalación en riel DIN
Module de boîtier à montage sur rail DIN
DIN-Schienen-Montage-Gehäusemodul
Modulo di custodia per montaggio su guida DIN
Purchased product may
differ from image.
El producto comprado
puede diferir de la imagen.
Le produit acheté peut
différer de l’image.
Das gekaufte Produkt kann
vom Bild abweichen.
Il prodotto acquistato
potrebbe differire
dall’immagine.
2
Installation
Instalación / Installation /
Installation / Installazione
1
1
2
2
3
3
4
4
upper and lower fixed latches
Broches fijos superior e inferior
Loquets fixes supérieurs
et inférieurs
Obere und untere
Fixpunkt-Riegel
Chiusure fisse superiori
e inferiori
A
C
B
3
Installation
Instalación / Installation /
Installation / Installazione
1
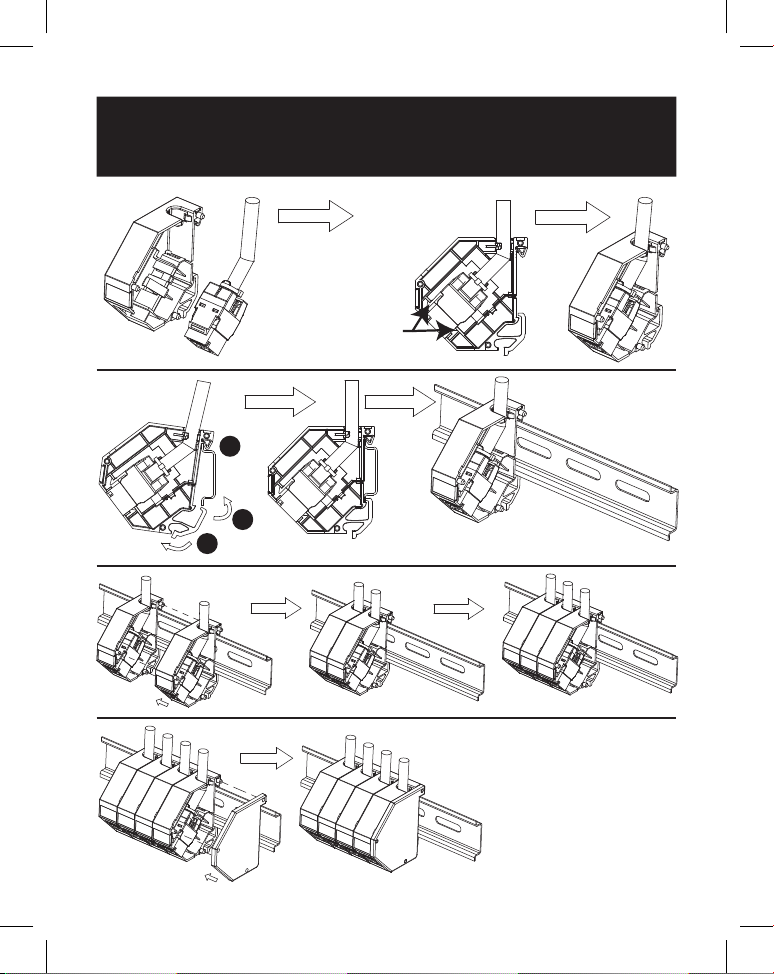
Snap the N238-001-WH-6A RJ45 Keystone Jack into the N063-001-ENC-K1
Enclosure Module.
Note: Both the upper and lower fixed latches on the keystone jack align with the hook of the
N063-001-ENC-K1.
2
To attach the assembly onto a DIN rail, hold the assembly at an angle and
place the top latch underneath the top DIN bracket
A
. Push the bottom latch
B
, then push the bottom of the assembly into the bottom DIN bracket
C
and release the latch.
3
To combine multiple assemblies of the N063-001-ENC-K1 onto the DIN rail,
repeat steps 1 and 2.
4
After all desired assemblies are attached to the DIN rail, put the side cap on
the last assembly to cover the internal components.
Español
1
Instale el enchufe Keystone RJ45
N238-001-WH-6A en el módulo de
carcasa N063-001-ENC-K1.
Nota: Los broches fijos del enchufe
Keystone, tanto superior como inferior, se
alinean con el gancho del N063-001-ENC-K1.
2
Para fijar el armado a un riel DIN,
sujete el armado en ángulo y
coloque el broche superior debajo
del soporte DIN superior
A
.
Empuje el broche inferior
B
, luego
empuje la parte inferior del armado
en el soporte DIN inferior
C
y
suelte broche.
3
Para combinar varios armados del
N063-001-ENC-K1 en el riel DIN,
repita los pasos 1 y 2.
4
Una vez fijados todos los armados
deseados al riel DIN, coloque la
tapa lateral en el último armado
para cubrir los componentes
internos.
Français
1
Enclenchez la prise Keystone RJ45
N238-001-WH-6A dans le module
de boîtier N063-001-ENC-K1.
Remarque : Les loquets fixes supérieur et
inférieur de la prise Keystone s'alignent avec
le crochet du N063-001-ENC-K1.
2
Pour fixer l'ensemble sur un rail
DIN, maintenez l'ensemble en biais
et placez le loquet supérieur sous le
support DIN supérieur
A
. Enfoncez
le loquet inférieur
B
, puis poussez
le bas de l'assemblage dans le
support DIN inférieur
C
et relâchez
le loquet.
3
Pour combiner plusieurs assemblages
du N063-001-ENC-K1 sur le rail DIN,
répétez les étapes 1 et 2.
4
Une fois que tous les assemblages
souhaités sont fixés au rail DIN,
placez le capuchon latéral sur le
dernier assemblage pour recouvrir
les composants internes.
4
Eaton
1000 Eaton Boulevard
Cleveland, OH 44122
United States
Eaton.com
© 2024 Eaton
All Rights Reserved
Publication No. 24-06-183 /
93-4B69_RevA
June 2024
Eaton is a registered
trademark.
All trademarks are property
of their respective owners.
Installation
Instalación / Installation /
Installation / Installazione
Deutsch
1
Stecken Sie den N238-001-WH-6A
RJ45 Keystone Jack in das
N063-001-ENC-K1 Gehäusemodul.
Hinweis: Sowohl der obere als auch der untere
feste Riegel am Keystone Jack richten sich nach
dem Haken des N063-001-ENC-K1aus.
2
Um die Baugruppe auf einer DIN-
Schiene zu befestigen, halten Sie die
Baugruppe schräg und platzieren Sie
den oberen Riegel unter der oberen
DIN-Halterung
A
. Drücken Sie den
unteren Riegel
B
, dann drücken Sie
die Unterseite der Baugruppe in die
untere DIN-Halterung
C
und lassen
Sie den Riegel los.
3
Um Multiple-Baugruppen der N063-
001-ENC-K1 auf der DIN-Schiene zu
kombinieren, wiederholen Sie die
Schritte 1 und 2.
4
Nachdem alle gewünschten
Baugruppen auf der DIN-Schiene
befestigt sind, setzen Sie die
Seitenkappe auf die letzte
Baugruppe, um die internen
Komponenten abzudecken.
Italiano
1
Inserisca lo spinotto Keystone RJ45
di N238-001-WH-6A nel modulo di
custodia N063-001-ENC-K1.
Nota: entrambe le chiusure fisse, superiore
e inferiore sullo spinotto keystone, sono
allineate col gancio di N063-001-ENC-K1.
2
Per fissare il gruppo su una guida
DIN, tenga il gruppo in posizione
angolata e collochi la chiusura
superiore sotto la staffa DIN
superiore
A
. Spinga la chiusura
inferiore
B
, quindi spinga la parte
inferiore del gruppo nella staffa DIN
inferiore
C
e rilasci la chiusura.
3
Per combinare i gruppi multipli della
N063-001-ENC-K1 sulla guida DIN,
ripeta i passi 1 e 2.
4
Dopo che tutti i gruppi desiderati
sono stati fissati alla guida DIN,
metta il tappo laterale sull'ultimo
gruppo per coprire i componenti
interni.
