
1
1111 W. 35th Street, Chicago, IL 60609 USA
tripplite.com/support
Copyright © 2022 Tripp Lite. All rights reserved.
Installation Instructions
WARRANTY REGISTRATION
Register your product today and be automatically entered
to win an ISOBAR
®
surge protector in our monthly drawing!
tripplite.com/warranty
8-Port DIN Rail Mounting
Keystone Panel
Model: N063-008-ENC
Español 6 • Français 11
Русский 16 • Deutsch 21

2
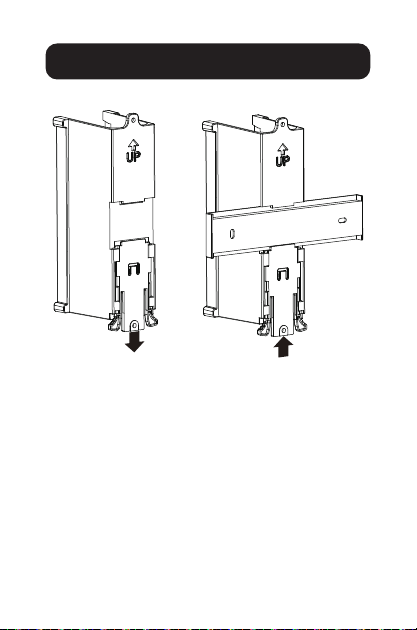
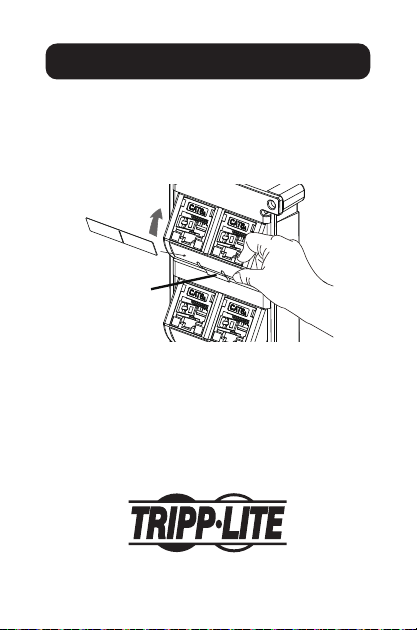
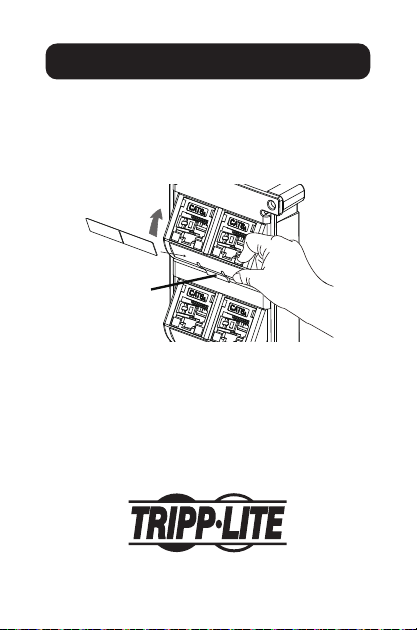
1 Attach the Box to the DIN rail.
Installation
Release tap
Push to lock box to
DIN rail

3
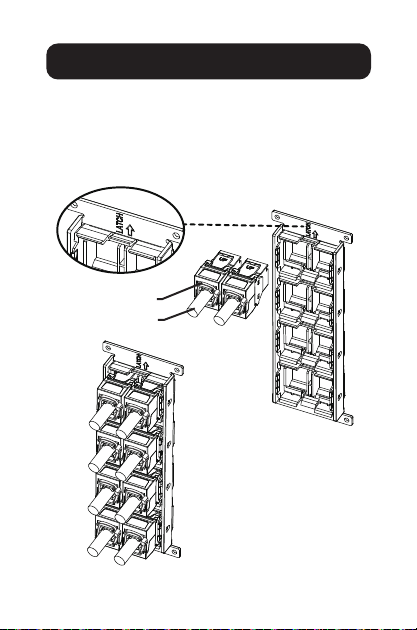
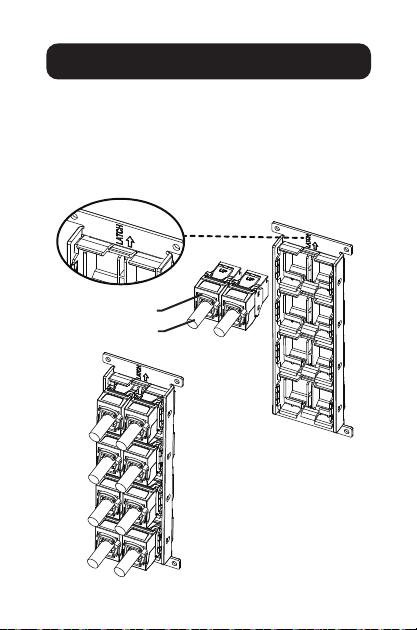
Installation
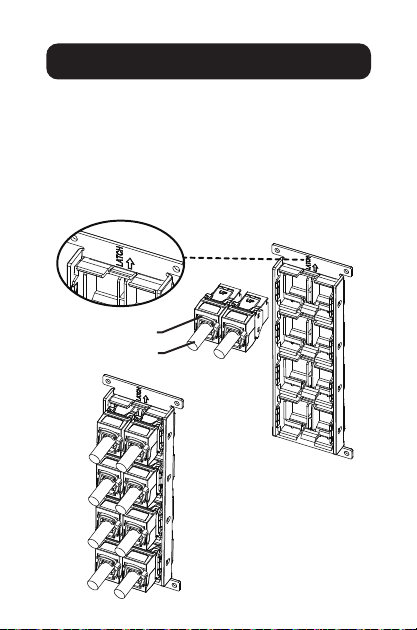
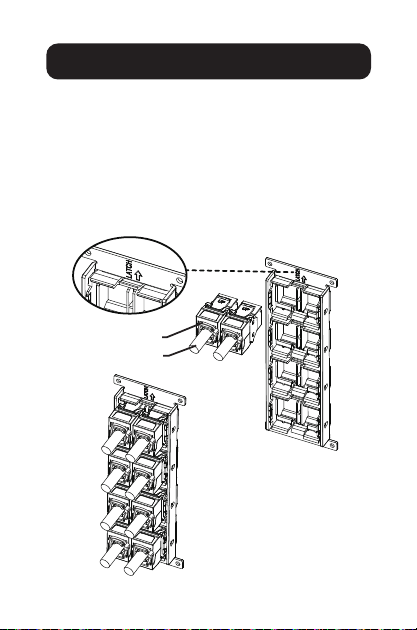
2 Finish cable termination on each RJ45 module.
3 Use the “LATCH” marking to locate the module
direction. Place the assembled RJ45 module
onto the back of the panel.
4 Snap each RJ45 module onto the panel until all
RJ45 modules are installed.
Cable tie
Solid cable

4
Installation
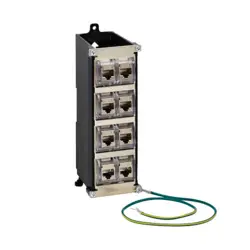
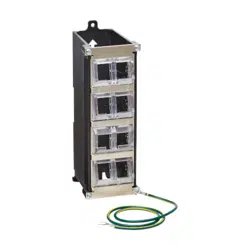
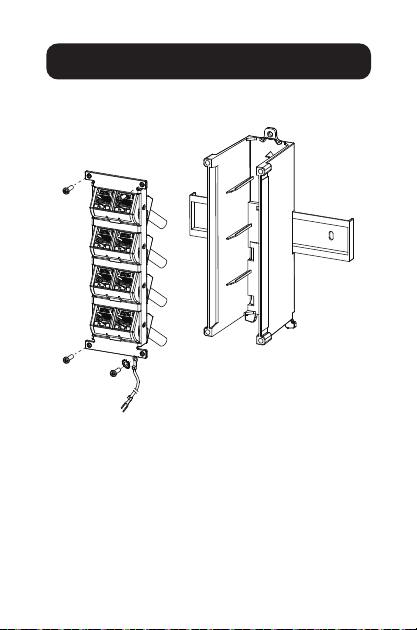
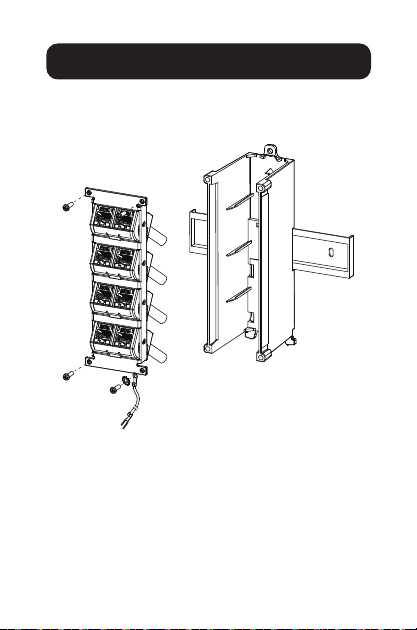
5 Use screws to attach the panel with terminated
jacks to the box.
1 2
3 4
5 6
7 8
Attach the
grounding wire

5
Installation
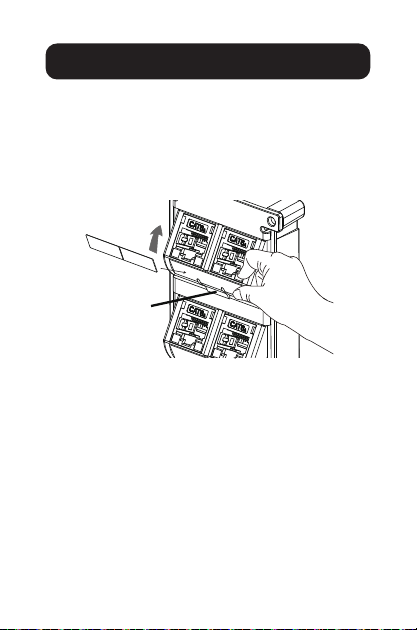
6 To adjust the modules:
A Rotate the bezel to the desired direction until
you hear a clicking sound.
B Press the clip onto the bezel to release the
bezel and change the direction.
B
A
1 2
1111 W. 35th Street, Chicago, IL 60609 USA
tripplite.com/support
22-03-045 9341BF_RevA

6
1111 W. 35th Street, Chicago, IL 60609, EE. UU.
tripplite.com/support
Copyright © 2022 Tripp Lite. Todos los derechos reservados.
Instrucciones de Instalación
Panel Keystone de
8 Puertos para
Instalación en Riel DIN
Modelo: N063-008-ENC
English 1 • Français 11
Русский 16 • Deutsch 21

7
1 Fije la Caja al Riel DIN.
Instalación
Suelte el borne
Empuje para
bloquear la caja al
riel DIN
8
Instalación
2 Acabe la terminación del cable en cada módulo
RJ45.
3 Use la marca "LATCH" para ubicar la
dirección del módulo. Coloque el módulo RJ45
ensamblado en la parte posterior del panel.
4 Inserte cada módulo RJ45 en el panel hasta que
todos los módulos RJ45 estén instalados.
Amarre de cable
Cable sólido
9
Instalación
5 Usetornillosparajarelpanelconconectores
terminados a la caja.
1 2
3 4
5 6
7 8
Fije el cable de
conexión a tierra

10
Instalación
6 Para ajustar los módulos:
A Gire el bisel en la dirección deseada hasta
escuchar un clic.
B Presione el clip en el bisel para liberar el bisel
y cambiar la dirección.
B
A
1 2
1111 W. 35th Street, Chicago, IL 60609, EE. UU.
tripplite.com/support
22-03-045 9341BF_RevA

11
1111 W. 35th Street, Chicago, IL 60609 USA
tripplite.com/support
Droits d'auteur © 2022 Tripp Lite. Tous droits réservés.
Instructions d'installation
Panneau Keystone pour
montage sur rail DIN à
8 ports
Modèle : N063-008-ENC
English 1 • Español 6
Русский 16 • Deutsch 21
12
1 Fixer le boîtier au rail DIN.
Installation
Relâcher la
languette
Pousser pour
verrouiller la boîte
sur le rail DIN
13
Installation
2. Terminer la terminaison du câble sur chaque
module RJ45.
3 Utiliser le repère « LATCH » (verrouillage) pour
trouver la direction du module. Placer le module
RJ45 assemblé à l'arrière du panneau.
4 Enclencher chaque module RJ45 sur le panneau
jusqu'à ce que tous les modules RJ45 soient
installés.
Attache de câble
Câble plein

14
Installation
5 Utiliserdesvispourxerlepanneauavecles
prises terminées à la boîte.
1 2
3 4
5 6
7 8
Fixerleldemise
à la terre.
15
Installation
6 Pour régler les modules :
A Tourner le cadran dans la direction désirée
jusqu'à ce qu'un déclic se fasse entendre.
B Appuyer sur le clip sur le cadre pour relâcher
le cadran et changer de direction.
B
A
1 2
1111 W. 35th Street, Chicago, IL 60609 USA
tripplite.com/support
22-03-045 9341BF_RevA

16
1111 W. 35th Street, Chicago, IL 60609 USA
tripplite.com/support
Copyright © 2022 Tripp Lite. Перепечатка запрещается.
Руководство по монтажу
8-портовая панель Keystone для
монтажа на DIN-рейку
Модель: N063-008-ENC
English 1 • Español 6
Français 11 • Deutsch 21

17
1 Прикрепите корпус к DIN-рейке.
Установка
Ослабьте крепление
Нажмите, чтобы закрепить
корпус на DIN-рейке
18
Установка
2 Завершите заделку кабелей на каждом модуле RJ45.
3 С помощью маркировки “LATCH” определите направление модуля.
Поместите собранный модуль RJ45 на заднюю часть панели.
4 Вставьте каждый модуль RJ45 в панель, пока не будут установлены
все модули RJ45.
Кабельная стяжка
Одножильный кабель

19
Установка
5 С помощью винтов прикрепите панель с заделанными разъемами
к корпусу.
1 2
3 4
5 6
7 8
Подсоедините
заземляющий провод
20
Установка
6 Для корректировки модулей:
A Вращайте лицевую панель в нужном направлении до тех пор,
пока не услышите щелчок.
B Нажмите на фиксатор на лицевой панели, чтобы
разблокировать ее и изменить направление.
B
A
1 2
1111 W. 35th Street, Chicago, IL 60609 USA
tripplite.com/support
22-03-045 9341BF_RevA

21
1111 W. 35th Street, Chicago, IL 60609 USA
tripplite.com/support
Copyright © 2022 Tripp Lite. Alle Rechte vorbehalten.
Installationsanleitung
Keystone-Panel zur
DIN-Schienenmontage
mit 8 Anschlüssen
Modell: N063-008-ENC
English 1 • Español 6
Français 11 • Русский16

22
1 Bringen Sie die Box an der DIN-Schiene an.
2 Beenden Sie den Kabelanschluss an jedem
RJ45-Modul.
Installation
Entriegelungsventil
Zum Verriegeln
der Box an DIN-
Schiene drücken
23
Installation
3 Verwenden Sie die Markierung „LATCH“,
um die Richtung des Moduls zu bestimmen.
Positionieren Sie das montierte RJ45-Modul auf
die Rückseite des Panels.
4 Rasten Sie jedes RJ45-Modul in das Panel ein,
bis alle RJ45-Module installiert sind.
Kabelbinder
Festkabel
24
Installation
5 Verwenden Sie die Schrauben, um das Panel
mit den terminierten Buchsen an der Box zu
befestigen.
1 2
3 4
5 6
7 8
Erdungskabel
anbringen
25
Installation
6 So stellen Sie die Module ein:
A Drehen Sie die Blende in die gewünschte
Richtung, bis Sie ein Klicken hören.
B Drücken Sie den Clip auf die Blende um
diese Gehäuserahmen freizugeben und die
Richtung zu ändern.
B
A
1 2

26

27

28
1111 W. 35th Street, Chicago, IL 60609 USA
tripplite.com/support
22-03-045 9341BF_RevA