
2

3
CONTENTS
TECHNICAL DATA
.................................................................................................................................3
INTRODUCTION
..................................................................................................................................... 4
SAFETY INFORMATION
....................................................................................................................... 4
GENERAL SAFETY RULES
................................................................................................................... 5
SPECIFIC SAFETY RULES FOR ELECTRIC PRESSURE WASHER ................................................. 8
SYMBOLS .................................................................................................................................................9
KNOWING YOUR ELECTRIC PRESSURE WASHER .......................................................................10
OPERATING INSTRUCTION ............................................................................................................... 13
MAINTENANCE .................................................................................................................................... 16
RECYCLING AND DISPOSAL .............................................................................................................17
TROUBLE SHOOTING ..........................................................................................................................18
EXPLODED VIEW & PARTS LIST
...................................................................................................... 19
WARRANTY
.......................................................................................................................................... 21
TECHNICAL DATA
Electric High-pressure Washer
Motor:
Pressure:
Max Flow Rate:
Hose Length:
Cord Length:
Water Temperature:
IP Rating
:
Protection Class:
Package Dimensions (l x w x h):
N.W:
Model # DB1023
120V, 60Hz, 11A
1850PSI
1.85GPM
35Feet
20Feet
32~140℉
IPX5
Ⅱ
12.2 x 11.8 x 15.8 inch
13.8 lb.

4
INTRODUCTION
Thank You for Purchasing a PowerSmart
®
Product. This manual provides information regarding the
safe operation and maintenance of this product. Every effort has been made to ensure the accuracy of
the information in this manual. PowerSmart
®
reserves the right to change this product and
specifications at any time without prior notice.
Please keep this manual available to all users during the entire life of the electric pressure washer.
This manual contains special messages to bring attention to potential safety concerns,
electric pressure washer damage as well as helpful operating and servicing information.
Please read all the information carefully to avoid injury and machine damage.
QUESTIONS? PROBLEMS?
Please contact our Customer Service Dept. with any questions and/or comments, either by Email:
available Mon-Fri 9am-5pm EST to help solve any issues that you might encounter.
SAFETY INFORMATION
Before operating this electric pressure washer, read and observe all warnings, cautions, and
instructions on the electric pressure washer and in this Owner’s Manual.
NOTE: The following safety information is not meant to cover all possible conditions and situations
that may occur. Read the entire Owner’s Manual for safety and operating instructions. Failure to
follow instructions and safety information could result in serious injury or death.
This safety alert symbol is used to identify safety information about hazards that can result in personal
injury.
A signal word (DANGER, WARNING, or CAUTION) is used with the alert symbol to
indicate the likelihood and the potential severity of injury. In addition, a hazard symbol
may be used to represent the type of hazard.
DANGER Indicates a hazard, which, if not avoided, will result in death or serious injury.
WARNING Indicates a hazard, which, if not avoided, could result in death or serious injury.
CAUTION Indicates a hazard, which, if not avoided, might result in minor or moderate injury.
CAUTION Without the alert symbol, indicates a situation that could result in damage.

5
GENERAL SAFETY RULES
Safety is a combination of common sense, staying alert, and knowing how your electric pressure
washer works. PLEASE SAVE THESE SAFETY INSTRUCTIONS.
WARNING: Do not operate this unit until you read this instruction manual for safety,
operation and maintenance instructions. Failure to follow all instructions listed below may
result in electric shock, fire, and/or serious personal injury.
Work Area Safety
This appliance is not intended for use by children or by unassisted, unsupervised persons whose
physical, sensory or mental capabilities prevent them from using it safely. Children should be
supervised to ensure that they do not play with the appliance.
Keep bystanders away . All visitors and pets should be kept a safe distance away from the work
area.
Never use the machine in potentially explosive areas under any circumstances.
The operator must use the appliance correctly. When working with the appliance, he must
consider the local conditions and pay due care and attention to other persons, in particular
children who are nearby.
This electric pressure washer is designed for domestic use only:
1
.
To clean cars, motorbikes, caravans, bicycles.
2.To clean patios, fences, garden walls, pathways, driveways and house facades, particularly
useful
for cleaning blocked driveway.
3
.
To remove of algae and moss from roofs, brickwork and guttering.
4
.
To clean garden tools and machinery, furniture and barbecues.
5.To clean hygienic of animal pens and their surrounding area.
Electrical Safety
Grounding instructions
IN THE EVENT OF A MALFUNCTION OR BREAKDOWN, grounding provides the path of least
resistance for electric current and reduces the risk of electric shock. This tool is equipped with an
electric cord that has an equipment grounding conductor and a grounding plug. The plug MUST be
plugged into a matching outlet that is properly installed and grounded in accordance with ALL local
codes and ordinances.
DO NOT MODIFY THE PLUG PROVIDED. If it will not fit the outlet, have the proper outlet
installed by a licensed electrician.
IMPROPER CONNECTION of the equipment grounding conductor can result in electric shock. The
conductor with the green insulation (with or without yellow stripes) is the equipment grounding
conductor. If repair or replacement of the electric cord or plug is necessary, DO NOT connect the
equipment grounding conductor to a live terminal.
CHECK with licensed electrician or service personnel if you do not completely understand the
grounding instructions, or if you are not sure if the tool is properly grounded.

6
USE ONLY THREE-WIRE EXTENSION CORDS that have 3-pronged plugs and outlets that accept
the tool's plug as shown in Fig. A. Repair or replace a damaged or worn cord immediately.
CAUTION: In all cases, make certain the outlet in question is properly grounded. If you are not sure
if it is, have a licensed electrician check the outlet.
WARNING: Do not expose to rain or use in damp locations.
Guidelines for using extension cords
Make sure your extension cord is in good condition. When using an extension cord, be sure to use one
heavy enough to carry the current your product will draw. An undersized cord will cause a drop in line
voltage resulting in loss of power and overheating. The table below shows the correct size to be used
according to cord length and nameplate ampere rating. If in doubt, use the next heavier gauge. The
smaller the gauge number, the heavier the cord.
Minimum Gauge for Extension Cords (AWG)
(When using 120 V only)
Make sure your extension cord is properly wired and in good condition. Always replace a damaged
extension cord or have it repaired by a qualified person before using it.
Protect your extension cords from sharp objects, excessive heat and damp or wet areas.
Use a separate electrical circuit for your tools. This circuit must not be less than a #12 wire and should
be protected with a 15 A time-delayed fuse. Before connecting the motor to the power line, make sure
the switch is in the OFF position and the electric current is rated the same as the current stamped on
the motor nameplate. Running at a lower voltage will damage the motor.
WARNING: This tool must be grounded while in use to protect the operator from electric
shock.
Ampere Rating
Total Length of Cord in feet
More
Than
Not More
Than
25
50
100
150
0
6
18
16
16
14
6
10
18
16
14
12
10
12
16
16
14
12
12
16
14
12
Not Recommended

7
Personal Safety
The electric pressure washer may not be directed at persons, animals, live electrical equipment
or at the appliance itself.
Keep bystanders away . All visitors and pets should be kept a safe distance away from the work
area.
Do not wear loose clothing or jewelry. They can get caught in moving parts. Protective rubber
gloves and non-slip footwear are recommended when working outdoors.
Watch what you are doing. Use common sense. Do not operate the pressure washer when you
are tired, or under the influence of alcohol or drugs.
Do not overreach. Keep proper footing and balance at all times.
Avoid unintentional starting. Do not carry a plugged-in machine with your finger on the trigger.
Make sure the switch is off before plugging in the machine.
Do not abuse the cord . Never carry the machine by the cord or yank the cord to disconnect it
from the receptacle. Keep the cord away from heat, oil, and sharp edges.
Use safety glasses . Also use safety footwear, snug-fitting clothing, protective gloves, hearing
and head protection.
Service
Tool service must be performed only by qualified repair personnel. Service or maintenance
performed by unqualified personnel could result in a risk of injury.
When servicing a tool, use only identical replacement parts. Follow instructions in the
Maintenance section of this manual. Use of unauthorized parts or failure to follow Maintenance
Instructions may create a risk of electric shock or injury.

8
SPECIFIC SAFETY RULES FOR ELECTRIC PRESSURE WASHER
Do not point the gun at anyone or at any part of the body.
Before servicing, cleaning, or removing any parts, shut off the power and relieve pressure.
Check the water temperature .This pressure washer is not meant to pump hot water. NEVER
connect it to a hot water supply as it will significantly reduce the life of the pump.
Store indoors. NEVER store the pressure washer outdoors or where it could freeze. The pump
could be seriously damaged.
Risk of explosion. Do not spray flammable liquids. Never draw in fluids containing solvents or
undiluted acids. This includes petrol, paint thinner and heating oil. The spray mist thus generated
is highly inflammable, explosive and poisonous. Do not use acetone, undiluted acids or solvents
as they are damaging to the materials from which is the appliance is made.
High pressure hoses, fixtures and couplings are important for the safety of the appliance. Only
use high pressure hoses, fixtures and couplings recommended by the manufacturer.
Create stability for the appliance prior to all work on or with the appliance to prevent accidents
or damage. The stability of the appliance is warranted when it is placed on to an even surface.
Never leave the appliance unattended when it is in operation.
The appliance must not be used if the power cord or important parts of the appliance, e.g. high
pressure hoses, trigger gun or safety devices are damaged. Please arrange for it to be replaced
immediately by an authorized repair agent or a skilled electrician.
The electric pressure washer must not be directed at other persons or directed by the user at
him/herself to clean clothing or footwear.
If the appliance is used in hazardous areas (e.g. filling stations) all of the safety provisions and
operating instructions detailed in this manual must be observed.
Never use the appliance to clean objects containing hazardous substances.
Vehicle tyres or tyre valves are susceptible to damage from the electric pressure washer and may
burst. The first indication of this is a discoloration of the tyre. Damaged vehicle tyres/tyre valves
are highly dangerous. Ensure that a distance of at least 30 cm is observed when cleaning with the
washer.
Risk of explosion. Do not spray flammable liquids. Never draw in fluids containing solvents or
undiluted acids. This includes petrol, paint thinner and heating oil. The spray mist thus generated
is highly inflammable, explosive and poisonous. Do not use acetone, undiluted acids or solvents
as they are damaging to the materials from which is the appliance is made.
Always fully unroll electrical cables.
Do not cover or modify the spray wand or the spray nozzle in any way.
Do not use the machine if the persons nearby do not wear safety protection device.
Wearing protective clothing and safety goggles to protect against splash back containing water
or dirt.

9
SYMBOLS
Some of the following symbols may be used on this product. Please study them and learn their
meaning. Proper interpretation of these symbols will allow you to operate the product better and safer.
SYMBOL
NAME
DESIGNATION/EXPLANATION
V
Volts
Voltage
A
Amperes
Current
Hz
Hertz
Frequency (cycles per second)
W
Watts
Power
MIN
Minutes
Time
Safety Alert
Precautions that involve your safety.
Read the
user’s manual
To reduce the risk of injury, user must read and understand
user’s manual before using this product.
Eye protection
Wear eye protection when operating this equipment.
Wear non-slip
footwear
Wear non-slip footwear that will protect your feet and
improve your footing on slippery surfaces.
Keep
bystanders
away
Warning! Never point the gun to human, animals, the
machine body, power supply or or any electric appliances.
To reduce the risk of injury, user must keep all bystanders at
least 49 ft (15 m) away.
Wet
conditions
alert
Do not expose to rain or use in damp locations.
Electric shock
alert
Beware of electric shock hazard.
Double
Insulation
Class II construction Double Insulated construction
Waste
electrical
products
Waste electrical products should not be disposed of with
household waste please recycle where facilities exist. Check
with your local authority or retailer for recycling advice.
Do not throw
into water
Do not throw the machine into water.
Do not throw
into fire
Do not throw the machine into fire.

10
KNOWING YOUR ELECTRIC PRESSURE WASHER
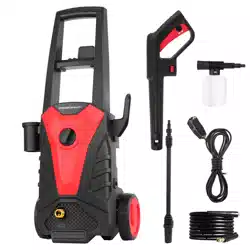
Unpacking
Unpack the power tool and all its parts, and compare against the list below. Do not discard the carton
Including
Electric Pressure Washer/ Trigger Gun / Sprinkler Head / Long Gun Rod / High Pressure Hose/
Plastic Quick Connector / Detergent Tank / Universal Intake Male Joint / Through Needle / Handle
/Screw Of Handle*2 / User Manual
1
Wire hanging
10
Gun handle
2
Long handle
11
Trigger
3
Gun hanging
12
Safety lock
4
Switch knob
13
Intake pipe
5
Outlet pipe
14
Through needle
6
High pressure pipe
15
Inlet filter joint
7
Sprinkler head
16
Water inlet soft pipe
8
Long gun rod
17
Detergent tank
9
Power cord
18
Plastic quick connector

11
ASSEMBLY INSTRUCTION
WARNING: If any parts are damaged or missing do not operate this product until the parts
are replaced. Use of this product with damaged or missing parts could result in serious
personal injury.
WARNING: Do not connect to power supply until assembly is complete. Failure to comply
could result in accidental starting and possible serious personal injury.
1. Fix the handle(2) on the machine. Screw the washer handle tight to the main body as shown in the
figure.
NOTE: The screws will be packed together with the main body, please kindly check and find it when
unpacked.
2. Install the gun hanging(3) and wire hanging(1) in the arrow direction as shown in the figure.
3. High pressure gun set assemble. Push the long gun rod(8) to the gun handle(10) in the arrow
direction and tight it by rotating clockwise; Push the sprinkler head(7) to the long gun rod(8), adjust
the water spray by rotating the sprinkler head(7).
4. Attach the high pressure hose(6) to the gun(10). Insert and quick-connect it tight to avoid
leakage.

12
5. Install the high pressure pipe to the main body. Push the high pressure pipe to the outlet
connector, tighten it by rotating the pipe connector clockwise.
6. Connect water inlet pipe(16) with main body. Connect the plastic quick connector(18) to the
intake pipe of the machine, then push the water inlet pipe to the quick connector and tighten it by
rotating the pipe connector clockwise.
7. Connect the inlet pipe with faucet.
pipe connector
High pressure
pipe connector
Outlet connector
Water inlet
pipe connector

13
OPERATING INSTRUCTION
Starting Up
WARNING:
Prior to cleaning, make sure that the electric pressure washer is placed safely on level ground.
Impurities in the water can damage the high pressure pump and accessories.
All electric pressure washer (except hot water system) use the cold water. The suitable water
temperature is 32°F to 104°F.
Check the high pressure washer is assemble properly before connecting the pressure cleaner to
your cold water supply.
Make sure that the ON/OFF switch is in the OFF position.
Motor does not run continuously, only when the trigger is squeezed. Release the lever of the
trigger gun, the device will switch off again. Electric pressure washer remains in the system.
NEVER direct the high pressure water stream at people or animals!
Wear protective goggles and protective clothing during the cleaning process.
Bleeding The Gun
It is very important to bleed the gun before using the pressure cleaner.
To bleed the gun, simply connect the garden hose to the pressure cleaner and squeeze the trigger
BEFORE turning the electrical supply on. This allows any air trapped inside the pressure cleaner and
gun to be removed before using the unit. Continue holding trigger for approximately one minute to
allow any excess air out of the unit. Water will flow through the gun at low pressure during this
procedure.
Gun Safety Lock
This pressure cleaner is equipped with a gun trigger safety lock. When not
using the pressure cleaner, press the safety lock of the gun to keep from
accidentally engaging the high pressure spray. The gun trigger safety lock is
on the trigger gun as shown in the figure.
Switch ON/OFF
To switch ON the pressure washer
1. Press the trigger on the gun, turn on the water tap to expel the air inside the machine.
2. Plug in the power cord and turn on the switch knob to “I” position.
NOTE: The pressure cleaner will only run when the switch knob is in the ON position and the trigger
on the gun is squeezed. When you release the trigger to stop spraying water through the gun, the
motor on the pressure cleaner will automatically shut off. Simply squeeze the trigger again to resume
using the cleaner.
To switch off the pressure washer
1. Release the trigger.
2. Switch the unit to the OFF position by turning the switch knob to “O”
position.
NOTE: Press the safety lock out to avoid accident start. The unit should be
switch
knob

14
turned completely OFF while not in use or unattended.
Adjustable Spray Nozzle
The adjustable nozzle will allow you to use any variety of spray patterns from a full fan spray to a
direct stream spray.
When using the pressure cleaner to clean wood decks, siding ,vehicles etc., always start using the fan
spray and begin spraying from a minimum36" away to avoid damaging the surface of the material you
are cleaning. Always begin by spraying in a testing area free and clear of people and objects.
WARNING: High pressure jets can be dangerous if subject to misuse. The jet must not be
directed at persons live electrical equipment or the appliance itself.
Do not direct the jet against yourself or others in order to clean clothes or foot-wear.
Using Detergents
CAUTION: Use only detergents specifically designed for use with pressure washers.
DO NOT USE household detergents, acids, alkaline solutions, bleaches, solvents, flammable
material, or industrial grade solutions. These could damage the pressure washer. Many detergents may
require mixing prior to use. Prepare the cleaning solution as instructed on the solution bottle.
The pressure cleaner will dispense detergent at low pressure.
1. 1.Connect the detergent tank with the gun handle.
NOTE: Pressing and rotating the long gun rod counter-clockwise at the same time
when separating the long gun rod with gun handle.
2. Separate the nozzle from the detergent container by turning the detergent
reservoir clockwise and separating the two components.
3. Fill the detergent container with approved detergent. Pour the detergent slowly
into the reservoir using a funnel. Re-attach the two components by re-inserting the
nozzle back onto the detergent reservoir and turning counter-clockwise.
4.Press the gun trigger to use detergents.
NOTE: Fill the container with detergent only. Do not put any water into the container. The pressure
cleaner will mix water and detergent automatically. When finished applying the detergent to the work
surface, remove the detergent tank and install the high pressure spray to cleaning the detergents.
Cleaning Tips
CAUTION! Always test the spray in an area free and clear of people and objects before
you spray at the intended cleaning surface.
Wood and Vinyl Decks
Rinse deck and surrounding area with fresh water.If using detergent, fill the detergent reservoir and
apply to the area being cleaned at low pressure. For optimal results, reduce your work area to smaller
sections and clean each section one at a time. Allow the detergent to rest on the surface for a few
minutes and then rinse at high pressure. DO NOT LET THE DETERGENT DRY.
Always clean from left to right and top to bottom for best results. Rinse at high pressure using the fan
spray keeping the tip of the spray nozzle at least 6-9 inches from the cleaning surface Maintain a
further distance from the cleaning area when using a direct spray. Caution: For softer woods, increase
the distance from the cleaning area.

15
Cement Patios, Stone, and Brick
Rinse cleaning and surrounding area with fresh water. If using detergent. fill the detergent reservoir
and apply to the area being cleaned at low pressure. Rinse at high pressure using the fans praying
sweeping motion keeping the tip of the spray nozzle at least 3-6 inches from the cleaning surface.
Maintain a further distance from the cleaning area when using a direct spray.
Cars, Boats, and Motorcycles
Rinse cleaning and surrounding area with fresh water. If using detergent. fill the detergent reservoir
and apply to the area being cleaned at low pressure. To achieve the best results. clean one side at a
time. Allow the detergent to rest on the surface for a few minutes. but do not let the detergent dry.
Rinse at high pressure using the fan spray in a sweeping motion keeping the tip of the spray nozzle at
least 8 inches from the cleaning surface. Maintain a further distance from the cleaning area when
using a direct spray. Wipe surface dry for a polished finish.
Barbecue Grills, Power Equipment, and Garden Tools
Rinse cleaning and surrounding area with fresh water. If using detergent. fill the detergent reservoir
and apply to the area being cleaned at low pressure. Allow the detergent to rest on the surface for a
few minutes, but do not let the detergent dry. Rinse at high pressure using the fan spray keeping the
tip of the spray nozzle at least 1-3 inches from the cleaning surface. Maintain a further distance from
the cleaning area when using a direct spray.

16
MAINTENANCE
WARNING: In order to avoid personal injury and the risk of fire and electric shock, turn
off the appliance and remove the mains plug prior to any care and maintenance work.
When servicing, use only identical replacement parts. Use of any other parts could create a hazard or
cause product damage.
Clean-up
When finished using the pressure washer, follow these steps:
1. Turn the pressure cleaner to the OFF(O) position.
2. Turn off the water supply.
3. Before disconnecting high-pressure hose connection, point the gun in a safe direction and
discharge the high-pressure water.
4. Disconnect high-pressure hose from the pressure cleaner and gun.
5. Disconnect garden hose from the pressure cleaner.
6. Remove quick coupler fitting from garden hose and attach to the nipple portion of the fitting
installed on the pressure cleaner for storage.
7. Remove excess water from the pump by tipping the unit on both sides to drain any remaining
water from inlet and outlet fittings.
8. Remove water intake filter and flush with water to remove dirt or debris, then remount the filter
back.
9. Drain detergent reservoir and flush with running water.
10. Wipe away any remaining water on all parts and fittings Engage the gun safety lock.
11. Store the pressure cleaner,parts,and accessories in an area with a temperature above 0° C (32°F).
Storage
Winterizing and Long-Term Storage
Follow all of the above shut-down procedures. adding the following steps:
● After disconnecting the water supply, and before disconnecting the high-pressure hose, turn the
pressure cleaner on for 2-3 seconds, until any remaining water in the pump exits TURN UNIT
OFF IMMEDIATELY. Continued use of the pressure cleaner without water supply attached
will cause severe damage to the unit!
● Always store the pressure cleaner, parts, and accessories in an area with a temperature above
32°F.
NOTE: Failure to comply with these storage instructions will result in damage to the pump
assembly.
Maintenance
● This pressure cleaner is supplied with a closed lubrication system, so no addition of oil is
needed.
● Check all hoses and accessories for damage prior to use.
● Check the inlet filter periodically for deposits. Clean this filter regularly for maximum
performance.

17
RECYCLING AND DISPOSAL
The device is supplied in packaging to avoid transport damages. This packaging is raw material
and can thus be used again or can be reintegrated into the raw material cycle.
The device and its accessories are made of different materials, such as metals and plastics. Take
defective components to special waste disposal sites. Check with your specialist dealer or
municipal administration!
Old devices must not be disposed of with household waste!
This symbol indicates that this product must not be disposed of together with domestic waste
in compliance with the Directive (2012/19/EU) pertaining to waste electrical and electronic
equipment (WEEE).
This product must be handed over at the intended collection point. This can be done, for example, by
returning it when purchasing a similar product or delivering it to an authorized collection point for the
recycling of old electrical and electronic devices. Improper handling of waste equipment may have
negative consequences for the environment and human health due to potentially hazardous substances
that are often contained in electrical and electronic equipment. By properly disposing of this product,
you are also contributing to the effective use of natural resources. You can obtain information on
collection points for waste equipment from your municipal administration, public waste disposal
authority, an
authorized body for the disposal of waste electrical and electronic equipment or your waste disposal
company.

18
TROUBLE SHOOTING
Problem
Possible Cause
Possible Solution
When the switch is
in “I”position the
machine will not
start
1. Machine not plugged in.
2. Defective socket.
3. Defective extension cable.
4. Incorrect mains voltage.
5. Switch off.
6. Fuse has blown.
1. Plug in machine.
2. Try another socket.
3. Try another extension
cable.
4. Check voltage correctly.
5. Turn on switch.
6. Replace fuse.
The pressure
cleaner makes
excessive noise
1. Intake is blocked.
2. Valves are worn, dirty, or
clogged.
3. Filter is dirty.
1. Check the intake valves.
2. Check, clean or replace
valves.
3. Check, clean, or replace
filter.
The pump does not
peach adequate
pressure or
fluctuates
1. Water inlet filter is
clogged.
2. Pump is drawing air.
3. Suction valves are clogged
/worn.
4. Diameter of garden hose
too small.
5. Water supply is restricted
Insufficient water supply.
1. Remove and clean filter.
2. Tighten connections/bleed
system.
3. Clean or replace valves.
4. Replace with ¾ inch garden
hose.
5. Check hose for kinks or
leaks Fully open water source.
The pressure
cleaner has or will
not maintain
pressure
Excessive air in waterline and
pump.
Turn unit and water supply off/
Bleed system/Hold trigger
down.
The motor stops
running while in use
1.Net voltage lower than
suggested.
2.Lack of water lead to high
temperature.
3.Fuse blown.
4.The original of the thermal
protection is activated
1. Check whether the voltage
is adequate.
2. Check water flow quantity.
3. Replace the fuse and shut
down the other machines.
4. Cool the wash machine for
5 to 10 minutes
Machine often starts
and stops by itself
1. Safety valve worn out.
2. Pump,high pressure hose,
trigger gun is leaking.
Consult customer service.
Trigger gun cannot
be used
Trigger gun is locked.
Unlock trigger gun safety.
The machine is
started without
water flow out
1.Pumps, pipes or accessories
blocked by frozen.
2. Non-water.
3. Filter blocked.
4.Nozzles blocked.
1. Waiting for pumps, pipes or
accessories to thaw.
2.Connected to water.
3. Cleaning filter.
4.Cleaning nozzles.

19
EXPLODED VIEW & PARTS LIST

20
ITEM
STOCK#
DESCRIPTION
QTY
1
DB1023-001
ON/OFF SWITCH
1
2
DB1023-002
SWITCH COVER
1
3
DB1023-003
Φ8.5XΦ1.8 O RING
1
4
DB1023-004
BULL STICK
1
5
DB1023-005
ROKER SWITCH
1
6
DB1023-006
CABLE SHIELD
1
7
DB1023-007
LEFT MOTOR COVER
1
8
DB1023-008
RUBBER GASKET
2
9
DB1023-009
WIRE PLATE
1
10
DB1023-010
WIRE PRESS BASE
1
11
DB1023-011
SCREW 5X16MM
4
12
DB1023-012
GEAR BOX
1
13
DB1023-013
SERIES MOTOR
1
14
DB1023-014
RIGHT MOTOR COVER
1
15
DB1023-015
POWER CORD
1
16
DB1023-016
SCREW 4X16MM
25
17
DB1023-017
BREAKWATER
1
18
DB1023-018
WHEEL COVER
2
19
DB1023-019
WHEEL
2
20
DB1023-020
WIRE HANGING
1
21
DB1023-021
STORAGE LID
1
22
DB1023-022
BACK BODY
1
23
DB1023-023
GUN HANGING
1
24
DB1023-024
TERMINAL CAP
1
25
DB1023-025
Φ61.5XΦ1.9 O RING
1
26
DB1023-026
FRONT BODY
1
27
DB1023-027
LONG HANDLE
1
28
DB1023-028
DECORATED PART
1
29
DB1023-029
HIGH PRESSURE PIPE
1
30
DB1023-030
DETERGENT TANK
1
31
DB1023-031
PLASTIC QUICK CONNECTOR
1
32
DB1023-032
LEDDLE
1
33
DB1023-033
GUN HANDLE
1
34
DB1023-034
LONG GUN ROD
1
35
DB1023-035
SPRINKLER HEAD
1
36
DB1023-036
MAIN PLUG
1

21
TWO (2) YEARS LIMITED WARRANTY
PowerSmart
®
is committed to building tools that are dependable for years. Our warranties are consistent with
our commitment and dedication to quality.
TWO (2) YEARS LIMITED WARRANTY OF POWERSMART PRODUCTS FOR HOME USE.
PowerSmart (“Seller") warrants to the original purchaser only, that all PowerSmart consumer power tools will
be free from defects in material or workmanship for a period of two (2) years from date of purchase. Ninety (90)
days for all PowerSmart Products, if the tool is used for professional or commercial use.
SELLER’S SOLE OBLIGATION AND YOUR EXCLUSIVE REMEDY under this Two (2) Years Limited
Warranty and, to the extent permitted by law, any warranty or condition implied by law, shall be the repair or
replacement of parts, without charge, which are defective in material or workmanship and which have not been
misused, carelessly handled, or misrepaired by persons other than Seller or Authorized Service Center. To
make a claim under this Limited Warranty, you must return the entire power tool product; transportation
prepaid, to PowerSmart Include a legible copy of the original receipt, which lists the date of purchase (month
and year) and the name of the company purchased from.
THIS LIMITED WARRANTY DOES NOT APPLY TO ANY ACCESSORY ITEMS INCLUDED WITH
THE TOOL SUCH AS CIRCULAR SAW BLADES OTHER RELATED ITEMS OR TO ANY
REPLACEMENT PARTS LISTED UNDER MAINTENANCE.
ANY IMPLIED WARRANTIES SHALL BE LIMITED IN DURATION TO TWO (2) YEARS FROM DATE
OF PURCHASE. SOME STATES IN THE U.S. AND SOME CANADIAN PROVINCES DO NOT ALLOW
LIMITATIONS ON HOW LONG AN IMPLIED WARRANTY LASTS, SO THE ABOVE LIMITATION
MAY NOT APPLY TO YOU.
IN NO EVENT SHALL SELLER BE LIABLE FOR ANY INCIDENTAL OR CONSEQUENTIAL
DAMAGES (INCLUDING BUT NOT LIMITED TO LIABILITY FOR LOSS OF PROFITS) ARISING
FROM THE SALE OR USE OF THIS PRODUCT. SOME STATES IN THE U.S. AND SOME CANADIAN
PROVINCES DO NOT ALLOW THE EXCLUSION OR LIMITATION OF INCIDENTAL OR
CONSEQUENTIAL DAMAGES, SO THE ABOVE LIMITATION OR EXCLUSION MAY NOT APPLY TO
YOU.
THIS LIMITED WARRANTY GIVES YOU SPECIFIC LEGAL RIGHTS, AND YOU MAY ALSO HAVE
OTHER RIGHTS WHICH VARY FROM STATE TO STATE IN THE U.S., PROVINCE TO PROVINCE IN
CANADA AND FROM COUNTRY TO COUNTRY.
For questions / comments, technical assistance or repair parts –
Please call toll free at: 1-872-314-0005 (M-F 9am – 5pm EST)
Email: support@amerisuninc.com / support@powersmartusa.com
SAVE YOUR RECEIPTS. THIS WARRANTY IS VOID WITHOUT THEM.
