
A
B
1
2
3
4
5
6
7
8
9
10
11
12
1
1
2
3
4 5 6 7
8
9
10
2
3
4
5
6
7
8
9 10
1
2
11
12
13 14
15
16

en
5
Futher information and explanations are
available online:
Table of contents
1 Safety............................................7
1.1 General information....................7
1.2 Intended use...............................7
1.3 Restriction on user group...........7
1.4 Safe transport.............................7
1.5 Safe installation ..........................8
1.6 Safe use .....................................9
1.7 Damaged appliance.................11
2 Preventing material damage .....13
3 Environmental protection and
saving energy.............................13
3.1 Disposing of packaging ...........13
3.2 Saving energy...........................13
4 Installation and connection.......14
4.1 Scope of delivery......................14
4.2 Criteria for the installation
location .....................................14
4.3 Installing the appliance ............14
4.4 Preparing the appliance for
the first time..............................15
4.5 Connecting the appliance to
the electricity supply.................15
5 Familiarising yourself with
your appliance............................15
5.1 Appliance .................................15
5.2 Control panel............................15
6 Features......................................16
6.1 Shelf..........................................16
6.2 Bottle shelf................................16
6.3 Storage container.....................16
6.4 Fruit and vegetable con-
tainer with humidity control ......16
6.5 Door rack..................................17
6.6 Ice cube maker ........................17
6.7 Accessories..............................17
7 Basic operation ..........................17
7.1 Switching on the appliance ......17
7.2 Operating tips...........................17
7.3 Switching off the appliance ......18
7.4 Setting the temperature............18
8 Additional functions ..................18
8.1 Super cooling ..........................18
8.2 Super freezing ..........................18
8.3 Holiday mode ...........................19
8.4 Energy-saving mode.................19
8.5 Freshness mode ......................19
9 Alarm...........................................20
9.1 Door alarm ...............................20
9.2 Temperature alarm ...................20
10 Refrigerator compartment.......20
10.1 Tips for storing food in the
refrigerator compartment .......20
10.2 Chill zones in the refriger-
ator compartment...................21
11 Freezer compartment...............21
11.1 Freezing capacity ...................21
11.2 Fully utilising the freezer
compartment volume .............21
11.3 Tips for storing food in the
freezer compartment ..............21
11.4 Tips for freezing fresh food ....22
11.5 Shelf life of frozen food at
−18°C....................................22
11.6 Defrosting methods for
frozen food .............................22

en
6
12 Defrosting.................................23
12.1 Defrosting in the refriger-
ator compartment...................23
12.2 Defrosting in the freezer
compartment ..........................23
13 Cleaning and servicing............23
13.1 Preparing the appliance for
cleaning ..................................23
13.2 Cleaning the appliance ..........23
13.3 Removing the fittings..............24
14 Troubleshooting.......................25
14.1 Power failure...........................28
14.2 Conducting an appliance
self-test ...................................28
15 Storage and disposal...............28
15.1 Taking the appliance out of
operation ................................28
15.2 Disposing of old appliance ....28
16 Customer Service.....................29
16.1 Product number (E-Nr.) and
production number (FD).........29
17 Technical data ..........................29

Safety en
7
1 Safety
Observe the following safety instructions.
1.1 General information
¡ Read this instruction manual carefully.
¡ Keep the instruction manual and the product information safe
for future reference or for the next owner.
¡ Do not connect the appliance if it has been damaged in transit.
1.2 Intended use
Only use this appliance:
¡ for chilling and freezing food and for making ice cubes.
¡ In private households and in enclosed spaces in a domestic en-
vironment.
¡ Up to an altitude of 2000 m above sea level.
1.3 Restriction on user group
This appliance may be used by children aged 8 or over and by
people who have reduced physical, sensory or mental abilities or
inadequate experience and/or knowledge, provided that they are
supervised or have been instructed on how to use the appliance
safely and have understood the resulting dangers.
Do not let children play with the appliance.
Cleaning and user maintenance must not be performed by chil-
dren unless they are being supervised.
1.4 Safe transport
WARNING‒Risk of injury!
The high weight of the appliance may result in injury when lifted.
▶ Do not lift the appliance on your own.
en Safety
8
1.5 Safe installation
WARNING‒Risk of electric shock!
Incorrect installation is dangerous.
▶ Connect and operate the appliance only in accordance with the
specifications on the rating plate.
▶ Connect the appliance to a power supply with alternating cur-
rent only via a properly installed socket with earthing.
▶ The protective conductor system of the domestic electrical in-
stallation must be properly installed.
▶ Never equip the appliance with an external switching device,
e.g. a timer or remote control.
▶ When the appliance is installed, the mains plug of the power
cord must be freely accessible. If free access is not possible, an
isolating switch must be integrated into the permanent electrical
installation according to the installation regulations.
▶ When installing the appliance, check that the power cable is not
trapped or damaged.
If the insulation of the power cord is damaged, this is dangerous.
▶ Never let the power cord come into contact with heat sources.
WARNING‒Risk of explosion!
If the appliance's ventilation openings are sealed, a leak in the re-
frigeration circuit may result in a flammable mixture of gas and air.
▶ Keep ventilation openings, in the appliance enclosure or in the
built-in structure, clear of obstruction.
WARNING‒Risk of fire!
It is dangerous to use an extended power cord and non-approved
adapters.
▶ Do not use extension cables or multiple socket strips.
▶ Only use adapters and power cords approved by the manufac-
turer.
▶ If the power cord is too short and a longer one is not available,
please contact an electrician to have the domestic installation
adapted.

Safety en
9
Portable multiple socket strips or portable power supply units may
overheat and cause a fire.
▶ Do not place portable multiple socket strips or power supply
units on the back of the appliance.
1.6 Safe use
WARNING‒Risk of electric shock!
An ingress of moisture can cause an electric shock.
▶ Only use the appliance in enclosed spaces.
▶ Never expose the appliance to intense heat or humidity.
▶ Do not use steam- or high-pressure cleaners to clean the appli-
ance.
WARNING‒Risk of suffocation!
Children may put packaging material over their heads or wrap
themselves up in it and suffocate.
▶ Keep packaging material away from children.
▶ Do not let children play with packaging material.
Children may breathe in or swallow small parts, causing them to
suffocate.
▶ Keep small parts away from children.
▶ Do not let children play with small parts.
WARNING‒Risk of explosion!
If the cooling circuit is damaged, flammable refrigerant may es-
cape and explode.
▶ To accelerate the defrosting process, do not use any other
mechanical devices or means other than those recommended
by the manufacturer.
▶ If food is stuck to the freezer compartment, loosen it with a blunt
implement such as the handle of a wooden spoon.
Products which contain flammable propellants and explosive sub-
stances may explode, e.g. spray cans.
▶ Do not store products which contain flammable propellants (e.g.
spray cans) or explosive substances in the appliance.

en Safety
10
WARNING‒Risk of fire!
Electrical devices within the appliance may cause a fire, e.g. heat-
ers or electric ice makers.
▶ Do not operate electrical devices within the appliance.
WARNING‒Risk of injury!
Containers that contain carbonated drinks may burst.
▶ Do not store containers that contain carbonated drinks in the
freezer compartment.
Injury to the eyes caused by escaping flammable refrigerant and
hazardous gases.
▶ Do not damage the tubes of the refrigerant circuit or the insula-
tion.
The appliance may tip.
▶ Do not stand or support yourself on the base, runners or doors.
WARNING‒Risk of burns!
Individual parts on the back of the appliance become hot during
operation.
▶ Never touch these hot parts.
WARNING‒Risk of cold burns!
Contact with frozen food and cold surfaces may cause burns by
refrigeration.
▶ Never put frozen food straight from the freezer compartment
into your mouth.
▶ Avoid prolonged contact of the skin with frozen food, ice and
surfaces in the freezer compartment.
CAUTION‒Risk of harm to health!
To prevent food from being contaminated, you must observe the
following instructions.
▶ If the door is open for an extended period of time, this may lead
to a considerable temperature increase in the compartments of
the appliance.
▶ Regularly clean the surfaces that may come into contact with
food and accessible drain systems.
Safety en
11
▶ Store raw meat and fish in suitable containers in the refrigerator
so that they do not touch or drip on other food.
▶ If the fridge/freezer is empty for an extended period of time,
switch off the appliance, defrost it, clean it and leave the door
open to prevent the formation of mould.
Metal or metal-style parts in the appliance may contain aluminium.
If acidic food comes into contact with aluminium in the appliance,
aluminium foil ions may pass into the food.
▶ Do not consume soiled food.
1.7 Damaged appliance
WARNING‒Risk of electric shock!
If the appliance or the power cord is damaged, this is dangerous.
▶ Never operate a damaged appliance.
▶ Never pull on the power cord to unplug the appliance. Always
unplug the appliance at the mains.
▶ If the appliance or the power cord is damaged, immediately un-
plug the power cord or switch off the fuse in the fuse box.
▶ Call customer services. →Page29
Incorrect repairs are dangerous.
▶ Repairs to the appliance should only be carried out by trained
specialist staff.
▶ Only use genuine spare parts when repairing the appliance.
▶ If the power cord of this appliance is damaged, it must be re-
placed with a special connection cable, which is available from
the manufacturer or his Customer Service.
WARNING‒Risk of fire!
If the tubes are damaged, flammable refrigerant and harmful
gases may escape and ignite.
▶ Keep naked flames and ignition sources away from the appli-
ance.
▶ Ventilate the room.
▶ Switch off the appliance. →Page18


Preventing material damage en
13
2 Preventing material
damage
ATTENTION!
If not rolling freely, the appliance's
castors may damage the floor when
the appliance is moved.
▶ Transport the appliance using a
sack truck.
▶ Use floor protection when moving
the appliance, and do not move it
in a zigzag fashion.
Using the base, runners or appliance
doors as a seat surface or climbing
surface may damage the appliance.
▶ Do not stand or support yourself
on the base, runners or doors.
Contamination with oil or fat may
cause plastic parts and door seals to
become porous.
▶ Keep plastic parts and door seals
free of oil and grease.
Metal or metal-style parts in the appli-
ance may contain aluminium. Alu-
minium reacts when it comes into
contact with acidic foods.
▶ Do not store unpackaged food in
the appliance.
3 Environmental protec-
tion and saving energy
3.1 Disposing of packaging
The packaging materials are environ-
mentally compatible and can be re-
cycled.
▶ Sort the individual components by
type and dispose of them separ-
ately.
3.2 Saving energy
If you follow these instructions, your
appliance will use less power.
Selecting the installation location
¡ Keep the appliance out of direct
sunlight.
¡ Install the appliance as far away as
possible from heating elements,
cookers and other heat sources:
– Maintain a 30mm clearance to
electric or gas cookers.
– Maintain a 300mm clearance to
oil or solid-fuel cookers.
¡ Make sure there is a small gap
between the side wall and the ap-
pliance.
¡ Never cover or block the external
ventilation openings.
Saving energy during use
Note:The arrangement of the fittings
does not affect the energy consump-
tion of the appliance.
¡ Open the appliance only briefly
and then close it carefully.
¡ Never cover or block the interior
ventilation openings or the exterior
ventilation openings.
¡ Transport purchased food in a
cool bag and place in the appli-
ance quickly.
¡ Allow warm food and drinks to
cool down before storing them.
¡ Thaw frozen food in the refrigerator
compartment to utilise the low tem-
perature of the food.
¡ Always leave some space between
the food and to the back panel.

en Installation and connection
14
4 Installation and con-
nection
4.1 Scope of delivery
After unpacking all parts, check for
any transport damage and for com-
pleteness of delivery.
If you have any complaints, contact
your dealer or our after-sales service
→Page29.
The delivery consists of the following:
¡ Free-standing appliance
¡ Equipment and accessories
1
¡ Installation instructions
¡ User manual
¡ Customer service directory
¡ Warranty enclosure
2
¡ Energy label
¡ Information on energy consump-
tion and noises
4.2 Criteria for the installation
location
WARNING
Risk of explosion!
If the appliance is in a space that is
too small, a leak in the refrigeration
circuit may result in a flammable mix-
ture of gas and air.
▶ Only install the appliance in a
space with a volume of at least
1m
3
per 8g refrigerant. The
volume of refrigerant is indicated
on the rating plate. →Fig.
1
/
5
The weight of the appliance ex works
may be up to 95kg depending on
the model.
The subfloor must be sufficiently
stable to bear the weight of the appli-
ance.
Permitted room temperature
The permitted room temperature de-
pends on the appliance's climate
class.
The climate class can be found on
the rating plate. →Fig.
1
/
5
Climate
class
Permitted room tem-
perature
SN 10°C to 32°C
N 16°C to 32°C
ST 16°C to 38°C
T 16°C to 43°C
The appliance is fully functional within
the permitted room temperature.
If an appliance with climate class SN
is operated at colder room temperat-
ures, the appliance will not be dam-
aged up to a room temperature of
5°C.
Over-and-under and side-by-side
installation
If you want to install 2 refrigerating
appliances one over the other or side
by side, you must maintain a clear-
ance of at least 150mm between the
appliances. Selected appliances can
be installed without a minimum clear-
ance. Ask your dealer or kitchen
planner about this.
4.3 Installing the appliance
▶ Install the appliance in accordance
with the enclosed installation in-
structions.
1
Depending on the appliance specifications
2
Not in all countries
Familiarising yourself with your appliance en
15
4.4 Preparing the appliance
for the first time
1. Remove the informative material.
2. Remove the protective foil and
transit bolts, e.g. remove the ad-
hesive strips and carton.
3. Clean the appliance for the first
time. →Page23
4.5 Connecting the appliance
to the electricity supply
1. Insert the non-heating appliance
plug of the power cable into the
appliance.
2. Insert the mains plug of the appli-
ance's power cable in a socket
nearby.
The connection data of the appli-
ance can be found on the rating
plate. →Fig.
1
/
5
3. Check the mains plug is inserted
properly.
a The appliance is now ready for
use.
5 Familiarising yourself
with your appliance
5.1 Appliance
You can find an overview of the parts
of your appliance here.
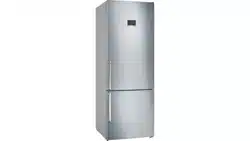
→Fig.
1
A
Refrigerator compartment
→Page20
B
Freezer compartment
→Page21
1
Lighting
2
Interior ventilation opening
3
Bottle shelf →Page16
4
Temperature controller (stor-
age container) →Page18
5
Rating plate →Page29
6
Storage container
→Page16
7
Fruit and vegetable container
with humidity control
→Page16
8
Frozen food container
→Page24
9
Ice cube maker →Page17
10
Screw foot
11
Control panel
12
Door storage compartment
for large bottles →Page17
Note:Deviations between your appli-
ance and the diagrams may differ
with regard to their features and size.
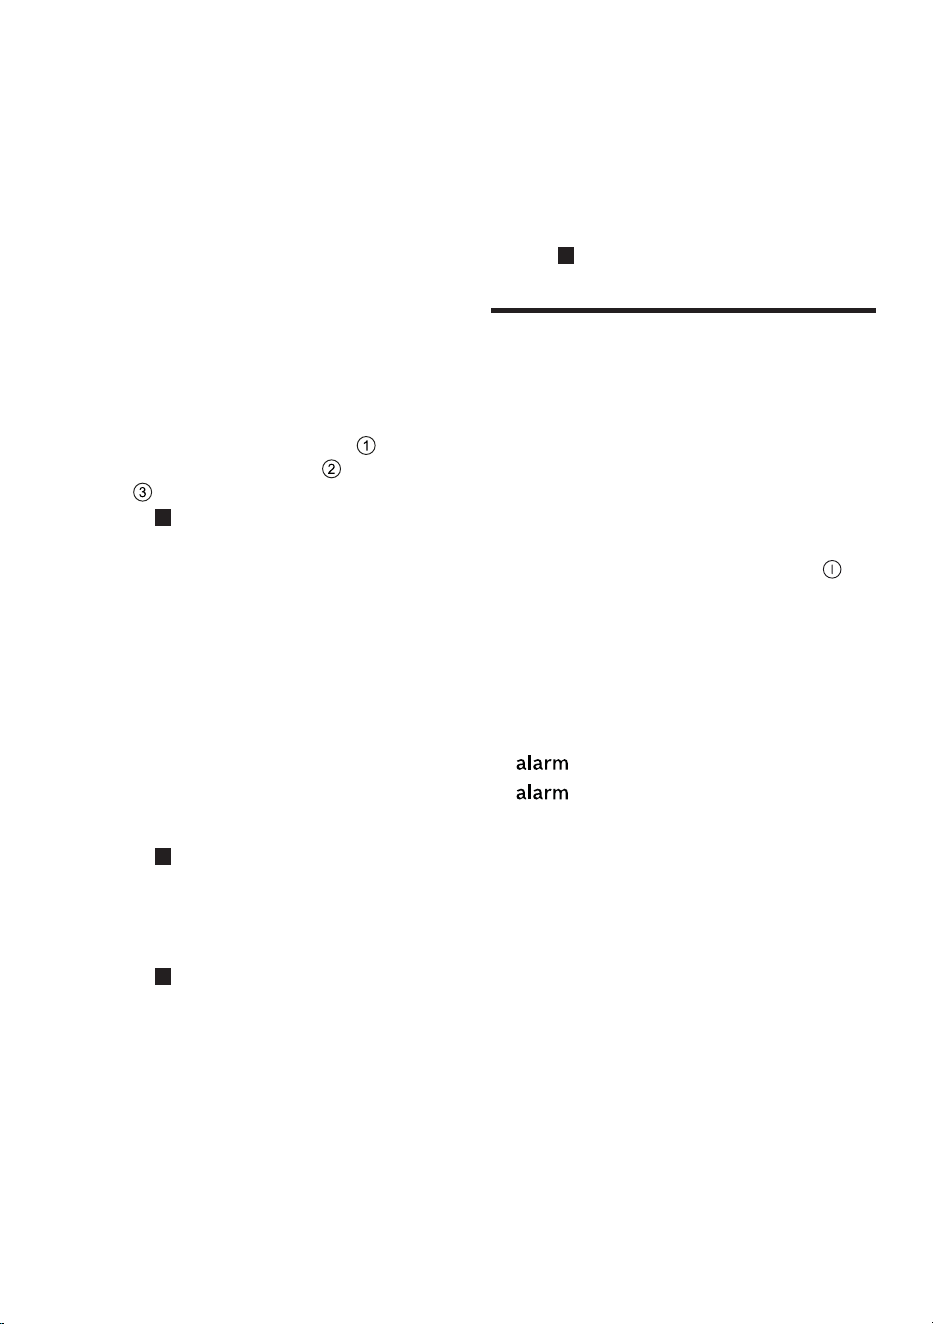
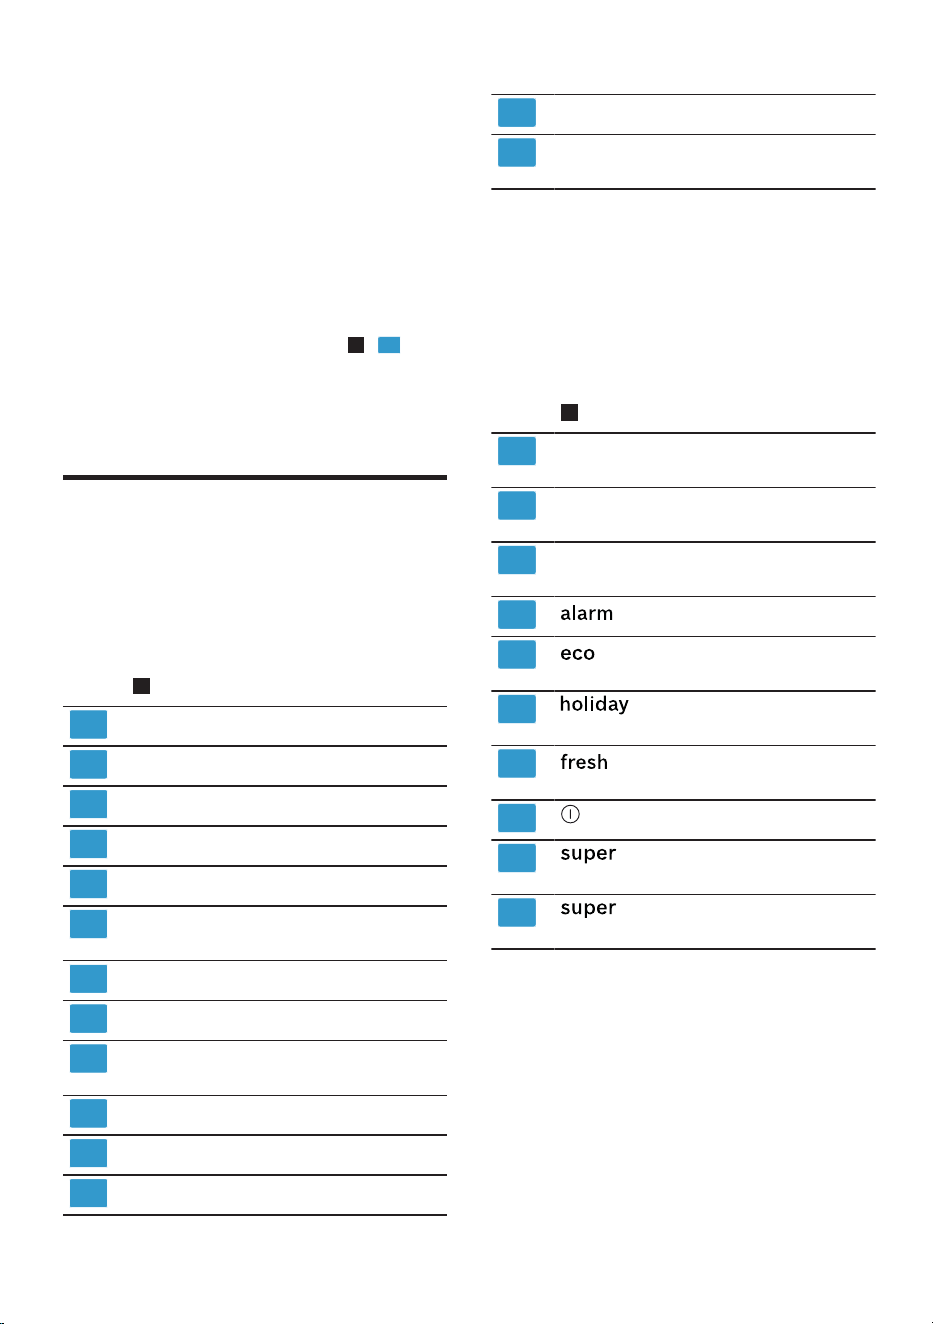
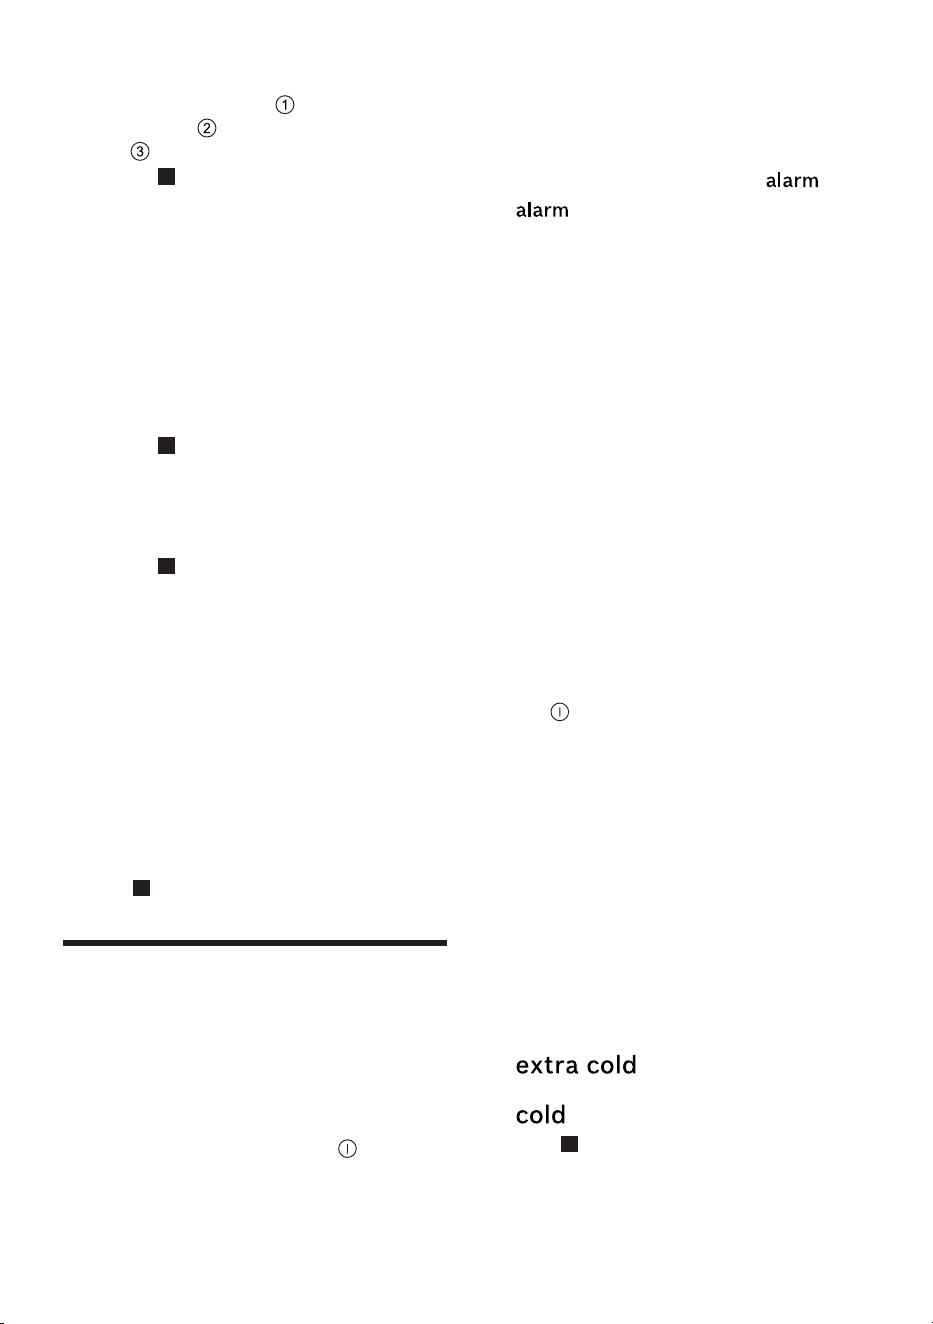
5.2 Control panel
You can use the control panel to con-
figure all functions of your appliance
and to obtain information about the
operating status.
→Fig.
2
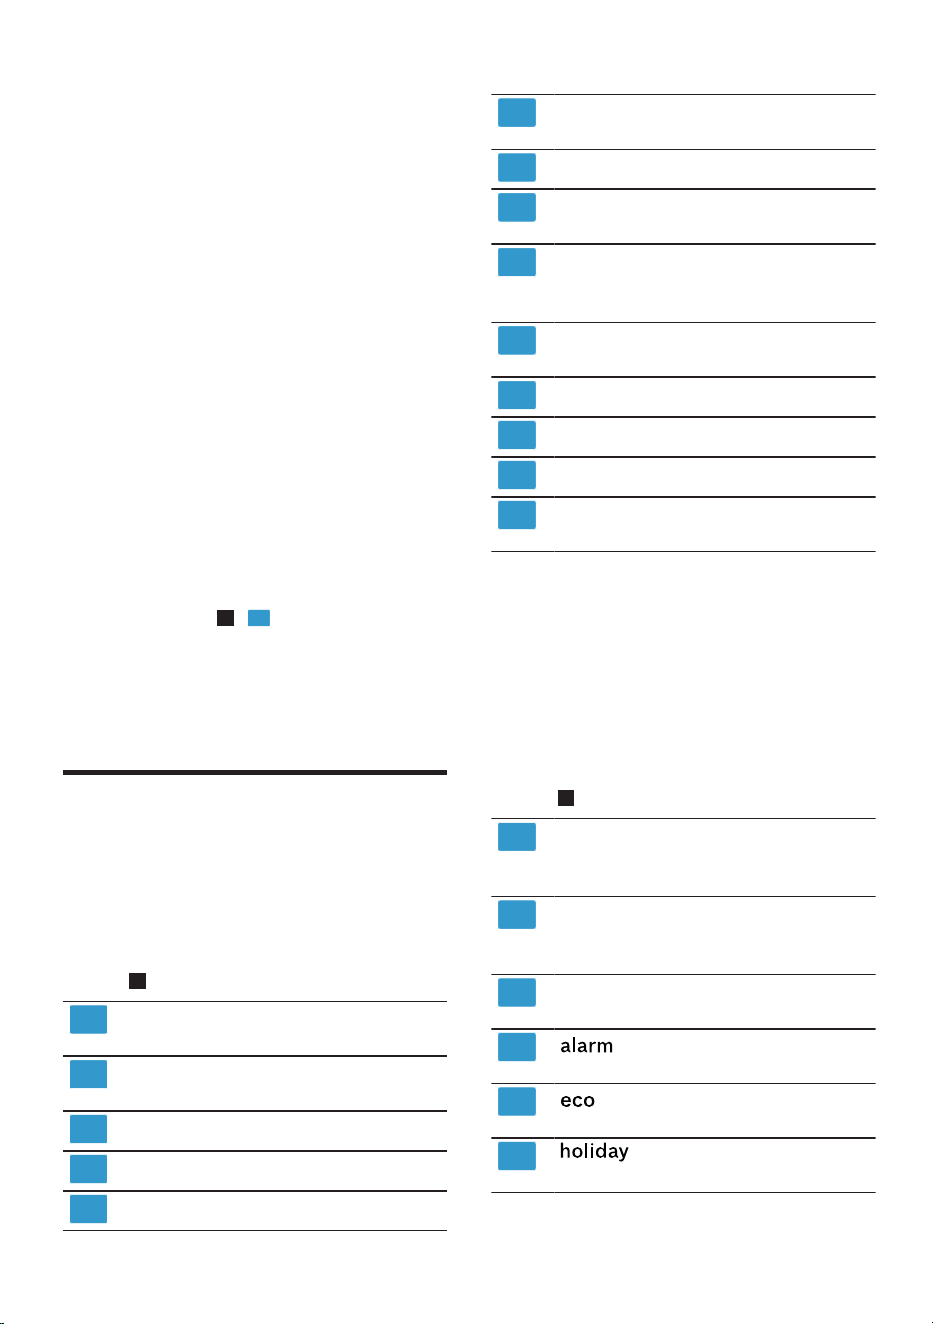
1
Displays the set temperature
for the refrigerator compart-
ment in°C.
2
Displays the set temperature
for the freezer compartment
in °C.
3
The light bar provides visual
feedback.
4
switches the warning
signal off.
5
switches energy-saving
mode on or off.
6
switches holiday mode
on or off.
en Features
16
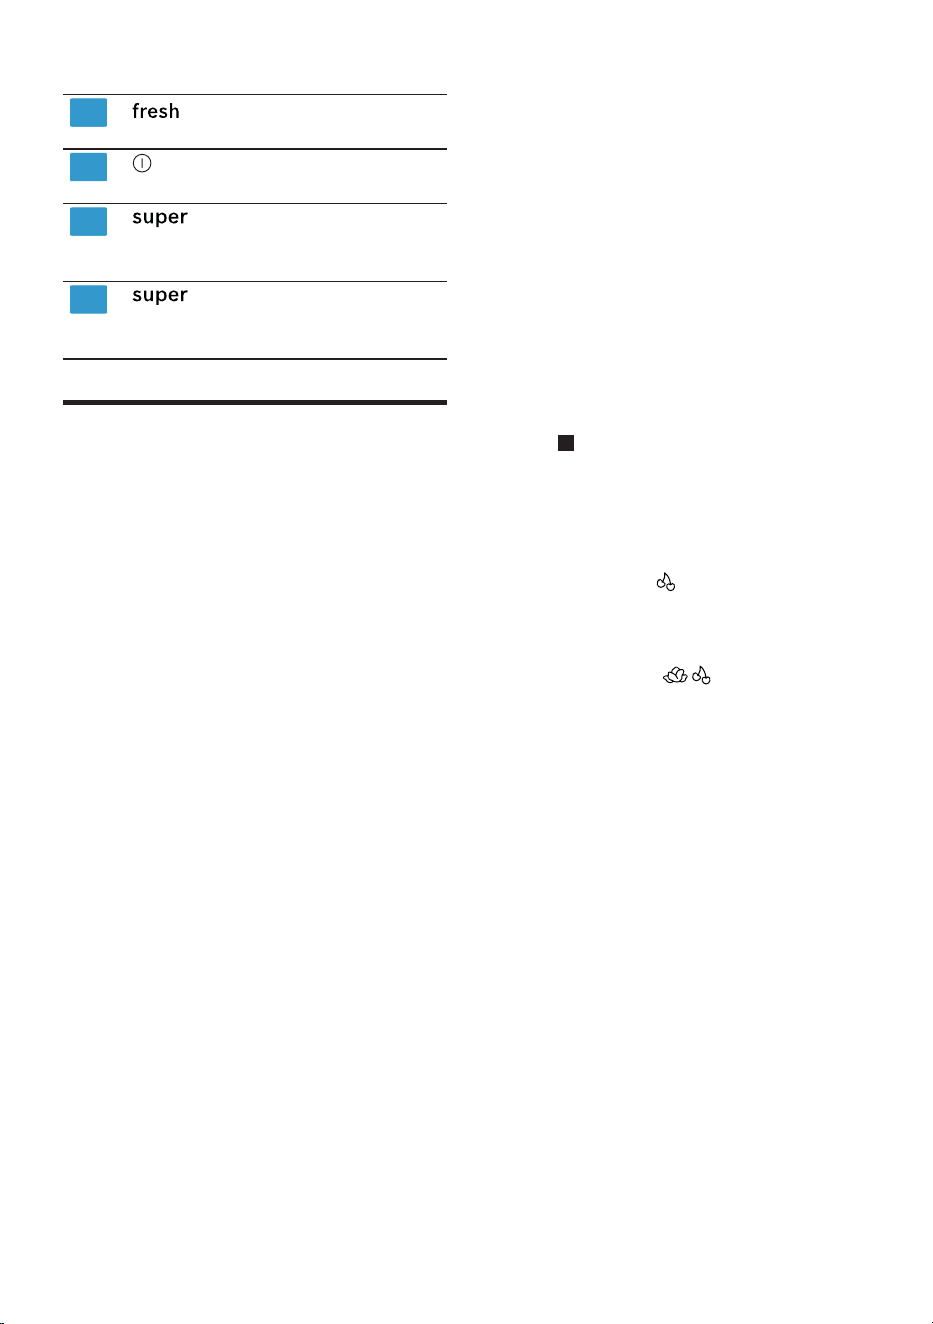
7
switches freshness
mode on or off.
8
switches the appliance on
or off.
9
(Freezer compartment)
switches Super freezing on or
off.
10
(Refrigerator compart-
ment) switches Super cooling
on or off.
6 Features
The features of your appliance de-
pend on the model.
6.1 Shelf
To vary the shelf as required, you
can remove the shelf and re-insert it
elsewhere.
→"Removing the shelf", Page24
6.2 Bottle shelf
Store bottles securely on the bottle
shelf.
To vary the bottle shelf as required,
you can remove the bottle shelf and
re-insert it elsewhere.
→"Removing the shelf", Page24
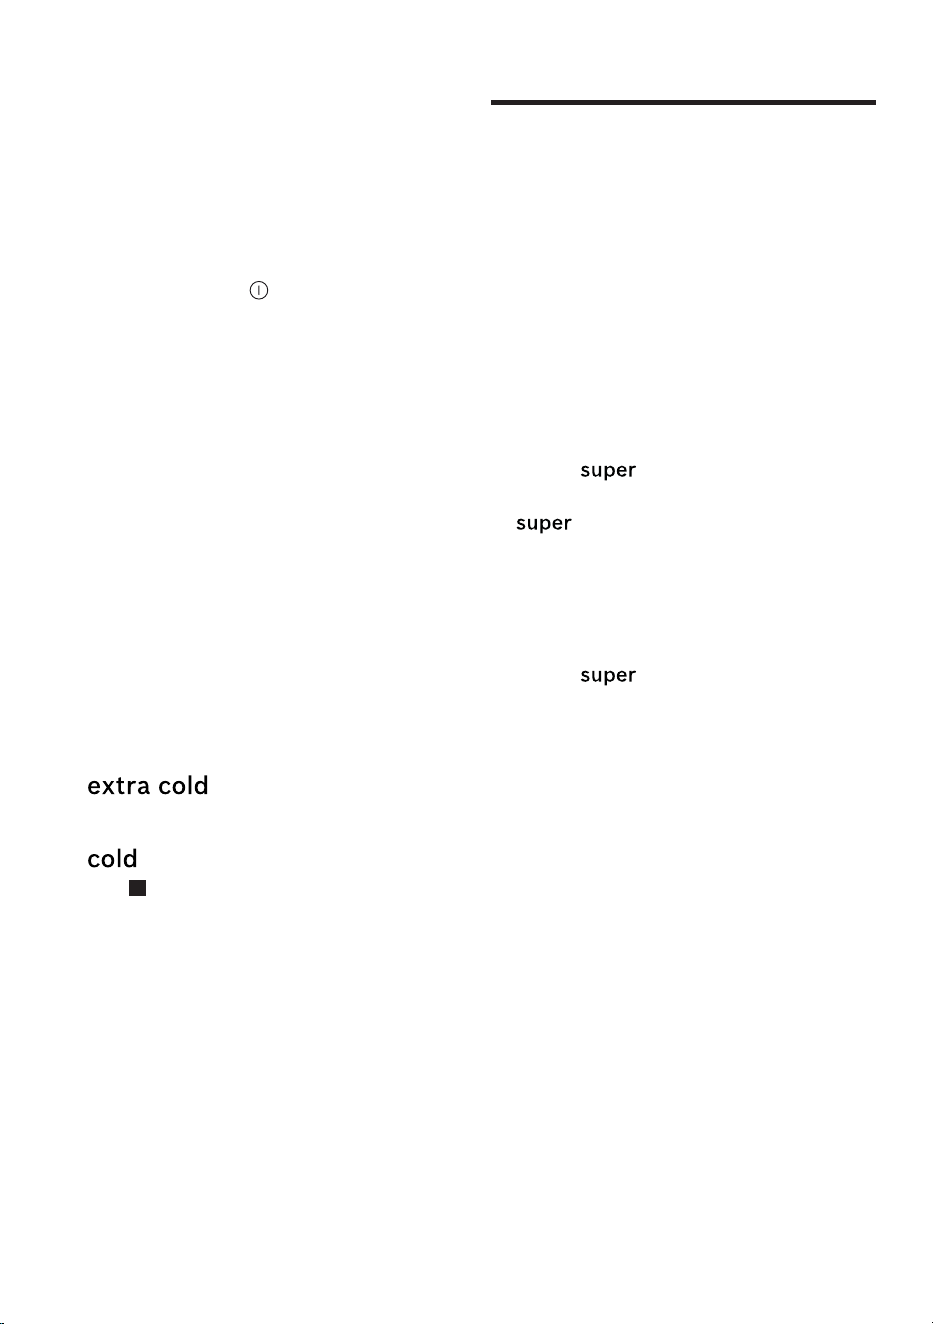
6.3 Storage container
The temperatures in the storage con-
tainer are lower than in the refriger-
ator compartment. Temperatures be-
low 0°C may occur occasionally.
In order to reach temperatures close
to 0 °C in the storage container, set
the refrigerator compartment temper-
ature to 2 °C. →Page18
Use the lower temperatures in the
storage container to store highly per-
ishable food, e.g. fish, meat and
sausages.
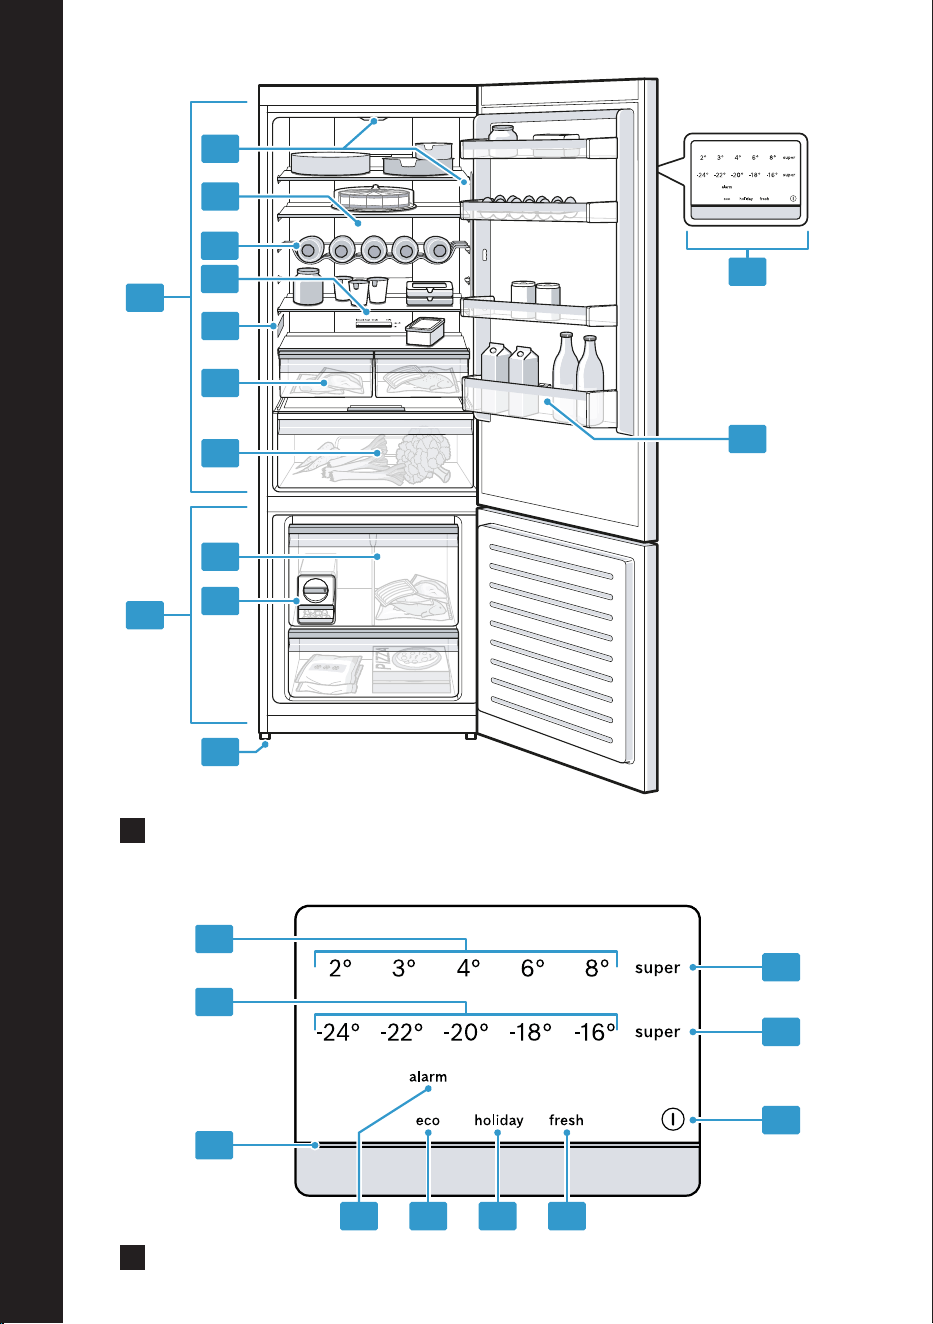
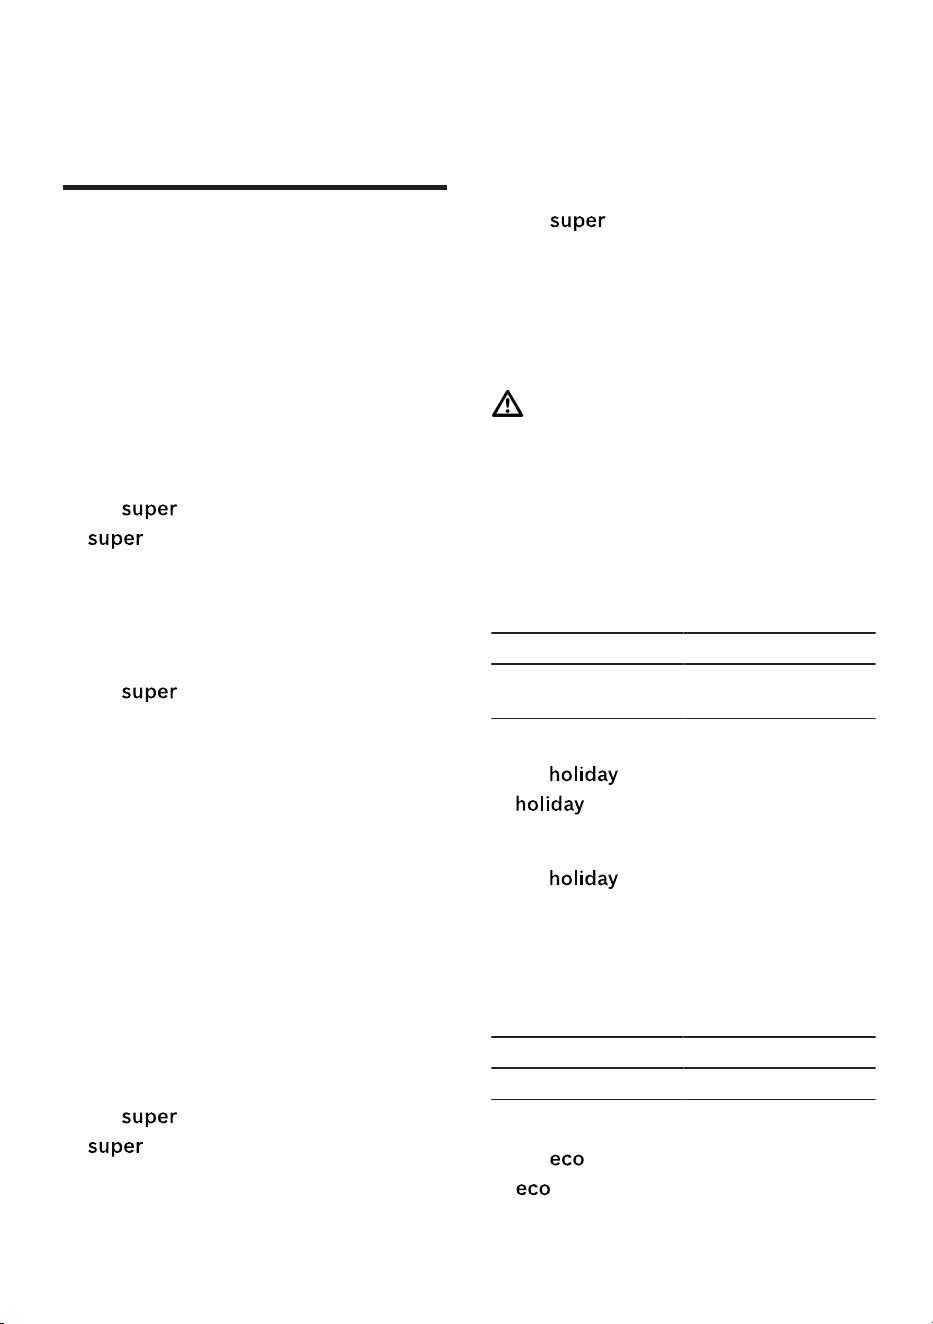
6.4 Fruit and vegetable con-
tainer with humidity con-
trol
Store fresh fruit and vegetables loose
in the fruit and vegetable container.
Cover any chopped fruit and veget-
ables, or store in air-tight packaging.
You can adjust the humidity in the
fruit and vegetable container using
the humidity controller. This allows
fresh fruit and vegetables to be
stored for longer than with conven-
tional storage.
→Fig.
3
The air humidity in the fruit and
vegetable container can be set
according to the type and amount of
food to be stored by moving the
humidity controller:
¡ Low humidity required when
primarily storing fruit or mixed
items, or if the appliance is very
full.
¡ High humidity required when
primarily storing vegetables or
when the appliance is not very full.
Condensation may form in the fruit
and vegetable container depending
on the food and quantity stored.
Remove the condensation with a dry
cloth and adjust the air humidity to a
lower setting using the humidity con-
troller.
To ensure that the quality and aroma
are retained, store fruit and veget-
ables that are sensitive to cold out-
side of the appliance at temperatures
of approx. 8°C to 12°C, e.g. pine-
apple, bananas, citrus fruits, cucum-
bers, courgettes, peppers, tomatoes
and potatoes.
operation en
17
6.5 Door rack
To adjust the door rack as required,
you can remove the door rack and
re-insert elsewhere.
→"Removing door rack", Page24
6.6 Ice cube maker
Use the ice cube maker to make ice
cubes out of drinking water.
Making ice cubes
Use only drinking water tomake ice
cubes.
1. Remove the ice cube tray , fill ¾
full with drinking water and re-in-
sert .
→Fig.
4
Note:If it is filled with too much
drinking water, this may impair the
function of the ice cube maker.
The ice cubes cannot be removed
individually from the ice cube tray.
Too much drinking water was ad-
ded and isrunning into the ice
cube container, causing any ice
cubes tofreeze together.
2. When the ice cubes are frozen, ro-
tate the knob on the ice cube tray
several times in a clockwise direc-
tion and release it.
→Fig.
5
a The ice cubes will loosen and fall
into the ice cube container.
3. Pull out the ice storage container
and remove the ice cubes.
→Fig.
6
6.7 Accessories
Use original accessories. These have
been made especially for your appli-
ance.
The accessories for your appliance
depend on the model.
Egg tray
Store eggs safely on the egg tray.
Bottle shelf
Store bottles securely on the bottle
shelf.
→Fig.
7
operation
7 Basic operation
operation
7.1 Switching on the appli-
ance
1. Electrically connect the appliance.
→Page15
Note:If the appliance has been
previously switched off using the
control panel, press and hold
for threeseconds.
a The appliance begins to cool.
a A warning signal sounds and the
temperature display flashes be-
cause the freezer compartment is
still too warm.
2. Switch off the warning tone using
.
a goes out as soon as the set
temperature has been reached.
3. Set the required temperature.
→Page18
7.2 Operating tips
¡ Once you have switched on the
appliance, the set temperature is
only reached after several hours.
Do not put any food in the appli-
ance until the set temperature has
been reached.
¡ The front panels of the housing are
temporarily heated slightly. This
prevents condensation in the area
of the door seal.
en Additional functions
18
¡ When you close the door, a va-
cuum may be created. The door is
then difficult to open again. Wait a
moment until the vacuum is offset.
7.3 Switching off the appli-
ance
▶ Press and hold for
threeseconds.
7.4 Setting the temperature
Setting the refrigerator
compartment temperature
▶ Press the required temperature.
To reach the set temperature, slide
the temperature controller for the
storage container to a position that
is one third from the bottom.
→Page18
The recommended temperature in
the refrigerator compartment is
4°C.
Setting the storage container
temperature
1. To reduce the temperature, slide
the temperature controller in the
direction.
2. To increase the temperature, slide
the temperature controller in the
direction.
→Fig.
8
Setting the freezer compartment
temperature
▶ Press the required temperature.
The recommended temperature in
the freezer compartment is
−18°C.
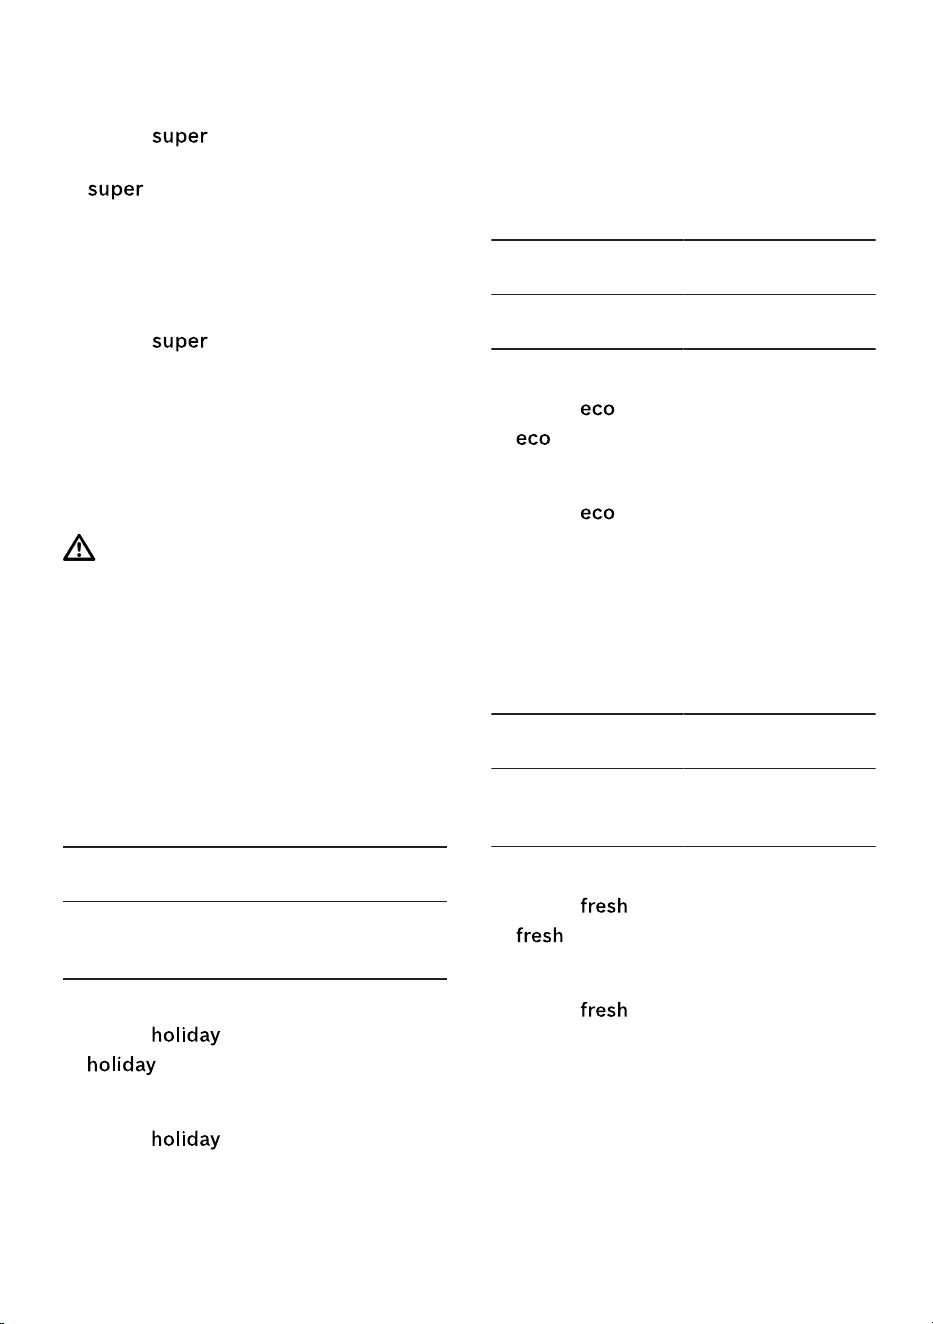
8 Additional functions
8.1 Super cooling
With Super cooling, the refrigerator
compartment cools as cold as pos-
sible.
Switch on Super cooling before pla-
cing large quantities of food.
Note:When Super cooling is
switched on, increased noise may
occur.
Switching on Super cooling
▶ Press (Refrigerator compart-
ment).
a (Refrigerator compartment)
lights up.
Note:After approx. 6hours, the ap-
pliance switches to normal operation.
Switching off Super cooling
▶ Press (Refrigerator compart-
ment).
8.2 Super freezing
With Super freezing, the freezer com-
partment cools as cold as possible.
Switch on Super freezing four to
sixhours before placing food weigh-
ing 2kg or more into the freezer
compartment.
In order to utilise the freezer capacity,
use Super freezing.
→"Prerequisites for freezing capa-
city", Page21
Note:When Super freezing is
switched on, increased noise may
occur.
Additional functions en
19
Switching on Super freezing
▶ Press (Freezer compart-
ment).
a (Freezer compartment) lights
up.
Note:After approx. 54hours, the ap-
pliance switches to normal operation.
Switching off Super freezing
▶ Press (Freezer compart-
ment).
8.3 Holiday mode
If you are going to be away for a long
time, you can switch on energy-sav-
ing holiday mode on the appliance.
CAUTION
Risk of harm to health!
The refrigerator compartment heats
up while the holiday mode is
switched on. The increased temperat-
ure may cause bacteria to increase
and spoil the food.
▶ When the holiday mode is
switched on, do not store any food
in the refrigerator compartment.
The appliance automatically sets the
temperatures.
Refrigerator com-
partment
14°C
Freezer compart-
ment
Temperature re-
mains un-
changed
Switching on holiday mode
▶ Press .
a lights up.
Switching off holiday mode
▶ Press .
8.4 Energy-saving mode
You can set the appliance to save
energy with the energy-saving mode.
The appliance automatically sets the
temperatures.
Refrigerator com-
partment
8°C
Freezer compart-
ment
−16°C
Switching on energy-saving mode
▶ Press .
a lights up.
Switching off energy-saving mode
▶ Press .
8.5 Freshness mode
In order to keep the food fresh for
longer, you can switch on the fresh-
ness mode on the appliance.
The appliance automatically sets the
temperatures.
Refrigerator com-
partment
2°C
Freezer compart-
ment
Temperature re-
mains un-
changed
Switching freshness mode on
▶ Press .
a lights up.
Switching off freshness mode
▶ Press .
en Alarm
20
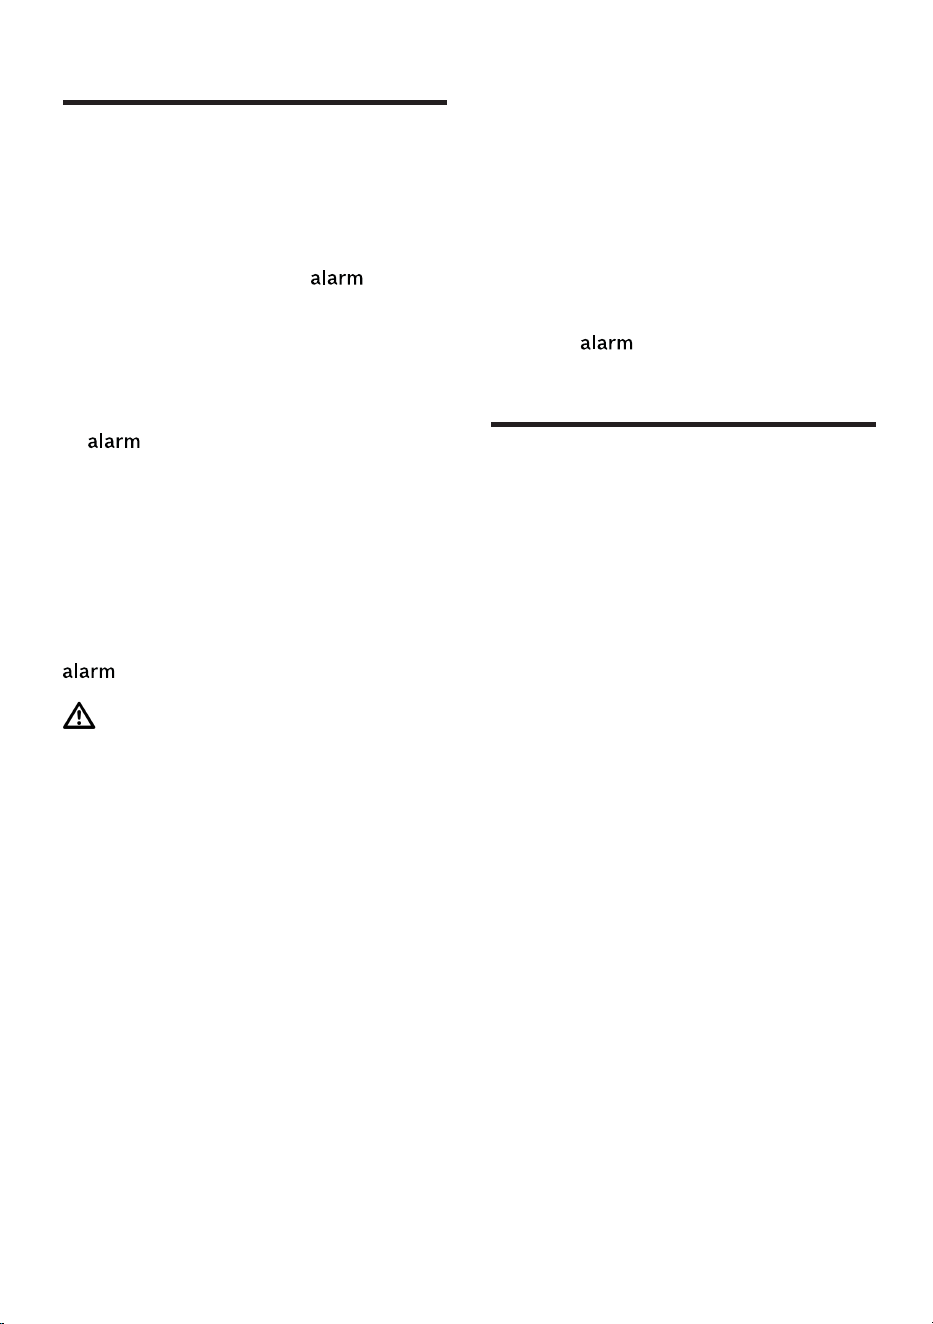
9 Alarm
9.1 Door alarm
If the appliance door is open for a
while, the door alarm switches on.
A warning tone sounds, flashes,
the light bar flashes and the temper-
ature display for the affected com-
partment flashes.
Switching off the door alarm
▶ Close the appliance door or press
.
a The warning tone is switched off.
9.2 Temperature alarm
If the freezer compartment becomes
too warm, the temperature alarm is
switched on.
A warning tone sounds and the set
temperature (freezer compartment),
and the light bar flash.
CAUTION
Risk of harm to health!
During the thawing process, bacteria
may multiply and spoil the frozen
food.
▶ Do not refreeze food after it has
been defrosted or started to de-
frost.
▶ Refreeze food only after cooking.
▶ These items should no longer be
stored for the maximum storage
period.
The temperature alarm can be
switched on in the following cases:
¡ The appliance is switched on.
Do not store any food until the ap-
pliance has reached the set tem-
perature.
¡ Large quantities of fresh food are
being placed inside.
Switch on Super freezing before
placing large quantities of food in
the appliance.
¡ The freezer compartment door is
open for too long.
Check whether the frozen food has
defrosted or thawed.
Switching off the temperature
alarm
▶ Press .
a The warning tone is switched off.
10 Refrigerator compart-
ment
You can keep meat, sausage, fish,
dairy products, eggs, prepared meals
and pastries in the refrigerator com-
partment.
The temperature can be set from
2°C to 8°C.
The refrigerator compartment can
also be used to store highly perish-
able foods in the short to medium
term. The lower the selected temper-
ature, the longer the food remains
fresh.
10.1 Tips for storing food in
the refrigerator compart-
ment
¡ Only store food when fresh and
undamaged.
¡ Store food covered or in air-tight
packaging.
¡ To avoid impeding the circulation
of air and to prevent food from
freezing, do not place food in front
of the inner ventilation openings or
in direct contact with the back wall.
¡ Allow hot food and drinks to cool
down first before placing in the ap-
pliance.

Freezer compartment en
21
¡ Observe the best-before date or
use-by date specified by the manu-
facturer.
10.2 Chill zones in the refri-
gerator compartment
The air circulation in the refrigerator
compartment creates different chill
zones.
Coldest zone
The coldest zone is in the storage
container.
Tip:Store highly perishable food
such as fish, sausages and meat in
the coldest zone.
Warmest zone
The warmest zone is at the very top
of the door.
Tip:Store food that does not spoil
easily in the warmest zone, e.g. hard
cheese and butter. Cheese can then
continue to release its aroma and the
butter will still be easy to spread.
11 Freezer compartment
You can store frozen food, freeze
food and make ice cubes in the
freezer compartment.
The temperature can be set from
−16°C to −24°C.
Long-term storage of food should be
at –18°C or lower.
The freezer compartment can be
used to store perishable food long-
term. The low temperatures slow
down or stop the spoilage.
11.1 Freezing capacity
The freezing capacity indicates the
quantity of food that can be frozen
right through to the centre within a
specific period of time.
Information on freezing capacity can
be found on the rating plate.
→Fig.
1
/
5
Prerequisites for freezing capacity
1. Approx. 24 hours before placing
fresh food in the appliance, switch
on Super freezing.
→"Switching on Super freezing",
Page19
2. Place food in the bottom frozen
food container first.
11.2 Fully utilising the freezer
compartment volume
Learn how to store the maximum
amount of frozen food in the freezer
compartment.
1. Remove all fittings from the freezer
compartment. →Page24
2. Store food directly on the shelves
and on the floor of the freezer
compartment.
11.3 Tips for storing food in
the freezer compartment
¡ Store food in air-tight packaging.
¡ Do not bring food which is to be
frozen into contact with frozen
food.
¡ Place thefood over thewhole area
ofthefrozen food containers.
¡ To quickly and gently freeze larger
quantities of fresh food, place this
in the bottom frozen food con-
tainer.
¡ To ensure that the air can circulate
freely in the appliance, push the
frozen food containers in as far as
they will go.
en Freezer compartment
22
11.4 Tips for freezing fresh
food
¡ Freeze fresh and undamaged food
only.
¡ Freeze food in portions.
¡ Cooked food is more suitable than
food that can be eaten raw.
¡ Vegetables: Wash, chop up and
blanch before freezing.
¡ Fruit: Wash, pit and perhaps peel,
possibly add sugar or ascorbic
acid solution.
¡ Food that is suitable for freezing in-
cludes baked items, fish and sea-
food, meat, game, poultry, eggs
without shells, cheese, butter and
quark, ready meals and leftovers.
¡ Food that is unsuitable for freezing
includes lettuce, radishes, eggs in
shells, grapes, raw apples and
pears, yoghurt, sour cream, crème
fraîche and mayonnaise.
Packing frozen food
If you select suitable packaging ma-
terial and the correct type of pack-
aging, you can determine the product
quality and prevent freezer burn.
1. Place the food in the packaging.
2. Squeeze out the air.
3. Pack food airtight to prevent it
from losing flavour and drying out.
4. Label the packaging with the con-
tents and the date of freezing.
11.5 Shelf life of frozen food
at −18°C
Food Storage time
Fish, sausages, pre-
pared meals and
baked goods
up to
6months
Poultry, meat up to
8months
Food Storage time
Vegetables, fruit up to
12months
The imprinted freezer calendar indic-
ates the maximum storage duration
in months at a constant temperature
of –18°C.
11.6 Defrosting methods for
frozen food
CAUTION
Risk of harm to health!
During the thawing process, bacteria
may multiply and spoil the frozen
food.
▶ Do not refreeze food after it has
been defrosted or started to de-
frost.
▶ Refreeze food only after cooking.
▶ These items should no longer be
stored for the maximum storage
period.
¡ Defrost animal-based food, such
as fish, meat, cheese, quark, in the
refrigerator compartment.
¡ Defrost bread at room temperat-
ure.
¡ Prepare food for immediate con-
sumption in the microwave, in the
oven or on the hob.

Defrosting en
23
12 Defrosting
12.1 Defrosting in the refri-
gerator compartment
The refrigerator compartment in your
appliance defrosts automatically.
12.2 Defrosting in the freezer
compartment
The fully automatic NoFrost system
ensures that the freezer compartment
remains frost-free. Defrosting is not
required.
13 Cleaning and servi-
cing
To keep your appliance working effi-
ciently for a long time, it is important
to clean and maintain it carefully.
Customer Service must clean inac-
cessible points. Cleaning by cus-
tomer service can give rise to costs.
13.1 Preparing the appliance
for cleaning
1. Switch off the appliance.
→Page18
2. Disconnect the appliance from the
power supply.
Unplug the appliance from the
mains or switch off the circuit
breaker in the fuse box.
3. Take out all of the food and store it
in a cool place.
Place ice packs (if available) onto
the food.
4. Remove all fittings and accessor-
ies from the appliance.
→Page24
13.2 Cleaning the appliance
WARNING
Risk of electric shock!
An ingress of moisture can cause an
electric shock.
▶ Do not use steam- or high-pres-
sure cleaners to clean the appli-
ance.
Liquid in the lighting, controls or in-
ner ventilation openings can be dan-
gerous.
▶ The rinsing water must not drip
into the lighting, controls or inner
ventilation openings.
ATTENTION!
Unsuitable cleaning products may
damage the surfaces of the appli-
ance.
▶ Do not use hard scouring pads or
cleaning sponges.
▶ Do not use harsh or abrasive de-
tergents.
▶ Do not use cleaning products with
a high alcohol content.
If you clean fittings and accessories
in the dishwasher, this may cause
them to become deformed or discol-
our.
▶ Never clean fittings and accessory
in the dishwasher.
1. Prepare the appliance for cleaning.
→Page23
2. Clean the appliance, the fittings,
the accessories and the door seals
with a dish cloth, lukewarm water
and a little pH-neutral washing-up
liquid.
3. Dry thoroughly with a soft, dry
cloth.
4. Insert the fittings.
5. Electrically connect the appliance.
→Page15
6. Putting the food into the appliance.
en Cleaning and servicing
24
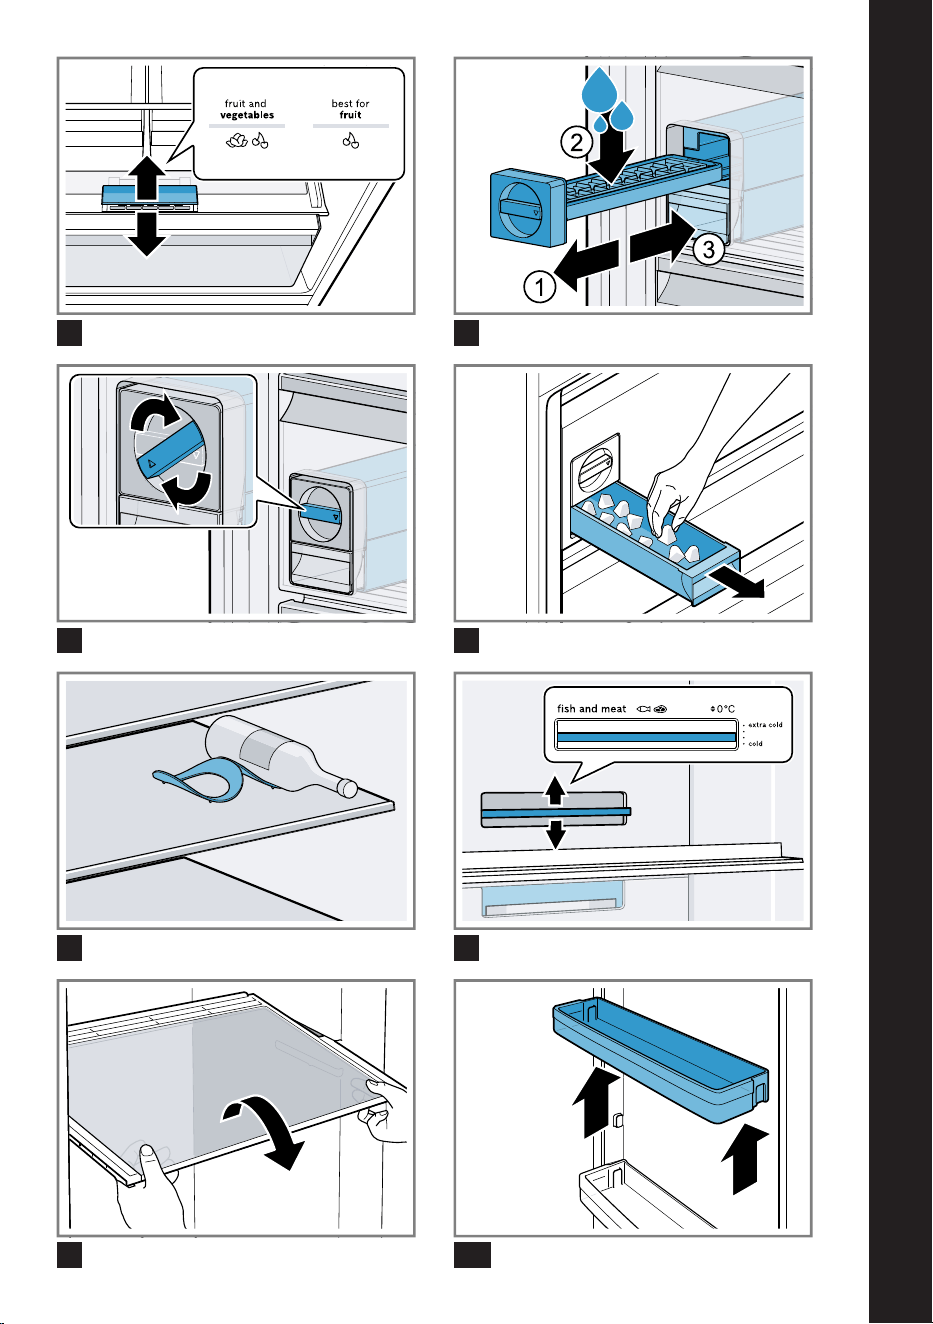
13.3 Removing the fittings
If you want to clean the fittings thor-
oughly, remove these from your ap-
pliance.
Removing the shelf
▶ Pull out and remove the shelf.
→Fig.
9
Removing door rack
▶ Lift the door rack and remove it.
→Fig.
10
Removing the storage container
1. Pull out the storage container as
far as it will go.
2. Lift the storage container at the
front and remove it .
→Fig.
11
Removing the fruit and vegetable
container
1. Pull out the fruit and vegetable
container as far as it will go.
2. Lift the fruit and vegetable con-
tainer at the front and remove it
.
→Fig.
12
Removing the frozen food
container
1. Take out the frozen food container
as far as it will go.
2. Lift the frozen food container at the
front and remove it .
→Fig.
13
Removing the front of the
container
You can remove the front of the fruit
and vegetable container to facilitate
cleaning.
▶ Press in the snap-in hooks on the
side of the container and re-
move the front from the container
in a turning motion .
→Fig.
14
Removing the ice cube maker
1. Pull out the frozen food container
as far as it will go.
2. Loosen the clip on the left side of
the container by pressing it to-
gether and remove the ice cube
maker .
→Fig.
15
Troubleshooting en
25
14 Troubleshooting
You can rectify minor faults on your appliance yourself. Read the troubleshoot-
ing information before contacting after-sales service. This will avoid unneces-
sary costs.
WARNING
Risk of electric shock!
Incorrect repairs are dangerous.
▶ Repairs to the appliance should only be carried out by trained specialist
staff.
▶ Only use genuine spare parts when repairing the appliance.
▶ If the power cord of this appliance is damaged, it must be replaced with a
special connection cable, which is available from the manufacturer or his
Customer Service.
Fault Cause and troubleshooting
The appliance is not
cooling, the displays
and lighting are lit.
Showroom mode is switched on.
1.
Switch off the appliance. →Page18
2. Wait 2minutes.
3.
Switch the appliance back on. →Page17
4. Wait 1 minute and then press and hold (Refri-
gerator compartment) until 4 audible signals have
sounded.
5. After a short time, check whether your appliance is
cooling.
The LED lighting does
not work.
Different causes are possible.
▶ Call customer service.
The customer service number can be found in the
enclosed customer service directory.
Side panels of the ap-
pliance are warm.
Not a fault. The side panels contain pipes which heat
up during the cooling process. Units touching the ap-
pliance will not be damaged by the heat.
No action required.
A warning tone
sounds and the tem-
perature display (refri-
gerator compartment),
and the light bar
flash.
The door alarm is
switched on.
The refrigerator compartment door is open.
▶ Close the refrigerator compartment door.
en Troubleshooting
26
Fault Cause and troubleshooting
A warning tone
sounds and the tem-
perature display
(freezer compart-
ment), and the
light bar flash.
The door alarm is
switched on.
The freezer compartment door is open.
▶ Close the freezer compartment door.
A warning tone
sounds and the set
temperature (freezer
compartment),
and the light bar flash.
The temperature
alarm is switched on.
Different causes are possible.
▶ Press .
a The alarm is switched off.
External ventilation openings are covered up.
▶ Remove any obstructions from in front of the ex-
ternal ventilation openings.
Larger quantities of fresh food have been put in.
▶ Do not exceed the max. freezing capacity.
→"Freezing capacity", Page21
The set temperature is
not reached.
Fully automatic de-
frosting no longer
works.
The freezer compartment door was open for a long
time. The evaporator (refrigeration unit) in the noFrost
system is heavily iced up.
Requirement:Store the frozen food well insulated in a
cool place.
1.
Switch off the appliance. →Page18
2. Disconnect the appliance from the mains.
Unplug the appliance from the mains or switch off
the circuit breaker in the fuse box.
3. Move the appliance away from the wall.
4. Leave the appliance door open.
a After approx. 20 minutes, the condensation starts to
run into the evaporation pan at the rear of the appli-
ance.
→Fig.
16
5. To prevent the evaporation pan from overflowing,
mop up the condensation water with a sponge.
The evaporator is defrosted if no more condensa-
tion water runs into the evaporation pan.
6.
Clean the interior of the appliance. →Page23
7.
Switch the appliance back on. →Page17
Troubleshooting en
27
Fault Cause and troubleshooting
The temperature dif-
fers greatly from the
setting.
Different causes are possible.
1.
Switch off the appliance. →Page18
2. Switch the appliance back on after fiveminutes.
→Page17
‒ If the temperature is too warm, check the temper-
ature again after a couple of hours.
‒ If the temperature is too cold, check the temper-
ature again on the following day.
Condensation accu-
mulates on the sur-
face of the appliance
and on the shelves in-
side.
The water contained in warm and humid air con-
denses on the colder surfaces of the appliance.
1. Wipe away the water with a soft, dry cloth.
2. Open the appliance as briefly as possible.
3. Ensure that the appliance is always closed properly.
The appliance hums,
bubbles, buzzes,
gargles, clicks or
crackles.
Not a fault. A motor is running, e.g. refrigerating unit,
fan. Refrigerant flows through the pipes. The motor,
switches or solenoid valves are switching on or off.
Automatic defrosting is running.
No action required.
The appliance makes
noises.
The appliance is not level.
▶ Align the appliance using a spirit level and the
screw feet.
The appliance is not free-standing.
▶ Observe the minimum clearances for the appliance.
Fittings wobble or stick.
▶ Check the removable fittings and, if required, re-
place these.
Bottles or containers are touching.
▶ Move the bottles or containers away from each
other.
Super freezing is switched on.
No action required.
en Storage and disposal
28
14.1 Power failure
During a power failure, the temperat-
ure in the appliance rises; this re-
duces the storage time and the qual-
ity of the frozen food.
On the website for your appliance,
the technical data provides you with
the storage times for frozen food in
the event of a fault.
Notes
¡ Open the appliance as little as
possible during a power failure
and do not place any other food in
the appliance.
¡ Check the quality of the food
immediately after a power failure.
– Dispose of any frozen food that
has defrosted and is hotter than
5°C.
– Cook or fry slightly thawed
frozen food, and then either con-
sume it or freeze it again.
14.2 Conducting an appliance
self-test
Your appliance has an appliance self-
test which displays faults that can be
eliminated by your customer service.
1. Switch off the appliance.
→Page18
2. Disconnect the appliance from the
power supply.
Unplug the appliance from the
mains or switch off the circuit
breaker in the fuse box.
3. Electrically reconnect the appli-
ance after fiveminutes. →Page15
4. One minute after connecting to the
power supply, press and hold
(Refrigerator compartment)
for 3 to 5seconds until a second
audible signal sounds.
a If, at the end of the appliance self-
test, two audible signals sound
and the temperature display indic-
ates the set temperature, your ap-
pliance is OK. The appliance
switches to normal operation.
a If, at the end of the appliance self-
test, 5audible signals sound and
the temperature display LEDs light
up with a different brightness, in-
form customer service. The LEDs
provide customer service with in-
formation about this fault.
15 Storage and disposal
15.1 Taking the appliance out
of operation
1. Switch off the appliance.
→Page18
2. Disconnect the appliance from the
power supply.
Unplug the appliance from the
mains or switch off the circuit
breaker in the fuse box.
3. Remove all of the food.
4.
Clean the appliance. →Page23
5. To guarantee the ventilation inside
the appliance, leave the appliance
open.
15.2 Disposing of old appli-
ance
Valuable raw materials can be re-
used by recycling.
WARNING
Risk of harm to health!
Children can lock themselves in the
appliance, thereby putting their lives
at risk.
▶ Leave shelves and containers in-
side the appliance to prevent chil-
dren from climbing in.
▶ Keep children away from the re-
dundant appliance.
Customer Service en
29
WARNING
Risk of fire!
If the tubes are damaged, flammable
refrigerant and harmful gases may
escape and ignite.
▶ Do not damage the tubes of the re-
frigerant circuit or the insulation.
1. Unplug the appliance from the
mains.
2. Cut through the power cord.
3. Dispose of the appliance in an en-
vironmentally friendly manner.
Information about current disposal
methods are available from your
specialist dealer or local authority.
This appliance is la-
belled in accordance
with European Directive
2012/19/EU concerning
used electrical and elec-
tronic appliances (waste
electrical and electronic
equipment - WEEE).
The guideline determ-
ines the framework for
the return and recycling
of used appliances as
applicable throughout
the EU.
16 Customer Service
Detailed information on the warranty
period and terms of warranty in your
country is available from our after-
sales service, your retailer or on our
website.
If you contact Customer Service, you
will require the product number (E-
Nr.) and the production number (FD)
of your appliance.
The contact details for Customer Ser-
vice can be found in the enclosed
Customer Service directory or on our
website.
16.1 Product number (E-Nr.)
and production number
(FD)
You can find the product number (E-
Nr.) and the production number (FD)
on the appliance's rating plate.
→Fig.
1
/
5
Make a note of your appliance's de-
tails and the Customer Service tele-
phone number to find them again
quickly.
17 Technical data
Refrigerant, cubic capacity and fur-
ther technical specifications can be
found on the rating plate.
→Fig.
1
/
5

th
30
สำหรับข้อมูลเพิ่มเติม โปรดดูคู่มือผู้ใช้ดิจิทัล
สารบัญ
1 ความปลอดภัย ................................32
1.1 หมายเหตุทั่วไป............................32
1.2 การใช้งานที่ตรงตามวัตถุประสงค์...32
1.3 การจำกัดกลุ่มผู้ใช้ .......................32
1.4 การขนย้ายอย่างปลอดภัย .............32
1.5 การติดตั้งอย่างปลอดภัย................32
1.6 การใช้งานอย่างปลอดภัย..............33
1.7 ตัวเครื่องที่ชำรุดเสียหาย ...............35
2 การหลีกเลี่ยงความเสียหายต่อ
ทรัพย์สิน ........................................37
3 การรักษาสิ่งแวดล้อมและการ
ประหยัด ........................................37
3.1 กำจัดหีบห่อบรรจุทิ้ง .....................37
3.2 ประหยัดพลังงาน..........................37
4 การติดตั้งและการเชื่อมต่อ................38
4.1 รายการอุปกรณ์ที่จัดส่ง .................38
4.2 เกณฑ์สำหรับตำแหน่งการติดตั้ง.....38
4.3 การประกอบเครื่อง........................38
4.4 การเตรียมเครื่องสำหรับการใช้
งานครั้งแรก ................................38
4.5 การเชื่อมต่ออุปกรณ์ไฟฟ้า.............39
5 มาทำความรู้จักเกี่ยวกับอุปกรณ์กัน.....39
5.1 ตัวเครื่อง.....................................39
5.2 แผงควบคุม .................................39
6 อุปกรณ์ติดตั้ง..................................40
6.1 ชั้นวาง........................................40
6.2 ชั้นวางขวด .................................40
6.3 ช่องเก็บของ ................................40
6.4 ช่องแช่ผลไม้และผักพร้อมตัว
ควบคุมความชื้น...........................40
6.5 ชั้นวางที่ประตู..............................40
6.6 เครื่องทำน้ำแข็งก้อน ....................40
6.7 อุปกรณ์เสริม................................41
7 การใช้งานทั่วไป ..............................41
7.1 การเปิดใช้งานเครื่อง ....................41
7.2 คำแนะนำเกี่ยวกับการใช้งาน.........41
7.3 การปิดใช้งานเครื่อง .....................41
7.4 การปรับตั้งอุณหภูมิ ......................41
8 ฟังก์ชันเสริม ...................................42
8.1 ฟังก์ชัน Super Cool ..................42
8.2 ฟังก์ชัน Super Freeze ................42
8.3 โหมด Holiday ............................42
8.4 โหมดประหยัดพลังงาน..................42
8.5 โหมด Fresh ...............................43
9 สัญญาณเตือน .................................43
9.1 สัญญาณเตือนการเปิดประตู...........43
9.2 สัญญาณเตือนอุณหภูมิ .................43
10 ช่องแช่เย็น ...................................43
10.1 เคล็ดลับเกี่ยวกับการจัดเก็บ
วัตถุดิบในช่องแช่เย็น .................43
10.2 โซนทำความเย็นในช่องแช่เย็น....44
11 ช่องแช่แข็ง...................................44
11.1 ความจุในการแช่แข็ง..................44
11.2 การใช้ปริมาณความจุช่องแช่
แข็งอย่างเต็มพิกัด ......................44
11.3 เคล็ดลับเกี่ยวกับการจัดเก็บ
วัตถุดิบในช่องแช่แข็ง.................44
11.4 เคล็ดลับเกี่ยวกับการแช่แข็ง
วัตถุดิบสด .................................45
11.5 ความสามารถในการเก็บรักษา
อาหารแช่แข็งที่อุณหภูมิ −18
°C ...........................................45
11.6 วิธีการละลายน้ำแข็งอาหารแช่
แข็ง..........................................45

th
31
12 การละลายน้ำแข็ง .........................46
12.1 การละลายน้ำแข็งในช่องแช่เย็น...46
12.2 การละลายน้ำแข็งในช่องแช่
แข็ง..........................................46
13 การทำความสะอาดและการดูแล
รักษา...........................................46
13.1 การเตรียมเครื่องสำหรับการ
ทำความสะอาด ..........................46
13.2 การทำความสะอาดเครื่อง............46
13.3 การถอดชิ้นส่วนอุปกรณ์ติดตั้ง......47
14 การแก้ไขข้อขัดข้อง .......................48
14.1 ไฟดับ .......................................51
14.2 การดำเนินการทดสอบตัวเอง
ของเครื่อง.................................51
15 การเก็บรักษาและการกำจัด............51
15.1 การปิดใช้งานเครื่อง ...................51
15.2 กำจัดอุปกรณ์เก่า........................51
16 ฝ่ายบริการลูกค้า...........................52
16.1 หมายเลขผลิตภัณฑ์ (E-Nr.)
และหมายเลขการผลิต (FD) ........52
17 ข้อมูลทางเทคนิค...........................52
th ความปลอดภัย
32
1 ความปลอดภัย
โปรดปฏิบัติตามคำแนะนำด้านความปลอดภัยต่อไปนี้
1.1 หมายเหตุทั่วไป
¡ โปรดอ่านคู่มือฉบับนี้อย่างละเอียด
¡ โปรดเก็บรักษาคู่มือและข้อมูลผลิตภัณฑ์สำหรับการใช้งานในภายหลังหรือ
ผู้ใช้งานคนถัดไปไว้ให้ดี
¡ ห้ามเชื่อมต่อเครื่องหากเกิดความเสียหายระหว่างการขนส่ง
1.2 การใช้งานที่ตรงตามวัตถุประสงค์
โปรดใช้งานเครื่องเฉพาะในกรณีต่อไปนี้:
¡ ใช้ในการแช่เย็นและแช่แข็งอาหาร รวมถึงการทำน้ำแข็งก้อน
¡ ในครัวเรือนและในพื้นที่ปิดบริเวณรอบบ้าน
¡ ที่ความสูงไม่เกิน 2000 ม. เหนือระดับน้ำทะเล
1.3 การจำกัดกลุ่มผู้ใช้
เด็กที่มีอายุ 8 ปีขึ้นไปและบุคคลที่ด้อยความสามารถทางร่างกาย ประสาท
สัมผัส หรือทางจิต และ/หรือผู้ขาดประสบการณ์และความรู้สามารถใช้งาน
เครื่องนี้ได้ ถ้ามีผู้คอยระวังดูแลหรือได้รับการชี้แจงวิธีใช้งานได้อย่าง
ปลอดภัย และเข้าใจถึงอันตรายที่จะเกิดขึ้นได้
ไม่อนุญาตให้เด็กเล่นกับอุปกรณ์เครื่องนี้
ห้ามเด็กทำความสะอาดและทำการบำรุงรักษาทั่วไปโดยไม่อยู่ภายใต้การดูแล
1.4 การขนย้ายอย่างปลอดภัย
คำเตือน‒ระวังการบาดเจ็บ!
อุปกรณ์ที่มีน้ำหนักมากอาจจะทำให้ได้รับบาดเจ็บขณะที่ยกขึ้น
▶ ห้ามยกอุปกรณ์ขึ้นเพียงลำพัง
1.5 การติดตั้งอย่างปลอดภัย
คำเตือน‒ระวังไฟดูด!
การติดตั้งอย่างไม่ถูกวิธีอาจก่อให้เกิดอันตราย
▶ สามารถเชื่อมต่อและใช้เครื่องนี้ทำงานได้ตามข้อมูลอ้างอิงบนป้ายกำกับรุ่น
เท่านั้น
ความปลอดภัย th
33
▶ ให้เชื่อมต่อเครื่องผ่านทางซ็อคเกตที่ติดตั้งตามข้อกำหนดซึ่งมีการต่อกราว
ด์กับแหล่งจ่ายไฟที่มีกระแสไฟฟ้าสลับ
▶ ต้องมีการติดตั้งระบบป้องกันไฟฟ้าของระบบไฟฟ้าในบ้านอย่างถูกต้องตาม
ข้อกำหนด
▶ ห้ามใช้ไฟเครื่องผ่านอุปกรณ์สวิตช์ภายนอก เช่น ตัวจับเวลาหรือการ
ควบคุมระยะไกล
▶ หากติดตั้งอุปกรณ์แล้ว จะต้องเข้าถึงปลั๊กไฟและสายไฟได้ง่าย หรือหากไม่
สามารถเข้าถึงได้อย่างอิสระ จะต้องติดตั้งอุปกรณ์ตัดการเชื่อมต่อในการ
ติดตั้งระบบไฟฟ้าแบบถาวรตามข้อกำหนดการติดตั้ง
▶ ในการติดตั้งอุปกรณ์ โปรดระมัดระวังว่าสายไฟต่อไม่ได้ถูกอัดจนติดขัด
หรือได้รับความเสียหาย
ฉนวนหุ้มหรือสายไฟที่ชำรุดเสียหายเป็นอันตราย
▶ ห้ามให้สายไฟสัมผัสกับแหล่งกำเนิดความร้อนเด็ดขาด
คำเตือน‒ระวังการระเบิด!
หากช่องระบายอากาศของเครื่องปิดอยู่ ส่วนผสมระหว่างแก๊สกับอากาศที่มี
คุณสมบัติติดไฟอาจก่อตัวขึ้นในกรณีที่วงจรทำความเย็นมีรอยรั่ว
▶ ห้ามปิดช่องระบายอากาศในตัวเรือนเครื่องหรือตัวเรือนการติดตั้ง
คำเตือน‒ระวังไฟไหม้!
การใช้สายเชื่อมต่อแหล่งจ่ายไฟแบบต่อขยายและอะแดปเตอร์ที่ไม่ได้รับ
อนุญาตอาจก่อให้เกิดอันตราย
▶ ห้ามใช้สายไฟต่อขยายหรือปลั๊กพ่วงแบบหลายช่อง
▶ ใช้เฉพาะอะแดปเตอร์และสายเชื่อมต่อแหล่งจ่ายไฟที่ผู้ผลิตอนุญาตเท่านั้น
▶ หากสายเชื่อมต่อแหล่งจ่ายไฟสั้นเกินไปและไม่มีสายเชื่อมต่อแหล่งจ่ายไฟ
เส้นที่ยาวกว่า โปรดติดต่อช่างไฟฟ้าเพื่อปรับระบบติดตั้งภายในบ้านให้
เหมาะสม
ปลั๊กต่อซ็อคเกตแบบหลายตัวหรือชิ้นส่วนจ่ายไฟแบบพกพาอาจมีความร้อน
สูงเกินและก่อให้เกิดไฟลุกไหม้
▶ ห้ามวางปลั๊กต่อซ็อคเกตแบบหลายตัวหรือชิ้นส่วนจ่ายไฟแบบพกพาไว้
บริเวณด้านหลังตัวเครื่อง
1.6 การใช้งานอย่างปลอดภัย
คำเตือน‒ระวังไฟดูด!
ความชื้นที่แทรกซึมเข้าไปอาจเป็นสาเหตุให้เกิดไฟฟ้าดูดได้
▶ ใช้งานเครื่องในพื้นที่ปิดเท่านั้น
▶ ห้ามปล่อยให้เครื่องอยู่ในบริเวณที่ต้องสัมผัสความร้อนและความชื้นสูง

th ความปลอดภัย
34
▶ ห้ามใช้เครื่องทำความสะอาดไอน้ำหรือเครื่องทำความสะอาดแรงดันสูงใน
การทำความสะอาดอุปกรณ์
คำเตือน‒ระวังการขาดอากาศหายใจ!
เด็กอาจจะดึงวัสดุหีบห่อมาสวมหัวหรือเอามาพันจนขาดอากาศหายใจได้
▶ ห้ามทิ้งวัสดุหีบห่อไว้ใกล้เด็ก
▶ ห้ามเด็กเล่นกับวัสดุหีบห่อ
เด็กอาจจะสูดหรือกลืนชิ้นส่วนขนาดเล็กเข้าไปจนขาดอากาศหายใจได้
▶ ห้ามทิ้งชิ้นส่วนขนาดเล็กไว้ใกล้เด็ก
▶ ห้ามเด็กเล่นกับชิ้นส่วนขนาดเล็ก
คำเตือน‒ระวังการระเบิด!
วงจรน้ำหล่อเย็นที่ชำรุดเสียหายอาจทำให้น้ำยาทำความเย็นที่มีคุณสมบัติ
ติดไฟเกิดการรั่วไหลและระเบิด
▶ ห้ามใช้อุปกรณ์เชิงกลอื่นหรือสารใดๆ นอกเหนือจากที่ผู้ผลิตแนะนำเพื่อเร่ง
กระบวนการละลายน้ำแข็ง
▶ นำวัตถุดิบที่จับตัวเป็นน้ำแข็งออกโดยใช้วัตถุที่มีลักษณะทื่อ เช่น ไม้ตักน้ำ
ผึ้ง
ผลิตภัณฑ์ที่มีสารขับดันที่มีคุณสมบัติติดไฟและสารไวไฟอาจเกิดการระเบิด
เช่น กระป๋องสเปรย์
▶ ห้ามจัดเก็บผลิตภัณฑ์ที่มีสารขับดันที่มีคุณสมบัติติดไฟและสารไวไฟไว้ใน
เครื่อง
คำเตือน‒ระวังไฟไหม้!
อุปกรณ์ไฟฟ้าภายในตัวเครื่องอาจก่อให้เกิดไฟลุกไหม้ เช่น อุปกรณ์ทำความ
ร้อนหรือเครื่องทำไอศกรีมระบบไฟฟ้า
▶ ห้ามใช้งานอุปกรณ์ไฟฟ้าภายในตัวเครื่อง
คำเตือน‒ระวังการบาดเจ็บ!
ภาชนะที่มีเครื่องดื่มอัดลมอาจระเบิดแตก
▶ ห้ามจัดเก็บภาชนะที่มีเครื่องดื่มอัดลมในช่องแช่แข็ง
ระวังได้รับบาดเจ็บที่ดวงตาเนื่องจากการรั่วไหลของน้ำยาทำความเย็นที่มี
คุณสมบัติติดไฟและแก๊สที่เป็นอันตราย
▶ ห้ามให้ท่อสารทำความเย็นและท่อระบายชำรุดเสียหาย
ตัวเครื่องอาจพลิกล้ม
▶ ห้ามเหยียบหรือลงน้ำหนักบนฐานวาง ชั้นเลื่อน หรือประตู

ความปลอดภัย th
35
คำเตือน‒ระวังความร้อน!
ชิ้นส่วนแต่ละชิ้นที่ด้านหลังตัวเครื่องจะร้อนขึ้นในระหว่างเครื่องทำงาน
▶ ห้ามสัมผัสชิ้นส่วนที่มีความร้อนโดยเด็ดขาด
คำเตือน‒ระวังความเย็นกัด!
การสัมผัสกับอาหารแช่แข็งและพื้นผิวที่มีความเย็นอาจทำให้เกิดแผลไหม้
เนื่องจากความเย็น
▶ ห้ามนำอาหารแช่แข็งเข้าปากทันทีหลังจากนำออกจากช่องแช่แข็ง
▶ หลีกเลี่ยงไม่ให้ผิวหนังสัมผัสกับอาหารแช่แข็ง น้ำแข็ง และพื้นผิวในช่อง
แช่แข็งเป็นเวลานาน
ข้อควรระวัง‒ระวังอันตรายต่อสุขภาพ!
โปรดปฏิบัติตามคำแนะนำต่อไปนี้เพื่อป้องกันไม่ให้วัตถุดิบเกิดการปนเปื้อน
▶ หากเปิดประตูค้างไว้เป็นเวลานาน อุณหภูมิในช่องต่างๆ ของเครื่องอาจเพิ่ม
สูงขึ้นเป็นอย่างมาก
▶ ทำความสะอาดพื้นผิวที่อาจสัมผัสกับวัตถุดิบและระบบระบายน้ำที่สามารถ
เข้าถึงได้เป็นประจำ
▶ จัดเก็บเนื้อสัตว์และเนื้อปลาดิบในตู้เย็นโดยใช้ภาชนะที่เหมาะสมเพื่อไม่ให้
สัมผัสกับวัตถุดิบอื่นๆ หรือมีน้ำจากเนื้อสัตว์ดังกล่าวหยดลงบนวัตถุดิบ
▶ หากตู้แช่เย็น/ตู้แช่แข็งว่างเปล่าเป็นเวลานาน ให้ปิดใช้งานเครื่อง ละลาย
น้ำแข็ง ทำความสะอาด และเปิดประตูทิ้งไว้เพื่อป้องกันการเกิดเชื้อรา
ชิ้นส่วนในตัวเครื่องที่ทำจากโลหะหรือมีลักษณะคล้ายโลหะอาจประกอบด้วย
อะลูมิเนียม หากวัตถุดิบที่เป็นกรดสัมผัสกับอะลูมิเนียม อะลูมิเนียมไอออนอาจ
ปนเปื้อนเข้าไปในวัตถุดิบ
▶ ห้ามบริโภควัตถุดิบที่มีการปนเปื้อน
1.7 ตัวเครื่องที่ชำรุดเสียหาย
คำเตือน‒ระวังไฟดูด!
เครื่องหรือสายไฟที่ชำรุดเสียหายเป็นอันตราย
▶ ห้ามใช้งานเครื่องที่ชำรุดเสียหาย
▶ ห้ามดึงสายไฟเพื่อหยุดการเชื่อมต่อเครื่องออกจากแหล่งจ่ายไฟโดยเด็ด
ขาด ให้ดึงที่ปลั๊กไฟของสายไฟทุกครั้ง
▶ ถ้าเครื่องหรือสายไฟชำรุด ให้ดึงปลั๊กไฟของสายไฟต่อออกหรือปิดสวิตช์
ฟิวส์ในกล่องฟิวส์ทันที
▶ ติดต่อฝ่ายบริการลูกค้า →
หน้า
52
th ความปลอดภัย
36
การซ่อมแซมที่ไม่ได้มาตรฐานเป็นอันตราย
▶ อนุญาตให้เฉพาะบุคลากรผู้เชี่ยวชาญที่ผ่านการอบรมดำเนินการซ่อมแซม
เครื่องเท่านั้น
▶ อนุญาตให้ใช้อะไหล่แท้สำหรับการซ่อมแซมเครื่องเท่านั้น
▶ หากสายไฟของเครื่องชำรุด จะต้องทำการเปลี่ยนด้วยการใช้สายไฟพิเศษ
ซึ่งมีจำหน่ายที่ผู้ผลิตหรือที่ฝ่ายบริการลูกค้า
คำเตือน‒ระวังไฟไหม้!
ในกรณีที่ท่อชำรุดเสียหาย น้ำยาทำความเย็นที่มีคุณสมบัติติดไฟและแก๊ส
อันตรายอาจรั่วไหลและเกิดการลุกไหม้
▶ จัดวางเครื่องให้อยู่ห่างจากเปลวไฟและแหล่งกำเนิดไฟ
▶ ระบายอากาศภายในห้อง
▶ ปิดใช้งานเครื่อง →
หน้า
41
▶ ดึงปลั๊กไฟของสายเชื่อมต่อแหล่งจ่ายไฟหรือปิดใช้งานฟิวส์ในตู้ควบคุม
ระบบไฟฟ้า
▶ โทรติดต่อฝ่ายบริการลูกค้า →
หน้า
52

การหลีกเลี่ยงความเสียหายต่อทรัพย์สิน th
37
2 การหลีกเลี่ยงความเสียหาย
ต่อทรัพย์สิน
ข้อควรระวัง!
ล้อเลื่อนเครื่องที่มีลักษณะเอียงอาจทำให้พื้น
เกิดความเสียหายขณะเลื่อนตัวเครื่อง
▶ ขนย้ายเครื่องโดยใช้รถเข็นสองล้อ
▶ ใช้แผ่นป้องกันพื้นขณะเลื่อนตัวเครื่อง
และห้ามเคลื่อนไหวแบบสลับฟันปลา
การใช้ฐานวาง ชั้นเลื่อน หรือประตูเครื่อง
เป็นเบาะนั่งหรือฐานปีนอาจทำให้ตัวเครื่อง
เกิดความเสียหาย
▶ ห้ามเหยียบหรือลงน้ำหนักบนฐานวาง
ชั้นเลื่อน หรือประตู
ชิ้นส่วนพลาสติกและซีลประตูอาจเป็นรูพรุน
เนื่องจากเปื้อนน้ำมันหรือจาระบี
▶ ดูแลไม่ให้ชิ้นส่วนพลาสติกและซีลประตู
เปื้อนน้ำมันหรือจาระบี
ชิ้นส่วนในตัวเครื่องที่ทำจากโลหะหรือมี
ลักษณะคล้ายโลหะอาจประกอบด้วย
อะลูมิเนียม อะลูมิเนียมจะทำปฏิกิริยาเมื่อ
สัมผัสกับวัตถุดิบที่เป็นกรด
▶ ห้ามจัดวางวัตถุดิบในเครื่องโดยไม่มี
บรรจุภัณฑ์
3 การรักษาสิ่งแวดล้อมและ
การประหยัด
3.1 กำจัดหีบห่อบรรจุทิ้ง
วัสดุบรรจุภัณฑ์ทั้งหมดไม่เป็นอันตรายต่อ
สิ่งแวดล้อมและสามารถนำกลับมาใช้ใหม่
ได้
▶ โปรดกำจัดชิ้นส่วนประกอบแต่ละชิ้นแยก
ตามประเภท
3.2 ประหยัดพลังงาน
หากคุณดำเนินการตามคำแนะนำเหล่านี้ จะ
สามารถลดระดับการใช้ไฟของอุปกรณ์นี้ลง
ได้
การเลือกตำแหน่งการติดตั้ง
¡ ป้องกันไม่ให้เครื่องสัมผัสกับแสงแดด
โดยตรง
¡ จัดวางตัวเครื่องให้มีระยะห่างจากแผง
ทำความร้อน เตา และแหล่งทำความร้อน
อื่นๆ ให้มากที่สุดเท่าที่เป็นไปได้:
– รักษาระยะห่างจากเตาไฟฟ้าหรือเตา
แก๊ส 30 มม.
– รักษาระยะห่างจากเตาน้ำมันหรือเตา
ถ่าน 300 มม.
¡ เว้นระยะห่างจากผนังด้านข้างเล็กน้อย
¡ ห้ามปิดคลุมหรือปิดกั้นช่องระบายอากาศ
ด้านนอกโดยเด็ดขาด
การประหยัดพลังงานขณะใช้งาน
หมายเหตุ:การจัดวางชิ้นส่วนอุปกรณ์ติดตั้ง
ไม่ส่งผลต่ออัตราความสิ้นเปลืองพลังงาน
ของเครื่อง
¡ เปิดเครื่องเป็นระยะเวลาสั้นๆ เท่านั้นและ
ปิดด้วยความระมัดระวัง
¡ ห้ามปิดคลุมหรือปิดกั้นช่องระบายอากาศ
ด้านในหรือด้านนอกโดยเด็ดขาด
¡ ขนย้ายวัตถุดิบที่ซื้อในกระเป๋าเก็บความ
เย็น แล้ววางลงในตัวเครื่องอย่างรวดเร็ว
¡ ปล่อยให้วัตถุดิบและเครื่องดื่มที่มีความ
ร้อนเย็นตัวลงก่อนจัดเก็บ
¡ สำหรับการละลายน้ำแข็ง ให้วางอาหาร
แช่แข็งลงในช่องแช่เย็นเพื่อใช้
ประโยชน์จากความเย็นของอาหารแช่
แข็ง
¡ เว้นพื้นที่เล็กน้อยระหว่างวัตถุดิบแต่ละ
อย่าง รวมถึงเว้นพื้นที่จากผนังด้านหลัง
เสมอ
th การติดตั้งและการเชื่อมต่อ
38
4 การติดตั้งและการเชื่อมต่อ
4.1 รายการอุปกรณ์ที่จัดส่ง
โปรดตรวจเช็คความเสียหายจากการขน
ย้ายของชิ้นส่วนทั้งหมดและความครบถ้วน
ของอุปกรณ์ที่จัดส่งหลังนำออกจากบรรจุ
ภัณฑ์
หากคุณมีปัญหาร้องเรียน กรุณาติดต่อผู้
แทนจำหน่ายหรือติดต่อฝ่ายบริการลูกค้า
→
หน้า
52ของเรา
อุปกรณ์ที่จัดส่งประกอบด้วย:
¡ ตัวเครื่องตั้งเดี่ยว
¡ อุปกรณ์ติดตั้งและอุปกรณ์เสริม
1
¡ คู่มือการประกอบ
¡ คู่มือการใช้งาน
¡ รายการศูนย์บริการลูกค้า
¡ เอกสารการรับประกัน
2
¡ ฉลากประหยัดพลังงาน
¡ ข้อมูลเกี่ยวกับอัตราความสิ้นเปลือง
พลังงานและเสียงรบกวน
4.2 เกณฑ์สำหรับตำแหน่งการติดตั้ง
คำเตือน
ระวังการระเบิด!
หากเครื่องตั้งอยู่ในห้องที่มีขนาดเล็กเกินไป
ส่วนผสมระหว่างแก๊สกับอากาศที่มี
คุณสมบัติติดไฟอาจก่อตัวขึ้นในกรณีที่
วงจรทำความเย็นเกิดการรั่วไหล
▶ ตั้งเครื่องในห้องที่มีปริมาตรอย่างน้อย 1
ตร.ม. ต่อน้ำยาทำความเย็น 8 กรัม โดย
ปริมาณน้ำยาทำความเย็นจะระบุอยู่บน
ป้ายกำกับรุ่น →
รูปที่
1
/
5
ตัวเครื่องจากโรงงานอาจมีน้ำหนักถึง 95
กก. ทั้งนี้ขึ้นอยู่กับแต่ละรุ่น
พื้นผิวต้องมีความแข็งแรงทนทานเพียงพอ
ต่อการรับน้ำหนักตัวเครื่อง
อุณหภูมิห้องที่อนุญาต
อุณหภูมิห้องที่อนุญาตจะขึ้นอยู่กับระดับ
สภาพอากาศของเครื่อง
โดยระดับสภาพอากาศจะระบุอยู่บนป้าย
กำกับรุ่น →
รูปที่
1
/
5
ระดับสภาพ
อากาศ
อุณหภูมิห้องที่อนุญาต
SN 10°C…32°C
N 16°C…32°C
ST 16°C…38°C
T 16°C…43°C
เครื่องจะสามารถทำงานได้อย่างเต็ม
ประสิทธิภาพภายใต้อุณหภูมิห้องที่อนุญาต
การใช้งานเครื่องที่มีระดับสภาพอากาศ SN
ขณะอุณหภูมิห้องต่ำจะช่วยป้องกันไม่ให้
เกิดความเสียหายที่ตัวเครื่องตราบใดที่
อุณหภูมิห้องไม่เกิน 5°C
การติดตั้งแบบ Over-and-Under และ
Side-by-Side
หากต้องการติดตั้งเครื่องทำความเย็น 2
เครื่องซ้อนทับกันหรือข้างกัน คุณจำเป็น
ต้องรักษาระยะห่างระหว่างตัวเครื่องอย่าง
น้อย 150มม. ทั้งนี้กับเครื่องบางเครื่อง
คุณสามารถติดตั้งได้โดยไม่ต้องคำนึงถึง
ระยะห่างขั้นต่ำ โปรดสอบถามตัวแทน
จำหน่ายที่มีความเชี่ยวชาญหรือนัก
ออกแบบห้องครัว
4.3 การประกอบเครื่อง
▶ ประกอบเครื่องตามคู่มือการประกอบที่
แนบมาด้วย
4.4 การเตรียมเครื่องสำหรับการใช้
งานครั้งแรก
1. ศึกษาเอกสารข้อมูล
2. นำฟิล์มป้องกันและตัวล็อคสำหรับการขน
ย้ายออก เช่น เทปกาวและกล่องกระดาษ
1
ขึ้นอยู่กับคุณสมบัติของอุปกรณ์
2
ไม่ใช่ในทุกประเทศ
มาทำความรู้จักเกี่ยวกับอุปกรณ์กัน th
39
3. ทำความสะอาดเครื่องเป็นครั้งแรก
→
หน้า
46
4.5 การเชื่อมต่ออุปกรณ์ไฟฟ้า
1. เสียบปลั๊กอุปกรณ์ที่เย็นของสายไฟเข้า
กับอุปกรณ์
2. เสียบปลั๊กไฟของสายไฟอุปกรณ์เข้า
ในซ็อคเกตใกล้กับอุปกรณ์
ข้อมูลการเชื่อมต่ออุปกรณ์จะแสดงอยู่บน
แผ่นป้ายข้อมูลกำกับ →
รูปที่
1
/
5
3. ตรวจสอบปลั๊กไฟว่าติดตั้งอยู่ในตำแหน่ง
อย่างแน่นหนา
a อุปกรณ์พร้อมทำงานแล้ว
5 มาทำความรู้จักเกี่ยวกับ
อุปกรณ์กัน
5.1 ตัวเครื่อง
รายละเอียดภาพรวมเกี่ยวกับชิ้นส่วน
ประกอบต่าง ๆ ของอุปกรณ์คุณอยู่ที่นี่
→
รูปที่
1
A
ช่องแช่เย็น →
หน้า
43
B
ช่องแช่แข็ง →
หน้า
44
1
ไฟส่องสว่าง
2
ช่องระบายอากาศด้านใน
3
ชั้นวางขวด →
หน้า
40
4
ตัวควบคุมอุณหภูมิ (ช่องเก็บของ)
→
หน้า
41
5
ป้ายกำกับรุ่น →
หน้า
52
6
ช่องเก็บของ →
หน้า
40
7
ช่องแช่ผลไม้และผักพร้อมตัว
ควบคุมความชื้น →
หน้า
40
8
ช่องใส่อาหารแช่แข็ง →
หน้า
47
9
เครื่องทำน้ำแข็งก้อน →
หน้า
40
10
ฐานสกรู
11
แผงควบคุม
12
ชั้นวางที่ประตูสำหรับขวดขนาด
ใหญ่ →
หน้า
40
หมายเหตุ:อุปกรณ์ติดตั้งและขนาดของ
เครื่องอาจมีความคลาดเคลื่อนไปจากภาพ
ประกอบ
5.2 แผงควบคุม
คุณสามารถตั้งค่าฟังก์ชันทั้งหมดของ
อุปกรณ์และรับข้อมูลเกี่ยวกับสถานะการใช้
งานได้ผ่านแผงควบคุม
→
รูปที่
2
1
จะแสดงอุณหภูมิช่องแช่เย็นที่ปรับ
ตั้งไว้ในหน่วย °C
2
จะแสดงอุณหภูมิช่องแช่แข็งที่ปรับ
ตั้งไว้ในหน่วย °C
3
แถบไฟจะแสดงการตอบสนองทาง
ภาพ
4
จะปิดใช้งานเสียงเตือน
5
จะเปิดหรือปิดใช้งานโหมด
ประหยัดพลังงาน
6
จะเปิดหรือปิดใช้งาน
โหมด Holiday
7
จะเปิดหรือปิดใช้งานโหมด
Fresh
8
จะเปิดหรือปิดการทำงานเครื่อง
9
(ช่องแช่แข็ง) จะเปิดหรือ
ปิดใช้งาน ฟังก์ชัน Super Freeze
10
(ช่องแช่เย็น) จะเปิดหรือปิด
ใช้งาน ฟังก์ชัน Super Cool

th อุปกรณ์ติดตั้ง
40
6 อุปกรณ์ติดตั้ง
อุปกรณ์ติดตั้งสำหรับตัวเครื่องจะขึ้นอยู่กับ
แต่ละรุ่น
6.1 ชั้นวาง
คุณสามารถถอดชั้นวางและใส่กลับเข้าใน
ตำแหน่งอื่นเพื่อปรับเปลี่ยนชั้นวางได้ตาม
ความต้องการ
→"
การถอดชั้นวาง
",
หน้า
47
6.2 ชั้นวางขวด
คุณสามารถจัดเก็บขวดไว้บนชั้นวางขวดได้
อย่างปลอดภัย
คุณสามารถถอดชั้นวางขวดและใส่กลับ
เข้าไปในตำแหน่งอื่นอีกครั้งเพื่อปรับเปลี่ยน
ชั้นวางขวดได้ตามความต้องการ
→"
การถอดชั้นวาง
",
หน้า
47
6.3 ช่องเก็บของ
ช่องเก็บของจะมีอุณหภูมิต่ำกว่าช่องแช่เย็น
โดยอุณหภูมิอาจลดต่ำกว่า 0 °C ในบาง
ครั้ง
ปรับตั้งอุณหภูมิช่องแช่เย็นให้อยู่ที่ 2 °C
เพื่อให้ช่องเก็บของมีอุณหภูมิใกล้เคียง 0
°C →
หน้า
41
ใช้ประโยชน์จากอุณหภูมิที่ต่ำกว่าในช่อง
เก็บของเพื่อจัดเก็บวัตถุดิบที่เน่าเสียง่าย
เช่น เนื้อปลา เนื้อสัตว์ และไส้กรอก
6.4 ช่องแช่ผลไม้และผักพร้อมตัว
ควบคุมความชื้น
จัดเก็บผลไม้และผักสดในช่องแช่ผลไม้และ
ผักโดยนำออกจากบรรจุภัณฑ์
จัดเก็บผลไม้และผักที่หั่นแล้วในภาชนะที่มี
ฝาครอบหรือบรรจุภัณฑ์แบบปิดล็อค
สุญญากาศ
คุณสามารถปรับความชื้นในอากาศภายใน
ช่องแช่ผลไม้และผักโดยใช้ตัวควบคุม
ความชื้นได้ ดังนั้นจึงสามารถจัดเก็บผลไม้
และผักสดได้นานกว่าการจัดเก็บทั่วไป
→
รูปที่
3
ตั้งค่าความชื้นในอากาศภายในช่องแช่ผล
ไม้และผักตามประเภทและปริมาณของ
วัตถุดิบที่ต้องการจัดเก็บโดยการเลื่อนตัว
ควบคุมความชื้น:
¡ ความชื้นในอากาศต่ำ สำหรับจัดเก็บ
ผลไม้เป็นส่วนใหญ่ จัดเก็บสิ่งของหลาย
ชนิดรวมกัน หรือจัดเก็บสิ่งของใน
ปริมาณมาก
¡ ความชื้นในอากาศสูง สำหรับจัด
เก็บผักเป็นส่วนใหญ่หรือจัดเก็บสิ่งของ
ในปริมาณน้อย
น้ำที่เกิดจากการควบแน่นอาจก่อตัวขึ้นใน
ช่องแช่ผลไม้และผัก ทั้งนี้ขึ้นอยู่กับปริมาณ
และสิ่งของที่นำมาจัดเก็บ
ใช้ผ้าแห้งเช็ดน้ำที่เกิดจากการควบแน่น
แล้วปรับความชื้นในอากาศให้อยู่ที่ระดับต่ำ
โดยใช้ตัวควบคุมความชื้น
หากต้องการรักษาคุณภาพและกลิ่นหอม ให้
จัดเก็บผลไม้และผักที่ไวต่อความเย็นไว้นอก
ตัวเครื่องที่อุณหภูมิประมาณ 8 °C ถึง 12
°C เช่น สับปะรด กล้วย ผลไม้รสเปรี้ยว
แตงกวา ซูกินี ปาปริก้า มะเขือเทศ และมัน
ฝรั่ง
6.5 ชั้นวางที่ประตู
คุณสามารถถอดชั้นวางที่ประตูและใส่กลับ
เข้าในตำแหน่งอื่นเพื่อปรับเปลี่ยนชั้นวางที่
ประตูได้ตามความต้องการ
→"
การถอดชั้นวางที่ประตู
",
หน้า
47
6.6 เครื่องทำน้ำแข็งก้อน
คุณสามารถใช้เครื่องทำน้ำแข็งก้อนในการ
ทำน้ำแข็งก้อนจากน้ำดื่มได้
การทำน้ำแข็งก้อน
ใช้เฉพาะน้ำดื่มในการทำน้ำแข็งก้อน
เท่านั้น
การใช้งาน th
41
1. ถอดถาดน้ำแข็งก้อน เติมน้ำดื่มให้อยู่
ในระดับ ¾ แล้วใส่กลับเข้าไปอีก
ครั้ง
→
รูปที่
4
หมายเหตุ:หากเติมน้ำดื่มมากเกินไป
การทำงานของเครื่องทำน้ำแข็งก้อนอาจ
ได้รับผลกระทบ น้ำแข็งก้อนจะไม่หลุด
ออกจากถาดน้ำแข็งเป็นก้อนๆ น้ำดื่มที่
เติมไว้มากเกินไปจะไหลเข้าไปในถาด
รองน้ำแข็งก้อนและทำให้น้ำแข็งก้อนที่มี
อยู่จับตัวเป็นก้อนแข็ง
2. เมื่อน้ำแข็งเป็นก้อนแล้ว ให้หมุนมือหมุน
ของถาดน้ำแข็งก้อนไปทางด้านขวาแล้ว
ปล่อยหลายๆ ครั้ง
→
รูปที่
5
a น้ำแข็งก้อนจะหลุดและหล่นลงในถาด
รองน้ำแข็งก้อน
3. ดึงถาดรองน้ำแข็งก้อนออก แล้วนำน้ำ
แข็งก้อนออกมา
→
รูปที่
6
6.7 อุปกรณ์เสริม
ใช้อุปกรณ์เสริมของแท้ ซึ่งได้รับการปรับ
ให้เหมาะสมกับเครื่องของคุณ
อุปกรณ์เสริมขึ้นอยู่กับรุ่นอุปกรณ์ของคุณ
ชั้นวางไข่
จัดเก็บไข่บนชั้นวางไข่อย่างปลอดภัย
ชั้นวางขวด
คุณสามารถจัดเก็บขวดไว้บนชั้นวางขวดได้
อย่างปลอดภัย
→
รูปที่
7
การใช้งาน
7 การใช้งานทั่วไป
การใช้งาน
7.1 การเปิดใช้งานเครื่อง
1. เชื่อมต่อเครื่องเข้ากับระบบไฟฟ้า
→
หน้า
39
หมายเหตุ:หากปิดใช้งานเครื่องผ่านแผง
ควบคุมไว้ก่อนหน้านี้ ให้กด ค้างไว้
3วินาที
a เครื่องจะเริ่มทำความเย็น
a เสียงเตือนจะดังขึ้นและจอแสดงอุณหภูมิ
จะกะพริบเนื่องจากช่องแช่แข็งยังคงอุ่น
เกินไป
2. ปิดใช้งานเสียงเตือนโดยกด
a จะดับลงทันทีที่อุณหภูมิถึงระดับที่
ปรับตั้งไว้
3.
ปรับตั้งอุณหภูมิที่ต้องการ →
หน้า
41
7.2 คำแนะนำเกี่ยวกับการใช้งาน
¡ เมื่อเปิดใช้งาน เครื่องอาจใช้เวลาหลาย
ชั่วโมงจนกว่าอุณหภูมิจะถึงระดับที่ปรับ
ตั้งไว้
ห้ามวางวัตถุดิบก่อนอุณหภูมิถึงระดับที่
ปรับตั้งไว้
¡ ด้านหน้าของตัวเรือนจะได้รับการ
ทำความร้อนเล็กน้อยในบางช่วงเวลา ซึ่ง
ช่วยป้องกันการเกิดไอน้ำควบแน่น
บริเวณซีลฝาเครื่อง
¡ การปิดประตูอาจทำให้เกิดความดัน
อากาศต่ำ ซึ่งทำให้เปิดประตูอีกครั้งได้
ยาก โปรดรอสักครู่จนกว่าความดัน
อากาศต่ำจะได้รับการชดเชย
7.3 การปิดใช้งานเครื่อง
▶ กด ค้างไว้ 3วินาที
7.4 การปรับตั้งอุณหภูมิ
การปรับตั้งอุณหภูมิช่องแช่เย็น
▶ กดอุณหภูมิที่ต้องการ
เลื่อนตัวควบคุมอุณหภูมิช่องเก็บของไป
ยังตำแหน่ง ⅓ จากด้านล่างเพื่อให้
อุณหภูมิถึงระดับที่ปรับตั้งไว้
→
หน้า
41
อุณหภูมิที่แนะนำสำหรับช่องแช่เย็นอยู่ที่
4 °C
การปรับตั้งอุณหภูมิช่องเก็บของ
1. เลื่อนตัวควบคุมอุณหภูมิไปในทิศทาง
เพื่อปรับลดอุณหภูมิ
2. เลื่อนตัวควบคุมอุณหภูมิไปในทิศทาง
เพื่อปรับเพิ่มอุณหภูมิ
→
รูปที่
8
การปรับตั้งอุณหภูมิช่องแช่แข็ง
▶ กดอุณหภูมิที่ต้องการ
th ฟังก์ชันเสริม
42
อุณหภูมิที่แนะนำสำหรับช่องแช่แข็งอยู่ที่
−18 °C
8 ฟังก์ชันเสริม
8.1 ฟังก์ชัน Super Cool
เมื่อใช้งาน ฟังก์ชัน Super Cool ช่องแช่
เย็นจะทำความเย็นระดับสูงสุด
เปิดใช้งาน ฟังก์ชัน Super Cool ก่อนจัด
เก็บวัตถุดิบในปริมาณมาก
หมายเหตุ:เมื่อเปิดใช้งาน ฟังก์ชัน Super
Cool อาจมีเสียงรบกวนดังขึ้นหลายเสียง
การเปิดใช้งาน ฟังก์ชัน Super Cool
▶ กด (ช่องแช่เย็น)
a (ช่องแช่เย็น) จะติดสว่าง
หมายเหตุ:หลังจากเวลาผ่านไปประมาณ 6
ชั่วโมง เครื่องจะสลับมาทำงานในโหมด
ปกติ
การปิดใช้งาน ฟังก์ชัน Super Cool
▶ กด (ช่องแช่เย็น)
8.2 ฟังก์ชัน Super Freeze
เมื่อใช้งาน ฟังก์ชัน Super Freeze ช่อง
แช่แข็งจะทำความเย็นระดับสูงสุด
เปิดใช้งาน ฟังก์ชัน Super Freeze เป็น
เวลา 4 ถึง 6ชั่วโมงก่อนจัดเก็บวัตถุดิบ
ปริมาณตั้งแต่ 2กก. ขึ้นไปในช่องแช่แข็ง
ใช้ ฟังก์ชัน Super Freeze เพื่อให้
สามารถใช้ประโยชน์จากความจุในการแช่
แข็งได้อย่างเต็มพิกัด
→"
เงื่อนไขสำหรับความจุในการแช่แข็ง
",
หน้า
44
หมายเหตุ:เมื่อเปิดใช้งาน ฟังก์ชัน Super
Freeze อาจมีเสียงรบกวนดังขึ้นหลายเสียง
การเปิดใช้งาน ฟังก์ชัน Super Freeze
▶ กด (ช่องแช่แข็ง)
a (ช่องแช่แข็ง) จะติดสว่าง
หมายเหตุ:หลังจากเวลาผ่านไปประมาณ
54 ชั่วโมง เครื่องจะสลับมาทำงานในโหมด
ปกติ
การปิดใช้งาน ฟังก์ชัน Super Freeze
▶ กด (ช่องแช่แข็ง)
8.3 โหมด Holiday
หากไม่อยู่บ้านเป็นระยะเวลานาน คุณ
สามารถเปิดใช้งานโหมด Holiday ที่ช่วย
ประหยัดพลังงานบนตัวเครื่องได้
ข้อควรระวัง
ระวังอันตรายต่อสุขภาพ!
ในระหว่างที่โหมด Holiday เปิดใช้งานอยู่
ช่องแช่เย็นจะอุ่นขึ้น อุณหภูมิที่สูงขึ้นอาจ
ทำให้แบคทีเรียเพิ่มจำนวนขึ้นและวัตถุดิบ
อาจเน่าเสีย
▶ ห้ามจัดเก็บวัตถุดิบในช่องแช่เย็นในขณะ
ที่โหมด Holiday เปิดใช้งานอยู่
เครื่องจะปรับตั้งอุณหภูมิโดยอัตโนมัติ
ช่องแช่เย็น 14°C
ช่องแช่แข็ง อุณหภูมิไม่
เปลี่ยนแปลง
การเปิดใช้งานโหมด Holiday
▶ กด
a จะติดสว่าง
การปิดใช้งานโหมด Holiday
▶ กด
8.4 โหมดประหยัดพลังงาน
คุณสามารถใช้โหมดประหยัดพลังงานเพื่อ
ให้เครื่องทำงานแบบประหยัดพลังงานได้
เครื่องจะปรับตั้งอุณหภูมิโดยอัตโนมัติ
ช่องแช่เย็น 8 °C
ช่องแช่แข็ง −16 °C
การเปิดใช้งานโหมดประหยัดพลังงาน
▶ กด
a จะติดสว่าง
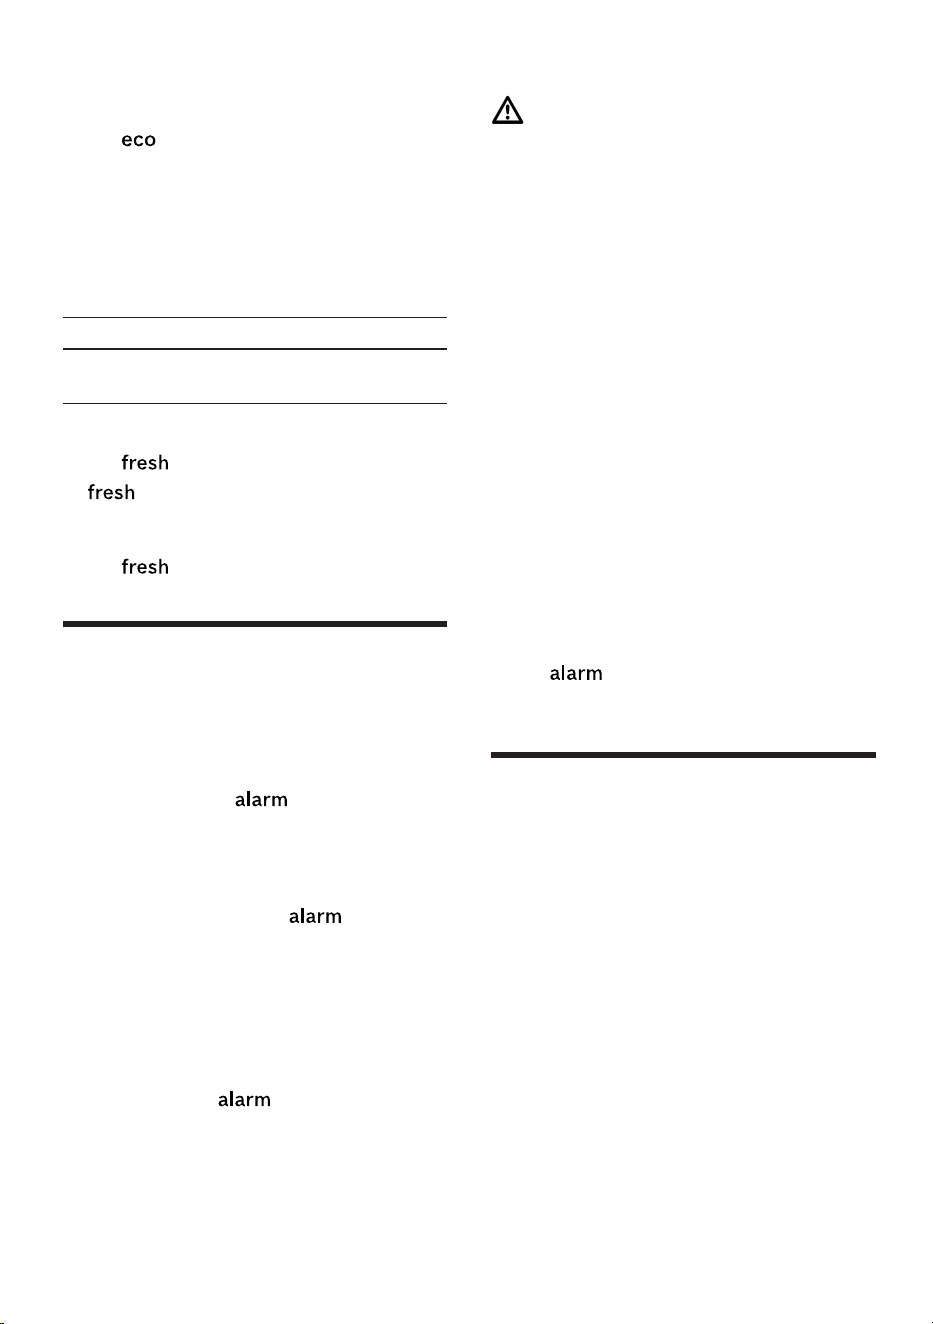
สัญญาณเตือน th
43
การปิดใช้งานโหมดประหยัดพลังงาน
▶ กด
8.5 โหมด Fresh
คุณสามารถเปิดใช้งานโหมด Fresh บนตัว
เครื่องเพื่อให้วัตถุดิบคงความสดไว้ได้นาน
ยิ่งขึ้น
เครื่องจะปรับตั้งอุณหภูมิโดยอัตโนมัติ
ช่องแช่เย็น 2°C
ช่องแช่แข็ง อุณหภูมิไม่มีการ
เปลี่ยนแปลง
การเปิดใช้งานโหมด Fresh
▶ กด
a จะติดสว่าง
การปิดใช้งานโหมด Fresh
▶ กด
9 สัญญาณเตือน
9.1 สัญญาณเตือนการเปิดประตู
หากเปิดประตูเครื่องค้างไว้นาน สัญญาณ
เตือนการเปิดประตูจะเปิดใช้งาน
เสียงเตือนจะดังขึ้น จะกะพริบ แถบ
ไฟจะกะพริบ และจอแสดงอุณหภูมิของช่อง
ที่เกี่ยวข้องจะกะพริบ
การปิดใช้งานสัญญาณเตือนการเปิดประตู
▶ ปิดประตูเครื่องหรือกด
a เสียงเตือนจะปิดใช้งาน
9.2 สัญญาณเตือนอุณหภูมิ
หากช่องแช่แข็งอุ่นเกินไป สัญญาณเตือน
อุณหภูมิจะเปิดใช้งาน
เสียงเตือนจะดังขึ้น รวมถึงอุณหภูมิที่ปรับตั้ง
ไว้ (ช่องแช่แข็ง) และแถบไฟจะ
กะพริบ
ข้อควรระวัง
ระวังอันตรายต่อสุขภาพ!
การละลายน้ำแข็งอาจทำให้แบคทีเรียเพิ่ม
จำนวนขึ้นและอาหารแช่แข็งอาจเน่าเสีย
▶ ห้ามแช่แข็งอาหารแช่แข็งที่เริ่มละลาย
หรือละลายน้ำแข็งแล้วอีกครั้ง
▶ แช่แข็งอาหารอีกครั้งหลังจากปรุงสุก
หรืออบแล้วเท่านั้น
▶ ไม่ควรจัดเก็บอาหารตามระยะเวลาสูงสุด
อีกต่อไป
สัญญาณเตือนอุณหภูมิอาจเปิดใช้งานใน
กรณีดังต่อไปนี้:
¡ เมื่อเครื่องทำงาน
จัดเก็บวัตถุดิบต่อเมื่ออุณหภูมิถึงระดับที่
ปรับตั้งไว้แล้วเท่านั้น
¡ เมื่อจัดเก็บวัตถุดิบสดในปริมาณมาก
เปิดใช้งาน ฟังก์ชัน Super Freeze
ก่อนจัดเก็บวัตถุดิบในปริมาณมาก
¡ เมื่อเปิดประตูช่องแช่แข็งนานเกินไป
ตรวจเช็คว่าอาหารแช่แข็งเริ่มละลาย
หรือละลายน้ำแข็งแล้วหรือไม่
การปิดใช้งานสัญญาณเตือนอุณหภูมิ
▶ กด
a เสียงเตือนจะปิดใช้งาน
10 ช่องแช่เย็น
คุณสามารถจัดเก็บเนื้อสัตว์ ไส้กรอก เนื้อ
ปลา ผลิตภัณฑ์ที่ทำจากนม ไข่ อาหารปรุง
สำเร็จ และขนมปังอบในช่องแช่เย็นได้
อุณหภูมิสามารถปรับตั้งได้ระหว่าง 2 °C
ถึง 8 °C
การจัดเก็บแบบแช่เย็นช่วยให้คุณสามารถ
จัดเก็บวัตถุดิบที่เน่าเสียง่ายได้ในช่วงเวลา
สั้นๆ จนถึงปานกลาง ยิ่งเลือกอุณหภูมิต่ำลง
วัตถุดิบก็จะคงความสดได้นานมากขึ้น
10.1 เคล็ดลับเกี่ยวกับการจัดเก็บ
วัตถุดิบในช่องแช่เย็น
¡ จัดเก็บเฉพาะวัตถุดิบสดและไม่มีความ
เสียหายเท่านั้น
¡ จัดเก็บวัตถุดิบในบรรจุภัณฑ์หรือภาชนะ
ครอบแบบปิดล็อคสุญญากาศ

th ช่องแช่แข็ง
44
¡ ห้ามวางวัตถุดิบไว้หน้าช่องระบายอากาศ
ด้านในหรือวางชิดผนังด้านหลังโดยตรง
เพื่อให้อากาศสามารถหมุนเวียนได้อย่าง
มีประสิทธิภาพและป้องกันไม่ให้วัตถุดิบ
ถูกแช่แข็ง
¡ ปล่อยให้อาหารและเครื่องดื่มที่มีความ
ร้อนเย็นตัวลงก่อน
¡ สังเกตวันที่ควรบริโภคหรือวันหมดอายุที่
ผู้ผลิตกำหนดไว้
10.2 โซนทำความเย็นในช่องแช่เย็น
การหมุนเวียนอากาศภายในช่องแช่เย็น
ทำให้เกิดโซนทำความเย็นที่แตกต่างกัน
โซนที่เย็นที่สุด
โซนที่เย็นที่สุดจะอยู่ในช่องเก็บของ
เคล็ดลับจัดเก็บวัตถุดิบที่เน่าเสียง่ายไว้ใน
โซนที่เย็นที่สุด เช่น เนื้อปลา ไส้กรอก และ
เนื้อสัตว์
โซนที่อุ่นที่สุด
โซนที่อุ่นที่สุดจะอยู่ที่บริเวณประตูด้านบน
สุด
เคล็ดลับจัดเก็บวัตถุดิบที่สามารถเก็บได้
นานไว้ในโซนที่อุ่นที่สุด เช่น ชีสแข็งและ
เนย วิธีนี้จะช่วยรักษากลิ่นของชีส รวมถึง
ช่วยให้เนยยังคงสามารถนำไปทาได้
11 ช่องแช่แข็ง
คุณสามารถจัดเก็บอาหารแช่แข็ง แช่แข็ง
วัตถุดิบ และทำน้ำแข็งก้อนในช่องแช่แข็ง
ได้
อุณหภูมิสามารถปรับตั้งได้ระหว่าง −16 °C
ถึง −24 °C
การจัดเก็บวัตถุดิบเป็นระยะเวลานานควรใช้
อุณหภูมิที่ −18 °C หรือต่ำกว่า
การจัดเก็บแบบแช่แข็งจะช่วยให้สามารถ
จัดเก็บวัตถุดิบที่เน่าเสียได้เป็นระยะเวลา
นาน อุณหภูมิต่ำจะช่วยยืดระยะเวลาหรือ
หยุดการเน่าเสีย
11.1 ความจุในการแช่แข็ง
ความจุในการแช่แข็งจะระบุถึงปริมาณของ
วัตถุดิบต่อจำนวนชั่วโมงที่ใช้ในการแช่แข็ง
วัตถุดิบดังกล่าวจนถึงแกนใน
คุณสามารถดูข้อมูลเกี่ยวกับความจุในการ
แช่แข็งได้จากป้ายกำกับรุ่น →
รูปที่
1
/
5
เงื่อนไขสำหรับความจุในการแช่แข็ง
1. เปิดใช้งาน ฟังก์ชัน Super Freeze เป็น
เวลาประมาณ 24 ชั่วโมงก่อนจัดเก็บ
วัตถุดิบสด
→"
การเปิดใช้งาน
ฟังก์ชัน
Super
Freeze",
หน้า
42
2. วางวัตถุดิบในช่องใส่อาหารแช่แข็งชั้น
ล่างสุดก่อน
11.2 การใช้ปริมาณความจุช่องแช่
แข็งอย่างเต็มพิกัด
โปรดศึกษาวิธีการใส่อาหารแช่แข็งในช่อง
แช่แข็งให้ได้ปริมาณสูงสุด
1. นำชิ้นส่วนอุปกรณ์ติดตั้งทั้งหมดในช่อง
แช่แข็งออก →
หน้า
47
2. จัดเก็บวัตถุดิบบนชั้นวางและพื้นช่องแช่
แข็งโดยตรง
11.3 เคล็ดลับเกี่ยวกับการจัดเก็บ
วัตถุดิบในช่องแช่แข็ง
¡ จัดเก็บวัตถุดิบในบรรจุภัณฑ์แบบปิดล็อค
สุญญากาศ
¡ ห้ามไม่ให้วัตถุดิบที่ต้องการนำมาแช่แข็ง
สัมผัสกับวัตถุดิบที่แช่แข็งอยู่
¡ กระจายวัตถุดิบในช่องใส่อาหารแช่แข็ง
ให้ทั่ว
¡ วางวัตถุดิบสดที่มีปริมาณมากในช่องใส่
อาหารแช่แข็งชั้นล่างสุดเพื่อให้สามารถ
แช่แข็งวัตถุดิบดังกล่าวได้อย่างรวดเร็ว
และทั่วถึง
¡ เลื่อนช่องใส่อาหารแช่แข็งเข้าจนสุดเพื่อ
ให้อากาศสามารถหมุนเวียนภายใน
เครื่องได้อย่างอิสระ
ช่องแช่แข็ง th
45
11.4 เคล็ดลับเกี่ยวกับการแช่แข็ง
วัตถุดิบสด
¡ แช่แข็งเฉพาะวัตถุดิบที่สดและไม่มีตำหนิ
เท่านั้น
¡ แช่แข็งวัตถุดิบโดยแบ่งขนาดสำหรับรับ
ประทาน
¡ วัตถุดิบปรุงสำเร็จเหมาะสมกว่าวัตถุดิบที่
รับประทานแบบดิบได้
¡ ล้างผัก หั่นให้เป็นชิ้นเล็กๆ และลวกก่อน
แช่แข็ง
¡ ล้าง แกะเมล็ด และปอกเปลือกผลไม้ก่อน
แช่แข็ง รวมถึงเติมน้ำตาลหรือ
สารละลายกรดแอสคอร์บิกหากจำเป็น
¡ วัตถุดิบที่เหมาะสำหรับการแช่แข็ง ได้แก่
ขนมปังอบ เนื้อปลา อาหารทะเล เนื้อ
สัตว์ เนื้อสัตว์ป่า และเนื้อสัตว์ปีก รวมถึง
ไข่ไม่มีเปลือก ชีส เนย ควาร์ก อาหาร
สำเร็จรูป และเศษอาหาร
¡ วัตถุดิบที่ไม่เหมาะสำหรับการแช่แข็ง
ได้แก่ สลัดผักใบเขียว แรดิช ไข่มีเปลือก
องุ่น แอปเปิ้ลและลูกแพร์ดิบ โยเกิร์ต
ครีมเปรี้ยว ครีมสด และมายองเนส
การบรรจุอาหารแช่แข็ง
วัสดุบรรจุภัณฑ์และประเภทของบรรจุภัณฑ์
ที่เหมาะสมจะช่วยรักษาคุณภาพของ
ผลิตภัณฑ์ได้เป็นอย่างมากและช่วยป้องกัน
ความเสียหายจากการโดนความเย็นกัด
1. วางวัตถุดิบลงในบรรจุภัณฑ์
2. กดไล่อากาศออก
3. ปิดล็อคบรรจุภัณฑ์แบบสุญญากาศเพื่อ
ป้องกันไม่ให้วัตถุดิบสูญเสียรสชาติหรือ
แห้งเกินไป
4. เขียนข้อมูลสิ่งที่บรรจุและวันที่แช่แข็งบน
บรรจุภัณฑ์
11.5 ความสามารถในการเก็บรักษา
อาหารแช่แข็งที่อุณหภูมิ −18
°C
วัตถุดิบ ระยะเวลาการ
จัดเก็บ
เนื้อปลา ไส้กรอก
อาหารปรุงสำเร็จ และ
ขนมปังอบ
ไม่เกิน 6 เดือน
วัตถุดิบ ระยะเวลาการ
จัดเก็บ
เนื้อสัตว์ปีกและเนื้อสัตว์ ไม่เกิน 8 เดือน
ผักและผลไม้ ไม่เกิน 12
เดือน
ตารางระยะเวลาแช่แข็งที่จัดพิมพ์ไว้จะ
แสดงระยะเวลาจัดเก็บสูงสุดในรูปแบบเดือน
เมื่อจัดเก็บในอุณหภูมิคงที่ -18°C
11.6 วิธีการละลายน้ำแข็งอาหาร
แช่แข็ง
ข้อควรระวัง
ระวังอันตรายต่อสุขภาพ!
การละลายน้ำแข็งอาจทำให้แบคทีเรียเพิ่ม
จำนวนขึ้นและอาหารแช่แข็งอาจเน่าเสีย
▶ ห้ามแช่แข็งอาหารแช่แข็งที่เริ่มละลาย
หรือละลายน้ำแข็งแล้วอีกครั้ง
▶ แช่แข็งอาหารอีกครั้งหลังจากปรุงสุก
หรืออบแล้วเท่านั้น
▶ ไม่ควรจัดเก็บอาหารตามระยะเวลาสูงสุด
อีกต่อไป
¡ ละลายน้ำแข็งวัตถุดิบจากสัตว์ในช่องแช่
เย็น เช่น เนื้อปลา เนื้อสัตว์ ชีส และค
วาร์ก
¡ ละลายน้ำแข็งขนมปังในอุณหภูมิห้อง
¡ นำวัตถุดิบสำหรับรับประทานทันทีมา
ประกอบอาหารในไมโครเวฟ เตาอบ
หรือบนเตา
th การละลายน้ำแข็ง
46
12 การละลายน้ำแข็ง
12.1 การละลายน้ำแข็งในช่องแช่
เย็น
ช่องแช่เย็นในเครื่องจะละลายน้ำแข็งโดย
อัตโนมัติ
12.2 การละลายน้ำแข็งในช่องแช่
แข็ง
ระบบ NoFrost แบบอัตโนมัติเต็มรูปแบบ
ช่วยให้ช่องแช่แข็งไม่มีน้ำแข็งเกาะ ดังนั้น
จึงไม่จำเป็นต้องละลายน้ำแข็ง
13 การทำความสะอาดและ
การดูแลรักษา
ทำความสะอาดและดูแลรักษาเครื่องอย่าง
ระมัดระวังเพื่อให้ยังคงใช้งานเครื่องได้
ยาวนาน
จะต้องให้ฝ่ายบริการลูกค้าดำเนินการ
ทำความสะอาดในจุดที่เข้าไม่ถึง การ
ทำความสะอาดโดยฝ่ายบริการลูกค้าอาจมี
ค่าใช้จ่าย
13.1 การเตรียมเครื่องสำหรับการ
ทำความสะอาด
1.
ปิดใช้งานเครื่อง →
หน้า
41
2. ตัดการเชื่อมต่อเครื่องออกจากแหล่งจ่าย
ไฟ
ดึงปลั๊กไฟของสายเชื่อมต่อแหล่งจ่ายไฟ
หรือปิดใช้งานฟิวส์ในตู้ควบคุมระบบ
ไฟฟ้า
3. นำวัตถุดิบทั้งหมดออก แล้ววางไว้ใน
บริเวณที่มีความเย็น
วางน้ำแข็งเทียมลงบนวัตถุดิบ (ถ้ามี)
4. นำชิ้นส่วนอุปกรณ์ติดตั้งและชิ้นส่วน
อุปกรณ์เสริมทั้งหมดออกจากเครื่อง
→
หน้า
47
13.2 การทำความสะอาดเครื่อง
คำเตือน
ระวังไฟดูด!
ความชื้นที่แทรกซึมเข้าไปอาจเป็นสาเหตุ
ให้เกิดไฟฟ้าดูดได้
▶ ห้ามใช้เครื่องทำความสะอาดไอน้ำหรือ
เครื่องทำความสะอาดแรงดันสูงในการ
ทำความสะอาดอุปกรณ์
ของเหลวที่อยู่ในไฟส่องสว่าง ส่วนควบคุม
หรือช่องระบายอากาศด้านในอาจเป็น
อันตรายได้
▶ ห้ามไม่ให้น้ำที่ใช้ล้างไหลเข้าไปในไฟ
ส่องสว่าง ส่วนควบคุม หรือช่องระบาย
อากาศด้านใน
ข้อควรระวัง!
สารทำความสะอาดที่ไม่เหมาะสมอาจจะ
ทำให้พื้นผิวของอุปกรณ์เสียหายได้
▶ อย่าใช้ใยขัดหรือฟองน้ำที่แข็ง
▶ อย่าใช้สารทำความสะอาดที่แรงหรือขูด
ขีด
▶ อย่าใช้สารทำความสะอาดที่มีแอลกอ
ฮอลเข้มข้น
การทำความสะอาดชิ้นส่วนอุปกรณ์ติดตั้ง
และอุปกรณ์เสริมในเครื่องล้างจานอาจ
ทำให้ชิ้นส่วนและอุปกรณ์ดังกล่าวเสียรูป
หรือเกิดการเปลี่ยนสี
▶ ห้ามทำความสะอาดชิ้นส่วนอุปกรณ์ติด
ตั้งและอุปกรณ์เสริมในเครื่องล้างจาน
โดยเด็ดขาด
1. เตรียมเครื่องสำหรับการทำความสะอาด
→
หน้า
46
2. ทำความสะอาดเครื่อง ชิ้นส่วนอุปกรณ์
ติดตั้ง ชิ้นส่วนอุปกรณ์เสริม และซีลประตู
โดยใช้ผ้าเช็ด น้ำอุ่น และน้ำยาล้างจาน
ที่มีค่า pH เป็นกลางในปริมาณเล็กน้อย
3. ใช้ผ้าแห้งเนื้อนุ่มเช็ดให้แห้งสนิท
4. ใส่ชิ้นส่วนอุปกรณ์ติดตั้งเข้าไป
5. เชื่อมต่อเครื่องเข้ากับระบบไฟฟ้า
→
หน้า
39
6. วางวัตถุดิบ
การทำความสะอาดและการดูแลรักษา th
47
13.3 การถอดชิ้นส่วนอุปกรณ์ติดตั้ง
หากต้องการทำความสะอาดชิ้นส่วนอุปกรณ์
ติดตั้งอย่างทั่วถึง ให้นำชิ้นส่วนดังกล่าว
ออกจากเครื่อง
การถอดชั้นวาง
▶ ดึงชั้นวาง แล้วถอดออก
→
รูปที่
9
การถอดชั้นวางที่ประตู
▶ ยกชั้นวางที่ประตูขึ้น แล้วถอดออก
→
รูปที่
10
การถอดช่องเก็บของ
1. ดึงช่องเก็บของออกจนสุด
2. ยกช่องเก็บของขึ้นบริเวณด้านหน้า
แล้วถอดออก
→
รูปที่
11
การถอดช่องแช่ผลไม้และผัก
1. ดึงช่องแช่ผลไม้และผักออกจนสุด
2. ยกช่องแช่ผลไม้และผักขึ้นบริเวณด้าน
หน้า แล้วถอดออก
→
รูปที่
12
การถอดช่องใส่อาหารแช่แข็ง
1. ดึงช่องใส่อาหารแช่แข็งออกจนสุด
2. ยกช่องใส่อาหารแช่แข็งขึ้นบริเวณด้าน
หน้า แล้วถอดออก
→
รูปที่
13
การถอดส่วนหน้าของช่องแช่
คุณสามารถถอดส่วนหน้าของช่องแช่ผลไม้
และผักเพื่อให้ทำความสะอาดได้ดียิ่งขึ้น
▶ ดันตะขอคล้องด้านข้างของช่องแช่
เข้าไป แล้วถอดส่วนหน้าออกจากช่อง
แช่โดยการหมุน
→
รูปที่
14
การถอดเครื่องทำน้ำแข็งก้อน
1. ดึงช่องใส่อาหารแช่แข็งออกจนสุด
2. ปลดแคลมป์บริเวณด้านซ้ายของช่องแช่
โดยการดันเข้าหากัน แล้วถอดเครื่อง
ทำน้ำแข็งก้อน
→
รูปที่
15
th การแก้ไขข้อขัดข้อง
48
14 การแก้ไขข้อขัดข้อง
คุณสามารถแก้ไขข้อขัดข้องเล็ก ๆ น้อย ๆ ที่ตัวอุปกรณ์ได้ด้วยตัวเอง ใช้ข้อมูลเกี่ยวกับการ
แก้ไขข้อขัดข้องก่อนที่จะติดตั้งฝ่ายบริการลูกค้า ด้วยการนี้ คุณสามารถหลีกเลี่ยงค่าใช้จ่าย
ที่ไม่จำเป็น
คำเตือน
ระวังไฟดูด!
การซ่อมแซมที่ไม่ได้มาตรฐานเป็นอันตราย
▶ อนุญาตให้เฉพาะบุคลากรผู้เชี่ยวชาญที่ผ่านการอบรมดำเนินการซ่อมแซมเครื่องเท่านั้น
▶ อนุญาตให้ใช้อะไหล่แท้สำหรับการซ่อมแซมเครื่องเท่านั้น
▶ หากสายไฟของเครื่องชำรุด จะต้องทำการเปลี่ยนด้วยการใช้สายไฟพิเศษซึ่งมีจำหน่ายที่
ผู้ผลิตหรือที่ฝ่ายบริการลูกค้า
ความผิดปกติ สาเหตุและวิธีแก้ปัญหา
เครื่องไม่ทำความเย็น รวม
ถึงการแสดงผลและไฟติด
สว่าง
โหมดสาธิตเปิดใช้งานอยู่
1.
ปิดใช้งานเครื่อง →
หน้า
41
2. รอเป็นเวลา 2นาที
3.
เปิดใช้งานเครื่องอีกครั้ง →
หน้า
41
4. รอเป็นเวลา 1นาที จากนั้นให้กด (ช่องแช่เย็น) ค้าง
ไว้จนกระทั่งสัญญาณเสียงดังขึ้น 4 ครั้ง
5. ตรวจเช็คว่าเครื่องเย็นลงแล้วหรือไม่หลังจากเวลาผ่านไปสัก
ครู่
ไฟส่องสว่าง LED ไม่
ทำงาน
สาเหตุแตกต่างกันที่เป็นไปได้
▶ โทรติดต่อฝ่ายบริการลูกค้า
คุณสามารถดูหมายเลขติดต่อฝ่ายบริการลูกค้าได้จาก
รายการศูนย์บริการลูกค้าที่แนบมาด้วย
ผนังด้านข้างของเครื่อง
ร้อน
ไม่มีความผิดปกติ ผนังด้านข้างได้รับการเดินท่อซึ่งจะร้อนขึ้น
ในระหว่างกระบวนการทำความเย็น ทั้งนี้เฟอร์นิเจอร์ที่สัมผัส
กับเครื่องจะไม่ได้รับความเสียหายจากความร้อน
ไม่จำเป็นต้องดำเนินการใด ๆ
เสียงเตือนดังขึ้น รวมถึง
จอแสดงอุณหภูมิ (ช่องแช่
เย็น) และแถบไฟ
กะพริบ
สัญญาณเตือนการเปิด
ประตูเปิดใช้งานอยู่
ฝาช่องแช่เย็นเปิดอยู่
▶ ปิดฝาช่องแช่เย็น
เสียงเตือนดังขึ้น รวมถึง
จอแสดงอุณหภูมิ (ช่องแช่
แข็ง) และแถบไฟ
กะพริบ
สัญญาณเตือนการเปิด
ประตูเปิดใช้งานอยู่
ฝาช่องแช่แข็งเปิดอยู่
▶ ปิดฝาช่องแช่แข็ง
การแก้ไขข้อขัดข้อง th
49
ความผิดปกติ สาเหตุและวิธีแก้ปัญหา
เสียงเตือนดังขึ้น รวมถึง
อุณหภูมิที่ปรับตั้งไว้ (ช่อง
แช่แข็ง) และแถบ
ไฟกะพริบ
สัญญาณเตือนอุณหภูมิ
เปิดใช้งานอยู่
สาเหตุแตกต่างกันที่เป็นไปได้
▶ กด
a สัญญาณเตือนจะปิดใช้งาน
ช่องระบายอากาศด้านนอกถูกปิดคลุม
▶ กำจัดสิ่งกีดขวางหน้าช่องระบายอากาศด้านนอก
จัดเก็บวัตถุดิบสดในปริมาณมาก
▶ ห้ามจัดเก็บเกินความจุในการแช่แข็ง
→"
ความจุในการแช่แข็ง
",
หน้า
44
อุณหภูมิไม่ถึงระดับที่ปรับ
ตั้งไว้
การละลายน้ำแข็งโดย
อัตโนมัติเต็มรูปแบบไม่
ทำงานอีกต่อไป
เปิดฝาช่องแช่แข็งไว้นานเกินไป คอยล์เย็น (เครื่องทำความ
เย็น) ในระบบ NoFrost มีน้ำแข็งเกาะอยู่มาก
ข้อกำหนด:อาหารแช่แข็งได้รับการหุ้มเป็นอย่างดีและจัดเก็บไว้
ในบริเวณที่มีความเย็น
1.
ปิดใช้งานเครื่อง →
หน้า
41
2. ยกเลิกการเชื่อมต่อเครื่องกับแหล่งจ่ายไฟ
ดึงปลั๊กไฟของสายเชื่อมต่อแหล่งจ่ายไฟหรือปิดใช้งานฟิวส์
ในตู้ควบคุมระบบไฟฟ้า
3. ดันเครื่องให้ออกห่างจากผนัง
4. เปิดฝาเครื่องทิ้งไว้
a หลังจากเวลาผ่านไป 20นาที น้ำที่เกิดจากการควบแน่นจะ
เริ่มหยดลงในถาดรองน้ำหยดบริเวณด้านหลังตัวเครื่อง
→
รูปที่
16
5. เพื่อหลีกเลี่ยงไม่ให้น้ำล้นออกจากถาดรองน้ำหยด ให้ซับน้ำ
ที่เกิดจากการควบแน่นโดยใช้ฟองน้ำ
คอยล์เย็นจะละลายน้ำแข็งเสร็จเมื่อไม่มีน้ำที่เกิดจากการ
ควบแน่นในถาดรองน้ำหยดอีก
6.
ทำความสะอาดพื้นที่ด้านในตัวเครื่อง →
หน้า
46K
7.
เปิดใช้งานเครื่องอีกครั้ง →
หน้า
41
อุณหภูมิคลาดเคลื่อนไป
จากการปรับตั้งเป็นอย่าง
มาก
สาเหตุแตกต่างกันที่เป็นไปได้
1.
ปิดใช้งานเครื่อง →
หน้า
41
2. เปิดใช้งานเครื่องอีกครั้งหลังจากเวลาผ่านไปประมาณ
5นาที →
หน้า
41
‒ หากอุณหภูมิอุ่นเกินไป ให้ตรวจเช็คอุณหภูมิอีกครั้งหลัง
จากเวลาผ่านไป 2-3 ชั่วโมง
‒ หากอุณหภูมิเย็นเกินไป ให้ตรวจเช็คอุณหภูมิอีกครั้งใน
วันถัดไป
มีน้ำที่เกิดจากการ
ควบแน่นเกาะอยู่บนพื้นผิว
ตัวเครื่องและบนชั้นวาง
ในเครื่อง
น้ำที่เป็นส่วนประกอบในอากาศร้อนชื้นจะควบแน่นบริเวณพื้น
ผิวตัวเครื่องที่มีความเย็น
1. เช็ดน้ำโดยใช้ผ้านุ่มและแห้ง
2. เปิดเครื่องเป็นระยะเวลาสั้นที่สุดเท่าที่ทำได้
3. ตรวจสอบให้แน่ใจว่าปิดเครื่องอย่างถูกต้องเสมอ
th การแก้ไขข้อขัดข้อง
50
ความผิดปกติ สาเหตุและวิธีแก้ปัญหา
ตัวเครื่องมีเสียงหึ่งๆ เสียง
แตกฟอง เสียงหวือ เสียง
ปุดๆ เสียงคลิก หรือเสียง
แตกกะเทาะ
ไม่มีความผิดปกติ มอเตอร์ทำงาน เช่น เครื่องทำความเย็นและ
พัดลม น้ำยาทำความเย็นไหลผ่านท่อ มอเตอร์ สวิตช์ หรือโซลิ
นอยด์วาล์วเปิดหรือปิดใช้งาน การละลายน้ำแข็งทำงาน
อัตโนมัติ
ไม่จำเป็นต้องดำเนินการใด ๆ
ตัวเครื่องส่งเสียงรบกวน ตัวเครื่องวางไม่เสมอกัน
▶ จัดวางเครื่องโดยใช้เครื่องมือวัดระดับน้ำและสกรูขาตั้ง
ตัวเครื่องไม่สามารถติดตั้งแบบแยกเดี่ยวได้
▶ รักษาระยะห่างขั้นต่ำของตัวเครื่อง
ชิ้นส่วนอุปกรณ์ติดตั้งขยับหรือติดขัด
▶ ตรวจเช็คชิ้นส่วนอุปกรณ์ติดตั้งแบบถอดออกได้ แล้วใส่
เข้าไปใหม่ในบางกรณี
ขวดหรือภาชนะสัมผัสกัน
▶ แยกขวดหรือภาชนะออกจากกัน
ฟังก์ชัน Super Freeze เปิดใช้งานอยู่
ไม่จำเป็นต้องดำเนินการใด ๆ

การเก็บรักษาและการกำจัด th
51
14.1 ไฟดับ
ในกรณีที่ไฟดับ อุณหภูมิในตัวเครื่องจะเพิ่ม
สูงขึ้นซึ่งส่งผลให้ระยะเวลาในการจัดเก็บ
สั้นลงและคุณภาพของอาหารแช่แข็งลดลง
คุณสามารถดูข้อมูลทางเทคนิคเกี่ยวกับ
ระยะเวลาในการจัดเก็บอาหารแช่แข็งใน
กรณีที่เกิดความขัดข้องได้จากเว็บไซต์ของ
เราสำหรับเครื่องของคุณ
หมายเหตุ
¡ เปิดเครื่องให้น้อยที่สุดเท่าที่เป็นไปได้
ขณะไฟดับและไม่จัดเก็บวัตถุดิบเพิ่มเติม
¡ ตรวจสอบคุณภาพของวัตถุดิบทันทีหลัง
จากไฟดับ
– กำจัดอาหารแช่แข็งที่ละลายและมี
อุณหภูมิอุ่นกว่า 5 °C
– นำอาหารแช่แข็งที่ละลายเล็กน้อยไป
ปรุงสุกหรืออบ แล้วรับประทานหรือ
แช่แข็งอีกครั้ง
14.2 การดำเนินการทดสอบตัวเอง
ของเครื่อง
เครื่องมาพร้อมการทดสอบตัวเองที่จะแสดง
ความขัดข้องซึ่งฝ่ายบริการลูกค้าสามารถ
แก้ไขให้คุณได้
1.
ปิดใช้งานเครื่อง →
หน้า
41
2. ตัดการเชื่อมต่อเครื่องออกจากแหล่งจ่าย
ไฟ
ดึงปลั๊กไฟของสายเชื่อมต่อแหล่งจ่ายไฟ
หรือปิดใช้งานฟิวส์ในตู้ควบคุมระบบ
ไฟฟ้า
3. เชื่อมต่อเครื่องเข้ากับระบบไฟฟ้าอีกครั้ง
หลังจากเวลาผ่านไป 5 นาที →
หน้า
39
4. เมื่อเวลาผ่านไป 1 นาทีหลังจากเชื่อมต่อ
ระบบไฟฟ้า ให้กด (ช่องแช่เย็น)
ค้างไว้เป็นเวลา 3 ถึง 5วินาทีจนกระทั่ง
สัญญาณเสียงดังขึ้นเป็นครั้งที่สอง
a หากสัญญาณเสียงดังขึ้น 2 ครั้งหลังจาก
สิ้นสุดการทดสอบตัวเองของเครื่องและ
จอแสดงอุณหภูมิแสดงอุณหภูมิที่ปรับตั้ง
ไว้ แสดงว่าเครื่องเป็นปกติ เครื่องจะสลับ
ไปทำงานในโหมดปกติิ
a หากสัญญาณเสียงดังขึ้น 5ครั้งหลังจาก
สิ้นสุดการทดสอบตัวเองของเครื่องและ
ไฟ LED ของจอแสดงอุณหภูมิติดสว่าง
ด้วยความสว่างในระดับที่แตกต่างกัน ให้
ติดต่อฝ่ายบริการลูกค้า ไฟ LED เหล่านี้
จะบอกให้ฝ่ายบริการลูกค้าทราบถึง
ข้อมูลเกี่ยวกับความขัดข้องที่เกิดขึ้น
15 การเก็บรักษาและการ
กำจัด
15.1 การปิดใช้งานเครื่อง
1.
ปิดใช้งานเครื่อง →
หน้า
41
2. ตัดการเชื่อมต่อเครื่องออกจากแหล่งจ่าย
ไฟ
ดึงปลั๊กไฟของสายเชื่อมต่อแหล่งจ่ายไฟ
หรือปิดใช้งานฟิวส์ในตู้ควบคุมระบบ
ไฟฟ้า
3. นำวัตถุดิบทั้งหมดออก
4.
ทำความสะอาดเครื่อง →
หน้า
46
5. เปิดตัวเครื่องทิ้งไว้เพื่อให้สามารถระบาย
อากาศภายในเครื่องได้
15.2 กำจัดอุปกรณ์เก่า
สามารถนำวัตถุดิบที่มีมูลค่ากลับมาใช้ซ้ำได้
อีกครั้งด้วยการกำจัดตามข้อบังคับที่
สอดคล้องกับการรักษาสิ่งแวดล้อม
คำเตือน
ระวังอันตรายต่อสุขภาพ!
เด็กอาจเข้าไปติดอยู่ในเครื่องและเป็น
อันตรายถึงชีวิต
▶ เพื่อป้องกันไม่ให้เด็กปีนป่ายอุปกรณ์
ห้ามดึงช่องลิ้นชักและช่องเก็บออกจาก
อุปกรณ์
▶ ป้องกันให้เด็กอยู่ห่างจากอุปกรณ์ที่ไม่ใช้
งานแล้ว
คำเตือน
ระวังไฟไหม้!
หากท่อชำรุดเสียหายอาจทำให้สารทำความ
เย็นที่ติดไฟได้และก๊าซอันตรายรั่วไหลออก
มาและลุกเป็นไฟได้
▶ ห้ามให้ท่อสารทำความเย็นและท่อระบาย
ชำรุดเสียหาย
1. ดึงปลั๊กไฟของสายไฟออก
th ฝ่ายบริการลูกค้า
52
2. ดึงสายไฟแยกออก
3. กำจัดเครื่องทิ้งด้วยวิธีที่เป็นมิตรต่อสิ่ง
แวดล้อม
โปรดสอบถามข้อมูลการกำจัดขยะ
ปัจจุบันจากผู้จัดจำหน่ายของคุณหรือ
จากเทศบาล
อุปกรณ์นี้ได้มาตรฐานตาม
European Guideline
2012/19/EU ว่าด้วยการ
ทำเครื่องหมายอุปกรณ์
ไฟฟ้า-อิเล็กทรอนิกส์เก่า
(การกำจัดทิ้งอุปกรณ์ไฟฟ้า-
อิเล็กทรอนิกส์ – WEEE)
ซึ่งใช้เป็นแนวทางสำหรับ
สหภาพยุโรปในการยกเลิก
การใช้งานและการใช้งาน
อุปกรณ์ไฟฟ้า-อิเล็กทรอนิกส์
เก่าอย่างถูกต้อง
16 ฝ่ายบริการลูกค้า
คุณสามารถขอรับข้อมูลรายละเอียดเกี่ยว
กับระยะเวลาการรับประกันและเงื่อนไขการ
รับประกันในประเทศของคุณได้จากฝ่าย
บริการลูกค้า ตัวแทนจำหน่าย หรือบน
เว็บไซต์ของเรา
เมื่อติดต่อฝ่ายบริการลูกค้า กรุณาแจ้ง
หมายเลขผลิตภัณฑ์ (E-Nr.) และหมายเลข
การผลิต (FD) ของเครื่องแก่ฝ่ายบริการ
ลูกค้า
ข้อมูลติดต่อฝ่ายบริการลูกค้าอยู่ใน
ไดเร็กทอรี่ฝ่ายบริการลูกค้าที่แนบมาหรือ
บนเว็บไซต์ของเรา
16.1 หมายเลขผลิตภัณฑ์ (E-Nr.)
และหมายเลขการผลิต (FD)
สามารถดูหมายเลขผลิตภัณฑ์ (E-Nr.) และ
หมายเลขการผลิต (FD) ได้บนป้ายกำกับ
รุ่นของเครื่อง
→
รูปที่
1
/
5
คุณสามารถจดบันทึกข้อมูลไว้เพื่อที่จะหา
เจอข้อมูลอุปกรณ์ของคุณและหมายเลข
โทรศัพท์ของฝ่ายบริการลูกค้าได้อย่าง
รวดเร็วอีกครั้ง
17 ข้อมูลทางเทคนิค
คุณสามารถดูข้อมูลเกี่ยวกับน้ำยาทำความ
เย็น ความจุในการใช้งาน และข้อมูลทาง
เทคนิคเพิ่มเติมได้จากป้ายกำกับรุ่น
→
รูปที่
1
/
5


Thank you for buying a
Bosch Home Appliance!
Register your new device on MyBosch now and profit directly from:
• Expert tips & tricks for your appliance
• Warranty extension options
• Discounts for accessories & spare-parts
• Digital manual and all appliance data at hand
• Easy access to Bosch Home Appliances Service
Free and easy registration – also on mobile phones:
www.bosch-home.com/welcome
Looking for help?
You'll find it here.
Expert advice for your Bosch home appliances, help with problems
or a repair from Bosch experts.
Find out everything about the many ways Bosch can support you:
www.bosch-home.com/service
Contact data of all countries are listed in the attached service direct-
ory.
*8001263907*
8001263907 (021031)
en, th
BSH Hausgeräte GmbH
Carl-Wery-Straße 34
81739 München, GERMANY
www.bosch-home.com
A Bosch Company
