These operating instructions refer to several models
The features of the models may vary. The diagrams may differ.
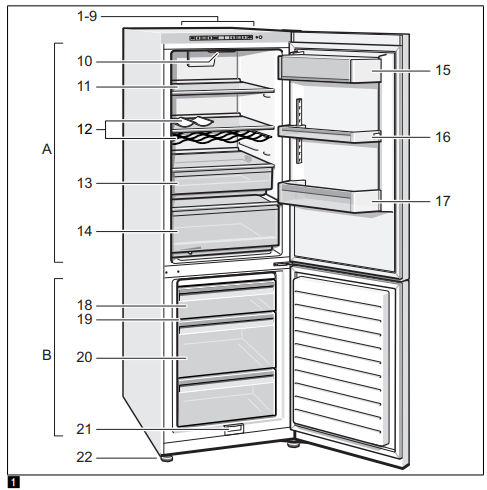
Fig. 1*
Not all models.
A Refrigerator compartment B Freezer compartment 1-9 Controls 10 Light (LED) 11 Glass shelf in the refrigerator compartment 12* Bottle shelf 13 Cold storage compartment 14 Vegetable container 15* Butter and cheese compartment 16* Door shelf “EasyLift” 17 Shelf for large bottles 18 Frozen food container (small) 19 Glass shelf in the freezer compartment 20 Frozen food container (large) 21 Condensation outlet 22 Height-adjustable feet
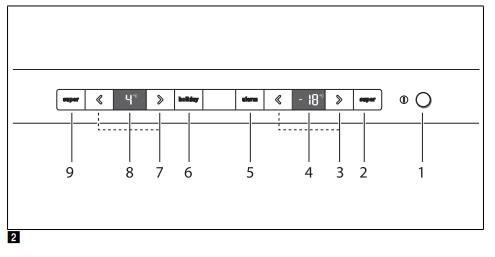
Controls
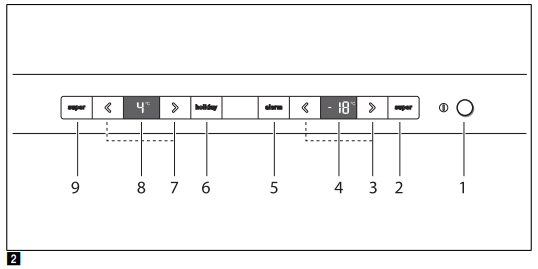
Fig.2
1. On/Off button
Serves to switch the whole appliance on and off.
2. "Super” button (freezer compartment)
Switches super freezing on and off.
3. Temperature selection buttons freezer compartment
These buttons set the temperature in the freezer compartment.
4. Temperature display freezer compartment
The numbers correspond to the set freezer compartment temperatures in °C.
5. Alarm button
Used to switch off the warning signal, see chapter “Alarm function”.
6. Holiday button
Is used to switch vacation mode on and off (see chapter entitled Vacation mode).
7. Temperature selection buttons refrigerator compartment
These buttons set the temperature in the refrigerator compartment.
8. Temperature display refrigerator compartment
The numbers correspond to the set refrigerator compartment temperatures in °C.
9. Super” button refrigerator compartment
Switches super cooling on and off.
Switching the appliance on
Fig.2
1. Switch on the appliance with the On/
Off button 1.
A warning signal sounds, the temperature display 4 flashes and the alarm button 5 is lit.
2. The warning signal is switched off by pressing the alarm button 5.
The appliance begins to cool. Light is switched on when the door is open.
The factory has recommended the following temperatures:
■ Refrigerator compartment: +4 °C
■ Freezer compartment: -18 °C
Operating tips
■ When the appliance has been switched on, it may take several hours until the set temperatures have been reached. Do not put any food in the appliance beforehand.
■ The sides of the housing are sometimes heated slightly. This prevents condensation in the area of the door seal.
■ If the freezer compartment door cannot be immediately re-opened after it has been closed, wait until the resulting low pressure has equalised.
Setting the temperature
Fig.2
Refrigerator compartment
The temperature can be set from +2 °C to +8 °C.
Keep pressing temperature setting button on refrigerator compartment 7, until the required refrigerator compartment temperature is set.
The value last selected is saved. The set temperature is indicated on the temperature display for the refrigerator compartment 8.
Perishable food should not be stored above +4 °C.
Freezer compartment
The temperature can be set from –16 °C to –24 °C.
Keep pressing temperature setting button freezer compartment 3 until the required freezer compartment temperature is set.
The value last selected is saved. The set temperature is indicated on temperature display for the freezer compartment 4.
Alarm functions
Door alarm
The door alarm switches on if the refrigerator compartment door is left open for longer than one minute. Close the door to switch off the warning signal.
Temperature alarm
The temperature alarm switches on if the freezer compartment is too warm and the frozen food is at risk of thawing.
When the alarm button 5 is pressed, the freezer compartment temperature display 4 indicates for five seconds the warmest temperature reached in the freezer compartment.
Then this value is deleted. The temperature display for the freezer compartment 4 indicates the set freezer compartment temperature without flashing.
Henceforth the “warmest temperature” will be redefined and saved.
The alarm may switch on without any risk to the frozen food:
■ when the appliance is switched on,
■ when large quantities of fresh food are placed in the appliance,
■ if the freezer compartment door is open too long.
Note
Do not refreeze thawing or thawed food. Only ready meals (boiled or fried) may be refrozen.
No longer store the frozen produce for the max. storage period.
Switching off the alarm
Fig.2
Press the alarm button 5 to switch off the warning signal.
Refrigerator compartment
The refrigerator compartment is the ideal storage location for ready meals, cakes and pastries, preserved food, condensed milk, hard cheese, fruit and vegetables sensitive to cold.
Note when loading products
Wrap or cover food before placing in the appliance. This will retain the aroma, colour and freshness of the food. In addition, flavours will not be transferred between foods and the plastic parts will not become discoloured.
Note
Avoid contact between food and rear panel. Otherwise the air circulation will be impaired.
Food or packaging could freeze to the rear panel.
Note the chill zones in the refrigerator compartment
The air circulation in the refrigerator compartment creates different chill zones:
■ Coldest zone
is on the rear panel inside the appliance and on the cold storage compartment. Fig. !/13
Note Store perishable food e.g. fish, sausage, meat in the coldest zones.
■ Warmest zone
is at the very top of the door.
Note Store e.g. hard cheese and butter in the warmest zone. Cheese can then continue to release its flavour and the butter will still be easy to spread.
Super cooling
Super cooling sets the refrigerator temperature to the coldest temperature setting for approx. 15 hours. Then the appliance automatically switches to the temperature set prior to super cooling mode.
Switch on super cooling mode, e.g.
■ before placing large quantities of food in the refrigerator compartment.
■ for the fast cooling of drinks.
Note When super cooling is switched on, increased operating noises may occur.
Switching on and off
Fig.2
Press super button 9 refrigerator compartment.
The button is lit when super cooling is switched on.
Freezer compartment
Use the freezer compartment
■ To store deep-frozen food.
■ To make ice cubes.
■ To freeze food.
Note Ensure that the freezer compartment door has been closed properly. If the door is open, the frozen food will thaw. The freezer compartment will become covered in thick ice. Also: waste of energy due to high power consumption!
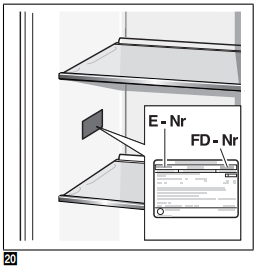
Max. freezing capacity
Information about the max. freezing capacity within 24 hours can be found on the rating plate. Fig.20
Prerequisites for max. freezing capacity
■ Switch on super freezing before placing fresh products in the compartment (see chapter entitled “Super freezing”).
■ Remove the fittings. The food can be stacked directly on the shelves and in the bottom of the freezer compartment.
■ Freeze large quantities of food preferably in the very top compartment where food freezes particularly quickly and therefore also gently.
■ Freeze fresh food as close as possible to the side panels.
Freezing and storing food
Purchasing frozen food
■ Packaging must not be damaged.
■ Use by the “use by” date.
■ Temperature in the supermarket freezer must be -18 °C or lower.
■ If possible, transport deep-frozen food in an insulated bag and place quickly in the freezer compartment.
Freezing food
■ Freeze fresh and undamaged food only.
■ Keep food which is to be frozen away from food which is already frozen.
■ To prevent food from losing its flavour or drying out, place in airtight containers.
Storing frozen food
Insert frozen food container all the way to ensure unrestricted air circulation.
If you have to store lots of food, it is possible to transfer the food to the glass shelves and stack it on the base of the freezer base.
1. To do this, remove all the frozen food containers.
2. Pull out the frozen food containers all the way, lift at the front and remove. Fig.16
Freezing smaller amounts of food
How you freeze smaller amounts of food, so that they are frozen solid extremely quickly, can be found in the section Automatic super freezing.
Cleaning the appliance
Caution
■ Do not use abrasive, chloride or acidic cleaning agents or solvents.
■ Do not use scouring or abrasive sponges. The metallic surfaces could corrode.
■ Never clean shelves and containers in the dishwasher.
The parts may become deformed!
Proceed as follows:
Before cleaning: Switch off the appliance.
Pull out mains plug or switch off fuse.
Take out the frozen food and store in a cool location. Place the ice pack (if enclosed) on the food.
Wait until the layer of frost has thawed.
Clean the appliance with a soft cloth, lukewarm water and a little pH neutral washing-up liquid. The rinsing water must not run into the light.
Wipe the door seal with clear water only and then wipe dry thoroughly.
After cleaning reconnect and switch the appliance back on.
Put the frozen food back into the appliance.
Interior fittings
All variable parts of the appliance can be taken out for cleaning.
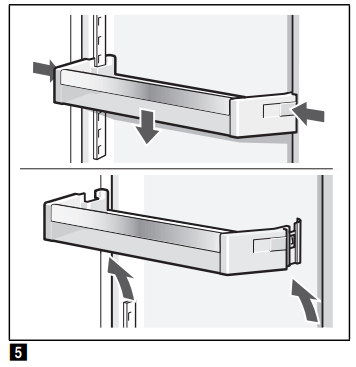
Take out shelves in the door
Fig.6
Lift shelves upwards and take out.
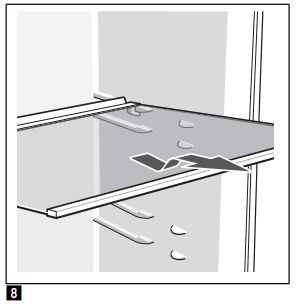
Take out glass shelves
Fig.8
Lift the glass shelves, pull forwards, lower and swivel out to the side.
Taking out pull-out container
Lift the container and pull out.
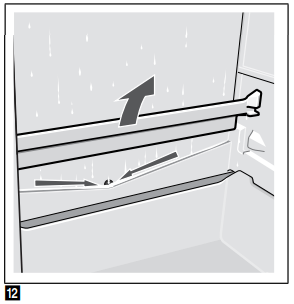
Condensation outlet fascia
To clean the condensation outlet channel, the glass shelf above the vegetable container, Fig.1/14, must be separated from the condensation outlet fascia:
1. Take out the glass shelf.
2. Lift condensation outlet fascia and take out. Fig.12,
Note Regularly clean the condensation channel and drainage hole with a cotton bud or similar implement to ensure that the condensation can drain.
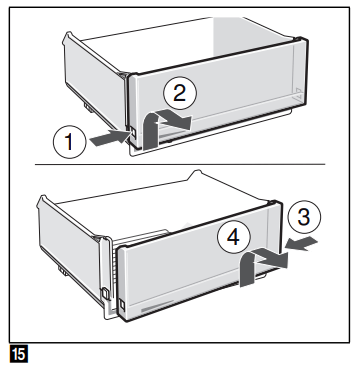
Vegetable container
Fig.15
The fascia of the vegetable container can be removed for cleaning.
Press side buttons in succession and remove fascia from the vegetable container.
Removing the container
Fig.5
Pull out the container all the way, lift at the front and remove.
Odours
If you experience unpleasant odours:
Switch off the appliance with the On/ Off button. Fig.2/1
Take all food out of the appliance.
Clean interior (see chapter “Cleaning the appliance”).
Clean all packages.
Seal strong smelling food in order to avoid odours from forming.
Switch the appliance on again.
Store food in the appliance.
Check whether the formation of odours is still occuring after 24 hours.
Light (LED)
Your appliance features a maintenancefree LED light.
These lights may be repaired by customer service or authorised technicians only.
Tips for saving energy
■ Install the appliance in a dry, well ventilated room! The appliance should not be installed in direct sunlight or near a heat source (e.g. radiator, cooker).
If required, use an insulating plate.
■ Allow warm food and drinks to cool down before placing in the appliance.
■ Thaw frozen food in the refrigerator compartment and use the low temperature of the frozen food to cool refrigerated food.
■ Regularly defrost the freezer compartment to remove the layer of frost.
A layer of hoarfrost will impair refrigeration of the frozen food and increase power consumption.
■ Open the appliance as briefly as possible.
■ To avoid increased power consumption, occasionally clean the back of the appliance.
■ If available: Fit wall spacers to obtain the indicated energy rating of the appliance (see Installation instructions). A reduced wall gap will not restrict the function of the appliance. The energy rating may then increase slightly. The gap of 75 mm must not be exceeded.
■ The arrangement of the fittings does not affect the energy rating of the appliance.
Operating noises
Quite normal noises
Note
When super freezing is switched on, increased operating noises may occur.
Droning
Motors are running (e.g. refrigerating units, fan).
Bubbling, humming or gurgling noises
Refrigerant is flowing through the tubing.
Clicking
Motor, switches or solenoid valves are switching on/off.
Preventing noises
The appliance is not level
Please align the appliance with a spirit level. Use the height-adjustable feet or place packing underneath them.
The appliance is not free-standing
Please move the appliance away from adjacent units or appliances.
Containers or storage areas wobble or stick
Please check the removable parts and re-insert them correctly if required.
Bottles or receptacles are touching each other
Move the bottles or receptacles slightly away from each other.
Eliminating minor faults yourself
Before you call customer service:
Please check whether you can eliminate the fault yourself based on the following information.
Customer service will charge you for advice – even if the appliance is still under guarantee!
Fault
Possible cause
Remedial action
Temperature differs greatly from the set value.
In some cases it is adequate to switch off the appliance for 5 minutes.
If the temperature is too high wait a few hours and check whether the temperature has approached the set value.
If the temperature is too low check the temperature again the next day.
Displays do not illuminate.
Power failure; the fuse has been switched off; the mains plug has not been inserted properly.
Connect mains plug. Check whether the power is on, check the fuses.
Temperature display indicates “E..”.
Electronics have detected a fault.
Call customer service.
Warning signal sounds, “alarm” button lights up. Fig.2/5
The freezer compartment is too warm!
Frozen food is at risk!
To switch off the warning signal, press the “alarm” button 5.
Appliance is open.
Close the appliance.
Ventilation openings have been covered.
Ensure that there is adequate ventilation.
Too much food was placed in the freezer compartment at once.
Do not exceed max. freezing capacity.
When the fault has been eliminated, the “alarm” button 5 goes out shortly afterwards.
Freezer compartment temperature display flashes. Fig.2/4
Warning signal sounds.
The alarm button is lit. Fig.2/5
The freezer compartment is too warm!
Frozen food is at risk!
To switch off the warning signal, press the “alarm” button, Fig.2/5.
Appliance is open.
Close the appliance.
Ventilation openings have been covered.
Ensure that there is adequate ventilation.
Too much food was placed in the freezer compartment at once.
Do not exceed max. freezing capacity
When the fault has been eliminated, the alarm display goes out shortly afterwards.
Freezer compartment temperature display flashes. Fig.2/4
A fault caused the freezer compartment to become too warm in the past.
When the alarm button 5 is pressed, the temperature display stops flashing. Fig.2/4
The temperature display indicates for 5 seconds the warmest temperature which was reached in the freezer compartment.
Appliance is not cooling, temperature display and light are lit.
Showroom mode is switched on.
Hold down alarm button, Fig2/5, for 10 seconds until an acknowledgement signal sounds.
After a short time check whether your appliance is cooling.
Automatic super freezing does not switch on.
The appliance decides independently whether automatic Super freezing is required and automatically switches it on or of
Appliance self-test
Your appliance features an automatic self-test program which shows you sources of faults which may be repaired by customer service only.
Starting the appliance self-test
1. Switch off the appliance and wait 5 minutes.
2. Switch on appliance and hold down the super button, Fig.2/2, for 3–5 seconds within the first 10 seconds until an acoustic signal sounds.
The self-test programme starts.
While the self-test is running, a long acoustic signal sounds.
When the self-test ends and an acoustic signal sounds twice, your appliance is in working order
If the super button flashes for 10 seconds and 5 acoustic signals sound, there is a fault. Inform customer service.
Ending the appliance self-test
When the programme has ended, the appliance switches over to normal operation.