Quick Guide – MOBOTIX NAS & IoT Cameras
Setting up MOBOTIX NAS/MxManagementCenter
Using IoT Cameras

2
General Information (1)
Minimum requirements for software versions
• MOBOTIX NAS: Mx-NAS2-4A-4.3.4.0807, Mx-NAS8A-4.3.4.0807, ContainerStation 1.8.3.207,
MOBOTIX NAS QVRProServer 1.2.1.0 (see MOBOTIX NAS Quick Install)
• MOBOTIX IoT Cameras: 5.2.x (Mx6), 4.7.x (Mx3)
• MxManagementCenter: 2. 2+
IMPORTANT: We recommend updating all system components to the latest software releases. Please
download the latest releases of MxMC, MOBOTIX NAS, and MOBOTIX IoT cameras from the MOBOTIX website
www.mobotix.com:
• Support > Download Center > Software Downloads
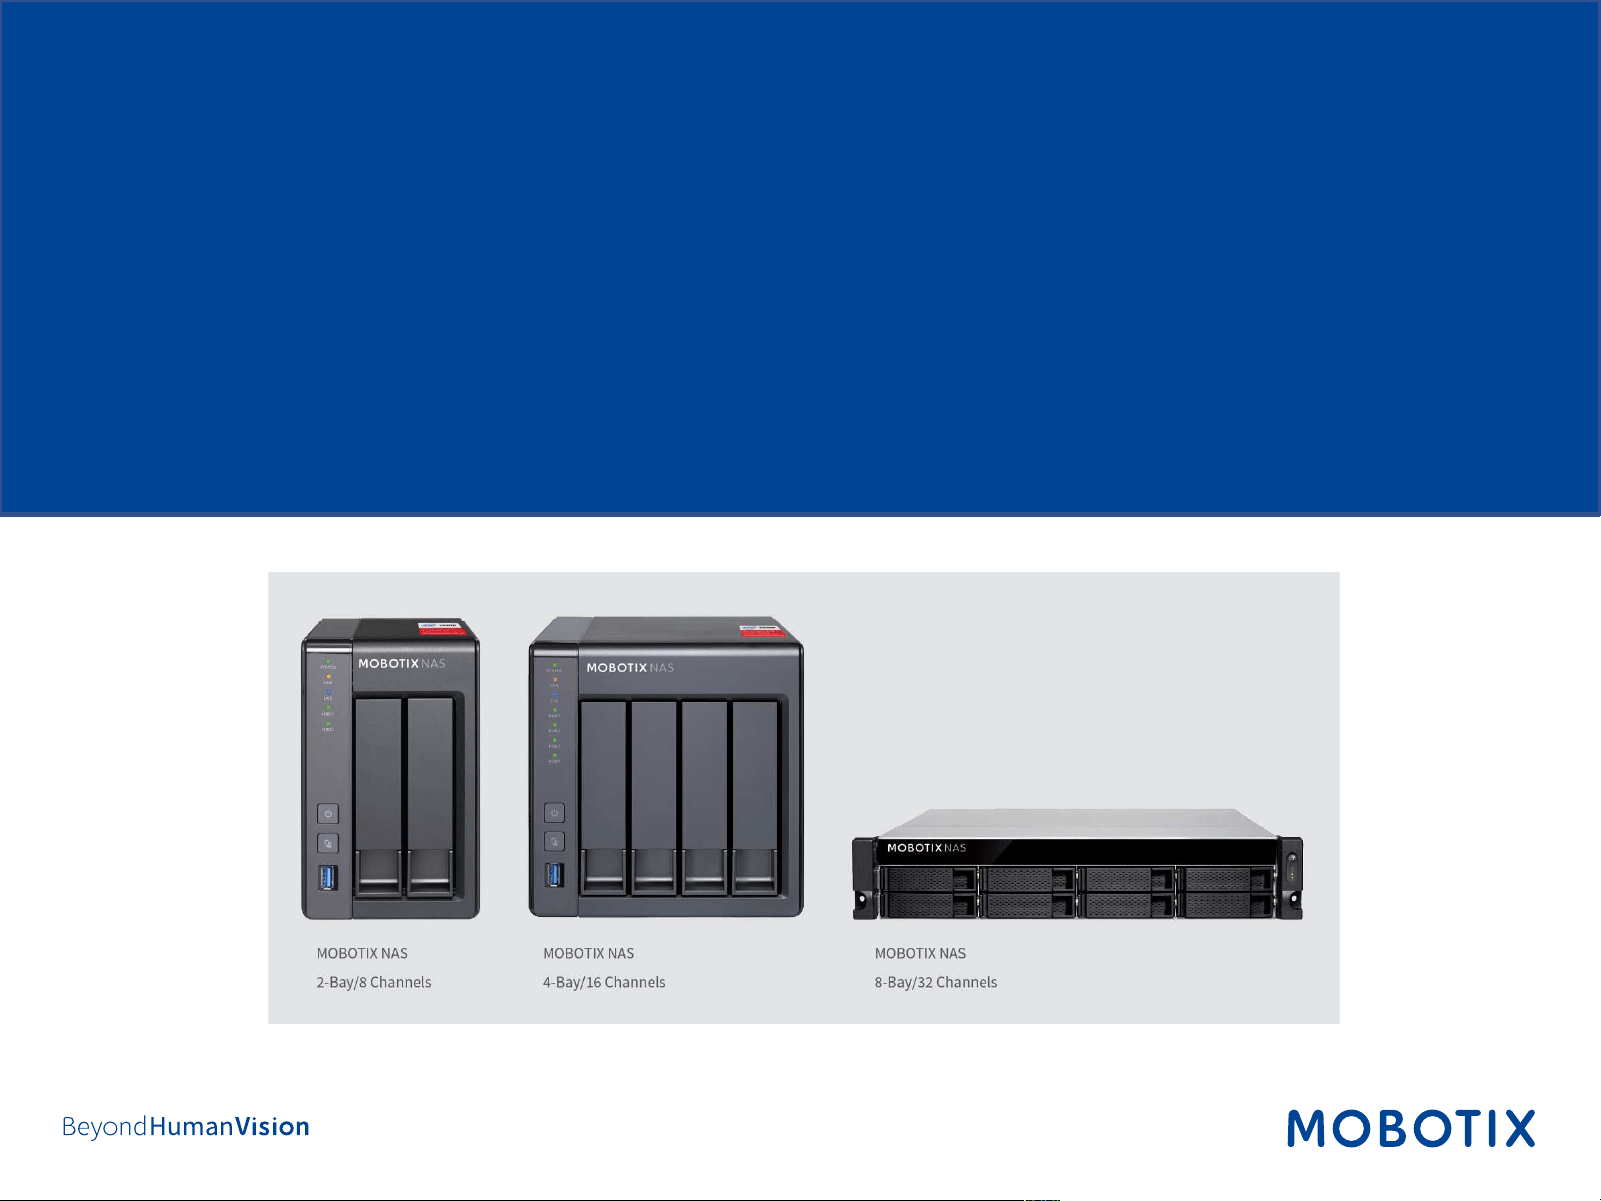
This document is valid for the following MOBOTIX NAS models
Product Name
Item Number
Product Label
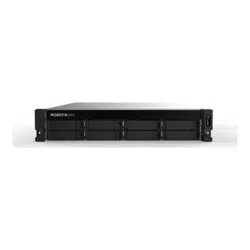
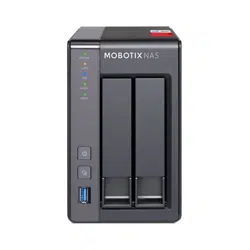
MOBOTIX NAS 2
-Bay/8 Channels
Mx
-S-NAS2a-8
251
-G
MOBOTIX NAS 4
-Bay/16 Channels
Mx
-S-NAS4A-16
451
-G
MOBOTIX NAS 8
-Bay/32 Channels
Mx
-S-NAS8A-32
873U
-G

3
General Information (2)
A Note on Licensing
• MxManagementCenter can show MOBOTIX IoT and MOVE cameras “as is”, i.e., without any further
licensing. For bandwidth-optimized usage and professional applications, it is highly recommended to
use MxPEG.
• Using the Advanced Configuration feature of MxManagementCenter requires a license. This is
recommended for quick and easy setup of a video surveillance system.
For more information on licensing models, please read the MxMC 2.0 Tutorial from the MOBOTIX website
www.mobotix.com:
• Support > Download Center > Documentation > Brochures & Guides > Tutorials
Video Tutorials are available from the MOBOTIX website www.mobotix.com:
• Support > Download Center > Documentation > Video Tutorials
The MOBOTIX NAS HDD Compatibility List is available from the MOBOTIX website www.mobotix.com:
• Support > Download Center > Documentation > White Lists
Password Security!
• NEVER use the default access privileges! Always make sure that you have changed the default
passwords to strong passwords (numbers, lower/upper case letters, special characters)!
• The default user of the MOBOTIX NAS is “admin” and the password is “admin”.
• The default user of the MOBOTIX Cameras is “admin” and the password is “meinsm”.
• NEVER use the default access privileges! Always make sure that you have changed the default
passwords to strong passwords (numbers, lower/upper case letters, special characters)!

4
Motivation
The objective of this document is to set up a MOBOTIX NAS as a storage device for MOBOTIX IoT cameras. In this
scenario, the cameras will be using the NAS as network share.
The MOBOTIX NAS QVRProServer recording software is not required for recording MOBOTIX IoT cameras on the
NAS. For most efficient configuration of camera settings, use the Advanced Configuration feature of
MxManagementCenter.
MOBOTIX IoT cameras can
bridge network failures using
their internal SD card

5
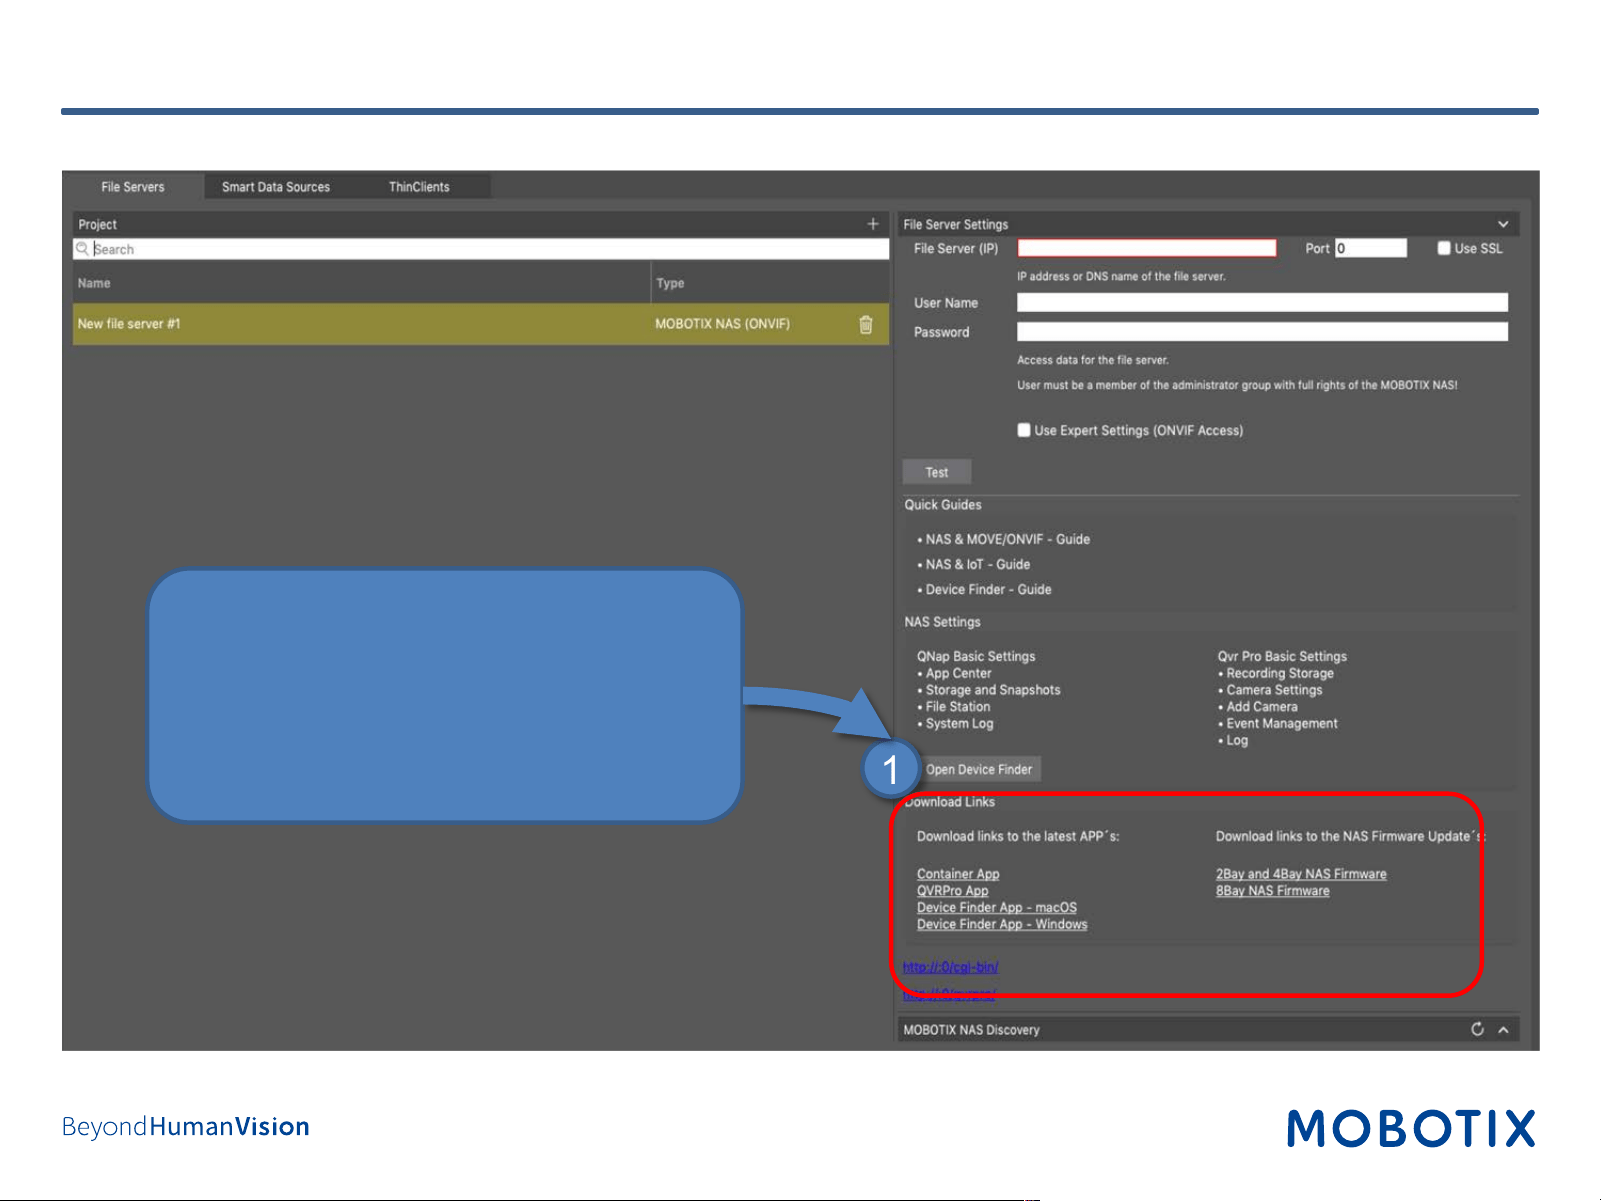
Step 1: Adding NAS in MxManagementCenter (1)
• Open the Components View of
MxMC
• In tab File Servers add a MOBOTIX
NAS
6
Step 1: Adding NAS in MxManagementCenter (2)
1
• From the Download Links section,
download and install the Device Finder app
• Optional: Download the latest NAS
firmware (see also step 6)

7
Step 2: Device Finder
• Select your MOBOTIX NAS
• Note the IP-Adresse of the NAS
• If your MOBOTIX NAS has not yet been
initialized, start the Intelligent Installation
Guide.
1
2

8
Step 3: Initially configure the NAS (1) - Set the access data
• If necessary, change the NAS-Name
• Set a password
• Click on Next
1

9
Step 3: Initially configure the NAS (2) – Optionally configure hard disks
• Choose Configure Disk Now
• Configure the available disks according to
your requirements
• Click on Next
1
10
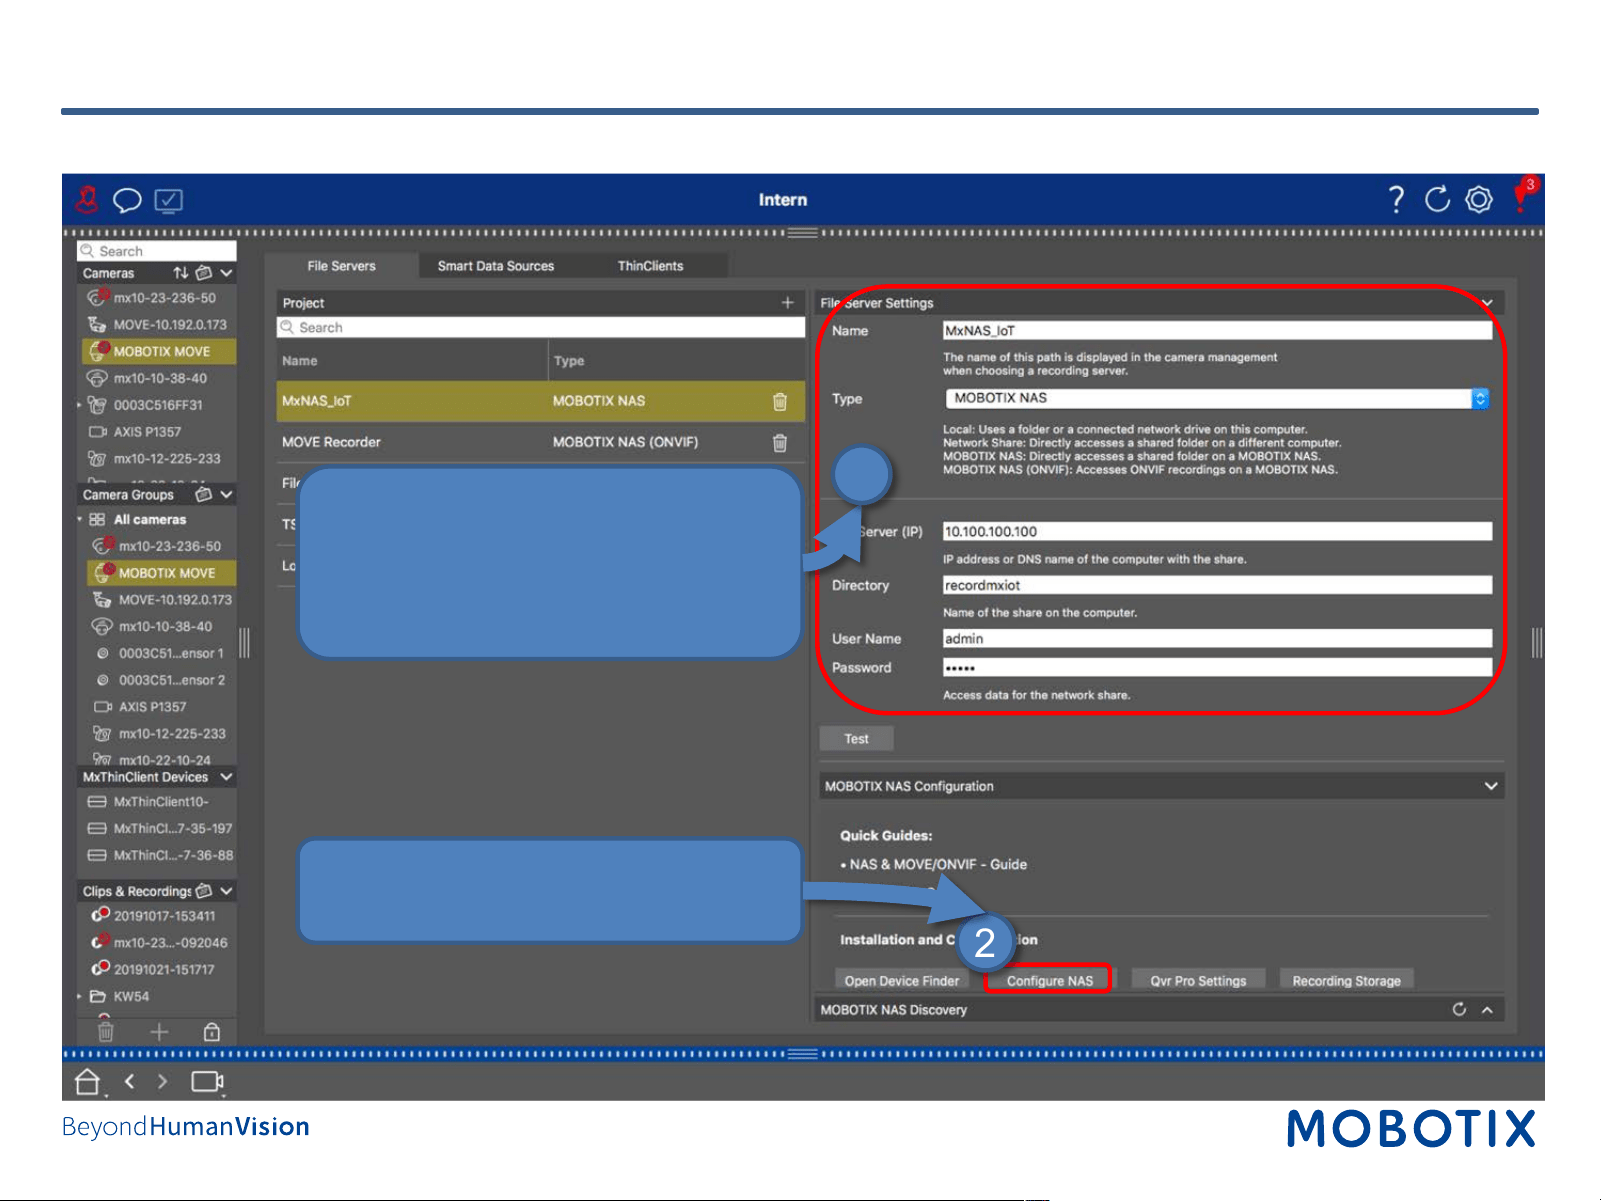
Step 4: Setting up the NAS in the MxManagementCenter
• Enter the access data for your NAS
under File Server Settings
1
2
• Click Configure NAS

11
Step 5: Login to NAS Web Interface
• Log in to the web
interface of the NAS
1

12
Step 6: optionally update firmware (1)
• Open the Control Panel

13
Step 6: optionally update firmware(2)
• Click on Firmware Update

14
Step 6: optionally update firmware(2)
• Select the firmware (see step 1)
• Click on Update System
• Follow the instructions on the screen
15
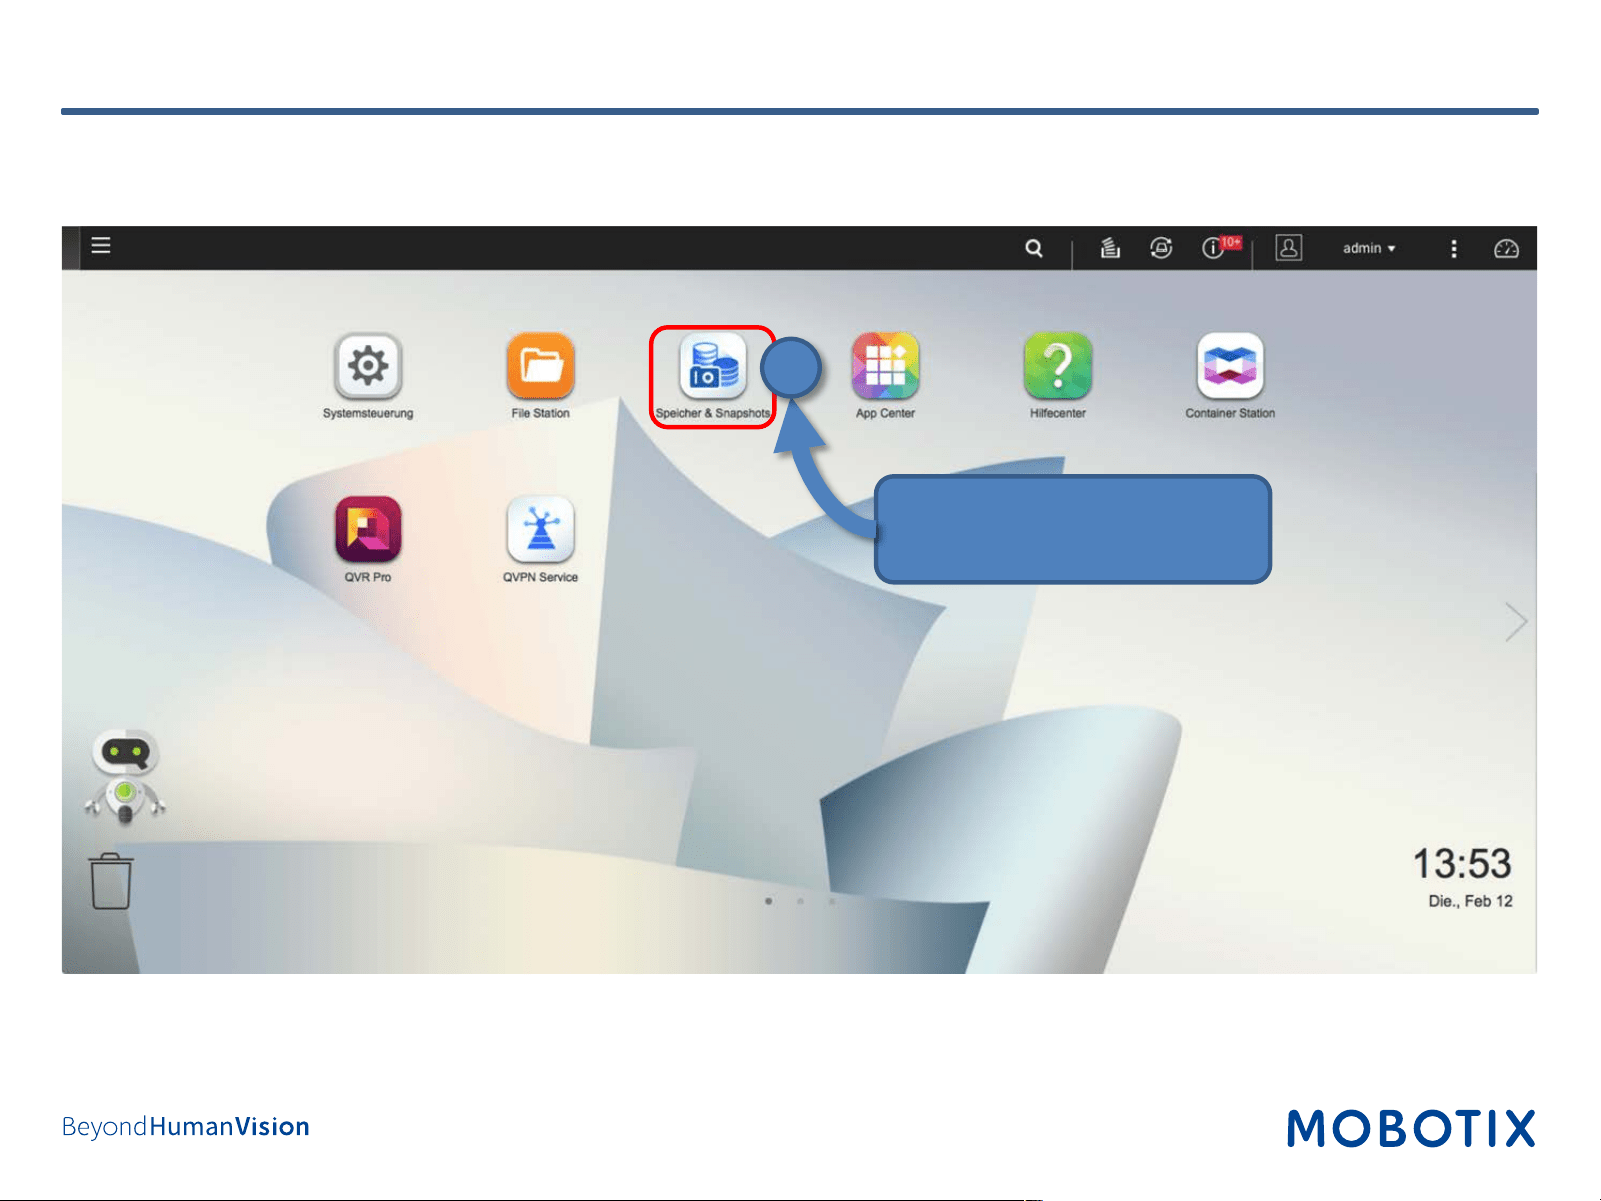
Step 7: Configure volume (1)
• Open Storage &
Snapshots.
2
16
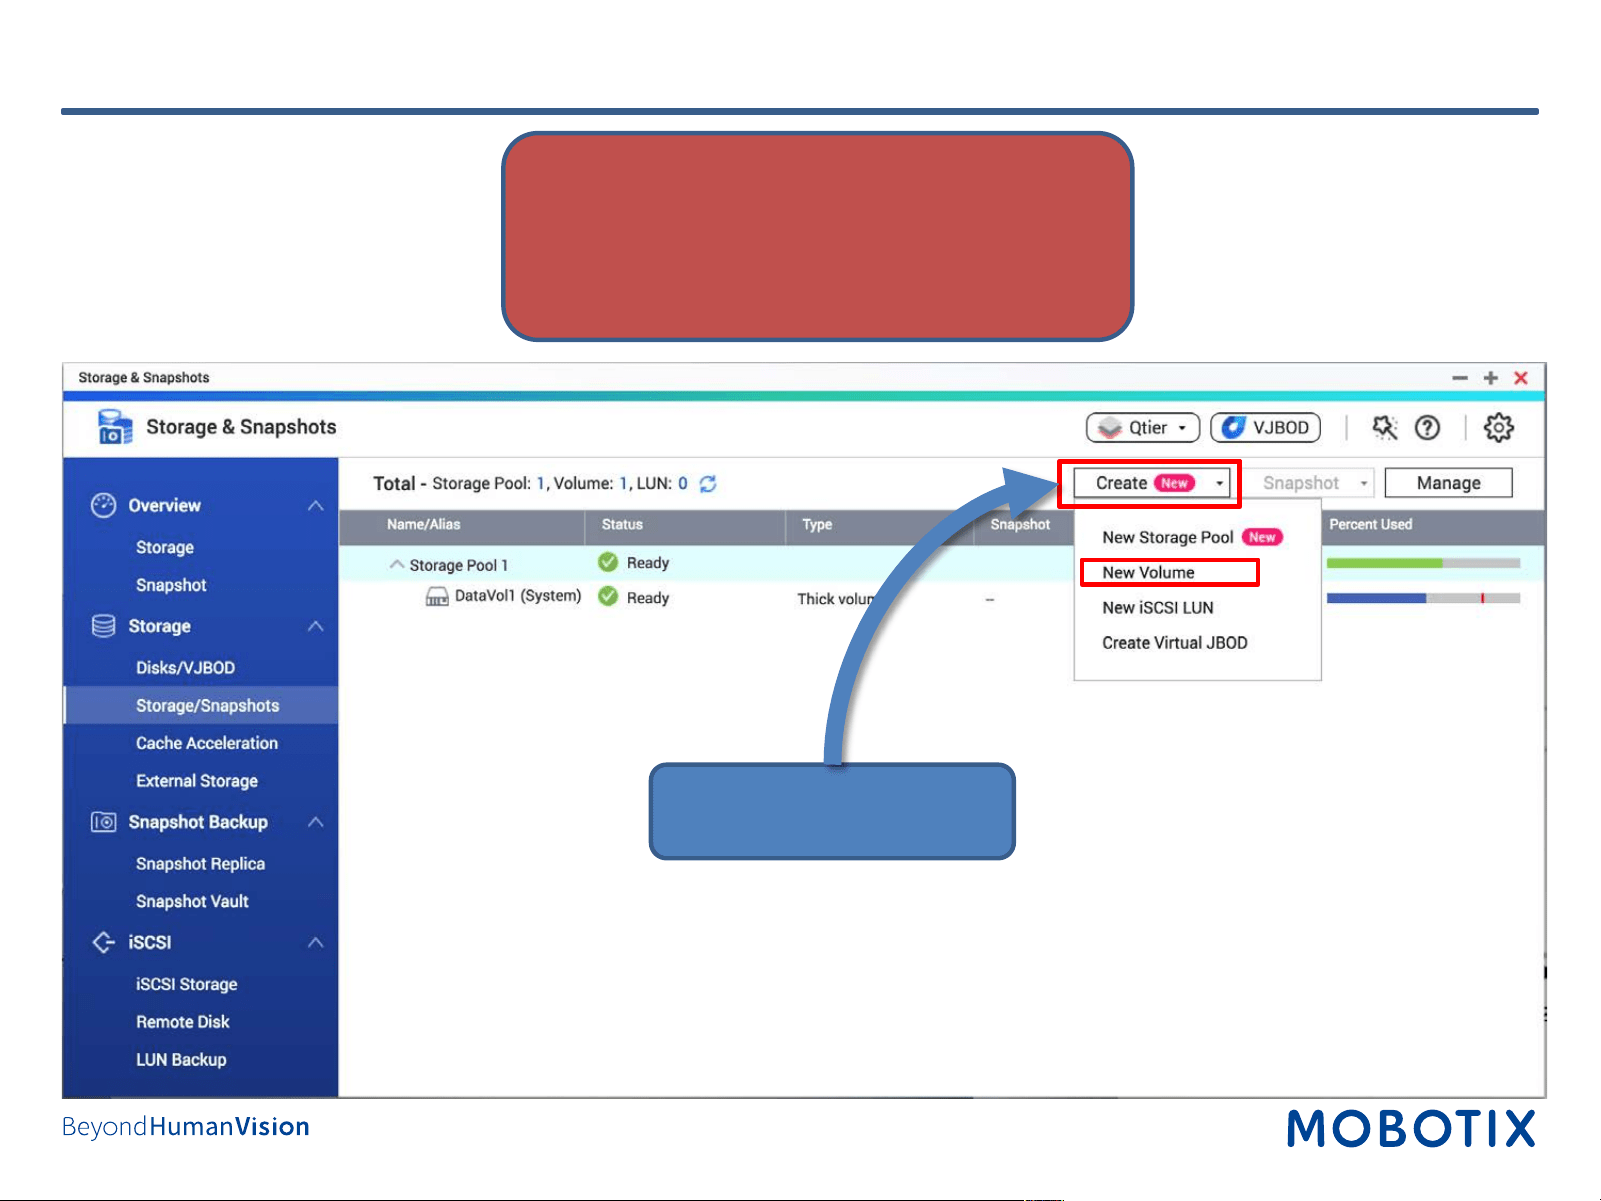
Step 7: Configure Volume (2)
1. Click on Create.
2. Click on New Volume.
IMPORTANT: Reserve extra Recording Space if
you’d like to add MOBOTIX-MOVE cameras later on!
17
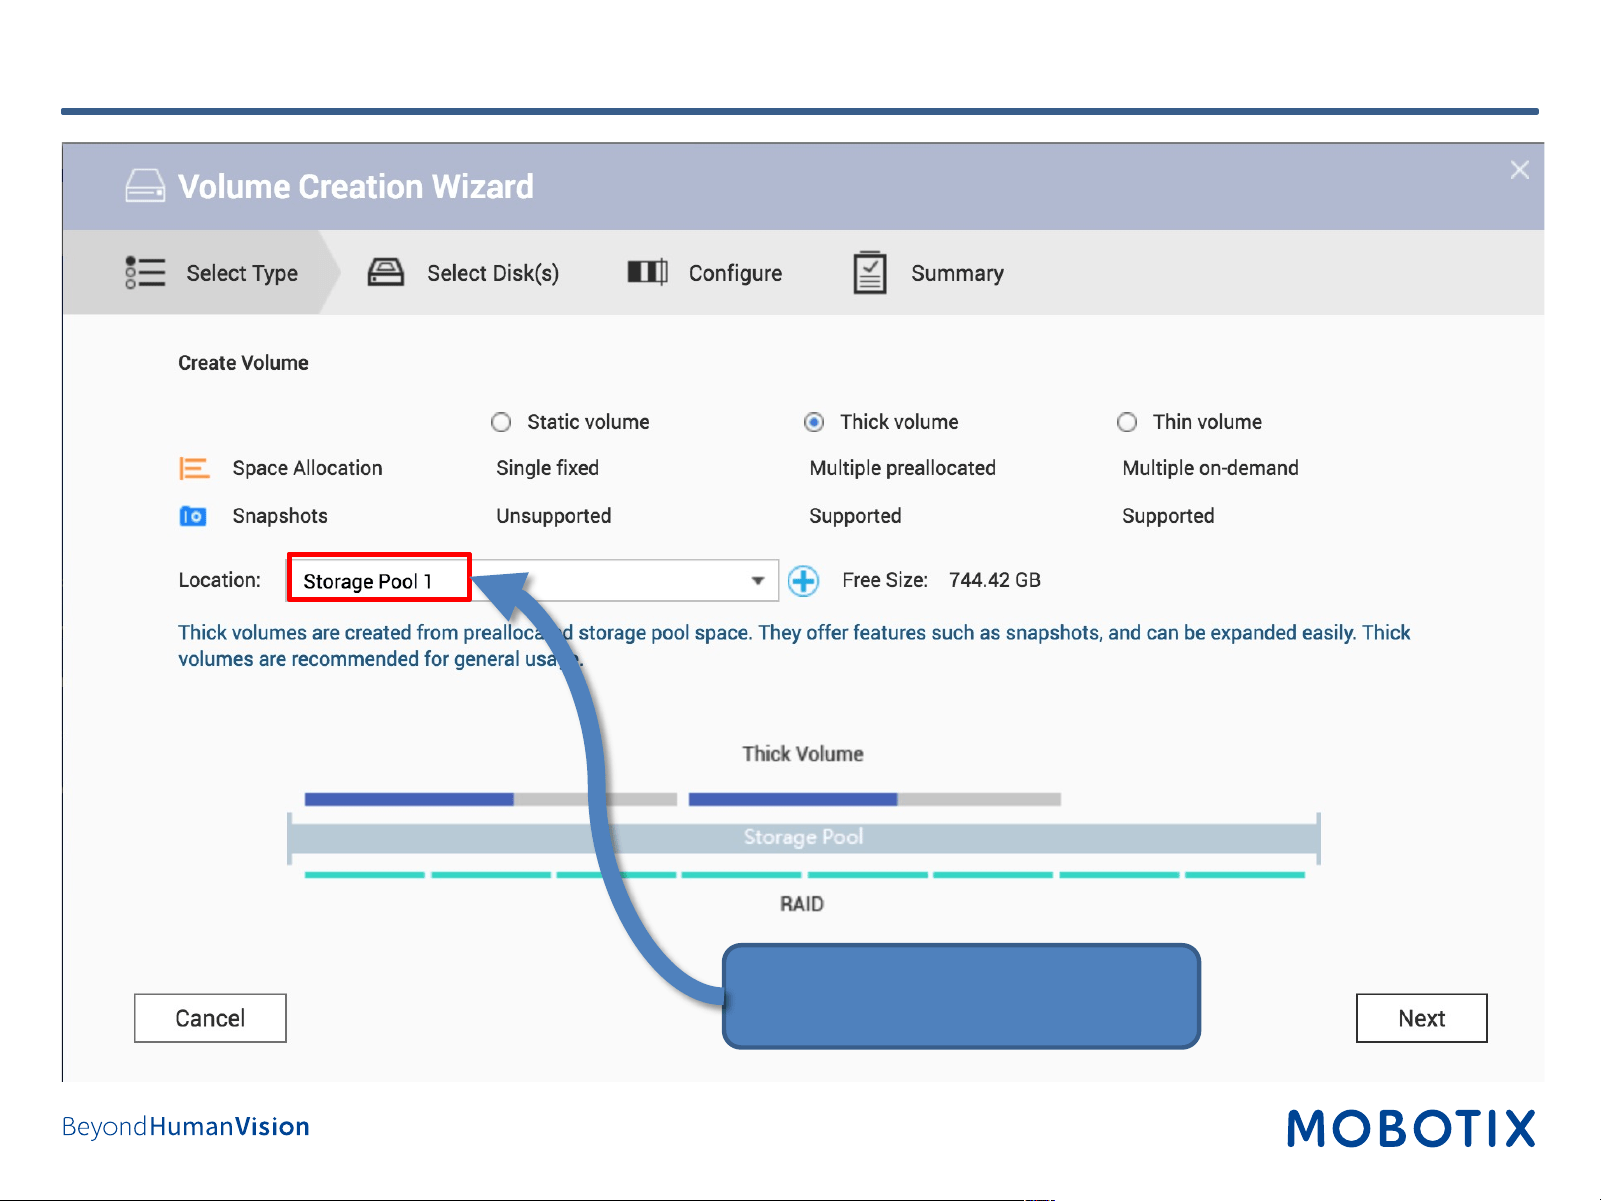
• Select Storage Pool 1 as Location.
• Click on Next to proceed.
Step7: Configure Volume (3)

18
Step 7: Configure Volume (4)
1. Fill in the fields as required.
2. Click on Next to proceed.
Note: To calculate the space requirements, use
the Storage Calculator on www.mobotix.com.
2
1
Quick Guide – MOBOTIX NAS &
MOVE/ONVIF Cameras
www.mobotix.com
IMPORTANT: Reserve extra Recording Space if
you’d like to add MOBOTIX-MOVE cameras later
on!
19
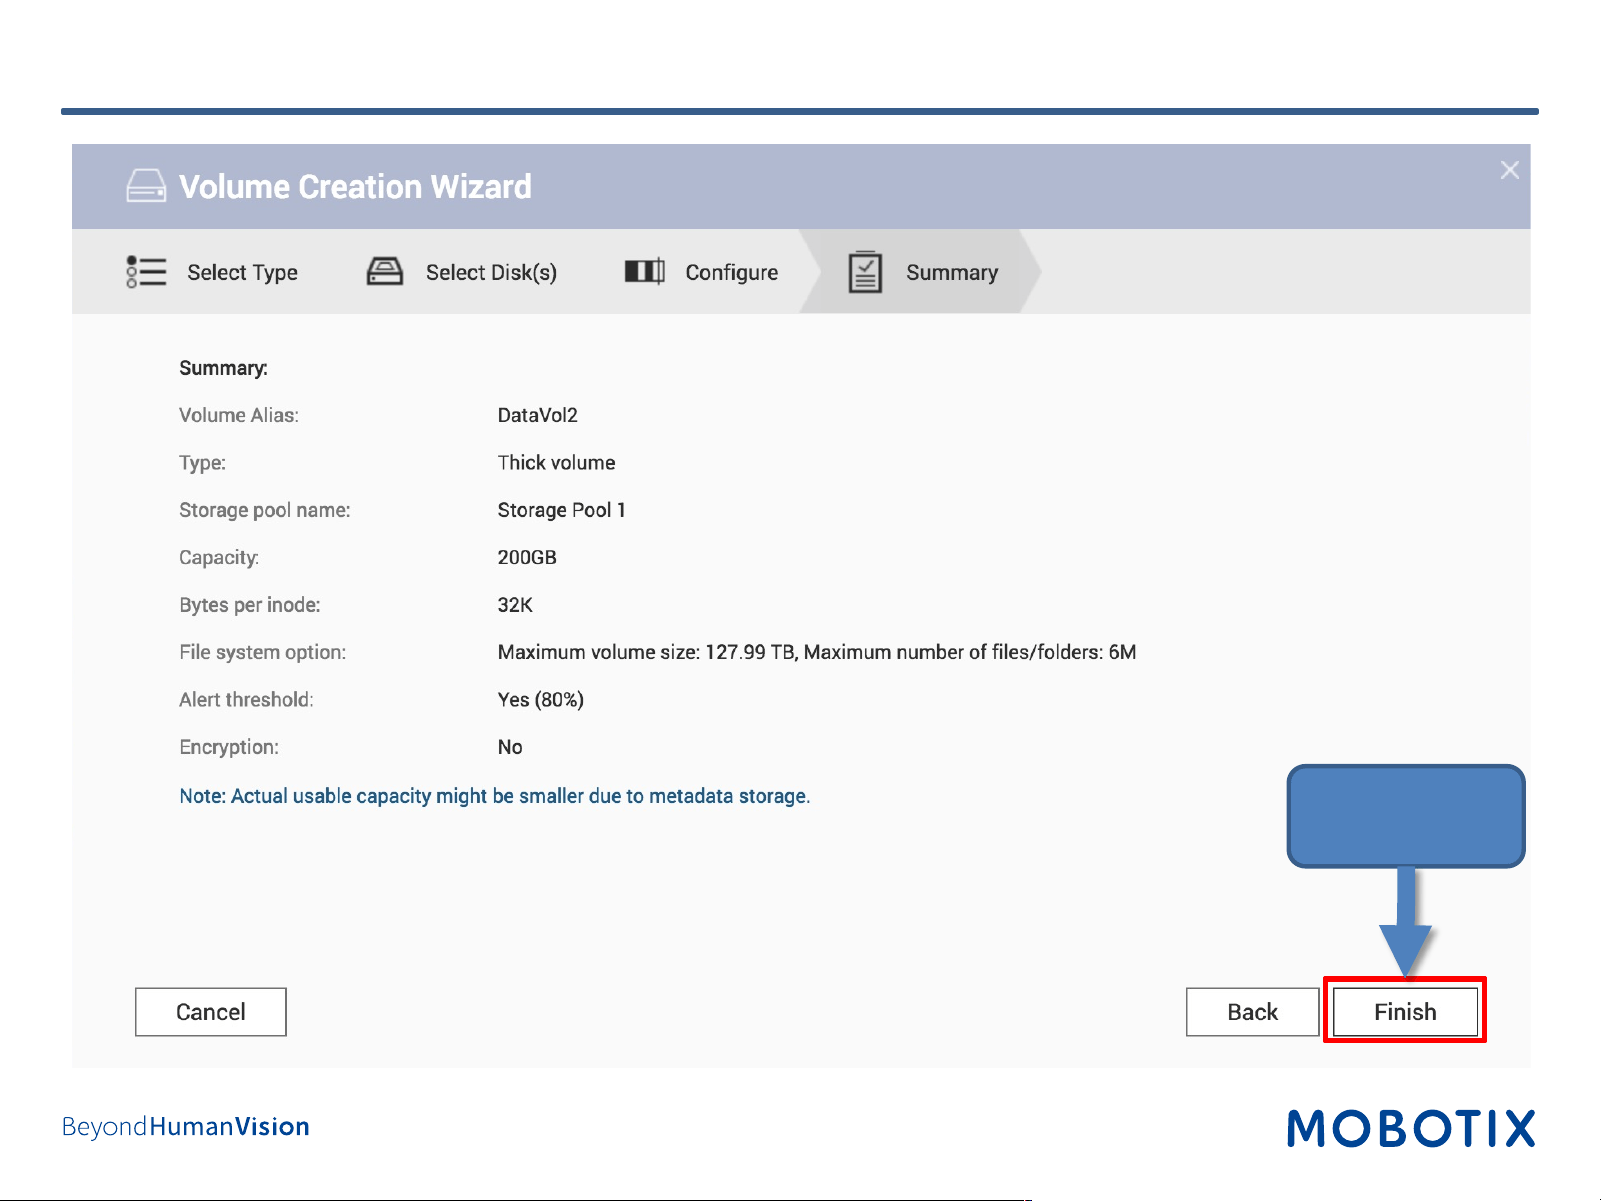
Step 7:Configure Volume (5)
Klick Finish
20
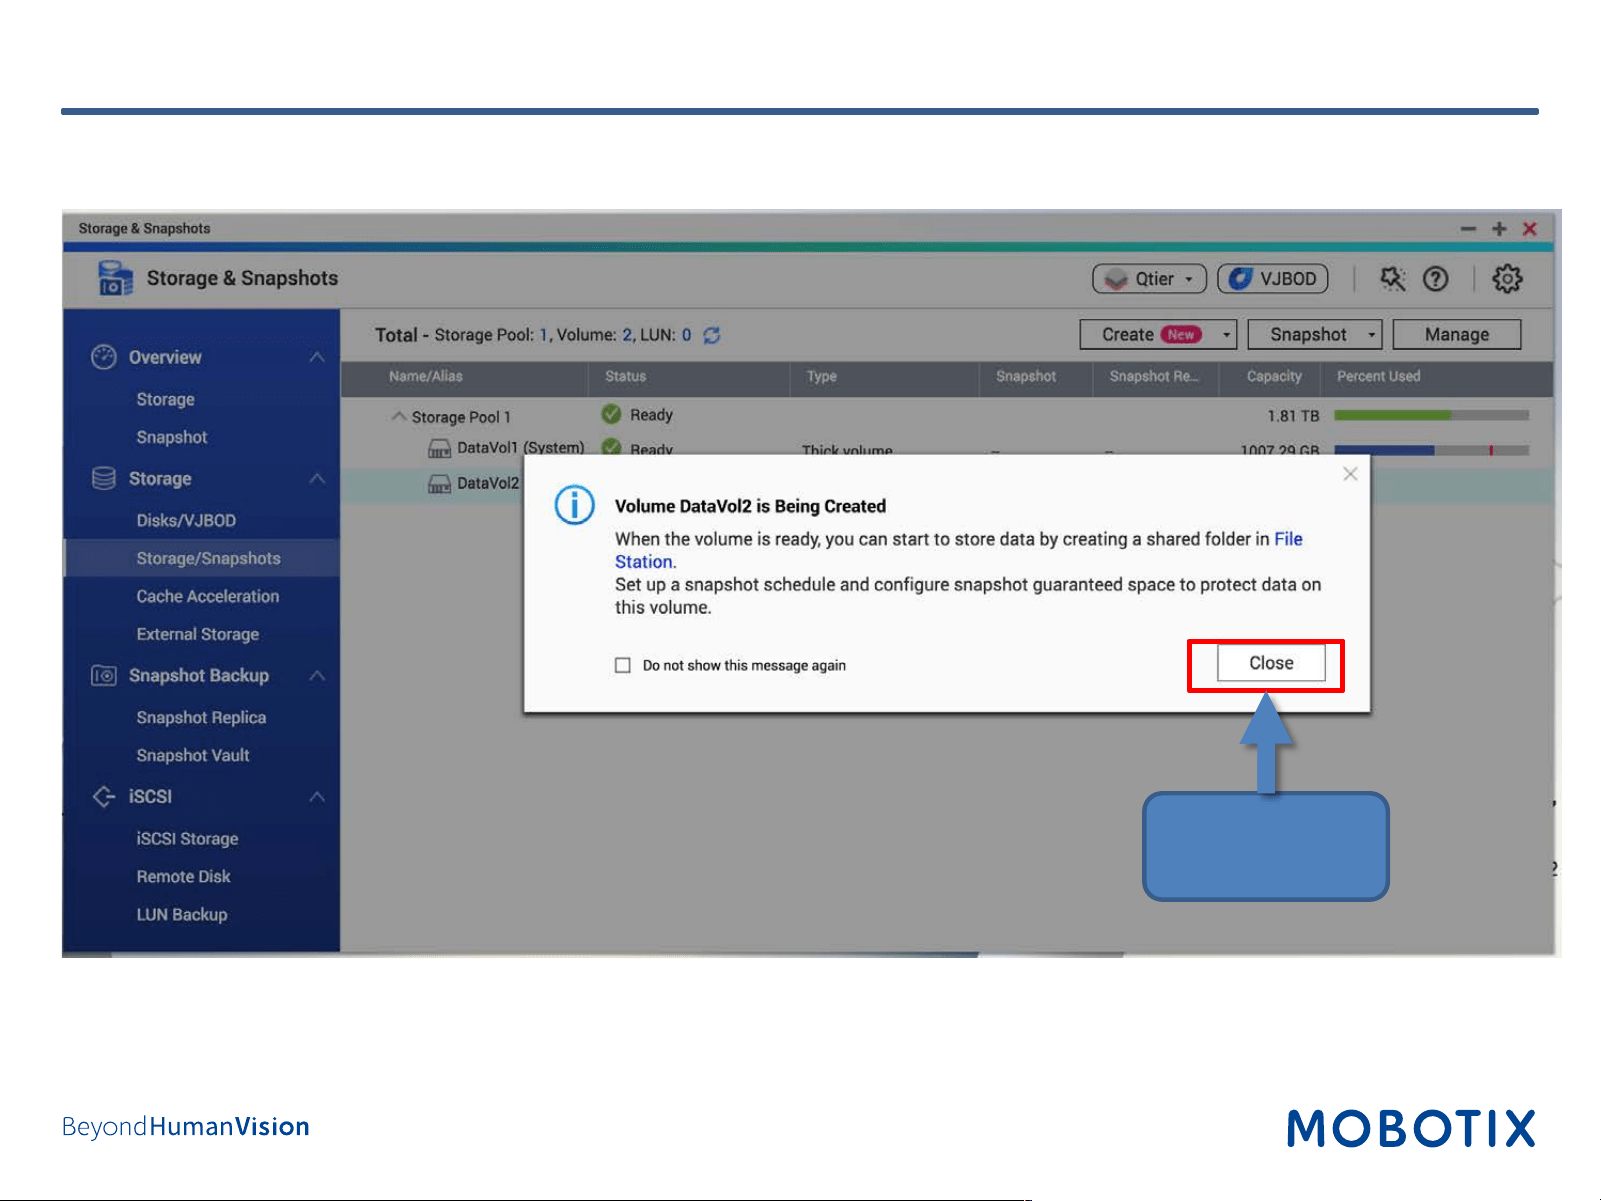
Step 7: Configure Volume (6)
• Click on Close
21
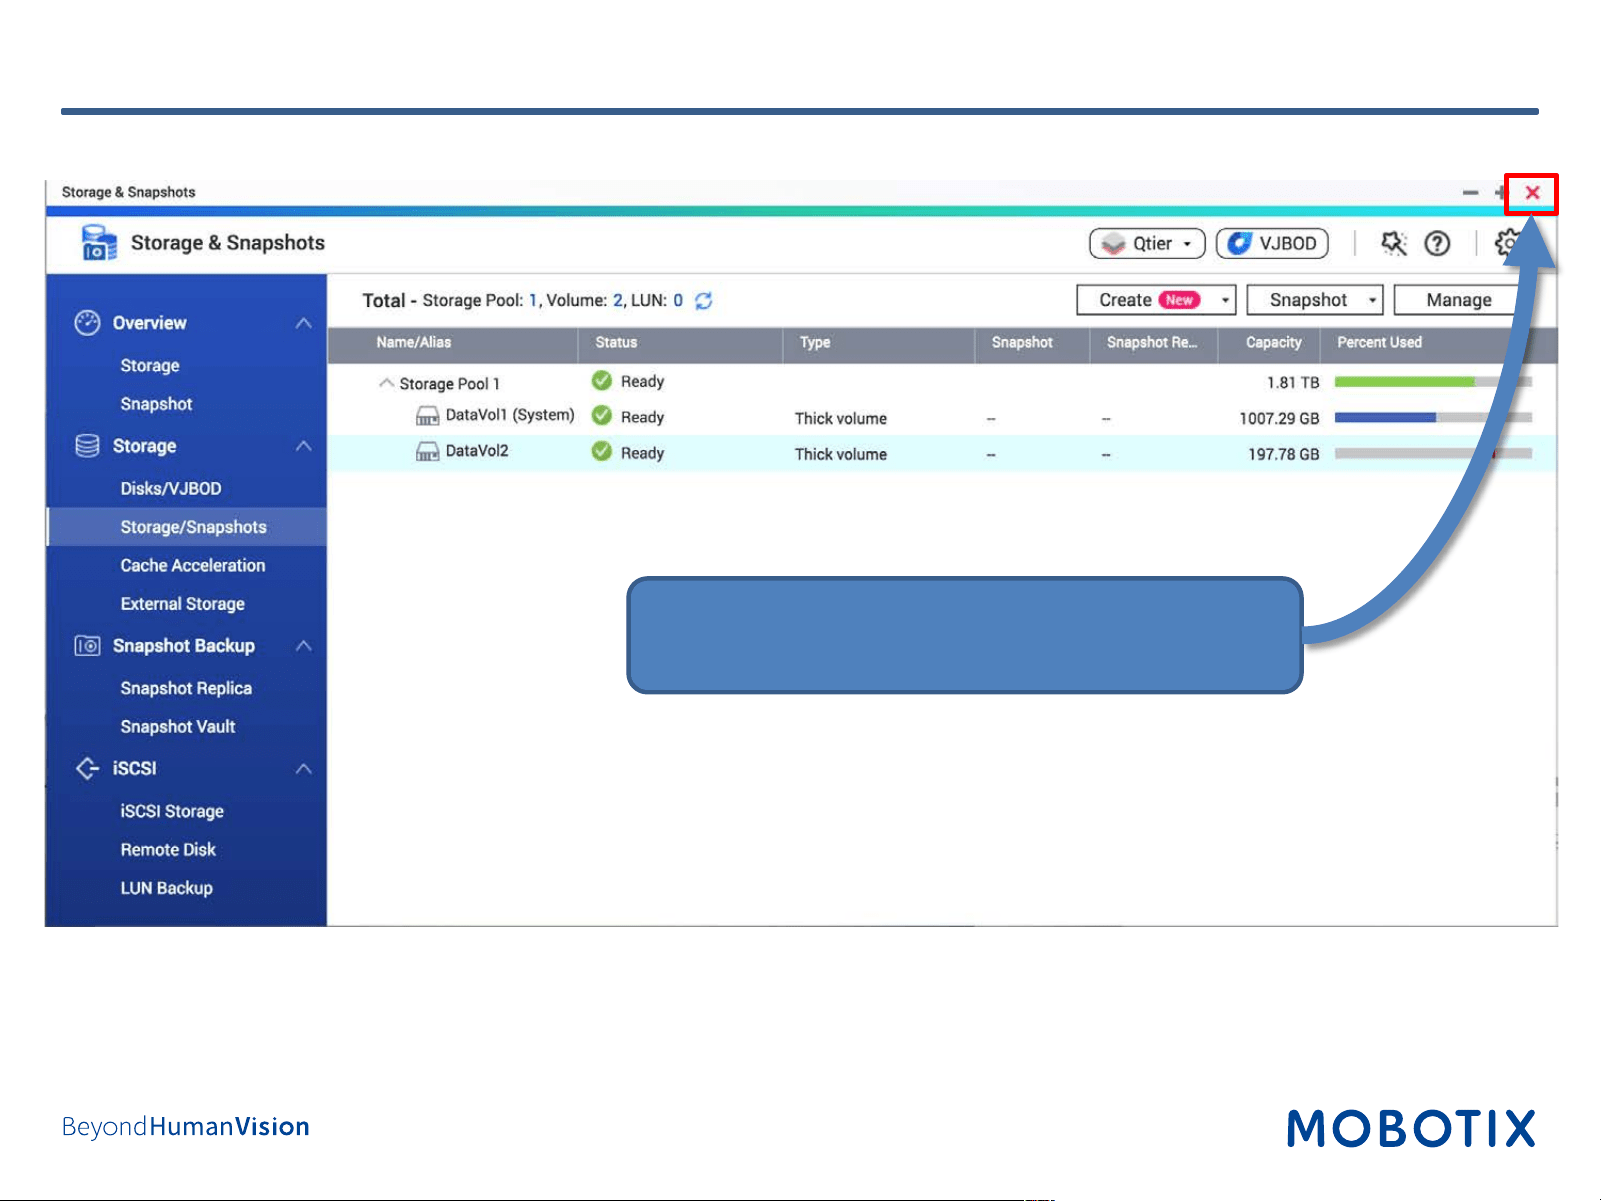
• After completing the wizard, the Storage &
Snapshots dialog shows the new volume.
• Close the window to proceed.
Step 7: Configure Volume (Completed)
22
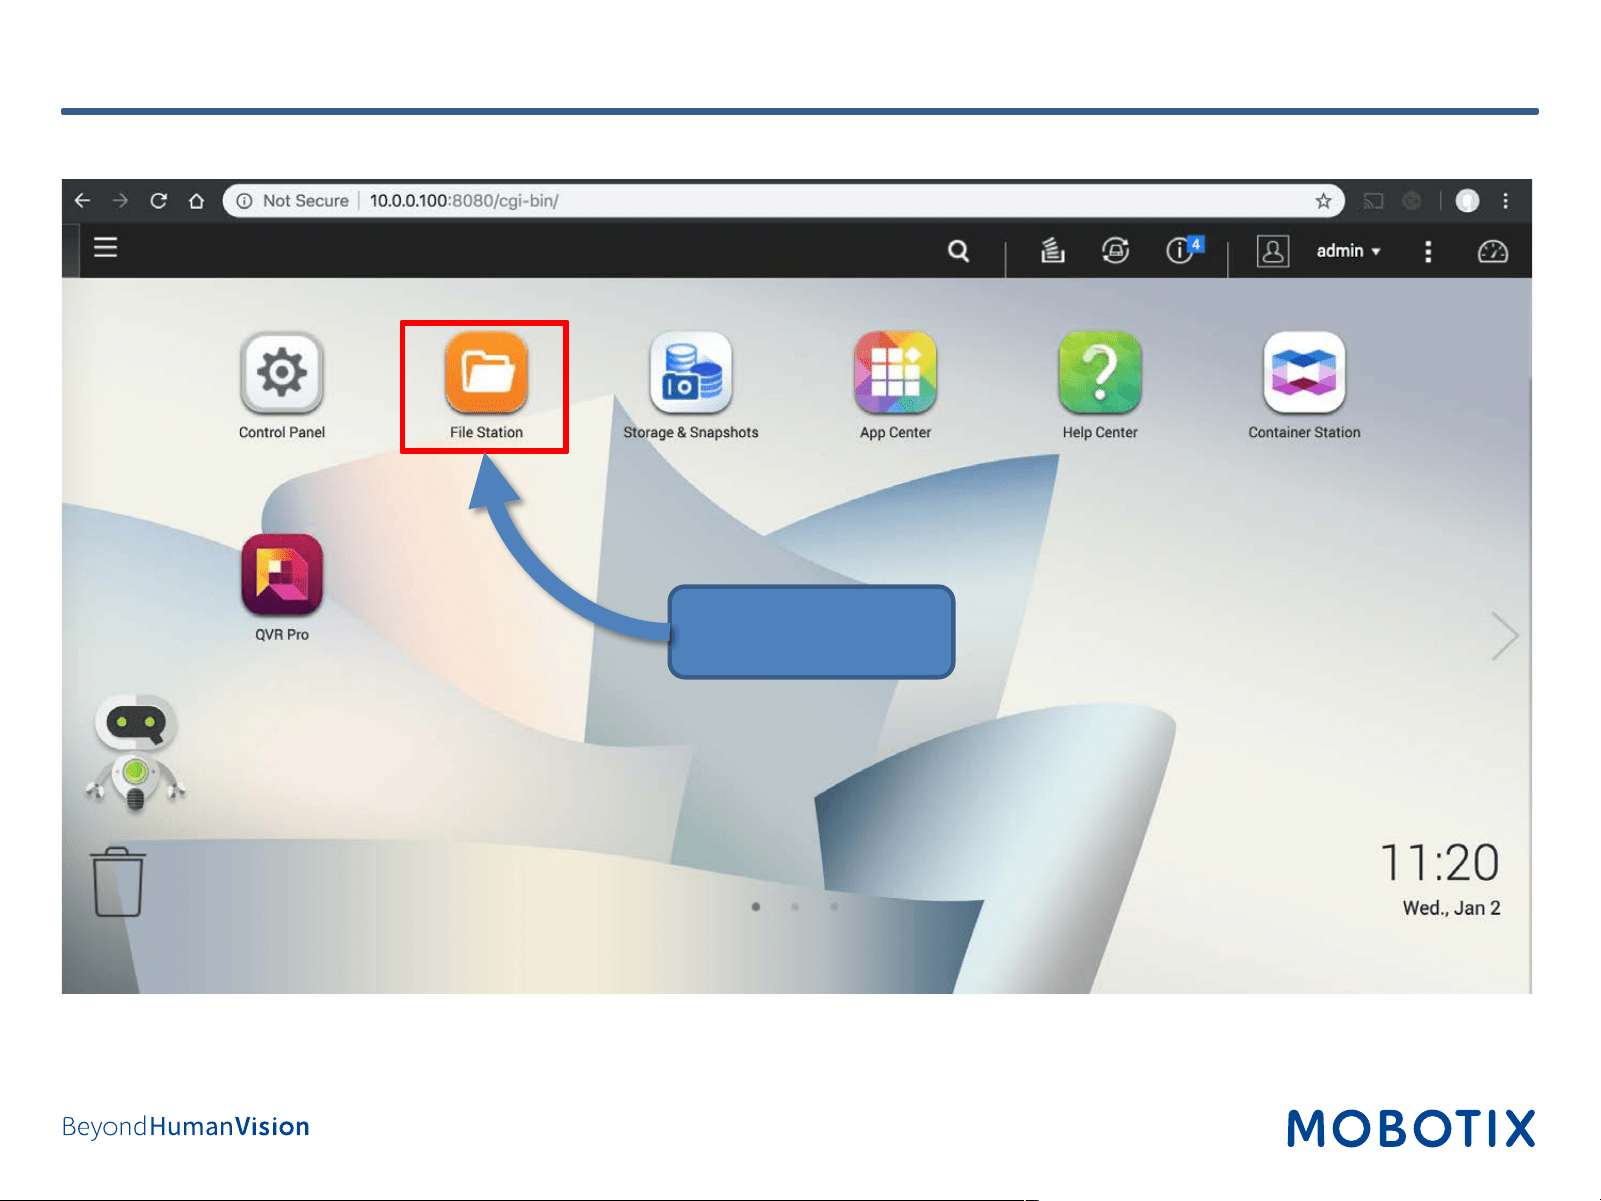
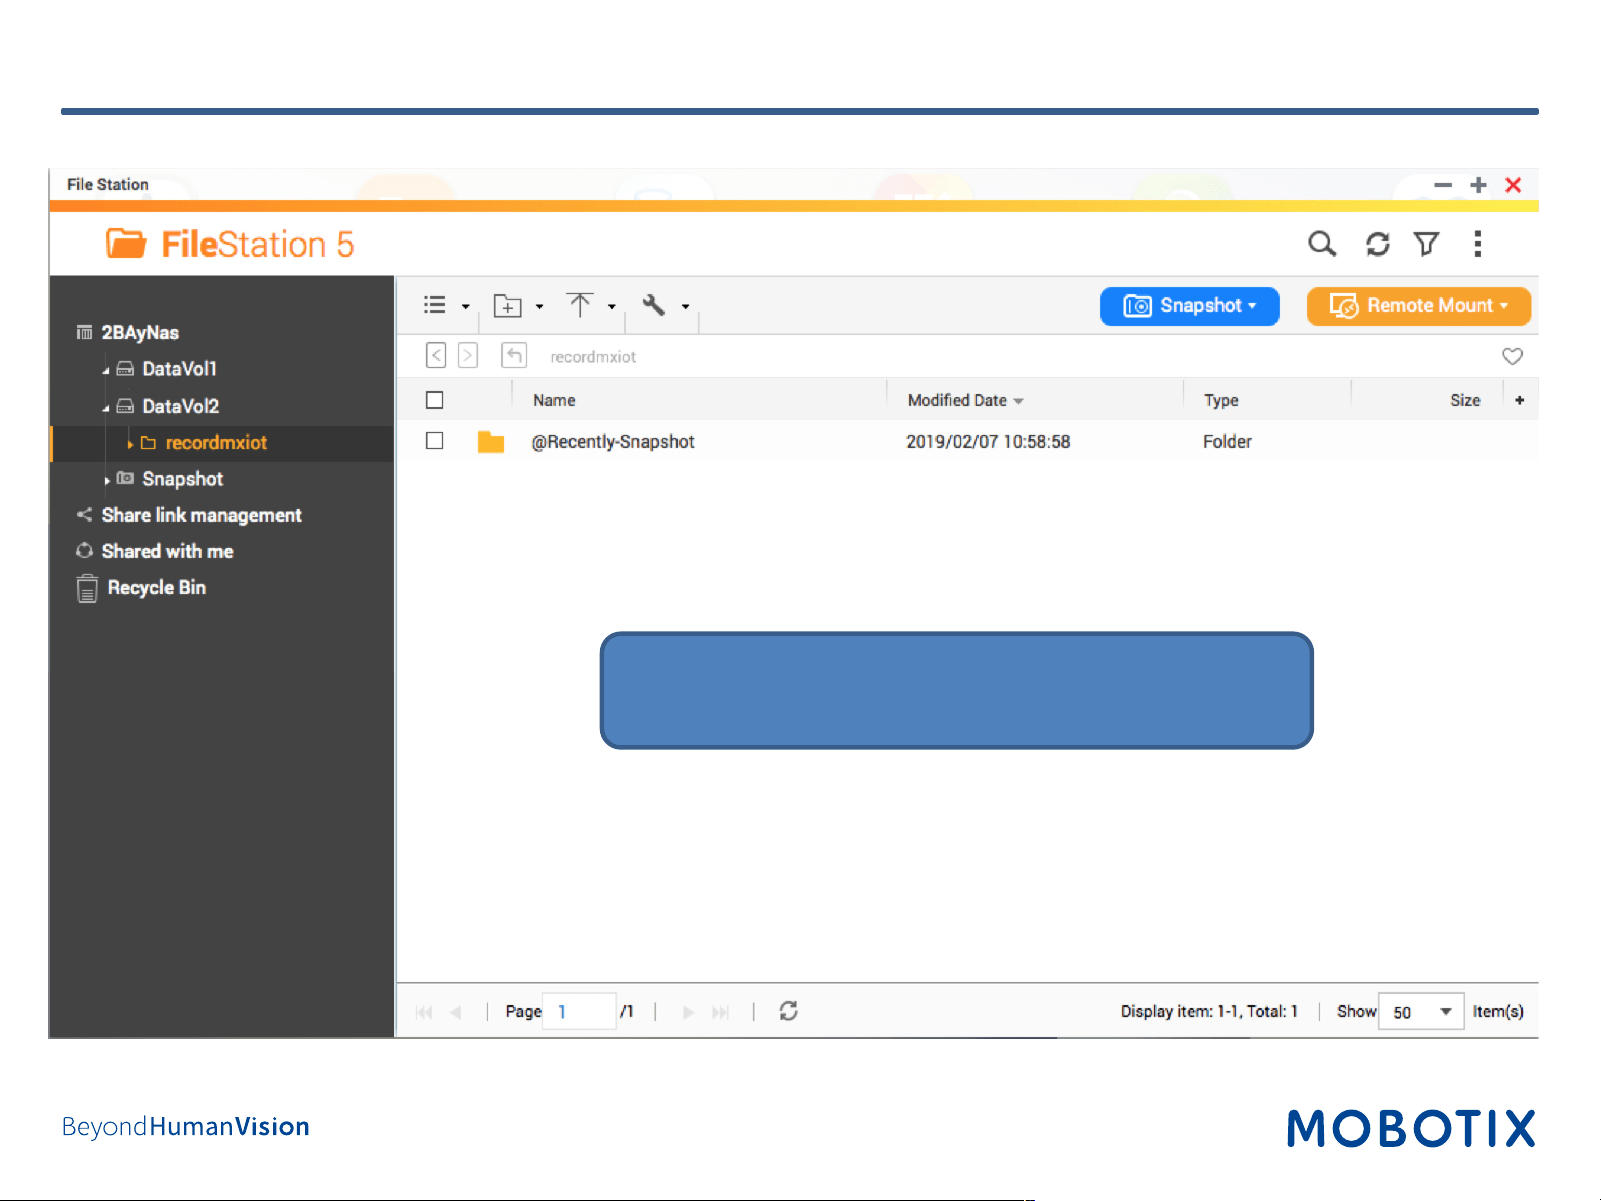
Step 8: Configure Share (1)
Open File Station.
23
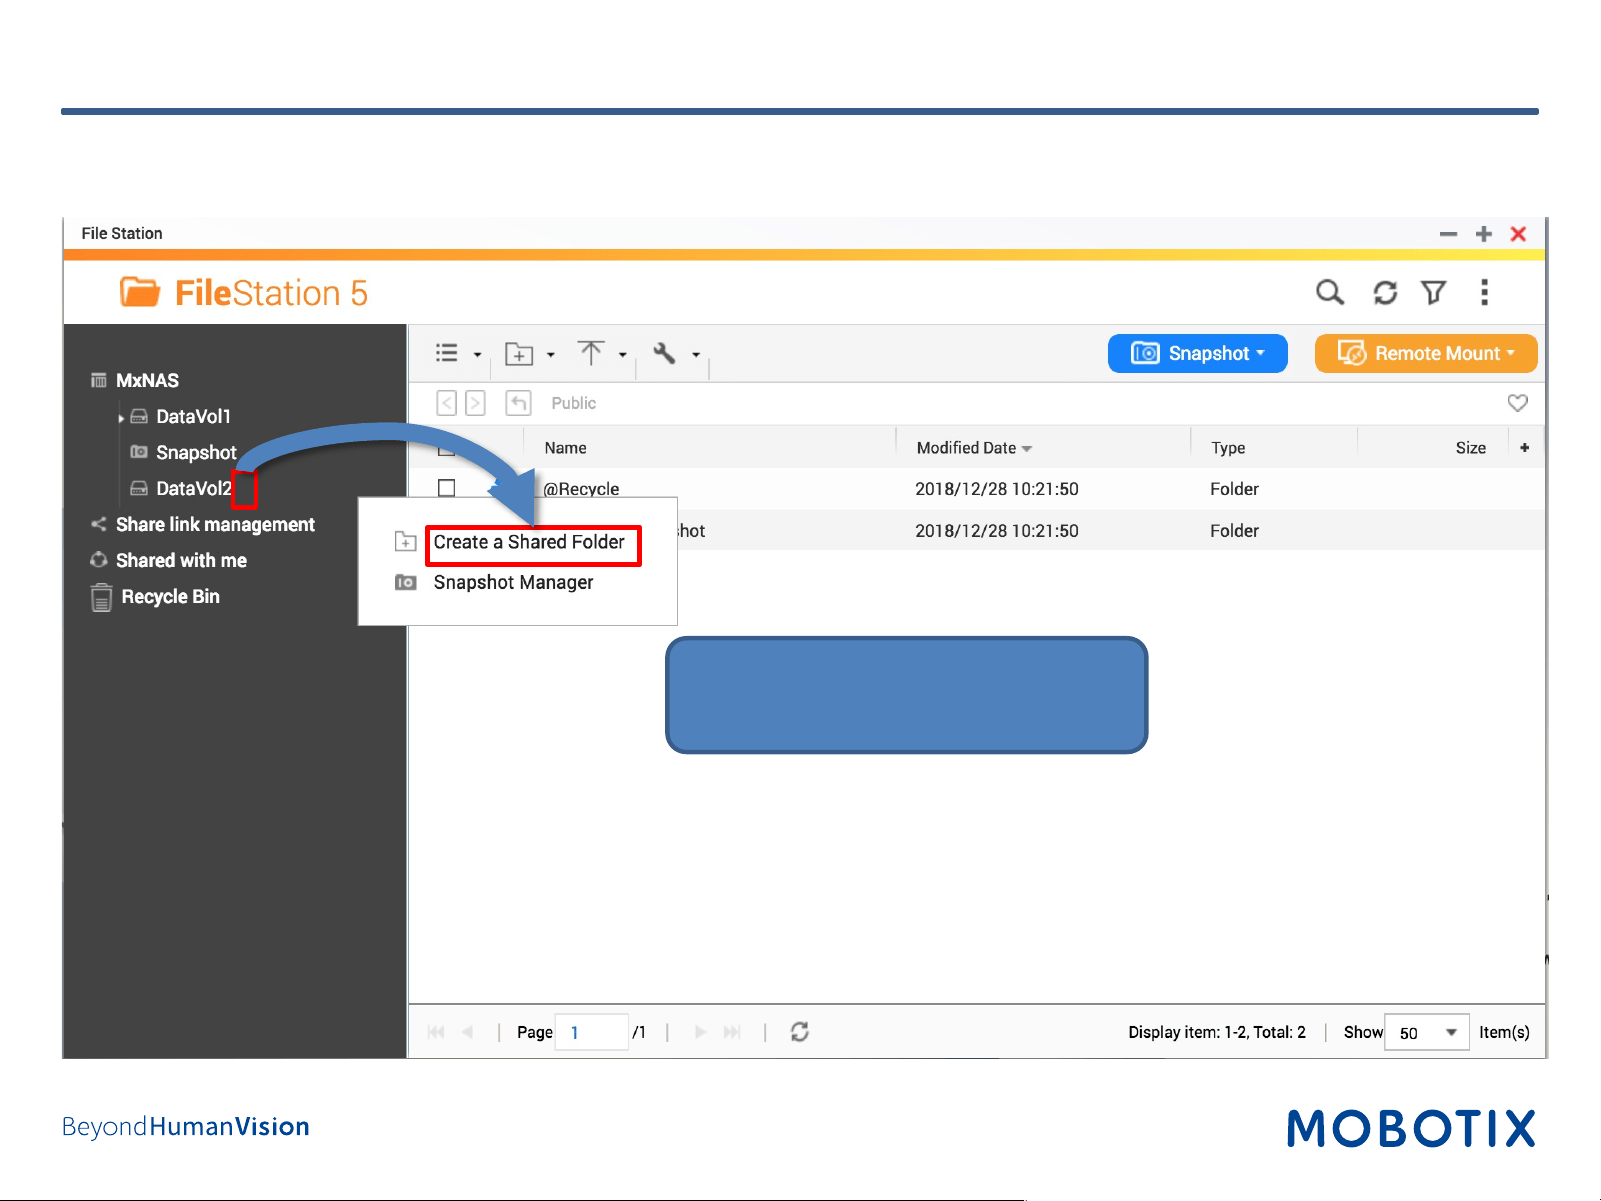
Step 8: Configure Share (2)
1. Open the settings for Data Vol2.
2. Select Create a Shared Folder.
•
•
•
24
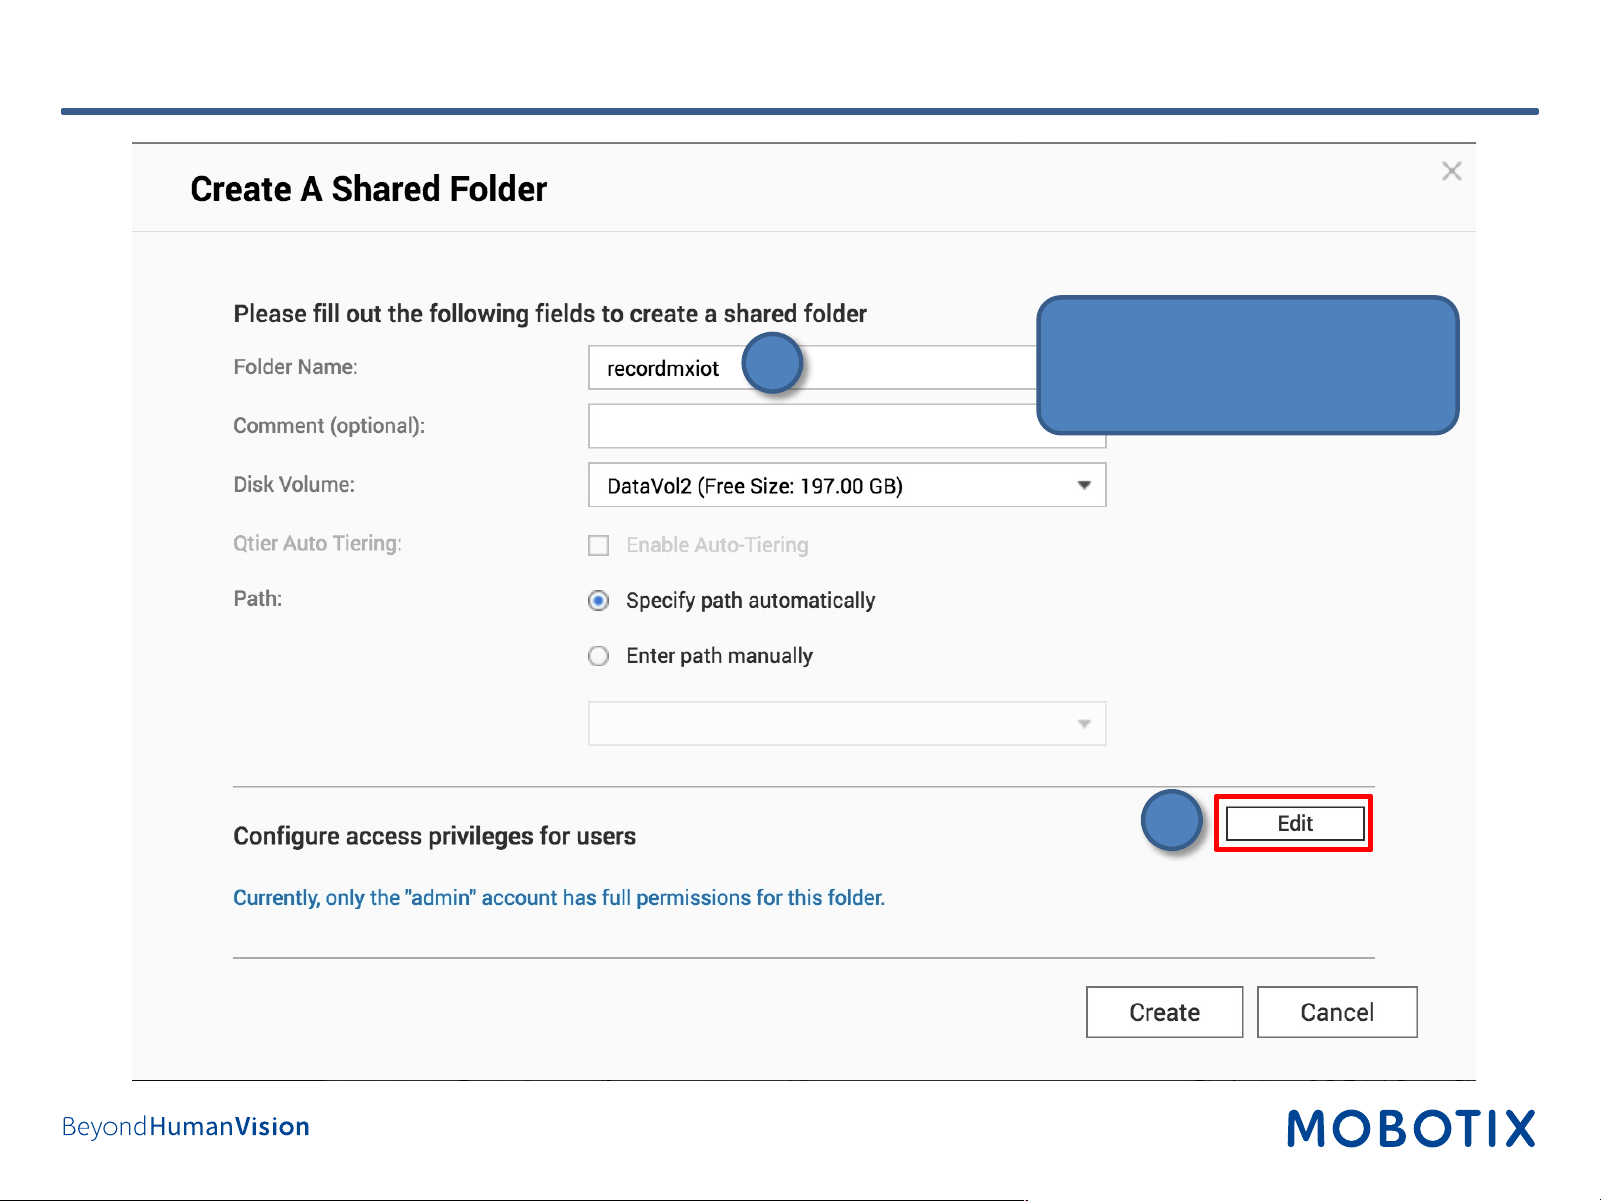
Step 8: Configure Share (3)
1. Enter the Folder Name.
2. Configure access privileges if
required.
1
2
25
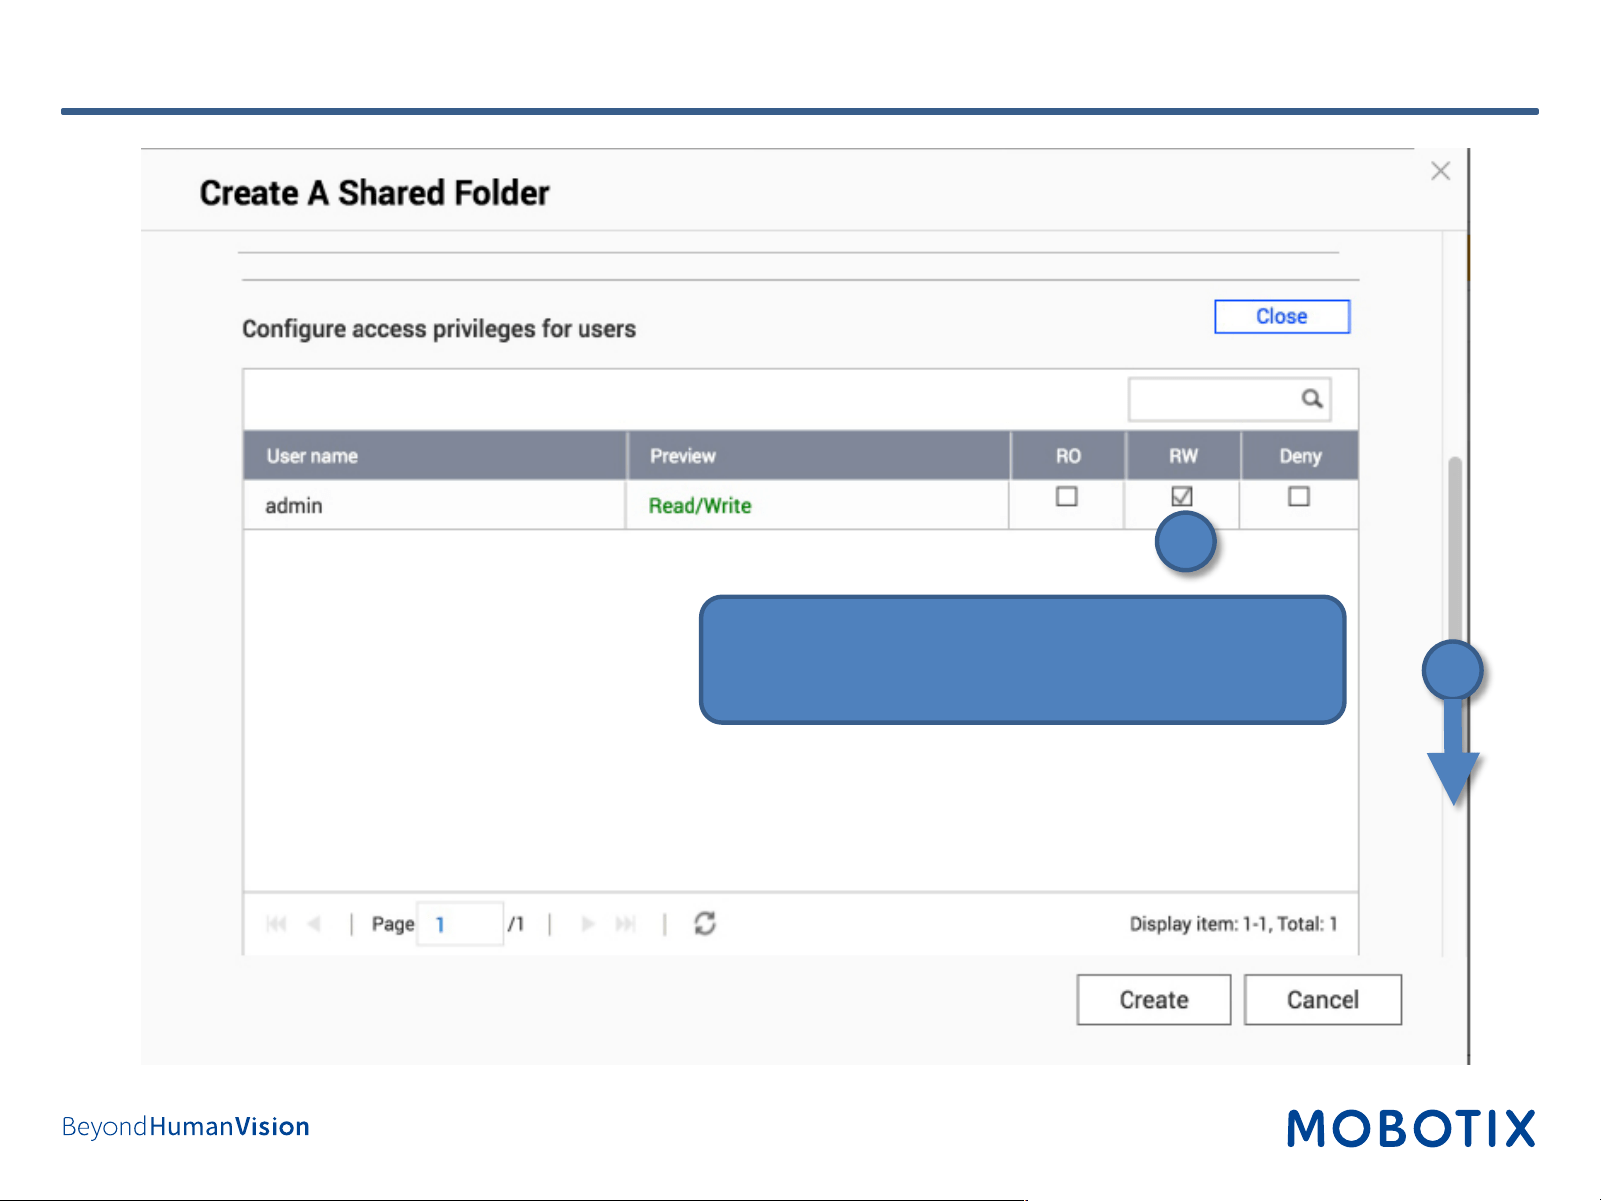
1. Enable Read/Write (RW) rights for the camera
user (default: “admin”).
2. Scroll down.
Step 8: Configure Share (4)
2
1
26
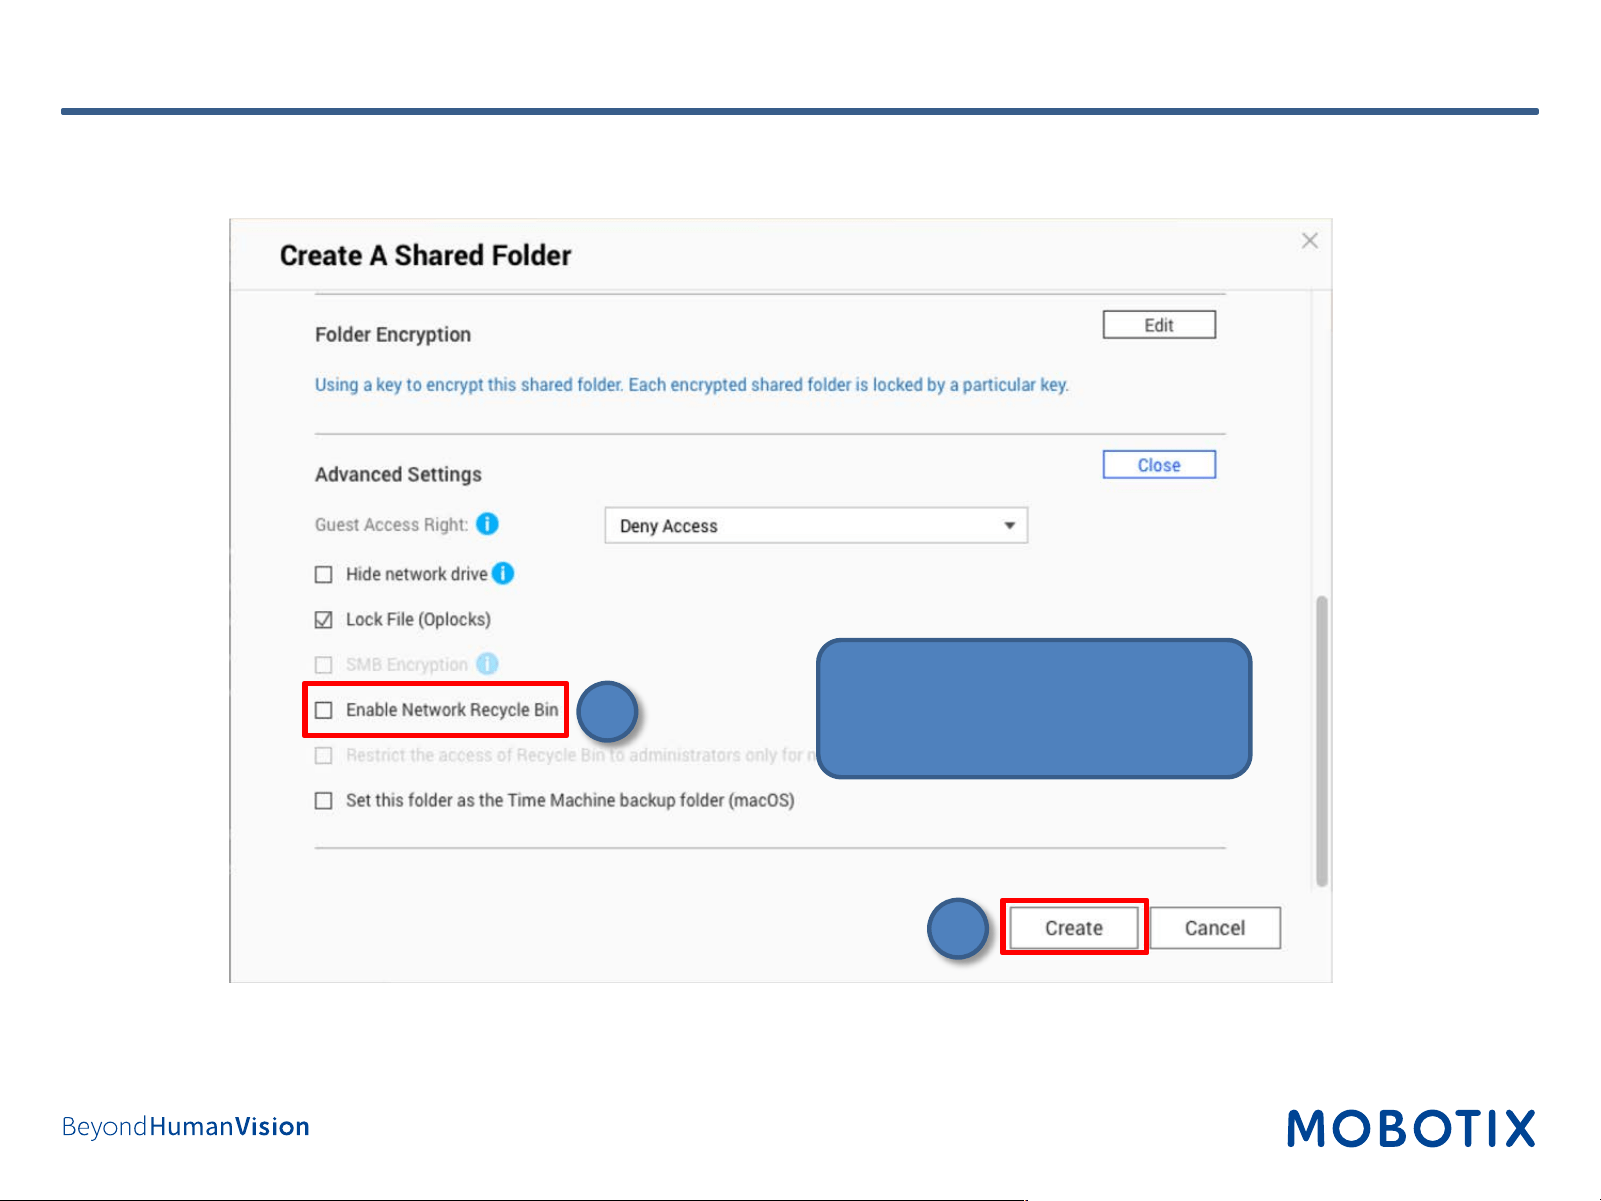
Step 8: Configure Share (5)
1. Disable Network Recycle Bin.
2. Click on Create.
1
2
27
Step 8: Configure Share (Completed)
Dialog shows an overview of the shared folder you just
created.
28
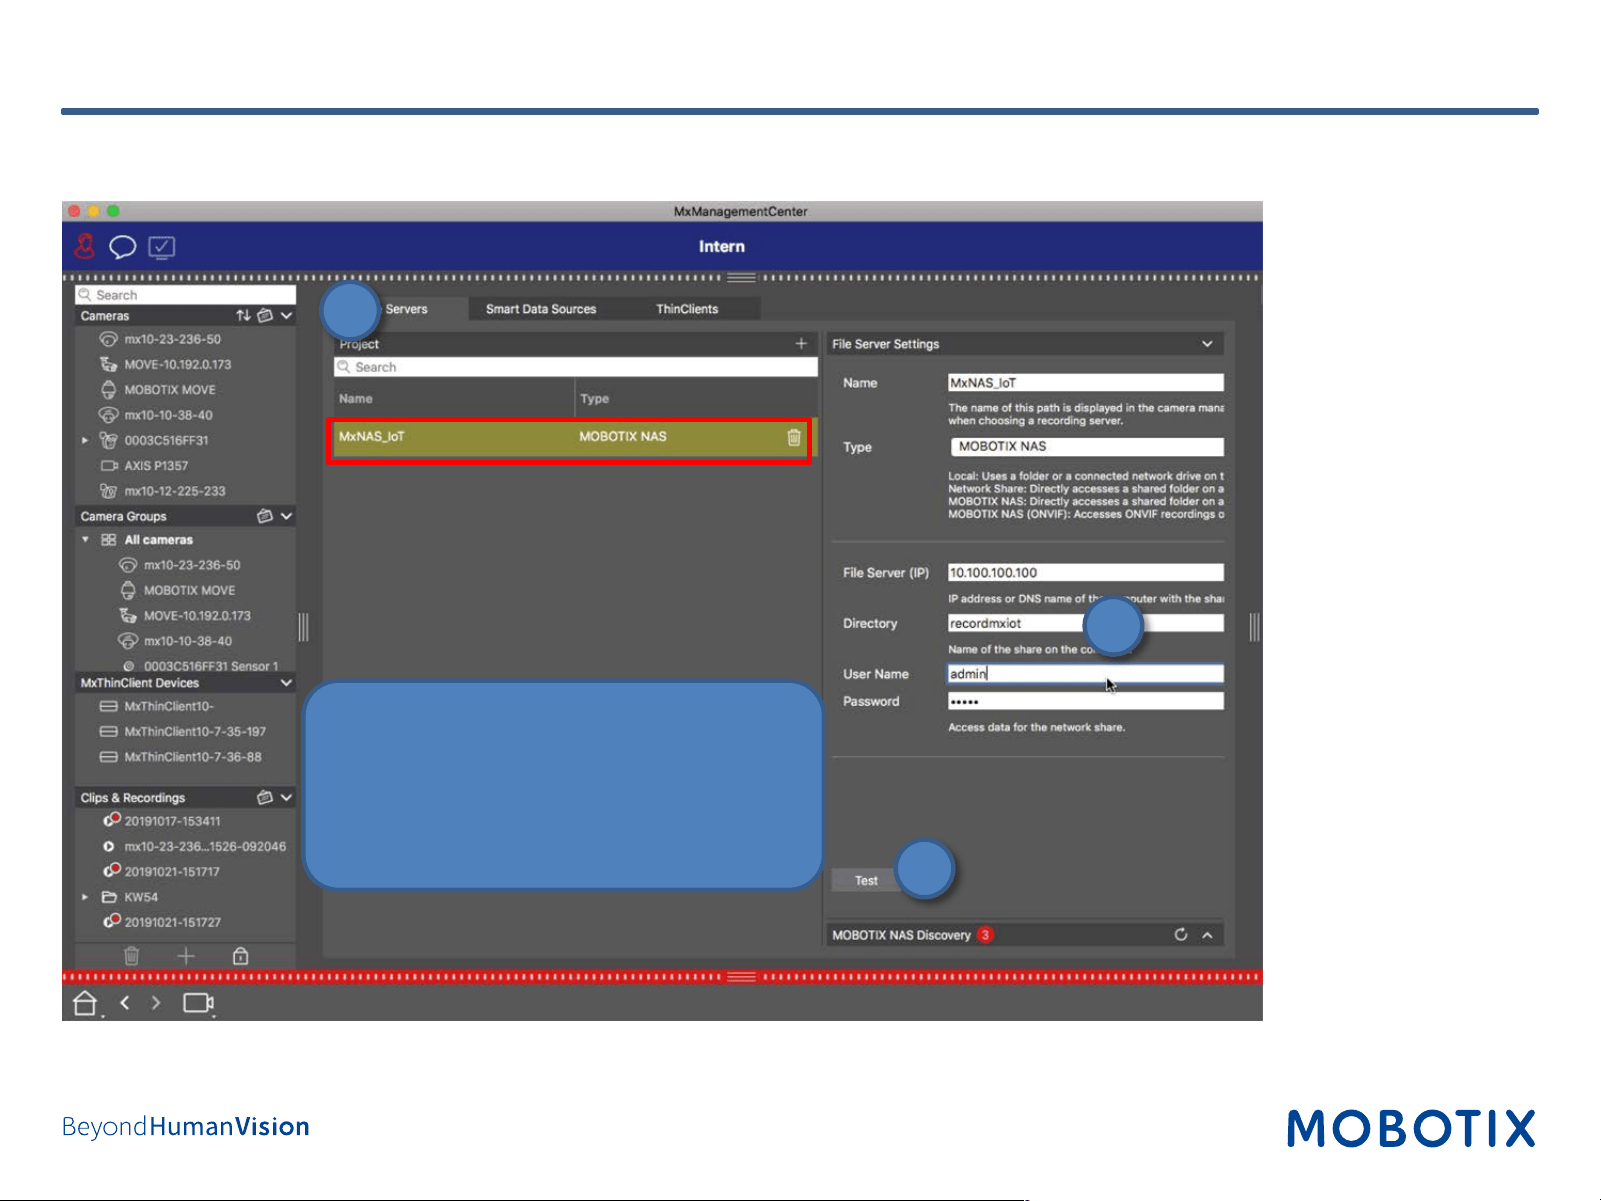
Step 9: Assign Recording Paths in MxManagementCenter (3)
1. Select tab File Servers
2. Enter share name as defined before
(e.g., recordmxiot).
3. Klick Test to check the connection.
1
2
3
29
Step 10: Add MOBOTIX IoT Cameras to MxManagementCenter
1. Start MxManagementCenter.
2. Start the Welcome wizard by clicking on File > Welcome in the menu bar.
3. Click on Add Devices. Then select the desired MOBOTIX IoT cameras to be added to MxMC.
3. Enter the access privileges for each camera.
30
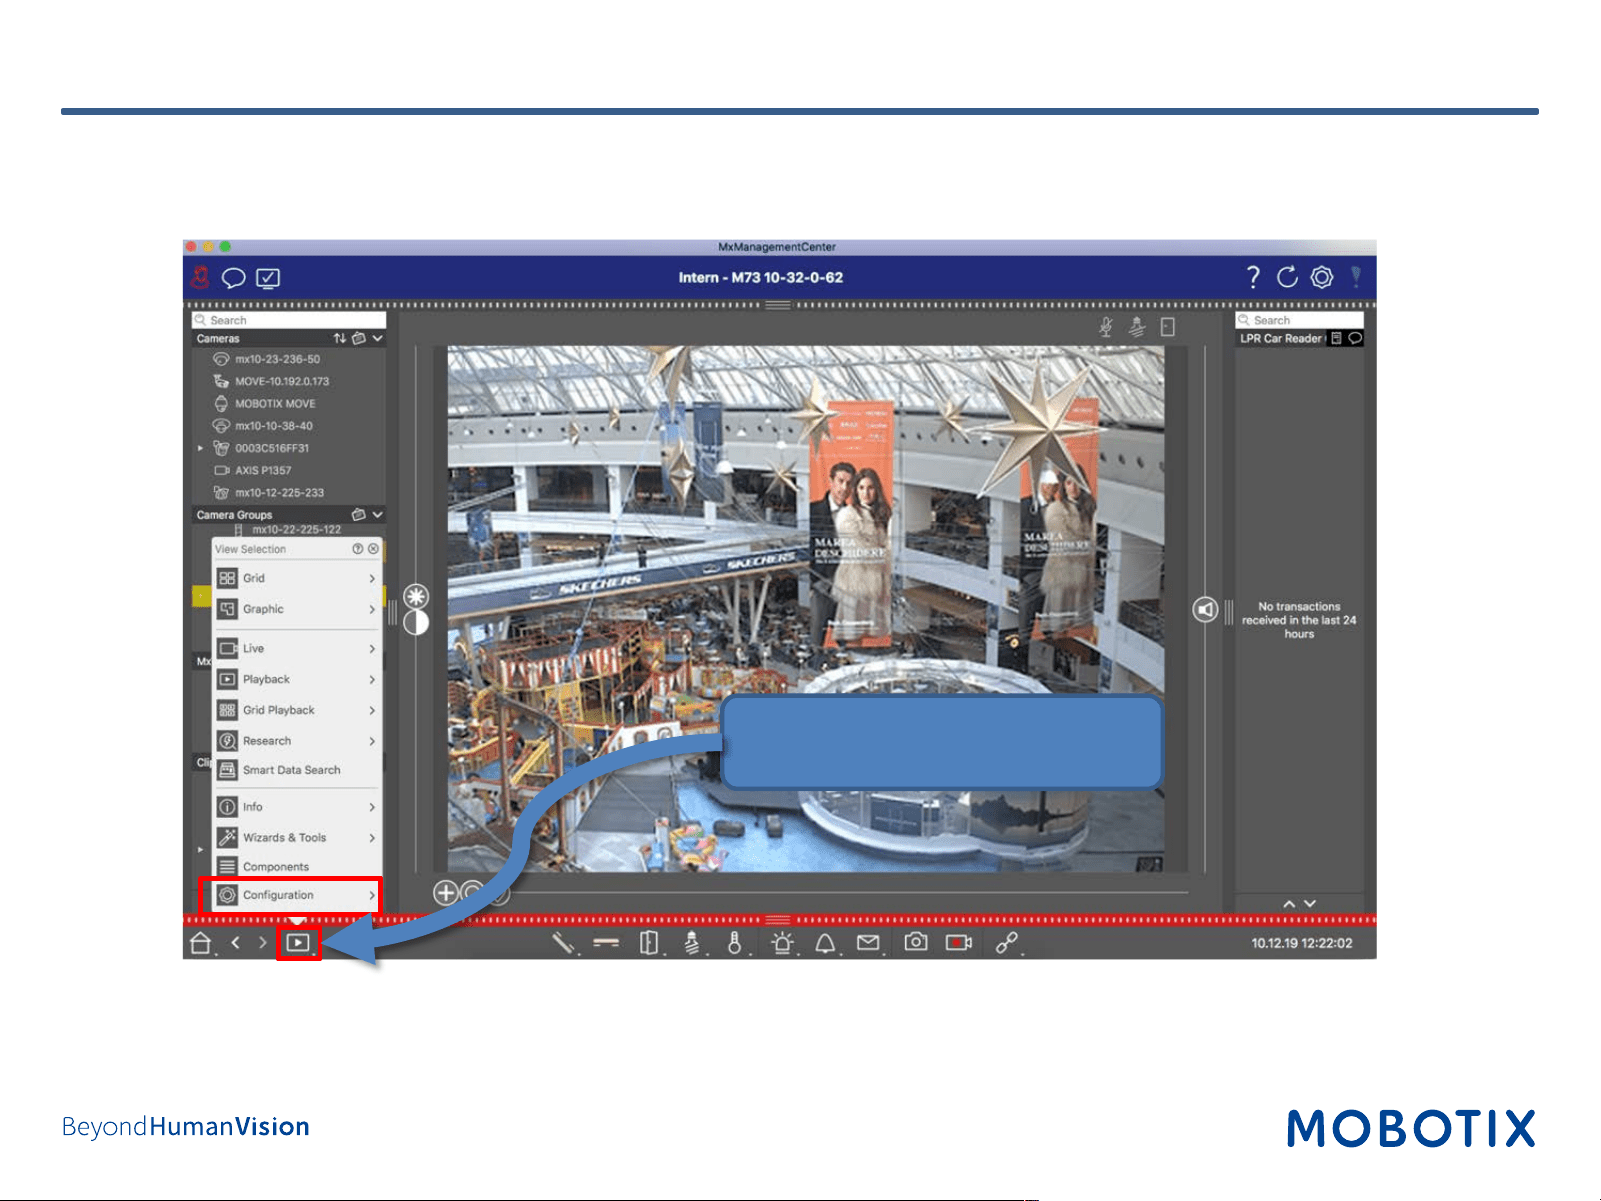
Step 11: Configure Camera Recording (1)
1. Right-click to open the menu.
2. Click on Configuration.
31
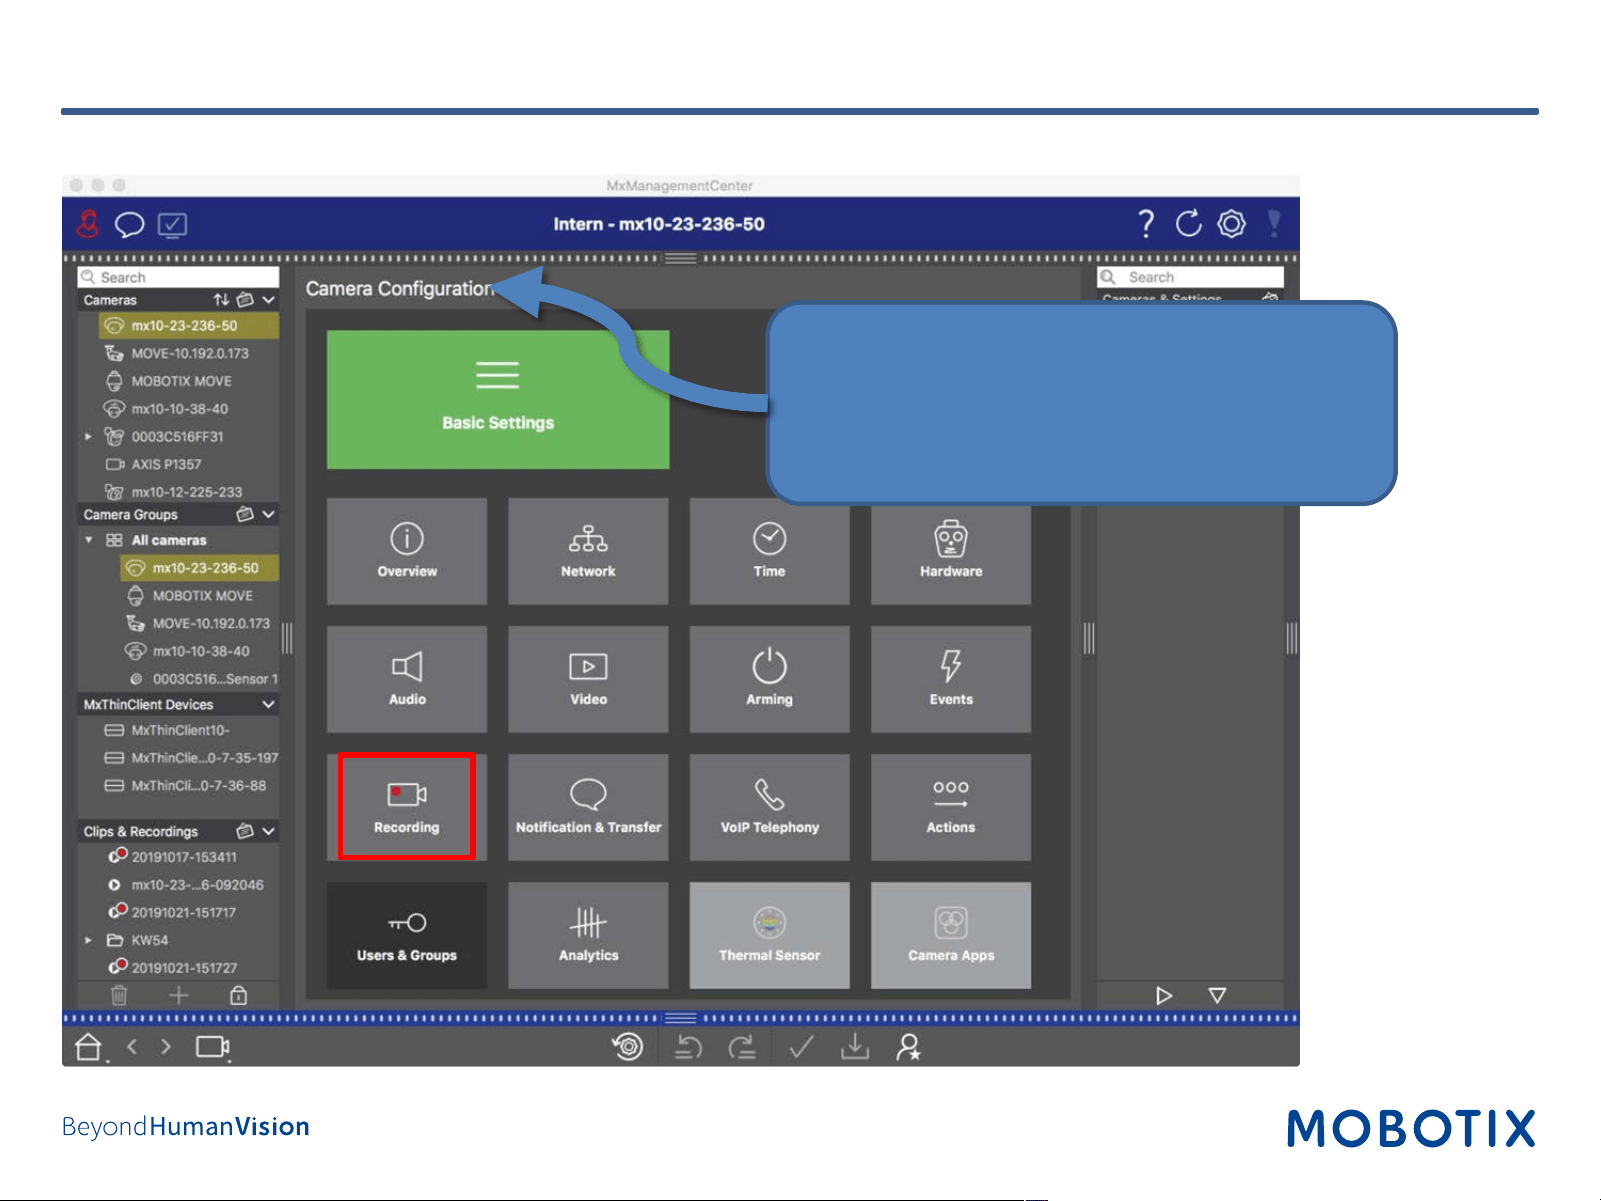
Step 11: Configure Camera Recording (2)
The Camera Configuration is not available if you
do not have an Advanced Configuration license.
Without this license, please configure the
corresponding settings in the browser interface of
the camera.
32
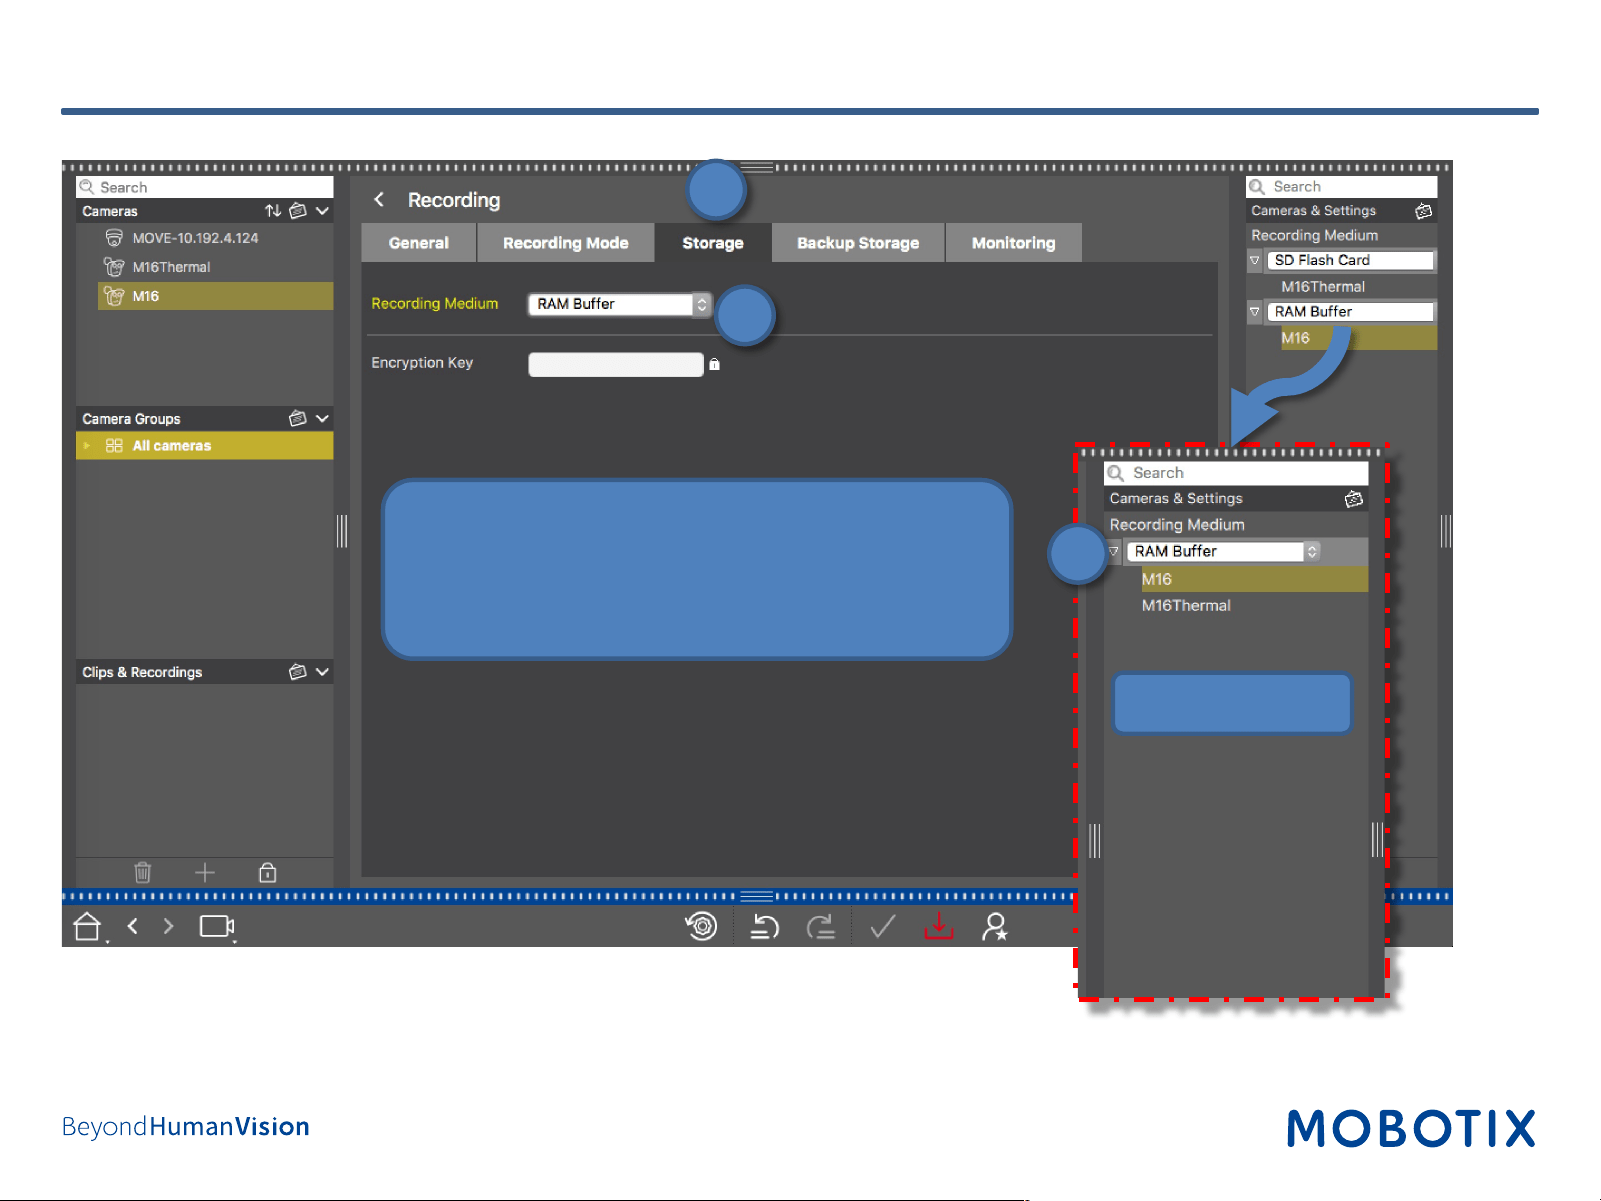
Step 11: Configure Camera Recording (3)
1. Open Storage tab.
2. Select RAM Buffer.
3. Copy this setting to all desired cameras using
Drag&Drop in the configuration bar.
1
2
3
Configuration Bar
33
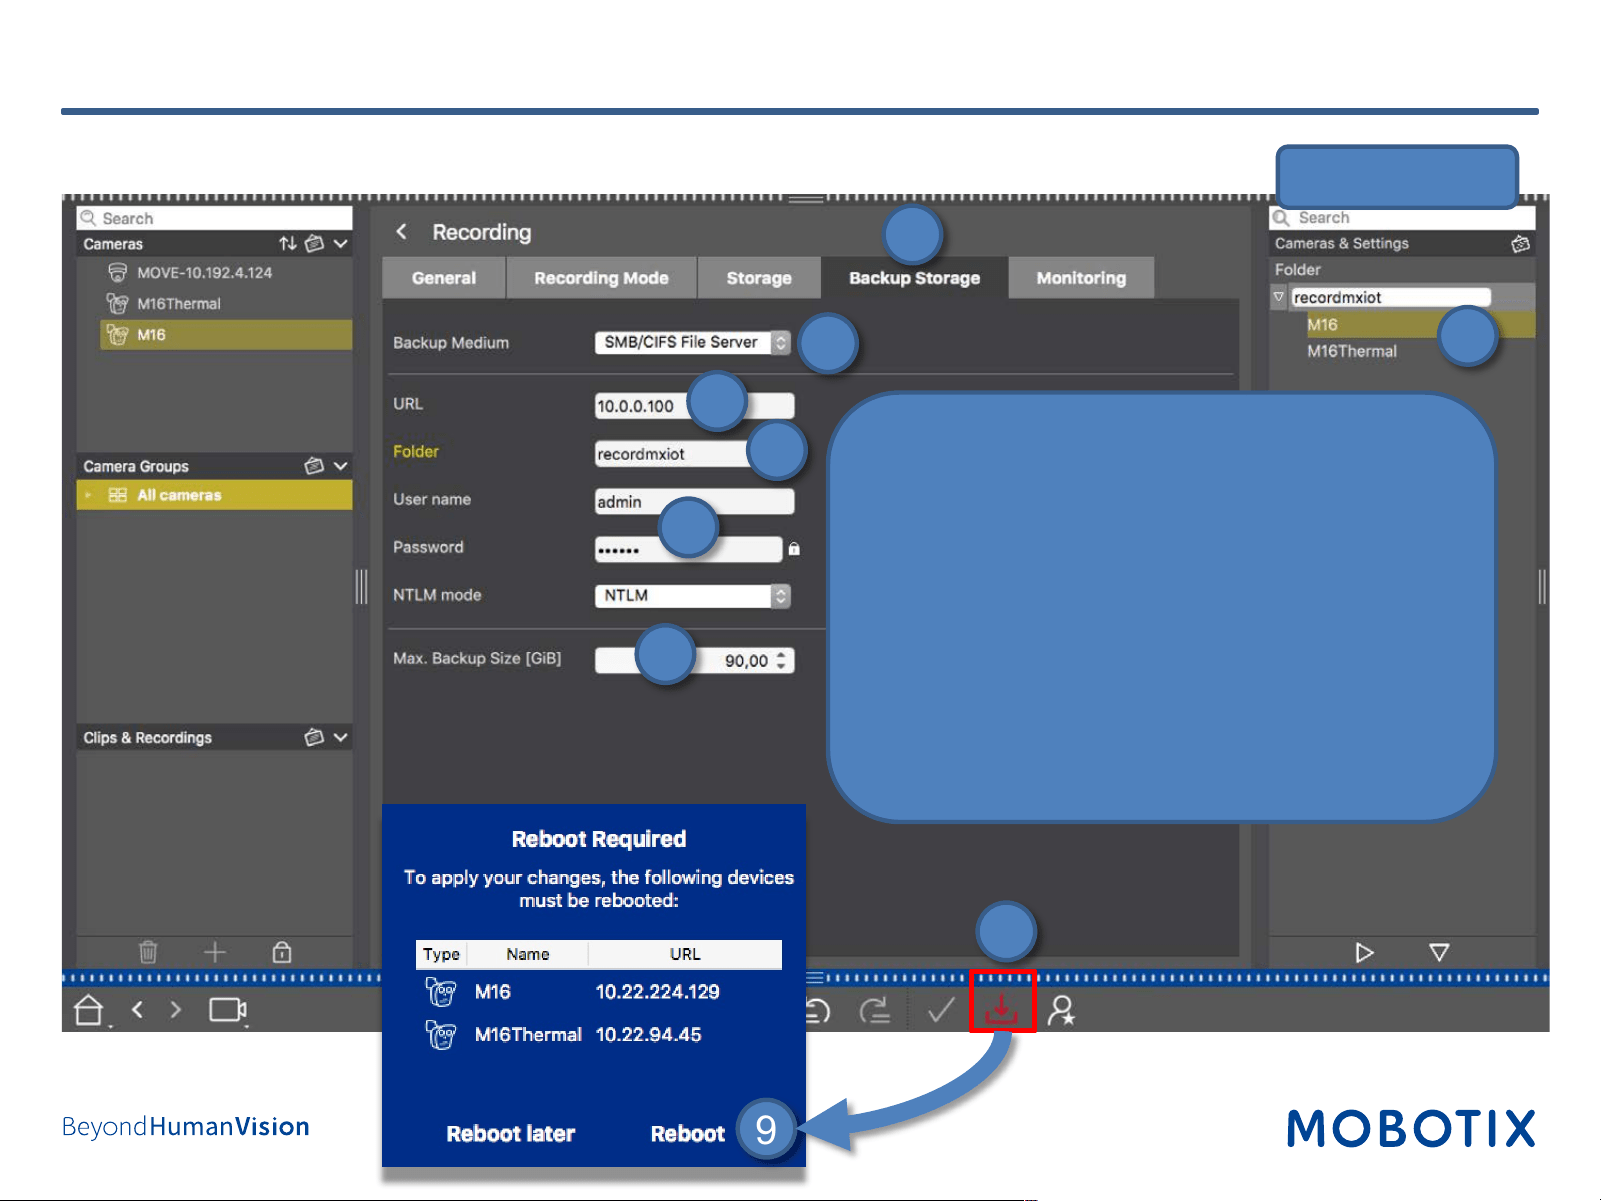
1. Open Backup Storage.
2. Select SMB/CIFS File Server.
3. Enter MOBOTIX NAS IP address.
4. Enter the share name of the NAS.
5. Enter user name and password for accessing the
share.
6. Set Max. Backup Size for the camera.
7. Copy this setting to all desired cameras using
Drag&Drop in the configuration bar.
8. Press the Store button to store the configuration.
9. Reboot the cameras you just modified.
Step 11: Configure Camera Recording (4)
Configuration Bar
1
2
3
4
6
5
7
8
9
34
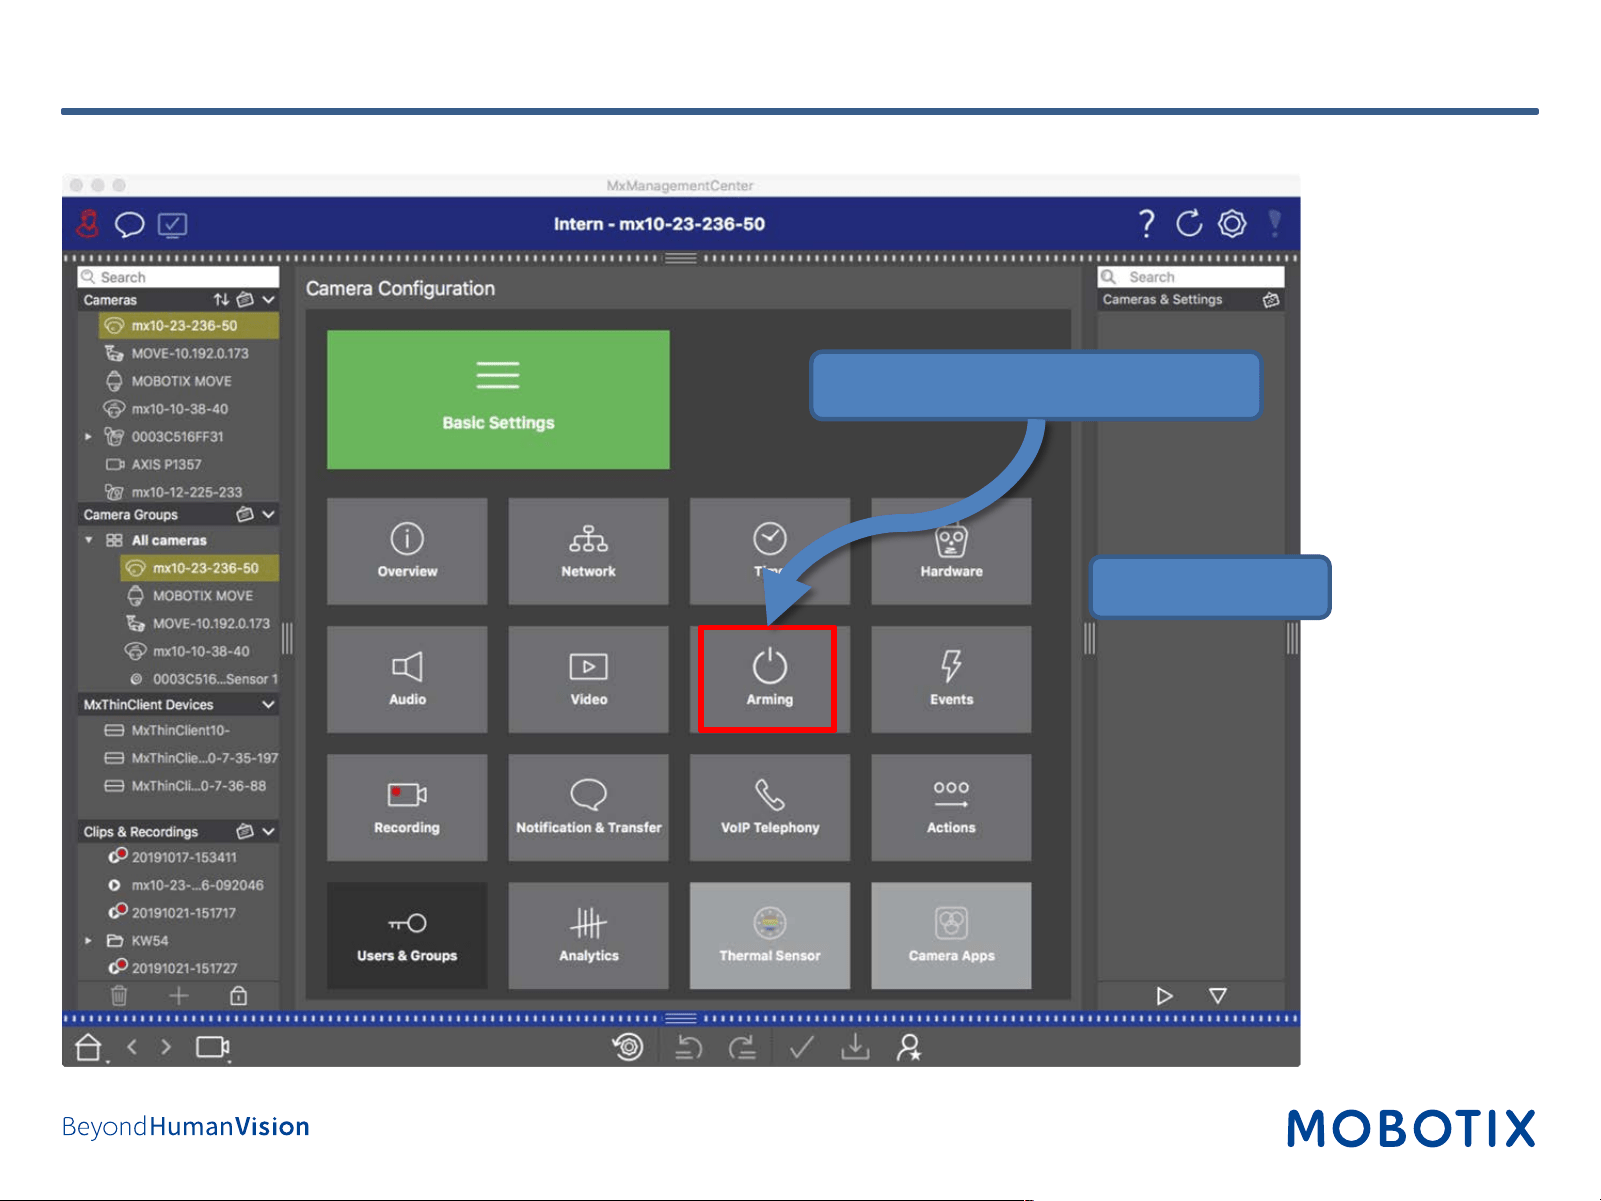
Step 12: Configure Camera Arming and Recording Mode (1)
Click on Arming to enable recording.
Configuration Bar
35
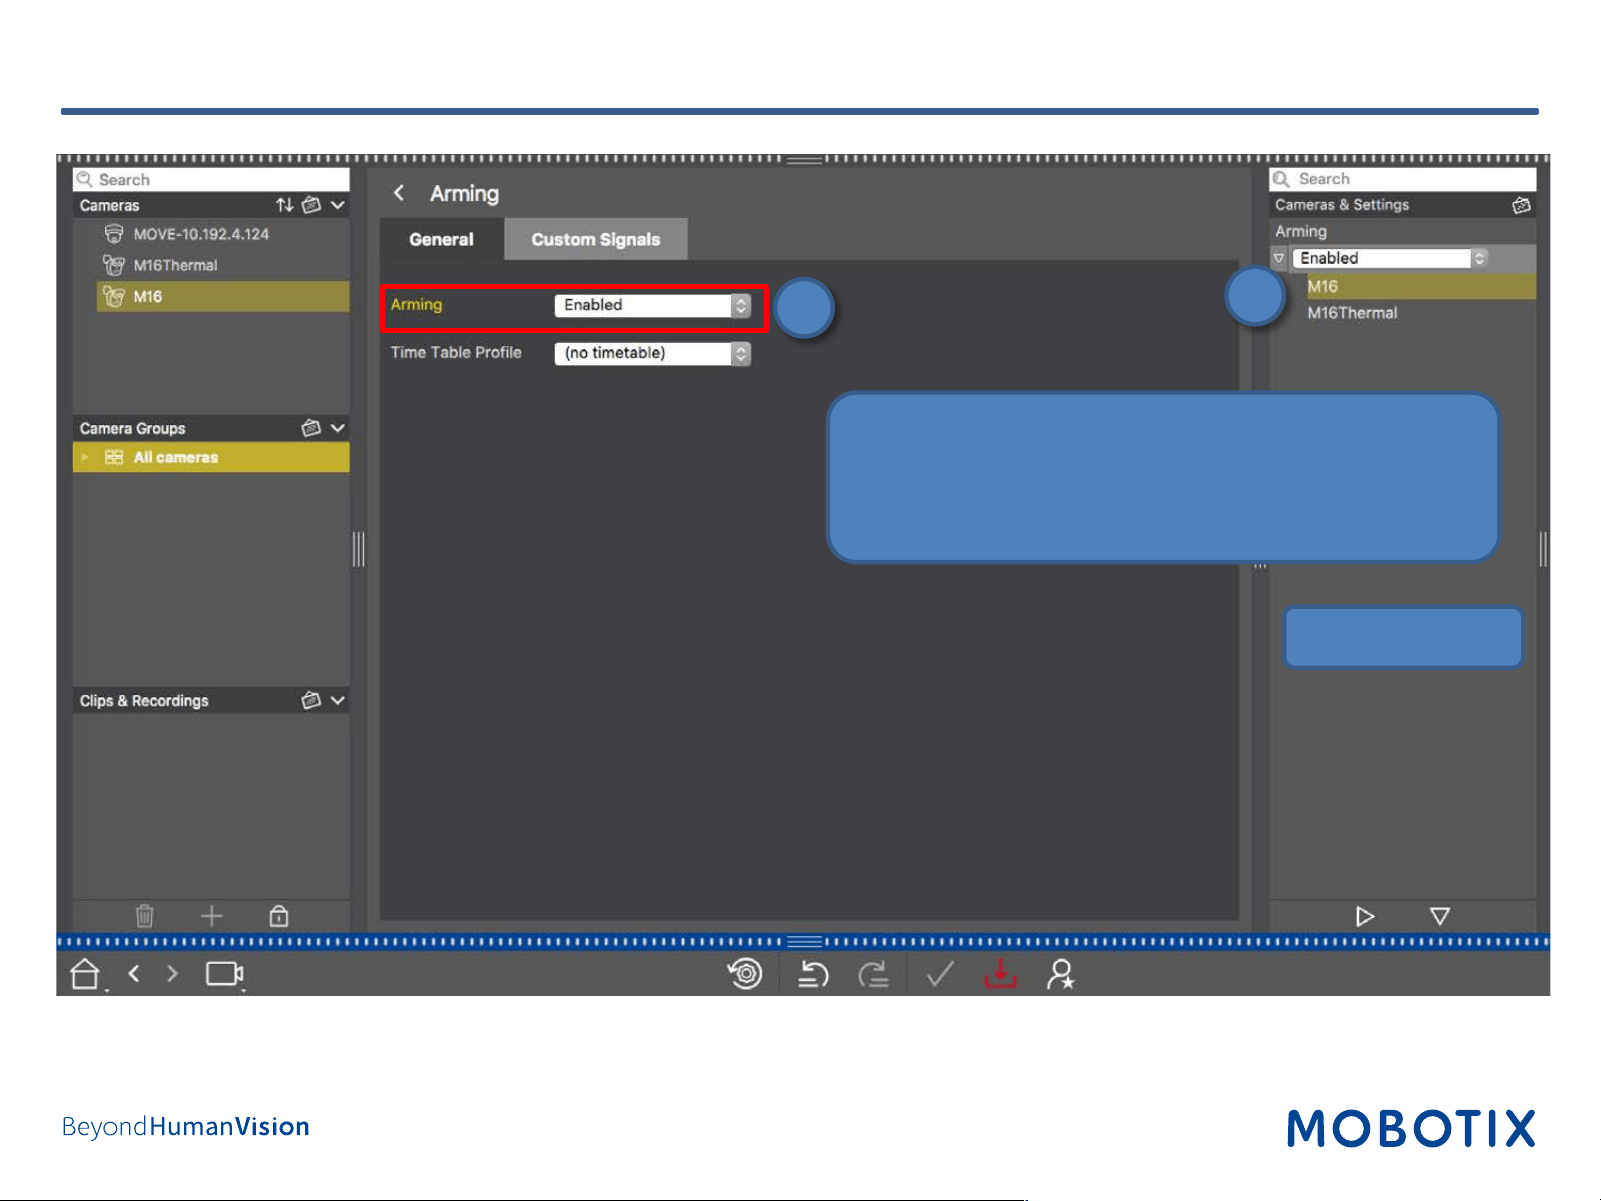
Step 12: Configure Camera Arming and Recording Mode (2)
1. Enable the Arming (i.e., main switch for recording).
2. Copy this setting to all desired cameras using
Drag&Drop in the configuration bar.
1
2
Configuration Bar
36
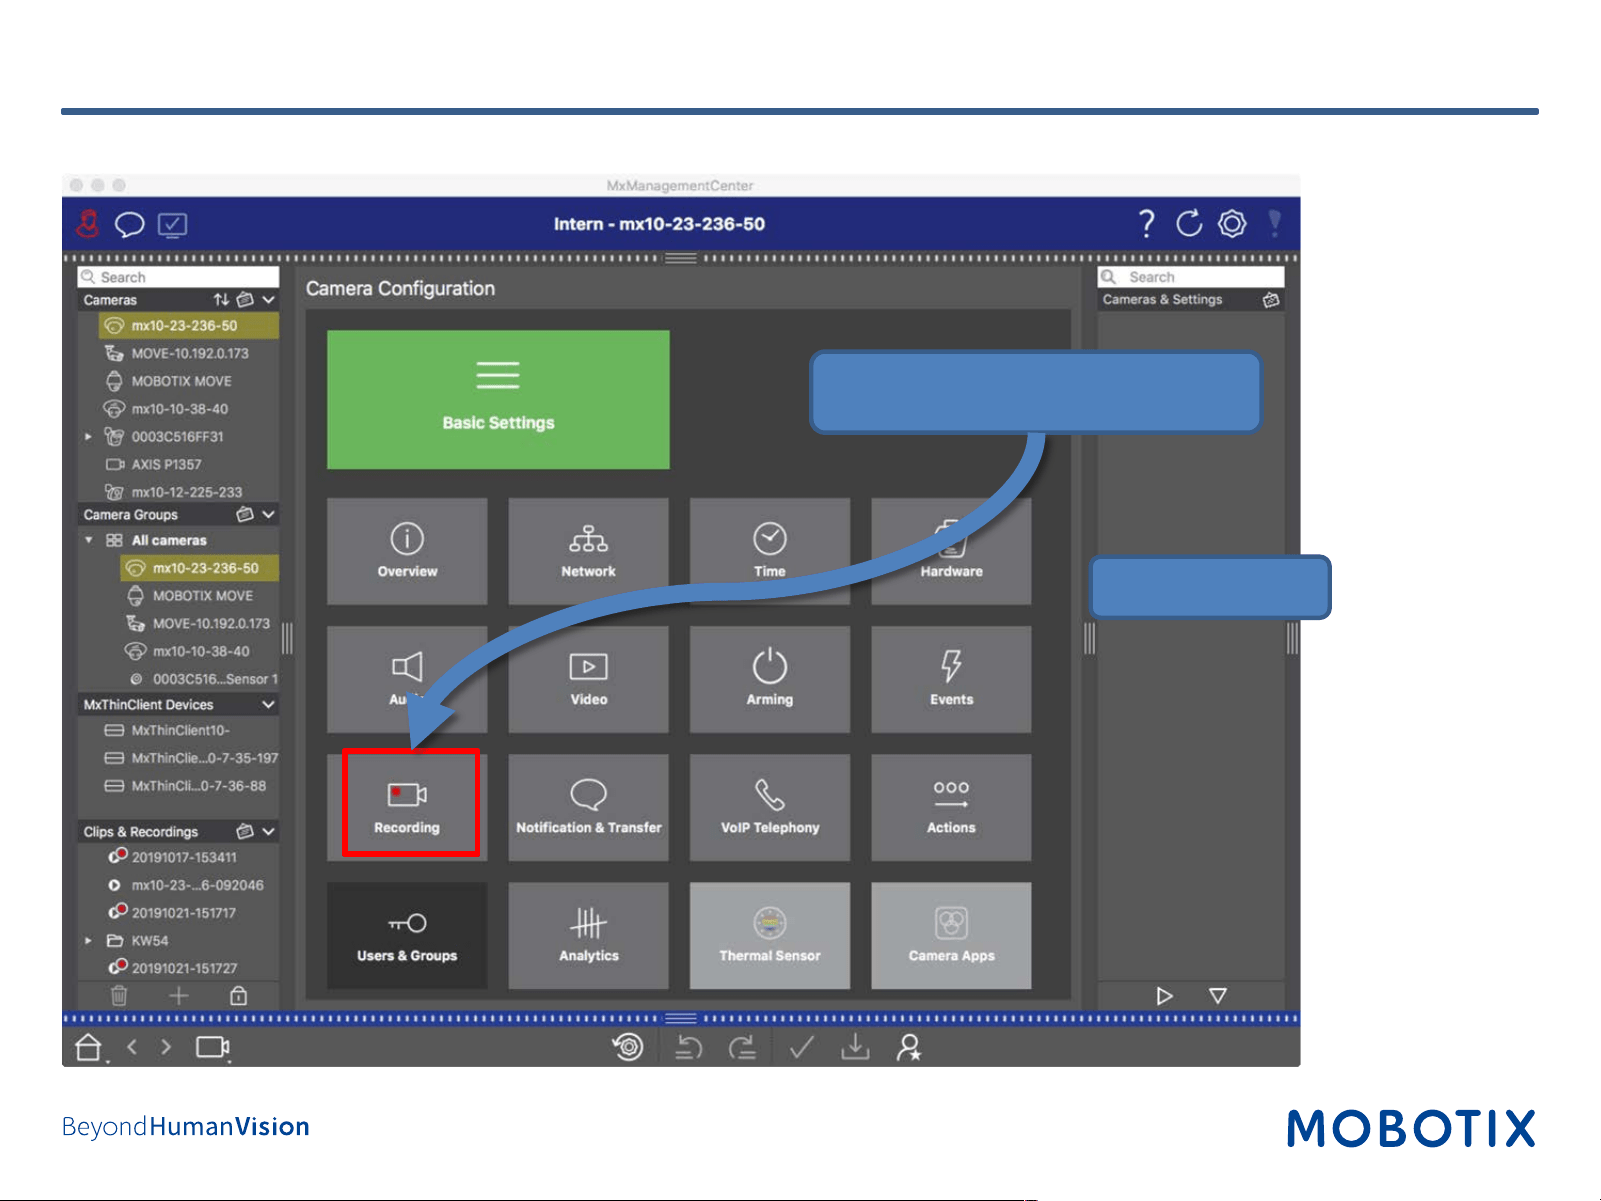
Step 12: Configure Camera Arming and Recording Mode (3)
Click on Recording to configure
recording.
Configuration Bar
37
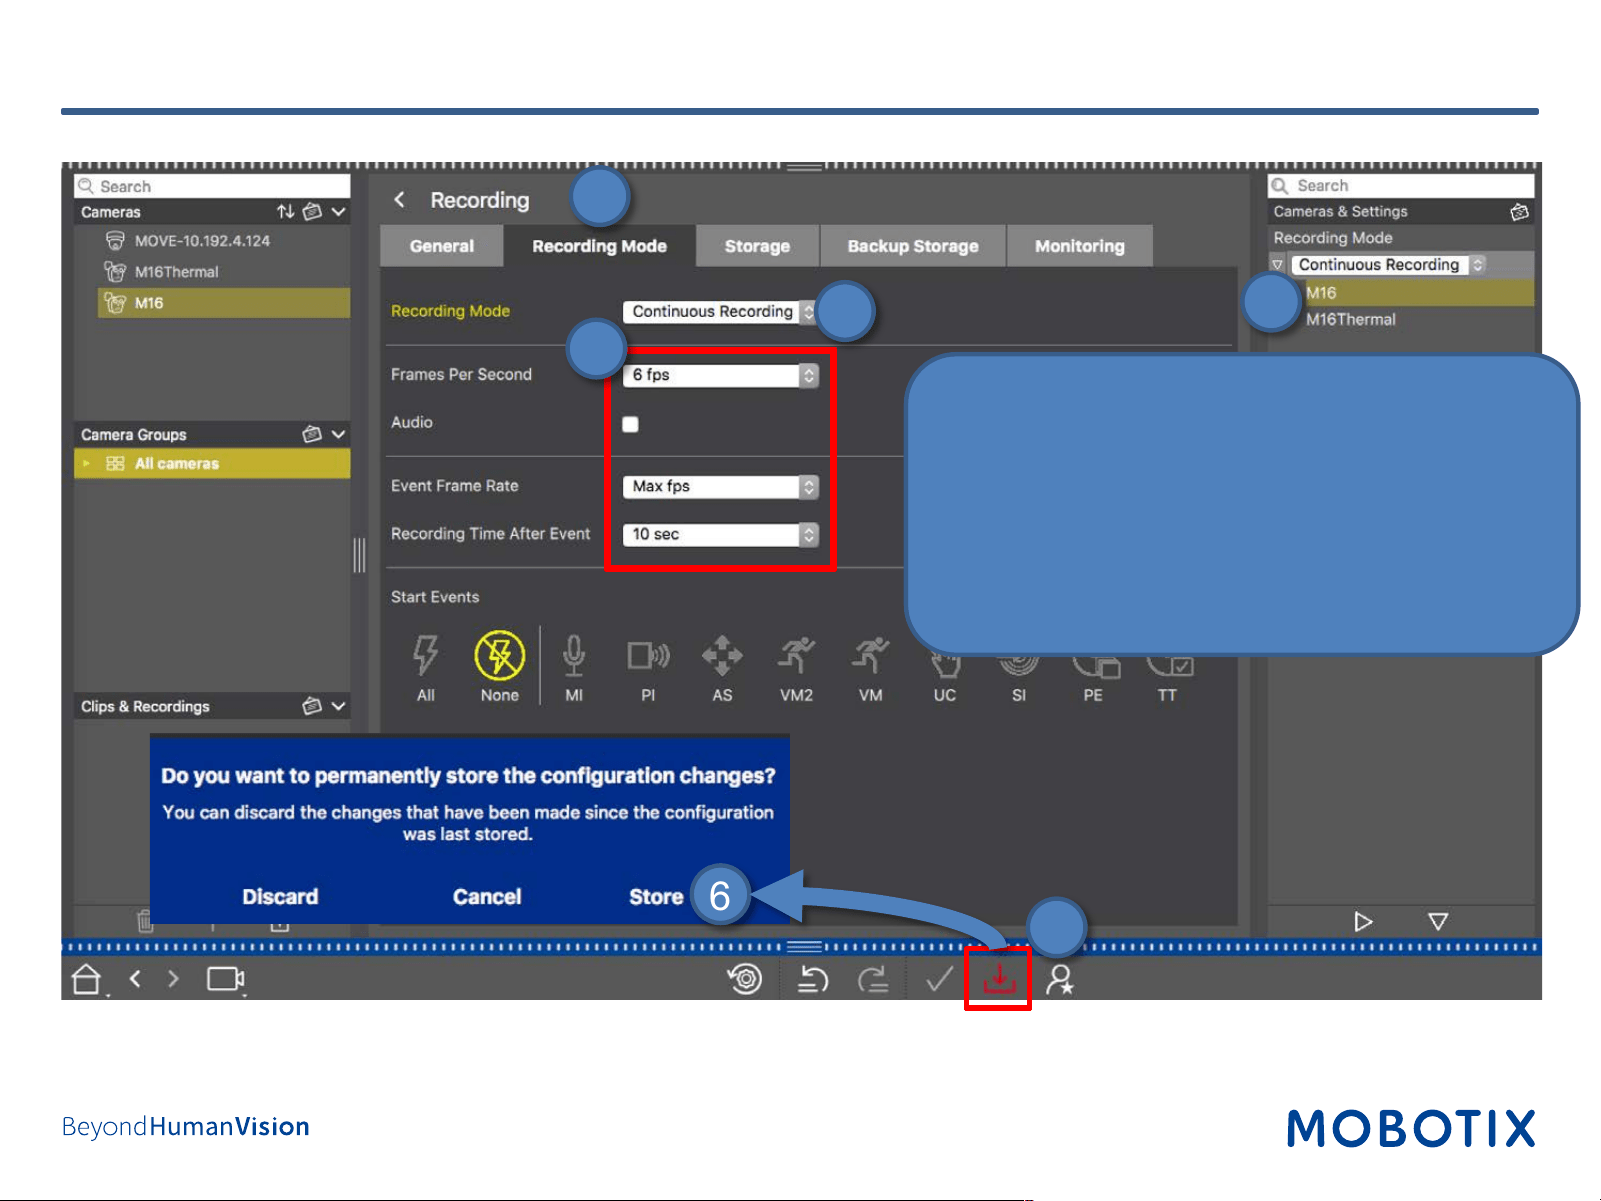
Step 12: Configure Camera Arming and Recording Mode (4)
1. Open Recording Mode tab.
2. Select Continuous Recording.
3. Set parameters (additional settings for event
recording).
4. Copy these settings to all desired cameras using
Drag&Drop in the configuration bar.
5. Press Store button at the bottom.
6. Press Store in the dialog.
1
2
4
6
5
3
38
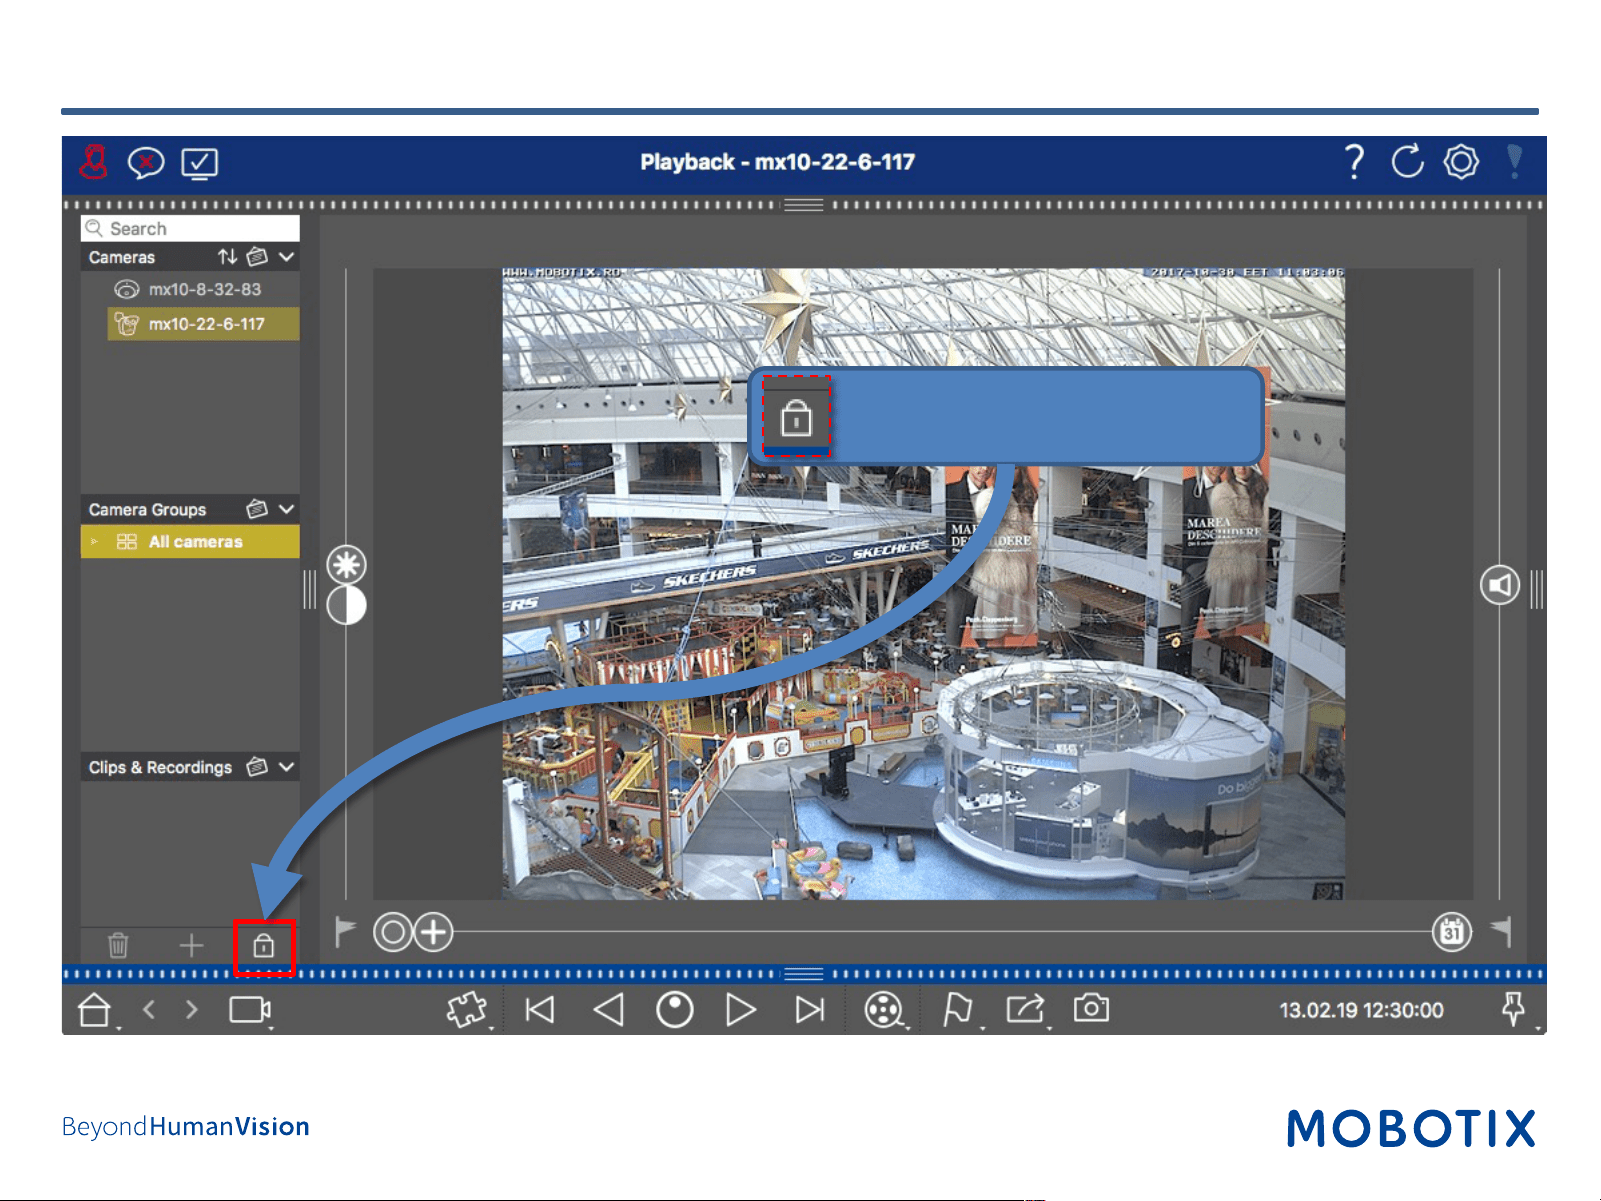
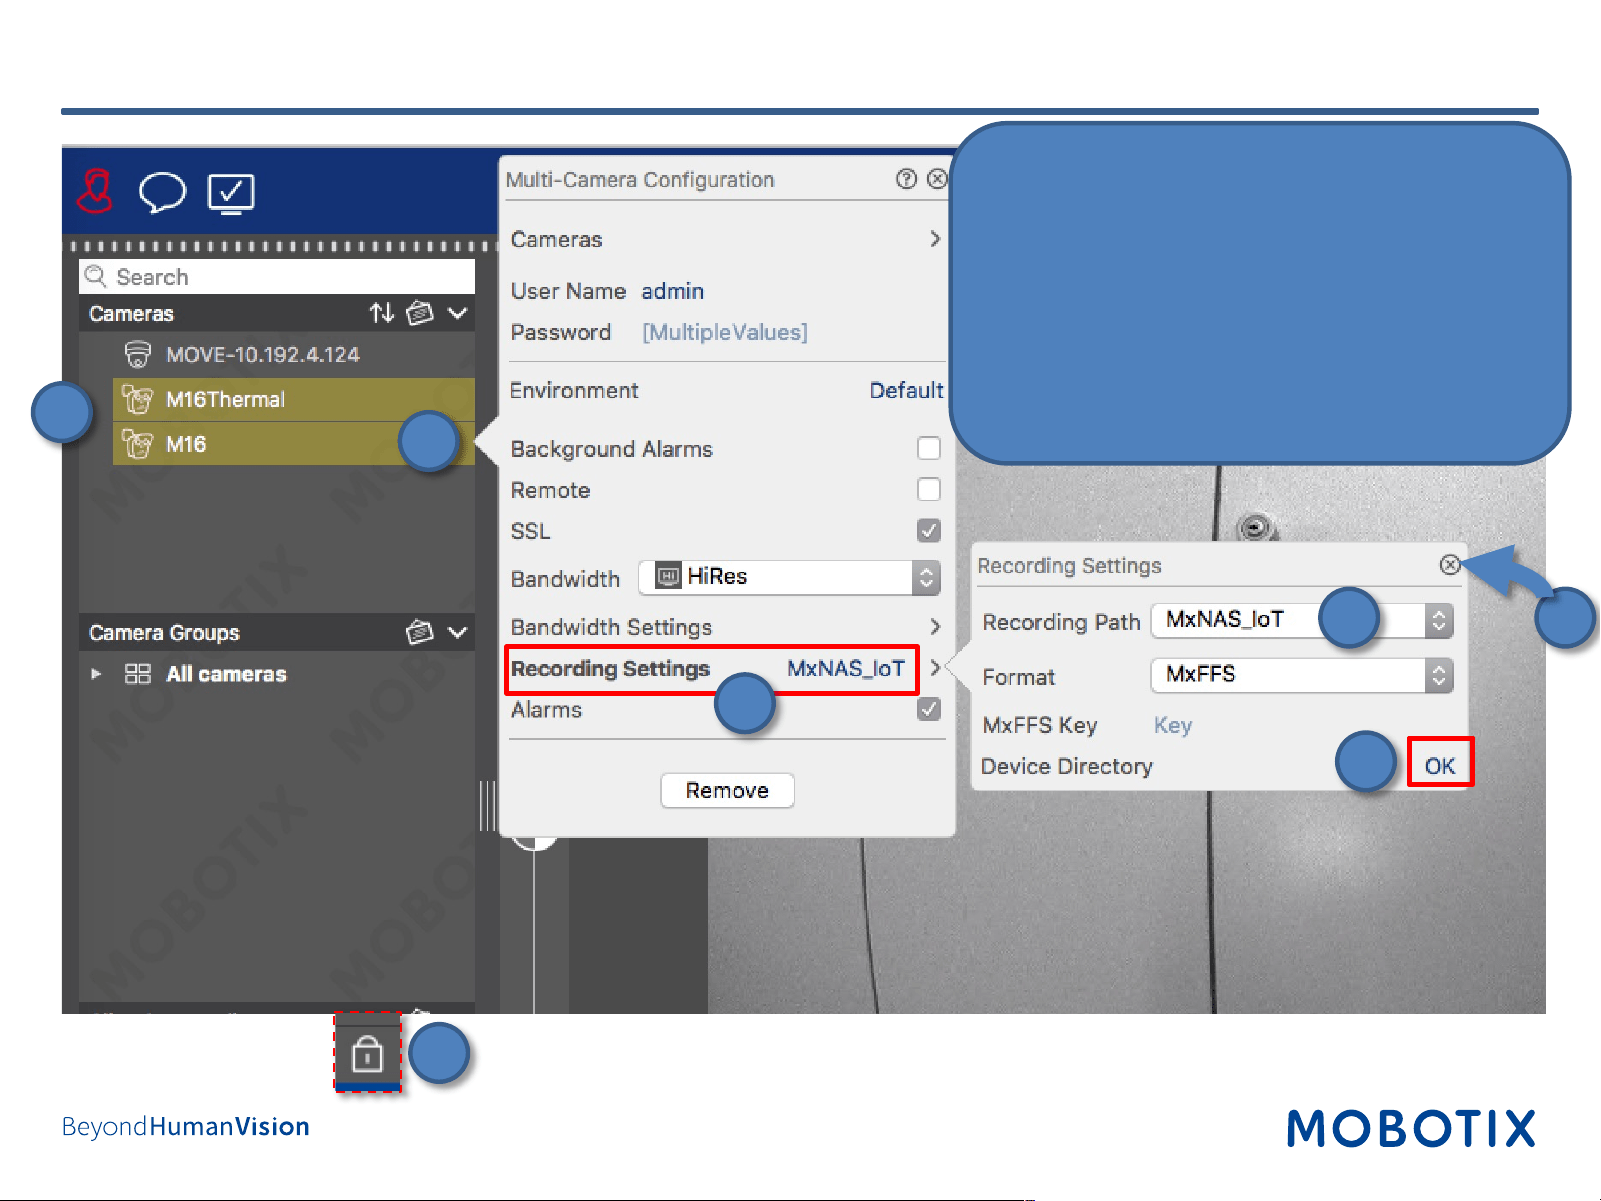
Step 13: Assign Cameras to Share (1)
Open lock icon to enter edit mode.
39
1. Select all cameras that will be using the same
share.
2. Right-click the cameras to open the
configuration dialog.
3. Click on Recording Settings.
4. Select the Recording Path.
5. Wait until Device Directory shows status OK.
6. Close the dialogs.
7. Click on the lock icon to close the edit mode.
Step 13: Assign Cameras to Share (2)
1
2
3
4
7
5
6
40
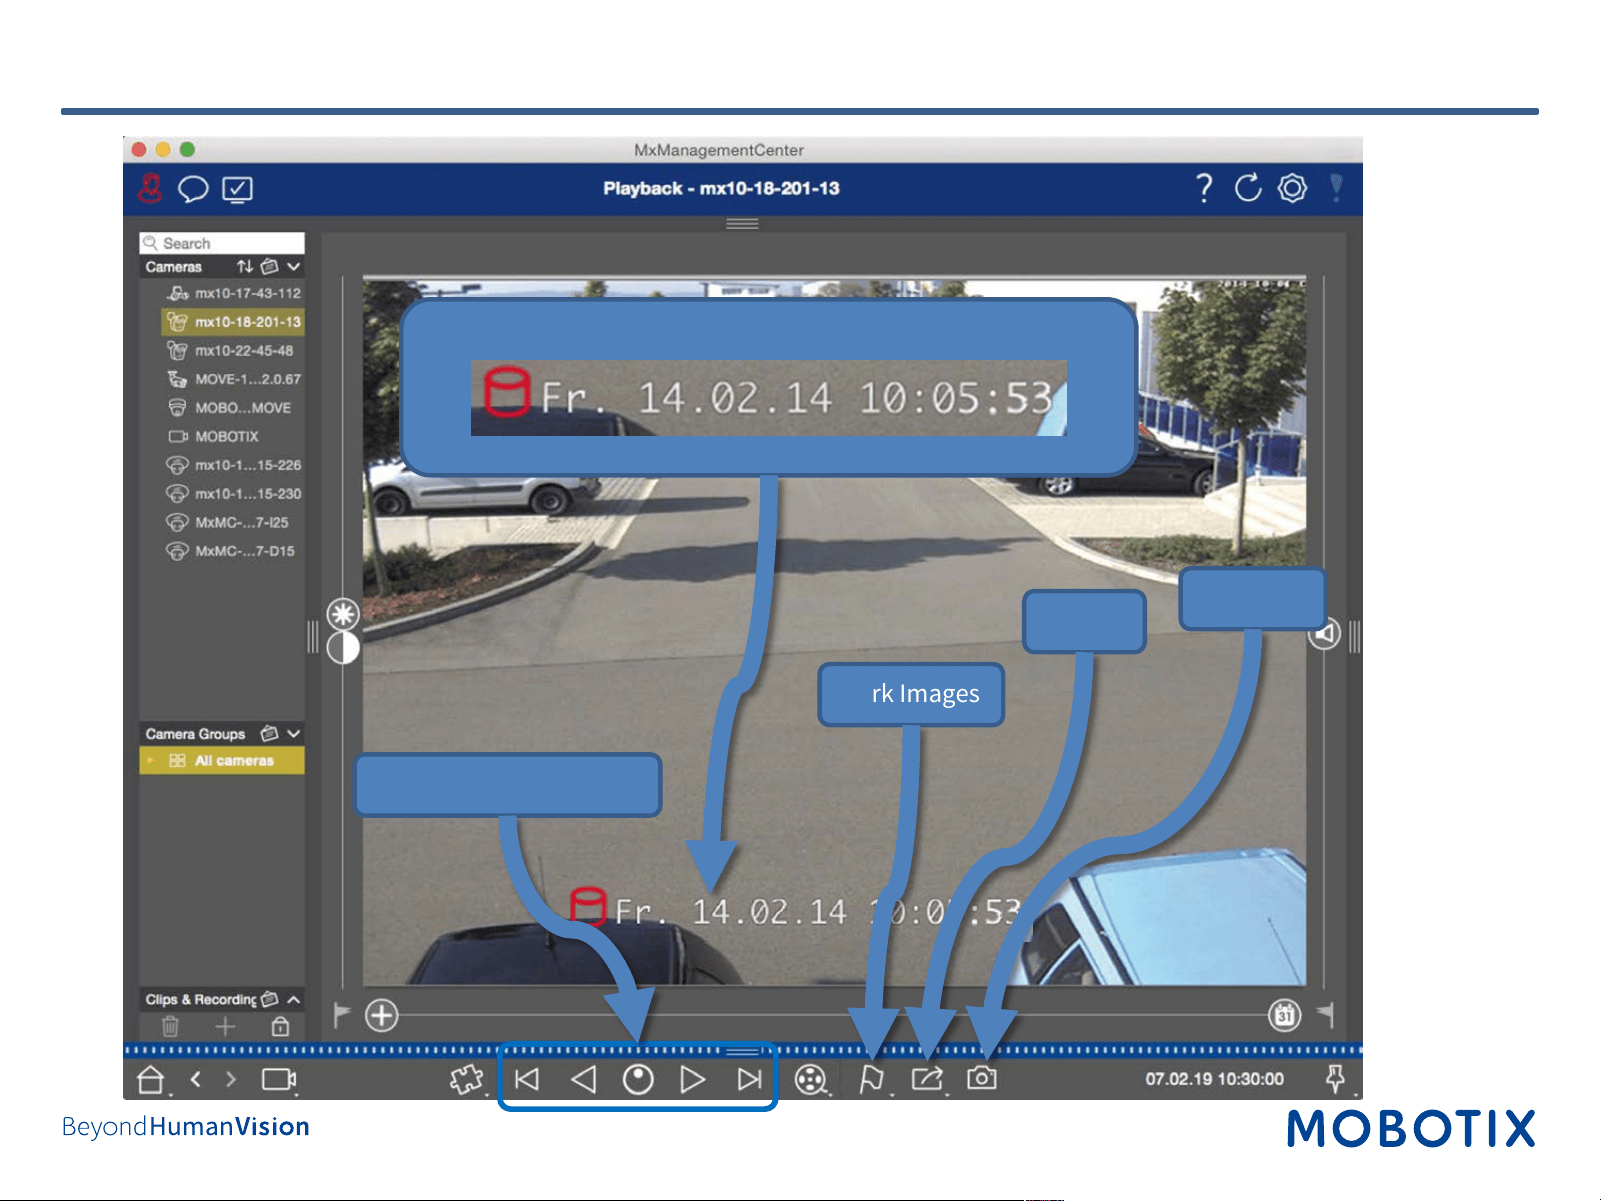
Finished – Playback of MOBOTIX IoT Cameras in MxManagementCenter
Export
Full Playback control
Mark Images
Snapshot
Search by Date and Time
MOBOTIX AG
Kaiserstrasse
67722 Langmeil
Germany
+49 6302 9816-0
info@mobotix.com
www.mobotix.com
MOBOTIX, the MOBOTIX Logo, MxControlCenter, MxEasy, MxPEG, MxDisplay
and MxActivitySensor are trademarks of MOBOTIX AG registered in the
European Union, the U.S.A. and in other countries • Subject to change without
notice • MOBOTIX do not assume any liability for technical or editorial errors or
omissions contained herein • All rights reserved • © MOBOTIX AG