E-CLVG4598I
Estimadocliente:
Porfavor,leaestamanualdeusoatentamenteygúardelocomounareferenciaparaelfuturo.
Noolvidedeentregarloalosposterioresusuariodeesteaparato.
Estemanualcontieneseccionesconinstruccionesdeseguridad,instruccionesoperativas,
instruccionesparalainstalaciónyconsejosrápidosparasolucionarproblemascomunes,etc.
Léalocuidadosamenteantesdeusarellavavajillas,serádeayudaparaelusoymantenimiento
delmismo.
Reviselaseccióndeconsejosrápidosparasolucionarproblemas;leserádeayudapara
resolverporUd.mismolosproblemascomunessinnecesidaddepedirayudaalserviciotécnico.
Elfabricante,siguiendounapolíticaconstantededesarrolloypuestaapuntodeproductos,
podrárealizarmodificacionessinprevioaviso.
1. Información de seguridad.
Atención!
Cuando use el lavavajillas adopte las precauciones básicas acá indicadas.
ATENCIÓN! EL GAS HIDRÓGENO ES EXPLOSIVO.
Bajo ciertas condiciones, el gas hidrógeno se puede producir en un sistema de agua caliente que no
ha sido usado por dos semanas o más. EL GAS HIDROGENO ES EXPLOSIVO. Si el sistema de agua
caliente no ha sido usado por dicho período, antes de usar el lavavajillas , abra todas las canillas de agua
caliente y deje correr el agua durante varios minutos. Esto eliminará cualquier acumulación que hubiere
de gas hidrógeno.
ATENCIÓN! USO APROPIADO
No sentarse o pararse sobre la puerta o los canastos del lavavajillas
No tocar los elementos calientes durante el uso o inmediatamente después del mismo
No hacer funcionar el lavavajillas hasta que todos los elementos estén correctamente colocados. Abrir
la puerta del lavavajillas con cuidado si está en uso. Hay riesgo de que salpiquen chorros de agua
hacia afuera.
No colocar ningún objeto pesado sobre la puerta cuando esté abierta. El aparato se puede inclinar.
Cuando se carga para lavar:
colocar los elementos filosos de forma tal que no dañen el revestimiento de la puerta
colocar el filo de los cuchillos con los mangos hacia arriba para reducir el riesgo de lastimarse. Esto
puede ocasionar desgaste en los cestos, pero es más importante su seguridad.
Atención, los cuchillos y otros utensilios con punta filosa deben ser cargados en el canasto con las
puntas hacia abajo o en posición horizontal
Cuando use el lavavajillas, debe evitar colocar elementos de plástico que queden en contacto con
elementos calientes.
Controle que el recipiente del detergente quede vacío una vez completado el ciclo de lavado.
No lave ítems de plástico a menos que tengan la indicación de que son aptos para lavavajillas. Para
ítems de plástico que no tengan esta indicación, vea las recomendaciones del fabricante.
Use solamente detergentes y aditivos abrillantadores específicos para lavavajillas automático. Nunca
use jabón, detergente para lavar ropa o detergente para lavar a mano.
El equipo debe estar conectado a la red eléctrica, con fichas de 3mm en sus polos.
Mantenga fuera del alcance de los niños el detergente y el abrillantador. Mantenga fuera del alcance de
los niños la posibilidad de abrir la puerta del lavavajillas, podría haber aún algo de detergente dentro.
Los adolescentes deben ser supervisados para asegurarse de que ellos no juegan con el lavavajillas.
Este producto no está diseñado para ser usado por personas (incluyendo niños) con capacidad física,
mental o sensorial reducida, o personas sin experiencia o conocimiento, salvo que sean instruidas y
supervisadas durante el uso del aparato por una persona responsable por su seguridad.
Los detergentes para lavavajillas son muy alcalinos. Pueden ser muy peligrosos si se aspiran. Evite
el contacto con la piel y con los ojos. Mantenga a los niños alejados del lavavajillas cuando la puerta
esté abierta.
La puerta no debe dejarse abierta dado que es peligroso tropezarla.
Si el cable de alimentación está dañado, debe ser reemplazado por el fabricante o servicio autorizado
o persona calificada para evitar accidentes.
Favor, disponer de los materiales del embalaje en forma apropiada
1
Use el lavavajillas solamente para la función para la cual fue creado.
Al instalarlo, el cable que lleva la corriente no debe quedar excesivamente curvado o
aplastado.
No desnaturalizar las regulaciones preexistentes.
El aparato debe ser conectado a la entrada de agua utilizando manguera y elementos de
conexión nuevos. La manguera y elementos de conexión viejos no deben reutilizarse.
Compruebe que la alfombra que eventualmente pueda estar colocada debajo del aparato,
no obstruya o dificulte la apertura de la puerta en la parte de abajo de la misma.
Es para uso interior exclusivamente.
LEA ATENTAMENTE Y SIGA ESTAS INSTRUCCIONES DE SEGURIDAD.
GUARDE ESTAS INSTRUCCIONES
2.
Destrucción
del
embalaje.
El embalaje del lavavajillas debe ser destruido correcta-
mente.
Todos los materiales del embalaje pueden ser reciclados.
Las partes de plástico estándar marcadas con las abreviaciones
standard internacionales.(ej.: PS para el polietileno,
material de relleno)
ATENCIÓN!
Este aparato está identificado de acuerdo con la normativa
europea 2012/19/EU con relación a los deshechos
eléctricos y electrónicos-WEEE. La guía específica de las
estructuras de viejos aparatos para un ancho EU válido para
retornar y reusar.
El material del embalaje puede ser peligroso para los niños.!
Para desechar el embalaje o un aparato, favor diríjase a un centro de reciclaje. Corte el cable
de la corriente y haga que el dispositivo de cierre de la puerta quede inutilizable.
El cartón del embalaje está fabricado con papel reciclado y puede ser desechado en el
recipiente de basura destinado a papel para un nuevo reciclaje.
Asegúrese de que la forma de desechar el producto sea la correcta, de esta manera colabora
evitando potenciales consecuencias negativas para el medioambiente y la salud humana.
Para una información más detallada acerca del reciclaje de este producto, favor contactar la
oficina local responsable de la basura.
IMPORT
ANTE!
Para lograr el mejor uso de su lavavajillas, lea todas las instrucciones
de la operativa del mismo antes de usarlo la primera
vez.
2
SEGURIDADELÉCTRICA:DESCONEXIÓNDELARED
Sedebeinstalarunatomadecorrientecercadelequipoyserfcilmenteaccesible.
á
3. Instrucciones
operativas
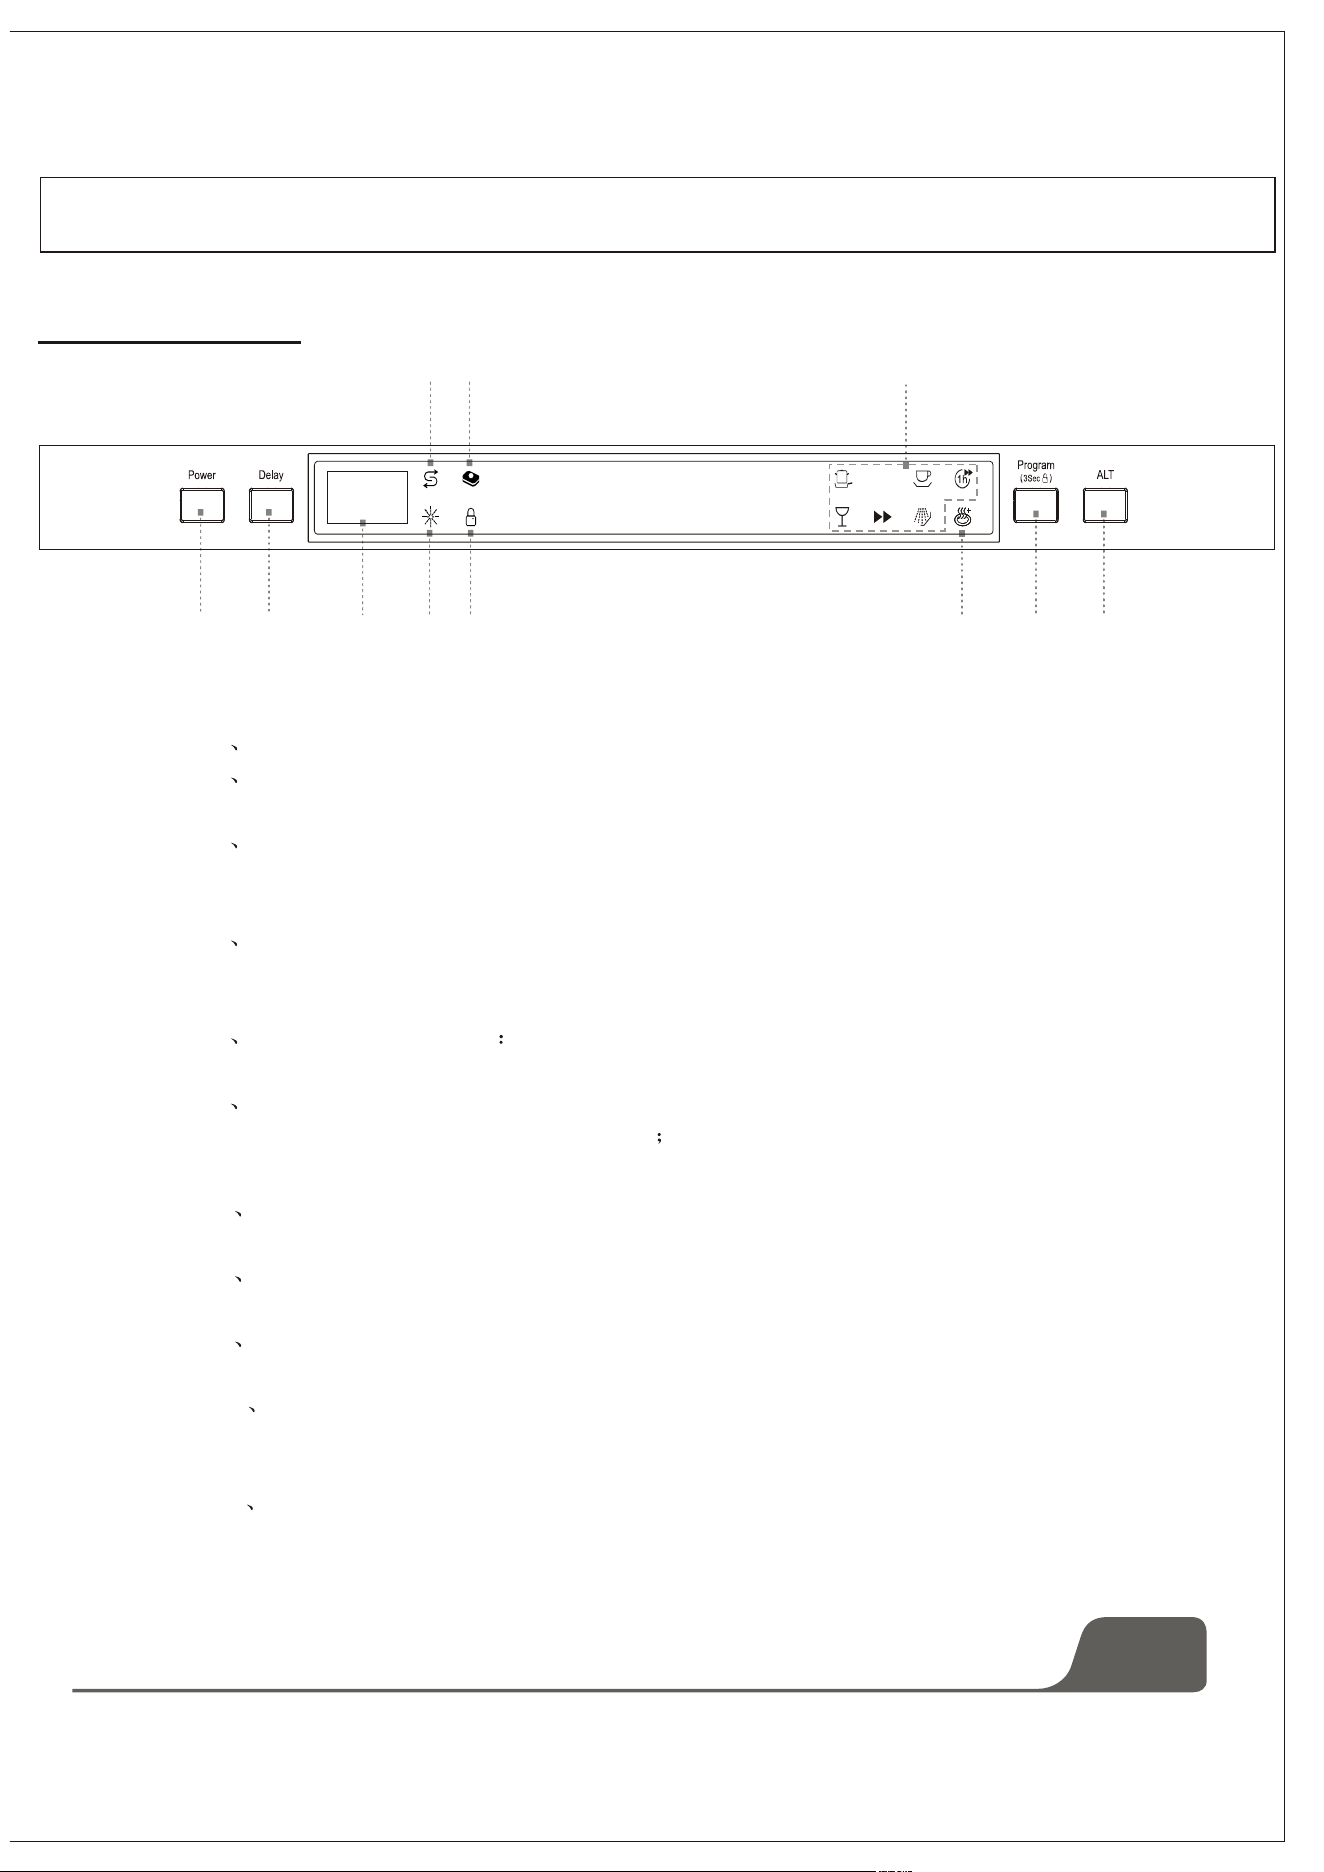
PANEL DE CONTROL
1 2
3 4
8 10
97
5
6
11
Eco
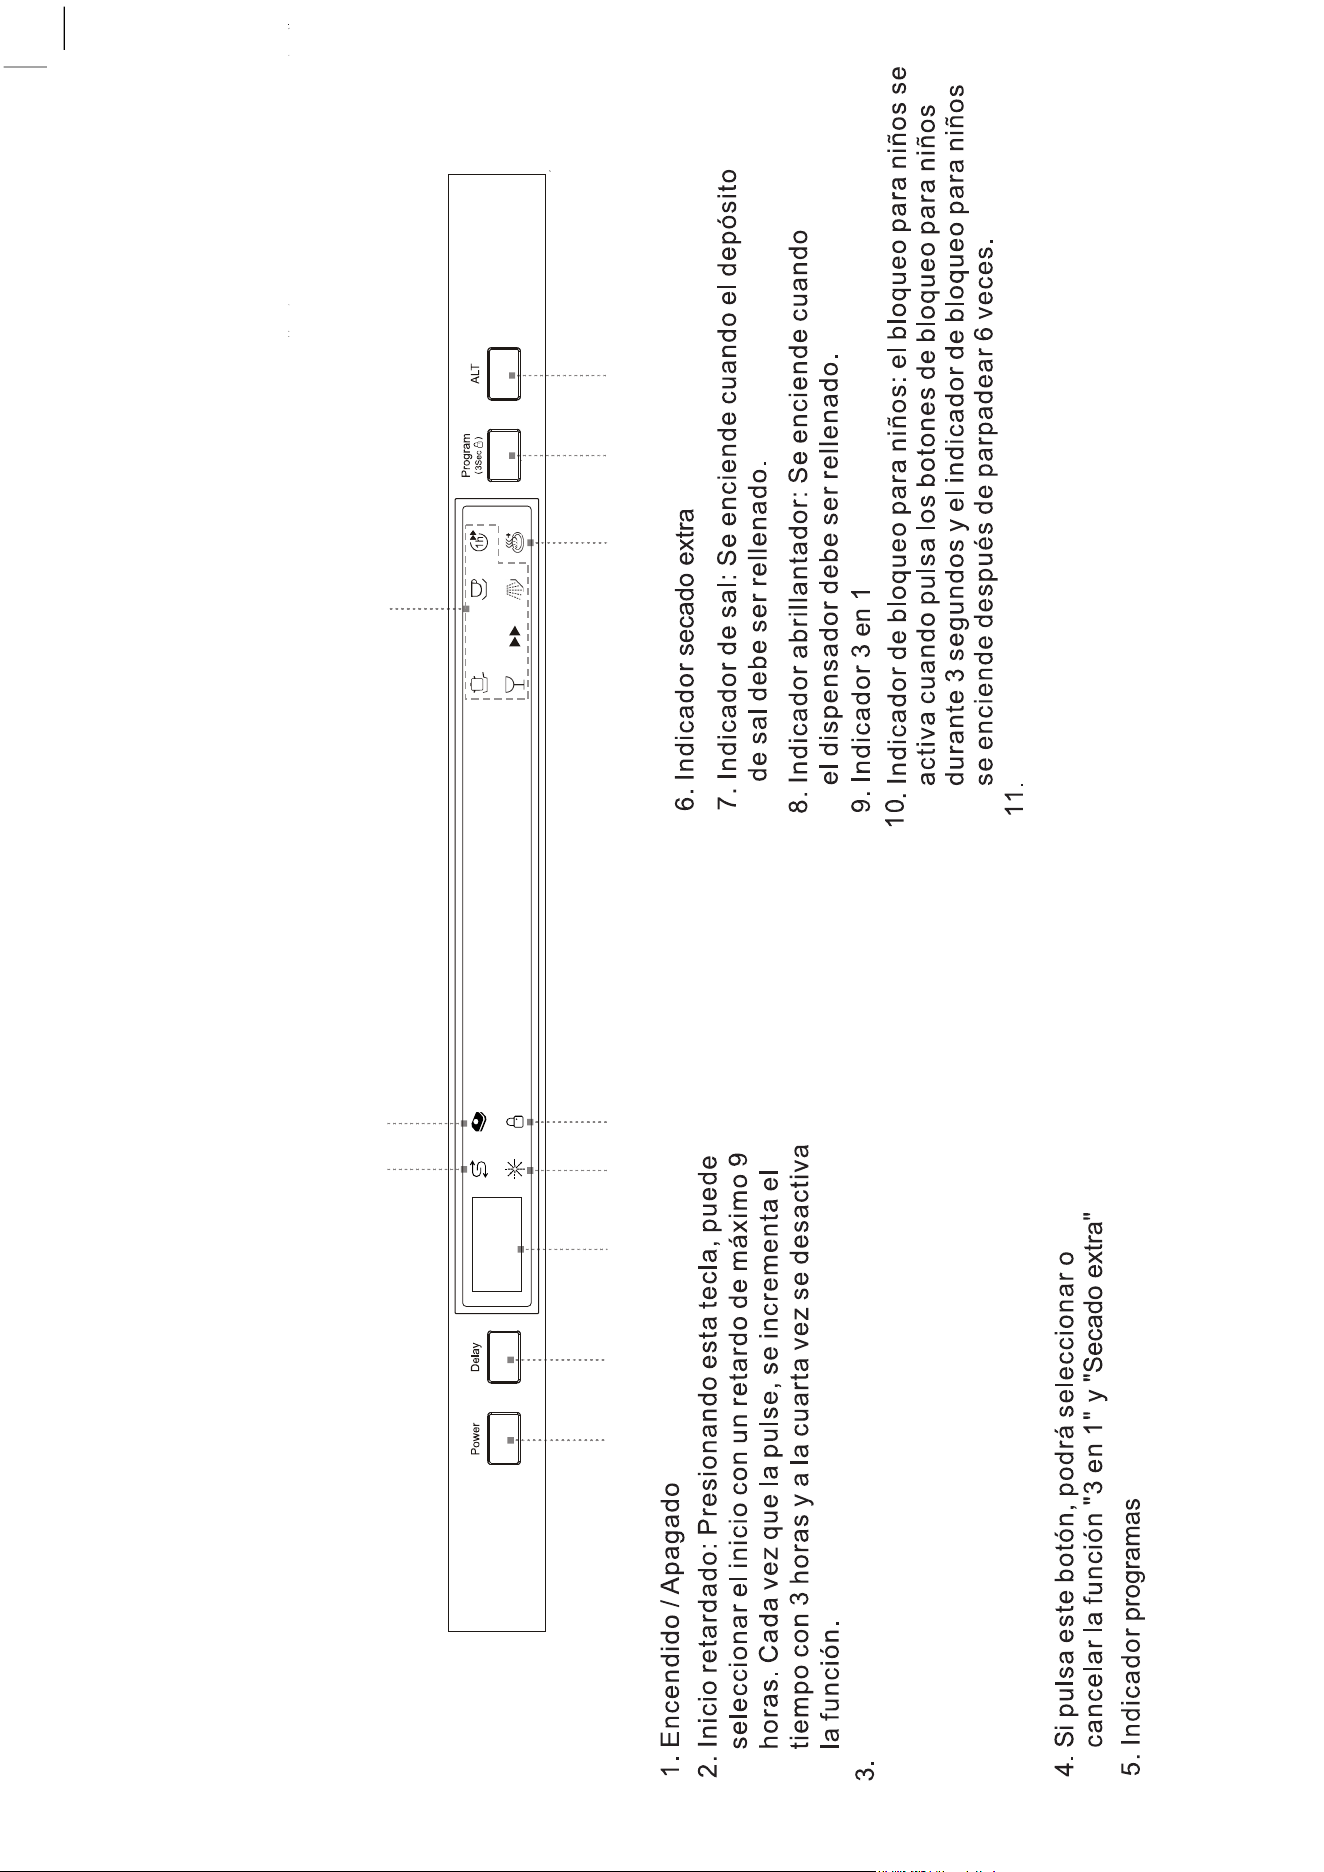
Tecla de programación: Presione para escoger el programa deseado. Se
encenderá el señalizador del programa seleccionado. Si mantiene
presionado este botón durante 3 segundos activara el bloqueo infantil.
Aparecerá el código LO en el display. Para desactivar esta función, vuelva
a presionar la tecla durante 3 segundos.
Pantalla digital: para visualizar el tiempo de funcionamiento
restante, los códigos de error y la temporización.
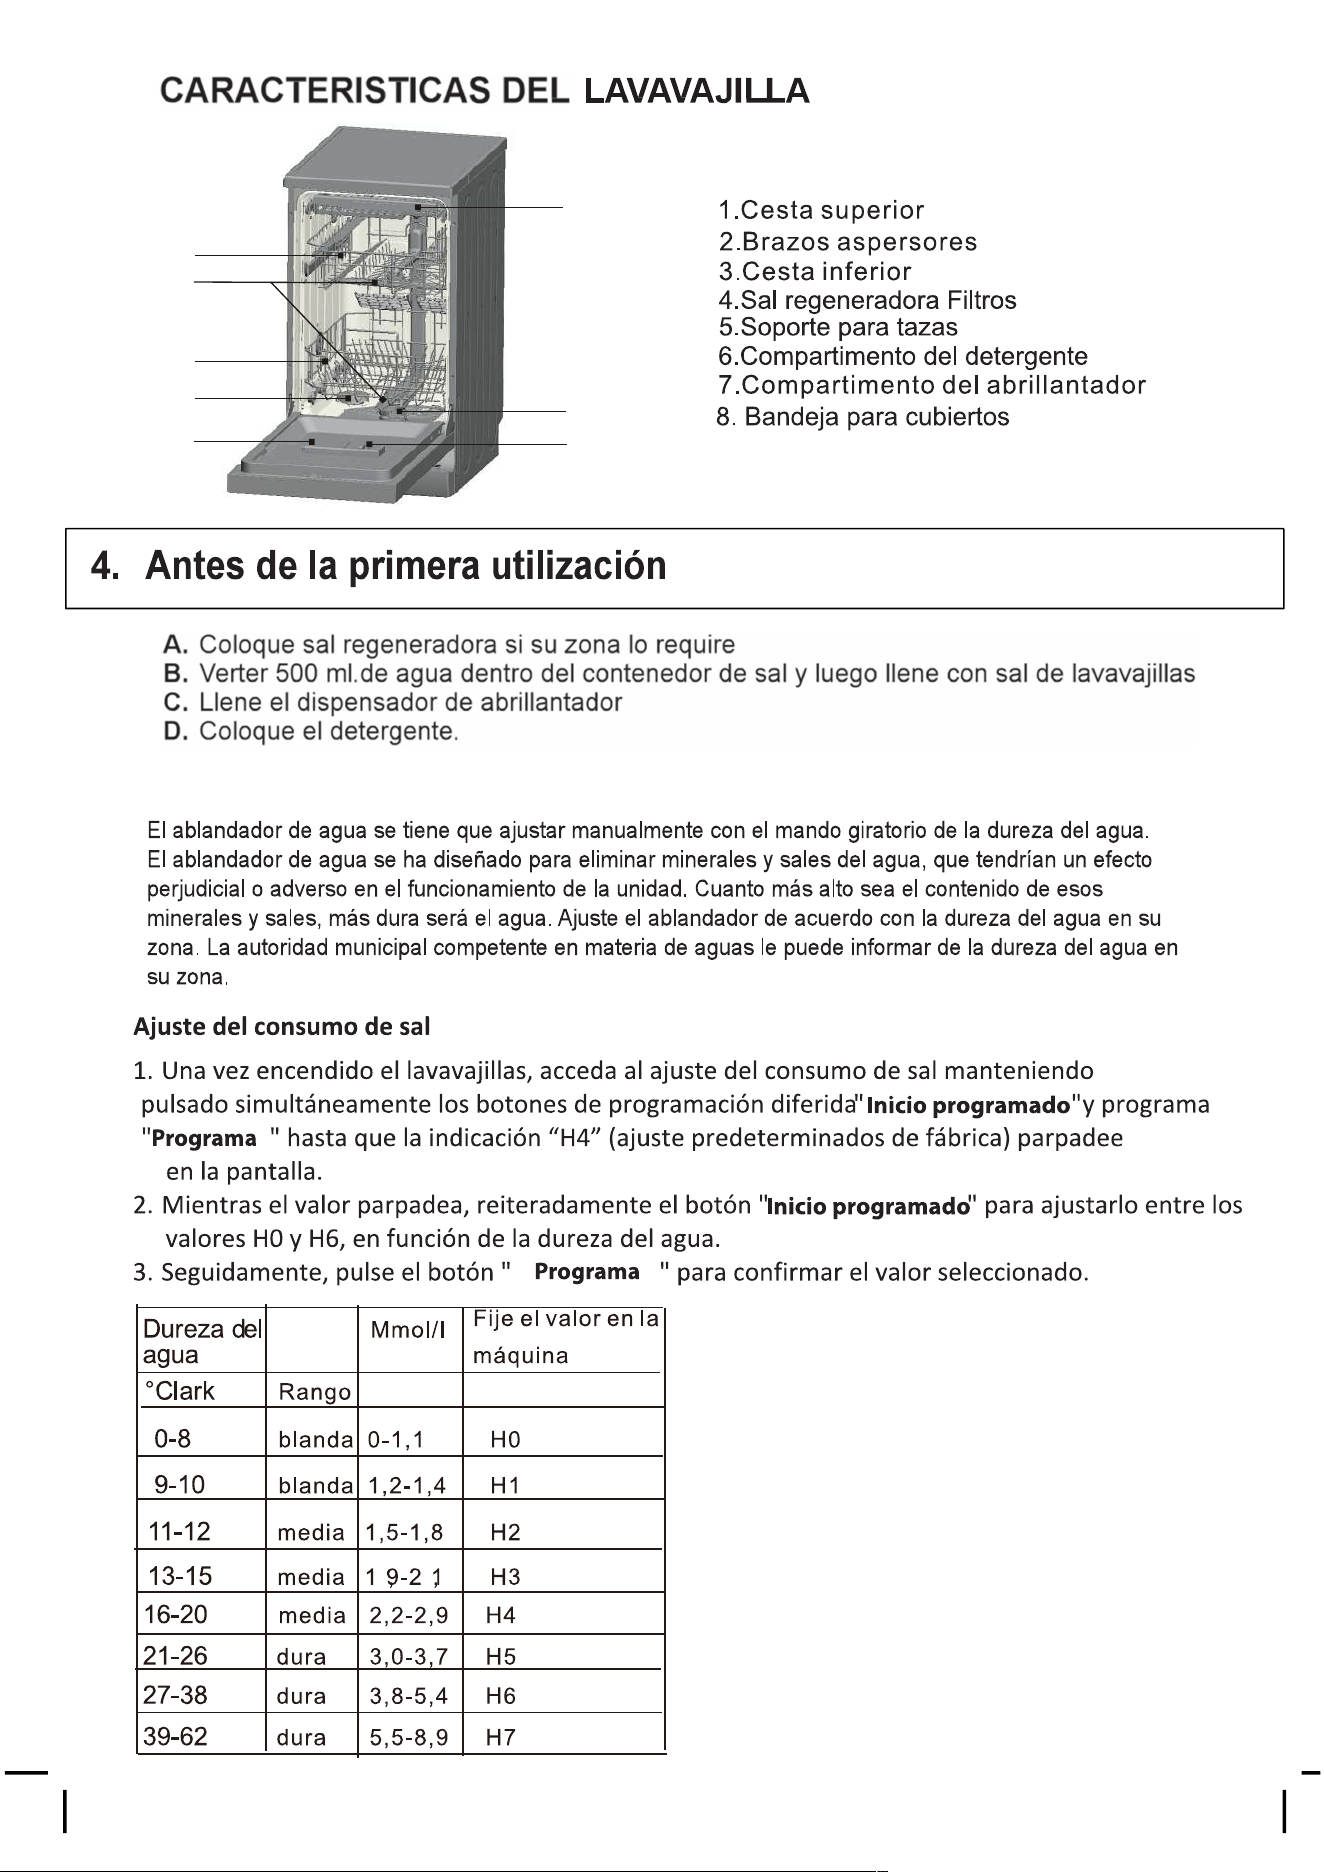
A.
ABLANDOR DE AGUA
4
1
2
3
4
5
6
8
7
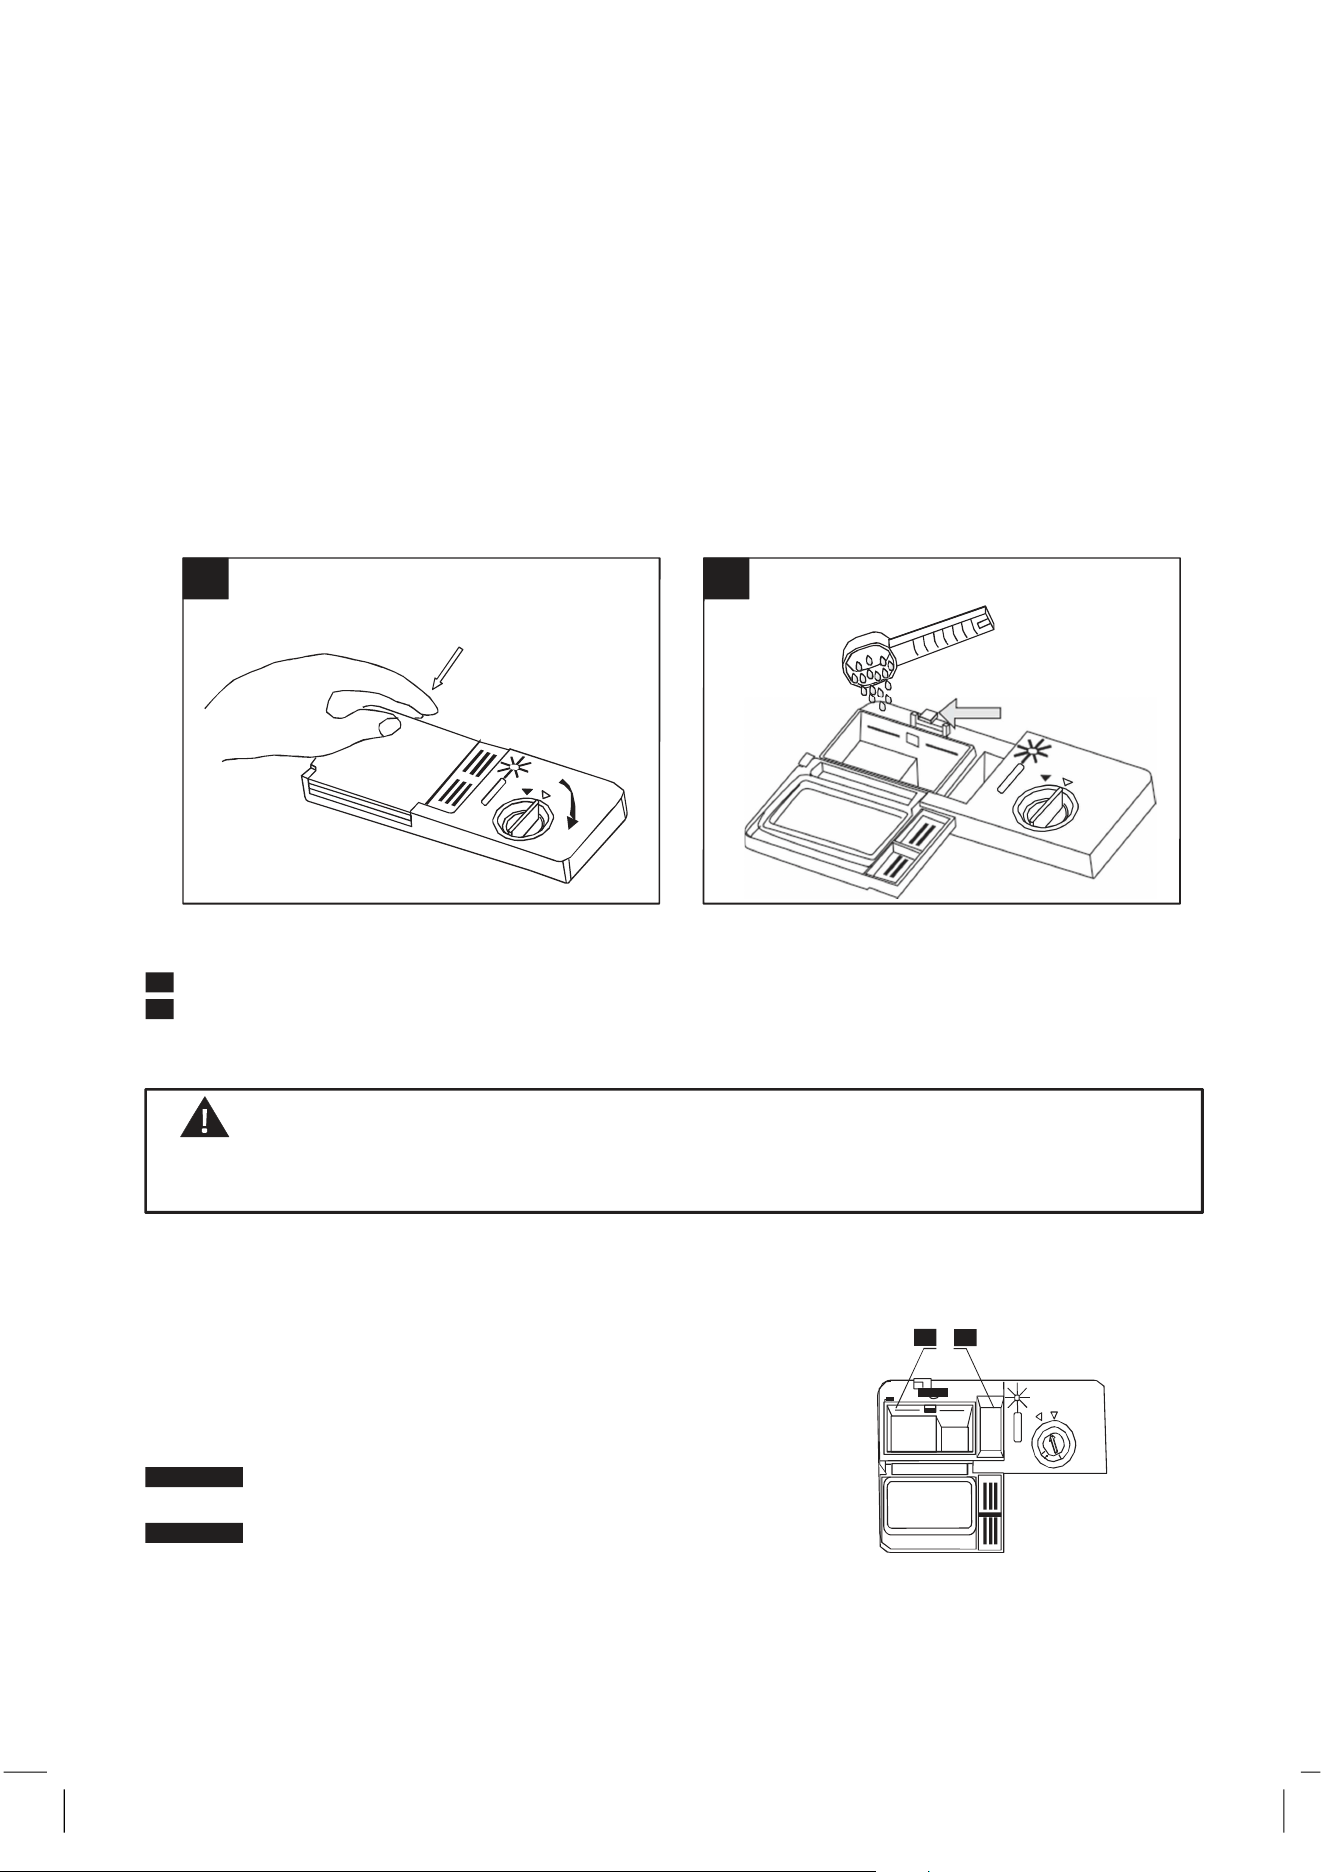
B) Cargando la sal en el contenedor.
Siempre use sal destinada a lavavajillas.
NOTA: Si su modelo no posee dispensador de sal, Ud. debe saltear esta sección.
ABLANDAR EL AGUA
La dureza del agua varía de una zona a otra. Si se usa agua dura en el lavavajillas, se
formarán depósitos en la vajilla y los utensilios.
El aparato está equipado con un REGULADOR especial que usa sal específica-
mente diseñada para eliminar sal y minerales del agua.
El contenedor de sal está ubicado debajo del canasto inferior y puede ser llenado de la
siguiente mane
Sólo use sal específicamente diseñada para ser usada en lavavajillas.! Toda otra sal,
especialmente la sal de mesa, alterará la dureza/ablandamiento del agua. En caso de
desperfectos ocasionados por el uso de una sal inadecuada, el fabricante no otorga ninguna
garantía no responsabilizándose por los daños ocasionados.
Sólo cargue la sal antes de comenzar un programa de lavado completo.
Esto previene que cualquier grano de sal o agua salada , que pudo haber salpicado,
permanezca en el fondo del lavavajillas por un cierto período de tiempo, lo que puede
ocasionar corrosión.
Después del primer ciclo de lavado, la luz del panel de control expira.
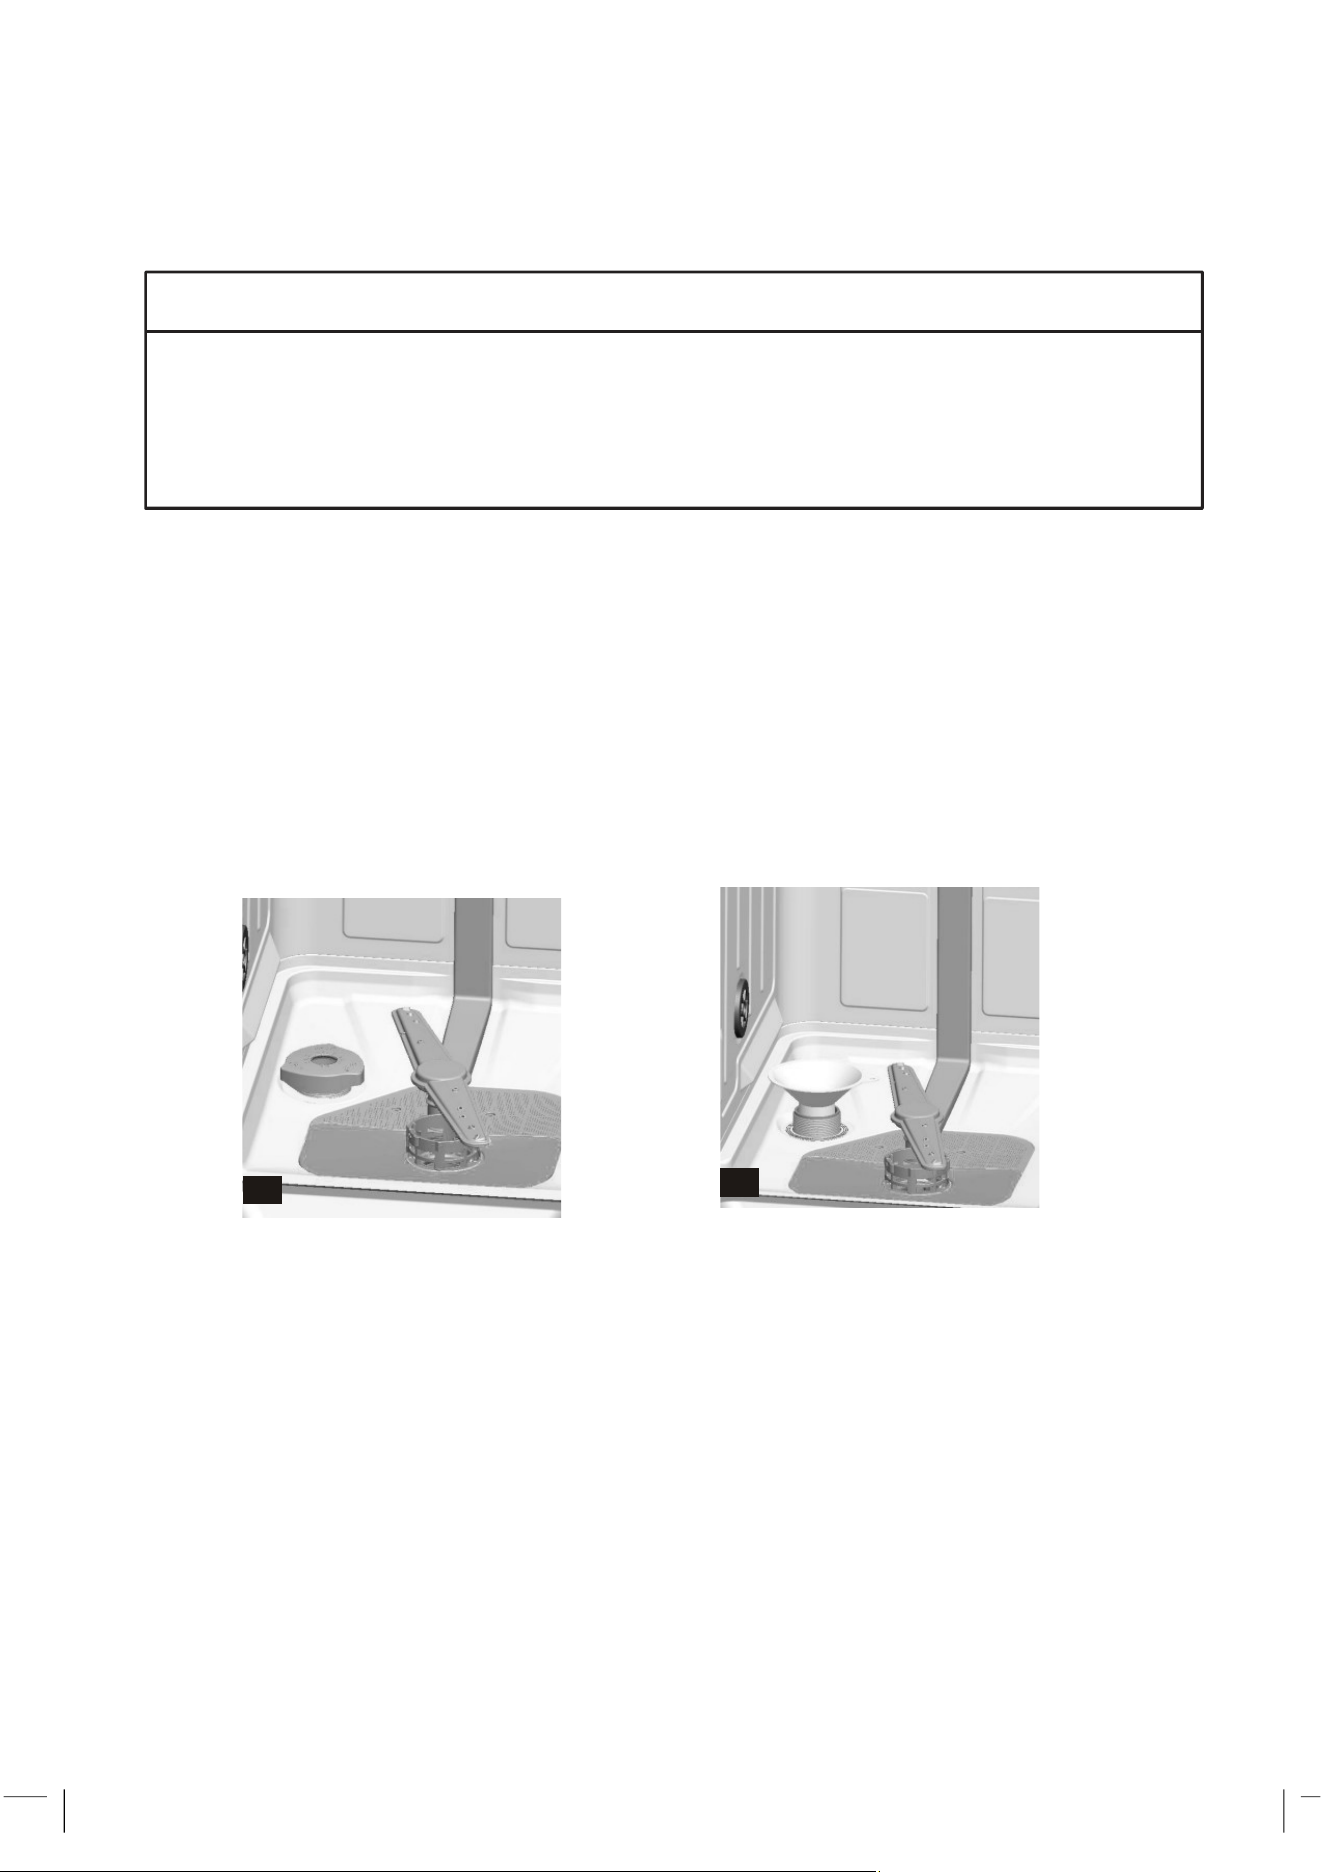
A.
Remueva el cesto inferior y luego destornille y retire la tapa del contenedor de sal.
B.
Si Ud. está rellenando el contenedor por primera vez, llene 2/3 del volumen con agua
(alrededor de 500 ml)
C.
Coloque el pico del embudo en el orificio e introduzca alrededor de 2 Kg. de sal. Es normal
que una pequeña cantidad de agua pueda desbordarse del contenedor de sal
D.
Atornille cuidadosamente la tapa del contenedor.
E.
Usualmente, la luz de advertencia de sal estará apagada en los 2 a 6 lavados posteriores
a que el contenedor fue llenado con sal.
5
1
2

(Rinse-Aid
indicator)
NOTA:
1.
El contenedor de sal debe ser rellenado cuando la luz de alarma por falta de
sal en el panel de control se encienda. Aunque el contenedor de sal esté suficientemente
lleno, la luz indicadora puede no apagar antes de que la sal se disuelva completamente.
Si no se encendió la luz de alarma por sal en el panel de control (para algunos modelos)
Ud. puede evaluar cuándo cargar con sal en función de la cantidad de ciclos de lavado
realizados.
2.
Si hay derrame de sal, se recomienda hacer correr un programa de enjuague
para limpiar totalmente.
C) Llenando el dispensador de abrillantador.
Función del abrillantador
El abrillantador se agrega automáticamente durante el último enjuague, asegurando así el
aclarado, ausencia de salpicado y rayado en el proceso de secado
Atención!
Sólo utilice abrillantadores específicos para lavavajillas . Nunca llene el dispensador de
abrillantador con cualquier otra sustancia (por ej, agentes limpiadores de lavavajillas, líquido
detergente). Esto puede dañar el aparato.
Cuándo rellenar el dispensador de abrillantador.
Si no está encendida la luz de alarma por abrillantador en el panel de control, Ud. puede
juzgar la cantidad de abrillantador necesaria por el color del indicador de nivel “D” ubicado
al lado de la tapa. Cuando el contenedor de abrillantador está lleno, el indicador estará
oscuro. A medida que el nivel de abrillantador disminuye, el tamaño de la mancha oscura
disminuye. No debe permitir que el nivel baje de ¼.
A medida que el nivel disminuye, el tamaño del punto negro del indicador de nivel de
abrillantador cambia como se ilustra abajo.
Lleno
¾ lleno
½ lleno
¼ lleno. Debe rellenarse
Vacío
RELLENADO DEL DISPENSADOR.
D
Indicador Abrillantador
4 3
5
2
6
1
MAX
1
2 3
6

Adjust lever
(Rinse)
1
Para abrir el dispensador, gire la tapa hacia “abrir” (flecha hacia la izquierda) y levántela.
2
Vierta el abrillantador dentro del dispensador, preste atención de no excederse en el
llenado.
3
Vuelva a colocar la tapa insertándola alineada con la señal de “abrir” y gírela hacia “cerrar”
(flecha hacia la derecha)
El abrillantador se va liberando durante el último enjuague para prevenir que se formen gotas
sobre su vajilla que pueden dejar manchas o rayas. También mejora la calidad del secado
de la misma.
Su lavavajillas está diseñado para utilizar abrillantador líquido. El dispensador de
abrillantador está localizado dentro de la puerta al lado del dispensador de detergente.
Para llenar el dispensador, abra la tapa y vierta el abrillantador en el dispensador hasta que
el indicador del nivel quede completamente negro. El volumen del contenedor de abrillantador
es de aproximadamente 140 ml.
Preste atención a no llenarlo de más, porque puede provocar espuma. Retire cualquier sal-
picadura con un paño húmedo. No olvide volver a colocar la tapa antes de cerrar la puerta del
lavavajillas.
Atención!
Retire cualquier salpicadura que se de en el momento del llenado con un paño absorbente
para evitar exceso de espuma en el siguiente lavado.
Ajustando el dispensador del abrillantador.
El dispensador del abrillantador tiene 6 o 4 posiciones.
Siempre comience con el dispensador colocado en “4”.
Si quedan gotas o el secado es pobre, incremente la
cantidad de abrillantador moviendo el dial del dispensador
a “5”. Si la vajilla aún no se seca adecuadamente
o tiene gotas, ajuste el dial al número siguiente y
así sucesivamente hasta
lograr una vajilla bien seca y libre de gotas.
Se recomienda colocarlo en “5”.
Ajuste de nivel
Abrillantador
NOTA: Aumente la graduación si hay gotas de agua o gotas de sal en la vajilla después del
lavado. Reduzca la graduación si hay rayas pegajosas blanquecinas sobre la vajilla o una
película azulada sobre los vasos o filo de los cuchillos.
D) Función del detergente.
El detergente con sus ingredientes químicos es necesario para remover la suciedad, la acu-
mula y la transporta fuera del lavavajillas. La mayoría de los detergentes de calidad están
concebidos para este propósito.
Detergente concentrado.
En base a su composición química, se puede dividir en:
• convencional, detergente alcalino con componentes cáusticos.
• detergentes concentrados con baja alcalinidad y encimas naturales.
El uso de un programa de lavado “normal” conjuntamente con detergentes concentrados,
reduce la polución y es bueno para su vajilla; estos programas de lavado están
especialmente concebidos para enfrentar la disolución adecuada de la suciedad. Por esa
razón, el programa de lavado “normal” cuando se usan detergentes concentrados logra
igual resultado que con el programa “intensivo”.
Detergente en tabletas.
El detergente en tabletas de diferentes marcas, se disuelve a diferente velocidad. Por esta
razón algunos detergentes
1
2
3
4
5
6
MAX
7
no se disuelven y desarrollan su poder de limpieza durante un programa corto. De todas
formas, favor usar programas largos cuando use detergente en tabletas, para asegurar que
se remuevan totalmente los residuos del detergente.
Dispensador de detergente.
El dispensador debe ser llenado antes de comenzar cada lavado de acuerdo a las
instrucciones previstas en la tabla de ciclos de lavado. Su lavavajillas utiliza menos detergente
y menos abrillantador que los lavavajillas convencionales. Generalmente, sólo una
cucharada sopera de detergente se necesita para un lavado normal
La vajilla más sucia necesita más detergente.
Coloque el detergente justo antes de comenzar el lavado, de lo contrario se puede
humedecer y no se disolverá adecuadamente.
Cantidad de detergente a usar.
1 2
NOTA:
1
Si la tapa está cerrada, presione el botón que lo libera. De esta forma la tapa salta y abre.
2
Siempre coloque el detergente en el momento de comenzar cada ciclo de lavado. Sola-
mente use adecuados detergentes hechos para lavavajillas.
ATENCIÓN!
El detergente para lavavajillas es corrosivo. Ponga atención de dejarlo fuera del alcance
de los niños.
Use solamente detergente hecho específicamente para ser usado en lavavajillas. Mantenga
el detergente en lugar fresco y seco.
No coloque el detergente en polvo en el dispensador hasta que no tenga lista la vajilla para lavar.
Llenado de detergente.
Llene el dispensador con el detergente.
La marca indica los niveles de dosificación como se
Ilustra a la derecha:
1
2
4
3
5
2
6
1
MAX
1
Lugar para colocar el detergente principal “MIN”
significa aprox. 20 grs. de detergente.
2
Lugar para el detergente para el pre lavado,
aproximadamente 5 gr. de detergente.
Favor, observar la dosificación y almacenaje recomendado por el fabricante al abrir el
paquete de detergente.
Cierre la tapa y presione hasta que quede cerrado correctamente.
8

Si la vajilla tiene suciedad pesada, coloque detergente adicional en el compartimiento de pre
lavado Este detergente se usará en la fase de pre lavado.
NOTA:
Ud. encontrará información acerca de la cantidad de detergente para cada programa en la
última página. Favor, tener en cuenta que de acuerdo al nivel de suciedad y la dureza del
agua, pueden haber diferencias.
Favor, Observar las recomendaciones del fabricante en el embalaje del detergente.
Detergentes:
Hay tres tipos de detergentes:
1.Con fosfato y cloro
2.Con fosfato y sin cloro
3.Sin fosfato y sin cloro.
Normalmente los nuevos detergentes en polvo son sin fosfato. La función del fosfato de
alivianar el agua no se obtiene. En estos casos, recomendamos colocar sal en el
compartimiento correspondiente incluso cuando la dureza del agua es solamente 6 dH. Si
se usan detergentes sin fosfato en casos que tienen agua dura, aparecerán puntos blancos
en vajilla y vasos. En ese caso, favor agregar más detergente para lograr mejores
resultados. Detergentes sin cloro, sólo blanquean un poco.
Manchas fuertes y coloreadas no se removerán completamente. En este caso, favor elegir un
programa con temperatura más elevada.
9
Paraunmejorrendimientodellavavajillas,sigalassiguientesrecomendaciones.
Lascaractersticasyaparienciadeloscanastosyrecipienteparaloscubiertospueden
variarsegúnelmodelo.
Atención.Antesdecargarloscanastosdellavavajillas.
1. Rasparyretirarcualquiercantidadimportantederestosdealimentos.Noesnecesario
enjuagarlosplatos.
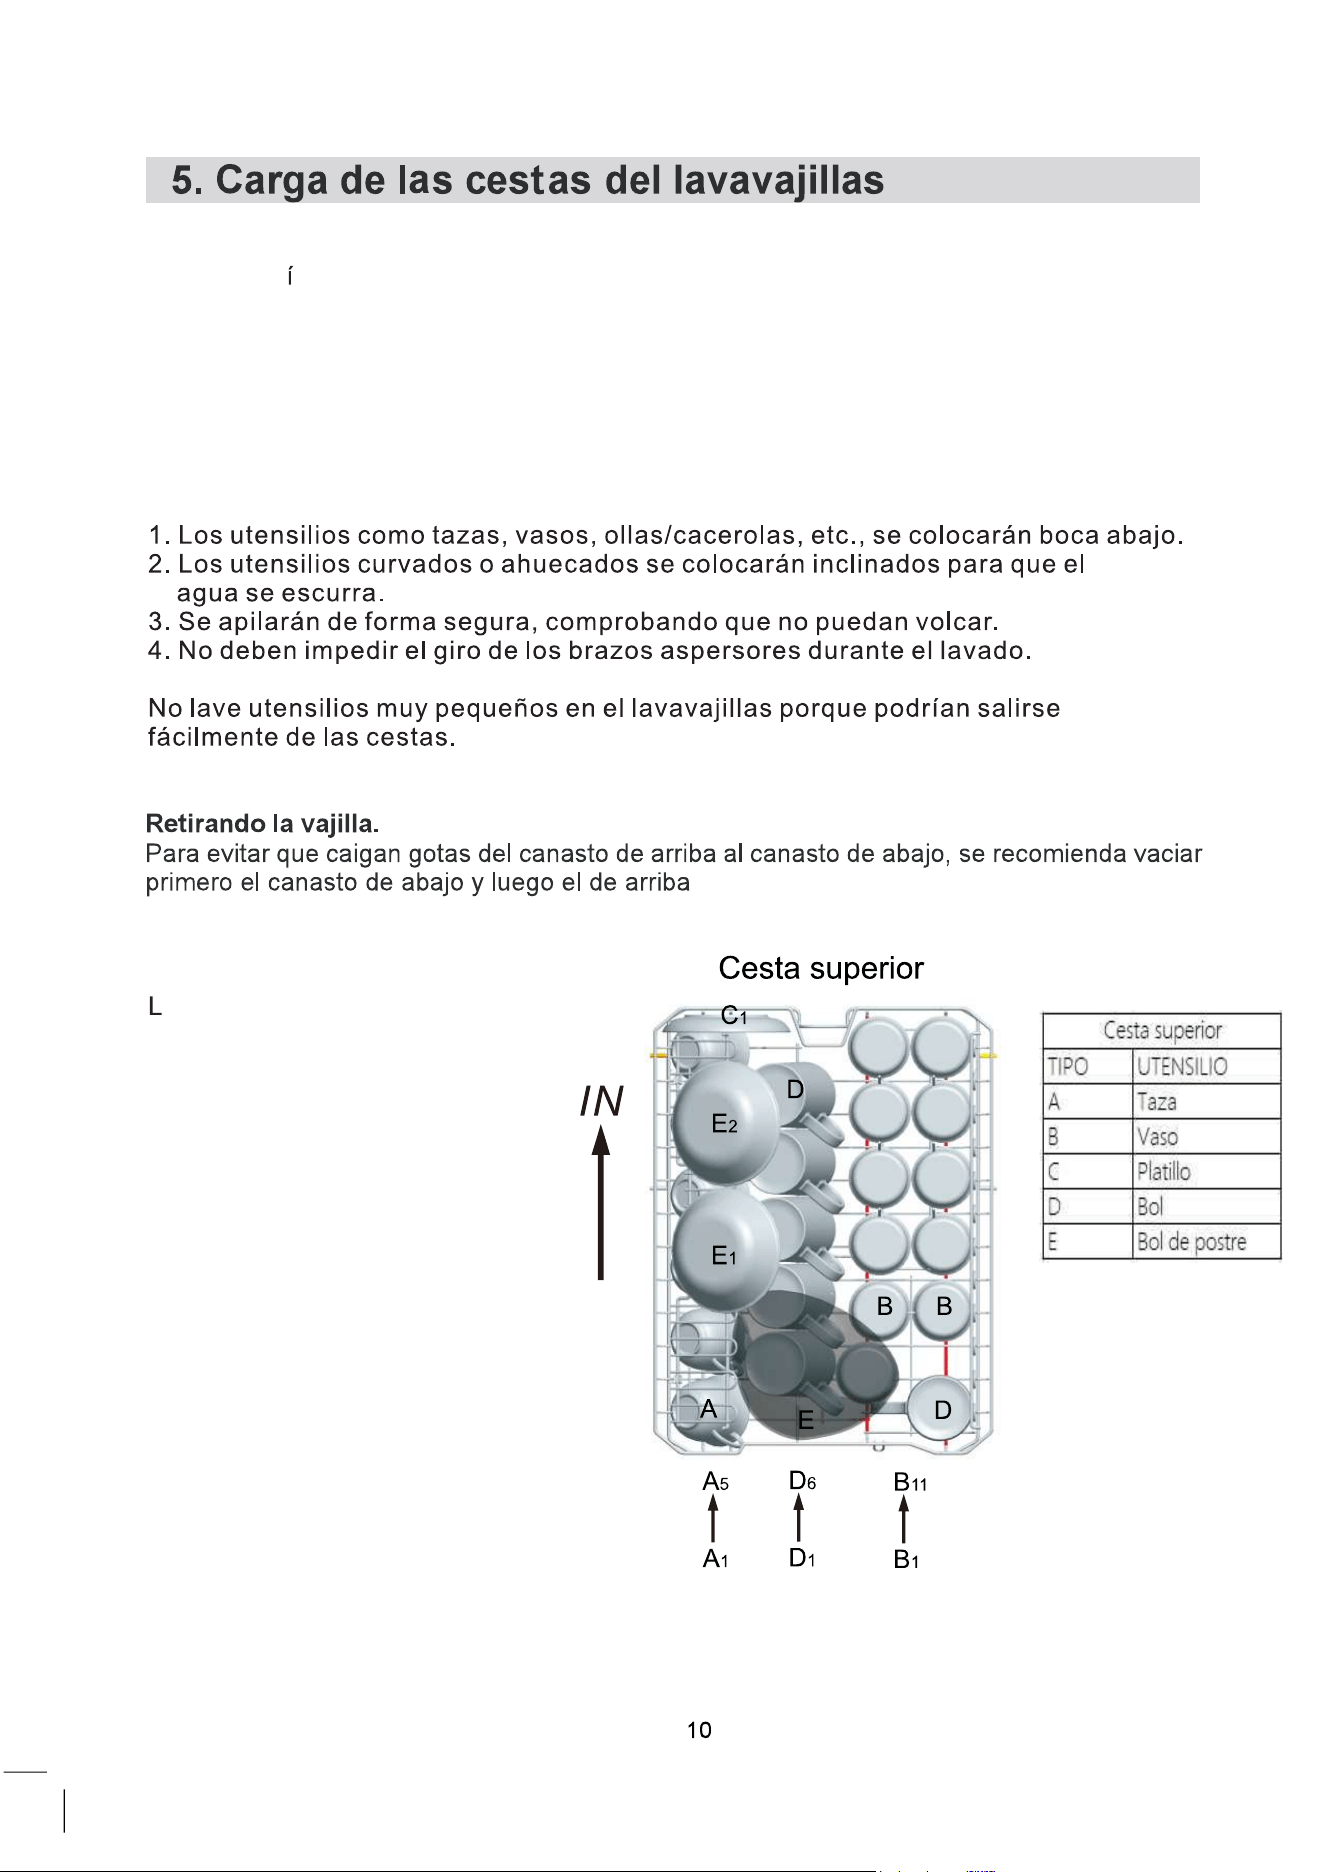
Coloquelosobjetosenellavavajillasdelasiguientemanera:
Cargandoelcestosuperior.
anscanasdearribaestádiseñado
paracolocarloselementosmás
livianosydelicados,comovasos,
tazasdecaféyté,salseras,bols
pequeñosycazuelaspoco
profundas(partiendodelabase
dequenoestándemasiado
sucios).
Coloquelavajilladeformalaque
nosemuevaconelespraydel
agua.
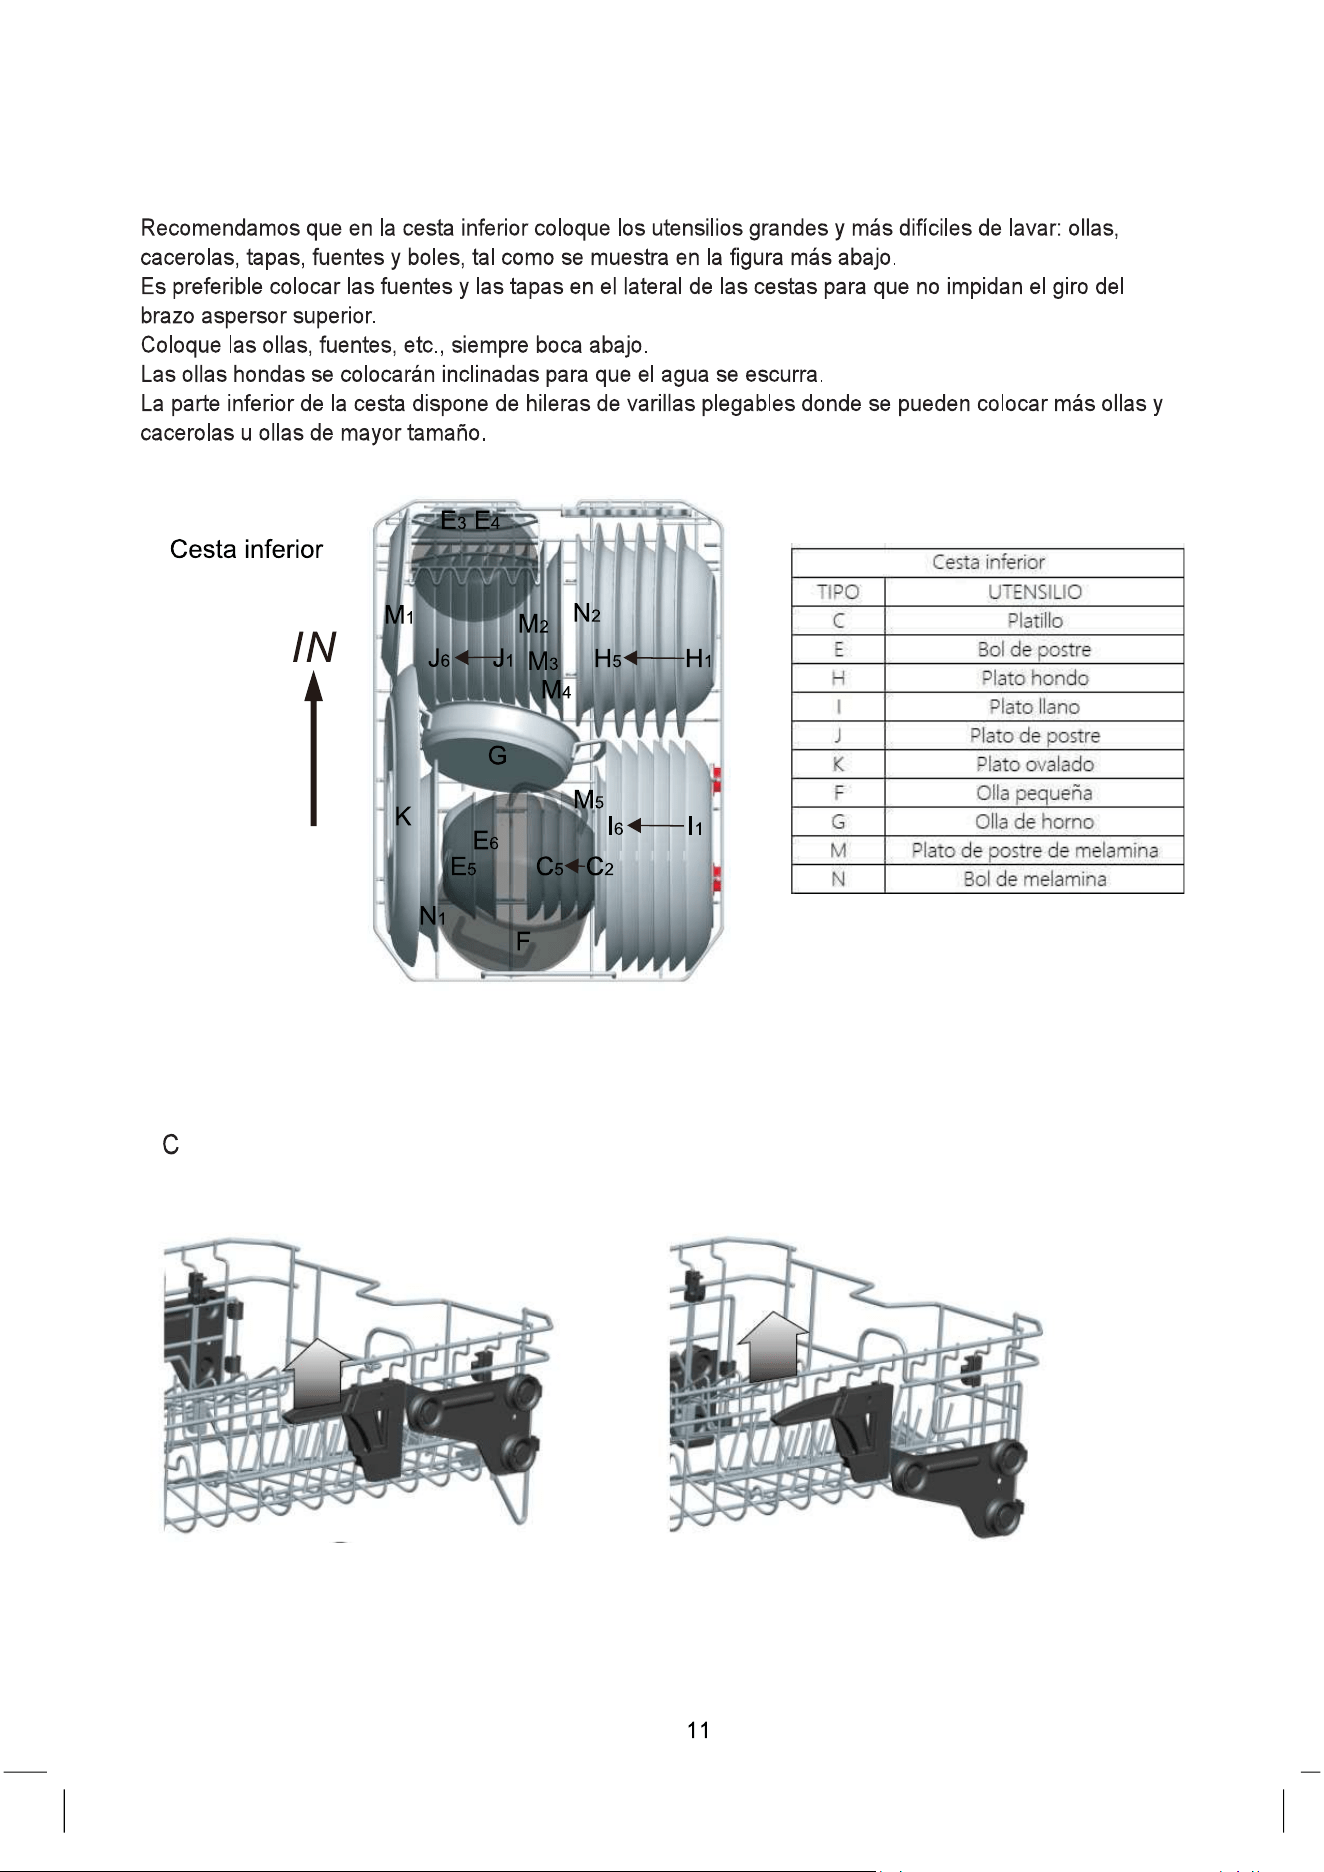
Cargandoelcestoinferior
Ajustedelcestodearriba
C estos regulables en altura presionando las pestañas laterales.
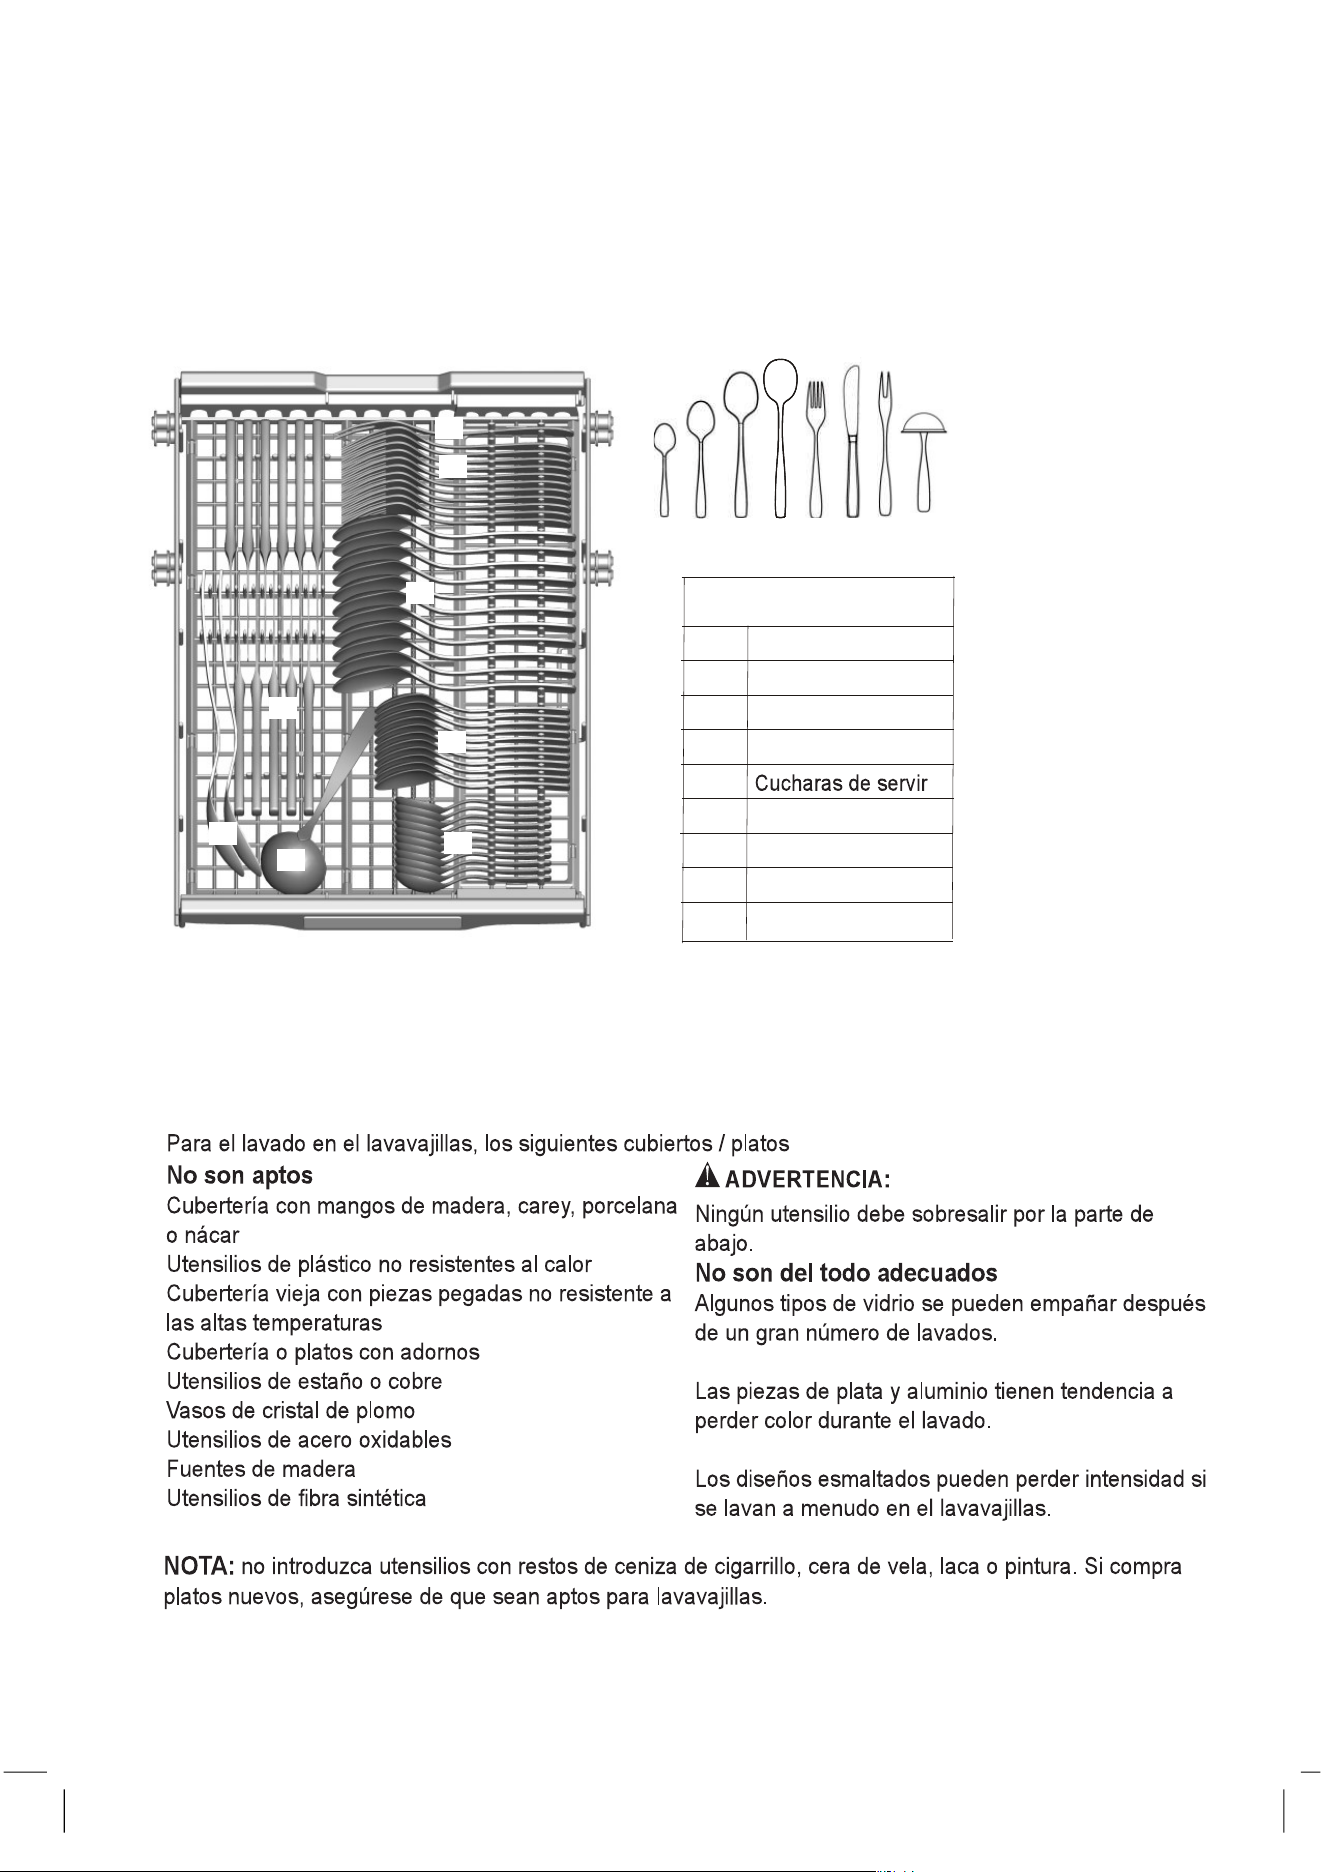
Cesto para cubiertos.
Los cubiertos deben ser colocados en el cesto para cubiertos con los mangos hacia abajo.
Si el cesto tiene canastos laterales, las cucharas deben ser cargadas individualmente en el
agujero correspondiente. Los utensilios largos deben colocarse horizontalmente en la parte
de adelante del cesto.
Los cuchillos con mucho filo se deben colocar con el mango hacia arriba.
12
Cesta de cubiertos
Tipo
1
2
3
4
5
6
7
cucharas de té
cucharas de postre
cucharas de sopa
tenedores
cuchillos
cuchara para salsas
tenedor de servicio
1
2
3
4
5
6
8
7
1 2
3 4 5 6 7 8
8
Artículos
NOTA: No sobrecargue su lavavajillas. Hay espacio solamente para 12 platos est ndar. No
utilice platos que no son recomendados para lavavajillas. Es importante para un buen
resultado del lavado y para un razonable consumo de energía.
Cargando cubiertos y platos.
Antes de cargar los platos, se debe:
Remover suciedades importantes
Restos de alimentos quemados en las cacerolas.
Cuando cargue los platos y cubiertos, tome nota
ATENCION!
Cuchillos con hoja larga colocados con el filo hacia arriba resultan peligrosos.
Cubiertos con filo largo o afilado deben colocarse horizontales en el canasto superior.
Daño en la vajilla de vidrio u otras vajillas.
Causas posibles:
Tipo de vidrio o manufactura del mismo. Componentes químicos del detergente.
Temperatura del agua y duración del programa de lavado.
Sugerencias.
Use vajilla de vidrio o de porcelana que tengan la marca “para lavavajillas” colocada por
el fabricante.
Utilice detergente suave que se indique para este tipo de vajilla. Si es necesario, solicite
más información al fabricante de detergentes.
Seleccione un programa con baja temperatura
Para evitar daños, retire del lavavajillas los cubiertos y vasos tan pronto como sea posible,
una vez finalizado el programa de lavado.
Al final del lavado.
Cuando el programa de trabajo ha terminado, el timbre del lavavajillas sonará 6 veces y
parará. Apague el aparato utilizando el botón ON/OFF, abra la puerta del lavavajillas. Espere
unos minutos antes de descargar el lavavajillas para evitar el manipuleo de vajilla y cubiertos
mientras están aún calientes, y por consiguiente más sensibles a la rotura. También se
secarán mejor.
13
á

6. Tabla de
Programas
Tabla de ciclos de lavado.
EN60436: Este programa es el ciclo de pruebas
La información para la prueba de comparabilidad, de conformidad con EN60436, de la
siguiente manera:
- Capacidad: 11 cubiertos
- Posición cesto superior: Ruedas superiores en los carriles
Encendiendo el lavavajillas
Comenzando un ciclo de lavado…..
Saque hacia fuera los cestos inferior y superior, cargue la vajilla y
empuje los cestos hacia adentro. Se recomienda cargar el
cestos inferior primero y luego el superior (vea la sección titulada
“Carga del lavavajillas”). Coloque el detergente (vea la sección
titulada “sal, detergente y abrillantador”)
Coloque el enchufe en el tomacorriente. La energía debe ser 220-240V AC 50 Hz, la
especificación del tomacorriente es 12ª 250 VAC 50 Hz.
Asegúrese que la canilla que suministra el agua está abierta al máximo.
Cierre la puerta, presione el botón ON/OFF. Presione el botón de programa para
seleccionar el ciclo de lavado deseado (Vea la sección titulada “Tabla de ciclos de lavado”).
Corrobore que la puerta está debidamente cerrada.
NOTA: Se puede sentir un clic cuando la puerta está correctamente cerrada.
Cuando la máquina terminó, Ud. puede apagarla presionando el botón ON/OFF.
14
3/16g
185
14.01.360
(or 3 in 1)
3/16g
238 9.00.804
(or 3 in 1)
3/15g
143 11.50.730
(or 3 in 1)
3/15g
115 0.670 8.6
3/15g
60 0.850 8.7
15
40 5.90.650
12
3.30.010 /
44
(*EN60436)

Cambio de programa.
Premisa: Un ciclo que está encaminado, sólo puede ser modificado si ha funcionado por un
lapso pequeño de tiempo. De lo contrario, el detergente se puede haber liberado, y el aparato
puede haber desagotado el agua. Si esta es la situación, el contenedor del detergente debe
llenarse nuevamente (vea la sección “Llenado de detergente”)
Abra la puerta. Presione el botón general de programas más de tres segundos para cancelar
el programa, luego Ud. puede cambiar el programa al deseado (vea la sección “Comenzando
un ciclo de lavado…”). Luego cierre la puerta.
NOTA: Si Ud. abre la puerta mientras está lavando, la máquina se para y suena un timbre de
alarma, en el pantalla aparece E1.Cuando Ud. cierra la puerta, la máquina seguirá trabajando
después de 10 segundos.
La luz de los 6 programas muestra la situación del lavavajillas:
a) Todas las luces de programas apagadas : en stand
b) La luz de un programa encendida: ciclo que está
corriendo
c) La luz de uno de los programas parpadeando:
pausa.
NOTA: Si todas las luces brillan tenuemente, indica que la máquina está fuera de servicio,
favor desenchúfela de la corriente y desconecte la entrada de agua antes de llamar al servicio
técnico.
¿Se olvidó de colocar un plato?
Se puede agregar en cualquier momento antes de que el compartimiento del detergente se
abra.
1.
Abra un poquito la puerta para que la máquina se detenga
2.
Después que el brazo se detiene, puede abrir completamente la puerta.
3.
Agregue la vajilla que había olvidado
4.
Cierre la puerta, el lavavajillas comenzará a trabajar nuevamente luego de 10 segundos.
ATENCIÓN!
Es peligroso abrir la puerta cuando la máquina está lavando, porque puede salpicar aguao
caliente. Apague el lavavajillas.
Si en el display digital aparece “…..” , y el sonido de pitido suena 6 veces, sól
en ese caso el programa
ha
terminado.
1.
Apague el lavavajillas presionando el botón ON/OFF
2.
Cierre el grifo de agua!
Abra la puerta cuidadosamente. Gotas calientes pueden saltar cuando se abre la puerta.
Los platos calientes son sensibles a los golpes. La vajilla se debe dejar enfriar alrededor
de 15 minutos antes de retirarlas del aparato.
Abra la puerta del lavavajillas, déjela entreabierta y espere unos minutos antes de retirar
la vajilla. De esta forma la vajilla estará más fría y el secado se habrá realizado.
Descargando el lavavajillas.
Es normal que el lavavajillas quede húmedo adentro.
Vacíe el canasto inferior primero y luego el superior. Esto evitará que gotas de agua del
canasto de arriba caigan sobre la vajilla que está en el cesto de abajo.
15
7. Mantenimiento
y
limpieza
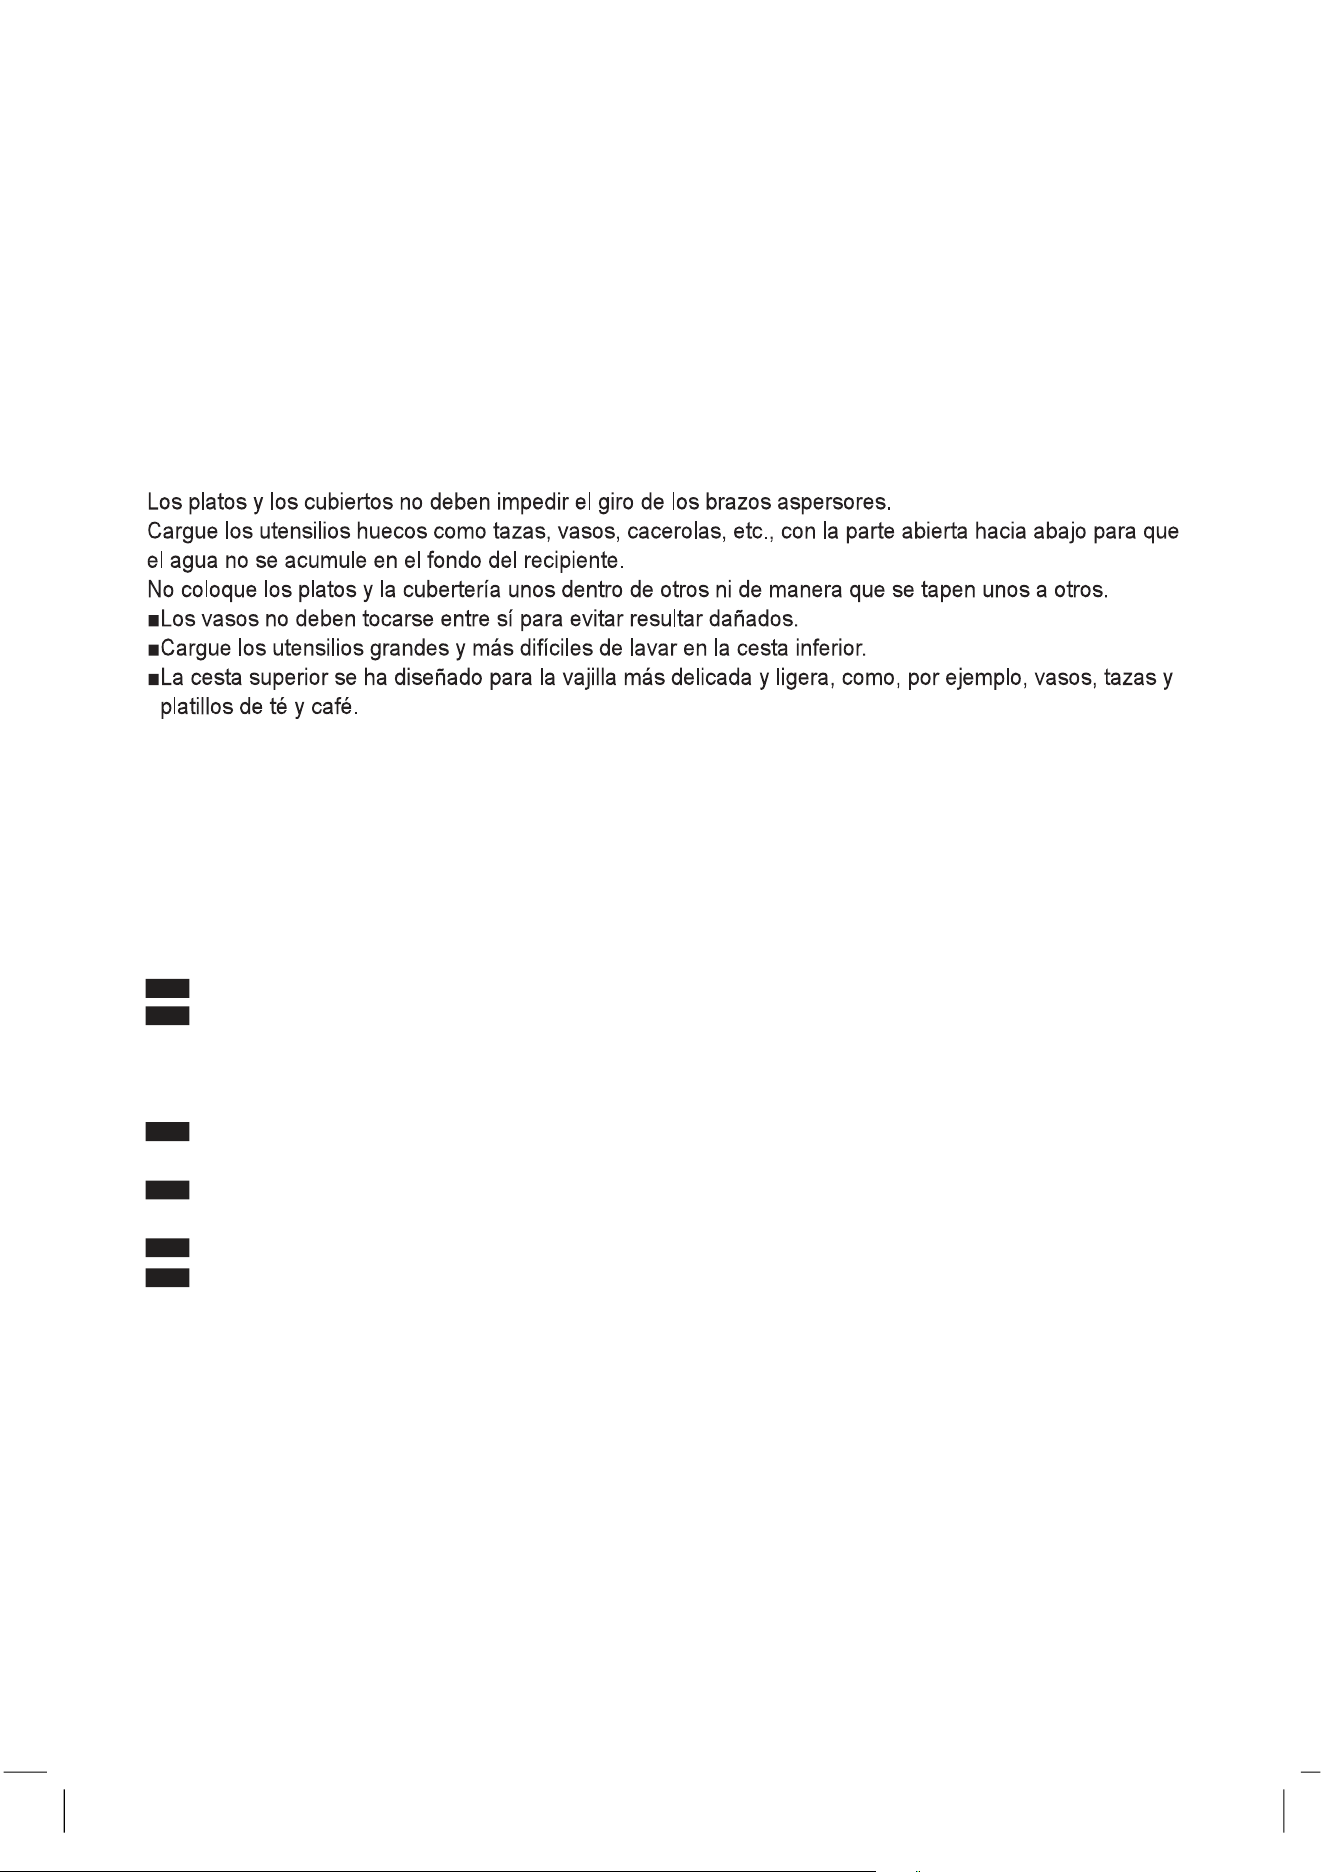
Filtro
El filtro se utiliza para evitar que grandes residuos y otros objetos caigan dentro
de la bomba. En algunas oportunidades, los residuos pueden obstruir el filtro.
El sistema de filtro consiste en un filtro grueso, uno
plano
(filtro principal) y un micro filtro (filtro fino)
1.
Filtro plano.
Alimentos y deshechos se atraparán por
un chorro especial en el brazo de abajo
2.
Filtro grueso.
Grandes deshechos como hueso y vidrio que podrí
an trabar
el desagüe quedarán atrapados en el fil
tro grueso. Para retirar
lo que haya quedado en este filtro, presione y golpee en la
part
superior de este filtro y caerá.
3.
Micro filtro.
Este filtro retiene basura y residuos de alimentos en
el área del vertedero y evita que se re deposite en
la vajilla durante el ciclo de lavado.
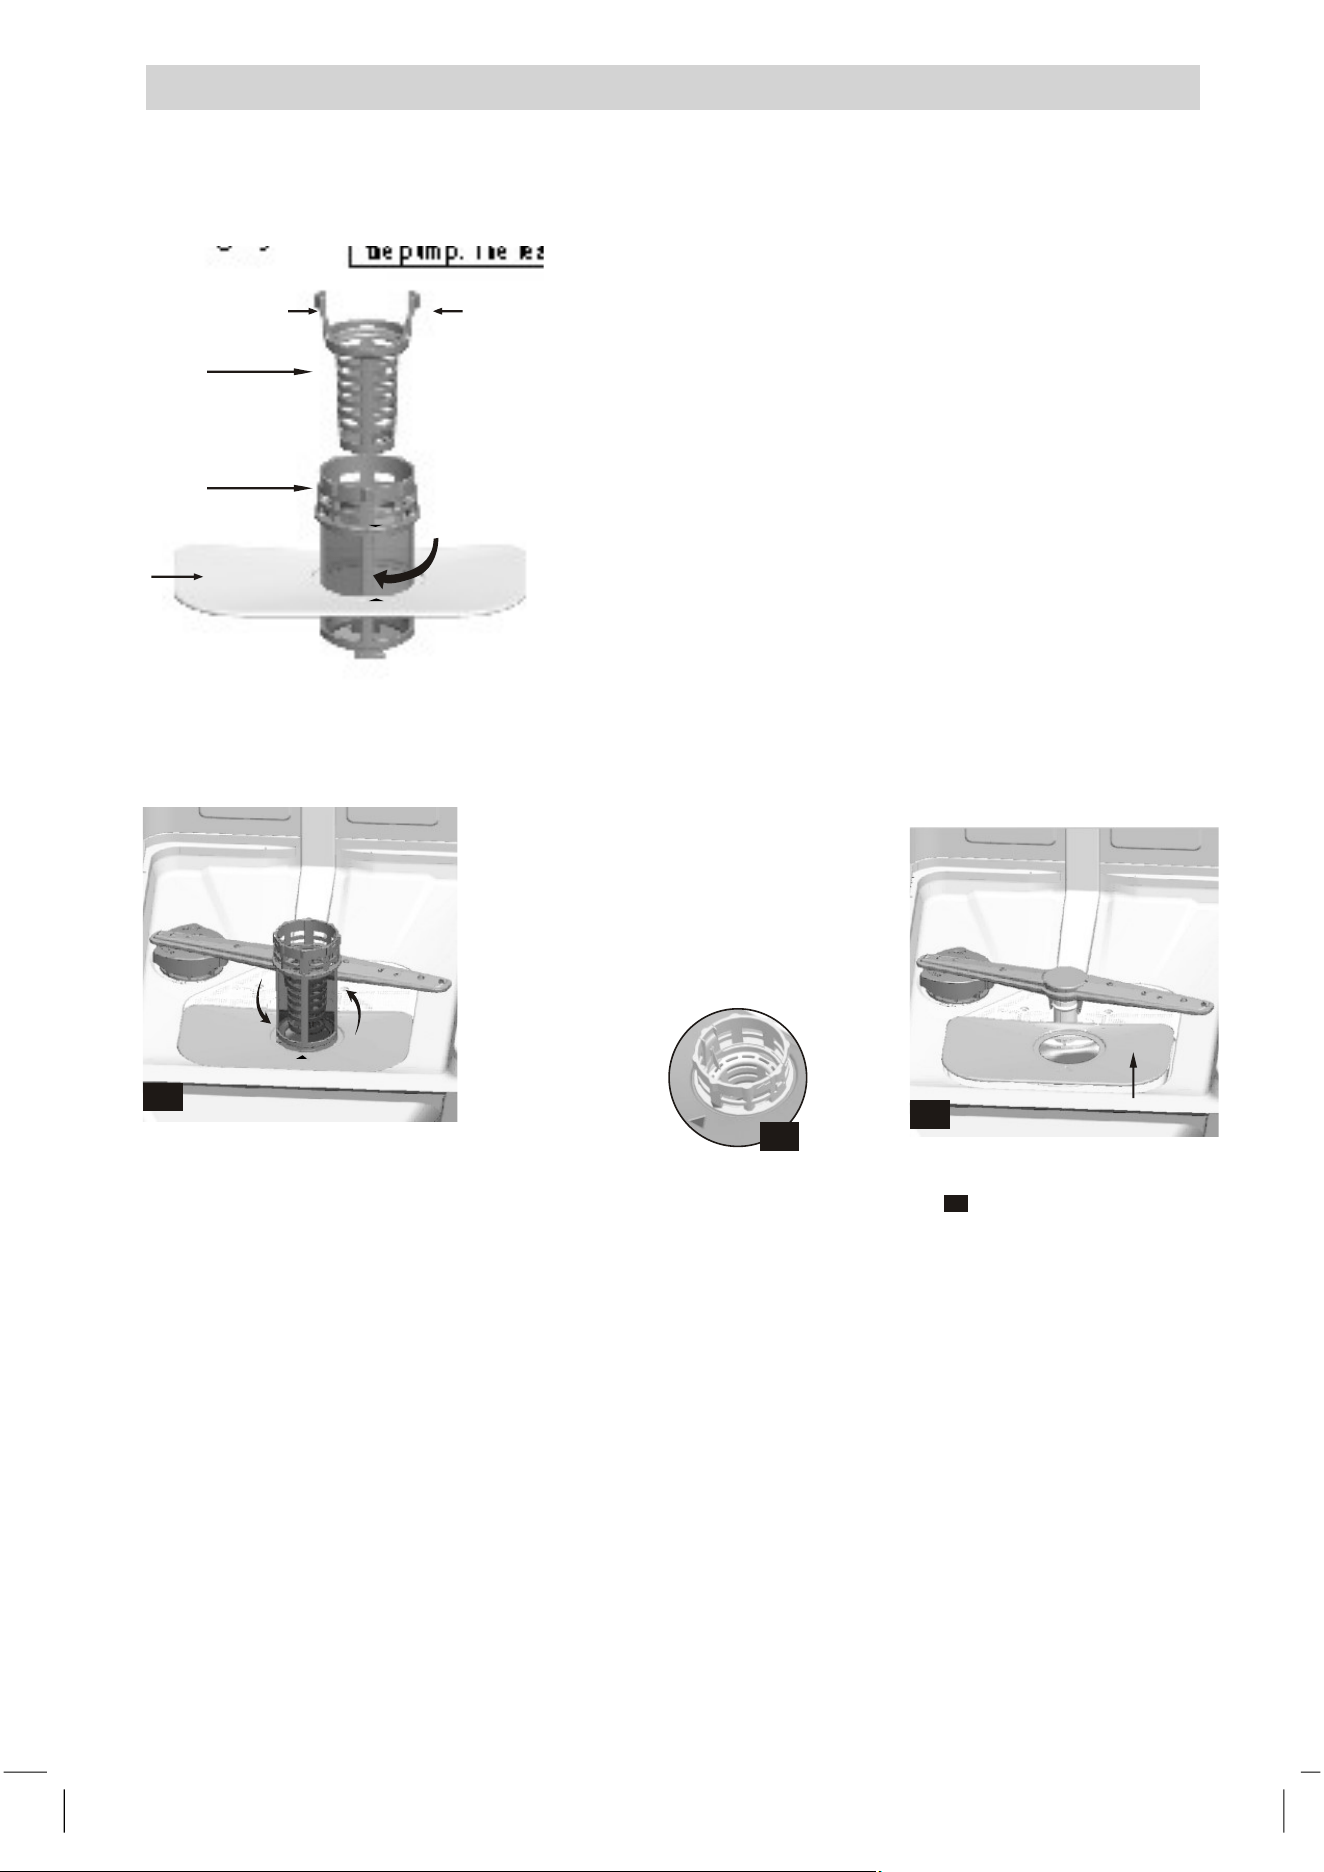
Revise que los filtros estén libres de obstrucciones
cada vez que se va a usar el lavavajillas.
Destornillando el filtro grueso, puede remover el
sistema de filtros. Retire todo remanente de
alimentos y limpie los filtros debajo de la canilla con
agua.
Paso 1. Gire el filtro grueso en
el sentido opuesto a las agujas
del reloj , y luego levántelo.
Paso 2. Levante el filtro plano
hacia arriba.
NOTA: Si la operación se hace del paso 1 al paso 2, el sistema de filtros se removerá; cuando
se opera del paso 2 al paso 1 el sistema de filtros se vuelve a instalar.
Cadena de filtros.
Para obtener mejores resultados, la cadena de filtros debe limpiarse. Un filtro eficiente
remueve partículas de alimentos del agua del lavado, permitiendo que ésta recircule durante
el ciclo. Por esta razón, es recomendable remover partículas grandes de alimentos atrapadas
en el filtro después de cada ciclo de lavado enjuagando el filtro semicircular y colocándolo
debajo de una canilla. Para retirar la cadena de filtros, tirar hacia arriba la manija del recipiente
recolector. El conjunto de filtros deberían limpiarse una vez por semana. Para limpiar el filtro
grueso y el micro filtro, use un cepillo de limpieza. Luego rearme las partes del filtro
como se muestra en las figuras de arriba y reinserte el conjunto en el lavavajillas,
colocándolo en su lugar y presionando hacia abajo. El lavavajillas nunca debe ser usado sin
los filtros. El reemplazo incorrecto de los filtros puede reducir el rendimiento del aparato y
dañar platos y utensilios.
16
2
1
3
1
3
2
3
ATENCIÓN!
Nunca ponga a funcionar el lavavajillas sin los filtros colocados en su lugar. Cuando limpie
los filtros, no los golpee. Los filtros se pueden torcer y la performance del lavavajillas puede
disminuir.
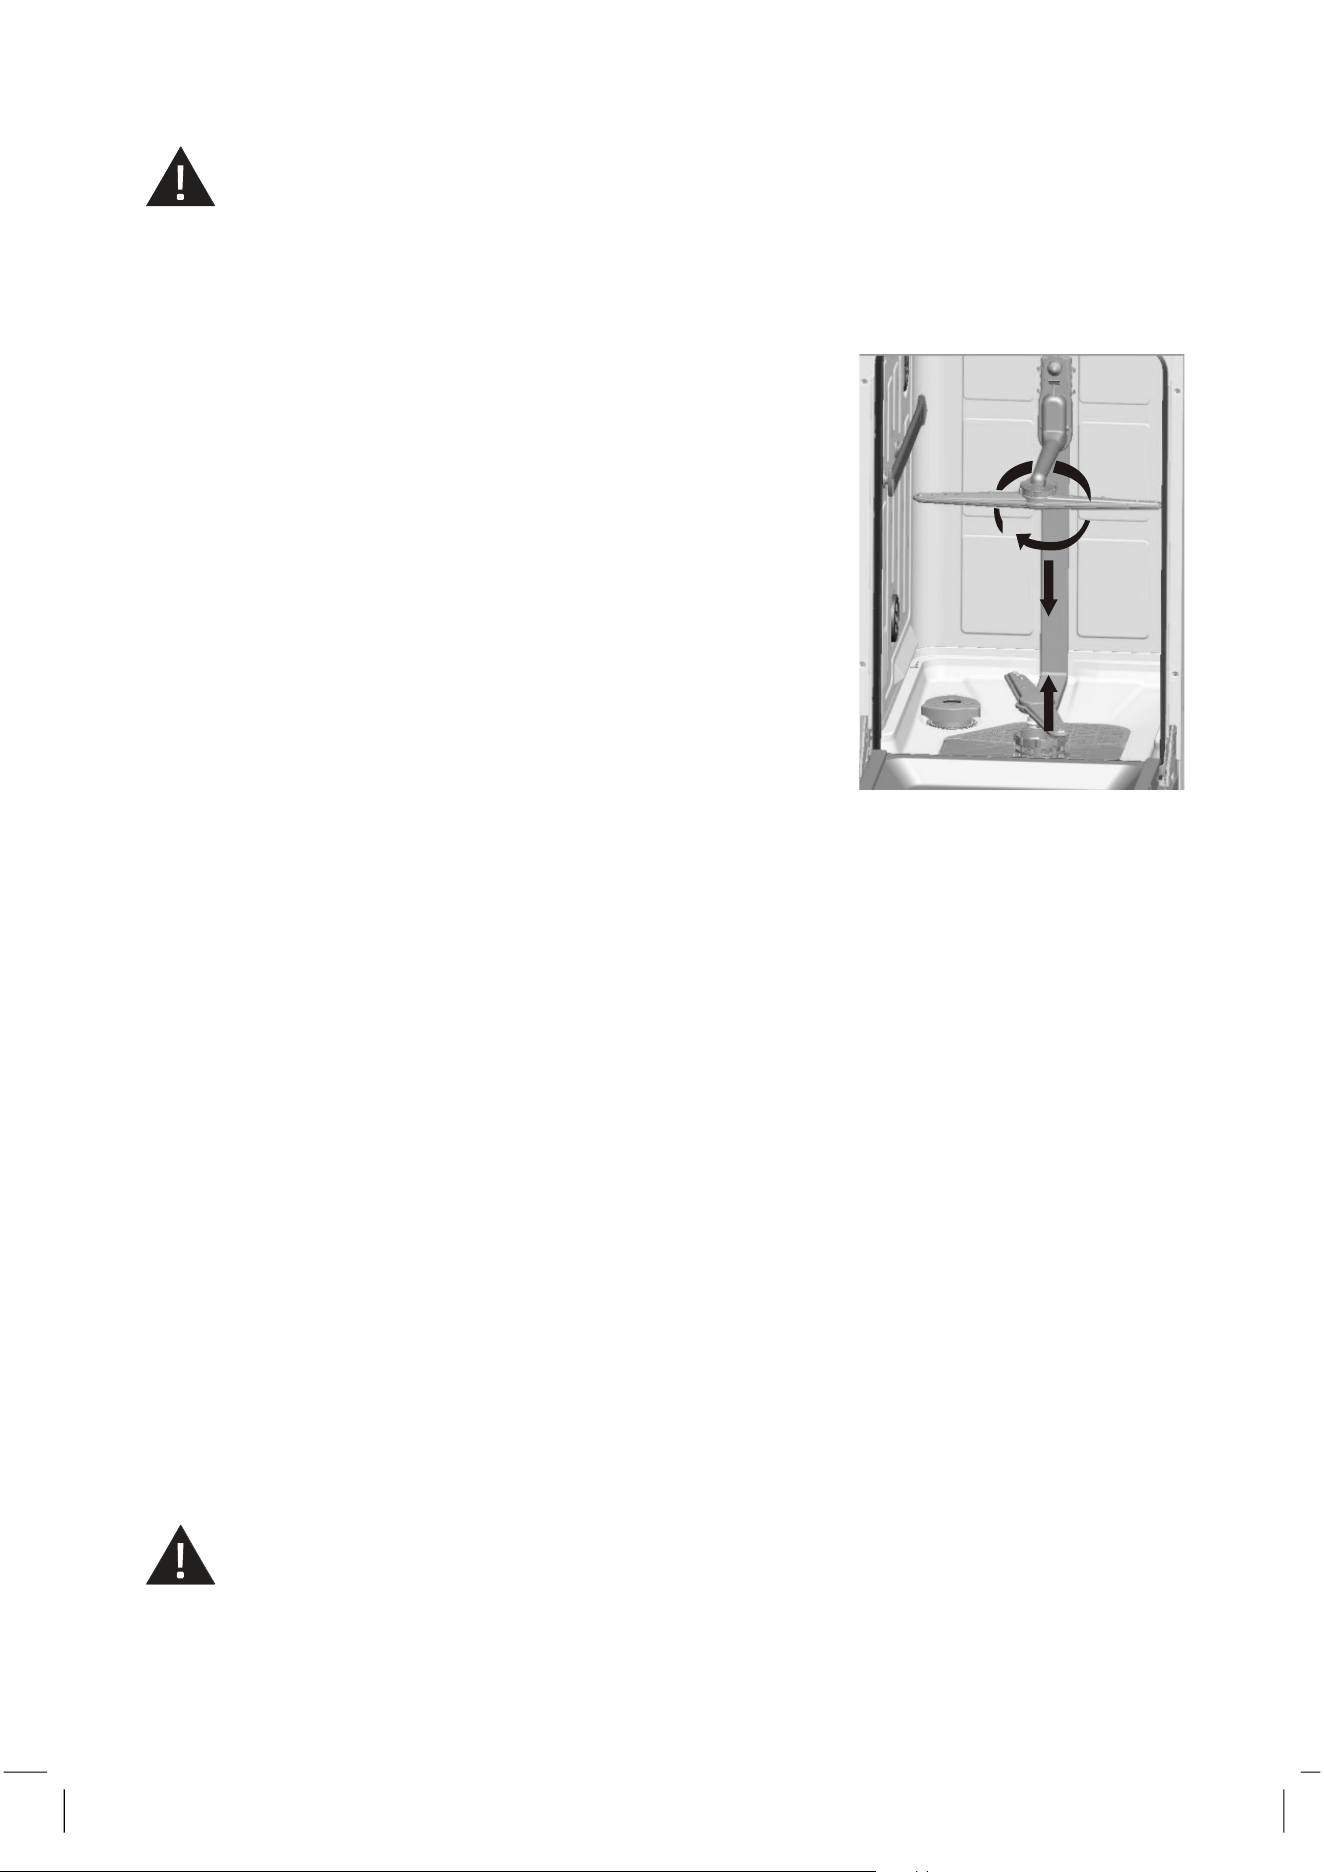
Limpieza de los Aspersores
Es necesario limpiar los aspersores regularmente
por obstrucciones provocadas por agua dura y
productos químicos.
Para remover los aspersores, destornille la tuerca
eje en el sentido de las agujas de reloj para sacar
la arandela en la parte superior de los aspersores
y remueva los brazos.
Lave los brazos con agua tibia jabonosa y use un
cepillo suave para limpiar los eyectores. Vuelva a
colocarlos una vez enjuagados.
Cuidados para el lavavajillas.
Para limpiar el panel de control , use un paño
levemente humedecido y luego séquelo perfecta-
mente.
Para limpiar el exterior, use una buena cera para
electrodomésticos.
Nunca use objetos abrasivos, esponjas de
limpieza o limpiadores ásperos sobre ninguna
parte del lavavajillas.
Protección contra el congelamiento.
Si el lavavajillas queda en un lugar no calefaccionado durante el invierno, consulte al servicio
técnico acerca de:
1.
Cortar la alimentación eléctrica del lavavajillas.
2.
Cerrar el aprovisionamiento de agua y desconectar la conexión
3.
Elimine el agua de la manguera y de la válvula de agua (Use un recipiente para
contener el agua).
4.
Vuelva a conectar la cañería de entrada de agua a la válvula de agua.
5.
Remueva el filtro de entrada y límpielo con una esponja para retirar el agua del
sumidero
Limpieza de la puerta.
Para limpiar el borde alrededor de la puerta, debe usar solamente un paño húmedo, tibio y
suave. Para evitar que penetre agua en el cierre de la puerta y en los componentes eléctricos,
no use limpiadores en espray de cualquier tipo.
Tampoco utilice limpiadores abrasivos o paños ásperos en la superficie exterior porque
deteriorará el acabado . Algunas toallas de papel también rayan o dejan marcas en la
superficie.
ATENCIÓN!
Nunca use un limpiador en spray para limpiar el panel de la puerta porque puede dañar la
cerradura de la puerta y los componentes eléctricos. No está permitido utilizar abrasivos o
algún papel toalla porque hay riesgo de rayar o dejar marcas en la superficie de acero.
17
Cómo mantener el lavavajillas en buenas condiciones
Después de cada lavado.
Después de cada lavado, cierre el suministro de
agua. Deje la puerta levemente abierta a
efectos de que la humedad y los olores no
queden adentro
Desenchufar
Antes de limpiar o hacer el mantenimiento
Siempre desenchufe. No asuma riesgos.
No use limpiadores abrasivos
Para limpiar el exterior y las partes de goma
del lavavajilla, no use solventes o productos
de limpieza abrasivos. Use solamente un paño
con agua jabonosa tibia. Para remover gotas o
manchas de la superficie interior, use un paño
humedecido con agua con un poco de vinagre,
o un producto de limpieza específico para
lavavajillas.
Cuando sale de vacaciones.
Cuando sale de vacaciones, se recomienda
correr un ciclo de lavado con el lavavajillas
vacío, luego desenchufar, cerrar la entrada de
agua y dejar la puerta del lavavajillas levemente
abierta.
Mudando el aparato.
Si el aparato debe ser mudado, trate de
mantenerlo en posición vertical. Si es
absolutamente necesario, puede posicionarlo
sobre su parte trasera.
Junta
Uno de los factores que dan olor en el lavavajillas
son alimentos que quedan atrapados en el
burlete.
Límpielo periódicamente con una esponja húmeda
como prevención.
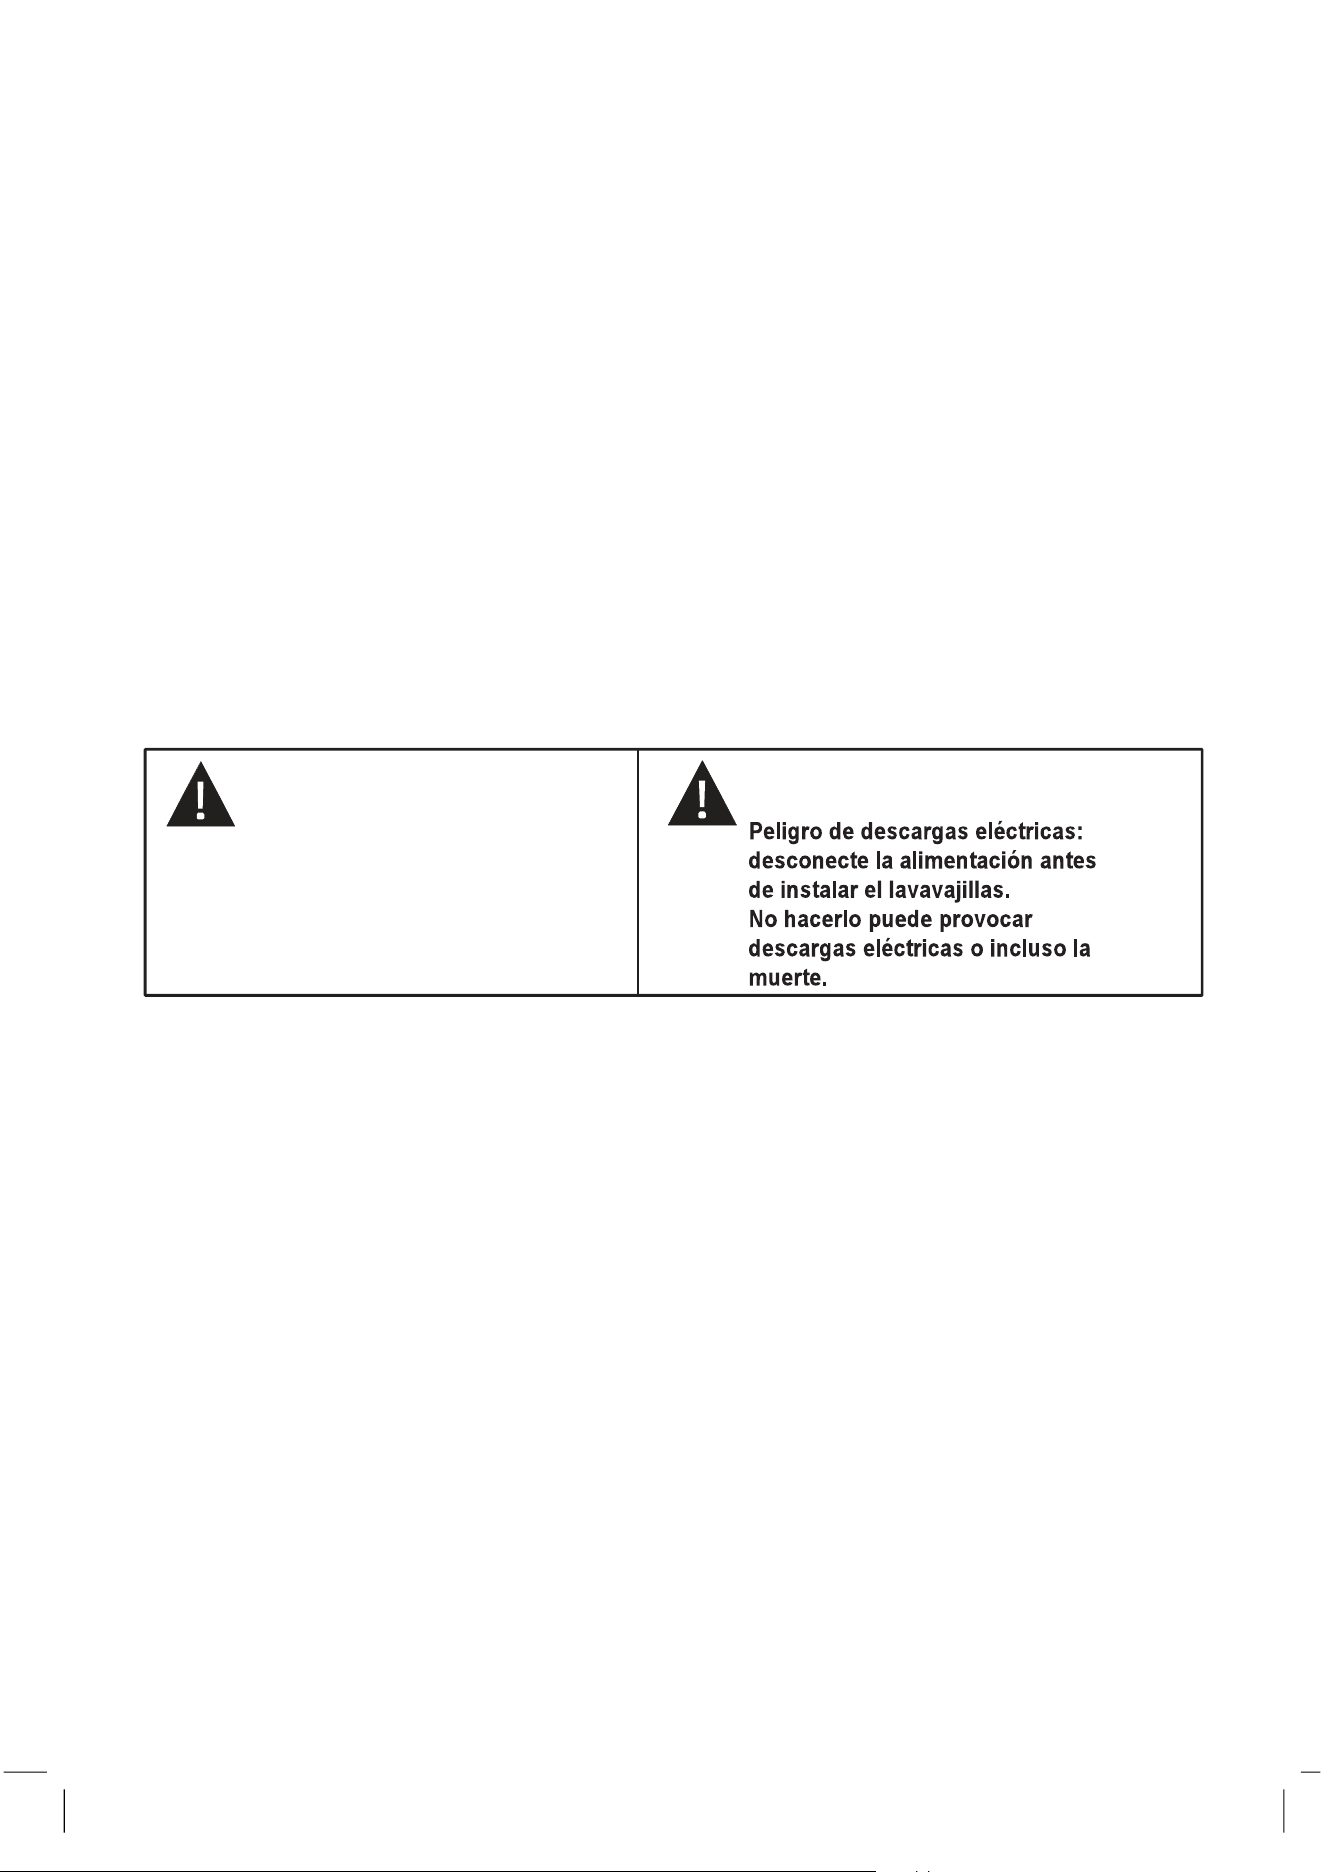
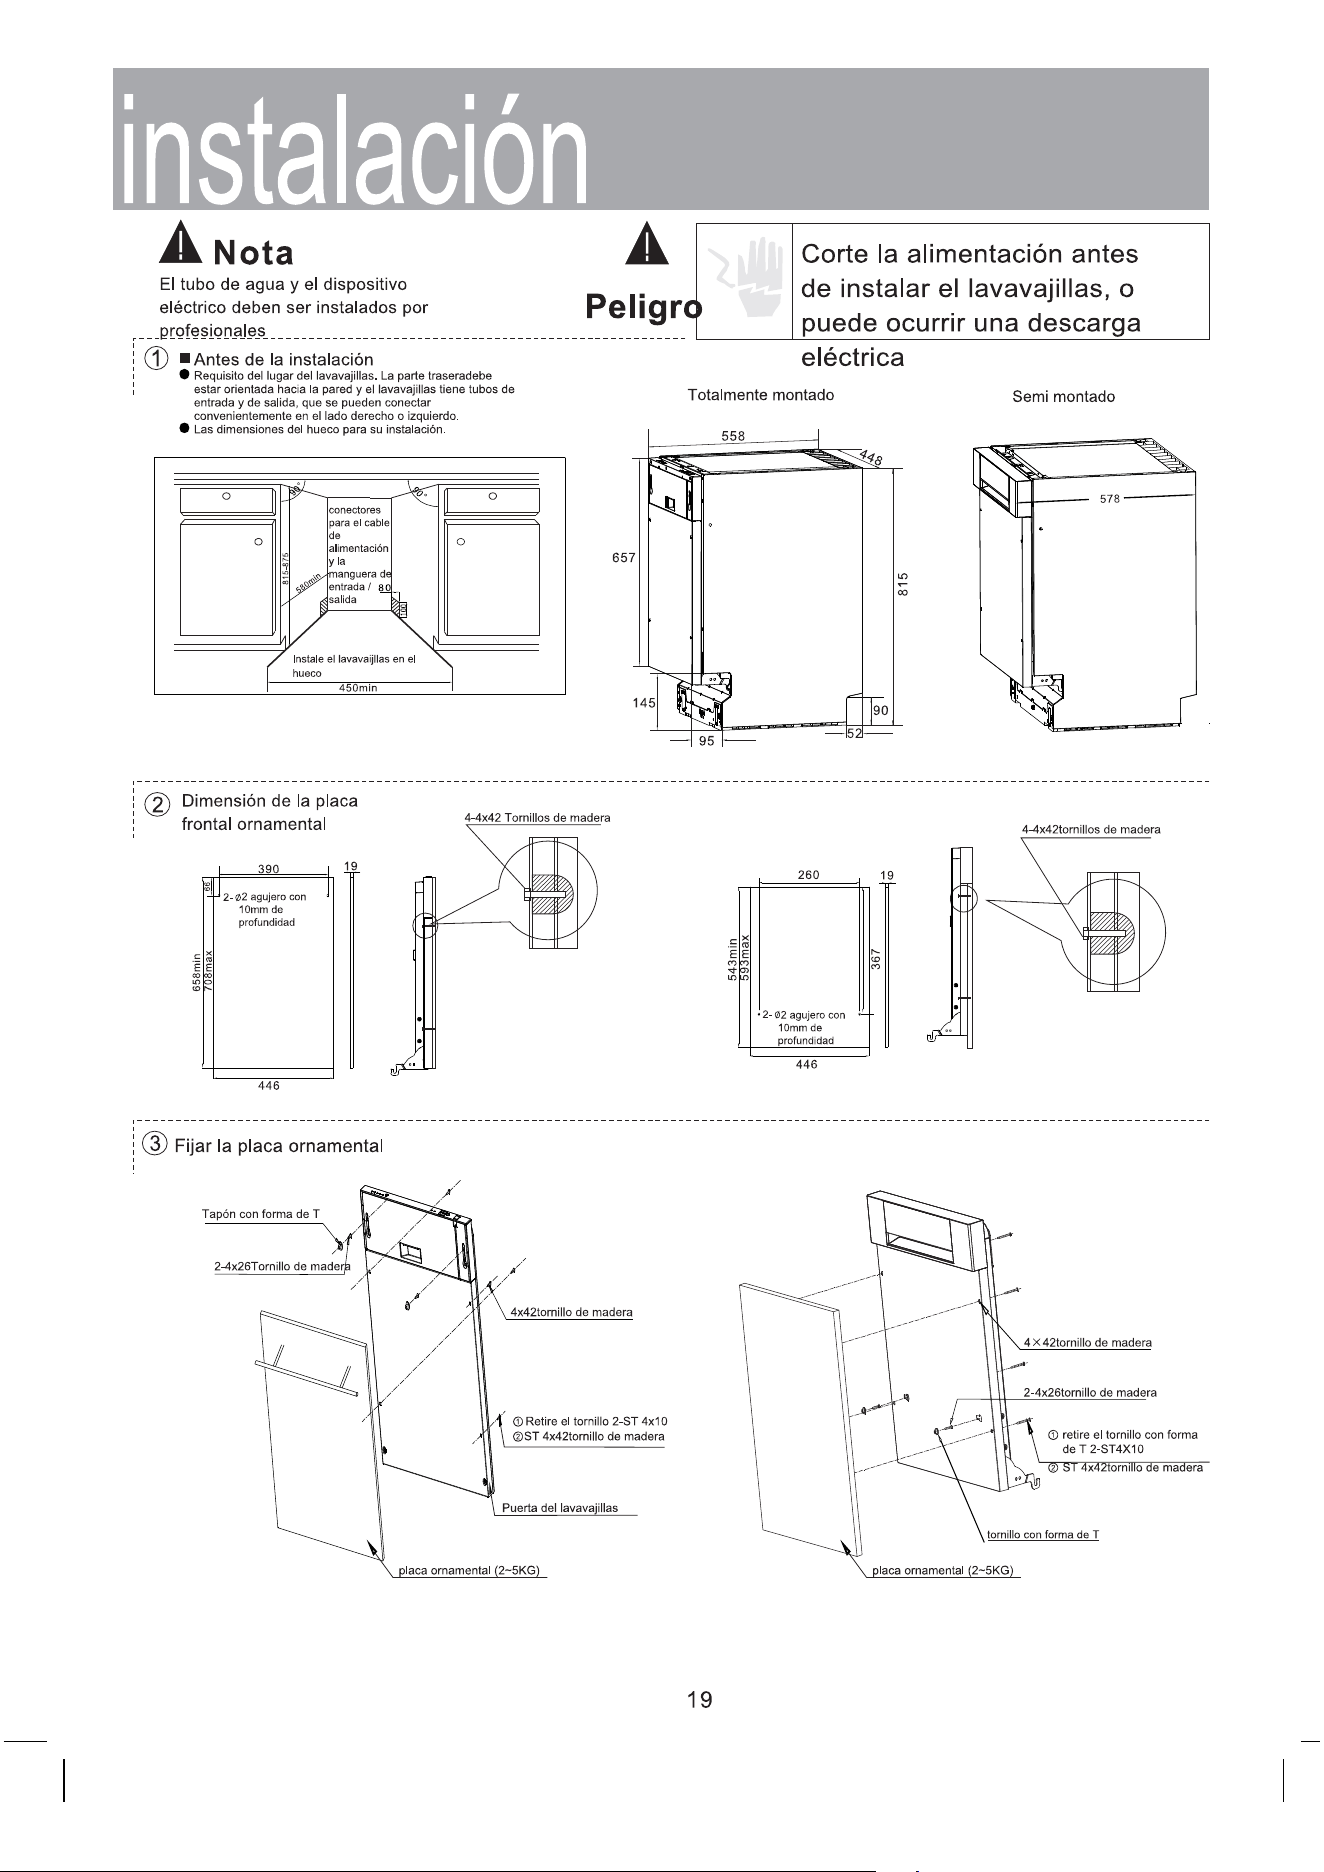
ATENCIÓN!
La instalación del equipo y conexión
eléctrica debe ser hecha por profesionales.
ATENCIÓN!
18
8. Instalación.
Guarde este manual de instrucciones en un lugar a salvo para poder ser utilizado como
referencia a futuro. Si el aparato se vende, se regala o se muda, asegúrese que el manual
va con el aparato, de forma que el nuevo propietario pueda beneficiarse de las advertencias
contenidas en el mismo.
Lea este manual de instrucciones con atención, contiene importante información
referente a los cuidados para la instalación, uso y mantenimiento del aparato.
Si el aparato debe ser mudado en cualquier momento, manténgalo en posición vertical;
si es absolutamente necesario, puede ser inclinado hacia atrás.
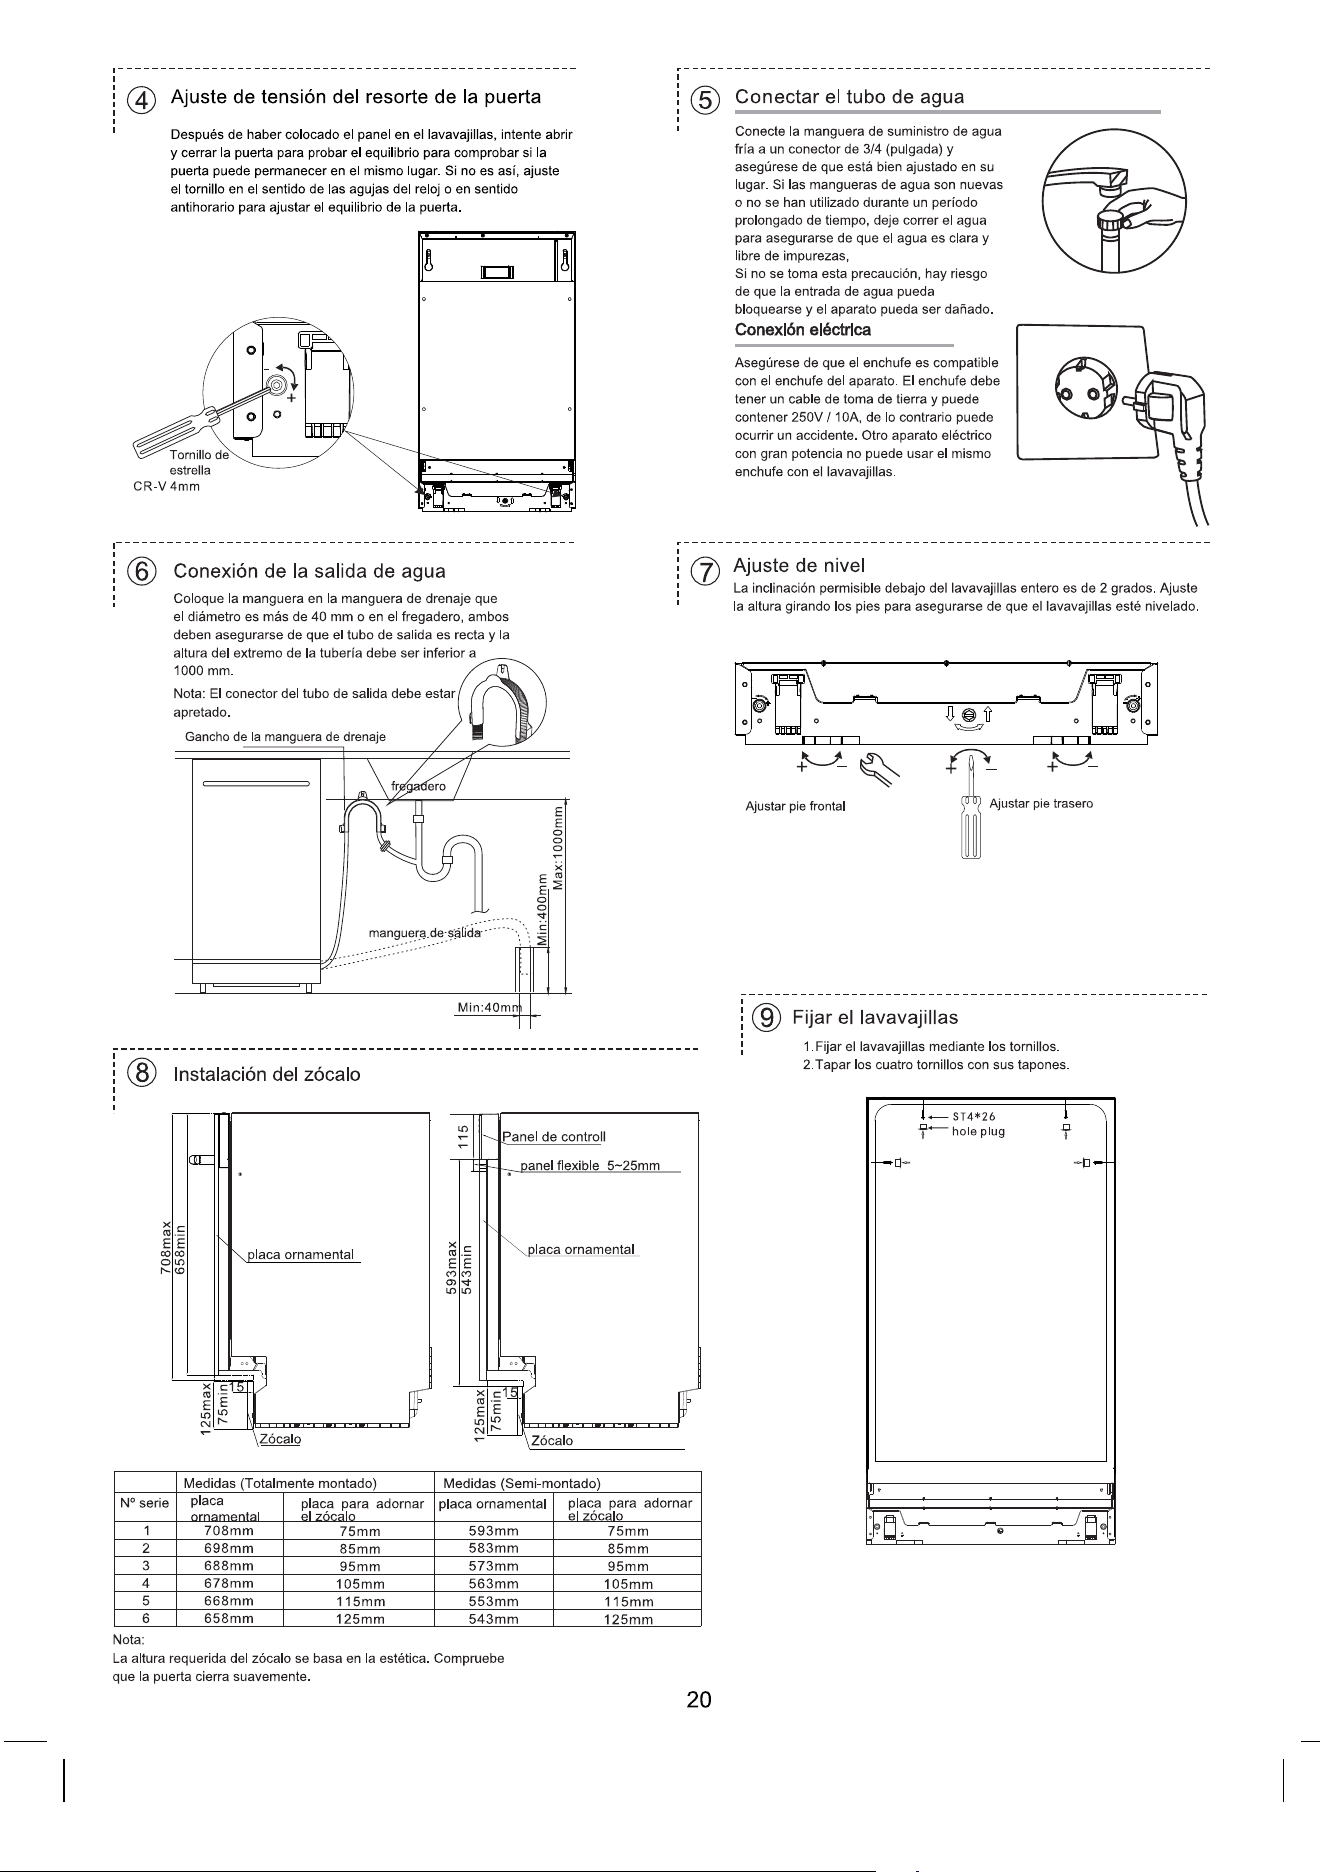
Colocación y nivelado.
1.
Retire el aparato del embalaje y controle que no ha sido dañado durante el
transporte. Si ha sido dañado, contáctese con la empresa vendedora y no continúe con el
proceso de instalación.
2.
Controle el lugar para el lavavajillas, si sus laterales o panel de atrás están en contacto
con gabinetes adyacentes o eventualmente con la pared. Este aparato puede también ser
colocado en el hueco debajo de encimera
(vea la hoja de instrucciones para su montaje) .
20
3.
Coloque el lavavajillas sobre un piso nivelado y firme. Si el piso es desparejo, las
patas delanteras del aparato deben ajustarse hasta que se logra una posición horizontal (el
ángulo de inclinación no debe exceder a 2 grados). Si el aparato está correctamente
nivelado, será más estable y no tendrá vibraciones ni ruidos durante la operativa de lavado.
Conexión de agua y electricidad.
La conexión de agua y electricidad sólo debe ser realizada por un técnico calificado.
.
El lavavajillas no debe quedar parado sobre la manguera de agua o el cable de
electricidad.
El aparato debe ser conectado a la red de agua usando pipas nuevas . No use pipas
viejas
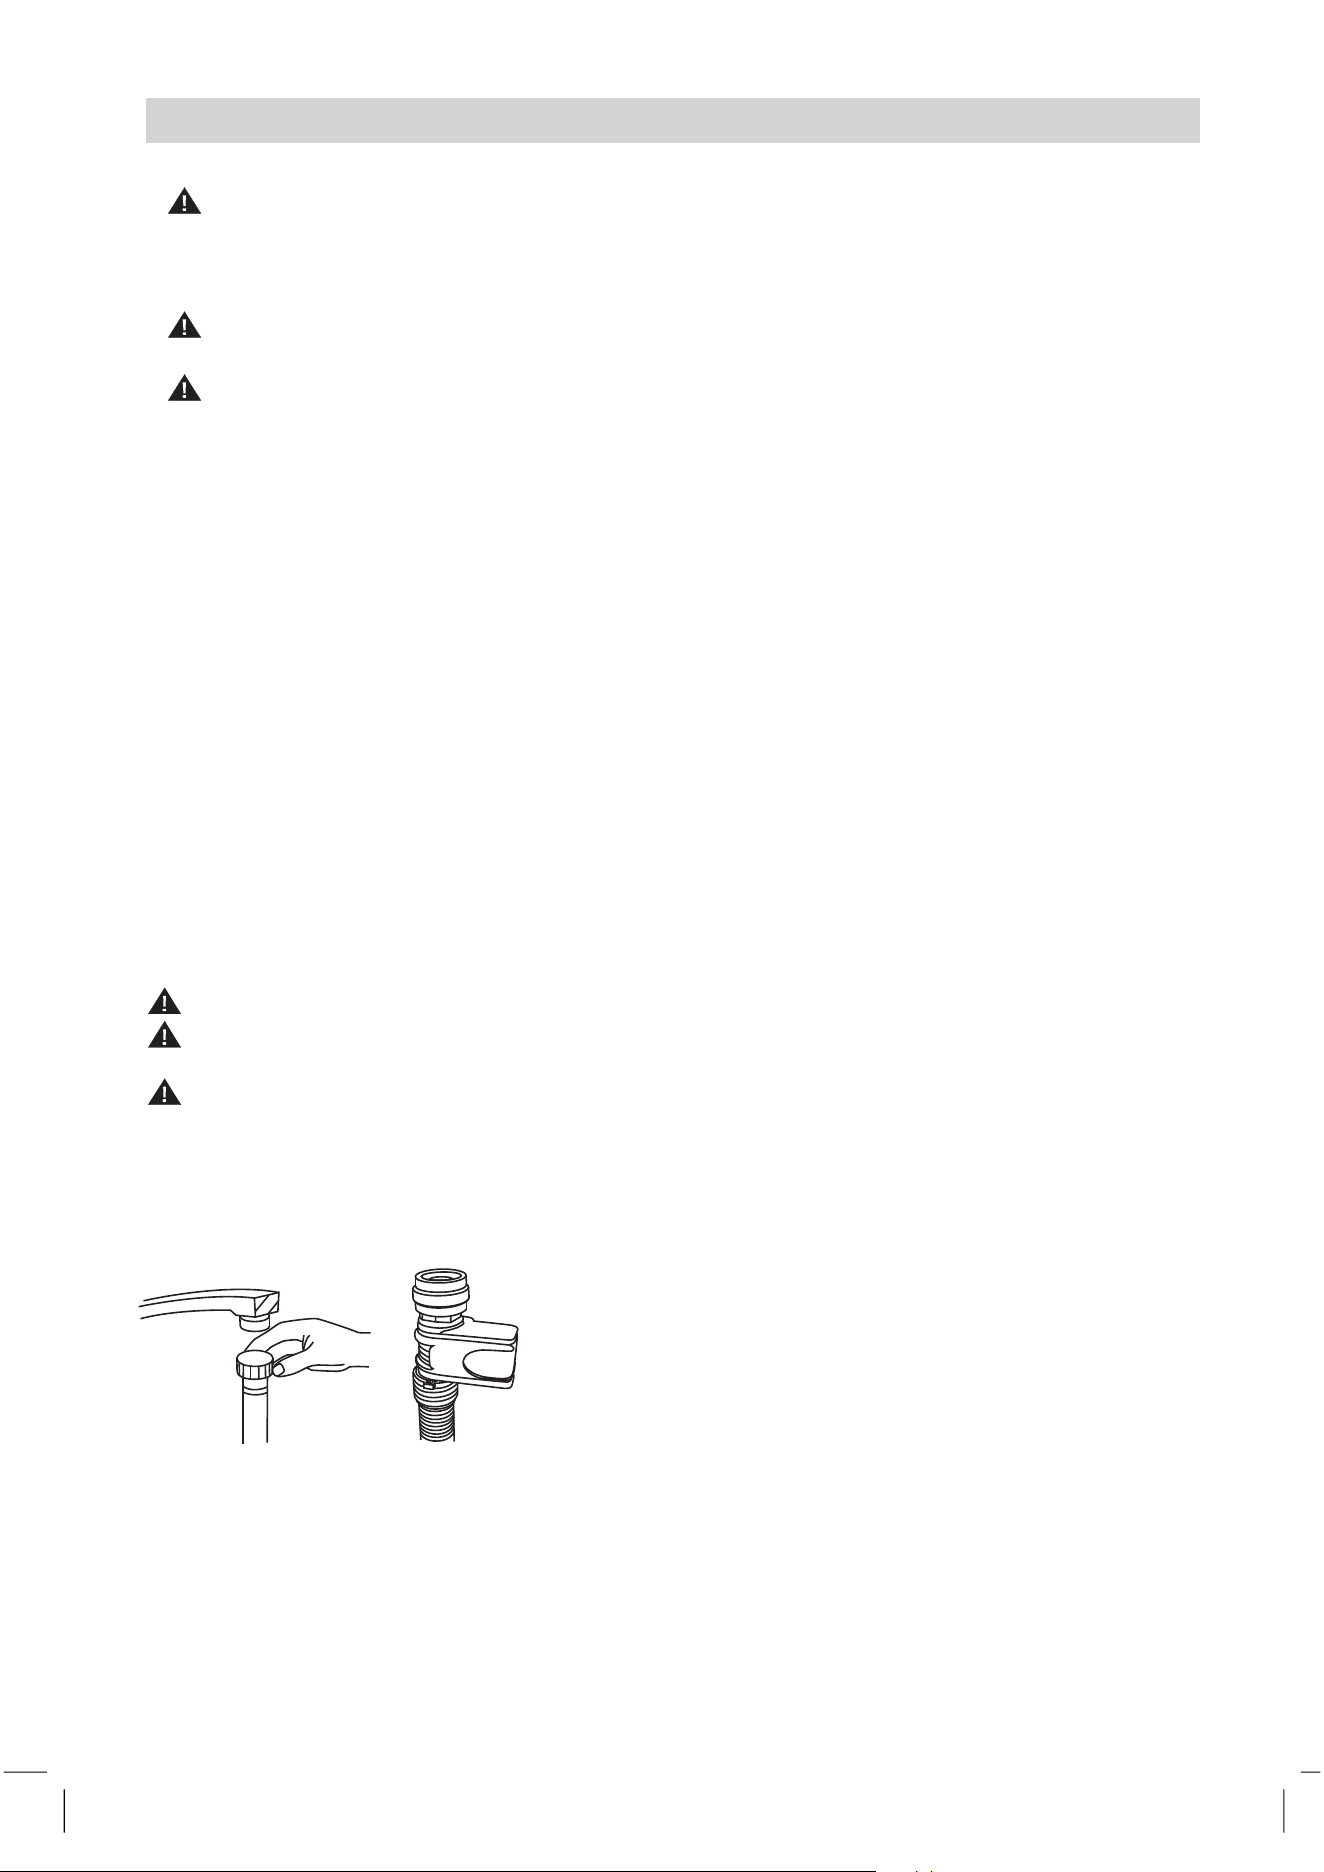
Conexión de la entrada de la manguera de agua.
Conecte la manguera de agua fría a un conector de
rosca ¾ (pulgadas) y asegúrese que queda
correctamente su- jeto y Ajustado.
Si las mangueras para el agua son nuevas o no han sido
usadas por un período prolongado, deje correr el agua
para asegurarse que el agua es clara y libre de
impurezas.
Si no se tiene esta precaución, hay riesgo de que la
entrada de agua se bloquee y el aparato se dañe.
19
max1000mm
min400mm
min120mm
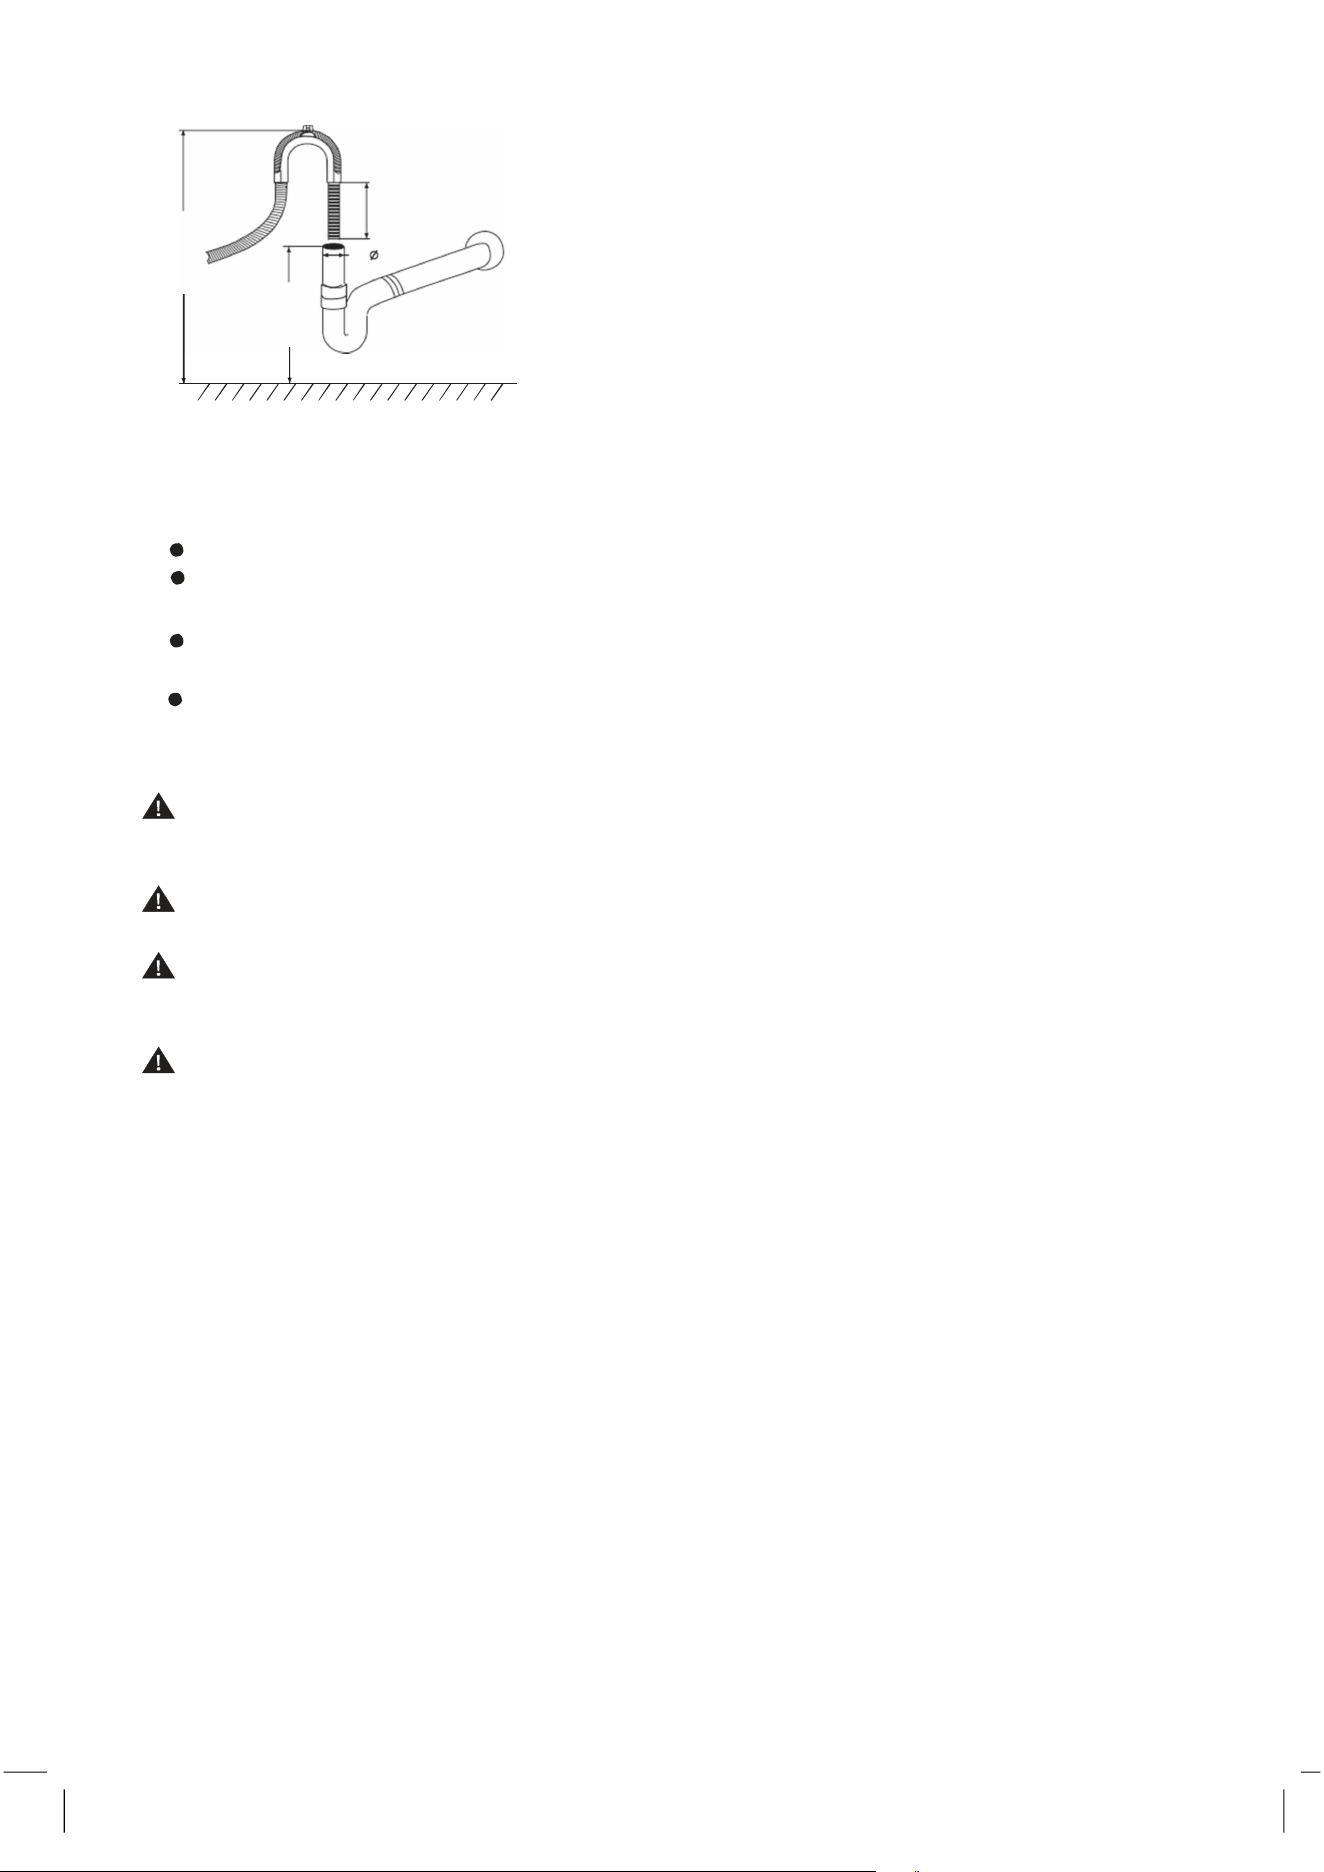
Conexión de la salida de la manguera de agua.
Conecte sin curvar la manguera de desagüe de su
máquina con la boca del drenaje.
Si el largo de la manguera no es suficiente, recurra a un
servicio autorizado para obtener una extensión hecha del
min
40mm
Conexión eléctrica.
mismo material que la manguera original.
Recuerde que el largo total de la manguera no debe
exceder los 4 mts.
Si la manguera de desagüe es de más de 4 mts.
Los platos no se limpiarán adecuadamente. Asegure
firmemente la manguera a la conexión del drenaje para
evitar que se desprenda durante el proceso de lavado.
Antes de insertar el enchufe dentro del toma, asegúrese que:
El toma tenga conexión a tierra t cumpla con las regulaciones normales.
El toma puede soportar la carga máxima del aparato, que está indicada en la chapa de
información colocada en la parte interior de la puerta (ver descripción del aparato)
Que la corriente suministrada tiene el rango de voltaje indicado en la referida chapa de la
parte interior de la puerta.
El toma es compatible con el enchufe del aparato. Si no es así, consulte a un técnico
autorizado para reemplazar el enchufe (vea asistencia); no use alargadores de cables ni
adaptadores múltiples.
20
Una vez que el aparato ha sido instalado, el cable de alimentación y él toma eléctrico
deben ser de fácil acceso.
El cable no debe quedar curvado ni apretado.
Si el cable de alimentación se daña, debe ser reemplazado por el fabricante o su servicio
técnico, para prevenir riesgos potenciales
La compañía no se responsabiliza por cualquier accidente ocurrido si estas indicaciones
no fueron observadas.
Advertencia a considerar en el primer ciclo de lavado.
Después que el aparato ha sido instalado, inmediatamente antes de hacer correr el primer
ciclo de lavado, complete el llenado del dispensador de sal colocando aproximadamente 1.2
Kg. de sal (vea rellenado de abrillantador y de sal). El agua puede derramarse, es normal y
no es motivo de preocupación. Es también normal que la luz indicadora de sal baja continúe
destellando por algunos ciclos después que se ha colocado la sal.
Colocando el aparato.
Coloque el aparato en la ubicación deseada. La parte de atrás debe recostarse contra la
pared que está detrás del aparato, y los laterales, a lo largo de la pared o muebles laterales.
El lavavajillas está equipado con entrada de agua y manguera de desagüe que puede ser
posicionada a la derecha o a la izquierda, para facilitar su instalación.
Nivelando el aparato
Una vez que el aparato está ubicado, ajustar las patas (atornillando en uno u otro sentido)
de modo de ajustar la altura de la máquina y dejarlo a nivel. En cualquier caso, el aparato no
debe inclinarse más de 2º.
NOTA: El ajuste máximo de altura de las patas es de 20mm.

Cómo drenar exceso de agua de las mangueras.
Si el sumidero está a 1000mm por arriba del piso, el exceso de agua en las mangueras no
puede drenar directamente en el sumidero. Será necesario drenar el agua excedente de las
mangueras en una palangana o contenedor apropiado
Desagüe de agua.
Conecte la manguera de desagüe. Debe está correctamente ubicada para evitar pérdidas de
agua. Asegúrese de que la manguera no esté retorcida o aplastada.
Extensión de la manguera.
Si se necesita una extensión de la manguera de desagüe, preste atención de usar una
manguera similar. Debe ser de una longitud no mayor a 4 mts., de lo contrario la efectividad
de la limpieza del lavavajillas puede reducirse.
Conexión al sifón.
La conexión se debe hacer a una altura entre 50 cm. (mínimo) y 100 cm. (máximo) tomado
desde la parte de abajo del lavavajillas. La manguera de desagüe debe estar fijada por un clip
de manguera.
21
Al comenzar con el lavavajillas.
Lo que debe ser controlado antes de comenzar a usar el lavavajillas:
1.
Que el lavavajillas esté fijo y nivelado
2.
Que la válvula de entrada esté abierta
3.
Que no haya pérdidas en las conexiones.
4.
Que los cables estén bien ajustados en su conexión
5.
.Que la energía esté encendida
6.
Que las mangueras de entrada y desagüe no estén dobladas o quebradas
7.
Que todo el material de embalaje, adhesivos e impresos se hayan retirado del lavavajillas.
ATENCIÓN!
Después de la instalación, guardar este manual en la bolsa de los impresos. El contenido de
este manual es de suma utilidad para el usuario.
9. Información
para
resolver
problemas.
Cuando surge algún problema, la pantalla del aparato indica un código de error
CODIGO SIGNIFICADO
POSIBLES CAUSAS
Puerta abierta
Puerta abierta cuando el
lavavajillas está operativo
Entrada de agua
Malfuncionamiento de la
entrada de agua.
Desagüe
Malfuncionamiento
de la salida de agua.
Sensor de temperatura
Malfuncionamiento del sensor
de la temperatura.
Derrame/pérdida
Hubo un derrame / Hay una pérdida
Pérdida de agua
Hay una pérdida de agua
Calentamiento
Calentamiento anormal
ATENCIÓN!
Si hay un derrame, cierre la entrada de agua antes de llamar al servicio. Si hay agua en el
fondo porque hubo un derrame o una pequeña pérdida, el agua debería retirarse antes de
reanudar el proceso de lavado
22
E1
E2
E3
E4
E5
E6
E7

Antes de llamar al servicio técnico.
Revise este cuadro antes de llamar al servicio técnico.
PROBLEMA CAUSA PROBABLE
QUE
HACER
No funciona
Saltó el fusible o el circuito
interruptor no funciona
Reemplace el fusible o reinicia el circuito
interruptor. Retire cualquier otro aparato que
comparta el circuito con el lavavajillas.
La entrada de corriente
no enciende
Asegúrese de que el lavavajillas está
encendido y la puerta bien cerrada.
Asegúrese que el cable está
adecuadamente enchufado en él toma.
La presión del agua es baja
Controle que la entrada de agua está
abierta y adecuadamente conectada
La bomba
de desagüe
Derrame
El sistema está diseñado para
detectar un derrame. Cuando sucede,
corta la circulación de la bomba y
comienza el desagüe de la bomba.
Ruido
Sentir algún ruido es normal
Ruido cuando abre el compartimiento
del detergente.
Los utensilios no están
colocados seguros en el
canasto o algún objeto
pequeño ha caído en el
cesto.
Asegúrese que todo está bien asegurado
dentro del lavavajillas.
Zumbido en el motor.
El lavavajillas no se ha usado regularmente.
Si no se usa a menudo, recuerde cargarlo y
desagotarlo todas las semanas, esto ayudará
a mantener la junta húmeda.
Espuma
en la tina
Detergente inadecuado.
Use sólo detergentes especiales para lava-
vajillas para evitar la espuma. Si esto le
ocurre, abra el lavavajillas y deje que la
espuma se evapore. Agregue 4 Lts. de
agua fría a la tina. Cierre la puerta e
inicie un ciclo de remojo para desagotar
toda el agua. Repita si es necesario.
Derrame de abrillantador
Siempre limpie el abrillantador excedente
en forma inmediata.
Manchas
en la tina
Se usó detergente con
colorante
Asegúrese de usar detergente sin colorante
Platos y
cubiertos no
limpios.
Programa inadecuado
Seleccione un programa más fuerte.
Canasto cargado
inadecuadamente
Asegúrese que el accionar del dispensador
de detergente y el espray de los brazos no
está bloqueado por vajilla grande.
23

Gotas y un
film sobre
vasos y
vajilla
1- Agua extremadamente
dura 2- Baja entrada de
tempera- tura
3 - Sobrecarga de
platos 4 - Carga
inadecuada
5 - Detergente viejo
o húmedo.
6 - Dispensador de
abrillantador vacío
7 - Dosificación de detergente
incorrecta.
Para remover las gotas de los vasos:
1 Retire todos los utensilios de metal
2 No agregue detergente
3 Elija el ciclo más largo
4 Inicie el programa del lavavajillas y
permítale correr por alrededor de
18 a 22 minutos, luego estará en el
lavado principal.
5 Abra la puerta y vierta 2 tazas de
vinagre blanco en la parte de abajo
del lavavajillas
6 Cierre la puerta y permita que el
lavavajillas complete el ciclo de
Lavado. Si el vinagre no actúa,
repita lo anterior, excepto usar
¼ taza (60 ml) de cristales de ácido
cítrico en vez de vinagre.
Vasos
opacos
Combinación de agua
blanda y demasiado
detergente.
Use menos detergente si Ud. tiene agua
blanda y seleccione un programa más
corto
para lavar los vasos y sacarlos limpios.
Film amarillo o
marrón sobre
la superficie
interior
Manchas de té o café
Usar una solución de ½ taza de
blanqueador y 3 tazas de agua caliente para
remover las manchas a mano.
ATENCIÓN. Debe esperar unos 20 minu
tos después del ciclo de lavado para
permitir que los elementos calientes se
enfríen antes de iniciar la limpieza del
interior, de
lo contrario de quemará.
Depósitos de hierro en el
agua pueden ser la causa
del film
Ud. debe llamar a la compañía que le
suministra el agua para que le coloque
un filtro especial.
Film blanco en
la superficie
interior.
Agua dura con materiales
Para limpiar el interior, use una esponja
húmeda con detergente para lavavajillas y
utilice guantes de goma. No use ningún
otro limpiador que detergente para lava-
vajillas por el riesgo que haga espuma.
Tapa del
compartimiento
de detergente
no cierra.
El dial no está en la
posición OFF.
Gire el dial a la posición OFF y deslice
el picaporte de la puerta hacia la izquierda.
Queda
detergente en
el dispensador
Platos que bloquean el
compartimiento del
detergente.
Vuelva a cargar los platos adecuada-
mente.
Vapor
Fenómeno normal.
Puede salir algo de vapor durante el secado
o el desagüe.
Marcas negras o
grises en los
platos.
Utensilios de aluminio
han rozado contra los
platos
Use un limpiador abrasivo suave para
eliminar esas marcas.
24
Agua estanca-
da en el fondo
de la tina
Es normal.
Una pequeña cantidad de agua limpia
alrededor de la salida de la parte inferior
de la tina mantiene los precintos de agua.
Lubricados.
Fuga del
lavavajillas
Llenado de más el
dispensador o derrame
de abrillantador.
Tenga cuidado de no sobrellenar el
dispensador de abrillantador .El derrame de
abrillantador puede formar un exceso de
espuma que conduce a un desbordamiento.
Enjuague y pase un paño húmedo.
El lavavajillas no está
nivelado
Asegúrese de ponerlo a nivel.
25
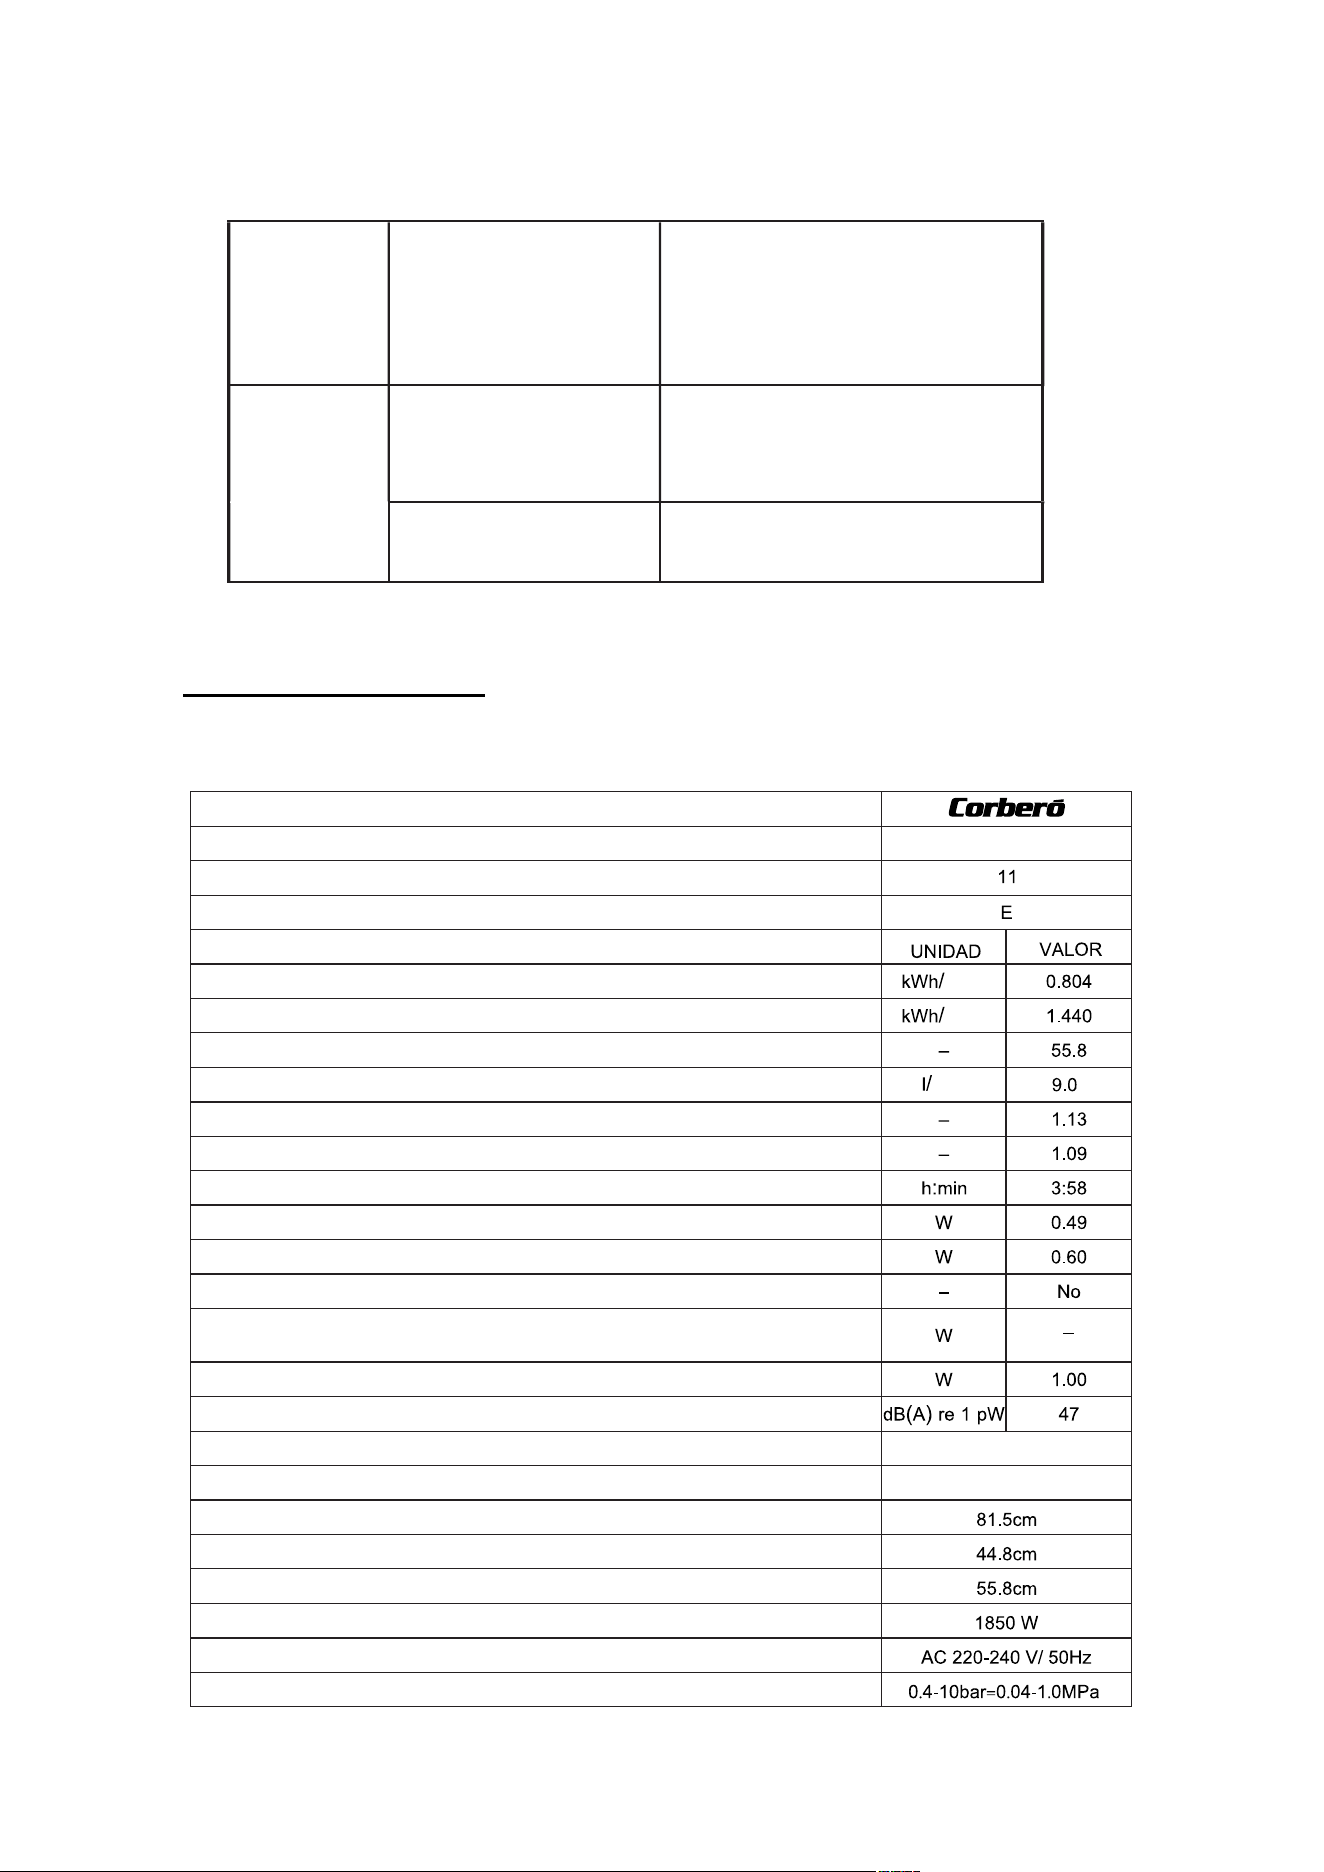
Fabricante
Modelo
Capacidad de cubiertos
Energía eficiente clase 1
Programa estándar de consumo de energía (SPEC) redondeado a tres decimales
Duración del programa ecológico (Tt) redondeada al minuto más cercano
Consumo de energía en modo de espera (Psm) redondeado a dos decimales
Consumo de energía en modo de espera (Psm) en estado de espera en red
(si corresponde), redondeado a dos decimales
Emisiones acústicas de ruido aéreo.
Posible instalación empotrada
Alto
Ancho
Profundidad (con conectores)
Consumo de energía
Tensión nominal / frecuencia
Presión de agua (presión de flujo)
Consumo de energía del programa ecológico (EPEC) redondeado a tres decimales
índice de Eficiencia Energética (EEI)
índice de rendimiento de limpieza (IC)
índice de rendimiento de secado (ID)
Consumo de energía en modo apagado (Po) redondeado a dos decimales
Consumo de agua del programa ecológico (EPWC) redondeado a un decimal
Consumo de energía en inicio diferido (Pds) (si corresponde) redondeado a dos decimales
Instalación
ciclo
ciclo
ciclo
De independente
Si
E-CLVG4598I
Par metro
á
¿El modo de espera incluye la visualización de información?
Ficha de datos técnicos
Ficha de datos técnicos del lavavajillas según la Directiva de la UE:
2019/2017

26
(eficiencia más alta)
a G (eficiencia más baja).
1.
E-CLVG4598I
DISHWASHER USER MANUAL

Read this Manual
Dear Customer,
Please read this User Information carefully
and keep it to refer to at a later date.
Pass it on to any subsequent owner of the
appliance.
This manual contains sections of Safety
Instructions, Operating Instructions, Installation
Instructions and Troubleshooting Tips, etc.
Carefully read it before using the dishwasher
will help you to use and maintain the
dishwasher properly.
Before Calling for Service
To review the section on Troubleshooting Tips
will help you to solve some common problems
by yourself and no need to ask for the help of
professional technicians.
NOTE:
The manufacturer, following a policy of
constant development and updating of
the product, may make modifications
without giving prior notice.
1) Safety Information .............................1-3
2) Disposal ............................................3-4
3) Operation Instruction.........................5-6
Control Panel ..............................................5
Dishwasher Features ..................................6
4) Prior using for the first time ...........6-11
Set the Water Softener ...............................6-7
Loading the Salt into the Softener.............7-8
Fill the Rinse Aid Dispenser......................8-9
Function of Detergent ............................9-11
5) Loading the Dishwasher Baskets..12-15
6) Starting a washing programme ....16-17
Wash Cycle Table ......................................16
Turning on the Appliance............................16
Change the Programme.............................17
Forget to Add Dish...............................17
7) Maintenance and cleaning.............18-20
8) Troubleshooting Tips.....................21-25
Error codes ...............................................21
Before calling for service .....................22-23
Technical information ................................24-25
1
WARNING !
When using your dishwasher, follow the basic precautions
including the following:
WARNING! HYDROGEN GAS IS EXPLOSIVE
Under certain conditions, Hydrogen gas may be produced in a hot-
water system that has not been used for two weeks or more.
HYDROGEN GAS IS EXPLOSIVE. If the hot-water system has not
been used for such a period, before using the dishwasher turn on
all hot-water faucets and let the water flow from each for several
minutes. This will release some accumulated hydrogen gas. As the
gas is flammable, do not smoke or use an open flame this time.
WARNING! PROPER USE
Do not abuse, sit on, or stand on the door or dish basket of the
dishwasher.
Do not touch the heating element during or immediately after
using.
Do not operate your dishwasher unless all enclosure panels are
properly in place. Open the door very carefully if the dishwasher
is operating. There is a risk of water squirting out.
Do not place any heavy objects or stand on the door when it is
open. The appliance could tip forward.
When loading items to be washed:
Locate sharp items so that they are not likely to damage the door
seal;
Load sharp knives with the handles up to reduce the risk of cut-
type injuries;
Warning: Knives and other utensils with sharp points must be
loaded in the basket with their points down or placed in a
horizontal position.
When using your dishwasher, you should prevent plastic items
from contacting with heating element.
1. Safety Information

Check that the detergent receptacle is empty after completion of
the wash cycle.
Do not wash plastic items unless they are marked dishwasher
safe or the equivalent. For plastic items not so marked, check
the manufacturer's recommendations.
Use only detergent and rinse additives designed for an
automatic dishwasher. Never use soap, laundry detergent, or
hand washing detergent in your dishwasher.
Other means for disconnection from the supply must be
incorporated in the fixed wiring with at least 3mm contact
separation in all poles.
Keep children away from detergent and rinse aid, keep children
away from the open door of the dishwasher , there could still be
some detergent left inside.
Dishwasher detergents are strongly alkaline. They can be
extremely dangerous if swallowed. Avoid contact with skin and
eyes, and keep children away from the dishwasher when the
door is open.
The door should not be left in the open position since this could
present a tripping hazard.
If the supply cord is damaged, it must be replaced by the
manufacturer or its service agent or a similarly qualified person
in order to avoid a hazard.
These instructions shall also be got from the manufacturer or
responsible Vendor.
To protect against the risk of electrical shock, do not immerse the
unit, cord or plug in water or other liquid.
This appliance can be used by children aged from 8 years and
above and persons with reduced physical, sensory or mental
capabilities or lack of experience and knowledge if they have been
given supervision or instruction concerning use of the appliance
in a safe way and understand the hazards involved. Children shall
not play with the appliance. Cleaning and user maintenance shall
not be made by children without supervision.
2
3
Please dispose of packing materials properly.
During installation, the power supply must not be excessively or
dangerously bent or flattened.
Do not tamper with controls.
The appliance is to be connected to the water mains using new
hose sets, and the old hose-sets should not be reused.
Make sure that the carpet must not obstruct the openings at the
bottom base.
Use the dishwasher only for its intended function.
The dishwasher is intended for indoor use only.
The dishwasher is not designed for commercial use. It is
intended for use in domestic households and in similar working
and residential environments.
READ AND FOLLOW THIS SAFETY INFORMATION
CAREFULLY
SAVE THESE INSTRUCTIONS
2 Disposal
Please do not overload your dishwasher. There is only space for
11 standard dishes. Do not use dish that is not suitable for
dishwashers. This is important for good results and for
reasonable energy consumption.
Dispose of the dishwasher packaging material
correctly.
All packaging materials can be recycled.
Plastic parts are marked with the standard
international abbreviations:
(e.g. PS for polystyrene, padding material)
4
Packaging material could be dangerous for children!
For disposing of package and the appliance please go to a
recycling centre. Cut off the power supply cable and make the
door closing device unusable.
Cardboard packaging is manufactured from recycled paper and
should be disposed in the waste paper collection for recycling.
By ensuring this product is disposed of correctly, you will help
prevent potential negative consequences for the environment and
human health, which could otherwise be caused by inappropriate
waste handling of this product.
For more detailed information about recycling of this product,
please contact your local city office and your household waste
disposal service
IMPORTANT!
To get the best performance from your
dishwasher, read all operating instructions before
using it for the first time.
WARNING!
This appliance is identified according to the European guideline
2012/19/EU on waste electrical and electronic equipment -WEEE.
The guideline specifies the framework for an EU-wide valid return
and re-use of old appliances.
5
1 Power switch: To turn on/off the power supply.
2 D :
3
5 Program indicator light When you select a washing programme ,
the corresponding light will display.
6
elay button The START DELAY will allow you to delay the
start time of any cycle automatically up to 24 hours.
Program select button/Child lock button: Press the button to select
the program. The "child lock"will be available when you press the
button 3 seconds ,and "LO" flashes 6 times on digital displays.
4 Function alternative button: Press this button you can choose the
additional function "3 IN 1" or dry+, and the corresponding
light flashes.
Dry+ indicator: An increased temperature during the final rinse
stage will improve the drying process The indicator will be
available when the Dry+ button is selected.
7
Child lock :
Salt refill indicator: The indicator lights up when the softener
needs to be refilled.
8 Rinse aid refill indicator: The indicator lights up when dispenser
needs to be refilled.
9 3 in 1 indicator: The indicator lights up when the additional
function be selected.
10 indicator The "Child Lock" will be available when
you press the Child lock buttons for 3 seconds, and the
"Child lock"indicator lights up after flashing 6 times.
11 Digital display: To display the running time remain, malfunction
codes and delay time.
1 2
3 48 10
97
5
6
11
3. Operation Instruction
Control Panel
Eco
4 Prior Using for the First Time
Before using your dishwasher for the first time:
A. Set the water softener
B. Loading the salt into the softener
C. Fill the rinse aid dispenser
D. Fill in detergent
A. Set the Water Softener
The water softener is designed to remove minerals and salts from the water, which would have a
detrimental or adverse effect on the operation of the appliance. The higher the content of these
minerals and salts, the harder the water is. The softener should be adjusted according to the
hardness of the water in your area. Your local Water Authority can advise you on the hardness of
the water in your area.
6
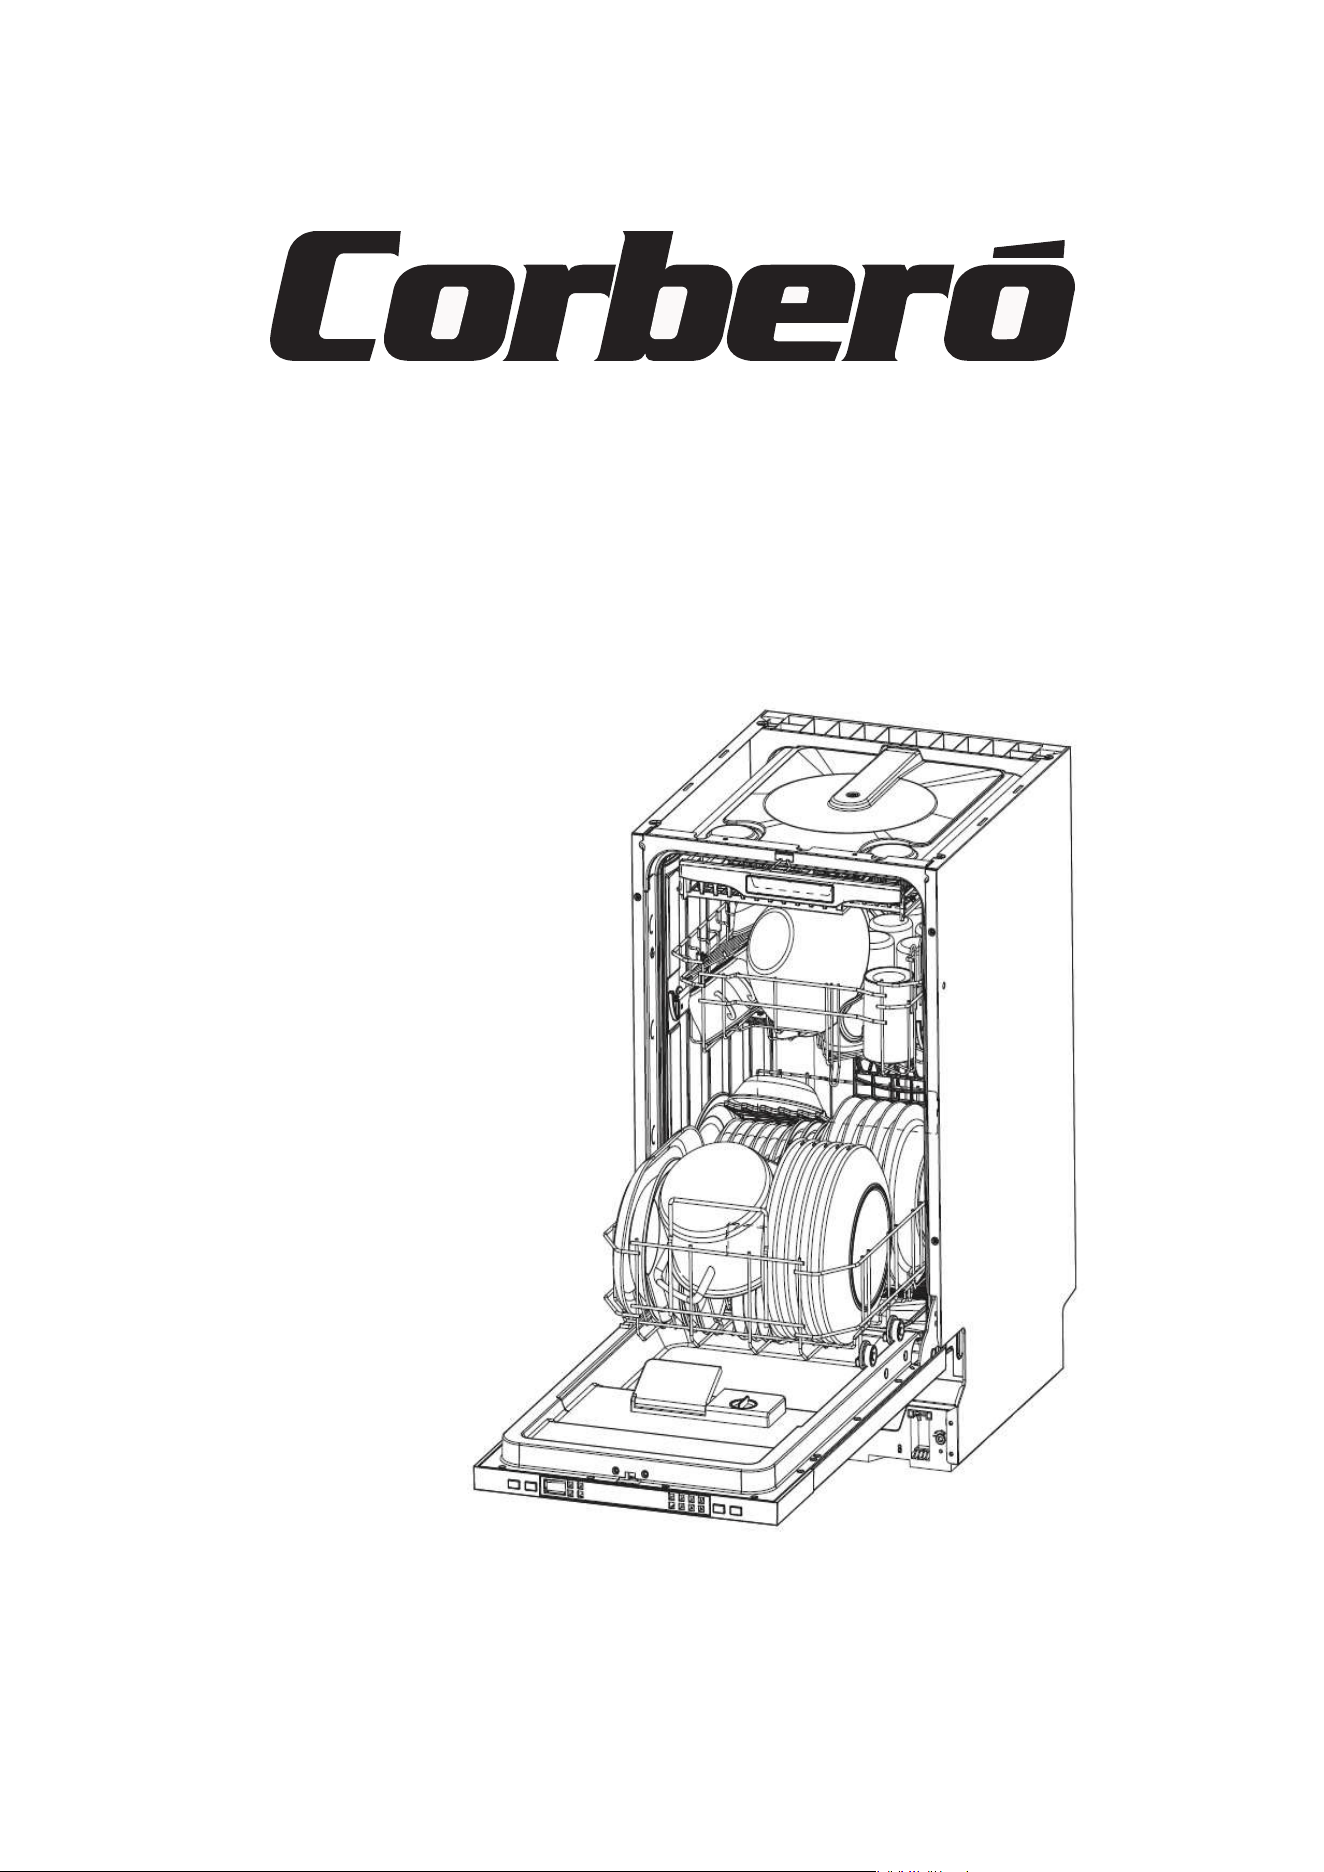
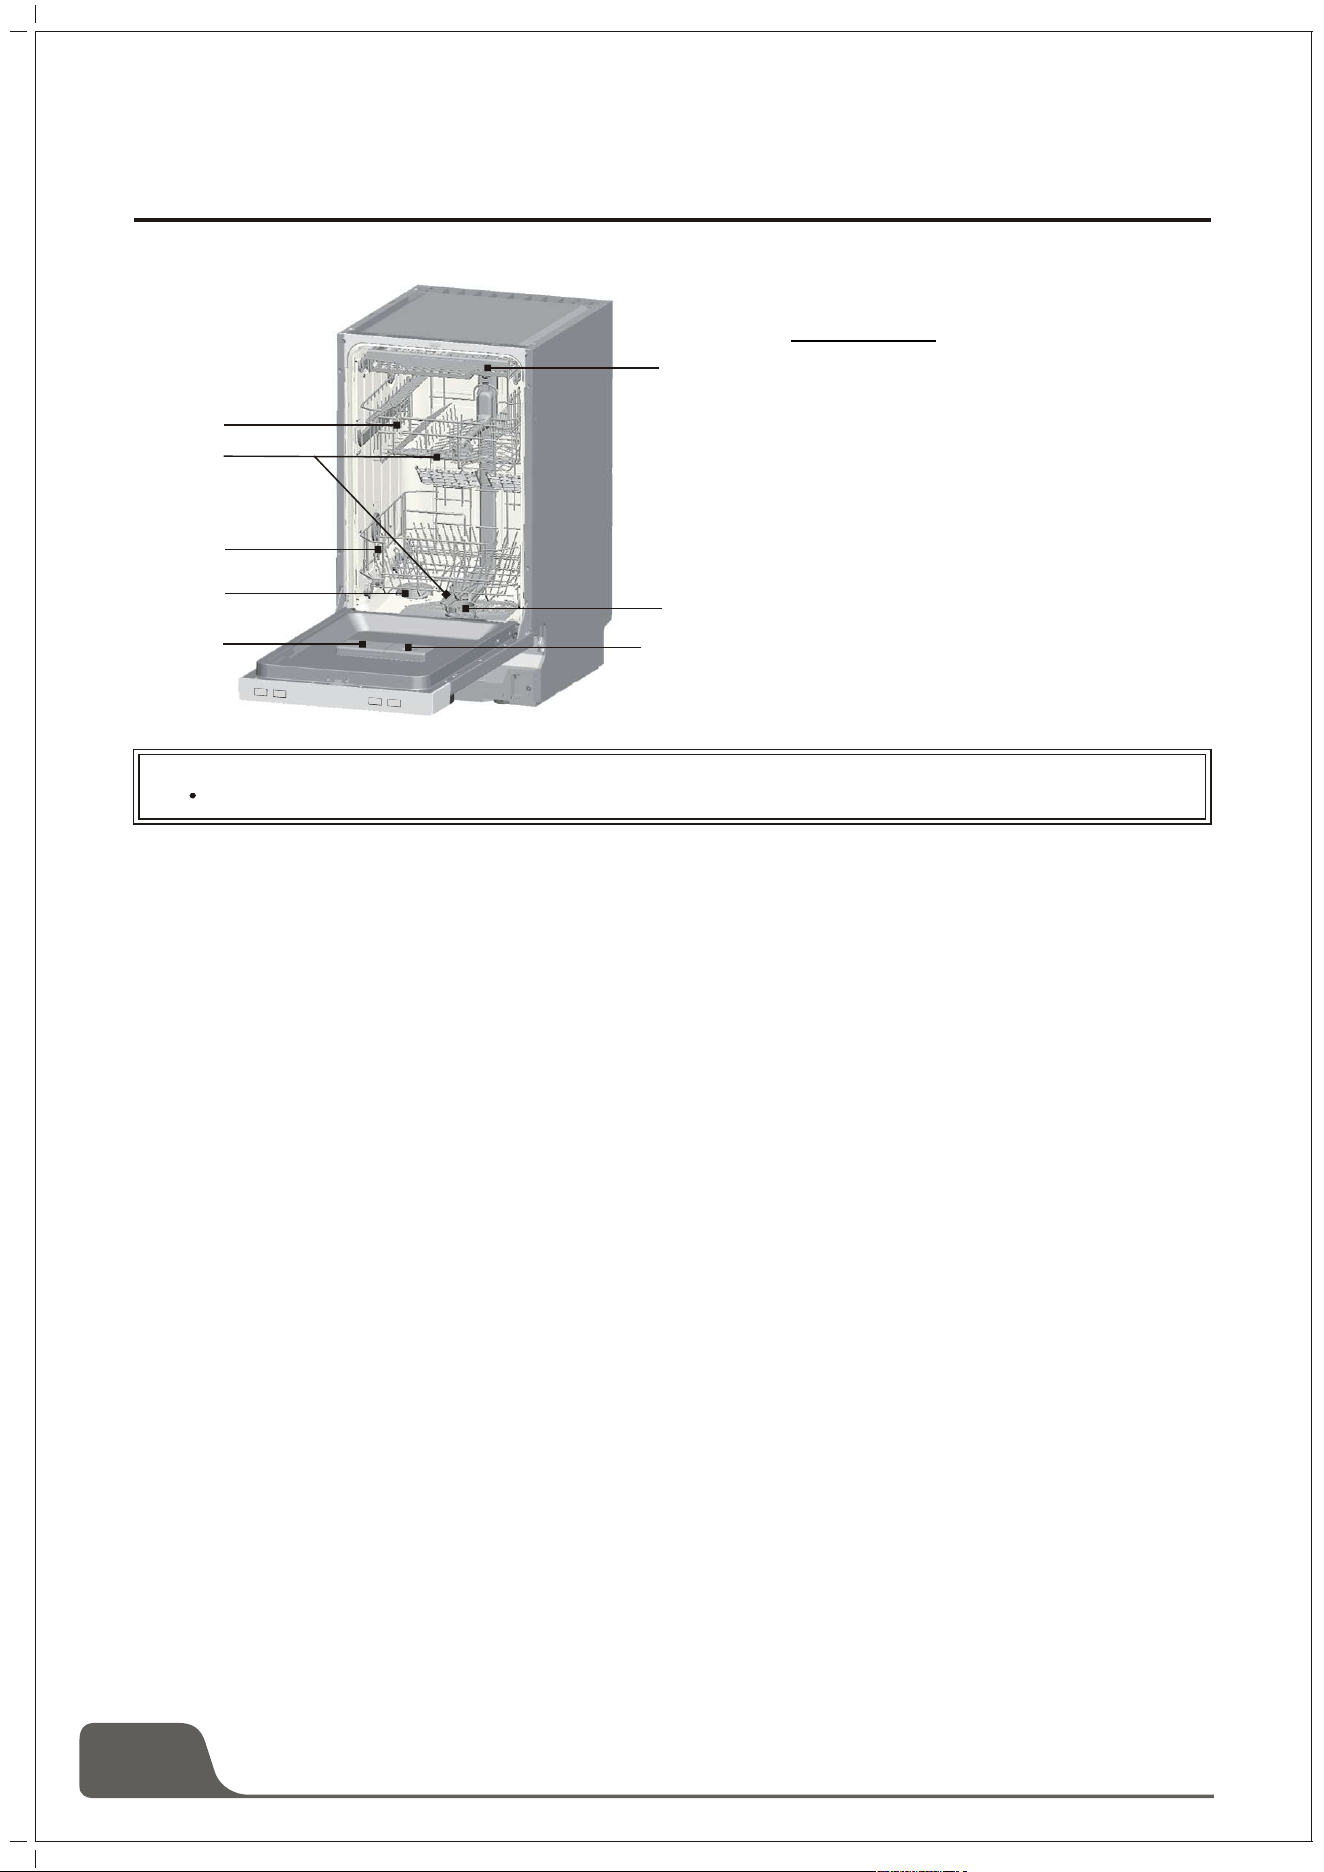
Front View
1 Upper Basket
2 Spray Arms
3 Lower Basket
4 Water Softener
5 Filters
6 Detergent Dispenser
7 Rinse Aid Dispenser
8 Cutlery basket
Dishwasher Features
Setting
The amount of salt dispensed can be set from H0 to H7.
Salt is not required at the set value H0.
1. Find out about the hardness value of your tap water. Your water utility company will help you
with this.
2. Set value can be found in the water hardness table.
3. Close the door.
4. Switch on "Power" switch.
5. Hold down " Delay" button and then press "Program" button for 5 seconds.The buzzer rings
one time and H..
flashes on the digital display.(factory setting is H4)
1
2
3
4
5
6
8
7
1
Clark
2
7
B. Loading the Salt into the Softener
Always use salt intended for use with dishwasher.
NOTE: If your model has no water softener, you may skip this section
WATER SOFTENER
The hardness of the water varies from place to place. If hard water is used in the
dishwasher, deposits will form on the dishes and utensils.
The appliance is equipped with a special softener that uses salts specifically
designed to eliminate lime and minerals from the water.
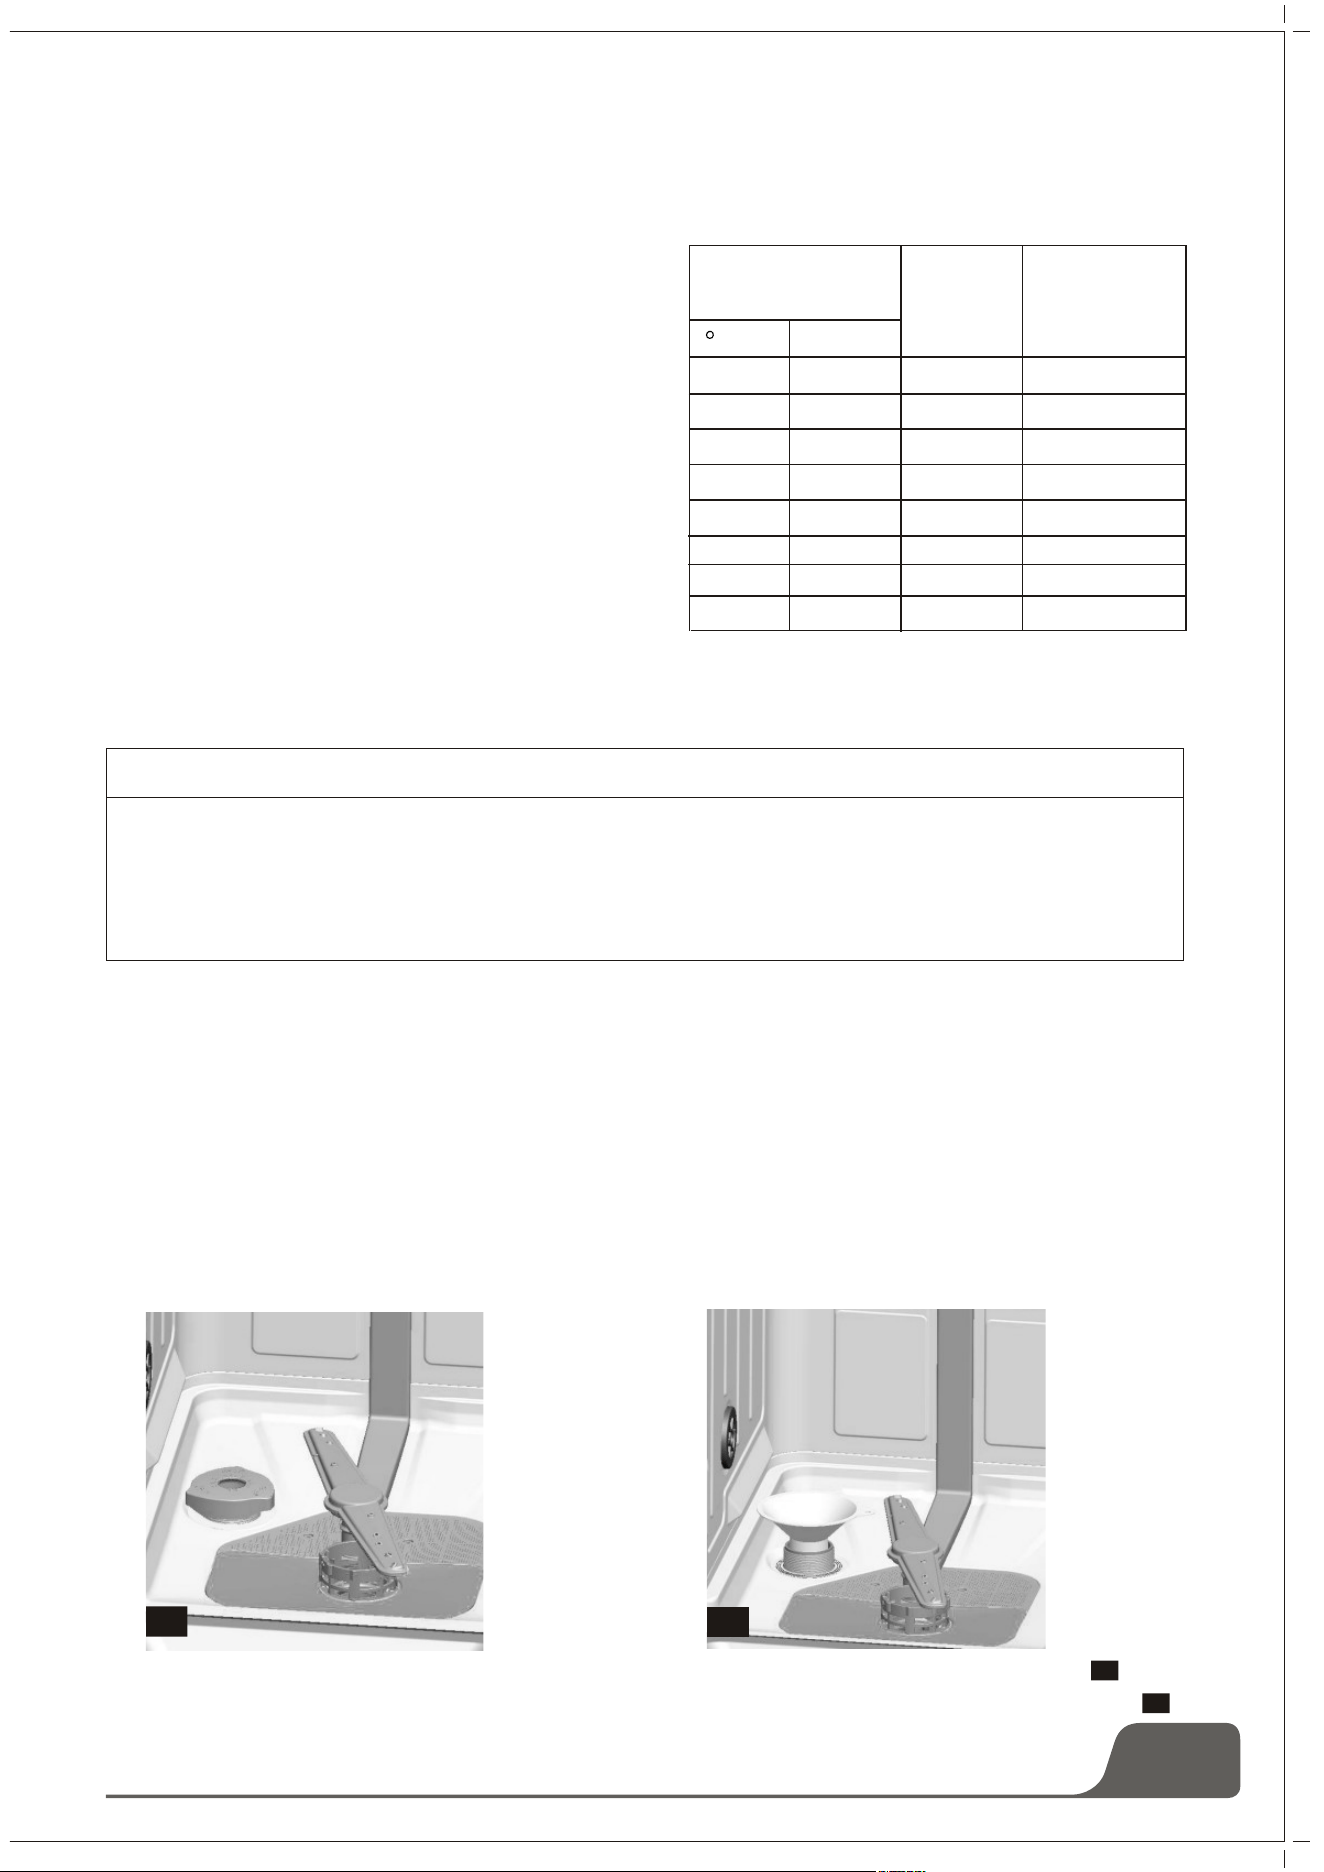
A. Remove the lower basket and then unscrew and remove the cap from the salt container.
B. If you are filling the container for the first time, fill 2/3 of its volume with water (around 500ml).
1
2
The salt container is located beneath the lower basket and should be filled as follows:
Attention!
Only use salt specifically designed for use in dishwashers! All other types of salt not specifically
designed for use in a dishwasher, especially table salt, will damage the water softener. In case of
damages caused by the use of unsuitable salt the manufacturer does not give any warranty nor is
liable for any caused damages.
Only fill with salt just before starting one of the complete washing programmes.
This will prevent any grains of salt or salty water, which may have been split, remaining on the
bottom of the machine for any period of time, which may cause corrosion.
After the first wash cycle the control panel light expires.
To change the setting:
1. Press " Delay " button.
Each time the button is pressed, the set value
increasesby one level;when the value of H7 has
been reached, the display jumps back to H0(off).
2. Press " Program " button. The chosen setting
has now been stored.
Water hardness
Range
Mmol/l
Set value on
the machine
0-8
9-10
11-12
13-15
16-20
21-26
27-38
39-62
soft
soft
medium
medium
medium
hard
hard
hard
0-1.1
1.2-1.4
1.5-1.8
1.9-2.1
2.2-2.9
3.0-3.7
3.8-5.4
5.5-8.9
H0
H1
H2
H3
H4
H5
H6
H7
Water hardness table
Contact your local water board for infor-
mation on the hardness of your water
supply.

1 . The salt container mu st be refilled w hen the salt w arning lig ht in the control panel com es
on. Thou g h the salt container is filled enou g h, the indicator lig ht m ay not black ou t before
the salt fu lly dissolve. If there is no salt w arning lig ht in the control panel (for some models),
you can ju dg e w hen to load the salt into the softener by the cycles that the dishw asher had
ru n (see the follow ing schem a).
2. If there are spills of the salt, a soak prog ram cou ld be ru n to w ipe them ou t.
NOTE:
1
2
3
4
5
6
M AX
2
1
3
C. Fill the Rinse Aid Dispenser
Function of Rinse Aid
R inse aid is au tom atically added du ring the last rinse, ensu ring thorou g h rinsing , spot and streak
free drying .
Attention!
Only u se branded rinse aid for dishw asher. Never fill the rinse aid dispenser w ith any other
su bstances (e.g . dishw asher cleaning ag ent, liqu id deterg ent). This w ou ld damag e the appliance.
When to Refill the Rinse Aid Dispenser
If there is no rinse-aid w arning lig ht on the control panel, you can ju dg e the amou nt of rinse-aid by
the color of the optical level indicator "D" located next to the cap. W hen the rinse-aid container is fu ll,
the w hole indicator w ill be dark .As the rinse aid diminishes, the size of the dark dot decreases. You
shou ld never let the rinse aid g et below 1 / 4 fu ll.
As the rinse aid diminishes, the size of the black dot
on the rinse aid level indicator chang es, as illu strated below .
Fu ll
3 / 4 fu ll
1 / 2 fu ll
1 / 4 fu ll - Shou ld refill to elim inate spotting
Empty
D (R inse-Aid ind ica tor)
RINSE AID DISPENSER
8
C. Place the end of the fu nnel (su pplied) into the hole and introdu ce abou t 1 .2kg of salt. It is
norm al for a sm all am ou nt of w ater to come ou t of the salt container.
D. Carefu lly screw the cap back on.
E. Usu ally, the salt w arning lig ht w ill be off in 2-6 days after the salt container is filled w ith salt.

1
2
3
1
2
3
4
5
6
MAX
9
D. Function of Detergent
"
To open the dispenser, turn the cap to the "open" (left) arrow and lift it out.
Pour the rinse aid into the dispenser, be careful not to overfill.
Replace the cap by inserting it aligned with "open" arrow and turning it to the "closed" (right)
arrow.
The rinse aid is released during the final rinse to prevent water from forming droplets on your dishes
that can leave spots and streaks. It also improves drying by allowing water to sheet off the dishes.
Your dishwashers are designed to use liquid rinse aids. The rinse aid dispenser is located inside the
door next to the detergent dispenser.
To fill the dispenser, open the cap and pour the rinse aid into the dispenser until the level indicator
turns completely black. The volume of the rinse aid container is about 140ml.
Be careful not to overfill the dispenser, because this could cause over sudsing. Wipe away any spills
with a damp cloth. Don't forget to replace the cap before you close dishwasher door.
Attention!
Clean up any rinse aid split during filling with an absorbent cloth to avoid excess foaming during the
next wash.
Adjusting Rinse Aid Dispenser
The rinse aid dispenser has four or six settings. Always start with
the dispenser set on "4" If spots and poor drying are problems,
increase the amount of rinse aid dispensed by removing the
dispenser lid and rotating the dial to "5 . If the dishes still are not
drying properly or are spotted, adjust the dial to the next higher
number until your dishes are spot-free. The dose is factory set in
position 5.
NOTE: Increase the dose if there are drops of water or lime spots on the dishes after washing.
Reduce it if there are sticky whitish streaks on the dishes or a bluish film on glassware or knife
blades.
Detergents with its chemical ingredients are necessary to remove dirt, crush dirt and transport it out
of the dishwasher. Most of commercial quality detergents are suitable for this purpose.
Concentrated Detergent
Based on their chemical composition, dishwasher can be split in two basic types:
conventional, alkaline detergents with caustic components
low alkaline concentrated detergents with natural enzymes
The use of "Eco" washing programme in conjunction with concentrated detergents reduces pollution
and is good for your dishes; these washing programmes are specially matched to the dirt-dissolving
properties of the enzymes of the concentrated detergent. For this reason"Eco" washing programme
in which concentrated detergents are used can achieve the same results that can otherwise only be
achieved using"intensive" programme.
Detergent Tablets
Detergent tablets of different brands dissolve at different speeds. For this reason some detergent
Adjust lever
(Rinse)
2
1
2
1
10
NOTE:
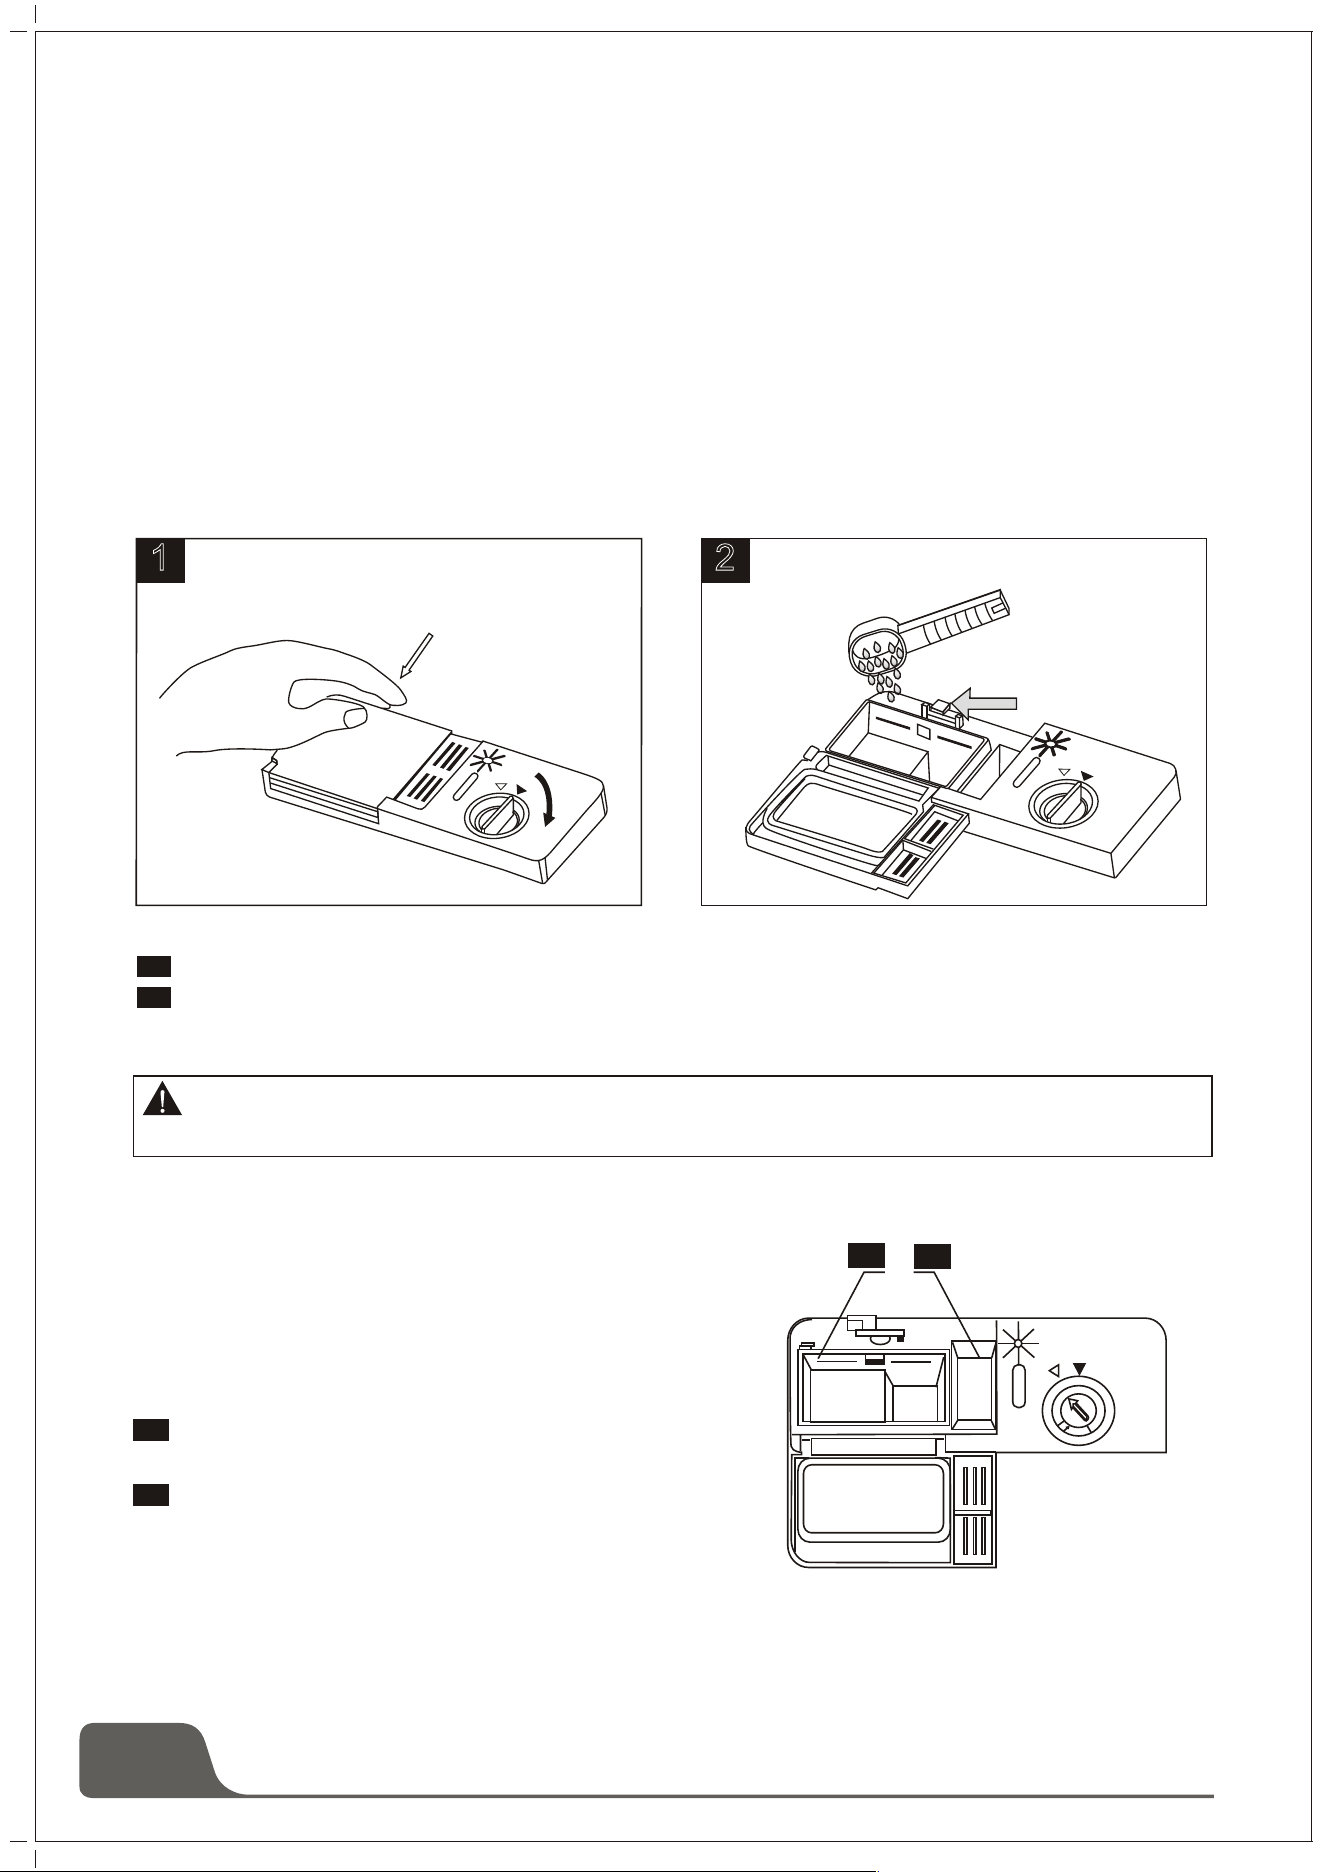
If the lid is closed: press release button. The lid springs open.
Always add the detergent just before starting each wash cycle. Only use branded detergent aid
for dishwasher.
WARNING!
Dishwasher detergent is corrosive! Take care to keep it out of reach of children
Use only detergent specifically made for use in dishwashers. Keep your detergent fresh and dry.
Don't put powder detergent into the dispenser until you're ready to wash dishes.
Fill in the detergent
Fill the detergent dispenser with detergent.
The marking indicates the dosing levels , as
illustrated on the right:
The place of main wash cycle detergent placed,
MIN means approximately 20g of detergent.
The place of pre-wash cycle detergent placed ,
approximately 5g of detergent.
" "
cannot dissolve and develop their full cleaning power during short programmes. Therefore please
use long programmes when using detergent tablets, to ensure the complete removal of detergent
residuals.
Detergent Dispenser
The dispenser must be refilled before the start of each washing cycle following the instructions
provided in the Wash Cycle Table. Your dishwashers use less detergent and rinse aid than
conventional dishwashers. Generally, only one tablespoon of detergent is needed fora normal wash
load. Also, more heavily soiled items need more detergent. Always add the detergent just before
starting dishwasher, otherwise it could get damp and will not dissolve properly.
Amount of Detergent to Use
Please observe the manufacturer's dosing and storage recommendations as stated on the detergent
packaging.
Close the lid and press until it locks in place.
If the dishes are heavily soiled, place an additional detergent dose in the pre-wash detergent
Chamber. This detergent will take effect during the pre-wash phase.
1 2
1
2
3
4
5
6
MA X
2
1

11
NOTE:
You find information about the amount of detergent for the single programme on the last page.
Please be aware that according to the level soiling and the specific hardness of water, differences
are possible.Please observe the manufacturer's recommendations on the detergent packaging.
Detergents
There are 3 sorts of detergents
1.With phosphate and with chlorine
2.With phosphate and without chlorine
3.Without phosphate and without chloride
Normally new pulverized detergent is without phosphate. The water softener function of phosphate
is not given. In this case we recommend to fill salt in the salt container even when the hardness of
water is only 6 dH. If detergents without phosphate were used in case of hard water often white
spots appear at dishes and glasses. In this case please add more detergent to reach better results.
Detergents without chlorine do only bleach a little. Strong and coloured spots will not removed
completely. In this case please choose a programme with higher temperature.
1. Press the power switch and select the 3in1 washing cycle by pressing the option button "ALT"
until the "3in1" indicator blinks.
2. The 3in1 washing cycle will be available after pressing the start/pause button , and the"3in1"
indicator lights.
"ALT"
Use of "3 in 1" Detergent Tablets
General Advice
1. Before using these products you should first check that the water hard-ness in your supply is
compatible with the use of these products as per the detergent manufacturers instructions (on the
product packaging).
2. These products should be strictly used according to the detergent manufacturers instructions.
3. If you encounter problems when using "3 in 1" products for the first time then please contact the
detergent manufacturers care line (the telephone number is given on the product packaging).
These products are detergents with integrated and combined detergent/rinse aid and salt functions.
Before using these products you should first check that the water hardness in your supply is
compatible with the use of these products as per the detergent manufacturers (on the product
packaging).
Special Advice
When using combination products, the rinse-aid and salt lights are no longer useful. It may be
helpful to select the lowest possible setting for water hardness.
To select "3in1" function:
To cancel "3in1" function:
To cancel 3in1 washing cycle by pressing the button or follow the "change the programme"
instructions.
If you decide to switch to the use of a standard detergent system we advise that you:
1. Refill both the salt and rinse aid compartments.
2. Switch the water hardness setting to the highest possible position and run for three normal cycles
without load.
3. Readjust the water hardness setting again according to the conditions for your region (For more
information please refer to your instruction manual).
Note:3in1washing cycle is additional function, they must be used with other programme (Intensive,
Eco and Light).
For best performance of the dishwasher, follow these loading guidelines. Features and appearance
of baskets and silverware baskets may vary from your model.
Attention before or after Loading the Dishwasher Baskets
Scrape off any large amounts of leftover food. It is not necessary to rinse the dishes under running
water. Place objects in the dishwasher in the following way:
1.Items such as cups, glasses, pots/pans, etc. are stood upside down.
2.Curve items, or those with recesses, should be at a slant so that water can run off.
3.They are stacked securely and can not tip over.
4.They do not prevent the spray arms from rotating while washing takes place.
Very small items should not be washed in the dishwasher as they could easily fall out of the baskets.
Removing the Dishes
To prevent water dripping from the upper basket into the lower basket, we recommend that you
empty the lower basket first and then the upper basket.
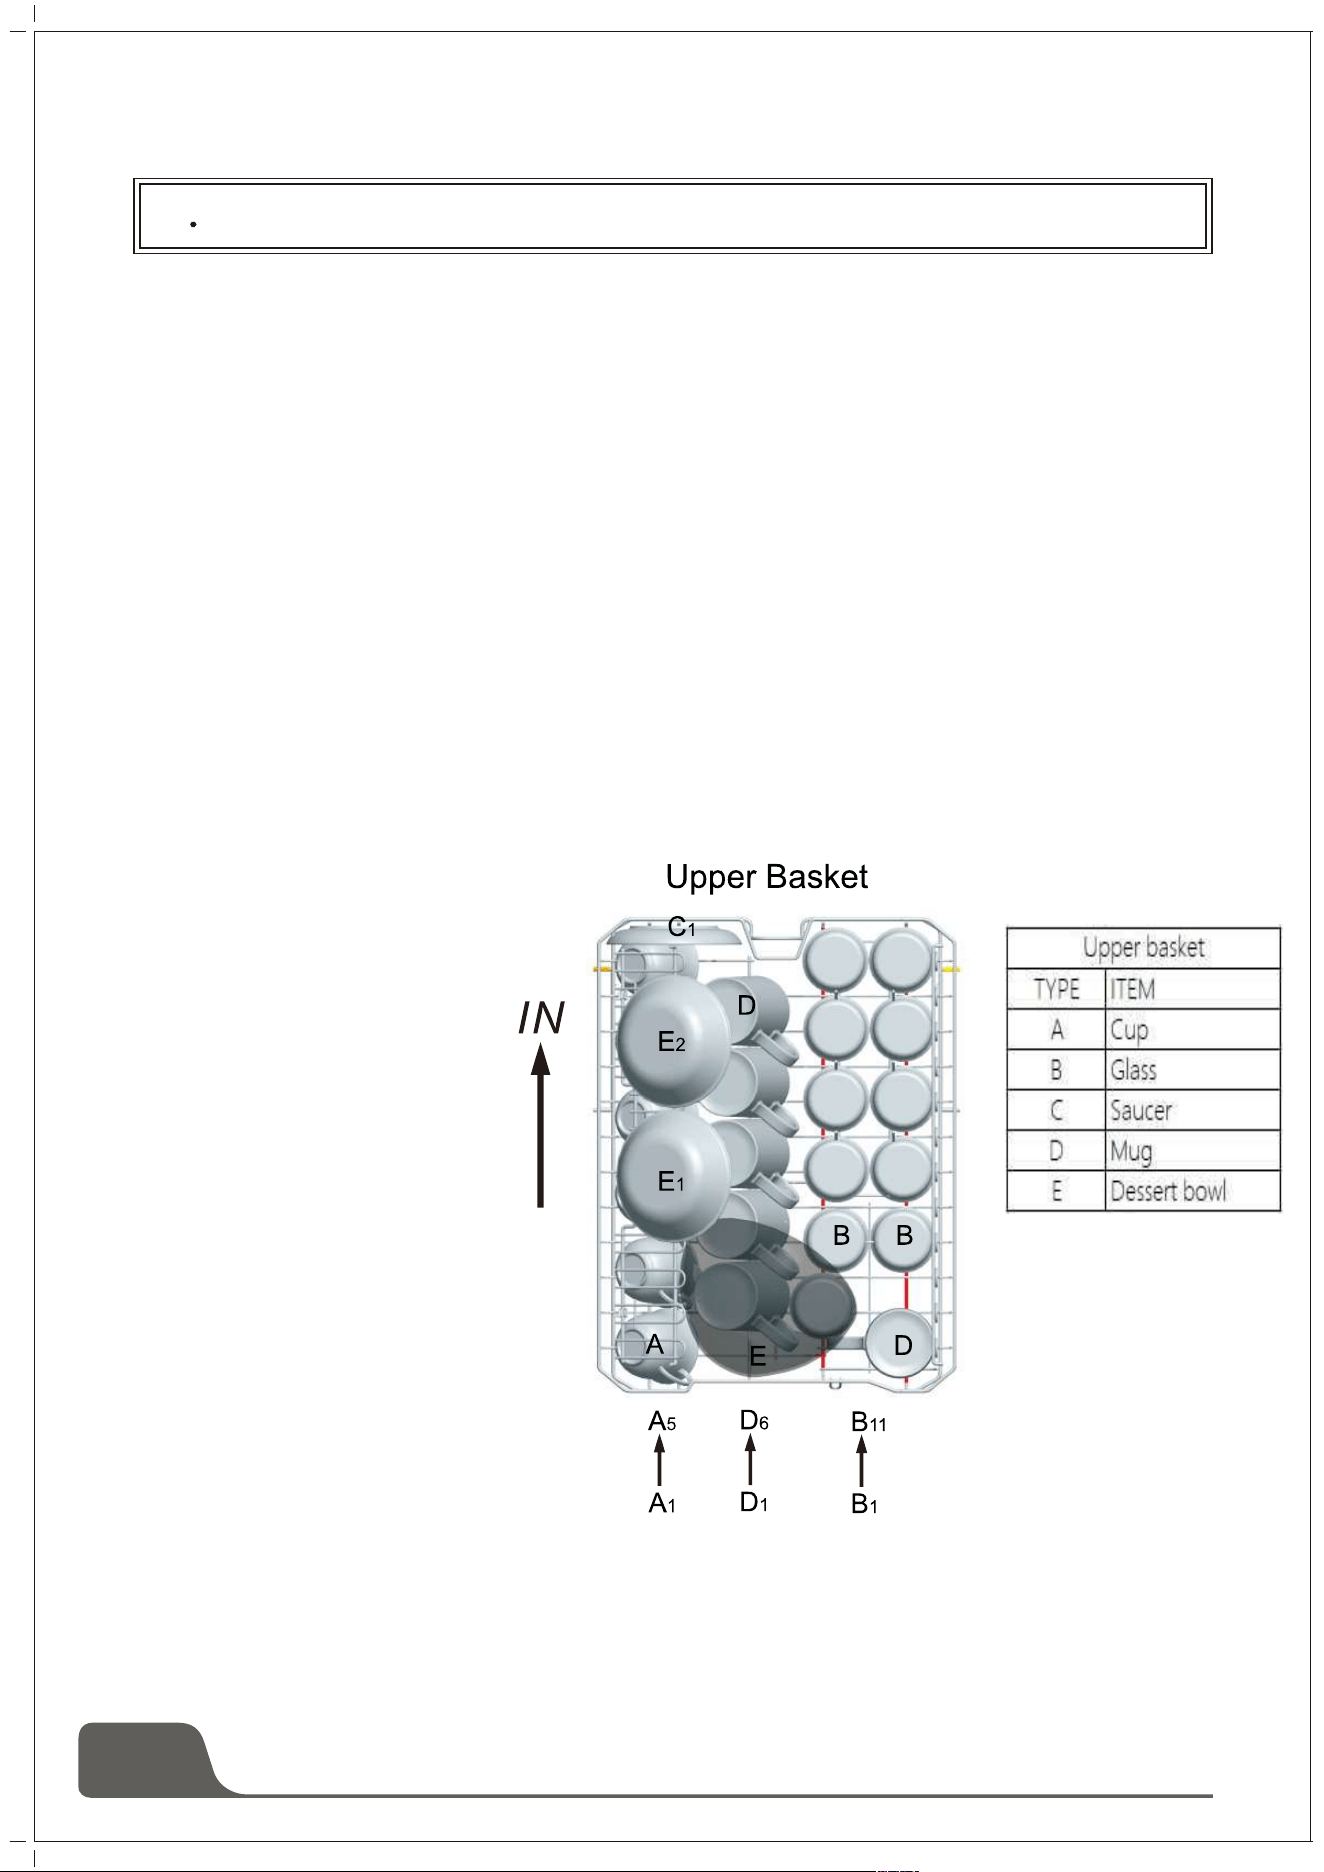
Loading the Upper Basket
The upper basket is designed to
hold more delicate and lighter
dishware such as glasses,
coffee and tea cup and
saucers, as well as plates,
small bowls and shallow
pans (as long as they are
not too dirty). Position the
dishes and cookware so
that they do not get moved
by the spray of water.
Adjusting the Upper Basket
If required, the height of the upper basket can be adjusted in order to create more space for large
utensils either in the upper basket or lower basket. The upper basket can be adjusted for height by
putting wheels of different height into the rails. Long items, serving cutlery, salad servers or knives
should be placed on the shelf so that they do not obstruct the rotation of the spray arms. The shelf
can be folded back or removed when not be required for use.
12
5 Loading the Dishwasher Baskets
2
1
1
2
13
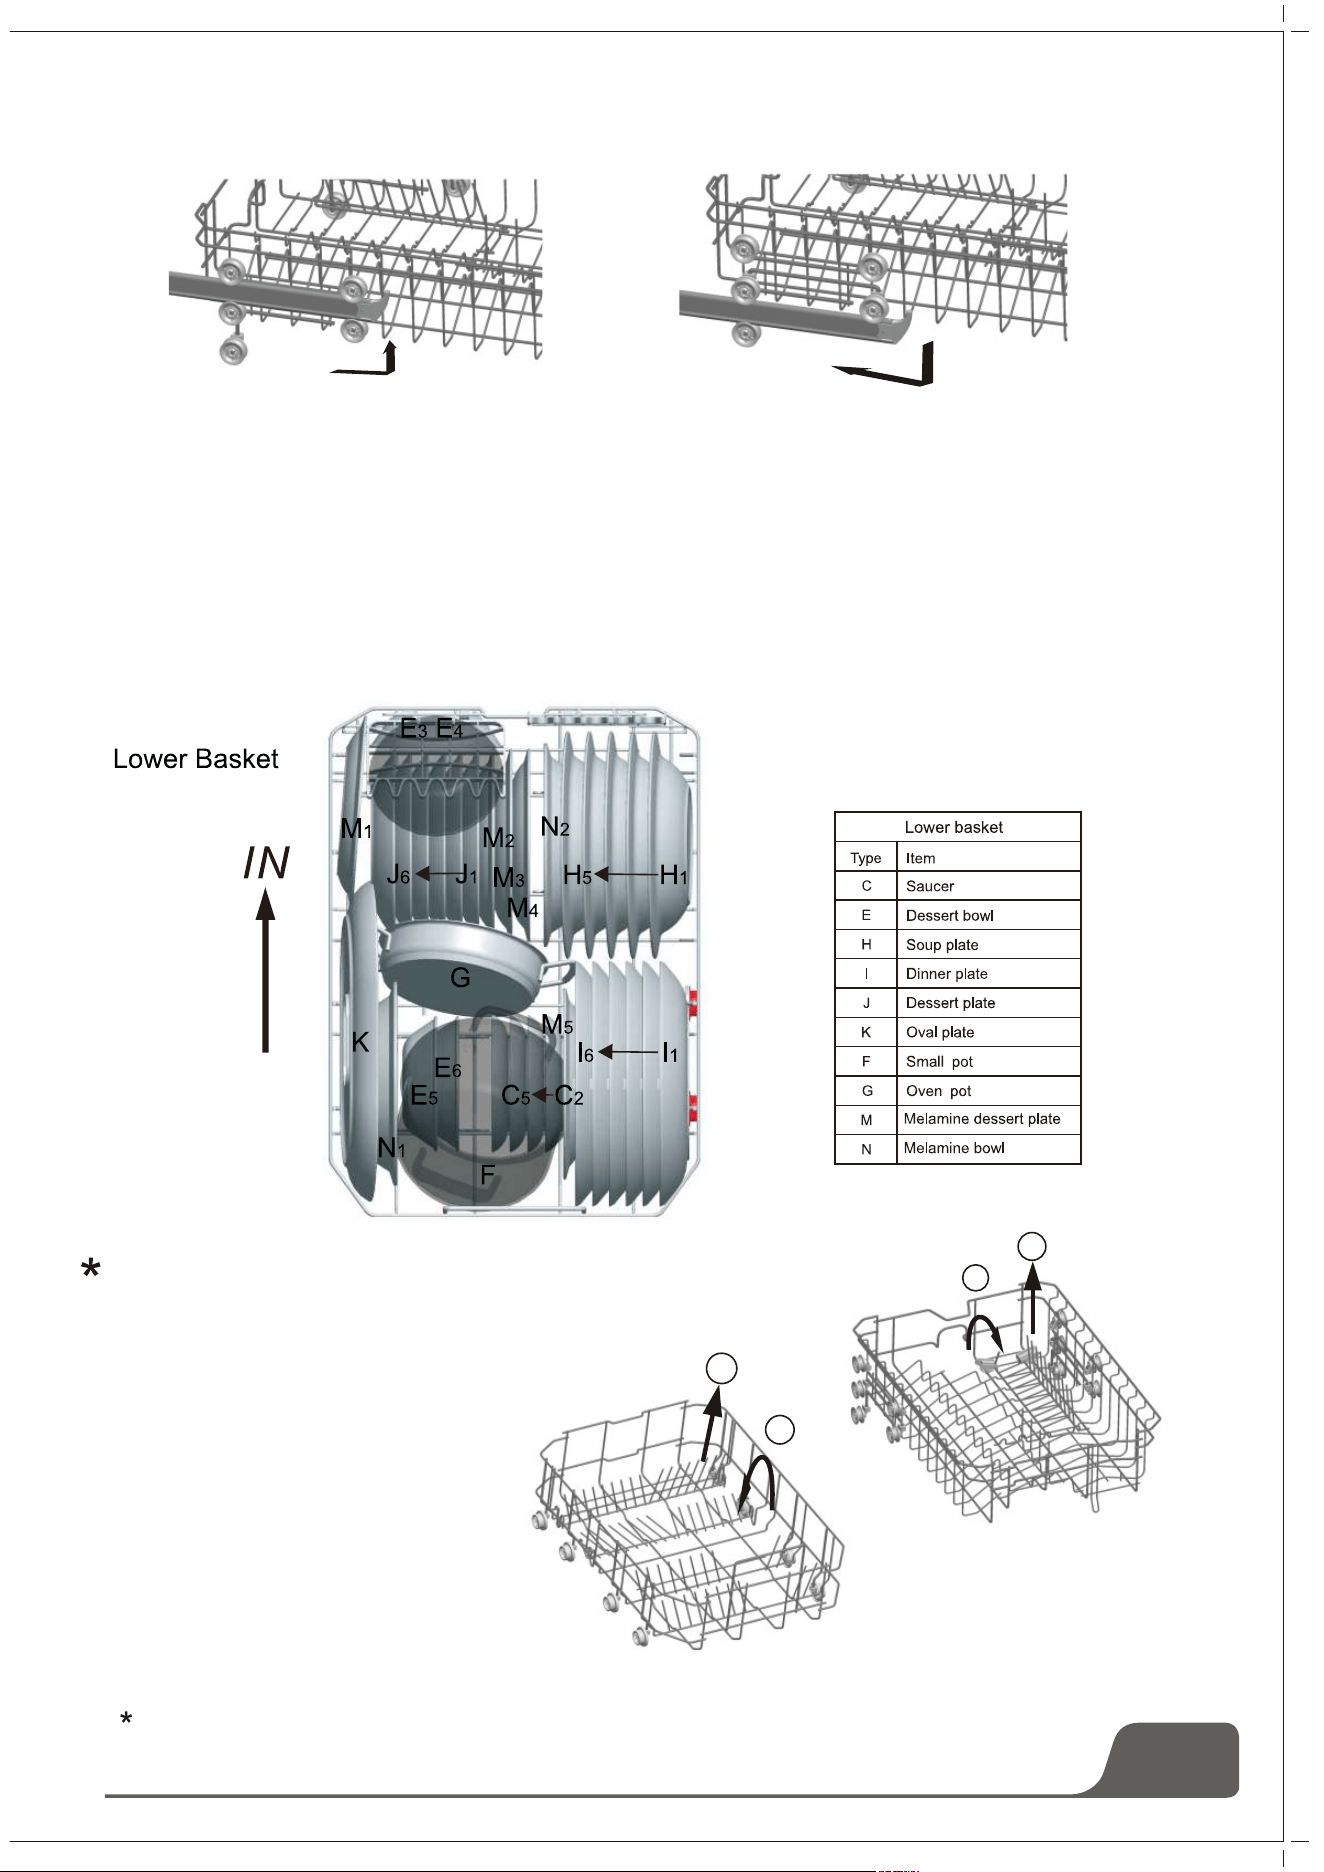
Loading the Lower Basket
We recommend that you place large items which are most difficult to clean in to the lower basket:
pots, pans, lids, serving dishes and bowls, as shown in the figure below.
It is preferable to place serving dishes and lids on the side of the baskets in order to avoid blocking
the rotation of the top spray arm.
Pots, serving bowls, etc. must always be placed top down.
Deep pots should be slanted to allow water to flow out.
The bottom basket features fold down tine rows so that larger or more pots and pans can be loaded.
Upper and Lower basket Folding racks
Folding racks consisting of two
parts that are located on the lower
basket of your machine are
designed in order to let you place
big items easier as pots, pans, etc.
If requested, each part can be
folded separately, or all of them
can be folded and larger can be
obtained. You can use folding
racks by rasing then upwards, or
by folding.
For optional
1
2
Lower Basket
Upper Basket

1 2 3 4
5
6 7 8
1
2
3
4
5
6
8
7
14
Cutlery tray
Arrange the cutlery in the tray as shown. Cutlery should be placed to ensure that water runs off freely.
Cutlery tray consists of two parts, and each of parts is adjustable. Lift one part or both up to
increase the space for larger utensils for upper basket.
Door side
Cutlery tray
Cutlery basket
Type
Item
1 Tea spoons
2 Dessert spoons
3 Soup spoons
4 Serving spoons
5 Forks
6 Knives
7 Serving fork
8 Gravy ladle
For washing in the dishwasher the following cutlery/dishes
Are not suitable
Cutlery with wooden, horn china or
mother-of-pearl handles
Plastic items that are not heat resistant
Older cutlery with glued parts that is not
temperature resistant
Bonded cutlery items or dishes
Pewter or cooper items
Lead crystal glass
Steel items subject to rusting
Wooden platters
Items made from synthetic fibre
WARNING!
Do not let any item extend through bottom
Are of limited suitability
Some types of glasses can become
dull after a large number of washes
Silver and aluminium parts have a
tendency to discolour during washing
Glazed patterns may fade if machine
washed frequently

15
NOTE:
Do not put in items that are dirty of cigarette ash, candle wax, lacquer or paint. If you buy
new dishes please make sure that they are suitable for dishwashers.
NOTE:
Please do not overload your dishwasher. There is only space for 11 standard dishes. Do not
use dish that is not suitable for dishwashers. This is important for good results and for reasonable
energy consumption.
Before loading the dishes, you should:
Remove large left-over
Soften remnants of burnt food in pans
Loading Cutlery and Dishes
When Loading the Dishes and Cutlery, Please Note:
Dishes and cutlery must not impede the rotation of the spray arms.
Load hollow items such as cups, glasses, pans etc. with the opening downwards so that water cannot
collect in the container or a deep base.
Dishes and items of cutlery must not lie inside one another, or cover each other
To avoid damage to glasses, they must not touch
Load large items which are most difficult to clean into the lower basket
The upper basket is designed to hold more delicate and lighter dishware such as glasses, coffee
and tea cups
Long bladed knives stored in an upright position are a potential hazard!
Long and/or sharp items of cutlery such as carving knives must be positioned horizontally in the upper
basket
Attention!
Damage to Glassware and other Dishes
Possible causes:
Type of glass or manufacturing process. Chemical composition of detergent.
Water temperature and duration of dishwasher programme.
Suggested remedy:
Use glassware or porcelain dishes that have been marked dishwasher-proof by the manufacturer.
Use a mild detergent that is described as kind of dishes. If necessary, seek further information from
detergent manufacturers.
Select a programme with a low temperature.
To prevent damage, take glass and cutlery out of the dishwasher as soon as possible after the
programme has ended.
At the End of the Wash
When the working cycle has finished, the buzzer of dishwasher will ring for 6 times, then stop. Turn
off the appliance using the "Power" button, shut off the water supply and open the door of the
dishwasher. Wait a few minutes before unloading the dishwasher to avoid handling the dishes and
utensils while they are still hot and more susceptible to breakage. They will also dry better.
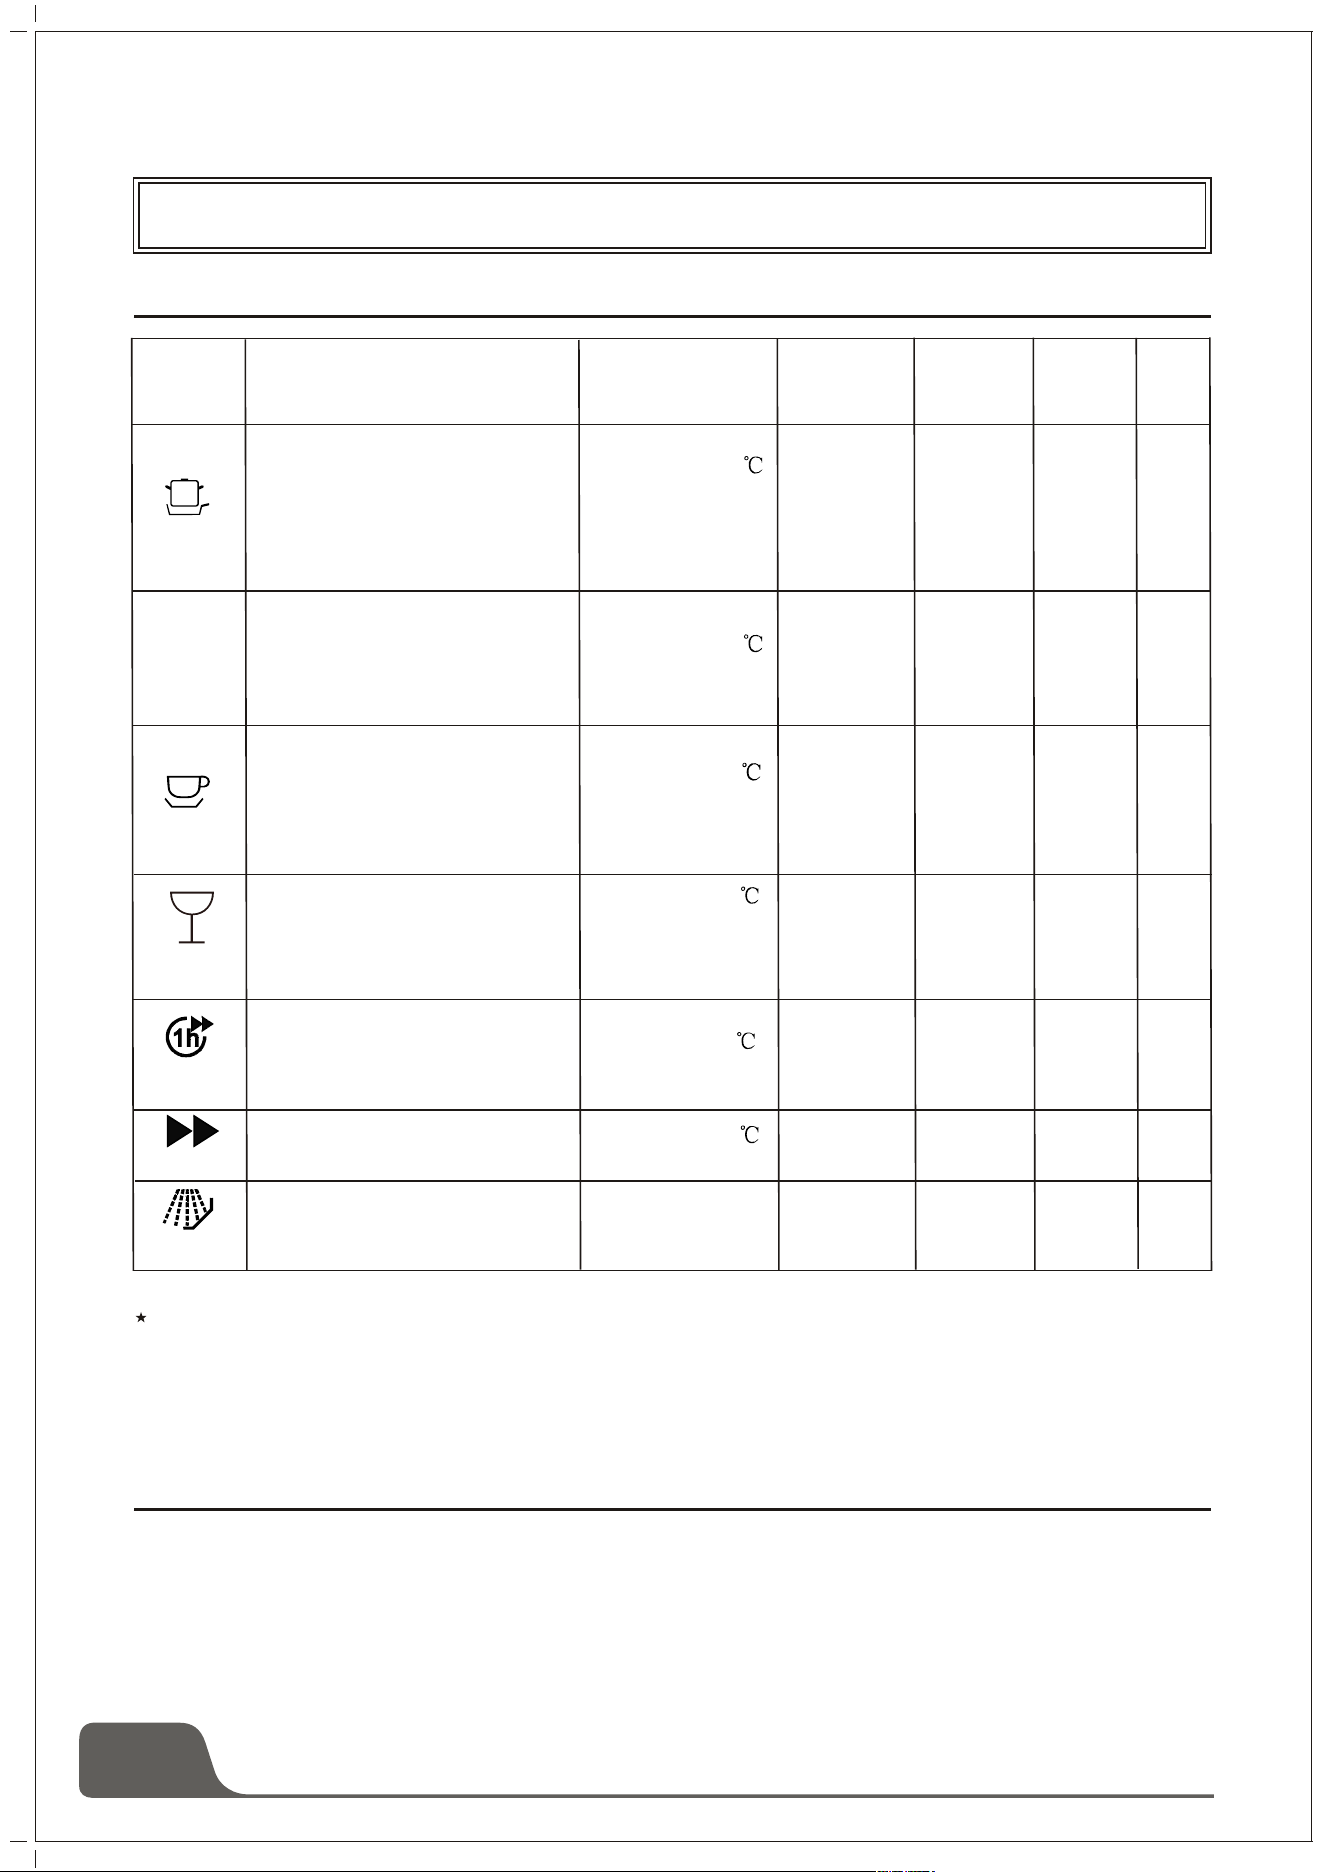
Programme)
(Standard
16
6. Starting a Washing Programme
Wash cycle table
Starting a wash cycle...
Draw out the lower and upper basket, load the dishes and
1. push them back. It is recommended to load the lower basket first, then the upper one (see the
section entitled "Loading the Dishwasher"). Pour in the detergent (see the section entitled "Salt,
Detergent and Rinse Aid").
Turning on the Appliance
EN 60436: this program is the test cycle
The information for comparability test in accordance with EN60436,as follows:
--Capacity: 11 settings
--Position of upper basket: Lower position
--Rinse aid setting: 6 ( or 4 for four setting dispenser)
Program
Cycle Selection
Information
Description
of Cycle
Detergent
Pre/main
Running
Time
(min)
Energy
(kWh)
Water
(L)
Intensive
Eco
Light
Rapid
Pre-Rinse
For the heaviest soiled loads,
such as pots, pans, casserole
dishes and dishes that have
been sitting with dried food
on them for a while.
For normally soiled loads,
such as pots, plates, glasses
and lightly soiled pans.
standard daily cycle.
Light wash cycle to be used
for more delicate items which
are sensitive to high
temperatures.(Run cycle
immediately after use)
A shorter wash for lightly soiled
loads that do not need drying.
To rinse dishes that you
plan to wash later that day
Pre-wash
Main wash(60 )
Rinse 1
Rinse 2
Hot rinse
Drying
Pre-wash
Main wash
(44 )
Hot rinse
Drying
Pre-wash
Main wash(45 )
Rinse
Hot rinse
Drying
Main wash(45 )
Hot rinse
Pre-wash
3/16g
3/16g
3/15g
15
185
238
143
40
12
14.0
9.0
11.5
5.9
3.3
1.360
0.804
0.730
0.650
0.010
(*E 60436)
/
N
60 min
For lightly and normally soiled
plates and pans for every day.
Pre-wash
Main wash
(50 )
Hot rinse
Drying
3/15g
60 0.850 8.7
(or 3 in 1)
(or 3 in 1)
(or 3 in 1)
3/15g
115 0.670 8.6
Crystal
For lightly soiled loads, such
as plates, glasses, bowls and
lightly soiled pans.
Main wash(40 )
Rinse
Hot rinse
Drying

17
NOTE:
A click could be heard when the door is closed perfectly.
When the washing is over, you can shut off the switch by pressing"Power" button.
NOTE:
If all the lights begin to glimmer, that indicates the machine is out of order, please turn off the
main power and water supply before calling a service.
Forget to Add Dish
A forgotten dish can be added any time before the detergent cup opens.
1 Open the door a little to stop the washing.
2 After the spray arms stop working, you can open the door completely.
3 Add forgotten dishes.
4 Close the door, the dishwasher will work after ten seconds.
WARNING!
It is dangerous to open the door when washing, because the hot water may scald you.
Switch Off the Dishwasher
The digital display appears "---" and the buzzer rings 6 times, only in this case the programme
has ended.
1.Switch off the dishwasher by pressing the"Power" button.
2.Turn off the water tap!
Open the door carefully. Hot steam may escape when the door is opened!
Hot dishes are sensitive to knocks. The dishes should therefore be allowed to cool down around
15 minutes before removing from the appliance.
Open the dishwasher's door, leave it ajar and wait a few minutes before removing the dishes. In
this way they will be cooler and the drying will be improved.
Unloading the dishwasher
It is normal that the dishwasher is wet inside.
Empty the lower basket first and then the upper one. This will avoid water dripping from the upper
basket onto the dishes in the lower one.
2. Insert the plug into the socket. The power supply is 220-240V AC 50 Hz, the specification of the
socket is 12 A 250 VAC.50 Hz.
Make sure that the water supply is turned on to full pressure. Close the door, press the" Power"
button, Press the " Program” button to select a desired "Wash cycle". (See the section entitled "Wash
Cycle Table") . With a little force to ensure the door is properly closed.
Change the Programme.
Premise: A cycle that is underway can only be modified if it has only been running for a short time.
Otherwise, the detergent may have already been released, and the appliance may have already
drained the wash water. If this is the case, the detergent dispenser must be refilled (see the section
entitled " Fill in the Detergent " ).
Press”Power” button to cancel the programme, and turn on it again ,then you can change the
programme to the desired cycle setting (see the section entitled "Starting a wash cycle. . . " ).
NOTE: If you open the door when washing, the machine pauses and warning alarm rings, the display
appears E1. When you close the door, the machine will keep on working after 10 seconds.
The 6 programme lights show the state of the dishwasher:
a) One of the programme lights on--> cycle running
b) One of the programme lights blinking -->pause
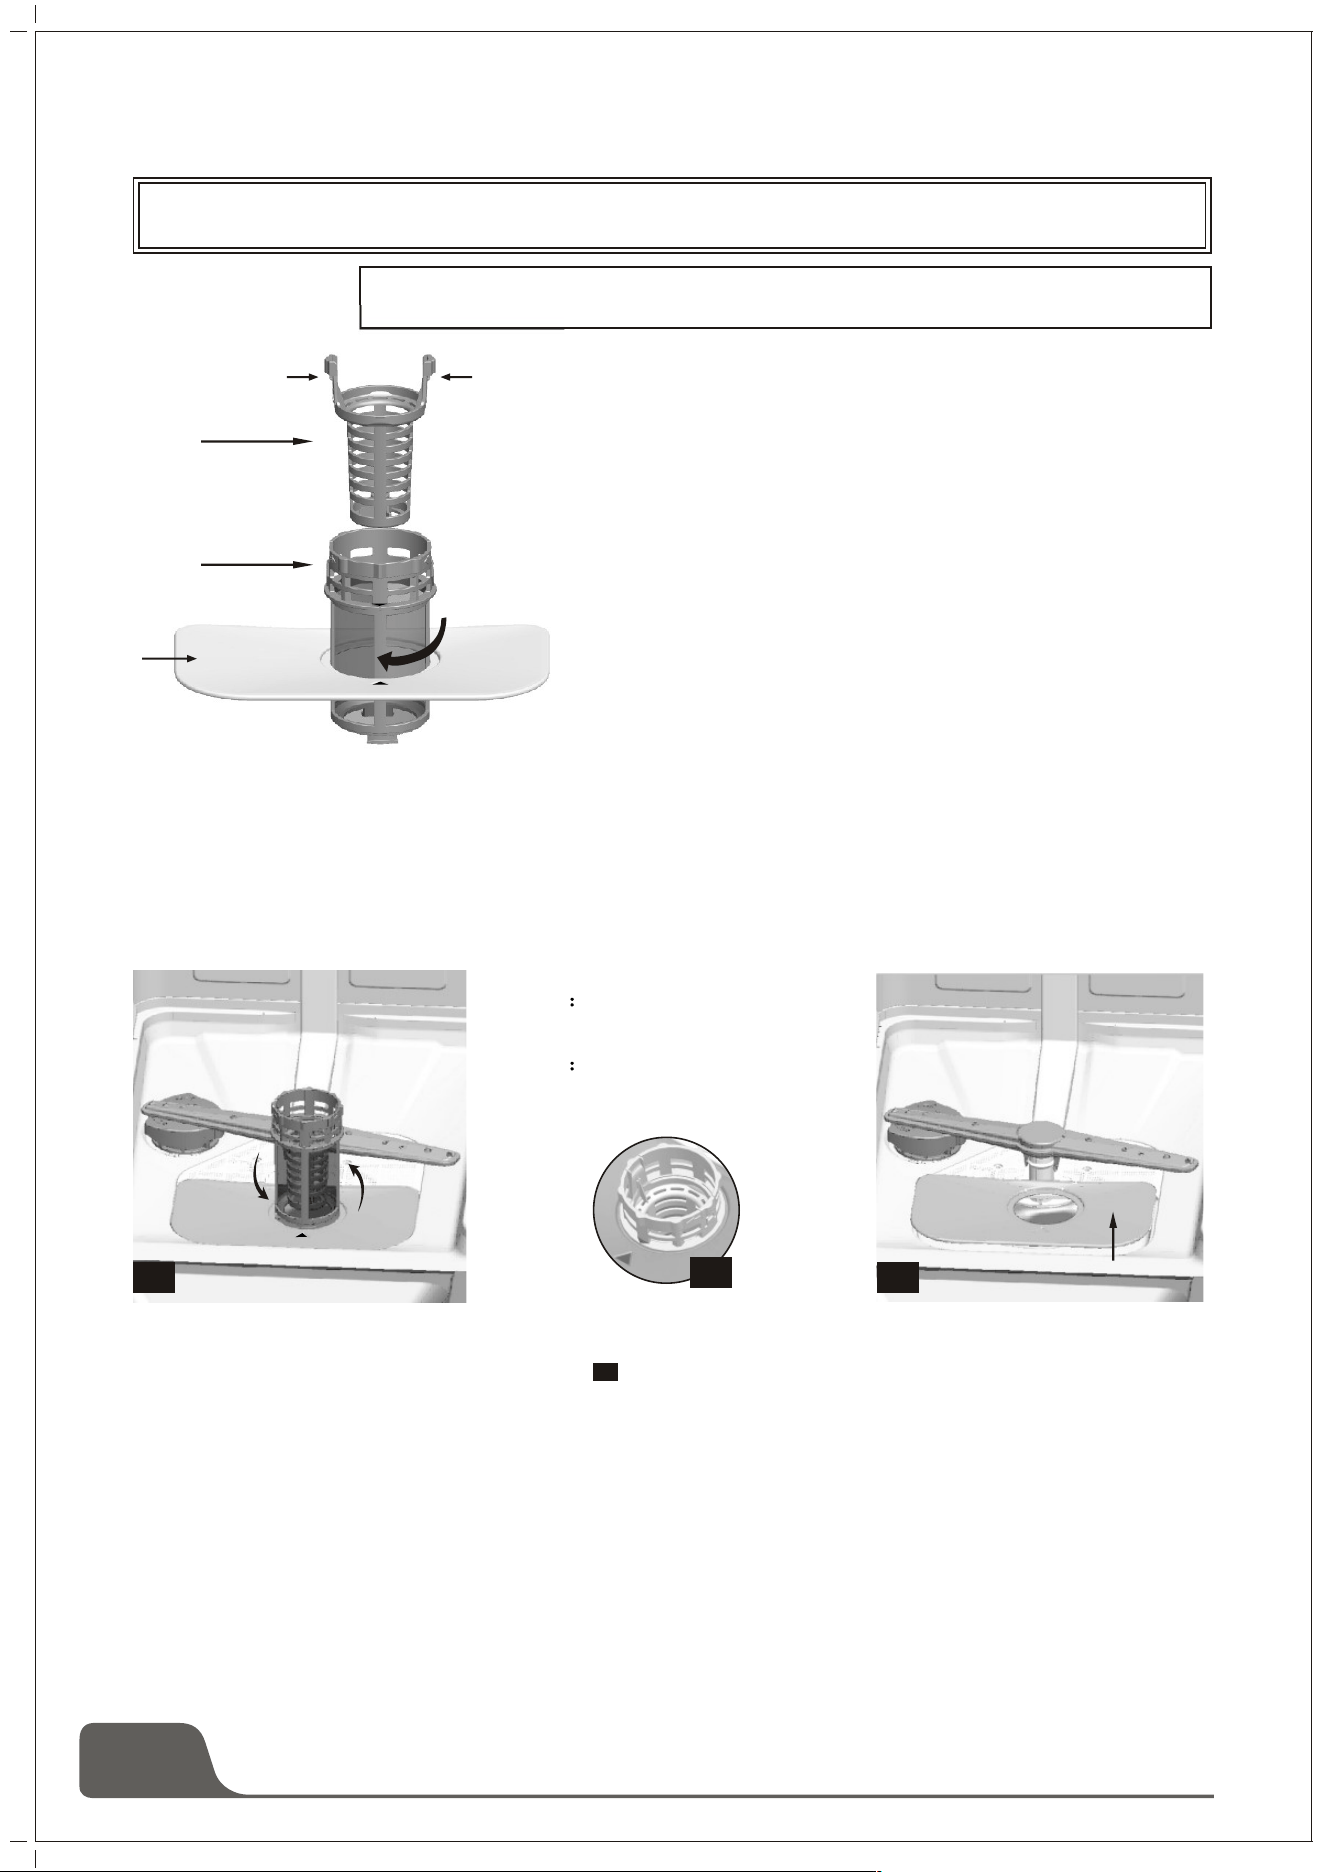
2
1
3
18
Filtering System
The filter is used to avoid the big remnants and other sundries getting inside
the pump. The residue can obstruct the filter in sometime.
The filter system consists of a coarse filter, a flat
(Main filter) and a micro filter (fine filter).
1 Flat filter
Food and debris will be trapped by a special jet
on the lower spray arm.
2 Coarse filter
Big debris, such as bone and glass that could clog the
drain will be trapped in the coarse filter.
To remove an item caught in this filter, gently squeeze
the taps on the top of this filter and lift it out.
3 Micro filter
This filter holds soil and food residue in the sump area
and prevents it from being redeposit on the dishes
during a cycle.
- Inspect the filters for obstructions every time the
dishwasher has been used.
- By unscrewing the coarse filter, you can remove
the filter system. Remove any food remnants and
clean the filters under running water.
Step 1 contrarotate the
Coarse filter ,and then lift it up;
7. Maintenance and cleaning
NOTE:
If operate from step 1 to step 2, the filter system will be removed; while operate from step 2
to step 1, the filter system will be installed .
Filter assembly
For best performance and results, the filter assembly must be cleaned. The filter efficiently removes
food particles from the wash water, allowing it to be recirculated during the cycle. For this reason, it
is a good idea to remove the larger food particles trapped in the filter after each wash cycle by rinsing
the semicircular filter and cup under running water. To remove the filter assembly, pull on the cup
handle in the upward direction. The entire filter assembly should be cleaned once a week. To clean
the coarse filter and the micro filter, use a cleaning brush. Then, reassemble the filter parts as shown
in the figures above and reinsert the entire assembly in the dishwasher, positioning in its seat and
pressing downward. The dishwasher must never be used without the filters. Improper replacement
of the filter may reduce the performance level of the appliance and damage dishes and utensils.
Step 2 lift the Flat filter up
21
3
3
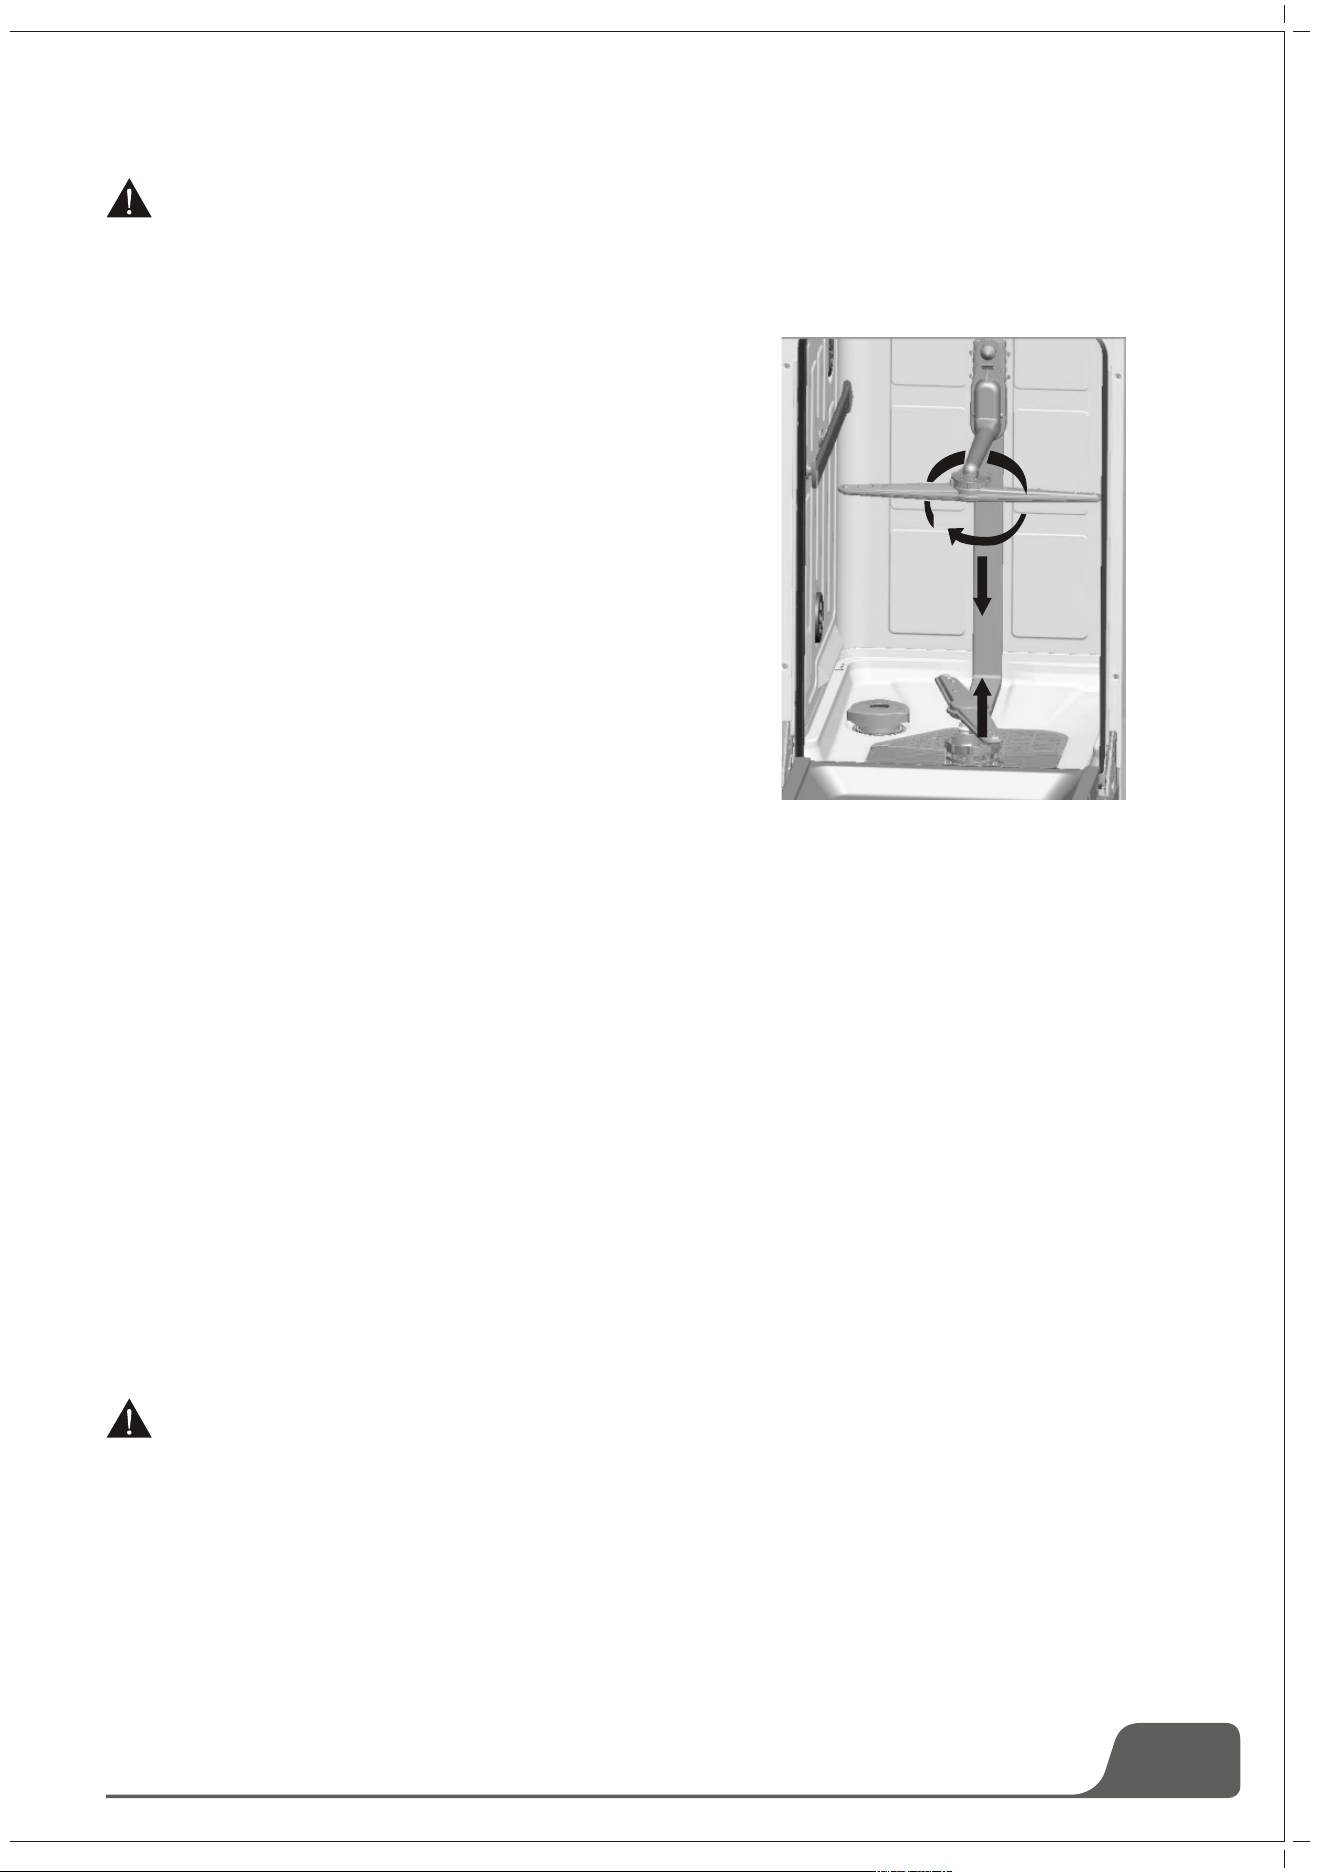
WARNING!
WARNING!
19
Never run the dishwasher without the filters in place. When cleaning the filters, don't knock on them.
Otherwise, the filters could be contorted and the performance of dishwasher could be debased.
Cleaning the Spray Arms
It is necessary to clean the spray arms regularly for hard
water chemicals will clog the spray arm jets and bearings.
To remove the spray arms, screw off the nut clockwise to
take out the washer on top of the spray arm and remove the
arm. Wash the arms in soapy and warm water and use a soft
brush to clean the jets. Replace them after rinsing thoroughly.
Caring for the Dishwasher
To clean the control panel, use a lightly dampened cloth then
dry thoroughly.
To clean the exterior, use a good appliance polish wax.
Never use sharp objects, scouring pads or harsh cleaners
on any part of the dishwasher.
Protect Against Freezing
If your dishwasher is left in an unheated place during the winter, ask a service technical to:
1.Cut off electrical power to the dishwasher.
2.Turn off the water supply and disconnect the water inlet pipe from the water valve.
3.Drain water from the inlet pipe and water valve. (Use a pan to catch the water)
4.Reconnect the water inlet pipe to the water valve.
5.Remove the filter in the tub and the bottom and use a sponge to use up water in sump
Cleaning the Door
To clean the edge around the door, you should use only a soft warm, damp rag. To prevent
penetration of water into the door lock and electrical components, do not use a spray cleaner of any
kind.
Also, never use abrasive cleaners or scouring pads on the outer surfaces because they will scratch
the finish. Some papers towels can also scratch or leave marks on the surface.
Never use a spray cleaner to clean the door panel for it could damage the door lock and electrical
components. It is not allowed to use the abrasive agent or some paper towel because of the risk of
scratching or leaving spots on the stainless steel surface.
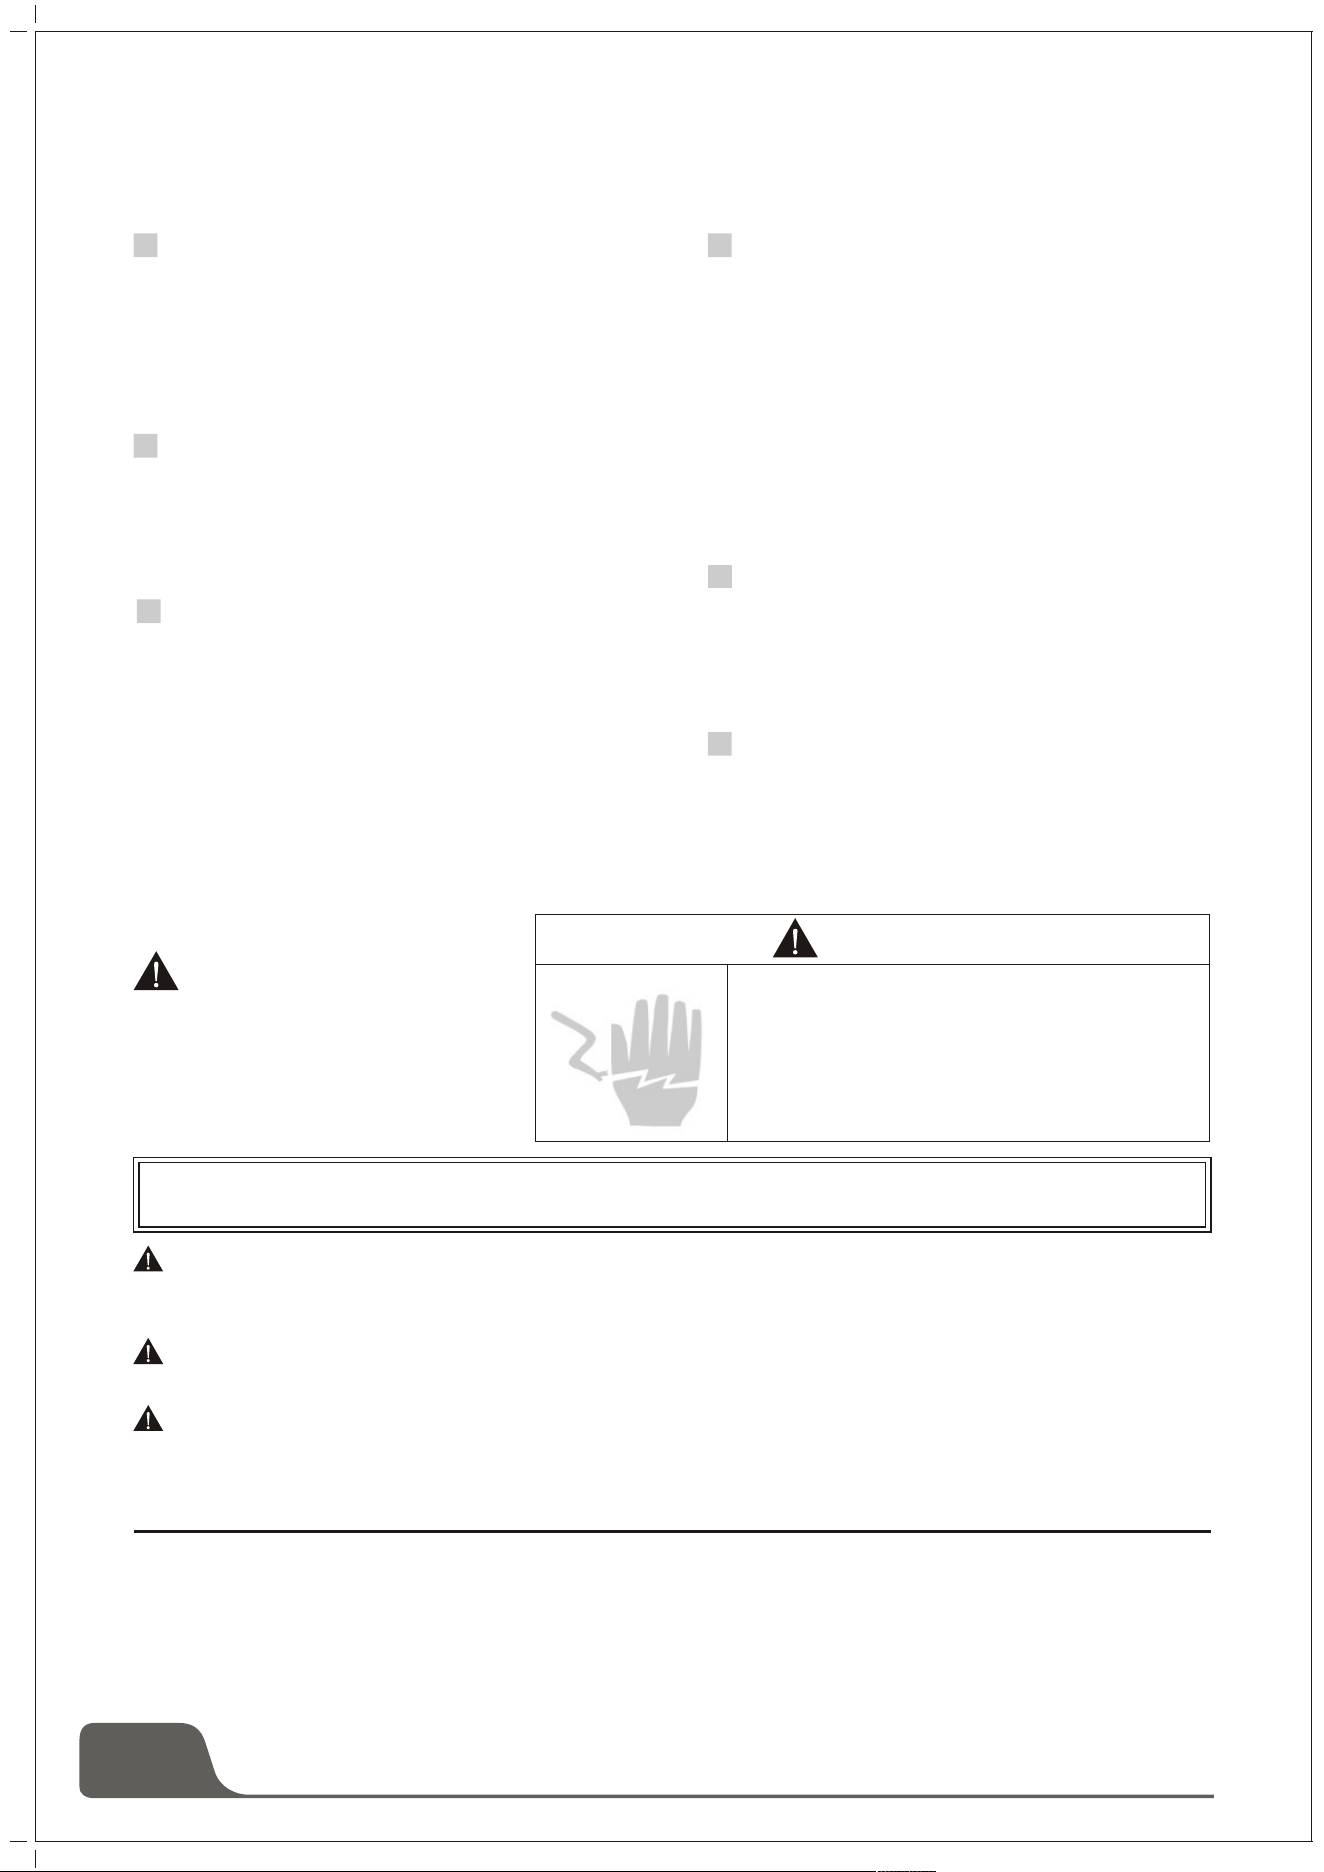
20
How to Keep Your Dishwasher in Shape
After Every Wash
After every wash, turn off the water supply
to the appliance and leave the door slightly
ajar so that moisture and odors are not
trapped inside.
Remove the Plug
Before cleaning or performing
maintenance, always remove the plug from
the socket. Do not run risks.
No Solvents or Abrasive Cleaning
To clean the exterior and rubber parts of
the dishwasher, do not use solvents or
abrasive cleaning products. Use only a
cloth and warm soapy water. To remove
spots or stains from the surface of the
interior, use a cloth dampened with water
and a little white vinegar, or a cleaning
product made specifically for dishwashers.
When You Go on holiday
When you go on holiday, it is
recommended that you run a wash cycle
with the dishwasher empty and then
remove the plug from the socket, turn off
the water supply and leave the door of the
appliance slightly ajar. This will help the
seals last longer and prevent odors from
forming in the appliance.
Moving the Appliance
If the appliance must be moved, try to keep
it in the vertical position. If absolutely
necessary, it can be positioned on its back.
Seals
One of the factors that cause odors to form
in the dishwasher is food that remains
trapped in the seals. Periodic cleaning with
a damp sponge will prevent this.
Attention:
The installation of the pipes
and electrical equipments
should be done by professionals.
Electrical Shock Hazard!
Disconnect electrical power before
installing dishwasher.
Failure to do so can result in death or
electrical shock.
Warning
8. Installation
Keep this instruction manual in a safe place for future reference. If the appliance is sold, given
away or moved, please ensure the manual is kept with the machine, so that the new owner may
benefit from the advice contained within it.
Please read this instruction manual carefully: it contains important information regarding the safe
installation, use and maintenance of the appliance.
If the appliance must be moved at any time, keep it in an upright position; if absolutely necessary,
it may be tilted onto its back.
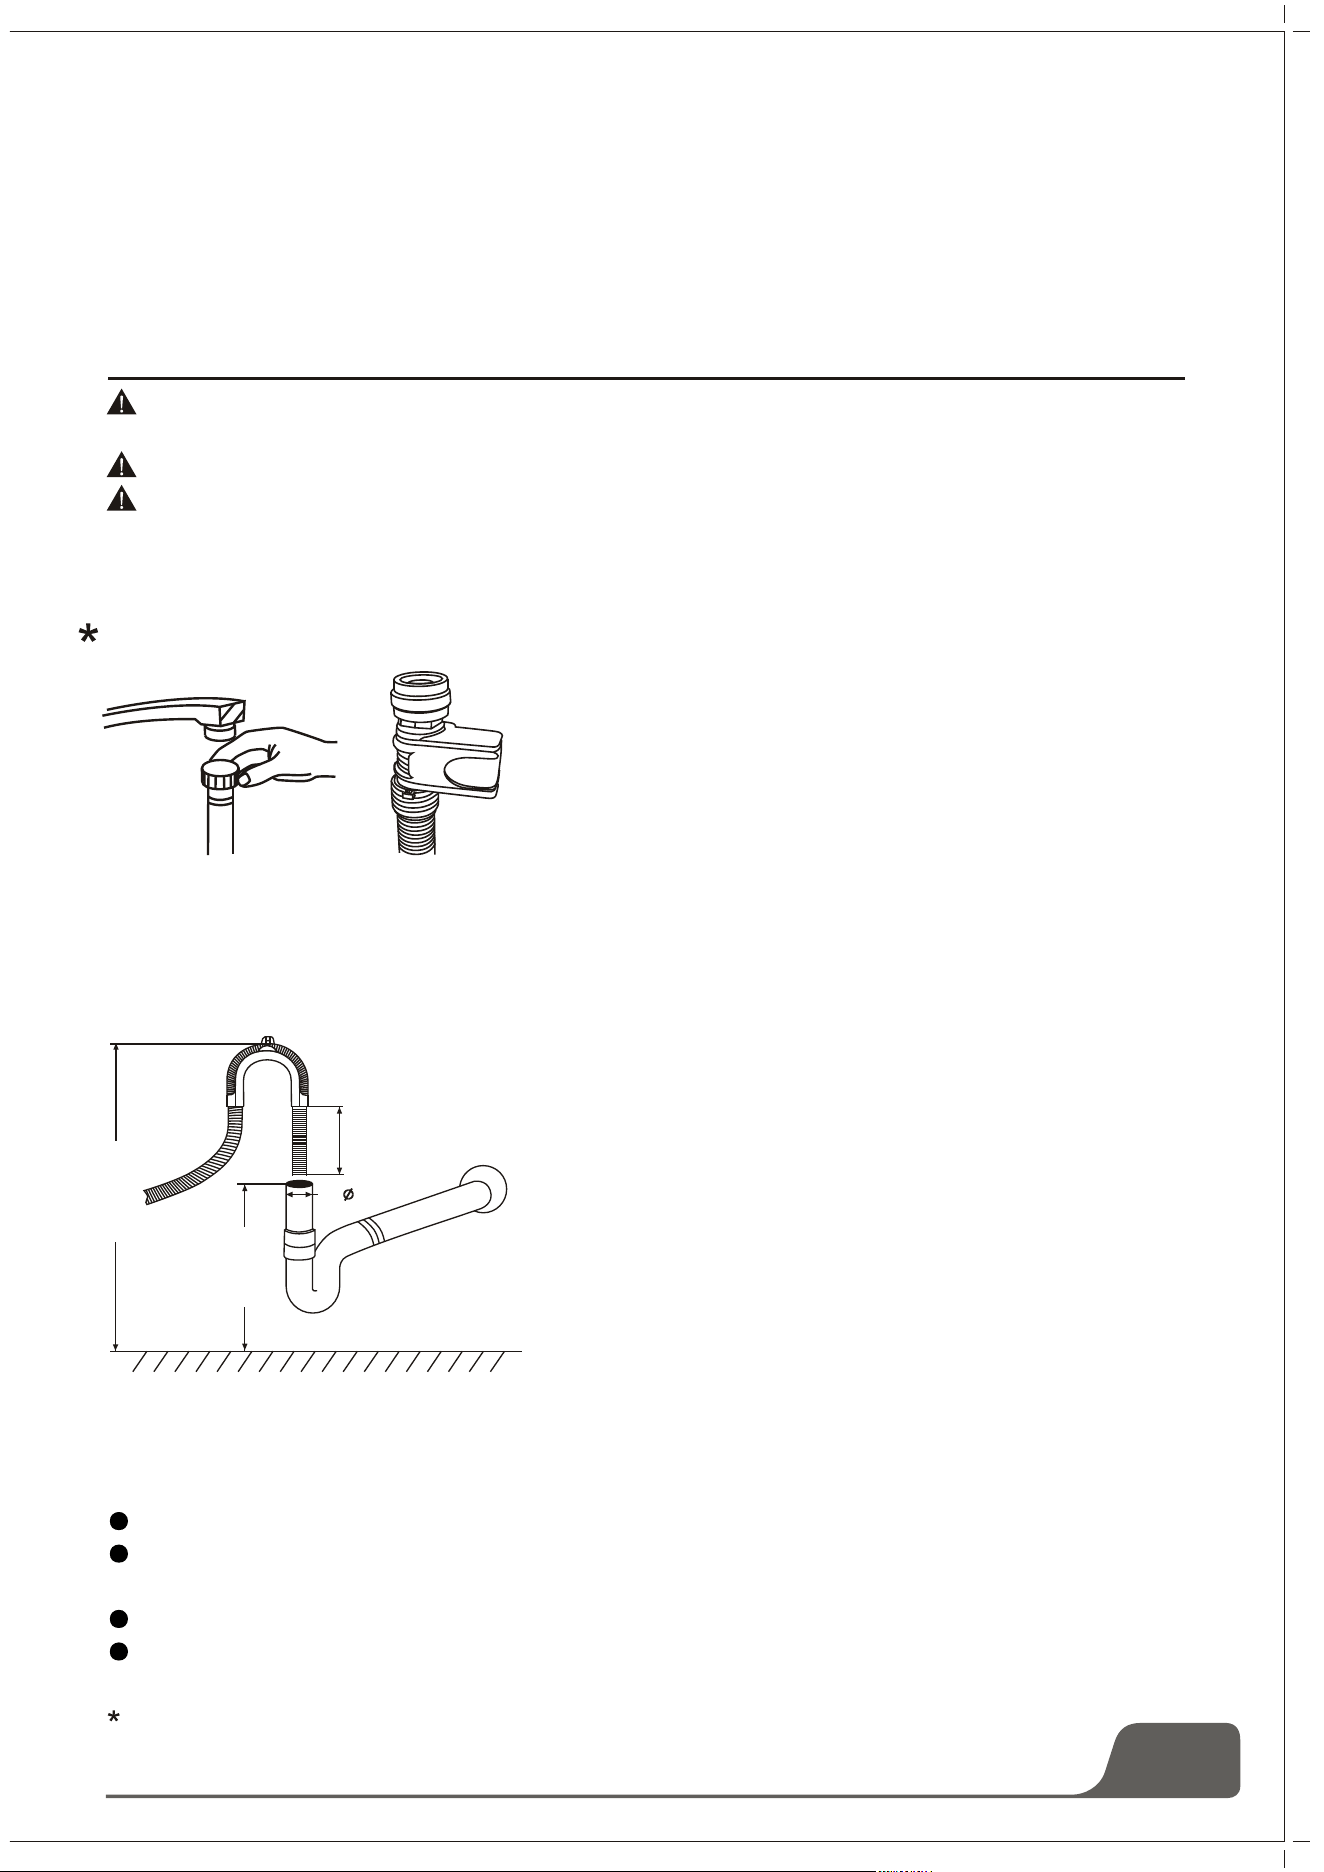
max1100mm
min500mm
min120mm
min 40mm
21
3. Position the dishwasher on a level and sturdy floor. If the floor is uneven, the front feet of the
appliance may be adjusted until it reaches a horizontal position (the angle of inclination must not
exceed 2 degrees). If the appliance is levelled correctly, it will be more stable and much less likely to
move or cause vibrations and noise while it is operation.
Connection to the water and electricity supplies should only be performed by a qualified
technician.
The dishwasher should not stand on top of the water hoses or the electricity supply cable
The appliance must be connected to the water supply network using new piping. Do not use old
piping.
Electrical connection
Before inserting the plug into the electrical socket, make sure that:
the socket is earthed and complies with current regulations;
the socket can withstand the maximum load of the appliance, which is indicated on the data plate
located on the inside of the door(see description of the appliance);
the power supply voltage falls within the values indicated on the data plate on the inside of the door;
the socket is compatible with the plug of the appliance. If this is not the case, ask an authorised
technician to replace the plug (see assistance); do not use extension cables or multiple sockets.
Connecting the water and electricity supplies
Connecting the water inlet hose
Connect the cold water supply hose to a threaded 3/4(inch)
connector and make sure that it is fastened tightly in place.
If the water pipes are new or have not been used for an
extended period of time, let the water run to make sure that
the water is clear and free of impurities. If this precaution is
not taken, there is a risk that the water inlet can get blocked
and the appliance could be damaged.
Fit the d rainage hose of your machine to the drainage pipe
without bending.
If the length of the hose is not sufficient, apply to the
authorized service for an extension made from the same
material as the original. Remember that the length of the
hose should not exceed 4meters even when with an
extension.
If the drainage hose is longer the 4 m. the dishes will not
be cleaned properly secure your hose firmly to the drainage
pipe to avoid it coming off during the washing process.
Connecting the water outlet hose
For optional
Once the appliance has been installed, the power supply cable and the electrical socket should
be easily accessible.
The cable should not be bent or compressed.
If the power supply cable is damaged, it must be replaced by the manufacturer or its Technical
Assistance Service in order to prevent all potential hazards.(See Assistance)
The company shall not be held responsible for any incidents that occur if these regulations are
not observed.
Advice regarding the first wash cycle
After the appliance has been installed, immediately before running the first wash cycle, completely
fill the salt dispenser with and add approximately 2 Kg of salt (see Rinse aid and refined salt). The
water may overflow: this is normal and is not a cause for concern. It is also normal that the LOW
SALT indicator light continues to flash for a few cycles after the salt has been loaded.
Positioning the Appliance
Position the appliance in the desired location. The back should rest against the wall behind it, and
the sides, along the adjacent cabinets or wall. The dishwasher is equipped with water supply and
drain hoses that can be positioned to the right or the left to facilitate proper installation.
Leveling the Appliance
Once the appliance is positioned, adjust the feet (screwing them in or out) to adjust the height of the
dishwasher, making it level. In any case, the appliance should not be inclined more than 2 .
NOTE:
The maximum adjustment height of the feet is 20 mm.
How to Drain Excess Water From Hoses
If the sink is 1000mm higher from the floor, the excess water in hoses cannot be drained directly
into the sink. It will be necessary to drain excess water from hoses into a bowl or a suitable
container that is held outside and lower than the sink.
Water Outlet
Connect the water drain hose. The drain hose must be correctly fitted to avoid water leaks.
Ensure that the water inlet hose is not kinked or squashed.
Extension Hose
If you need a drain hose extension, observe to use a similar drain hose..
It must be no longer than 4 metres; otherwise the cleaning effect of the dishwasher could be
reduced.
Syphon Connection
The waste connection must be at a height of between 50cm (minimum) and 100cm (maximum)
from the bottom of the dish. The water drain hose should be fixed by a hose clip.
22
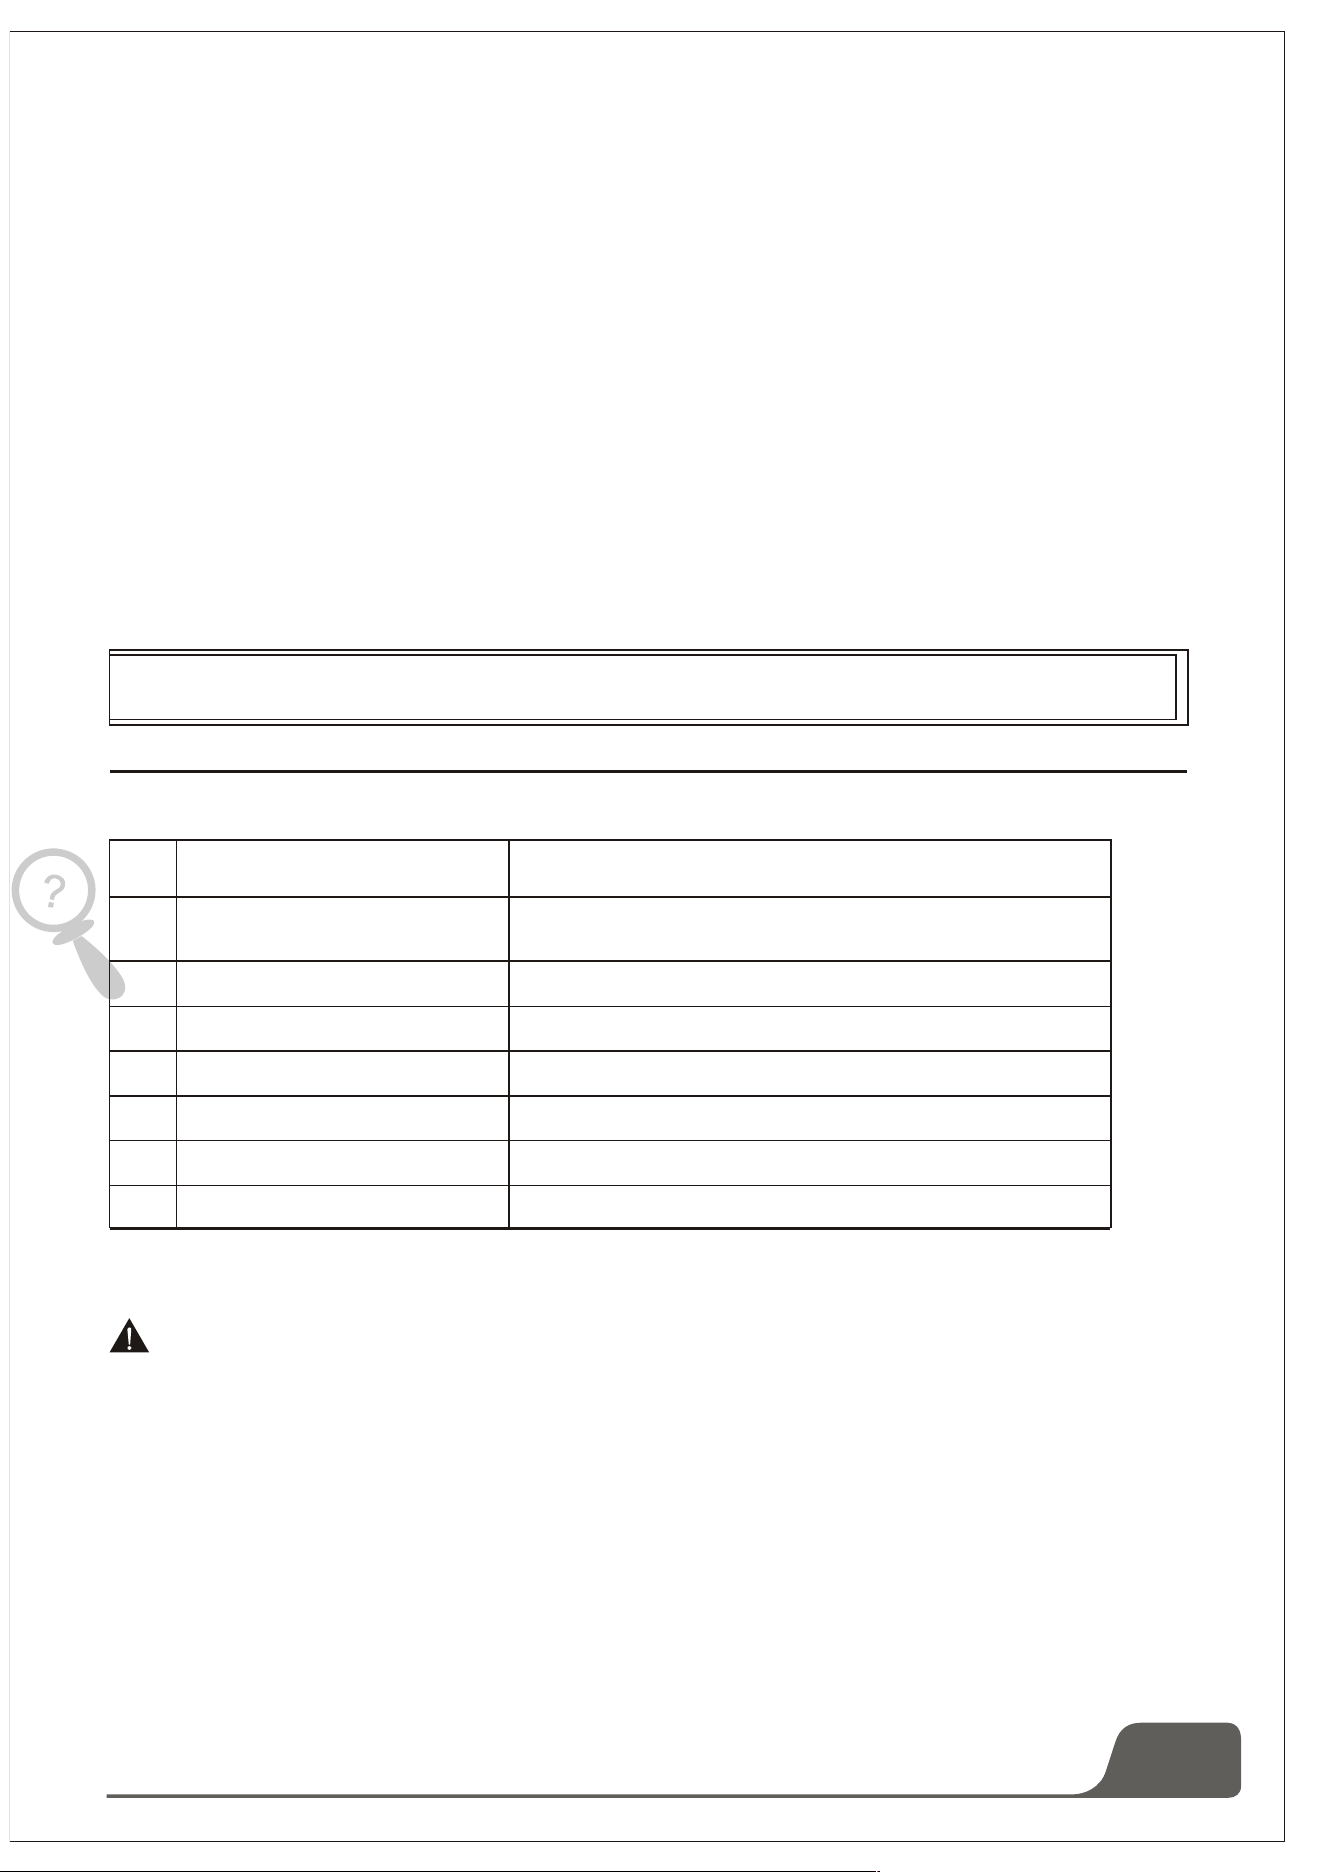
Attention
The followings should be checked before starting the dishwasher:
1 Whether the dishwasher is level and fixed
2 Whether the inlet valve is opened
3 Whether there is leakage at the connections of the conducts
4 Whether the wires are tightly connected
5 Whether the power is switched on
6 Whether the inlet and drain hoses are knotted
7 All packing materials and printings should be taken out from the dishwasher
After installation, please put this manual into the bags of printings.
The content of this manual is very helpful to the users.
Start of Dishwasher
9. Troubleshooting Tips
Error codes
When some malfunctions happen, the appliance will display error codes to warn you.
WARNING!
If overflow occurs, turn off the main water supply before calling a service. If there is water in the base
pan because of an overfill or small leak, the water should be removed before restarting the
dishwasher.
Codes
Meanings
Possible Causes
Water drainage malfunction
E1
E2
E3
E4
E5
E6
E7
Door open
Water inlet
Water drainage
Temperature sensor
Overflow/leakage
Water leakage
Heating element
The door is opened when the
dishwasher is operating
Water inlet malfunction
Temperature sensor malfunction
Overflow occurs/Water leakage occurs
Water leakage occurs
Abnormal heating
23
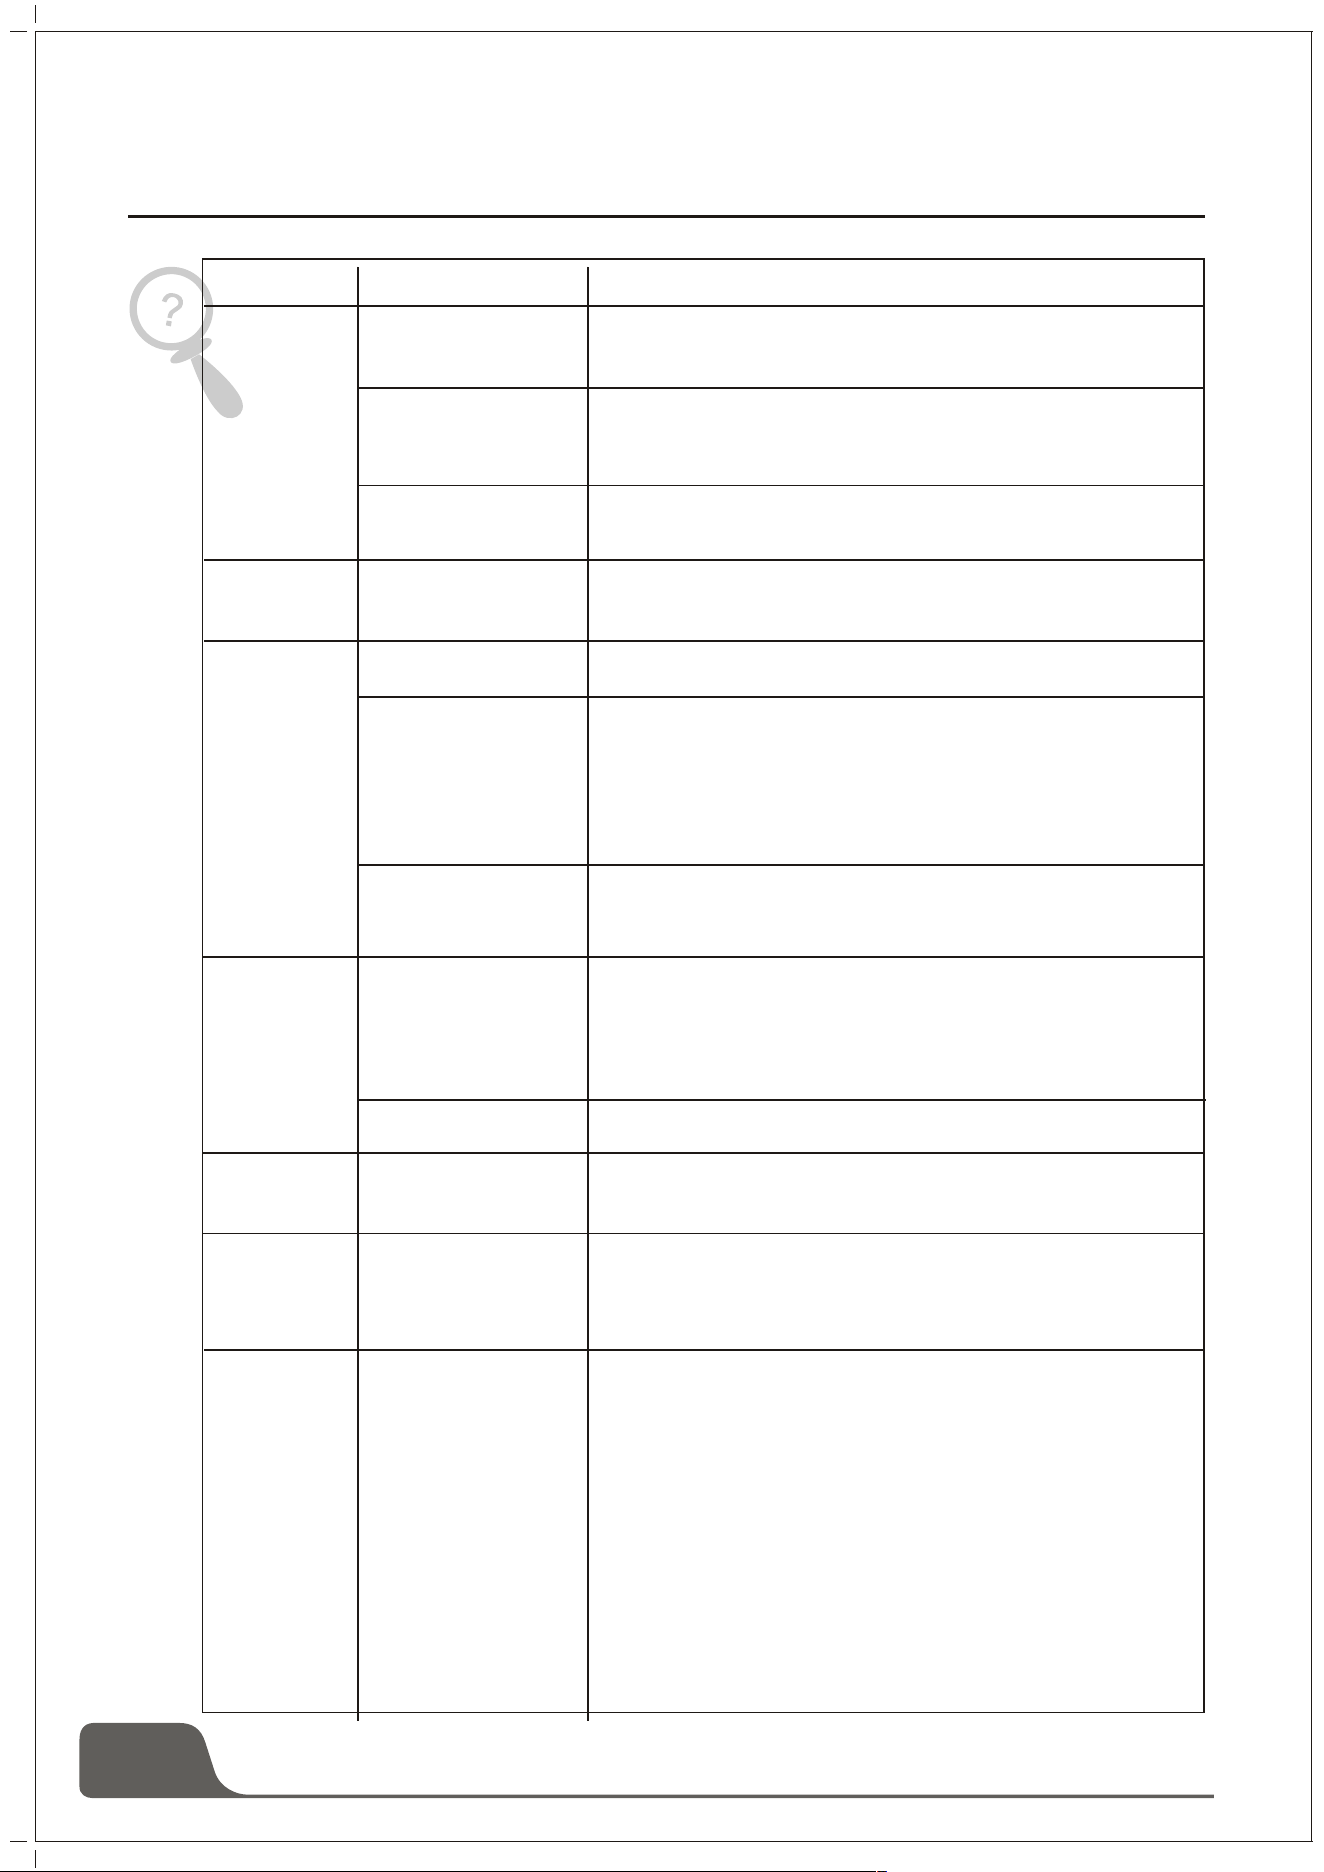
24
Stained tub
interior
Detergent with
colorant was used
Make sure that the detergent is the one without colorant.
Dishes and
flatware
not clean
Make sure that the action of the detergent dispenser
and spray arms are not blocked by large dishware.
Improper program
Improper basket
loading
Select a stronger programme.
Spots and
filming on
glasses and
flatware
1 Extremely hard
water
2 Low inlet
temperature
3 Overloading the
dishwasher
4 Improper loading
5 Old or damp
powder detergent
6 Empty rinse agent
dispenser
7 Incorrect dosage
of detergent
To remove spots from glassware:
1 Take out all metal utensils out of the dishwasher.
2 Do not add detergent.
3 Choose the longest cycle.
4 Start the dishwasher and allow it to run for about
18 to 22 minutes, then it will be in the main wash.
5 Open the door to pour 2 cups of white vinegar
into the bottom of the dishwasher.
6 Close the door and let the dishwasher complete
the cycle. If the vinegar does not work: Repeat
as above, except use 1/4 cup (60 ml)of citric acid
crystals instead of vinegar.
Before Calling for Service
Reviewing the charts on the following pages may make you be free of calling for service.
Use only the special dishwasher detergent to avoid
suds. If this occurs, open the dishwasher and let suds
evaporate. Add 1 gallon of cold water to the tub. Close
and latch the dishwasher, then start the "pre-rinse" wash
cycle to drain out the water... Repeat if necessary.
Problem
Dishwasher
doesn't run
Drain pump
doesn't stop
Noise
Suds in
the tub
Possible Causes
What To Do
Spilled rinse agent
Always wipe up rinse agent spills immediately.
Fuse blown, or the
circuit breaker acted
Power supply is
not turned on
Water pressure
is low
Overflow
The system is designed to detect an overflow. When it
does, it shuts off the circulation pump and turns on the
drain pump.
Some audible
sounds are normal
Utensils are not
secure in the
baskets or
something small
has dropped into
the basket
Motor hums
Improper detergent
Dishwasher has not been used regularly. If you do not
use it often, remember to set it to fill and pump out
every week, which will help keep the seal moist.
To ensure everything is secured in the dishwasher.
Sound from detergent cup opening.
Check that the water supply is connected properly and
the water is turned on.
Make sure the dishwasher is turned on and the door is
closed securely. Make sure the power cord is properly
plugged into the wall socket.
Replace fuse or reset circuit breaker. Remove any other
appliances sharing the same circuit with the dishwasher.
25
Cloudiness
on glassware
Combination of soft
water and too much
detergent
Use less detergent if you have soft water and select a
shortest cycle to wash the glassware and to get them
clean.
Yellow or
brown film
on inside
surfaces
White film on
inside surface
The Detergent
dispenser lid
cannot be
closed prop
-erly
Detergent left
in dispenser
cups
Steam
Black or
gray marks
on dishes
Water
standing on
the bottom
of the tub
Iron deposits in
water can cause
an overall film
Dishes block
detergent Cups
Using a solution of 1/2 cup of bleach and 3 cups of
warm water to remove the stains by hand.
WARNING
You have to wait for 20 minutes after a cycle to let the
heating elements cool down before cleaning interior;
otherwise, burns will happen.
To clean the interior, use a damp sponge with
dishwasher detergent and wear rubber gloves. Never
use any other cleaner than dishwasher detergent for the
risk of foaming or suds.
Hard water minerals
Clogged detergent re
-sidue is blocking the
catch
Tea or coffee stains
A small amount of clean water around the outlet on
the tub bottom keeps the water seal lubricated.
Use a mild abrasive cleaner to eliminate those marks.
There is some steam coming through the vent by the
door latch during drying and water draining.
Re-loading the dishes properly.
Clean the detergent from the catch.
You have to call a water softener company for a special
filter.
This is normal
Aluminum utensils
have rubbed
against dishes
Normal phenomenon
Dishwasher
leaks
Dishwasher
isn't level
Make sure the dishwasher is level.
Be careful not to overfill the rinse aid dispenser.
Spilled rinse aid could cause oversudsing and lead
to overflowing. Wipe away any spills with a damp cloth.
Overfill dispenser or
rinse aid spills

26
Technical Data Sheet
Sheet of household dishwasher according to EU Directive2019/2017:
E-CLVG4598I

27
CERTIFICADO DE GARANTÍA
Imprescindible la presentación de la factura de compra acompañada del presente certicado de garantía.
Riesgos cubiertos.
Este aparato está garantizado contra cualquier defecto de funcionamiento, siempre que se destine a uso doméstico,
procediéndose a su reparación dentro del plazo de garantía y sólo por la red de SAT autorizados.
Excepciones de garantía.
• Que la fecha del certicado no coincida con la fecha de venta de la factura original.
• Averías producidas por golpe, por caída o cualquier otra causa de fuerza mayor.
• Si el aparato ha sido manipulado por personal no autorizado.
• Las averías producidas o derivadas como consecuencia de un uso inadecuado, por defectos de instalación,
por introducir modicaciones en el aparato que alteren su funcionamiento.
• Puestas en marcha, mantenimiento, limpiezas, componentes sujetos a desgaste, lámparas, piezas estéticas,
oxidaciones, plásticos, gomas, carcasas y cristales.
“ESTAS EXCEPCIONES ANULAN LA GARANTÍA, SIENDO LA REPARACIÓN CON CARGO AL CLIENTE”
Periodo amparado en aparatos según ley de garantias en la venta de bienes de consumo
Sevicio Técnico Ocial:
911 08 08 08
•
•
•
•
•
•
•
“ ”
:
911 08 08 08
•
•