
E360 User Manual


Contents
1. What’s in the box?
2. Component Instructions
3. Installation Instructions
6. Specications
7. Warranty & Suppo
4. Menu Oveiew
4.1 Touchscreen Operation Instructions
4.2 Menu Instructions
5. Function Instructions
2.1 Camera Oveiew
2.2 Screen Oveiew
3.1 Installing a Memo Card
3.2 Installing the Car Charger
3.3 Installing the Split Adhesive Mount
3.4 Installing the Rear Camera Cable
3.5 Installing the Rear Camera
3.6 Handheld Record Mode Installation
5.1 WiFi Connection
5.2 Main Functions of APP
5.3 Drive Record Mode
5.4 Handheld Record Mode
5.5 Firmware Upgrade
01
38
39
04
02
02
03
04
04
05
07
07
08
21
21
24
27
34
36
08
08
13

Please read the user manual carefully before using this
dash cam.
To use this dash cam, please keep it plugged in.
To ensure the driving safety, please don’t congure
this dash cam or watch the driving footage when
driving.
This product requires a SD card for operation, please
use a functioning SD card.
Do not disassemble the dash cam or repair it yourself.
If the product malfunctions, please contact Vantrue
ocial suppo.
Do not install the dash cam on the position that may
obstructs your driving view.
Keep the product away from high temperature and
humid environments.
To enhance user experience, we will update rmware
periodically. Please update the rmware and
experience it if needed.
Do not install the dash cam directly in front of
passengers in case of accidental detachment and
potential safety hazards.
Please use this product within the bounds of the law.
1.
2.
3.
4.
5.
6.
7.
8.
9.
10.
Warnings:

- 1 -
1. What’s in the box?
H. Rear Camera I. Rear Camera
Cable (20ft)
Optional Accessories
(Buy Separately)
A.Vantrue E360
Main Camera
C. Car Charger
(11.5ft)
B. GPS Mount
G. 3M Adhesive
Stickers
F. USB Data Cable
(3.3ft)
E. Electrostatic
Stickers
J. Handheld Mount
K. Tripod Stand L. Vantrue
Hardwire Kit
M. LTE Module
*This device is
non-waterproof,
please keep it
away from water.
*This device is non
-waterproof, please
keep it away from
water.
Standard Accessories:
D. Cable Clip
- 2 -
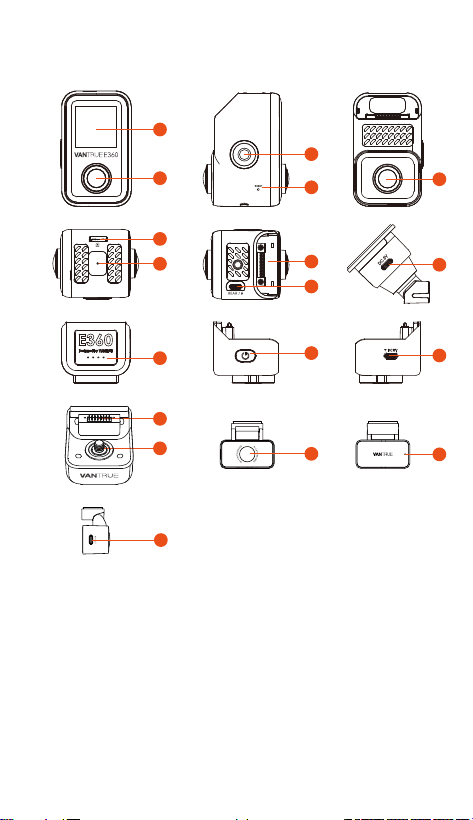
2. Component Instructions
2.1 Camera Oveiew
1. Display Screen
2. Cabin Camera
3. Emergency Lock Button
(Power Button)
4. Reset Button
5. Front Camera
6. Memo Card Slot
7. Microphone
8. Mount Connection Po
9. Rear Camera Po
10. Power Po
11. Handheld Mount Batte
Indicator
12. Handheld Mount Power
Button
13. Handheld Mount
Charging Po
14. Handheld Mount
Connection Inteace
5
10
13
17
1
2
6
7
11
18
3
4
8
9
12
16
14
15
- 3 -- 3 -
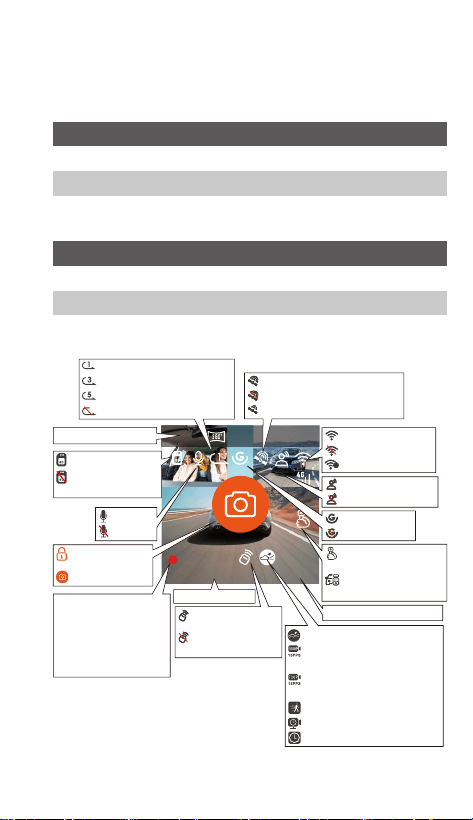
2.2 Screen Oveiew
Main Camera Indicator
Always On
Flashing Slowly
Flashing Rapidly
In standby status
Camera is recording
Firmware is upgrading
Rear Camera Indicator
Always On
O
Power on
Power o
2024/05/20 14:09:07 MP/H
65
00:00:37
+1440P 30FPS5.2K
WiFi ON
WiFi OFF
WiFi is connected
Collision Detection ON
1080P 15FPS Low Bitrate
Mode ON
720P 15FPS Low Bitrate
Mode ON
Motion Detection ON
Low Framerate Mode ON
Time Lapse ON
SD Card Inseed
MIC ON
MIC OFF
Emergency File
Locked
Snapshot
Loop Recording for 1 min
Loop Recording for 3 min
Loop Recording for 5 min
Loop Recording OFF
G-sensor ON
G-sensor OFF
Voice Control ON
Voice Control OFF
Date and Time
In Handheld Record
Mode
In Drive Record
Mode
GPS is located successfully
GPS OFF
GPS is locating
Current Resolution
Current Driving Speed
Remote control
is connected
Remote control
is not connected
15. Handheld Mount Fixing Screw
16. Rear Camera
17. Rear Camera Indicator
18. Rear Camera Connection Po
No SD Card /
SD Card Error
It displays recording
time when
recording.
It displays available
recording time
when recording
paused.
- 4 -
3. Installation Instructions
There are 2 usage scenarios for this dash cam: the
interior of car and outdoor. The installation methods
are dierent for these 2 usage scenarios. To install it in
the interior of car, please follow the installation steps
below.
Please inse a memo card into the card slot
according to the direction shown in the diagram. We
recommend using Vantrue SD card or other SD card
with U3 data transfer speed.
3.1 Installing a Memo Card
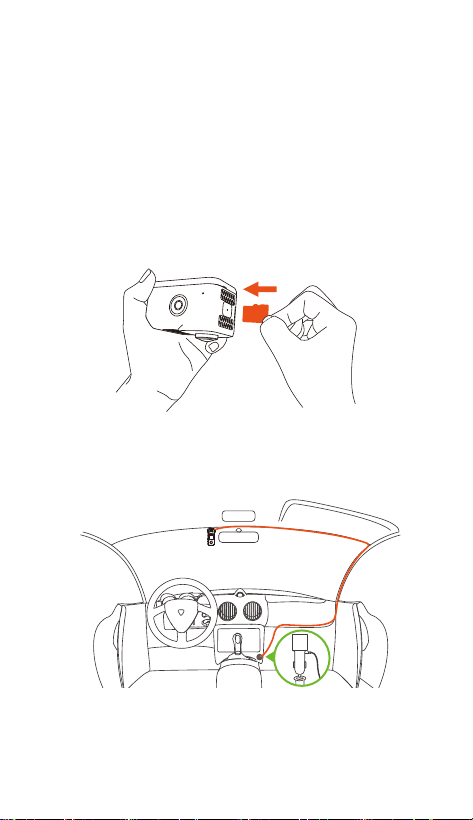
Inse the car charger into the cigarette lighter socket
and tuck the cable into the gap along the car's A-pillar.
3.2 Installing the Car Charger
microSD
When organizing or storing car charger cables or rear
camera wires, cable clips can be used for securing them
in place. After attaching the cable clip to a suitable
spot, simply fasten the cables within the clip.
- 5 -
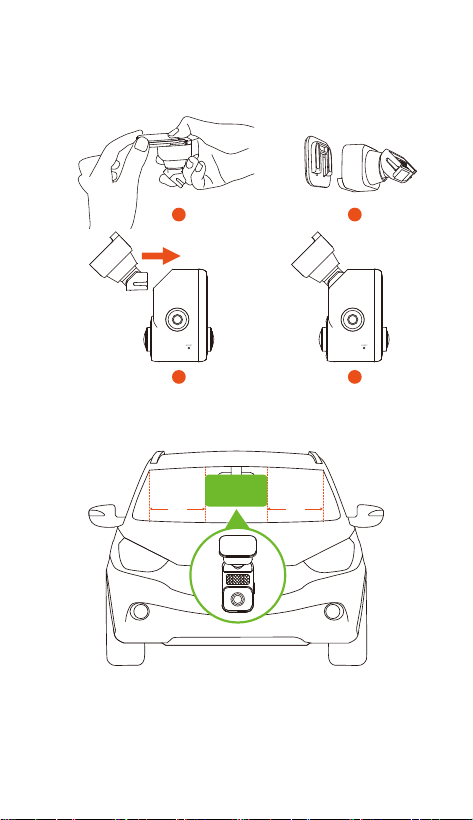
E360 comes with a split adhesive mount. Please remove
the base of split adhesive mount and connect the
mount to main camera according to the diagram.
When installing the mount base, please refer to the
recommended installation area shown in the diagram.
3.3 Installing the Split Adhesive Mount
1 2
3 4
Note: The distance between the E360 main camera and
the car's A-pillar should be more than 40cm. It is
recommended to install it in the center of the front
windshield or in the area that is more than 40cm away
from both sides of the A-pillars.
15.7in 15.7in
INSTALLATION
AREA
- 6 -- 6 -
Electrostatic
Stickers
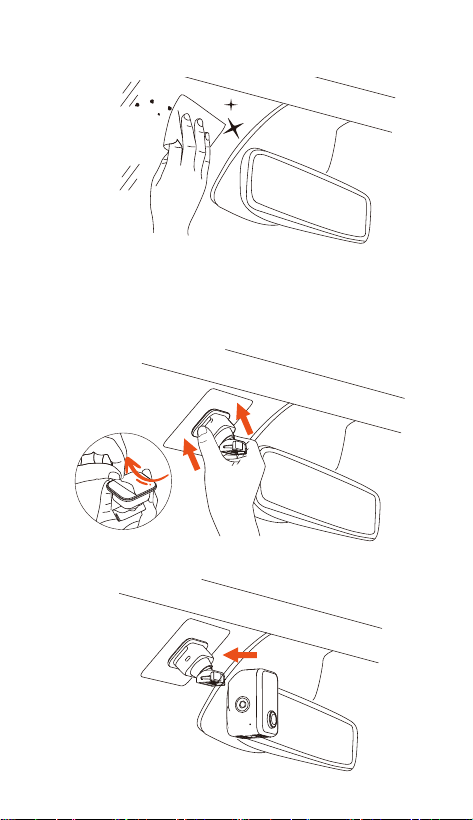
After conrming the installation position for the mount,
please use a clean cloth to clean the installation area.
Peel o the protective lms from electrostatic stickers,
attach the electrostatic stickers to the installation
position.
Peel o the protective lm from the mount base, attach
the mount to the electrostatic stickers and press rmly.
Finally, connect the E360 main camera to the mount.
- 7 -
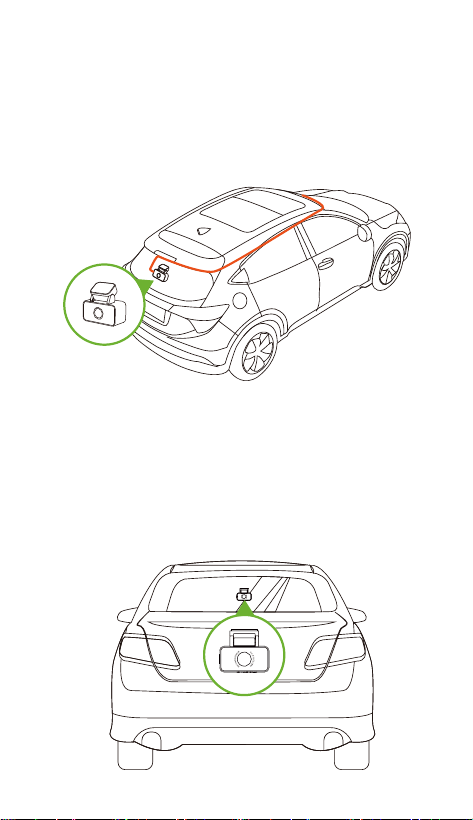
3.4 Installing the Rear Camera Cable (Rear camera Cable
is optional and needs to be purchased separately.
It is included in E360 Plus or Ace Bundle.)
Please install the rear camera cable following the
instructions in the diagram. Adjusting the cable
according to the actual length of the car to avoid the
cable hanging down and obstructing your view,
ensuring driving safety.
3.5 Installing the Rear Camera (Rear Camera is optional
and needs to be purchased separately. It is included
in E360 Ace Bundle. )
It is recommended to install the rear camera in the
central position of the rear window and avoid placing it
over the defogging lines. Please adjust the recording
angle of the rear camera according to the actual
recording situation.
- 8 -
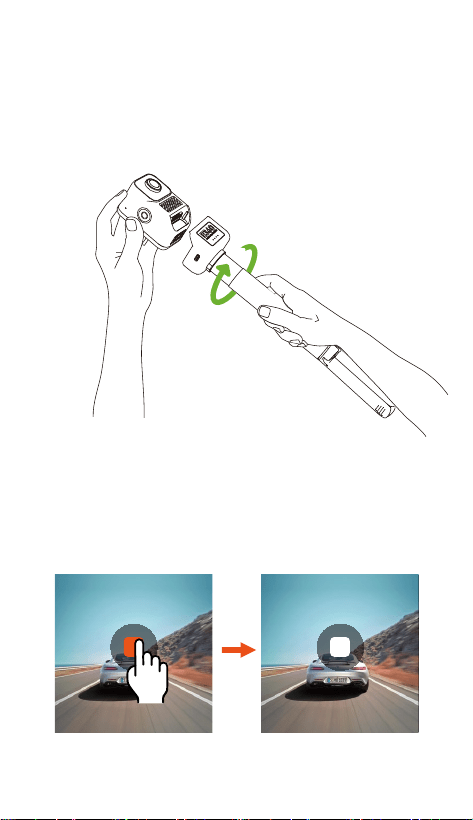
Click to sta recording
Click to pause
recording
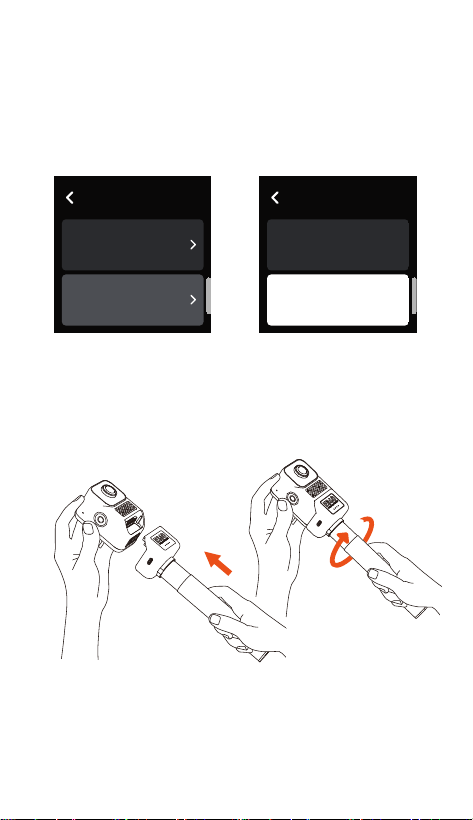
3.6 Handheld Record Mode Installation (Handheld
mount is optional and needs to be purchased
separately. It is included in E360 Ace Bundle. )
After detaching the E360 main camera from the split
adhesive mount, you can install it on the handheld
mount to switch to handheld mode, making it
convenient for outdoor use.
4. Menu Oveiew
4.1 Touchscreen Operation Instructions
The menu of E360 dash cam is mainly operated in touch
control mode. The following are the touchscreen
operation instructions.
Sta / Pause Recording
Drive Record
Setup
- 9 -
2024/10/30 14:09:07 MP/H
65
00:00:37
+1440P 30FPS5.2K
2024/10/30 14:09:07 MP/H
65
00:00:37
+1440P 30FPS5.2K
Note:
In handheld mode, default setting is that it will not
automatically sta recording. Please manually click the
recording icon on the screen to sta recording.
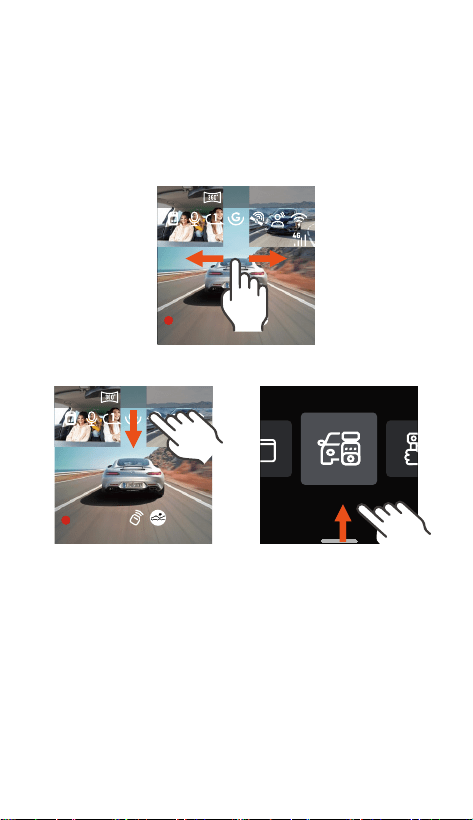
Adjust Screen Display
In the recording inteace, it can be swiped left or right
to switch the screen display.
Enter / Exit Menu
Swipe down from the
top of the screen to
enter the menu setup.
Swipe down from the top
of the menu or swipe
up from the bottom of the
menu to exit the menu.
Resolution
Loop
Recording
Drive Record Setup
Drive Record
Setup
- 10 -
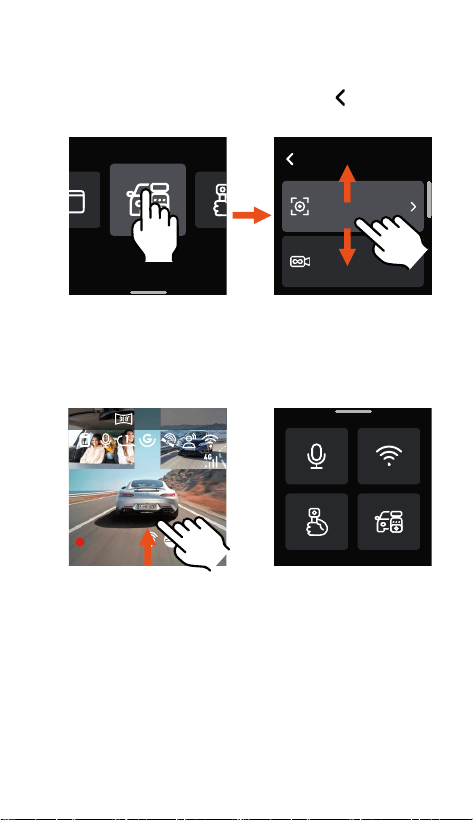
Menu Setup Operation
After entering the second menu, swipe up or down to
browse the menu options. Click a menu option to enter
the corresponding menu settings. Click to go back to
the previous menu.
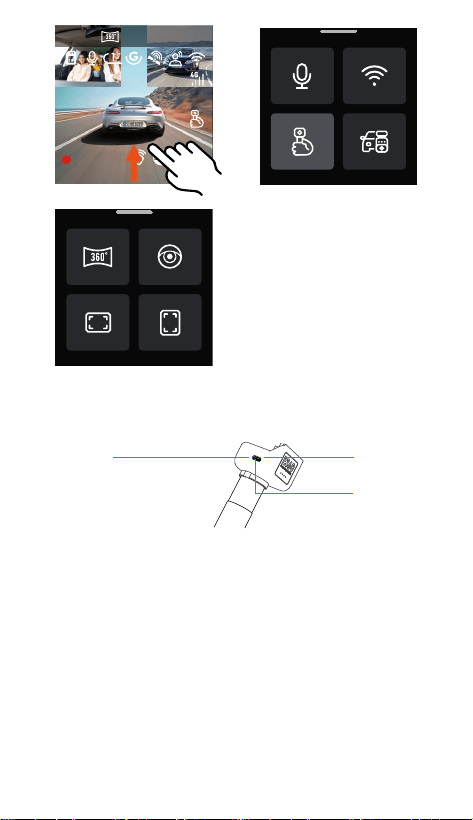
Quick Menu Setup Operation
In the recording inteace, swipe up to enter the quick
menu inteace.
2024/05/20 14:09:07 MP/H
65
00:00:37
+1440P 30FPS5.2K
Swipe up from the
bottom of recording
Inteace
Quick Menu Inteace
Main Menu
Second Menu
- 11 -
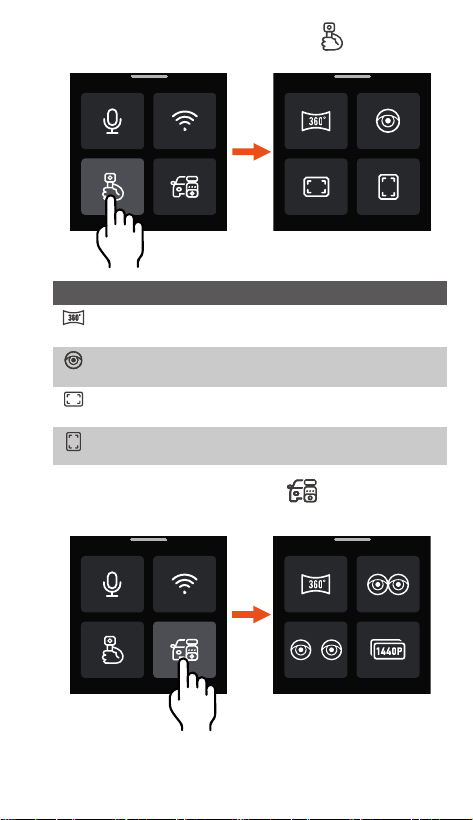
Click the handheld record mode icon to quickly set
the handheld record mode resolution.
Click the drive record mode icon to quickly set the
drive record mode resolution.
Quick Menu Icon Instructions
Click to switch to 5.2K Panorama View 30FPS
resolution.
+
Click to switch to Dual Fisheye Lens 30FPS
resolution.
Click to switch to 1440P+1440P 30FPS 16:9
resolution.
Click to switch to 1440P+1440P 30FPS 9:16
resolution.

- 12 -
Quick Menu Icon Instructions
In front and cabin recording mode, click to switch
to 5.2K Panorama View 30FPS resolution.
In front, cabin and rear recording mode, click to
switch to 5.2K Panorama View+1440P 30FPS
resolution.
In front and cabin recording mode, click to
switch to Dual Fisheye Lens 30FPS resolution.
In front, cabin and rear recording mode, click to
switch to Dual Fisheye Lens+1440P 30FPS
resolution.
In front and cabin recording mode, click to switch
to 1440P+1440P 30FPS resolution.
In front, cabin and rear recording mode, click to
switch to 1440P+1440P+1440P 30FPS resolution.
In front and cabin recording mode, click to switch
to Fisheye+Fisheye 30FPS resolution.
In front, cabin and rear recording mode, click to
switch to Fisheye+Fisheye+1440P 30FPS
resolution.

- 13 -
4.2 Menu Instructions
a. Resolution: The E360 dash cam suppos the
following resolutions for drive record mode:
Front + Cabin + Rear Recording:
5.2K Panoramic View+1440P 30FPS
Dual Fisheye Lens+1944P 30FPS
Dual Fisheye Lens+1440P 30FPS
Fisheye+Fisheye+1944P 30FPS
Fisheye+Fisheye+1440P 30FPS
1944P+1944P+1944P 30FPS
1440P+1440P+1440P 30FPS
1440PX2 60FPS+1440P 30FPS
1440P+1440P+1080P 30FPS
1080P+1080P+1080P 30FPS
Front + Cabin Recording:
5.2K Panoramic View 30FPS
Dual Fisheye Lens 30FPS
Fisheye+Fisheye 30FPS
1944P+1944P 30FPS
1440P+1440P 30FPS
1440P+1440P 60FPS
1440P+1080P 30FPS
1080P+1080P 30FPS
4.2.1 Drive Record Setup
Front + Rear Recording:
Fisheye+1944P 30FPS
Fisheye+1440P 30FPS
1944P+1944P 30FPS
1440P+1440P 30FPS
Drive Record
Setup

- 14 -
b.
c.
d.
e.
f.
g.
h.
i.
j.
Loop Recording: Default setting is 1 Minute. There
are 4 options for you to select: O, 1 Minute, 3
Minutes and 5 Minutes.
IR LEDs: The IR LED lights switch mode for front
camera and cabin camera can be set separately.
There are 3 options for you to select: Auto, O and
On. The default setting for front camera is O, and
the default setting for cabin camera is Auto. It
displays black and white image when IR LEDs On.
G-Sensor: The collision sensitivity level can be
selected as needed. There are 3 directions options
(Front+Rear/Left+Right/Up+Down) and 6 sensitivity
levels options (1/2/3/4/5/O) for you to select. The
default setting is level 3.
Audio Recording: Default setting is On. There are 2
options for you to select: O and On.
Audio Denoise: Default setting is On. It optimizes
the audio recording eect by dynamic noise
reduction. There are 2 options for you to select: O
and On.
Exposure: The exposure value for front, cabin and
rear camera can be set separately. Default setting is
+0.0. It allows you to adjust the exposure of lens.
REC Status Light: Default setting is On. There are 2
options for you to select: O and On.
HDR: Default setting is On. It allows you to adjust
the HDR switch for front and cabin lens to achieve
better balanced recording. HDR can be turned On
and O here.
HDR Timer: Default setting is O. After turning on
HDR Timer, HDR can be automatically switched on
1440P+1080P 30FPS
1080P+1080P 30FPS
Front Recording:
Fisheye 30FPS
2592x1944P 30FPS
2592x1944P 60FPS
2560x1440P 30FPS
2560x1440P 60FPS
1920x1080P 30FPS

- 15 -
k.
l.
m.
n.
o.
p.
q.
r.
s.
and o according to the set time.
Rotate Display: Default setting is O. Rotate
Display for front, cabin and rear cameras can be
turned on separately.
Mirror: Default setting is On. The images for cabin
and rear cameras can be set to mirror mode
separately under drive record mode.
Number Plate: The plate number can be set 9
characters (number or letter) and displayed on the
recorded video.
Stamp: Enable or disable the watermark stamp on
videos and photos. The watermark stamp includes
time and date label, VANTRUE label, license plate
number, GPS location information, and speed label.
All enabled by default.
Time Lapse: Default setting is O. There are 5
options for you to select: O, 1FPS, 5FPS, 10FPS
and 15FPS.
Parking Mode: There are 5 options for you to select:
O, Collision Detection, Motion Detection, Low
Bitrate Mode and Low Framerate Mode. You can
select the parking mode as needed. Default setting
is O.
Parking Monitor Settings: Detection Lens Setting,
Low Light Night Vision in Parking Mode, Collision
Detection in Parking Mode can be adjusted here.
Mileage Statistics: Default setting is On. It logs
driving mileage information. You can check mileage
statistics function in WiFi connection mode via the
APP, analyze and expo the mileage statistics le.
GPS Settings: Default setting is On. It contains GPS
On/O, Speed Unit settings and GPS information.

- 16 -
4.2.2 Handheld Record Setup
Resolution: Handheld Record Mode only suppos
setting the resolution for front and cabin
cameras, it contains 8 options:
5.2K Panoramic View 30FPS
Dual Fisheye Lens 30FPS
Fisheye+Fisheye 30FPS
1944P+1944P 30FPS 4:3
1440P+1440P 30FPS 16:9
1440P+1440P 60FPS 16:9
1440P+1440P 30FPS 9:16
1440P+1440P 60FPS 9:16
Segment Recording: In handheld record mode,
there are 4 segment recording options for you to
select: 3 Minutes, 5 Minutes, 10 Minutes and 15
Minutes. Default setting is 5 Minutes.
Loop Recording: Default setting is O. It will
overwrites the oldest footage with the newest after
you turn on Loop Recording.
Time Lapse: Default setting is O. There are 5
options for you to select: O, 1FPS, 5FPS, 10FPS and
15FPS
IR LEDs: Default setting is Auto. There are 3 options
for you to select: Auto, O and On. It displays black
and white image when IR LEDs On.
Audio Recording: Default setting is On. Audio
Recording can be turned O and On here.
Audio Noise Reduction: Default setting is On. It
optimizes the audio recording eect by dynamic
noise reduction. Audio Noise Reduction can be
a.
b.
c.
d.
e.
f.
g.
turned O and On here.
Exposure: The exposure value can be set here.
Default setting is +0.0. It allows you to adjust the
exposure of lens.
REC Status Light: Default setting is On. REC status
light can be turned On and O here.
HDR: Default setting is On. It allows you to adjust
the HDR switch for the lens to achieve better
balanced recording. HDR can be turned On and O
here.
Rotate Display: Default setting is O. The Rotate
Display for lens can be turned On and O here.
Stamp: Enable or disable the watermark stamp on
videos and photos. The watermark stamp includes
time and date label, VANTRUE label, license plate
number, GPS location information, and speed label.
All enabled by default.
The default setting for the E360 dash cam is drive
record mode, please swipe up from the bottom of
recording inteace to enter the quick menu and
select handheld record mode. The related functions
will be activated once handheld record mode is on.
Handheld
Record Setup

- 17 -
Resolution: Handheld Record Mode only suppos
setting the resolution for front and cabin
cameras, it contains 8 options:
5.2K Panoramic View 30FPS
Dual Fisheye Lens 30FPS
Fisheye+Fisheye 30FPS
1944P+1944P 30FPS 4:3
1440P+1440P 30FPS 16:9
1440P+1440P 60FPS 16:9
1440P+1440P 30FPS 9:16
1440P+1440P 60FPS 9:16
Segment Recording: In handheld record mode,
there are 4 segment recording options for you to
select: 3 Minutes, 5 Minutes, 10 Minutes and 15
Minutes. Default setting is 5 Minutes.
Loop Recording: Default setting is O. It will
overwrites the oldest footage with the newest after
you turn on Loop Recording.
Time Lapse: Default setting is O. There are 5
options for you to select: O, 1FPS, 5FPS, 10FPS and
15FPS
IR LEDs: Default setting is Auto. There are 3 options
for you to select: Auto, O and On. It displays black
and white image when IR LEDs On.
Audio Recording: Default setting is On. Audio
Recording can be turned O and On here.
Audio Noise Reduction: Default setting is On. It
optimizes the audio recording eect by dynamic
noise reduction. Audio Noise Reduction can be
h.
i.
j.
k.
l.
Language: Available languages are English /Français
/Español/Deutsch/ Italiano/简体中文/русский/日本語
/Polski/한국어.
Wi-Fi: It contains Wi-Fi Auto On, Wi-Fi Mode and
Wi-Fi Info options.
Wi-Fi Auto On: Default setting is On. Wi-Fi will be
a.
b.
*
4.2.3 System Setup
turned O and On here.
Exposure: The exposure value can be set here.
Default setting is +0.0. It allows you to adjust the
exposure of lens.
REC Status Light: Default setting is On. REC status
light can be turned On and O here.
HDR: Default setting is On. It allows you to adjust
the HDR switch for the lens to achieve better
balanced recording. HDR can be turned On and O
here.
Rotate Display: Default setting is O. The Rotate
Display for lens can be turned On and O here.
Stamp: Enable or disable the watermark stamp on
videos and photos. The watermark stamp includes
time and date label, VANTRUE label, license plate
number, GPS location information, and speed label.
All enabled by default.
The default setting for the E360 dash cam is drive
record mode, please swipe up from the bottom of
recording inteace to enter the quick menu and
select handheld record mode. The related functions
will be activated once handheld record mode is on.
System Setup

- 18 -
•
•
*
c.
d.
e.
f.
g.
automatically turned o after 10 minutes without
connection if you select “Turn o after 10 mins”.
Wi-Fi needs to be turned on manually if you select
“O”.
Wi-Fi Mode: Default setting is 5G. After turning on,
you can connect the Wi-Fi and operate the E360
dash cam through phone.
Wi-Fi Info: Wi-Fi name and password can be
checked here.
Voice Control: Default setting is Standard. Voice
commands can be recognized after you turn it on.
There are 4 options for you to select: O, Low
Sensitivity, Standard and High Sensitivity.
Voice Content: It contains the voice commands
that can be recognized by this dash cam. You can
use dierent commands to remotely control the
dash cam.
Format SD Card: Format all data on the memo
card.
Format Reminder Setup: Default setting is O.
There are 3 options for you to select: 15 Days, 1
Month and O. From the set date, calculate 15 days
or 1 month. After reaching the time, you can select
"Yes, format now" to format, or select "No, next
time." to recalculate.
Time & Date: There are 2 ways to set the time and
date:
GPS Automatic Update: GPS Automatic Update is
enabled by default. The time and date are based on
the user's time zone, please select the correct time
zone.
Set Date/Time Manually: You can choose to turn o
GPS Automatic Update and turn on Set Date/Time
Manually to manually adjust the date and time.
ST/WT Auto Switch: Default setting is O. When
enabled, it will automatically switch according to
the dates for summer time and winter time.
This feature is only available in Noh America; Time
discrepancies may occur in other regions.
Additionally, the date format and time zone settings

- 19 -
h.
i.
j.
k.
l.
m.
n.
o.
can also be adjusted in this menu.
Auto LCD O: Default setting is O. There are 4
options for you to select: O, 30 Seconds, 1 Minute
and 3 Minutes.
LCD Brightness: Default setting is Auto. In Auto
mode, if the dash cam is idle for 10 minutes, the
screen brightness will be reduced by 50%. There are
3 brightness level options for you to select: High,
Medium, and Low.
Device Sound: The default volume level is 2. The
lowest volume level is 0 and the highest volume level
is 5.
Warning Tone: The dash cam has 5 warning tones
for dierent situations: Power on Sound, Keys Sound,
File locked Sound, Format Reminder Sound, and
Abnormal Stop Recording Reminder Sound. All
warning tones are enabled by default.
Frequency: Dierent countries have dierent
frequencies. To avoid inuencing the recording,
please select 50Hz or 60Hz frequency according to
your region.
System Info: Check the current model, rmware
version and Vantrue ocial website URL.
Ceication Info: The ceication information of
the dash cam can be checked here.
Default Settings: Reset the dash cam to its default
system settings.
Files
- 20 -
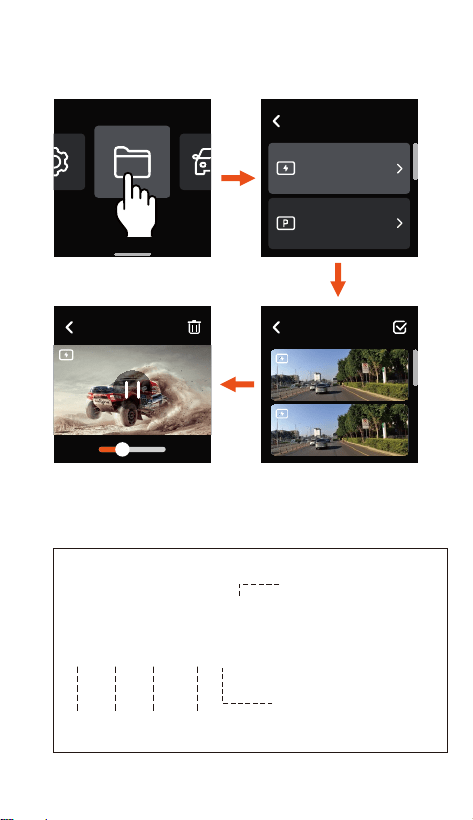
4.2.4 Files
In the Files menu, you can playback the recorded
videos, check the snapshot images, and delete the les.
002
00:30 01:07
2024/10/30 10:12:27
0002
Dierent types of les in the E360 dash cam are
displayed as below, you can nd relevant les based on
the corresponding type.
A Front camera video le
B Cabin camera video le
Year Date Time
File Type Instructions:
20300128_140933_00008_N_A.MP4
20300128_140833_00007_P_B.MP4
20300128_140733_00006_T_C.MP4
20300128_140633_00005_S_A.MP4
N Loop recording video le
P Parking video le
T Time lapse video le
E Emergency video le
Sequence
Number
Event Video
Parking Video
Files
Event Video
2024/10/30 10:12:27
0002
2024/10/30 10:12:27
0002

- 21 -
5. Function Instructions
This section mainly introduces the connection between
the E360 dash cam and the APP, the main functions of
the APP, drive record mode and handheld record mode,
to help users quickly understand and use the E360 dash
cam.
WiFi Connection
---Installing the APP
Please use your phone to scan the QR code below to
download and install the Vantrue APP following the
instructions.
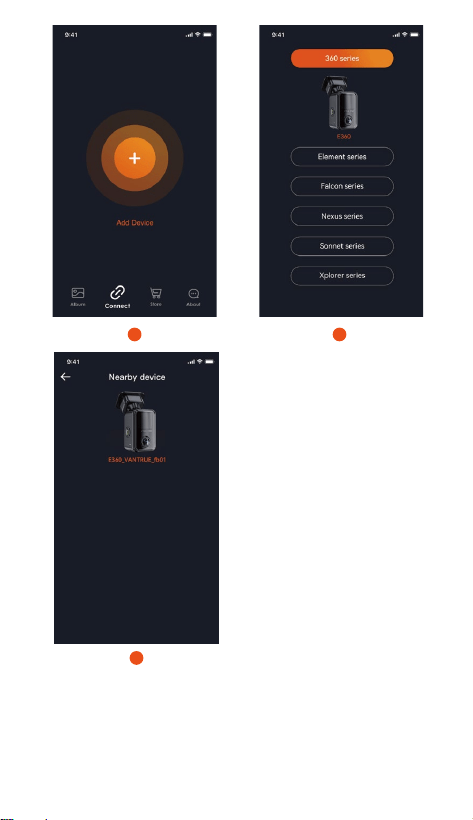
---Connecting the APP
When the E360 dash cam is turned on, it will automati-
cally enable the WiFi function. Before connecting to the
APP, please ensure that the WiFi function is turned on.
Open the APP, click "+" to add device, then select
Element series and nd the E360 model, click to add it.
2024/10/30 14:09:07 MP/H
65
00:00:37
+1440P 30FPS5.2K
5.1
- 22 -
*
1 2
3
The initial WiFi password is 12345678. If you forget
the set password, it can be restored to the initial
password by resetting the dash cam to its default
settings.
- 23 -
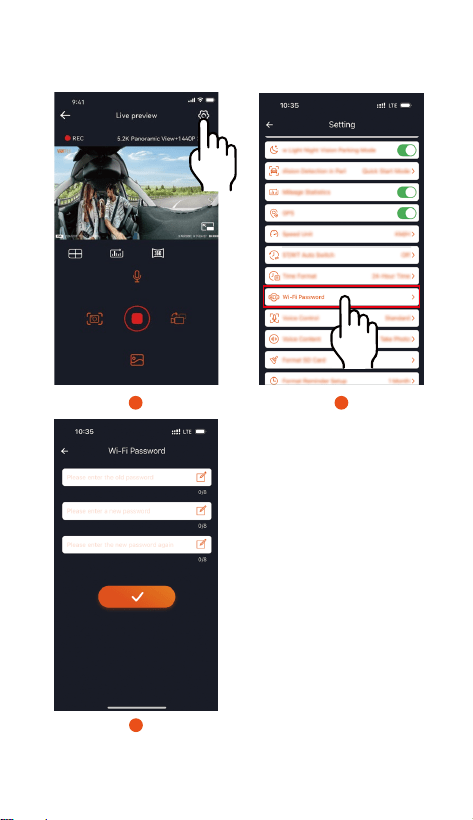
*
1 2
3
To avoid privacy leaks, it is recommended that users
change the initial WiFi password. The WiFi password
can be set in the Vantrue APP.

- 24 -
Setup
Mileage
Statistics
Click to turn on
360 display
mode.
Lens
Calibration
Line
Full Screen
Switch
Snapshot
Lens Switch
View Files
Sta/Pause
Recording
Microphone
Switch
Video Preview: Once the APP is connected
successfully, it will enter the live preview inteace.
Click the Full Screen button or rotate the phone to
switch to full screen preview mode. Click the Lens
Switch button to toggle between front and rear video
views, it is only available on multi-channel dash cam.
Playback Video: Click “Files” to browse and view the
recorded videos or photos in the SD card.
Video Download: You can select to download video
or images in the SD card les inteace or video
playback inteace. After downloading the video, you
can playback it in the local le inteace of the APP
and view the GPS track of the video.
Video Snapshot: You can take a snapshot of the
current view in the live preview inteace of the APP.
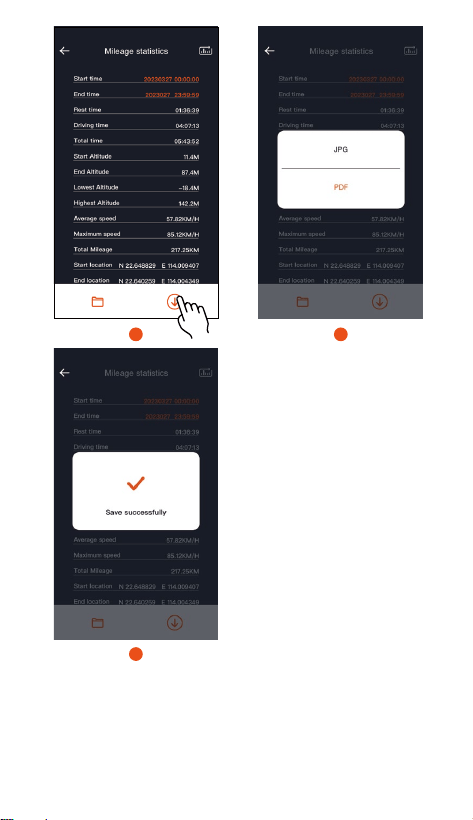
Mileage Statistics: You can click to download
mileage information as needed, and the mileage
information will be saved in the APP as an image or a
PDF le.
a.
b.
c.
d.
e.
After entering the live preview inteace of the APP,
you can peorm the following operations:
5.2 Main Functions of APP
- 25 -
1 2
3
Lens Calibration Line: Calibrate lens balance by the
precise cross-line, ensuring that the recording image
will not be skewed.
OTA Upgrade: Upgrade the E360 dash cam via the
APP.
f.
g.
- 26 -
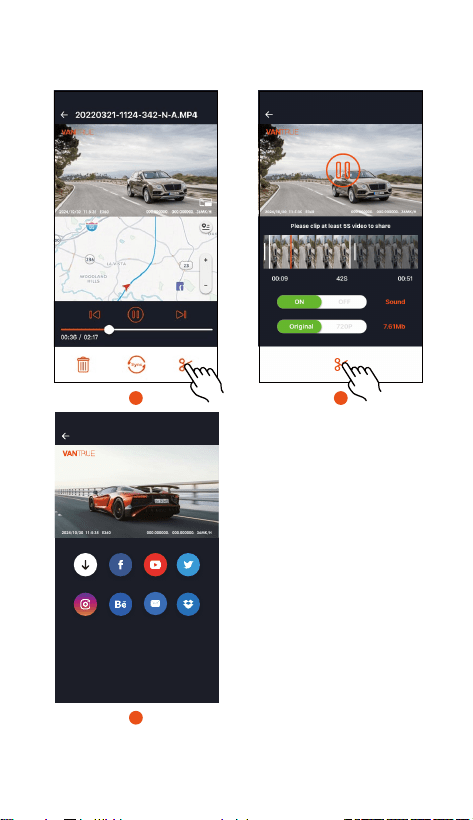
h.
Share
2021/12/16 11:5:35 X4S 000.000000. 000.000000. 36MK/H
2024/10/30 11:5:35 E360 000.000000. 000.000000. 36MK/H
Album Twitter
Instagram Dropbox
Facebook
Behance
Youtube
Mail
1 2
3
Share Video: After downloading the video, you can
edit it in the playback inteace and share it on social
media platforms.
- 27 -
5.3 Drive Record Mode
The E360 dash cam primarily operates in drive record
mode when driving. The following are the main
functions Instructions of drive record mode:
---Loop Recording
The dash cam will automatically enter loop recording
mode upon staup, and it will save video les in the
standard video folder based on the preset loop
duration. This feature ensures continuous recording by
automatically overwriting the oldest video les with the
newest.
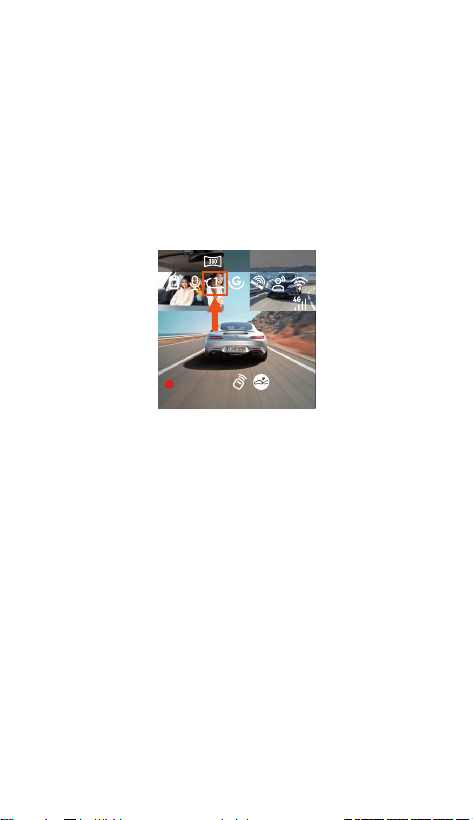
---Emergency Recording
During driving, the recording can be manually locked
by users or automatically locked by the dash cam when
any incident happens. You can press the emergency
recording button to sta recording. The video will be
Note:
The stable operation of loop recording depends on
the data transfer speed of memo card. Please
regularly format the card to avoid the issues caused
by excessive les, aging card, etc.
Please regularly check loop recording videos to
prevent the impoant videos from being overwritten.
If loop recording is turned o, the emergency lock
feature will not work.
When loop recording is turned o, each video
segment lasts 20 minutes. When the SD card is full,
the dash cam will stop recording and pop up "Card
Full!" message.
2024/10/30 14:09:07 MP/H
65
00:00:37
+1440P 30FPS5.2K
•
•
•
•
2024/10/30 14:09:07 MP/H
65
00:00:37
+1440P 30FPS5.2K
2024/10/30 14:09:07 MP/H
65
00:00:37
+1440P 30FPS5.2K
- 28 -
---Voice Control
Users can control the dash cam by voice commands
such as Take Photo, Video Sta, Turn On/O Wi-Fi,
Lock The Video,etc. It suppos multiple languages
including English, Japanese, Russian, Chinese and
French. To learn more about the specic voice
commands, please refer to System Setup > Voice
Content.
*There are 4 options for Voice Control: O, Low
Sensitivity, Standard and High Sensitivity. Default
setting is Standard. Users can control the dash cam
remotely by voice commands.
---GPS Function
GPS is enabled by default and receives signals through
the GPS mount. It can automatically adjust the time and
date according to the user's location and record the
location and speed information of vehicle.
automatically saved in the event video folder, and the
snapshot photos will be saved in the photo folder.

- 29 -
GPS Automatic Update for Time & Date is turned on by
default. Please select the correct time zone. For
example, if in Los Angeles, please choose GMT-08:00. If
you are unsure of the time zone, please connect the
Vantrue APP and ensure GPS Automatic Update is
enabled in the APP. The dash cam’s time zone will be
adjusted according to the time zone of your phone.
Note:
GPS will be connected within 1 minute after
powering on. If it is not connected successfully within
1 minute, please check the status of GPS function
and GPS mount, and consider environmental factors
(underground parking lot, densely built areas,
subways, tunnels and so on will aect GPS signal
reception).
GPS information is recorded in the video. To view it,
please download and install the Vantrue APP and
Vantrue GPS Player.
•
•
Note:
GPS Automatic Update is based on the set time zone.
Please refer to representative cities in each time zone
to select correct time zone.
•
GPS Information
40
46
39
43
48
Time & Date
GPS Automatic
Update
Set Date/Time
Manually

- 30 -
---Parking Mode
When parking, users can customize various parking
monitor settings based on vehicle, parking environment,
and personal needs. There are 4 parking modes
available.
Note:
To ensure the dash cam operates properly in parking
mode, please use Vantrue hardwire kit or other
external batte with stable and constant power.
Please use the Vantrue ACC hardwire kit. The ACC
hardwire kit from other brands might not work due to
dierent ACC detection PIN positions.
In high temperature environment, we recommend
using collision detection mode. If the interior
temperature of vehicle reaches 60°C, it is advised to
turn o the dash cam to prevent malfunction due to
high temperature.
Time lapse and parking mode (including collision
detection, motion detection, low bitrate mode, and
low frame rate mode) cannot be enabled simultane-
ously. If one of them is enabled, the other one will be
automatically disabled.
All parking mode video les will be saved in the
parking video folder. To avoid overwriting, please
regularly check and back up these les.
Parking mode function will be improved with the dash
cam’s features. For detailed rmware information,
please refer to the rmware instructions in Vantrue
ocial website or consult customer seice.
•
•
•
•
•
•
Summer Time/Winter Time Auto Switch is only
available in Noh America
•
Parking Mode
Low Bitrate Mode
Low Framerate
Mode

- 31 -
Mode 1: Collision Detection
When collision detection is turned on, the collision
detection icon will be displayed on the recording
inteace, indicating that collision detection mode is
active. When triggered by a collision, the dash cam will
record for 1 minute and save the video le in the
parking video folder. The video can be playbacked via
the Vantrue APP on phone or the Vantrue GPS player
on computer.
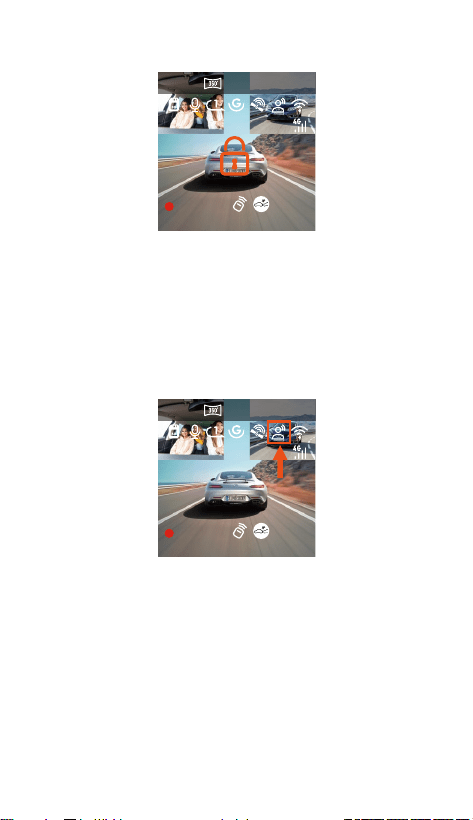
Mode 2: Motion Detection
When motion detection is turned on, the motion
detection icon will be displayed on the recording
inteace, indicating that motion detection mode is
active. When any motion is detected within the
monitoring range, the dash cam will record for 10
seconds before triggered and record 30 seconds after
triggered, the 40-second motion detection video will
be saved in the parking video folder.
2024/10/30 14:09:07 MP/H
65
00:00:37
+1440P 30FPS5.2K
2024/10/30 14:09:07 MP/H
65
00:00:37
+1440P 30FPS5.2K

- 32 -
Mode 3: Low Bitrate Mode
In low bitrate mode, all camera’s resolution will
automatically switch to 1080P 15FPS or 720P 15FPS
with a recording duration of 3 minutes. The video will
be saved in the parking video folder.
2024/10/30 14:09:07 MP/H
65
00:00:37
+1440P 30FPS5.2K
2024/10/30 14:09:07 MP/H
65
00:00:37
+1440P 30FPS5.2K
Mode 4: Low Framerate Mode
In low framerate mode, the recording time will be
compressed. Each low framerate video will be 1 minute
long and saved in the parking video folder.
2024/10/30 14:09:07 MP/H
65
00:00:37
+1440P 30FPS5.2K
- 33 -
Setting 1: Detection Lens Setting
After enabling any of parking modes, all cameras can
detect. You can adjust dierent camera combinations
for parking monitoring detection based on the actual
usage scenario.
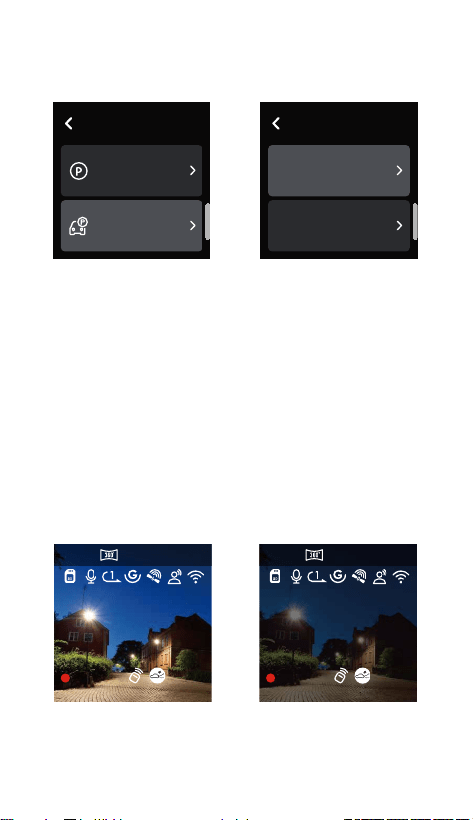
Setting 2: Low Light Night Vision in Parking Mode
To improve the parking safety during nighttime, we
utilize the camera’s peormance with low light night
vision technology to enhance night vision in parking
mode. This feature is enabled by default and only
activated in parking mode, so it has no eect on
normal recording.
2024/10/30 14:09:07 MP/H
65
00:00:37
+1440P 30FPS5.2K
2024/10/30 14:09:07 MP/H
65
00:00:37
+1440P 30FPS5.2K
Low Light Night
Vision On
Low Light Night
Vision O
---Parking Monitor Settings
This feature allows the adjustment of various parking
monitor settings to enhance accuracy and exibility.
Parking Mode
Parking Monitor
Settings
Drive Record Setup
Detection Lens
Setting
Low Light Night
Vision in Parking Mode
Parking Monitor
Settings
- 34 -
Setting 3: Collision Detection in Parking Mode
This feature allows you to adjust the mode to activate
collision detection. In power saving mode, the dash
cam will shut down. When triggered, it will be turned
on and sta recording; In quick sta mode, the dash
cam will be in standby and sta recording immediately
when triggered.
5.4 Handheld Record Mode
---The E360 dash cam suppos various scenarios. It
can be removed from the windshield and used with a
handheld mount for easy recording of camping,
gatherings, meetings, and more.
---After connecting to the handheld mount, you can
enable handheld record mode in the quick menu to
sta handheld recording.
Parking Monitor
Settings
Low Light Night
Vision in Parking…
Collision Detection
in Parking Mode
Collision Detection
in Parking Mode
Power Saving Mode
Quick Sta Mode
- 35 -
2024/10/30 14:09:07 MP/H
65
00:00:37
+1440P 30FPS5.2K
---The handheld mount can be charged by Vantrue
Hardwire kit, car charger, external batte pack, etc.
Car Charger
External
Batte Pack
Vantrue
Hardwire Kit

- 36 -
5.5 Firmware Upgrade
To constantly optimize the features of E360 dash cam,
we will periodically update the rmware. Please check
it on Vantrue ocial website and upgrade the rmware
in a timely manner.
Upgrade Method 1: File Upgrade
Download the newest rmware le from Vantrue
ocial website and place the le into the root
directo of the memo card, then inse it back into
the dash cam, and power on to upgrade.
Upgraded Files
- 37 -
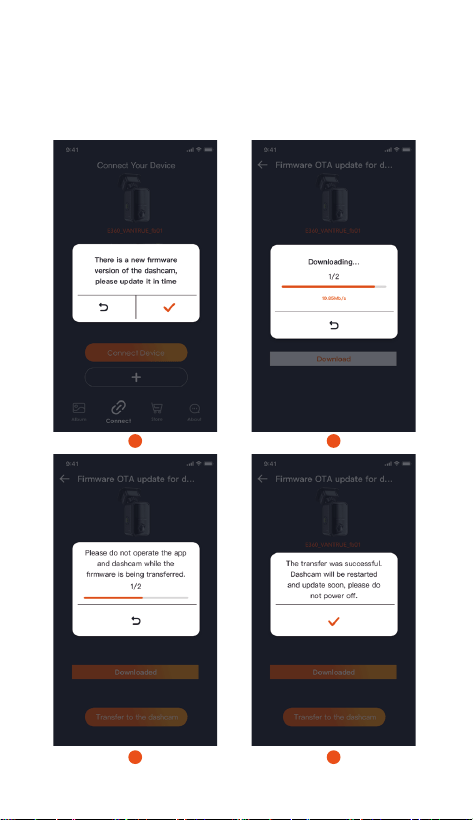
Upgrade Method 2: OTA(Over the Air) Upgrade
Open the APP, you will receive a rmware update push
notication. After conrming the upgrade, it will jump
to the OTA upgrade inteace, where you can follow
the guide to complete the upgrade.
1 2
3 4

•
•
•
Note:
During upgrading, please keep the E360 dash cam
plugged in.
OTA upgrade will spend network trac when
downloading rmware.
For le upgrade, please format the memo card on
the E360 dash cam before placing the rmware le
into it.
6. Specications
To provide users with a better using experience, we
may upgrade the product specications without prior
notice.
Model E360
Novatek high-peormance processor
Sony Sensor
Built-in six-axis gyroscope
2.4GHz & 5GHz
1.54 inch IPS touchscreen
Chips
Image Sensor
G-sensor
WiFi
Screen
Camera Angle
Languages
Apeure
Resolution
Front: 210°wide angle
Cabin: 210°wide angle
Rear: 165°wide angle
Front: F2.2
Cabin: F2.2
Rear: F1.8
English、简体中文、日本語、Deutsch、
Italiano、Español、Français、
Русский、язык、Polski、한국어
Drive record mode:
5.2K Panoramic View+1440P 30FPS
Max
Handheld record mode:
5.2K Panoramic View 30FPS
MP4
JPEG
Built-in microphone and speaker
Video Format
Image Format
Audio
- 38 -

The Vantrue E360 dash cam comes with a 12-month
warranty. If you register the dash cam on Vantrue
ocial website (http://www.vantrue.net/register), the
warranty can be extended to 18 months. If you have
any question about the products, please solve it
through the following ways, a dedicated team will
respond within 12-24 hours:
VANTRUE® is committed to continuously improving
products, seices, and user experience. If you have
any thoughts on how we can do better, please share
with us at our ocial email suppo@vantrue.net. We
welcome your valuable feedback and suggestions.
Thank you for choosing VANTRUE®.
Micro SD card(suppos 32GB-512GB,
U3 or higher data transfer speed)
Power Source
Supply Voltage
Current
Power
Working
Temperature
Storage
Temperature
Memo
Storage
7. Warranty & Suppo
- 39 -
USB Po
Type-C
Built-in super capacitor
DC 5V 2.4A
6W
-4℉ to 140℉(-20℃ to 60℃)
-4℉ to 158℉(-20℃ to 70℃)
Open the Vantrue APP and nd answers under
About > FAQ;
Contact the customer seice of the purchase
channel;
Drop us an email at Vantrue ocial email
(suppo@vantrue.net).
①
②
③