THIS INSTRUCTION BOOKLET CONTAINS IMPORTANT SAFETY INFORMATION.
PLEASE READ AND KEEP FOR FUTURE REFERENCE.
BB5762
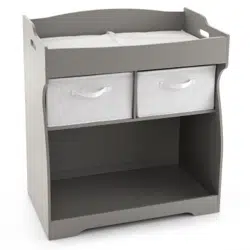
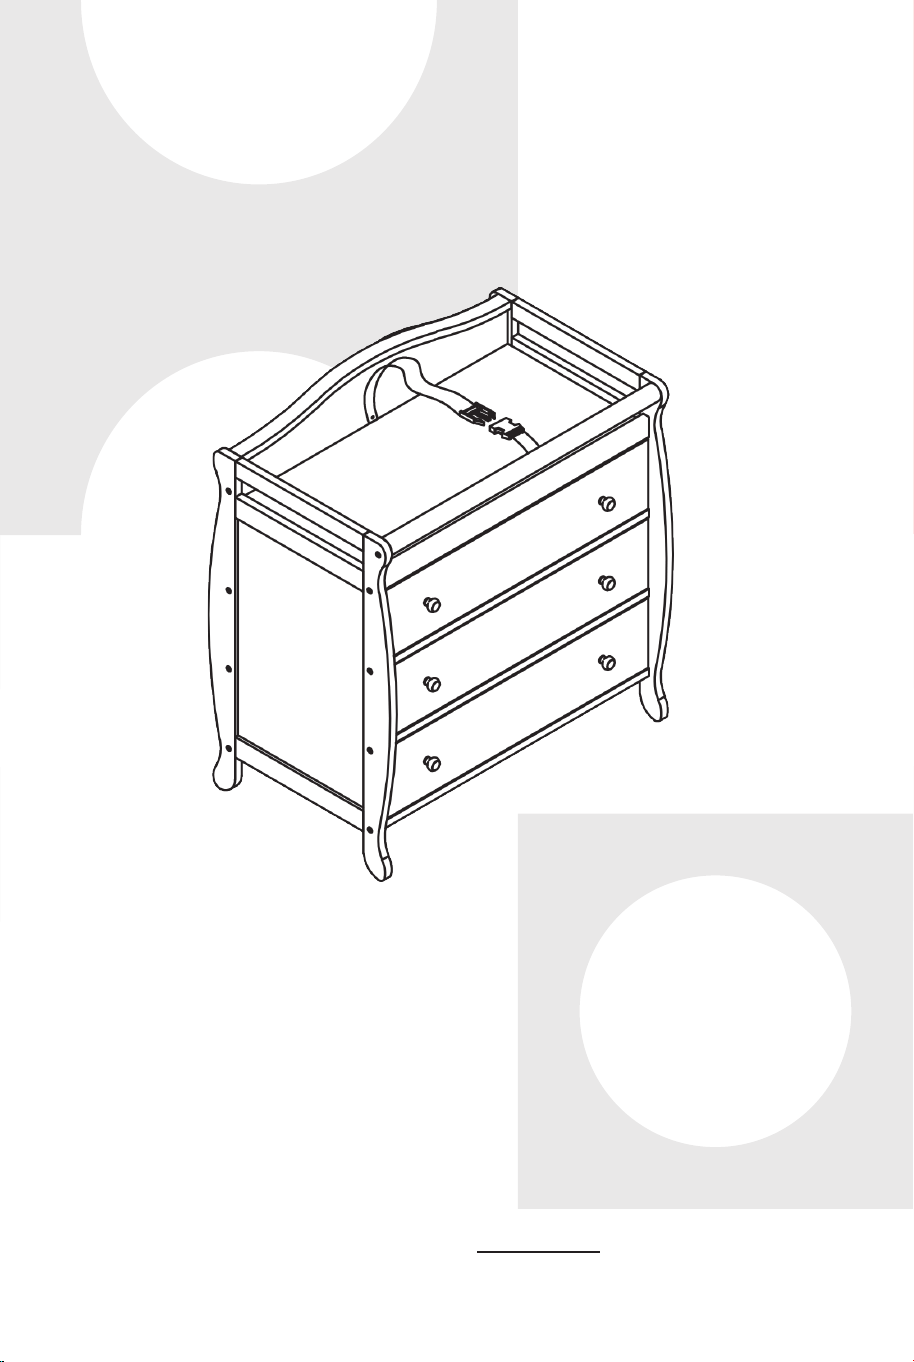
Baby Changing Table
Table à Langer Bébé
Before You Start
Please read all instructions carefully.
Retain instructions for future reference.
Separate and count all parts and hardware.
Read through each step carefully and follow the proper order.
We recommend that, where possible, all items are assembled near to the area in
which they will be placed in use, to avoid moving the product unnecessarily once
assembled.
Always place the product on a flat, steady and stable surface.
Keep all small parts and packaging materials for this product away from babies
and children as they potentially pose a serious choking hazard.
FR
Veuillez lire attentivement toutes les instructions.
Conservez les instructions pour vous y référer ultérieurement.
Vérifiez toutes les pièces et les accessoires.
Lisez attentivement chaque étape et suivez l'ordre correct.
Nous recommandons que, dans la mesure du possible, tous les produits
soient assemblés à proximité de la zone où ils seront utilisés, afin d'éviter tout
déplacement inutile du produit une fois assemblé.
Placez toujours le produit sur une surface plane et stable.
Conservez toutes les petites pièces de ce produit et les matériaux d'emballage
hors de portée des bébés et des enfants, car ils pourraient présenter un risque
d'étouffement.
Avant de Commencer
EN
02
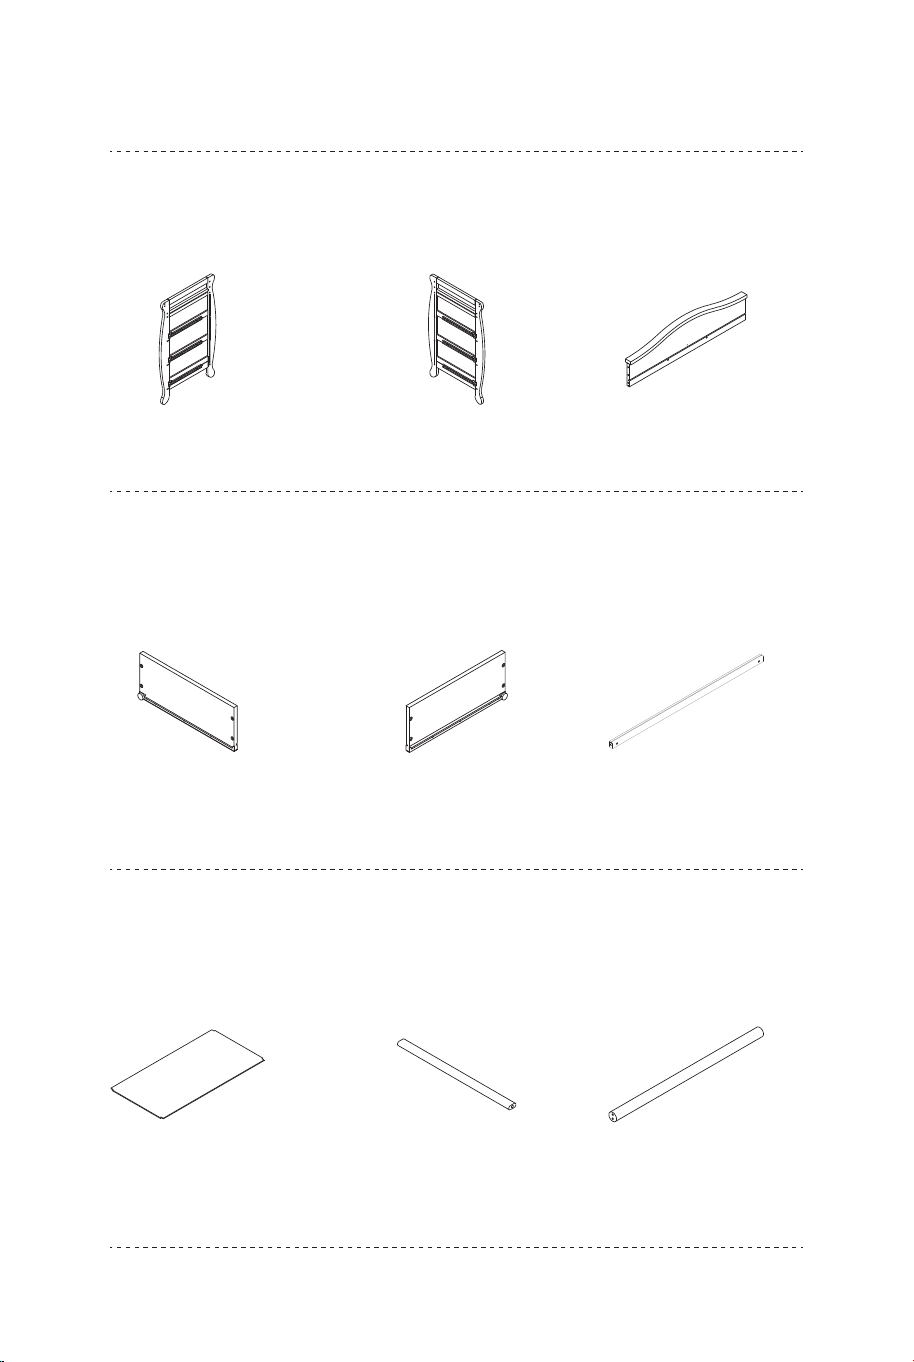
Parts List / Liste des Pièces
A.
Left Side Panel
/Panneau Latéral
Gauche
B.
Right Side Panel
/Panneau Latéral
Droit
C.
Back Cross Beam
/Traverse Arrière
D.
Drawer Left Panel
/Panneau Gauche de
Tiroir
E.
Drawer Right Panel
/Panneau Droit de
Tiroir
F.
Back Bottom Rail /Rail
Inférieur Arrière
G.
Top Panel /Panneau
Supérieur
H.
Panel Support Bar
/Barre de Support de
Panneau
I.
Top Round Rail /Rail
Supérieur Rond
(1 pc / pièce) (1 pc / pièce) (1 pc / pièce)
(3 pcs / pièces) (3 pcs / pièces) (1pc / pièce)
(1 pc / pièce) (2 pcs / pièces) (1pc / pièce)
03
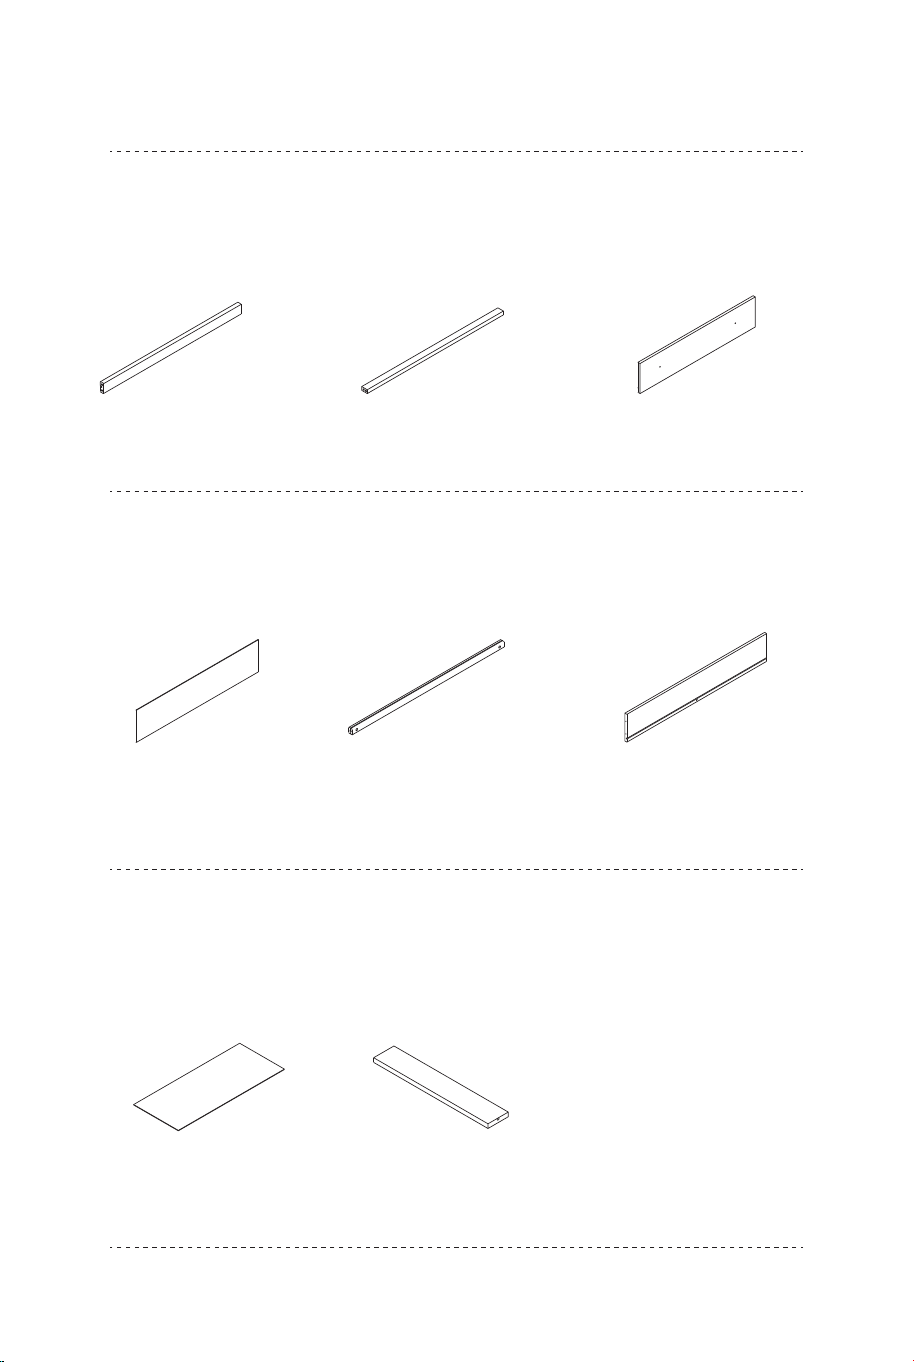
Parts List / Liste des Pièces
J.
Front Cross Beam
/Traverse Avant
K.
Drawer Rail
/Rail de Tiroir
L.
Drawer Front Panel
/Panneau Avant de
Tiroir
M.
Back Panel /Panneau
Arrière
N.
Back Middle Rail /Rail
Central Arrière
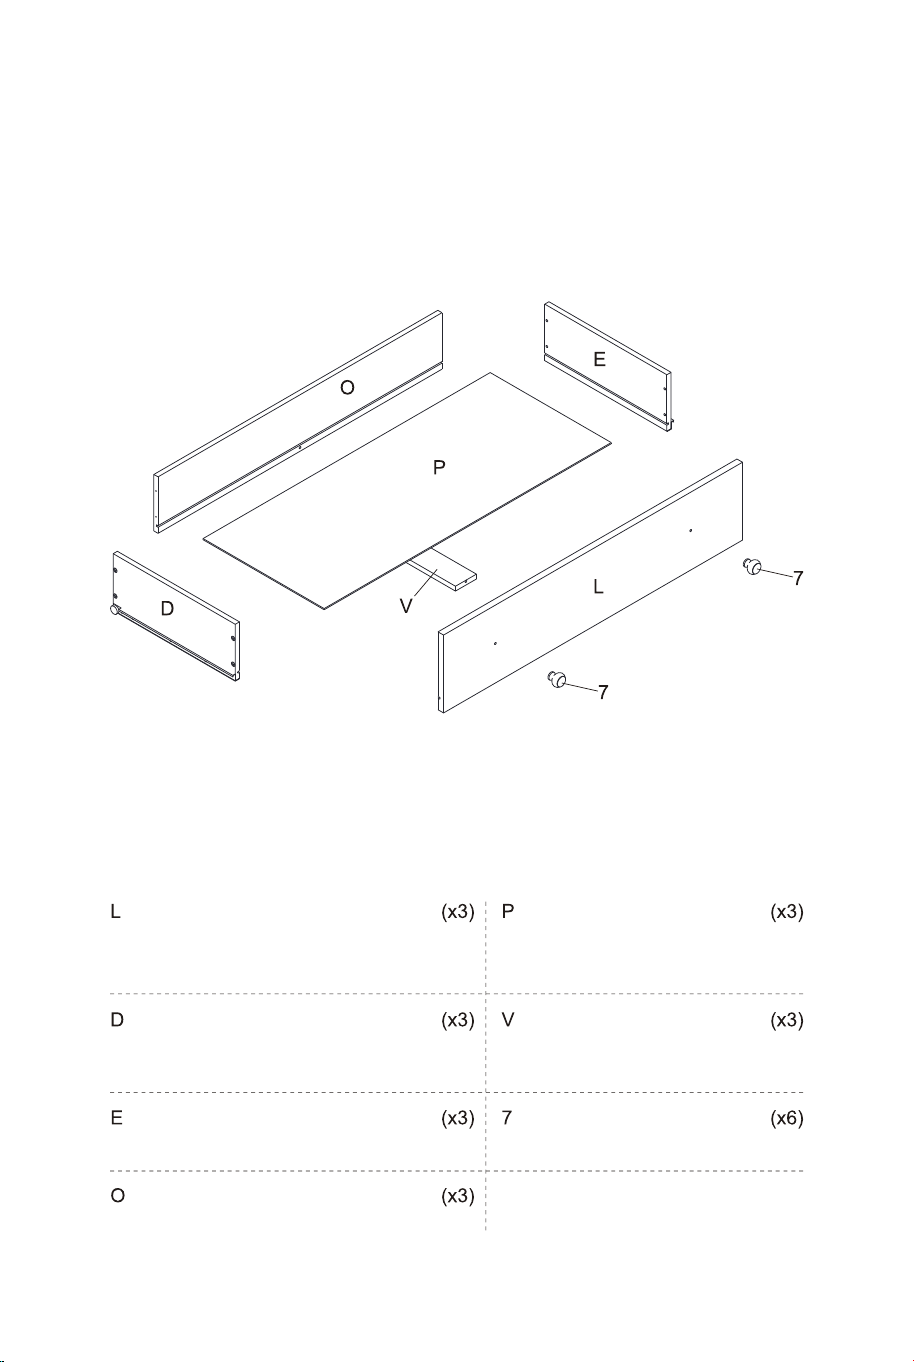
O.
Drawer Back Panel
/Panneau Arrière de
Tiroir
P.
Drawer Bottom Panel
/Panneau de Fond de
Tiroir
V.
Drawer Support
/Support de Tiroir
(1 pc / pièce) (3 pcs / pièces) (3 pcs / pièces)
(3 pcs / pièces) (2 pcs / pièces) (3 pcs / pièces)
(3 pcs / pièces) (3 pcs / pièces)
04
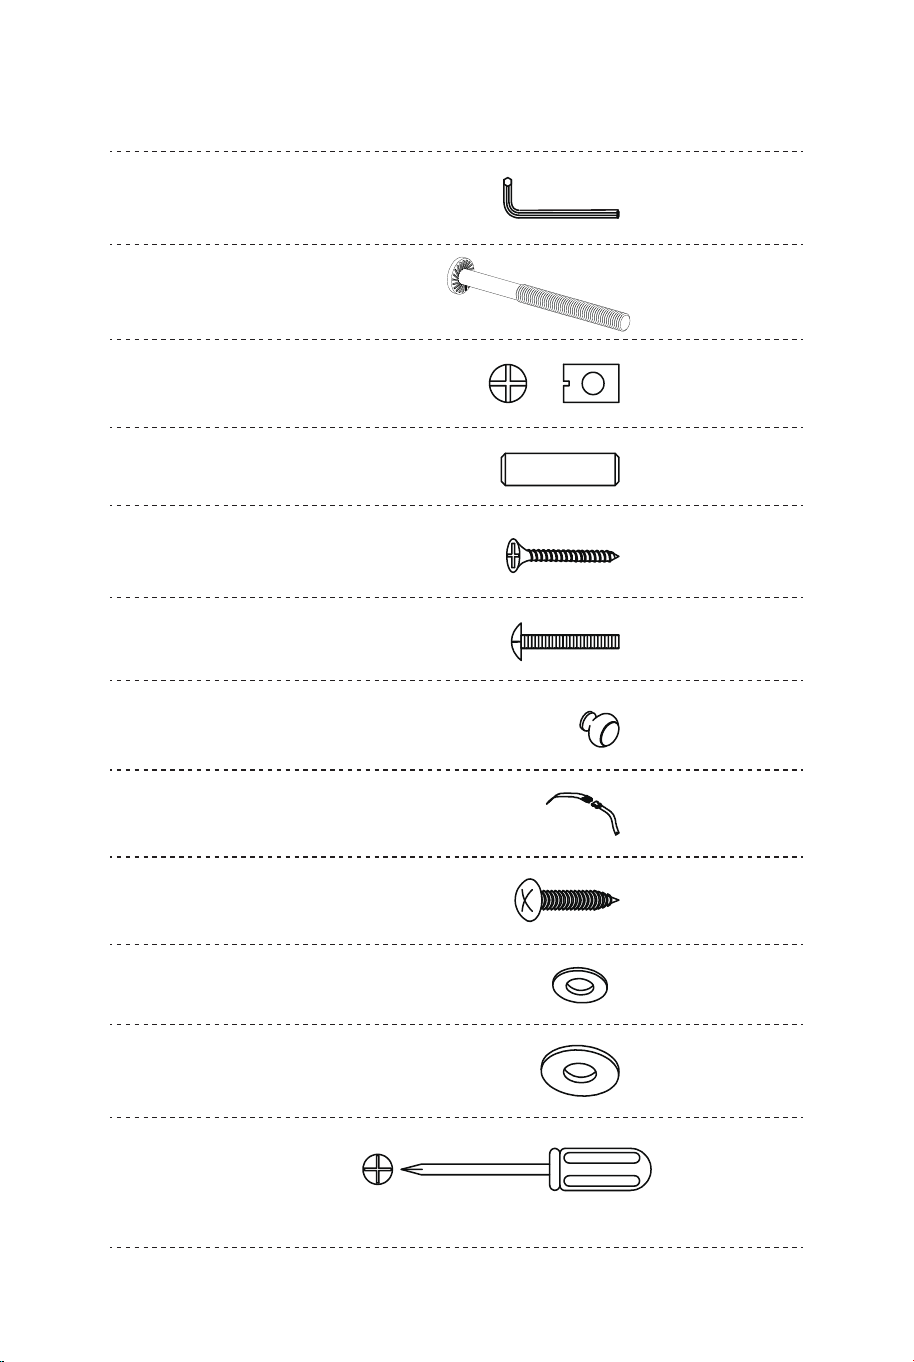
Hardware List / Liste de la Quincaillerie
Allen Key/Clé Allen
3/16”*1”
Bolt/Boulon
1/4”*2-1/4”
Barrel Nut/Écrou de Barillet
1/4”*3mm
Dowel/Goujon
8*30 mm
Screw/Vis
F4*25 mm
Bolt/Bouton
5/32”*28mm
Knob/Bouton
Safety Strap/Sangle de
Sécurité 900x 25mm
Screw/Vis
F4*15mm
Flat Washer/Rondelle à Plat
Φ13mm
Flat Washer/Rondelle à Plat
Φ16mm
Phillips Screwdriver/
Tournevis à Tête Phillips
(Not included)
/(Non inclus)
1
2
3
4
5
6
7
8
9
10
11
x1
x18
x18
x14
x27
x6
x6
x1
x2
x18
x2
05
FALL HAZARD - Children have suffered serious injuries after falling
from changing tables /trays.
Falls can happen quickly.
STAY in arm's reach of you child.
Read all instructions before use of the changing table/tray.
Keep instructions for future use.
Do not use the changing table/tray if it is damaged or broken.
ALWAYS secure this product to the support frame by using the
hardware provided.
See instructions.
This product is designed to be used on a surface that is level, stable
and structurally sound with a minimum surface dimensions of
51"(1295mm) x 18.5" (470mm).
SUFFOCATION HAZARD: Babies have suffocated while sleeping in
changing area.
Changing area is not designed for safe sleep.
NEVER allow baby to sleep in changing area.
WARNING! When child reaches a maximum weight of 30 lbs/13.6
kg, the changing table/tray shall no longer be use.
The flat changing pad used should be 16.5" (41.9cm)W x 32.5"
(82.55cm)L with a maximum thickness of 1" (2.54 cm).
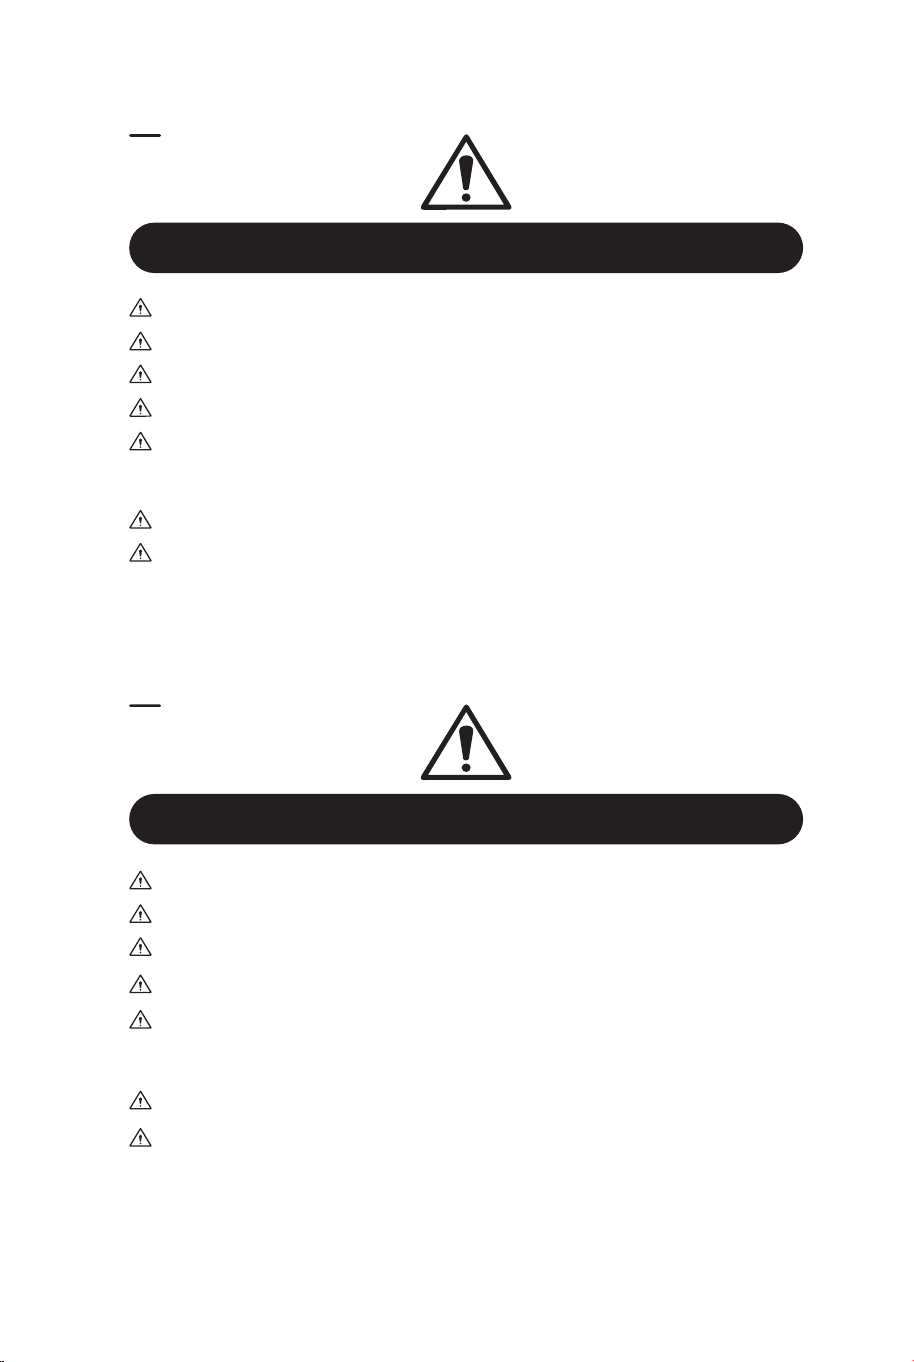
WARNING
06

RISQUE DE CHUTE - Des enfants ont subi des blessures graves
après être tombés d'une table à langer ou d'un plateau.
Les chutes peuvent arriver rapidement.
RESTEZ à portée de bras de votre enfant.
Lisez toutes les instructions avant d'utiliser la table à langer/le
plateau.
Conservez les instructions pour une utilisation future.
N'utilisez pas la table à langer/plateau s'il est endommagé ou cassé.
Fixez TOUJOURS ce produit au cadre de support à l’aide du
matériel fourni.
Voir les instructions.
Ce produit est conçu pour être utilisé sur une surface plane, stable
et structurellement solide avec des dimensions de surface minimales
de 1295mm x 470mm.
RISQUE DE SUFFOCATION : Des bébés se sont étouffés en
dormant dans un espace à langer.
Le vestiaire n’est pas conçu pour dormir en toute sécurité.
NE JAMAIS laisser bébé dormir dans la zone à langer.
AVERTISSEMENT! Lorsque l'enfant atteint un poids maximum de
13,6 kg, la table à langer/plateau ne doit plus être utilisée.
Le matelas à langer plat utilisé doit mesurer 41,9 cm de largeur x
82,55 cm de longueur avec une épaisseur maximale de 2,54 cm.
MISES EN GARDE
07

Parts List / Liste des Pièces
Left Side Panel
/Panneau Latéral Gauche
Back Cross Beam
/Traverse Arrière
Back Middle Rail
/Rail Central Arrière
Top Panel
/Panneau Supérieur
Top Round Rail
/Rail Rond Supérieur
Drawer Rail
/Rail de Tiroir
Right Side Panel
/Panneau Latéral Droit
Back Panel
/Panneau Arrière
Back Bottom Rail
/Rail Inférieur Arrière
Panel Support Bar
/Barre de Support de
Panneau
Front Cross Beam
/Traverse Avant
08
Drawer Front Panel
/Panneau Avant du
Tiroir
Drawer Left Panel
/Panneau Gauche du Tiroir
Drawer Right Panel
/Panneau Droit du Tiroir
Drawer Back Panel
/Panneau Arrière du Tiroir
Drawer Bottom Panel
/Panneaux de Fond de
Tiroir
Drawer Support
/Support de Tiroir
Knob / Bouton
Parts of Drawer / Tiroir
09
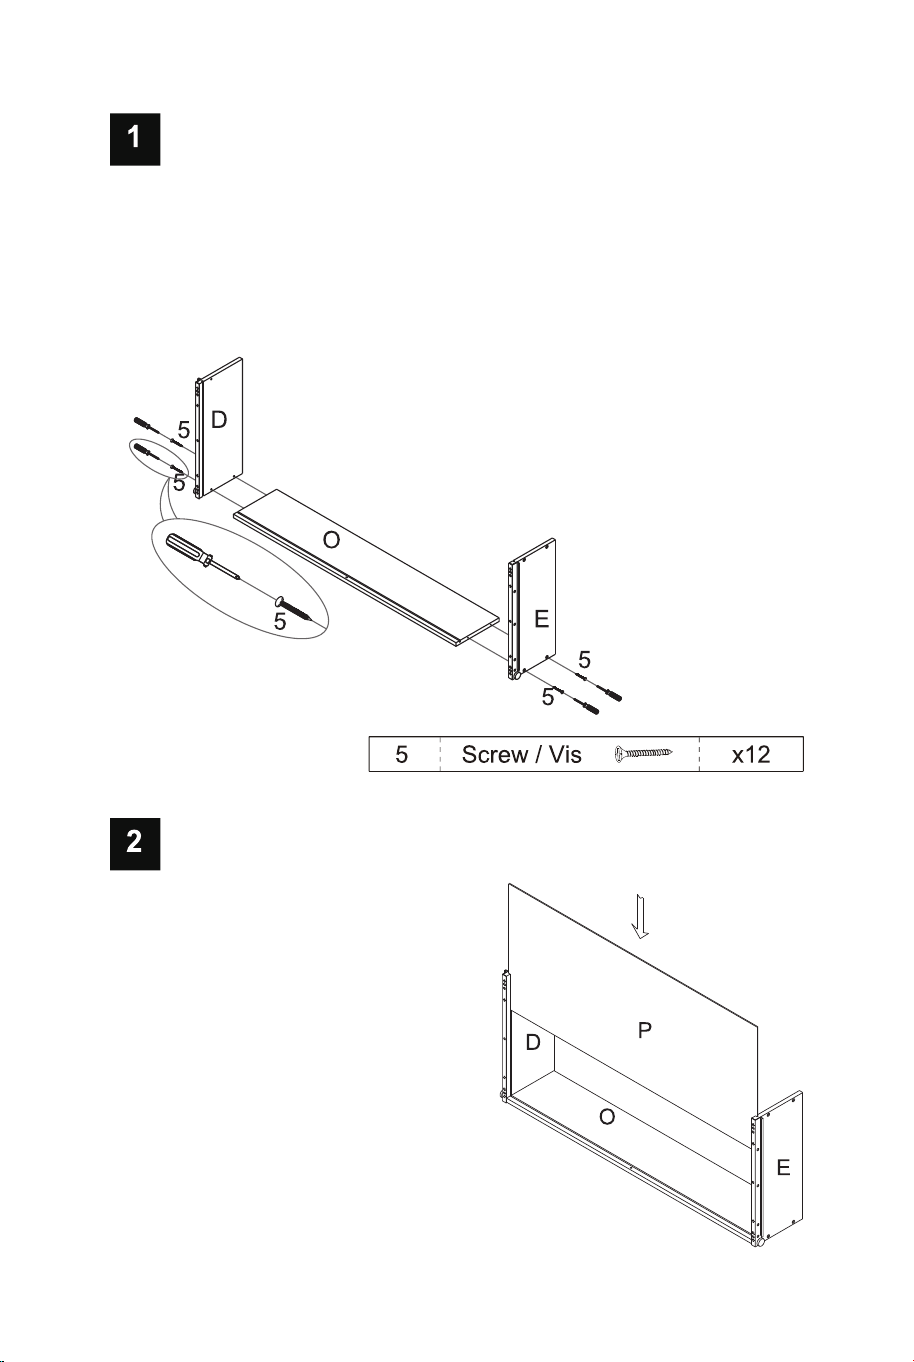
EN: Attach drawer left panel (D) and drawer right panel (E) to drawer
back panel (O) with 12 screws (#5)
FR : Fixez le panneau gauche du tiroir (D) et le panneau droit du
tiroir (E) au panneau arrière du tiroir (O) avec 12 vis (#5).
EN: Slide drawer bottom
panel (P) into the grooves of
the side panels
FR : Glissez le panneau
inférieur du tiroir (P) dans les
rainures des panneaux
latéraux.
10
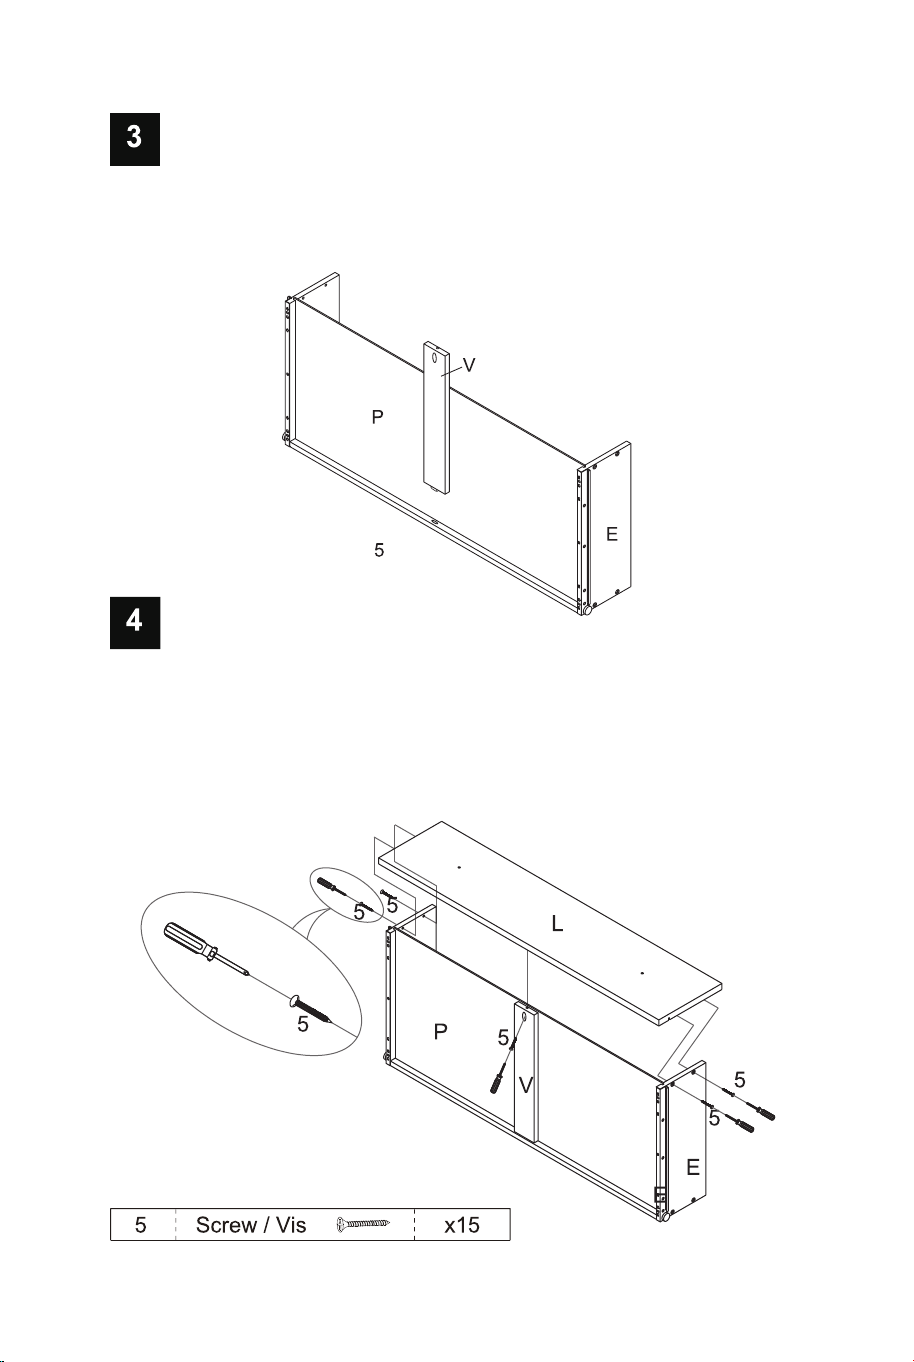
EN: Attach drawer support (V) to drawer back panel (O)
FR : Fixez le support de tiroir (V) au panneau arrière du tiroir (O).
EN: Attach drawer front panel (L) to assemble drawer left panel (D) and
drawer right panel(E) and drawer support (V) with 15 screws (#5).
FR: Fixez le panneau avant du tiroir (L) pour assembler le panneau
gauche du tiroir (D) et le panneau droit du tiroir (E) ainsi que le support
du tiroir (V) avec 15 vis (#5).
11
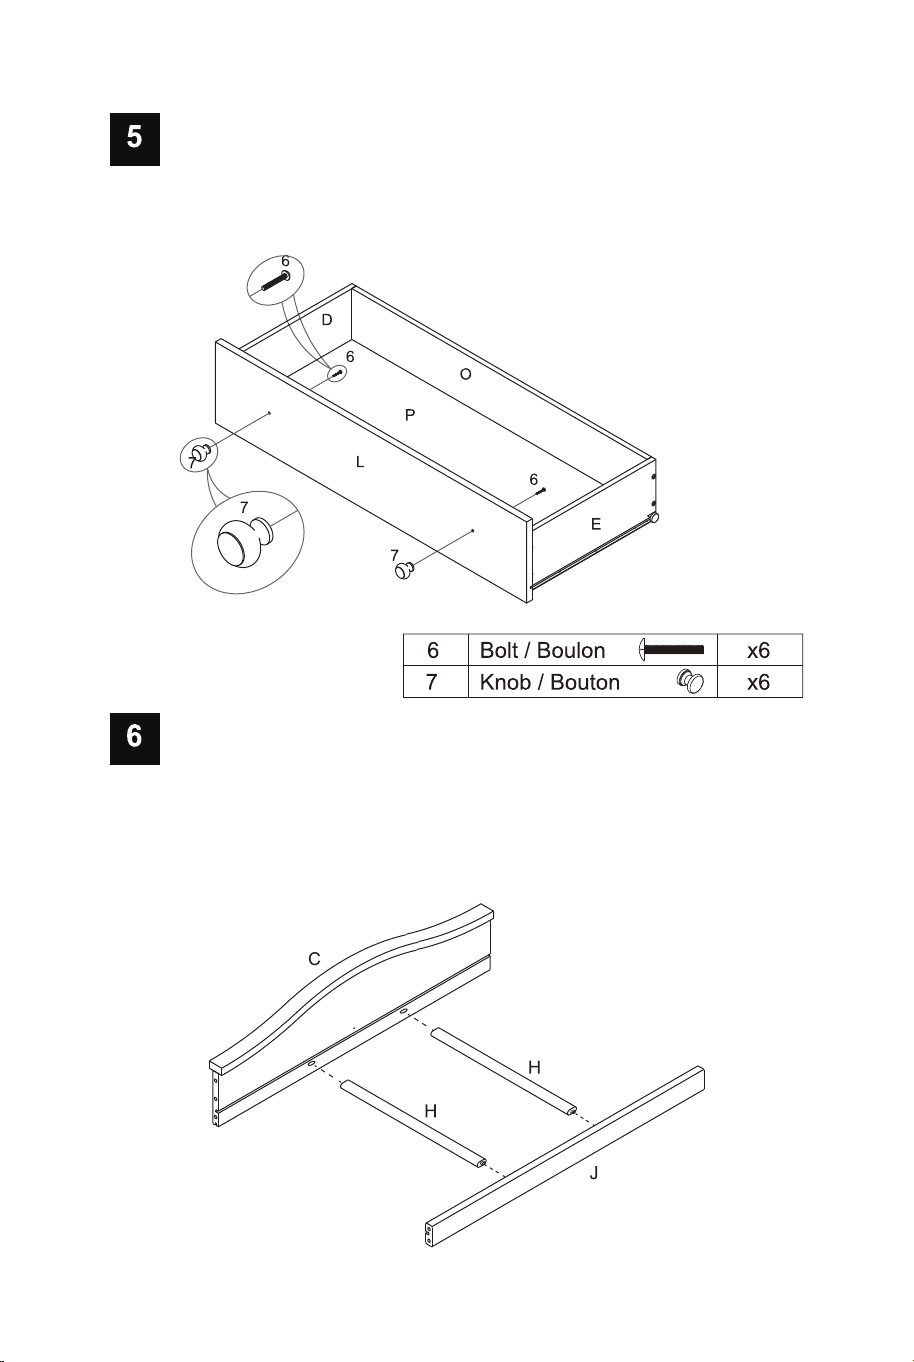
EN: Attach knob (#7) to drawer front panel (L) with bolt (#6).
FR: Fixez le bouton (#7) au panneau avant du tiroir (L) avec le
boulon (#6).
EN: Attach 2 panel support bars (H) to back cross beam (C) and
front cross beam (J) with 4 dowels (#4).
FR: Fixez 2 barres de support de panneau (H) à la traverse arrière
(C) et à la traverse avant (J) avec 4 chevilles (#4).
12
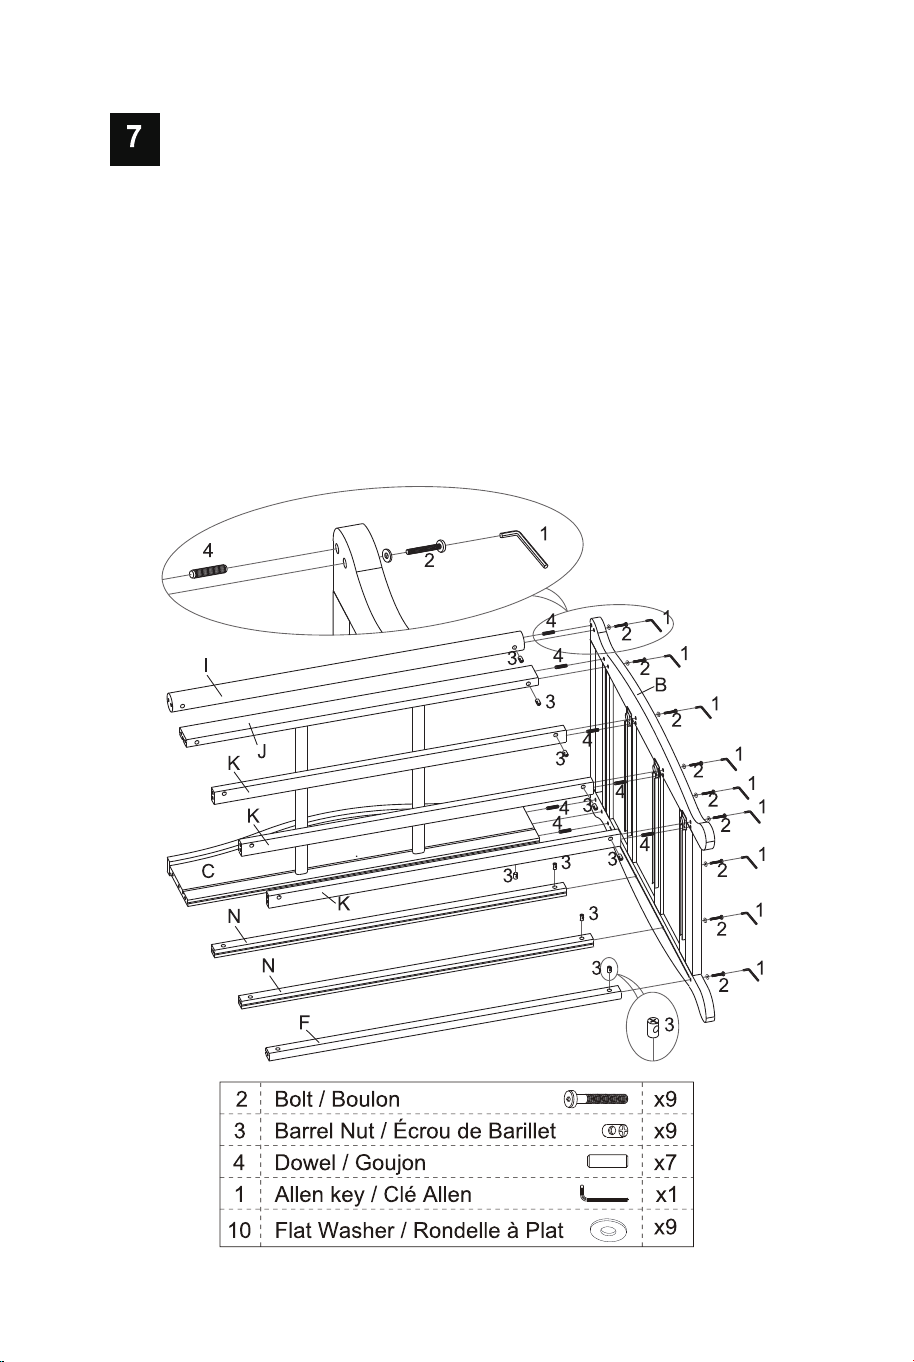
EN: Attach back cross beam (C), back middle rail (N), back bottom
rail (F), top round rail (I), front cross beam (J) and drawer rail (K) to
right side panel (B), using 9 bolts (#2) and 9 flat washer(#10) and 9
barrel nuts (#3) and 7 dowels (#4). Tighten firmly with Allen key (#1).
FR : Fixez la traverse arrière (C), la traverse centrale arrière (N), la
traverse inférieure arrière (F), la traverse ronde supérieure (I), la
traverse avant (J) et le rail de tiroir (K) au panneau latéral droit (B),
en utilisant 9 boulons (#2) et 9 rondelles plates (#10) et 9 écrous
cylindriques (#3) et 7 chevilles (#4). Serrez fermement avec la clé
Allen (#1).
13
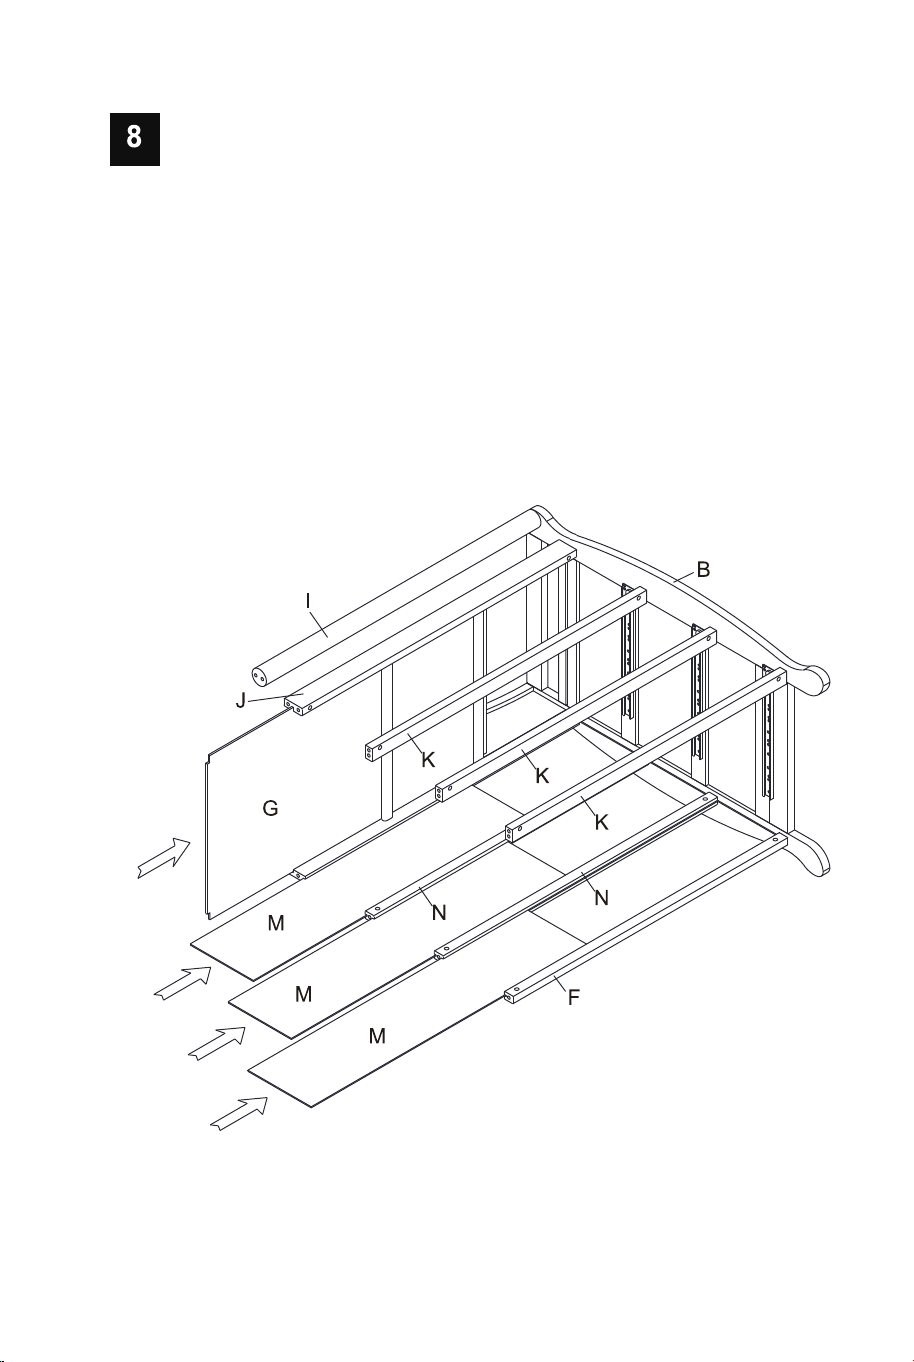
EN: Slide top panel (G), back panel (M) into the grooves.
FR : Faites glisser le panneau supérieur (G) et le panneau arrière
(M) dans les rainures.
14
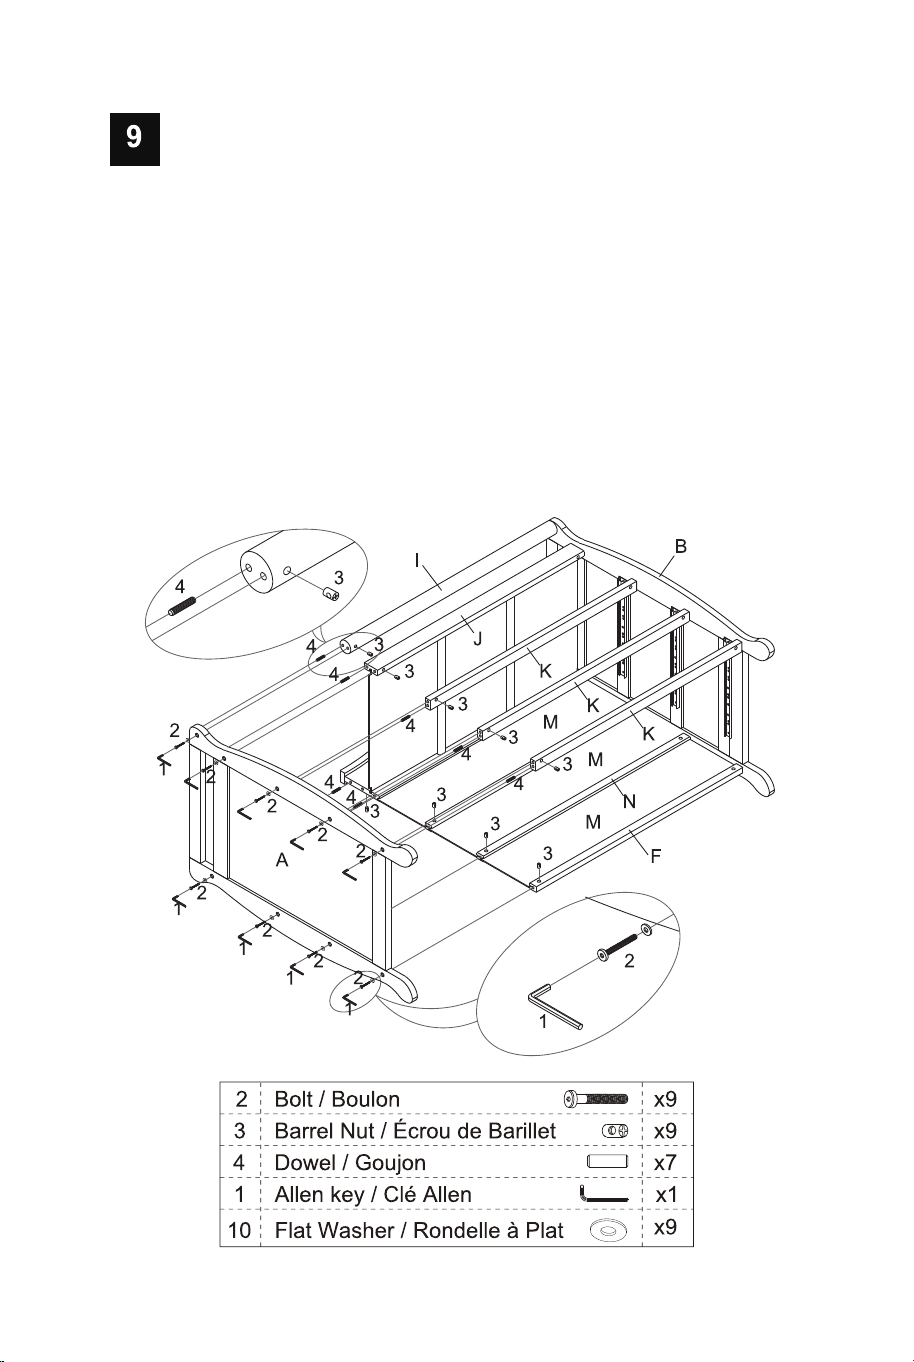
EN: Attach back cross beam (C), back middle rail (N), back bottom
rail (F), top round rail (I), front cross beam (J) and drawer rail (K) to
left side panel (A), using 9 bolts (#2) and 9 flat washer(#10) and 9
barrel nuts (#3) and 7 dowels (#4). Tighten firmly with Allen key (#1).
FR : Fixez la traverse arrière (C), la traverse centrale arrière (N), la
traverse inférieure arrière (F), la traverse ronde supérieure (I), la
traverse avant (J) et le rail de tiroir (K) au panneau latéral gauche
(A), en utilisant 9 boulons (#2) et 9 rondelles plates (#10) et 9 écrous
cylindriques (#3) et 7 chevilles (#4). Serrez fermement avec la clé
Allen (#1).
15

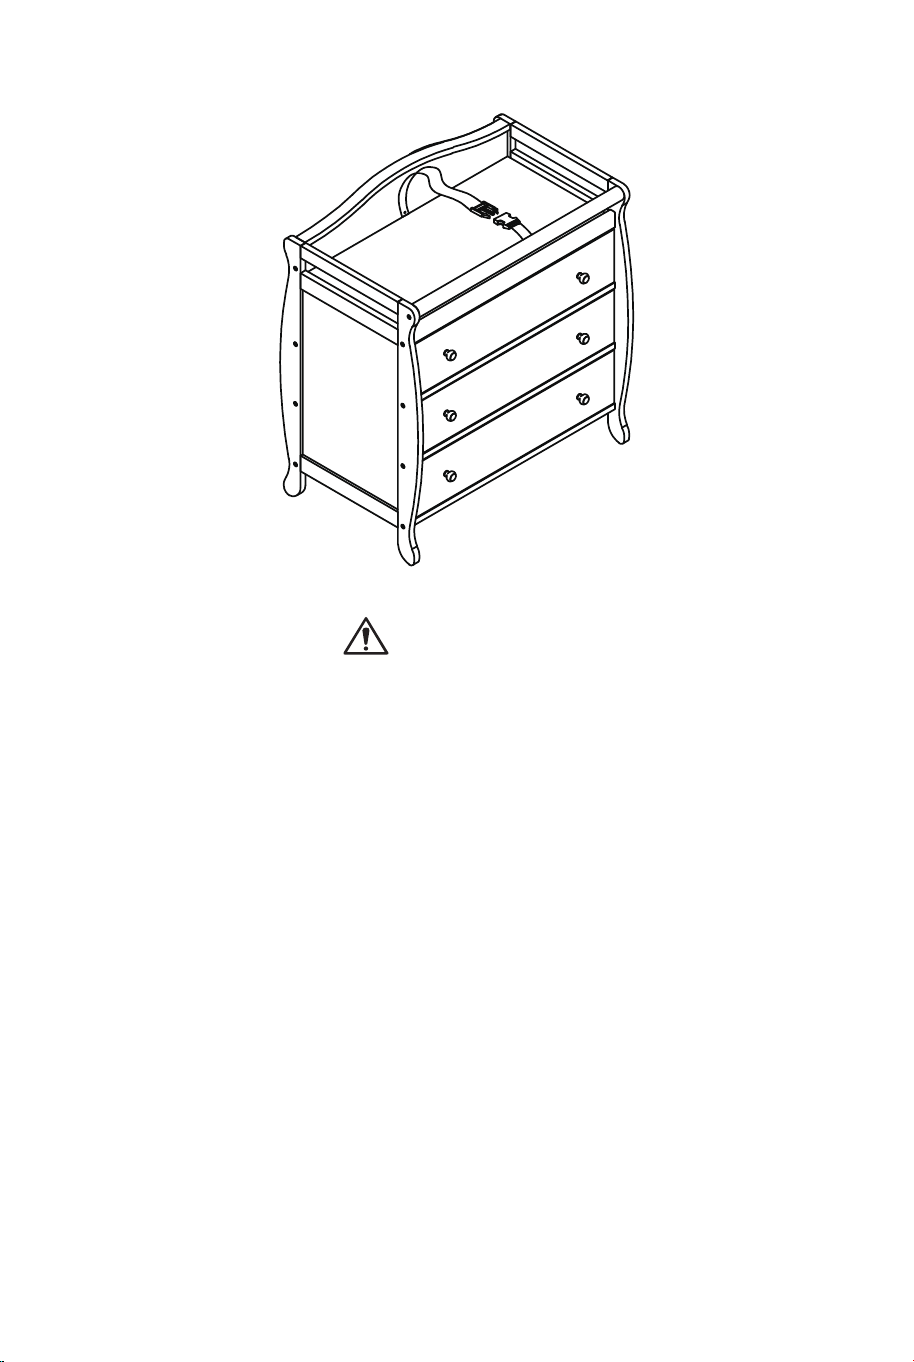
EN: Insert the three assembled drawers into unit.
FR: Insérez les trois tiroirs assemblés dans l'unité.
16
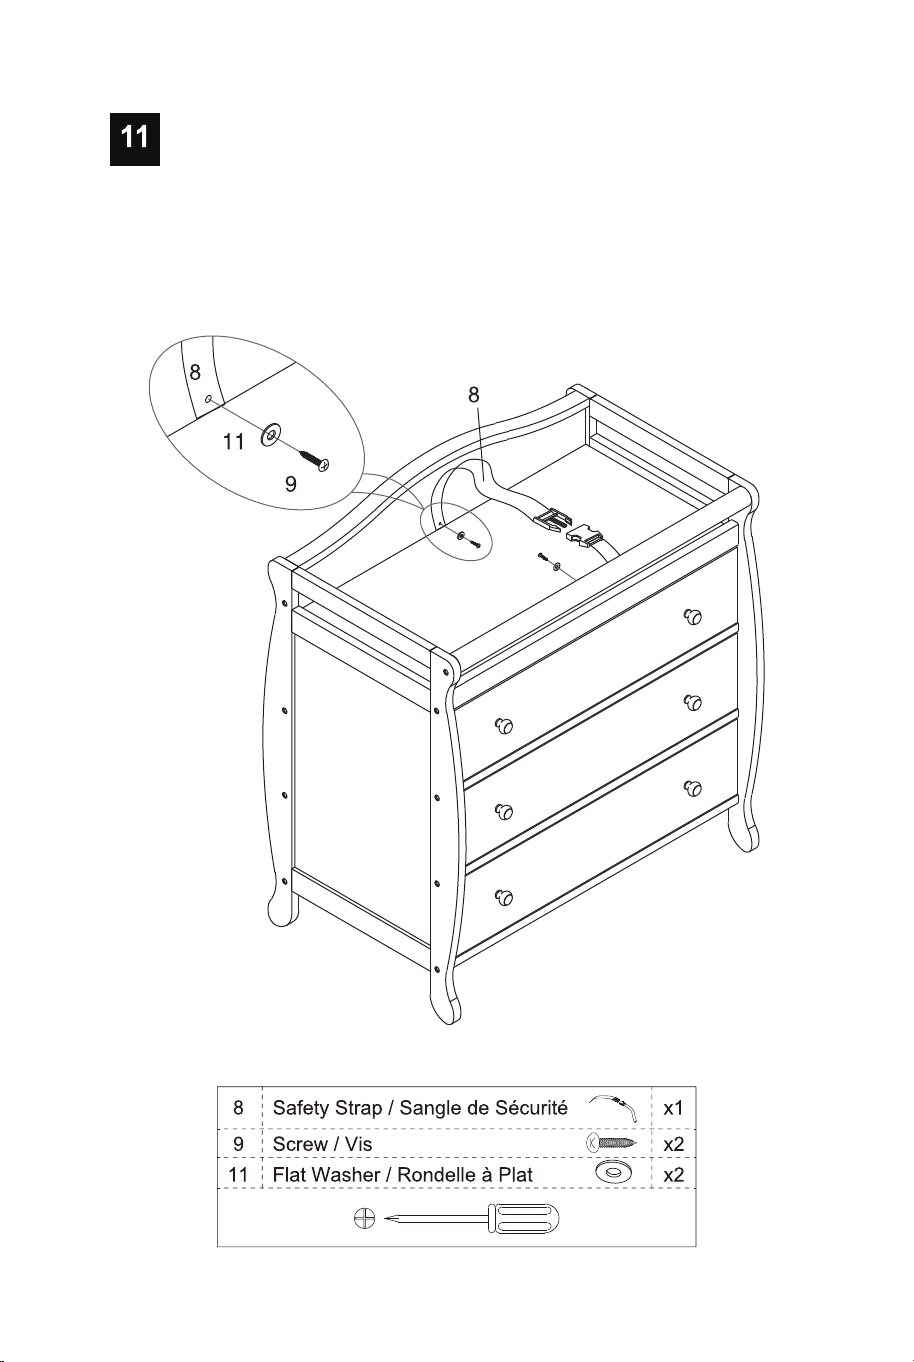
EN: Attach the safety strap (#8) to back cross beam (C) and front
cross beam (J) by using the screws (#9) and flat washer (#11).
FR: Fixez la sangle de sécurité (#8) à la traverse arrière (C) et à la
traverse avant (J) à l'aide des vis (#9) et de la rondelle plate (#11).
17
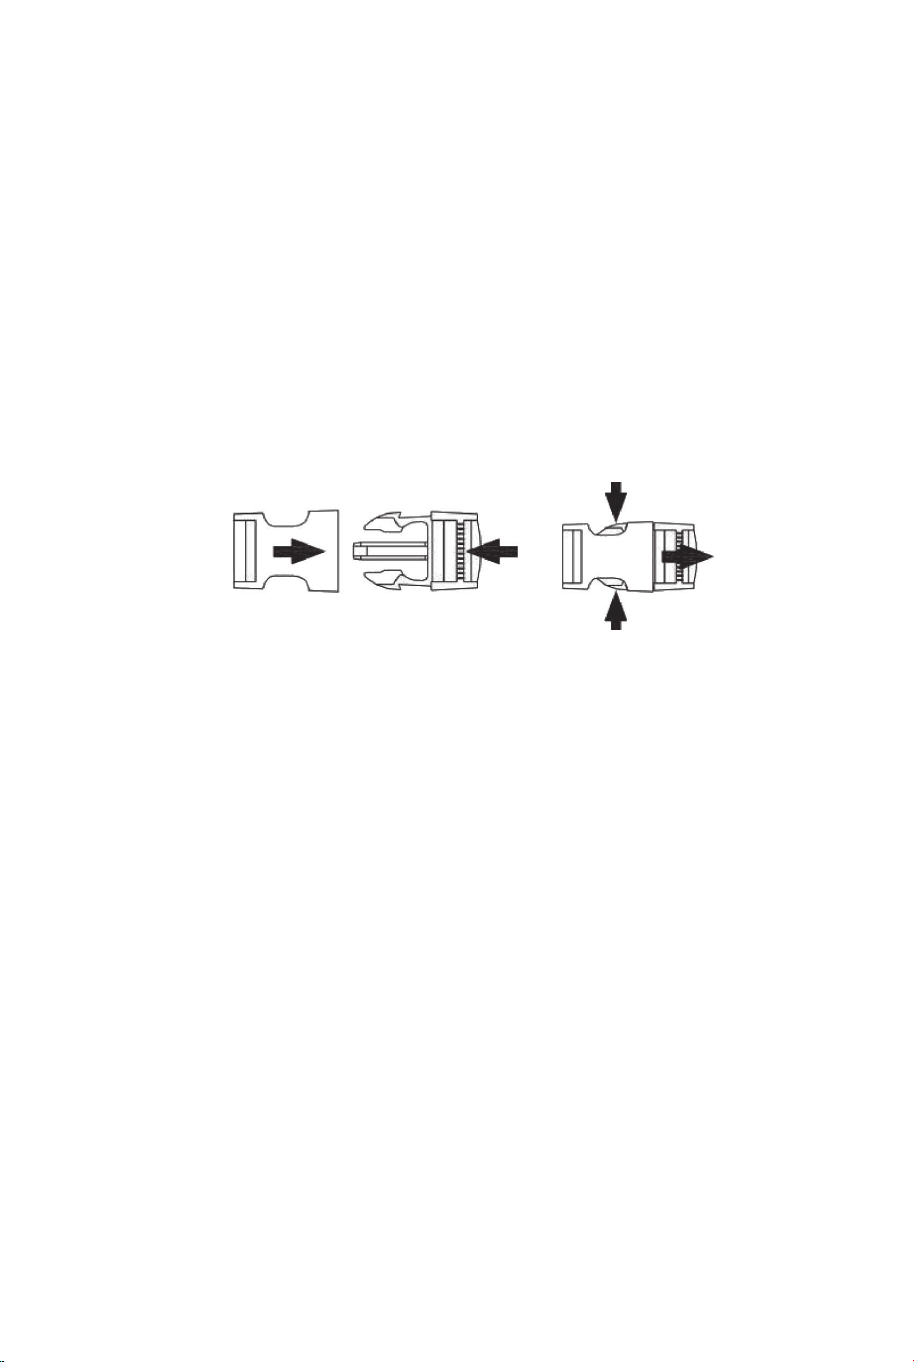
How to use safety strap /
Comment utiliser la sangle de sécurité :
EN: Adjust the restraint strap to fit baby’s body. To fasten restraint
strap, insert the buckle as shown below. To release press inward on
the tabs.
FR: Ajustez la sangle de retenue pour s'adapter au corps de bébé.
Pour attacher la sangle de retenue, insérez la boucle comme illustré
ci-dessous. Pour relâcher, appuyez vers l'intérieur sur les
languettes.
To fasten
/ Pour
attacher
To release /
Pour libérer
18
Instructions De Retour / Réclamation De Dommages
Dans le cas où un retour est requis, l'article doit être retourné dans sa boîte
d'origine. Sans cela, votre retour ne sera pas accepté.
NE PAS jeter la boîte/l'emballage d'origine.
Prenez une photo des marquages de la boîte.
Prenez une photo des dommages (le cas échéant).
Envoyez-nous un e-mail avec les images demandées.
Une photo des marquages (texte) sur le côté de la boîte est requise au cas où
une pièce serait nécessaire pour le remplacement. Cela aide notre personnel à
identifier votre numéro de produit pour s'assurer que vous recevez les bonnes
pièces.
Une photo des dommages est toujours requise pour déposer une réclamation et
obtenir rapidement votre remplacement ou votre remboursement. Assurez-vous
d'avoir la boîte même si elle est endommagée.
Envoyez-nous un e-mail directement depuis le marché où votre article a été
acheté avec les images ci-jointes et une description de votre réclamation.
FR
In case a return is required, the item must be returned in original box. Without this
your return will not be accepted.
DO NOT discard the box / original packaging.
Take a photo of the box markings.
Take a photo of the damaged part (if applicable).
Send us an email with the images requested.
A photo of the markings (text) on the side of the box is required in case a part is
needed for replacement. This helps our staff identify your product number to
ensure you receive the correct parts.
A photo of the damage is always required to file a claim and get your replacement
or refund processed quickly. Please make sure you have the box even if it is
damaged.
Email us directly from marketplace where your item was purchased with the
attached images and a description of your claim.
EN
Return / Damage Claim Instructions
Instructions De Retour / Réclamation De Dommages
19

If you're having difficulty, our friendly
customer team is always here to help.
USA office: Fontana
AUS:cs.au@costway.com
GBR:cs.uk@costway.com
FRA:cs.fr@costway.com
GBR office: FDS Corporation Limited,Unit 4, Blackacre Road, Great Blakenham,Ipswich, Ip6 0FL,United Kingdom
AUS office: Truganina FRA office: Saint Vigor d'Ymonville