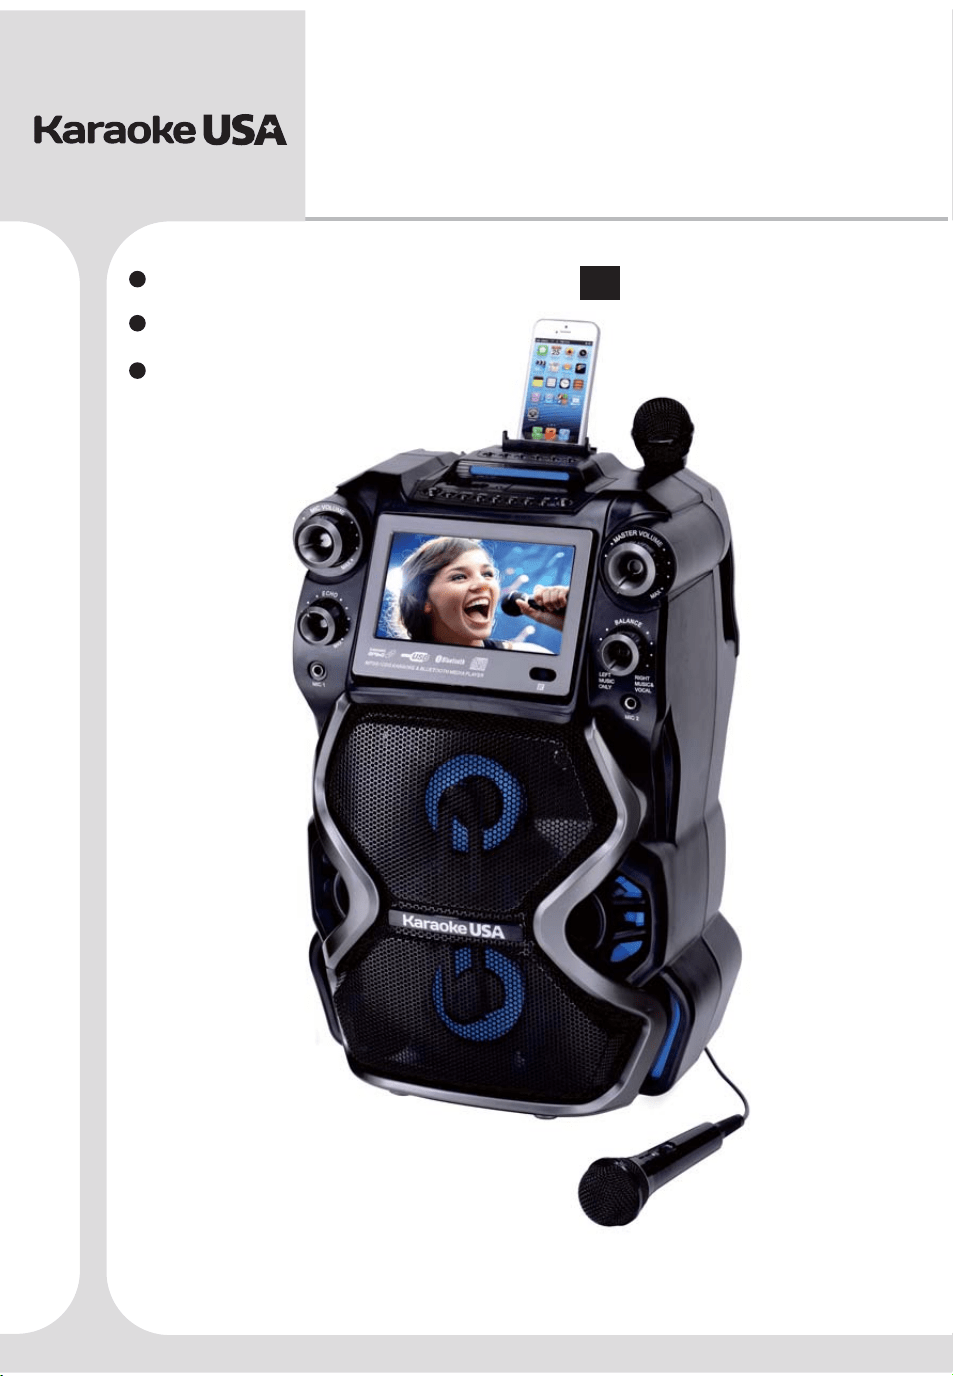
GF920
Before operating this product, please read these instructions.
CDG /MP3G KARAOKE
& BLUETOOTH MEDIA PLAYER
Smart Device not included
User’s Guide
MODEL:
EN
Español
Français
English

Contents
Warnings and Precautions........................................................................................ 01
Important Safety Instructions....................................................................................02
Caution...................................................................................................................03
What’s in the Gift Box...............................................................................................04
Song List on your Disc......................................................................................... 05-06
Features.................................................................................................................07
Front Panel Illustration.............................................................................................08
Top&Rear Panel Illustration..................................................................................... 09
Remote Control Functions........................................................................................10
Monitor Message.....................................................................................................11
Connect Power Adapter............................................................................................11
Charging Internal Battery..........................................................................................12
Using Microphone.....................................................................................................12
Charging Your Mobile............................................................................................... 13
Replace Built - in Battery...........................................................................................13
Install Cradle........................................................................................................... 14
Place Smart Device into Cradle................................................................................. 14
Connecting to Television / Ext. Device........................................................................15
Loading a Disc..........................................................................................................16
Playing Disc Music................................................................................................... 16
Install USB Memory Stick.......................................................................................... 17
Playing USB Music Files........................................................................................... 17
Using Repeat / Program.............................................................................................18
Using Bluetooth........................................................................................................19
Disco Light...............................................................................................................19
Using Echo...............................................................................................................19
Using Balance..........................................................................................................19
Record Feature Instructions.......................................................................................20
Specification.............................................................................................................21
01
CAUTION
MOISTURE AND CONDENSATION
For units with an insertable AC Power Adapter
cord set:
• The power adapter should remain operable for its
intended use. Disconnect the AC Power Adapter
if you are not intending to use the unit for a long
period of time.
• When connecting or disconnecting the AC Power
Adapter Cord, grip the plug and not the cord
itself. Pulling the cord may cause damage and
create a hazard.
For units with a Rechargeable Battery:
• Do not expose batteries to excessive conditions
– extreme cold, heat, sun or fire.
SAFETY
WHEN IN USE
FCC INFORMATION
WARNING: To reduce the risk of fire or electric
shock, do not expose this unit to rain or moisture.
CAUTION: Use of controls or adjustments or
performance of procedures other than those
specified may result in hazardous radiation
exposure.
“Caution Marking and Rating Label” is affixed
under the lid or on the bottom of the unit with a
mass not exceeding 7kg.
RISK OF ELECTRIC SHOCK,
DO NOT OPEN.
CAUTION: TO PREVENT THE RISK OF
ELECTRIC SHOCK – DO NOT REMOVE
COVER OR BACK. NO USER-SERVICEABLE
PARTS INSIDE. REFER SERVICING TO
QUALIFIED PERSONNEL.
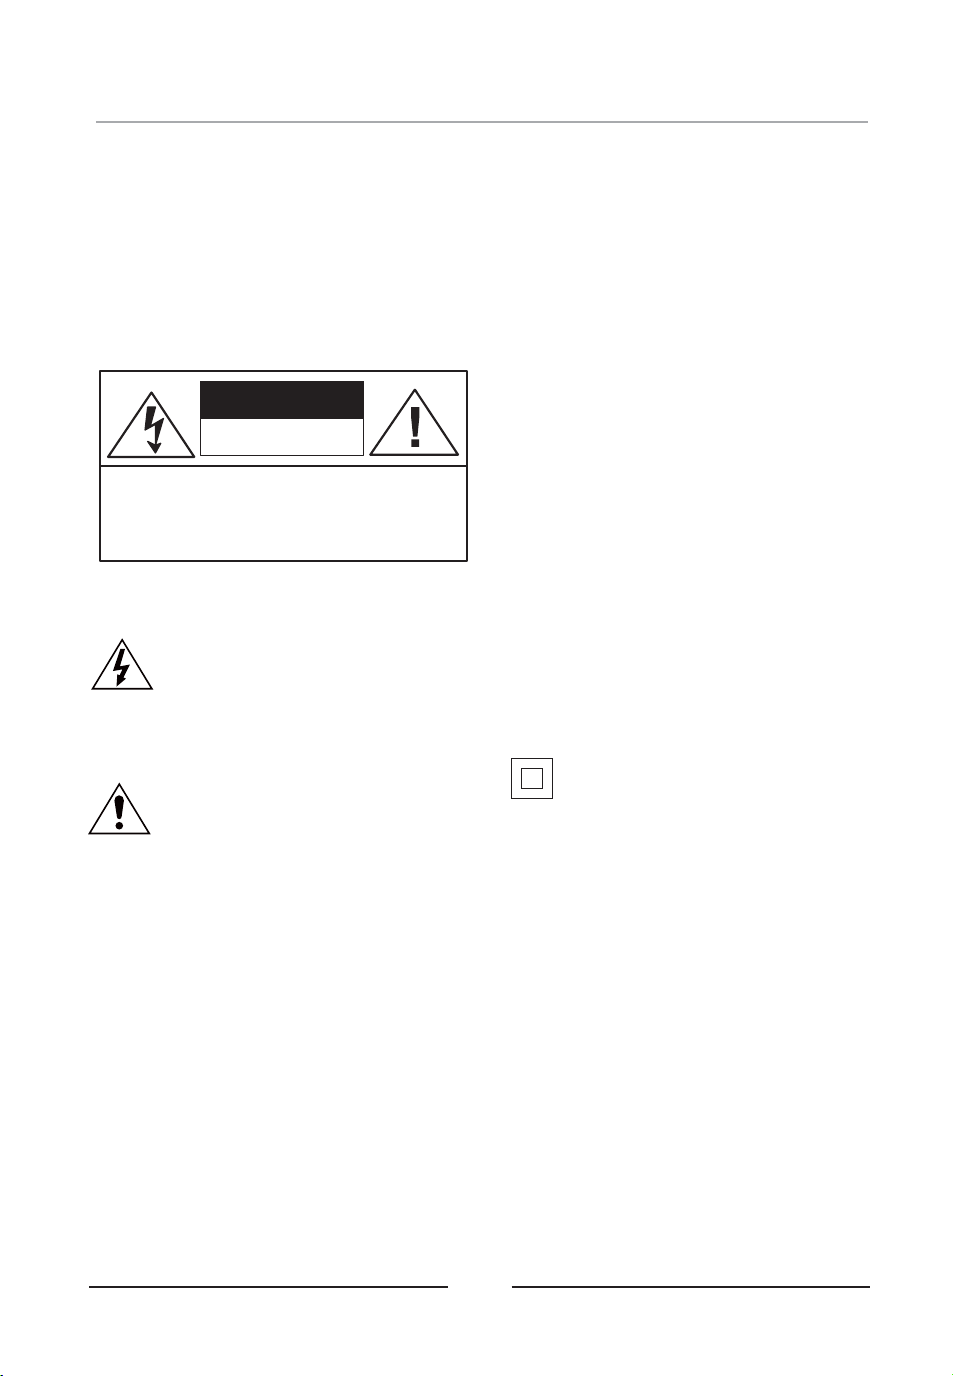
This symbol is intended to alert you to
the presence of uninsulated, dangerous
voltage within the unit's enclosure that
might be of a sufficient magnitude to
constitute a risk of electric shock. DO
NOT OPEN THE UNITS CASE.
This symbol is intended to inform you
that important operating and
maintenance instructions are included in
the literature accompanying this
product.
If the unit is exposed to moisture and extreme
cold temperatures and moved to a warm
environment, condensation may form on the units
internal components. Under these
circumstances, turning the power “ON” may
cause damage to the unit or cause harm to the
user. Allow the unit to stand in a warm
environment for 1 to 3 hours and allow the unit to
air dry safely.
• Do not use this unit in conditions that are
extreme – hot, cold, dusty or humid.
• Do not restrict the air flow of the unit by placing
it on a soft surface like a bed, carpet or
covering.
This unit complies with part 15 of the “FCC
Rules.” Operation is subject to the following
conditions:
1. This unit may not cause harmful interference.
2. This unit must accept any interference
received, including interference that may
cause undesirable operation.
Double insulation.
This is a Class II apparatus.
Warnings and Precautions
FCC ID: 2ANH7-3938021TFT
02
1. Read These Instructions: All
safety and operations manual should
be read before the product is
operated.
2. Keep These Instructions: The
safety and operations manual should
be retained for future reference.
3. Heed All Warnings: All warnings
applicable to the unit and in the
operations manual should be adhered
to.
4. Follow All Instructions: All
operations manual should be
followed.
5. Water and Moisture: Do not use
this unit near water. For example, do
not use near a bath tub, wash bowl,
kitchen sink, or laundry tub. Do not
use this unit in a wet basement or
near a swimming pool or similar
location. The unit shall not be
exposed to dripping or splashing and
no objects filled with liquids (ex:
vases), shall be placed on or near
this unit.
6. Cleaning: Clean the unit only with
a dry cloth. Unit must be unplugged
from the wall outlet before cleaning.
Do not use liquid cleaners or aerosol
cleaners on the unit.
7. Ventilation: Slots and openings in
the cabinet of the unit are provided to
ensure reliable operation and
ventilation and to protect the unit from
overheating. The openings must not
be covered and should never be
blocked by placing the product on a
soft surface like a bed, sofa, or rug.
This unit should not be placed in a
built-in installation like a bookcase or
rack, unless proper ventilation is
provided.
8. Heat: Do not install the unit near
any heat source like a radiator, heat
register, stove or other device that
produces heat, including amplifiers.
9. Grounding or Polarization: If
applicable, do not disable or
circumvent the polarized or
grounding-type plug. A polarized
plug has 2 blades with 1 wider than
the other. A grounding-type plug has
2 blades and a 3 grounding plug.
rd
The wide blade, or the 3 prong, is
rd
provided for your safety. If the
provided plug does not fit into an
outlet, consult a qualified electrician
for replacement of this outlet.
10. Power Cord Protection: Protect
the power cord from being walked on,
pinched or cut or damaged in any
way. If any damage occurs, consult
with a trained technician for repair.
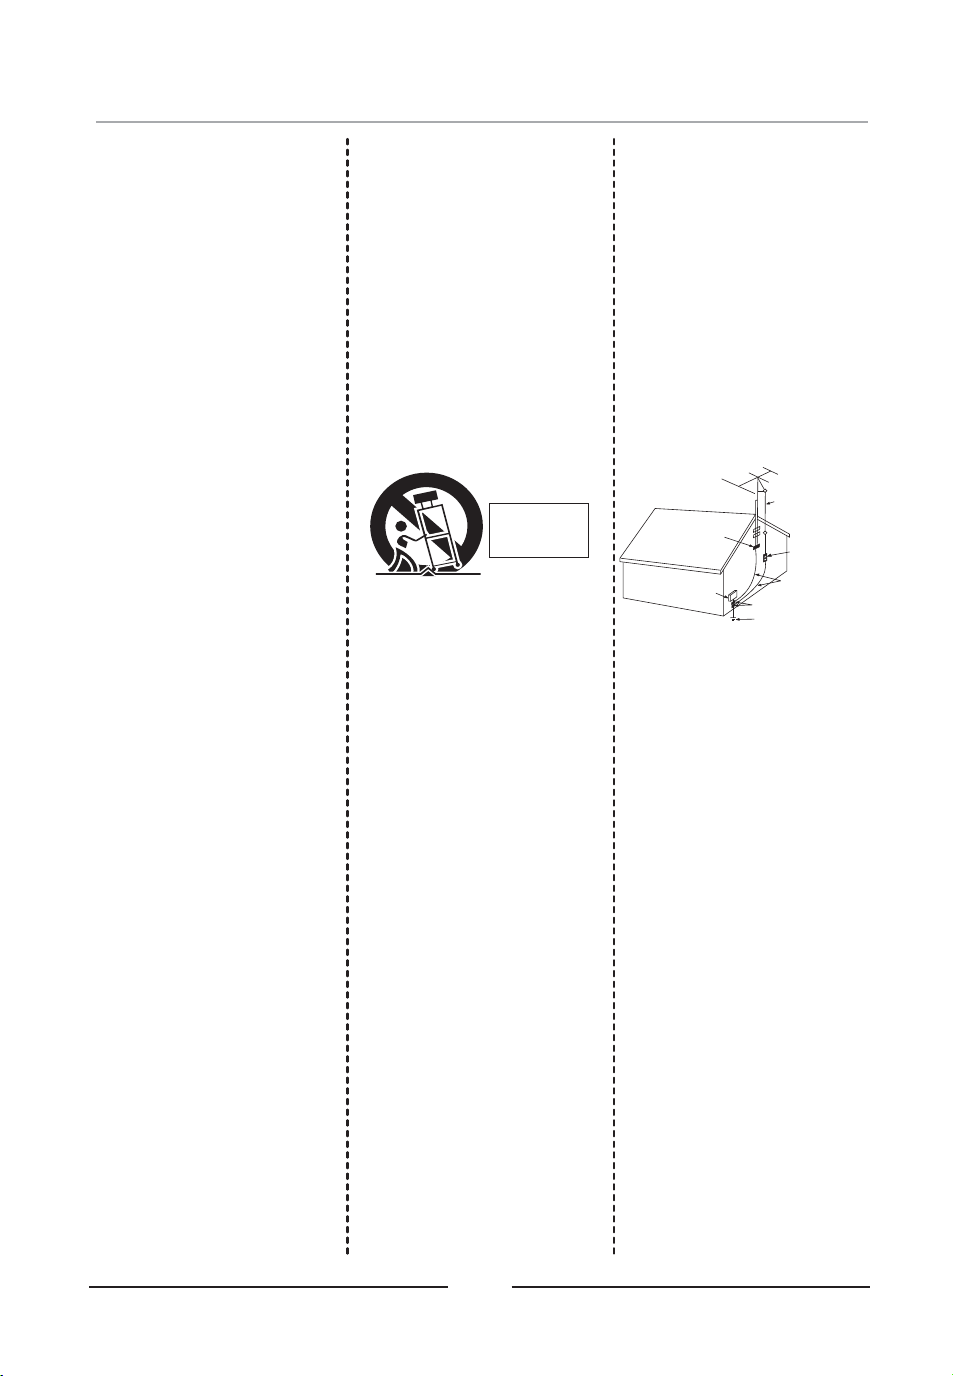
11. Accessories: Only use
accessories specified and approved
by the manufacturer. Do not place this
unit on an unstable cart, stand, tripod,
bracket or table that has not been
previously approved by the
manufacturer. This unit may fall,
causing serious injury to a child, adult
or to the unit itself. Any mounting of
the unit should be done within the
manufacturer's guidelines.
12. Transporting: If a pre-approved
device is used to transport this unit,
caution and care must be observed
and practiced to avoid damages.
Make sure the device and unit
together are stable before moving.
13. Lightning: Unplug this unit and
disconnect the antenna or cable
system during lightning storms or
when unused for long periods of time.
This will help prevent damage to the
unit due to lightning and power line
surges.
14. Servicing: Do not attempt to
service this unit yourself. Opening or
removing covers may expose you to
dangerous voltage or other hazards.
Refer all servicing to a qualified
service technician.
15. Power Sources: Only connect to
the type of household power supply as
indicated in the operations manual and
“Caution Marking and Rating Label.” If
you are not sure of the type of power
supplied to your home (or location of
the outlet the unit is being plugged
into), consult with the local power
company. For units intended to
operate from battery power, or other
sources, refer to the manufacturer's
operations manual.
16. Overloading: Do not overload
wall outlets or extension cords. This
can result in a risk of fire or electric
shock and may be hazardous.
17. Foreign Material: Protect this unit
from intrusion of any foreign
substances like dirt, water, moisture
and insects. Do not force any foreign
materials or chemicals into this unit.
This could result in a risk of fire or
electric shock and may be hazardous.
18. Replacement Parts and Safety
Check: When replacement parts are
required, be sure the service
technician has used replacement parts
specified and approved by the
manufacturer. Ask the service
technician to perform safety checks to
ensure the proper operation to avoid
possible fire, electric shock or other
hazards.
19. Outdoor Antenna Grounding: If
an outside antenna or cable system is
connected to the unit, be sure the
antenna or cable system is grounded
to provide some protection against
voltage surges and built-up static
charges. If there is any doubt to the
proper grounding of these systems,
contact a qualified electrician to
inspect your location.
20. Wall or Ceiling Mounted: The
unit should be mounted to a wall or a
ceiling only as recommended by the
manufacturer.
21. Disconnect Device: Make sure
all disconnect devices are in proper
working condition and readily available
in the event of an emergency or if
power “off ” is needed quickly.
22. Protective Attachment Plug: If
applicable, this unit may be equipped
with an attachment plug having
overload protection. This is a safety
feature. See the operations manual
for replacement or resetting of this
protective device. If replacement of
the plug is required, be sure the
qualified service technician has used a
replacement plug specified by the
manufacturer that has the same
overload protection as the original
plug.
23. Power Lines: An outside antenna
system should not be located in the
vicinity of overhead power lines or
other electric light or power circuits, or
where it can fall into such power lines
or circuits. When installing an outside
antenna system, extreme care should
be taken to keep from touching such
power lines or circuits, as contact with
them may be fatal. Always consult
with your local power company before
installing an outside antenna.
S3125A
PORTABLE
CART
WARNING
Antenna Lead
In wire
Antenna Discharge
Unit (NEC Section 810-20)
Grounding Conductors
(NEC Section 810-21)
Ground Clamp
Power Service Grounding
Electrode System
(NEC Art 250 Part H)
Ground Clamps
Electric
Service
Equipment
Important Safety Instructions

03
When EQ function /key control is turned on, the Recording
effect/result would not be ideal.
USB Flash Devices should be formatted to FAT32 on your
computer before use.
Please use the original box and packing materials for safe
transportation of this product.
It is normal for the cover and rear panel to become warm after the
player has been operating for an extended period of time.
Do not move this product during playing. Doing so may cause
damage to the pickup and the disc.
Press OPEN CD DOOR button to open tray. Do not pull the
tray. Do not touch tray when opening or closing.
Do not use hard or sharp instruments to touch the TFT Screen, it
may scratch or damage its surface!
Caution
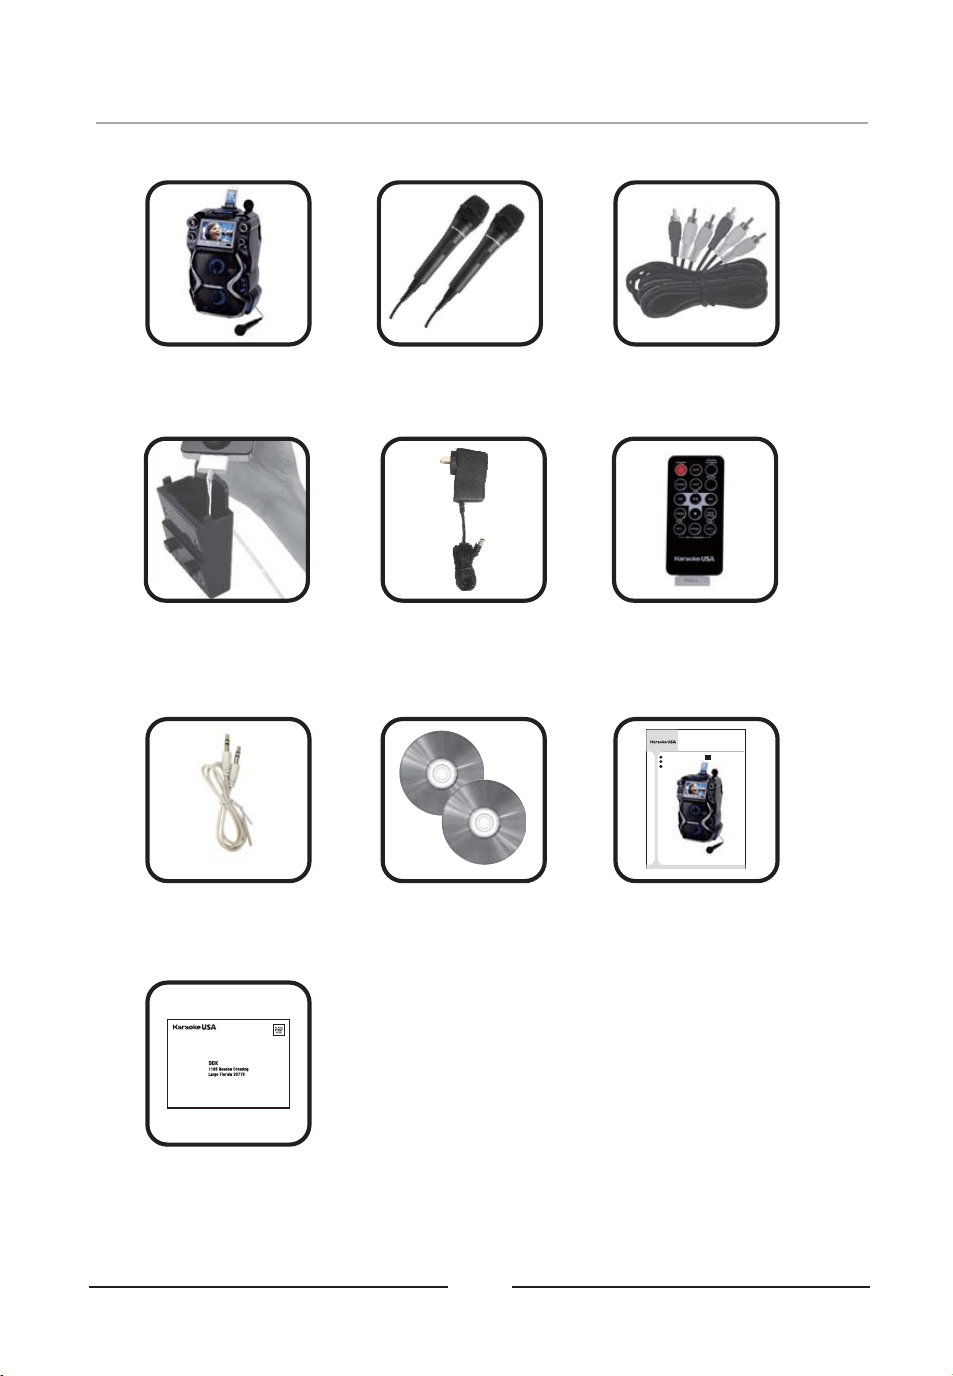
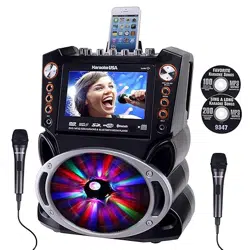
What’s in the Gift Box
Smart Device
Holder x 1
Microphone x 2GF920 X1 RCA Cable x 1
Remote Control x 1
AUX IN
Warranty Card x 1
Disc x 2
User’s Guide x 1
04
AC Adaptor x 1
DC15V/2A
Cable x 1
MP3G Demo
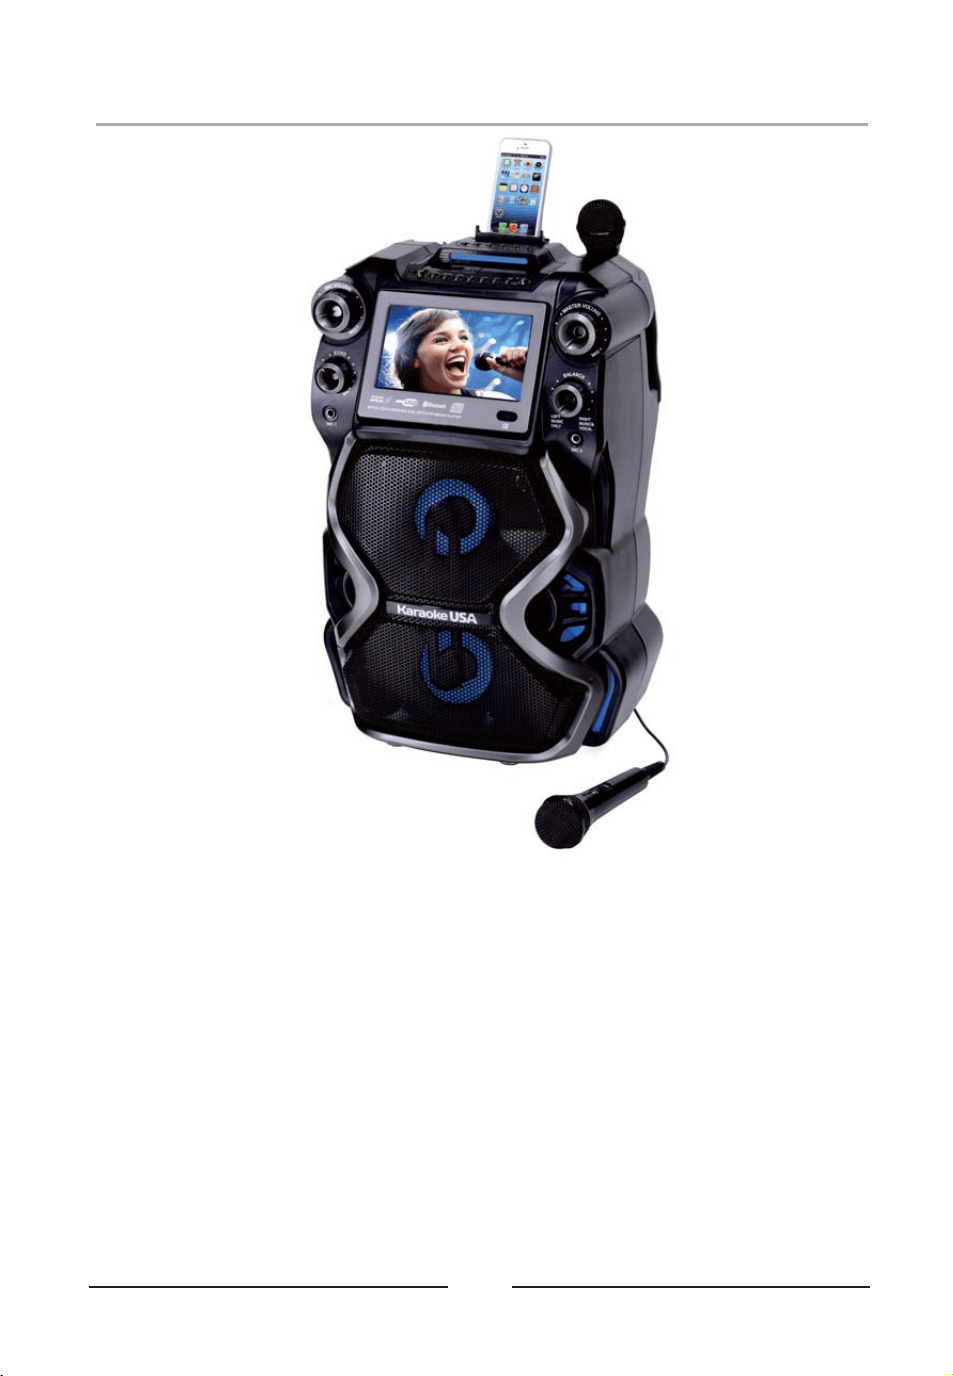
GF920
Before operating this product, please read these instructions.
CDG / MP3G KA RAOKE
& BLU ETOOTH M EDIA PL AYER
Smart Device not included
User’s Guide
MODEL:
EN
Español
Français
English
(Included CR2025 3V
lithium battery)

Song List on your Discs
1. Alexander's Ragtime Band
2. All Things Bright And Beautiful
3. All Through The Night
4. Alouette
5. Alphabet Song, The
6. America (My Country Tis Of Thee)
7. Animal Fair
8. Around And Around The Village
9. Aye Aye Aye Aye The Limerick Song
10. B I N G O
11. Baa Baa Black Sheep
12. Barney Buntline
13. Be Kind To Your Web Footed Friends
14. Bear Went Over The Mountain
15. Big Rock Candy Mountain
16. Billy Boy
17. Billy Pringle
18. Bird's Song
19. Blessed Assurance
20. Blow The Man Down
21. Blue Bells Of Scotland
22. Bluebird
23. Bollweevil
24. Bye, Baby Bunting
25. Caissons Go Rolling Along
26. Calendar Song
27. Camptown Races
28. Capital Ship, A
29. Cat Came Back, The
30. Cinderella
31. Clementine
32. Cock A Doodle Doo
33. Cockles And Mussels
34. Cocky Robin
35. Colors
36. Come, O Come, Emanuel
37. Counting Song
38. Crawdad Song
39. Crocodile, The
40. Cuckoo Is A Pretty Bird
41. Day And Night
42. Dixie
43. Do Your Ears Hang Low
44. Dry Bones
45. Elephant And The Flea
46. Father Grumble
47. Fiddle De De
48. Fishes
49. Five Currant Buns
50. For He's A Jolly Good Fellow
51. For Me And My Gal
52. Fox
53. Frere Jacques
54. Froggie Went A Courting
55. Georgie Porgie
56. German Lullaby
57. Girls And Boys Come Out To Play
58. Git Along Little Dogies
59. Golden Slumbers
60. Good Morning Merry Sunshine
61. Goosey Goosey Gander
62. Grasshopper
63. Grasshoppers Three
64. Greensleeves
65. Ground Hog
66. Harrigan
67. Here We Go Around The Mulberry Bush
9347 Sing A Long Karaoke Songs (200 Traditional Karaoke Songs)
05
68. Here We Go Looby Loo
69. Hey Diddle Diddle
70. Hickory Dickory Dock
71. Higgledy Piggledy My Black Hen
72. Home On The Range
73. Humpty Dumpty
74. Hunting We Will Go, A
75. Hush Little Baby
76. Hush-a-bye
77. I Am A Young Musician
78. I Gave My Love A Cherry
79. I Had A Little Nut Tree
80. I Love You Truly
81. I Spy
82. If You're Happy And You Know It
83. I'll Take You Home Again, Kathleen
84. I'm A Little Teapot
85. I'm Always Chasing Rainbows
86. I'm Looking Over A Four Leaf Clover
87. In The Good Old Summertime
88. It Ain't Gonna Rain No More
89. It's Raining It's Pouring
90. I've Been Working On The Railroad
91. Jack And Jill
92. Jack Be Nimble
93. Jack Spratt
94. Jenny Jenkins
95. Jimmy Crack Corn
96. Lady Bird Lady Bird
97. Letters Of The Alphabet
98. Little Black Bull
99. Little Boy Blue
100. Little Jack Horner
101. Little Sally Waters
102. Little Things, The
103. Little Tommy Tucker
104. London Bridge Falling Down
105. London Street
106. Ma She's Making Eyes At Me
107. Mademoiselle From Armentieres
108. Marine's Hymn
109. Michael Row The Boat Ashore
110. Midnight Special, The
111. Moonlight Bay
112. My Old Dog Tray
113. My Old Hen
114. Now I Lay Me Down To Sleep
115. Oats Beans And Barley Grow
116. Off To Bed Now
117. Oh Dear What Can The Matter Be
118. Ol Woman Who Lived In A Shoe
119. Old Blue
120. Old John Braddleum
121. Old Mother Hubbard
122. On The Banks Of The Sacramento
123. On Top Of Old Smokey
124. One Meat Ball
125. One Two Buckle My Shoe
126. One Two Three Four Five
127. Oranges And Lemons
128. Over In The Meadow
129. Over The River And Through The Woods
130. Pat A Cake
131. Pease Porridge Hot
132. Peg O' My Heart
133. Peter Peter Pumpkin Eater
134. Polly Put The Kettle On
135. Polly Wolly Doodle
136. Pop Goes The Weasel
137. Ride A Cock Horse To Banbury Cross
138. Right Hand Says Good Morning
139. Ring Around The Rosie
140. Rise And Shine
141. Rock A Bye Baby
142. Rock A Bye Baby Green
143. Rock Island Line
144. Rocking The Cradle
145. Rose Of Tralee
146. Row Row Row Your Boat
147. Russian Cradle Song
148. Sailing Sailing
149. School Days
150. She'll Be Coming Around The Mountain
151. Shoo Fly Don't Bother Me
152. Shortening Bread
153. Simple Simon
154. Sing A Song Of Sixpence
155. Six Little Ducks
156. Skip To My Lou
157. Sleep Baby Sleep
158. Spelling
159. Spider And The Fly, The
160. Star Spangled Banner, The
161. Sur Le Pont D'avignon
162. Swanee River
163. Sweetly Sings The Donkey
164. Swing Low Sweet Chariot
165. Tailor And The Mouse
166. Take Me Out To The Ball Game
167. Ten In A Bed
168. The Ants Go Marching
169. The Eensy Weensy Spider
170. The Farmer In The Dell
171. The Holly And The Ivy
172. The Muffin Man
173. The Old Gray Mare
174. There Was A Little Man
175. There Was A Tree
176. There's A Hole In Middle Of Sea
177. This Little Pig Went To Market
178. This Old Man
179. Three Blind Mice
180. Three Little Kittens
181. Three Little Pigs
182. Tisket A Tasket, A
183. To Market To Market
184. Toot Toot Toosie Goodbye
185. Try Try Again
186. Tura Lura Lura
187. Turkey In The Straw
188. Vive La Compagne
189. Wabash Cannonball, The
190. Waltzing Matilda
191. We Hunted And We Hunted
192. We Three Kings
193. What Child Is This
194. When Johnny Comes Marching Home
195. Where Oh Where Has My Little Dog Gone
196. Who Threw The Overalls In Mrs. Murphy's
Chowder
197. Wish You A Happy Birthday
198. World Turned Upside Down, The
199. Yankee Doodle
200. Yellow Rose Of Texas
Any and all discs shown are for illustration only and may or may not represent the actual disc(s)
included in this package

Song List on your Discs
9346 Favorite Karaoke Songs (100 Traditional English and Spanish Karaoke Songs)
06
68. Oh You Beautiful Doll
69. Oh, Susanna
70. Old King Cole
71. Old MacDonald Had A Farm
72. Old Time Religion
73. One Day At A Time
74. One More River To Cross
75. Onward Christian Soldiers
76. Peace In The Valley
77. Precious Lord Take My Hand
78. Precious Memories
79. Rock Of Ages
80. Rock-A-My Soul
81. Silent Night
82. Sweet By And By
83. Sweet Hour Of Prayer
84. The Little Drummer Boy
85. The Lord's Prayer
86. The Old Rugged Cross
87. This Little Light Of Mine
88. Toda La Noche
89. Twelve Days Of Christmas
90. Twinkle Twinkle Little Star
91. We Gather Together
92. We Wish You A Merry Christmas
93. Wedding Song (There Is Love)
94. What A Friend We Have In Jesus
95. When Irish Eyes Are Smiling
96. When The Roll Is Called Up Yonder
97. While Shepherds Watched, Their Flocks
98. Whispering Hope
99. Ya Llego La Navidad
100. You're A Grand Old Flag
1. Abide With Me
2. Amazing Grace
3. Angel De Los Reinos Santos
4. Angels From The Realms Of Glory
5. Angels We Have Heard On High
6. April Shower
7. Auld Lang Syne
8. Ave Maria
9. Away In A Manger
10. Battle Hymn Of The Republic
11. Bicycle Built For Two
12. Bill Bailey, Won't You Come Home
13. Boom, Boom, Ain't It Great To Be Crazy
14. Brahm's Lullaby
15. Bringing In The Sheaves
16. Campanas de Navidad
17. Church in The Wildwood
18. Con Mi Burrito Sabanero
19. Daddy Sang Bass
20. Danny Boy
21. Deck The Halls
22. Ding Dong Que Alegria
23. Doce Dias De Navidad
24. Down By The Riverside
25. El Buen Rey Weceslao
26. El Primer Noel
27. El Tamborilero
28. First Noel, The
29. Frankie And Johnny
30. Give My Regards To Broadway
31. Go Tell It On The Mountain
32. God Rest Ye Merry Gentlemen
33. Hail Hail The Gang's All Here
34. Hark! The Herald Angels Sing
35. He's Got The Whole World In His Hand
36. His Eye Is On The Sparrow
37. How Great Thou Art
38. I Love To Tell The Story
39. I'll Fly Away
40. In The Garden
41. It Came Upon A Midnight Clear
42. It Is No Secret What God Can Do
43. Jeanie With The Light Brown Hair
44. Jesus Loves Me
45. Jingle Bells (Childrens)
46. Joy To The World
47. Just A Closer Walk With Thee
48. Let Me Call You Sweetheart
49. Little Bo Peep
50. Little Miss Muffet
51. Llego A Mi Medianoche
52. Los Tres Reyes
53. Mary Had A Little Lamb
54. Mary Quite Contrary
55. Mozart's Lullaby
56. My Bonnie Lies Over The Ocean
57. My Old Kentucky Home
58. My Wild Irish Rose
59. Navidad, Navidad
60. Noche De Paz
61. Noche Santa
62. O Holy Night
63. Oh Christmas Tree
64. Oh Come All Ye Faithful
65. Oh Little Town Of Bethlehem
66. Oh Ven Oh Ven Emmanuel
67. Oh When The Saints Go Marching In
Any and all discs shown are for illustration only and may or may not represent the actual disc(s)
included in this package
● CD+G/MP3+G Karaoke Player
● 7" TFT Color Screen
● Record CD+G/MP3+G Video/Audio mix
● Record and Record Instant Playback
● 300W Peak Power Output
● Remote Control
● 2 Microphones
● 2 Microphone Inputs and Holders
● USB Slots (up to 32GB)
● USB Charger for Smart Device
07
● Balance Control
● Digital Key Control
● Audio Input
● Audio and Video Output
● Audio/Video RCA Cable
● 3.5mm to RCA Cable
● AC 110V~240V
Adaptor
● Bluetooth wireless connection and Speaker
Analog Echo Control
●
Features
LED Lightings that Synchronize and
Flash with the rhythm of Music
●
● PA System record function
08
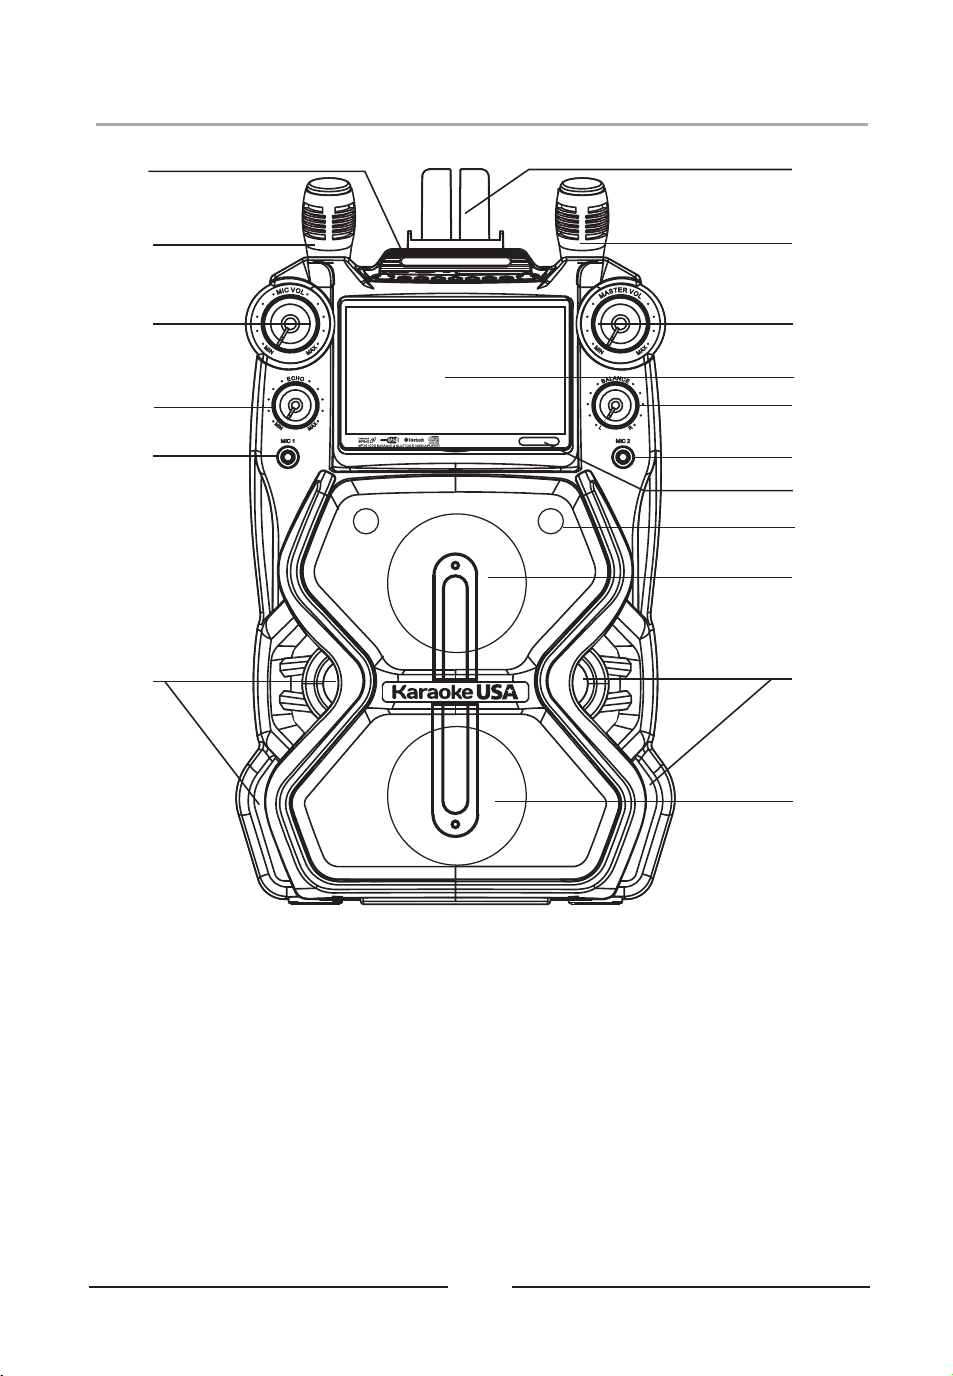
Front Panel Illustration
1
2
3
4
5
5
5
1
6
7
8
9
10
13
11
13
12
1. MICROPHONE HOLDER
2. MICROPHONE VOLUME CONTROL
3. ECHO CONTROL
4. MICROPHONE 1 INPUT
5. LED LIGHT
6. SMART DEVICE CRADLE
7. MASTER VOLUME CONTROL
8. TFT DISPLAY AND DISC DOOR
9. BALANCE CONTROL
10. MICROPHONE 2 INPUT
11. REMOTE SENSOR
12. SPEAKER (HIGH-RANGE)
13. SPEAKER (MID-RANGE)
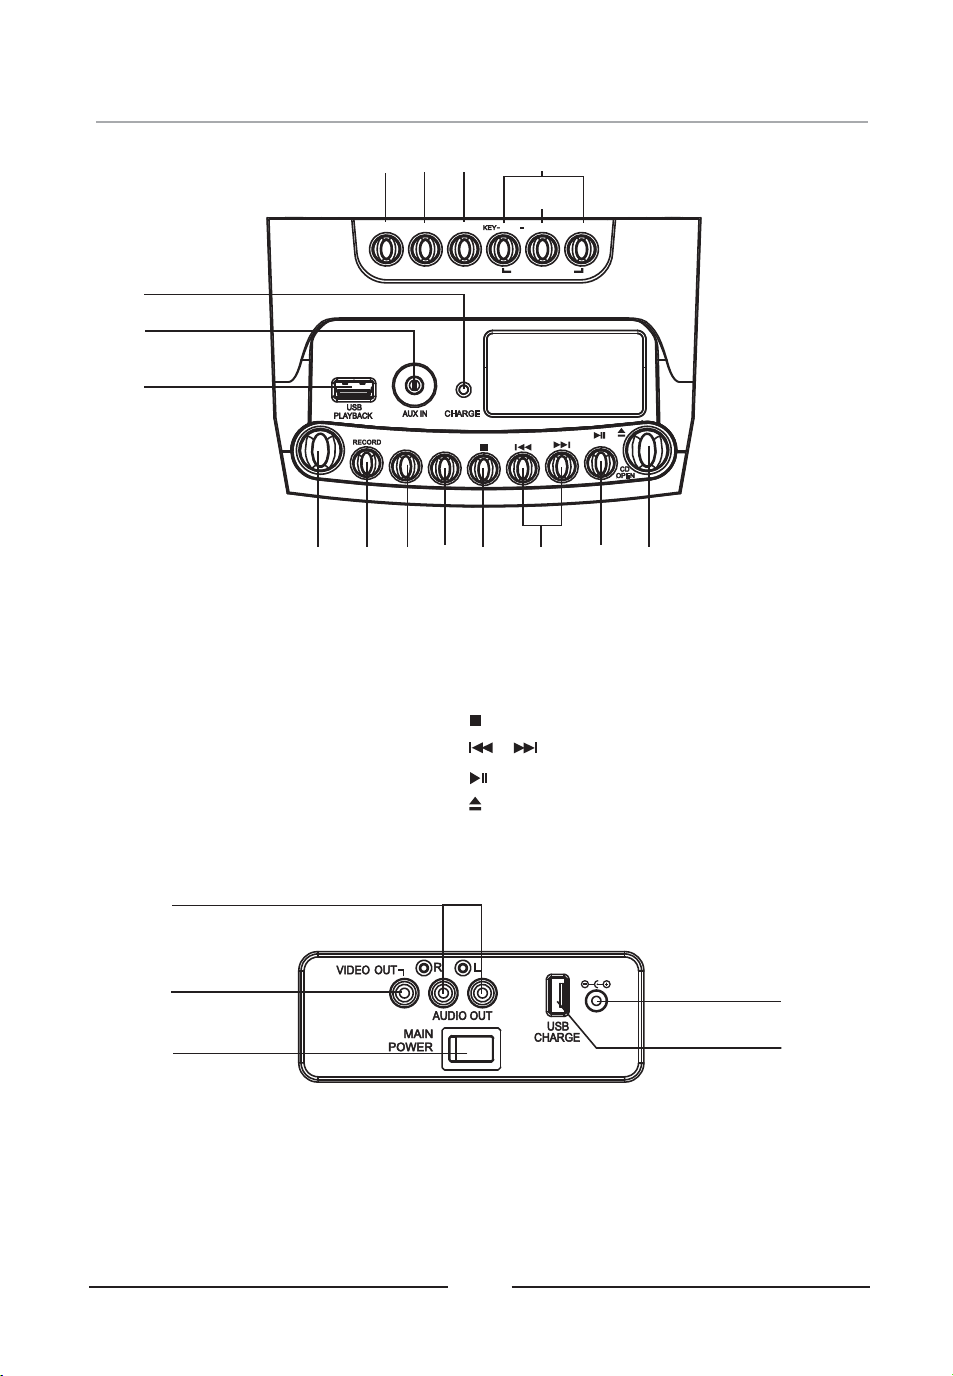
Top Panel Illustration& Rear
09
STANDBY
NORMAL
PLAYBACK
RECORD
SOURCE
SCREEN
LIGHT
PAIR
REPEAT
/
PROG
/
PAGE
/
KEY+
+
PAGE
/
KEY CHANGERKEY CHANGER
14
15
16
17
18
19
20
21
22
23 24
25
26
27
28
29
14. SCREEN Button
15. SOURCE Button
16. LIGHT Button
17. KEY CHANGER Button :
KEY- / PAGE- or KEY+/PAGE+
18. KEY NORMAL Button
19. CHARGING Indicator
20. AUX IN Input
21. USB Port For Play Back
30
32
34
31
33
22. STANDBY Button
23. RECORD Button
24. RECORD PLAYBACK Button
25. PROG / REPEAT Button
26 STOP Button.
27. / SKIP/ SEARCH Button
28. /PAIR / PLAY / PAUSE button
29. DISC DOOR OPEN Button
30. AUDIO OUT RCA Jack
31. VIDEO OUT RCA Jack
32. MAIN POWER Switch
33. DC IN Jack
34. USB Port For Charging
DC 15V
10
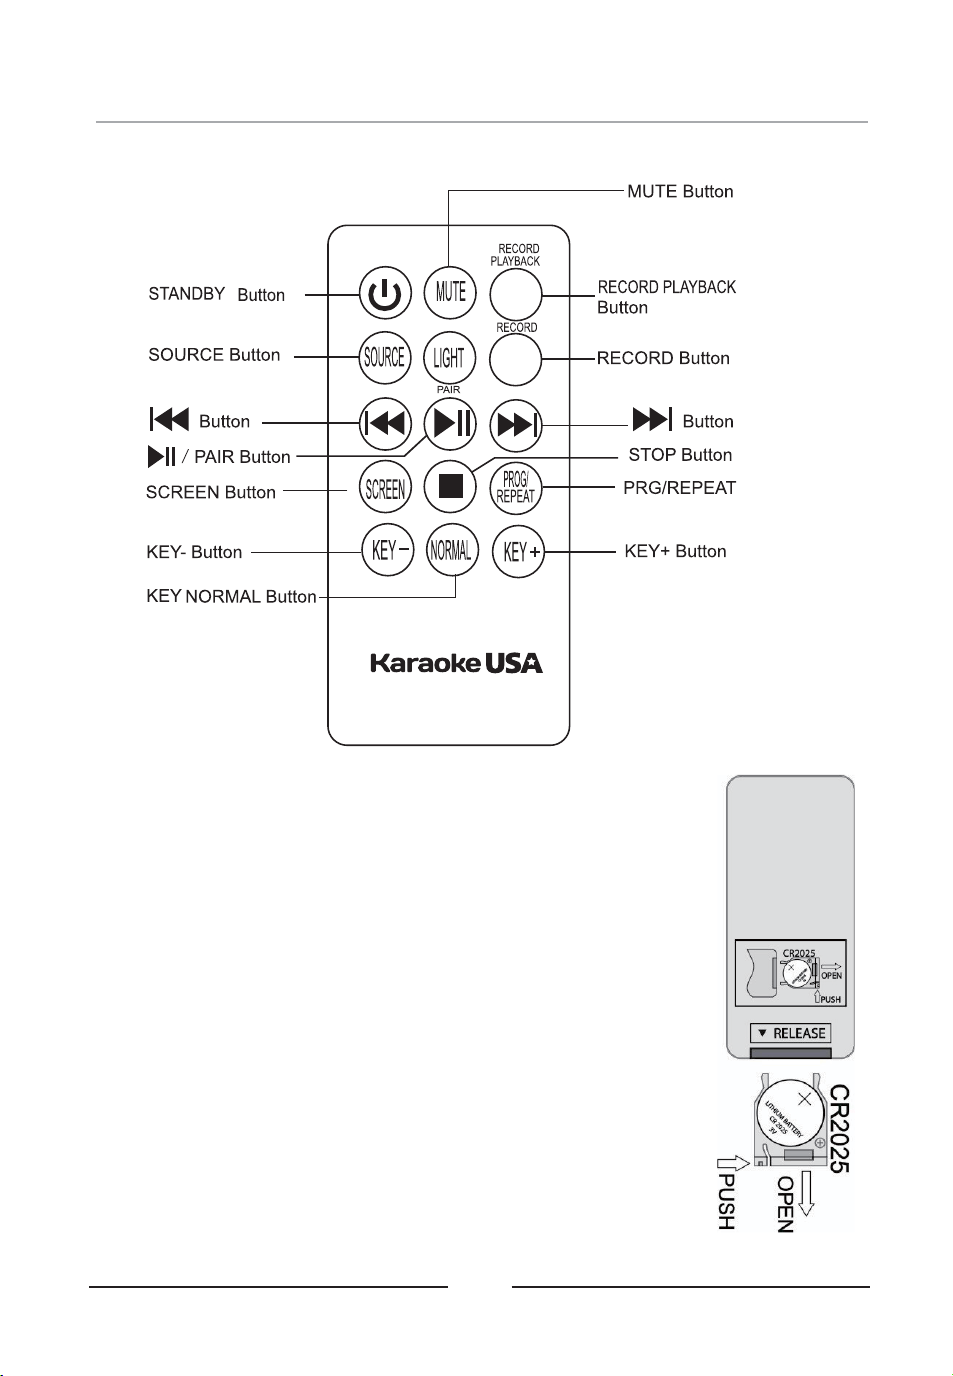
Notes:
1. Press the MUTE button of remote to mute the audio sound, press
again to resume. Other button of remote same as main unit function.
2. Remove spacer tab before using this unit for first time .
3. Press the buttons of the remote to pointing the main unit remote
senor area to fully control the main unit.
INSTALLING OR REPLACING REMOTE CONTROL BATTERY
1. Pull the battery door at the back of the unit as shown figure.
2. Insert the battery in the battery door with “+" positive facing up. Only
CR2025 3V lithium battery should be used.
3. Insert the battery door with new battery back into the unit.
BATTERY WARNING:
1. Make sure the correct polarity of battery to be installed.
2. Make sure you dispose of batteries properly (refer to your local
regulations).
3. Do not open batteries.
4. Do not dispose of batteries in fire.
5. Do not heat up batteries.
6. Do not expose batteries to water.
7. Do not charge or recharge batteries.
Remote Control Functions
11
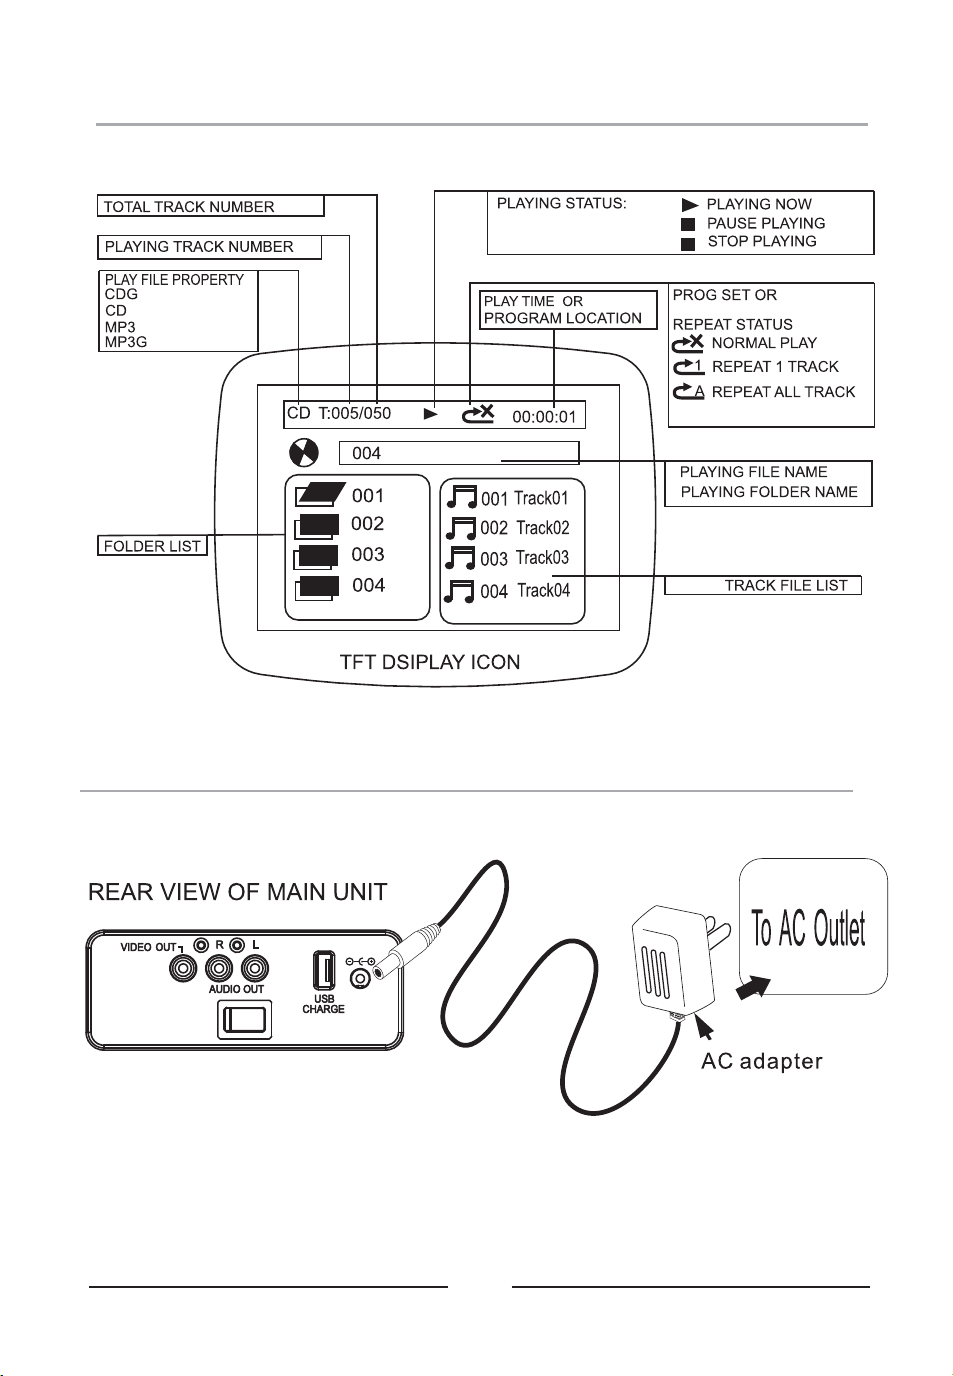
Monitor Message
Connect Power Adapter
MAIN
POWER
Plug the included AC adapter into the standard AC power outlet to power the unit. Connect small
end to DC INPUT jack of the KARAOKE MACHINE. After adapter connection, Slide the MAIN
POWER switch to ON position and press STANDBY button to turn on unit. Press the SOURCE
button ( unit or remote) to select USB / DISC / BLUETOOTH / AUX mode for listening.
DC 15V
12
Charging Internal Battery
The KARAOKE MACHINE operates on a built-in battery that can be recharged using
included adapter.
CHARGING THE BATTERY FOR FIRST TIME
1. Connect the including adapter for start charging the internal battery
2. Charge the built-in battery a minimum of 12 hours prior to first use. Plug the included
adapter for charging.
3. The CHARGING indicator will light to RED color while charging and turn to GREEN
color when the unit is fully charged.
4. When battery charging completed, unplug the adapter.
RECHARGING THE INTERNAL BATTERY
After prolonged use, the internal battery will become weak and the operation may become
intermittent. When the internal battery charge is low, the CHARGING indicator will turn
“ON” RED color and FLASH” alerting you to recharge the internal battery as soon as
possible.
BATTERY WARNING:
1. Do not open batteries.
2. Do not dispose of batteries in fire.
3. Do not heat up batteries.
4. Do not expose batteries to water.
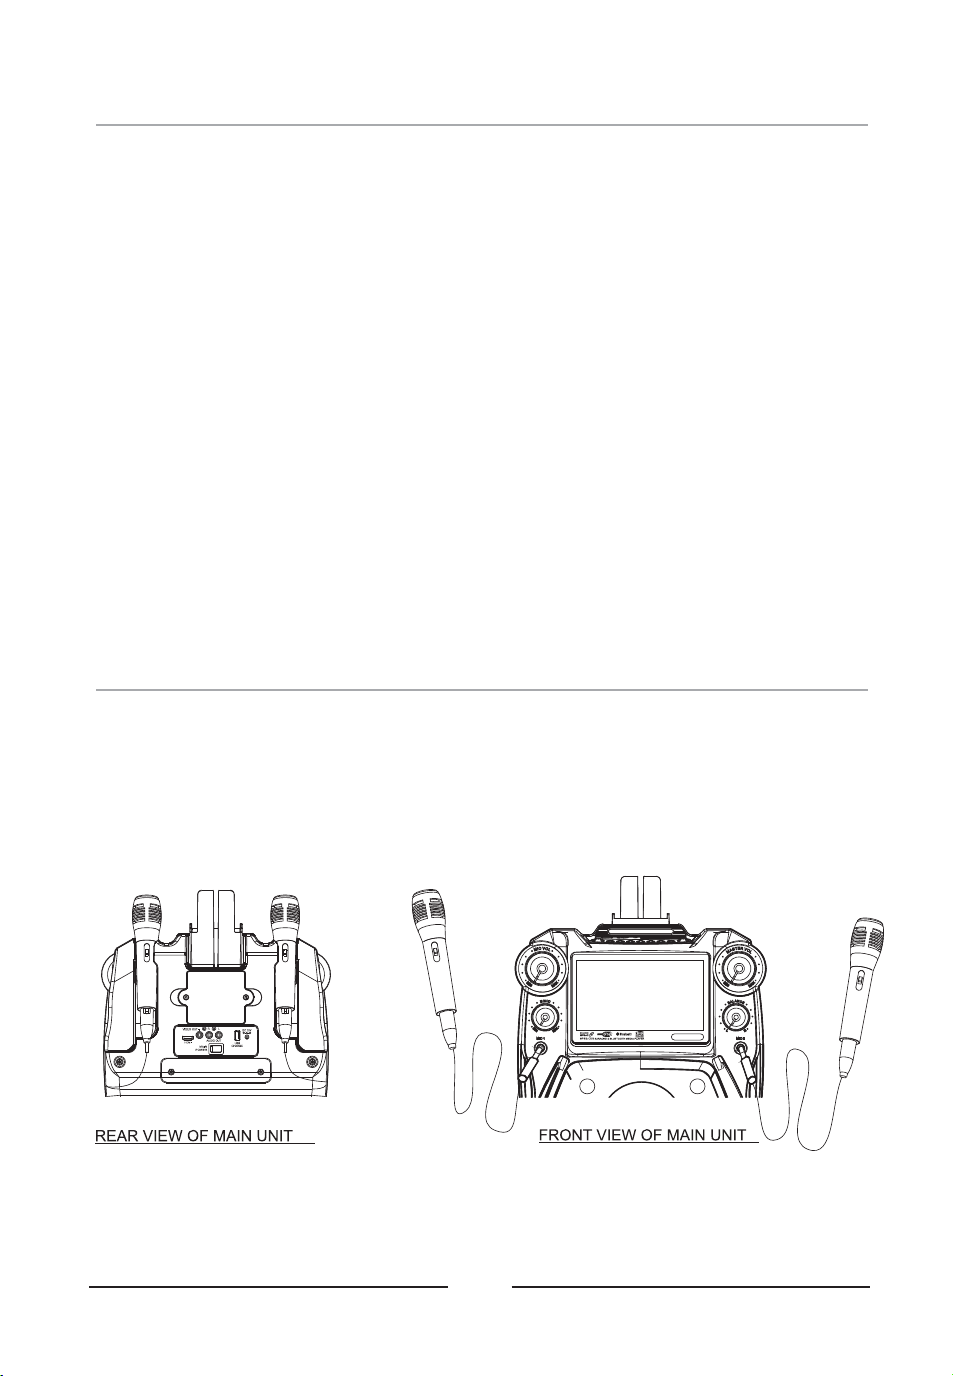
Using Microphone
Requires a microphone (included 2 microphone) .
1. Plug the microphone (see below figure) into the MIC 1 INPUT or MIC 2 INPUT of the
KARAOKE MACHINE.
2. Slide the ON /OFF switch of MICROPHONE,
3. Use the MIC VOL dial to adjust the volume of audio sound from the microphone.
DC 15VDC 15V
13
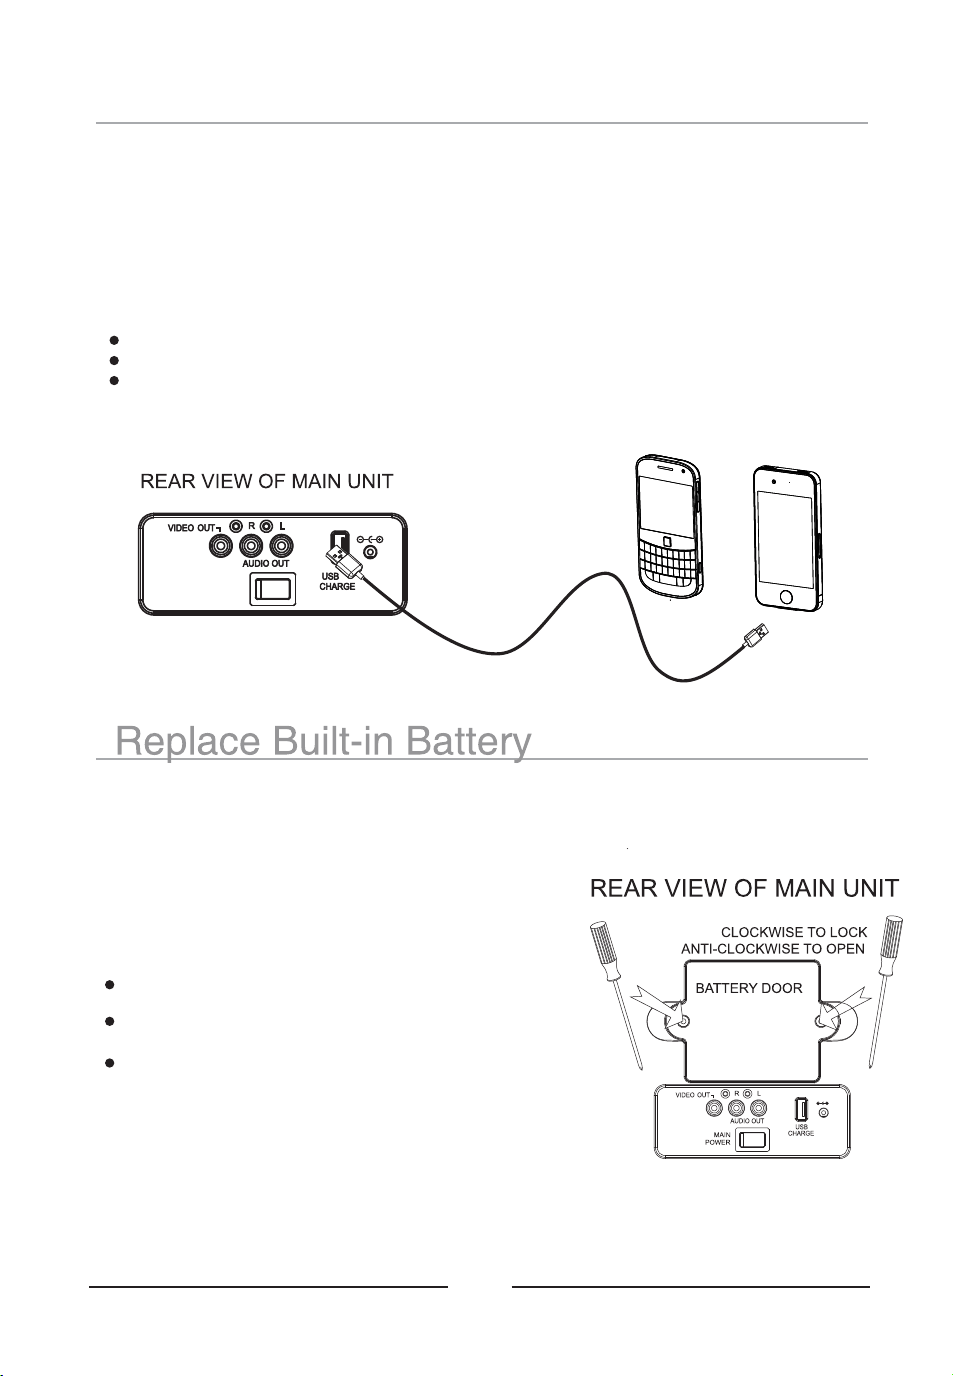
Charging Your Mobile
Connect USB cable (not included) for charging your smart device.
1. Plug the standard end of the USB cable into the USB port located on the rear of the
KARAOKE MACHINE. Plug the small end of the USB cable into the device you wish to
charge.
2. Observe the battery charge indicator on your device and the charging will start
immediately.
3. Remove the charging cable when charging complete.
Notes:
USB charging port supplies DC 5V output,
USB charging port cannot support data transfer or connect to computer.
Do not connect USB port of this unit to other external power charger USB ports or
computer, it may damage both units and void the warranty.
MAIN
POWER
FOR MOBILE BATTERY
or
1. Push the POWER switch to OFF position.
2. Use screw driver to open the battery door
3. Move out the internal battery
4. Push in new battery pack into battery compartment.
5. Close the battery door.
6. Use screw driver to lock the battery door.
Notes:
Batteries shall not be exposed to excessive heat
such as sunshine, fire
Only same or equivalent type batteries as
recommend are to be used.
Do not dispose of batteries in fire, battery may
explode or leak.
DC 15V
14
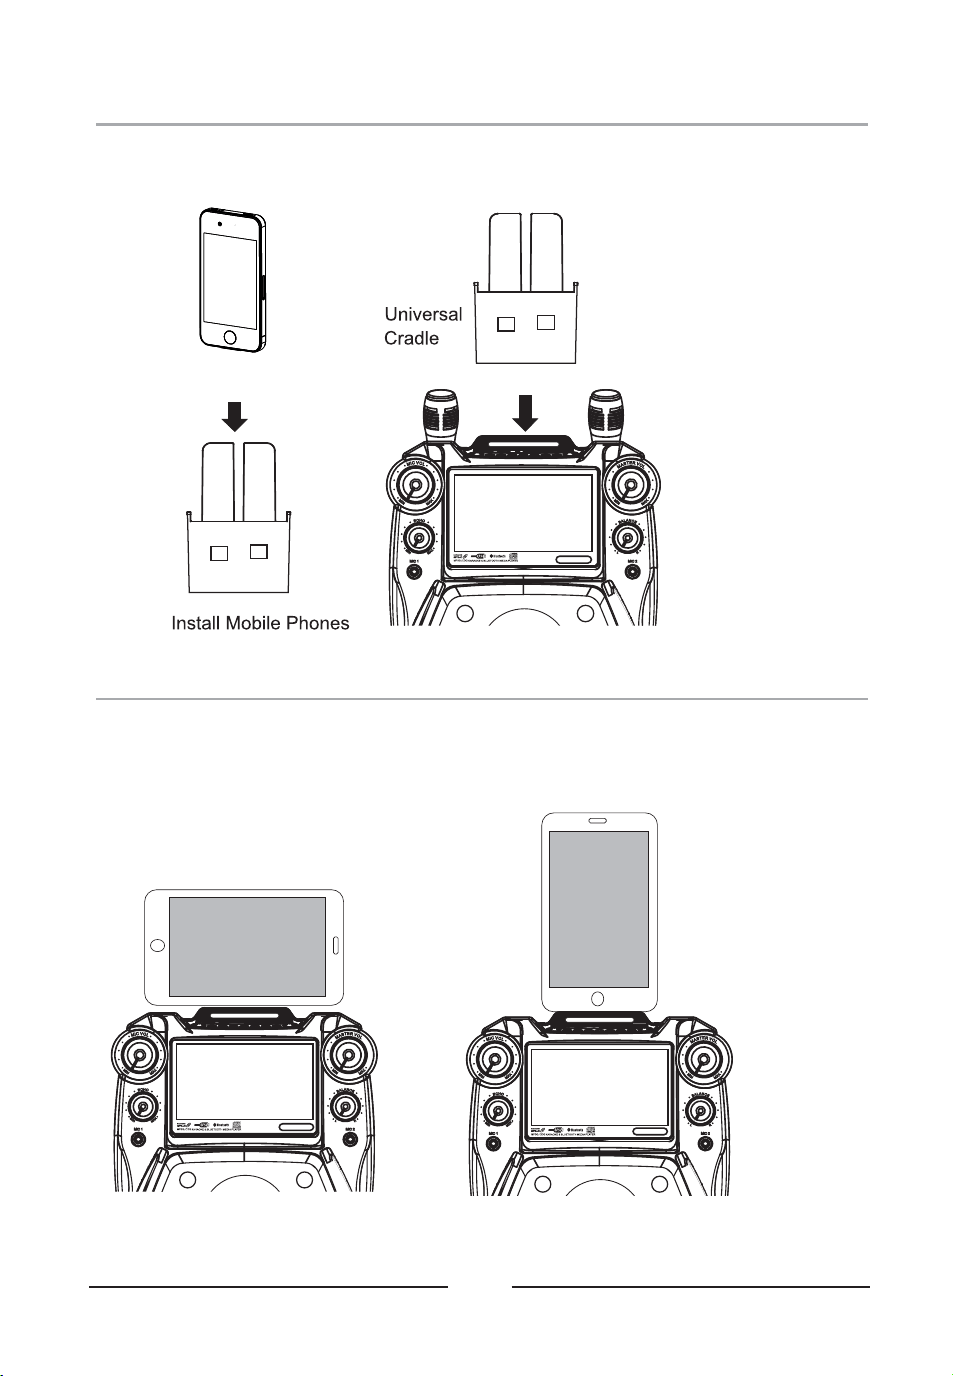
Install Cradle
INSTALL CRADLE INTO THE UNIT
Install the cradle (included ) to hold the Mobile & Tablet onto unit.
Place Smart Device into Cradle
PLACE EXTERNAL DEVICE
Insert Personal Player / Mobile Phone / Tablet with cradle onto the unit.
15
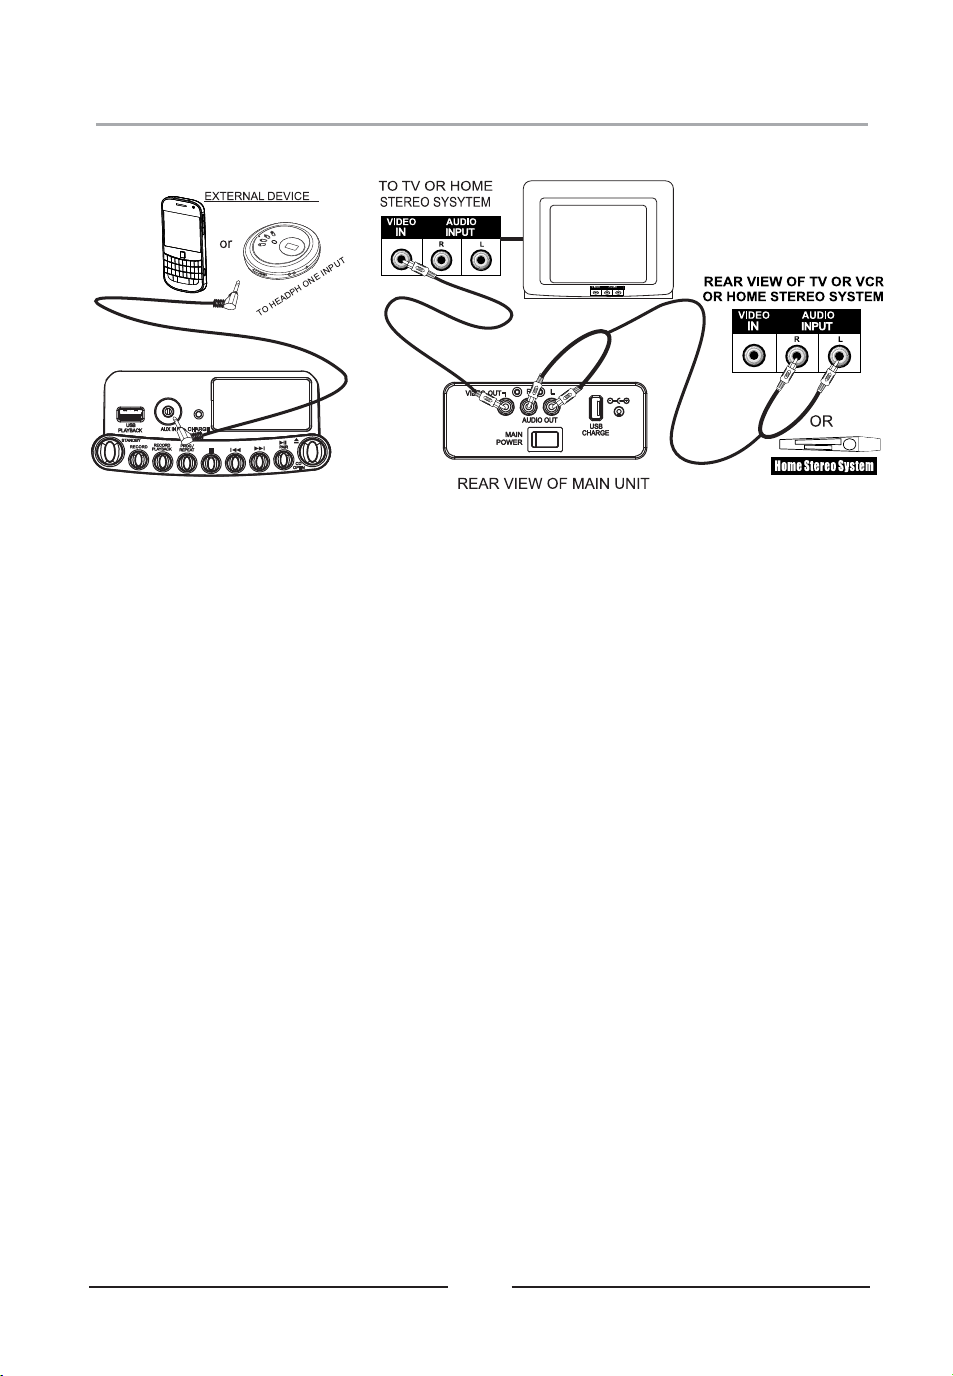
Connecting to a Television / Ext. Device
AUX IN ( AUDIO IN / LINE IN )
To connect a MP3 Player or other Audio Device you will need a 3.5mm Auxiliary Cable.
1. Connect a 3.5mm Auxiliary Cable to the AUX IN jack on top of unit and to the Audio Output
or Phones on the audio device you wish to play.
2. Press SOURCE button to AUX mode.
3. Turn on both units.
4. After the connection, the external device will sound from speakers of your unit.
COMPOSITE VIDEO OUTPUT
1. Require an RCA video cable and plug the included RCA audio/video cable into the VIDEO
OUT of the KARAOKE MACHINE and a composite video input on a television.
2. Adjust the television to the correct input setting.
3. When playing a USB ( MP3+G) or CDG disc that the KARAOKE MACHINE will output
written lyrics / video / image to the connected television.
RCA AUDIO OUTPUT
1. Require an RCA audio cable and plug the included RCA audio/video cable into the AUDIO
OUT of the KARAOKE MACHINE and a RCA audio input on a television or stereo system.
2. Adjust the television or stereo system to the correct input setting.
3. When playing the USB / Disc / Bluetooth that the KARAOKE MACHINE will output audio to
the connected television or stereo system. Use the external device to control the output
sound level.
INPUT
IN
/
DC 15V
GRAPHICS
MP3 AUDIO
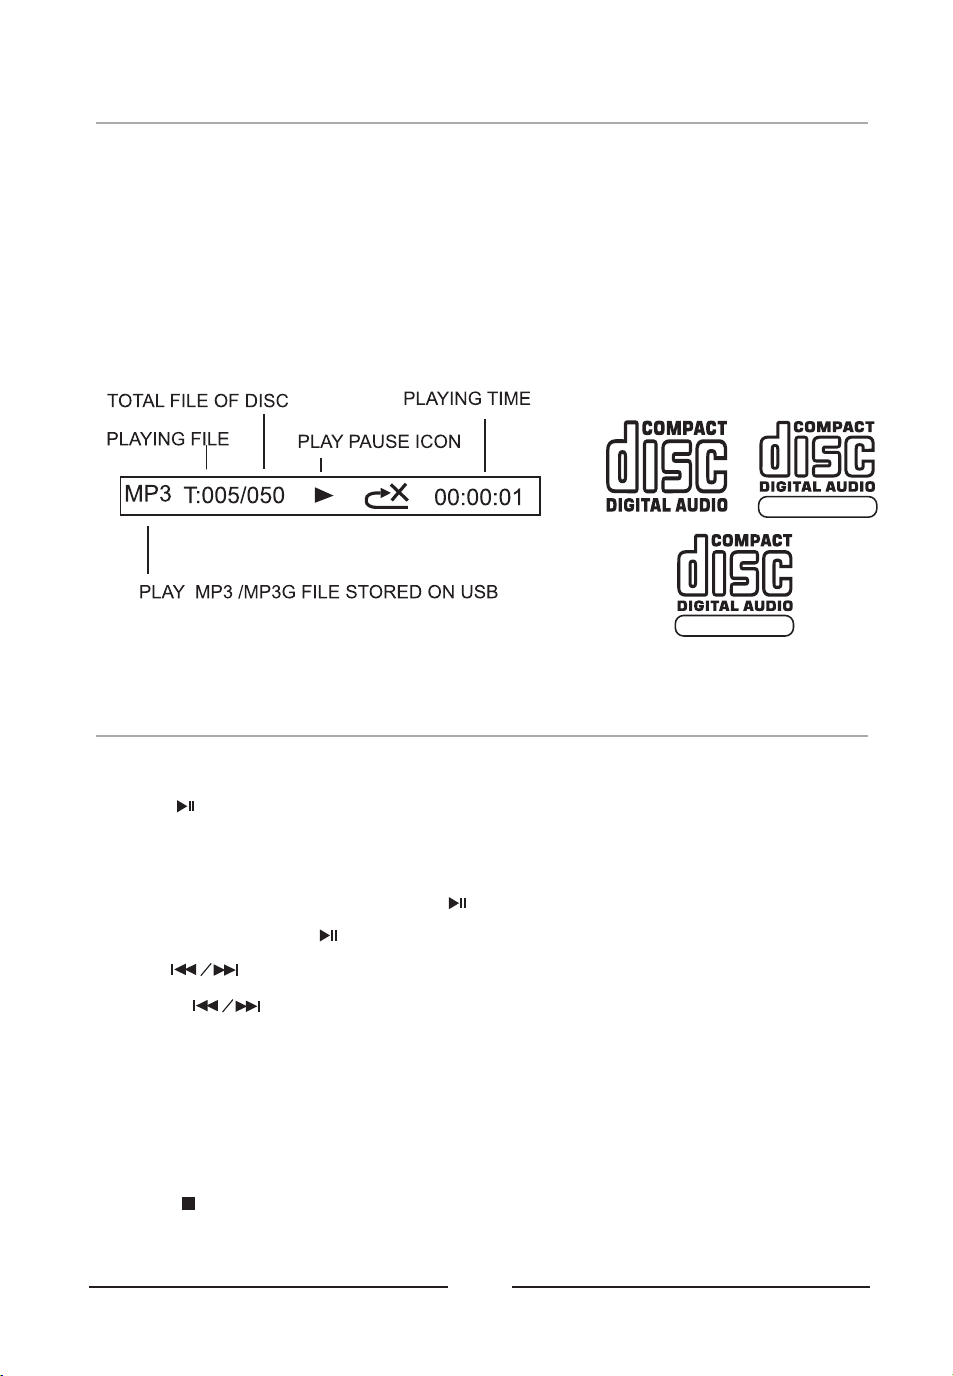
Loading a Disc
16
1. Turn on POWER follow previous page CONNECT POWER ADAPTER
2. Press the CD DOOR OPEN AREA to open the CD DOOR.
3. Place a DISC into the CD compartment.
4. Close the CD DOOR.
5. Press the SOURCE button to select DISC mode.
Notes: This unit is designed to play CDs bearing these identification logos.
Playing Disc Music
1. Turn on POWER and select DISC mode follow page.LOADING A DISC
2. Press the button to begin playing the loaded disc. The PLAY/PAUSE icon will light
on display.
3 Rotate the MASTER VOLUME dial to select the sound level..
4 To temporarily stop playing, press the button once (PAUSE indicator will light ). To.
resume play, press the button one more.
5 Press buttons to skip between next or previous tracks..
6 Hold the buttons to fast search through the track..
Note: The fast-forward / fast-rewind functions will not work for CDG discs.
7. Search Folder : In stop mode, press PAGE + / PAGE- button to search.
8. Key Control : In music playing, press PAGE + / PAGE- button to select different sound
speed.
9. Connect the VIDEO OUT jack to TV, the lyrics text will show on TV.
10 Press the button to stop playing..
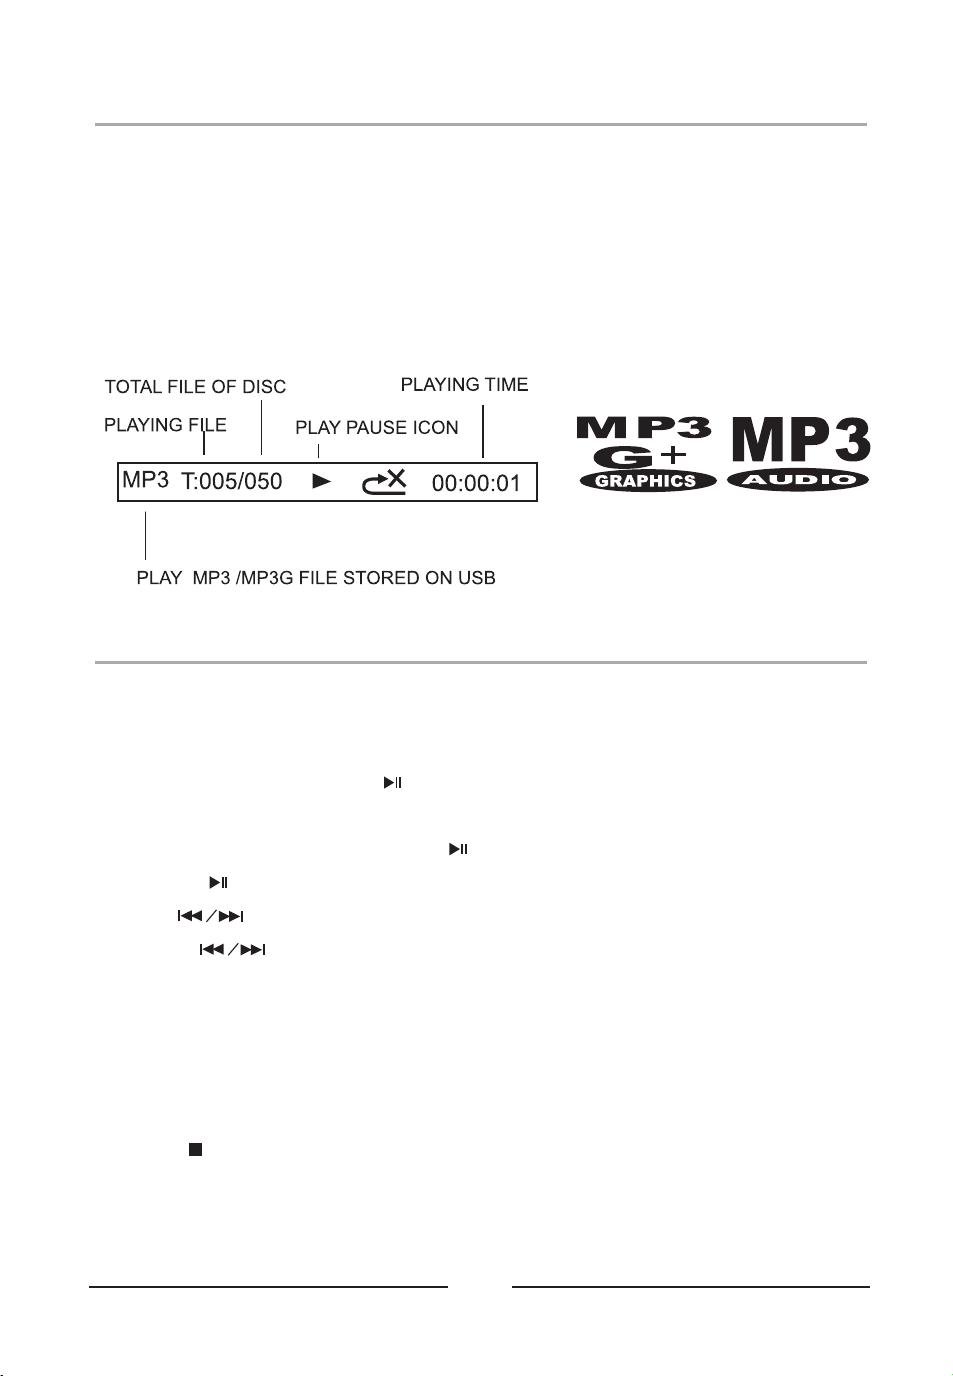
Install USB Memory Stick
17
1. Turn on POWER follow previous page CONNECT POWER ADAPTER
2. Plug the USB memory stick to USB input jack ( on top panel of main unit).
3. Press the SOURCE button to USB mode. The USB playback start.
Notes: The system is able to decode and playback MP3 OR MP3+G files which are stored
in the memory media of your USB thumb drive.
Playing USB Music Files
1. Turn on POWER follow previous page .INSTALL USB MEMORY STICK
2. After install USB, the unit will be start play automatically.
3. If unit not start play, press the PLAY/ PAUSE button to begin playing the loaded USB.
Rotate the MASTER VOLUME dial to select sound level.
4. To temporarily stop playing, press the button once to pause mode. To resume play,
press the button again.
5. Press buttons to skip between next or previous tracks.
6. Hold the buttons to fast search through the track.
Note: The fast-forward / fast-rewind functions will not work for MP3G file.
7. Search Folder : In stop mode, press PAGE + / PAGE- button to search.
8. Key Control : In music playing, press PAGE + / PAGE- button to select different sound
speed.
9. Connect the VIDEO OUT jack to TV, the lyrics text will show on TV.
10. Press the button to stop playing.
Using Repeat / Program
18
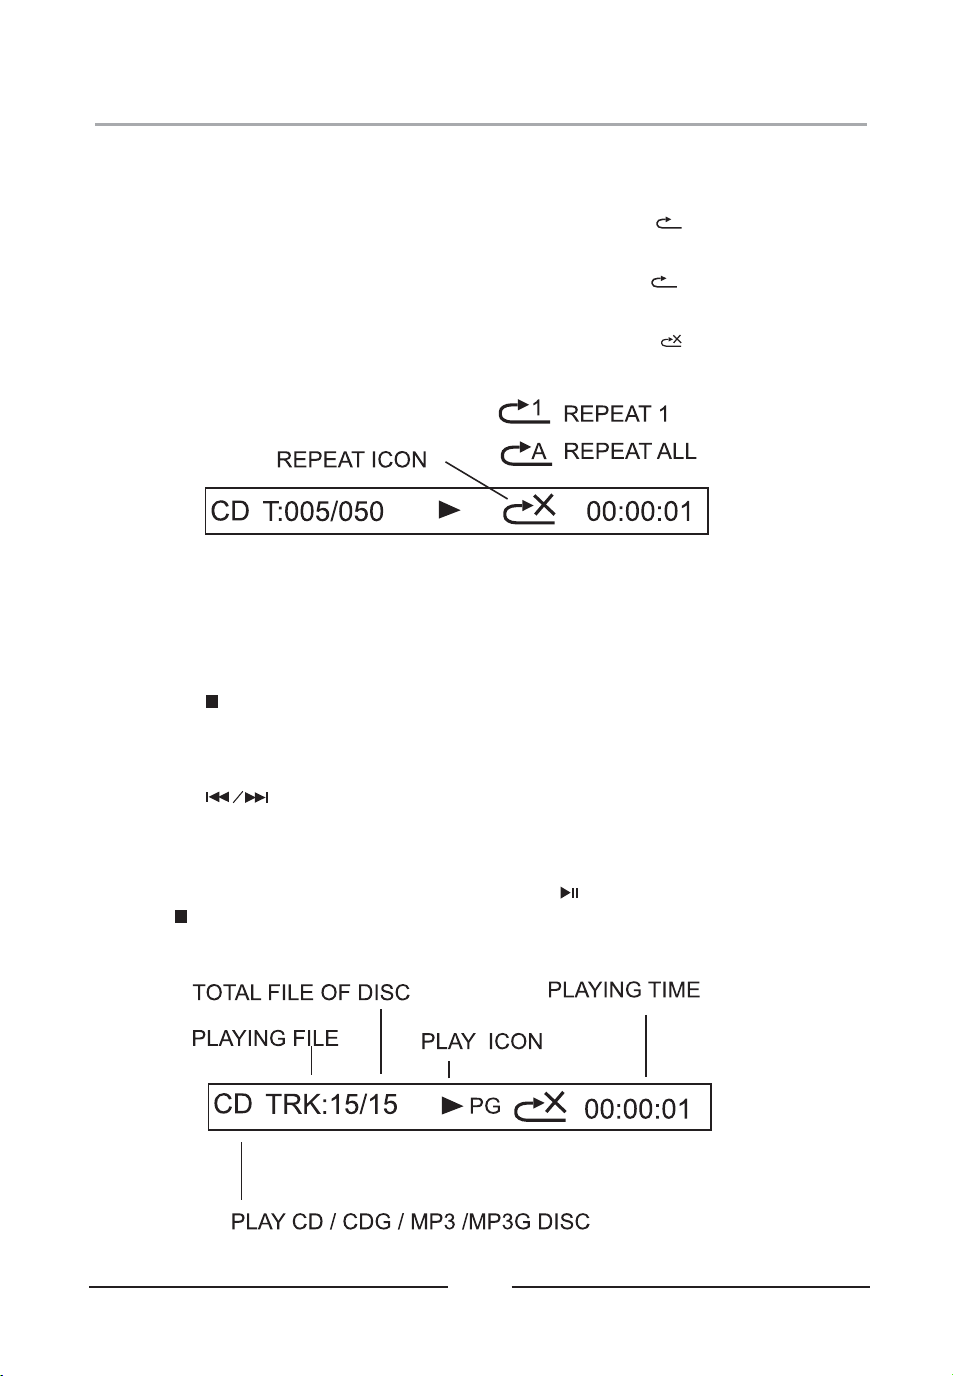
REPEAT FUNCTION
When play music on USB / DISC mode of the KARAOKE MACHINE.
1. To repeat the current track: Press the REPEAT button until the
icon will show on the display. The track will continue to play .
2. To repeat all the tracks: Pressing the REPEAT button until the
icon show in the monitor. All the tracks on the disc will be played repeatedly.
3 To clear the repeat function: Press the REPEAT button until the.
icon show in the monitor.
1
A
PROGRAM FUNCTION
When play music on USB / DISC mode of the KARAOKE MACHINE.
1. Press the button once to stop playing / on stop mode.
2. Press the PROGRAM button. The PROGRAM (PROG) SET 01:01 will show in the
monitor, the track number “- -“ digits are flashing.
3 If necessary, press the PAGE+/ PAGE- button to select folder..
4 Press the button to select a desired track..
5 Press PROGRAM button to confirm entry..
6 You can repeat the steps 3-5 up to a maximum of 20 tracks. When maximum of 20.
tracks have been programmed, “PROG FULL” message appears briefly in the monitor.
7 When you have completed programming and press button to start playing..
8 Press button twice or open the CD DOOR to clear all the programmed entries..

19
Using Bluetooth
Connecting Bluetooth to your Smartphone / Tablet
1. Press the POWER button to turn on unit.
2. On your smartphone / Tablet, turn on Bluetooth and enable device scanning.
3. When GF920 shows on the Bluetooth scan, select it to connect it to your device.
4. When both devices are successfully connected, you are ready to play music wirelessly
from your device.
5. Press the PLAY button of the KARAOKE MACHINE or external Bluetooth device to start
music playback.
6. Press the button of the KARAOKE MACHINE next / previous of external
Bluetooth device to switch between music tracks.
7. Hold the PAIR button to reconnect other Bluetooth device.
Notes: When your unit playing mobile music by Bluetooth and receiving an incoming call on
your mobile phone, the music will be stop and ring sound from your mobile phone. Just end
the call that the music will sound automatic.
Disco Light
When unit turn on, the disco light will show on speaker panel. Press the LIGHT button to
turn on /off the disco light show.
Using Echo
Turn on KARAOKE MACHINE and connect microphone. Adjust the ECHO knob of
KARAOKE MACHINE to enhance your voice for a concert hall effect.
Using Balance
Turn on the KARAOKE MACHINE and play the MP3G file / CDG disc music. Rotate the
BALANCE knob to hear the music and vocals or to hear the music only.
NOTE: To use the BALANCE function, a CD+G disc MP3G file must be used. Otherwise
it will operate as a standard BALANCE control.

20
Record Feature Instructions
This unit can record the unit music sound to USB from DISC / BLUETOOTH / AUX mode.
1. Turn on POWER follow previous page INSTALL USB MEMORY STICK.
2. Follow below step to use recording.
Using recording from CD, CD+G, MP3, MP3G:
a. Place the CD/CD+G/MP3+G disc on CD compartment.
b. Press SOURCE button to DISC mode.
c. Press or PAGE +/ PAGE- button to search special track.
d. Press the button to start play.
e. Finally, press the RECORD button to start recording. Press the button again to stop the
recording.
Using recording from BLUETOOTH :
a. Press SOURCE button to BLUETOOTH mode.
b. Connect the Bluetooth to external device.
c. Press the button to start play.
d. Finally, press the RECORD button to start recording. Press the button again to stop the
recording.
Using recording from AUX :
a. Press SOURCE button to AUX mode.
b. Start play the external device.
c. Finally, press the RECORD button to start recording. Press the button again to stop the
recording.
Note: Make sure the USB enough memory for all recording
Recall the recording file from USB
Turn on POWER follow previous page .INSTALL USB MEMORY STICK
Press SOURCE button to select USB mode
Press RECORD PLAYBACK button to start playback recorded file.
If more file show on display, press button to select different file.

21
Specification
AC/DC Power Adapter
Use included adapter
AC Input : 120~240V , 50 / 60 Hz ,
DC Output : 15V , 000 mA2
Built-In battery
11.1V 6000 mAh,
USB Slot (Top) Up to 32GB memory
USB Charger (Rear)
For Smart Devices Charging
5V/1000mA()
Music Format
Support CD / CDG / MP3+G/ MP3
Bluetooth
Support music share from mobile
Master Power Output
70W(RMS) /300W Peak Power
Mid-Range Speakers
45Hz-12KHz(5 inch,30W,6 ) x 2Ω
High-Range Speakers
Specifications are typical, individual units might vary. They are subject to
continuous improvement without notice and without incurring any obligation.
17KHz-20KHz(1.5 inch,5W,6 ) x 2Ω

Printed in China
KARAOKE USA
1185 GOODEN CROSSING
LARGO, FL 33778 USA
TECH SUPPORT: WWW.KARAOKEUSA.COM/CS
DOWNLOAD SONGS: WWW.SINGTHEHITS.COM
SALES DEPARTMENT: [email protected]