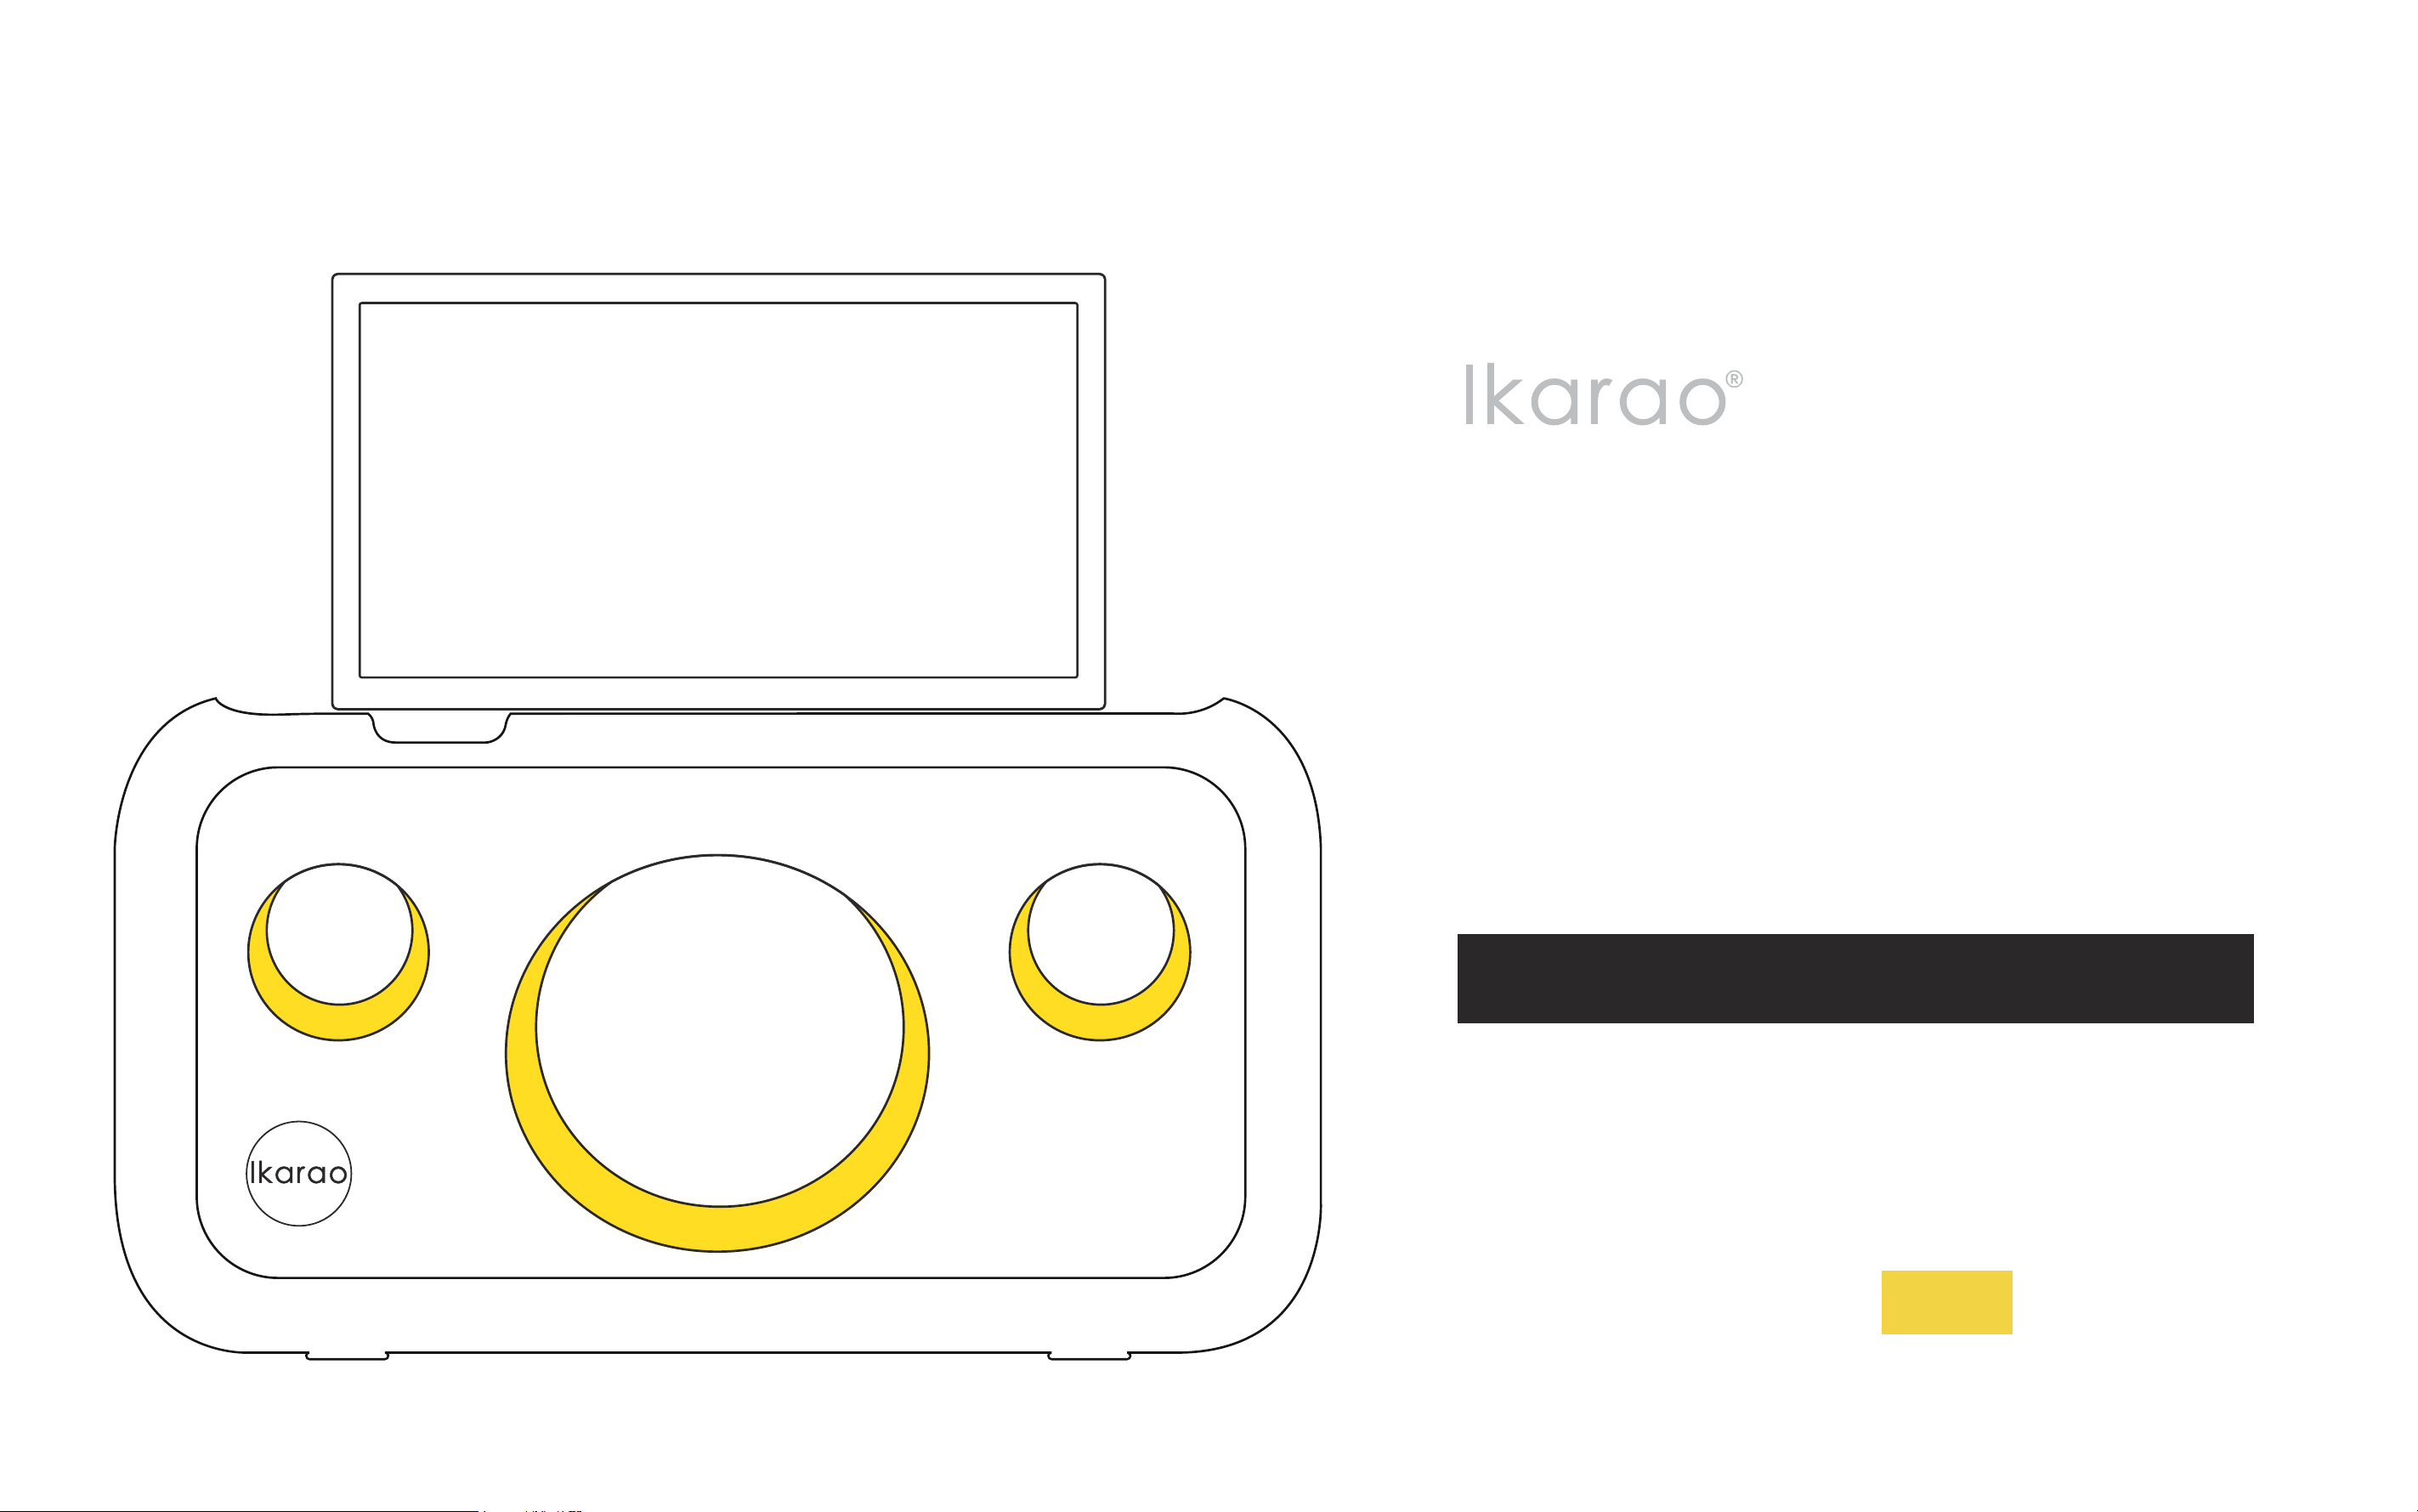
Break
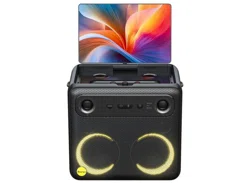
X1
Smart Karaoke Speaker
User Manual EN
Introduction:
Thank you for your purchase of this product. Be sure that you have read this manual and understood its contents before using the product. Keep
the manual where it will be read by all who use the product.
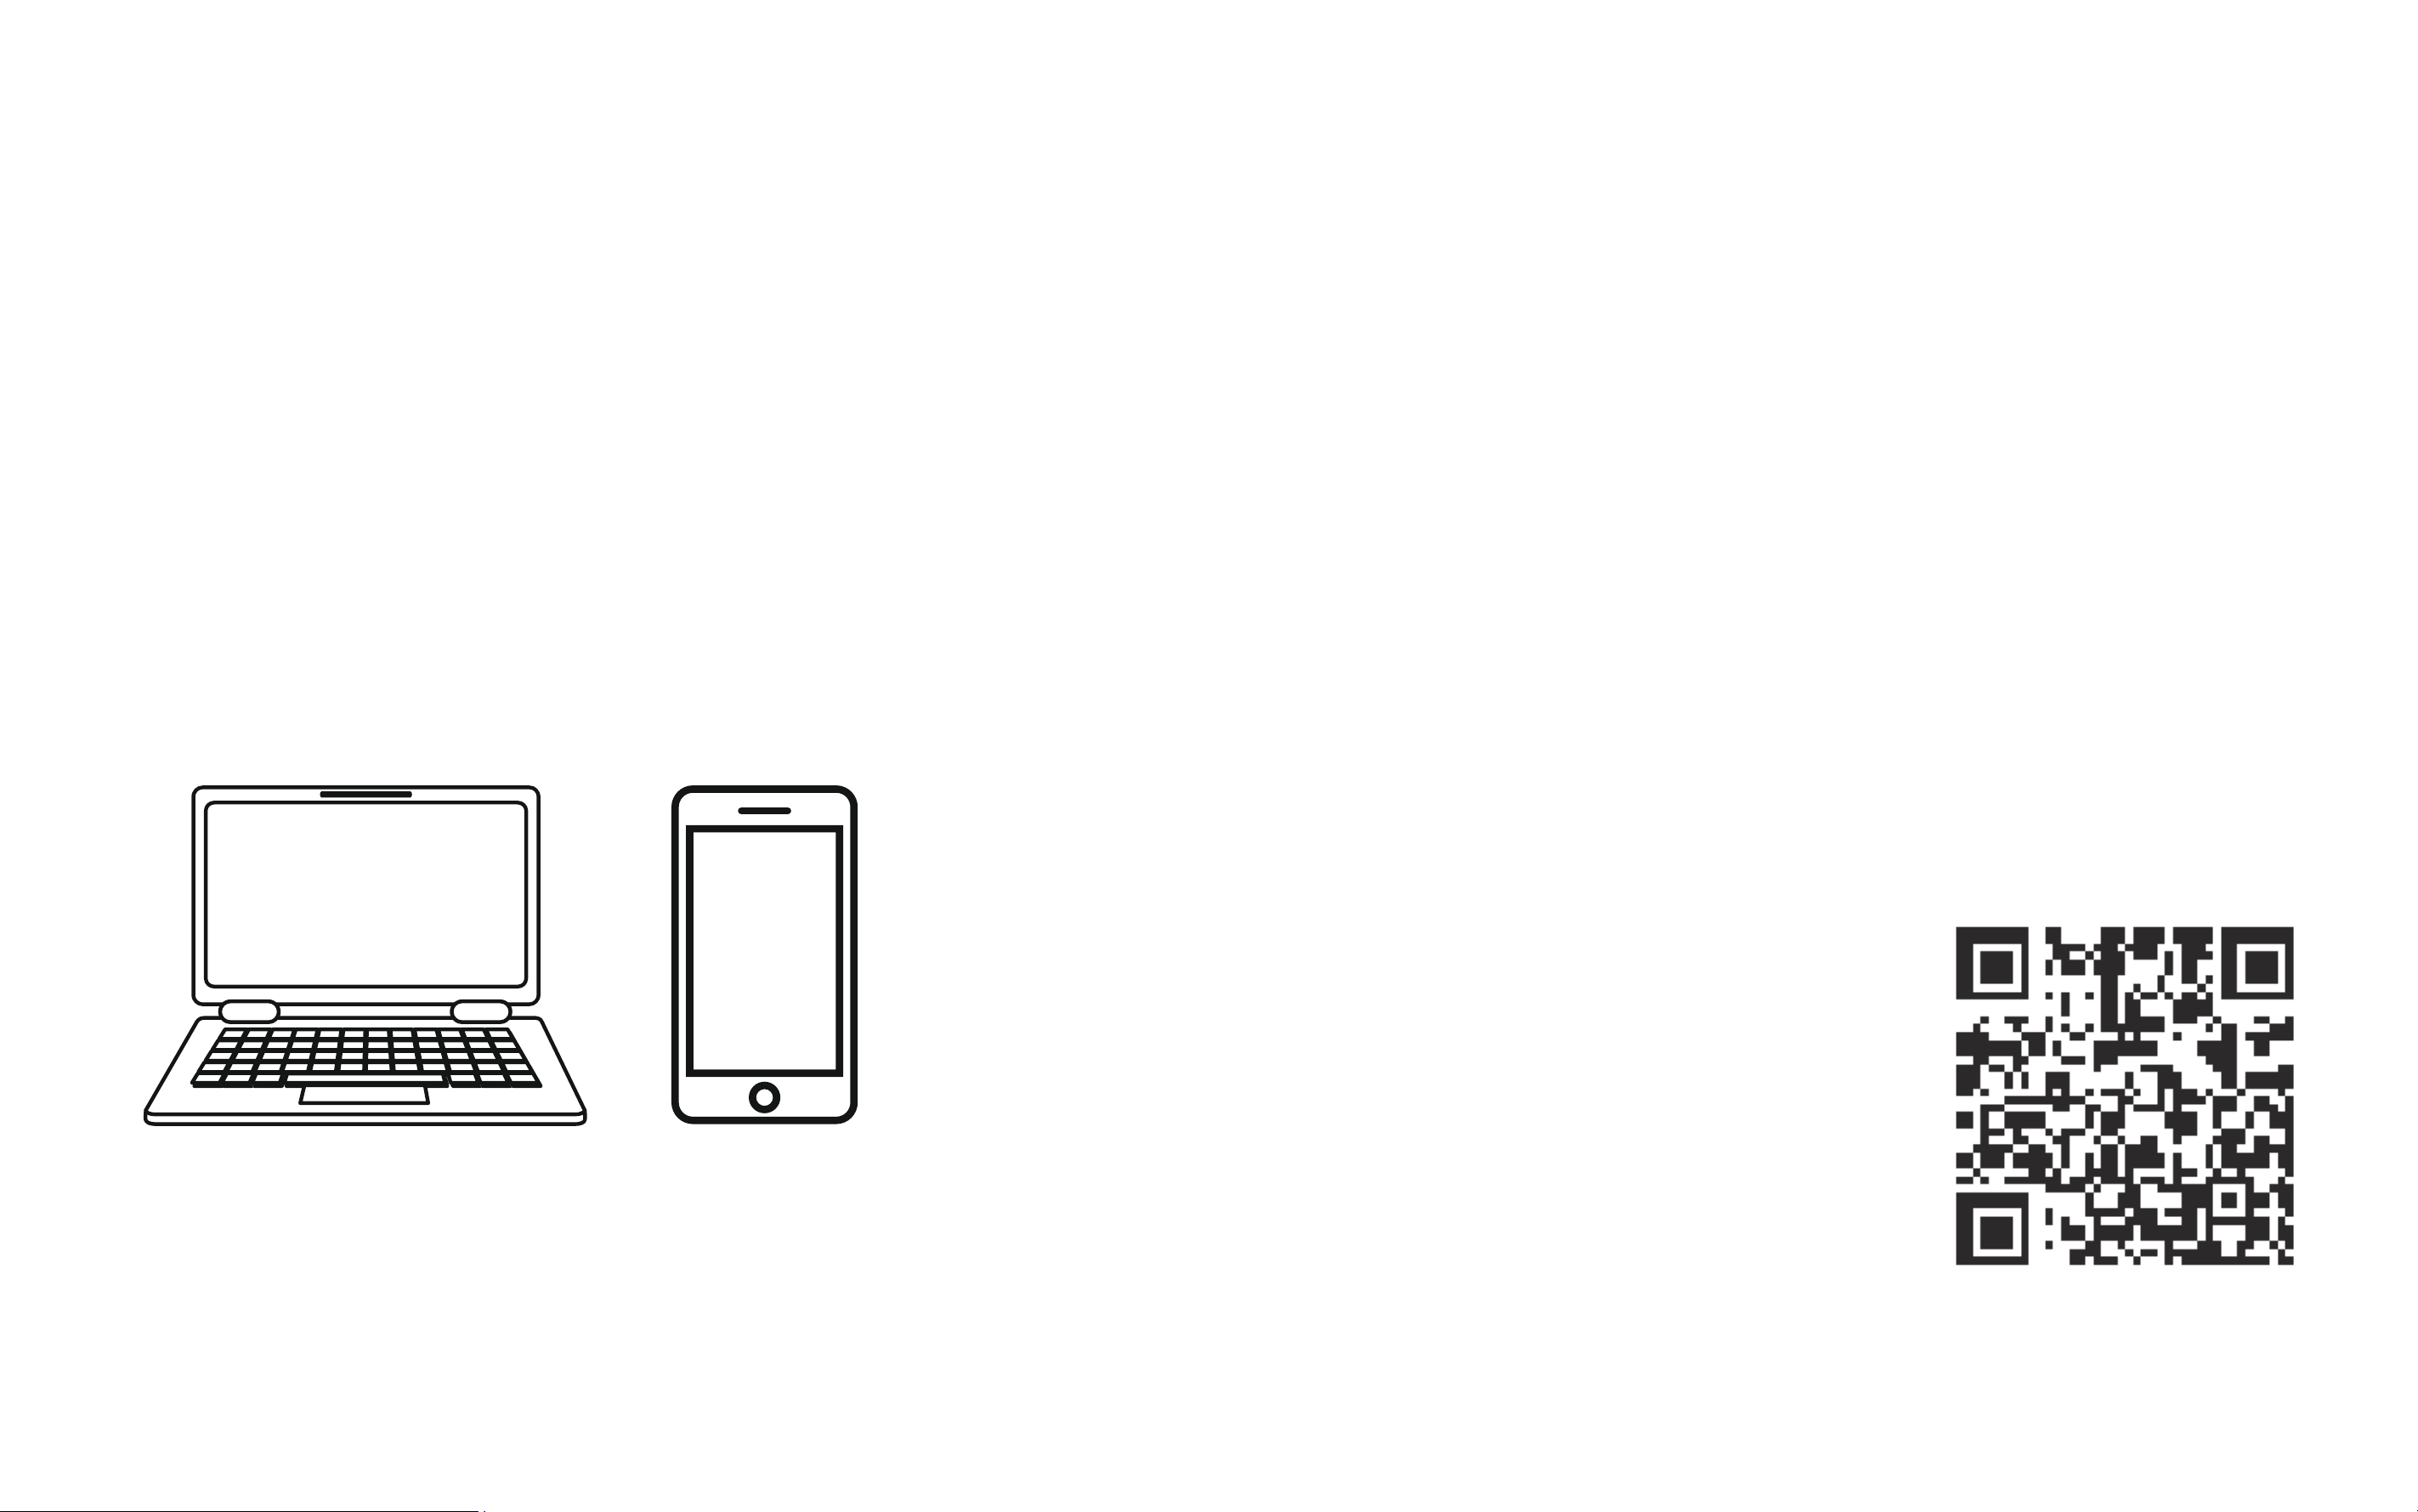
For the Latest Information
The latest versions of the manuals are available from:
https://www.ikarao.com/pages/support
The website can be accessed not only from your computer
but also from smartphones and tablets.

Table of Contents
Before You Begin
•
Parts of the Speaker
..................................................................... 9-19
Light Effect Roller..................................................................................... 12
Volume Roller............................................................................................ 12
Bass Boost Button.................................................................................... 12
Power Button............................................................................................ 12
Bluetooth Button....................................................................................... 12
Playback Mode Switch Button............................................................... 13
Ambient Light............................................................................................ 13
Speaker Strap Ring................................................................................... 13
Speaker Handle Slot................................................................................. 14
Foldable Touch Screen............................................................................ 14
Left/Right Microphone Charging
Compartment............................................................................................ 14
Left/Right Microphone Charging
Compartment Indicator Light................................................................ 14
Microphone Sound Effect Switch Button........................................... 15
Custom Microphone Sound Effect Button.......................................... 16
Music Ducking Button............................................................................. 16
Aux Out....................................................................................................... 17
Aux In
.......................................................................................................... 18
TF Card....................................................................................................... 18
USB.............................................................................................................. 18
6.5mm Microphone/Instrument Port................................................... 18
Microphone/Instrument Switch Button............................................... 18
Microphone/Instrument Input Gain Knob........................................... 18
HDMI........................................................................................................... 19
Expansion Port Cover.............................................................................. 19
Power Charging Port................................................................................ 19
Power Charging Port Cover.................................................................... 19
•
Parts of the Microphones
......................................................20-21
Microphone Indicator Light.................................................................... 21
Microphone Power Button...................................................................... 21
Microphone Volume Control.................................................................. 21
Microphone Play/Pause Button............................................................ 21
Microphone Wireless Charging Ring.................................................... 21
•
Parts of the Homepage
.......................................................... 22-25
Aux Mode................................................................................................... 23
Bluetooth........................................................... ........................................ 23
WiFi............................................................................................................. 23
Lighting Mode
........................................................................................... 24

Volume........................................................................................................ 24
Music Effect...............................................................................................24
Microphone Effect....................................................................................24
Settings...................................................................................................... 24
Ikarao Service............................................................................................ 25
Power Icon................................................................................................. 25
WiFi Icon................................................................................................. 25
Battery Icon............................................................................................... 25
Time Icon................................................................................................... 25
First Steps
USE Carrying Strap
....................................................................... 27
Using the Speaker Stand
......................................................... 28
Speaker Charging
......................................................................... 29
Microphone Charging
............................................................... 30
Power On/Off
.....................................................................................31
•
Basic Settings
.................................................................................. 32-40
About........................................................................................................... 33
Brand Name
Model Name
Serial Number
App Version
Device Version
Version Update
Restore Factory Settings
Display........................................................................................................ 34
Brightness
Key Brightness
Sleep Time
Sound.......................................................................................................... 35
Wireless Mic Volume
Mic Mode
WiFi.......................................................................................................... 36
WiFi On/Off
Refresh Available Networks List
Enter Wi-Fi Password
Wi-Fi Basic Information
Storage....................................................................................................... 37
Available Storage
Storage Control
USB Drive
TWS............................................................................................................. 38
TIME............................................................................................................ 39
Automatic Time Update
24-Hour Format
Timezone
Language................................................................................................... 40

Start to Play
•
Local Media Player
..................................................................... 42-45
Favorites..................................................................................................... 43
Repeat Mode............................................................................................. 43
Play from Beginning................................................................................. 43
Play/Pause................................................................................................. 43
Next Track.................................................................................................. 43
Volume........................................................................................................ 43
Playlist....................................................................................................... 43
Add to Queue............................................................................................. 43
Create Playlist........................................................................................... 43
Batch Create Playlist................................................................................ 44
Page Turning............................................................................................. 44
Quick Jump to Specified Page.............................................................. 44
View Lyrics................................................................................................. 45
Different Display on External Screen.................................................... 45
Call Up Control Bar................................................................................... 45
•
Bluetooth Instructions
............................................................. 46-47
Enter Bluetooth Mode.............................................................................. 46
Connect Bluetooth.................................................................................... 46
Disconnect Bluetooth.............................................................................. 47
Display Lyrics in Bluetooth Mode.......................................................... 47
View Current Bluetooth Connected Devices
....................................... 47
•
Play With Third-Party APP
........................................................... 48
Open Control Bar...................................................................................... 48
Return to Homepage from Third-Party App........................................ 48
Troubleshooting
•
Network Issues
................................................................................ 50-52
What to do if You are Unable to Connect to WiFi?............................. 51
What to do if Wi-Fi is Connected but Unable to Access
the Internet?............................................................................................... 51
Why does Wi-Fi Disconnect Automatically?....................................... 51
Why does Music or Video Playback Stutter?...................................... 52
•
Bluetooth Issues
............................................................................ 52-53
Why does the Music Playback Stutter
when Using Bluetooth?........................................................................... 52
Why can't I Find the Speaker
When Pairing via Bluetooth?.................................................................. 52
Why does the First Connection to the Speaker's Bluetooth Fail Even
Though it is Found?................................................................................. 53
Why does Bluetooth Fail to Reconnect?.............................................. 53

•
Microphone Issues
.............................................................................. 54
Why is there No Sound from My Microphone?................................. 54
Why does the Speaker's Music Volume Automatically Lower When I
Sing with the Microphone?................................................................... 54
Why can't the Microphone Power On?................................................. 54
•
Local Player Issues
.............................................................................. 55
Should I Use Music Stored on a TF Card, USB Drive, or External
Hard Drive?................................................................................................ 55
Why does My Local Player Not Display Lyrics?.................................. 55
Technical Notes
Safety Usage
............................................................................... 57-58
Battery and Power
.................................................................. 59-60
Screen Usage
................................................................................... 60
Certications and Declarations
.................................. 61-62
Product Technical Specications
............................... 63-64
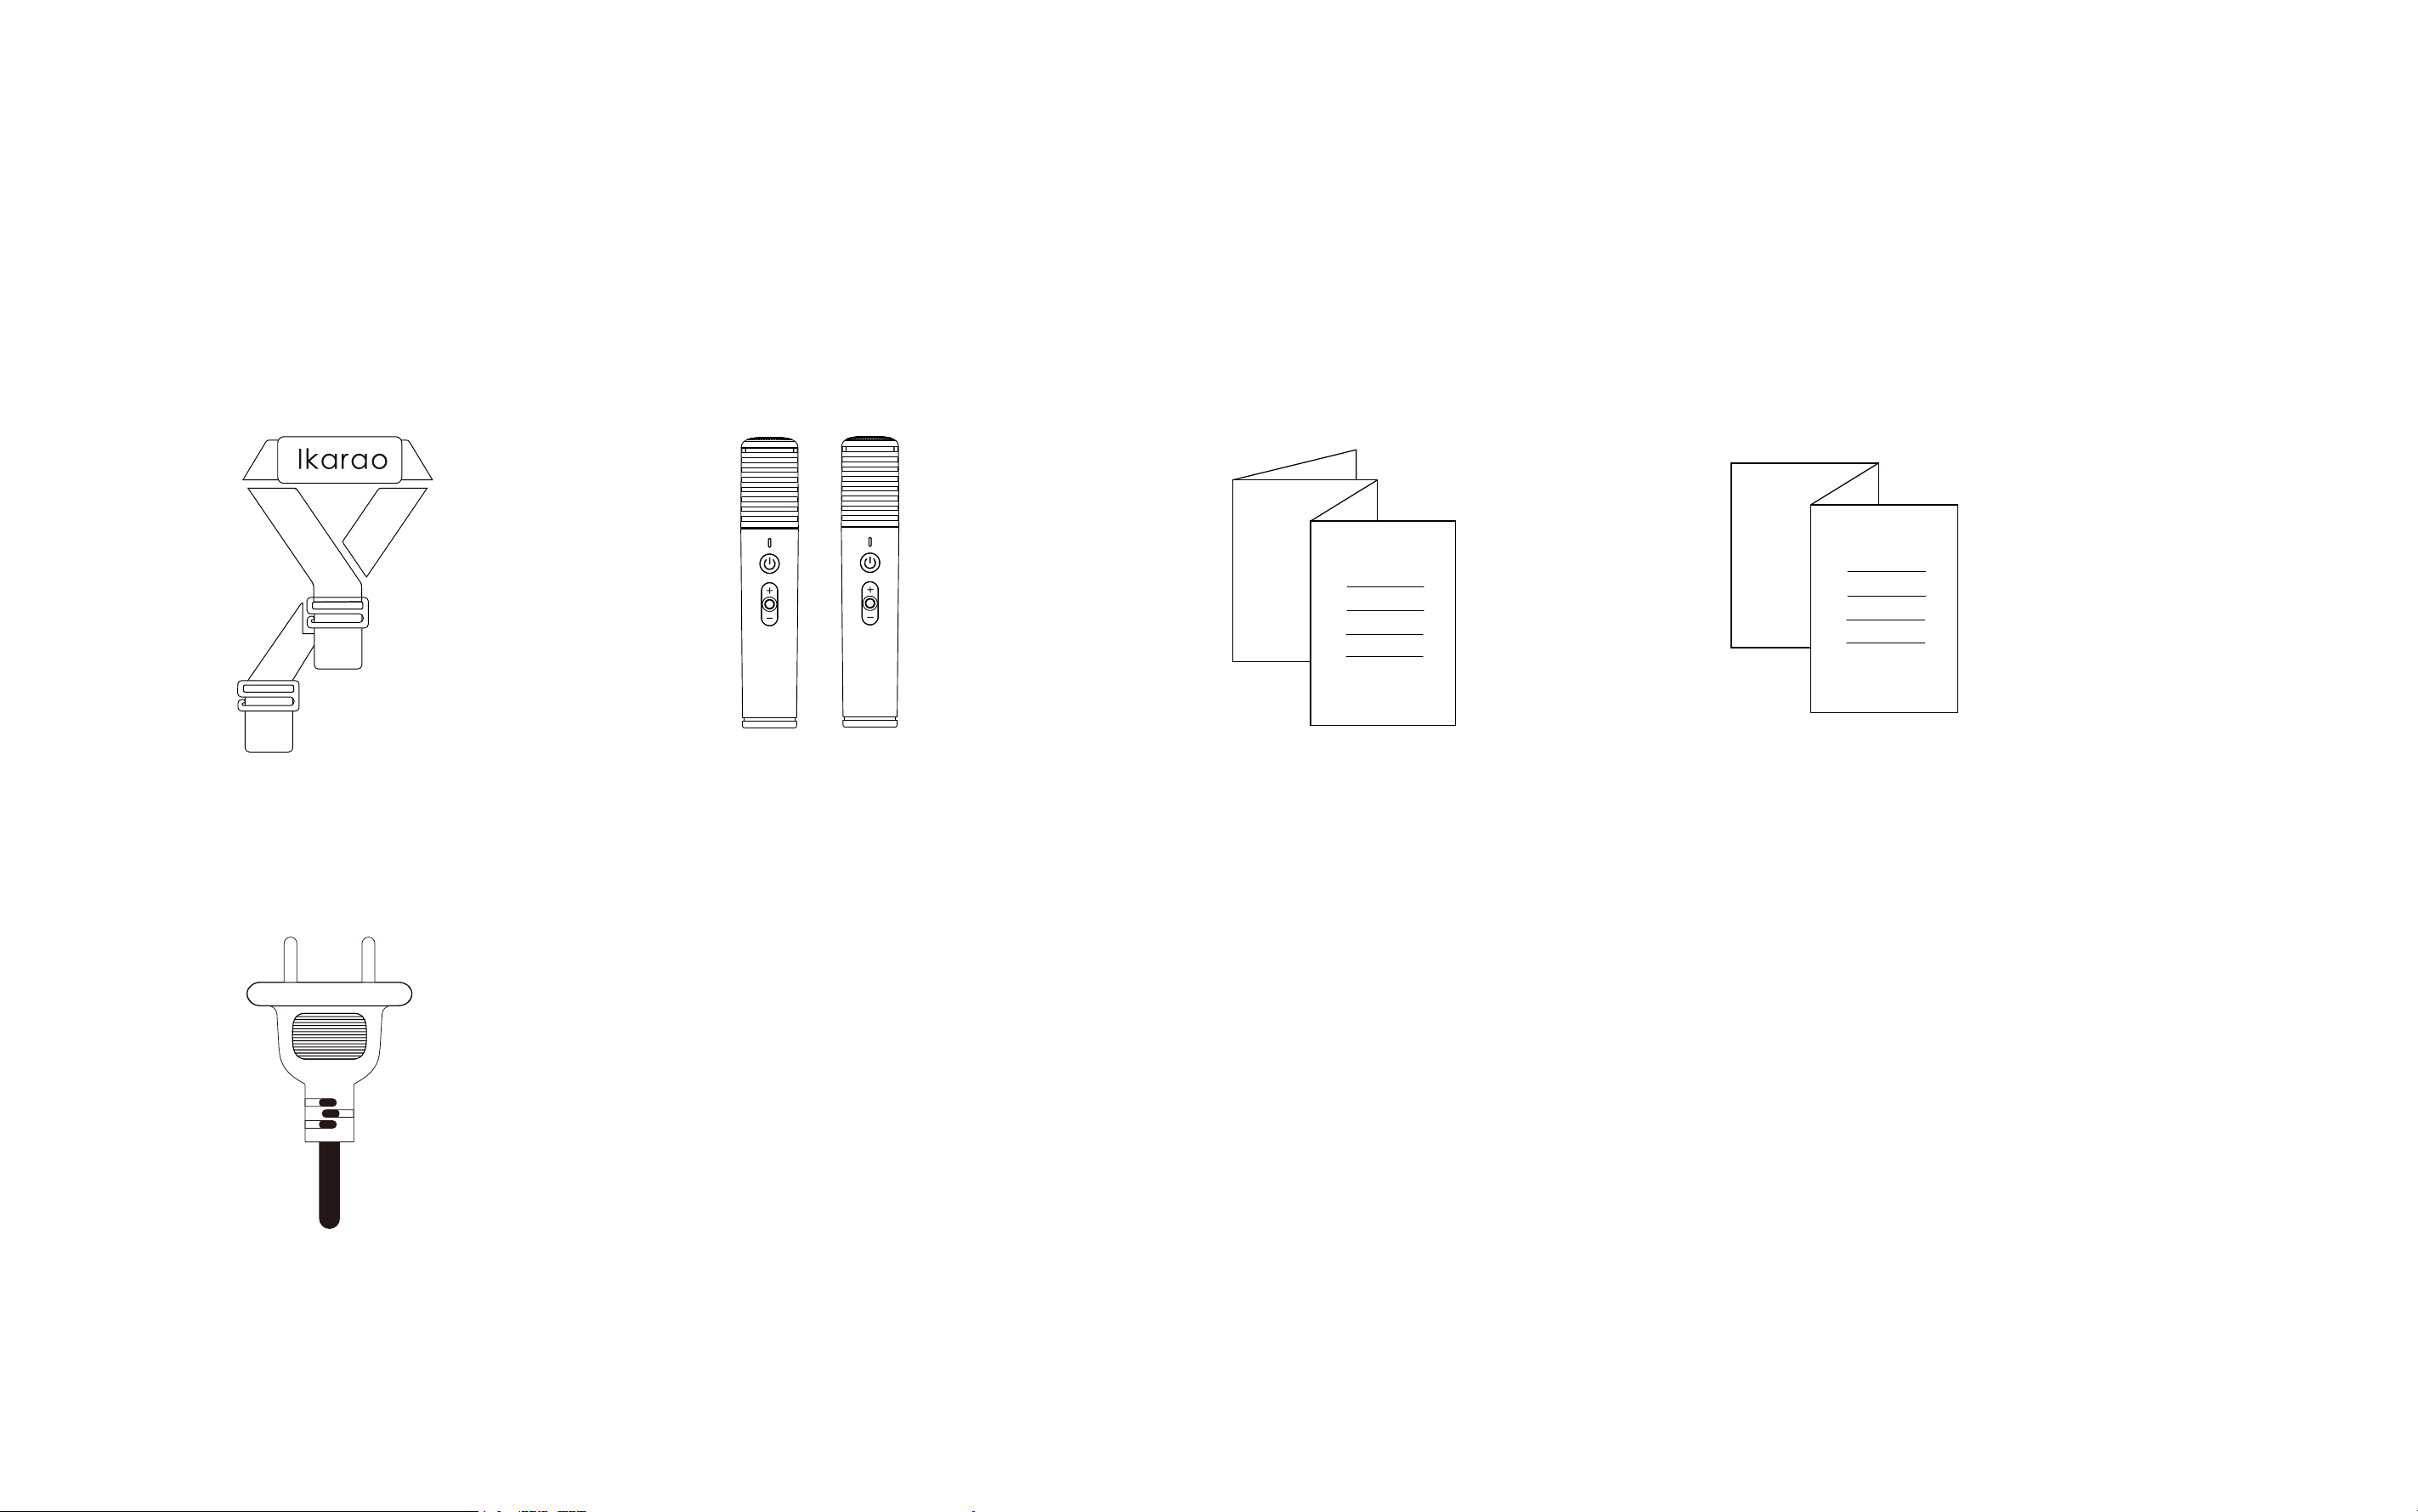
Supplied Accessories
The following are included with the speaker:
Shoulder Strap
AC Power Cable
Wireless Microphones * 2 Quick Start Manual Warranty Card

Before
You Begin
01
9
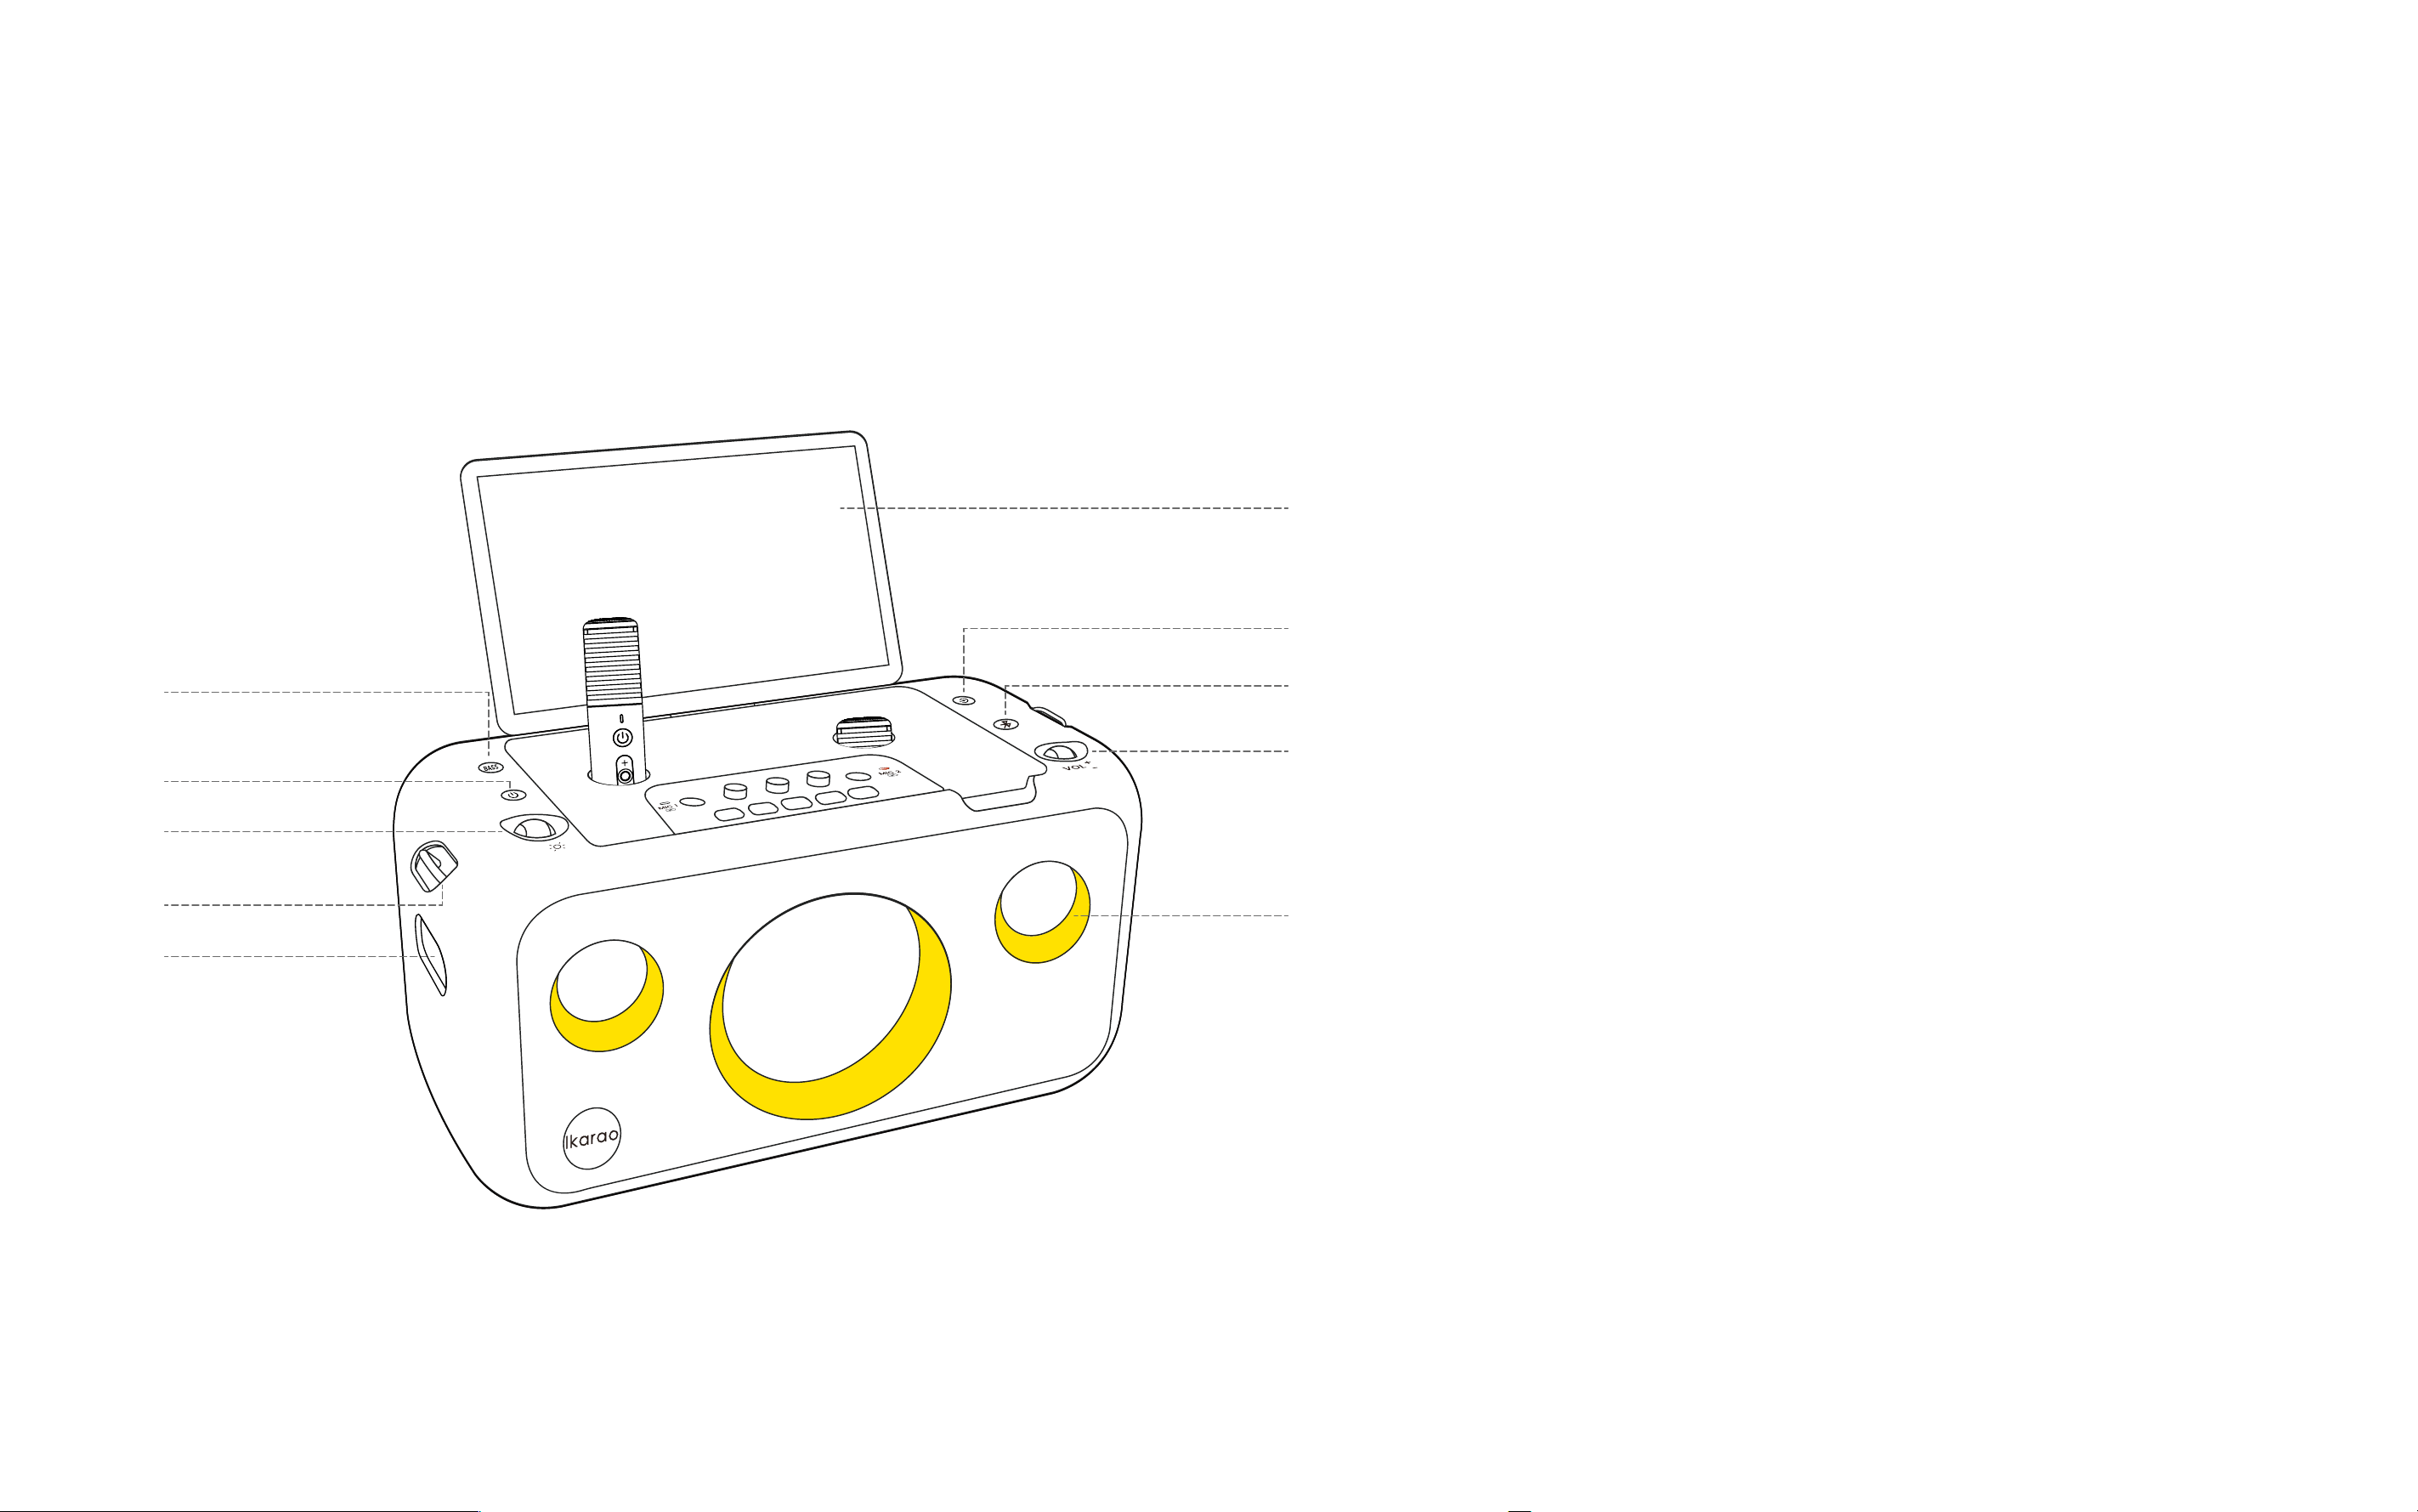
Parts of the Speaker
①
②
④
③
⑤
⑥
⑦
⑨
⑩
⑧
①
Bass Boost Button
........................................... 12
②
Power Button
....................................................12
③
Light Effect Roller
............................................. 12
④
Speaker Strap Ring
...........................................12
⑤
Speaker Handle Slot
.........................................14
⑥
Foldable Touch Screen
.................................... 14
⑦
Bluetooth Button
.............................................. 12
⑧
Playback Mode Switch Button
.........................13
⑨
Volume Roller
....................................................12
⑩
Ambient Light
................................................... 13
10
⑪
⑫
⑬
⑭
⑮
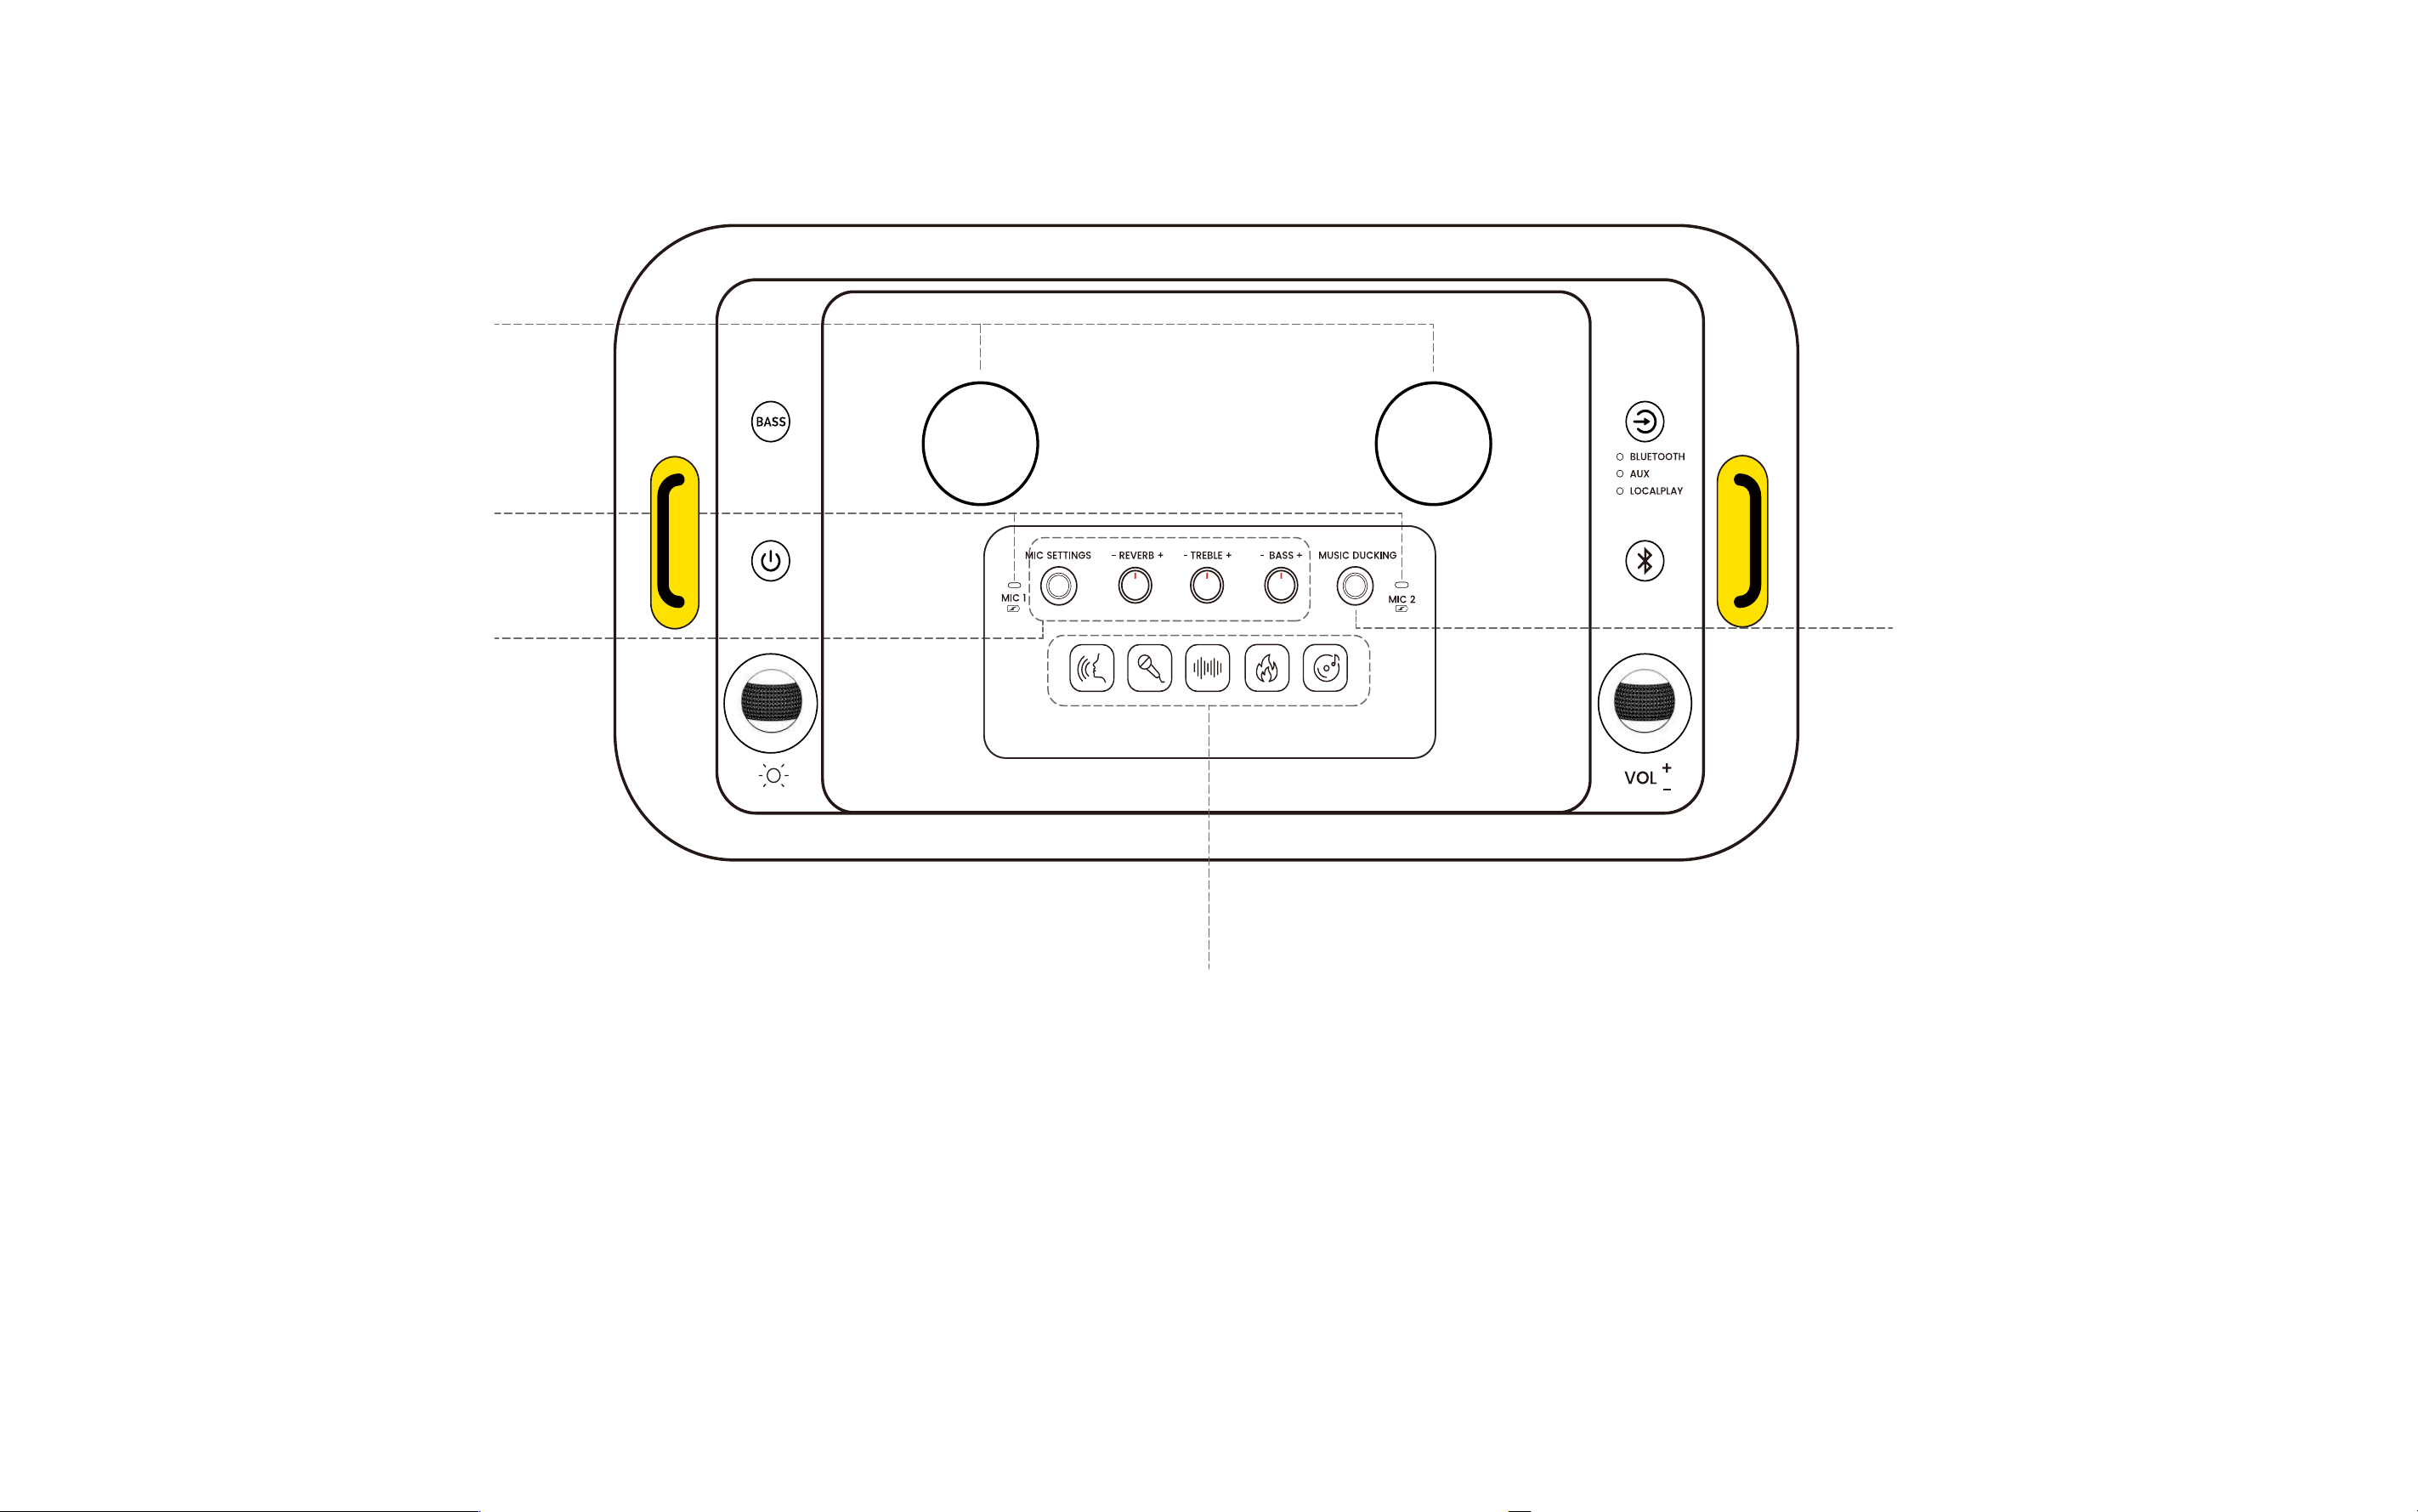
⑪
Left/Right Microphone Charging Compartment
.......................... 14
⑫
Left/Right Microphone Charging Compartment and
Indicator Light
................................................................................. 14
⑬
Custom Microphone Sound Effect Button
................................... 16
⑭
Microphone Sound Effect Switch Button
..................................... 15
⑮
Music Ducking Button
.................................................................... 16
11
SN:XXXXXXXXXXXXX
⑯
⑰
⑱⑲⑳
㉒
㉓
㉔㉕
㉑
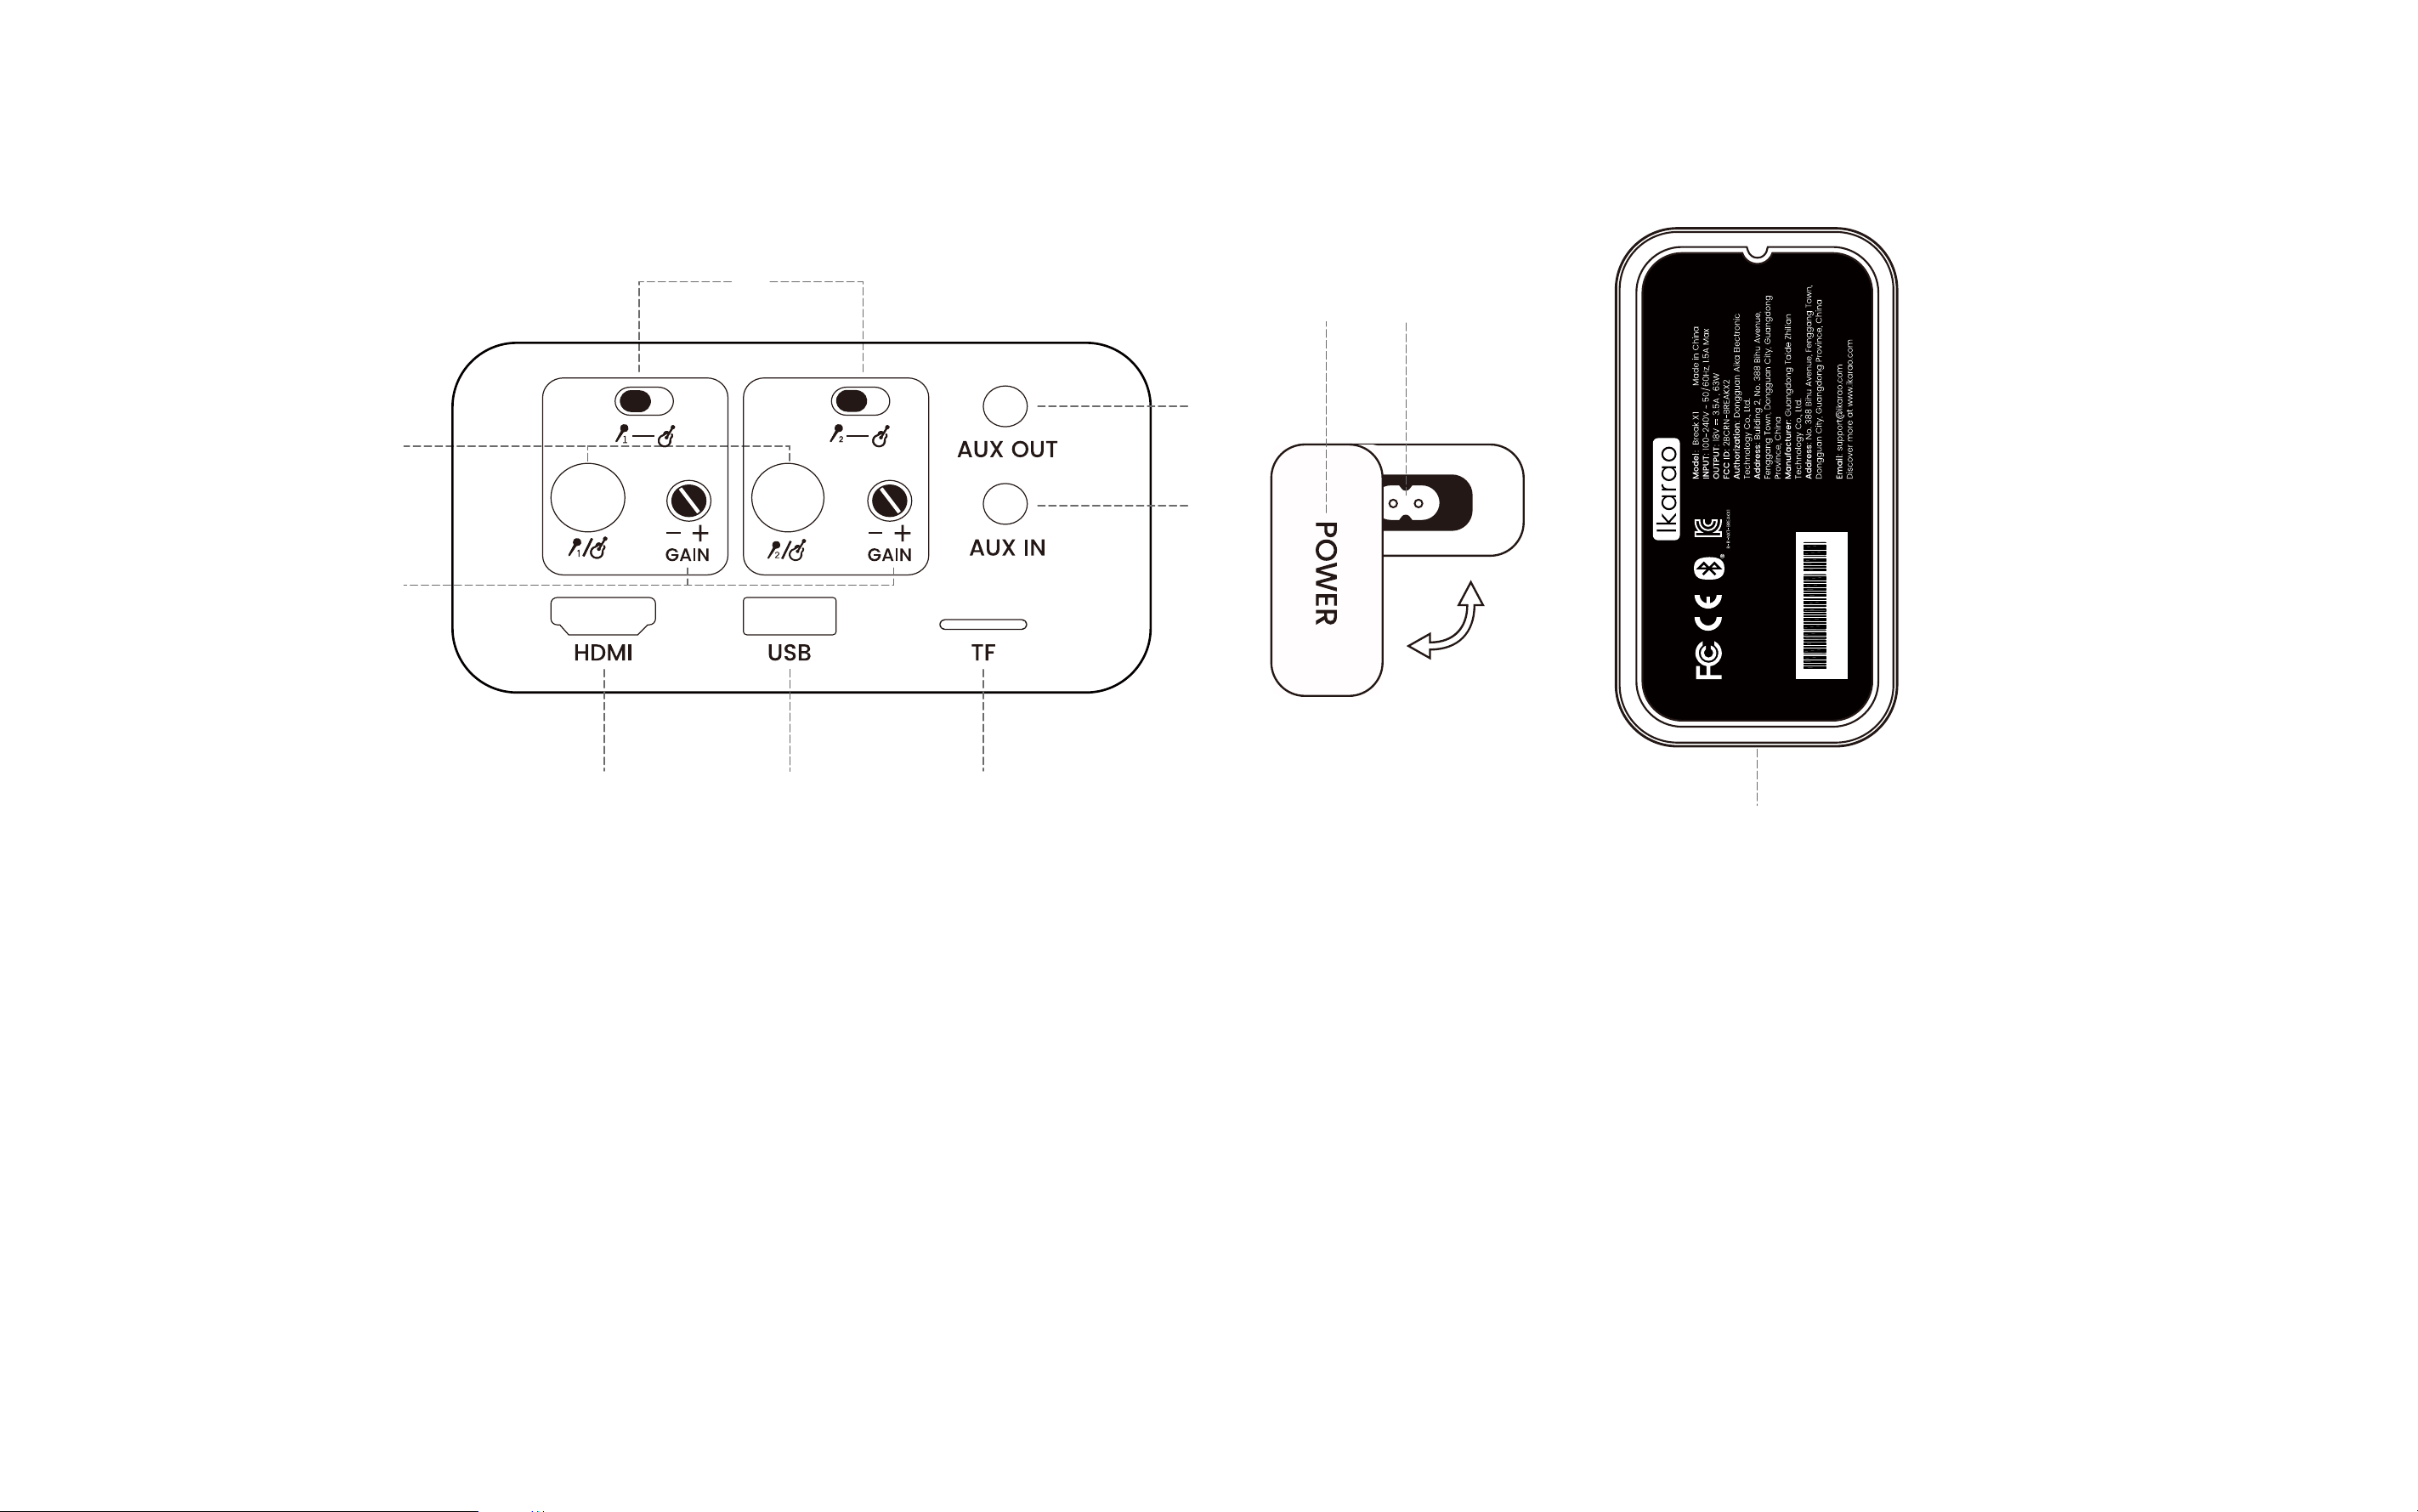
⑯
6.5mm Microphone/Instrument Port
............................................ 18
⑰
Microphone/Instrument Input Gain Knob
..................................... 18
⑱
HDMI
................................................................................................ 19
⑲
USB
.................................................................................................. 18
⑳
TF Card
............................................................................................ 18
㉑
Aux In
............................................................................................... 18
㉒
Aux Out
............................................................................................ 17
㉓
Microphone/Instrument Switch Button
......................................... 18
㉔
Power Charging Port Cover
............................................................ 19
㉕
Power Charging Port
...................................................................... 19
㉖
Expansion Port Cover
..................................................................... 19
㉖

12
Light Effect Roller
You can adjust between four lighting effects by toggling the light effect wheel left and right.
(For lighting effects, please refer to Page 13 - Lighting)
Volume Roller
You can adjust the speaker volume by toggling the left and right volume roller. Microphone volume is controlled separately and not by this volume
roller.
(For microphone volume control, please refer to Page 21 - Microphone Volume Control)
Bass Boost Button
Pressing the Bass Boost button enhances the bass effect.
Power Button
Press and hold the power button to turn the device on or off.
When the device is on, pressing the power button once toggles the screen on/off.
(For shutting down, rebooting, or screen operations via the screen, please refer to Page 25 - Power Icon)
Bluetooth Button
Single-click the Bluetooth button to enter pairing mode and disconnect from connected Bluetooth devices.
(For playing music via Bluetooth, please refer to Page 46 - Play With Bluetooth)
13
Playback Mode Switch
Pressing the play/pause button allows you to switch between three playback sources: LOCAL PLAY - Bluetooth - AUX.
(For playing music via AUX IN, please refer to Page 18 - Aux In. For playing music via USB, please refer to Page 18 - USB.)
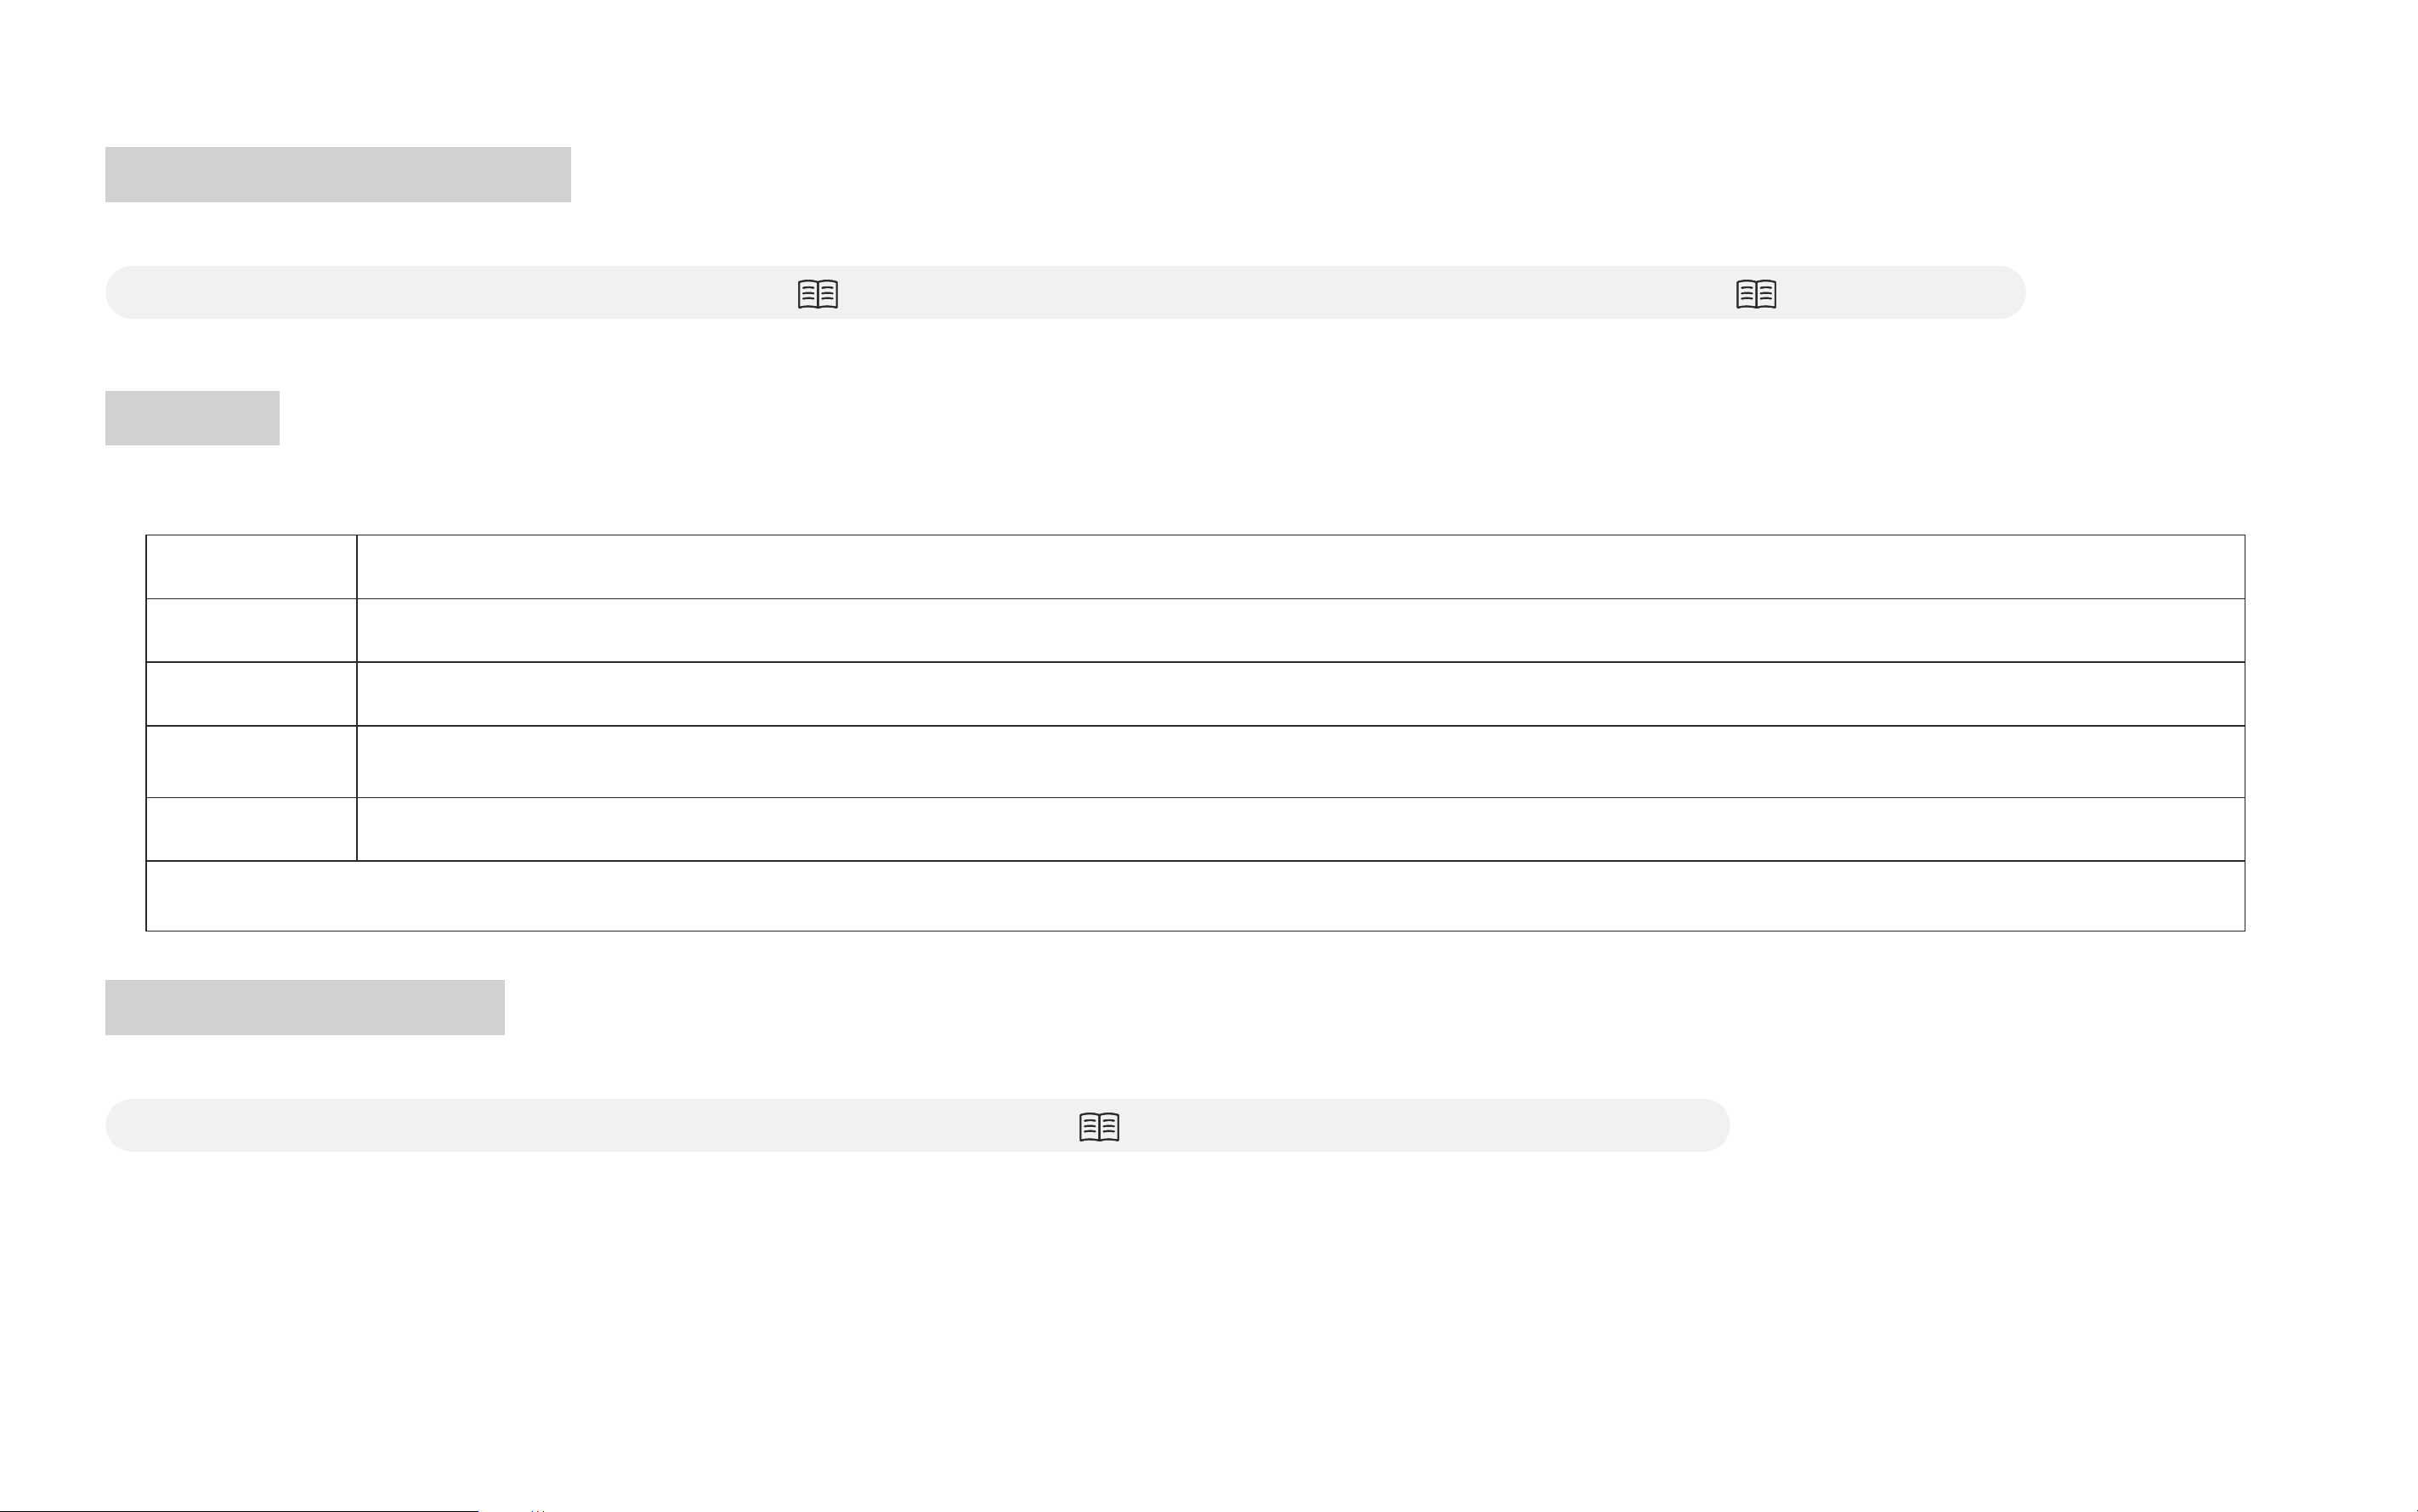
Lighting
Break X1 features 4 lighting effects. You can also adjust these effects using the light effect roller or the Light option on the screen.
Light Red, blue, and green gradient from bottom to top, changing color every 3 seconds.
Romantic Red, blue, and green lights appear simultaneously, flowing slowly.
Dynamic Single-color lights rotate with the rhythm of the music.
Bright
Red, blue, and green lights open and close with the music rhythm, with the current color fading and changing to the next
every 3 seconds.
Close Turn off lights.
Lights turn yellow when adjusting the volume, changing with the volume level.
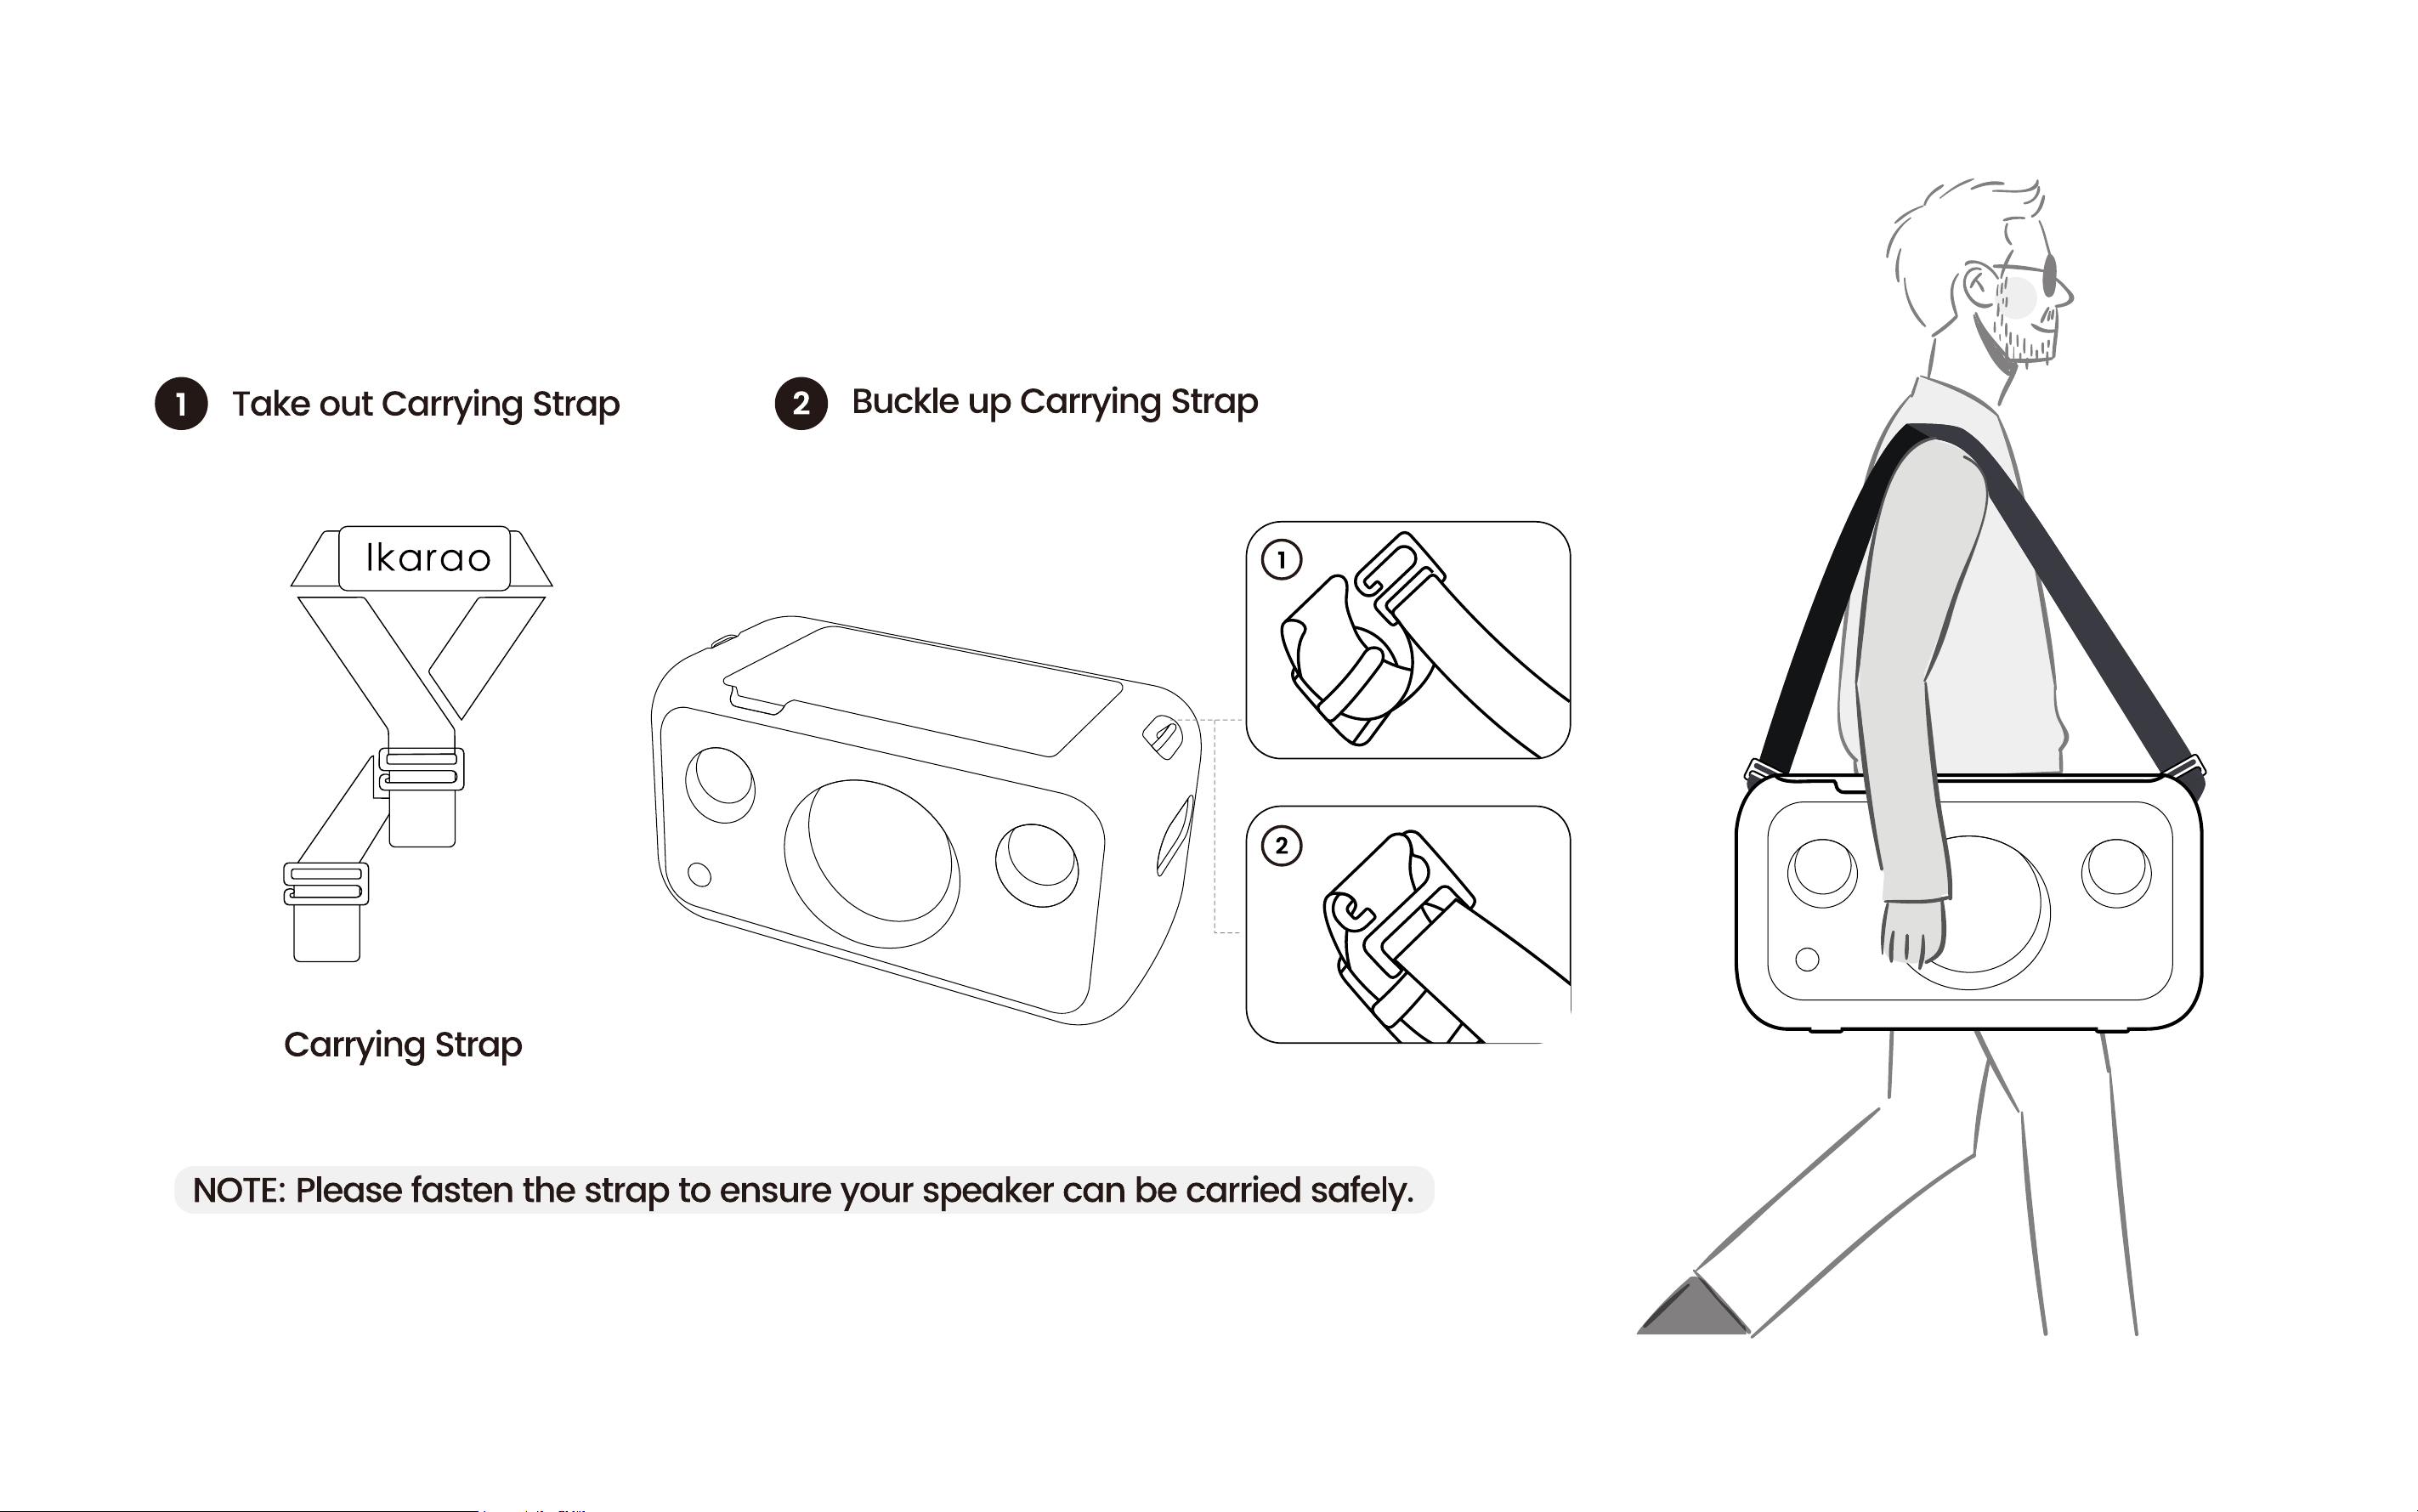
Speaker Strap Ring
Used to secure the included shoulder strap.
(For instructions on attaching the shoulder strap, please refer to Page 27 - Installing the Shoulder Strap.)

14
Speaker Handle Slot
Used for lifting and carrying the speaker with both hands.
(NOTE: For your safety and product integrity , avoid carrying the speaker with one hand.)
Foldable Touch Screen
Supports a 120° fold, multi-point hover, and 180° rotation touch screen.
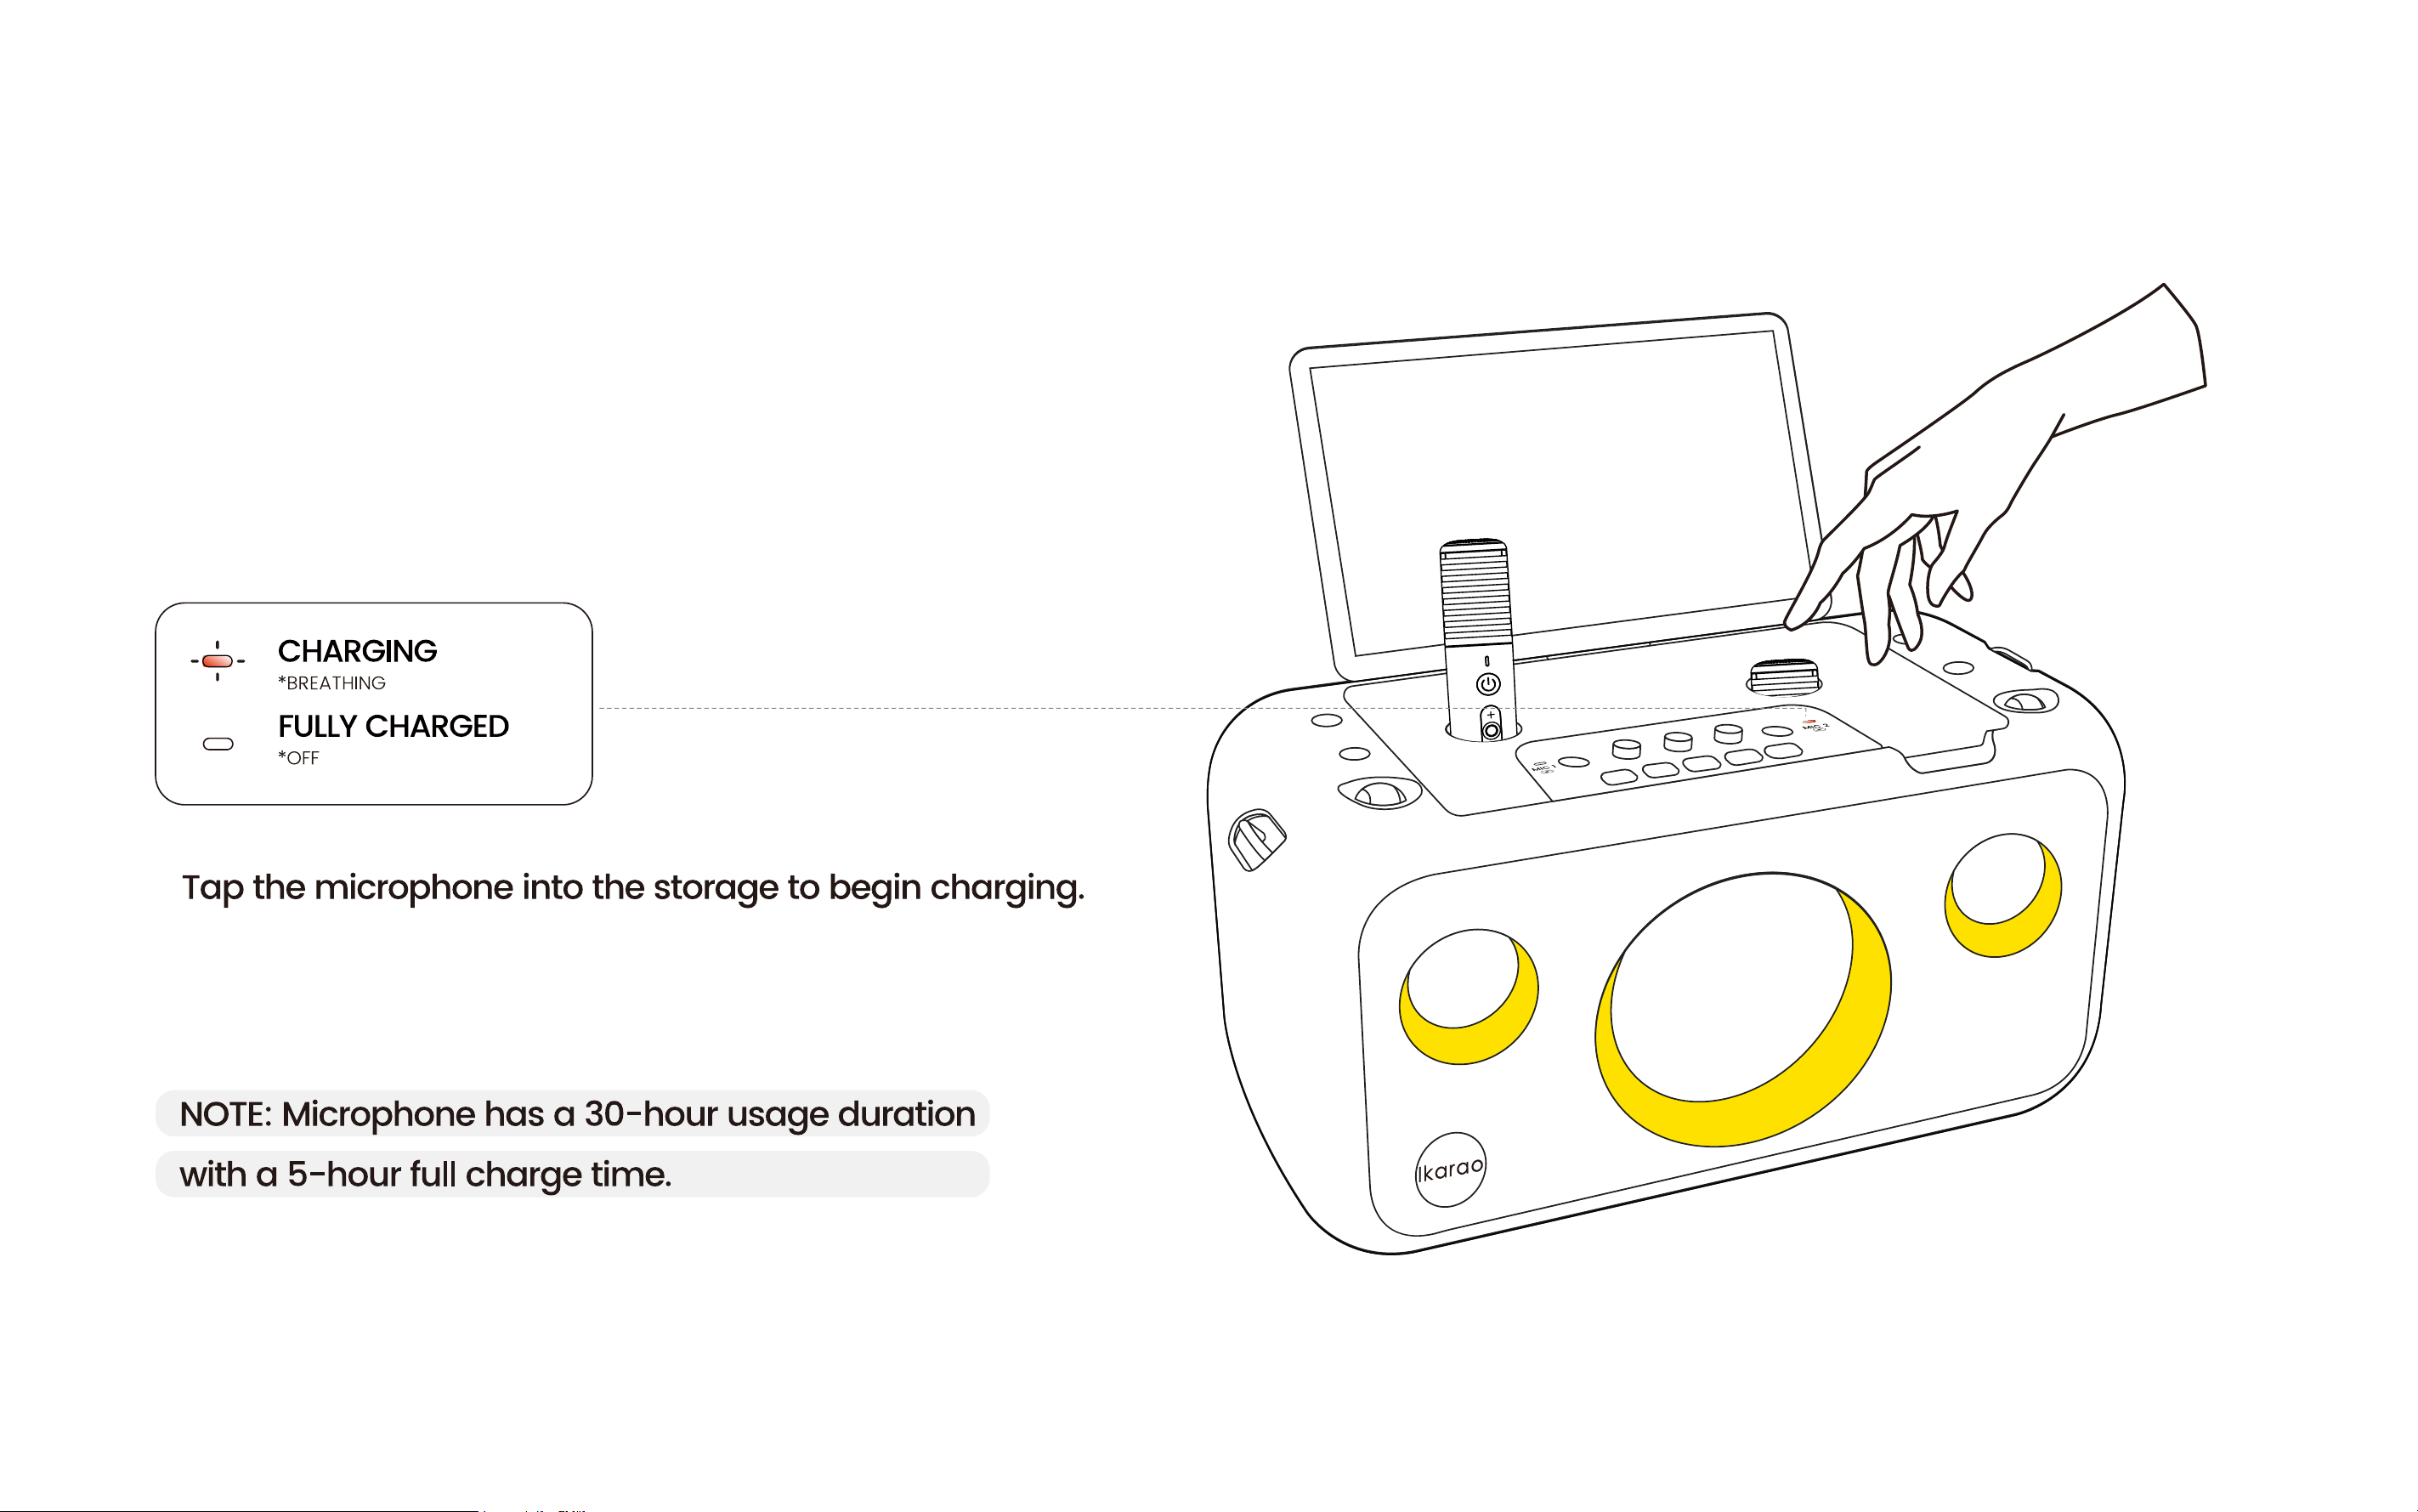
Left/Right Microphone Charging Compartment
Stores and charges the microphones.
Left/Right Microphone Charging Compartment Indicator Light
Indicates the charging status of the microphone. A red light means the microphone is currently charging; when the red light is off, the microphone
is not charging.
(For details, see Page 30 - Microphone Charging.)
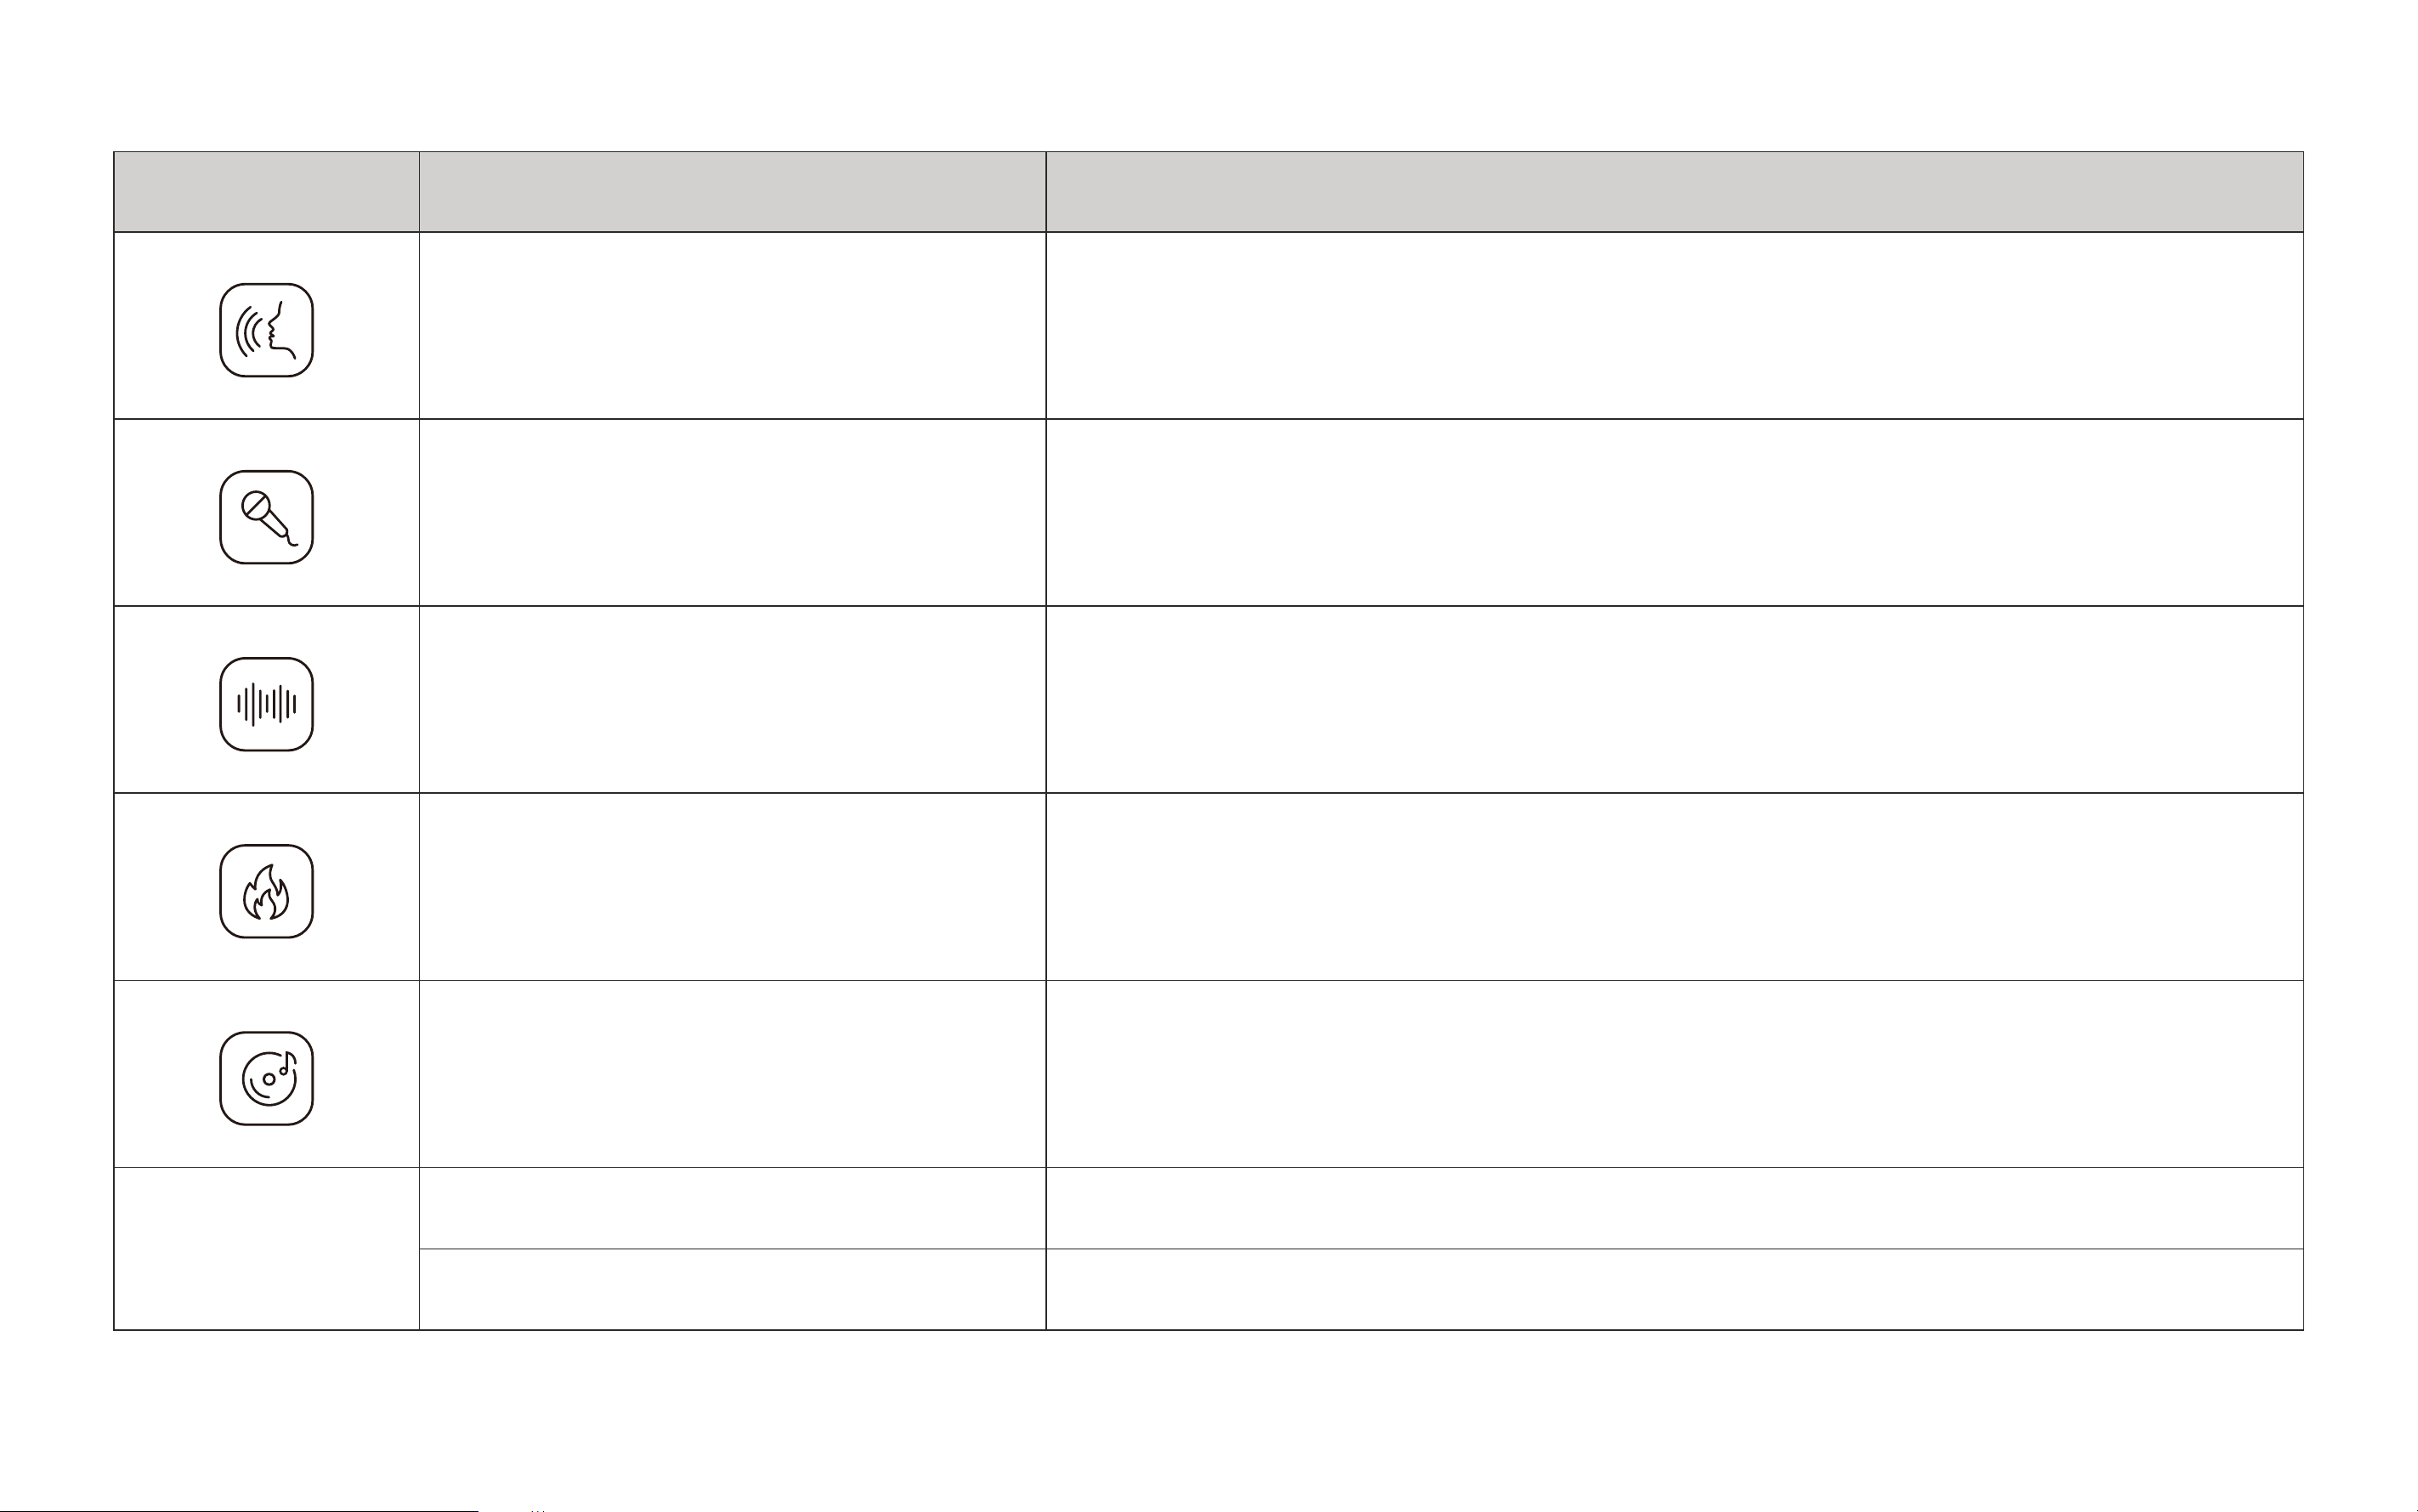
Microphone Sound Effect Switch Button
Press to switch microphone sound effects.
15
Icon Microphone sound effects Described
Original Mode Original sound without any effects.
Karaoke Mode
Increased delay and mid-frequency boost for a magnetic vocal tone, simulating
the 90s Karaoke era.
Super Reverb Mode High reverb for a spacious sound, ideal for ethereal songs.
Popular Mode Balanced reverb and clear EQ for most pop music.
Profession Mode Minimal effects for skilled singers to achieve a performance-level sound.
* On screen only
Cartoon Mode Playful and cute tone, like a cartoon fairy.
Monster Mode Deep and frightening tone, like a movie monster.
16
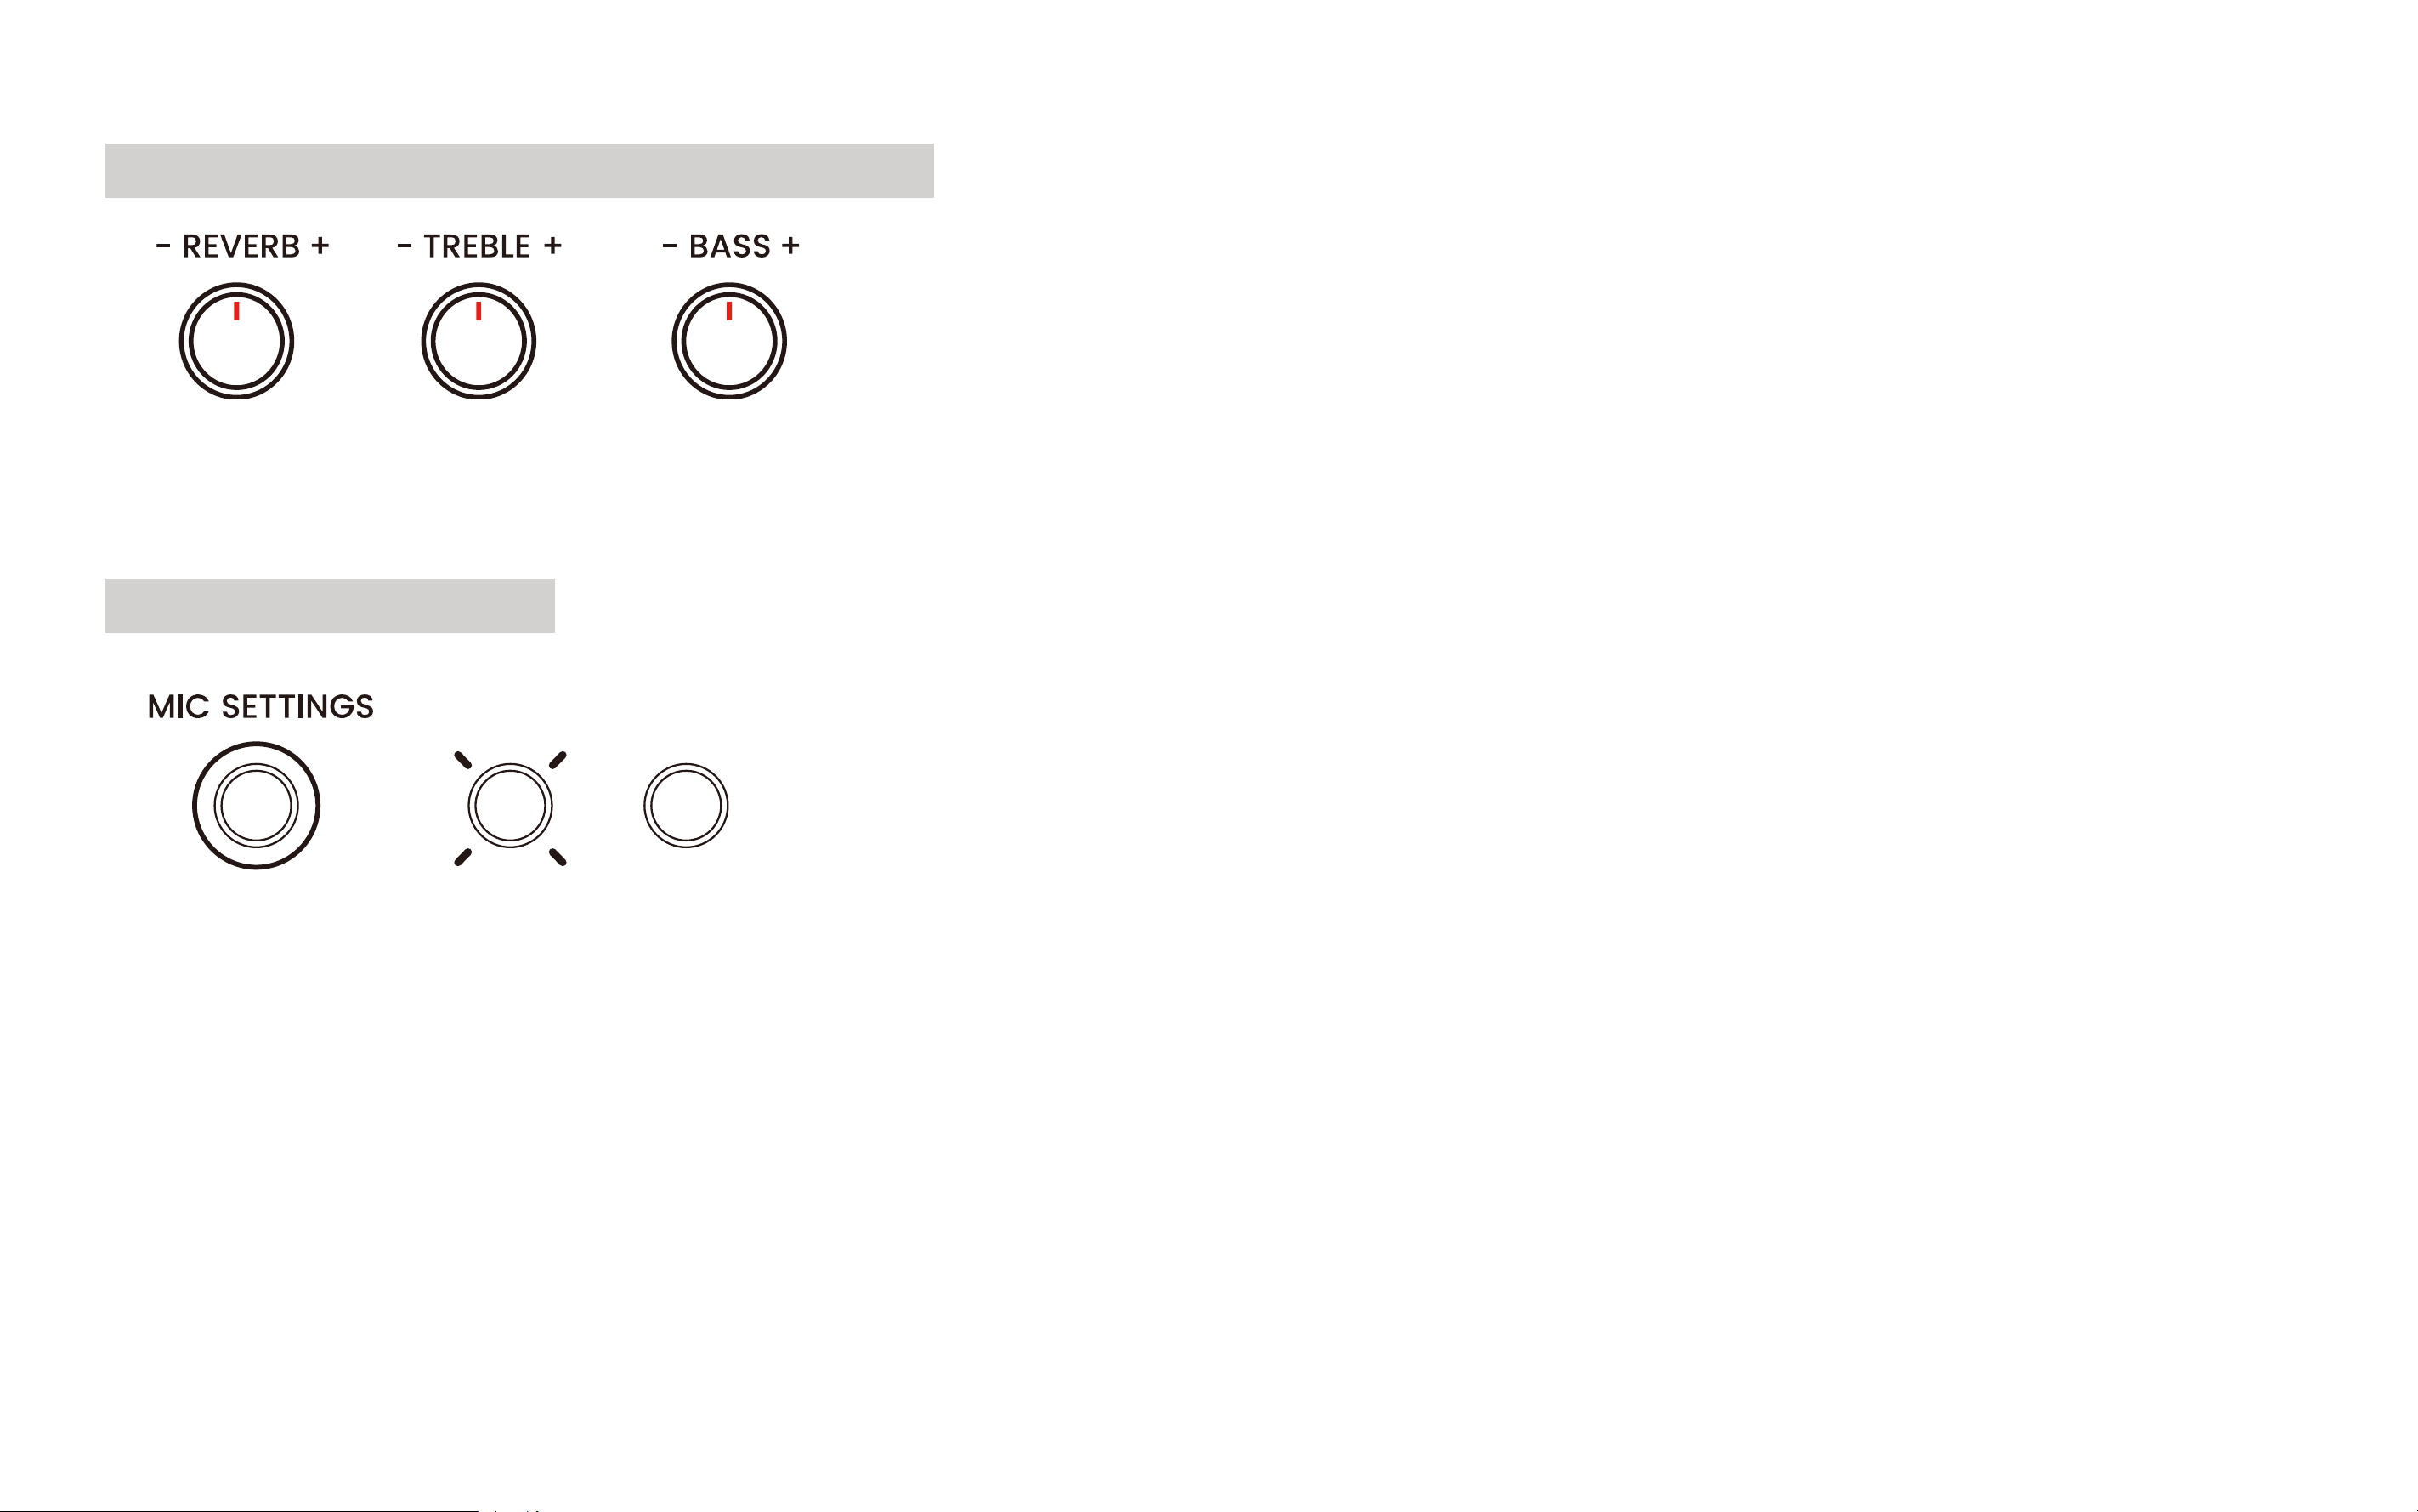
Custom Microphone Sound Effect Button
Single-click MIC SETTING to activate the custom microphone effect. Adjust the microphone's Reverb, Treble, and Bass effects by rotating the
respective knobs.
Music Ducking Button
Single-click Music Ducking to activate the mode where the speaker volume lowers when vocals are detected, giving priority to speech. This is
useful for making announcements at parties or events without stopping the music.
*OFF*ON
17
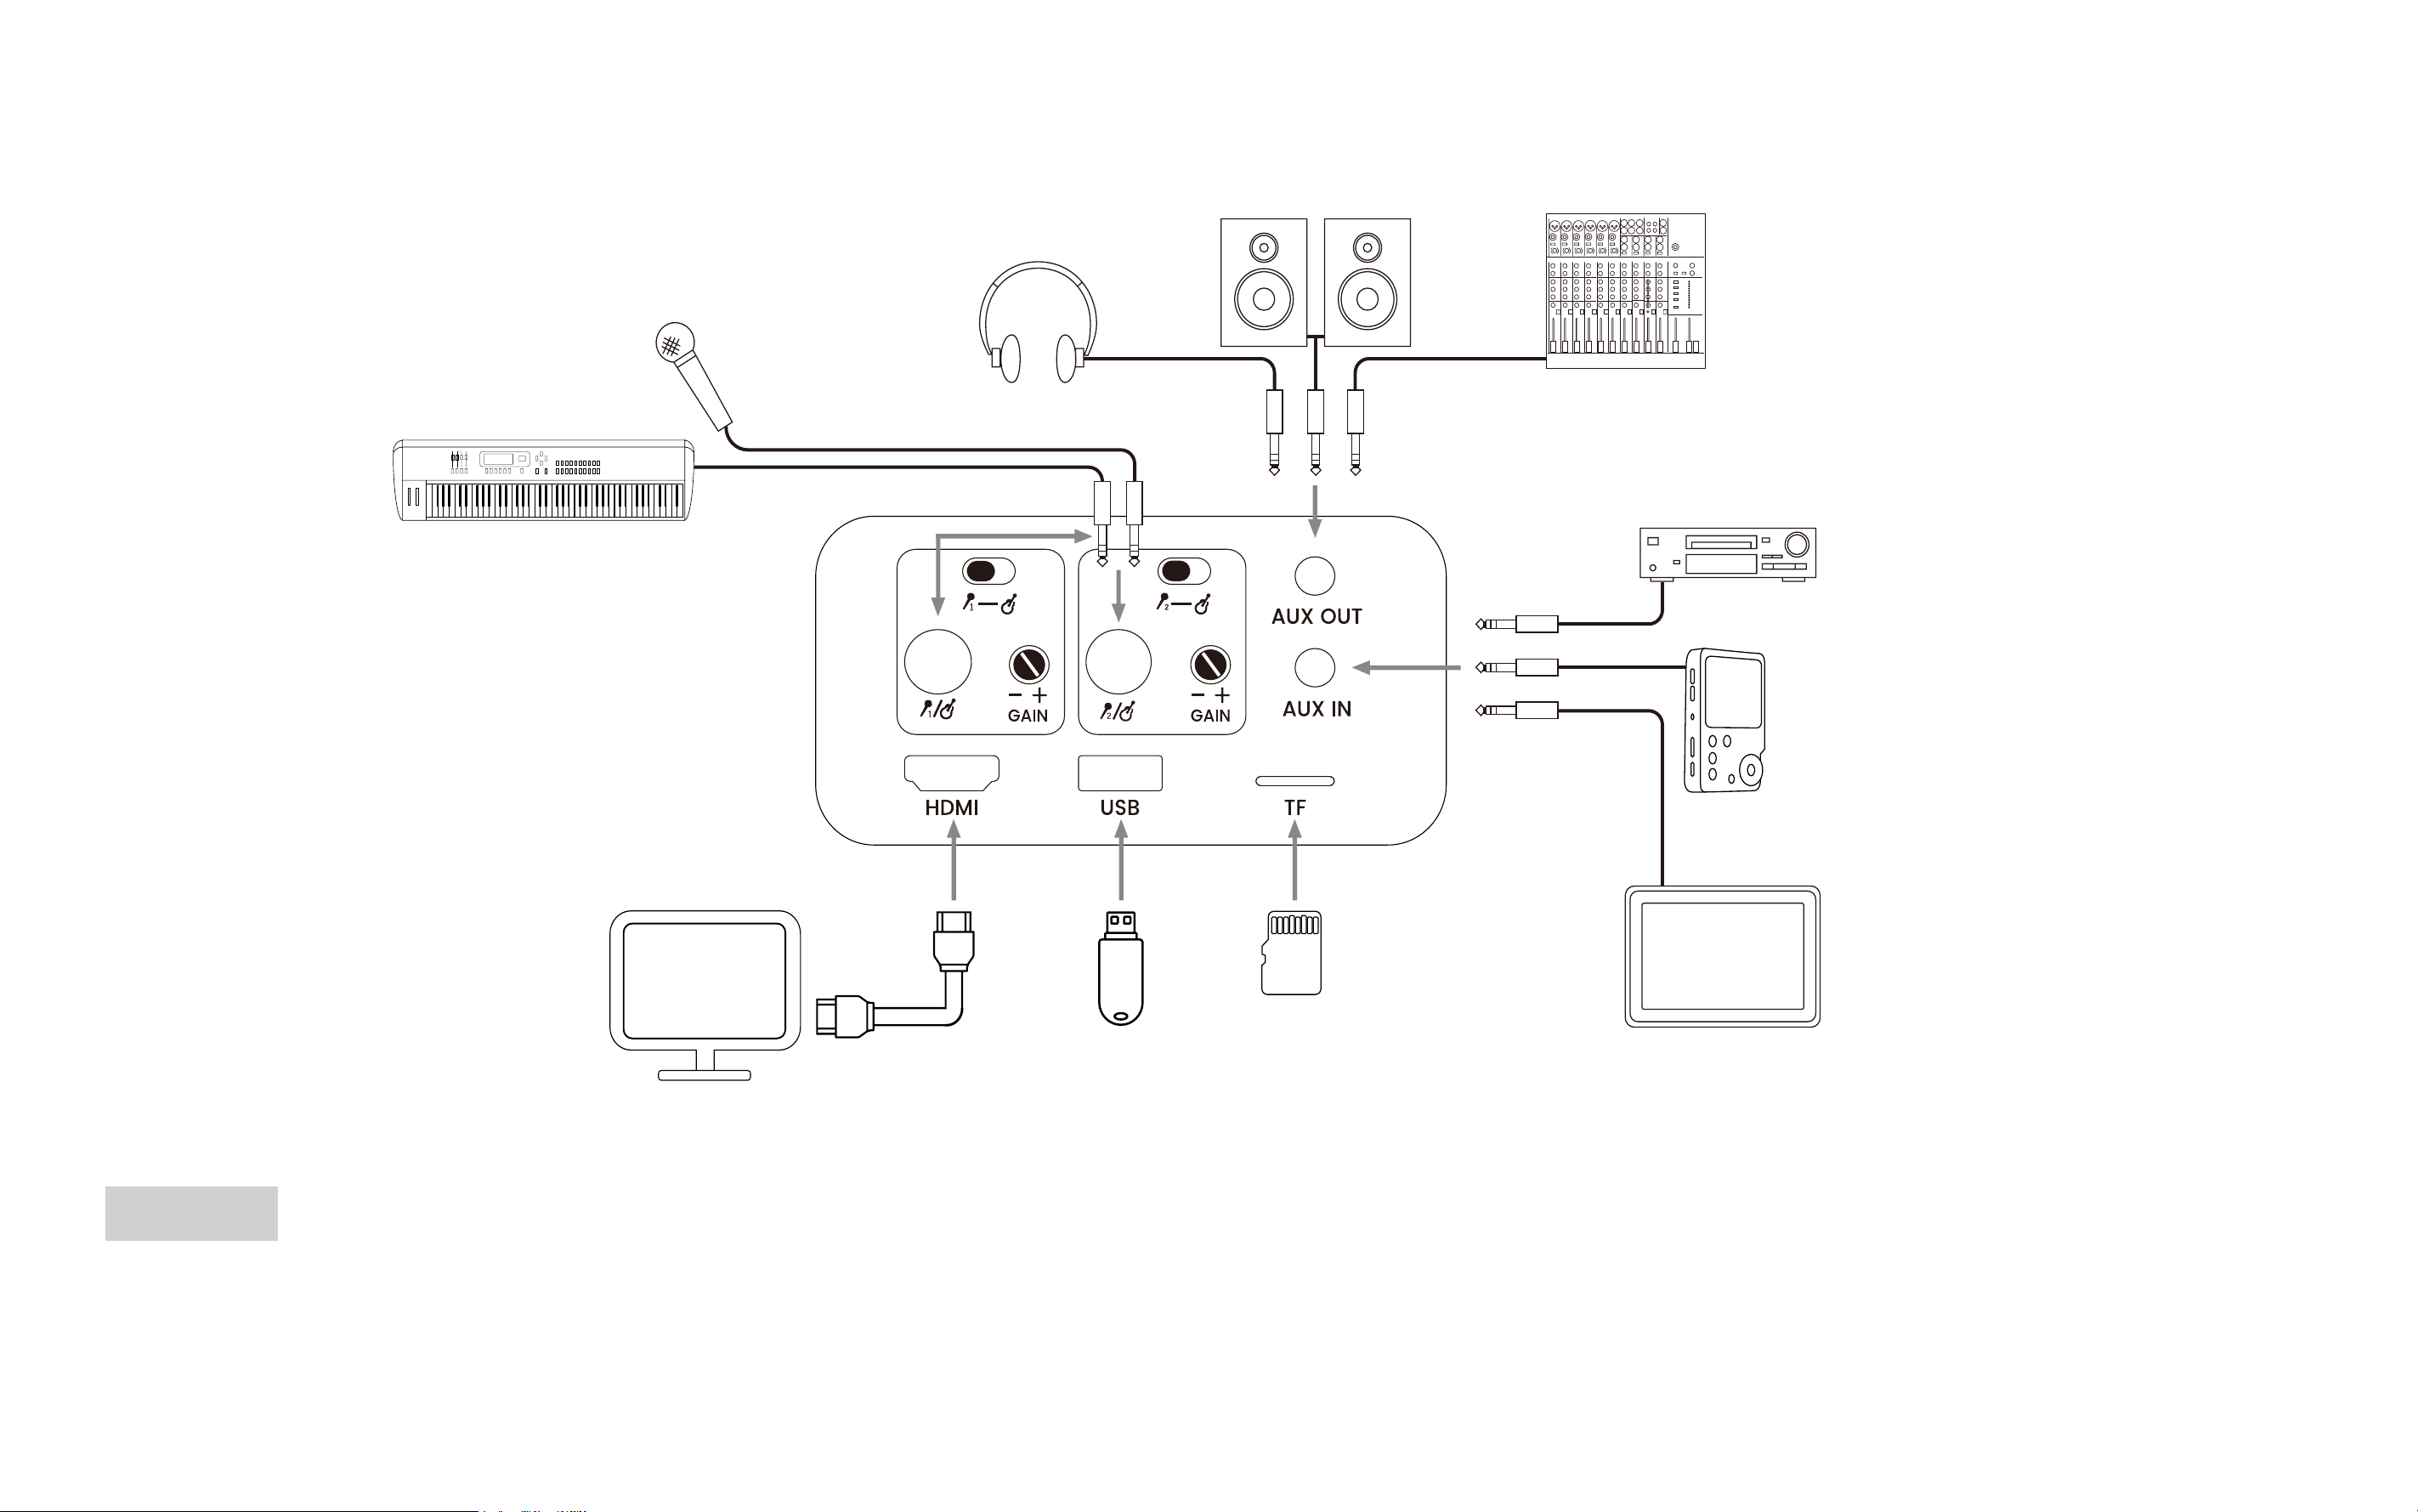
Aux Out
Outputs all sounds, including from the speaker and microphone, via a 3.5mm audio cable. The speaker will be silent during this time. Use Aux Out
to connect the Ikarao speaker to a higher-power sound system or for headphone monitoring.
CD Player
Hi-Fi Audio Player
PC / iPad /Laptop
USB flash drive
Television
Headphones
Stereo Speakers
Microphone
Electronic Keyboard
Audio Mixer
Memory Card

18
Aux In
Allows external devices such as PCs, laptops, iPods, CD players, and digital audio players to be used as the Ikarao Speaker's audio source via a
3.5mm audio cable. When a device is detected in the Aux In port, the playback mode automatically switches to LOCAL PLAY.
TF Card
Use a TF card as external storage for the Ikarao Speaker.
USB
Supports external storage using USB drives or external hard drives, and provides 5V1A power supply.
6.5mm Microphone/Instrument
Supports connecting wired microphones or instruments like guitars and electric pianos via a 6.5mm audio cable.
Microphone/Instrument Switch Button
Toggle left or right to select the input device type.
Microphone/Instrument Input Gain Knob
Use the knob for precise adjustment of input gain.
Supported Storage Formats EXFAT/FAT32/NTFS/EXT4
Maximum Supported Memory TF Card: 256GB USB: 1TB
Supported Media Codec Formats
AAC/AC3/APE/FLAC/M4A/MP2/MP3/WMA/OGG/3G2/3GP/AVI/FLV/MKV/MOV/MP4/MPG/
VOB/WMV
19
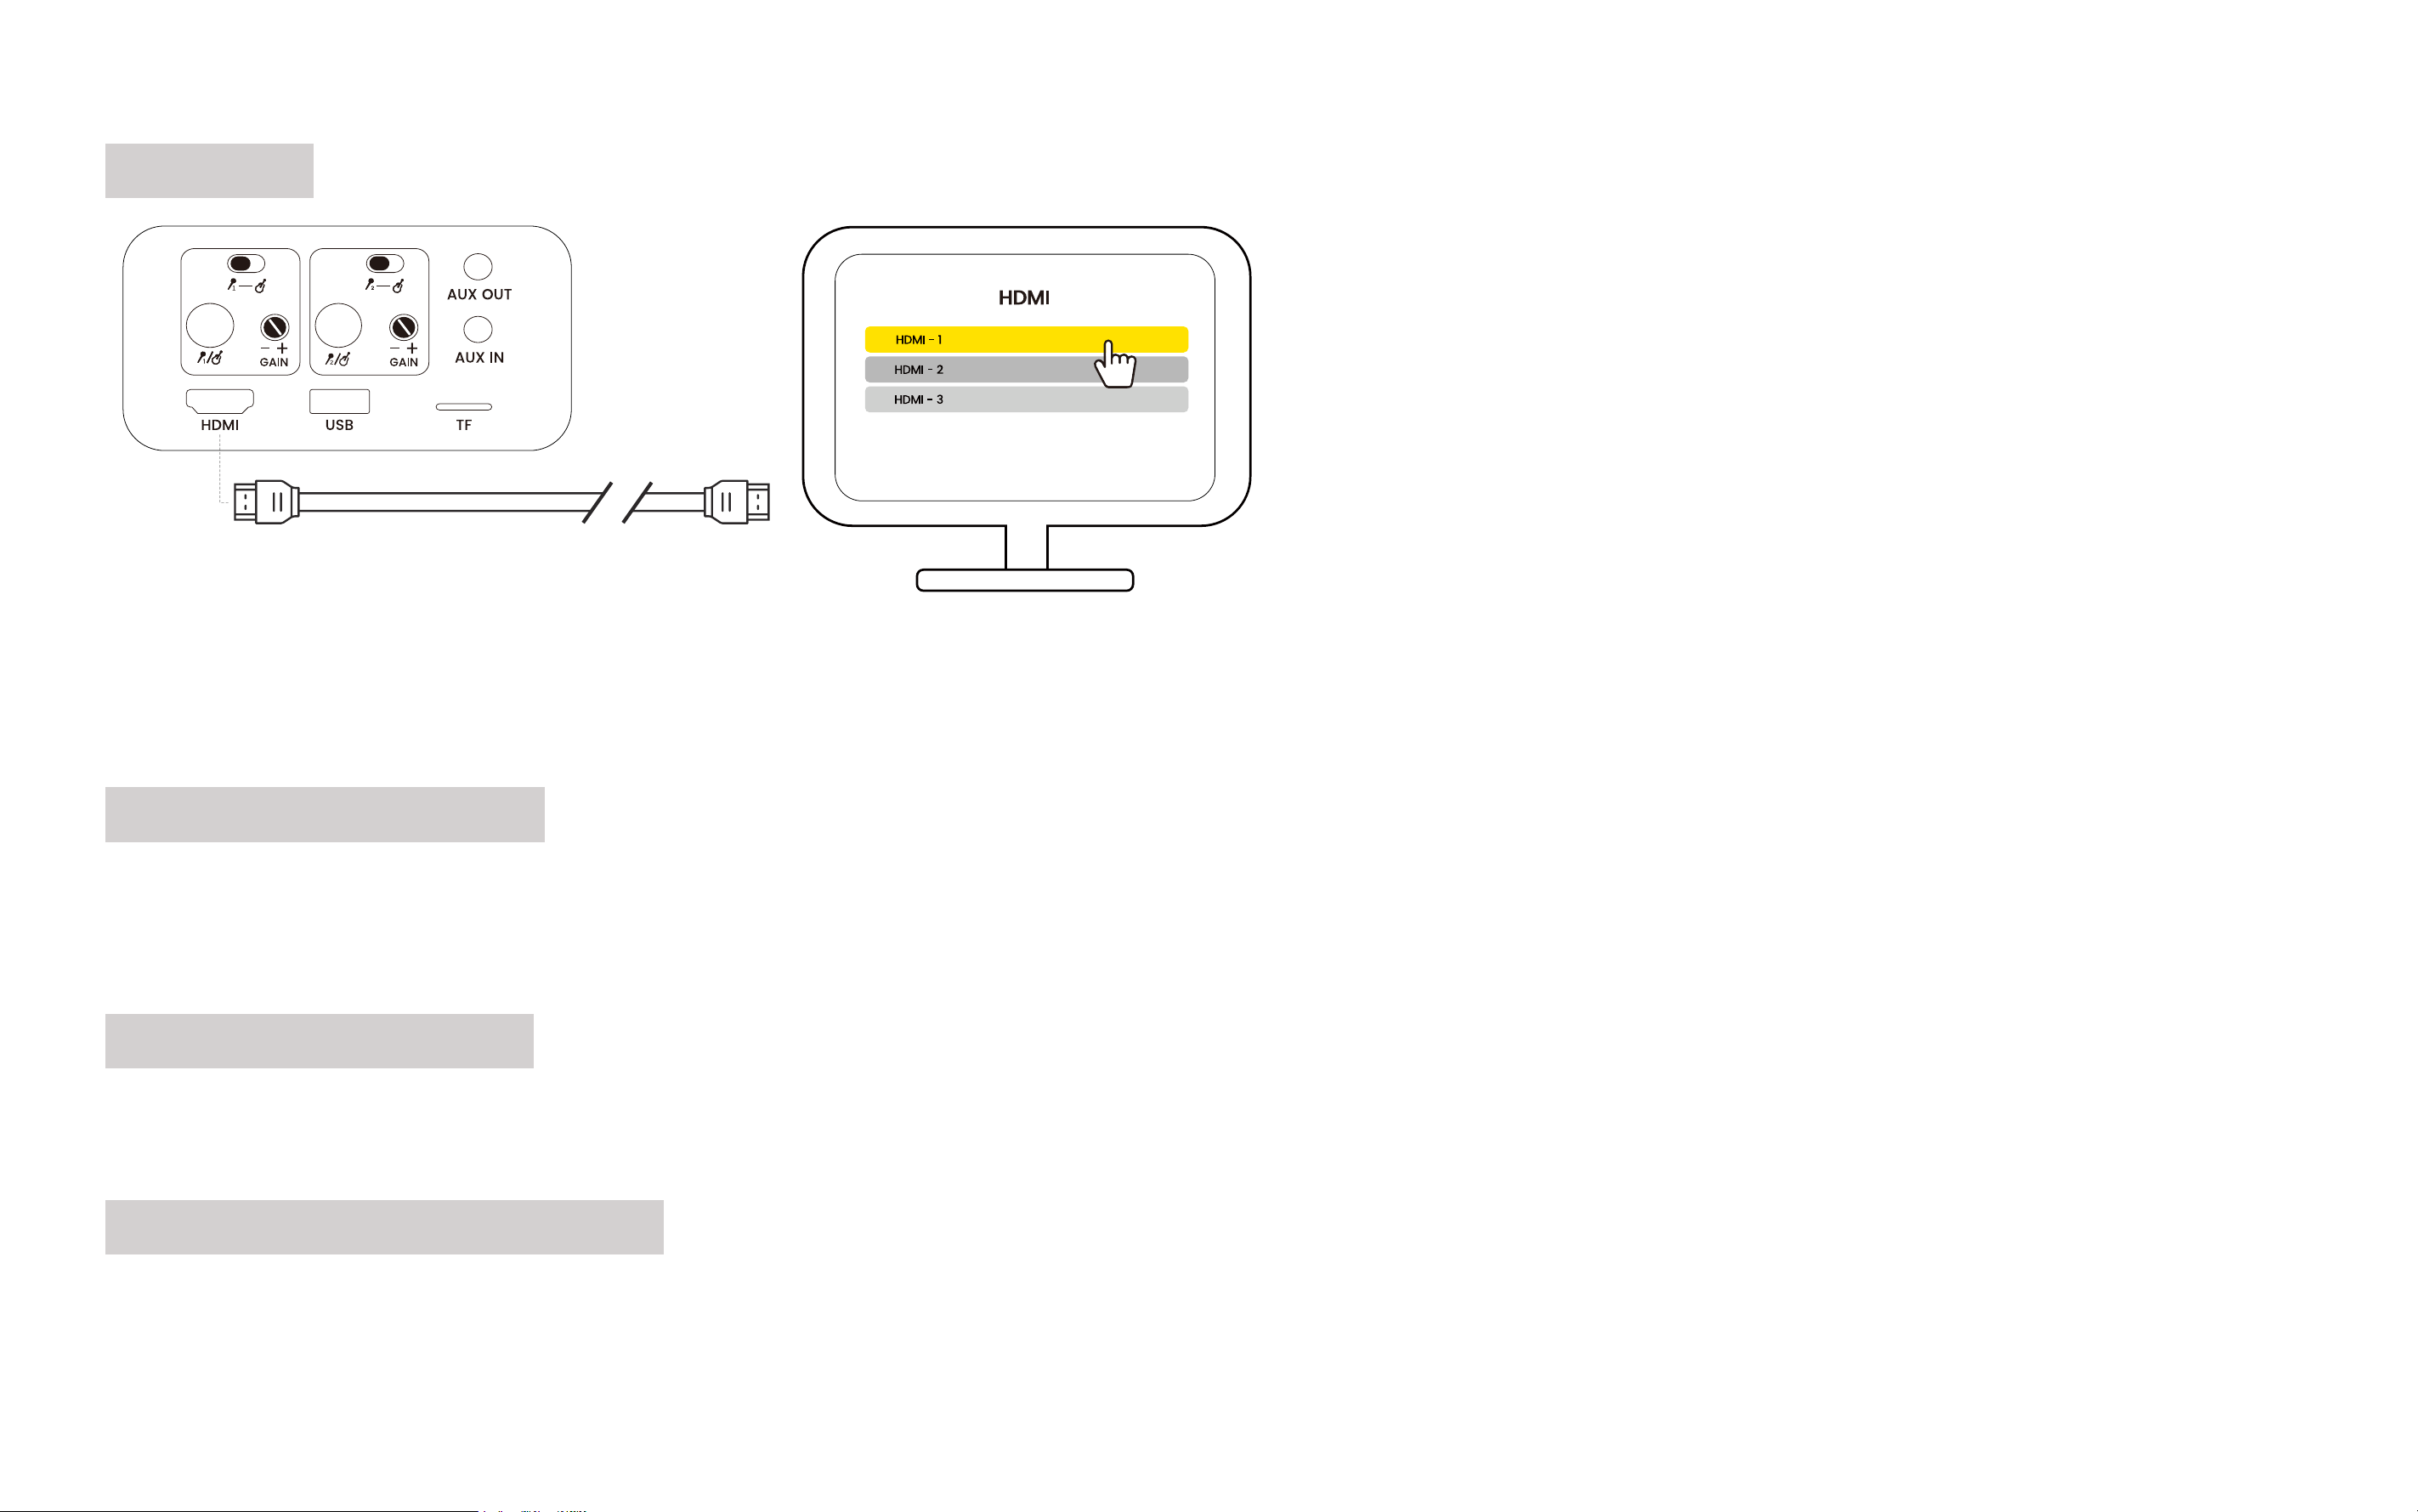
HDMI Port
Use HDMI cable to connect to monitors, TVs, or projectors, supporting up to 1080P resolution. Compatible with HDMI protocols HDMI 1.4 and
HDMI 2.0.
Expansion Port Cover
Protects the expansion ports and features product labeling stickers.
NOTE: Do not remove the product label sticker, which contains important information including serial number and FCC ID.
Power Charging Port
DC power port for charging.
Power Charging Port Cover
Protects the power charging port effectively.
20
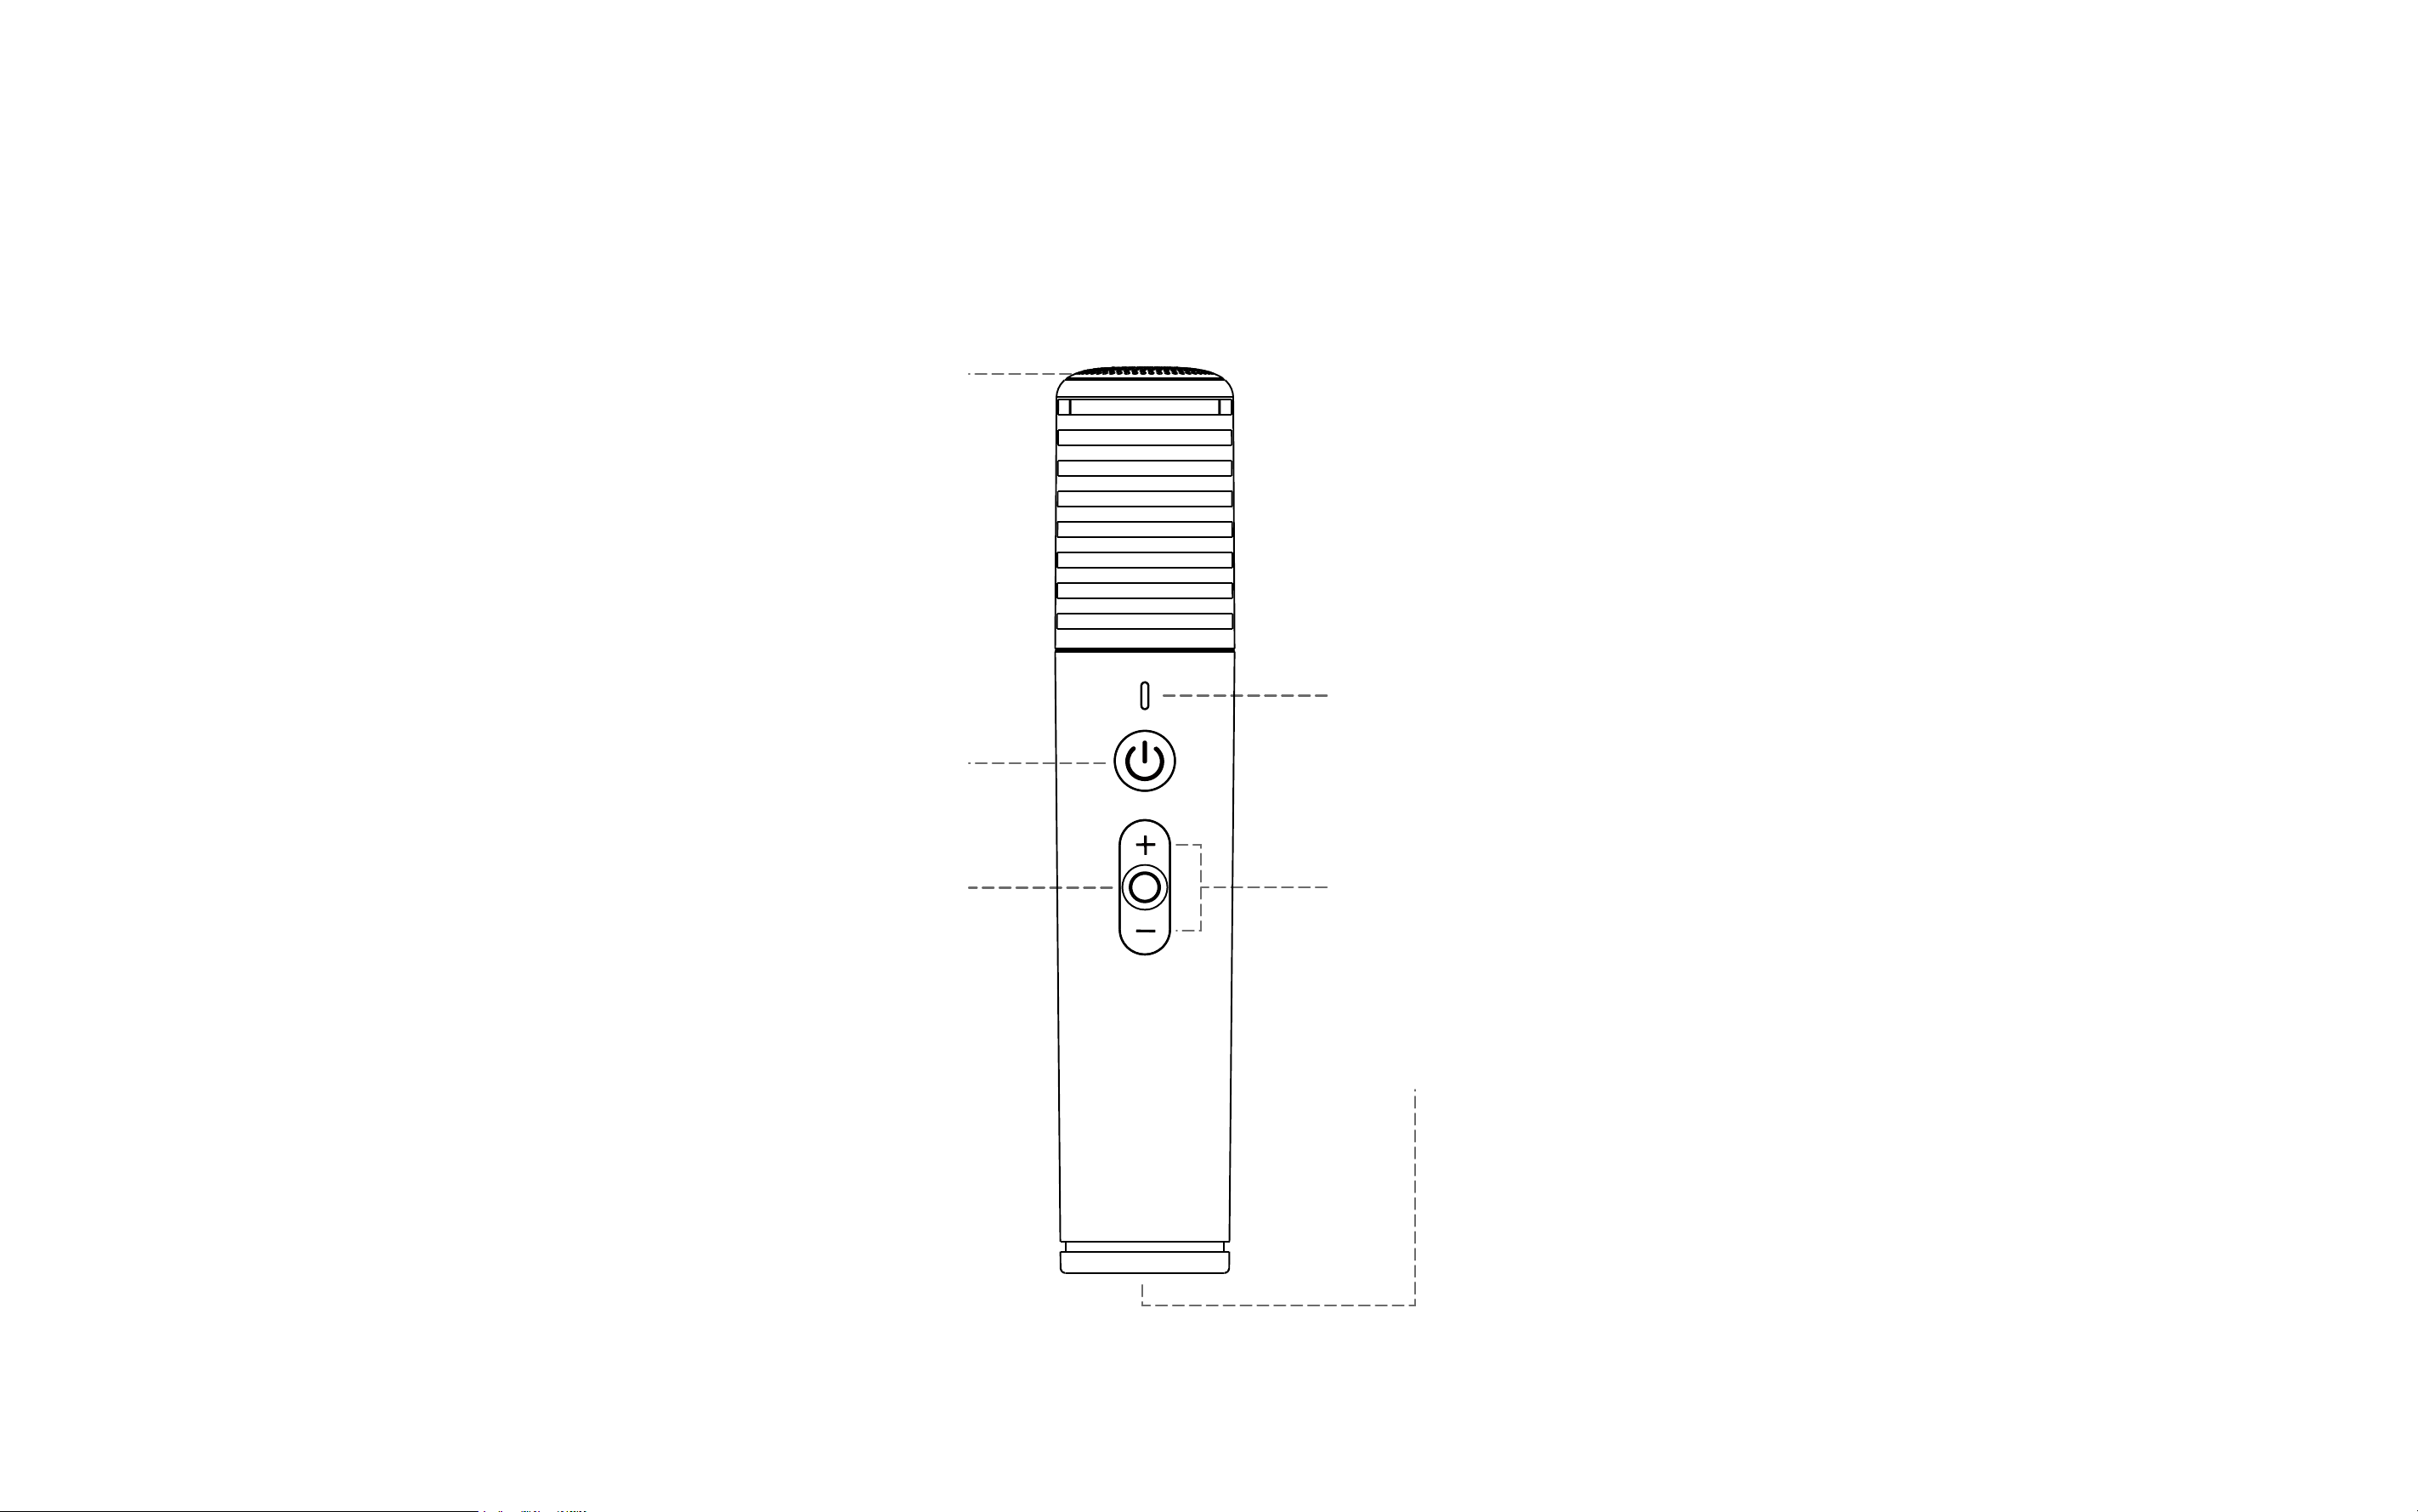
Parts of the Microphones
Microphone
Microphone Wireless Charging Ring
Microphone Volume Control
Microphone Indicator Light
Microphone Power Button
Microphone Play/Pause Button
21
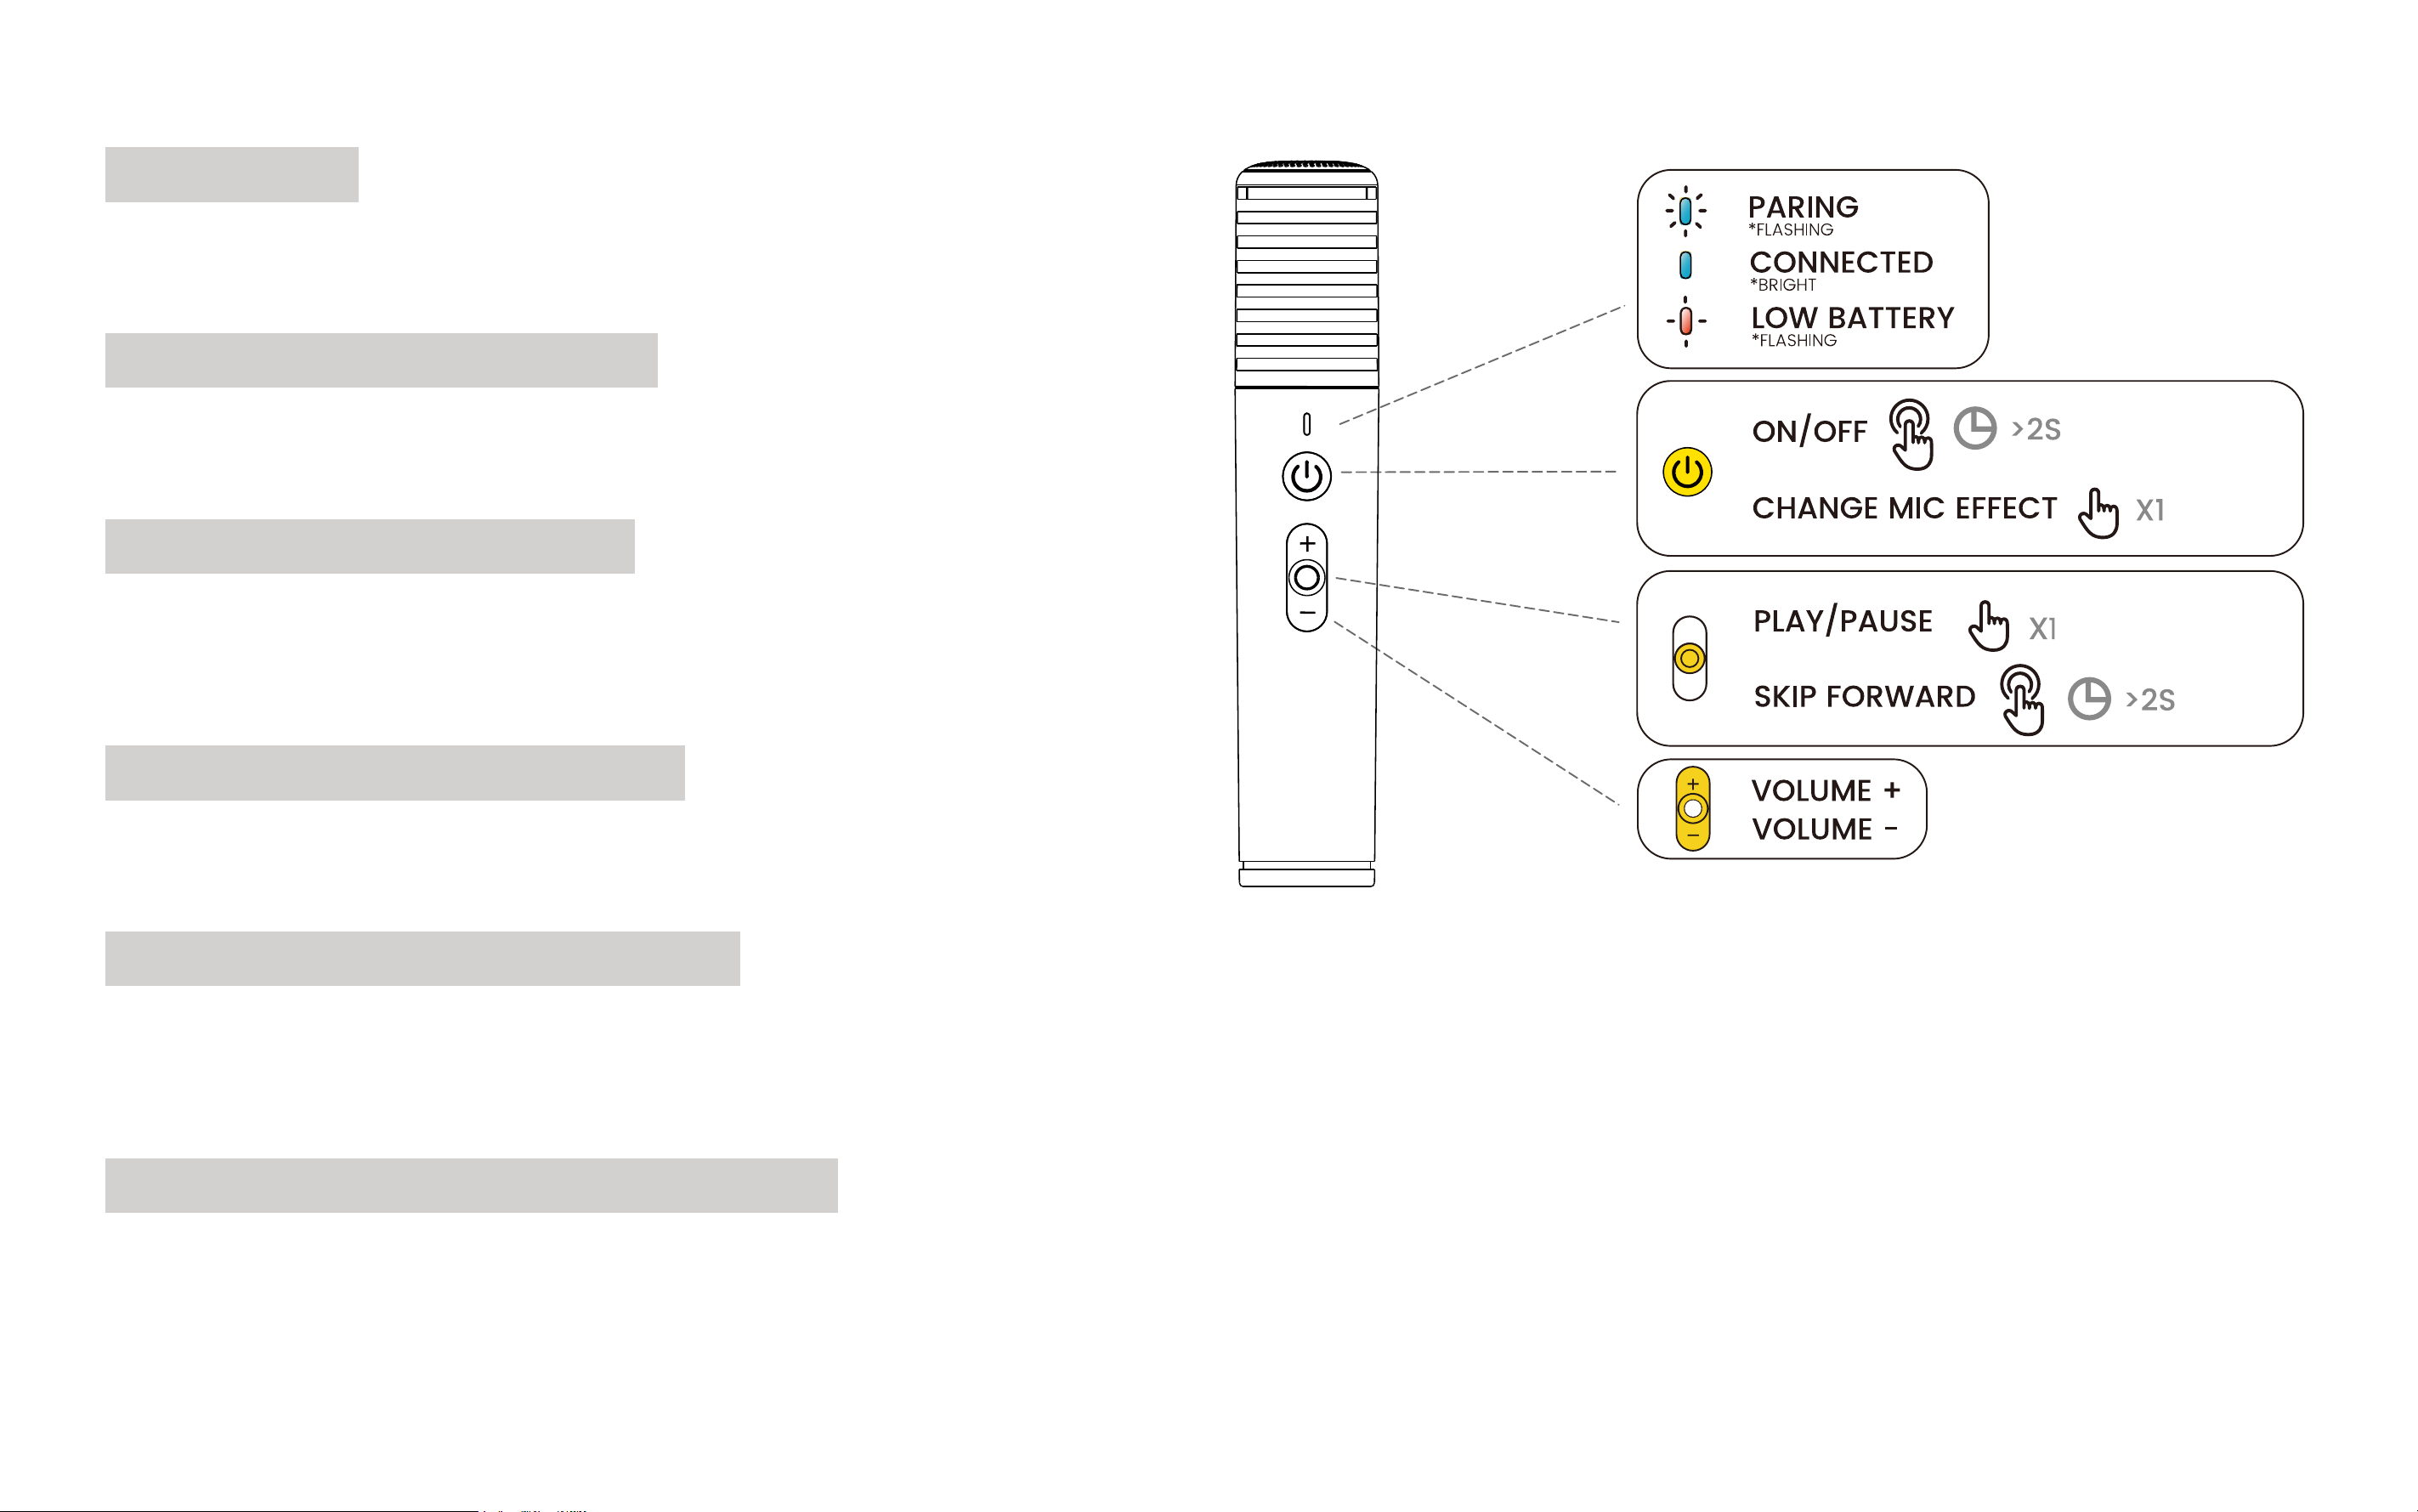
Microphone
Dynamic microphone cartridge for picking up sound signals.
Microphone Indicator Light
Displays various microphone statuses.
Microphone Power Button
Press and hold for 2 seconds to power on/off;
Double-press to quickly switch sound effects.
Microphone Volume Control
Adjust the microphone volume.
Microphone Play/Pause Button
Press once to play/pause audio and video (Bluetooth and Local Media Player).
Press and hold for 2 seconds to skip to the next song
Microphone Wireless Charging Ring
For wireless charging of the microphone.
NOTE: Avoid spilling liquids on the wireless charging ring.
22
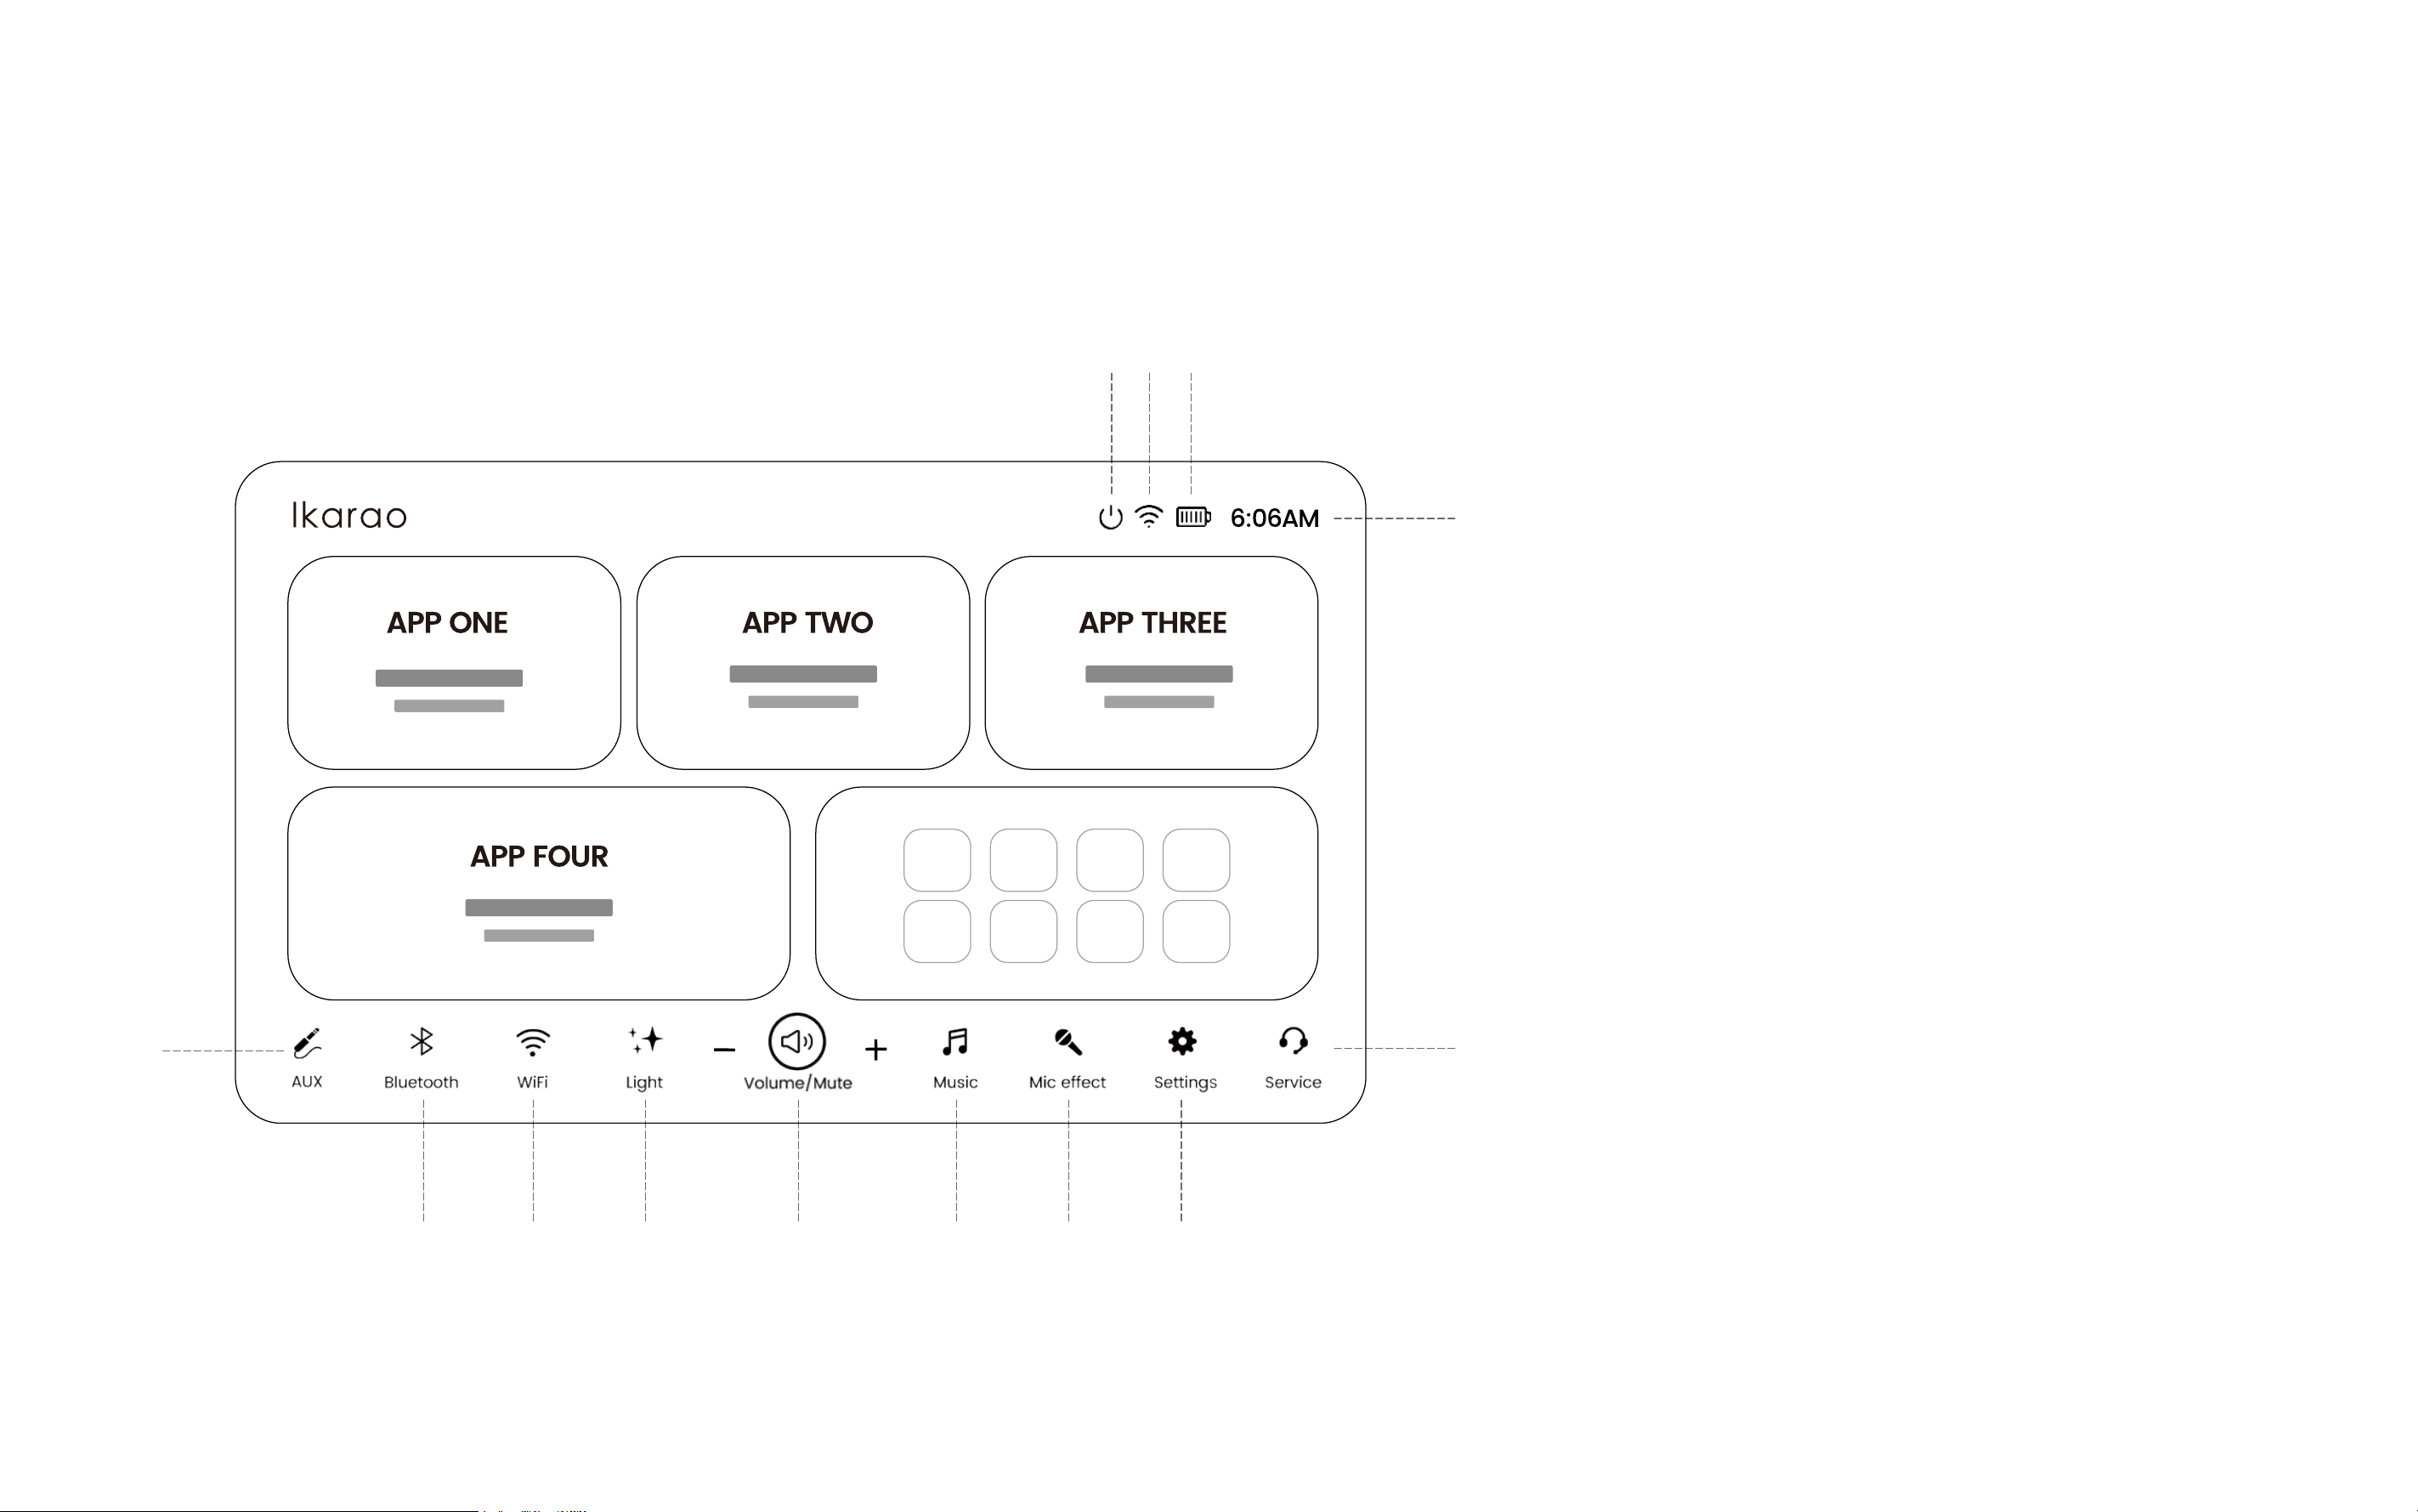
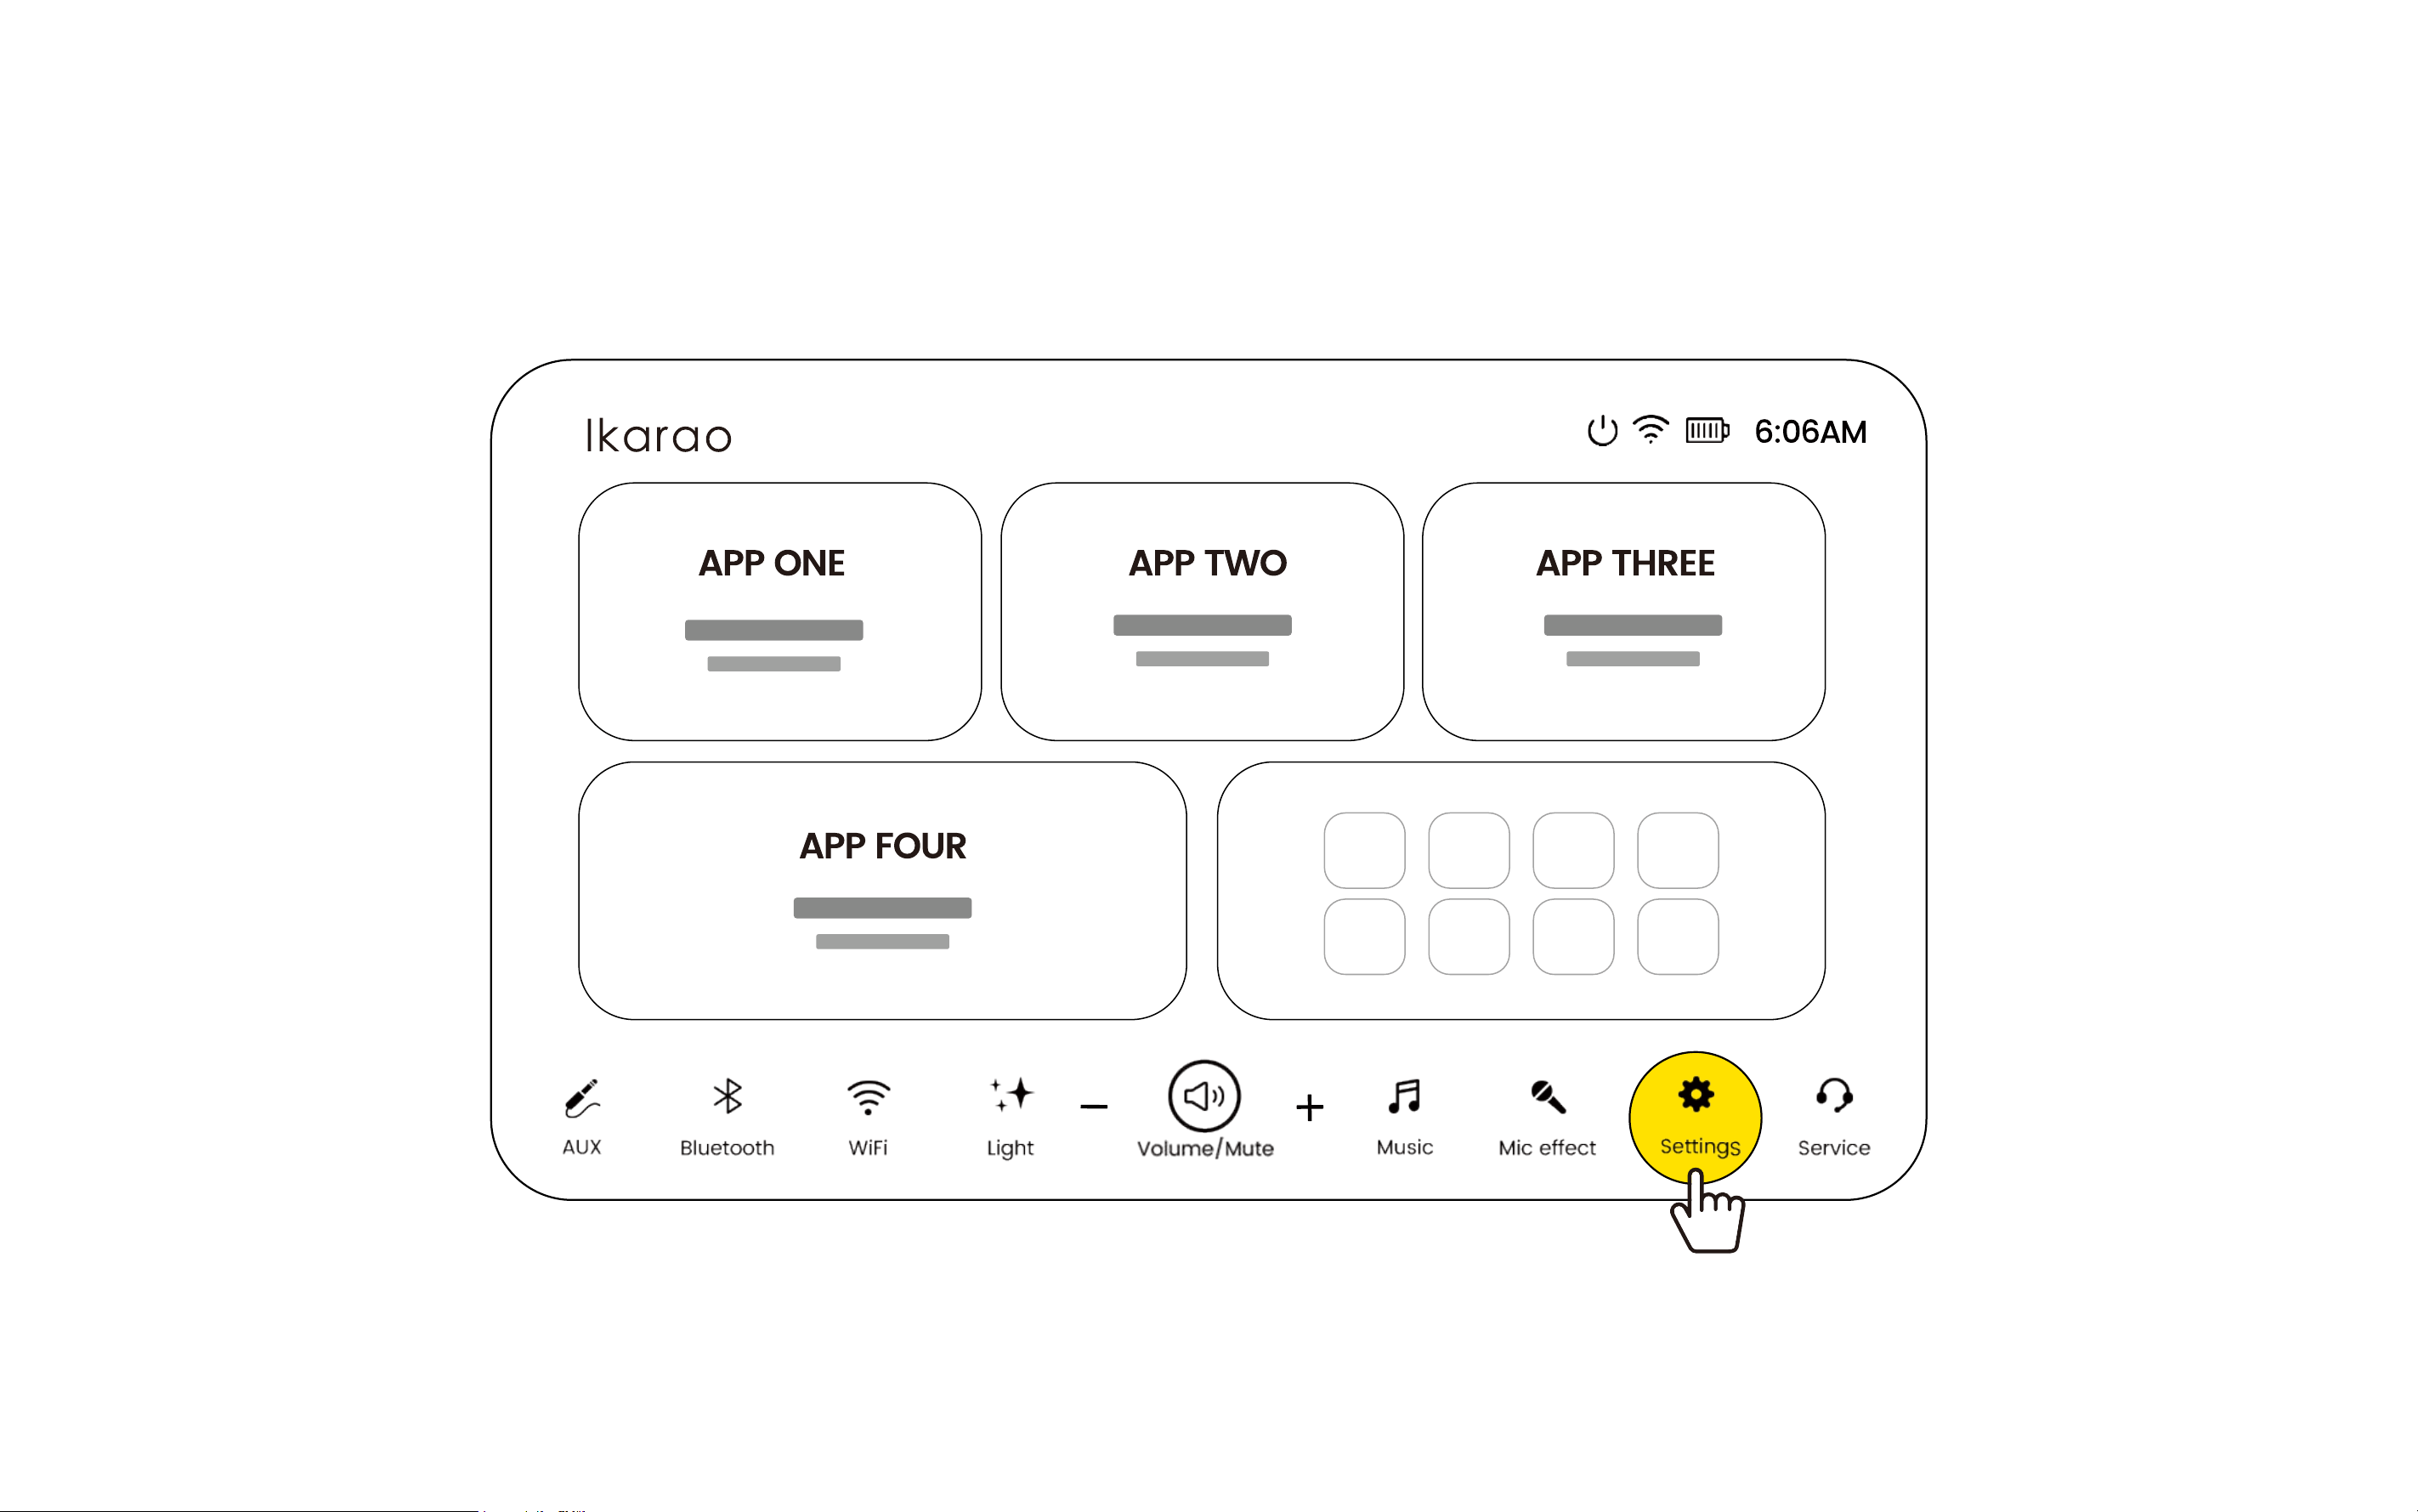
Parts of the Homepage
①
②③④⑤⑥⑦⑧
⑨
⑬
⑩⑪⑫
①
Aux Mode
......................................................... 23
②
Bluetooth
.......................................................... 23
③
WiFi
................................................................ 23
④
Lighting Mode
.................................................. 23
⑤
Volume
............................................................. 23
⑥
Music Effect
..................................................... 24
⑦
Microphone Effect
........................................... 24
⑧
Setting
............................................................... 24
⑨
Ikarao Service
................................................... 24
⑩
Power
................................................................ 25
⑪
WiFi
................................................................ 25
⑫
Battery
............................................................... 25
⑬
Time
.................................................................. 25

23
Aux Mode
Click to enter Aux Mode. You can also access it via the Playback Mode button. Connecting a device to Aux In will automatically switch to the Aux
Mode page.
Bluetooth
Click to enter Bluetooth Mode. You can also access it via the Playback Mode button.
WiFi
Click to enter WiFi settings. You can also access it through the Settings menu.
Light
Click Light to enter light adjustment.
(For light instructions, see Page 13 - Lighting)
Volume
Use the +/- buttons to adjust the speaker volume. Tap the center button to mute. You can also adjust the volume with the volume wheel.
(For volume roller adjustments, see Page 12 - Volume Roller)
24
Music Mode
Click to enter Music Mode to control the speaker's sound effects.
Microphone Effect
Click to enter microphone sound effect adjustment.
Setting
Click to enter settings.
(For detailed settings, refer to Page 32-40 - Settings.)
Ikarao Service
Ikarao after-sales service page. You can scan the QR code or fill out a form to get technical support.
Sound Effect Mode Description.
HiFi Restores the purity of sound, focusing on original details and dynamics.
Light Enhances midrange clarity, suitable for vocal-centric music.
Outdoor Emphasizes bass and treble, effectively increasing loudness for outdoor use.
Bass Boosts low frequencies to energize music, ideal for rhythmic tracks.
25
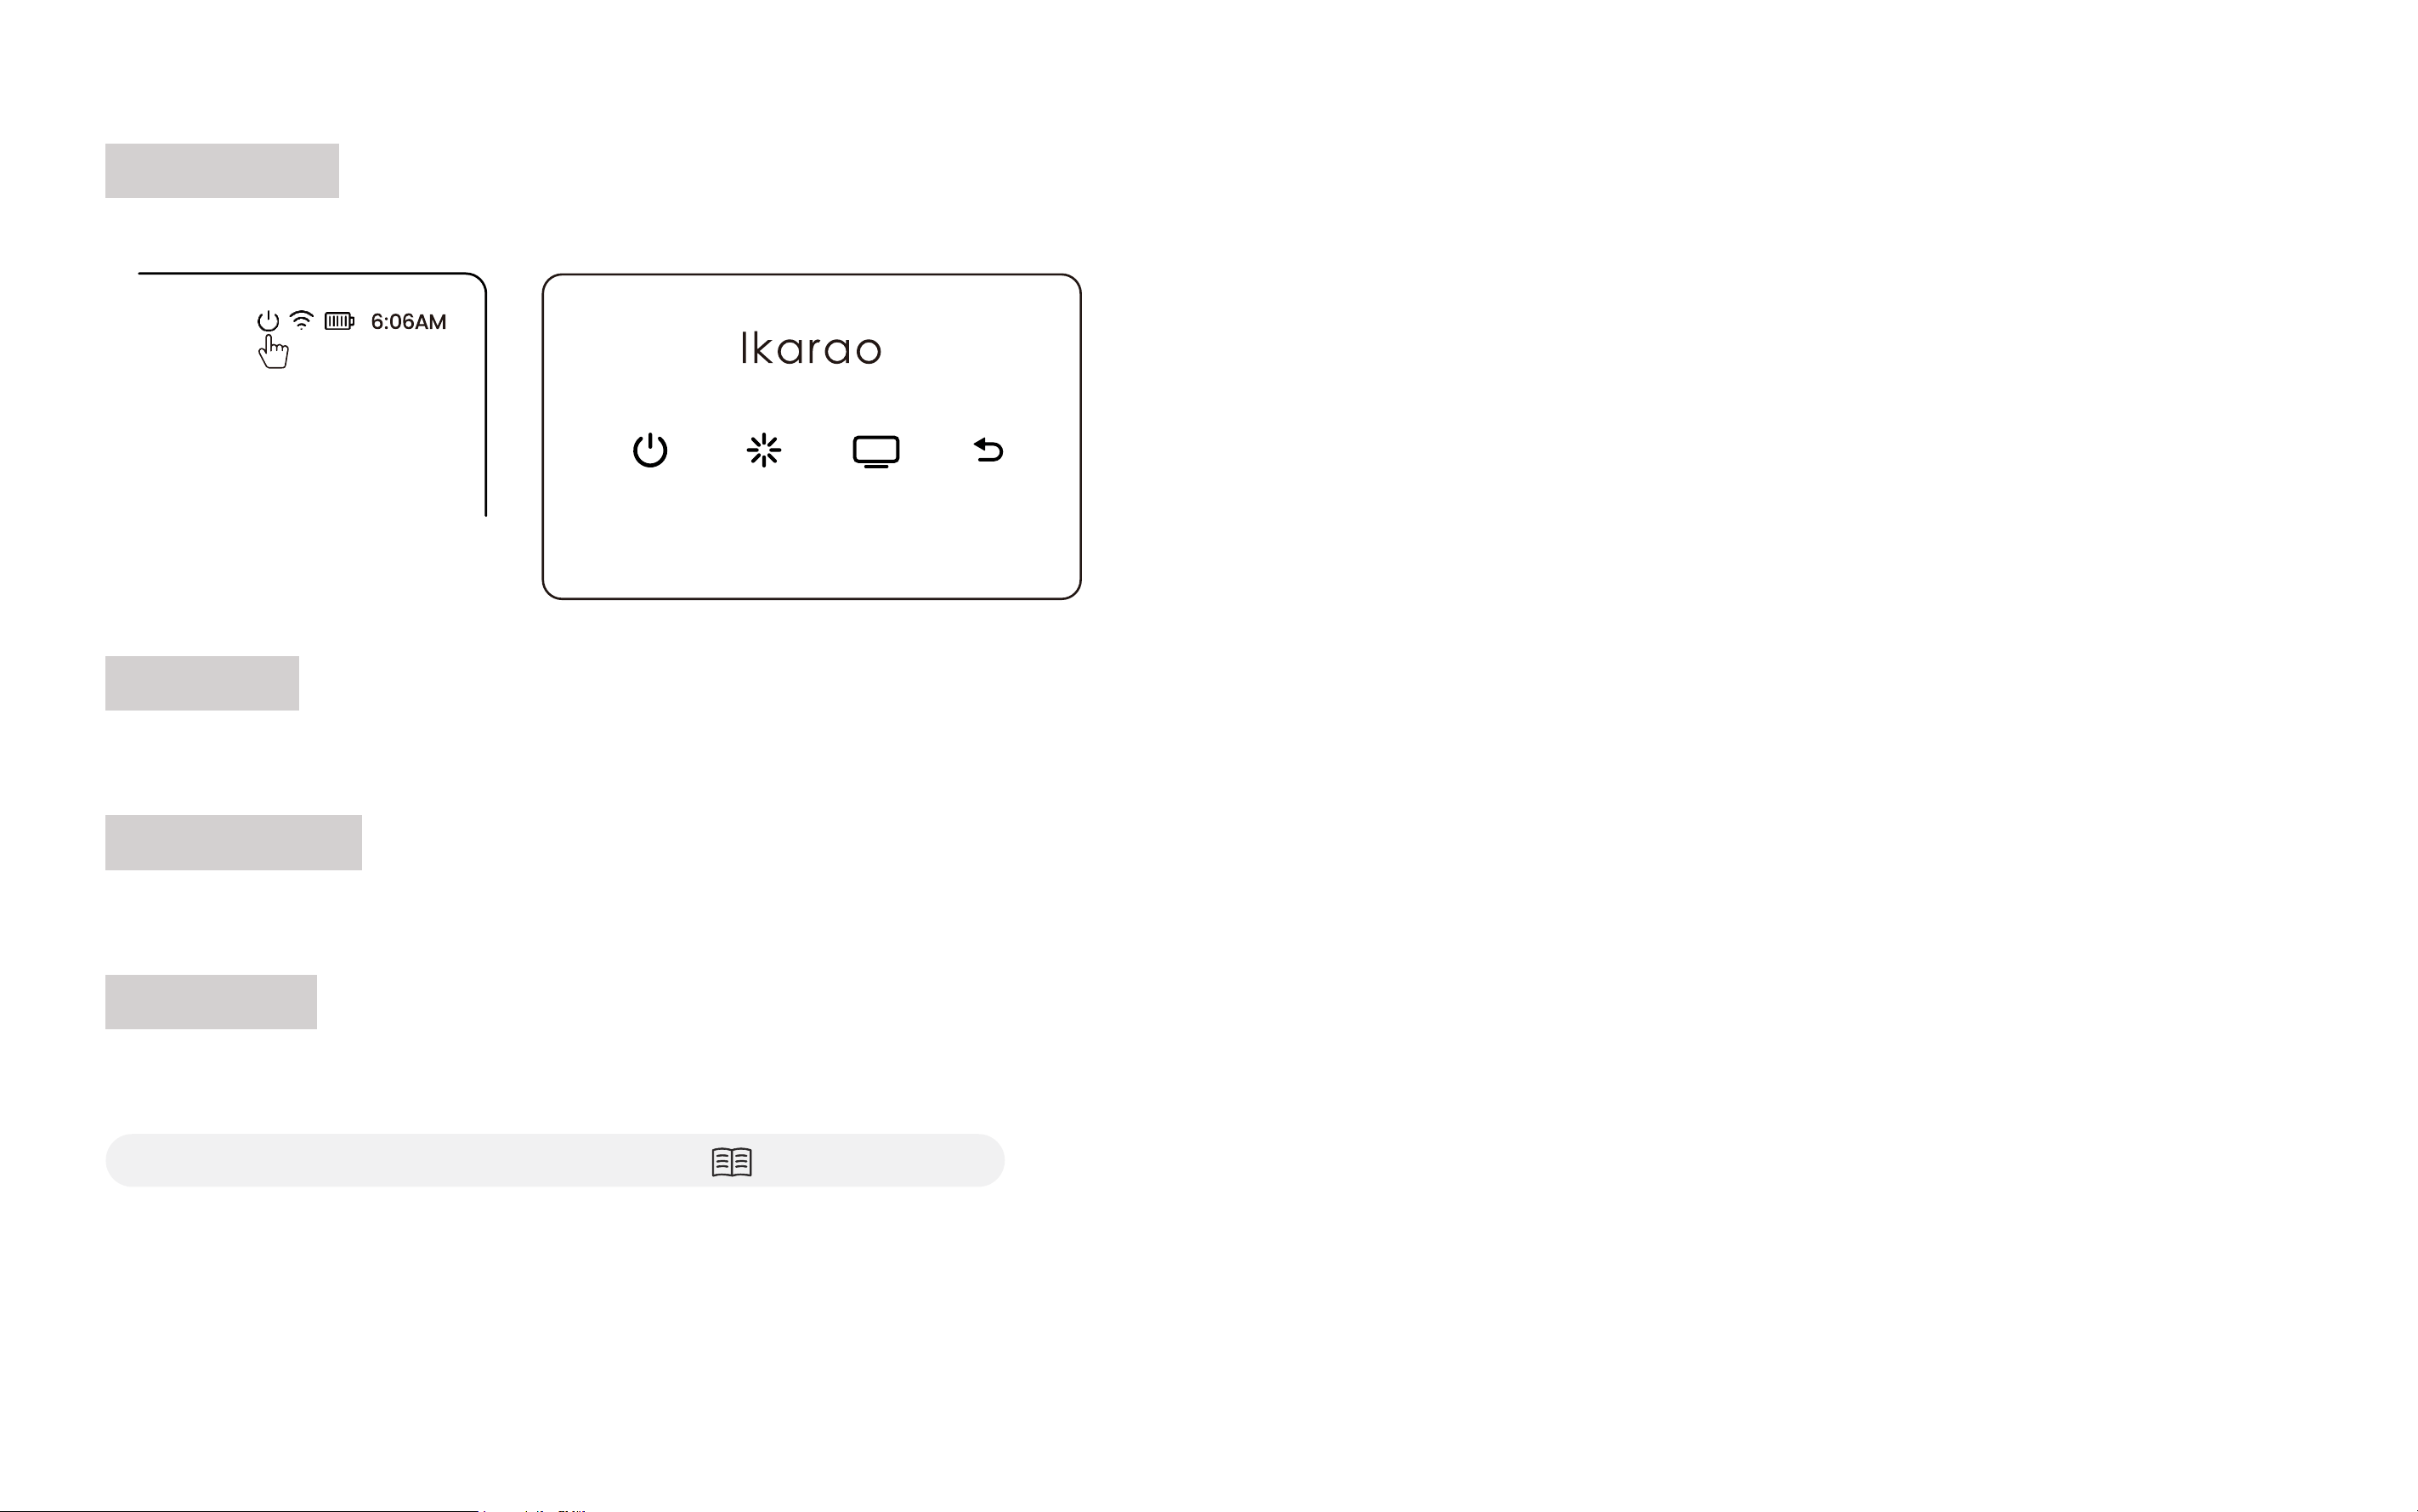
Power Icon
Click the Power icon on the screen to shut down, restart, or turn off the screen.
WiFi Icon
Indicates Wi-Fi is connected.
Battery Icon
Indicates battery status.
Time Icon
Displays the time. For first-time use, the time is automatically set when connected to the internet;
otherwise, configure the time manually.
(For manual time configuration, refer to Page 39 - Time)
Shtdown Reboot Screen Off Exit

First
Steps
02
27
USE Carrying Strap
28
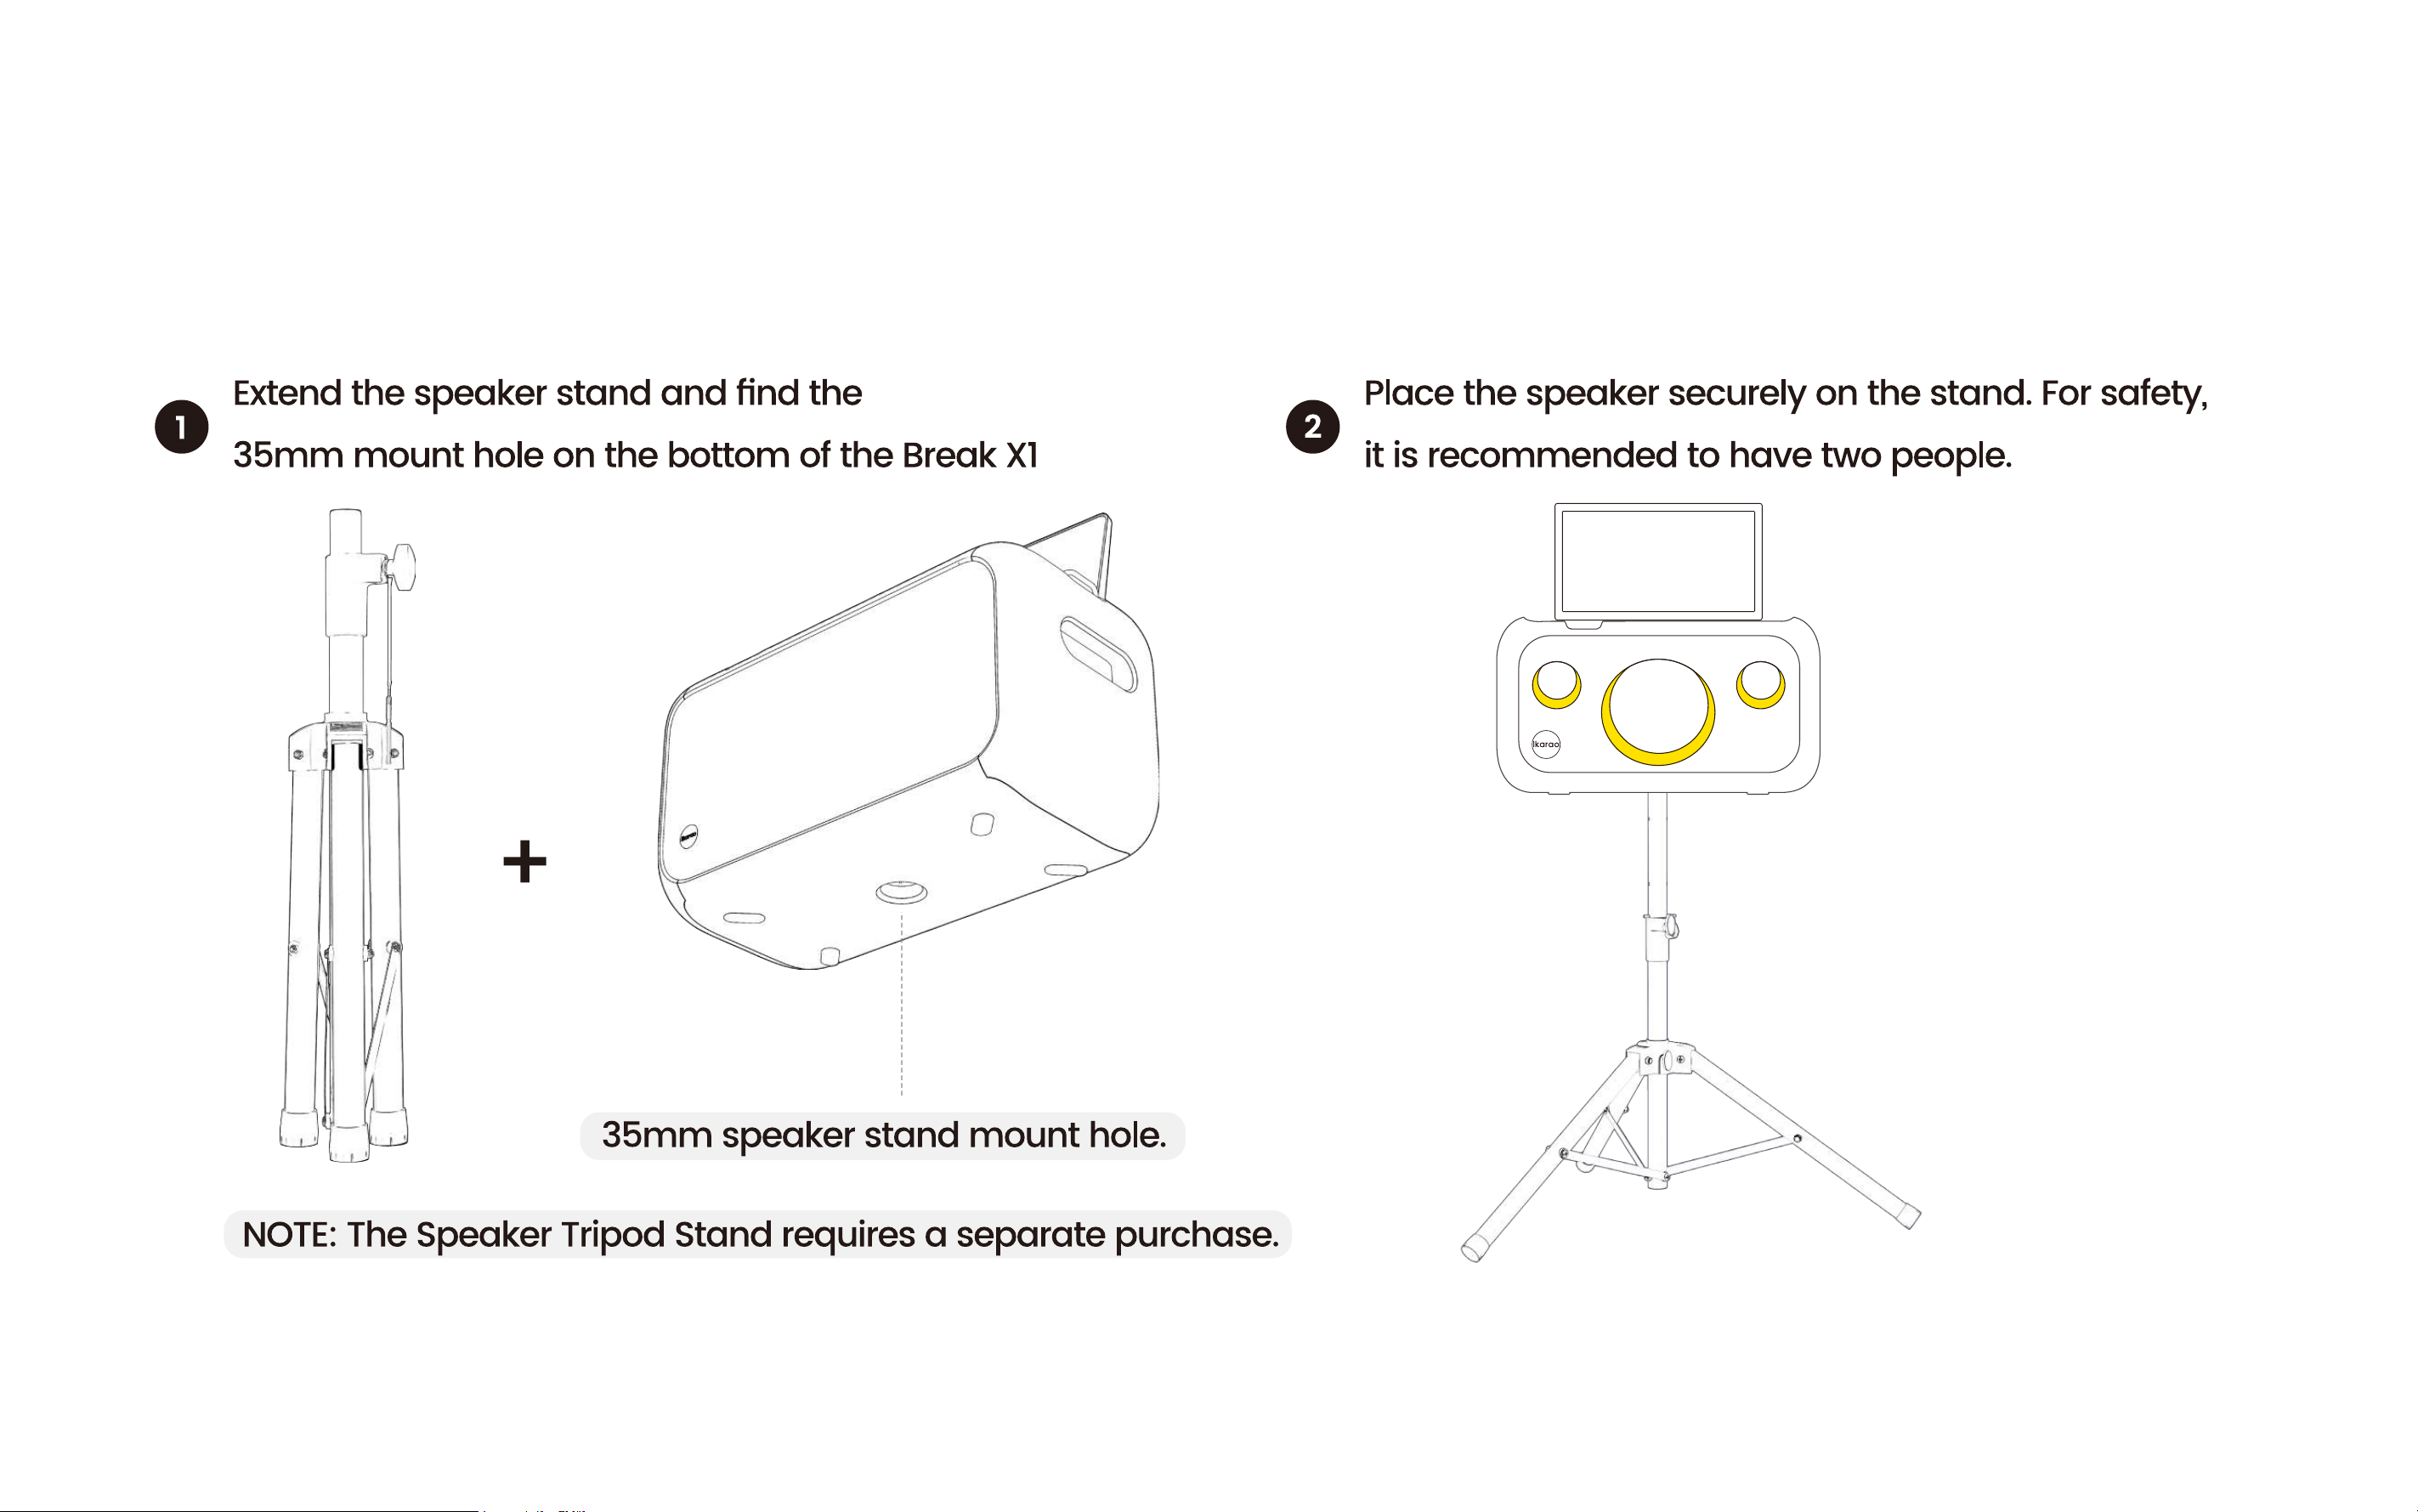
Using the Speaker Stand
29
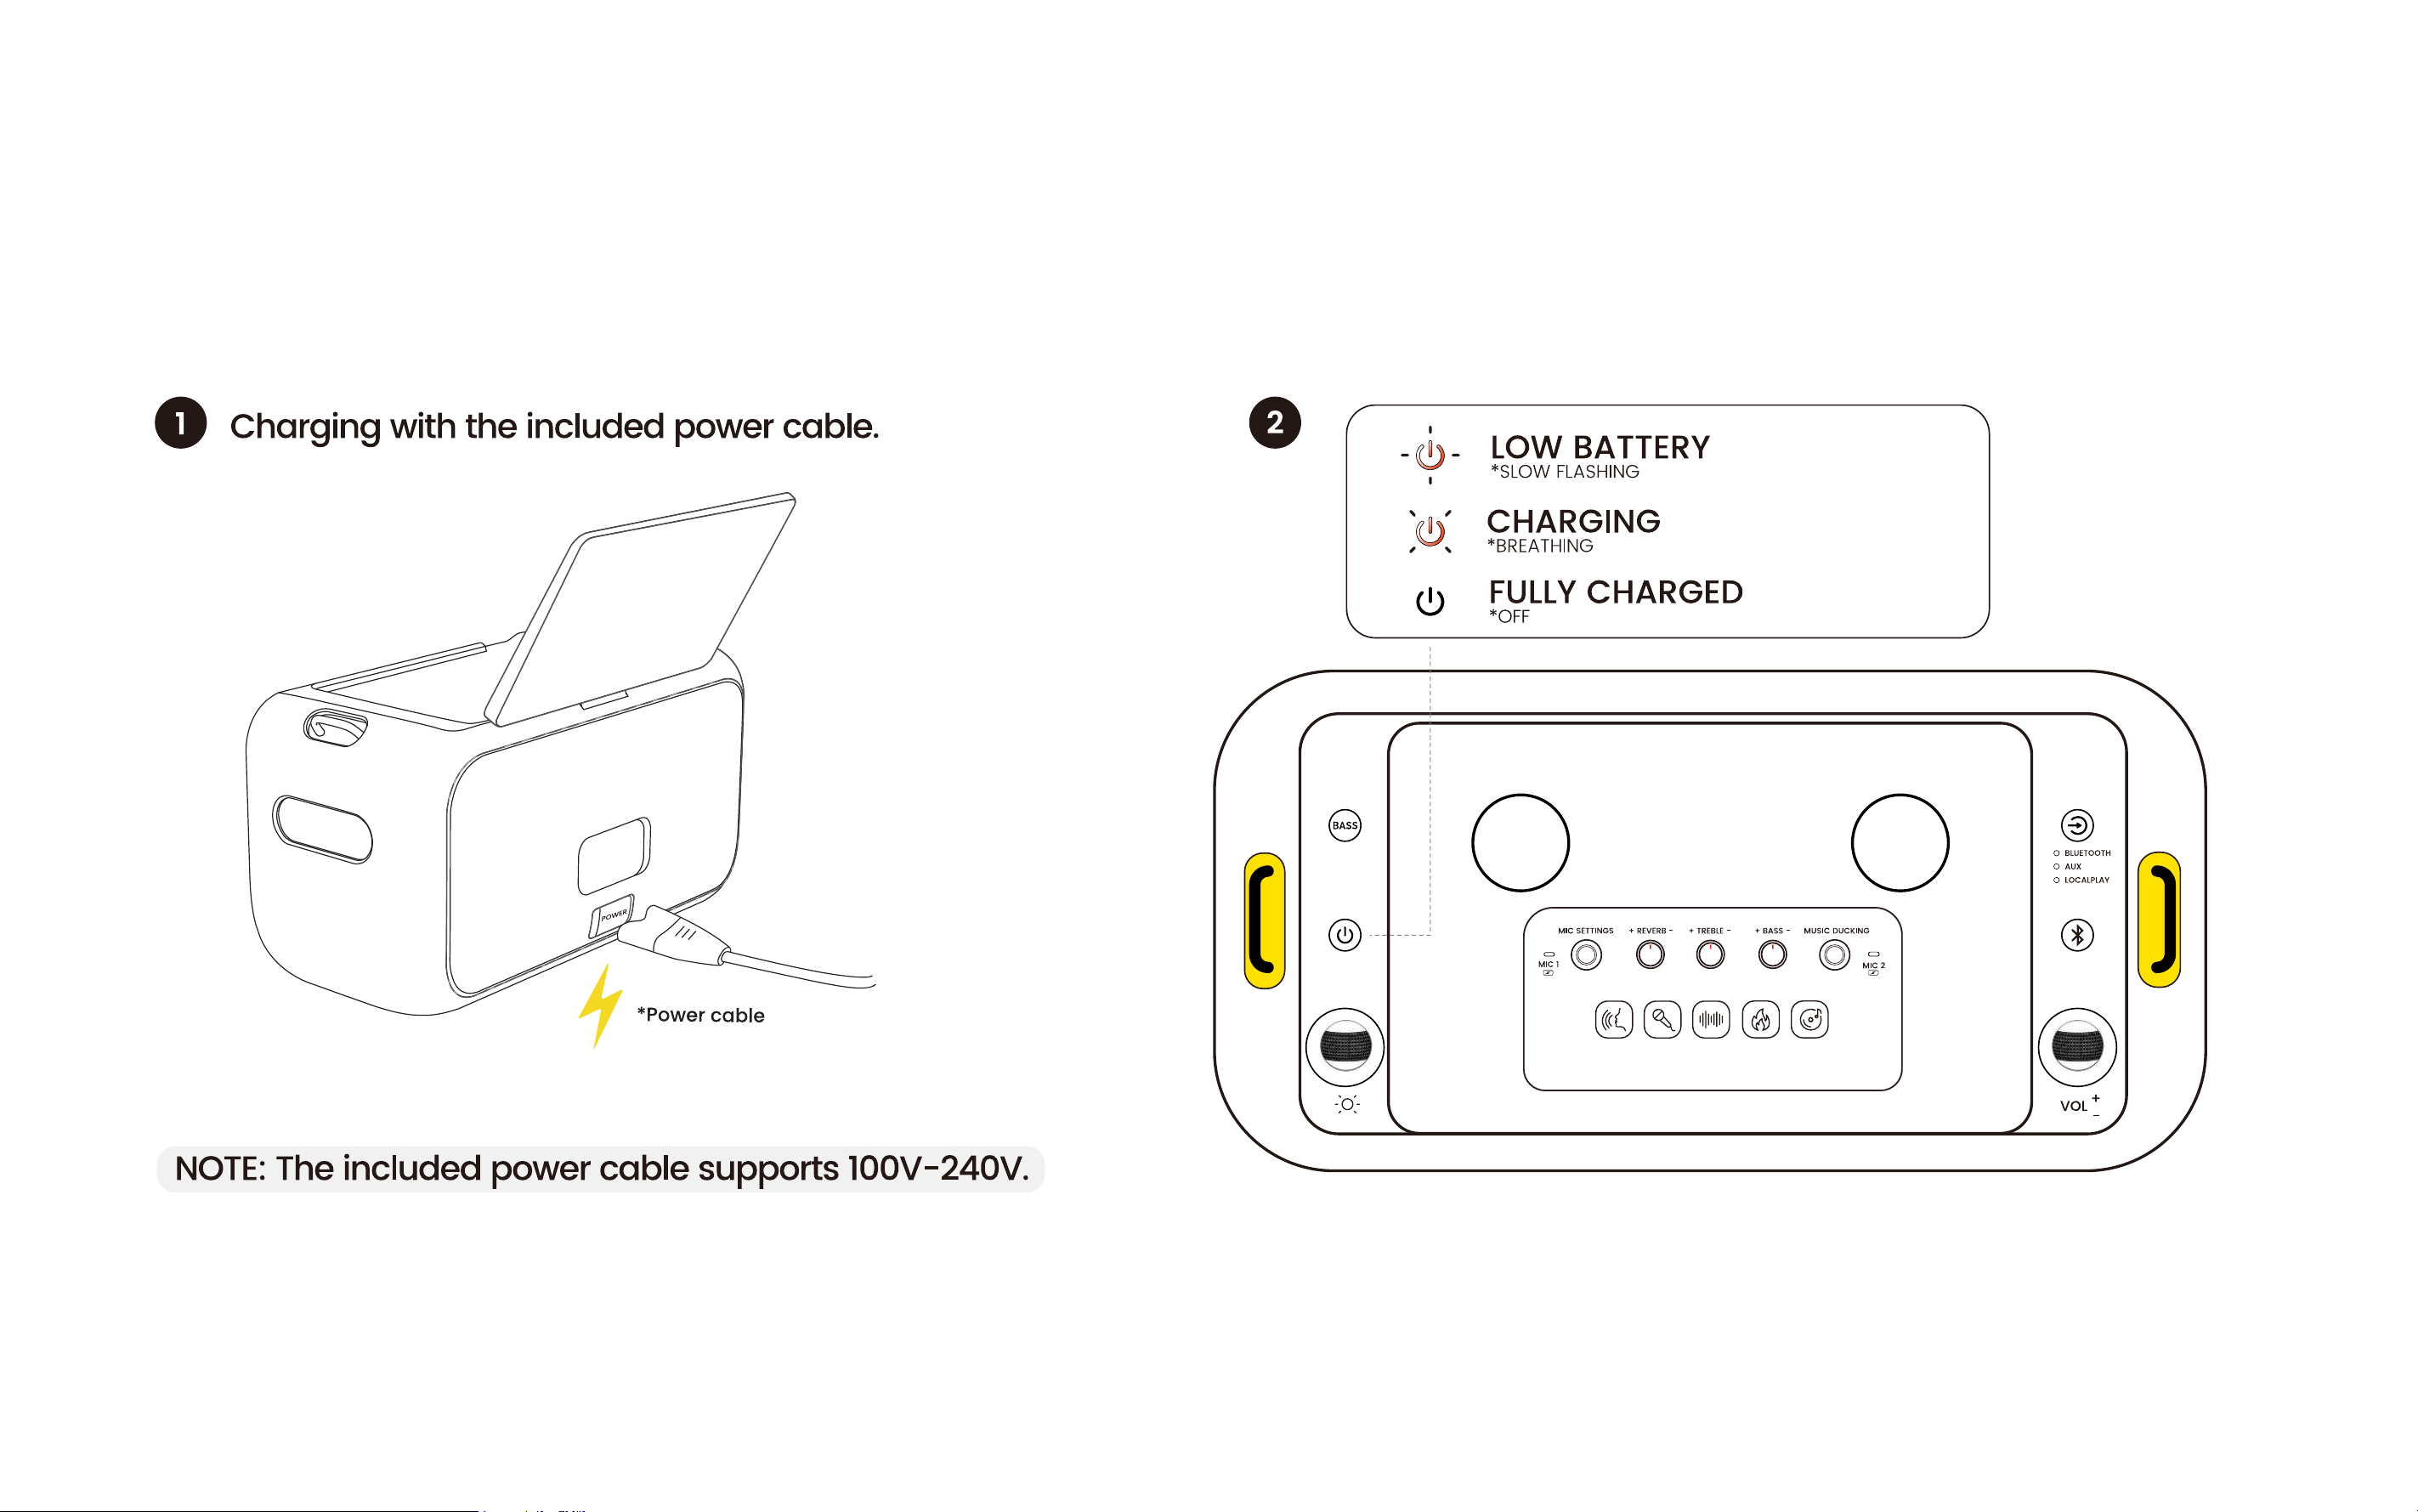
Speaker Charging
30
Microphone Charging
31
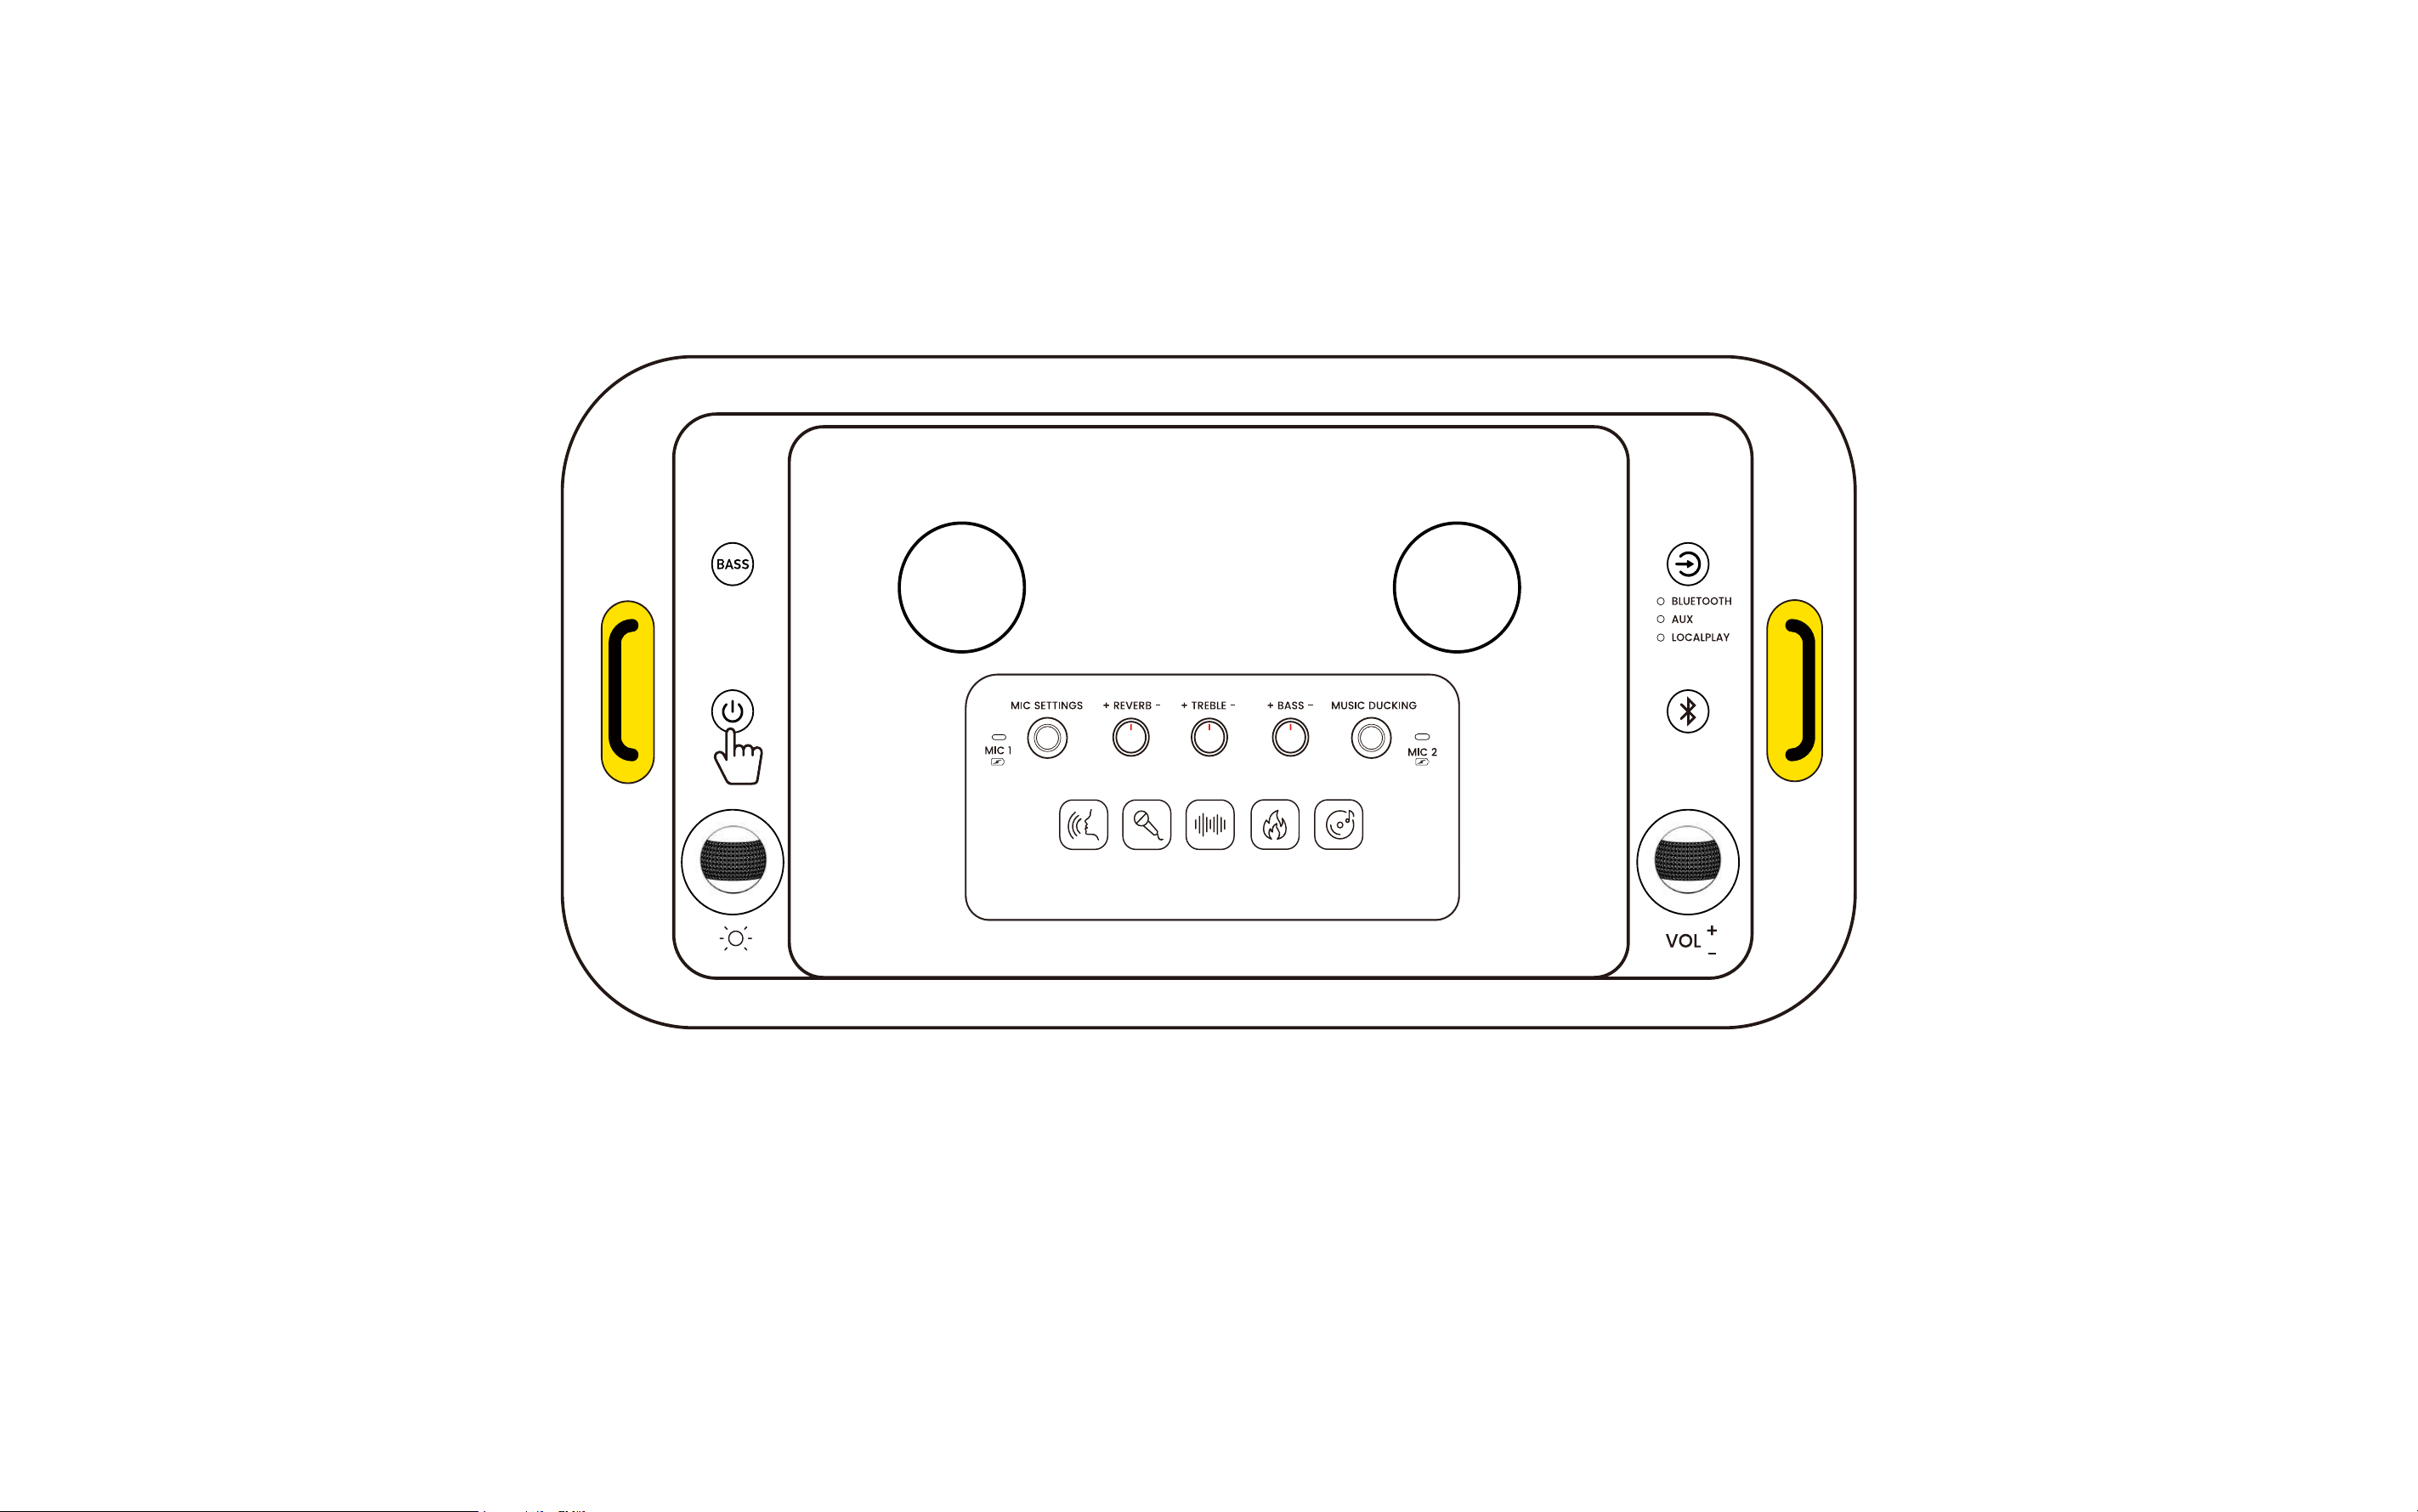
Power On/Off
Press and hold the power button for 3 seconds to turn the device on or off.
When the device is on, single-click the power button to turn the screen off or on.
32
Basic Settings

33
Version Update
Click "Detect New Version" to update the version. To ensure a successful
upgrade, please connect to a power source or ensure the battery is
above 50% before upgrading.
Restore Factory Settings
Click "Restore Factory Settings" to revert to factory settings.
Please Note:
1. This action will erase all user data.
2. After restoring factory settings, the speaker will automatically
restart. The restart process takes about 2-3 minutes. Please keep
the speaker connected to a power source, do not perform any
operations, and wait patiently for the speaker to complete the
startup process.
Brand Name
Displays the product name - Ikarao
Model Name
Displays the model of the device
Serial Number
The unique identifier for Ikarao products
App Version
The current system version
Device Version
The current device version
About

34
Brightness
Drag the slider left or right to adjust the screen brightness.
Key Brightness
Drag the slider left or right to adjust the backlight brightness of the keys.
Sleep Time
Select the number of minutes of inactivity after which the device will automatically shut down.
Display

35
Tone Volume
To control the volume of the prompt tone
Wireless Mic Volume
Indicates the connection status and volume of the wireless microphone
Mic Mode
Microphone mode switch
Sound
36
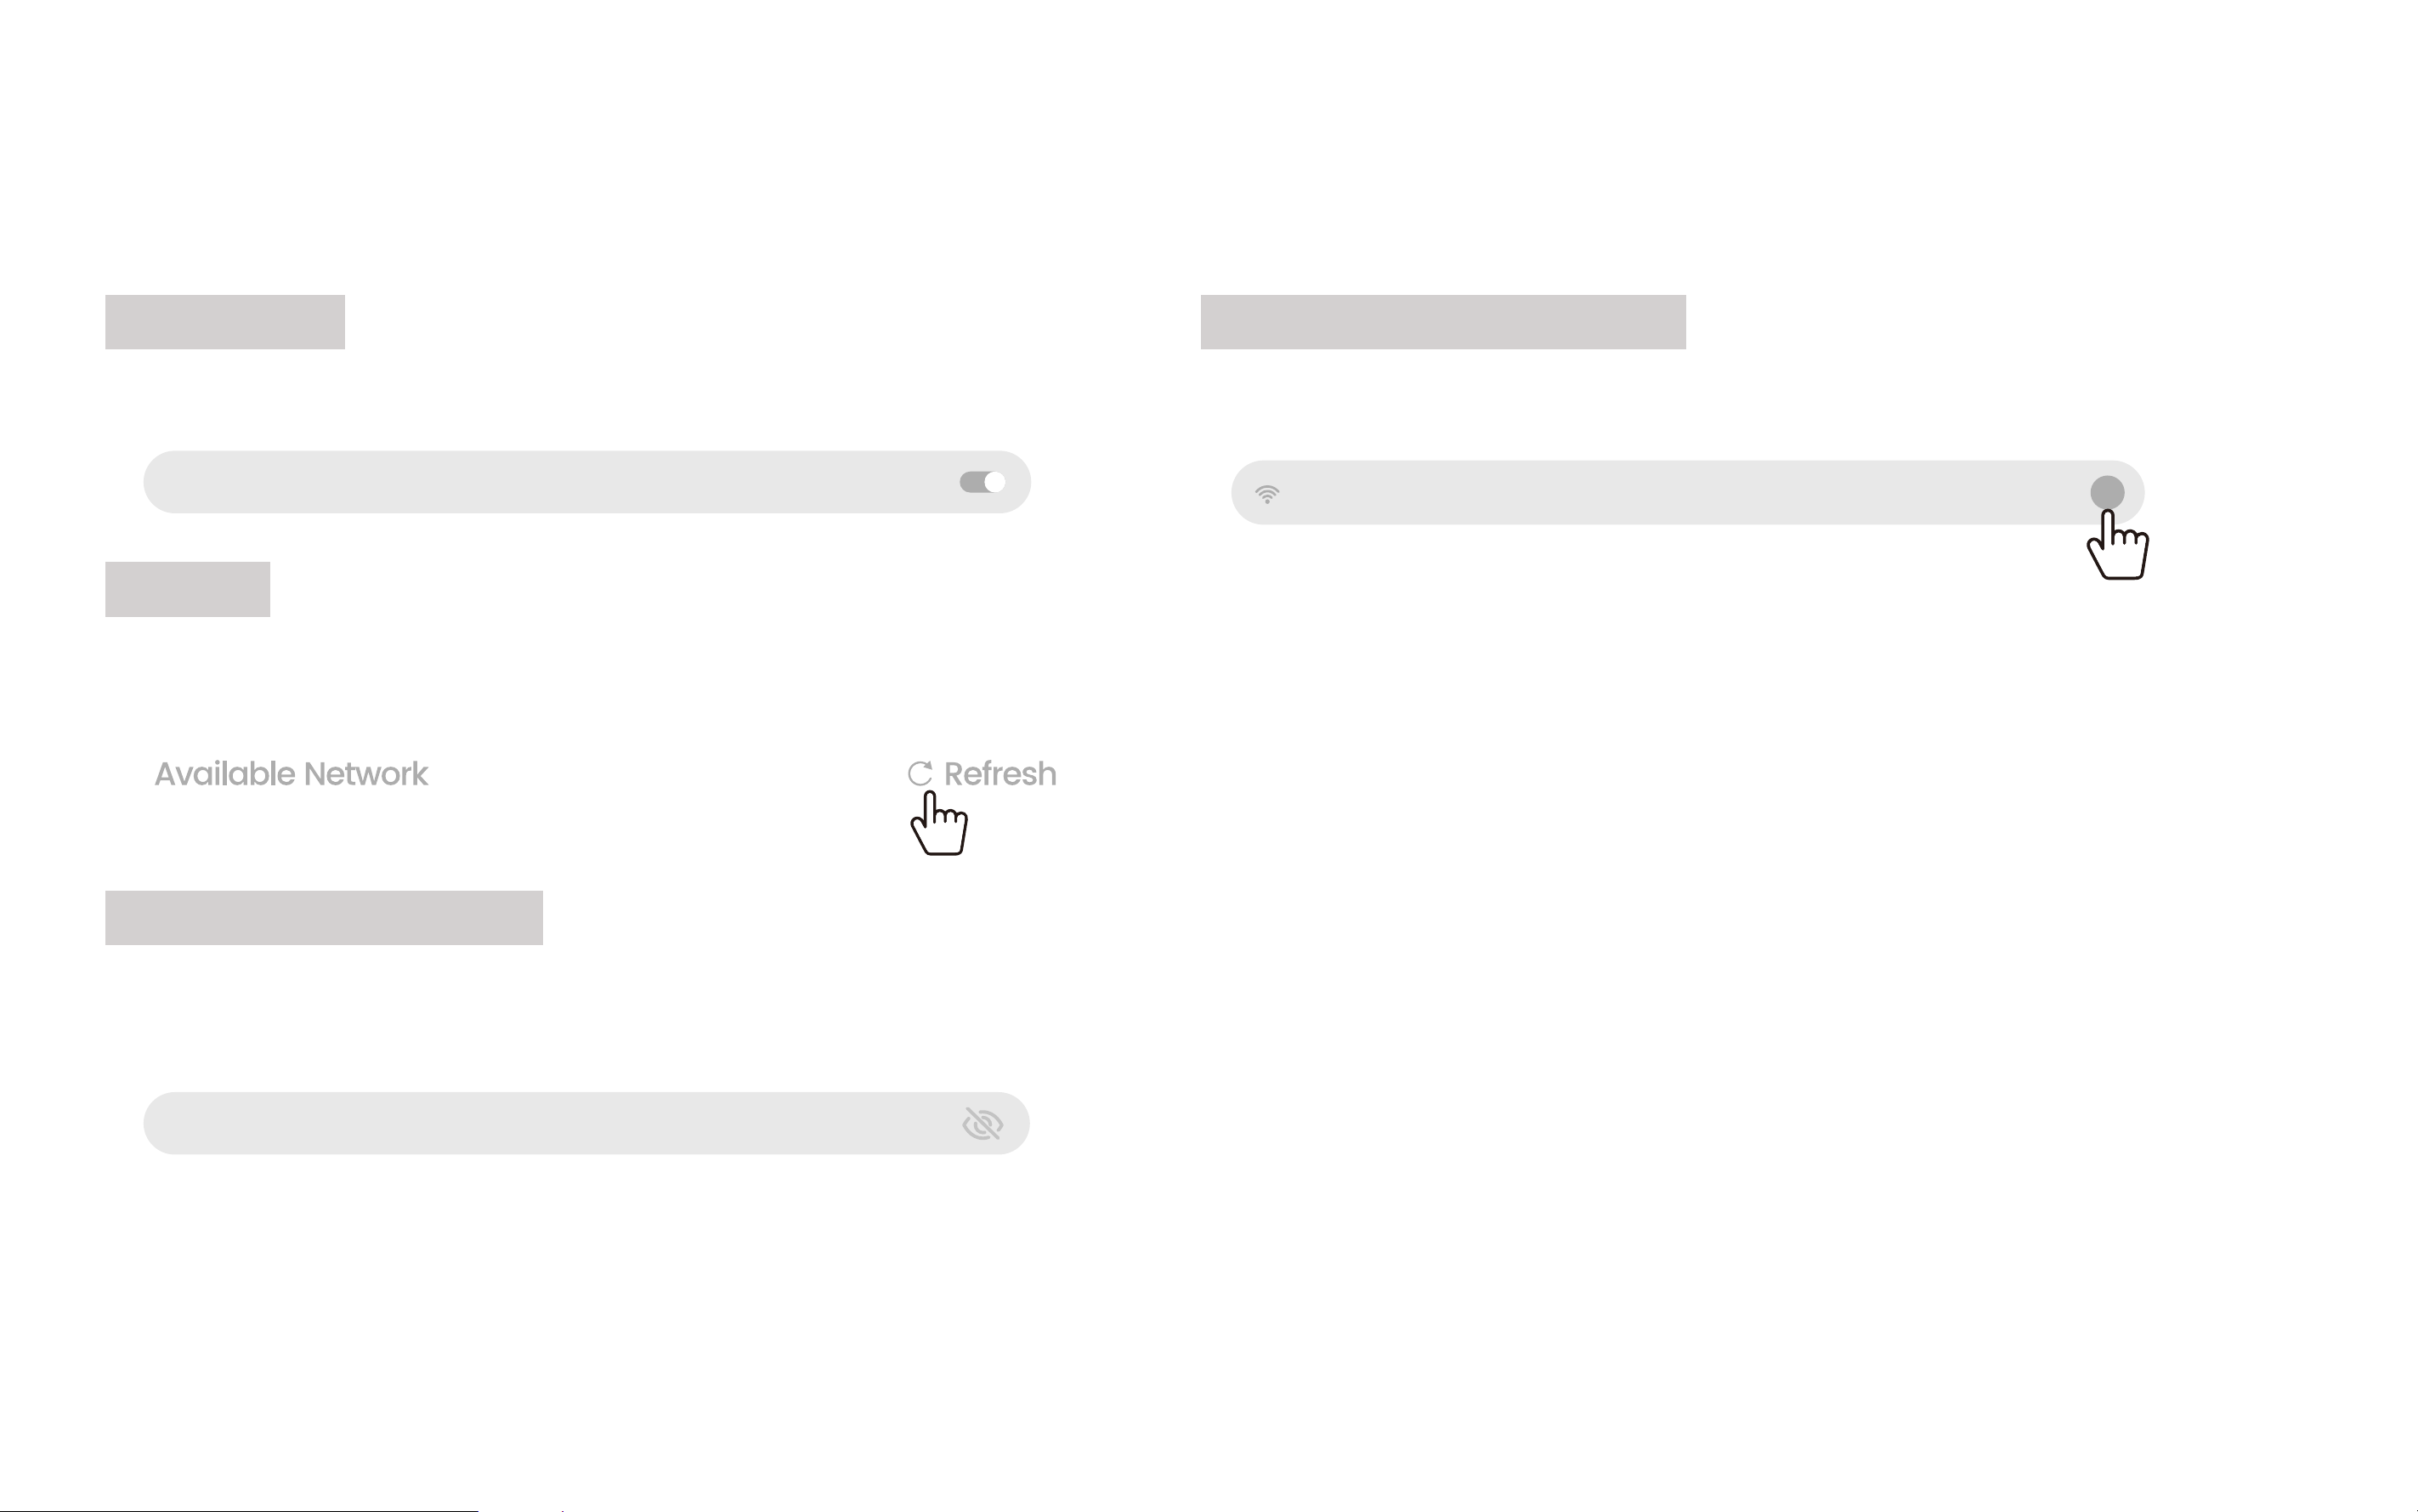
WiFi Switch
Click the button to turn the WiFi on or off.
Refresh
If your WiFi name is not found, click Refresh to update the available
network list.
Enter Wi-Fi Password
1. Wi-Fi Password Display, Displays the entered Wi-Fi password.
2. Connects to the selected Wi-Fi network.
WiFi
WLAN
WiFi Enter WiFi password.
Wi-Fi Basic Information
Displays basic information about the current Wi-Fi connection.
1. Connection Speed
Shows the maximum bandwidth of the connected Wi-Fi.
2. Signal Frequency
Indicates the frequency band of the current Wi-Fi.
3. Security
Indicates the encryption protocol of the current Wi-Fi.
4. IP Address
Displays the IP address of the current Wi-Fi.
WiFi
i

37
Storage
Displays the current used storage and total storage.
Storage Control
Cleanup Acceleration
Cache **MB indicates the storage space occupied by the current cache.
One-Click Cleaning clears the cache with one click.
USB Drive
If you insert an external storage device, the used capacity/available capacity of the external storage device will be displayed here.
Storage
Cache xx.xxMB
Storage Control
One-Click Cleaning
38
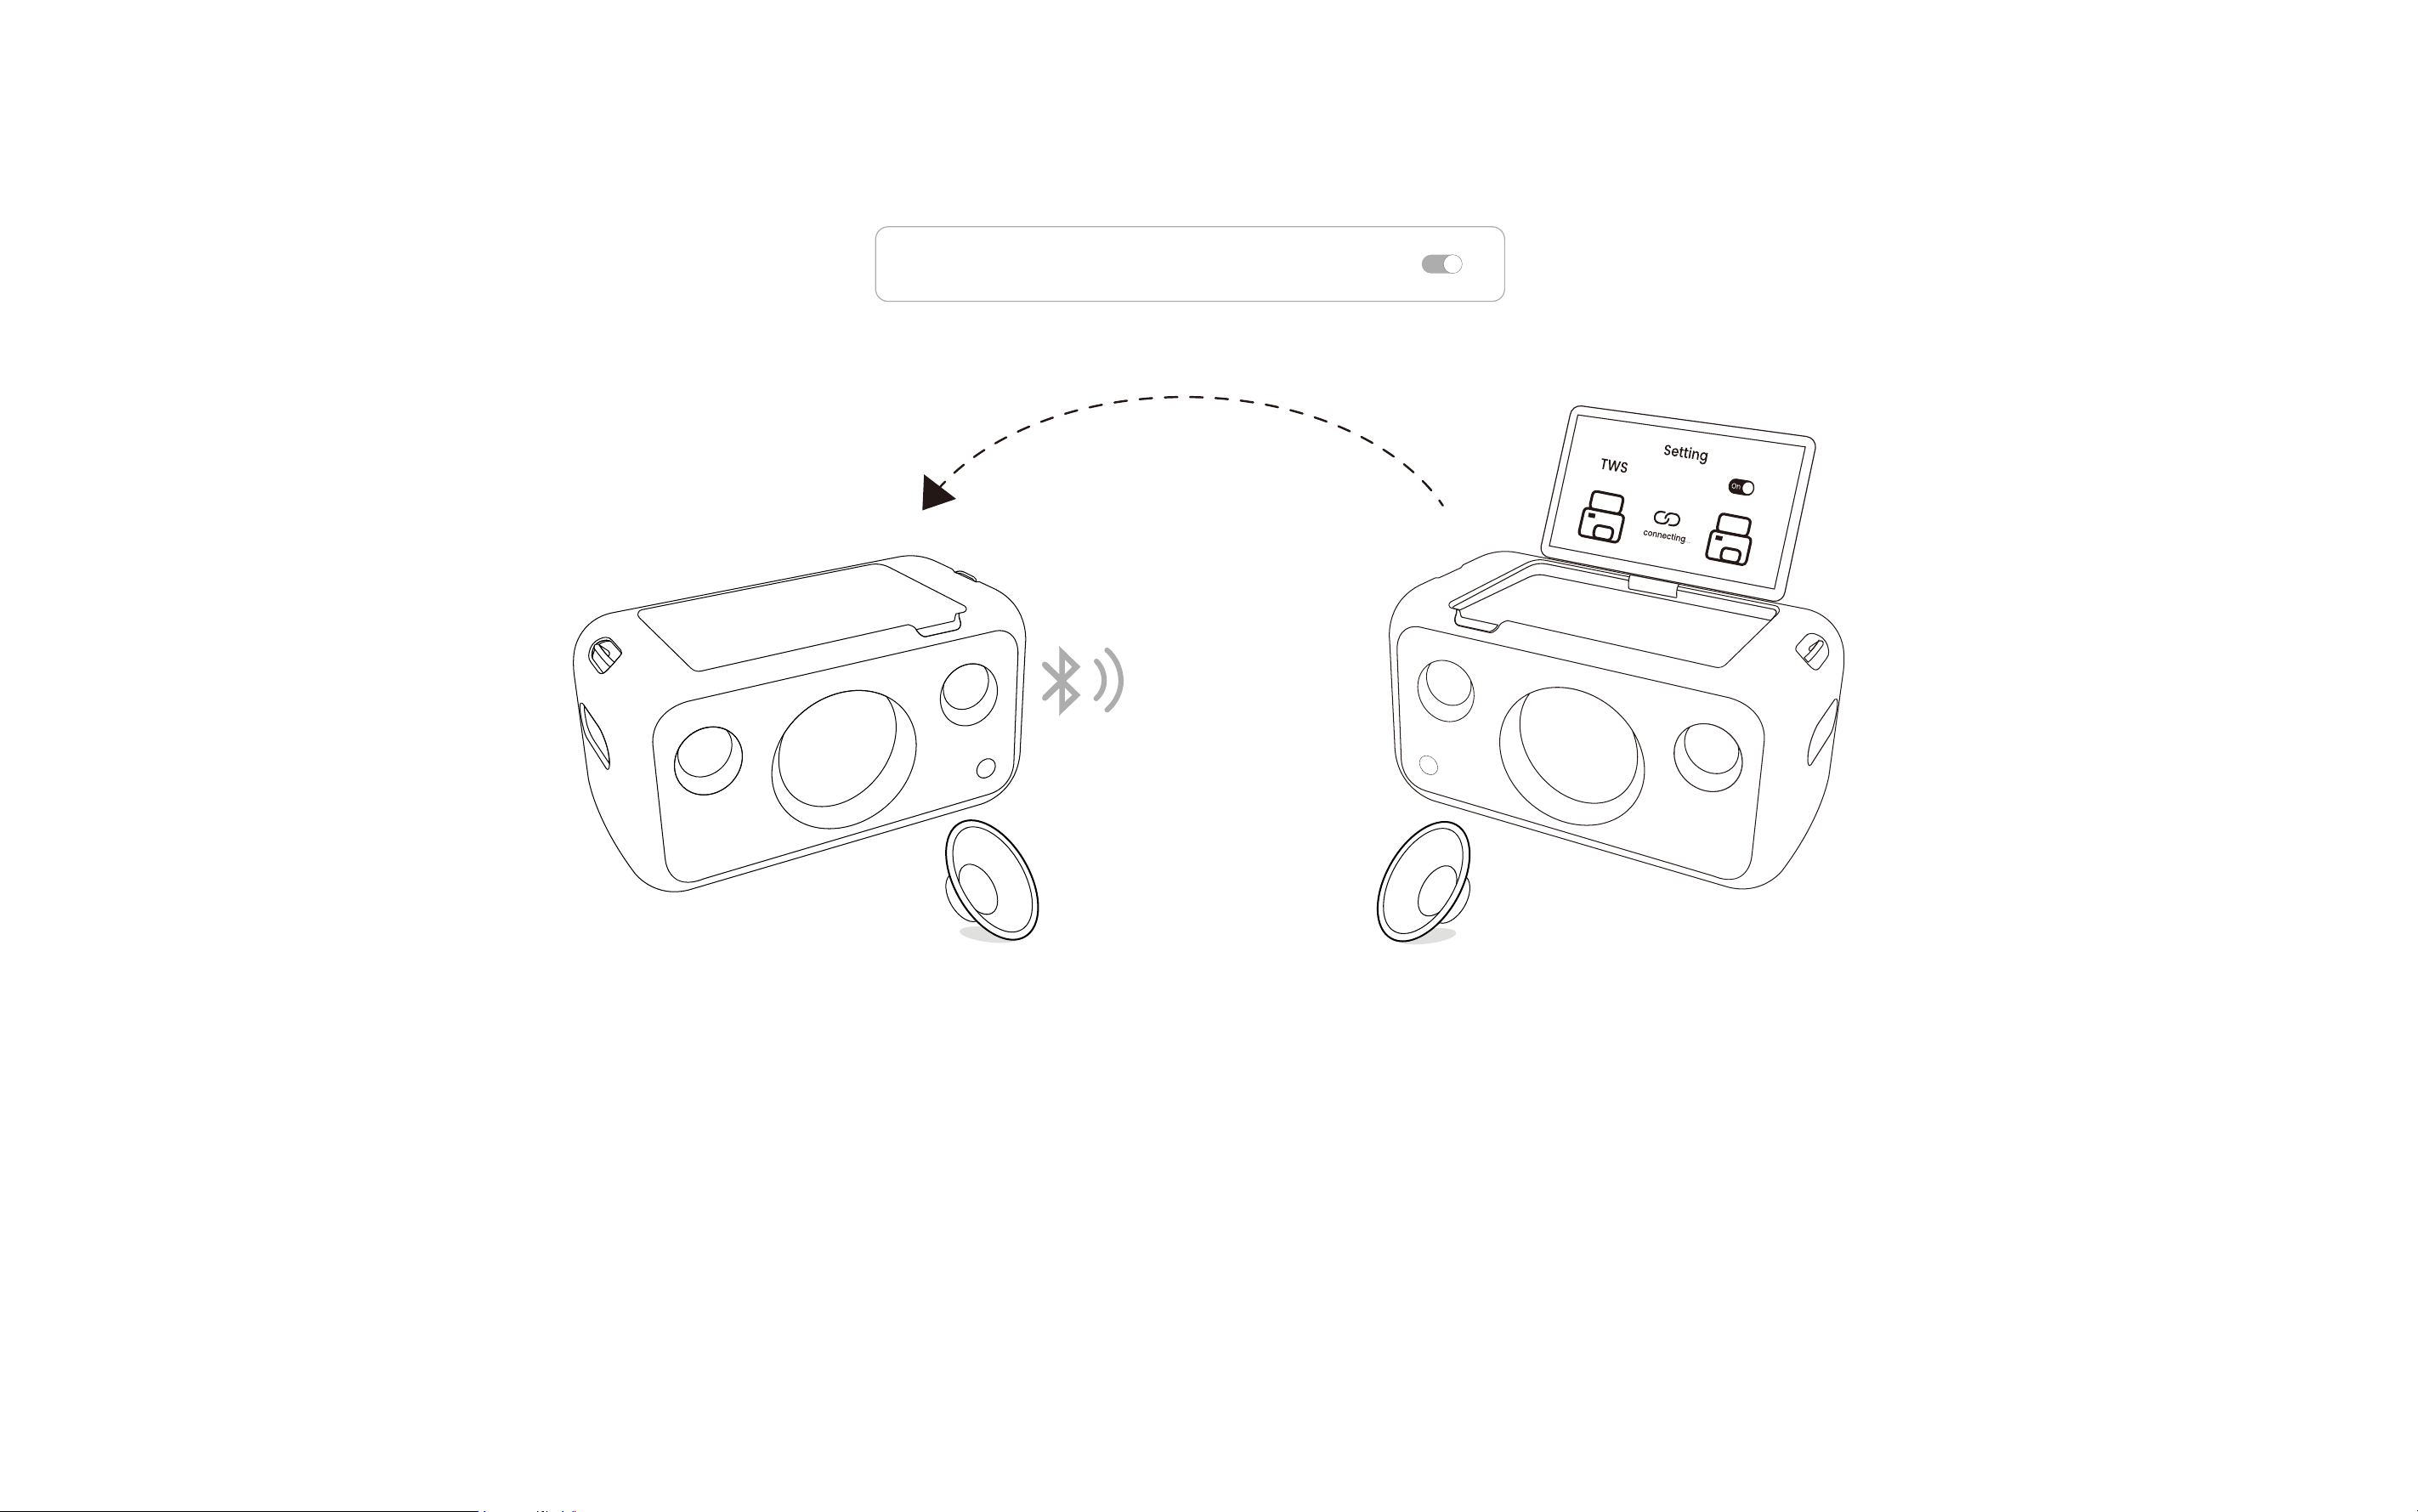
You can wirelessly connect two Break X1 speakers or pair a Break X1 with a Break X1 for stereo sound.
1. Activate TWS on the main speaker by tapping the TWS symbol in Settings, then select Open TWS.
2. Turn on the TWS switch on the second speaker.
3. Wait for the connection. Once connected, play audio from the main speaker. Do not exit the TWS page on the second speaker.
NOTE: With TWS enabled, music plays from both speakers for true stereo sound. However, the microphone sound can only come from the
connected speaker due to Bluetooth protocol limitations.
TWS
Open TWS

39
Automatic Time Update
Automatically updates the current time.
24-Hour Format
Enables 24-hour time format.
Timezone
Select your region and timezone.
Time
If Automatic Time Update is off, you can manually set the time.
Date
If Automatic Date Update is off, you can manually set the date.
Time
40
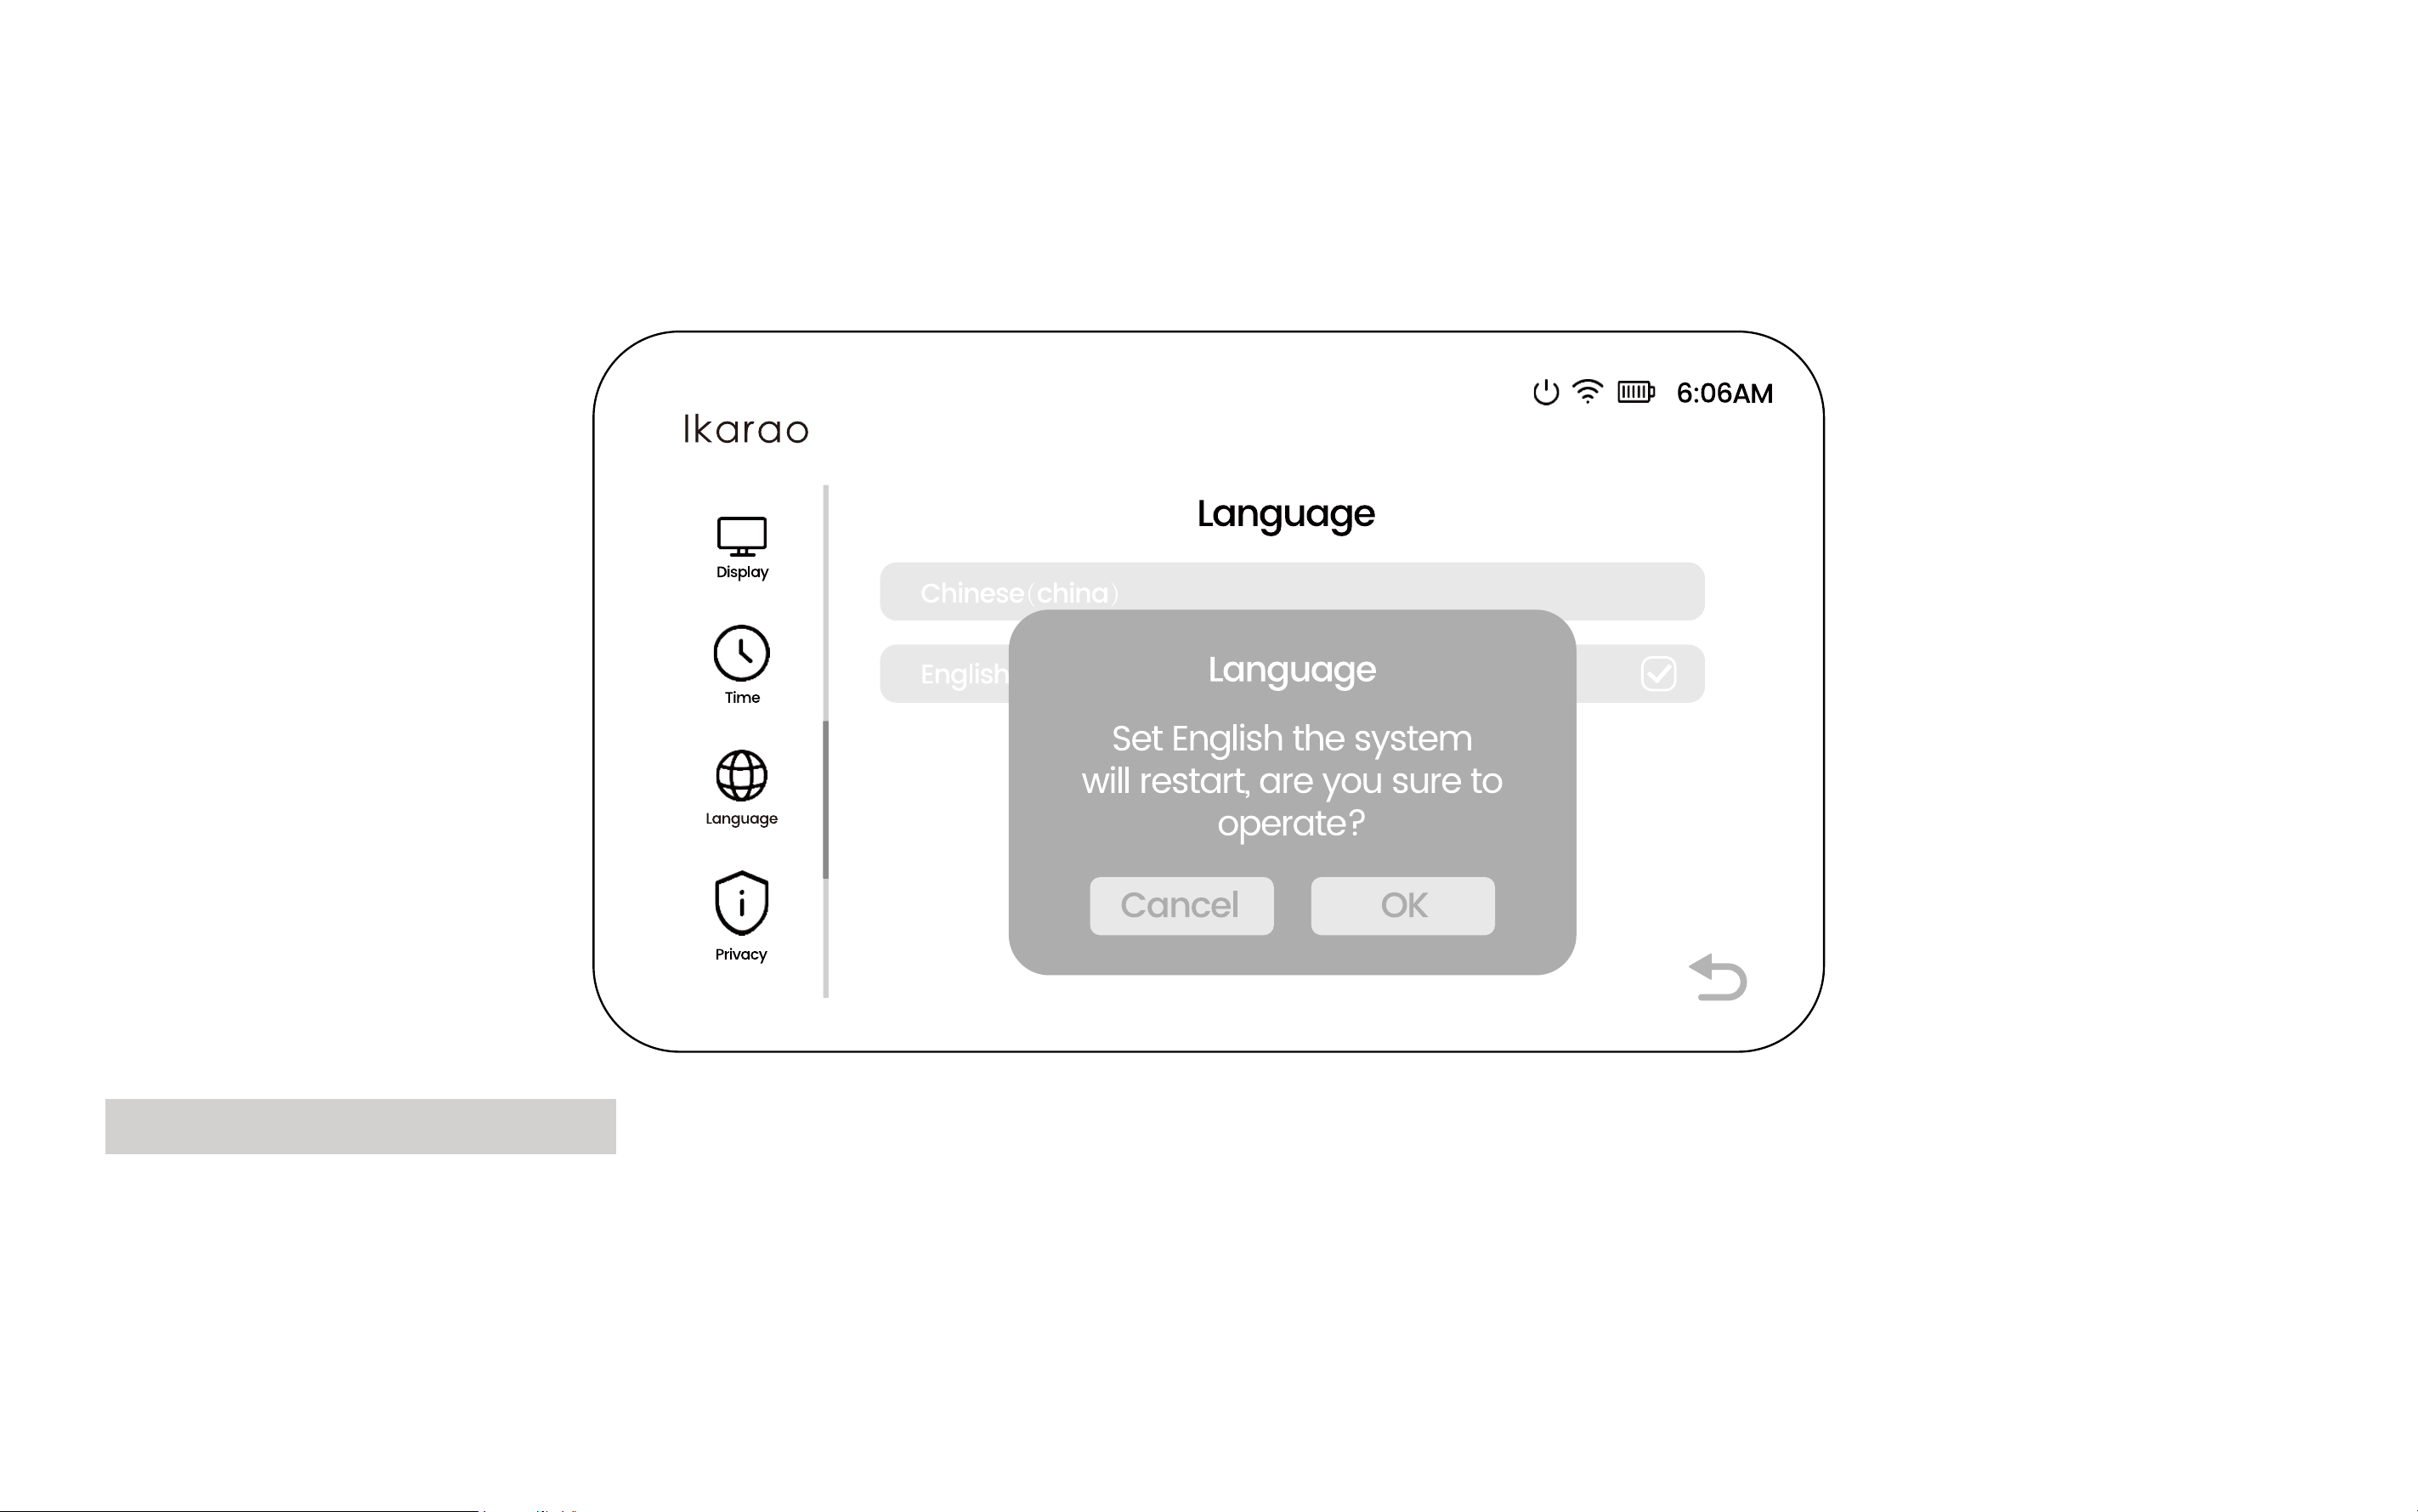
Select System Language
When switching languages, the Break X1 will restart.
Please do not perform any other operations on the speaker during the restart.
Language

Start
to Use
03
42
Local Media Player
< 1 / 2 >
Song
cover

43
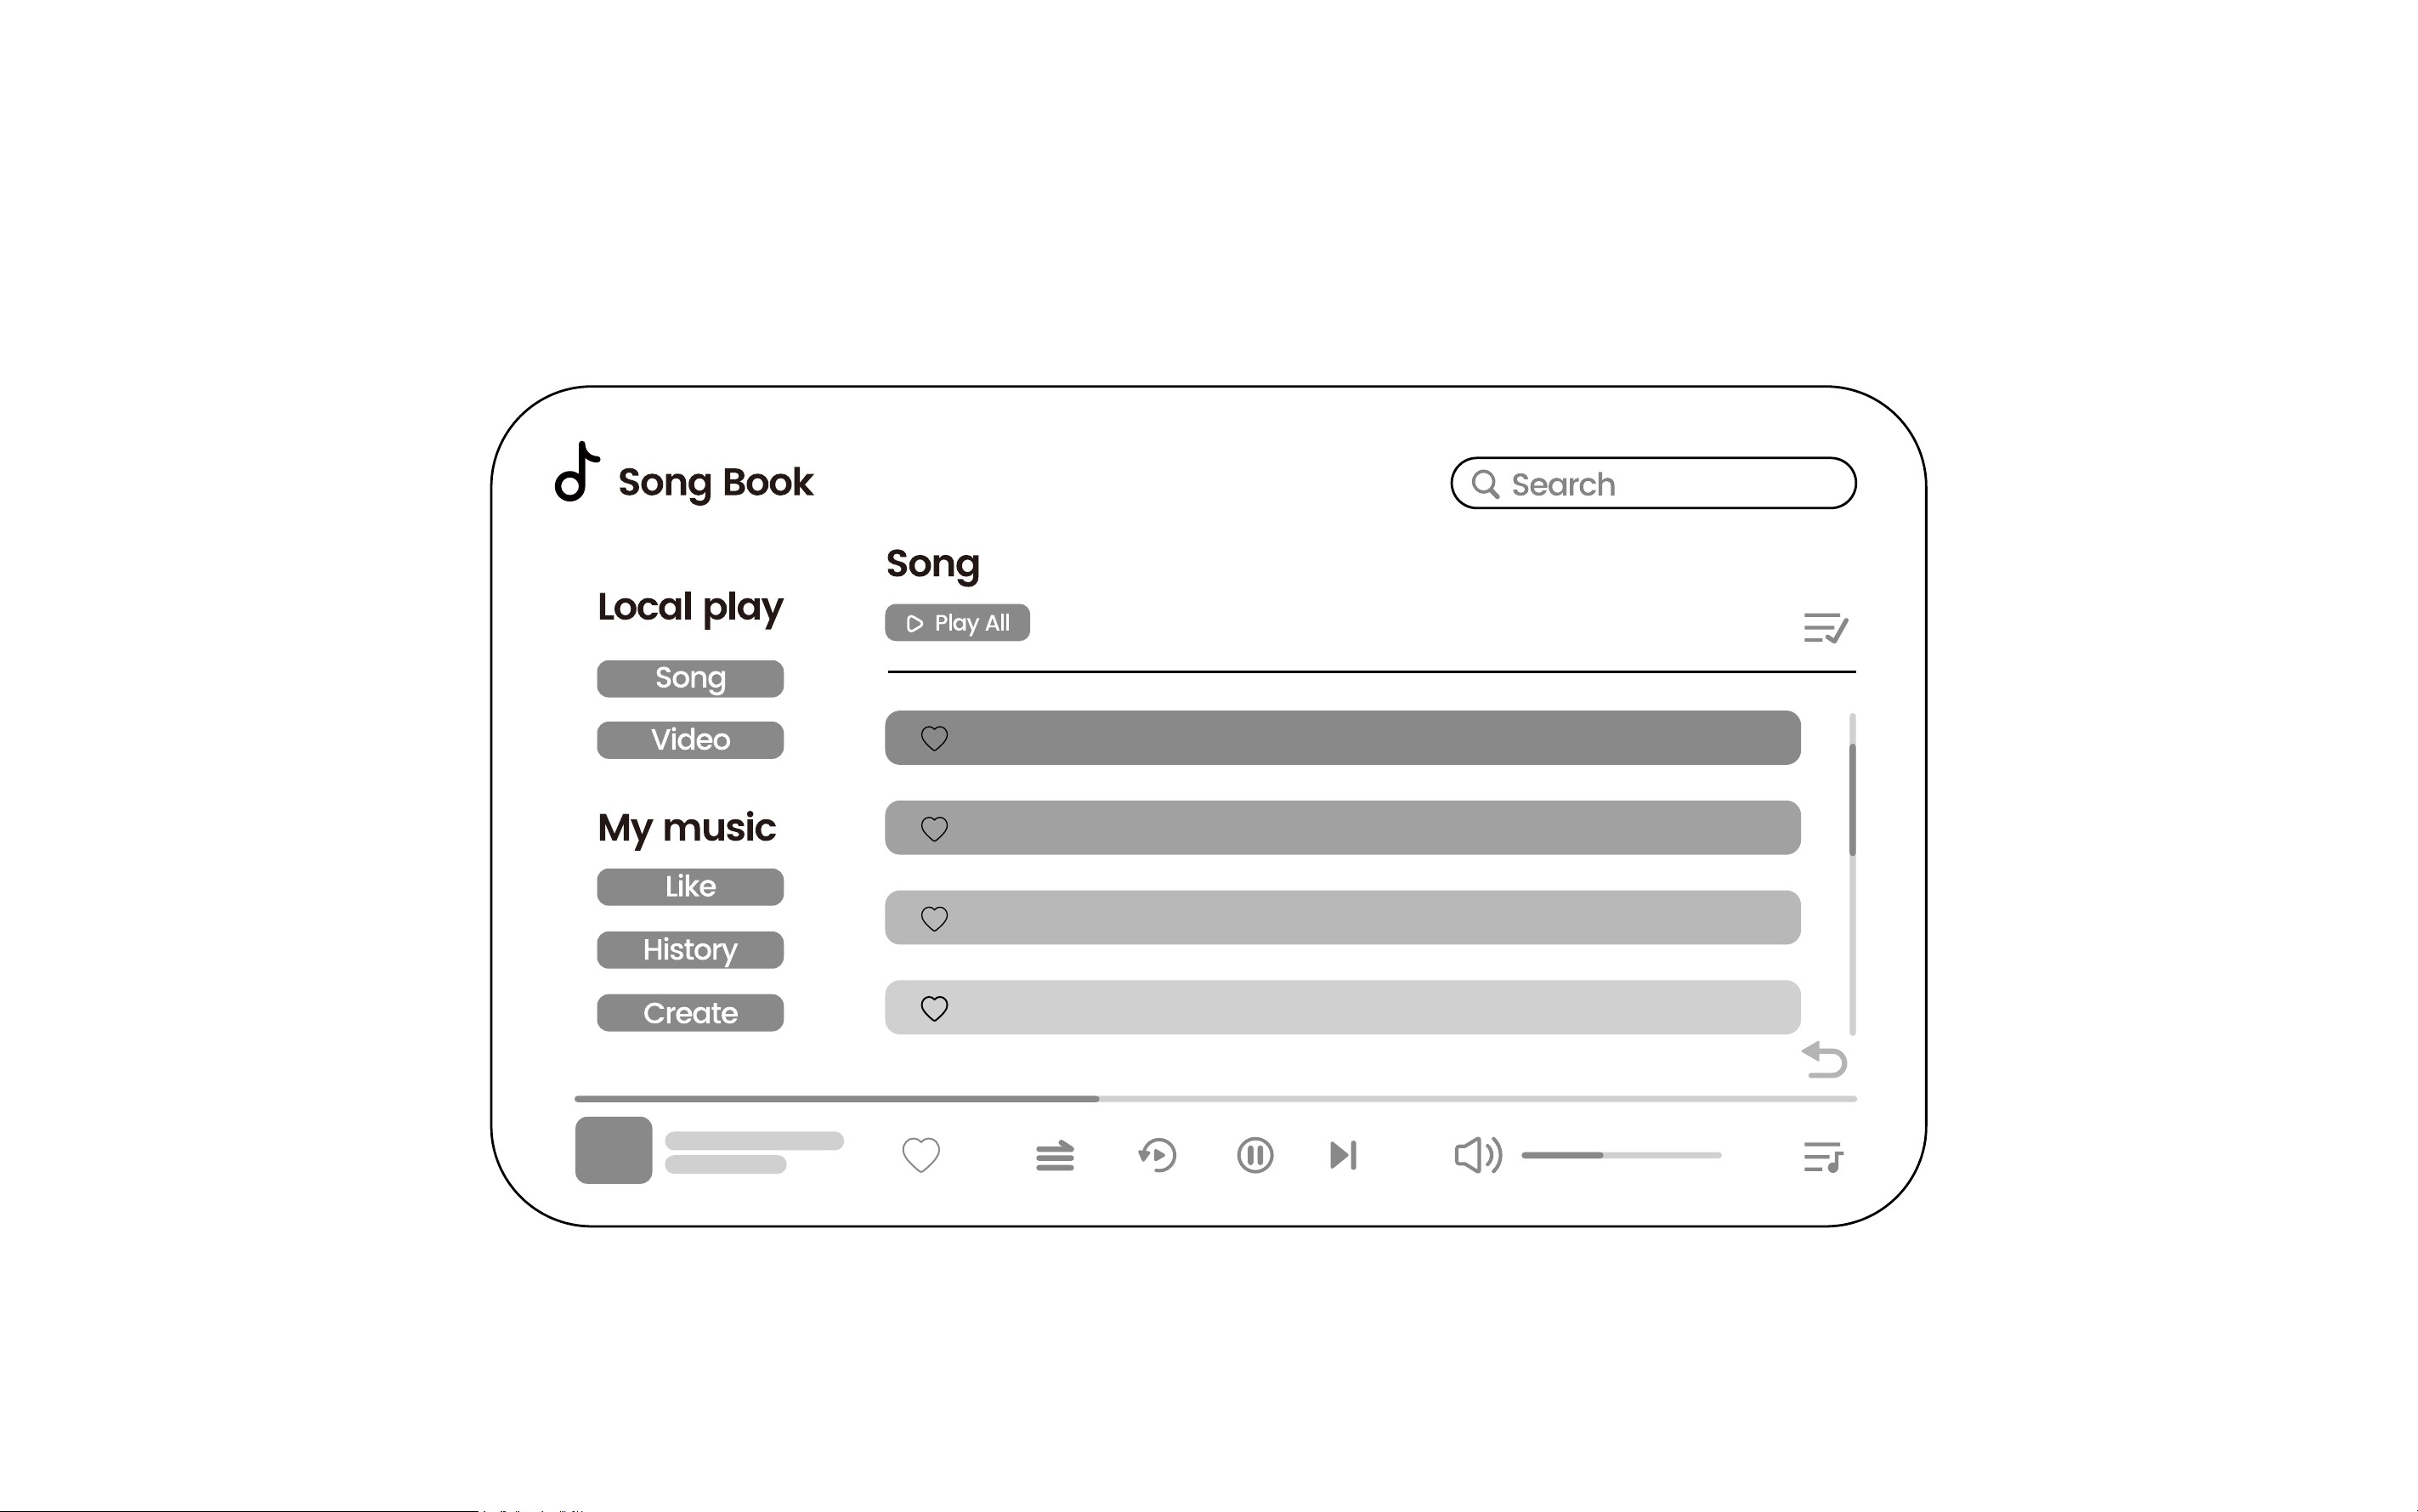
Favorites
Click the heart icon to add music to your favorites.
View favorites in the Like section.
Repeat Mode
Single repeat - Shuffle - Sequence play
Play From Beginning
Click to play from the start.
Play/Pause
Click to play or pause.
Next Track
Click to skip to the next song.
Volume
Drag to adjust the volume.
Playlist
Displays the current Playlist.
Add to Queue
Click the plus icon to add songs to the Playlist.
Create Playlist
Click Create on the Add to Queue page or in My Music to create a Playlist.
Name: Enter the Playlist name.
Description: Describe the Playlist.
Create
Name:
Describe:

44
Batch Create Playlist
1. Long press on a song or click the list icon in the top right corner to activate batch selection mode.
2. Click the add icon.
3. Select the Playlist to add the tracks.
Page Turning
Click left or right to turn pages.
Quick Jump to Specied Page
Click the page number, enter the page number, and click OK to jump to the specified page.
< 1 / 2 >
Song
cover
< 1 / 2 >
Song
cover
+ Add to Exit
Like
Play List
1.
2.
3.
< / 6 >
45
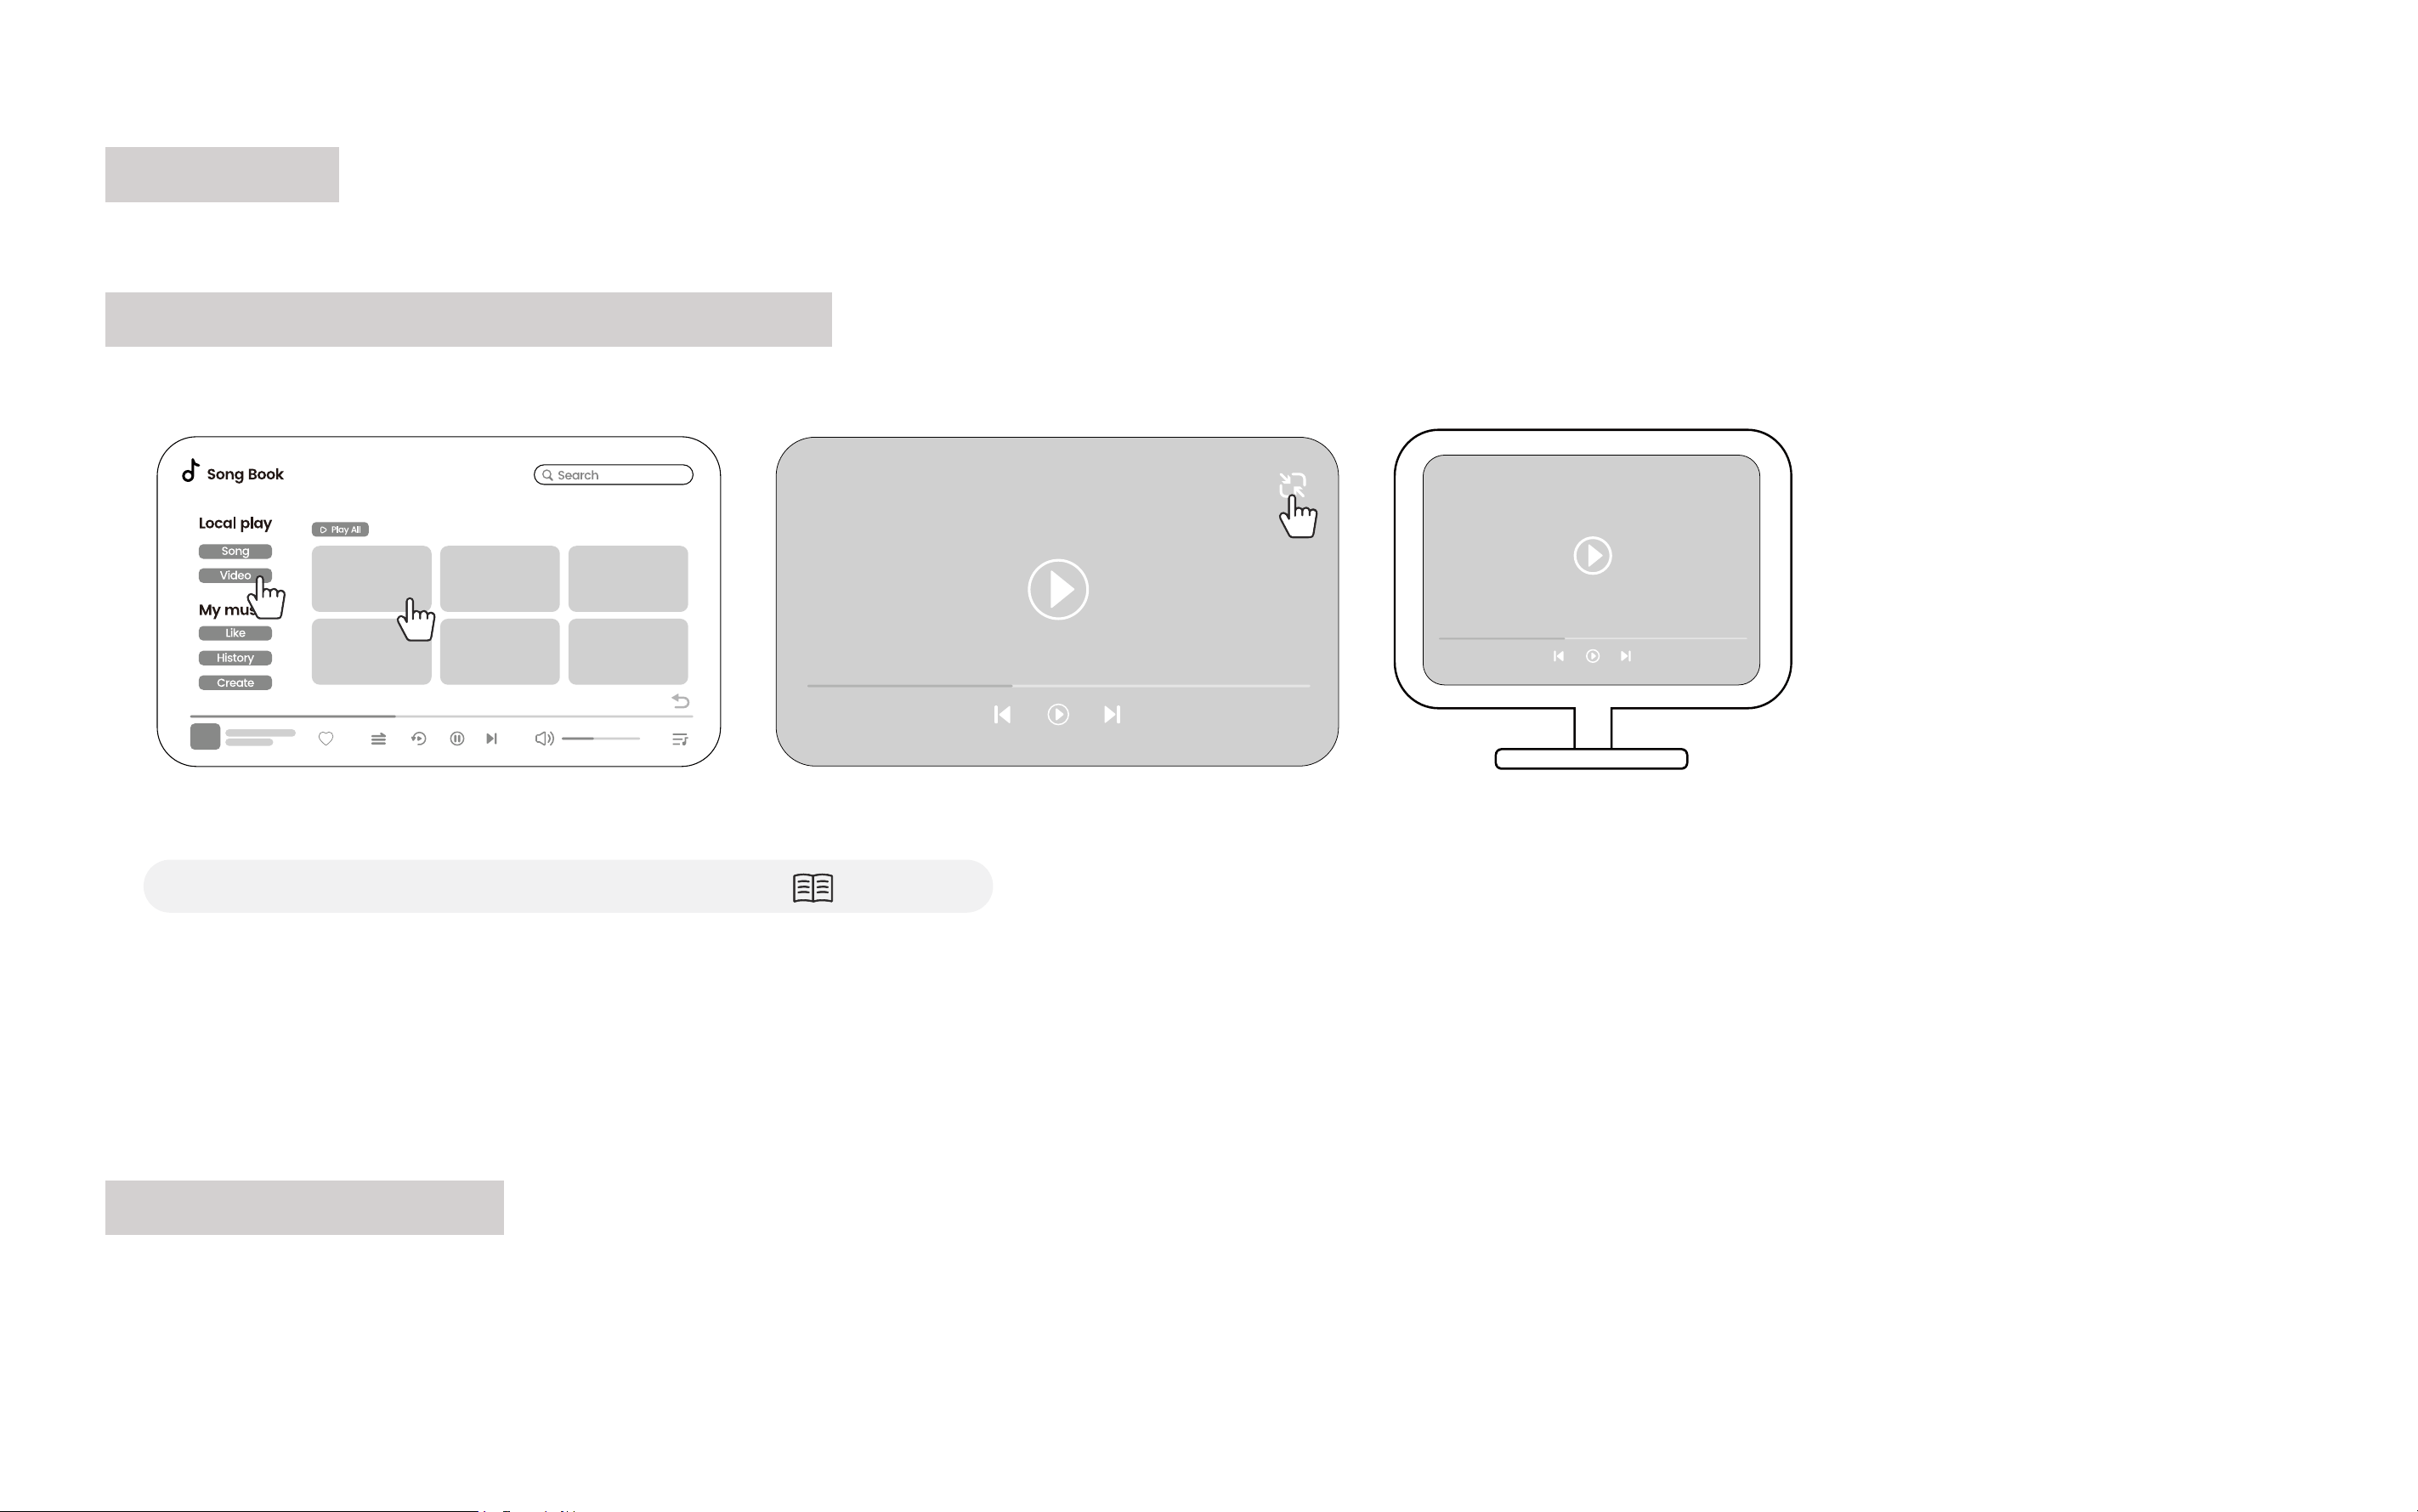
View Lyrics
Click the song cover on the bottom status bar to enter the song playback page. If an LRC. lyrics file is in the song folder, lyrics will be displayed.
Different Display on External Screen
When connected to an external display, TV, or projector, the Ikarao Break X1's screen and the external screen can display different content.
1. Connect the external display.
(See the specific operation on the relevant Page 19.)
2. Open Local Media Player, go to Video, and tap a Video to play.
3. Click the minimize icon in the top right corner of the video. You can perform other operations without affecting the playback on the external
screen.
NOTE: This feature requires app support. Currently, only Local Media Player and KaraFun support this function.
Call Up Control Bar
Swipe left on the blue vertical bar on the right to call up quick controls for Display, Music Mode, Sound, and Lighting Mode.
< 1 / 2 >
Song
cover
Video
Video 1
Video 2 Video 3
Video 4
Video 5 Video 6
46
Bluetooth Instructions
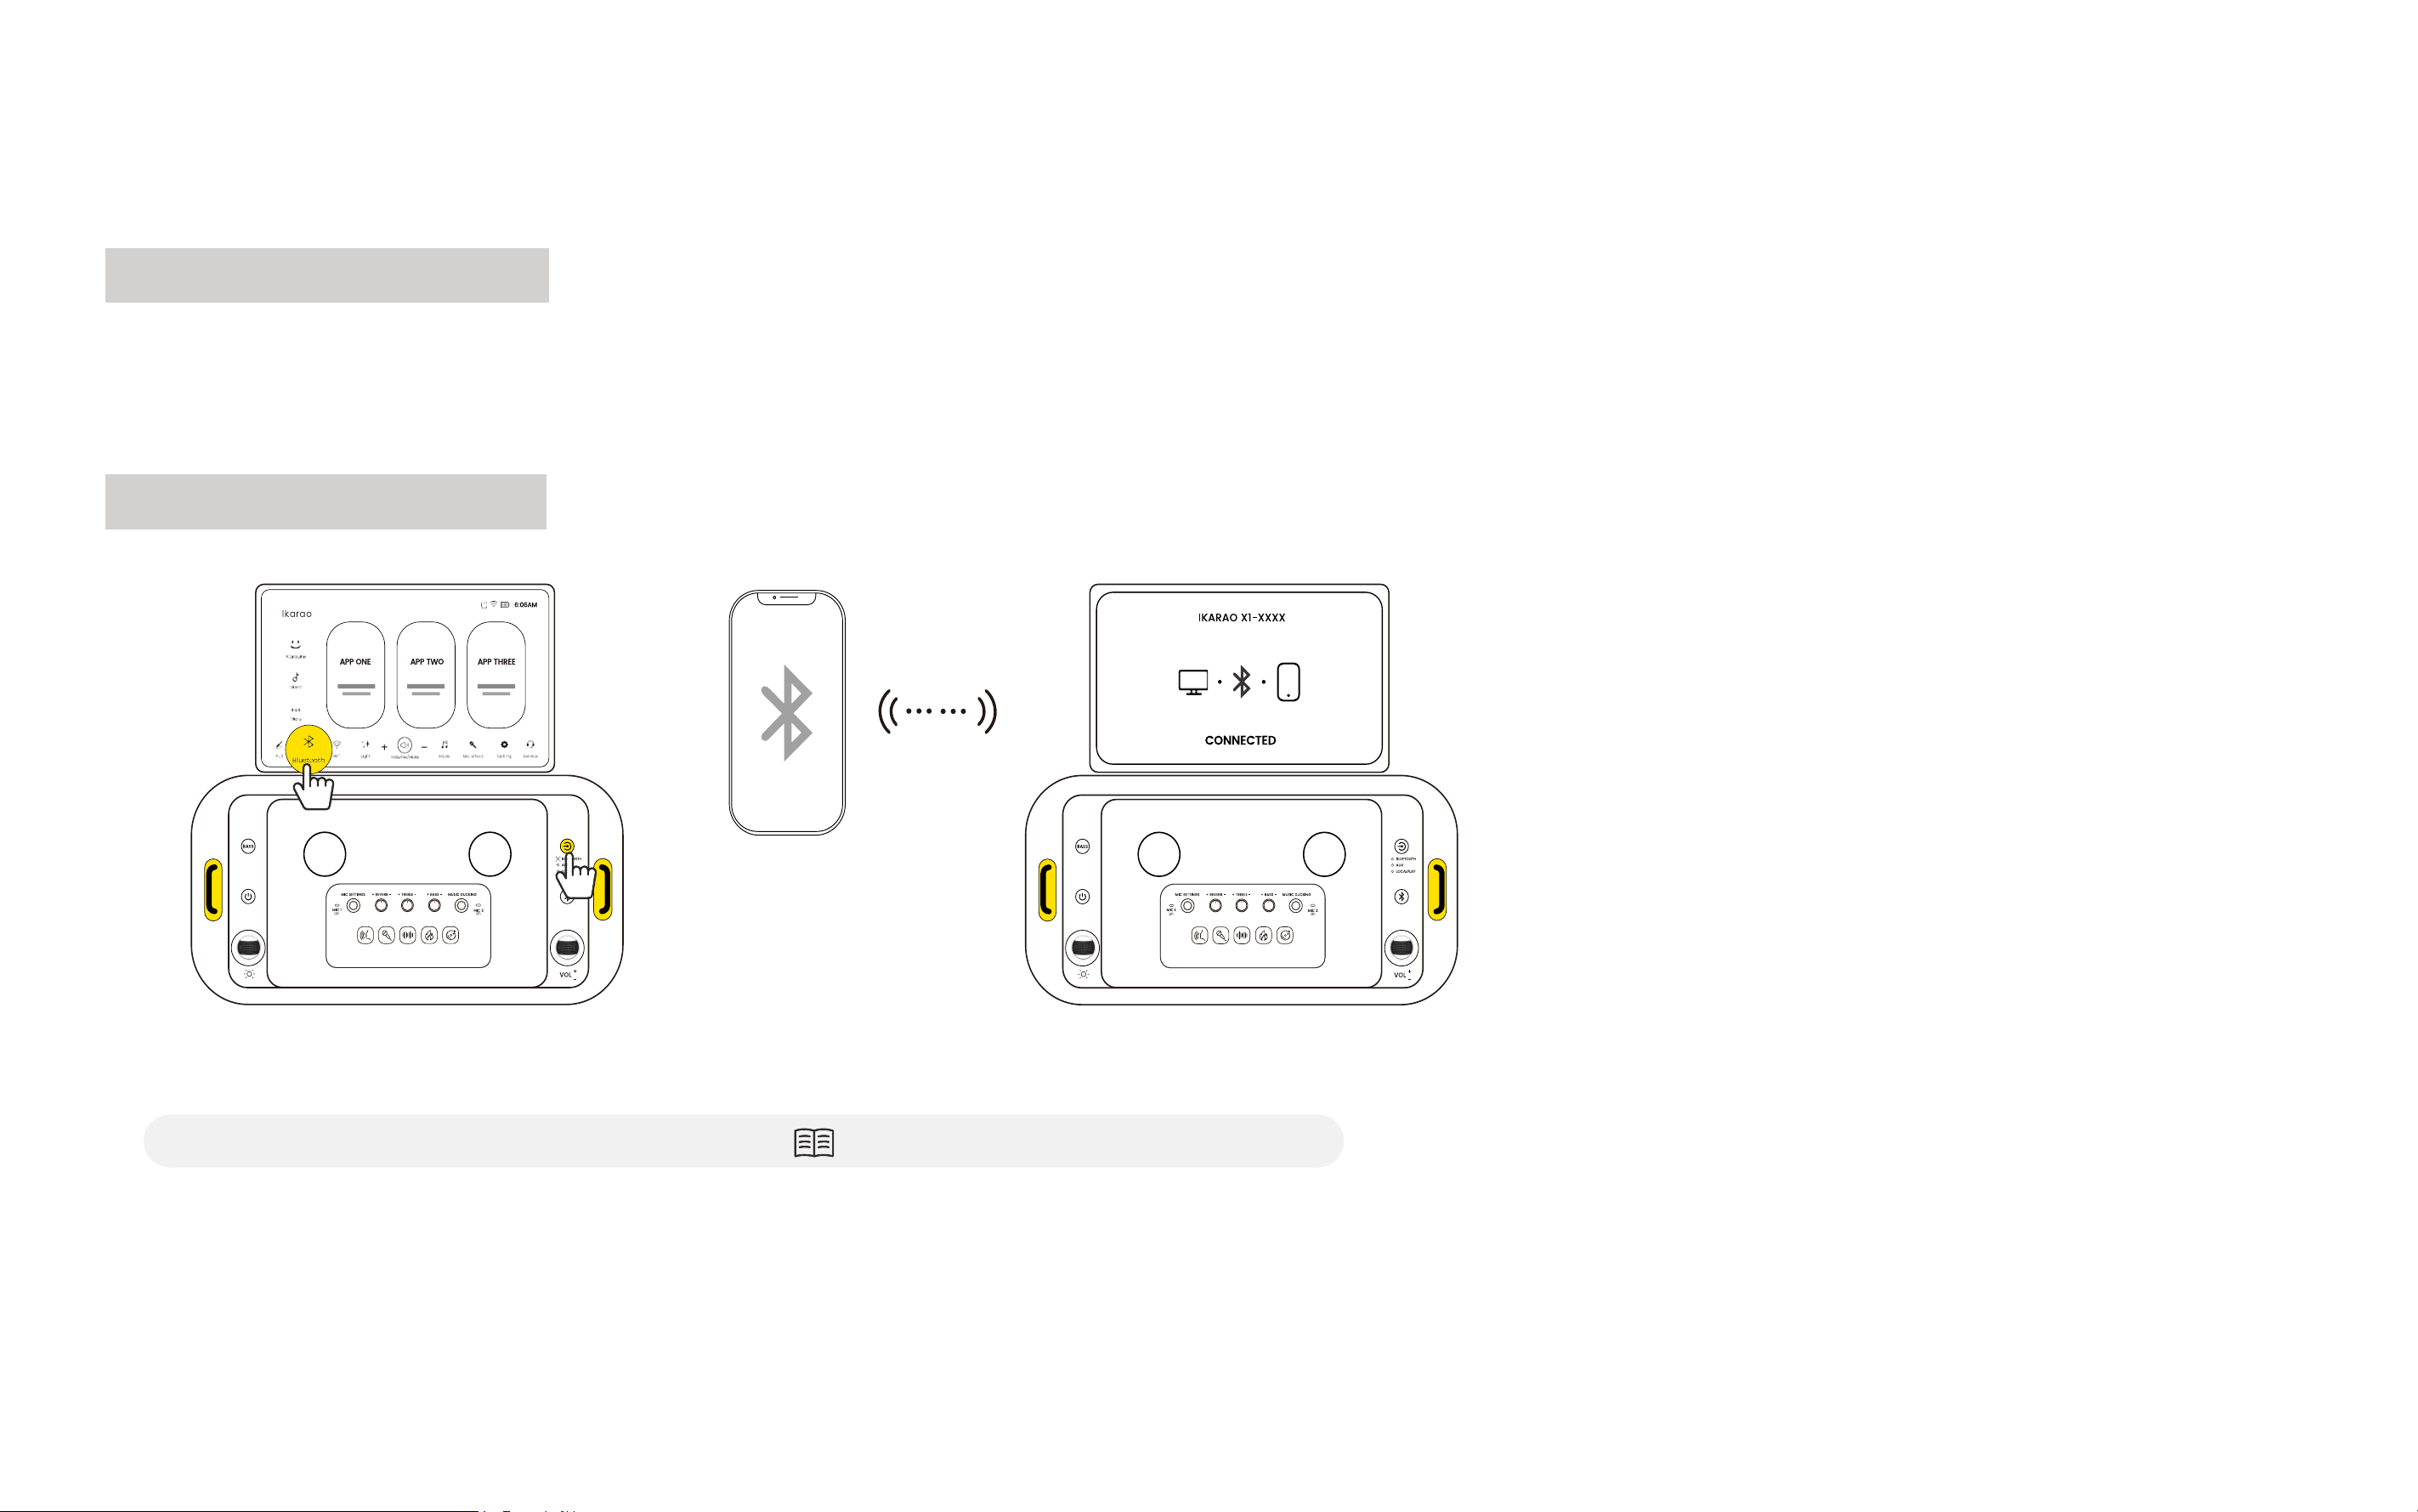
Enter Bluetooth Mode
Click the Bluetooth icon on the screen or press the Playback Mode button to switch to Bluetooth mode. The device will automatically reconnect to
previously paired devices within one minute and remain in pairing mode for 10 minutes.
Connect to Bluetooth
1. Ensure the Bluetooth status is "Bluetooth Pairing".
(if it shows "Bluetooth Connected," refer to Page 47 - Disconnect Bluetooth).
2. Turn Bluetooth on your device (iPhone, Android, Laptop, iPad, etc.) and find "Ikarao X1-xxxx" to pair.
3. If the connection times out and the indicator light turns off, short-press the Bluetooth button to re-enter pairing mode.
4. Once paired, the status will change to "Bluetooth Connected."

47
Disconnect Bluetooth
Press the Bluetooth button on the speaker to disconnect the current Bluetooth connection, changing the status to "Bluetooth Pairing." You can
also short press the button to enter pairing mode without accessing the Bluetooth Mode.
Bluetooth Playback With Lyrics Display
If supported by the music app, lyrics will be displayed automatically. Note that many major Western music apps (Apple Music, Spotify, YouTube
Music, Amazon Music, Tidal) do not support this feature due to copyright issues.
View Current Bluetooth Connection Device
Enter the Bluetooth mode settings to see the currently connected device and modify the Bluetooth name if needed.

48
Third-Party APP
Once connected to Wi-Fi, you can use pre-installed third-party apps for Karaoke, listening to music, watching videos, and more.
Access Control Bar
Slide the blue vertical bar on the right side of the screen to the left to access quick controls for Display, Music Mode, Sound, and Lighting Mode.
Return to Home From Third-Party Apps
Find the blue return button at the bottom right of the screen. Single-click to go back to the previous page, long-press to return to the home screen.
NOTE: You can drag the return button to any location on the screen.

Discover
Repair fault
04
50
For more after-sales service and information
please visit: www.ikarao.com/pages/support

51
Network Issues
What to do if Wi-Fi Connection Fails
1. Ensure the router password is correct.
(enable password visibility settings, refer to Page 36 - WiFi)
2. Place the router and the speaker closer together, avoiding walls.
3. Connect the speaker to a personal hotspot on your phone to check for router compatibility and network issues.
4. If certain routers have compatibility issues, modify the SSID (wireless network name) and password in the router's management settings to a
combination of letters and numbers. Also, check the router's whitelist and blacklist settings. Then, reset the speaker and configure the network
again.
What to do if Wi-Fi Connects But can't Access the Internet
This might be due to network fluctuations or issues with your modem. Follow these steps:
1. Check if other devices on the same Wi-Fi can connect to the internet. If they can, contact your network administrator or access the router's
management settings to see if there are any restrictions.
2. If other devices also can't connect to the internet, check if the router's connections are loose and if the indicator lights are normal (refer to the
router manual).
3. Verify that your broadband service is not overdue for payment.
Why does Wi-Fi Disconnect Automatically?
The speaker will attempt to reconnect to Wi-Fi if the network is temporarily lost. If the network recovers quickly, it might be due to router or
network provider fluctuations. If the network remains disconnected for a long time, follow these steps:
1. Ensure the router's power is functioning properly.
2. Check if the router's WAN port is properly connected.

52
3. Confirm if other devices can connect to Wi-Fi and the internet normally.
4. Verify if the router password has changed.
5. Ensure the router and the speaker are not too far apart or separated by walls. Place them closer together if necessary.
6. If none of the above resolves the issue, try restarting the speaker.
Music or Video Playback Stuttering
1. Check Wi-Fi signal strength. Move the speaker closer to the router if the signal is weak.
2. Ensure the Wi-Fi connection is on the 5G frequency band.
(refer to Page 36 for instructions)
3. Use another device on the same network to access the content. If it still stutters, the issue may be with the source.
Bluetooth Issues
Music Stuttering Over Bluetooth
1. Ensure the source device is playing offline music. Online music might stutter due to network speed or buffering issues.
2. Check the distance between the source device and the speaker. The effective Bluetooth range is generally 10m. Too much distance or a wall
can cause stuttering.
3. Ensure there are not too many 2.4GHz devices (e.g., 2.4GHz Wi-Fi routers, phones, smart home devices) nearby, as they can cause interference.
4. Try turning Bluetooth off and on again on the source device, then reconnect.
Unable to Find the Speaker When Pairing Bluetooth
1. Ensure the speaker is powered on and in normal working condition.
2. Make sure the speaker is in Bluetooth audio mode by pressing the Bluetooth button or switching to Bluetooth mode.

53
3. Ensure there are not too many devices connected to a 2.4GHz Wi-Fi band in the room. Interference can occur. Try connecting the speaker to a
5GHz band.
4. Restart the phone’s Bluetooth and try again if there is a system issue.
Bluetooth Fails to Connect Initially Despite Finding the Speaker
1. Check if the speaker is already connected to another Bluetooth device.
(Refer to Page 46-47 for detailed steps.)
2. Press the Bluetooth button to re-enter pairing mode and try connecting again.
Bluetooth Reconnection Fails
If the phone previously connected to the speaker but now fails to reconnect, go to the phone's settings: Settings > Bluetooth > My Devices, forget
the previously connected speaker, and try connecting again.
Displaying Lyrics via Bluetooth
Displaying lyrics over Bluetooth requires music app support. Most major music apps in Western regions do not support this feature due to
copyright issues, including Apple Music, Spotify, YouTube Music, Amazon Music, and Tidal.

54
Microphone Issues
No Sound from Microphone
1. Check if the microphone is successfully connected. A solid blue indicator light, a microphone icon on the screen, and the ability to switch
microphone effects by pressing the power button indicate a successful connection.
2. If not connected, restart the microphone and try reconnecting. If connected but still no sound, try moving the main unit away from other 2.4GHz
devices and restart.
Music Volume Drops When Singing with Microphone
Check if the Music Ducking feature is accidentally enabled
(refer to page 16 . This feature prioritizes vocals by automatically lowering the music volume.)
Microphone Won’t Turn On
1. Ensure you are holding the power button for at least 2 seconds.
2. If it still won’t turn on, try charging the microphone. Ensure the speaker has sufficient battery or is connected to a power source. The charging in
dicator on the microphone should light up while charging.

55
Local Media Player Issues
Playing Music from TF Card, USB Drive, or External Hard Drive
1. Insert the TF card, USB drive, or external hard drive into the corresponding port.
2. A prompt will appear on the screen: “USB Drive: The machine detects the insertion of USB, do you want to enter the local media?” Click Yes.
3. If you accidentally click No, go to MUSIC > LOCAL MEDIA to access the local media player.
No Lyrics in Local Media Player
The local media player requires an LRC file to display lyrics. Ensure the LRC file name matches the music file name except for the extension. For
example, if the music file is named "Love The Way You Lie.mp3," the lyrics file should be named "Love The Way You Lie.lrc."

Techincal
Notes
05

57
Safety Instructions
Ensure proper use of the product. Please read your User Manual carefully before use,
especially the following safety instructions.
General Safety Tips:
1. Avoid extreme high or low temperatures.
2. Keep away from moisture, rain, or other liquids.
3. Do not expose to direct sunlight.
4. Avoid dropping or severe impacts.
Battery and Charging:
1. Use the specified charger and power cable.
2. Keep away from flammable materials while charging.
3. Do not attempt to replace the battery yourself.
4. Avoid overcharging or completely discharging the battery.
Electrical Safety:
1. Ensure the power outlet meets the product requirements.
2. Avoid contact with live electrical parts.
3. Do not use in a damp environment.
Health and Environment:
1. Prolonged use may cause eye strain or other health issues; take regular breaks.
2. Do not use while driving or operating machinery.

58
3. Do not dispose of it improperly; follow local recycling regulations.
Child Safety:
1. Small parts may pose a choking hazard; keep away from children.
2. Children should use the product under adult supervision.
Radiation and Interference:
1. The product may cause electromagnetic interference; avoid using it near sensitive equipment.
2. Comply with local regulations regarding RF devices.
Maintenance and Cleaning:
1. Turn off the power and unplug before cleaning.
2. Do not use corrosive cleaning agents.
Emergency Handling:
1. If the product emits smoke, odor, or shows any abnormal condition, stop using it immediately and disconnect the power.
2. If the battery swells or leaks, avoid direct contact and follow local disposal regulations.

59
Battery and Power
This section describes the correct usage of the battery and methods to extend its lifespan. Improper use can
shorten battery life or cause leakage, overheating, re, or explosion.
Battery Usage
1. Idle batteries gradually lose charge. Recharge the battery within a day or two before use. Turn off the product when not in use to extend battery
life.
2. Battery performance declines in cold environments; low-charge batteries may not work properly in cold conditions.
Charging
1. Use the provided adapter or power cable for charging. Charging time increases when the temperature is below +10°C or above +35°C. Do not
charge the product when the temperature is above +40°C or below +5°C.
2. It is normal for the product to heat up during charging or after use.
3. To maintain battery health, charge the battery at least once every three months.
Battery Life
1. When the product’s battery life noticeably decreases, the battery has reached the end of its life and needs to be replaced. Contact the Ikarao
support team or a dealer for replacement.
2. Long periods without charging can degrade battery quality. Regularly charge the battery.

60
Storage
For long-term storage, charge the battery to about 1/2 to 2/3 capacity and store it at room temperature.
Adapter or Power Cable
1. The AC power adapter is for indoor use only.
2. Ensure the cable is securely connected to the speaker.
3. Turn off the speaker before disconnecting the adapter.
4. Do not disassemble the adapter.
5. Avoid placing the adapter in high-temperature or humid areas.
6. Do not subject the adapter to strong shocks.
7. It is normal for the adapter to make a humming noise or become warm during use.
Screen Use
1. If the display screen is damaged, avoid contact with the liquid crystal. In case of any of the following incidents, take the specified emergency
measures.
2. Skin Contact: Clean the area with a cloth, apply soap, and wash thoroughly with water.
3. Eye Contact: Rinse the affected eye with clean water for at least 15 minutes and seek medical help.
4. Ingestion: Rinse your mouth thoroughly with water, drink a large amount of water to induce vomiting, and seek medical help.

61
Certications and Declarations
Tested To Comply With FCC Standards
FOR HOME OR OFFICE USE
Contains FCC ID:2BCRN-BREAKX1
FCC Statement:This device complies with Part 15 of the FCC Rules. Operation is subject to the following two conditions:
1. This device may not cause harmful interference,
2. And this device must accept any interference received, including interference that may cause undesired operation.
FCC WARNING:Changes or modifications not expressly approved by the party responsible for compliance could void the user’s authority to
operate this equipment.
Radiation Exposure Statement(Only for speaker):This equipment complies with FCC radiation exposure limits set forth for uncontrolled
environment. This equipment should be installed and operated with minimum distance of 20 cm between the radiation &your body.
Dongguan Aika Electronic Technology Co., Ltd. Declares that this product is in compliance with Directives 2014/53EU and all other applicable
EU directivce requirements. The complete declaration of conformity can be found at: www.ikarao.com

62
The Bluetooth® word mark and logos are registered trademarks owned by Bluetooth SIG, Inc. and any use of such marks by Dongguan Aika
Electronic Technology Co., Ltd. is under license. Other trademarks and trade names are those of their respective owners.
This symbol means the product must not be discarded as household waste, and should be delivered to an appropriate collection facility for
recycling. Follow local rules and never dispose of the product and rechargeable batteries with normal household waste. Correct disposal of old
products and rechargeable batteries helps prevent negative consequences for the environment and human health.
The KC (KoreaCertification) marksignifies compliance with Korea's product safety requirements for electrical and electronic equipmentand is
issued by Korea-based certification bodies that have been approved by the Korea Standards Association.
The UL markshows the product is tested by UL and meets UL Standardsof Safety for the U.S.

63
Technical Specications
Dimensions: 50cm*27.5cm*25.3cm
Weight: Approx. 11.8kg, including two wireless microphones
Speaker Dimensions: Woofer: 4 inches * 2 | Tweerter: 1.2 inches * 2
Frequency Response: 45HZ-20KHz
Speaker SPL: 106dB
Suitable for areas
:
15-200m² 150-2000 ft²
RMS Power: 80W+10Wx2
Bluetooth Version: V5.4
Wi-Fi Protocol: 802.11ac/b/g/n
Signal-to-Noise Ratio (20K LPF):
≥
95dBA(Rated power)
Screen Size: 13.3 inch
CPU: Quad-core Cortex-A55
RAM: 2GB
EMMC: 64GB
Input: AC: 100V-240V/2A 50-60Hz
Standby Power Consumption:
≤
0.5W

64
Speaker Charging Time:
≤
4H
Speaker Battery Life:
≥
6H(screen on),
≥
10H(screen off)
Microphone Charging Time:
≤
5H
Microphone Battery Life:
≥
30H
Microphone Type: Dynamic
Microphone Size: 2*Φ35×H183mm
Microphone Battery Capacity: 1500mAH
Microphone Distortion:
≤
1%
Microphone Frequency Response(By-Pass) 60Hz-12KHz (±1.5dB )
NOTE:Specifications and performance are subject to change without notice. Ikarao will not be held liable for any errors this manual may cortain.
The appearance of the product may differ from that described in this manual.