3-IN-1 BUTANE SOLDERING IRON KIT, QUICK
RELEASE
Thank you for purchasing a Sealey product. Manufactured to a high standard, this product will, if used according to these
instructions, and properly maintained, give you years of trouble free performance.
IMPORTANT: PLEASE READ THESE INSTRUCTIONS CAREFULLY. NOTE THE SAFE OPERATIONAL REQUIREMENTS, WARNINGS & CAUTIONS. USE
THE PRODUCT CORRECTLY AND WITH CARE FOR THE PURPOSE FOR WHICH IT IS INTENDED. FAILURE TO DO SO MAY CAUSE DAMAGE AND/OR
PERSONAL INJURY AND WILL INVALIDATE THE WARRANTY. KEEP THESE INSTRUCTIONS SAFE FOR FUTURE USE.
1. SAFETY
▲ IMPORTANT: Read these instructions for use carefully, so as to familiarize yourself with the appliance before connecting it to its gas
cartridge, or gas cylinder. Keep these instructions for future reference.
WARNING! Ensure Health & Safety, local authority, and general workshop practice regulations are adhered to when using this
equipment, make sure you know where the nearest re extinguisher is.
WARNING! This appliance shall only be used with the butane rell canister or butane-propane mixture gas rell canister that
complies with EN417 standard. It may be hazardous to attempt to t other types of gas cartridges or gas cylinders.
9 This appliance may be lled with any canisters marked ‘Butane’ complying with EN417.
WARNING! Always wear approved eye/ face protection when operating the torch.
WARNING! DO NOT use the torch if you notice that it is damaged or if there could be a gas leak from it. If leaking, remove the torch
to a well ventilated open area and cover with a damp cloth.
WARNING! Butane gas is extremely ammable, handle with care.
WARNING! Always point the torch away from the eyes and body when igniting and during operation.
WARNING! DO NOT put the torch down when it is lit, DO NOT leave it unattended.
WARNING! The ame is not easily visible in bright daylight.
WARNING! Ensure the ame is completely extinguished after use. DO NOT use water to cool the torch down.
WARNING! Only use in a well ventilated area.
WARNING! Assembly and adjustment made in the factory shall not be modied. It can be dangerous to try to modify the adjustment
or the construction of the appliance, to dismantle some parts or to use components other than those recommended.”
8 DO NOT use the torch in an area where paint fumes, solvents or other ammable solids, liquids or gases pose a potential hazard.
Keep ammable material away from the torch when operating.
8 DO NOT operate the torch when you are tired or under the inuence of alcohol, drugs or intoxicating medication.
8 DO NOT hold any workpiece by hand.
8 DO NOT use grease or oil with parts in contact with oxygen.”
8 DO NOT attempt to touch the workpiece close to the heated area as it will be very hot. Allow to cool.
8 DO NOT operate the torch if it is damaged as this may cause failure and/or possible personal injury.
8 DO NOT use the appliance if it has worn seals.
8 DO NOT touch the top of the torch during or immediately after use, as it will be very hot. Allow to cool.
8 DO NOT allow children to operate the torch. Keep unit out of reach of children.
9 After use, allow the torch to cool before storing it.
9 When not in use, store away from direct sunlight in a safe, dry, childproof location.
8 DO NOT store at over 40°C, such as in a car in hot weather.
8 DO NOT modify the appliance.
9 When lled, it will contain ammable gas under pressure.
8 DO NOT puncture or put in re.
9 Make sure the re is o before relling.
8 DO NOT keep lit for more than 5 minutes.
NOTE: If there is a leak on your appliance (smell of gas), take it outside immediately into a well-ventilated ame free location where
the leak may be detected and stopped. If you wish to check for leaks on your appliance, do it outside. DO NOT try to detect leaks
using a ame, use soapy water
9 Allow the micro torch to cool down before storage. Store the appliance in a well ventilated and dry area and ensure the ame is out
after the operation.
9 Use only Sealey original spare parts.
8 DO NOT use torch as a cigarette lighter.
9 Be extra careful when using the torch outdoors on sunny or windy days. Wind may carry the torch’s heat back toward you or other
areas which are not intended to be heated.
9 The appliance must be used in a well-ventilated location in accordance with national requirements, for the supply of combustion air
and to avoid the dangerous building up of un-burnt gases for appliances not tted with a ame supervision device.
9 The appliance shall be operated on a horizontal surface”
9 Always check to make sure no unintended parts or materials are being heated.
8 Operate at least 500mm away from any adjacent surfaces i.e. walls / ceiling.
9 Whenever there is a possibility that unintended material has been heated, wait at least two hours before leaving the area.
AK2976 Issue 1 17/10/2024
Original Language Version
© Jack Sealey Limited
Refer to
instructions
Hot surfaces Wear eye
protection
Wear protective
gloves
MODEL NO: AK2976
Original Language Version
© Jack Sealey Limited
AK2976 Issue 1 17/10/2024
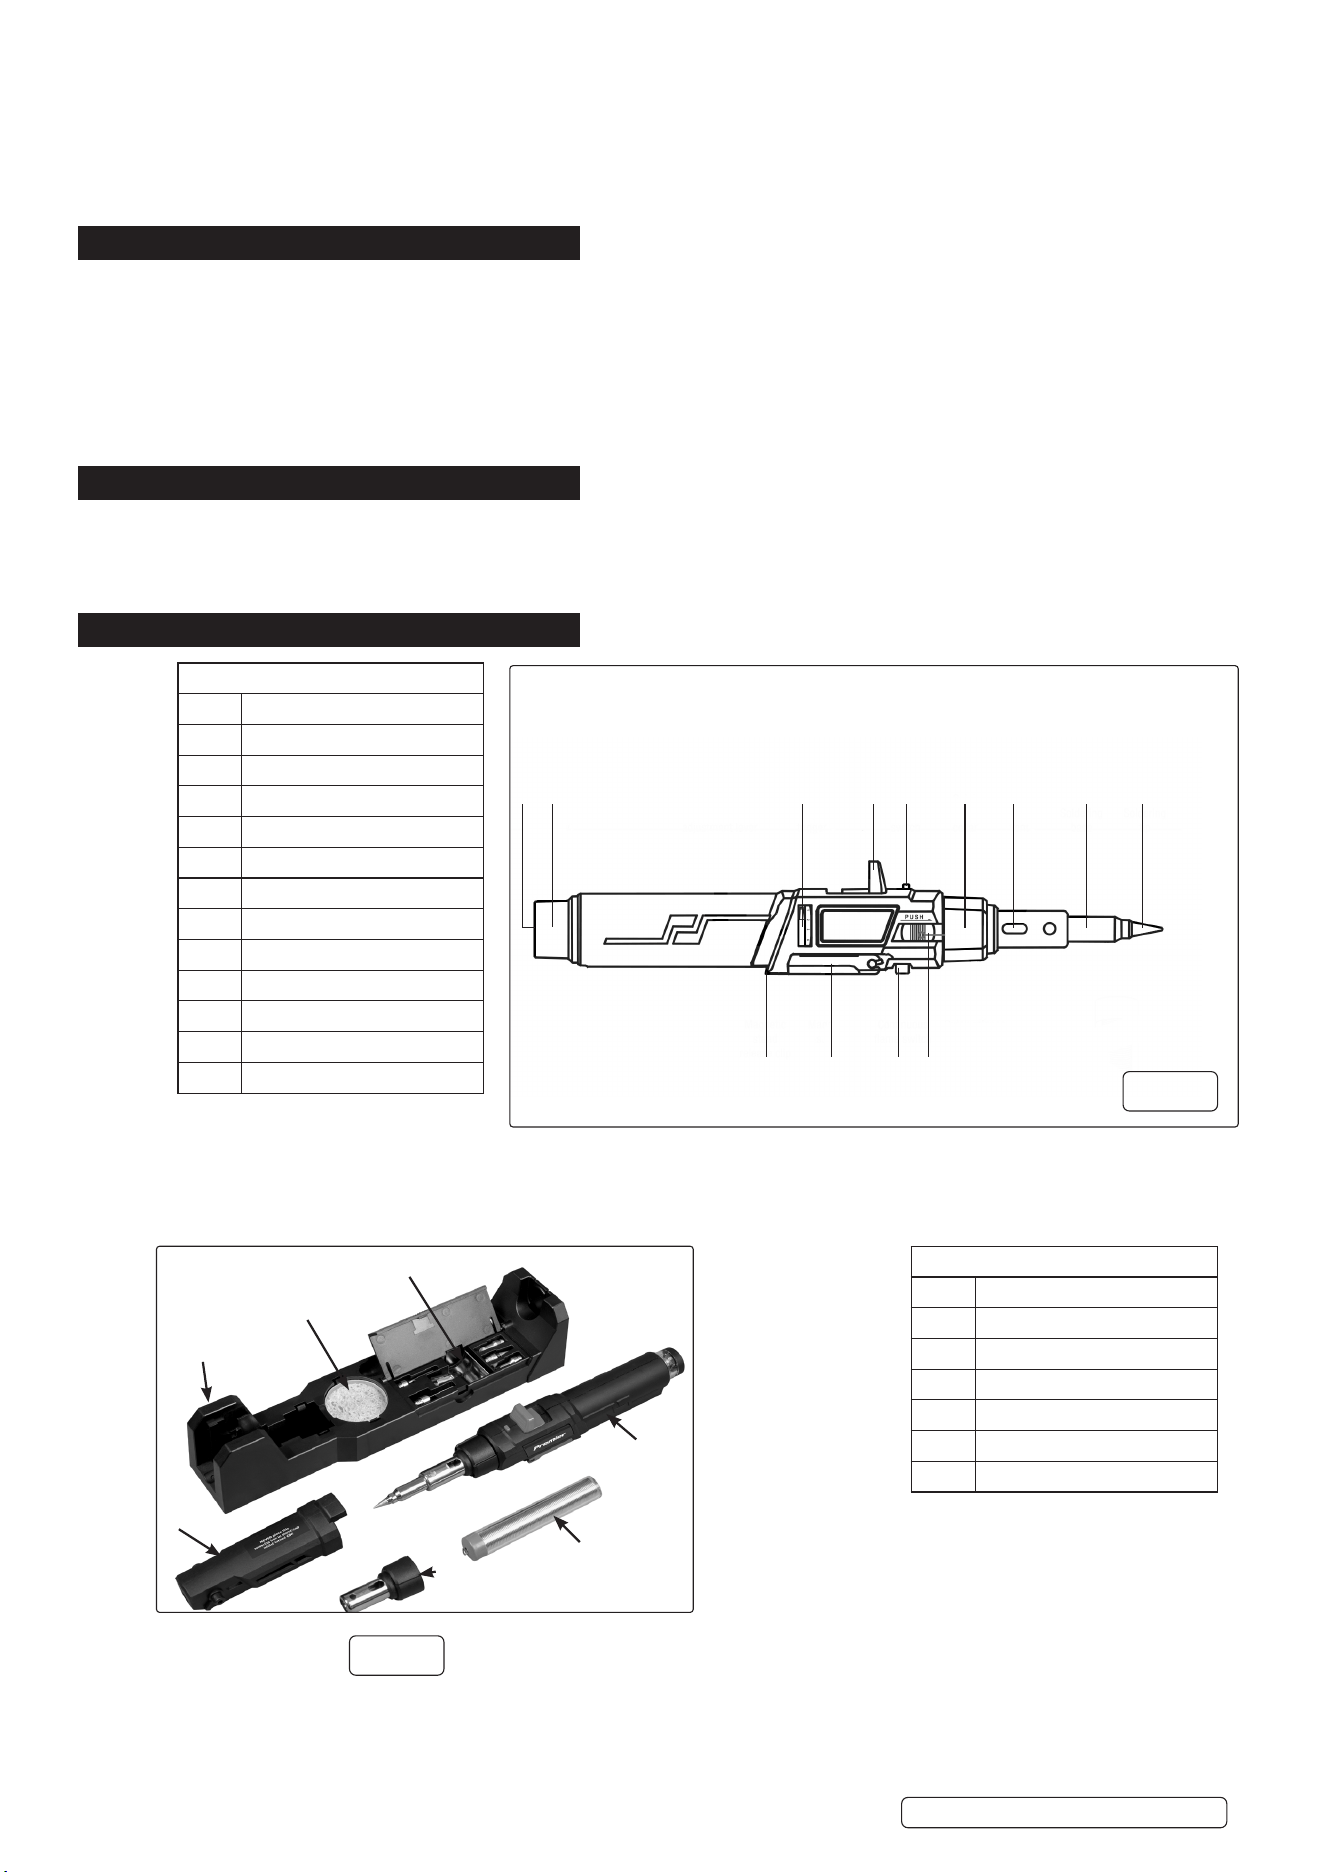
Fig. 1 Key
1 Butane rell valve
2 Gas window
3 Flame adjustment lever
4 Piezo ignition trigger
5 Safety lock switch
6 Quick release collar
7 Exhaust vent
8 Soldering base
9 Soldering tip
10 Magnetic stand release clip
11 Magnetic stand
12 Continuous ame switch
13 Quick release switch
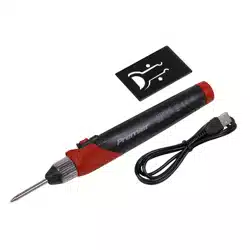
Fig.2 Key
1 Storage case
2 Sponge for cleaning
3 Soldering tips
4 Vented cap
5 Open ame tip
6 Lead free solder
7 Soldering gun
8 DO NOT inhale soldering fumes.
9 Follow relling procedure to avoid serious accidents.
9 Wear non-greased clothes
8 DO NOT work in an enclosed space; maintain good ventilation. Operate at least 500mm away from any adjacent surfaces.
2. INTRODUCTION
High quality, lightweight 3-in-1 torch kit, suitable for heating, shrinking and soldering jobs. Powered by butane (lighter fuel) and features
a piezoelectric ignition switch with safety lock. Quick release system with interchangeable nozzles. 45-60Min runtime with 25ml fuel
capacity. Viewing window at bottom of device to monitor fuel. Includes integral stand with magnet. Contents; Soldering Iron, Pointed
Tip, Chisel Tip, Anvil Tip, Knife Tip, Heat Deector, Needle Tip, Lead Free Solder, Cleaning Sponge and Open Flame Tip. Flame
temperature 1300°C, soldering temperature 450°C and hot air temperature of 600°C (approximately). Heat resistant safety cap can be
utilised with the storage case to enable use as a temporary soldering stand. Torch and accessories supplied in multifunctional compact
storage case.
3. SPECIFICATION
Model No.: ................................................................. AK2976
Nett Weight: ................................................................ 0.32kg
Temperature Range: ......................................... 450 - 1300
o
C
4. CONTENTS
1 2 3 4 5 6 7 8 9
10 11 12 13
g.2
g.1
1
2
3
4
5
6
7

5. OPERATION
5.1. FILLING WITH GAS
NOTE: Ensure that you have read and understood the Safety section before lling / re-lling the torch.
5.1.1. Fill only with butane gas. It may be hazardous to attempt to t other types of gas.
5.1.2. Rell in a well-ventilated area, away from ame, combustible materials and another person.
5.1.3. Please make sure the re is o before relling.
5.1.4. Placing the soldering iron in an upside-down position, Insert the gas canister into the torch relling valve.
5.1.5. Fill slowly. DO NOT overll. When gas start to ow out, stop lling
5.1.6. After lling, wipe lighter and hands dry before Igniting.
5.1.7. The relling operation takes some minutes to allow the gas to stabilize.
5.1.8. For next relling, let the torch cool down for 5 minutes before lling the tank.
5.1.9. Nominal rate of use/rell is 30g/h
5.1.10. Approximate run time 45 mins.
5.1.11. If there is a leak on your appliance (smell of gas), take it outside immediately into a well-ventilated ame free location where the leak
may be detected and stopped. If you wish to check for leaks on your appliance, do it outside. DO NOT try to detect leaks using a ame,
use soapy water.
5.2. SOLDERING IRON IGNITION
5.2.1. Make sure the exhaust vent (g.1.7) is facing upwards to avoid damaging the tabletop.
5.2.2. Press the safety lock switch (g.1.5) and simultaneously use your thumb pull down the ignition trigger (g.1.4). This action will ignite the
soldering iron.
5.2.3. Hold the ignition button and release the safety lock switch (g.1.5). Press the continuous ame switch (g.1.12) for continuous use.
5.3. FLAME ADJUSTMENT
5.3.1. Move the adjustment lever (g.1.3) toward right side to increase the ame strength or toward left to decrease the ame strength.
5.3.2. When the ame is at “+” position, the longer ames may cause the torch to are or extinguish. In this situation, please adjust the gas
adjustment lever to “-” side to decrease the ame strength and set up a most ecient ame.
8 DO NOT put an ignited blowpipe down.
5.3.3. Flaring may occur during warm-up if the torch is over-lled or moved abruptly.
5.4. EXTINGUISHING
5.4.1. Press the trigger again, this will cut o the gas supply and extinguish the ame.
5.5. REMOVING THE TIP
WARNING! Ensure the iron has cooled down before removing the tip.
5.5.1. Slide the quick release collar (g.1.6) toward tip to release.
5.6. REPLACEMENT OR INSTALLATION OF INSERTS
WARNING! Always leave to cool completely before attempting to remove or replace the inserts.
5.6.1. Be sure to use the insert right for the job you want.
5.6.2. Use only the inserts that t perfectly on the tool (either threaded or slip-on). The inserts that DO NOT t perfectly can result in
uncontrolled and dangerous ame. Remove the tip by sliding Quick Release switch (g.1.13). Remove the tip and install the desired
one.
5.6.3. Tighten the inserts securely. For the complete heating of the inserts it is necessary to wait for 25 seconds.
Fig.3 Key
1 Soldering Attachment
2 Blow Torch Assembly
3 Flat Tip
4 Knife Tip
5 Chisel Tip
6 Polyfoam Cutter Tip
7 Conical Tip
8 Heat Shrink Attachment
1
2 3 4 8765
g.3
Original Language Version
© Jack Sealey Limited
AK2976 Issue 1 17/10/2024
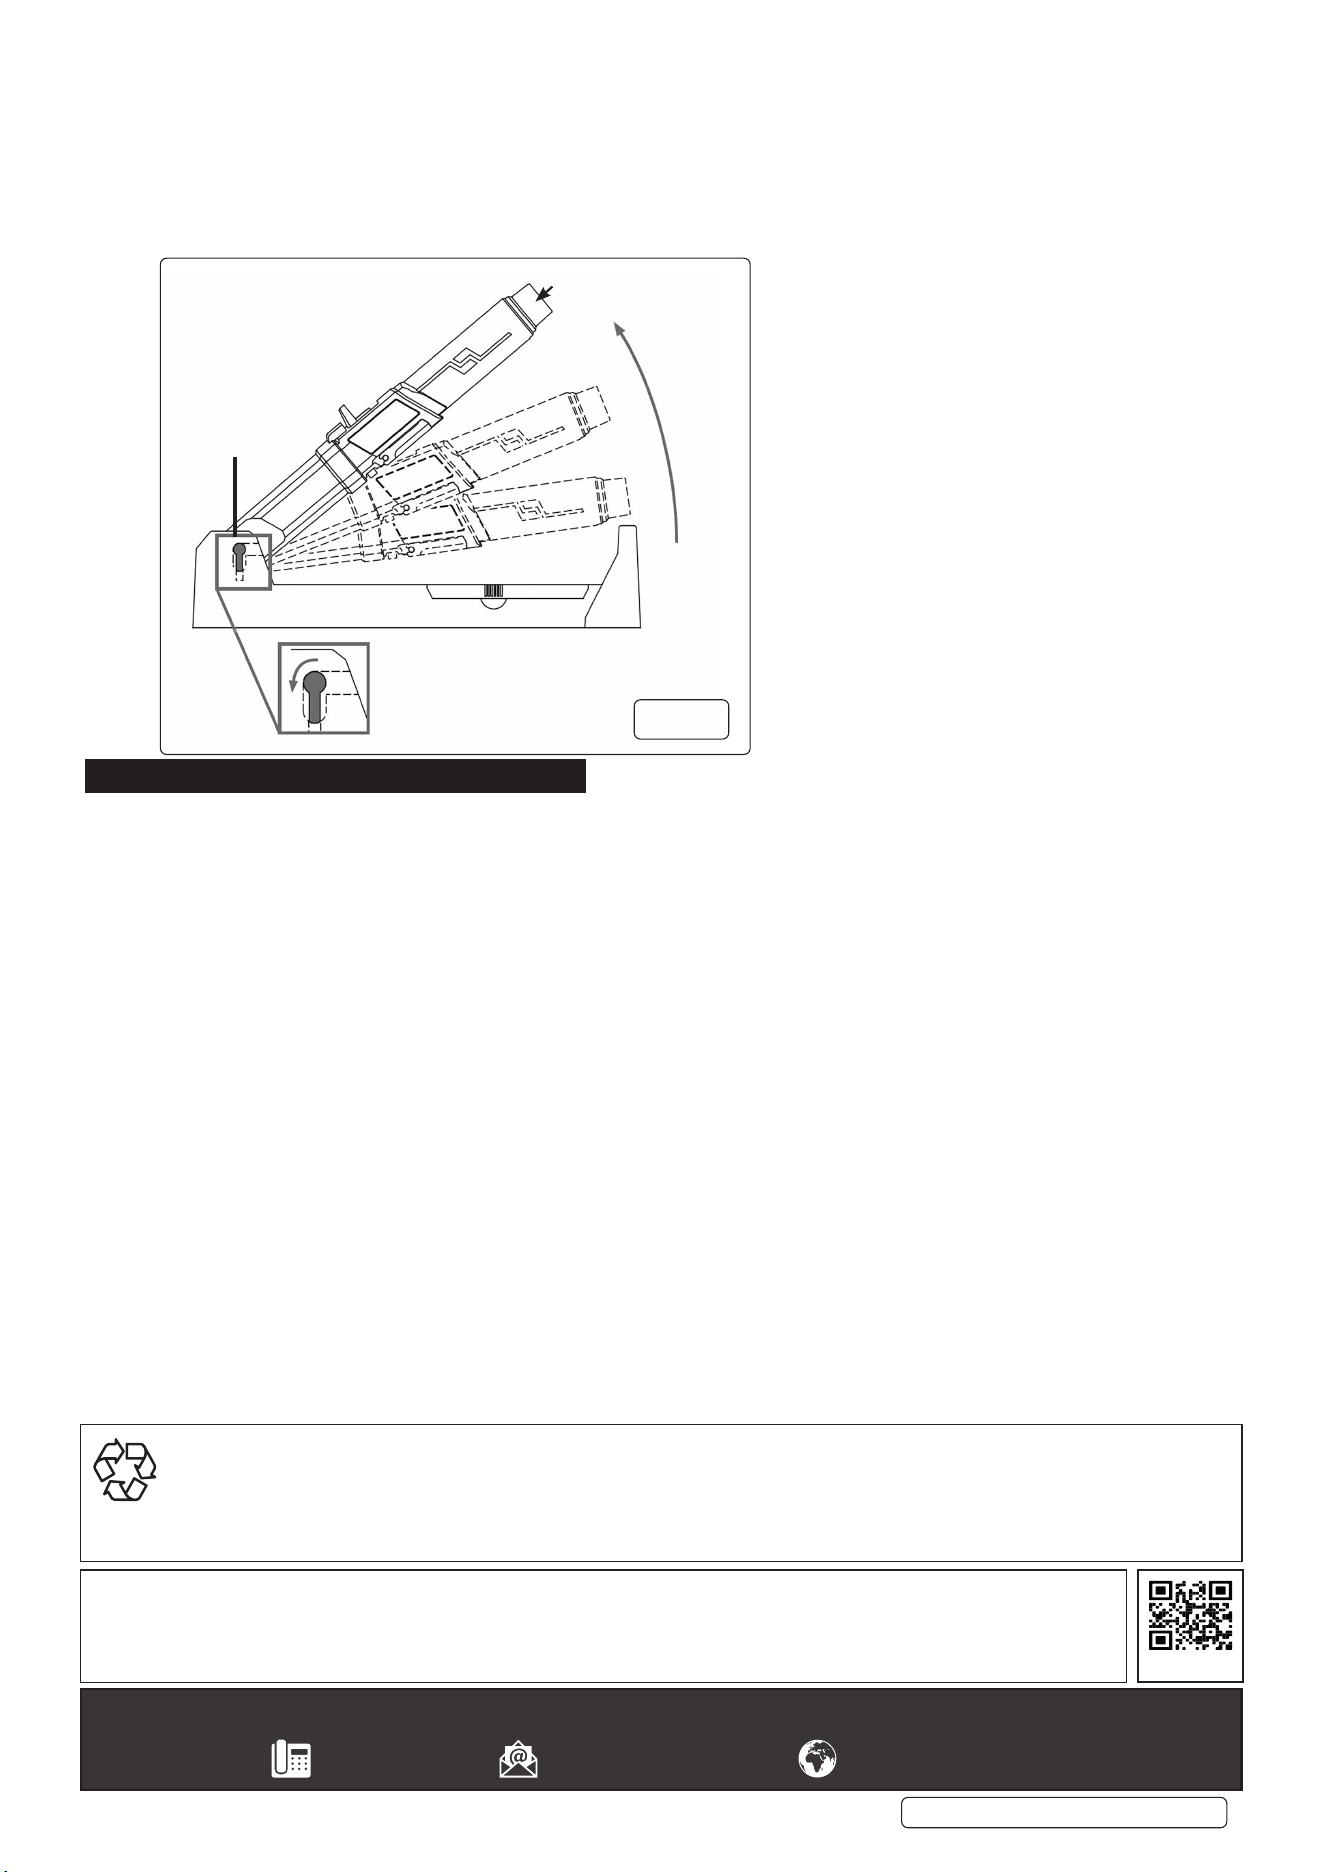
5.7. STORAGE CASE AND STAND
WARNING! Ensure the iron and all accessories are cool before stand. When using the stand, ensure the iron has been turned o.
5.7.1. To set up the storage case as a stand, lift the soldering iron from the bottom end in an upwards direction (g.4) to approximately 45
o.
.
5.7.2. When the soldering iron is at approximately 45
o
the soldering iron will locate into a groove in the stand (g.4.A). Press the cap in a
downward direction (g.4.B) to locate and secure the soldering iron.
5.7.3. Once at the top of the groove, rotate and lower the cap and soldering iron back to the horizontal position.
5.7.4. The soldering iron is now secure and back in its original storage position.
6. MAINTENANCE
6.1. REFILL
6.1.1. This appliance shall only be used with the butane rell canister or butane-propane mixture gas rell canister that complies with EN417
standard. It may be hazardous to attempt to t other types of gas cartridges or gas cylinders.
6.1.2. Fill only with butane gas. It may be hazardous to attempt to t other types of gas.
6.1.3. Rell in a well-ventilated area, away from ame, combustible materials and another person.
6.1.4. Please make sure the unit is o before relling.
6.1.5. Placing the soldering iron in an upside-down position, Insert the gas canister into the torch relling valve.
6.1.6. Fill slowly. DO NOT overll. When gas starts to overow stop lling
6.1.7. After lling, wipe lighter and hands dry before igniting.
6.1.8. The relling operation takes some minutes to allow the gas to stabilize.
6.1.9. For next relling, let the torch cool down for 5 Minutes before lling the tank.
6.1.10. Rellable containers shall only be relled by the supplier; relling by another method may lead to serious accidents.
6.2. CLEANING
6.2.1. Turn o the soldering iron and let it cool completely before cleaning.
6.2.2. The outside unit can be cleaned with a damp cloth with a little mild detergent. DO NOT use solvents.
6.2.3. Clean the attachments while still warm with a damp cloth with a little mild detergent. DO NOT use solvents.
6.3. STORAGE
6.3.1. DO NOT store at ambient temperatures greater than 50
o
C.
6.3.2. Store in dry environment.
Original Language Version
© Jack Sealey Limited
AK2976 Issue 1 17/10/2024
Sealey Group, Kempson Way, Suffolk Business Park, Bury St Edmunds, Suffolk. IP32 7AR
01284 757500 sales@sealey.co.uk www.sealey.co.uk
ENVIRONMENT PROTECTION
Recycle unwanted materials instead of disposing of them as waste. All tools, accessories and packaging should be sorted, taken to
a recycling centre and disposed of in a manner which is compatible with the environment. When the product becomes completely
unserviceable and requires disposal, drain any fluids (if applicable) into approved containers and dispose of the product and fluids
according to local regulations.
Note: It is our policy to continually improve products and as such we reserve the right to alter data, specifications and component parts
without prior notice.
Important: No Liability is accepted for incorrect use of this product.
Warranty: Guarantee is 12 months from purchase date, proof of which is required for any claim.
REGISTER YOUR
PURCHASE HERE
B
A
g.4