EN DE FR ES IT PL
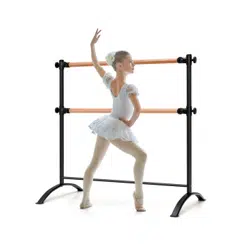
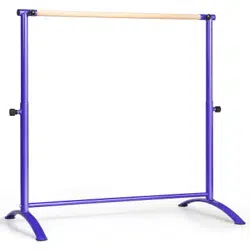
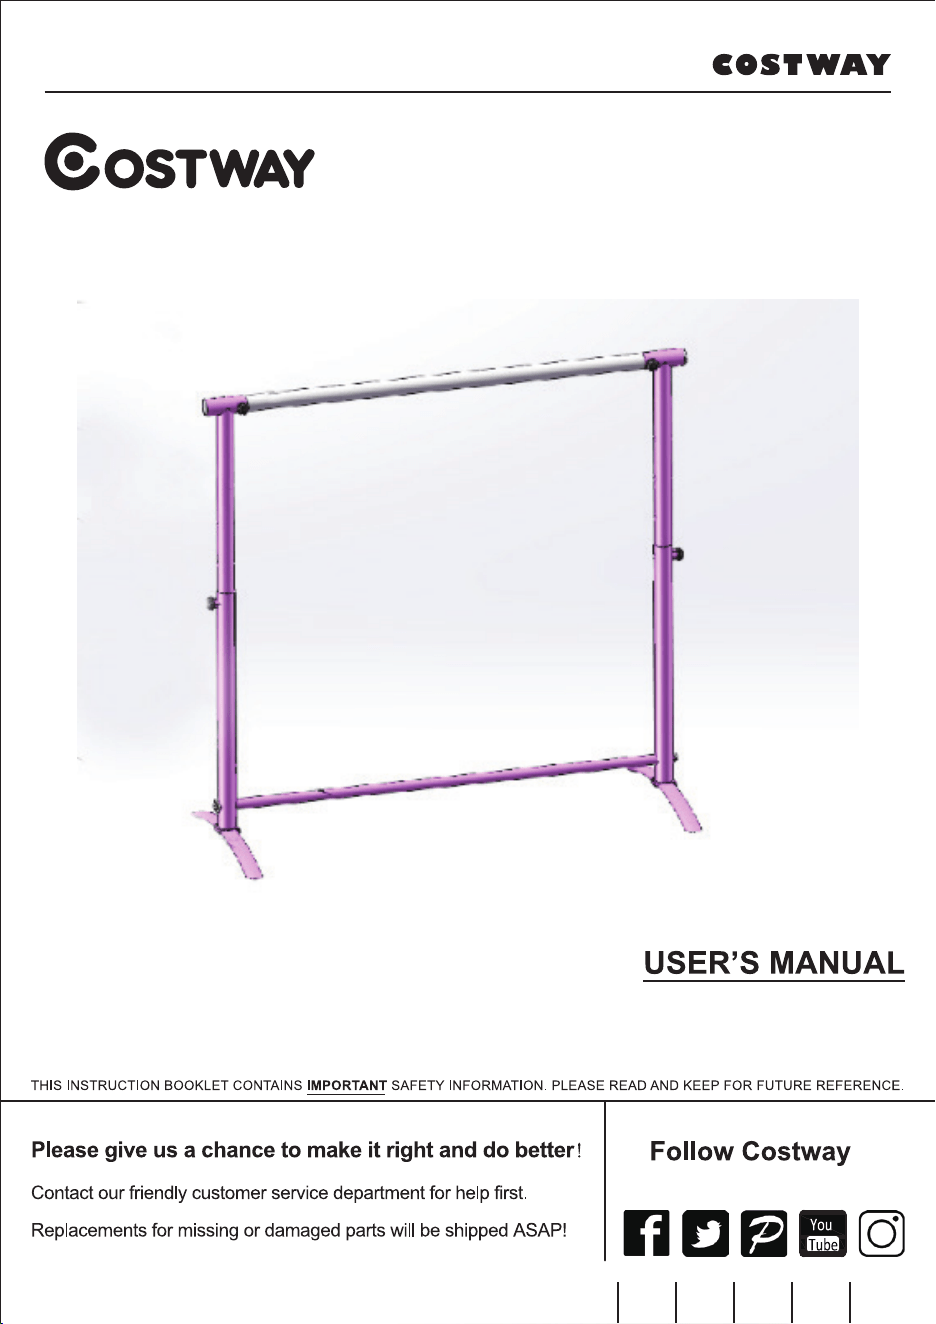
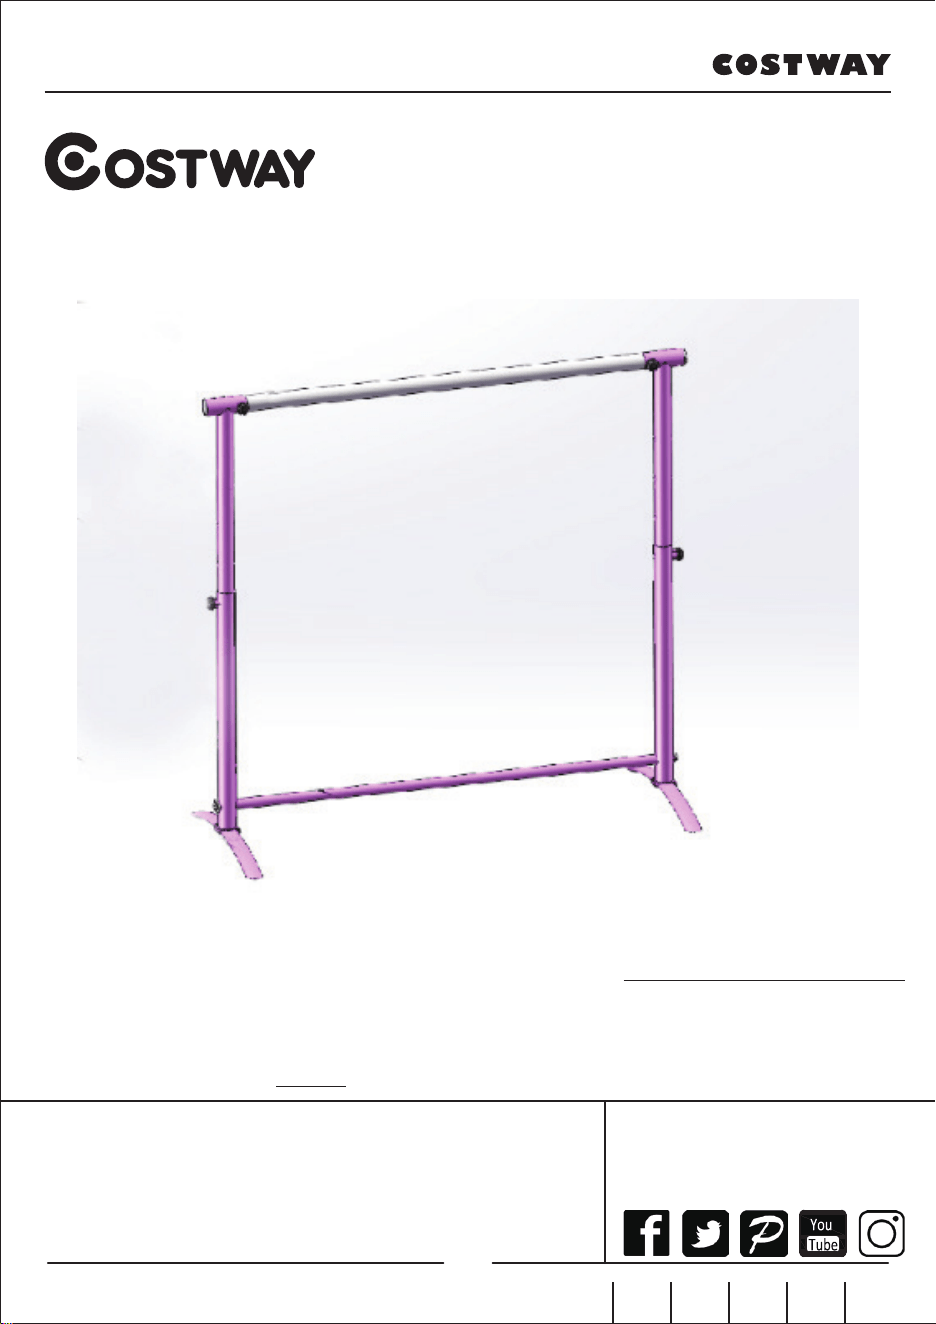
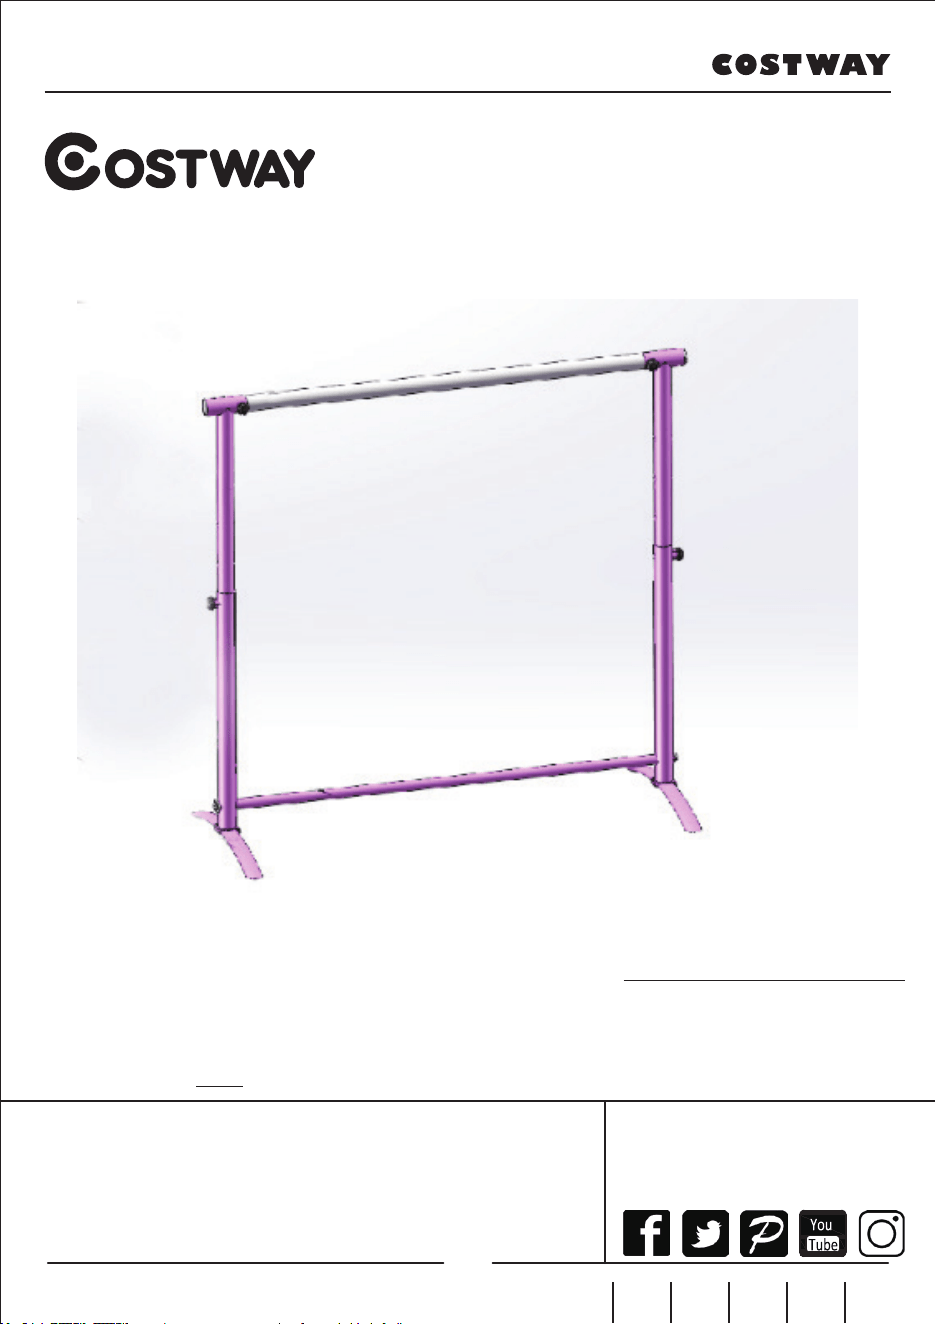
Ballet Barre
SP37447
Please read all instructions carefully and keep it for future reference.
Warnings:
Attention: For home use only.
Attention: The Product is not suitable for the children under 3 years
Danger: Keep all small parts and packaging materials for this product away from babies and
children, otherwise they may pose a choking hazard.
Danger: Lack of attachment may cause a risk of tipping or fall hazards.
General Warnings:
The product must be installed and used under the supervision of an adult.
Read through each step carefully and follow the proper order.
Remove all packaging, separate and count all parts and hardware.
Please ensure that all parts are correctly installed, incorrect installation can lead to a danger.
We recommend that, where possible, all items are assembled near to the area in which they will
be placed in use, to avoid moving the product unnecessarily once assembled.
Ensure a secure surface during construction, and place the product always on a flat, steady
and stable surface.
Please check and maintain regularly, the most important parts for suspension, fixing,
anchoring to the ground.
02

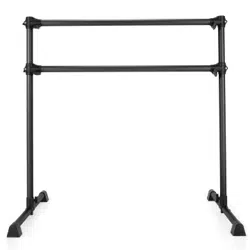
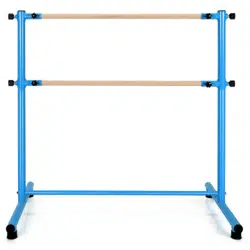
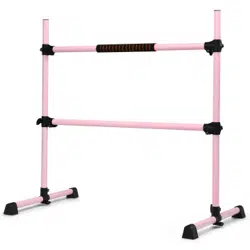
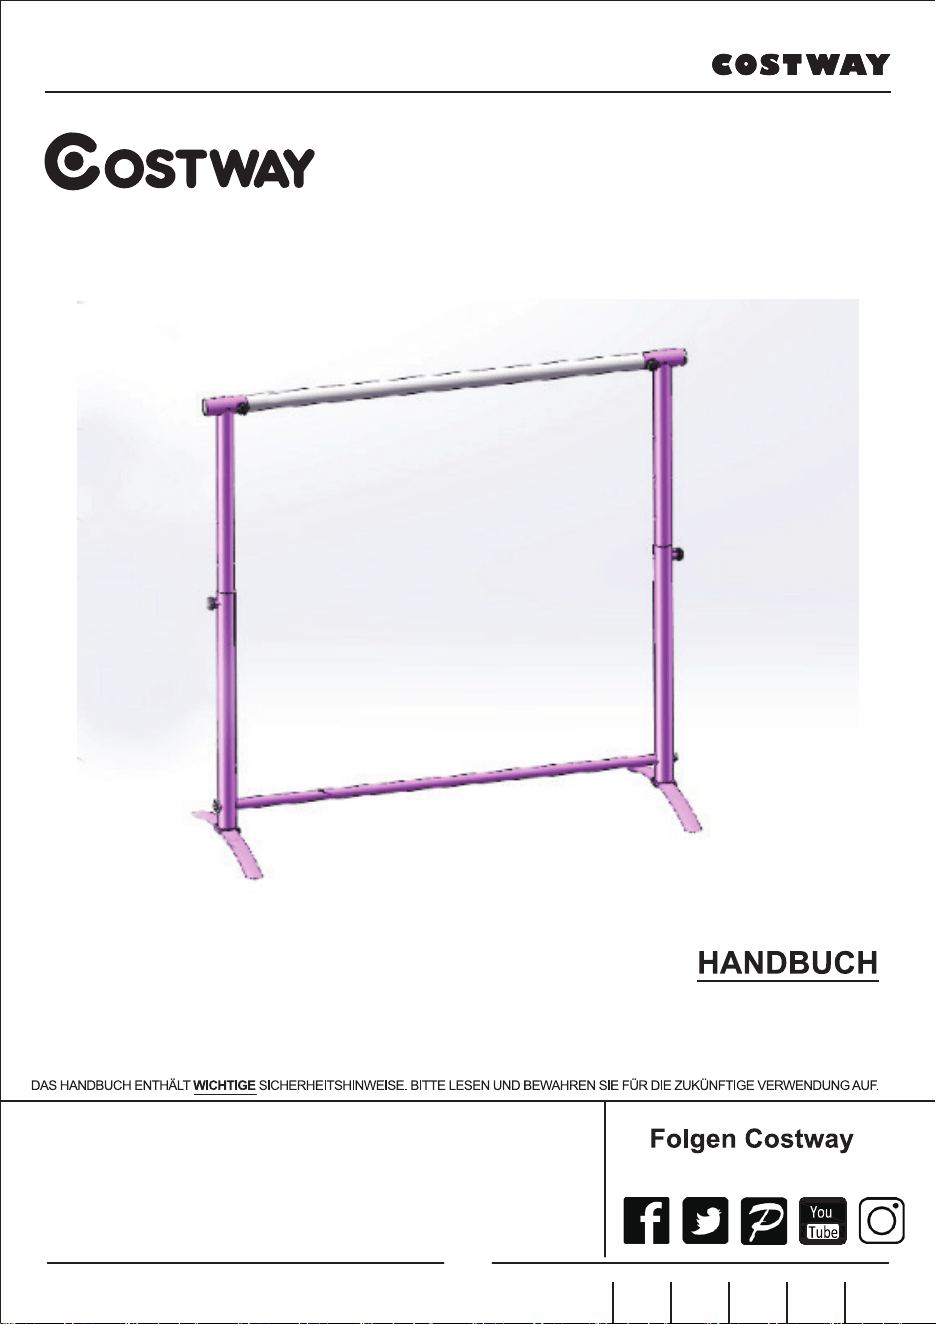
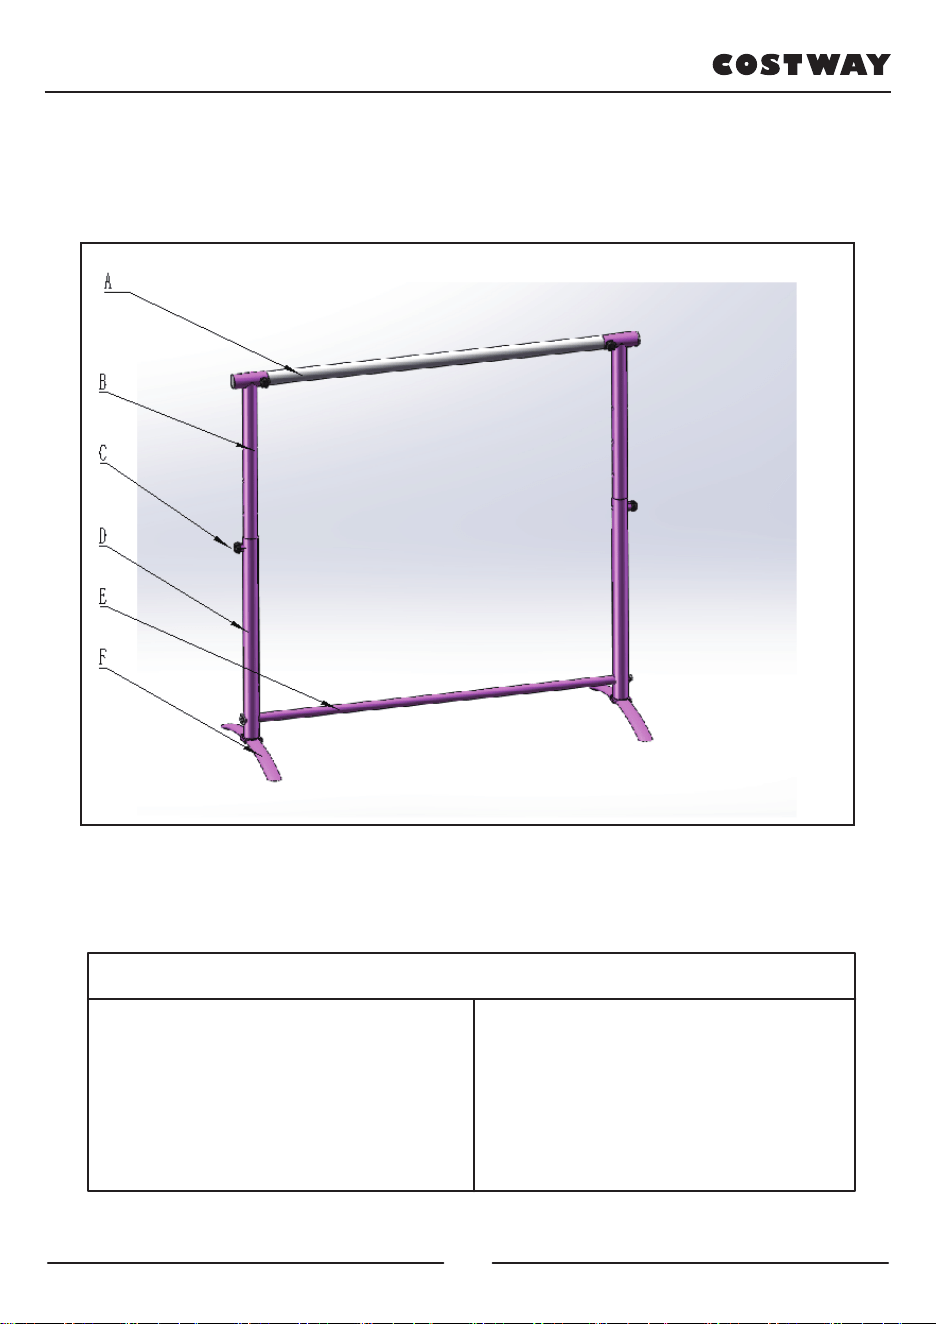
General Diagram
Part List
A: Wooden Bar
B: Adjustable Pole
C: Rotating Knob
D: Main Pole
E: Bottom Pole
F: Curved Leg
03

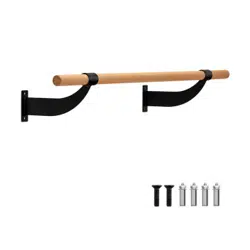
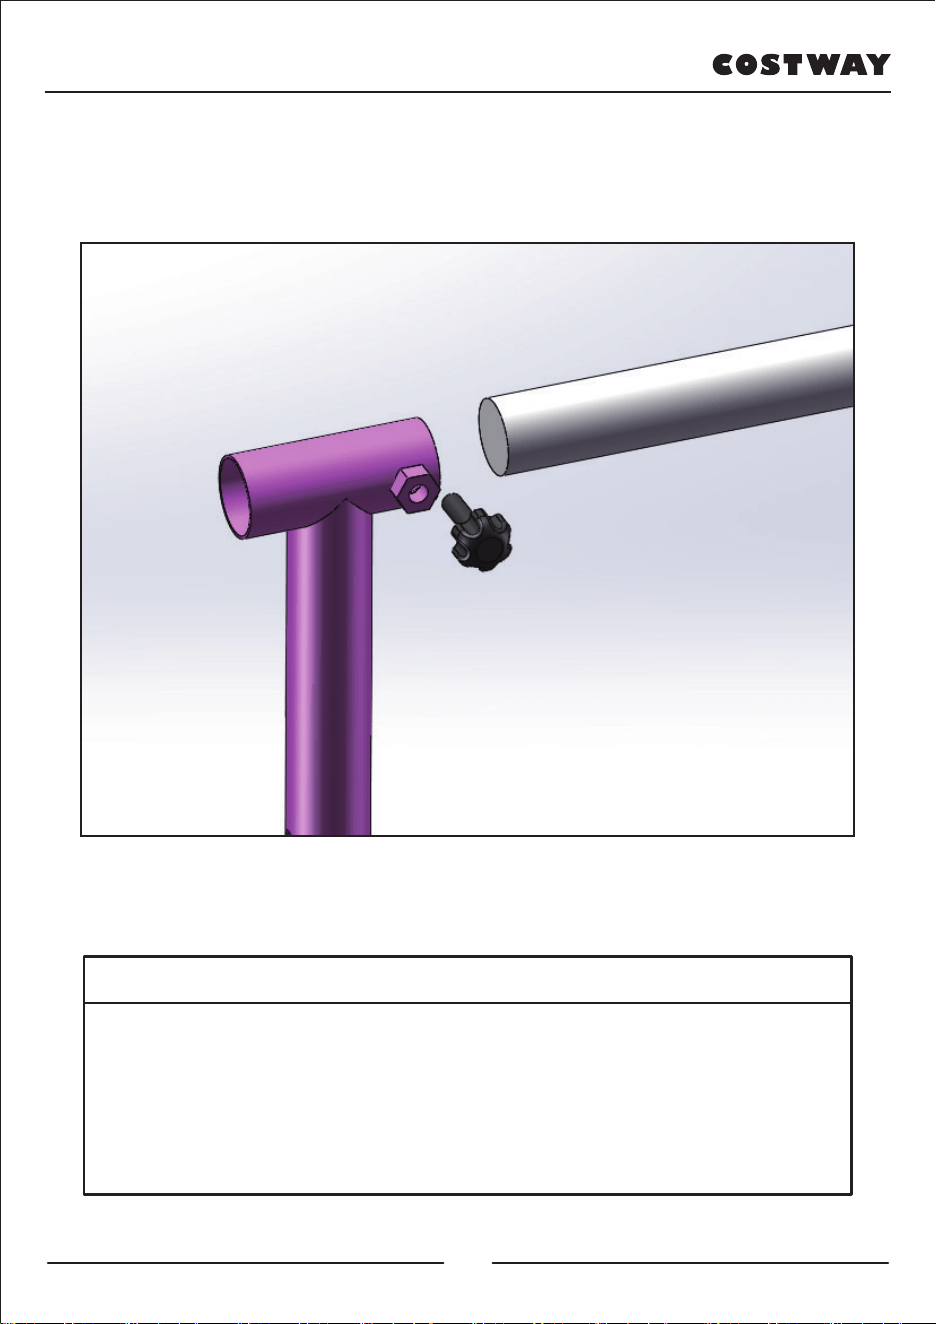
Wooden Bar Assembly
As shown in the figure: insert Part A into Part B, and tighten the
part A by rotating the knob Part C.
As shown in the picture
04
Height Adjustment Assembly
As shown in the figure: Part B has position holes with different heights. Inter Part B
into part D, and adjust the total height through different holes, finally rotate the part C to
fix them.
As shown in the picture
05

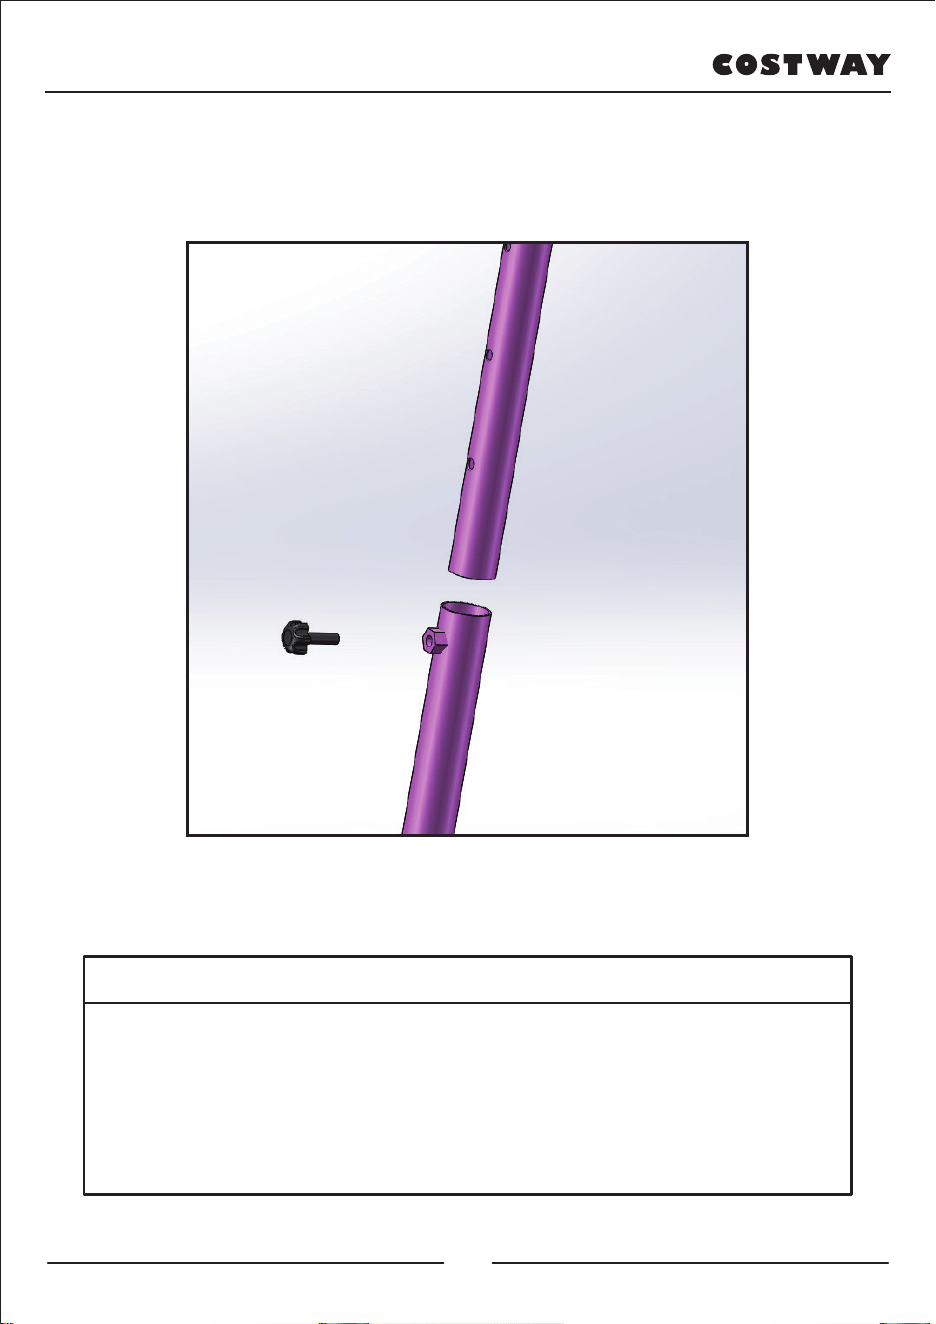
Leg Assembly
As shown in the figure:
Fix the Part D and Part F together by bolt;
Fix the Part E and the Part D together by bolt.
As shown in the picture
06
Welcome to visit our website and purchase our quality products!
We would like to extend our hear�elt thanks to
all of our customers for taking �me to assemble
this product and giving us valuable feedbacks.
With your inspiring rating, COSTWAY will be more consistent to offer you
EASY SHOPPING EXPERIENCE, GOOD PRODUCTS and EFFICIENT SERVICE!
US office: Fontana, California
UK office: Ipswich
Reward Points
Exclusive Customer Service
Personalized Recommenda�ons
Permanent Shopping Cart
Order History
07
Bitte geben Sie uns eine Chance,
es zu korrigieren und besser zu machen!
Wenden Sie sich zunächst an unseren freundlichen Kundendienst.
Ersatz für fehlende oder beschädigte Teile wird so schnell wie möglich versendet!
EN DE FR ES IT PL
Ballettstange
SP37447
08
Bitte lesen Sie alle Anweisungen sorgfältig durch und Bewahren Sie die Anweisungen zur
zukünftigen Verwendung auf.
Warnung!
Achtung! Nur für den Hausgebrauch.
Achtung! Das Produkt ist nicht geeignet für Kinder unter 3 Jahren.
Gefahr! Halten Sie alle kleinen Teile und Verpackungsmaterialien fern von Babys und Kindern, da
Erstickungsgefahr besteht.
Gefahr! Bei fehlender Befestigung kann Kippgefahr oder Sturzgefahr bestehen.
Warnhinweise:
Das Produkt muss unter Aufsicht eines Erwachsenen installiert und verwendet werden.
Lesen Sie jeden Schritt sorgfältig durch und befolgen Sie die richtige Reihenfolge.
Entfernen Sie alle Verpackungen, separieren und zählen Sie alle Teile und Hardware vor der
Montage oder Verwendung.
Bitte beachten Sie darauf, alle Teile richtig anzubringen, eine falsche Montage kann zu einer
Gefährdung führen.
Wir empfehlen, wenn möglich, alle Artikel in der Nähe des Einsatzortes zu montieren, um eine
unnötige Bewegung der Artikel zu vermeiden.
Achten Sie auf einen sicheren Untergrund während des Aufbaus stellen, und stellen Sie das
Produkt immer auf eine glatte, flache und stabile Oberfläche.
Bitte überprüfen und warten Sie regelmäßig die wichtigsten Teile zur Aufhängung,
Befestigung, Verankerung am Boden.
Kontak�eren Sie uns!
Senden Sie diesen Artikel NICHT zurück.
Wenden Sie sich zunächst an unseren freundlichen Kundendienst.
Vor dem Beginnen
09
Allgemeines Diagramm
Teileliste
A: Holzstange
B: Einstellbare Stange
C: Drehknopf
D: Hauptstange
E: Untere Stange
F: Gebogenes Bein
10
Holzstangenbaugruppe
Wie in der Abbildung gezeigt: Teil A in Teil B einführen und Teil A
durch Drehen des Knopfes Teil C festziehen.
As shown in the picture
11

Komponenten zur Höhenverstellung
Wie in der Abbildung gezeigt: Teil B hat Positionslöcher mit
unterschiedlichen Höhen. Inter Teil B in Teil D und stellen Sie die
Gesamthöhe durch verschiedene Löcher ein. Drehen Sie
schließlich den Teil C, um sie zu fixieren.
As shown in the picture
12

Beinmontage
Wie in der Abbildung gezeigt:
Befestigen Sie Teil D und Teil F mit einer Schraube.
Befestigen Sie Teil E und Teil D mit einer Schraube.
As shown in the picture
13
VIELEN
DANK
Ihre Vorschläge und Kommentare für COSTWAY sind wirklich wich�g für uns!
Wir möchten uns bei allen Kunden herzlich bedanken,
dass sie sich die Zeit genommen haben, dieses Produkt
zusammenzubauen und uns wertvolle Bewertung
zukommen zu lassen.
Mit Ihrer inspirierenden Bewertung wird COSTWAY konsistenter sein, um Ihnen
EIN SCHÖNES EINKAUFSERLEBNIS, GUTE PRODUKTE und EFFIZIENTEN SERVICE zu bieten!
DE office:FDS GmbH,Neuer Höltigbaum 36,22143 Hamburg,Deutschland
Belohnungspunkte
Exklusiver Kundendienst
Personalisierte Empfehlungen
Permanenter Einkaufswagen
Bestellverlauf
5 Sterne Bewertung
14

CE MANUEL D’INSTRUCTIONS CONTIENT DES INFORMATIONS IMPORTANTES SUR LA SÉCURITÉ. VEUILLEZ LIRE ET CONSERVER POUR LA RÉFÉRENCE FUTURE.
EN DE FR ES IT PL
Barre de Danse
SP37447
15
Veuillez lire attentivement toutes les instructions et les conserver pour la référence ultérieure.
Avertissements:
Attention : Pour l’usage domestique seulement.
Attention : Le produit ne convient pas aux enfants de moins de 3 ans
Danger : Gardez toutes les petites pièces et les matériaux d’emballage de ce produit hors de
portée des bébés et des enfants pour éviter un risque d’étouffement.
Danger : La manque de la fixation pourrait entraîner un risque de basculement ou de chute.
Avertissements Généraux :
Le produit doit être installé et utilisé sous la surveillance d’un adulte.
Lisez attentivement chaque étape et suivez l’ordre correct.
Retirez tous les emballages, séparez et comptez toutes les pièces et le matériel.
Veuillez vous assurer que toutes les pièces sont correctement installées, une installation
incorrecte peut entraîner un danger.
Nous recommandons que, dans la mesure du possible, tous les articles soient assemblés à
proximité de la zone dans laquelle ils seront utilisés, afin d’éviter de déplacer inutilement le
produit une fois assemblé.
Assurez-vous que la surface est solide pendant l’assemblage et placez toujours le produit
sur une surface plane et stable.
Veuillez vérifier et entretenir régulièrement les pièces les plus importantes pour la
suspension, la fixation, l’ancrage au sol.
16

Schéma général
Liste des pièces
A: Barre en bois
B: Poteau réglable
C: Bouton rotatif
D: Poteau principal
E: Support inférieur
F: Pied courbé
17

Assemblage de barre
Comme indiqué sur la figure : insérez la barre en bois (A) dans le
poteau réglable (B), et serrez la barre en bois (A) en tournant le
bouton (C).
As shown in the picture
18

Réglage de la hauteur
Comme le montre la figure : le poteau réglable (B) a des trous de
positionnement de hauteurs différentes. Insérez le poteau réglable
(B) dans le poteau principal (D), et ajustez la hauteur totale en
fonction des trous, puis tournez la bouton (C) pour les fixer.
As shown in the picture
19

Assemblage de pied
Comme indiqué sur la figure :
Fixez le poteau principal (D) et le pied (F) ensemble avec des boulons;
Fixez le support inférieur (E) et le poteau principal (D) ensemble
avec des boulons.
As shown in the picture
20
Bienvenue pour visiter notre site et acheter nos produits de qualité!
Nous tenons à vous présenter nos remerciements
sincères à tous nos clients qui prennent beaucoup
de temps pour assembler ce produit et nous donner
des commentaires précieux.
Avec votre évaluation inspirante, COSTWAY sera plus professionnel pour vous offrir une
BONNE EXPÉRIENCE D’ACHATS, de BONS PRODUITS et un SERCIVE EFFICACE !
FR office : 26 RUE DU VERTUQUET, 59960 NEUVILLE EN FERRAIN, FRANCE
Points de Récompense
Service à la Clientèle Exclusif
Recommanda�ons Personnalisées
Panier Permanent
Historique des Commandes
merci
21
ESTE MANUAL DE INSTRUCCIONES CONTIENE IMPORTANTES INFORMACIONES DE SEGURIDAD, POR FAVOR LO LEA Y GUARDE PARA REFERENCIAS FUTURAS.
EN DE FR ES IT PL
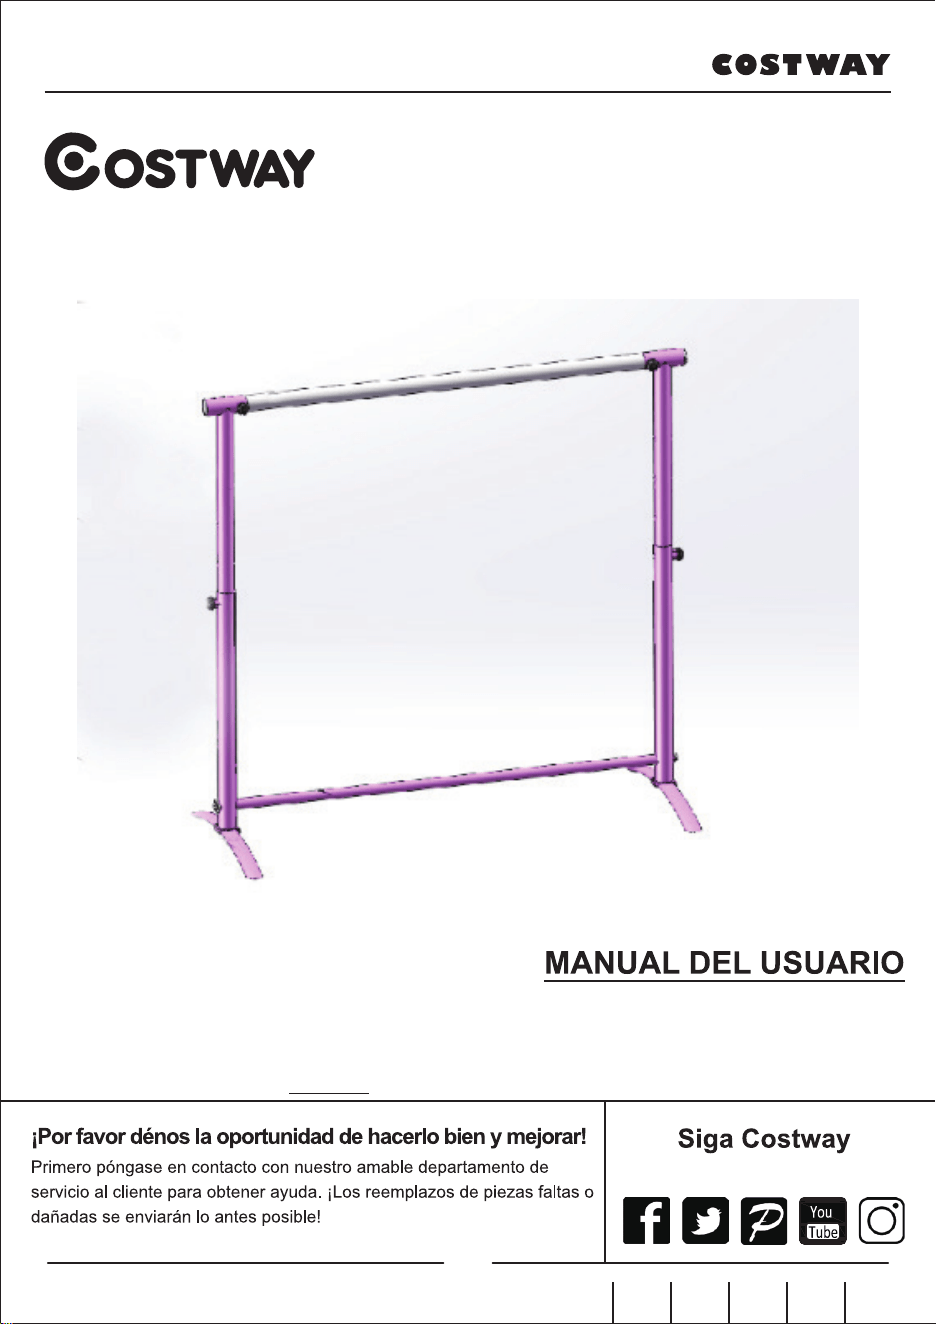
Barra de Ballet
SP37447
22
Lea todas las instrucciones detenidamente y guárdelas para futuras referencias.
Advertencias:
Atención: solo es para uso doméstico.
Atención: el producto no es adecuado para niños menores de 3 años
Peligro: Mantenga todas las piezas pequeñas y materiales de embalaje de este producto fuera del
alcance de bebés y niños, de lo contrario, pueden causar un peligro de asfixia.
Peligro: La falta de fijación puede provocar un riesgo de vuelco o caída.
Advertencias Generales:
El producto debe instalarse y usarse bajo la supervisión de un adulto.
Lea detenidamente cada paso y siga el orden correcto.
Quite todo el embalaje, separe y cuente todas las piezas y los accesorios.
Asegúrese de que todas las piezas estén instaladas correctamente, la instalación incorrecta
puede provocar un peligro.
Recomendamos que, cuando sea posible, todos los artículos se ensamblen cerca del área en la
que se colocarán en uso, para evitar mover el producto innecesariamente una vez ensamblado.
Asegúrese de que esté en una superficie segura durante la construcción, y coloque el
producto siempre sobre una superficie plana y estable.
Compruebe y mantenga regularmente las partes más importantes para la suspensión, fijación
y anclaje al suelo.
ES
¡Contáctenos!
NO devuelva este artículo.
Primero póngase en contacto con nuestro amable departamento de servicio al cliente para
obtener ayuda.
23

Diagrama General
Lista de Piezas
A: Barra de madera
B: Poste ajustable
C: Perilla giratoria
D: Poste principal
E: Poste inferior
F: Pata curva
24

Montaje de la Barra de Madera
Como se muestra en la figura: inserte la pieza (A) en la pieza (B), y
apriete la pieza (A) girando la perilla (C).
As shown in the picture
25

Ajuste de la Altura
Como se muestra en la figura: La pieza (B) tiene orificios de
posición con diferentes alturas.
Inserte la pieza (B) en la pieza (D), y ajuste la altura total a través
de diferentes orificios, finalmente gire la pieza (C) para fijarlas.
As shown in the picture
26
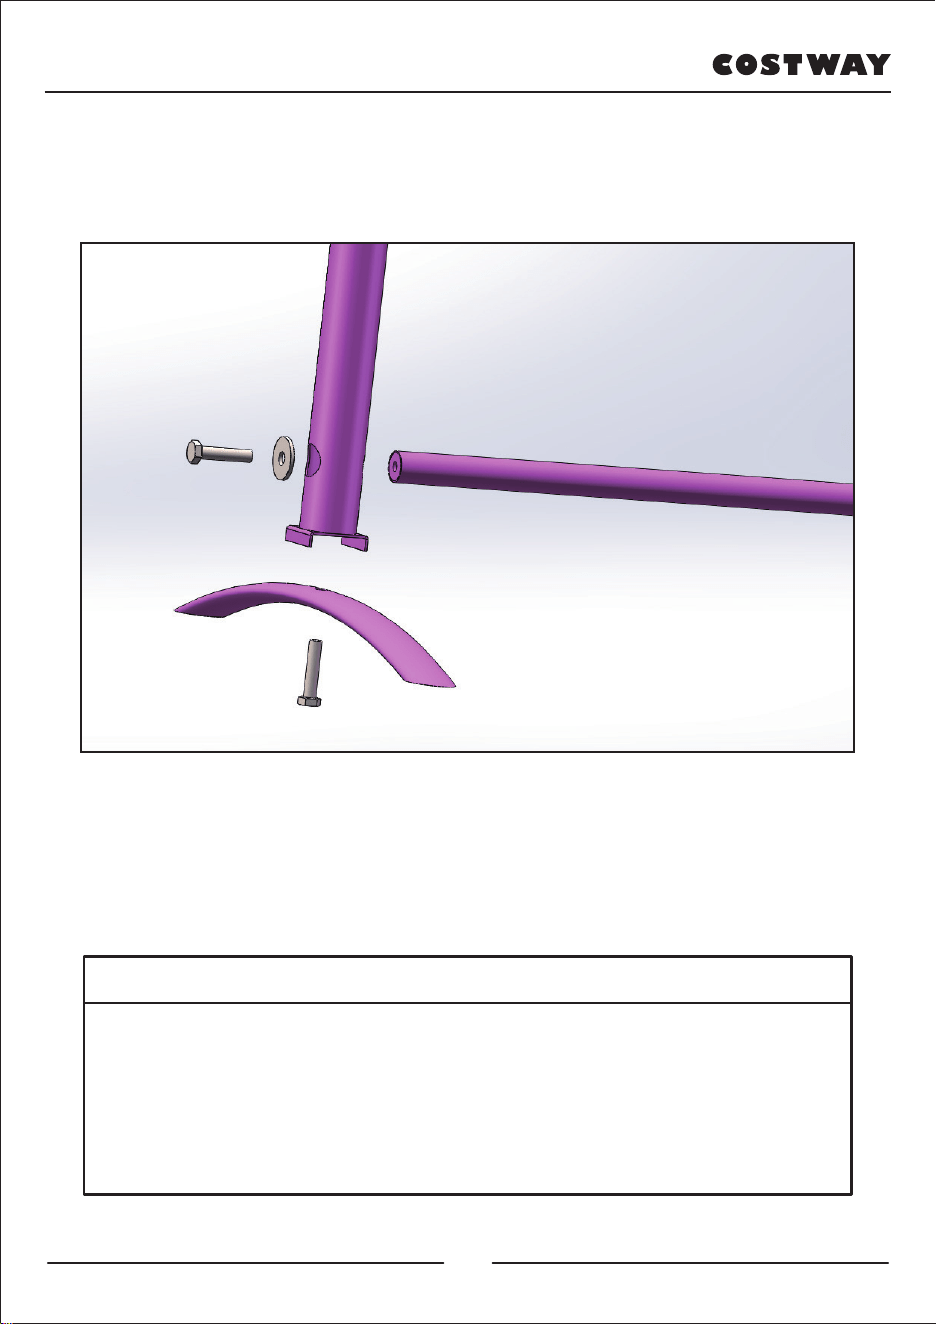
Montaje de la Pata
Como se muestra en la figura:
Fije la pieza (D) y la pieza (F) juntas con el perno;
Fije la pieza (E) y la pieza (D) juntas con el perno.
As shown in the picture
27

¡Bienvenido a visitar nuestro si�o web y comprar nuestros
productos de alta calidad!
Nos gustaría expresar nuestro más sincero
agradecimiento a todos nuestros clientes por tomarse
el �empo de ensamblar este producto y brindarnos
valiosos comentarios.
¡Con su calificación inspiradora, COSTWAY será más consistente para ofrecerle EXPERIENCIA
DE COMPRA CONVENIENTE, BUENOS PRODUCTOS y SERVICIO EFICIENTE!
EE.UU.: Fontana, California
Reino Unido: Ipswich
Puntos de recompensa
Servicio al cliente exclusivo
Recomendaciones personalizadas
Carrito de compras permanente
Historial de pedidos
Gracias
28
Seguire Costway
Per prima cosa contatta il nostro servizio di assistenza clienti.
Sostituzioni per parti mancanti o danneggiate saranno spedite al più
presto!
MANUALE UTENTE
QUESTO MANUALE DI ISTRUZIONI CONTIENE IMPORTANTI INFORMAZIONI SULLA SICUREZZA. SI PREGA DI LEGGERE E CONSERVARE PER RIFERIMENTO FUTURO.
Vi preghiamo di darci la possibilità di fare bene e fare di meglio!
EN DE FR ES IT PL
Barra da Balletto
SP37447
29
Conta�aci!
NON restituire questo articolo.
Per prima cosa contatta il nostro servizio di assistenza clienti.
Prima di iniziare
Si prega di leggere attentamente tutte le istruzioni e conservarle per riferimenti futuri.
Avvertenze:
Attenzione: Solo per uso domestico.
Attenzione: Il prodotto non è adatto a bambini di età inferiore a 3 anni
Pericolo: Tenere tutte le parti piccole e i materiali di imballaggio per questo prodotto lontano da
neonati e bambini, altrimenti potrebbero rappresentare un rischio di soffocamento.
Pericolo: La mancanza di collegamento può causare rischi di ribaltamento o caduta.
Avvertenze Generali:
Il prodotto deve essere installato e utilizzato sotto la supervisione di un adulto.
Leggere attentamente ogni passo e seguire l'ordine corretto.
Rimuovere tutti gli imballaggi, separare e contare tutte le parti e l'hardware.
Assicurarsi che tutte le parti siano installate correttamente, un'installazione errata può
comportare un pericolo.
Raccomandiamo che, ove possibile, tutti gli articoli siano assemblati vicino all'area in cui
verranno messi in uso, per evitare di spostare inutilmente il prodotto una volta assemblato.
Assicurare una superficie sicura durante la costruzione e posizionare il prodotto sempre
su una superficie piana, stabile e solida.
Si prega di controllare e mantenere regolarmente le parti più importanti per la sospensi-
one, il fissaggio, l'ancoraggio a terra.
E-mail
IT: cs.it@costway.com
30

Diagramma Generale
Lista de Piezas
A: Barra di Legno
B: Palo Regolabile
C: Manopola Rotante
D: Palo Principale
E: Palo Inferiore
F: Gamba Curva
31

Assemblaggio della Barra
Come mostrato in figura: inserire la parte (A) nella parte (B) e
serrare la parte (A) ruotando la manopola parte (C).
As shown in the picture
32

Regolazione dell'Altezza
Come mostrato in figura: La parte (B) ha fori di posizione con
altezze diverse. Inserire la parte (B) nella parte (D) e regolare
l'altezza totale attraverso diversi fori, infine ruotare la parte (C)
per fissarli.
As shown in the picture
33

Assemblaggio delle Gambe
Come mostrato in figura:
Fissare la parte (D) e la parte (F) insieme mediante il bullone;
Fissare la parte (E) e la parte (D) insieme mediante il bullone.
As shown in the picture
34
Benvenu� a visitare il nostro sito Web e acquistare i nostri
prodo� di qualità!
Ringraziamo sinceramente tu� i nostri clien� per
aver dedicato del tempo per assemblare questo
prodo�o e fornirci preziosi feedback.
Con il tuo commento stimolante, COSTWAY continuerà a offrirti FACILITÀ DI ACQUISTO FACILE,
PRODOTTI BUONI e SERVIZIO EFFICIENTE!
US ufficio: Fontana, California
UK ufficio: Ipswich
Pun� del premio
Servizio dei clien� esclusivo
Raccomandazioni personalizzate
Carrello permanente
Storia degli ordini
Grazie
35
Śledź Costway
Jeśli potrzebujesz pomocy skontaktuj się z naszym przyjaznym działem
obsługi klienta.
Ewentualne braki elementów zostaną uzupełnione najszybciej jak to możliwe!
INSTRUKCJA OBSŁUGI
Stojący drążek baletowy
SP37447
NINIEJSZA INSTRUKCJA ZAWIERA ISTOTNE INFORMACJE DOTYCZĄCE BEZPIECZEŃSTWA. PROSIMY O ZAPOZNANIE SIĘ Z NIĄ I ZACHOWANIE JEJ DO WGLĄDU W PRZYSZŁOŚCI.
W razie kłopotów skontaktuj się z nami!
EN DE FR ES IT PL
36
Przeczytaj uważnie wszystkie instrukcje i zachowaj je na przyszłość.
Uwaga!
Uwaga: Produkt wyłącznie do użytku domowego
Uwaga: Produkt nie jest odpowiedni dla dzieci poniżej 3 lat
Niebezpieczeństwo: Trzymaj wszystkie małe części i opakowania tego produktu z dala od
niemowląt i dzieci - w przeciwnym razie mogą stwarzać ryzyko zadławienia.
Niebezpieczeństwo: Brak mocowania może spowodować ryzyko przewrócenia lub upadku.
Ogólne ostrzeżenia:
Produkt musi być złożony i używany pod nadzorem osoby dorosłej.
Przeczytaj uważnie każdy krok i postępuj we właściwej kolejności.
Usuń opakowanie i upewnij się, że zestaw zawiera wszystkie części i elementy montażowe.
Upewnij się, że wszystkie części są poprawnie połączone, nieprawidłowa instalacja może
prowadzić do wypadku.
Zalecamy, aby w miarę możliwości wszystkie elementy były montowane w pobliżu miejsca, w
którym będą używane, aby uniknąć niepotrzebnego przenoszenia produktu po złożeniu.
Zapewnij bezpieczną przestrzeń roboczą podczas montażu i upewnij się, że produkt znajduje
się na płaskiej i stabilnej powierzchni.
Należy regularnie sprawdzać i konserwować najważniejsze części produktu takie jak
mocowania czy zakotwiczenie do podłoża.
Skontaktuj się z nami!
Nie zwracaj tego produktu.
Jeśli potrzebujesz pomocy, skontaktuj się z naszym przyjaznym działem obsługi klienta.
Zanim Zaczniesz
E-mail
PL: sklep@costway.com
37

Schemat ogólny
Lista części
A: Drewniany pręt
B: Regulowany słupek
C: Pokrętło obrotowe
D: Główny słupek
E: Dolny słupek
F: Zakrzywiona nóżka
38

Montaż drewnianego pręta
Włóż część A do części B i dokręć część A, obracając pokrętło
(część C), tak jak pokazano na rysunku.
As shown in the picture
39

Regulacja wysokości
Jak pokazano na rysunku: Część B ma otwory pozycjonujące na
różnych wysokościach. Wsuń część B do części D i ustal wysokość
za pomocą różnych otworów, na koniec obróć część C, aby
zamocować części.
As shown in the picture
40

Montaż nóżki
Jak pokazano na rysunku:
Zmontuj ze sobą część D i część F i dokręć za pomocą śruby;
Zmontuj ze sobą część E i część D i dokręć za pomocą śruby.
As shown in the picture
41
Zapraszamy do odwiedzenia naszej strony internetowej!
Dziękujemy za dokonanie zakupu w naszym
sklepie i zapraszamy do odwiedzenia go w
przyszłości!
Twoja ocena nas inspiruje! Dzięki niej COSTWAY będzie dążył do zaoferowania ci WYDAJNEJ
OBSŁUGI, DOBRYCH PRODUKTÓW I BEZPROBLEMOWYCH ZAKUPÓW!
PL office: Gdańsk
punkty lojalnościowe
doskonała obsługa klienta
personalizowane rekomendacje
karta stałego klienta
historia zamówień
Pięciogwiazdkowa Ocena
42