THIS INSTRUCTION BOOKLET CONTAINS IMPORTANT SAFETY INFORMATION. PLEASE READ AND KEEP FOR FUTURE REFERENCE.
DE FR ES IT PLEN
USER'S MANUAL/HANDBUCH
/MANUEL DE L'UTILISATEUR/MANUAL DEL USUARIO
/MANUALE UTENTE/INSTRUKCJA OBSŁUGI
UY10025
Baby Playpen / Baby Laufstall / Parc Bébé /
Parque Infantil / Recinto per Bambini / Stolik boczny

Before You Start
General Warnings:
Danger! Keep all small parts and packaging materials for this product away from
babies and children, otherwise they may pose a choking hazard.
The product must be installed and used under the supervision of an adult.
Read through each step carefully and follow the proper order.
Remove all Packaging, separate and count all parts and hardware before
installation.
Please ensure that all parts are correctly installed, incorrect installation can lead to
a danger.
We recommend that, where possible, all items are assembled near the area in
which they will be placed in use, to avoid moving the product unnecessarily once
assembled.
Ensure a secure surface during installation, and place the product always on a flat,
steady and stable surface.
Please read all instructions carefully and keep it for future reference.
EN
02

Bevor Sie beginnen
Hinweis zur Montage
Achtung! Halten Sie alle kleinteile und Verpackungsmaterialien fern von Babys und
Kindern, ansonsten besteht Erstickungsgefahr.
Der Artikel muss unter der Aufsicht eines Erwachsenen montiert und benutzt
werden.
Lesen Sie jeden Schritt sorgfältig durch und befolgen Sie die richtige Reihenfolge.
Entfernen Sie alle Verpackungen, Überprüfen Sie, ob alle Teile und Zubehörteile
vorhanden sind.
Bitte stellen Sie sicher, dass alle Teile richtig montiert sind, eine falsche Montage
kann zu einer Gefahr führen.
Wir empfehlen, alle Teile möglichst in der Nähe des Aufstellungsortes zu
montieren, um unnötige Bewegungen nach der Montage zu vermeiden.
Achten Sie bei der Montage auf einen sicheren Untergrund und stellen Sie den
Artikel immer auf eine ebene, feste und stabile Fläche.
Bitte sorgfältig lesen und zum späteren Nachschlagen aufbewahren.
DE
03

Avant de Commencer
Avertissements Généraux :
Danger ! Éloignez toutes les petites pièces et le matériel d’emballage des bébés et
des enfants pour éviter un risque d’étouffement.
Le produit doit être installé et utilisé sous la surveillance d’un adulte.
Lisez attentivement chaque étape et suivez le bon ordre.
Retirez tous les emballages, séparez et comptez toutes les pièces et le matériel
avant l’installation.
Assurez-vous que toutes les pièces soient correctement installées. Une installation
incorrecte peut entraîner un danger.
Assurez une surface sûre pendant l’assemblage et placez le produit toujours sur
une surface plane et stable.
Veuillez lire attentivement toutes les instructions et les conserver pour la référence
ultérieure.
FR
04
Antes de Empezar
Advertencias Generales:
¡Peligro! Mantenga todas las piezas pequeñas y los materiales de embalaje de este
producto fuera del alcance de los bebés y los niños, ya que, de lo contrario, pueden
suponer un peligro de asfixia.
El producto debe instalarse y usarse bajo la supervisión de un adulto.
Lea cada paso cuidadosamente y siga el orden correcto.
Retire todo el embalaje, separe y cuente todas las piezas y los accesorios antes de
la instalación.
Asegúrese de que todas las piezas estén instaladas correctamente, una instalación
incorrecta puede provocar un peligro.
Asegure una superficie segura durante el montaje, y coloque el producto siempre
sobre una superficie plana, firme y estable.
Lea todas las instrucciones detenidamente y guárdelas para futuras referencias.
ES
05

Prima di iniziare
Avvertenza:
Pericolo! Tenere tutte le piccole parti e i materiali di imballaggio di questo prodotto
lontano da neonati e bambini, altrimenti potrebbero rappresentare un rischio di
soffocamento.
Il prodotto deve essere installato e utilizzato sotto la supervisione di un adulto.
Leggere attentamente ogni passo e seguire l'ordine corretto.
Rimuovere tutti gli imballaggi, separare e contare tutte le parti e tutti gli accessori.
Si prega di assicurarsi che tutte le parti siano installate correttamente,
un'installazione errata può portare a un pericolo.
Si consiglia, ove possibile, di montare tutti gli articoli vicino alla zona in cui verranno
posti in uso, per evitare di spostare inutilmente il prodotto una volta assemblato.
Garantire una superficie sicura durante il montaggio e posizionare il prodotto sempre
su una superficie piana, stabile.
Si prega di leggere attentamente tutte le istruzioni e conservarle per riferimento futuro.
IT
06

Zanim Zaczniesz
Ogólne ostrzeżenia:
Niebezpieczeństwo! Wszystkie małe części i materiały opakowaniowe należy
przechowywać z dala od niemowląt i dzieci, w przeciwnym razie mogą stwarzać ryzyko
zadławienia.
Produkt musi być zainstalowany i używany pod nadzorem osoby dorosłej.
Przeczytaj uważnie każdy krok i postępuj we właściwej kolejności.
Usuń opakowanie i upewnij się, że zestaw zawiera wszystkie części i elementy
montażowe.
Upewnij się, że wszystkie części są zainstalowane poprawnie - nieprawidłowa
instalacja może prowadzić do wypadków.
Zalecamy, aby w miarę możliwości wszystkie elementy były montowane w pobliżu
miejsca, w którym będą używane, aby uniknąć niepotrzebnego przenoszenia produktu
po złożeniu.
Zapewnij bezpieczną przestrzeń roboczą podczas montażu i upewnij się, że produkt
znajduje się na płaskiej i stabilnej powierzchni.
Przeczytaj uważnie wszystkie instrukcje i zachowaj je na przyszłość.
PL
07
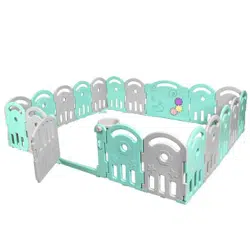
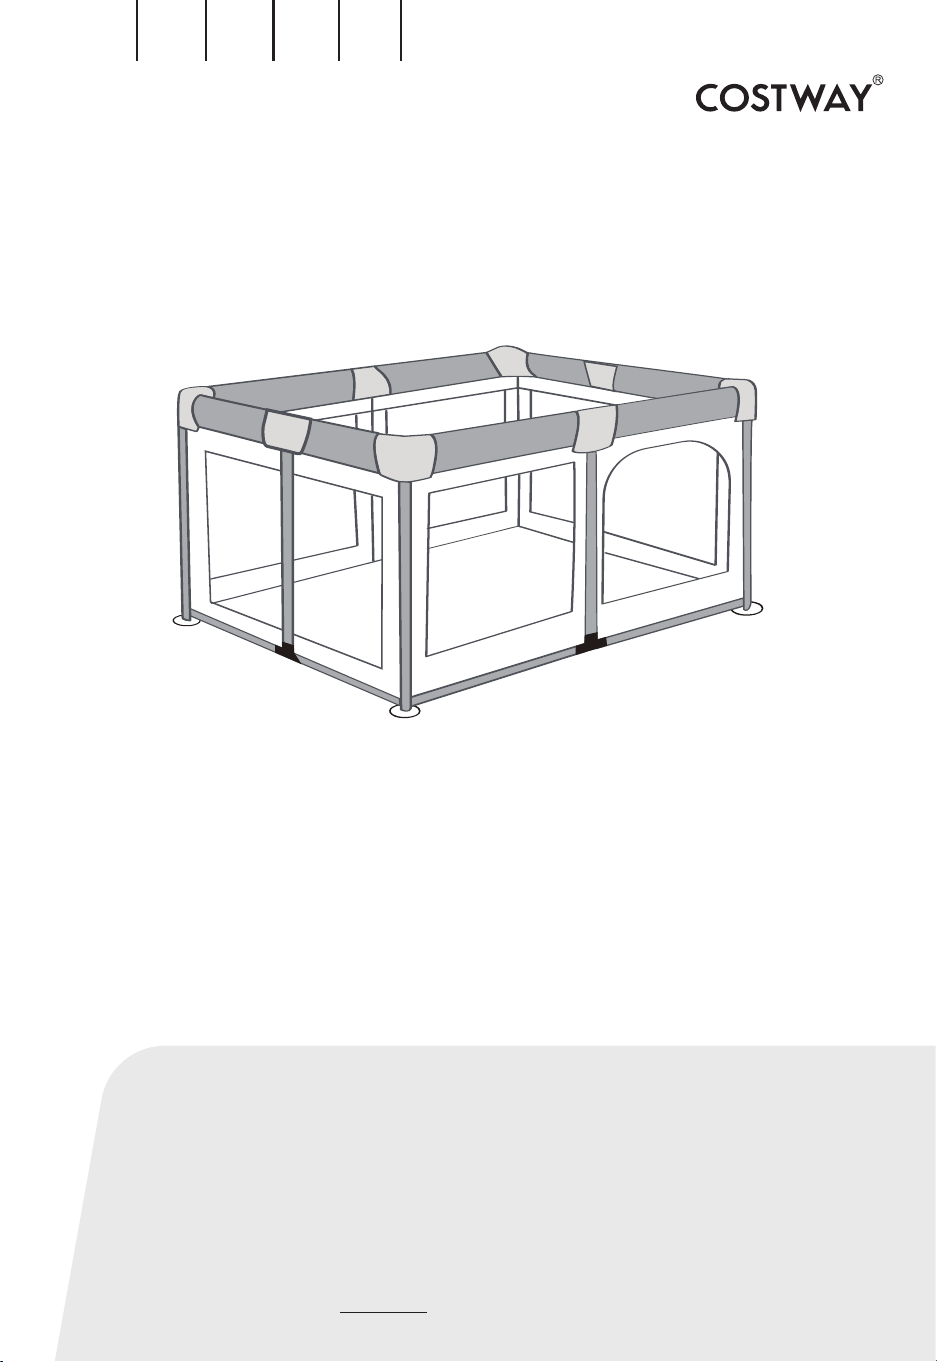
Before installing and using playpen, please read the user manual carefully.
Specification:
Material: Steel pipe, ABS plastic connector, 210D Oxford cloth
Use Range: Indoor/Outdoor
Fit Age: 10 Months-6 Years Old
1.The product is suitable for children over 10 months.
2.The product is only for adult assembly, and accessories need to be
tightened after installation.
3.Place it on a flat, uncluttered floor.
4.Please use under adult supervision and prevent children from climbing.
5.Keep away from source of fire.
6.Appropriate open areas should be left around the installation area.
7.Please place in a space with good lighting conditions.
8.Don't place in water or on permeable ground.
9.Don't use it upside down.
10.Check all the parts are firm before use.
11.Please regularly clean the fence with a neutral detergent to allow your
baby to play in a clean and hygienic environment.
12.If there are extra parts after installation, please recheck the installation
steps.
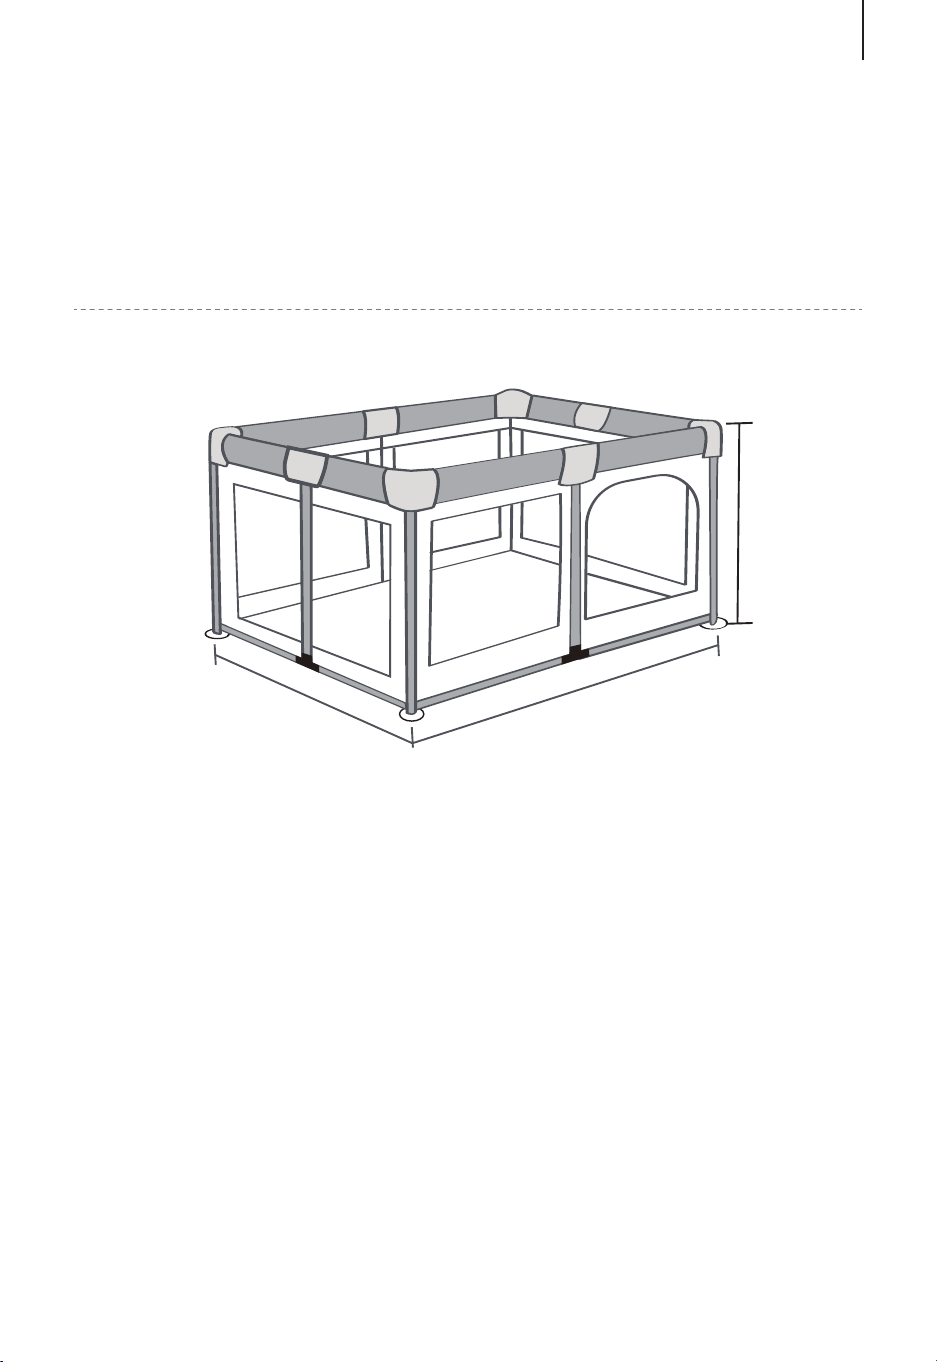
Size:180*200*68cm/70.9*78.7*26.8inch(L*W*H)
Installation Notes
Note:
180cm (70.9")
200cm (78.7")
68cm (26.8")
EN
08
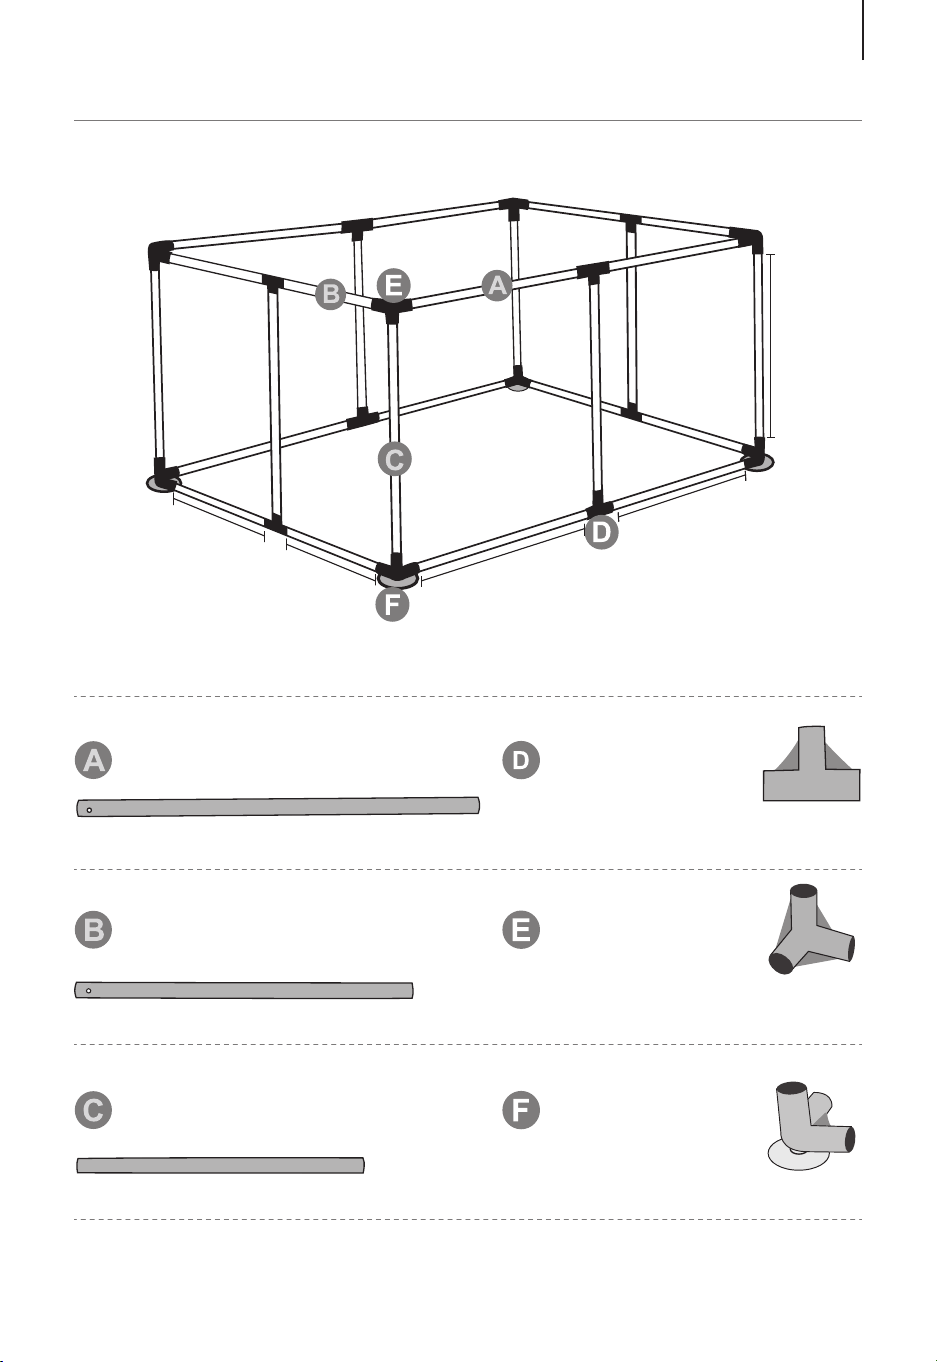
90cm(35.4") Tube * 8 T type tee * 4
Tee * 4
Suction cup tee * 4
100cm(39.4") Tube * 8
62cm(24.4") Tube * 8
62cm (24.4")
90cm (35.4")
90cm (35.4")
100cm (39.4")
100cm (39.4")
Parts list
EN
09

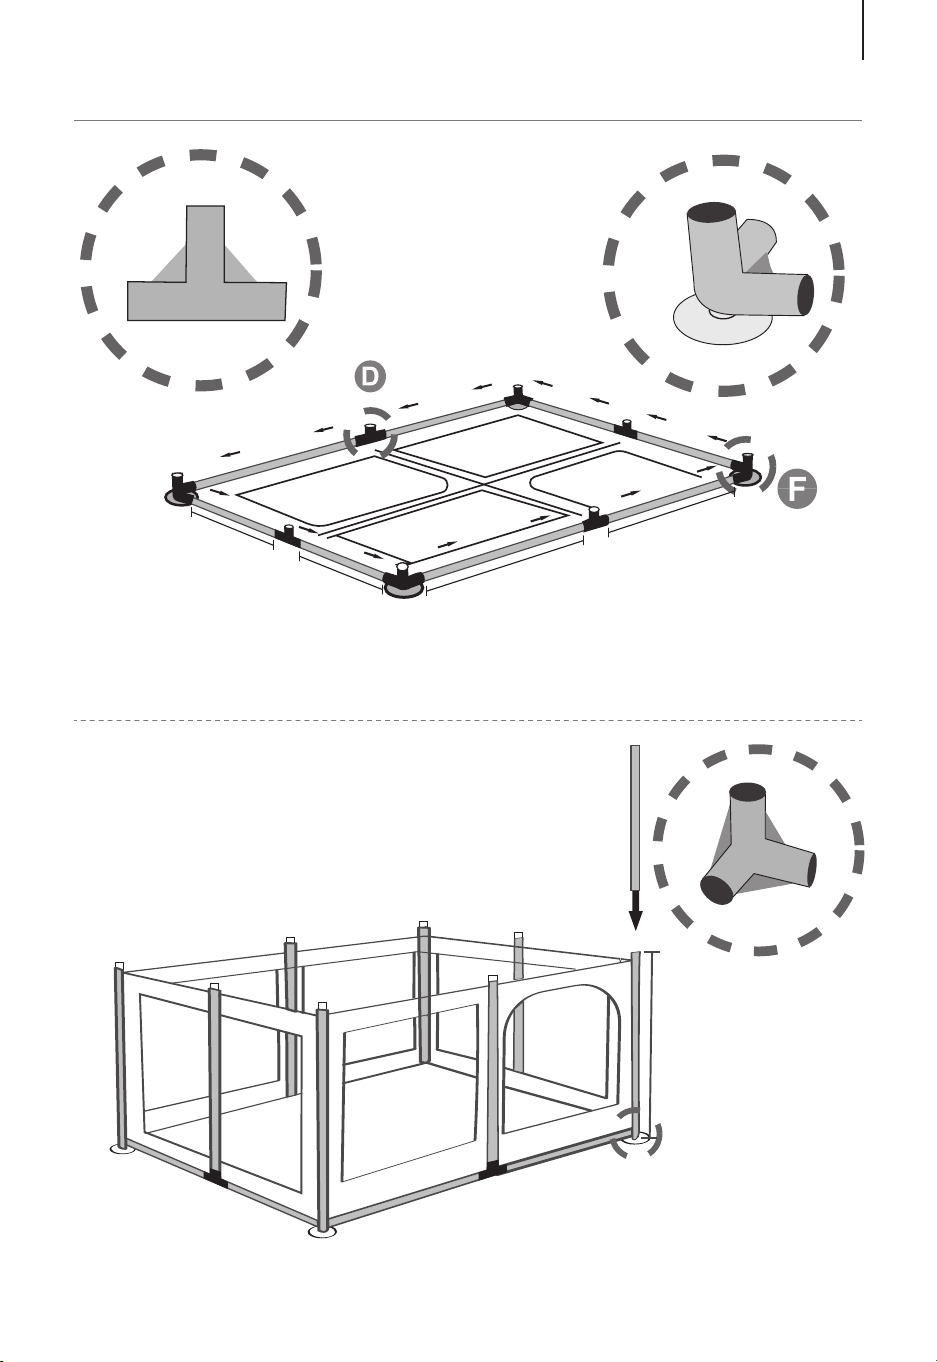
Installation Steps
Step 1: The cloth sleeve is tiled, and the iron pipe is connected through the
cloth sleeve in turn according to the illustration.
Step 2: Install the 62cm (24.4") vertical tube as
shown.
3
5
6
9
10
11
12
13
14
15
16
7
8
1
2
4
90cm (35.4")
90cm (35.4")
100cm (39.4")
100cm (39.4")
62cm (24.4")
1
2
3
4
5
6
7
8
EN
10

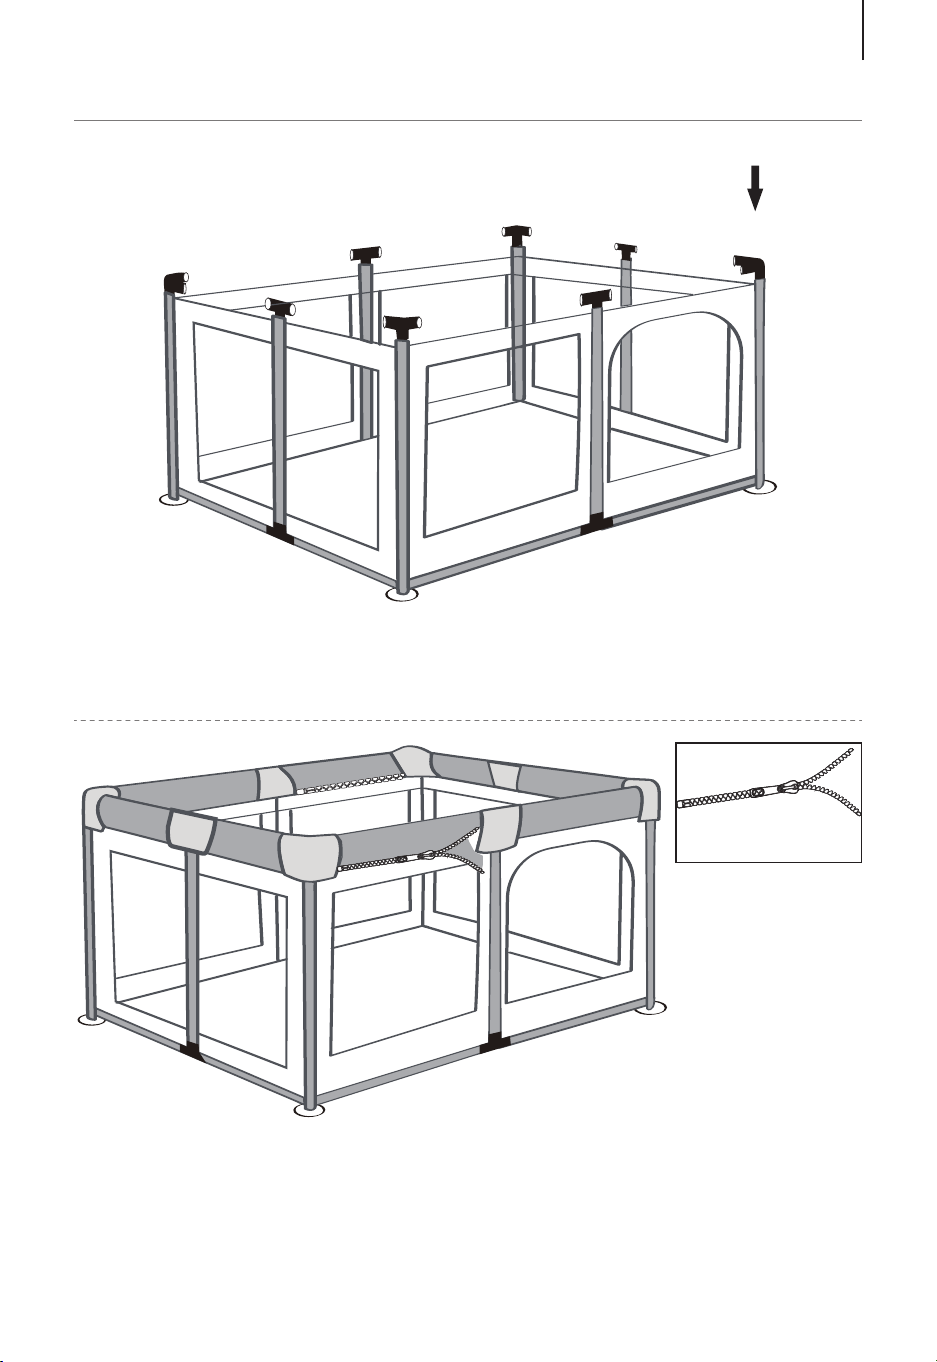
Installation Steps
Step 3: Install the plastic parts in turn according to the diagram.
Step 4: According to the diagram, the iron pipe is connected to the plastic
part through the cloth sleeve in turn, and the section with the zipper is
placed.
7
6
5
4
3
2
1
8
zipper
zipper
zipper
1
2
3
7
8
6
5
4
EN
11

Bevor Sie das Laufstall montieren und benutzen, lesen Sie bitte die Bedi-
enungsanleitung sorgfältig durch.
Spezifikation:
Material: Stahlrohr, ABS-Kunststoffverbinder, 210D Oxford Tuch. Einsatzbere-
ich: Innen/Außen
Geeignetes Alter: 10 Monate-6 Jahre alt
1. Der Artikel ist für Kinder ab 10 Monaten geeignet.
2. Der Artikel ist nur für Erwachsene Montage, und Zubehör müssen nach der
Montage angezogen werden.
3. Stellen Sie es auf einen ebenen, sauberen Boden.
4. Bitte verwenden Sie es unter Aufsicht von Erwachsenen und verhindern
Sie, dass Kinder darauf klettern.
5. Von Brandherden fernhalten.
6. Um den Aufstellungsort herum sollten geeignete Freiflächen belassen
werden.
7. Bitte stellen Sie das Gerät an einem Ort mit guten Lichtverhältnissen auf.
8. Nicht im Wasser oder auf durchlässigem Boden aufstellen.
9. Verwenden Sie es nicht auf dem Kopf stehend.
10. Prüfen Sie vor dem Gebrauch, ob alle Teile fest sind.
11. Bitte reinigen Sie das Gitter regelmäßig mit einem neutralen
Reinigungsmittel, damit Ihr Baby in einer sauberen und hygienischen
Umgebung spielen kann.
12. Wenn nach der Installation zusätzliche Teile vorhanden sind, überprüfen
Sie bitte die Montageschritte erneut.
Größe:180*200*68cm (L*B*H)
Hinweise zur Montage
Hinweis:
180cm (70.9")
200cm (78.7")
68cm (26.8")
DE
12

90 cm Rohr * 8 T-Verbinder * 4
Oberer Eckverbinder
* 4
Unterer Eckverbinder
* 4
100 cm Rohr * 8
62 cm Rohr * 8
62cm
90cm
90cm
100cm
100cm
Teileliste
DE
13
Montageschritte
Schritt 1: Die Stoffhülse wird gefliest, und das Eisenrohr wird der Reihe nach
gemäß der Abbildung durch die Stoffhülse verbunden.
Schritt 2: Montieren Sie das 62 cm lange vertikale
Rohr wie abgebildet.
3
5
6
9
10
11
12
13
14
15
16
7
8
1
2
4
90cm
90cm
100cm
100cm
62cm
1
2
3
4
5
6
7
8
DE
14

Montageschritte
Schritt 3: Montieren Sie die Kunststoffteile der Reihe nach gemäß der Abbil-
dung.
Schritt 4: Gemäß der Abbildung wird das Eisenrohr nacheinander durch die
Stoffhülle mit dem Kunststoffteil verbunden, und der Abschnitt mit dem
Reißverschluss wird angebracht.
7
6
5
4
3
2
1
8
Reißverschluss
Reißverschluss
Reißverschluss
1
2
3
7
8
6
5
4
DE
15

Avant d'installer et d'utiliser le parc, veuillez lire attentivement le manuel
d'utilisation.
Spécification:
Matériau : Tuyau en acier, Connecteur en plastique ABS, Tissu Oxford 210D
Plage d'Utilisation : Intérieur/Extérieur
Âge Recommandé : 10 Mois-6 Ans
1. Le produit convient aux enfants de plus de 10 mois.
2. Le produit ne doit être assemblé que par des adultes et les accessoires
doivent être serrés après l'assemblage.
3. Placez-le sur un sol plat et dégagé.
4. Veuillez l'utiliser sous la surveillance d'un adulte et empêcher les enfants
de grimper dessus.
5. Gardez-le loin de la source d'incendie.
6. Des zones ouvertes appropriées doivent être laissées autour de la zone
d'installation.
7. Placez-le dans un espace avec de bonnes conditions d'éclairage.
8. Ne le placez pas dans l'eau ou sur un sol perméable.
9. Ne l'utilisez pas à l'envers.
10. Vérifiez que toutes les pièces sont sécurisées avant utilisation.
11. Veuillez nettoyer régulièrement le produit avec un détergent neutre afin
que votre bébé puisse jouer dans un environnement propre et hygiénique.
12. S'il y a des pièces supplémentaires après l'assemblage, veuillez vérifier à
nouveau les étapes d'assemblage.
Dimension: 180*200*68cm (L x l x H)
Notes d'Installation
Remarque:
180cm (70,9")
200cm (78,7")
68cm (26,8")
FR
16

Tube de 90 cm * 8 Connecteur de type T
* 4
Connecteur
* 4
Connecteur à ventouse
* 4
Tube de 100 cm * 8
Tube de 62 cm * 8
Liste des Pièces
FR
62cm
90cm
90cm
100cm
100cm
17

Étapes d’Installation
Étape 1 : Posez le manchon en tissu horizontalement, insérez les tubes dans
le manchon en tissu et connectez-les dans l'ordre à l'aide des connecteurs
comme indiqué sur l’image.
Étape 2 : Installez les tubes verticaux de 62 cm
comme indiqué sur l’image.
62cm
1
2
3
4
5
6
7
8
FR
3
5
6
9
10
11
12
13
14
15
16
7
8
1
2
4
18

Étapes d’Installation
Étape 3 : Installez les connecteurs en plastique en séquence comme indiqué
sur l’image.
Étape 4 : Comme indiqué sur l’image, passez les tubes de fer à travers le
manchon en tissu et connectez-les en séquence aux connecteurs en
plastique, la section avec la fermeture éclair doit être assemblée en dernier.
Enfin, fermez la fermeture éclair et l'assemblage est terminé.
7
6
5
4
3
2
1
8
fermeture éclair
fermeture éclair
fermeture éclair
1
2
3
7
8
6
5
4
FR
19

Antes de montar y utilizar el producto, lea detenidamente el manual del
usuario.
Especificación:
Material: Tubo de acero, conector de plástico ABS, tela Oxford 210D.
Rango de uso: Interior/exterior
Edad adecuada: 10 meses - 6 años
1. El producto es adecuado para niños mayores de 10 meses.
2. El producto solo debe ser montado por adultos, y los accesorios necesitan
ser apretados después del montaje.
3. Colóquelo en un suelo plano y despejado.
4. Por favor, utilícelo bajo la supervisión de un adulto y evite que los niños se
suban.
5. Manténgalo alejado de la fuente de fuego.
6. Deben dejarse zonas abiertas apropiadas alrededor de la zona de
instalación.
7. Colóquelo en un espacio con buenas condiciones de iluminación.
8. No lo coloque en el agua ni en suelos permeables.
9. No lo utilice al revés.
10. Compruebe que todas las piezas están firmes antes del uso.
11. Por favor, limpie regularmente el producto con un detergente neutro para
que su bebé pueda jugar en un entorno limpio e higiénico.
12. Si hay piezas extra después del montaje, por favor vuelva a comprobar
los pasos de montaje.
Tamaño: 180*200*68cm (L x AN x AL)
Notas de Montaje
Nota:
180cm
200cm
68cm
ES
20

Tubo de 90 cm * 8 Conector de tipo T
* 4
Conector
* 4
Conector de ventosa
* 4
Tubo de 100 cm * 8
Tubo de 62 cm * 8
Lista de Piezas
ES
62cm
90cm
90cm
100cm
100cm
21

Pasos de Montaje
Paso 1: Coloque la funda de tela en posición horizontal, introduzca los tubos
en la funda de tela y conéctelos en secuencia utilizando los conectores como
se muestra en la figura.
Paso 2: Instale los tubos verticales de 62 cm como
se muestra en la figura.
62cm
1
2
3
4
5
6
7
8
ES
3
5
6
9
10
11
12
13
14
15
16
7
8
1
2
4
22

Pasos de Montaje
Paso 3: Instale los conectores de plástico por turnos de acuerdo con la figura.
Paso 4: De acuerdo con la figura, pase los tubos de hierro a través de la
funda de tela y conéctelos a los conectores de plástico a su vez, la sección
con la cremallera debe ser montada en último lugar. Finalmente, cierre la
cremallera y el montaje está terminado.
7
6
5
4
3
2
1
8
Cremallera
Cremallera
Cremallera
1
2
3
7
8
6
5
4
ES
23

Si prega di leggere attentamente questo manuale prima di installare e usare
il recinto.
Specificazione:
Materiale: Tubo in acciaio, connettore in plastica ABS, tessuto Oxford 210 D.
Ambito dell’Utilizzo: Interno / Esterno
Età Consigliata: 10 Mesi - 6 Anni
1.Questo prodotto è adatto ai bambini più di 10 mesi.
2.Questo prodotto è installato solo dall’adulto e, gli accessori devono essere
serrati dopo l’installazione.
3.Posizionare il prodotto sul terreno piatto e ordinato.
4.Si prega di utilizzare il prodotto sotto la supervisione dell’adulto per evitare
che i bambini si arrampichino.
5.Tenere lontano da fonti di fuoco.
6.Le apposite aree aperte devono essere lasciate attorno all'area
dell’installazione.
7.Si prega di posizionare il prodotto nello spazio con le buone condizioni
dell’illuminazione.
8.Non posizionare il prodotto nell’acqua o sul terreno permeabile.
9.Non utilizzare il prodotto capovolto.
10.Controllare che tutte le parti siano fissate prima dell’utilizzo.
11.Si prega di pulire regolarmente il recinto con un detergente neutro per
consentire al tuo bambino di giocare in un ambiente pulito e igienico.
12.Se ci sono le parti aggiuntive dopo l'installazione, si prega di ricontrollare i
passi dell’installazione.
Dimensione: 180*200*68cm
Note dell’Installazione
Note:
180cm
200cm
68cm
IT
24

90 cm Tubo*8
75 cm Tubo*8
62 cm Tubo*8
Raccordo a T
* 4
Raccordo
* 4
Raccordo con ventosa
* 4
Lista delle Parti
IT
62cm
90cm
90cm
100cm
100cm
25

Passi dell’Installazione
Passo 1: Stendere la fodera in tessuto e, collegare rispettivamente i tubi in
ferro attraverso la fodera in tessuto come mostrato in figura.
Passo 2: Installare i tubi verticali da 62 cm come
mostrato.
62cm
1
2
3
4
5
6
7
8
IT
3
5
6
9
10
11
12
13
14
15
16
7
8
1
2
4
26
Passi dell’Installazione
Passo 3: Installare rispettivamente le parti in plastica come mostrato.
Passo 4: Collegare rispettivamente i tubi in ferro alle parti in plastica
attraverso la fodera in tessuto e posizionare la parte con la cerniera come
mostrato.
7
6
5
4
3
2
1
8
cerniera
cerniera
cerniera
1
2
3
7
8
6
5
4
IT
27

Przed przystąpieniem do montażu zapoznaj się z instrukcją.
Specyfikacja:
Materiał: stalowa rama, trójniki z tworzywa ABS, osłona z tkaniny oxford
210D
Do użytku: wewnątrz / na zewnątrz
Dla dzieci w wieku: 10 miesięcy - 6 lat
1.Produkt jest przeznaczony dla dzieci w wieku 10 miesięcy - 6 lat.
2.Wymagany montaż przez osobę dorosłą. Po zakończeniu montażu dokręć
wszystkie części.
3.Umieść produkt na równym, wolnym od przeszkód podłożu.
4.Wymagany stały nadzór osoby dorosłej. Nie pozwalaj dziecku wspinać się
po ściankach produktu.
5.Trzymaj produkt z dala od ognia.
6.W czasie montażu pozostaw wokół produktu odpowiednią ilość wolnej
przestrzeni.
7.Umieść produkt w odpowiednio oświetlonym miejscu.
8.Nie umieszczaj produktu w wodzie ani na nierównym podłożu.
9.Nie używaj produktu do góry nogami.
10.Przed użyciem sprawdź czy wszystkie części są odpowiednio zamocowane.
11.Regularnie czyść produkt przy użyciu neutralnego detergentu.
12.Jeśli po zakończeniu montażu zostaną ci jakiekolwiek części, ponownie
zapoznaj się z etapami montażu.
Wymiary: 180 x 200 x 68cm (dł. x szer. x wys.)
Uwagi dotyczące montażu:
UWAGA:
180cm (70.9")
200cm (78.7")
68cm (26.8")
PL
28

Rurka 100 cm x8
Rurka 90 cm x8
Rurka 62 cm x8
Trójnik kształcie
litery „T” x4
Trójnik kątowy x4
Trójnik z przyssawką
x4
Lista części:
PL
62cm
90cm
90cm
100cm
100cm
29

Etapy montażu
Krok 1: Połóż osłonę z tkaniny płasko na ziemi, a następnie przełóż rurki o
długości 100 i 90 cm przez materiałowe rękawy w tkaninie. Następnie
zamocuj za pomocą plastikowych trójników.
Krok 2: Zamocuj rurki o długości 62 cm w
plastikowych trójnikach, tak jak pokazano na
rysunku.
62cm
1
2
3
4
5
6
7
8
PL
3
5
6
9
10
11
12
13
14
15
16
7
8
1
2
4
30

Etapy montażu
Krok 3: Zamontuj plastikowe trójniki, tak jak pokazano na rysunku.
Krok 4: Umieść rurki w plastikowych trójnikach, przekładając je przez
materiałowe rękawy w tkaninie, tak jak pokazano na rysunku. Zapnij zamek
błyskawiczny, aby zakończyć montaż.
7
6
5
4
3
2
1
8
zamek błyskawiczny
zamek błyskawiczny
zamek błyskawiczny
1
2
3
7
8
6
5
4
PL
31
EN
DE
FR
ES
IT
PL
With your inspiring rating, COSTWAY will be more consistent to offer you EASY
SHOPPING EXPERIENCE, GOOD PRODUCTS and EFFICIENT SERVICE!
Mit Ihrer inspirierenden Bewertung wird COSTWAY konsistenter sein, um Ihnen EIN
SCHÖNES EINKAUFSERLEBNIS, GUTE PRODUKTE und EFFIZIENTEN SERVICE zu
bieten!
Avec votre évaluation inspirante, COSTWAY continuera à fournir une EXPÉRIENCE
D’ACHAT PRATIQUE, des PRODUITS DE QUALITÉ et un SERVICE EFFICACE !
Con su calificación inspiradora, COSTWAY será más consistente para ofrecerle
EXPERIENCIA DE COMPRA FÁCIL, BUENOS PRODUCTOS y SERVICIO EFICIENTE.
Con la tua valutazione incoraggiante, COSTWAY sarà più coerente per offrirti
ESPERIENZA DI ACQUISTO FACILE, BUONI PRODOTTI e SERVIZIO EFFICIENTE!
Dzięki twojej opinii COSTWAY będzie mógł oferować jeszcze WYGODNIEJSZE
ZAKUPY, LEPSZE PRODUKTY i SPRAWNIEJSZĄ OBSŁUGĘ KLIENTA.
US office: Fontana UK office: Ipswich AU office: Truganina
DE office: FDS GmbH, Neuer Höltigbaum 36, 22143 Hamburg, Deutschland
FR office: Saint Vigor d'Ymonville
PL office: Gdańsk