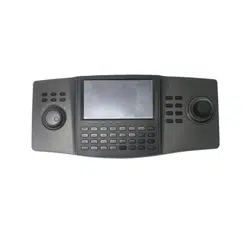

DS-1105KI Network Keyboard
User Manual

Legal Informaon
©2020 Hangzhou Hikvision Digital Technology Co., Ltd. All rights reserved.
About this Manual
The Manual includes instrucons for using and managing the Product. Pictures, charts, images and
all other informaon hereinaer are for descripon and explanaon only. The informaon
contained in the Manual is subject to change, without noce, due to rmware updates or other
reasons. Please
nd the latest version of this Manual at the Hikvision website ( hps://
www.hikvision.com/ ).
Please use this Manual with the guidance and assistance of professionals trained in
supporng the
Product.
Trademarks
and other Hikvision's trademarks and logos are the properes of
Hikvision in various
jurisdicons.
Other trademarks and logos menoned are the properes of their respecve owners.
Disclaimer
TO THE MAXIMUM EXTENT PERMITTED BY APPLICABLE LAW, THIS MANUAL AND THE PRODUCT
DESCRIBED, WITH ITS HARDWARE, SOFTWARE AND FIRMWARE, ARE PROVIDED “AS IS” AND “WITH
ALL FAULTS AND ERRORS”. HIKVISION MAKES NO WARRANTIES, EXPRESS OR IMPLIED, INCLUDING
WITHOUT LIMITATION, MERCHANTABILITY, SATISFACTORY QUALITY, OR FITNESS FOR A PARTICULAR
PURPOSE. THE USE OF THE PRODUCT BY YOU IS AT YOUR OWN RISK. IN NO EVENT WILL HIKVISION
BE LIABLE TO YOU FOR ANY SPECIAL, CONSEQUENTIAL, INCIDENTAL, OR INDIRECT DAMAGES,
INCLUDING, AMONG OTHERS, DAMAGES FOR LOSS OF BUSINESS PROFITS, BUSINESS
INTERRUPTION, OR LOSS OF DATA, CORRUPTION OF SYSTEMS, OR LOSS OF DOCUMENTATION,
WHETHER BASED ON BREACH OF CONTRACT, TORT (INCLUDING NEGLIGENCE), PRODUCT LIABILITY,
OR OTHERWISE, IN CONNECTION WITH THE USE OF THE PRODUCT, EVEN IF HIKVISION HAS BEEN
ADVISED OF THE POSSIBILITY OF SUCH DAMAGES OR LOSS.
YOU ACKNOWLEDGE THAT THE NATURE OF INTERNET PROVIDES FOR INHERENT SECURITY RISKS,
AND HIKVISION SHALL NOT TAKE ANY RESPONSIBILITIES FOR ABNORMAL OPERATION, PRIVACY
LEAKAGE OR OTHER DAMAGES RESULTING FROM CYBER-ATTACK, HACKER ATTACK, VIRUS
INSPECTION, OR OTHER INTERNET SECURITY RISKS; HOWEVER, HIKVISION WILL PROVIDE TIMELY
TECHNICAL SUPPORT IF REQUIRED.
YOU AGREE TO USE THIS PRODUCT IN COMPLIANCE WITH ALL APPLICABLE LAWS, AND YOU ARE
SOLELY RESPONSIBLE FOR ENSURING THAT YOUR USE CONFORMS TO THE APPLICABLE LAW.
ESPECIALLY, YOU ARE RESPONSIBLE, FOR USING THIS PRODUCT IN A MANNER THAT DOES NOT
INFRINGE ON THE RIGHTS OF THIRD PARTIES, INCLUDING WITHOUT LIMITATION, RIGHTS OF
PUBLICITY, INTELLECTUAL PROPERTY RIGHTS, OR DATA PROTECTION AND OTHER PRIVACY RIGHTS.
YOU SHALL NOT USE THIS PRODUCT FOR ANY PROHIBITED END-USES, INCLUDING THE
DEVELOPMENT OR PRODUCTION OF WEAPONS OF MASS DESTRUCTION, THE DEVELOPMENT OR
DS-1105KI Network Keyboard User Manual
i

PRODUCTION OF CHEMICAL OR BIOLOGICAL WEAPONS, ANY ACTIVITIES IN THE CONTEXT RELATED
TO ANY NUCLEAR EXPLOSIVE OR UNSAFE NUCLEAR FUEL-CYCLE, OR IN SUPPORT OF HUMAN
RIGHTS ABUSES.
IN THE EVENT OF ANY CONFLICTS BETWEEN THIS MANUAL AND THE APPLICABLE LAW, THE LATER
PREVAILS.
DS-1105KI Network Keyboard User Manual
ii
Regulatory Informaon
FCC Informaon
Please take aenon that changes or modicaon not expressly approved by the party responsible
for compliance could void the user's authority to operate the equipment.
FCC compliance: This equipment has been tested and found to comply with the limits for a Class B
digital device, pursuant to part 15 of the FCC Rules. These limits are designed to provide
reasonable
protecon against harmful interference in a residenal installaon. This equipment
generates, uses and can radiate radio frequency energy and, if not installed and used in accordance
with the
instrucons, may cause harmful interference to radio communicaons. However, there is
no guarantee that interference will not occur in a parcular installaon. If this equipment does
cause harmful interference to radio or television
recepon, which can be determined by turning
the equipment o and on, the user is encouraged to try to correct the interference by one or more
of the following measures:
• Reorient or relocate the receiving antenna.
• Increase the
separaon between the equipment and receiver.
• Connect the equipment into an outlet on a circuit dierent from that to which the receiver is
connected.
• Consult the dealer or an experienced radio/TV technician for help.
FCC
Condions
This device complies with part 15 of the FCC Rules. Operaon is subject to the following two
condions:
• This device may not cause harmful interference.
• This device must accept any interference received, including interference that may cause
undesired
operaon.
EU Conformity Statement
This product and - if applicable - the supplied accessories too are marked
with "CE" and comply therefore with the applicable harmonized European
standards listed under the EMC Direcve 2014/30/EU, LVD Direcve 2014/
35/EU, the RoHS
Direcve 2011/65/EU.
2012/19/EU (WEEE direcve): Products marked with this symbol cannot be
disposed of as unsorted municipal waste in the European Union. For
proper recycling, return this product to your local supplier upon the
DS-1105KI Network Keyboard User Manual
iii

purchase of equivalent new equipment, or dispose of it at designated
collecon points. For more informaon see: hp://www.recyclethis.info .
2006/66/EC (baery direcve): This product contains a baery that cannot
be disposed of as unsorted municipal waste in the European Union. See
the product documentaon for specic baery informaon. The baery is
marked with this symbol, which may include
leering to indicate cadmium
(Cd), lead (Pb), or mercury (Hg). For proper recycling, return the
baery to
your supplier or to a designated
collecon point. For more informaon
see: hp://www.recyclethis.info .
Industry Canada ICES-003 Compliance
This device meets the CAN ICES-3 (B)/NMB-3(B) standards requirements.
DS-1105KI Network Keyboard User Manual
iv
Preface
This secon is to ensure that you can avoid danger or property loss in the process of using the
product. Before using the product, please read the user manual carefully and keep it for future
reference.
Data Acquision
Visit our website (hp://www.hikvision.com/) for user manuals, applicaon tools and
development materials.
Applicable Model
This manual is applicable to DS-1105KI Network Keyboard.
Important Clause
Please strictly abide by the applicable laws and regulaons for the use and maintenance of
monitoring interface. It is illegal to use video monitoring device for illegal purposes, or to explore
other people's privacy.
Symbol
Convenons
The symbols that may be found in this document are dened as follows.
Symbol
Descripon
Danger
Indicates a hazardous situaon which, if not avoided, will or could
result in death or serious injury.
Cauon
Indicates a potenally hazardous situaon which, if not avoided, could
result in equipment damage, data loss, performance degradaon, or
unexpected results.
Note
Provides addional informaon to emphasize or supplement
important points of the main text.
Operaon Convenon
The following operaons may be found in this document are dened as follows.
DS-1105KI Network Keyboard User Manual
v

Operaon Descripon
Press Number + REGION • Press a numeric
buon and REGION buon to select a region.
• Number represents region ID. Go to region menu for the ID.
Press Number + WIN • Press a numeric
buon and WIN buon to select a sub-window.
• In video wall mode, if the monitor is divided in to
mulple
windows, the number represents sub-window ID.
Press Number + MON • If device is video wall or decoder:
• Press a numeric
buon and MON buon to select a monitor.
• Number represents monitor ID. Go to video wall client for the
ID.
• If device is video recorder:
• Press a numeric
buon and MON buon to select an output
channel.
• Number represents output channel ID. Go to Keyboard →
Channel → Output Channel for the ID.
Press Number + CAM • Keyboard mode:
• Press a numeric
buon and CAM buon to select an output
channel.
• Number represents input channel ID. Go to Keyboard →
Channel → Input Channel for the ID.
• HikCentral/iSecure mode:
• Press a numeric
buon and CAM buon to select a camera.
• Number represents camera ID. Check camera ID in resource list.
Press Number + CAM-G • Press a numeric
buon and CAM-G buon to select an input
channel group.
• Number represents input channel group ID. Go to Keyboard →
Channel → Camera Group for the ID.
Press Number + MACRO • Press a numeric
buon and MACRO buon to select a macro.
• Number represents macro ID. Go to Keyboard → Macro for the
ID.
Press Number + MULT • Press a numeric
buon and MULT buon to divide monitor.
• Number represents sub-window
quanty.
Press Number + SCENE • Press a numeric
buon and SCENE buon to switch video wall
scene.
• Number represents scene ID. Check the ID in video wall mode.
DS-1105KI Network Keyboard User Manual
vi

Safety Instrucons
Danger
• This equipment is not suitable for use in
locaons where children are likely to be present.
• Do not ingest baery. Chemical burn hazard!
• This product contains a
coin/buon cell baery. If the coin/buon cell baery is swallowed, it
can cause severe internal burns in just 2 hours and can lead to death.
• Keep new and used
baeries away from children.
• If the
baery compartment does not close securely, stop using the product and keep it away
from children.
• If you think
baeries might have been swallowed or placed inside any part of the body, seek
immediate medical aenon.
• CAUTION: Risk of explosion if the baery is replaced by an incorrect type.
• Improper replacement of the baery with an incorrect type may defeat a safeguard (for
example, in the case of some lithium
baery types).
• Do not dispose of the baery into re or a hot oven, or mechanically crush or cut the baery,
which may result in an explosion.
• Do not leave the
baery in an extremely high temperature surrounding environment, which may
result in an explosion or the leakage of ammable liquid or gas.
• Do not subject the
baery to extremely low air pressure, which may result in an explosion or the
leakage of ammable liquid or gas.
• Dispose of used baeries according to the instrucons.
Cauon
• The equipment shall not be exposed to dripping or splashing and that no objects
lled with
liquids, such as vases, shall be placed on the equipment.
• + idenes the posive terminal(s) of equipment which is used with, or generates direct current.
- idenes the negave terminal(s) of equipment which is used with, or generates direct current.
• No naked
ame sources, such as lighted candles, should be placed on the equipment.
• The USB port of the equipment is used for
connecng to a mouse, a keyboard, or a USB ash
drive only.
DS-1105KI Network Keyboard User Manual
vii

Contents
Chapter 1 Product Introducon .................................................................................................. 1
Chapter 2 Acvaon ................................................................................................................... 2
2.1 Local Menu Acvaon ........................................................................................................... 2
2.2 SADP Acvaon ..................................................................................................................... 3
2.3 Web Acvaon ....................................................................................................................... 3
Chapter 3 Network ..................................................................................................................... 4
Chapter 4 Keyboard .................................................................................................................... 5
4.1 Login ...................................................................................................................................... 5
4.2 Add Devices ........................................................................................................................... 5
4.2.1 Manually Add ................................................................................................................ 5
4.2.2 Add in Batches .............................................................................................................. 8
4.3 Local Live View ....................................................................................................................... 9
4.3.1 Preview by Operang Touchscreen ............................................................................... 9
4.3.2 Preview by Operang Keyboard Shortcut ................................................................... 10
4.3.3 PTZ Control .................................................................................................................. 11
4.4 Video Wall ............................................................................................................................ 13
4.4.1 Video Wall
Conguraon ............................................................................................ 13
4.4.2 Video Wall Control ...................................................................................................... 15
4.4.3 PTZ Control .................................................................................................................. 17
4.4.4 Macro .......................................................................................................................... 17
4.5 Playback ............................................................................................................................... 18
4.5.1 Local Playback ............................................................................................................. 18
4.5.2 Video Wall Playback .................................................................................................... 19
4.6 Channel Management ......................................................................................................... 20
4.6.1 Edit Channel ................................................................................................................ 20
4.6.2 Output Channel ........................................................................................................... 21
DS-1105KI Network Keyboard User Manual
viii

4.6.3 Camera Group ............................................................................................................. 21
4.7 User Management ............................................................................................................... 23
4.8 Video Recorder .................................................................................................................... 24
4.8.1 Remote Panel .............................................................................................................. 24
4.8.2 Live View ..................................................................................................................... 27
4.8.3 PTZ Control .................................................................................................................. 27
4.8.4 Playback ...................................................................................................................... 27
4.9 Connect the Device Through Serial Ports ............................................................................. 28
4.9.1 Connect Video Recorders ............................................................................................ 28
4.9.2 Connect Analog Matrix ............................................................................................... 29
4.9.3 Connect Analog Dome ................................................................................................ 30
Chapter 5 iSecure Mode ........................................................................................................... 32
5.1 Login .................................................................................................................................... 32
5.2 Resource List ........................................................................................................................ 33
5.3 Local Live View ..................................................................................................................... 33
5.3.1 Enable Local Live View ................................................................................................ 33
5.3.2 PTZ Operaon ............................................................................................................. 34
5.4 Video Wall Operaon ........................................................................................................... 34
5.4.1 Region Conguraon .................................................................................................. 34
5.4.2 Video Wall Control ...................................................................................................... 35
5.4.3 PTZ
Operaon ............................................................................................................. 36
5.5 Video Wall Playback ............................................................................................................. 36
Chapter 6 HikCentral Mode ...................................................................................................... 37
6.1 Login .................................................................................................................................... 37
6.2 Resource List ........................................................................................................................ 38
6.3 Local Live View ..................................................................................................................... 38
6.3.1 Enable Local Live View ................................................................................................ 38
6.3.2 PTZ
Operaon ............................................................................................................. 39
DS-1105KI Network Keyboard User Manual
ix

6.4 Video Wall Operaon ........................................................................................................... 40
6.4.1 Region Conguraon .................................................................................................. 40
6.4.2 Video Wall Control ...................................................................................................... 41
6.4.3 PTZ
Operaon ............................................................................................................. 41
6.5 Video Wall Playback ............................................................................................................. 41
Chapter 7 System ...................................................................................................................... 42
7.1 Language .............................................................................................................................. 42
7.2 Hardware ............................................................................................................................. 42
7.3 Storage ................................................................................................................................. 43
7.3.1 FTP Storage ................................................................................................................. 43
7.3.2 USB Storage ................................................................................................................. 44
7.4 Upgrade ............................................................................................................................... 44
7.4.1 FTP Upgrade ................................................................................................................ 44
7.4.2 USB Flash Drive Upgrade ............................................................................................ 44
7.5 Import/Export Conguraon File ......................................................................................... 44
7.6 Factory Default ..................................................................................................................... 45
7.7 Auxiliary Key ......................................................................................................................... 45
7.8 Lock Keyboard ...................................................................................................................... 45
Chapter 8 Web
Conguraon ................................................................................................... 46
8.1 Login .................................................................................................................................... 46
8.2 Add Devices ......................................................................................................................... 46
8.2.1 Manually Add .............................................................................................................. 46
8.2.2 Import Input Channels in Batches ............................................................................... 48
8.3 Channel Management ......................................................................................................... 49
8.3.1 Edit Channel ................................................................................................................ 49
8.3.2 Camera Group ............................................................................................................. 50
8.4 Serial Port
Sengs ............................................................................................................... 51
8.5 Network ............................................................................................................................... 51
DS-1105KI Network Keyboard User Manual
x

8.6 System Sengs .................................................................................................................... 52
8.6.1 Version ........................................................................................................................ 52
8.6.2 User Management ...................................................................................................... 52
8.6.3 System Maintenance ................................................................................................... 54
8.6.4 Log Management ........................................................................................................ 55
8.6.5 Security
Sengs .......................................................................................................... 55
DS-1105KI Network Keyboard User Manual
xi

Chapter 1 Product Introducon
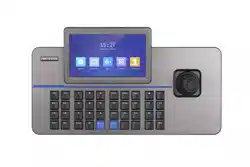
DS-1105KI is a network keyboard independently developed by Hikvision. It features in 7-inch full
view
mul-touch LCD screen and four-dimensional joysck. It supports network access to DVR,
DVS, NVR, network camera, network dome, video integrated plaorm, decoder, iSecure, HikCentral
and other plaorm soware, with powerful funcons and quick and simple operaons. It can be
widely used in
nance, public security, army, telecommunicaon, transportaon, electric power,
educaon, water conservancy and other elds.
DS-1105KI Network Keyboard User Manual
1
Chapter 2 Acvaon
You can acvate network keyboard via local menu, SADP client or Web interface.
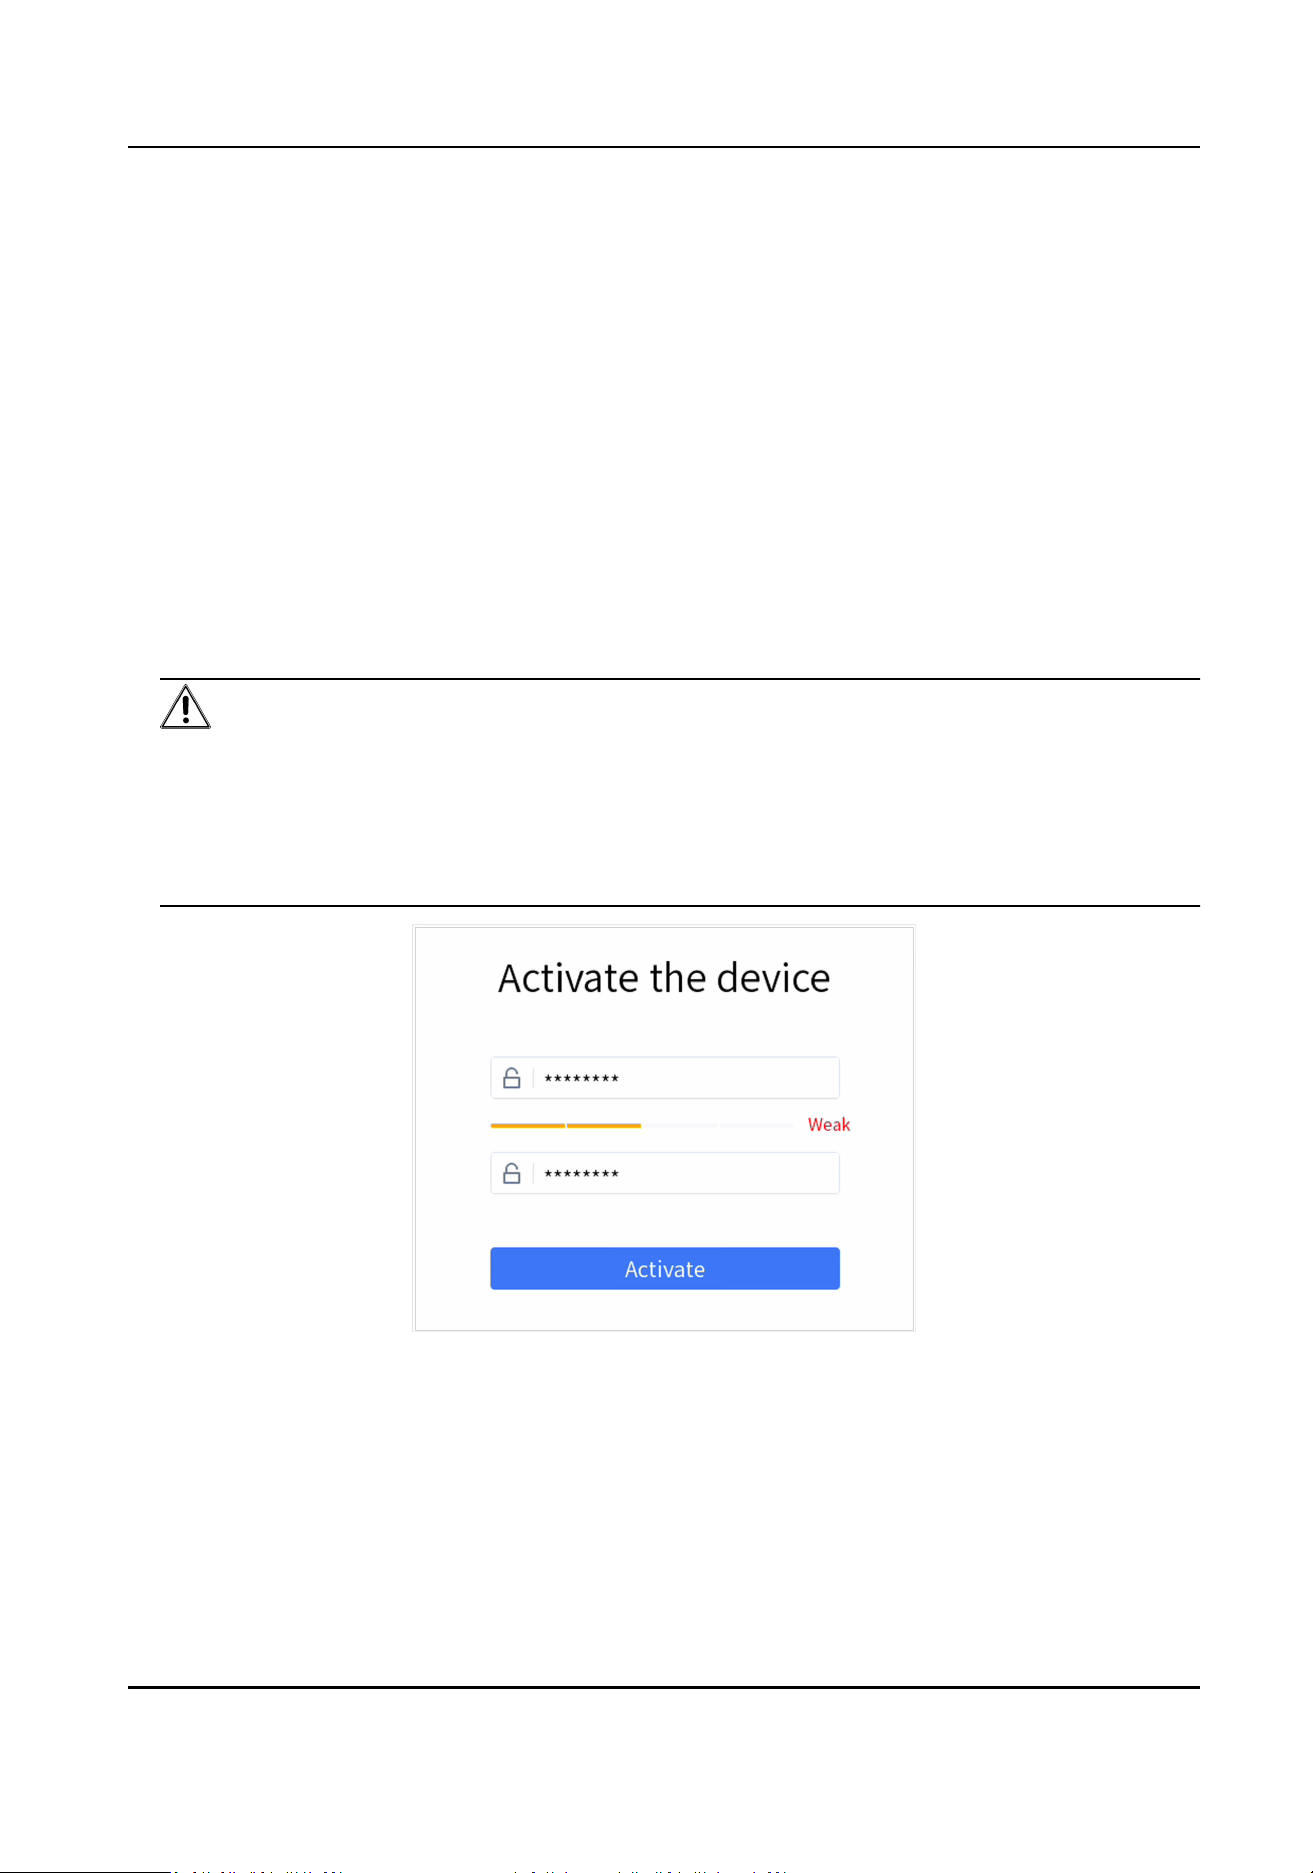
2.1 Local Menu Acvaon
For the rst-me access, you need to acvate the network keyboard by seng an admin password.
Steps
1. Connect your network keyboard power supply to an electrical outlet, and turn on the network
keyboard.
The
acvaon interface will be popped up automacally.
2. Set password and conrm it.
Warning
We highly recommend you create a strong password of your own choosing (Using a minimum of
8 characters, including at least three of the following categories: upper case leers, lower case
leers, numbers, and special characters.) in order to increase the security of your product. And
we recommend you reset your password regularly, especially in the high security system,
reseng the password monthly or weekly can beer protect your product.
Figure 2-1 Acvaon
3. Tap Acvate.
DS-1105KI Network Keyboard User Manual
2
2.2 SADP Acvaon
SADP soware is used for detecng the online device, acvang the device, and reseng its
password.
Get the SADP soware from the supplied disk or the ocial website, and install the SADP
according to the prompts.
Steps
1. Connect your network keyboard power supply to an electrical outlet, and turn on the network
keyboard.
2. Run the SADP
soware downloaded from our website to search the online devices.
3. Check the keyboard status from the device list, and select the inacve keyboard.
4. Enter the new password in the password
eld, and conrm it.
Warning
• 8 to 16 characters allowed, including at least two of the following: digits, upper case
leers,
lower case leers and special characters.
• STRONG PASSWORD RECOMMENDED– We highly recommend you create a strong password
of your own choosing (using a minimum of 8 characters, including upper case
leers, lower
case
leers, numbers, and special characters) in order to increase the security of your
product. And we recommend you reset your password regularly, especially in the high
security system, reseng the password monthly or weekly can beer protect your product.
5. Click Acvate.
2.3 Web
Acvaon
Aer eding the PC and the network keyboard to the same network segment, you can directly log
in to the web interface of the network keyboard to
acvate.
DS-1105KI Network Keyboard User Manual
3
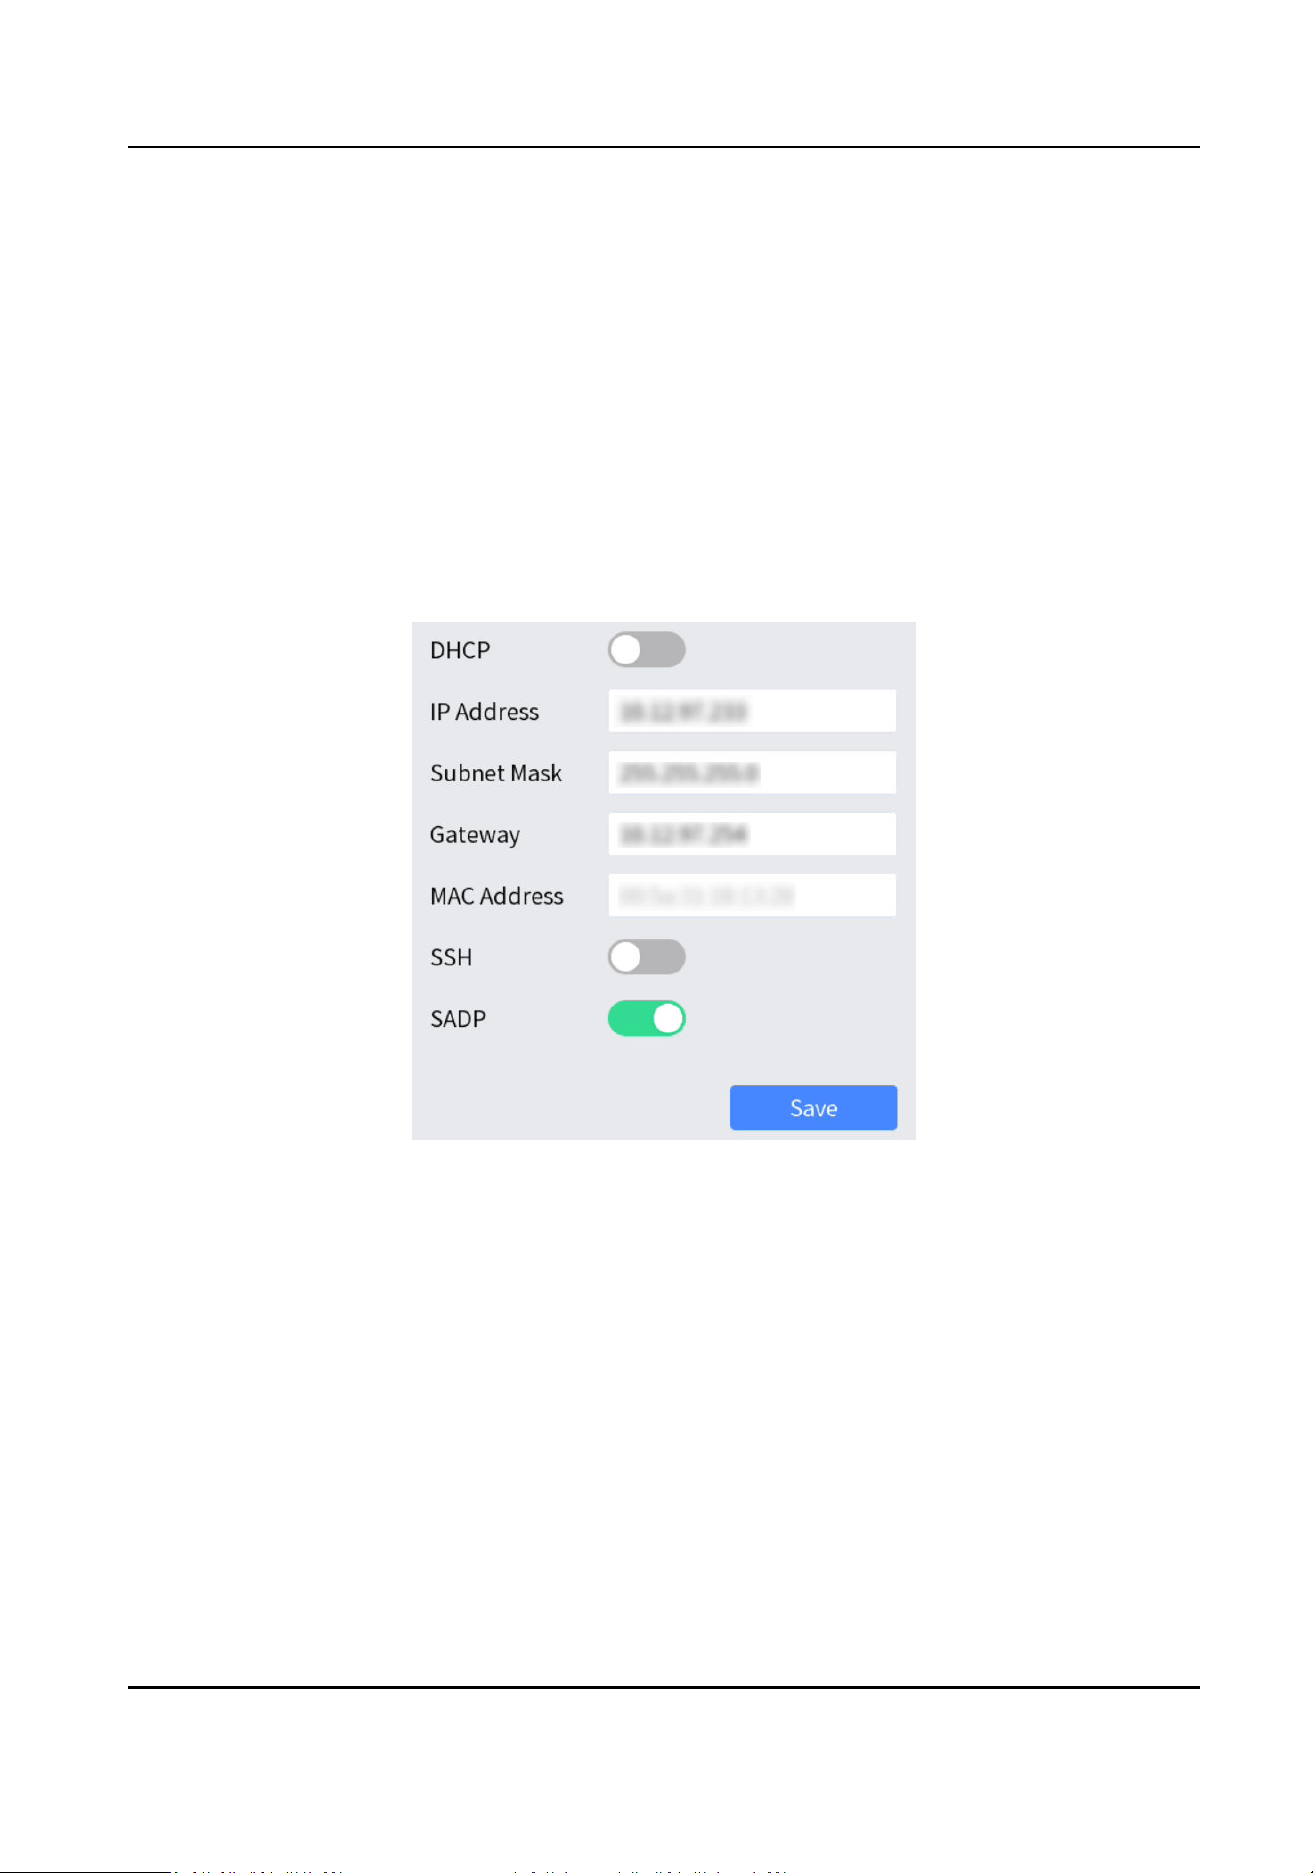
Chapter 3 Network
Network parameters must be properly congured before you can add network devices and operate
the network keyboard over network.
Steps
1. Go to System → Network .
2.
Congure network parameters.
-
Enable DHCP to obtain IP sengs automacally.
-
Manually enter IP address, subnet mask, and gateway.
-
Enable SADP to search devices, change IP addresses through SADP
soware.
3. Tap Save.
Figure 3-1 Network Parameters
DS-1105KI Network Keyboard User Manual
4
Chapter 4 Keyboard
Keyboard mode is mainly applied to small-sized surveillance projects. Network keyboard works as a
control center and manages surveillance devices in it.
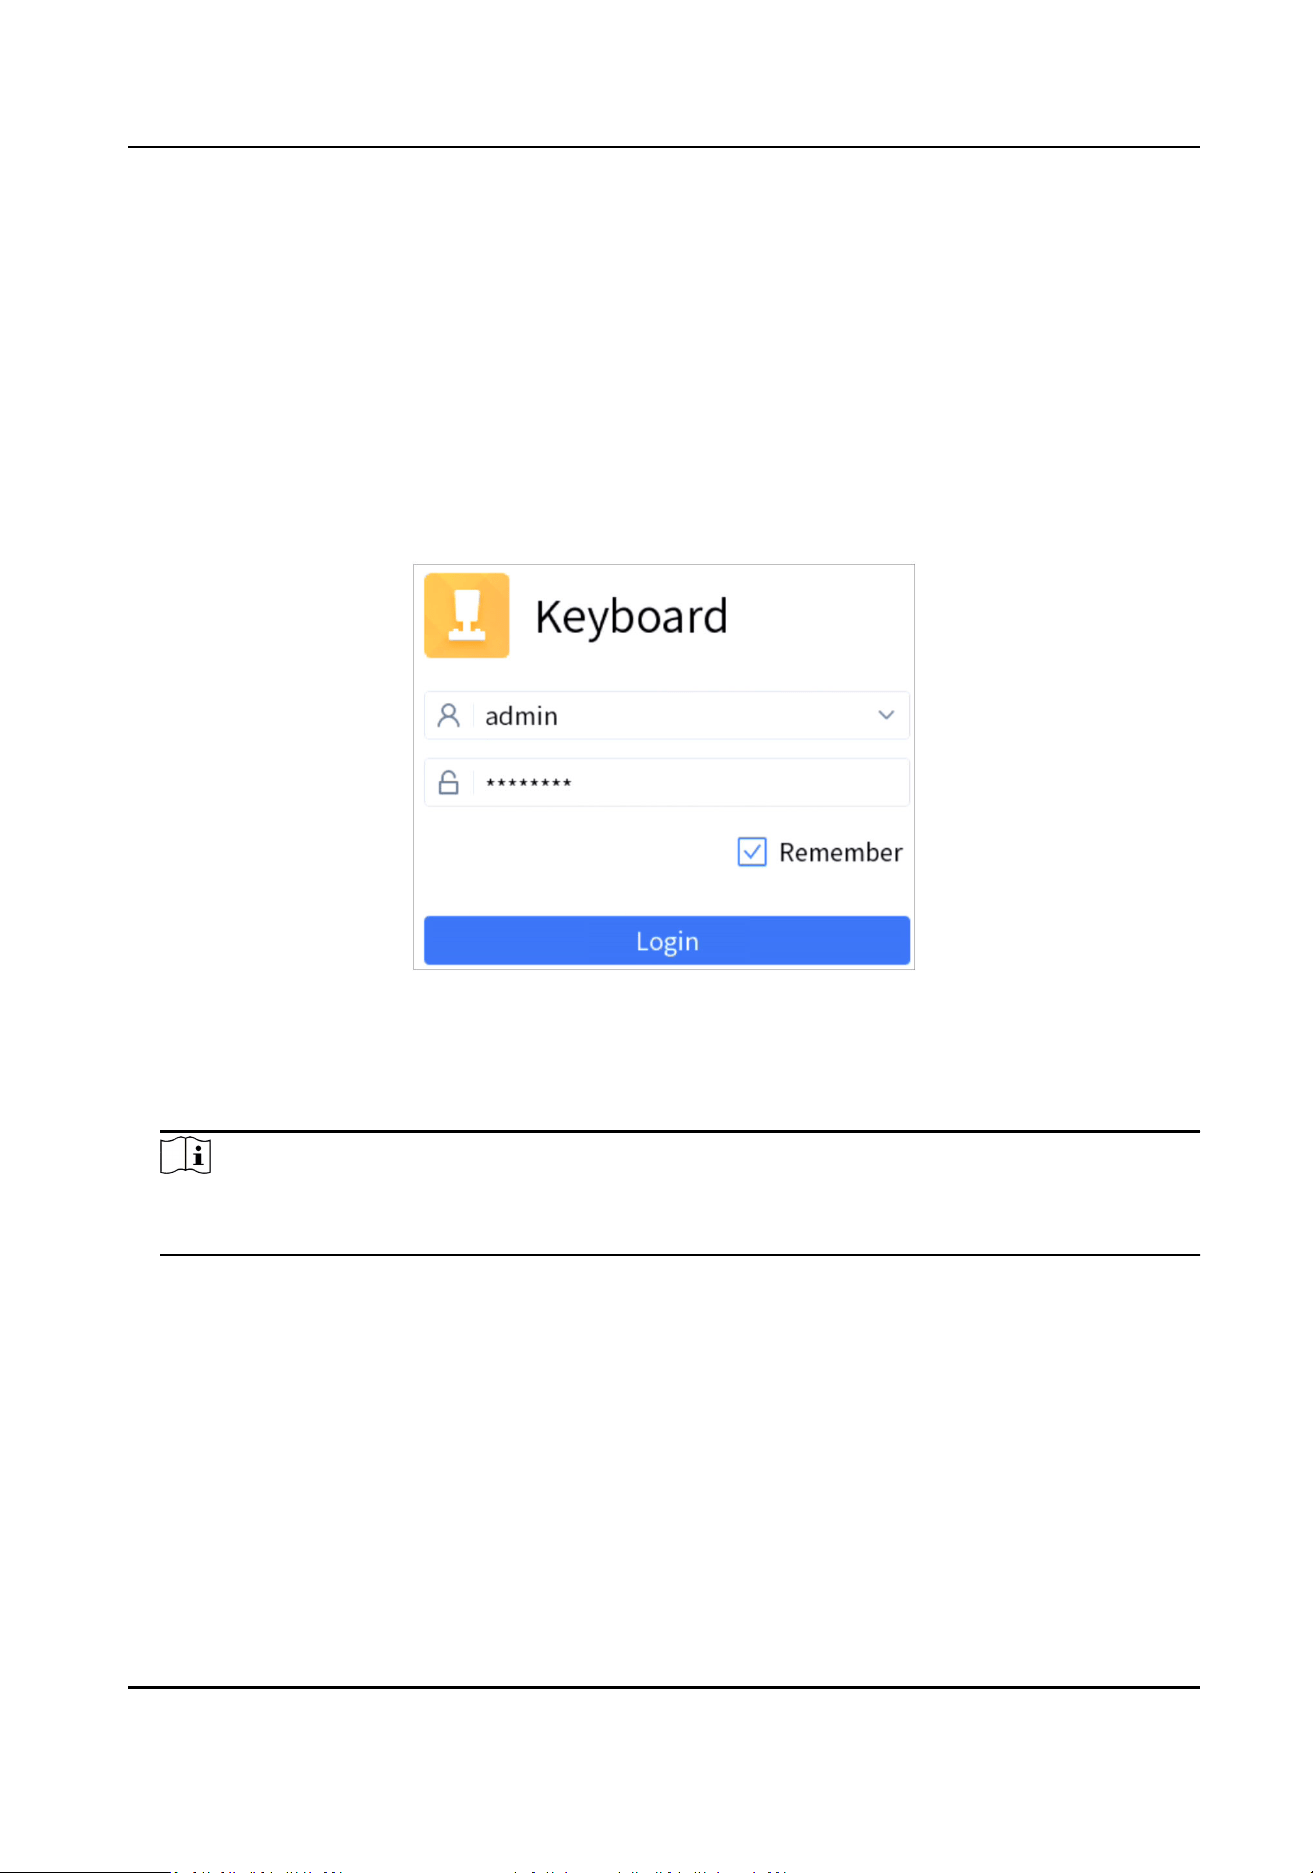
4.1 Login
Steps
1. Tap Keyboard at home page.
Figure 4-1 Login
2. Enter user name and password.
3. Oponal: Check Remember.
4. Tap Login.
Note
If you enter the wrong password 7 mes for administrator or 5 mes for operator, the current
user account will be locked for 30 minutes.
4.2 Add Devices
Up to 4000 devices can be added.
4.2.1 Manually Add
Steps
1. Go to Keyboard → Device .
DS-1105KI Network Keyboard User Manual
5
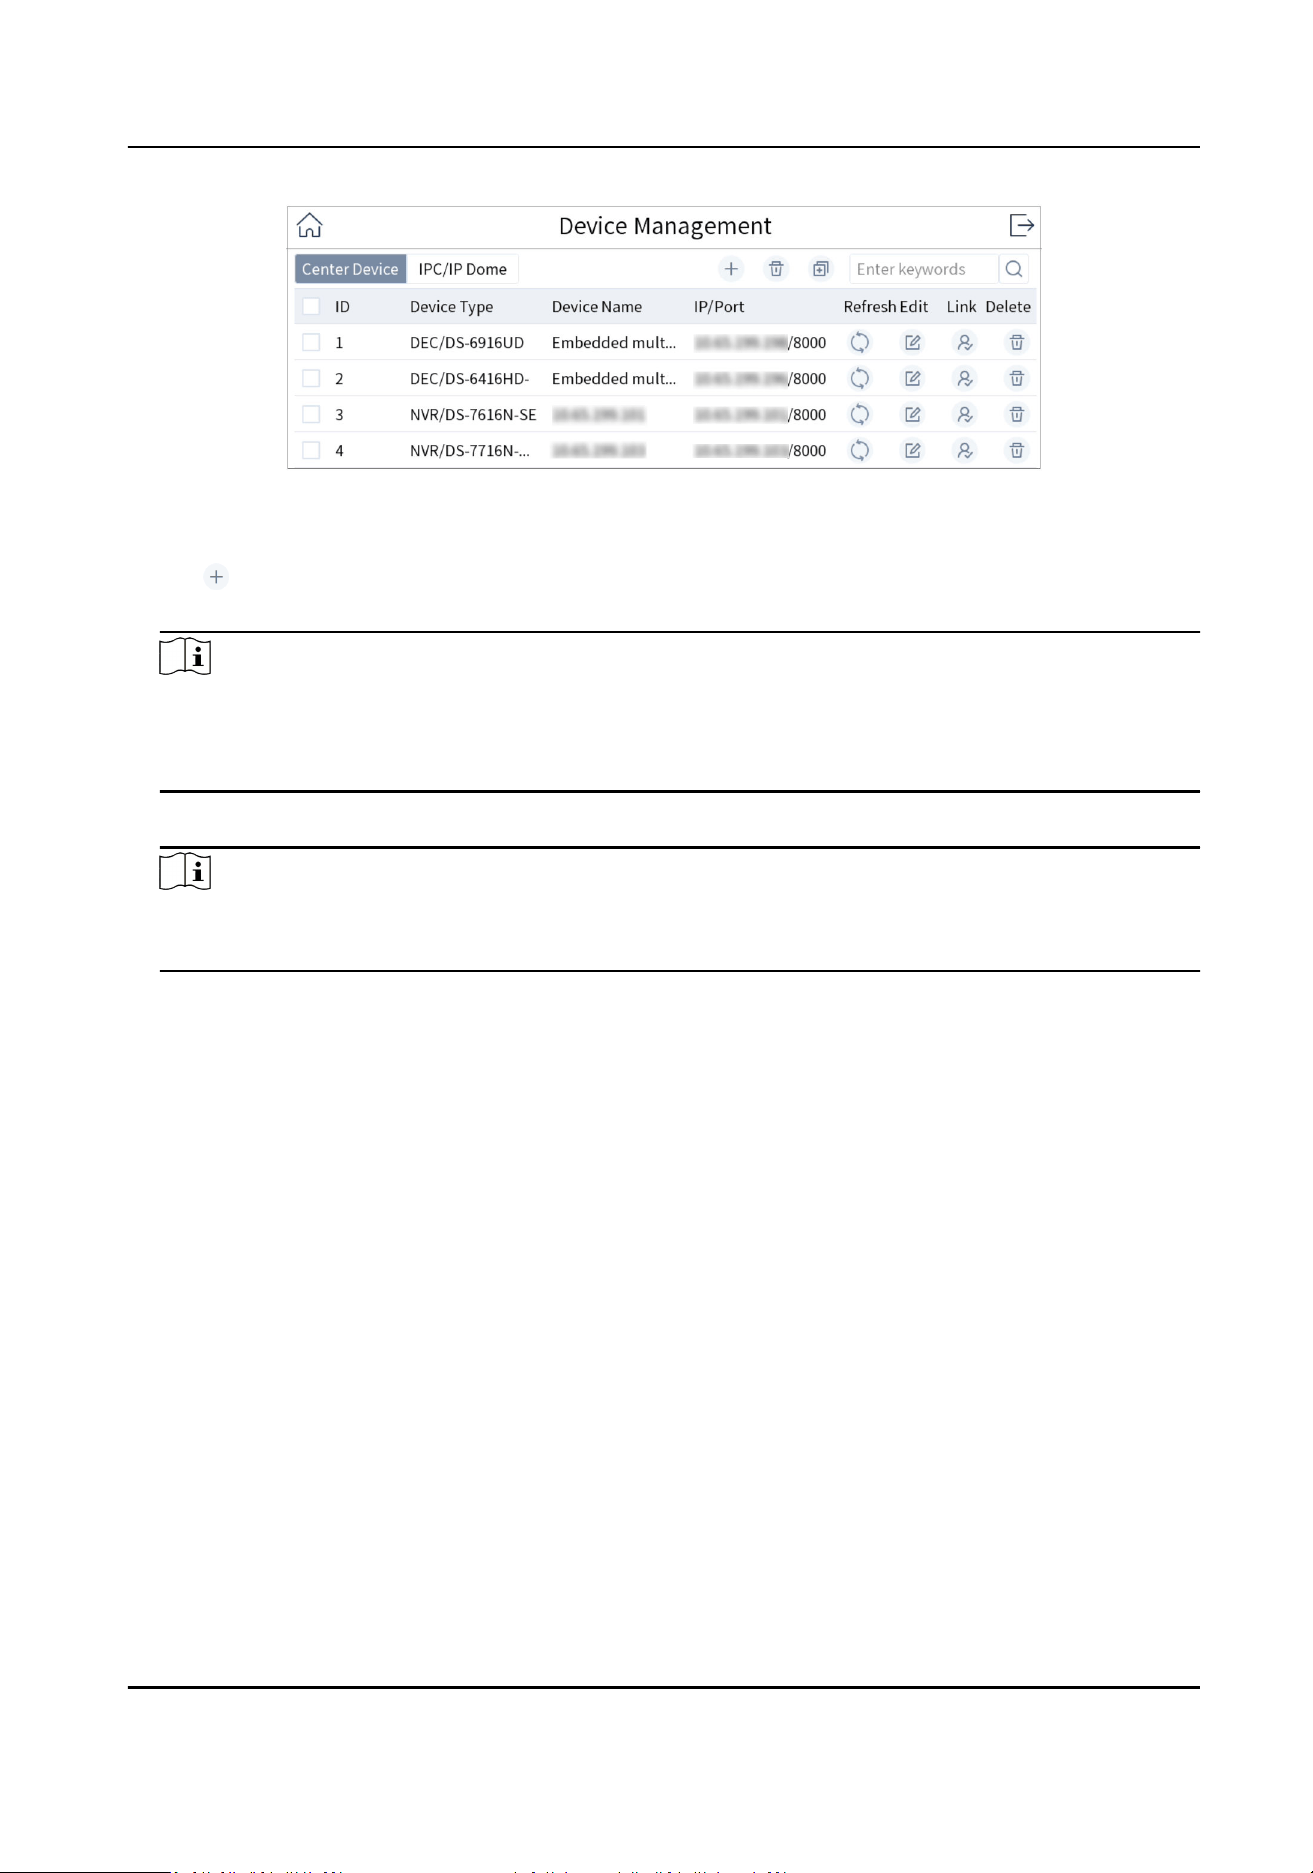
Figure 4-2 Device Management
2. Tap Center Device or IPC/IP Dome as desired.
3. Tap
.
4. Enter device IP address, port, user name, and password.
Note
• The device name is obtained
automacally or can be congured as required.
• If you enable the stream encrypon for the device, you need to enter the vericaon code
when adding the device.
5. Check or uncheck Add Video Recorder Output.
Note
Check Add Video Recorder Output, and the output port type, channel number and other
informaon will be listed in the output port list.
6. Tap OK.
DS-1105KI Network Keyboard User Manual
6
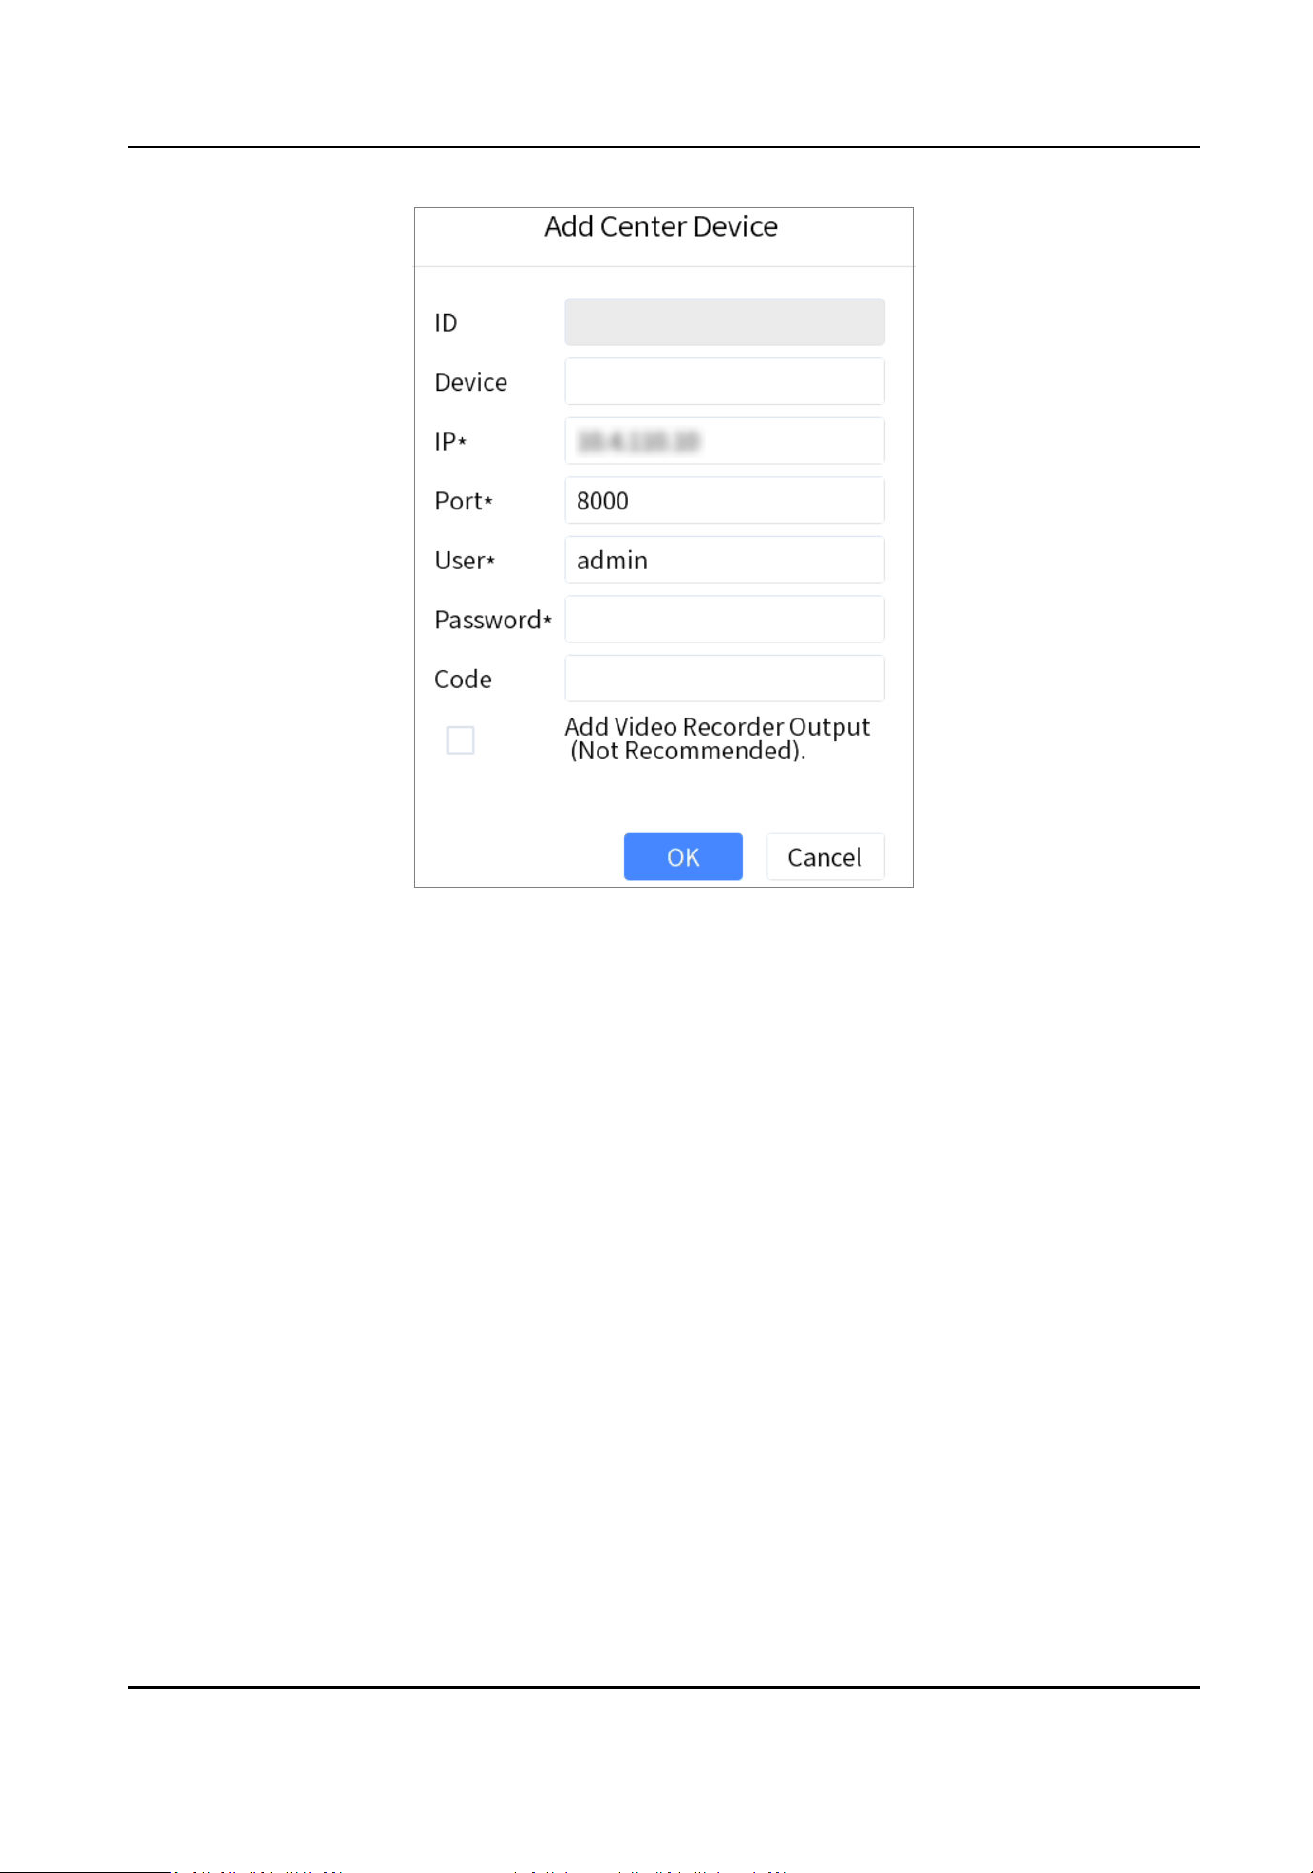
Figure 4-3 Add Center Device
DS-1105KI Network Keyboard User Manual
7

Figure 4-4 Add Network Camera
4.2.2 Add in Batches
Add Online Devices in Batches
You can add the devices with the same user name and password in batches.
Steps
1. Go to Keyboard → Device .
Figure 4-5 Device Management
2. Tap to enter Add by SADP interface.
DS-1105KI Network Keyboard User Manual
8
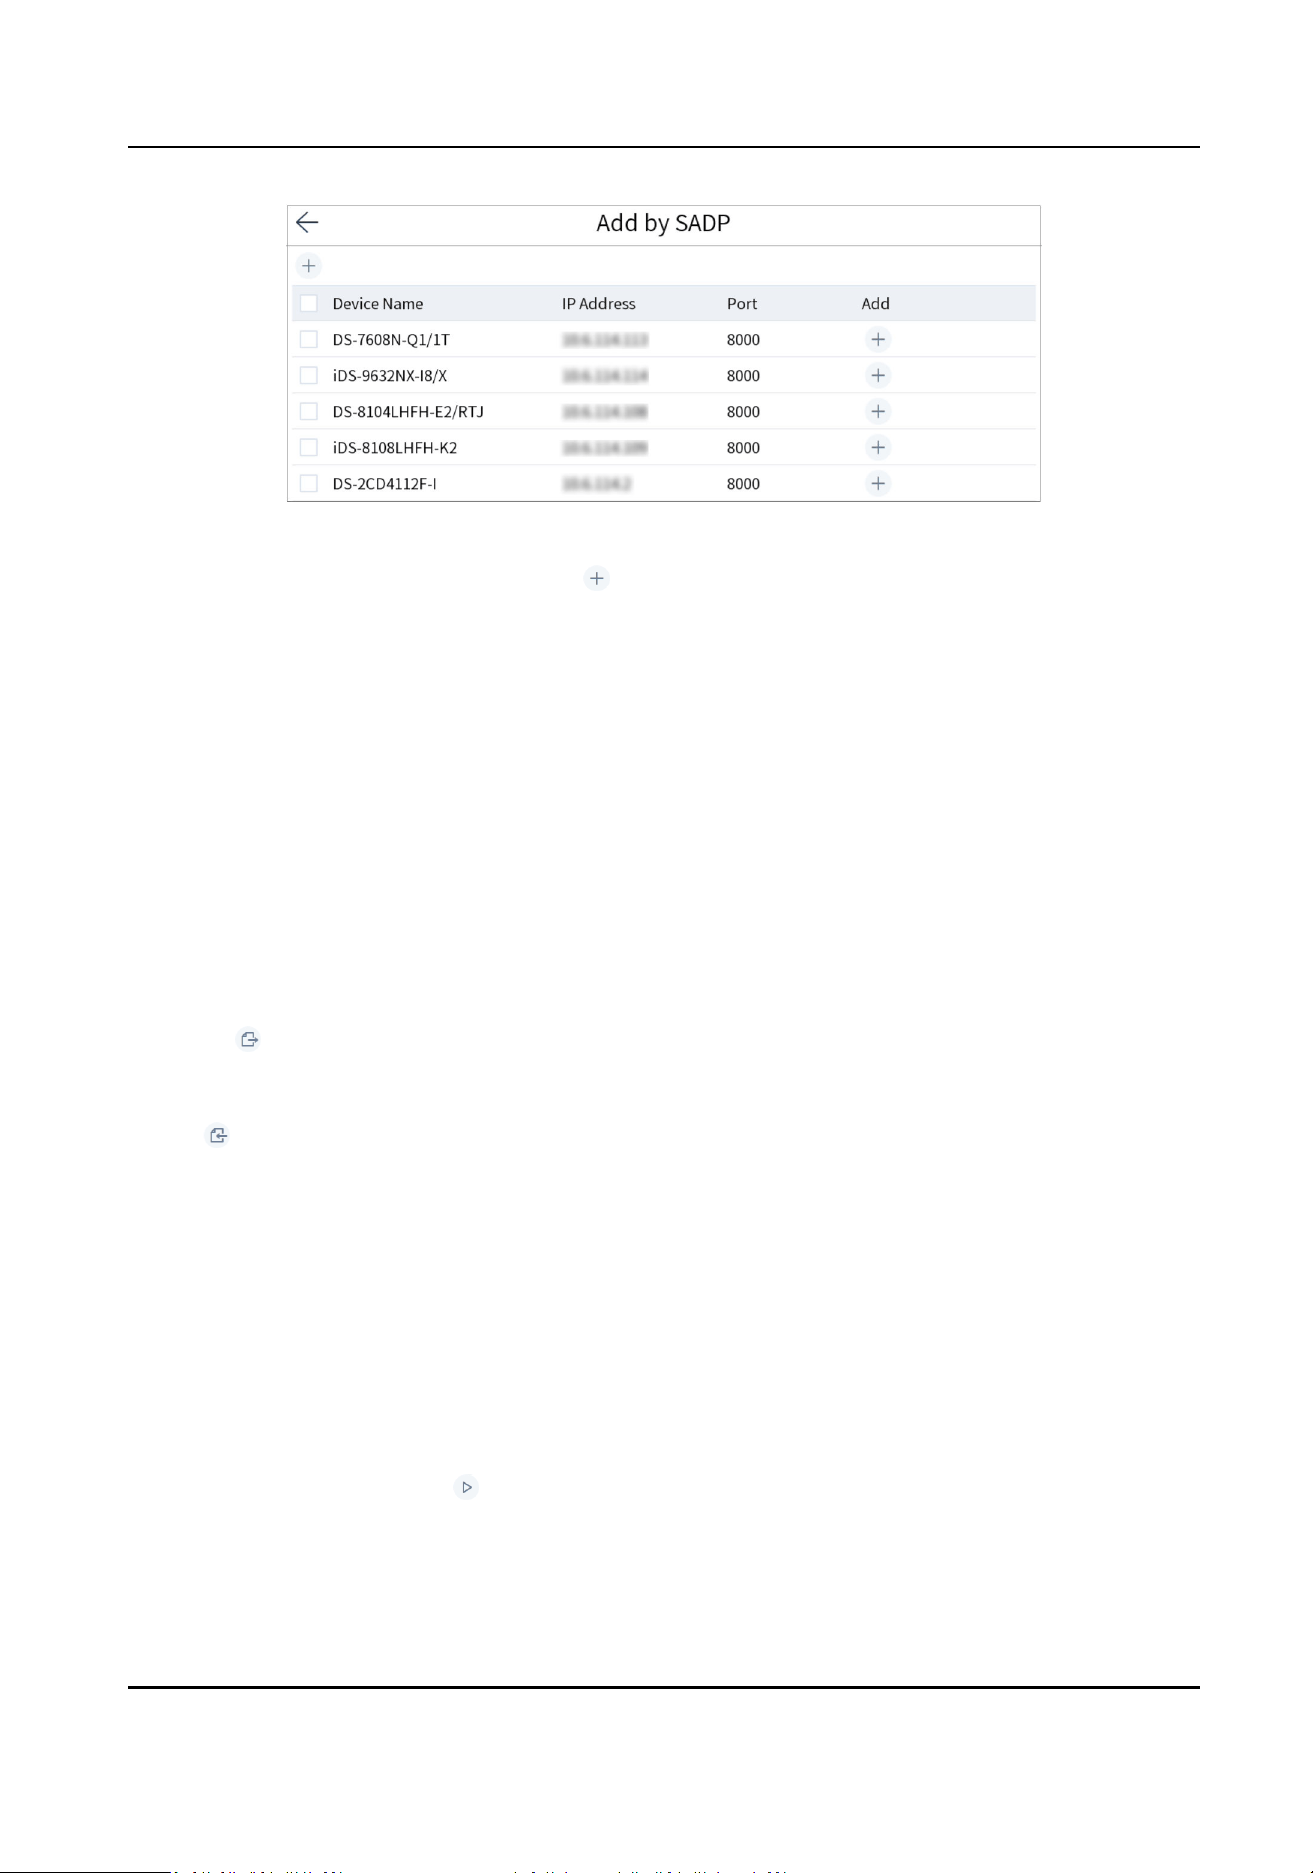
Figure 4-6 Online Devices
3. Check the devices to be added and tap .
4. Enter user name and password.
5. Tap Add.
Import Input Channels in Batches
The informaon of added input channel can be generated into an excel le and exported to the
USB
ash drive for backup.
Before You Start
Connect an USB ash drive to the network keyboard.
Steps
1. Go to Keyboard → Channel .
2. Export input channel template.
1) Tap
to export an excel le.
2) Edit the le on your computer, like adding or deleng input channels.
3) Copy the
le to an USB ash drive and connect it to your network keyboard.
3. Tap to import input channels.
4.3 Local Live View
Preview an input channel in keyboard touchscreen.
4.3.1 Preview by
Operang Touchscreen
Steps
1. Go to Keyboard → Channel .
2. Select the channel and tap
to preview.
DS-1105KI Network Keyboard User Manual
9
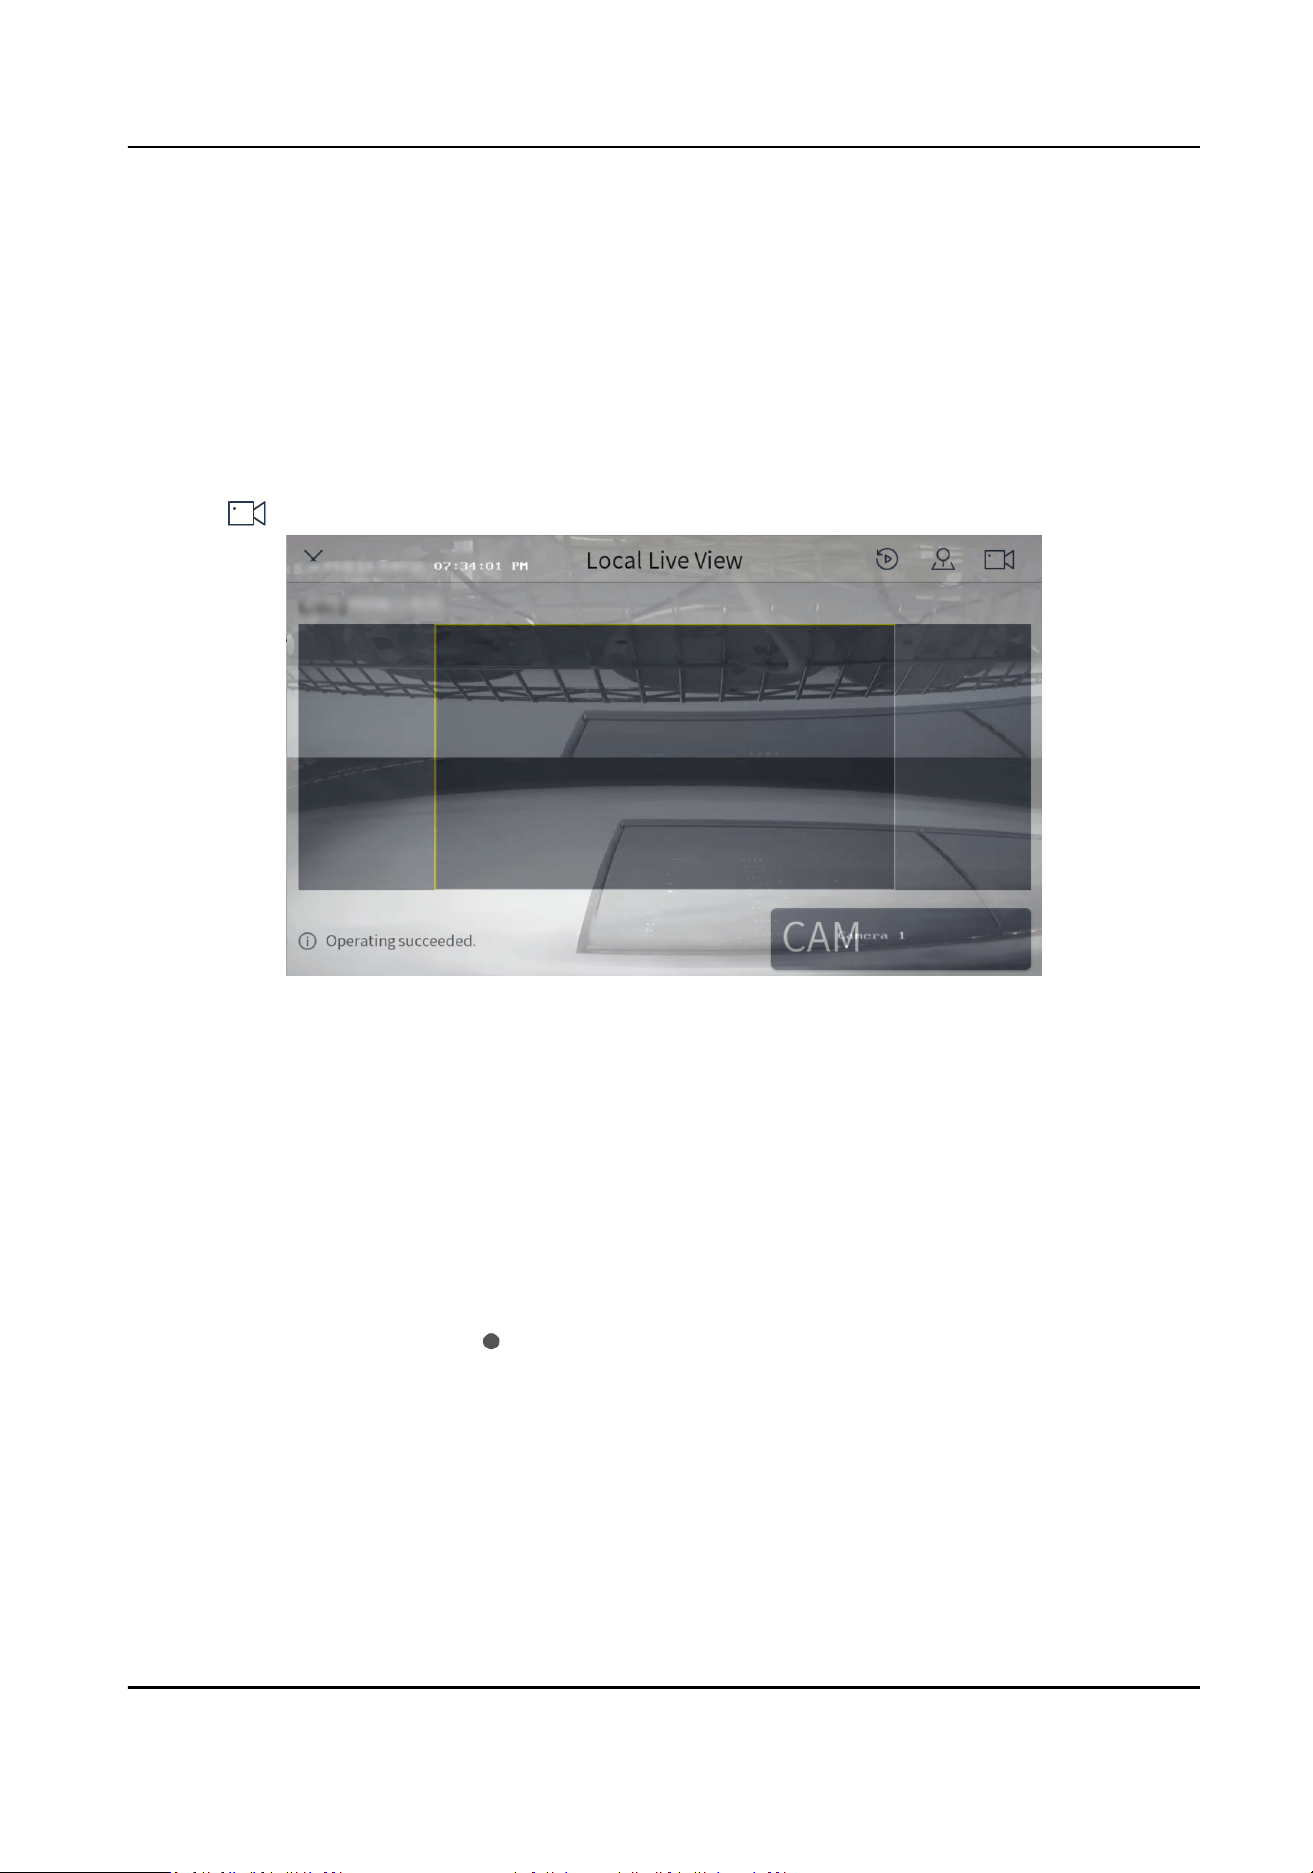
4.3.2 Preview by Operang Keyboard Shortcut
Press the keys of the keyboard to preview the input channel.
Steps
1. Press 0+MON.
2. Preview the channel as desired.
• Press Num+CAM to preview the signal of the corresponding channel.
•
Press Num+CAM-G to preview the camera group.
• Tap
in the touchscreen and select the channel or the camera group as desired to preview.
Figure 4-7 Local Live View
3. You can do the following operaons.
4-Screen Preview
• Press 4+MULT to switch the current image into 4 screens, and tap any
screen to preview the images of
dierent cameras.
• Press 1+MULT to return the previous image.
Switch Channels Press PREV/NEXT to switch to the previous or next channel.
Full Screen Press ESC to switch to the full screen.
Capture Images Press the top of the rocker to capture a image.
Clip Videos Press to start clipping and press it again to stop clipping.
4. Press 0+CAM to stop previewing.
DS-1105KI Network Keyboard User Manual
10
Note
• You can preview the channel with up to 4K
resoluon.
• Press Num+CAM to control PTZ without previewing images from speed domes.
• The captured image and the recording can be saved in USB
ash drive or uploaded to FTP
server. For FTP conguraon, see Storage .
4.3.3 PTZ Control
You can control the added speed dome, like control PTZ movement, turn
on/o light, turn on/o
wiper, zoom in/out, increase/decrease focus, increase/decrease iris, set/call preset, patrol and
paern.
General
Operaon
Steps
1. Preview speed dome image.
Note
For detailed steps, see Preview by Operang Touchscreen and Preview by Operang Keyboard
Shortcut .
2. Move joysck and press buons of keyboard to control PTZ.
Table 4-1
Buons Descripon
Buon Descripon Buon Descripon
LIGHT Turn on/o light. WIPER Turn on/o wiper.
FOCUS+ Increase focus. FOCUS- Decrease focus.
IRIS+ Increase iris. IRIS- Decrease iris.
ZOOM+ Zoom in. ZOOM- Zoom out.
PRESET Call preset. PATROL Call patrol.
PATTERN Call paern and start/
stop auto-scan.
Joysck Rotate PTZ.
Set and Call Preset
You can record the horizontal posions, vercal posions and lens magnicaon of the preset
point by seng a preset point. To quickly monitor a certain target, you can call out the preset
posion by operang the keyboard.
DS-1105KI Network Keyboard User Manual
11

Steps
1. Preview speed dome image.
For detailed steps, see Preview by
Operang Touchscreen and Preview by Operang Keyboard
Shortcut .
2. Set a preset.
1) Tap
.
2) Tap Preset.
3) Rotate the
joysck to move PTZ to a desired posion.
4) Tap to set a preset.
3. Tap
to call the preset.
Set and Call Patrol
Patrol means that PTZ moves among several presets. PTZ will stay in a preset for a duraon before
moving on to the next preset.
Steps
1. Preview speed dome image.
For detailed steps, see Preview by
Operang Keyboard Shortcut and Preview by Operang
Touchscreen .
2. Set a patrol.
1) Tap
.
2) Tap Patrol.
3) Tap of a desired patrol.
4) Tap Add Preset to add presets, including their speed and
duraon me, in the patrol.
5) Tap OK.
3. Tap
to call the patrol.
Set and Call
Paern
Paern records the movement of the PTZ. You can call the paern to automacally move the PTZ
according to the
predened path.
Steps
1. Preview speed dome image.
For detailed steps, see Preview by Operang Touchscreen and Preview by Operang Keyboard
Shortcut .
2. Set a
paern.
1) Tap .
2) Tap Paern.
3) Tap
of a desired paern.
4) Tap OK.
DS-1105KI Network Keyboard User Manual
12
5) Rotate the joysck to control PTZ. The movement will be recorded.
6) Tap to save the paern.
3. Tap
to call the paern.
4.4 Video Wall
4.4.1 Video Wall Conguraon
Congure Region
Divide a video wall into several regions to manage video wall by region.
Steps
1. Go to Keyboard → Region .
Figure 4-8 Region Management
2. Tap .
Figure 4-9 Add Region
3. Enter video wall ID, start coordinate, and end coordinate.
4. Tap OK.
Note
• Up to 16 regions can be added.
• Region size cannot be larger than 6 × 8 (row × column).
DS-1105KI Network Keyboard User Manual
13
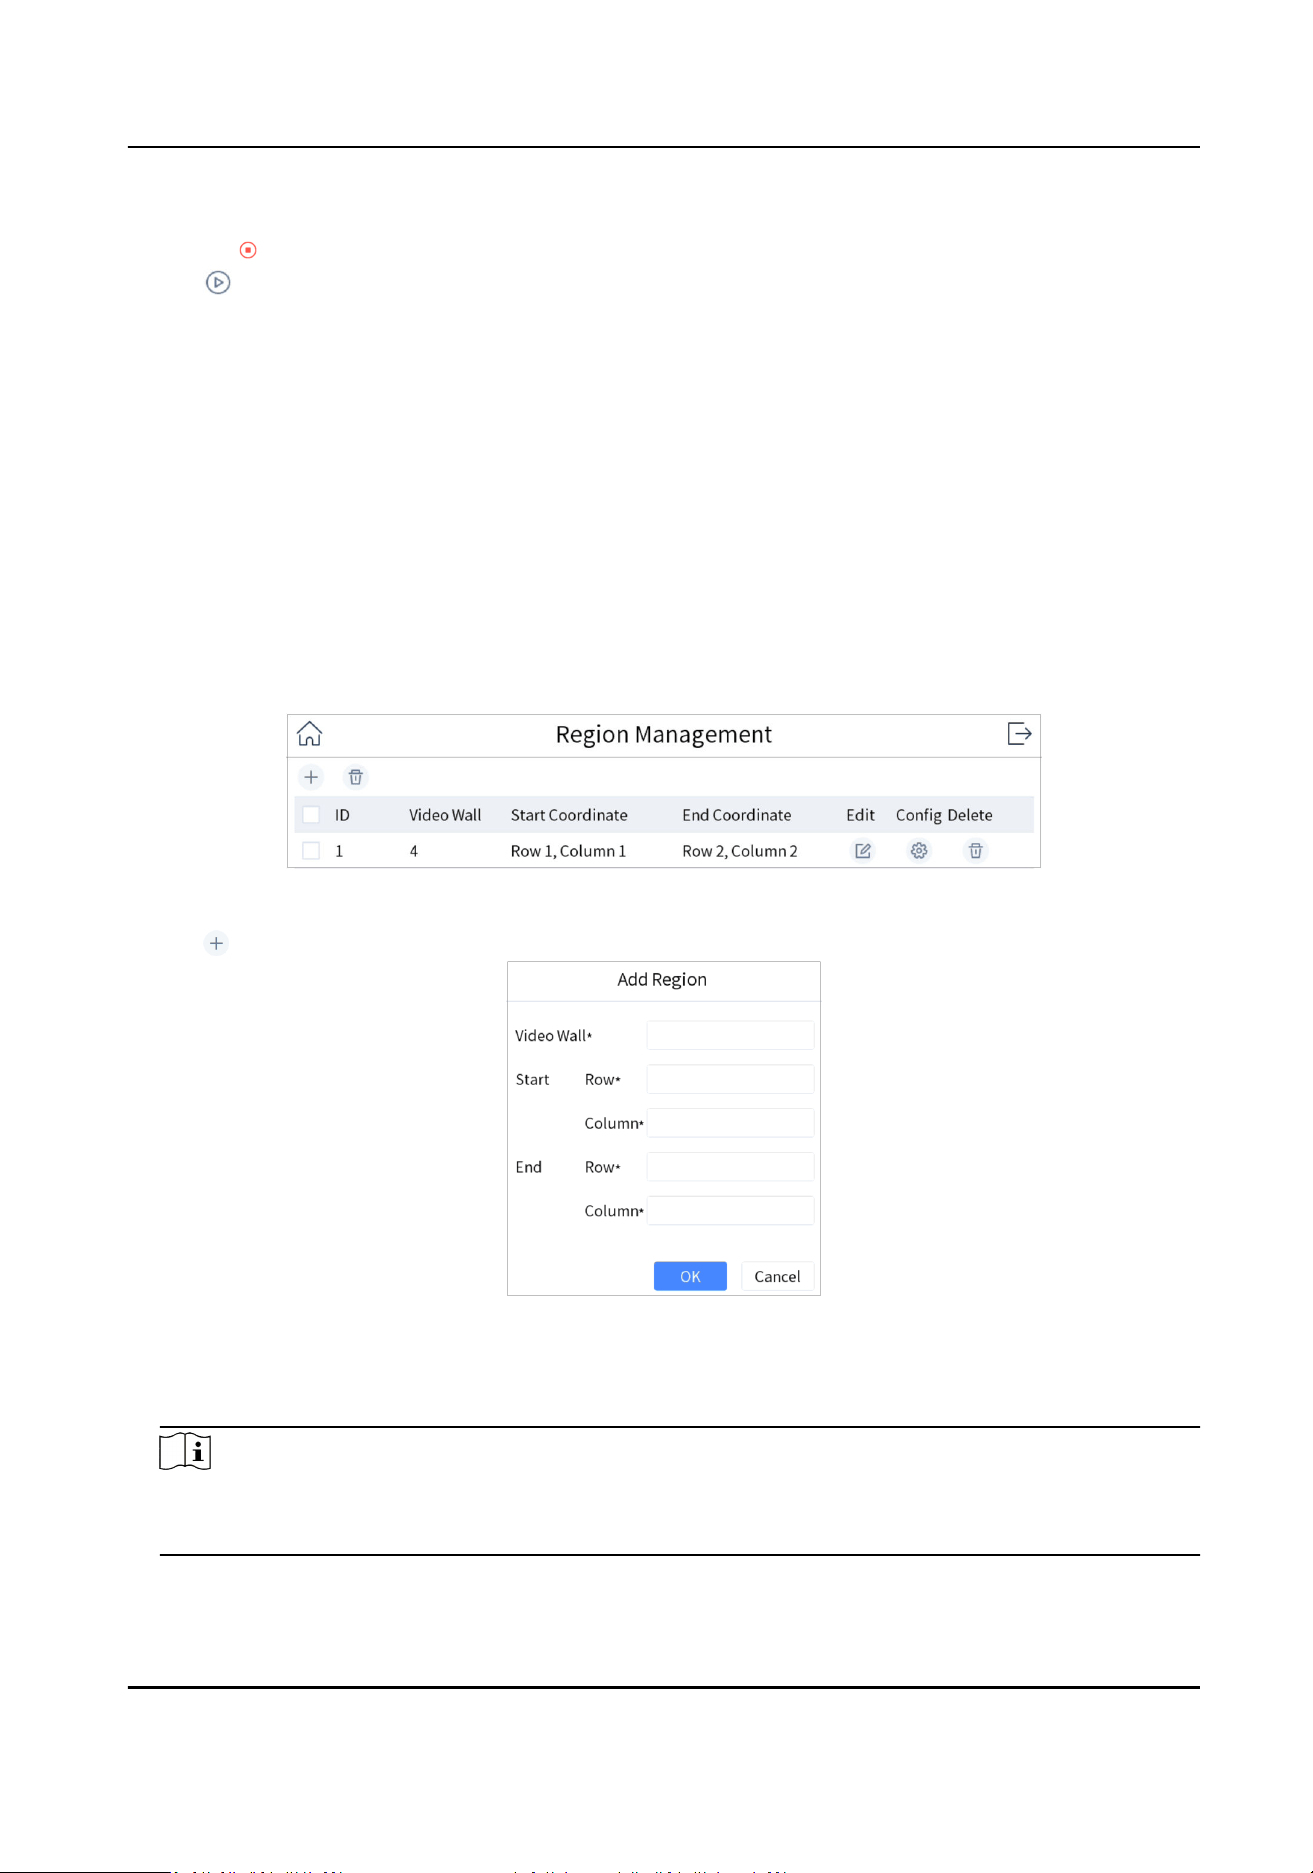
Link Output Channel to Video Wall
Steps
1. Tap
of region to congure.
Figure 4-10 Region Conguraon
2. Tap of a grid.
3. Select a decoding device and select its output channel.
4. Tap OK to nish seng.
Note
Region output channel layout should be the same with the actual video wall.
DS-1105KI Network Keyboard User Manual
14

Figure 4-11 Add Output
4.4.2 Video Wall Control
Layout Operaon
Select a monitor to open, close, resize, and divide windows.
Steps
1. Press Num+REGION.
2. Tap to select a monitor.
3. Operate the window as desired.
Open window
Press Num+CAM or Num+CAM-G to display an input channel or camera
group on the monitor.
Window
roaming
Long press a window, and you can move it.
Close window Long press a window, and tap to close the window.
Resize window • Double tap a window to expand it to cover all the grids it overlays.
Double tap the window again to restore it to the previous size.
• Drag the four corners of the window to resize the window.
DS-1105KI Network Keyboard User Manual
15

Divide window Press Num+MON and press Num+MULT to divide the window.
Expand/
restore sub-
window
Press Num+MON, press Num+WIN to select a sub-window, and press F2
to expand the sub-window to cover the whole monitor. Press F2 again to
restore the sub-window.
Window Operaon
Display an input channel or camera group on a monitor.
Steps
1. Select a monitor to display. Three methods are provided. You are recommended to use the
rst
one.
•
a. Press Num+REGION to show monitors on the region and video wall layout.
b. Press Num+MON. Or tap to select a monitor.
•
a. In iSecure or HikCentral
plaorm, select a wall in the wall list.
b. Press Num+MON. Or tap to select a monitor.
• Press Num+MON: Select a monitor directly.
2. Select an input channel or camera group to preview.
• Press Num+CAM to preview the input channel.
• Press Num+CAM-G to preview the camera group.
• Tap
on the upper right corner of the touchscreen and select an input channel to preview.
3. During live view, you can switch live view input channel, capture images, and clip videos.
Switch Channels
Press PREV/NEXT to switch to previous/next online input channel.
Capture Images Press the buon on the top of joysck to capture a picture.
Clip Videos Press to start clipping and press it again to stop clipping.
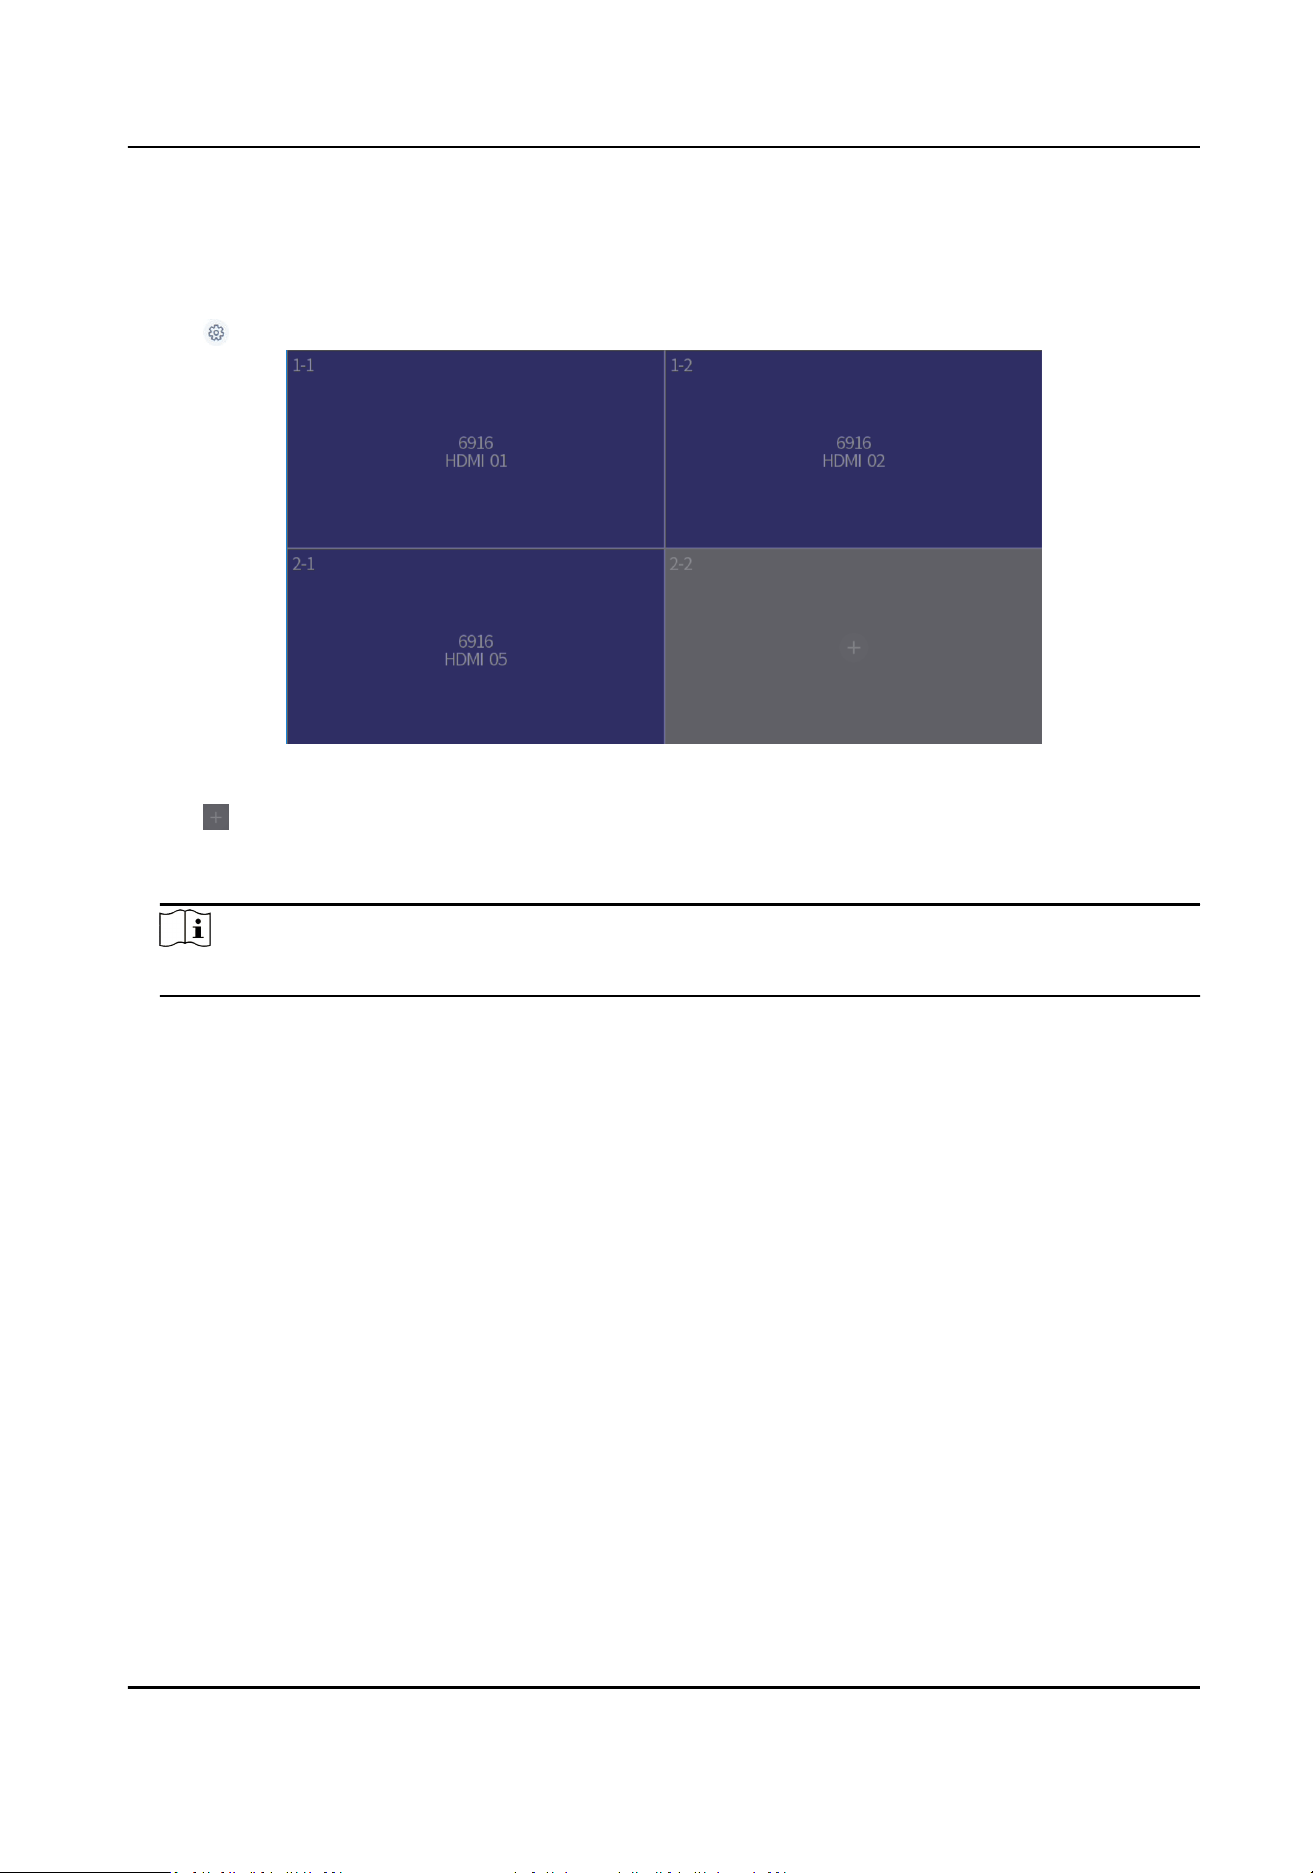
Scene Operaon
You can switch the scene for a region or video wall.
Steps
1. Press Num+REGION.
2. Select a monitor or window on touchscreen.
3. Select a scene as desired.
-
Tap on the upper right corner and select a desired scene.
DS-1105KI Network Keyboard User Manual
16
Figure 4-12 Scene
Table 4-2 Icon Descripon
Icon Descripon
Switch scene.
Save scene.
-
Press Num+SCENE to switch scenes.
4.4.3 PTZ Control
You can control the added speed dome, like control PTZ movement, turn on/o light, turn on/o
wiper, zoom in/out, increase/decrease focus, increase/decrease iris, set/call preset, patrol and
paern.
Steps
1. Display speed dome image on video wall. For detailed steps, see Window Operaon .
2. Control PTZ. For detailed steps, see PTZ Control .
4.4.4 Macro
You can execute a series of connuous acons in sequence by calling a macro. Steps of seng
group and macro are the same, we take seng and calling macro as the example to describe the
steps.
Steps
1. Go to Keyboard → Macro .
2. Tap .
DS-1105KI Network Keyboard User Manual
17
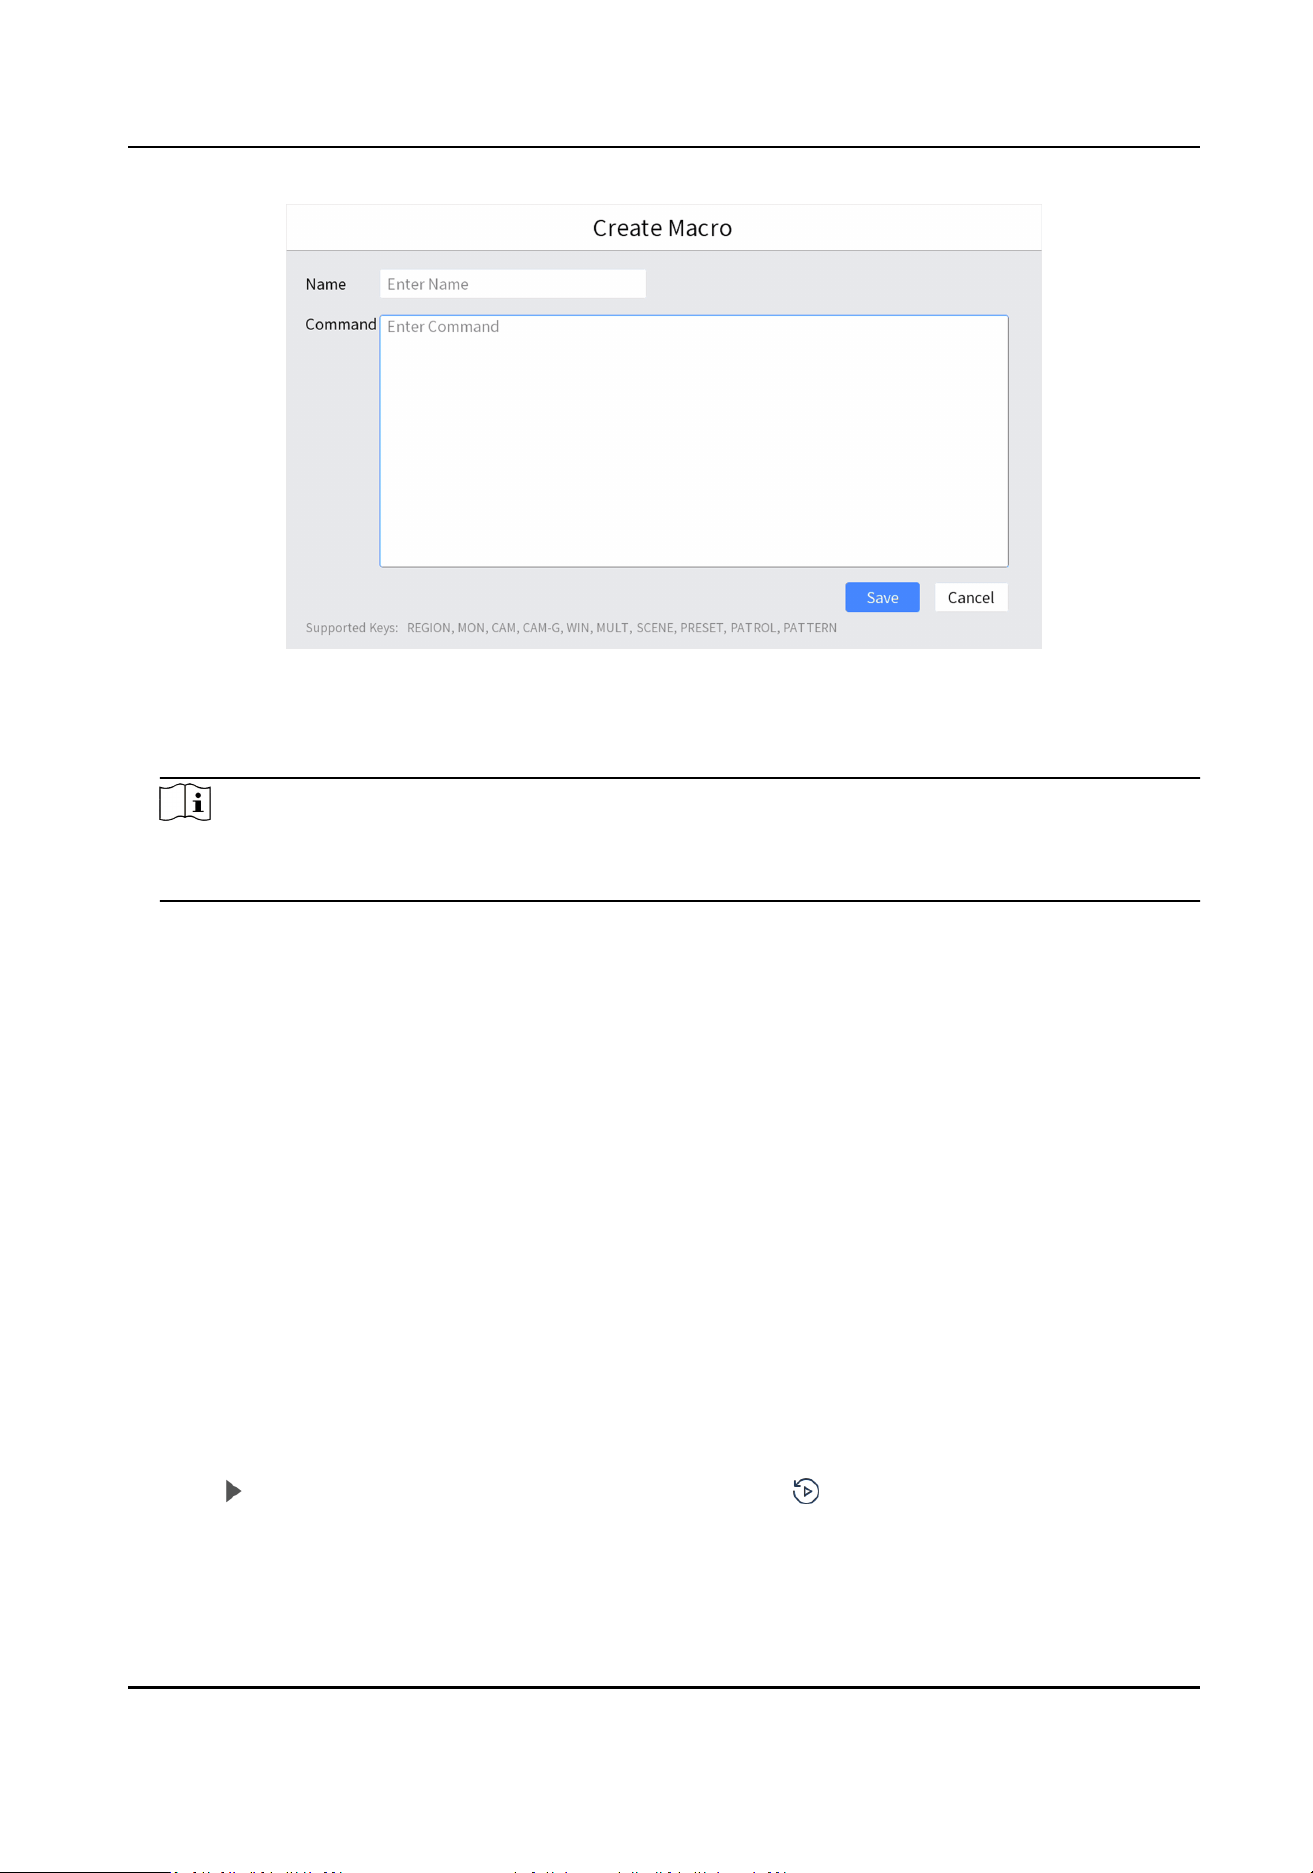
Figure 4-13 Create Macro
3. Enter macro name.
4. Press keyboard buons to enter commands.
Note
You can add up to 256 keys in one macro. A number may contain several keys, e.g., 369 contains
3 keys. A funconal buon is one key.
5. Tap Save.
6. Press Num+MACRO to call the macro.
4.5 Playback
4.5.1 Local Playback
Play videos on the touchscreen.
Instant Playback
Play videos in 3/5/10/15 minutes.
Steps
1. Start local live view. For detailed steps, see Preview by Operang Touchscreen and Preview by
Operang Keyboard Shortcut .
2. Press to start playing the video within 5 minutes. Or tap , tap Instant, and select the
playback
me.
DS-1105KI Network Keyboard User Manual
18
Playback by Time
Steps
1. Start local live view. For detailed steps, see Preview by
Operang Touchscreen and Preview by
Operang Keyboard Shortcut .
2. Tap
.
3. Tap By Time.
4. Select a day in calendar.
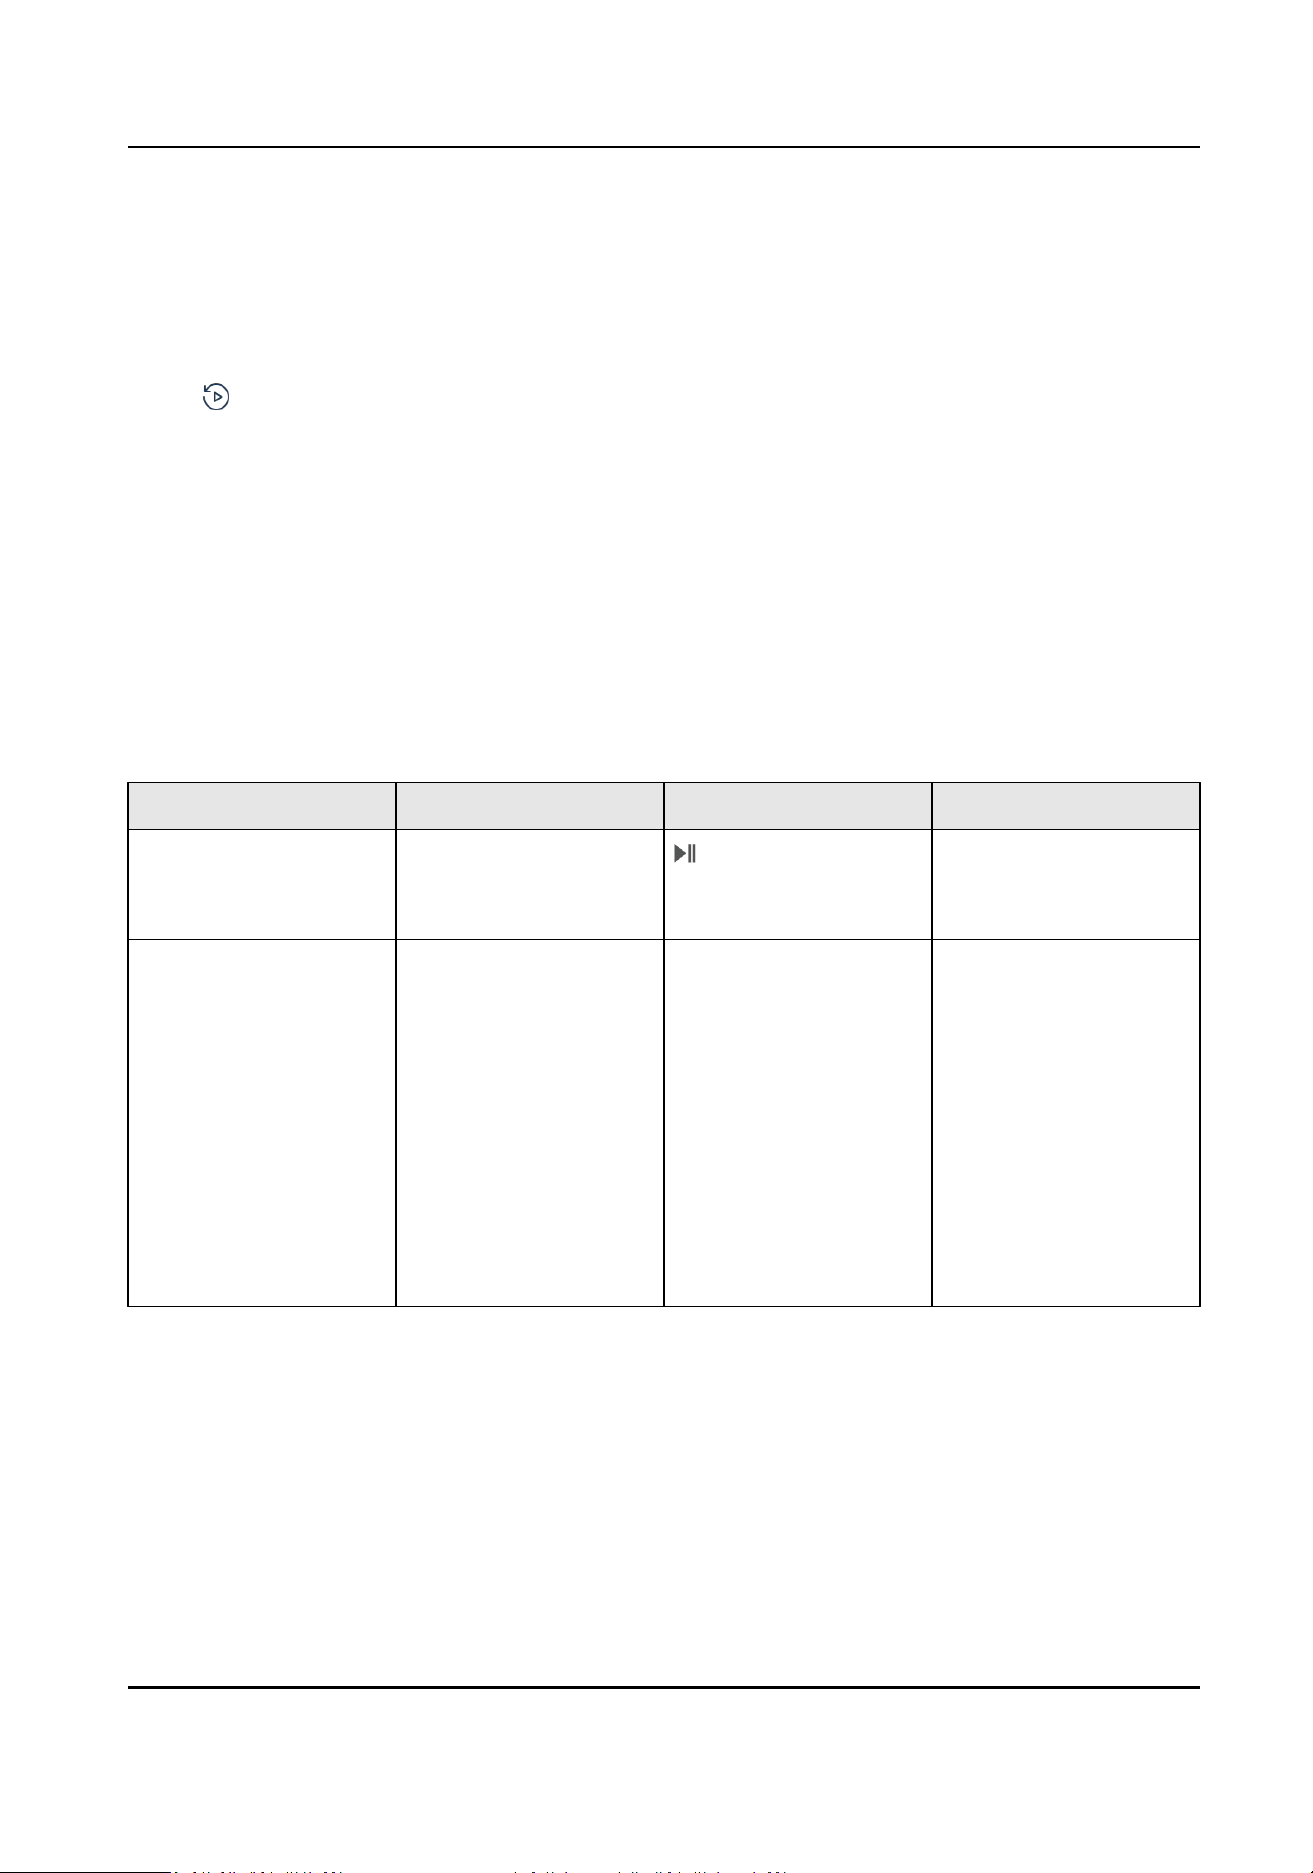
Playback Control
During playback, you can clip videos, capture images, control playback speed, etc.
Before the operaon, you need to connect a USB ash drive or congure keyboard FTP sengs.
Clipped videos and captured pictures will be saved to USB ash drive or FTP server. For steps of
storage conguraon, see Storage .
Table 4-3 Buon Descripon
Buon Descripon Buon Descripon
Time bar Drag me bar to
quickly locate on a
certain me to play.
Pause/resume
playback.
ESC Stop playback. Joysck • Push it to the
le to
slow down.
• Push it to the right
to speed up.
•
Rotate it clockwise
to jump forward for
30 seconds.
• Rotate it
anclockwise to
back forward for 30
seconds.
4.5.2 Video Wall Playback
Play videos on video wall.
Instant Playback
Play videos in 3/5/10/15 minutes.
DS-1105KI Network Keyboard User Manual
19
Steps
1. Start video wall live view. For detailed steps, see Window
Operaon .
2. Press
to start playing the video within 5 minutes. Or tap , tap Instant, and select the
playback me.
Playback by Time
Steps
1. Start video wall live view. For detailed steps, see Window Operaon .
2. Tap
, tap By Time, and select a day in calendar.
Playback Control
For detailed steps, see Playback Control .
Note
Capturing, clipping, recording, jumping forward or backward for 30 seconds are not supported in
Video Wall Playback.
4.6 Channel Management
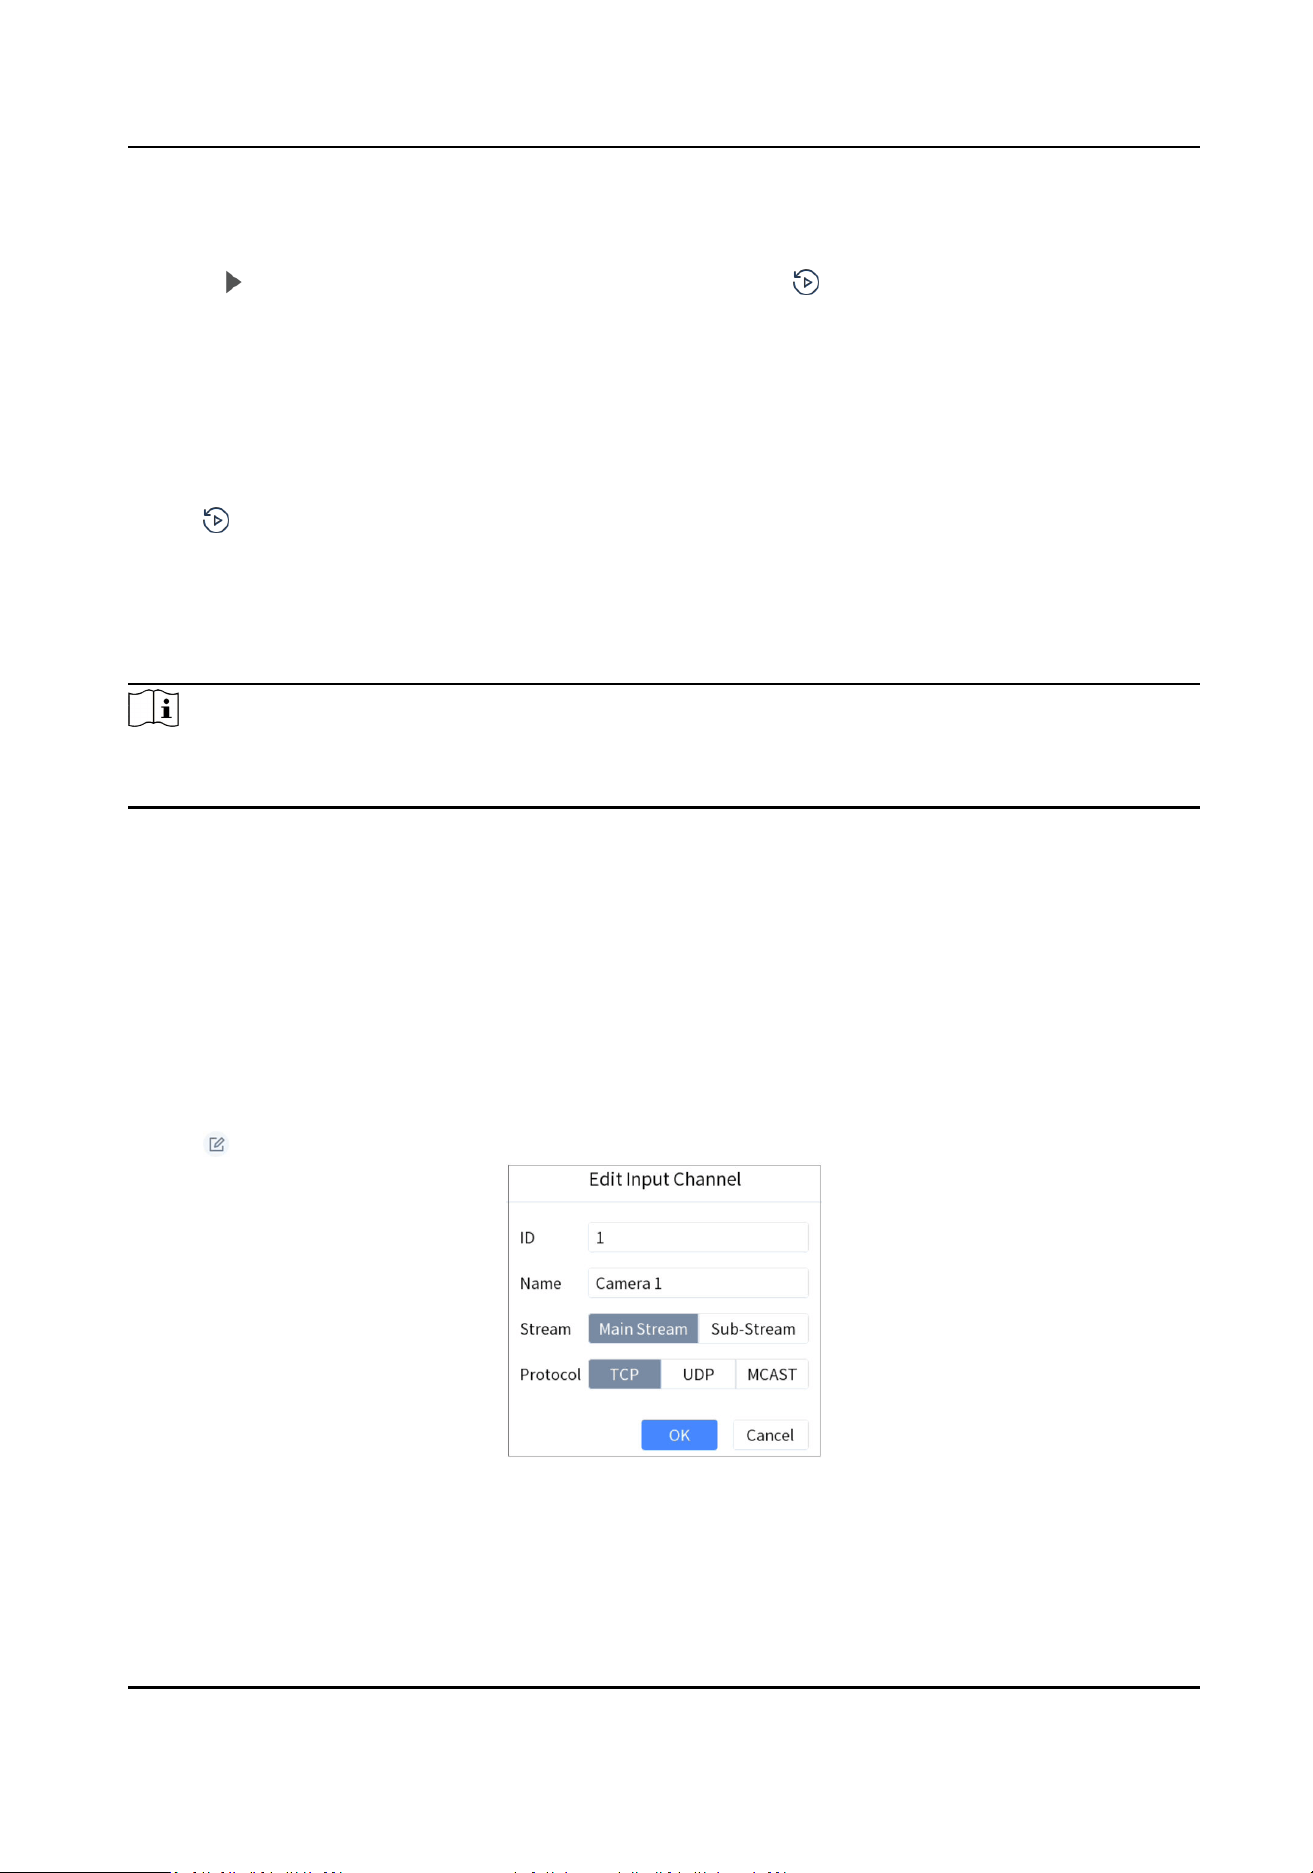
4.6.1 Edit Channel
We take eding input channel as the example to describe the steps.
Steps
1. Go to Keyboard → Channel .
2. Tap of input channel/output channel to edit.
Figure 4-14 Edit Input Channel
3. Edit parameters.
ID
DS-1105KI Network Keyboard User Manual
20

The unique idencaon for input channel. It is valid in local and video wall live view mode.
Stream
The stream to preview in local and video wall live view mode.
Protocol
It is valid for video wall preview.
4. Tap OK.
4.6.2 Output Channel
When adding decoders or video recorders, their output channels will be added and displayed in
output channel list. You can press Num+MON to operate an output channel, and the number
refers to output channel ID. Video wall also need to link to these output channels.
Figure 4-15 Output Channel
4.6.3 Camera Group
Camera group enables you to preview a group of cameras (input channels) in sequence.
Steps
1. Go to Keyboard → Channel → Camera Group .
DS-1105KI Network Keyboard User Manual
21
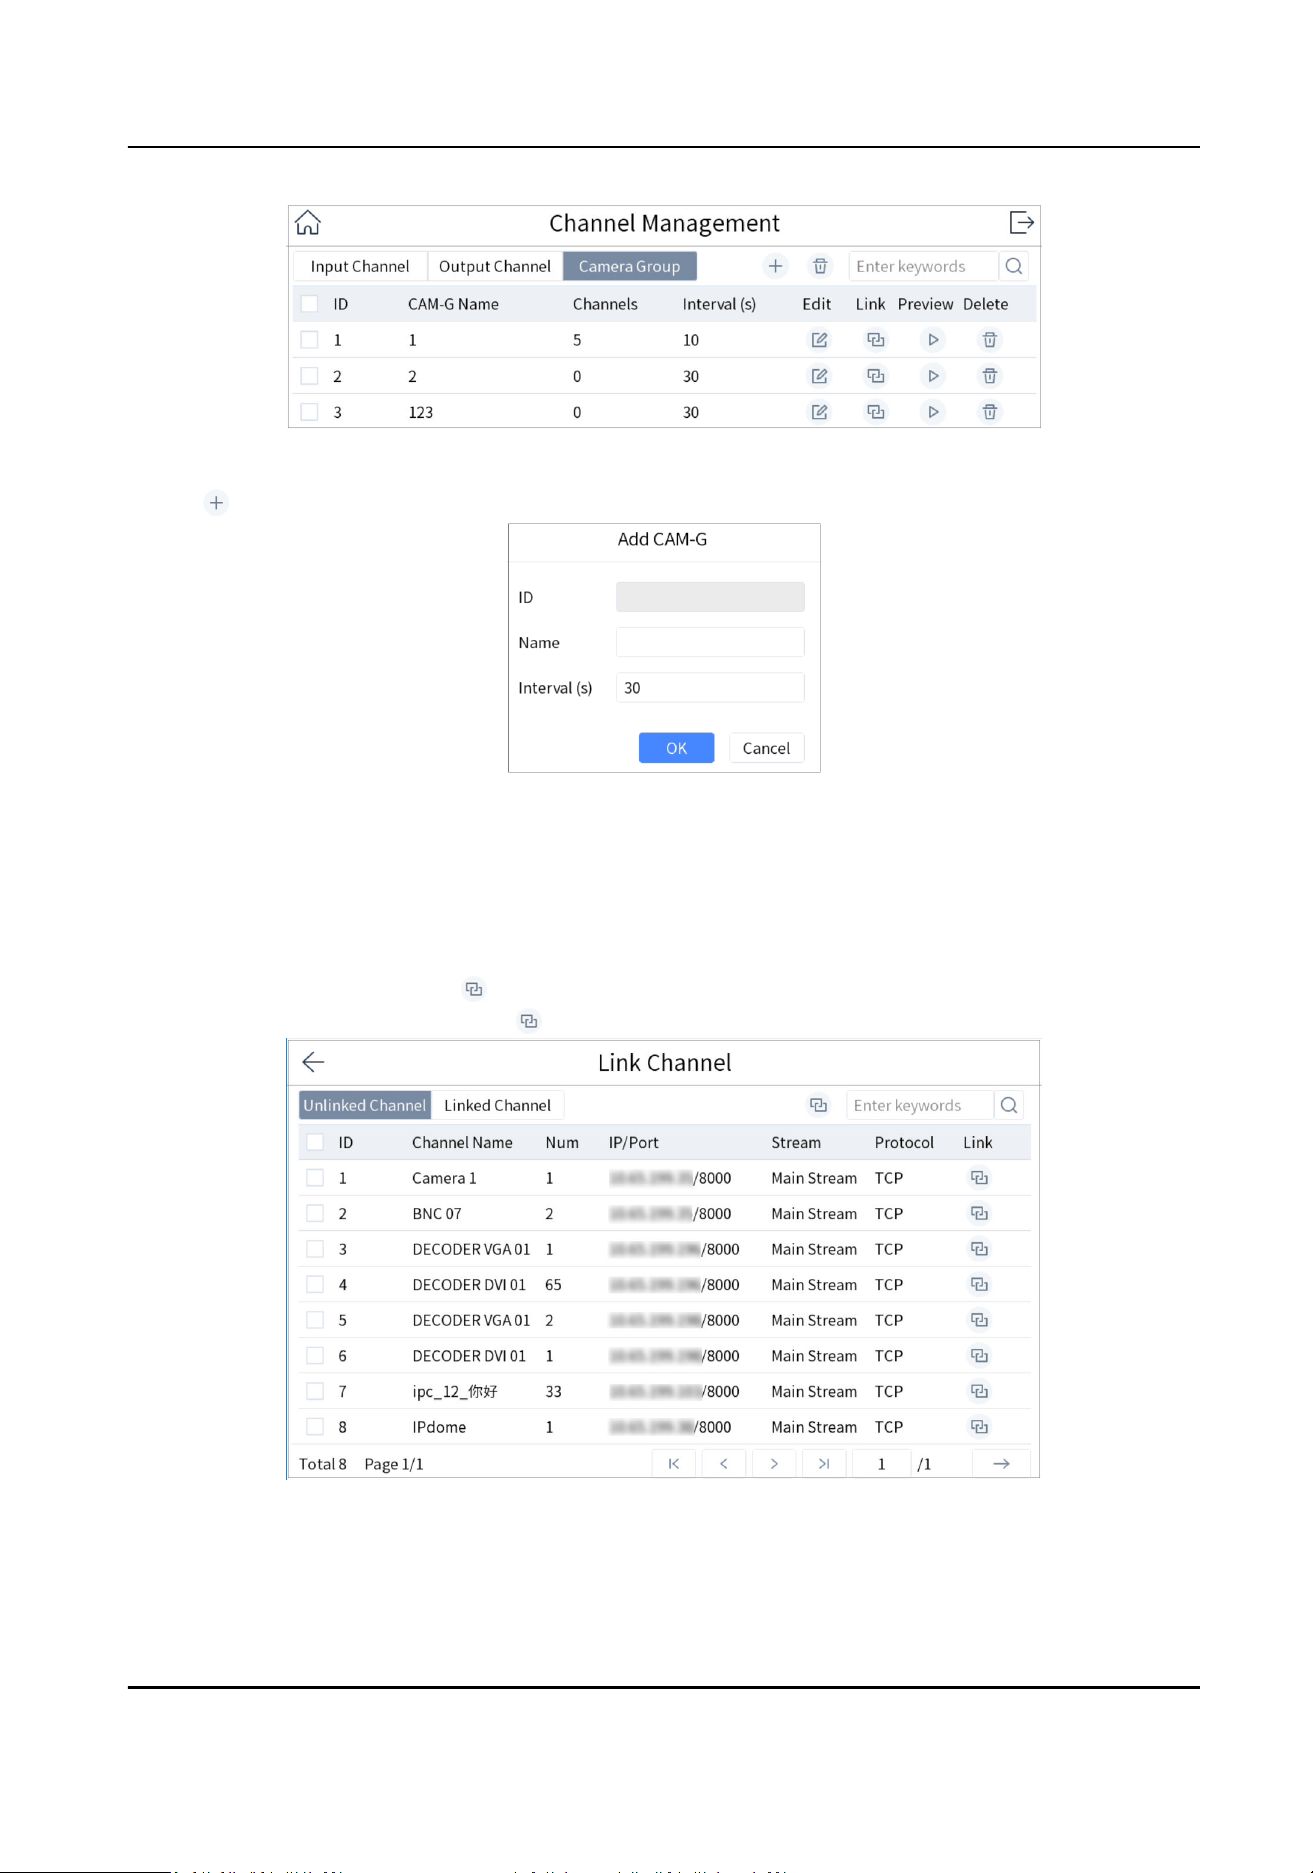
Figure 4-16 Camera Group
2.
Tap .
Figure 4-17 Add Camera Group
3. Enter group name and interval.
Interval: The me to dwell in each input channel before switching to next channel.
4. Tap OK.
5. Add input channel to camera group.
-
Select a channel and tap on the right.
-
Check input channels and tap on the upper-right corner.
Figure 4-18 Link Channel
DS-1105KI Network Keyboard User Manual
22
Note
• Up to 16 camera groups can be added.
• Each camera group can link up to 64 input channels.
• Interval range: 10 to 65535 seconds.
• The camera groups set by
dierent users are independent. Namely, users can only view and
edit their own camera groups.
6. Oponal: Tap Linked Channel, check input channels to be unlinked and tap to unlink the
input channel.
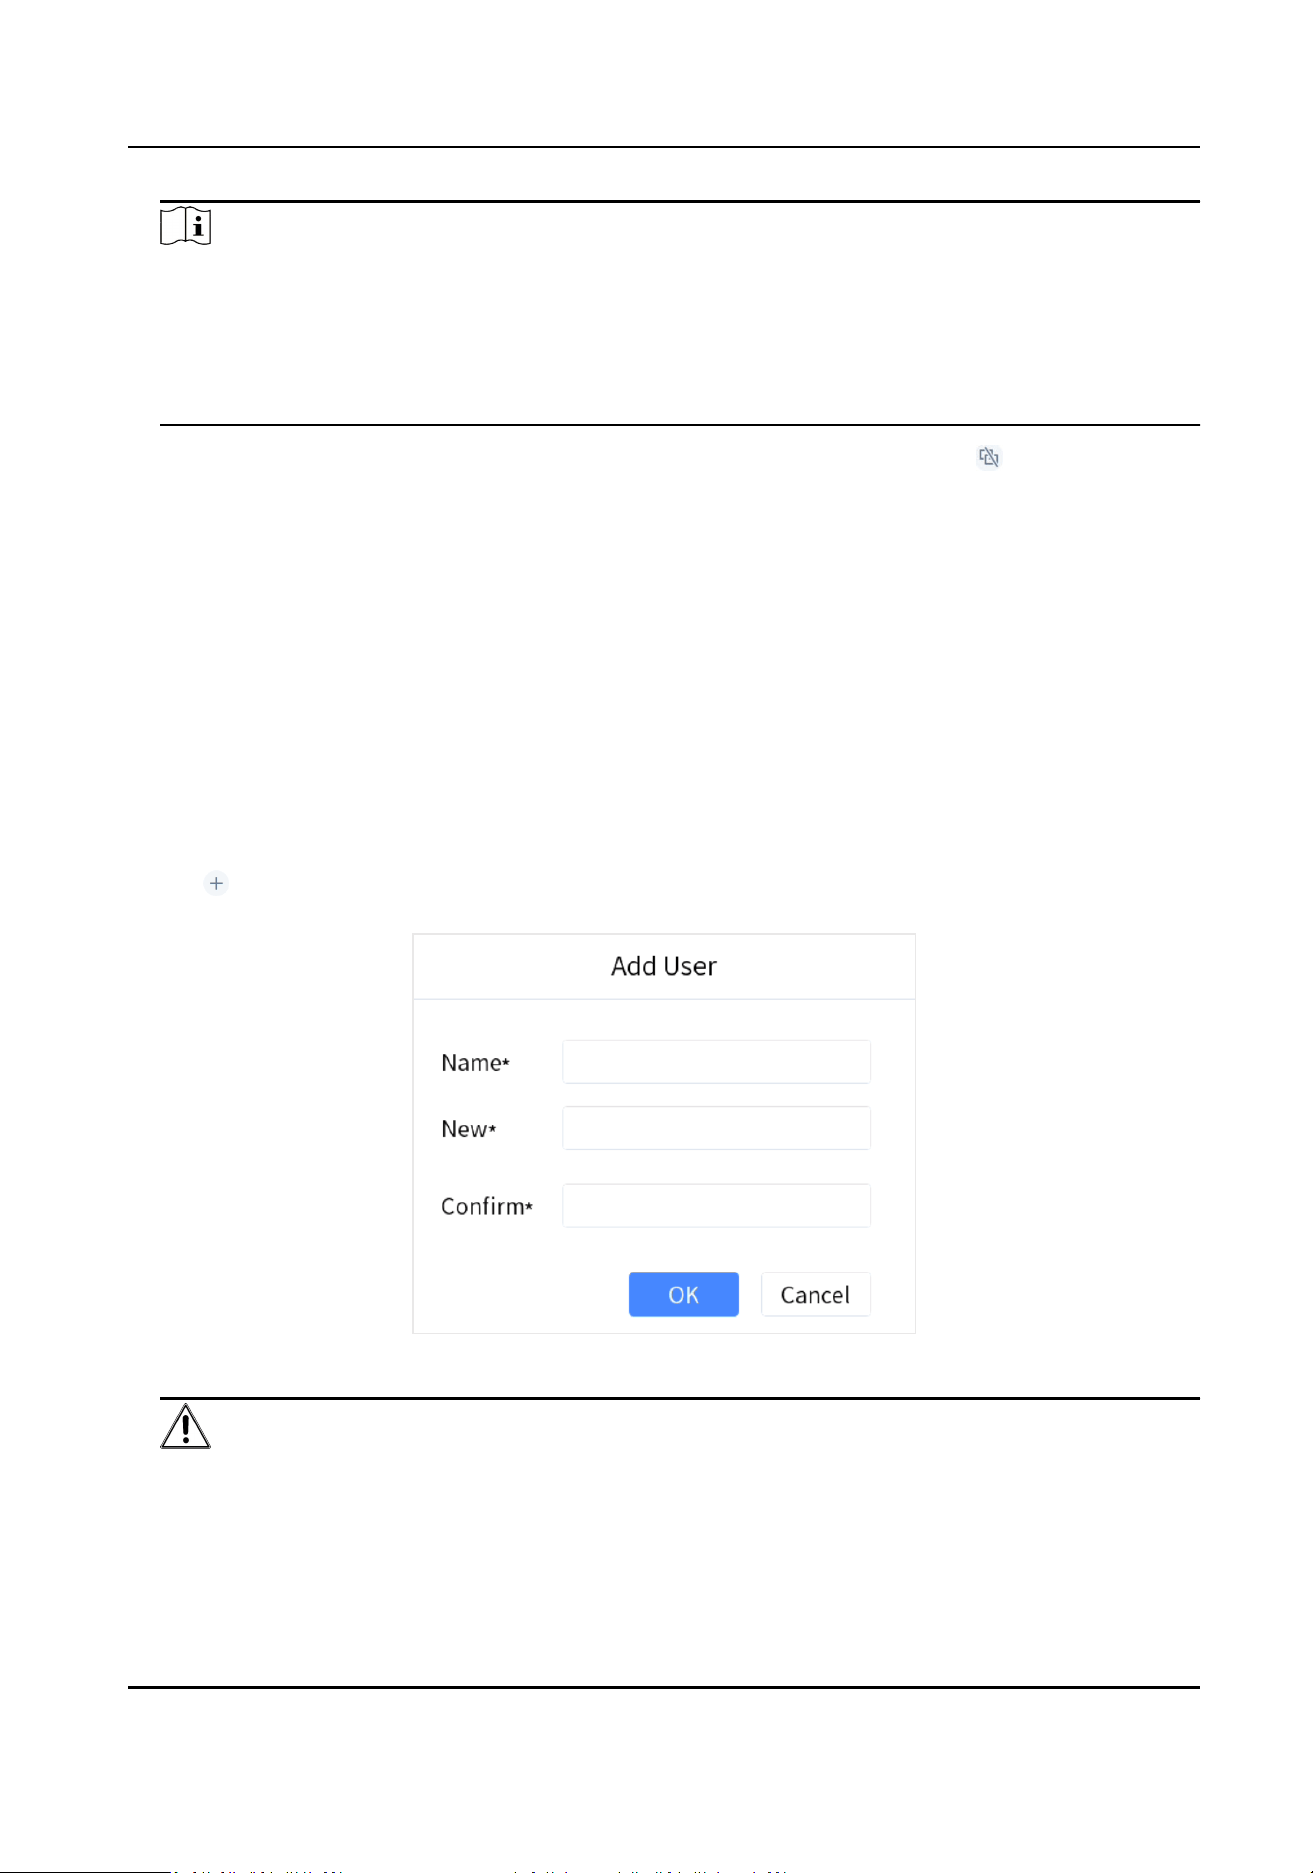
4.7 User Management
Administrator can add operator and allocate devices to operator. Operator permissions are as
follows:
• Add, edit, and delete macro and group.
• Add, edit, and delete region.
•
Deleng, eding, and adding devices are not allowed.
Steps
1. Go to Keyboard → System → User .
2. Tap
.
3. Enter user name and password for an operator, and tap OK.
Figure 4-19 Add User
Cauon
We highly recommend you create a strong password of your own choosing (Using a minimum of
8 characters, including at least three of the following categories: upper case leers, lower case
DS-1105KI Network Keyboard User Manual
23

leers, numbers, and special characters.) in order to increase the security of your product. And
we recommend you reset your password regularly, especially in the high security system,
reseng the password monthly or weekly can beer protect your product.
4. Allocate devices to operator.
-
Tap
of device to be linked.
-
Check devices as desired and tap
on the upper-right corner.
Note
• Keyboard supports up to 32 users: 1 administrator and 31 operators.
• The operator can only operate on the devices allocated.
5. Oponal: Tap Linked Device, check the devices to be unlinked and tap to unlink the devices.
4.8 Video Recorder
Control video recorder by operang video record remote panel.
4.8.1 Remote Panel
Press Num+DEVICE to show video recorder remote panel. Num refers to video recorder ID. Go to
Device for video recorder ID.
Figure 4-20 Remote Panel (Disable PTZ)
DS-1105KI Network Keyboard User Manual
24
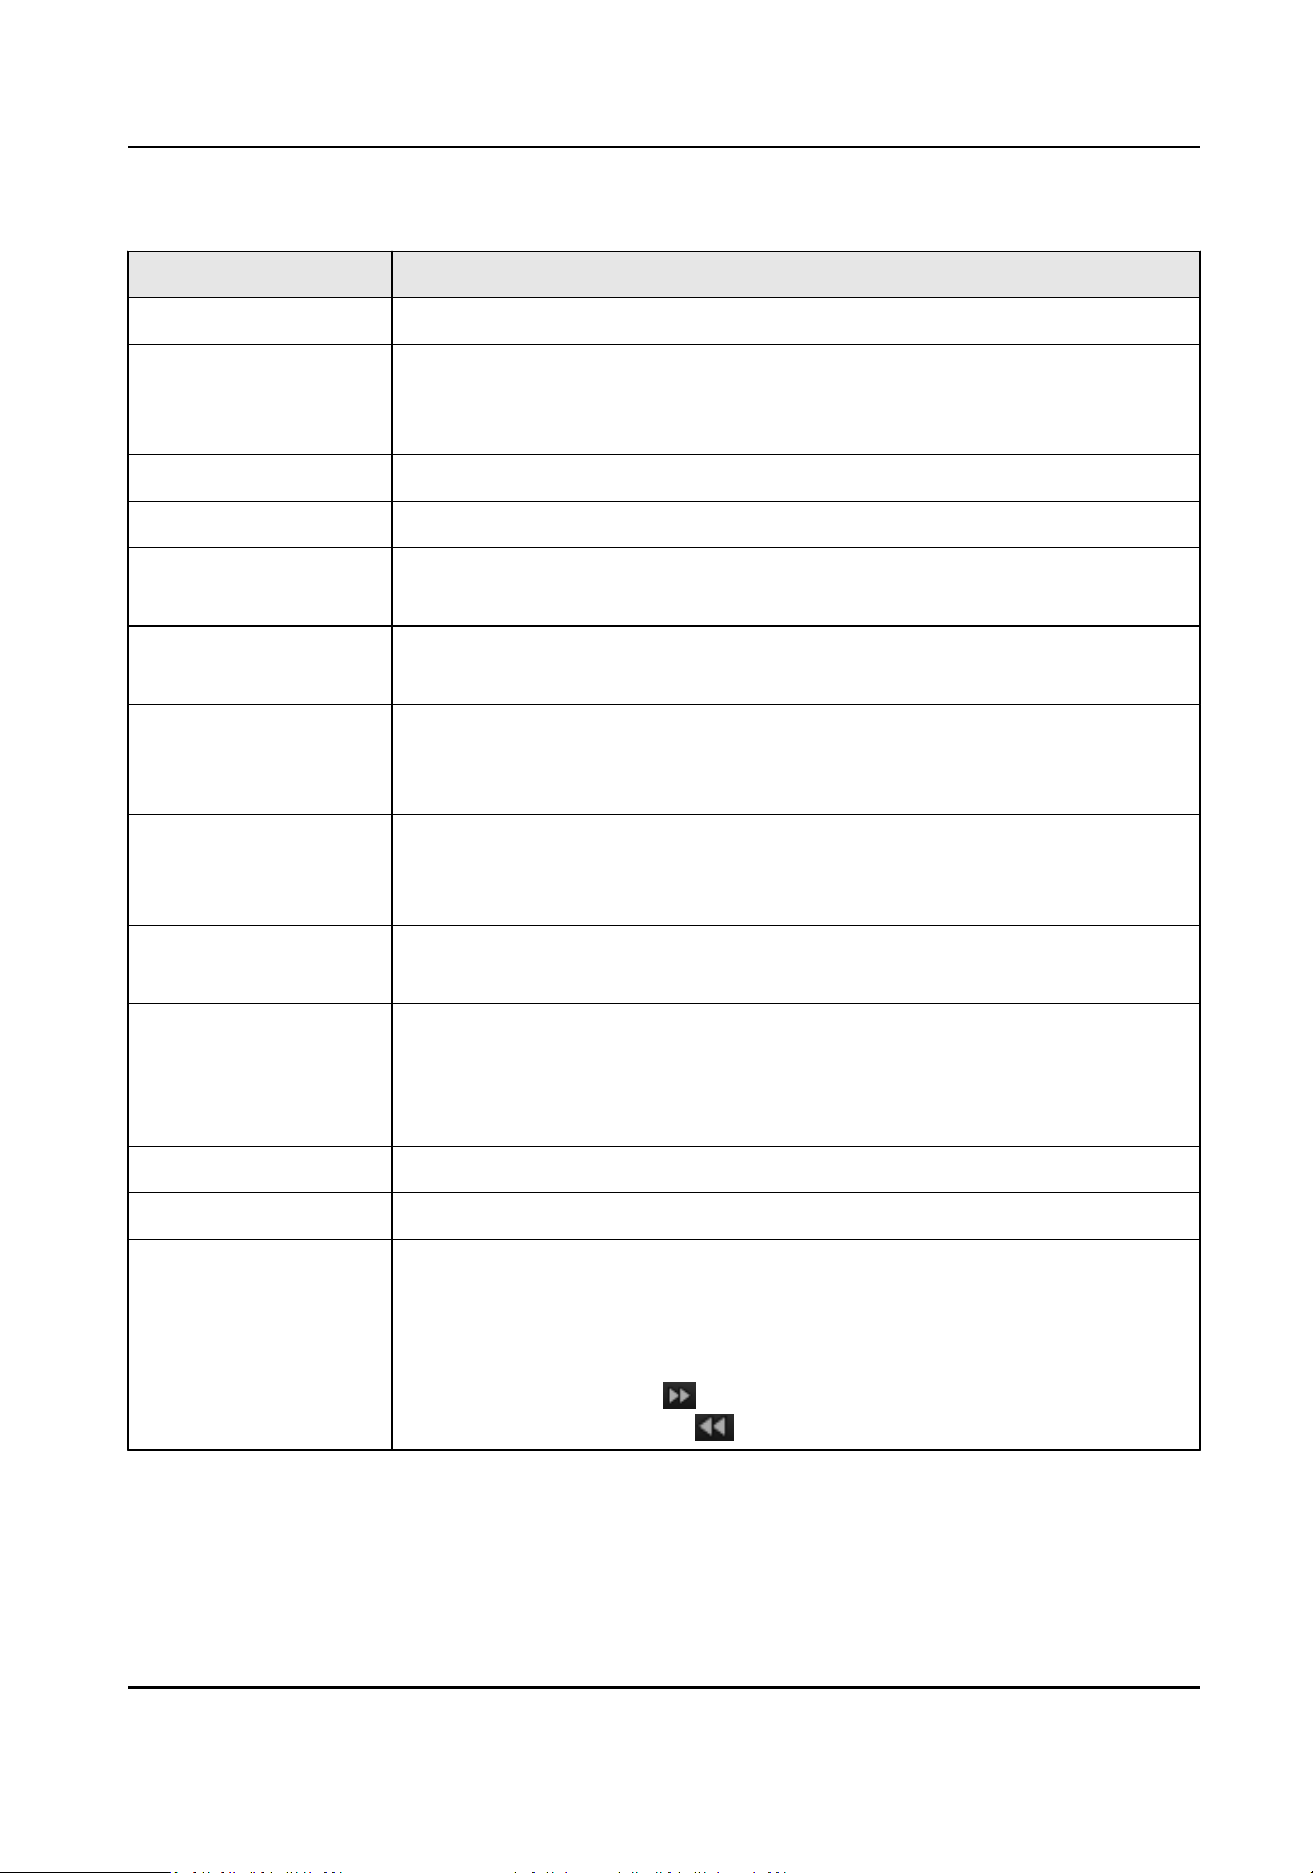
Table 4-4 Buon Descripon
Buon Descripon
Disable PTZ Exit PTZ control mode.
Numeric Key • In
eding mode, tap it to enter number 1 to 16.
• In live view or PTZ mode, tap it to switch channel.
• During playback, tap it to switch channel.
ESC Exit the current menu.
REC Start/stop manual recording.
PLAY • In live view mode, tap it to enter Instant Playback interface.
• During playback, tap it to select a day in the calendar.
ABC In eding mode, tap it to switch input method among digits, leers, and
characters.
EDIT • In
eding mode, tap it to delete the content before the cursor.
• Check/uncheck a checkbox.
• In seng menu, tap it to enter eding mode.
MENU • Enter main menu interface.
• In second-level menu, tap it to go back to Live View interface.
• During playback, tap it to hide the control bar.
F1 • During playback, tap it to switch between play and reverse play.
• In live view mode, tap it to start instant playback.
F2 • Tap it to switch tab page.
• During playback, tap it to switch playback mode between playback by
channel and playback by le.
• During simultaneous playback, tap it to switch channel.
MAIN/SPOT Tap it to switch the output between main port and auxiliary port.
MULT In live view mode, tap it to switch image division.
Direconal Buon • Move the
acve selecon in a menu. Tap it to move the selecon up
and down.
• In live view mode, tap it to switch
dierent channels.
• In playback mode:
• Up (corresponds to in playback menu): Tap it to speed up.
• Down (corresponds to
in playback menu): Tap it to slow down.
DS-1105KI Network Keyboard User Manual
25
Buon Descripon
•
Le (corresponds to in playback menu): Tap it to switch to
previous le/event/tag/day.
• Right (corresponds to
in playback menu): Tap it to switch to next
le/event/tag/day.
Enter •
Conrm an operaon.
• Check a checkbox and switch ON/OFF.
• During playback, tap it to stop/resume playback.
• In single frame playback mode, tap it to play next frame.
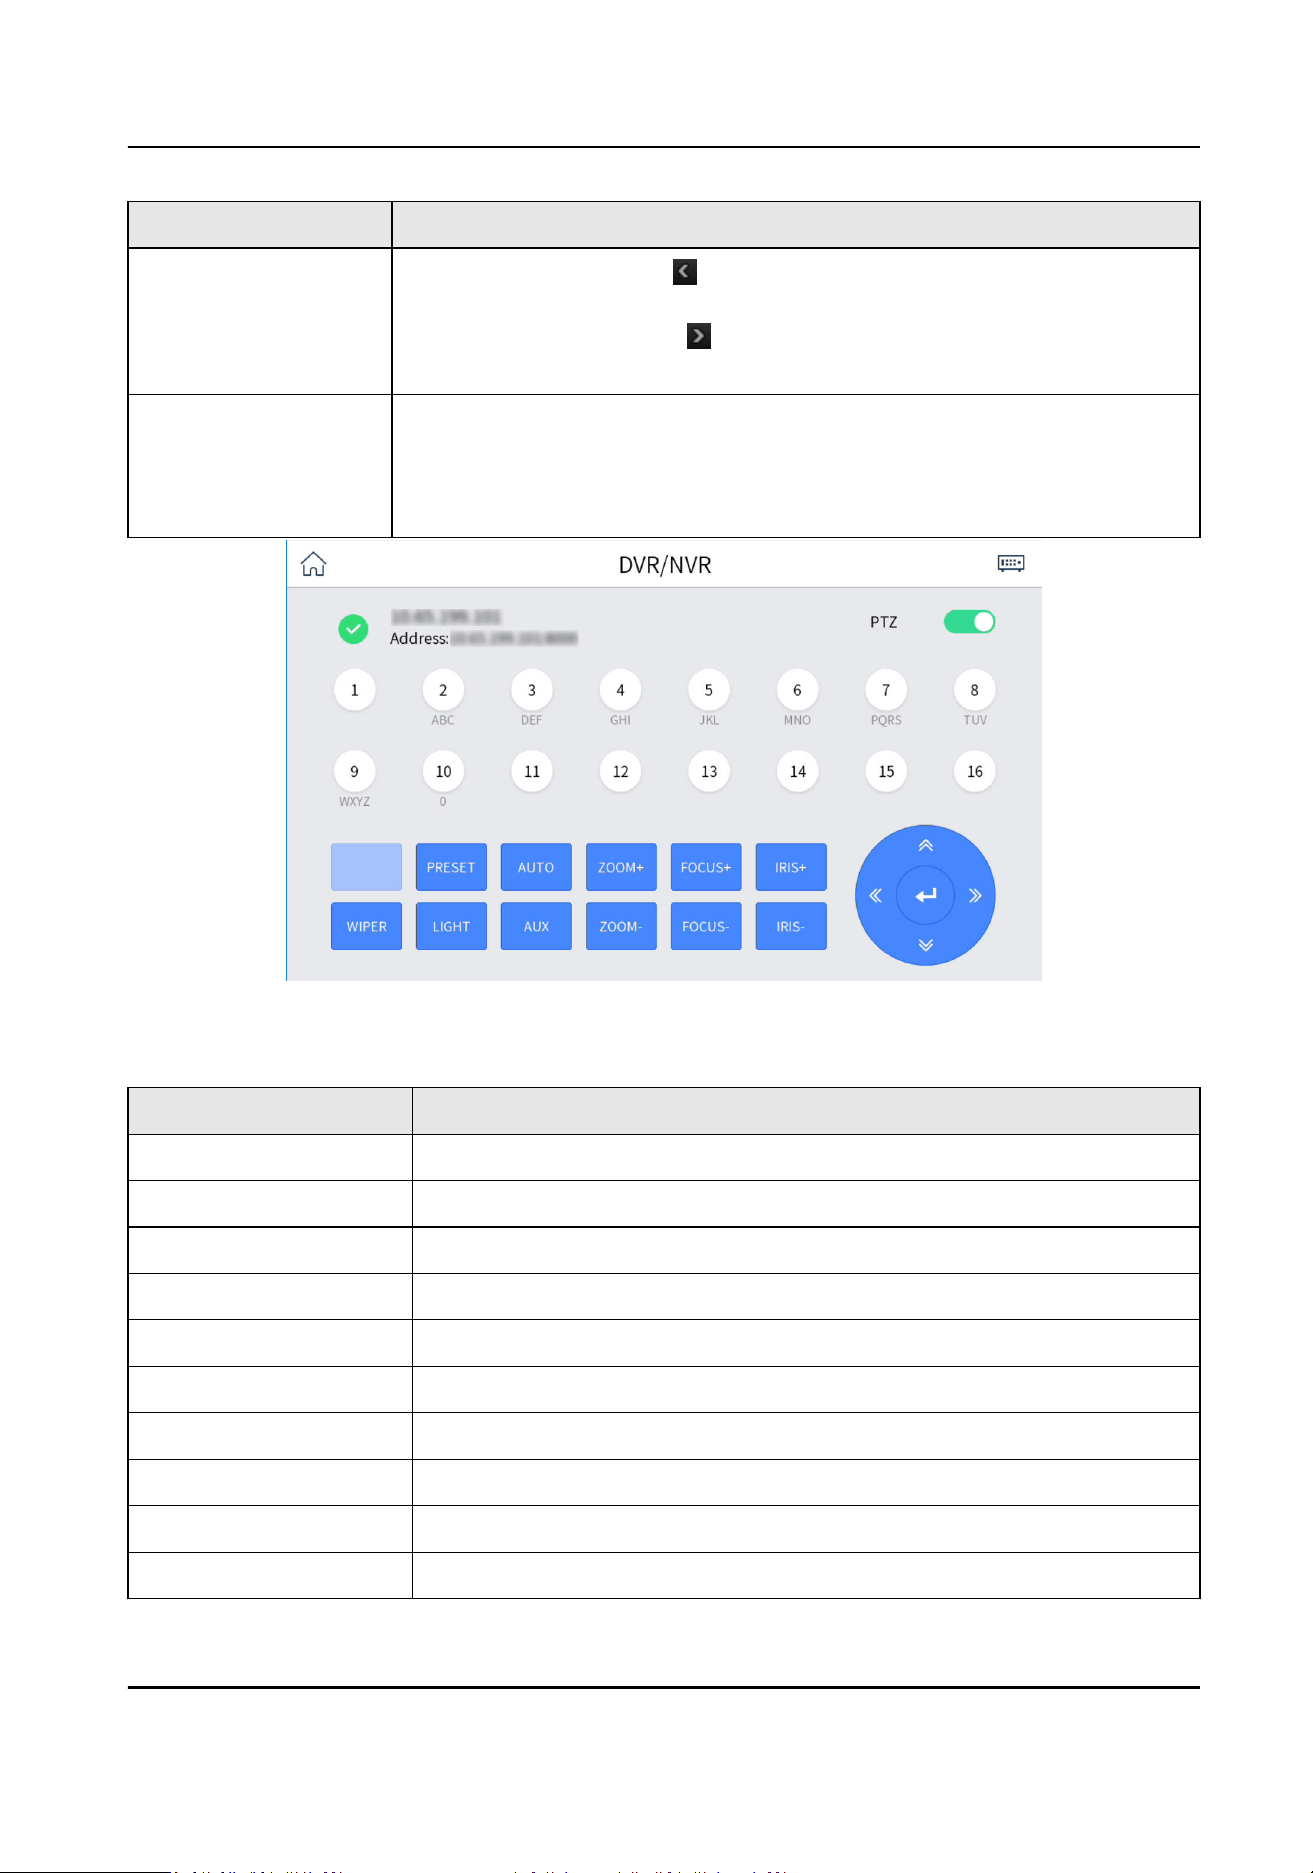
Figure 4-21 Remote Panel (Enable PTZ)
Table 4-5 Buon Descripon
Buon Descripon
Enable PTZ In PTZ live view mode, enable PTZ to enter PTZ control mode.
Numeric Buon Switch to the corresponding channel.
PRESET Tap PRESET+Num to call the preset.
AUTO Enter auto-scan mode.
ZOOM+ Zoom in.
FOCUS+ Increase focus.
IRIS+ Increase iris.
WIPER Turn on/o PTZ wiper.
LIGHT Turn on/o PTZ light.
AUX Reserved.
DS-1105KI Network Keyboard User Manual
26

Buon Descripon
ZOOM- Zoom out.
FOCUS- Decrease focus.
IRIS- Decrease iris.
Direconal Buon Control PTZ movement.
Enter In auto-scan mode, tap it to stop/resume auto-scan.
4.8.2 Live View
Video Recorder (Version before 4.0)
Whatever interface the video recorder is in, tap ESC ll you enter the live view mode.
Video Recorder (Version: 4.0 and above)
Whatever interface the video recorder is in, tap direconal buon to enter the live view mode.
4.8.3 PTZ Control
You can control the added speed dome, like control PTZ movement, turn on/o light, turn on/o
wiper, increase/decrease iris, increase/decrease focus, zoom in/out, call preset. But seng preset,
seng and calling paern, and seng and calling patrol are not supported.
General Operaon
Operate the joysck and buons to control PTZ.
Call a Preset
Tap PRESET+Num to call the preset.
4.8.4 Playback
Video Recorder (Version before 4.0)
In live view mode, tap PLAY.
Video Recorder (Version 4.0 and above)
• In live view mode, tap PLAY.
• In other menu, tap
direconal buon to navigate to playback menu.
DS-1105KI Network Keyboard User Manual
27
4.9 Connect the Device Through Serial Ports
The network keyboard can be connected to the device through RS-232 and RS-485 serial port. Aer
the connecon, the keyboard can be used to control the video recorder, analog dome and analog
matrix.
4.9.1 Connect Video Recorders
The keyboard can be connected to the video recorder through RS-485 serial port to realize preview,
playback, PTZ control and other
funcons.
Steps
1. Connect the KB port of the video recorder with the RS-485 interface of the keyboard.
Note
T+ and T- of RS-485 interface correspond to D+ and D- of KB port respecvely.
2. Enter Serial Port Control, and select DVR/NVR.
3. Select Device Address.
4. Select Device Version.
Note
• The device version is the
rmware version of the corresponding device.
• Please select according to the actual device version. Wrong version selecon will cause some
funcon excepons.
5. Control video recorder through remote panel of video recorder. For details, see Remote Panel .
Note
You can only control the video recorder through the joysck and touchscreen, and the shortcut
of network keyboard cannot be used to control the video recorder.
DS-1105KI Network Keyboard User Manual
28
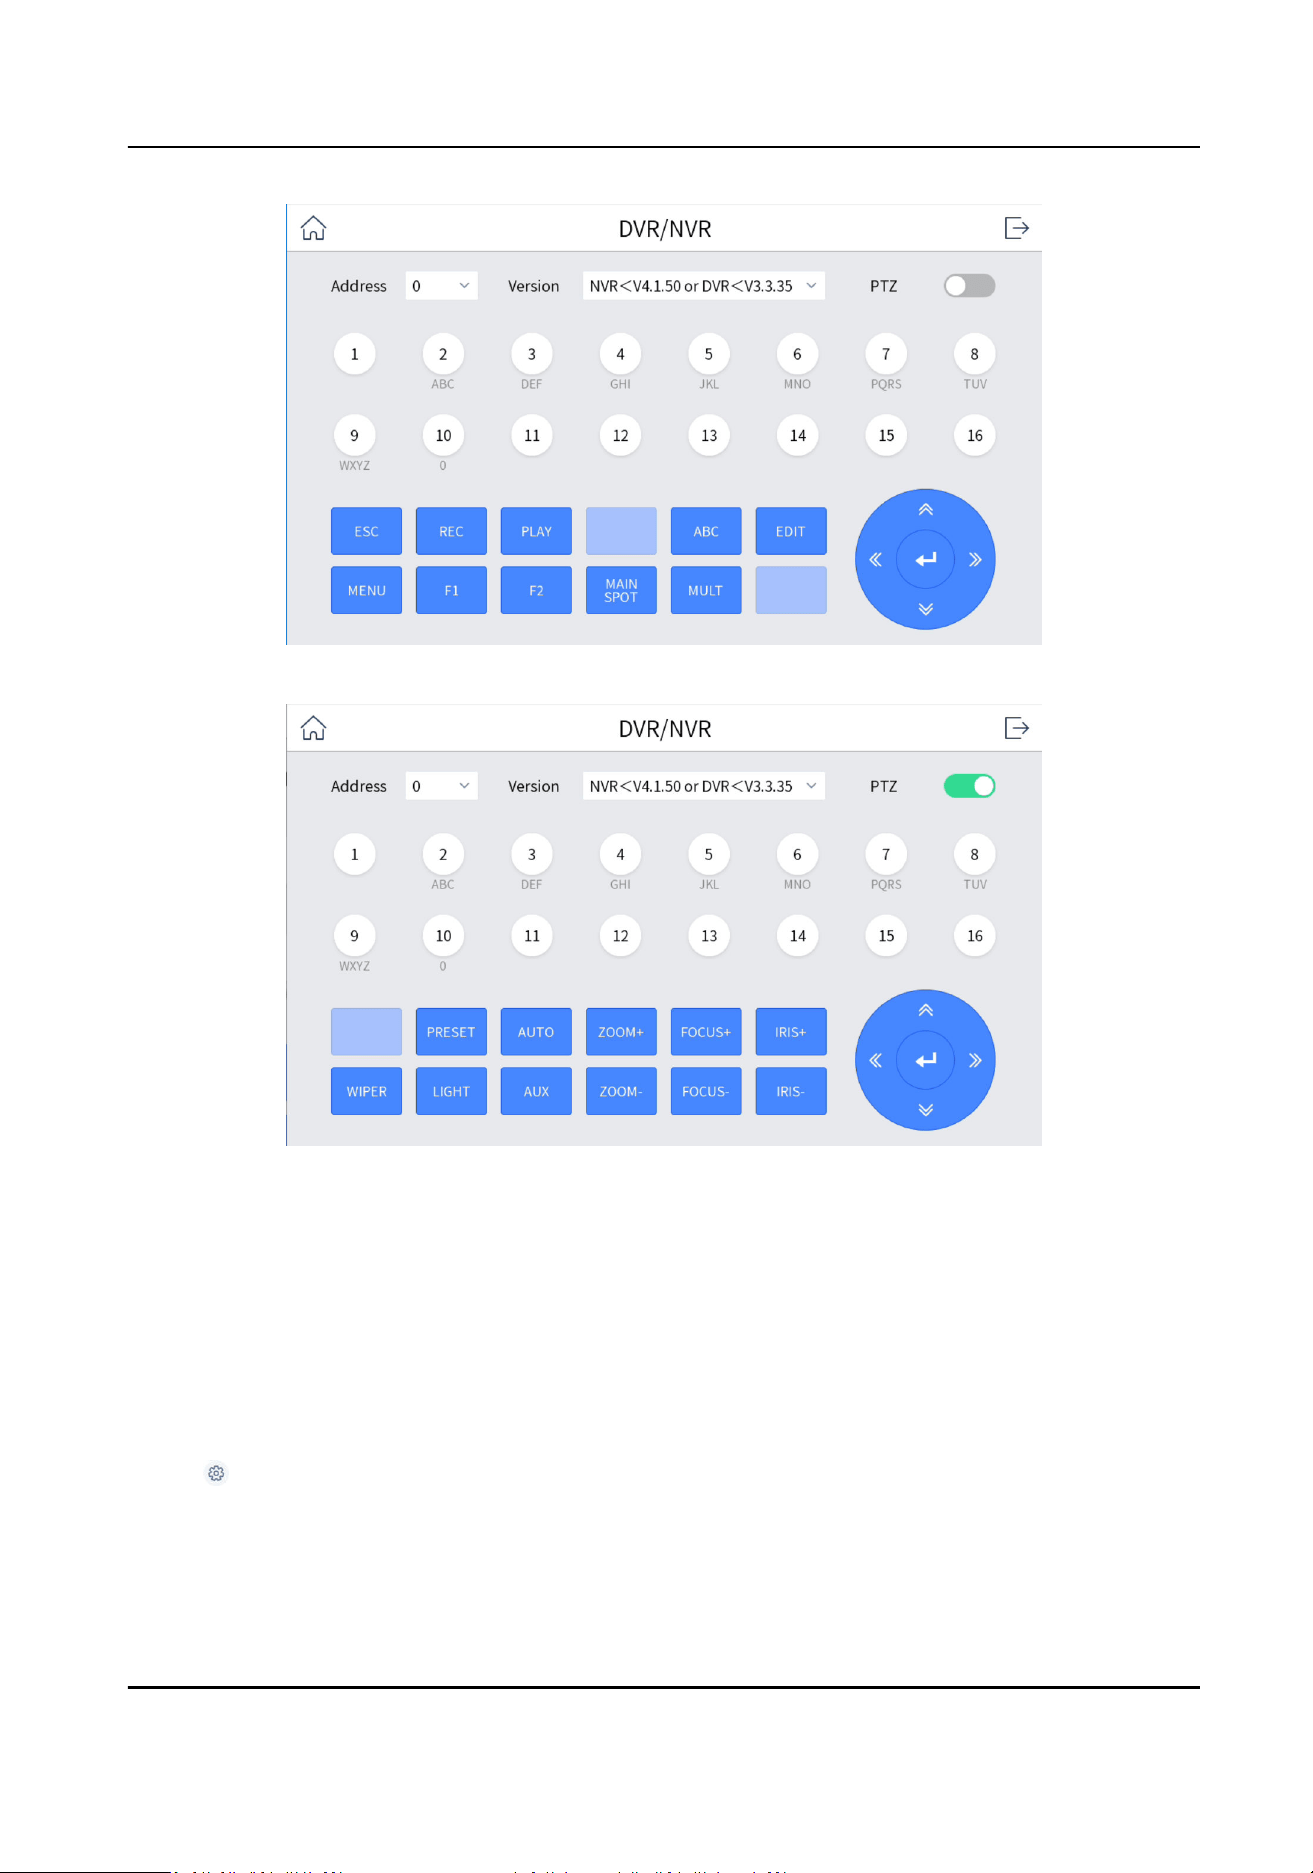
Figure 4-22 Connect Video Recorder (PTZ Disabled)
Figure 4-23 Connect Video Recorder (PTZ Enabled)
4.9.2 Connect Analog Matrix
The keyboard can be connected to the analog matrix through RS-232 serial port.
Steps
1. Connect the analog matrix to the RS-232 interface on the keyboard.
2. Enter Serial Port Control, select Analog Dome/Analog Matrix, and tap OK.
3. Tap
on the upper-right corner and select RS232.
4. Set the parameters of RS232 serial port.
DS-1105KI Network Keyboard User Manual
29
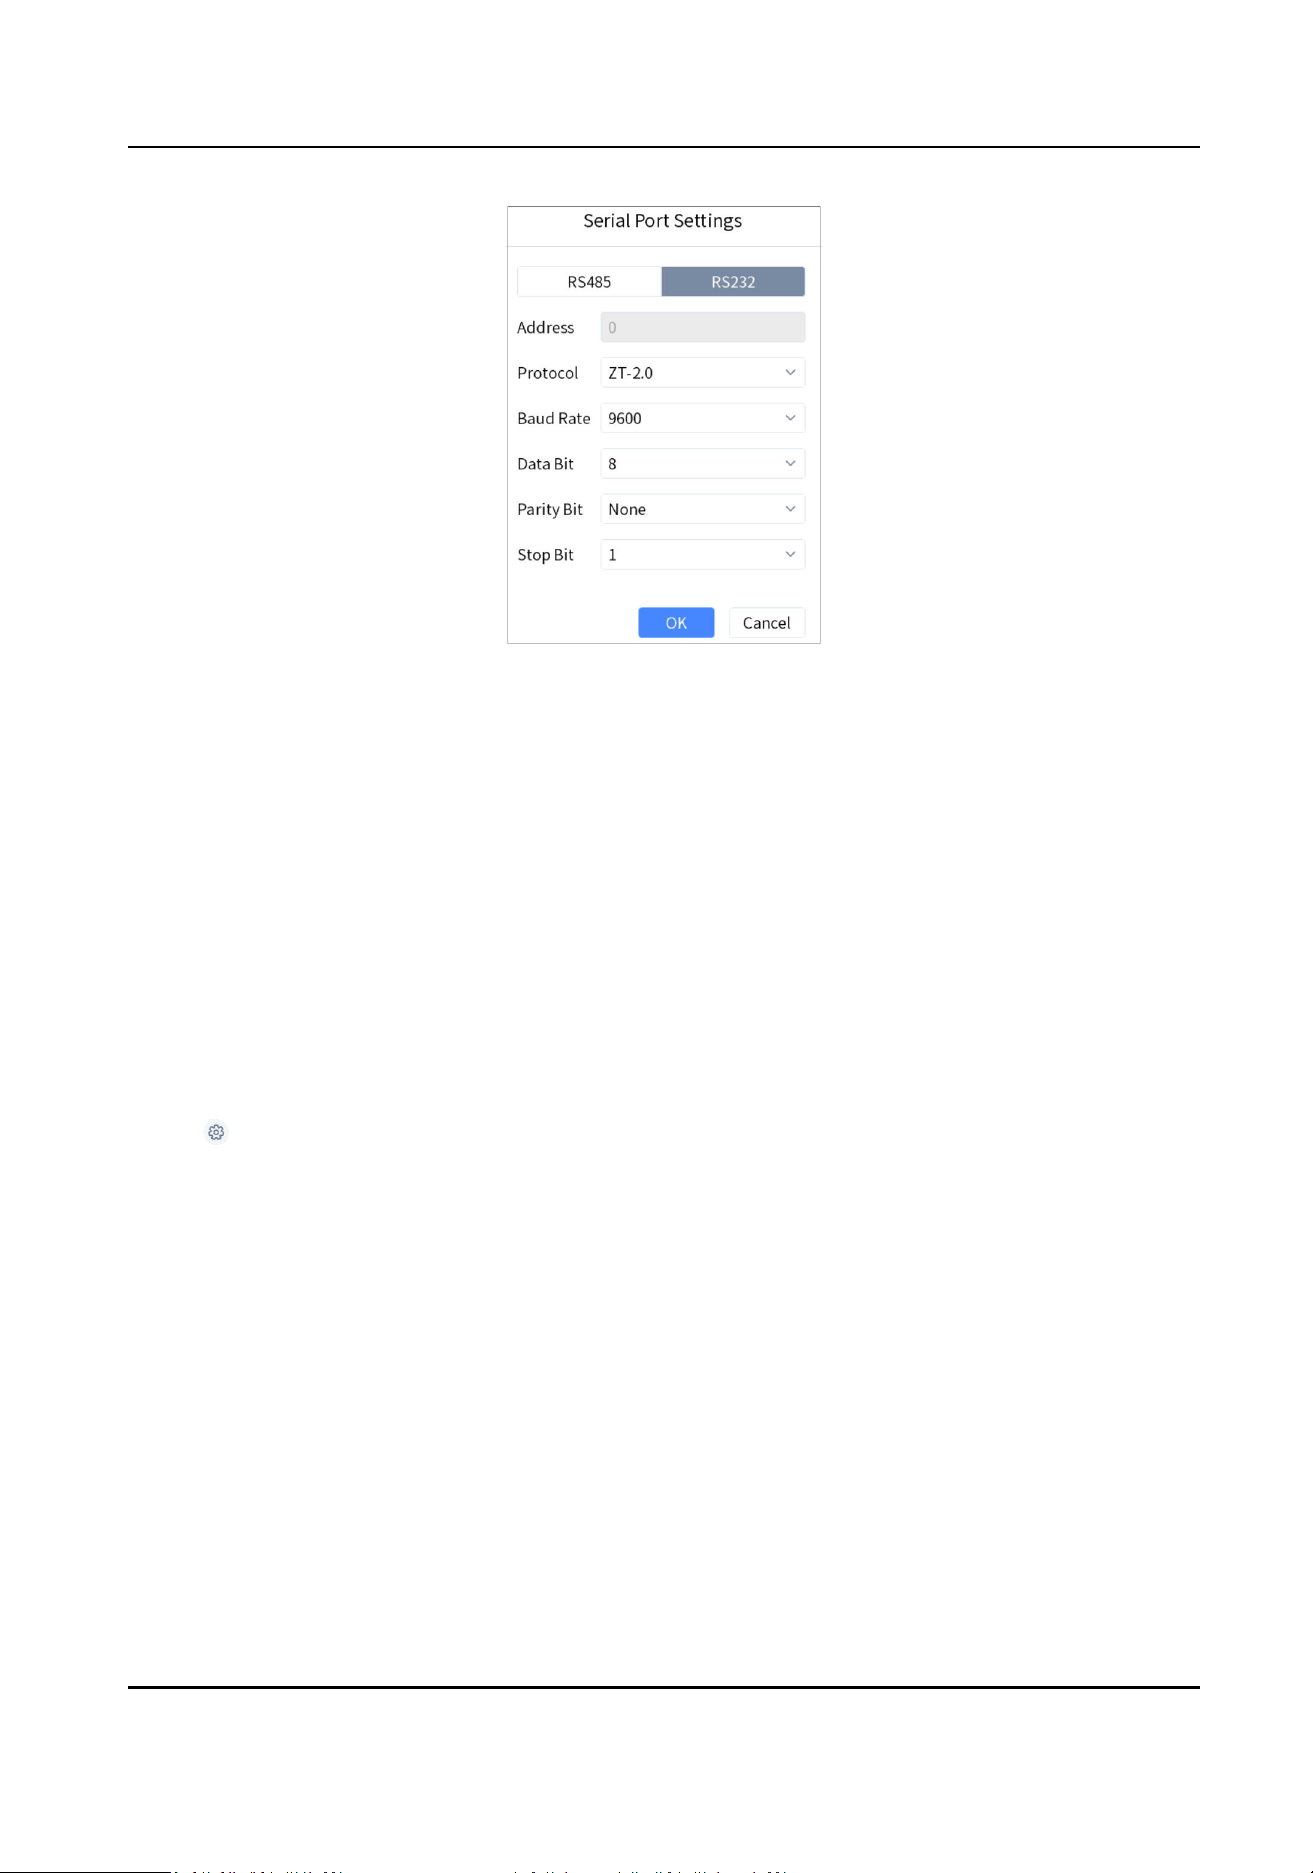
Figure 4-24 Seng Parameters of RS232 Serial Port
5. Oponal: Switch one input port of the analog matrix to the output port.
1) Part of the analog matrix needs to enter the device number in the keyboard.
2) Press 1+MON.
3) Press 2+CAM to switch the input port 2 to the output port 1.
4.9.3 Connect Analog Dome
The keyboard can be connected to the analog dome through RS-485 serial port to control PTZ
control, set and call preset, call patrol and
paern, etc.
Steps
1. Connect the analog dome to RS-485 interface on the keyboard.
2. Tap Serial Port Control, select Analog Dome/Analog Matrix and tap OK.
3. Tap
on the upper-right corner and select RS485.
4. Set the parameters of RS485 serial port.
DS-1105KI Network Keyboard User Manual
30
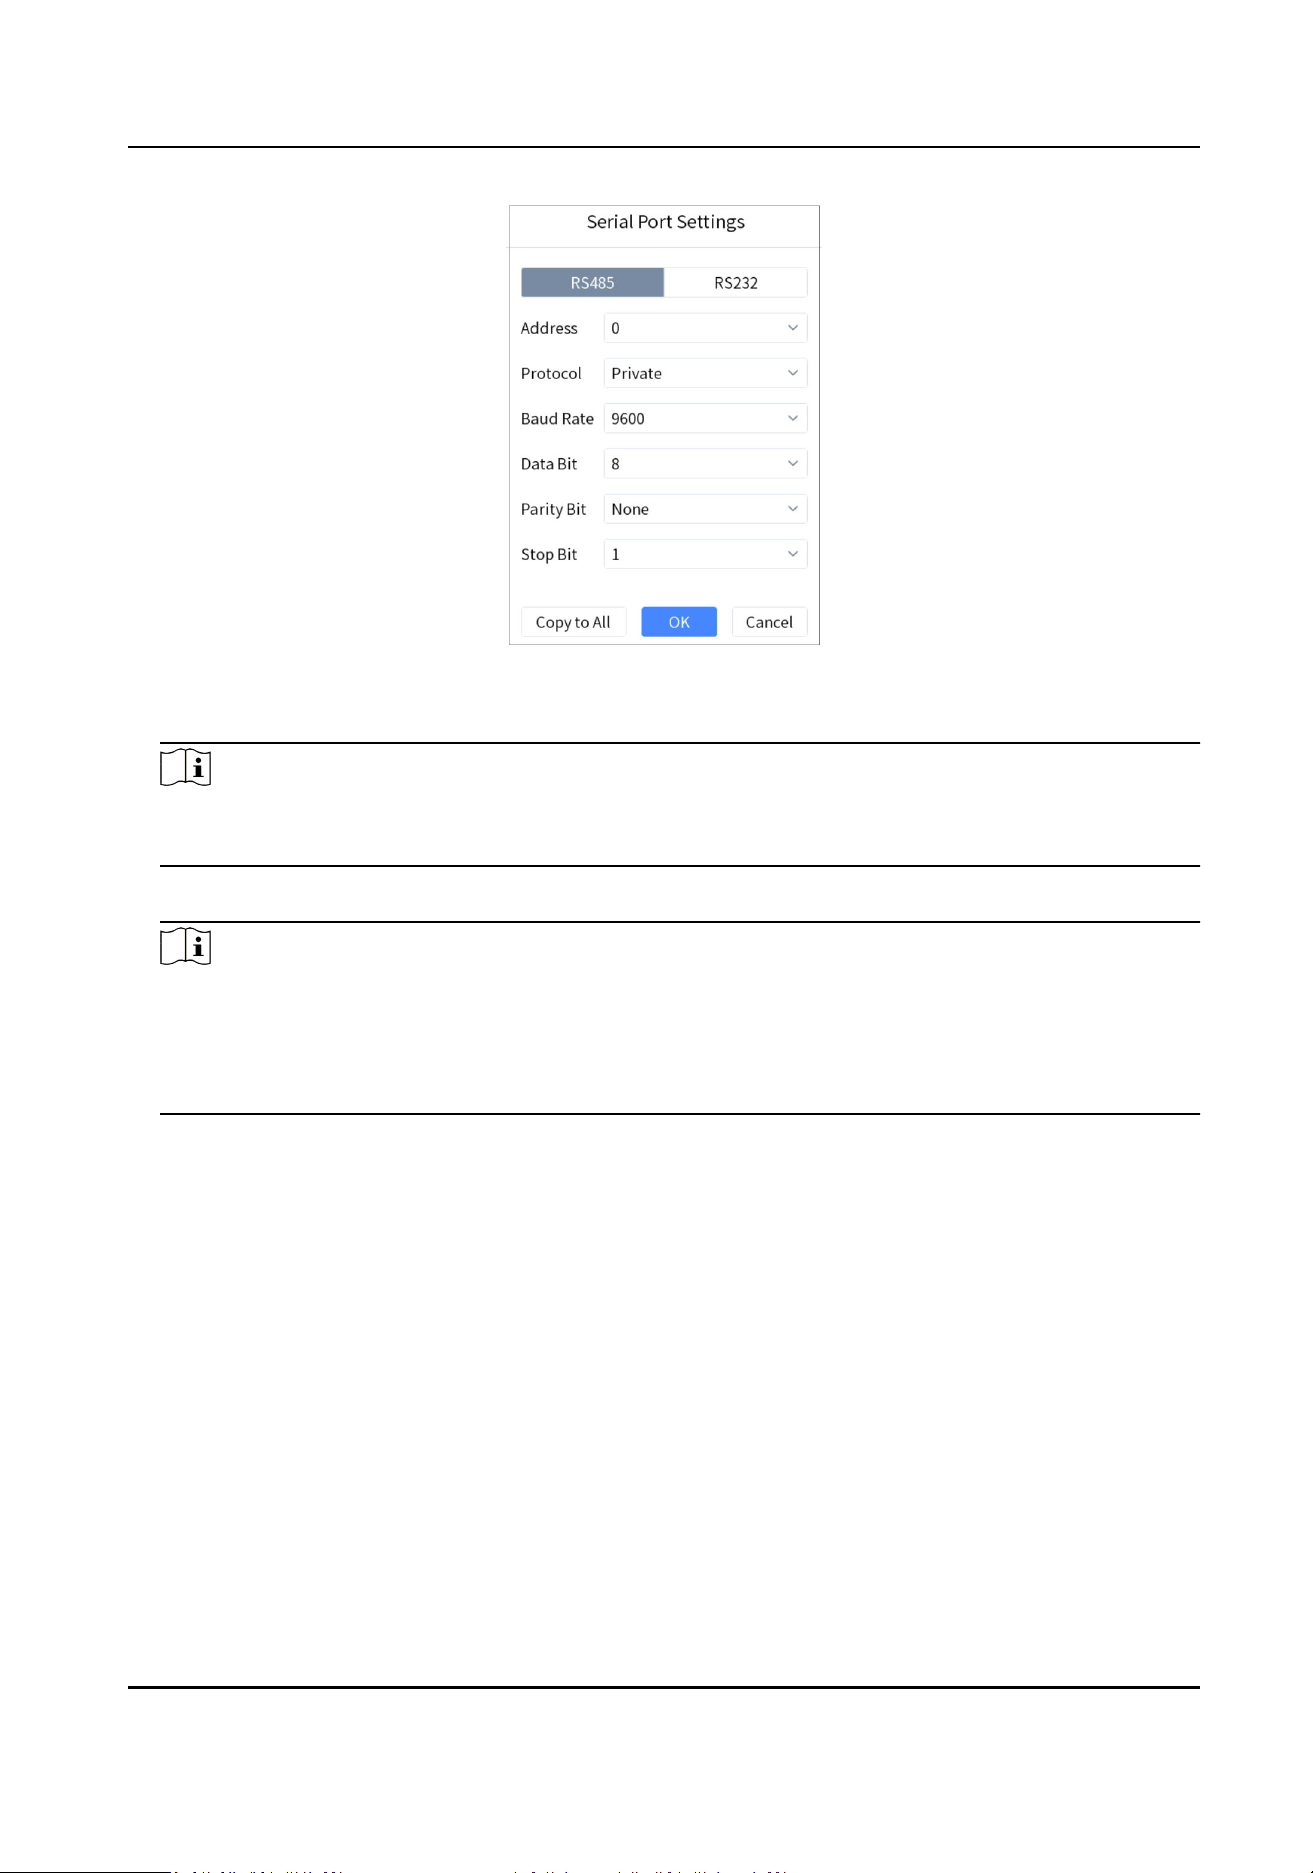
Figure 4-25 Seng Parameters of RS485 Serial Port
5. Press NUM+CAM and select analog dome.
Note
One RS-485 serial port can be connected to mulple analog domes. The longer the serial port
cable is, the fewer analog dome can be connected at the same me.
6. Control PTZ through the joysck.
Note
•
Seng and calling preset, and calling patrol and paern are supported. For details, see PTZ
Control .
• Calling and seng patrol are supported, and the specic number of analog domes supported
varies with the protocol of the analog domes.
DS-1105KI Network Keyboard User Manual
31
Chapter 5 iSecure Mode
5.1 Login
Steps
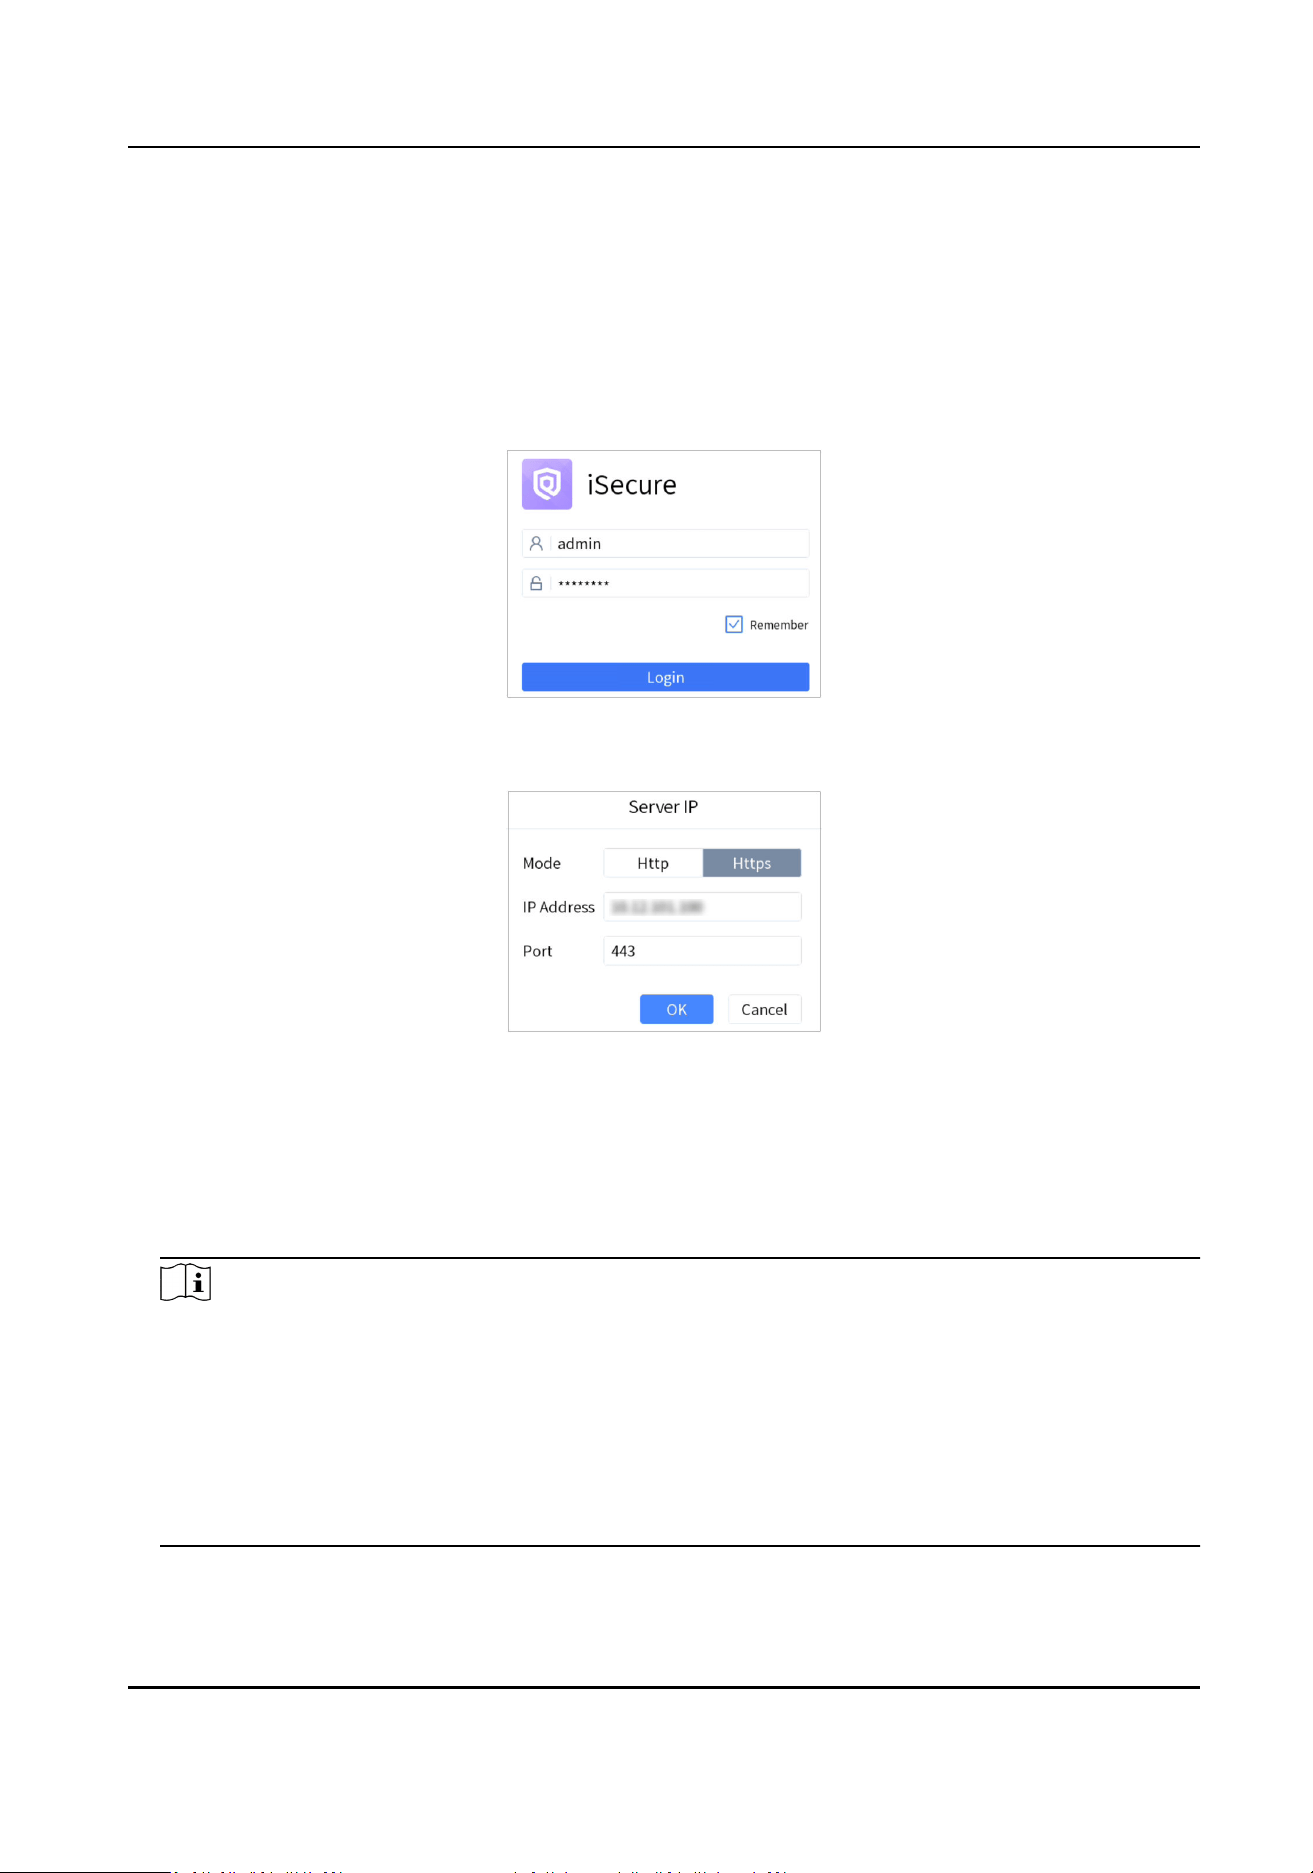
1. Tap iSecure at home page.
Figure 5-1 Log in to iSecure
2. Tap Server IP on the upper right corner.
Figure 5-2 Server IP Conguraon
3. Select Hp or Hps as the login mode.
4. Enter the IP address and port No. of the server, and tap OK.
5. Enter the user name and password of the server.
6.
Oponal: Check Remember.
7. Tap Login.
Note
•
Aer several failed login aempts, you need to enter vericaon code. The details are subject
to the actual interface.
• When you aempt to log into the plaorm for the rst me, you will be prompted to log into
the client rst.
• If a
plaorm is cascaded with other plaorms, you can view all cameras and video walls of
the
plaorm and its cascading plaorms when you log in to the plaorm through the
keyboard.
DS-1105KI Network Keyboard User Manual
32
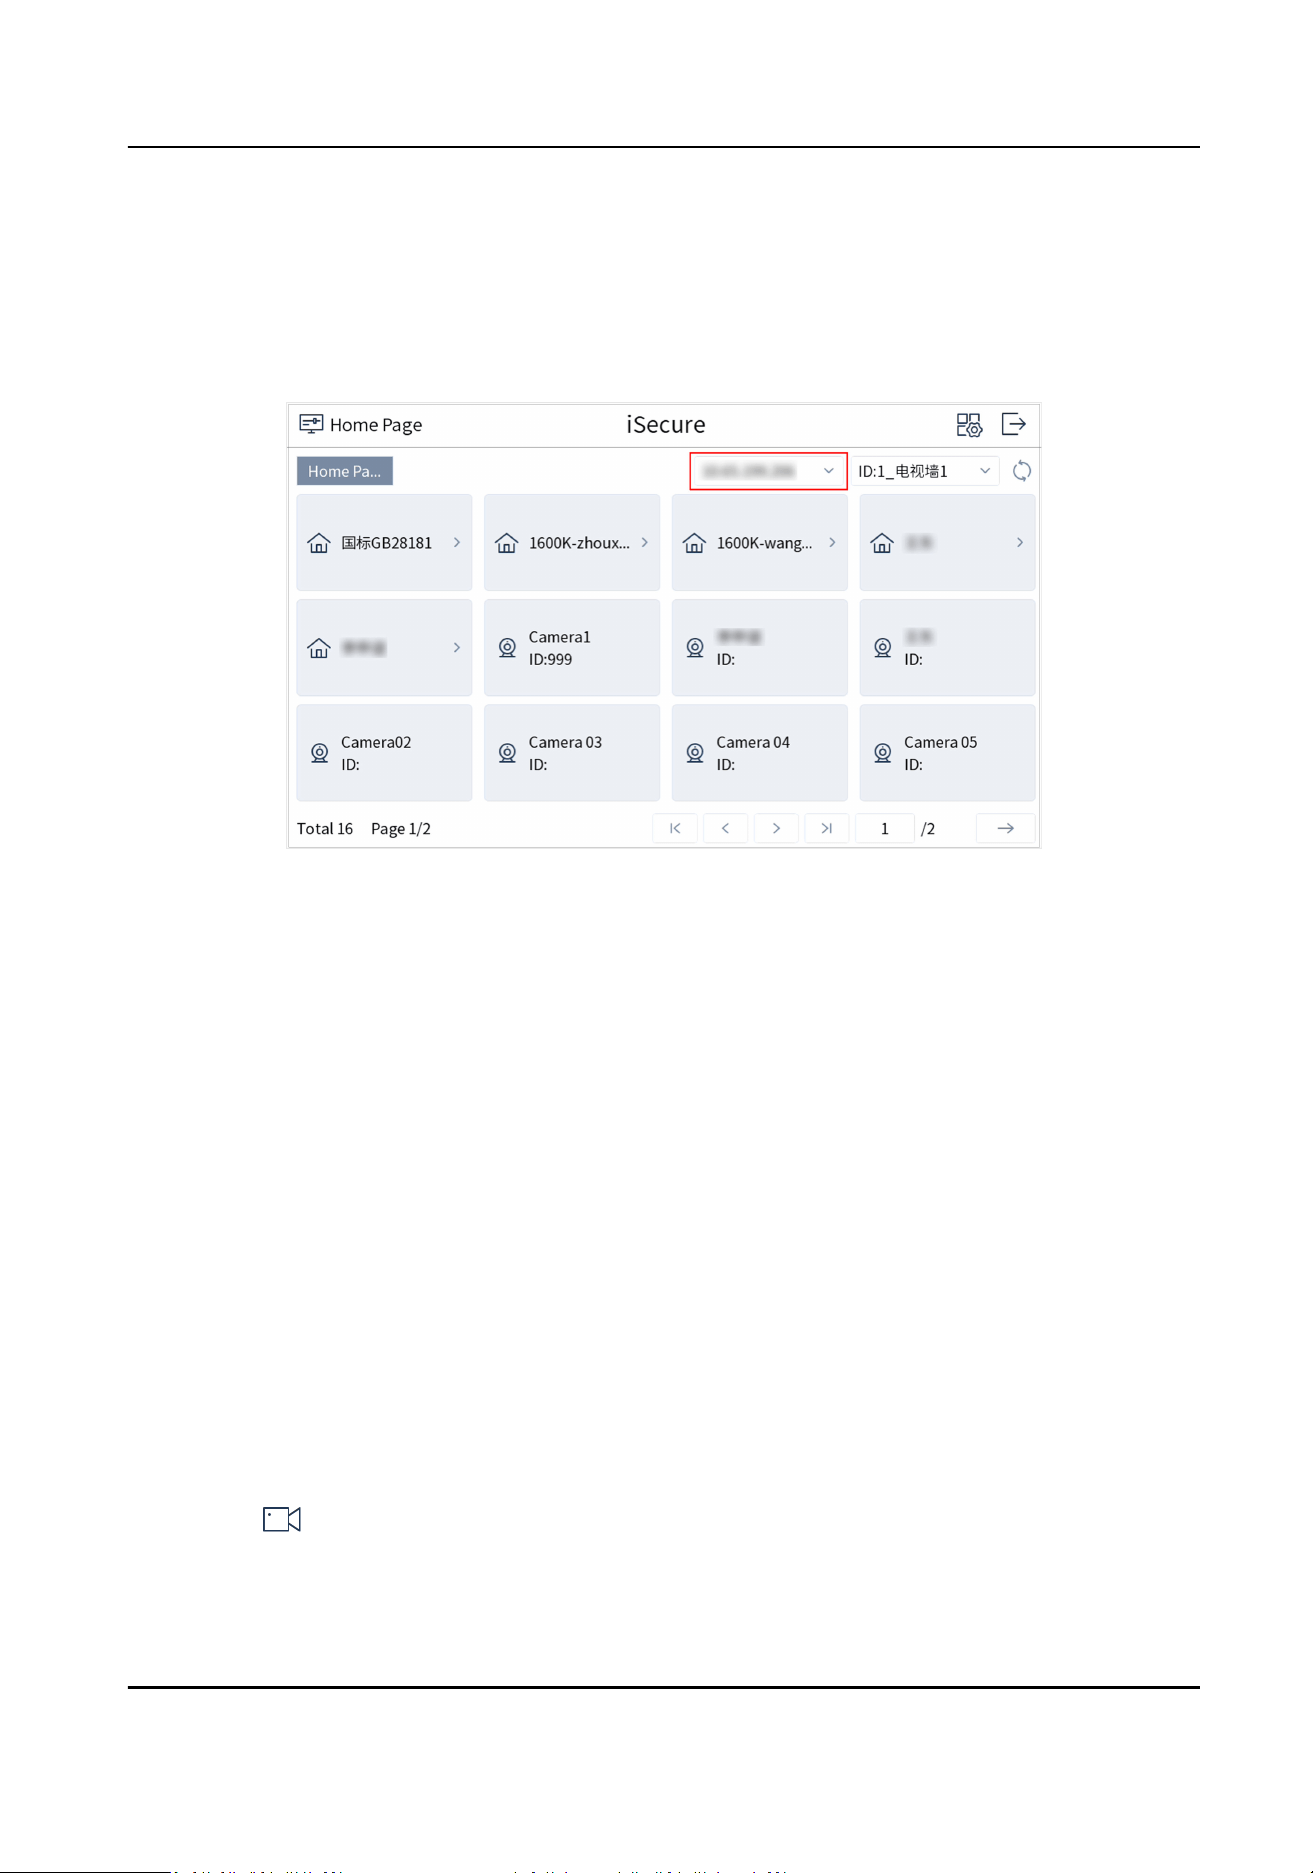
5.2 Resource List
Resource list interface appears aer you log in to iSecure. Resource list contains control center,
region, video wall, and camera. Tap a control center or region, you can view its subordinate control
center, region, and camera.
Figure 5-3 Resource List (iSecure)
• Tap the drop-down list on the upper right corner to view video wall ID and select a video wall.
Tap the drop-down list in the red box to select other server.
• Tap to select a control center or region to view its subordinate camera ID.
• The camera ID can be only edited in the
plaorm client. For details, please refer to the user
manual of the plaorm.
5.3 Local Live View
You can preview the cameras on iSecure plaorm on the touchscreen.
5.3.1 Enable Local Live View
Preview the images of cameras by operang keyboard shortcut.
Steps
1. Press 0+MON to enter local live view.
2. Preview Operaons.
-
Press Num+CAM to perform the preview operaon.
-
Select on the upper-right corner on the touchscreen, and select a channel under the
node to display.
3. During preview, switch channels, capture images or clip images.
DS-1105KI Network Keyboard User Manual
33

4-Window
Preview
• Press 4+MULT to switch the current image into 4 windows, and tap
any window to preview more cameras.
• Press 1+MULIT to return the previous image.
Switch Channels Press PREV/NEXT to switch to the previous or next channel.
Capture Images Press the top of the joysck to capture an image.
Clip Videos Press to start clipping and press it again to stop clipping.
5.3.2 PTZ Operaon
You can control the added speed dome, like control PTZ movement, turn on/o light, turn on/o
wiper, zoom in/out, increase/decrease iris, increase/decrease focus, set and call preset, call patrol/
paern.
For detailed steps, see PTZ Control .
5.4 Video Wall
Operaon
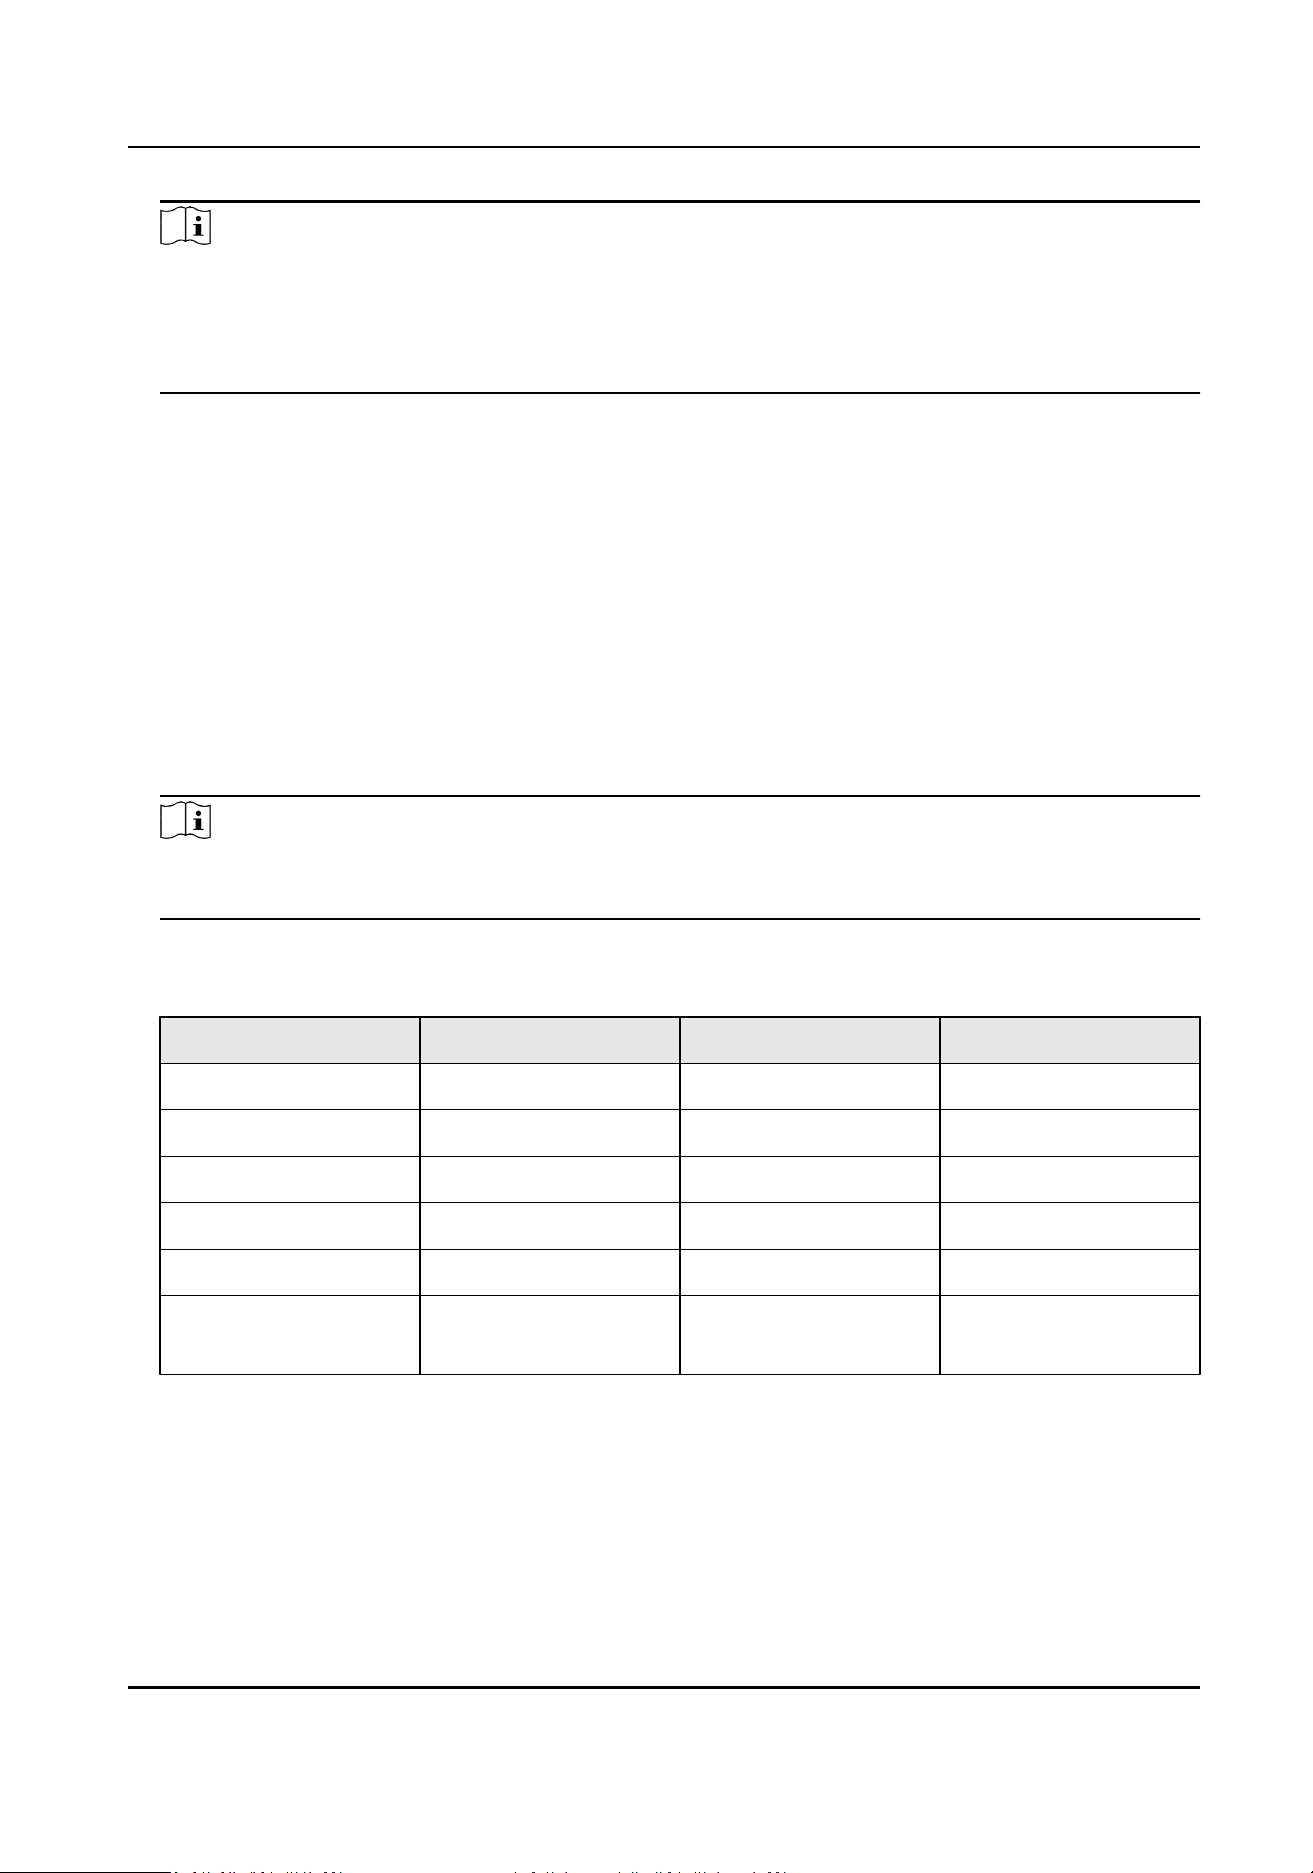
5.4.1 Region Conguraon
The whole video wall can be divided into dierent regions.
Steps
1. Tap on the upper-right corner.
2. Tap .
DS-1105KI Network Keyboard User Manual
34
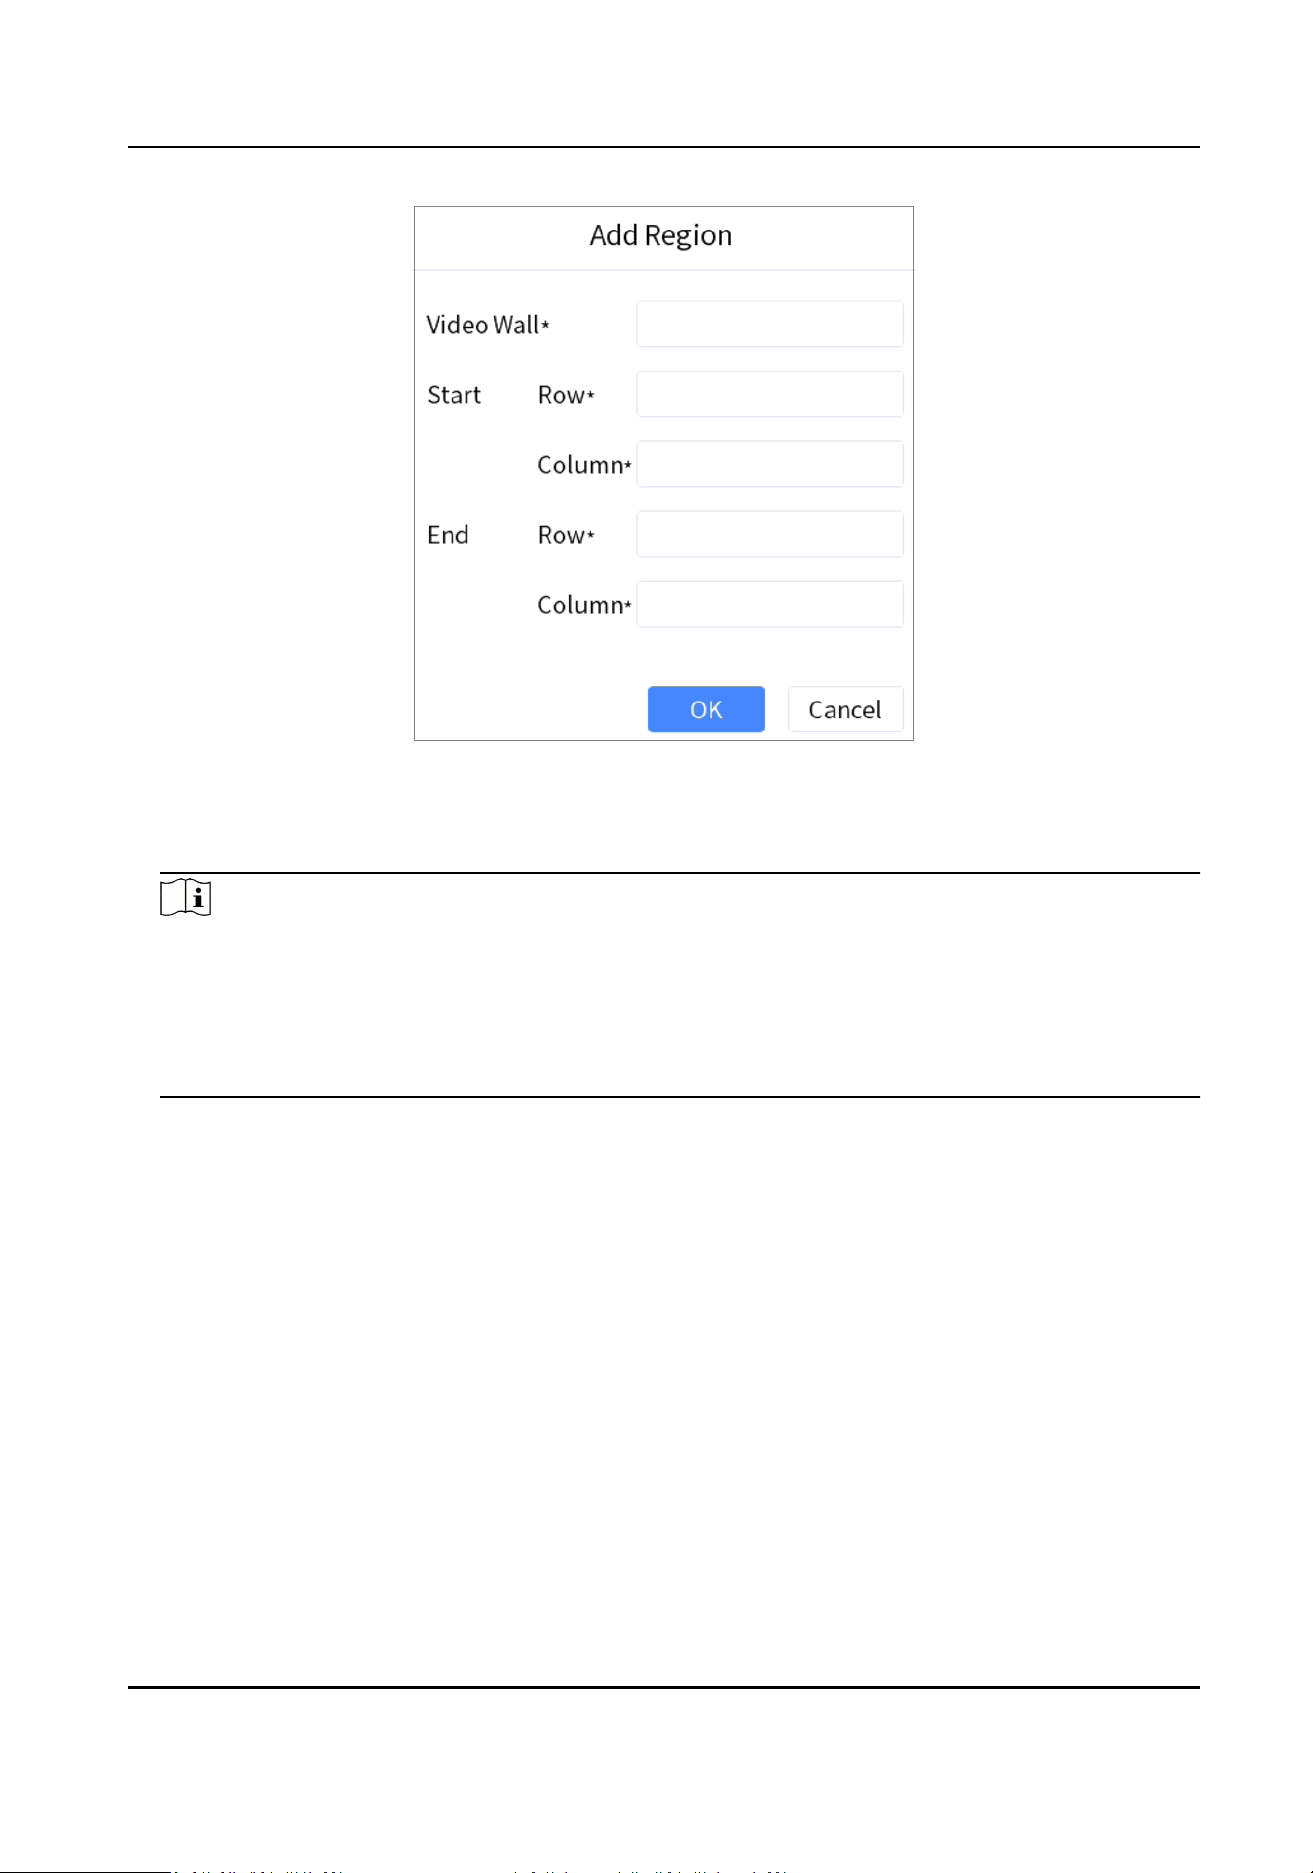
Figure 5-4 Add Region
3. Enter video wall ID, start and end coordinates.
4. Tap OK.
Note
• Up to 16 regions are supported.
• The maximum region
specicaon is 6 × 8.
•
Aer the region is congured, when pressing Num+REGION, it will rstly select the region.
• If you do not congure the region, region 1 corresponds to video wall 1, region 2 corresponds
to video wall 2, region 16 corresponds to video wall 16 by default.
5.4.2 Video Wall Control
• Select a coordinate grid that has been linked with an output interface, and perform operaons
such as opening a window, closing a window, resizing a window, and dividing a window.
• Select a video wall to switch scenes and display the current layout.
• Switch the designated camera to the designated monitor or sub-window of the video wall.
• Do not support camera group.
For detailed steps, see Video Wall Control .
DS-1105KI Network Keyboard User Manual
35
5.4.3 PTZ Operaon
You can control the added speed dome, like control PTZ movement, turn on/o light, turn on/o
wiper, zoom in/out, increase/decrease iris, increase/decrease focus, set and call preset, call patrol/
paern.
For detailed steps, see PTZ Control .
5.5 Video Wall Playback
On the keyboard video wall, you can play back video les from cameras on iSecure plaorm.
Note
• Some
operaons in the process of playback are not supported. Please follow the interface
prompt messages.
• The progress bar will be displayed during playback. You can drag the progress bar back and forth
to view the playback image.
Method 1
1. Press Num+REGION to select a region, or press Num+WALL to select a wall.
2. Tap to select a window to start playback. For detailed steps, see Video Wall Playback .
Method 2
1. Select a wall in the wall list.
2. Press Num+MON.
3. Select a channel with records to start playback.
DS-1105KI Network Keyboard User Manual
36
Chapter 6 HikCentral Mode
The keyboard is accessible to HikCentral plaorm, and the images of the cameras accessible to
HikCentral
plaorm can be displayed on the video wall and previewed locally.
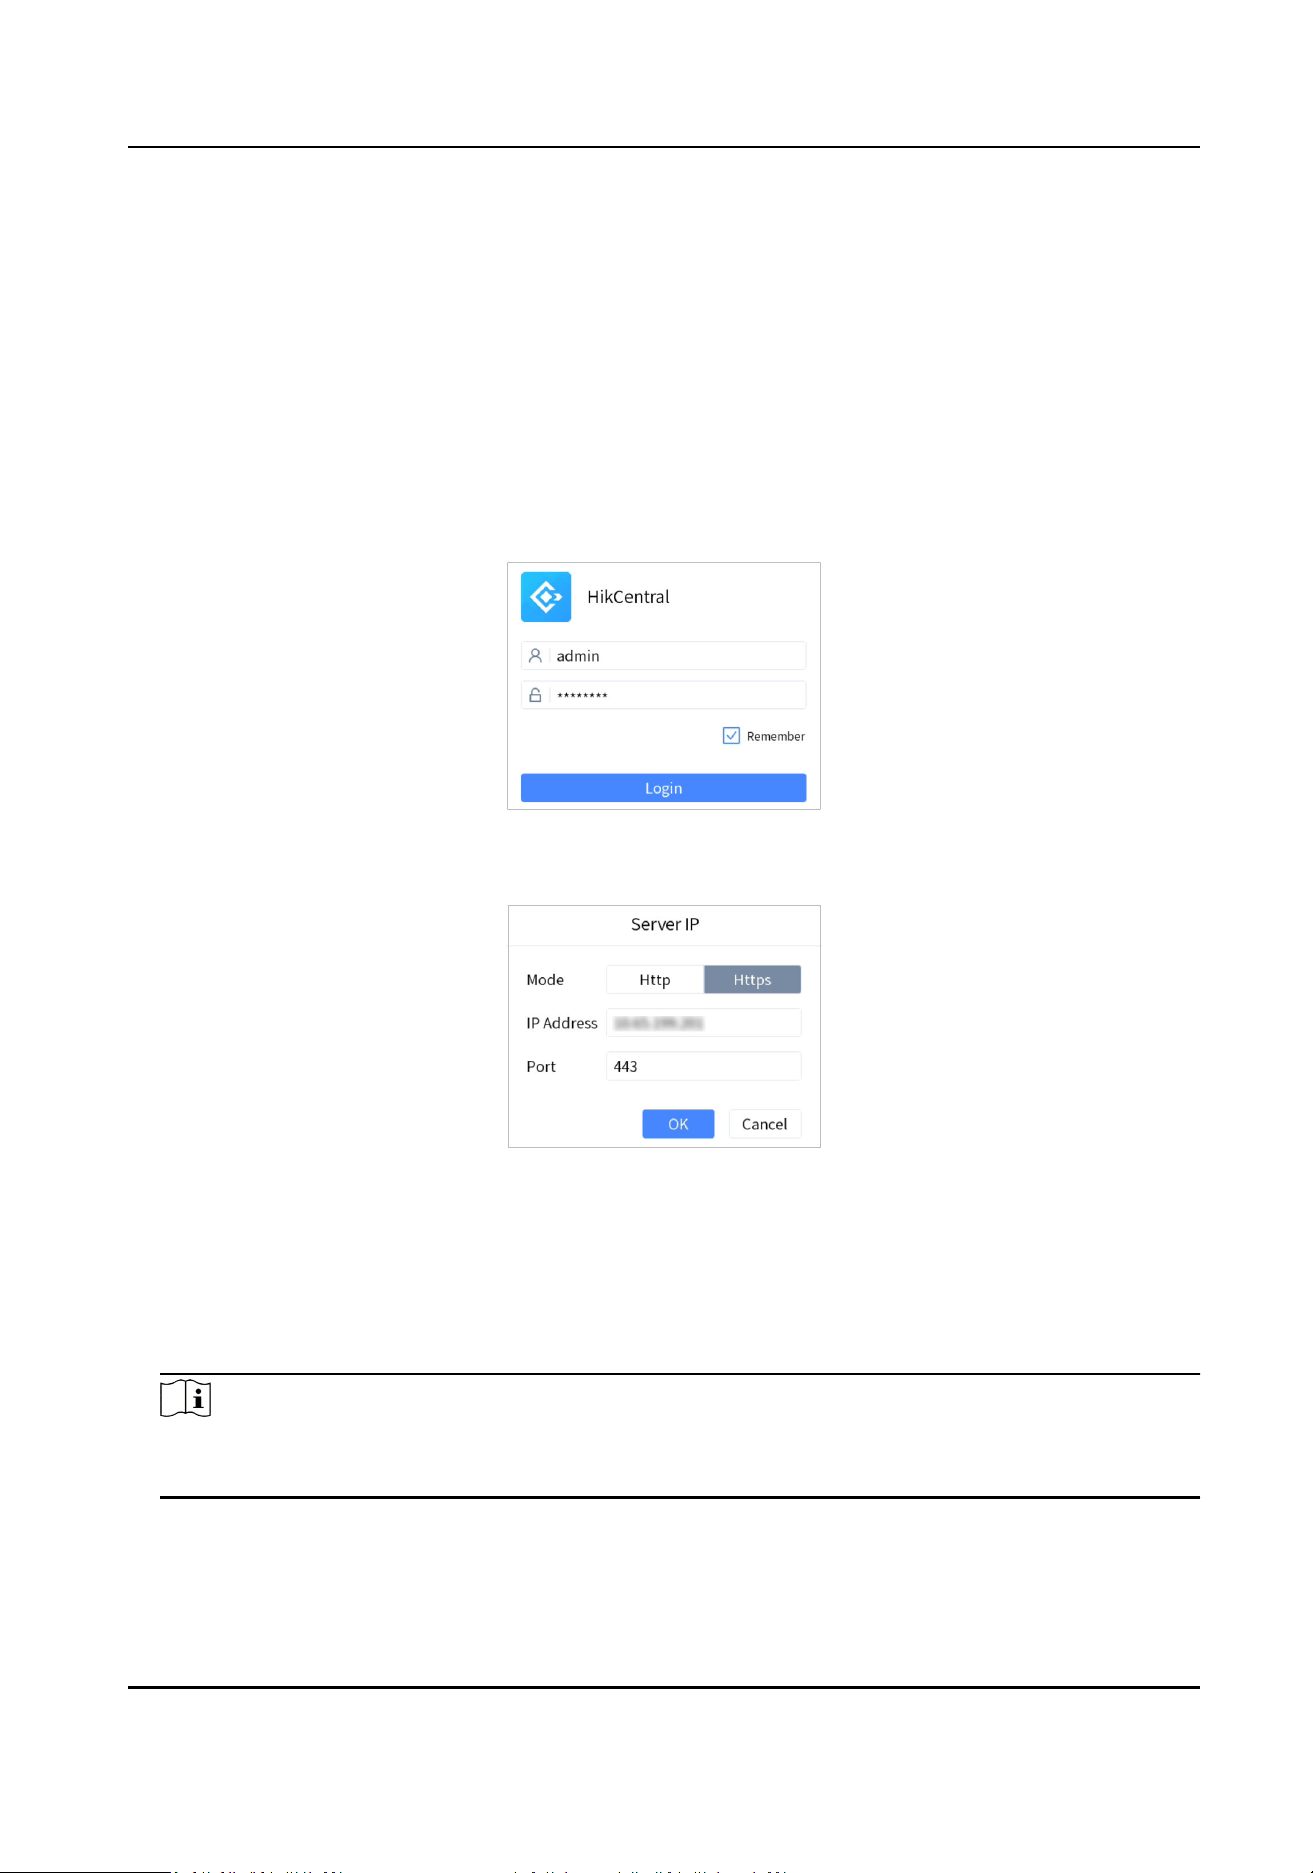
6.1 Login
Steps
1. Tap HikCentral at home page.
Figure 6-1 HikCentral Login
2. Tap Server IP on the upper right corner.
Figure 6-2 Congure Server IP (HikCentral)
3. Select Hp or Hps as the login mode.
4. Enter server IP address and port, and tap OK.
5. Enter server user name and password.
6.
Oponal: check Remember.
7. Tap Login.
Note
Aer several failed login aempts, you need to enter vericaon code. The login aempt mes
are decided by plaorm.
DS-1105KI Network Keyboard User Manual
37
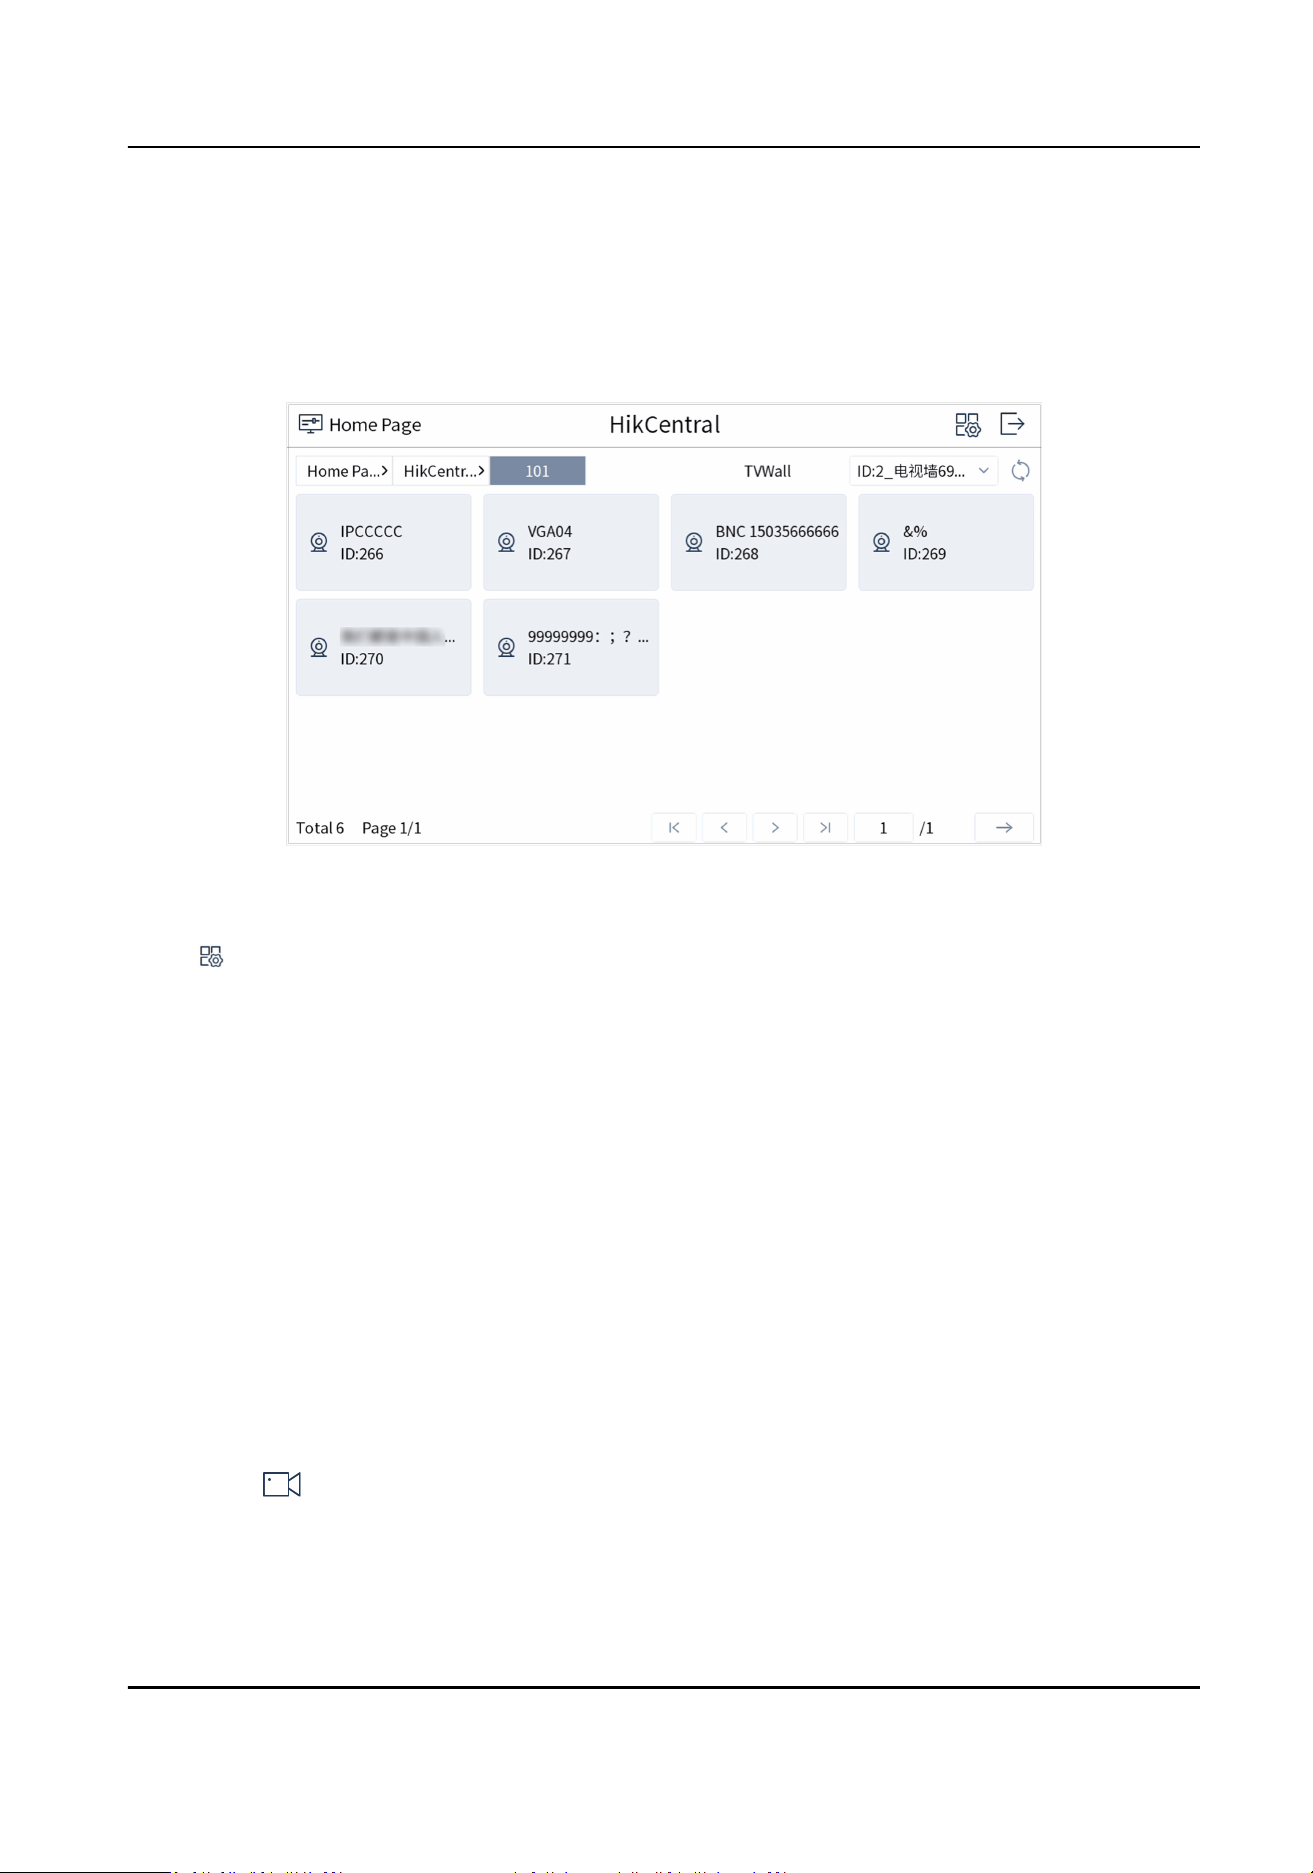
6.2 Resource List
Resource list interface appears aer you log into HikCentral plaorm. Resource list contains control
center, region, video wall, and camera. Tap a control center or region, and you can view its
subordinate control center, region, and camera.
Figure 6-3 Resource List (HikCentral)
• Tap the dropdown list on the upper right corner to view video wall ID and select a video wall.
• Tap on the upper right corner to divide the whole video wall into regions.
• Select a site, and tap to select a control center or region to view its subordinate camera ID.
• The camera ID can be only edited in the
plaorm client.
6.3 Local Live View
You can preview the cameras on HikCentral plaorm on the touchscreen.
6.3.1 Enable Local Live View
Preview the images of cameras by operang keyboard shortcut.
Steps
1. Press 0+MON to enter local live view.
2. Preview Operaons.
-
Press NUM+CAM to perform the preview operaon.
-
Select on the upper-right corner on the touchscreen, and select a channel under the
node to preview.
DS-1105KI Network Keyboard User Manual
38

Figure 6-4 Local Live View
3. During preview, use the joysck to control the paern of PTZ.
4. During preview, switch channels, capture images or clip videos.
4-Window
Preview
• Press 4+MULT to switch the current image into 4 windows, and tap
any window to preview more cameras.
• Press 1+MULIT to return the previous image.
Switch Channels Press PREV/NEXT to switch to the previous or next channel.
Capture Images Press the top of the joysck to capture an image.
Clip Videos Press to start clipping and press it again to stop clipping.
Note
In HikCentral interface, press Num+CAM to control PTZ without previewing the images from
speed domes.
6.3.2 PTZ Operaon
You can control the added speed dome, like control PTZ movement, turn on/o light, turn on/o
wiper, zoom in/out, increase/decrease iris, increase/decrease focus, set and call preset, call patrol/
paern.
For detailed steps, see PTZ Control .
DS-1105KI Network Keyboard User Manual
39
6.4 Video Wall Operaon
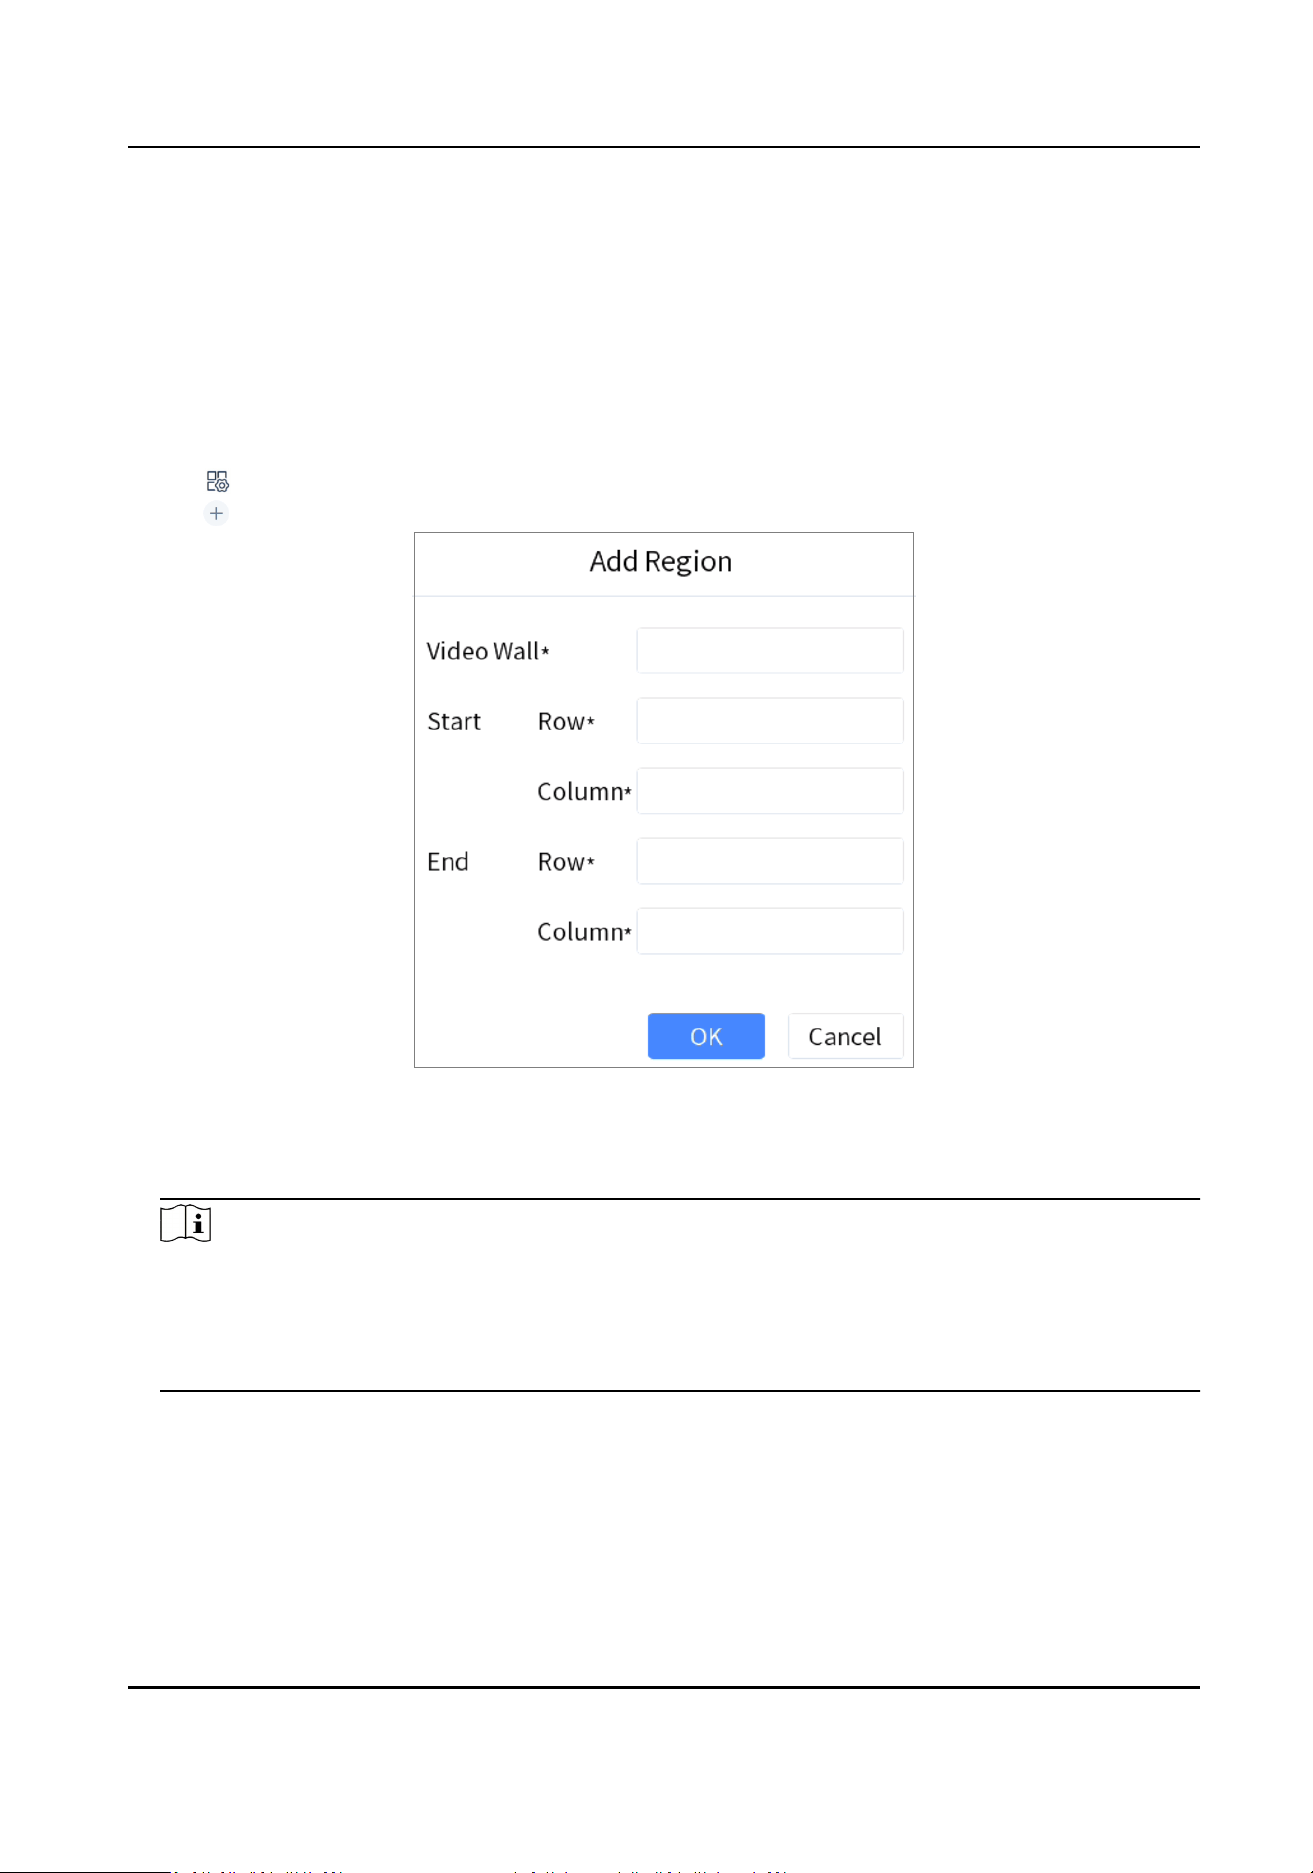
6.4.1 Region Conguraon
The whole video wall can be divided into dierent regions for management.
Steps
1.
Tap on the upper-right corner.
2. Tap .
Figure 6-5 Add Region
3. Enter video wall ID, start and end coordinates.
4. Tap OK.
Note
• Up to 16 regions are supported.
• The maximum region
specicaon is 6 × 8.
• If you do not
congure the region, region 1 corresponds to video wall 1, region 2 corresponds
to video wall 2, and region 16 corresponds to video wall 16 by default.
DS-1105KI Network Keyboard User Manual
40

6.4.2 Video Wall Control
• When you press Num+CAM to preview, the stream type adapts to the
plaorm by default. But
you can switch the stream type.
• Select a coordinate grid that has been linked with an output interface, and perform
operaons
such as opening a window, closing a window, resizing a window, and dividing a window.
• Select a video wall to switch scenes and display the current layout.
• Switch the specied camera to the specied monitor or sub-window of the video wall.
•
Do not support camera group.
For detailed steps, see Video Wall Control .
6.4.3 PTZ
Operaon
You can control the added speed dome, like control PTZ movement, turn on/o light, turn on/o
wiper, zoom in/out, increase/decrease iris, increase/decrease focus, set and call preset, call patrol/
paern.
For detailed steps, see PTZ Control .
6.5 Video Wall Playback
On the keyboard video wall, you can play back video les from cameras on HikCentral plaorm.
Note
Fast playback, slow playback, and pause/resume playback are supported. The progress bar will be
displayed during playback. You can drag the progress bar back and forth to view the playback
screen.
Method 1
1. Press Num+REGION to select a region, or press Num+WALL to select a wall.
2. Tap to select a window to start playback. For detailed steps, see Video Wall Playback .
Method 2
1. Select a wall in the wall list.
2. Press Num+MON.
3. Select a channel with records to start playback.
DS-1105KI Network Keyboard User Manual
41
Chapter 7 System
Tap System at home page to enter system interface. You can congure keyboard network,
hardware,
me, etc.
Note
Restoring default sengs, imporng/exporng conguraon les, and remote upgrades require
the administrator password to be veried.
7.1 Language
Select System → Maintenance → Language to view the language.
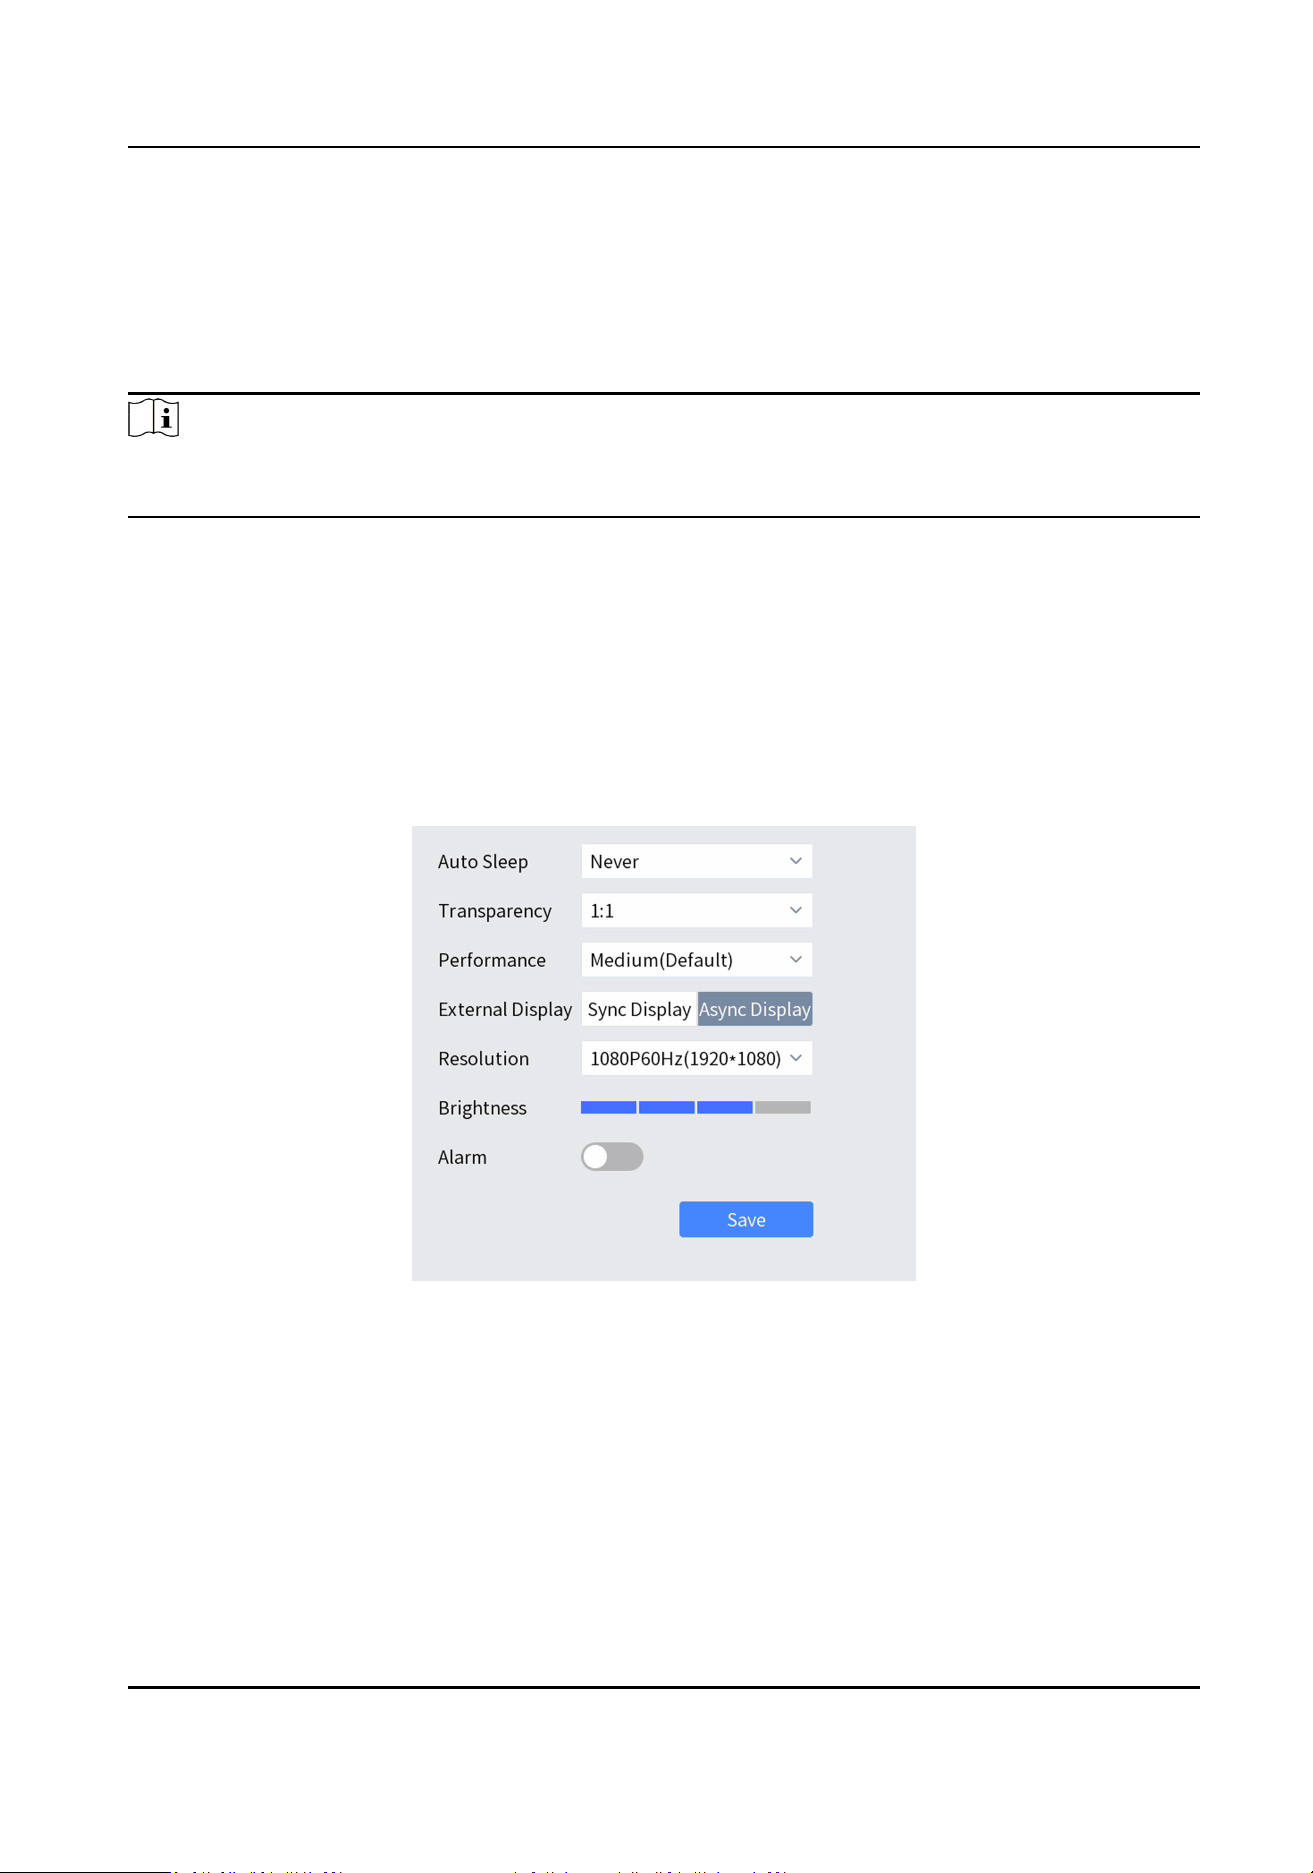
7.2 Hardware
Go to System → Hardware , and set the following parameters.
Figure 7-1 Hardware Parameters
Transparency
Select menu transparency. Available only in local live view.
Performance
You can select minimum delay, medium(default) or default according to the actual network.
External Display
DS-1105KI Network Keyboard User Manual
42
When Sync Display is selected, the connected monitor displays the same image as the
keyboard. When Async Display is selected, the connected monitor displays the local live view
image.
Alarm
Keyboard alarms when network disconnected or IP conicted.
7.3 Storage
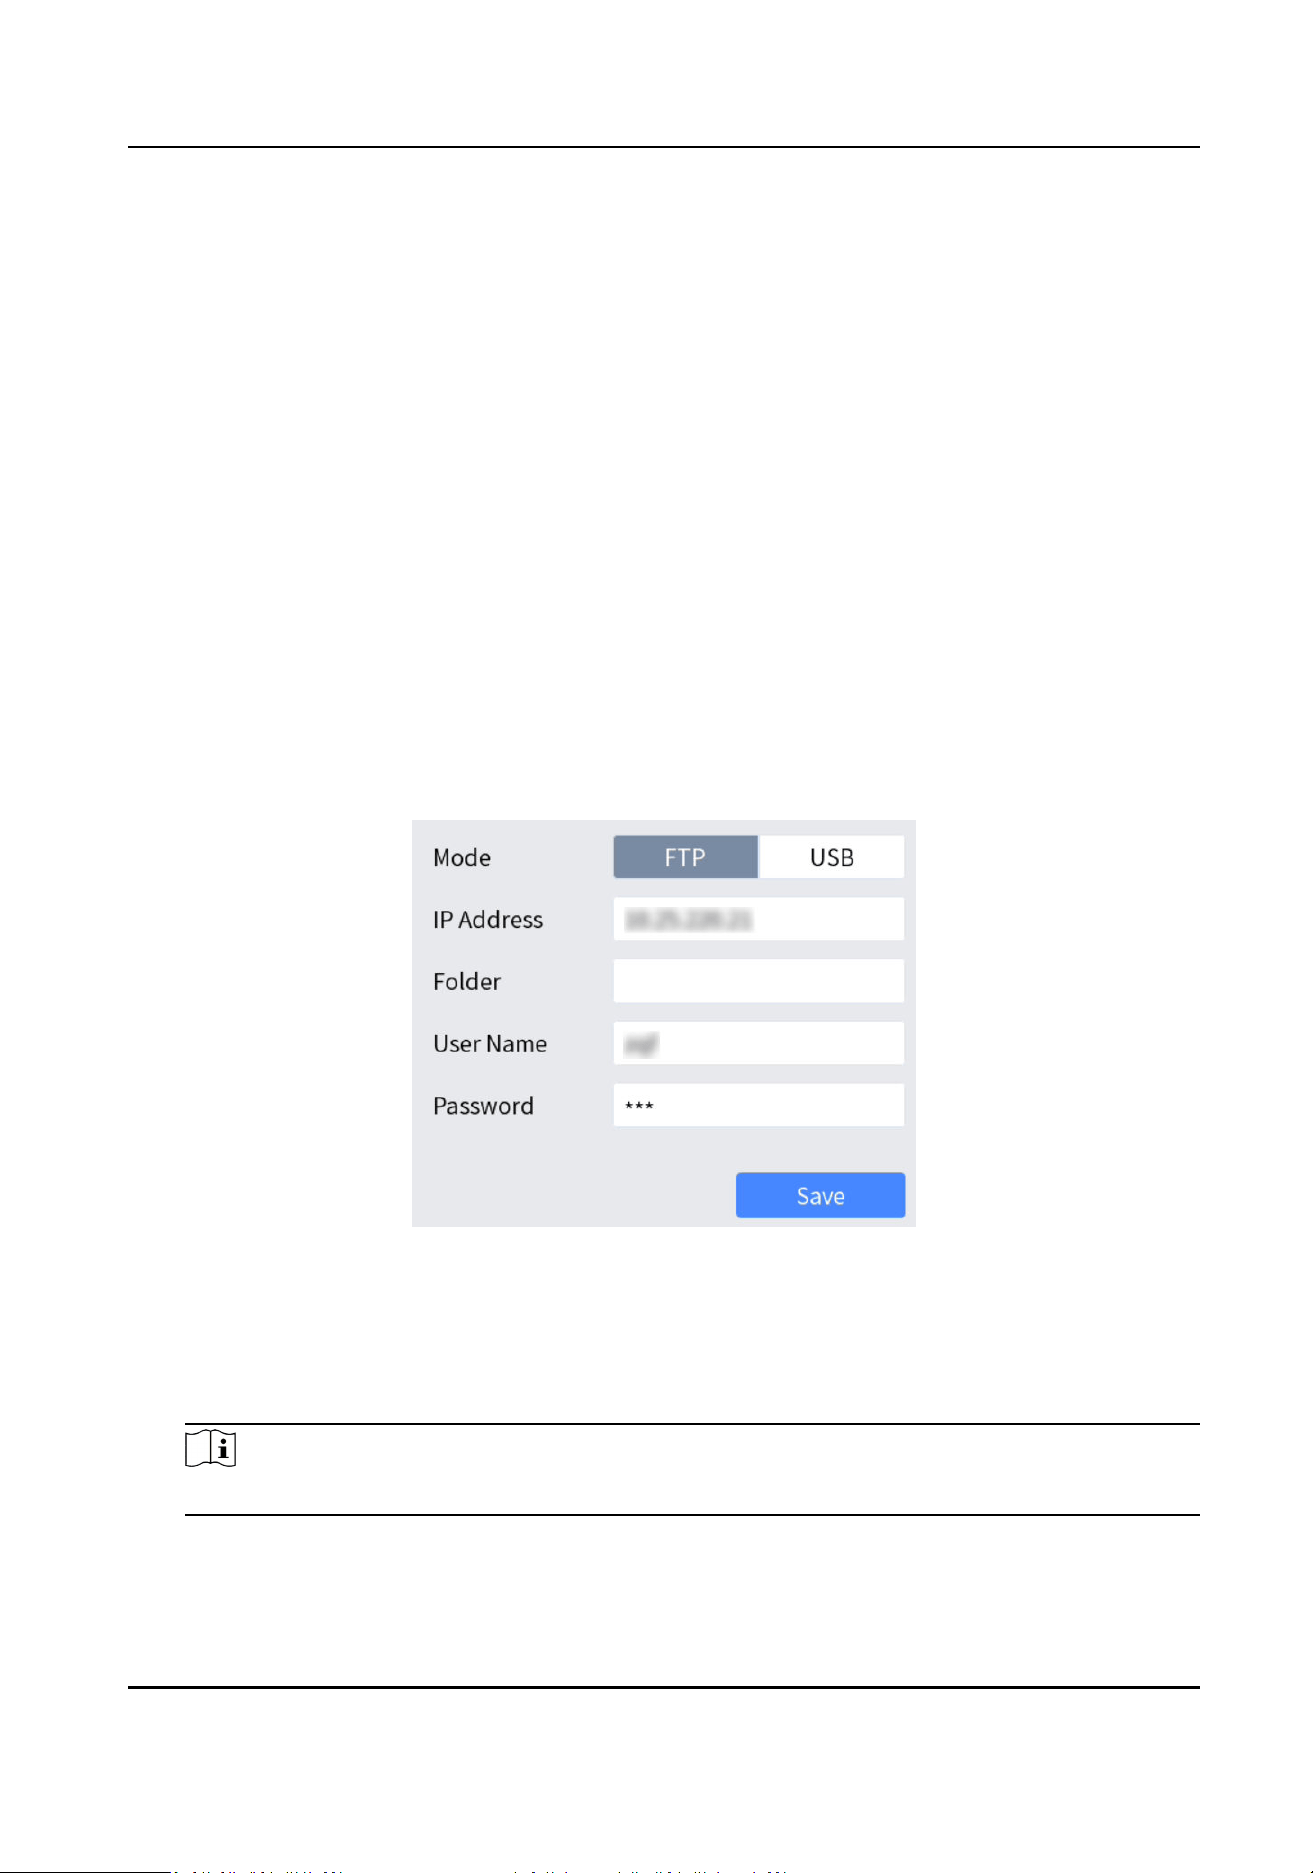
7.3.1 FTP Storage
Captured images and clipped videos will be saved to FTP server. And when you upgrade keyboard
via FTP server, the upgrade le from FTP server will be uploaded to the keyboard.
Before You Start
Build a FTP server.
Steps
1. Go to System → Storage → FTP .
Figure 7-2 FTP Storage
2.
Congure FTP server informaon.
• IP Address: IP address of FTP server.
• Folder: The folder name to be created in FTP server.
• User Name and Password: User name and password of FTP server.
Note
The following special characters are not allowed: / \ : * ? ' " < > | %.
3. Tap Save.
DS-1105KI Network Keyboard User Manual
43

7.3.2 USB Storage
Save captured images and clipped videos in USB ash drive.
Steps
1. Go to System → Storage → USB .
2. Tap Save.
7.4 Upgrade
You are recommended to upgrade your keyboard under the help of professional technical support.
Export conguraon le of the keyboard before upgrade.
For detailed steps, see Import/Export Conguraon File .
7.4.1 FTP Upgrade
Steps
1.
Congure FTP server. For detailed steps, see Storage .
2. Turn on FTP server and input upgrade le into FTP root folder.
3. Go to System → Maintenance and select FTP upgrade.
4. Enter admin password to
conrm.
7.4.2 USB Flash Drive Upgrade
Steps
1. Save upgrade le in USB ash drive.
2. Connect USB ash drive to keyboard USB interface.
3. Go to System → Maintenance and select USB Flash Drive upgrade.
4. Enter admin password to
conrm.
7.5 Import/Export
Conguraon File
You can export the conguraon le to the computer or import the conguraon le from the
computer to the keyboard. In case of keyboard failure, you need to back up the data by
exporng
the conguraon le rst, and then repair the failure. When you need to copy the data of this
keyboard to another keyboard, you can also import/export the
conguraon le.
Steps
1. Go to System → Maintenance .
2. Import/export
conguraon le.
• Import Conguraon File:
DS-1105KI Network Keyboard User Manual
44

a. Tap Import.
b. Enter admin password.
c. Select the database le (DataConguraon) to import.
• Export
Conguraon File:
a. Tap Export.
b. Enter admin password.
c. Select the folder to export
conguraon le (kbCong).
7.6 Factory Default
Restore keyboard to factory default
sengs.
Go to System → Maintenance .
• Simple: Restore all parameters, except the network (including IP address, subnet mask, gateway,
MTU, NIC working mode, default route, server port, etc.) and user account parameters, to the
factory default
sengs.
• Complete: Restore all sengs to factory default sengs.
7.7 Auxiliary Key
You can set F1 or F2 as Two-way Audio or Enlarge/Restore Sub-Window.
7.8 Lock Keyboard
Steps
1. Hold LOCK for 3 seconds to exit to home page and lock keyboard.
2. Press LOCK again to unlock keyboard.
DS-1105KI Network Keyboard User Manual
45
Chapter 8 Web Conguraon
You can add devices, manage channels or congure basic parameters through the web interface of
the network keyboard. It is convenient to remotely
congure and maintain the network keyboard.
8.1 Login
Before You Start
Ensure that the network keyboard is connected to the network and the IP address of the network
keyboard is obtained.
Steps
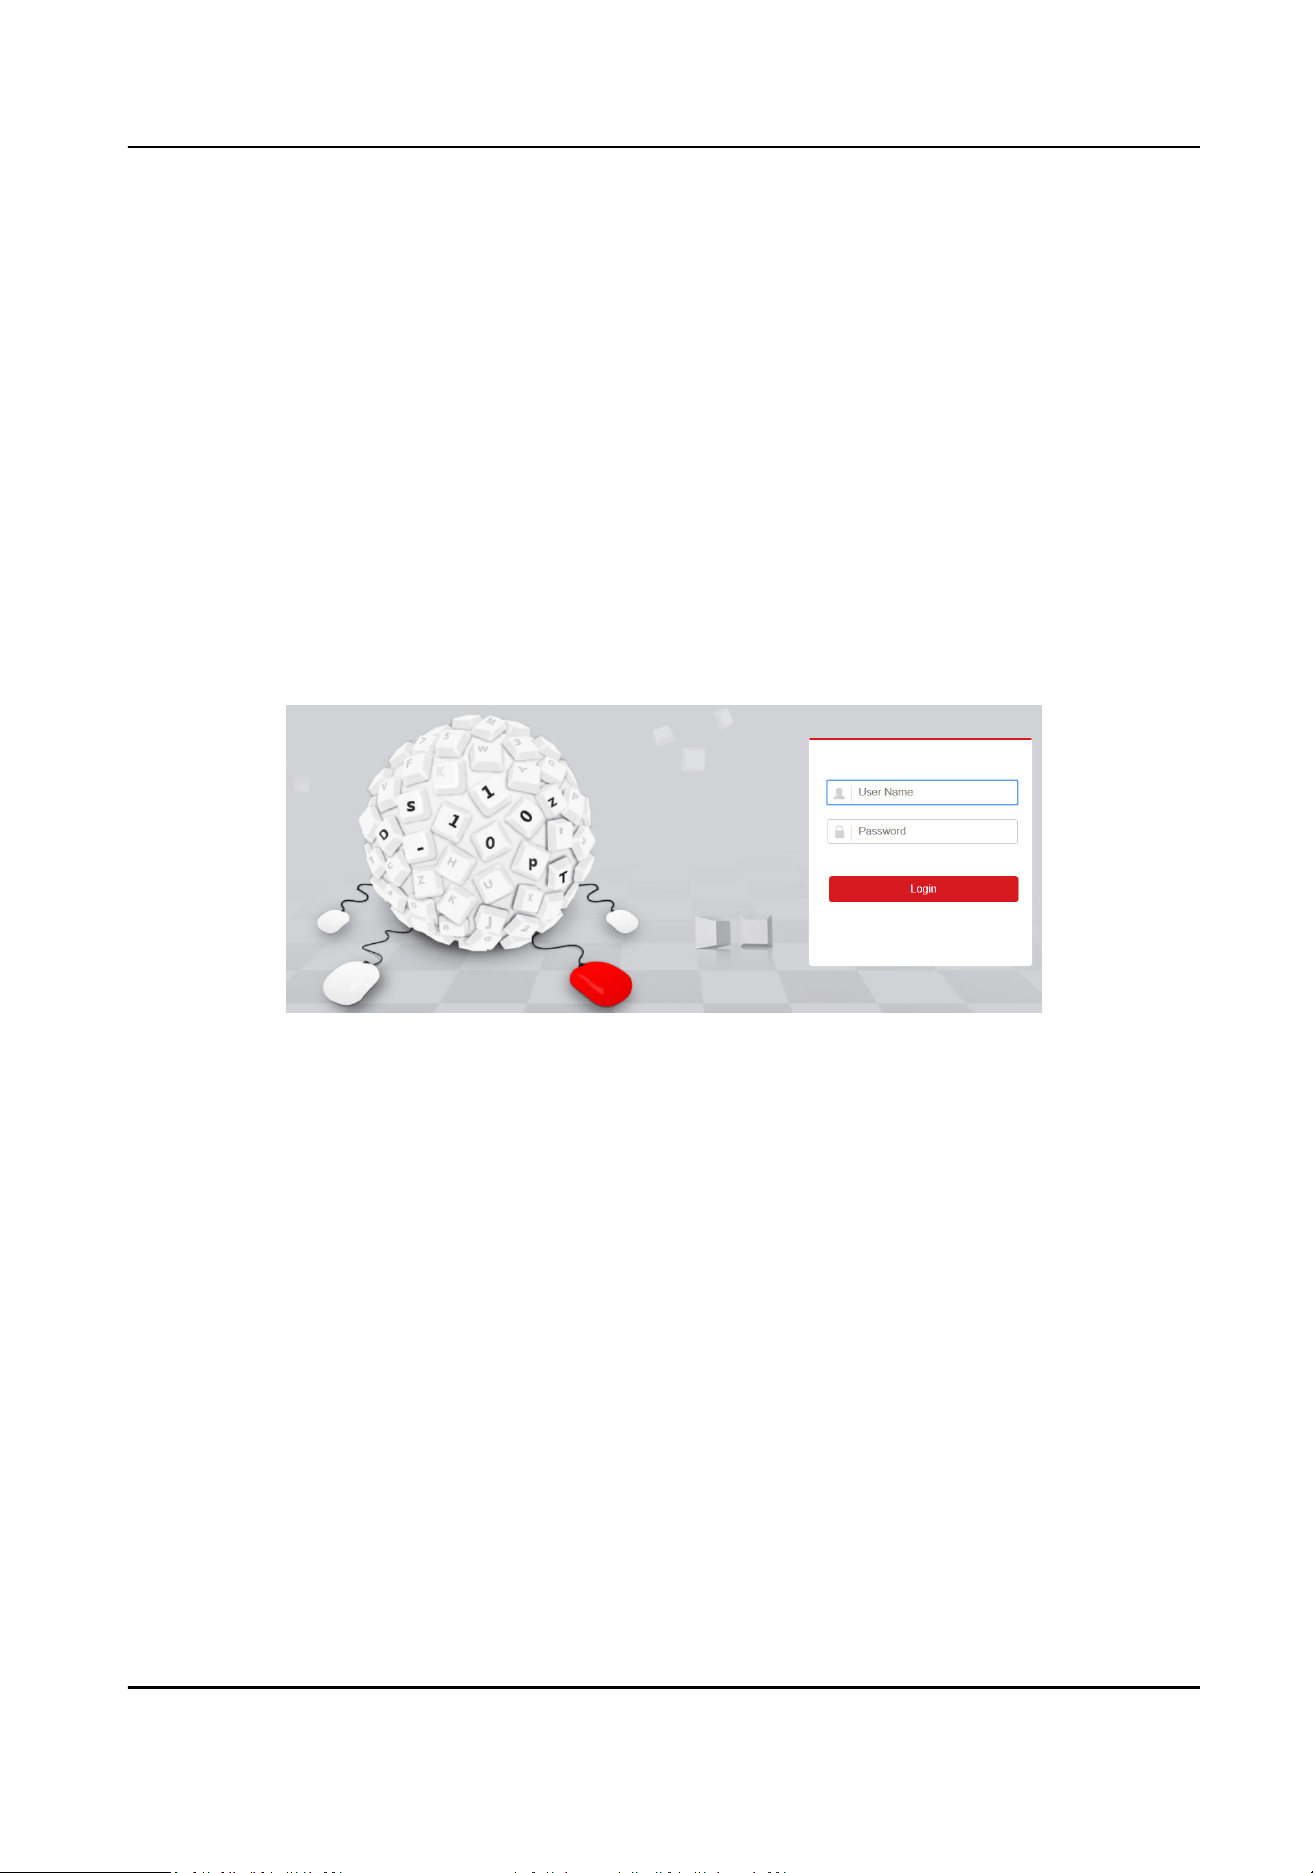
1. Open the browser, enter the IP address of the network keyboard (HTTPS://IP address) in the
address bar, and enter the login interface.
Figure 8-1 Login
2. Enter user name and password.
3. Click Login.
8.2 Add Devices
8.2.1 Manually Add
When the network keyboard is used as the control center and you select the keyboard operaon
mode, add the device rst according to this secon.
Steps
1. In Device Management interface, select to add Center Device or IPC/Network Dome.
2. Click Add, select to add devices by IP address or IP segment, and enter IP Address, Port, User
Name and Password, and select protocol type.
DS-1105KI Network Keyboard User Manual
46
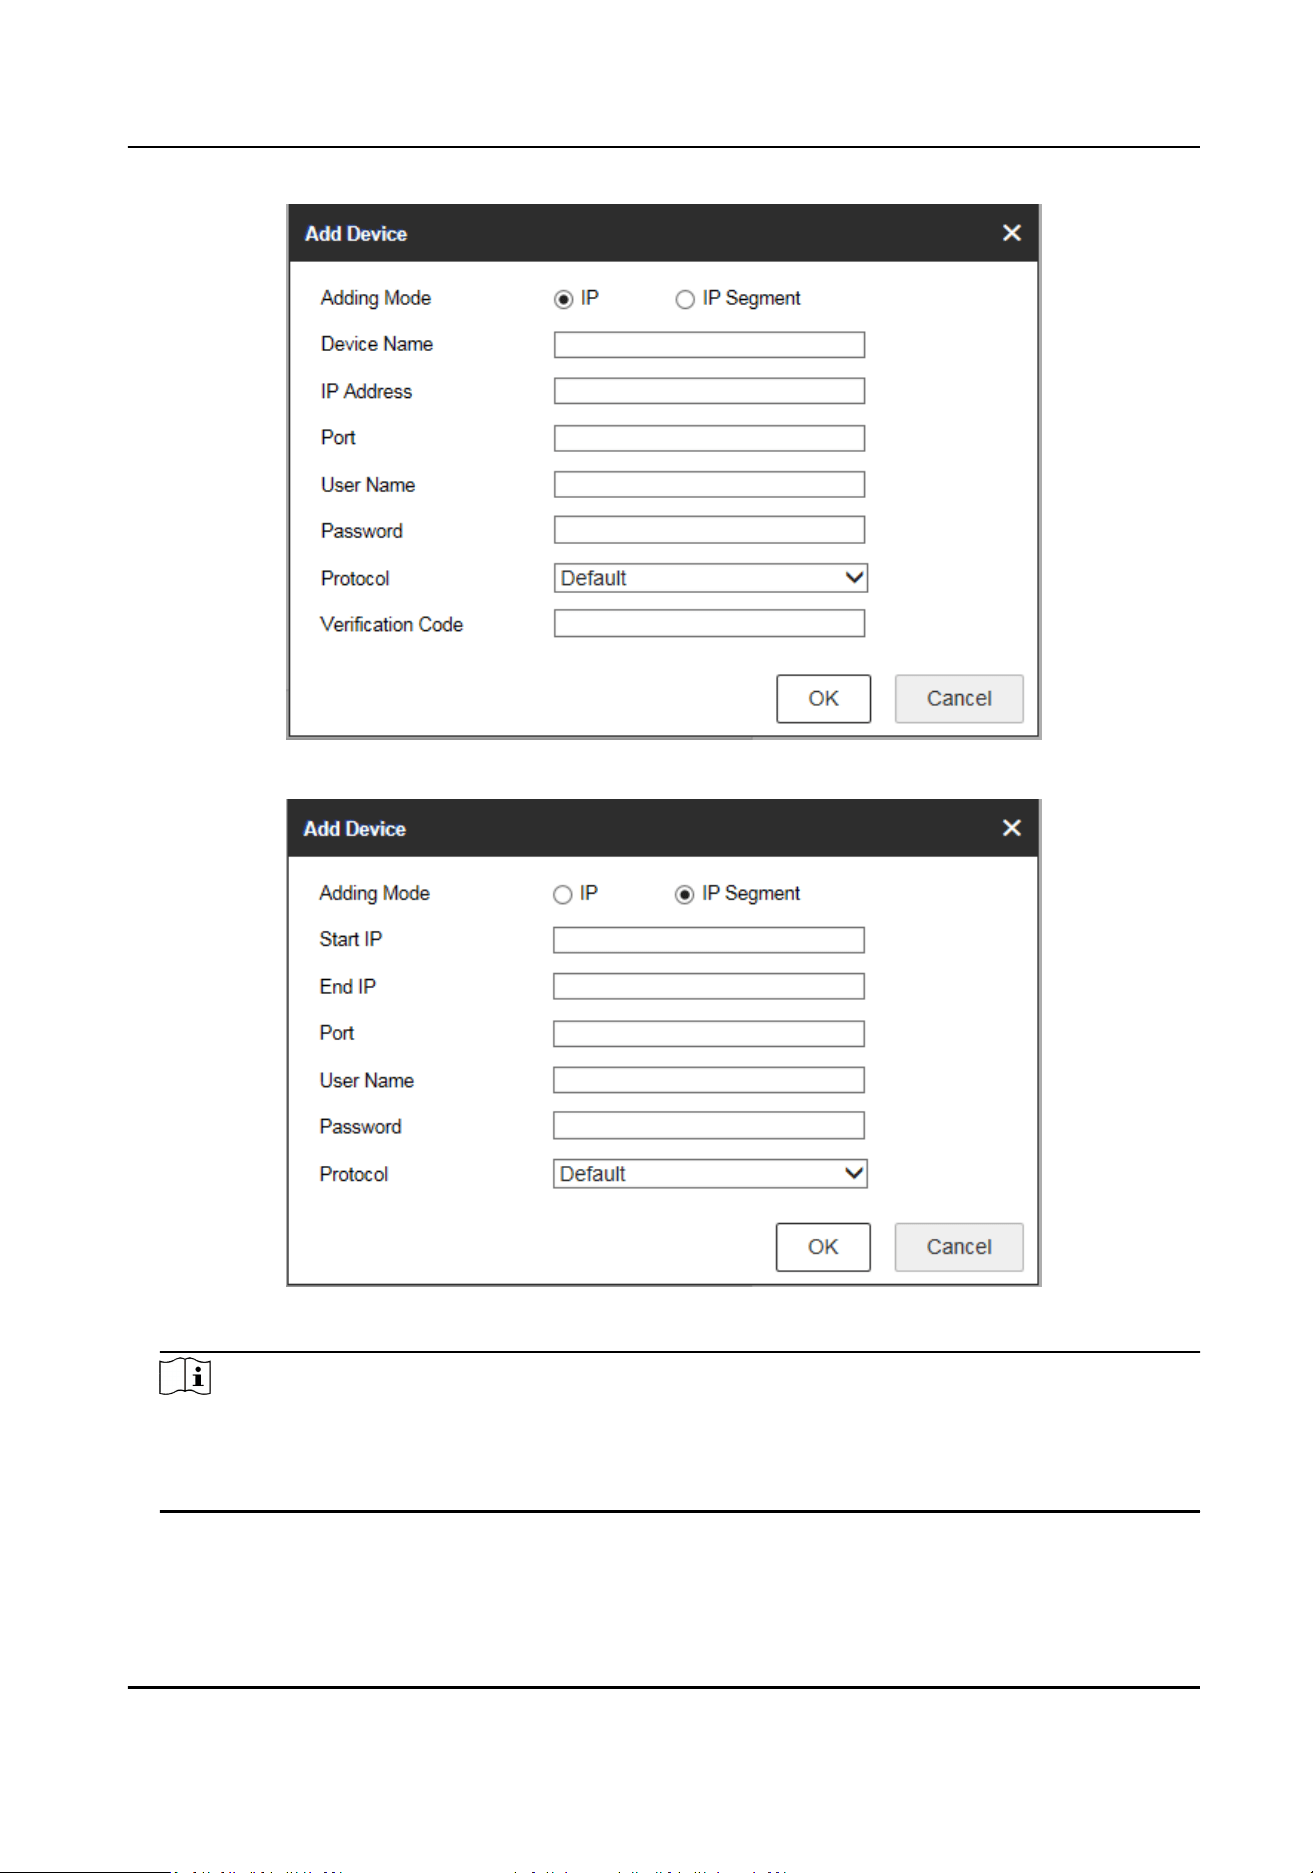
Figure 8-2 Add Device by IP Address
Figure 8-3 Add Device by IP Segment
Note
• It takes a long
me to add devices by IP segment. Please wait paently.
• Aer adding devices in IP segment mode, you need to refresh manually to get the added
devices.
3. If you enable stream encrypon for the device, you need to enter the vericaon code when
adding the device by IP address.
DS-1105KI Network Keyboard User Manual
47

4. Check or uncheck Add Video Recorder Output as desired.
Note
Check Add Video Recorder Output, and the output port type, channel number and other
informaon will be listed in the output port list.
5. Oponal: In Device Management interface, click Add SADP, enter user name and password,
check the device to be added, and click OK to add online devices on the same network segment.
Figure 8-4 Add SADP
Note
• SADP search can only add devices in the same network segment.
•
Aer adding devices in batches by SADP, you need to refresh manually to get the added
devices.
8.2.2 Import Input Channels in Batches
Before You Start
1. Add several devices manually. Go to Channel Management → Input Channel , click Export,
enter password, and then export channel informaon.
2. Edit the device channel informaon based on the exported template, and save the exported
channel informaon into the local PC.
Steps
1. Go to Channel Management → Input Channel .
2. Click Import.
DS-1105KI Network Keyboard User Manual
48
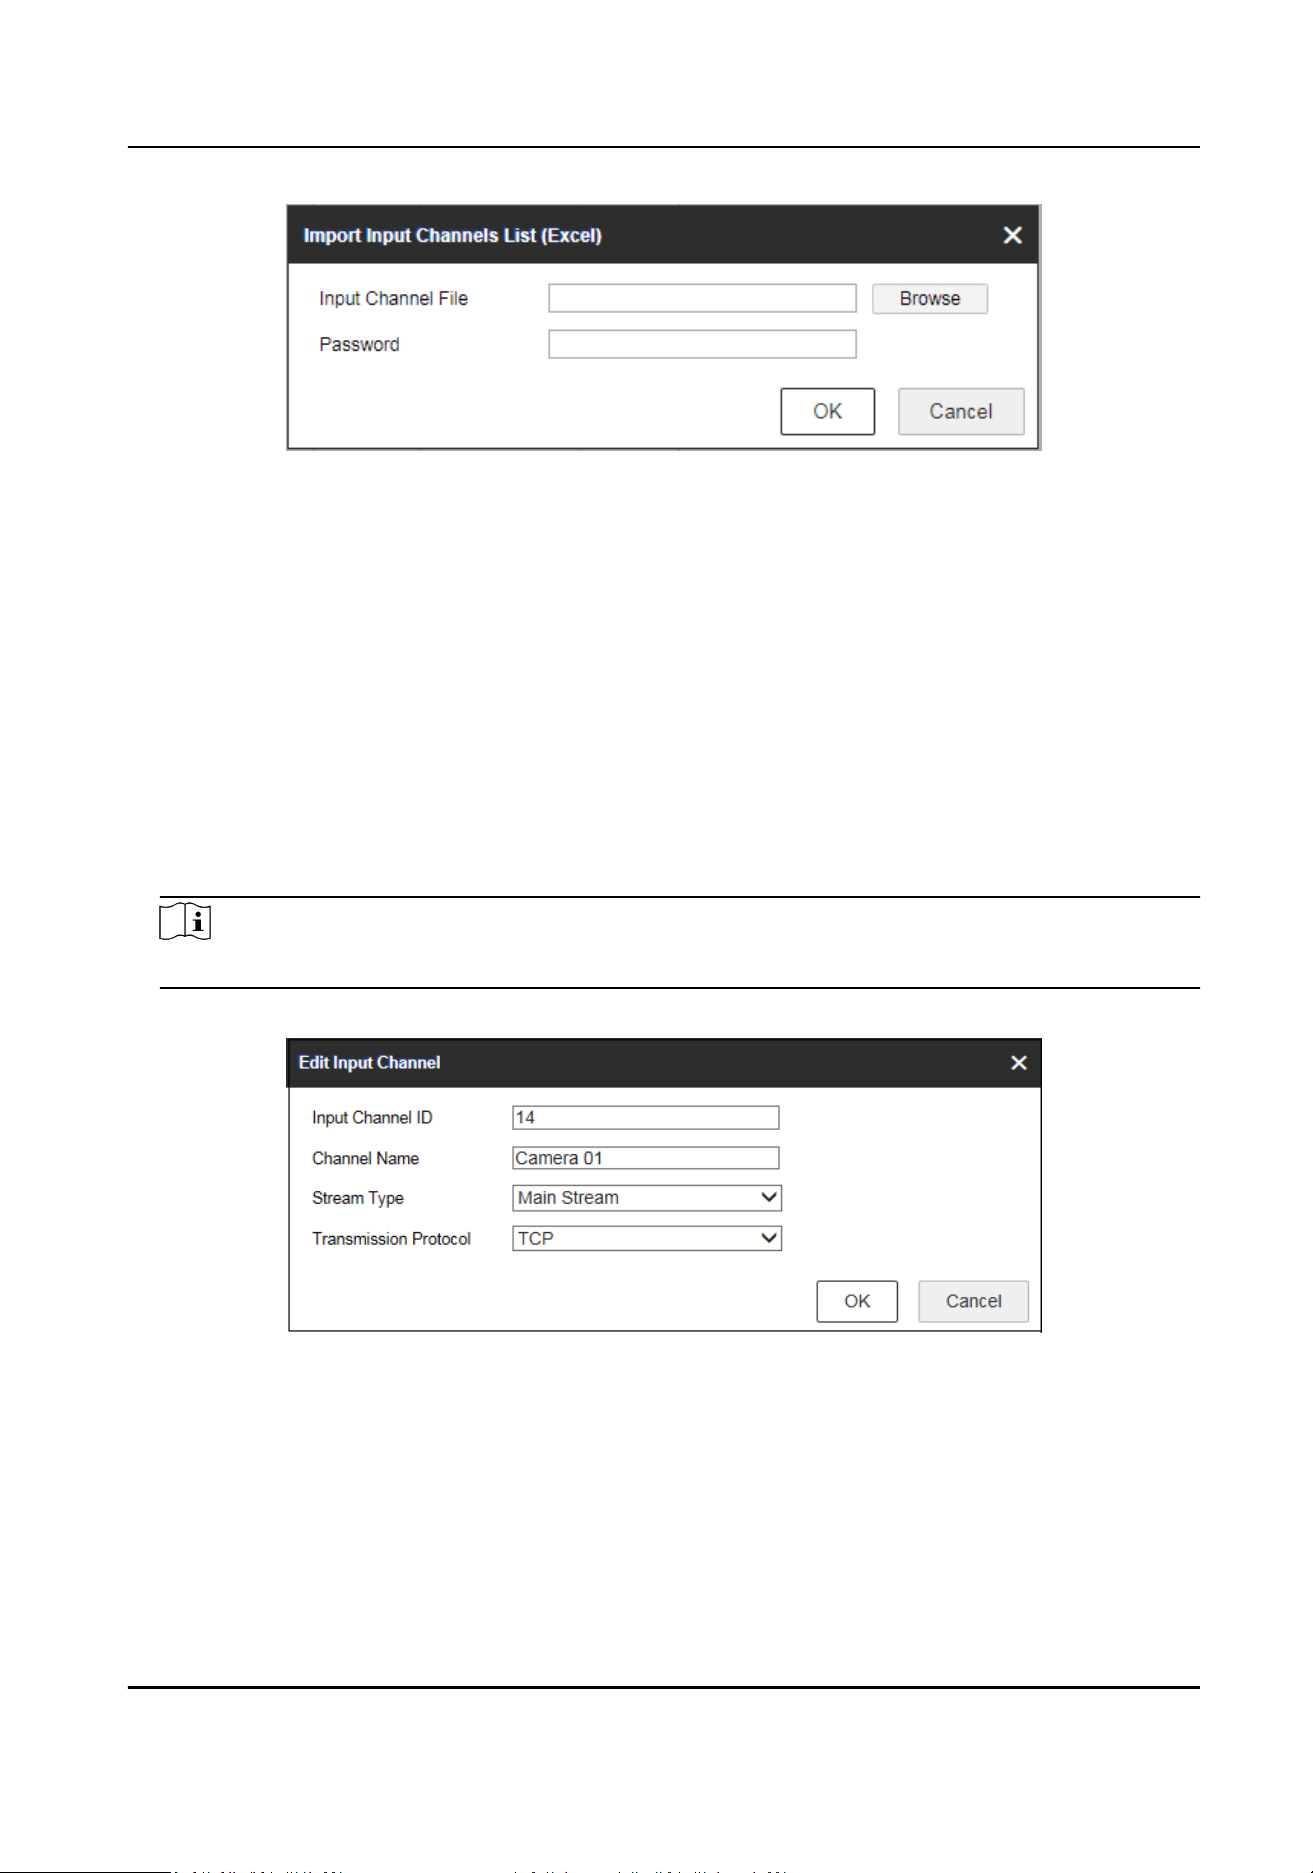
Figure 8-5 Import Input Channel in Batches
3. Click Browse and select the imported template.
4. Enter password and click OK.
The channels in the template will be added into network keyboards.
8.3 Channel Management
8.3.1 Edit Channel
Steps
1. Go to Channel Management → Input Channel .
Note
Input and output channels can be edited. This secon takes input channels as an example.
2. Select the input channel to be edited and click Edit.
Figure 8-6 Edit Input Channel
3. Edit channel parameters.
Input Channel ID
Each input channel corresponds to a unique number, which is valid for video wall and local
live view.
Stream Type
DS-1105KI Network Keyboard User Manual
49
Code stream for local live view and video wall preview.
Transmission Protocol
Available for video wall preview.
4. Click OK.
8.3.2 Camera Group
Camera group enables you to preview a group of cameras (input channels) in sequence.
Steps
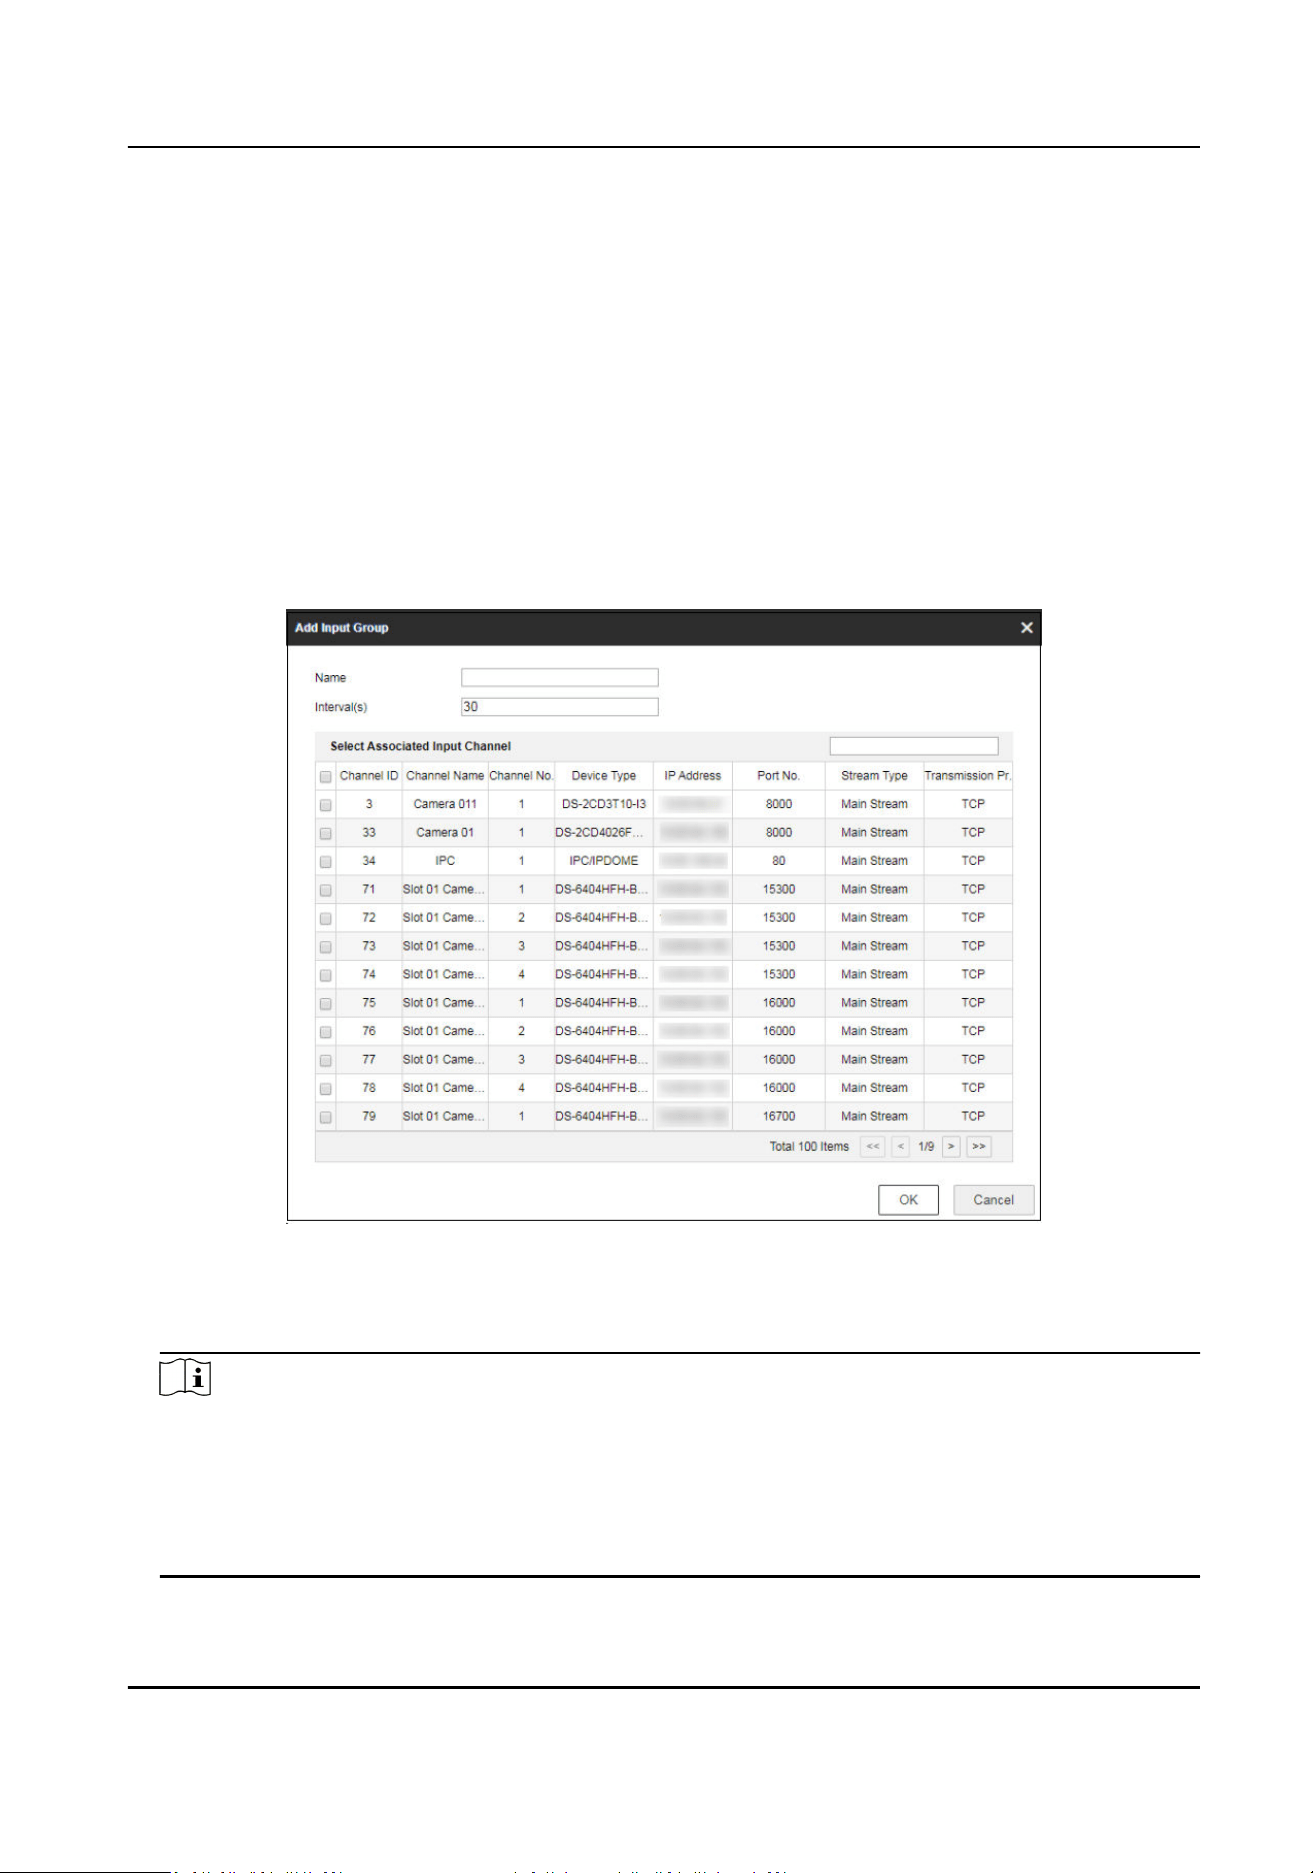
1. Go to Channel Management → Camera Group .
2. Click Add.
Figure 8-7 Add Camera Group
3. Enter Name and Interval(s).
4. Check input channels to be linked and click OK.
Note
• Up to 16 camera groups can be added.
• Each camera group can link up to 64 input channels.
• Interval range: 10 to 65535 seconds.
• The camera groups set by
dierent users are independent. Namely, users can only view and
edit their own camera groups.
DS-1105KI Network Keyboard User Manual
50
5. Click Edit in Camera Group interface, uncheck input channels to be unlinked and click OK to
unlink the input channel.
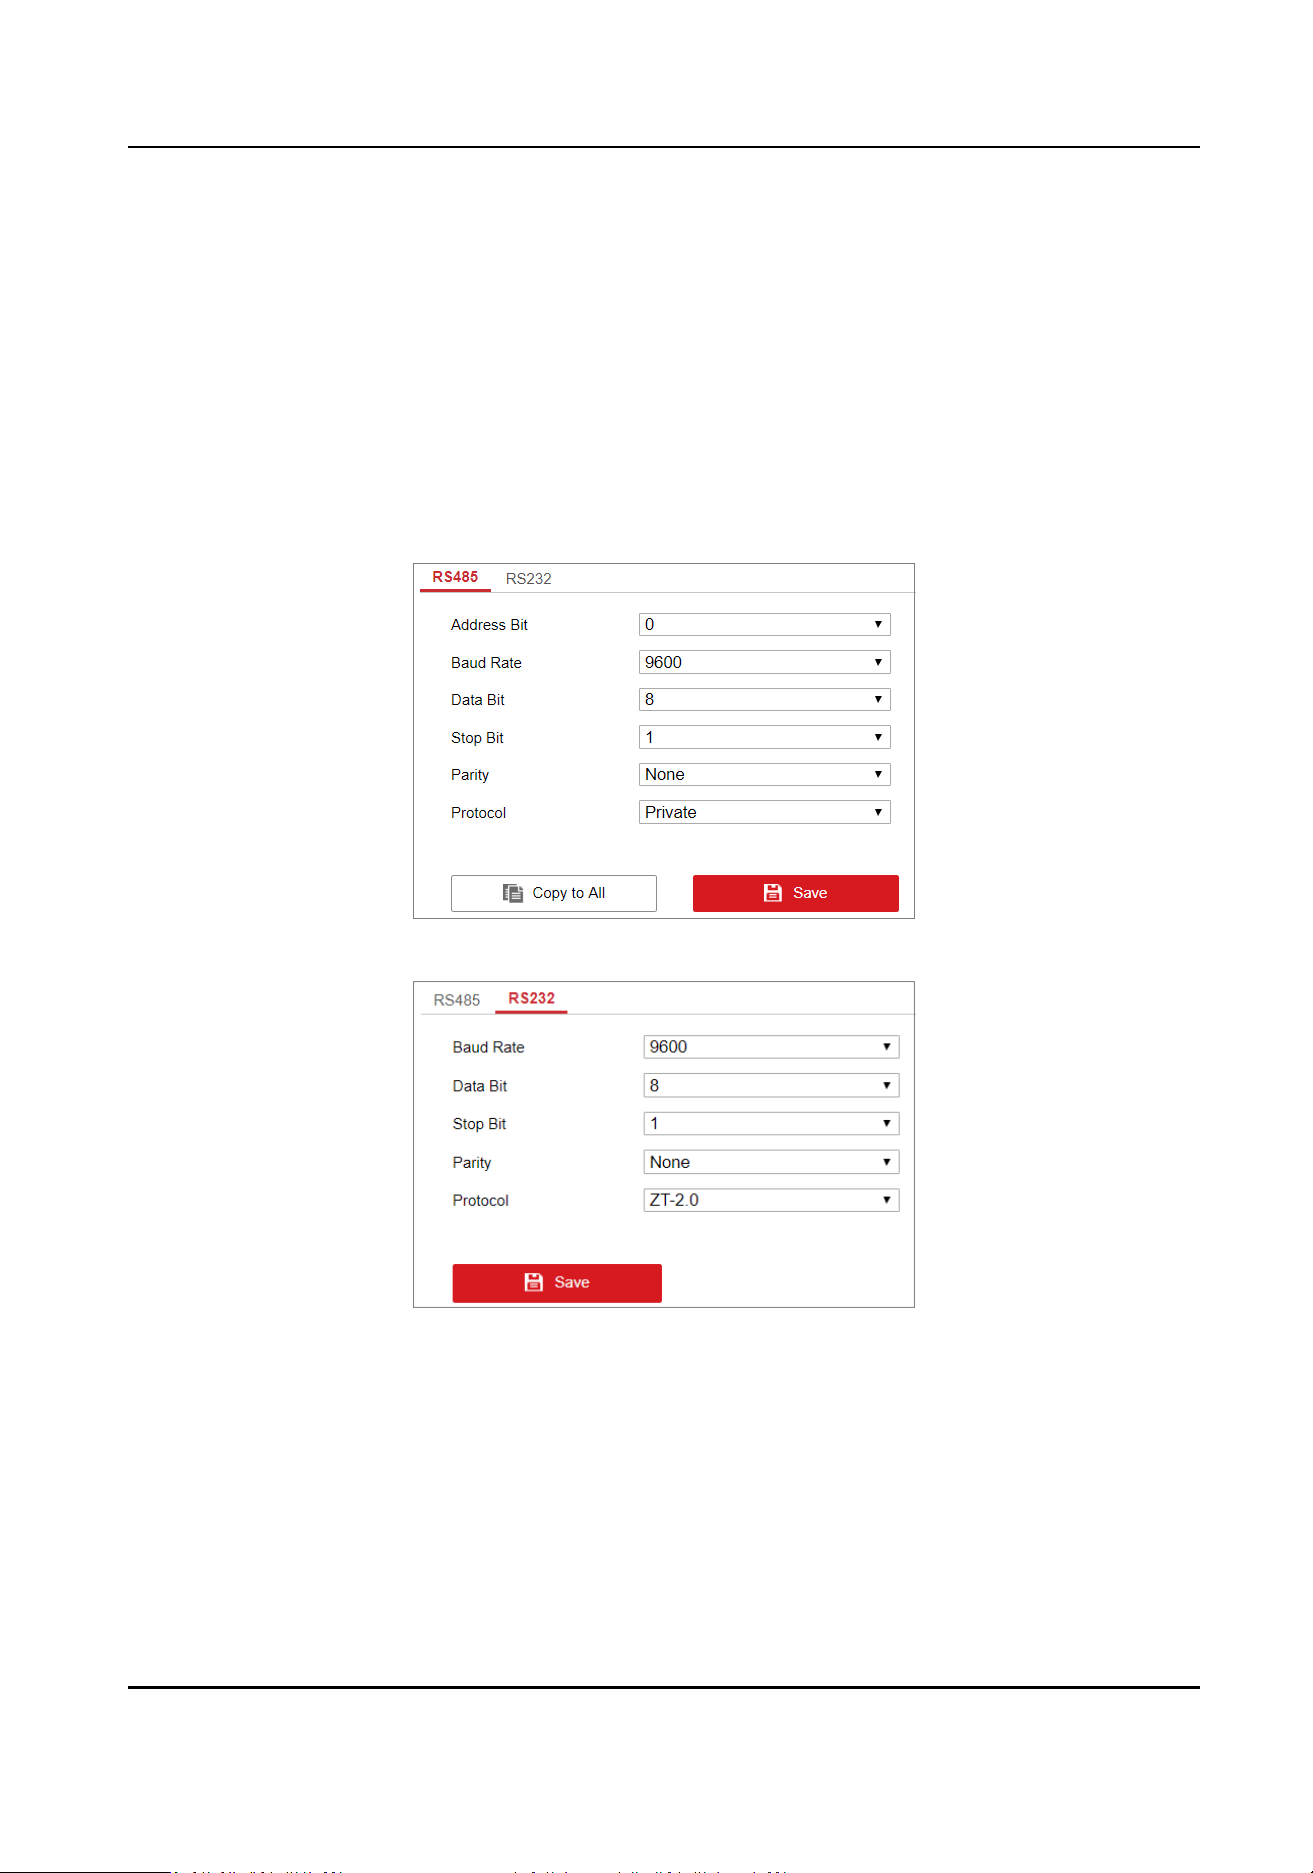
8.4 Serial Port Sengs
RS-485 and RS-232 serial port parameters can be set in the Serial Port Sengs interface. You can
set baud rate, data bit, protocol type, stop bit, parity and other parameters of RS232 and RS485,
edit the address of RS485 serial port, and copy RS485 serial port
sengs to all.
• Congure the parameters of RS-485 port when the serial port is connected to analog dome.
•
Congure the parameters of RS-232 port when the serial port is connected to the analog matrix.
Figure 8-8 RS485 Serial Port Sengs
Figure 8-9 RS232 Serial Port Sengs
8.5 Network
Steps
1. Select Network Management at the main interface.
2. Congure network parameters.
DS-1105KI Network Keyboard User Manual
51
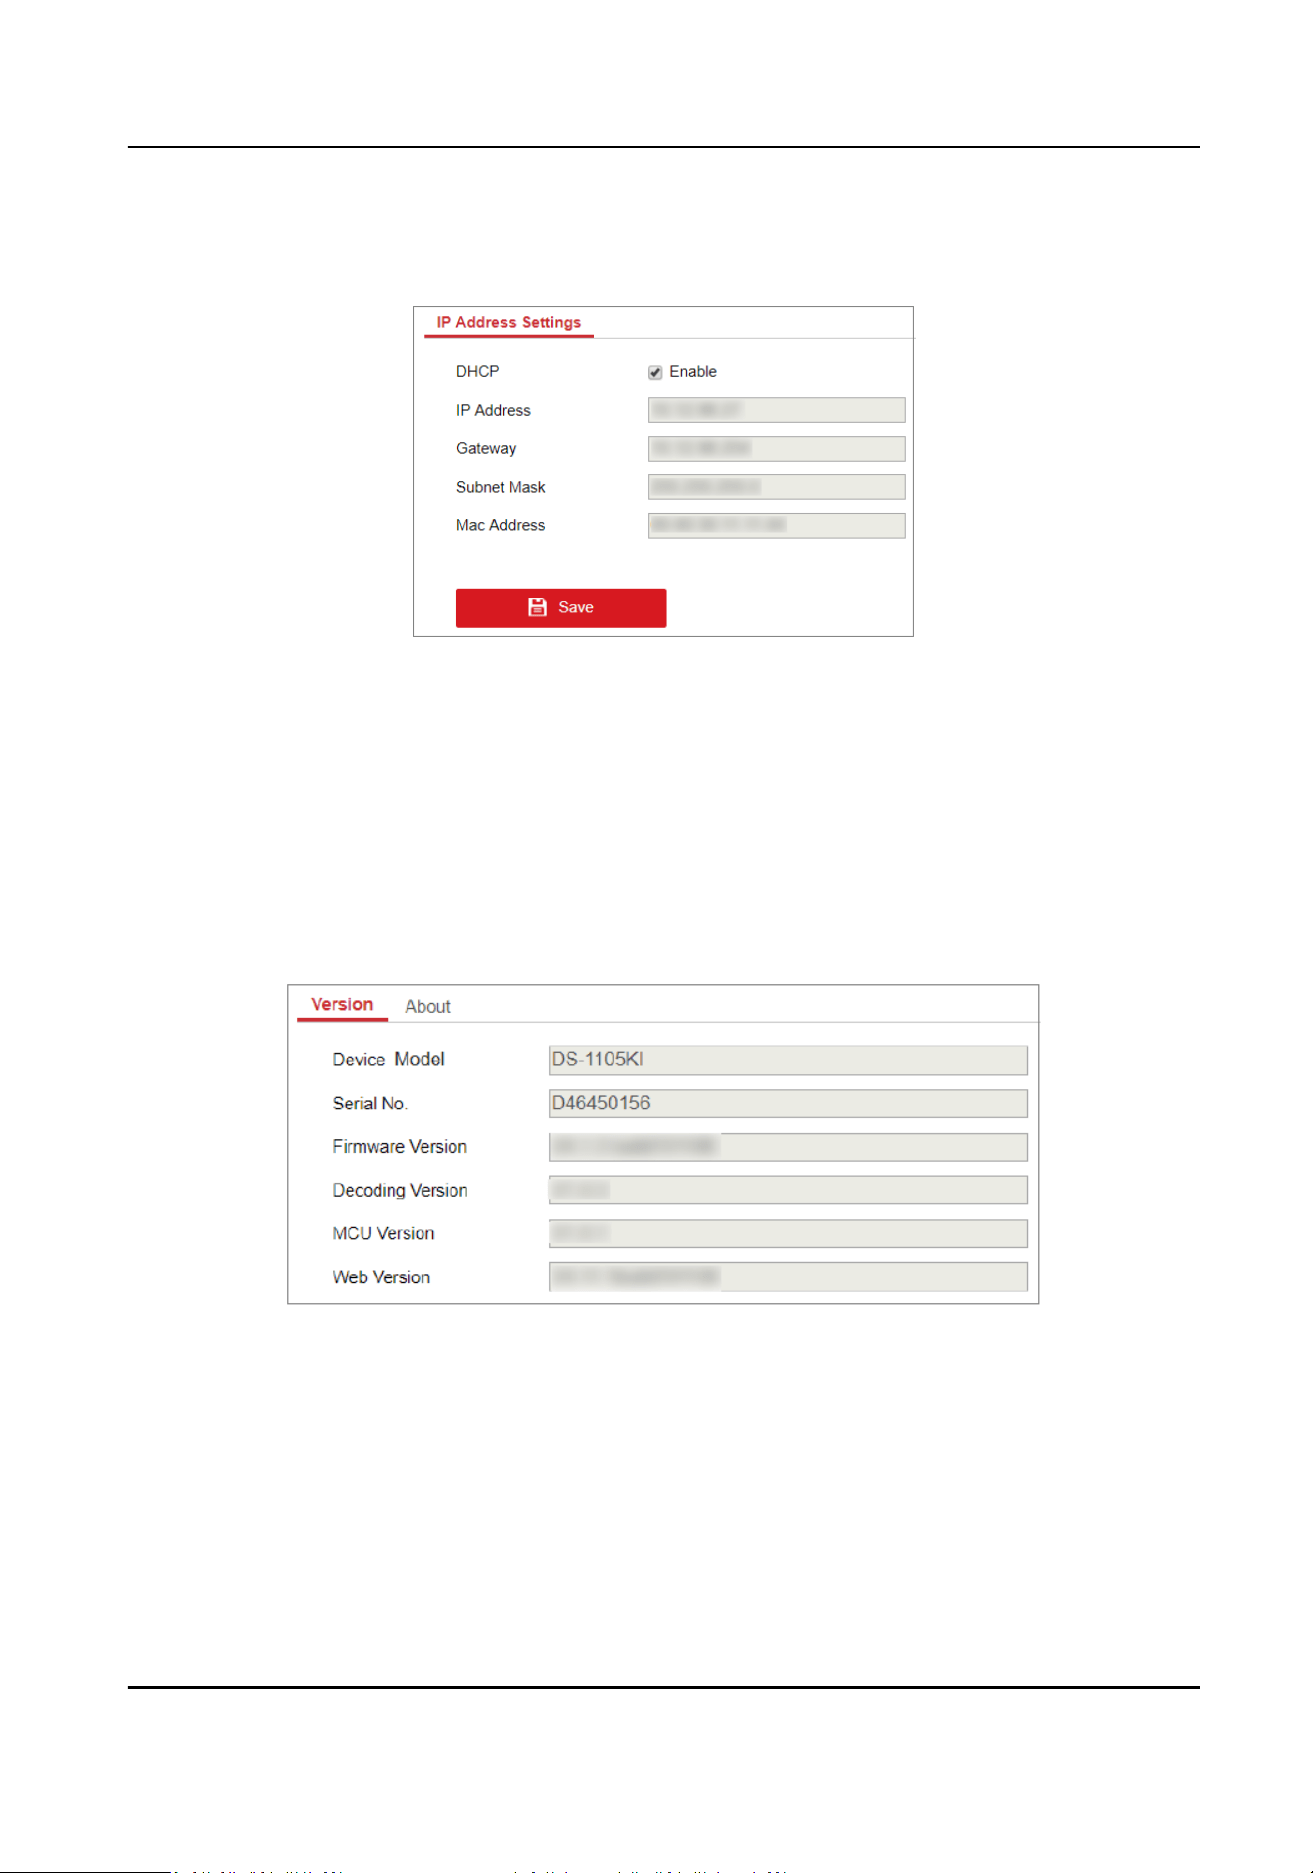
• Check DHCP to obtain IP address and related network parameters
automacally.
• Uncheck DHCP and enter IP address, gateway, subnet mask.
3. Click Save.
Figure 8-10 Network Parameters
8.6 System
Sengs
8.6.1 Version
Go to System Management → Version to view system version informaon, including device type,
serial No., rmware version, decoding version, MCU version and web version.
Figure 8-11 Version Informaon
8.6.2 User Management
Administrator can add operator and allocate devices to operator. Operator permissions are as
follows:
DS-1105KI Network Keyboard User Manual
52

• Add, edit, and delete macro and group.
• Add, edit, and delete region.
•
Deleng, eding, and adding devices are not allowed.
Steps
1. Go to System Management → User Management .
2. Click Add.
Figure 8-12 Add User
3. Enter user name and password for an operator, and click OK.
DS-1105KI Network Keyboard User Manual
53
Cauon
We highly recommend you create a strong password of your own choosing (Using a minimum of
8 characters, including at least three of the following categories: upper case leers, lower case
leers, numbers, and special characters.) in order to increase the security of your product. And
we recommend you reset your password regularly, especially in the high security system,
reseng the password monthly or weekly can beer protect your product.
4. Check devices to be linked as desired and click OK.
Note
• Keyboard supports up to 32 users: 1 administrator and 31 operators.
• The operator can only operate on the devices allocated.
5. Oponal: Click Edit, uncheck the devices to be unlinked and click OK to unlink the devices.
8.6.3 System Maintenance
Go to System Management → System Maintenance to restart the device, restore defaults, export/
import
conguraon le, etc.
Note
Restoring default sengs, imporng/exporng conguraon les, and remote upgrades require
the administrator password to be veried.
Restart
You can restart the network keyboard.
Restore Defaults
• Simply Restore: Keep the acvaon state (administrator password) and the network parameters
of the network keyboard, and the remaining parameters will be restored to the default sengs.
• Completely Restore: Completely restore the parameters to default sengs.
Import/Export Conguraon File
You can export the conguraon le to the computer or import the conguraon le from the
computer to the keyboard. In case of keyboard failure, you need to back up the data by exporng
the conguraon le rst, and then repair the failure. To copy the data of this keyboard to another
keyboard, you can also import/export the conguraon le.
DS-1105KI Network Keyboard User Manual
54
Note
• Please set the key for the
conguraon le when exporng it.
• The conguraon le encrypted and exported is named as conguraondata.
• If the
conguraon le is encrypted, you need to enter the key of the conguraon le when
imporng it.
Remote Upgrade
Click Browse to select the upgrade le in the computer, and click Upgrade to upgrade the network
keyboard remotely.
Note
The upgrade le must be named as digicap.dav.
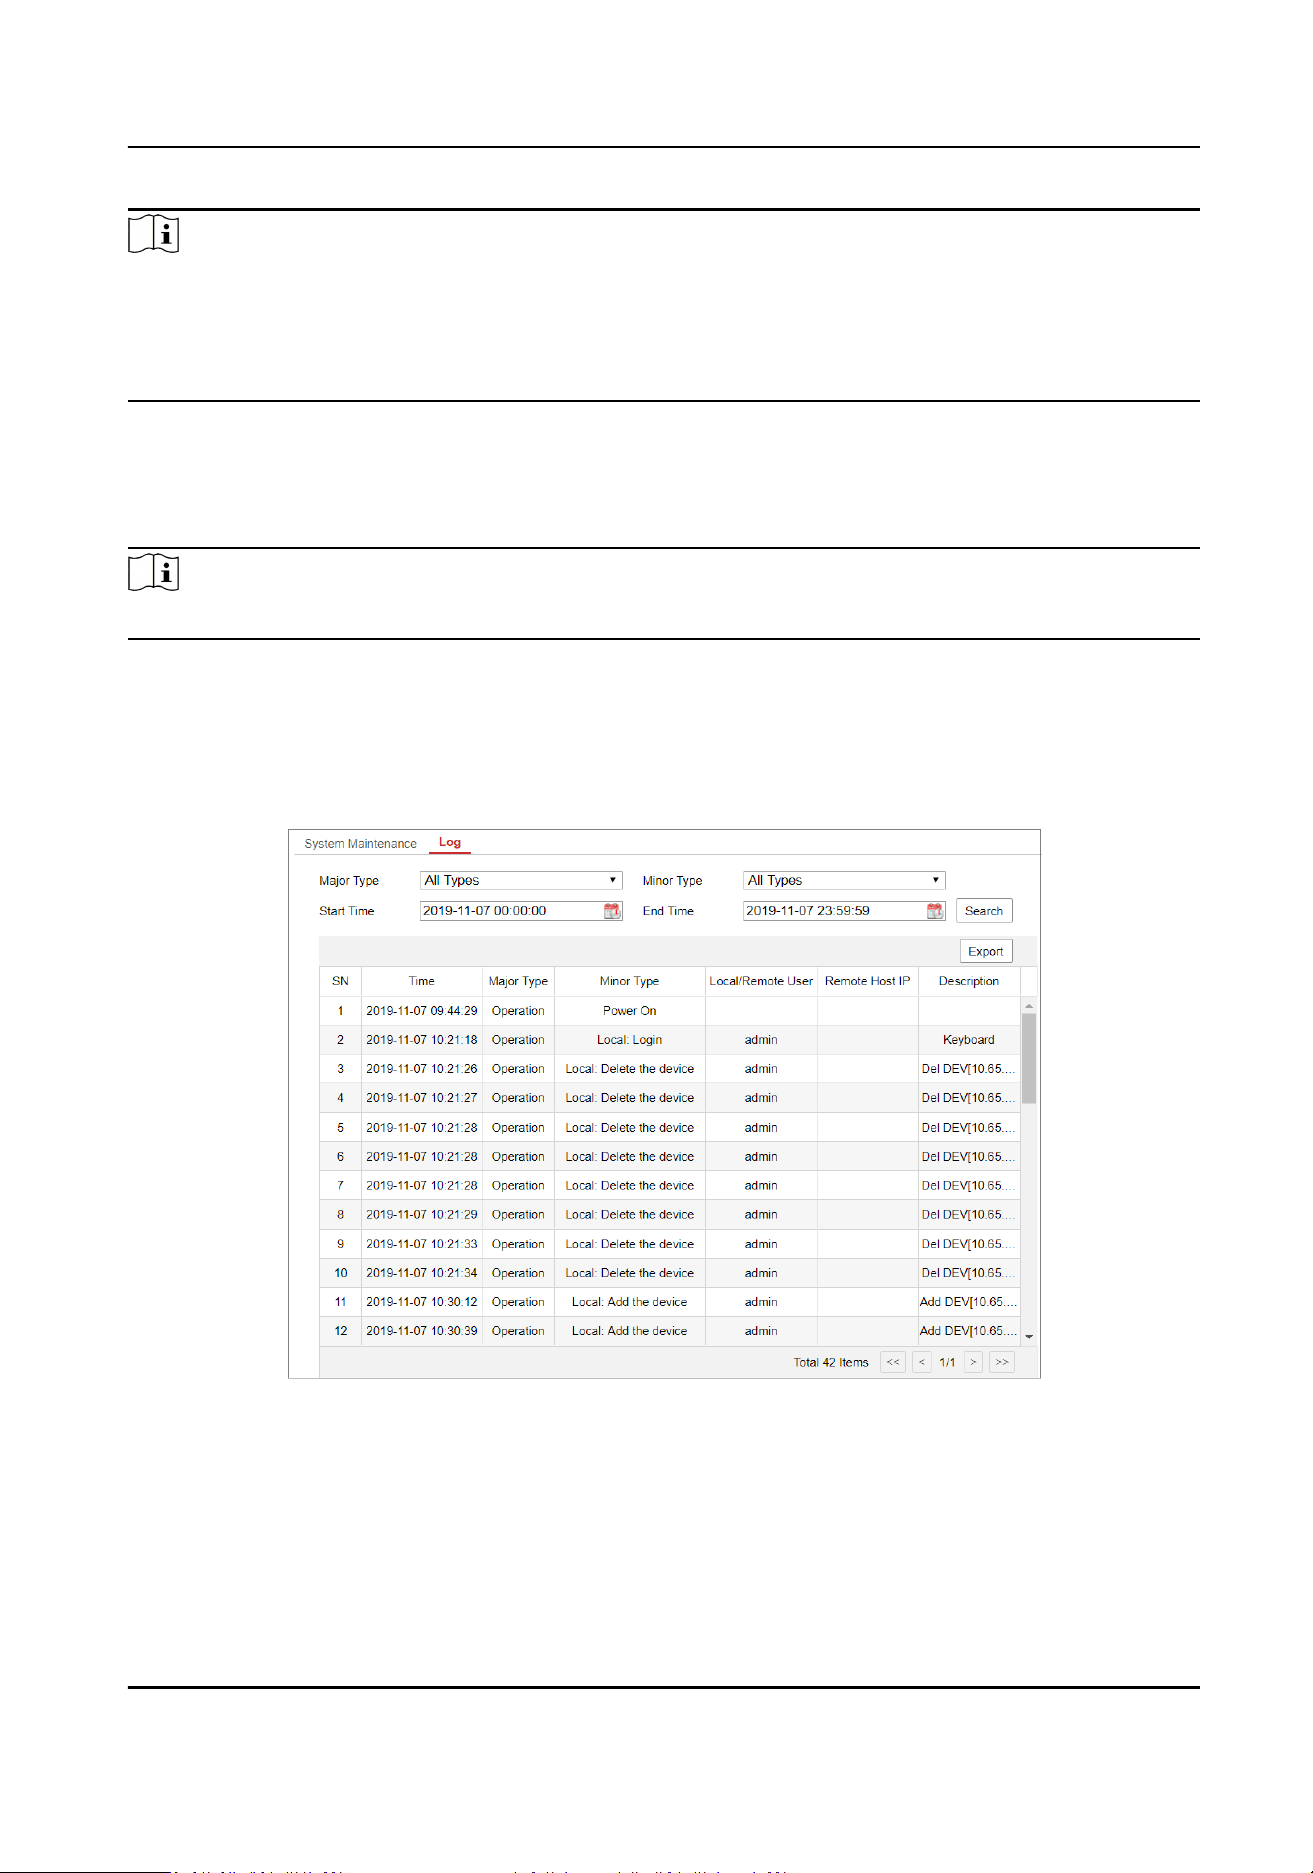
8.6.4 Log Management
Go to System Management → System Maintenance → Log , select the major and minor types and
start and end
me of the log, and then search and export the log.
Figure 8-13 View Logs
8.6.5 Security
Sengs
Go to System Management → Security Sengs , and enable or disable SSH and SADP.
DS-1105KI Network Keyboard User Manual
55

• SSH is disabled by default
aer the network keyboard is restarted.
• When you enable SADP, the keyboard can be searched. When you disable SADP, the keyboard
cannot be searched.
DS-1105KI Network Keyboard User Manual
56

UD19469B