
DS-1600KI Keyboard
Quick Start Guide

Legal Informaon
©2019 Hangzhou Hikvision Digital Technology Co., Ltd. All rights reserved.
About this Manual
The Manual includes instrucons for using and managing the Product. Pictures, charts, images and
all other informaon hereinaer are for descripon and explanaon only. The informaon
contained in the Manual is subject to change, without noce, due to rmware updates or other
reasons. Please
nd the latest version of this Manual at the Hikvision website ( hps://
www.hikvision.com/en/ ).
Please use this Manual with the guidance and assistance of professionals trained in
supporng the
Product.
Trademarks
and other Hikvision's trademarks and logos are the properes of
Hikvision in various
jurisdicons.
Other trademarks and logos menoned are the properes of their respecve owners.
Disclaimer
TO THE MAXIMUM EXTENT PERMITTED BY APPLICABLE LAW, THIS MANUAL AND THE PRODUCT
DESCRIBED, WITH ITS HARDWARE, SOFTWARE AND FIRMWARE, ARE PROVIDED “AS IS” AND “WITH
ALL FAULTS AND ERRORS”. HIKVISION MAKES NO WARRANTIES, EXPRESS OR IMPLIED, INCLUDING
WITHOUT LIMITATION, MERCHANTABILITY, SATISFACTORY QUALITY, OR FITNESS FOR A PARTICULAR
PURPOSE. THE USE OF THE PRODUCT BY YOU IS AT YOUR OWN RISK. IN NO EVENT WILL HIKVISION
BE LIABLE TO YOU FOR ANY SPECIAL, CONSEQUENTIAL, INCIDENTAL, OR INDIRECT DAMAGES,
INCLUDING, AMONG OTHERS, DAMAGES FOR LOSS OF BUSINESS PROFITS, BUSINESS
INTERRUPTION, OR LOSS OF DATA, CORRUPTION OF SYSTEMS, OR LOSS OF DOCUMENTATION,
WHETHER BASED ON BREACH OF CONTRACT, TORT (INCLUDING NEGLIGENCE), PRODUCT LIABILITY,
OR OTHERWISE, IN CONNECTION WITH THE USE OF THE PRODUCT, EVEN IF HIKVISION HAS BEEN
ADVISED OF THE POSSIBILITY OF SUCH DAMAGES OR LOSS.
YOU ACKNOWLEDGE THAT THE NATURE OF INTERNET PROVIDES FOR INHERENT SECURITY RISKS,
AND HIKVISION SHALL NOT TAKE ANY RESPONSIBILITIES FOR ABNORMAL OPERATION, PRIVACY
LEAKAGE OR OTHER DAMAGES RESULTING FROM CYBER-ATTACK, HACKER ATTACK, VIRUS
INSPECTION, OR OTHER INTERNET SECURITY RISKS; HOWEVER, HIKVISION WILL PROVIDE TIMELY
TECHNICAL SUPPORT IF REQUIRED.
YOU AGREE TO USE THIS PRODUCT IN COMPLIANCE WITH ALL APPLICABLE LAWS, AND YOU ARE
SOLELY RESPONSIBLE FOR ENSURING THAT YOUR USE CONFORMS TO THE APPLICABLE LAW.
ESPECIALLY, YOU ARE RESPONSIBLE, FOR USING THIS PRODUCT IN A MANNER THAT DOES NOT
INFRINGE ON THE RIGHTS OF THIRD PARTIES, INCLUDING WITHOUT LIMITATION, RIGHTS OF
PUBLICITY, INTELLECTUAL PROPERTY RIGHTS, OR DATA PROTECTION AND OTHER PRIVACY RIGHTS.
YOU SHALL NOT USE THIS PRODUCT FOR ANY PROHIBITED END-USES, INCLUDING THE
DEVELOPMENT OR PRODUCTION OF WEAPONS OF MASS DESTRUCTION, THE DEVELOPMENT OR
DS-1600KI Keyboard Quick Start Guide
i

PRODUCTION OF CHEMICAL OR BIOLOGICAL WEAPONS, ANY ACTIVITIES IN THE CONTEXT RELATED
TO ANY NUCLEAR EXPLOSIVE OR UNSAFE NUCLEAR FUEL-CYCLE, OR IN SUPPORT OF HUMAN
RIGHTS ABUSES.
IN THE EVENT OF ANY CONFLICTS BETWEEN THIS MANUAL AND THE APPLICABLE LAW, THE LATER
PREVAILS.
DS-1600KI Keyboard Quick Start Guide
ii
Preface
Applicable Models
This manual is applicable to the models listed in the following table.
Series Model
Network Keyboard DS-1600KI
Access Documentaon
Visit ocial website ( www.hikvision.com ) for user manual, applicaon, SDK document, etc.
Scan the following QR code to get more informaon about the operaons of DS-1600KI network
keyboard.
Symbol
Convenons
The symbols that may be found in this document are dened as follows.
DS-1600KI Keyboard Quick Start Guide
iii
Symbol Descripon
Danger
Indicates a hazardous situaon which, if not avoided, will or could
result in death or serious injury.
Cauon
Indicates a potenally hazardous situaon which, if not avoided, could
result in equipment damage, data loss, performance degradaon, or
unexpected results.
Note
Provides addional informaon to emphasize or supplement
important points of the main text.
Safety Instrucons
Danger
• Proper
conguraon of all passwords and other security sengs is the responsibility of the
installer and/or end-user.
• In the use of the product, you must be in strict compliance with the electrical safety regulaons
of the naon and region. Please refer to technical specicaons for detailed informaon.
• Do not connect several devices to one power adapter as adapter overload may cause
over-
heang
or a re hazard.
• Please make sure that the plug is rmly connected to the power socket.
• If smoke, odor or noise rise from the device, turn
o the power at once and unplug the power
cable, and then please contact the service center.
Cauon
• Ensure unit is installed in a
well-venlated, dust-free environment.
• Unit is designed for indoor use only.
• Keep all liquids away from the device.
• Ensure environmental condions meet factory specicaons.
• Ensure unit is properly secured to a rack or shelf. Major shocks or jolts to the unit as a result of
dropping it may cause damage to the
sensive electronics within the unit.
• Use the device in conjuncon with an UPS if possible.
• Power down the unit before
connecng and disconnecng accessories and peripherals.
• A factory recommended HDD should be used for this device.
• Improper use or replacement of the
baery may result in hazard of explosion. Replace with the
same or equivalent type only. Dispose of used baeries according to the instrucons provided by
the
baery manufacturer.
DS-1600KI Keyboard Quick Start Guide
iv

Contents
Chapter 1 Product Descripon .................................................................................................... 1
1.1 Product Overview .................................................................................................................. 1
1.2 Appearance ............................................................................................................................ 2
Chapter 2 Acvate Keyboard ...................................................................................................... 5
Chapter 3 Congure Network ..................................................................................................... 6
3.1 Set Wired Network ................................................................................................................ 6
3.2 Set Wireless Network ............................................................................................................. 6
Chapter 4 Manage Keyboard ...................................................................................................... 7
4.1 Manage Device ...................................................................................................................... 7
4.1.1 Add and Edit Device ...................................................................................................... 7
4.1.2 Manage Connected Cameras ...................................................................................... 11
4.1.3 Manage Auto-switch Group ........................................................................................ 13
4.2 Live View on Screen ............................................................................................................. 15
4.2.1 View Video with Keyboard .......................................................................................... 15
4.2.2 PTZ Control .................................................................................................................. 16
4.2.3 Play Video on Video Wall ............................................................................................ 17
4.2.4 Save Current Video Wall
Sengs as a Scene .............................................................. 18
4.2.5 Video Wall Playback .................................................................................................... 18
4.3 Video Playback ..................................................................................................................... 19
4.4 Control DVR .......................................................................................................................... 20
4.5 Manage User ........................................................................................................................ 23
4.5.1 Add New Users with Admin Account .......................................................................... 23
4.5.2 Edit User Accounts by Administrator .......................................................................... 24
Chapter 5 Control
Plaorm ....................................................................................................... 25
5.1 Control iSecure ..................................................................................................................... 25
5.1.1 Login ............................................................................................................................ 25
DS-1600KI Keyboard Quick Start Guide
v

5.1.2 Display a Camera on Video Wall ................................................................................. 26
5.1.3 Local Live View ............................................................................................................ 27
5.1.4 Video Wall Playback .................................................................................................... 28
5.2 Control HikCentral ................................................................................................................ 29
5.2.1 Login ............................................................................................................................ 29
5.2.2 Display a Camera on Video Wall ................................................................................. 30
5.2.3 Local Live View ............................................................................................................ 31
5.2.4 Video Wall Playback .................................................................................................... 33
5.3 Control KPS .......................................................................................................................... 34
DS-1600KI Keyboard Quick Start Guide
vi

Chapter 1 Product Descripon
1.1 Product Overview
Introducon
DS-1600KI is a fully touch-enabled and detachable network keyboard independently developed by
Hikvision.
In addion to displaying images, the 10.1" capacive touchscreen supports DVI and HDMI video
outputs. The
soware system runs on Android 6.0. It is compable with all series of Hikvision IP
cameras, NVRs/DVRs, and control center plaorm such as HikCentral. It supports recording, picture
capturing and two-way audio, as well as the video wall control and scene switch of
plaorm and
decoding devices.
The four-axis joysck can be used to the PTZ control of speed dome and quick locaon of the
target. The
joysck panel is detachable for convenience.
Key Features
• 10.1" capacive touchscreen, with 1280 × 800 resoluon
• Android operaon system and detachable design of the touchscreen and joysck
• Capable of decoding 4-ch at 1080p resoluon
• Up to 16-division window display
• Supports H.265/H.264 encoding format
• Live view on touchscreen
• DVI and HDMI outputs to monitor
• Local playback of video
• Accessible to private products including DVR, DVS, NVR, network camera, speed dome, etc.
• Control of decoders for video decoding and output on video wall
• Accessible by
plaorms and matrix access gateway
• Supports video wall conguraon and scene switch
• Smart scaling of video wall layout
• Flexible PTZ control including
seng and calling the preset, calling the patrol, auto-scan, seng
and calling the paern, light on/o, wiper on/o, focus control and iris control; You can control
the
direcons, zoom in, zoom out and capture pictures via the joysck
• Upgrade and conguraon les import/export by USB ash drive
• Recording, picture capturing and two-way audio; Saving
les in USB ash drive or uploading to
FTP server
• Two-level user authority and up to 32 user accounts are
congurable, including 1 admin and 31
operators
• Wired and Wi-Fi network connecon
DS-1600KI Keyboard Quick Start Guide
1
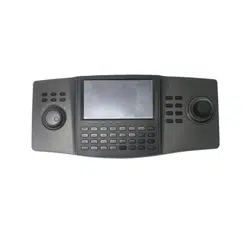
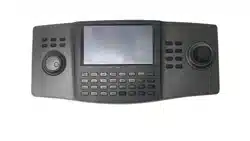
1.2 Appearance
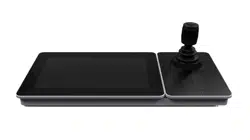
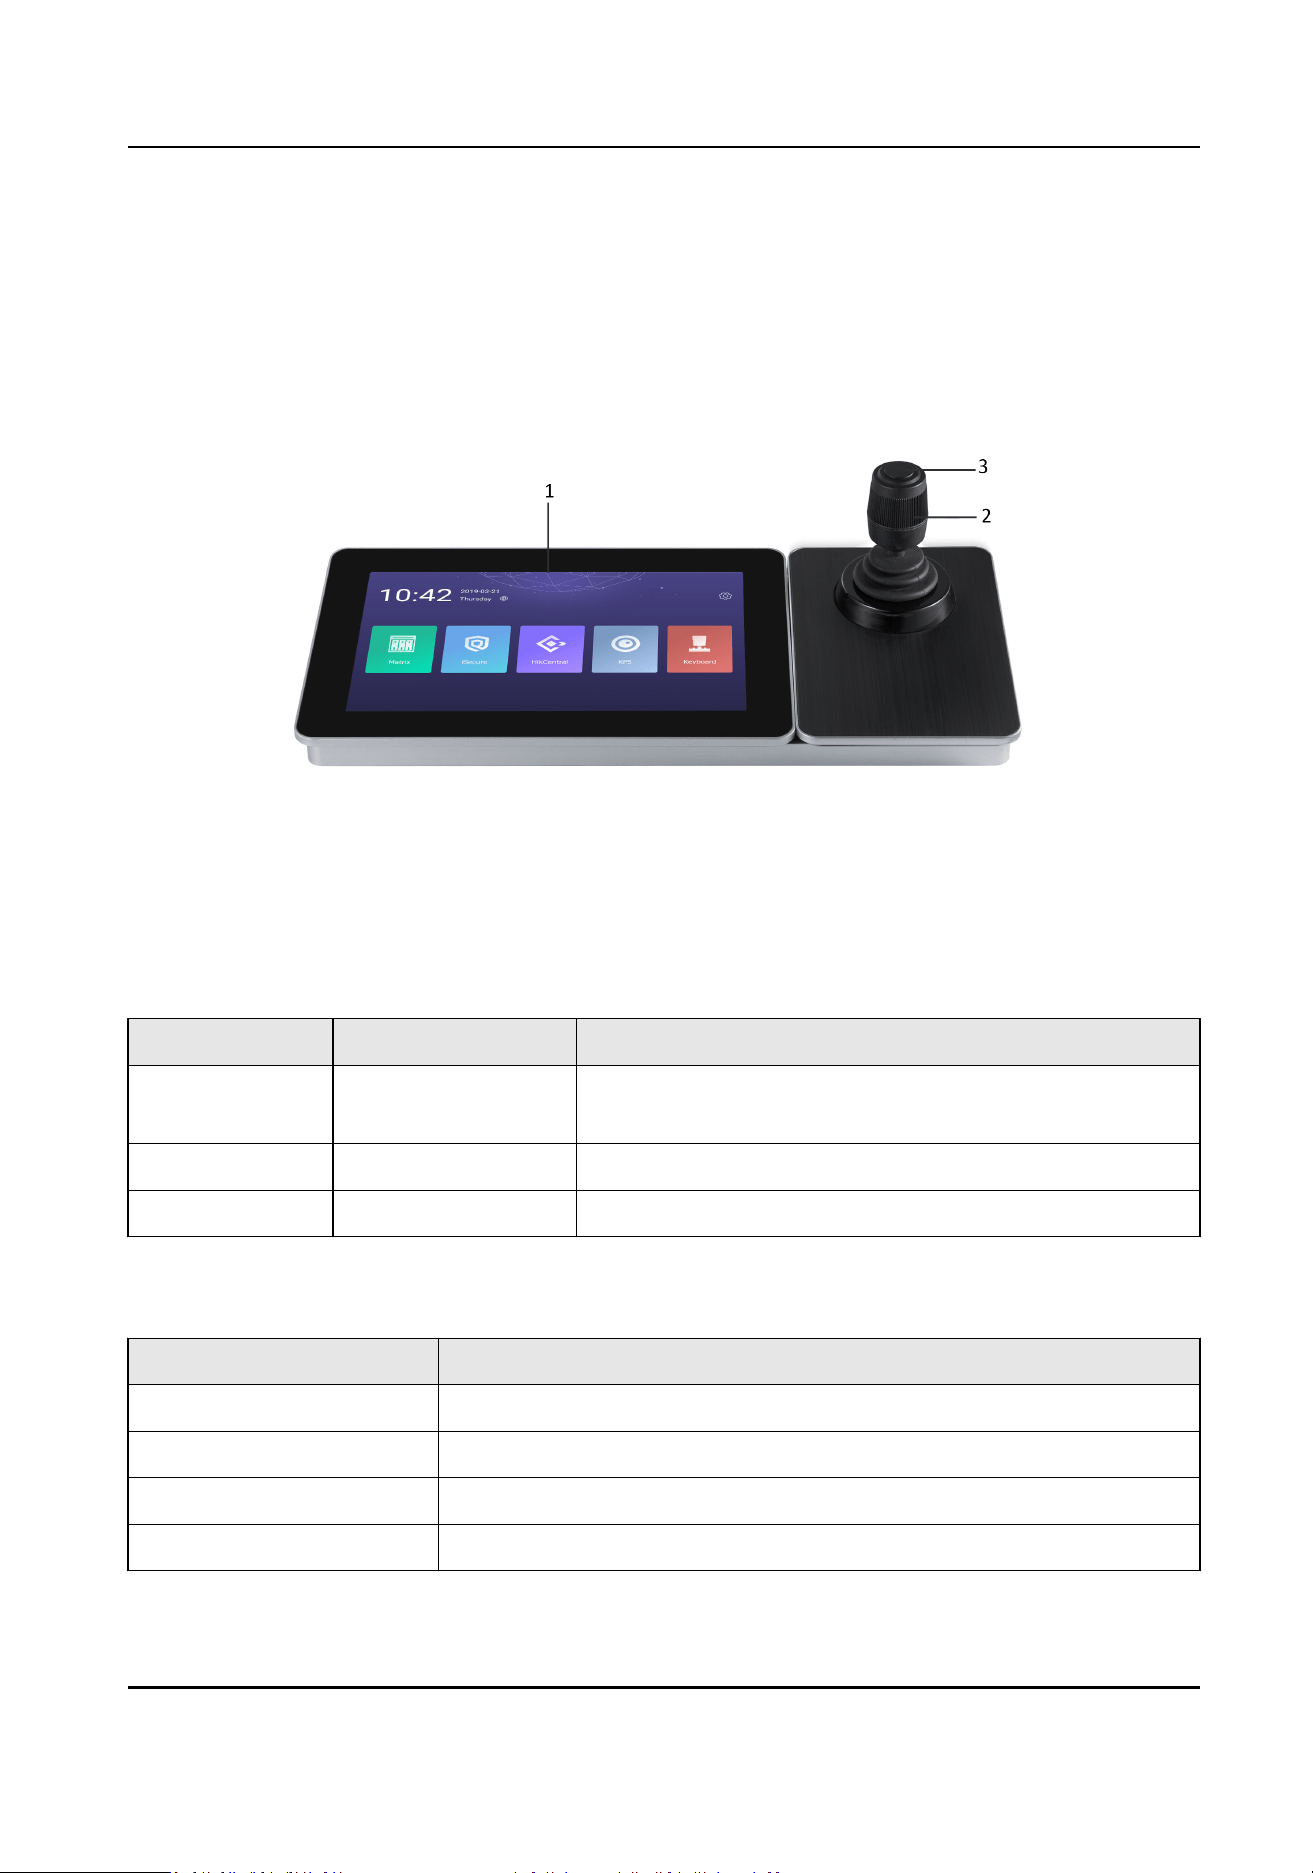
The DS-1600KI keyboard consists of a touchscreen and a joysck panel. The joysck panel is
detachable and can be separated from the keyboard.
Refer to the following gure for keyboard appearance.
Figure 1-1 DS-1600KI Keyboard Appearance
Front Panel
Refer to the following table for descripon of keyboard appearance.
Table 1-1 Keyboard Appearance
Descripon
Number Name Descripon
1 Touchscreen 10.1" capacive touchscreen for display, conguraon
and operaon of the keyboard.
2 Joysck Used for PTZ control.
3 Capture Buon Used for picture capture.
Refer to the following table for descripon of joysck operaons.
Table 1-2
Joysck Operaon Descripon
Operaon Funcon
Up PTZ control mode: Move the PTZ up.
Down PTZ control mode: Move the PTZ down.
Le PTZ control mode: Move the PTZ le.
Right PTZ control mode: Move the PTZ right.
DS-1600KI Keyboard Quick Start Guide
2
Operaon Funcon
Upper le PTZ control mode: Move the PTZ upper le.
Upper right PTZ control mode: Move the PTZ upper right.
Lower le PTZ control mode: Move the PTZ lower le.
Lower right PTZ control mode: Move the PTZ lower right.
Rotate anclockwise Zoom out (ZOOM-)
Rotate clockwise Zoom in (ZOOM+)
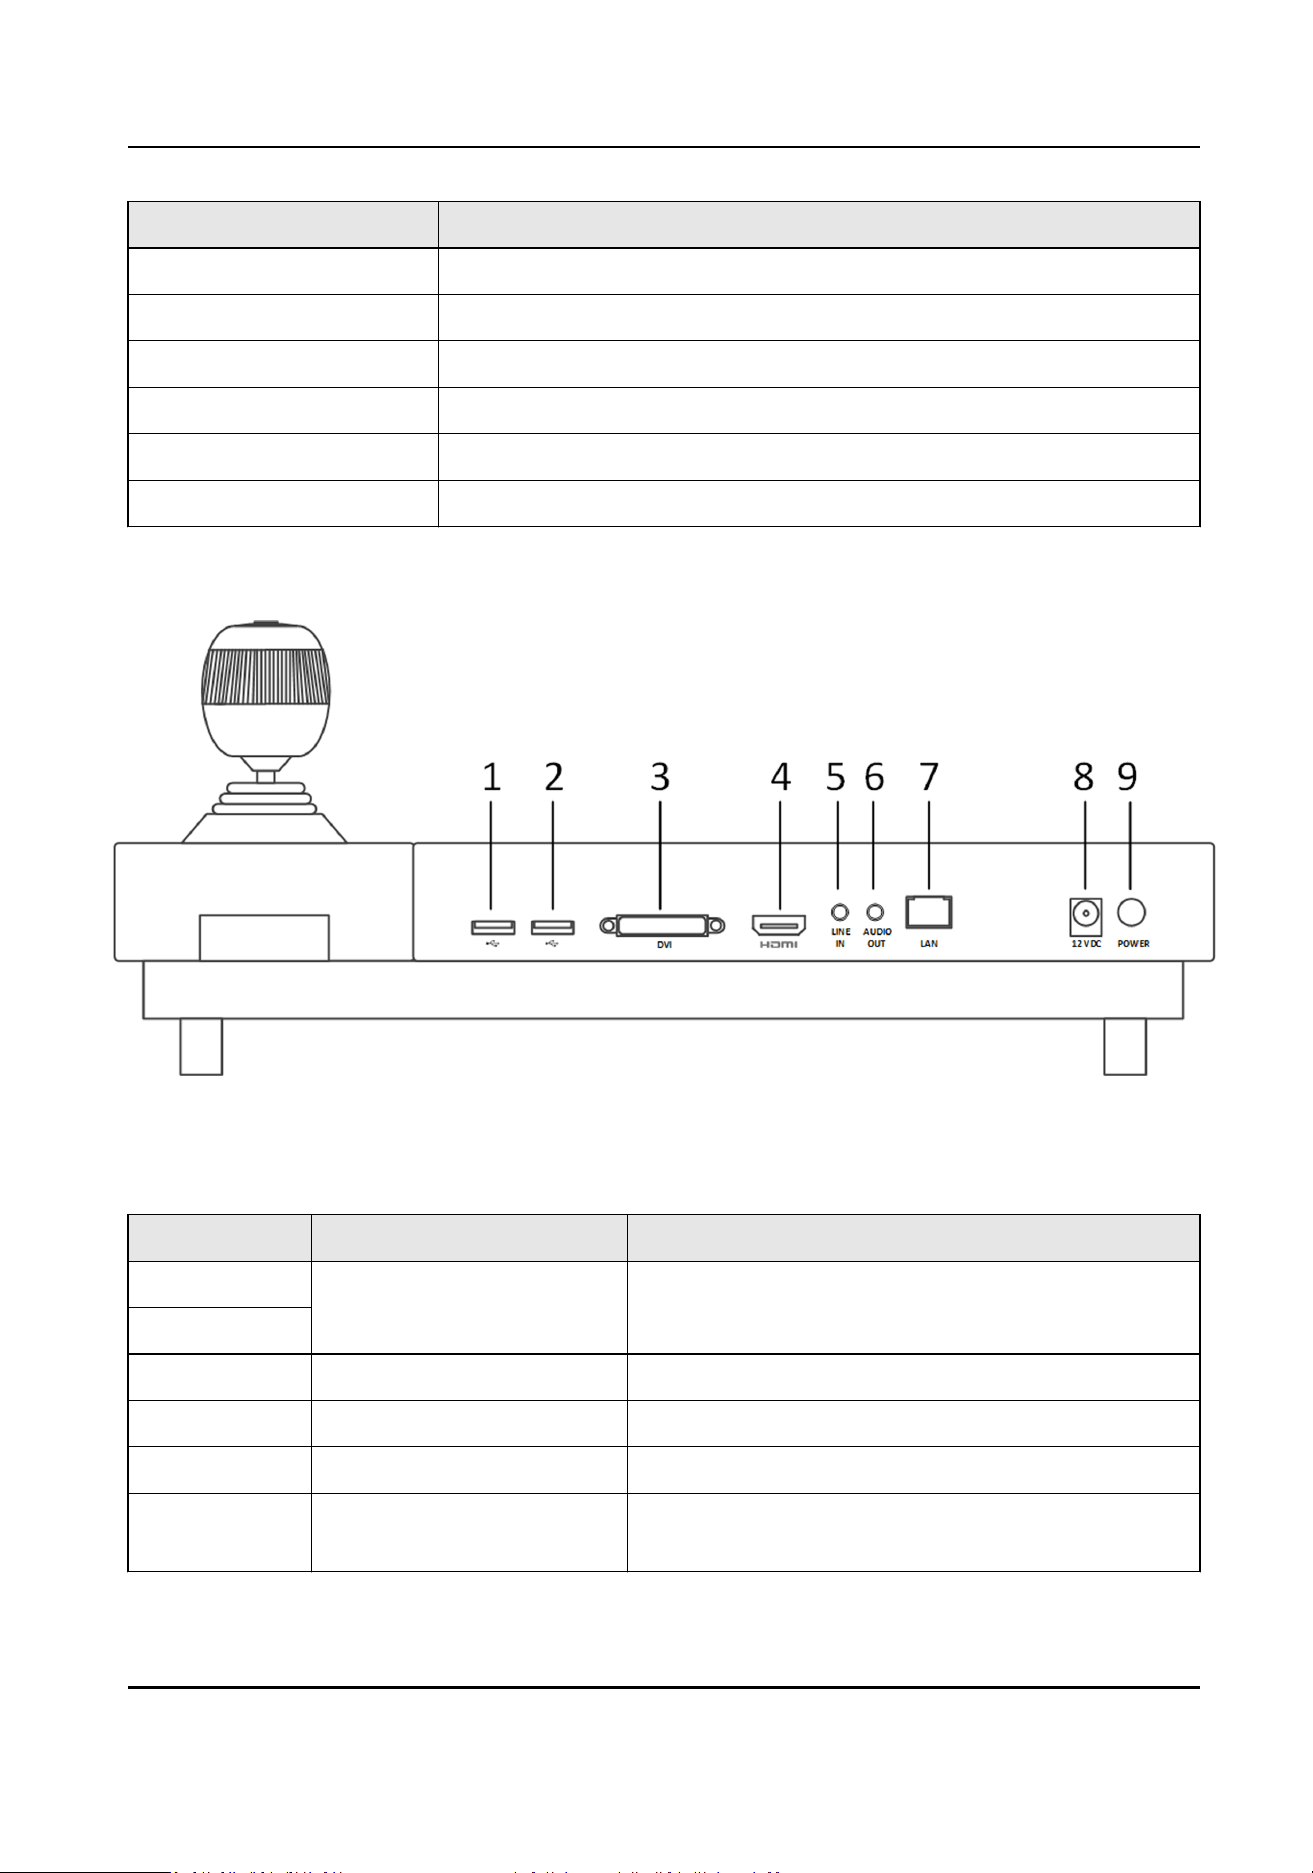
Interfaces
Eight interfaces and one buon are provided on the rear panel of DS-1600KI keyboard.
Figure 1-2 Rear Panel of DS-1600KI
Refer to the following table for descripon of the interfaces.
Table 1-3
Descripon of Interfaces
Number Name Descripon
1 USB Interface One for connecng to the USB device. One for
connecng to the joysck.
2
3 DVI DVI video output connector.
4 HDMI HDMI video output connector.
5 LINE IN 3.5 mm connector for audio input.
6 AUDIO OUT 3.5 mm connector for audio output (the external
amplier must be connected).
DS-1600KI Keyboard Quick Start Guide
3

Number Name Descripon
7 LAN Network Interface 1 10M/100M/1000M adapve Ethernet interface.
8 Power Input 12 VDC power input.
9 Power Switch Press to wake up the touchscreen, or turn the
keyboard into sleeping mode.
Hold (for 3 s) to power on/o, or reboot the device.
DS-1600KI Keyboard Quick Start Guide
4
Chapter 2 Acvate Keyboard
The network keyboard is inacve by default. You should acvate it before performing other
operaons. Then you can log in and log out of the keyboard. Here we introduce the local
operaon. Refer to SADP user manual for SADP operaon.
Set an admin password to acvate the keyboard for the rst me access. No operaon is allowed
before
acvaon. You can acvate it by the local keyboard operaon or changing sengs in SADP
soware.
Steps
1. Enter the device password.
Cauon
STRONG PASSWORD RECOMMENDED-We highly recommend you create a strong password of
your own choosing (using a minimum of 8 characters, including upper case leers, lower case
leers, numbers, and special characters) in order to increase the security of your product. And
we recommend you reset your password regularly, especially in the high security system,
reseng the password monthly or weekly can beer protect your product.
2. Conrm the password and click Acvate.
Note
You can acvate the network keyboard on the Web when PC and the keyboard are on the same
network segment.
What to do next
You can log in the keyboard and operate it now.
DS-1600KI Keyboard Quick Start Guide
5

Chapter 3 Congure Network
3.1 Set Wired Network
Seng the wired network parameters to connect to the network.
Before You Start
Make sure the network cable is appropriately connected.
Steps
1. Click on the home page and choose Ethernet.
2. Switch on Ethernet to enable Ethernet
conguraon.
3. Set network parameters. You can connect to network by two following ways.
Stac IP Stac IP addresses don't change. Using the stac IP method, you must set your
own IP address, network gateway, subnet mask and other parameters.
DHCP With DHCP, you don't need to set your IP address; it is assigned dynamically.
3.2 Set Wireless Network
The keyboard has Wi-Fi module that can connect to wireless network.
Before You Start
A Wi-Fi network must be appropriately congured.
Steps
1. Click on the home page and choose WLAN.
2. Switch on WLAN to enable
automac acquision of WLAN informaon.
You can obtain Wi-Fi informaon nearby or enter Wi-Fi informaon manually to add network.
3. Connect to an
exisng Wi-Fi hotspot or add a new network.
Connect to a nearby Wi-Fi hotspot
a. Click the Wi-Fi hotspot in the Wi-Fi list.
b. Enter the password and connect to the network.
Add a new Wi-Fi network a. Click Add Network at the boom of the Wi-Fi list.
b. Enter the SSID name manually.
c. Select the Security Type.
d. Enter the password to connect to the network.
DS-1600KI Keyboard Quick Start Guide
6
Chapter 4 Manage Keyboard
4.1 Manage Device
4.1.1 Add and Edit Device
Add Device Manually
You can add devices manually by inpung device parameters. Up to 8,000 devices can be added by
the admin.
Steps
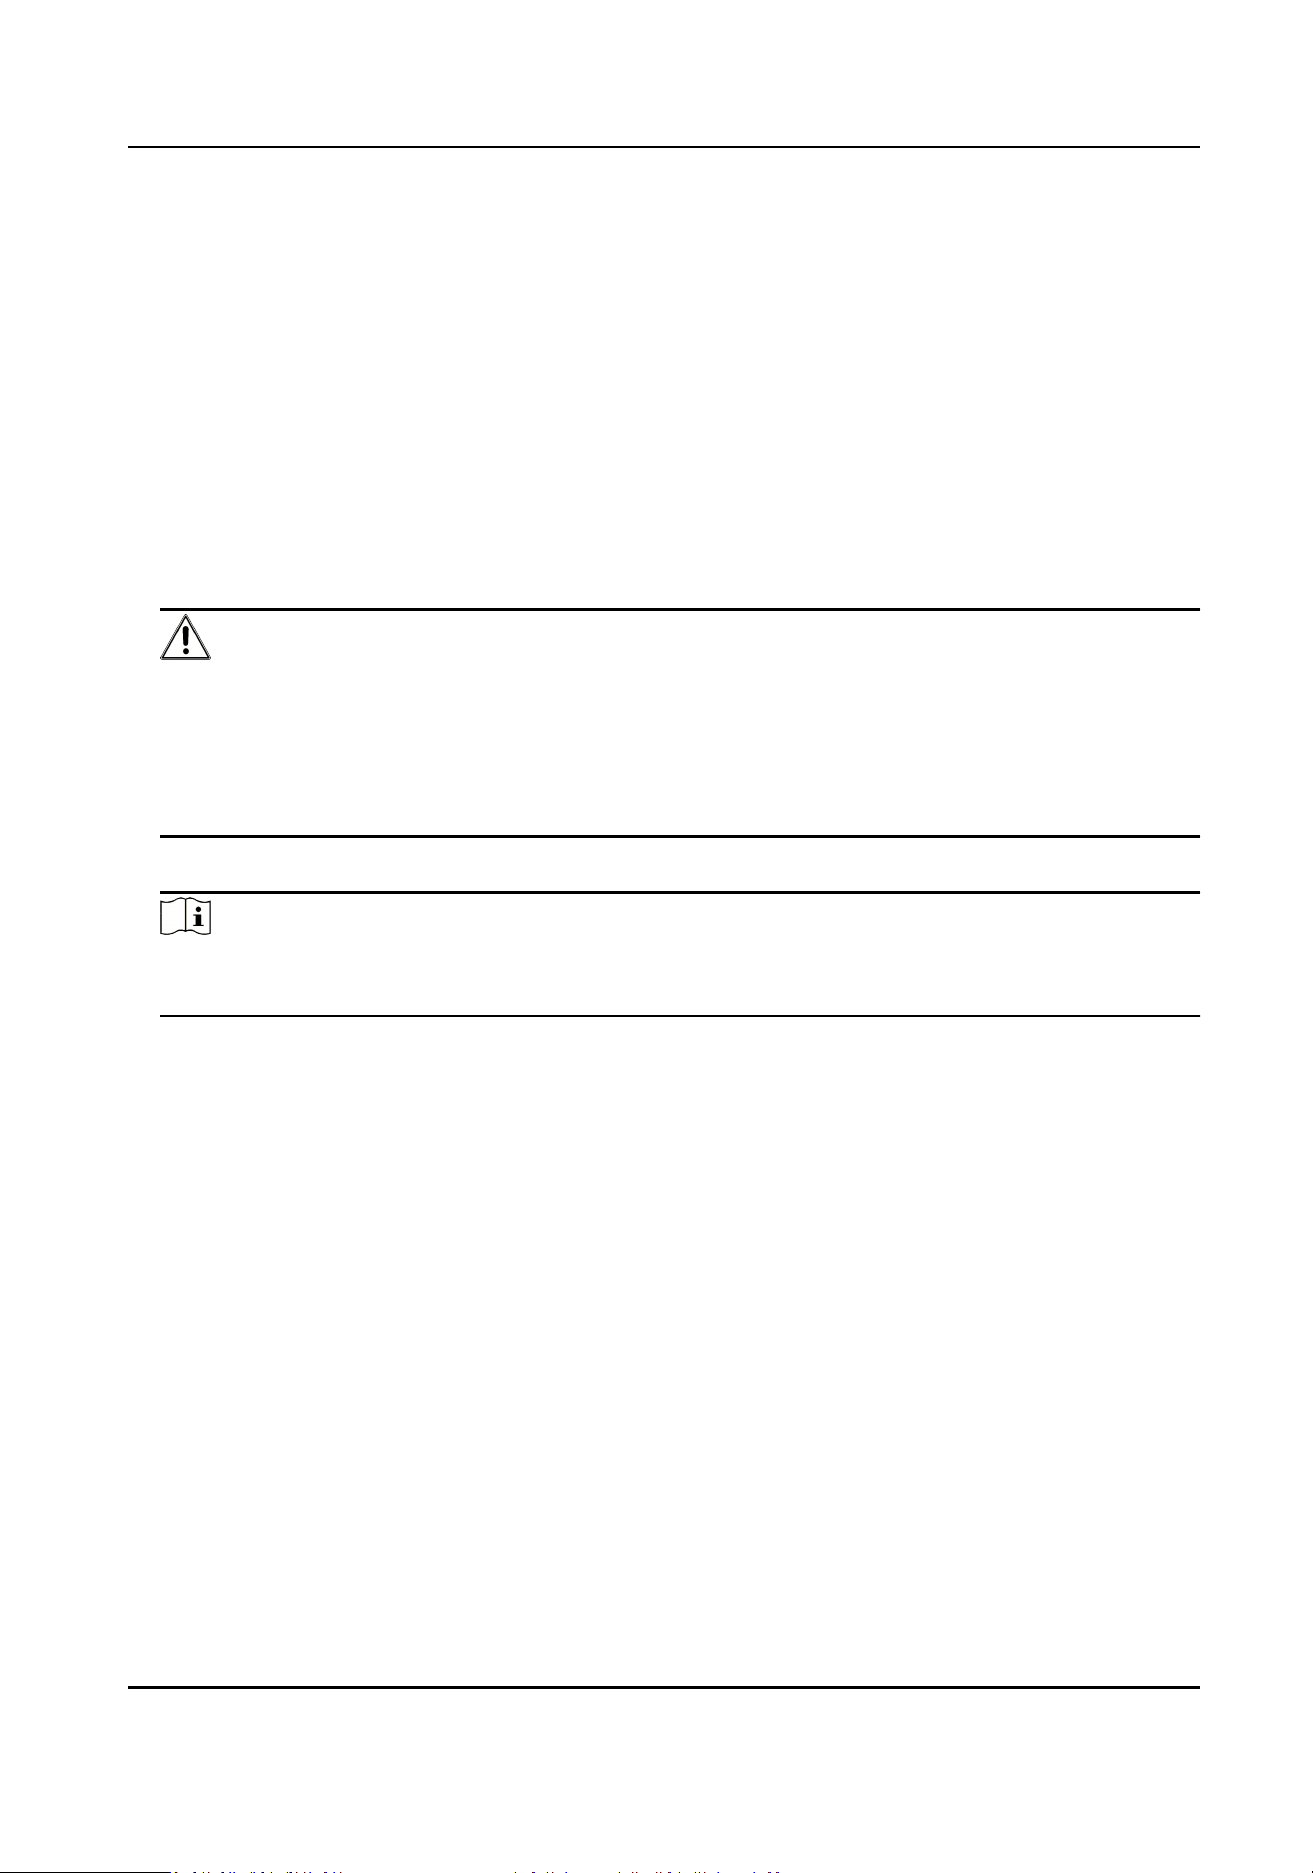
1. Click Keyboard.
2. Click
.
3. Click Device.
Figure 4-1 Device Management Interface of the Admin
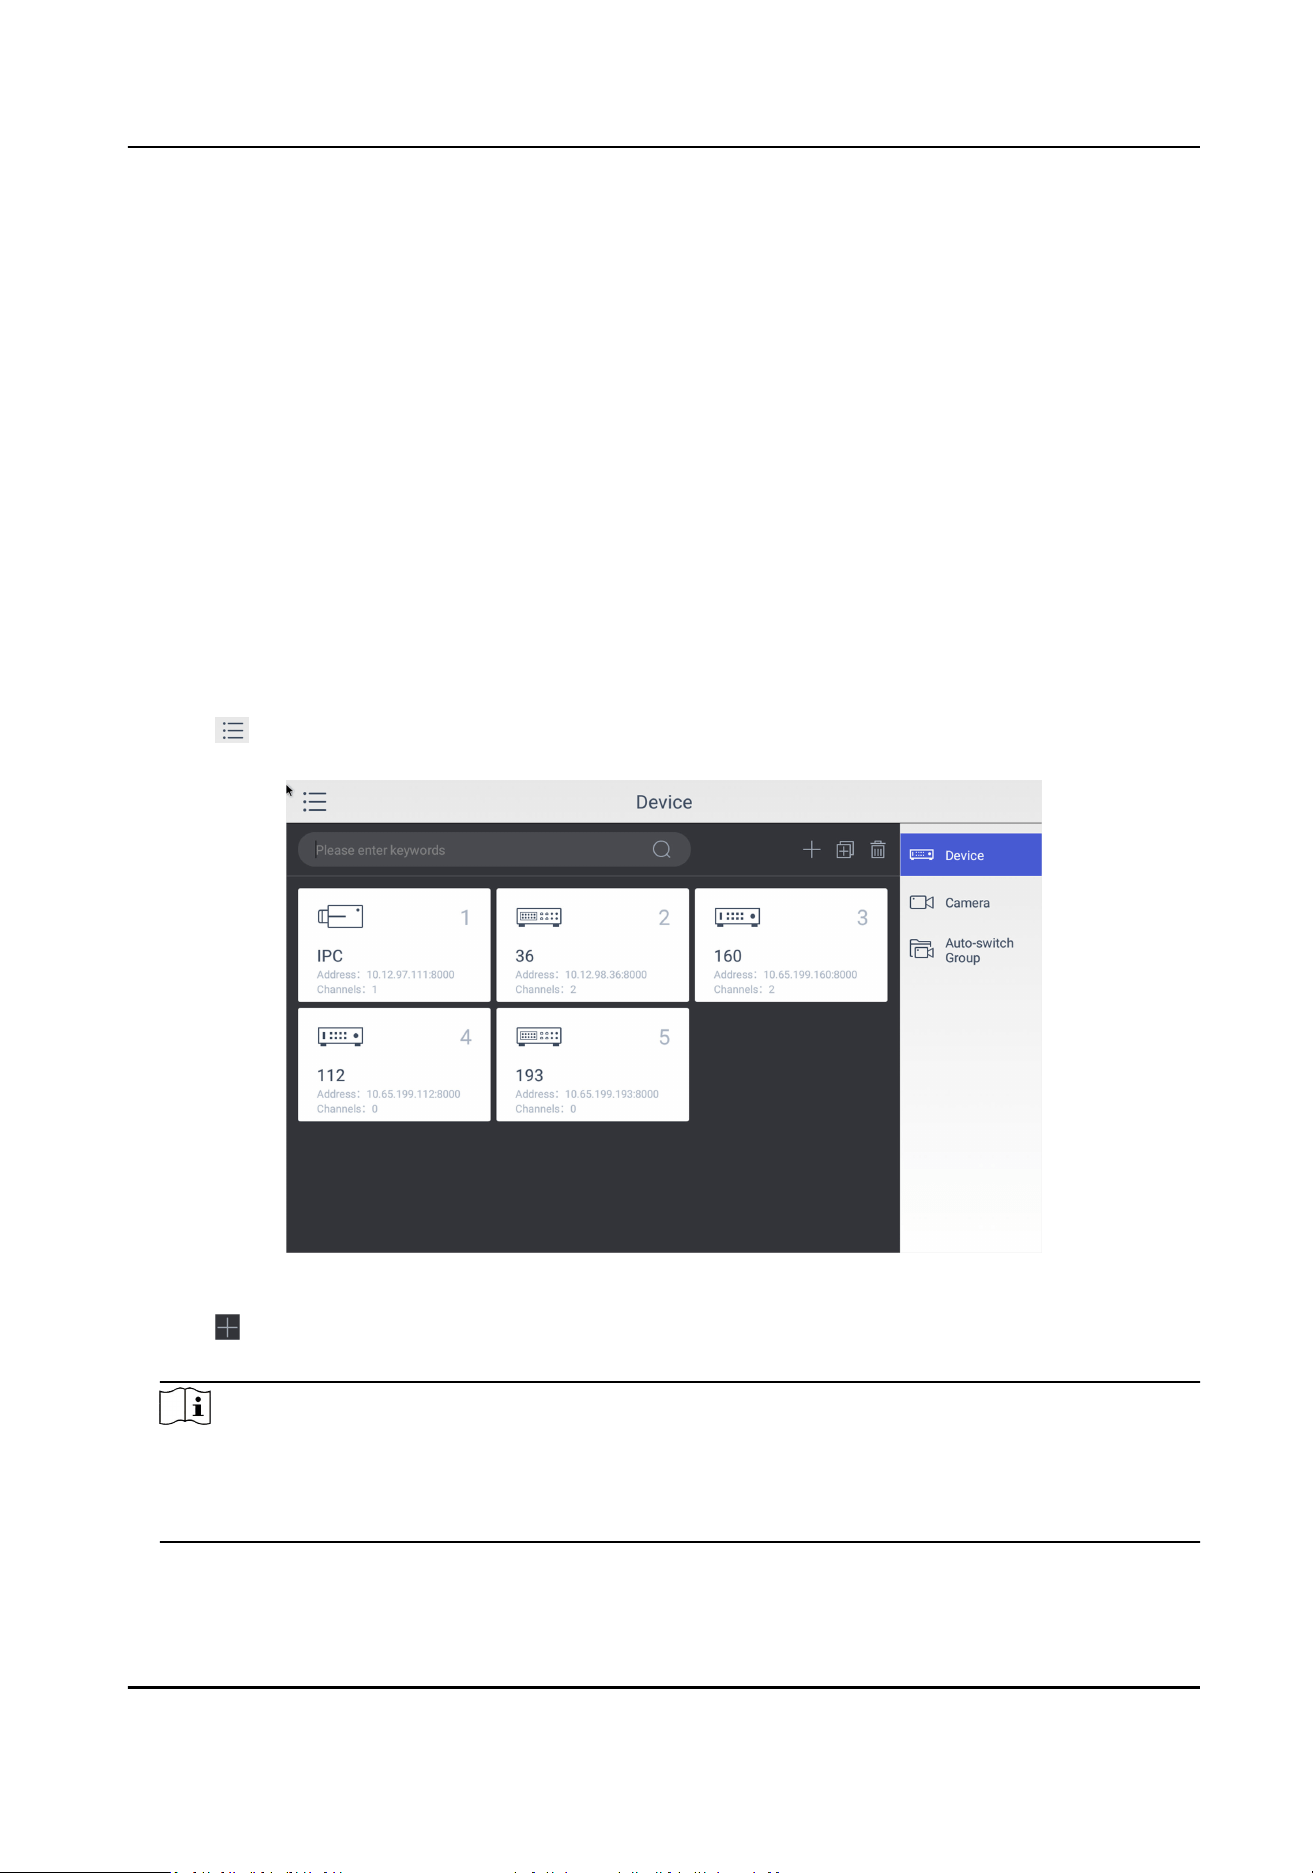
4. Click to enter the Add Device interface.
5. Input device parameters including Name, Address, Port, User Name, Password, and Protocol.
Note
• It will keep using the original device name if you leave Device Name empty.
• In Protocol, you can select Default for same brand devices, or select ONVIF for devices from
other manufacturers.
DS-1600KI Keyboard Quick Start Guide
7
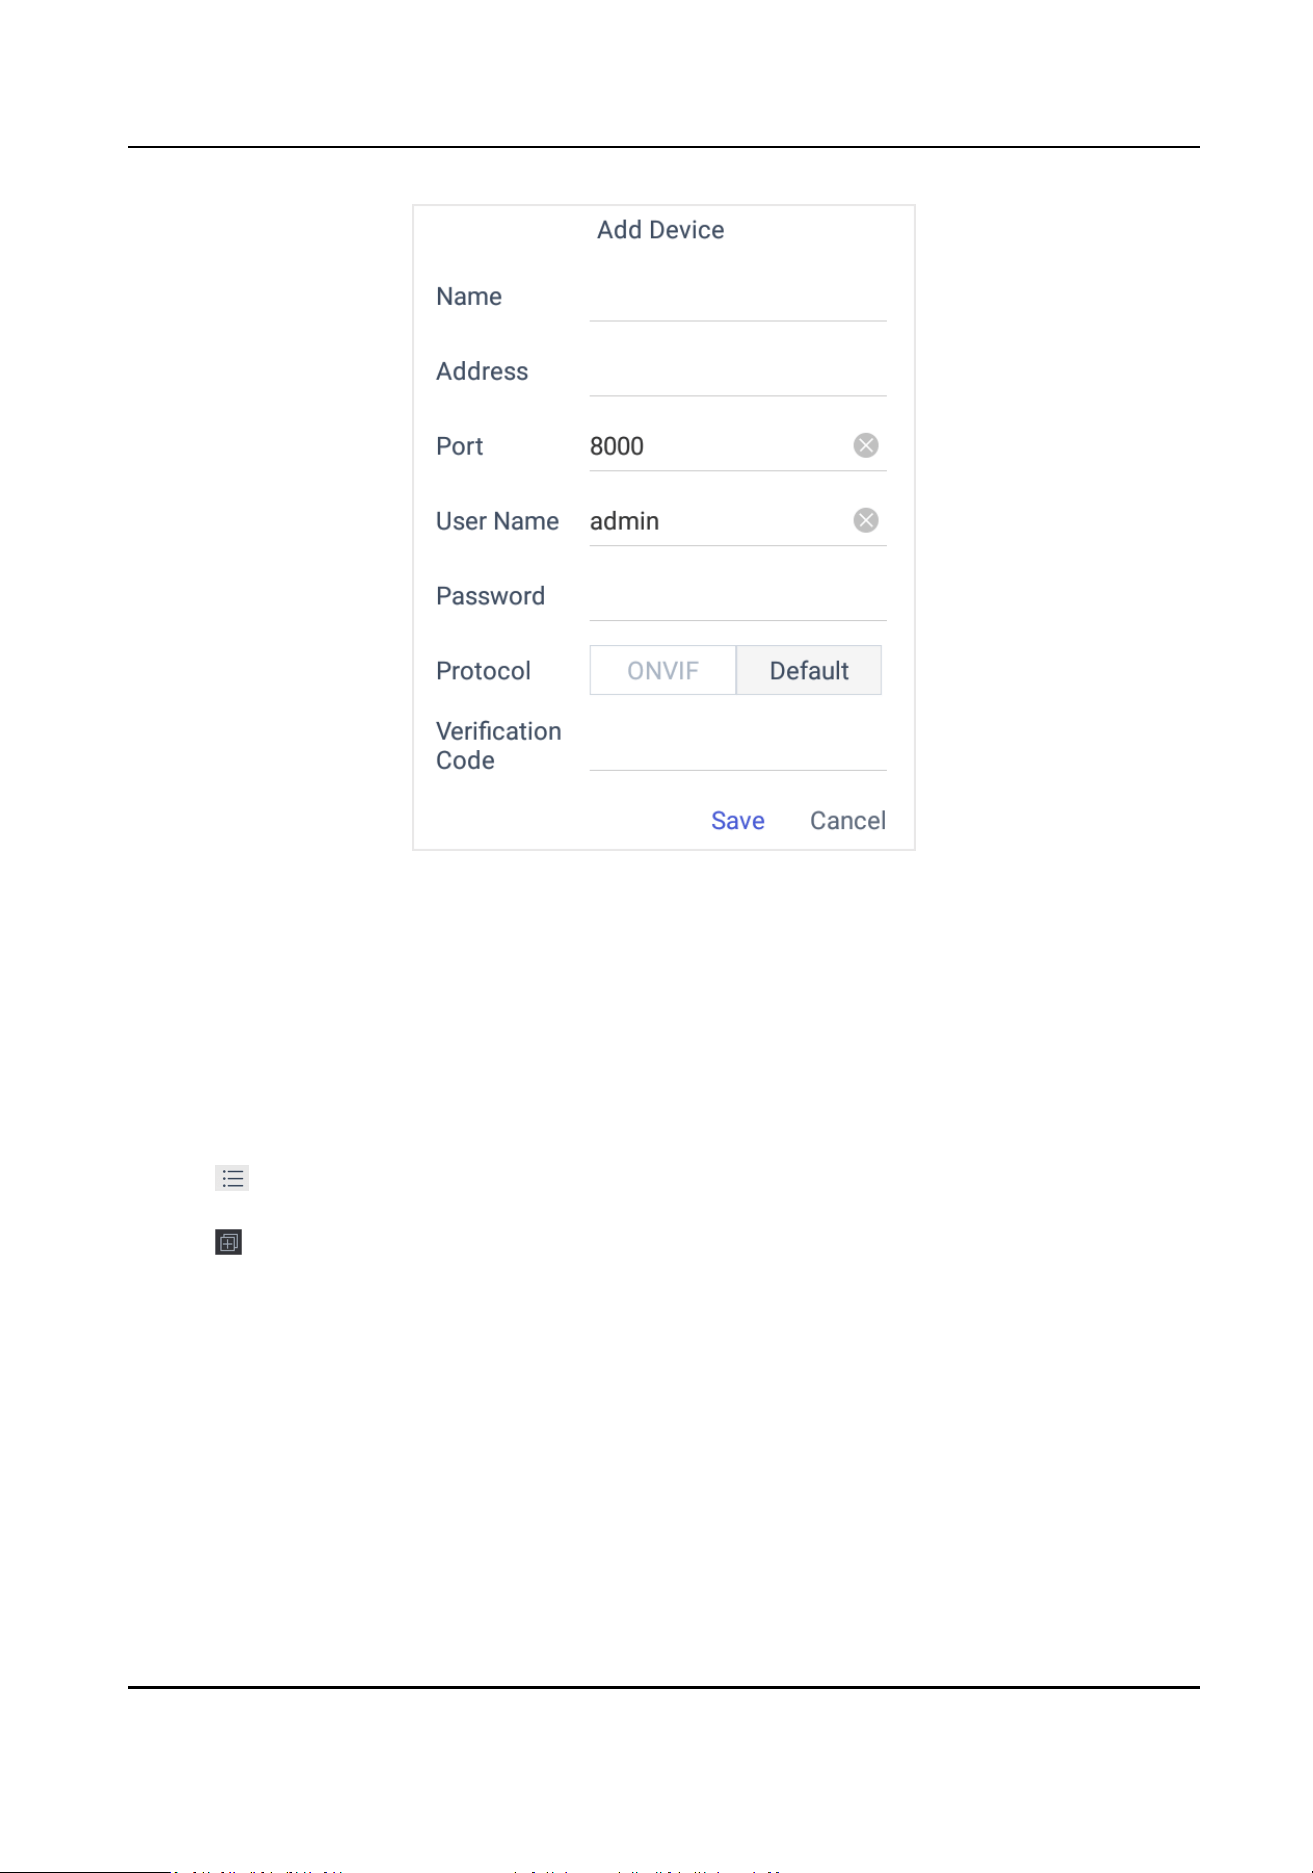
Figure 4-2 Add Device Manually
6. Click Save to nish adding.
Add Device by Searching Online Devices
You can also add devices by online searching
Steps
1. Click Keyboard.
2. Click .
3. Click Device.
4. Click
to enter Auto Search interface. All online devices in the same network segment will be
displayed in the list.
DS-1600KI Keyboard Quick Start Guide
8
Figure 4-3 Auto Search Result
5. Select the device(s) as you desired.
6. Enter User Name, and Password.
7. Click Save.
Note
If you want to add mulple devices, all device user names and passwords must be the same.
Add Device by Imporng from USB Flash Drive
You can add devices in batch by imporng device informaon from USB ash drive.
Before You Start
You need a USB ash drive to import devices. Make sure you have added at least one device.
Steps
1. Click Keyboard.
2. Click
.
3. Click Camera.
4.
Oponal: If you don't know the import le format, you can export a le to nd out.
1) Click .
2) Enter the admin password.
3) Select a
le where you want to export.
4) Click Export to export the excel
le.
5) Edit the excel sheet in other device, then save it in USB ash drive.
DS-1600KI Keyboard Quick Start Guide
9
5. Click
.
6. Enter the admin password.
7. Select the import
le from the USB ash drive.
8. Click Conrm.
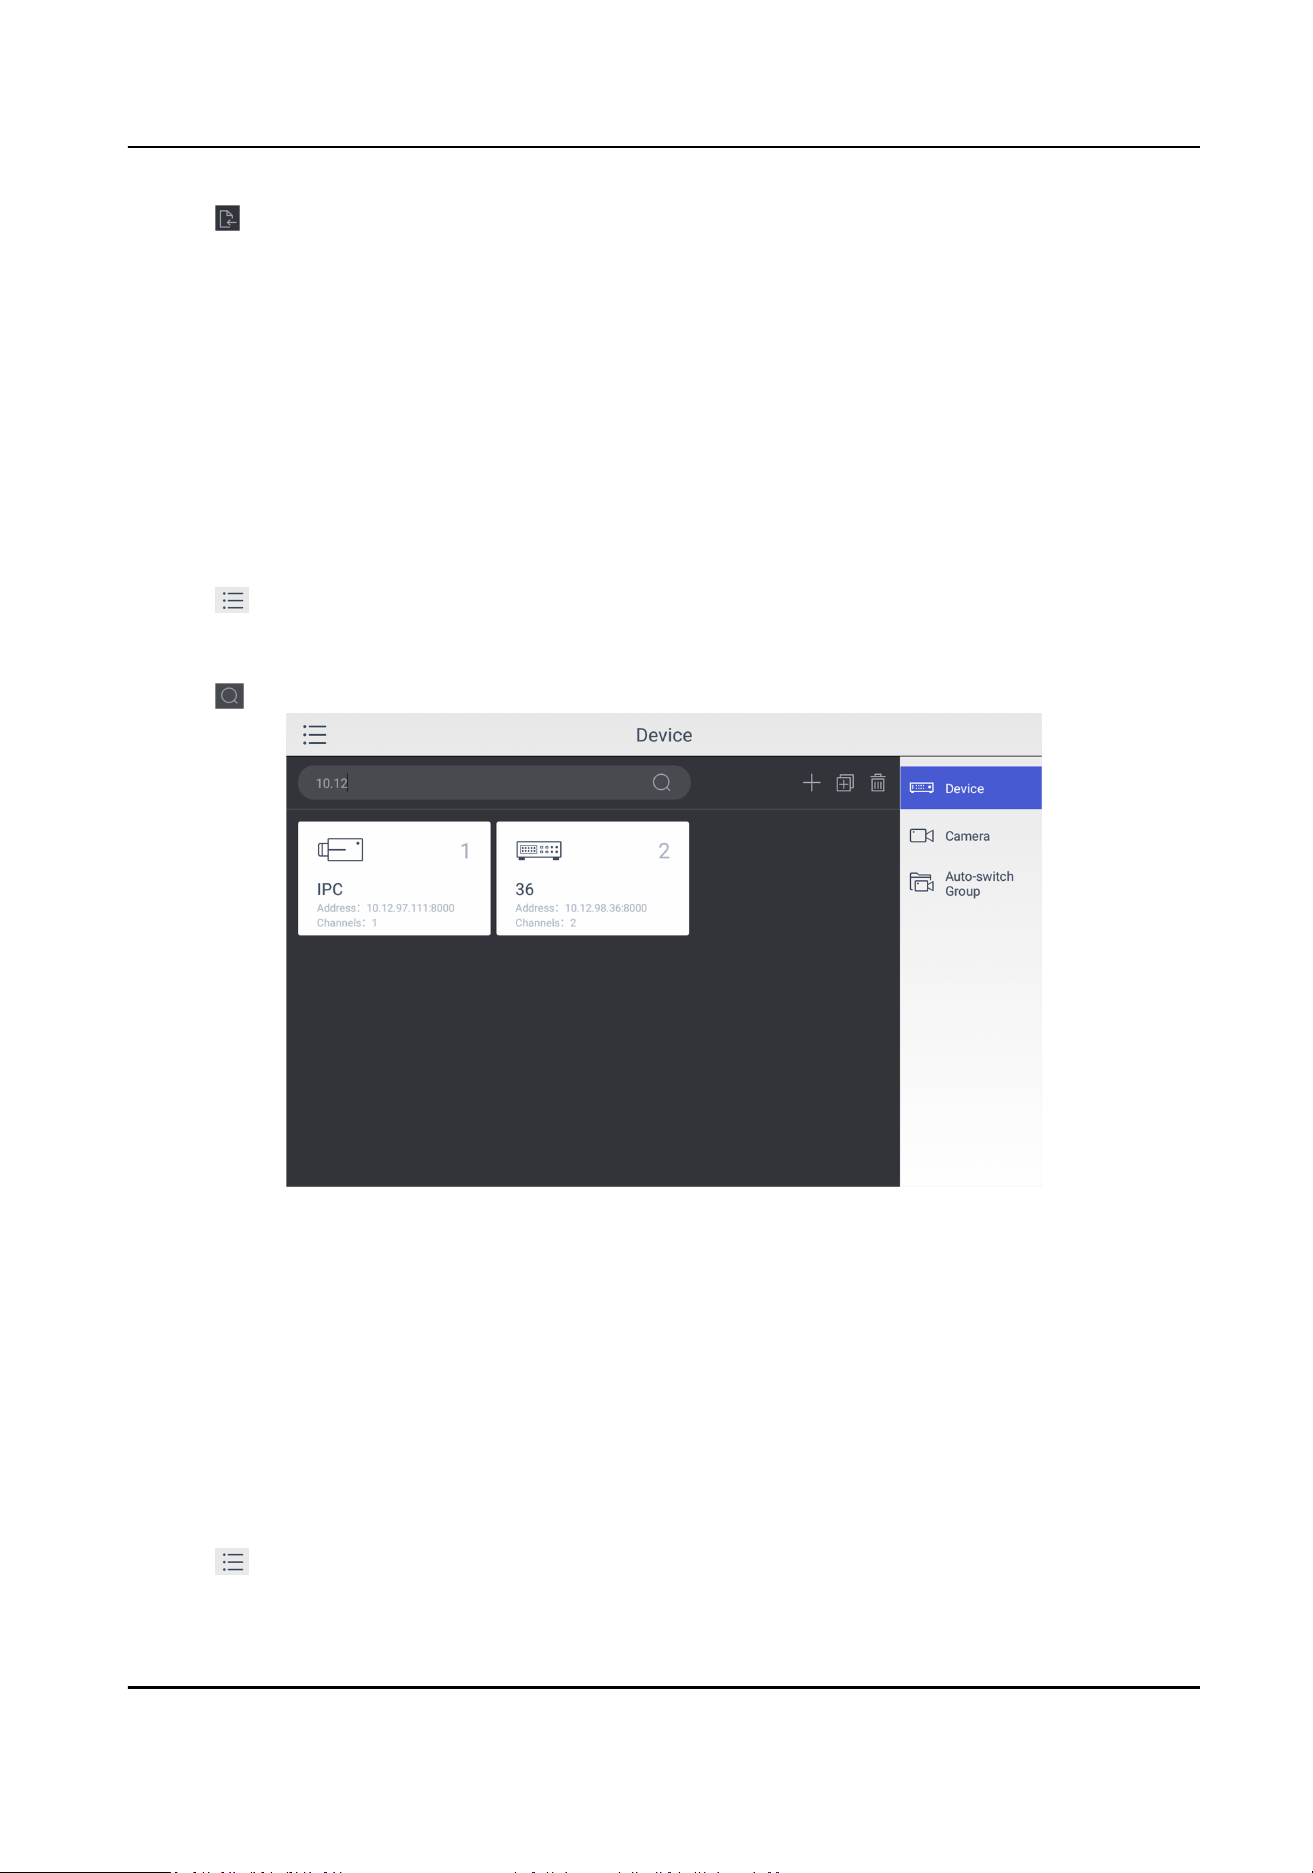
Find Added Devices
In the device/camera management interface, you can quickly search the added device/camera by
IP address, keywords, or name.
Steps
1. Click Keyboard.
2. Click
.
3. Click Device.
4. You can input device ID, IP address, keywords or name in the text
eld to search device.
5. Click
.
Figure 4-4 Search Device
Edit Device Property
You can view and edit details of the added devices in
Device interface.
Before You Start
Ensure you have at least added one device.
Steps
1. Click Keyboard.
2. Click .
DS-1600KI Keyboard Quick Start Guide
10
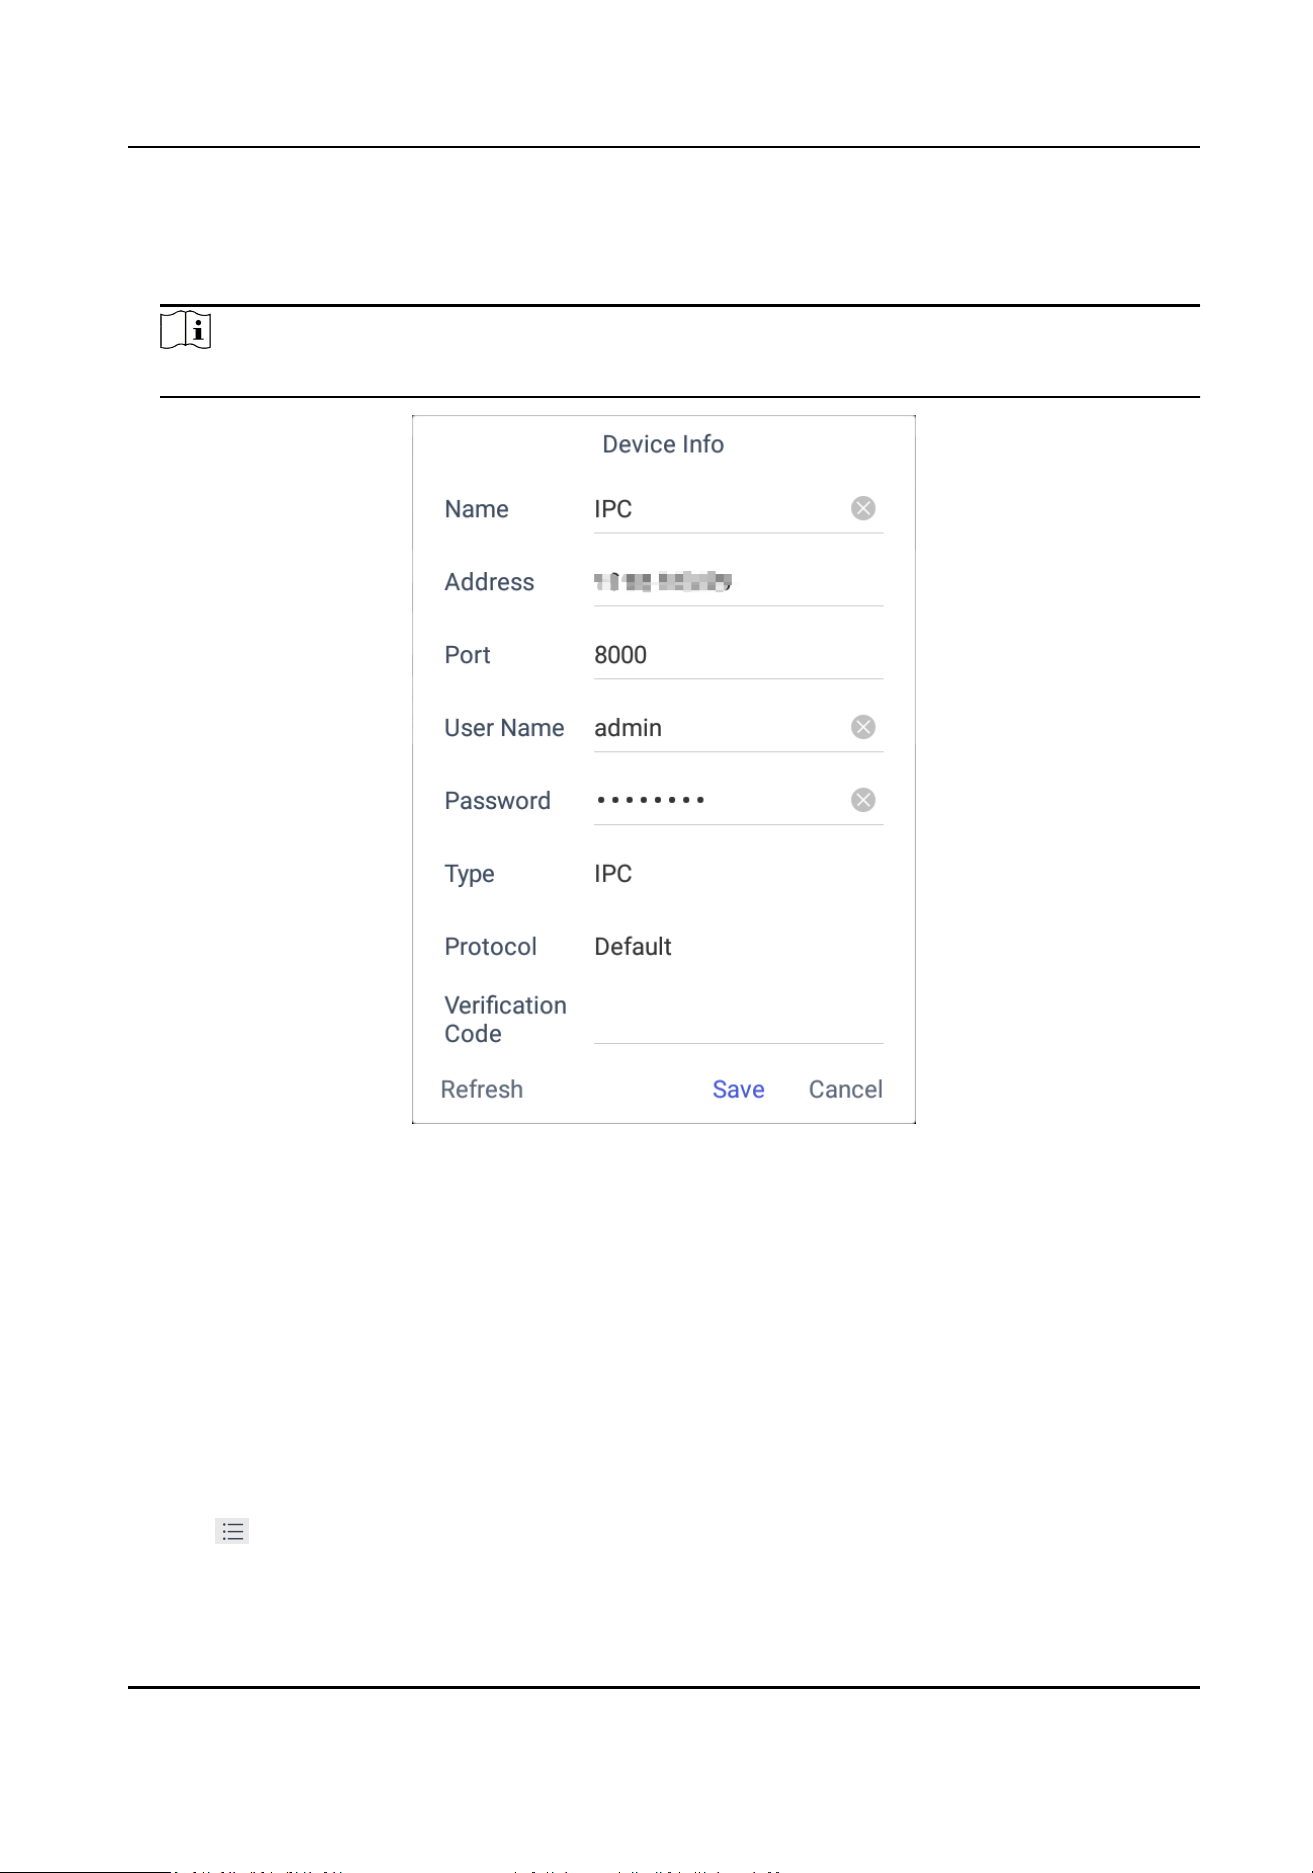
3. Click Device.
4. Click on the name of the added device to view device details.
5. Modify the device parameters on the pop-up window.
Note
Only Name, User Name, and Password are editable.
Figure 4-5 Edit the Device
6. Click Save to conrm the modicaon.
4.1.2 Manage Connected Cameras
You can view and edit connected camera informaon.
Before You Start
Ensure you have added at least one camera and logged in the admin user account.
Steps
1. Click Keyboard.
2. Click
.
3. Click Device → Camera .
DS-1600KI Keyboard Quick Start Guide
11
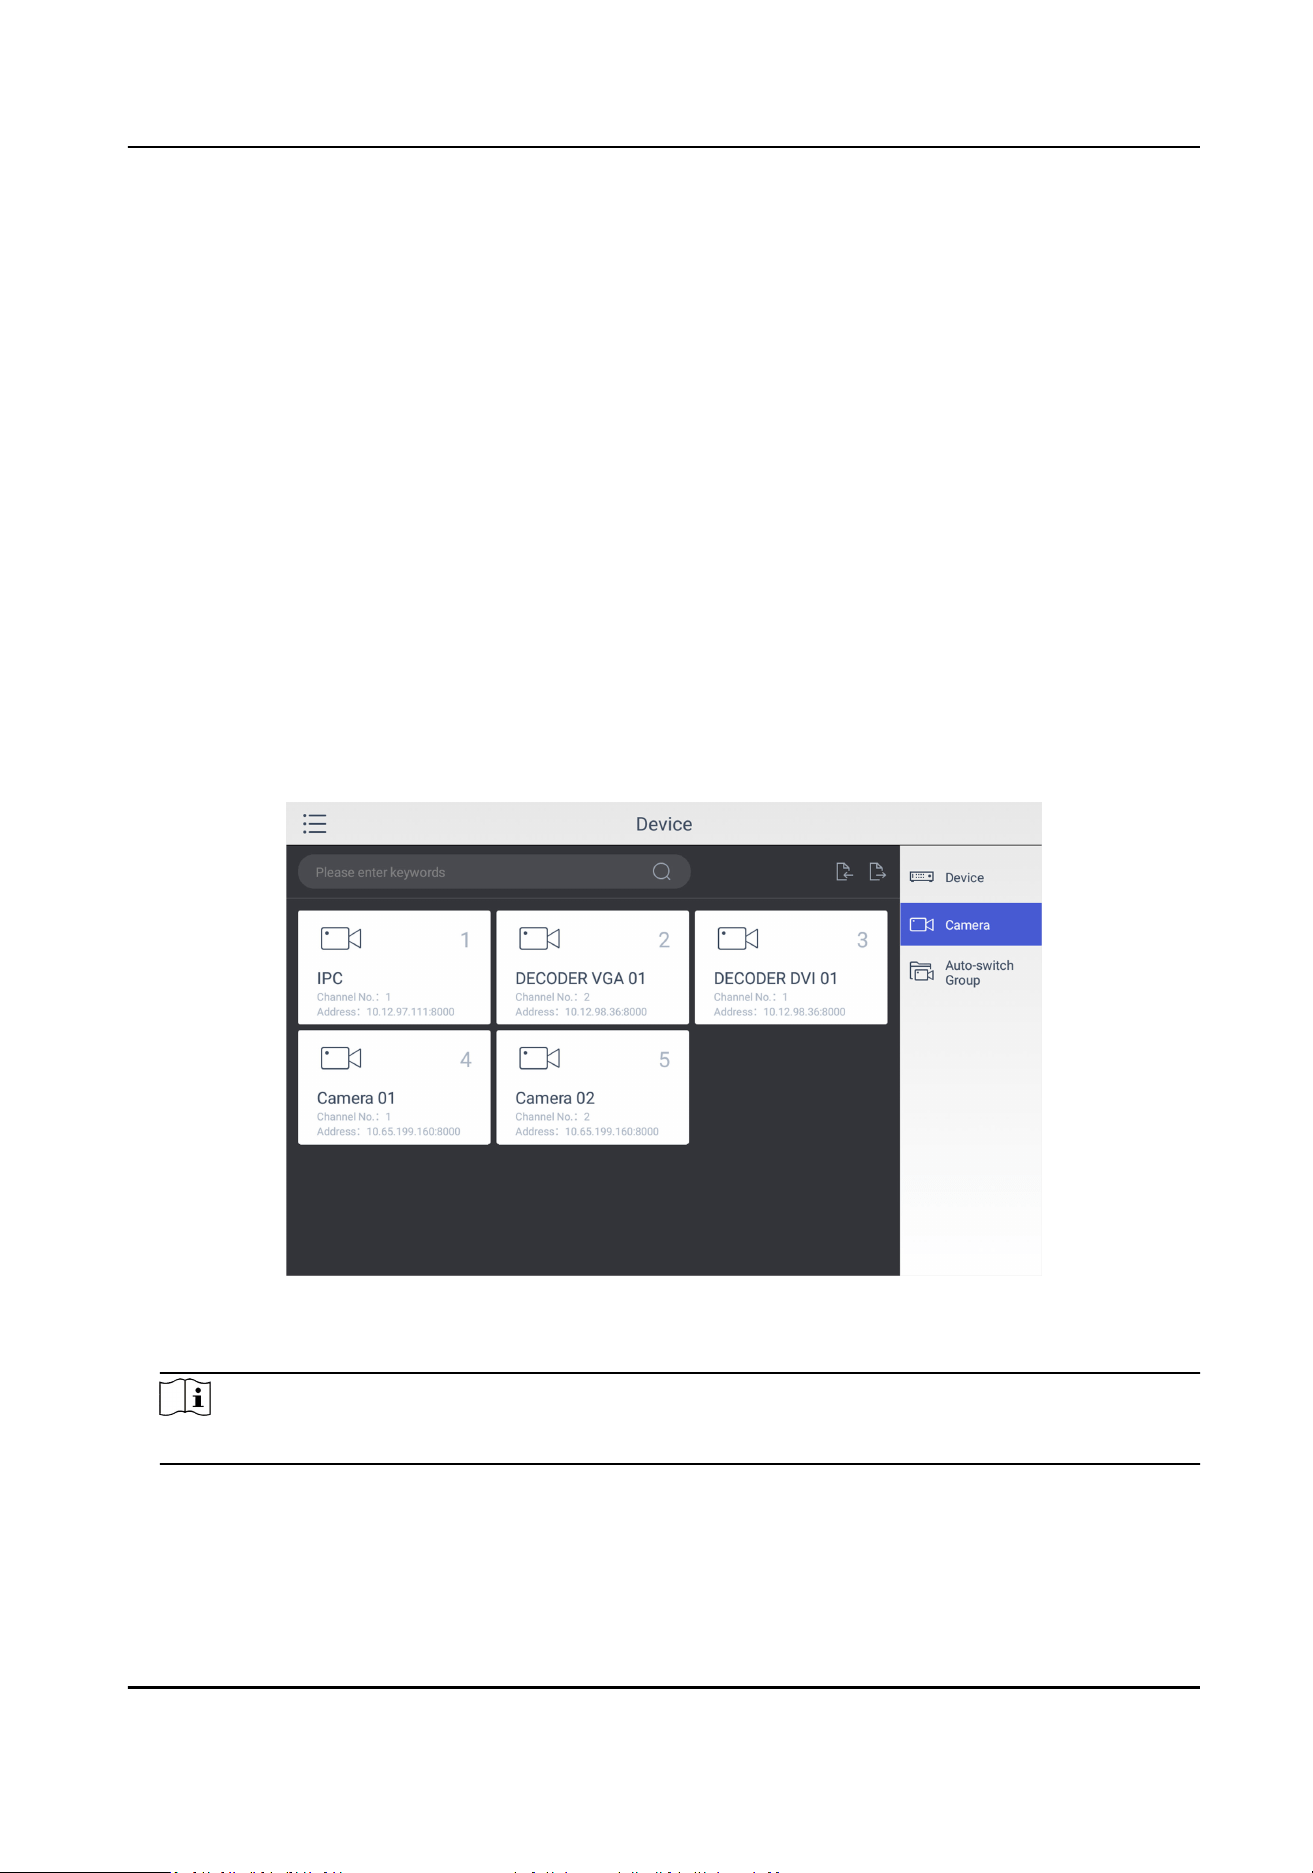
4. Click the camera as you desired and then you can view its details.
Name
The camera name.
Channel ID
The camera serial number according to the added sequence.
Protocol
The transfer protocol.
Stream
The stream type.
Device
The device name.
Address
The IP address and port of the corresponding device.
Channel No.
The channel number of added camera.
Figure 4-6 Camera Management Interface
5. Modify the camera details. Only Name, Channel ID, Protocol, and Stream are editable.
Note
The range of Channel ID is from 1 to 99999999, and the ID cannot be repeated.
6. Click Save to nish modicaon.
DS-1600KI Keyboard Quick Start Guide
12
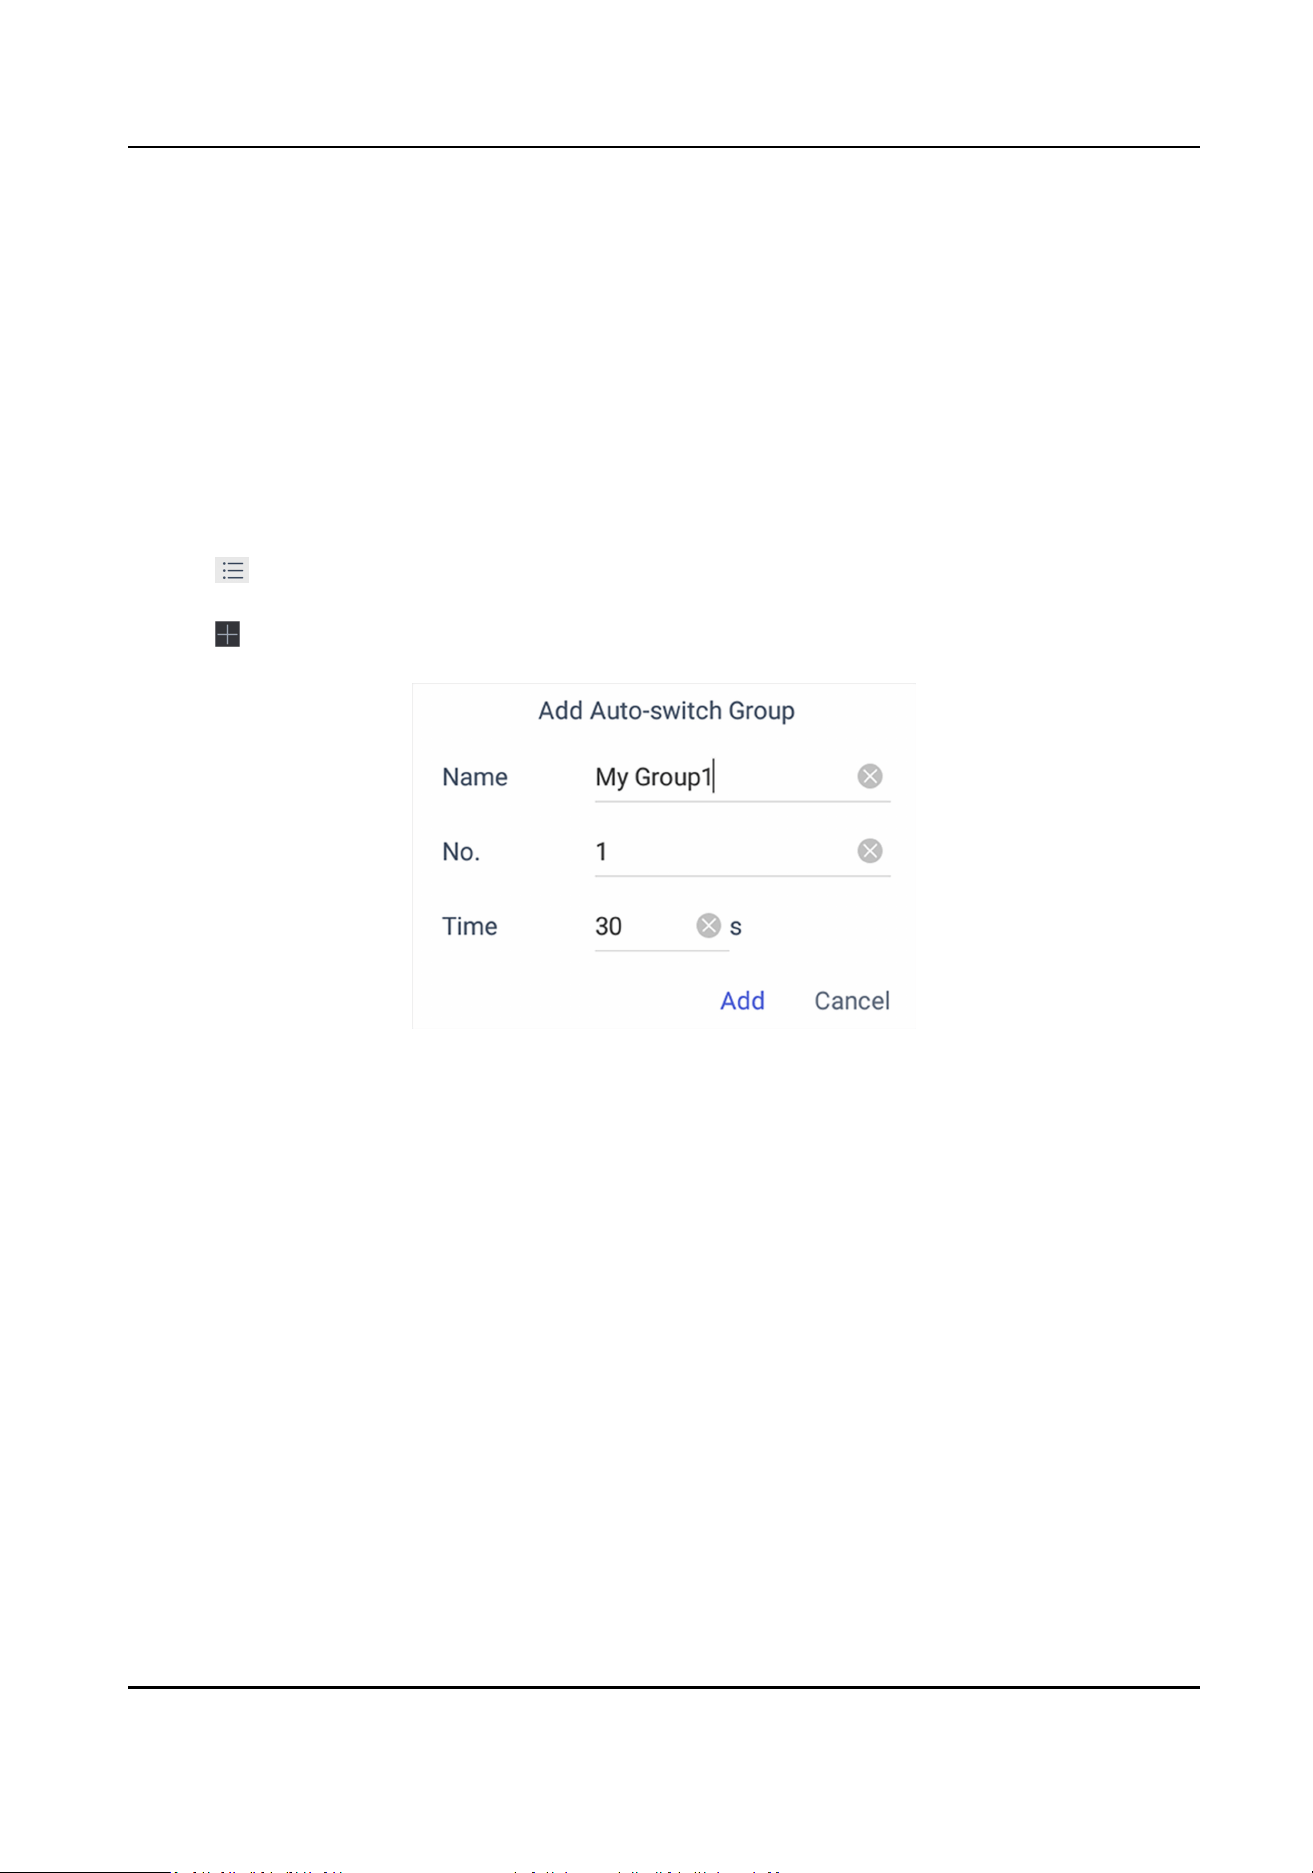
4.1.3 Manage Auto-switch Group
Create Auto-switch Group
It would be easier to manage your devices by adding relevant cameras into a group. For example,
you can add all the underground garage cameras into one auto-switch group, so you can view the
group to view the cameras in it.
Steps
1. Click Keyboard.
2. Click
.
3. Click Device → Auto-switch Group .
4. Click
.
5. Enter the group parameters.
Figure 4-7 Create a New Group
Name
Enter the group name as desired. Special characters, including / : * ? ' " < > | %, are not
allowed, and the length cannot exceed 32 characters.
No.
Enter the group number as desired. The range is from 1 to 16, and it cannot be repeated. Up
to 64 cameras can be added in each group, no more than 16 groups can be added.
Time
Enter the cycle dwell
me for each channel as desired. The range is from 10s to 10000s. The
default dwell
me is 30s.
6. Click Add.
DS-1600KI Keyboard Quick Start Guide
13
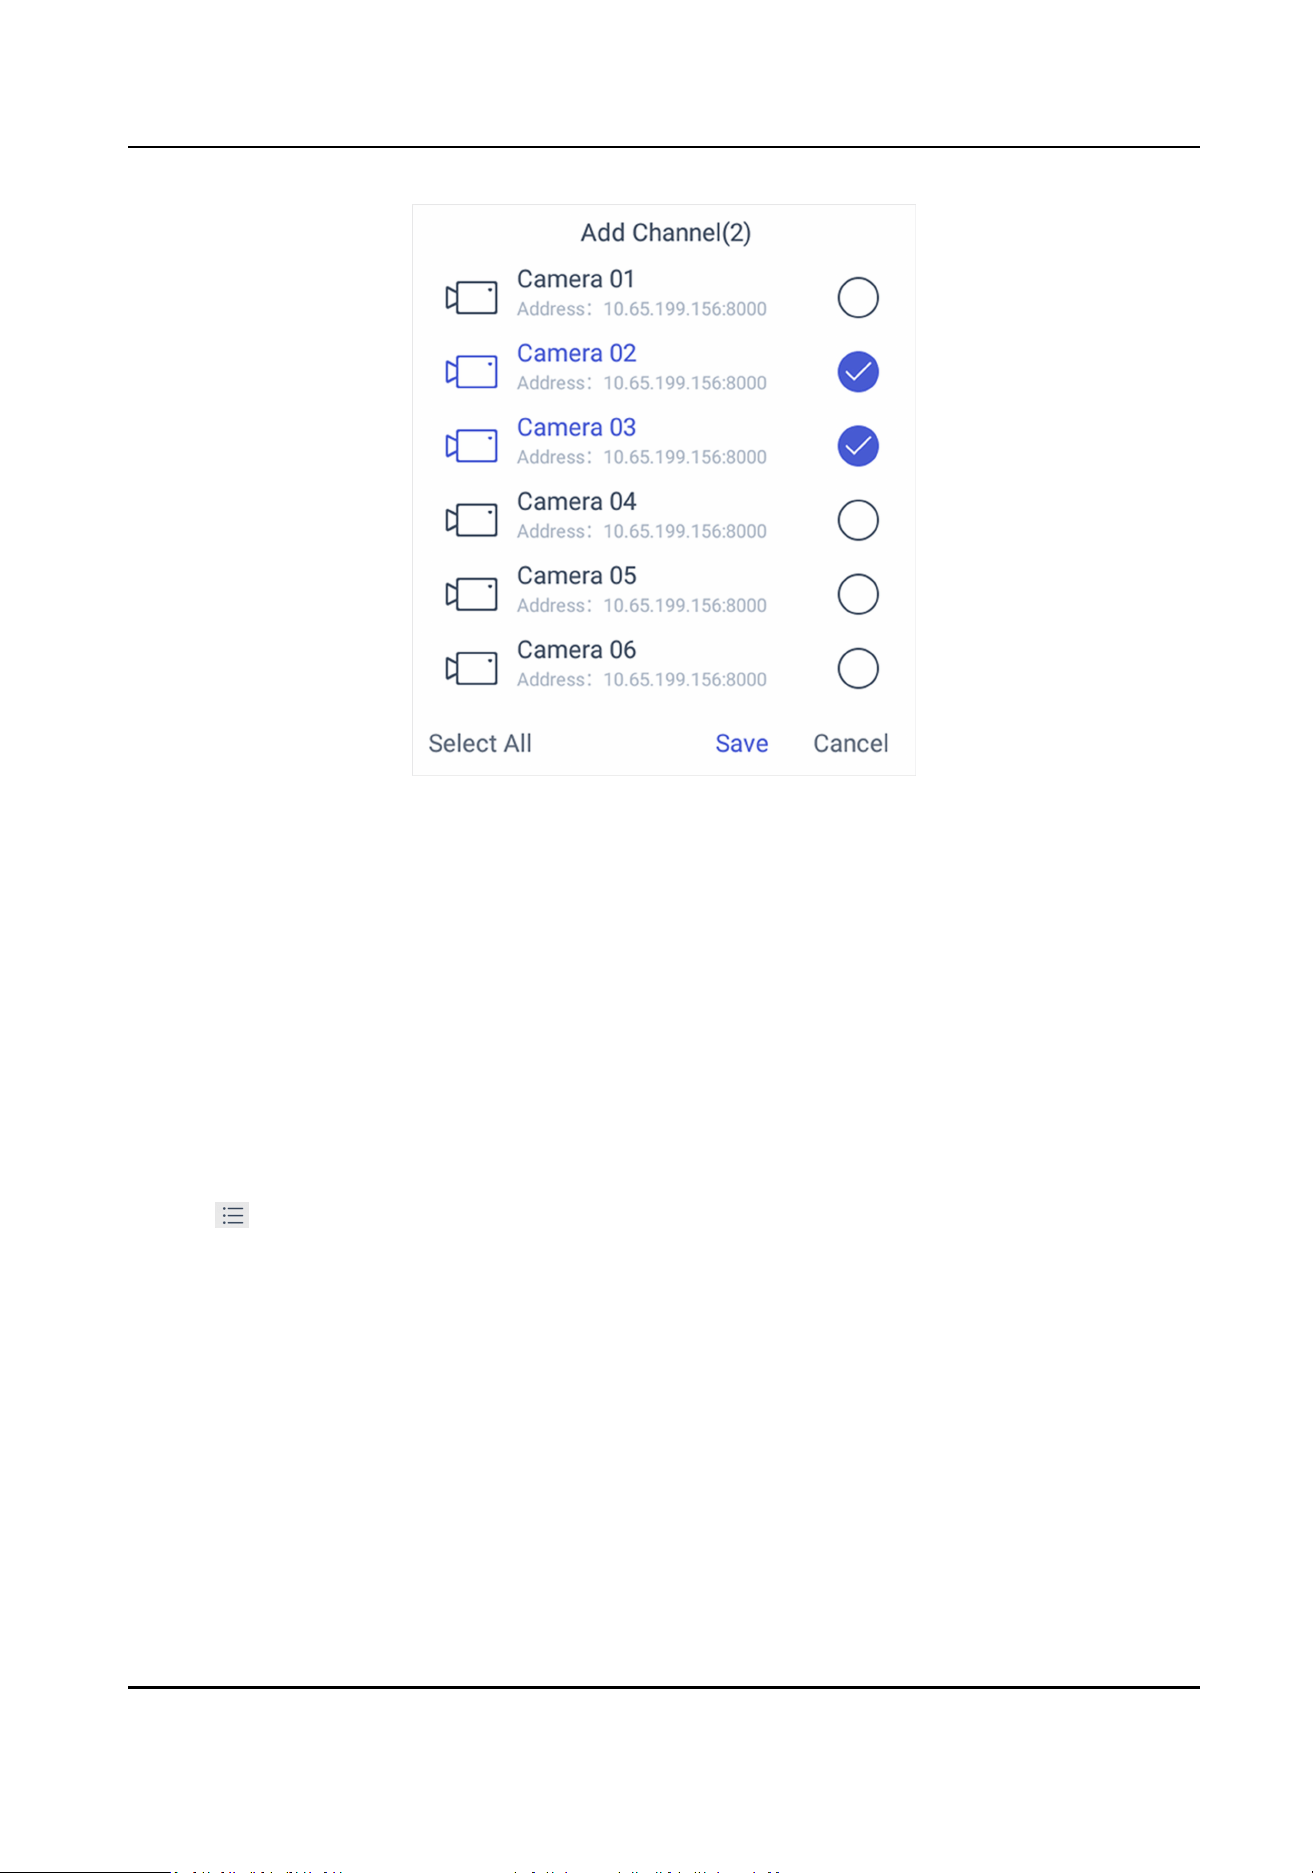
Figure 4-8 Add Camera(s) to the New Group
7. Select the camera(s).
8. Click Save to
nish creang auto-switch group.
Edit Auto-switch Group
You can view and modify auto-switch group details in Auto-switch Group interface.
Before You Start
Ensure you have groups added.
Steps
1. Click Keyboard.
2. Click
.
3. Click Device → Auto-switch Group .
4. Click on the added group.
DS-1600KI Keyboard Quick Start Guide
14
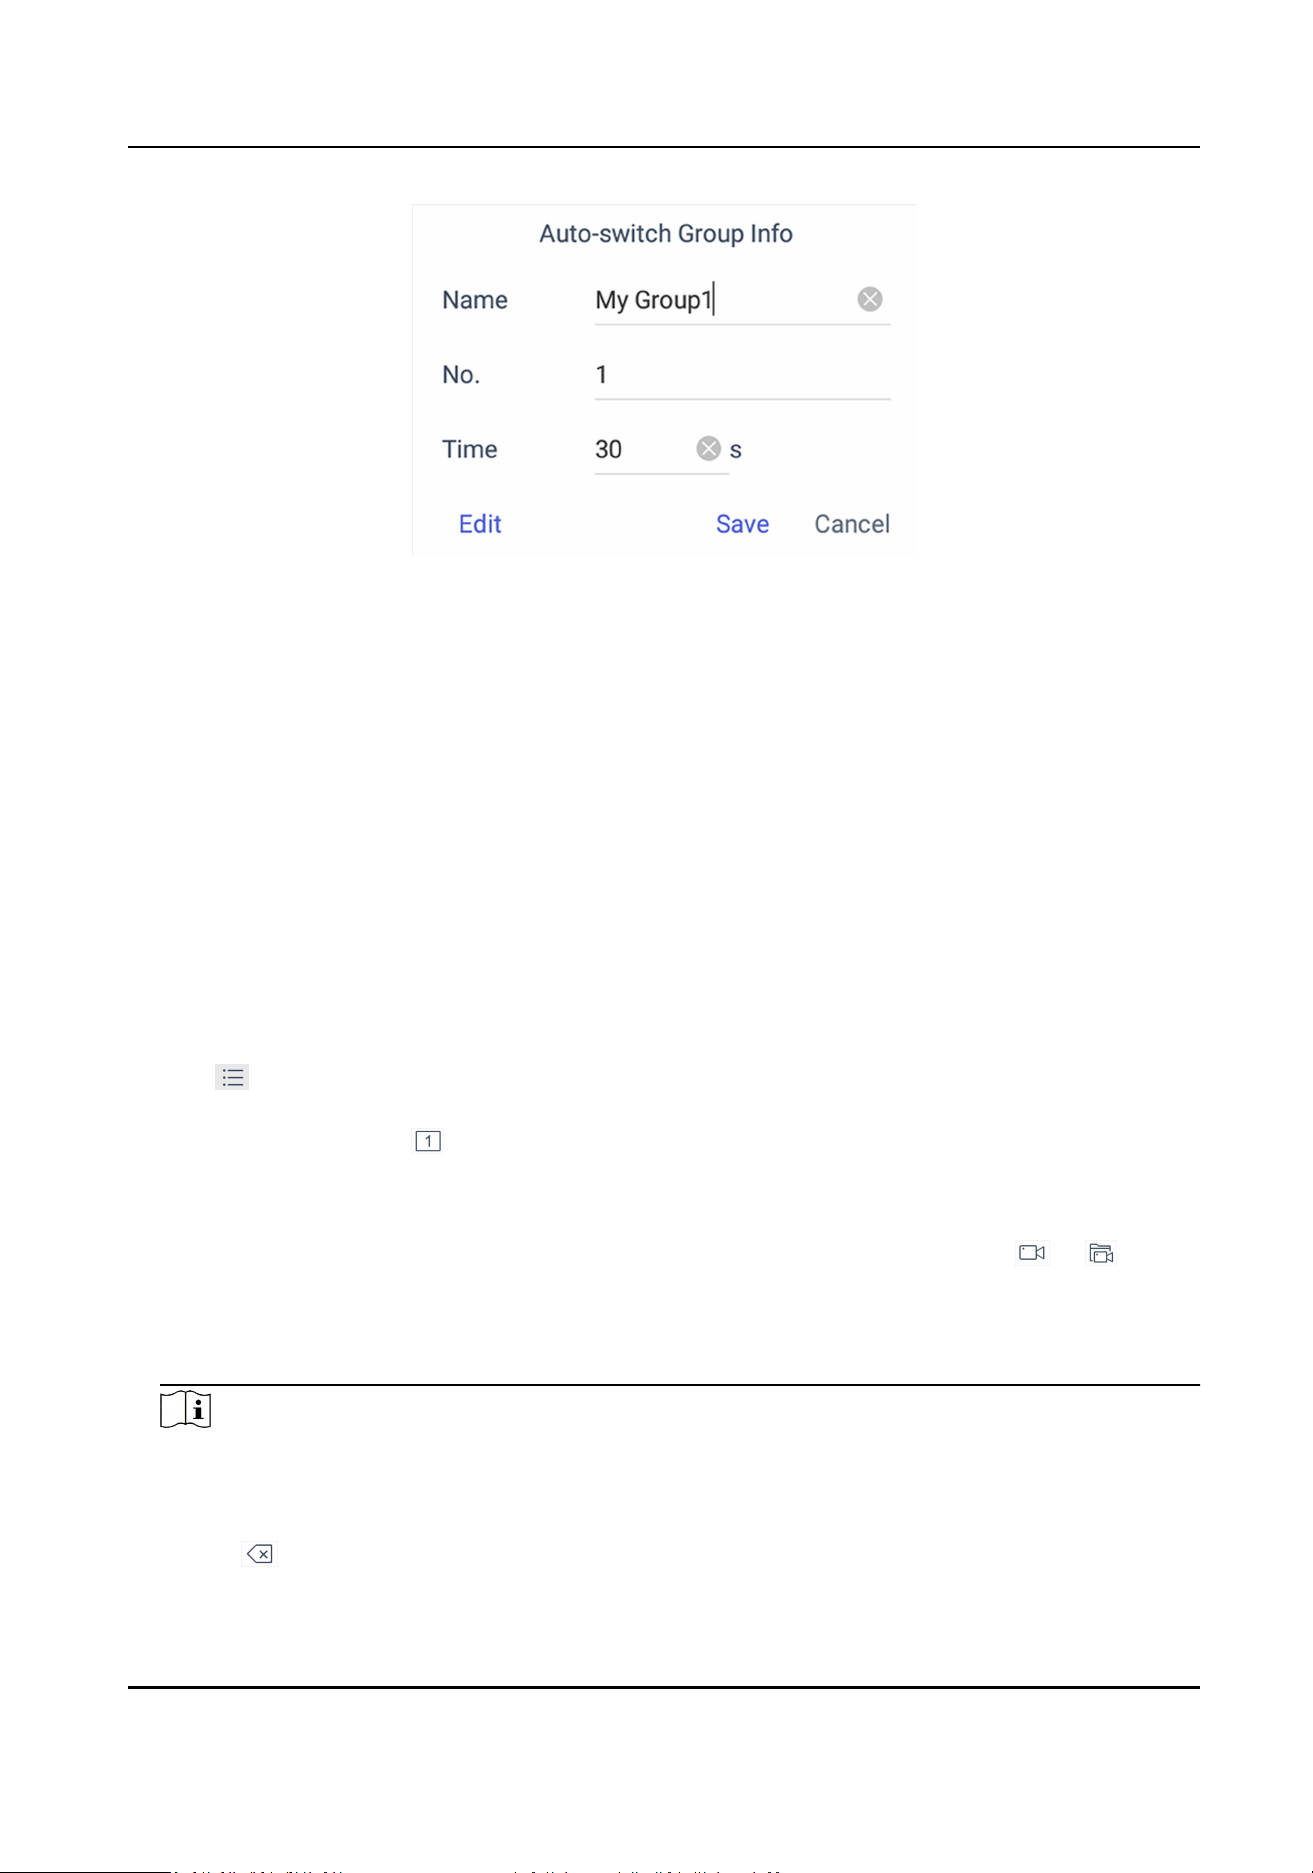
Figure 4-9 Edit the Group
5. Edit group parameters of Name, No., and Time.
6. Click Edit to edit channel(s) in the group.
7. Click Save to
conrm the modicaon.
4.2 Live View on Screen
4.2.1 View Video with Keyboard
Aer device is successfully added, you can view the live video of the added network cameras or
video encoders.
Steps
1. Click Keyboard.
2. Click
.
3. Click Live View.
4.
Oponal: You can click to select the window division mode.
5. Select a display window.
6. Select a camera to display by two selectable ways.
In keyboard
panel
Enter the serial number in the numeric panel, and click or to play
the live video of corresponding camera or camera group on the window.
In the list a. Click List or Group.
b. Select a camera or group from the list to play.
Note
• Up to 16 cameras can be selected for live view at the same
me.
• For group, auto-switch is not supported in mul-screen mode.
• Hold down the
tle bar to move the channel selecon panel.
• Click to delete the entered informaon if you entered incorrectly.
DS-1600KI Keyboard Quick Start Guide
15
• Click
or to preview the previous or next camera or group.
• Enter 0 in the numeric panel and click to stop the live view.
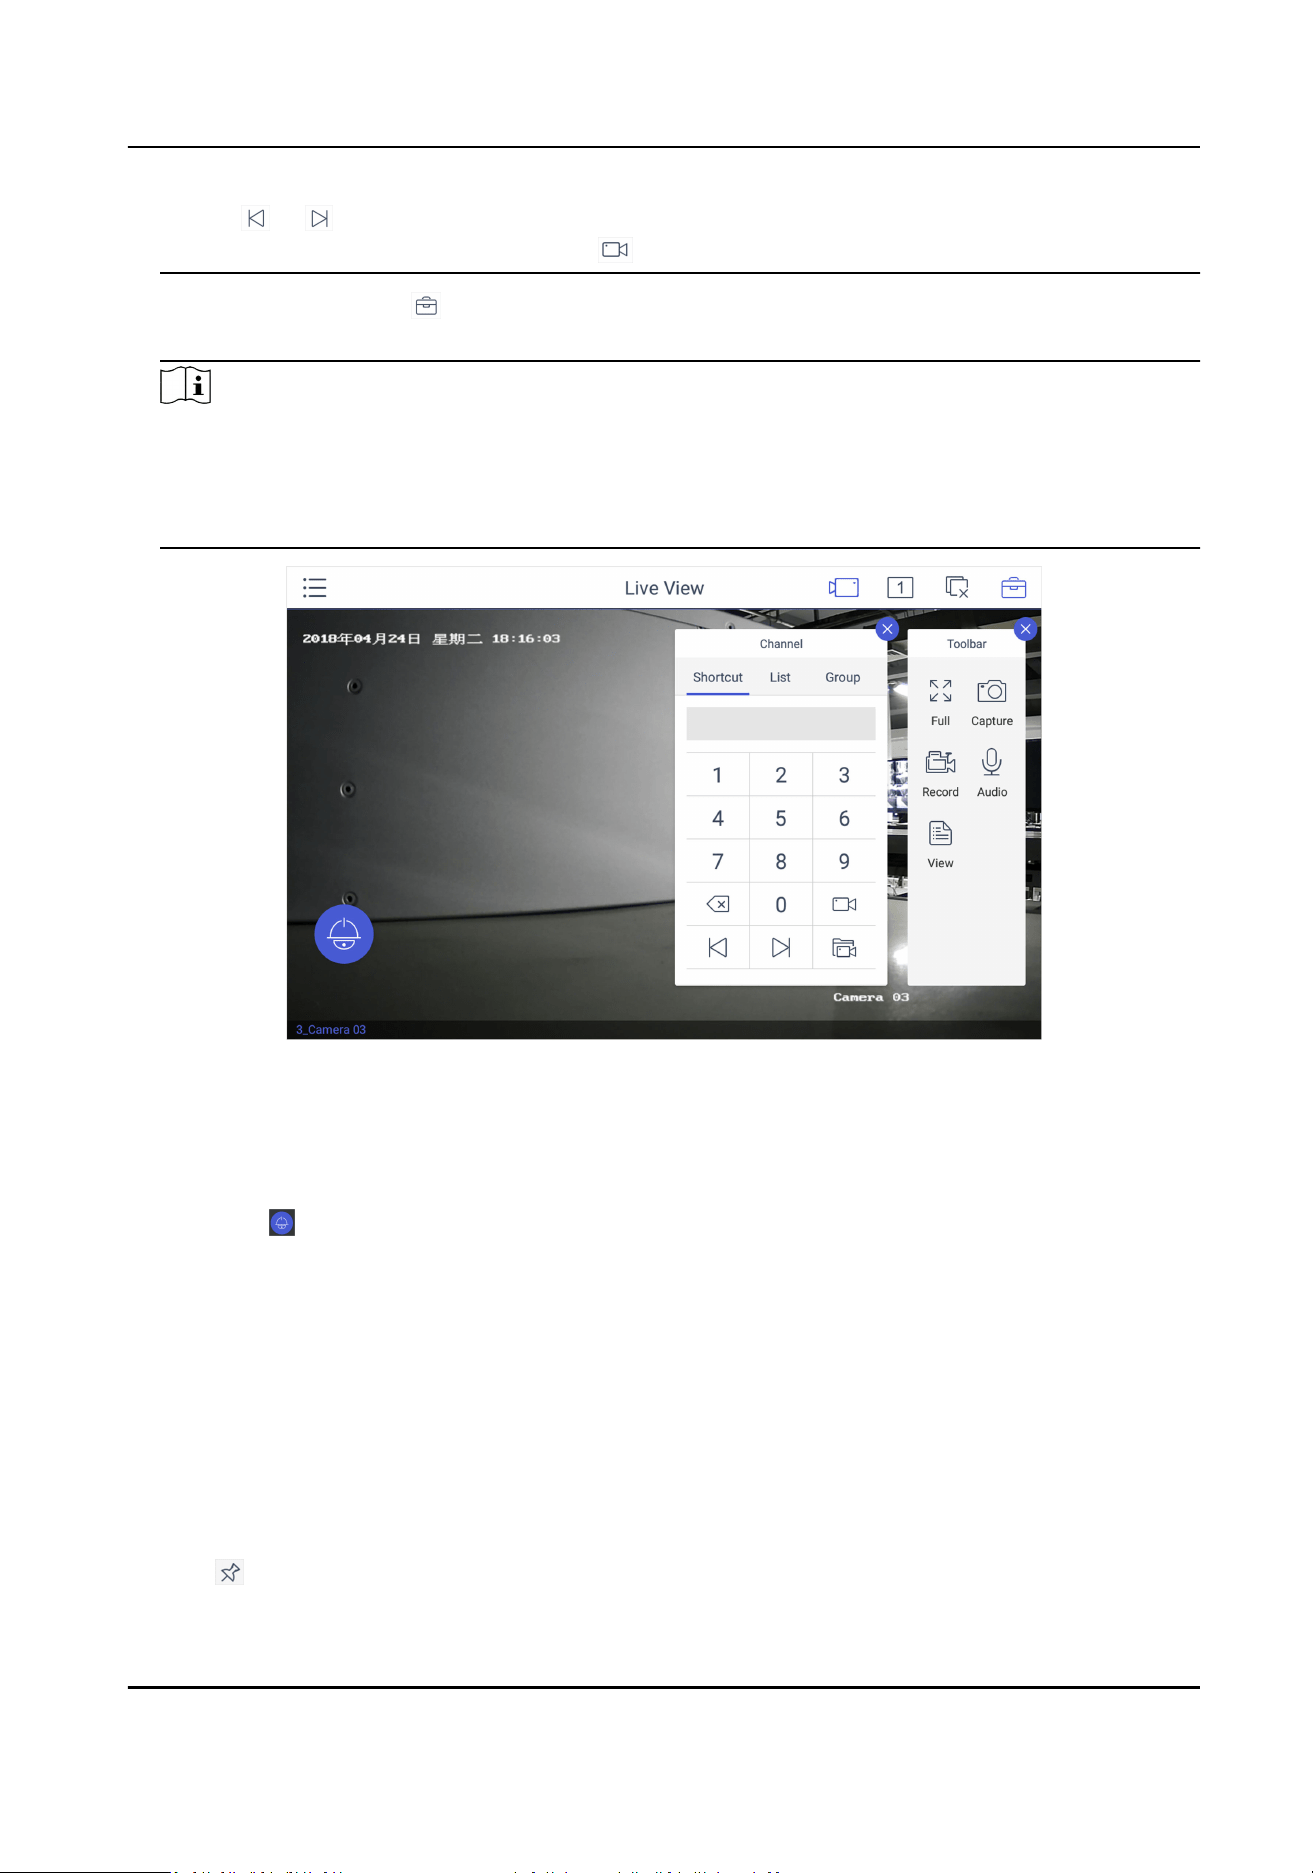
7.
Oponal: You can click to perform operaons including full screen, capture picture, record
video, two-way audio, and view parameters of the camera on live view.
Note
If you perform operaons of capture picture and record video, make sure to connect the
keyboard with a USB ash drive, or provide a valid and correct network connecon between PC
(running FTP server) and the keyboard, and set the FTP parameters of keyboard correctly. Refer
to Set Storage for FTP
conguraon.
Figure 4-10 Live View
4.2.2 PTZ Control
You can click in the live view mode to achieve PTZ control operaon. The PTZ control should be
supported by the added device.
Set and Call a Preset
A preset is a
predened image posion which contains informaon of pan, lt, zoom, focus and
other parameters.
Steps
1. Click Preset in the PTZ control panel.
2. Use the
joysck to move the camera to the desired scene.
3. Click
to set the preset.
DS-1600KI Keyboard Quick Start Guide
16
Note
Up to 300 presets can be congured.
What to do next
You can click a preset from the list to call the preset.
Call a Patrol
A patrol is a scanning track specied by a group of user-dened presets, with the scanning speed
between two presets and the dwell me at the preset separately programmable.
Before You Start
Set the patrol for the camera through Web Browser, client
soware, etc.
Steps
1. Click Patrol in the PTZ control mode.
2. Click a patrol from the list to call it.
Note
Up to 8 pre-dened patrols can be called.
Set and Call a Paern
You can record the pan/lt movements and zoom control of the PTZ camera, and call the paern.
Steps
1. Tap Paern in the PTZ control panel.
2. Tap to start recording path of the desired paern.
3. Use the joysck and other buons to control the PTZ movement, including pan/lt movements,
zoom and focus control, auto-scanning, etc.
4. Tap
to stop recording of this paern path.
Note
Up to 4 paerns can be congured.
What to do next
You can tap a
paern from the list to call the paern.
4.2.3 Play Video on Video Wall
You can play live video on video wall window.
DS-1600KI Keyboard Quick Start Guide
17
Steps
1. Click Keyboard.
2. Click
.
3. Click Video Wall.
4.
Select a playing window.
5. Click to expand the channel panel.
6. Select the camera No. you want to play on the selected display window.
1) Click Shortcut.
2) Enter the camera/group No. in the numeric panel.
3) Click
or on the display window.
Note
• You can also select camera by clicking the camera or group from List or Group interface.
• You can see the camera No. on the display window. If you select a group, the display window
will show G.
7.
Oponal: You can perform PTZ control by clicking , refer to PTZ Control for specicaons.
8. Oponal: You can achieve funcons such as capture picture, record video, and refresh display
interface by clicking .
4.2.4 Save Current Video Wall
Sengs as a Scene
You can save your current video wall sengs as a scene.
Steps
1. Click Keyboard.
2. Click .
3. Click Video Wall.
4. Select a display window on the
congured video wall layout.
5. Click to expand the toolbar.
6. Click Scene to access the scene list.
7. Select the scene in the list.
8. Click Save to save the current video wall scene.
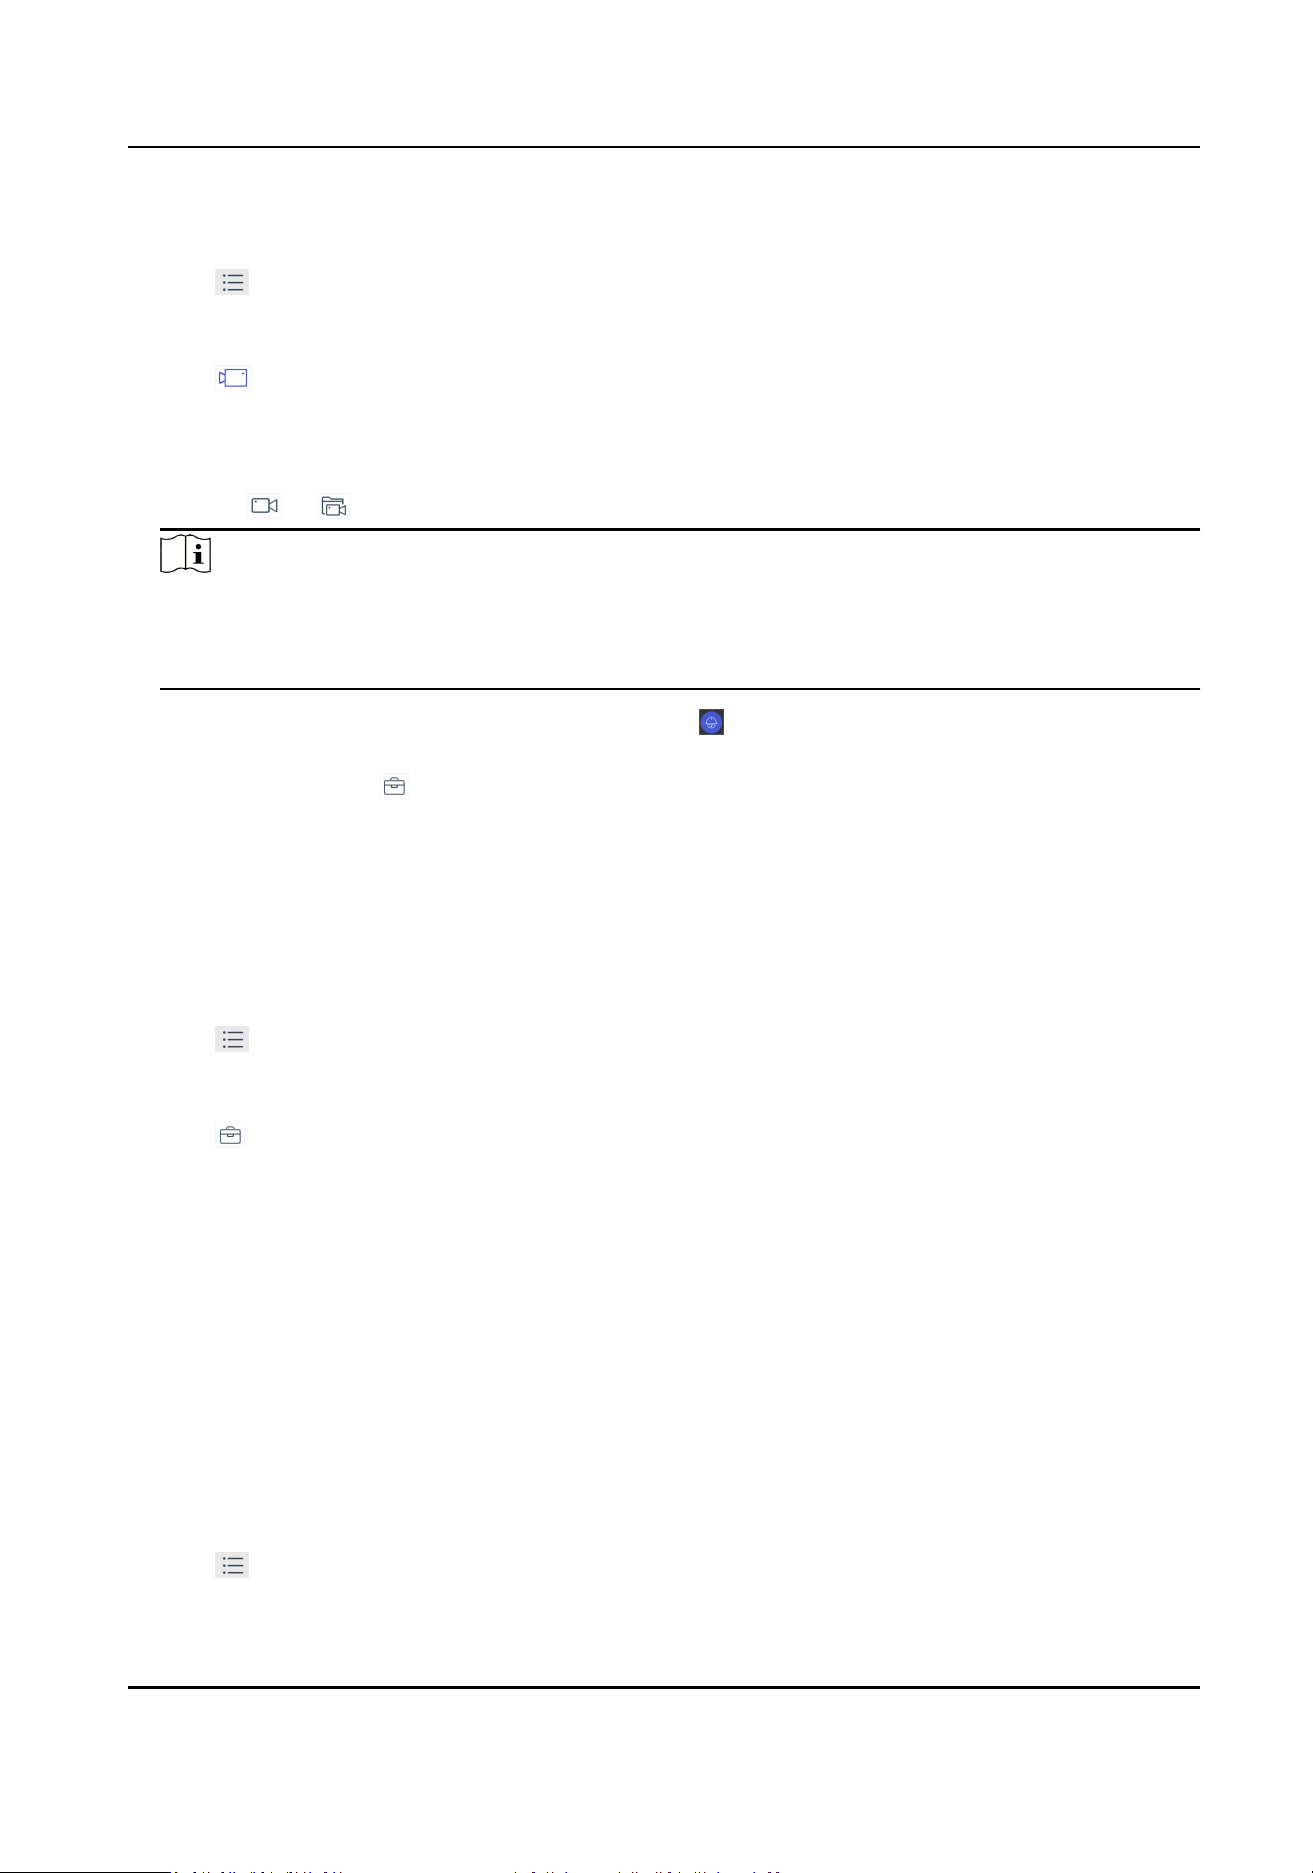
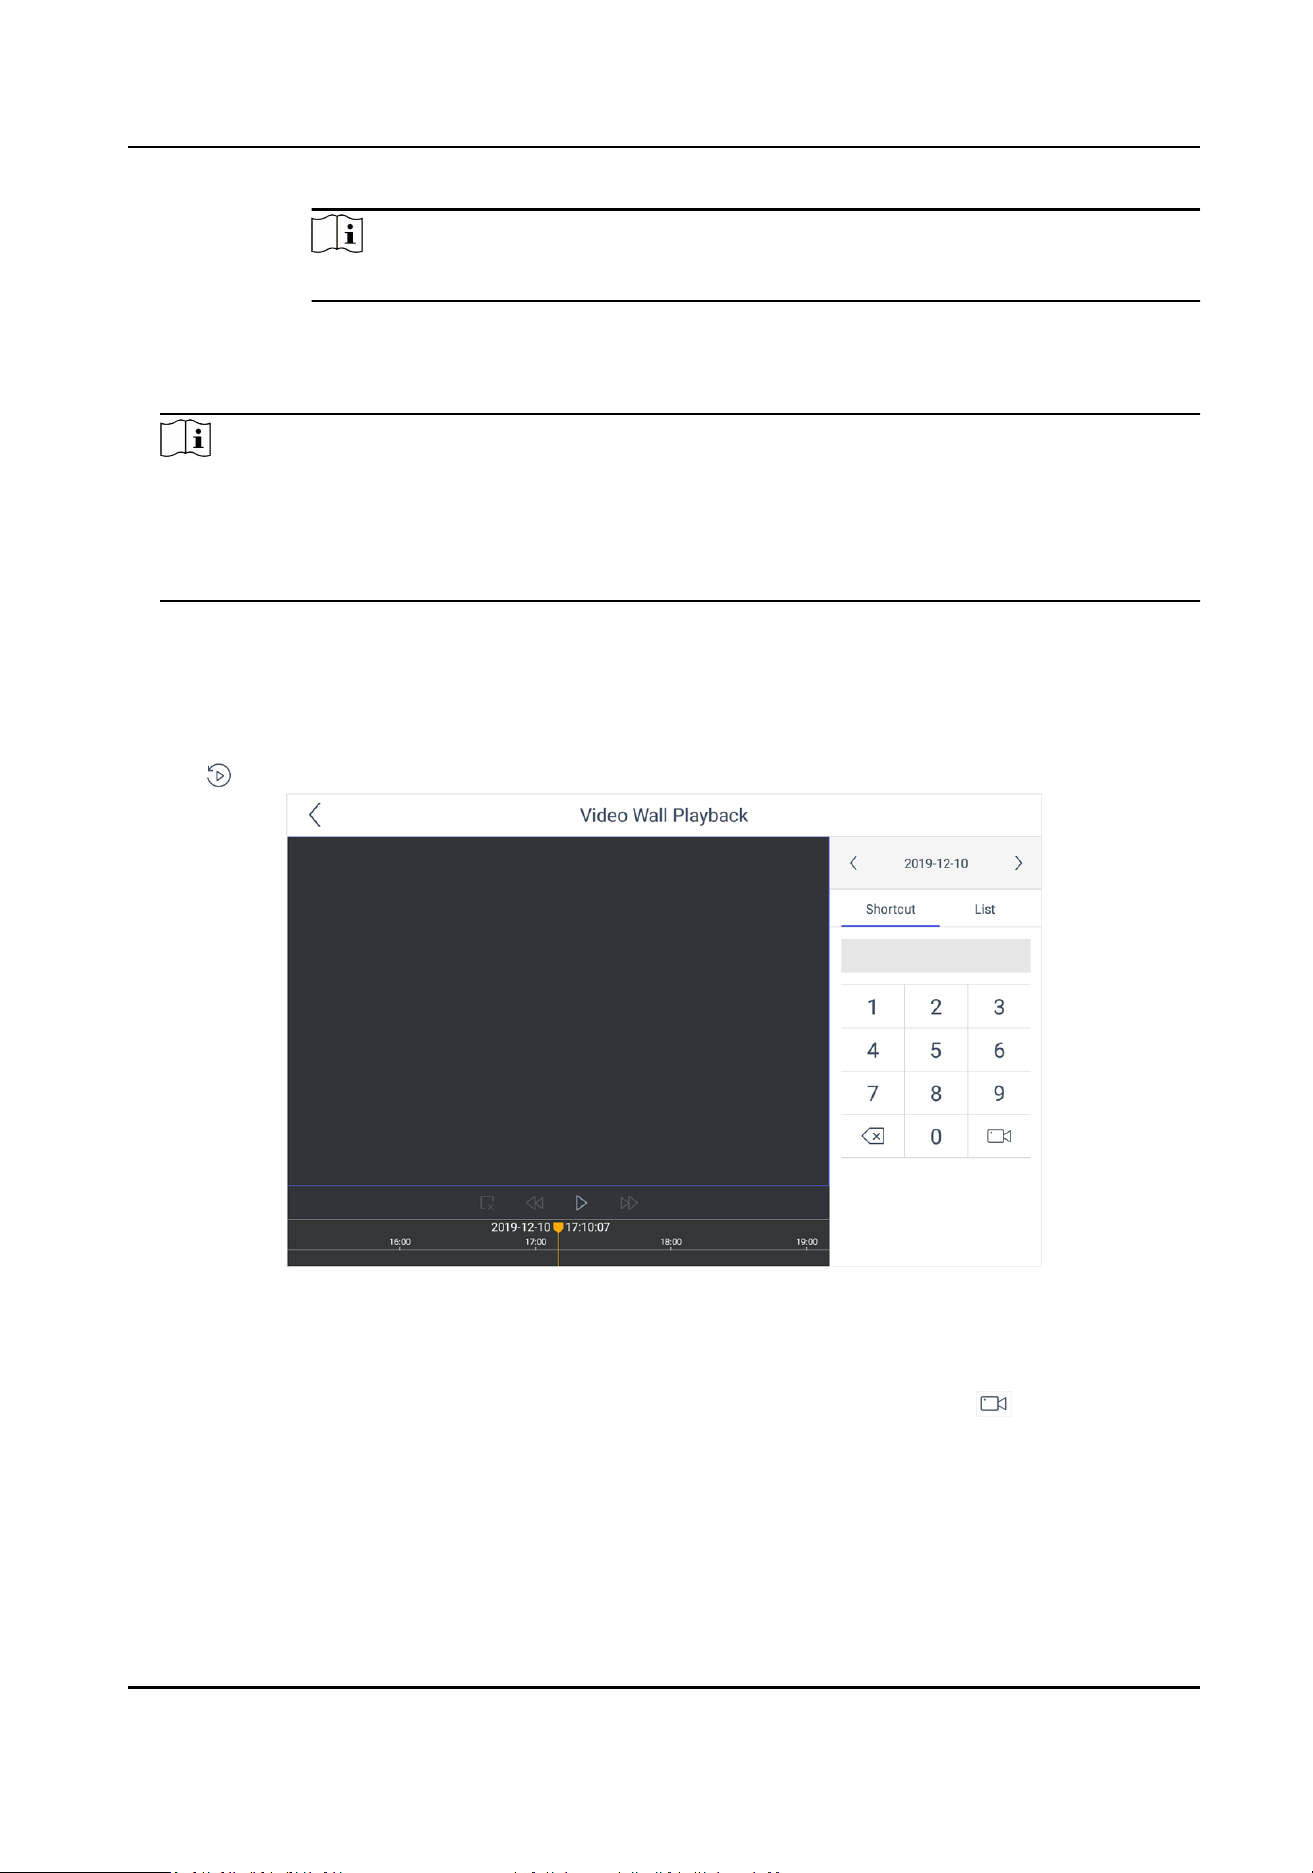
4.2.5 Video Wall Playback
You can playback and view videos on video wall.
Before You Start
Ensure you have added decoding device channel to the video wall.
Steps
1. Click Keyboard.
2. Click
.
DS-1600KI Keyboard Quick Start Guide
18
3. Click Video Wall.
4. Select a window on the video wall interface.
5. Click
.
6. Select the date as you desired.
Figure 4-11 Video Wall Playback
7. Oponal: You can switch channel by two ways.
In keyboard panel
Enter the serial number in the numeric panel, and click .
In the list a. Click List
b. Select a camera in the list.
Note
The channel of the selected window must be from a decoding device.
8. Drag the slider to set required playback me.
9. Use the toolbar to perform playback operaons, including stop playing video, start/pause
playing video, slow forward speed, and fast forward speed.
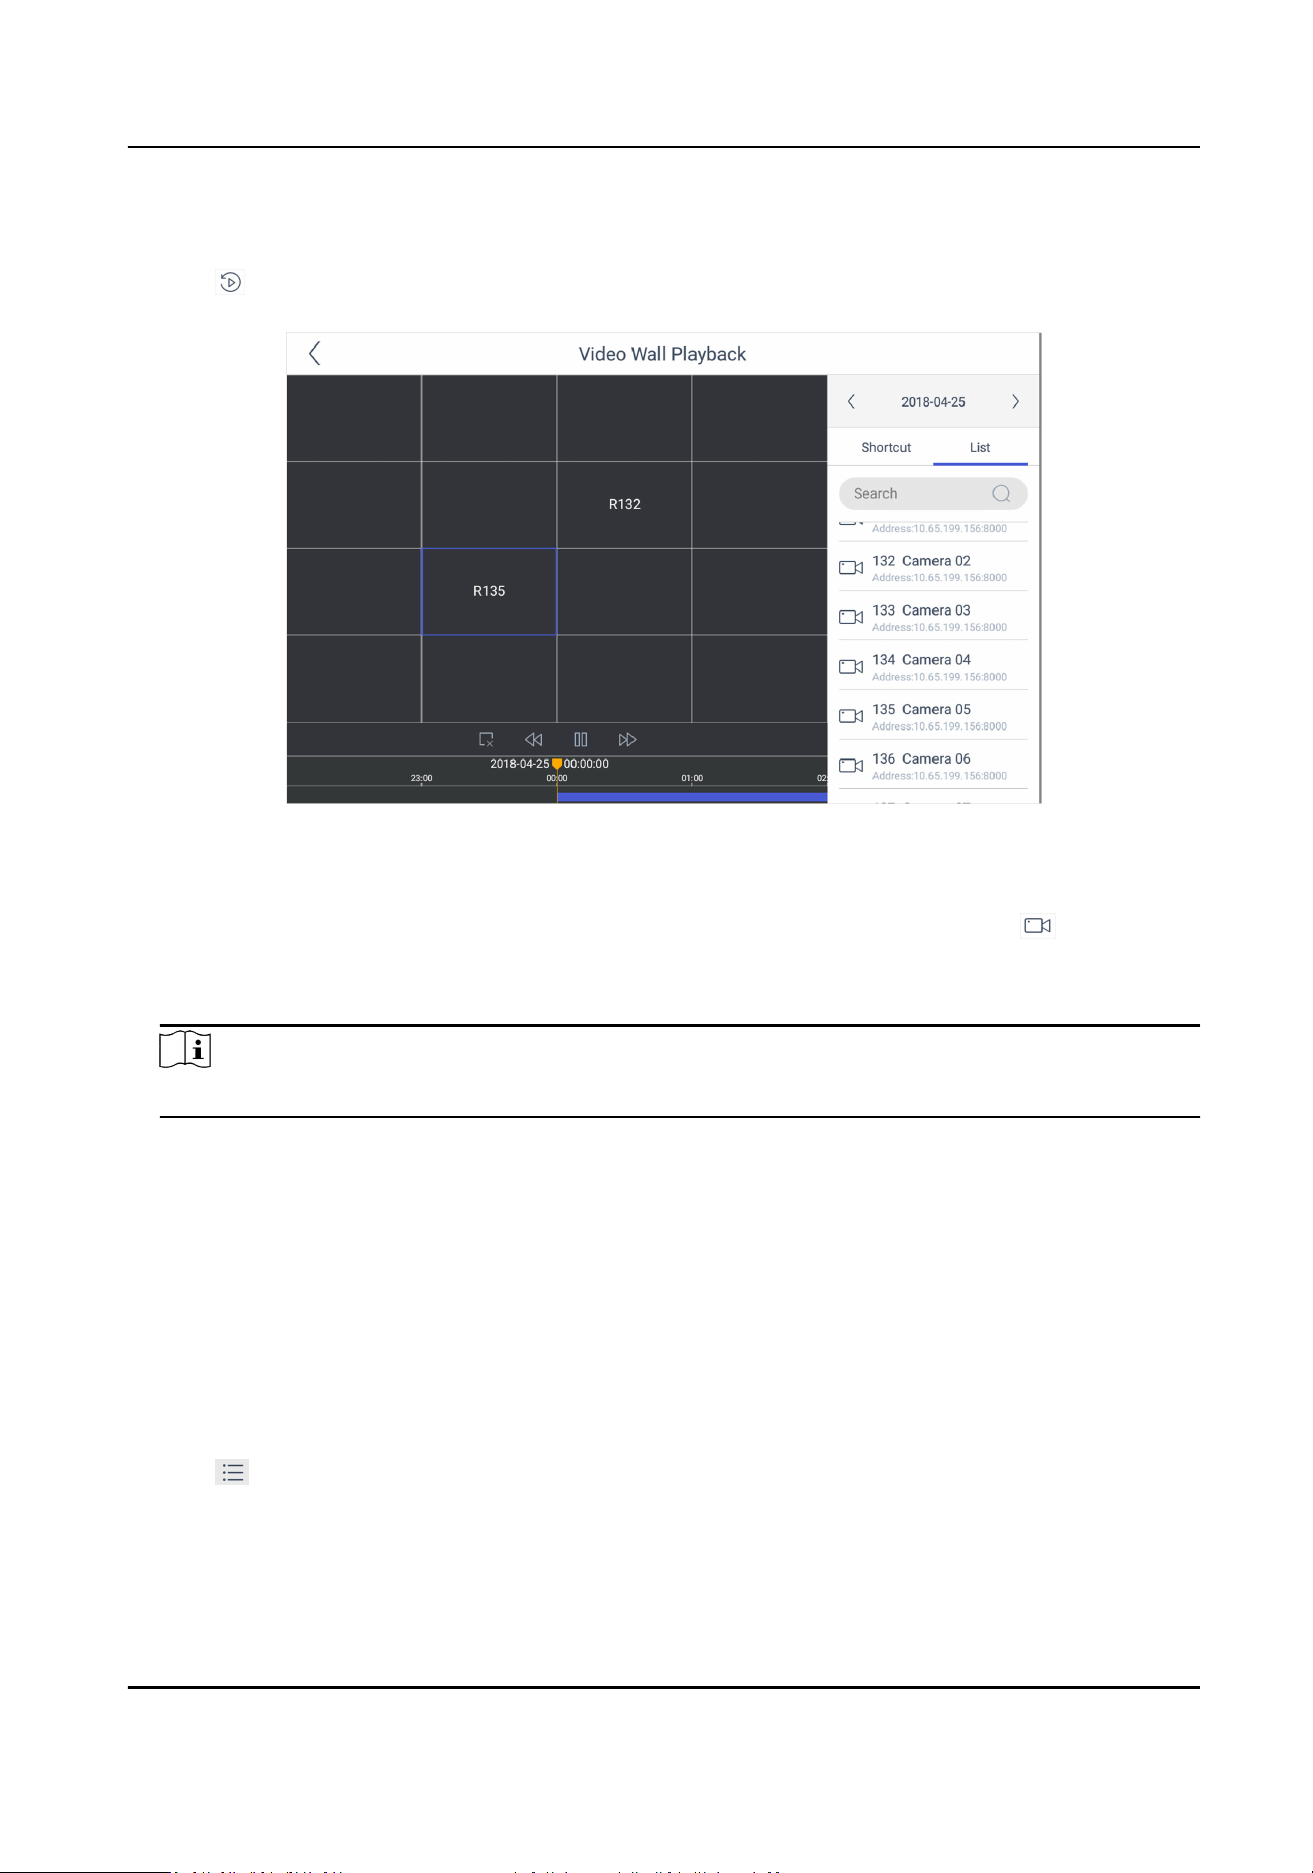
4.3 Video Playback
The videos stored in the encoding device within 24 hours can be played back on the keyboard.
Steps
1. Click Keyboard.
2. Click
.
3. Click Playback on the menu to enter the play back interface.
4. Select the date as you desired.
DS-1600KI Keyboard Quick Start Guide
19
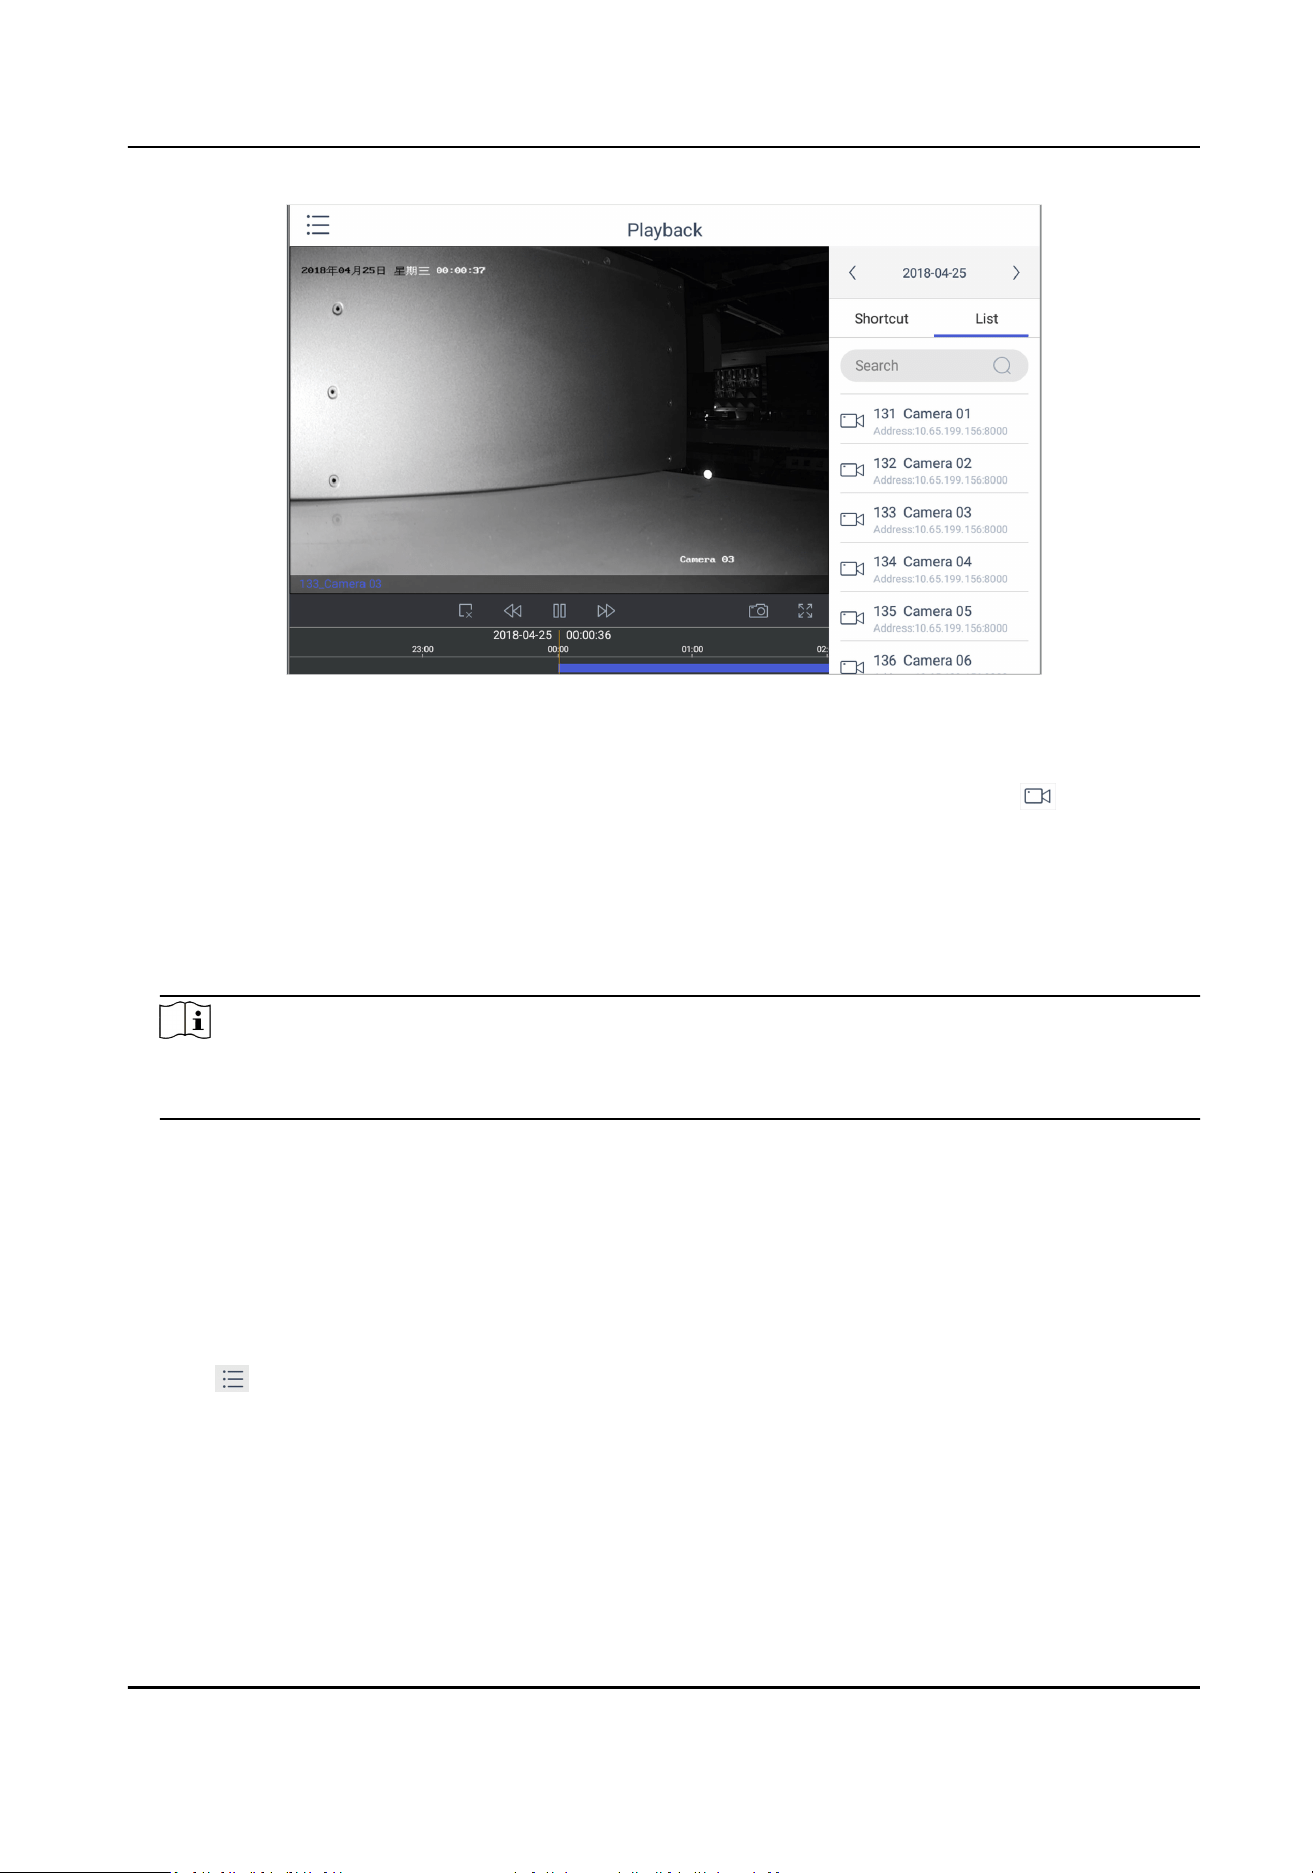
Figure 4-12 Video Playback
5. You can switch channel by two ways.
In keyboard panel Enter the serial number in the numeric panel, and click .
In the list a. Click List
b. Select a camera in the list.
6. Drag the me bar to set required playback me.
7. Use the toolbar to perform playback operaons, including stop playing video, start/pause
playing video, slow forward speed, and fast forward speed.
Note
To control the play speed, you can also move joyscks le or right to slow or fast forward the
video respecvely.
4.4 Control DVR
The keyboard can operate the added DVR/NVR and achieve PTZ control operaon.
Steps
1. Click Keyboard.
2. Click
.
3. Click Operate DVR.
4. Select the NVR/DVR from the right list as you desired.
5. Apply the
buons on the control panel to achieve DVR/NVR funcons such as switching the
camera, playing the video, recording, entering menu, main/spot output switching, Aux
funcons, etc.
DS-1600KI Keyboard Quick Start Guide
20
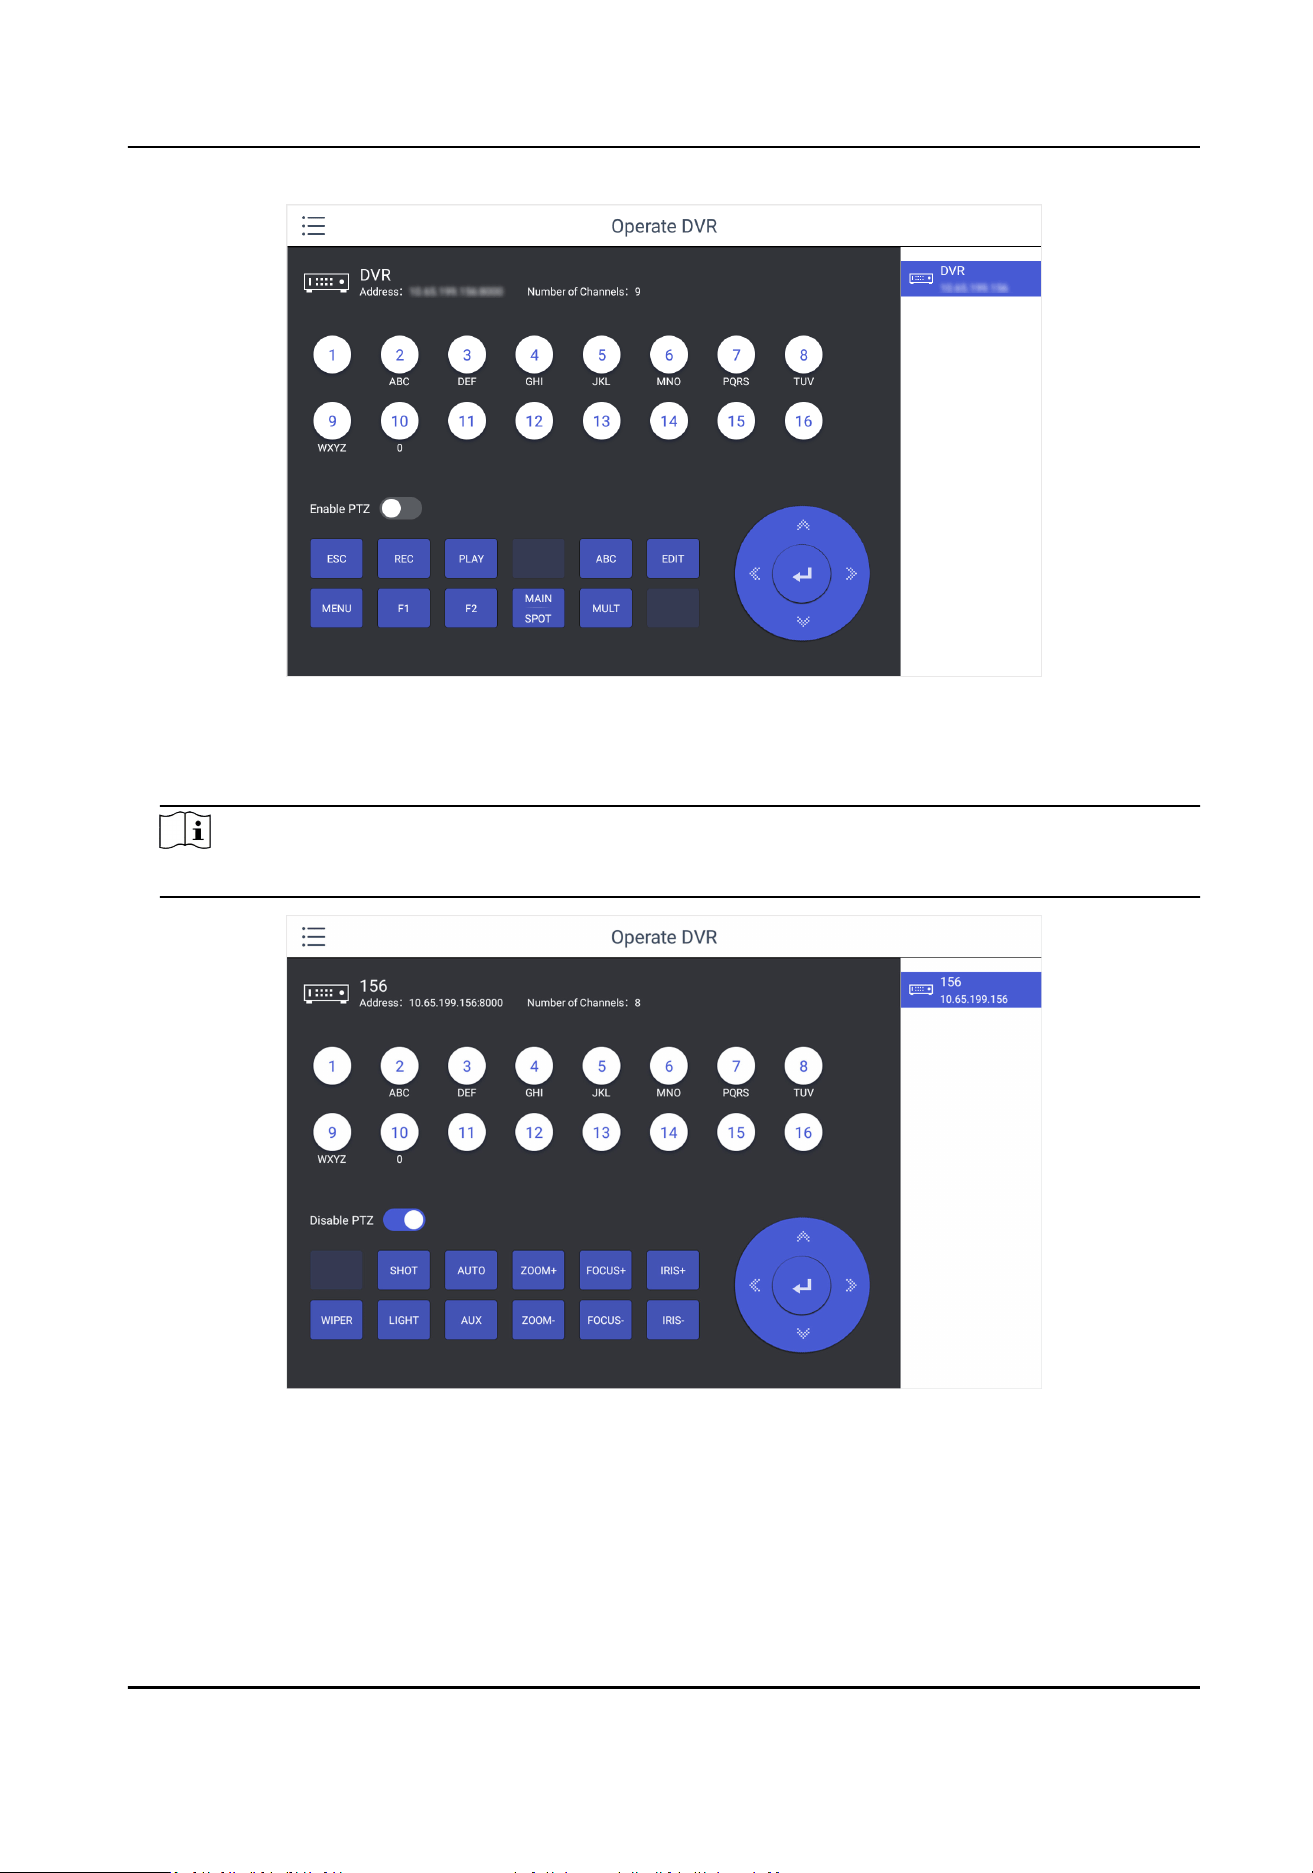
Figure 4-13 DVR/NVR Remote Panel
6. Oponal: You can switch on Enable PTZ to achieve funcons such as PTZ control, iris control,
focus, wiper, light, etc.
Note
Ensure the device that connects to DVR/NVR device supports PTZ control operaon.
Figure 4-14 Enable PTZ
DS-1600KI Keyboard Quick Start Guide
21
Table 4-1 Panel Descripon
Name Funcon Descripon
ESC Returns to the previous menu.
Presses for arming/disarming the device in live view mode.
REC/SHOT Enters the Manual Record sengs menu.
Presses this buon followed by a numeric buon to call a PTZ preset
in PTZ control sengs.
Turns audio on/o in the playback mode.
PLAY/AUTO Enters the playback mode.
Automacally scans in the PTZ control menu
ZOOM+ Zooms in the PTZ camera in the PTZ control seng.
ABC/FOCUS+ Adjusts focus in the PTZ Control menu.
Switches between input methods (upper and lower case alphabet,
symbols and numeric input).
EDIT/IRIS+ Edits text elds. When eding text elds, it also deletes the
character in front of the cursor.
Checks the checkbox in the checkbox elds.
Adjusts the iris of the camera in PTZ control mode.
Generates video clips for backup in playback mode.
Enters/exits the folder of USB device and eSATA HDD.
MAIN/SPOT/ZOOM- Switches between main and spot output.
Zooms out the image in PTZ control mode.
F1/ LIGHT Selects all items on the list when used in a list eld.
Turns on/o PTZ light (if applicable) in PTZ control mode.
Switches between play and reverse play in playback mode.
F2/AUX Cycles through tab pages.
Switches between channels in synchronous playback mode.
MENU/WIPER Returns to the Main menu (aer successful login).
Presses and holds the buon for ve seconds to turn o audible key
beep.
Starts wiper (if applicable) in PTZ control mode.
DS-1600KI Keyboard Quick Start Guide
22
Name Funcon Descripon
Shows/hides the control interface in playback mode.
MULT/FOCUS- Switches between single screen and mul-screen mode.
Adjusts the focus in conjuncon with the A/FOCUS+ buon in PTZ
control mode.
IRIS- Adjusts the iris of the PTZ camera in PTZ control mode.
4.5 Manage User
4.5.1 Add New Users with Admin Account
Mulple user accounts can be added to operate the keyboard. The admin user is assigned with the
highest permissions, including
viewing/deleng user accounts, adding devices to the users, and
changing password. For the operator, you can view your assigned devices and change your own
password.
Steps
1. Click Keyboard.
2. Click
3. Click User.
4. Click
to add new user.
5. Enter the user name and password.
Cauon
STRONG PASSWORD RECOMMENDED-We highly recommend you create a strong password of
your own choosing (using a minimum of 8 characters, including upper case leers, lower case
leers, numbers, and special characters) in order to increase the security of your product. And
we recommend you reset your password regularly, especially in the high security system,
reseng the password monthly or weekly can beer protect your product.
6. Click Add.
7. Select camera(s) from the device list to assign user device permission.
8. Click Save to save the
sengs.
Note
You can have only 1 admin user account and up to 31 operator accounts.
DS-1600KI Keyboard Quick Start Guide
23
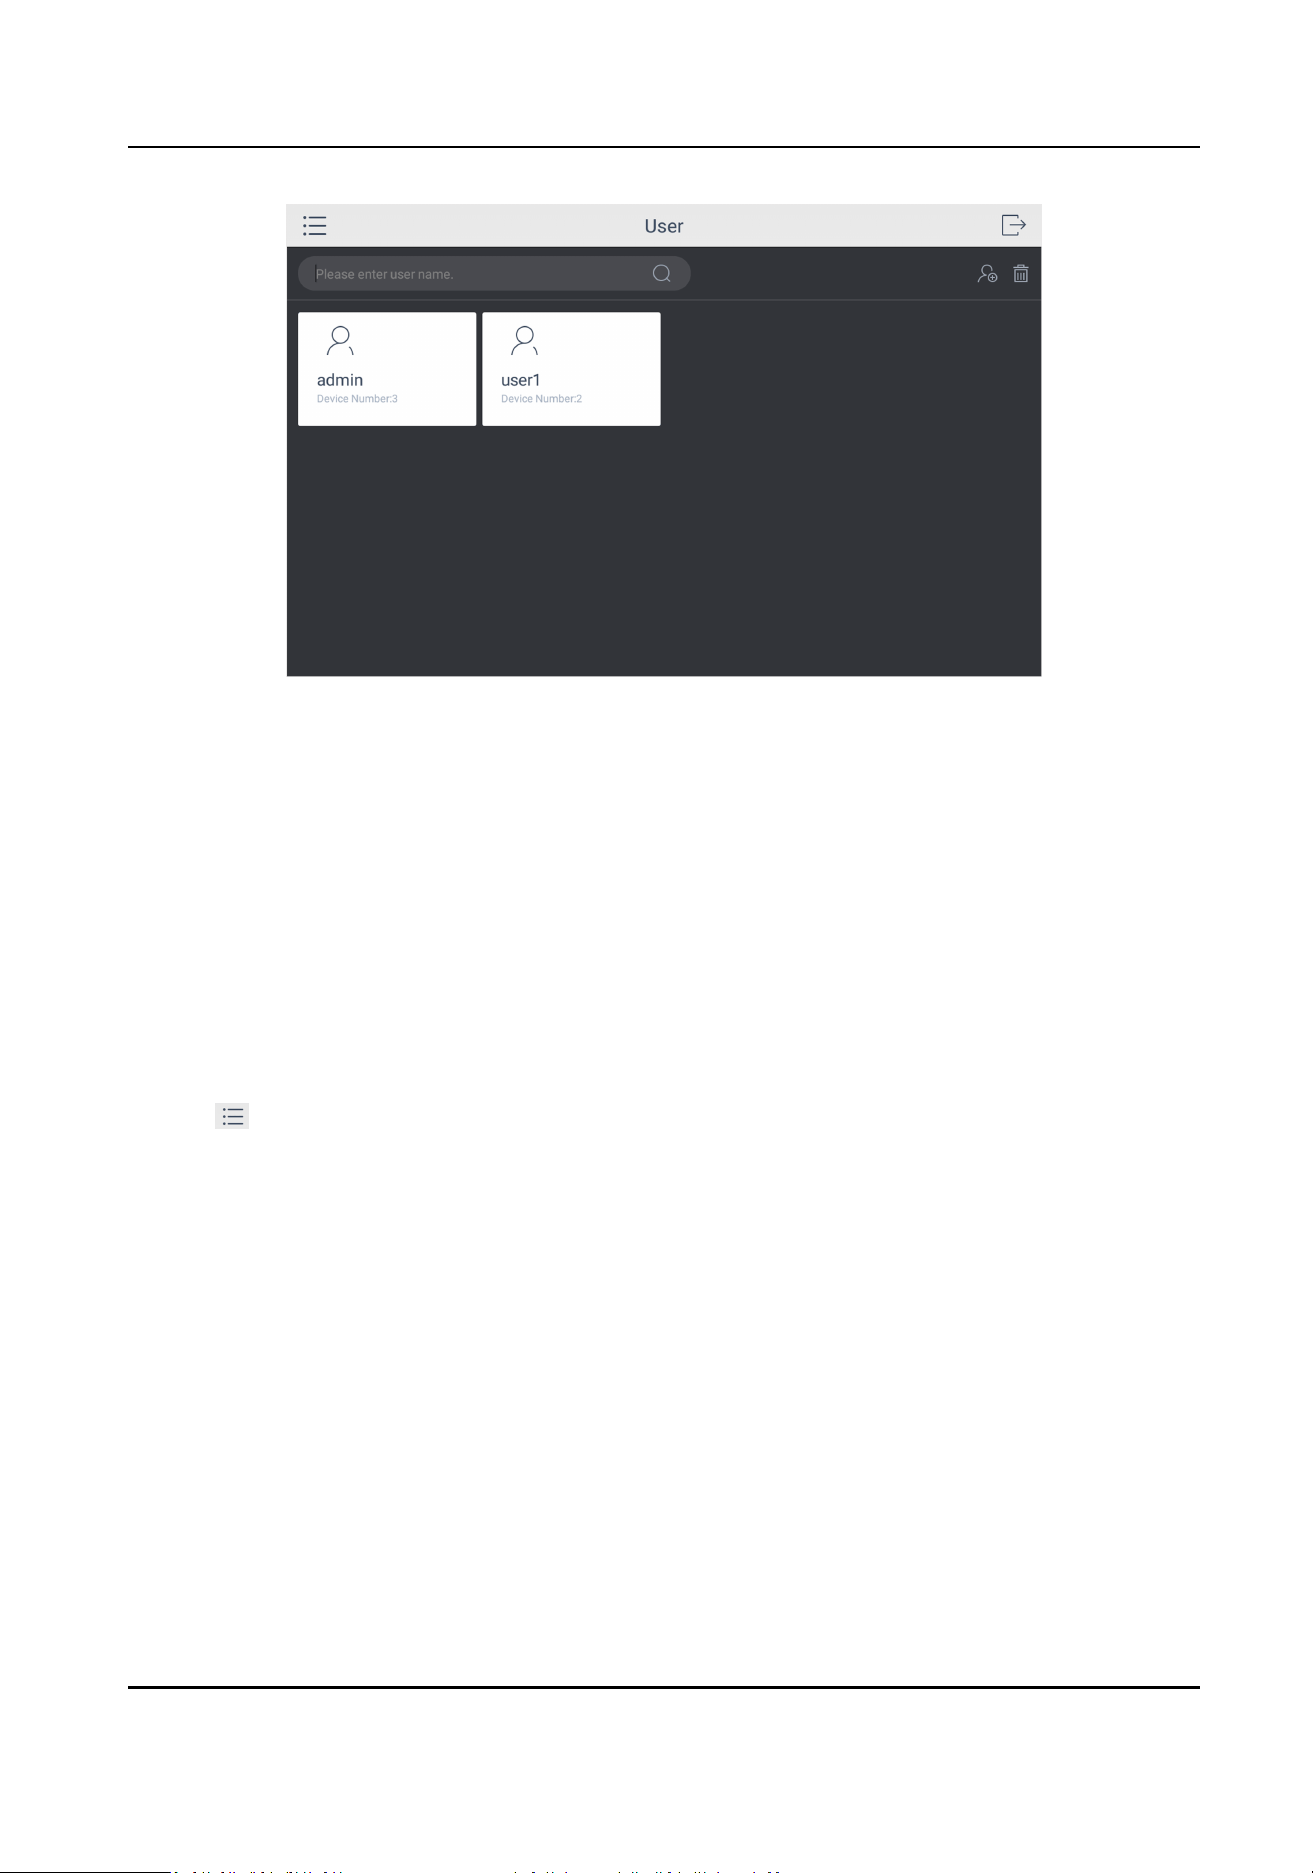
Figure 4-15 User Management
4.5.2 Edit User Accounts by Administrator
The administrator has the highest operaon permissions that can change the sengs of all other
operators, including assigning device permission to the operator, and changing the password of
other operator accounts.
Before You Start
Make sure you log in with the admin account.
Steps
1. Click Keyboard.
2. Click
3. Click User.
4. Select a user account as you desired.
5. You can change password or assign device permission to the user account.
Edit password
a. Click Edit.
b. Enter new password twice.
c. Click Save to conrm.
Edit device permission a. Click Device.
b. Select device permission for the account.
c. Click Save.
DS-1600KI Keyboard Quick Start Guide
24
Chapter 5 Control Plaorm
You can connect the keyboard to plaorms to play live video on video wall or watch live video on
the local keyboard interface.
5.1 Control iSecure
You can connect the keyboard to iSecure
plaorm to play live video on video wall, watch live video
or watch video playback on the local keyboard interface.
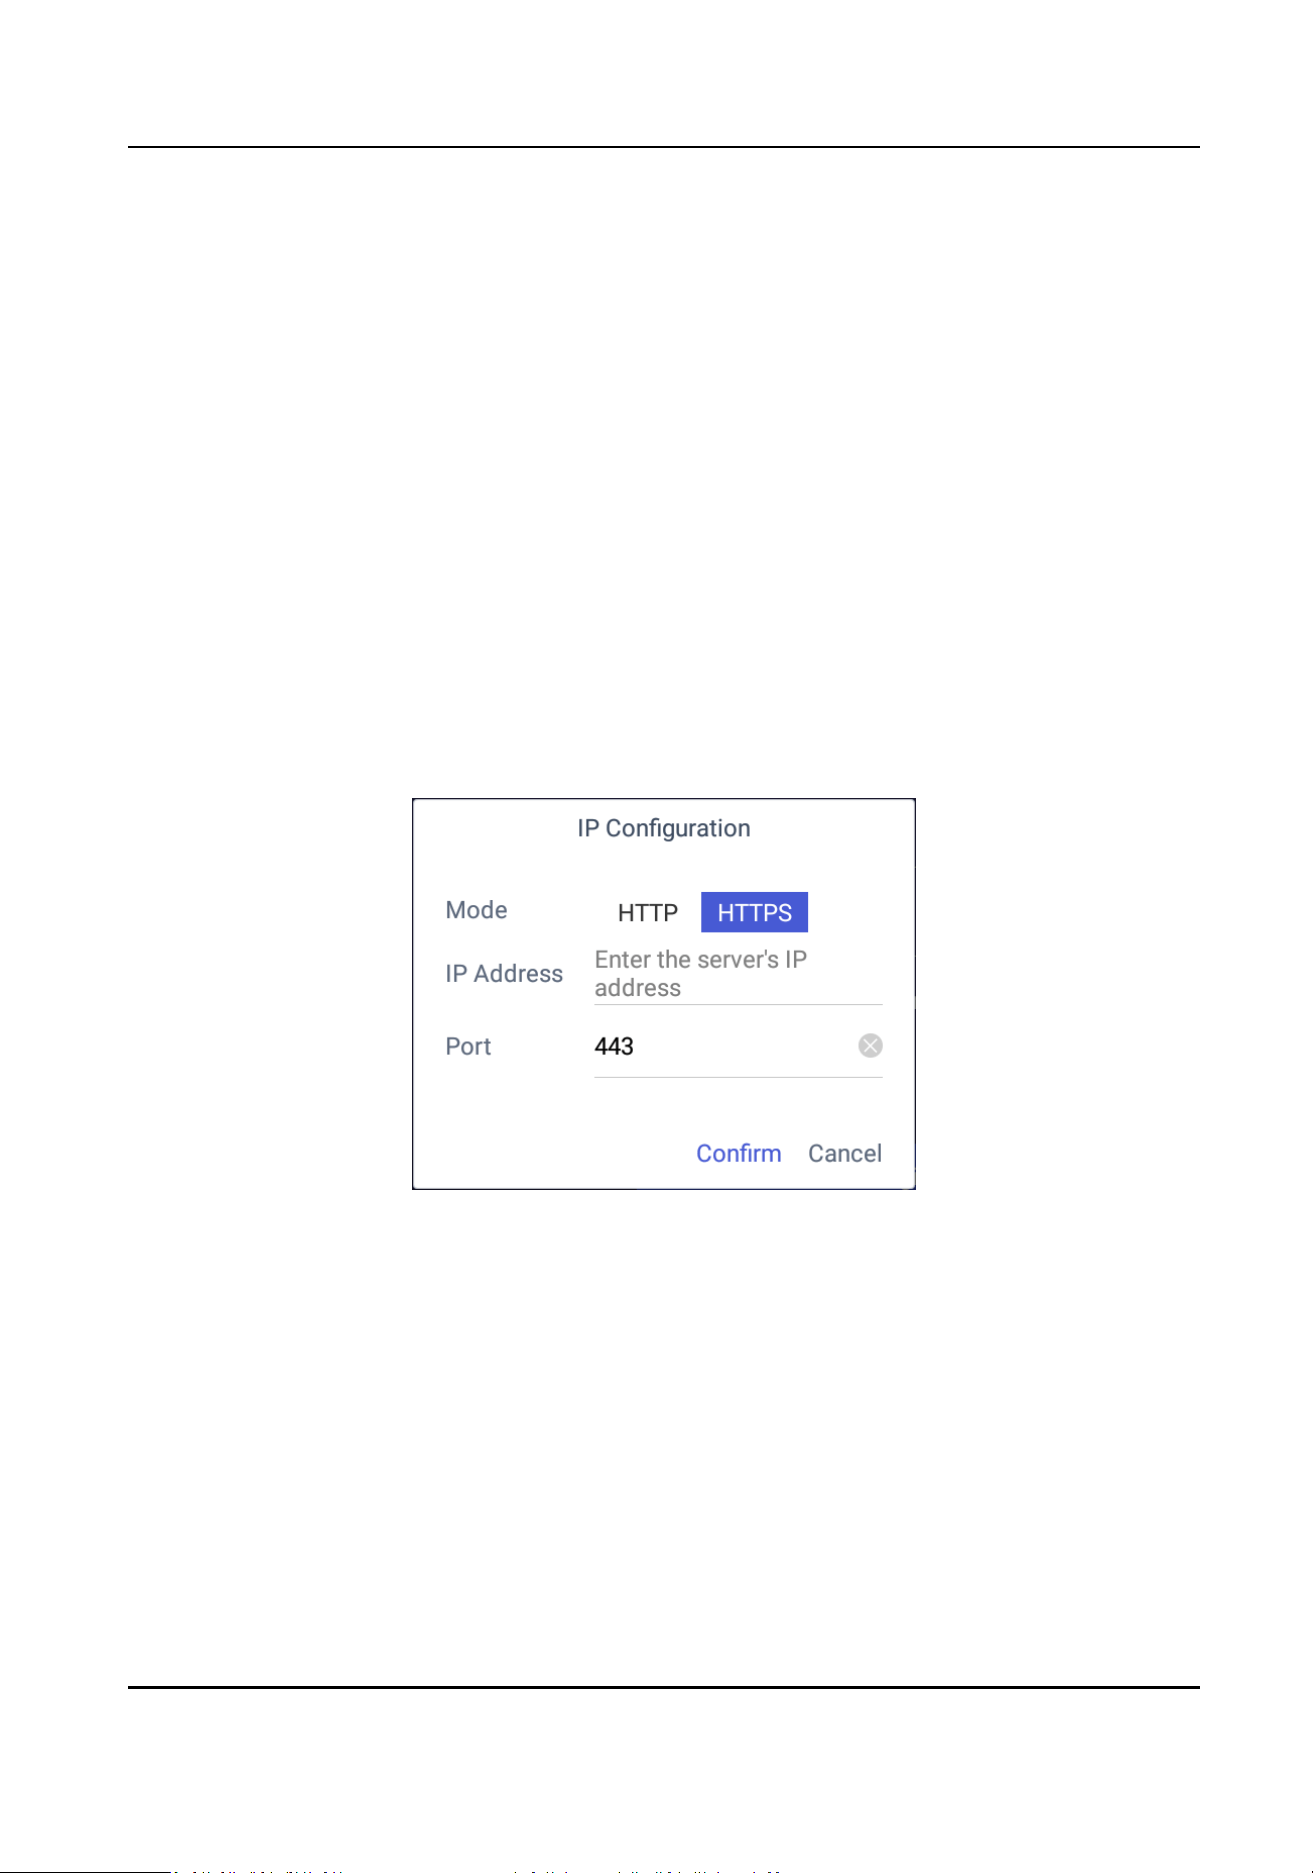
5.1.1 Login
Steps
1. Tap iSecure on the main page.
2. Tap IP
Conguraon.
3. Select HTTP or HTTPS mode, enter the server's IP Address, and tap Conrm.
Figure 5-1 IP Conguraon
4. Enter the server's user name and password.
DS-1600KI Keyboard Quick Start Guide
25
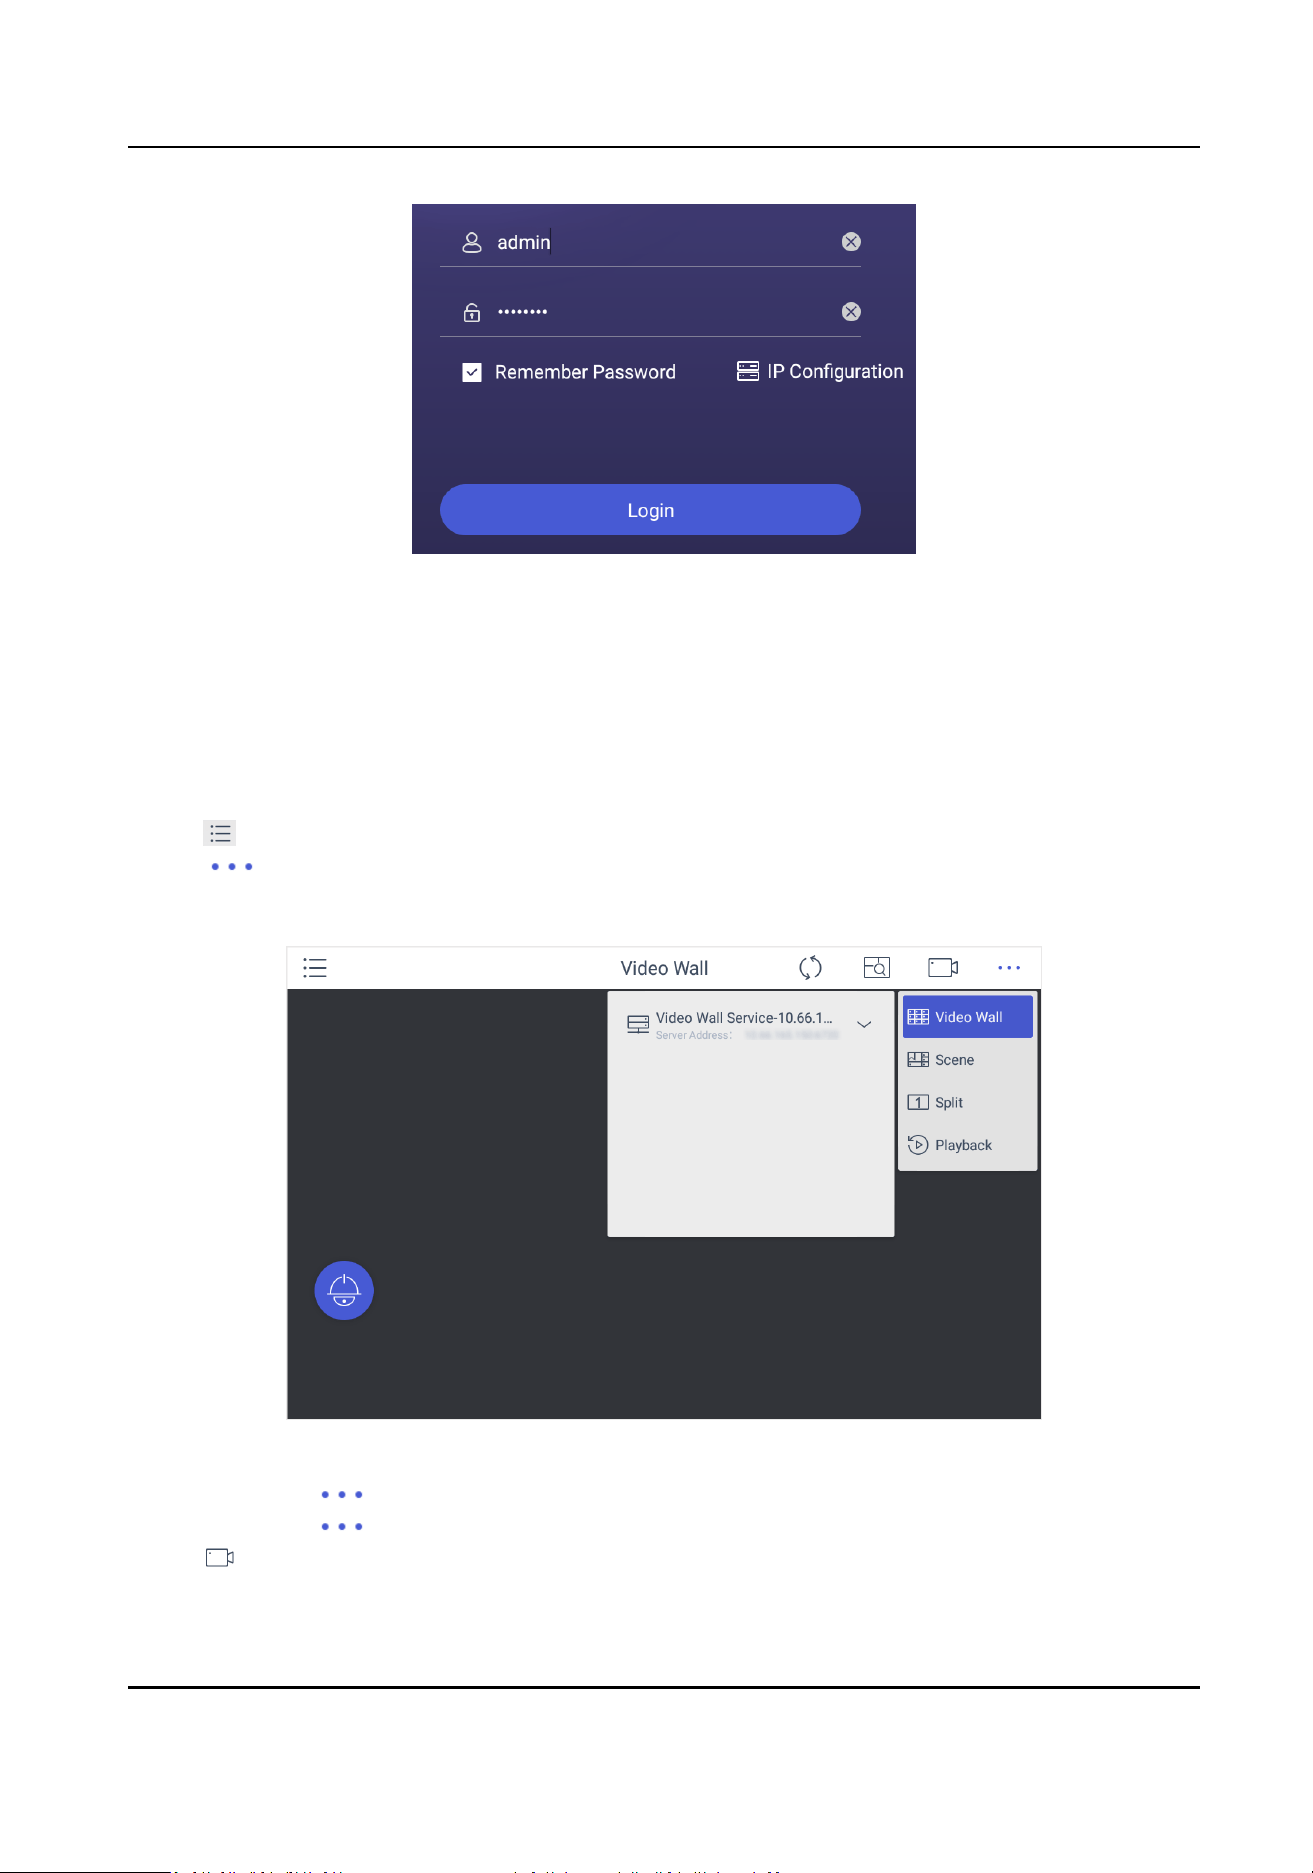
Figure 5-2 Login
5. Oponal: Check Remember Password to log in with no need to enter password next me.
6. Tap Login.
5.1.2 Display a Camera on Video Wall
Steps
1. Tap on the iSecure main page, and select Video Wall.
2. Tap
in the upper-right corner and select Video Wall, and select the video wall that you
want to congure.
All video wall resources from the plaorm will be listed in Video Wall.
Figure 5-3 Video Wall
3. Oponal: Tap to select desired scene from Scene list.
4.
Oponal: Tap and select Split to split the output window.
5. Tap to play the live video of corresponding camera on the window. You can choose one of
the following ways:
DS-1600KI Keyboard Quick Start Guide
26

-
Tap Shortcut, and enter the serial number in the numeric panel, and tap .
-
Tap List, and select a camera to display.
You can also perform the following operaons:
• Enter 0+ to stop playing the live video of corresponding camera on the window.
• Tap
to preview the live video of the previous input camera channel on the selected output
monitor.
• Tap
to preview the live video of the next input camera channel on the selected output
monitor.
6.
Other operaons:
• Tap and use the smart scaling funcon to select and zoom in the desired wall area. For
details about the
operaon, see Smart Scaling on Video Wall.
• Tap to perform PTZ control. For details, see PTZ Control for specicaons.
5.1.3 Local Live View
Steps
1. Tap
and select Live View to go to the local live view.
Figure 5-4 Live View
2. Oponal: Tap to select the window division mode.
Note
You can also preview the window rst and then split the window. In this situaon, the
previewed window in on the upper-le by default.
3. Select a channel, and tap .
4. Watch the live view.
-
Tap Shortcut, and enter the serial number in the numeric panel, and tap .
DS-1600KI Keyboard Quick Start Guide
27
-
Tap List, and select a channel to preview.
5.
Oponal: Switch the channel.
-
Enter 0+ to stop previewing.
-
Tap to preview the live video of the previous input camera channel on the selected output
monitor.
-
Tap
to preview the live video of the next input camera channel on the selected output
monitor.
6.
Oponal: Tap to close all the live view windows. You can tap to perform the following
operaons.
Icon Descripon
Full • Tap Full to have a full-screen preview of the live video of corresponding camera
on the window.
• Double-tap the window to have a full-screen preview.
Capture Select a window and tap Capture to save pictures to a USB ash drive or FTP
server.
Note
You can also press the buon on the joysck to capture pictures.
Record Select a window and tap Record to save records to a USB ash drive or FTP server.
View Tap View to view parameters of the camera on live view.
Note
If you perform operaons of capturing pictures or recording videos, make sure to connect the
keyboard with a USB ash drive, or provide a valid and correct network connecon between PC
(running FTP server) and the keyboard, and set the FTP parameters of keyboard correctly. Refer
to Set Storage for FTP
conguraon.
5.1.4 Video Wall Playback
Steps
1. Tap on the iSecure main page, and select Video Wall.
2. Select a display window, tap
in the upper-right corner, and select Playback.
DS-1600KI Keyboard Quick Start Guide
28
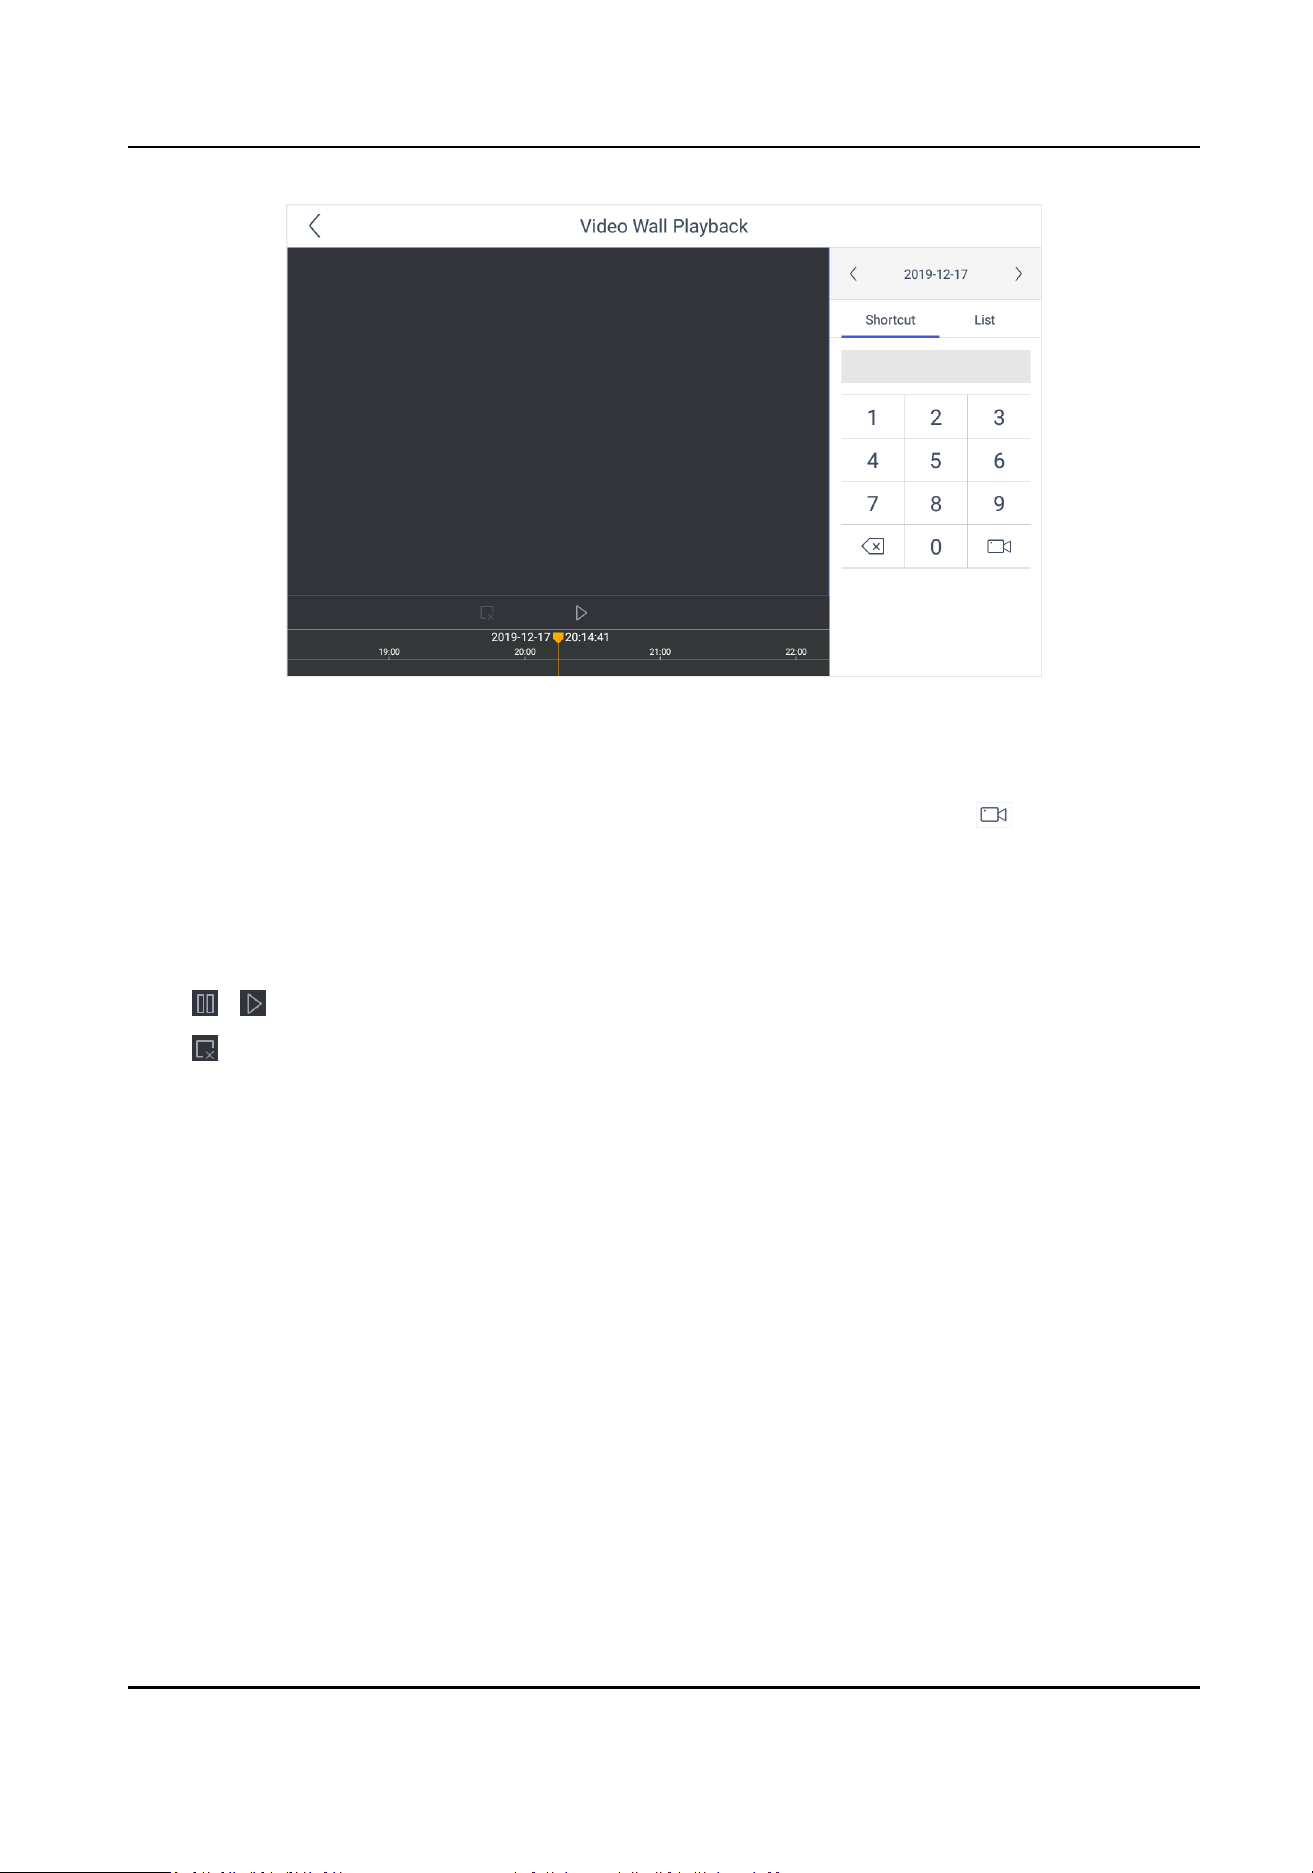
Figure 5-5 Video Wall Playback
3. Select the date.
4. Select the channel. You can choose one of the following ways.
-
Tap Shortcut, and enter the serial number in the numeric panel, and tap
.
-
Tap List, and select the desired channel.
5. Drag the slider to set required playback me and play from the start me by default.
6. Use the toolbar to perform playback operaons.
Icon
Descripon
/ Pause/Start
Stop
5.2 Control HikCentral
You can connect the keyboard to HikCentral plaorm to play live videos on the video wall, watch
video playback or watch live video locally.
5.2.1 Login
Steps
1. Tap HikCentral on the main page.
2. Tap IP
Conguraon.
3. Select HTTP or HTTPS mode, enter the server's IP Address, and tap Conrm.
DS-1600KI Keyboard Quick Start Guide
29
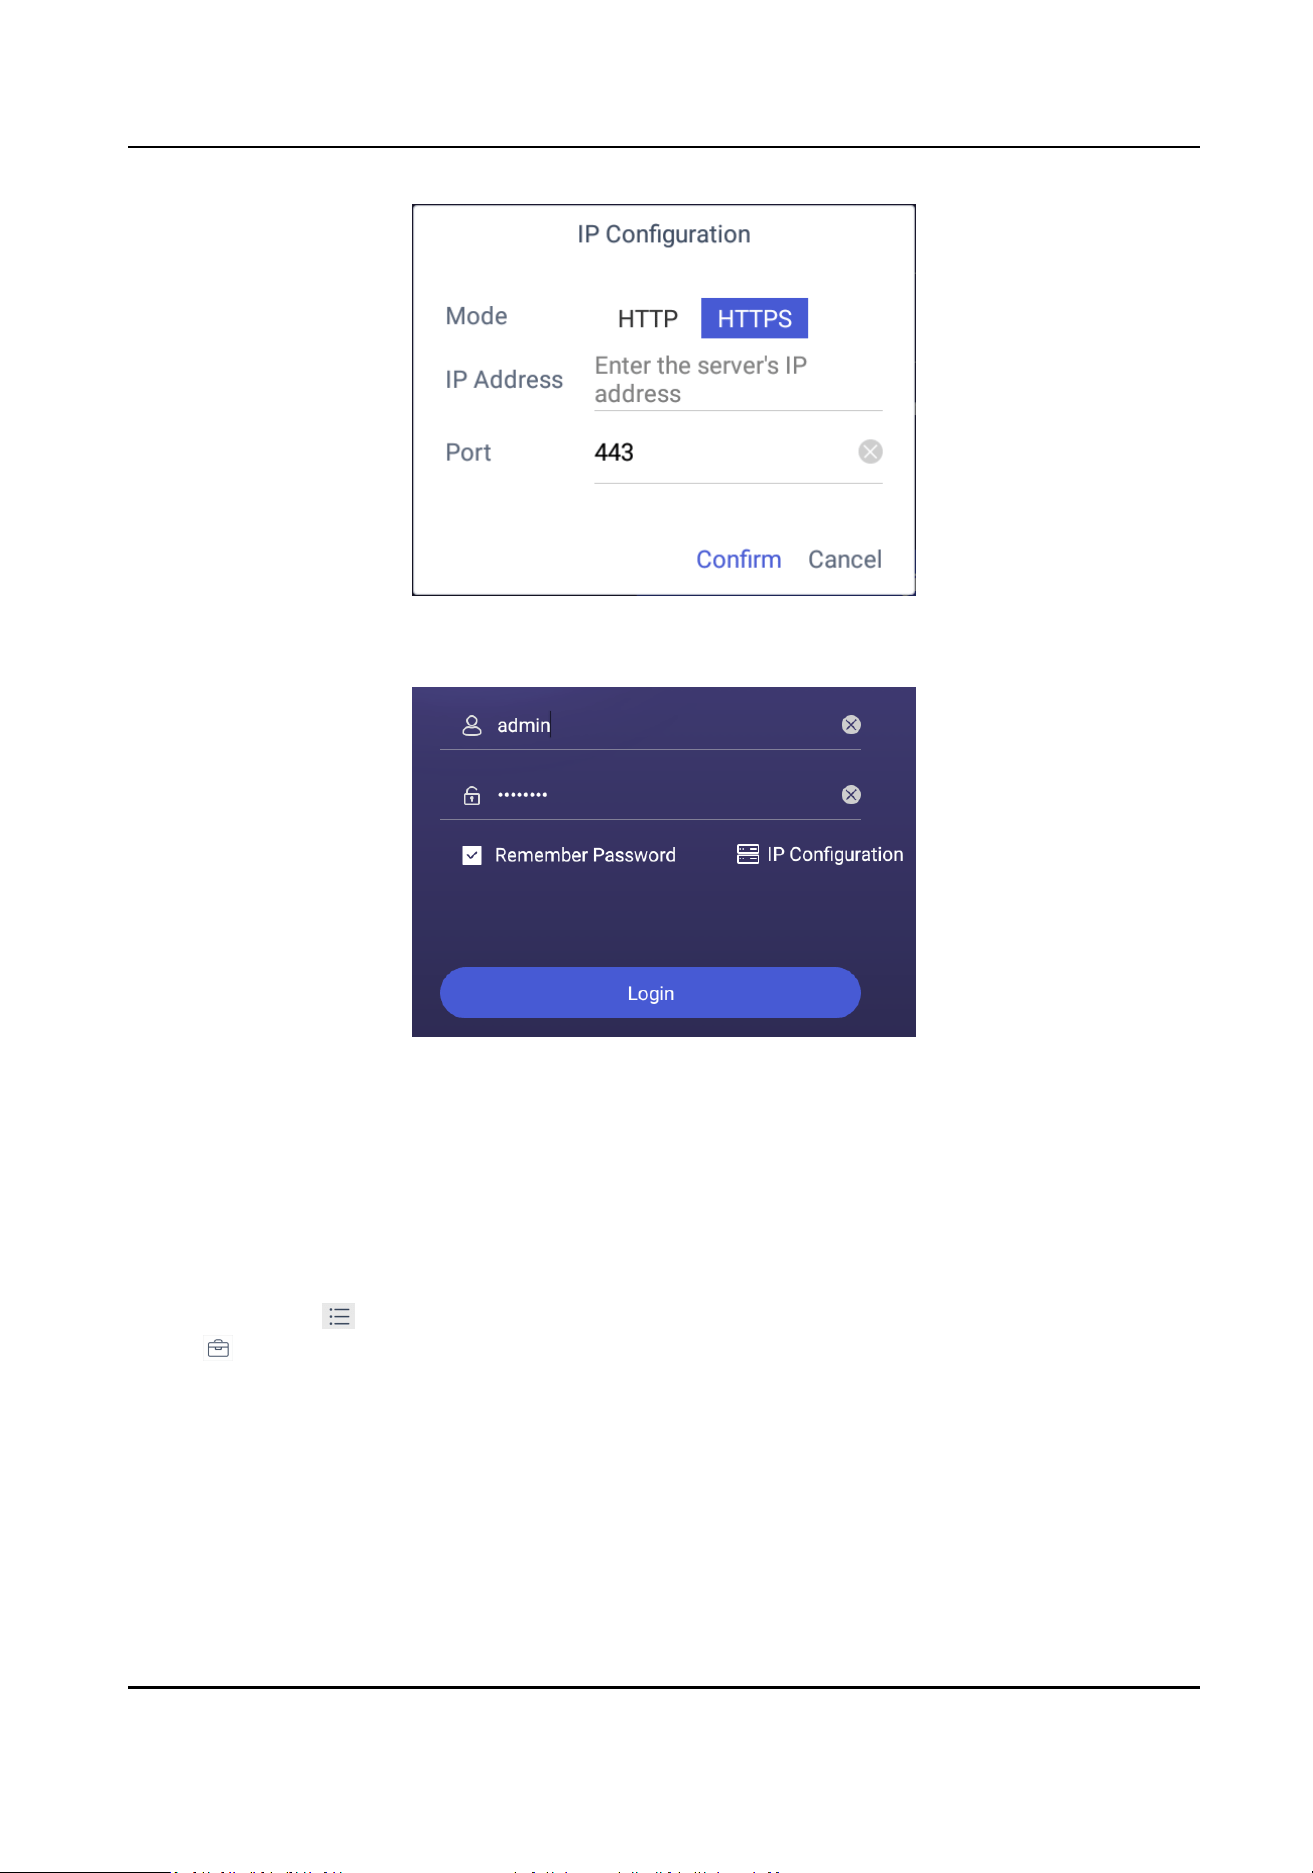
Figure 5-6 IP Conguraon
4. Enter the server's user name and password.
Figure 5-7 Login
5. Oponal: Check Remember Password to log in with no need to enter password next me.
6. Tap Login.
5.2.2 Display a Camera on Video Wall
Steps
1. Tap HikCentral on the iSecure main page, and select Video Wall.
2. Tap
in the upper-right corner and select Wall, and select the video wall that you want to
congure.
All video wall resources from the plaorm will be listed in Wall.
DS-1600KI Keyboard Quick Start Guide
30

Figure 5-8 Video Wall
3. Oponal: Tap to select desired scene from Scene list.
4. Oponal: Tap and select Split to split the output window.
5. Tap to play the live video of corresponding camera on the window. You can choose one of
the following ways:
-
Tap Shortcut, and enter the serial number in the numeric panel, and tap .
-
Tap List, and select a camera to display.
You can also perform the following operaons:
• Enter 0+ to stop playing the live video of corresponding camera on the window.
• Tap
to preview the live video of the previous input camera channel on the selected output
monitor.
• Tap
to preview the live video of the next input camera channel on the selected output
monitor.
6. Other
operaons:
• Select a non-BNC window, tap and select Open to open a new window above non-
roaming windows.
• Tap
to perform PTZ control. For details, see PTZ Control for specicaons.
• Select a window and tap Enlarge to enlarge the window.
• Select a window and tap Main to switch the stream type.
5.2.3 Local Live View
Steps
1. Tap
and select Live View to go to the local live view.
DS-1600KI Keyboard Quick Start Guide
31
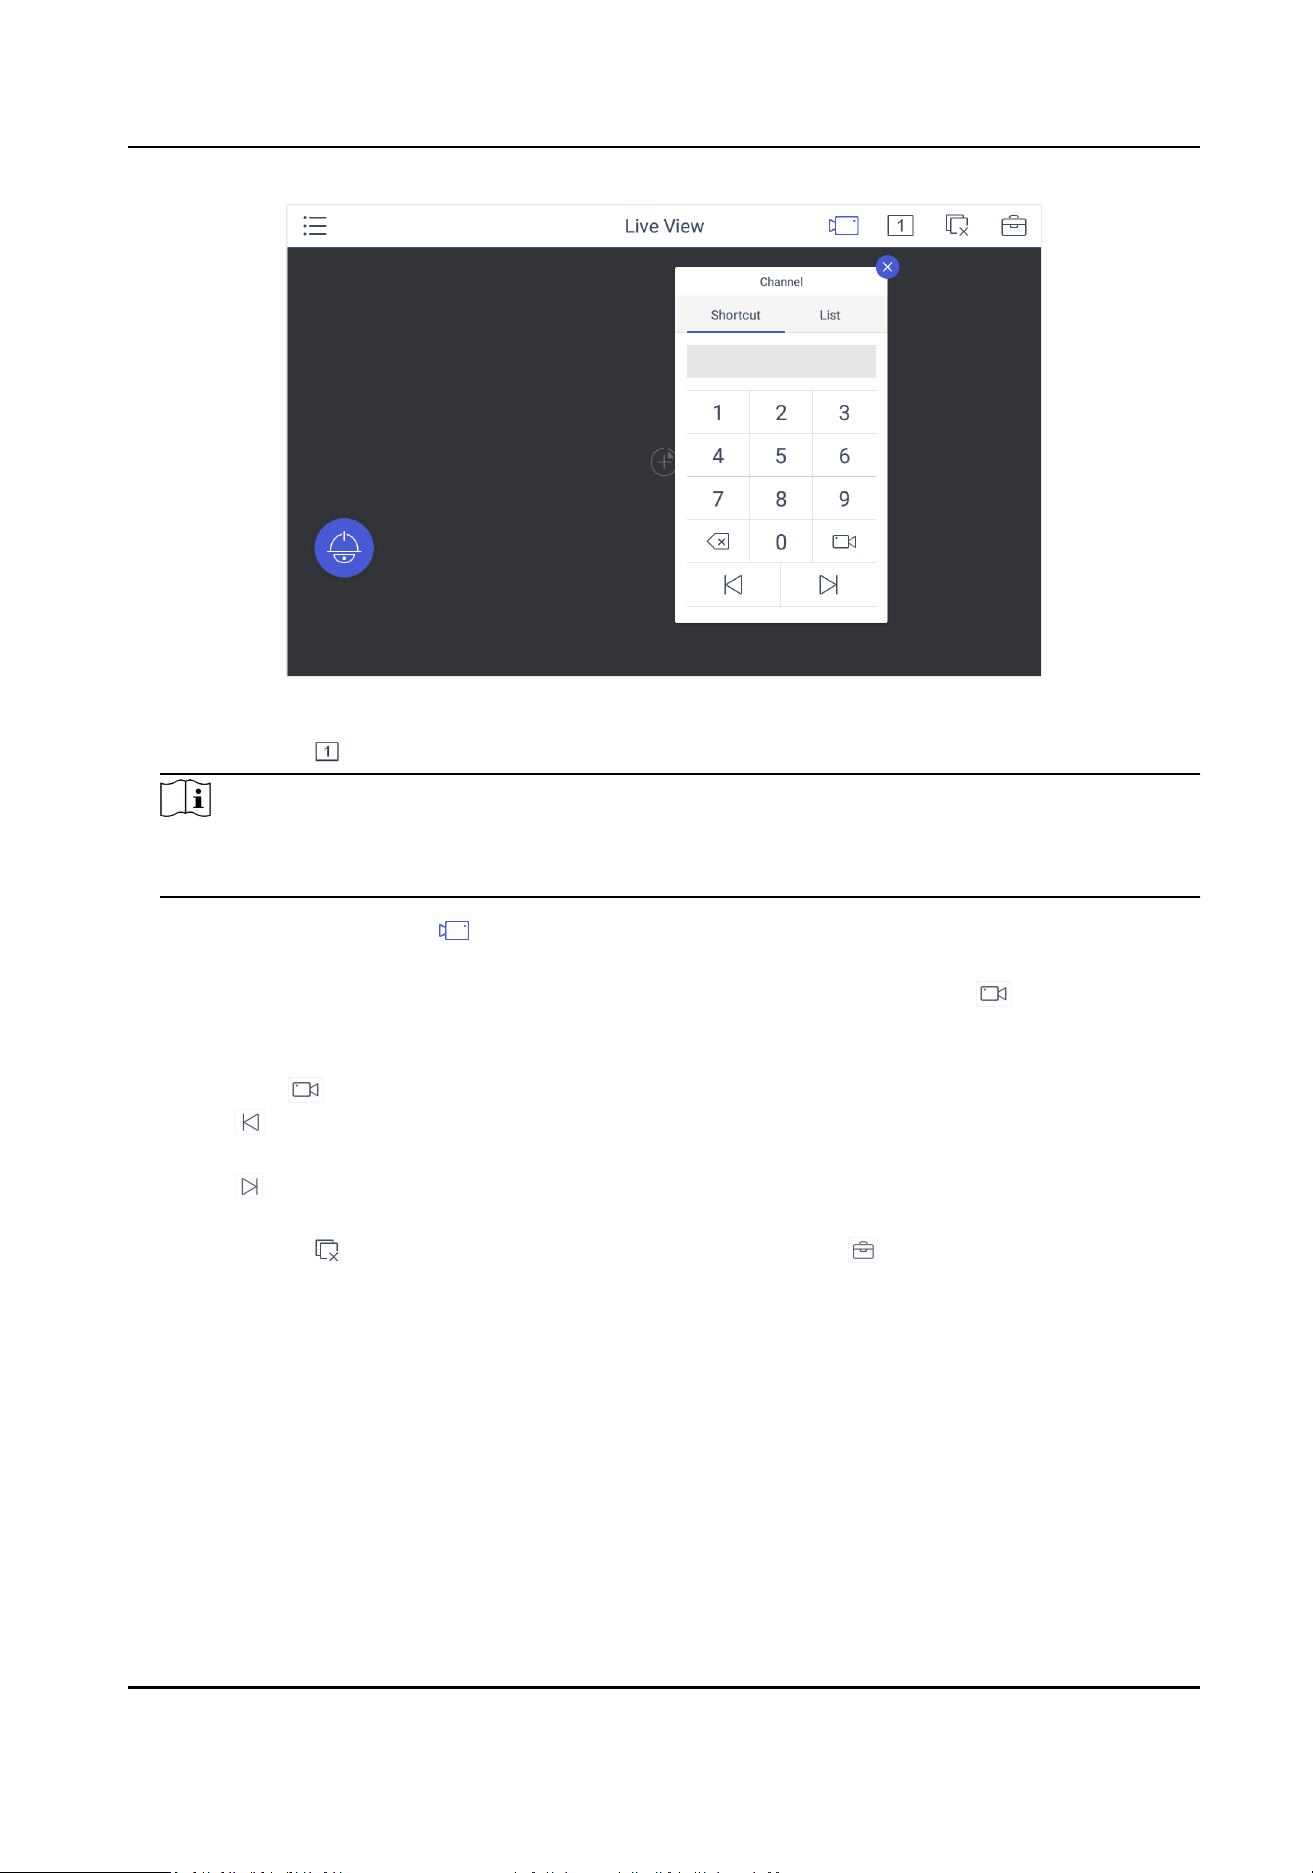
Figure 5-9 Live View
2. Oponal: Tap to select the window division mode.
Note
You can also preview the window rst and then split the window. In this situaon, the
previewed window in on the upper-le by default.
3. Select a channel, and tap .
4. Watch the live view.
-
Tap Shortcut, and enter the serial number in the numeric panel, and tap .
-
Tap List, and select a channel to preview.
5. Oponal: Switch the channel.
-
Enter 0+
to stop previewing.
-
Tap to preview the live video of the previous input camera channel on the selected output
monitor.
-
Tap
to preview the live video of the next input camera channel on the selected output
monitor.
6.
Oponal: Tap to close all the live view windows. You can tap to perform the following
operaons.
Icon
Descripon
Full • Tap Full to have a full-screen preview of the live video of corresponding camera
on the window.
• Double-tap the window to have a full-screen preview.
Capture Select a window and tap Capture to save pictures to a USB ash drive or FTP
server.
DS-1600KI Keyboard Quick Start Guide
32
Note
You can also press the buon on the joysck to capture pictures.
Record Select a window and tap Record to save records to a USB ash drive or FTP server.
View Tap View to view parameters of the camera on live view.
Note
If you perform operaons of capturing pictures or recording videos, make sure to connect the
keyboard with a USB ash drive, or provide a valid and correct network connecon between PC
(running FTP server) and the keyboard, and set the FTP parameters of keyboard correctly. Refer
to Set Storage for FTP
conguraon.
5.2.4 Video Wall Playback
Steps
1. Tap
in the upper-right corner to watch video wall playback.
Figure 5-10 Video Wall Playback
2. Select the date.
3. Select the channel. You can choose one of the following ways.
-
Tap Shortcut, and enter the serial number in the numeric panel, and tap .
-
Tap List, and select the desired channel.
4. Drag the slider to set required playback me and play from the start me by default.
5. Use the toolbar to perform playback
operaons.
Icon
Descripon
DS-1600KI Keyboard Quick Start Guide
33
/ Pause/Start
Fast forward speed; you can also move the joysck right to fast forward the video.
Slow forward speed; you can also move the joysck le to slow forward the video.
Stop
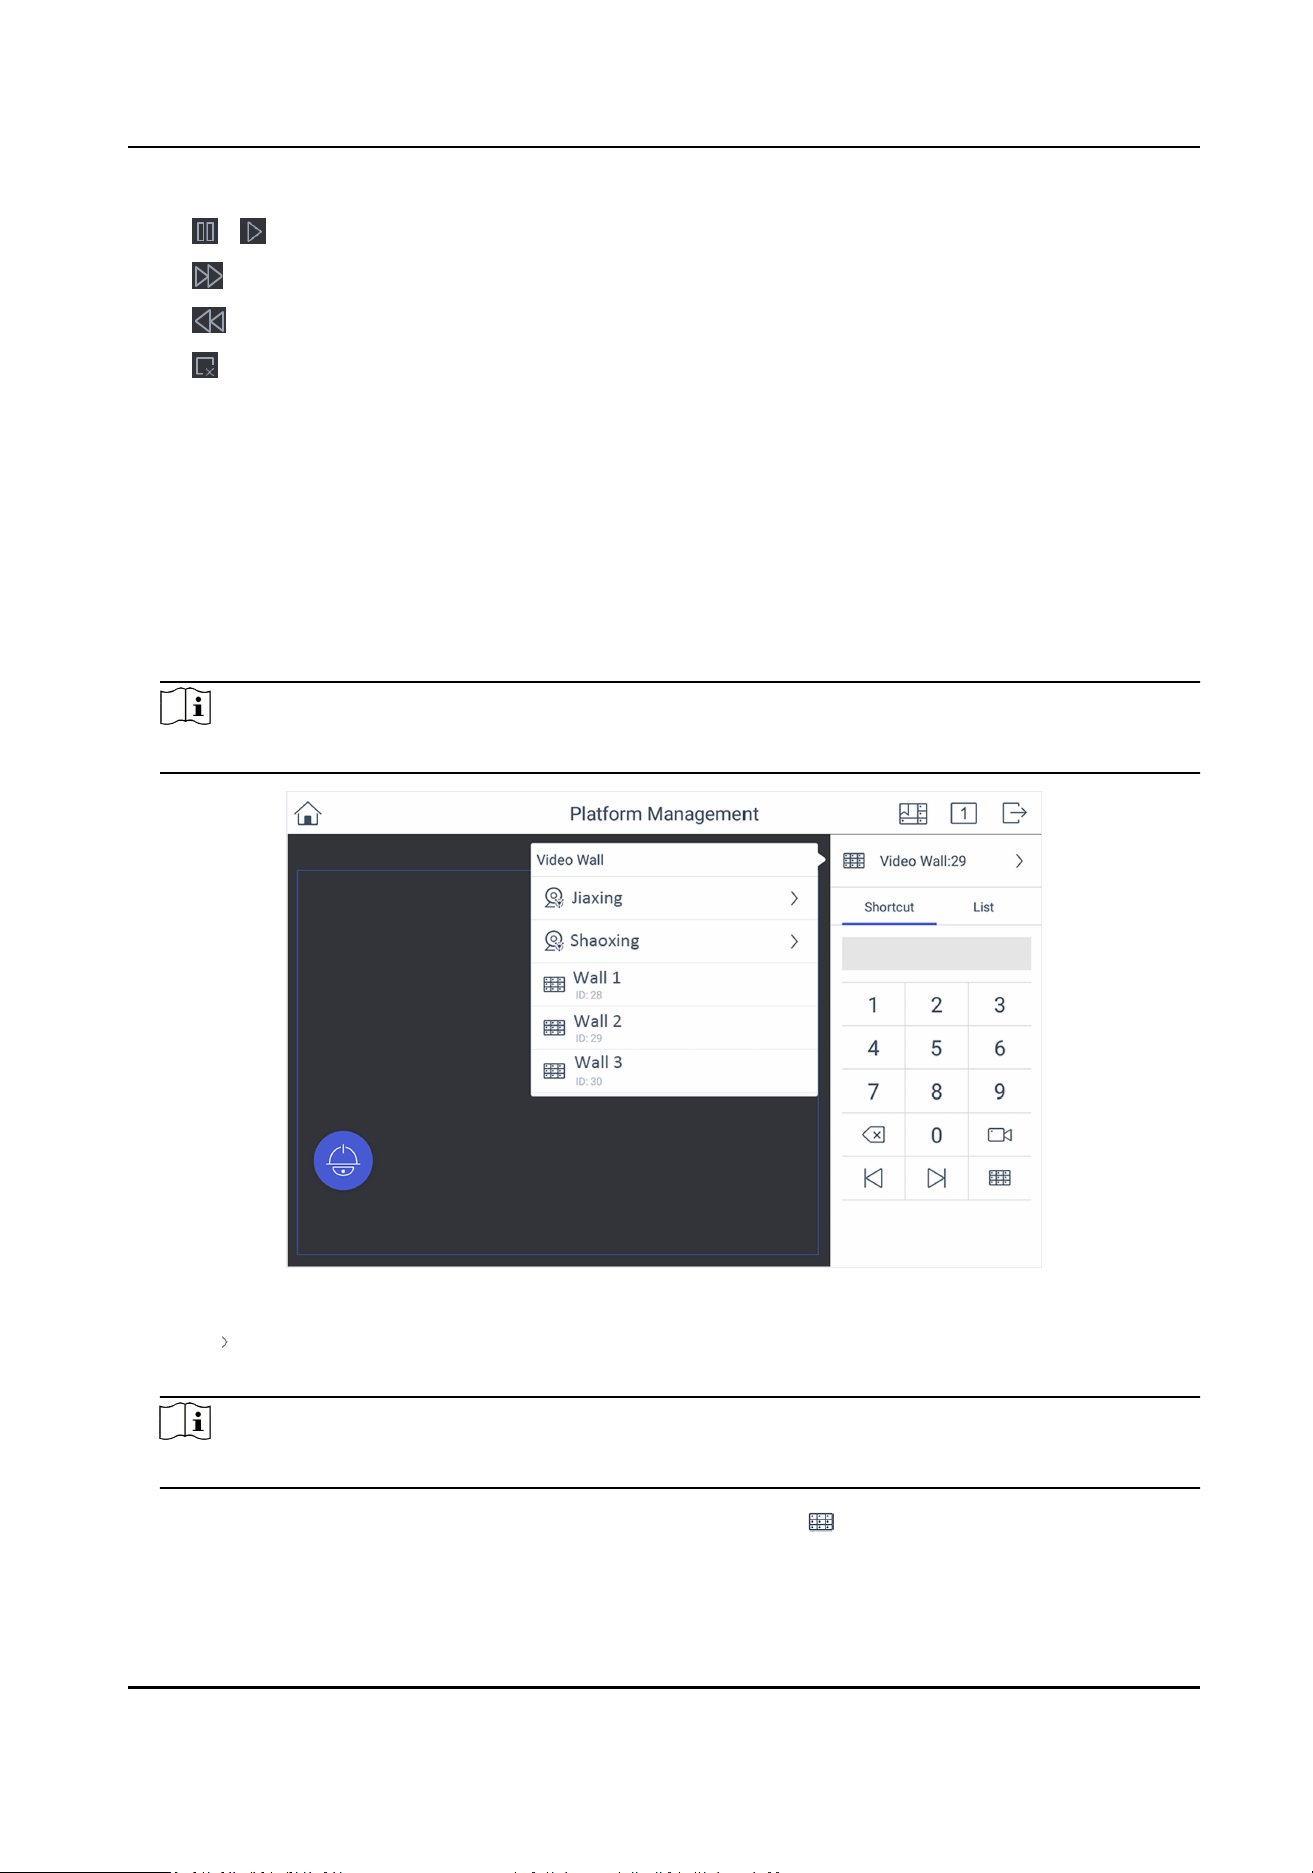
5.3 Control KPS
You can connect the keyboard to KPS plaorm to play live videos on the video wall.
Steps
1. Click KPS on the home page.
2. Enter Server IP, Port, User Name, and Password to log in the
plaorm.
3. Click Login to enter the plaorm interface.
Note
You can check Remember Password to remember the login password in next me.
Figure 5-11 Plaorm Management
4. Click in the upper-right corner and select Video Wall, and select the video wall that you want
to congure.
Note
All video wall resources from the plaorm will be listed in Video Wall.
5. Click Shortcut, enter the serial number of window and click to select the window.
6. Select a camera to play on video wall.
1) Select an output window on the video wall to play the camera.
DS-1600KI Keyboard Quick Start Guide
34

2) Click , enter the serial number in the numeric panel, and click to play the live video of
corresponding camera on the window.
Note
You can also select from List.
7.
Oponal: Click or to preview the live video of the previous or next input camera channel
on the selected output monitor.
8.
Oponal: Click to select desired scene from Scene list.
9.
Oponal: Click to split the output window.
10. Oponal: Click to perform PTZ control. For details, see PTZ Control for specicaons.
DS-1600KI Keyboard Quick Start Guide
35

UD17856B