PART# 40060 | REV060718ART
ATTENTION! READ ALL INSTRUCTIONS CAREFULLY
FAILURE TO FOLLOW WARNING INSTRUCTIONS CAN RESULT IN FIRE,
PERSONAL INJURY OR PROPERTY DAMAGE.
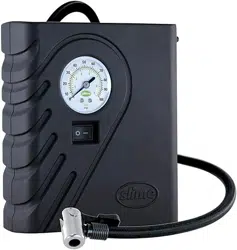
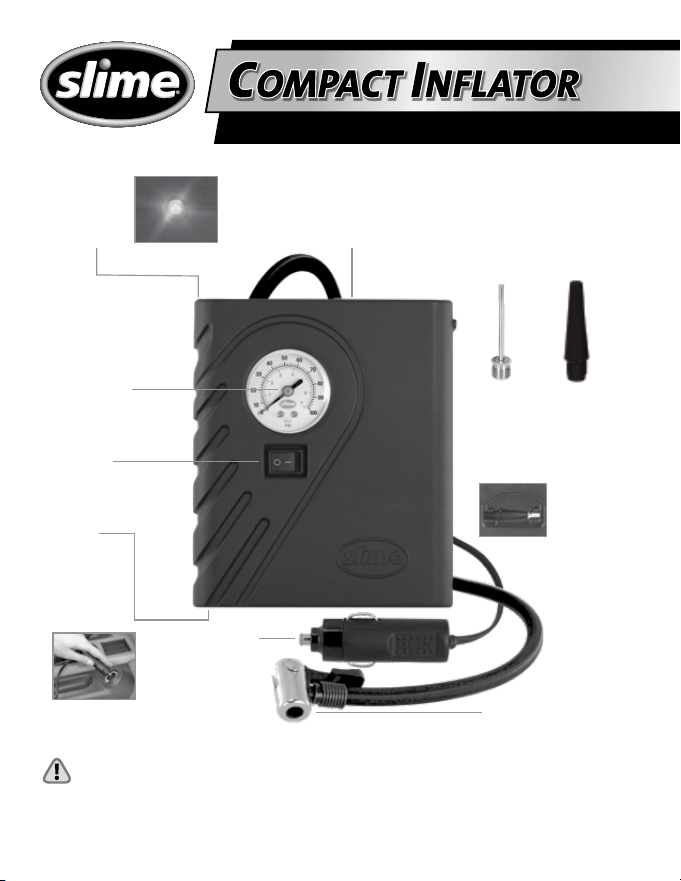
TIRE INFLATOR WITH LED LIGHT
POWER SOURCE
• Plugs into 12V
power outlet
LIGHT
• Bright LED
• For night-time
emergencies
ON/OFF
SWITCH
DIAL GAUGE
• Measures PSI/BAR
AIR ADAPTER
STORAGE ON BACK
• Inflatables adapters
snap-in-place for easy access
CORD
STORAGE
QUICK CONNECT
AIR HOSE
AIR HOSE
STORAGE
BALLS INFLATABLES
CAUTION: DO NOT OVERINFLATE!
HOT • DO NOT HOLD IN HAND WHILE OPERATING • PLACE
INFLATOR ON A HARD, CLEAN SURFACE.
1. DO NOT run vehicle while inflator is operating. You may need to be in
“accessory” or “on” position. Please make sure emergency brake is set
and car is in park.
2. Keep inflator out of reach of children.
3. DO NOT use inflator continuously for more than 10 minutes. Allow unit
to cool approximately 25 minutes between uses. Do not leave inflator
unattended.
4. Soft inflatables (i.e. rafts, balls, etc.) may not have recommended
pressure markings. Be careful not to inflate items beyond their capacity.
5. While operating, never block the inflator input or output.
6. For use with 12 volt DC power outlets rated 15 amps or higher. Do not
use with older 8 amp cigarette lighter receptacles.
TIRE INFLATION TIME
CFM (LPM)
DIAL GAUGE
POWER SOURCE
POWER CORD LENGTH
REPLACEABLE FUSE
AIR HOSE LENGTH
TOTAL REACH
LED LIGHT
10 min*
0.44 (12.5 LPM)**
0-100 PSI / (0-7BAR)
12 volt accessory power outlet
9.7 ft. (2.95 m)
15A 250V 5mm x 20mm
19.5 in. (0.5m)
11.3 ft. (3.45m)
7 Lumens
TECH SPECS
* (0-35 PSI, Standard Tire: P195/65 R15) ** (@ 0 PSI/BAR)
1
2
3
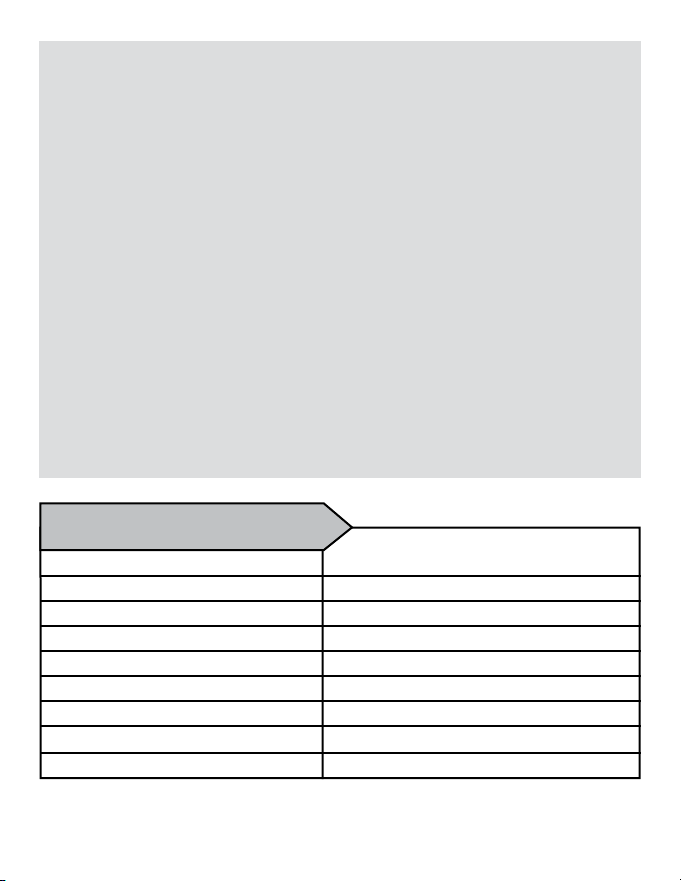
1. Place connector on air valve stem and
push down.
INFLATE TIRES
4
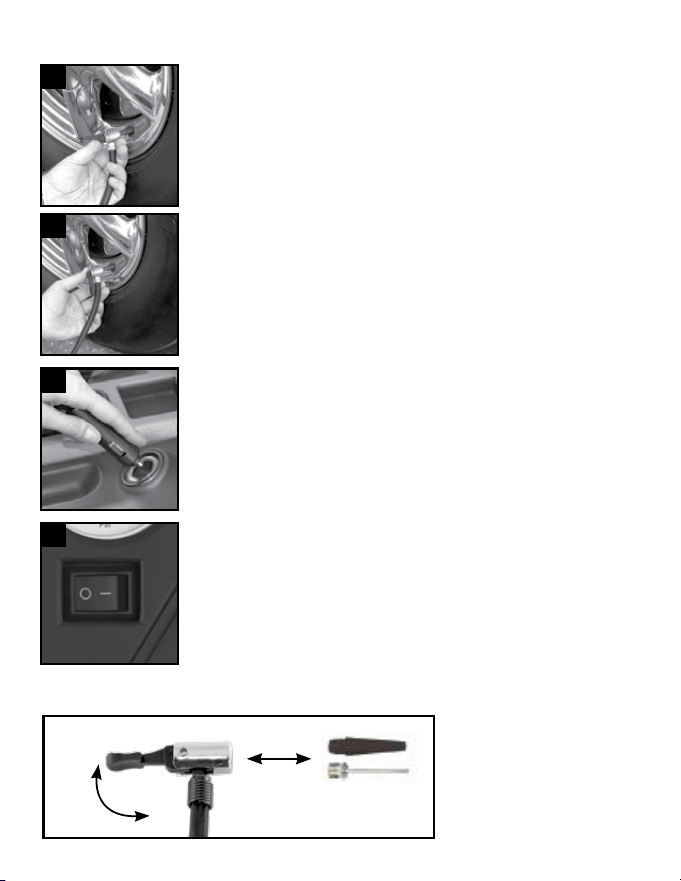
To unlock the hammerhead
valve, pull handle upward,
then place in adapter and
push down to lock in adapter.
USING THE ADAPTERS
PULL UP TO
UNLOCK
PUSH DOWN
TO LOCK
4. Turn on inflator and when proper pressure
is reached, turn off inflator, unplug power
cord and remove connector.
*NOTE: Correct tire pressure can be found in vehicle
owner’s manual or on driver’s side door jamb.
3. Plug power cord into power outlet
receptacle.
2. Close thumb latch connector to secure
to valve.
TROUBLESHOOTING:
Inflator does not turn ON :
1. Check the power plug and push it firmly into the receptacle,
twist back and forth.
2. Check receptacle and plug terminals for dirt, or debris.
(Use a non-conductive probe, not fingers or metal).
3. Check vehicle power outlet fuse. It should be 15 amps minimum.
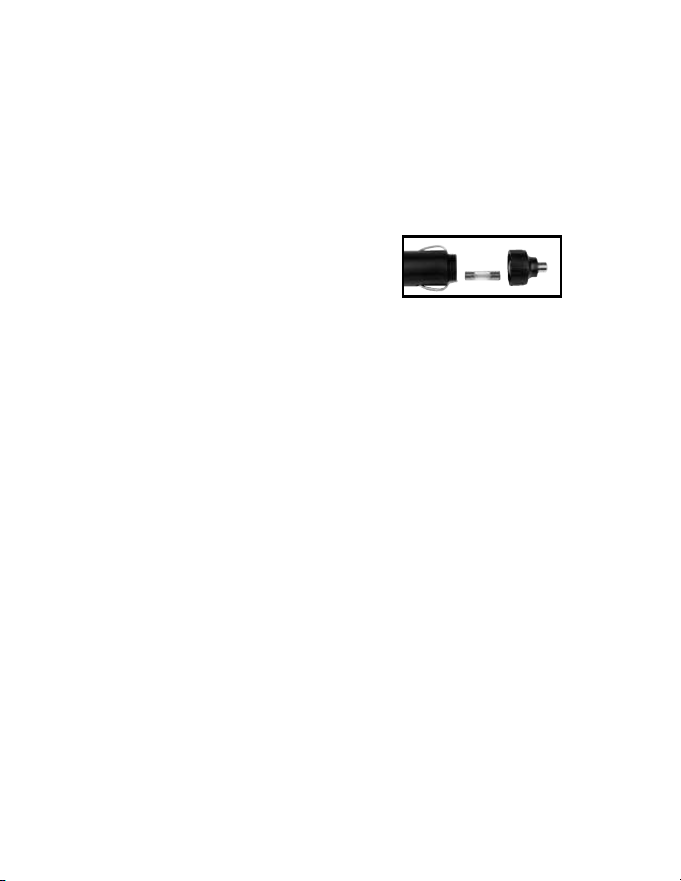
4. C heck the fuse. It may have blown:
12V fuse is located in the plug adaptor:
unscrew the tip, remove fuse, and inspect.
If necessary, replace fuse with 15A 250V (5mm x 20mm).
Inflator runs but does not inflate:
1. Be sure the air hose valve connector is fully secured on the tire valve.
2. Check tire for leaks, and check hose for breaks and leaks at fittings.
3. Check valve core for damage.
Inflator runs slowly:
1. The inflator may be overheated from excessive use. Shut if off and allow to
cool for 25 minutes.
2. Voltage too low. Check condition of vehicle battery.
NOTE:
If tire is totally deflated, it is possible that the tire could separate from the
rim allowing air to leak out when trying to inflate. In the event this occurs, you
will have to jack up the tire prior to inflation.
Dispose of this product at an e-waste recycling collection point or facility.
Do not place in the trash or standard recycling receptacle.
WARRANTY: For the period of one year from date of purchase, manufacturer guarantees that this Product
will meet the specifications when used as directed. Manufacturer’s sole liability and Customer’s sole remedy
under any warranty claim is limited to Manufacturer’s coupon upon return of proof of purchase.
QUESTIONS OR COMMENTS:
Call (888)457-5463 or visit www.slime.com
ITW Global Tire Repair • 125 Venture Drive, Suite 210, San Luis Obispo, CA 93401 USA
Slime® is a trademark of Illinois Tool Works, Inc., registered in the U.S. and other countries.
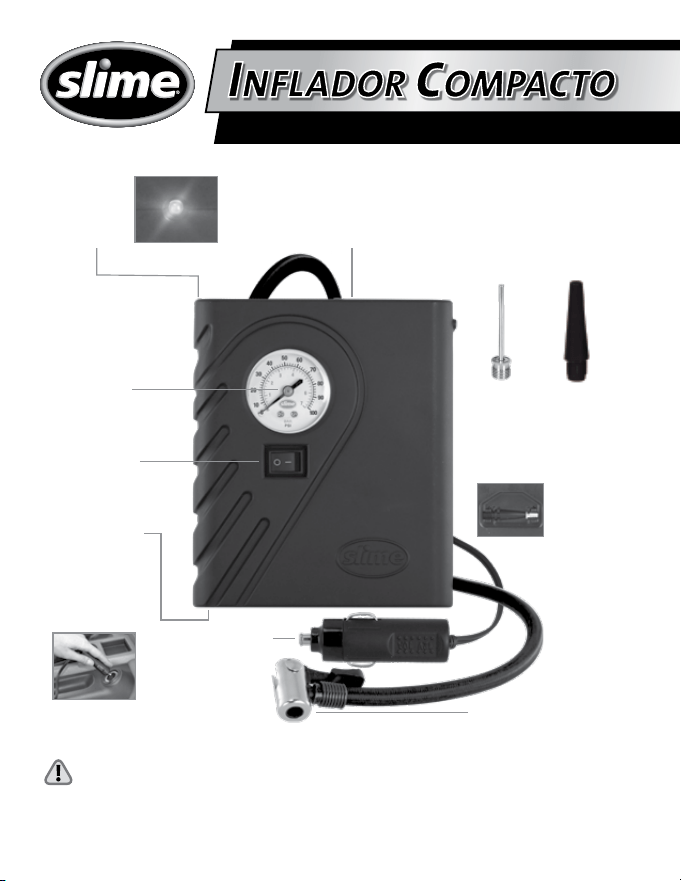
INFLADOR DE LLANTAS CON LUZ LED
INFLADOR COMPACTO
¡ATENCIÓN! LEA TODAS LAS INSTRUCCIONES CON ATENCIÓN
SI NO SIGUE LAS INSTRUCCIONES DE ADVERTENCIA, PUEDE CAUSAR
INCENDIO, LESIONES A PERSONAS O DAÑOS MATERIALES.
LUZ
• LED brillante
• Para emergencias
de noche
MEDIDOR DE
CUADRANTE
• Mide PSI/BAR
SITIO PARA
ALMACENAR LA
MANGUERA DE AIRE
INTERRUPTOR
DE ENCENDIDO/
APAGADO
ESPACIO PARA
ALMACENAR
EL CABLE
FUENTE DE ENERGÍA
• Se conecta en una toma de
corriente de 12V
MANGUERA DE AIRE
DE CONEXIÓN RÁPIDA
PELOTAS INFLABLES
COMPARTIMIENTO PARA
EL ADAPTADOR DE AIRE
• Los adaptadores inflables se
insertan en su lugar para fácil
acceso
PRECAUCIÓN: NO INFLE LOS ARTÍCULOS DEMASIADO
CALIENTE • NO SOSTENGA CON LA MANO AL OPERAR • COLOQUE EL
INFLADOR SOBRE UNA SUPERFICIE FIRME Y LIMPIA.
1. NO conduzca el vehículo mientras esté funcionando el inflador. Es posible
que deba estar en la posición de “accesorios” o “encendido”. Asegúrese
de colocar el freno de emergencia y que el vehículo esté en park
(estacionamiento).
2. Mantenga el inflador lejos del alcance de los niños.
3. NO USE el inflador continuamente durante más de 10 minutos. Permita
que la unidad se enfríe aproximadamente 10 minutos entre cada uso. No
inflador funcionando solo.
4. Los inflables blandos (balsas, pelotas, etc.) pueden no tener marcaciones
de presión recomendada. Tenga cuidado de no inflar los artículos por
arriba de su capacidad.
5. Durante la operación, no bloquee la entrada ni la salida del inflador.
6. Para usarse con una alimentación eléctrica de 12 VCD y una corriente
nominal de 15 A o mayor. No use con las tomas antiguas para cigarrillos
de 8 A.
TIEMPO PARA INFLAR LA LLANTA
PULGADAS CÚBICAS POR MINUTO
INDICADOR DE CUADRANTE EN LÍNEA
FUENTE DE ENERGÍA
LONGITUD DEL CORDÓN DE CORRIENTE
REPLACEABLE FUSE
LONGITUD DE LA MAGUERA DE AIRE
DISTANCIA COMPLETA
LED LUZ
10 min*
0.44 (12.5 LPM)**
0-100 PSI / (0-7BAR)
Toma de corriente para accesorio de 12 voltios
9.7 ft. (2.95 m)
15A 250V 5mm x 20mm
19.5 in. (0.5m)
11.3 ft. (3.45m)
7 Lumens
TECH SPECS
* (0-35 PSI,Llanta Estàndar: P195/65 R15) ** (@ 0 PSI/BAR)

1
2
3
1. Coloque el conector sobre el vástago de
la válvula de aire y presione hacia abajo.
4
4.Encienda el inflador y cuando llegue a la presión
adecuada, apague el inflador, desconecte el
cable eléctrico y retire el conector.
*NOTA: La presión de la llanta adecuada se encuentra en
el manual del propietario del vehículo o en el panel de la
puerta del lado del conductor.
3.Conecte el cable en el receptáculo del
tomacorriente.
2. Luego cierre el pestillo con el pulgar
para sujetar la válvula.
TIRE HACIA
ARRIBA PARA
LIBERAR
EMPUJE HACIA
ABAJO PARA
ASEGURAR
Libere la válvula Air Chuck,
tire de la manija hacia arriba,
introduzca el adaptador y
empuje hacia abajo para
asegurarlo.
CÓMO USAR LOS ADAPTADORES
INFLE LAS LLANTAS
TROUBLESHOOTING:
El inflador no enciende:
1. Empuje con firmeza el enchufe en la toma y gírelo de atrás hacia adelante.
2. Inspeccione las terminales del receptáculo y del enchufe en busca de suciedad.
(Use un elemento que no conduzca electricidad, no use los dedos ni nada de
metal).
3. Revise el fusible de la toma de corriente del vehículo; debe ser de un mínimo
de 15 A.
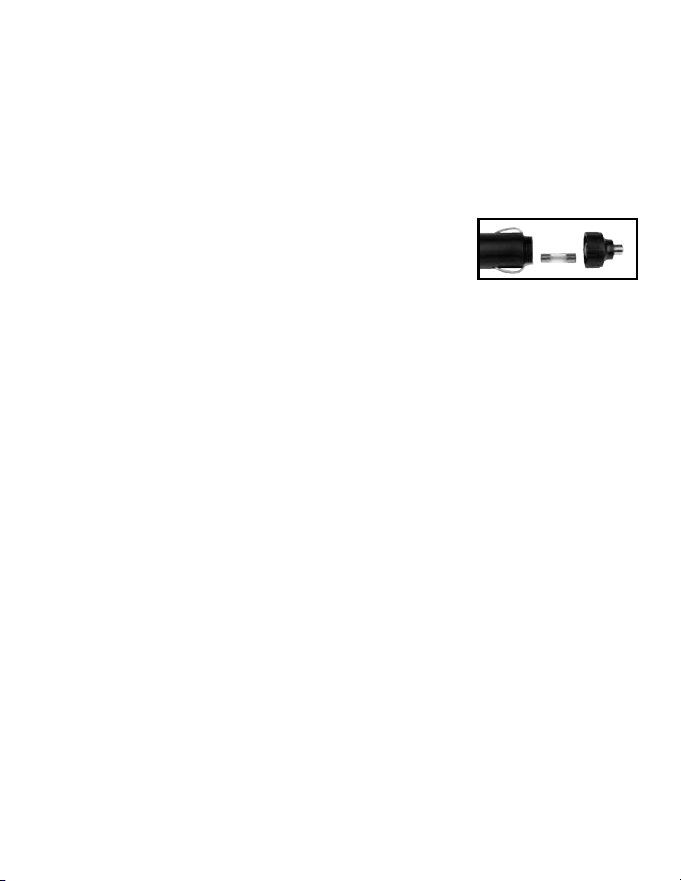
4. Verifique el fusible, puede haberse fundido: el fusible de
12 V está ubicado en el adaptador del enchufe.
Desenrosque la punta, retire el fusible e inspeccione.
Si es necesario, reemplace el fusible con uno de 15A 250V (5mm20mm).
El inflador funciona pero no infla:
1. Asegúrese de que la válvula esta correctamente conectada al conector de la
manguera.
2. Verifique que la llanta no tenga fugas. Revise que la manguera no tenga
grietas ni fugas en las conexiones.
3. Revise si existe algun daño en la manguera.
El inflador funciona lentamente:
1. El inflador puede estar sobrecalentado debido a uso excesivo. Apáguelo y
espere 25 minutos para que se enfríe.
2. El voltaje puede ser demasiado bajo. Revise la condición de la batería de su
vehículo.
NOTA: Si la llanta está totalmente desinflada, es posible que esté separada del
aro y éste permite que el aire se escape cuando trata de inflarla. Si ocurre esta
situación, puede ser necesario levantar la llanta con un gato para inflarla.
Deseche este producto en un lugar o establecimiento de colección o reciclaje de desechos
electrónicos. No lo coloque en la basura ni en el recipiente normal para el reciclaje.
GARANTÍA: Por el periodo de un año desde la fecha de compra, el fabricante garantiza que este producto
cumplirá las especificaciones si se usa de acuerdo con las instrucciones. La única responsabilidad del
fabricante y la única solución para el cliente bajo cualquier reclamación de garantía se limita a un cupón del
fabricante para el reemplazo del producto cuando se haya devuelto el artículo con el comprobante de compra.
PREGUNTAS O COMENTARIOS: Llamar al (888)457-5463 o visitar www.slime.com
ITW Global Tire Repair • 125 Venture Drive, Suite 210, San Luis Obispo, CA 93401 USA
Slime® es una marca registrada de Illinois Tool Works, Inc., registrada en Estados Unidos y en otros países.
