EM9926B User Manuals
Attentions
Please use the original or manufacturer specified attachments or accessories.
Please do not disassemble products, so as not to cause trouble or safety hazards
Do not use this product in the place near the water source, do not place this product in the damp place
Due to improper use of product damage, odor, smoke and other phenomena, please immediately terminate the use,
and send to professional maintenance personnel
Do not place the product in a strong electromagnetic wave, strong static electricity and easy condensation
Please do not place the magnetic stripe card (including credit card, telephone card, bank card, boarding card, etc.)
near the product, Otherwise, it will be damaged by the magnetic field
If you use a wireless charger in an area with weak network signals, your mobile device may not be able to receive
the network
Do not place metal, magnet, magnetic stripe card and other foreign matters between the mobile device and the
wireless charger, otherwise, the mobile device will not charge normally or be damaged due to overheating
If a thick protective shell is installed for the mobile device, the wireless charging may not work properly. If the cover is
thick, remove it, and then put the mobile device on the wireless charger for charging
Main features
Smart home wireless charger charge any equipment that accord with wireless charging standard
Wireless charging output: MAX.10W
USB socket can charge for mobile device (5V1.0A)
High definition and super large digital LCD screen time display
Perpetual Calendar Up to Year 2099
Time format in optional 12/24 HR
Day of week in 7 languages
Mood light can be adjustment in 3 modes or OFF
LCD backlight brightness can be adjustment in 3 gears or OFF
Daily Alarm clock and snooze function
Low battery indicate
433.92MHz wireless outdoor temperature and humidity sensor
Wireless transmission distance greater than 60 meters in an open area
Temperature unit in optional °C /°F
INDOOR temperature measurement ranges: -9.9°C (14.2°F) ~ 50°C (122°F)
Humidity measurement ranges: 20-95%
OUTDOOR temperature measurement ranges: -40°C (-40°F) ~ 70°C (158°F)
Humidity measurement ranges: 20-95%
Air pressure measurement ranges: 850~1100 hPa/mB
Daily maximum / minimum temperature and humidity record and query
Weather forecasting function
Power Supply:
Weather station: 2 x LR03 AAA size 1.5V
Remote sensor: 2 x LR06 AA size 1.5V
Adapter:DC9V2000mA
EM9926B User Manuals
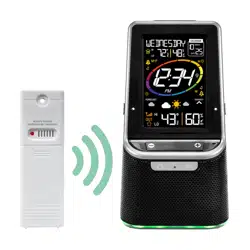
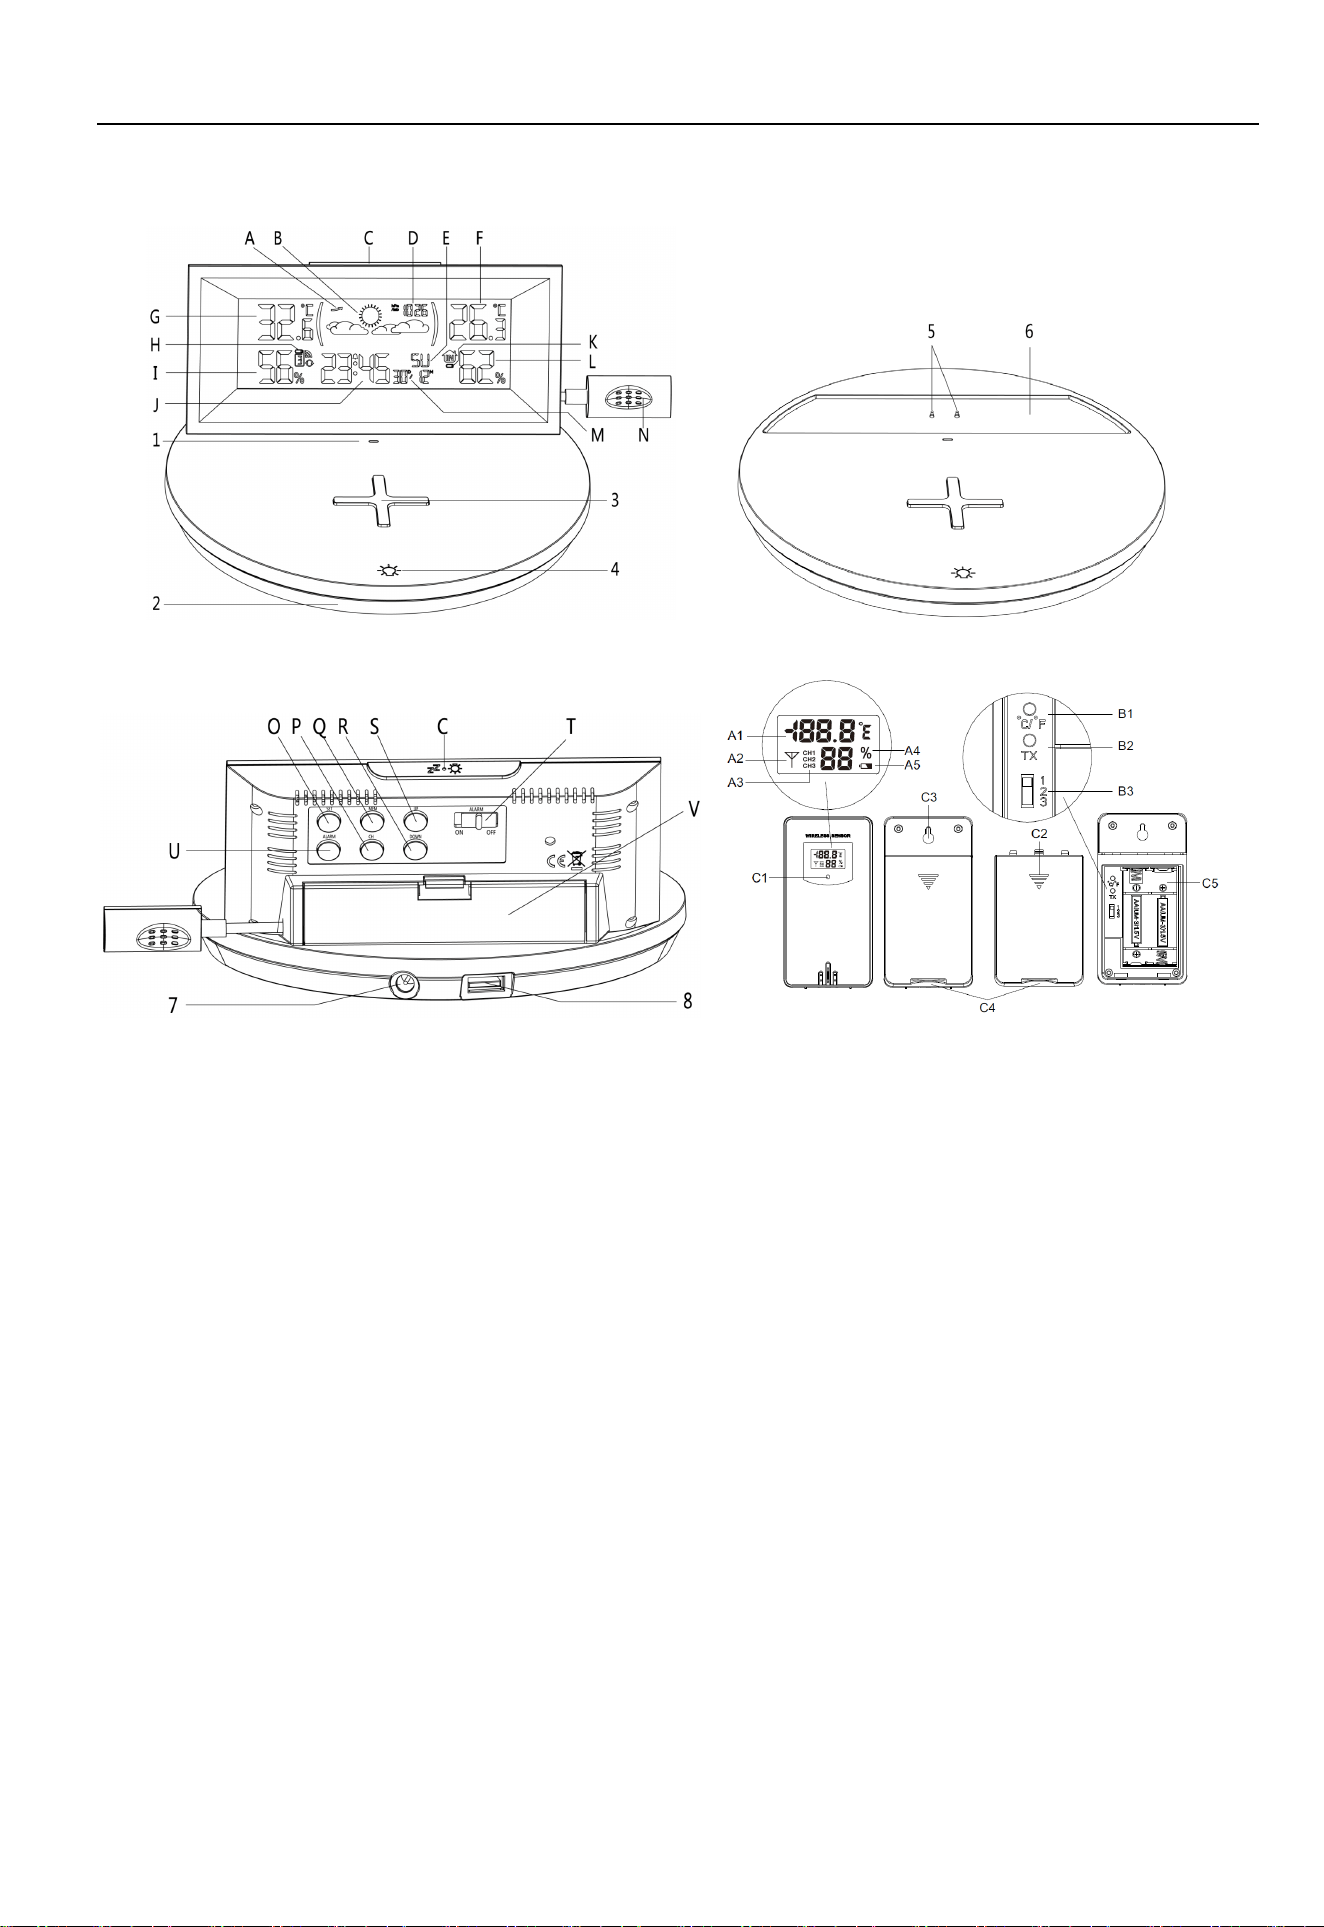
Appearance description
A:Trend of pressure L: INDOOR humidity
B:Weather forecast pattern M: Date
C:【Backlight /snooze】button N: INDOOR sensor
D:Pressure O: 【SET】 button
E:Day of week P: 【CH】button
F:INDOOR temperature Q: 【MEM】button
G:OUTDOOR temperature R: 【DOWN】button
H:Low battery indicator of remote sensor S: 【UP】button
I:OUTDOOR humidity T: Alarm ON/OFF switch
J:Time U: 【ALARM】button
K:Low battery indicator of weather station V: Battery compartment cover
1: Wireless Charging status indicator
2: Mood light emitting area
3: Antiskid pad of mobile device wireless charger
4: Touch button of mood light
5: Weather station DC power supply terminals
6: Place area of DC power supply to weather station
7: Adapter DC input socket
8: USB charging socket of 5V1.0A
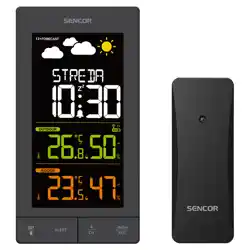
A1: Remote sensor temperature A2: Emission symbols
EM9926B User Manuals
A3: Channel number A4: Remote sensor humidity
A5: Remote sensor low battery indicate
B1: °C /°F unit transfer button B2: Manual transmitter button
B3: Channel switch
C1: Transmit indicating lamp C2: Battery compartment cover
C3: Wall mounting hole C4: Stand cover
C5: Battery compartment
Initial operation
Open the weather station battery compartment cover V , Install 2 x AAA batteries correctly and pay attention to the
positive and negative directions.
When you insert the batteries, the all icon on the LCD will light up for 3 seconds, and you will hear a beep tone, then
detect indoor temperature /humidity and pressure
The Weather Station will now start to make a connection to the outdoor remote sensor. This operation takes about 3
minutes and will display by a flashing reception RF signal symbol in the “OUTDOOR” display area on the receiver.
This now, Open the remote Sensor battery compartment cover C2, Toggle the switch B3 to select the channel you
want,Insert 2 x AA batteries with correct polarity 【“+” and “–“ marks】.
After receiver has created a connection to the outdoor remote sensor, Pairing mode will exit after 3 minutes.
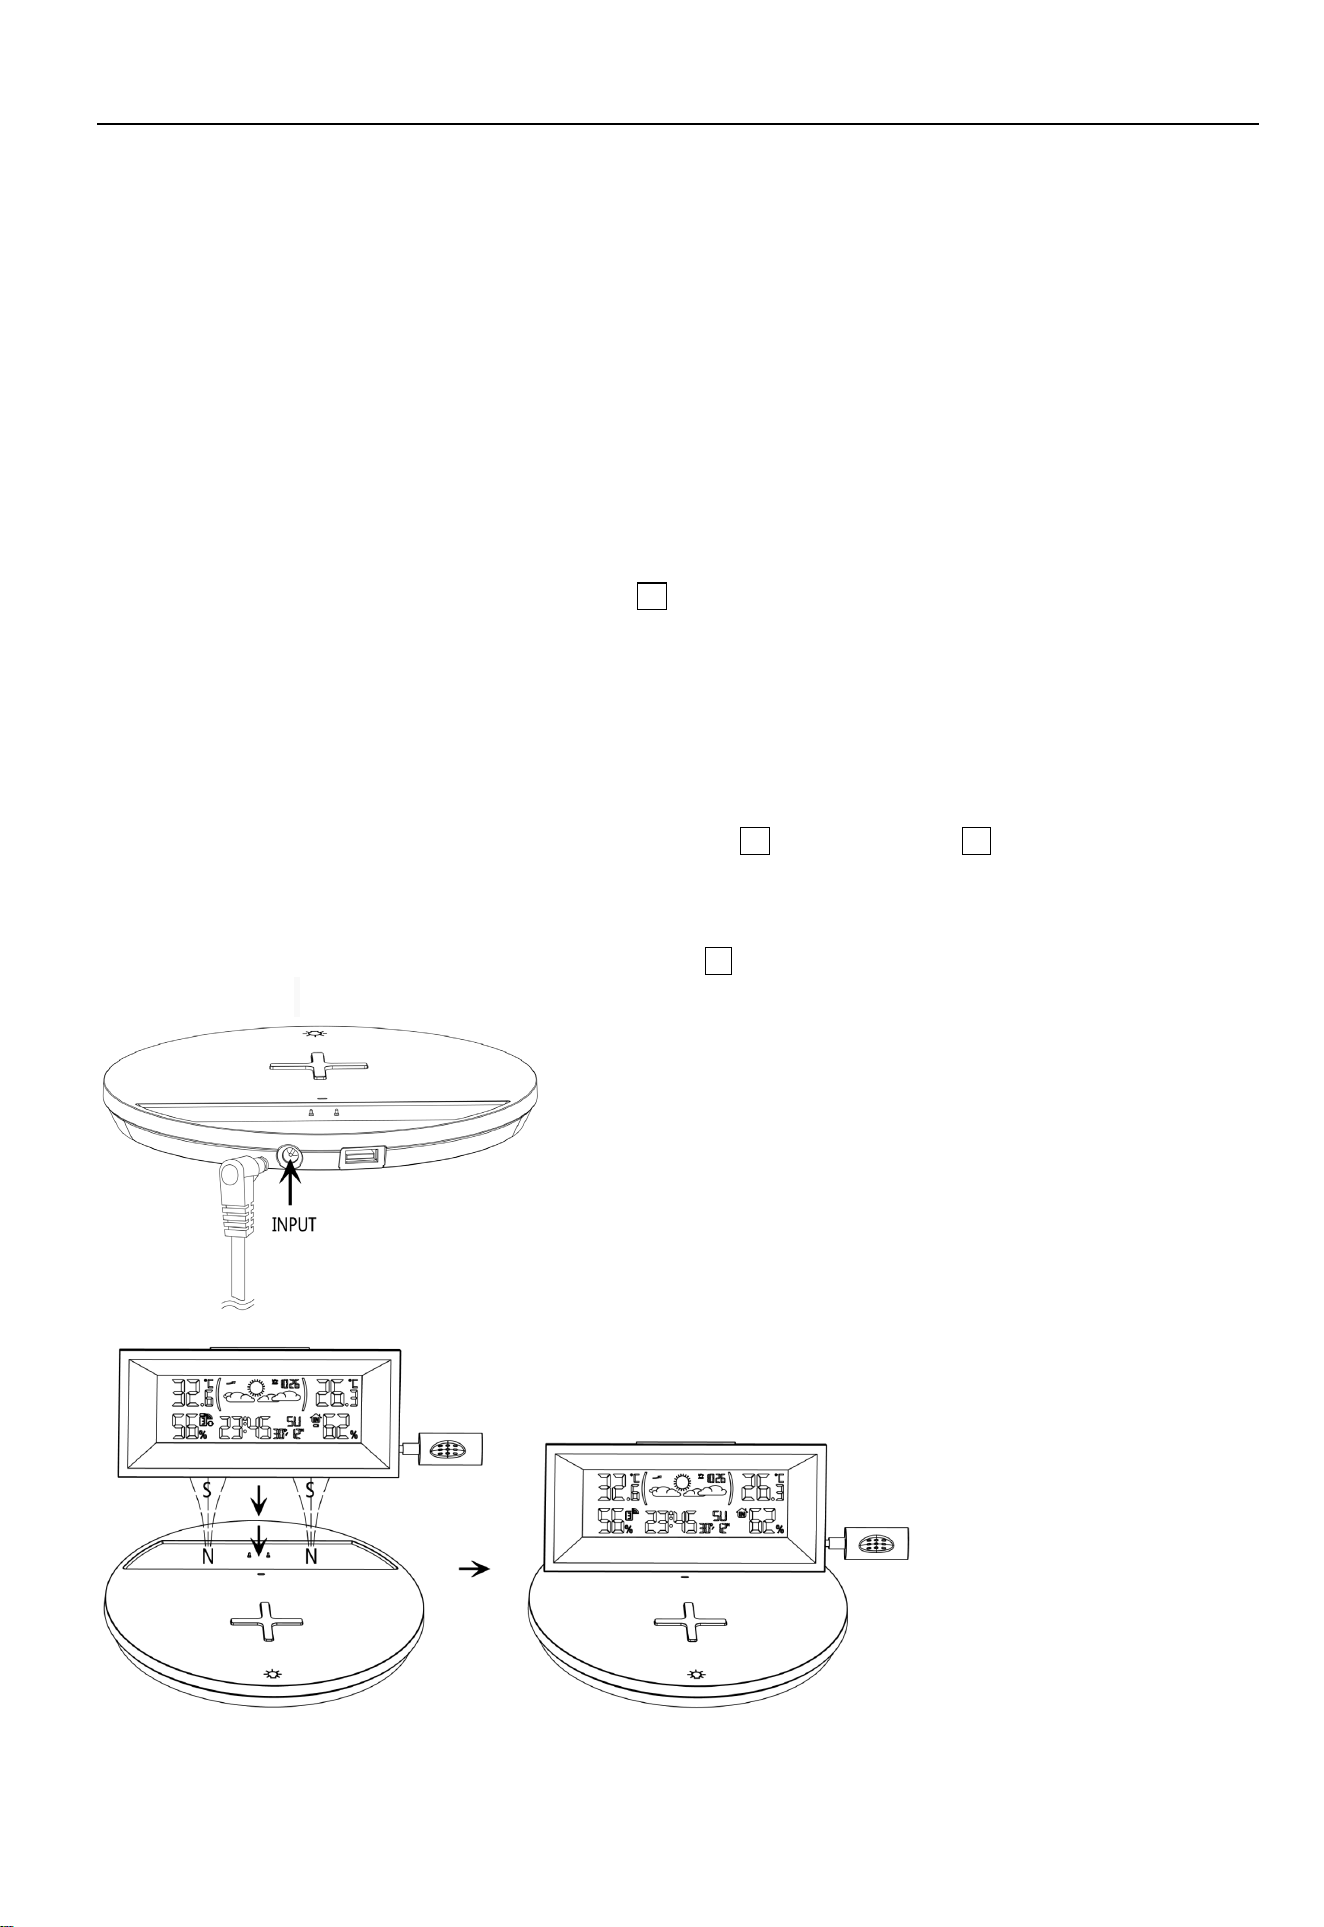
Inserting the adapter DC plug into the product power socket 7 , plug the AC input of the adapter into the mains
socket of electricity.
After the base is powered on, you can see that the mood light will go out after a demonstration.
Warning: do not use metal and other conductive objects to contact two power supply
EM9926B User Manuals
terminals 5 at the same time.
After placing the weather station in the designated position on the base, the weather station will be powered from the
DC terminal of the base.
Warning: There is a magnetic field in the DC terminal power supply area 6 of the base.
Please do not put the magnetic stripe card (including credit card, telephone card, bank card,
boarding card, etc.) on it.
Clock settings
Press and hold the【SET】button O for 2 seconds, the 24/12Hr start to flash, and press【UP】or【DOWN】buttons
to set the timing format you need.
Press the【SET】button to confirm the item has been set and go to the next one, the sequence of setting items is as
follows:
12/24Hr HOUR MINUTE Format of DATE (D/M or M/D) YEAR MONTH DATE Language of
week Pattern of weather forecast Unit of pressure Value of pressure
When adjusting the value, press and hold the 【UP】or【DOWN】 button to adjust quickly.
Press 【SET】button to confirm the last item to end the setting procedures, then it will return to the normal mode.
When choosing the 12Hr format, if “PM” is displayed before the hours, it means that the hour is post meridiem.
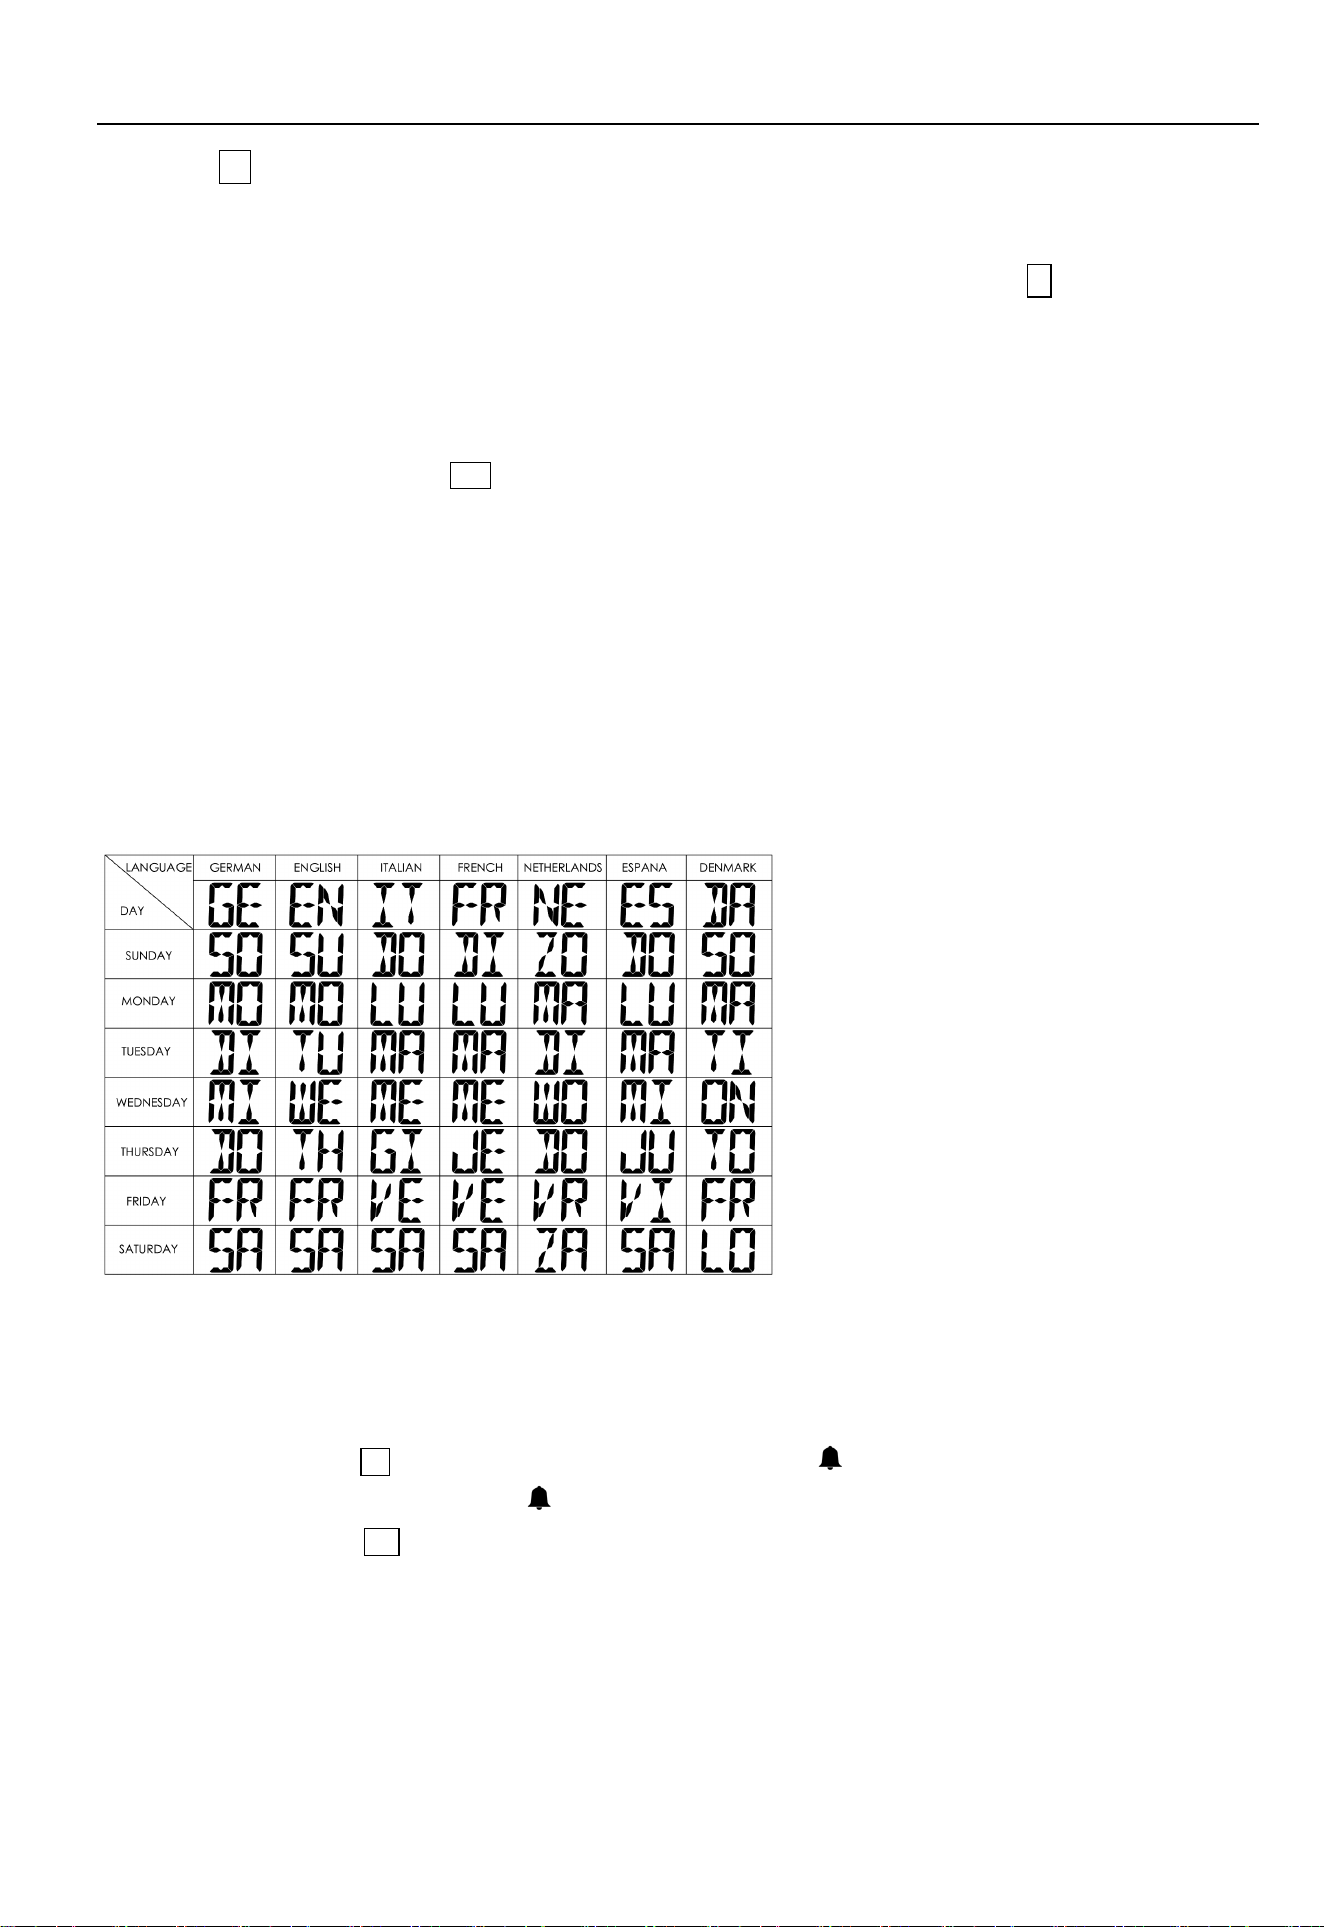
The 7 languages that show week abbreviations are listed below:
F.Y.I.:
If there is no valid operation within 20 seconds, it will automatically return to normal time mode from the set mode.
Daily alarm settings
Push the ALARM switch T to the "ON" position, The LCD display the “ ” icon, the alarm function is ON, Push the
“ALARM” switch to the "OFF" position, the “ ” icon will disappears from the display, the alarm function is OF F.
Press【ALARM】button U once, the time will switch to the alarm time display for 5 seconds.
Press and hold【ALARM】button for 2 seconds, the hours of the ALARM time starts to flash, and press【UP】or
【DOWN】buttons to set the required HOUR, hold the【UP】or【DOWN】buttons for 2 seconds can be adjusted
quickly.
Press【ALARM】button to confirm the item has been set and go to the next one, the sequence of setting items is as
follows:
Alarm HOUR Alarm MINUTE

EM9926B User Manuals
Press【ALARM】button to confirm your setting and to end the setting procedure.
The alarm will sound for 2 minutes if you do not deactivate it by pressing any button. In this case the alarm will be
repeated automatically after 24 hours.
When the alarm is ringing, press any buttons except【SNOOZE】 C to stop the alarm signal, applicable to the day
when the alarm does not need to be reactivated, it will ring again this time next day.
When the alarm is ringing, press the button【SNOOZE】the alarm mode will to get to snooze mode. The alarm signal
sounds again after 8 minutes.
F.Y.I.:
If there is no valid operation within 20 seconds, it will automatically return to normal time mode from the alarm time
set mode.
Backlight brightness settings
When the base is powered by the adapter and the weather station is correctly placed at the DC terminal power
supply position, the backlight will always be on. Press the 【BACKLIGHT】 C button to adjust the brightness level of
the backlight.
When the weather station leaves the base and is powered by battery, press the 【BACKLIGHT】button once and the
backlight will be on for 15 seconds.
Temperature unit switch
Press the【UP】button S to switch the temperature unit in ℃ or ℉.
RF Transmission Procedure
The weather station automatically starts receiving transmission from remote sensor for outdoor temperature and
humidity after batteries inserted.
The remote sensor will automatically transmit temperature and humidity signal to the Weather Station after batteries
inserted.
If the Weather Station failed to receive transmission from remote sensor (“- -.-”display on the LCD), press and hold
【CH】 button P for 2 seconds to receive transmission manually, RF icon flashes on the LCD,The Weather Station
to receive the remote sensor.
If the weather station is received with 2 or 3 channel transmitters signals, Press【CH】 button to query CH2, CH3 data
or cyclic display.
Query Maximum/minimum numerical value
When the indoor / outdoor temperature and humidity are shown in the LCD, The weather station began to record
temperature and humidity maximum and minimum numerical value.
Press【MEM】button Q, the LCD will display maximum value of temperature and humidity, The LCD will display the
minimum value of temperature and humidity if you press once 【MEM】button again when the maximum value is
displayed.
at the same time, there are “MAX” or “MIN” displayed on the LCD.
The temperature and humidity maximum/minimum value will RE records after press and hold【MEM】button 2
seconds, at the same time, there will be "- -.-" displayed in the LCD 1 second.
The memory value of the day will be automatically cleared at 0:00 every night.
EM9926B User Manuals
F.Y.I.:
If the temperature reading is below ranges, the LL.L will be displayed. If the temperature reading is above ranges,
the HH.H will be displayed.
Weather forecasting function
Warning: Please take the weather forecast from your local weather forecasting service into account as well as the
forecast from your weather station. If there are discrepancies between the information from your device and from the
local weather forecasting service, please take the advice of the latter as authoritative.
The weather forecast is calculated from evaluation of fluctuations in the barometric pressure and may deviate from
the actual weather conditions.
The weather symbols indicate the weather fluctuation over the next 8 hours and not the current weather.
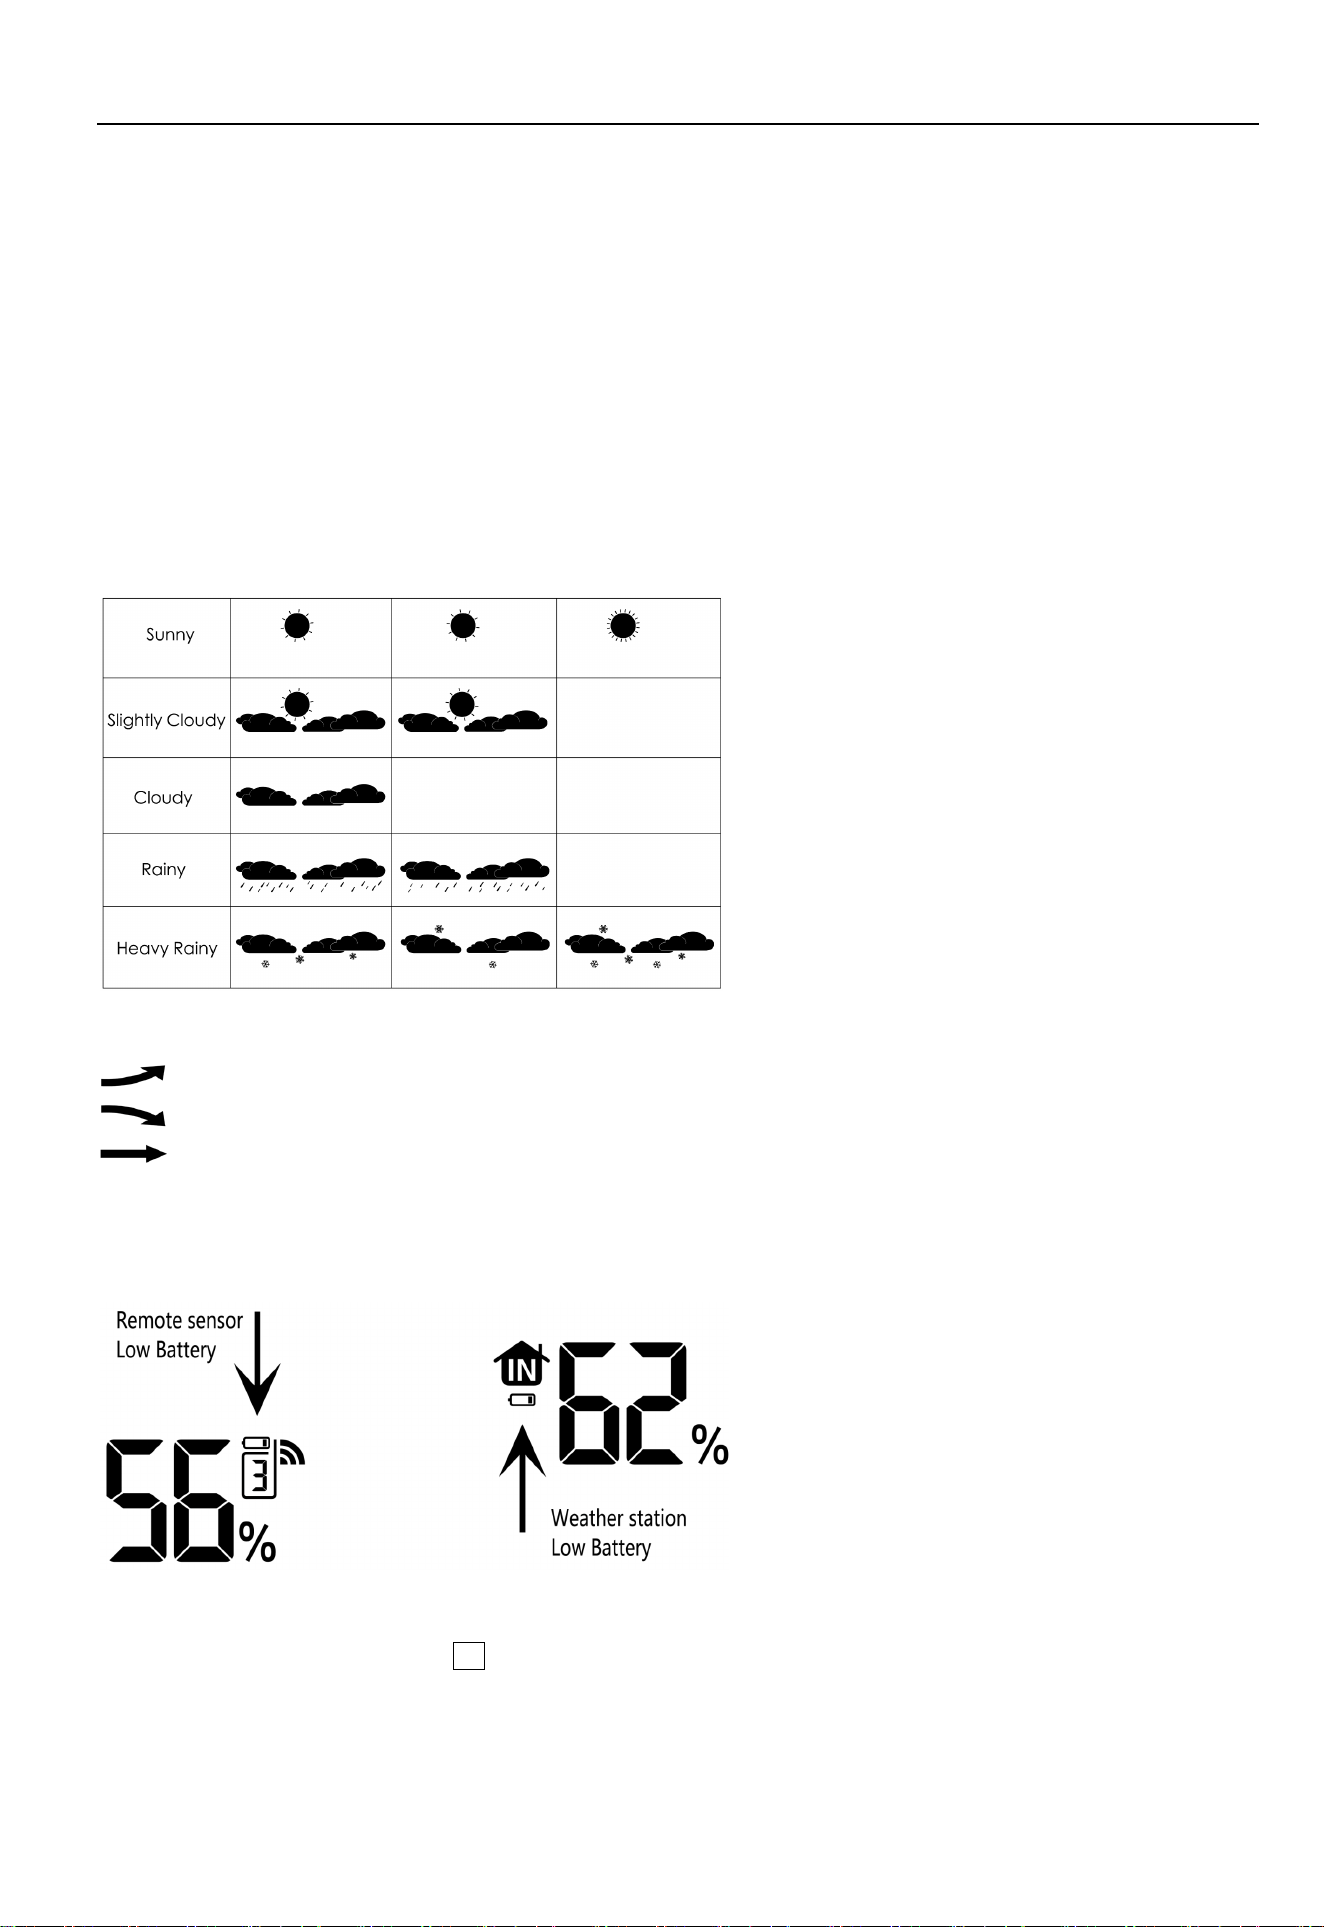
The weather station displays the following weather symbols:
Barometric pressure trend display
The barometric pressure is rising.
The barometric pressure is falling.
The barometric pressure is steadying.
Low Battery
When the low battery symbol of INDOOR appears, please replace the weather station with new batteries.
When the low battery symbol of OUTDOOR appears, please replace the remote sensor with new batteries.
Mood light mode
Touch and hold the【light】button 4 of base 2 seconds to turn ON mood light and enter the A mode.
In mode A, touch the【light】button again to enter the mood light B mode.
In mode B, touch the【light】button again to enter the mood light C mode.
In mode C, touch the【light】button again to OFF the Mood light.

EM9926B User Manuals
In mode B, press and hold the【light】button for 1 second to lock the current color and stop the gradual change. press
and hold the【light】button for 1 second again to restore the gradual change.
In mode C, press and hold the【light】button for 1 second to Switch to another color fade in and out.
Wireless charging
Place the mobile device on the antiskid pad
3
middle of wireless charger correctly,
the red indicator light on.
T
he indicator light is red when charging normally and green when fully charged (currently only supported by some
Samsung mobile devices). The red indicator light flashes when metal or similar items are detected.

MC-W6 User Manuals