
final page size: 8.5 x 5.5 in
IF YOU HAVE QUESTIONS OR COMMENTS, CONTACT US.
POUR TOUTE QUESTION OU TOUT COMMENTAIRE, NOUS CONTACTER.
SI TIENE DUDAS O COMENTARIOS, CONTÁCTENOS.
1-888-331-4569 WWW.CRAFTSMAN.COM
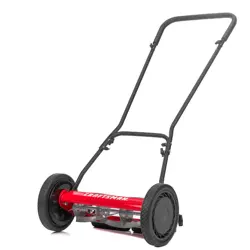
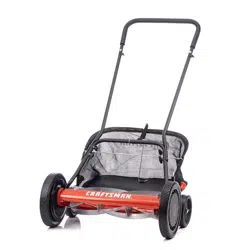
CMXRMLM181618
INSTRUCTION MANUAL GUIDE D’UTILISATION MANUAL DE INSTRUCTIONES
18" (46cm) Reel Lawnmower
with Grass Catcher
Tondeuse à rouleau
de 18 (46cm) po avec
bacà herbe
Cortacésped de carrete
de 18" (46cm)
conrecogedor de céspz

ENGLISH
B
English (original instructions) 3
Français (traduction de la notice d’instructions originale) 10
Español (traducido de las instrucciones originales) 20
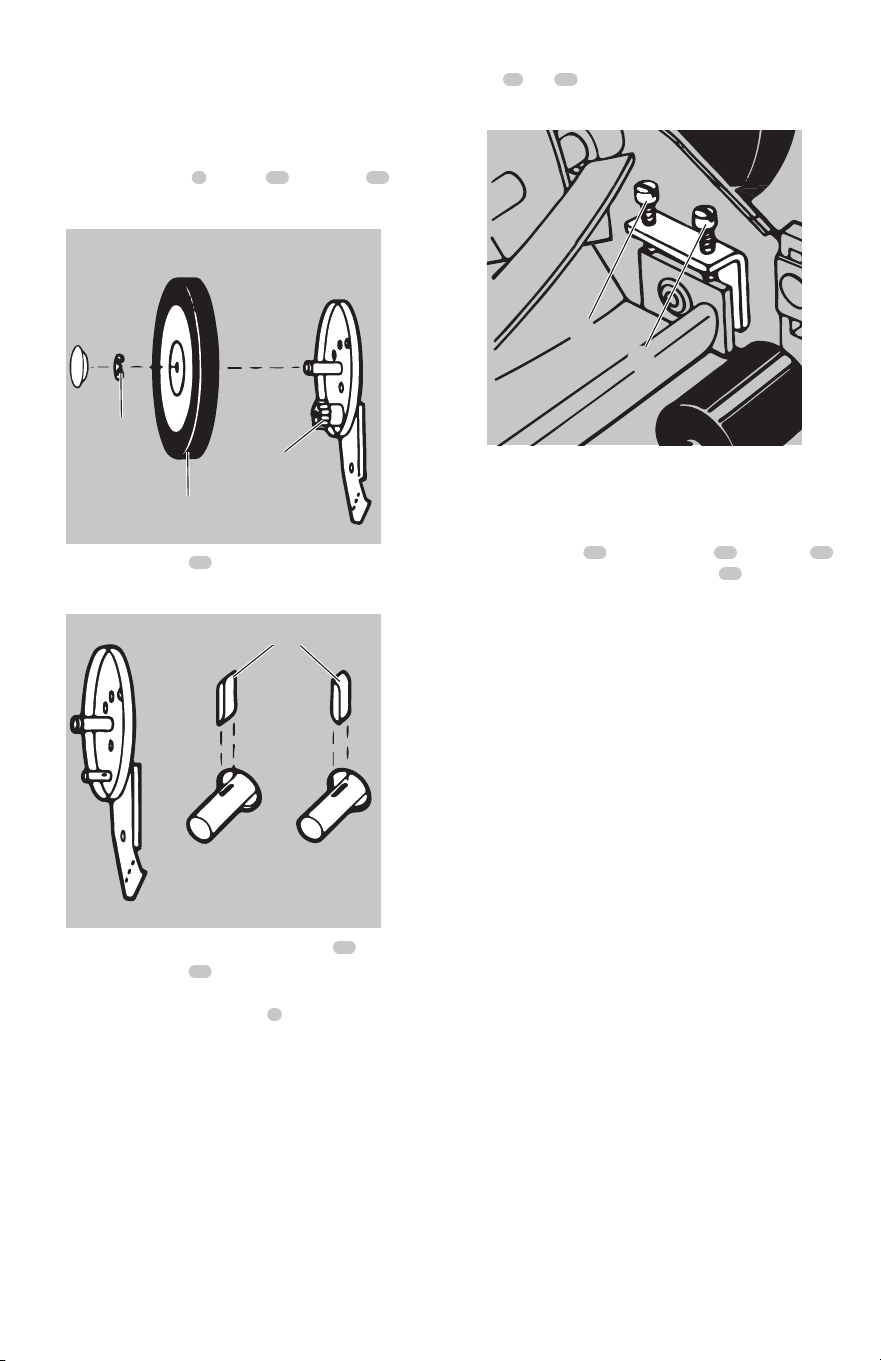
Be Sure You Have All Of These Parts Before You
Begin Assembly
(2) L-SHAPE
CONNECTION
TUBES
(6) M6X35
HANDLE
BOLTS
(6)
WING
BOLTS
(6)
WASHERS
(2)
“E” RINGS
MODEL CMXRMLM181618 PACKING LIST
1. 18" (46cm) Reel Lawn Mower
2. (4) Four Piece Handles with Foam Grip (Fig. A)
3. Handle Assembly Hardware Bag
4. Grass Catcher
5. Instruction Manual
HANDLE ASSEMBLY HARDWARE
BAG COMPONENTS
• (2) L-Shape Connection Tubes
• (6) M6x35 Handle Bolts
• (6) Wing Bolts
• (6) Washers
• (2) “E” Rings

1
ENGLISH
COMPONENTS
1
Upper Handle
2
Middle Handle
3
Lower and Upper Connecting Bolt and Wingnuts
4
Lower Handle
5
Blade Reel
6
Grass Catcher
7
Cut Height Adjustment Lever
WARNING: Read all safety warnings and all
instructions. Failure to follow the warnings and
instructions may result in electric shock, fire and/or
seriousinjury.
WARNING: To reduce the risk of injury, read the
instructionmanual.
If you have any questions or comments about
this or any product, call CRAFTSMAN
toll free at: 1-888-331-4569
1
2
4
7
6
Definitions: Safety Alert Symbols and Words
This instruction manual uses the following safety alert symbols and words to alert you to hazardous situations and your risk of
personal injury or property damage.
DANGER: Indicates an imminently hazardous situation which, if not avoided, will result in death or seriousinjury.
WARNING: Indicates a potentially hazardous situation which, if not avoided, could result in death or seriousinjury.
CAUTION: Indicates a potentially hazardous situation which, if not avoided, may result in minor or moderateinjury.
(Used without word) Indicates a safety related message.
NOTICE: Indicates a practice not related to personal injury which, if not avoided, may result in propertydamage.
5
3

ENGLISH
2
English (original instructions)
IMPORTANT SAFETY WARNINGS AND
INSTRUCTIONS
WARNING: To reduce risk of injury:
• Before any use, be sure everyone using this tool
reads and understands all safety instructions and
other information contained in this manual.
• Save these instructions and review frequently prior
to use and in instructing others.
• When using lawn mowers, basic safety precautions
should always be followed to reduce personal
injury, including the following:
READ ALL INSTRUCTIONS
GENERAL SAFETY WARNINGS AND
INSTRUCTIONS FOR ALL TOOLS
• This tool can be dangerous. Follow all warnings
and Safety Instructions in this manual. The operator is
responsible for following warnings and instructions in
this manual and on unit. Restrict use of this mower to
persons who read, understand and follow warnings and
instructions in this manual and onunit.
• Avoid dangerous environment – don’t use lawn mowers
in damp or wetlocations.
• Don’t Use InRain.
• Keep Children Away – All visitors should be kept a safe
distance from workarea.
• Dress Properly – Do not wear loose clothing or jewelry.
They can be caught in moving parts. Use of rubber gloves
and footwear is recommended when workingoutdoors.
• Use Safety Glasses – Always use face or dust mask if
operation isdusty.
• Use Right Appliance – Do not use reel mower for any job
except that for which it isintended.
• Check for damaged parts. Before further use of the
mower, a guard or other part that is damaged should be
carefully checked to determine that it will operate properly
and perform its intended function. Check for alignment of
moving parts, binding of moving parts, breakage of parts,
mounting, and any other conditions that may affect their
operation. A guard or other part that is damaged should
be properly repaired or replaced by an authorized service
center unless otherwise indicated elsewhere in thismanual.
• Repairs and service. Repairs, maintenance and
any adjustments not specified in this manual should
be performed by authorized service centers or other
qualified service organizations, always using identical
replacementparts.
• Don’t Force Lawn Mower – It will do the job better and
safer at the rate for which it wasdesigned.
• Don’t Overreach – Keep proper footing and balance at
alltimes.
• Stay Alert – Watch what you are doing. Use common
sense. Do not operate lawn mower when you aretired.
• Store Lawn Mower Indoors – When not in use, lawn
mower should be stored in an indoor dry and locked-up
place – out of reach of children.
• Maintain Lawn Mower With Care – Keep cutting edges
sharp and clean for best and safestperformance.
Follow instructions for lubricating and changing
accessories. Keep handles dry, clean, and free from oil
andgrease.
• Keep bladessharp.
• Keep hands and feet away from cuttingarea.
• Objects struck by the lawn mower blade can cause
severe injuries to persons. The lawn should always
be carefully examined and cleared of all objects prior to
eachmowing.
• If lawn mower strikes a foreign object, follow
thesesteps:
1. Stop pushing reel mower.
2. Inspect fordamage.
3. Repair any damage before restarting and operating
the reelmower.
• Use identical replacement bladesonly.
SAVE THESE INSTRUCTIONS
Important
Safe Practices for Pedestrian-
ControlledMowers
This machine is capable of amputating hands and feet and
throwing objects. Failure to observe the following safety
instructions could result in serious injury or death.
General Information
1 . Read, understand, and follow instructions and warnings in
this manual and on the machine andattachments.
2 . Only allow operators, who are responsible, trained, familiar
with the instructions, and physically capable to operate the
machine.
3 . Do not carry passengers and keep bystanders away.
4 . Do not operate the machine while under the influence of
alcohol or drugs.
5 . Follow the manufacturer’s recommendation for wheel
weights or counterweights.
Preparation Before Operating
1 . Clear the operating area of any objects which could be
thrown by or interfere with operation of the machine.
2 . Keep the area of operation clear of all bystanders,
particularly small children. Stop the machine and
attachment(s) if anyone enters the area.
3 . Do not operate the machine without safety devices in place
and functioning properly. Check frequently for signs of wear
or deterioration and replace as needed.
4 . Wear appropriate personal protective equipment such as
safety glasses and footwear.
Operating
1 . Only operate the machine in daylight or good
artificiallight.
3
ENGLISH
2 . Avoid holes, ruts, bumps, rocks, or other hidden hazards.
Uneven terrain could overturn the machine, or cause
operator to lose their balance or footing.
3 . Do not put hands or feet near rotating parts or under the
machine. Keep clear of the discharge opening at all times.
4 . Do not direct discharge material toward anyone. Avoid
discharging material against a wall or obstruction. Material
may ricochet back toward the operator. Stop the blade(s)
when crossing gravel surfaces.
5 . Never intentionally strike or ram trees, fences, etc. This can
cause injuries or severely damage the mower
Children Specific
1 . Tragic accidents can occur if the operator is not alert to
the presence of children. Children are often attracted to
the machine and the mowing activity. Never assume that
children will remain where you last saw them.
2 . Keep children out of the operating area and under
the watchful care of a responsible adult other than
theoperator.
Slope Specific
1 . Slopes are a major factor related to accidents. Operation on
slopes requires extra caution.
2 . Travel in the manufacturer recommended direction on
slopes. Use caution while operating near dropoffs.
3 . Avoid mowing wet grass. (Poor footing could cause a slip
and fall accident.)
4 . Do not operate machine under any condition where
traction, steering, or stability is in question. Tires Mower
could slide even if the wheels are stopped.
5 . Avoid starting and stopping on slopes. Avoid making
sudden changes in speed or direction. Make turns slowly
and gradually.
6 . Use extra care while operating machine with a grass
catcher or other attachment(s). They can affect the stability
of the machine.
Service
1 . Keep machine in good working order. Replace worn or
damaged parts.
2 . Use caution when servicing blades. Wrap the blade(s) or
wear gloves. Replace damaged blades. Do not repair or
alter blade(s).
The following are explanations of important safety
hazard pictorials on themower.
User must read and understand the
instructionmanual.
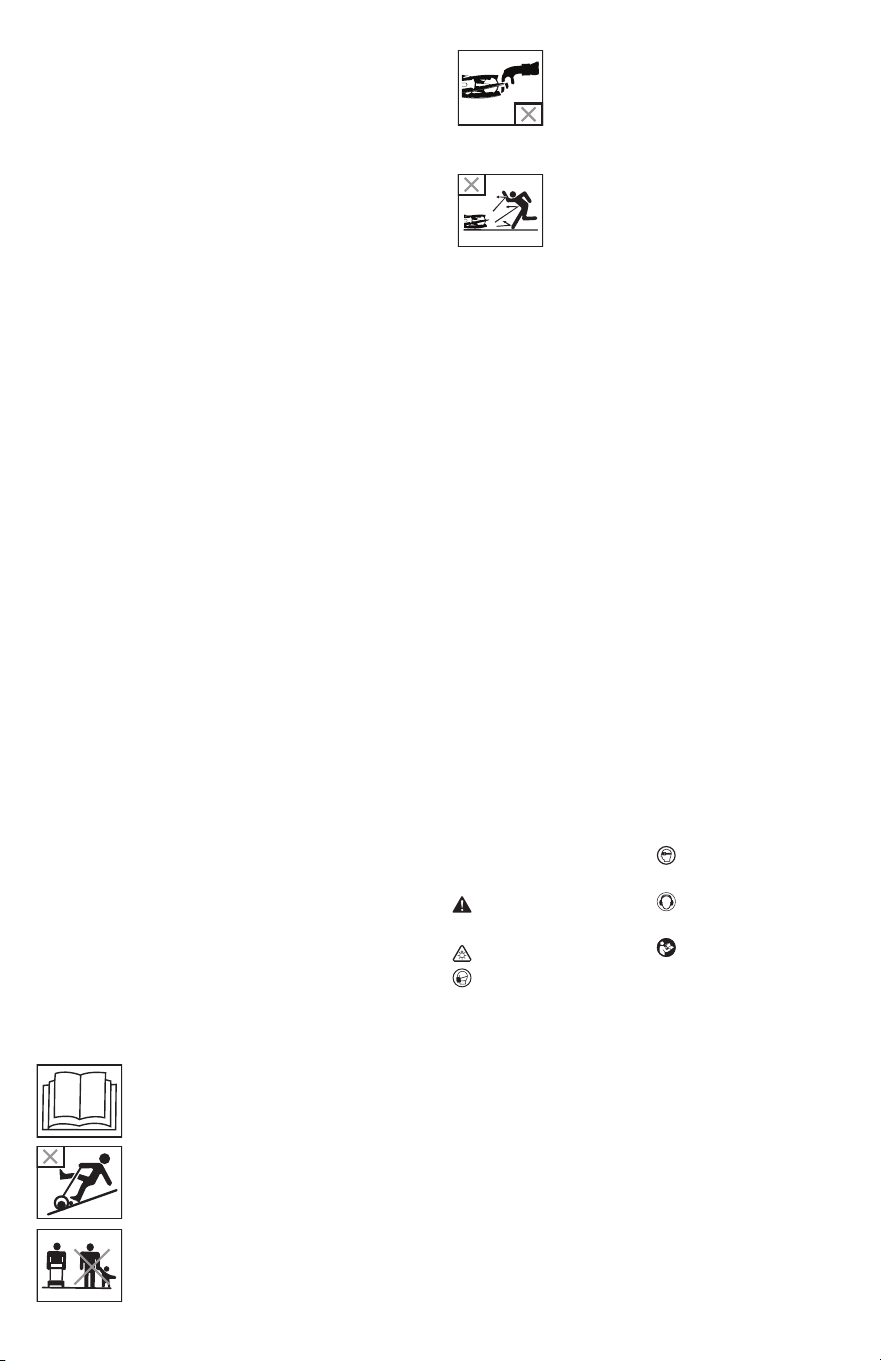
To avoid the risk of serious injury do not
mow up and down slopes. Always mow
acrossslopes.
To avoid the risk of injury to bystanders keep
all persons and pets at a safe distance from the
mower whileoperating.
Rotating blades can cause serious injury.
Keep hands and feet clear of reel blades and
discharge opening at all times. Always be sure
blade has stopped before cleaning, servicing,
transporting or lifting themower.
Objects struck by mower blade can cause
serious injury. Stay behind the handle when the
pushing the reel. Always ensure persons and
pets are clear of the discharge from the mower
while operating. Always inspect mowing area
before mowing and remove objects that could
be thrown by blade.
Additional Safety Information
WARNING: ALWAYS use safety glasses. Everyday
eyeglasses are NOT safety glasses. Also use face or
dust mask if cutting operation is dusty. ALWAYS WEAR
CERTIFIED SAFETYEQUIPMENT:
• ANSI Z87.1 eye protection (CAN/CSA Z94.3),
• ANSI S12.6 (S3.19) hearing protection,
• NIOSH/OSHA/MSHA respiratoryprotection.
WARNING: Some dust created by this product
contains chemicals known to the State of California to
cause cancer, birth defects or other reproductive harm.
Some examples of these chemicals are:
• compounds in fertilizers
• compounds in insecticides, herbicides
andpesticides
• arsenic and chromium from chemically
treatedlumber
To reduce your exposure to these chemicals, wear approved
safety equipment such as dust masks that are specially designed
to filter out microscopic particles.
La etiqueta de su herramienta puede incluir los siguientes
símbolos. Los símbolos y sus definiciones son los siguientes:
min ..................... minutos
…/min ..............por minuto
.....................símbolo de alerta
de seguridad
..................... evitar mirar a la luz
..................... usar protección
respiratoria
..................... use protección para
los ojos
..................... use protección
auditiva
..................... leer toda la
documentación
IPXX .................... IP símbolo
ENGLISH
4
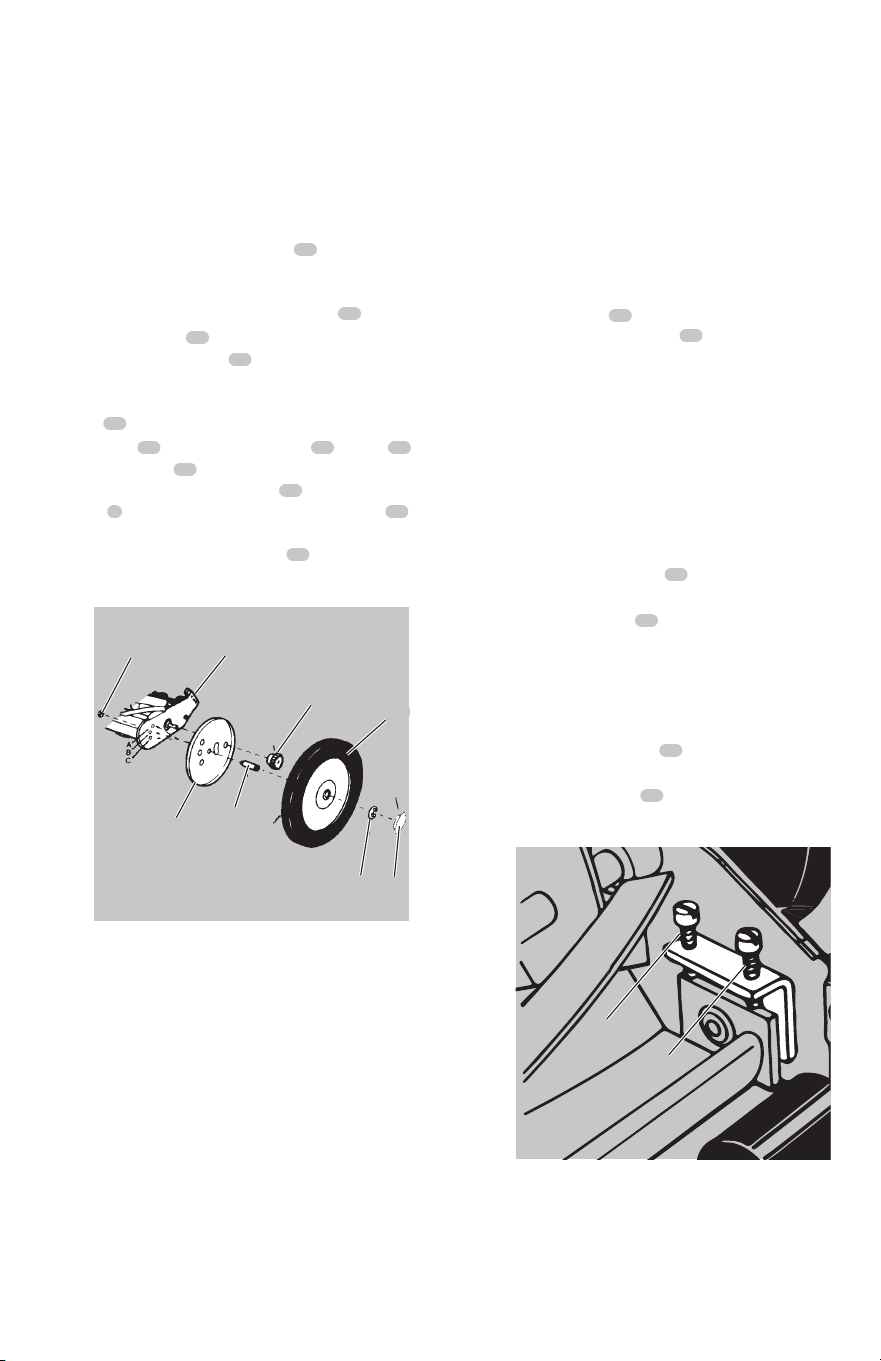
NOTE: It can take quiet a bit of pressure to force the second
pin into its proper position. If you are having trouble, set the
entire reel on its side. Apply pressure downward on the lower
handle to position it underneath the short metal posts on the
reel. Gently relieve the pressure until the handle is set into
place upon the second pin.
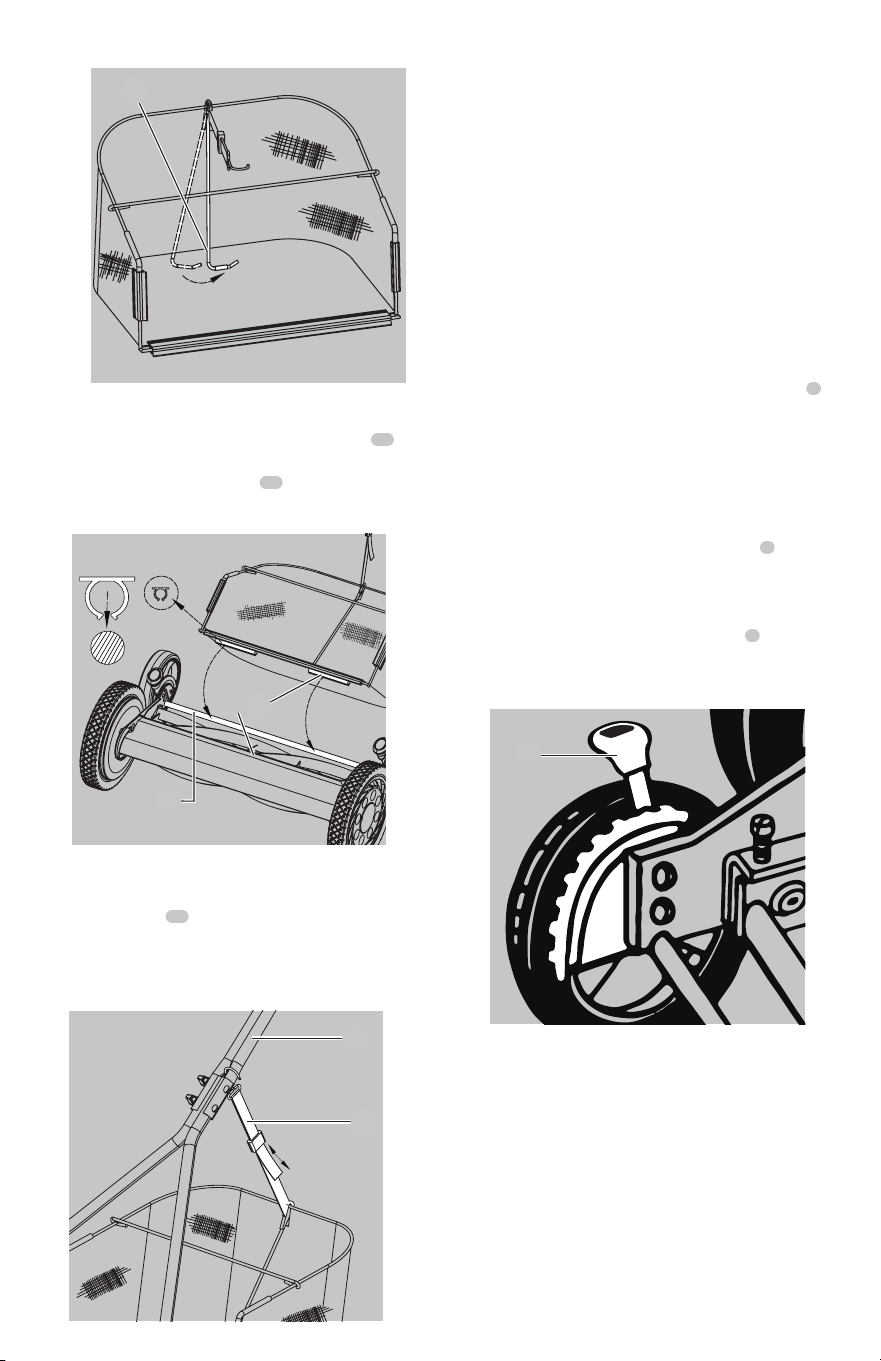
Assembling Grass Catcher (Fig.C, D,E)
Enclosed in the carton is the grass catcher frame and 2 L
shaped steel tubes
22
.
1. Insert the long end of the L shaped steel tube
22
downward into the front catcher frame. See Figure C.
Fig.C
22
2. Snap the formed plastic groove
23
over the connected
catcher. See Figure D.
Fig.D
23
3. Repeat steps 1 and 2 on the opposite side.
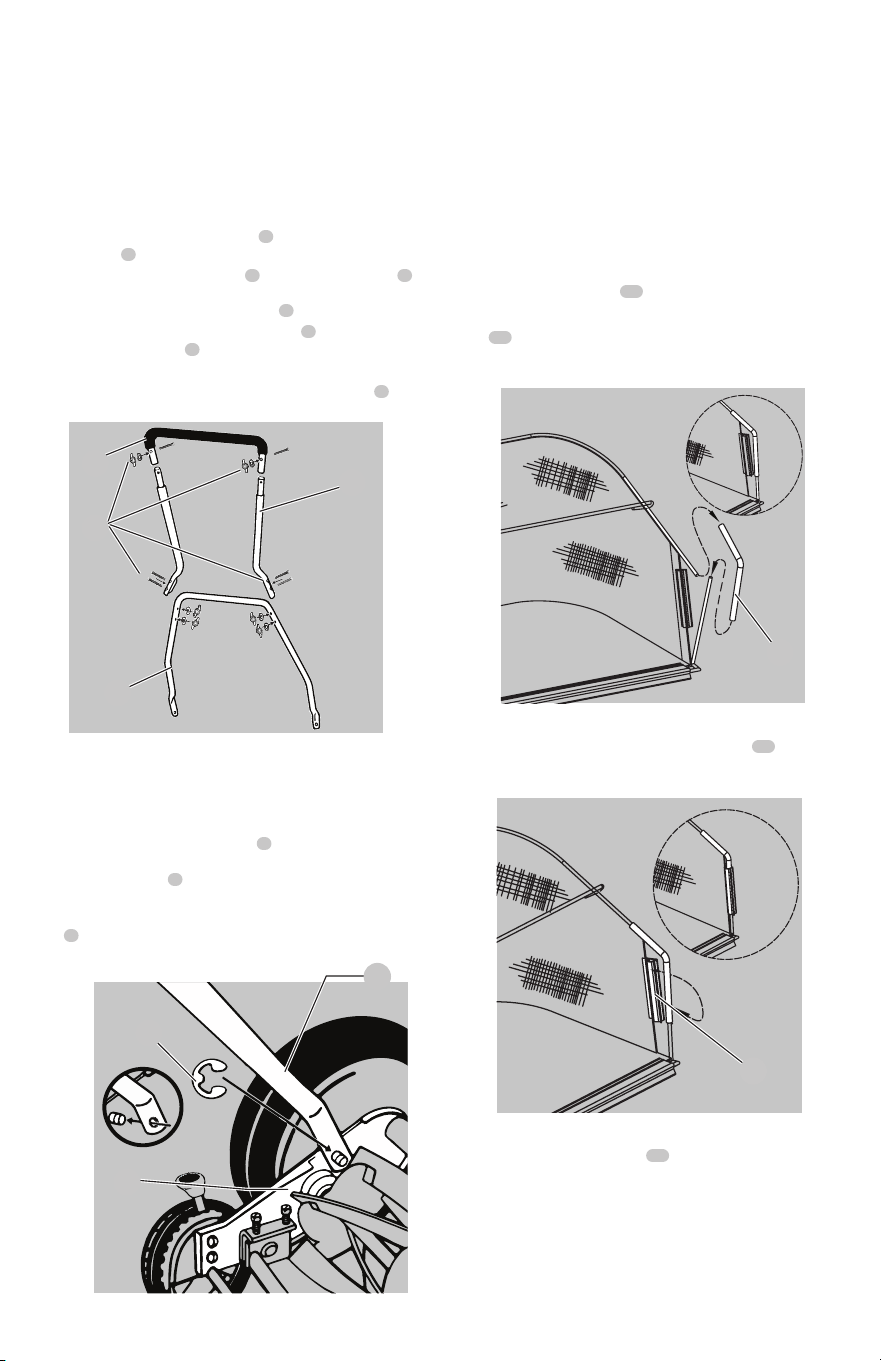
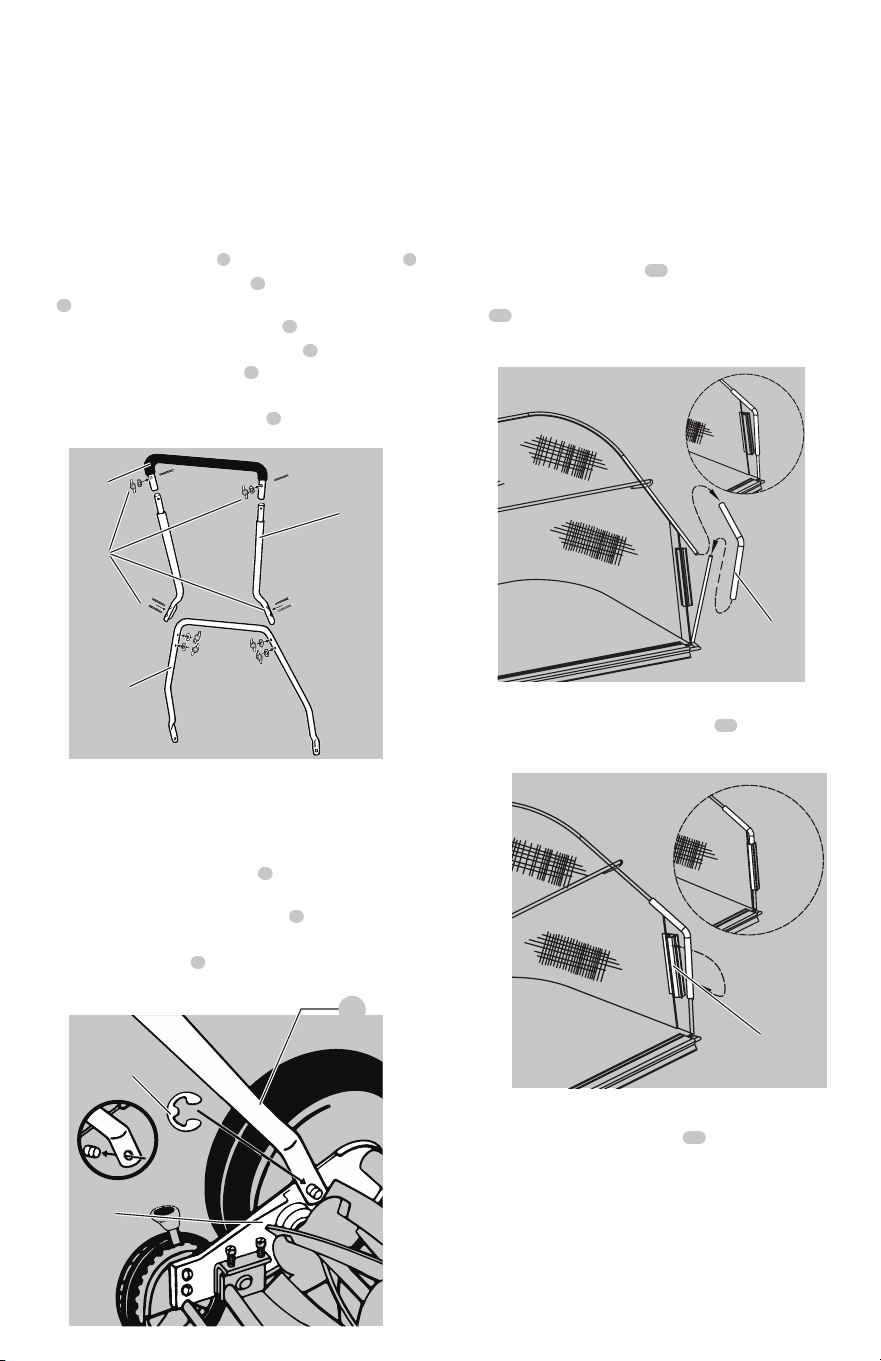
Assembling Handle (Fig. A)
Enclosed in the carton are the mower handle parts
(1 upper handlebar pieces, 2 middle handlebar pieces and 1
lower handlebar piece) and hardware package (for contents,
see inside front cover).
1. Lay out the parts of the handle as shown in Figure A
2. Insert the 2 middle handlebar
2
pieces into the upper
handlebar
1
3. Fasten the 2 middle handlebars
2
to the upper
handlebar
1
piece on both sides with a single handle
bolt, washer, and a wing nut
3
.
4. Align the holes of the middle handlebar
2
with the
holes of the lower handlebar
4
piece.
5. Fasten each side of the two handlebars with handle
bolts, washers, and wingnuts
3
.
Fig.A
2
1
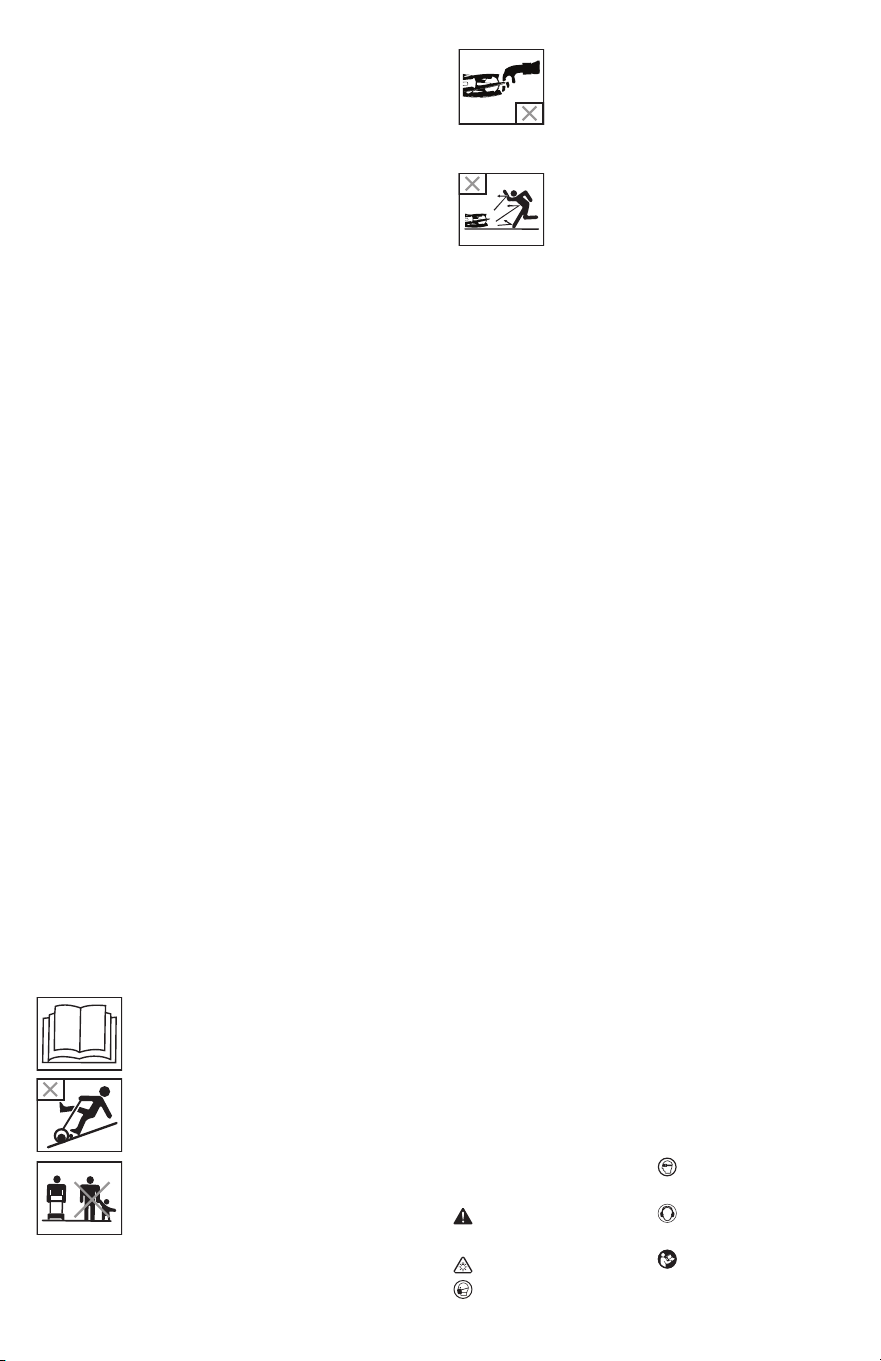
Attaching The Handle To The Mower
(Fig.B)
1. After assembling the handle, fit the holes at the end of
the lower handlebar
4
on the left and right side, over
the short metal posts extending out from the side plates
8
of the reel.
2. When the handlebar is in place over the posts, snap
the “E” rings
9
onto the slotted posts on both sides to
prevent the handle from coming off.
Fig.B
4
8
9
MONTAJE Y AJUSTES
3
4
5
ENGLISH
4. Push wire support
24
foot through the loop sewn into
the bottom of the catcher. This will support the top rail.
See Figure E.
Fig.E
24
Attaching Grass Catcher To Mower (Fig.F)
1. There are 2 sections of formed plastic grooves
23
at the
front underside of the catcher. Snap the grooved section
over the support tube
25
between the trailing wheels of
the mower. See Figure F.
.
Fig.F
23
25
2. Adjust the strap
26
to your preferred length and then
attach the hook to the handle crossbar 27 (your crossbar
style may vary). This strap prevents the grass catcher from
dragging on the ground. See Figure G.
Fig.G
27
26
USAGE AND CARE
General Care (Fig. H-J)
Minimum care is required to assure smooth operation of your
mower.
• To avoid damage to the mower or cutting blades, keep
the area to be mowed free from any debris.
• We suggest a routine application of oil or lubricant (i.e.
WD-40). This should be applied to all cutting surfaces, the
cutting reel axle shaft and wheels.
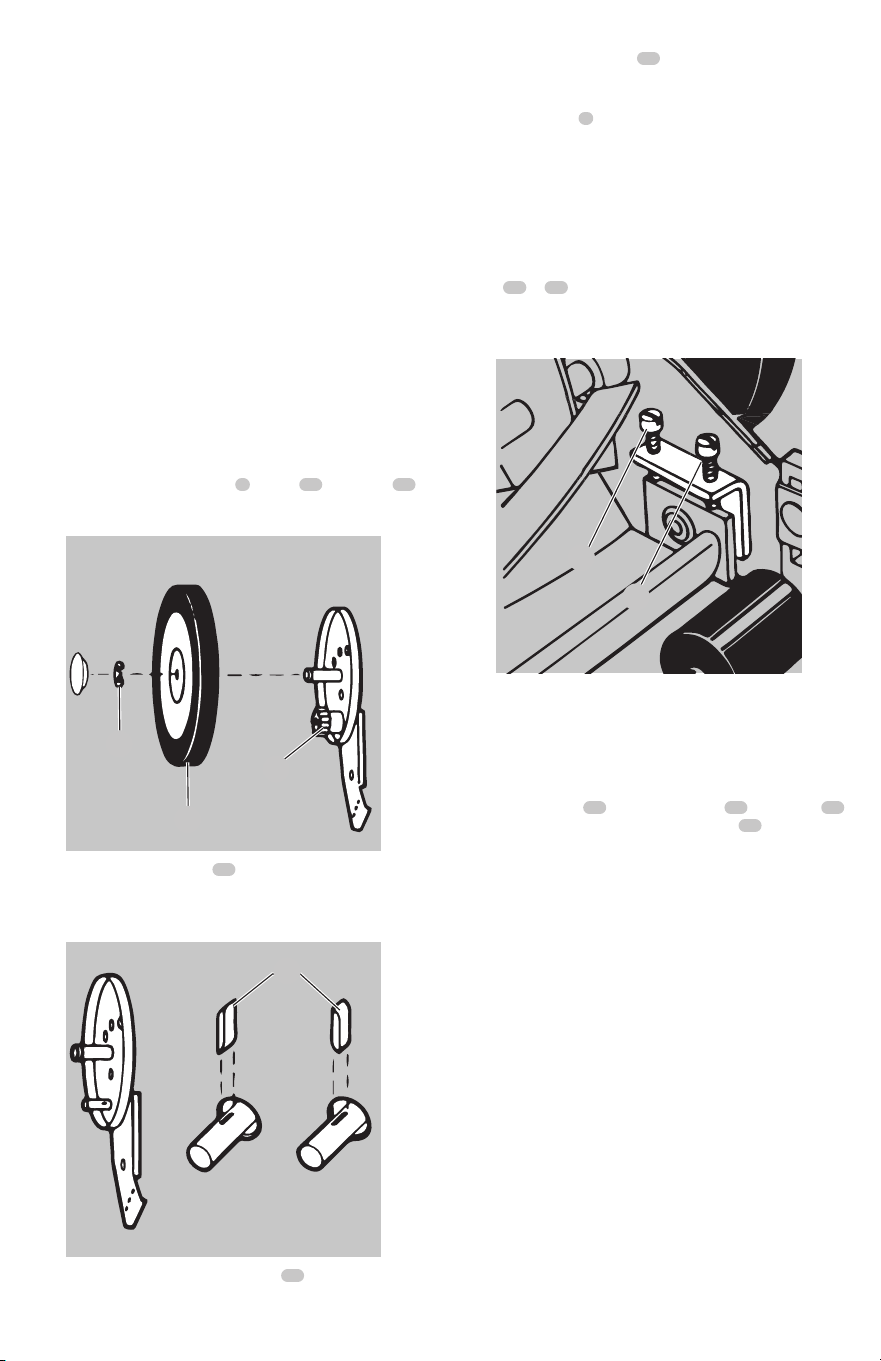
Primary Cutting Height Adjustments
These units can be adjusted to offer a cutting height range
from 1" to 3" (2.5cm to 7.5cm) simply by adjusting the cut
height adjustment lever
7
. Keep in mind that the same
adjustment must be performed on both sides of the mower.
As you follow the instructions below, refer to Figure
H for more information.
• To achieve the lowest cutting position, push the cut
height adjustment lever
7
forward, towards the mower
reel, and set in place. Repeat for both sides.
• To achieve the highest cutting position, pull the cut
height adjustment lever
7
backwards, away from the
the mower reel, and set in place. Repeat for both sides.
Fig.H
7
Secondary Cutting Height Adjustments
This is used to reduce your cutting height below 2" tall.
The wheel/dust cover assembly can be moved to one of
3 positions on the side plate. Keep in mind that the same
adjustment must be performed on both sides of the mower.
As you follow the instructions below, refer to Figure I.
• Remove the plastic hub cap
15
(only for the 16" (41cm)
and 18" (46cm) reels) by inserting a small flat head
screwdriver into the slot on the hub cap and pop it off
the wheel
16
.
• Remove the axle nut
12
on the inside of the mower
by holding the axle pin
13
in place with either a 1/2"
ENGLISH
6
(1.27 cm) socket or flat blade screwdriver (depending on
model type), and either a socket or box-end wrench on
the nut
12
.
• Pull the wheel
16
, dust cover
17
pinion gear
14
, and
axle pin
13
out gently as a unit until the axle pin
13
clears the side plate
8
. Then, reposition the axle pin
13
to one of the other two holes to get the desired height.
Replace and retighten axel nut
12
.
• Repeat for both sides.
Fig.I
15
16
12
13
Figure I Letter Callout Reference
A - Lowest Setting)
B - Middle Setting
C - Highest Setting
NOTE: It is not recommended to use position "A" unless you
have an extremely flat lawn in order to avoid scalping.
Mower Blade Adjustment (Fig. J)
The blades have been preadjusted before leaving the factory
Misalignment can occur resulting in blades that are too loose
or too tight. If this happens, you will notice a rough, uneven
cut or a hard-pushing mower.
All adjustments are made from the rear of the mower
(opposite from the bar with the logo decal). Each end of the
cutting bar can be adjusted separately.
As you follow the instructions below, refer to Figure J for
more information.
• The cutting bar blade (located under the reel) pivots.
The front screws
18
move the cutter bar away from the
blades, while the rear screws
19
move the cutter bar
toward the blades.
• Adjusting the screws is a very sensitive procedure. 1/16th
of a turn is considered a major adjustment.
• Before tightening one adjusting screw, be sure to loosen
the opposing screw an equal amount.
Loosening The Blades
The cutting bar blade must be moved further from the
cutting reel.
• Loosen both back screws
19
equally by turning them
counterclockwise.
• Tighten both front screws
18
equally by turning them
clockwise.
Tightening The Blades
The cutting bar blade must be moved closer to the cutting
reel.
• Loosen both front screws
18
equally by turning them
counterclockwise.
• Tighten both back screws
19
equally by turning them
clockwise.
Fig.J
19
Checking Adjustments
The cutting bar blade must be moved further from the
cutting reel.
• Turn mower upside down.
• Insert piece of paper (i.e., writing or newspaper) between
the cutter bar and the reel blades, and carefully turn the
reel blades by hand.
All blades should slice the paper evenly the entire length of
the cutter bar while the reel turns smoothly.
If the mower has an intermittent cut, adjustment should
be made to appropriate side of the blades to attain proper
cutting action.
18
14
17
8
9
7
ENGLISH
Sharpening The Cutting Blades (Fig. K-M)
When the mower is properly lubricated and adjusted,
sharpening should not be necessary for several years.
However, the following steps will allow you to do the
procedure yourself at relatively little expense.
• Remove the “E” rings
9
, wheels
16
and pinion
14
from
both sides of the mower (Refer to Figure K).
Fig.K
14
• Remove both pawls
20
from the rectangular slots in reel
shaft and reverse their positions (refer to Figure L).
Fig.L
20
• Reverse the placement of the pinion gears
14
.
• Place the left pinion
14
on the right end of the reel
shaft and the right pinion on the left end of the reel shaft.
Replace the wheels and “E” rings
9
.
• Spread a thin layer of lapping compound on the front
edge of the reel blades.
• Adjust the cutter bar so that the cutter bar blade has light
but firm contact with the reel blades across the full width
of the cutter bar (refer to Figure M).
CAUTION: Do not overtighten the adjusting screws
18
and
19
, as this could damage the cutter bar. Both
screws must be tight on the final adjustment.
Fig.M
18
• Push the mower backward on a smooth surface (such as
a sidewalk or paved driveway). Continue to do this until
the reel blades rotate relatively free and front edge of the
cutter bar blade is polished.
• Remove wheels
16
; reverse pinions
14
and pawls
20
so that the beveled edge of the pawl
20
is on the right.
CAUTION: Clean any grinding compound or debris
from the cutter bar blade, reel blades, pinions and
pawls. Lubricate axle and pinion with a light film of
wheel bearing grease and replace wheels and “E” rings.
NOTE: It is recommended to use an industrial or valve
lapping compound between 100-240 grit. This is usually
available at an industrial or automotive supply store. If
professional sharpening is required, consult your local yellow
pages for lawn mower repair services.
Mowing Tips
WARNING: Always inspect area where mower is to
be used and remove all stones, sticks, wire, bones,
and other debris which might be thrown by the
rotatingblade.
WARNING: Mow across the face of slopes, never
up-and-down. Exercise extreme caution when
changing direction on slopes. Do not mow excessively
steep slopes. Always maintain good footing.
• Set mower at highest cutting height when mowing in
rough ground or in tall weeds. Removing too much grass
at one time can cause the motor to be overloaded and
to stop.
16
9
19

ENGLISH
8
Accessories
WARNING: Since accessories, other than those
offered by CRAFTSMAN have not been tested with
this product, use of such accessories with this tool
could be hazardous. To reduce the risk of injury, only
CRAFTSMAN recommended accessories should be used
with thisproduct.
Recommended accessories for use with your tool are available
at extra cost from your local dealer or authorized service
center. If you need assistance in locating any accessory, please
contact CRAFTSMAN on our website www.Craftsman.com or
call at 888-331-4569.
Cleaning
WARNING: Never use solvents or other harsh
chemicals for cleaning the non-metallic parts of the
tool. These chemicals may weaken the plastic materials
used in these parts. Use a cloth dampened only with
water and mild soap. Never let any liquid get inside the
tool; never immerse any part of the tool into aliquid.
Apply a wax or oil after cleaning to prevent corrosion.
Repairs
WARNING: To assure product SAFETY and RELIABILITY,
repairs, maintenance and adjustment (including power
cord repair and brush inspection and replacement,
when applicable) should be performed by a
CRAFTSMAN authorized service center. Always use
identical replacementparts.
Register Online
Thank you for your purchase. Register your product nowfor:
• WARRANTY SERVICE: Registering your product will
help you obtain more efficient warranty service in case
there is a problem with yourproduct.
• CONFIRMATION OF OWNERSHIP: In case of
an insurance loss, such as fire, flood or theft, your
registration of ownership will serve as your proof
ofpurchase.
• FOR YOUR SAFETY: Registering your product will
allow us to contact you in the unlikely event a safety
notification is required under the Federal Consumer
SafetyAct.
Register online at www.craftsman.com/craftsmanclub/
Register
Preventing Corrosion
Fertilizers and other garden chemicals contain agents which
greatly accelerate the corrosion of metals. If you mow in
areas where fertilizers or chemicals have been used, the
mower should be cleaned immediately afterward as follows:
Use a lubricating oil or wax after each use to prevent rust
and unsure smooth and squeak free operation
Wipe all exposed parts with a damp cloth.
Meets CPSC Safety Requirements
CRAFTSMAN Mowers conform to the safety standards of
the American National Standards Institute, and the U.S.
Consumer Product Safety Commission.
Limited Warranty
There are no warranties that extend beyond the product
description except that the lawn mower sold thereunder is
warranted as follows:
Three-Year Limited Warranty
For three (3) years from purchase, The Great States
Corporation(GSC)/American Lawn Mower Company
warrants to the original owner that this CRAFTSMAN
product and service part is free from defects in materials and
workmanship and agrees to repair or replace any defective
product or part for the warranty period stated above.
Warranty voided if used for commercial or industrial purposes
or any other improper use as determined by GSC. Warranty
does not include repairs necessary due to operator's abuse
or negligence (including overloading the product beyond
capacity, immersion in water, or the failure to assemble,
operate, maintain, or store the product according to the
instructions in the owner's manual). This warranty does not
cover:
• Wear items, including but not limited to - drive belts &
gears, cutting blades, mower blades, guide bars, wheels,
handles, worn bags, other items subject to wear over time.
This warranty does not cover damage caused by cold, heat,
rain excessive humidity, or other environmental extremes.
This warranty does not cover normal deterioration of the
exterior finish or normal wear and tear on the products
including, but not limited to scratches, cracks, dents, or
damage caused by outside chemicals.
This warranty is not transferable and only applies to new
products sold directly from an authorized retailer. This
warranty does not apply to any product, new or used,
purchased through unauthorized third-party channels. For
information on authorized dealers, contact our customer
support hotline at 888-331-4569 (Mon-Fri 8am-5pm Est). Any
incidental, indirect or consequential loss, damage, or expense

9
ENGLISH
that may result from any defect or malfunction of the
products is not covered by the warranty. The warranty does
not include installation, assembly or normal adjustments
explained in the owner’s manual. The expense of delivering
the product to the vendor and the expense of returning the
product or replacement parts to the owner is not covered by
the warranty.
Additional Warranty Limitations
Some states do not allow the exclusion or limitation on how
long an implied warranty lasts, so the above limitation may
not apply to you. Products sold damaged or incomplete,
sold as is, or sold as reconditioned are not covered under the
warranty.
Damage or liability caused by shipping, improper handling,
improper assembly, incorrect voltage, improper wiring,
improper maintenance, improper modification or the
use of accessories and/or attachments not specifically
recommended is not covered by this warranty.
Proof of purchase, original dated sales receipt, must
accompany all warranty claims.
www.craftsman.com
(1-888-331-4569)
A Great States Corporation/American Lawn Mower Company
7444 Shadeland Station Way
Indianapolis, IN 46256
Copyright ©2022 CRAFTSMAN (US) INC.,
CRAFTSMAN and the CRAFTSMAN Logo are trademarks of
Stanley Black & Decker, Inc. or an affiliate thereof and are used
under license.
CALL US WITH QUESTIONS
ABOUT OPERATING OR MAINTAINING
YOUR CRAFTSMAN REEL MOWER
OR GET ASSISTANCE ONLINE
THIS TOOL CAN BE DANGEROUS.
Follow all warnings and safety instructions in this manual.
The operator is responsible for following warnings
and instructions in this manual.
Restrict use of this mower to persons
who read, understand and follow the warning
and instructions in this manual.
Provide all relevant information when you call or visit online.
REPAIR PARTS (KITS/ITEMS)
The model/ serial number of this tool is found on a plate or label
attached to the housing. Please record the serial number in the
space provided below.
MODEL NUMBER: CMXRMLM181618
RECORD YOUR SERIAL NUMBER:
HOW TO ORDER REPLACEMENT PARTS
ALWAYS MENTION THE MODEL NUMBER WHEN
ORDERING KIT / ITEMS FOR THIS TOOL
RM-WK10A-1
RM18-HK-1
RM-GPK-1
RM-APK-1
RM-TWK-1
RM-HA
RM-UHP-1
GC91820
10 INCH WHEEL KIT
HANDLE KIT U-SHAPE
WITH WINGNUTS
GEAR AND PAWL KIT
AXLE PIN KIT
TRAILING WHEEL KIT
HEIGHT ADJUSTER KIT
U-HANDLE ASSEMBLY
HARDWARE PACKAGE
GRASS CATCHER
1
1
1
1
1
1
1
1
KIT / ITEM NUMBER DESCRIPTION
QTY
How To Order Parts
Specify the following information when ordering
parts:
1. Complete model number (found on the identification
decal on the rear of the cutter bar)
2. Cutting width of your unit.

FRANÇAISE
10
Français (traduction de la notice d’instructions originale)
English (original instructions) 3
Français (traduction de la notice d’instructions originale) 10
Español (traducido de las instrucciones originales) 20
Assurez-vous d'avoir toutes ces pièces avant de
commencer l'assemblage
(2) EN FORME
DE L LIEN
TUBES
(6) M6X35
MANIPULER
BOULONS
(6)
AILE
BOULONS
(6)
RONDELLES
(2)
ANNEAUX EN “E”
LISTE DE COLISAGE DU MODÈLE CMXRMLM181618
1. Tondeuse à rouleau 46 cm (18")
2. (4) Poignées en quatre parties avec prise en mousse (Fig. A)
3. Sac de matériel d'assemblage de poignée
4. Ramasseur d'herbe
5. Manuel d'instructions
MATÉRIEL D’ASSEMBLAGE DE LA POIGNÉE
COMPOSANTS DU SAC
• (2) Tubes de connexion en forme de L
• (6) boulons de poignée M6x35
• (6) boulons à oreilles
• (6) Rondelles
• (2) Anneaux en "E"

FRANÇAISE
11
COMPOSANTS
1
Poignée supérieure
2
Poignée centrale
3
Boulon de connexion inférieur et supérieur et écrous à oreilles
4
Poignée inférieure
5
Bobine de lame
6
Ramasseur d'herbe
7
Levier de réglage de la hauteur de coupe
AVERTISSEMENT: Lisez tous les avertissements de
sécurité et toutes les instructions. Le non-respect
des avertissements et des instructions peut entraîner un
choc électrique, un incendie et/ou des blessures graves.
AVERTISSEMENT: Pour réduire le risque de blessure,
lisez le manuel d'instructions.
Si vous avez des questions ou des commentaires sur
ceci ou n'importe quel produit, appelez CRAFTSMAN
sans frais au : 1-888-331-4569
1
2
4
7
6
Définitions: symboles et mots d'alerte de sécurité
Ce manuel d'instructions utilise les symboles et les mots d'alerte de sécurité suivants pour vous avertir des situations
dangereuses et des risques de blessures corporelles ou de dommages matériels.
DANGER: Indique une situation dangereuse imminente qui, si elle n'est pas évitée, entraînera la mort ou des blessures graves.
AVERTISSEMENT: Indique une situation potentiellement dangereuse qui, si elle n'est pas évitée,
peut entraîner la mort ou des blessures graves.
ATTENTION: indique une situation potentiellement dangereuse qui, si elle n'est pas évitée,
peut entraîner des blessures mineures ou modérées.
(Utilisé sans mot) Indique un message relatif à la sécurité.
AVIS: Indique une pratique non liée à des blessures
corporelles qui, si elle n'est pas évitée,
peut entraîner des dommages
matériels.
5
3

FRANÇAISE
12
IMPORTANT SAFETY WARNINGS AND
INSTRUCTIONS
WARNING: To reduce risk of injury:
• Before any use, be sure everyone using this tool
reads and understands all safety instructions and
other information contained in this manual.
• Save these instructions and review frequently prior
to use and in instructing others.
• When using lawn mowers, basic safety precautions
should always be followed to reduce personal
injury, including the following:
READ ALL INSTRUCTIONS
GENERAL SAFETY WARNINGS AND
INSTRUCTIONS FOR ALL TOOLS
• This tool can be dangerous. Follow all warnings
and Safety Instructions in this manual. The operator is
responsible for following warnings and instructions in
this manual and on unit. Restrict use of this mower to
persons who read, understand and follow warnings and
instructions in this manual and onunit.
• Avoid dangerous environment – don’t use lawn mowers
in damp or wetlocations.
• Don’t Use InRain.
• Keep Children Away – All visitors should be kept a safe
distance from workarea.
• Dress Properly – Do not wear loose clothing or jewelry.
They can be caught in moving parts. Use of rubber gloves
and footwear is recommended when workingoutdoors.
• Use Safety Glasses – Always use face or dust mask if
operation isdusty.
• Use Right Appliance – Do not use reel mower for any job
except that for which it isintended.
• Check for damaged parts. Before further use of the
mower, a guard or other part that is damaged should be
carefully checked to determine that it will operate properly
and perform its intended function. Check for alignment of
moving parts, binding of moving parts, breakage of parts,
mounting, and any other conditions that may affect their
operation. A guard or other part that is damaged should
be properly repaired or replaced by an authorized service
center unless otherwise indicated elsewhere in thismanual.
• Repairs and service. Repairs, maintenance and
any adjustments not specified in this manual should
be performed by authorized service centers or other
qualified service organizations, always using identical
replacementparts.
• Don’t Force Lawn Mower – It will do the job better and
safer at the rate for which it wasdesigned.
• Don’t Overreach – Keep proper footing and balance at
alltimes.
• Stay Alert – Watch what you are doing. Use common
sense. Do not operate lawn mower when you aretired.
• Store Lawn Mower Indoors – When not in use, lawn
mower should be stored in an indoor dry and locked-up
place – out of reach of children.
• Maintain Lawn Mower With Care – Keep cutting edges
sharp and clean for best and safestperformance.
Follow instructions for lubricating and changing
accessories. Keep handles dry, clean, and free from oil
andgrease.
• Keep bladessharp.
• Keep hands and feet away from cuttingarea.
• Objects struck by the lawn mower blade can cause
severe injuries to persons. The lawn should always
be carefully examined and cleared of all objects prior to
eachmowing.
• If lawn mower strikes a foreign object, follow
thesesteps:
1. Stop pushing reel mower.
2. Inspect fordamage.
3. Repair any damage before restarting and operating
the reelmower.
• Use identical replacement bladesonly.
SAVE THESE INSTRUCTIONS
Important
Safe Practices for Pedestrian-
ControlledMowers
This machine is capable of amputating hands and feet and
throwing objects. Failure to observe the following safety
instructions could result in serious injury or death.
General Information
1 . Read, understand, and follow instructions and warnings in
this manual and on the machine andattachments.
2 . Only allow operators, who are responsible, trained, familiar
with the instructions, and physically capable to operate the
machine.
3 . Do not carry passengers and keep bystanders away.
4 . Do not operate the machine while under the influence of
alcohol or drugs.
5 . Follow the manufacturer’s recommendation for wheel
weights or counterweights.
Preparation Before Operating
1 . Clear the operating area of any objects which could be
thrown by or interfere with operation of the machine.
2 . Keep the area of operation clear of all bystanders,
particularly small children. Stop the machine and
attachment(s) if anyone enters the area.
3 . Do not operate the machine without safety devices in place
and functioning properly. Check frequently for signs of wear
or deterioration and replace as needed.
4 . Wear appropriate personal protective equipment such as
safety glasses and footwear.
Operating
1 . Only operate the machine in daylight or good
artificiallight.
2 . Avoid holes, ruts, bumps, rocks, or other hidden hazards.
Uneven terrain could overturn the machine, or cause
operator to lose their balance or footing.
FRANÇAISE
13
3 . Do not put hands or feet near rotating parts or under the
machine. Keep clear of the discharge opening at all times.
4 . Do not direct discharge material toward anyone. Avoid
discharging material against a wall or obstruction. Material
may ricochet back toward the operator. Stop the blade(s)
when crossing gravel surfaces.
5 . Never intentionally strike or ram trees, fences, etc. This can
cause injuries or severely damage the mower
Children Specific
1 . Tragic accidents can occur if the operator is not alert to
the presence of children. Children are often attracted to
the machine and the mowing activity. Never assume that
children will remain where you last saw them.
2 . Keep children out of the operating area and under
the watchful care of a responsible adult other than
theoperator.
Slope Specific
1 . Slopes are a major factor related to accidents. Operation on
slopes requires extra caution.
2 . Travel in the manufacturer recommended direction on
slopes. Use caution while operating near dropoffs.
3 . Avoid mowing wet grass. (Poor footing could cause a slip
and fall accident.)
4 . Do not operate machine under any condition where
traction, steering, or stability is in question. Tires Mower
could slide even if the wheels are stopped.
5 . Avoid starting and stopping on slopes. Avoid making
sudden changes in speed or direction. Make turns slowly
and gradually.
6 . Use extra care while operating machine with a grass
catcher or other attachment(s). They can affect the stability
of the machine.
Service
1 . Keep machine in good working order. Replace worn or
damaged parts.
2 . Use caution when servicing blades. Wrap the blade(s) or
wear gloves. Replace damaged blades. Do not repair or
alter blade(s).
The following are explanations of important safety
hazard pictorials on themower.
User must read and understand the
instructionmanual.
To avoid the risk of serious injury do not
mow up and down slopes. Always mow
acrossslopes.
To avoid the risk of injury to bystanders keep
all persons and pets at a safe distance from the
mower whileoperating.
Rotating blades can cause serious injury.
Keep hands and feet clear of reel blades and
discharge opening at all times. Always be sure
blade has stopped before cleaning, servicing,
transporting or lifting themower.
Objects struck by mower blade can cause
serious injury. Stay behind the handle when the
pushing the reel. Always ensure persons and
pets are clear of the discharge from the mower
while operating. Always inspect mowing area
before mowing and remove objects that could
be thrown by blade.
Additional Safety Information
WARNING: ALWAYS use safety glasses. Everyday
eyeglasses are NOT safety glasses. Also use face or
dust mask if cutting operation is dusty. ALWAYS WEAR
CERTIFIED SAFETYEQUIPMENT:
• ANSI Z87.1 eye protection (CAN/CSA Z94.3),
• ANSI S12.6 (S3.19) hearing protection,
• NIOSH/OSHA/MSHA respiratoryprotection.
WARNING: Some dust created by this product
contains chemicals known to the State of California to
cause cancer, birth defects or other reproductive harm.
Some examples of these chemicals are:
• compounds in fertilizers
• compounds in insecticides, herbicides
andpesticides
• arsenic and chromium from chemically
treatedlumber
To reduce your exposure to these chemicals, wear approved
safety equipment such as dust masks that are specially designed
to filter out microscopic particles.
La etiqueta de su herramienta puede incluir los siguientes
símbolos. Los símbolos y sus definiciones son los siguientes:
min ..................... minutos
…/min ..............por minuto
.....................símbolo de alerta
de seguridad
..................... evitar mirar a la luz
..................... usar protección
respiratoria
..................... use protección para
los ojos
..................... use protección
auditiva
..................... leer toda la
documentación
IPXX .................... IP símbolo
FRANÇAISE
14
REMARQUE: Il peut être nécessaire d'exercer une légère
pression pour forcer la deuxième goupille dans sa position
correcte. Si vous rencontrez des problèmes, placez tout le
moulinet sur le côté. Appliquez une pression vers le bas
sur la poignée inférieure pour la positionner sous les tiges
métalliques courtes du moulinet. Relâchez doucement la
pression jusqu'à ce que la poignée soit mise en place sur la
deuxième broche..
Assemblage du bac à herbe (Fig.C, D, E)
Le cadre du bac à herbe et 2 tubes en acier en forme de L
sont inclus dans le carton
22
.
1. Insérez l'extrémité longue du tube en acier en forme de
L
22
vers le bas dans le cadre du ramasseur avant. Voir
la figure C.
Fig.C
22
2. Encliquetez la rainure en plastique formée
23
sur le
receveur connecté. Voir la figure D.
Fig.D
23
3. Répétez les étapes 1 et 2 du côté opposé.
4. Support de fil de poussée
24
pied à travers la boucle
cousue dans le bas du receveur. Cela soutiendra le rail supérieur.
Voir la la figure E
Poignée d'assemblage (Fig. A)
Le carton contient les pièces de la poignée de la tondeuse:
(1 partie supérieure du guidon, 2 parties centrales
du guidon et 1 partie inférieure du guidon) et le kit
de quincaillerie (pour le contenu, voir l'intérieur de la
couverture avant).
1. Disposez les parties de la poignée comme illustré à la figure A
2. Insérez les 2 guidons du milieu
2
pièces dans le guidon
supérieur
1
3. Fixez les 2 guidons du milieu
2
au guidon supérieur
1
pièce des deux côtés avec un seul boulon à poignée,
une rondelle et un écrou à oreilles
3
.
4. Alignez les trous du milieu du guidon
2
avec les trous
du guidon inférieur
4
pièce.
5. Fixez chaque côté des deux guidons avec des boulons
de poignée, des rondelles et des écrous à oreilles
3
.
Fig.A
2
Fixation de la poignée à la tondeuse
(Fig.B)
1. Après avoir assemblé la poignée, monter les trous à
l'extrémité du guidon inférieur
4
à gauche et à droite,
au-dessus des petits poteaux métalliques sortant des
plaques latérales
8
de la bobine.
2. Lorsque le guidon est en place sur les
poteaux, enclenchez les anneaux en «E»
9
sur les poteaux fendus des deux côtés
pour empêcher la poignée de se détacher.
Fig.B
4
8
9
MONTER ET AJUSTER
3
4
1
FRANÇAISE
15
5.
Fig.E
24
Fixation du bac à herbe à la tondeuse (Fig.F)
1. Il y a 2 sections de rainures en plastique formées
23
à
l'avant du dessous du receveur. Encliquetez la section
rainurée sur le tube de support
25
entre les roues arrière
de la tondeuse. Voir la figure F.
.
Fig.F
23
25
2. Ajuster la sangle
26
à la longueur souhaitée, puis fixez
le crochet à la barre transversale de la poignée 27 (le
style de votre barre transversale peut varier). Cette sangle
empêche le bac à herbe de traîner sur le sol. Voir Figure G.
Fig.G
27
26
UTILISATION ET ENTRETIEN
Soins généraux (Fig. H-J)
Un minimum de soin est nécessaire pour assurer le bon
fonctionnement de votre tondeuse.
• Pour éviter d'endommager la tondeuse ou les lames de
coupe, gardez la zone à tondre libre de tout débris.
• Nous suggérons une application régulière d'huile ou de
lubrifiant (c'est-à-dire WD-40). Cela doit être appliqué à
toutes les surfaces de coupe, à l'arbre d'essieu du rouleau
de coupe et aux roues.
Réglages primaires de la hauteur de coupe
Ces unités peuvent être ajustées pour offrir une plage de
hauteur de coupe de 1" à 3" (2,5 cm à 7,5 cm) simplement
en ajustant le levier de réglage de la hauteur de coupe
7
.
N'oubliez pas que le même réglage doit être effectué des
deux côtés de la tondeuse.
En suivant les instructions ci-dessous, reportez-vous à la
figure H pour plus d'informations.
• Pour obtenir la position de coupe la plus basse, poussez
le levier de réglage de la hauteur de coupe
7
vers
l'avant, vers le rouleau de la tondeuse, et mis en place.
Répétez pour les deux côtés.
• Pour obtenir la position de coupe la plus élevée, tirez le
levier de réglage de la hauteur de coupe
7
vers l'arrière,
loin du rouleau de la tondeuse, et mis en place. Répétez
pour les deux côtés.
Fig.H
7
FRANÇAISE
16
Réglage de la hauteur de coupe secondaires
Ceci est utilisé pour réduire votre hauteur de coupe en
dessous de 2" de hauteur. L'ensemble roue/cache-poussière
peut être déplacé vers l'une des 3 positions sur la plaque
latérale. Gardez à l'esprit que le même réglage doit être
effectué des deux côtés de la tondeuse.
En suivant les instructions ci-dessous, reportez-vous à la figure I.
• Retirez le cache-moyeu en plastique
15
(uniquement
pour les moulinets 16" (41cm) et 18" (46cm)) en insérant
un petit tournevis à tête plate dans la fente sur le
chapeau de moyeu et enlevez-le de la roue
16
.
• Retirer l'écrou d'axe
12
à l'intérieur de la tondeuse en
tenant la goupille d'essieu
13
en place avec une douille
de 1/2" (1,27 cm) ou un tournevis à lame plate (selon le
type de modèle) et une douille ou une clé à douille sur
l'écrou
12
.
• Tirez la roue
16
, housse de protection
17
pignon
14
, et goupille d'axe
13
doucement comme une unité
jusqu'à ce que la goupille d'essieu
13
dégage la plaque
latérale
8
. Ensuite, repositionnez la goupille d'axe
13
à
l'un des deux autres trous pour obtenir la hauteur désirée.
Remplacer et serrer l'écrou d'essieu
12
.
• Répétez pour les deux côtés.
Fig.I
15
16
12
13
Figure I Lettre Légende Référence
A - Réglage le plus bas
B - Réglage du milieu
C - Réglage le plus élevé
REMARQUE: Il n'est pas recommandé d'utiliser la position
"A" sauf si vous avez une pelouse extrêmement plate afin
d'éviter le scalpage.
Réglage de la lame de la tondeuse (Fig. J)
Les lames ont été préréglées avant de quitter l'usine
Un désalignement peut se produire, entraînant des
lames trop lâches ou trop serrées. Si cela se produit, vous
remarquerez une coupe grossière et inégale ou une tondeuse
qui pousse fort. Tous les réglages s'effectuent depuis l'arrière
de la tondeuse (à l'opposé de la barre avec l'autocollant
du logo). Chaque extrémité de la barre de coupe peut être
ajustée séparément.
En suivant les instructions ci-dessous, reportez-vous à la
figure J pour plus d'informations..
• La lame de la barre de coupe (située sous le moulinet)
pivote. Les vis avant
18
éloigner la barre de coupe des
lames, tandis que les vis arrière
19
déplacer la barre de
coupe vers les lames.
• Le réglage des vis est une procédure très sensible.
1/16ème de tour est considéré comme un ajustement
majeur.
• Avant de serrer une vis de réglage, assurez-vous de
desserrer la vis opposée d'une quantité égale.
Desserrer les lames
La lame de la barre de coupe doit être éloignée du rouleau
de coupe.
• Desserrez les deux vis arrière
19
également en les
tournant dans le sens inverse des aiguilles d'une montre.
• Serrer les deux vis avant
18
également en les tournant
dans le sens des aiguilles d'une montre.
Serrage des lames
La lame de la barre de coupe doit être rapprochée du rouleau
de coupe.
• Desserrez les deux vis avant
18
également en les
tournant dans le sens inverse des aiguilles d'une montre.
• Serrer les deux vis arrière
19
également en les
tournant dans le sens des aiguilles d'une montre.
Fig.J
19
18
14
17
8
9
FRANÇAISE
17
Vérification des ajustements
La lame de la barre de coupe doit être éloignée du rouleau
de coupe.
• Retourner la tondeuse.
• Insérez un morceau de papier (c.-à-d., écrit ou journal)
entre la barre de coupe et les lames du rouleau, et
tournez soigneusement les lames du rouleau à la main.
Toutes les lames doivent trancher le papier uniformément sur
toute la longueur de la barre de coupe tandis que la bobine
tourne en douceur.
Si la tondeuse a une coupe intermittente, un réglage doit
être effectué sur le côté approprié des lames pour obtenir
une action de coupe appropriée.
Affûtage des lames de coupe (Fig. K-M)
Lorsque la tondeuse est correctement lubrifiée et réglée,
l'affûtage ne devrait pas être nécessaire pendant plusieurs
années. Cependant, les étapes suivantes vous permettront de
faire la procédure vous-même à relativement peu de frais.
• Retirez les anneaux en «E»
9
, roues
16
et pignon
14
des deux côtés de la tondeuse (reportez-vous à la figure K).
Fig.K
14
• Retirer les deux cliquets
20
des fentes rectangulaires de
l'arbre du moulinet et inversez leurs positions (reportez-
vous à la figure L).
Fig.L
20
• Inverser le placement des pignons
14
.
• Placer le pignon gauche
14
sur l'extrémité droite de
l'arbre du moulinet et le pignon droit sur l'extrémité
gauche de l'arbre du moulinet. Remplacer les roues et les
anneaux en "E"
9
.
• Étalez une fine couche de composé de rodage sur le bord
avant des lames du moulinet.
• Réglez la barre de coupe de manière à ce que la lame de
la barre de coupe soit en contact léger mais ferme avec
les lames du cylindre sur toute la largeur de la barre de
coupe (reportez-vous à la figure M).
MISE EN GARDE: Ne pas trop serrer les vis de réglage
18
et
19
, car cela pourrait endommager la barre de
coupe. Les deux vis doivent être serrées lors du réglage
final.
Fig.M
18
• Poussez la tondeuse vers l'arrière sur une surface lisse
(telle qu'un trottoir ou une allée pavée). Continuez
ainsi jusqu'à ce que les lames du cylindre tournent
relativement librement et que le bord avant de la lame
de la barre de coupe soit poli.
• Retirer les roues
16
; pignons inversés
14
et cliquets
20
de sorte que le bord biseauté du cliquet
20
est à droite.
MISE EN GARDE: Nettoyez tout composé abrasif ou
débris de la lame de la barre de coupe, des lames du
cylindre, des pignons et des cliquets. Lubrifiez l'essieu et
le pignon avec un léger film de graisse pour roulement
de roue et remplacez les roues et les anneaux en « E ».
REMARQUE: Il est recommandé d'utiliser un composé de
rodage industriel ou de valve entre 100 et 240 grains. Ceci
est généralement disponible dans un magasin de fournitures
industrielles ou automobiles. Si un affûtage professionnel
est nécessaire, consultez vos pages jaunes locales pour les
services de réparation de tondeuses à gazon.
Conseils de tonte
AVERTISSEMENT: Inspectez toujours la zone où la
tondeuse doit être utilisée et retirez toutes les pierres,
bâtons, fils, os et autres débris qui pourraient être
projetés par la lame en rotation.
AVERTISSEMENT: Tondez en travers des pentes,
jamais de haut en bas. Soyez extrêmement prudent
lorsque vous changez de direction sur les pentes. Ne
tondez pas les pentes trop raides. Maintenez toujours
une bonne assise.
• Réglez la tondeuse à la hauteur de coupe la plus élevée
lorsque vous tondez dans un sol accidenté ou dans de
hautes herbes. Si vous enlevez trop d'herbe en une seule
fois, le moteur peut être surchargé et s'arrêter.
16
9
19

FRANÇAISE
18
Accessories
WARNING: Since accessories, other than those
offered by CRAFTSMAN have not been tested with
this product, use of such accessories with this tool
could be hazardous. To reduce the risk of injury, only
CRAFTSMAN recommended accessories should be used
with thisproduct.
Recommended accessories for use with your tool are available
at extra cost from your local dealer or authorized service
center. If you need assistance in locating any accessory, please
contact CRAFTSMAN on our website www.Craftsman.com or
call at 888-331-4569.
Prévention de la corrosion
Les engrais et autres produits chimiques de jardin
contiennent des agents qui accélèrent considérablement
la corrosion des métaux. Si vous tondez dans des zones où
des engrais ou des produits chimiques ont été utilisés, la
tondeuse doit être nettoyée immédiatement après comme
suit : Utilisez une huile lubrifiante ou de la cire après chaque
utilisation pour éviter la rouille et un fonctionnement
incertain et sans grincement. Essuyez toutes les parties
exposées avec un chiffon humide.
Conforme aux exigences de sécurité du CPSC
Les tondeuses CRAFTSMAN sont conformes aux normes de
sécurité de l'American National Standards Institute et de la
U.S. Consumer Product Safety Commission.
Garantie limitée
Il n'y a aucune garantie qui s'étend au-delà de la description
du produit, sauf que la tondeuse à gazon vendue en vertu de
celle-ci est garantie comme suit :
Garantie limitée de trois ans
Pendant trois (3) ans à compter de l'achat, The Great States
Corporation (GSC)/American Lawn Mower Company
garantit au propriétaire d'origine que ce produit et pièce de
rechange CRAFTSMAN est exempt de défauts de matériaux
et de fabrication et s'engage à réparer ou à remplacer tout
produit défectueux. ou pièce pendant la période de garantie
indiquée ci-dessus.
La garantie est annulée si elle est utilisée à des fins
commerciales ou industrielles ou toute autre utilisation
inappropriée telle que déterminée par GSC. La garantie
n'inclut pas les réparations nécessaires en raison de l'abus ou
de la négligence de l'opérateur (y compris la surcharge du
produit au-delà de sa capacité, l'immersion dans l'eau ou le
défaut d'assemblage, d'utilisation, d'entretien ou de stockage
du produit conformément aux instructions du manuel du
propriétaire). Cette garantie ne couvre pas :
• Articles d'usure, y compris, mais sans s'y limiter, les
courroies d'entraînement et les engrenages, les lames de
coupe, les lames de tondeuse, les barres de guidage, les
roues, les poignées, les sacs usés, d'autres articles sujets à
l'usure au fil du temps.
Cette garantie ne couvre pas les dommages causés par le
froid, la chaleur, la pluie, l'humidité excessive ou d'autres
conditions environnementales extrêmes. Cette garantie ne
couvre pas la détérioration normale de la finition extérieure
ou l'usure normale des produits, y compris, mais sans s'y
limiter, les rayures, les fissures, les bosses ou les dommages
causés par des produits chimiques extérieurs.
Cette garantie n'est pas transférable et ne s'applique qu'aux
produits neufs vendus directement auprès d'un détaillant
autorisé. Cette garantie ne s'applique à aucun produit, neuf
ou d'occasion, acheté via des canaux tiers non autorisés.
Pour plus d'informations sur les revendeurs agréés, contactez
Nettoyage et Réparations
AVERTISSEMENT: N'utilisez jamais de solvants ou
d'autres produits chimiques agressifs pour nettoyer
les parties non métalliques de l'outil. Ces produits
chimiques peuvent affaiblir les matières plastiques
utilisées dans ces pièces. Utilisez un chiffon imbibé
uniquement d'eau et de savon doux. Ne laissez jamais
de liquide pénétrer à l'intérieur de l'outil; n'immergez
jamais aucune partie de l'outil dans unliquide.
Appliquez une cire ou une huile après le nettoyage pour
éviter la corrosion.
AVERTISSEMENT: Pour assurer la SÉCURITÉ et
la FIABILITÉ du produit, les réparations, l'entretien
et les réglages (y compris la réparation du cordon
d'alimentation et l'inspection et le remplacement des
brosses, le cas échéant) doivent être effectués par un
centre de service agréé Craftsman. Utilisez toujours des
pièces de rechange identiques.
Inscrivez-vous en ligne
Merci pour votre achat! Enregistrez votre produit maintenantpour:
• SERVICE DE GARANTIE: L'enregistrement de votre
produit vous aidera à obtenir un service de garantie plus
efficace en cas de problème avec votre produit.
• CONFIRMATION DE PROPRIÉTÉ: En cas de perte
d'assurance, comme un incendie, une inondation ou un
vol, votre enregistrement de propriété servira de preuve
d'achat.
• POUR VOTRE SÉCURITÉ: L'enregistrement de votre
produit nous permettra de vous contacter dans le cas
peu probable où une notification de sécurité serait
requise en vertu de la loi fédérale sur la sécurité des
consommateurs.
Inscrivez-vous en ligne sur
www.craftsman.com/craftsmanclub/Register
FRANÇAISE
19
notre service d'assistance téléphonique au 888-331-4569 (du
lundi au vendredi de 8h à 17h, heure de l'Est). Toute perte,
dommage ou dépense accidentelle, indirecte ou consécutive
pouvant résulter d'un défaut ou d'un dysfonctionnement
des produits n'est pas couverte par la garantie. La garantie
n'inclut pas l'installation, l'assemblage ou les réglages
normaux expliqués dans le manuel du propriétaire. Les frais
de livraison du produit au vendeur et les frais de retour du
produit ou des pièces de rechange au propriétaire ne sont
pas couverts par la garantie.
Limites de garantie supplémentaires
Certains États n'autorisent pas l'exclusion ou la limitation de
la durée d'une garantie implicite, de sorte que la limitation
ci-dessus peut ne pas s'appliquer à vous. Les produits
vendus endommagés ou incomplets, vendus tels quels ou
reconditionnés ne sont pas couverts par la garantie.
Les dommages ou la responsabilité causés par l'expédition,
une mauvaise manipulation, un assemblage incorrect,
une tension incorrecte, un câblage incorrect, un entretien
incorrect, une modification incorrecte ou l'utilisation
d'accessoires et/ou d'accessoires non spécifiquement
recommandés ne sont pas couverts par cette garantie.
La preuve d'achat, le ticket de caisse original daté, doit
accompagner toutes les réclamations de garantie.
www.craftsman.com
(1-888-331-4569)
The Great States Corporation/American Lawn Mower Company
7444 Shadeland Station Way
Indianapolis, IN 46256
Copyright ©2022 CRAFTSMAN (États-Unis) INC.,
CRAFTSMAN et le logo CRAFTSMAN sont des marques de
Stanley Black & Decker, Inc. ou une société affiliée et sont
utilisés sous licence.
APPELEZ-NOUS POUR DES QUESTIONS
À PROPOS DU FONCTIONNEMENT OU DE LA
MAINTENANCE VOTRE TONDEUSE À MOULINET
CRAFTSMAN OU OBTENEZ DE L’ASSISTANCE EN LIGNE
CET OUTIL PEUT ÊTRE DANGEREUX.
Suivez tous les avertissements et consignes de sécurité de ce manuel.
L’opérateur est responsable des avertissements suivants
et les instructions de ce manuel.
Limitez l’utilisation de cette tondeuse aux personnes
qui lisent, comprennent et suivent l’avertissement
et les instructions de ce manuel.
Fournissez toutes les informations pertinentes lorsque vous appelez
ou visitez en ligne.
PIÈCES DE RECHANGE (KITS/ARTICLES)
Le modèle/numéro de série de cet outil se trouve sur une plaque ou
une étiquette xée au boîtier. Veuillez enregistrer le numéro de série
dans lel’espace prévu ci-dessous..
NUMÉRO DE MODÈLE: CMXRMLM181618
ENREGISTREZ VOTRE NUMÉRO DE SÉRIE:
COMMENT COMMANDER DES PIÈCES DE RECHANGE
MENTIONNEZ TOUJOURS LE NUMÉRO DE MODÈLE
LORS DE LA COMMANDE DU KIT / DES ARTICLES
POUR CET OUTIL
RM-WK10A-1
RM18-HK-1
RM-GPK-1
RM-APK-1
RM-TWK-1
RM-HA
RM-UHP-1
GC91820
KIT ROUES 10 PO
KIT POIGNEE EN U
AVEC PAPILLON
KIT ENGRENAGE
ET CLIQUET
KIT DE GOUPILLES D’AXE
KIT DE ROUES
SUSPENDUES
KIT DE RÉGLAGE
DE LA HAUTEUR
ASSEMBLAGE DE LA POIGNÉE
EN U FORFAIT MATÉRIEL
COLLECTEUR D’HERBE
1
1
1
1
1
1
1
1
NUMÉRO D’ARTICLE LA DESCRIPTION
QTÉ
Comment commander des pièces
Précisez les informations suivantes lors de la commande
les pièces:
1. Numéro de modèle complet (trouvé sur l'autocollant
d'identification à l'arrière de la barre de coupe)
2. Largeur de coupe de votre appareil.
AVERTISSEMENT: lisez tous les avertissements
de sécurité et toutes les instructions. Ne pas suivre
les avertissements et les instructions peut entraîner un
choc électrique, un incendie et/ou des blessuresgraves.
AVERTISSEMENT: pour réduire le risque de blessure,
lisez le guided’utilisation.

ESPAÑOL
20
English (original instructions) 3
Français (traduction de la notice d’instructions originale) 10
Español (traducido de las instrucciones originales) 20
Asegúrese de Tener Todas Estas Piezas Antes de
Comenzar el Montaje
(2) FORMA DE L
CONEXIÓN
TUBOS
(6) M6X35
RESOLVER
PERNOS
(6)
ALA
PERNOS
(6)
ARANDELAS
(2)
ANILLOS “E”
LISTA DE EMPAQUE DEL MODELO CMXRMLM181618
1. Cortacésped de carrete de 46 cm (18")
2. (4) Mangos de cuatro piezas con empuñadura de
espuma (Fig. A)
3. Bolsa de herrajes para ensamblaje de manija
4. Colector de herbia
5. Manual de instrucciones
HERRAJES DE MONTAJE DEL MANGO
COMPONENTES DE LA BOLSA
• (2) Tubos de conexión en forma de L
• (6) Pernos de manija M6x35
• (6) Pernos de mariposa
• (6) Arandelas
• (2) Anillos "E"

ESPAÑOL
21
COMPONENTES
1
Manija superior
2
Mango medio
3
Perno de conexión inferior y superior y tuercas de
mariposa
4
Mango inferior
5
Carrete de hoja
6
Colector de hierba
7
Palanca de ajuste de altura de corte
ADVERTENCIA: Lea todas las advertencias
de seguridad y todas las instrucciones. El
incumplimiento de las advertencias e instrucciones
puede provocar descargas eléctricas, incendios y/o
lesiones graves.
ADVERTENCIA: Para reducir el riesgo de lesiones, lea
el manual de instrucciones.
Si tiene alguna pregunta o comentario sobre
este o cualquier producto, llame a CRAFTSMAN
gratuito al: 1-888-331-4569
1
2
4
7
6
Definiciones: Símbolos y Palabras de Alerta de Seguridad
Este manual de instrucciones utiliza los siguientes símbolos y palabras de alerta de seguridad para alertarlo sobre situaciones
peligrosas y su riesgo de lesiones personales o daños a la propiedad.
PELIGRO: Indica una situación de peligro inminente que, si no se evita, provocará la muerte o lesiones graves.
ADVERTENCIA: Indica una situación potencialmente peligrosa que, si no se evita, podría provocar la muerte o lesiones graves.
PRECAUCIÓN: Indica una situación potencialmente peligrosa que, si no se evita, puede provocar lesiones leves o moderadas.
(Usado sin palabra) Indica un mensaje relacionado con la seguridad.
AVISO: Indica una práctica no relacionada con lesiones personales que, si no se evita, puede provocar daños a la propiedad.
5
3

ESPAÑOL
22
IMPORTANT SAFETY WARNINGS AND
INSTRUCTIONS
WARNING: To reduce risk of injury:
• Before any use, be sure everyone using this tool
reads and understands all safety instructions and
other information contained in this manual.
• Save these instructions and review frequently prior
to use and in instructing others.
• When using lawn mowers, basic safety precautions
should always be followed to reduce personal
injury, including the following:
READ ALL INSTRUCTIONS
GENERAL SAFETY WARNINGS AND
INSTRUCTIONS FOR ALL TOOLS
• This tool can be dangerous. Follow all warnings
and Safety Instructions in this manual. The operator is
responsible for following warnings and instructions in
this manual and on unit. Restrict use of this mower to
persons who read, understand and follow warnings and
instructions in this manual and onunit.
• Avoid dangerous environment – don’t use lawn mowers
in damp or wetlocations.
• Don’t Use InRain.
• Keep Children Away – All visitors should be kept a safe
distance from workarea.
• Dress Properly – Do not wear loose clothing or jewelry.
They can be caught in moving parts. Use of rubber gloves
and footwear is recommended when workingoutdoors.
• Use Safety Glasses – Always use face or dust mask if
operation isdusty.
• Use Right Appliance – Do not use reel mower for any job
except that for which it isintended.
• Check for damaged parts. Before further use of the
mower, a guard or other part that is damaged should be
carefully checked to determine that it will operate properly
and perform its intended function. Check for alignment of
moving parts, binding of moving parts, breakage of parts,
mounting, and any other conditions that may affect their
operation. A guard or other part that is damaged should
be properly repaired or replaced by an authorized service
center unless otherwise indicated elsewhere in thismanual.
• Repairs and service. Repairs, maintenance and
any adjustments not specified in this manual should
be performed by authorized service centers or other
qualified service organizations, always using identical
replacementparts.
• Don’t Force Lawn Mower – It will do the job better and
safer at the rate for which it wasdesigned.
• Don’t Overreach – Keep proper footing and balance at
alltimes.
• Stay Alert – Watch what you are doing. Use common
sense. Do not operate lawn mower when you aretired.
• Store Lawn Mower Indoors – When not in use, lawn
mower should be stored in an indoor dry and locked-up
place – out of reach of children.
• Maintain Lawn Mower With Care – Keep cutting edges
sharp and clean for best and safestperformance.
Follow instructions for lubricating and changing
accessories. Keep handles dry, clean, and free from oil
andgrease.
• Keep bladessharp.
• Keep hands and feet away from cuttingarea.
• Objects struck by the lawn mower blade can cause
severe injuries to persons. The lawn should always
be carefully examined and cleared of all objects prior to
eachmowing.
• If lawn mower strikes a foreign object, follow
thesesteps:
1. Stop pushing reel mower.
2. Inspect fordamage.
3. Repair any damage before restarting and operating
the reelmower.
• Use identical replacement bladesonly.
SAVE THESE INSTRUCTIONS
Important
Safe Practices for Pedestrian-
ControlledMowers
This machine is capable of amputating hands and feet and
throwing objects. Failure to observe the following safety
instructions could result in serious injury or death.
General Information
1 . Read, understand, and follow instructions and warnings in
this manual and on the machine andattachments.
2 . Only allow operators, who are responsible, trained, familiar
with the instructions, and physically capable to operate the
machine.
3 . Do not carry passengers and keep bystanders away.
4 . Do not operate the machine while under the influence of
alcohol or drugs.
5 . Follow the manufacturer’s recommendation for wheel
weights or counterweights.
Preparation Before Operating
1 . Clear the operating area of any objects which could be
thrown by or interfere with operation of the machine.
2 . Keep the area of operation clear of all bystanders,
particularly small children. Stop the machine and
attachment(s) if anyone enters the area.
3 . Do not operate the machine without safety devices in place
and functioning properly. Check frequently for signs of wear
or deterioration and replace as needed.
4 . Wear appropriate personal protective equipment such as
safety glasses and footwear.
Operating
1 . Only operate the machine in daylight or good
artificiallight.
ESPAÑOL
23
2 . Avoid holes, ruts, bumps, rocks, or other hidden hazards.
Uneven terrain could overturn the machine, or cause
operator to lose their balance or footing.
3 . Do not put hands or feet near rotating parts or under the
machine. Keep clear of the discharge opening at all times.
4 . Do not direct discharge material toward anyone. Avoid
discharging material against a wall or obstruction. Material
may ricochet back toward the operator. Stop the blade(s)
when crossing gravel surfaces.
5 . Never intentionally strike or ram trees, fences, etc. This can
cause injuries or severely damage the mower
Children Specific
1 . Tragic accidents can occur if the operator is not alert to
the presence of children. Children are often attracted to
the machine and the mowing activity. Never assume that
children will remain where you last saw them.
2 . Keep children out of the operating area and under
the watchful care of a responsible adult other than
theoperator.
Slope Specific
1 . Slopes are a major factor related to accidents. Operation on
slopes requires extra caution.
2 . Travel in the manufacturer recommended direction on
slopes. Use caution while operating near dropoffs.
3 . Avoid mowing wet grass. (Poor footing could cause a slip
and fall accident.)
4 . Do not operate machine under any condition where
traction, steering, or stability is in question. Tires Mower
could slide even if the wheels are stopped.
5 . Avoid starting and stopping on slopes. Avoid making
sudden changes in speed or direction. Make turns slowly
and gradually.
6 . Use extra care while operating machine with a grass
catcher or other attachment(s). They can affect the stability
of the machine.
Service
1 . Keep machine in good working order. Replace worn or
damaged parts.
2 . Use caution when servicing blades. Wrap the blade(s) or
wear gloves. Replace damaged blades. Do not repair or
alter blade(s).
The following are explanations of important safety
hazard pictorials on themower.
User must read and understand the
instructionmanual.
To avoid the risk of serious injury do not
mow up and down slopes. Always mow
acrossslopes.
To avoid the risk of injury to bystanders keep
all persons and pets at a safe distance from the
mower whileoperating.
Rotating blades can cause serious injury.
Keep hands and feet clear of reel blades and
discharge opening at all times. Always be sure
blade has stopped before cleaning, servicing,
transporting or lifting themower.
Objects struck by mower blade can cause
serious injury. Stay behind the handle when the
pushing the reel. Always ensure persons and
pets are clear of the discharge from the mower
while operating. Always inspect mowing area
before mowing and remove objects that could
be thrown by blade.
Additional Safety Information
WARNING: ALWAYS use safety glasses. Everyday
eyeglasses are NOT safety glasses. Also use face or
dust mask if cutting operation is dusty. ALWAYS WEAR
CERTIFIED SAFETYEQUIPMENT:
• ANSI Z87.1 eye protection (CAN/CSA Z94.3),
• ANSI S12.6 (S3.19) hearing protection,
• NIOSH/OSHA/MSHA respiratoryprotection.
WARNING: Some dust created by this product
contains chemicals known to the State of California to
cause cancer, birth defects or other reproductive harm.
Some examples of these chemicals are:
• compounds in fertilizers
• compounds in insecticides, herbicides
andpesticides
• arsenic and chromium from chemically
treatedlumber
To reduce your exposure to these chemicals, wear approved
safety equipment such as dust masks that are specially designed
to filter out microscopic particles.
La etiqueta de su herramienta puede incluir los siguientes
símbolos. Los símbolos y sus definiciones son los siguientes:
min ..................... minutos
…/min ..............por minuto
.....................símbolo de alerta
de seguridad
..................... evitar mirar a la luz
..................... usar protección
respiratoria
..................... use protección para
los ojos
..................... use protección
auditiva
..................... leer toda la
documentación
IPXX .................... IP símbolo
ESPAÑOL
24
Español (traducido de las instrucciones originales)
NOTA: Puede ser necesario un poco de presión para forzar el
segundo pasador a su posición correcta. Si tiene problemas,
coloque todo el carrete de costado. Aplique presión hacia
abajo sobre el mango inferior para colocarlo debajo de los
postes cortos de metal en el carrete. Libere suavemente la
presión hasta que el mango se coloque en su lugar sobre el
segundo pasador.
Montaje del Recogedor de Césped (Fig.C, D, E)
En la caja se encuentra el marco del colector de césped y 2
tubos de acero en forma de L
22
.
1. Inserte el extremo largo del tubo de acero en forma de
L
22
hacia abajo en el marco del receptor delantero.
Consulte la figura C.
Fig.C
22
2. Encaje la ranura de plástico formada
23
sobre el receptor conectado. Consulte la figura D
Fig.D
23
3. Repita los pasos 1 y 2 en el lado opuesto.
4. Soporte de alambre de empuje
24
pie a través del lazo
cosido en la parte inferior del receptor. Esto soportará el
riel superior. Consulte la figura E.
Asa de Montaje (Fig. A)
En la caja de cartón se encuentran las piezas del mango
del cortacésped. (1 pieza superior del manillar, 2 piezas
intermedias del manillar y 1 pieza inferior del manillar) y
paquete de herrajes (consulte el contenido en el interior de
la portada).
1. Coloque las partes del mango como se muestra en la Figura A
2. Inserte el manillar medio 2
2
piezas en el manillar superio
1
3. Fijar los 2 manillares centrales
2
to the upper handlebar
1
pieza en ambos lados con un solo perno de manija,
arandela y una tuerca de mariposa
3
.
4. Alinee los orificios del manillar central
2
con los
agujeros del manillar inferior
4
pedazo.
5. Sujete cada lado de los dos manubrios con pernos,
arandelas y tuercas de mariposa
3
.
Fig.A
2
1
Colocación del mango en el cortacésped
(Fig.B)
1. Después de montar el manillar, encaje los agujeros en
el extremo del manillar inferior
4
en el lado izquierdo
y derecho, sobre los postes cortos de metal que se
extienden desde las placas laterales
8
del carrete
2. Cuando el manillar esté en su lugar sobre los postes,
encaje los anillos "E"
9
en los postes ranurados en
ambos lados para evitar que la manija se salga.
Fig.B
4
8
9
MONTAJE Y AJUSTES
3
4
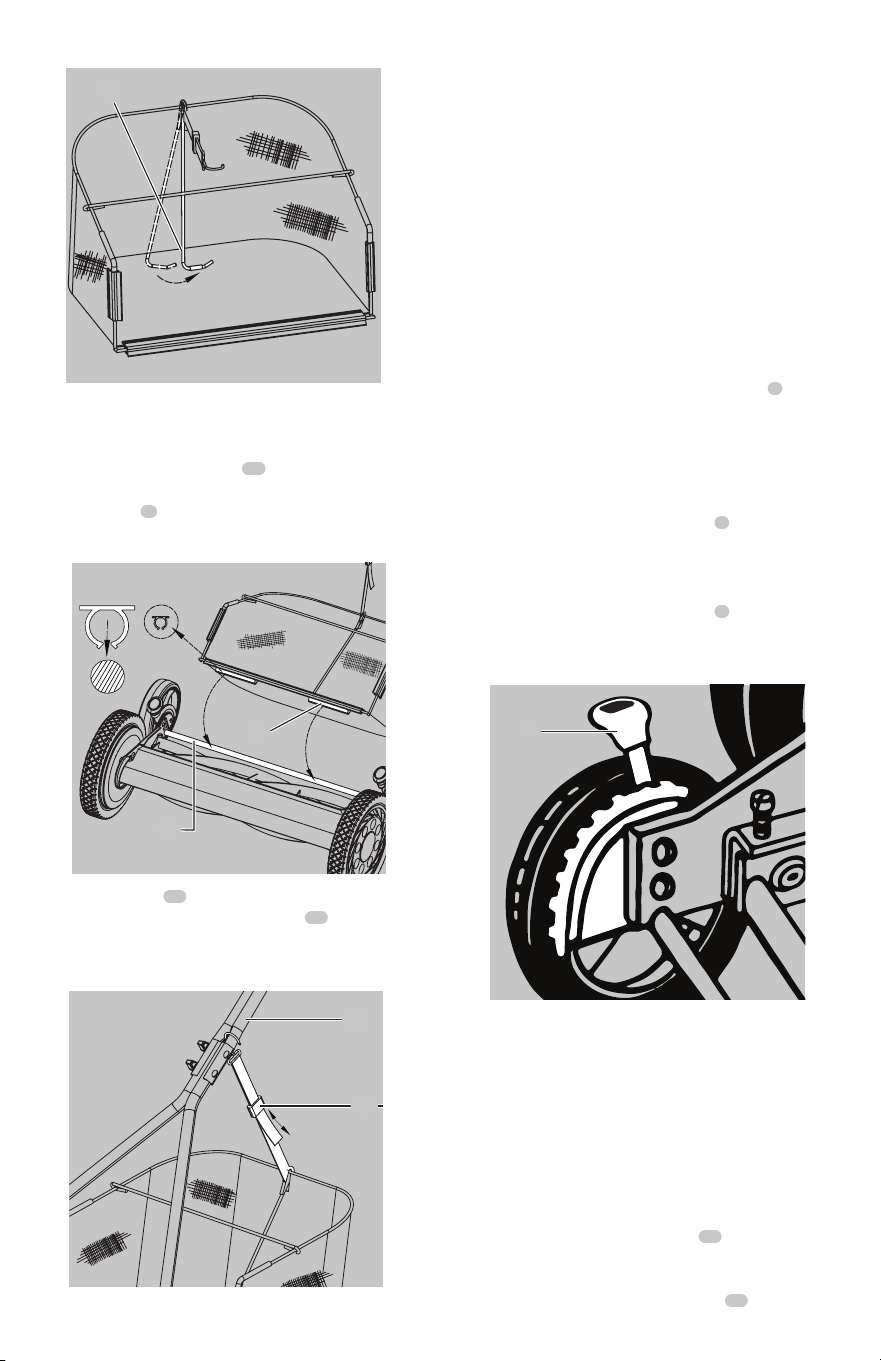
ESPAÑOL
25
Fig.E
24
Conexión del Recogedor de Césped a la
Cortadora de Césped (Fig.F) Hay 2 secciones
de ranuras de plástico formadas
23
en la parte inferior
delantera del receptor. Encaje la sección ranurada sobre el
tubo de soporte
25
entre las ruedas traseras del cortacésped.
Consulte la figura F.
.
Fig.F
23
25
1. Ajustar la correa
26
a la longitud que prefiera y luego
fije el gancho al travesaño del mango
27
(su estilo de
barra transversal puede variar). Esta correa evita que el
recogedor de hierba se arrastre por el suelo. (Fig G.)
Fig.G
27
26
USO Y CUIDADO
Cuidados Generales (Fig. H-J)
Se requiere un cuidado mínimo para garantizar el buen
funcionamiento de su cortacésped.
• Para evitar daños al cortacésped o a las cuchillas de corte,
mantenga el área que va a cortar libre de residuos.
• Sugerimos una aplicación rutinaria de aceite o lubricante
(es decir, WD-40). Esto debe aplicarse a todas las
superficies de corte, el eje del molinete de corte y las
ruedas.
Ajustes de Altura de Corte Principal
Estas unidades se pueden ajustar para ofrecer un rango de
altura de corte de 2,5 cm a 7,5 cm (1" a 3") simplemente
ajustando la palanca de ajuste de altura de corte
7
. Tenga en
cuenta que se debe realizar el mismo ajuste en ambos lados
del cortacésped.
Mientras sigue las instrucciones a continuación, consulte la
Figura H para más información.
• Para lograr la posición de corte más baja, empuje la
palanca de ajuste de altura de corte
7
fadelante, hacia el
molinete del cortacésped, y colóquelo en su lugar. Repita
para ambos lados.
• Para lograr la posición de corte más alta, tire de la
palanca de ajuste de altura de corte
7
hacia atrás, lejos
del carrete del cortacésped, y colóquelo en su lugar.
Repita para ambos lados.
Fig.H
7
Ajustes Secundarios de Altura de Corte
Esto se utiliza para reducir la altura de corte por debajo de 2".
El conjunto de la rueda/cubierta antipolvo se puede mover
a una de las 3 posiciones en la placa lateral. Tenga en cuenta
que se debe realizar el mismo ajuste en ambos lados del
cortacésped.
Mientras sigue las instrucciones a continuación, consulte la
Figura I.
• Retire la tapa del cubo de plástico
15
(solo para los
carretes de 16" (41 cm) y 18" (46 cm)) insertando un
pequeño destornillador de cabeza plana en la ranura de
la tapa del cubo y sáquelo de la rueda
16
.
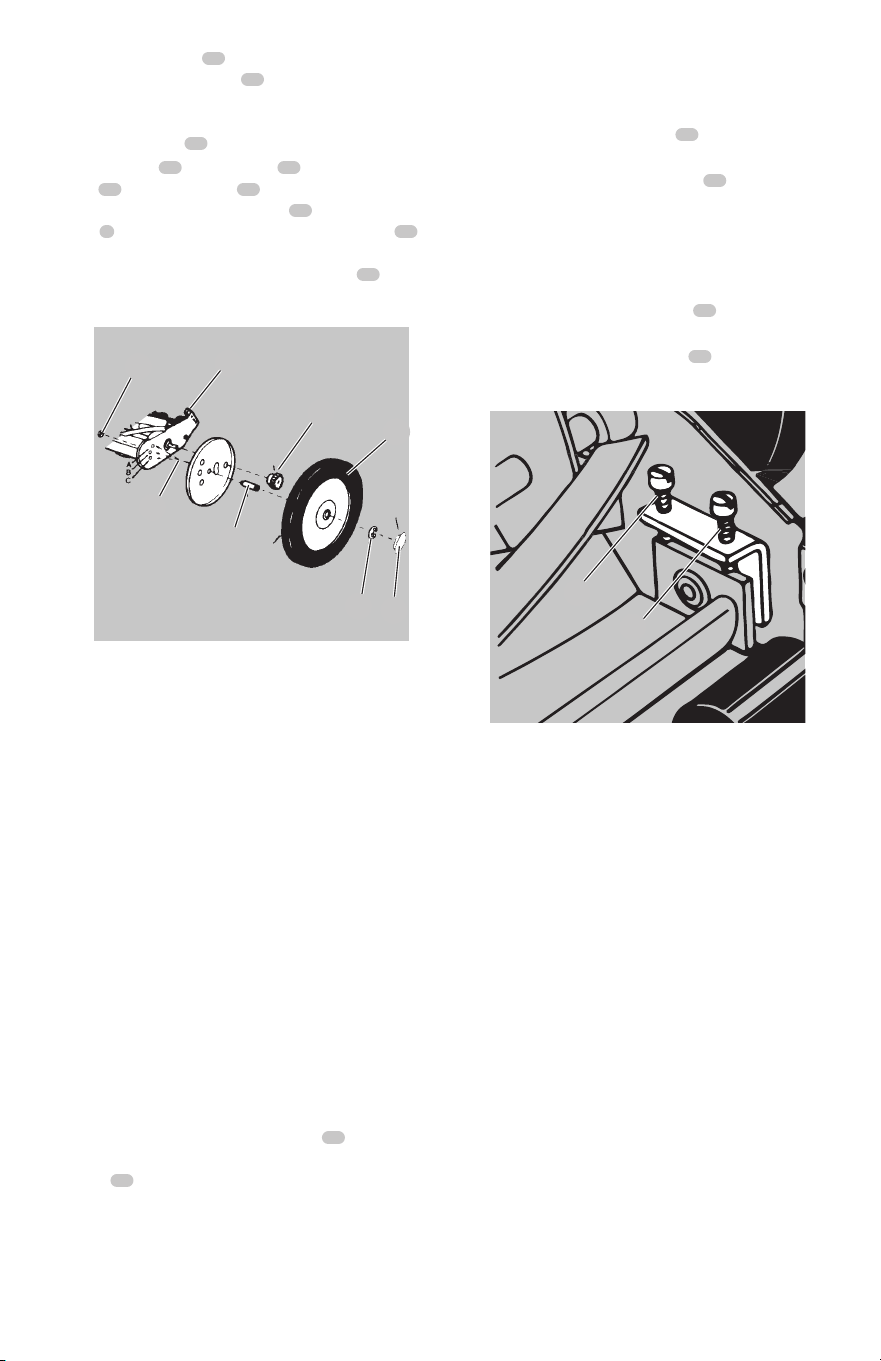
ESPAÑOL
26
• Retire la tuerca del eje
12
en el interior del cortacésped
sujetando el pasador del eje
13
en su lugar con un
destornillador de punta plana o de cubo de 1/2" (1,27
cm) (según el tipo de modelo) y una llave de tubo o de
estrella en la tuerca
12
.
• Tira de la rueda
16
, guardapolvo
17
engranaje de
piñón
14
, y pasador de eje
13
suavemente como una
unidad hasta que el pasador del eje
13
limpia la placa
lateral
8
. Luego, vuelva a colocar el pasador del eje
13
a uno de los otros dos agujeros para obtener la altura
deseada. Reemplace y apriete la tuerca del eje
12
.
• Repita para ambos lados.
Fig.I
15
16
12
13
FIGURA I REFERENCIA DE LEYENDA DE LETRAS
A - Configuración más baja)
B - Ajuste medio
C - Configuración más alta
NOTA: No se recomienda usar la posición "A" a menos que
tenga un césped extremadamente plano para evitar el cuero
cabelludo.
Ajuste de la Cuchilla del Cortacésped (Fig. J)
Las cuchillas han sido preajustadas antes de salir de fábrica.
Puede ocurrir una desalineación que resulte en cuchillas
demasiado flojas o demasiado apretadas. Si esto sucede,
notará un corte áspero e irregular o un cortacésped que
empuja con fuerza. Todos los ajustes se realizan desde
la parte trasera del cortacésped (frente a la barra con la
calcomanía con el logotipo). Cada extremo de la barra de
corte se puede ajustar por separado.
Mientras sigue las instrucciones a continuación, consulte la
Figura J para obtener más información.
• La cuchilla de la barra de corte (ubicada debajo del
molinete) pivota. Los tornillos delanteros
18
aleje la
barra de corte de las cuchillas, mientras los tornillos
traseros
19
mueva la barra de corte hacia las cuchillas.
• El ajuste de los tornillos es un procedimiento muy
delicado. 1/16 de vuelta se considera un ajuste importante.
• Antes de apretar un tornillo de ajuste, asegúrese de
aflojar el tornillo opuesto por igual.
Aflojando las Cuchillas
La cuchilla de la barra de corte debe alejarse más del carrete
de corte.
• Afloje ambos tornillos traseros
19
igualmente girándolos
en sentido antihorario.
• Apriete ambos tornillos delanteros
18
por igual
girándolos en el sentido de las agujas del reloj.
Apretando las Cuchillas
La hoja de la barra de corte se debe acercar al molinete de
corte.
• Afloje ambos tornillos delanteros
18
igualmente
girándolos en sentido antihorario
• Apriete ambos tornillos traseros.
19
Igualmente
girándolos en el sentido de las agujas del reloj.
Fig.J
19
Comprobación de Ajustes
La cuchilla de la barra de corte debe alejarse más del carrete
de corte.
• Dé la vuelta al cortacésped.
• Inserte un pedazo de papel (es decir, escrito o periódico)
entre la barra de corte y las cuchillas del carrete, y con
cuidado gire las cuchillas del carrete con la mano.
Todas las cuchillas deben cortar el papel de manera uniforme
en toda la longitud de la barra de corte mientras el carrete
gira suavemente.
Si el cortacésped tiene un corte intermitente, se debe realizar
el ajuste en el lado apropiado de las cuchillas para lograr la
acción de corte adecuada.
18
14
17
8
9
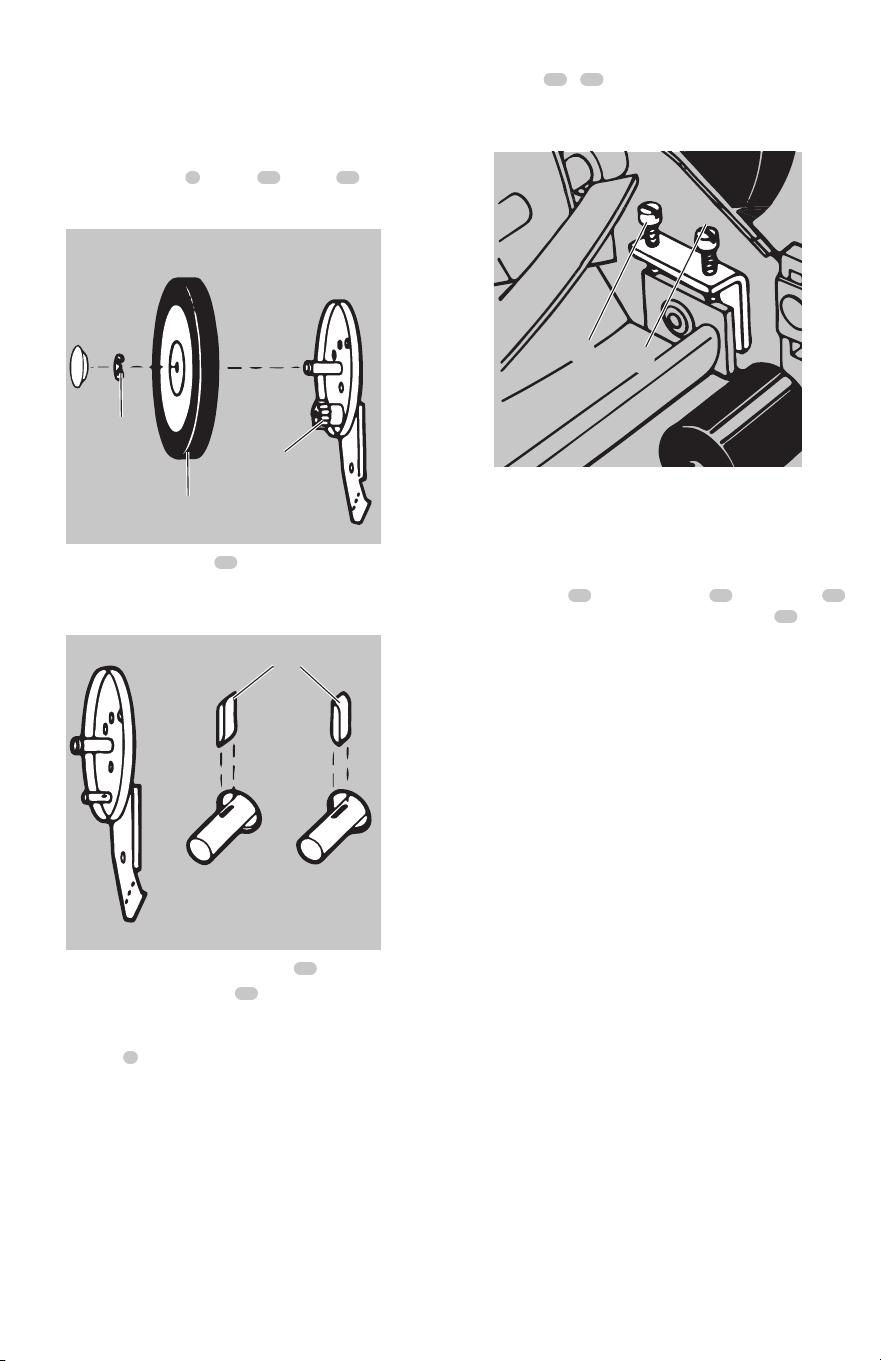
ESPAÑOL
27
Afilado de las Cuchillas de Corte (Fig. K-M)
Cuando el cortacésped está correctamente lubricado y
ajustado, no debería ser necesario afilarlo durante varios
años. Sin embargo, los siguientes pasos le permitirán realizar
el procedimiento usted mismo a un costo relativamente bajo.
• Retire los anillos "E"
9
, ruedas
16
y piñón
14
desde
ambos lados del cortacésped (Consulte la Figura K).
Fig.K
14
• Retire ambos trinquetes
20
de las ranuras rectangulares
en el eje del carrete e invierta sus posiciones (consulte la
Figura L).
Fig.L
20
• Invierta la colocación de los piñones
14
.
• Coloque el piñón izquierdo
14
en el extremo derecho
del eje del carrete y el piñón derecho en el extremo
izquierdo del eje del carrete. Reemplace las ruedas y los
anillos "E"
9
.
• Extienda una capa delgada de compuesto para lapear en
el borde delantero de las cuchillas del molinete.
• Ajuste la barra de corte de modo que la cuchilla de la
barra de corte tenga un contacto ligero pero firme con
las cuchillas del molinete en todo el ancho de la barra de
corte (consulte la Figura M).
PRECAUCIÓN: No apriete demasiado los tornillos de
ajuste
18
y
19
, ya que esto podría dañar la barra
de corte. Ambos tornillos deben estar apretados en el
ajuste final.
Fig.M
18
• Empuje el cortacésped hacia atrás sobre una superficie
lisa (como una acera o una entrada pavimentada).
Continúe haciendo esto hasta que las hojas del molinete
giren relativamente libres y el borde delantero de la hoja
de la barra de corte esté pulido.
• Quitar ruedas
16
; piñones inversos
14
y trinquetess
20
de modo que el borde biselado del trinquete
20
está a
la derecha.
•
PRECAUCIÓN: Limpie cualquier compuesto abrasivo
o residuos de la cuchilla de la barra de corte, las
cuchillas del molinete, los piñones y los trinquetes.
Lubrique el eje y el piñón con una película ligera de
grasa para cojinetes de ruedas y reemplace las ruedas
y los anillos "E".
NOTA: Se recomienda utilizar un compuesto industrial o de
lapeado de válvulas de grano 100-240. Esto generalmente
está disponible en una tienda de suministros industriales o
automotrices. Si se requiere un afilado profesional, consulte
las páginas amarillas locales para obtener servicios de
reparación de cortadoras de césped.
Consejos Para Cortar el Césped
ADVERTENCIA: Siempre inspeccione el área donde se
usará la cortadora de césped y retire todas las piedras,
palos, alambres, huesos y otros desechos que pueda
arrojar la cuchilla giratoria.
ADVERTENCIA: Corte el césped a lo largo de las
pendientes, nunca hacia arriba y hacia abajo. Extreme
las precauciones al cambiar de dirección en pendientes.
No siegue pendientes excesivamente empinadas.
Mantenga siempre un buen equilibrio.
• Coloque el cortacésped a la altura de corte más alta
cuando corte en terreno accidentado o maleza alta.
Retirar demasiado césped de una sola vez puede hacer
que el motor se sobrecargue y se detenga.
16
9
19

ESPAÑOL
28
Accessorios
ADVERTENCIA: Dado que no se han probado con este
producto otros accesorios que no sean los ofrecidos
por Craftsman, el uso de dichos accesorios con esta
herramienta podría ser peligroso. Para reducir el riesgo
de lesiones, solo deben usarse con este producto los
accesorios recomendados por Craftsman.
Los accesorios recomendados para usar con su herramienta
están disponibles a un costo adicional en su distribuidor local
o centro de servicio autorizado. Si necesita ayuda para ubicar
algún accesorio, comuníquese con Craftsman en nuestro sitio
web www.Craftsman.com o llame al 888-331-4569.
Prevención de la Corrosión
Los fertilizantes y otros productos químicos para el
jardín contienen agentes que aceleran en gran medida
la corrosión de los metales. Si corta el césped en áreas
donde se han utilizado fertilizantes o productos químicos,
la cortadora de césped debe limpiarse inmediatamente
después de la siguiente manera: Use un aceite lubricante
o cera después de cada uso para evitar la oxidación y un
funcionamiento suave y sin chirridos.
Limpie todas las partes expuestas con un paño húmedo.
Cumple con los Requisitos
de Seguridad de CPSC
Los cortacéspedes CRAFTSMAN cumplen con los estándares
de seguridad del Instituto Nacional Estadounidense de
Estándares y la Comisión de Seguridad de Productos del
Consumidor de EE. UU.
Garantía Limitada
No hay garantías que se extiendan más allá de la descripción
del producto, excepto que la cortadora de césped que se
vende debajo está garantizada de la siguiente manera:
Garantía Limitada de Tres Años
Durante tres (3) años a partir de la compra, The Great
States Corporation (GSC)/American Lawn Mower Company
garantiza al propietario original que este producto
CRAFTSMAN y la pieza de servicio están libres de defectos
en los materiales y la mano de obra y acepta reparar o
reemplazar cualquier producto defectuoso. o parte durante
el período de garantía indicado anteriormente.
La garantía queda anulada si se usa con fines comerciales
o industriales o cualquier otro uso inapropiado según lo
determine GSC. La garantía no incluye las reparaciones
necesarias debido al abuso o negligencia del operador
(incluida la sobrecarga del producto más allá de su
capacidad, la inmersión en agua o la falta de ensamblaje,
operación, mantenimiento o almacenamiento del producto
de acuerdo con las instrucciones del manual del propietario).
Esta garantía no cubre:
• Artículos de desgaste, incluidos, entre otros, correas de
transmisión y engranajes, cuchillas de corte, cuchillas de
cortacésped, barras guía, ruedas, manijas, bolsas desgastadas
y otros artículos sujetos a desgaste con el tiempo.
Esta garantía no cubre los daños causados por el frío, el
calor, la lluvia, la humedad excesiva u otras condiciones
ambientales extremas. Esta garantía no cubre el deterioro
normal del acabado exterior o el desgaste normal de los
productos, incluidos, entre otros, rayones, grietas, abolladuras
o daños causados por productos químicos externos.
Esta garantía no es transferible y solo se aplica a productos
nuevos vendidos directamente de un minorista autorizado.
Esta garantía no se aplica a ningún producto, nuevo o usado,
comprado a través de canales de terceros no autorizados.
Limpieza y Reparaciones
ADVERTENCIA: Nunca use solventes u otros
productos químicos agresivos para limpiar las partes
no metálicas de la herramienta. Estos productos
químicos pueden debilitar los plásticos utilizados en
estas piezas. Utilice un paño humedecido únicamente
con agua y jabón suave. Nunca permita que ningún
líquido entre en la herramienta; nunca sumerja
ninguna parte de la herramienta en líquido. Aplique
cera o aceite después de la limpieza para evitar la
corrosión.
ADVERTENCIA: Para garantizar la SEGURIDAD y
la CONFIABILIDAD del producto, las reparaciones, el
servicio y los ajustes (incluida la reparación del cable de
alimentación y la inspección y el reemplazo del cepillo,
si corresponde) deben ser realizados por un Centro de
servicio autorizado de Craftsman. Utilice siempre piezas
de repuesto idénticas.
Registro en línea
Gracias por su compra! Registre su producto ahora para:
• SERVICIO DE GARANTÍA: registrar su producto lo
ayudará a obtener un servicio de garantía más eficiente
en caso de que surja un problema con su producto.
• CONFIRMACIÓN DE PROPIEDAD: en caso de pérdida
del seguro, como incendio, inundación o robo, su
registro de propiedad servirá como prueba de compra.
• PARA SU SEGURIDAD: El registro de su producto nos
permitirá comunicarnos con usted en el improbable
caso de que se requiera una notificación de seguridad
conforme a la ley federal de seguridad del consumidor.
Regístrese en línea en
www.craftsman.com/craftsmanclub/Registrarse
ESPAÑOL
29
Para obtener información sobre distribuidores autorizados,
comuníquese con nuestra línea directa de atención al cliente
al 888-331-4569 (de lunes a viernes, de 8 a. m. a 5 p. m.,
hora estándar del este). Cualquier pérdida, daño o gasto
incidental, indirecto o consecuente que pueda resultar de
cualquier defecto o mal funcionamiento de los productos
no está cubierto por la garantía. La garantía no incluye
instalación, montaje o ajustes normales explicados en el
manual del propietario. La garantía no cubre los gastos de
entrega del producto al vendedor ni los gastos de devolución
del producto o las piezas de repuesto al propietario.
Limitaciones de Garantía Adicionales
Algunos estados no permiten la exclusión o limitación de la
duración de una garantía implícita, por lo que es posible que
la limitación anterior no se aplique a usted. Los productos
vendidos dañados o incompletos, vendidos como están o
vendidos como reacondicionados no están cubiertos por la
garantía.
Esta garantía no cubre los daños o la responsabilidad
causados por el envío, el manejo inadecuado, el ensamblaje
incorrecto, el voltaje incorrecto, el cableado incorrecto,
el mantenimiento incorrecto, la modificación incorrecta
o el uso de accesorios y/o accesorios no recomendados
específicamente.
El comprobante de compra, el recibo de compra con la fecha
original, debe acompañar todos los reclamos de garantía.
www.craftsman.com
(1-888-331-4569)
The Great States Corporation/American Lawn Mower Company
7444 Shadeland Station Way
Indianapolis, IN 46256 USA
Derechos de autor ©2022 CRAFTSMAN (US) INC.,
CRAFTSMAN y el logotipo de CRAFTSMAN son marcas
comerciales de Stanley Black & Decker, Inc. o una de sus filiales
y se utilizan bajo licencia.
LLÁMANOS CON PREGUNTAS
SOBRE LA OPERACIÓN O EL MANTENIMIENTO
SU CORTACÉSPED DE CARRETE CRAFTSMAN
O OBTENGA ASISTENCIA EN LÍNEA
TESTA HERRAMIENTA PUEDE SER PELIGROSA.
Siga todas las advertencias e instrucciones de seguridad de este manual.
El operador es responsable de seguir las advertencias
e instrucciones de este manual.
Restrinja el uso de este cortacésped a personas
que leen, entienden y siguen la advertencia
e instrucciones de este manual.
Proporcione toda la información relevante cuando llame o visite en línea.
PIEZAS DE REPARACIÓN (JUEGOS/ARTÍCULOS)
El modelo/número de serie de esta herramienta se encuentra en una
placa o etiqueta adherida a la carcasa. Registre el número de serie en
el espacio proporcionado a continuación.
MODELO # : CMXRMLM181618
REGISTRE SU NÚMERO DE SERIE:
CÓMO PEDIR PIEZAS DE REPUESTO SIEMPRE
MENCIONE EL NÚMERO DE MODELO AL SOLICITAR
EL KIT/ARTÍCULOS PARA ESTA HERRAMIENTA
RM-WK10A-1
RM18-HK-1
RM-GPK-1
RM-APK-1
RM-TWK-1
RM-HA
RM-UHP-1
GC91820
JUEGO DE RUEDAS DE 10 PULG.
KIT MANILLA EN U
CON TUERCAS DE MARIPOSA
KIT DE ENGRANAJES
Y TRINQUETES
JUEGO DE PASADORES DE EJE
JUEGO DE RUEDAS DE ARRASTRE
JUEGO DE AJUSTE DE ALTURA
CONJUNTO DE MANGO EN U
PAQUETE DE HERRAJES
RECOGEDOR DE CÉSPED
1
1
1
1
1
1
1
1
NÚMERO DE ARTÍCULO DESCRIPCIÓN
CANT.
Cómo Pedir Piezas
Especifique la siguiente información al pedir piezas:
1. Número de modelo completo (se encuentra en la
etiqueta de identificación en la parte trasera de la barra
de corte).
2. Ancho de corte de su unidad.

AMERICAN LAWN MOWER COMPANY/A GREAT STATES CORPORATION
7444 SHADELAND STATION WAY, INDIANAPOLIS, IN46256
Copyright © 2022
05/22 Model No. CMXRMLM181618